Motorcycle Helmet
Bluetooth Intercom Headset Manual
QXX

Bluetooth 5.1 Intelligent noise reduction system Hi-Fi high fidelity sound effect
Windproof and noise reduction microphone Bluetooth fast pairing Mobile phone priority
Waterproof grade: IP67
The maximum effective intercom distance of 2 devices is 1000 meters
Support the connection of 2-4 Q4X devices, and the best intercom distance of 4 people is
2500meters Hands-free calls (Can be set up)
Ultra clear FM radio
Music GPS navigation Voice prompt tone Voice assistant
Bluetooth compatible with most devices Battery reminder
OVP intelligent charging protection Type-C quick charge Type-C earphone
Easy to use and operate Upgradeable
1
Function Introduction
High standard composite diaphragm combined with perfect cavity design to achieve ultra-thin and
high-definition speakers, so as to ensure excellent audio fidelity; The precise structure design of
the original windbreak noise reduction microphone and the advanced noise reduction algorithm
make the sound quality of the call clearer. The auto answer function can be set. It also comes with
a 1000mAh battery that provides about 30 hours of music or 24 hours of intercom time for settings
and about 300 hours of standby time. Suitable for most full helmets, half helmets, uncovered
helmets, off-road helmets, etc.
2
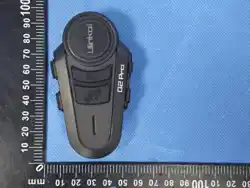
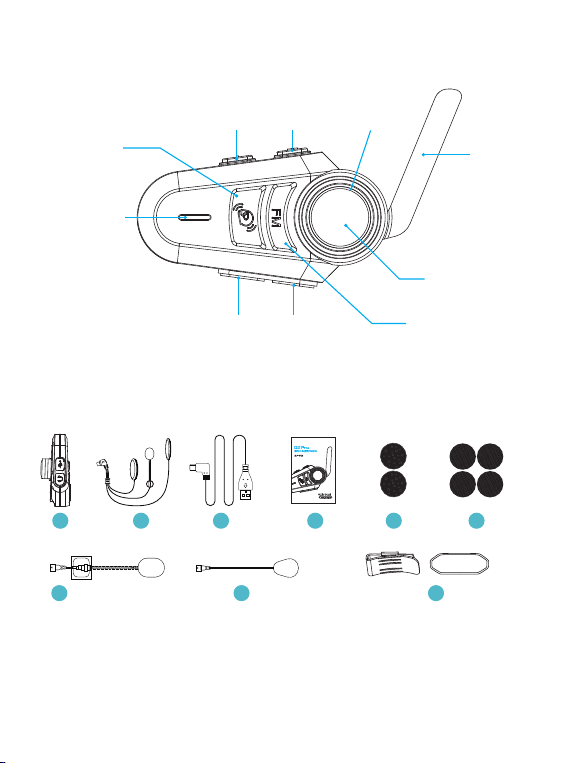
Product Diagram
Packing List
Antenna
Phone Button
Intercom Button
Type-C earphoneType-C Charging port
FM Button
LED Indicator
LED IndicatorVolume down Volume up
Tips: This picture is for reference only. If the physical appearance is different from the picture,
please refer to the physical appearance
1 2 3 4 5 6
7 8 9
1. QXX series devices 2. 40mm HD slim headset * 1 set 3. Charging cable 4. Manual
5. Height adjusting sponge *2PCS 6. Velcro with a hairy surface*4PCS
7. Hard microphone * 1PCS 8. Soft microphone * 1PCS
9. Installation clip * 1 set
3
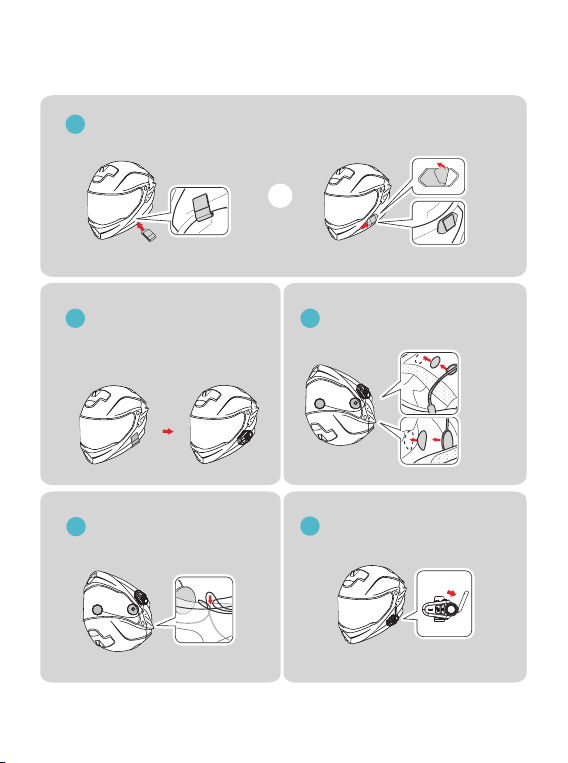
Installation
1
2
4
5
3
Clip the clip directly on the left side of the helmet or tear the sticker behind the
clip and stick it on the left side of the helmet in the direction of the arrow on the clip
Face the front of the interphone
to the outside, and push the clip
down along the slot at the back
of the interphone
Put the extra wire of the headset
around the helmet
Turn on the antenna to the maximum
Tear off the white sticker on the label
and stick the label on the left side of
the helmet
OR
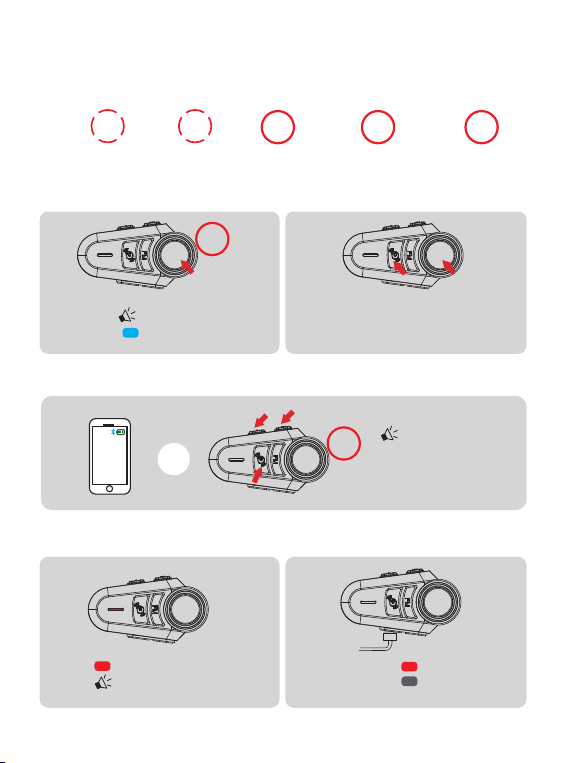
Charging Red light always on
Full Red light OFF
4
Mobile Phone Operations
Basic Operation Diagram
1x
TAP
2x
TAP
HOLD
1s
HOLD
3s
HOLD
5s
Operating Instructions (Please charge it before using)
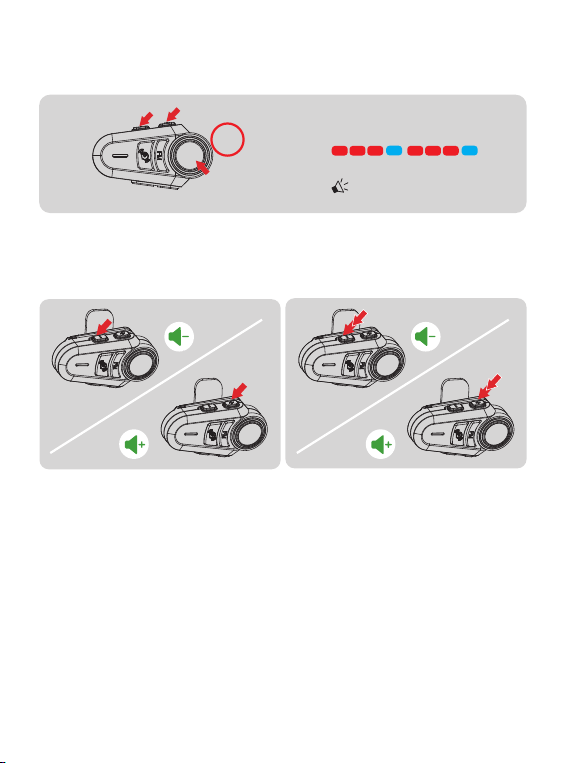
Power ON / OFF
Battery Level
Power ON “Welcome Ulinkal”
Standby Blue light flashes slowly
Power OFF
Tap the <Phone Button>and
< Intercom Buttons> simultaneously.
"High"
"Medium"
"Low Battery"
Low Battery Indication Charging Indication
Red light quickly flashes twice
"Low Battery"
HOLD
1s
HOLD
3s
OR
Single-tap Double-tap Long-press for 1s Long-press for 3s Simultaneously
press for 5s
5
Restore Default Settings
Volume control
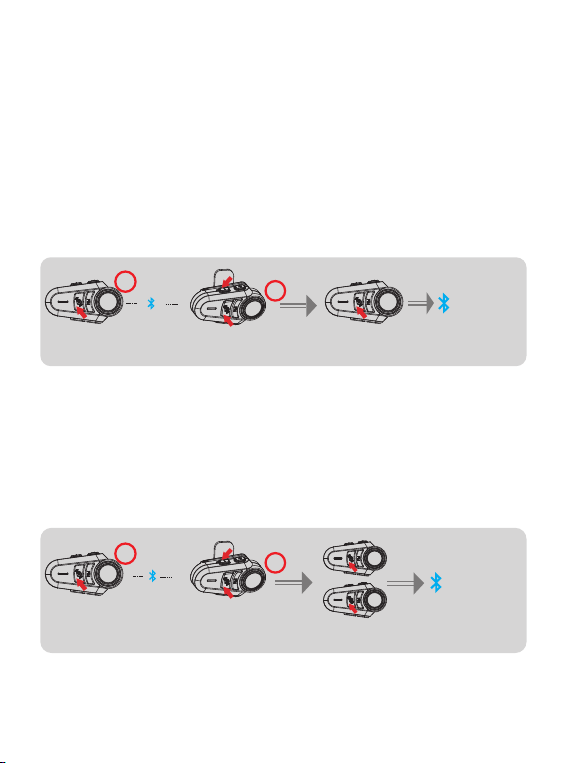
Intercom Pairing
Long press the “+”、“-”、“Phone”
buttons for 5S at the same time
When intercom,mobile phone, music and
FM are used separately
When using FM+ intercom at the same time
(1 ) In standby mode, press and hold the device 1 and device 2<intercom button> for 5 seconds,
and the red and blue lights of device 1 and device 2 will flash alternately, "Intercom Pairing".
(2)Start searching and automatically pair.
(3)Paired successfully. The blue light flashes slowly, "Pairing Successful".
(4)Connect successfully and start intercom. "Intercom Connected".
Q4 * series device pairing method
Step 1: Pair the Q4 * series devices of the two parties
(1 ) In standby mode, press and hold the device 1<intercom button>for 5 seconds, press and hold
Q2 * series device pairing method
HOLD
5s
"Restore Default Setting"
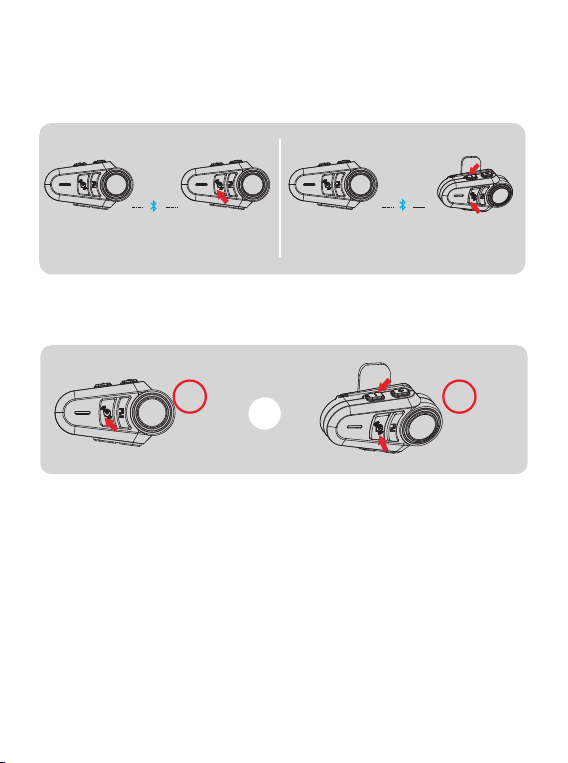
Step 2: The third-party Q4X series equipment is paired using the device 2 intercom
button to pair the device 3 equipment
6
the device 2<intercom button>+<volume decrease button for 5 seconds, and the red and blue lights
of device 1 and device 2 will flash alternately, "Intercom Pairing".
(2)Start searching and automatically pair.
(3)Paired successfully. The blue light flashes slowly, "Pairing Successful".
(4)Connect successfully and start intercom. "Intercom Connected".
Note: If you only need to pair two Q4 * series devices, you only need to complete step 1, without further steps.
Then tap the<intercom button>on the device 1 to enter the intercom connection
—— Connect successfully and start intercom. "Intercom Connected".
Step 3: Multi-party Q4X series device pairing Use the device three intercom buttons
to pair the device four pairs
Tap the intercom button of device 1 and device 2 to enter the intercom connection
—— Connect successfully and start intercom. "Intercom Connected".
HOLD
5s
HOLD
5s
HOLD
5s
HOLD
5s
Pairing
Pairing
Device I
Device I 、 Device II
Device II
In standby mode, long press the device 2<intercom button> for 5 seconds, meanwhile long press
the device 3 <intercom button>+<volume decrease button> for 5 seconds to enter the pairing
state - start searching and automatically pair—— Paired successfully.
In standby mode, long press the device 3<intercom button> for 5 seconds, meanwhile long press
the device 4<intercom button>+<volume down button> for 5 seconds to enter the pairing state -
start searching and automatically pair—— Paired successfully. The blue light flashes synchronously
"Pairing Successful".
Device III
Device III Device IV
Connection
succeeded
Connection
succeeded
7
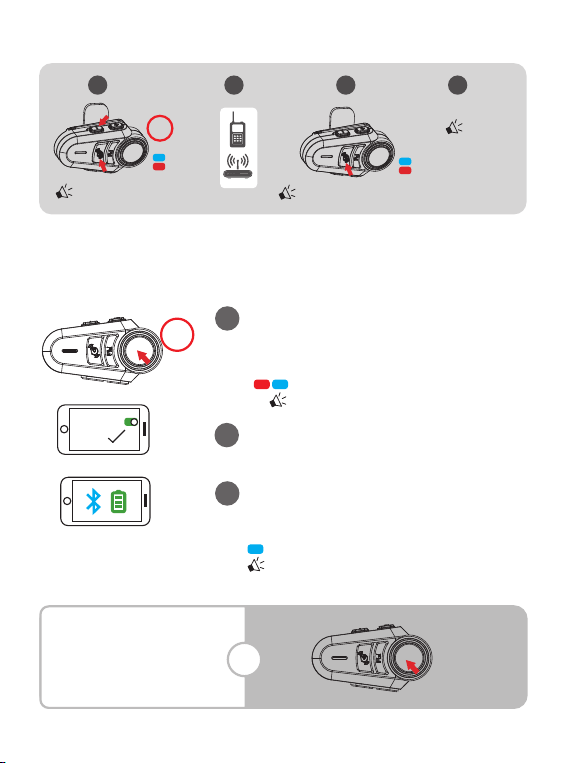
Intercom connection (take device 2 as an example)
Intercom disconnection
Press and hold 1S<intercom button>or<intercom button>+<volume decrease button>.
Paired headset or Bluetooth interphone of other brands
Active connection mode
(1)At the same time, press and hold the<intercom button>and<plus button>for 5 seconds, and the
red and blue lights will flash alternately; “Intercom Pairing”.
(2) Other devices enter Bluetooth search mode.
(3)Tap<intercom button>Connect, "Intercom Search".
(4)"Intercom Pairing Successful".
Passive connection mode
(1) At the same time, press and hold the<Intercom button>and<Minus button>for 5 seconds, and
the red and blue lights will flash alternately; “Intercom Pairing”.
(2) Other devices enter Bluetooth search mode.
(3)Tap<intercom button>Connect, "Intercom Search".
(4)"Intercom Pairing Successful".
HOLD
1s
HOLD
1s
Device I Device II Device I Device II
Connecting Connecting
To connect device 3, tap device 2<intercom button>.
To connect device 1, tap device 2<intercom button>+<volume down button>.
OR
Note: This function does not guarantee compatibility with all Bluetooth headsets or Bluetooth interphones on the market.
In standby mode, press and hold the<Phone button>5 seconds
to enter the pairing mode. (If the phone is not connected, the
pairing mode will exit after 2 minutes).
8
Bluetooth Pairing
Mobile phone paring
1
2
Open the mobile phone Bluetooth and tap the device.
3
Connection succeeded
Blue light slow double flashing
"Pairing Successfu,Connected"
The current power is displayed on the Bluetooth
icon of the mobile phone. (The mobile phone
needs to support HFP).
Bluetooth and mobile phone back connection
Automatic connection
after startup
HOLD
5s
HOLD
5s
“Intercom Pairing” “Intercom Searching”
“Intercom
Pairing
Successful”
1 2 3 4
Bluetooth
QXX
OR
The red and blue lights flash alternately.
"Phone Pairing"
9
HOLD
2s
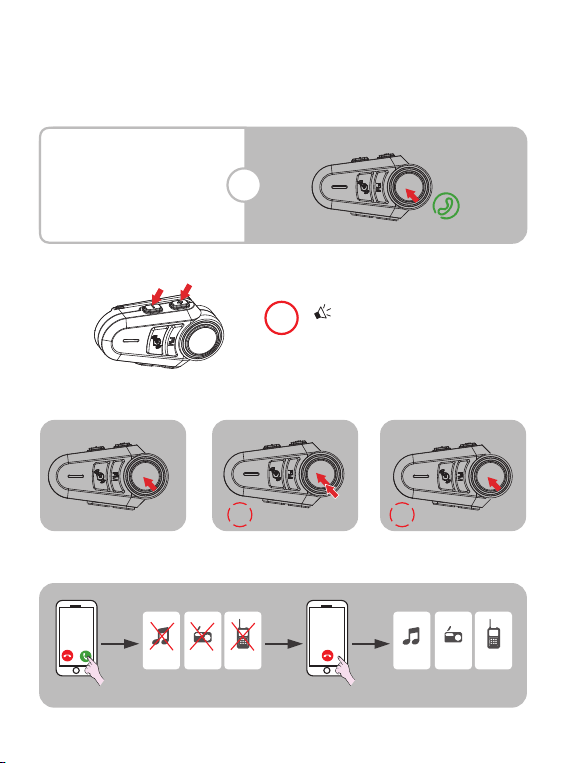
Answer the phone
Answer the phone
Automatically answer
when there is no operation
within 6 seconds
Mobile Phone Control
Automatic call answering Settings
Redial the last number Hang up
Mobile phone priority Receiving a call while listening to music/FM/intercom
music
Call interrupt hang up intercom
FM intercom music FM intercom
“ Auto answer on ”
“ Auto answer off ”
2x
TAP
1x
TAP
OR
10
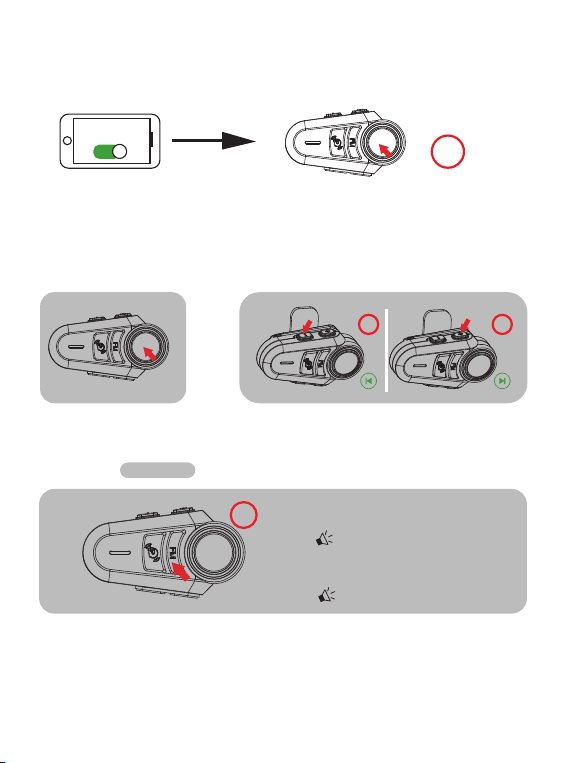
Music Control
FM
Play/Pause Song switching
Voice Assistant Phone must support the voice assistant (Google assistant & Siri)
Voice Assistant
Turn on the voice assistant Press the “Power” button for 1s
HOLD
1s
HOLD
1s
HOLD
1s
Press and hold the<FM button>
for 1 second to open FM
"FM Radio"
Press and hold the<FM button>
1 second to turn off FM
"FM Radio Off"
Save channels (up to 6)
Tap<FM>to save the current channel, "number".
When the radio is working, tap the<FM button>to save the current channel. At the same time,
there will be a prompt tone to save the number of channels.
HOLD
1s
FM ON/OFF 76~108MHz Intercom and radio can be used simultaneously
11
Product Characteristics
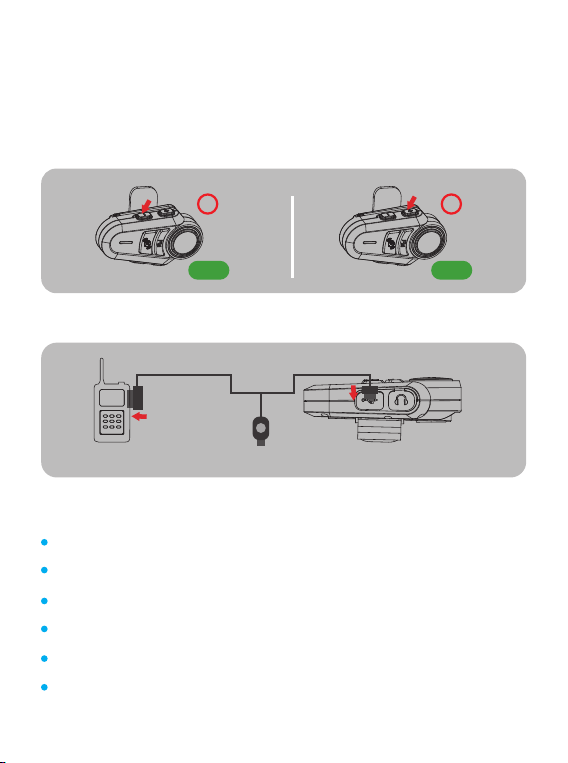
Switch channel
A total of 6 channels can be saved, and they will be overwritten circularly after being saved.
Double-tap the<FM button>Delete to save the current channel.
Press and hold the<Volume+button>,<Volume - button>to switch channels.
Wired connection of interphone (optional, Q2 and Q4 are not supported)
Device TYPE_ C charging portButton
Bluetooth Version: Bluetooth 5.1
Technical Support: Intelligent noise reduction system,Hi-Fisound
Intercom communication distance (Q2 *): about 1000 meters
Intercom communication distance (4 sets of Q4 *): about 2500 meters
Temperature:-10~55℃
Battery Parameter:3.7V/900mAh
HOLD
1s
Channel-
HOLD
1s
Channel+

12
Warning
Power Adapter: DC 5V/1A
Charging Time: Approximately 2 hours
Intercom working time: Approximately 26 hours
Music working time: Approximately 20 hours
Standby time: Over 300 hours
Charging Interface: Type-C USB
1.Verify compliance with all local laws and regulations regarding the use of
in-helmet speakers when operating a motor vehicle.
2.In the operation of motor vehicles, in order to ensure driving safety, do not
operate mobile phones.
3. Using this product at a high volume for a long time will cause damage to your
hearing. Please keep the volume appropriate.
Attention
1. Installing equipment on the helmet is a modification of the helmet which may
cause the helmet’s warranty to fail or hinder the helmet’s function. So please fully
understand the facts when using with the helmet. If you can’t accept please return
the product.
2.Before driving, please make sure that the product is firmly and correctly
mounted on the helmet. If the product falls of during driving, may cause injury
oraccident.
3. To ensure riding safety, please use this product carefully while on the road to
avoid serious accident or injury.
4. The product contains 3.7V/1000mAh battery. The battery capacity will chance
with the temperature When the battery is used at low temperature or below 0℃
the battery life of the product may attenuate to different degrees.
5. If the electronic function fails, please power off and try again.
RF COMPLIANCE NOTICE
FCC Requirements:
FCC ID:2BRNH-H2
This devive complies with Part 15 of FCC Rules.Operation is subject to the
following two conditions:
(1)this device may not cause harmful interference, and (2)this device must accept
any interference received, including interference that may cause undesired
operation.
13
Precautions for battery use
1.Please don't put the discarded batteries together with the general household
garbage. In areas with relevant laws ®ulations on recycling and disposal of
waste batteries, please follow the relevant regulations of the local administrative
department to make a contribution to environmental protection.
2. Don't remove, squeeze, heat or bum the battery inside the product. It is strictly
prohibited 1o use sharp objects, screwdrivers or other devices to puncture or pry
the battery. The above operation may cause the battery to catch fire or burn.
3. The battery's electrolyte enters the eye and can lead to blindness. If you splash
the battery electrolyte into your eyes, do not rub your eyes with your hands. Rinse
thoroughly with water immediately and contact the hospital for treatment. If the
battery electrolyte sticks to the skin and clothes, wash them immediately with
soapy water and clean water and seek medical attention if necessary.
4.When charging, since the battery temperature will rise, please don't put the
battery and flammable objects together to avoid fire.
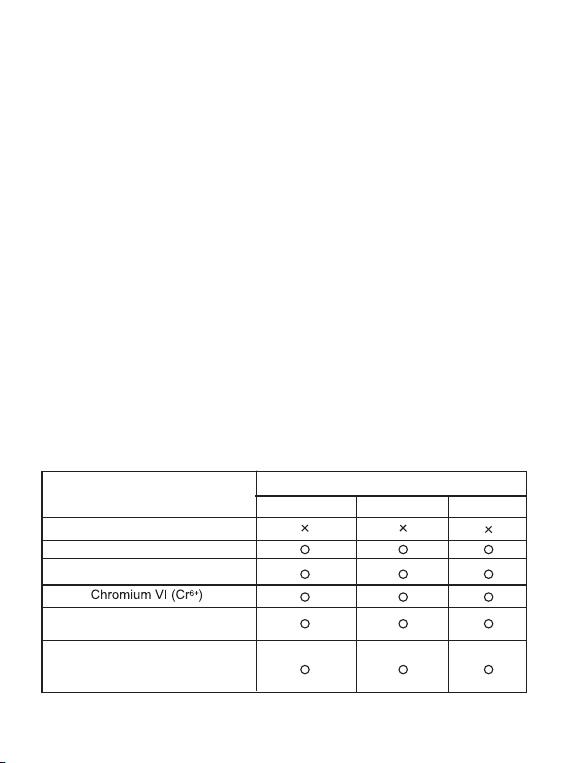
Environmental friendliness
Toxic and harmful substances or elements and content table
Plumbum (Pb)
Meroury (Hg)
Cadmium (Cd)
Polybrominalnd Biphenyls(PBB)
Polybrominaled diphenyl ethers
(PBDE)
Toxic or harmful
substances or elements
Part name
Host Battery Accessories
RF COMPLIANCE NOTICE
FCC Requirements:
FCC ID:2BRNH-H2
This devive complies with Part 15 of FCC Rules.Operation is subject to the
following two conditions:
(1)this device may not cause harmful interference, and (2)this device must accept
any interference received, including interference that may cause undesired
operation.

RF COMPLIANCE NOTICE
FCC Requirements:
FCC ID
:2BVNX-K1608
FCC Caution:
This device complies with part 15 of the FCC Rules. Operation is subject to the
following two conditions:(1)this device may not cause harmful interference, and
(2)this device must accept any interference received, including interference that may
cause undesired operation.
Any Changes or modifications not expressly approved by the party responsible for
compliance could void the user's authority to operate the equipment.
NOTE: This equipment has been tested and found to comply with the limits for a
Class B digital device, pursuant to part 15 of the FCC Rules. These limits are
designed to provide reasonable protection against harmful interference in a
residential installation. This equipment generates, uses and can radiate radio
frequency energy and, if not installed and used in accordance with the instructions,
may cause harmful interference to radio communications. However, there is no
guarantee that interference will not occur in a particular installation. If this equipment
does cause harmful interference to radio or television reception, which can be
determined by turning the equipment off and on, the user is encouraged to try to
correct the interference by one or more of the following measures:
- Reorient or relocate the receiving antenna.
- Increase the separation between the equipment and receiver.
- Connect the equipment into an outlet on a circuit different from that to which
the receiver is connected.
- Consult the dealer or an experienced radio/TV technician for help
The device has been evaluated to meet general RF exposure requirement. The
device can be used in portable exposure condition without restriction.
14
Design and manufacture ● Shenzhen, China
QXX-QA-V1.0