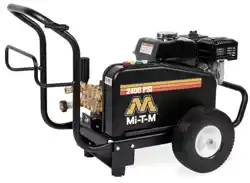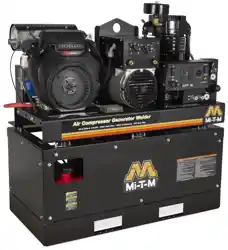

Operator’s Manual 1
AIR COMPRESSOR/GENERATOR/WELDER
OPERATOR’S MANUAL
CAUTION
RISK OF INJURY! READ ENTIRE MANUAL BEFORE OPERATING!
THIS MANUAL IS AN IMPORTANT PART OF THE AIR COMPRESSOR/GENERATOR/WELDER
AND MUST REMAIN WITH THIS UNIT!
©Copyright 2011, Mi-T-M Corporation® 37-1159-E/S-020123
PARTS LIST

2 Operator’s Manual
INTRODUCTION
THANK YOU for purchasing a Mi-T-M product.
READ THIS MANUAL carefully to learn how to operate
and service your machine correctly. Failure to do so could
result in personal injury or equipment damage. This manual
and safety signs on your machine may also be available in
other languages. (See your dealer to order.)
THIS MANUAL SHOULD BE CONSIDERED a permanent
part of your machine and should remain with the machine
when you sell it.
MEASUREMENTS in this manual are given in both metric
and customary U.S. unit equivalents. Use only correct re-
placement parts and fasteners. Metric and inch fasteners
may require a specic metric or inch wrench.
RIGHT HAND AND LEFT HAND sides are determined by
facing the motor end of the machine.
The SERIAL NUMBER is located in the Specication or
Identication Numbers section. Accurately record all the
numbers to help in tracing the machine should it be stolen.
Your dealer also needs these numbers when you order
parts. File the identication numbers in a secure place off
the machine.
WARRANTY is provided from your dealer for customers
who operate and maintain their equipment as described
in this manual. The warranty is explained on the warranty
certicate shown in this manual.
This warranty provides you the assurance that your dealer
will back products where defects appear within the war-
ranty period. Should the equipment be abused, or modi-
ed to change its performance beyond the original factory
specications, the warranty will become void.
WARNING: This product can expose you to
chemicals including carbon monoxide, which is
known to the State of California to cause birth
defects or other reproductive harm. For more
information go to www.P65Warnings.ca.gov
WARNING
WARNING: This product can expose you to
chemicals including Lead, which is known to
the State of California to cause cancer and birth
defects or other reproductive harm. For more
information go to www.P65Warnings.ca.gov
WARNING

Operator’s Manual 3
All information, illustrations and specications in this manual are based
on the latest information available at the time of publication. The right is
reserved to make changes at any time without notice.
CONTENTS
INTRODUCTION ..........................................................................................................................2
SAFETY .........................................................................................................................................4
RECOGNIZE SAFETY INFORMATION .......................................................................................................4
UNDERSTAND SIGNAL WORDS ...............................................................................................................4
FOLLOW SAFETY INSTRUCTIONS...........................................................................................................4
CARBON MONOXIDE - POISONOUS GAS ...............................................................................................4
SAFETY WARNING WHEN REFUELING ...................................................................................................5
ELECTRICAL HAZARDS ............................................................................................................................5
RISK OF FIRE OR EXPLOSION .................................................................................................................6
RISK OF BURSTING .................................................................................................................................. 7
RISK OF BREATHING ................................................................................................................................ 7
RISK OF BURNS ........................................................................................................................................7
RISK OF FLYING OBJECTS.......................................................................................................................8
RISK FROM MOVING PARTS .................................................................................................................... 8
IMPORTANT SAFETY INSTRUCTIONS .....................................................................................................8
WEAR PROTECTIVE CLOTHING ...............................................................................................................9
PREPARE FOR EMERGENCIES ................................................................................................................9
INSPECT UNIT ...........................................................................................................................................9
SERVICE UNIT SAFELY .............................................................................................................................9
SAFETY SIGNS ...........................................................................................................................10
CONTROLS ................................................................................................................................11
INSTALLATION ...........................................................................................................................13
LOCATION: ..............................................................................................................................................13
SERVICE TRUCK INSTALLATION: ...........................................................................................................13
GROUNDING INSTRUCTIONS ................................................................................................................13
GASOLINE ENGINE ................................................................................................................................. 14
ENGINE OIL .............................................................................................................................................15
ENGINE OIL CAPACITY ........................................................................................................................... 15
FUELING .................................................................................................................................................. 16
GENERAL RECOMMENDATIONS ...........................................................................................................16
FUEL TYPE ..............................................................................................................................................16
BATTERY INSTALLATION ........................................................................................................................16
HIGH ALTITUDE .......................................................................................................................................17
OPERATION ...............................................................................................................................18
PRE-OPERATION:....................................................................................................................................18
START-UP: ...............................................................................................................................................18
WELDING START-UP: .............................................................................................................................. 18
ELECTRODE CHART ...............................................................................................................................19
SHUTDOWN: ...........................................................................................................................................20
OPERATING CONTROLS ........................................................................................................................20
CABLE SIZE: ............................................................................................................................................21
ELECTRIC MOTOR LOADS: .................................................................................................................... 21
TROUBLESHOOTING ................................................................................................................22
MAINTENANCE ..........................................................................................................................24
MAINTENANCE CHART: ..........................................................................................................................24
MAINTENANCE .......................................................................................................................................25
ENGINE: ...................................................................................................................................................25
AIR CLEANER: ......................................................................................................................................... 25
GENERATOR MAINTENANCE ................................................................................................................. 26
CLEANING AND GAPPING SPARK PLUG: .............................................................................................28
BELT TENSION ADJUSTMENT: ..............................................................................................................28
WIRING SCHEMATIC...............................................................................................................................29
WIRING DIAGRAM - AGW-SM14 AND AGW-SV14 (AFTER SERIAL #20284607) .................................. 30
WIRING DIAGRAM - AGW-SH22 (AFTER SERIAL #20284448) ..............................................................31
STORAGE ...................................................................................................................................32
SPECIFICATIONS ....................................................................................................................... 33
4 Operator’s Manual
W
A
R
N
I
N
G
W
A
R
N
I
N
G
S
I
N
TH
E
M
A
N
U
A
L
S
.
W
A
R
N
I
N
G
S
I
N
TH
E
M
A
N
U
A
L
S
.
C
A
U
T
I
O
N
O
CAU
T
I
O
N
S
I
N
O
T
H
E
M
A
N
U
A
L
S
O
CAU
T
I
O
N
S
I
N
O
T
H
E
M
A
N
U
A
L
S
O
CAU
T
I
O
N
S
I
N
O
T
H
E
M
A
N
U
A
L
S
O
CAU
T
I
O
N
S
I
N
O
T
H
E
M
A
N
U
A
L
S
SAFETY
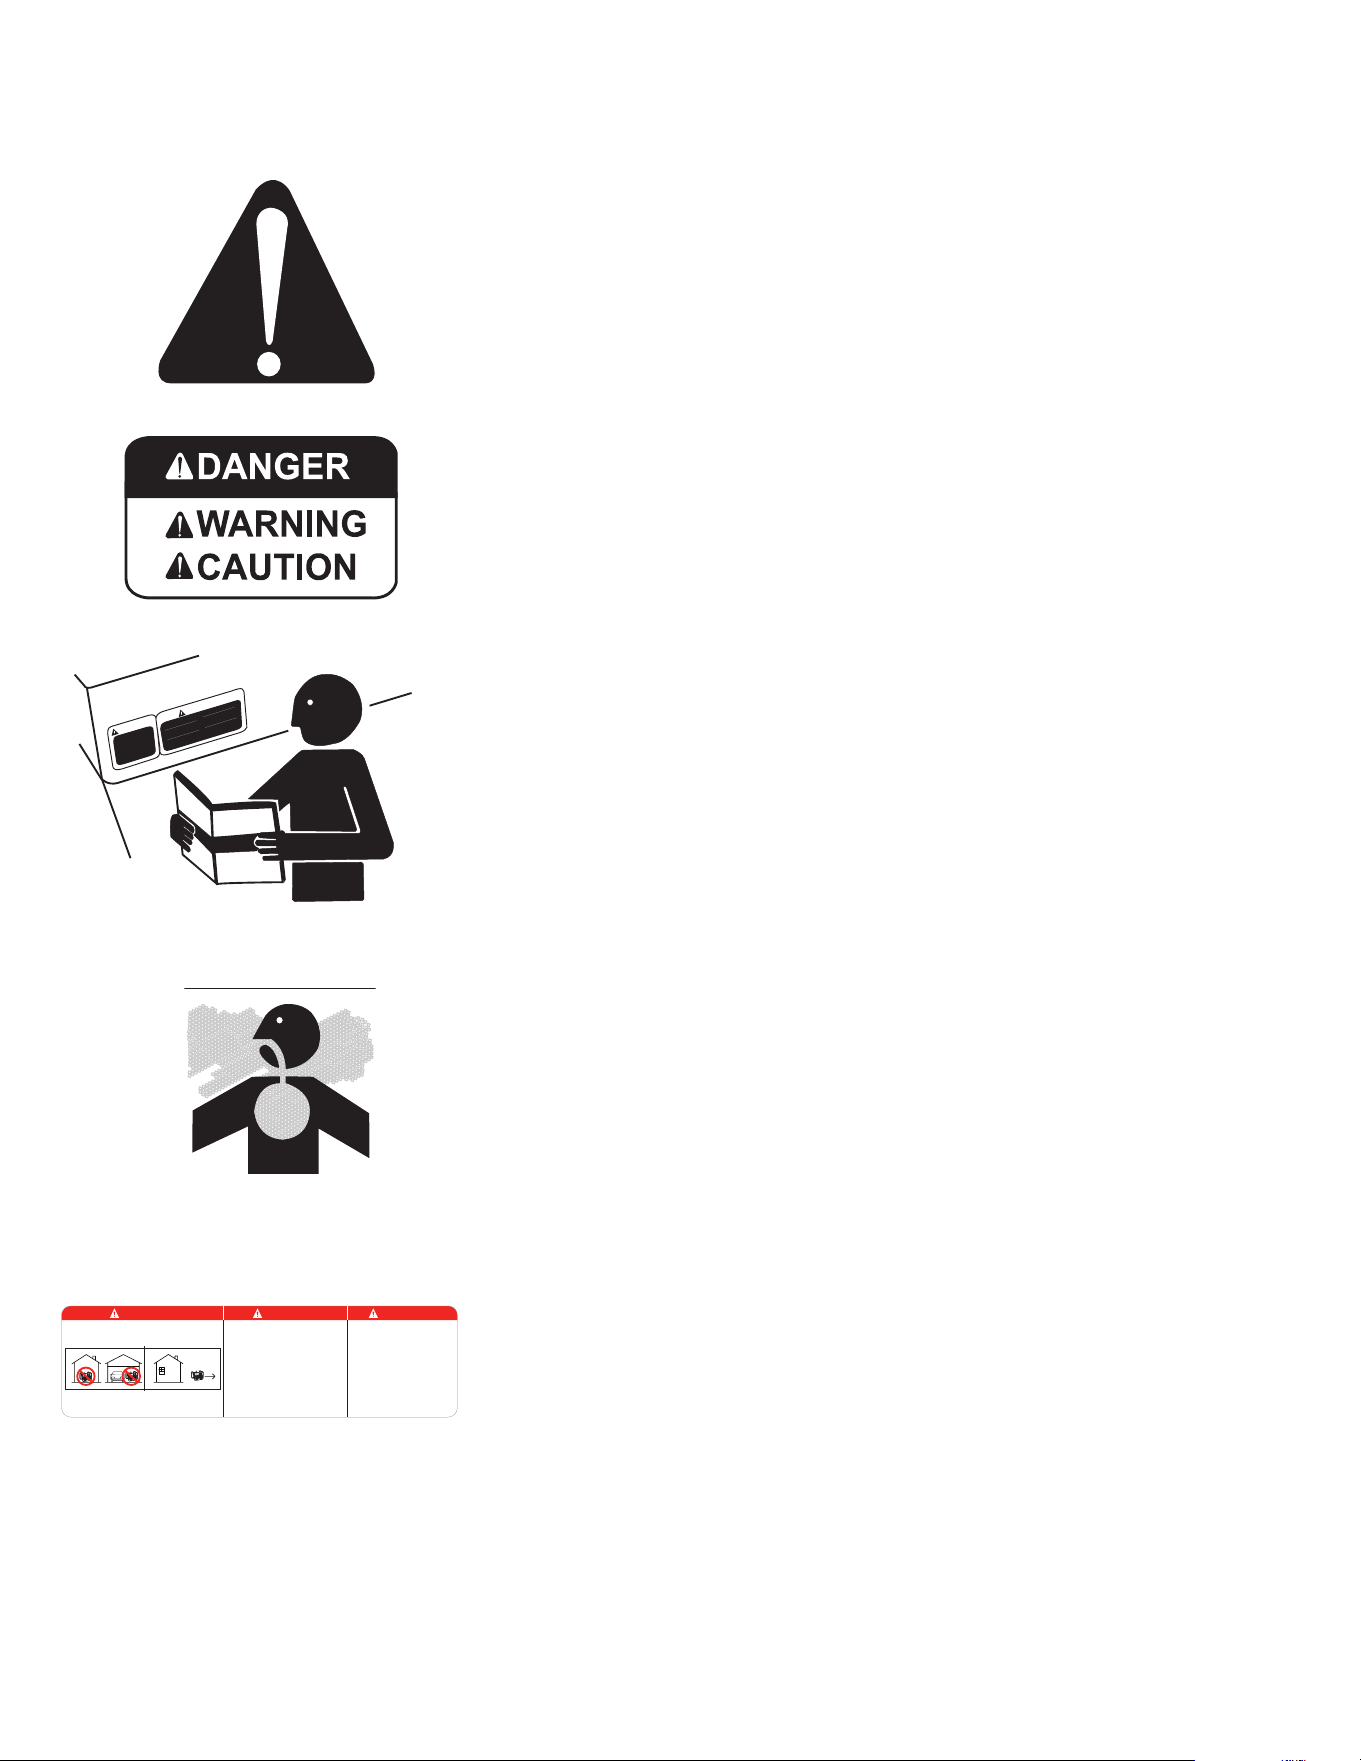
RECOGNIZE SAFETY INFORMATION
This is the safety alert symbol. When you see this symbol on your machine
or in this manual, be alert to the potential for personal injury.
Follow recommended precautions and safe operating practices.
UNDERSTAND SIGNAL WORDS
A signal word--DANGER, WARNING or CAUTION--is used with the safety-
alert symbol. DANGER identies the most serious hazards.
DANGER or WARNING safety signs are located near specic hazards. Gen-
eral precautions are listed on CAUTION safety signs. CAUTION also calls
attention to safety messages in this manual.
FOLLOW SAFETY INSTRUCTIONS
Carefully read all safety messages in this manual and safety signs on your
machine. Keep safety signs in good condition. Replace missing or dam-
aged safety signs. Be sure new equipment components and repair parts
include the current safety signs. Replacement safety signs are available
from your dealer.
Learn how to operate the machine and how to use controls properly. Do not
let anyone operate without instruction.
Keep your machine in proper working condition. Unauthorized modica-
tions to the machine may impair the function and/or safety and affect ma-
chine life.
If you do not understand any part of this manual and need assistance, con-
tact your dealer.
CARBON MONOXIDE - POISONOUS GAS
Use unit outdoors, away from open windows, vents, or doors.
Unit exhaust contains carbon monoxide - a poisonous gas that can kill you.
You CAN NOT smell or see this gas.
Never use the unit in enclosed or partially-enclosed spaces. The unit can
produce high levels of carbon monoxide very quickly. When you use this
unit, remember that you cannot smell or see carbon monoxide. Even if you
can’t smell exhaust fumes, you may still be exposed to carbon monoxide.
If you start to feel sick, dizzy, or weak while using the unit, get to fresh air
RIGHT AWAY. DO NOT DELAY. The carbon monoxide from the unit can rap-
idly lead to full incapacitation and death.
If you experience serious symptoms, get medical attention immediately.
Inform medical staff that carbon monoxide poisoning is suspected. If you
experienced symptoms while indoors, have someone call the re depart-
ment to determine when it is safe to re-enter the building.
Never operate the unit in an explosive atmosphere, near combustible ma-
terials or where ventilation is not sufcient to carry away exhaust fumes.
Exhaust fumes can cause serious injury or death.
NEVER use the unit indoors, including in homes, garages, basements, crawl
spaces, and other enclosed or partially-enclosed areas, even with ventila-
tion. Opening doors and windows or using fans will not prevent carbon
monoxide build-up in the home.
Follow the instructions that come with your unit. Locate the unit outdoors
and away from doors, windows, and vents that could allow the carbon mon-
oxide gas to come indoors.
ONLY run unit outdoors and away from air intakes.
34-1916-092410-E-F-S.
Using a generator indoors CAN KILL YOU IN MINUTES.
Generator exhaust contains carbon monoxide. This is a
poison you cannot see or smell.
NEVER use inside a home
or garage, EVEN IF doors
and windows are open.
Only use OUTSIDE and far
away from windows, doors,
and vents.
DANGER DANGER PELIGRO
Utilizando un generador adentro
PUEDE MATARLE EN MINUTOS.
El escape de generador contiene
monóxido de carbono. Este es un
gas tóxico que usted no puede ver ni
puede oler.
Nunca utilice dentro de un hogar ni el
garaje, INCLUSO SI puertas y
ventanas estén abiertas.
Solo utilice AFUERAS y lejos de
ventanas abiertas, las puertas, y
descargas.
L'utilisation d'un groupe électrogène à
l'intérieur PEUT VOUS TUER EN
QUELQUES MINUTES.
Le gaz d'échappement du groupe
électrogène contient de l'oxyde de
carbone. C'est un gaz toxique que l'on
ne peut pas voir ou sentir.
Ne JAMAIS utiliser à l'intérieur d'une
maison ou d'un garage, MÊME SI les
portes et fenêtres s'ont ouvertes.
N'utiliser qu'à l'EXTÉRIEUR et bien éloigné
des fenêtres, portes, et conduits d'aération.
Operator’s Manual 5
SAFETY
NEVER run unit inside homes, garages, sheds, or other semi-enclosed spac-
es. These spaces can trap poisonous gases EVEN IF you run a fan or open
doors and windows.
If you start to feel sick, dizzy, or weak while using the unit, shut if off and
get fresh air IMMEDIATELY. See a doctor. You may have carbon monoxide
poisoning.
Install battery-operated carbon monoxide alarms or plug-in carbon monox-
ide alarms with battery back-up in your home, according to the manufactur-
er’s installation instructions. The carbon monoxide alarms should be certi-
ed to the requirements of the latest safety standards for carbon monoxide
alarms. (UL 2034, IAS 6-96, or CSA 6.19.01).
Test your carbon monoxide alarm frequently and replace dead batteries.
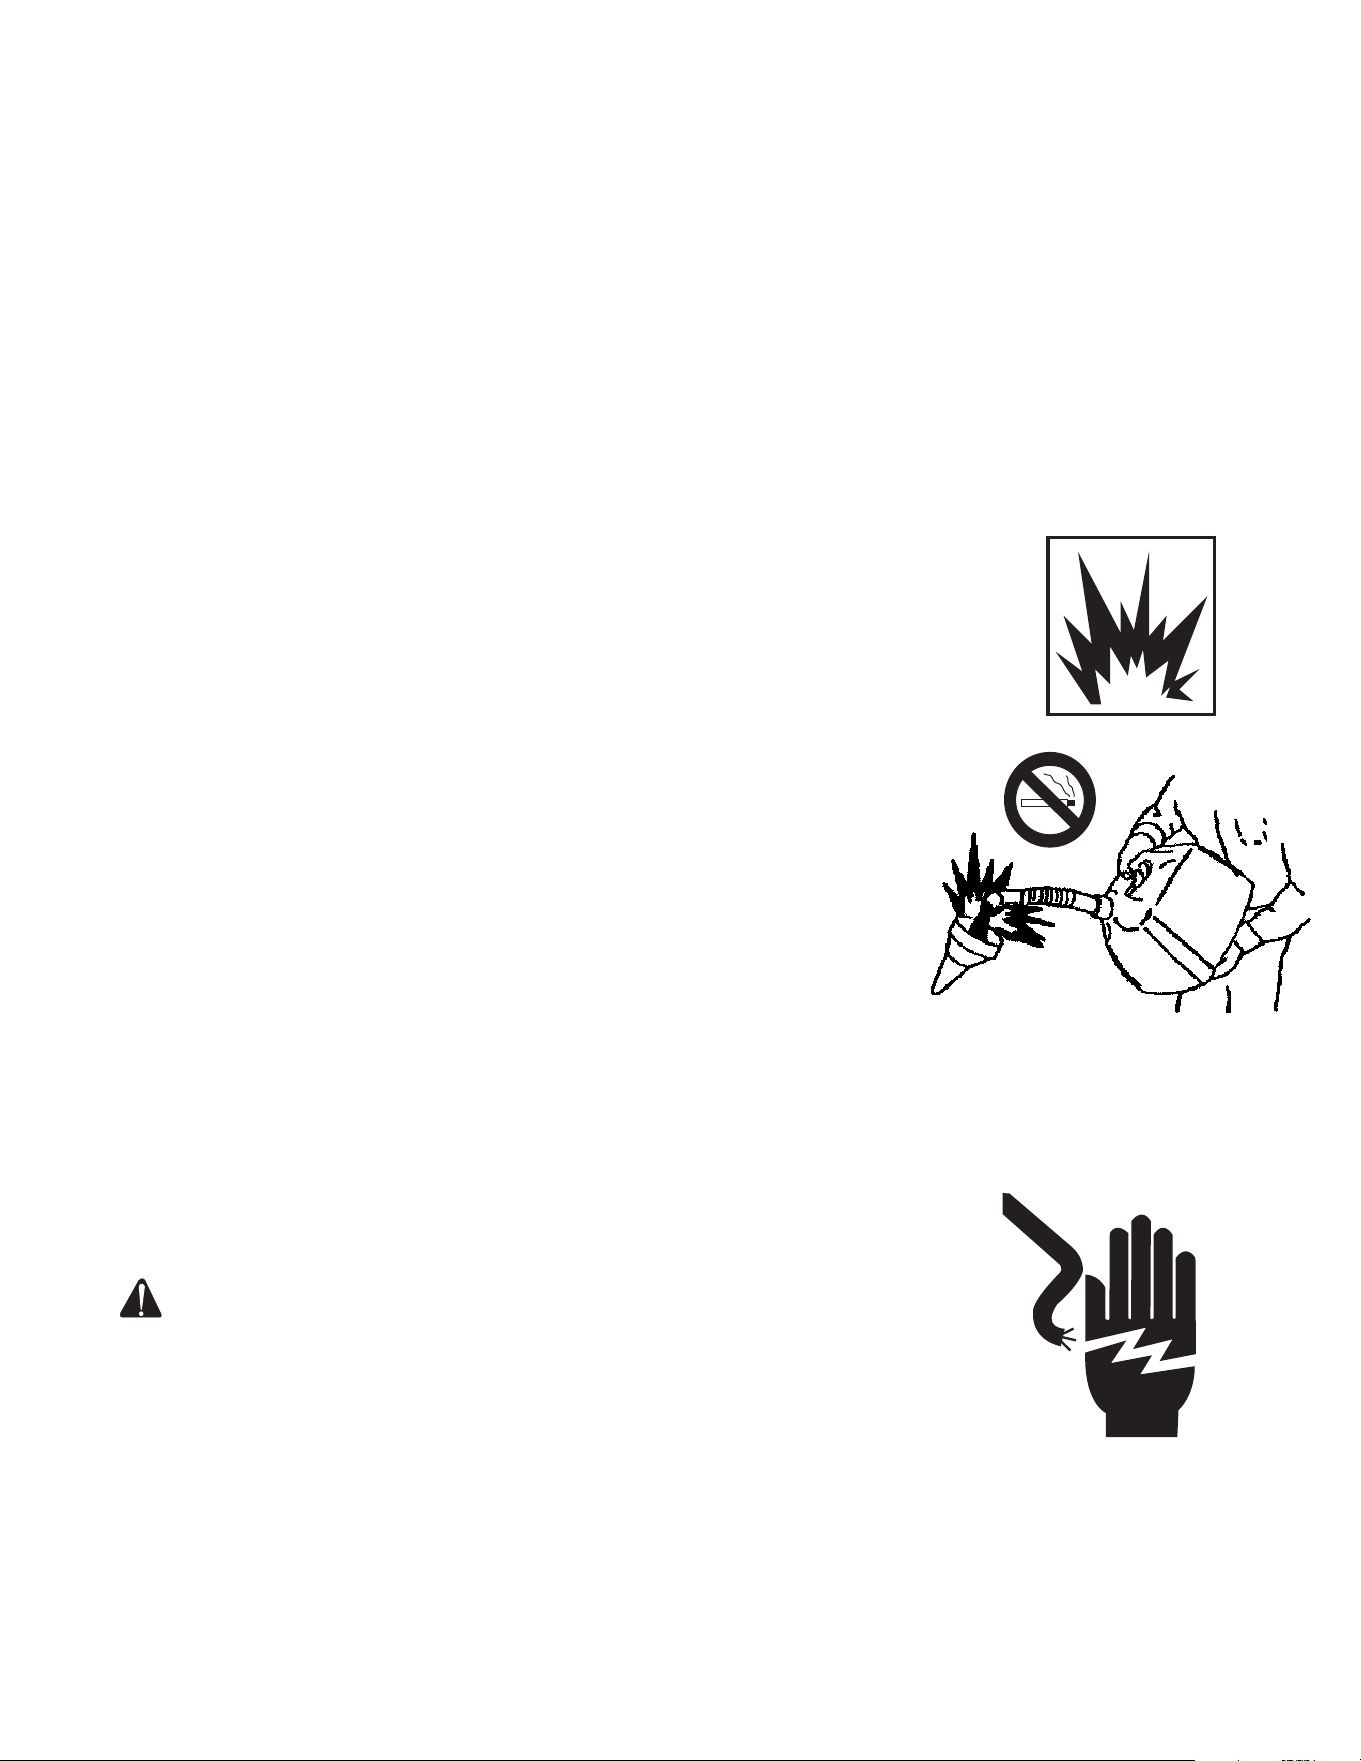
SAFETY WARNING WHEN REFUELING
Injury or death may occur as a result of improper fueling. Do not smoke
while lling engine fuel tank.
Always refuel slowly to avoid the possibility of spilled fuel which may cause
a risk of re.
Gasoline is extremely ammable and its vapors can explode if ignited.
Observe all safety regulations for the safe handling of fuel. Handle fuel in
safety containers. If the container does not have a spout, use a funnel.
Do not overll the fuel tank, leave room for the fuel to expand.
Fill the tank only on an area of bare ground. While fueling the tank, keep
heat, sparks and open ame away. Carefully clean up any spilled fuel before
starting engine.
Always ll fuel tank in an area with plenty of ventilation to avoid inhaling
dangerous fumes.
NEVER store fuel for your unit in the home. Gasoline, propane, kerosene,
and other ammable liquids should be stored outside of living areas in
properly-labeled, non-glass safety containers. Do not store them near a fuel-
burning appliance, such as a natural gas water heater in a garage. If the fuel
is spilled or the container is not sealed properly, invisible vapors from the
fuel can travel along the ground and can be ignited by the appliance’s pilot
light or by arcs from electric switches in the appliance.
ELECTRICAL HAZARDS
This product must be grounded. If it should malfunction or breakdown,
grounding provides a path of least resistance for electric current to reduce
the risk of electric shock. Do not touch live electrical parts.
DANGER - IMPROPER CONNECTION OF THE EQUIPMENT-
GROUNDING CONDUCTOR CAN RESULT IN A RISK OF
ELECTROCUTION. CHECK WITH A QUALIFIED ELECTRICIAN
OR SERVICE PERSON IF YOU ARE INDOUBT AS TO WHETHER
THE UNIT IS PROPERLY GROUNDED.
This unit is equipped with a grounding terminal for your protection. Always
complete the ground path from the unit to an external ground source as
instructed in the section labeled “Grounding Instructions” in the Preparation
section of this manual.
The unit is a potential source of electrical shock if not kept dry. Keep the unit
dry and do not use in rain or wet conditions. To protect from moisture, oper-
ate it on a dry surface under an open, canopy-like structure. Dry your hands
if wet before touching the unit.
6 Operator’s Manual
Plug appliances directly into the unit. Or, use a heavy duty, outdoor-rated
extension cord that is rated (in watts or amps) at least equal to the sum of
the connected appliance loads. Check that the entire cord is free of cuts or
tears and that the plug has all three prongs, especially a grounding pin.
NEVER try to power the house wiring by plugging the unit into a wall outlet,
a practice known as “back feeding”. This is an extremely dangerous practice
that presents an electrocution risk to utility workers and neighbors served by
the same utility transformer. It also bypasses some of the built-in household
circuit protection devices.
If you must connect the unit to the house wiring to power appliances, have a
qualied electrician install the appropriate equipment in accordance with lo-
cal electrical codes. Or, check with your utility company to see if it can install
an appropriate power transfer switch.
For power outages, permanently installed stationary units are better suited
for providing backup power to the home. Even a properly connected porta-
ble unit can become overloaded. This may result in overheating or stressing
the unit components, possibly leading to a unit failure.
Do not use worn, damaged, undersized, or poorly spliced welding cables.
Do not drape welding cables over your body. Do not touch electrode if you
are in contact with the work, ground, or another electrode from a different
machine.
RISK OF FIRE OR EXPLOSION
Serious injury or death may occur from normal sparks in the engine igni-
tion system or engine exhaust/mufer. Always operate the unit in a well
ventilated area free of ammable vapors, combustible dust, gases or other
combustible materials. Do not weld where the atmosphere may contain
ammable dust, gas, or liquid vapors (such as gasoline).
DO NOT SMOKE if spraying ammable material. Locate the unit at least 20
feet away from the spray area. (An additional hose may be required.)
Never ll the engine fuel tank while the engine is running or hot. Allow the
engine to cool two minutes before refueling. Do not refuel indoors or in a
poorly ventilated area.
Do not operate the unit if gasoline is spilled. Wipe the unit clean and move
it away from the spill. Avoid creating any ignition until the gasoline has
evaporated.
Do not store the unit near an open ame or any equipment such as a stove,
furnace, water heater, etc. which utilizes a pilot light or sparking device.
A spark arrester must be added to the mufer of this engine if it is to be
used on any forest covered, brush covered or grass covered unimproved
land. The arrester must be maintained in effective working order by the
operator.
Serious injury may occur if any of the unit's ventilation openings are restrict-
ed, causing the unit to overheat and start a re. Never place objects against
or on top of the unit. Operate the unit at least 12 inches away from any wall
or obstruction that would restrict proper ventilation.
Welding on closed containers, such as tanks, drums, or pipes, can cause
them to explode. Accidental contact of electrode to metal objects can cause
sparks, explosion, overheating, or re.
Remove all ammables within 35 ft (10.7 m) of the welding arc. Do not weld
where ying sparks can strike ammable material. Watch for re, and keep a
re extinguisher nearby.
SAFETY
Operator’s Manual 7
After completion of work, inspect area to ensure it is free of sparks, glowing
embers, and ames. Remove stick electrode from holder when not in use.
RISK OF BURSTING
Serious injury or death may occur from an air tank explosion if air tanks are
not properly maintained. Drain air tank daily or after each use to prevent
moisture buildup in the air tank.
If air tank develops a leak, replace the air tank immediately. Never repair,
weld or make modications to the air tank or its attachments. Use only
genuine manufacturer repair parts for your unit. NEVER make adjustments
to the factory set pressures.
Serious injury may occur from the unit malfunction or exploding accesso-
ries if incorrect system components, attachments or accessories are used.
Never exceed manufacturers maximum allowable pressure rating of attach-
ments.
Because of extreme heat, do not use plastic pipe or lead tin soldered joints
for a discharge line.
Never use the unit to inate small, low pressure objects such as toys.
RISK OF BREATHING
Serious injury or death could occur from inhaling compressed air. The air
stream may contain carbon monoxide, toxic vapors or solid particles. Never
inhale air from the unit either directly or from a breathing device connected
to the unit.
Serious injury or death may occur from inhaling engine exhaust. This unit
was designed for outdoor use. Never operate this unit in an enclosed
area. Always make certain there is adequate ventilation (fresh outside air)
for breathing and combustion. This will prevent the buildup of dangerous
carbon monoxide gases. Beware of poorly ventilated areas, or areas with
inadequate exhaust fans.
Sprayed materials such as paint, solvents, paint remover, insecticides,
weed killers, etc. contain harmful vapors and poisons. Operate the unit only
in a well ventilated area. Follow all safety instructions provided with the ma-
terials you are spraying. Use of a respirator may be required when working
with some materials.
Welding produces fumes and gases. Breathing these fumes and gases
can be hazardous to your health. Keep your head out of the fumes. Do not
breathe the fumes.
Do not weld in locations near degreasing, cleaning, or spraying operations.
The heat and rays of the arc can react with vapors to form highly toxic and
irritating gases.
Do not weld on coated metals, such as galvanized, lead, or cadmium plated
steel. The coatings and any metals containing these elements can give off
toxic fumes if welded.
RISK OF BURNS
Serious injury could occur from touching exposed metal parts. These areas
can remain hot for some time after the unit is shutdown. Never allow any
part of your body or other materials to make contact with any exposed
metal parts on the unit.
Never allow any part of your body to contact the engine mufer, compressor
head or adjacent areas.
SAFETY

8 Operator’s Manual
RISK OF FLYING OBJECTS
Soft tissue damage can occur from the compressed air stream. Always wear
safety glasses to shield the eyes from ying debris.
Never point the air stream at any part of your body, anyone else or animals.
Never leave pressurized air in the unit. Shut off the unit and relieve pressure
when storing or attempting maintenance.
Serious injury can occur from loose debris being propelled at a high speed
from the compressed air stream. Always maintain a safe distance from
people and animals while operating the unit.
Do not move the unit while air tank is under pressure. Do not attempt to
move the unit by pulling on the hose.
RISK FROM MOVING PARTS
Risk of bodily injury from moving parts. Before performing maintenance,
always turn off the unit. Bleed pressure from the air hose and disconnect
spark plug wire to prevent engine from starting unexpectedly. All repairs to
the unit should be made by an Authorized Service person.
Do not operate without protective covers/guards. Always turn off the unit
before removing any guard. Replace damaged covers/guards before using
the unit.
IMPORTANT SAFETY INSTRUCTIONS
WARNING: TO REDUCE THE RISK OF INJURY, READ THIS
OPERATOR’S MANUAL COMPLETELY BEFORE USING.
WHEN USING THIS PRODUCT, THE FOLLOWING BASIC
PRECAUTIONS SHOULD ALWAYS BE FOLLOWED:
1. Risk from Negligence: Risk of injury from negligent use. Never allow children
or adolescents to operate this unit! Stay alert-watch what you are doing.
Do not operate the unit when fatigued or under the inuence of alcohol or
drugs. Know how to stop the unit. Be thoroughly familiar with controls.
2. Risk of Unit Damage: Risk of major repair. Do not operate the unit without
an air lter. Do not operate the unit in a corrosive environment. Always
operate the unit in a stable, secure position to prevent the unit from falling.
Follow all maintenance instructions listed in this manual. Overuse can
cause overheating; allow cooling period; follow rated duty cycle. Reduce
current or reduce duty cycle before starting to weld again. Do not block
or lter airow to unit.
3. When starting the unit, using recoil starter grip, be sure that nothing is in
a position to be hit by the operator’s hand or arm. Be sure the switch on
electric power tools is in the “OFF” position before plugging them into the
unit.
4. Do not operate the unit or any electrical tool in any area where water or
similar materials constitute an electrical hazard to the operator. Do not
operate on wet surfaces, in rain or in snow.
5. Always be sure that the unit is on secure footing so that it cannot slide or
shift around, endangering workers.
6. Avoid contacting the hot exhaust manifold, mufer or cylinder(s).
7. Keep clear of all rotating parts.
8. Unless the tool or appliance is double insulated, it must be grounded
through a properly grounded receptacle. Tools and appliances which
have 3 prong plugs must be plugged into extension cords and electrical
receptacles with 3 holes. Before operating any electrical item, be sure it
is in good repair.
SAFETY
Operator’s Manual 9
SAFETY
9. Beware of using this equipment in conned spaces. Conned spaces,
without sufcient fresh air ventilation, can contain dangerous gases. Running
gasoline engines in such environments can lead to deadly explosions and/
or asphyxiation.
10. Use extreme caution when lifting this unit. This unit is heavy so proper
lifting techniques should be used.
WEAR PROTECTIVE CLOTHING
Wear close tting clothing and safety equipment appropriate to the job.
Wear dry, hole-free insulating gloves and body protection.
Wear a suitable hearing protective device such as earmuffs or earplugs to
protect against objectionable or uncomfortable loud noises.
Operating equipment safely requires the full attention of the operator. Do not
wear radio or music headphones while operating machine.
Arc rays from the welding process produce intense visible and invisible
(ultraviolet and infrared) rays that can burn eyes and skin. Sparks y off from
the weld. ARC RAYS can burn eyes and skin. Wear an approved welding
helmet tted with a proper shade of lter lenses to protect your face and
eyes when welding or watching. Wear approved safety glasses with side
shields under your helmet.
Use protective screens or barriers to protect others from ash, glare and
sparks; warn others not to watch the arc. Wear protective clothing made
from durable, ame-resistant material and foot protection.
Welding, chipping, wire brushing, and grinding cause sparks and ying
metal. As welds cool, they can throw off slag. Wear approved safety glasses
with side shields even under your welding helmet.
PREPARE FOR EMERGENCIES
Keep a rst aid kit and re extinguisher handy.
Keep emergency numbers for doctors, ambulance service, hospital and re
department near your telephone.
Be prepared if a re starts.
INSPECT UNIT
Be sure all covers, guards and shields are tight and in place.
Locate all operating controls and safety labels.
Inspect power cord for damage before using. There is a hazard of electrical
shock from crushing, cutting or heat damage.
SERVICE UNIT SAFELY
Before servicing the unit, disconnect all equipment and battery (if equipped)
and allow unit to cool down.
Service unit in a clean dry at area.
SAVE THESE INSTRUCTIONS
W
A
R
N
I
N
G
W
A
R
N
I
N
G
S
I
N
TH
E
M
A
N
U
A
L
S
.
W
A
R
N
I
N
G
S
I
N
TH
E
M
A
N
U
A
L
S
.
C
A
U
T
I
O
N
O
CAU
T
I
O
N
S
I
N
O
T
H
E
M
A
N
U
A
L
S
O
CAU
T
I
O
N
S
I
N
O
T
H
E
M
A
N
U
A
L
S
O
CAU
T
I
O
N
S
I
N
O
T
H
E
M
A
N
U
A
L
S
O
CAU
T
I
O
N
S
I
N
O
T
H
E
MA
N
U
A
L
S
10 Operator’s Manual
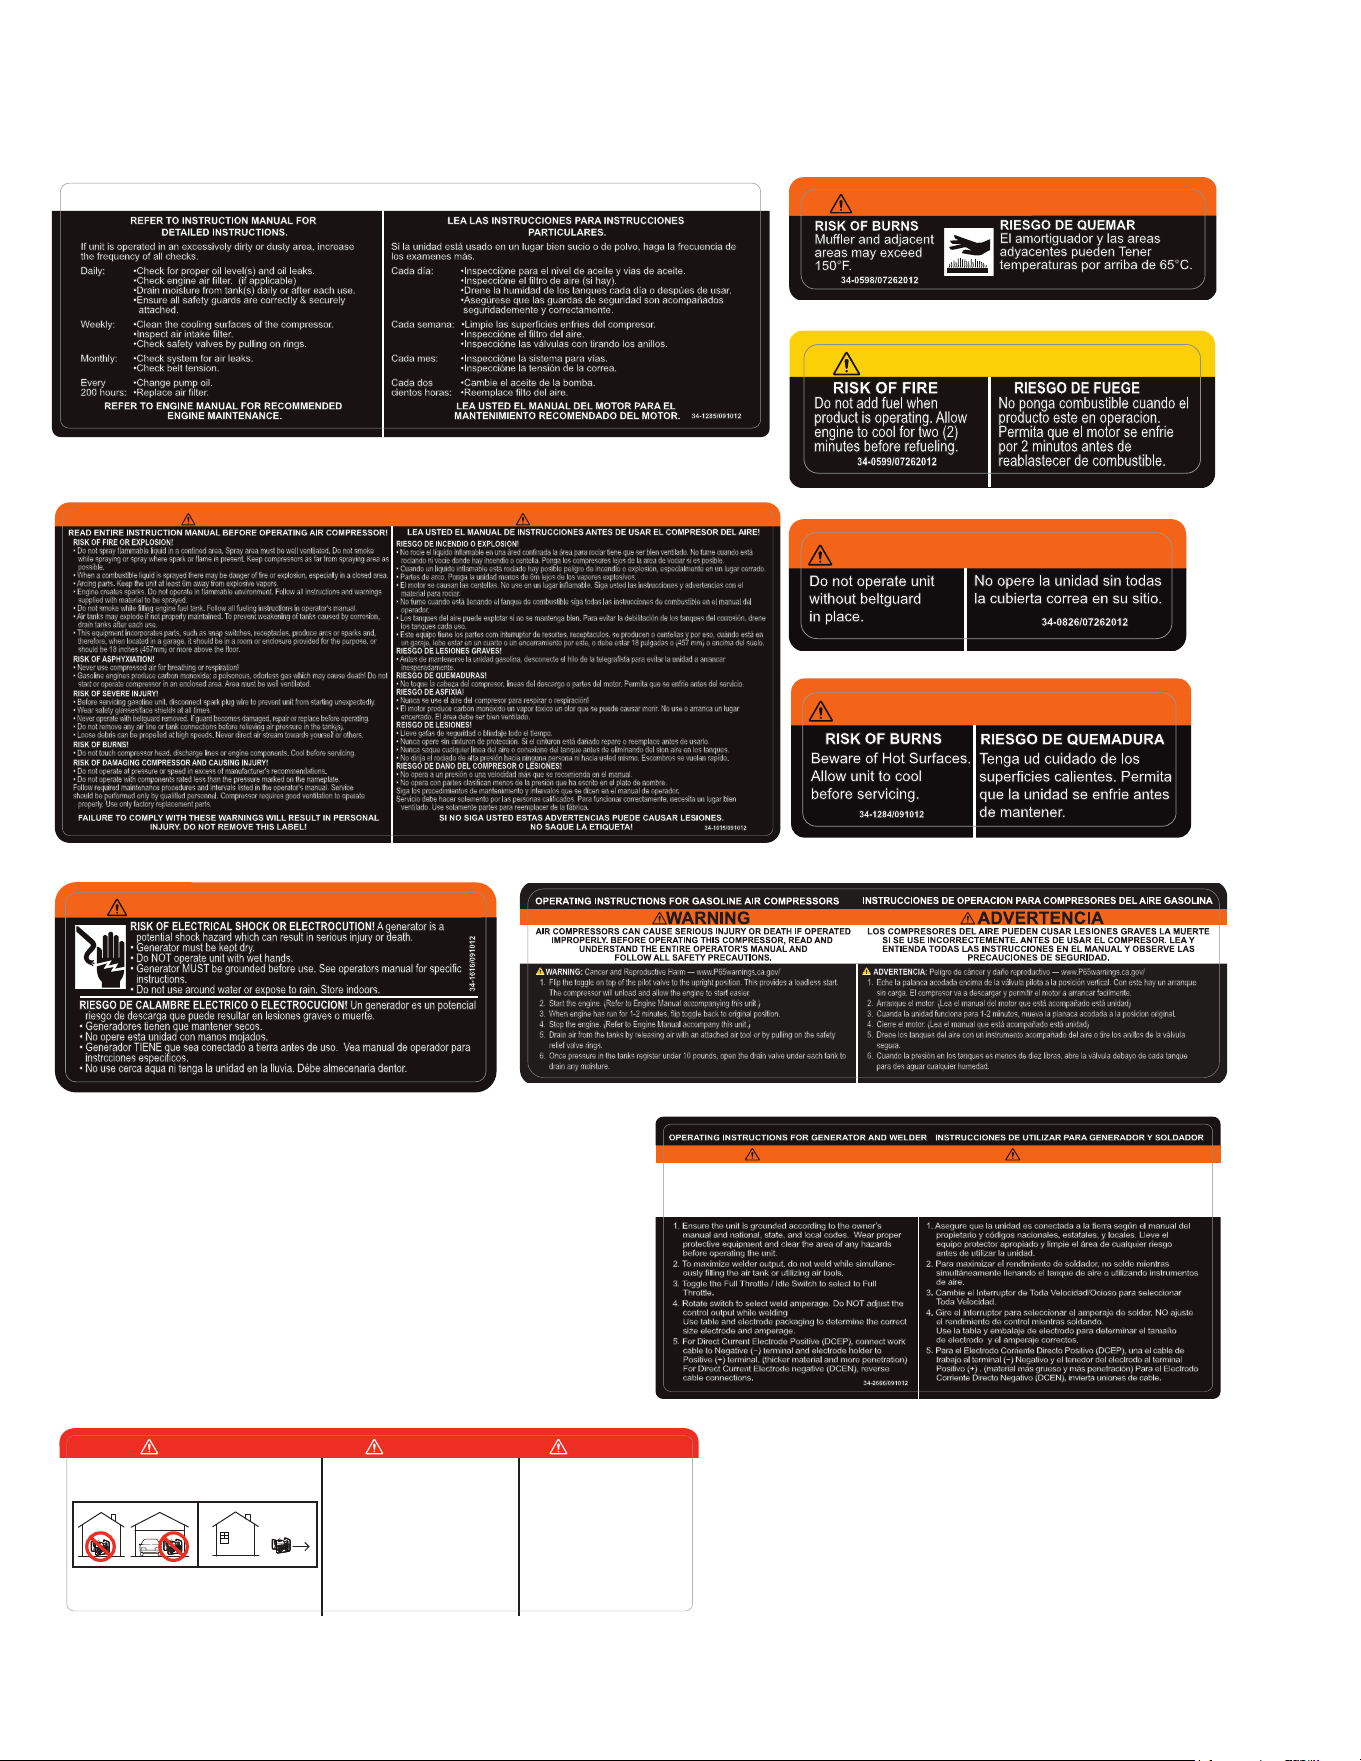
SAFETY SIGNS
34-1284
34-0826
34-0599
34-1616
CAUTION/PRECAUCIÓN
Do not add fuel when
product is operating. Allow
engine to cool for two (2)
minutes before refueling.
34-0599/07262012
RISK OF FIRE
RIESGO DE FUEGE
No ponga combustible cuando el
producto este en operacion.
Permita que el motor se enfrie
por 2 minutos antes de
reablastecer de combustible.
WARNING/ADVERTENCIA
RISK OF BURNS
Muffler and adjacent
areas may exceed
150°F.
RIESGO DE QUEMAR
El amortiguador y las areas
adyacentes pueden Tener
temperaturas por arriba de 65°C.
34-0598/07262012
34-0598
Beware of Hot Surfaces.
Allow unit to cool
before servicing.
RISK OF BURNS
RIESGO DE QUEMADURA
Tenga ud cuidado de los
superficies calientes. Permita
que la unidad se enfrie antes
de mantener.
34-1284/091012
WARNING/ADVERTENCIA
34-1616/091012
RISK OF ELECTRICAL SHOCK OR ELECTROCUTION! A generator is a
potential shock hazard which can result in serious injury or death.
• Generator must be kept dry.
• Do NOT operate unit with wet hands.
• Generator MUST be grounded before use. See operators manual for specific
instructions.
• Do not use around water or expose to rain. Store indoors.
RIESGO DE CALAMBRE ELECTRICO O ELECTROCUCION! Un generador es un potencial
riesgo de descarga que puede resultar en lesiones graves o muerte.
• Generadores tienen que mantener secos.
• No opere esta unidad con manos mojados.
• Generador TIENE que sea conectado a tierra antes de uso. Vea manual de operador para
instrcciones especificos.
• No use cerca aqua ni tenga la unidad en la lluvia. Débe almecenaria dentor.
WARNING / ADVERTENCIA
WARNING/ADVERTENCIA
34-0826/07262012
No opere la unidad sin todas
la cubierta correa en su sitio.
Do not operate unit
without beltguard
in place.
34-0826/07262012
No opere la unidad sin todas
la cubierta correa en su sitio.
Do not operate unit
without beltguard
in place.
RISK OF FIRE OR EXPLOSION!
• Do not spray flammable liquid in a confined area. Spray area must be well ventilated. Do not smoke
while spraying or spray where spark or flame is present. Keep compressors as far from spraying area as
possible.
• When a combustible liquid is sprayed there may be danger of fire or explosion, especially in a closed area.
• Arcing parts. Keep the unit at least 6m away from explosive vapors.
• Engine creates sparks. Do not operate in flammable environment. Follow all instructions and warnings
supplied with material to be sprayed.
• Do not smoke while filling engine fuel tank. Follow all fueling instructions in operator's manual.
• Air tanks may explode if not properly maintained. To prevent weakening of tanks caused by corrosion,
drain tanks after each use.
• This equipment incorporates parts, such as snap switches, receptacles, produce arcs or sparks and,
therefore, when located in a garage, it should be in a room or enclosure provided for the purpose, or
should be 18 inches (457mm) or more above the floor.
RISK OF ASPHYXIATION!
• Never use compressed air for breathing or respiration!
• Gasoline engines produce carbon monoxide; a poisonous, odorless gas which may cause death! Do not
start or operate compressor in an enclosed area. Area must be well ventilated.
RISK OF SEVERE INJURY!
• Before servicing gasoline unit, disconnect spark plug wire to prevent unit from starting unexpectedly.
• Wear safety glasses/face shields at all times.
• Never operate with beltguard removed. If guard becomes damaged, repair or replace before operating.
• Do not remove any air line or tank connections before relieving air pressure in the tank(s).
• Loose debris can be propelled at high speeds. Never direct air stream towards yourself or others.
RISK OF BURNS!
• Do not touch compressor head, discharge lines or engine components. Cool before servicing.
RISK OF DAMAGING COMPRESSOR AND CAUSING INJURY!
• Do not operate at pressure or speed in excess of manufacturer's recommendations.
• Do not operate with components rated less than the pressure marked on the nameplate.
Follow required maintenance procedures and intervals listed in the operator's manual. Service
should be performed only by qualified personnel. Compressor requires good ventilation to operate
properly. Use only factory replacement parts.
RIESGO DE INCENDIO O EXPLOSION!
• No rocie el líquido inflamable en una áred confinada la área para rociar tiene que ser bien ventilado. No fume cuando está
rociando ni vocie donde hay incendio o centella. Ponga los compresores lejos de la area de vociar si es posible.
• Cuando un liquido inflamable está rociado hay posible peligro de incendio o explosión, especialmente en un lugar cerrado.
• Partes de arco. Ponga la unidad menos de 6m lejos de los vapores explosívos.
• El motor se causan las centellas. No use en un lugar inflamable. Siga usted las instrucciones y advertencias con el
material para rociar.
• No fume cuando está llenando el tanque de combustible siga todas las instrucciones de combustible en el manual del
operador.
• Los tanques del aire puede explotar si no se mantenga bien. Para evitar la debilitación de los tanques del corrosión, drene
los tanques cada uso.
• Este equipo tiene los partes com interruptor de resortes, receptaculos, se producen o centellas y por eso, cuándo está en
un garaje, lebe estar en un cuarto o un encerramiento por este, o debe estar 18 pulgadas o (457 mm) o encima del suelo.
RIESGO DE LESIONES GRAVES!
• Antes de mantenerse la unidad gasolina, desconecte el hilo de la telegrafista para evitar la unidad a arrancar
inesperadamente.
RIESGO DE QUEMADURAS!
• No toque la cabeza del compresor, lineas del descargo o partes del motor. Permita que se enfrie antes del servicio.
RIESGO DE ASFIXIA!
• Nunca se use el aire del compresor para respirar o respiración!
• El motor produce carbón monóxido un vapor tóxico un olor que se puede causar morir. No use o arranca un lugar
encerrado. El área debe ser bien ventilado.
REISGO DE LESIONES!
• Lleve gafas de seguridad o blindaje todo el tiempo.
• Nunca opere sin cinturon de protección. Si el cinturon está dañado repare o reemplace antes de usarlo.
• Nunca saque cualquier linea del aire o conexione del tanque antes de eliminando del sion aire en los tanques.
• No dirija el rociado de alta presión hacia ninguna persona ni hacia usted mismo. Escombros se vuelan rapído.
RIESGO DE DAÑO DEL COMPRESOR O LESIONES!
• No opera a un presión o una velocidad más que se recomienda en el manual.
• No opera con partes clasifican menos de la presión que ha escrito en el plato de nombre.
Siga los procedimientos de mantenimiento y intervalos que se dicen en el manual de operador.
Servicio debe hacer solemento por las personas calificados. Para funcionar correctamente, necesita un lugar bien
ventilado. Use solamente partes para reemplacer de la fábrica.
READ ENTIRE INSTRUCTION MANUAL BEFORE OPERATING AIR COMPRESSOR!
LEA USTED EL MANUAL DE INSTRUCCIONES ANTES DE USAR EL COMPRESOR DEL AIRE!
SI NO SIGA USTED ESTAS ADVERTENCIAS PUEDE CAUSAR LESIONES.
NO SAQUE LA ETIQUETA!
FAILURE TO COMPLY WITH THESE WARNINGS WILL RESULT IN PERSONAL
INJURY. DO NOT REMOVE THIS LABEL!
34-1615/091012
WARNING ADVERTENCIA
34-1615
WARNING: Cancer and Reproductive Harm — www.P65warnings.ca.gov/
1. Flip the toggle on top of the pilot valve to the upright position. This provides a loadless start.
The compressor will unload and allow the engine to start easier.
2. Start the engine. (Refer to Engine Manual accompanying this unit.)
3. When engine has run for 1-2 minutes, flip toggle back to original position.
4. Stop the engine. (Refer to Engine Manual accompany this unit.)
5. Drain air from the tanks by releasing air with an attached air tool or by pulling on the safety
relief valve rings.
6. Once pressure in the tanks register under 10 pounds, open the drain valve under each tank to
drain any moisture.
ADVERTENCIA: Peligro de cáncer y daño reproductivo — www.P65warnings.ca.gov/
1. Eche la palanca acodada encima de la válvula pilota a la posición vertical. Con este hay un arranque
sin carga. El compresor va a descargar y permitir el motor a arrancar facilmente.
2. Arranque el motor. (Lea el manual del motor que está acompañado está unidad)
3. Cuanda la unidad funciona para 1-2 minutos, mueva la planaca acodada a la posicion original.
4. Cierre el motor. (Lea el manual que está acompañado está unidad)
5. Drene los tanques del aire con un instrumento acompañado del aire o tire los anillos de la válvula
segura.
6. Cuando la presión en los tanques es menos de diez libras, abre la válvula debayo de cada tanque
para des aguar cualquier humedad.
34-1286/060421
34-1286
LEA LAS INSTRUCCIONES PARA INSTRUCCIONES
PARTICULARES.
LEA USTED EL MANUAL DEL MOTOR PARA EL
MANTENIMIENTO RECOMENDADO DEL MOTOR.
Si la unidad está usado en un lugar bien sucio o de polvo, haga la frecuencia de
los examenes más.
Cada día: •Inspecciòne para el nivel de aceite y vias de aceite.
•Inspecciòne el filtro de aire (si hay).
•Drene la humidad de los tanques cada día o despúes de usar.
•Asegúrese que las guardas de seguridad son acompañados
seguridademente y correctamente.
Cada semana: •Limpie las superficies enfries del compresor.
•Inspeccióne el filtro del aire.
•Inspeccióne las válvulas con tirando los anillos.
Cada mes: •Inspeccióne la sistema para vías.
•Inspeccióne la tensión de la correa.
Cada dos •Cambie el aceite de la bomba.
cientos horas: •Reemplace filto del aire.
REFER TO INSTRUCTION MANUAL FOR
DETAILED INSTRUCTIONS.
REFER TO ENGINE MANUAL FOR RECOMMENDED
ENGINE MAINTENANCE.
If unit is operated in an excessively dirty or dusty area, increase
the frequency of all checks.
Daily: •Check for proper oil level(s) and oil leaks.
•Check engine air filter. (if applicable)
•Drain moisture from tank(s) daily or after each use.
•Ensure all safety guards are correctly & securely
attached.
Weekly: •Clean the cooling surfaces of the compressor.
•Inspect air intake filter.
•Check safety valves by pulling on rings.
Monthly: •Check system for air leaks.
•Check belt tension.
Every •Change pump oil.
200 hours: •Replace air filter.
34-1285/091012
MAINTENANCE INSTRUCTIONS INSTRUCCIONES DE MANTENIMIENTO
34-1285
DANGER DANGER PELIGRO
34-1916/083012
Using a generator indoors CAN KILL YOU IN MINUTES.
Generator exhaust contains carbon monoxide. This is a
poison you cannot see or smell.
NEVER use inside a home
or garage, EVEN IF doors
and windows are open.
Only use OUTSIDE and far
away from windows, doors,
and vents.
Utilizando un generador adentro
PUEDE MATARLE EN MINUTOS.
El escape de generador contiene
monóxido de carbono. Este es un
gas tóxico que usted no puede ver ni
puede oler.
Nunca utilice dentro de un hogar ni el
garaje, INCLUSO SI puertas y
ventanas estén abiertas.
Solo utilice AFUERAS y lejos de
ventanas abiertas, las puertas, y
descargas.
L'utilisation d'un groupe électrogène à
l'intérieur PEUT VOUS TUER EN
QUELQUES MINUTES.
Le gaz d'échappement du groupe
électrogène contient de l'oxyde de
carbone. C'est un gaz toxique que l'on
ne peut pas voir ou sentir.
Ne JAMAIS utiliser à l'intérieur d'une
maison ou d'un garage, MÊME SI les
portes et fenêtres s'ont ouvertes.
N'utiliser qu'à l'EXTÉRIEUR et bien éloigné
des fenêtres, portes, et conduits d'aération.
34-2666
34-1916
34-2666/091012
OPERATING INSTRUCTIONS FOR GENERATOR AND WELDER
GENERATOR / WELDER CAN CAUSE SERIOUS INJURY OR
DEATH IF OPERATED IMPROPERLY. BEFORE OPERATING
THIS UNIT READ AND UNDERSTAND THE ENTIRE OPERA-
TOR’S MANUAL AND FOLLOW ALL SAFETY
PRECAUTIONS.
1. Ensure the unit is grounded according to the owner’s
manual and national, state, and local codes. Wear proper
protective equipment and clear the area of any hazards
before operating the unit.
2. To maximize welder output, do not weld while simultane-
ously filling the air tank or utilizing air tools.
3. Toggle the Full Throttle / Idle Switch to select to Full
Throttle.
4. Rotate switch to select weld amperage. Do NOT adjust the
control output while welding
Use table and electrode packaging to determine the correct
size electrode and amperage.
5. For Direct Current Electrode Positive (DCEP), connect work
cable to Negative (−) terminal and electrode holder to
Positive (+) terminal. (thicker material and more penetration)
For Direct Current Electrode negative (DCEN), reverse
cable connections.
INSTRUCCIONES DE UTILIZAR PARA GENERADOR Y SOLDADOR
EL GENERADOR/SOLDADOR PUEDE CAUSAR LA HERIDA SERIA
O LA MUERTE SI UTILIZADO INCORRECTAMENTE. ANTES DE
UTILIZAR ESTA UNIDAD, LEA Y ENTIENDA EL MANUAL DEL
OPERADOR ENTERO Y SIGA TODAS LAS
PRECAUCIONES DE SEGURIDAD.
1. Asegure que la unidad es conectada a la tierra según el manual del
propietario y códigos nacionales, estatales, y locales. Lleve el
equipo protector apropiado y limpie el área de cualquier riesgo
antes de utilizar la unidad.
2. Para maximizar el rendimiento de soldador, no solde mientras
simultáneamente llenando el tanque de aire o utilizando instrumentos
de aire.
3. Cambie el Interruptor de Toda Velocidad/Ocioso para seleccionar
Toda Velocidad.
4. Gire el interruptor para seleccionar el amperaje de soldar. NO ajuste
el rendimiento de control mientras soldando.
Use la tabla y embalaje de electrodo para determinar el tamaño
de electrodo y el amperaje correctos.
5. Para el Electrodo Corriente Directo Positivo (DCEP), una el cable de
trabajo al terminal (−) Negativo y el tenedor del electrodo al terminal
Positivo (+) . (material más grueso y más penetración) Para el Electrodo
Corriente Directo Negativo (DCEN), invierta uniones de cable.
WARNING ADVERTENCIA
Operator’s Manual 11
CONTROLS
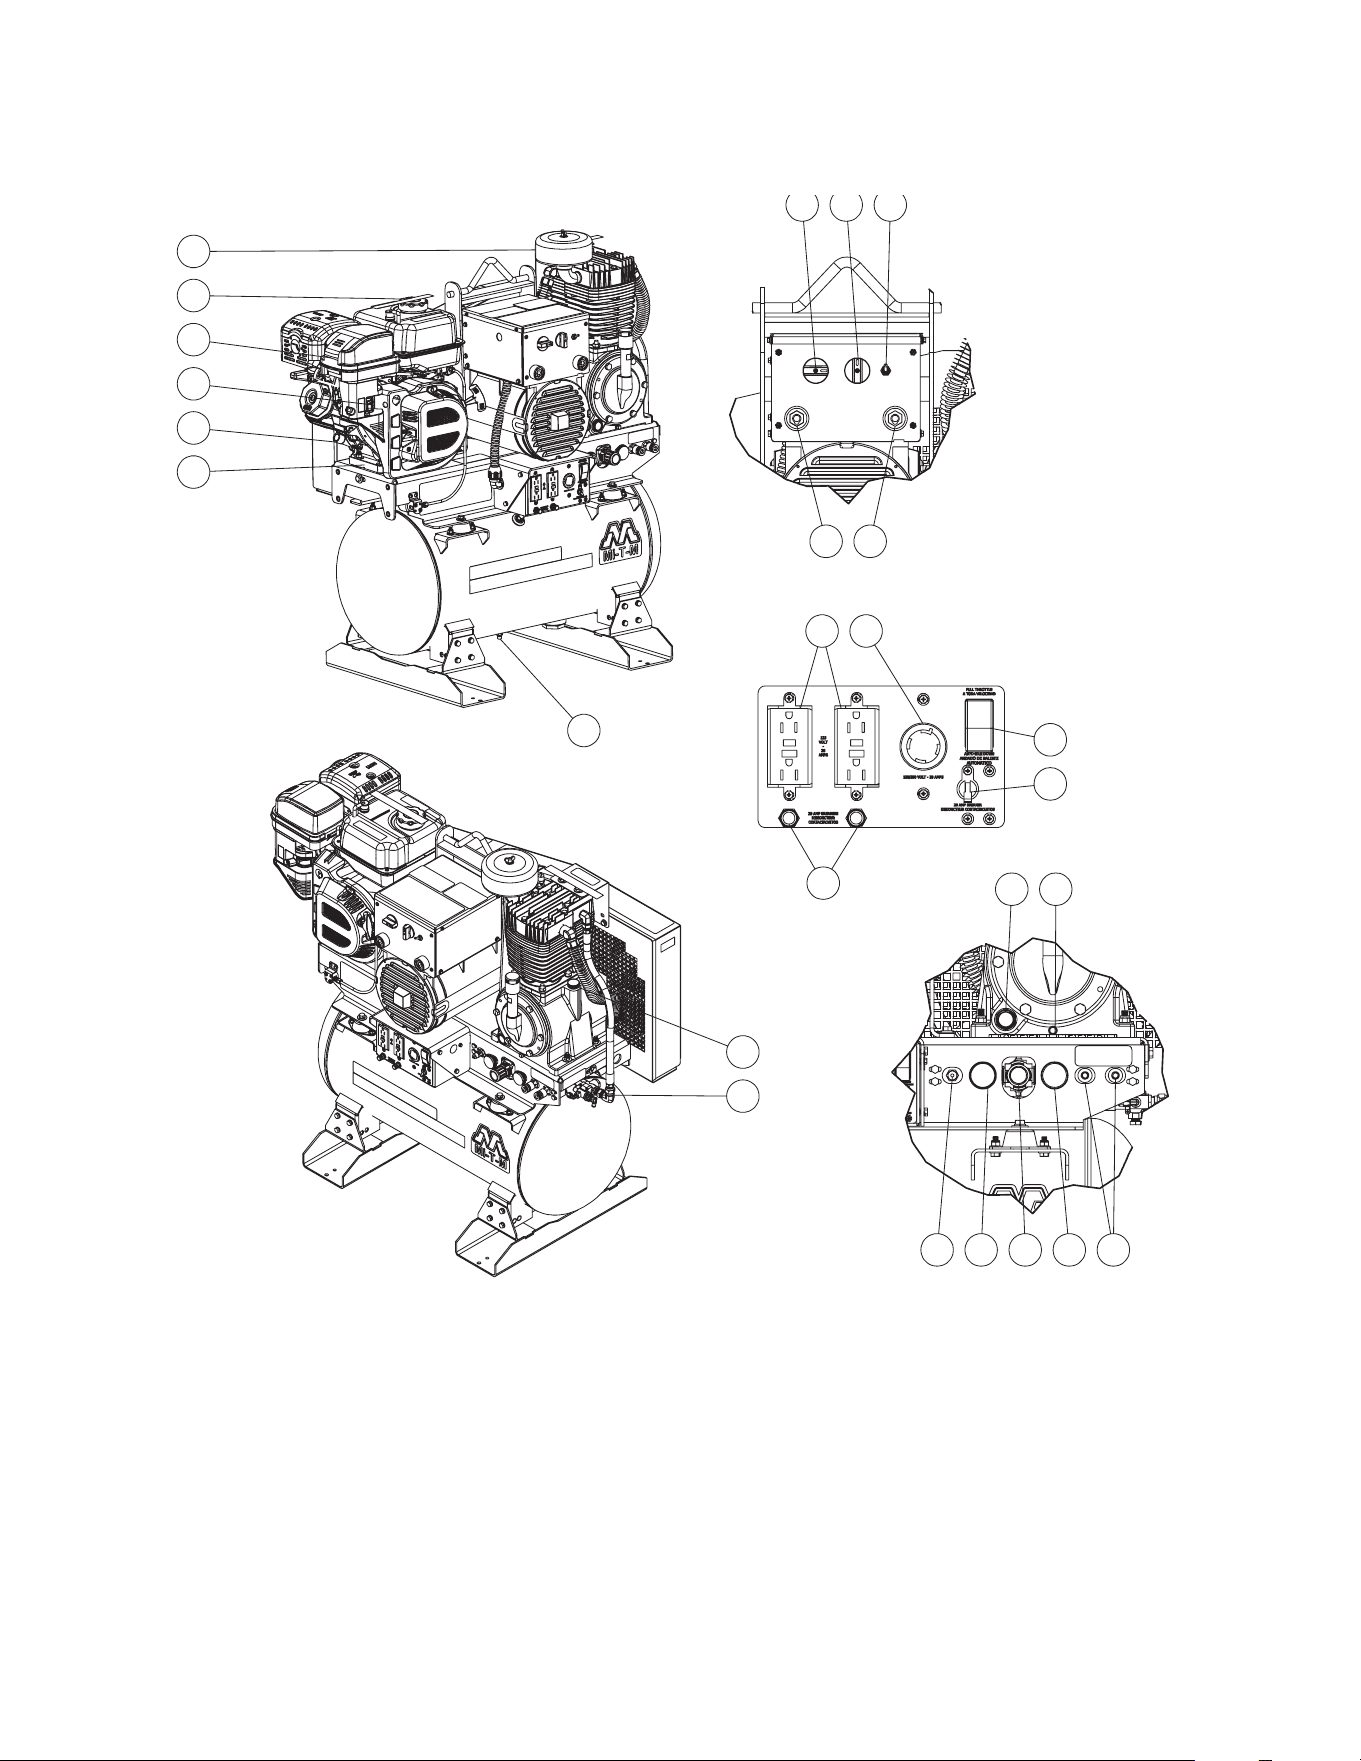
1-Pump Air Filter
2-Fuel Cap
3-Engine Air Cleaner
4-Engine Choke
5-Engine Oil Fill
6-Engine Oil Drain
7-Air Tank Drain
8-Pump Oil Fill
9-Pilot Valve
10-Weld Amperage Setting
11-Generator/Welder Selector Switch
12-Min/Max Weld Amperage Toggle
Switch
13-Positive Welding Terminal
14-Negative Welding Terminal
15-125V Receptacle
16-120/250V 20A Twist Lock
17-Idle Control Switch
18-20A Toggle Breaker
19-20A Push Button Breaker
20-Pump Oil Sight Glass
21-Pump Oil Drain
22-Safety Relief Valve
23-Pressure Gauge
24-Regulator
25-Quick Connect
1
3
4
5
6
2
8
9
10 11 12
13
14
20 21
22 23 24 23 25
15 16
17
18
19
7
12 Operator’s Manual
CONTROLS
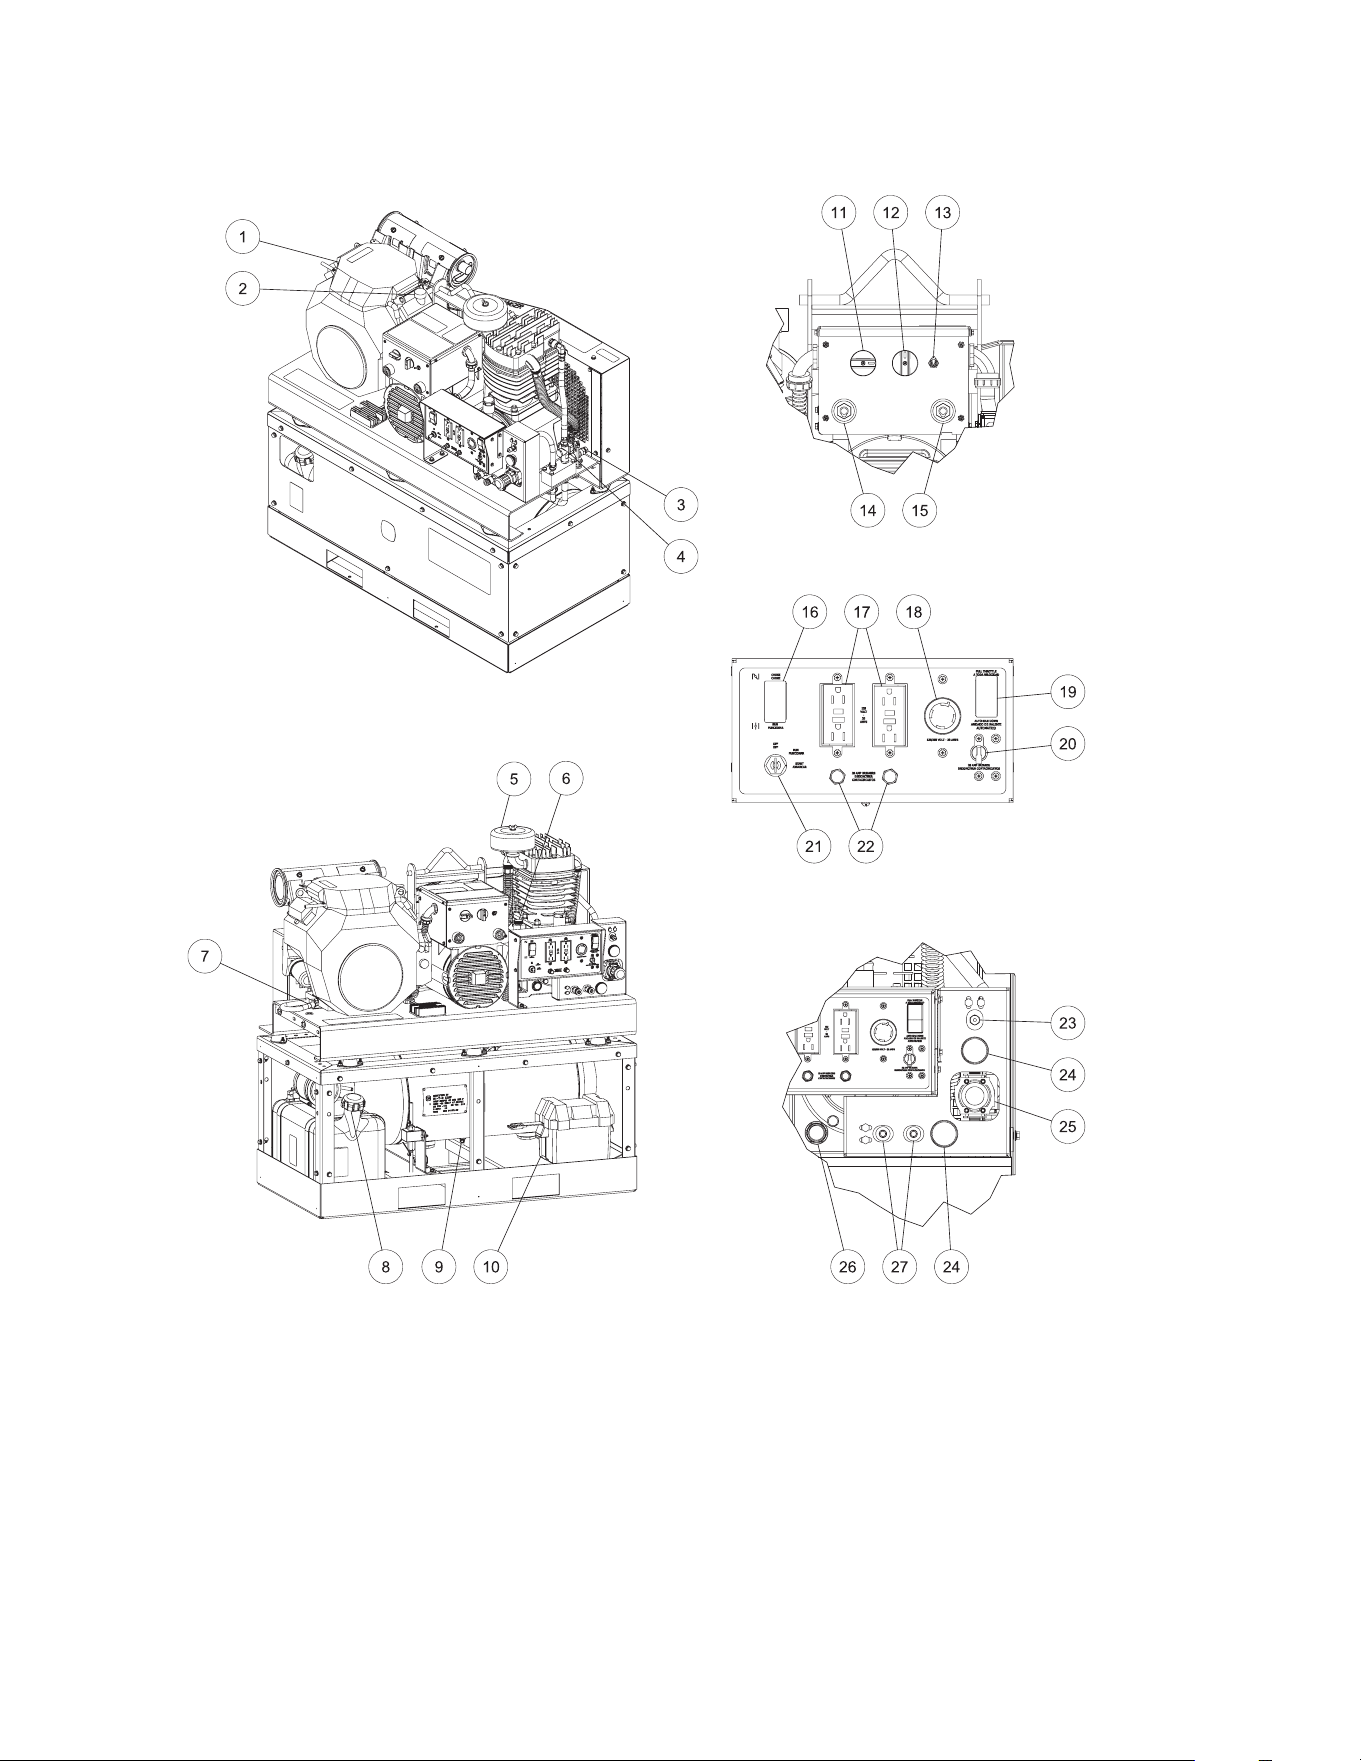
1-Engine Air Cleaner
2-Engine Oil Fill
3-Pump Oil Drain
4-Pilot Valve
5-Pump Air Filter
6-Pump Oil Fill
7-Engine Oil Drain
8-Fuel Cap
9-Air Tank Drain
10-Battery
11-Weld Amperage Setting
12-Generator/Welder Selector Switch
13-Min/Max Weld Amperage Toggle
Switch
14-Positive Welding Terminal
15-Negative Welding Terminal
16-Engine Choke
17-125V Receptacle
18-125/250V 20A Twist Lock
19-Idle Control Switch
20-20A Toggle Breaker
21-Engine Keyswitch
22-20A Push Button Breaker
23-Safety Relief Valve
24-Pressure Gauge
25-Regulator
26-Pump Oil Sight Glass
27-Quick Connect
Operator’s Manual 13
Read safety warnings before setting-up the unit.
Ensure the oil level in the unit's pump is adequate. If low, add
SAE-30W non-detergent oil.
LOCATION:
In order to avoid damaging the unit, do not incline the unit transversely or
longitudinally more than 10°.
WARNING: RISK OF ASPHYXIATION! DO NOT OPERATE IN AN
ENCLOSED AREA. USE THIS PRODUCT ONLY IN WELL
VENTILATED AREAS! THE EXHAUST FROM THE ENGINE
CONTAINS CARBON MONOXIDE, A POISONOUS, ODORLESS
AND INVISIBLE GAS. BREATHING THE GAS CAN CAUSE
SERIOUS INJURY, ILLNESS AND POSSIBLE DEATH.
WARNING: RISK OF EXPLOSION OR FIRE CAUSING SERIOUS
INJURY OR DEATH! DO NOT ALLOW THE ENGINE OR
MUFFLER TO COME IN CONTACT WITH FLAMMABLE
VAPORS, COMBUSTIBLE DUST, GASES OR OTHER
COMBUSTIBLE MATERIALS. A SPARK MAY CAUSE A FIRE.
WHEN USING THE UNIT FOR SPRAY PAINTING, PLACE THE
UNIT AS FAR AWAY FROM THE WORK AREA AS POSSIBLE,
USING EXTRA AIR HOSES IF NEEDED.
Place unit at least 12 inches away from obstacles that may prevent proper
ventilation. Do not place unit in an area:
- where there is evidence of oil or gas leaks.
- where ammable gas vapors or materials may be present.
- where air temperatures fall below 32°F or exceed 104°F.
- where extremely dirty air or water could be drawn into the unit.
SERVICE TRUCK INSTALLATION:
Installations may vary. Mounting should be done to a rigid frame member.
Installer is responsible for securing the equipment in a safe manner.
30 GALLON UNITS:
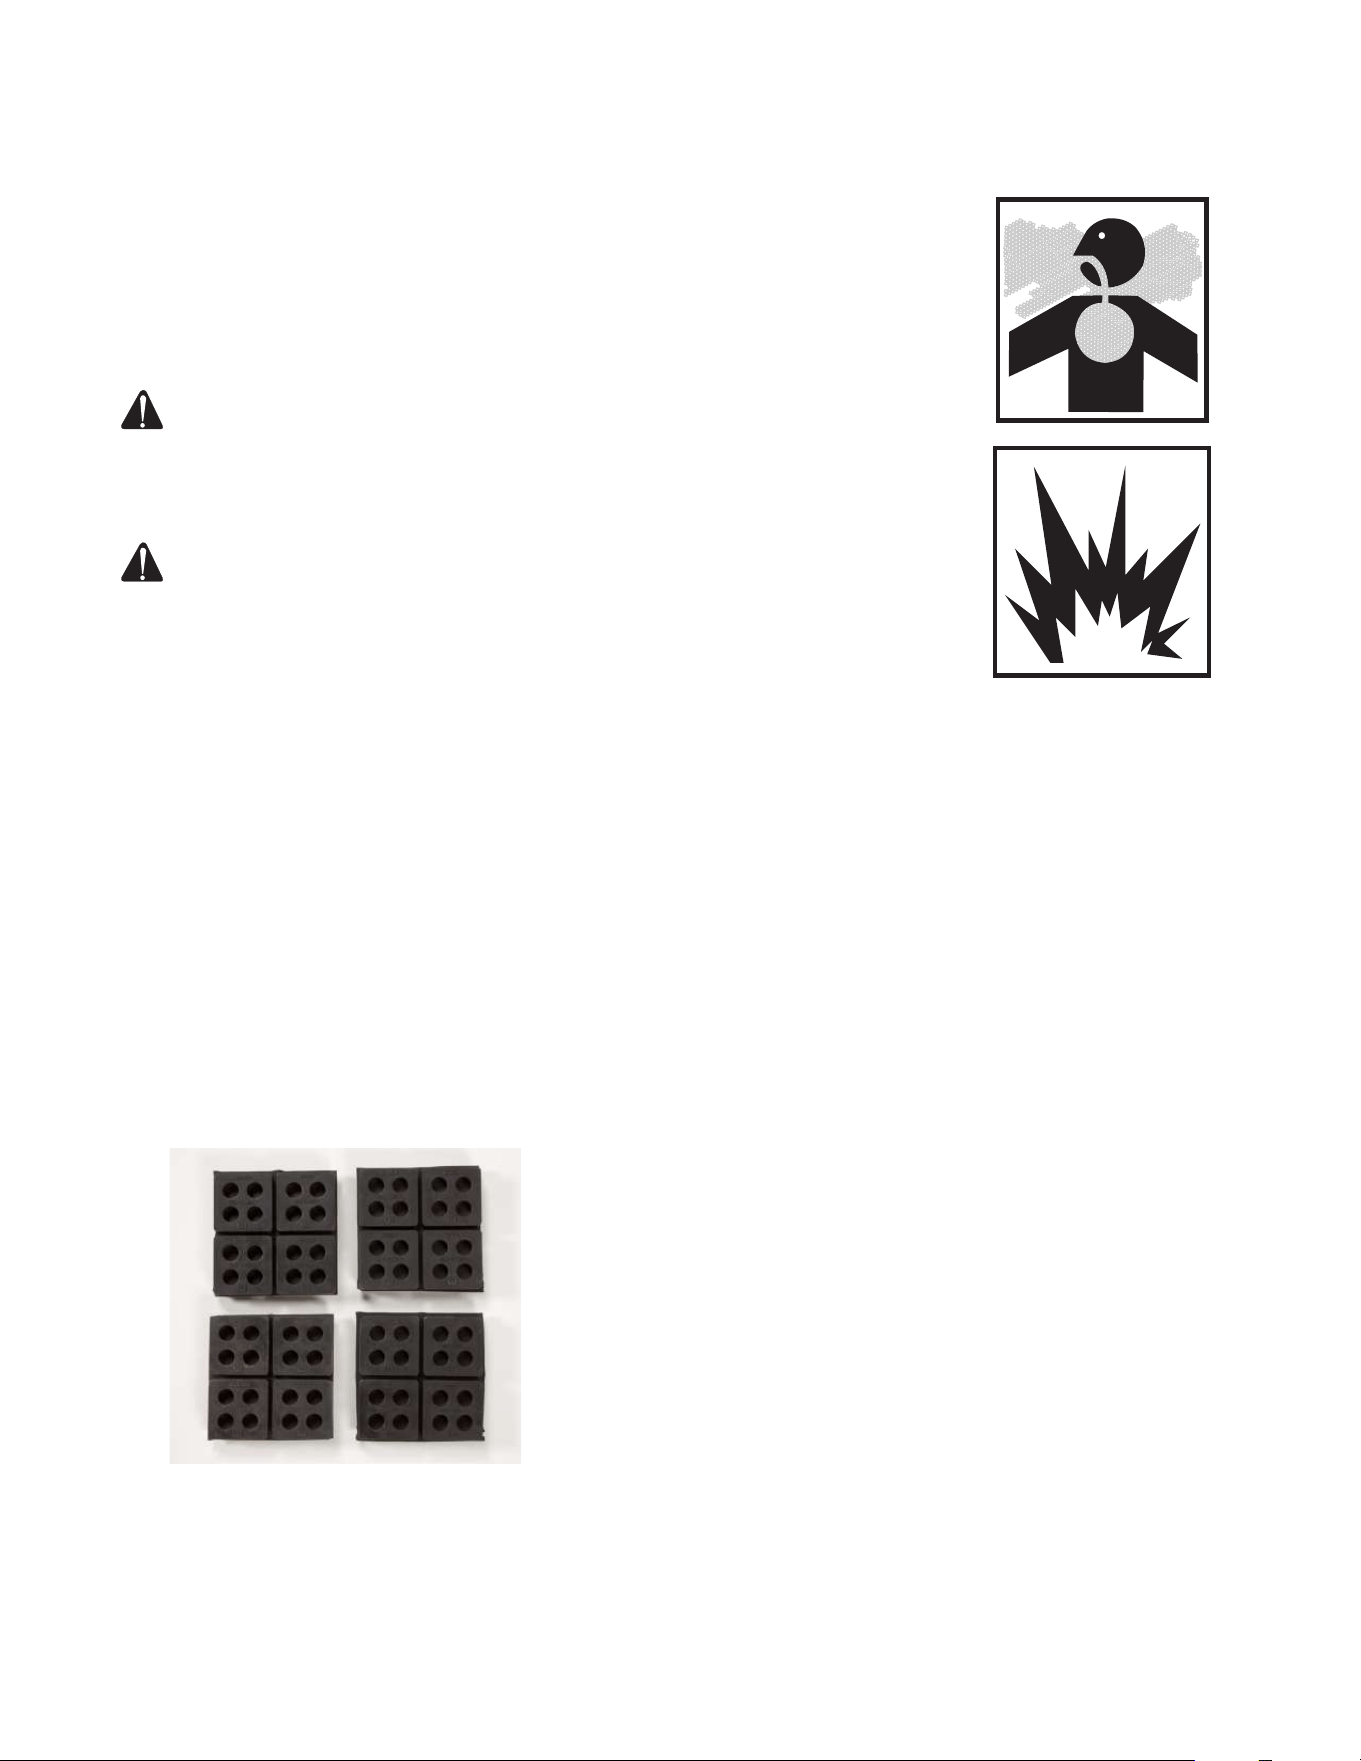
Optional Hardware: IX-0001 (Isolators).
GROUNDING INSTRUCTIONS
This product must be grounded. If it should malfunction or breakdown,
grounding provides a path of least resistance for electric current to reduce
the risk of electric shock.
INSTALLATION

14 Operator’s Manual
INSTALLATION
DANGER: IMPROPER CONNECTION OF THE EQUIPMENT
GROUNDING CONDUCTOR CAN RESULT IN A RISK OF
ELECTROCUTION. CHECK WITH A QUALIFIED ELECTRICIAN
OR SERVICE PERSON IF YOU ARE IN DOUBT AS TO WHETHER
THE UNIT IS PROPERLY GROUNDED.
The screw and ground terminal on the frame must always be used to con-
nect the unit to a suitable ground source. The ground path should be made
with #8 size wire. Connect the terminal of the ground wire between the star
washers and screw then tighten the screw fully. Connect the other end of
the wire securely to a suitable ground source.
The National Electric Code contains several practical ways in which to es-
tablish a good ground source. Examples given below illustrate a few of the
ways in which a good ground source may be established.
A metal underground water pipe in direct contact with the earth for at least
10 feet can be used as a grounding source. If a pipe is unavailable, an 8 foot
length of pipe or rod may be used as the ground source. The pipe should
be 3/4 inch trade size or larger and the outer surface must be noncorrosive.
If a steel or iron rod is used it should be at least 5/8 inch diameter and if a
nonferrous rod is used it should be at least 1/2 inch diameter and be listed
as material for grounding. Drive the rod or pipe to a depth of 8 feet. If a
rock bottom is encountered less than 4 feet down, bury the rod or pipe in a
trench. All electrical tools and appliances operated from this unit, must be
properly grounded by use of a third wire or be “Double Insulated”.
It is recommended to:
1. Use electrical devices with 3 prong power cords.
2. Use an extension cord with a 3 hole receptacle and a 3 prong plug at the
opposite ends to ensure continuity of the ground protection from the unit
to appliance.
Mi-T-M strongly recommends that all applicable federal, state and local
regulations relating to grounding specications be checked and followed.
LINE TRANSFER SWITCH:
If this unit is used for standby service, it must have a transfer switch be-
tween the utility power service and the unit. The transfer switch not only pre-
vents the utility power from feeding into the unit, but also prevents the unit
from feeding out into the utility company’s lines. This is intended to protect
the serviceman who may be working on a damaged line.
THIS INSTALLATION MUST BE DONE BY A LICENSED ELECTRI-
CIAN AND ALL LOCAL CODES MUST BE FOLLOWED.
GASOLINE ENGINE
Review "Risk of Fire or Explosion" before fueling. Read the engine manual
accompanying this unit for correct engine start-up maintenance procedures.
Read and understand the safety labels located on the unit.
WARNING: RISK OF EXPLOSION OR FIRE CAUSING SERIOUS
INJURY OR DEATH! DO NOT SMOKE WHILE FUELING!
DO NOT FILL FUEL TANK WHILE THE UNIT IS RUNNING OR
HOT. ALLOW THE UNIT AND ENGINE TO COOL DOWN FOR
TWO MINUTES BEFORE REFUELING.
DO NOT FILL FUEL TANK TO POINT OF OVERFLOWING.
ALLOW APPROXIMATELY 1/4" OF TANK SPACE FOR FUEL
EXPANSION.
Operator’s Manual 15
INSTALLATION
DO NOT PLACE UNIT IN AN AREA WHERE FLAMMABLE GAS
VAPORS MAY BE PRESENT. A SPARK COULD CAUSE AN
EXPLOSION OR FIRE.
ALWAYS STORE FUEL AWAY FROM THE UNIT WHILE IT IS
RUNNING OR HOT.
WARNING: RISK OF EXPLOSION OR FIRE CAUSING SERIOUS
INJURY OR DEATH DO NOT ALLOW THE ENGINE OR
MUFFLER TO COME IN CONTACT WITH FLAMMABLE VAPORS,
COMBUSTIBLE DUST, GASES OR OTHER COMBUSTIBLE
MATERIALS. A SPARK MAY CAUSE A FIRE.
WHEN USING THE UNIT FOR SPRAY PAINTING, PLACE THE UNIT
AS FAR AWAY FROM THE WORK AREA AS POSSIBLE, USING
EXTRA AIR HOSES IF NEEDED.
A minimum of 87 octane fuel is recommended for use with this air compres-
sor. Do not mix oil with gasoline.
Use of clean, fresh, lead free gasoline is recommended. Leaded gasoline
may be used if lead free is not available. Do not use gasoline containing
methanol or alcohol.
Refer to the engine manual for all necessary maintenance and adjustments.
ENGINE OIL
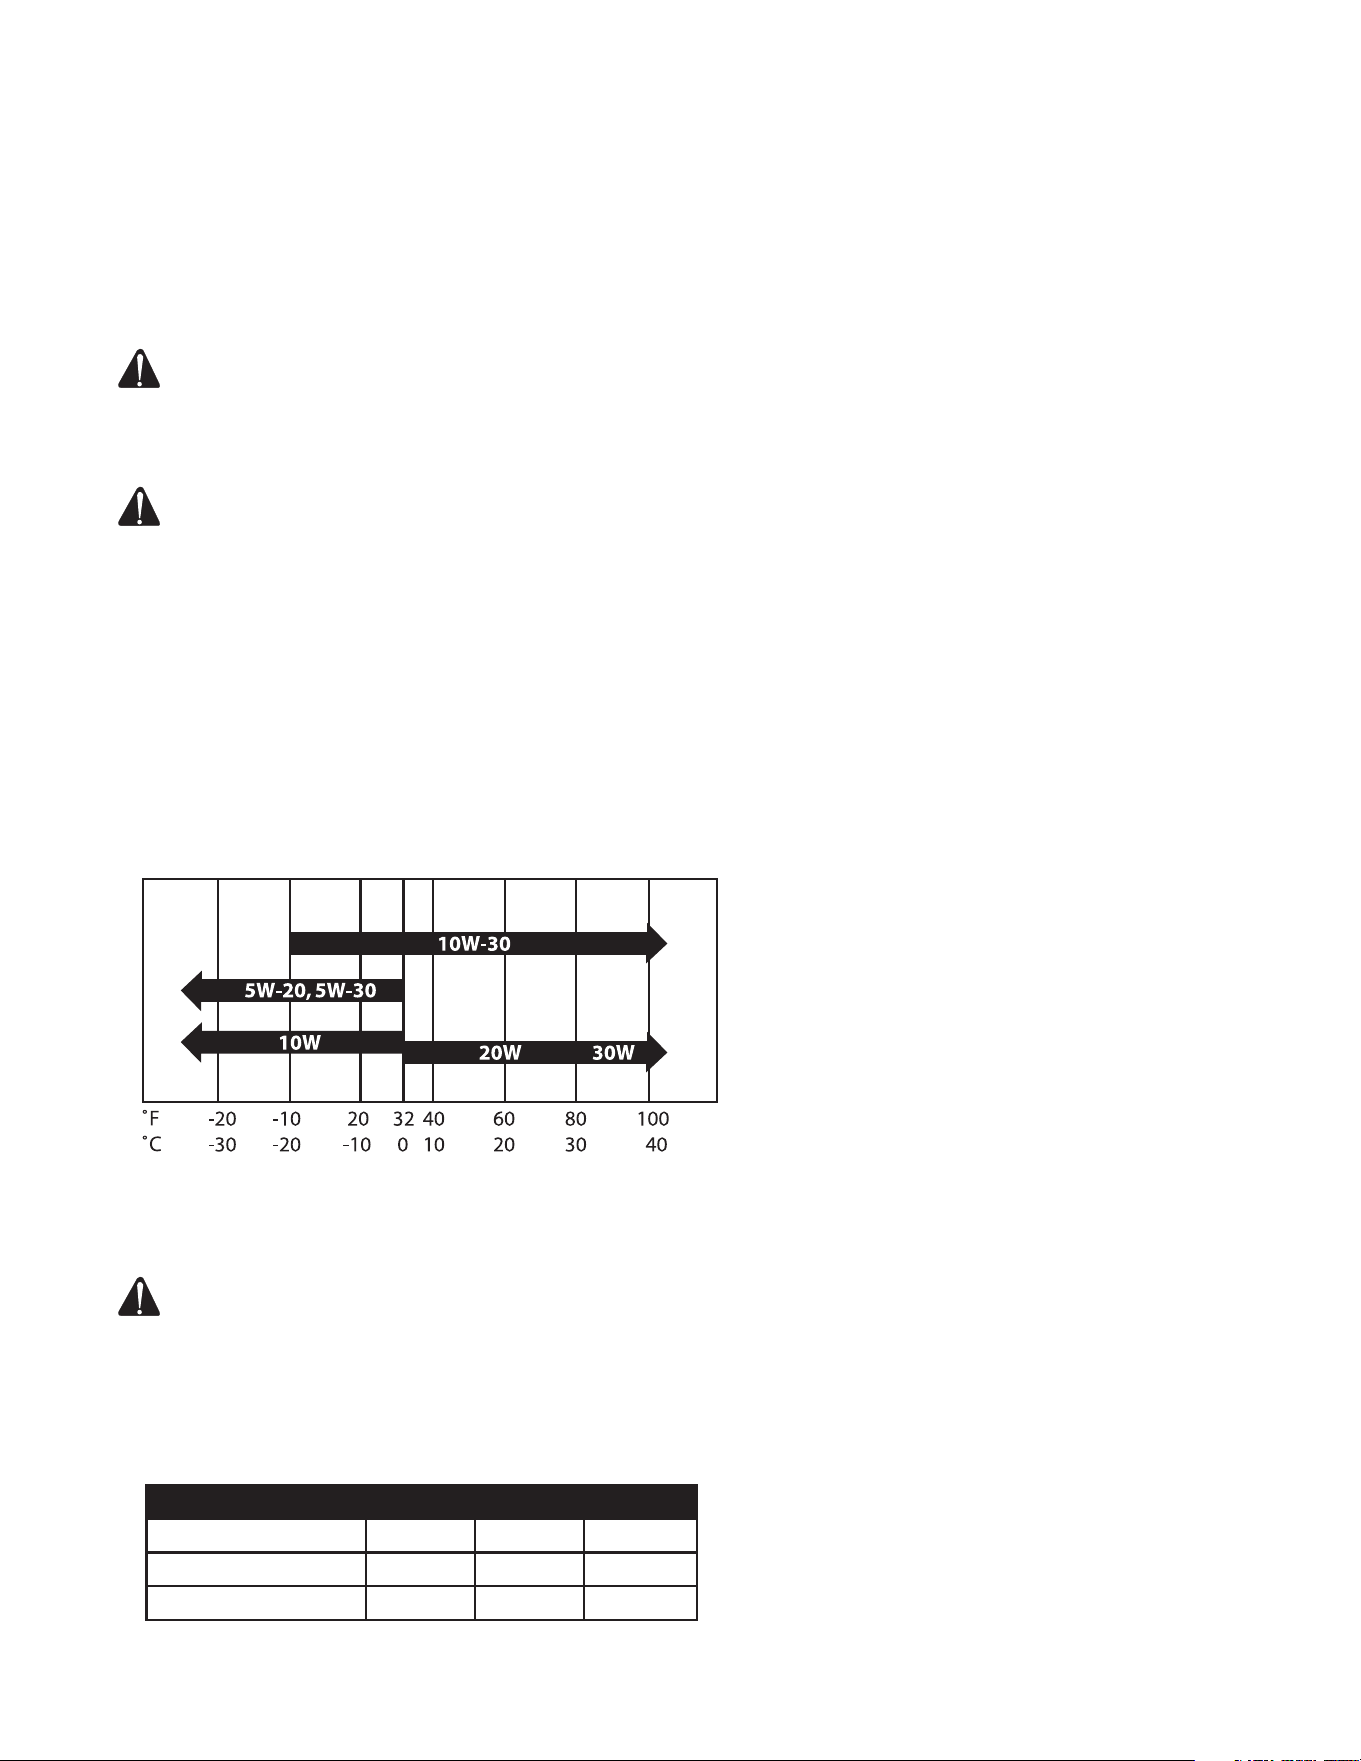
Use oil viscosity based on the expected air temperature range during the
period between oil changes.
Use a high quality detergent oil with API classications of SJ or higher.
Check oil level before each operation and ensure that it is maintained.
CAUTION: THIS ENGINE CRANKCASE IS NOT FILLED WITH OIL AT
THE FACTORY, SO BE SURE TO FILL IT BEFORE OPERATING
THE ENGINE.
ENGINE OIL CAPACITY
NOTE: These engines are equipped with a “Low Oil” shut-off system for
engine protection. If the engine fails to start, check engine crankcase
for oil.
TEMPERATURE CHART
MODEL # Liters Quart Ounces
AGW-SM14-30M 1.1 1.16 37.2
AGW-SH22-20M 2.0 2.1 67.6
AGW-SV14-30M 0.95 1.0 32
16 Operator’s Manual
INSTALLATION
TO FILL WITH OIL:
1. Level the engine to ensure accurate inspection and to prevent overlling.
2. Unscrew the oil gauge (Fig. 1), wipe the dipstick dry. Reinsert the oil gauge
back into the oil ll gauge opening. Remove the oil gauge and check the
oil level.
3. The oil level should be between the full and low marks on the dipstick. (Fig. 2)
NOTE: When checking the oil be sure the engine is level.
4. Fill with oil as required through the oil ll gauge opening.
5. Replace the oil gauge and screw in rmly.
6. Wipe up any spilled oil.
FUELING
WARNING: EXPLOSIVE FUEL! GASOLINE IS EXTREMELY
FLAMMABLE AND ITS VAPORS CAN EXPLODE IF IGNITED.
STORE GASOLINE ONLY IN APPROVED CONTAINERS, IN WELL
VENTILATED, UNOCCUPIED BUILDINGS AND AWAY FROM
SPARKS OR FLAMES.
DO NOT FILL THE FUEL TANK WHILE THE ENGINE IS HOT OR
RUNNING, SINCE SPILLED FUEL COULD IGNITE IF IT COMES
IN CONTACT WITH HOT PARTS OR SPARKS FROM IGNITION.
DO NOT START THE ENGINE NEAR SPILLED FUEL.
NEVER USE GASOLINE AS A CLEANING AGENT.
WARNING: DO NOT OVERFILL THE FUEL TANK, LEAVE ROOM FOR
THE FUEL TO EXPAND.
GENERAL RECOMMENDATIONS
• Purchase gasoline in small quantities and store in clean, approved
containers.
• To minimize gum deposits in your fuel system and to insure easy
starting, do not use gasoline left over from the previous season.
• Do not add oil to the gasoline.
FUEL TYPE
• For best results use only clean, fresh, unleaded gasoline with a
pump sticker octane rating of 87 or higher.
• Unleaded gasoline is recommended as it leaves less combustion
chamber deposits.
GASOLINE/ALCOHOL BLENDS:
Gasohol (up to 10% ethyl alcohol, 90% unleaded gasoline by volume) is ap-
proved, as a fuel. Other gasoline/alcohol blends are not approved.
GASOLINE/ETHER BLENDS:
Methyl Tertiary Butyl Ether (MTBE) and unleaded gasoline blends (up to a
maximum of 15% MTBE by volume) are approved as a fuel. Other gasoline/
ether blends are not approved.
BATTERY INSTALLATION
WARNING: SHOULD ONLY BE DONE BY AN AUTHORIZED DEALER.
BATTERY REPLACEMENT #
32-0058

Operator’s Manual 17
INSTALLATION
HIGH ALTITUDE
At high altitude, the standard carburetor air/fuel mixture will be too rich.
Performance will decrease, and fuel consumption will increase. A very rich
mixture will also foul the spark plug and cause hard starting. Operation at an
altitude that differs from that at which this engine was certied, for extended
periods of time, may increase emissions.
High altitude performance can be improved by specic modications to
the carburetor. If you always operate your unit at altitudes above 5,000 feet
(1,500 meters), have your dealer perform this carburetor modication. This
engine, when operated at high altitude with the carburetor modications for
high altitude use, will meet each emission standard throughout its useful life.
Even with carburetor modication, engine horsepower will decrease about
3.5% for each 1,000-foot (300-meter) increase in altitude. The effect of
altitude on horsepower will be greater than this if no carburetor modication
is made.
NOTE: When the carburetor has been modified for high altitude opera-
tion, the air/fuel mixture will be too lean for low altitude use. Op-
eration at altitudes below 5,000feet (1,500 meters) with a modified
carburetor may cause the engine to overheat and result in serious
engine damage.
For use at low altitudes, have your servicing dealer return the carbu-
retor to original factory specifications.

18 Operator’s Manual
PRE-OPERATION:
Check the engine oil level before starting. (See engine manual.) Fill the fuel
tank according to the engine manual instruction.
Pump oil level should be checked before each use. Check the oil level
indicator on the pump crankcase. Make certain the oil is in the center of the
oil sight glass. If the level appears to be low, ll with SAE20 or 30 non-deter-
gent pump oil.
Remove any moisture in the unit's air tank.
WARNING: NEVER ATTEMPT TO OPEN THE AIR TANK DRAIN
VALVE WHEN MORE THAN 10 PSI OF AIR PRESSURE IS IN THE
AIR TANK!
Remove excessive pressure with an air tool, then open the Air Tank Drain
Valve in the bottom of the air tank. Close tightly when drained. Make sure
the Engine Switch is in the "OFF" position. Make sure the Safety Relief
Valve is working correctly. Make sure all guards and covers are in place and
securely mounted.
START-UP:
1. Read safety warnings before performing operation.
2. Make sure the unit is grounded. See Grounding Instructions.
NOTE: Unplug all equipment from the power receptacles before starting
the unit.
3. Flip the toggle on top of the Pilot Valve to the upright position. This provides
a load less start. The unit will unload and allow easier engine start-up.
4. Start the engine. (Refer to the Engine Manual accompanying this unit. On
Honda engine units, the choke and key switch is located on the electric box
panel.)
5. When the engine has run for 1-2 minutes, ip toggle back to the original
position.
6. Set pressure by adjusting the Pressure Regulator counterclockwise for
less pressure and clockwise for more pressure.
7. Ensure breakers are in on position.
8. Test the GFCI receptacle(s) on the unit. Push the test button. The reset
button should pop out and there should be no power at the receptacle.
Apply a test load or lamp to each receptacle to verify. IF THE RESET
BUTTON DOES NOT POP OUT, DO NOT USE THE RECEPTACLES(S).
SEE DEALER FOR SERVICE IMMEDIATELY.
9. If GFCI receptacle(s) test correctly, rmly push the reset button to restore
power. A distinctive click should be heard or felt when this is complete.
IF THE RECEPTACLE(S) DO NOT RESET PROPERLY, DO NOT USE THE
RECEPTACLE(S). SEE DEALER FOR SERVICE IMMEDIATELY.
10. Turn idle control switch to AUTO-IDLE DOWN position. Loads can now be
applied to unit.
WELDING START-UP:
1. Remove all AC electrical loads from the unit.
2. Move GEN/WELD switch to WELD position.
3. Position selector switch min/max switch for amperage setting.
4. Move idle control to full throttle setting.
5. Check grounding.
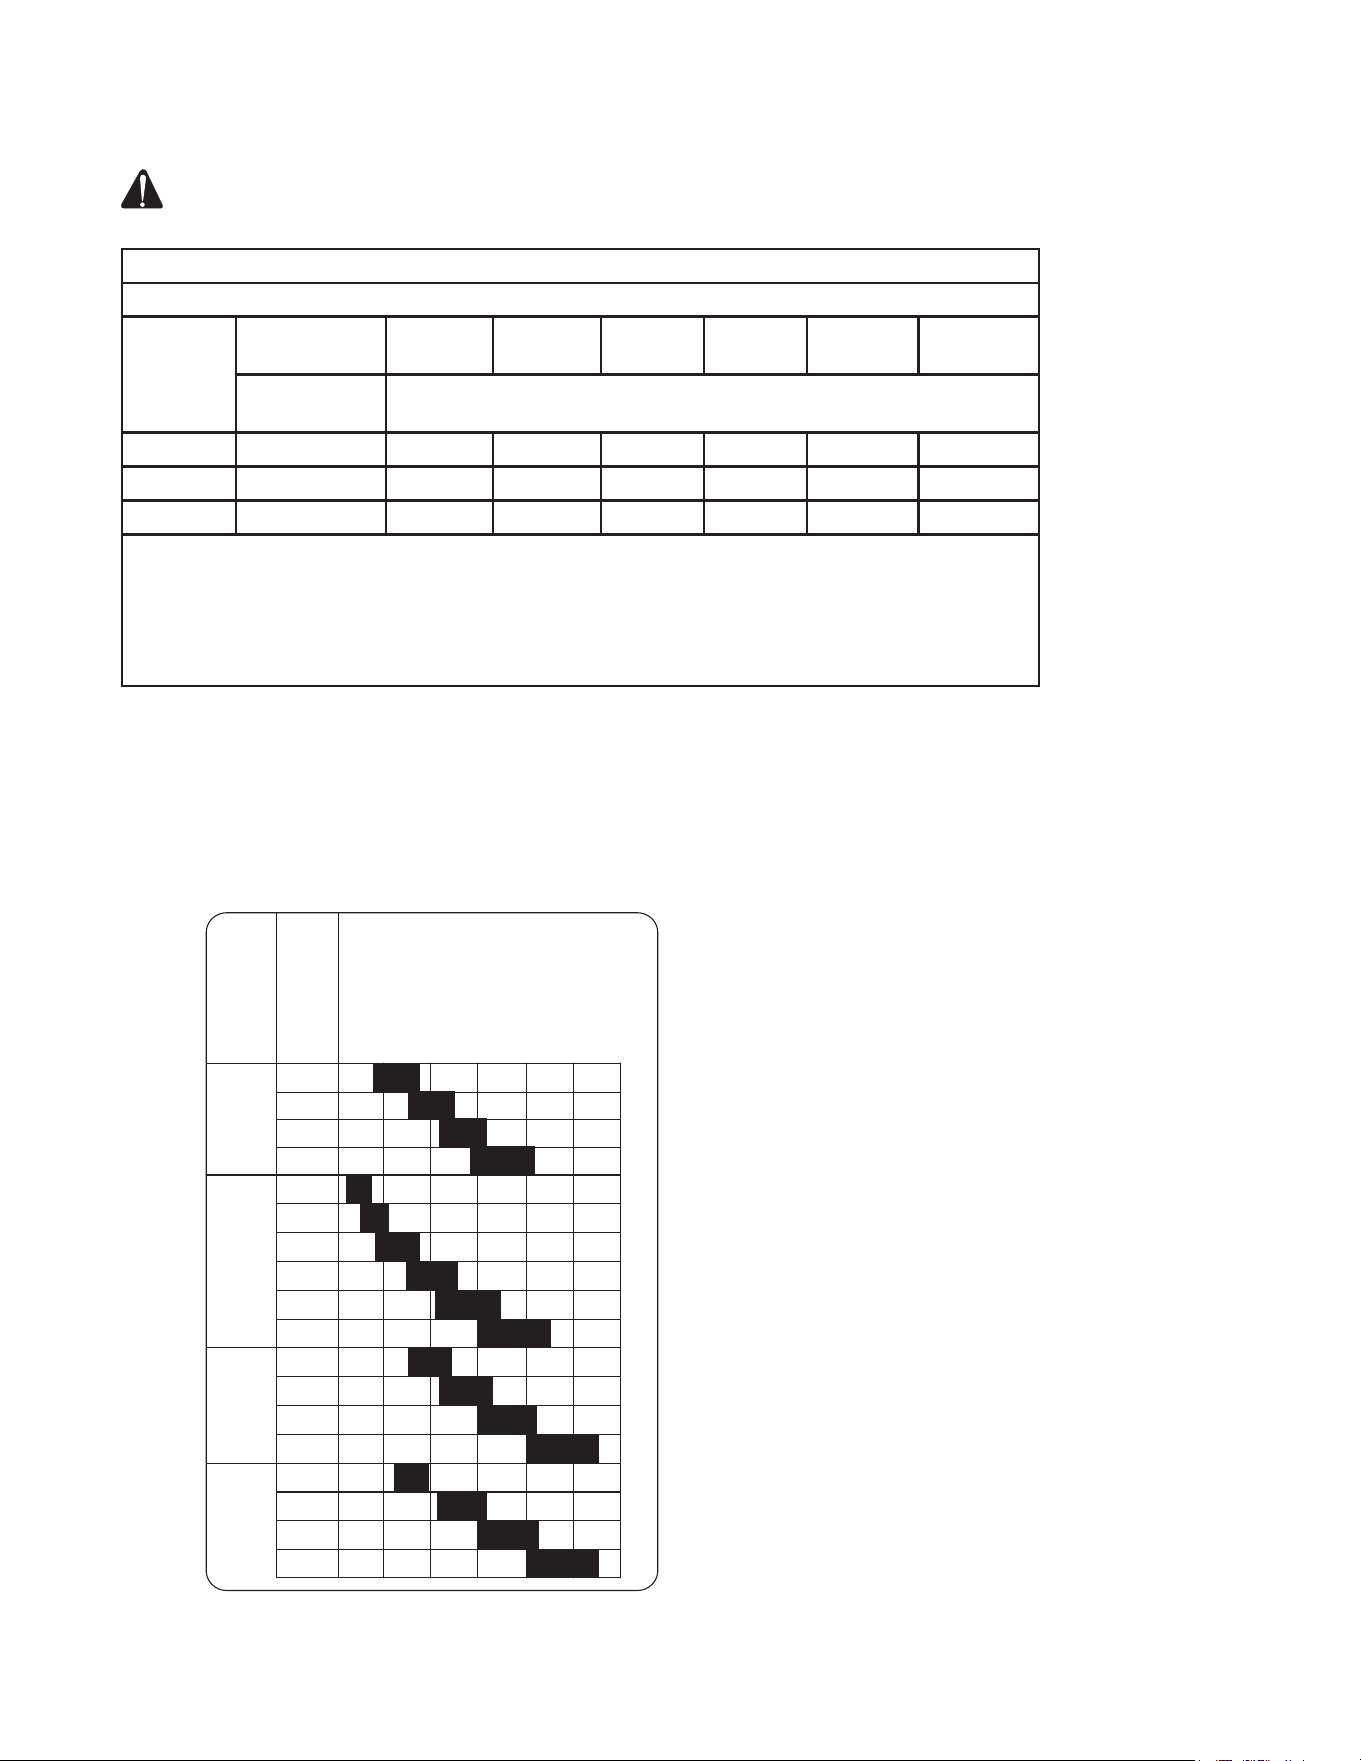
6. Welding Cable Diagram (Selecting Weld Cable Sizes)*:
OPERATION
Operator’s Manual 19
OPERATING THE UNIT
WARNING: DO NOT USE WORN, DAMAGED, UNDERSIZED, OR
POORLY SPLICED CABLES. TURN OFF POWER BEFORE
CONNECTING TO WELD OUTPUT TERMINALS.
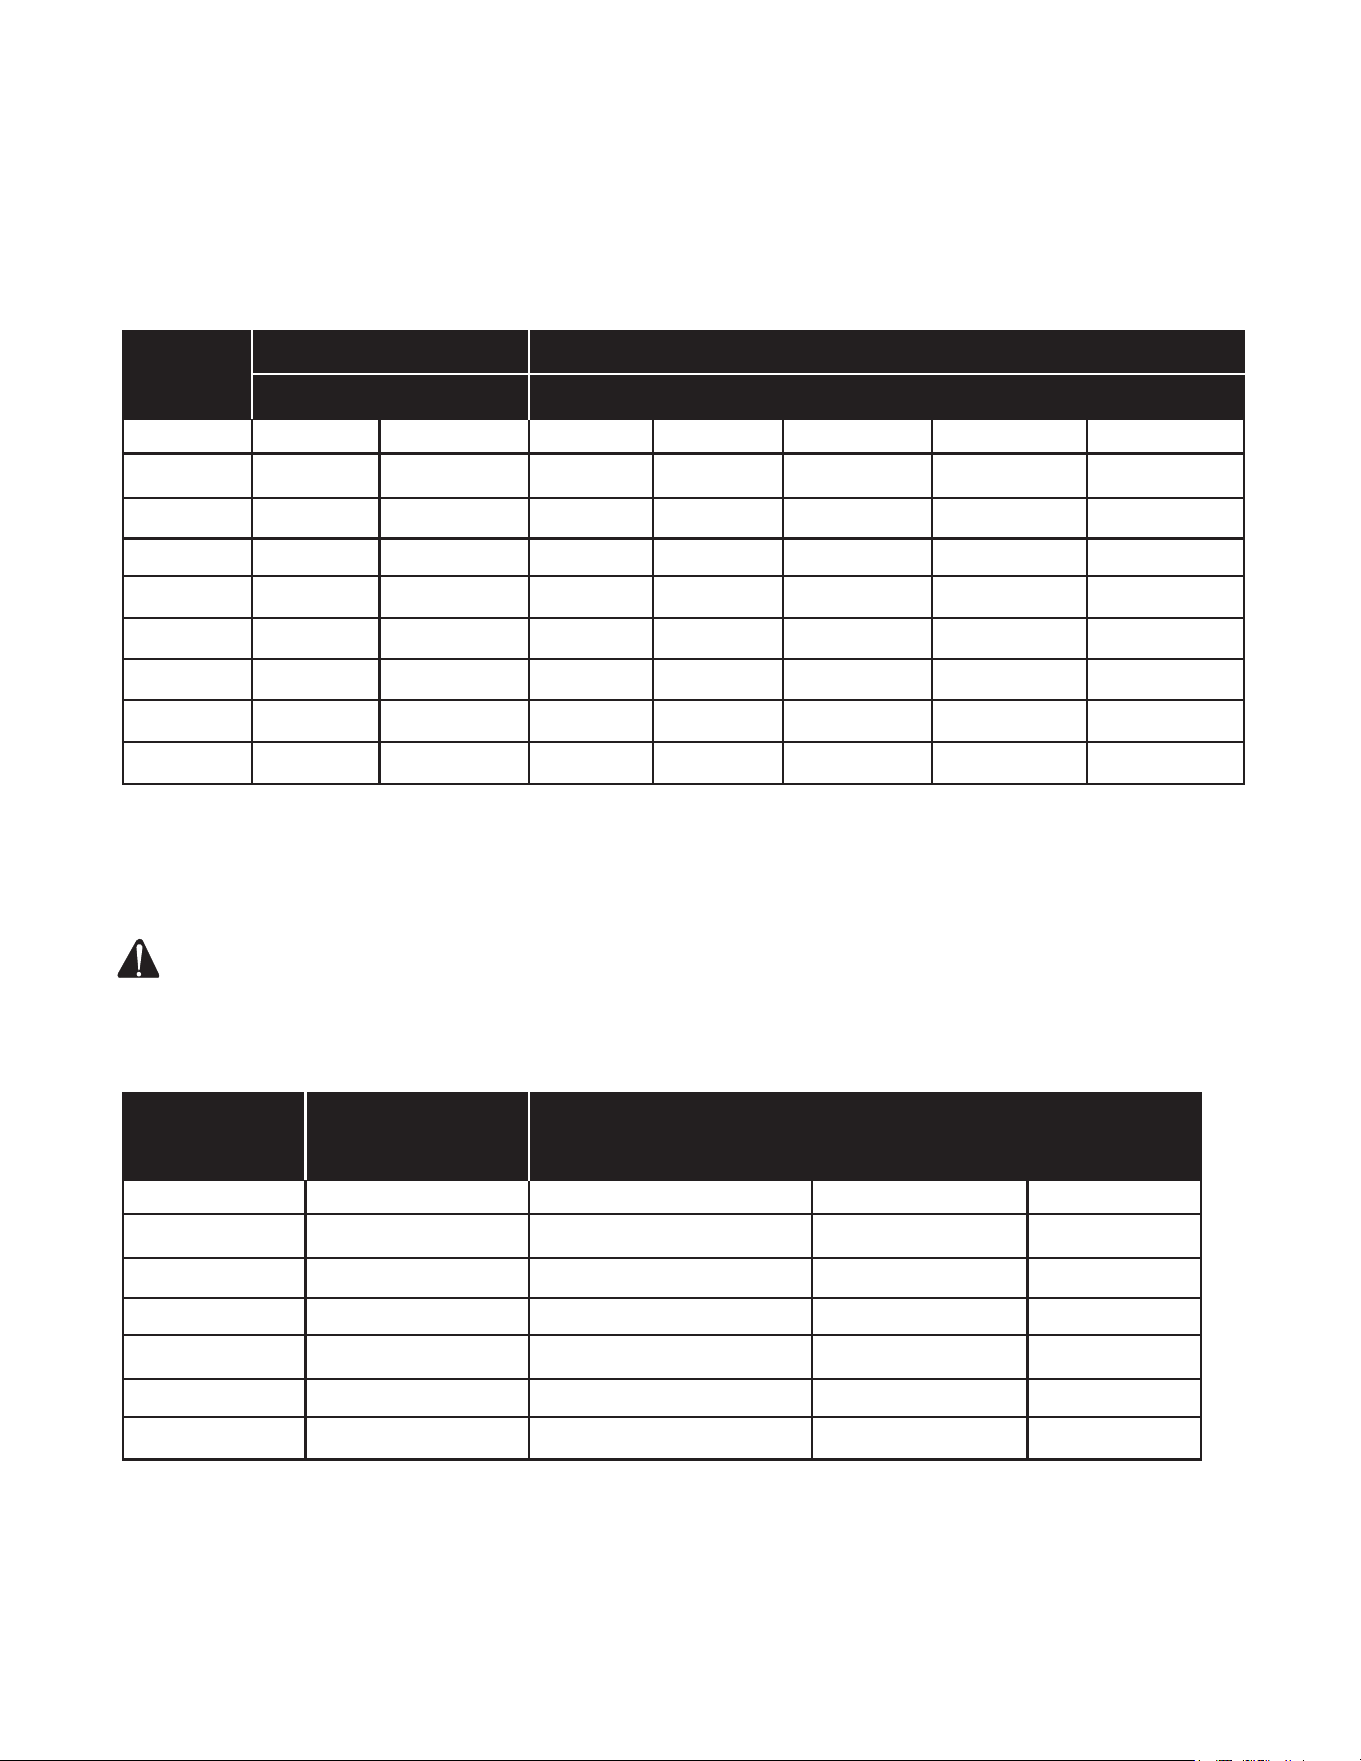
ELECTRODE CHART
NOTE: This engine is equipped with a “Low Oil” shutdown system for
engine protection. The engine stops when the oil level gets too low.
The engine will not restart without adding oil.
If you notice any unusual noise or vibration, stop the unit and refer to
"Troubleshooting".
WELD OUTPUT TERMINALS
Weld Cable Size** and Total Cable (Copper) Length in Weld Circuit Not Exceeding***
Welding
Amperes
100 ft (30 m)
or Less
150 ft
(45 m)
200 ft
(60 m)
250 ft
(70 m)
300 ft
(90 m)
350 ft
(105 m)
400 ft
(120 m)
100% Duty
Cycle
10 − 100% Duty Cycle
100 4 (20) 4 (20) 3 (30) 2 (35) 1 (50) 1/0 (60) 1/0 (60)
150 3 (30) 2 (35) 1 (50) 1 (50) 2/0 (70) 3/0 (95) 3/0 (95)
200 2 (35) 1 (50) 1/0 (60) 2/0 (70) 3/0 (95) 4/0 (120) 4/0 (120)
* This chart is a general guideline and may not suit all applications. If cable overheats, use
next size larger cable.
**Weld cable size (AWG) is based on either a 4 volts or less drop or a current density of at
least 300 circular mils per ampere ( ) = mm2 for metric use.
***For distances longer than those shown in this guide, call a representative at 800-553-9053.
3/32
1/8
5/32
3/16
1/16
5/64
3/32
1/8
5/32
3/16
3/32
1/8
5/32
3/16
3/32
1/8
5/32
3/16
6010
and
6011
6013
7014
7018
ELECTRODE
AMPERAGE RANGE
DIAMETER
34-2670 081711
50
100
150
200
250
300

20 Operator’s Manual
SHUTDOWN:
1. Remove all load by turning off electrical appliances and unplugging electric/
welding cords.
2. Move the Engine Switch to the "Off" position. (Refer to the Engine Manual
accompanying this unit.)
3. Move the GEN/WELD switch to the GEN position.
4. Drain air from the air tanks by releasing air with an attached air tool or by
pulling on the Safety Relief Valve.
5. Once the Air Tank Pressure Gauge registers under 10 pounds, open the
drain valve under each air tank to drain any moisture.
6. Close fuel valve on unit or engine.
7. Wipe the unit clean and store in a safe, non-freezing, dry area.
NOTE: Failure to allow the engine to cool at idle for two (2) minutes may
result in damage to the generator.
OPERATING CONTROLS
IDLE CONTROL OPERATION:
Note: Idle control is disabled in welding mode. Idle control switch must
be at full throttle setting.
The idle control is factory installed. This electrical device is designed to let
the engine run at fuel saving low idle speed when the generator or compres-
sor are not loaded, and at full normal governed speed when a load is ap-
plied. The idle system overrides the engine governor to provide idle speed.
When a load is applied, the electronic circuit reacts to de-energize the idle
system so that the engine can resume full governed operating speed.
The idle control system controls the engine speed in the following manner:
1. With the idle control switch in the “FULL THROTTLE” position, start the
engine.
2. After one or two minute warm up period, apply load and move the switch to
the “IDLE CONTROL” position. The engine will throttle back to idle speed
following a 5-8 second delay.
3. When a load is applied to the generator or air compressor tank pressure drops
below regulated set point. The idle control system becomes de-energized.
The engine then accelerates to normal operating speed, controlled by the
governor.
4. When the load is removed or air compressor tank pressure is restored, the
idle system becomes re-energized and throttles the engine back to idle
speed after a 5-8 second delay.
NOTE: While the engine is idling, the generator voltage is automatically
reduced to reduce generator temperatures. The voltage will return to
normal levels immediately upon the application of load.
OPERATING THE UNIT
Operator’s Manual 21
CURRENT LOAD IN WATTS MAXIMUM CABLE LENGTH (FEET)
IN AMPS 120 VOLTS 240 VOLTS #8 WIRE #10 WIRE #12 WIRE #14 WIRE #16 WIRE
2.5 300 600 1000 600 375 250
5 600 1200 500 300 200 125
7.5 900 1800 350 200 125 100
10 1200 2400 250 150 100 50
15 1800 3600 150 100 65
20 2400 4800 175 125 75 50
25 3000 6000 150 100 60
30 3600 7200 125 65
40 4800 9600 90
CABLE SIZE:
Equipment damage can result from low voltage. Therefore, to prevent ex-
cessive voltage drop between the unit and the equipment, the cable should
be of adequate gauge for the length used. The cable selection chart gives
the maximum cable lengths for various gauges of wire which can adequately
carry the loads shown.
ELECTRIC MOTOR LOADS:
It is characteristic of common electric motors in normal operation to draw
up to six times their running current while starting. This table may be used to
estimate the watts required to start “CODE G” electric motors.
CAUTION: IF AN ELECTRIC MOTOR FAILS TO START OR REACH
RUNNING SPEED, TURN OFF THE APPLIANCE OR TOOL
IMMEDIATELY TO AVOID EQUIPMENT DAMAGE. ALWAYS
CHECK THE REQUIREMENTS OF THE TOOL OR APPLIANCE
BEING USED COMPARED TO THE RATED OUTPUT OF THE
UNIT.
WATTS REQUIRED TO START MOTOR
MOTOR (H.P.) RUNNING WATTS REPULSION INDUCTION CAPACITOR SPLIT PHASE
1/8 275 600 850 1200
1/6 275 600 850 2050
1/4 400 850 1050 2400
1/3 450 975 1350 2700
1/2 600 1300 1800 3600
3/4 850 1900 2600
1 1100 2500 3300
OPERATING THE UNIT

22 Operator’s Manual
TROUBLESHOOTING
Symptom Problem Solution
Engine will not start. Various engine problems. Refer to the engine manual accompanying your unit.
Noisy operation. Loose engine pulley or pump
ywheel.
Tighten pulley and or ywheel.
Lack of oil in the pump. Add correct amount of oil. Check for bearing damage.
Carbon deposits on pistons
or valves.
Remove cylinder head and inspect. Clean or replace.
Bearing, piston or connecting
rod failure.
STOP THE Unit! Contact customer service.
Pressure drop in
air tank or rapid
pressure loss when
theunit is shut off.
Air leaks at connections. Allow the unit to build pressure to the maximum allowed. Turn
off and brusha soapy water solution onto all connections. Check
connections for air bubbles. Tighten the connections where leaks
are present.
Air leak in air tank. Air tank must be replaced. Do not attempt to repair air tank!
Defective Pilot Valve. Clean or replace.
Insufcient pressure
at air tool or acces-
sory.
Pressure Regulator not
turned to high enough pres-
sure or defective.
Adjust Pressure Regulator to proper setting or replace.
Restricted air intake. Clean or replace Air Intake Filter.
Air leaks or restrictions. Check for leaks and repair.
Hose or hose connections
are toosmall or long.
Replace with larger hose or connectors.
Slipping belt. Tighten or replace.
The unit is not large enough
for air requirement.
Check the accessory air requirement.If it is higher than the CFM
or pressure supply to the air compressor, use a larger unit.
Restriction in Pilot Valve. Clean or replace.
Unit has no output. Circuit breakers tripped. Reset circuit breakers.
Inadequate cord sets or ex-
tension cords.
Check cord sets or extension cords
capabilities.
Air leaks from
Safety Relief Valve.
Possible defective Safety
Relief Valves.
Operate Safety Relief Valve manually
by pulling on ring. If it still leaks, it should be replaced.
Excessive air tank pressure. Clean, reset or replace Pilot Valve.
Air leaks at pump. Defective gaskets. Tighten bolts on compressor head to proper torque or replace
gaskets.
Air blowing from Air
Intake Filter.
Defective inlet (reed) valve. Contact your customer service center.
Moisture in dis-
charge air.
Condensation in air tank
caused by high level of atmo-
spheric humidity or the unit is
not run long enough.
Run the unit a minimum of one hour
to prevent condensation buildup.
Drain air tank more often in humidweather and use an air line
lter.
Excessive oil con-
sumption or oil in
hose.
Restricted Air Intake Filter. Clean or replace.
The unit on unlevel surface. Do not incline the unit more than 10° in any direction while run-
ning.
Crankcase overlled with oil. Drain oil. Rell to proper level with SAE-30W non-detergent oil.
Wrong viscosity. Drain oil. Rell to proper level with SAE-30W non-detergent oil.
Plugged crankcase breather. Clean or replace.
Oil leaks. Tighten bolts on compressor to proper torque or replace gaskets.

Operator’s Manual 23
TROUBLESHOOTING
Symptom Problem Solution
Oil has milky ap-
pearance.
Water in oil due to condensa-
tion.
Change oil and move air compressor to a less humid environ-
ment.
Unit has no output. Inadequate cord sets or ex-
tension cords.
Check cord sets or extension cords capabilities in section
Maintenance; Cable Size in this manual. Consult your Customer
Service Center.
24 Operator’s Manual
MAINTENANCE
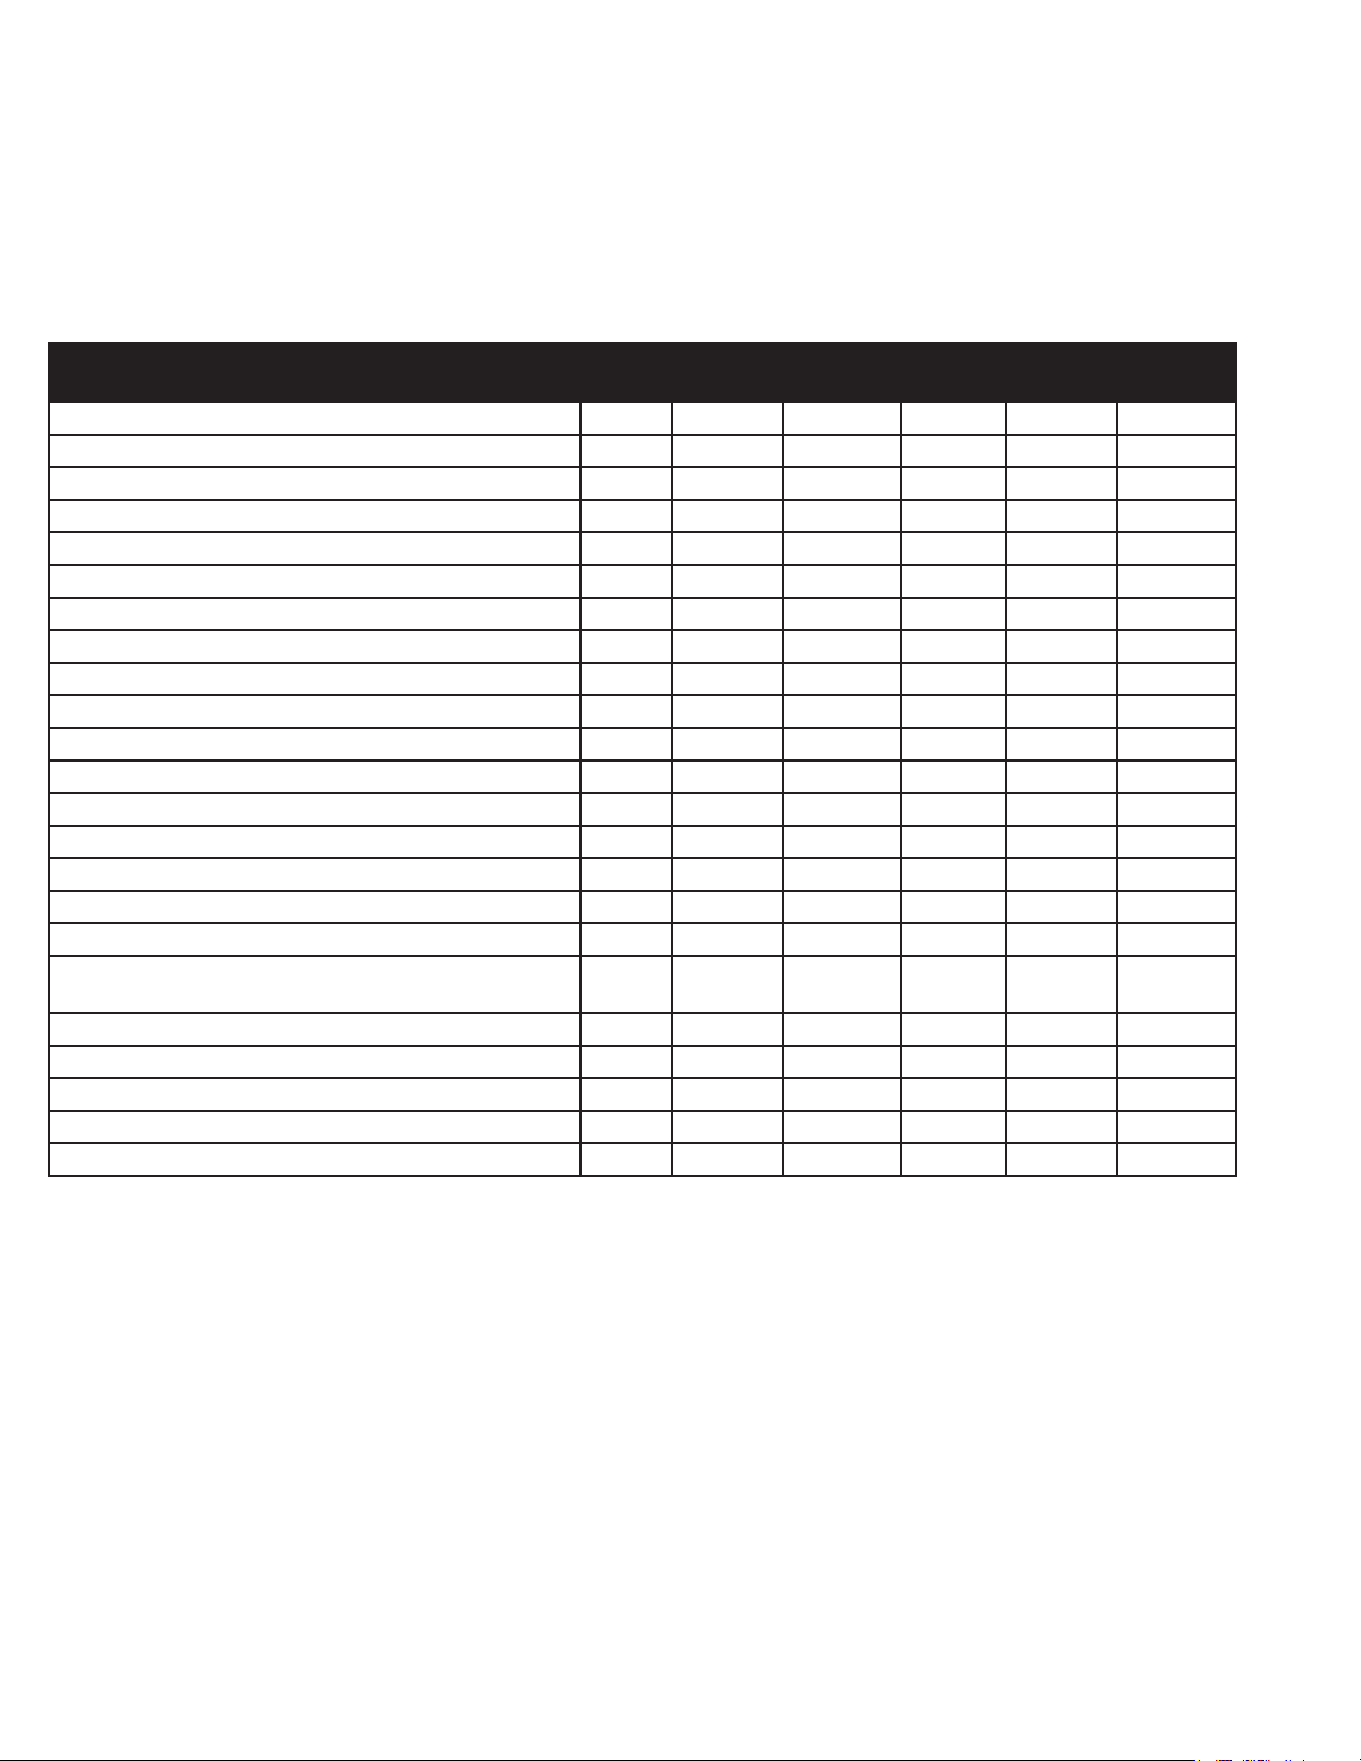
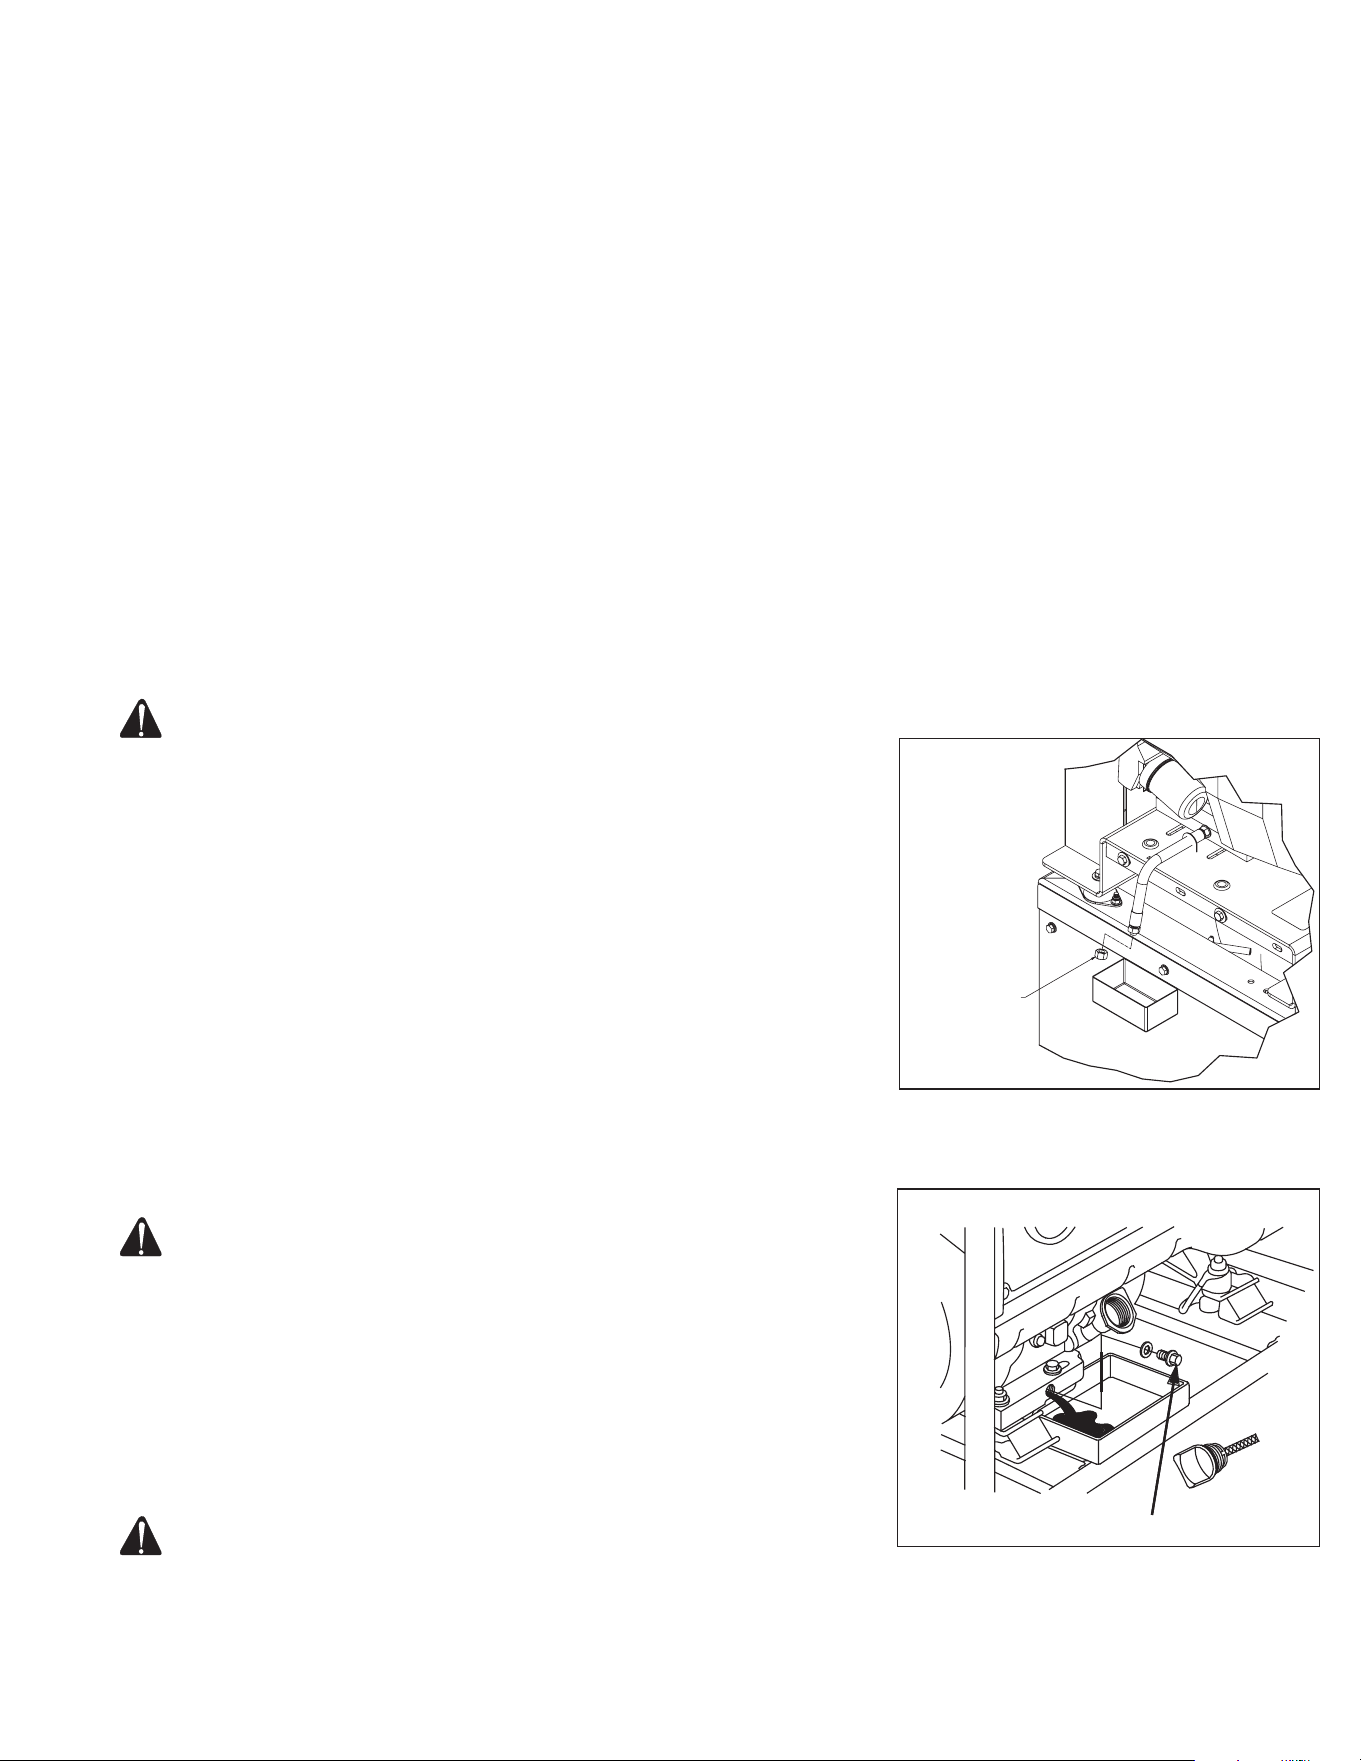
MAINTENANCE CHART:
To ensure satisfactory operation over an extended period of time, an engine requires normal maintenance at regular in-
tervals. The Periodic Maintenance Chart below shows periodic inspection and maintenance items and suitable intervals.
The bullet mark designates that the corresponding item should be performed at that interval.
NOTE: Some adjustments require the use of special tools or other equipment. An electronic tachometer will facilitate
setting idle and running speeds.
• The pump oil must be changed after the rst 50 hours of operation and every 200 hours or 3 months, whichever
comes rst.
•• The engine oil must be changed after the rst 5 hours of operation and every 50 hours or 3 months, whichever
comes rst.
••• Service more frequently under dusty conditions. Every 2 years, an Authorized Service Technician should check
the safety valve, intake valves and delivery valves.
Procedure Daily Weekly Monthly 100
Hours
200
Hours
Before
Storage
Check Pump Oil Level x
Check Engine Oil Level x
Oil Leak Inspection x
Check Engine Air Filter x
Drain Condensation in Air Tank (s) x
Inspect Guards/Covers x
Check for Unusual Noise/Vibration x
Check for Air Leaks x
Check cylinder and head ns for dust and dirt x
Check battery electrolyte level x
Check fuel lines (replace if necessary) x
Clean Exterior of Compressor x
Inspect Air Filter x
Inspect Belt x
Check Safety Relief Valve x
Change engine oil (••) x
Clean fuel lter x
Clean dust and dirt from cylinder and cylinder head
ns (•••)
x
Change Pump Oil (•) x
Replace Air Filter x
Check Engine Spark Plug x
Add fuel stabilizer x
Run unit dry x
Operator’s Manual 25
MAINTENANCE
MAINTENANCE
Read the instruction manual before performing maintenance.
Keep all air vents clear.
Keep the unit clean.
DO NOT spray with water.
Periodically check all fasteners and tighten, see the periodic maintenance
chart.
The following procedures must be performed when stopping the unit for
maintenance or service:
1. Turn off the unit.
2. Disconnect spark plug wire from engine.
3. Open all drains.
4. Wait for the unit to cool before starting service.
ENGINE:
The engine for this unit is governed to operate at speeds close to 3600 RPM
(60Hz) throughout the operating load range.
WARNING: DO NOT TAMPER WITH THE GOVERNOR
MECHANISM, CHANGE THE SETTING EXPERIMENTALLY, OR
PUSH THE THROTTLE OPEN IN AN ATTEMPT TO GENERATE
MORE ELECTRICAL CURRENT; EQUIPMENT DAMAGE OR
PERSONAL INJURY MAY RESULT.
GOVERNOR SPEED ADJUSTMENT SHOULD BE MADE ONLY BY
A SERVICING DEALER.
CHECKING ENGINE OIL:
Check oil level before each operation and ensure that it is maintained per
engine manual.
CHANGING ENGINE OIL:
Change oil after the rst 25 hours of operation. Thereafter it should be
changed every 50 hours.
1. Make sure the unit is on level ground. Run the engine to warm the oil.
2. Stop the engine.
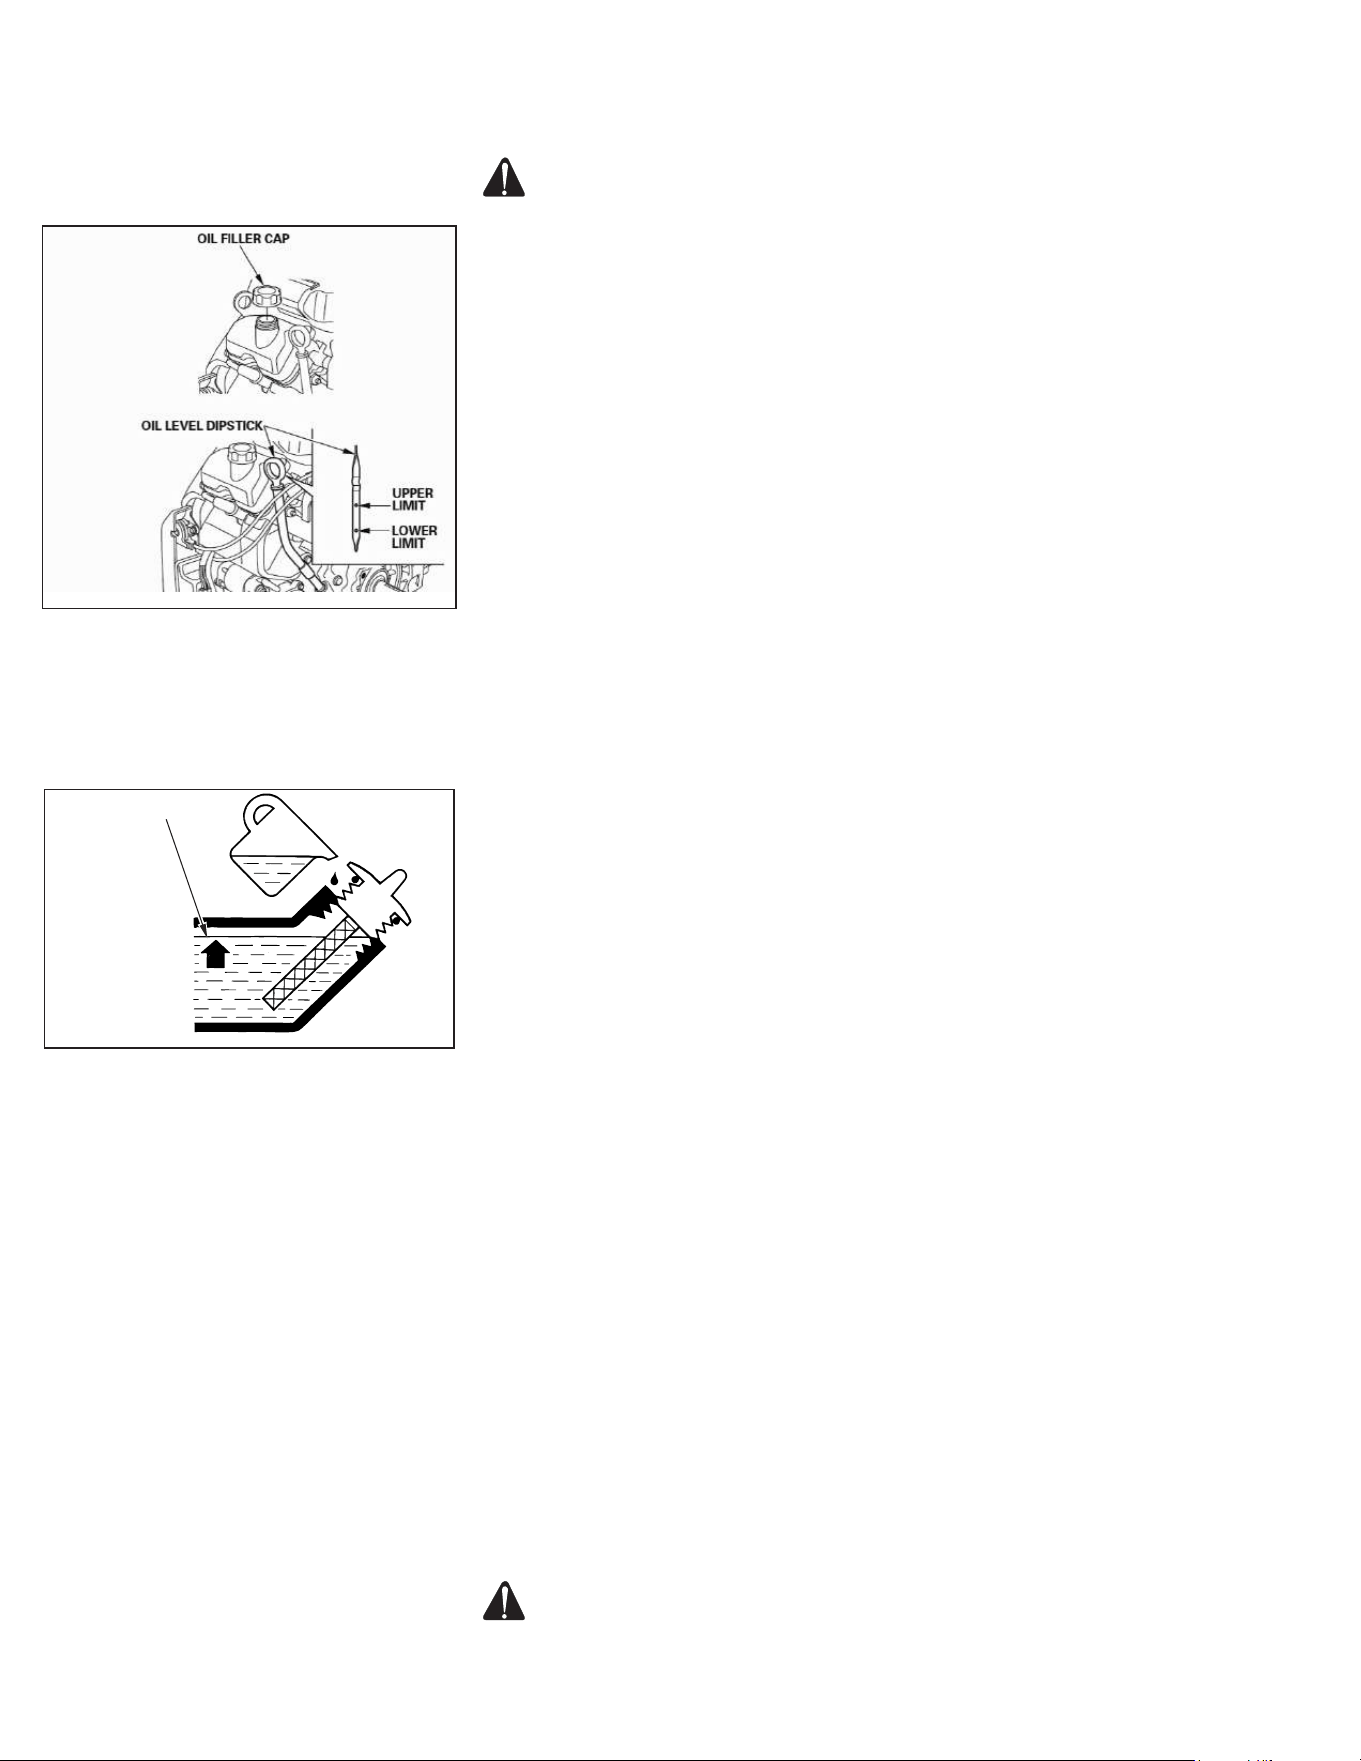
3. Remove the oil drain plug. (See Fig. 1)
CAUTION: OIL BEING DRAINED MAY BE HOT. TO REDUCE THE
RISK OF BURN INJURY, HANDLE WITH CARE. DISPOSE OF
USED OIL PROPERLY.
4. Drain oil while engine is warm, into a suitable container.
5. Reinstall the oil drain plug.
6. Remove oil gauge and rell with new oil. (Fig. 2)
7. Check the oil level as instructed in the engine manual.
8. Wipe up any spilled oil.
AIR CLEANER:
WARNING: RISK OF FIRE OR EXPLOSION. DO NOT USE GASOLINE
OR LOW FLASH POINT SOLVENTS TO CLEAN THE ELEMENT.
CLEAN THE ELEMENT IN A WELL VENTILATED AREA. ENSURE
THAT NO SPARKS OR FLAMES ARE NEAR THE WORKING
AREA, THIS INCLUDES ANY APPLIANCE WITH A PILOT LIGHT.
(Fig. 1 MI-T-M)
(Fig. 1 Honda)
OIL DRAIN PLUG
OIL DRAIN PLUG
26 Operator’s Manual
MAINTENANCE
CAUTION: NEVER RUN THE ENGINE WITHOUT THE AIR FILTER,
SERIOUS DANGER CAN RESULT.
Check the air cleaner daily or before starting the engine. Check for and cor-
rect heavy buildup of dirt and debris along with loose or damaged compo-
nents.
1. Unscrew the air cleaner cover and remove the elements.
2. Clean the element:
PAPER AIR CLEANER ELEMENT: Do not wash the paper element or use
pressurized air, as this will damage the element. Clean by gently tapping the
element to remove dust. Replace the element if damaged, bent or extremely
dirty. Handle new element carefully; do not use if the sealing surfaces are
bent or damaged.
NOTE: Replace the paper element every 100 hours (more often under
extremely dusty conditions.)
3. Reinstall the paper air cleaner element. Close air cleaner cover and screw
shut.
GENERATOR MAINTENANCE
EVAPORATIVE EMISSION COMPONENTS:
The unit you have purchased includes the following components that are
in compliance with California Air Resources Board Evaporative Emission
Standards;
1. Fuel Hose
2. Fuel Hose Fittings
3. Fuel Tank and Cap
4. Carbon Canister and Mounting Brackets
These components should be inspected on a daily basis for cracks, leaks,
and abnormal wear. If cracking, leaks or abnormal wear has occurred, the
components should be replaced immediately.
IDLE CONTROL ADJUSTMENT:
NOTE: The automatic idle speed is set between 2640 and 2940 RPM.
The idle speed has been pre-set at the factory and should rarely require
readjustment. We recommend that all adjustments of this nature be made by
a Customer Service Representative.
Erratic idle operation of the engine usually indicates a need for carburetor
adjustment to provide a smooth idle. The idle control will not function prop-
erly when the idle speed is below the recommended limits or the carburetor
is improperly adjusted.
HAVE THE UNIT SERVICED BY AN AUTHORIZED Customer Service
Representative.
GFCI TEST RECORDS:
As with any other safety devices, the GFCIs supplied with these generators
must be checked every month to insure that they are functioning properly.
To test the GFCIs, follow the instructions and then enter the date of the test
below.
1. With the generator running and the idle control switch in the “START”
position, push the “TEST” button. The “RESET” button should pop out.
This should result in the power being off at both outlets of the duplex
receptacle. Verify this by plugging a test lamp into each outlet.
WARNING: IF THE RESET BUTTON DOES NOT POP OUT, DO NOT
USE THE RECEPTACLE(S). SEE AUTHORIZED CUSTOMER
SERVICE REPRESENTATIVE FOR SERVICE IMMEDIATELY.
(Fig. 2 Honda)
UPPER LEVEL
(Fig. 2 MI-T-M)
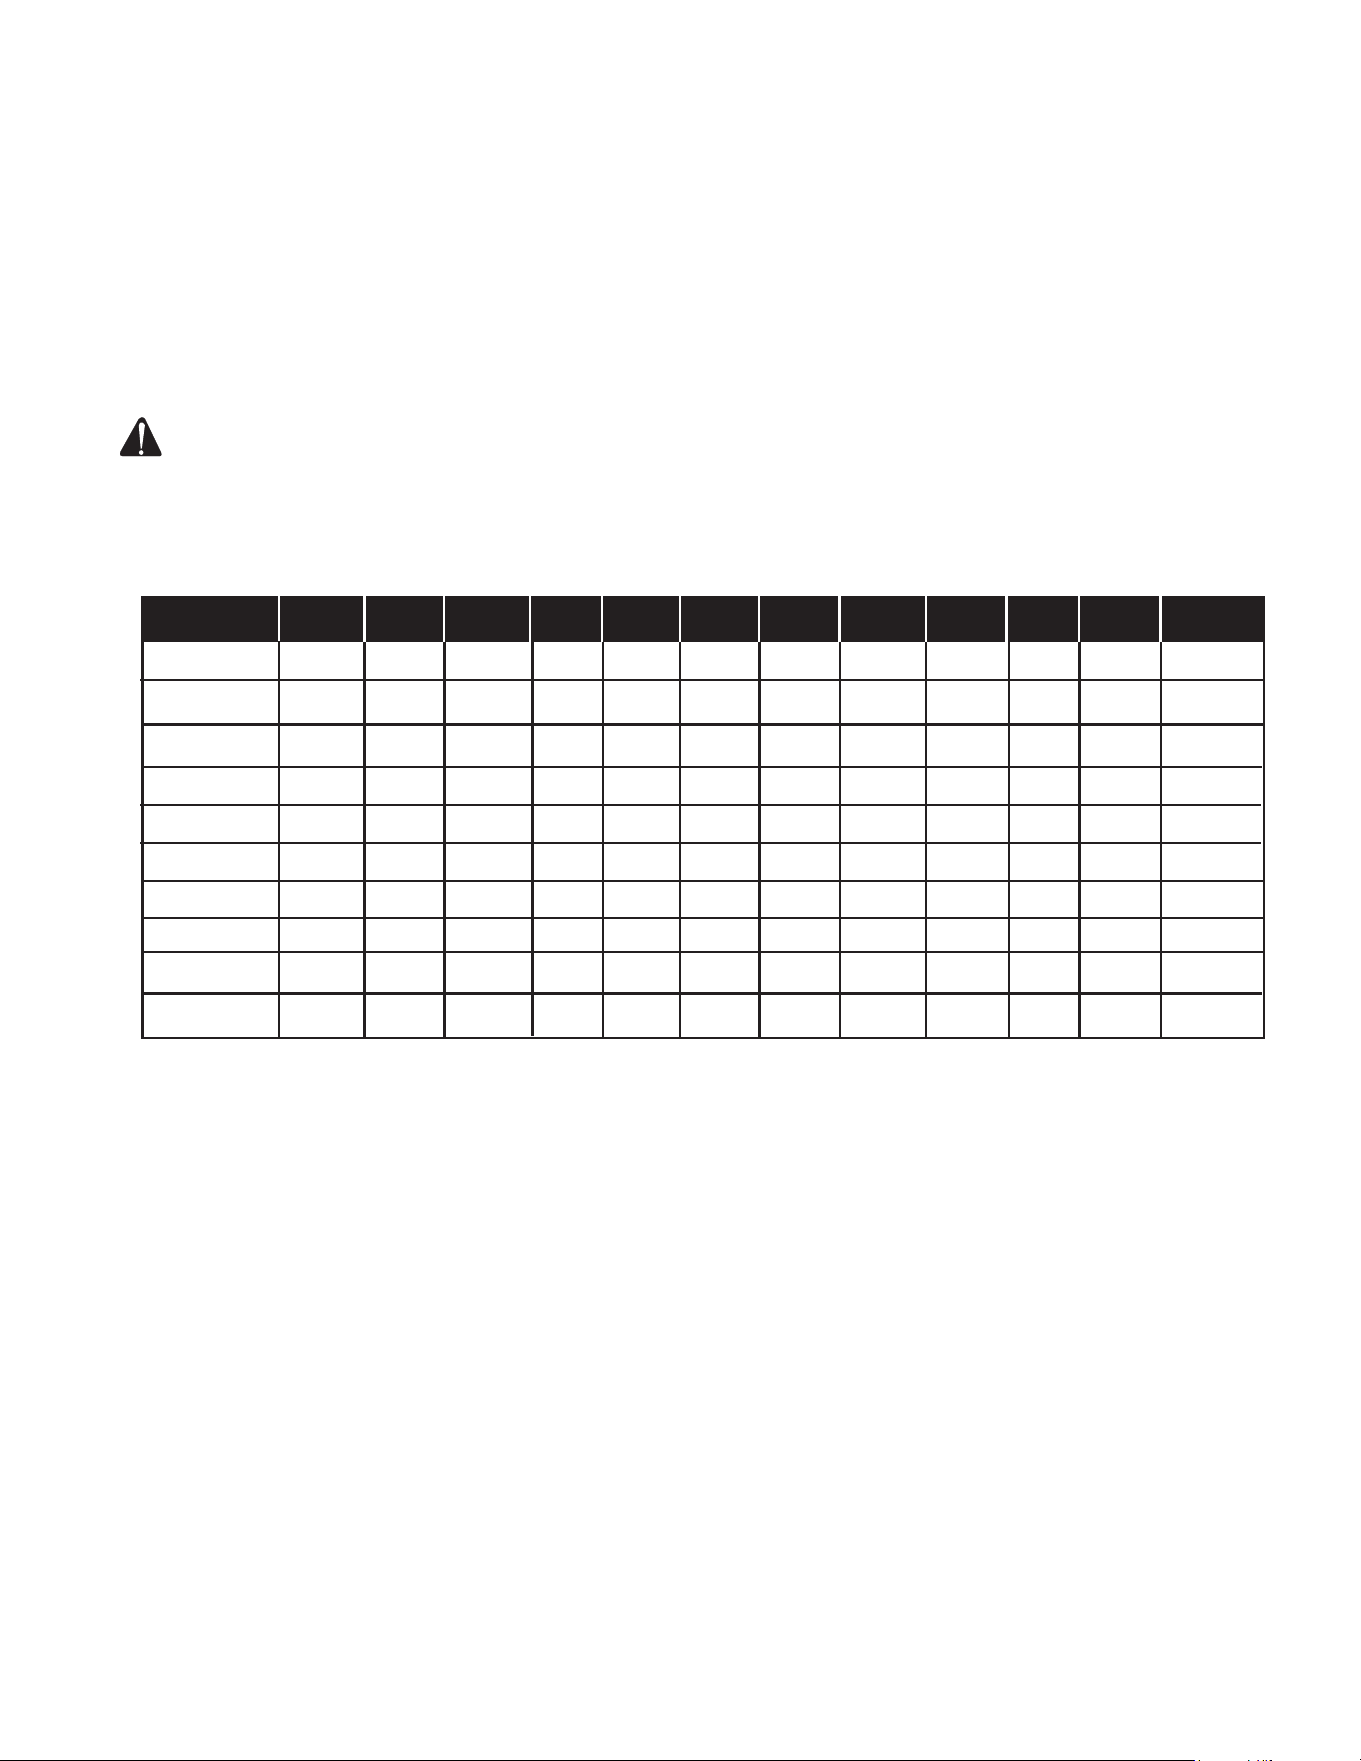
Operator’s Manual 27
MAINTENANCE
2. If the GFCI test correctly, restore power by FIRMLY pushing the “RESET”
button back in until you hear or feel a distinctive “click”. IF THE GFCI FAILS
TO RESET PROPERLY, DO NOT USE EITHER OUTLET OF THE DUPLEX
RECEPTACLE. Have the unit serviced by an authorized Customer Service
Representative immediately.
3. High vibration or severe mechanical shock loads may cause the GFCIs to
trip. IF EITHER GFCI TRIPS BY ITSELF AT ANY TIME, reset it and perform
test procedures 1 and 2.
4. Repeat steps 1-3 for the second GFCI.
WARNING: ALTHOUGH THE ABOVE TEST PROCEDURES WILL
INDICATE PROPER GFCI OPERATION ON AN UNGROUNDED
OR IMPROPERLY GROUNDED GENERATOR, THE GENERATOR
MUST STILL BE GROUNDED PER THE GROUNDING
INSTRUCTIONS LISTED ON PAGE 14 FOR THE GFCI TO
FUNCTION PROPERLY AND PROTECT THE USER FROM
ELECTRICAL FAULTS.
Year Jan. Feb. March April May June July Aug. Sept. Oct. Nov. Dec.
NOTE: Situations exist where a GFCI will not afford any protection against the hazards of electrical shock.
Example: if a person touches two or more conductors from a damaged cord set and is not in direct contact
with the ground, he or she may receive a shock. Since there is no path to ground for a ground fault current to
flow through, the GFCI will not operate and serious injury may result.
The GFCI are merely an added safety feature. There are no substitutes for good safety precautions, correct
electrical practices and proper maintenance of cords, equipment and connections.
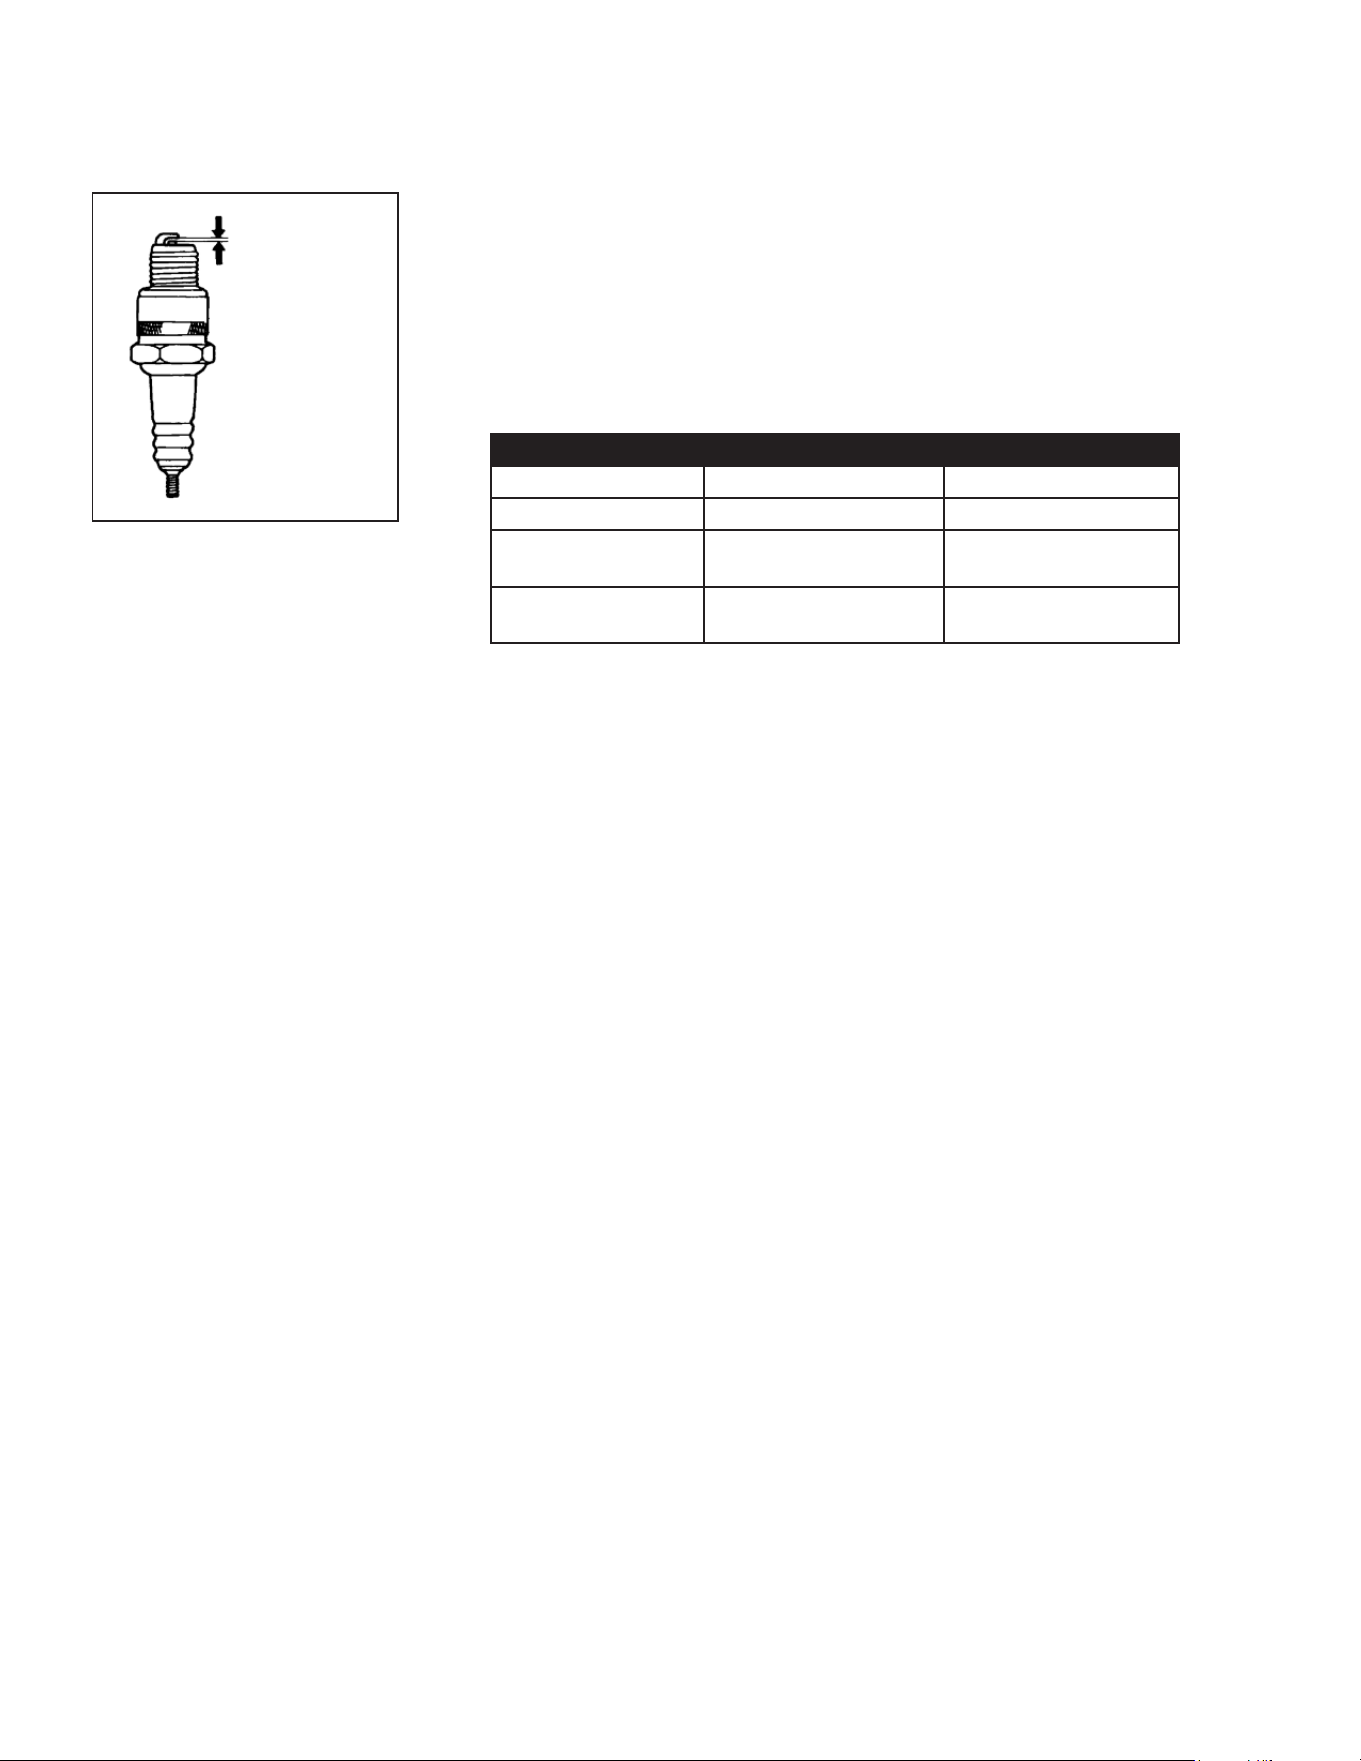
28 Operator’s Manual
MAINTENANCE
CLEANING AND GAPPING SPARK PLUG:
If the plug is contaminated with carbon, remove it using a plug cleaner or
wire brush.
Check the spark plug gap and reset it if necessary. The spark plug gaps are
listed below. To change the gap, bend the side-electrode only, using a spark
plug tool. (Fig. 3)
Install and tighten the spark plug. Connect the spark plug lead.
RECOMMENDED SPARK PLUG:
BELT TENSION ADJUSTMENT:
To maintain peak performance of your unit, it may be necessary to adjust the
belt tension on occasion. Follow the procedure outlined below:
1. Remove the beltguard and loosen the two nuts on each side of the pump
or engine. There are a total of 4 nuts.
2. Turn the cap screw clockwise until a 1/2 inch belt deection is noticed
between the pulleys.
3. Tighten the side nuts.
4. Put a straight edge across both pulleys. If necessary, loosen one set of pulley
screws and adjust in or out to properly align. Tighten the pulley screws
and check the tension again.
5. Replace the beltguard and tighten the fasteners securely.
Spark Plug Gap
(See recommendations)
(Fig. 3)
Engine MI-T-M Honda
Spark Plug NGK BPR6ES ZFR5F
Spark Plug Gap 0.7 - 0.8 mm (0.03 in.) 0.7 - 0.8 mm (0.03 in.)
Torque - New 8.7-10.9 ft-lb 1/2 turn to compress
washer
Torque - Retighten 16.6-19.5 ft-lb 1/8 to 1/4 turn to
compress washer
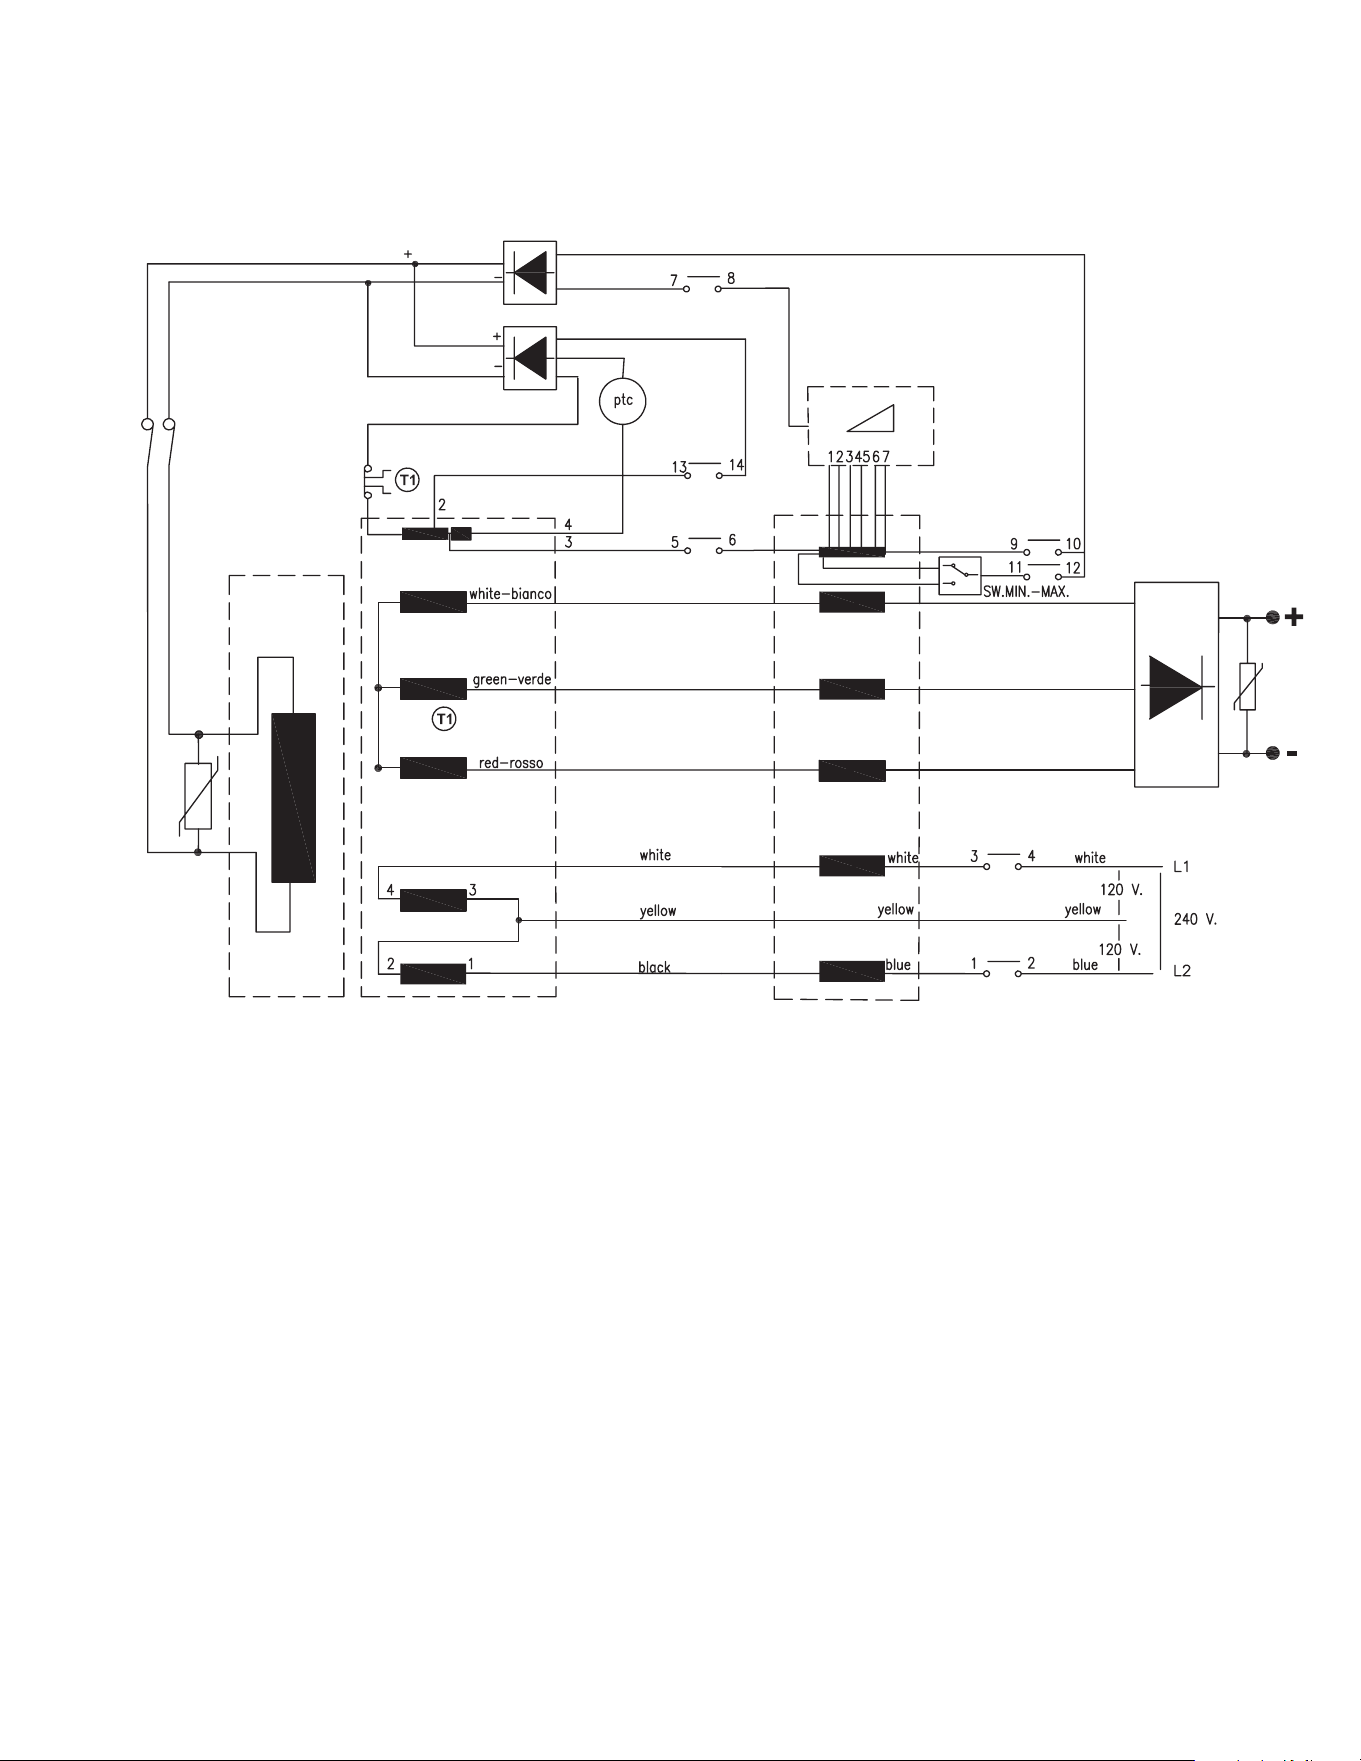
Operator’s Manual 29
MAINTENANCE
IMPEDANCESTATORROTOR
RECTIFIER N° 1
RECTIFIER N° 2-3
SWITCH 2
WELDER OUT
WIRING SCHEMATIC
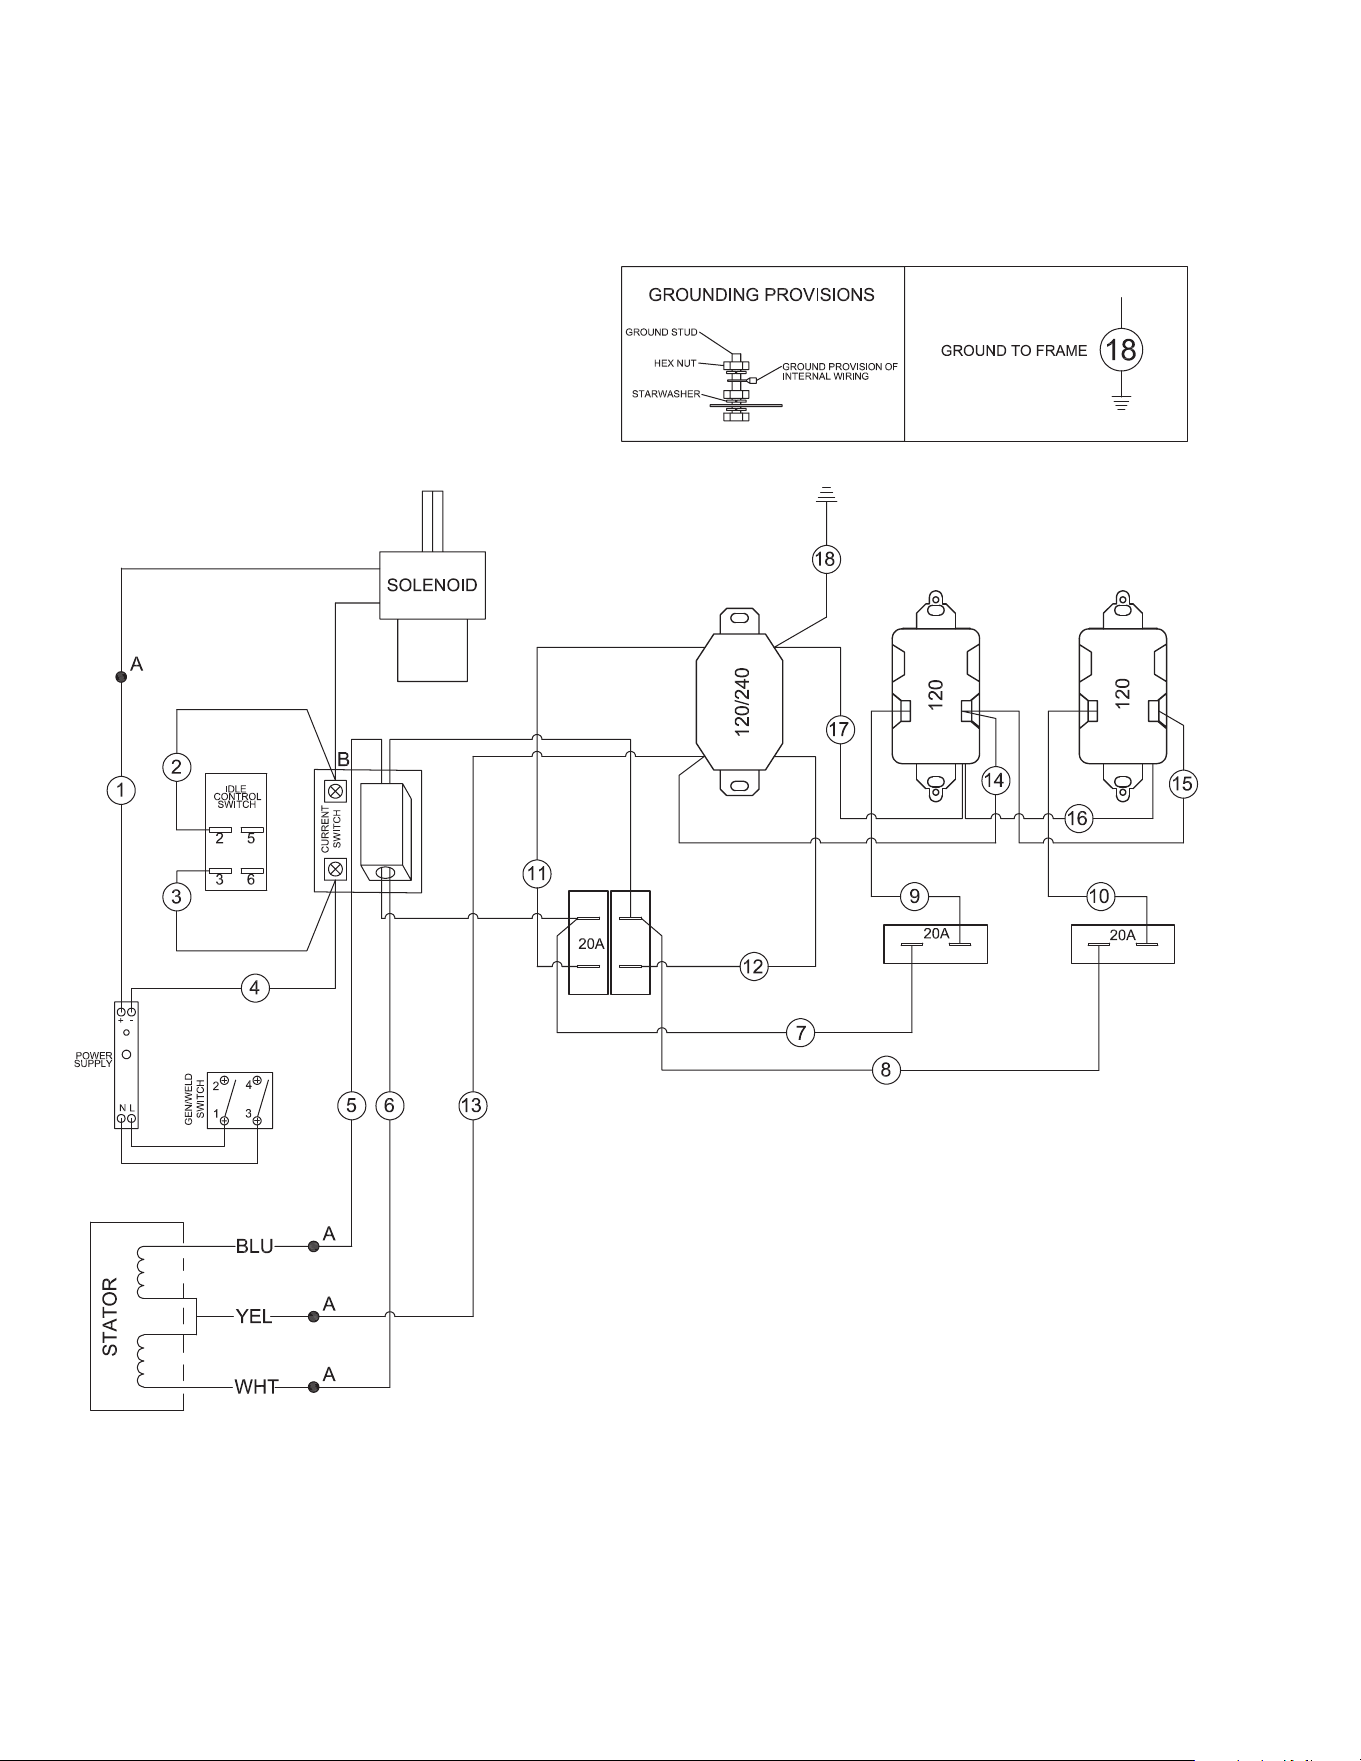
30 Operator’s Manual
MAINTENANCE
WIRING DIAGRAM - AGW-SM14 AND AGW-SV14 (AFTER SERIAL #20284607)
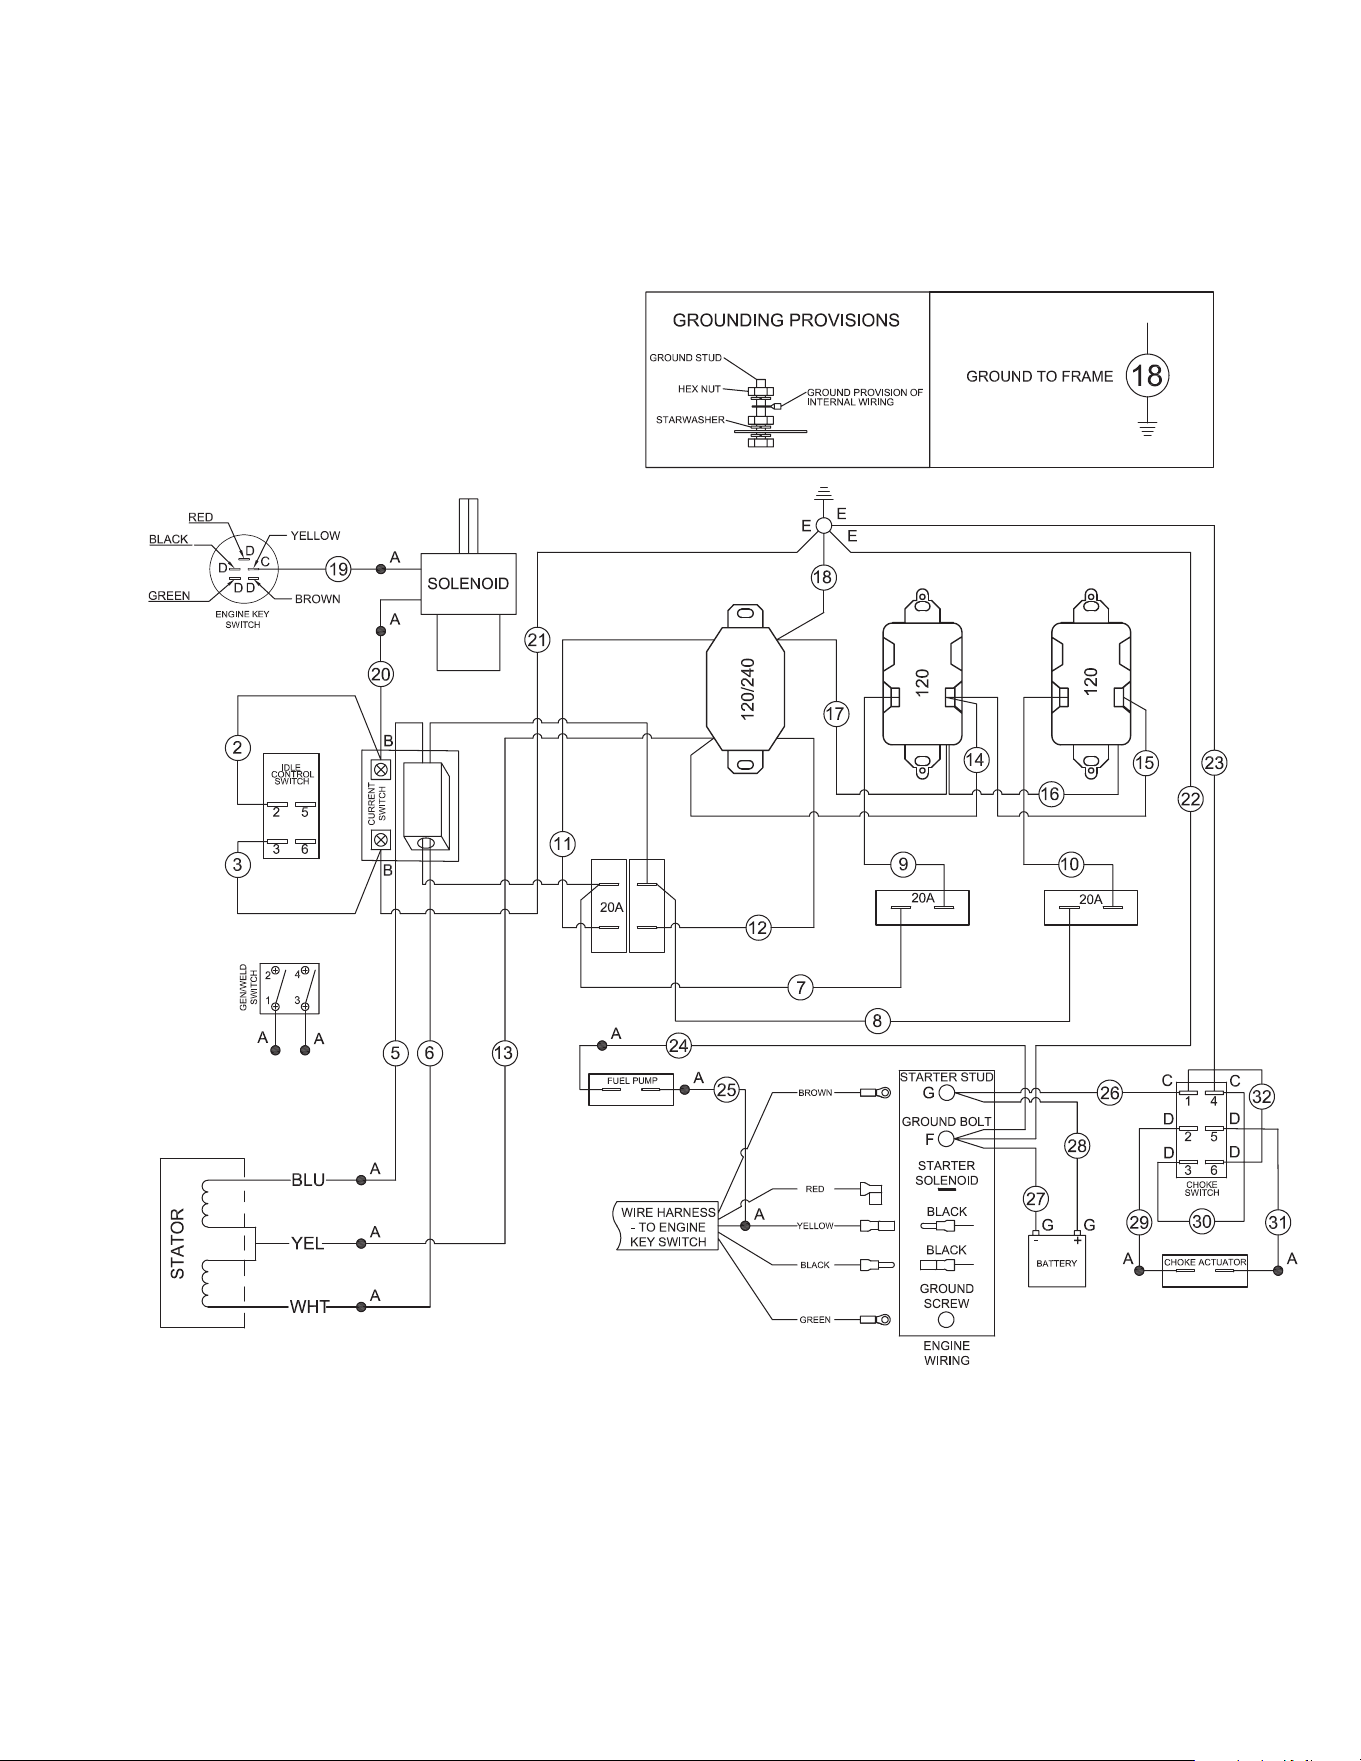
Operator’s Manual 31
MAINTENANCE
WIRING DIAGRAM - AGW-SH22 (AFTER SERIAL #20284448)

32 Operator’s Manual
SHORT TERM (1-6 MONTHS):
1. Add gasoline conditioner & stabilizer at the specied concentration.
2. Run the unit for two (2) minutes to ensure the mixed fuel is in the entire
fuel system. Close the fuel valve and run the unit until it stops.
3. Remove the spark plug, pour 1-2 teaspoons (5-10cc) of engine oil into the
cylinder, slowly pull the starter handle 2 or 3 times, reinstall the spark plug
and tighten securely.
4. Clean the exterior surface of the unit and apply a rust inhibitor.
5. Store the unit in a dry, well ventilated place.
LONG TERM (MORE THAN 6 MONTHS):
1. Add gasoline conditioner & stabilizer at the specied concentration.
2. Run the unit until the fuel tank and carburetor are dry. As the engine is
beginning to die, move the choke lever to the choke position.
NOTE: Turn off the idle control to decrease the run time.
3. Remove the spark plug, pour 1-2 teaspoons (5-10cc) of engine oil into the
cylinder, slowly pull the starter handle 2 or 3 times, reinstall the spark plug
and tighten securely.
4. Clean the exterior surface of the unit and apply a rust inhibitor.
5. Store the unit in a dry, well ventilated place.
WARNING: FUEL SHOULD BE DRAINED IN A WELL VENTILATED
AREA AND STORED IN A CONTAINER APPROVED FOR
GASOLINE.
STORAGE

Operator’s Manual 33
SPECIFICATIONS
ITEM SPECIFICATION
AGW-SM14 / SV14-30M AGW-SM14 / SV14-B AGW-SH22-20M
Mi-T-M Mi-T-M Honda
Model R420E / 25V3 R420E / 25V3 GX690
Engine Oil 37.2 oz ./ 32 oz 37.2 oz. / 32 oz 67.6 oz.
Max Watts w/o Compressor 5000 5000 5000
Cont. Watts w/o Compressor 4500 4500 4500
Cont. Watts w/ Compressor @100 PSI 3000 @100 PSI 3000 @100 PSI 4500
Cont. Watts w/ Compressor @150 PSI 2500 @150 PSI 2500 @150 PSI 4500
Rated Voltage 120 V 120 V 120 V
Frequency 60 Hz 60 Hz 60 Hz
Compressor Pump 2 stage 2 stage 2 stage
Pump Oil 24.7 oz 24.7 oz 48 oz
Air Tank 30 gallons - 20 gallons
Max. Pressure 175 PSI 175 PSI 175 PSI
RECORD SERIAL NUMBER
Write your model number, machine serial number and date
of purchase in the spaces provided below. Your dealer
needs this information when ordering parts.
Model No. _____________________________________
Machine Serial No. _____________________________
______________________________________________
Date of Purchase_______________________________
(To be lled in by purchaser)
34 Operator’s Manual
STATEMENT OF WARRANTY
Mi-T-M warrants all parts, (except those referred to below), of your new unit to be free from defects in materi-
als and workmanship during the following periods:
For Two (2) years from the date of original purchase:
Compressor Pump Plumbing
Alternator Tank Assembly
For Six (6) months from date of original purchase:
Pressure Switch Regulator
Check Valve Pilot Valve
Copper/stainless steel line
For Ninety (90) days from the date of original purchase:
Pressure Gauges Safety Relief Valves
Drain Valves
Defective parts not subject to normal wear and tear will be repaired or replaced at our option during the war-
ranty period. In any event, reimbursement is limited to the purchase price paid.
Exclusions
1. Engine is covered under separate warranty by its respective manufacturer and is subject to the terms set
forth therein.
2. Normal wear parts:
Isolators Air Filter
3. This warranty does not cover parts damaged due to normal wear, abnormal conditions, misapplication,
misuse, accidents, operation at other than recommended speeds, pressures or temperature, improper
storage or freight damage. Parts damaged or worn by operation in dusty environments are not warranted.
Failure to follow recommended operating and maintenance procedures also voids warranty.
4. Labor charges, loss or damage resulting from improper operation, maintenance (other than routine air tank
draining and oil changes, if applicable) or repairs made by persons other than a Authorized Service Center.
5. The use of other than Genuine Repair Parts will void warranty. Parts returned, prepaid to our factory or to
an Authorized Service Center will be inspected and replaced free of charge if found to be defective and
subject to warranty. Under no circumstances shall the manufacturer bear any responsibility for loss of use
of the unit, loss of time or rental, inconvenience, commercial loss or consequential damages. There are no
warranties which extend beyond the description of the face hereof.
For Service or Warranty Consideration, contact
Mi-T-M
®
Corporation, 50 Mi-T-M Drive, Peosta, IA 52068
563-556-7484 / 800-553-9053 / Fax 563-556-1235
Monday - Friday 8:00 a.m. - 5:00 p.m. CST

Operator’s Manual 35
CALIFORNIA EVAPORATIVE EMISSIONS CONTROL WARRANTY STATEMENT
YOUR WARRANTY RIGHTS AND OBLIGATIONS
The California Air Resources Board and Mi-T-M are pleased to explain the emission control system’s warranty on your 2022/2023
small off-road engine/equipment (SORE). In California, new equipment that use small off-road engines must be designed, built and
equipped to meet the State’s stringent anti-smog standards. Mi-T-M must warrant the evaporative emissions control system (EECS) on
your SOREs for the period listed below provided there has been no abuse, neglect or improper maintenance of your equipment leading
to the failure of the evaporative emission control system.
Your EECS may include parts such as the carburetor, fuel tanks, fuel lines (for liquid fuel and fuel vapors), fuel caps, valves,
canisters, filters, clamps, connectors, and other associated components. Where warrantable conditions exist, Mi-T-M will repair your
small off-road engine at no cost to you including diagnosis, parts and labor.
MANUFACTURER’S WARRANTY COVERAGE:
This EECS is warranted for two years. If any evaporative emissions-related part on your small off-road engine/equipment is
defective, the part will be repaired or replaced by Mi-T-M.
OWNER’S WARRANTY RESPONSIBILITIES:
-As the SORE owner, you are responsible for performance of the required maintenance listed in your owner’s manual. Mi-T-M
recommends that you retain all receipts covering maintenance on your SORE , but Mi-T-M cannot deny warranty coverage solely
for the lack of receipts.
-As the SORE owner, you should be aware that Mi-T-M may deny you warranty coverage if your SORE or a part has failed due to
abuse, neglect, or improper maintenance or unapproved modifications.
-You are responsible for presenting your SORE to distribution center or service center authorized by Mi-T-M Corporation, 50 Mi-
T-M Drive, Peosta, IA 52068 (herein Mi-T-M) as soon as the problem exists. The warranty repairs shall be completed in a
reasonable amount of time, not to exceed 30 days.
If you have a question regarding your warranty coverage, you should contact Mi-T-M Customer Service Department at 1-800-
553-9053 or by emailing us at corp@mitm.com.
GENERAL EMISSIONS WARRANTY COVERAGE
- CALIFORNIA ONLY -
Mi-T-M warrants to the ultimate purchaser and each subsequent purchaser that the SORE (1) has been designed, built and
equipped so as to conform with all applicable regulations; and (2) is free from defects in materials and workmanship that cause the
failure of a warranted part to conform with those regulations as may be applicable to the terms and conditions stated below.
(a) The warranty period begins on the date the engine is delivered to an ultimate purchaser or first placed into service. The warranty
period is two years.
(b) Subject to certain conditions and exclusions as stated below, the warranty on emissions related parts is as follows:
(1) Any warranted part that is not scheduled for replacement as required maintenance in your owner’s manual is warranted for
the warranty period stated above. If the part fails during the period of warranty coverage, the part will be repaired or replaced by
Mi-T-M according to subsection (4) below. Any such part repaired or replaced under warranty will be warranted for the remainder
of the period.
(2) Any warranted part that is scheduled only for regular inspection in your owner’s manual is warranted for the warranty period
stated above. Any such part repaired or replaced under warranty will be warranted for the remaining warranty period.
(3) Any warranted part that is scheduled for replacement as required maintenance in your owner’s manual is warranted for the
period of time before the first scheduled replacement date for that part. If the part fails before the first scheduled replacement, the
part will be repaired or replaced by Mi-T-M according to subsection (4) below. Any such part repaired or replaced under warranty
will be warranted for the remainder of the period prior to the first scheduled replacement point for the part.
(4) Repair or replacement of any warranted part under the warranty provisions herein must be performed at a warranty station at
no charge to the owner.
(5) Not withstanding the provisions herein, warranty services or repair will be provided at all of our distribution centers that are
franchised to service the subject engines.
(6) The owner must not be charged for diagnostic labor that leads to the determination that a warranted part is in fact defective,
provided that such diagnostic work is performed at a warranty station.
(7) Throughout the engine warranty period stated above, Mi-T-M will maintain a supply of warranted parts sufficient to meet the
expected demand for such parts.
(8) Any replacement parts that do not increase the exhaust or evaporative emissions of the engine or evaporative emission
control system must be used in the performance of any warranty maintenance or repairs and must be provided without charge to
the owner. Such use will not reduce the warranty obligations of Mi-T-M.
(9) Add-on or modified parts that are not exempted by the Air Resources Board may not be used. The use of any non-exempted
add-on or modified parts by the ultimate purchaser will be grounds for disallowing a warranty claims. Mi-T-M will not be liable to
warrant failures of warranted parts caused by the use of a non-exempted add-on or modified part.

36 Operator’s Manual
(10) Mi-T-M shall provide any documents that describe that Mi-T-M warranty procedures or policies within five working days of
request by the Executive Officer.
(c) WARRANTED PARTS:
The repair or replacement of any warranted part otherwise eligible for warranty coverage may be excluded from such warranty
coverage if Mi-T-M demonstrates that the engine has been abused, neglected, or improperly maintained, and that such abuse ,
neglect ,or improper maintenance was the direct cause of the need for repair or replacement of the part. That notwithstanding,
any adjustment of a component that has a factory installed, and properly operating, adjustment limiting device is still eligible for
warranty coverage. The following emissions warranty parts list are covered.
(1) Fuel Tank*
(2) Fuel Cap
(3) Fuel Lines (for liquid fuel and fuel vapors)
(4) Fuel Line Fittings
(5) Clamps*
(6) Pressure Relief Valves*
(7) Control Valves*
(8) Control Solenoids*
(9) Electronic Controls*
(10) Vacuum Control Diaphragms*
(11) Control Cables*
(12) Control Linkages*
(13) Purge Valves*
(14) Gaskets*
(15) Liquid/Vapor Separator
(16) Carbon Canister
(17) Canister Mounting Brackets
(18) Carburetor Purge Port Connector
* Note: As they relate to the evaporative emission control system.

Manual del Operador 37
INTRODUCCIÓN
Gracias para comprando este Mi-T-M producto.
Lea este manual con cuidado para aprender como operar
y heacerie servicao su máquina correcto. Falla resultaría
en lesiones personales o daño a equipo.
Este manual debe considerar una parte permanente de su
máquina y debe quedar con máquina cuando venderla.
Medidas en este manual se dan en sistema métrico y en
equivalentes de unidades de Estado Unidos. Use sólo
partes y cierres de reemplazar correctos. Cierres métricos
y pulgadas necesitarian un tirón especial de métrico o
pulgada.
Lados de mano derecha y mano izquierda se determinan
de que da al n de máquina.
El número de serie está situada en sección de especica-
ciones o números de identicación. Escriba correcta todos
números para ayndaría en encontrar la máquina si sea
robado. Su concesionario también necesite estos números
cuando ordenaría partes. Ponga números de identicación
en lugar seguro atuera de máquina.
Garantía provece de concesionario Mi-T-M para quien
opere y mantenga su equipo como describido en este
manual. Este manual está explicado en certicado de ga-
rantía que se vea en este manual.
Esta garantía provece la seguridad que su concesionario
Mi-T-M daría garantia de productos donde defectos apare-
cen durante tiempo de garantia. Debe abusar al equipo o
cambios para modicar la función atrás de especicacio-
nes de fabrica la garantia será vació.
ADVERTENCIA: Este producto puede expo-
nerle a químicos incluyendo carbon monoxide,
que es conocido por el Estado de California
como causante de defectos de nacimiento u
otros daños reproductivos. Para mayor
información, visite www.P65Warnings.ca.gov.
ADVERTENCIA
ADVERTENCIA: Este producto puede
exponerlo a productos químicos, incluido el
plomo, que el Estado de California conoce a
causar cáncer y defectos congénitos u otros
daños reproductivos. Para obtener más
información, visite www.P65Warnings.ca.gov
ADVERTENCIA

38 Manual del Operador
MATERIAS
TODA INFORMACIÓN, ILUSTRACIÓNES, Y ESPECIFICACIONES EN ESTE MANUAL SE BASA EN INFORMACIÓN LO ÚLTIMO QUE
DISPONIBLE AL TIEMPO DE PUBLICACIÓN. SE RESERVA EL DERCHO DE EFECTUAR COMBIOS SIN PREVIO AVISO.
INTRODUCCIÓN ...........................................................................................................37
MATERIAS .....................................................................................................................38
SEGURIDAD ..................................................................................................................39
RECONOZCA INFORMACIÓN DE SEGURIDAD .....................................................................................39
COMPRENDA PALABRAS DE ALERTAS .................................................................................................39
SIGA LAS INSTRUCCIÓNES DE SEGURIDAD ........................................................................................39
MONÓXIDO DE CARBONO- GAS VENENOSO .....................................................................................39
INSTRUCCIONES DE SEGURIDAD DE LLENDADO DE COMBUSTIBLE ...............................................40
RIESGOS DE ELECTRICOS ....................................................................................................................40
RIESGO DE EXPLOSIÓN .........................................................................................................................41
RIESGO DE ESTALLIDO ..........................................................................................................................42
RIESGOS A LA RESPIRACIÓN ................................................................................................................42
RIESGO DE QUEMADURAS ....................................................................................................................43
RIESGO DE OBJETOS VOLANTES .........................................................................................................43
RIESGO DE PARTES EN MOVIMIENTO ..................................................................................................43
ADVERTENCIAS IMPORTANTES DE SEGURIDAD .................................................................................43
USE ROPA PROTECTORA ......................................................................................................................44
PREPARE PARA EMERGENCIAS ............................................................................................................ 45
INSPECCIONES UNIDAD ........................................................................................................................45
SERVICIO CON CIUDADO UNIDAD ........................................................................................................45
SEÑALES DE SEGURIDAD ..........................................................................................46
MANDOS .......................................................................................................................47
INSTALACIÓN ...............................................................................................................49
COLOCACIÓN: ........................................................................................................................................49
INSTALACIÓN DE CAMIÓN DE SERVICIO: ............................................................................................49
INSTRUCCIONES DE CONEXION A TIERRA .......................................................................................... 49
MOTOR DE GASOLINA ...........................................................................................................................51
ACEITE DEL MOTOR ...............................................................................................................................51
VOLUMEN DE ACEITE DEL MOTOR .......................................................................................................52
CARGA DE COMBUSTIBLE ....................................................................................................................52
RECOMENDACIONES GENERALES .......................................................................................................52
TIPO DE COMBUSTIBLE .........................................................................................................................53
INSTALACIÓN DE BATERÍA .....................................................................................................................53
ALTITUD ALTA ..........................................................................................................................................53
OPERACIÓN .................................................................................................................. 54
COMENZAR .............................................................................................................................................54
COMIENZO DE SOLDAR: ........................................................................................................................55
APAGAMIENTO:.......................................................................................................................................55
CARTA DE ELECTRODO .........................................................................................................................56
CONTROLES DE OPERAR ......................................................................................................................56
CONTROLES ...........................................................................................................................................57
TAMAÑO DEL CABLE: .............................................................................................................................57
CARGAS DEL MOTOR ELECTRICO:.......................................................................................................57
LOCALIZACIÓN DE FALLAS ........................................................................................ 58
MANTENIMIENTO .........................................................................................................60
MOTOR: ................................................................................................................................................... 61
FILTRO DE AIRE: .....................................................................................................................................61
COMPONENTES DE EMISIÓN EVAPORADO: ........................................................................................62
MAINTENANCE .......................................................................................................................................64
DIAGRAMA DE CABLEADO - AGW-SM14 AND AGW-SV14 (AFTER SERIAL #20284607) ....................66
DIAGRAMA DE CABLEADO - AGW-SH22 (DESPUÉS DEL NÚMERO DE SERIE #20284448) ..............67
ALMACENAMIENTO ..................................................................................................... 68
ESPECIFICACIÓNES ....................................................................................................69
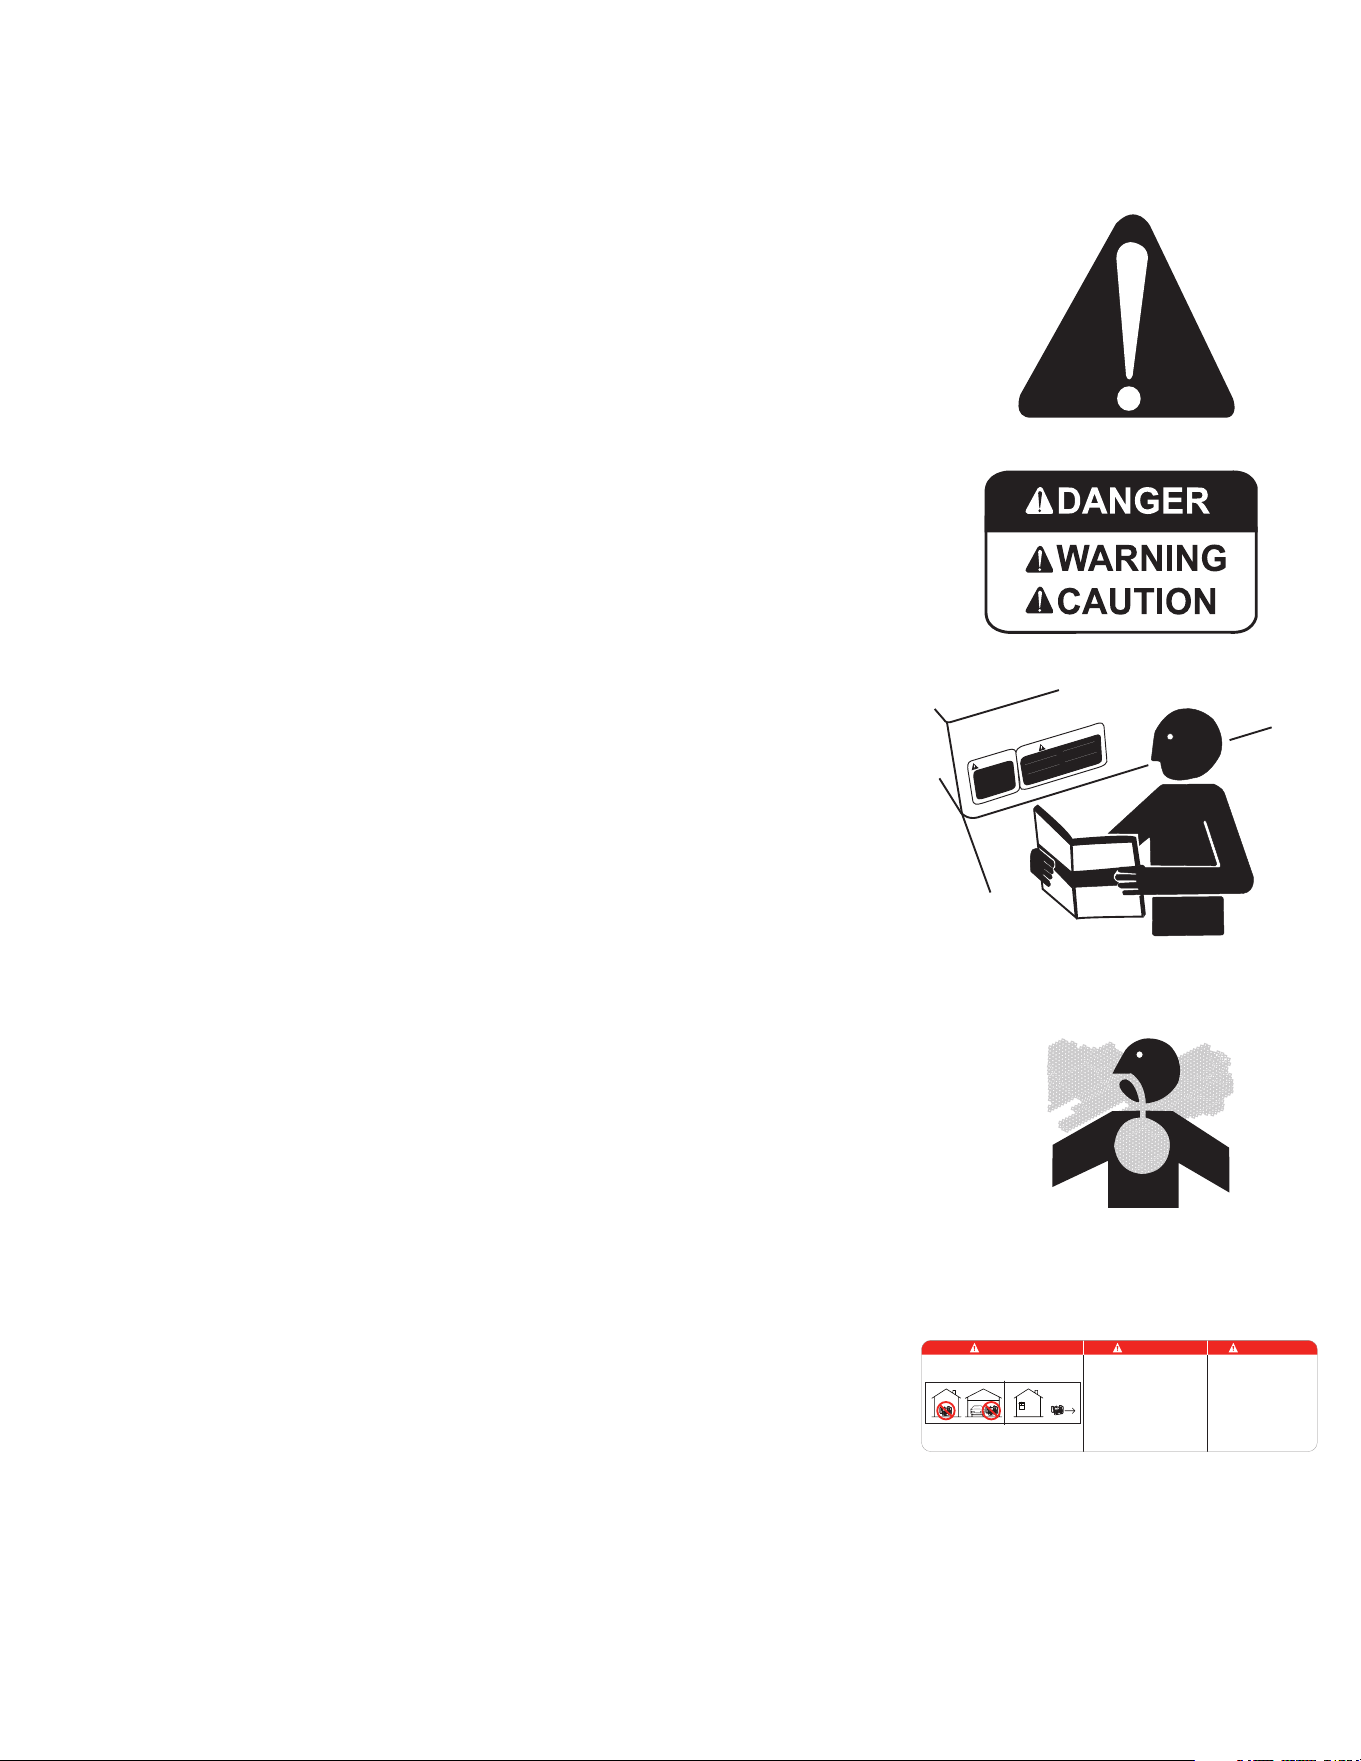
Manual del Operador 39
SEGURIDAD
RECONOZCA INFORMACIÓN DE SEGURIDAD
Este es el símbolo de alerta de seguridad. Cuando mire este símbolo en la
máquina o manual, sea alerta de posibilidad o potencia de graves person-
ales.
Siga precauciones recomendables y prácticas de operación.
COMPRENDA PALABRAS DE ALERTAS
Una palabra de alerta -- Peligro, Advertencia, Precaución -- se usa con el
símbolo de alerta de seguridad. Peligro indica la situación más seria.
Señales de seguridad como PELIGRO y ADVERTENCIA está situada cerca
de riesgos especícos. Precauciones generales están en una lista en las
señales de seguridad precaución a mensajes de seguridad en este manual.
SIGA LAS INSTRUCCIÓNES DE SEGURIDAD
Lea con ciudado todos mensajes de seguridad en este manual y en las
señales de seguridad en máquina. Mantengase señales de seguridad en
condición bueno. Reemplace desaparecidos o señales de seguridad con
daño. Asegurese que componentes nuevos de equipo y partes de repa-
ración incluir las señales de seguridad último. Señales de seguridad para
reemplace son disponibles de su concesario.
Aprenda como operar la máquina y como usar los mandos correcta. No
permita nadie para operar sin instrucciones.
Mantengase la máquina en condición corecta para trabajar. Modicaciónes
con no autorizado a la máquina pueden afectar la función y/o seguridad y
afecta la vida de máquina.
Si usted no entiende cualquier parte de este manual y no necesita ayuda,
entre en contacto con a su distribuidor.
MONÓXIDO DE CARBONO- GAS VENENOSO
Use unidad en aire libre, afuera de ventanas abiertas, tiros, o puertas.
Exhausto de unidad contiene monóxido de carbono- un gas venenoso que
puede matarle. No puede oler o ver este gas.
Nunca use unidad en espacios cerrados o parcialamente cerrados. Uni-
dades puede producir neveles altas de monóxido de carbono muy rápido.
Cuando use un unidad portable, recuerde que no puede oler o ver monóxi-
do de carbono. Aunque si no pueda oler gases de exhausto, puede expon-
erle a monóxido de carbono.
Si empieza sentir enfermo, mareo, o débil cuando usando unidad, vaya
adentro PRONTO. NO RETRASE. Monóxido de carbono de generardores
puede llevar rápidamente a todo incapacitado y muerte.
Si tenga síntomas serias, tenga atención medica immediamente . Diga
empleados medicos que sospechar de venenoso de monóxido de carbono.
Si tenga síntomas mientras adentro diga alguien llamar el departamento de
fuegos para determinar cuando seguro para entrar otra vez el edicio.
NUNCA opere unidad en atmósfera explosivo, cerca materias combustibles
o donde ventilación no es suciente para llevar gases de exhausto afuera.
Gases de exhausto puede causar lesiones graves o muerte.
NUNCA use unidad adentro, incluyendo en casas, garajes, sótanos, espa-
cios pequeños, y otras áreas cerradas o parcialamente cerradas, aunque
con ventilación. Abriendo puertas y ventanas o usando ventiladores no
prevenir acumulación de monóxido de carbono en casas.
Siga las instrucciones que viene con su unidad. Encuentre unidad de
W
A
R
N
I
N
G
W
A
R
N
I
N
G
S
I
N
TH
E
M
A
N
U
A
L
S
.
W
A
R
N
I
N
G
S
I
N
TH
E
M
A
N
U
A
L
S
.
C
A
U
T
I
O
N
O
CAU
T
I
O
N
S
I
N
O
T
H
E
M
A
N
U
A
L
S
O
CAU T
I
O
N
S
I
N
O
T
H
E
M
A
N
U
A
L
S
O
CAU T
I
O
N
S
I
N
O
T
H
E
M
A
N
U
A
L
S
O
CAU
T
I
O
N
S
I
N
O
T
H
E
M
A
N
U
A
L
S
34-1916-092410-E-F-S.
Using a generator indoors CAN KILL YOU IN MINUTES.
Generator exhaust contains carbon monoxide. This is a
poison you cannot see or smell.
NEVER use inside a home
or garage, EVEN IF doors
and windows are open.
Only use OUTSIDE and far
away from windows, doors,
and vents.
DANGER DANGER PELIGRO
Utilizando un generador adentro
PUEDE MATARLE EN MINUTOS.
El escape de generador contiene
monóxido de carbono. Este es un
gas tóxico que usted no puede ver ni
puede oler.
Nunca utilice dentro de un hogar ni el
garaje, INCLUSO SI puertas y
ventanas estén abiertas.
Solo utilice AFUERAS y lejos de
ventanas abiertas, las puertas, y
descargas.
L'utilisation d'un groupe électrogène à
l'intérieur PEUT VOUS TUER EN
QUELQUES MINUTES.
Le gaz d'échappement du groupe
électrogène contient de l'oxyde de
carbone. C'est un gaz toxique que l'on
ne peut pas voir ou sentir.
Ne JAMAIS utiliser à l'intérieur d'une
maison ou d'un garage, MÊME SI les
portes et fenêtres s'ont ouvertes.
N'utiliser qu'à l'EXTÉRIEUR et bien éloigné
des fenêtres, portes, et conduits d'aération.
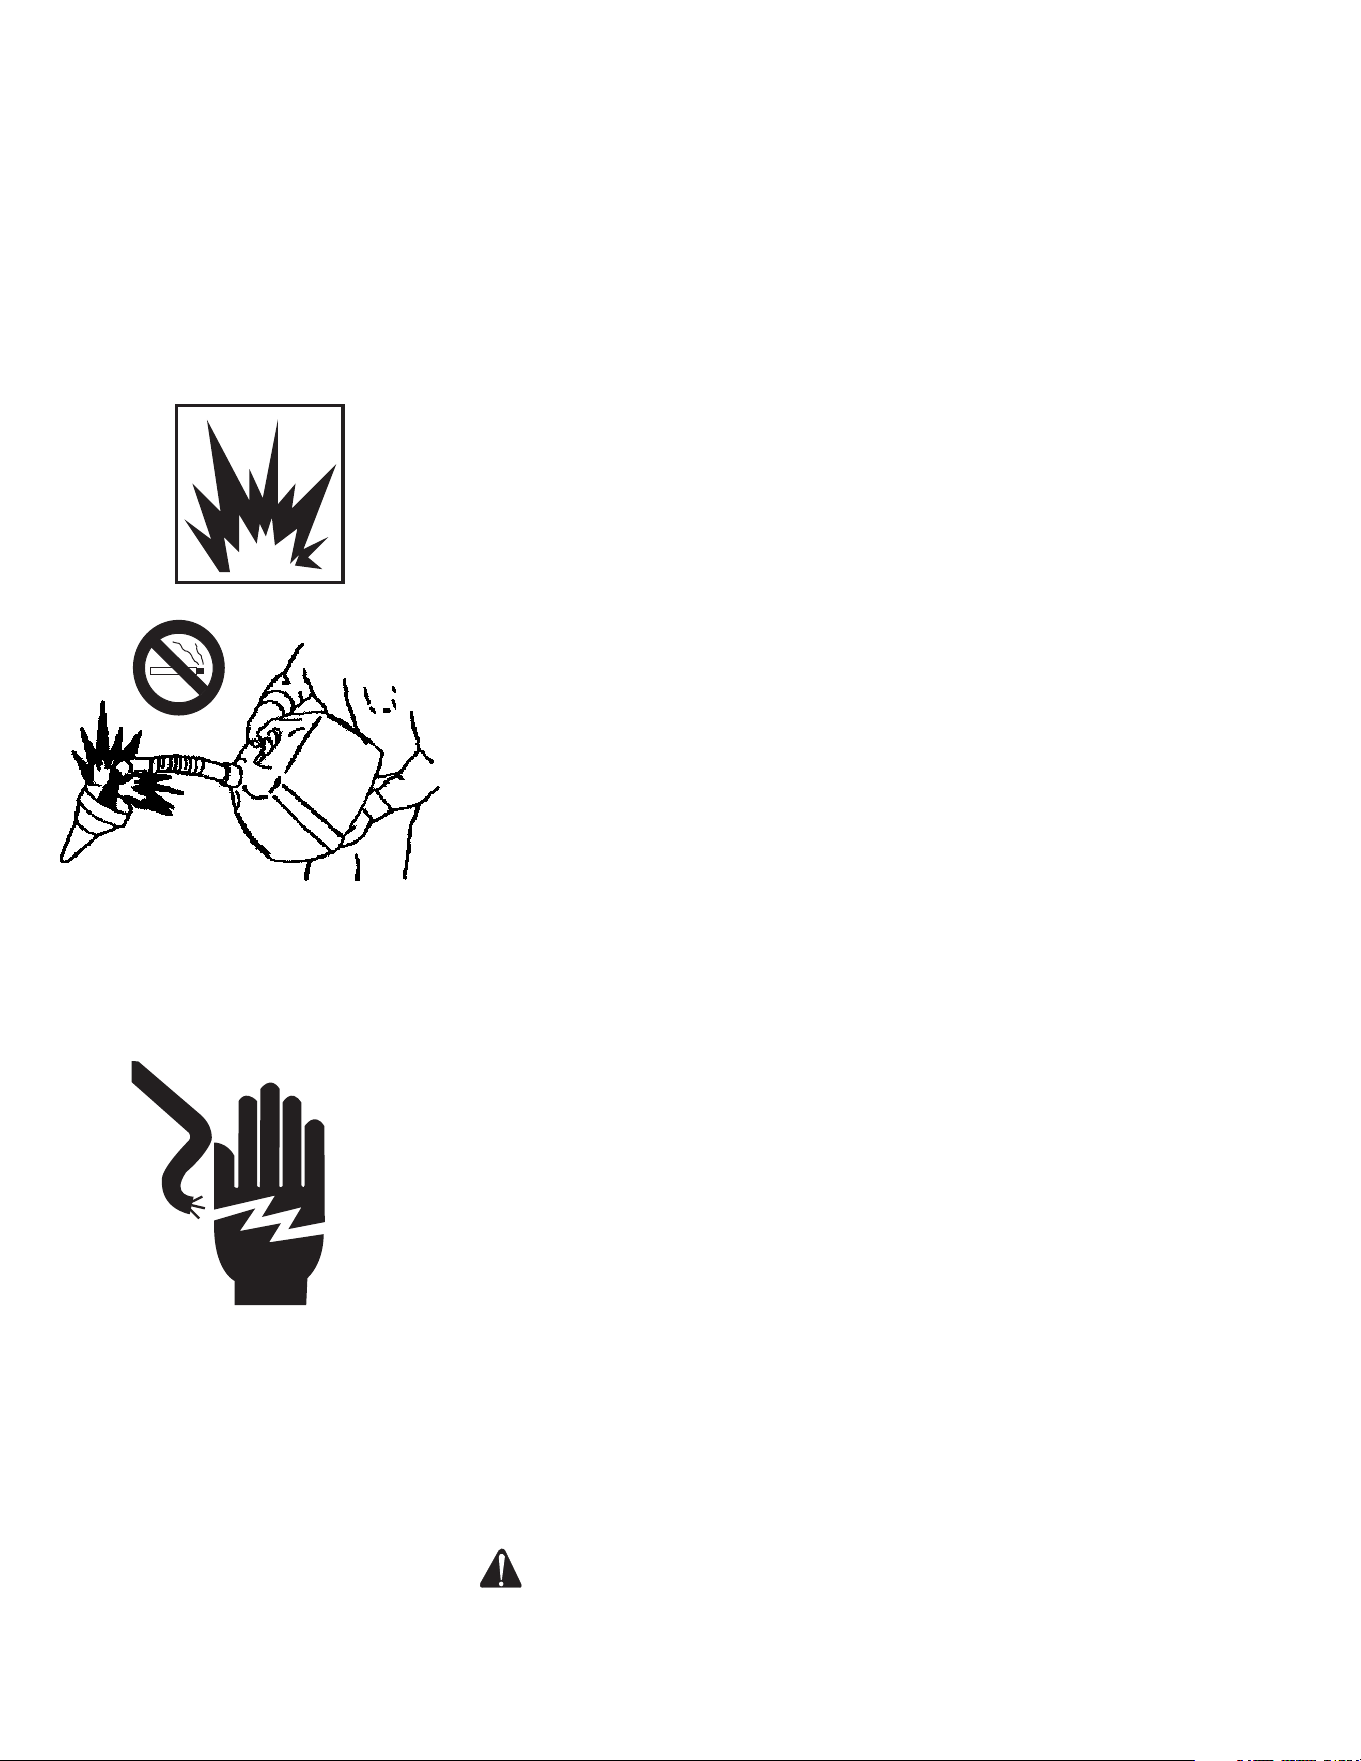
40 Manual del Operador
SEGURIDAD
aire libre y afuera de puertas, ventanas, y tiros que puede permitar gas de
monóxido de carbono para entrar adentro.
Funcione SOLAMENTE el unidad al aire libre y lejos de tomas de aire.
NUNCA funcione el unidad dentro de hogares, de garages, de vertientes, o
de otros espacios semi-enclosed. Estos espacios pueden atrapar los gases
venenosos INCLUSO SI usted funciona un ventilador o abre puertas y ven-
tanas.
Si usted comienza a sentirse enfermo, mareado, o débil mientras que usa el
unidad, cerró si apagado y consigue el aire fresco ENSEGUIDA. Vea a doc-
tor. Usted puede tener envenenamiento de monóxido de carbono.
Instale alarmasde monóxido de carbono que operados de bateria o alar-
mas de monóxido de carbono enchufadas con seguridad de batería en su
casa según las instrucciones de instalación de fabricante. Las alarmas de
monóxido de carbono deben tener certicación de requisitos de calidades
de seguridad últimos para alarmas de monóxido de carbono. (UL 2034, IAS
6-96 o CSA 6.19.01).
Examine su alarma de monóxido de carbono frecuentemente y reemplace
baterías muertas.
INSTRUCCIONES DE SEGURIDAD DE LLENDADO DE
COMBUSTIBLE
Un resulto de abastecer de combustible incorrecto es lesiones graves y la
muerte. No fumar cuando llenar el tanque de motor con combustible (fuel).
Siempre reabastecer de fuel despacio para evitar derrames que puede cau-
sar riesgo de fuego.
Gasolina es amable extremo y sus vapores pueden explotar si inamar.
Observe todas regulaciones de seguridad para manejando seguro de com-
bustible. Maneje combustible en envases de seguridad. Si envase no tiene
pico, use un embudo.
No sobrellene el tanque de combustible, mantenga espacio para expansión
de combustible.
Llene el tanque solamente en una área de tierra pelada. Mientras llenando
el tanque, mantenga calor, chispas, y llamas abiertas afuera. Con cuidado
limpie todo combustible derramado antes de empezando el motor.
Siempre llene tanque de combustible en una área con mucha ventilación
para evite inhalando gases peligrosos.
NUNCA mantenga combustible para su generado e la casa. Gasolina, pro-
pano, kerosene, y otros liquidos amables deben mantener afuera de áreas
de viviendo en envases seguros sin vidrio y calicados correctos. No los
mantenga cerca de aparato de ardiente de combustible como calentador de
gas natural en un garaje. Si combustible derrame o envase no cerrado cor-
recto, vapores invisibles de lata de combustible viaja adelante de la tierra y
pueden inamar del piloto de aparato o de arcos de interruptores eléctricos
en aparato.
RIESGOS DE ELECTRICOS
Este producto tiene que tener la toma a tierra. Si lo debe fallar o funcionar
mal la toma a tierra proveer un camino de resistencia mínima para corriente
eléctrico para reducir el riesgo de descarga eléctrica. No tocar las partes
eléctricas.
PELIGRO - CONECCIÓN INCORRECTA DE EQUIPO -
CONDUCTOR DE TIERRA PUEDE RESULTAR EN RIESGO
DE ELECTROCUCIÓN. HABLE CON UN ELECTRICISTA
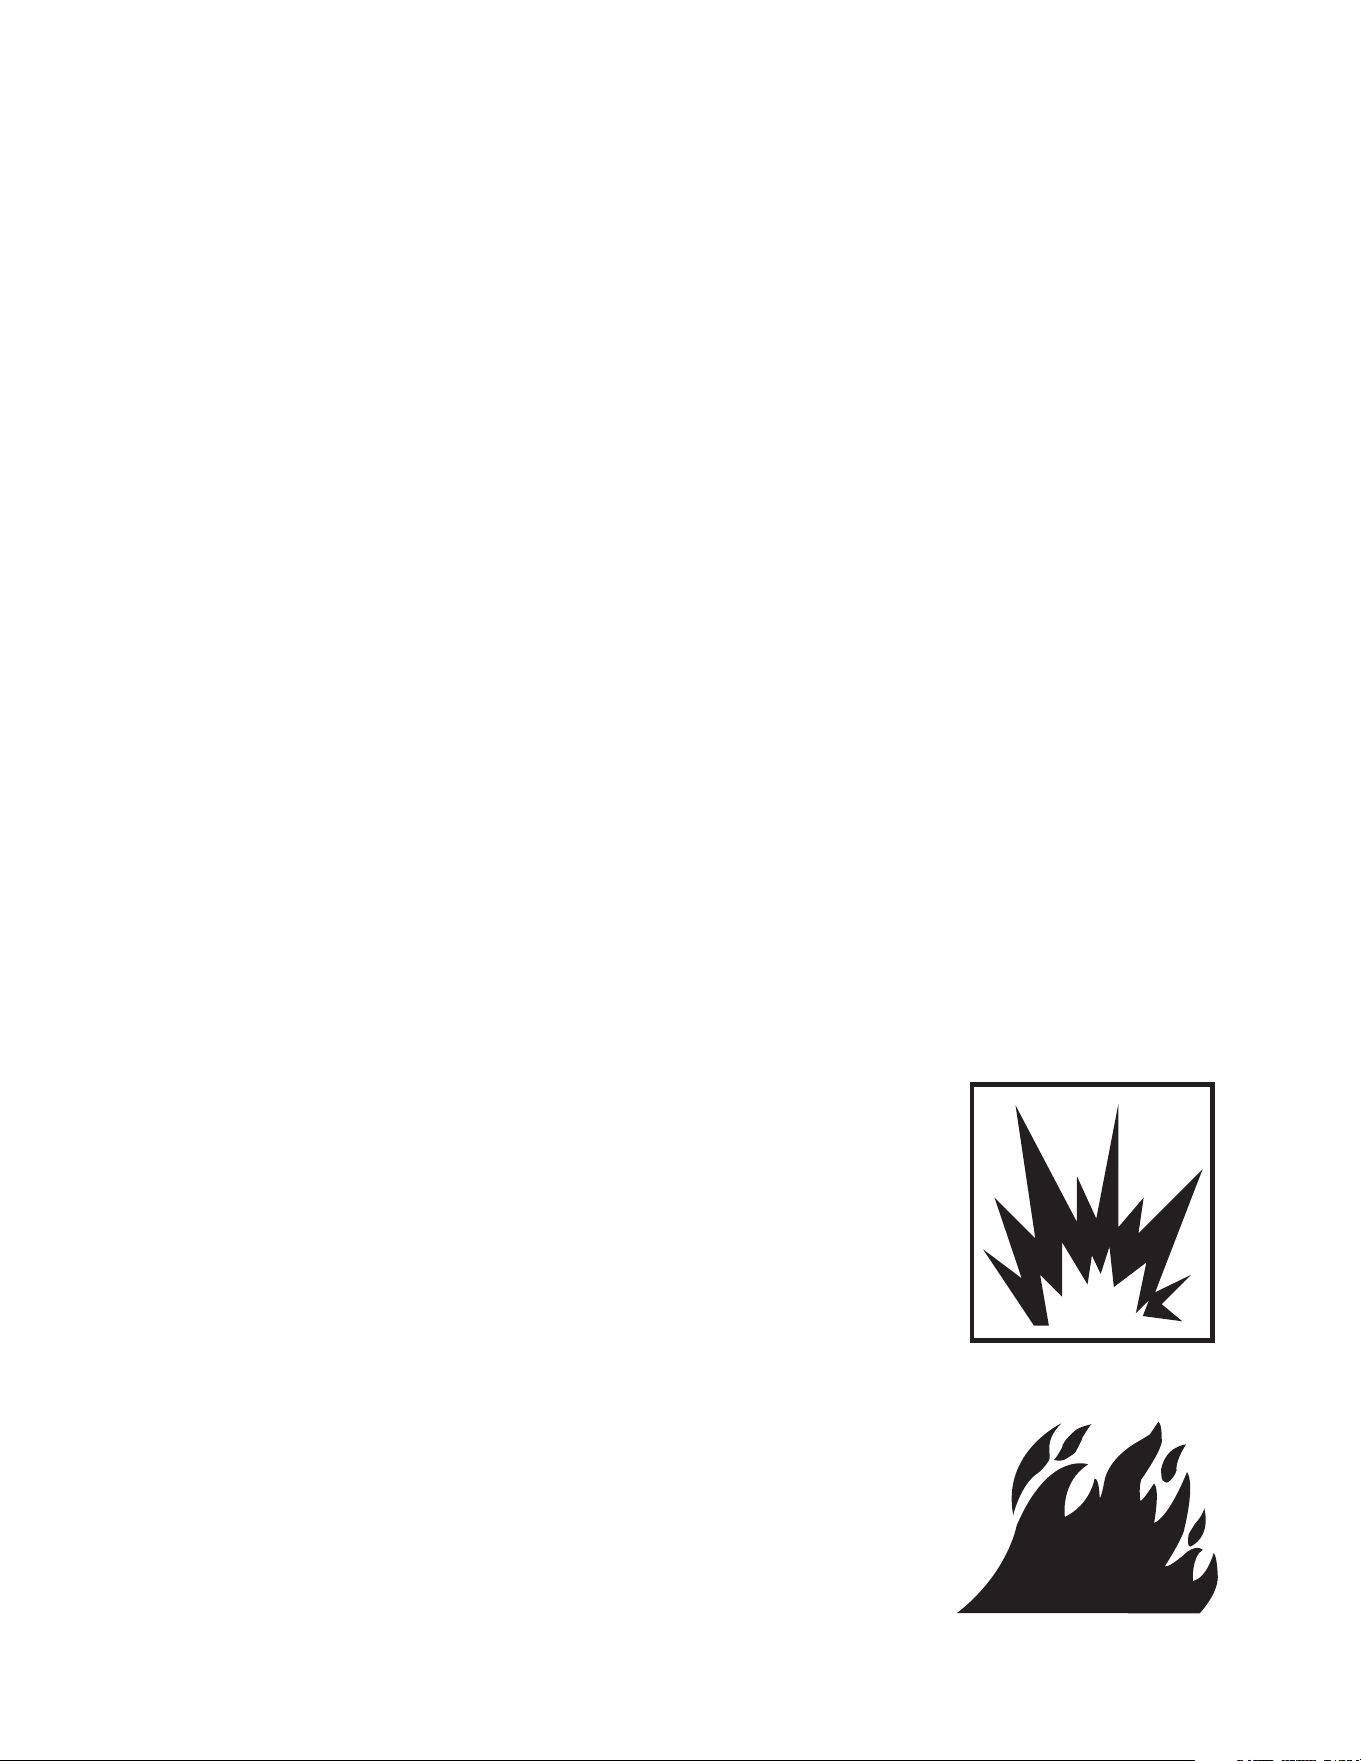
Manual del Operador 41
SEGURIDAD
CALIFICADO O REPRESENTANTE DE SERVICIO SI TENGA
DUDA SOBRE QUE LA UNIDAD TIENE LA TOMA A TIERRA
CORRECTA.
Este unidad tiene una terminal de tierra para su protección. Siempre
completar el camino de tierra del unidad a un fuente de tierra exterior
como enseñar en la sección se llama “ Instrucciones de Instalación” en
la sección de Preparación en este manual.
El unidad es un fuente potencial de descarga de eléctrico si no man-
tenga seco. Mantenga el unidad seco y no use en lluvia o condiciones
mojados. Para porteger de humedad, opere en supercie seco abajo
de una estructura abierta y como un dosel. Seque sus manos si moja-
dos antes de tocando el unidad.
Tape aparatos directamente entre el unidad. O, use extensión muy re-
sistente que tiene indice de aire libre y tiene indice (en vatios o amperi-
os) por lo menos igual a la suma de las cargas de aparatos conecta-
das. Revise que todo cordón sea libre de cortos, roturas, y que la tapa
tiene todos los tres dientes, especialamente un perno de tierra
NUNCA trate dar potencia a instalación de casa como tapando el uni-
dad entre un tomacorriente del muro, una práctica se llama “alimentan-
do atraso.” Esta práctica es muy peligroso que presentar un riesgo de
electrocución a trabajadores de utilidad y algunos vecinos que tienen
servicio del mismo transformador de utilidad. Esta también circunvala
aglunos aparatos de protección de circuito que son empotrados en la
casa.
Si tiene que conectar el unidad a la instalación de casa a aparatos de
potencia, tiene un electricista calicado instala el equipo apropriado de
acuerdo con códigos de électrico locales. O revise con su companía
de utilidad para preguntar sobre instalación de un interruptor apropria-
do de tranferir de potencia.
Para apagados de potencia, unidades estacionarios que instalados
permanente son mejores para manteniendo potencia respalda a la
casa. Hasta un unidad portable que conecte correcto puede sobrecar-
gar. Este puede resultar en recalentando o recalcando los componen-
tes de unidad, con la posibilidad de empezar a falla del unidad.
No use cables de soldar gastados, dañados, de tamano insuciente,
o mal empalmados. No cubra cables de soldar sobre su cuerpo.No
toque el electrodo si usted está en contacto con el trabajo, tierra, u
otro electrodo de una máquina diferente.
RIESGO DE EXPLOSIÓN
O fuego chipas normales de sistema de encendido del motor o de
exhosto de motor/moe puede causar lesiones graves y la muerte.
Siempre funcionar el compresor de aire en ambientes de bien ventila-
dos sin vapores amables, polvos combusible, gases, o toras materia-
les combustibles. No solde donde la atmósfera puede contener polvo
inamable, gas, o vapores líquidos (como la gasolina).
No fumar si pulverizando materiales amables. Poner el compresor de
aire más de 20 pisos de ambiente de pulverizar. (Puede necesitar un
otro tubo.)
Nunca llenar el tanque del motor con fuel cuando motor es calor o fun-
cionamiento. Permitir el motor 2 (dos) minutos para enifriarse antes de
más fuel. No dar más fuel adentro o en ambientes con mal ventilados.
No funcionar el unito si hay derrames de gasolina. Limpiar el com-
presor de aire y mover afuera de derrame. Evitar encendido o funcionar
hasta gasolina ha evaporar.
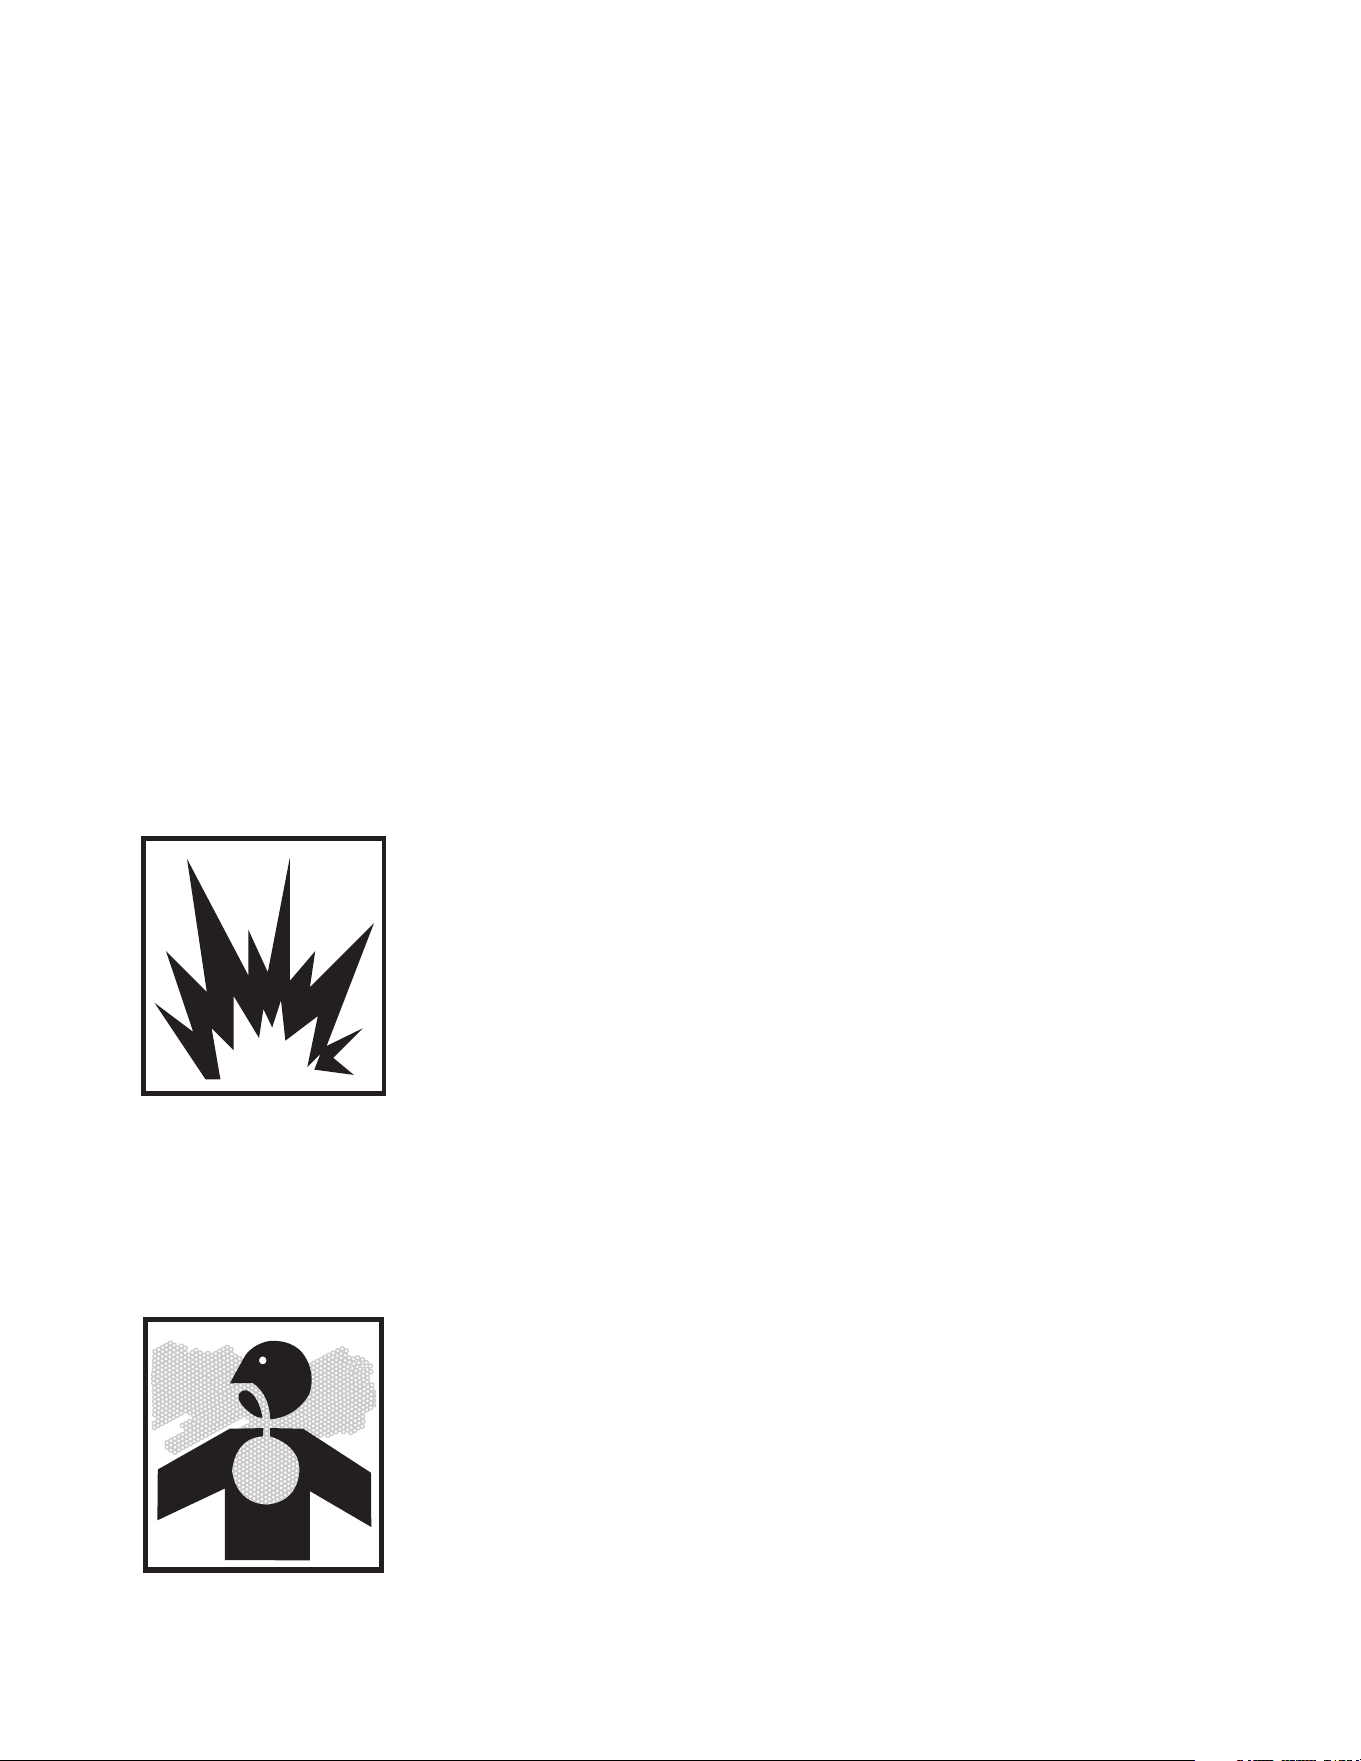
42 Manual del Operador
No guardar el compresor de aire cerca de fuegos o máquinas como una
estufa, horno, calentador de agua, etc. cual utilizar una luz pilota o disposi-
tivo de chispas.
Necesitar tener arrestador de chispas en el moee de este motor para usar
con algo tierra que tener hierba o arboles. Esta parte mantener efectuar por
operador.
Abiertas limitados de ventilación de compresor de aire puded causar lesio-
nes graves. Necesitar ventilación para evitar excesivo calor y empieza del
fuego. No poner objectos cerca o arriba de compresor de aire. Funcionar
compresor de aire más de 12 pulgudos afuera de pared o obstrución que
limitar ventilación apropriado.
Soldando en envases cerrados, como tanques, los tambores, o los tubos,
pueden hacer que ellos exploten. El contacto accidental del electrodo a
objetos metálicos puede causar chispas, explosión, sobrecalentamiento, o
fuego.
Quite todos los objetos amables dentro de 35 pies (10.7 m) del arco de
soldar. No solde donde las chispas volantes pueden golpear el material
amable. Mire para el fuego, y guarda un extintor cerca.
Después de la nalización del trabajo, inspeccione el área para asegurar
que es sin chispas, ascuas encendidos, y llamas. Quite el electrodo del
tenedor cuando no en el uso..
RIESGO DE ESTALLIDO
Si no se respeta el mantenimiento adecuado el depósito de aire podría es-
tallar y causar lesiones graves o la muerte. Vaciar el depósito de aire todos
los días o al nal de cada uso, para evitar que se acumule la condensación.
Si el depósito de aire tiene una fuga, sustituirlo inmediatamente. No reparar,
soldar o modicar jamàs el depósito de aire o sus accesorios. Usar sólo
piezas originales para el compresor de aire. No modicar jamàs las presio-
nes ajustadas en al fàbrica.
El funcionamiento incorrecto del compresor o, en el caso en que se em-
pleen componentes o accesorios inadecuados, el estallido de sus acceso-
rios podría causar lesiones graves o la muerte. No superar jamàs las presio-
nes màximas permitidas de los accesorios, recomendadas por el fabricante.
Debido al excesivo calor, no usar tubos de plàstico o uniones con soldadu-
ras de plomo en la línea de descarga.
No usar jamás un compresor de aire para inar objetos pequeños o que
requieren poca presión como los juguetes.
RIESGOS A LA RESPIRACIÓN
La inhalación de aire comprimido puede causar lesiones graves e incluso
la muerte. El chorro de aire podría contener monóxido de carbono, vapores
tóxicos o partículas sólidas. No inhalar jamás el aire porcedente del com-
presor de aire ni a través de cualquier dispositivo de respricaión conectado
al compresor de aire.
La inhalación de gases de motor puede causar lesiones graves y la muerte.
Este compresor de aire se disenado para funcionar en aire libre. Nunca fun-
cionar este compresor de aire en ambientes cerrados, empre tener venti-
lación adecuado. Este prevenirá la acumule de gases peligros que contener
monóxido de carbono. Ten ciudad de ambientes de mal ventilados.
Materiales pulverizados como pinturas, solventes para pinturas, desbarniza-
dores, insecticidas, herbicidas, etc. contienen vapores dañinos y venenos.
El compresor de aire debe funcionar sólo en ambientes bien ventilados.
SEGURIDAD
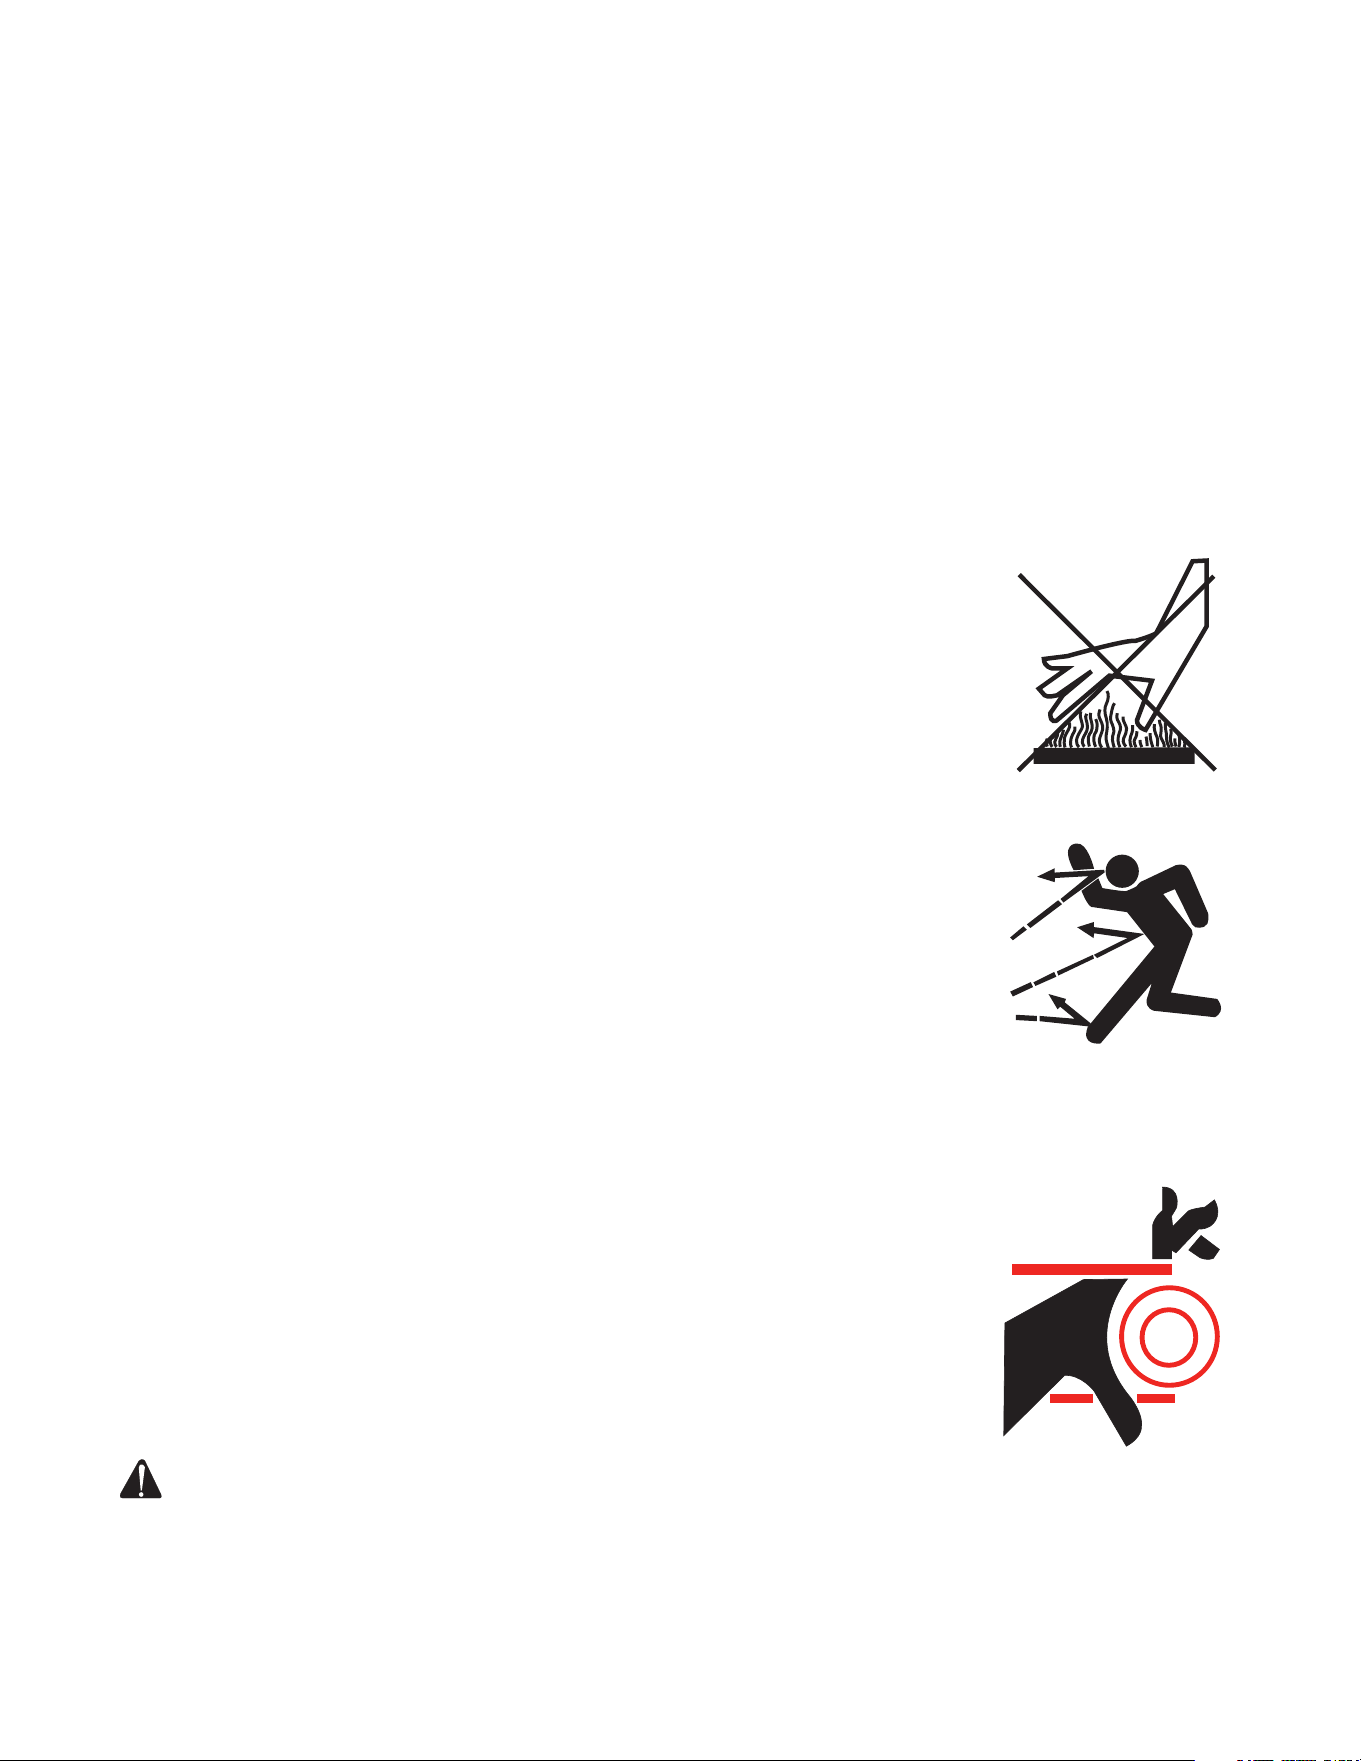
Manual del Operador 43
Atenerse a las instrucciones de seguridad indicadas para los materiales que
se pulverizan. Al pulverizar ciertos materiales podría ser necesario usar un
respirador.
La soldadura produce humo y gases. La respiración de estos vapores y
gases puede ser arriesgada a su salud. Guarde su cabeza de los vapores.
No respire los vapores.
No solde en areas cerca de desengrasar, limpiar, o operaciones de rociar. El
calor y los rayos del arco pueden reaccionar con vapores para formar gases
muy tóxicos e irritantes.
No solde en metales cubiertos, como galvanizado, de plomo, o el acero de
cadmio plateado, a menos que la capa sea quitada del área de soldar, el
área es bien ventilada, y mientras llevando un respirador suministrado por
aire. Las capas y cualquier metal que contiene estos elementos pueden
emitir vapores tóxicos si son soldados.
RIESGO DE QUEMADURAS
El tocar partes metálicas expuestas podría causar lesiones graves. La tem-
peratura en estas zonas no baja inmediatamente al apagar el compresor de
aire. Asegurarase que ninguna parte del cuerpo o de otros materiales entre
en contacto con las partes metálicas expuestas del compresor de aire.
Nunca tener contacto de su cuerpo y el moetle del motor, cabeza del com-
presor o ambientes adyacentes.
RIESGO DE OBJETOS VOLANTES
El chorro de aire comprimido podría causar lesiones a los tejidos blandos.
Usar siempre las gafas de protección para proteger los ojos de las par-
ticulas volantes. No dirigir jamás el chorro de aire a cualquier parte de su
cuerpo o del cuerpo de otra persona o animal.
No dejar jamás un compresor de aire bajo presión sin vigilancia. Apagar el
compresor y descargar la presión antes de efectuar cualquier operación de
mantenimiento, conectar cualquier herramienta o accesorio.
La proyección de partículas del chorro de aire comprimido a velocidad
elevada puede causar lesiones graves. Con el compresor de aire en marcha
mantener siempre una distancia de seguridad de presonas y animales.
No debe moverse el compresor de aire cuando el depósito de aire está bajo
presión. No intentar mover el compresor de aire tirando del tubo.
RIESGO DE PARTES EN MOVIMIENTO
Riesgo de lesiones graves de partes en movimiento. Antes de hacer mante-
miento siempre parar el compresor de aire. Purgar presión de tubo de aire y
desmontar el cable de bomba de chispa para impedir el encendido de mo-
tor. Todas reparaciones hacer de personas autorizadas de servicio.
No usar el compresor de aire sin las protecciones de seguridad. Siempre re-
mova el enchufe del compresor del aire antes de remover cualquier guarda.
Sustituir las protecciones dañadas antes de encender le compresor de aire.
ADVERTENCIAS IMPORTANTES DE SEGURIDAD
ADVERTENCIA: PARA REDUCIR EL RIESGO DE LESIONES,
LEA ESTE MANUAL DE OPERADOR COMPLETAMENTE.
CUANDO USANDO ESTE PRODUCTO, SEGUIR SIEMPRE LAS
PRECAUCIONES BASICAS CONSIGUENTES:
1. Riesgo de negligencia: Un uso negligente del compresor puede ocasionar
lesiones. No permitir jamás que niños o adolescentes pongan en marcha
SEGURIDAD
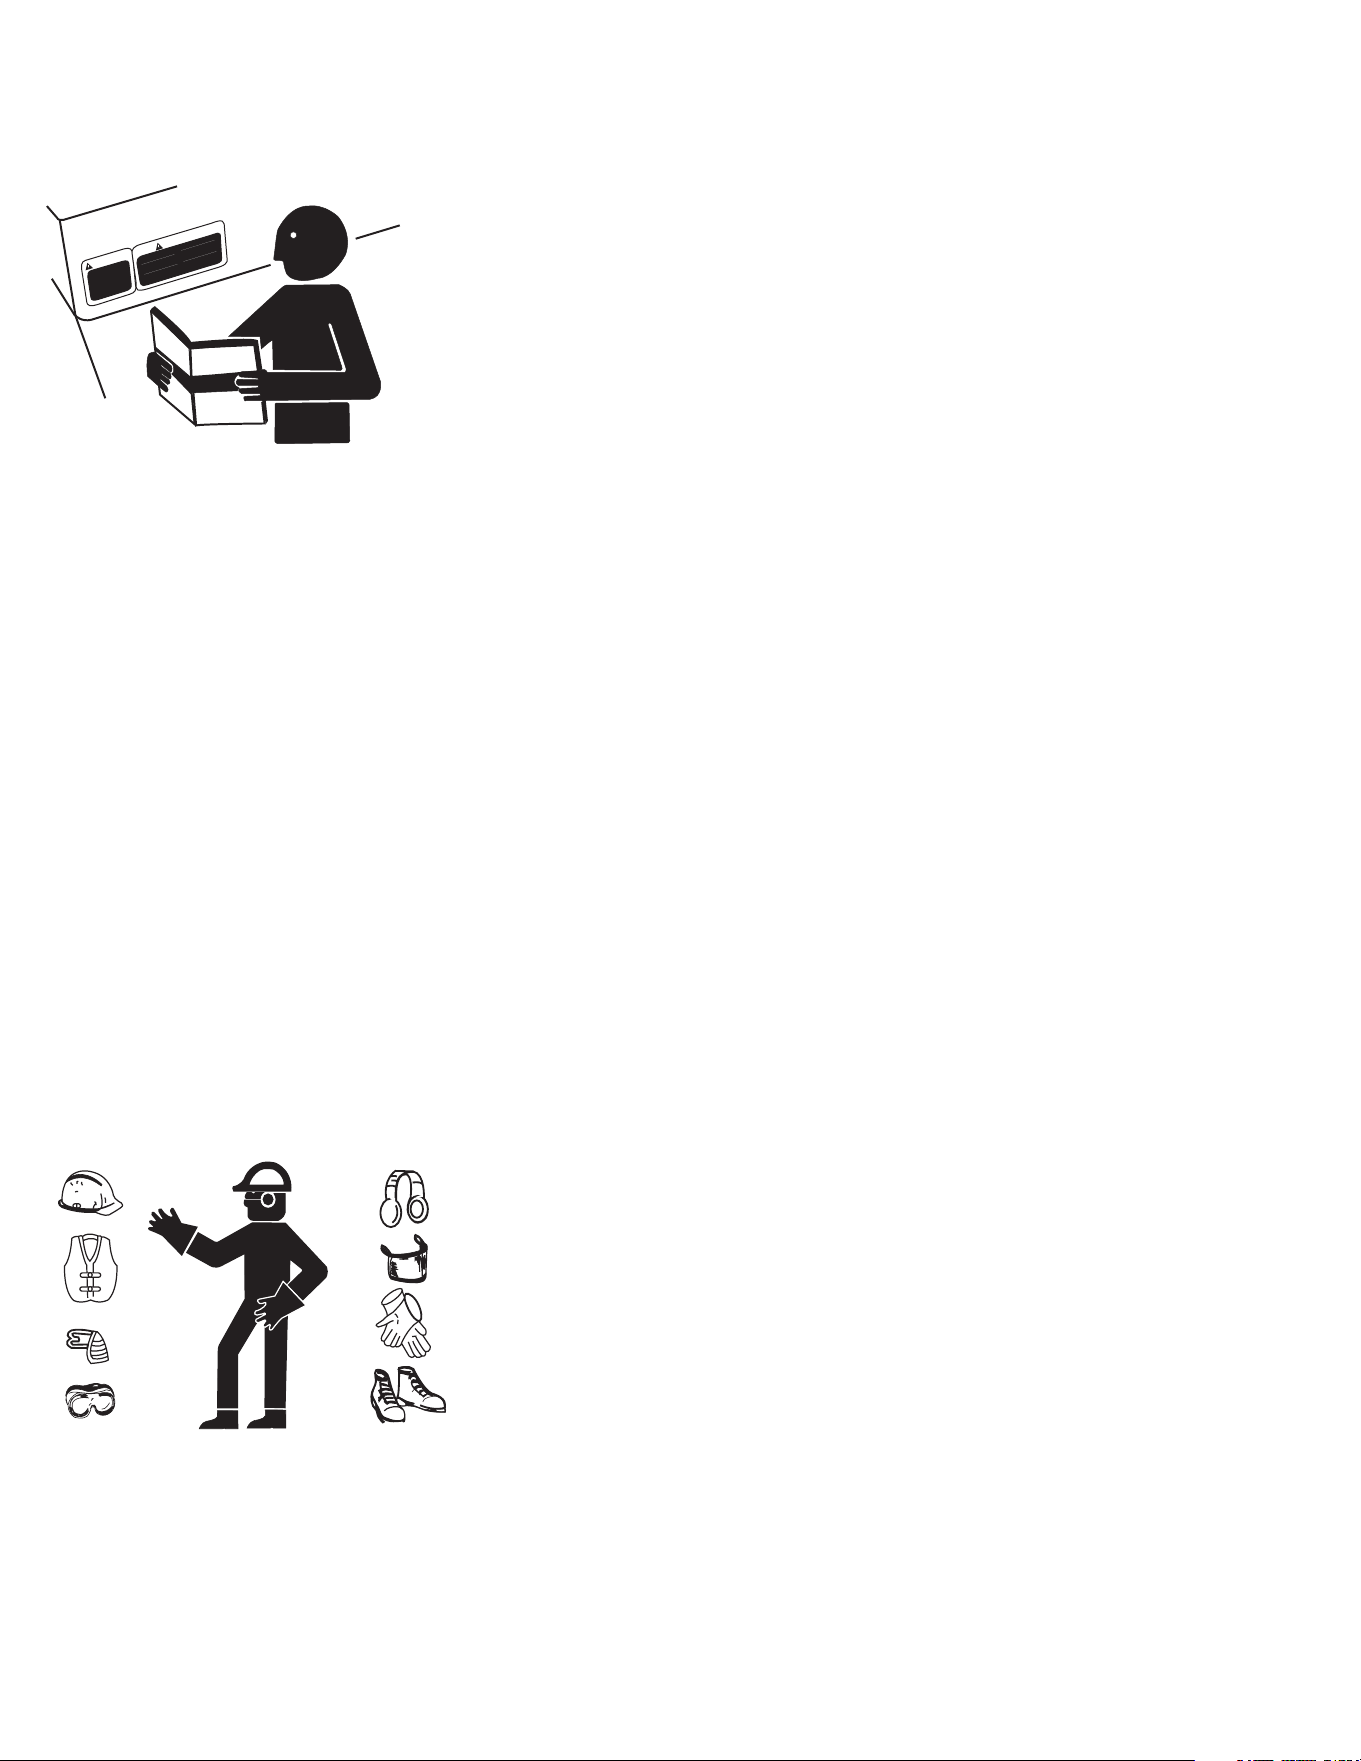
44 Manual del Operador
el compresor de aire. Prestar mucha atención a la operación que se está
cumpliendo. No se debe poner en marcha el compresor de aire en caso
de cansancio o bajo la inuencia de alcohol o drogas. Es necesario saber
apagar el compresor de aire. Es preciso conocer bien todos los mandos.
2. Riesgo de averías del compresor de aire: Riesgo de graves averías. No
encender el compresor de aire sin el ltro de aire. No encender el compresor
de aire sin el ltro de aire. No encender el compresor de aire en un
ambiente corrosivo. El compresor de aire debe funcionar en una posición
estable y segura para prevenir que caiga. Atenerse a las instrucciones de
mantenimiento descritas en este manual. El uso excesivo puede causar el
sobrecalentamiento; permita un período de refrescar; siga el ciclo de deber
tasado. Reduzca corriente o reduzca el ciclo de deber antes de comenzar
a soldar otra vez. No bloquee o ltre el corriente de aire a la unidad.
3. Cuando empezando el unidad usando la empuñada de arranque de retroceso
asegúrese que nada está en posición para tocar de mano o brazo de
operador. Asegúrese que interruptor en herramientos Eléctricos está en
posición de “OFF” antes de los tapando entre unidad.
4. No opere el unidad o alga herramienta eléctrica en área donde agua o
materiales similares constituir un riesgo eléctrico a operador. No opere
en supercies mojados, en lluvia o nieve.
5. Siempre asegúrese que unidad está en equilibrio seguro para no puede
resbalar o mover, poniendo los trabajadores en posiciones peligrosos.
6. Evite tocando el colector de exhausto calor, moee, o cilandros.
7. Quede afuera de todas partes moviendo.
8. A menos que el herramiento o aparato es insultado doble, lo tiene que
tomoar a tierra por recipiente que conectar a tierra correcto. Herramientos y
aparatos que tienen 3 tapones de dientes tienen que tapar entre extensiones
y recipientes eléctricos con 3 agujeros. Antes de operando algo artículo
eléctrico, asegúrese que estar en arreglo bueno.
9. Ten ciudado de usando este equipo en espacios limitados. Espacios
limitados, sin ventilación insuciente de aire fresco, pueden contener gases
peligrosos. Operando motores de gasolina en estos medios ambientes
puede empezar explosiones y / o asxia.
10. Use caución extremo o cuando levantando este unidad. Este unidad es
muy pesado entonces debe usar técnicas correctas de levantando.
USE ROPA PROTECTORA
Use ropa medida cerca y equipo de seguridad apropiado al trabajo.Lleve
guantes de aislamiento secos y sin agujero y protección de cuerpo.
Use devise protector de oído como orejeras o tapón para el oído para pro-
tectar en contra de ruidos inaceptables y altos.
Operando equipo de seguridad necesita toda atención de operador. No use
auriculares de radio o música mientras operando máquina.
Los rayos de arco del proceso de soldar producen intenso visible e invisible
(ultravioleta e infrarrojo) rayos que pueden quemar ojos y piel. Las chispas
se van volando de soldar. Los RAYOS DE ARCO pueden quemar ojos y piel.
Lleve un casco de soldar aprobado encajado con una sombra apropiada de
lentillas con ltro para proteger su cara y ojos mientras soldando o mirando.
Lleve las gafas de seguridad aprobadas con escudos de lado bajo su casco.
Use pantallas protectoras o barreras para proteger a otros de destello, luz
deslumbrante y chispas; advierta a otros de no mirar el arco. Lleve la ropa
protectora hecha de materia duradero y resistente de llama y también lleve
la protección de pie.
W
A
R
N
I
N
G
W
A
R
N
I
N
G
S
I
N
TH
E
M
A
N
U
A
L
S
.
W
A
R
N
I
N
G
S
I
N
TH
E
M
A
N
U
A
L
S
.
C
A
U
T
I
O
N
O
CAU
T
I
O
N
S
I
N
O
T
H
E
M
A
N
U
A
L
S
O
CAU
T
I
O
N
S
I
N
O
T
H
E
M
A
N
U
A
L
S
O
CAU
T
I
O
N
S
I
N
O
T
H
E
M
A
N
U
A
L
S
O
CAU
T
I
O
N
S
I
N
O
T
HE
M
A
N
U
A
L
S
SEGURIDAD
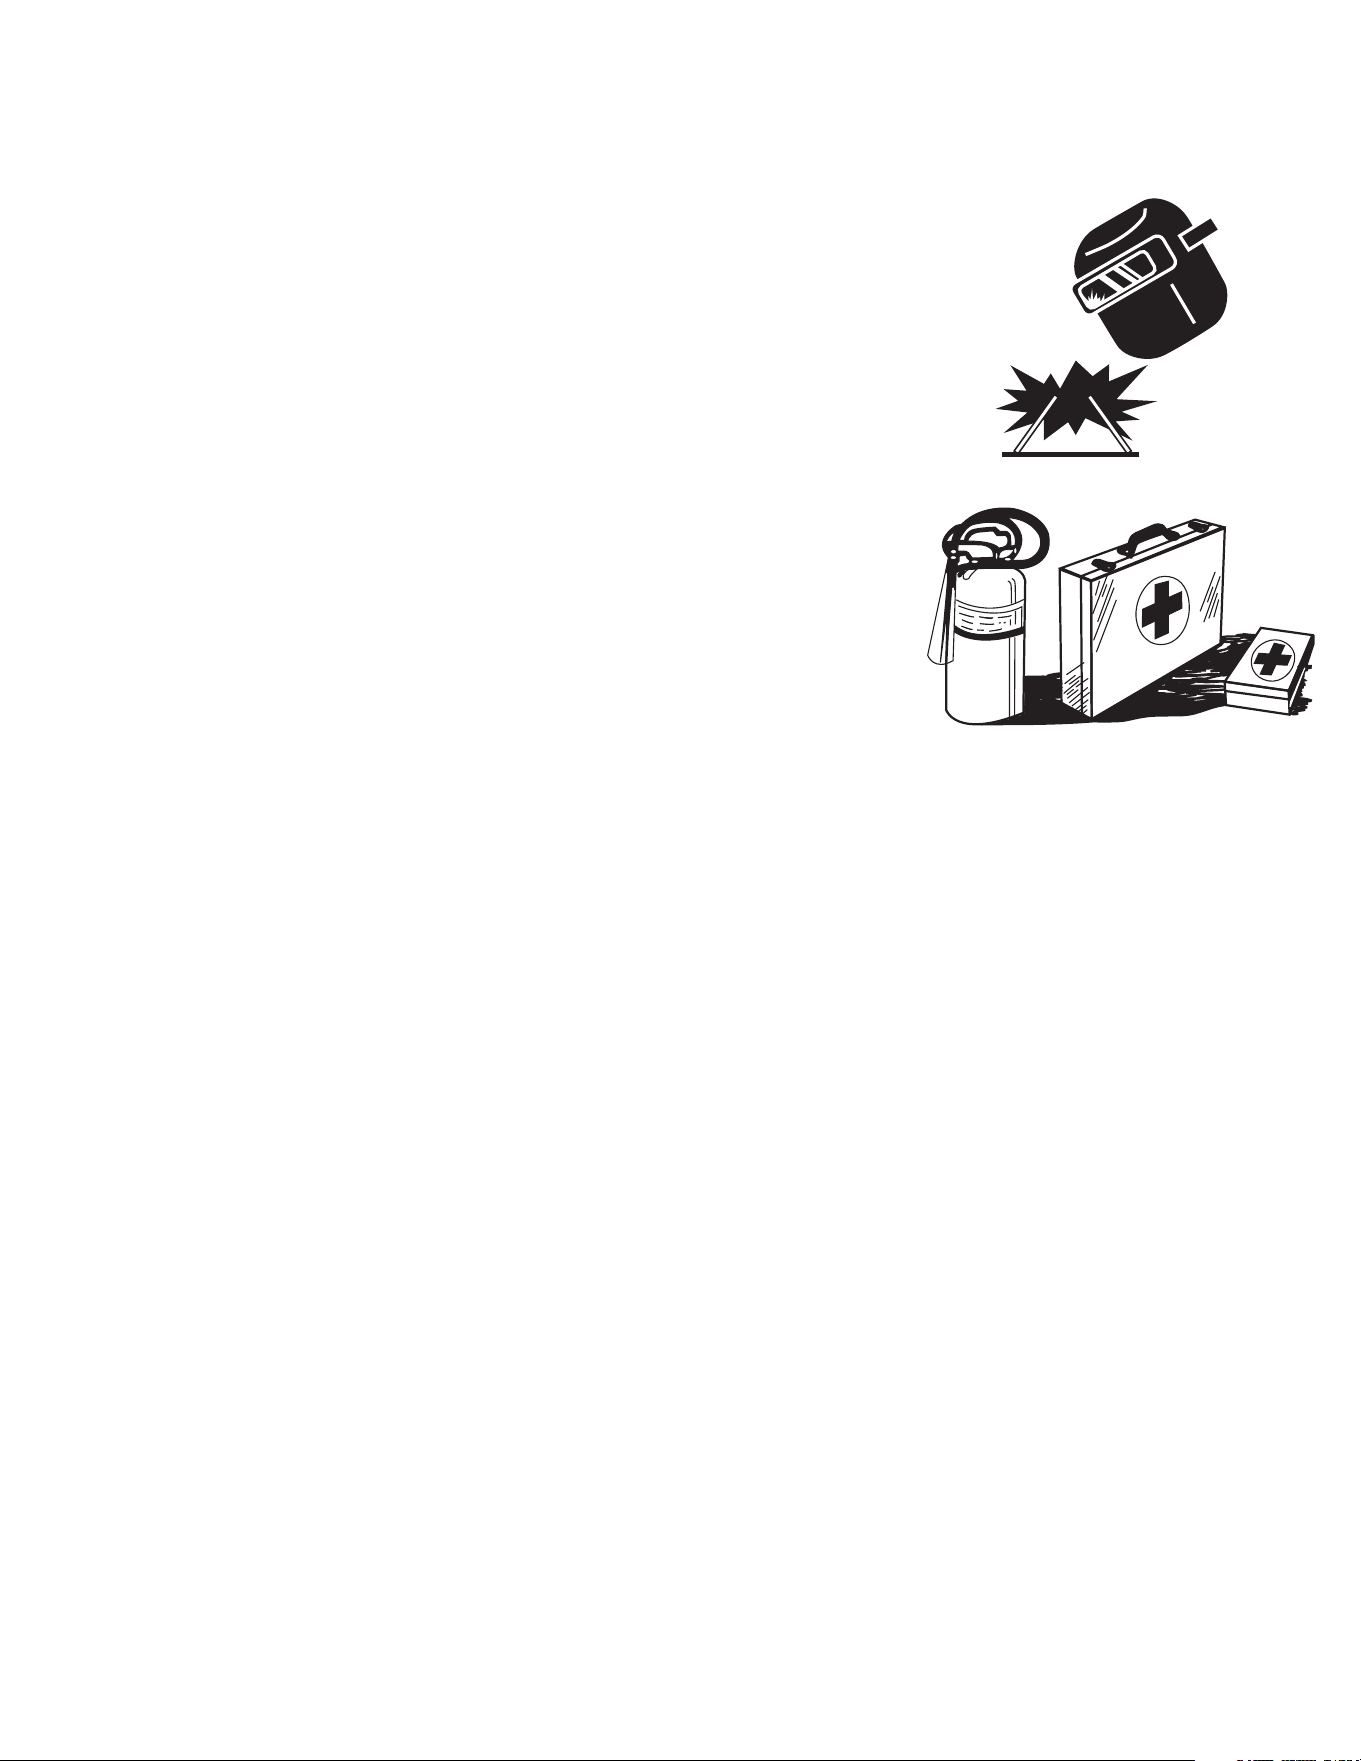
Manual del Operador 45
Soldando, astillando, cepillando de alambre, y moliando causa chispas y
metal volante. Mientras soldadura enfrie, ellos pueden tirar la escoria. Lleve
las gafas de seguridad aprobadas con escudos de lado bajo su casco de
soldar.
PREPARE PARA EMERGENCIAS
Mantenga primeros auxilios y extinguidor cerca.
Mantenga números de emergencia para doctores, servicio de ambulancia,
hospital, y departamento de fuego cerca de telefono.
Sea preparado si un fuego empiece.
INSPECCIONES UNIDAD
Asegúrese que todas tapas, guardias, y escudos son ajustados y en
posición.
Encuentre todos controles operando y etiguetas de seguridad.
Inspeccione cordón eléctrico para daño antes de usando. Hay un riesgo de
electrocución de aplastante, cortando, o daño de calor.
SERVICIO CON CIUDADO UNIDAD
Apague la unidad, desconéctela de la red eléctrica, y permita que la unidad
se enfrié antes de repararla.
Preste servicio en un área limpie, seca y planca. Embraque el freno para
evitar el movimiento de la unidad.
¡GUARDE ESTAS INSTRUCCIONES!
SEGURIDAD
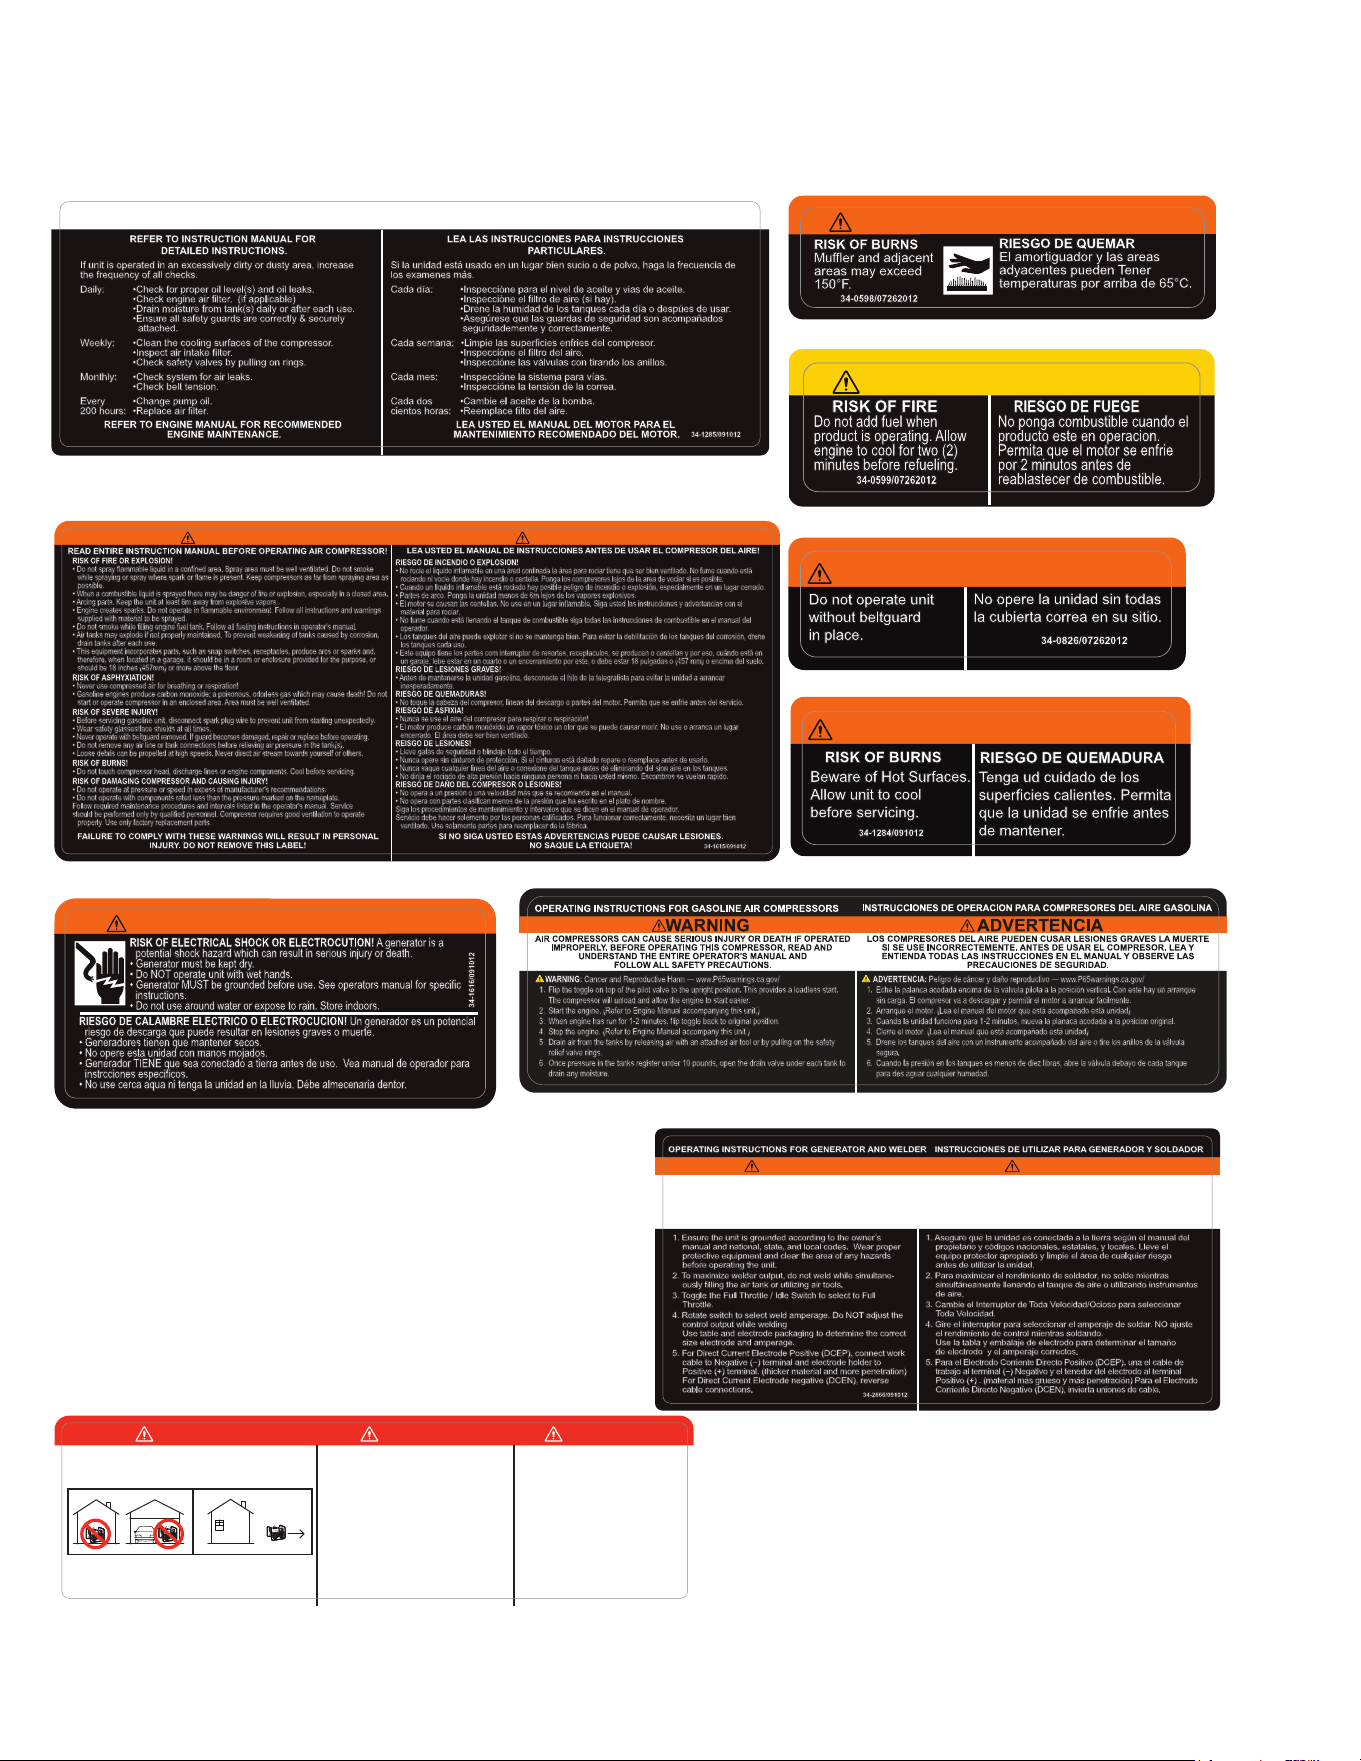
46 Manual del Operador
SEÑALES DE SEGURIDAD
34-1284
34-0826
34-0599
34-1616
CAUTION/PRECAUCIÓN
Do not add fuel when
product is operating. Allow
engine to cool for two (2)
minutes before refueling.
34-0599/07262012
RISK OF FIRE
RIESGO DE FUEGE
No ponga combustible cuando el
producto este en operacion.
Permita que el motor se enfrie
por 2 minutos antes de
reablastecer de combustible.
WARNING/ADVERTENCIA
RISK OF BURNS
Muffler and adjacent
areas may exceed
150°F.
RIESGO DE QUEMAR
El amortiguador y las areas
adyacentes pueden Tener
temperaturas por arriba de 65°C.
34-0598/07262012
34-0598
Beware of Hot Surfaces.
Allow unit to cool
before servicing.
RISK OF BURNS
RIESGO DE QUEMADURA
Tenga ud cuidado de los
superficies calientes. Permita
que la unidad se enfrie antes
de mantener.
34-1284/091012
WARNING/ADVERTENCIA
34-1616/091012
RISK OF ELECTRICAL SHOCK OR ELECTROCUTION! A generator is a
potential shock hazard which can result in serious injury or death.
• Generator must be kept dry.
• Do NOT operate unit with wet hands.
• Generator MUST be grounded before use. See operators manual for specific
instructions.
• Do not use around water or expose to rain. Store indoors.
RIESGO DE CALAMBRE ELECTRICO O ELECTROCUCION! Un generador es un potencial
riesgo de descarga que puede resultar en lesiones graves o muerte.
• Generadores tienen que mantener secos.
• No opere esta unidad con manos mojados.
• Generador TIENE que sea conectado a tierra antes de uso. Vea manual de operador para
instrcciones especificos.
• No use cerca aqua ni tenga la unidad en la lluvia. Débe almecenaria dentor.
WARNING / ADVERTENCIA
WARNING/ADVERTENCIA
34-0826/07262012
No opere la unidad sin todas
la cubierta correa en su sitio.
Do not operate unit
without beltguard
in place.
34-0826/07262012
No opere la unidad sin todas
la cubierta correa en su sitio.
Do not operate unit
without beltguard
in place.
RISK OF FIRE OR EXPLOSION!
• Do not spray flammable liquid in a confined area. Spray area must be well ventilated. Do not smoke
while spraying or spray where spark or flame is present. Keep compressors as far from spraying area as
possible.
• When a combustible liquid is sprayed there may be danger of fire or explosion, especially in a closed area.
• Arcing parts. Keep the unit at least 6m away from explosive vapors.
• Engine creates sparks. Do not operate in flammable environment. Follow all instructions and warnings
supplied with material to be sprayed.
• Do not smoke while filling engine fuel tank. Follow all fueling instructions in operator's manual.
• Air tanks may explode if not properly maintained. To prevent weakening of tanks caused by corrosion,
drain tanks after each use.
• This equipment incorporates parts, such as snap switches, receptacles, produce arcs or sparks and,
therefore, when located in a garage, it should be in a room or enclosure provided for the purpose, or
should be 18 inches (457mm) or more above the floor.
RISK OF ASPHYXIATION!
• Never use compressed air for breathing or respiration!
• Gasoline engines produce carbon monoxide; a poisonous, odorless gas which may cause death! Do not
start or operate compressor in an enclosed area. Area must be well ventilated.
RISK OF SEVERE INJURY!
• Before servicing gasoline unit, disconnect spark plug wire to prevent unit from starting unexpectedly.
• Wear safety glasses/face shields at all times.
• Never operate with beltguard removed. If guard becomes damaged, repair or replace before operating.
• Do not remove any air line or tank connections before relieving air pressure in the tank(s).
• Loose debris can be propelled at high speeds. Never direct air stream towards yourself or others.
RISK OF BURNS!
• Do not touch compressor head, discharge lines or engine components. Cool before servicing.
RISK OF DAMAGING COMPRESSOR AND CAUSING INJURY!
• Do not operate at pressure or speed in excess of manufacturer's recommendations.
• Do not operate with components rated less than the pressure marked on the nameplate.
Follow required maintenance procedures and intervals listed in the operator's manual. Service
should be performed only by qualified personnel. Compressor requires good ventilation to operate
properly. Use only factory replacement parts.
RIESGO DE INCENDIO O EXPLOSION!
• No rocie el líquido inflamable en una áred confinada la área para rociar tiene que ser bien ventilado. No fume cuando está
rociando ni vocie donde hay incendio o centella. Ponga los compresores lejos de la area de vociar si es posible.
• Cuando un liquido inflamable está rociado hay posible peligro de incendio o explosión, especialmente en un lugar cerrado.
• Partes de arco. Ponga la unidad menos de 6m lejos de los vapores explosívos.
• El motor se causan las centellas. No use en un lugar inflamable. Siga usted las instrucciones y advertencias con el
material para rociar.
• No fume cuando está llenando el tanque de combustible siga todas las instrucciones de combustible en el manual del
operador.
• Los tanques del aire puede explotar si no se mantenga bien. Para evitar la debilitación de los tanques del corrosión, drene
los tanques cada uso.
• Este equipo tiene los partes com interruptor de resortes, receptaculos, se producen o centellas y por eso, cuándo está en
un garaje, lebe estar en un cuarto o un encerramiento por este, o debe estar 18 pulgadas o (457 mm) o encima del suelo.
RIESGO DE LESIONES GRAVES!
• Antes de mantenerse la unidad gasolina, desconecte el hilo de la telegrafista para evitar la unidad a arrancar
inesperadamente.
RIESGO DE QUEMADURAS!
• No toque la cabeza del compresor, lineas del descargo o partes del motor. Permita que se enfrie antes del servicio.
RIESGO DE ASFIXIA!
• Nunca se use el aire del compresor para respirar o respiración!
• El motor produce carbón monóxido un vapor tóxico un olor que se puede causar morir. No use o arranca un lugar
encerrado. El área debe ser bien ventilado.
REISGO DE LESIONES!
• Lleve gafas de seguridad o blindaje todo el tiempo.
• Nunca opere sin cinturon de protección. Si el cinturon está dañado repare o reemplace antes de usarlo.
• Nunca saque cualquier linea del aire o conexione del tanque antes de eliminando del sion aire en los tanques.
• No dirija el rociado de alta presión hacia ninguna persona ni hacia usted mismo. Escombros se vuelan rapído.
RIESGO DE DAÑO DEL COMPRESOR O LESIONES!
• No opera a un presión o una velocidad más que se recomienda en el manual.
• No opera con partes clasifican menos de la presión que ha escrito en el plato de nombre.
Siga los procedimientos de mantenimiento y intervalos que se dicen en el manual de operador.
Servicio debe hacer solemento por las personas calificados. Para funcionar correctamente, necesita un lugar bien
ventilado. Use solamente partes para reemplacer de la fábrica.
READ ENTIRE INSTRUCTION MANUAL BEFORE OPERATING AIR COMPRESSOR!
LEA USTED EL MANUAL DE INSTRUCCIONES ANTES DE USAR EL COMPRESOR DEL AIRE!
SI NO SIGA USTED ESTAS ADVERTENCIAS PUEDE CAUSAR LESIONES.
NO SAQUE LA ETIQUETA!
FAILURE TO COMPLY WITH THESE WARNINGS WILL RESULT IN PERSONAL
INJURY. DO NOT REMOVE THIS LABEL!
34-1615/091012
WARNING ADVERTENCIA
34-1615
WARNING: Cancer and Reproductive Harm — www.P65warnings.ca.gov/
1. Flip the toggle on top of the pilot valve to the upright position. This provides a loadless start.
The compressor will unload and allow the engine to start easier.
2. Start the engine. (Refer to Engine Manual accompanying this unit.)
3. When engine has run for 1-2 minutes, flip toggle back to original position.
4. Stop the engine. (Refer to Engine Manual accompany this unit.)
5. Drain air from the tanks by releasing air with an attached air tool or by pulling on the safety
relief valve rings.
6. Once pressure in the tanks register under 10 pounds, open the drain valve under each tank to
drain any moisture.
ADVERTENCIA: Peligro de cáncer y daño reproductivo — www.P65warnings.ca.gov/
1. Eche la palanca acodada encima de la válvula pilota a la posición vertical. Con este hay un arranque
sin carga. El compresor va a descargar y permitir el motor a arrancar facilmente.
2. Arranque el motor. (Lea el manual del motor que está acompañado está unidad)
3. Cuanda la unidad funciona para 1-2 minutos, mueva la planaca acodada a la posicion original.
4. Cierre el motor. (Lea el manual que está acompañado está unidad)
5. Drene los tanques del aire con un instrumento acompañado del aire o tire los anillos de la válvula
segura.
6. Cuando la presión en los tanques es menos de diez libras, abre la válvula debayo de cada tanque
para des aguar cualquier humedad.
34-1286/060421
34-1286
LEA LAS INSTRUCCIONES PARA INSTRUCCIONES
PARTICULARES.
LEA USTED EL MANUAL DEL MOTOR PARA EL
MANTENIMIENTO RECOMENDADO DEL MOTOR.
Si la unidad está usado en un lugar bien sucio o de polvo, haga la frecuencia de
los examenes más.
Cada día: •Inspecciòne para el nivel de aceite y vias de aceite.
•Inspecciòne el filtro de aire (si hay).
•Drene la humidad de los tanques cada día o despúes de usar.
•Asegúrese que las guardas de seguridad son acompañados
seguridademente y correctamente.
Cada semana: •Limpie las superficies enfries del compresor.
•Inspeccióne el filtro del aire.
•Inspeccióne las válvulas con tirando los anillos.
Cada mes: •Inspeccióne la sistema para vías.
•Inspeccióne la tensión de la correa.
Cada dos •Cambie el aceite de la bomba.
cientos horas: •Reemplace filto del aire.
REFER TO INSTRUCTION MANUAL FOR
DETAILED INSTRUCTIONS.
REFER TO ENGINE MANUAL FOR RECOMMENDED
ENGINE MAINTENANCE.
If unit is operated in an excessively dirty or dusty area, increase
the frequency of all checks.
Daily: •Check for proper oil level(s) and oil leaks.
•Check engine air filter. (if applicable)
•Drain moisture from tank(s) daily or after each use.
•Ensure all safety guards are correctly & securely
attached.
Weekly: •Clean the cooling surfaces of the compressor.
•Inspect air intake filter.
•Check safety valves by pulling on rings.
Monthly: •Check system for air leaks.
•Check belt tension.
Every •Change pump oil.
200 hours: •Replace air filter.
34-1285/091012
MAINTENANCE INSTRUCTIONS INSTRUCCIONES DE MANTENIMIENTO
34-1285
DANGER DANGER PELIGRO
34-1916/083012
Using a generator indoors CAN KILL YOU IN MINUTES.
Generator exhaust contains carbon monoxide. This is a
poison you cannot see or smell.
NEVER use inside a home
or garage, EVEN IF doors
and windows are open.
Only use OUTSIDE and far
away from windows, doors,
and vents.
Utilizando un generador adentro
PUEDE MATARLE EN MINUTOS.
El escape de generador contiene
monóxido de carbono. Este es un
gas tóxico que usted no puede ver ni
puede oler.
Nunca utilice dentro de un hogar ni el
garaje, INCLUSO SI puertas y
ventanas estén abiertas.
Solo utilice AFUERAS y lejos de
ventanas abiertas, las puertas, y
descargas.
L'utilisation d'un groupe électrogène à
l'intérieur PEUT VOUS TUER EN
QUELQUES MINUTES.
Le gaz d'échappement du groupe
électrogène contient de l'oxyde de
carbone. C'est un gaz toxique que l'on
ne peut pas voir ou sentir.
Ne JAMAIS utiliser à l'intérieur d'une
maison ou d'un garage, MÊME SI les
portes et fenêtres s'ont ouvertes.
N'utiliser qu'à l'EXTÉRIEUR et bien éloigné
des fenêtres, portes, et conduits d'aération.
34-2666
34-1916
34-2666/091012
OPERATING INSTRUCTIONS FOR GENERATOR AND WELDER
GENERATOR / WELDER CAN CAUSE SERIOUS INJURY OR
DEATH IF OPERATED IMPROPERLY. BEFORE OPERATING
THIS UNIT READ AND UNDERSTAND THE ENTIRE OPERA-
TOR’S MANUAL AND FOLLOW ALL SAFETY
PRECAUTIONS.
1. Ensure the unit is grounded according to the owner’s
manual and national, state, and local codes. Wear proper
protective equipment and clear the area of any hazards
before operating the unit.
2. To maximize welder output, do not weld while simultane-
ously filling the air tank or utilizing air tools.
3. Toggle the Full Throttle / Idle Switch to select to Full
Throttle.
4. Rotate switch to select weld amperage. Do NOT adjust the
control output while welding
Use table and electrode packaging to determine the correct
size electrode and amperage.
5. For Direct Current Electrode Positive (DCEP), connect work
cable to Negative (−) terminal and electrode holder to
Positive (+) terminal. (thicker material and more penetration)
For Direct Current Electrode negative (DCEN), reverse
cable connections.
INSTRUCCIONES DE UTILIZAR PARA GENERADOR Y SOLDADOR
EL GENERADOR/SOLDADOR PUEDE CAUSAR LA HERIDA SERIA
O LA MUERTE SI UTILIZADO INCORRECTAMENTE. ANTES DE
UTILIZAR ESTA UNIDAD, LEA Y ENTIENDA EL MANUAL DEL
OPERADOR ENTERO Y SIGA TODAS LAS
PRECAUCIONES DE SEGURIDAD.
1. Asegure que la unidad es conectada a la tierra según el manual del
propietario y códigos nacionales, estatales, y locales. Lleve el
equipo protector apropiado y limpie el área de cualquier riesgo
antes de utilizar la unidad.
2. Para maximizar el rendimiento de soldador, no solde mientras
simultáneamente llenando el tanque de aire o utilizando instrumentos
de aire.
3. Cambie el Interruptor de Toda Velocidad/Ocioso para seleccionar
Toda Velocidad.
4. Gire el interruptor para seleccionar el amperaje de soldar. NO ajuste
el rendimiento de control mientras soldando.
Use la tabla y embalaje de electrodo para determinar el tamaño
de electrodo y el amperaje correctos.
5. Para el Electrodo Corriente Directo Positivo (DCEP), una el cable de
trabajo al terminal (−) Negativo y el tenedor del electrodo al terminal
Positivo (+) . (material más grueso y más penetración) Para el Electrodo
Corriente Directo Negativo (DCEN), invierta uniones de cable.
WARNING ADVERTENCIA
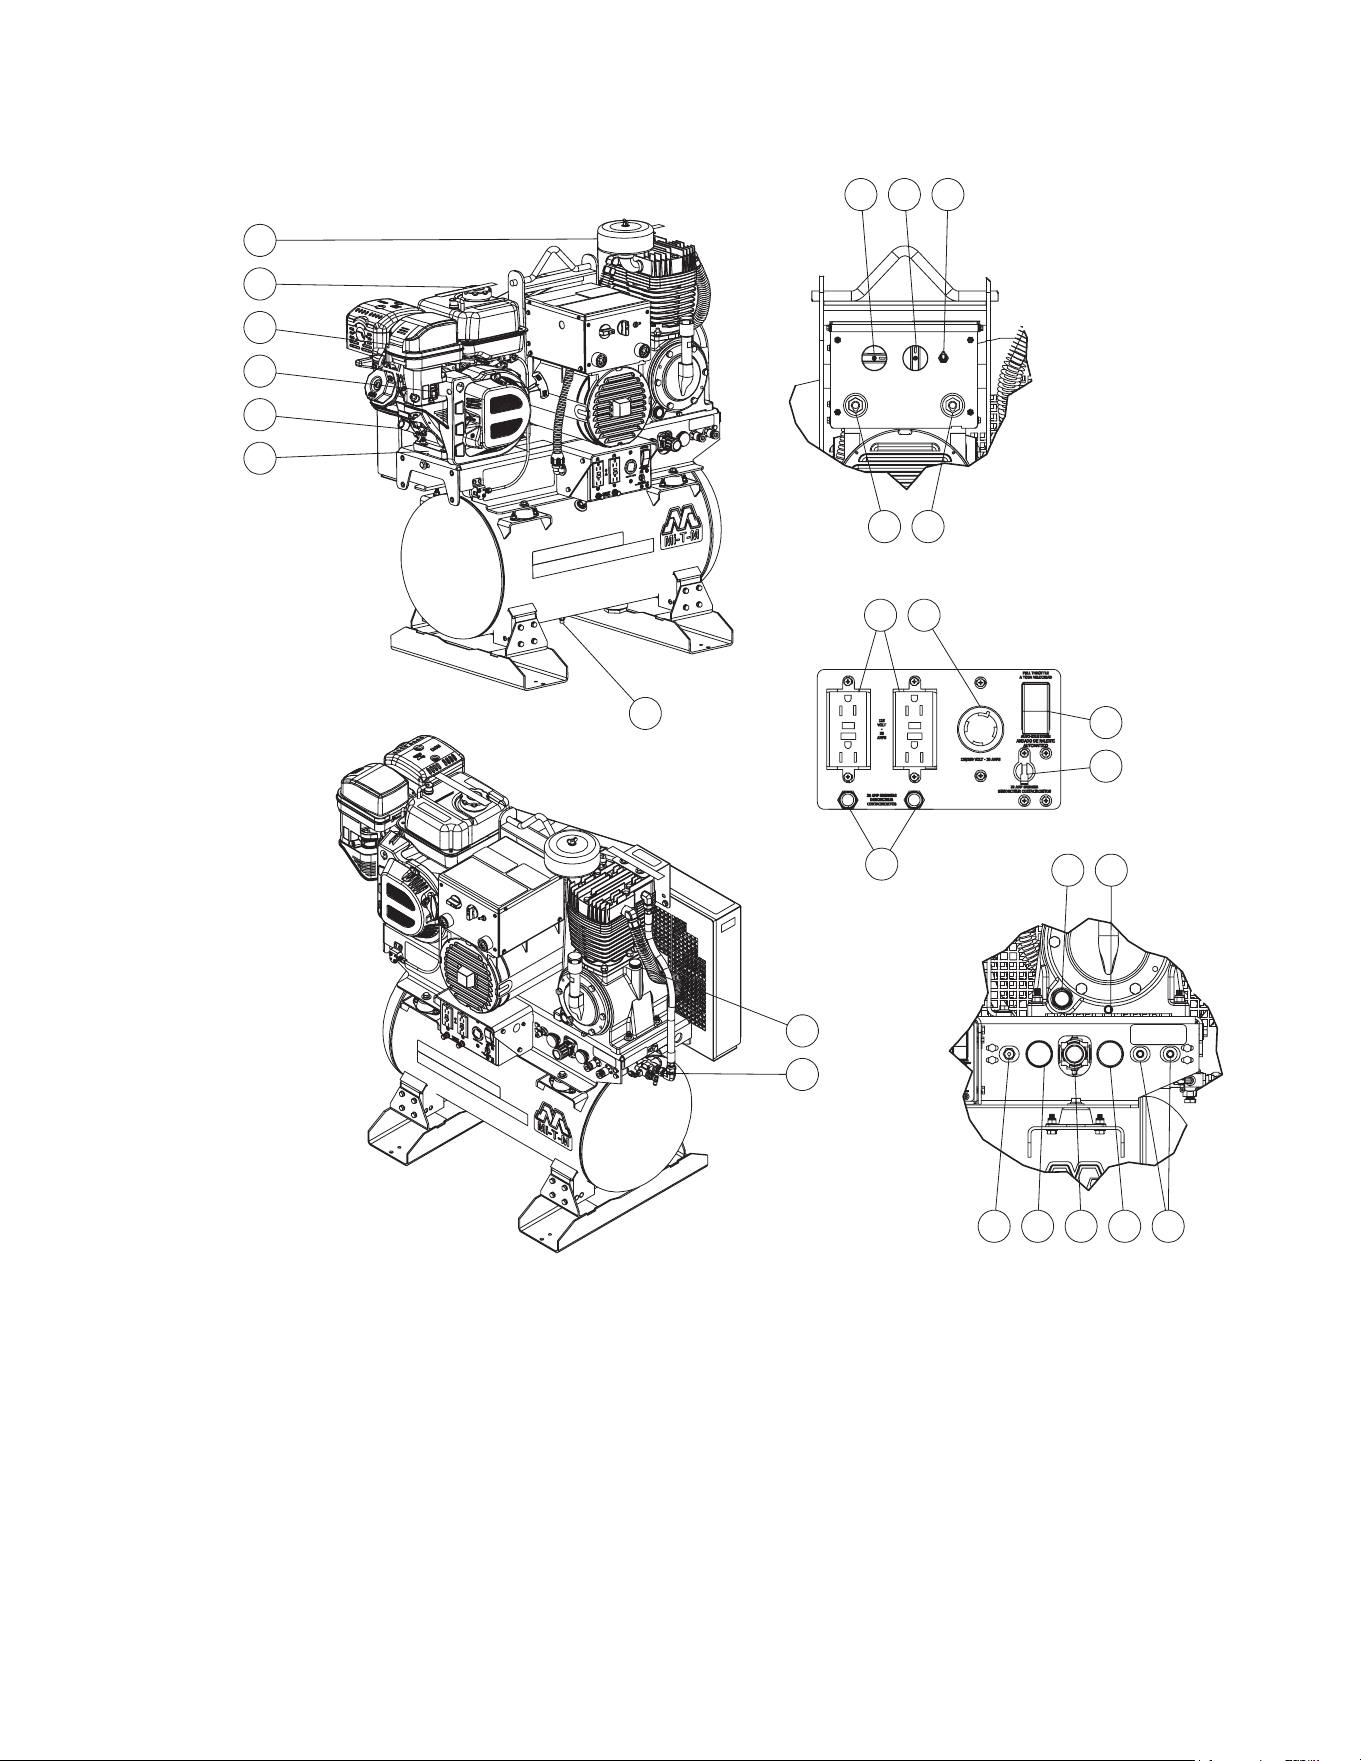
Manual del Operador 47
MANDOS
1
3
4
5
6
2
8
9
10 11
12
13
14
20 21
22 23 24 23 25
15 16
17
18
19
7
1-Filtro de Aire de Bomba
2-Capa de Combustible
3-Filtro de Aire de Motor
4-Estárter de motores
5-Llena de Petroleo de Motor
6-Desagüe del Petroleo de Motor
7-Desagüe de Tanque de Aire
8-Llena de Petroleo de Bomba
9-Válvula de Piloto
10-Ajuste de Amperaje de Soldar
11-Interruptor Seleccionador de
Generador/Soldar
12-Interruptor Palanca de Mínimo/
Máximo Amperaje
13-Enchufe de Soldar Positivo
14-Enchufe de Soldar Negativo
15-Receptáculo de 125V
16-125/250V 20A Cerradura de
Torcedura
17-Interruptor de Control Inactivo
18-20A Interruptor de Palanca
19-20A Interruptor de Botón Empujado
20-Cristal de Vista del Petroleo de
Bomba
21-Desagüe del Petroleo de Bomba
22-Válvula de Alivio de Seguridad
23-Indicador de Presión
24-Regulador
25-Conexión Rápido
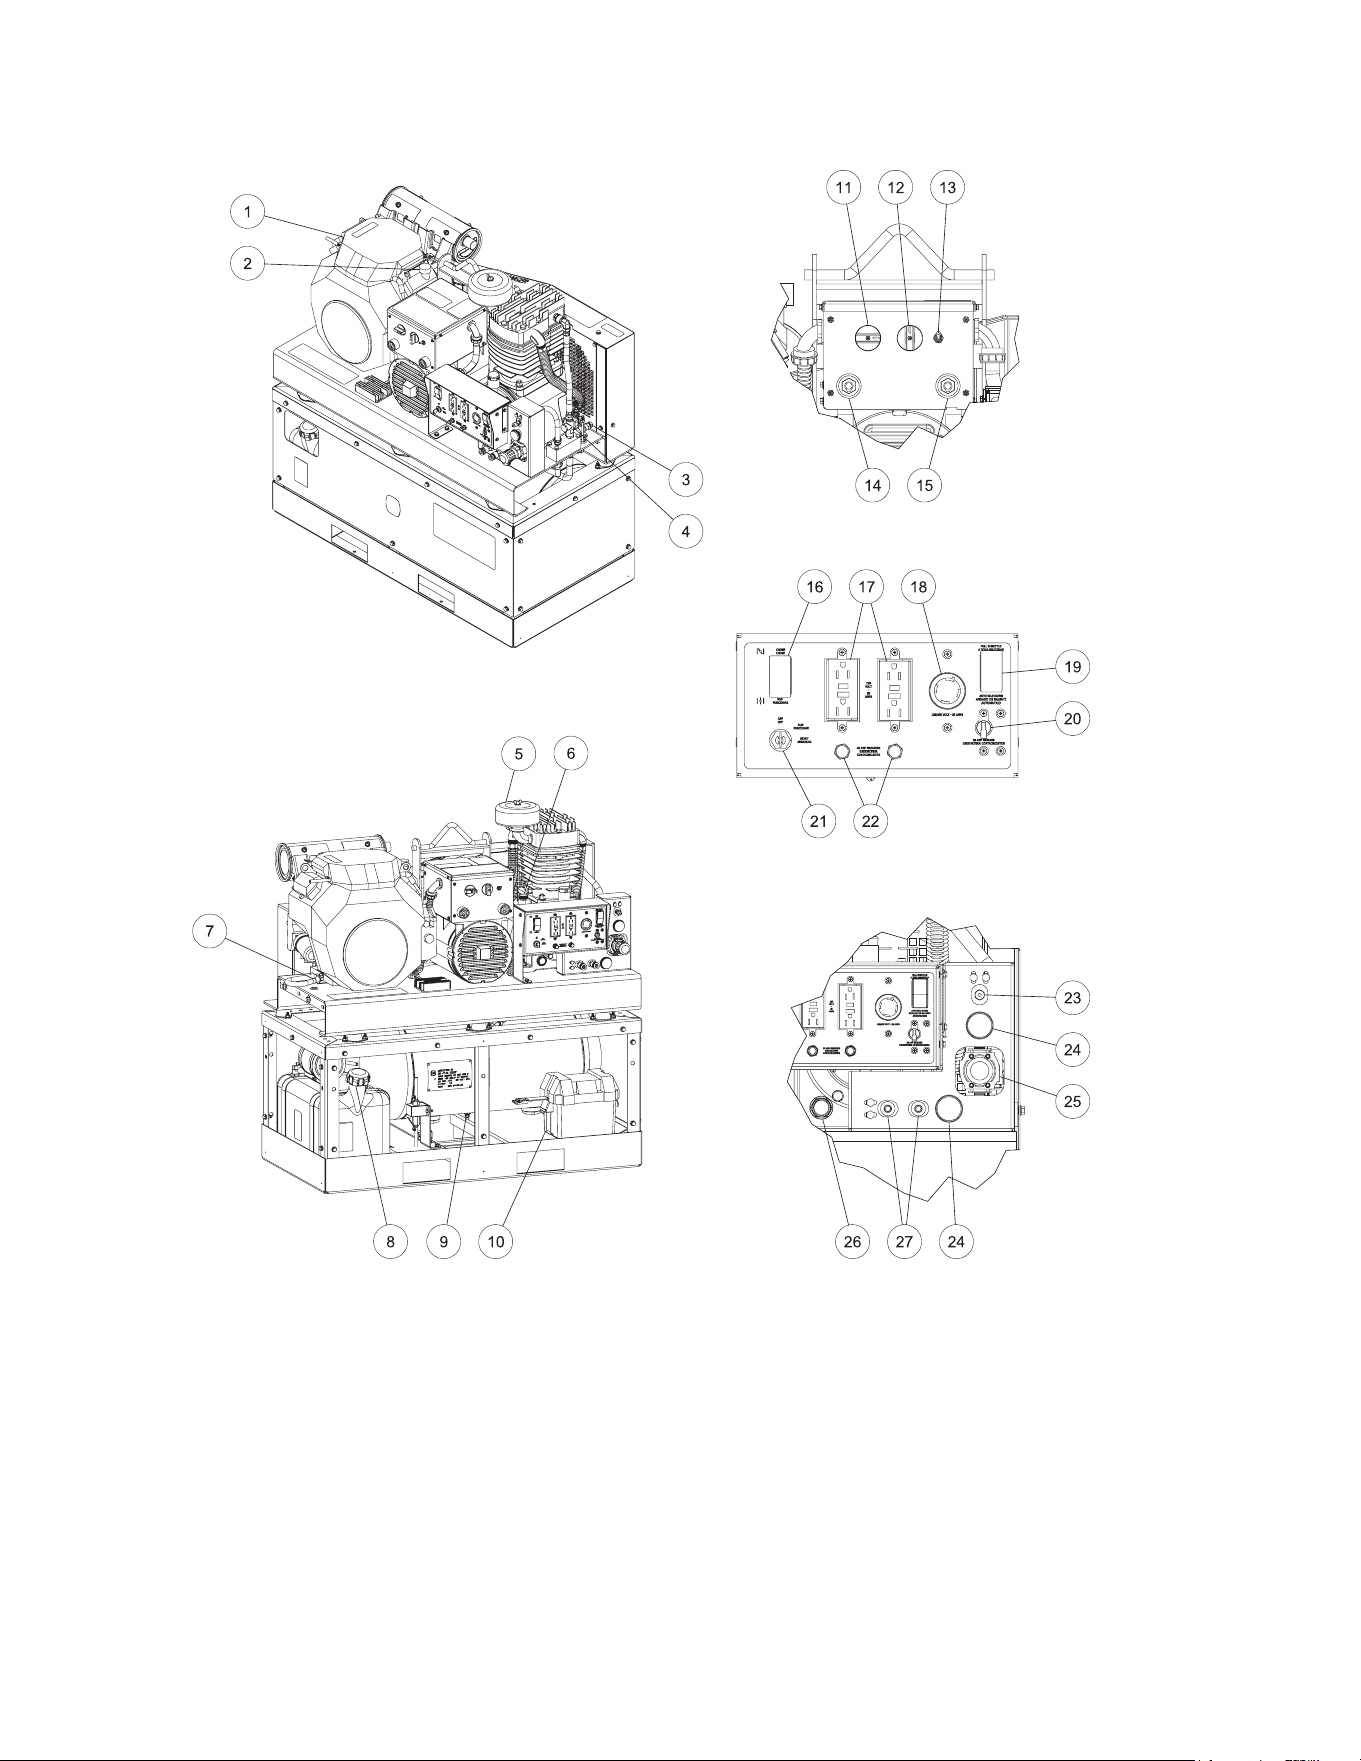
48 Manual del Operador
MANDOS
1- Filtro de Aire de Motor
2- Llena de Petroleo de Motor
3- Desagüe del Petroleo de Bomba
4- Válvula de Piloto
5- Filtro de Aire de Bomba
6- Llena de Petroleo de Bomba
7- Desagüe del Petroleo de Motor
8- Capa de Combustible
9- Desagüe de Tanque de Aire
10- Batería
11- Ajuste de Amperaje de Soldar
12- Interruptor Seleccionador de
Generador/Soldar
13- Interruptor Palanca de Mínimo/
Máximo Amperaje
14- Enchufe de Soldar Positivo
15- Enchufe de Soldar Negativo
16- Estárter de motores
17- Receptáculo de 125V
18- 125/250V 20A Cerradura de
Torcedura
19- Interruptor de Control Inactivo
20- 20A Interruptor de Palanca
21- Motor interruptor de llave
22- 20A Interruptor de Botón Empujado
23- Válvula de Alivio de Seguridad
24-Indicador de Presión
25-Regulador
26-Cristal de Vista del Petroleo de
Bomba
27-Conexión Rápido
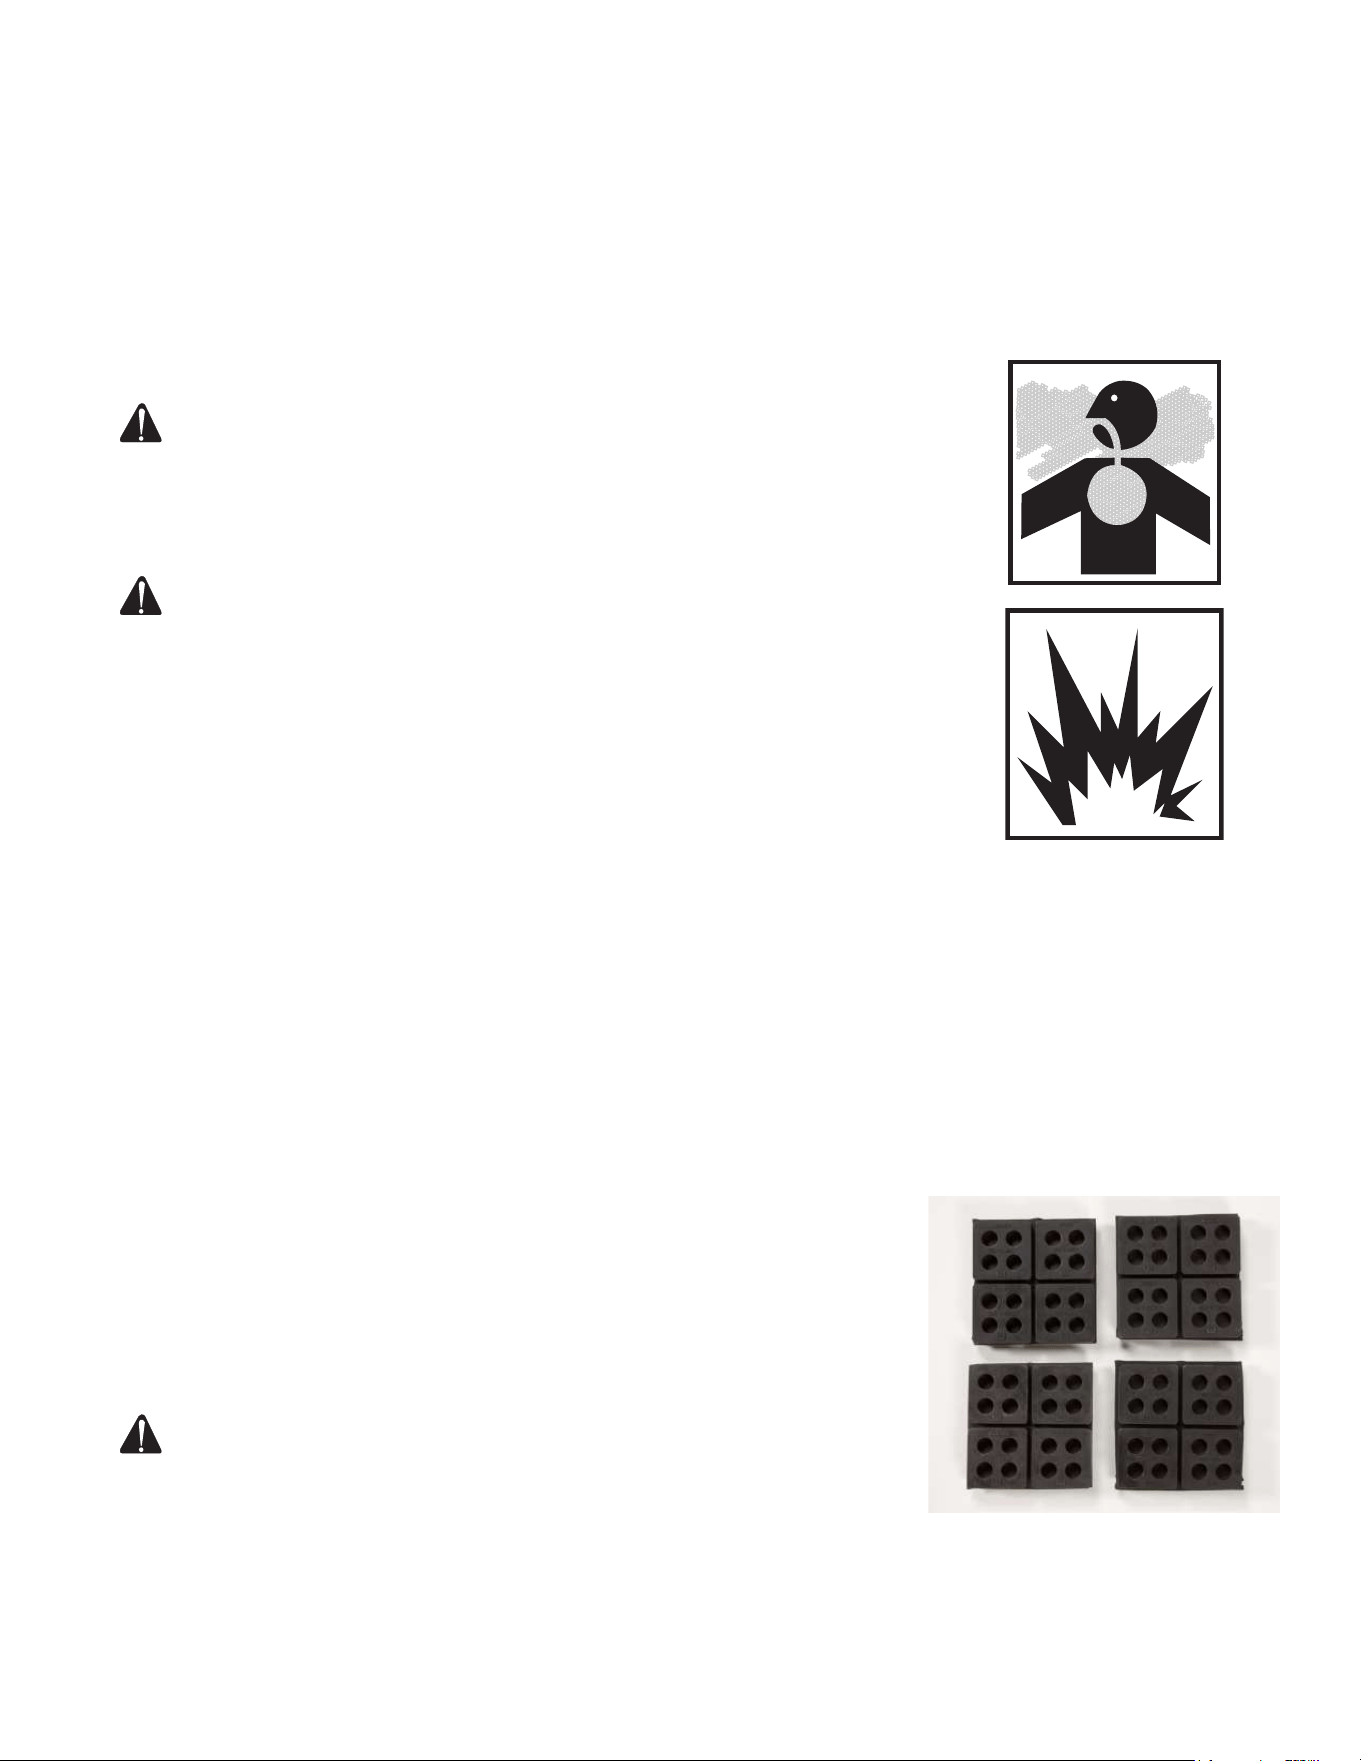
Manual del Operador 49
Lea las advertencias de seguridad antes de preparar el compresor del aire.
Asegurar que el nivel del aceite en bomba de compresor de aire es adec-
uado. Si bajo, agregar SAE-30W, aceite sin-detergente.
COLOCACIÓN:
Para evitar daños al compresor de aire, éste no debe inclinarse transversal-
mente o longitudinalmente a más de 10°.
ADVERTENCIA: RIESGO DE ASFIXIA! NO FUNCIONAR EN
AMBIENTES DE MAL VENTILADOS. USAR ESTE PRODUCTO
EN AMBIENTES DE BUEN VENTILADOS SÓLO. EL EXHUSTO
DEL MOTOR CONTENER MONÓXIDO DE CARBONO. ESUN
GAS INODORO, VENENOSO, Y INVISIBLE. RESPIRACIÓN DE
ESTE GAS PUEDE CAUSAR LESIONES GRAVES, ENFERMOS, Y
POSIBLE LA MUERTE.
ADVERTENCIA: RIESGO DE EXPLOSIÓN O FUEGO QUE
PUEDE CAUSAR LESIONES GRAVES Y LA MUERTE! NO
TENER CONTACTO DE MOTOR Y MOEFLE CON VAPORES
FLAMABLES, POLVOS COMBUSTILES, O OTRAS MATERIALES
COMBUSTIBLES. UNA CHISPA PUEDE CAUSAR UN FUEGO.
CUANDO USANDO EL COMPRESOR DE AIRE PARA PINTAR,
PONER EL COMPRESOR DE AIRE DEMASIADO AFUERA, DE
AMBIENTE DE TRABAJAR. USAR MÁS TUBOS DE AIRE SI
NECESITAR.
Colocar el compresor de aire a una distancia mínima de 12 pulgadas de
cualquier obstáculo que impida una correcta ventilación. No colocar jamás
un compresor de aire en una zona:
- donde hay fugas de aceite o gas.
- donde puede haber vapores o materiales inamables.
- donde la temperatura del aire es inferior a 32°F o superior a 104°F.
- donde aire sucio o agua podria ser aspirado por el compresor de
aire.
INSTALACIÓN DE CAMIÓN DE SERVICIO:
Las instalaciones pueden variar. Montando debe ser hecho a un marco
rígido. El instalador es responsable de asegurar el equipo en una manera
segura.
PARA TODAS LAS 30 GALÓN UNIDADES:
Partes Opcionales : IX-0001 (Isoladores)
INSTRUCCIONES DE CONEXION A TIERRA
Este equipo debe conectarse a tierra. La conexión a tierra provee un camino
de resistencia reducida a la corriente elétrica para reducir el riesgo de
choque, en caso de malfuncionamiento o falla.
PELIGRO: LA CONEXIÓN INCORRECTA DEL CONDUCTOR DE
CONEXIÓN A TIERRA DEL EQUIPO PUEDE RESULTAR EN
UN RIESGO DE ELECTROCUCIÓN. SI USTED TIENE DUDAS
ACERCA DE SI EL TOMACORRIENTE ESTÁ CORRECTAMENTE
CONECTADO A TIERRA, CONSULTE CON UN ELECTRICISTA
CALIFICADO O PERSONAL DE SERVICIO.
En todos los casos se deberán utilizar la tuerca con orejetas y el terminal
de la toma a tierra situados en el armazón para conectar el generador a una
fuente de toma a tierra adecuada. Se deberá utilizar un cable de tamaño
INSTALACIÓN

INSTALACIÓN
50 Manual del Operador
#8 para efectuar el circuito de la toma a tierra. Conecte el terminal del para
la toma a tierra entre la arandela de seguridad y la tuerca con orejetas y
apriete la tuerca completamente. Conecte rmemente el otro extremo del
cable a una fuente de toma a tierra adecuada.
En el Código Eléctrico Nacional (<<National Electric Code>>) se indican
algunos métodos prácticos para establecer una buena fuente para la toma a
tierra. Los ejemplos que se indican a continuación ilustran algunos de estos
métodos para establecer una toma a tierra adecuada.
Como fuente para la toma a tierra se puede utilizar un conducto metálico
subterráneo para el paso de agua que se encuentre en contacto directo con
el suelo y que tenga una extensión mínima de 10 pies. En caso de que no
disponga de un tubo subterráneo, se puede utilizar un tubo o barra con una
longitud de 8 pies como fuente para la toma a tierra. El tubo debería tener
un tamaño estándar de 3/4 pulgadas como mínimo, y la supercie exterior
debería ser resistente a la corrosión. En caso de que se utilice una barra de
acero o hierro, el diámetro de la misma debería ser de 5/8 pulgadas como
mínimo. Si se utiliza una barra de un material que no sea hierro, el diámetro
de la misma debe ser de 1/2 pulgada como mínimo, y debe estar clasicado
como un material adecuado para efectuar la toma a tierra. Introduzca la bar-
ra o el tubo a una profundidad de 8 pies. En caso de que el fondo empiece
a ser rocoso a una profundidad inferior a cuatro pies, deberá enterrar el tubo
o la barra en una zanja. Todas las herramientas e instrumentos eléctricos
operados desde este generador deberán tener la toma a tierra adecuada.
Para ello se habrá de utilizar un tercer cable, el cual deberá tener un <<Ais-
lamiento Doble>>.
Se recomienda que:
1. Use dispositivos eléctricos con cables eléctricos de 3 espigas.
2. Use un cable de extensión con 3 tomas y un enchufe de 3 espigas en los
extremos opuestos, para asegurar la continuidad de la protección de la
toma a tierra que va desde el generador hasta el aparato eléctrico.
Le recomendamos igualmente que se cumplan con todos los reglamentos
nacionales, regionales y locales relacionados con las especicaciones de
toma a tierra que resulten aplicables.
CONMUTADOR DE TRANSFERENCIA DE LINEA:
Si este generador va a ser utilizado como servicio de reserva para casos de
emergencia, será necesario que incorpore un conmutador de transferencia
de línea entre el servicio de suministro eléctrico público y el generador. El
conmutador de transferencia no sólo evita que la l ínea de suministro eléctri-
co público alimente al generador, sino que además impide que el generador
alimente a las líneas de suministro de la compañía eléctrica. Se pretende
con ello proteger a las personas encargadas del servicio cuando se encuen-
tren trabajando en una línea que pueda estar dañada.
ESTA INSTALACIÓN DEBERÍA SER EFECTUADA POR UN ELECTRICISTA CER-
TIFICADO. SE DEBERA CUMPLIR CON TODOS LOS CÓDIGOS LOCALES.
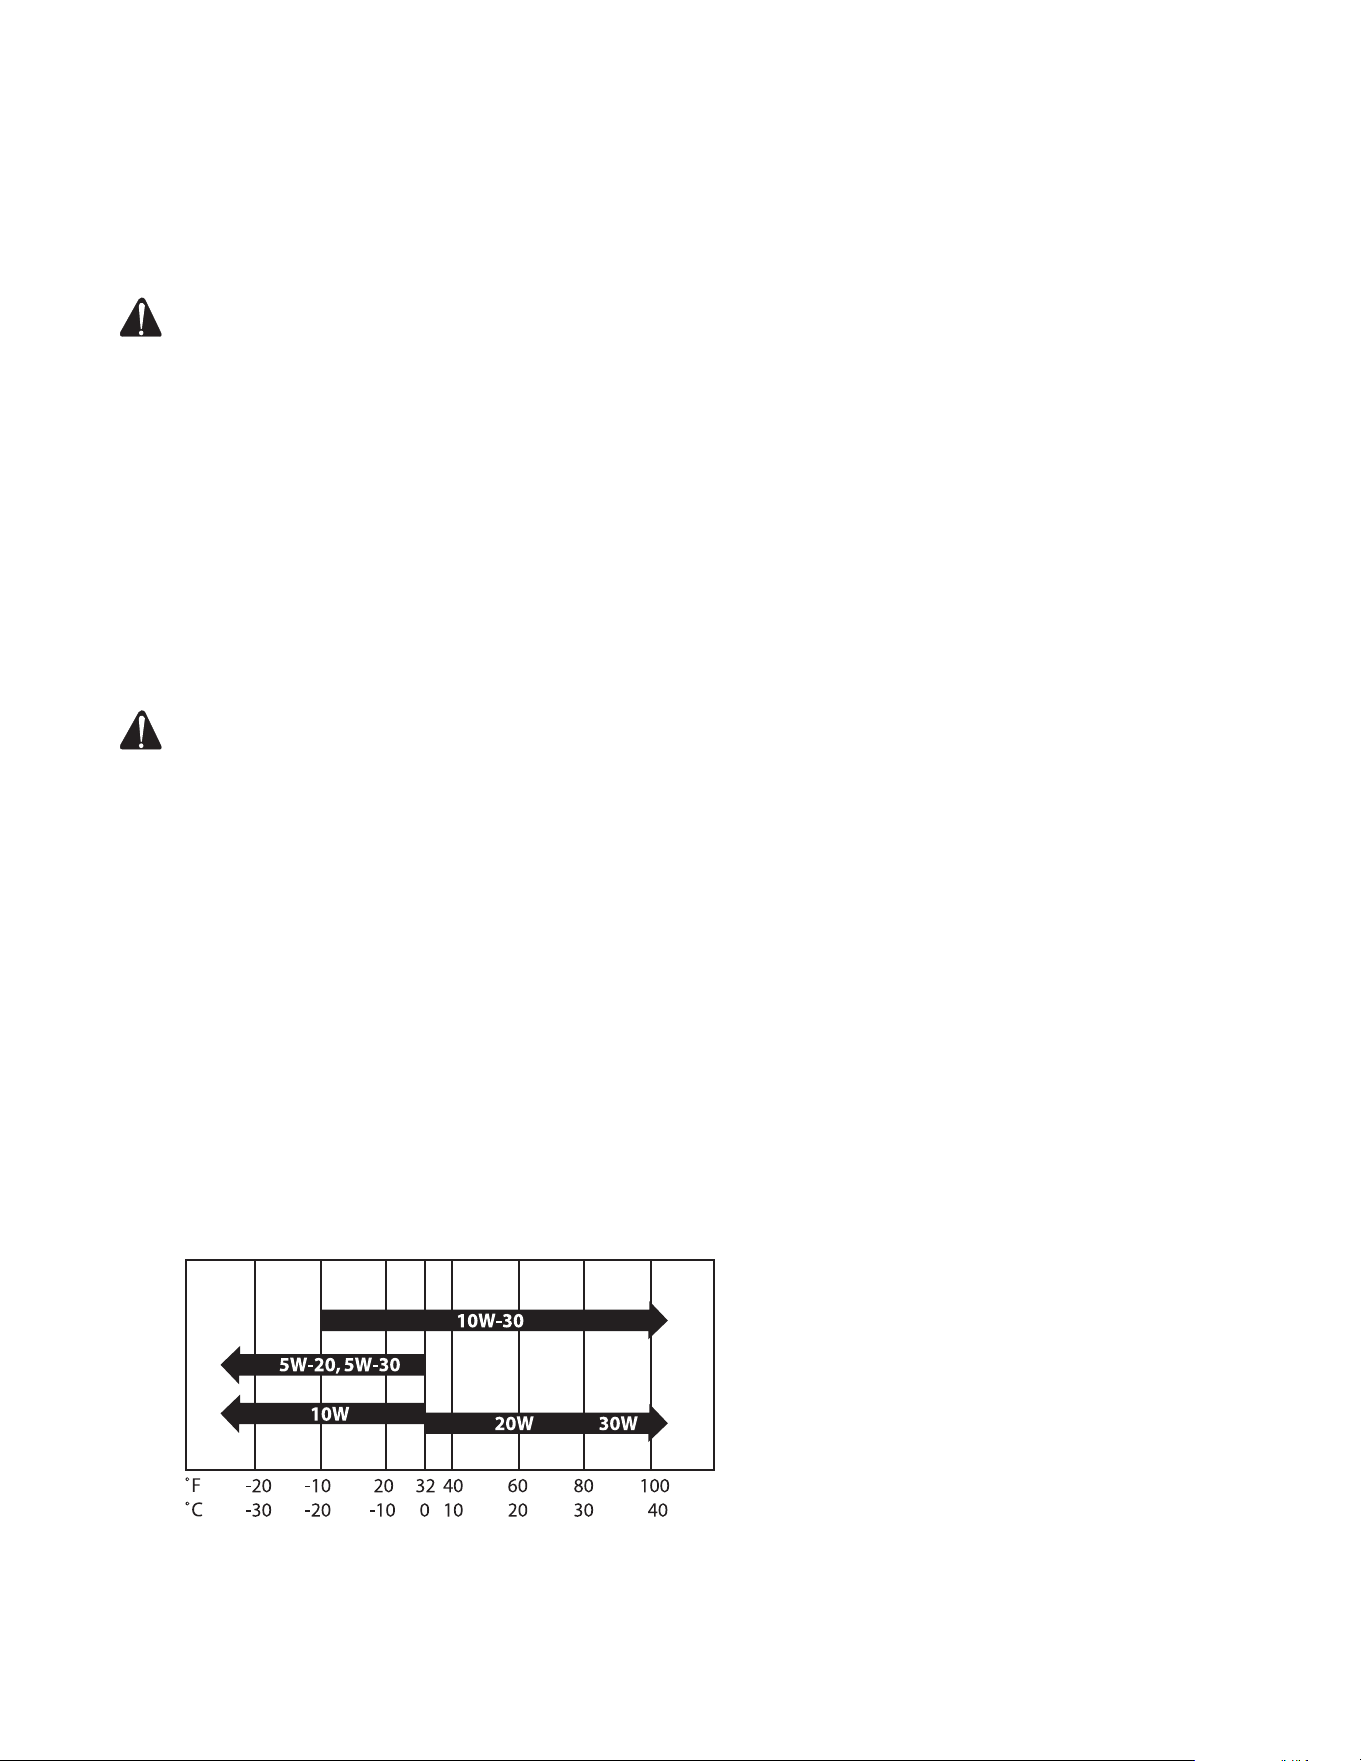
INSTALACIÓN
Manual del Operador 51
MOTOR DE GASOLINA
Revisar "Riesgo de expolsión o fuego" antes de agregar fuel. Leer manual
de motor que acompando este compresor de aire para mantenimiento cor-
recto de encender de motor.
ADVERTENCIA RIESGO DE EXPLOSIÓN O FUEGO QUE CAUSAR
LESIONES GRAVES Y LA MUERTE! NO FUMAR CUANDO
DANDO FUEL!
NO LLENAR EL TANQUE DE FUEL CUANDO COMPRESOR DE
AIRE ENCENDIDO O CALOR. PERMITIAR DOS MINUTOS PARA
ENFRIAR ANTES DE MÁS FUEL/COMBUSTIBLE.
PERMITIR 1/4" DE ESPACIO DE TANQUE PARA EXPANSIÓN DE
FUEL. NO LLENAR EL TANQUE COMPLETO.
NO PONER EL UNITO EN AMBIENTES CON VAPORES
FLAMABLES. UNA CHISPA PUEDE CAUSAR UN EXPLOSIÓN O
UNFUEGO.
SIEMPRE GUARDAR EL FUEL AFUERA DE COMPRESOR DE
AIRE CUANDO FUNCIONANDO O CALOR.
ADVERTENCIA: RIESGO DE EXPLOSIÓN O FUEGO QUE
PUEDE CAUSAR LESIONES GRAVES Y LA MUERTE! NO
TENER CONTACTO DE MOTOR Y MOEFLE CON VAPORES
FLAMABLES, POLVOS COMBUSTILES, O OTRAS MATERIALES
COMBUSTIBLES. UNA CHISPA PUEDE CAUSAR UN FUEGO.
CUANDO USANDO EL COMPRESOR DE AIRE PARA PINTAR,
PONER EL COMPRESOR DE AIRE DEMASIADO AFUERA, DE
AMBIENTE DE TRABAJAR. USAR MÁS TUBOS DE AIRE SI
NECESITAR.
Recomendar usar fuel del minimo de 87 octano con este compresor de aire.
No mezclar aceite con gasolina.
Recomendar usar gasolina sin plomo y limpiado y fresco. Puede usar gaso-
lina con plomo si no tener gasolina sin plomo. No usar gasolina con metano
o alcohol.
Referir a manual de motor para mantenimiento necesario y ajustados.
ACEITE DEL MOTOR
Use un aceite de motor de la viscosidad que corresponda a la gama de
temperatura ambiente durante el periodo entre cambios de aceite.
Usar un aceite detersivo de alta calidad con clasicación API SJ o superior.
Revise siempre el nivel de aceite antes de poner la máquina en marcha, y
asegurarse de que se mantenga.
Tabla de Temperatura
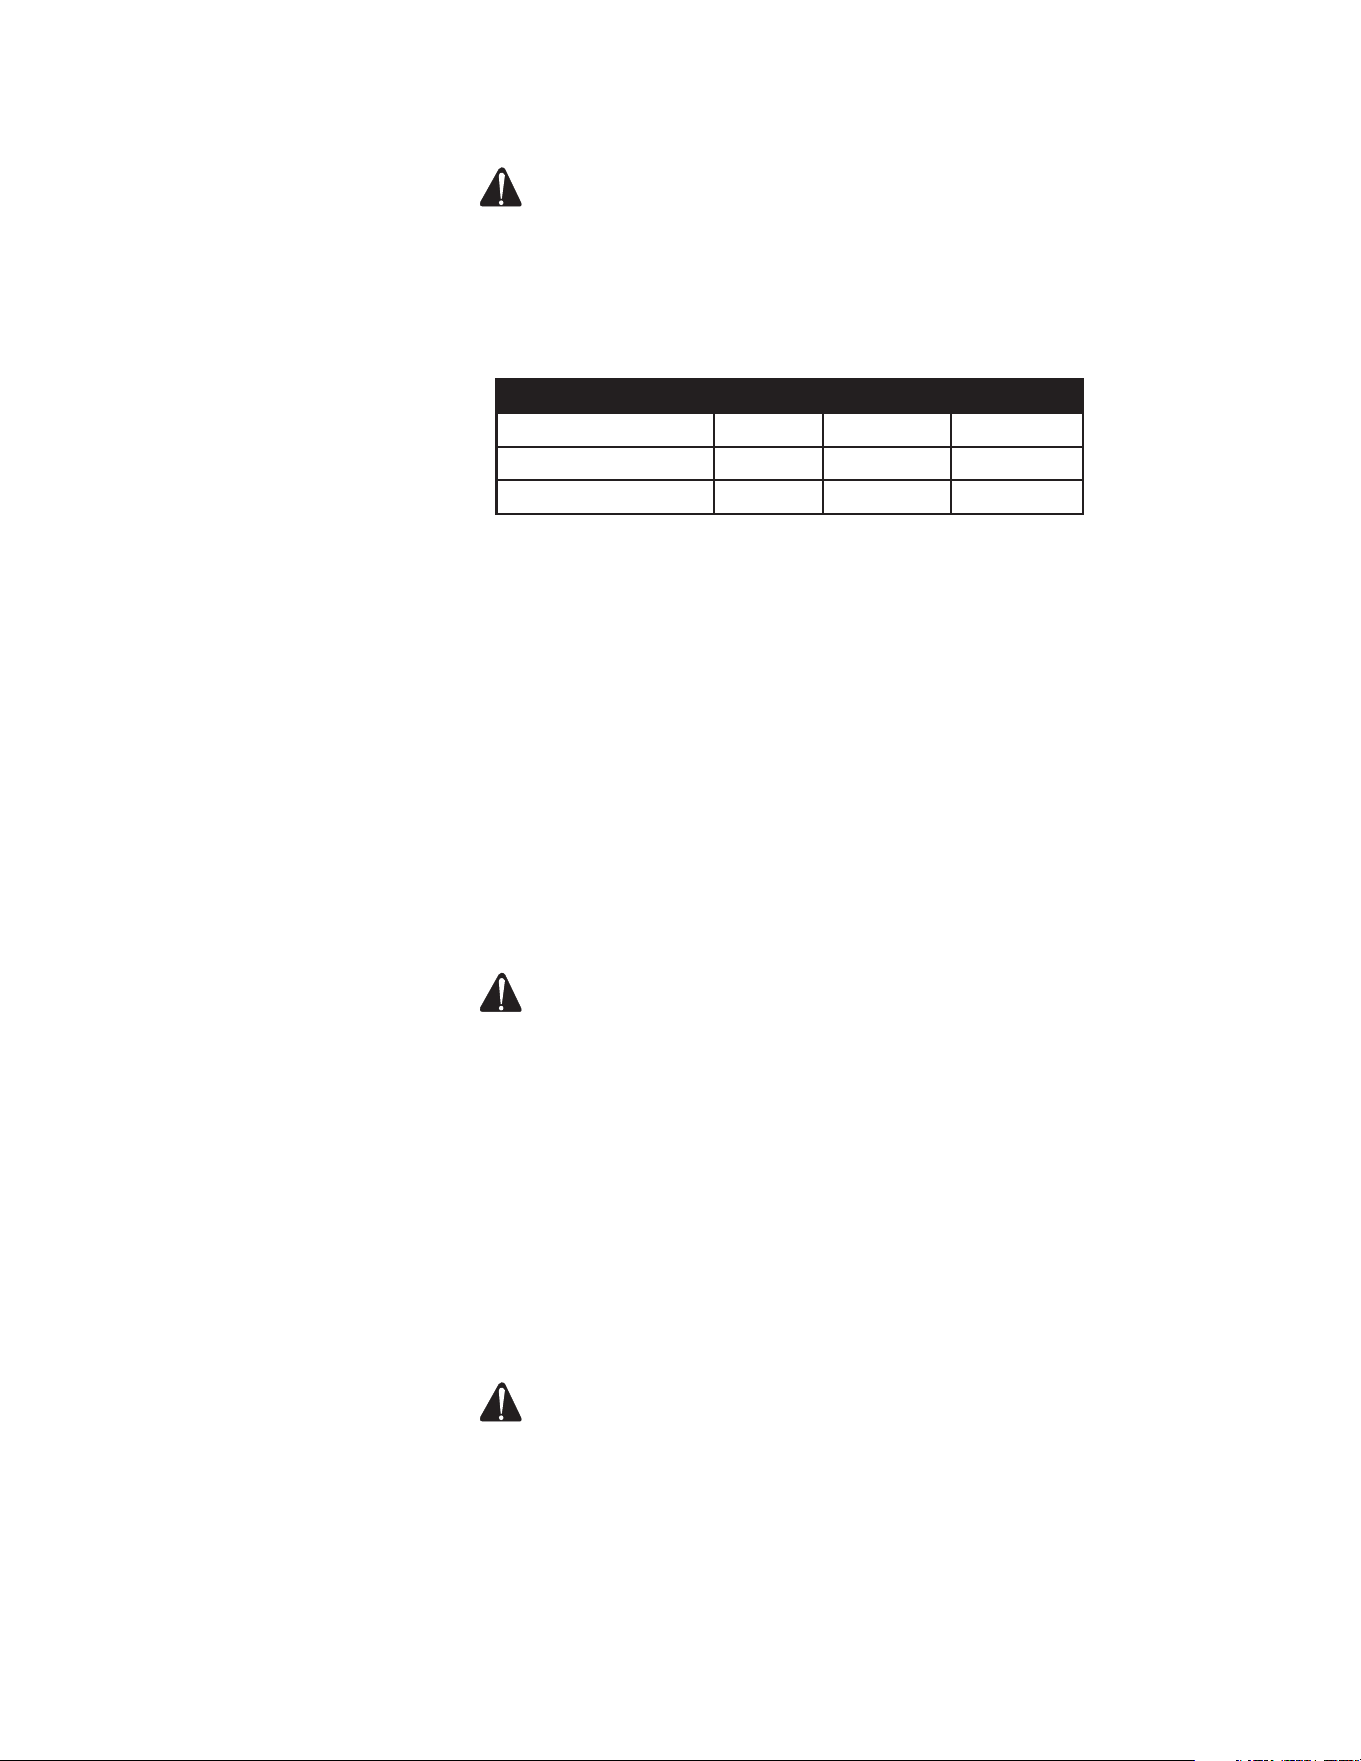
INSTALACIÓN
52 Manual del Operador
PRECAUCIÓN: ESTE MOTOR VIENE DE FÁBRICA SIN ACEITE EN
EL CÁRTER. ASEGURARSE DE CARGAR ACEITE ANTES DE
PONER EL MOTOR EN MARCHA.
VOLUMEN DE ACEITE DEL MOTOR
NOTA: Estos motores están protegidos con un sistema de corte por
bajo nivel de aceite. Si el motor no arranca, como primera medida
inspeccionar el nivel de aceite en el cárter.
PARA LLENAR CON ACEITE:
1. Ponga en nivel el motor para asegurar de inspeción adecuada para prevenir
sobrellenando.
2. Destornille el indicador de aceite, limpie varilla del aceite seco. Vuelve a
insertar el indicador del aceite respaldo entre la abierta de indicador del
aceite. Evite el indicador del aceite y revise el nivel del aceite.
3. El nivel del aceite debe estar entre la marca del lleno y abajo en varilla del
aceite.
NOTA: Cuando revisando el aceite, asegúrese que motor esté en nivel.
4. Llene con aceite como necesario por abierta del indicador de llenado del
aceite.
5. Reemplace indicador del aceite y atornille rmemente.
6. Limpie algo aceite derramado.
CARGA DE COMBUSTIBLE
ADVERTENCIA: EL COMBUSTIBLE ES EXPLOSIVO! LA GASOLINA
(NAFTA) ES UN FLUIDO EXTREMADAMENTE INFLAMABLE Y
SUS VAPORES PUEDEN EXPLOTAR EN PRESENCIA DE UNA
CAUSA DE IGNICIÓN.
GUARDE EL COMBUSTIBLE EN RECIPIENTES APRO
BADOS ESPECIALMENTE PARA ELLO, EN LUGARES BIEN
VENTILADOS, NO HABITADOS, Y ALEJADOS DE LLAMAS Y
CHISPAS.
NO CARGUE COMBUSTIBLE CON EL MOTOR CALIENTE O EN
MARCHA, YA QUE UN DERRAME PODRÍA INCENDIARSE SI
ENTRA EN CONTACTO CON UNA PIEZA MUY CALIENTE O CON
LA CHISPA DE UNA BUJÍA. NO ARRANCAR EL MOTOR CERCA
DE COMBUSTIBLE DERRAMADO.
NO USE COMBUSTIBLE COMO LÍQUIDO LIMPIADOR.
ADVERTENCIA: NO CARGUE EN EXCESO EL TANQUE DE
COMBUSTIBLE. DEJAR ESPACIO PARA LA EXPANSIÓN DEL
COMBUSTIBLE.
RECOMENDACIONES GENERALES
• Compre gasolina en cantidades moderadas y guardarlo en recipien-
tes limpios especialmente aprobados para uso con combustible.
• Es recomendable no utilizar combustible que haya quedado del año
anterior. Así se reducirá al mínimo la formación de sedimentos en el
circuito de combustible y la máquina arrancará con más facilidad.
• No agregue aceite a la gasolina.
# de Modelo Litros Cuartos Onzas
AGW-SM14-30M 1.1 1.16 37.2
AGW-SH22-20M 2.0 2.1 67.6
AGW-SV14-30M 0.95 1.0 32.0
INSTALACIÓN
Manual del Operador 53
TIPO DE COMBUSTIBLE
• Para obener óptimo rendimiento, usar gasolina limpia, sin contenido
de plomo, y con un grado de octanaje de al menos 87.
• Es más conveniente utilizar gasolina sin plomo, ya que deja menos
sedimentos en la cámara de combustión del motor.
MEZCLAS DE GASOLINA Y ALCOHOL:
Las mezclas de gasolina sin plomo y alcohol, también denominadas Gaso-
hol o Alconafta, se pueden usar para motores (hasta el 10% de alcohol etí-
lico y 90% de gasolina sin plomo, en proporción volumétrica). No use otros
tipos de mezcla de alcohol y gasolina con el motor.
MEZCLAS DE GASOLINA Y ÉTER:
Las mezclas de gasolina sin plomo y éter terciario butilmetílico (MTBE) se
pueden usar para motores (hasta un máximo del 15% de MTBE en propor-
ción volumétrica). No use otros tipos de mezcla de gasolina y éter con el
motor.
INSTALACIÓN DE BATERÍA
ADVERTENCIA: DEBERÁ HACER DE UN CONCESIONARIO
AUTHORIZADO DE MI-T-M.
ALTITUD ALTA
En altitud alta, la mezcla de aire/combustible del carburador estandard será
demasiado rico. Función disminuirá y consumpción de combustible aumen-
tará. Una mezcla muy rica también fallará el chispero y causar empezando
difícil. Operación a una altitud que es diferente de altitud donde el motor fue
certicado, para una extensión de mucho tiempo, puede aumentar emissio-
nes.
Función de altitud alta puede mejorar de modicaciones especicos al
carburador. Si siempre operar su unidad a altitudes más de 5,000 pies (1500
metros), su concesionario haga esta función de modicación a carburador.
Este motor, cuando operando a altitud alta con modicaciones a carburador
para uso en altitud alta, encontrará cada estandard de emissión en toda
vida de uso.
Con modicación de carburador, caballo de fuerza de motor disminuirá so-
bre 3.5% para cada 1,000 pies (300-metros) aumento en altitud. Este efecto
de altitud en caballo de fuerza será más grande de este si no haga modi-
cación de carburador.
NOTA: Cuando el carburador modificó para operación altitud alta, la
mezcla de aire/combustible será demasiado delgado para uso en al-
titud abajo. Operación a altitudes abajo de 5,000 pies (1500 metros)
con carburador modificado causaría recalentado de motor y resul-
taría en daño serio de motor.
Para uso a altitudes abajos, vuelva carburador a concesionario de servi-
cio a especificados orginales de fábrica.
# DE REEMPLACE DE BATERÍA
32-0058

54 Manual del Operador
OPERACIÓN
Controles antes del arranque:
Antes de empezar, controlar el nivel del aceite. (ver manual de motor.) Llenar
el tanque de fuel en accordancia de manual de instruccion.
Debe revisarse el nivel del aceite de la bomba debe revisarse antes de cada
aplicación. Revise el indicador del nivel de aciete en el cárter de la bomba.
Asegúrese que el aciete esté al nivel correcto indicado por el punto en el
vidrio de nivel. Use aceite para bombas de SAE20 o 30 no detergente si
parece que el nivel está bajo.
Eliminar la condensación del depósito del compresor de aire.
ADVERTENCIA: PELIGRO DE LESIONES AL CUERPO. NO INTENTE
JAMÁS ABRIR LA VÁLVULA DE DESCARGA CUANDO HAY MÁS
DE 10 PSI DE PRESIÓN EN EL INTERIOR DEL DEPÓSITO.
Descargar la presión excesiva con una herramienta de aire, luego abrir la
válvula de descarga del depósito de aire ubicada en la parte inferior del
depósito. Cerrar bien una vez descargado.
Controlar el boton de motor es en posición de "OFF".
Controlar que la válvula de seguridad funcionando correcto.
Controlar que todas tapas y cubiertas están en posición y montar seguri-
ando.
COMENZAR
1. Leer atentamente las advertencias de seguridad antes de efectuar esta
operación.
2. Asegúrese que unidad toma a tierra. Vea Instrucciones de Conexión a
Tierra.
NOTA: Desenchufe todo el equipo de los receptáculos de energía antes
de comenzar la unidad.
3. Colocar muletilla que estar en la arriba de válvula pilota a posición vertical.
Este dar una empezada sin descargar. Este compresor de aire puede
descargar y tener una empezada de motor más facil.
4. Encender el motor. (Referir a manual de este unito de motor. (Referir a manual
de este unito de motor. En unidades de motor de Honda, la inductancia y
la tecla del interruptor en el panel de la caja eléctrica.)
5. Despues de 1-2 minutos de funcionando, poner muletilla en posición
orginal.
6. Ajustar la presión moviendo el regulador de presión en el sentido contrario
a las manecillas del reloj para reducir la presión y en el sentido de las
manecillas del reloj para aumentaria.
7. Asegure que los cachones están en la posición de usar.
8. Examine recipiente(s) de GFCI en la unidad. Empuje el botón de exam.
El botón de colocar debe saltar y no debe tener potencia al recipiente.
Aplique una carga de examinar o luz a cada recipiente para vericar. SI
BOTÓN DE COLOCAR NO SALTE, NO USE LOS RECIPIENTES. VEA
CONCESIONARIO PARA SERVICIO INMEDIATAMENTE.
9. Si recipientes examine correcto, empuje el botón de colocar para restablecer
potencia. Debe oír o sentir un taconazo distincto cuando este es completo.
SI RECIPIENTES NO COLOCAR CORRECTO, NO USE RECIPIENTES. VEA
CONCESIONARIO PARA SERVICIO INMEDIATAMENTE.
10. Si unidad tiene control de ojear a posición de ANDADO DE RALENTI
AUTOMATICO. Ahora cargas pueden aplicar a la unidad.
OPERACIÓN
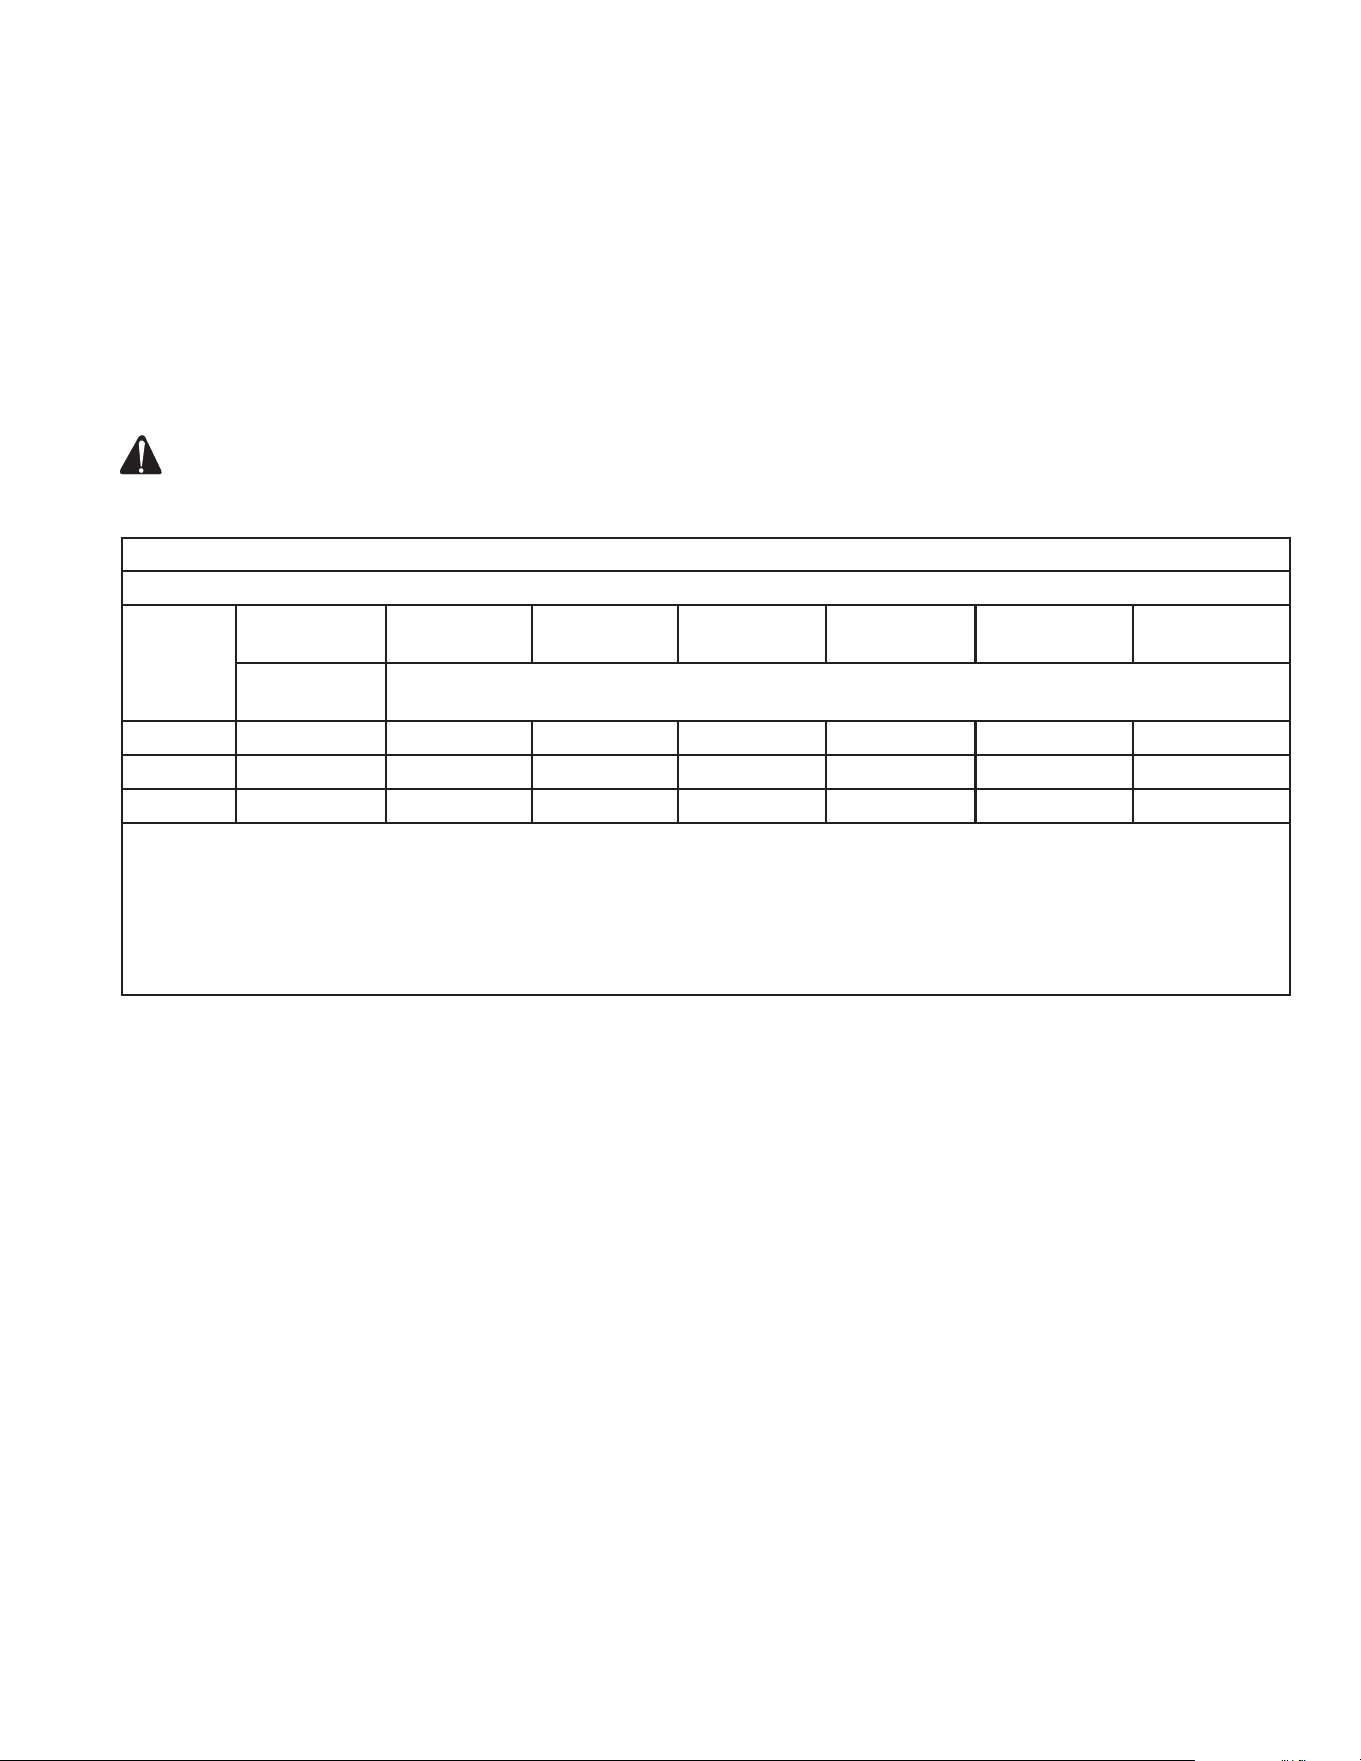
OPERACIÓN
Manual del Operador 55
COMIENZO DE SOLDAR:
1.Quite toda la corriente alterna cargas eléctricas de la unidad.
2. Mueva el interruptor de GEN/SOLDAR a la posición de SOLDAR.
3. Ponga el interruptor del seleccionador minimo/máximo en la posicion del
ajuste de amperaje.
4. Mueva interruptor de control de ralenti a la posicion de toda velocidad.
5. Compruebe la conexion a la tierra.
6. Carta de Soldar (Selección de los Tamaños de Cable de Soldar)*
ADVERTENCIA: APAGUE EL PODER ANTES DE UNIR CON
TERMINALES DE SALIDA DE SOLDAR. NO USE CABLES
LLEVADOS PUESTOS, DAÑADOS, DE TAMANO INSUFICIENTE,
O MAL EMPALMADOS.
NOTA: Este motor está protegido con un sistema que para el motor
cuando el aceite alcanza un nivel muy bajo. El motor no volverá a
arrancar si no se agrega aceite.
En caso de ruidos o vibraciones anómalos, detener el compresor de
aire y consultar la sección "Localización de Averías".
APAGAMIENTO:
1. Quite todas cargas como desconecten cordones électricos y apagadando
aparatos électricos.
2. Para parar el compresor de aire mover el boton de motor a posición de
"OFF". (Referir a manual de motor de este unito.)
3. Mueva el interruptor de GEN/SOLDAR a la posición de GEN.
4. Descargar el aire de los depósitos de aire, por medio de una herramienta
conectada o tirando los anillos de la válvula de seguridad.
5. Una vez que le presión en el interior de los depósitos de aire es inferior
a 10 libras, abrir la válvula de descarga debajo de cada depósito de aire
para eliminar la humedad.
6. Cierre válvula de comestible en unidad o motor.
7. Limpiar el compresor de aire con un paño y colocarlo en un lugar seguro,
donde no exista el riesgo de congelación.
NOTA: El motor podría dañarse si no se lo deja enfriar en vacío durante
dos (2) minutos antes de parario.
Terminales de Salida de Soldar
Tamaño de Cable de Soldar** y la Longitud del Cable Total (Cobre) en el Recorrido de Soldar que No Excede ***
Amperios
de Soldar
100 ft (30 m)
or Less
150 ft (45 m) 200 ft (60 m) 250 ft (70 m) 300 ft (90 m) 350 ft (105 m) 400 ft (120 m)
100% Duty
Cycle
10 − 100% Deber Cyclev
100 4 (20) 4 (20) 3 (30) 2 (35) 1 (50) 1/0 (60) 1/0 (60)
150 3 (30) 2 (35) 1 (50) 1 (50) 2/0 (70) 3/0 (95) 3/0 (95)
200 2 (35) 1 (50) 1/0 (60) 2/0 (70) 3/0 (95) 4/0 (120) 4/0 (120)
* Esta carta es una pauta general y es posible que no satisfeche todas las aplicaciones. Si el cable se recalienta, use
el tamaño cable proximo más grande.
** El tamaño de cable de soldar (AWG) está basado en 4 voltios o en menos descenso o una densidad corriente de
al menos 300 circular mils por amperio. () = mm2 para uso métrico
*** Para distancias más largas que aquellos mostrados en esta guía, llame un representante de aplicaciones de fábrica
en 800-553-9053.
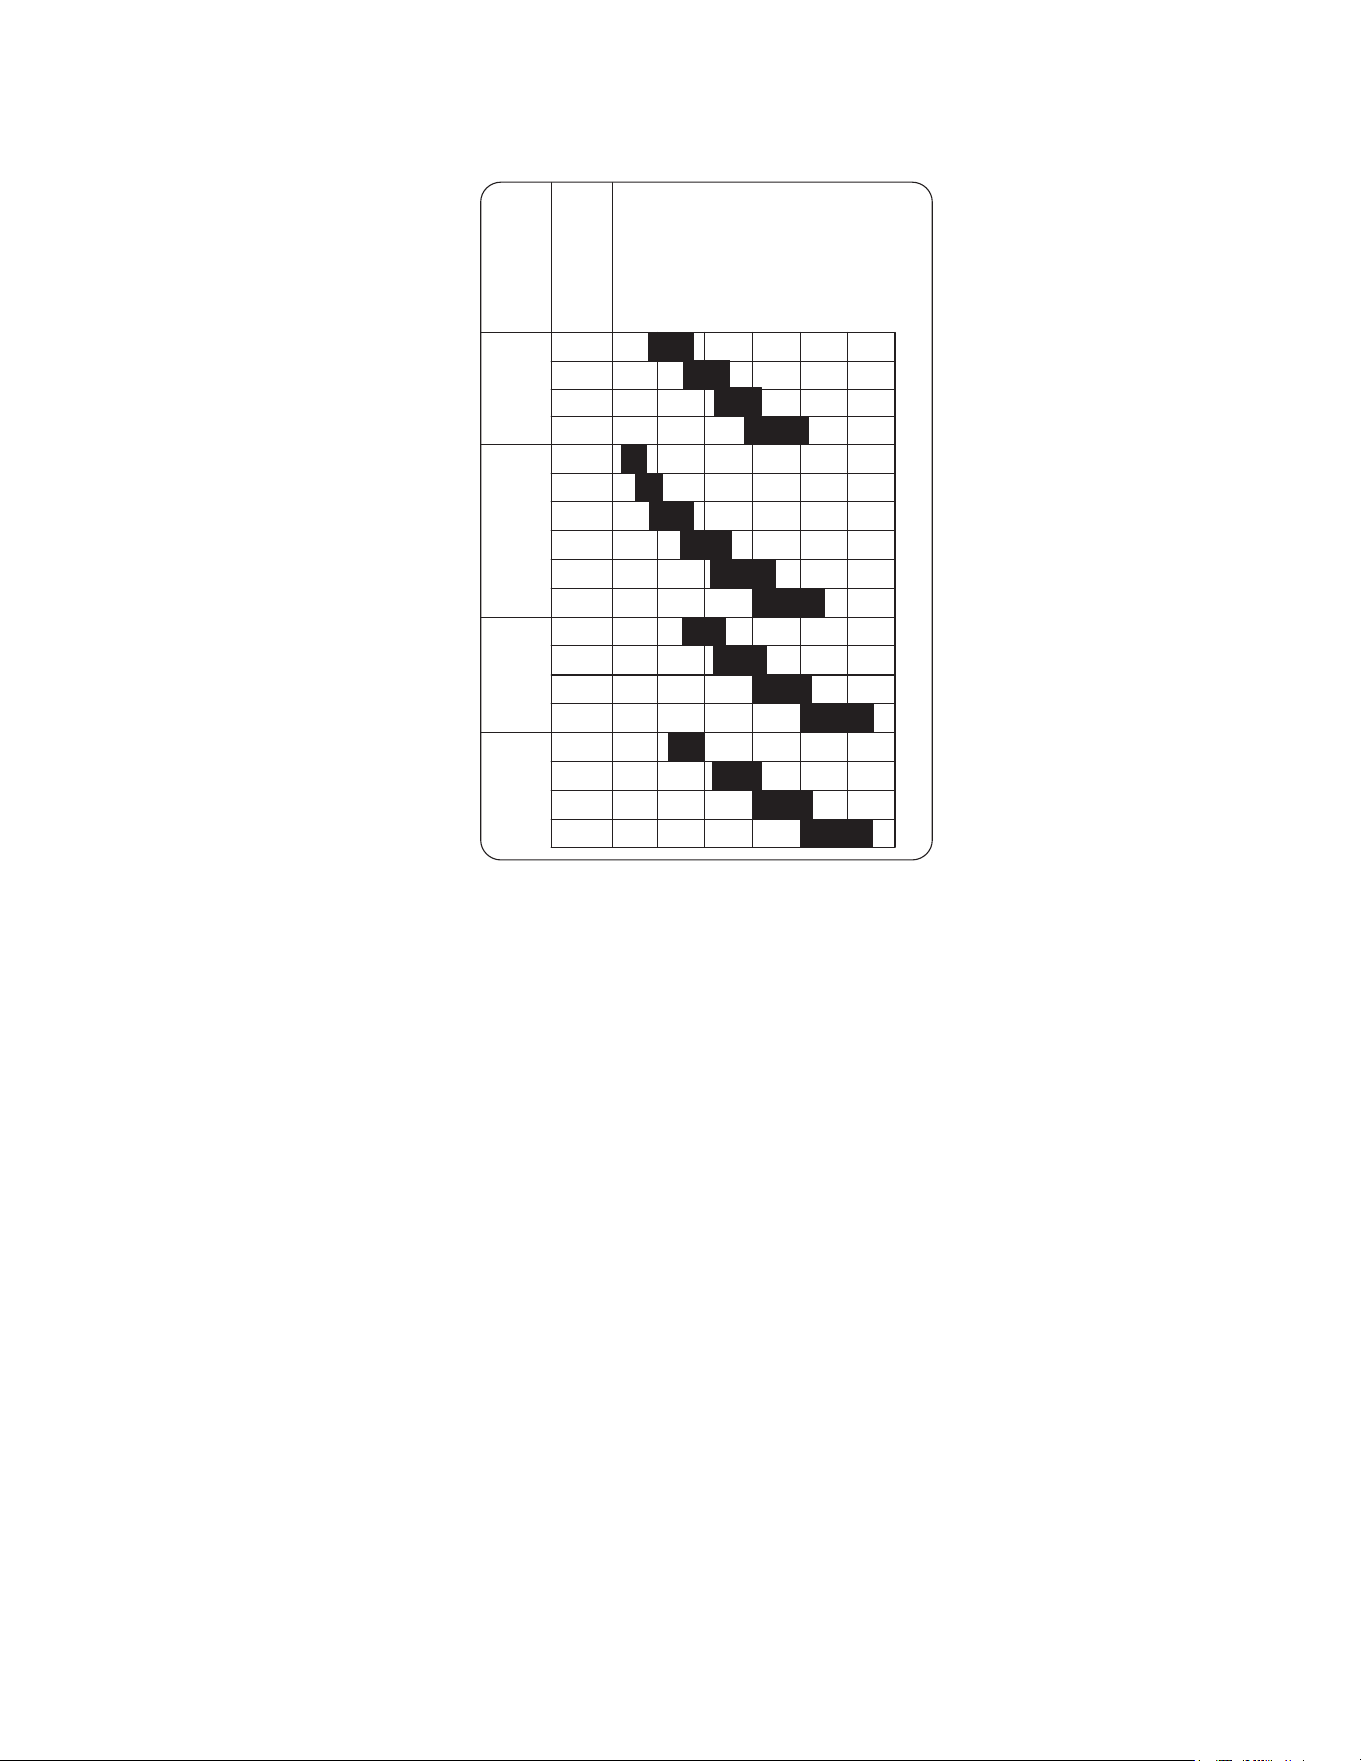
OPERACIÓN
56 Manual del Operador
CARTA DE ELECTRODO
CONTROLES DE OPERAR
CONTROL DE MARCHA EN VACÍO:
Nota: el control inactivo es incapacitado en el modo de soldar.
El control de marcha en vacío viene instalado de fábrica, y es un disposi-
tivo electrónico que comanda la economización de combustible durante
la marcha en vacío del motor (sin carga), y pasa automáticamente a mar-
cha gobernada a velocidad normal cuando se aplican cargas eléctricas. El
control de marcha en vacío comanda la velocidad del motor de la siguiente
manera:
1. Con interruptor del control de marcha en vacío en posición de a toda
velocidad (OFF), arranque el motor.
2. Después de precalentar el motor durante un par de minutos, llevar el
interruptor de control de marcha en vacío a la posición de marcha (ON).
Después de un período de retardo de 5 a 8 segundos, el motor pasará a
velocidad en vacío.
3. Cuando se aplica una carga al generador, o la presión de tanque de
compresor de aire se cae debajo de setpoint (punto jado) regulado el
sistema de control en vacío se desenergiza automáticamente y el motor
se acelera a velocidad normal comandado por el gobernador.
4. Al desconectarse la carga del generador, o la presión de tanque de compresor
de aire es restaurada., se vuelve a energizar el control de marcha en vacío
y después de un retardo de 5 a 8 segundos, el motor pasa a velocidad en
vacío.
Nota: Cuando interviene el control de marcha en vacío, anula la interven-
ción del gobernador de velocidad del motor. Al aplicar una carga, el
circuito electrónico reacciona desenergizando el sistema de coman-
do en vacío y vuelve a intervenir el gobernador de velocidad normal
de servicio.
3/32
1/8
5/32
3/16
1/16
5/64
3/32
1/8
5/32
3/16
3/32
1/8
5/32
3/16
3/32
1/8
5/32
3/16
6010
and
6011
6013
7014
7018
ELECTRODO
VARIEDAD DE AMPERAJE
DIÁMETRO
34-2670 081711
50
100
150
200
250
300
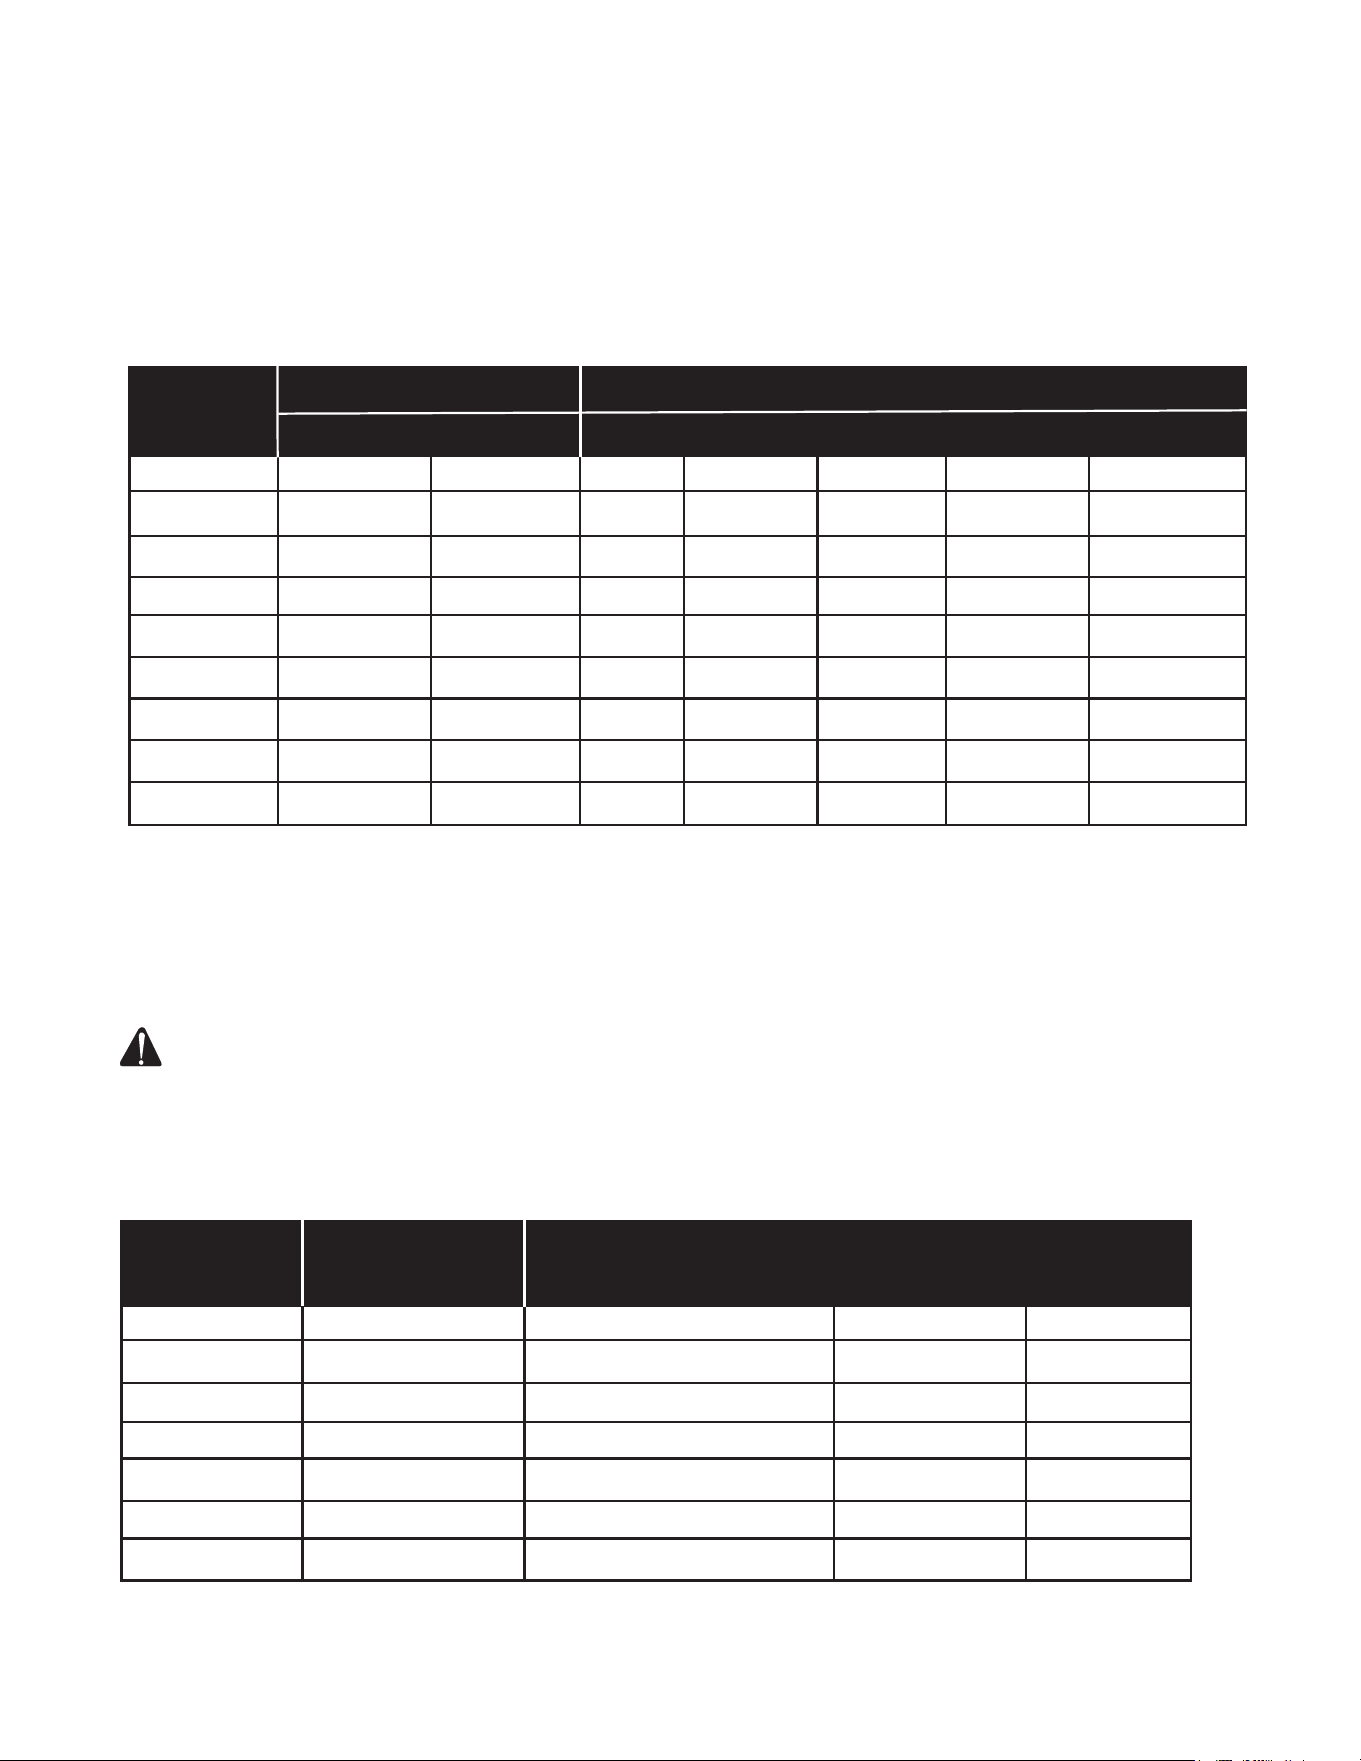
OPERACIÓN
Manual del Operador 57
CONTROLES
TAMAÑO DEL CABLE:
Un voltaje bajo puede dañar el equipo. Por consiguiente, para evitar las
caídas de tensión excesivas entre el generador y el equipo, el cable deberá
tener el calibre adecuado para la longitud requerida. La tabla de datos para
la selección del cable proporciona la longitud máxima para los distintos cali-
bres de alambre que pueden tolerar las cargas indicadas a continuación.
CARGAS DEL MOTOR ELECTRICO:
Una de las características de los motores eléctricos comunes es que, en el
momento de arrancar, necesitan mulitplicarsels veces la potencia requerida
para su funcionamiento. Ud. puede utilizer esta tabla para calcular los vatios
requeridos para el arranque de los motores eléctricos de “CODE G” (CODI-
GO G).
PRECAUCIÓN: EN EL CASO DE QUE UN MOTOR NO ARRANQUE
O NO ALCANCE LA VELOCIDAD NECESARIA PAR SU
FUNCIONAMIENTO, DEBERÁ APAGAR INMEDIATAMENTE
EL EQUIPO ELÉCTRICO O EL INSTRUMENTO PARA EVITAR
DAÑOS A LOS MISMOS. SIEMPRE DEBERÁ COMPROBAR LOS
REQUISITOS DEL INSTRUMENTO O EQUIPO ELÉCTRICO QUE
SE VA A UTILIZAR, EN COMPARACIÓN CON LA CAPACIDAD
NOMINAL DEL GENERADOR.
TAMAÑO DEL VATIOS DE VATIOS REQUERIDOS PARA ARRANCAR EL MOTOR
MOTOR (CV) FUNCIONAMIENTO REPULSIÓN DE INDUCCIÓN CAPACITOR FASE DIVIDIDA
1/8 275 600 850 1200
1/6 275 600 850 2050
1/4 400 850 1050 2400
1/3 450 975 1350 2700
1/2 600 1300 1800 3600
3/4 850 1900 2600
1 1100 2500 3300
CORRIENTE CARGA EN VATIOS MAXIMA LONGITUD ADECUADA DE CABLE (ALAMBRE DE CABLE)
EN AMPERIOS A 120 VOLTIOS A 240 VOLTIOS #8 #10 #12 #14 #16
2.5 300 600 1000 ft 600 ft 375 ft 250 ft
5 600 1200 500 300 200 125
7.5 900 1800 350 200 125 100
10 1200 2400 250 150 100 50
15 1800 3600 150 100 65
20 2400 4800 175 ft 125 75 50
25 3000 6000 150 100 60
30 3600 7200 125 65
40 4800 9600 90

58 Manual del Operador
LOCALIZACIÓN DE FALLAS
Symptom Problem Solution
El motor no en-
cender.
Varias problemos de motor. Referir a manual de motor de su compresor de aire.
Funcionamiento
ruidoso.
Polea de motor o bomba de
rueda voldao es suelto.
Apretar polea y/o rueda volado.
Falta aceite en la bomba. Reponer la cantidad de aceite necesaria. Controlar que los coji-
netes no se hayan dañado.
Residuos de carbono en los
pistones o en las válvulas.
Desmontar e inspeccionar la culata del cilindro. Limpiar y susti-
tuir.
Avería del cojinete, pistón o
biela.
PARAR EL COMPRESOR! Póngase en contacto con la Asisten-
cia Clientes.
Abajo de presión
en tanque de aire
o abajo de presión
rapidamente cuan-
do el compresor de
aire está apagado.
Los accesorios no han sido
apretados bien.
Aretar los accesorios donde se oye que el aire dale. Controlar los
accesorios con una solución de agua y jabón. No apretar de-
masiado.
Fugas de aire del depósito
de aire.
Sustituir el depósito de aire. No intentar reparar el depósito.
La válvula de retención y la
válvula piloto es defectuose.
Desmontar, limpiar o sustituir.
Presión insuciente
en la herramienta o
en los accesorios.
El regulador de presión no ha
sido ajustado a una presión
sucientemente alta o avería
del regulador de presión.
Ajustar el regulador de presión al valor adecuado o sustituir.
Filtro aspiración aire ob-
struido.
Limpiar o sustituir.
Fugas de aire. Localizar las fugas y reparar.
Los tubos o los empalmes
de los tubos son demasiado
pequeños o largos.
Sustituir con tubos o empalmes más grandes.
Las resbalaban de correa. Haga mas apretado o reemplace.
El compresor de aire no
produce la capacidad de aire
requerida.
Controlar el requisito de aire del accesorio. Si es superior al CMF
o a la presión suministrada or el compresor de aire, es necesario
usar un compresor más grande.
Válvula pilota restrica. Limpie o reemplace.
No hay salida de
voltaje de la unidad.
Disyuntores disparados. Restablezca los disyuntores.
Serie de cordon o extensio-
nes inadecuados.
Revise capabilidades de series de cordon o extensiones.
El aire sale de la vál-
vula de seguridad.
La válvula de seguridad
probablemente es defec-
tuosa.
Activar la válvula de seguridad manualmente tirando del anillo.Si
el aire sigue saliendo, debe sustituida.
La presión de aire en el
depósito es excesiva.
Limpie, restablezca o reemplace la válvula piloto.
Fugas de aire en la
bomba.
Juntas defectuosas. Apriete los pernos en el compresor usando la fuerza de torsión
correcta o reemplace las empaquetaduras.
D’air provenant du
ltre d’admission
d’air.
Soupape (reed) d’admission
défectuuese.
Sustituir.
Condensación en el
aire de descarga.
Condensación en el depósito
de aire debido a una elevada
humedad atmosférica o el
compresor de aire no ha
funcionado por un tiempo
suciente.
Opera el compresor de aire por una hora para impedir demasi-
ado condensión. Vaciar el depósito de aire después de cada
empleo.
Vaciar el depósito de aire más frecuentemente en climas húm-
edos y usar un ltro en la línea de aire.

Manual del Operador 59
LOCALIZACIÓN DE FALLAS
Symptom Problem Solution
Excesivo consumo
de aceite en la
bomba.
Filtro aspiración aire obstru-
cido.
Limpiar o sustituir.
Compresor de aire sobre
supercie no nivelada.
No inclinar el compresor de aire a un ángulo superior a 10° en
ninguna dirección mientras esté en marcha.
Cárter demasiado lleno de
aceite.
Vaciar el aceite. Reponer con aceite hasta el nivel apropiado.
Viscocidad incorrecto. Elimina el aceite. Llene al nivel correcto con SAE-30W aceite sin
detergente.
Respirado de cárter es
taparo.
Limpiar o sustituir.
Pérdidas de aceite. Apriete los pernos en el cabeza del compresor usando la fuerza
de torsión correcta o reemplace las empaquetaduras.
El aceite tiene apari-
encia lechosa.
Agua en el aceite por con-
densación.
Cambie el aceite y mueva el compresor de aire a un ambiente
menos húmedo.
No hay salida de
voltaje del unidad.
Serie de cordon o extensio-
nes inadecuados.
Revise capabilidades de series de cordon o extensiones en sec-
ción de Controles; Tamaño de Cable en este manual. Consultar
con un concesionario de distribuidor.
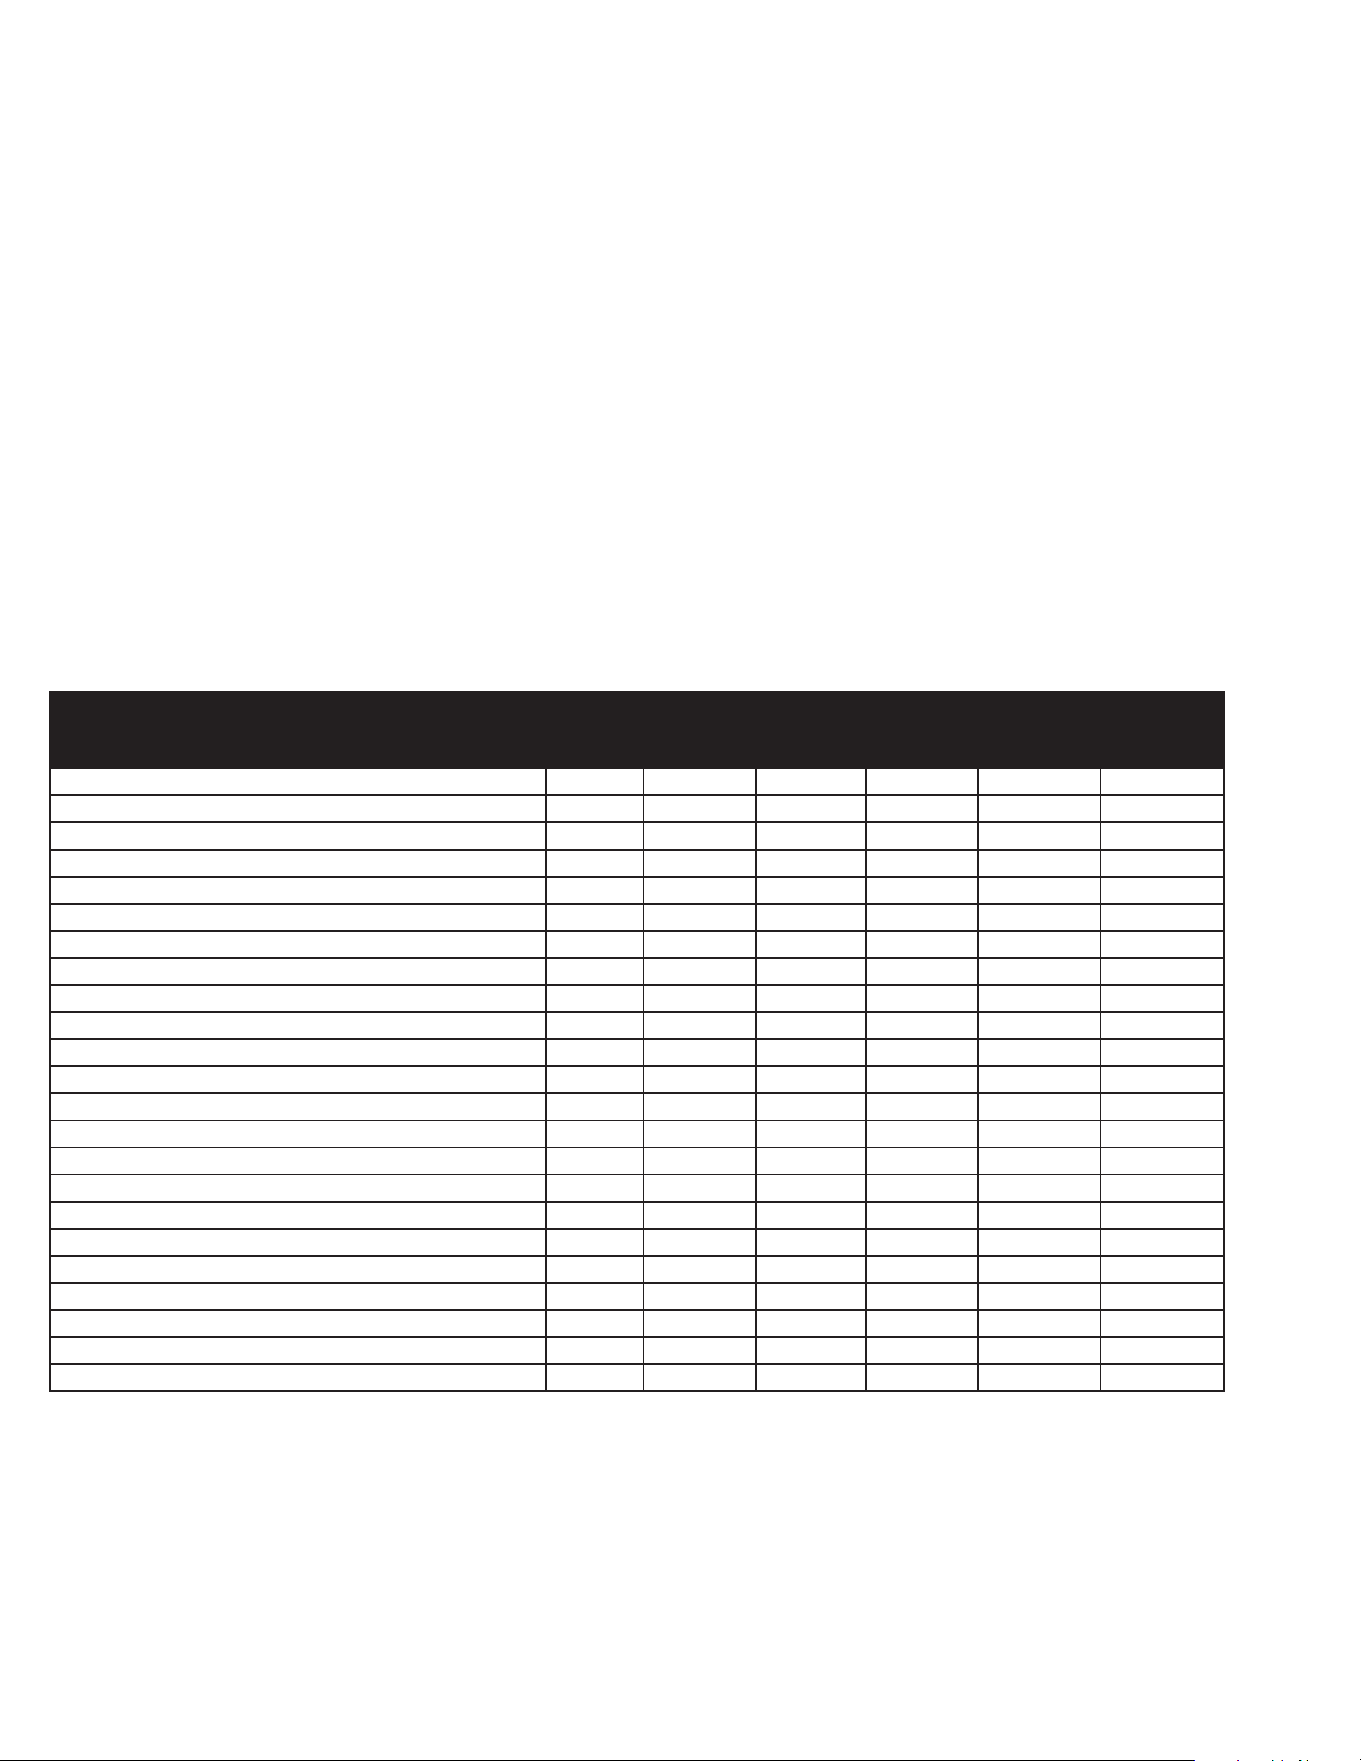
60 Manual del Operador
MANTENIMIENTO
Leer el manual de instrucciónes antes de efecturar cualquier operación de mantenimiento. Mantener limpias las aber-
turas de ventilación. Mantenga el unidad limpiado. No rociar con agua. Revisar periódicamente los tornillos y pernos, y
ajustarlos en la medida de lo necesario (véase el cuadro de mantenimiento periódico).
Las operaciónes descritas a continuación deben ser llevadas a cabo cuando el compresor se apaga por mantenimien-
to o reparaciónes:
1. Apagar el compresor de aire.
2. Desconectar el cable de la toma de corriente principal.
3. Abrir todas las descargas.
4. Esperar que el compresor de aire se haya enfriado antes de comenzar las operaciónes.
Cuadro de Mantenimiento periódico:
MANTENIMIENTO
El mantenimiento de un motor a intervalos regulares asegura su funcionamientosatisfactorio por largos periodos. En el
siguiente cuadro de mantenimiento periódico se indican los elementos a inspeccionar y mantener, y la frecuencia de
ejecución de las tareas, que está marcada con un punto alineado con la tarea involucrada.
NOTA: Para ciertas tareas de regulación y calibración es necesario utilizar herramientas y equipos especiales. Para
calibrar la velocidad en vacío y de servicio, es sumamente conveniente contar con un tacómetro electrónico.
• El aceite de la bomba debe cambiarse después de 50 horas de trabajo y cada 200 horas o 3 meses, según la
condición que ocurra antes. Se recomienda el uso de sustancias puras sin detergente.
•• Ejecutar esta tareas después de las primeras cinco (5) horas de servicio, y después con la frecuencia indicada.
••• Aumentar la frecuencia si la unidad trabaja en ambientes muy polvorientos. Cada dos anòs, un técnico autorizado de
servicio debe inspeccionar la válvula, válvulas de entrar y válvulas de liberar.
Operación Diaria Semanal Men-
sual
Cada
100
Horas
Cada 200
Horas
Antes de
alma-
cenar
Controlar el nivel del aceite de la bomba x
Controlar el nivel del aceite de motor x
Inspeccionar que no haya pérdidas de aceite
x
Controlar el ltro de aire de motor x
Descargar la condensación del depósito/s de aire x
Controlar el cubierta/tapa x
Controlar que no hay ruidos/viraciones anómalos x
Inspeccionar que no hay fugas de aire x
Inspección de limpieza de aletas de cilindro y tapa de cilindros x
Inspección de nivel de electrolito de batería x
Inspección de línea de combustible (cambiar si fuera necesario) x
Limpiar el compresor de aire exteriormente x
Controlar el ltro del aire x
Controlar el correa x
Controlar la válvla de seguridad x
Cambio de aceite del motor (••) x
Limpieza del ltro de combustible x
Cambio del elemento de papel del ltro de aire (•••) x
Cambiar el aceite de la bomba (•) x
Sustituir el ltro del aire x
Compruebe el enchufe de chispa del motor x
Agregar estabilizador de combustible x
Dejar la unidad marcha hasta consumir el combustible x
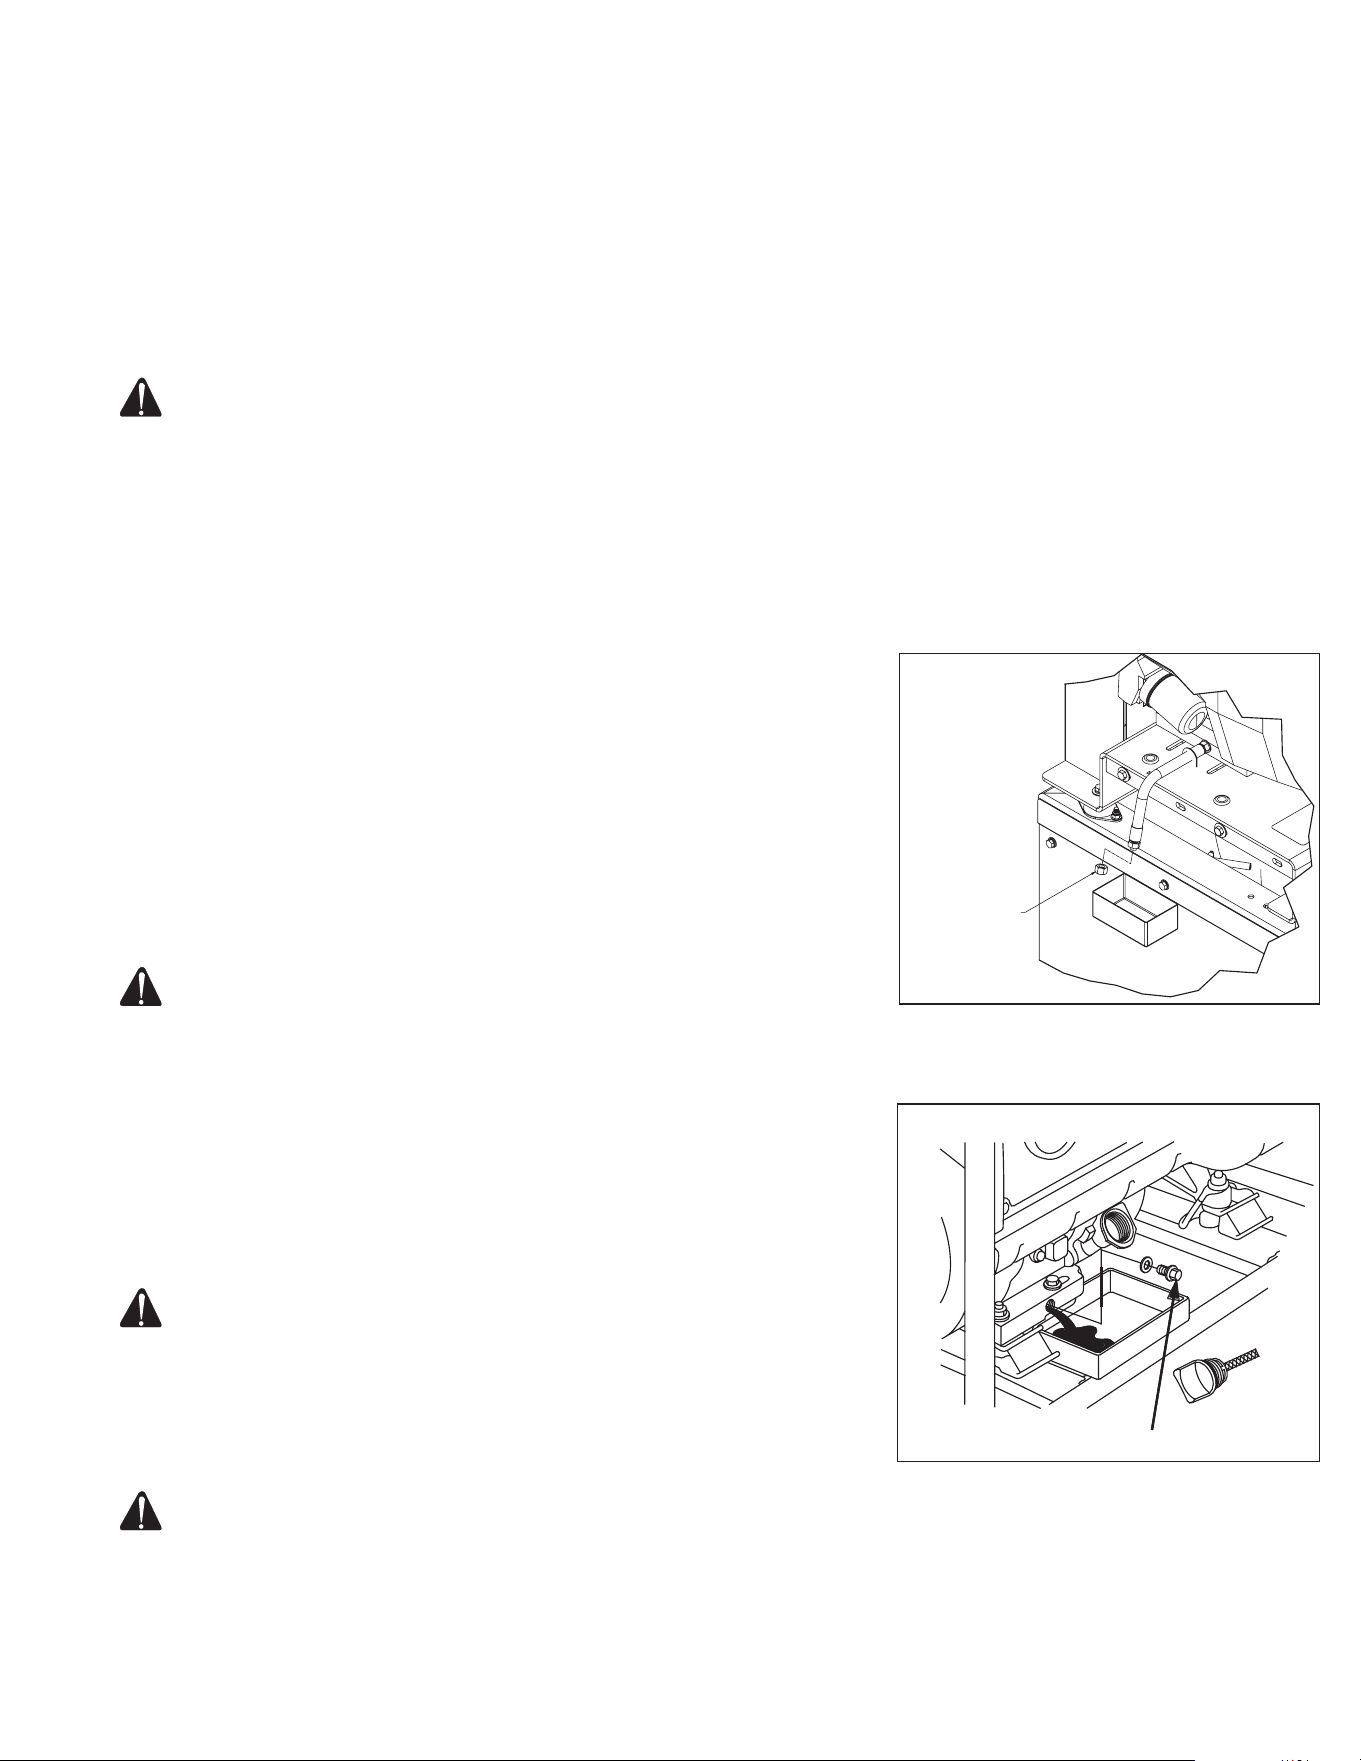
MANTENIMIENTO
Manual del Operador 61
MANTENIMIENTO
MOTOR:
El motor de este generador está gobernado para funcionar a velocidades
próximas a 3600 RPM (60Hz) durante la marcha dentro del rango de cargas
admisibles. La velocidad del motor antes de la aplicación de la carga es
levemente mayor que la velocidad baja carga, y normalmente está regulada
a 3750 RPM.
ADVERTENCIA: NO ALTERAR EL MECANISMO DEL GOBERNADOR
DE VELOCIDAD DE LA MÁQUINA, NI CAMBIAR SU
CALIBRACIÓN PARA EXPERIMENTAR, NI ABRIR AL MÁXIMO
EL ACELERADOR PARA TRATAR DE GENERAR MÁS POTENCIA
ELÉCTRICA, YA QUE SE PUEDE DAÑAR EL EQUIPO O CAUSAR
ACCIDENTES PERSONALES.
LA REGULACIÓN DEL GOBERNADOR DE VELOCIDAD SE DEBE
LLEVAR A CABO ÚNICAMENTE EN UN CONESIONARIO DE
JOHN DEERE.
INSPECCIÓN DEL NIVEL DE ACEITE:
Antes de ponga en marcha la máquina, revise siempre el nivel de aceite y
mantener seguido en las pautas; referir a manual de motor de este unidad.
CAMBIO DE ACEITE DEL MOTOR:
Cambie el aceite después de las primeras 25 horas de funcionamiento, y
después hacerio cada 50 horas.
1. Asegúrese que la unidad está en tierra nivel. Opere el motor para calentar
el aceite.
2. Pare el motor.
3. Evite tapón de descarga del aceite. (Fig. 1)
PRECAUCIÓN: EL ACEITE PODRÍA ESTAR MUY CALIENTE. TOMAR
PRECAUCIONES PAR EVITAR LESIONES PERSONALES.
DESECHAR EL ACEITE USADO SEGÚN LOS REGLAMENTOS
VIGENTES.
4. Decargue aceite mientras motor es tipido entre envase apropiado.
5. Reinstale tapón de descarga del aceite.
6. Evite indicador de aceite y rellenar con aceite nuevo. (Fig. 2)
7. Revise el nivel del aceite como informado del manual el motor.
8. Limpie algo aceite que derramado.
FILTRO DE AIRE:
ADVERTENCIA: LIMPIE EL ELEMENTO DEL FILTRO EN UN
ÁREA BIEN VENTILADA. ASEGURARSE DE QUE NO HAYAN
ELEMENTOS QUE PRODUZCAN CHISPAS NI LLAMAS EN
LAS CERCANÍAS DEL LUGAR DE TRABAJO, INCLUYENDO
LLAMAS PILOTO. NO USE COMBUSTIBLES NI SOLVENTES DE
BAJO PUNTO DE IGNICIÓN PARA LIMPIAR EL ELEMENTO DEL
FILTRO, YA QUE SE PONRÍA GENERAR UN INCENDIO O UNA
EXPLOSIÓN..
PRECAUCIÓN: NO PONGA EL MARCHA EL MOTOR SIN EL FILTRO
DE AIRE, YA QUE SE PONDRÍAN CAUSAR SERIAS AVERÍAS.
Inspeccione el estado del ltro de aire todos los días, o antes de arrancar el
motor. No permite que se acumule suciedad ni residuos en el ltro, y cam-
biar los componentes que se encuentren dañados.
(Fig. 1 MI-T-M)
(Fig. 1 Honda)
OIL DRAIN PLUG
OIL DRAIN PLUG
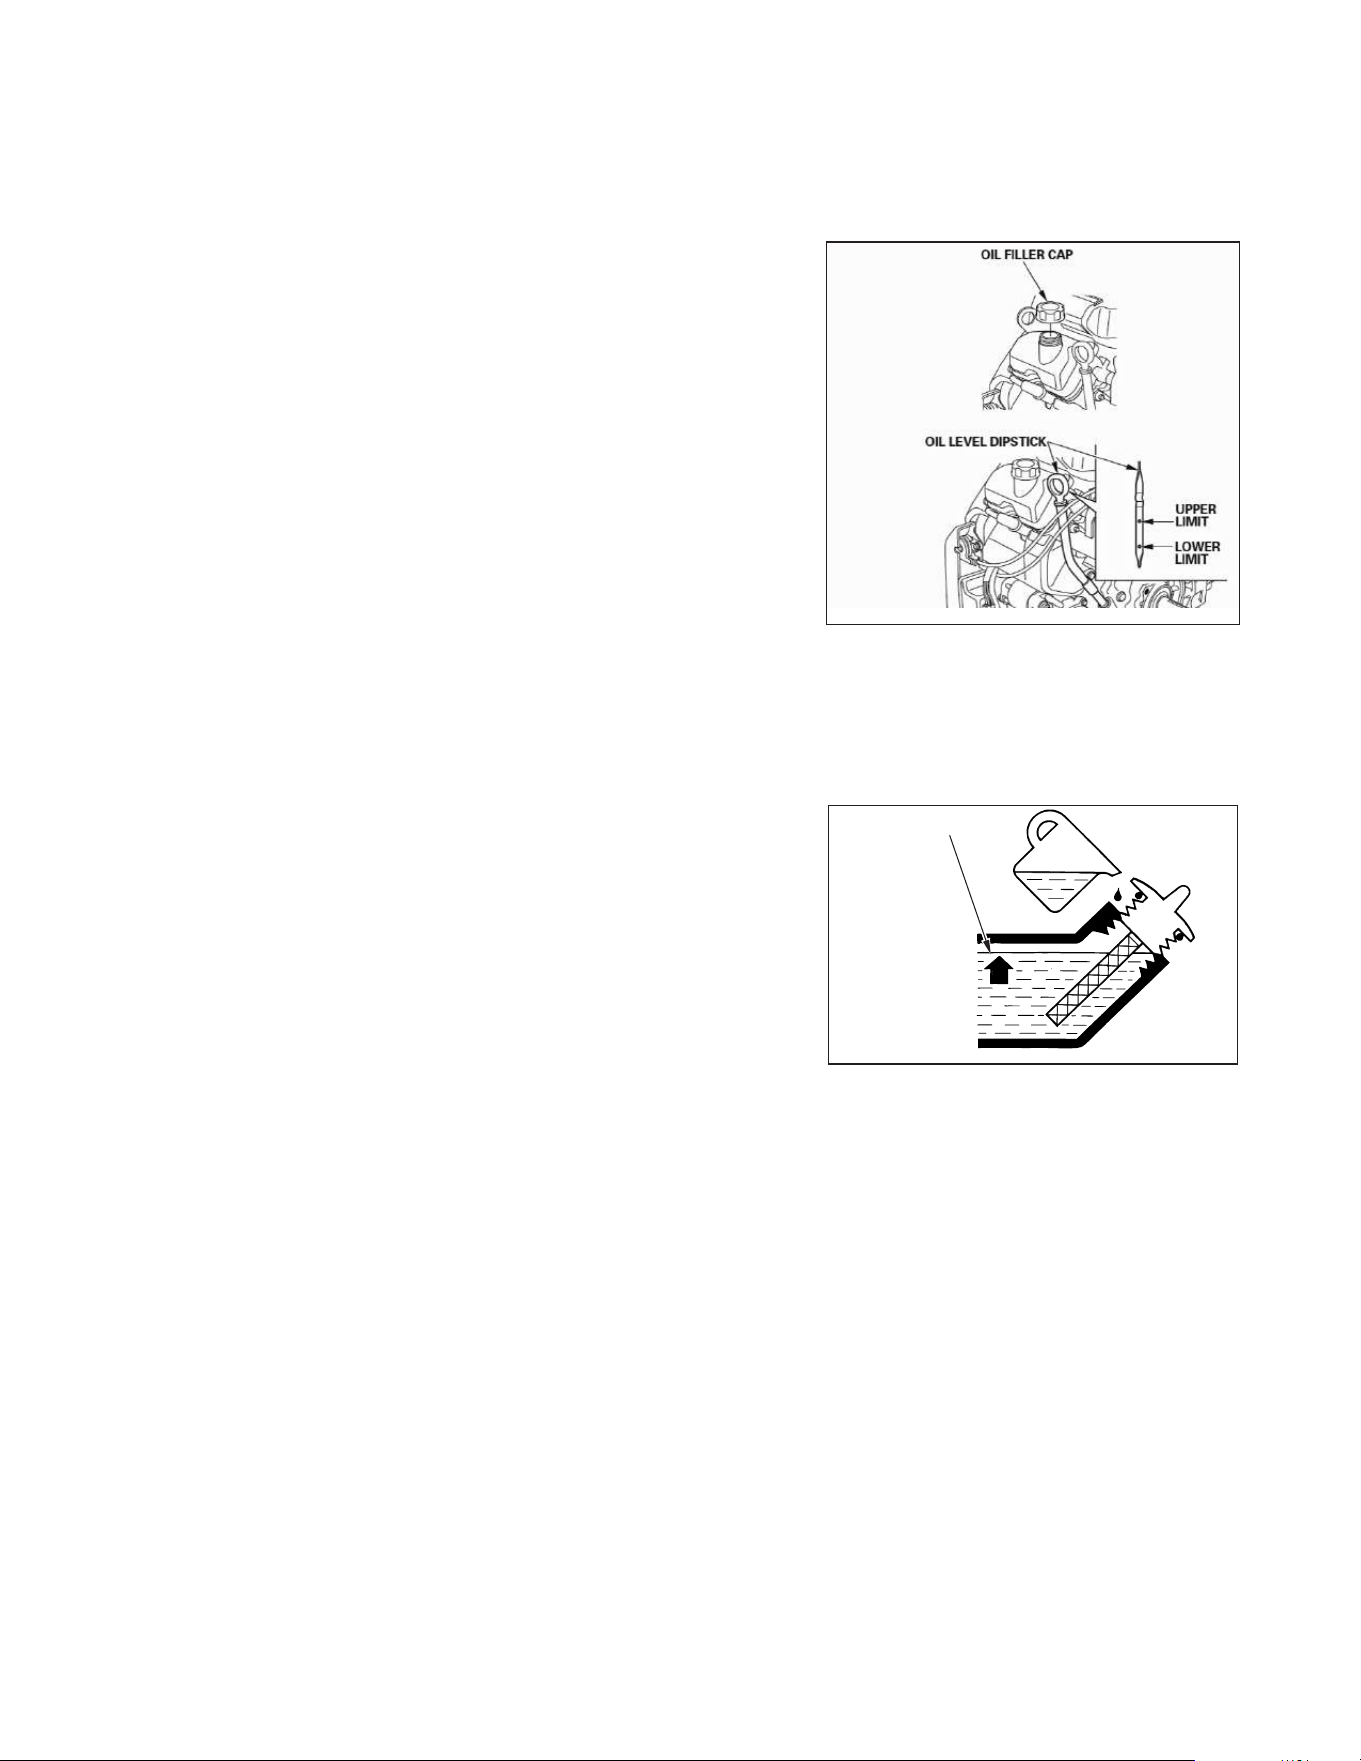
MANTENIMIENTO
62 Manual del Operador
1. Incerrar la tapa de limpiador de aire y envitar los elementos.
2. Limpie los elemento:
ELEMENTO FILTRANTE DE PAPEL: No lave el ltro de papel ni limpiarlo
con aire comprimido, ya que se pondría dañar. Simplemente golpeario y
sacudirlo con suavidad para eliminar el polvo. Cambiar el ltro de papel si
estuviera dañado, doblado o muy sucio. Manejar con cuidado el ltro de
papel nuevo, y no usario si las superces de unión estuvieran dobladas o
averiadas.
NOTA: Cambie el filtro de papel cada 100 horas de servicio (o con mayor
frecuencia si las condiciones de servicio son extremadamente pol-
vorientas o sucias).
3. Reinstale el elemento de ltro de papel con aire comprimido. Cierre tapa
de ltro y sujetar.
COMPONENTES DE EMISIÓN EVAPORADO:
La unidad que compró incluir los components siguentes que son de acu-
erdo con los Estandardes de Emisión Evaporado de California Air Resources
Board de 2006.
ESTANDARDES DE EMISIÓN:
1. Manguera de combustible
2. Instalaciones de Manguera de combustible
3. Del tanque de combustible y la tapa
4. Carbon Canister y soportes de montaje
Estos componenetes deben tener inspección en un base diario para grietas,
agujeros y uso abnormal. Si ocurrió las grietas, agujeros o uso abnormal,
reemplace los components inmediatamente.
REGULACIÓN DE VELOCIDAD DEL CONTROL DE MARCHA EN VACIO:
NOTA: La velocidad automática en vacío está calibrada entre 2640 y
2940 RPM.
La velocidad de vacío viene regulada de fábrica y raramente necesita reca-
libración. Es recomendable llevar a cabo las regulaciones de este tipo en un
concesionario de Mi-T-M.
Cuando se produce funcionamiento errático del motor en vacío, normal-
mente es indicación de que se debe regular el carburador. Si la velocidad en
vacío es menor que el límite inferior recomendado o el carburador está mal
regulado, el control de velocidad en vacío no funcionará normalmente.
TENGA SERVICIO PARA SU UNIDAD DE UN CONCESIONARIO AU-
THORIZADO DE Mi-T-M.
REGISTRO DE PRUEBAS DE DISYUNTORES DE FALLA A TIERRA:
Al igual que otros dispositivos de seguridad, el GFCI incorporado a estos
generadores requiere una inspección mensual para comprobar que funcione
correctamente. Para someter el GFCI a prueba, siga las instrucciones y
registre la fecha de la prueba en el cuadro que véase la ilustraciónura más
abajo.
1. Ponga el conmutador de control de marcha lenta en la posición
<<START>> (arranque) (Si se encuentra equipado de esta manera).
A continuación, oprima el botón <<TEST>> (prueba), lo cual
hará que se levante el botón ><<RESET>> (posición inicial). Esto
interrumpirá el suministro de electricidad hacia ambos toma corrientess
del enchufe doble. Compruebe la interrupción una lámpara en cada
tomacorrientes.
(Fig. 2 Honda)
UPPER LEVEL
(Fig. 2 MI-T-M)
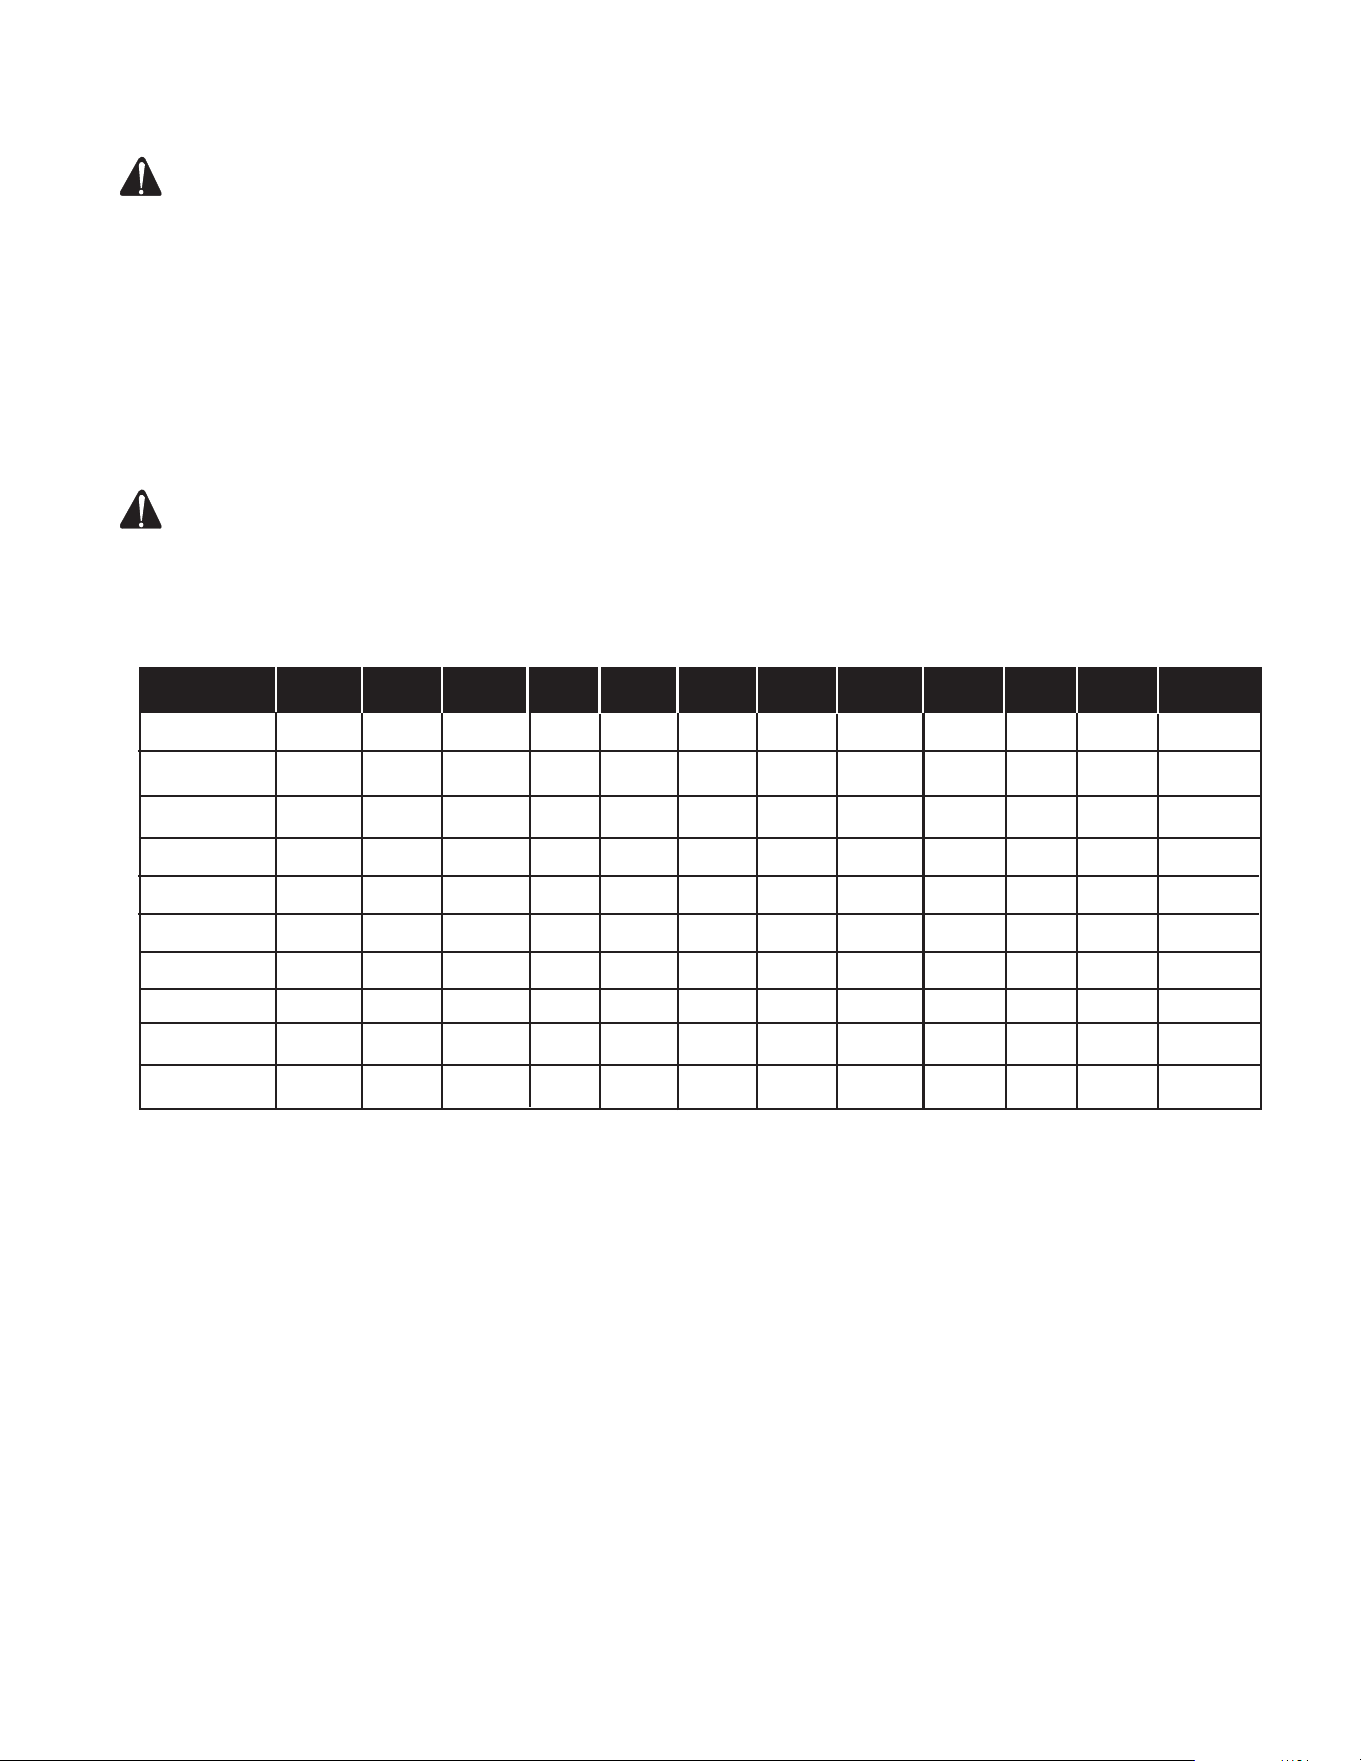
MANTENIMIENTO
Manual del Operador 63
ADVERTENCIA: SI EL BOTÓN DE COLOCAR NO SALTE AFUERA,
NO USE EL RECIPIENTE(S). VEA UN CONCESIONARIO
AUTORIZADO DE MI-T-M PARA SERVICIO INMEDIATAMENTE.
2. Si el resultado de la prueba indica que el GFCI funciona correctamente,
conéctelo nuevamente a la electricidad presionando FIRMEMENTE el
botón <<RESET>> (posición inicial) hasta que escuche con claridad un
clic o sienta que ha vuelto a caer en posición.
3. La alta vibración o el efecto de cargas mecánicas severas pueden hacer
que el GFCI se dispare. SI EL GFCI SE DISPARA POR SI MISMO EN
CUALQUIER MOMENTO, vuelva a ponerlo en la posición inicial y póngalo
a prueba según se indica en los puntos anteriores 1 y 2.
4. Para el segundo disyuntor de falla a tierra, repetir los pasos 1 a 3.
ADVERTENCIA: AUNQUE LOS PROCEDIMIENTOS DE EXAMEN
ARRIBA INDICARÁN OPERACIÓN CORRECTO EN UN
GENERADOR BAJO TIERRA O A TIERRA INCORRECTO,
EL GENERADOR TIENE QUE TOMAR A TIERRA DE
INSTRUCCIONES DE CONEXIÓN A TIERRA QUE ESTÁ EN
UNALISTA DE PAGIÑA 82 PARA GFCI OPERE CORRECTO Y
PARA PROTEJAR EL USADOR DE FALLAS ELÉCTRICAS.
NOTA: Existen casos en los que el GFCI no ofrece protección contra el peligro de contacto con la electricidad,
EJEMPLO: Si une apersona toca dos conductores o más de un cordón eléctrico defectuoso y no se encuen-
tra en contacto con la tierra, puede entonces experimentar un contacto con la electricidad. Dado que no
existe una vía para que pase la corriene de pérdida a tierra, el GFCI no funcionará y puede ocasionar daños
graves.
El GFCI es simplemente una característica de seguridad adicional. No existe ningún dispositivo que pueda
reemplazar las buenas medidas de seguridad en las tareas eléctricas y el mantenimiento adecuado de los
cables, del equipo y de las conexiones.
Año Ene. Feb. Mar. Apr. Mayo Jun. Jul. Ago. Sep. Oct. Nov. Dic.
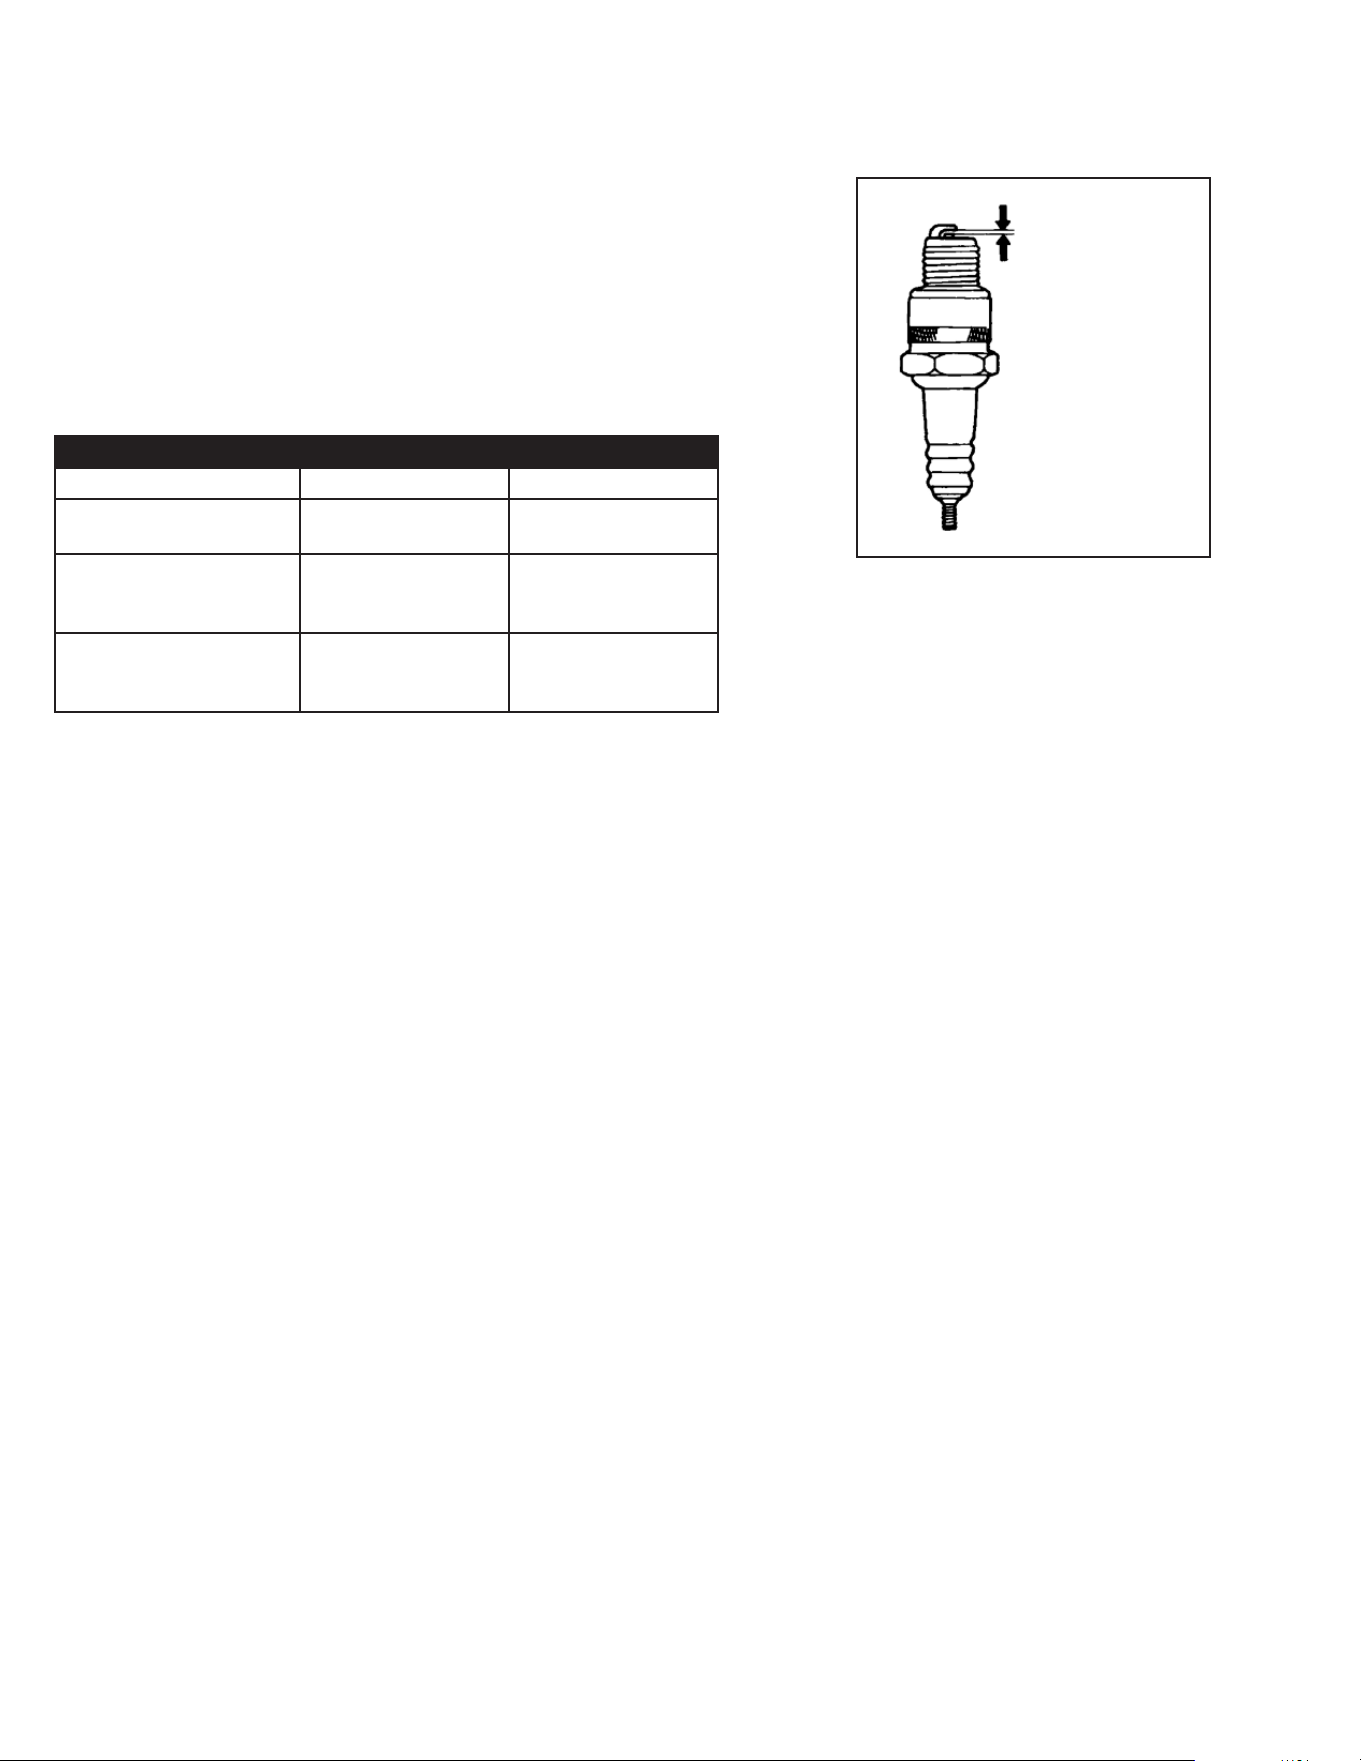
64 Manual del Operador
MANTENIMIENTO
MAINTENANCE
LIMPIEZA Y CALIBRACIÓN DE LUZ DE BUJÍA:
Si tapón sea contaminado con carbono, lo evite usando una limpieza de
tapón o cepilla de alambre.
Revise espacio de chispero y colocar si es necesario. Los espacios de chis-
pero están en una lista abajo. Para cambiar el espacio, torcer sólo el lado-
electrodo, usando herramiento de chispero. (Fig. 3)
Instale y aprete el chispero. Conecte el cable de chispero.
Chispero Recomendado:
AJUSTE DE TENSIÓN DE CORREAS: Para mantener la máxima eciencia
de su lavadora de alta presión, puede ser necesario ajustar la tensión de las
correas ocasionalmente. Siga el procedimiento que se describe a continu-
ación.
1. Quite el protector de correas y aoje las tuercas que están a los lados de
la bomba. Hay un total de 4 tuercas.
2. Gire el tornillo en el sentido de las manecillas del reloj hasta observar que
la correa se exiona una 1/2 pulgada (1,3 cm) entre las poleas.
3. Apriete las tuercas laterales.
4. Ponga una regla tocando el costado de ambas poleas. Si es necesario,
aoje los tornillos de una polea y muévala hacia adentro o hacia afuera
para que quede correctamente alineada. Apriete los tornillos de la polia y
verique otra vez la tensión.
5. Vuelva a poner la protección y apriete los sujetadores rmemente.
(Fig. 3)
Espacio de Tapón de
Chispa (Vea recomenda-
ciones)
MOTOR MI-T-M HONDA
CHISPERO NGK BPR6ES ZFR5F
ESPACIO DE CHISPER 0.7 Milímetros
(0.03 pulgadas)
0.7 Milímetros
(0.03 pulgadas)
ESFUERZO DE
TORSIÓNNUEVO
8.7-10.9 pie-libra 1/2 vuelta para
comprimir la
arandela
ESFUERZO DE
TORSIÓNREAPRETE
16.6-19.5 pie-libra 1/8 a 1/4 de vuel-
ta para comprimir
la arandela
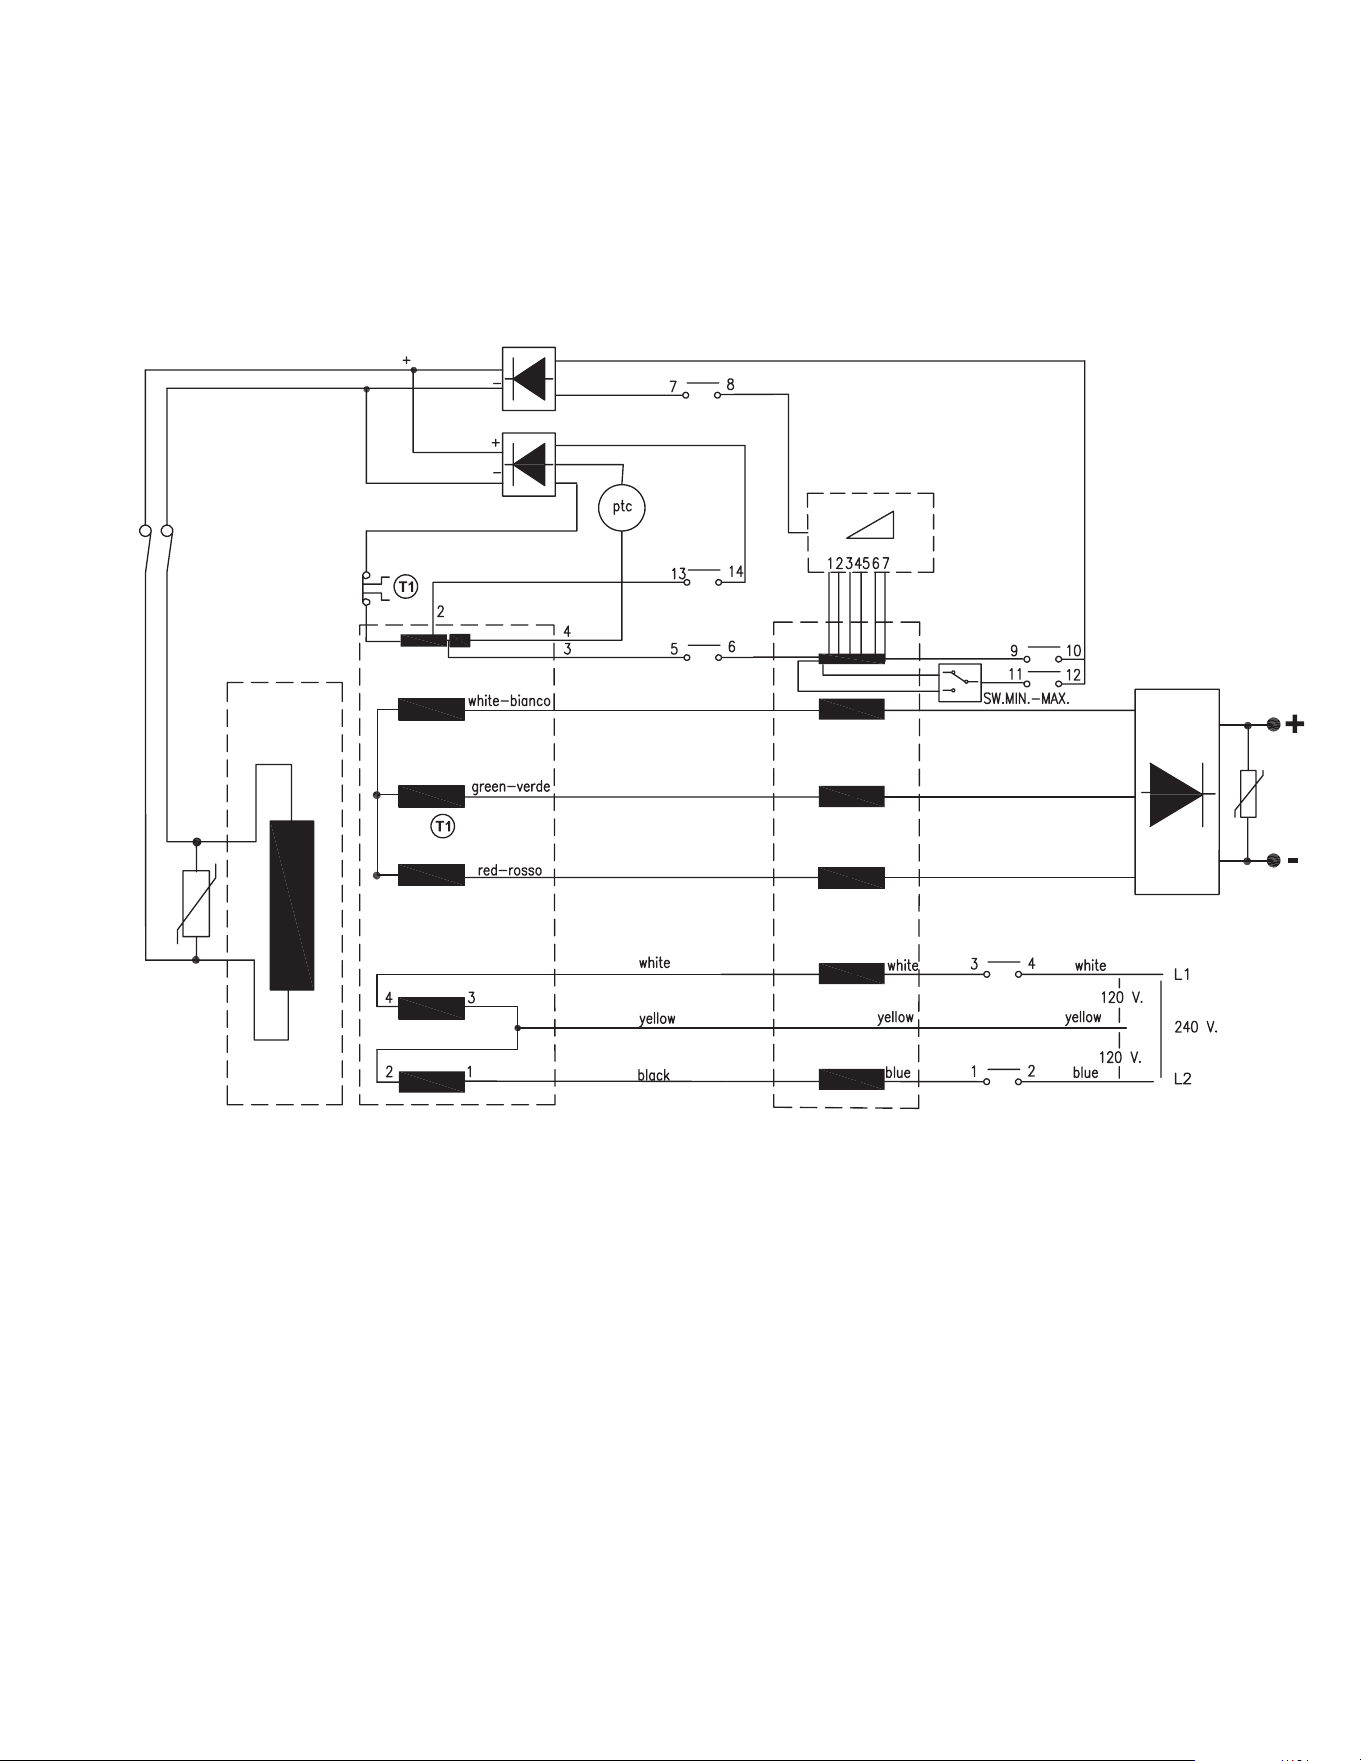
Manual del Operador 65
MANTENIMIENTO
IMPEDANCESTATORROTOR
RECTIFIER N° 1
RECTIFIER N° 2-3
SWITCH 2
WELDER OUT
Esquema de Cableado
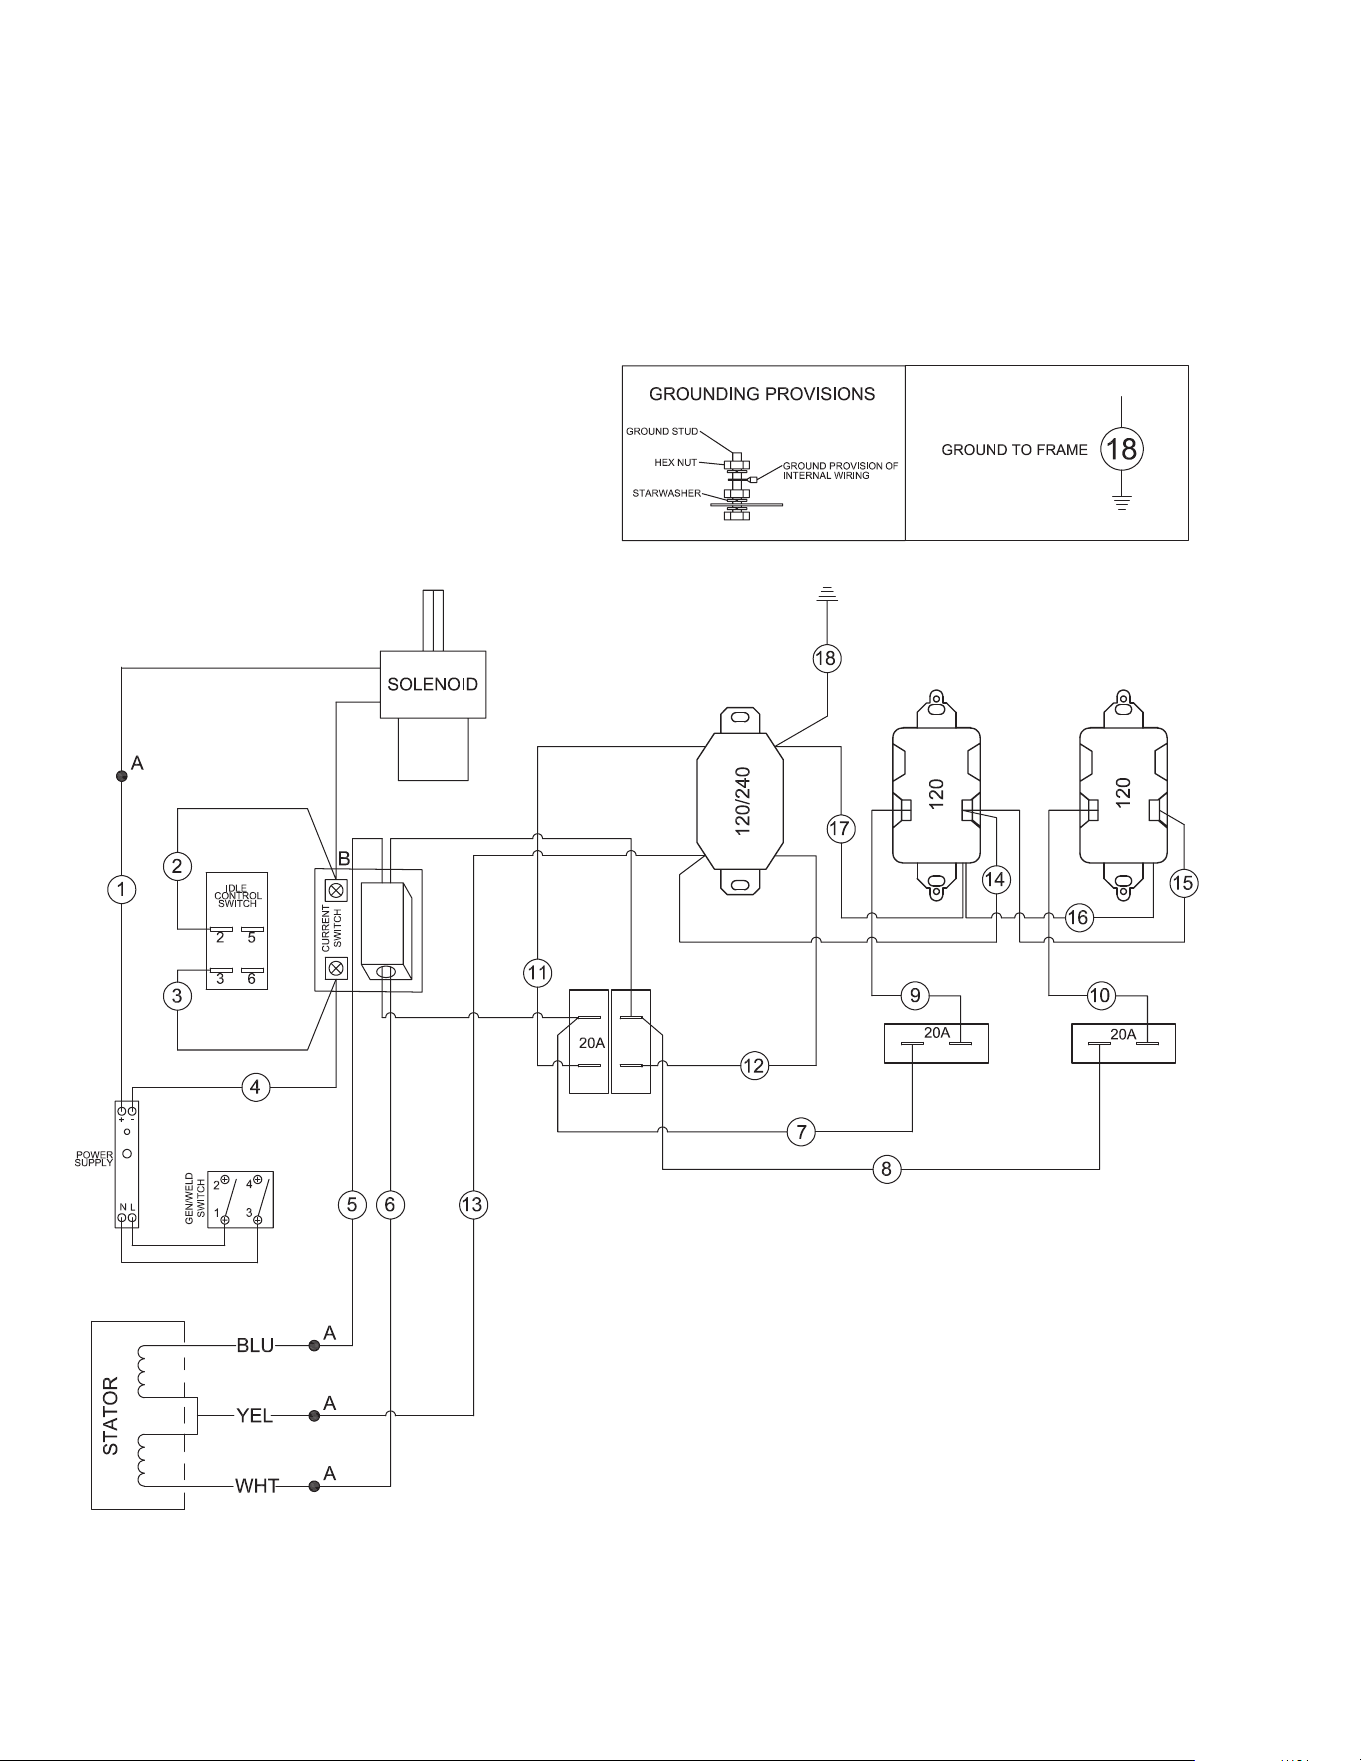
66 Manual del Operador
MANTENIMIENTO
DIAGRAMA DE CABLEADO - AGW-SM14 AND AGW-SV14 (DESPUÉS DEL NÚMERO DE SERIE #20284607)
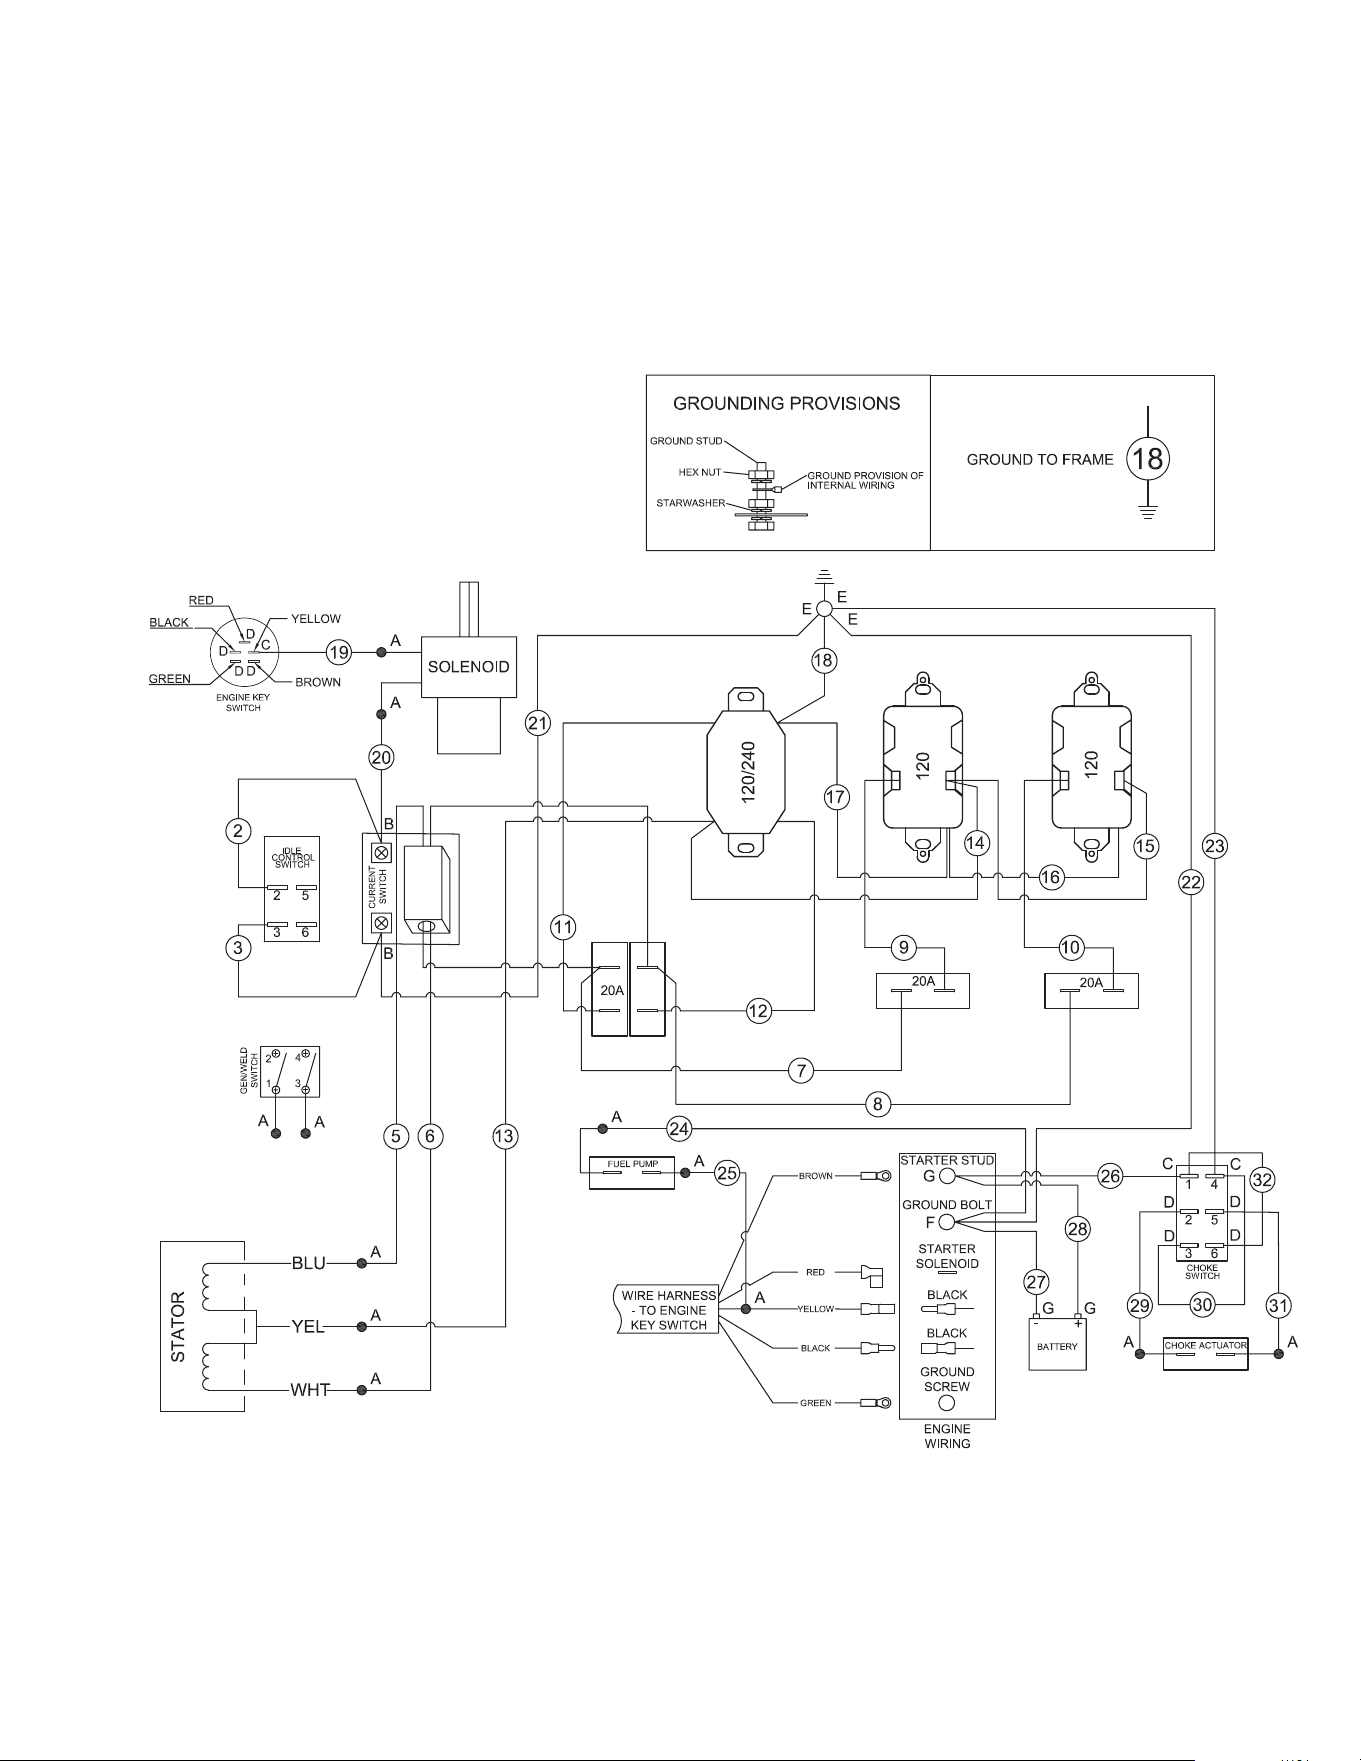
Manual del Operador 67
MANTENIMIENTO
DIAGRAMA DE CABLEADO - AGW-SM14 AND AGW-SV14 (DESPUÉS DEL NÚMERO DE SERIE #20284607) DIAGRAMA DE CABLEADO - AGW-SH22 (DESPUÉS DEL NÚMERO DE SERIE #20284448)

68 Manual del Operador
A CORTO PLAZO (1 A 6 MESES):
1. Agregue acondicionador y estabilizador de combustible, con la concentración
adecuada.
2. Ponga en marcha la unidad durnate dos (2) minutos para asegurar que la
mezcla de combustible se distribuya en todo el circuito. Cierre la válvula
de combustible y dejar en marcha la unidad hasta que se detenga.
3. Seque la bujía, ponga directamente en el cilindro una o dos cucharadas
(5 a 10 centímetros cúbicos) de aceite para motor, tirar lentamente 2 o 3
veces de la cuerda del arrancador, colocar la bujía y ajustarla rmemente.
4. Limpie la supercie externa del generador y aplique una capa de inhibidor
de corrosión.
5. Almacene el generador en un lugar seco y bien ventilado.
A LARGO PLAZO (MÁS DE 6 MESES):
1. Agregue acondicionador y estabilizador de combustible, con la concentración
adecuada.
2. Ponga en marcha la unidad hasta se consuma el combustible en el tanque
y en el carburador. Cuando el motor está aminorando la marcha, lleve la
palanca del cebador a la posición de cebado.
NOTA: Anular el control de marcha en vacío para reducir el tiempo en
marcha.
3. Seque la bujía, poner directamente en el cilindro una o dos cucharadas
(5 a 10 centímetros cúbicos) de aceite para motor, tirar lentamente 2 o 3
veces de la cuerda del arrancador, colocar la bujía y ajustarla rmemente.
4. Limpie la supercie externa del generador y aplique una capa de inhibidor
de corrosión.
5. Almacene el generador en un lugar seco y bien ventilado.
ADVERTENCIA: VACIE EL COMBUSTIBLE EN UN ÁREA BIEN
VENTILADA Y GUARDARLO EN UN RECIPIENTE APROBADO
PARA DICHO USO.
ALMACENAMIENTO

Manual del Operador 69
ARTÍCULO ESPECIFICACIÓN
AGW-SM14 / SV14-30M AGW-SM14 / SV14-B AGW-SH22-20M
Motor Mi-T-M ....................................Mi-T-M ................................ Honda
Modél R420E/25V3 ............................R420E/25V3 ....................... GX690
Aceite 1.1 L / 0.95 L ...........................1.1 L / 0.95 L ...................... 1.99 L
Vatios con el compresor 5000 ........................................5000.................................... 5000
Vatios sin el compresor 4500 ........................................4500.................................... 4500
Vatios con el compresor @100 PSI- 3000 ......................@100 PSI- 3000 .................. @100 PSI- 4500
Vatios con el compresor @150 PSI- 2500 ......................@150 PSI- 2500 .................. @150 PSI- 4500
Tension nominale 120 V .......................................120 V .................................. 120 V
Frecuencia 60 Hz ......................................60 Hz .................................. 60 Hz
Bomba Compresor Doble Fase ..............................Doble Fase ......................... Doble Fase
Aceite 0.73 L ......................................0.73 L.................................. 1.42 L
Depósito Aire 113.5 ......................................- .......................................... 88 L
Presión máximo 175 PSI ...................................175 PSI ............................... 175 PSI
ESPECIFICACIÓNES
ANOTE NúMERO SERIE
Escriba número de modelo, numero serie de máquina
(vea etiqueta de número serie (A) en ilustración y fecha
de compra en espacios abajo. Su concesario necesita
esta información cuando ordenando partes.
Num. de modelo _______________________________
Num. serie de máquina _________________________
______________________________________________
Fecha de compra ______________________________
(llene de comprador)
70 Manual del Operador
DECLARACIÓN DE GARANTÍA
Mi-T-M garantiza que todas las piezas (excepto aquellas a las que se hace referencia abajo), de su nueva
generador libres de defectos en materiales y mano de obra durante los periodos siguientes:
Por dos (2) años a partir de la fecha original de compra:
Bomba de Compresor Cañerias
Generador Asamblea de Tanque
Por seis (6) mes a partir de la fecha original de compra:
Interruptor de Presión Reguladores
Vàlvula de revisar Válvula de piloto
Linea de cobre/acero inoxidable
Por noventa (90) días a partir de la fecha original de compra:
Indicadores de presión Válvula de alivio de seguridad
Válvulas de desagüe
Las piezas defectuosas que no están sujetas a deterioro causado por el uso serán reparadas o reemplaza-
das a nuestra opción durante el periodo de garantía. En todo caso, el reembolso está limitado al precio de
compra pagado.
EXCLUSIONES
1. El motor está cubierto bajo una garantía separada proporcionada por el fabricante respectivo y está
sujeta a los términos en ella establecidos.
2. Partes de desgaste normal:
Aisladores Filtro de aire
3. Esta garantía no cubre las piezas dañadas debido al deterioro normal causado por el uso, mala aplicación,
mal uso, operación a velocidades, presiones o temperaturas diferentes a las recomendadas. Las piezas
dañadas o gastadas a causa del uso de líquidos cáusticos o por la operación en medios ambientes
abrasivos o corrosivos o bajo condiciones que causan cavitación de la bomba no están garantizadas.
La falla en seguir los procedimientos recomendados de operación y mantenimiento también cancela la
garantía.
4. Cobras de trabajar, peridio o daño resultando de operación mala, mantenimiento (otro de descarga de
tanque de aire rutina y cambios de aceite si aplica) o reparaciones hace por personas otro de Mi-T-M
Centro de servicio autorizado.
5. El uso de piezas de repuesto diferentes a las genuinas Mi-T-M cancelará la garantía. Las piezas devueltas,
con franqueo pagado a un Centro de Servicio Autorizado Mi-T-M serán inspeccionadas y reemplazadas,
libre de cargos, si se determina que están defectuosas y sujetas a la garantía. No existen garantías
que se extiendan más allá de la descripción contenida aquí. Bajo ninguna circunstancia Mi-T-M será
responsable por la pérdida de uso de la unidad, pérdida de tiempo, inconvenientes, pérdida comercial
o daños consecuentes.
PARA SERVICIO O CONSIDERACION DE LA GARANTIA CONSULTE CON:
Mi-T-M
®
Corporation/50 Mi-T-M Drive, Box 50/Peosta, IA 52068-0050
Telefono: 563-556-7484 / 800-553-9053 / Fax 563-556-1235
Lunes - Viernes 8:00 a.m. - 5:00 p.m. CST

Manual del Operador 71
DDEECCLLAARRAACCIIOONN DDEE CCOOBBEERRTTUURRAA DDEE EEMMIISSIIOONNEESS DDEE CCAALLIIFFOORRNNIIAA
SSUUSS DDEERREECCHHOOSS DDEE GGAARRAANNTTIIAA YY OOBBLLIIGGAACCIIOONNEESS
La Tabla de Recursos Aéreos de California y MI-T-M están felices para explicar la garantía de sistema de control de emisiones en
su 2022/2023 modelo del pequeño motor todoterreno (PMT). En California, Pequeños Motores Todoterreno (PMTs) nuevos tienen
que ser diseñados, construidos y equipados para conformar a los estándares rigurosos de no-niebla con humo del estado. Mi-T-M
debe justificar el sistema de control de emisiones en su PMT por los períodos de tiempo indicados abajo a condición que no ha
habido abuso, negligencia ni el mantenimiento impropio de su PMT.
Su sistema de control de emisiones puede incluir partes como el carburador, sistema de inyección de combustible, sistema de
ignición, catalizador, tanques de combustible, líneas de combustible, capas de combustible, válvulas, botes, filtros, mangueras de
vapor, abrazaderas, conectores, y otros componentes asociados relatados a la emisión. Donde existe una condición de la garantía,
Mi-T-M reparará su PMT en ningún costo a usted, incluyendo diagnóstico, las piezas, y trabajo.
COBERTURA DE GARANTIA DE FABRICANTE
Este sistema de control de emisiones tiene garantía durante dos años. Si cualquier parte que está relacionada a emisiones en su
motor es defectuosa, la parte será reparada o será reemplazada por Mi-T-M.
RESPONSABILIDADES DE GARANTIA DEL PROPIETARIO
-Como el propietario del Pequeño Motor Todoterreno, usted es responsable de la ejecución del mantenimiento necesario indicado
en su manual de propietario. Mi-T-M recomienda que usted retenga todos recibos sobre el mantenimiento de su PMT, pero Mi-T-M
no puede negar de garantía solo para la falta de recibos.
-Como el propietario del Pequeño Motor Todoterreno, usted debe saber que Mi-T-M puede negar cobertura de garantía si su
Pequeño Motor Todoterreno o una pieza ha fracasada a causa de abuso, negligencia o el mantenimiento impropia o las
modificaciones desaprobadas.
-Usted es responsable de presentar su Pequeño Motor Todoterreno al centro de distribución o centro de reparaciones autorizado
por Mi-T-M Corporation, 50 Mi-T-M Drive, Peosta, IA 52068 (Mi-T-M) en pronto que un problema exista. Las reparaciones de
garantía deben ser completadas en una cantidad razonable de tiempo, no exceder 30 días.
Si usted tiene una pregunta con respecto a su cobertura de garantía, usted debe contactar el Departamento de Servicio para
Clientes de Mi-T-M en 1-800-553-9053 o por correo electrónico a corp@mitm.com.
CCOOBBEERRTTUURRAA GGEENNEERRAALL DDEE GGAARRAANNTTIIAA DDEE EEMMIISSIIOONNEESS
--SSóólloo CCaalliiffoorrnniiaa--
Mi-T-M justifica al último comprador y cada comprador subsiguiente que el Pequeño Motor Todoterreno PMT (1) ha sido diseñado,
construido y equipado para conformarse con todas regulaciones aplicables; y (2) es libre de defectos en materias y disfraza que
causa el fracaso de una pieza garantizado conformarse con esas regula
ciones como puede ser aplicable a los términos y
condiciones que son indicados abajo.
(a) El período de garantía empieza en la fecha que el motor está entregado a un último comprador o cuando está primero puesto en
servicio. El período de garantía es dos años.
(b) Sujeto a ciertas condiciones y exclusiones como indicadas abajo, la garantía de piezas relatadas a emisiones es el siguiente:
(1) Cualquier pieza garantizada que no está programado para el reemplazo como mantenimiento necesario en su manual de
propietario está garantizado para el período de garantía indicado arriba. Si la pieza fracasa durante el período de cobertura
de garantía, la pieza será reparada o será reemplazada por Mi-T-M según la subdivisión (4) abajo. Cualquiera pieza reparada
o reemplazada bajo la garantía será garantizada para el resto del periodo.
(2) Cualquier pieza garantizada que está programada sólo para inspección regular en su manual de propietario está garantizada
para el período de garantía indicada arriba. Cualquiera pieza reparada o reemplazada bajo la garantía será garantizada por el
resto del período de garantía.
(3) Cualquier pieza garantizada que está programada para el reemplazo como mantenimiento necesario en su manual de
propietario está garantizado para el período del tiempo antes de la primera fecha planificada de reemplazo para esa pieza. Si
la pieza fracasa antes del primer reemplazo planificado, la pieza será reparada o será reemplazada por Mi-T-M según la
subdivisión (4) abajo. Cualquiera pieza reparada o reemplazada bajo la garantía será garantizada por el resto del período de
garantía antes del primer punto planificado de reemplazo para la pieza.
(4) Reparación o el reemplazo de alguna pieza garantizada bajo las provisiones de garantía en este debe ser realizado en una
estación de garantía sin cargo al propietario.
(5) Sin prejuicio de lo dispuesto en esta, los servicios de garantía y de reparación serán proporcionados en todos nuestros
centros de distribución que tengan la franquicia para atender a los motores sujetos.
(6) El propietario no debe ser cargado para trabajo diagnóstico que lleva a la determinación que una pieza garantizada es de
hecho defectuosa, con tal de que el trabajo diagnóstico sea realizado en una estación de garantía.
(7) A través del período de garantía de motor que está indicado arriba, Mi-T-M mantendrá un suministro de piezas garantizadas
suficientes para satisfacer la demanda esperada para tales partes.
(8) Cualquier pieza reemplazada puede ser utilizada en la ejecución de cualquier mantenimiento de garantía o reparaciones y
debe ser proporcionado sin cargo al propietario. Tal uso no reducirá las obligaciones de garantía de Mi-T-M.

72 Manual del Operador
(9) Las piezas añadidas o modificadas que no están eximidas por la Tabla de Recursos Aéreos no pueden ser utilizadas. El uso
de cualquier pieza a
ñ
adida o modificada que no está eximida por el último comprador será razón para no permitir o aceptar
un reclamo de la garantía. Mi-T-M no será responsable a garantizar los fracasos de piezas garantizadas causados por el uso
de una pieza a
ñ
adida o modificada que no está eximida.
(10) Mi-T-M proporcionará cualquier documento que describa los procedimientos o políticas de garantía de Mi-T-M dentro de
los cinco días hábiles posteriores a la solicitud del Director Ejecutivo.
(C) Piezas que tienen Garantía
La reparación o el reemplazo de cualquier parte garantizada de otro modo elegible para la cobertura de garantía pueden ser
excluidos de tal cobertura de garantía si Mi-T-M demuestra que el motor ha sido abusado, descuidado, o mantenido
incorrectamente, y que el abuso, negligencia, o mantenimiento impropio fue el causo directo de la necesidad para la reparación
o reemplaza de la pieza. Sin embargo, cualquier ajuste de un componente que tiene un dispositivo de la limitación de ajuste
que ha sido instalado por la fábrica y está funcionando apropiadamente todavía está elegible para la cobertura de la garantía.
Las siguientes piezas de garantía de emisiones están garantizadas:
(
1) Tanque de Combustible
(2) Tapa de Tanque de Combustible
(3) Líneas de Combustible (para combustible líquido y vapores de combustible)
(4) Accesorios de Líneas de Combustible
(5) Abrazaderas*
(6) Válvulas Limitadoras de Presión*
(7) Válvulas de Control*
(8) Control de Solenoides*
(9) Controles Electrónicos*
(10) Diafragmas de Control de Vacío*
(11) Cables de Control*
(12) Enlaces de Control*
(13) Válvula de Purga*
(14) Juntas*
(15) Separador de Liquido/Vapor
(16) Depósito De Carbón
(17) Depósito de Soporte de Montaje
(18) Conector de Puerto de Purga del Carburador
*Nota: Al estar estos relacionados con el sistema de control de emisiones por evaporación.

Manual del Operador 73

74 Manual del Operador
Manufactured by Mi-T-M
50 Mi-T-M Drive, Peosta IA 52068
563-556-7484/ Fax 563-556-1235