WARNING: Do not attempt to clean the machine
by inserting pointed objects through openings in the
machines casings etc. The machines air vents can be
cleaned using compressed dry air. Observe all
necessary H&S precautions when using compressed
air as a cleaning medium.
Excessive sparking may indicate the presence of dirt in
the motor or worn out carbon brushes.
If this is suspected have the machine serviced and the
brushes replaced by a qualied technician.
9. STORING
Store the machine, operating instructions and where
necessary the accessories in the original packaging.
In this way you will always have all the information and
parts ready to hand.
Pack the device well or use the original packaging in
order to avoid transit damage.
Always keep the machine in dry place
Remove the plug from the socket before carrying
out any adjustment, servicing or maintenance.
WARNING: Any maintenance must be carried out
with the machine switched off and disconnected from
the mains power supply.
On a regular basis check that all safety features and
guards are operating correctly. Only use this machine
if all guards/safety features are fully operational. All
motor bearings in this machine are lubricated for life.
No further lubrication is required. Use a clean, slightly
damp cloth to clean the plastic parts of the machine.
Do not use solvents or similar products which could
damage the plastic or rubber parts.
Removing the blade from the machine will allow
access to the inside of the blade guard. Any build up
of debris etc can be removed using a blunt non
metallic scrapper or similar tool (not supplied).
CUTTING
PRE-CUTTING CHECKS
Important!
■ Verify that the power supply corresponds to the
specications indicated on the machine’s rating
plate.
■ Make sure the machine’s trigger switch is set to the
‘OFF’ position. (Fig. 2) Connecting the machine to
a power source while the trigger switch is in the
‘ON’ position could cause the machine to start
unexpectedly, leading to a serious accident.
■ If an extension cable is necessary, it must be
appropriate for the work environment. When used
outdoors, it should be waterproof and clearly
labeled as such.
■ Always adhere to the manufacturer’s instructions
when using an extension cable.
■ Position any extension cable in a way that prevents
it from creating a tripping hazard or any other risk
to the operator, colleagues, or bystanders.
1) Blade Guard guard adjustment (Fig.6)
Adjust the blade guard angle with the knob so dust
and debris from the material or sparks do not contact
the operator during the cutting operation.
Check that the knob used to secure the blade guard is
tight. Make sure that the knob that secures the blade
guard is adequately tight.
If this knob is loose,it may result in injury to
the operator.
2) ON/OFF SWITCH(Fig. 7)
TO start the machine, press the safety lock (1) rst,
then press the power switch (2); the machine starts
and locks.
TO STOP THE MACHINE, press the trigger again, the
trigger pops out.
For Residual Current Device (RCD) operation please
follow these instructions:
■ When plugging the saw in the RCD will need to be
reset before the saw will power on. Plug the saw in,
press the reset button on the RCD, there will be a
click. (b)
■ The indicator window will change to RED to show
the power is on. (a)
■ To test, press the TEST button. Again, there will be
a click and the indicator window will switch to black
showing the power is off. (c)
■ Press the reset button again to reset and use the
saw.
Note: If the RCD trips during use, simply press RESET.
Cutting Procedures
(1)Place this tool on the material to be cut and align
the pre-marked line and the diamond blade.
The cutting can be performed smoothly if you cut
straight ahead on the scribe line in the initial cut.
(2)Turn on the switch when the diamond blade is not
touching the material to be cut.
CAUTION
Always check the diamond blade before starting
work. Never use a diamond blade which is cracked,
broken or bent.
Do not apply water or coolant to the diamond blade.
Start cutting only when diamond blade reaches its
maximum speed.
If the diamond blade seizes or there is any
abnormal noise, immediately turn the power off.
Never use the diamond blade to cut zigzag or curved
lines. Never use the side surface of the diamond
blade. Never use to perform inclination cutting.
If excessive force is applied to the diamond blade
to make it align with the pre-marked line during
cutting, this might not only overload the motor and
cause burn damage but may also overheat the
diamond blade and shorten the service life.
Take care not to allow the power cord to come into
contact with the diamond blade during operation.
When the work is completed,turn the power off and
disconnect the power plug from the receptacle.
Support the work piece in such a way that it is
possible to predict what will happen,and so that the
cut remains open while cutting.(Fig. 8)
Check that the blade is not in contact with anything
when the machine is started.
Always cut at the maximum speed.
Start cutting smoothly, allowing the machine to
work without forcing or pressing the blade.
Move the blade slowly forwards and backwards to
achieve a small contact area between the blade and
the material to be cut. This reduces the temperature
of the blade and ensures effective cutting(Fig. 9).
Feed down the machine in line with the blade.
Pressure from the side can damage the blade and
is very dangerous(Fig. 10).
1) Checking and installing the diamond
blade
Check the diamond blade is a specied one and is not
cracked,broken or bent.Check the diamond blade is
installed securely.
a. Installation
(1) Wipe the cutting dust from the spindle and washers.
(2) Make sure the rotation direction of the diamond
blade conforms to the direction indicated on the
blade guard and install the diamond blade as
shown in Fig. 3 and Fig. 4.
· When the bore diameter of the saw blade is 1"
(25.4mm), install the ange in the direction of A in
Fig. 3
· When the bore diameter of the saw blade is 2"
(50mm), install the ange in the direction of B in Fig. 3
(3) Firmly secure the spindle by tightening the bolt with
the provided wrench until fully fastened. Ensure
proper xation through manual verication.
(4) Manually rotate the blade to conrm smooth spindle
movement and verify secure installation without
resistance.
NOTE
· Always use the provided wrench to secure the bolt.
· Be careful because the bolt tightens to the left
(counterclockwise direction)to prevent it from being
loosened during cutting.
b. Removal
Remove the bolt with the provided wrench and remove
the diamond blade.
NOTE: Before using the tools, read the
instruction book carefully.
Ensure that the power source to be utilized
conforms to the power requirements
specified on the product nameplate.
Ensure that the power switch is in the OFF
position. If the plug is connected to a power
receptacle while the power switch is in the
ON position,the power tool will start
operating immediately, which could cause a
serious accident.
When the work area is removed from the
power source, use an extension cord of
sufficient thickness and rated capacity. The
extension cord should be kept as short as
practicable.
W125344A
Distributed by:
Hangzhou GreatStar Industrial Co., Ltd.
No.35 Jiuhuan Road, Shangcheng District,
Hangzhou 310019, China
www.greatstartools.com
Made in China
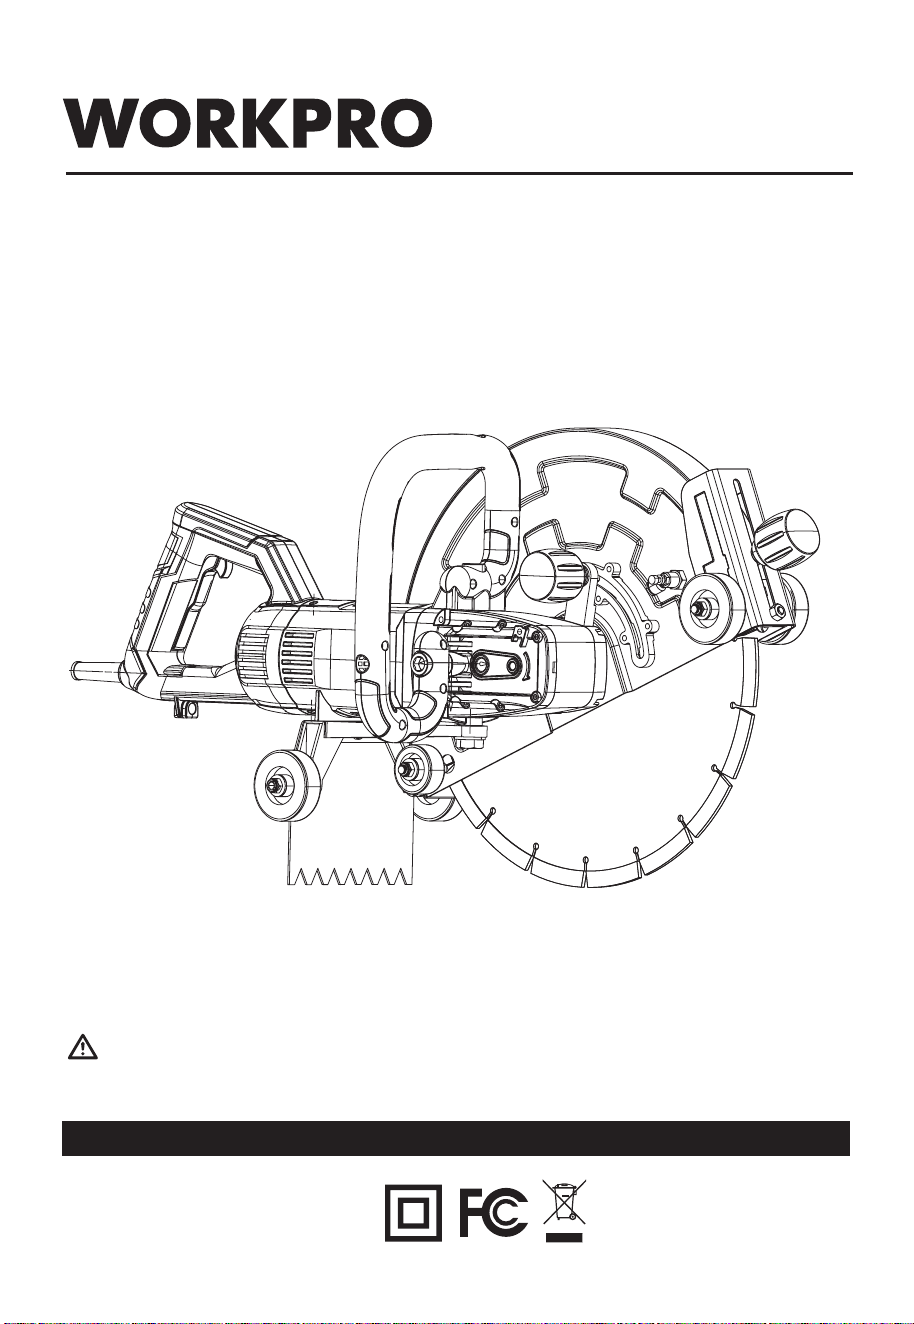
ORIGINAL SAFETY AND
OPERATING INSTRUCTIONS
CONCRETE SAW
WARNING: To reduce the risk of injury, the user must read and understand the
operator's manual.
Model#: 429-1
SAVE THIS MANUAL FOR FUTURE REFERENCE
WARNING: Do not attempt to clean the machine
by inserting pointed objects through openings in the
machines casings etc. The machines air vents can be
cleaned using compressed dry air. Observe all
necessary H&S precautions when using compressed
air as a cleaning medium.
Excessive sparking may indicate the presence of dirt in
the motor or worn out carbon brushes.
If this is suspected have the machine serviced and the
brushes replaced by a qualied technician.
9. STORING
Store the machine, operating instructions and where
necessary the accessories in the original packaging.
In this way you will always have all the information and
parts ready to hand.
Pack the device well or use the original packaging in
order to avoid transit damage.
Always keep the machine in dry place
Remove the plug from the socket before carrying
out any adjustment, servicing or maintenance.
WARNING: Any maintenance must be carried out
with the machine switched off and disconnected from
the mains power supply.
On a regular basis check that all safety features and
guards are operating correctly. Only use this machine
if all guards/safety features are fully operational. All
motor bearings in this machine are lubricated for life.
No further lubrication is required. Use a clean, slightly
damp cloth to clean the plastic parts of the machine.
Do not use solvents or similar products which could
damage the plastic or rubber parts.
Removing the blade from the machine will allow
access to the inside of the blade guard. Any build up
of debris etc can be removed using a blunt non
metallic scrapper or similar tool (not supplied).
CUTTING
PRE-CUTTING CHECKS
Important!
■ Verify that the power supply corresponds to the
specications indicated on the machine’s rating
plate.
■ Make sure the machine’s trigger switch is set to the
‘OFF’ position. (Fig. 2) Connecting the machine to
a power source while the trigger switch is in the
‘ON’ position could cause the machine to start
unexpectedly, leading to a serious accident.
■ If an extension cable is necessary, it must be
appropriate for the work environment. When used
outdoors, it should be waterproof and clearly
labeled as such.
■ Always adhere to the manufacturer’s instructions
when using an extension cable.
■ Position any extension cable in a way that prevents
it from creating a tripping hazard or any other risk
to the operator, colleagues, or bystanders.
1) Blade Guard guard adjustment (Fig.6)
Adjust the blade guard angle with the knob so dust
and debris from the material or sparks do not contact
the operator during the cutting operation.
Check that the knob used to secure the blade guard is
tight. Make sure that the knob that secures the blade
guard is adequately tight.
If this knob is loose,it may result in injury to
the operator.
2) ON/OFF SWITCH(Fig. 7)
TO start the machine, press the safety lock (1) rst,
then press the power switch (2); the machine starts
and locks.
TO STOP THE MACHINE, press the trigger again, the
trigger pops out.
For Residual Current Device (RCD) operation please
follow these instructions:
■ When plugging the saw in the RCD will need to be
reset before the saw will power on. Plug the saw in,
press the reset button on the RCD, there will be a
click. (b)
■ The indicator window will change to RED to show
the power is on. (a)
■ To test, press the TEST button. Again, there will be
a click and the indicator window will switch to black
showing the power is off. (c)
■ Press the reset button again to reset and use the
saw.
Note: If the RCD trips during use, simply press RESET.
Cutting Procedures
(1)Place this tool on the material to be cut and align
the pre-marked line and the diamond blade.
The cutting can be performed smoothly if you cut
straight ahead on the scribe line in the initial cut.
(2)Turn on the switch when the diamond blade is not
touching the material to be cut.
CAUTION
Always check the diamond blade before starting
work. Never use a diamond blade which is cracked,
broken or bent.
Do not apply water or coolant to the diamond blade.
Start cutting only when diamond blade reaches its
maximum speed.
If the diamond blade seizes or there is any
abnormal noise, immediately turn the power off.
Never use the diamond blade to cut zigzag or curved
lines. Never use the side surface of the diamond
blade. Never use to perform inclination cutting.
If excessive force is applied to the diamond blade
to make it align with the pre-marked line during
cutting, this might not only overload the motor and
cause burn damage but may also overheat the
diamond blade and shorten the service life.
Take care not to allow the power cord to come into
contact with the diamond blade during operation.
When the work is completed,turn the power off and
disconnect the power plug from the receptacle.
Support the work piece in such a way that it is
possible to predict what will happen,and so that the
cut remains open while cutting.(Fig. 8)
Check that the blade is not in contact with anything
when the machine is started.
Always cut at the maximum speed.
Start cutting smoothly, allowing the machine to
work without forcing or pressing the blade.
Move the blade slowly forwards and backwards to
achieve a small contact area between the blade and
the material to be cut. This reduces the temperature
of the blade and ensures effective cutting(Fig. 9).
Feed down the machine in line with the blade.
Pressure from the side can damage the blade and
is very dangerous(Fig. 10).
1
1) Checking and installing the diamond
blade
Check the diamond blade is a specied one and is not
cracked,broken or bent.Check the diamond blade is
installed securely.
a. Installation
(1) Wipe the cutting dust from the spindle and washers.
(2) Make sure the rotation direction of the diamond
blade conforms to the direction indicated on the
blade guard and install the diamond blade as
shown in Fig. 3 and Fig. 4.
· When the bore diameter of the saw blade is 1"
(25.4mm), install the ange in the direction of A in
Fig. 3
· When the bore diameter of the saw blade is 2"
(50mm), install the ange in the direction of B in Fig. 3
(3) Firmly secure the spindle by tightening the bolt with
the provided wrench until fully fastened. Ensure
proper xation through manual verication.
(4) Manually rotate the blade to conrm smooth spindle
movement and verify secure installation without
resistance.
NOTE
· Always use the provided wrench to secure the bolt.
· Be careful because the bolt tightens to the left
(counterclockwise direction)to prevent it from being
loosened during cutting.
b. Removal
Remove the bolt with the provided wrench and remove
the diamond blade.
NOTE: Before using the tools, read the
instruction book carefully.
Ensure that the power source to be utilized
conforms to the power requirements
specified on the product nameplate.
Ensure that the power switch is in the OFF
position. If the plug is connected to a power
receptacle while the power switch is in the
ON position,the power tool will start
operating immediately, which could cause a
serious accident.
When the work area is removed from the
power source, use an extension cord of
sufficient thickness and rated capacity. The
extension cord should be kept as short as
practicable.
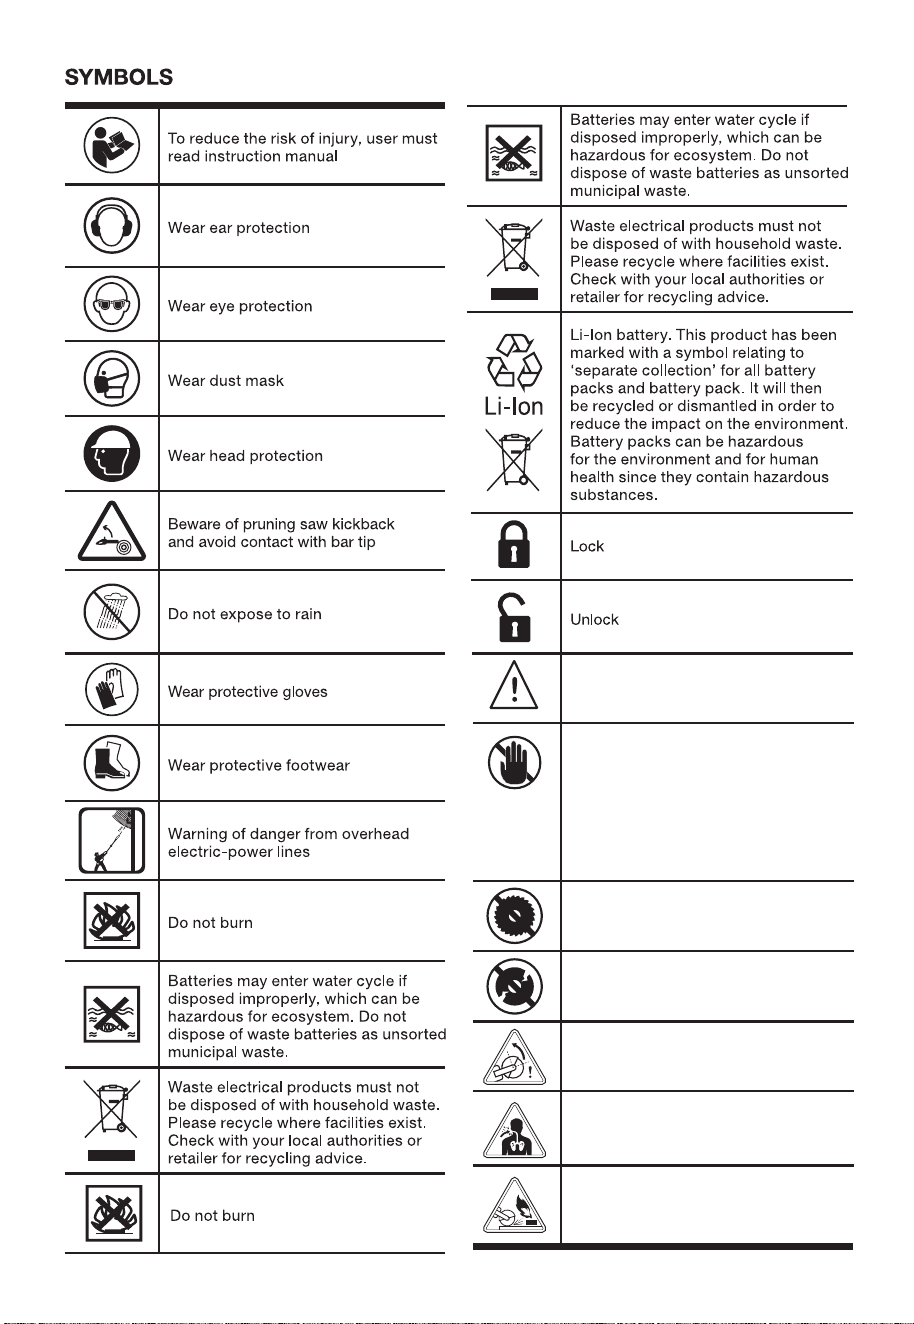
Warning!
Keep Hands away. Do not place your
hand on or below the line marked with
this symbol on the front handle. Ensure
hand is kept above the line & symbol at
all times to ensure a safe distance
between your hand and the blade.
Failure to do so may cause injury.
Only use diamond blades, do not use
toothed blades
Don't use defected or broken blades
High risk of kickback
Risk of dust inhalation
Risk of Fire. Ensure surrounding area is
free from ammable materials.

WARNING: Do not attempt to clean the machine
by inserting pointed objects through openings in the
machines casings etc. The machines air vents can be
cleaned using compressed dry air. Observe all
necessary H&S precautions when using compressed
air as a cleaning medium.
Excessive sparking may indicate the presence of dirt in
the motor or worn out carbon brushes.
If this is suspected have the machine serviced and the
brushes replaced by a qualied technician.
9. STORING
Store the machine, operating instructions and where
necessary the accessories in the original packaging.
In this way you will always have all the information and
parts ready to hand.
Pack the device well or use the original packaging in
order to avoid transit damage.
Always keep the machine in dry place
Remove the plug from the socket before carrying
out any adjustment, servicing or maintenance.
WARNING: Any maintenance must be carried out
with the machine switched off and disconnected from
the mains power supply.
On a regular basis check that all safety features and
guards are operating correctly. Only use this machine
if all guards/safety features are fully operational. All
motor bearings in this machine are lubricated for life.
No further lubrication is required. Use a clean, slightly
damp cloth to clean the plastic parts of the machine.
Do not use solvents or similar products which could
damage the plastic or rubber parts.
Removing the blade from the machine will allow
access to the inside of the blade guard. Any build up
of debris etc can be removed using a blunt non
metallic scrapper or similar tool (not supplied).
CUTTING
PRE-CUTTING CHECKS
Important!
■ Verify that the power supply corresponds to the
specications indicated on the machine’s rating
plate.
■ Make sure the machine’s trigger switch is set to the
‘OFF’ position. (Fig. 2) Connecting the machine to
a power source while the trigger switch is in the
‘ON’ position could cause the machine to start
unexpectedly, leading to a serious accident.
■ If an extension cable is necessary, it must be
appropriate for the work environment. When used
outdoors, it should be waterproof and clearly
labeled as such.
■ Always adhere to the manufacturer’s instructions
when using an extension cable.
■ Position any extension cable in a way that prevents
it from creating a tripping hazard or any other risk
to the operator, colleagues, or bystanders.
1) Blade Guard guard adjustment (Fig.6)
Adjust the blade guard angle with the knob so dust
and debris from the material or sparks do not contact
the operator during the cutting operation.
Check that the knob used to secure the blade guard is
tight. Make sure that the knob that secures the blade
guard is adequately tight.
If this knob is loose,it may result in injury to
the operator.
2) ON/OFF SWITCH(Fig. 7)
TO start the machine, press the safety lock (1) rst,
then press the power switch (2); the machine starts
and locks.
TO STOP THE MACHINE, press the trigger again, the
trigger pops out.
For Residual Current Device (RCD) operation please
follow these instructions:
■ When plugging the saw in the RCD will need to be
reset before the saw will power on. Plug the saw in,
press the reset button on the RCD, there will be a
click. (b)
■ The indicator window will change to RED to show
the power is on. (a)
■ To test, press the TEST button. Again, there will be
a click and the indicator window will switch to black
showing the power is off. (c)
■ Press the reset button again to reset and use the
saw.
Note: If the RCD trips during use, simply press RESET.
Cutting Procedures
(1)Place this tool on the material to be cut and align
the pre-marked line and the diamond blade.
The cutting can be performed smoothly if you cut
straight ahead on the scribe line in the initial cut.
(2)Turn on the switch when the diamond blade is not
touching the material to be cut.
CAUTION
Always check the diamond blade before starting
work. Never use a diamond blade which is cracked,
broken or bent.
Do not apply water or coolant to the diamond blade.
Start cutting only when diamond blade reaches its
maximum speed.
If the diamond blade seizes or there is any
abnormal noise, immediately turn the power off.
Never use the diamond blade to cut zigzag or curved
lines. Never use the side surface of the diamond
blade. Never use to perform inclination cutting.
If excessive force is applied to the diamond blade
to make it align with the pre-marked line during
cutting, this might not only overload the motor and
cause burn damage but may also overheat the
diamond blade and shorten the service life.
Take care not to allow the power cord to come into
contact with the diamond blade during operation.
When the work is completed,turn the power off and
disconnect the power plug from the receptacle.
Support the work piece in such a way that it is
possible to predict what will happen,and so that the
cut remains open while cutting.(Fig. 8)
Check that the blade is not in contact with anything
when the machine is started.
Always cut at the maximum speed.
Start cutting smoothly, allowing the machine to
work without forcing or pressing the blade.
Move the blade slowly forwards and backwards to
achieve a small contact area between the blade and
the material to be cut. This reduces the temperature
of the blade and ensures effective cutting(Fig. 9).
Feed down the machine in line with the blade.
Pressure from the side can damage the blade and
is very dangerous(Fig. 10).
2
When operating a power tool outdoors, use an
extension cord suitable for outdoor use. Use of
a cord suitable for outdoor use reduces the risk of
electric shock.
If operating a power tool in a damp location is
unavoidable, use a residual current device
(RCD) protected supply. Use of an RCD reduces
the risk of electric shock.
NOTE: The term "residual current device (RCD)" may
be replaced by the term "ground fault circuit
interrupterl (GFCI)” or “earth leakage circuit breaker
(ELCB)".
3) Personal Safety
Stay alert, watch what you are doing and use
common sense when operating a power tool.
Do not use a power tool while you are tired or
under the inuence of drugs, alcohol or medica-
tion. A moment of inattention while operating
power tools may result in serious personal injury.
Use personal protective equipment. Always
wear eye protection. Protective equipment such
as a dust mask, non-skid safety shoes, hard hat or
hearing protection used for appropriate conditions
will reduce personal injuries.
Prevent unintentional starting. Ensure the
switch is in the off-position before connecting
to power source and/or battery pack, picking up
or carrying the tool. Carrying power tools with
your nger on the switch or energising power tools
that have the switch on invites accidents.
Remove any adjusting key or wrench before
turning the power tool on. A wrench or a key left
attached to a rotating part of the power tool may
result in personal injury.
Do not overreach. Keep proper footing and balance
at all times. This enables better control of the
power tool in unexpected situations.
Dress properly. Do not wear loose clothing or
jewellery. Keep your hair and clothing away from
moving parts. Loose clothes, jewellery or long hair
can be caught in moving parts.
If devices are provided for the connection of
dust extraction and collection facilities, ensure
these are connected and properly used. Use of
dust collection can reduce dust-related hazards.
Do not let familiarity gained from frequent use
of tools allow you to become complacent and
ignore tool safety principles. A careless action
can cause severe injury within a fraction of a
second.
4) Power Tool Use and Care
Do not force the power tool. Use the correct
power tool for your application. The correct power
tool will do the job better and safer at the rate for
which it was designed.
DANGER!
When using the equipment, a few safety precautions
must be observed to avoid injuries and damage.
Please read the complete operating instructions and
safety regulations with due care. Keep this manual in
a safe place, so that the information is available at all
times. If you give the equipment to any other person,
hand over these operating instructions and safety
regulations as well. We cannot accept any liability for
damage or accidents which arise due to a failure to
follow these instructions and the safety instructions.
1. SAFETY REGULATIONS
WARNING!
Read all safety warnings, instructions, illustrations
and specifications provided with this power tool.
Failure to follow all instructions listed below may result
in electric shock, re and/or serious injury.
Save all warnings and instructions for future
reference.
The term "power tool" in the warnings refers to your
mains-operated (corded) power tool or battery-operat-
ed (cordless) power tool.
1) Work area safety
Keep work area clean and well lit. Cluttered or
dark areas invite accidents.
Do not operate power tools in explosive
atmospheres, such as in the presence of
flammable liquids, gases or dust. Power tools
create sparks which may ignite the dust or fumes.
Keep children and bystanders away while
operating a power tool. Distractions can cause
you to lose control.
2) Electrical Safety
Power tool plugs must match the outlet. Never
modify the plug in any way. Do not use any
adapter plugs with earthed (grounded) power tools.
Unmodied plugs and matching outlets will reduce
risk of electric shock.
Avoid body contact with earthed or grounded
surfaces, such as pipes, radiators, ranges and
refrigerators. There is an increased risk of electric
shock if your body is earthed or grounded.
Do not expose power tools to rain or wet
conditions. Water entering a power tool will
increase the risk of electric shock.
Do not abuse the cord. Never use the cord for
carrying, pulling or unplugging the power tool.
Keep cord away from heat, oil, sharp edges or
moving parts. Damaged or entangled cords
increase the risk of electric shock.
1) Checking and installing the diamond
blade
Check the diamond blade is a specied one and is not
cracked,broken or bent.Check the diamond blade is
installed securely.
a. Installation
(1) Wipe the cutting dust from the spindle and washers.
(2) Make sure the rotation direction of the diamond
blade conforms to the direction indicated on the
blade guard and install the diamond blade as
shown in Fig. 3 and Fig. 4.
· When the bore diameter of the saw blade is 1"
(25.4mm), install the ange in the direction of A in
Fig. 3
· When the bore diameter of the saw blade is 2"
(50mm), install the ange in the direction of B in Fig. 3
(3) Firmly secure the spindle by tightening the bolt with
the provided wrench until fully fastened. Ensure
proper xation through manual verication.
(4) Manually rotate the blade to conrm smooth spindle
movement and verify secure installation without
resistance.
NOTE
· Always use the provided wrench to secure the bolt.
· Be careful because the bolt tightens to the left
(counterclockwise direction)to prevent it from being
loosened during cutting.
b. Removal
Remove the bolt with the provided wrench and remove
the diamond blade.
NOTE: Before using the tools, read the
instruction book carefully.
Ensure that the power source to be utilized
conforms to the power requirements
specified on the product nameplate.
Ensure that the power switch is in the OFF
position. If the plug is connected to a power
receptacle while the power switch is in the
ON position,the power tool will start
operating immediately, which could cause a
serious accident.
When the work area is removed from the
power source, use an extension cord of
sufficient thickness and rated capacity. The
extension cord should be kept as short as
practicable.

WARNING: Do not attempt to clean the machine
by inserting pointed objects through openings in the
machines casings etc. The machines air vents can be
cleaned using compressed dry air. Observe all
necessary H&S precautions when using compressed
air as a cleaning medium.
Excessive sparking may indicate the presence of dirt in
the motor or worn out carbon brushes.
If this is suspected have the machine serviced and the
brushes replaced by a qualied technician.
9. STORING
Store the machine, operating instructions and where
necessary the accessories in the original packaging.
In this way you will always have all the information and
parts ready to hand.
Pack the device well or use the original packaging in
order to avoid transit damage.
Always keep the machine in dry place
Remove the plug from the socket before carrying
out any adjustment, servicing or maintenance.
WARNING: Any maintenance must be carried out
with the machine switched off and disconnected from
the mains power supply.
On a regular basis check that all safety features and
guards are operating correctly. Only use this machine
if all guards/safety features are fully operational. All
motor bearings in this machine are lubricated for life.
No further lubrication is required. Use a clean, slightly
damp cloth to clean the plastic parts of the machine.
Do not use solvents or similar products which could
damage the plastic or rubber parts.
Removing the blade from the machine will allow
access to the inside of the blade guard. Any build up
of debris etc can be removed using a blunt non
metallic scrapper or similar tool (not supplied).
CUTTING
PRE-CUTTING CHECKS
Important!
■ Verify that the power supply corresponds to the
specications indicated on the machine’s rating
plate.
■ Make sure the machine’s trigger switch is set to the
‘OFF’ position. (Fig. 2) Connecting the machine to
a power source while the trigger switch is in the
‘ON’ position could cause the machine to start
unexpectedly, leading to a serious accident.
■ If an extension cable is necessary, it must be
appropriate for the work environment. When used
outdoors, it should be waterproof and clearly
labeled as such.
■ Always adhere to the manufacturer’s instructions
when using an extension cable.
■ Position any extension cable in a way that prevents
it from creating a tripping hazard or any other risk
to the operator, colleagues, or bystanders.
1) Blade Guard guard adjustment (Fig.6)
Adjust the blade guard angle with the knob so dust
and debris from the material or sparks do not contact
the operator during the cutting operation.
Check that the knob used to secure the blade guard is
tight. Make sure that the knob that secures the blade
guard is adequately tight.
If this knob is loose,it may result in injury to
the operator.
2) ON/OFF SWITCH(Fig. 7)
TO start the machine, press the safety lock (1) rst,
then press the power switch (2); the machine starts
and locks.
TO STOP THE MACHINE, press the trigger again, the
trigger pops out.
For Residual Current Device (RCD) operation please
follow these instructions:
■ When plugging the saw in the RCD will need to be
reset before the saw will power on. Plug the saw in,
press the reset button on the RCD, there will be a
click. (b)
■ The indicator window will change to RED to show
the power is on. (a)
■ To test, press the TEST button. Again, there will be
a click and the indicator window will switch to black
showing the power is off. (c)
■ Press the reset button again to reset and use the
saw.
Note: If the RCD trips during use, simply press RESET.
Cutting Procedures
(1)Place this tool on the material to be cut and align
the pre-marked line and the diamond blade.
The cutting can be performed smoothly if you cut
straight ahead on the scribe line in the initial cut.
(2)Turn on the switch when the diamond blade is not
touching the material to be cut.
CAUTION
Always check the diamond blade before starting
work. Never use a diamond blade which is cracked,
broken or bent.
Do not apply water or coolant to the diamond blade.
Start cutting only when diamond blade reaches its
maximum speed.
If the diamond blade seizes or there is any
abnormal noise, immediately turn the power off.
Never use the diamond blade to cut zigzag or curved
lines. Never use the side surface of the diamond
blade. Never use to perform inclination cutting.
If excessive force is applied to the diamond blade
to make it align with the pre-marked line during
cutting, this might not only overload the motor and
cause burn damage but may also overheat the
diamond blade and shorten the service life.
Take care not to allow the power cord to come into
contact with the diamond blade during operation.
When the work is completed,turn the power off and
disconnect the power plug from the receptacle.
Support the work piece in such a way that it is
possible to predict what will happen,and so that the
cut remains open while cutting.(Fig. 8)
Check that the blade is not in contact with anything
when the machine is started.
Always cut at the maximum speed.
Start cutting smoothly, allowing the machine to
work without forcing or pressing the blade.
Move the blade slowly forwards and backwards to
achieve a small contact area between the blade and
the material to be cut. This reduces the temperature
of the blade and ensures effective cutting(Fig. 9).
Feed down the machine in line with the blade.
Pressure from the side can damage the blade and
is very dangerous(Fig. 10).
Do not use the power tool if the switch does not
turn it on and off. Any power tool that cannot be
controlled with the switch is dangerous and must
be repaired.
Disconnect the plug from the power source
and/or remove the battery pack, if detachable,
from the power tool before making any
adjustments, changing accessories, or storing
power tools. Such preventive safety measures
reduce the risk of starting the power tool
accidentally.
Store idle power tools out of the reach of
children and do not allow persons unfamiliar
with the power tool or these instructions to
operate the power tool. Power tools are
dangerous in the hands of untrained users.
Maintain power tools and accessories. Check
for misalignment or binding of moving parts,
breakage of parts and any other condition that
may affect the power tool’s operation. If
damaged, have the power tool repaired before use.
Many accidents are caused by poorly maintained
power tools.
Keep cutting tools sharp and clean. Properly
maintained cutting tools with sharp cutting edges
are less likely to bind and are easier to control.
Use the power tool, accessories and tool bits
etc. In accordance with these instructions, taking
into account the working conditions and the work
to be performed. Use of the power tool for
operations different from those intended could
result in a hazardous situation.
Keep handles and grasping surfaces dry, clean
and free from oil and grease. Slippery handles
and grasping surfaces do not allow for safe
handling and control of the tool in unexpected
situations.
5) Service
Have your power tool serviced by a qualied repair
person using only identical replacement parts. This
will ensure that the safety of the power tool is
maintained.
2. Cut-off machine safety warnings
a) The guard provided with the tool must be
securely attached to the power tool and
positioned for maximum safety, so the least
amount of wheel is exposed towards the
operator. Position yourself and bystanders away
from the plane of the rotating wheel. The guard
helps to protect operator from broken wheel
fragments and accidental contact with wheel.
3
b) Use only bonded reinforced or diamond cut-off
wheels for your power tool. Just because an
accessory can be attached to your power tool, it
does not assure safe operation.
c) The rated speed of the accessory must be at
least equal to the maximum speed marked on
the power tool. Accessories running faster than
their rated speed can break and y apart.
d) Wheels must be used only for recommended
applications. For example: do not grind with the
side of cut-off wheel. Abrasive cut-off wheels are
intended for peripheral grinding, side forces
applied to these wheels may cause them to
shatter.
e) Always use undamaged wheel anges that are
of correct diameter for your selected wheel.
Proper wheel anges support the wheel thus
reducing the possibility of wheel breakage.
f) Do not use worn down reinforced wheels from
larger power tools. Wheels intended for a larger
power tool are not suitable for the higher speed of
a smaller tool and may burst.
g) The outside diameter and the thickness of your
accessory must be within the capacity rating of
your power tool. Incorrectly sized accessories
cannot be adequately guarded or controlled.
h) The arbour size of wheels and anges must
properly t the spindle of the power tool. Wheels
and anges with arbour holes that do not match
the mounting hardware of the power tool will run
out of balance, vibrate excessively and may cause
loss of control.
i) Do not use damaged wheels. Before each use,
inspect the wheels for chips and cracks. If power
tool or wheel is dropped, inspect for damage or
install an undamaged wheel. After inspecting and
installing the wheel, position yourself and
bystanders away from the plane of the rotating
wheel and run the power tool at maximum no load
speed for one minute. during this test time.
Damaged wheels will normally break apart.
j) Wear personal protective equipment. Depending
on application, use face shield, safety goggles or
safety glasses. As appropriate, wear dust mask,
hearing protectors, gloves and shop apron capable
of stopping small abrasive or workpiece fragments.
The eye protection must be capable of stopping
ying debris generated by various operations. The
dust mask or respirator must be capable of
ltrating particles generated by your operation.
Prolonged exposure to high intensity noise may
cause hearing loss.
k) Keep bystanders a safe distance away from
work area. Anyone entering the work area must
wear personal protective equipment. Fragments of
workpiece or of a broken wheel may y away and
cause injury beyond immediate area of operation.
1) Checking and installing the diamond
blade
Check the diamond blade is a specied one and is not
cracked,broken or bent.Check the diamond blade is
installed securely.
a. Installation
(1) Wipe the cutting dust from the spindle and washers.
(2) Make sure the rotation direction of the diamond
blade conforms to the direction indicated on the
blade guard and install the diamond blade as
shown in Fig. 3 and Fig. 4.
· When the bore diameter of the saw blade is 1"
(25.4mm), install the ange in the direction of A in
Fig. 3
· When the bore diameter of the saw blade is 2"
(50mm), install the ange in the direction of B in Fig. 3
(3) Firmly secure the spindle by tightening the bolt with
the provided wrench until fully fastened. Ensure
proper xation through manual verication.
(4) Manually rotate the blade to conrm smooth spindle
movement and verify secure installation without
resistance.
NOTE
· Always use the provided wrench to secure the bolt.
· Be careful because the bolt tightens to the left
(counterclockwise direction)to prevent it from being
loosened during cutting.
b. Removal
Remove the bolt with the provided wrench and remove
the diamond blade.
NOTE: Before using the tools, read the
instruction book carefully.
Ensure that the power source to be utilized
conforms to the power requirements
specified on the product nameplate.
Ensure that the power switch is in the OFF
position. If the plug is connected to a power
receptacle while the power switch is in the
ON position,the power tool will start
operating immediately, which could cause a
serious accident.
When the work area is removed from the
power source, use an extension cord of
sufficient thickness and rated capacity. The
extension cord should be kept as short as
practicable.

WARNING: Do not attempt to clean the machine
by inserting pointed objects through openings in the
machines casings etc. The machines air vents can be
cleaned using compressed dry air. Observe all
necessary H&S precautions when using compressed
air as a cleaning medium.
Excessive sparking may indicate the presence of dirt in
the motor or worn out carbon brushes.
If this is suspected have the machine serviced and the
brushes replaced by a qualied technician.
9. STORING
Store the machine, operating instructions and where
necessary the accessories in the original packaging.
In this way you will always have all the information and
parts ready to hand.
Pack the device well or use the original packaging in
order to avoid transit damage.
Always keep the machine in dry place
Remove the plug from the socket before carrying
out any adjustment, servicing or maintenance.
WARNING: Any maintenance must be carried out
with the machine switched off and disconnected from
the mains power supply.
On a regular basis check that all safety features and
guards are operating correctly. Only use this machine
if all guards/safety features are fully operational. All
motor bearings in this machine are lubricated for life.
No further lubrication is required. Use a clean, slightly
damp cloth to clean the plastic parts of the machine.
Do not use solvents or similar products which could
damage the plastic or rubber parts.
Removing the blade from the machine will allow
access to the inside of the blade guard. Any build up
of debris etc can be removed using a blunt non
metallic scrapper or similar tool (not supplied).
CUTTING
PRE-CUTTING CHECKS
Important!
■ Verify that the power supply corresponds to the
specications indicated on the machine’s rating
plate.
■ Make sure the machine’s trigger switch is set to the
‘OFF’ position. (Fig. 2) Connecting the machine to
a power source while the trigger switch is in the
‘ON’ position could cause the machine to start
unexpectedly, leading to a serious accident.
■ If an extension cable is necessary, it must be
appropriate for the work environment. When used
outdoors, it should be waterproof and clearly
labeled as such.
■ Always adhere to the manufacturer’s instructions
when using an extension cable.
■ Position any extension cable in a way that prevents
it from creating a tripping hazard or any other risk
to the operator, colleagues, or bystanders.
1) Blade Guard guard adjustment (Fig.6)
Adjust the blade guard angle with the knob so dust
and debris from the material or sparks do not contact
the operator during the cutting operation.
Check that the knob used to secure the blade guard is
tight. Make sure that the knob that secures the blade
guard is adequately tight.
If this knob is loose,it may result in injury to
the operator.
2) ON/OFF SWITCH(Fig. 7)
TO start the machine, press the safety lock (1) rst,
then press the power switch (2); the machine starts
and locks.
TO STOP THE MACHINE, press the trigger again, the
trigger pops out.
For Residual Current Device (RCD) operation please
follow these instructions:
■ When plugging the saw in the RCD will need to be
reset before the saw will power on. Plug the saw in,
press the reset button on the RCD, there will be a
click. (b)
■ The indicator window will change to RED to show
the power is on. (a)
■ To test, press the TEST button. Again, there will be
a click and the indicator window will switch to black
showing the power is off. (c)
■ Press the reset button again to reset and use the
saw.
Note: If the RCD trips during use, simply press RESET.
Cutting Procedures
(1)Place this tool on the material to be cut and align
the pre-marked line and the diamond blade.
The cutting can be performed smoothly if you cut
straight ahead on the scribe line in the initial cut.
(2)Turn on the switch when the diamond blade is not
touching the material to be cut.
CAUTION
Always check the diamond blade before starting
work. Never use a diamond blade which is cracked,
broken or bent.
Do not apply water or coolant to the diamond blade.
Start cutting only when diamond blade reaches its
maximum speed.
If the diamond blade seizes or there is any
abnormal noise, immediately turn the power off.
Never use the diamond blade to cut zigzag or curved
lines. Never use the side surface of the diamond
blade. Never use to perform inclination cutting.
If excessive force is applied to the diamond blade
to make it align with the pre-marked line during
cutting, this might not only overload the motor and
cause burn damage but may also overheat the
diamond blade and shorten the service life.
Take care not to allow the power cord to come into
contact with the diamond blade during operation.
When the work is completed,turn the power off and
disconnect the power plug from the receptacle.
Support the work piece in such a way that it is
possible to predict what will happen,and so that the
cut remains open while cutting.(Fig. 8)
Check that the blade is not in contact with anything
when the machine is started.
Always cut at the maximum speed.
Start cutting smoothly, allowing the machine to
work without forcing or pressing the blade.
Move the blade slowly forwards and backwards to
achieve a small contact area between the blade and
the material to be cut. This reduces the temperature
of the blade and ensures effective cutting(Fig. 9).
Feed down the machine in line with the blade.
Pressure from the side can damage the blade and
is very dangerous(Fig. 10).
4
I) Hold the power tool by insulated gripping
surfaces only, when performing an operation
where the cutting accessory may contact
hidden wiring or its own cord. Cutting accessory
contacting a "live" wire may make exposed metal
parts of the power tool "live” and could give the
operator an electric shock.
m) Position the cord clear of the spinning accessory.
If you lose control, the cord may be cut or snagged
and your hand or arm may be pulled into the
spinning wheel.
n) Never lay the power tool down until the
accessory has come to a complete stop. The
spinning wheel may grab the surface and pull the
power tool out of your control.
o) Do not run the power tool while carrying it at
your side. Accidental contact with the spinning
accessory could snag your clothing, pulling the
accessory into your body.
p) Regularly clean the power tool's air vents. The
motor's fan will draw the dust inside the housing
and excessive accumulation of powdered metal
may cause electrical hazards.
q) Do not operate the power tool near ammable
materials. Sparks could ignite these materials.
r)
Do not use accessories that require liquid coolants.
Using water or other liquid coolants may result in
electrocution or shock.
s) Do not use this machine to cut asbestos.
t) In operations using a cutting wheel,if sparks
come out, cover the dust collection adapter with
a rubber cap and be sure to wear protective
glasses.
u) Never used damaged or incorrect blade washers
or bolt. The blade washers and bolt were specially
designed for your saw, for optimum performance
and safety of operation.
3. FURTHER SAFETY INSTRUCTIONS
FOR ALL SAWS
CAUSES AND OPERATOR PREVENTION OF
KICKBACK:
Kickback is a sudden reaction to a pinched, bound
or misaligned saw blade, causing an uncontrolled
saw to lift up and out of the workpiece toward the
operator.
When the blade is pinched or bound tightly by the
kerf closing down, the blade stalls and the motor
reaction drives the unit rapidly back toward the
operator.
If the blade becomes twisted or misaligned in the
cut, the teeth at the back edge of the blade can dig
into the top surface of the wood causing the blade
to climb out of the kerf and jump back toward the
operator.
KICKBACK AND RELATED WARNINGS
Kickback is a sudden reaction to a pinched or
snagged rotating wheel. Pinching or snagging causes
rapid stalling of the rotating wheel which in turn
causes the uncontrolled power tool to be forced in the
direction opposite of the wheel's rotation at the point
of the binding. For example, if an abrasive wheel is
snagged or pinched by the workpiece, the edge of the
wheel that is entering into the pinch point can dig into
the surface of the material causing the wheel to climb
out or kick out. The wheel may either jump toward or
away from the operator, depending on direction of the
wheel's movement at the point of pinching. Abrasive
wheels may also break under these conditions.
Kickback is the result of power tool misuse and/ or
incorrect operating procedures or conditions and can
be avoided by taking proper precautions as given below.
a) Maintain a rm grip on the power tool and
position your body and arm to allow you to
resist kickback forces. Always use auxiliary
handle, if provided, for maximum control over
kickback or torque reaction during start-up. The
operator can control torque reactions or kickback
forces, if proper precautions are taken.
b) Never place your hand near the rotating
accessory. Accessory may kickback over your
hand.
c) Do not position your body in line with the
rotating wheel. Kickback will propel the tool in
direction opposite to the wheel's movement at the
point of snagging.
d) Use special care when working corners, sharp
edges etc. Avoid bouncing and snagging the
accessory. Corners, sharp edges or bouncing have
a tendency to snag the rotating accessory and
cause loss of control or kickback.
e) Do not attach a saw chain, woodcarving blade,
segmented diamond wheel with a peripheral
gap greater than 10 mm or toothed saw blade.
Such blades create frequent kickback and loss of
control.
f) Do not "jam" the wheel or apply excessive
pressure. Do not attempt to make an excessive
depth of cut. Over stressing the wheel increases
the loading and susceptibility to twisting or binding
of the wheel in the cut and the possibility of
kickback or wheel breakage.
g) When wheel is binding or when Interrupting a
cut for any reason, switch off the power tool
and hold the power tool motionless until the
wheel comes to a complete stop. Never attempt
to remove the wheel from the cut while the wheel is
in motion otherwise kickback may occur.
Investigate and take corrective action to eliminate
the cause of wheel binding.
1) Checking and installing the diamond
blade
Check the diamond blade is a specied one and is not
cracked,broken or bent.Check the diamond blade is
installed securely.
a. Installation
(1) Wipe the cutting dust from the spindle and washers.
(2) Make sure the rotation direction of the diamond
blade conforms to the direction indicated on the
blade guard and install the diamond blade as
shown in Fig. 3 and Fig. 4.
· When the bore diameter of the saw blade is 1"
(25.4mm), install the ange in the direction of A in
Fig. 3
· When the bore diameter of the saw blade is 2"
(50mm), install the ange in the direction of B in Fig. 3
(3) Firmly secure the spindle by tightening the bolt with
the provided wrench until fully fastened. Ensure
proper xation through manual verication.
(4) Manually rotate the blade to conrm smooth spindle
movement and verify secure installation without
resistance.
NOTE
· Always use the provided wrench to secure the bolt.
· Be careful because the bolt tightens to the left
(counterclockwise direction)to prevent it from being
loosened during cutting.
b. Removal
Remove the bolt with the provided wrench and remove
the diamond blade.
NOTE: Before using the tools, read the
instruction book carefully.
Ensure that the power source to be utilized
conforms to the power requirements
specified on the product nameplate.
Ensure that the power switch is in the OFF
position. If the plug is connected to a power
receptacle while the power switch is in the
ON position,the power tool will start
operating immediately, which could cause a
serious accident.
When the work area is removed from the
power source, use an extension cord of
sufficient thickness and rated capacity. The
extension cord should be kept as short as
practicable.

WARNING: Do not attempt to clean the machine
by inserting pointed objects through openings in the
machines casings etc. The machines air vents can be
cleaned using compressed dry air. Observe all
necessary H&S precautions when using compressed
air as a cleaning medium.
Excessive sparking may indicate the presence of dirt in
the motor or worn out carbon brushes.
If this is suspected have the machine serviced and the
brushes replaced by a qualied technician.
9. STORING
Store the machine, operating instructions and where
necessary the accessories in the original packaging.
In this way you will always have all the information and
parts ready to hand.
Pack the device well or use the original packaging in
order to avoid transit damage.
Always keep the machine in dry place
Remove the plug from the socket before carrying
out any adjustment, servicing or maintenance.
WARNING: Any maintenance must be carried out
with the machine switched off and disconnected from
the mains power supply.
On a regular basis check that all safety features and
guards are operating correctly. Only use this machine
if all guards/safety features are fully operational. All
motor bearings in this machine are lubricated for life.
No further lubrication is required. Use a clean, slightly
damp cloth to clean the plastic parts of the machine.
Do not use solvents or similar products which could
damage the plastic or rubber parts.
Removing the blade from the machine will allow
access to the inside of the blade guard. Any build up
of debris etc can be removed using a blunt non
metallic scrapper or similar tool (not supplied).
CUTTING
PRE-CUTTING CHECKS
Important!
■ Verify that the power supply corresponds to the
specications indicated on the machine’s rating
plate.
■ Make sure the machine’s trigger switch is set to the
‘OFF’ position. (Fig. 2) Connecting the machine to
a power source while the trigger switch is in the
‘ON’ position could cause the machine to start
unexpectedly, leading to a serious accident.
■ If an extension cable is necessary, it must be
appropriate for the work environment. When used
outdoors, it should be waterproof and clearly
labeled as such.
■ Always adhere to the manufacturer’s instructions
when using an extension cable.
■ Position any extension cable in a way that prevents
it from creating a tripping hazard or any other risk
to the operator, colleagues, or bystanders.
1) Blade Guard guard adjustment (Fig.6)
Adjust the blade guard angle with the knob so dust
and debris from the material or sparks do not contact
the operator during the cutting operation.
Check that the knob used to secure the blade guard is
tight. Make sure that the knob that secures the blade
guard is adequately tight.
If this knob is loose,it may result in injury to
the operator.
2) ON/OFF SWITCH(Fig. 7)
TO start the machine, press the safety lock (1) rst,
then press the power switch (2); the machine starts
and locks.
TO STOP THE MACHINE, press the trigger again, the
trigger pops out.
For Residual Current Device (RCD) operation please
follow these instructions:
■ When plugging the saw in the RCD will need to be
reset before the saw will power on. Plug the saw in,
press the reset button on the RCD, there will be a
click. (b)
■ The indicator window will change to RED to show
the power is on. (a)
■ To test, press the TEST button. Again, there will be
a click and the indicator window will switch to black
showing the power is off. (c)
■ Press the reset button again to reset and use the
saw.
Note: If the RCD trips during use, simply press RESET.
Cutting Procedures
(1)Place this tool on the material to be cut and align
the pre-marked line and the diamond blade.
The cutting can be performed smoothly if you cut
straight ahead on the scribe line in the initial cut.
(2)Turn on the switch when the diamond blade is not
touching the material to be cut.
CAUTION
Always check the diamond blade before starting
work. Never use a diamond blade which is cracked,
broken or bent.
Do not apply water or coolant to the diamond blade.
Start cutting only when diamond blade reaches its
maximum speed.
If the diamond blade seizes or there is any
abnormal noise, immediately turn the power off.
Never use the diamond blade to cut zigzag or curved
lines. Never use the side surface of the diamond
blade. Never use to perform inclination cutting.
If excessive force is applied to the diamond blade
to make it align with the pre-marked line during
cutting, this might not only overload the motor and
cause burn damage but may also overheat the
diamond blade and shorten the service life.
Take care not to allow the power cord to come into
contact with the diamond blade during operation.
When the work is completed,turn the power off and
disconnect the power plug from the receptacle.
Support the work piece in such a way that it is
possible to predict what will happen,and so that the
cut remains open while cutting.(Fig. 8)
Check that the blade is not in contact with anything
when the machine is started.
Always cut at the maximum speed.
Start cutting smoothly, allowing the machine to
work without forcing or pressing the blade.
Move the blade slowly forwards and backwards to
achieve a small contact area between the blade and
the material to be cut. This reduces the temperature
of the blade and ensures effective cutting(Fig. 9).
Feed down the machine in line with the blade.
Pressure from the side can damage the blade and
is very dangerous(Fig. 10).
5
h) Do not restart the cutting operation In the
workpiece. Let the wheel reach full speed and
carefully re-enter the cut The wheel may bind, walk
up or kickback if the power tool is restarted in the
workpiece.
i) Support panels or any oversized workpiece to
minimize the risk of wheel pinching and
kickback. Large workpieces tend to sag under
their own weight. Supports must be placed under
the workpiece near the line of cut and near the
edge of the workpiece on both sides of the wheel.
j) Use extra caution when making a "pocket cut"
Into existing walls or other blind areas. The
protruding wheel may cut gas or water pipes,
electrical wiring or objects that can cause
kickback.
HEALTH ADVICE
WARNING: When using this machine,dust
particles may be produced. In some instances,
depending on the materials you are working with, this
dust can be particularly harmful. If you suspect that
paint on the surface of material you wish to cut
contains lead, seek professional advice. Lead based
paints should only be removed by a professional and
you should not attempt to remove it yourself. Once
the dust has been deposited on surfaces, hand to
mouth contact can result in the ingestion of lead.
Exposure to even low levels of lead can cause
irreversible brain and nervous system damage. The
young and unborn children are particularly vulnerable.
You are advised to consider the risks associated with
the materials you are working with and to reduce the
risk of exposure. As some materials can produce dust
that may be hazardous to your health, we recommend
the use of an approved face mask with replaceable
lters when using this machine.
You should always:
• Work in a well•ventilated area.
• Work with approved safety equipment, such as dust
masks that are specially designed to lter
microscopic particles.
WARNING: the operation of any power tool can
result in foreign objects being thrown towards your
eyes, which could result in severe eye damage.
Before beginning power tool operation, always wear
safety goggles or safety glasses with side shield or a
full face shield where necessary.
ADDITIONAL SAFETY INSTRUCTIONS WARNING:
Always disconnect the Concrete Saw from the mains
supply before cleaning, carrying out maintenance or
changing blades.
• Keep your hands away from cutting area or the
blade. If both your hands are holding the machines
handles, they cannot come into contact with the
diamond cutting blade.
• Never engage the spindle lock button while the
machine is running. Serious damage could occur to
the machine and a potentially dangerous situation
could arise for the operator.
• Only use cutting blades or other approved cutting
blades as speckled by the manufacturer.
• Visually c heck t he cutting blade before starting the
machine. If it is cracked, broken or bent, do not use
it. Carefully start the machine and check for any
unusual noises, vibration or other abnormalities.
• Be careful when cutting metal. Using the diamond
blade to cut metal (reinforcing rods embedded in
concrete) will shorten its service life. Use a
specialist metal cutting blade where possible.
• Allow the cutting blade to reach full speed before
beginning a cut. Start working only when maximum
speed is reached.
• Do not use excessive force. Excessive force
overloads the motor and reduces working efciency
and service life. Only cut concrete, tile or stone to a
maximum cutting depth of 50mm or less. If the
cutting depth ultimately required is greater than
50mm, cut the workpiece 2 or 3 times. If a cutting
depth of more than 50mm is attempted in one pass
the service life of the cutting blade could be
reduced and motor damage occur.
• Install the dust extraction port cover when a dust
collection hose is not in use. During cutting
operations sparks could be generated. Cover the
dust extraction port with Its rubber cap and be sure
to wear protective glasses.
• Never use a damaged or incorrect arbor bolt or
blade anges. The blade anges and arbor bolt
were specially designed for your machine and will
provide optimum performance during cutting
operations.
• This machine is tted with the correct moulded plug
and mains lead for the intended country of use. Do
not alter or modify the mains cable or plug In any
way. If the mains lead or the plug are damaged in
anyway, they must be replaced with original
replacement parts by a competent technician.
1) Checking and installing the diamond
blade
Check the diamond blade is a specied one and is not
cracked,broken or bent.Check the diamond blade is
installed securely.
a. Installation
(1) Wipe the cutting dust from the spindle and washers.
(2) Make sure the rotation direction of the diamond
blade conforms to the direction indicated on the
blade guard and install the diamond blade as
shown in Fig. 3 and Fig. 4.
· When the bore diameter of the saw blade is 1"
(25.4mm), install the ange in the direction of A in
Fig. 3
· When the bore diameter of the saw blade is 2"
(50mm), install the ange in the direction of B in Fig. 3
(3) Firmly secure the spindle by tightening the bolt with
the provided wrench until fully fastened. Ensure
proper xation through manual verication.
(4) Manually rotate the blade to conrm smooth spindle
movement and verify secure installation without
resistance.
NOTE
· Always use the provided wrench to secure the bolt.
· Be careful because the bolt tightens to the left
(counterclockwise direction)to prevent it from being
loosened during cutting.
b. Removal
Remove the bolt with the provided wrench and remove
the diamond blade.
NOTE: Before using the tools, read the
instruction book carefully.
Ensure that the power source to be utilized
conforms to the power requirements
specified on the product nameplate.
Ensure that the power switch is in the OFF
position. If the plug is connected to a power
receptacle while the power switch is in the
ON position,the power tool will start
operating immediately, which could cause a
serious accident.
When the work area is removed from the
power source, use an extension cord of
sufficient thickness and rated capacity. The
extension cord should be kept as short as
practicable.

WARNING: Do not attempt to clean the machine
by inserting pointed objects through openings in the
machines casings etc. The machines air vents can be
cleaned using compressed dry air. Observe all
necessary H&S precautions when using compressed
air as a cleaning medium.
Excessive sparking may indicate the presence of dirt in
the motor or worn out carbon brushes.
If this is suspected have the machine serviced and the
brushes replaced by a qualied technician.
9. STORING
Store the machine, operating instructions and where
necessary the accessories in the original packaging.
In this way you will always have all the information and
parts ready to hand.
Pack the device well or use the original packaging in
order to avoid transit damage.
Always keep the machine in dry place
Remove the plug from the socket before carrying
out any adjustment, servicing or maintenance.
WARNING: Any maintenance must be carried out
with the machine switched off and disconnected from
the mains power supply.
On a regular basis check that all safety features and
guards are operating correctly. Only use this machine
if all guards/safety features are fully operational. All
motor bearings in this machine are lubricated for life.
No further lubrication is required. Use a clean, slightly
damp cloth to clean the plastic parts of the machine.
Do not use solvents or similar products which could
damage the plastic or rubber parts.
Removing the blade from the machine will allow
access to the inside of the blade guard. Any build up
of debris etc can be removed using a blunt non
metallic scrapper or similar tool (not supplied).
CUTTING
PRE-CUTTING CHECKS
Important!
■ Verify that the power supply corresponds to the
specications indicated on the machine’s rating
plate.
■ Make sure the machine’s trigger switch is set to the
‘OFF’ position. (Fig. 2) Connecting the machine to
a power source while the trigger switch is in the
‘ON’ position could cause the machine to start
unexpectedly, leading to a serious accident.
■ If an extension cable is necessary, it must be
appropriate for the work environment. When used
outdoors, it should be waterproof and clearly
labeled as such.
■ Always adhere to the manufacturer’s instructions
when using an extension cable.
■ Position any extension cable in a way that prevents
it from creating a tripping hazard or any other risk
to the operator, colleagues, or bystanders.
1) Blade Guard guard adjustment (Fig.6)
Adjust the blade guard angle with the knob so dust
and debris from the material or sparks do not contact
the operator during the cutting operation.
Check that the knob used to secure the blade guard is
tight. Make sure that the knob that secures the blade
guard is adequately tight.
If this knob is loose,it may result in injury to
the operator.
2) ON/OFF SWITCH(Fig. 7)
TO start the machine, press the safety lock (1) rst,
then press the power switch (2); the machine starts
and locks.
TO STOP THE MACHINE, press the trigger again, the
trigger pops out.
For Residual Current Device (RCD) operation please
follow these instructions:
■ When plugging the saw in the RCD will need to be
reset before the saw will power on. Plug the saw in,
press the reset button on the RCD, there will be a
click. (b)
■ The indicator window will change to RED to show
the power is on. (a)
■ To test, press the TEST button. Again, there will be
a click and the indicator window will switch to black
showing the power is off. (c)
■ Press the reset button again to reset and use the
saw.
Note: If the RCD trips during use, simply press RESET.
Cutting Procedures
(1)Place this tool on the material to be cut and align
the pre-marked line and the diamond blade.
The cutting can be performed smoothly if you cut
straight ahead on the scribe line in the initial cut.
(2)Turn on the switch when the diamond blade is not
touching the material to be cut.
CAUTION
Always check the diamond blade before starting
work. Never use a diamond blade which is cracked,
broken or bent.
Do not apply water or coolant to the diamond blade.
Start cutting only when diamond blade reaches its
maximum speed.
If the diamond blade seizes or there is any
abnormal noise, immediately turn the power off.
Never use the diamond blade to cut zigzag or curved
lines. Never use the side surface of the diamond
blade. Never use to perform inclination cutting.
If excessive force is applied to the diamond blade
to make it align with the pre-marked line during
cutting, this might not only overload the motor and
cause burn damage but may also overheat the
diamond blade and shorten the service life.
Take care not to allow the power cord to come into
contact with the diamond blade during operation.
When the work is completed,turn the power off and
disconnect the power plug from the receptacle.
Support the work piece in such a way that it is
possible to predict what will happen,and so that the
cut remains open while cutting.(Fig. 8)
Check that the blade is not in contact with anything
when the machine is started.
Always cut at the maximum speed.
Start cutting smoothly, allowing the machine to
work without forcing or pressing the blade.
Move the blade slowly forwards and backwards to
achieve a small contact area between the blade and
the material to be cut. This reduces the temperature
of the blade and ensures effective cutting(Fig. 9).
Feed down the machine in line with the blade.
Pressure from the side can damage the blade and
is very dangerous(Fig. 10).
6
• Where possible always use a method of dust control
when cutting concrete, either Dust extraction or
water suppression where applicable. When using
dust extractors with Evolution Disc Cutters ensure
these are rated as Class M or Class H when cutting
concrete.
WARNING: This machine must not be used to cut
any material that may contain asbestos. If the presence
of asbestos is suspected, consult the relevant authorities
for advice.
Personal Protective Equipment
Note: If using this equipment on a construction site it
is important that the operator conforms to any site
rules/regulations t hat may apply. Consult the site
foreman or other responsible person for details.
• Wear suitable clothing. This could include a Boiler
Suit or Padded Coverall and Hi Vis jacket etc.
• Wear suitable footwear. Safety shoes with steel
toecaps and anti-slip soles are recommended.
• Wear suitable Safety Glasses. A Full Face Safety
Shield or Safety Goggles with side shields is
recommended.
• Protect your hearing. Wear suitable ear protectors.
• Wear suitable gloves. High grip g loves are
recommended.
• Wear respiratory protection. A dust mask with
replaceable lters which provide protection against
ne toxic dust, bres and vapours is recommended.
• Wear a Safety Helmet. The use of a Safety Hat may
be compulsory on some construction sites to
protect the operator from potential overhead
dangers.
1) Checking and installing the diamond
blade
Check the diamond blade is a specied one and is not
cracked,broken or bent.Check the diamond blade is
installed securely.
a. Installation
(1) Wipe the cutting dust from the spindle and washers.
(2) Make sure the rotation direction of the diamond
blade conforms to the direction indicated on the
blade guard and install the diamond blade as
shown in Fig. 3 and Fig. 4.
· When the bore diameter of the saw blade is 1"
(25.4mm), install the ange in the direction of A in
Fig. 3
· When the bore diameter of the saw blade is 2"
(50mm), install the ange in the direction of B in Fig. 3
(3) Firmly secure the spindle by tightening the bolt with
the provided wrench until fully fastened. Ensure
proper xation through manual verication.
(4) Manually rotate the blade to conrm smooth spindle
movement and verify secure installation without
resistance.
NOTE
· Always use the provided wrench to secure the bolt.
· Be careful because the bolt tightens to the left
(counterclockwise direction)to prevent it from being
loosened during cutting.
b. Removal
Remove the bolt with the provided wrench and remove
the diamond blade.
NOTE: Before using the tools, read the
instruction book carefully.
Ensure that the power source to be utilized
conforms to the power requirements
specified on the product nameplate.
Ensure that the power switch is in the OFF
position. If the plug is connected to a power
receptacle while the power switch is in the
ON position,the power tool will start
operating immediately, which could cause a
serious accident.
When the work area is removed from the
power source, use an extension cord of
sufficient thickness and rated capacity. The
extension cord should be kept as short as
practicable.
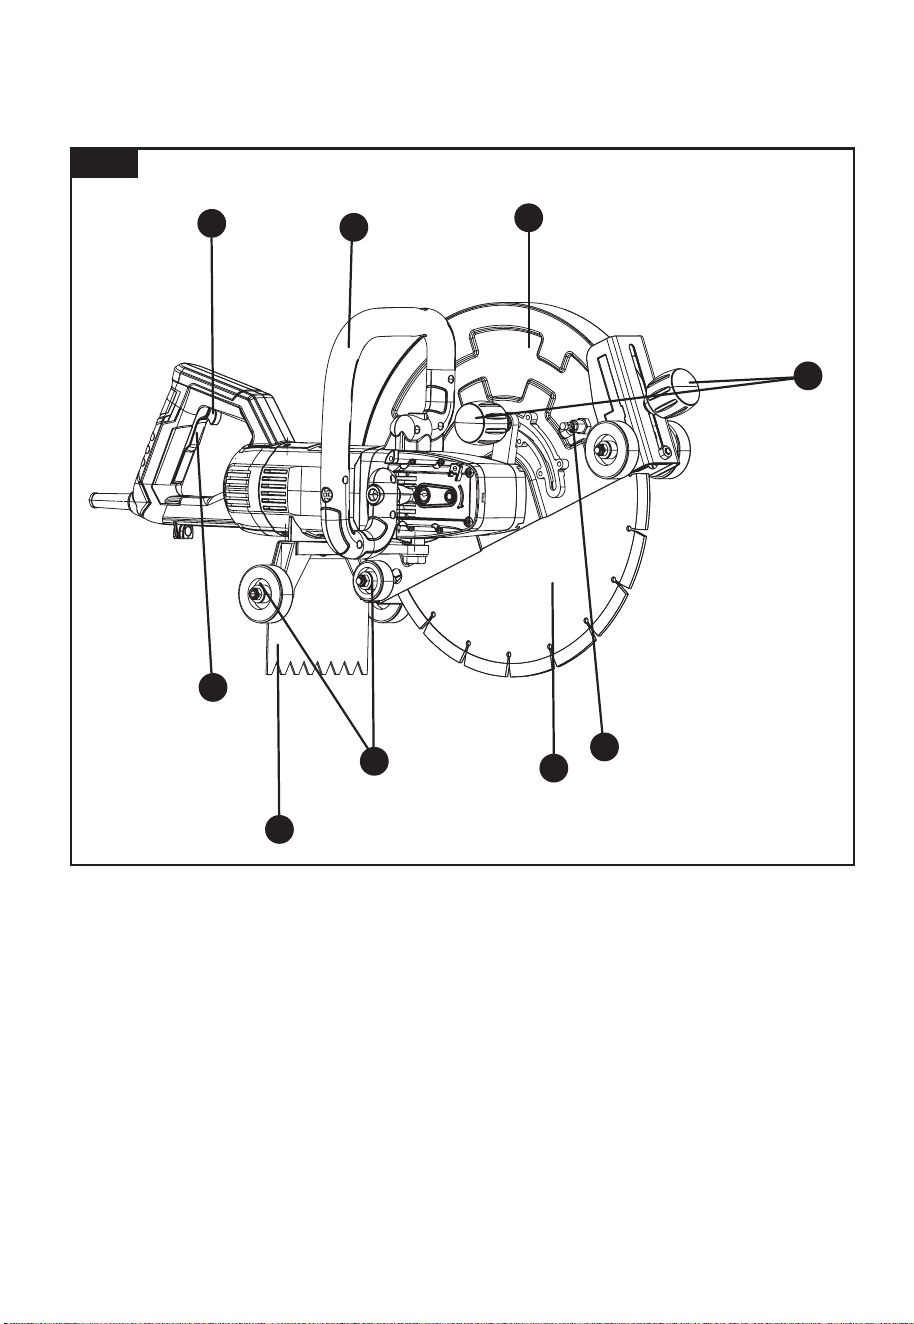
WARNING: Do not attempt to clean the machine
by inserting pointed objects through openings in the
machines casings etc. The machines air vents can be
cleaned using compressed dry air. Observe all
necessary H&S precautions when using compressed
air as a cleaning medium.
Excessive sparking may indicate the presence of dirt in
the motor or worn out carbon brushes.
If this is suspected have the machine serviced and the
brushes replaced by a qualied technician.
9. STORING
Store the machine, operating instructions and where
necessary the accessories in the original packaging.
In this way you will always have all the information and
parts ready to hand.
Pack the device well or use the original packaging in
order to avoid transit damage.
Always keep the machine in dry place
Remove the plug from the socket before carrying
out any adjustment, servicing or maintenance.
WARNING: Any maintenance must be carried out
with the machine switched off and disconnected from
the mains power supply.
On a regular basis check that all safety features and
guards are operating correctly. Only use this machine
if all guards/safety features are fully operational. All
motor bearings in this machine are lubricated for life.
No further lubrication is required. Use a clean, slightly
damp cloth to clean the plastic parts of the machine.
Do not use solvents or similar products which could
damage the plastic or rubber parts.
Removing the blade from the machine will allow
access to the inside of the blade guard. Any build up
of debris etc can be removed using a blunt non
metallic scrapper or similar tool (not supplied).
CUTTING
PRE-CUTTING CHECKS
Important!
■ Verify that the power supply corresponds to the
specications indicated on the machine’s rating
plate.
■ Make sure the machine’s trigger switch is set to the
‘OFF’ position. (Fig. 2) Connecting the machine to
a power source while the trigger switch is in the
‘ON’ position could cause the machine to start
unexpectedly, leading to a serious accident.
■ If an extension cable is necessary, it must be
appropriate for the work environment. When used
outdoors, it should be waterproof and clearly
labeled as such.
■ Always adhere to the manufacturer’s instructions
when using an extension cable.
■ Position any extension cable in a way that prevents
it from creating a tripping hazard or any other risk
to the operator, colleagues, or bystanders.
1) Blade Guard guard adjustment (Fig.6)
Adjust the blade guard angle with the knob so dust
and debris from the material or sparks do not contact
the operator during the cutting operation.
Check that the knob used to secure the blade guard is
tight. Make sure that the knob that secures the blade
guard is adequately tight.
If this knob is loose,it may result in injury to
the operator.
2) ON/OFF SWITCH(Fig. 7)
TO start the machine, press the safety lock (1) rst,
then press the power switch (2); the machine starts
and locks.
TO STOP THE MACHINE, press the trigger again, the
trigger pops out.
For Residual Current Device (RCD) operation please
follow these instructions:
■ When plugging the saw in the RCD will need to be
reset before the saw will power on. Plug the saw in,
press the reset button on the RCD, there will be a
click. (b)
■ The indicator window will change to RED to show
the power is on. (a)
■ To test, press the TEST button. Again, there will be
a click and the indicator window will switch to black
showing the power is off. (c)
■ Press the reset button again to reset and use the
saw.
Note: If the RCD trips during use, simply press RESET.
Cutting Procedures
(1)Place this tool on the material to be cut and align
the pre-marked line and the diamond blade.
The cutting can be performed smoothly if you cut
straight ahead on the scribe line in the initial cut.
(2)Turn on the switch when the diamond blade is not
touching the material to be cut.
CAUTION
Always check the diamond blade before starting
work. Never use a diamond blade which is cracked,
broken or bent.
Do not apply water or coolant to the diamond blade.
Start cutting only when diamond blade reaches its
maximum speed.
If the diamond blade seizes or there is any
abnormal noise, immediately turn the power off.
Never use the diamond blade to cut zigzag or curved
lines. Never use the side surface of the diamond
blade. Never use to perform inclination cutting.
If excessive force is applied to the diamond blade
to make it align with the pre-marked line during
cutting, this might not only overload the motor and
cause burn damage but may also overheat the
diamond blade and shorten the service life.
Take care not to allow the power cord to come into
contact with the diamond blade during operation.
When the work is completed,turn the power off and
disconnect the power plug from the receptacle.
Support the work piece in such a way that it is
possible to predict what will happen,and so that the
cut remains open while cutting.(Fig. 8)
Check that the blade is not in contact with anything
when the machine is started.
Always cut at the maximum speed.
Start cutting smoothly, allowing the machine to
work without forcing or pressing the blade.
Move the blade slowly forwards and backwards to
achieve a small contact area between the blade and
the material to be cut. This reduces the temperature
of the blade and ensures effective cutting(Fig. 9).
Feed down the machine in line with the blade.
Pressure from the side can damage the blade and
is very dangerous(Fig. 10).
7
COMPONENT LIST
Fig. 1
1) Checking and installing the diamond
blade
Check the diamond blade is a specied one and is not
cracked,broken or bent.Check the diamond blade is
installed securely.
a. Installation
(1) Wipe the cutting dust from the spindle and washers.
(2) Make sure the rotation direction of the diamond
blade conforms to the direction indicated on the
blade guard and install the diamond blade as
shown in Fig. 3 and Fig. 4.
· When the bore diameter of the saw blade is 1"
(25.4mm), install the ange in the direction of A in
Fig. 3
· When the bore diameter of the saw blade is 2"
(50mm), install the ange in the direction of B in Fig. 3
(3) Firmly secure the spindle by tightening the bolt with
the provided wrench until fully fastened. Ensure
proper xation through manual verication.
(4) Manually rotate the blade to conrm smooth spindle
movement and verify secure installation without
resistance.
NOTE
· Always use the provided wrench to secure the bolt.
· Be careful because the bolt tightens to the left
(counterclockwise direction)to prevent it from being
loosened during cutting.
b. Removal
Remove the bolt with the provided wrench and remove
the diamond blade.
NOTE: Before using the tools, read the
instruction book carefully.
Ensure that the power source to be utilized
conforms to the power requirements
specified on the product nameplate.
Ensure that the power switch is in the OFF
position. If the plug is connected to a power
receptacle while the power switch is in the
ON position,the power tool will start
operating immediately, which could cause a
serious accident.
When the work area is removed from the
power source, use an extension cord of
sufficient thickness and rated capacity. The
extension cord should be kept as short as
practicable.
1. Safty lock
2. Power Switch
3. Auxiliary handle
4. Adjustable Blade Guard
5. Angle adjustment
6. Water pipe interface
7. Saw blade
8. Rolling wheel
9. Fender
1
3
4
5
6
7
8
9
2
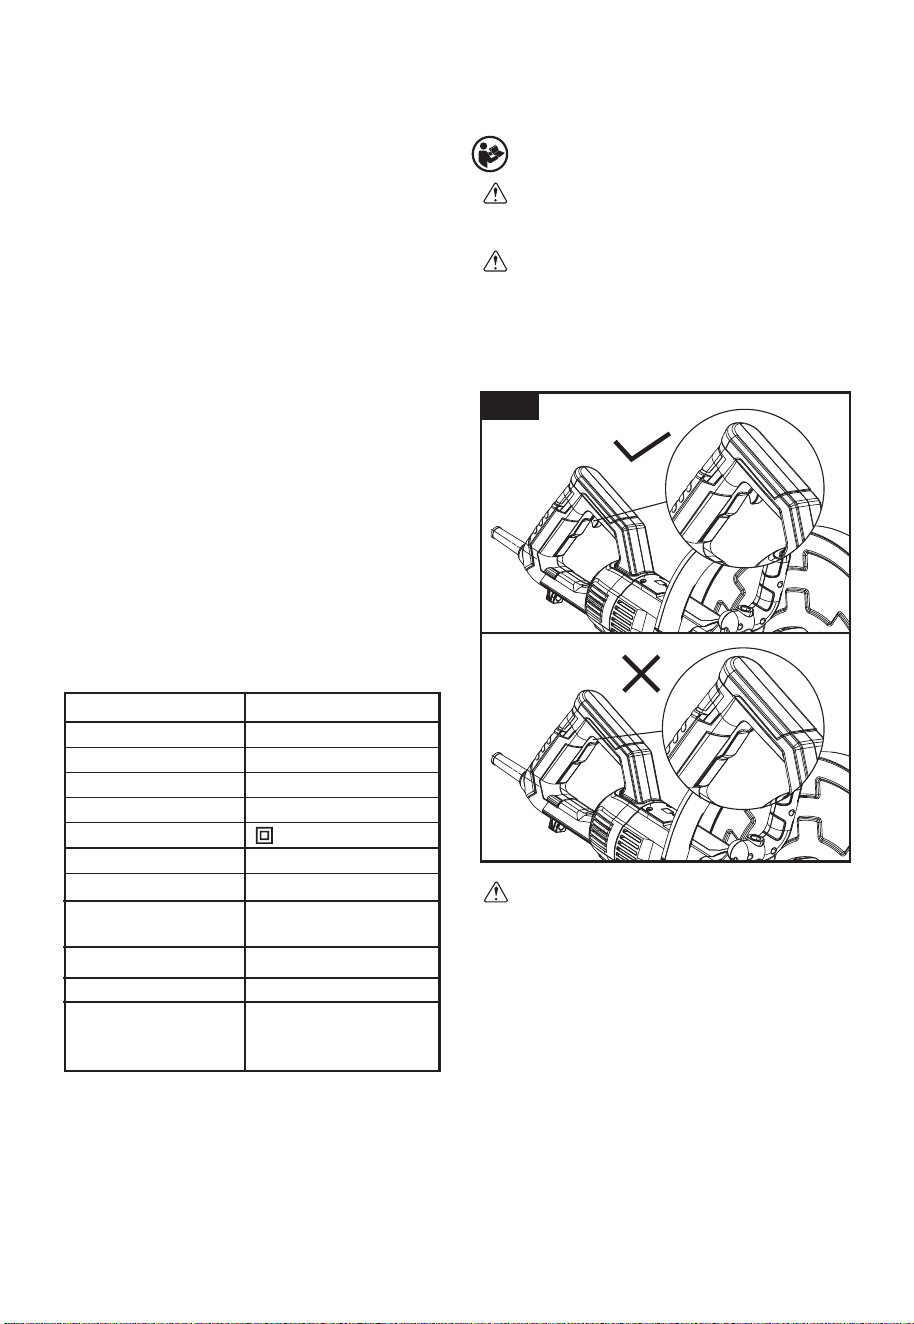
WARNING: Do not attempt to clean the machine
by inserting pointed objects through openings in the
machines casings etc. The machines air vents can be
cleaned using compressed dry air. Observe all
necessary H&S precautions when using compressed
air as a cleaning medium.
Excessive sparking may indicate the presence of dirt in
the motor or worn out carbon brushes.
If this is suspected have the machine serviced and the
brushes replaced by a qualied technician.
9. STORING
Store the machine, operating instructions and where
necessary the accessories in the original packaging.
In this way you will always have all the information and
parts ready to hand.
Pack the device well or use the original packaging in
order to avoid transit damage.
Always keep the machine in dry place
Remove the plug from the socket before carrying
out any adjustment, servicing or maintenance.
WARNING: Any maintenance must be carried out
with the machine switched off and disconnected from
the mains power supply.
On a regular basis check that all safety features and
guards are operating correctly. Only use this machine
if all guards/safety features are fully operational. All
motor bearings in this machine are lubricated for life.
No further lubrication is required. Use a clean, slightly
damp cloth to clean the plastic parts of the machine.
Do not use solvents or similar products which could
damage the plastic or rubber parts.
Removing the blade from the machine will allow
access to the inside of the blade guard. Any build up
of debris etc can be removed using a blunt non
metallic scrapper or similar tool (not supplied).
CUTTING
PRE-CUTTING CHECKS
Important!
■ Verify that the power supply corresponds to the
specications indicated on the machine’s rating
plate.
■ Make sure the machine’s trigger switch is set to the
‘OFF’ position. (Fig. 2) Connecting the machine to
a power source while the trigger switch is in the
‘ON’ position could cause the machine to start
unexpectedly, leading to a serious accident.
■ If an extension cable is necessary, it must be
appropriate for the work environment. When used
outdoors, it should be waterproof and clearly
labeled as such.
■ Always adhere to the manufacturer’s instructions
when using an extension cable.
■ Position any extension cable in a way that prevents
it from creating a tripping hazard or any other risk
to the operator, colleagues, or bystanders.
1) Blade Guard guard adjustment (Fig.6)
Adjust the blade guard angle with the knob so dust
and debris from the material or sparks do not contact
the operator during the cutting operation.
Check that the knob used to secure the blade guard is
tight. Make sure that the knob that secures the blade
guard is adequately tight.
If this knob is loose,it may result in injury to
the operator.
2) ON/OFF SWITCH(Fig. 7)
TO start the machine, press the safety lock (1) rst,
then press the power switch (2); the machine starts
and locks.
TO STOP THE MACHINE, press the trigger again, the
trigger pops out.
For Residual Current Device (RCD) operation please
follow these instructions:
■ When plugging the saw in the RCD will need to be
reset before the saw will power on. Plug the saw in,
press the reset button on the RCD, there will be a
click. (b)
■ The indicator window will change to RED to show
the power is on. (a)
■ To test, press the TEST button. Again, there will be
a click and the indicator window will switch to black
showing the power is off. (c)
■ Press the reset button again to reset and use the
saw.
Note: If the RCD trips during use, simply press RESET.
Cutting Procedures
(1)Place this tool on the material to be cut and align
the pre-marked line and the diamond blade.
The cutting can be performed smoothly if you cut
straight ahead on the scribe line in the initial cut.
(2)Turn on the switch when the diamond blade is not
touching the material to be cut.
CAUTION
Always check the diamond blade before starting
work. Never use a diamond blade which is cracked,
broken or bent.
Do not apply water or coolant to the diamond blade.
Start cutting only when diamond blade reaches its
maximum speed.
If the diamond blade seizes or there is any
abnormal noise, immediately turn the power off.
Never use the diamond blade to cut zigzag or curved
lines. Never use the side surface of the diamond
blade. Never use to perform inclination cutting.
If excessive force is applied to the diamond blade
to make it align with the pre-marked line during
cutting, this might not only overload the motor and
cause burn damage but may also overheat the
diamond blade and shorten the service life.
Take care not to allow the power cord to come into
contact with the diamond blade during operation.
When the work is completed,turn the power off and
disconnect the power plug from the receptacle.
Support the work piece in such a way that it is
possible to predict what will happen,and so that the
cut remains open while cutting.(Fig. 8)
Check that the blade is not in contact with anything
when the machine is started.
Always cut at the maximum speed.
Start cutting smoothly, allowing the machine to
work without forcing or pressing the blade.
Move the blade slowly forwards and backwards to
achieve a small contact area between the blade and
the material to be cut. This reduces the temperature
of the blade and ensures effective cutting(Fig. 9).
Feed down the machine in line with the blade.
Pressure from the side can damage the blade and
is very dangerous(Fig. 10).
OPERATING INSTRUCTIONS
8
1) Checking and installing the diamond
blade
Check the diamond blade is a specied one and is not
cracked,broken or bent.Check the diamond blade is
installed securely.
a. Installation
(1) Wipe the cutting dust from the spindle and washers.
(2) Make sure the rotation direction of the diamond
blade conforms to the direction indicated on the
blade guard and install the diamond blade as
shown in Fig. 3 and Fig. 4.
· When the bore diameter of the saw blade is 1"
(25.4mm), install the ange in the direction of A in
Fig. 3
· When the bore diameter of the saw blade is 2"
(50mm), install the ange in the direction of B in Fig. 3
(3) Firmly secure the spindle by tightening the bolt with
the provided wrench until fully fastened. Ensure
proper xation through manual verication.
(4) Manually rotate the blade to conrm smooth spindle
movement and verify secure installation without
resistance.
NOTE
· Always use the provided wrench to secure the bolt.
· Be careful because the bolt tightens to the left
(counterclockwise direction)to prevent it from being
loosened during cutting.
b. Removal
Remove the bolt with the provided wrench and remove
the diamond blade.
ITEMS SUPPLIED
CARTON CONTENTS
· Concrete Saw
· 16"(400mm) Diamond Disc Blade
· A pair of carbon brush
· A Residual Current Device (RCD)
· Wrench
· Water Pump
· Facuet
· Facuet Connect pipes
· Original safety and operating instructions
Carefully check to see that all of the above items are
supplied.
Inspect the product carefully to make sure no
breakage or damage occurred during shipping. If
you nd damaged or missing parts, please contact
us at the rst time.
NOTE: Do not discard the shipping carton and
packaging material until you are ready to use your new
cordless electric stapler. The packaging is made of
recyclable materials. Properly dispose of these
materials in accordance with local regulations.
IMPORTANT!
The equipment and packaging material are not toys.Do
not let children play with plastic bags, foils or small
parts. These items can be swallowed and pose a
suffocation risk!
TECHNICAL DATA
NOTE: Before using the tools, read the
instruction book carefully.
Ensure that the power source to be utilized
conforms to the power requirements
specified on the product nameplate.
Ensure that the power switch is in the OFF
position. If the plug is connected to a power
receptacle while the power switch is in the
ON position,the power tool will start
operating immediately, which could cause a
serious accident.
When the work area is removed from the
power source, use an extension cord of
sufficient thickness and rated capacity. The
extension cord should be kept as short as
practicable.
Rated Voltage
Rated Frequency
Rated Power
No Load Speed
Mass of Tool
Protection Class
Blade Dimensions
Minimum Diameter
Bore Diameter
Maximum Diameter
Bore Diameter
Blade Diameter
(Blade included with the
packaging)
120V~
60Hz
1600W
3100rpm
11.5kg
/ ll
9"(230mm)
1" or 2"
(25.4mm or 50mm)
18"(420mm)
1" or 2" (25.4mm or 50mm)
16" (400mm)
Fig. 2
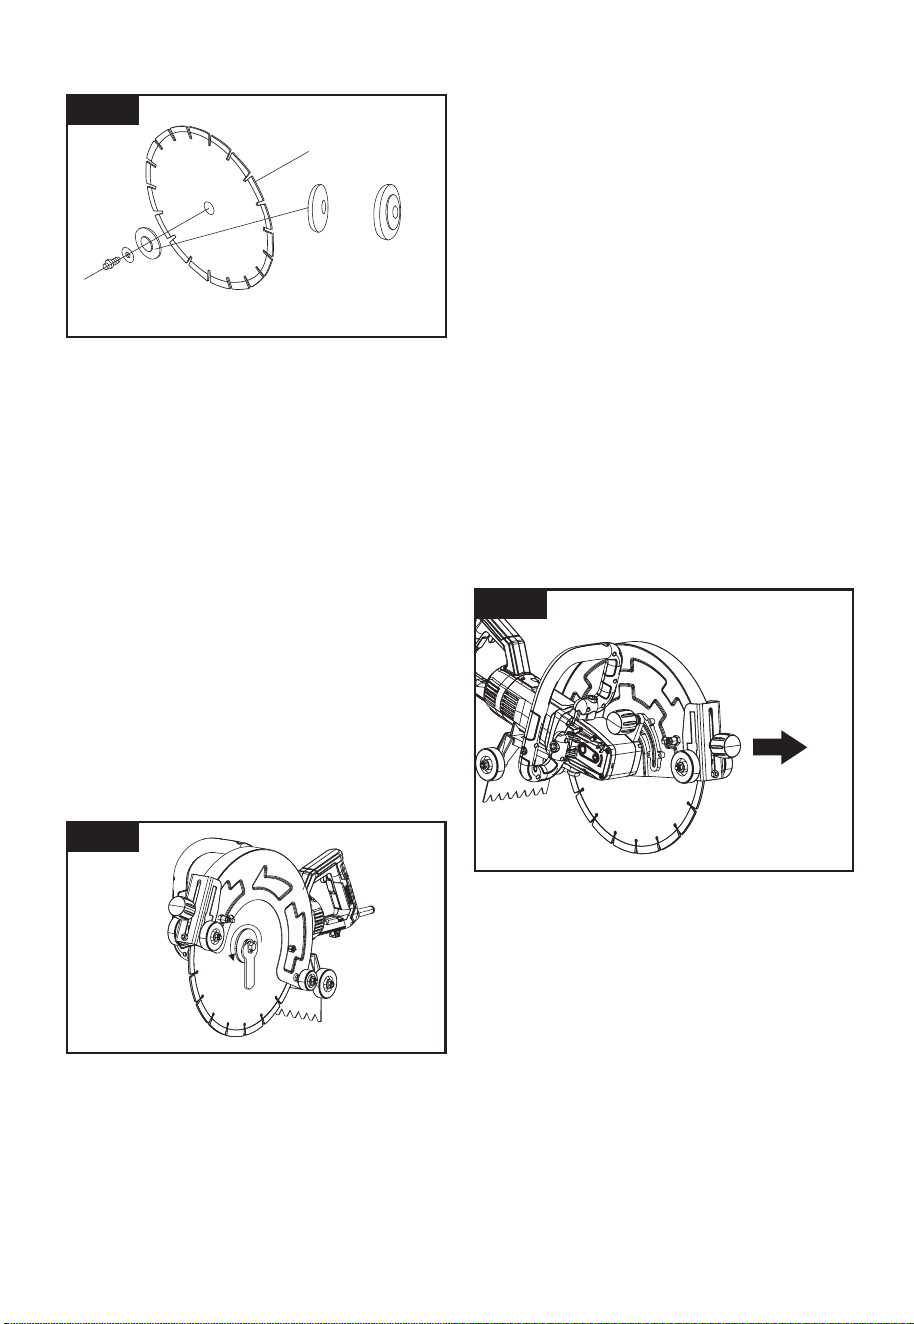
WARNING: Do not attempt to clean the machine
by inserting pointed objects through openings in the
machines casings etc. The machines air vents can be
cleaned using compressed dry air. Observe all
necessary H&S precautions when using compressed
air as a cleaning medium.
Excessive sparking may indicate the presence of dirt in
the motor or worn out carbon brushes.
If this is suspected have the machine serviced and the
brushes replaced by a qualied technician.
9. STORING
Store the machine, operating instructions and where
necessary the accessories in the original packaging.
In this way you will always have all the information and
parts ready to hand.
Pack the device well or use the original packaging in
order to avoid transit damage.
Always keep the machine in dry place
Remove the plug from the socket before carrying
out any adjustment, servicing or maintenance.
WARNING: Any maintenance must be carried out
with the machine switched off and disconnected from
the mains power supply.
On a regular basis check that all safety features and
guards are operating correctly. Only use this machine
if all guards/safety features are fully operational. All
motor bearings in this machine are lubricated for life.
No further lubrication is required. Use a clean, slightly
damp cloth to clean the plastic parts of the machine.
Do not use solvents or similar products which could
damage the plastic or rubber parts.
Removing the blade from the machine will allow
access to the inside of the blade guard. Any build up
of debris etc can be removed using a blunt non
metallic scrapper or similar tool (not supplied).
CUTTING
PRE-CUTTING CHECKS
Important!
■ Verify that the power supply corresponds to the
specications indicated on the machine’s rating
plate.
■ Make sure the machine’s trigger switch is set to the
‘OFF’ position. (Fig. 2) Connecting the machine to
a power source while the trigger switch is in the
‘ON’ position could cause the machine to start
unexpectedly, leading to a serious accident.
■ If an extension cable is necessary, it must be
appropriate for the work environment. When used
outdoors, it should be waterproof and clearly
labeled as such.
■ Always adhere to the manufacturer’s instructions
when using an extension cable.
■ Position any extension cable in a way that prevents
it from creating a tripping hazard or any other risk
to the operator, colleagues, or bystanders.
1) Blade Guard guard adjustment (Fig.6)
Adjust the blade guard angle with the knob so dust
and debris from the material or sparks do not contact
the operator during the cutting operation.
Check that the knob used to secure the blade guard is
tight. Make sure that the knob that secures the blade
guard is adequately tight.
If this knob is loose,it may result in injury to
the operator.
2) ON/OFF SWITCH(Fig. 7)
TO start the machine, press the safety lock (1) rst,
then press the power switch (2); the machine starts
and locks.
TO STOP THE MACHINE, press the trigger again, the
trigger pops out.
For Residual Current Device (RCD) operation please
follow these instructions:
■ When plugging the saw in the RCD will need to be
reset before the saw will power on. Plug the saw in,
press the reset button on the RCD, there will be a
click. (b)
■ The indicator window will change to RED to show
the power is on. (a)
■ To test, press the TEST button. Again, there will be
a click and the indicator window will switch to black
showing the power is off. (c)
■ Press the reset button again to reset and use the
saw.
Note: If the RCD trips during use, simply press RESET.
Cutting Procedures
(1)Place this tool on the material to be cut and align
the pre-marked line and the diamond blade.
The cutting can be performed smoothly if you cut
straight ahead on the scribe line in the initial cut.
(2)Turn on the switch when the diamond blade is not
touching the material to be cut.
CAUTION
Always check the diamond blade before starting
work. Never use a diamond blade which is cracked,
broken or bent.
Do not apply water or coolant to the diamond blade.
Start cutting only when diamond blade reaches its
maximum speed.
If the diamond blade seizes or there is any
abnormal noise, immediately turn the power off.
Never use the diamond blade to cut zigzag or curved
lines. Never use the side surface of the diamond
blade. Never use to perform inclination cutting.
If excessive force is applied to the diamond blade
to make it align with the pre-marked line during
cutting, this might not only overload the motor and
cause burn damage but may also overheat the
diamond blade and shorten the service life.
Take care not to allow the power cord to come into
contact with the diamond blade during operation.
When the work is completed,turn the power off and
disconnect the power plug from the receptacle.
Support the work piece in such a way that it is
possible to predict what will happen,and so that the
cut remains open while cutting.(Fig. 8)
Check that the blade is not in contact with anything
when the machine is started.
Always cut at the maximum speed.
Start cutting smoothly, allowing the machine to
work without forcing or pressing the blade.
Move the blade slowly forwards and backwards to
achieve a small contact area between the blade and
the material to be cut. This reduces the temperature
of the blade and ensures effective cutting(Fig. 9).
Feed down the machine in line with the blade.
Pressure from the side can damage the blade and
is very dangerous(Fig. 10).
9
1) Checking and installing the diamond
blade
Check the diamond blade is a specied one and is not
cracked,broken or bent.Check the diamond blade is
installed securely.
a. Installation
(1) Wipe the cutting dust from the spindle and washers.
(2) Make sure the rotation direction of the diamond
blade conforms to the direction indicated on the
blade guard and install the diamond blade as
shown in Fig. 3 and Fig. 4.
· When the bore diameter of the saw blade is 1"
(25.4mm), install the ange in the direction of A in
Fig. 3
· When the bore diameter of the saw blade is 2"
(50mm), install the ange in the direction of B in Fig. 3
(3) Firmly secure the spindle by tightening the bolt with
the provided wrench until fully fastened. Ensure
proper xation through manual verication.
(4) Manually rotate the blade to conrm smooth spindle
movement and verify secure installation without
resistance.
NOTE
· Always use the provided wrench to secure the bolt.
· Be careful because the bolt tightens to the left
(counterclockwise direction)to prevent it from being
loosened during cutting.
b. Removal
Remove the bolt with the provided wrench and remove
the diamond blade.
NOTE: Before using the tools, read the
instruction book carefully.
Ensure that the power source to be utilized
conforms to the power requirements
specified on the product nameplate.
Ensure that the power switch is in the OFF
position. If the plug is connected to a power
receptacle while the power switch is in the
ON position,the power tool will start
operating immediately, which could cause a
serious accident.
When the work area is removed from the
power source, use an extension cord of
sufficient thickness and rated capacity. The
extension cord should be kept as short as
practicable.
Fig. 3
A B
Fig. 4
Fig. 6
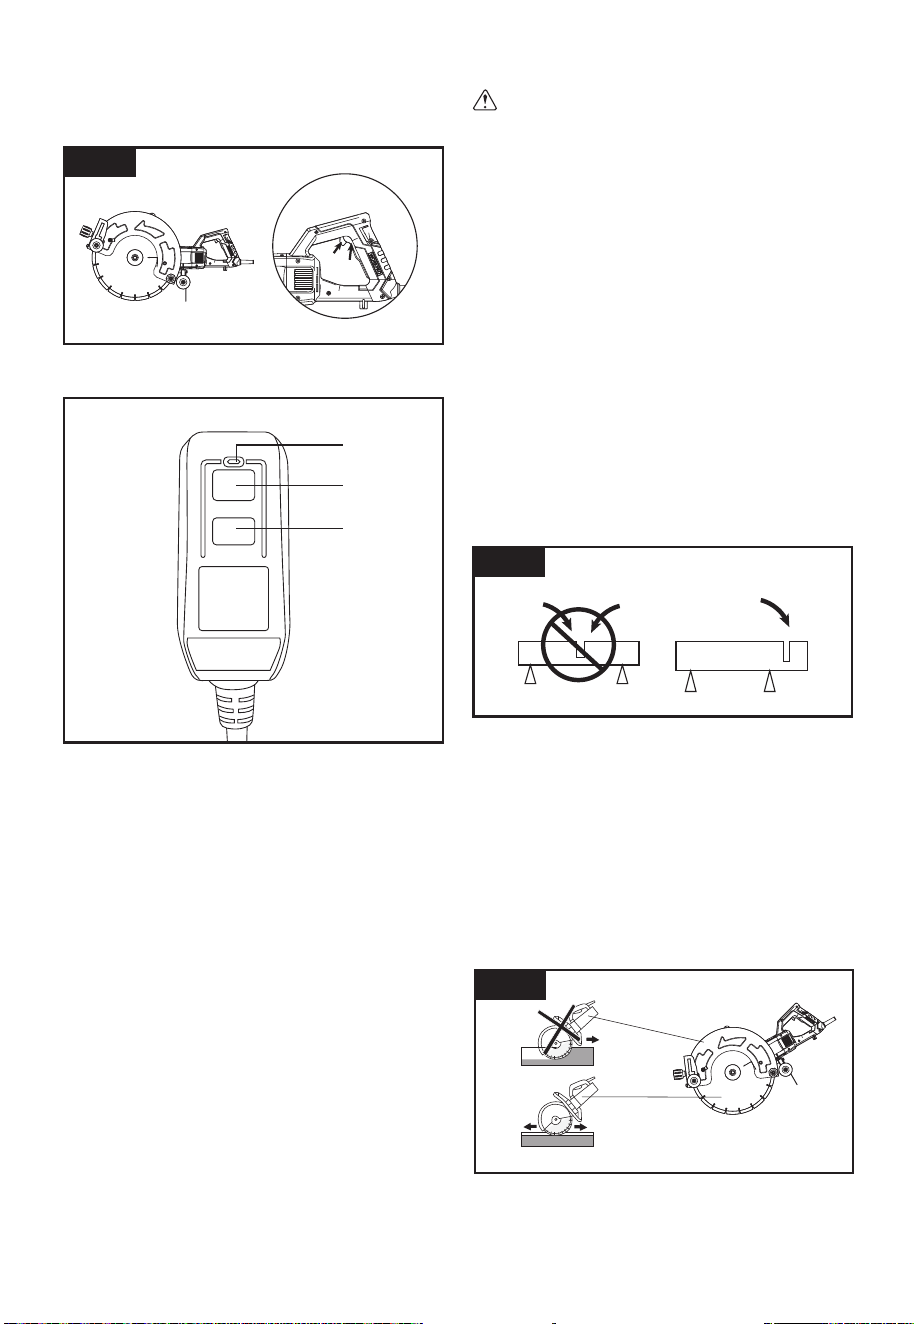
WARNING: Do not attempt to clean the machine
by inserting pointed objects through openings in the
machines casings etc. The machines air vents can be
cleaned using compressed dry air. Observe all
necessary H&S precautions when using compressed
air as a cleaning medium.
Excessive sparking may indicate the presence of dirt in
the motor or worn out carbon brushes.
If this is suspected have the machine serviced and the
brushes replaced by a qualied technician.
9. STORING
Store the machine, operating instructions and where
necessary the accessories in the original packaging.
In this way you will always have all the information and
parts ready to hand.
Pack the device well or use the original packaging in
order to avoid transit damage.
Always keep the machine in dry place
Remove the plug from the socket before carrying
out any adjustment, servicing or maintenance.
WARNING: Any maintenance must be carried out
with the machine switched off and disconnected from
the mains power supply.
On a regular basis check that all safety features and
guards are operating correctly. Only use this machine
if all guards/safety features are fully operational. All
motor bearings in this machine are lubricated for life.
No further lubrication is required. Use a clean, slightly
damp cloth to clean the plastic parts of the machine.
Do not use solvents or similar products which could
damage the plastic or rubber parts.
Removing the blade from the machine will allow
access to the inside of the blade guard. Any build up
of debris etc can be removed using a blunt non
metallic scrapper or similar tool (not supplied).
CUTTING
PRE-CUTTING CHECKS
Important!
■ Verify that the power supply corresponds to the
specications indicated on the machine’s rating
plate.
■ Make sure the machine’s trigger switch is set to the
‘OFF’ position. (Fig. 2) Connecting the machine to
a power source while the trigger switch is in the
‘ON’ position could cause the machine to start
unexpectedly, leading to a serious accident.
■ If an extension cable is necessary, it must be
appropriate for the work environment. When used
outdoors, it should be waterproof and clearly
labeled as such.
■ Always adhere to the manufacturer’s instructions
when using an extension cable.
■ Position any extension cable in a way that prevents
it from creating a tripping hazard or any other risk
to the operator, colleagues, or bystanders.
1) Blade Guard guard adjustment (Fig.6)
Adjust the blade guard angle with the knob so dust
and debris from the material or sparks do not contact
the operator during the cutting operation.
Check that the knob used to secure the blade guard is
tight. Make sure that the knob that secures the blade
guard is adequately tight.
If this knob is loose,it may result in injury to
the operator.
2) ON/OFF SWITCH(Fig. 7)
TO start the machine, press the safety lock (1) rst,
then press the power switch (2); the machine starts
and locks.
TO STOP THE MACHINE, press the trigger again, the
trigger pops out.
For Residual Current Device (RCD) operation please
follow these instructions:
■ When plugging the saw in the RCD will need to be
reset before the saw will power on. Plug the saw in,
press the reset button on the RCD, there will be a
click. (b)
■ The indicator window will change to RED to show
the power is on. (a)
■ To test, press the TEST button. Again, there will be
a click and the indicator window will switch to black
showing the power is off. (c)
■ Press the reset button again to reset and use the
saw.
Note: If the RCD trips during use, simply press RESET.
Cutting Procedures
(1)Place this tool on the material to be cut and align
the pre-marked line and the diamond blade.
The cutting can be performed smoothly if you cut
straight ahead on the scribe line in the initial cut.
(2)Turn on the switch when the diamond blade is not
touching the material to be cut.
CAUTION
Always check the diamond blade before starting
work. Never use a diamond blade which is cracked,
broken or bent.
Do not apply water or coolant to the diamond blade.
Start cutting only when diamond blade reaches its
maximum speed.
If the diamond blade seizes or there is any
abnormal noise, immediately turn the power off.
Never use the diamond blade to cut zigzag or curved
lines. Never use the side surface of the diamond
blade. Never use to perform inclination cutting.
If excessive force is applied to the diamond blade
to make it align with the pre-marked line during
cutting, this might not only overload the motor and
cause burn damage but may also overheat the
diamond blade and shorten the service life.
Take care not to allow the power cord to come into
contact with the diamond blade during operation.
When the work is completed,turn the power off and
disconnect the power plug from the receptacle.
Support the work piece in such a way that it is
possible to predict what will happen,and so that the
cut remains open while cutting.(Fig. 8)
Check that the blade is not in contact with anything
when the machine is started.
Always cut at the maximum speed.
Start cutting smoothly, allowing the machine to
work without forcing or pressing the blade.
Move the blade slowly forwards and backwards to
achieve a small contact area between the blade and
the material to be cut. This reduces the temperature
of the blade and ensures effective cutting(Fig. 9).
Feed down the machine in line with the blade.
Pressure from the side can damage the blade and
is very dangerous(Fig. 10).
10
1) Checking and installing the diamond
blade
Check the diamond blade is a specied one and is not
cracked,broken or bent.Check the diamond blade is
installed securely.
a. Installation
(1) Wipe the cutting dust from the spindle and washers.
(2) Make sure the rotation direction of the diamond
blade conforms to the direction indicated on the
blade guard and install the diamond blade as
shown in Fig. 3 and Fig. 4.
· When the bore diameter of the saw blade is 1"
(25.4mm), install the ange in the direction of A in
Fig. 3
· When the bore diameter of the saw blade is 2"
(50mm), install the ange in the direction of B in Fig. 3
(3) Firmly secure the spindle by tightening the bolt with
the provided wrench until fully fastened. Ensure
proper xation through manual verication.
(4) Manually rotate the blade to conrm smooth spindle
movement and verify secure installation without
resistance.
NOTE
· Always use the provided wrench to secure the bolt.
· Be careful because the bolt tightens to the left
(counterclockwise direction)to prevent it from being
loosened during cutting.
b. Removal
Remove the bolt with the provided wrench and remove
the diamond blade.
NOTE: Before using the tools, read the
instruction book carefully.
Ensure that the power source to be utilized
conforms to the power requirements
specified on the product nameplate.
Ensure that the power switch is in the OFF
position. If the plug is connected to a power
receptacle while the power switch is in the
ON position,the power tool will start
operating immediately, which could cause a
serious accident.
When the work area is removed from the
power source, use an extension cord of
sufficient thickness and rated capacity. The
extension cord should be kept as short as
practicable.
Fig. 7
Fig. 8
Fig. 9
2
1
a
b
c
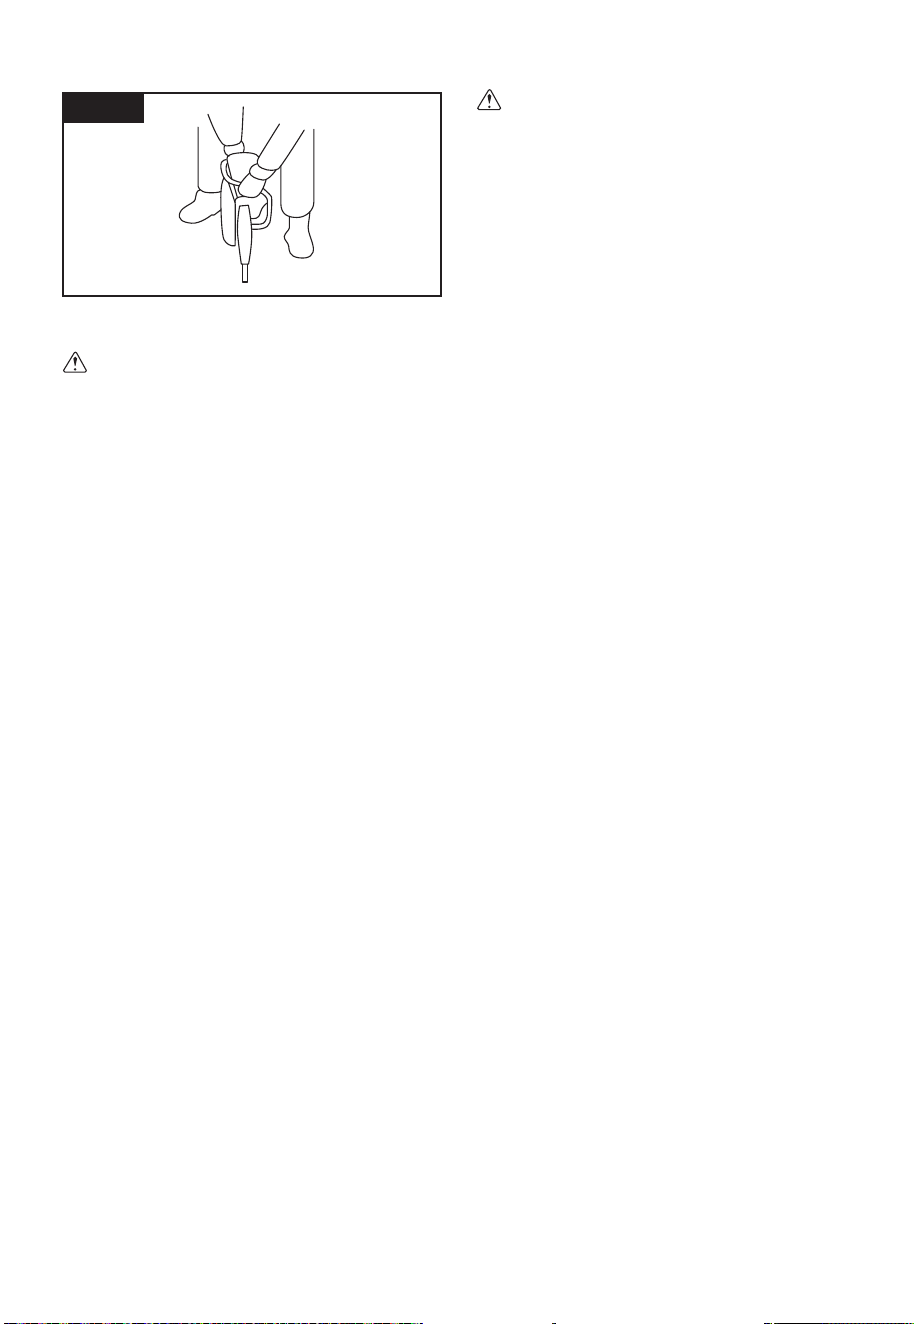
WARNING: Do not attempt to clean the machine
by inserting pointed objects through openings in the
machines casings etc. The machines air vents can be
cleaned using compressed dry air. Observe all
necessary H&S precautions when using compressed
air as a cleaning medium.
Excessive sparking may indicate the presence of dirt in
the motor or worn out carbon brushes.
If this is suspected have the machine serviced and the
brushes replaced by a qualied technician.
9. STORING
Store the machine, operating instructions and where
necessary the accessories in the original packaging.
In this way you will always have all the information and
parts ready to hand.
Pack the device well or use the original packaging in
order to avoid transit damage.
Always keep the machine in dry place
Remove the plug from the socket before carrying
out any adjustment, servicing or maintenance.
WARNING: Any maintenance must be carried out
with the machine switched off and disconnected from
the mains power supply.
On a regular basis check that all safety features and
guards are operating correctly. Only use this machine
if all guards/safety features are fully operational. All
motor bearings in this machine are lubricated for life.
No further lubrication is required. Use a clean, slightly
damp cloth to clean the plastic parts of the machine.
Do not use solvents or similar products which could
damage the plastic or rubber parts.
Removing the blade from the machine will allow
access to the inside of the blade guard. Any build up
of debris etc can be removed using a blunt non
metallic scrapper or similar tool (not supplied).
CUTTING
PRE-CUTTING CHECKS
Important!
■ Verify that the power supply corresponds to the
specications indicated on the machine’s rating
plate.
■ Make sure the machine’s trigger switch is set to the
‘OFF’ position. (Fig. 2) Connecting the machine to
a power source while the trigger switch is in the
‘ON’ position could cause the machine to start
unexpectedly, leading to a serious accident.
■ If an extension cable is necessary, it must be
appropriate for the work environment. When used
outdoors, it should be waterproof and clearly
labeled as such.
■ Always adhere to the manufacturer’s instructions
when using an extension cable.
■ Position any extension cable in a way that prevents
it from creating a tripping hazard or any other risk
to the operator, colleagues, or bystanders.
1) Blade Guard guard adjustment (Fig.6)
Adjust the blade guard angle with the knob so dust
and debris from the material or sparks do not contact
the operator during the cutting operation.
Check that the knob used to secure the blade guard is
tight. Make sure that the knob that secures the blade
guard is adequately tight.
If this knob is loose,it may result in injury to
the operator.
2) ON/OFF SWITCH(Fig. 7)
TO start the machine, press the safety lock (1) rst,
then press the power switch (2); the machine starts
and locks.
TO STOP THE MACHINE, press the trigger again, the
trigger pops out.
For Residual Current Device (RCD) operation please
follow these instructions:
■ When plugging the saw in the RCD will need to be
reset before the saw will power on. Plug the saw in,
press the reset button on the RCD, there will be a
click. (b)
■ The indicator window will change to RED to show
the power is on. (a)
■ To test, press the TEST button. Again, there will be
a click and the indicator window will switch to black
showing the power is off. (c)
■ Press the reset button again to reset and use the
saw.
Note: If the RCD trips during use, simply press RESET.
Cutting Procedures
(1)Place this tool on the material to be cut and align
the pre-marked line and the diamond blade.
The cutting can be performed smoothly if you cut
straight ahead on the scribe line in the initial cut.
(2)Turn on the switch when the diamond blade is not
touching the material to be cut.
CAUTION
Always check the diamond blade before starting
work. Never use a diamond blade which is cracked,
broken or bent.
Do not apply water or coolant to the diamond blade.
Start cutting only when diamond blade reaches its
maximum speed.
If the diamond blade seizes or there is any
abnormal noise, immediately turn the power off.
Never use the diamond blade to cut zigzag or curved
lines. Never use the side surface of the diamond
blade. Never use to perform inclination cutting.
If excessive force is applied to the diamond blade
to make it align with the pre-marked line during
cutting, this might not only overload the motor and
cause burn damage but may also overheat the
diamond blade and shorten the service life.
Take care not to allow the power cord to come into
contact with the diamond blade during operation.
When the work is completed,turn the power off and
disconnect the power plug from the receptacle.
Support the work piece in such a way that it is
possible to predict what will happen,and so that the
cut remains open while cutting.(Fig. 8)
Check that the blade is not in contact with anything
when the machine is started.
Always cut at the maximum speed.
Start cutting smoothly, allowing the machine to
work without forcing or pressing the blade.
Move the blade slowly forwards and backwards to
achieve a small contact area between the blade and
the material to be cut. This reduces the temperature
of the blade and ensures effective cutting(Fig. 9).
Feed down the machine in line with the blade.
Pressure from the side can damage the blade and
is very dangerous(Fig. 10).
11
1) Checking and installing the diamond
blade
Check the diamond blade is a specied one and is not
cracked,broken or bent.Check the diamond blade is
installed securely.
a. Installation
(1) Wipe the cutting dust from the spindle and washers.
(2) Make sure the rotation direction of the diamond
blade conforms to the direction indicated on the
blade guard and install the diamond blade as
shown in Fig. 3 and Fig. 4.
· When the bore diameter of the saw blade is 1"
(25.4mm), install the ange in the direction of A in
Fig. 3
· When the bore diameter of the saw blade is 2"
(50mm), install the ange in the direction of B in Fig. 3
(3) Firmly secure the spindle by tightening the bolt with
the provided wrench until fully fastened. Ensure
proper xation through manual verication.
(4) Manually rotate the blade to conrm smooth spindle
movement and verify secure installation without
resistance.
NOTE
· Always use the provided wrench to secure the bolt.
· Be careful because the bolt tightens to the left
(counterclockwise direction)to prevent it from being
loosened during cutting.
b. Removal
Remove the bolt with the provided wrench and remove
the diamond blade.
NOTE: Before using the tools, read the
instruction book carefully.
Ensure that the power source to be utilized
conforms to the power requirements
specified on the product nameplate.
Ensure that the power switch is in the OFF
position. If the plug is connected to a power
receptacle while the power switch is in the
ON position,the power tool will start
operating immediately, which could cause a
serious accident.
When the work area is removed from the
power source, use an extension cord of
sufficient thickness and rated capacity. The
extension cord should be kept as short as
practicable.
Fig. 10
WARNING: Do not attempt to clean the machine
by inserting pointed objects through openings in the
machines casings etc. The machines air vents can be
cleaned using compressed dry air. Observe all
necessary H&S precautions when using compressed
air as a cleaning medium.
Excessive sparking may indicate the presence of dirt in
the motor or worn out carbon brushes.
If this is suspected have the machine serviced and the
brushes replaced by a qualied technician.
9. STORING
Store the machine, operating instructions and where
necessary the accessories in the original packaging.
In this way you will always have all the information and
parts ready to hand.
Pack the device well or use the original packaging in
order to avoid transit damage.
Always keep the machine in dry place
Remove the plug from the socket before carrying
out any adjustment, servicing or maintenance.
WARNING: Any maintenance must be carried out
with the machine switched off and disconnected from
the mains power supply.
On a regular basis check that all safety features and
guards are operating correctly. Only use this machine
if all guards/safety features are fully operational. All
motor bearings in this machine are lubricated for life.
No further lubrication is required. Use a clean, slightly
damp cloth to clean the plastic parts of the machine.
Do not use solvents or similar products which could
damage the plastic or rubber parts.
Removing the blade from the machine will allow
access to the inside of the blade guard. Any build up
of debris etc can be removed using a blunt non
metallic scrapper or similar tool (not supplied).
CUTTING
PRE-CUTTING CHECKS
Important!
■ Verify that the power supply corresponds to the
specications indicated on the machine’s rating
plate.
■ Make sure the machine’s trigger switch is set to the
‘OFF’ position. (Fig. 2) Connecting the machine to
a power source while the trigger switch is in the
‘ON’ position could cause the machine to start
unexpectedly, leading to a serious accident.
■ If an extension cable is necessary, it must be
appropriate for the work environment. When used
outdoors, it should be waterproof and clearly
labeled as such.
■ Always adhere to the manufacturer’s instructions
when using an extension cable.
■ Position any extension cable in a way that prevents
it from creating a tripping hazard or any other risk
to the operator, colleagues, or bystanders.
1) Blade Guard guard adjustment (Fig.6)
Adjust the blade guard angle with the knob so dust
and debris from the material or sparks do not contact
the operator during the cutting operation.
Check that the knob used to secure the blade guard is
tight. Make sure that the knob that secures the blade
guard is adequately tight.
If this knob is loose,it may result in injury to
the operator.
2) ON/OFF SWITCH(Fig. 7)
TO start the machine, press the safety lock (1) rst,
then press the power switch (2); the machine starts
and locks.
TO STOP THE MACHINE, press the trigger again, the
trigger pops out.
For Residual Current Device (RCD) operation please
follow these instructions:
■ When plugging the saw in the RCD will need to be
reset before the saw will power on. Plug the saw in,
press the reset button on the RCD, there will be a
click. (b)
■ The indicator window will change to RED to show
the power is on. (a)
■ To test, press the TEST button. Again, there will be
a click and the indicator window will switch to black
showing the power is off. (c)
■ Press the reset button again to reset and use the
saw.
Note: If the RCD trips during use, simply press RESET.
Cutting Procedures
(1)Place this tool on the material to be cut and align
the pre-marked line and the diamond blade.
The cutting can be performed smoothly if you cut
straight ahead on the scribe line in the initial cut.
(2)Turn on the switch when the diamond blade is not
touching the material to be cut.
CAUTION
Always check the diamond blade before starting
work. Never use a diamond blade which is cracked,
broken or bent.
Do not apply water or coolant to the diamond blade.
Start cutting only when diamond blade reaches its
maximum speed.
If the diamond blade seizes or there is any
abnormal noise, immediately turn the power off.
Never use the diamond blade to cut zigzag or curved
lines. Never use the side surface of the diamond
blade. Never use to perform inclination cutting.
If excessive force is applied to the diamond blade
to make it align with the pre-marked line during
cutting, this might not only overload the motor and
cause burn damage but may also overheat the
diamond blade and shorten the service life.
Take care not to allow the power cord to come into
contact with the diamond blade during operation.
When the work is completed,turn the power off and
disconnect the power plug from the receptacle.
Support the work piece in such a way that it is
possible to predict what will happen,and so that the
cut remains open while cutting.(Fig. 8)
Check that the blade is not in contact with anything
when the machine is started.
Always cut at the maximum speed.
Start cutting smoothly, allowing the machine to
work without forcing or pressing the blade.
Move the blade slowly forwards and backwards to
achieve a small contact area between the blade and
the material to be cut. This reduces the temperature
of the blade and ensures effective cutting(Fig. 9).
Feed down the machine in line with the blade.
Pressure from the side can damage the blade and
is very dangerous(Fig. 10).
1) Checking and installing the diamond
blade
Check the diamond blade is a specied one and is not
cracked,broken or bent.Check the diamond blade is
installed securely.
a. Installation
(1) Wipe the cutting dust from the spindle and washers.
(2) Make sure the rotation direction of the diamond
blade conforms to the direction indicated on the
blade guard and install the diamond blade as
shown in Fig. 3 and Fig. 4.
· When the bore diameter of the saw blade is 1"
(25.4mm), install the ange in the direction of A in
Fig. 3
· When the bore diameter of the saw blade is 2"
(50mm), install the ange in the direction of B in Fig. 3
(3) Firmly secure the spindle by tightening the bolt with
the provided wrench until fully fastened. Ensure
proper xation through manual verication.
(4) Manually rotate the blade to conrm smooth spindle
movement and verify secure installation without
resistance.
NOTE
· Always use the provided wrench to secure the bolt.
· Be careful because the bolt tightens to the left
(counterclockwise direction)to prevent it from being
loosened during cutting.
b. Removal
Remove the bolt with the provided wrench and remove
the diamond blade.
NOTE: Before using the tools, read the
instruction book carefully.
Ensure that the power source to be utilized
conforms to the power requirements
specified on the product nameplate.
Ensure that the power switch is in the OFF
position. If the plug is connected to a power
receptacle while the power switch is in the
ON position,the power tool will start
operating immediately, which could cause a
serious accident.
When the work area is removed from the
power source, use an extension cord of
sufficient thickness and rated capacity. The
extension cord should be kept as short as
practicable.
12
Although your new mini circular saw is really very simple to operate, if you do experience problems, please
check the following:
Symptom Possible Causes Possible Solution
Tool will not start when
operating the ON/OFF switch.
Blade spins or slips
Blade kicks back when
beginning a cut.
Power cord not plugged in.
Power cord is broken.
Carbon brush has worn down.
Blade is not tightly
engaged with the spindle.
Check to make sure power cord
is connected well into a working
outlet.
Unplug the power cord. Replace
it by a qualied maintenance
person.
Replace the carbon brush by a
qualied maintenance person.
Remove the blade, and
reassemble it as described in
Checking and installing the
diamond blade section.
Blade is not spinning fast enough. Allow the saw blade to reach
full speed prior to beginning a
cut in the material.
10. TROUBLE SHOOTING
Manufacturer: YongkangYahang Industrial and Trade Co., Ltd
No.6 Dangui South Road, Chengxi New District, Yongkang City, Zhejiang Province
11. Disposal
A crossed-out wheelie bin icon means: Batteries and rechargeable batteries, electrical or electronic
devices must not be disposed of with household waste. They may contain substances that are harmful
to the environment and human health.
Consumers must dispose of waste electrical devices, spent portable batteries and rechargeable
Disposal of the packaging
batteries separately from household waste at an ofcial collection point to ensure that these items are processed
correctly. Information on returning these items is available from the seller. Sellers are required to
accept these items free of charge. Batteries and rechargeable batteries, which are not permanently installed in
waste electrical devices, must be removed prior to disposal and must be disposed of separately. Lithium
batteries and battery packs in all systems must only be retuned to a collection point when discharged. Batteries
must always be protected against short circuits by covering the poles with adhesive tape.
All end users are responsible for deleting any personal data stored on waste devices prior to their disposal.
The packaging consists of cardboard and correspondingly marked plastics that can be recycled. Make
these materials available for recycling.
Disposal of the appliance