INSTALLATION GUIDE
AND USER MANUAL
RESIDENTIAL
NORTH AMERICA
EN

2 Copyright © 2024 Sol-Ark LLC | SK140-0005-002
Copyright © 2024 Sol-Ark LLC | SK140-0005-002 3
READ THE INSTRUCTIONS COMPLETELY BEFORE OPERATING THE EQUIPMENT
Check the utility voltage before turning ON the unit.
Verify the inviter’s programmed grid type before connecting to the utility.
The unit will be programmed in 120/240V Split-Phase at 60Hz by default.
Disregarding these instructions could result in permanent damages to the unit
DISCLAIMER
UNLESS SPECIFICALLY AGREED TO IN WRITING:
Sol-Ark assumes no responsibility or liability for any damages, property loss, personal injury, or any adverse consequences resulting from
improper use and installation of the product or the failure to adhere to the guidelines provided in this document. Users are expressly advised
to follow the instructions and guidelines outlined in the documentation accompanying the product. Sol-Ark shall not be liable for any
damages or losses incurred due to deviations from recommended usage, installation, or maintenance procedures. By using the product,
users acknowledge their understanding of these disclaimers and agree to use the product at their own risk. Sol-Ark reserves the right to
update or modify product information, specifications, and guidelines without prior notice.
Sol-Ark retains the right to final interpretation of this document and all related materials pertaining to this product. This document is subject
to modifications, updates, revisions, or termination without prior notice. For the latest product information, please visit Sol-Ark’s official
website. www.sol-ark.com
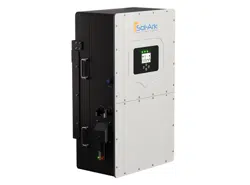
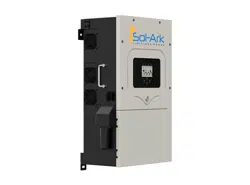
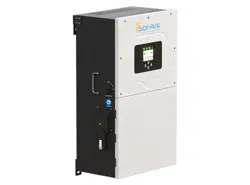
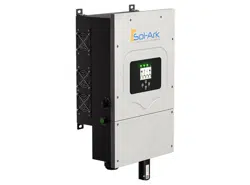
This manual is only for the 8K-2P-N Hybrid Inverter.
For OUTDOOR MODELS ONLY. Previous hardware versions of the Sol-Ark 8K are not compatible with the instructions contained herein.
For support, contact:
(USA) +1 (972) 575-8875 ext. (2)
support@sol-ark.com

4 Copyright © 2024 Sol-Ark LLC | SK140-0005-002
Table of Contents
IMPORTANT SAFETY INSTRUCTIONS ........................................................................................................................................................................................................... 5
1. Sol-Ark: At a First Glance .................................................................................................................................. 6
1.1 General Description ................................................................................................................................................................................................................................... 7
1.2 Specifications .............................................................................................................................................................................................................................................. 8
1.3 Connection Requirements ...................................................................................................................................................................................................................... 10
2. Installation ........................................................................................................................................................ 11
2.1 Mounting the Sol-Ark ............................................................................................................................................................................................................................... 11
2.2 Integrating Batteries ................................................................................................................................................................................................................................. 13
2.3 Battery Communication ........................................................................................................................................................................................................................... 14
2.4 Connecting PV Modules .......................................................................................................................................................................................................................... 15
2.5 Integrating a Generator ........................................................................................................................................................................................................................... 16
2.6 Grid Peak Shaving .................................................................................................................................................................................................................................... 17
2.7 Automatic Generator Start ...................................................................................................................................................................................................................... 17
2.8 Integrating Sensors and Accessories .................................................................................................................................................................................................... 18
2.9 Limit Sensors (CT sensors)....................................................................................................................................................................................................................... 19
2.10 Emergency Stop and Rapid Shutdown ............................................................................................................................................................................................... 21
2.11 Powering-up and Testing the Sol-Ark ................................................................................................................................................................................................. 22
2.12 Power Cycle Sequence .......................................................................................................................................................................................................................... 22
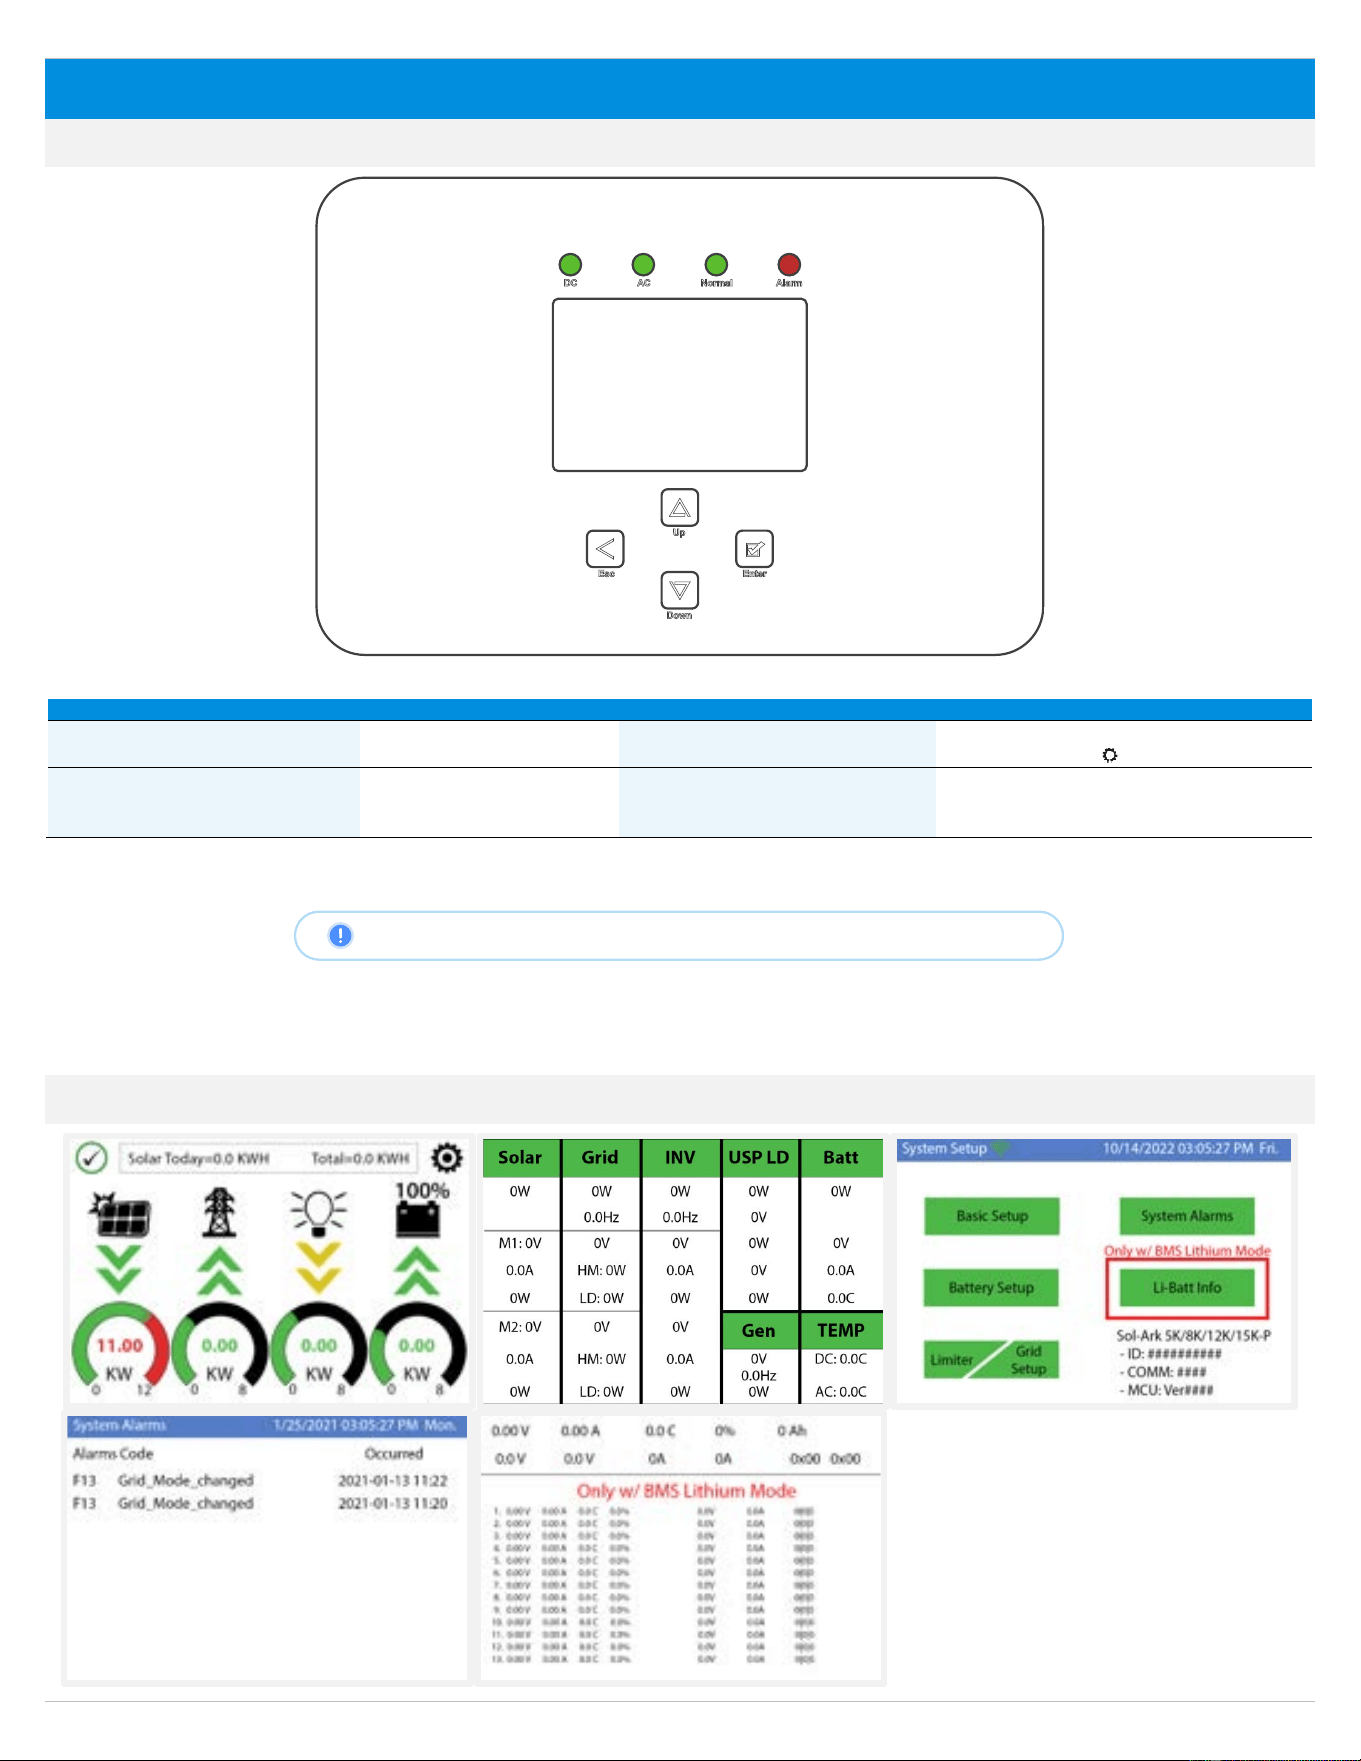
3. User Interface ................................................................................................................................................... 23
3.1 LED Indicators ........................................................................................................................................................................................................................................... 23
3.2 Main Menus ............................................................................................................................................................................................................................................... 23
3.3 Basic Setup ................................................................................................................................................................................................................................................ 25
3.4 Battery Setup ............................................................................................................................................................................................................................................. 26
3.5 Limiter ......................................................................................................................................................................................................................................................... 28
3.6 Grid Setup .................................................................................................................................................................................................................................................. 32
4. Installation Tips ............................................................................................................................................... 34
4.1 Battery Charge Controller ....................................................................................................................................................................................................................... 34
4.2 Grid Compliance Settings ....................................................................................................................................................................................................................... 35
5. MySolArk: Remote Monitoring ..................................................................................................................... 36
5.1 MySolArk Setup Instructions ................................................................................................................................................................................................................... 36
5.2 LED Indicator and troubleshooting ....................................................................................................................................................................................................... 40
6. Wiring Diagrams ............................................................................................................................................. 41
7. Troubleshooting Guide .................................................................................................................................. 47
7.1 Sol-Ark Error codes .................................................................................................................................................................................................................................. 49
8. Warranty Verification Checklist .................................................................................................................... 50
9. GUI Screens ...................................................................................................................................................... 52
Copyright © 2024 Sol-Ark LLC | SK140-0005-002 5
IMPORTANT SAFETY INSTRUCTIONS
SYMBOLS THAT APPEAR IN THIS DOCUMENT
WARNING: This symbol indicates information that, if ignored, could cause serious injury, equipment damage, or death.
CAUTION: This symbol indicates information that, if ignored, could result in minor injury or equipment damage.
NOTE: This symbol indicates relevant information that is not related to hazardous situations.
WARNINGS
Read this entire document before installing or using the Sol-Ark 8K-2P-N inverter. Failure to follow any of the instructions or warnings
in this document can result in electrical shock, serious injury, or death. Damage to the 8K-2P-N inverter is also possible, potentially rendering
it inoperable.
High Life Risk due to fire or electrocution – ONLY qualified persons should install the Sol-Ark inverter.
The system must have Ground connections and Neutral connections. Ground MUST be bonded to Neutral ONLY ONCE in the circuit.
Solar PV+/PV- are UNGROUNDED. Note, you may ground PV Racking/Mounts, but doing so directly to the Sol-Ark will likely result in
damage in the case of a direct lightning strike to the PV array.
DO NOT connect the grid to the “LOAD” output breaker.
DO NOT reverse the polarity of batteries. Damage WILL occur.
DO NOT exceed 500Voc on any MPPT on the Sol-Ark.
DO NOT turn off the battery breaker if there is current flowing in or out of the battery in any amount.
DO NOT use impact drivers to tighten any fasteners on the Sol-Ark.
MUST use conduit (or double insulated wire) for AC wires entering/exiting Sol-Ark user area.
ALL terminals/breakers, including battery, MPPT, and AC Terminal Block inputs, should only have one conductor connected to them.

6 Copyright © 2024 Sol-Ark LLC | SK140-0005-002
1. Sol-Ark: At a First Glance
INSPECT SHIPMENT
The box should include all items shown in the component guide. If there is damage or missing parts, immediately call the phone number
(USA) +1 (972) 575-8875 Ext. 2.
COMPONENT GUIDE
The Sol-Ark 8K-2P-N system includes the following components:
Component
Description
Quantity
A
Sol-Ark 8K-2P-N inverter
1
B
French cleat
1
C
Battery toroid
2
D
CAT 5E communication cable
1
E
Allen key (4 mm)
1
F
Temperature sensor
1
G
User manual
1
H
Wi-Fi / Ethernet antenna (dongle)
1
I
100A (Ø0.630”) Current transformers (CT sensors)
2
A B C
D E
F G
H
I
Copyright © 2024 Sol-Ark LLC | SK140-0005-002 7
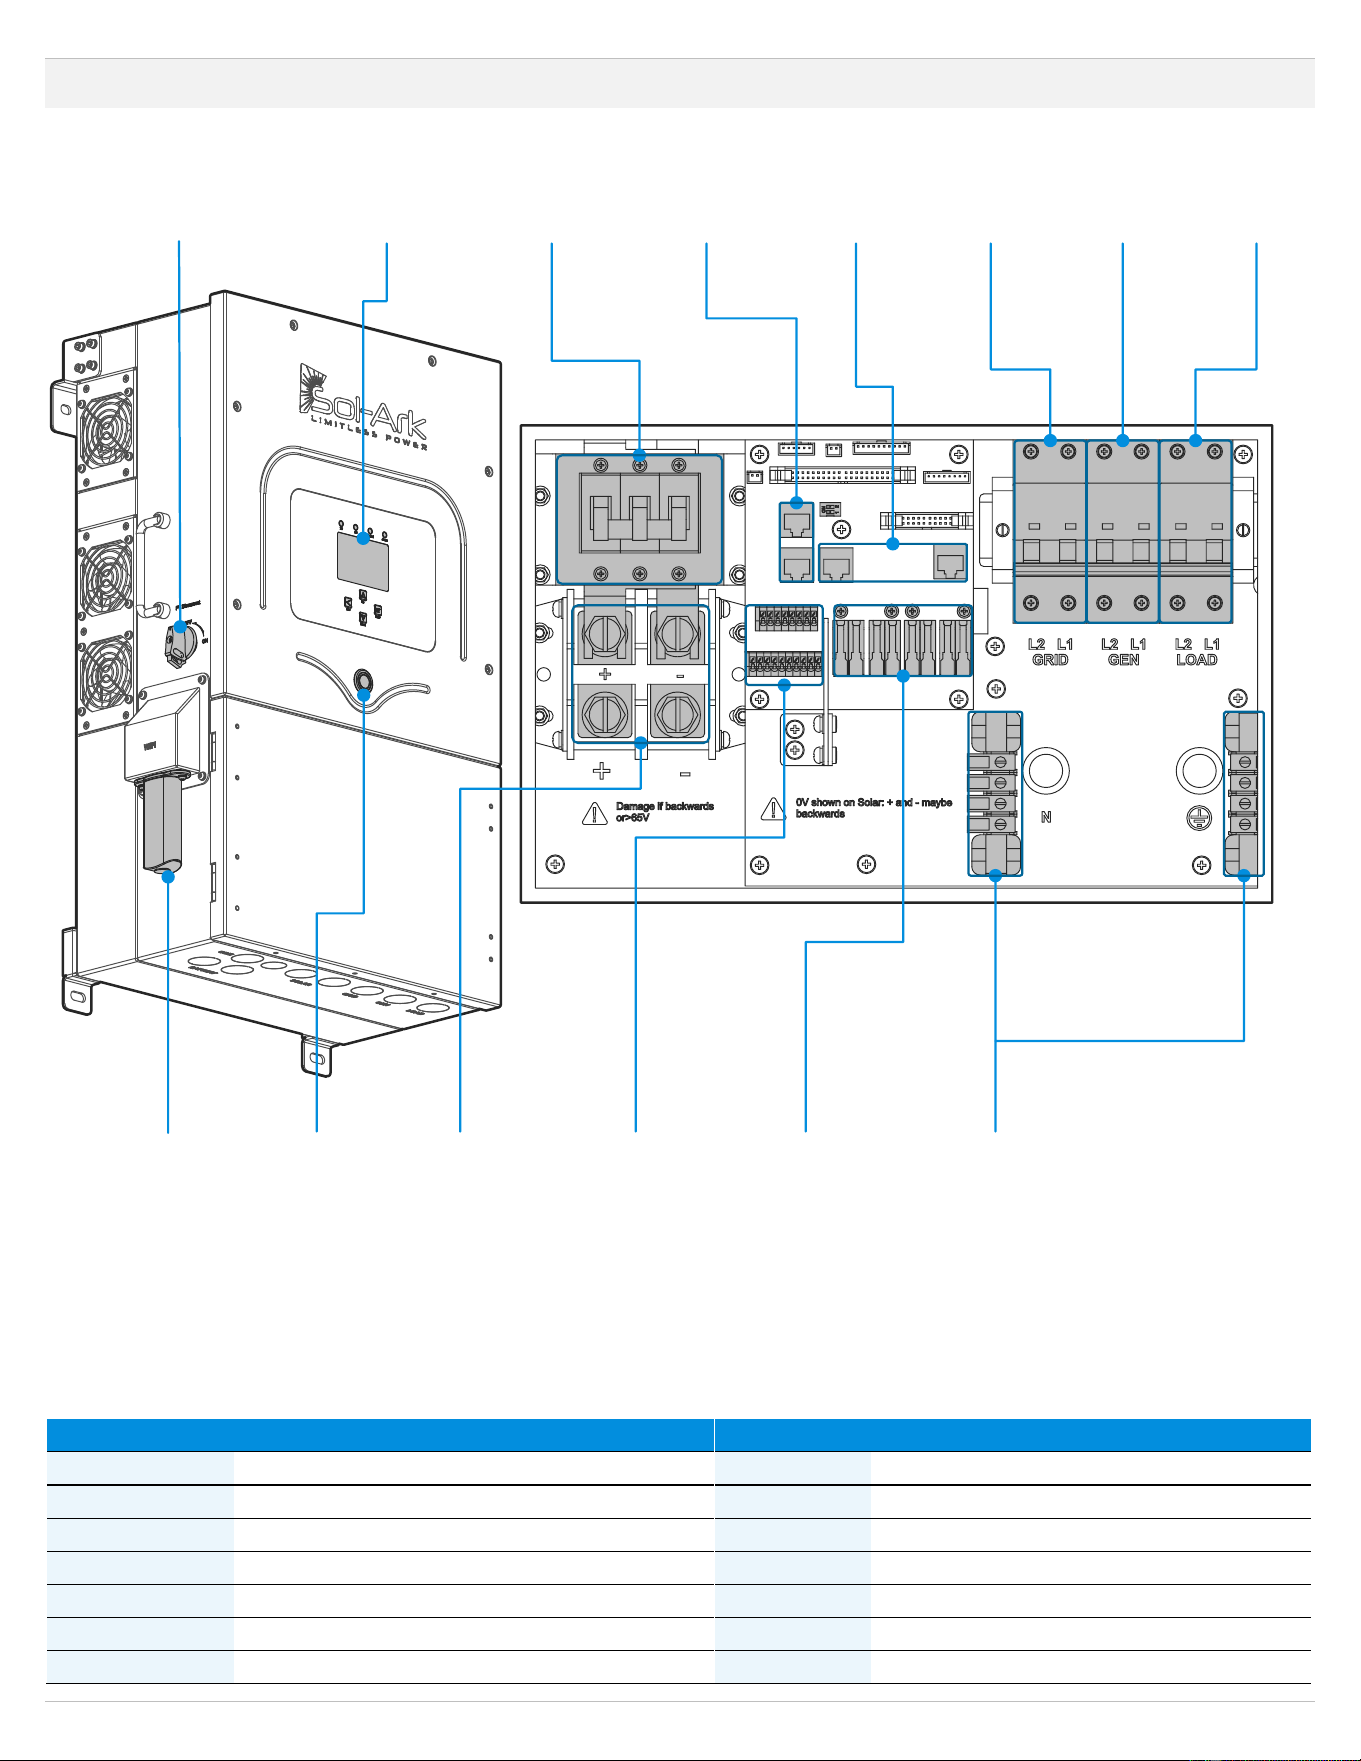
1.1 General Description
Component
Name
Component
Name
A
PV DC disconnect
H
(63A) LOAD breaker
B
LCD touch screen
I
Wi-Fi / Ethernet dongle
C
(250A) Battery breaker
J
ON / OFF Button
D
RJ45 ports (Not in use)
K
Battery terminals
E
BMS RJ45 ports (RS485 / CAN)
L
Input pinouts for sensors and accessories
F
(63A) GRID breaker
M
2x MPPT inputs
G
(50A) GEN breaker
N
GROUND / NEUTRAL Busbars
A
B
C
D
E
I
J
K
L
M
F
G
H
N
8 Copyright © 2024 Sol-Ark LLC | SK140-0005-002
1.2 Specifications
SOL-ARK 8K-2P-N TORQUE VALUES APPLICATION NOTE
Do not use impact drivers to tighten any fasteners on the Sol-Ark
Terminal / Breaker
Torque [in-lb]
Torque [Nm]
“LOAD”
26.5 in-lb
3 Nm
“GRID”
26.5 in-lb
3 Nm
“GEN”
26.5 in-lb
3 Nm
Neutral / Ground (Busbar)
26.5 in-lb
3 Nm
Cover Screws
26.5 in-lb
3 Nm
Battery Connection
90 in-lb
10 Nm
Temperature derating
Optimum: -25°C to 55°C
Derating: >45°C
DC: Shutdown @100°C
AC: Shutdown @82°C
Copyright © 2024 Sol-Ark LLC | SK140-0005-002 9
DATASHEET
8K-2P-N
Residential Hybrid Inverter
Inverter Model:
Sol-Ark-8K-48-ST
SKU:
8K-2P
Input Data (PV)
Max. Allowed PV Power (STC)
11,000W
Rated MPPT Operating Voltage Range
175 - 425V
MPPT Voltage Range
150 - 500V
Startup Voltage
125V
Max. Input Voltage
1
500V
Max. Operating Input Current per MPPT
18A (self-limiting)
No. of MPP Trackers
2
No. of PV Strings per MPPT
2
Max. AC Coupled Input
9,600W
Output Data (AC)
Nominal AC Voltage
120/240V, 120/208V, 220V
Grid Frequency
50 / 60Hz
Real Power, max continuous
8,000W
Max. Output Current
33A
Peak Apparent Power (10s, off-grid)
16,000VA @ 240V
Peak Apparent Power (100ms, off-grid)
25,000VA @ 240V
Max Output Fault Current (100ms)
104A
Max. Grid Passthrough Current
63A
Power Factor Output Range
+/- 0.9 adjustable
Backup Transfer Time
4ms
CEC Efficiency
96.5%
Max Efficiency
97.5%
Design (DC to AC)
Transformerless DC
Stackable
No
Battery Input Data (DC)
Battery Technologies
Lithium / Lead Acid
Nominal DC Voltage
48V
Operating Voltage Range
43 - 63V
Capacity
50 — 9900Ah
Max. Battery Charge / Discharge Current
185A
Charging Controller
3-Stage with Equalization
Grid to Battery Charging Efficiency
96.0%
External Battery Temperature Sensor (BTS)
Included
Automatic Generator Start (AGS)
2 Wire Start - Integrated
BMS Communication
CANBus & RS485 MODBUS
General Data
Dimensions (H x W x D)
750 x 450 x 254 mm ( 29.5 x 17.7 x 10 in)
Weight
35.4 kg / 78 lb.
Enclosure
IP65 / NEMA 3R
Ambient Temperature
-25~55°C, > 45°C Derating
Noise
< 30 dB @ 25°C (77°F)
Idle consumption - No Load
60W
Communication and Monitoring
Wi-Fi & LAN Hardware Included
Standard Warranty
10 Years
Protection and Certifications
Certifications and Listings
UL1741-2010/2018, IEEE1547a 2003/2014,
FCC 15 Class B, UL1741SB, CA Rule 21, HECO Rule 14H
PV DC Disconnect Switch — NEC 240.15
Integrated
Ground Fault Detection — NEC 690.5
Integrated
PV Rapid Shutdown Control — NEC 690.12
Integrated
PV Arc Fault Detection — NEC 690.11
Integrated
PV Input Lightning Protection
Integrated
PV String Input Reverse Polarity Protection
Integrated
AC Output Breaker - 63A
Integrated
250A Battery Breaker / Disconnect
Integrated
Surge Protection
DC Type II / AC Type II
1. See Installation Guide for more details on sizing array strings. The highest input voltage is based on the open-circuit voltage of the array at the minimum design temperature.
10 Copyright © 2024 Sol-Ark LLC | SK140-0005-002
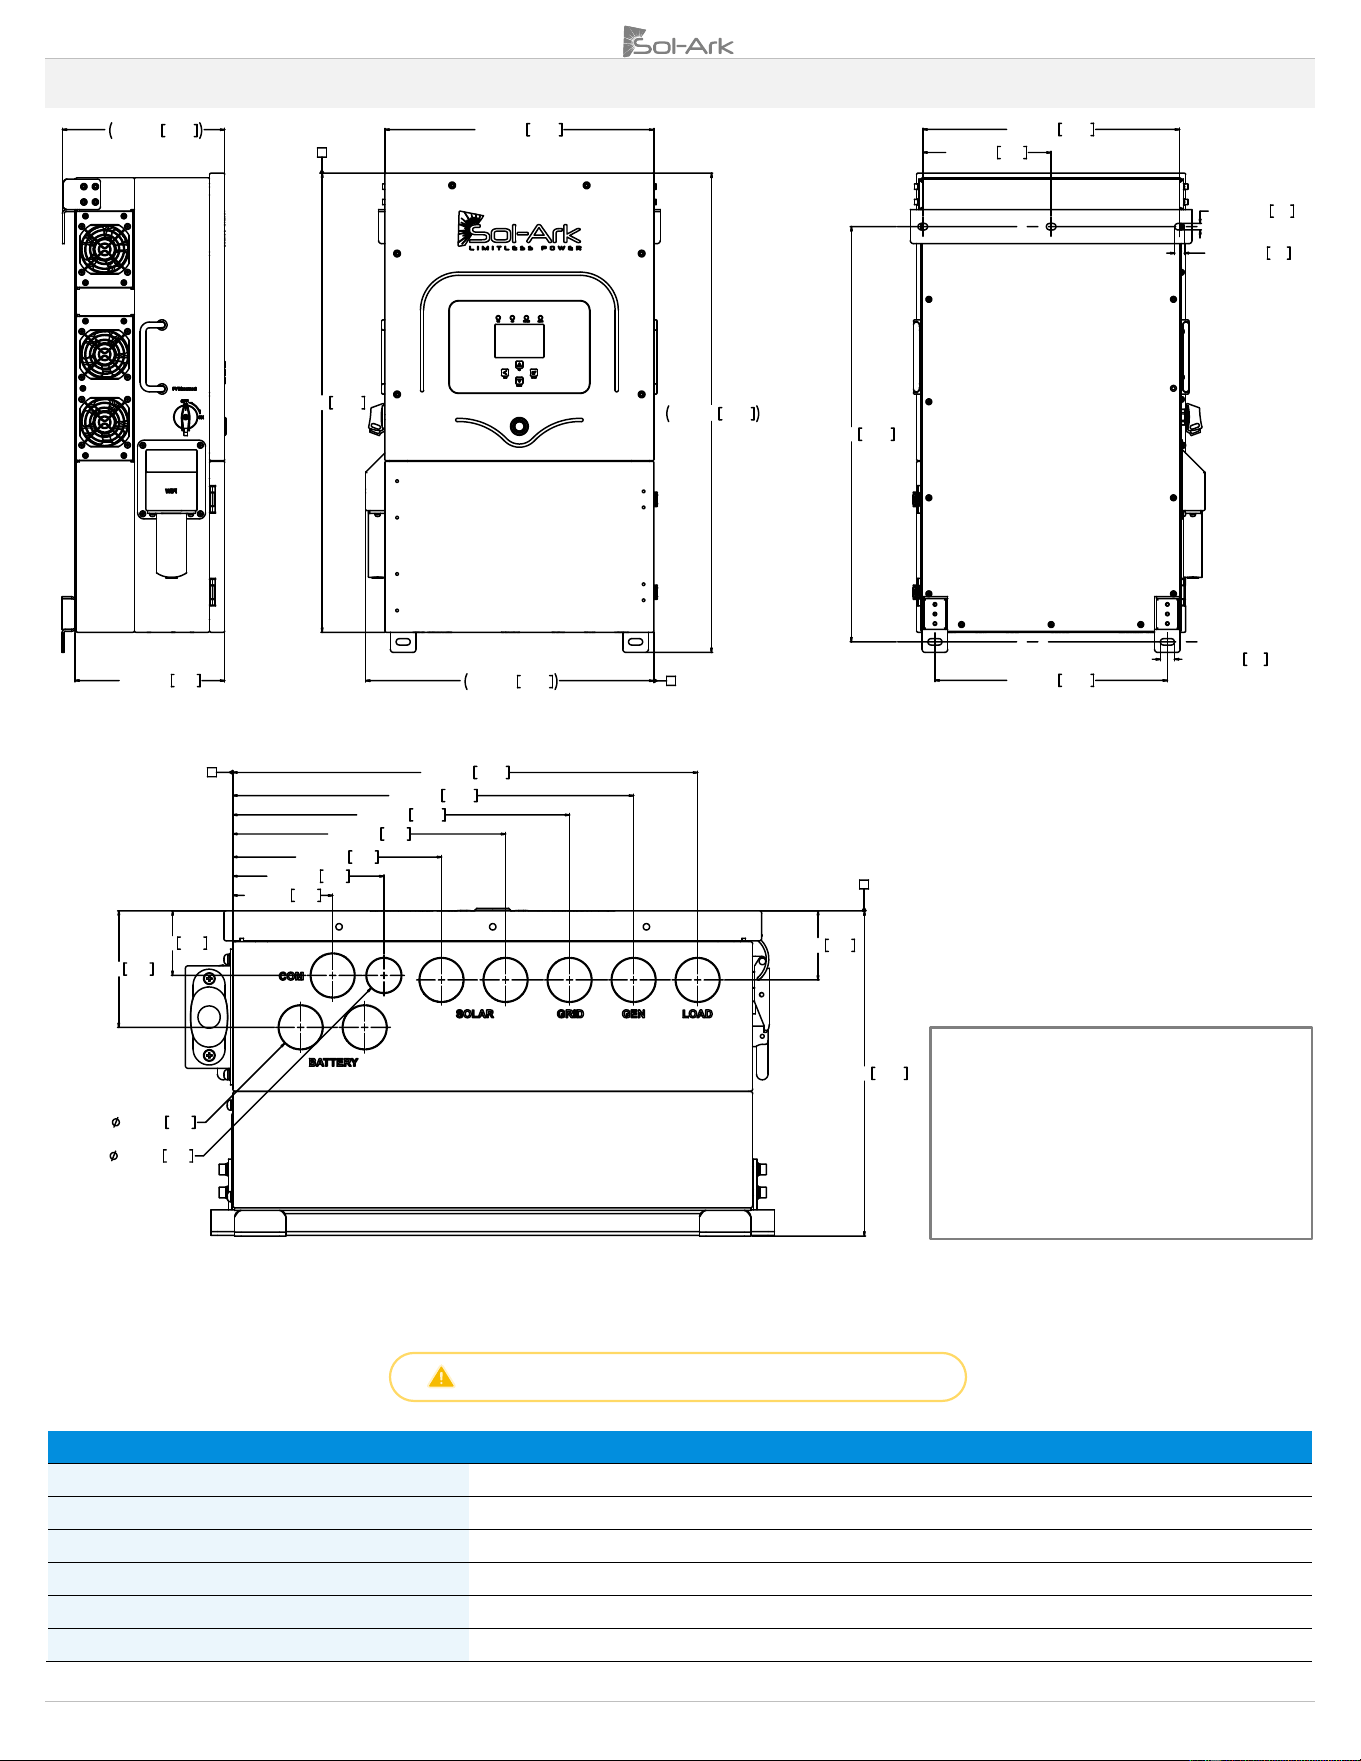
1.3 Connection Requirements
1. AC / DC Connection Requirements
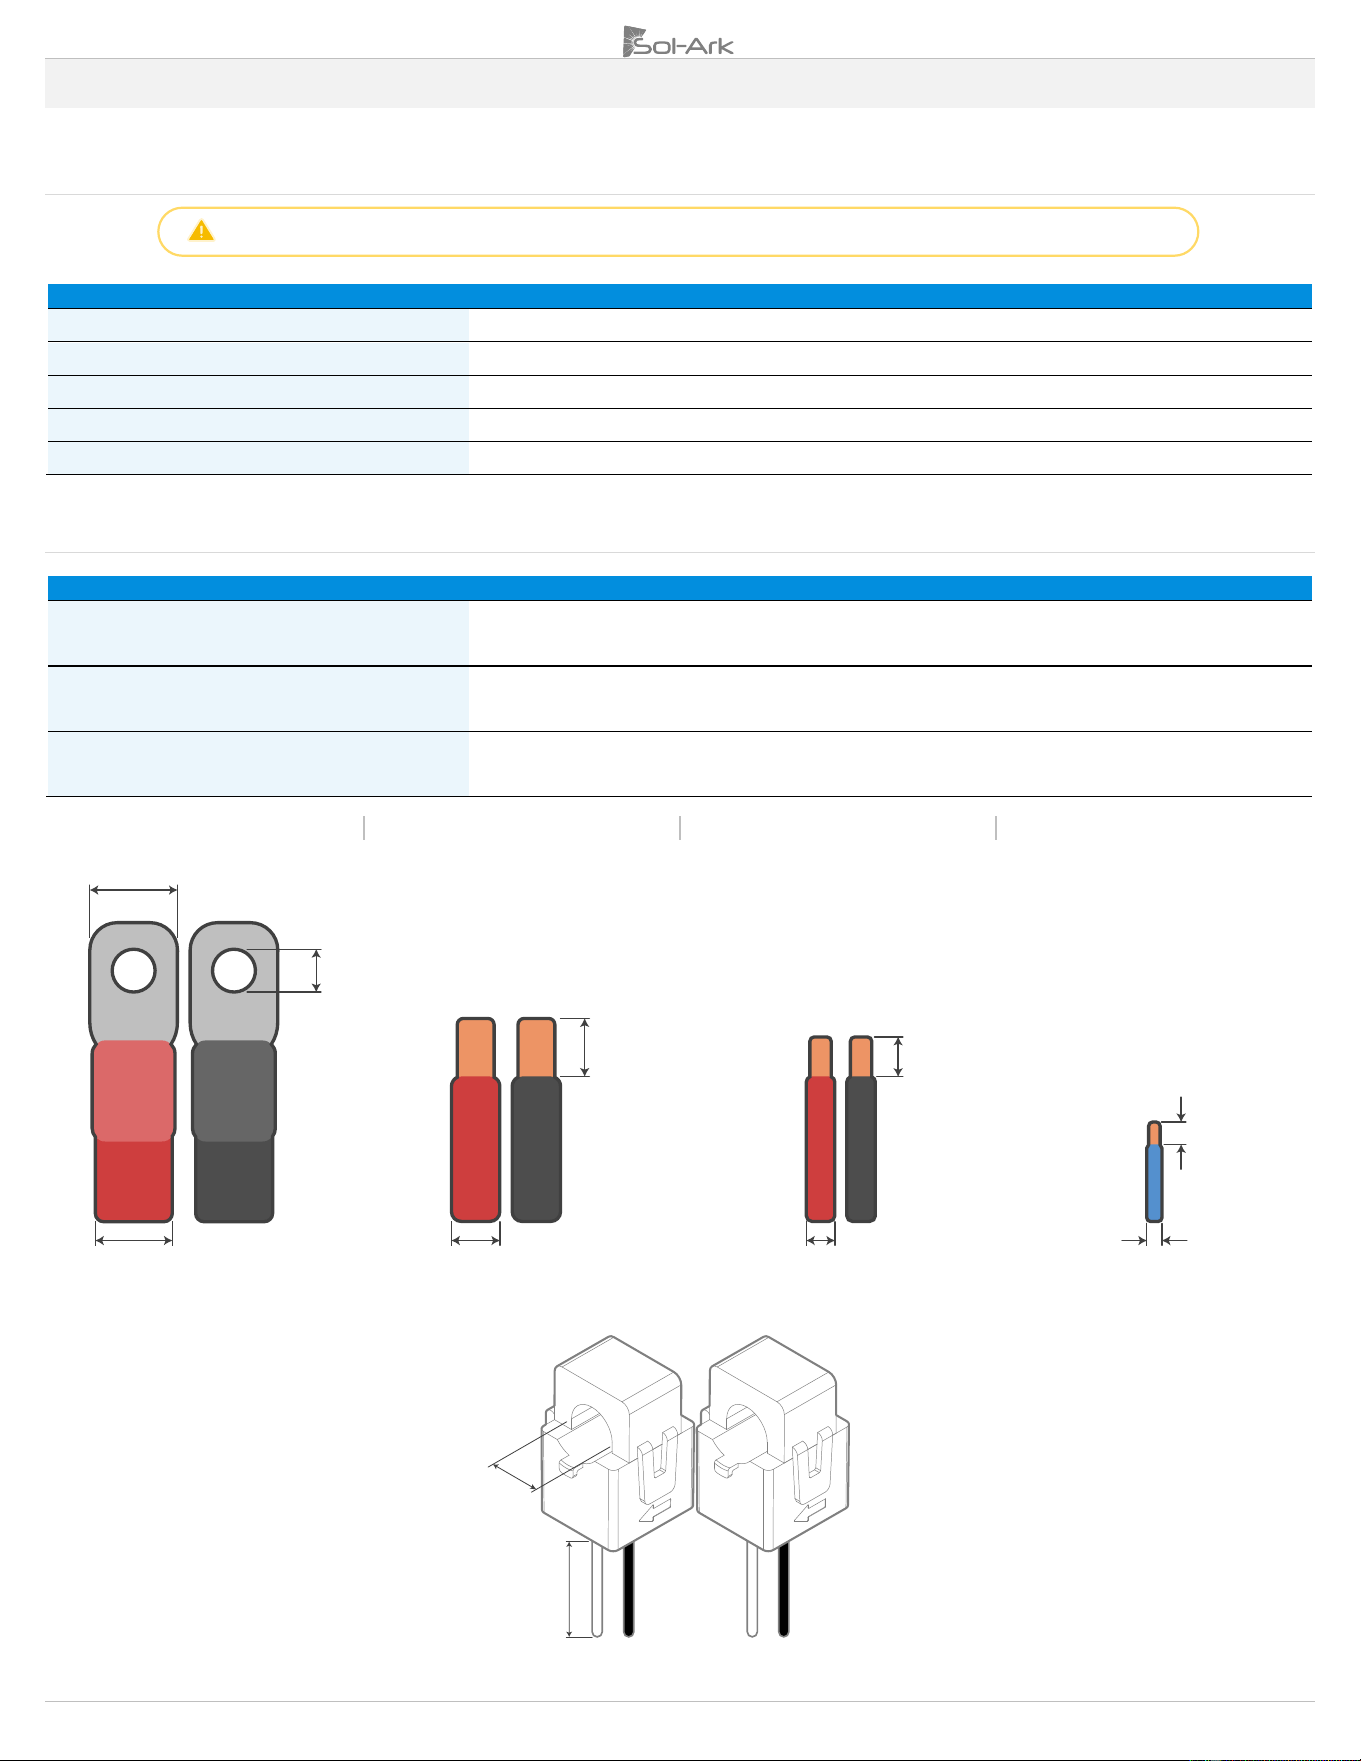
All wire runs should be sized to be at or below a 2.5% voltage drop at full load. Wire size must comply with your local electrical code.
Port
Terminal / Breaker Rating
Terminal Wire Size Range (min-max)
GRID
63A
AC
6 – 4 AWG
LOAD
63A
AC
6 – 4 AWG
GEN
50A
AC
6 – 4 AWG
MPPT
25A
DC
12 – 10 AWG
Battery Port
185A
DC
2/0 – 4/0 AWG
2. Sensors and Communications Requirements
Component
Wire Size Range
Max Distance
CT Sensor
16-20 AWG
0’ – 13’ [4 m]: 16 AWG included
13’ – 20’ [6 m]: CAT6 extendable
Communications
24 – 23 AWG
0’ – 100’ [30 m]: 24 AWG
100’ – 400’ [120 m]: 23 AWG
RJ45 Parallel Communication
CAT 5E or better
0’ – 7’ [2.1 m]: Included
7’ – 20’ [6m]: Extendable
Batteries
AC Conductors
PV Conductors
Sensors
CT Sensors (Included)
1 in [25.4 mm]
4 AWG max
3/8 in
[10 mm]
1/4 in
[6.35 mm]
10 AWG max
20 AWG max
4/0 AWG max
5/8 in
[16 mm]
5/8 in
[16 mm]
5/8 in
[16 mm]
13 ft
[4 m]
Copyright © 2024 Sol-Ark LLC | SK140-0005-002 11
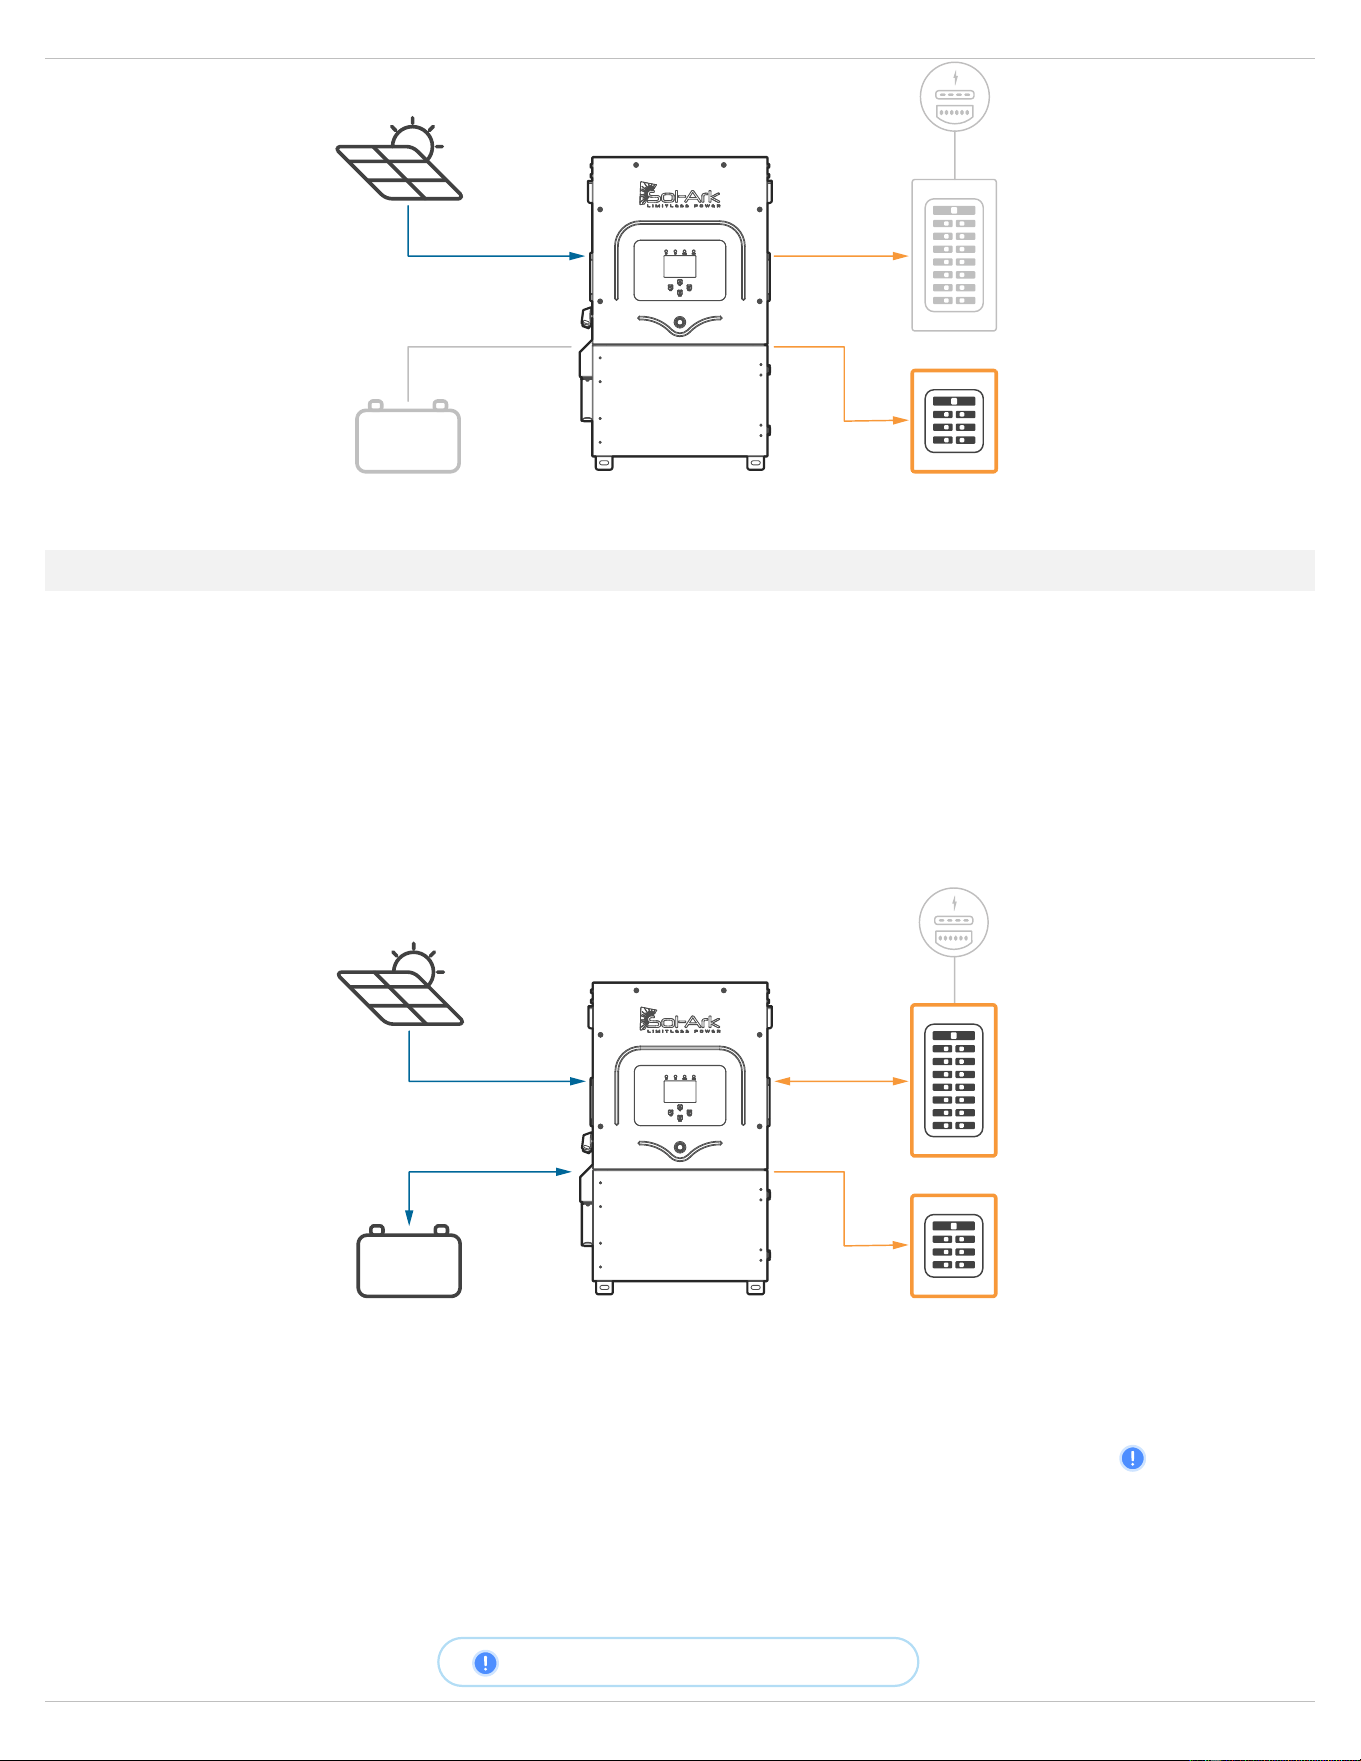
2. Installation
Backup Circuits
A. The “LOAD” connected service panel will be referred to as the Essential Loads Panel.
B. You must keep the essential loads panel within the limitations of the unit:
• Grid Tie → 15.12 kW = 240V * 63A max (passthrough).
• Off-Grid → 8 kW = 240V * 33.3A continuous (batteries or PV).
C. Verify that every load circuit power (P=V*I) does not surpass the aforementioned limits.
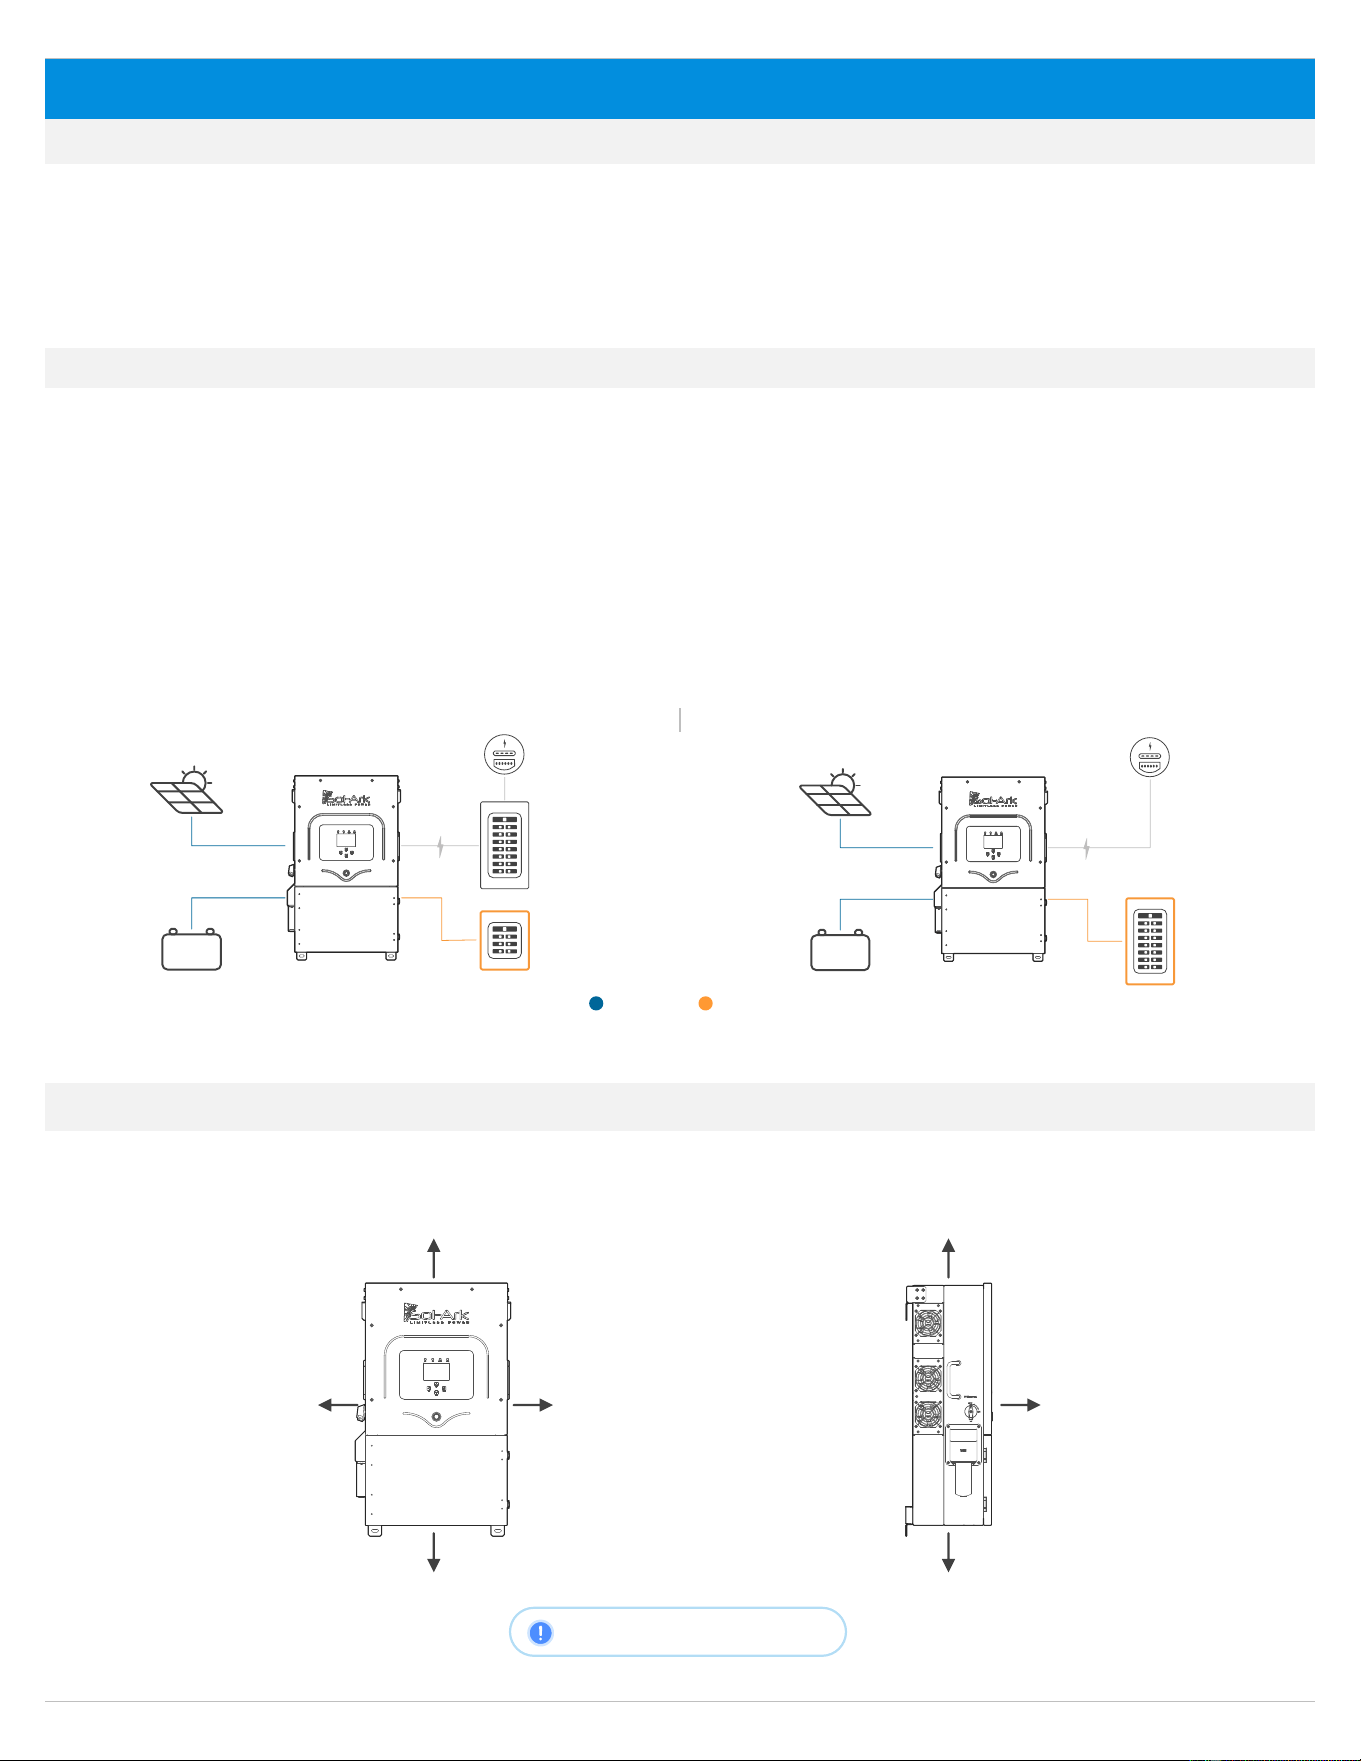
Single System Install
A. FOR PARTIAL BACKUP: Connect the output of your back-feed breaker or line side tap (depending on the point of interconnection)
to the "GRID" breaker.
• An external disconnect must be installed between the interconnection and the Sol-Ark. Size the disconnect according to code.
• Connect the "LOAD" output to the Essential Loads Panel. Follow electric code to select proper wire gauge.
B. FOR WHOLE-HOME BACKUP: Connect the incoming grid directly to the “GRID” input breaker.
• An external disconnect must be installed between the grid and the Sol-Ark. Size the disconnect according to code.
• Connect the “LOAD” output to the Main Service Panel. Follow electric code to select proper wire gauge.
It is possible to connect a generator or an AC coupled source (40A max or 9,600W) such as string or micro inverters to the “GEN” breaker of
the inverter. Only one AC source can be connected to the “GEN” breaker at a time.
Partial Backup
Whole-Home Backup
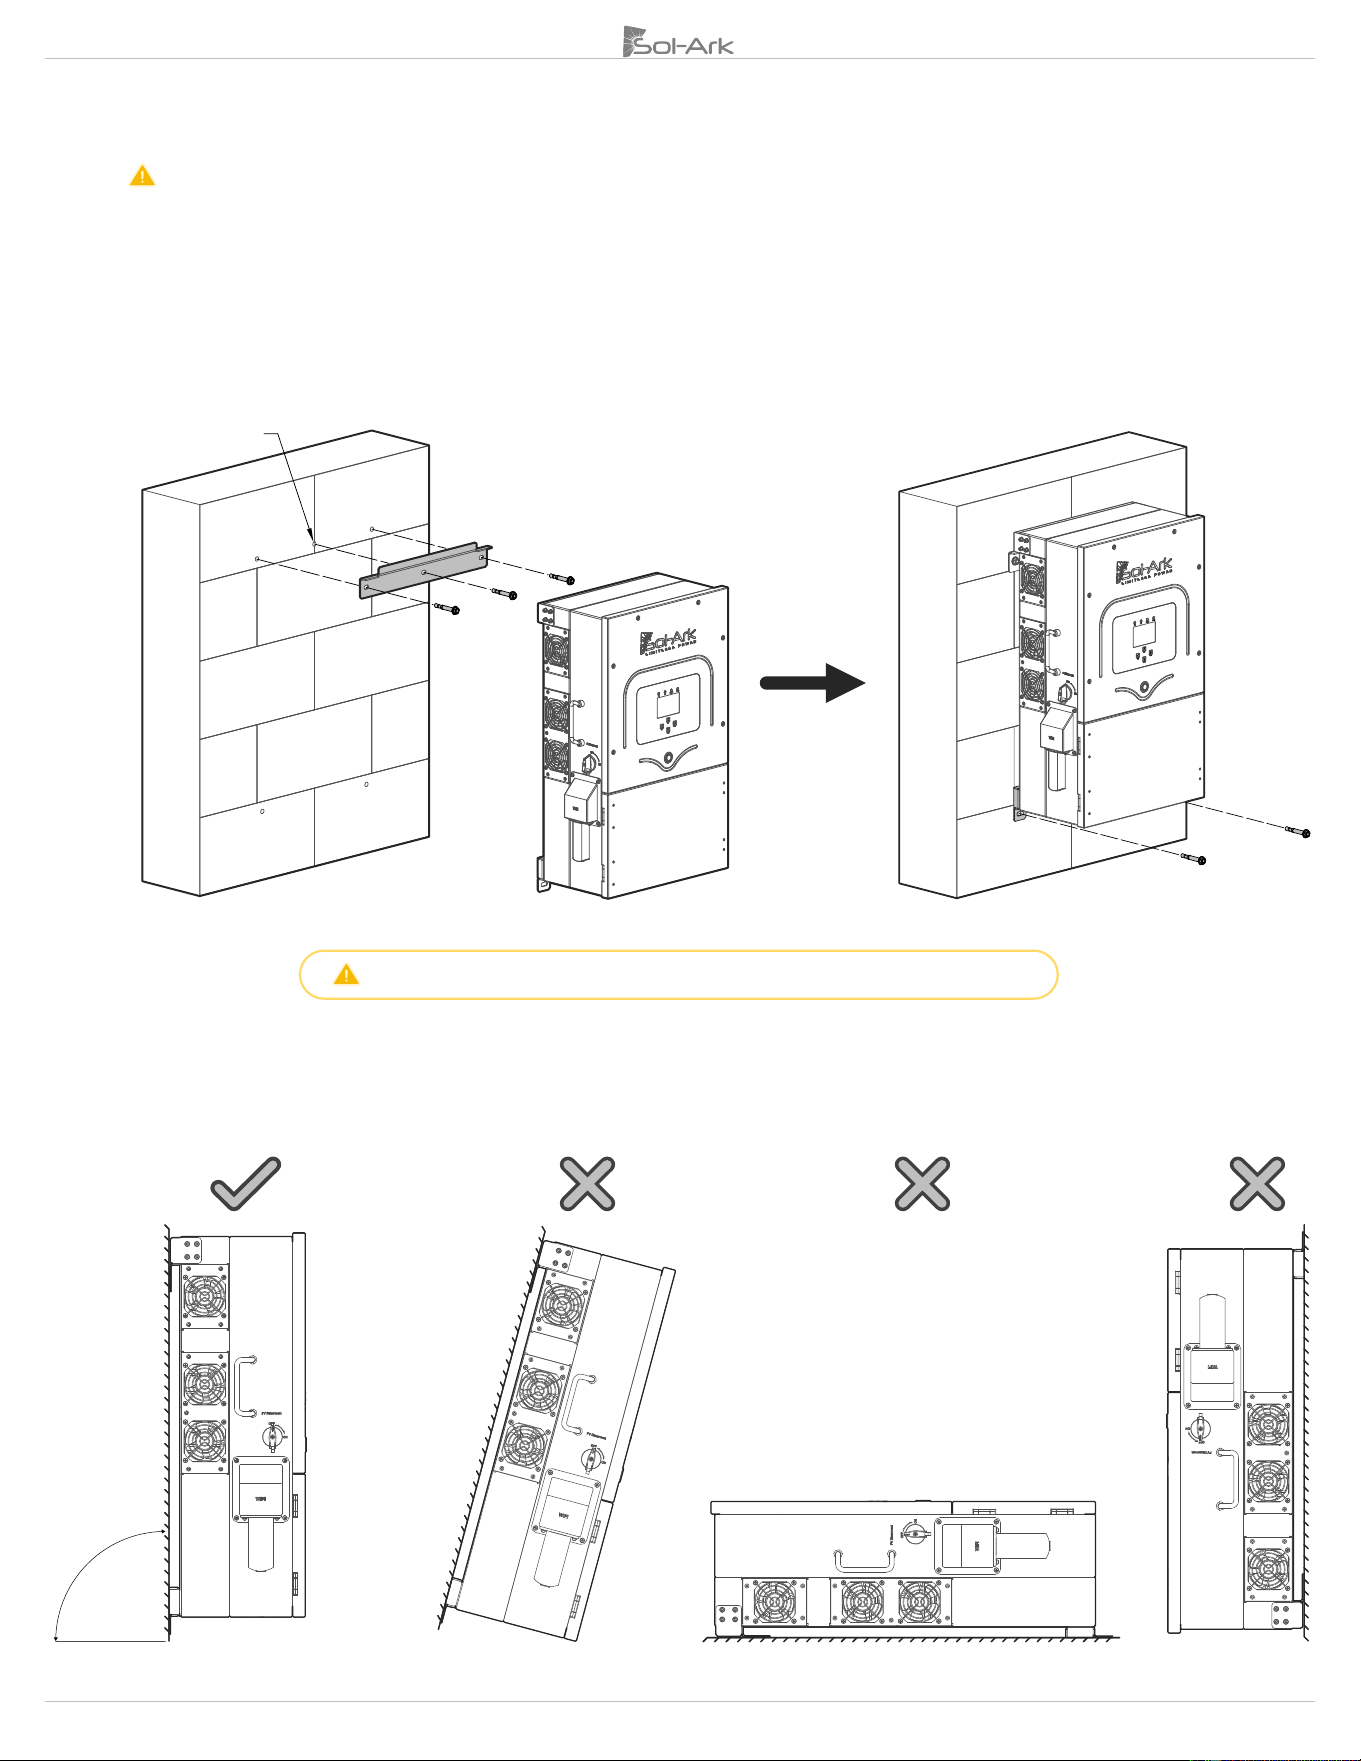
2.1 Mounting the Sol-Ark
A. Considering the dimensions of the inverter, find a suitable location for the system. There must be at least 2 in [5 cm] of vertical
clearance and 6 in [15 cm] of side clearance for proper heat dissipation.
Max heat dissipation of 315W
AC
DC
PV
Battery
Grid
Main Panel
Subpanel
PV
Battery
Grid
Main Panel
≥ 2” [5 cm]
≥ 2”[5 cm]
≥ 6” min [15 cm]
≥ 6” min 15 cm]
≥ 20” [50 cm]
≥ 2” [5 cm]
≥ 2”[5 cm]
12 Copyright © 2024 Sol-Ark LLC | SK140-0005-002
B. Under certain conditions, the National Electrical Code® specifies greater clearances. Ensure that the prescribed clearances in
accordance with the National Electrical Code®, paragraph 110.26 and Canadian Electrical Code® CSA C22.1 are adhered to.
C. The Sol-Ark 8K-2P-N is a NEMA 3R - IP65 enclosure that is rated for outdoor installation but can also be installed indoors.
D. PROTECT THE LCD SCREEN from direct exposure to UV light.
E. Use screws or anchors suitable for the support surface and capable of supporting the weight of the inverter (78 lb / 35.4kg).
a. For Concrete or Masonry Mounting: Use a minimum of five (5) 3/8in expanding anchors (not included).
b. For Wood Frame Mounting: Use a minimum of five (5) 3/8in lag screws with flat washers, making sure to anchor into at
least 2 framing members. (not included)
c. For Metal Framing Mounting: Use a minimum of five (5) 1/4in self-tapping metal screws with flat washers. (not included)
F. In the case a different anchorage is required, calculate the support needed to properly hold the weight of the equipment
Damage to the LCD Screen due to direct sunlight exposure will not be covered by warranty
G. Mount the inverter in the optimal orientation as shown below.
Suitable anchor for the
wall surface
Copyright © 2024 Sol-Ark LLC | SK140-0005-002 13
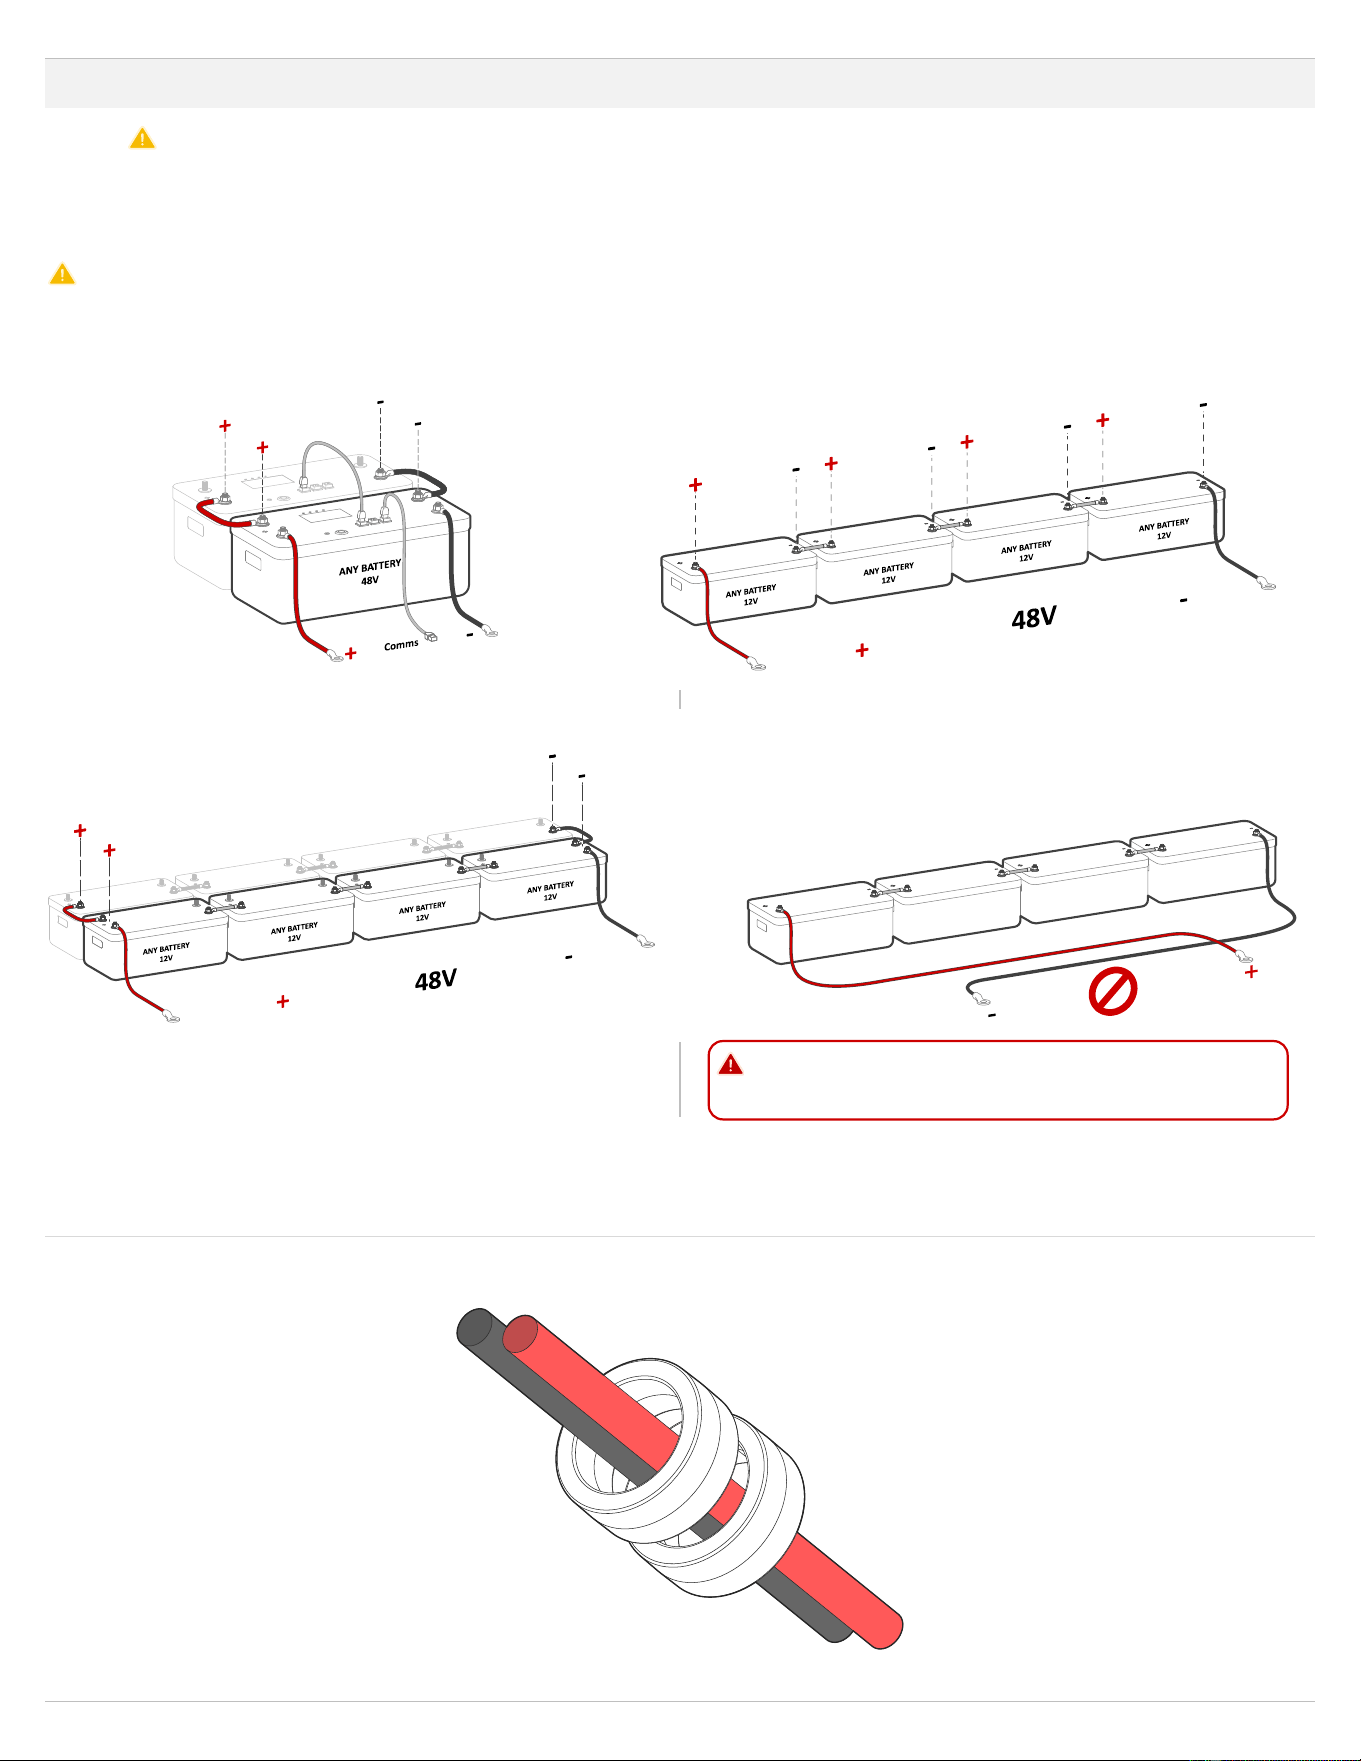
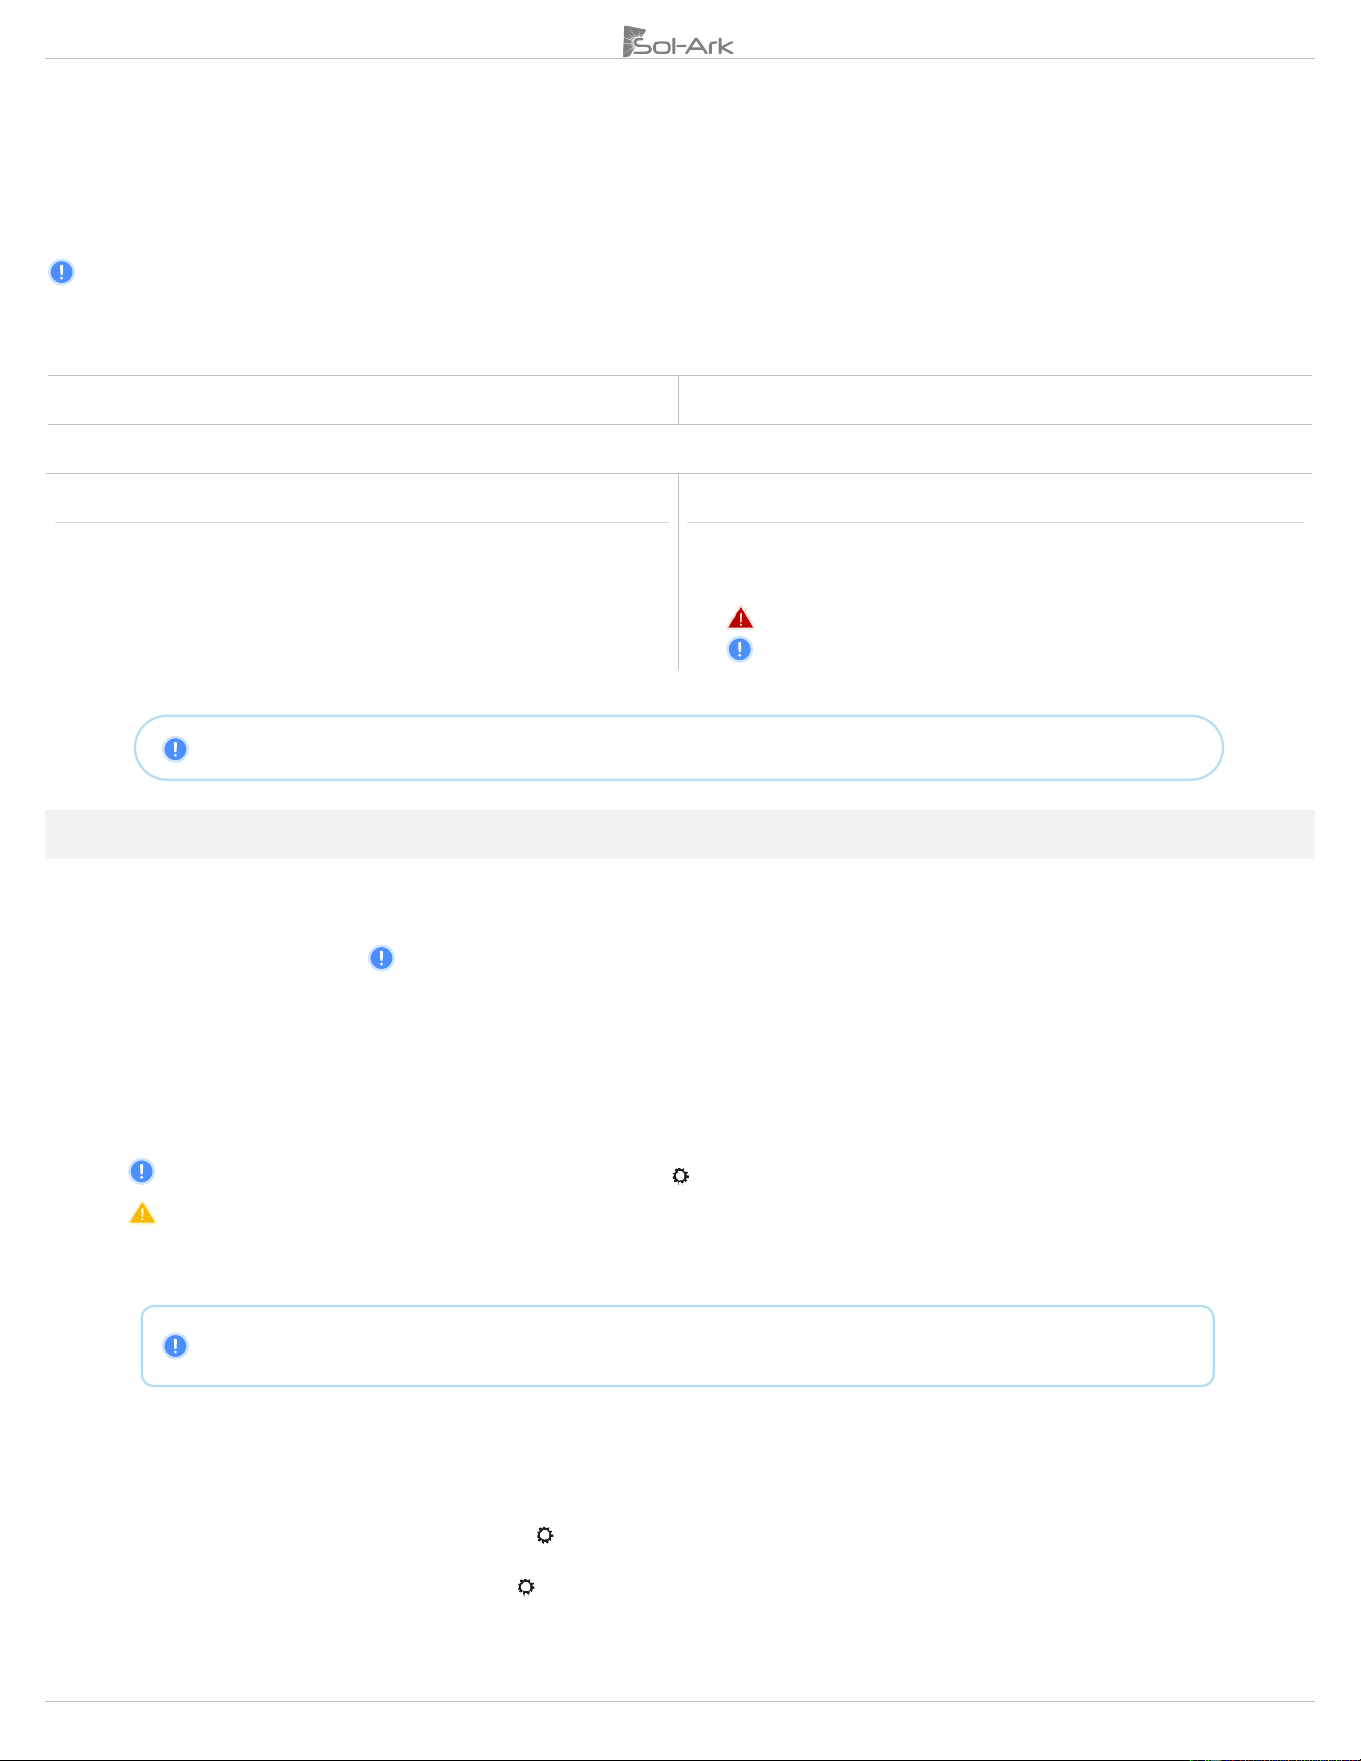
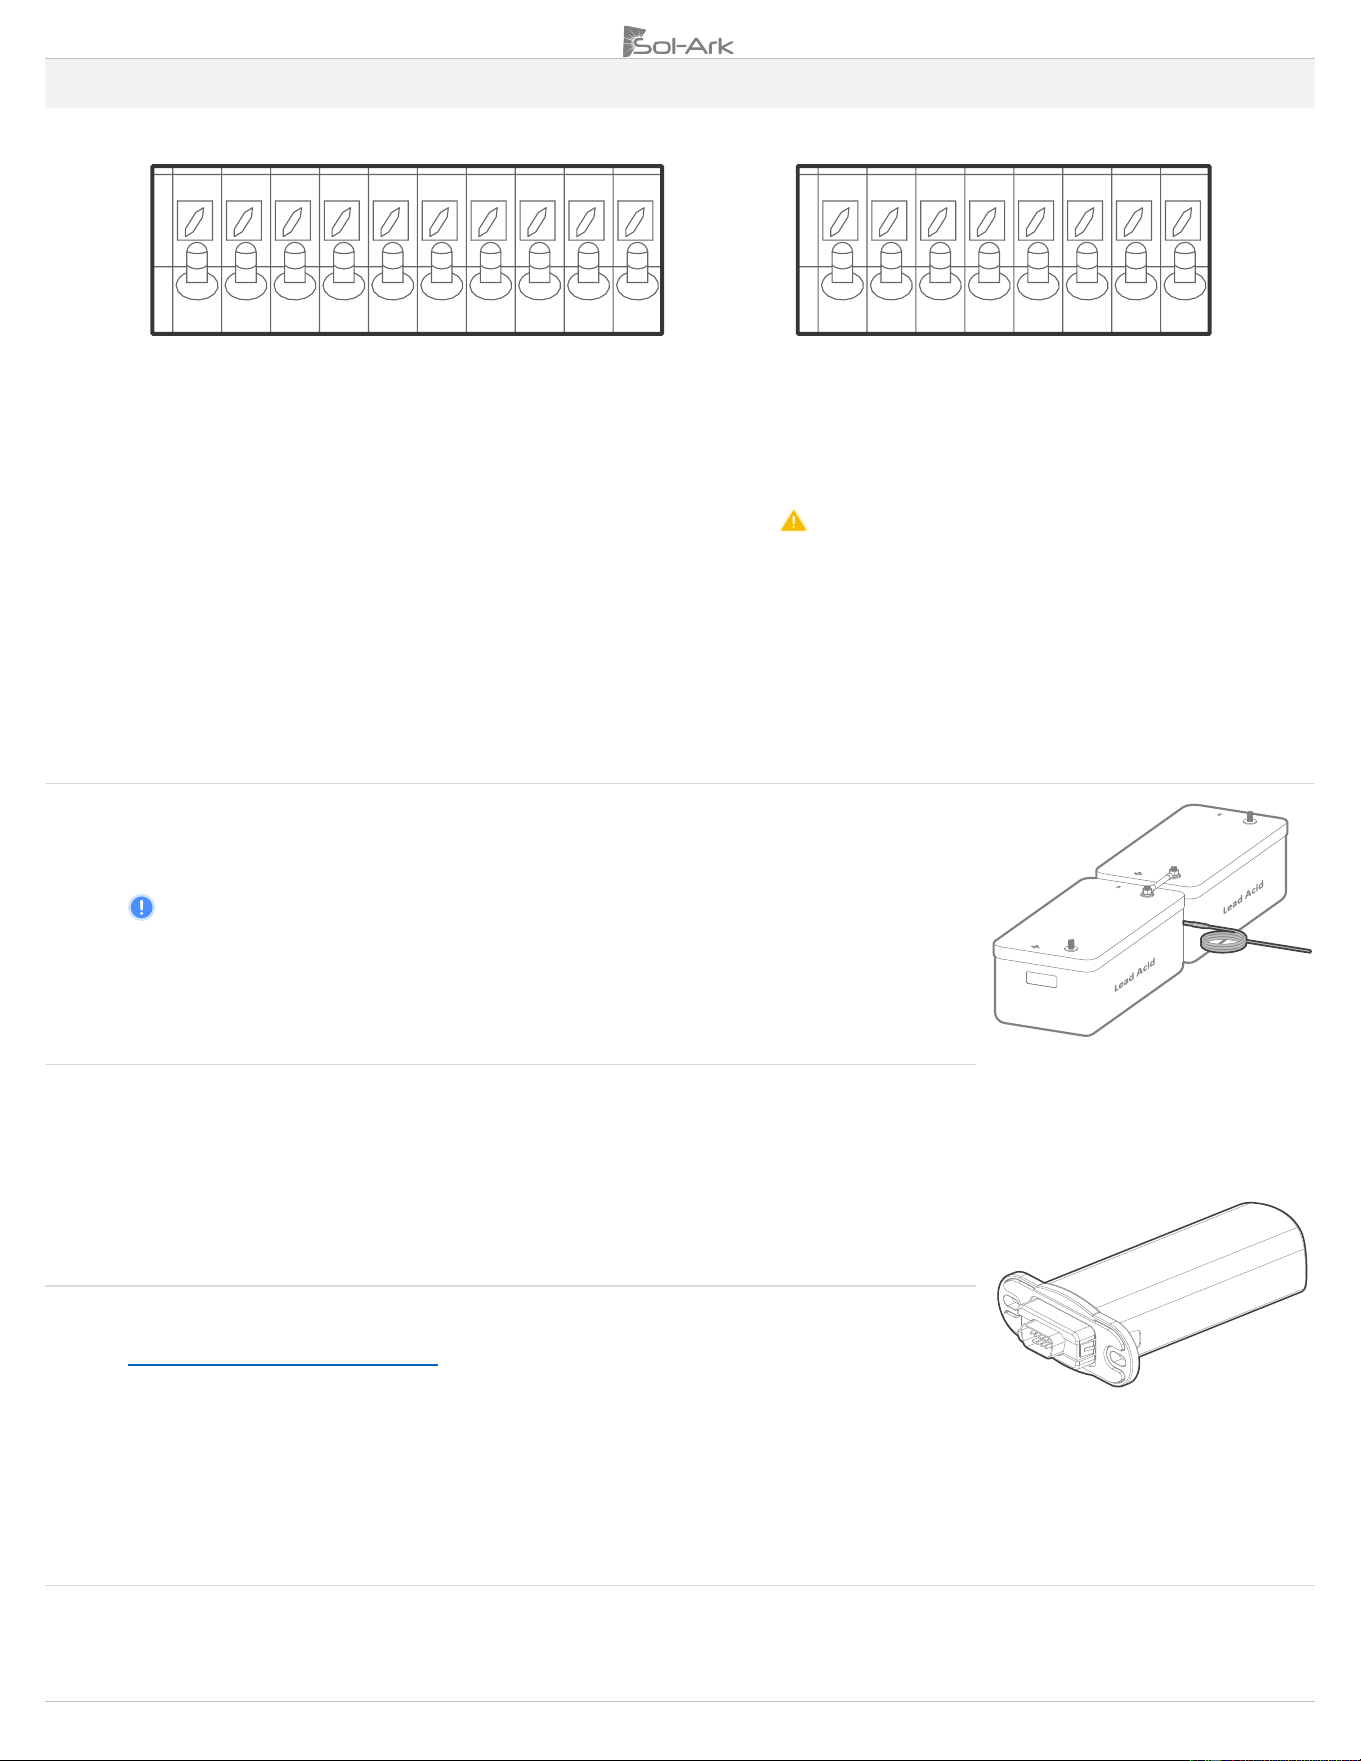
2.2 Integrating Batteries
A. Sol-Ark 8K-2P-N must be OFF while the batteries are being connected.
B. Depending on the battery voltage, wire up the battery bank in the possible configurations shown below.
C. Battery breakers must be OFF when wiring. If your battery bank does not have internal breakers, maintain the necessary safety
measures when handling.
Sol-Ark 8K-2P-N is a 48V
DC
nominal system. DO NOT connect the inverter to any other battery configuration. If you use 12V batteries,
you MUST NOT exceed four (4) batteries in series, as shown. The inverter can work with any battery chemistry as long as it remains within
the range of 43V
DC
to 63V
DC
.
48V batteries in parallel connection
12V batteries in series connection
Series and parallel connections for complete 48V batt bank
DO NOT
reverse polarity. The system will be damaged, and warranty will be
voided!
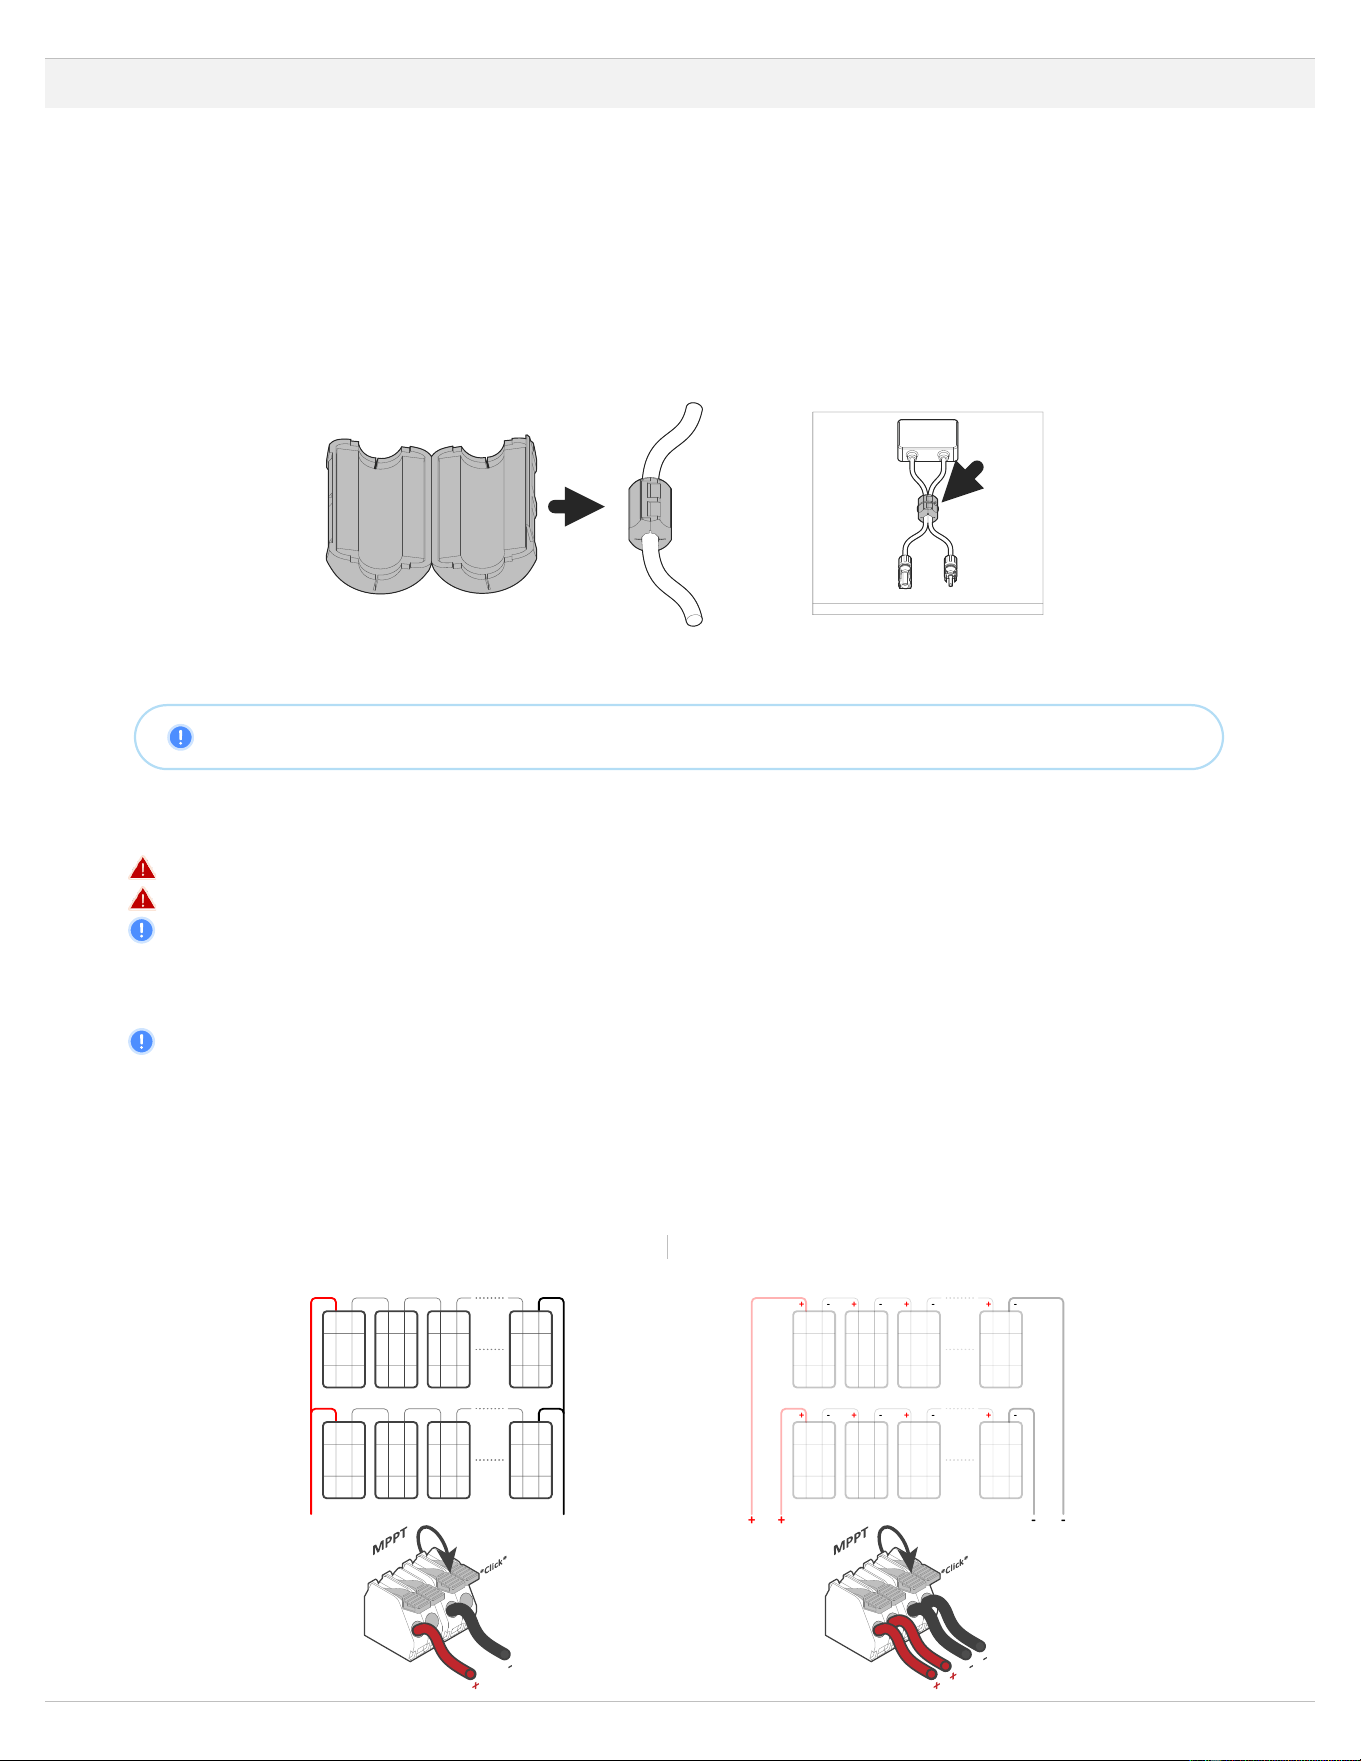
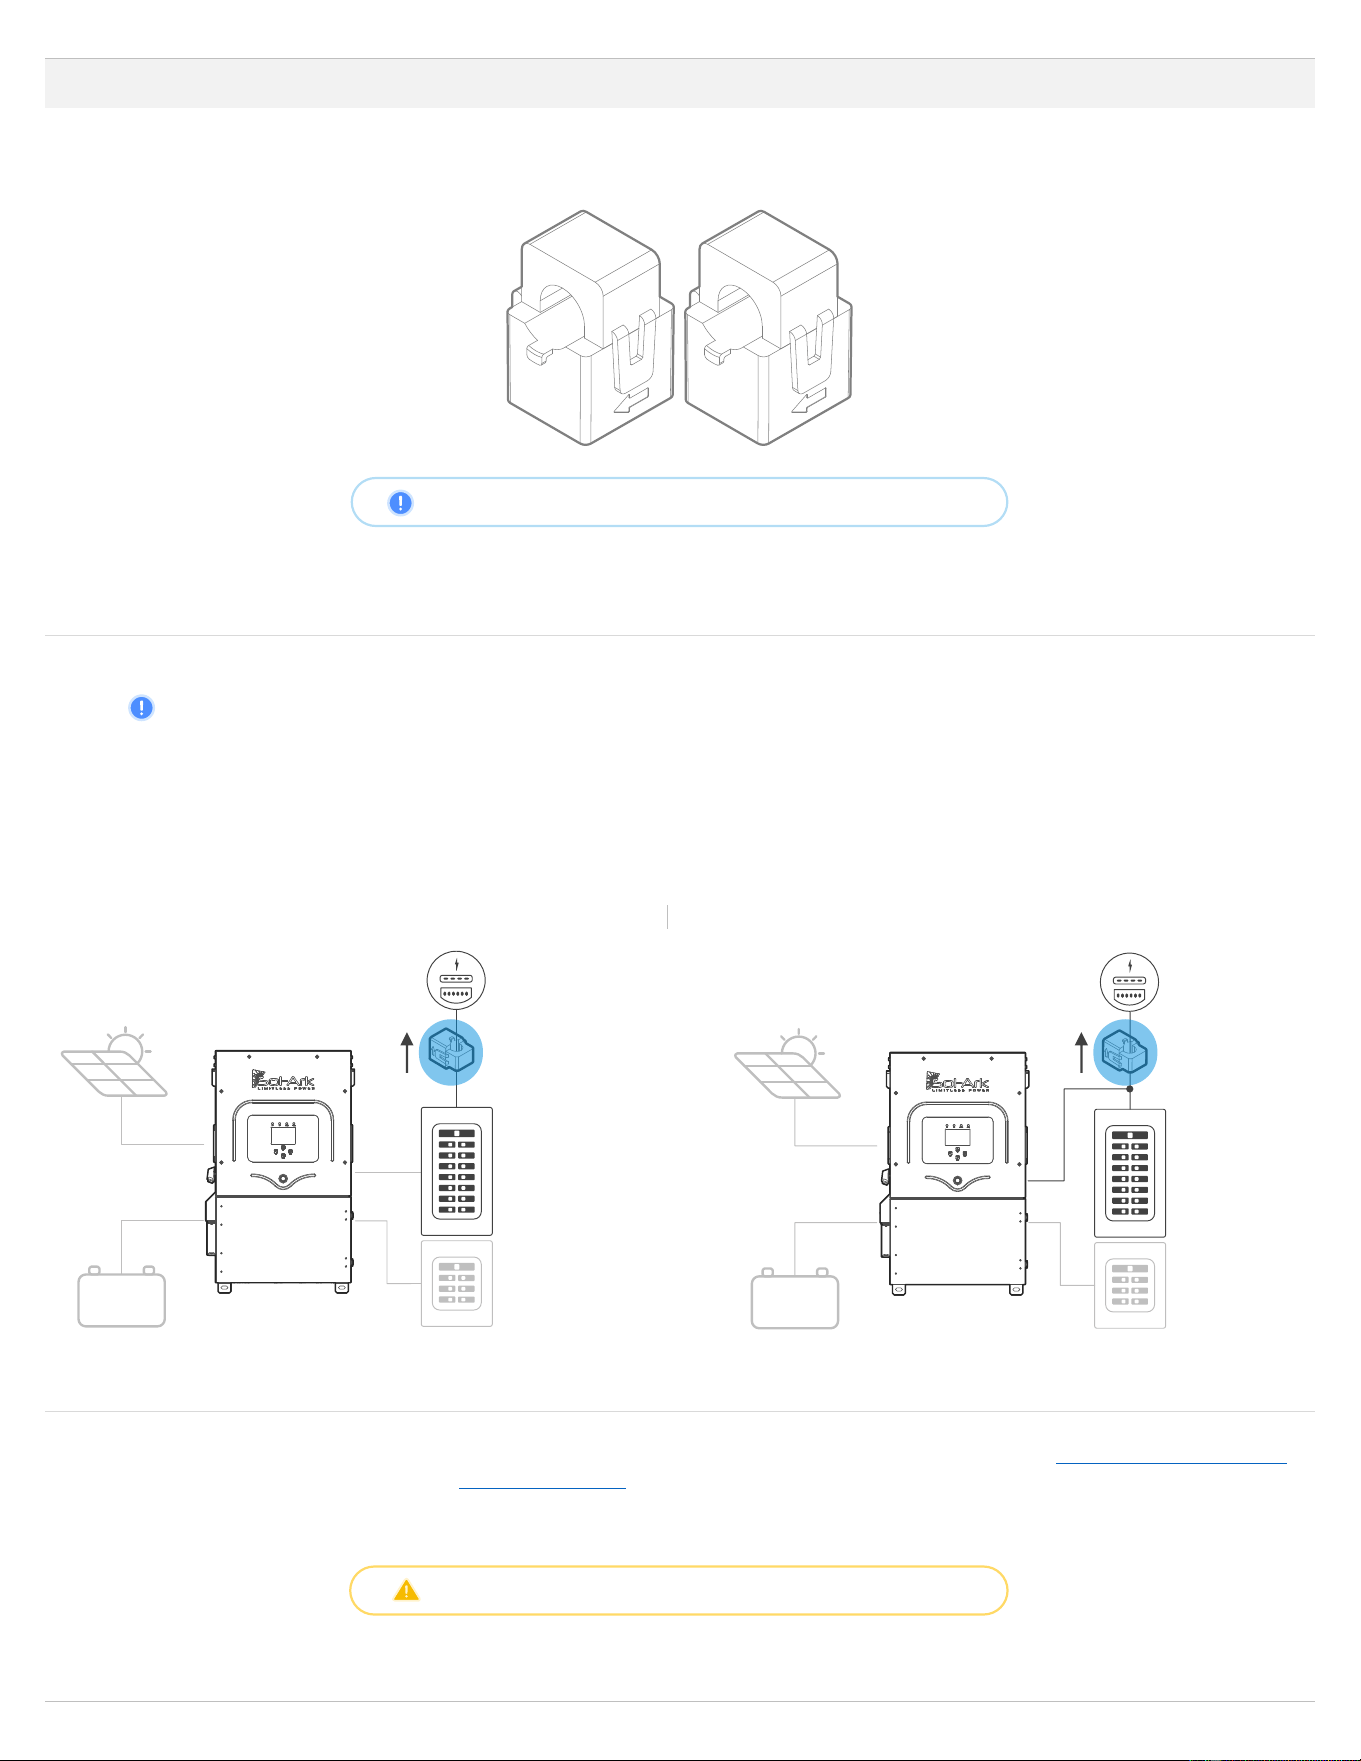
1. Battery Toroid
Install the included toroids on the battery conductors as shown in the next figure. Ensure that both (+) and (-) wires pass through both toroids
simultaneously.
14 Copyright © 2024 Sol-Ark LLC | SK140-0005-002
Follow all battery manufacturer-specified values to ensure proper charging and discharging
BATTERY CHARGING SETPOINT EXAMPLES (48V NOMINAL)
Battery Type
Absorption
Float
Equalize (Every 30 days for 3hr)
AGM / PCC
57.6V
53.6V
57.6V
Gel
56.4V
54.0V
Wet
59.0V
55.0V
59.0V
Lithium
54.6V
54.3V
-
CALCULATING BATTERY BANK AMP-HOURS EXAMPLES (AGM)
# of batteries
Voltage per Battery
Ah per battery
Ah @48V
(Chain of 4 batteries of 12V in series)
Max Charge / Discharge (A)
4
12V
230Ah
230Ah
100A
8
12V
230Ah
460Ah
185A
12
12V
230Ah
690Ah
185A
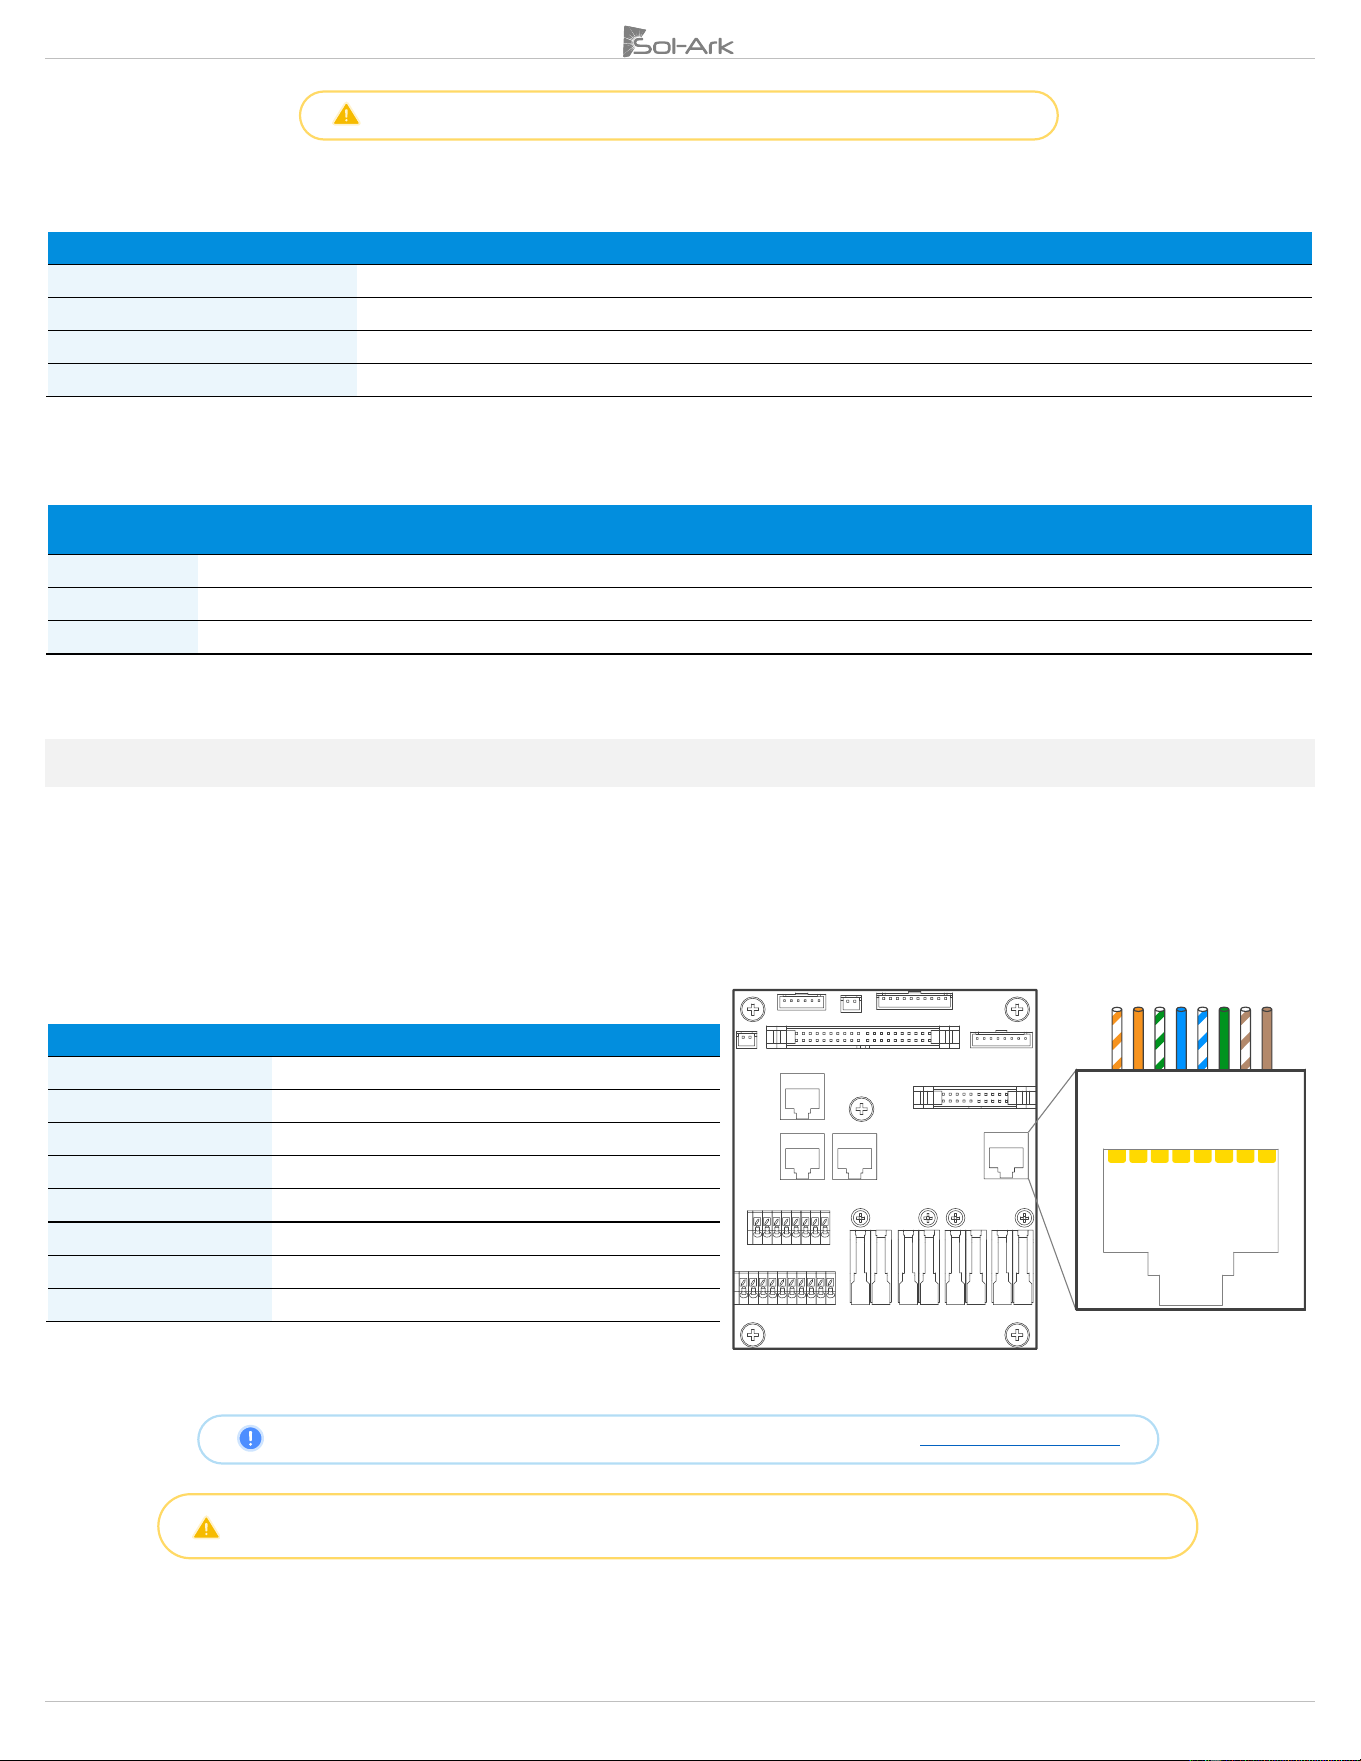
2.3 Battery Communication
RJ-45 Configurations
The Sol-Ark 8K-2P-N inverter achieves battery communications through a single RJ-45 port labeled “Battery CANBus”. This port combines
the RS-485 and CANBus pin configurations shown below. Both “Modbus RS485” and “Battery CANBus” ports are capable of Modbus
communication.
Complete battery integration guide of supported battery communications can be found at: sol-ark.com/battery-partners
Any damage caused by the improper use of the communication protocols (CANBUS or MODBUS) will not be covered by warranty.
Modbus map is available upon request for “READ” operations only. Contact technical support to obtain the MODBUS map.
External MODBUS Devices
If an external device utilizes BMS Lithium Batt 00, one must change the Modbus SN of the inverter to 01 as the default value is 00.
Pin
RS485
Battery CANBus
1
RS-485 B-
--
2
RS-485 A+
--
3
--
--
4
--
CAN Hi
5
--
CAN Lo
6
GND
GND
7
RS485 A+
--
8
RS485 B-
--
1 2 3 4 5 6 7 8
RJ-45 port configuration
Copyright © 2024 Sol-Ark LLC | SK140-0005-002 15
2.4 Connecting PV Modules
E.M.P Systems Only – Suppressor Installation
If you purchased your system with Lightning / EMP Hardening, most of the protection is within the Sol-Ark. However, additional EMP
suppressors are included to protect home appliances and solar panels. The Sol-Ark 8K-2P-N includes:
20 - Small suppressors
40 - Big suppressors
Although not critical, suppressor installation is recommended. These suppressors must be installed on the power cord, as close to the
appliance as possible. Additionally for solar panels, the big suppressors must clamp both conductors and must be secured with a zip tie. If
you purchased the solar panels from us, a >150kV/m protection has already been installed inside the solar panels.
a) Installation of small suppressor on appliance power cord b) If not using panels from Sol-Ark: big suppressor on solar panel
The Sol-Ark 8K-2P-N has 2 independent MPPTs that support up to 2 PV strings each. MPPTs can handle a maximum
V
OC
of 500V
and an
I
SC
of 25A
but will self-limit and operate at
18A
max.
A. Max DC solar input = 11 kW (± 5%) | Max input power per MPPT = 5.5 kW | Max recommended input voltage per MPPT = 425 V
OC
|
Max input current per MPPT = 18A (self-limiting).
B. Design for a max input current of 18A per MPPT. The inverter will self-limit beyond 18A. If I
SC
exceeds 25A, damage will occur.
C. PV Source Circuit max voltage of 500V
DC
; damage can occur with PV strings whose open-circuit voltage exceeds 500V
DC
D. Strings in parallel on the same MPPT must have the same designed open-circuit voltage (Voc), otherwise the system will be
limited to the lowest string voltage.
i. PV1 A/B must have the same Voc.
ii. If the solar panels are oriented in different directions and connected in the same MPPT, there will be a loss in PV efficiency.
E. De acuerdo con el art. 690.43 del NEC, las partes metálicas expuestas de los módulos FV, equipos eléctricos y envolventes de
conductores de los sistemas fotovoltaicos deberán estar conectadas a tierra. Todos los conductores y electrodos de tierra deben
instalarse de acuerdo con el Artículo 690.47 del NEC o según el código eléctrico local.
F. Para arreglos fotovoltaicos montados en suelo, Sol-Ark recomienda instalar un electrodo de tierra auxiliar colocado cerca del
arreglo FV para asegurar resistencia óptima entre tierra física y el sistema de tierra. Este electrodo auxiliar deberá cumplir con los
requisitos del Artículo 250.54 del NEC o código eléctrico local.
G. Connect the solar panel strings using either of the following configurations:
“Y” connection
Individual strings
Cadena PV1B
Cadena PV1A
Cadena PV1B
Conector
Y
Conector
Y
Cadena PV1A
16 Copyright © 2024 Sol-Ark LLC | SK140-0005-002
AC Coupling
The Sol-Ark 8K-2P-N is a system that supports the addition of AC coupled solar panels. The max solar input power can be expanded by
coupling micro or string inverters into the “GEN” or “LOAD” breakers. A full AC coupled solar system is not recommended as power control
and monitoring is limited. Having DC coupled modules or a combination of DC coupled and AC coupled solar panels is always preferred.
AC coupled inverters need to be either UL 1741SA or UL 1741 certified. This certification confirms the inverters’ ability to disconnect from
the grid based on frequency and ensures that the Sol-Ark will safely be able to frequency shift to control the AC coupled production.
Batteries are REQUIRED to AC couple solar panels to the “GEN” breaker. The AC coupled inverters can still produce solar power even
during grid outage events or in Off-Grid systems. Furthermore, the total AC coupling production will be monitored.
Maximum allowed AC coupling input: 9,600W
Maximum combined solar input (DC + AC): 15,000W
Optimal: 11,000W
DC
+ 4,000W
AC
1. AC coupling on “GEN”
2. AC coupling on “LOAD”
- CAN produce solar power during grid outages.
- CAN produce solar power for Off-Grid systems.
- CAN monitor solar production.
- CAN produce solar power during grid outages.
- CAN produce solar power for Off-Grid systems.
- CANNOT monitor solar production.
- “GEN” input CANNOT be used.
- Backup Transfer Time is extended to 2 seconds
In Off-Grid systems, Sol-Ark uses
Frequency Shift
technology to shut down AC coupled solutions when the battery is full. Grid-Tied AC coupled
solutions will
always
sell excess solar power back to the grid. “Limited to Load” will
NOT
limit production when AC coupled.
2.5 Integrating a Generator
Generators Smaller than 9.6kW → On “GEN” Input
1. ONLY Supports 120/240V Split-Phase generators.
2. 50A rated “GEN” breaker. 40A continuous.
3. A THD (Total Harmonic Distortion) of less than 15% is preferred.
Generators Bigger than 9.6kW → On “GRID” Input
1. Supports 220V Single phase, 120/240V Split phase, 120/208V 3-Phase (2 of 3 phases). The correct grid type must be selected before
connecting the generator.
2. Programming “GEN Connect to Grid Input” is required: → Limiter → Other →
🗹 GEN Connect to Grid Input
.
3. DO NOT use “Grid Sell” in Off-Grid systems. Potential to damage the generator. Installation of CT sensors on generator lines is
only required if “Peak Shaving” is intended to be used.
Weekly Gen Exercise:
If a generator has two-wire start compatibility, it will experience weekly generator tests. This test occurs at 8:00AM (local
time) every Monday by default. The test takes 20 minutes to complete. The generator will start and stop automatically. The test can be disabled
by specifying :00 | 00 min in the "Generator Exercise Cycle Day & Time" option.
Improve the Generator & Sol-Ark Compatibility
Navigate through the menus and program the following settings to improve the Sol-Ark and generator compatibility and operating range
to avoid frequent disconnections.
1. Change the grid mode to General Standard: → Grid Setup → Grid Selection → Grid Mode.
a. Tap and use the navigation arrows to cycle through the different grid modes. Choose “General Standard”.
2. Increase the frequency range of operation: → Grid Setup → Connect → Reconnect
a. Increase “Grid Hz High” to 65Hz.
b. Decrease “Grid Hz Low” to 55Hz.
c. Replicate changes for the “Normal Connect” settings.
Copyright © 2024 Sol-Ark LLC | SK140-0005-002 17
3. Increase the voltage range of operation:
a. Increase “Grid Volt High” to 275V.
b. Decrease “Grid Volt Low” to 185V.
c. Replicate changes for the “Normal Connect” settings.
Sol-Ark will not charge the batteries using the generator unless the “Start V” or “Start %” condition is fulfilled. Only one condition (V or %) can
be modified at a time depending on the control mode selected (“Use Batt V Charged” or “Use Batt % Charged”)
2.6 Grid Peak Shaving
1. To use Peak-Shaving on a generator, the equipment MUST be connected to the “GRID” terminal of the inverter.
2. Peak-Shaving helps reduce grid consumption during peak demand by utilizing battery
backup power. It can also be used to prevent generator overload above a specified power
threshold.
3. Install the CT sensors on grid / generator lines L1, L2. The arrows on the CTs MUST point
toward the grid / generator.
4. The Sol-Ark supplies power from the batteries whenever the “Power” threshold is met.
5. This mode will automatically adjust the “Grid Charge” amperage (A) to avoid generator
overloads during battery charging.
6. Grid Peak-Shaving will automatically enable “Time of Use” and MUST be configured.
2.7 Automatic Generator Start
1. “ 🗹 Gen Charge” is used when the generator is connected to the “GEN” terminal.
a. “Start V” or “Start %” is the set-point/condition that must be fulfilled to automatically start the generator.
b. To charge from the “GEN” source, “🗹 Gen Charge” must be enabled.
c. Batteries will charge from a generator until the battery bank accepts 5% of its programmed capacity in Amperes (A).
This is equivalent to around 95% of the state of charge (SOC).
2. “🗹 Grid Charge” is used to charge the battery from the “GRID” source (grid or a generator).
a. “Start V” or “Start %” is the set-point/condition that must be fulfilled to start the battery charge from the “GRID” source.
This will auto-start a generator as well.
b. To charge the battery from the “GRID” source, “🗹 Grid Charge” must be selected: → Battery Setup → Charge.
c. From utility grid: the batteries will be charged to 100% SOC.
d. From generator: the batteries will charge until the battery bank accepts 5% of its rated capacity in Amperes (A). This is
equivalent to around 95% SOC.
If
“Time of Use”
(TOU) is enabled, a time to charge from that GRID or GEN source
MUST
be designated.
“🗹 Charge”
must be checked on
desired time intervals, otherwise the generator will not start automatically even if the Start V or Start % condition has been met.
Gen Charge / Grid Charge “A”
“A” is how many amps (DC) are supplied to the battery from a generator. Adjusting and limiting the
GEN or GRID “A” value will ensure that small generators are not overloaded when charging the
battery bank.
Generator and grid charge settings
Grid peak-shaving settings
18 Copyright © 2024 Sol-Ark LLC | SK140-0005-002
2.8 Integrating Sensors and Accessories
Inverter pinouts for sensors and accessories
• (1,2) Battery temperature sensor: Not polarity sensitive. Used for voltage compensation for Lead Acid batteries
• (+3, -4) CT1 & (+5, -6) CT2: Current transformer (CT) inputs
• (7,8) Gen Start Relay: Normally open relay for generator two-wire start ( 12V, 100mA max)
• (9,10): Not in use
• (B, B) Emergency Stop: Normally open dry contact for emergency stop
• (+, -): Not in use
• (+15, -16): 12Vdc (-3%) power supply for RSD transmitters (100mA max, 12V
DC
, 1.2W)
1. Temperature Sensor
• Place the sensor between two batteries as shown in the next figure.
• Secure with tape and place away from the batteries terminals to prevent overheating.
• This sensor has no polarity. The temperature sensor helps perform voltage charging
adjustments and capacity calculations due to changes in temperature.
• Lithium Batteries DO NOT require our external temperature sensor.
2. Wi-Fi / Ethernet Antenna (Dongle)
• Remote monitoring and software updates require an internet connection through the WI-FI /
Ethernet Antenna (Dongle).
• Compatible with Wi-Fi or Ethernet connections.
3. BMS Port (CAN/RS485)
• This port is used to setup a Lithium Battery in closed-loop communication with the Sol-Ark 8K-
2P-N (consult our “Battery Communications Integration Guide” on the Sol-Ark website at
www.sol-ark.com/battery-partners).
• Must use an RJ45 connector.
• Only use the CAN port for battery BMS communications (the CAN port supports both CANBus
protocol and Modbus protocols).
4. GEN Start Signal (Two-wire start)
• Gen start relay: pins 7 & 8.
• The signal comes from a normally open relay that closes when the generator “Start” condition is met
Temperature sensor
Wi-Fi dongle (antenna)
Copyright © 2024 Sol-Ark LLC | SK140-0005-002 19
2.9 Limit Sensors (CT sensors)
The CT sensors (or limit sensors) enhance system capabilities by enabling the use of the system work modes known as “Limited Power to
Home” (Meter Zero) and “Grid Peak-Shaving”. The CTs will measure and calculate total load demand which the Sol-Ark 8K-2P-N will then
use to accurately supply and offset all existing loads (Meter Zero).
Off-Grid system do not require CT sensors unless “Grid Peak-Shaving” is used
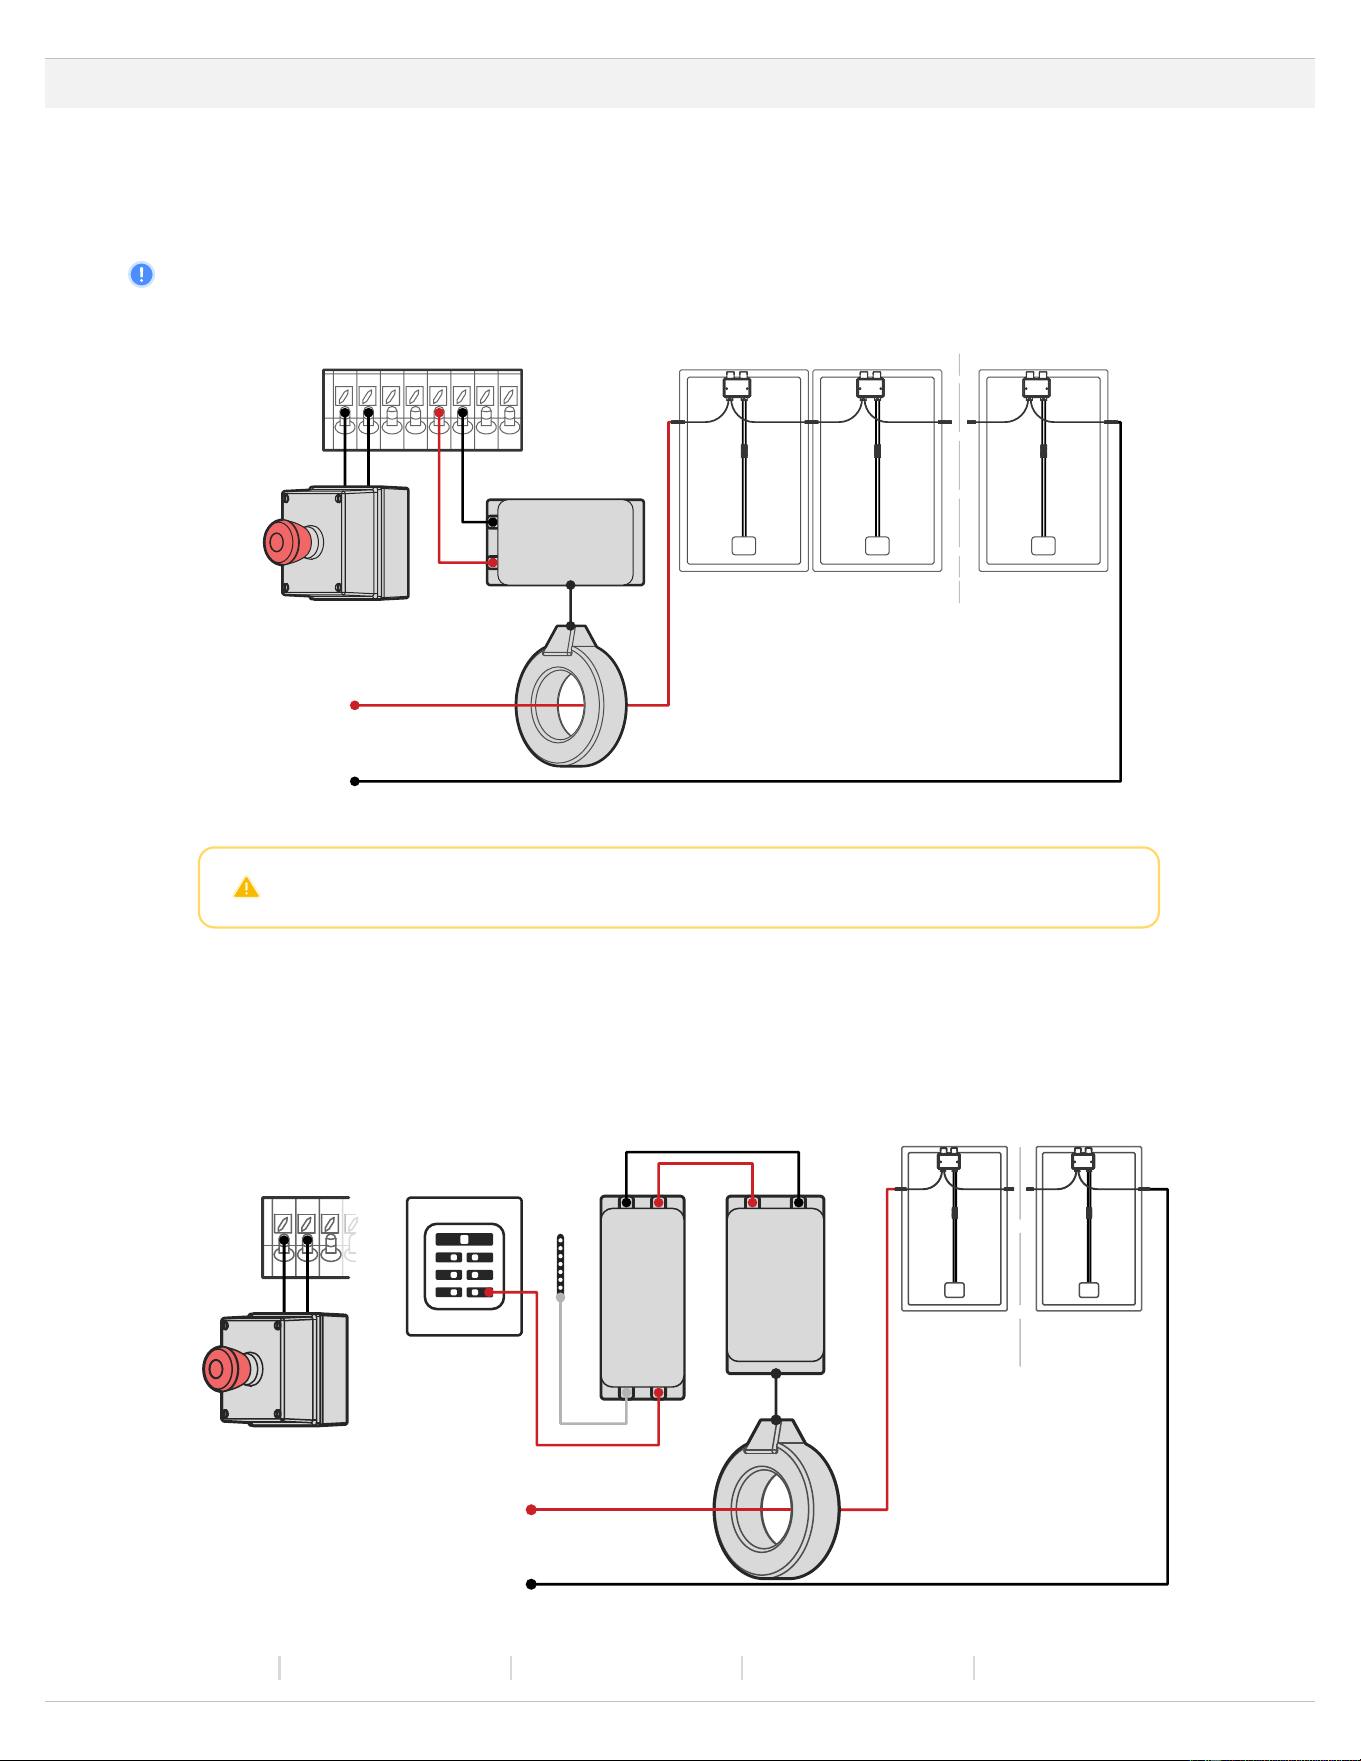
1. CT Sensors Installation
• Install sensors on incoming electrical service wires (L1, L2).
• Embossed arrows on the sensors must point towards the grid.
• If the system is 3Φ, the arrows must point towards the inverter(s).
• To ensure proper fit, check incoming wire diameters (grid or generator). If the sensors are too small, bigger CTs can be purchased
by calling sales: +1-972-575-8875 ext. 1 or [email protected]
• “Limited Power to Home” (Meter Zero) and “Grid Peak Shaving” require CT sensors.
• See section 3.5 “Limiter” for more information about the different work modes.
• See section 6 “Wiring diagrams” for more information on CT installation.
Back-feed breaker
Line side tap
2. CT Sensor Size
• The Sol-Ark 8K-2P-N includes two 100A CT sensors (Ø0.630”).
• Sol-Ark offers large 200A (Ø0.945”) and extra-large 600A (Ø1.976”) CT sensors upon request. Visit https://shop.sol-ark.com/ or
contact sales at +1 (972) 575-8875 / [email protected] to purchase bigger CT sensors.
• Default Sol-Ark CT ratio is 2000:1
Unless authorized,
DO NOT
change CT Ratio or warranty will be voided
Meter
CTs
Main Panel
Meter
CTs
Main Panel
20 Copyright © 2024 Sol-Ark LLC | SK140-0005-002
3. Wiring the CT sensor
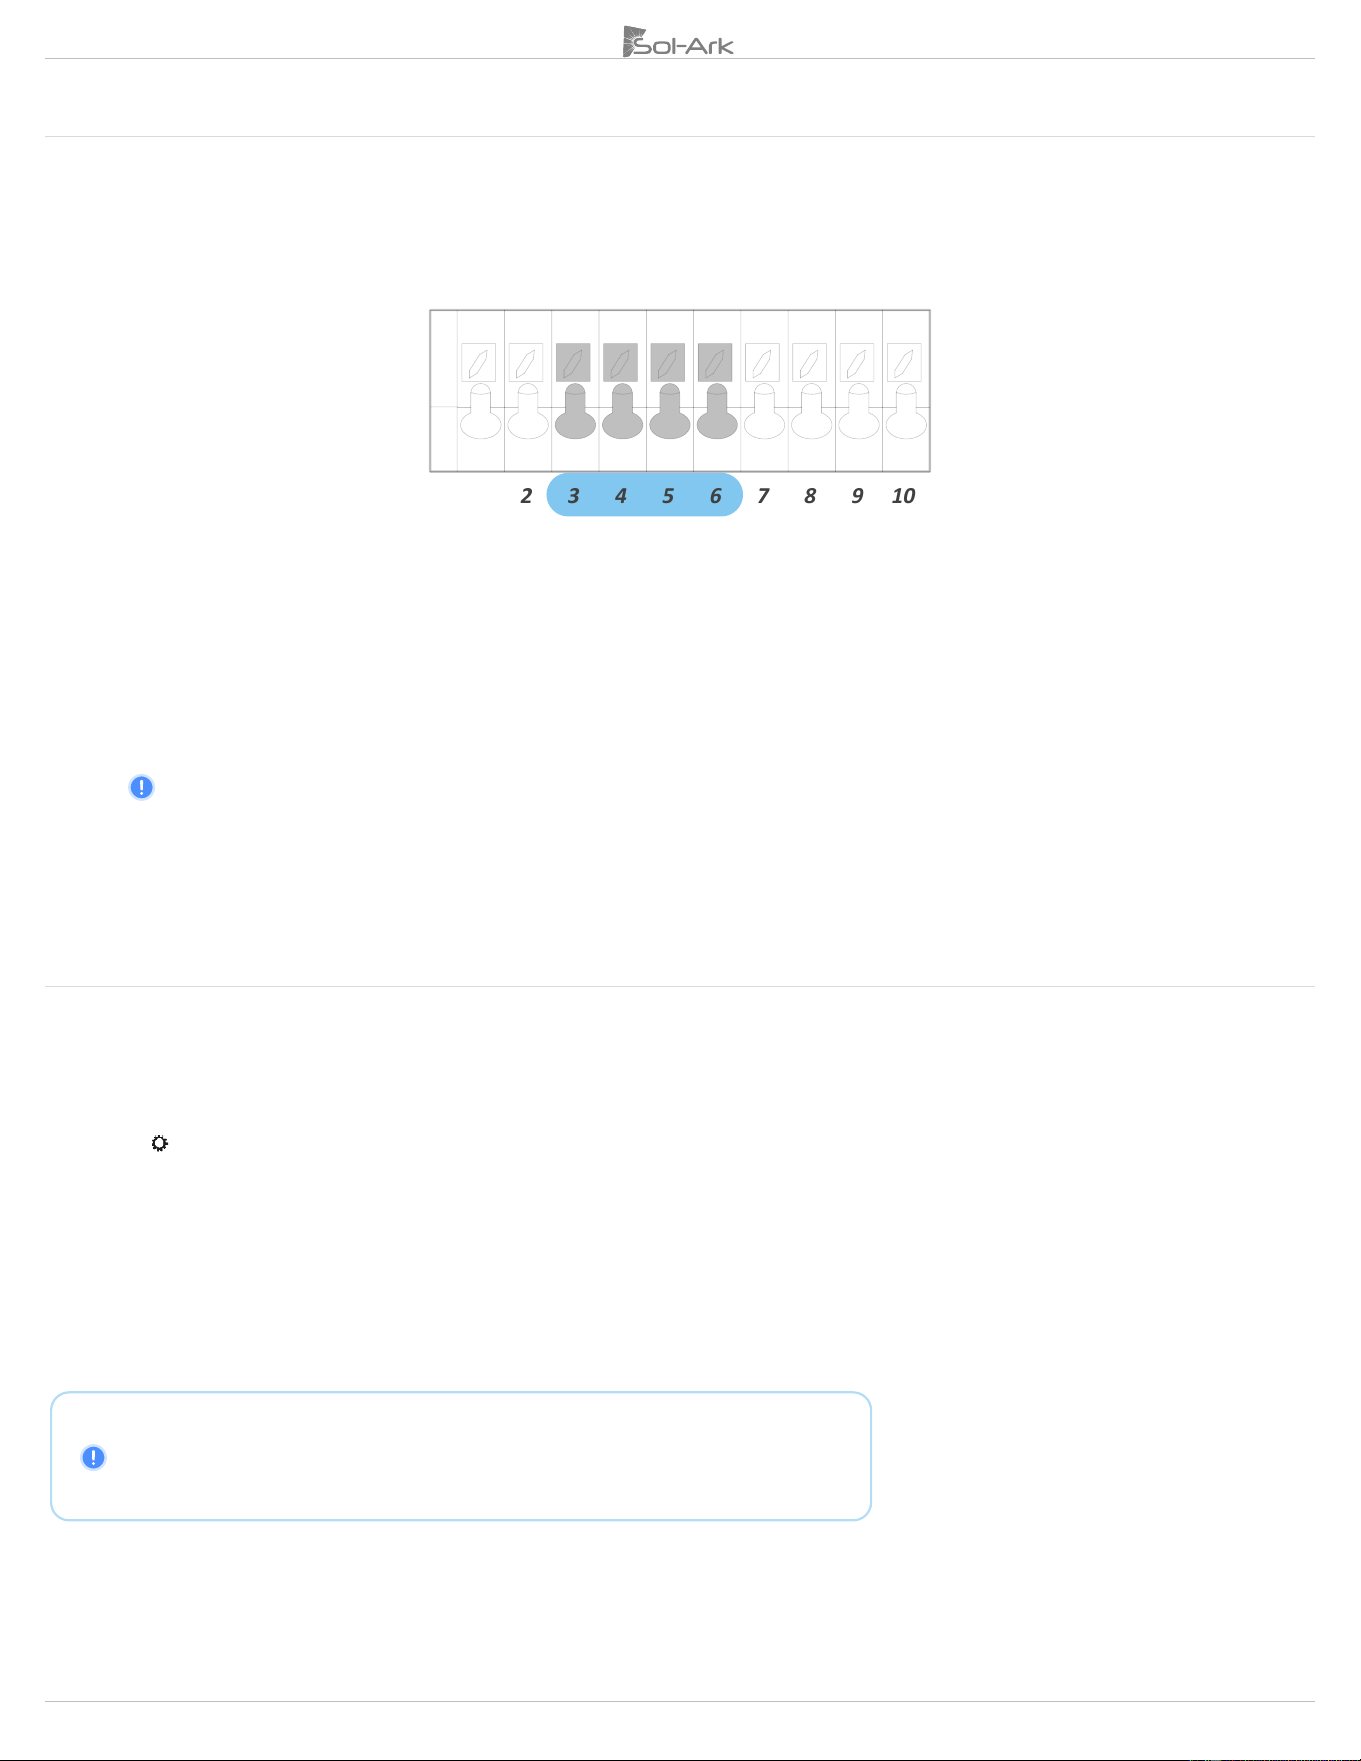
• Connect CT1 of line L1 to pins 3 (white) & 4 (black).
• Connect CT2 of line L2 to pins 5 (white) & 6 (black).
• Keep the wires twisted (white-black) throughout the connection.
• If the wires need to be extended, use CAT 6 (shielded) cable to make an extension.
CT Sensors for 120V/240V Split Phase
• The inverter will include two (2) CT sensors.
• Embossed arrows on the sensors must point towards the grid.
CT Sensors for 120V/208V Three-Phase
• CT sensors on 3-Phase systems MUST point in the opposite direction (i.e., towards the inverter).
4. Automatic CT Limit Sensors Configuration
This function REQUIRES batteries and 120/240V grid to auto detect and auto correct CT
orientation. AC coupled inverters need to be OFF during the detection test. If this test is
done with connected AC-coupled systems, a factory reset of the Sol-Ark must be
performed. Install the CT sensor as described in section 2.9 “Limit Sensor”. A battery
connection and grid power are required before starting the automatic configuration.
→ Basic Setup → Advanced →
🗹
Auto detect Home Limit Sensors
Wait at least 10 to 15 seconds while the inverter performs the test. The inverter will alternate
the current distribution in all lines, determining the correct orientation of the sensor.
• On “Limited power to Home” mode (no Grid Sell), HM values will read close to zero (0). Keep in
mind that all sensors have a 3% error.
• To avoid selling power to the utility use “Zero Export Power” equal to or greater than 20W.
• Buying power from the grid will display positive (+) HM values, while selling to the grid displays
negative (-) HM values.
+ - + -
CT wire extensions with shielded
CAT 6 cable
Copyright © 2024 Sol-Ark LLC | SK140-0005-002 21
2.10 Emergency Stop and Rapid Shutdown
The (B, B) emergency stop pins of the Sol-Ark 8K-2P-N are an ordinarily open contact that triggers rapid shutdown (RSD) when closed. RSD
will cut all power including the Sol-Ark’s internal power supply and stop all AC outputs. The internal 12Vdc (-3%) power supply of the Sol-
Ark (pins 15 & 16) will disconnect any RSD transmitter that will then shut down all solar panels when the emergency stop button is pressed.
• Emergency stop button connects to (B, B) pins of the Sol-Ark.
• RSD transmitter connects to pins 15 & 16 (12Vdc power supply)
• Transmitters placed inside the user area of the Sol-Ark can cause interference.
RSD Warning!
The Built-in 12Vdc power supply of the Sol-Ark 8K-2P-N (Pins 15 & 16) is rated for
100mA (1.2W)
. Do not exceed!
If unsure of the current (A) rating of the transmitter, contact the manufacturer before connecting
A transmitter that exceeds the maximum 100mA limit can still be integrated into the Sol-Ark inverter through an external power supply
connected to the “LOAD” output. Pressing the e-stop button will disconnect all AC outputs, cutting power to the “LOAD” service panel which
will initiate rapid shutdown.
Rapid Shutdown Recommendations
TIGO TS4-A-O
TIGO TS4-A-F
TIGO TS4-O
TIGO TS4-O-DUO
APsmart RSD S-PLC / RSD-D
Transmitter Coil
Transmitter
Power Line
Communication
(PLC)
Emergency
Stop Button
To MPPT
Optimizers with RSD or standalone RSD
Inverter pinouts
+
-
+
-
Receiver 1
Receiver 2
Receiver n
Transmitter Coil
Transmitter
Power Line
Communication
(PLC)
Emergency
Stop Button
To MPPT
Inverter pinouts
V+
+
-
Receiver 1
Receiver n
V-
External
PSU
N
L
“LOAD”
service panel
22 Copyright © 2024 Sol-Ark LLC | SK140-0005-002
2.11 Powering-up and Testing the Sol-Ark
TURN ON the inverter with at least one power source: 1) Battery, 2) PV or 3) Grid
1. Check the voltage of the battery bank
A. Voltage of the battery must be between 43V
DC
- 63V
DC
.
B. If applicable, turn ON internal switches of the batteries. Measure individual voltages.
C. Verify that the voltage of the battery bank at the Sol-Ark terminals is adequate.
D. DO NOT reverse polarity. DO NOT turn OFF battery disconnect if any current is flowing in or out of the battery.
2. Check the voltage of each PV input circuit
A. Input voltage must not exceed 500V
DC
.
B. Input voltage must be above the startup voltage of 125V
DC
.
C. Do not ground PV+ or PV-.
D. Verify polarity in each PV string. Backward polarity will measure 0Vdc by the Sol-Ark and will cause long term damage.
E. PV alone turns LCD screen only. Inverter requires grid and/or batteries to operate, otherwise an “OFF” message will appear.
F. PV DC disconnect switch on the side of the inverter will turn the PV ON or OFF.
3. Check GRID input voltage
A. Use the bottom screws of the “GRID” breaker to measure AC voltage with a multimeter.
B. Measure line (L) to neutral (N) voltages on “GRID” terminals. Ensure 120V
AC
on all phases.
C. Measure line (L) to line (L) voltages on “GRID” terminals. Ensure 240V
AC
. (If voltage reading is close to 220V or 210V, verify if grid is
single-phase or three-phase instead).
D. Verify that voltage between Neutral and Ground is 0V
AC
.
E. Verify that voltage between “GRID” L1 and “LOAD” L1 is 0V
AC
. Do the same for L2.
4. Power ON Sol-Ark 8K-2P-N
A. Turn ON the battery breaker.
B. PRESS down the power button to the ON position. Wait for the “Normal” LED indicator to turn on. This may take a few minutes.
C. Turn ON the PV DC disconnect switch. Wait for “DC” LED indicator to turn on.
D. Turn ON the “GRID” breaker. Wait for “AC” LED indicator to turn on.
E. Turn ON the “LOAD” and “GEN” breakers.
OFF
ON
2.12 Power Cycle Sequence
1. TURN OFF all AC breakers (“GRID”, “GEN” and “LOAD”).
2. TURN OFF the built-in PV DC disconnect switch on the side of the inverter.
3. PRESS the power button, making sure it is in the OFF position. An “OFF” message will appear after the “Normal” LED turns off.
4. TURN OFF the battery breaker.
5. Wait a moment (~1 min) to ensure the inverter is completely de-energized.
6. Make sure that the Sol-Ark is properly connected to the batteries, solar panels, “GRID”, “GEN”, and “LOAD”.
7. Reverse the steps to turn ON the Sol-Ark.
OFF
ON
OFF
ON
Copyright © 2024 Sol-Ark LLC | SK140-0005-002 23
3. User Interface
3.1 LED Indicators
DC
AC
Normal
Alarm
Green → DC Solar Panels connected
and providing voltage.
Green → Grid is connected
and providing voltage.
Green → Sol-Ark is fully energized*
and inverting power.
Red → Alarm state. Check the alarms menu.
Home Screen→ → “System Alarms”
OFF → Minimum MPPT voltage not
met, wrong polarity or no PV
DC
.
OFF → Grid voltage out of
range or Off-Grid system.
OFF → Not fully energized*, in fault
state or in passthrough mode.
OFF → No alarms / error codes / setting
change notifications
*Fully energizing
the unit constitutes at least: a) DC Solar panels
AND
Grid or b) Just batteries
3.2 Main Menus
24 Copyright © 2024 Sol-Ark LLC | SK140-0005-002
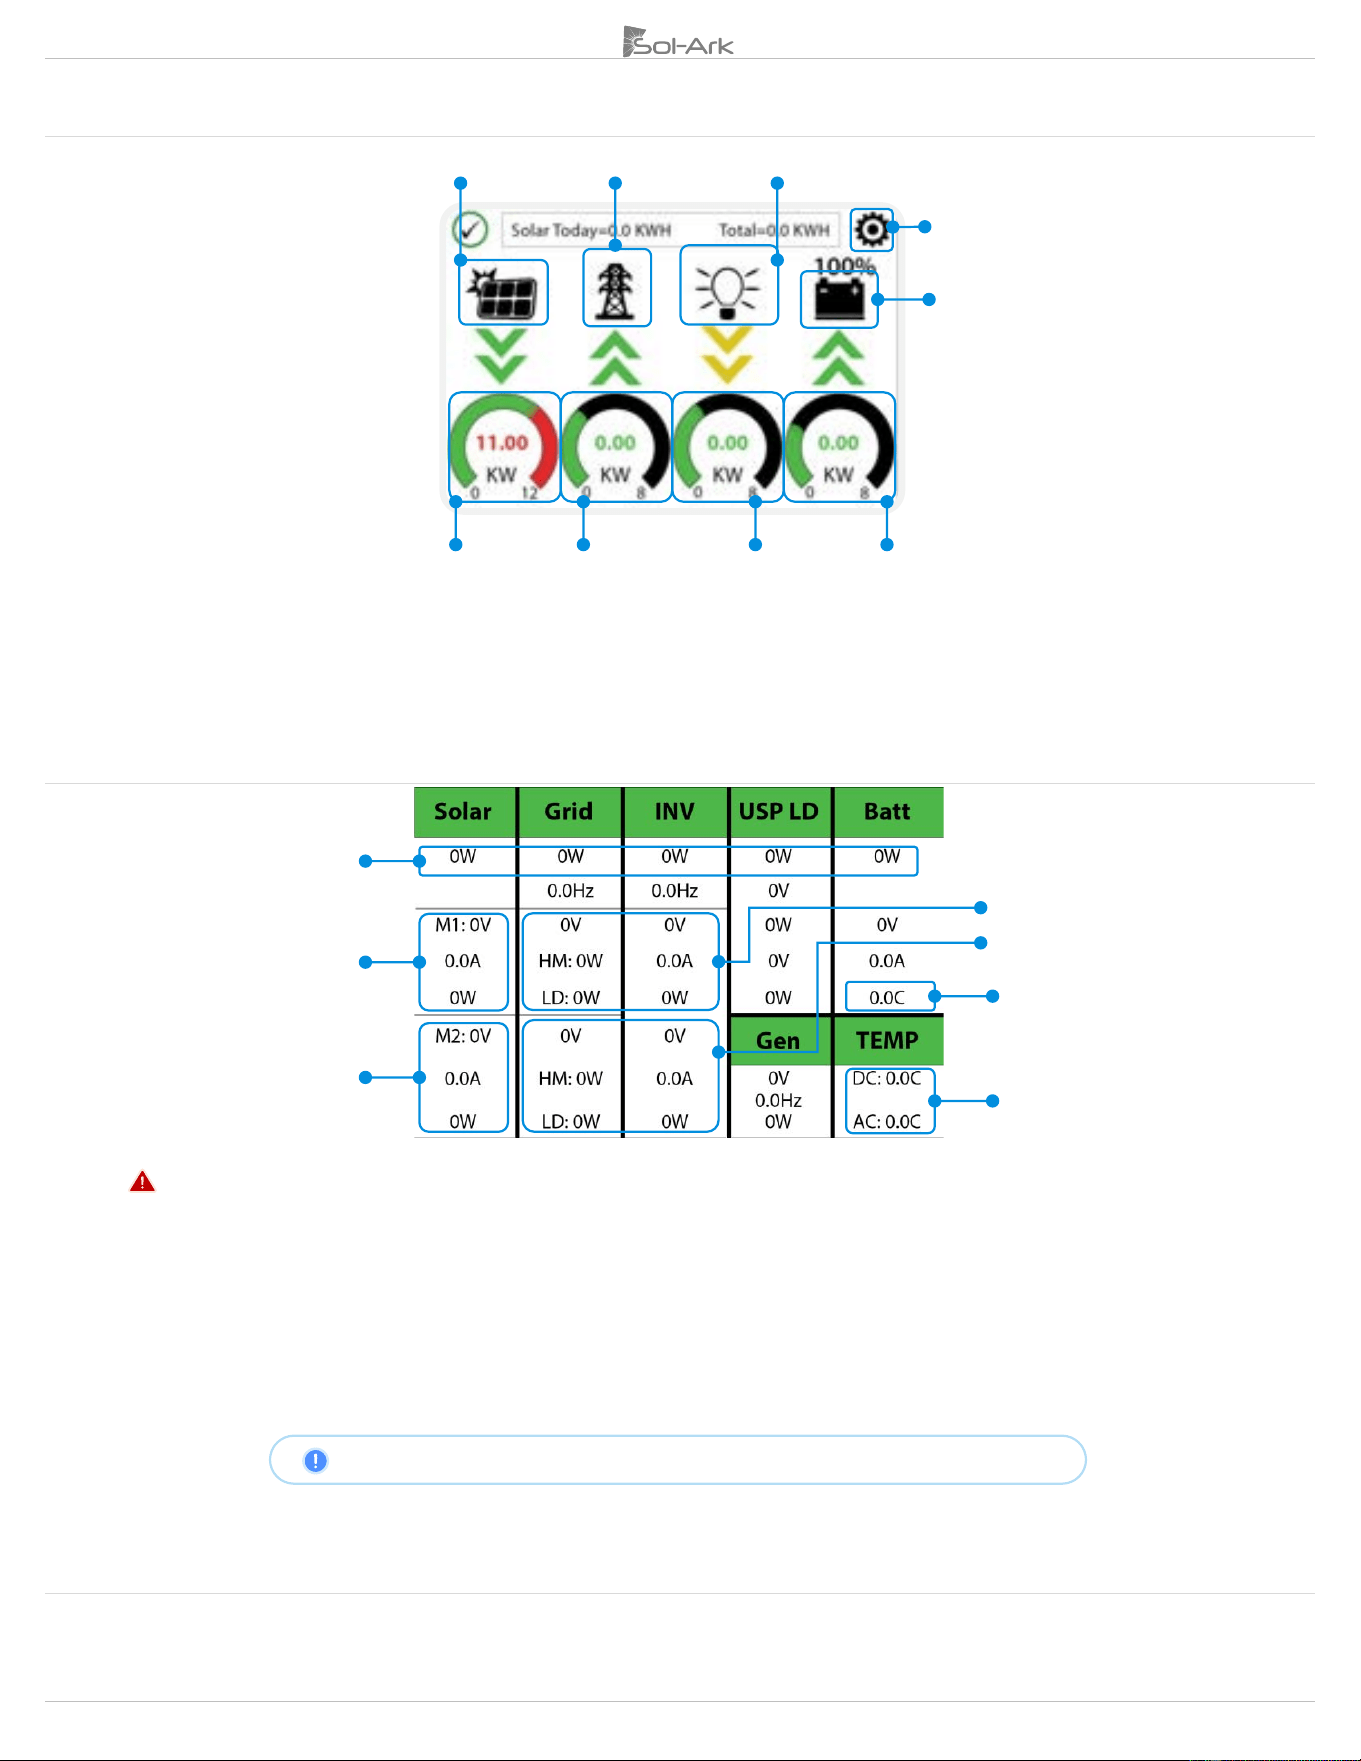
1. Main screen
2. Details Screen
• MPPT voltages MUST NOT exceed 500V.
• Battery temperature will measure 25°C by default if the battery sensor is not connected.
• DC Temp: Internal DC conversion side temperature.
• AC Temp: Internal AC conversion side temperature.
• “Grid” column measures: Voltage, Current, Power and frequency of the utility grid.
o If selling to the Grid, Watts = negative (-)
o If buying from the Grid, Watts = positive (+)
o HM: power measured by the external CT sensors. (L1, L2).
o LD: power measured by the internal sensor on “GRID” terminal. (L1, L2).
Opposing “Grid” or “HM” values indicate an incorrect installation of CT. See section 2.9 “Limit Sensor”
3. PV power Generation Graph
A. Display power production over time for the PV array.
B. Use up/down arrows (↑, ↓) to navigate between days.
C. Month view/ year view/ total production.
PV power generation graph
Grid usage graph
Hold 4 s to force Smart
Loads
Settings
Details Screen
Solar power production
Grid power
Sell (-) / Buy (+)
Load power
consumption
Battery power
Charge (-) / Discharge (+)
Total Power
V, I & P of MPPT1
V, I & P of MPPT2
Battery
temperature sensor
Sol-Ark’s internal
temperatures
V, I & P of L1
V, I & P of L2
Copyright © 2024 Sol-Ark LLC | SK140-0005-002 25
4. Grid Usage Graph
A. Displays power drawn from grid (+) / sold to the grid (-).
B. Values above the line indicate “power bought” from the grid.
C. Values bellow the line indicate “power sold back” to the grid.
D. This view can help to determine when the peak power is used from the grid.
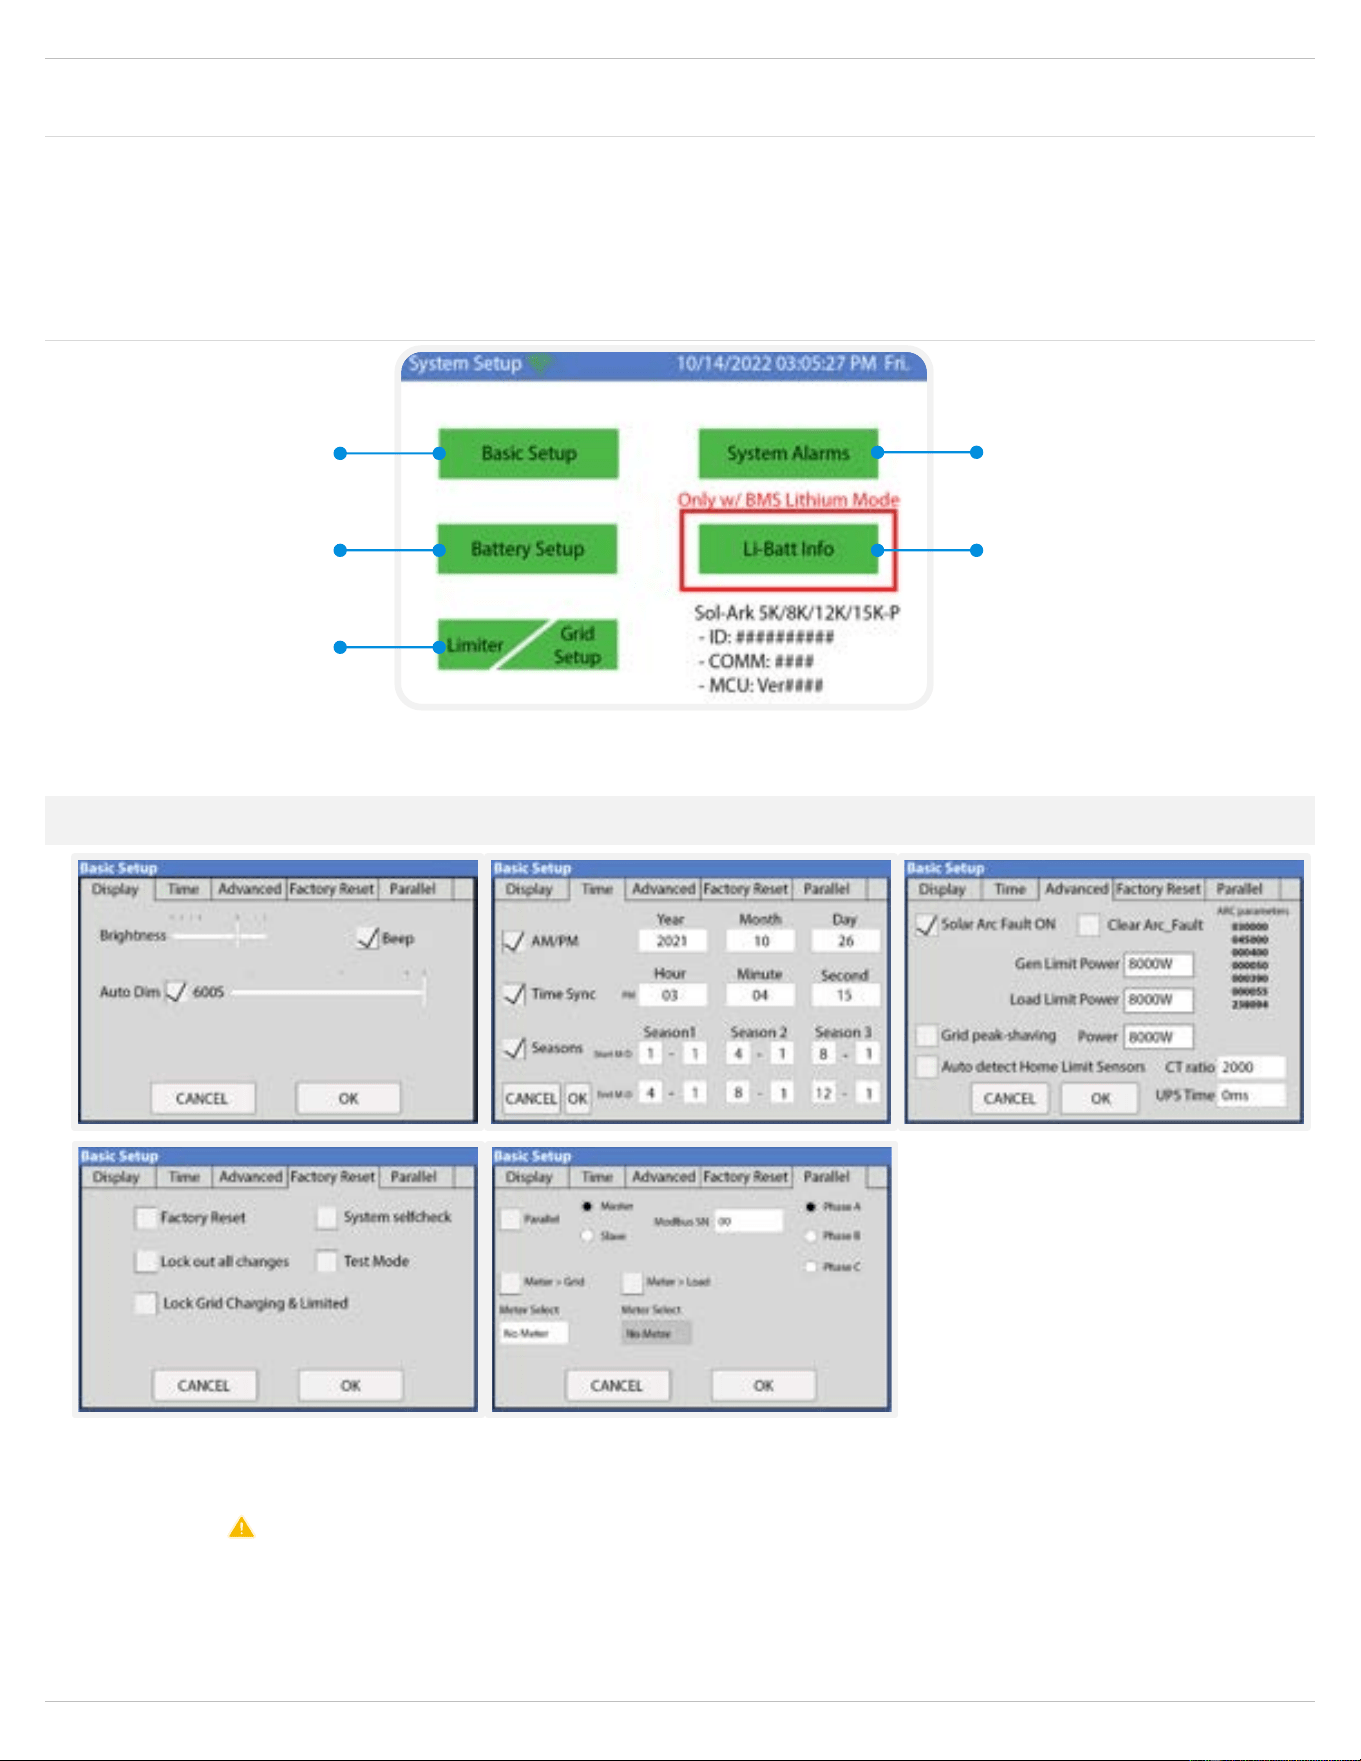
5. System Setup Menu
3.3 Basic Setup
Display
Brightness: Brightness adjustment (+, -).
Auto Dim: Must be enabled at all times to validate the warranty of the LCD screen.
Beep: Enable / disable the alarm sound.
Time
Time Sync: Automatically syncs with the internet for daylight saving time changes (Enabling “Time sync” is recommended).
Seasons: Setup and customize the seasons for TOU.
(1)
(2)
(3,4)
(5)
Information
provided by the BMS
26 Copyright © 2024 Sol-Ark LLC | SK140-0005-002
Advanced
Solar Arc Fault ON: Enables Arc fault detection algorithm on the MPPTs.
Clear Arc Fault: Command to clear an Arc Fault. It must be executed manually every time the system detects an F63 Arc_Fault
alarm. See section 7.1 "Sol-Ark Error Codes" for more detail.
Gen Limit Power: Limits the power drawn from the “GEN” AC source. The inverter will reduce battery charge when value is reached.
Load Limit Power: Sets a limit to the total “LOAD” output power. The max output power of the inverter is programmed by default.
Grid-Peak Shaving: Sets a “GRID” consumption threshold that allows use of battery backup power during peak demand. External
CT sensors are required. Peak shaving can be used on a generator provided it is wired to the “GRID” terminal.
Auto detect home Limit Sensor: Detects and auto-corrects the polarity of the CTs. See section 2.9 for details.
CT Ratio: Specifies the transformation ratio of the CT. Default value of 2000:1 DO NOT change or warranty will be voided.
UPS Time: Backup transfer time to essential loads upon grid disconnection. Default value of 4ms.
Factory reset
Restrictions: Changes to these settings must be previously authorized by Sol-Ark technical support agents.
Parallel
This tab DOES NOT have any effect on the behavior or performance of the Sol-Ark 8K-2P-N. This inverter is a single-system solution and does
not support connections of multiple inverters through parallel stacking of the same model or any other Sol-Ark products.
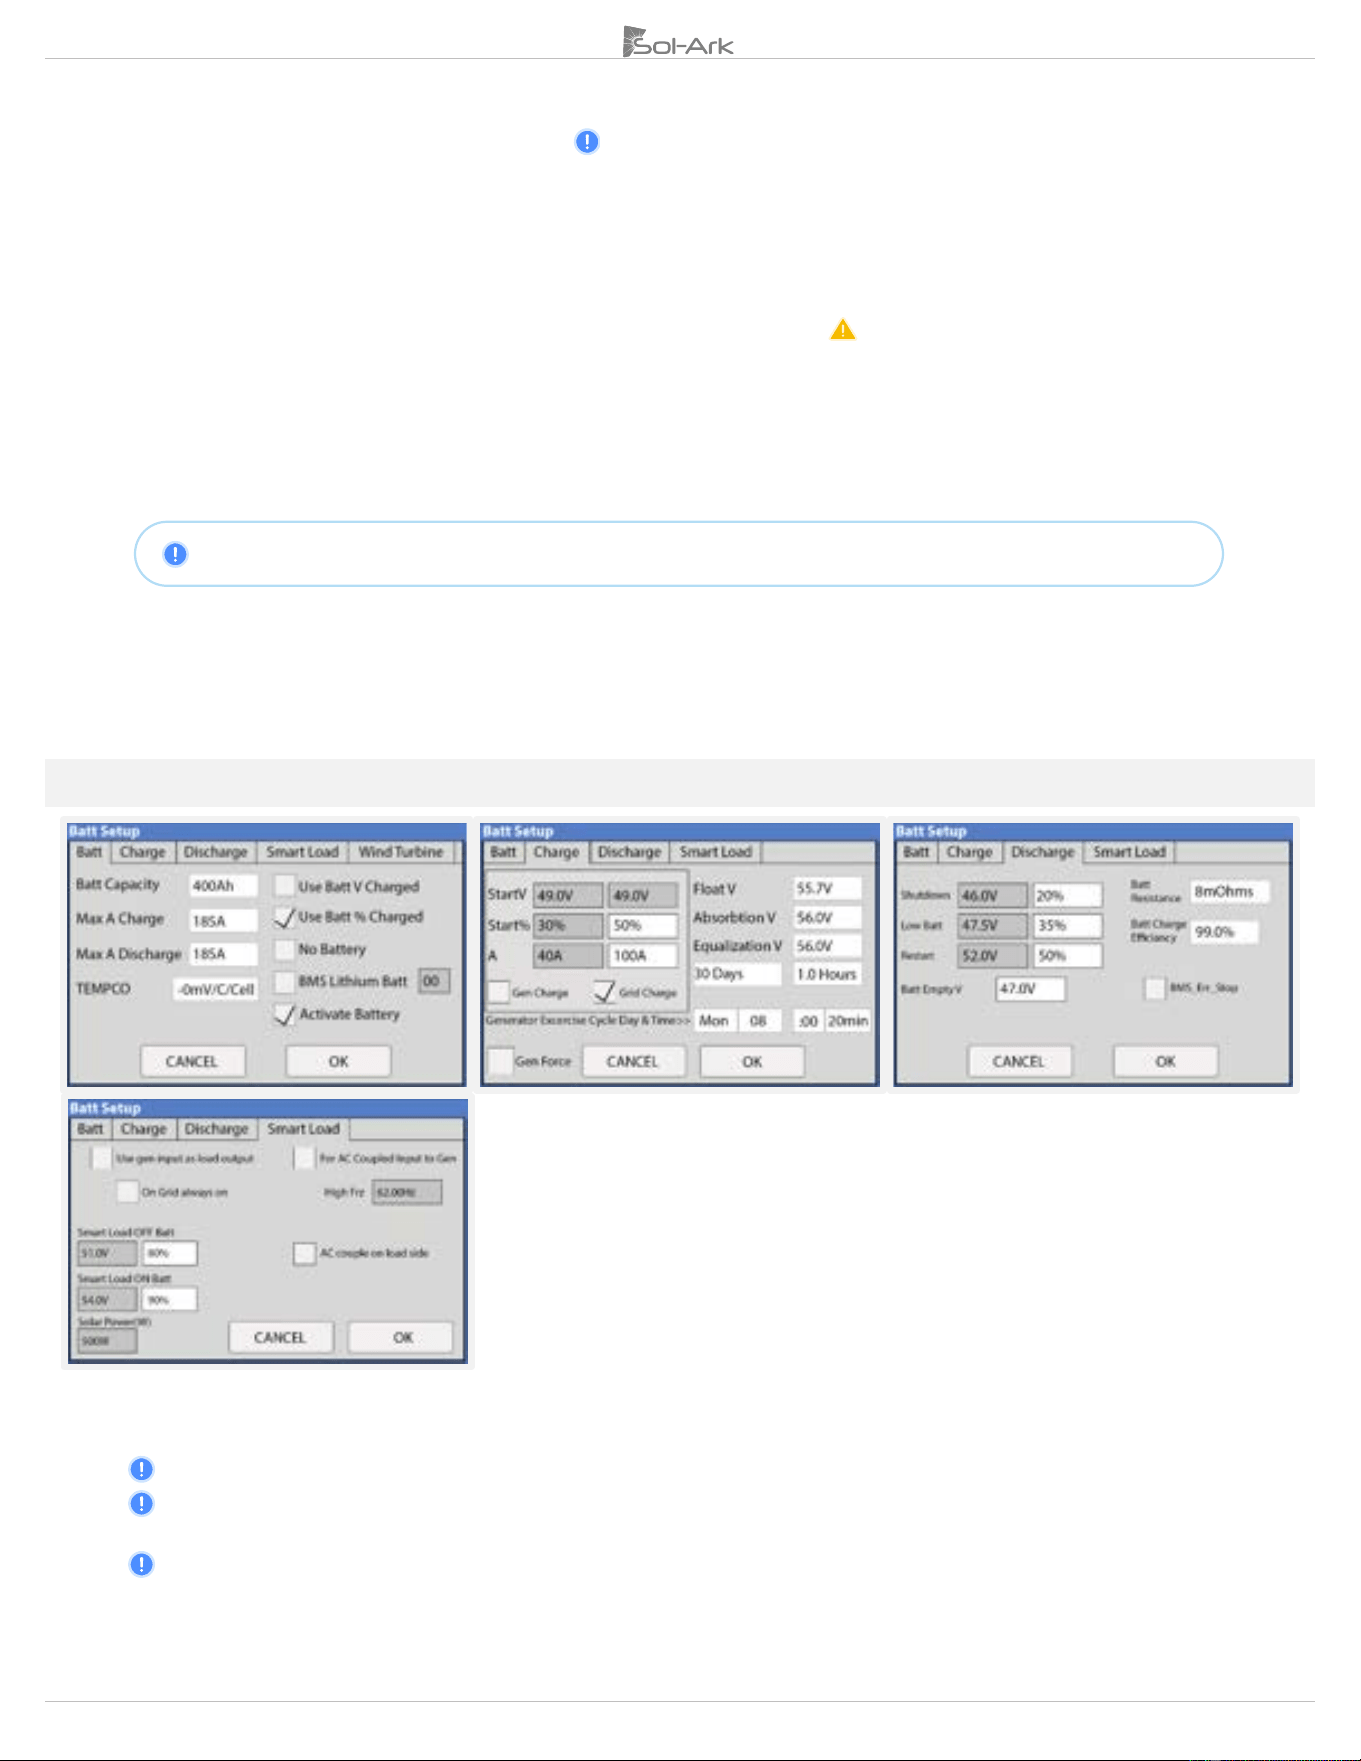
3.4 Battery Setup
Batt
Batt Capacity: Specifies the capacity of the battery bank. Value expressed in Amp Hour (Ah).
Batteries in series → Voltage adds up (V).
Batteries in parallel → Capacity adds up (Ah).
Max A Charge: Sets the maximum charge current (A) rate to the batteries when charged from solar power → 185A max allowed.
Rule of thumb for Lead-Acid batteries: If manufacturer does not specify rated charge amps, use 20% - 30% of battery capacity
as Max A Charge.
Max A Discharge: Sets the maximum discharge current (A) rate from the batteries → 185A max allowed.
For Off-Grid systems, the battery bank will discharge 120% of this value for a 10 second surge before the inverter faults to prevent
battery damage.
Copyright © 2024 Sol-Ark LLC | SK140-0005-002 27
TEMPCO: Temperature coefficient used in conjunction with the battery temperature sensor to adjust optimal voltages for lead-acid
batteries. Lithium batteries do not require a TEMPCO setting (-0 m/V/C/Cell).
Use Batt V Charged: Displays battery charge in terms of voltage.
Use Batt % Charged: Displays battery charge in terms of %. The inverter uses algorithms measuring power in and out to estimate a
true value for state-of-charge %. It compensates for aging batteries.
No Battery: “No Battery” option MUST be selected if there is no battery present. A power cycle sequence is REQUIRED when
selecting this option. Refer to section 2.12 for power cycle instructions.
BMS Lithium Batt: Allows closed-loop communication with our tested batteries included in our “Battery Integration Guide”. Refer
to www.sol-ark.com/battery-partners for complete list of compatible batteries.
Activate Battery: This option MUST be selected if the system has batteries, especially Lithium batteries.
Charge
Float V: Lower steady voltage at which the battery is maintained after being fully charged.
Absorption V: Constant voltage used to charge the battery.
• Absorption will stop at 98% of the capacity of the battery bank and then drop to the Float setpoint.
• Example: A 400Ah battery will stop charge reaching 392Ah.
Equalization V: Voltage that the system uses to generate a calculated overcharge, utilizing a higher voltage or equal to the
absorption to remove the generation of sulfates in batteries. Used to balance internal cells. Most Lithium batteries do not need
to equalize.
Days: The period between equalization cycles.
Hours: The period taken to equalize batteries.
If “Hours” is set to 0 hours, the system will not equalize batteries.
Gen Charge: Uses the “GEN” input of the system to charge the battery bank from a generator.
a. Start V: Voltage at which the system will AutoStart a generator to charge the battery.
b. Start %: Percentage S.O.C (state of charge) at which the system will AutoStart a generator to charge the battery.
c. A: Maximum rate of charge of the batteries from the generator (DC amps).
Grid Charge: There are two scenarios in which this option is used:
a. Grid connected to “Grid” input: The inverter will limit the charge rate to the set value in “A” and the battery will charge to
100% SOC.
b. Generator connected to “Grid” input: It will be necessary to select “🗹 GEN connect to Grid input”. The system will use
“Start V”, “Start%” and “A” conditions to charge the battery and stop charging at 95% SOC. Adjustable upper limit if
Time of Use is enabled.
Gen Exercise Cycle (Day & Time): Set a weekly generator exercise schedule. (Day of the week/time/duration length).
Gen Force: Test function for generator auto-start. Enable and press OK to close normally open relay (pins 7,8) and force the
generator on. Disable and press OK to disengage. The generator will not provide power during this test if grid power is available.
The gen must be in automatic mode if applicable and must have a two-wire start (dry-contact, normally open) connected to the Sol-Ark.
To disable the Gen exercise, adjust the time duration to 0 min.
Discharge
Shutdown: Battery voltage or % at which the inverter will shut down to protect the battery from an over discharge situation (battery
symbol on the home screen will turn red).
Low Batt: Low battery voltage or % (battery symbol on the home screen will turn yellow). Stopping point for TOU.
Restart: Battery voltage or % at which AC output will resume after previously reaching “shutdown”.
Batt Resistance: Internal resistance of mOhms from the battery bank. Used in % SOC batt calculations.
Batt Charge Efficiency: Value provided by battery manufacturer. Used in % SOC batt calculations.
Batt Empty V: Sets the empty voltage and associates this voltage to 0% charge. This value determines the lowest % SOC limit.
BMS_Err_Stop: Enables system stop when there is loss of battery communications.
Continuous GEN input/output of 40A.
DO NOT
EXCEED
.
Smart Load
A. This mode uses the “GEN” input as a load output that delivers power when the battery exceeds a user programmable threshold or
when the Sol-Ark is connected to the grid.
B. When “🗹 Use gen input as load output” is enabled, the “GEN” input breaker turns into an output to power high-power loads such
as a water heater, irrigation pump, AC unit, pool pump, or any other loads.
28 Copyright © 2024 Sol-Ark LLC | SK140-0005-002
C. When “🗹 On Grid always on” is enabled, the “GEN” breaker will always output power as long as the grid is connected, regardless
of battery charge.
Smart Load OFF Batt: Battery voltage or % at which the “GEN” breaker will stop outputting power.
Smart Load ON Batt: Battery voltage or % at which the “GEN” breaker will start outputting power.
Solar Power (W): Amount of PV production needed before “GEN” breaker starts outputting power.
AC Coupling Settings - (For AC Coupled Input)
A. Grid-tied systems with AC coupled solar arrays must have “🗹 Grid Sell” enabled. Ensure you are allowed to sell back to the grid.
B. To use the “GEN” terminal as an AC coupling input for micro inverters or string inverters, enable " 🗹 For AC Coupled Input to Gen”.
C. In off-grid systems, the Sol-Ark will use frequency shifting to control the AC coupled solution based on the battery SOC. The
meaning of “Smart Load OFF Batt” and “Smart Load ON Batt” will change in this mode.
Smart Load OFF Batt: The % SOC at which the AC coupled inverters turn OFF. 90% recommended.
Smart Load ON Batt: The % SOC at which the AC coupled inverters turn ON. 80% recommended.
To use the “LOAD” terminal for AC coupling microinverters or grid-tied string inverters:
a. Must select " 🗹 AC couple on load side".
b. The “GEN” terminal CANNOT be used. AC coupling on the “LOAD” terminal prevents the use of the “GEN” terminal for
any other purpose.
c. Wire as shown in diagram labeled "AC Coupling in LOAD".
d. Backup Transfer Time is extended to 2 seconds.
3.5 Limiter
Limiter
The Sol-Ark 8K-2P-N inverter will simultaneously utilize different available power sources to satisfy load demand in the electrical
service panels (essential loads panel / main service panel). The following work modes allow the user to determine how generated
power is utilized.
Grid Sell
Grid Sell: The inverter will produce as much power as it has available from PV array according to the programming. The maximum
power that can be sold to the grid will be 8,000W.
General description:
a. This mode allows your inverter to sell back to the grid all the excess power generated from the PV arrays without limitation.
b. The inverter will only show loads connected to the “LOAD” breaker.
c. The inverter will measure all power in / out of the “GRID” breaker as grid consumption or grid sell back.
Copyright © 2024 Sol-Ark LLC | SK140-0005-002 29
Grid Sell
Limited Power to Home
This work mode
REQUIRES
batteries
Limited Power to Home (Meter Zero): This mode limits the energy produced by the inverter to satisfy the home demand (essential
loads panel + main service panel). In this mode, the inverter delivers power to the “LOAD” breaker (essential loads panel) + the
“GRID” breaker (main service panel). CT sensors MUST be installed. These sensors measure load consumption in the main service
panel to offset total load demand and prevent selling to the utility. This system work mode is useful for users that don’t have a permit
to sell back. See section 2.9 “Limit Sensors” for proper external CT installation.
General description:
a. Power is delivered to the whole home without selling the excess solar back to the grid (required if no permit to sell back
from the utility company).
b. External CT sensors required for proper operation of this system work mode.
c. Monitored loads will be the addition of the main service panel + essential loads panel.
d. Energy Priority: 1. Solar PV Power | 2. Grid Power | 3. Batteries | 4. Generator
Limited Power to Home
Limited Power to Home + Grid Sell: This mode will NOT limit solar production to home demand. In this mode, the inverter delivers
power to the “LOAD” breaker (essential loads panel) + excess power to the “GRID” breaker (main service panel AND grid). The Sol-
Ark will monitor grid sell and load consumption simultaneously (with +/ - 3% error from CT sensors). The CT sensors MUST be
installed. The inverter will sell excess solar power up to a programmable limit. See section 2.9 “Limit Sensors” for proper external
CT placement.
30 Copyright © 2024 Sol-Ark LLC | SK140-0005-002
Limited Power to Home + Grid Sell
Limited Power to Load
This work mode
REQUIRES
batteries
Limited Power to Load: This mode limits the solar production to cover “LOAD” demand (essential loads panel) exclusively. In this
mode, the system disregards loads in the main service panel and will not deliver power to the “GRID” breaker.
General description:
a. The inverter will only cover the loads connected to the “LOAD” breaker.
b. It will NOT produce more power than the load demand.
c. This work mode will NOT deliver power to the “GRID” breaker (will NOT sell back).
d. The loads reported by the inverter will only be from the essential loads panel (“LOAD” breaker).
e. This system work mode is recommended for off-grid applications.
f. Energy Priority: 1. Solar PV Power | 2. Grid Power | 3. Batteries | 4. Generator
Limited Power to Load
Limited to Load + Grid Sell: This mode will NOT limit solar production to “LOAD” demand. The inverter delivers power to the
“LOAD” breaker (essential loads panel) + excess power to the “GRID” breaker (main service panel AND grid), however it will ONLY
track “LOAD” demand and sell excess solar up to a programmable limit. “GRID” loads cannot be measured, only the total output
through the “GRID” breaker. This mode is recommended for single inverter systems or for whole-home backup installations.
Copyright © 2024 Sol-Ark LLC | SK140-0005-002 31
Limited Power to Load + Grid Sell
Time of Use
Time Of Use (TOU): This mode combined with “Limited Power to Home” or “Limited Power to Load” allows the use of battery backup
power to reduce consumption from the grid during specific time intervals. Battery power will cover load demand at a programmable
power rate “Power(W)” down to a programmable “Batt (V / %SOC)”. You can configure six different time intervals over a 24-hour
period to cover a wide range of battery discharge or charge behaviors.
General description:
a. Uses battery power to reduce the power consumption during user defined time intervals.
b. Power (W) dictates the rate at which the battery discharges to assist with load demand.
c. Batt (V or %) dictates the lower discharge limit or upper charge limit.
d. Energy Priority: 1. Solar PV Power | 2. Batteries (down to programmed discharge V or %) | 3. Grid Power | 4. Generator.
Limited Power to Home + TOU
Time: Programable time intervals over a 24h period. All time slots MUST follow chronological order and must be programmed.
Power(W): Sets the maximum discharge rate of the battery during the corresponding time slot.
Batt: V or % used to specify a lower discharge limit or upper charge limit whenever “🗹 Charge” is enabled. Grid-tied systems
will not allow TOU to discharge lower than “Low Batt V/%”. Off-grid systems allow TOU discharge down to “Shutdown V/%”.
🗹 Charge: During the hours selected, it is allowed to charge batteries from an external AC source up to a programmed voltage or
%. If the external AC power source is a generator, the “Start V” or “Start %” condition must be fulfilled first. If available, the solar array
will always charge the batteries at 100% regardless of “🗹 Charge” in TOU.
🗹 Sell: Allows batteries to discharge and sell power to the grid at the programable “Power(W)” rate. “🗹 Grid Sell” MUST be enabled.
Do
NOT
enable “Charge” and “Sell” at the same time
32 Copyright © 2024 Sol-Ark LLC | SK140-0005-002
Other
GEN Connect to Grid Input: Specifies when a generator is connected to the “GRID” breaker.
Zero Export Power: Minimum power imported from the grid. Helps avoid selling back by ensuring constant grid consumption. The
value can be set between 1 – 100W (recommended 20W).
Batt First: Default and recommended option. Sets the solar power priority of the system to charge batteries first. Do NOT change
unless instructed by Sol-Ark technical support.
Load First: Sets the solar power priority of the system to cover loads demand first and deliver remaining power to batteries. Only
recommended for very specific situations.
3.6 Grid Setup
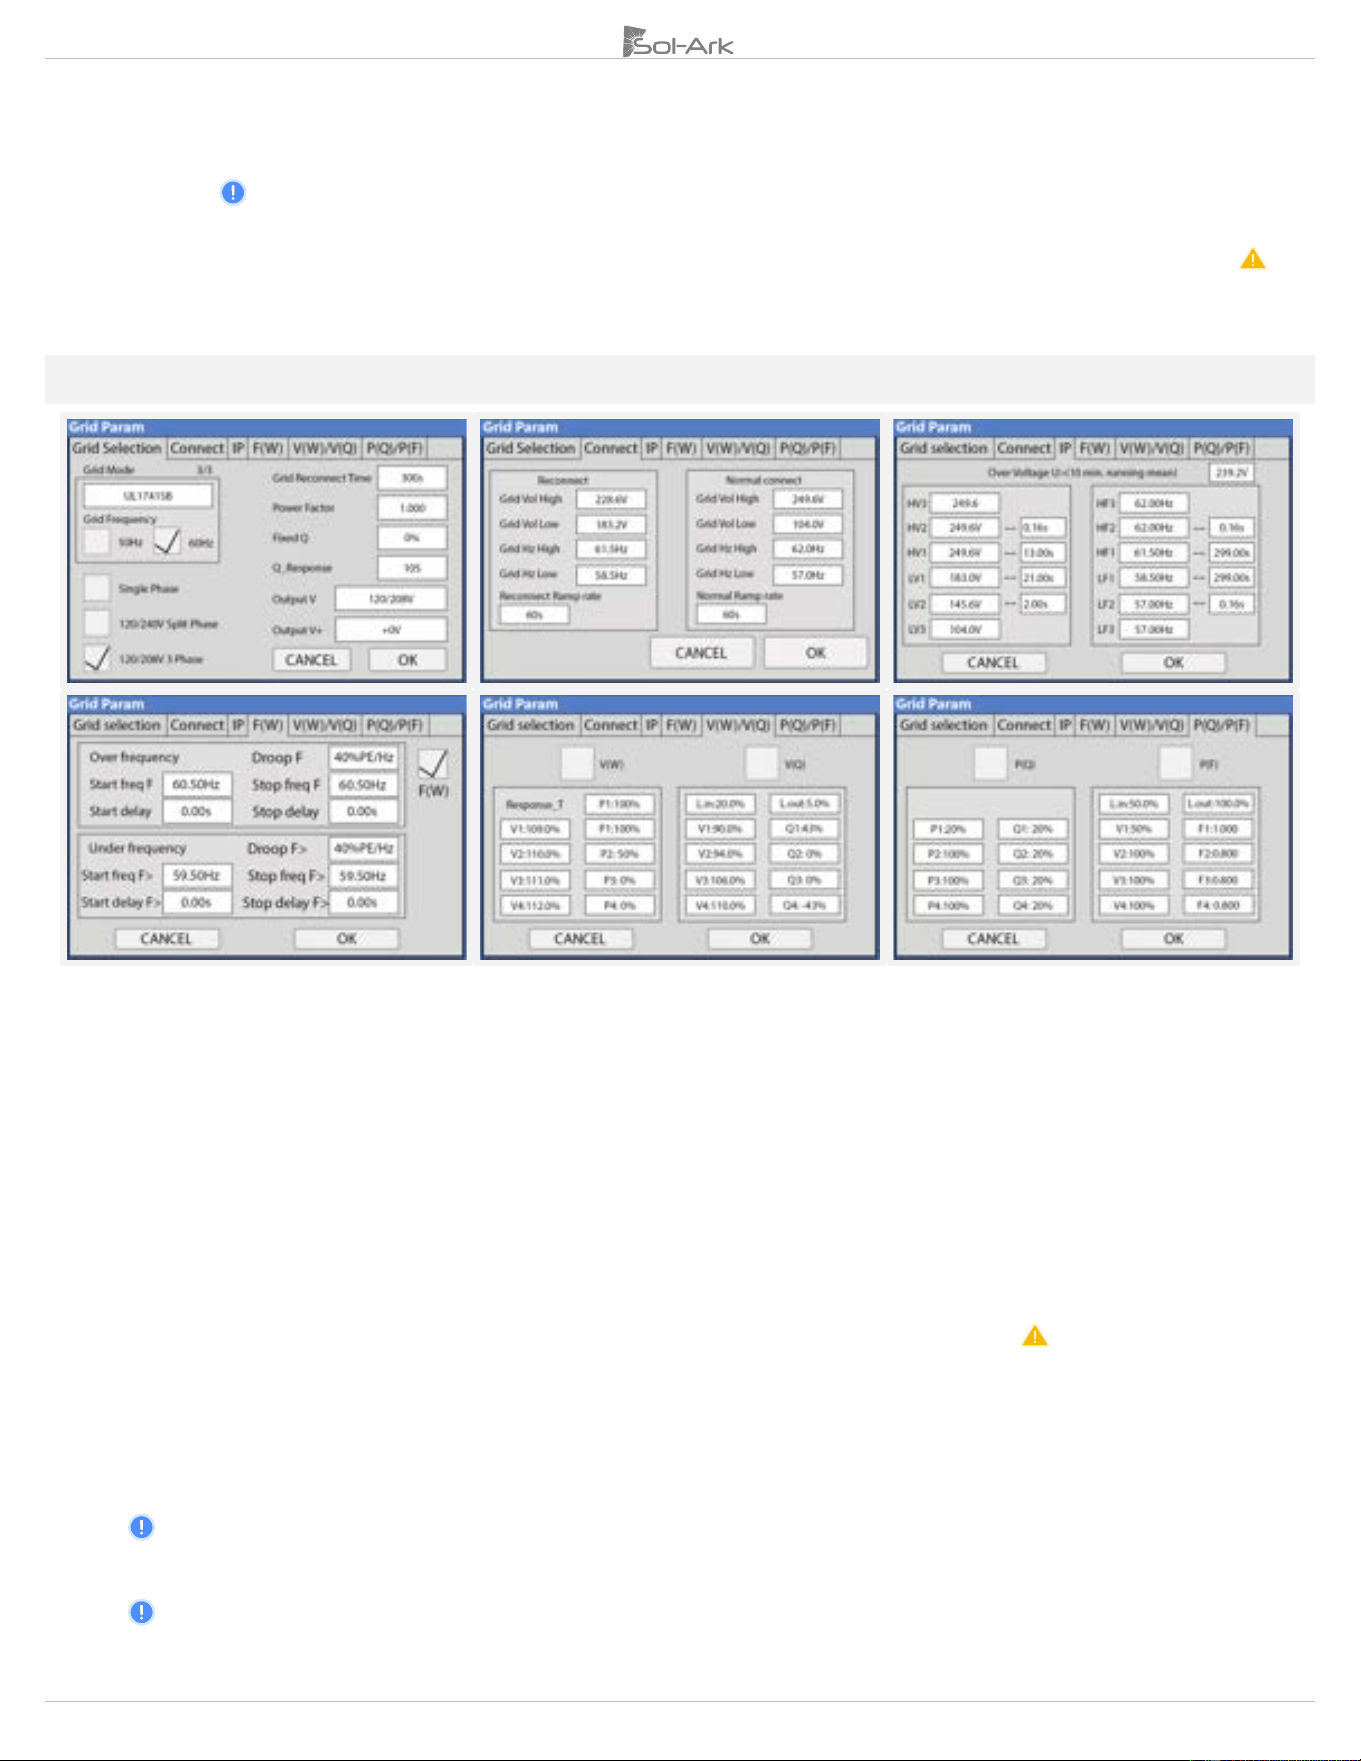
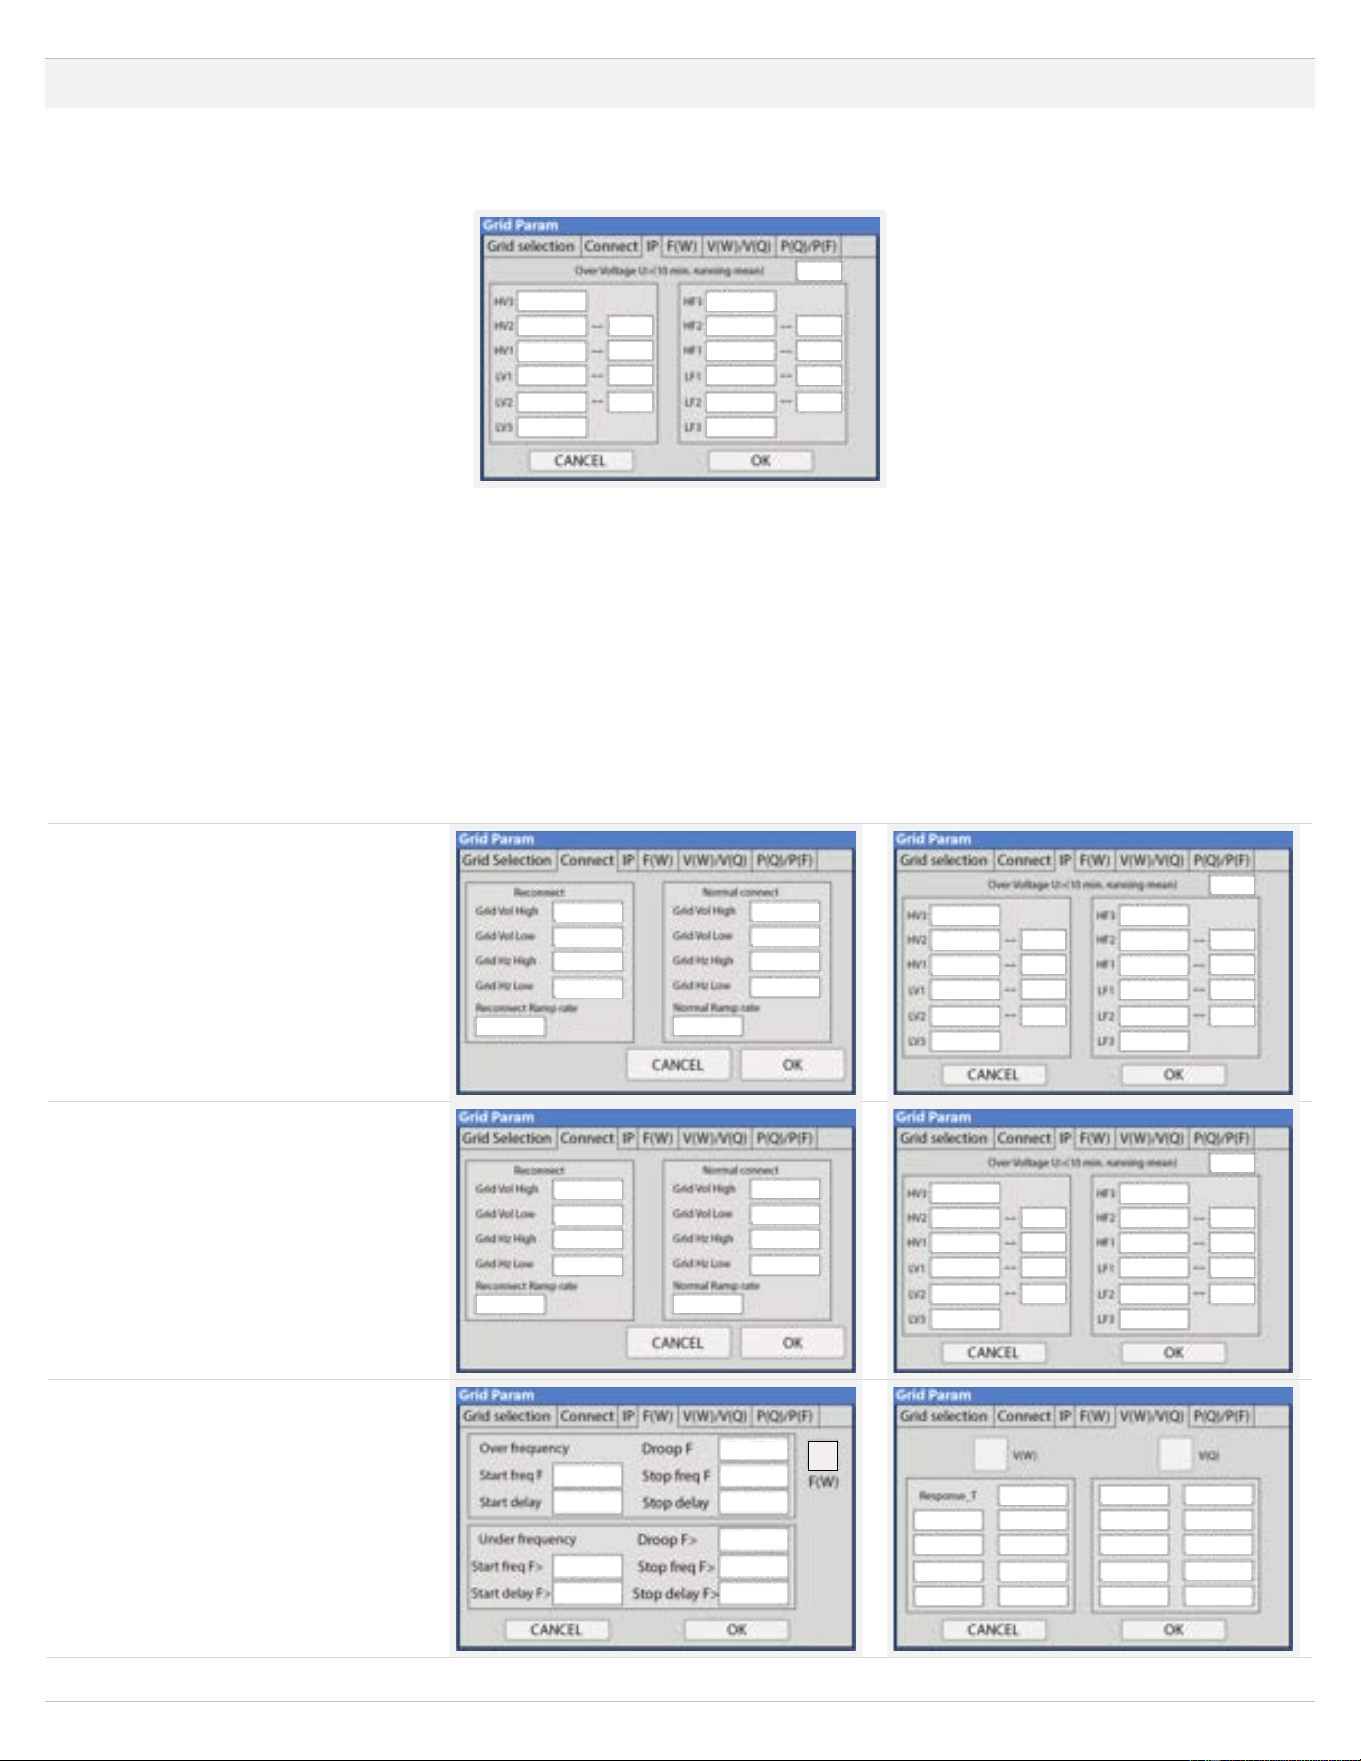
Grid Selection
Grid Mode: Tap and use navigation arrows to cycle through different grid modes:
1. General Standard: Applies general grid interconnection standards. Enables grid frequency and voltage adjustments.
(Useful for off-grid applications with backup generators).
2. UL1741 & IEEE1547: Applies UL 1741 and IEEE 1547 grid interconnection requirements and standards.
3. UL1741SB: Applies UL 1741SB grid interconnection requirements and standards.
Grid Frequency: Frequency of the AC sine wave.
Grid Type: Determines the type of system voltage and grid interconnection. Includes Single Phase, Split-Phase, and 3-Phase.
Grid Reconnect Time: The amount of time in seconds the inverter will wait before reconnecting to the grid.
Power Factor: Allows for power factor correction, ±0.9 to 1.0.
Fixed Q: Allows for power factor correction based on desired reactive power percentage.
Q_Response: Response time that will take to follow supported Volt-Var or Watt-Var reactive response modes.
Output V: Tap and use navigation arrows to cycle through different nominal grid voltage levels. Grid level must be selected
according to nominal grid voltage.
Ouput V+: Allows fine voltage modifications to the Output V to ensure proper nominal voltage.
Connect
Reconnect: Parameters used to determine an allowable range of frequency and voltages to dictate a reconnection to the grid after
initial grid loss. Frequency and voltages must be within these margins during Grid Reconnect Time to allow grid reconnection.
Parameters will be set automatically based on selected grid mode compliance, unless “General Standard” is selected.
Normal connect: Parameters used to determine an allowable range of frequency and voltages to retain connection to the grid
following a reconnect and normal operation.
Parameters will be set automatically based on selected grid mode compliance, unless “General Standard” is selected.
Reconnect Ramp Rate: Reconnection power ramp time in seconds.
Normal Ramp Rate: Startup power ramp time in seconds.
Copyright © 2024 Sol-Ark LLC | SK140-0005-002 33
IP
HV1/HV2/HV3: Overvoltage protection point.
LV1/LV2/LV3: Undervoltage protection point.
HF1/HF2/HF3: Over frequency protection point.
LF1/LF2/LF3: Under frequency protection point.
F(W)
F(W): Enables the use of Frequency-Watt. The Sol-Ark regulates its power output to the grid as a function of the frequency to support
grid stabilization during over and under-frequency conditions.
Droop F: Percentage of inverter’s nominal power increase / decrease per Hert (Hz).
Start freq F: Frequency at which the inverter will start decreasing active power by the programmed Droop F percentage.
Stop freq F: Frequency at which the inverter will stop decreasing active power by the programmed Droop F percentage.
V(W) / V(Q)
V(W): Enables the use of Volt-Watt. The Sol-Ark regulates active power output to the grid as a function of voltage to support
stabilization during over and under-voltage conditions.
V(Q): Enables the use of Volt-VAr. The Sol-Ark regulates reactive power output to the grid as a function of the voltage to support
stabilization during over and under-voltage conditions.
V, P & Q: Percentage of nominal grid voltage (V) to which the Sol-Ark will reduce its active power (P) or reactive power (Q).
P(Q) / P(F)
P(Q): Enables the use of Watt-VAr to regulate reactive power output according to programable active power parameters.
P(F): Enables PF regulation according to programmable active power parameters.
Follow electrical grid code before changing grid settings
34 Copyright © 2024 Sol-Ark LLC | SK140-0005-002
4. Installation Tips
Off-Grid Installation Tips
1. Limit sensors (CTs) are not required for completely off-grid installations unless using “Grid Peak Shaving” for a generator connected
to the “GRID” breaker.
2. Connecting generators to the “GRID” breaker is recommended to facilitate the integration “GEN” connected service panel. This
setup enables the utilization of the “Smart Load” function.
3. There is no need for a transfer switch. Connect the “LOAD” output to the main panel.
4. DO NOT use “Grid Sell” mode when Off-Grid. ONLY “Limited Power to Load” (default).
5. When using a Generator in an Off-Grid situation, it is recommended to change the “Grid Mode” to “General Standard” and a “Grid
Reconnect Time” to 30 seconds. See section 2.5 “Integrating a Generator” for detailed instructions.
6. The Auto Gen-Start activates when the battery voltage (V) or percentage (%) reaches the pre-set “Start V / %” value. Subsequently,
the generator will sustain the charging process until the batteries reach approximately 95% capacity. This is a non-modifiable
upper limit unless Time of Use is enabled and programmed.
o An exercise function will turn on the generator once a week on Monday mornings at 8 AM for 20 min by default. This
exercise is to maintain the internal generator batteries.
7. If planning on integrating a wind turbine, a 48V charge controller with a dump load MUST be incorporated to prevent battery
overcharge. This charge controller must be connected directly to the battery bank.
8. Remember to set the battery capacity and reasonable charge/discharge rates.
Grid-Tie and No Battery Install Tips (Passthrough mode)
1. Check the “🗹 No Battery” setting: → Battery Setup → Batt → No Battery . The inverter will fault momentarily.
2. A complete Power Cycle IS REQUIRED when changing the battery mode to “No Battery” (see section 2.12 “Power cycle
Sequence” for detailed instructions).
3. Enable “🗹 Grid Sell”: → Limiter → Grid Sell. Make sure to disable all other modes.
4. Tap the battery Icon to access the “Details Screen” and verify grid parameters and power import / export.
4.1 Battery Charge Controller
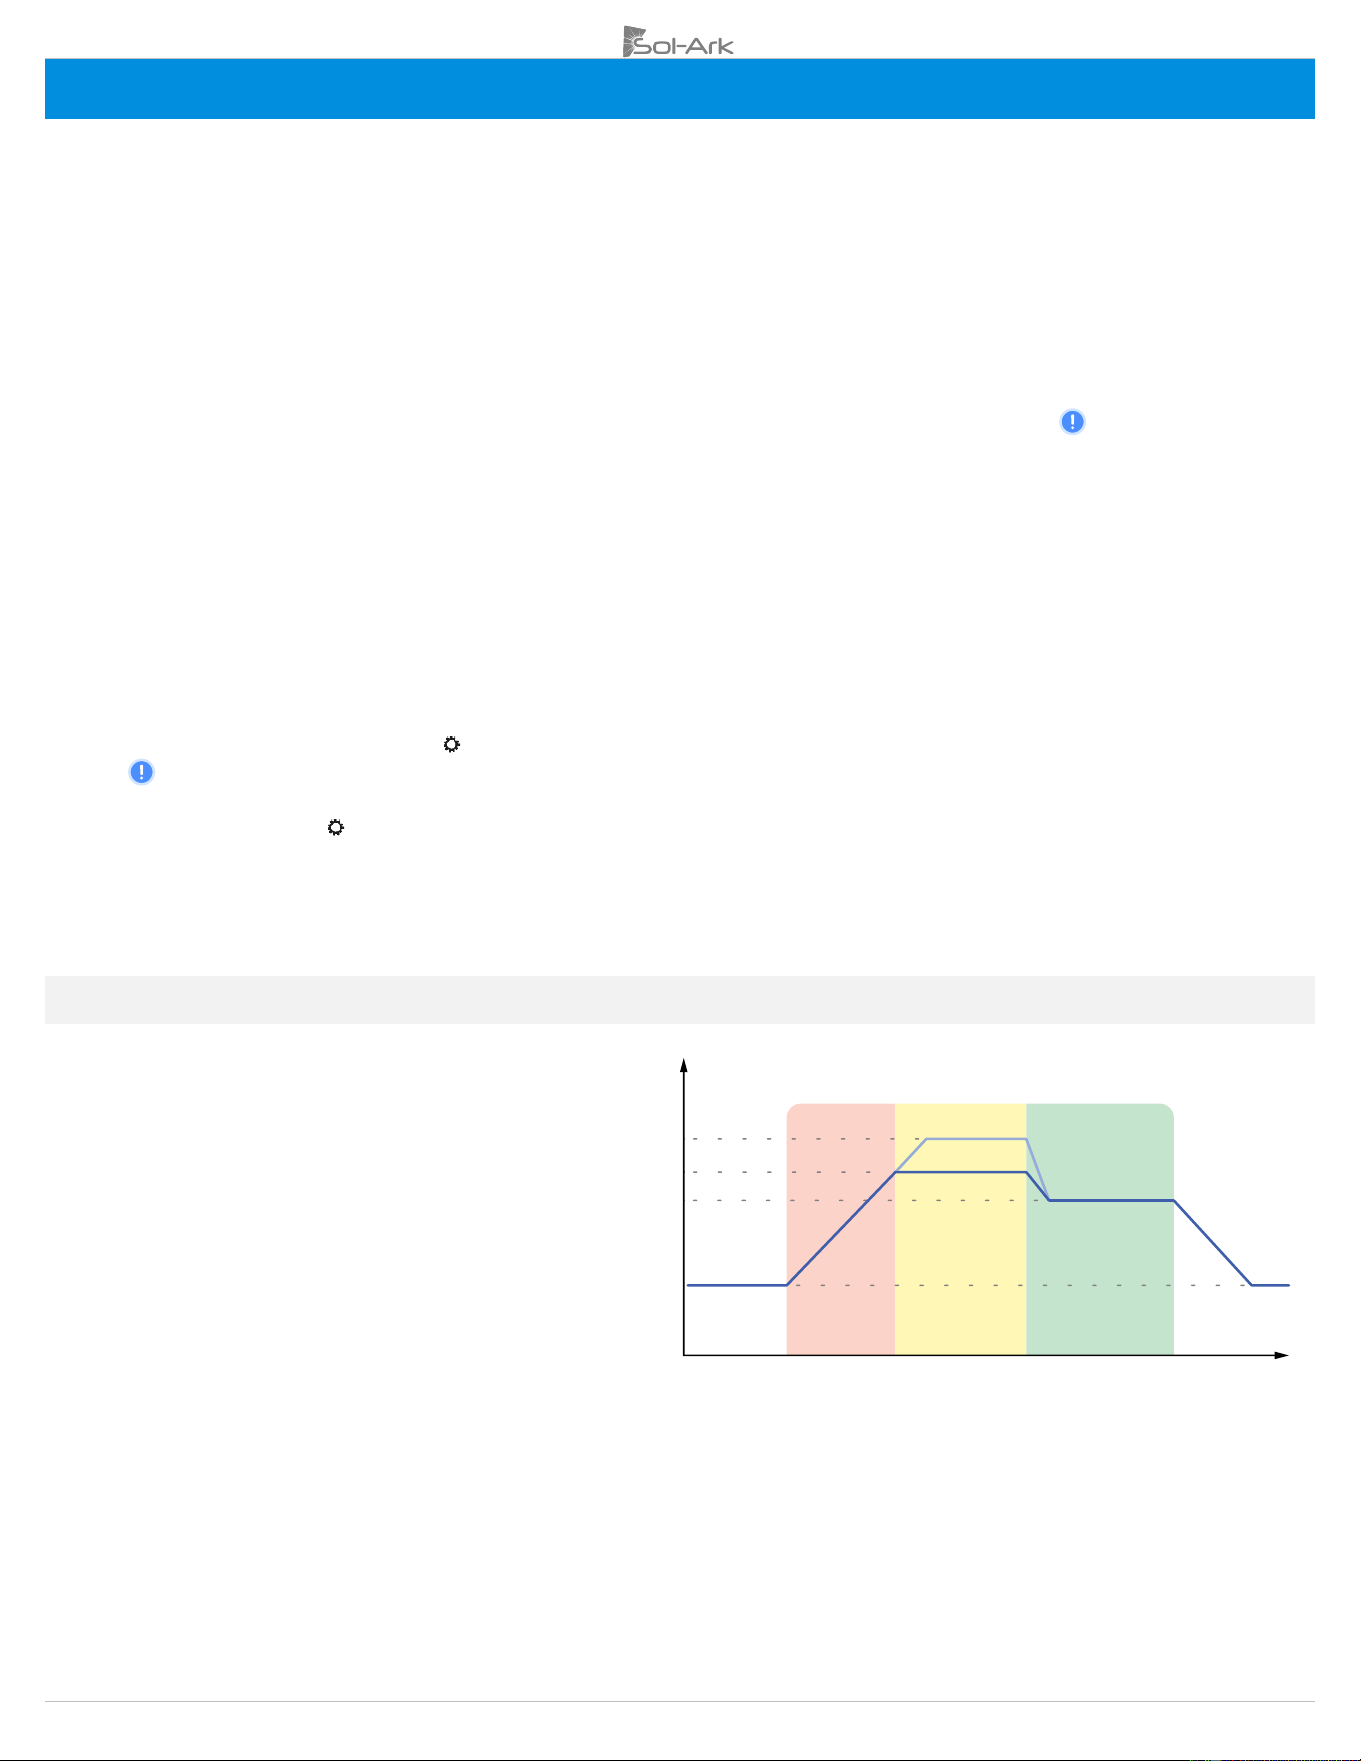
4-Stage Charging
The MPPT has a 4-stage battery charging
algorithm for rapid, efficient, and safe battery
charging. The next figure shows the stage
sequence.
Bulk Charge Stage
In the Bulk Charge stage, the battery is not at a
100% state of charge and has not yet reached the
Absorption voltage setpoint. The controller will
deliver 100% of available solar power to recharge
the battery.
Absorption Stage
When the battery has reached the absorption voltage setpoint, the Sol-Ark inverter uses constant-voltage regulation to maintain battery
voltage at the absorption setpoint, preventing overheating and excessive battery gassing. The battery is allowed to come to a full state of
charge at the absorption voltage setpoint. Absorption lasts until the battery charge amperage (A) rate reaches 2% of the programmed
capacity (Ah).
Float Stage
After the Absorption stage charges the battery fully, the MPPT reduces the battery voltage to the float voltage setpoint. If the batteries have
100% charge, there can be no more chemical reactions and all the charging current turns into heat and gassing. The Float stage provides a
meager rate of maintenance charging while reducing the heating and gassing of a fully charged battery. The purpose of the Float stage is
to protect the battery from long-term overcharge.
Charge controller curve
BULK
ABSORPTION
FLOAT
V
t
Equalization V
Absorption V
Float V
Shutdown V
Empty V
Low Batt V
Restart V
Night
Night
Copyright © 2024 Sol-Ark LLC | SK140-0005-002 35
4.2 Grid Compliance Settings
Puerto Rico Grid Compliance Settings
HECO Grid Compliance Verification for Sol-Ark
In cases where HECO compliance requirements are mandated, it is essential to program the following grid parameters in accordance with
the HECO specifications. Follow the next GUI screens, program the settings, and verify alignment with HECO compliance.
120/240V
120/208V
Frequency-Watt, Volt-Watt
and Volt-Var
252.0V
211.2V
60.1Hz
59.5Hz
300s
252.0V
211.2V
60.1Hz
59.5Hz
300s
0.16s
288.0V
288.0V
264.0V
211.2V
168.0V
120.0V
13.00s
21.00s
2.00s
65.00Hz
65.00Hz
63.00Hz
57.00Hz
50.00Hz
49.90Hz
0.16s
180.00s
180.00s
0.16s
276.0V
218.4V
183.1V
60.1Hz
59.5Hz
300s
218.4V
183.1V
60.1Hz
59.5Hz
300s
0.16s
249.6V
249.6V
228.8V
183.0V
145.6V
104.0V
13.00s
21.00s
2.00s
65.00Hz
65.00Hz
63.00Hz
57.00Hz
50.00Hz
49.90Hz
0.16s
180.00s
180.00s
0.16s
239.2V
60.04Hz
0.00s
59.96Hz
0.00s
50%PE/Hz
60.50Hz
0.00s
50%PE/Hz
59.50Hz
0.00s
✓
5S
V1:106.0%
✓
✓
V2:110.9%
V3:110.0%
V4:110.0%
P1:100%
P2: 0%
P3: 0%
P4: 0%
V1:92.0%
V2:98.0%
V3:100.0
%
V4:106.0%
L.in:20.0%
Q1:44%
Q2: 0%
Q3: 0%
Q4:44%
L.out:5.0%
0.16s
288.0V
288.0V
264.0V
211.2V
144.0V
108.0V
1.00s
2.00s
1.00s
61.50Hz
61.50Hz
60.50Hz
59.20Hz
57.50Hz
57.50Hz
10.00s
300.00s
300.00s
10.00s
239.2V
36 Copyright © 2024 Sol-Ark LLC | SK140-0005-002
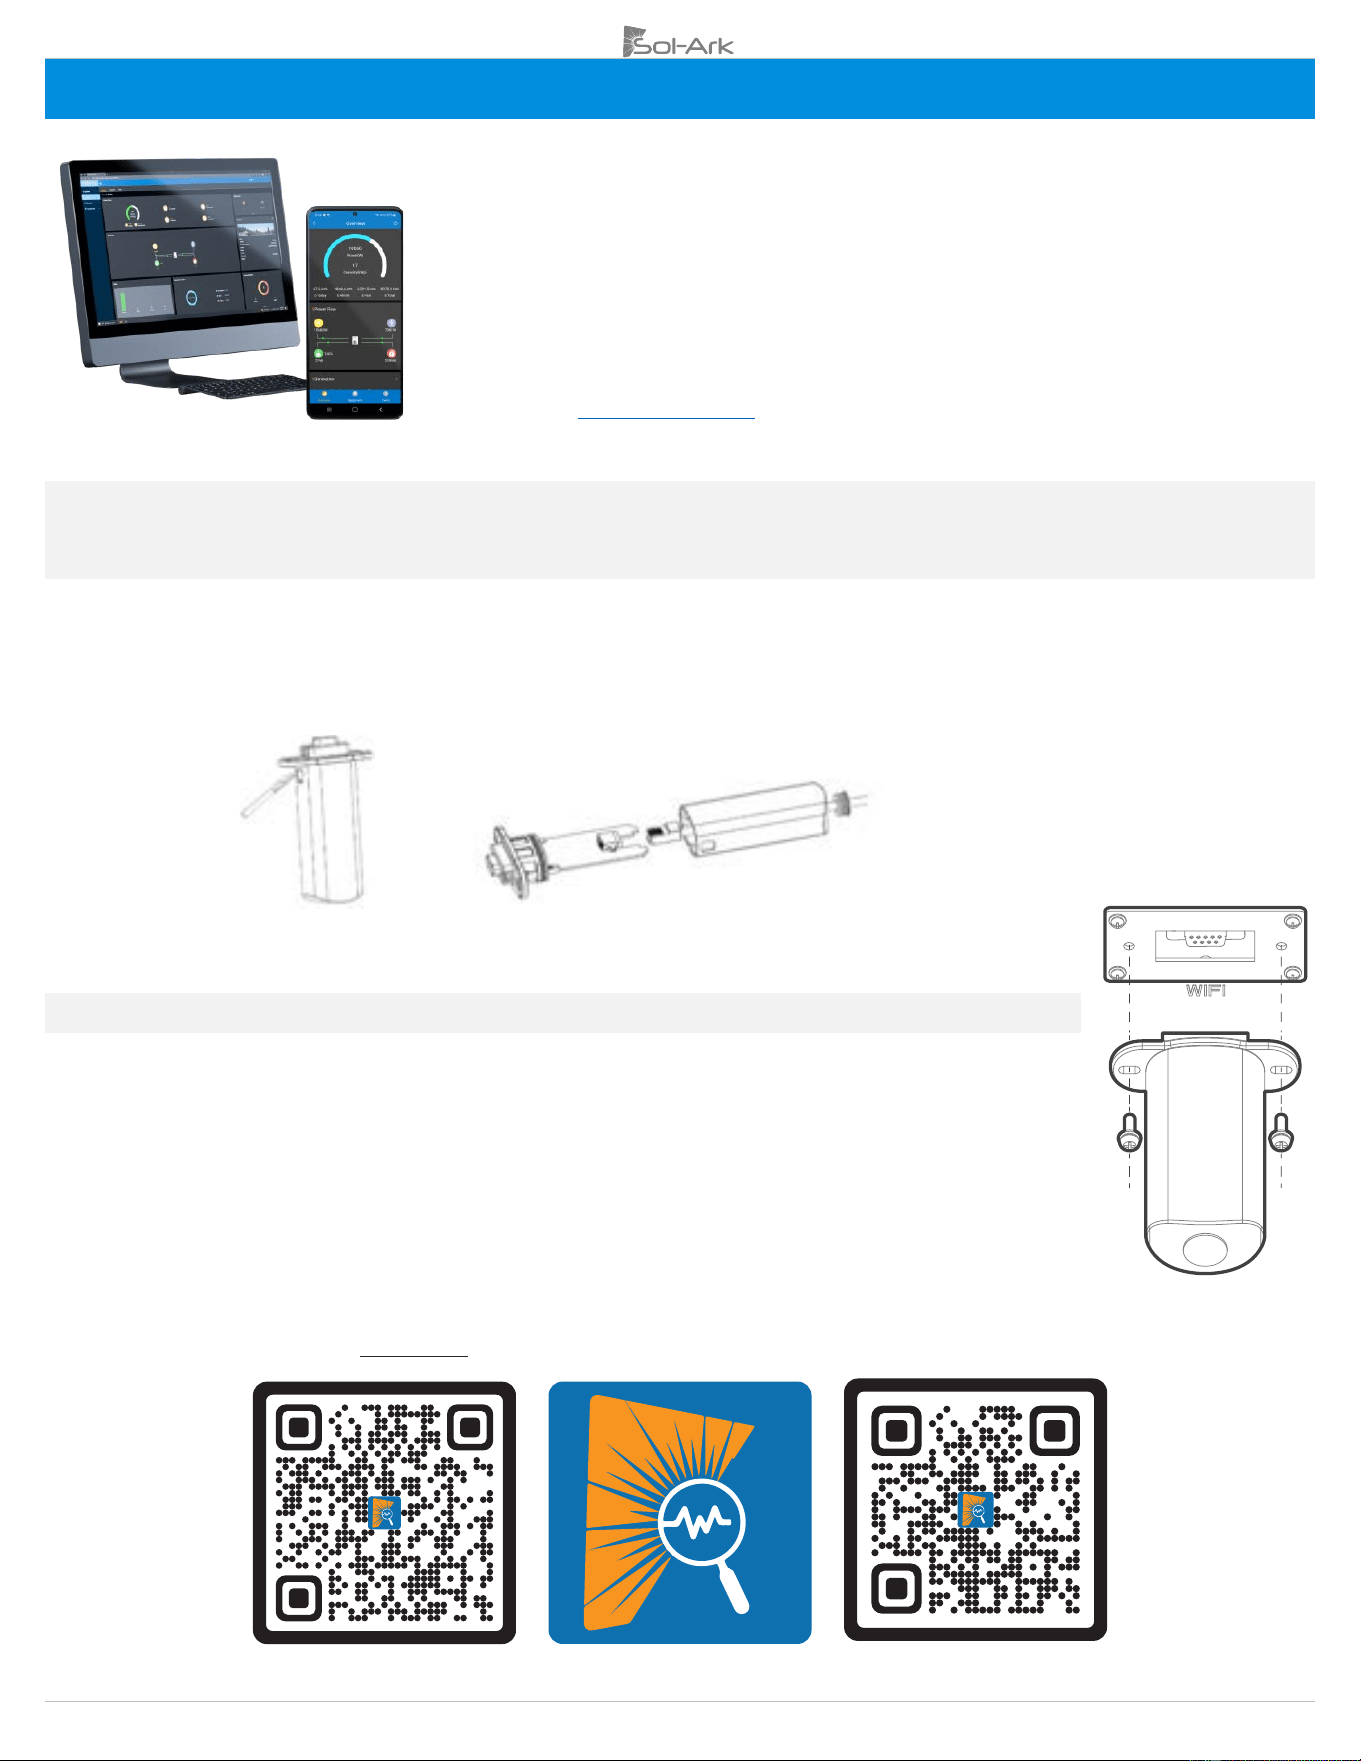
5. MySolArk: Remote Monitoring
"MySolArk" is a powerful and comprehensive tool designed for remote system monitoring of Sol-
Ark inverters and solar systems. This remote monitoring solution offers detailed insights into
energy generation and power consumption, allowing users to track system performance with great
precision. MySolArk displays all relevant electrical data on easy-to-understand energy generation
graphs, providing a comprehensive overview of electrical usage.
Beyond its monitoring capabilities, MySolArk offers users the flexibility to remotely adjust inverter
settings, allowing them to seamlessly configure their system from any location. This ensures that
users can fine-tune parameters to optimize performance effortlessly. With MySolArk, users can
confidently manage their solar systems and inverters to ensure peak performance and efficiency
at all times. Visit www.mysolark.com to access the desktop version of MySolArk.
5.1 MySolArk Setup Instructions
Connection to MySolArk through Ethernet
A. Remove the plastic enclosure of the dongle by pressing the plastic latches with a flat screwdriver as shown in the figure below.
B. Insert the ethernet cable through the plastic enclosure and connect the cable to the RJ45 port.
C. Reassemble the dongle housing and plug the dongle into the Sol-Ark, securing it with screws. You will see solid red and green
lights after a couple of minutes.
D. Follow “STEP 1” instructions on the following page in order to create a plant on MySolArk.
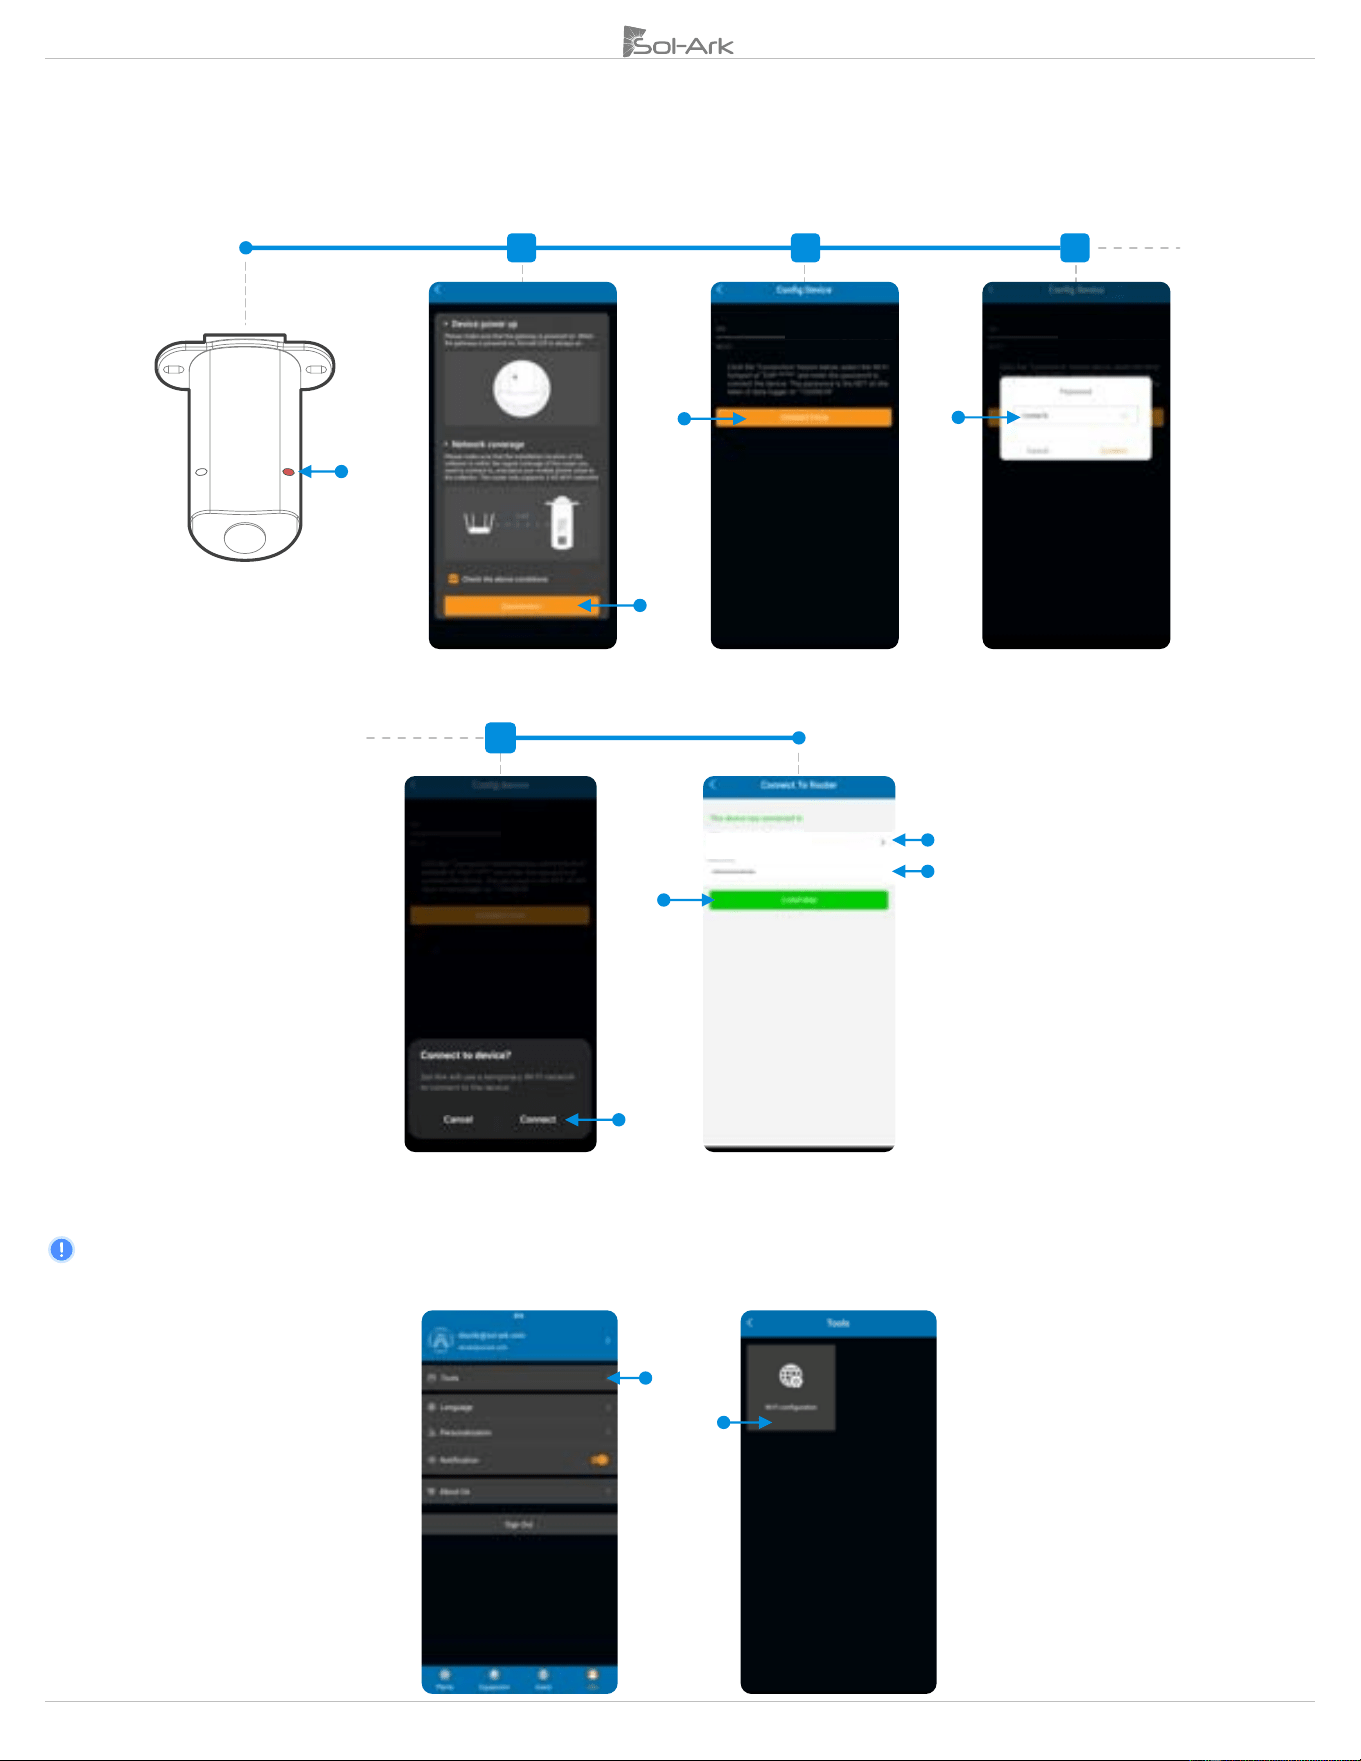
Connection to MySolArk through Wi-Fi
A. Plug the Wi-Fi dongle into the Sol-Ark DB-9 port.
B. Use two M4X10 screws to secure the dongle to the port.
C. Follow “STEP 1” through “SETP 3” in order to:
a. Create a plant on the MySolArk monitoring platform.
b. Connect the dongle to MySolArk through a Wi-Fi network.
STEP 1: Create a “Plant” on MySolArk
A. Download and install the “MySolArk” app for android or apple smartphones. QR codes are provided below.
Google Play Store
MySolArk
Apple App Store

Copyright © 2024 Sol-Ark LLC | SK140-0005-002 37
B. Create a MySolArk account and login.
C. Create Plant.
For Installers
Installers are advised to first create the plant and configure the system before sharing it with the owner. Once the plant has been created and configured, the
installer can share and grant manager permissions to the owner by navigating to “My Plants” → “…” → “Share” → “Add Account”. The homeowner must
create their own MySolArk account first.
1
2
3
4
5
Login
Sign Up
E-mail & verification Code
6
EA##########
############
8
7
9
Create plant
Configure network
Plant information
Scan QR code or type manually
38 Copyright © 2024 Sol-Ark LLC | SK140-0005-002
STEP 2: Configure Wi-Fi network though MySolArk
D. Configure Wi-Fi network.
NOTE: The Wi-Fi configuration tool can be accessed at any other time by tapping “Me” at the bottom right corner, then “Tools” and finally
“Wi-Fi configuration”. STEP 3 shows an alternative method of connecting the Wi-Fi dongle to a local network through an IP address.
Password
Connection
Turn inverter ON
to power dongle
Accept conditions
11
12
10
13
E4A0########
EAP-#####
E4A0########
EAP-#####
Confirm Wi-Fi network
Connect
E4A0########
EAP-#####
EAP-#####
My local network
My local Wi-Fi network
17
15
16
14
1
2
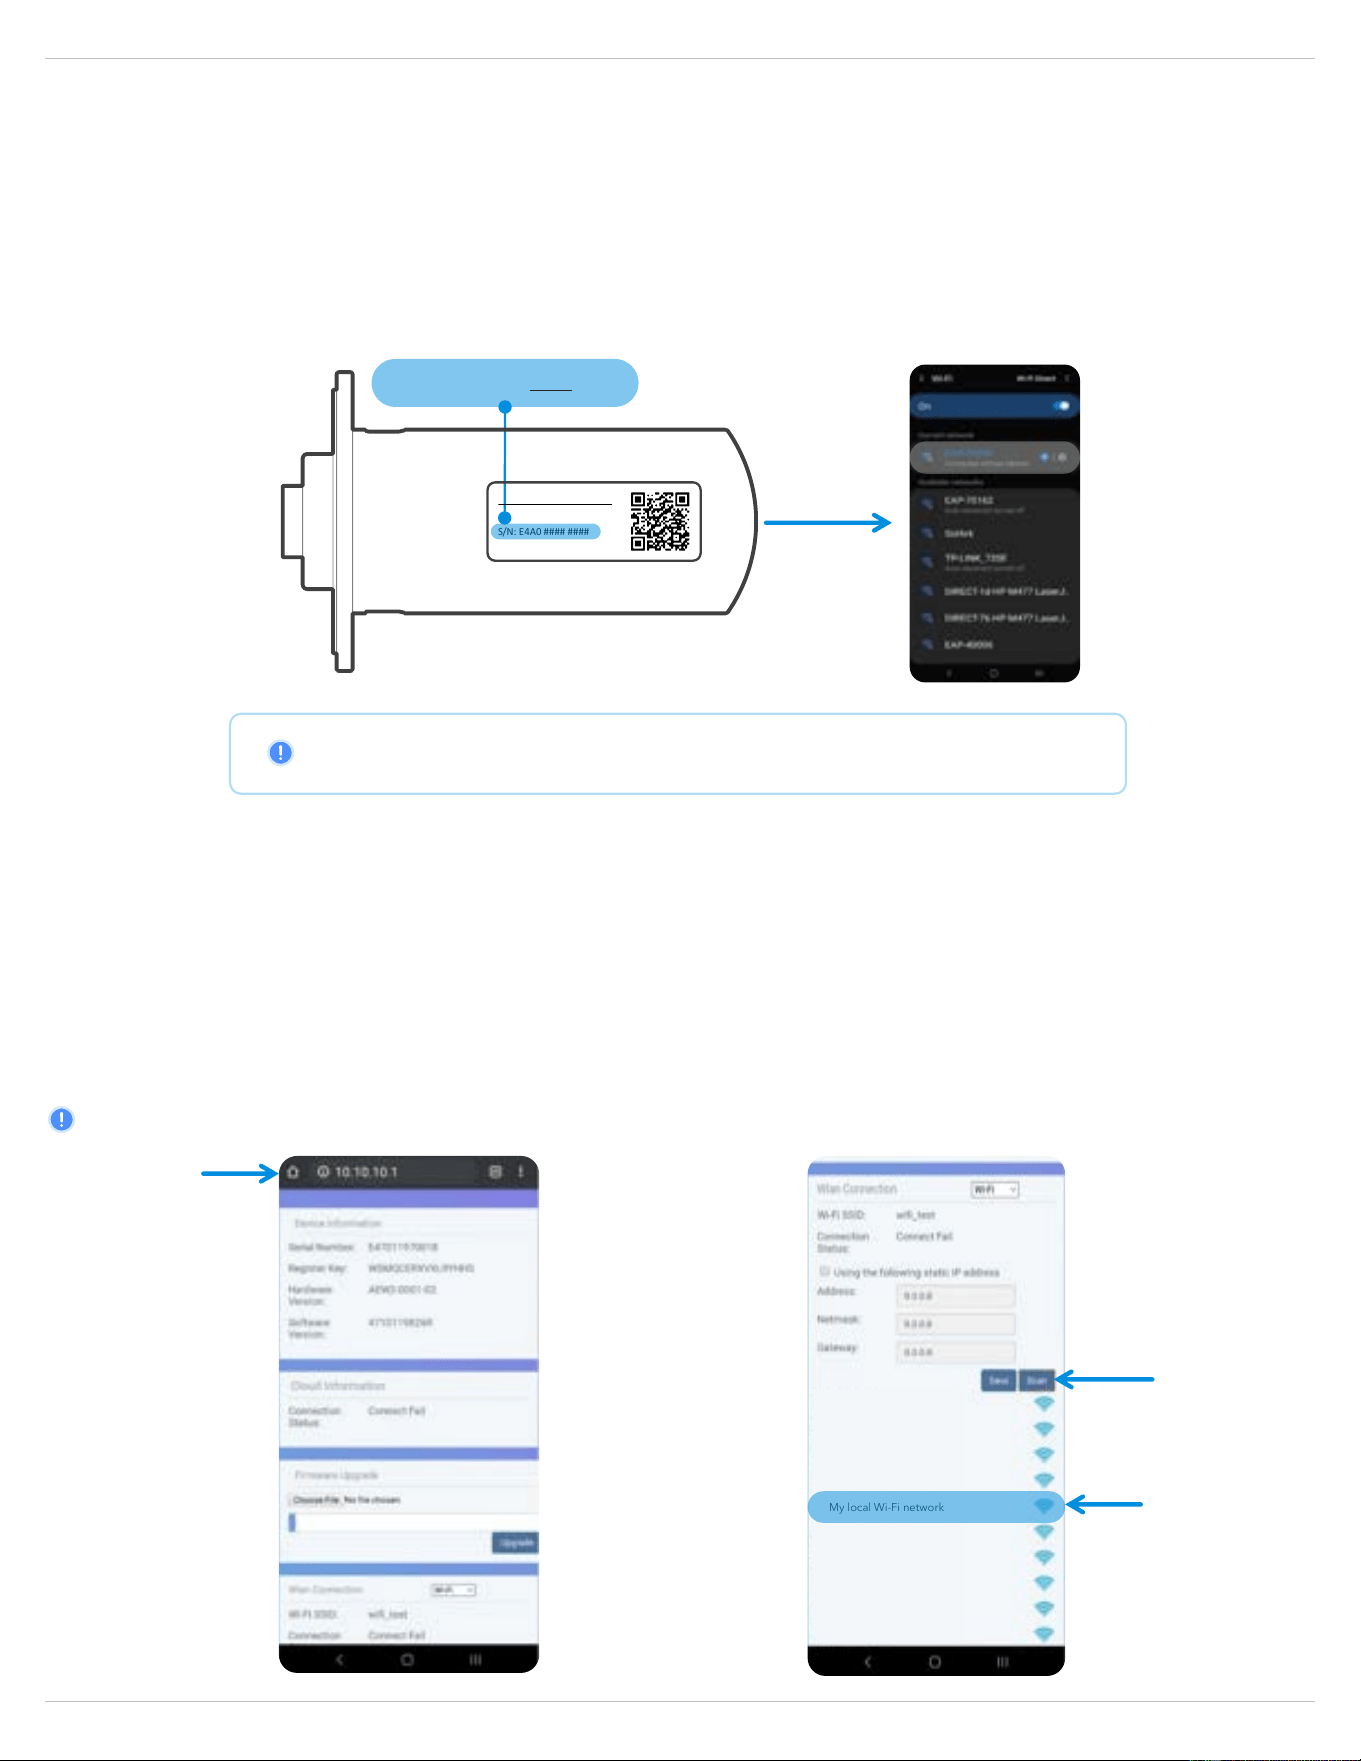
Copyright © 2024 Sol-Ark LLC | SK140-0005-002 39
STEP 3 (alternate method): Configure Wi-Fi Network Through an IP Address
A. An alternative to the “Distribution Network” configuration at the end of step C or the use of the “Wi-Fi configuration” tool, is by
configuring a Wi-Fi network through an IP address.
B. On a Smart Phone or Computer connect to the EAP-##### network. You can do this by going to: Settings → Wi-Fi → Select the
EAP-##### network → Password= 12345678. The EAP-##### network contains the last 5 digits of the Dongle Serial Number. You
can find this number on the label.
C. A message such as “Connected without internet” will appear once the device is connected to the EAP-#####.
EAP-##### Network Password= 12345678
NOTE:
The Wi-Fi dongle does NOT provide internet access. It needs an external internet provider to connect to.
The dongle is compatible with Wi-Fi signal broadcasted at 2.4 GHz
(it is not possible to use 5 GHz)
D. Once connected, open an internet browser on that same device such as Safari, Chrome, Firefox, Edge, or any other browser.
E. On the address bar (http://.........), type the following IP address: 10.10.10.1 as shown in the figure below. If you cannot access the
configuration page, try again on a different device.
F. Scroll down to the "Wlan Connection" section and press the “Scan” button to scan for local Wi-Fi networks.
G. Nearby Wi-Fi networks will appear. Select the local network you would like to connect to, input your credentials, and tap “Connect”.
H. Once connected, a “Connection Successful” message will appear. Press the “Save” button next to “Scan” to save settings.
I. Wait a moment (~5 minutes). The dongle will then connect to the Wi-Fi network and will now have access to MySolArk.
NOTE: DO NOT connect to the EAP-##### network as that is the Wi-Fi dongle itself. The device does not provide internet access.
a) Internet browser IP address
b) Wi-Fi network scan
E4A0 #### ####
Example 1
Example 2
Example 3
My local Wi-Fi network
Example 5
Example 6
Example 7
Example 8
Example 4

40 Copyright © 2024 Sol-Ark LLC | SK140-0005-002
If the connection is a success, you will see the following LED indicators.
o SOLID : Connected and powered by the Sol-Ark inverter.
o SOLID : Connected to the router and to MySolArk.
Wi-Fi dongle LED indicators
Connecting the through the 10.10.10.1 IP address is only meant to provide internet access to the Wi-Fi dongle.
Users must still create a MySolArk account and must create a Plant.
Visit www.mysolark.com to access the desktop version of MySolArk.
5.2 LED Indicator and troubleshooting
When both the red and green LEDs on the Wi-Fi dongle are consistently illuminated, it signifies normal operation, while flashing indicates
data transmission. If this isn't the case, reference the next table of LED indications for troubleshooting and corrective measures.
RED LED: Device communication indicator.
GREEN LED: MySolArk server communication indicator.
LED
State
Indication
Initial flashing, then constant illumination
Normal communication.
Initial flashing but no further illumination
Communication failure. Check proper device connection.
LED not illuminating
Power supply or device is abnormal. Contact technical support.
5 second illumination interval
Normal communication.
1 flash every minute
Router not connected.
3 flashes every minute
Connected to router but no internet access. Usually, a VPN or firewall
issue. Ports 80 and 51100 must be enabled.
4 flashes every minute
Device communication error. Contact support.
2 synchronized flashes
Ethernet cable inserted
3 synchronized flashes
Ethernet cable disconnected
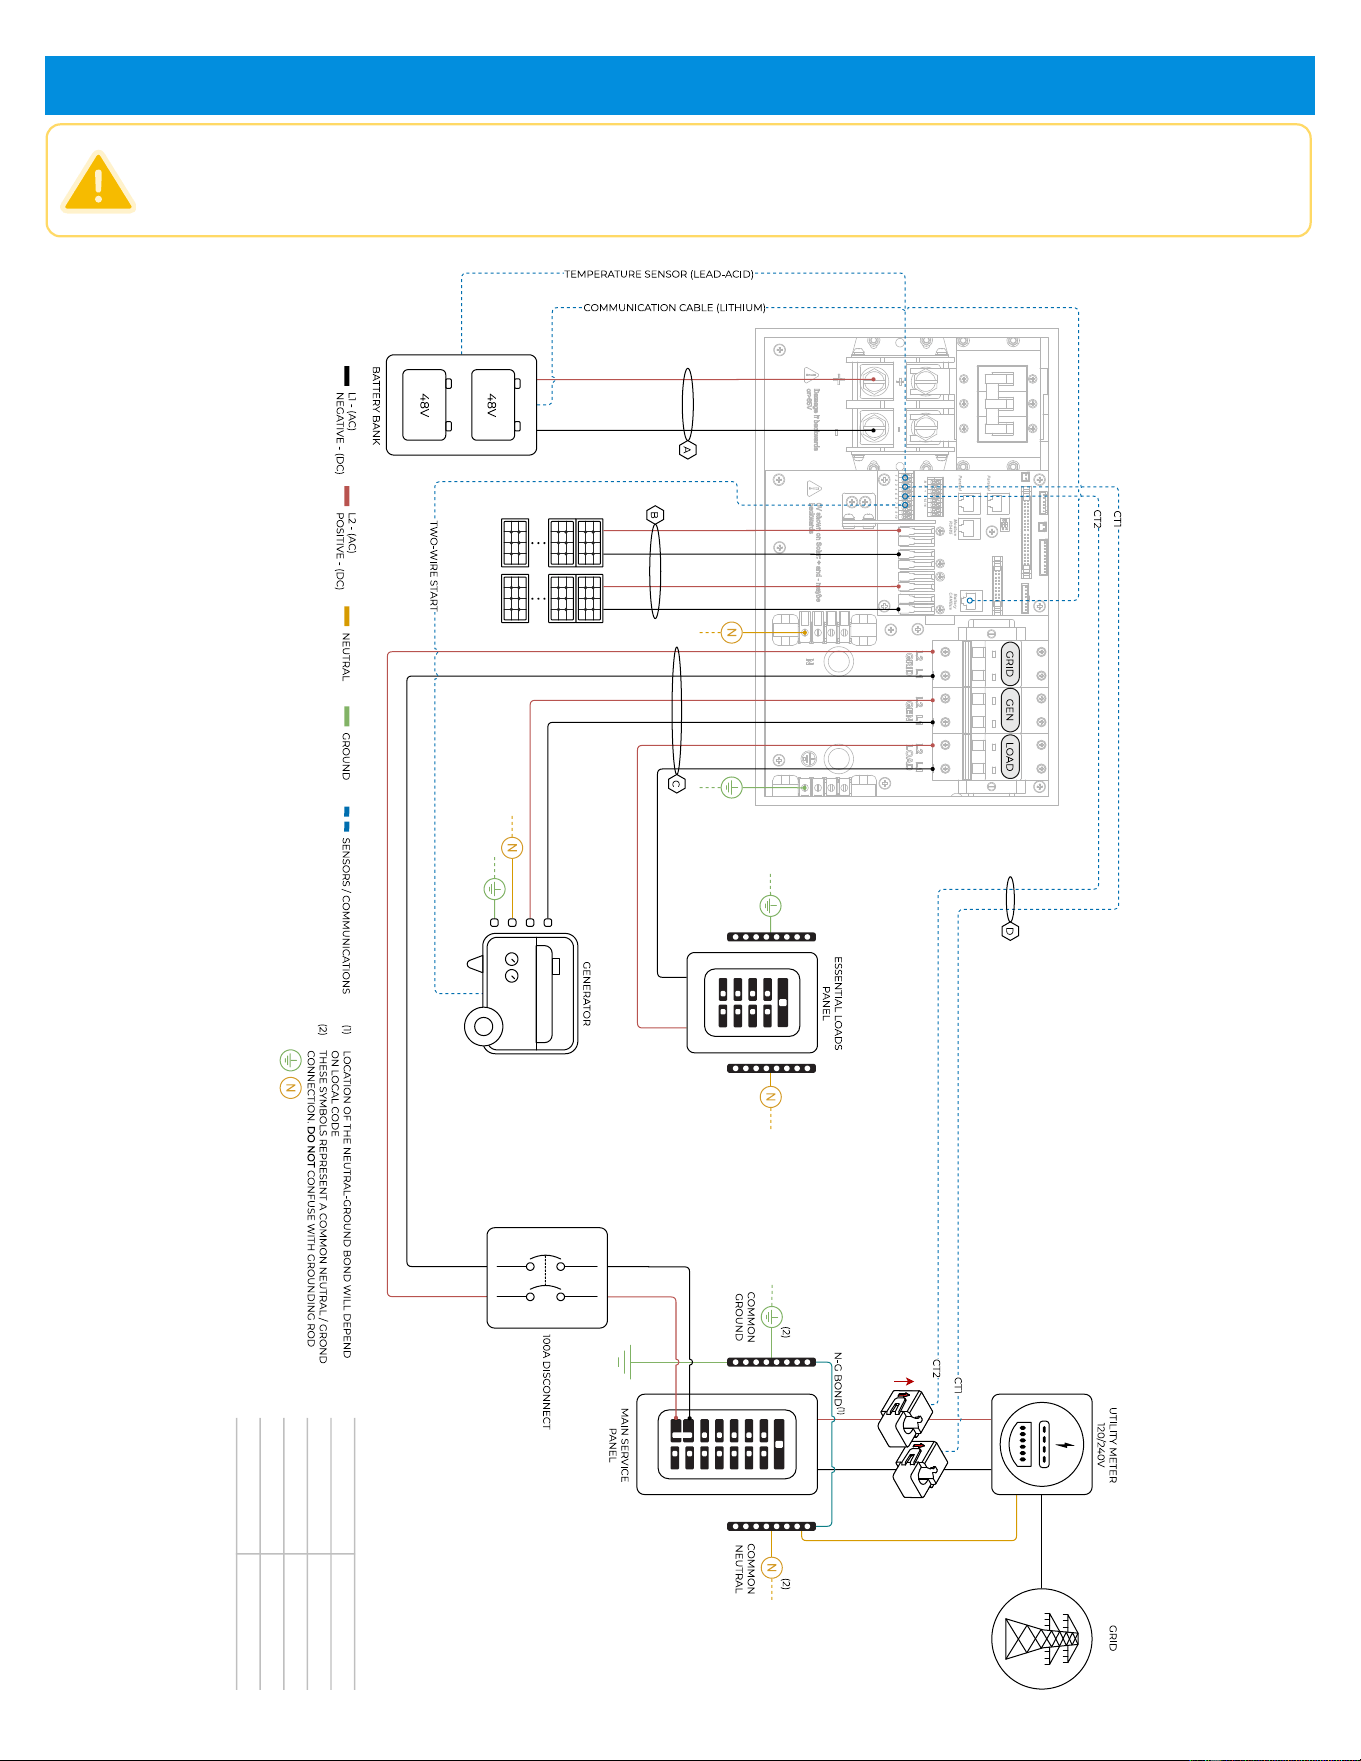
Copyright © 2024 Sol-Ark LLC | SK140-0005-002 41
6. Wiring Diagrams
The following diagrams are general use cases. Installers are reminded that adherence to local electrical codes and regulations is mandatory. While these diagrams
offer general guidance, they may not encompass all variations and specifics required by local codes. Consult with relevant authorities and ensure compliance before
proceeding with any installation. The diagrams presented herein are not exhaustive and should not be relied upon solely for permitting or warranty verification.
Installers are encouraged to exercise caution, seek professional advice when necessary, and undertake installations with due diligence and in accordance with
established electrical standards and regulations.
Sol-Ark 8K-2P-N
Standard Wiring Diagram
Diagram 01
5.5kW
MAX.
5.5kW
MAX.
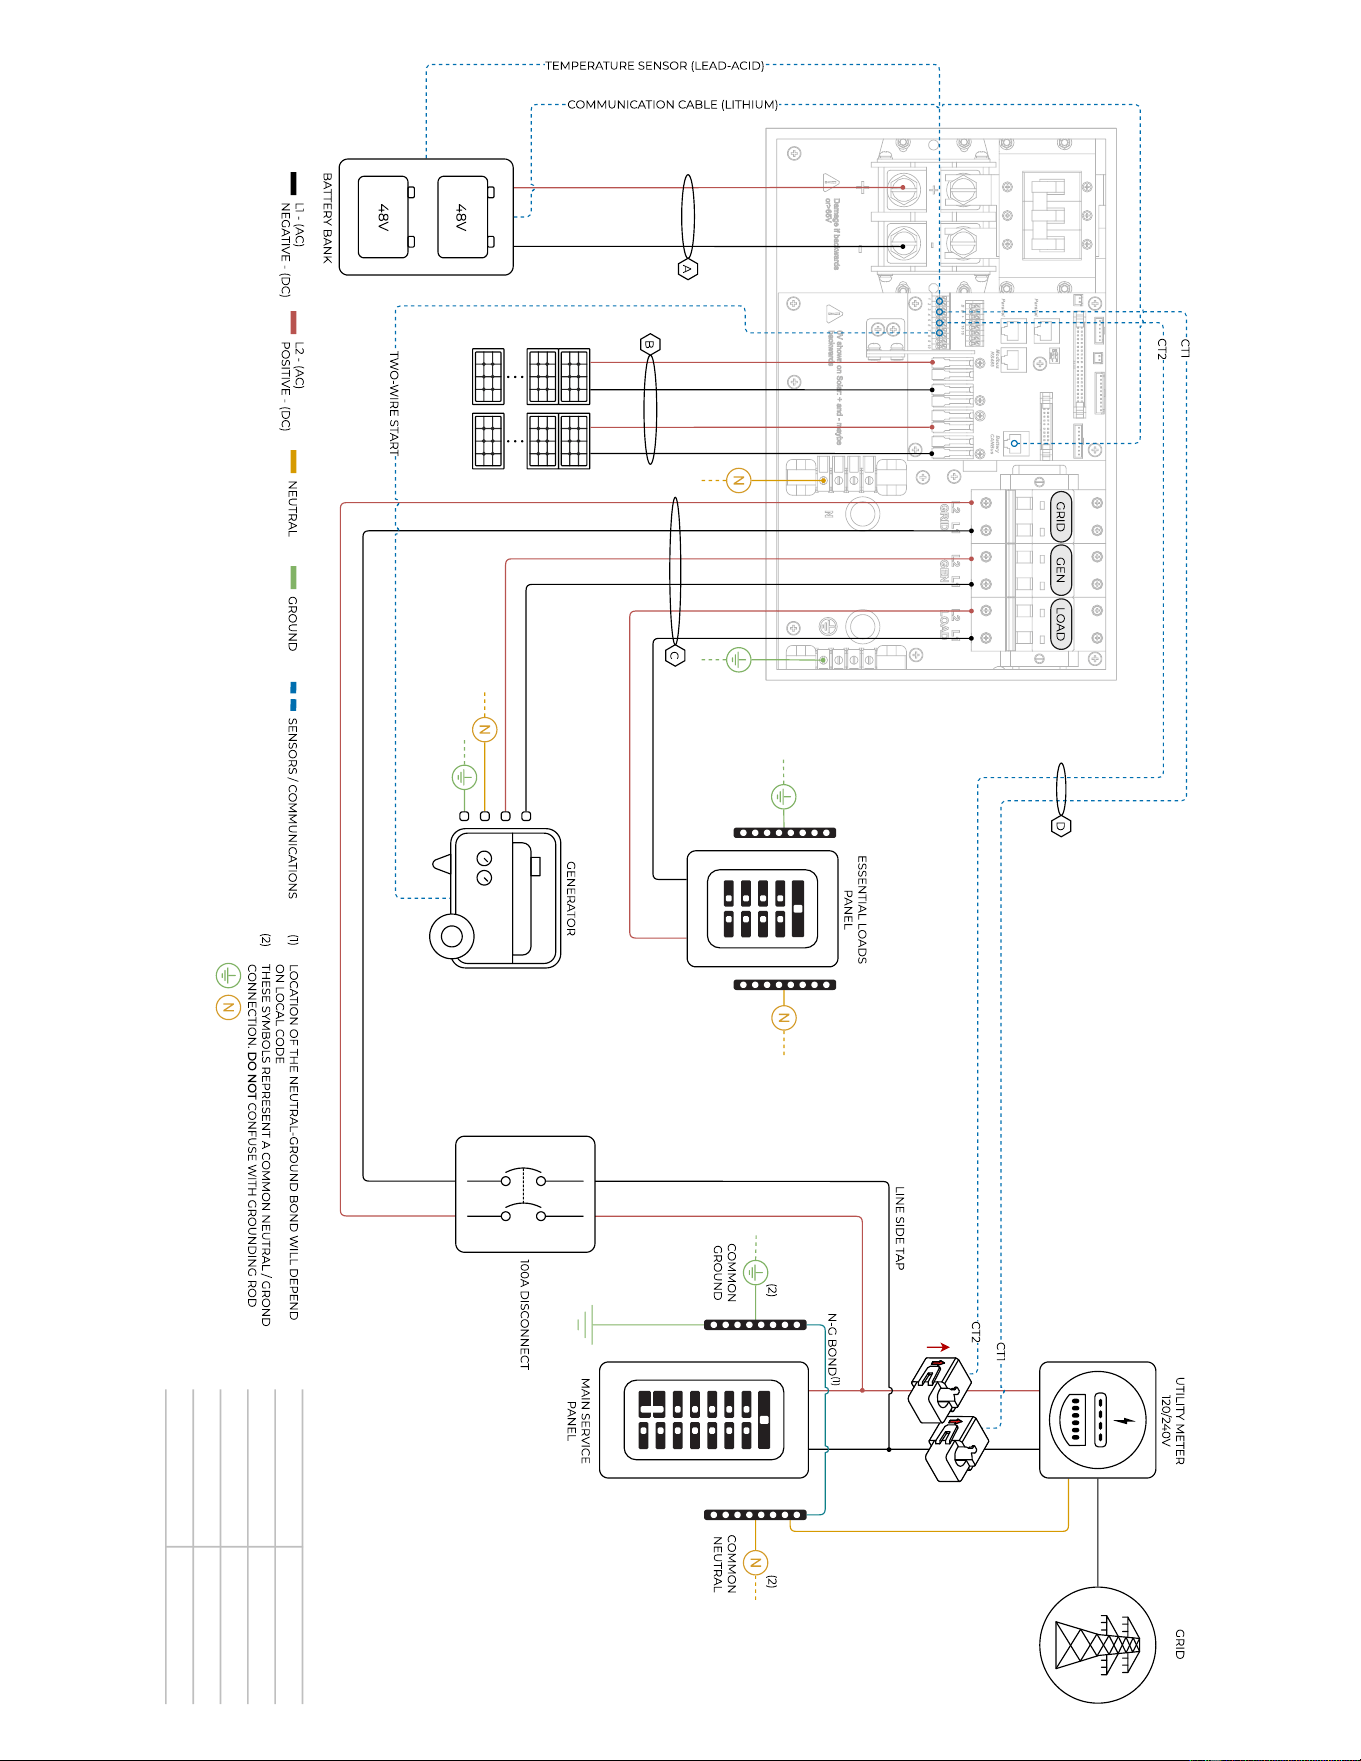
42 Copyright © 2024 Sol-Ark LLC | SK140-0005-002
Sol-Ark 8K-2P-N
Standard Wiring Diagram – Line Side Tap
Diagram 02
5.5kW
MAX.
5.5kW
MAX.
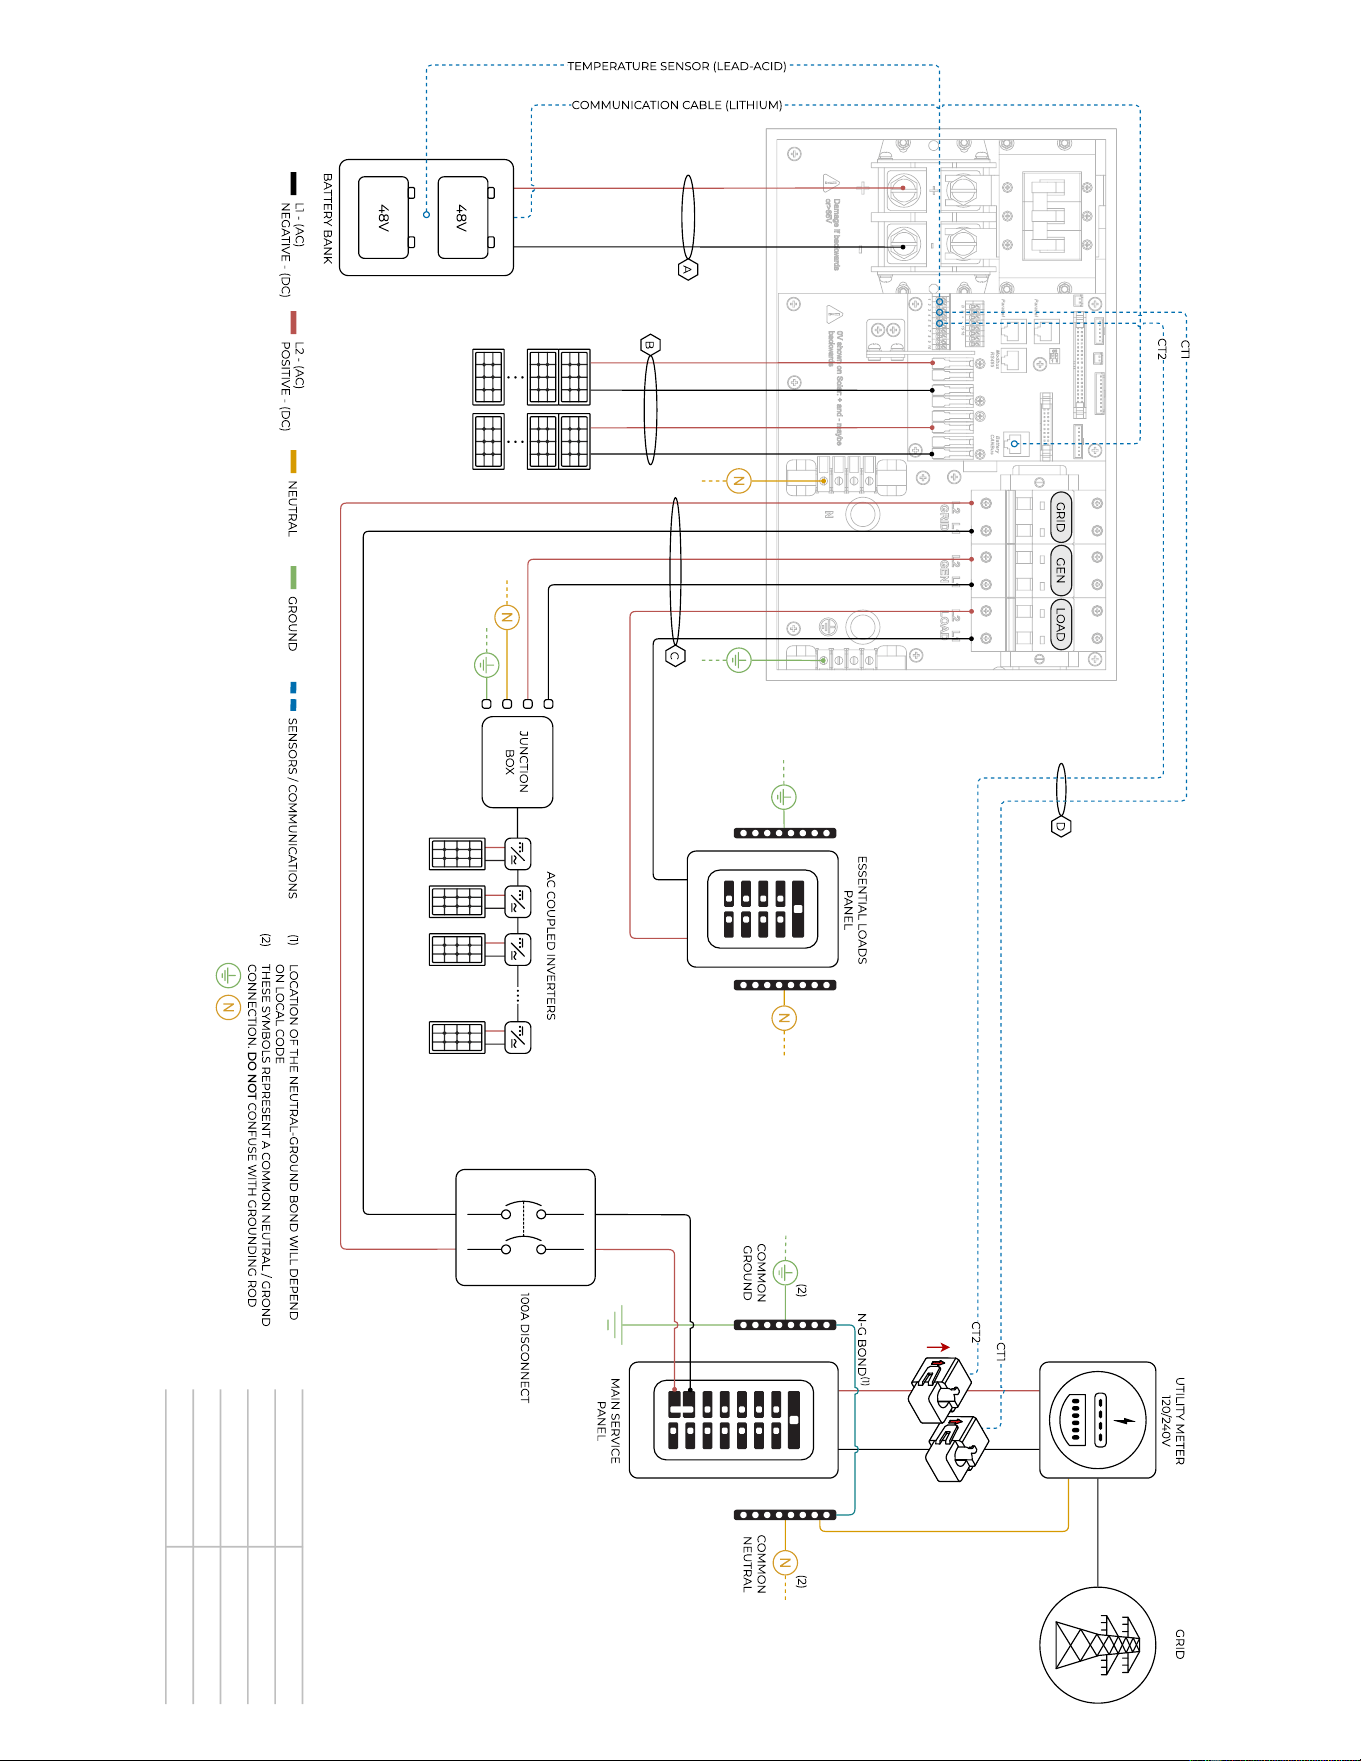
Copyright © 2024 Sol-Ark LLC | SK140-0005-002 43
Sol-Ark 8K-2P-N
Standard Wiring Diagram – AC Coupling in GEN
Diagram 03
5.5kW
MAX.
5.5kW
MAX.
4kW MAX.
44 Copyright © 2024 Sol-Ark LLC | SK140-0005-002
Sol-Ark 8K-2P-N
Standard Wiring Diagram – AC Coupling in LOAD
Diagram 04
5.5kW
MAX.
5.5kW
MAX.
4kW MAX.
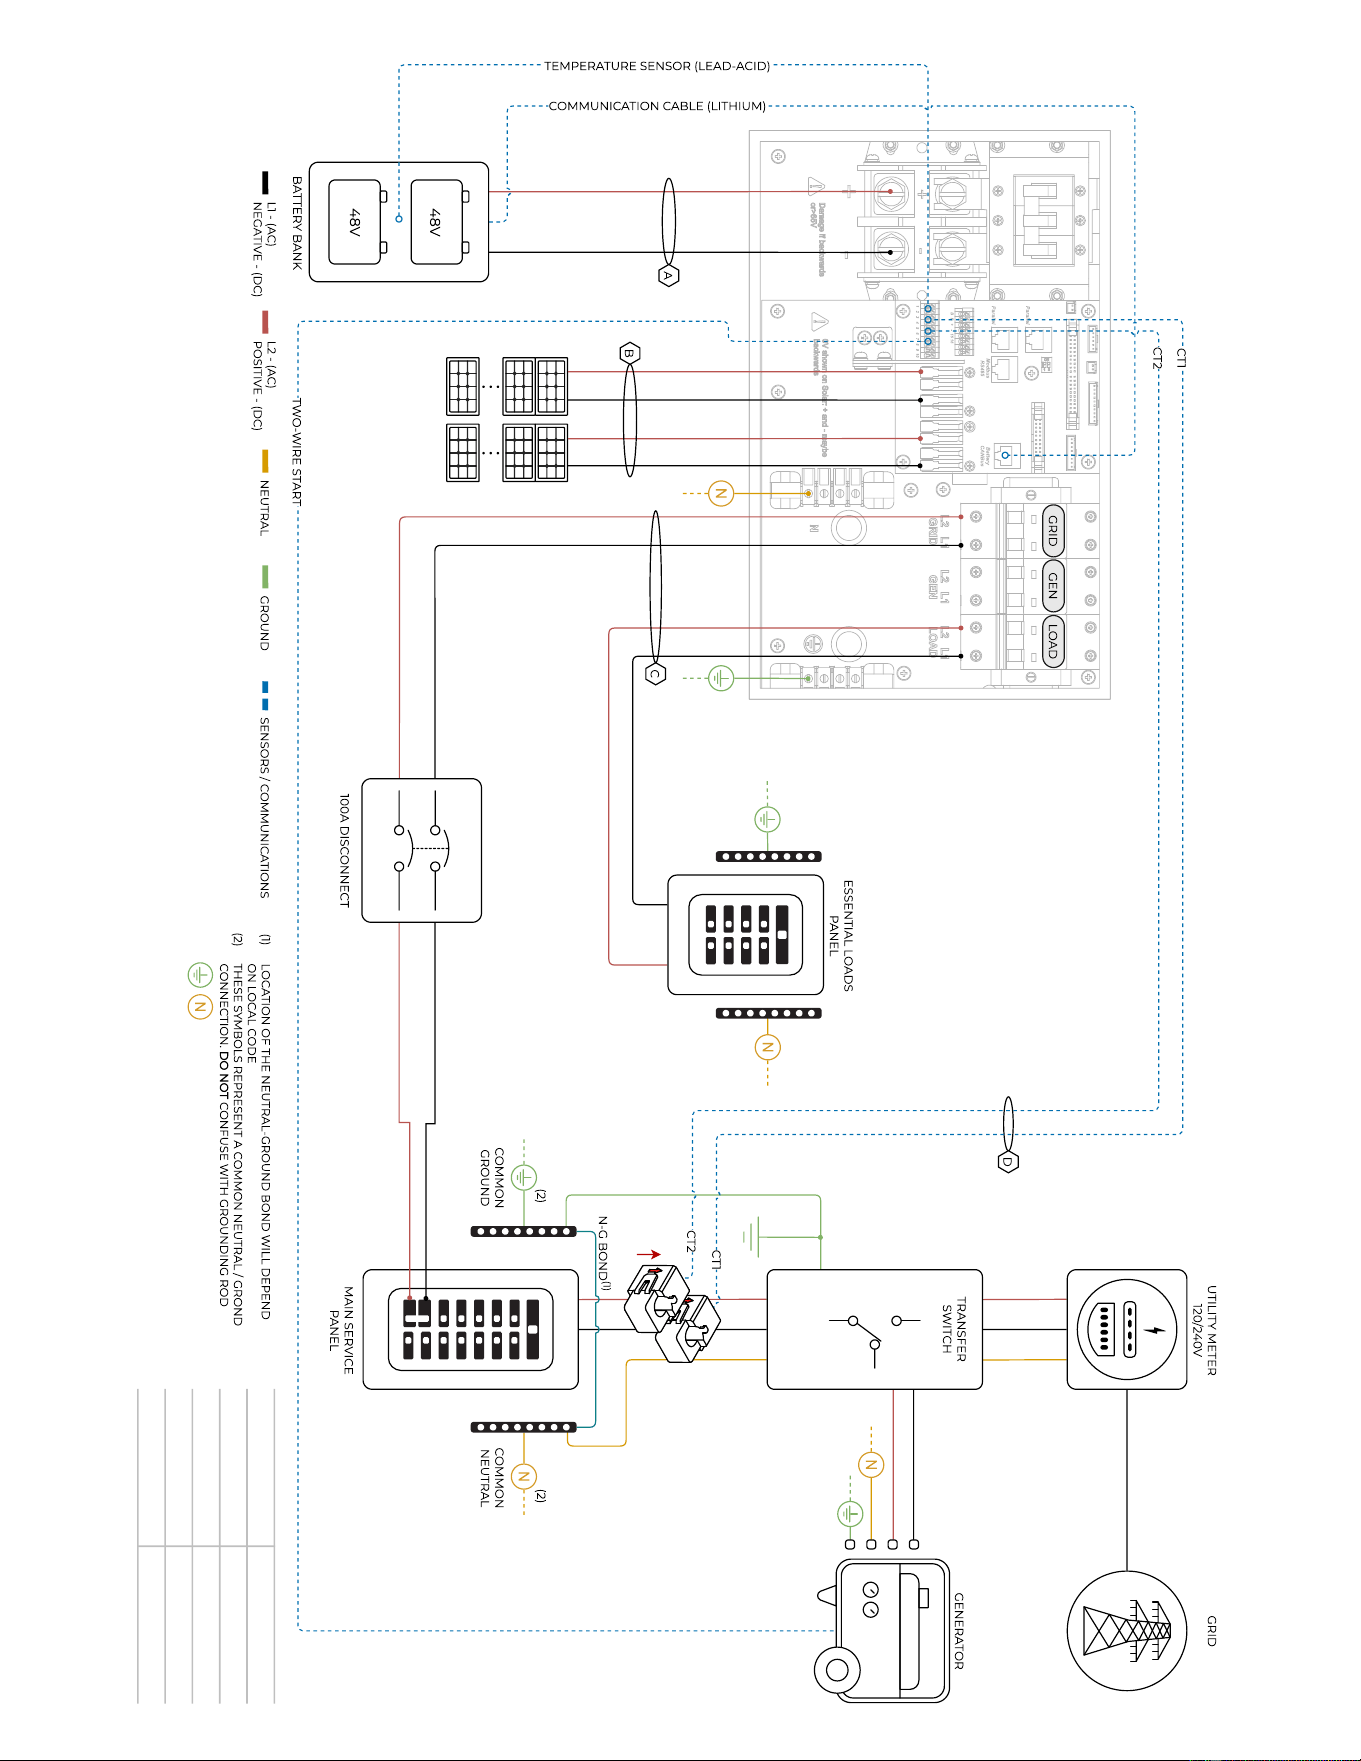
Copyright © 2024 Sol-Ark LLC | SK140-0005-002 45
Sol-Ark 8K-2P-N
Standard Wiring Diagram – Whole-Home Generator
Diagram 05
5.5kW
MAX.
5.5kW
MAX.
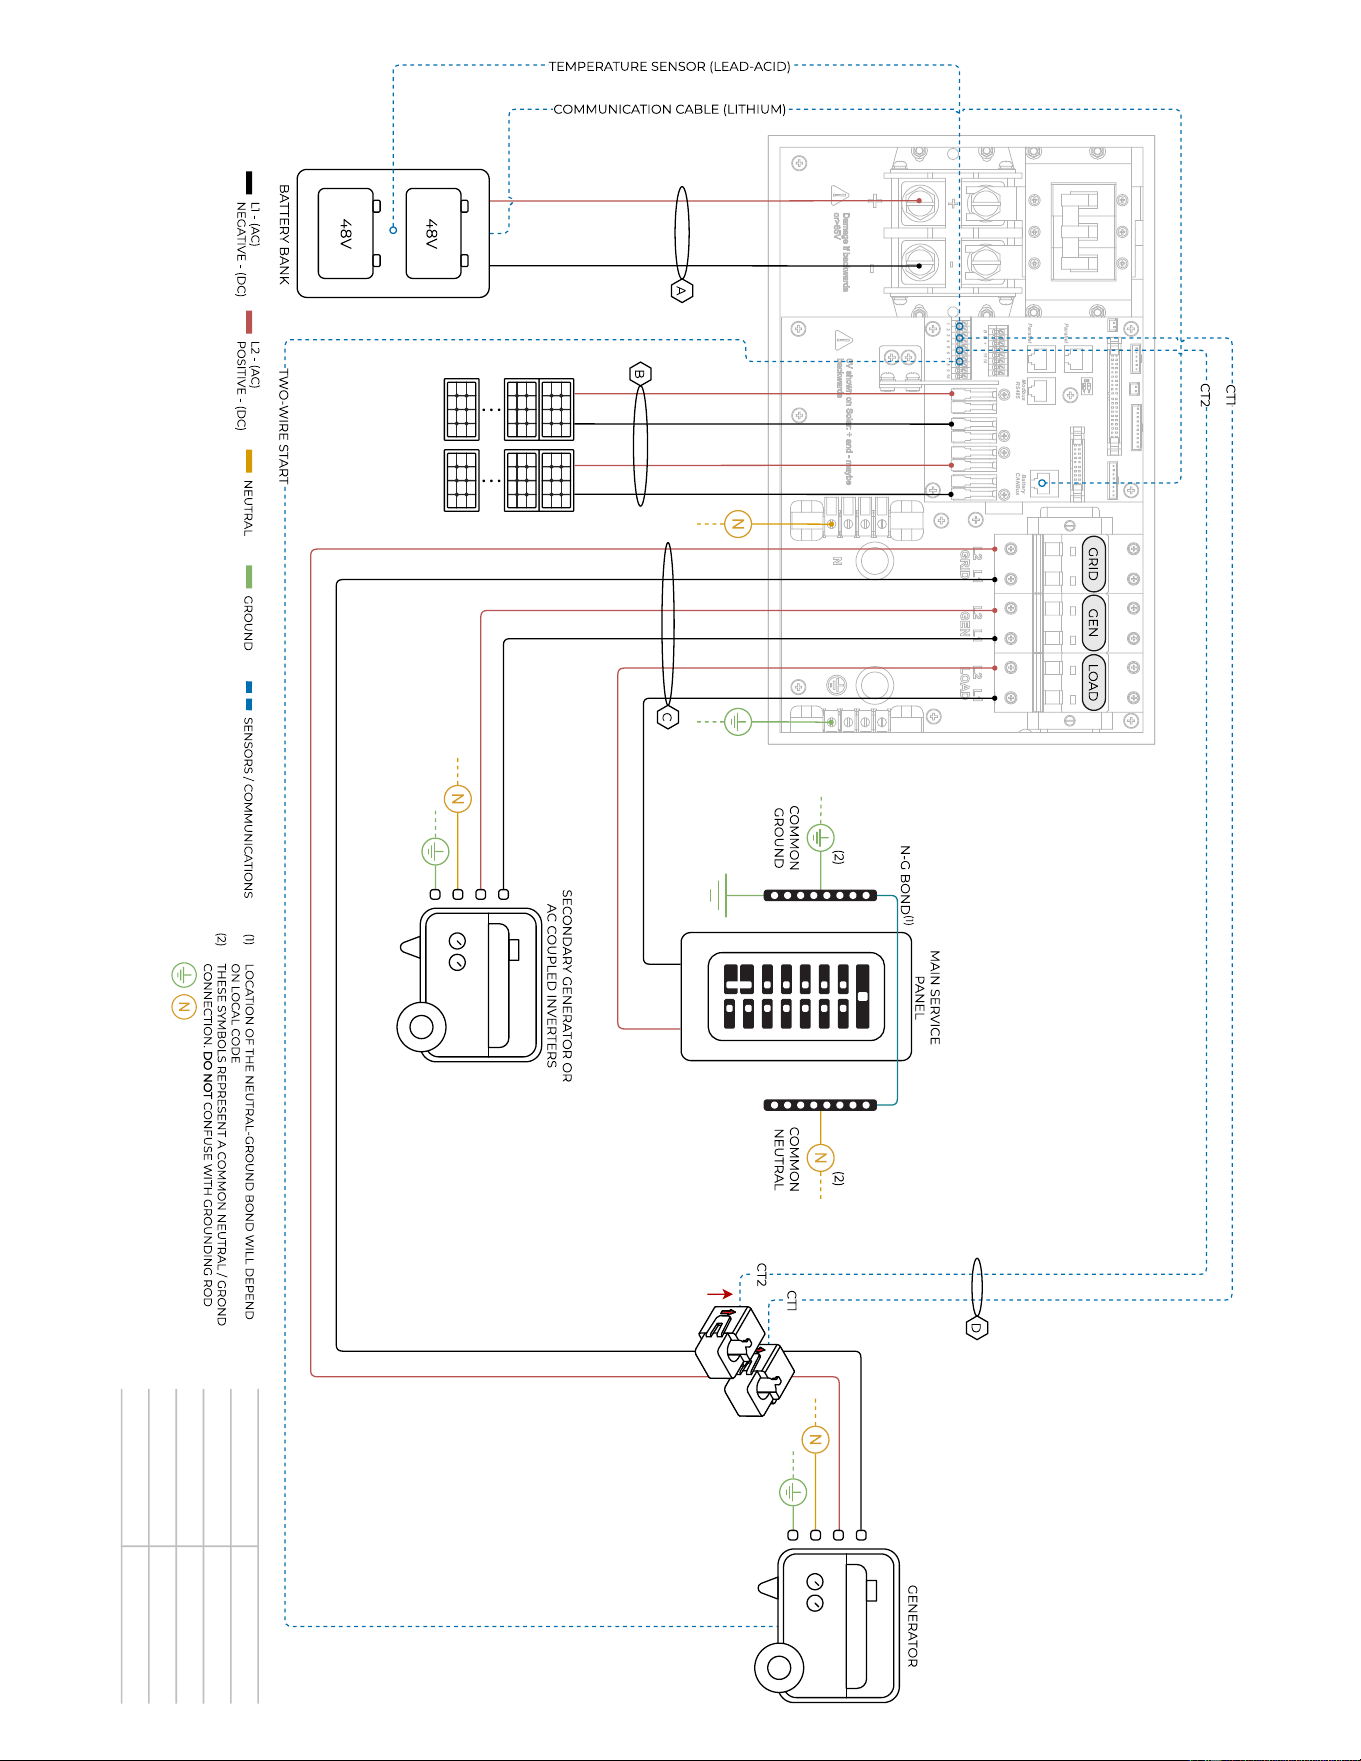
46 Copyright © 2024 Sol-Ark LLC | SK140-0005-002
Diagram 06
Sol-Ark 8K-2P-N
Standard Wiring Diagram – Off Grid
5.5kW
MAX.
5.5kW
MAX.

Copyright © 2024 Sol-Ark LLC | SK140-0005-002 47
7. Troubleshooting Guide
LCD is not powering on
- Check all connections – at least one of the following power sources is required: PV/Grid/Battery
- Try pressing the power button, touchscreen, or navigation buttons
Panels are connected, but “DC” LED indicator is not on
- Minimum starting voltage is 125V. Voltage must be above 125V and below 500V
- Wrong polarity. Check string polarity on MPPT
- PV DC disconnect is not on the ON position
Panels are not producing
- Check for proper wiring on all solar panel connections
- Turn PV disconnect "ON"
- Check that the PV input voltage is not greater than 500V
- If the system measures 0V even when PV DC disconnect is ON, polarity might be wrong. Check PV polarity
Panels are not producing much power
- PV Wire Strip Length: 5/8". Your batteries are charged and is limited to house loads; you can test Grid Sell to verify.
The system does not keep batteries charged
- Verify there is proper communication between the Sol-Ark and the battery. : → Li-Batt Info
- Verify proper Charge and Voltage settings according to battery manufacturer and battery bank arrangement
Auto Gen-Start is not working
- Make sure the generator has a compatible Two-Wire
- Verify adequate connection to the Sol-Ark auto-start input pins
“Normal” LED indicator is not on
- Sol-Ark is in pass-through-only mode, only a Grid connection
- Not fully energized (DC Solar panels AND Grid or just batteries)
- In alarm state.
- Sol-Ark is not working correctly (Call technical support +1 (972) 575-8875 Ext. 2)
The “Alarm” LED indicator is on
- Check the system alarms menu to identify the alarm
Grid HM value is negative when it should be positive (only applies in Limited to Home mode)
- Limiter Sensors are backwards, L1/L2 sensors are swapped, or incorrectly wired. Execute the "Auto Learn Home Limit Sensors"
command described in section 2.9 "Limit Sensors, Automatic CT Limit Sensors Configuration"
AC Overload Fault or Bus Unbalance Fault
- Check Transfer Switch/Subpanel wiring
- Check for large loads that consume more than the inverter rating
The system connects to grid and quickly disconnects
- Verify Neutral wire connection (0Vac referenced to GND)
- Check the programmed frequency, and verify the Sol-Ark measures 120V between L and N
- If the system is overloading: verify that proper phase sequence between “GRID” and “LOAD” breakers
DC Overload Fault
- Check PV voltage. Ensure no more than 500V
- Make sure you have not wired more than two (2) solar strings in parallel per MPPT
System is beeping
- Check the System Alarms menu to see which alarm has been triggered. Most alarms will self-reset
- Do a Power Cycle as described in section 2.12 “Power Cycle Sequence”
48 Copyright © 2024 Sol-Ark LLC | SK140-0005-002
Battery cable sparks when connected
- If applicable, flip the built-in breakers of the battery bank before connecting or disconnecting batteries
Battery symbol on the home screen is red
- The battery is below the empty voltage
- Battery is over-voltage
Battery symbol on the home screen is yellow
- The battery is low, or the charge/discharge current is close to the programmed limit
Grid symbol on the home screen is yellow
- Grid parameters are out of specified operating range
- There is a grid outage and there is no voltage on the “GRID” breaker
- System is Off-Grid
System has restarted
- Occurs when the system has overloaded, battery voltage has surpassed 63V
- There was a Software update
Batteries were connected backwards
- System will be damaged, and warranty will be lost
Why is the LCD screen still on when the power button is off?
- Occurs when the power button is in the “OFF” position
- Occurs when the system is not fully energized: PV or Grid only
The Batt SOC% is not reaching 100%
- The Sol-Ark might be in the calibration phase and estimating the battery SOC. We suggest waiting three full days to let the unit go
through the 4-stage charging curve to converge to an accurate %
- If the suggestion above does not work, you can re-adjust the battery capacity under “Battery Setup” → “Batt Capacity” to restart the
calibration process
Generator setup is reading 0Hz
- Generator is operating at a frequency outside the permissible range. Select " General Standard " grid mode. Widen the frequency
range to 55Hz-65Hz as described in section 2.5 “Integrating a Generator”
Color Touchscreen is Frozen
- Press and hold the escape button [◄] for 7-10 seconds
- Perform a power cycle sequence in case the above suggestion does not work. See section 2.12 “Power Cycle Sequence”

Copyright © 2024 Sol-Ark LLC | SK140-0005-002 49
7.1 Sol-Ark Error codes
FAULT
INSTRUCTION
COMMON CAUSE / REMEDY
F1
DC_Inversed_Failure
If you have parallel systems and turn one system off, you will get this notification. NOT a fault.
F8
GFDI_Relay_Failure
Check for continuity on the inverter's neutral and ground. Ensure there is only ONE neutral-to-ground
bond in the system. Current Leakage from inverter AC output to Ground, check Ground and neutral are
connected at the main panel.
F13
Grid_Mode_change
It can happen when not using batteries or if Grid Input settings are changed. This is a notification, NOT
a fault. If you switch from No Batt to Battery mode, power the system down completely to restart.
F15
AC_OverCurr_Failure
It is usually caused by Loads too large for the inverter. If Off-Grid, the battery discharge Amps are
programmed too low. Overloads can result in F15, F18, F20, or F26.
F16
GFCI_Failure
Ground fault. Check PV+ or PV- wiring (which must be ungrounded). Exposed PV conductors + rain can
also cause. Check that the neutral line and Ground are not double-bonded (common with portable
generators).
F18
Tz_AC_OverCurr_Fault
Overloaded the Load Output (reduce loads) or overloaded a generator (reduce Gen Start A). Wiring
Short on the AC Side can also cause this error. Overloads can result in F15, F18, F20, or F26.
F20
Tz_Dc_OverCurr_Fault
It is typically caused by DC current from the battery that is too large (ex: 4 Ton AC Unit) or too much PV
current (3 or more strings in parallel). Overloads can result in F15, F18, F20, or F26.
F22
Tz_EmergStop_Fault
Initiated Emergency Stop; see sensor pinout table.
F24
DC_Insulation_Fault
An exposed PV conductor combined with moisture is faulting (can cause F16, F24, and F26).
F25
DC_Feedback_Fault
No battery connection to the Inverter and Activate Battery is enabled. Disable Activate Battery in settings
while no battery is connected.
F26
BusUnbalance_Fault
Too much load on one leg (L1 or L2) vs. the other leg or DC loads on the AC output when Off-Grid.
Grounded PV+/- wire can cause F20, F23, or F26.
F29
Parallel_CANBus_Fault
Usually, a communication error for parallel systems. Check cables, and MODBUS addresses.
F31
Soft_Start_Failed
Soft Start of the large motor failed.
F34
AC_Overload_Fault
AC Overload or load shorted. Reduce heavy loads.
F35
AC_NoUtility_Fault
Grid connection lost.
F37
DCLLC_Soft_Over_Cur
Software DC overcurrent.
F39
DCLLC_Over_Current
Hardware DC overcurrent.
F40
Batt_Over_Current
Batteries exceeded their current discharge limit.
F41
Parallel_System_Stop_Fault
If one system faults in parallel, this normal fault will register on the other units as they disconnect from
the grid.
F45
AC_UV_OverVolt_Fault
Grid under voltage causes a disconnect. This will self-reset when the grid stabilizes.
F46
Battery_Backup_Fault
Cannot communicate with other parallel systems. Check Master = 1, Slaves = 2-9 and that ethernet are
connected.
F47
AC_OverFreq_Fault
Grid over Frequency (common in power outages) causes disconnect. Will self-reset when grid stabilizes.
F48
AC_UnderFreq_Fault
Grid under Frequency (common in power outages) causes a disconnect. Will self-reset when grid
stabilizes.
F55
DC_VoltHigh_Fault
PV may be higher than 500V. Battery voltage should not be above 59V or 63V (depending on the
model).
F56
DC_VoltLow_Fault
Batteries are overly discharged, the inverter is Off-Grid and exceeded the programmed batt discharge
current by 20%, or Lithium BMS has shut down. If battery settings are incorrect, this can also happen.
F58
BMS_Communication Fault
Sol-Ark is programmed to BMS Lithium Battery Mode but cannot communicate with a BMS.
BMS_Err_Stop is enabled, but cannot communicate with a battery BMS
F60
Gen_Volt_or_Fre_Fault
Generator Voltage or Frequency went outside the allowable range.
F61
Button_Manual_OFF
The parallel Slave system turned off without turning off the Master.
F63
Arc_Fault
It can be a poor PV connector / Connection. Or sometimes a false alarm due to powerful lighting storms.
F64
Heatsink_HighTemp_Fault
Check that the built-in fans are running; the ambient temperature may be too high. Ensure proper
clearance.
50 Copyright © 2024 Sol-Ark LLC | SK140-0005-002
8. Warranty Verification Checklist
MUST complete this form AFTER the system is operational. To register the product warranty, this verification checklist
must be filled out and submitted to Sol-Ark. Visit https://www.sol-ark.com/register-your-sol-ark/ to register warranty.
Installer/Company:___________________________________ Date: (YYYY-MM-DD) __________________________________
Inverter SN: _________________________________________ Gateway SN:_________________________________________
Mark ✓ for all that apply
Indicate the type of system (all that apply):
Grid-Tied only
Grid-Tied with battery backup
Off-Grid
Parallel system: # inverters
Indicate integrated components (all that apply):
Utility grid
DC solar panels
AC coupled solar panels
Generator
“LOAD” installed service panel
“GRID” installed service panel
“GEN” installed service panel
Lithium batteries
Lead-Acid batteries
Wind Turbine
It is strongly recommended to send a Wiring Diagram of the installation to [email protected] for verification, otherwise Sol-Ark
expressly disclaims any responsibility for performance issues arising from improper installation. Installers and users are solely responsible
for following proper installation procedures outlined in provided documentation. Sol-Ark disclaims any liability for changes in the installation
that might result in electrical malfunctions or any other issues related to the Sol-Ark product.
Circle N/A (Not Applicable) if the verification step is not relevant to the type of system or does not apply to the integrated components.
1. A wiring diagram of the installation was sent to Sol-Ark for verification
Y N
2. Setup for remote system monitoring through Wi-Fi / Ethernet is completed. Gateway SN:_______________________
Y N
3. The inverter is installed in a location where the LCD screen is always protected from direct sunlight
4. The inverter has the minimum specified vertical and lateral clearance for proper heat dissipation
5. The maximum DC input voltage does not surpass 500V
DC
6. The battery bank does not surpass 63V
DC
7. All battery conductors are properly connected and secured to the (+, -) terminals of the inverter
N/A
8. Battery communication was successfully established
N/A
9. All Battery Setup parameters are programmed according to battery manufacturer specifications
N/A
10. The Sol-Ark properly generates power from the solar panels to charge the batteries
N/A
11. Grid / Generator is properly connected to the Sol-Ark and the phase sequence was verified
N/A
12. “🗹 Grid / Gen Charge” settings are programmed correctly. Grid / Generator adequately charge the batteries
N/A
13. For Off-Grid systems: The mode “General Standard” is programmed and the V & f ranges are increased
N/A
14. When “🗹 Grid Sell” is enabled, the Sol-Ark sells power back to the grid (negative HM measurements for L1, L2)
N/A
15. Limit sensors are correctly installed on Grid lines / Generator lines
N/A
16. Only when “🗹 Limited Power to Home” is enabled, the Sol-Ark matches total load demand (Meter Zero)
N/A
17. Disconnect the grid: during Off-Grid operation, the inverter properly supplies “LOAD” demand for PV and batteries
N/A
18. Disconnect the grid AND solar panels: during Off-Grid operation, the inverter properly draws power from batteries
N/A
In the event of system-related issues, forward a comprehensive description of the problem via email to [email protected]. Ensure the
addition of images, including the "Details Screen" with all electrical measurements, as well as images of the inverter, wiring configuration,
user area, batteries, and any other integral components constituting the power system.
______________________________________
______________________________________
______________________________________
Installer name and signature
Customer name and signature
Date

Copyright © 2024 Sol-Ark LLC | SK140-0005-002 51
Copyright © 2024 Sol-Ark LLC | SK150-0047-002
Limited Warranty: Sol-Ark 8K-2P-N
10-Year Limited Warranty for Sol-Ark LLC Products. Sol-Ark LLC provides a Ten-year (10) limited
Warranty ("Warranty") against defects in materials and workmanship for its Sol-Ark LLC products
("Product"). The term of this warranty begins on the Product(s) initial purchase date, or the date
of receipt of the Product(s) by the end user, whichever is later. This must be indicated on the
invoice, bill of sale from your installer. This warranty applies to the original Sol-Ark LLC Product
purchaser and is transferable only if the Product remains installed in the original use location.
Please call Sol-Ark LLC to let us know if you are selling your Home and give us name and contact
of the new owner.
The warranty does not apply to any Product or Product part that has been modified or damaged by the following:
• Installation or Removal (examples: wrong voltage batteries, connecting batteries backward, damage due to water/rain to
electronics, preventable damage to solar wires.)
• Alteration or Disassembly.
• Normal Wear and Tear.
• Accident or Abuse.
• Unauthorized Firmware updates/software updates or alterations to the software code.
• Corrosion.
• Lightning: unless using EMP hardened system, then Sol-Ark LLC will repair the product.
• Repair or service provided by an unauthorized repair facility.
• Operation or installation contrary to manufacturer product instructions.
• Fire, Floods, or Acts of Nature.
• Shipping or Transportation.
• Incidental or consequential damage caused by other components of the power system.
• Any product whose serial number has been altered, defaced, or removed.
• Any other event not foreseeable by Sol-Ark LLC
Sol-Ark LLC liability for any defective Product, or any Product part, shall be limited to the repair or replacement of the Product, at Sol-Ark
LLC discretion. Sol-Ark LLC does not warrant or guarantee workmanship performed by any person or firm installing its Products. This warranty
does not cover the costs of installation, removal, shipping (except as described below), or reinstallation of Products or parts of Products. LCD
screen and fans are covered for 5 years from date of purchase.
THIS LIMITED WARRANTY IS THE EXCLUSIVE WARRANTY APPLICABLE TO SOL-ARK LLC PRODUCTS. SOL-ARK LLC EXPRESSLY DISCLAIMS
ANY OTHER EXPRESS OR IMPLIED WARRANTIES OF ITS PRODUCTS. SOL-ARK LLC ALSO EXPRESSLY LIMITS ITS LIABILITY IN THE EVENT
OF A PRODUCT DEFECT TO REPAIR OR REPLACEMENT IN ACCORDANCE WITH THE TERMS OF THIS LIMITED WARRANTY AND
EXCLUDES ALL LIABILITY FOR INCIDENTAL OR CONSEQUENTIAL DAMAGES, INCLUDING WITHOUT LIMITATION ANY LIABILITY FOR
PRODUCTS NOT BEING AVAILABLE FOR USE OR LOST REVENUES OR PROFITS, EVEN IF IT IS MADE AWARE OF SUCH POTENTIAL
DAMAGES.
Return Policy - No returns will be accepted without prior authorization and must include the Return Material Authorization (RMA) number.
Please call and talk to one of our engineers to obtain this number at 972-575-8875.
Return Material Authorization (RMA) A request for an RMA number requires all the following information: 1. Product model and serial
number; 2. Proof-of-purchase in the form of a copy of the original Product purchase invoice or receipt confirming the Product model number
and serial number; 3. Description of the problem; 4. Validation of problem by Technical Support, and 5. Shipping address for the repaired
or replacement equipment. Upon receiving this information, the Sol-Ark LLC representative can issue an RMA number. Any product that is
returned must be brand new, in excellent condition and packaged in the original manufacturer's carton with all corresponding hardware
and documentation. Returns must be shipped with prepaid freight and insured via the carrier of your choice to arrive back at Sol-Ark LLC
within 30 days of your initial delivery or pick-up. Shipping charges will not be refunded. All returns are subject to a 35% restocking fee. No
returns will be accepted beyond 30 days of original delivery. The value and cost of replacing any items missing (parts, manuals, etc.) will be
deducted from the refund. If you have any questions regarding our return policy, please email us at [email protected] or call us at the
number above during regular (Monday to Friday) business hours.
Sol-Ark 8K-2P-N Install Operational Verification Checklist Questionnaire must be filled out, signed, and dated to secure full warranty
coverage.
Contact: (USA) +1-972-575-8875
For Info/Purchasing:
[email protected]om | ext.1
For Tech Support/Warranty Claim:
support@sol-ark.com | ext.2
For Administrative Help | ext.3
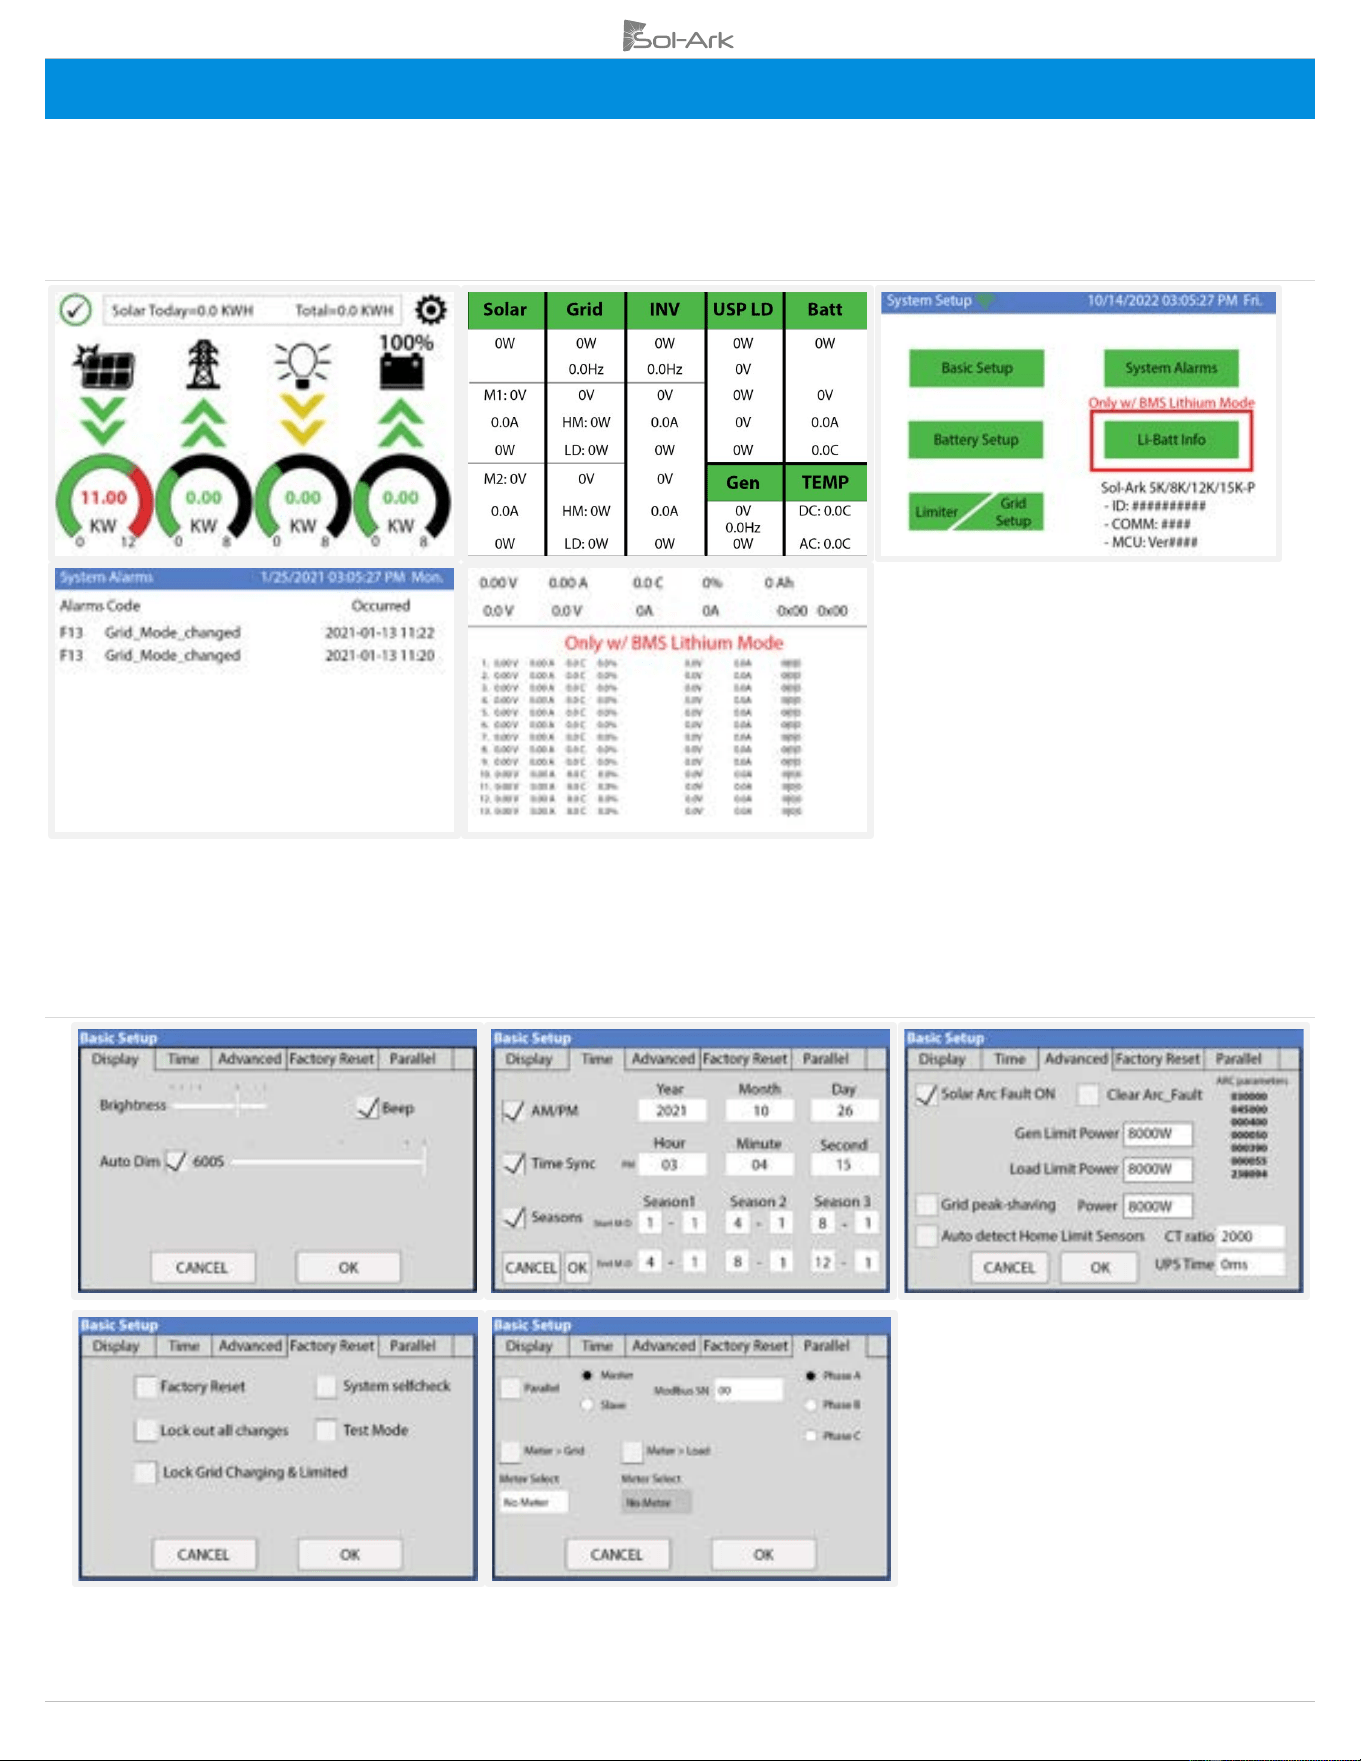
52 Copyright © 2024 Sol-Ark LLC | SK140-0005-002
9. GUI Screens
1. Main Menu
2. Basic Setup
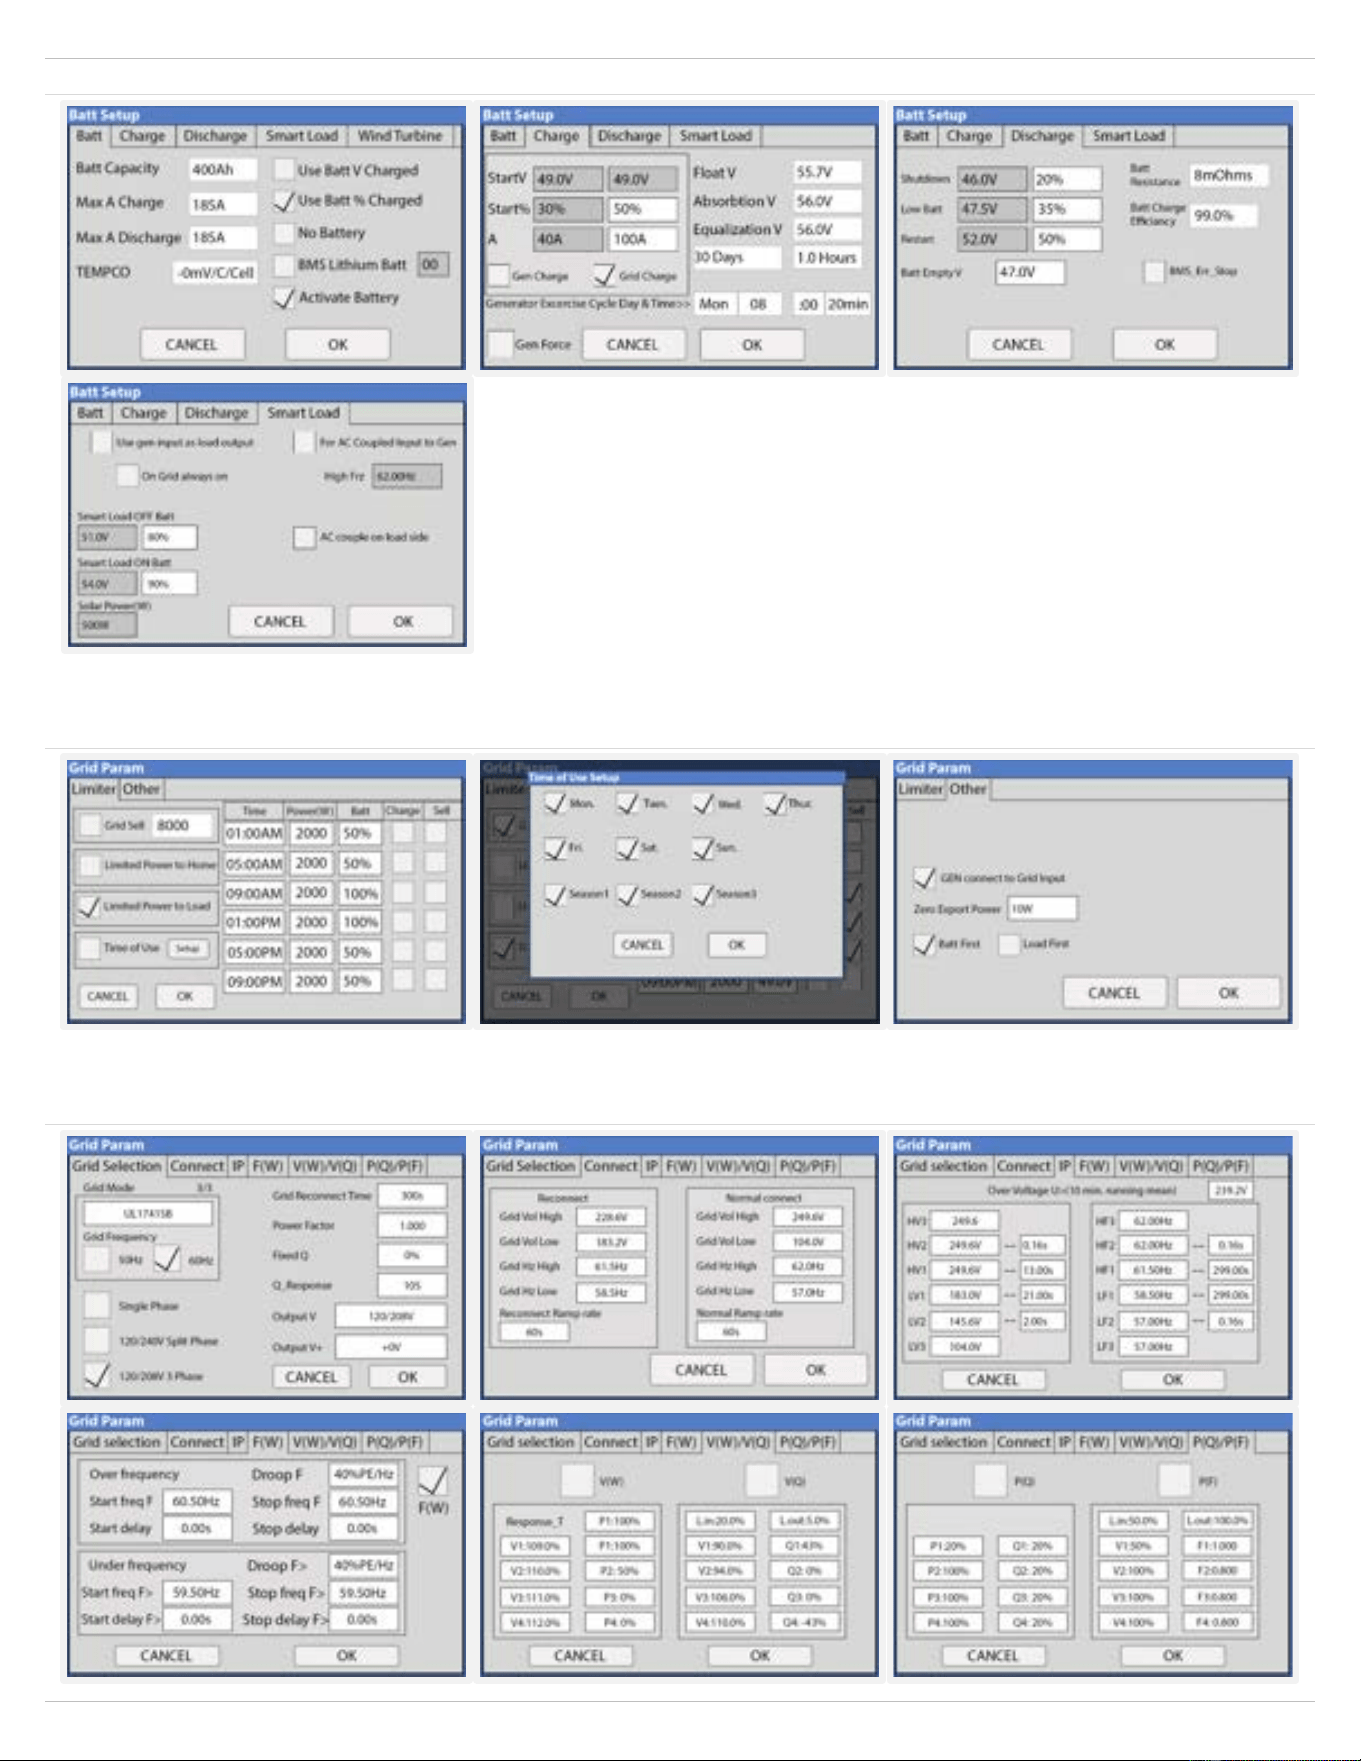
Copyright © 2024 Sol-Ark LLC | SK140-0005-002 53
3. Batt Setup
4. Limiter
5. Grid Setup
54 Copyright © 2024 Sol-Ark LLC | SK140-0005-002