www.klarstein.com
MISTERCOOK
DUO
Kochplatte
Hot Plate
Placa de cocción
Plaques de cuisson
Piano cottura
10033283


3
DE
Sicherheitshinweise4
Geräteübersicht5
Bedienung6
Bedienfelder und Tastenfunktionen7
Menü-Einstellungen8
Reinigung und Pege10
Fehlersuche und Fehlerbehebung11
Produktdatenblatt13
Spezielle Entsorgungshinweise für Verbraucher in Deutschland14
Hinweise zur Entsorgung16
Hersteller & Importeur (UK)16
Sehr geehrter Kunde,
wir gratulieren Ihnen zum Erwerb Ihres Gerätes. Lesen Sie
die folgenden Hinweise sorgfältig durch und befolgen Sie
diese, um möglichen Schäden vorzubeugen. Für Schäden,
die durch Missachtung der Hinweise und unsachgemäßen
Gebrauch entstehen, übernehmen wir keine Haftung. Scannen
Sie den folgenden QR-Code, um Zugriff auf die aktuellste
Bedienungsanleitung und weitere Informationen rund um das
Produkt zu erhalten:
INHALTSVERZEICHNIS
TECHNISCHE DATEN
Artikelnummer 10033283
Stromversorgung 220-240 V ~ 50/60 Hz
Leistung (Watt) 3000 W
English 17
Español 29
Français 41
Italiano 53

4
DE
SICHERHEITSHINWEISE
• Lesen Sie sich alle Hinweise in dieser Anleitung sorgfältig durch. Benutzen Sie das
Gerät bestimmungsgemäß und genau wie in der Anleitung beschrieben.
• Bei der Verwendung von Elektrogeräten sollten stets grundlegende
Sicherheitsvorkehrungen getroffen werden, um die Gefahr von Bränden,
elektrischen Gefahren und Verletzungen von Personen zu verringern, einschließlich
der folgenden.
• Berühren Sie keine heißen Oberächen.
• Um einen elektrischen Schlag zu vermeiden, darf dieses Gerät nicht in Wasser oder
andere Flüssigkeiten getaucht werden. Halten Sie sich an die Hinweise im Abschnitt
„Reinigung und Pege“.
• Verwenden Sie das Gerät nur unter Aufsicht. Stellen Sie die Kochplatte außerhalb
der Reichweite von Kindern auf.
• Kinder sollten beaufsichtigt werden, um sicherzustellen, dass sie nicht mit dem Gerät
spielen.
• Kinder ab 8 Jahren, physisch und körperlich eingeschränkte Menschen und
Personen mit fehlenden Kenntnissen oder Erfahrungen dürfen das Gerät nur
benutzen, wenn sie vorher von einer für Sie verantwortlichen Aufsichtsperson
ausführlich mit den Funktionen und den Sicherheitsvorkehrungen vertraut gemacht
wurden.
• Das Gerät darf nicht in Verbindung mit einem externen Timer oder einem separaten
Fernbedienungssystem verwendet werden.
• Stellen Sie das Gerät auf eine ebene, stabile Oberäche.
• Verwenden Sie das Gerät nicht in engen, schlecht belüfteten Räumen.
• Ziehen Sie den Netzstecker aus der Steckdose, wenn das Gerät länger nicht
benutzt wird und bevor Sie es reinigen. Schalten Sie das Gerät aus, bevor Sie den
Netzstecker ziehen. Lassen Sie das Gerät vor der Reinigung abkühlen.
• Betreiben Sie das Gerät nicht mit beschädigtem Kabel oder Stecker, wenn das
Gerät defekt ist oder in irgendeiner Weise beschädigt wurde. Bringen Sie das
Gerät zur Prüfung und Reparatur zu einem Fachbetrieb.
• Die Oberäche der Kochplatte besteht aus Kristallglas und bedeckt spannungs-
führende Geräteteile: Sollte die Glas-Oberäche der Kochplatte beschädigt
sein oder Risse aufweisen, schalten Sie das Gerät sofort aus und ziehen Sie den
Netzstecker, um die Möglichkeit eines Stromschlags zu vermeiden.
• Um das Verletzungsrisiko zu verringern, verwenden Sie nur die mitgelieferten
Zubehörteile.
• Benutzen Sie das Gerät nicht im Freien, in Feuchträumen oder in der Nähe von
offenem Feuer.
• Lassen Sie das Netzkabel nicht über die Kante des Tisches oder der Arbeitsplatte
hängen und achten Sie darauf, das es keine heißen Oberächen berührt. Biegen
Sie das Kabel nicht, dies kann zu Beschädigungen führen.
• Stellen Sie das Gerät nicht auf oder in die Nähe eines Gasherds, eines Elektroherds
oder eines beheizten Ofens.
• Verwenden Sie die Kochplatte nicht ohne Topf.
• Seien Sie vorsichtig, wenn Sie Pfannen oder Töpfe bewegen, in denen sich heißes
Öl oder heiße Flüssigkeiten benden.

5
DE
• Legen Sie beim Erwärmen der Kochplatte keine Kunststoffbehälter oder Papier auf
die Platte und achten Sie darauf, dass sich keine Stoff- oder KunststoffprodUKte in
der Nähe der Kochplatte be nden.
• Fassen Sie das Netzkabel und den Netzstecker nicht mit nassen Händen an.
• Legen Sie keine metallischen Gegenstände wie Messer, Gabeln, Löffel und Deckel
auf die Kochplatte, da sie heiß werden können.
• Blockieren oder verdecken Sie nicht die Zuluft- und Abluft-Öffnungen.
• Vermeiden Sie, dass etwas auf die Kochplatte fällt.
• Öffnen oder modi zieren Sie keine Geräteteile und und reparieren Sie die
Kochplatte nicht selbst, um Stromschläge, Kurzschlüsse oder Brände zu vermeiden.
• Falls das Netzkabel oder der Stecker beschädigt sind, müssen sie vom Hersteller,
einem autorisierten Fachbetrieb oder einer ähnlich quali zierten Person ersetzt
werden.
• Bewahren Sie die Anleitung zum späteren Nachschlagen gut auf.
• Das Gerät ist nicht für den kommerziellen Gebrauch, sondern nur für Gebrauch im
Haushalt und in haushaltsähnlichen Umgebungen vorgesehen. Dazu zählen Küchen
in Büros, Bauernhöfen, Hotels, Motels und Einrichtungen, die Bed & Breakfast
anbieten.
WARNUNG
Brandgefahr! Stellen Sie keine Gegenstände außer Töpfen und Pfannen
auf der Kochplatte ab.
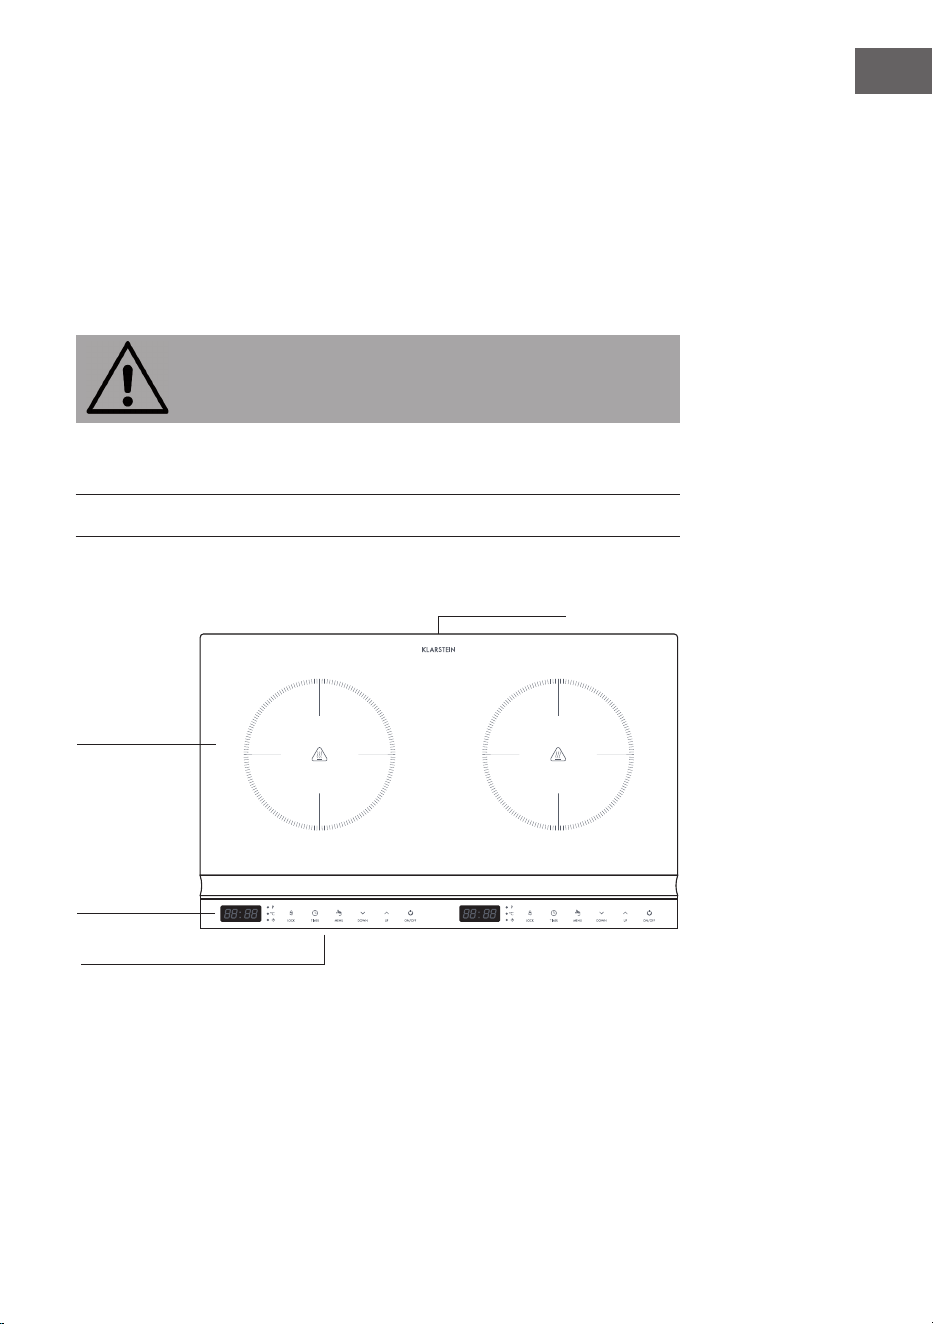
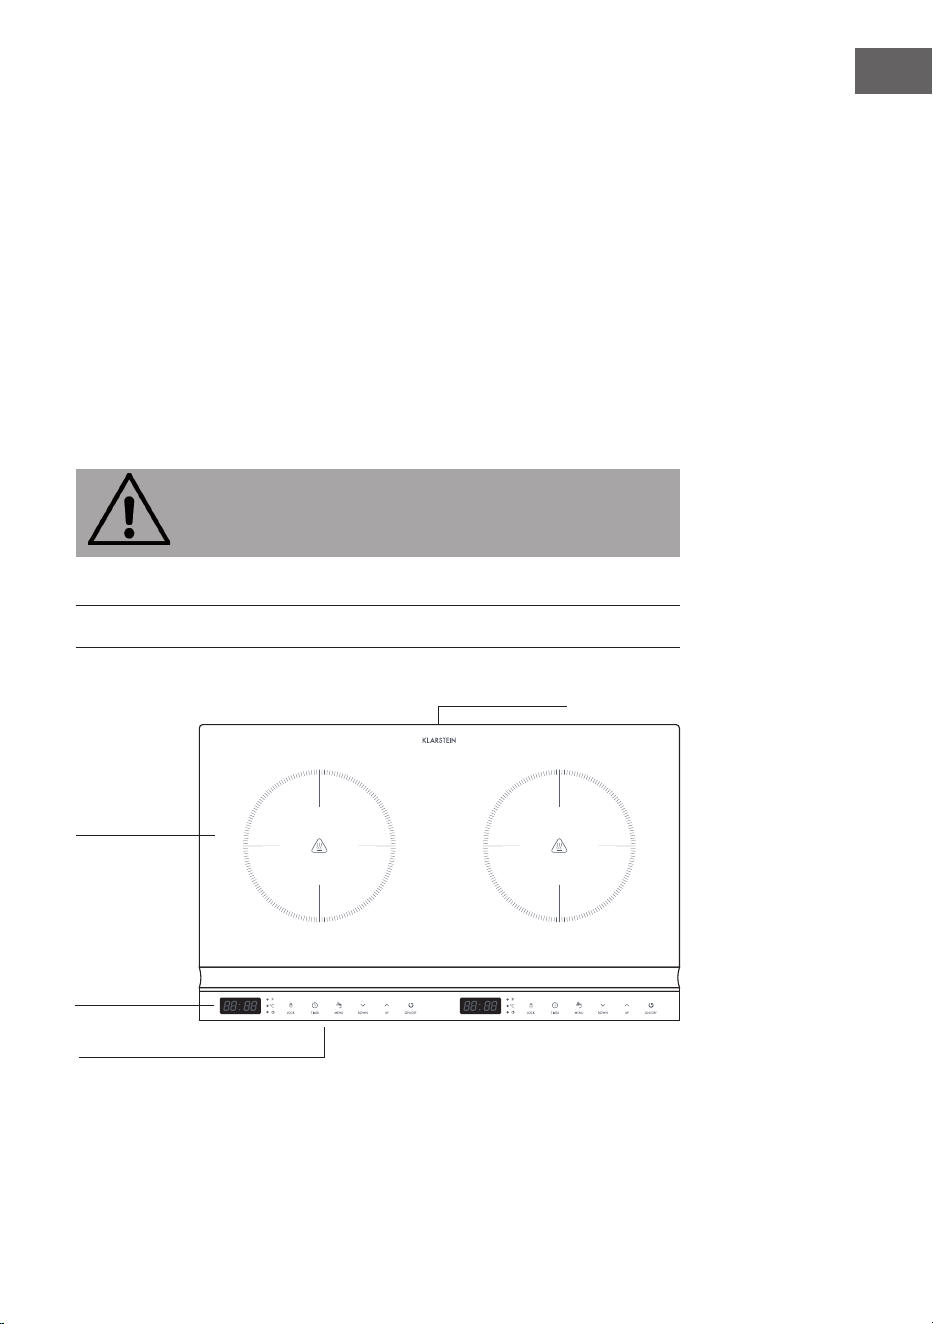
GERÄTEÜBERSICHT
Abluft
Schwarzes
Glas-Kochfeld
Bedienfeld
Zuluft
6
DE
BEDIENUNG
Vor dem ersten Gebrauch
• Prüfen Sie vor der Benutzung die Spannung auf dem Typenschild. Schließen Sie
das Gerät nur an Steckdosen an, die der Spannung des Geräts entsprechen. Wenn
Sie sich nicht sicher sind, ob Ihre Anschlüsse den Anforderungen genügen, ziehen
Sie einen Elektriker oder Ihren Stromanbieter zu Rate.
• Stellen Sie das Gerät auf einen ebenen, hitzebeständigen Untergrund. Stellen Sie
es nicht auf Ober ächen, die instabil sind und von denen es leicht herunterkippen
kann.
Inbetriebnahme
Stecken Sie den Netzstecker in die Steckdose. Um das Gerät zu starten, halten Sie
die Menü-Taste 2 Sekunden lang gedrückt.
Verwendung
• Geben Sie das zu erwärmende Essen in einen Topf und stellen Sie ihn in die Mitte
der Kochplatte. Bevor Sie das Kochgeschirr auf die Kochplatte stellen, reinigen Sie
den Boden des Topfes, um Verbrennungen zu vermeiden.
• Stellen Sie die die gewünschte Kochzeit, Leistung und Temperatur ein, wie in den
nachfolgenden Abschnitten beschrieben.
• Die Ober äche der Kochplatte wird während des Betriebes schnell heiß. Fassen Sie
sie nicht an.
• Schalten Sie das Gerät nach dem Kochen aus, indem Sie die EIN/AUS-Taste
drücken. Die Kochplatte hat noch eine hohe Temperatur, das Display leuchtet
weiterhin und der Lüfter läuft noch weiter. Berühren Sie die Kochplatte nicht mit der
Hand, bis das Gerät abgekühlt ist und ziehen Sie dann den Netzstecker aus der
Steckdose.
• Falls Sie das Gerät längere Zeit nicht benutzen, ziehen Sie ebenfalls den Stecker
aus der Steckdose, damit die Platte nicht aus Versehen angeht.
VORSICHT
Verbrennungsgefahr! Während der Verwendung werden die für den
Nutzer zugänglichen Geräteteile so heiß, dass sie Verbrennungen
verursachen können. Achten Sie darauf, dass Ihr Körper, ihre
Kleidung und andere Materialien als Kochutensilien die Kochplatte
erst dann berühren dürfen, wenn diese vollständig abgekühlt ist.
7
DE
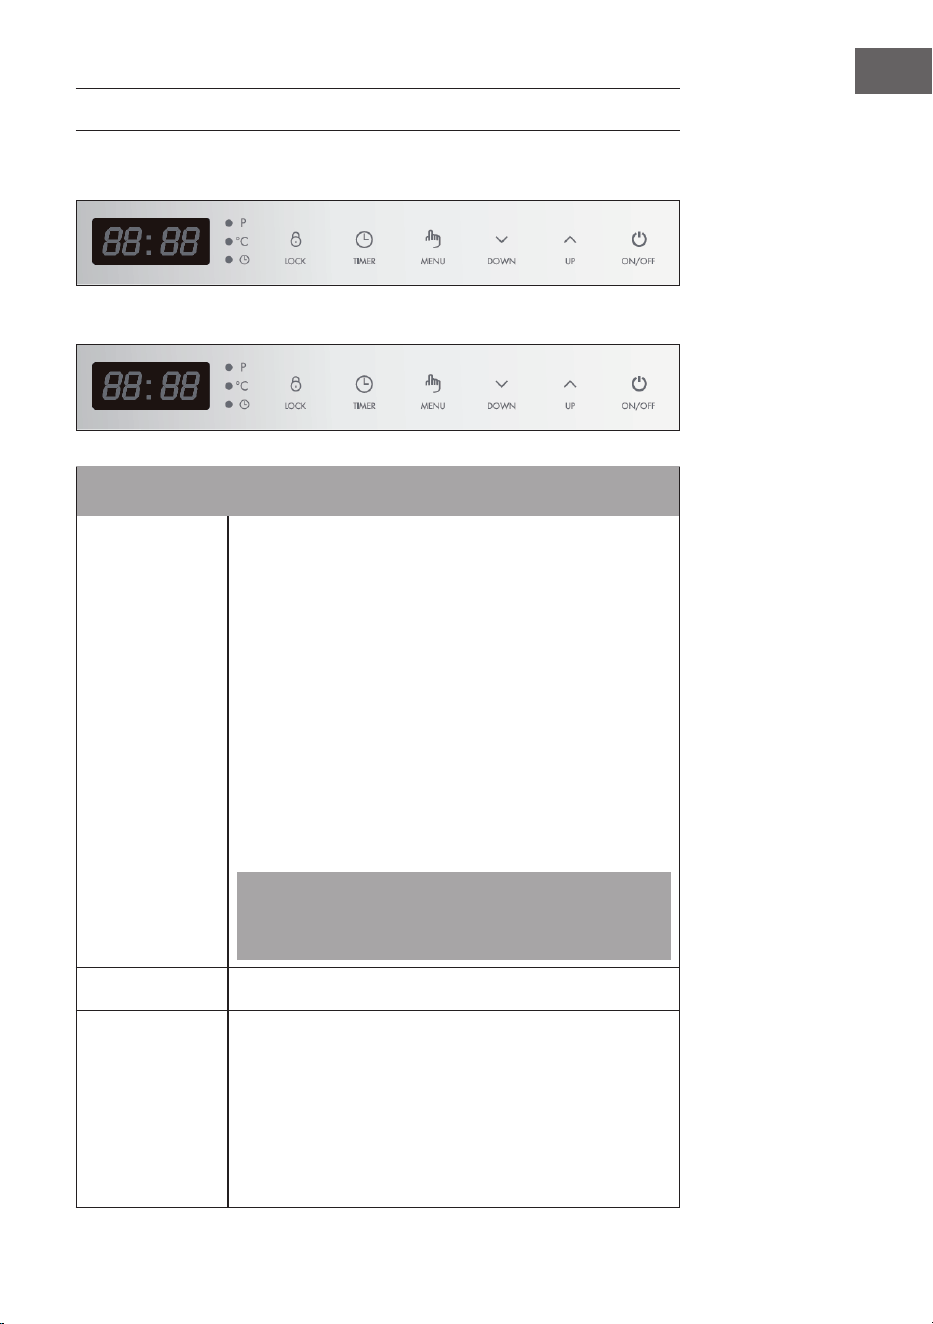
BEDIENFELDER UND TASTENFUNKTIONEN
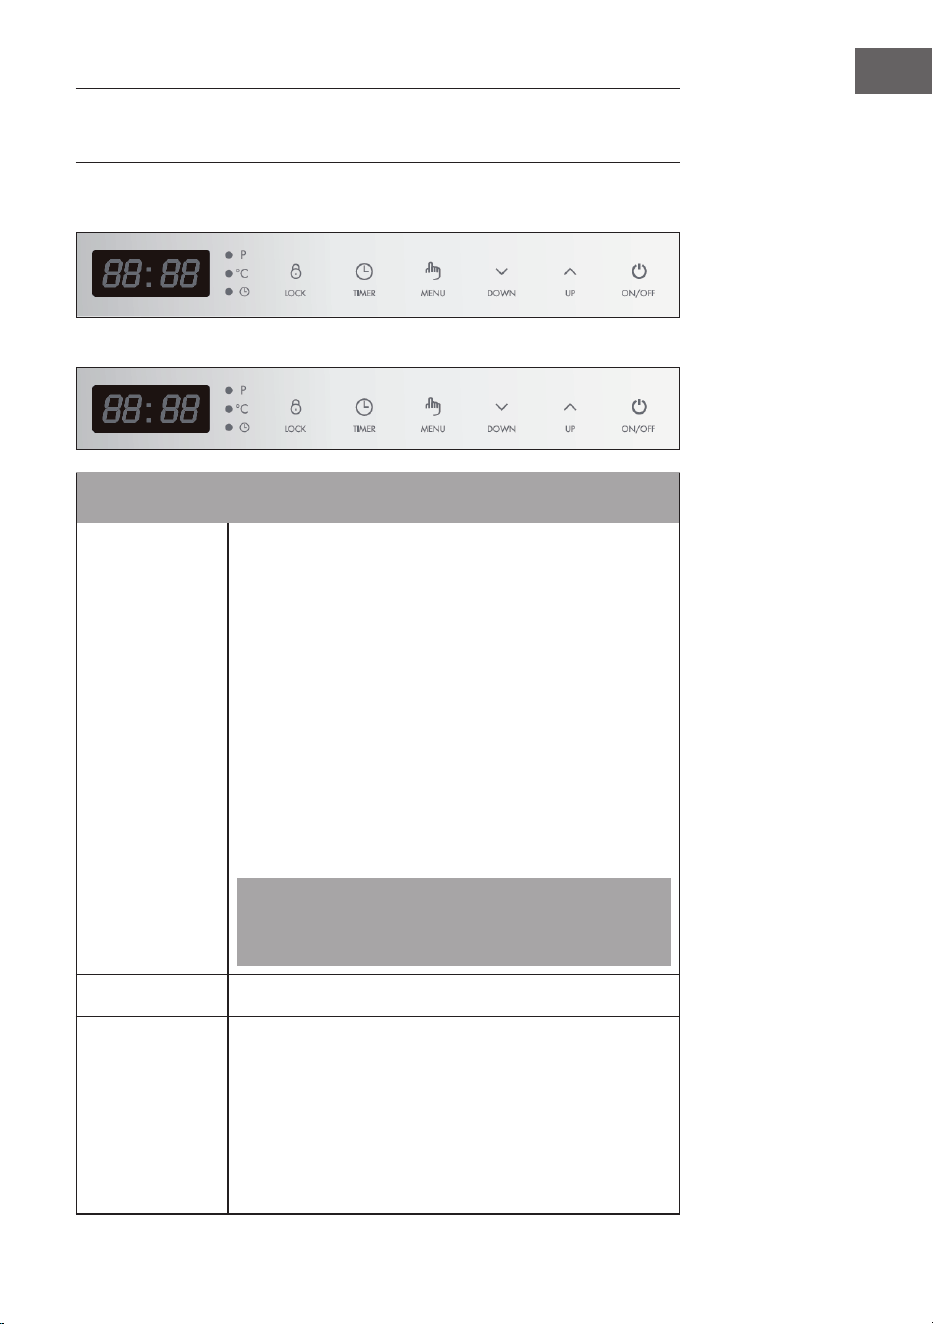
Linkes Bedienfeld
Rechtes Bedienfeld
Tastenfunktionen
EIN/AUS
(ON/OFF)
• Drücken Sie die EIN/AUS-Taste, um die Kochplatte
einzuschalten. Ein Piepton ertönt und im Display wird
„ON“ angezeigt. Sie können nun weitere Einstellung
vornehmen. Werden keine Eingaben getätigt, ertönt
nach 1 Minute ein Piepton und die Kochplatte schaltet
automatisch in den Standby-Modus.
• Wenn Sie die Kochplatte wieder einschalten wollen,
drücken Sie erneut die EIN/AUS-Taste. Im Display wird
„ON“ angezeigt.
• Um im laufenden Betrieb in den Standby-Modus zu
schalten, drücken Sie die EIN/AUS-Taste. Es ertönt ein
Piepton, das Heizelement wird ausgeschaltet, das Display
zeigt „HOT“ an und das Infrarot-Kochfeld wechselt in den
Standby-Modus. (Die Lüftung läuft noch einige Zeit weiter,
während die Kochplatte abkühlt.)
Hinweis: Die Kochplatte verfügt über keinen Netzschalter.
Die Stromversorgung lässt sich nur durch Ziehen des
Netzsteckers unterbrechen.
TIMER
• Mit dieser Taste können Sie die Kochzeit einstellen.
SPERRE
(LOCK)
• Halten Sie während des Betriebs die SPERRE-Taste
2Sekunden lang gedrückt, um die Kindersicherung zu
aktivieren. Wenn die Kindersicherung eingeschaltet ist,
sind alle anderen Tasten außer der SPERRE-Taste und der
EIN/AUS-Taste gesperrt.
• Drücken Sie zum Ausschalten die EIN/AUS-Taste oder
drücken Sie zum Entsperren der Kindersicherung für
2Sekunden die SPERRE-Taste.

8
DE
MENÜ
(MENU)
• Mit dieser Taste können Sie die Leistungs- und
Temperaturstufe auswählen.
AUF + AB
(UP + DOWN)
• Mit diesen Tasten können Sie die Leistung, die Temperatur
und den Timer einstellen.
Hinweise zur Arbeitsleistung
Die Arbeitsleistung beträgt 2000W für jedes einzelne Kochfeld. Die Gesamtleistung
beträgt nicht mehr als 3000W, wenn 2 Kochfelder in Betrieb sind.
1 Die Leistung jedes Kochfelders wird von der Leistung des anderen beeinusst. Ist ein
Kochfeld auf 2000 Weingestellt, kann das zweite Kochfeld nur noch auf 1000W
eingestellt werden. Die maximale angezeigte Gesamtleistung von 2Kochfeldern ist
3000W. Im Heizmodus steigt die Leistung des einen Kochfeldes, während die des
anderen abnimmt, die angezeigte Leistung ändert sich entsprechend.
2 Wenn beide Kochfelder in Betrieb sind und die Leistung eines Kochfelds 1400W
übersteigt, wird die Leistung jedes einzelnen Kochfelds automatisch auf 1400W
gesenkt. Die Leistungsanzeige ändert sich entsprechend.
3 Die Regelung der Leistung erfolgt entsprechend der zuletzt eingestellten
Leistungsstufe eines Kochfelds, die Leistung des zweiten Kochfeld wird relativ zu
diesem eingestellt.
MENÜ-EINSTELLUNGEN
Hinweis: Wenn Sie die MENÜ-Taste drücken, um die gewünschte Temperatur- und
Leistungsstufe einzustellen, heizt sich die Kochplatte sofort bis zu der voreingestellten
Temperatur- und Leistungsstufe (2000W/600°C) auf. Verwenden Sie die AUF/
AB-Tasten, um die Einstellungen zu ändern.
P Leistung (Watt):
1. Drücken Sie die MENÜ-Taste, um die Leistung einzustellen.
2. Die Anzeige „P“ (POWER/LEISTUNG) leuchtet auf. Voreingestellt sind
„2000 W“, die Leistungsstufe wird im Display angezeigt.
3. Verwenden Sie die AUF- und AB-Tasten, um die gewünschte
Leistungsstufe auszuwählen (200-2000 W).
°C Temperatur:
1. Drücken Sie die MENÜ-Taste, um die Temperatur einzustellen.
Die Anzeige „°C“ leuchtet auf. Voreingestellt sind „600°C“, die
Temperaturstufe wird im Display angezeigt.
Verwenden Sie die AUF/AB-Taste, um die gewünschte Temperaturstufe
einzustellen (90-650°C).

9
DE
2. Drücken Sie die TIMER-Taste, um die Kochzeit einzustellen. Es können
„0:01-3:00“ (1 min bis 3 h) ausgewählt werden.
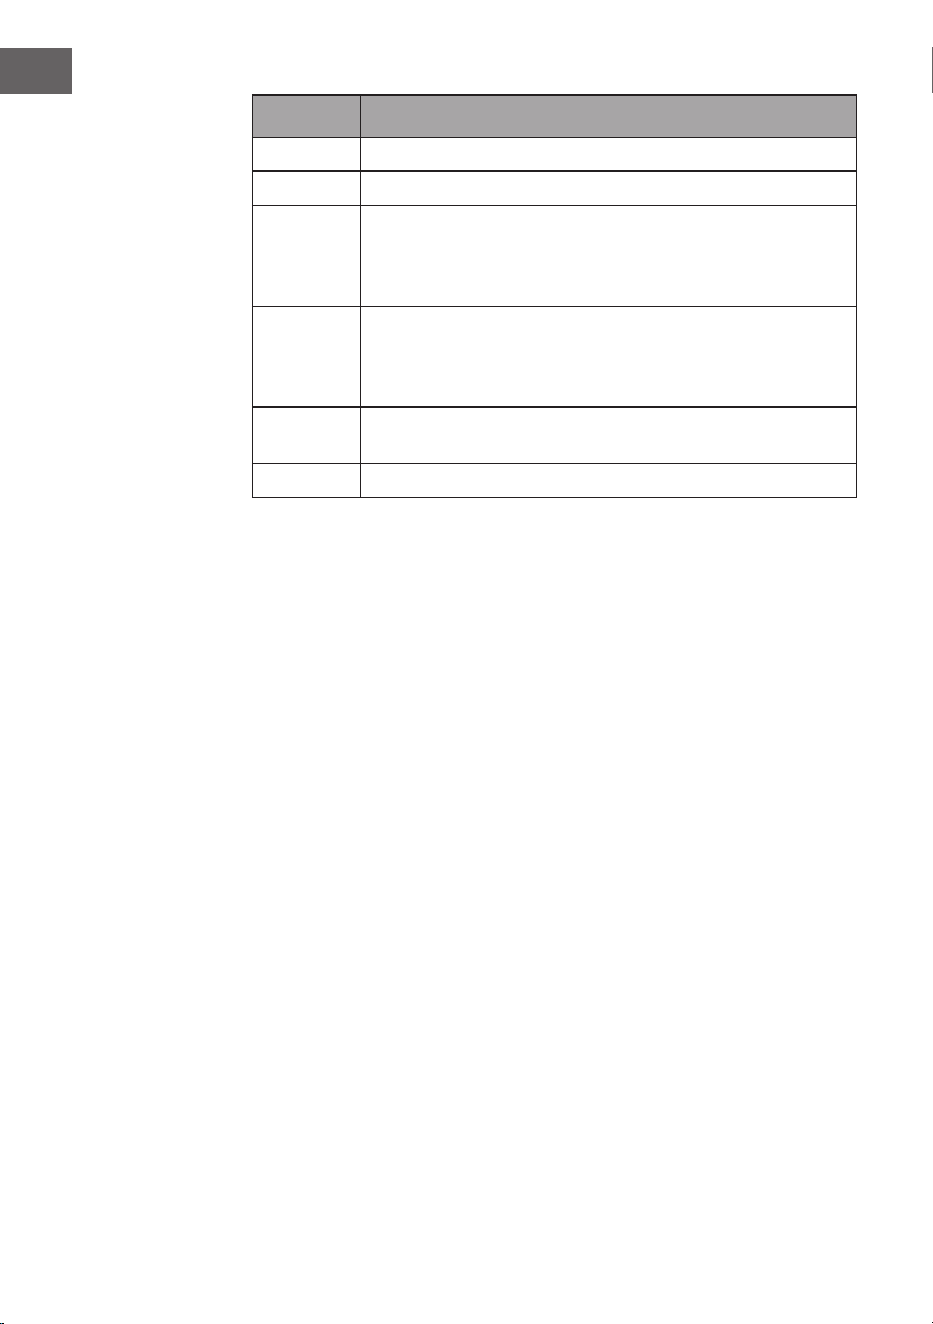
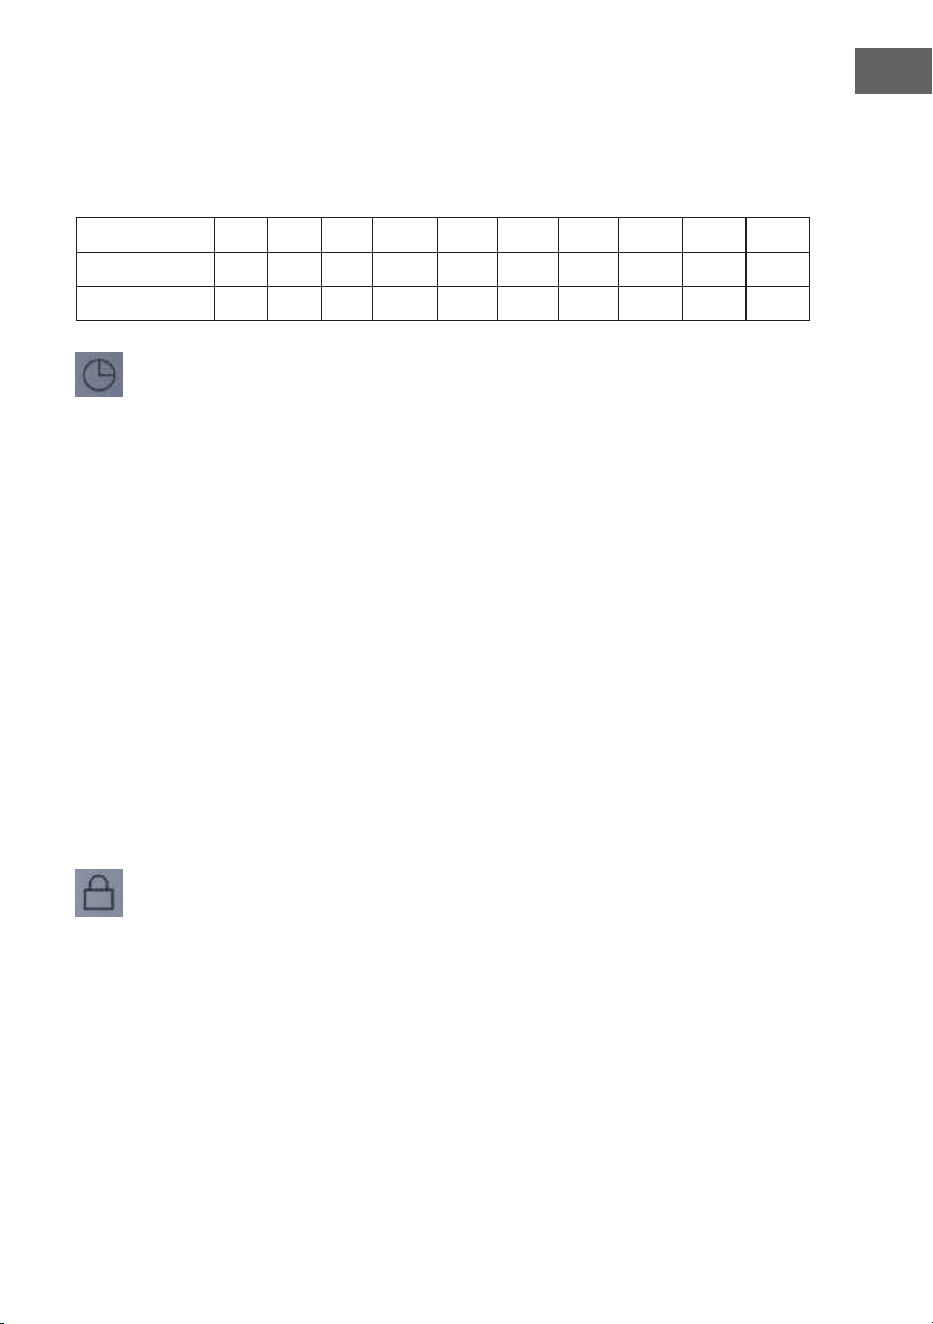
Übereinstimmung der variablen Leistungs- und Temperaturstufen
Stufe 1 2 3 4 5 6 7 8 9 10
Leistung (W) 200 400 600 800 1000 12 0 0 1400 1600 1800 2000
Temperatur (°C) 90 150 300 350 400 450 500 550 600 650
Timer:
1. Drücken Sie die TIMER-Taste, während Sie sich im Einstellmodus für
Temperatur oder Leistung benden, um die Kochzeit einzustellen. Die
TIMER-Anzeige leuchtet auf und das Display blinkt. Voreingestellt ist
„0:10“ (10 min).
2. Verwenden Sie die AUF-Taste, um die Kochzeit mit jedem Tastendruck um
10Minuten zu erhöhen oder verwenden Sie die AB-Taste um die Kochzeit
mit jedem Tastendruck um 1Minute zu verkürzen. Eingestellt werden
können „0:01“ bis „3:00“ (1 min bis 3 h). Mit einem langen Tastendruck
auf die AUF/AB-Tasten kann die Kochzeit schneller eingestellt werden.
Wenn Sie nach dem Einstellen der Kochzeit keine weitere Taste drücken,
wird der Countdown nach 5 Sekunden aktiviert und „:“ blinkt im Display.
3. Während der Timer-Countdown läuft, wird im Display alle 5 Sekunden
abwechselnd die Timer-Zeit und die Leistung oder die Temperatur
angezeigt.
4. Drücken Sie während der Countdown läuft zweimal die TIMER-Taste, um
den Timer neu einzustellen, oder drücken Sie die MENÜ-Taste, um eine
andere Temperatur- oder Leistungsstufe auszuwählen. Verwenden Sie die
AUF/AB-Tasten, um die Einstellungen zu ändern.
5. Die Kochplatte schaltet sich automatisch ab, wenn die Countdown-Zeit
abgelaufen ist.
Kindersicherung (SPERRE):
1. Halten Sie die SPERRE-Taste während des Betriebs 2Sekunden lang
gedrückt, um die Kindersicherung zu aktivieren. Im Display wird „LOC“
angezeigt und nach 5Sekunden wird die eingestellte Zeit automatisch
bestätigt. Wenn die Kindersicherung eingeschaltet ist, sind alle anderen
Tasten deaktiviert außer die LOCK-Taste und die EIN/AUS-Taste.
2. Drücken Sie die EIN/AUS-Taste, um die Kochplatte auszuschalten oder
drücken Sie die SPERRE-Taste für 2Sekunden, um die Kindersicherung zu
entsperren.
10
DE
REINIGUNG UND PFLEGE
Hinweis: Schalten Sie das Gerät aus und ziehen Sie vor der Wartung oder
Reinigung den Stecker aus der Steckdose, um Stromschläge zu vermeiden.
Vergewissern Sie sich, dass die Kochplatte bereits abgekühlt ist.
• Tauchen Sie das Gerät niemals in Wasser oder andere Flüssigkeiten.
• Reinigen Sie die Kochplatte, die Geräteoberäche und das Bedienfeld von
Verunreinigungen. Vernwenden Sie dazu einen feuchten Lappen oder Schwamm
und etwas Reinigungsmittel. Achten Sie darauf, dass kein Wasser in das Gerät
eindringt. Benutzen Sie zur Reinigung niemals Scheuermittel, Stahlwolle oder
Scheuerschwämme, sie können die Oberäche beschädigen.
• Halten Sie die Platte und das Gerätegehäuse sauber und schützen Sie alle
Geräteöffnungen, um einen Kurzschluss zu vermeiden.
• Nach längerem Gebrauch der Kochplatte können sich auf der Oberäche Flecke
bilden. Dies ist ein normaler Vorgang, der den Gebrauch des Gerätes nicht
beeinträchtigt.
• Verwenden Sie nach Möglichkeit kein Verlängerungskabel. Falls Sie doch eines
verwenden, achten Sie darauf, dass der Amperewert des angeschlossenen Geräts
den maximalen Amperewert des Netzkabels nicht überschreitet.
• Achten Sie darauf, dass beim Kochen keine Flüssigkeit auf die Kochplatte tropft, um
die Lebensdauer zu verlängern.
• Benutzen Sie nur Töpfe und Pfannen mit einem achen Boden, damit der Boden
vollständig auf der Kochplatte auiegt.
Topfwahl
• Zum Kochen können Töpfe aus allen Materialien verwendet werden. Gut geeignet
ist Kochgeschirr mit einem Bodendurchmesser von ca. 18-26cm (rund) oder ca. 12-
20cm Bodenlänge (quadratisch). Schlecht geeignet ist Kochgeschirr mit unebenem
Boden oder einem Bodendurchmesser von weniger als 12 cm.
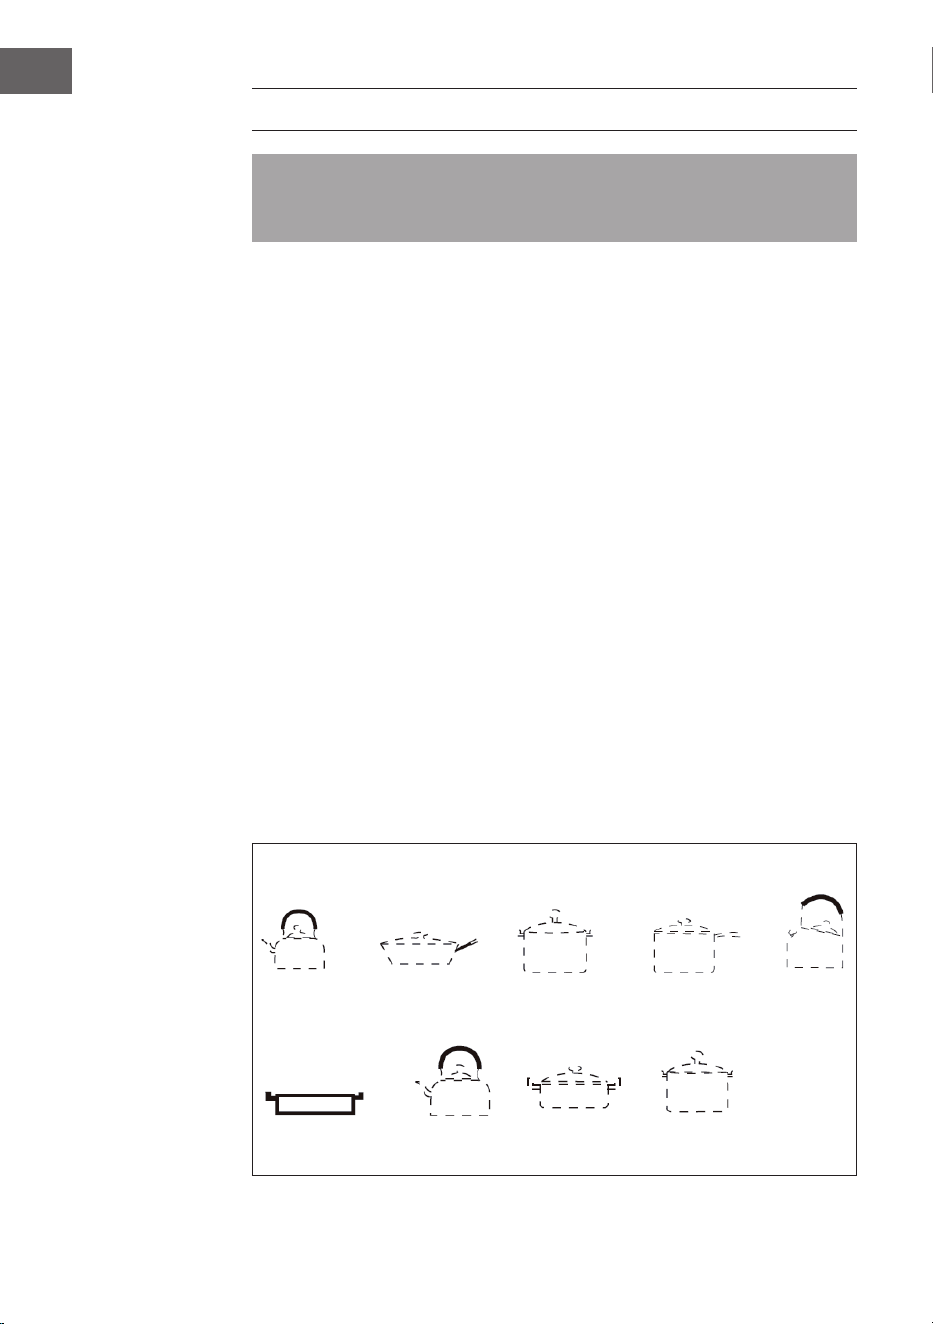
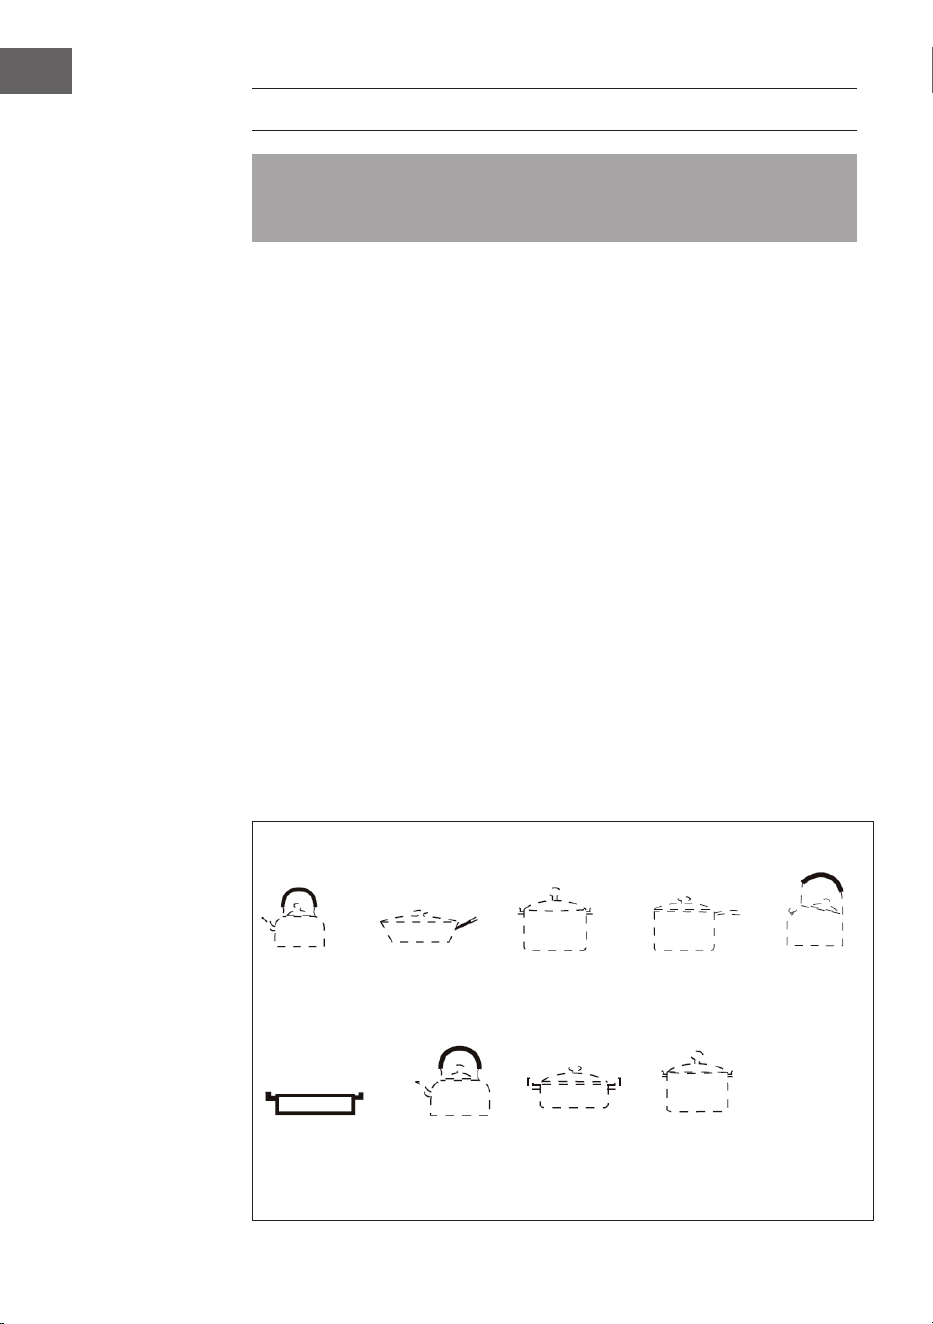
Gut geeignetes Kochgeschirr
Edelstahl-
kessel
Eisentopf Magnetischer
Edelstahltopf
Farbiger
Eisentopf
Magnetischer
Eisenkessel
Eisenpfanne Aluminium hitzebestän-
diger Topf
Keramik-
Topf

11
DE
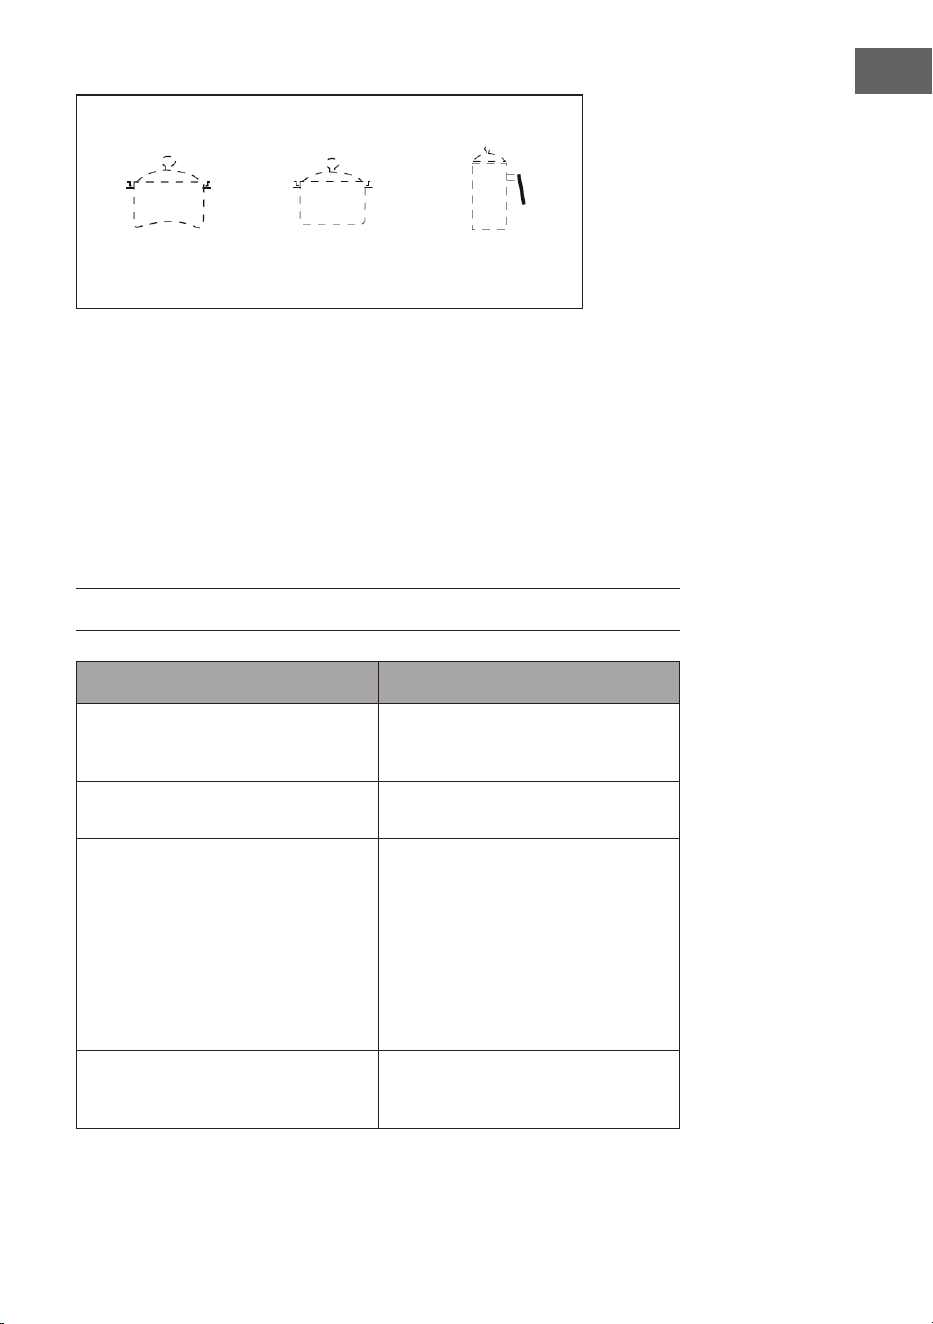
Schlecht geeignetes Kochgeschirr
unebener
Topfboden
Topfboden mit
Abstellfüßen
Topfboden mit
kleinem Durchmesser
Systemschutzfunktionen
1 Überhitzungsschutz: Wenn die Kochplatte sich auf 650°C erwärmt, wird sie
automatisch abgekühlt.
2 lnnenüberhitzungsschutz: Wenn die Innentemperatur der Maschine 100°C
erreicht, wird das Aufheizen gestoppt.
3 Überspannungsschutz: Wenn die Spannung über 275V liegt, wird die Kochplatte
nicht weiter aufgeheizt.
4 Niederspannungsschutz: Wenn die Spannung unter 120 V liegt, wird die
Kochplatte nicht weiter aufgeheizt.
FEHLERSUCHE UND FEHLERBEHEBUNG
Problem Lösungsmöglichkeit
Stecken Sie den Netzstecker in die
Steckdose. Drücken Sie die Ein-/Aus-
Taste, das Display leuchtet nicht auf.
Überprüfen Sie, ob der Netzstecker
richtig in der Steckdose steckt und die
Steckdose in gutem Zustand ist.
Die Ein/Aus-Anzeige leuchtet nicht. Überprüfen Sie, ob das Display oder
die Hauptplatine in Ordnung sind.
Während des Betriebes wird das
Aufheizen plötzlich gestoppt.
Überprüfen Sie, ob folgende Ursachen
vorliegen: die Umgebungstemperatur
ist zu hoch oder die eingestellte
Timer-Zeit wurde erreicht. Falls der
Überhitzungsschutz gestartet wurde,
nehmen Sie die Kochplatte erst nach
10Minuten wieder in Betrieb. Die
Kochplatte schaltet sich während
des Betriebes nach 2Stunden
Nichtgebrauch automatisch ab.

12
DE
Fehlercode Ursache/Lösung
E1 Kabelbruch- oder Kurzschlusserkennung des Temperaturfühlers.
E2 Kurzschluss- oder Unterbrechungs erkennung der Siliziumsteuerung.
E3 Überspannungsschutz:
Jede Sekunde ertönt ein Piepton und die LED-Display zeigt ein
blinkendes „E3“ an: Die Spannung ist ≥ 275 V. Wenn die Spannung
< 265 V ist, drücken Sie die EIN/AUS-Taste, der Infrarot-Kocher
funktioniert oder wird ausgeschaltet.
E4 Unterspannungsschutz:
Jede Sekunde ertönt ein Piepton und die LED-Display zeigt ein
blinkendes „E4“ an: Die Spannung ist ≤120V. Wenn die Spannung
>130V ist, drücken Sie die EIN/AUS-Taste, der Infrarot-Kocher
funktioniert oder wird ausgeschaltet.
E5 Störung des Lüfterstromkreises:
Der Betriebsstrom des Lüfters ist zu niedrig.
E6 Überhitzungsschutz der Siliziumsteuerung (intern)

13
DE
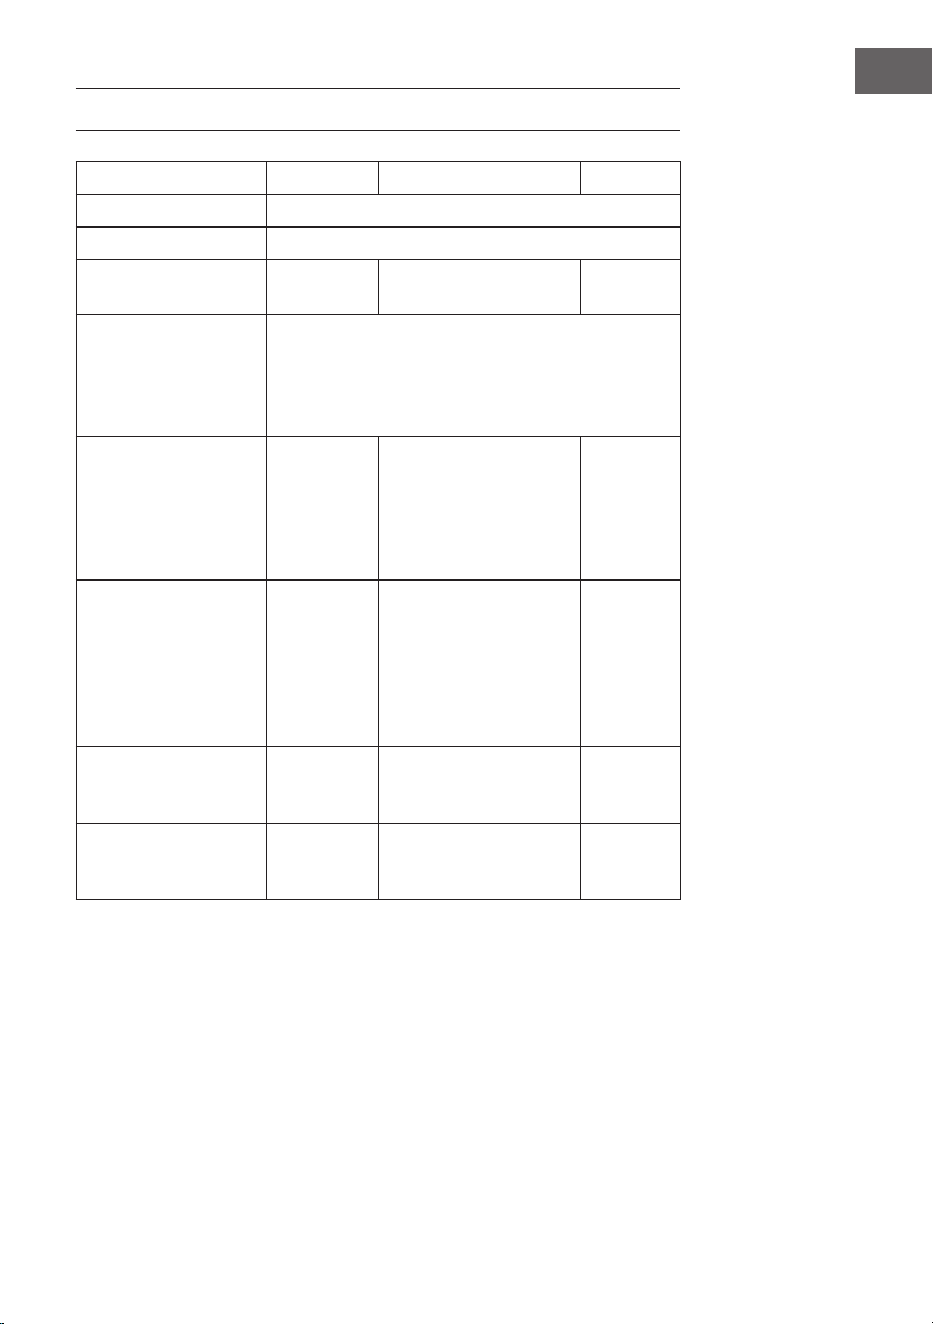
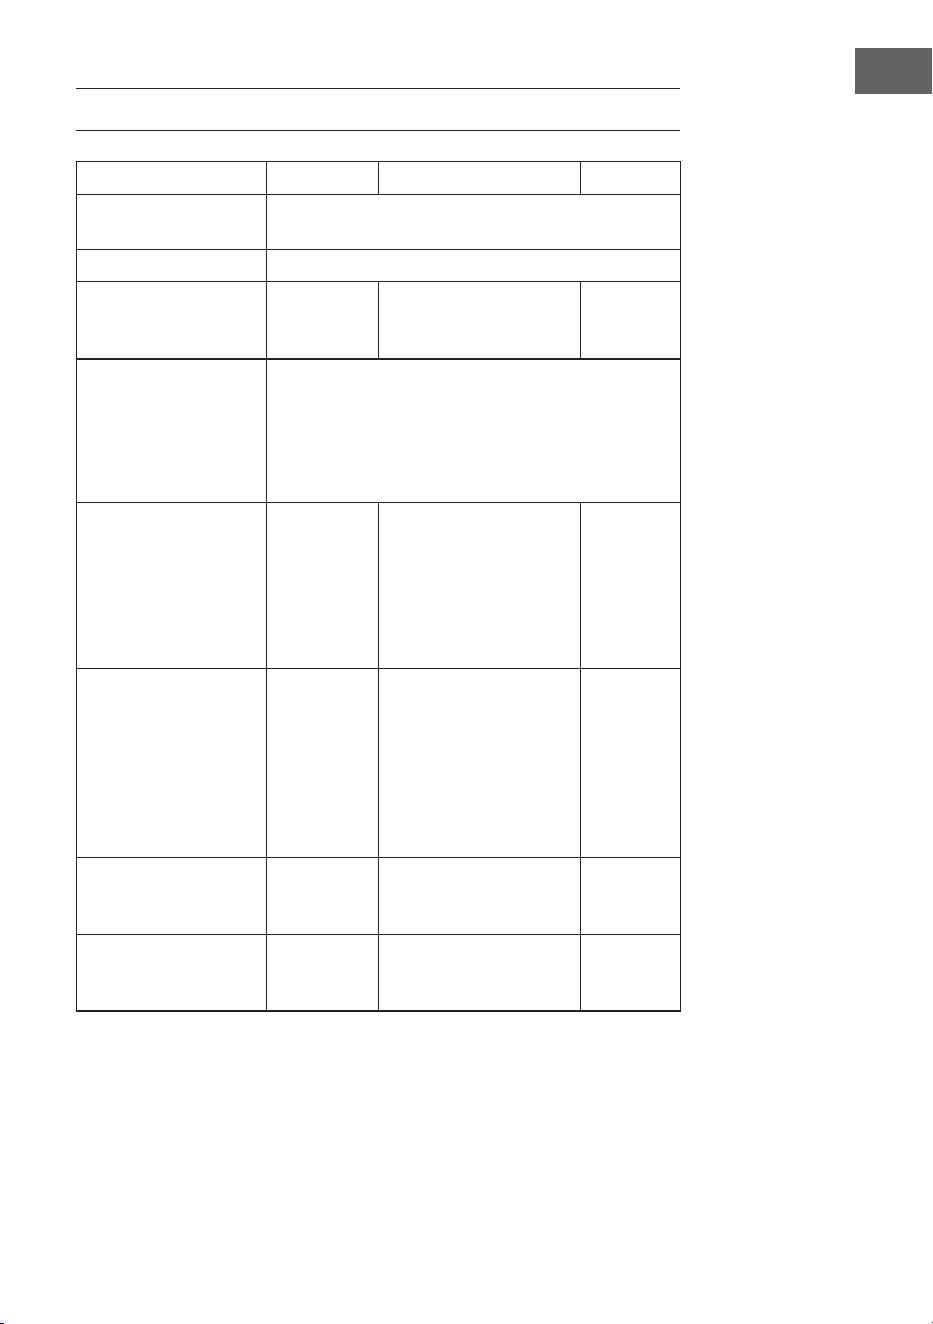
PRODUKTDATENBLATT
Symbol Wert Einheit
Modellkennung
10033283
Art der Kochmulde
Freistehend
Anzahl der Kochzonen
und/oder Kochächen
2
Heiztechnik
(IndUKtionskochzonen
und -kochächen,
Strahlungskochzonen,
Kochplatten)
Infrarot-Kochfeld
Bei kreisförmigen
Kochzonen oder -ächen:
Durchmesser der
nutzbaren Oberäche für
jede elektrisch beheizte
Kochzone, auf 5 mm
genau.
Ø 19,0 / 19,0 cm
Bei nicht kreisförmigen
Kochzonen oder -ächen:
Länge und Breite der
nutzbaren Oberäche für
jede elektrisch beheizte
Kochzone und jede
elektrisch beheizte
Kochäche, auf 5 mm
genau.
L
B
__
__
cm
Energieverbrauch je
Kochzone oder -äche
je kg
EC
Elektrisches
Kochfeld
190,5 / 187,0 Wh/kg
Energieverbrauch der
Kochmulde je kg
EC
Elektrisches
Kochfeld
188,7 Wh/kg
14
DE
SPEZIELLE ENTSORGUNGSHINWEISE FÜR
VERBRAUCHER IN DEUTSCHLAND
Entsorgen Sie Ihre Altgeräte fachgerecht. Dadurch wird gewährleistet, dass die
Altgeräte umweltgerecht verwertet und negative Auswirkungen auf die Umwelt und
menschliche Gesundheit vermieden werden. Bei der Entsorgung sind folgende Regeln
zu beachten:
• Jeder Verbraucher ist gesetzlich verpichtet, Elektro- und Elektro-
nikaltgeräte (Altgeräte) sowie Batterien und Akkus getrennt vom
Hausmüll zu entsorgen. Sie erkennen die entsprechenden Altgeräte
durch folgendes Symbol der durchgestrichene Mülltonne (WEEE-
Symbol).
• Sie haben Altbatterien und Altakkumulatoren, die nicht vom Altgerät umschlossen
sind, sowie Lampen, die zerstörungsfrei aus dem Altgerät entnommen werden
können, vor der Abgabe an einer Entsorgungsstelle vom Altgerät zerstörungsfrei zu
trennen.
• Bestimmte Lampen und Leuchtmittel fallen ebenso unter das Elektro- und
Elektronikgesetz und sind dementsprechend wie Altgeräte zu behandeln.
Ausgenommen sind Glühbirnen und Halogenlampen. Entsorgen Sie Glühbirnen
und Halogenlampen bitte über den Hausmüll, sofern sie nicht das WEEE-Symbol
tragen.
• Jeder Verbraucher ist für das Löschen von personenbezogenen Daten auf dem
Elektro- bzw. Elektronikgerät selbst verantwortlich.
Rücknahmepicht der Vertreiber
Vertreiber mit einer Verkaufsäche für Elektro- und Elektronikgeräte von mindestens 400
Quadratmetern sowie Vertreiber von Lebensmitteln mit einer Gesamtverkaufsäche von
mindestens 800 Quadratmetern, die mehrmals im Kalenderjahr oder dauerhaft Elektro-
und Elektronikgeräte anbieten und auf dem Markt bereitstellen, sind verpichtet,
1 bei der Abgabe eines neuen Elektro- oder Elektronikgerätes an einen Endnutzer ein
Altgerät des Endnutzers der gleichen Geräteart, das im Wesentlichen die gleichen
Funktionen wie das neue Gerät erfüllt, am Ort der Abgabe oder in unmittelbarer
Nähe hierzu unentgeltlich zurückzunehmen und
2 auf Verlangen des Endnutzers Altgeräte, die in keiner äußeren Abmessung größer
als 25 Zentimeter sind, im Einzelhandelsgeschäft oder in unmittelbarer Nähe hierzu
unentgeltlich zurückzunehmen; die Rücknahme darf nicht an den Kauf eines Elektro-
oder Elektronikgerätes geknüpft werden und ist auf drei Altgeräte pro Geräteart
beschränkt.

15
DE
• Bei einem Vertrieb unter Verwendung von Fernkommunikationsmitteln ist die
unentgeltliche Abholung am Ort der Abgabe auf Elektro- und Elektronikgeräte der
Kategorien 1, 2 und 4 gemäß § 2 Abs. 1 ElektroG, nämlich „Wärmeüberträger“,
„Bildschirmgeräte“ (Oberäche von mehr als 100 cm²) oder „Großgeräte“
(letztere mit mindestens einer äußeren Abmessung über 50 Zentimeter)
beschränkt. Für andere Elektro- und Elektronikgeräte (Kategorien 3, 5, 6) ist eine
Rückgabemöglichkeit in zumutbarer Entfernung zum jeweiligen Endnutzer zu
gewährleisten.
• Altgeräte dürfen kostenlos auf dem lokalen Wertstoffhof oder in folgenden
Sammelstellen in Ihrer Nähe abgegeben werden: www.take-e-back.de
• Für Elektro- und Elektronikgeräte der Kategorien 1, 2 und 4 bieten wir auch die
Möglichkeit einer unentgeltlichen Abholung am Ort der Abgabe. Beim Kauf eines
Neugeräts haben Sie die Möglichkeit, eine Altgerätabholung über die Webseite
auszuwählen.
• Batterien können überall dort kostenfrei zurückgegeben werden, wo sie verkauft
werden (z. B. Super-, Bau-, Drogeriemarkt). Auch Wertstoff- und Recyclinghöfe
nehmen Batterien zurück. Sie können Batterien auch per Post an uns zurücksenden.
Altbatterien in haushaltsüblichen Mengen können Sie direkt bei uns von Montag bis
Freitag zwischen 08:00 und 16:00 Uhr unter der folgenden Adresse unentgeltlich
zurückgeben:
Chal-Tec Fulllment GmbH
Norddeutschlandstr. 3
47475 Kamp-Lintfort
• Wichtig zu beachten ist, dass Lithiumbatterien aus Sicherheitsgründen vor der
Rückgabe gegen Kurzschluss gesichert werden müssen (z. B. durch Abkleben der
Pole).
• Finden sich unter der durchgestrichenen Mülltonne auf der Batterie zusätzlich die
Zeichen Cd, Hg oder Pb ist das ein Hinweis darauf, dass die Batterie gefährliche
Schadstoffe enthält. (»Cd« steht für Cadmium, »Pb« für Blei und »Hg« für
Quecksilber).
Hinweis zur Abfallvermeidung
Indem Sie die Lebensdauer Ihrer Altgeräte verlängern, tragen Sie dazu bei, Ressourcen
efzient zu nutzen und zusätzlichen Müll zu vermeiden. Die Lebensdauer Ihrer Altgeräte
können Sie verlängern, indem Sie defekte Altgeräte reparieren lassen. Wenn sich
Ihr Altgerät in gutem Zustand bendet, könnten Sie es spenden, verschenken oder
verkaufen.

16
DE
HINWEISE ZUR ENTSORGUNG
Wenn es in Ihrem Land eine gesetzliche Regelung zur
Entsorgung von elektrischen und elektronischen Geräten
gibt, weist dieses Symbol auf dem ProdUKt oder auf der
Verpackung darauf hin, dass dieses ProdUKt nicht im
Hausmüll entsorgt werden darf. Stattdessen muss es zu
einer Sammelstelle für das Recycling von elektrischen
und elektronischen Geräten gebracht werden. Durch
regelkonforme Entsorgung schützen Sie die Umwelt und die
Gesundheit Ihrer Mitmenschen vor negativen Konsequenzen.
Informationen zum Recycling und zur Entsorgung dieses
ProdUKts, erhalten Sie von Ihrer örtlichen Verwaltung oder
Ihrem Hausmüllentsorgungsdienst.
HERSTELLER & IMPORTEUR (UK)
Hersteller:
Chal-Tec GmbH, Wallstraße 16, 10179 Berlin, Deutschland.
Importeur für Großbritannien:
Berlin Brands Group UK Limited
PO Box 42
272 Kensington High Street
London, W8 6ND
United Kingdom
17
EN
Dear Customer,
Congratulations on purchasing this device. Please read the
following instructions carefully and follow them to prevent
possible damages. We assume no liability for damage caused
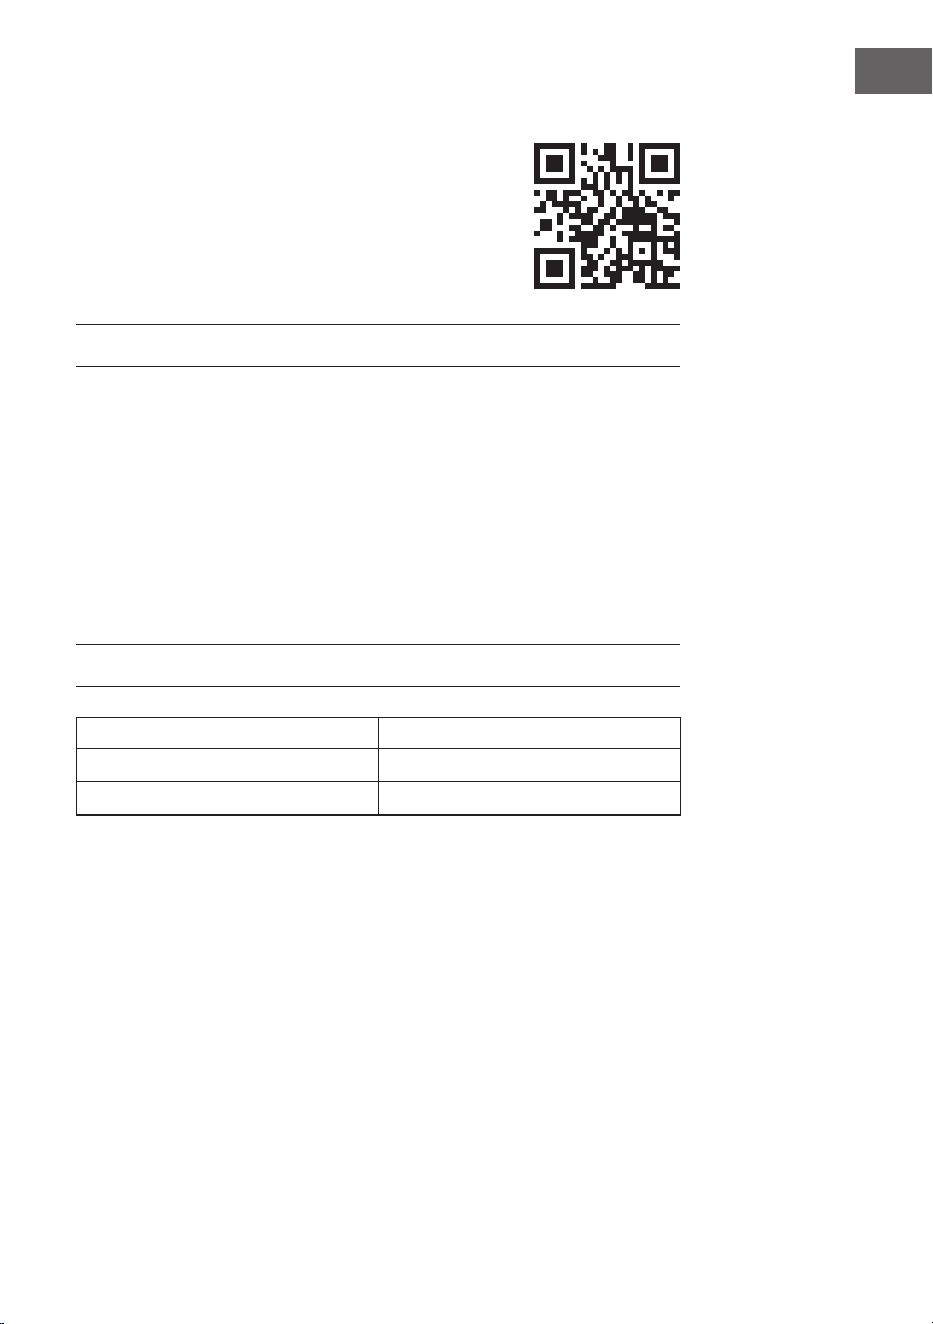
by disregard of the instructions and improper use. Scan the QR
code to get access to the latest user manual and more product
information.
CONTENTS
TECHNICAL DATA
Item number 10033283
Power supply 220-240 V ~ 50/60 Hz
Rated power (Watt) 3000 W
Safety Instructions18
Device Overview19
Operation20
Control Panels and Buttons21
Menu Settings22
Cleaning and Care24
Troubleshooting25
Product Data Sheet27
Disposal Considerations28
Manufacturer & Importer (UK)28

18
EN
SAFETY INSTRUCTIONS
• Read all instructions in this manual carefully. Only use the appliance as described in
this manual. Do not use the appliance except as intended.
• When using electrical appliances, basic safety precautions should always be
followed to reduce the risk of re, electric hazard and injury to persons, including
the following.
• Do not touch hot surfaces.
• To protect against electrical shock, do not place this appliance in water or other
liquid. See the instructions for cleaning in the section “Cleaning and care“.
• Only use the appliance under supervision. Place the hotplate out of the reach of
children.
• Children should be supervised to ensure that they do not play with the appliance.
• This appliance can be used by children aged from 8 years and above and persons
with reduced physical, sensory or mental capabilities or lack of experience and
knowledge if they have been given supervision or instruction concerning use of the
appliance by a person responsible for their safety.
• The appliance is not intended to be operated by means of an external timer or
separate remote-control system.
• Place the appliance on a at, stable surface.
• Do not use the appliance in narrow, poorly ventilated rooms.
• Unplug the main power from the wall socket when not in use and before cleaning.
Switch off the appliance before unplugging it from the mains. Allow to cool before
cleaning the appliance.
• Do not operate any appliance with a damaged cord or plug or after the appliance
malfunctions, or has been damaged in any manner. Return appliance to the nearest
authorized service facility for examination, repair or adjustment.
• The surface of the hotplate is made of crystal glass and covers live parts of the
appliance: If the glass surface of the hotplate is damaged or has cracks, switch off
the appliance immediately and disconnect the mains plug to avoid the possibility of
an electric shock.
• To reduce the risk of injury, use accessory attachments only if recommended by the
appliance manufacturer.
• Do not use the appliance outdoors, while standing in a damp area or near an open
re.
• Do not let the power cord hang over the edge of a table or counter, or touch hot
surfaces. Do not bend the power cord as this may cause damage.
• Do not place on or near a hot gas or electric burner, or in a heated oven.
• Do not use the hotplate without a pot.
• Extreme caution must be used when moving any pot or pan containing hot oil or
liquids from this appliance.
• When heating the hotplate, do not place any plastic containers or paper on
the hotplate and make sure that there are no fabric or plastic products near the
hotplate.
• Do not handle the power cord or plug with wet hands.
• Do not place metallic objects such as knives, forks, spoons and lids on the hotplate
as they can become hot.
19
EN
• Do not block or cover the air inlet and outlet openings.
• Avoid something falling on the hotplate.
• Do not open or modify any parts of the appliance and do not repair the hotplate
yourself to avoid electric shocks, short circuits or res.
• If the supply cord is damaged, it must be replaced by the manufacturer or its service
agent or a similarly quali ed person in order to avoid a hazard.
• Keep the manual in a safe place for future reference.
• The appliance is not intended for commercial use, but only for household use and in
similar environments, such as kitchens in of ces, farms, hotels, motels and facilities
offering bed & breakfasts.
WARNING:
Risk of re! Do not store other items on the cooking surfaces, except
pans and pots.
DEVICE OVERVIEW
Outlet
Black crystal panel
Control panel
Inlet
20
EN
OPERATION
Before rst Use
• Check the voltage on the rating plate before use. Connect the equipment only to
sockets that match the voltage of the equipment. If you are not sure whether your
connections meet the requirements, consult an electrician or your power supplier.
• Place the appliance on a level, heat-resistant surface. Do not place it on surfaces
that are unstable and from which it can easily tip over.
Initial use
Insert the mains plug into the wall socket. To start the unit, press and hold the Menu
button for 2 seconds.
Usage
• Put the food to be heated in a pot and place it in the middle of the hotplate. Before
placing the cookware on the hotplate, clean the bottom of the pot to prevent burns.
• Set the desired cooking time, output and temperature as described in the following
sections.
• The surface of the hotplate will quickly become hot during operation. Do not touch
it.
• After cooking, switch off the appliance by pressing the ON/OFF button. The
hotplate still has a high temperature, the display remains illuminated and the fan
continues to run. Do not touch the hotplate by hand until the appliance has cooled
down and then unplug the appliance from the wall outlet.
• If you are not going to use the appliance for a long time, remove the plug from the
socket so that the plate does not accidentally come on.
CAUTION
Risk of burns! During use, accessible parts of this appliance will
become hot enough to cause burns. Do not let your body, clothing or
any item other than suitable cookware contact the hotplate until the
surface is cool.

21
EN
CONTROL PANELS AND BUTTONS
Left control panel
Right control panel
Button functions
ON/OFF
• Press the ON/OFF button to turn on the hotplate. A beep
will sound and the display will show “ON“. You can now
make further settings. If no entries are made, a beep
sounds after 1minute and the hotplate automatically
switches to standby mode.
• If you want to switch the hotplate on again, press the ON/
OFF button. The display shows “ON“.
• To switch to standby mode during operation, press the
ON/OFF button. A beep sounds, the heating element is
switched off, the display shows “HOT“ and the infrared
hob switches to standby mode. (Ventilation will continue
for some time while the hotplate cools down.)
Note: The hotplate does not have a power switch. The
power supply can only be interrupted by pulling the mains
plug.
TIMER
• Use this button to set the cooking time.
LOCK
• During operation, press and hold the LOCK button for
2seconds to activate the child lock. When the child lock is
on, all buttons other than the LOCK button and the ON/
OFF button are locked.
• To turn off, press the ON/OFF button or press the LOCK
button for 2seconds to unlock the child lock.
MENU
• Use this button to select the power and temperature level.
UP + DOWN
• Use these buttons to set the power, temperature and timer.

22
EN
Notes on working power
Working power is 2000W for each hob, total power is not exceeding 3000W when
2hobs are working.
1 The power of each hob is inuenced by the power of the other. If one hob is set to
2000W, the second hob can only be set to 1000W.The maximum total displayed
power of 2hobs is 3000W. In heating mode, the power of one hob increases
while that of the other decreases, and the displayed power changes accordingly.
2 In share power status, when each burner losses connection, the power of each hob
is automatically reduced to 1400W with a corresponding change in the power
level display if the power of one hob exceeds 1400W.
3 The power is regulated according to the last set power level of a hob, the power of
the second hob is set relative to it.
MENU SETTINGS
Note: If you press the MENU button to set the desired temperature and power level,
the hotplate will immediately heat up to the default temperature and power level
(2000 W/600°C). Use the UP/DOWN buttons to change the settings.
P Power (Watt):
1. Press the MENU button to set the power.
2. The “P“ (POWER) indicator will light up. The default setting is “2000 W“
and the power level is shown in the display.
3. Use the UP and DOWN buttons to select the desired power level (200-
2000W).
°C Temperature:
1. Press the MENU button to set the temperature.
The “°C“ indicator lights up. The default setting is “600°C“ and the
temperature level is shown in the display.
Use the UP/DOWN buttons to set the desired temperature level (90-
650°C).
Press the TIMER button to set the cooking time. You can select “0:01-3:00“
(1 min to 3 h).
2. Press the MENU button to select additional functions.
23
EN
Correspondence of the variable power and temperature levels
Level 1 2 3 4 5 6 7 8 9 10
Power (W) 200 400 600 800 1000 1200 1400 1600 1800 2000
Temperature(°C) 90 15 0 300 350 400 450 500 550 600 650
Timer:
1. In the setting state of power or temperature, press the TIMER button to set
the cooking time. The TIMER indicator lights up and the display ashes.
The default setting is “0:10“ (10 min).
2. Use the UP button to increase the cooking time by 10 minutes each time
the button is pressed, or use the DOWN button to reduce the cooking time
by 1 minute each time the button is pressed. You can set “0:01“ to “3:00“
(1 min to 3 h). A long press on the UP/DOWN buttons allows you to set
the cooking time more quickly. If you do not press another button after
setting the cooking time, the countdown is activated after 5 seconds and
“:“ ashes in the display.
3. While the timer countdown is running, the display alternately shows the
timer time and the power or temperature every 5 seconds.
4. During countdown, press the TIMER button twice to reset the timer or press
the MENU button to select another temperature or power level. Use the
UP/DOWN buttons to change the settings.
5. The hotplate will automatically turn off when the countdown time has
elapsed.
Child Lock (LOCK):
1. During operation, press and hold the LOCK button for 2 seconds to
activate the child lock. The display will show „LOC“ and after 5 seconds
the set time will be conrmed automatically. When the child lock is on,
all other buttons are disabled except the LOCK button and the ON/OFF
button.
2. Press the ON/OFF button to turn off the hotplate or press the LOCK button
for 2 seconds to unlock the child lock.

24
EN
CLEANING AND CARE
Note: Turn off the appliance and unplug it from the wall outlet before maintenance
or cleaning to avoid electric shock. Make sure that the hotplate has already cooled
down.
• Never immerse the appliance in water or other liquids.
• Clean the cooking plate, the appliance surface and the control panel from dirt. Use
a damp cloth or sponge and a small amount of detergent. Make sure that no water
leaks into the hotplate. Never use abrasives, steel wool pads or abrasive sponges
for cleaning, as they can damage the surface.
• Keep the panel and housing clean and protect all openings to avoid short circuits.
• Stains may form on the surface after prolonged use of the hotplate. This is a normal
procedure and will not affect the use of the appliance.
• If possible, do not use an extension cord. If you do use one, make sure that the
amperage of the connected appliance does not exceed the maximum amperage of
the power cord.
• Make sure that no liquid drips onto the hotplate during cooking to prolong its life.
• Only use pots and pans with a at bottom so that the bottom is completely on the
hotplate.
Choose pot
• Pots made of all materials can be used for cooking. Cookware with a base
diameter of approx. 18-26 cm (round) or approx. 12-20 cm (square) is well suited.
Cookware with an uneven base or a base diameter of less than 12 cm is not well
suited.
Friendly cookware
Stainless-
Steel kettle
Iron pot Magnetic
stainless steel pot
Colored
iron pot
Magnetic
iron kettle
Iron pan Aluminium Heat-resistant
pot
Ceramic pot
25
EN
Non-friendly cookware
Uneven
pot bottom
Pot bottom
with feet
Pot bottom with
small diameter
System protection functions
1 Plate overheating protection: When the hotplate heats up to 650°C, it is
automatically cooled down.
2 Inner overheating protection: When the inner temperature of the machine reaches
100°C, heating is stopped.
3 Overvoltage protection: If the voltage exceeds 275V, the hotplate will not be
heated any further.
4 Low voltage protection: If the voltage is below 120 V, the hotplate will not be
heated any further.
TROUBLESHOOTING
Problem Possible Solution
Plug the mains plug into the wall socket.
Press the ON/OFF button, the display
does not light.
Check that the mains plug is plugged
into the wall socket correctly and that
the wall socket is in good condition.
The On/Off indicator does not light. Check if the display or the main board
are in good condition.
During operation, the heating process is
suddenly stopped.
Check whether the following causes
have occurred: the surrounding
temperature is high or the set timer time
has been reached. If the overheating
protection has been started, do not put
the hotplate back into operation until
after 10 minutes. The hotplate switches
off automatically during operation after
2 hours of non-use.
The power cord is damaged. Have the defective power cord replaced
by an authorized electrician with a
power cord of the same model.
26
EN
Error code Cause/Solution
E1 Short or open circuit detection of the temperature sensor.
E2 Short or open circuit detection of silicon controlled.
E3
High voltage protection:
A beep sounds every second and the LED display shows a ashing
“E3“: The voltage is ≥ 275 V. If the voltage is <265 V, press the ON/
OFF button, the infrared cooker will work or turn off.
E4
Low voltage protection:
A beep sounds every second and the LED display shows a ashing
“E4“: The voltage is ≤120 V. If the voltage is >130 V, press the ON/
OFF button, the infrared cooker will work or turn off.
E5
Fan open circuit:
The working current of the fan is too low.
E6 Overheat protection of silicon controlled (internal)
27
EN
PRODUCT DATA SHEET
Symbol Value Unit
Model identication
10033283
Type of hob
Freestanding
Number of cooking zones
and/or areas
2
Heating technology
(induction cooking zones
and cooking areas,
radiant cooking zones,
solid plates)
Infrared hob
For circular cooking
zones or area: diameter
of useful surface area per
electric heated cooking
zone, rounded to the
nearest 5 mm
Ø 19,0 / 19,0 cm
For non-circular cooking
zones or areas: length
and width of useful
surface area per
electric heated cooking
zone or area, rounded to
the nearest 5 mm
L
W
__
__
cm
Energy consumption per
cooking zone or area
calculated per kg
EC
Electric
Cooking Hob
190,5 / 187,0 Wh/kg
Energy consumption for
the hob calculated per kg
EC
Electric
Cooking Hob
188,7 Wh/kg
28
EN
DISPOSAL CONSIDERATIONS
If there is a legal regulation for the disposal of electrical
and electronic devices in your country, this symbol on the
product or on the packaging indicates that this product must
not be disposed of with household waste. Instead, it must be
taken to a collection point for the recycling of electrical and
electronic equipment. By disposing of it in accordance with
the rules, you are protecting the environment and the health of
your fellow human beings from negative consequences. For
information about the recycling and disposal of this product,
please contact your local authority or your household waste
disposal service.
MANUFACTURER & IMPORTER (UK)
Manufacturer:
Chal-Tec GmbH, Wallstrasse 16, 10179 Berlin, Germany.
Importer for Great Britain:
Berlin Brands Group UK Limited
PO Box 42
272 Kensington High Street
London, W8 6ND
United Kingdom

29
ES
Instrucciones de seguridad30
Vista general del aparato31
Operación32
Panel de control y funciones de las teclas33
Ajustes del menú34
Limpieza y cuidado36
Solución de problemas37
Hoja de datos del producto39
Indicaciones sobre la retirada del aparato40
Fabricante e importador (Reino Unido)40
Estimado cliente:
Le felicitamos por la adquisición de este producto. Lea
atentamente las siguientes instrucciones y sígalas para evitar
posibles daños. No asumimos ninguna responsabilidad por los
daños causados por el incumplimiento de las instrucciones y el
uso inadecuado. Escanee el siguiente código QR para obtener
acceso a la última guía del usuario y más información sobre el
producto:
ÍNDICE
DATOS TÉCNICOS
Número de artículo 10033283
Alimentación eléctrica 220-240 V ~ 50/60 Hz
Potencia (Vatio) 3000 W

30
ES
INSTRUCCIONES DE SEGURIDAD
• Lea atentamente toda la información de este manual. Utilice el aparato según lo
previsto y exactamente como se describe en el manual.
• Cuando se utiliza equipo eléctrico, siempre se deben tomar las precauciones
básicas de seguridad para reducir el riesgo de incendio, descarga eléctrica y
lesiones personales, incluyendo las siguientes.
• No toque las supercies calientes.
• Para evitar descargas eléctricas, no sumerja este equipo en agua ni en ningún otro
líquido. Siga las instrucciones de la sección «Limpieza y cuidado».
• Usar sólo bajo supervisión. Coloque la placa de cocción fuera del alcance de los
niños.
• Los niños deben ser supervisados para asegurarse de que no juegan con el
aparato.
• Los niños a partir de los 8 años, las personas con discapacidades físicas y
psíquicas y las personas sin conocimientos ni experiencia sólo podrán utilizar el
aparato si han sido familiarizados con sus funciones y precauciones de seguridad
por parte de un supervisor responsable de ellos.
• El dispositivo no debe ser utilizado junto con un temporizador externo o un sistema
de control remoto separado.
• Coloque la unidad sobre una supercie plana y estable.
• No utilice la unidad en áreas connadas y mal ventiladas.
• Desenchufe el aparato de la toma de corriente cuando no esté en uso y antes de
limpiarlo. Apague el aparato antes de desenchufarlo. Deje que el aparato se enfríe
antes de limpiarlo.
• No utilice el aparato con un cable o enchufe dañado si el aparato está defectuoso
o se ha dañado de alguna manera. Lleve la unidad a un centro de servicio para su
inspección y reparación.
• La supercie de la placa de cocción está hecha de cristal y cubre las partes activas
del aparato: Si la supercie de cristal de la placa de cocción está dañada o
presenta grietas, apague inmediatamente el aparato y desconéctelo para evitar el
riesgo de descarga eléctrica.
• Para reducir el riesgo de lesiones, utilice únicamente los accesorios suministrados.
• No utilice la unidad al aire libre, en habitaciones húmedas o cerca de la chimenea.
• No deje que el cable de alimentación cuelgue sobre el borde de la mesa o la
encimera ni toque las supercies calientes.
• No doble el cable, ya que podría dañarlo.
• No coloque el aparato sobre o cerca de una estufa de gas, una estufa eléctrica o
un horno caliente.
• No use la plancha sin una olla.
• Tenga cuidado al mover sartenes o ollas que contengan aceite o líquidos calientes.
31
ES
• Al calentar la placa calefactora, no coloque ningún recipiente de plástico o papel
sobre la placa calefactora y asegúrese de que no haya telas o productos de
plástico cerca de la placa calefactora.
• No toque el cable de alimentación ni el enchufe con las manos mojadas.
• No coloque objetos metálicos como cuchillos, tenedores, cucharas o tapas sobre
la placa de cocción, ya que pueden calentarse.
• No bloquee ni cubra las aberturas de entrada y salida de aire.
• Evite que algo caiga sobre la placa de cocción.
• No abra ni modi que ninguna parte del aparato y no repare la placa usted mismo
para evitar descargas eléctricas, cortocircuitos o incendios.
• Si el cable de alimentación o el enchufe están dañados, deben ser reemplazados
por el fabricante, un centro de servicio autorizado o una persona cali cada similar.
• Guarde este manual en un lugar seguro para futuras consultas.
• Este equipo no está destinado para uso comercial y está destinado únicamente a
entornos domésticos y similares. Esto incluye cocinas en o cinas, granjas, hoteles,
moteles e instalaciones que ofrecen Bed & Breakfasts.
ATENCIÓN
Peligro de incendio! No coloque ningún otro objeto que no sean ollas
y sartenes sobre la placa eléctrica.
VISTA GENERAL DEL APARATO
Aire de salida
Placa de
cocción de
vidrio negro
Panel de
control
Aire de suministro

32
ES
OPERACIÓN
Antes del primer uso
• Compruebe el voltaje en la placa de identi cación antes de usar. Conecte el
aparato sólo a tomas que correspondan a la tensión del aparato. Si no está
seguro de si sus conexiones cumplen los requisitos, consulte a un electricista o a su
proveedor de energía.
• Coloque el equipo sobre una super cie nivelada y resistente al calor. No lo
coloque sobre super cies que sean inestables y desde las cuales se pueda inclinar
fácilmente.
Puesta en marcha
Inserte el enchufe de la red en el enchufe. Para poner en marcha la unidad,
mantenga pulsado el botón de menú durante 2 segundos.
Uso
• Ponga la comida a calentar en una olla y colóquela en el centro de la plancha.
Antes de colocar los utensilios de cocina en la placa de cocción, limpie el fondo
de la olla para evitar quemaduras.
• Ajuste el tiempo de cocción, la potencia y la temperatura deseados tal y como se
describe en las secciones siguientes.
• La super cie de la placa de cocción se calentará rápidamente durante el
funcionamiento. No lo toques.
• Después de cocinar, apague el aparato pulsando el botón ON/OFF. La placa de
cocción todavía tiene una temperatura alta, la pantalla permanece encendida y
el ventilador sigue funcionando. No toque la placa de cocción con la mano hasta
que el aparato se haya enfriado y luego desenchufe el aparato de la toma de
corriente.
• Si no va a utilizar el aparato durante mucho tiempo, desconecte el enchufe de la
toma de corriente para que la placa no se encienda accidentalmente.
ATENCIÓN
Peligro de quemaduras! Durante el uso, los componentes del aparato
accesibles al usuario se calientan tanto que pueden provocar
quemaduras. Asegúrese de que su cuerpo, ropa y otros materiales que
no sean utensilios de cocina no toquen la placa de cocción hasta que
se haya enfriado completamente.
33
ES
PANEL DE CONTROL Y FUNCIONES DE LAS
TECLAS
Panel de control izquierdo
Panel de control derecho
Funciones de las teclas
ENCENDER/
APAGAR
(ON/OFF)
• Pulse el botón ON/OFF para encender la placa de
cocción. Sonará un pitido y la pantalla mostrará „ON“.
Ahora puede realizar más ajustes. Si no se realiza
ninguna entrada, suena un pitido después de 1 minuto y
la placa de cocción cambia automáticamente al modo
de espera.
• Si desea volver a encender la placa de cocción, pulse de
nuevo el botón ON/OFF. En el display aparece „ON“.
• Para cambiar al modo de espera durante el
funcionamiento, pulse el botón ON/OFF. Suena una
señal acústica, se desconecta el elemento calefactor,
en la pantalla aparece „HOT“ y la placa eléctrica de
infrarrojos pasa al modo de espera. (La ventilación
continuará durante algún tiempo mientras la placa se
enfría).
Nota: La placa de cocción no tiene interruptor de red.
La alimentación eléctrica sólo se puede interrumpir
desconectando el enchufe de la red.
TEMPORIZADOR
• Utilice este botón para ajustar el tiempo de cocción.
BLOQUEO
(LOCK)
• Durante el funcionamiento, mantenga pulsado el botón
LOCK durante 2 segundos para activar el control
parental. Cuando el control parental está activado, todos
los botones excepto el botón LOCK y el botón ON/OFF
están bloqueados.
• Para apagarlo, pulse el botón ON/OFF o pulse el botón
LOCK durante 2 segundos para desbloquear el control
parental.

34
ES
MENU
• Utilice este botón para seleccionar el nivel de potencia y
temperatura.
SUBIR + BAJAR
(UP + DOWN)
• Utilice estos botones para ajustar la potencia, la
temperatura y el temporizador.
Notas sobre el rendimiento
La potencia es de 2000 W para cada placa de cocción individual. La potencia total no
supera los 3000 W con 2 placas de cocción en funcionamiento.
1. El rendimiento de cada placa de cocción depende del rendimiento de la otra. Si
una de las talladoras se ajusta a 2000W, la segunda talladora sólo se puede
ajustar a 1000 W. La potencia máxima total mostrada de 2 placas de cocción es
de 3000 W. En el modo de calefacción, la potencia de una encimera aumenta
mientras que la de la otra disminuye, y la potencia visualizada cambia en
consecuencia.
2. Cuando ambas placas de cocción están en funcionamiento y la potencia de
una de ellas supera los 1300 W, la potencia de la placa de cocción disminuye
automáticamente a 1300 W. La potencia de la otra placa de cocción cambia en
consecuencia. El indicador de encendido cambia en consecuencia.
3. La potencia se regula en función del último nivel de potencia ajustado de una
placa de cocción, la potencia de la segunda placa de cocción se ajusta en
relación con ella.
AJUSTES DEL MENÚ
Nota: Si pulsa el botón MENU para ajustar la temperatura y el nivel de potencia
deseados, la placa calentadora se calentará inmediatamente hasta la temperatura y
el nivel de potencia preestablecidos (2000 W/600 °C). Utilice las teclas ARRIBA/
ABAJO para cambiar los ajustes.
P Potencia (Watt):
1. Pulse el botón MENU para ajustar la potencia.
2. El indicador „P“ (POWER) se iluminará. El ajuste por defecto es „2000 W“
y el nivel de potencia se muestra en la pantalla.
3. Utilice las teclas SUBIR y BAJAR para seleccionar el nivel de potencia
deseado (200-2000 W).
°C Temperatura:
1. Pulse el botón MENU para ajustar la temperatura y el indicador „°C“ se
iluminará. El ajuste por defecto es „600 °C“ y el nivel de temperatura se
muestra en la pantalla, utilice las teclas SUBIR/BAJAR para ajustar el nivel
de temperatura deseado (90-650 °C).
35
ES
2. Pulse el botón TIMER para ajustar el tiempo de cocción. Puede seleccionar
„0:01-3:00“ (1 min. a 3 h).
Conformidad de los niveles variables de potencia y temperatura
Nivel 1 2 3 4 5 6 7 8 9 10
Potencia (W) 200 400 600 800 1000 12 0 0 1400 1600 1800 2000
Temperatura °C 90 150 300 350 400 450 500 550 600 650
Temporizador:
1. Presione el botón TIMER mientras esté en el modo de ajuste de
temperatura o potencia para ajustar el tiempo de cocción. El indicador
TIMER se ilumina y la pantalla parpadea. El ajuste predeterminado es
«0:10» (10 min).
2. Use el botón SUBIR para aumentar el tiempo de cocción en 10 minutos
cada vez que pulse el botón, o use el botón ABAJO para disminuir el
tiempo de cocción en 1 minuto cada vez que pulse el botón. Puede
ajustar «0:01» a «3:00» (1 min. a 3 h). El tiempo de cocción puede ser
ajustado más rápido pulsando los botones ARRIBA/ABAJO durante un
tiempo prolongado. Si no pulsa otro botón después de ajustar el tiempo
de cocción, la cuenta atrás se activa después de 5 segundos y «:»
parpadea en la pantalla.
3. Mientras se ejecuta la cuenta atrás del temporizador, la pantalla muestra
alternativamente la hora del temporizador y la potencia o temperatura
cada 5 segundos.
4. Durante la cuenta atrás, pulse el botón TIMER dos veces para restablecer
el temporizador o pulse el botón MENU para seleccionar otra
temperatura o nivel de potencia.
5. La placa de cocción se apaga automáticamente cuando ha transcurrido
el tiempo de cuenta atrás.
Seguro para niños (Bloqueo):
1. Durante el funcionamiento, mantenga pulsado el botón LOCK durante
2 segundos para activar el seguro para niños. La pantalla mostrará
«LOC» y después de 5 segundos el tiempo ajustado se conrmará
automáticamente. Cuando el control parental está activado, todos los
demás botones están desactivados excepto el botón LOCK y el botón
ON/OFF.
2. Pulse el botón ON/OFF para apagar la placa de cocción o pulse el
botón LOCK durante 2 segundos para desbloquear el control parental.
36
ES
LIMPIEZA Y CUIDADO
Nota: Desconecte la corriente y desenchufe el aparato de la toma de corriente antes
de realizar tareas de mantenimiento o limpieza para evitar el riesgo de descargas
eléctricas. Asegúrese de que la placa de cocción ya se haya enfriado.
• Nunca sumerja el aparato en agua u otros líquidos.
• Limpie la placa de cocción, la supercie del aparato y el panel de control de
suciedad. Utilice un paño o esponja húmeda y un poco de detergente. Asegúrese
de que no penetre agua en el aparato. Nunca utilice limpiadores abrasivos,
lana de acero o esponjas abrasivas para la limpieza, ya que pueden dañar la
supercie.
• Mantenga limpios el panel y la carcasa y proteja todas las aberturas para evitar
cortocircuitos.
• Pueden formarse manchas en la supercie después de un uso prolongado de la
placa eléctrica. Este es un procedimiento normal y no afectará el uso del aparato.
• Si es posible, no utilice un cable de extensión. Si utiliza uno, asegúrese de que el
amperaje del dispositivo conectado no exceda el amperaje máximo del cable de
alimentación.
• Asegúrese de que no gotee líquido sobre la placa de cocción durante la cocción
para prolongar su vida útil.
• Utilice sólo ollas y sartenes con fondo plano para asegurarse de que el fondo esté
completamente en contacto con la placa de cocción.
Selección de olla
• Para cocinar se pueden utilizar ollas de todos los materiales. Los utensilios de
cocina con un diámetro de base de aprox. 18-26 cm (redondo) o aprox. 12-20 cm
(cuadrado) son muy adecuados. Los utensilios de cocina con una base irregular o
con un diámetro de base inferior a 12 cm no son adecuados.
Utensilios de cocina bien adaptados
Caldera
de acero
inoxidable
Olla de hierro Olla magnética
de acero
inoxidable
Olla de
hierro
coloreado
Caldera
magnética
de hierro
Sartén de
hierro
Aluminio Recipiente
de aluminio
resistente al
calor
Olla de
cerámica

37
ES
Utensilios de cocina poco adecuados
Fondo desigual de
la olla
Fondo de la olla
con pies de apoyo
Fondo de olla con
diámetro pequeño
Funciones de protección del sistema
1. Protección contra sobrecalentamiento: Cuando la placa calienta hasta 650 °C, se
enfría automáticamente.
2. Protección contra sobrecalentamiento interno: Cuando la temperatura interna de la
máquina alcanza los 100 °C, se detiene el calentamiento.
3. Protección contra sobretensión: Si la tensión supera los 275 V, la placa no se
calienta más.
4. Protección de baja tensión: Si la tensión es inferior a 120V, la placa no se
calentará más.
SOLUCIÓN DE PROBLEMAS
Problema Posible solución del problema
Inserte la clavija de alimentación en
el enchufe. Pulse el botón On/Off, la
pantalla no se ilumina.
Compruebe que el enchufe de
alimentación está bien conectado a
la toma de corriente y que ésta se
encuentra en buenas condiciones.
El indicador On/Off no se enciende. Compruebe que la pantalla o la placa
base está en orden.
Durante el funcionamiento, el
proceso de calentamiento se detiene
repentinamente.
Compruebe si existen las siguientes
causas: la temperatura ambiente es
demasiado alta o se ha alcanzado el
tiempo ajustado del temporizador. Si la
protección contra sobrecalentamiento
se ha puesto en marcha, no vuelva a
poner en funcionamiento la placa de
cocción hasta que hayan transcurrido
10 minutos. La placa de cocción se
desconecta automáticamente durante el
funcionamiento después de 2 horas de
inactividad.

38
ES
Código de error Causa/ Posible solución
E1
Detección de rotura de cable o cortocircuito en el sensor de
temperatura.
E2
Detección de cortocircuito o circuito abierto del control de
silicio.
E3
Protección contra sobretensión:
Se oye un pitido cada segundo y la pantalla LED muestra
un „E3“ parpadeante: La tensión es ≥ 275 V. Si la tensión es
< 265 V, pulse el botón ON/OFF, la cocina de infrarrojos
funcionará o se apagará.
E4
Protección contra baja tensión:
Se oye un pitido cada segundo y la pantalla LED muestra un
„E4“ parpadeante: La tensión es ≤ 120 V. Si la tensión es
> 130 V, pulse el botón ON/OFF, la cocina de infrarrojos
funcionará o se apagará.
E5
Fallo en el circuito del ventilador:
La tensión de funcionamiento del ventilador es demasiado
baja.
E6
Protección de sobrecalentamiento del control de silicio
(interno).
39
ES
HOJA DE DATOS DEL PRODUCTO
Símbolo Valor Unidad
Identicación del
producto
10033283
Tipo de módulo de cocina
Independiente
Número de zonas de
cocción y/o supercies
de cocción
2
Tecnología de
calentamiento (Zonas
y supercies de cocción
por inducción, zonas de
cocción por irradiación,
hornillos)
Placa de infrarrojos
En zonas o supercies
de cocción circulares:
Diámetro de la supercie
aprovechable para
cada zona de cocción
calentada, con una
exactitud de 5 mm.
Ø 19,0 / 19,0 cm
En zonas o supercies
de cocción no circulares:
Largo y ancho de la
supercie aprovechable
para cada zona de
cocción y toda supercie
de cocción calentada, con
exactitud de 5 mm.
L
A
__
__
cm
Consumo de energía
por zona o supercie de
cocción por kg
EC
Cocina
eléctrica
190,5 / 187,0 Wh/kg
Consumo de energía del
módulo de cocción por kg
EC
Cocina
eléctrica
188,7 Wh/kg
40
ES
INDICACIONES SOBRE LA RETIRADA DEL
APARATO
Si en su país existe una disposición legal relativa a la
eliminación de aparatos eléctricos y electrónicos, este
símbolo estampado en el producto o en el embalaje
advierte que no debe eliminarse como residuo doméstico.
En lugar de ello, debe depositarse en un punto de recogida
de reciclaje de aparatos eléctricos y electrónicos. Una
gestión adecuada de estos residuos previene consecuencias
potencialmente negativas para el medio ambiente y la salud
de las personas. Puede consultar más información sobre el
reciclaje y la eliminación de este producto contactando con
su administración local o con su servicio de recogida de
residuos.
FABRICANTE E IMPORTADOR (REINO UNIDO)
Fabricante:
Chal-Tec GmbH, Wallstraße 16, 10179 Berlín, Alemania.
Importador para Gran Bretaña:
Berlin Brands Group UK Limited
PO Box 42
272 Kensington High Street
London, W8 6ND
United Kingdom

41
FR
Consignes de sécurité42
Aperçu de l‘appareil43
Utilisation44
Panneaux de commande et fonctions des touches45
Paramètres du menu46
Nettoyage et entretien48
Identication et résolution des problèmes49
Fiche de données produit51
Informations sur le recyclage52
Fabricant et importateur (UK)52
Chère cliente, cher client,
Toutes nos félicitations pour l’acquisition de ce nouvel appareil.
Veuillez lire attentivement et respecter les instructions de ce mode
d’emploi an d’éviter d’éventuels dommages. Nous ne saurions
être tenus pour responsables des dommages dus au non-respect
des consignes et à la mauvaise utilisation de l’appareil. Scannez
le QR-Code pour obtenir la dernière version du mode d‘emploi
et des informations supplémentaires concernant le produit :
SOMMAIRE
FICHE TECHNIQUE
Numéro d'article 10033283
Alimentation 220-240 V ~ 50/60 Hz
Puissance (watts) 3000 W

42
FR
CONSIGNES DE SÉCURITÉ
• Lisez attentivement toutes les instructions de ce manuel. Utilisez l‘appareil comme
prévu et exactement comme décrit dans les instructions.
• Lors de l‘utilisation d‘appareils électriques, des précautions de sécurité élémentaires
doivent toujours être respectées pour réduire les risques d‘incendie, les risques
électriques et de blessures, notamment les suivantes.
• Ne touchez pas les surfaces chaudes.
• Pour éviter tout risque d‘électrocution, ne plongez pas cet appareil dans l‘eau ni
dans d‘autres liquides. Suivez les instructions de la section „Nettoyage et entretien“.
• Utilisez l‘appareil sous surveillance uniquement. Placez la plaque de cuisson hors
de portée des enfants.
• Les enfants doivent être surveillés pour s‘assurer qu‘ils ne jouent pas avec l‘appareil.
• Les enfants de plus de 8 ans, les handicapés physiques et mentaux et les personnes
manquant de connaissances ou d‘expérience ne peuvent utiliser l‘appareil que s‘ils
ont été préalablement familiarisés avec les fonctions et les précautions de sécurité
par une personne responsable.
• L‘appareil ne doit pas être utilisé avec une minuterie externe ou un système de
télécommande séparé.
• Placez l‘appareil sur une surface plane et stable.
• N‘utilisez pas l‘appareil dans des zones exiguës et mal ventilées.
• Débranchez le cordon d‘alimentation de la prise si vous n‘utilisez pas l‘appareil
pendant une longue période et avant de le nettoyer. Eteignez l‘appareil avant
de débrancher le cordon d‘alimentation. Laissez l’appareil refroidir avant de le
nettoyer.
• N‘utilisez pas l‘appareil avec un câble ou une che endommagés, s‘il est
défectueux ou endommagé de quelque manière que ce soit. Remettez l‘appareil à
une entreprise spécialisée pour inspection et réparation.
• La surface de la plaque chauffante est en verre cristal et recouvre les pièces
sous tension : si la surface en verre de la plaque chauffante est endommagée ou
ssurée, éteignez immédiatement l’appareil et débranchez-le pour éviter tout risque
de choc électrique.
• Pour réduire les risques de blessures, utilisez uniquement les accessoires fournis.
• N‘utilisez pas l‘appareil à l‘extérieur, dans des endroits humides ou à proximité de
ammes nues.
• Ne laissez pas le cordon d‘alimentation pendre au bord de la table ou du plan de
travail et veillez à ce qu‘il ne touche aucune surface chaude. Ne pliez pas le câble
car cela pourrait l‘endommager.
• Ne placez pas l‘appareil sur ou à proximité d‘une cuisinière à gaz, d‘une cuisinière
électrique ou d‘un four chauffé.
• Ne pas utiliser la plaque de cuisson sans casserole.
• Soyez prudent lorsque vous déplacez des casseroles ou des pots contenant de
l‘huile ou des liquides chauds.

43
FR
• Lorsque vous chauffez la plaque chauffante, ne placez pas de récipients en
plastique ni de papier sur la plaque et assurez-vous qu‘il n‘y a pas de tissu ou de
produits en plastique à proximité de la plaque chauffante.
• Ne manipulez pas le cordon d‘alimentation ou la che secteur avec les mains
mouillées.
• Ne placez pas d‘objets métalliques tels que des couteaux, des fourchettes, des
cuillères et des couvercles sur la plaque chauffante, car ils pourraient chauffer.
• Ne bloquez pas et ne couvrez pas les ouvertures d’alimentation et d’évacuation
d’air.
• Évitez de faire tomber des objets sur la plaque chauffante.
• N‘ouvrez pas et ne modi ez aucune partie de l‘appareil et ne réparez pas vous-
même la plaque de cuisson pour éviter tout risque d‘électrocution, de court-circuit
ou d‘incendie.
• Si le cordon d‘alimentation ou la che sont endommagés, ils doivent être
remplacés par le fabricant, par un spécialiste agréé ou par une personne de même
quali cation.
• Conservez soigneusement les instructions pour référence future.
• L‘appareil n‘est pas destiné à un usage commercial, mais uniquement à un usage
domestique ou similaire. Cela inclut les cuisines de bureaux, les fermes, hôtels,
motels et les installations proposant des services de type Bed & breakfast.
MISE EN GARDE
Risque d‘incendie ! Ne posez aucun autre objet que des casseroles ou
des poêles sur la plaque de cuisson.
APERÇU DE L‘APPAREIL
Evacuation d‘air
Surface de
cuisson en verre
noir
Panneau de
commande
Admission d‘air

44
FR
UTILISATION
Avant la première utilisation
• Véri ez la tension sur la plaque signalétique avant utilisation. Ne branchez
l‘appareil que sur des prises correspondant à la tension de l‘appareil. Si vous n‘êtes
pas sûr que vos prises répondent aux exigences, consultez un électricien ou votre
fournisseur d‘électricité.
• Placez l‘appareil sur une surface plane et résistante à la chaleur. Ne le placez pas
sur des surfaces instables sur lesquelles il pourrait facilement basculer.
Mise en marche
Branchez la che d’alimentation dans la prise. Pour démarrer l‘appareil, appuyez
sur la touche Menu et maintenez-la enfoncée pendant 2 secondes.
Utilisation
• Mettez les aliments à réchauffer dans une casserole et placez-les au centre de la
plaque de cuisson. Avant de placer l‘ustensile de cuisson sur la plaque chauffante,
nettoyez le fond de la casserole pour éviter les brûlures.
• Réglez le temps de cuisson, la puissance et la température souhaités comme décrit
dans les sections suivantes.
• La surface de la plaque chauffante chauffe rapidement pendant le fonctionnement.
Ne la touchez pas.
• Après la cuisson, éteignez l‘appareil en appuyant sur la touche MARCHE/ARRÊT.
La plaque de cuisson est toujours à une température élevée, l‘écran reste allumé
et le ventilateur continue de fonctionner. Ne touchez pas la plaque de cuisson à la
main tant qu‘elle n‘a pas refroidi, puis débranchez le cordon d‘alimentation de la
prise murale.
• Si vous ne comptez pas utiliser l‘appareil pendant une longue période,
débranchez-le de la prise pour éviter de faire démarrer la plaque involontairement.
ATTENTION
Risque d‘incendie ! Pendant l‘utilisation, les pièces accessibles à
l‘utilisateur deviennent si chaudes qu‘elles peuvent causer des brûlures.
Assurez-vous que votre corps, vos vêtements et tout autre matériel que
les ustensiles de cuisson ne puissent pas toucher la plaque de cuisson
avant qu‘elle ne soit complètement refroidie.

45
FR
PANNEAUX DE COMMANDE ET FONCTIONS DES
TOUCHES
Panneau de commande de gauche
Panneau de commande de droite
Fonctions des touches
MARCHE/ARRÊT
(ON/OFF)
• Appuyez sur la touche MARCHE/ARRÊT pour allumer
la plaque de cuisson. Un bip retentit et l‘écran afche
«ON». Vous pouvez maintenant effectuer d‘autres
réglages. Si aucune entrée n‘est effectuée, un bip retentit
au bout d‘1 minute et la table passe automatiquement en
mode veille.
• Si vous souhaitez rallumer la plaque de cuisson, appuyez
de nouveau sur le bouton MARCHE/ARRÊT. L‘écran
afche «ON».
• Pour passer en mode veille pendant le fonctionnement,
appuyez sur la touche MARCHE/ARRÊT. Un bip retentit,
l‘élément chauffant s‘éteint, l‘écran afche «HOT» et la
plaque de cuisson infrarouge passe en mode veille. (La
ventilation continue pendant un certain temps pendant que
la plaque de cuisson refroidit.)
Remarque : La plaque de cuisson ne possède pas
d‘interrupteur d‘alimentation. L‘alimentation ne peut être
interrompue qu‘en débranchant la che d‘alimentation.
TIMER
• Cette touche vous permet de régler la durée de la cuisson.
VERROUILLAGE
(LOCK)
• Pendant le fonctionnement, maintenez la touche
VERROUILLAGE pendant 2 secondes pour activer le
verrouillage parental. Lorsque le contrôle parental
est activé, toutes les touches autres que les boutons
VERROUILLAGE et MARCHE/ARRÊT sont verrouillées.
• Pour le désactiver, appuyez sur le bouton MARCHE/
ARRÊT ou appuyez sur le bouton VERROUILLAGE pendant
2 secondes pour déverrouiller la sécurité enfants.

46
FR
MENU
• Cette touche vous permet de régler la puissance et la
température.
HAUT + BAS
(UP + DOWN)
• Ces touches vous permettent de contrôler la puissance, la
température et la minuterie.
Informations sur la puissance de fonctionnement
La puissance de fonctionnement est de 2000 W pour chaque foyer de cuisson. La
puissance totale ne dépasse pas 3000 W lorsque 2 foyers de cuisson fonctionnent en
même temps.
1 La performance de chaque zone de cuisson dépend de la performance de l‘autre.
Si un foyer de cuisson est réglé sur 2000 W, le second foyer de cuisson ne peut
être réglé que sur 1000 W. La puissance totale afchée maximale de 2 plaques de
cuisson est de 3000 W. En mode de chauffage, la puissance d‘une plaque augmente
tandis que celle de l‘autre diminue, la puissance afchée change en conséquence.
2 Lorsque les deux foyers de cuisson sont en fonctionnement et que la puissance d‘un
foyer de cuisson dépasse 1300 W, la puissance de ce foyer de cuisson diminue
automatiquement à 1300 W. L‘afchage de la puissance change en conséquence.
3 Le contrôle de la puissance est effectué en fonction du dernier niveau de puissance
d‘un foyer de cuisson, la puissance du second foyer de cuisson est dénie par
rapport à celle-ci.
PARAMÈTRES DU MENU
Remarque : Lorsque vous appuyez sur la touche MENU pour régler la température
et le niveau de puissance souhaités, le foyer chauffe immédiatement à la température
et au niveau de puissance PR2réglés (2000 W / 600 °C). Utilisez les boutons
HAUT/BAS pour modier les paramètres.
P Puissance (Watt):
1. Appuyez sur le bouton MENU pour régler la puissance.
2. L‘indicateur «P» (POWER) s‘allume. Le réglage par défaut est «2000 W»,
le niveau de puissance est indiqué à l‘écran.
3. Utilisez les touches HAUT et BAS pour sélectionner le niveau de puissance
souhaité. (200-2000 W).
°C Température:
1. Appuyez sur la touche MENU pour régler la température. Le voyant «°C»
s‘allume. Le réglage par défaut est «600 °C», le niveau de température
s‘afche à l‘écran. Utilisez les touches HAUT/BAS pour régler le niveau de
température souhaité (90-650 °C).
47
FR
2. Appuyez sur la touche TIMER pour régler le temps de cuisson. Vous pouvez
sélectionner «0:01-3:00» (1 min à 3 h).
Correspondance entre les niveaux de puissance et de température variables
Niveau 1 2 3 4 5 6 7 8 9 10
Puissance (W) 200 400 600 800 1000 12 0 0 1400 1600 1800 2000
Température (°C) 90 15 0 300 350 400 450 500 550 600 650
Minuterie:
1. Appuyez sur la touche TIMER en mode de réglage de la température ou
de la puissance pour régler le temps de cuisson. Le voyant TIMER s‘allume
et l‘afchage clignote. La valeur par défaut est «0:10» (10 min).
2. Utilisez la touche HAUT pour augmenter le temps de cuisson de 10
minutes à chaque appui, ou utilisez le bouton BAS pour raccourcir le
temps de cuisson de 1 minute à chaque appui. Vous pouvez régler de
«0:01» à «3:00» (1 min à 3 h). En appuyant longuement sur les touches
HAUT/BAS, vous pouvez régler le temps de cuisson plus rapidement. Si
vous n‘appuyez sur aucune autre touche après avoir réglé le temps de
cuisson, le compte à rebours s‘activera au bout de 5 secondes et le signe
«:» clignotera à l‘écran.
3. Pendant le compte à rebours de la minuterie, l’écran afche
alternativement la durée de la minuterie et la puissance ou la température
toutes les 5 secondes.
4. Pendant le compte à rebours, appuyez deux fois sur la touche TIMER
pour réinitialiser la minuterie ou appuyez sur la touche MENU pour
sélectionner un niveau de température ou de puissance différent.
5. La plaque de cuisson s‘éteint automatiquement lorsque la durée du
compte à rebours est écoulée.
Verrouillage parental (SÉCURITÉ):
1. Maintenez la touche VERROUILLAGE pendant 2 secondes pendant le
fonctionnement pour activer le verrouillage parental. «LOC» s‘afche et
au bout de 5 secondes, la durée réglée est automatiquement conrmée.
Lorsque le contrôle parental est activé, toutes les touches sont désactivées,
à l‘exception de la touche VERROUILLAGE et de la touche MARCHE/
ARRÊT.
2. Appuyez sur la touche MARCHE/ARRÊT pour éteindre le foyer ou
appuyez sur le bouton VERROUILLAGE pendant 2 secondes pour
déverrouiller le verrouillage parental.

48
FR
NETTOYAGE ET ENTRETIEN
Remarque : Éteignez l‘appareil et débranchez la prise de courant avant l‘entretien
ou le nettoyage pour éviter tout risque d‘électrocution. Vériez que la plaque
chauffante est déjà refroidie.
• Ne plongez jamais l‘appareil dans de l‘eau ou dans d‘autres liquides.
• Nettoyez la plaque chauffante, la surface de l‘appareil et le panneau de
commande de toute contamination. Utilisez un chiffon humide ou une éponge et
un peu de détergent. Assurez-vous qu‘aucune eau ne pénètre dans l‘appareil.
N‘utilisez jamais d‘agents de récurage, de laine d‘acier ou de tampons à récurer
pour le nettoyage car ils pourraient endommager la surface.
• Gardez la plaque de cuisson et le boîtier de l‘appareil propres et protégez toutes
les ouvertures de l‘appareil pour éviter les courts-circuits.
• Après une utilisation prolongée de la plaque de cuisson, des taches peuvent
se former à la surface. Il s’agit d’un processus normal qui n’affecte pas le
fonctionnement de l‘appareil.
• Si possible, n‘utilisez pas de rallonge. Si vous en utilisez une, assurez-vous que
l‘intensité nominale de l‘appareil branché ne dépasse pas la capacité nominale
maximale de la rallonge.
• Veillez à ne pas renverser de liquide sur la plaque pendant la cuisson an de
prolonger sa durée de vie.
• Utilisez uniquement des casseroles et des poêles à fond plat de manière à ce que le
fond repose complètement sur la plaque de cuisson.
Choix des casseroles
• Pour la cuisson, vous pouvez utiliser des casseroles de n‘importe quel type de
matériaux. Les ustensiles de cuisson avec un diamètre de fond d‘environ 18-26 cm
(rond) ou d‘environ 1220 cm de longueur (carré) sont bien adaptés. Les ustensiles
de cuisson dont le fond est irrégulier ou inférieur à 12 cm sont mal adaptés.
Vaisselle adaptée
Marmite en
inox
Casserole
en fer
Casserole
magnétique
inox
Casserole fer
peint
Marmite fer
magnétique
Poêle en fer Aluminium Casserole
résistant à la
chaleur
Casserole
ecéramique
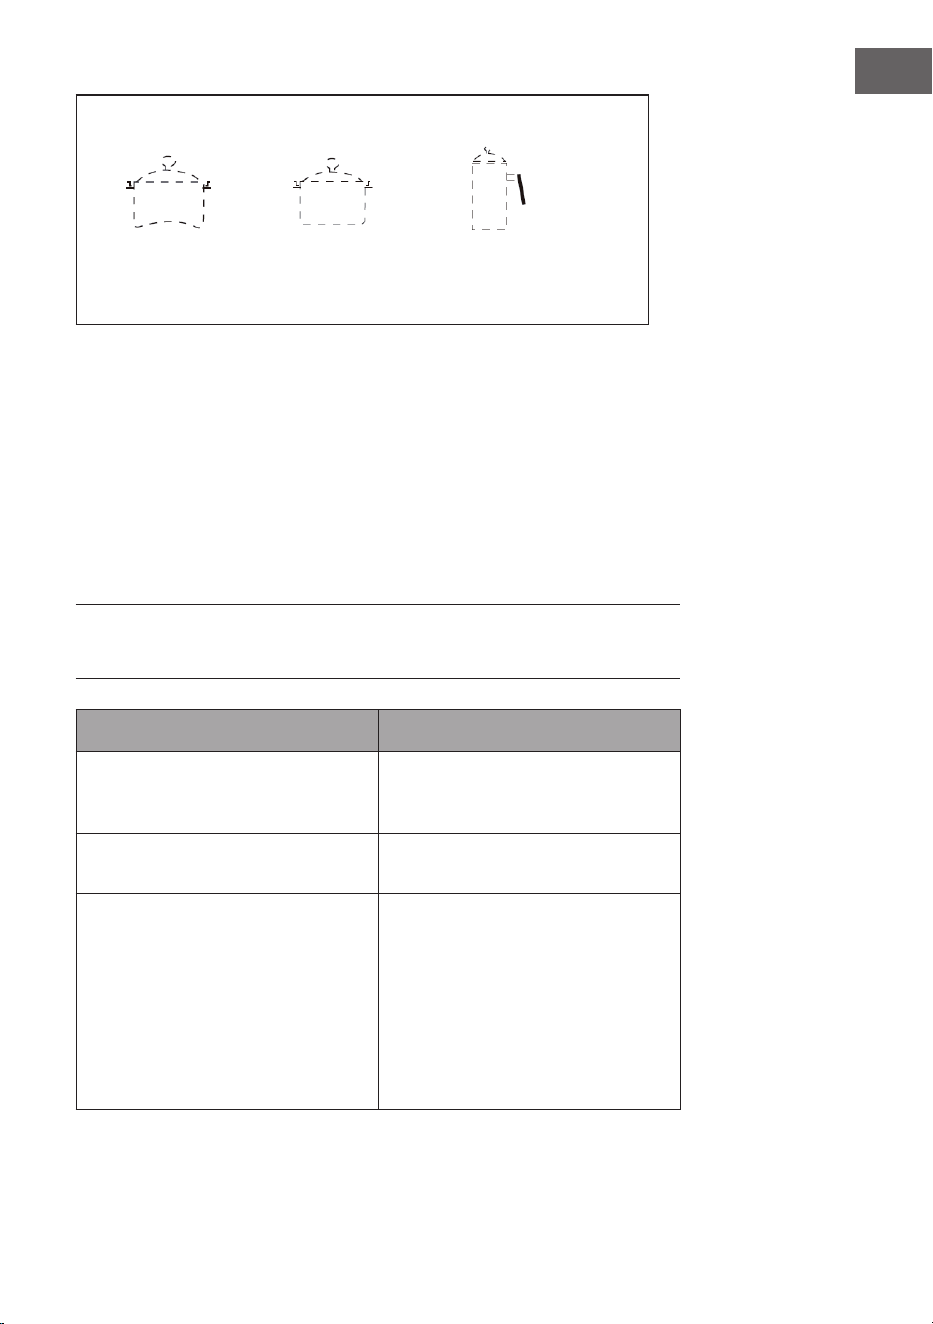
49
FR
Vaisselle mal adaptée
Fond de casserole inégal Fond de casserole
avec pieds de
support
Fond de casserole de
faible diamètre
Fonctions de protection du système
1 Protection contre la surchauffe : lorsque la plaque chauffante atteint 650 °C, elle
refroidit automatiquement.
2 Protection interne contre la surchauffe : lorsque la température interne de la
machine atteint 100 °C, le chauffage s‘arrête.
3 Protection contre les surtensions : Si la tension est supérieure à 275 V, la plaque
chauffante cesse de chauffer.
4 Protection contre la tension insufsante : Si la tension est inférieure à 120 V, le foyer
ne chauffe plus.
IDENTIFICATION ET RÉSOLUTION DES
PROBLÈMES
Problème Solution
Branchez le cordon d’alimentation dans
la prise. Appuyez sur la touche On/Off,
l'écran ne s'allume pas.
Vériez que la che d'alimentation est
correctement branchée et que la prise
de courant est en bon état.
L'indicateur d'alimentation ne s'allume
pas.
Vériez que l’écran et la carte mère sont
en bon état.
Le chauffage s'arrête brusquement
pendant le fonctionnement.
Recherchez les causes suivantes : la
température ambiante est trop élevée
ou la durée programmée est atteinte.
Si la protection contre la surchauffe
s'est déclenchée, ne redémarrez pas la
plaque chauffante avant 10 minutes. La
plaque de cuisson s'éteindra pendant le
fonctionnement au bout de 2 heures de
non-utilisation.
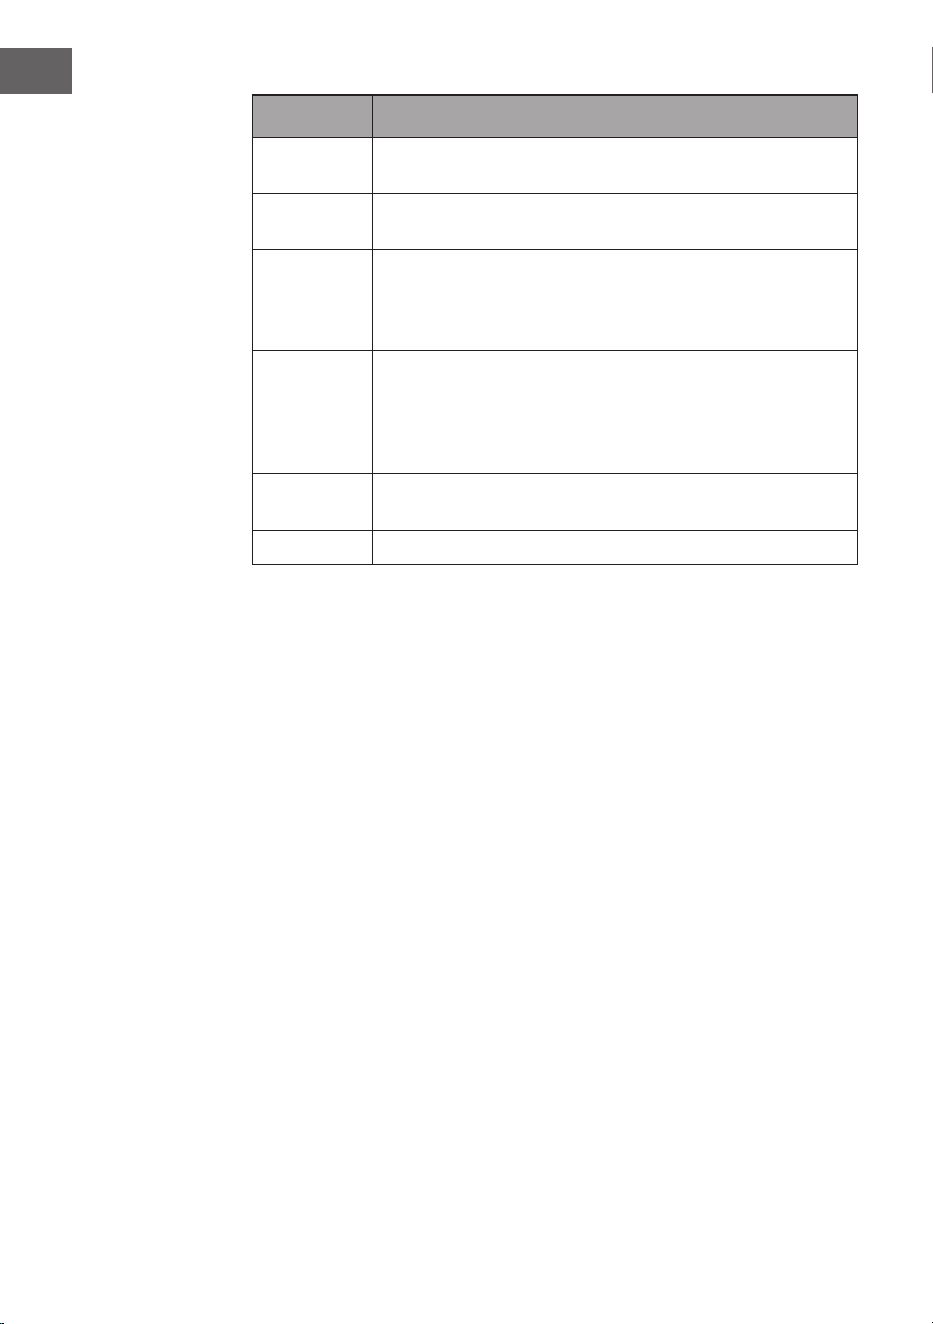
50
FR
Code erreur Cause/solution
E1
Détection de rupture de câble ou de court-circuit du capteur de
température.
E2
Détection de court-circuit ou de coupure de la commande au
silicium.
E3
Chaque seconde, un bip retentit et l’écran LED afche «E3»
clignotant : la tension est ≥ 275 V. Si la tension est < 265 V,
appuyez sur la touche ON/OFF, la cuisinière infrarouge démarrera
ou s’éteindra.
E4
Protection contre la sous-tension :
Un bip retentit toutes les secondes et le voyant «E4» clignote à
l’écran. La tension est ≤ 120 V. Si la tension est > 120 V, appuyez
sur la touche ON/OFF, la cuisinière à infrarouge démarrera ou
s’éteindra.
E5
Défaut du circuit de ventilation :
Le courant de fonctionnement du ventilateur est trop faible.
E6 Protection contre la surchauffe de la commande au silicium (interne).
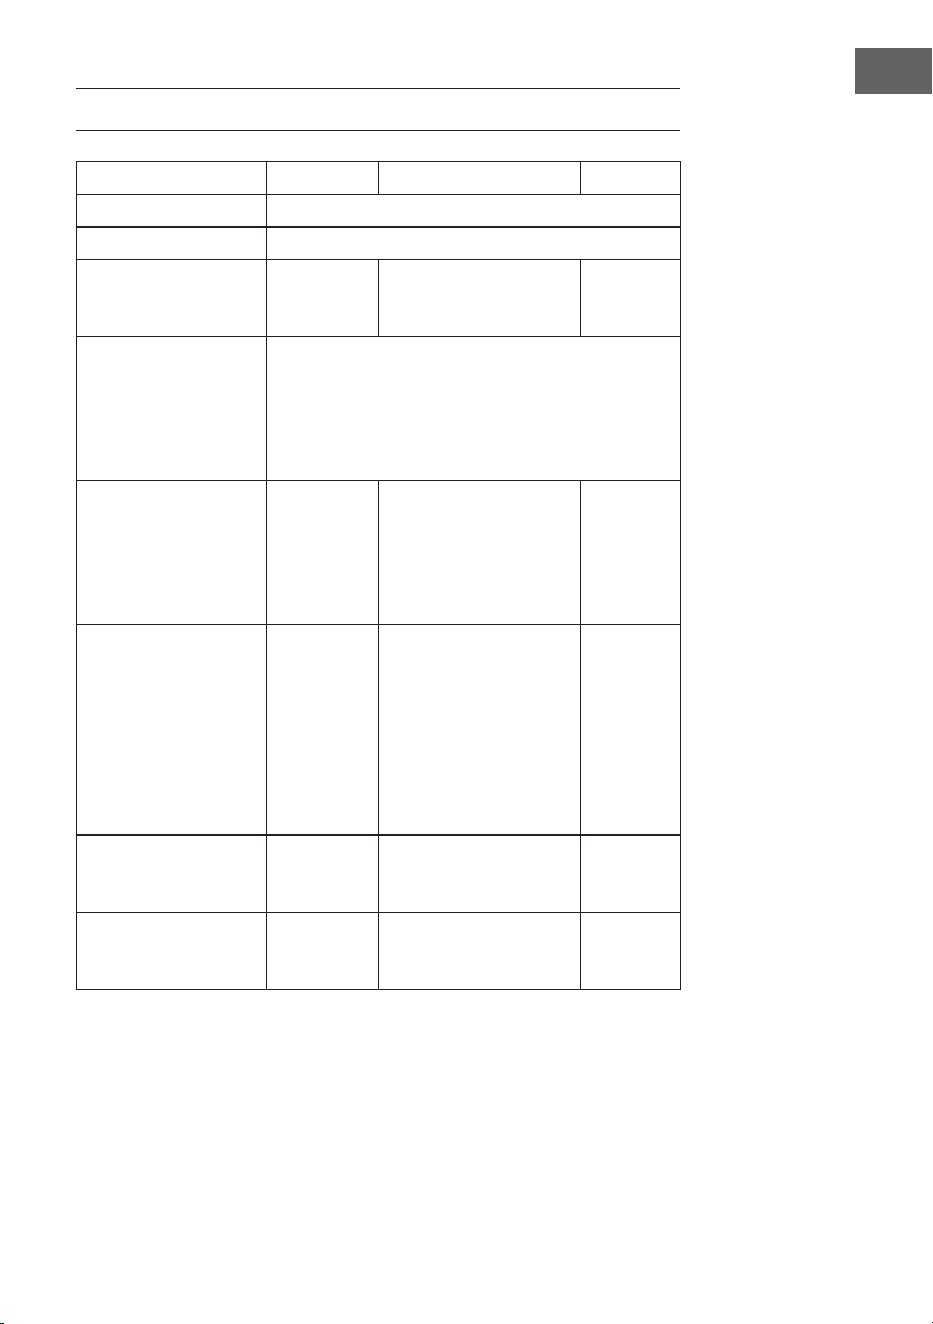
51
FR
FICHE DE DONNÉES PRODUIT
Symbole Valeur Unité
Référence (s) du modèle
10033283
Type de table de cuisson
Libre d’accès
Nombre de zones de
cuisson ou/et de foyers
de cuisson
2
Technique de chauffage
(zones de cuisson à
induction et -foyers de
cuisson, Zones de cuisson
par rayonnement,
Plaques de cuisson)
Plaque de cuisson à infrarouge
Pour les zones ou foyers
de cuisson circulaires
: Diamètre des surfaces
utiles pour chaque zone
chauffée électriquement,
à 5 mm près.
Ø 19,0 / 19,0 cm
Pour les zones ou
surfaces de cuisson non
circulaires : longueur et
largeur de la surface
utilisable pour chaque
zone ou surface de
cuisson chauffée
électriquement, avec une
précision de 5 mm.
L
L
__
__
cm
Consommation d'énergie
pour chaque zone ou
surface de cuisson par kg
EC
Foyer
électrique
190,5 / 187,0 Wh/kg
Consommation d'énergie
de la table de cuisson
par kg
EC
Foyer
électrique
188,7 Wh/kg
52
FR
INFORMATIONS SUR LE RECYCLAGE
S‘il existe une réglementation pour l‘élimination ou le
recyclage des appareils électriques et électroniques dans
votre pays, ce symbole sur le produit ou sur l‘emballage
indique que cet appareil ne doit pas être jeté avec les
ordures ménagères. Vous devez le déposer dans un point
de collecte pour le recyclage des équipements électriques
et électroniques. La mise au rebut conforme aux règles
protège l‘environnement et la santé de vos semblables des
conséquences négatives. Pour plus d‘informations sur le
recyclage et l‘élimination de ce produit, veuillez contacter
votre autorité locale ou votre service de recyclage des
déchets ménagers.
FABRICANT ET IMPORTATEUR (UK)
Fabricant :
Chal-Tec GmbH, Wallstraße 16, 10179 Berlin, Allemagne.
Importateur pour la Grande Bretagne :
Berlin Brands Group UK Limited
PO Box 42
272 Kensington High Street
London, W8 6ND
United Kingdom

53
IT
Avvertenze di sicurezza54
Descrizione del dispositivo55
Utilizzo56
Pannello di controllo e tasti funzione57
Impostazioni del menu58
Pulizia e manutenzione60
Ricerca e correzione degli errori61
Scheda informativa del prodotto63
Avviso di smaltimento64
Produttore e importatore (UK)64
Gentile Cliente,
La ringraziamo per aver acquistato il dispositivo. La preghiamo
di leggere attentamente le seguenti istruzioni per l’uso e di
seguirle per evitare possibili danni. Non ci assumiamo alcuna
responsabilità per danni scaturiti da una mancata osservazione
delle avvertenze di sicurezza e da un uso improprio del
dispositivo. Scansionare il codice QR seguente, per accedere
al manuale d’uso più attuale e per ricevere informazioni sul
prodotto:
INDICE
DATI TECNICI
Numero articolo 10033283
Alimentazione 220-240 V ~ 50/60 Hz
Potenza totale 3000 W

54
IT
AVVERTENZE DI SICUREZZA
• Leggere attentamente tutte le avvertenze contenute in questo manuale. Utilizzare il
dispositivo correttamente e nel rispetto delle indicazioni di questo manuale.
• Quando si utilizzano elettrodomestici, è necessario rispettare sempre fondamentali
misure di sicurezza, in modo da ridurre il rischio di incendi, pericoli di carattere
elettrico o lesioni a persone, incluse le seguenti.
• Non toccare le superci bollenti.
• Per evitare folgorazioni, non immergere il dispositivo in acqua o altri liquidi.
Rispettare le indicazioni al paragrafo “Pulizia e manutenzione”.
• Tenere sotto controllo il dispositivo mentre è in funzione. Posizionare il piano cottura
fuori dalla portata dei bambini.
• Bambini a partire da 8 anni e persone con limitate capacità siche e psichiche o
con esperienza e conoscenze insufcienti possono utilizzare il dispositivo solo se
sono stati precedentemente istruiti in modo esaustivo sulle funzioni e sulle procedure
di sicurezza.
• Non utilizzare il dispositivo con timer esterno o con un sistema di comando a
distanza separato.
• Posizionare il dispositivo su una supercie piana e stabile.
• Non utilizzare il dispositivo in locali stretti e con cattiva ventilazione.
• Staccare la spina se non si utilizza il dispositivo per tempi prolungati e prima di
pulirlo. Spegnere il dispositivo prima di staccare la spina. Lasciare raffreddare il
dispositivo prima di pulirlo.
• Non utilizzare il dispositivo con cavo o spina danneggiati, se il dispositivo è guasto
o se è stato danneggiato in qualche modo. Far ispezionare e, se necessario,
riparare il dispositivo da un’azienda tecnica.
• La supercie del piano cottura è composta da cristallo e copre i componenti che
trasmettono tensione: se la supercie in vetro del piano cottura è danneggiata o
presenta crepe, spegnere immediatamente il dispositivo e staccare la spina, per
evitare il rischio di folgorazioni.
• Per ridurre il rischio di lesioni, utilizzare solo gli accessori inclusi in consegna.
• Non utilizzare il dispositivo all’aperto, in locali umidi o vicino a amme libere.
• Non lasciare che il cavo penzoli dal bordo del tavolo o del piano di lavoro e
assicurarsi che non tocchi superci bollenti. Non piegare il cavo, altrimenti si
potrebbe danneggiare.
• Non posizionare il dispositivo vicino a un fornello a gas, a un fornello elettrico o a
un forno riscaldato.
• Non utilizzare il piano cottura senza pentola.
• Fare attenzione quando si spostano pentole o padelle che contengono olio o
liquidi bollenti.
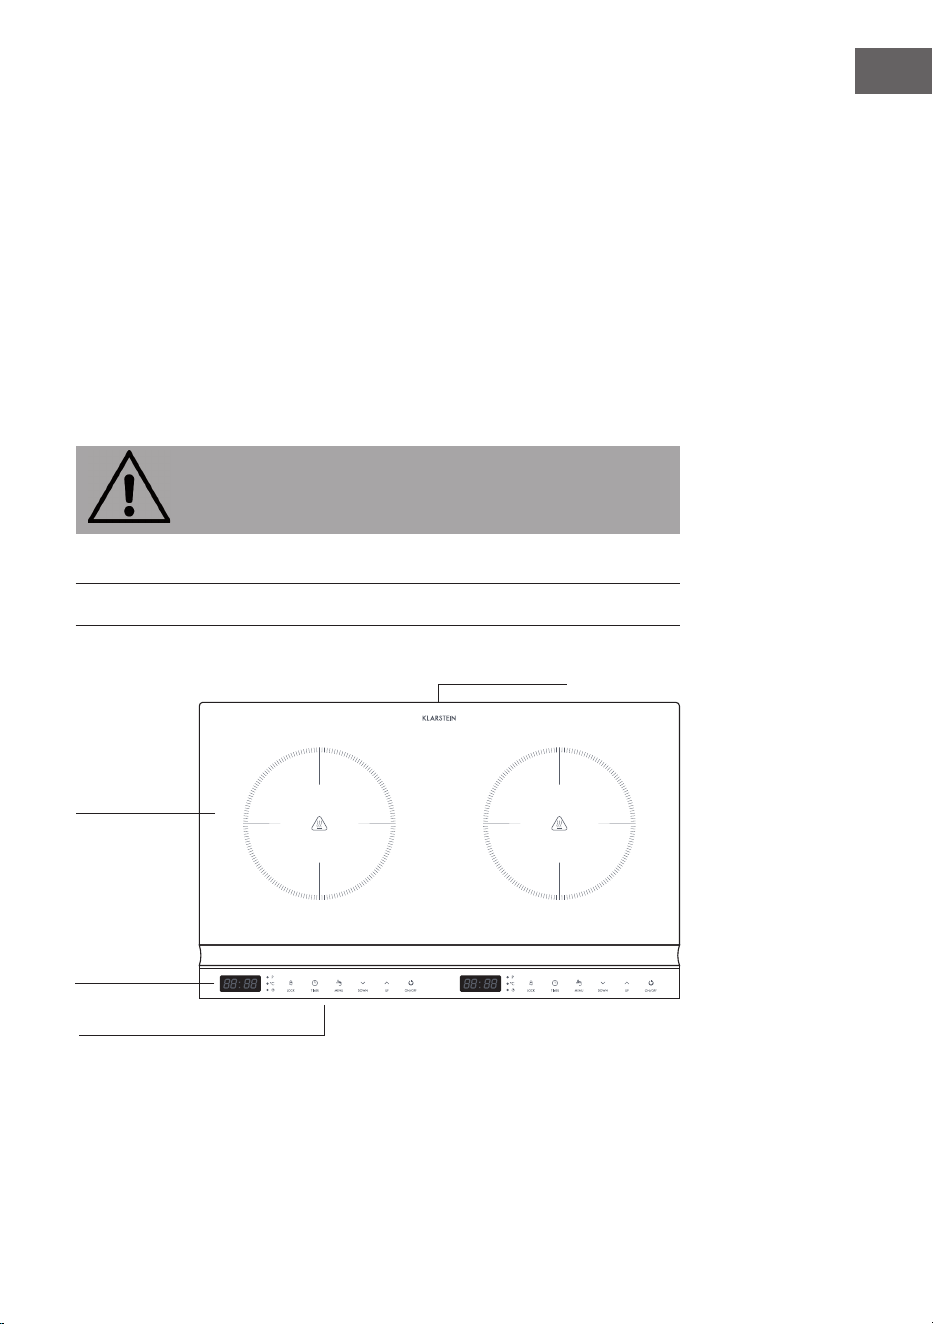
55
IT
• Quando il piano di cottura si sta scaldando, non poggiarci sopra contenitori in
plastica o carta e assicurarsi che non ci siano prodotti di plastica o tessuto nelle
vicinanze del piano cottura.
• Non toccare cavo e spina con le mani bagnate.
• Non poggiare oggetti metallici, come coltelli, forchette, cucchiai e coperchi sopra
al piano cottura, altrimenti potrebbero diventare bollenti.
• Non bloccare o coprire le aperture di af usso e scarico dell’aria.
• Evitare di far cadere oggetti sul piano cottura.
• Non aprire o modi care componenti del dispositivo e non riparare il piano cottura
autonomamente, in modo da evitare folgorazioni, cortocircuiti o incendi.
• Se il cavo o la spina sono danneggiati, devono essere riparati dal produttore, da
un’azienda tecnica autorizzata o da una persona con quali ca equivalente.
• Conservare il manuale per future consultazioni.
• Il dispositivo non è adatto a usi commerciali, ma solo casalinghi e in contesti simili,
come cucine presso uf ci, agriturismi, hotel, motel e bed & breakfast.
ATTENZIONE
Pericolo d’incendio! Non poggiare altri oggetti sul piano cottura che
non siano pentole o padelle.
DESCRIZIONE DEL DISPOSITIVO
Scarico dell’aria
Piano cottura
in vetro nero
Pannello di
controllo
Af usso d’aria
56
IT
UTILIZZO
Prima del primo utilizzo
• Prima di procedere al primo utilizzo, controllare la tensione sulla targhetta
del dispositivo. Collegare il dispositivo solo a prese di corrente con tensione
corrispondente a quella del dispositivo. Se non si è sicuri che le prese di corrente
soddis no i requisiti necessari, consultare un elettricista o il fornitore di elettricità.
• Posizionare il dispositivo su un fondo piano e termoresistente. Non poggiarlo su
super ci instabili e da cui potrebbe cadere facilmente.
Messa in funzione
Collegare la spina alla presa di corrente. Per avviare l’unità, tenere premuto il tasto
Menu per 2 secondi.
Utilizzo
• Mettere in una pentola le pietanze da scaldare e posizionarla al centro del
fornello. Prima di mettere la pentola sul piano cottura, pulire il fondo della pentola,
in modo da evitare che si brucino eventuali residui.
• Impostare il tempo di cottura desiderato, la potenza e la temperatura, come
descritto nei seguenti paragra .
• La super cie del piano cottura diventa bollente in modo molto rapido durante il
funzionamento. Non toccarla!
• A cottura terminata, spegnere il dispositivo premendo On/Off. Il piano cottura ha
ancora una temperatura elevata, il display continua a essere acceso e la ventola
resta in funzione. Non toccare il piano cottura con le mani no a quando non si è
raffreddato e staccare la spina.
• Se il dispositivo non viene utilizzato per lunghi periodi, staccare la spina, in modo
che non possa accendersi per sbaglio.
ATTENZIONE
Pericolo di ustione! Durante l’uso, i componenti accessibili all’utente
diventano estremamente caldi e possono causare ustioni. Assicurarsi
che parti del corpo, indumenti e materiali diversi dagli utensili
da cucina entrino in contatto con il piano cottura solo una volta
raffreddatosi completamente.
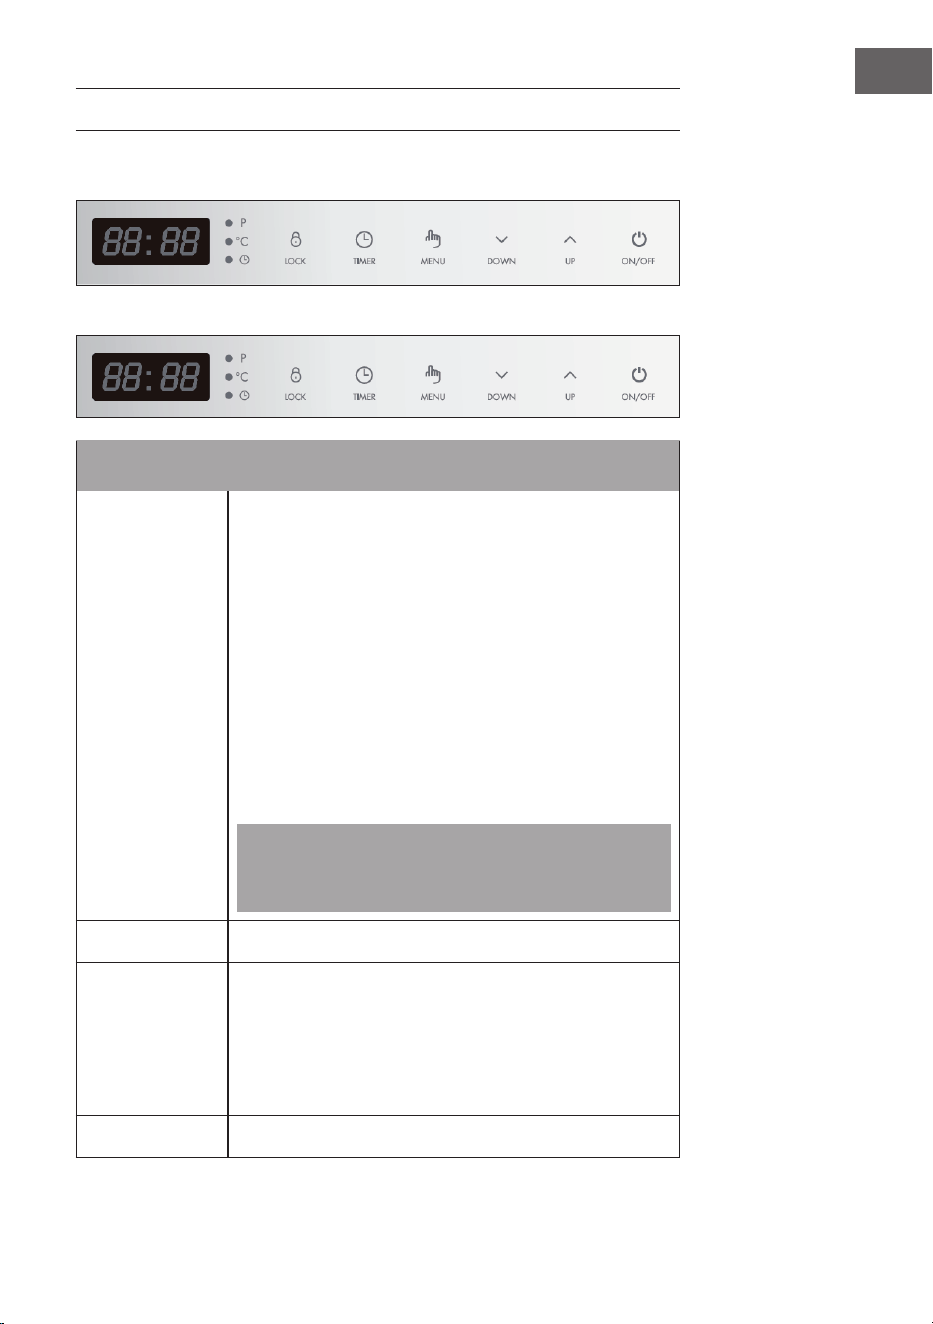
57
IT
PANNELLO DI CONTROLLO E TASTI FUNZIONE
Panello di controllo sinistro
Panello di controllo destro
Tasti funzione
ON/ OFF
• Premere On/Off per accendere il piano cottura. Viene
emesso un segnale acustico e il display mostra “ON”. Ora
è possibile impostare i valori desiderati. Se non vengono
inseriti valori, dopo un minuto viene emesso un segnale
acustico e il piano cottura passa automaticamente in
standby.
• Se si desidera riaccendere il piano cottura, premere di
nuovo On/Off. Il display mostra “ON”.
• Per passare in standby a dispositivo in funzione, premere
On/Off. Viene emesso un segnale acustico, l’elemento
riscaldante si spegne, il display mostra “HOT” e il piano
di cottura a infrarossi passa in modalità standby (la
ventilazione rimane in funzione no al raffreddamento del
piano cottura).
Nota: il piano di cottura non è dotato di interruttore di rete.
Per scollegarlo dall’alimentazione è necessario staccare la
spina.
TIMER
• Con questo tasto si imposta il tempo di cottura.
BLOCCO
(LOCK)
• Tenere premuto il tasto BLOCCO per 2 secondi a
dispositivo in funzione per attivare la protezione per i
bambini. Quando la protezione per i bambini è accesa,
tutti i tasti sono disattivati tranne BLOCCO e On/Off.
• Premere On/Off per spegnere o premere BLOCCO per
2secondi per disattivare la protezione per i bambini.
MENU
• Con questo tasto si selezionano potenza e temperatura.

58
IT
SÙ + GIÙ
(UP + DOWN)
• Con questi tasti si regolano potenza, temperatura e timer.
Avvertenze sulla potenza operativa
La potenza operativa è di 2000 W per ogni singolo fornello. La potenza totale non è
superiore a 3000 W quando entrambi i fornelli sono in funzione.
1 La potenza di ogni fornello dipende dalla potenza dell’altro fornello. Se un fornello
è impostato su 2000 W, il secondo può essere impostato no a un massimo
di 1000 W. La potenza totale di entrambi i fornelli è di 3000 W. In modalità
riscaldante, la potenza di un fornello aumenta mentre quella dell’altro diminuisce e
la potenza indicata cambia di conseguenza.
2 Se entrambi i fornelli sono in funzione e la potenza di un fornello supera 1300 W,
la potenza del fornello scende automaticamente a 1300 W. La potenza indicata
cambia di conseguenza.
3 La regolazione della potenza avviene in base all’ultima potenza impostata su un
fornello: la potenza del secondo fornello può essere impostata in relazione a tale
valore.
IMPOSTAZIONI DEL MENU
Nota: se si preme MENU per impostare temperatura e potenza desiderate, il piano
di cottura si scalda immediatamente alla temperatura e alla potenza predenite
(2000 W/600 °C) Utilizzare Su/Giù per modicare i valori.
P Potenza (Watt):
1. Premere MENU per impostare la potenza.
2. Si illumina l’indicazione “P” (POWER/POTENZA). Il valore predenito è
“2000 W” e viene mostrato sul display.
3. Utilizzare Su è Giù per selezionare la potenza desiderata (200-
2000W).
°C Temperatura:
1. Premere MENU per impostare la temperatura. Si illumina l’indicazione
“C”. Il valore predenito è “600 °C” e viene mostrato sul display.
Utilizzare Su è Giù per selezionare la temperatura desiderata (90-
650°C).
2. Premere TIMER per impostare il tempo di cottura. Il tempo è impostabile
tra “0:01-3:00” (da 1 minuto a 3 ore).
59
IT
Corrispondenze dei livelli variabili di potenza e temperatura
Livello 1 2 3 4 5 6 7 8 9 10
Potenza (W) 200 400 600 800 1000 1200 1400 1600 1800 2000
Temperatura(°C) 90 150 300 350 400 450 500 550 600 650
Timer:
1. Premere timer in modalità di impostazione temperatura o potenza per
impostare il tempo di cottura. L’indicazione TIMER si illumina e il display
lampeggia. Il valore predenito è “0:10” (10 minuti).
2. Utilizzare Su per aumentare di 10 minuti il tempo di cottura ad ogni
pressione del tasto o Giù per diminuire di 1 minuto il tempo di cottura ad
ogni pressione del tasto. I valori impostabili vanno da “0:01” a “3:00”
(da 1 minuto a 3 ore). Premendo a lungo il tasto Su/Giù è possibile
impostare il tempo più rapidamente. Se non si premono altri tasti dopo
aver regolato il tempo di cottura, il conto alla rovescia inizia dopo 5
secondi e sul display lampeggia “:”.
3. Mentre il contro alla rovescia è in corso, il display mostra alternativamente
ogni 5 secondi il tempo del timer, la potenza o la temperatura.
4. Premere due volte TIMER mentre il contro alla rovescia è in corso per
impostare nuovamente il timer o premere MENU per selezionare un’altra
temperatura o un altro livello di potenza.
5. Il piano cottura si spegne automaticamente una volta terminato il conto
alla rovescia.
Protezione per i bambini (BLOCCO):
1. Tenere premuto BLOCCO per 2 secondi a dispositivo in funzione per
attivare la protezione per i bambini. Il display mostra “LOC” e dopo
5secondi viene confermato il tempo impostato. Quando la protezione è
attiva, tutti i tasti sono disattivati tranne BLOCCO e On/Off.
2. Premere On/Off per spegnere il piano cottura o premere per 2 secondi
BLOCCO per disattivare la protezione.
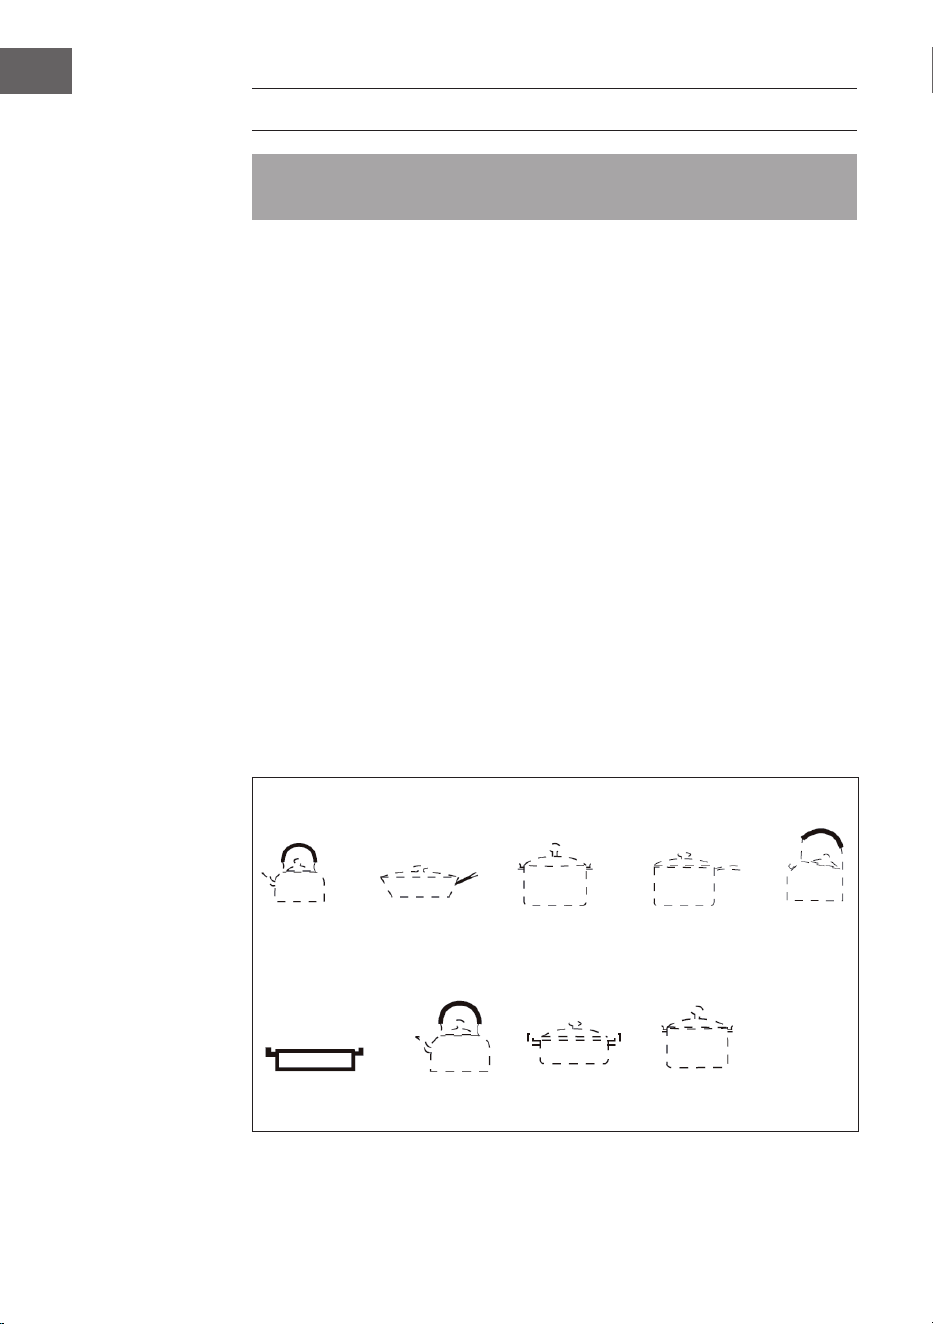
60
IT
PULIZIA E MANUTENZIONE
Nota: spegnere il dispositivo e staccare la spina prima della pulizia, in modo da
evitare folgorazioni. Assicurarsi che il piano cottura si sia raffreddato.
• Non immergere mai il dispositivo in acqua o altri dispositivi.
• Pulire il piano cottura, le superci e il pannello di controllo. Utilizzare un panno o
una spugna inumiditi e un po’ di detergente. Assicurarsi che non penetri acqua nel
dispositivo. Non utilizzare mai prodotti abrasivi, lana d’acciaio o spugne abrasive,
altrimenti le superci potrebbe rovinarsi.
• Tenere pulito il piano e l’alloggiamento e proteggere tutte le aperture del
dispositivo, in modo da evitare cortocircuiti.
• Dopo un lungo utilizzo del piano cottura possono formarsi macchie sulla supercie.
Questo è normale e non inuisce sulle funzionalità del dispositivo.
• Se possibile, evitare l’utilizzo di prolunghe. Se è tuttavia necessario, assicurarsi
che il valore di Ampere del dispositivo connesso non superi il valore di Ampere
massimo del cavo di alimentazione.
• Mentre si cucina, assicurarsi che non gocciolino liquidi sul piano di cottura, in
modo da prolungarne la vita utile.
• Utilizzare solo pentole e padelle a fondo piatto, in modo che il fondo sia
completamente a contatto con il fornello.
Scegliere le pentole
• Per cucinare è possibile utilizzare pentole di tutti i materiali. Ideali sono pentole con
un diametro del fondo di circa 18-26 cm (tonde) o con una lunghezza del fondo di
circa 12-20 cm (quadrate). Le pentole con fondi non piatti o con un diametro del
fondo inferiore a 12 cm non sono adatte.
Stoviglie adatte
Teiera in
acciaio
inox
Pentola di ferro Pentola magnetica
in acciaio inox
Pentola di
ferro colorata
Teiera
magnetica
in ferro
Padella di
ferro
Alluminio Pentola
termoresistente
Pentola di
ceramica

61
IT
Stoviglie non adatte
Pentole con fondo non
piano
Fondo della
pentola con piedi
d’appoggio
Fondo della pentola
con diametro
piccolo
Funzioni di protezione del sistema
1. Protezione da surriscaldamento: se il piano cottura si scalda a una temperatura di
650 °C, viene raffreddato automaticamente.
2. Protezione da surriscaldamento interno: se la temperatura interna del dispositivo
raggiunge i 100 °C, viene arrestata la funzione di riscaldamento.
3. Protezione da sovratensione: se la tensione è superiore a 275 V, il riscaldamento
del piano cottura viene arrestato.
4. Protezione da sottotensione: se la tensione è inferiore a 120 V, il riscaldamento del
piano cottura viene arrestato.
RICERCA E CORREZIONE DEGLI ERRORI
Problema Possibili soluzioni
Collegare la spina alla presa elettrica.
Premere On/Off, il display non si
illumina.
Controllare che la spina sia inserita
correttamente nella presa elettrica e che
questa sia in buono stato.
L’indicazione On/Off non si illumina. Controllare che display e scheda
principale non siano danneggiati.
Durante il funzionamento, la funzione
riscaldante si arresta improvvisamente.
Controllare se sono presenti le seguenti
cause: temperatura ambiente troppo
alta o il tempo di cottura impostato
è scaduto. Se è stata attivata la
protezione da surriscaldamento,
riavviare il piano cottura solo dopo
10 minuti. Il piano cottura si spegne
automaticamente dopo 2 ore di non
utilizzo.
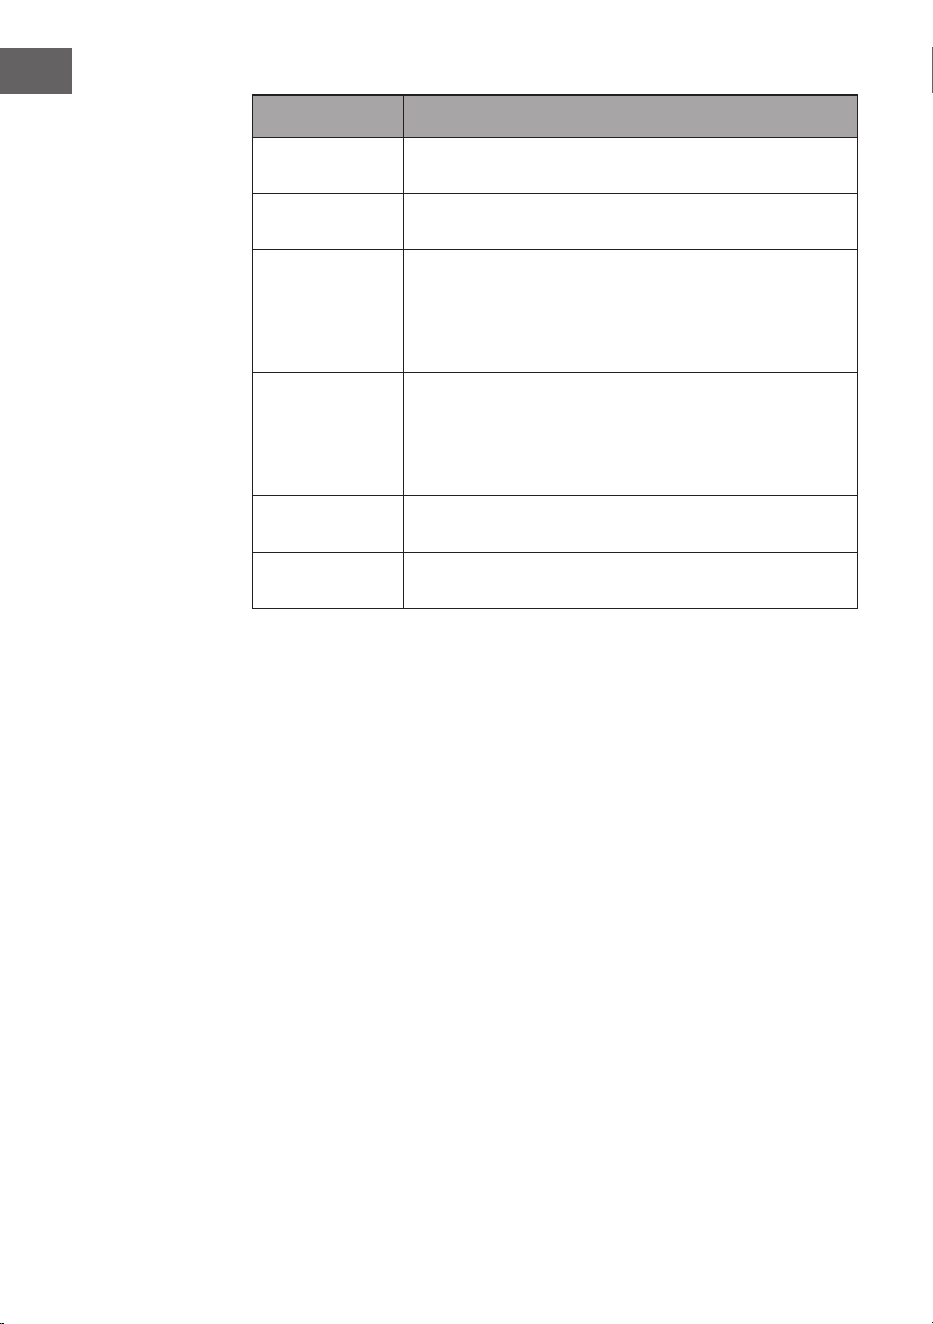
62
IT
Codice di errore Causa/Soluzione
E1
Rottura del cavo o rilevamento di cortocircuito nel sensore di
temperatura.
E2
Rilevamento del cortocircuito o del circuito aperto del controllo
del silicio.
E3
Protezione da sovratensione:
Viene emesso un segnale acustico ogni secondo e il display
LED mostra “E3” lampeggiante: La tensione è < 275 V. Se
la tensione è < 265 V, premere On/Off, il piano cottura a
infrarossi funziona o viene spento.
E4
Protezione da sottotensione:
Viene emesso un segnale acustico ogni secondo e il display
LED mostra “E4” lampeggiante: La tensione è ≤ 120 V. Se
la tensione è > 130 V, premere On/Off, il piano cottura a
infrarossi funziona o viene spento.
E5
Problema al circuito elettrico della ventola:
La tensione operativa della ventola è troppo bassa.
E6
Protezione da surriscaldamento del controllo del silicio
(interno).
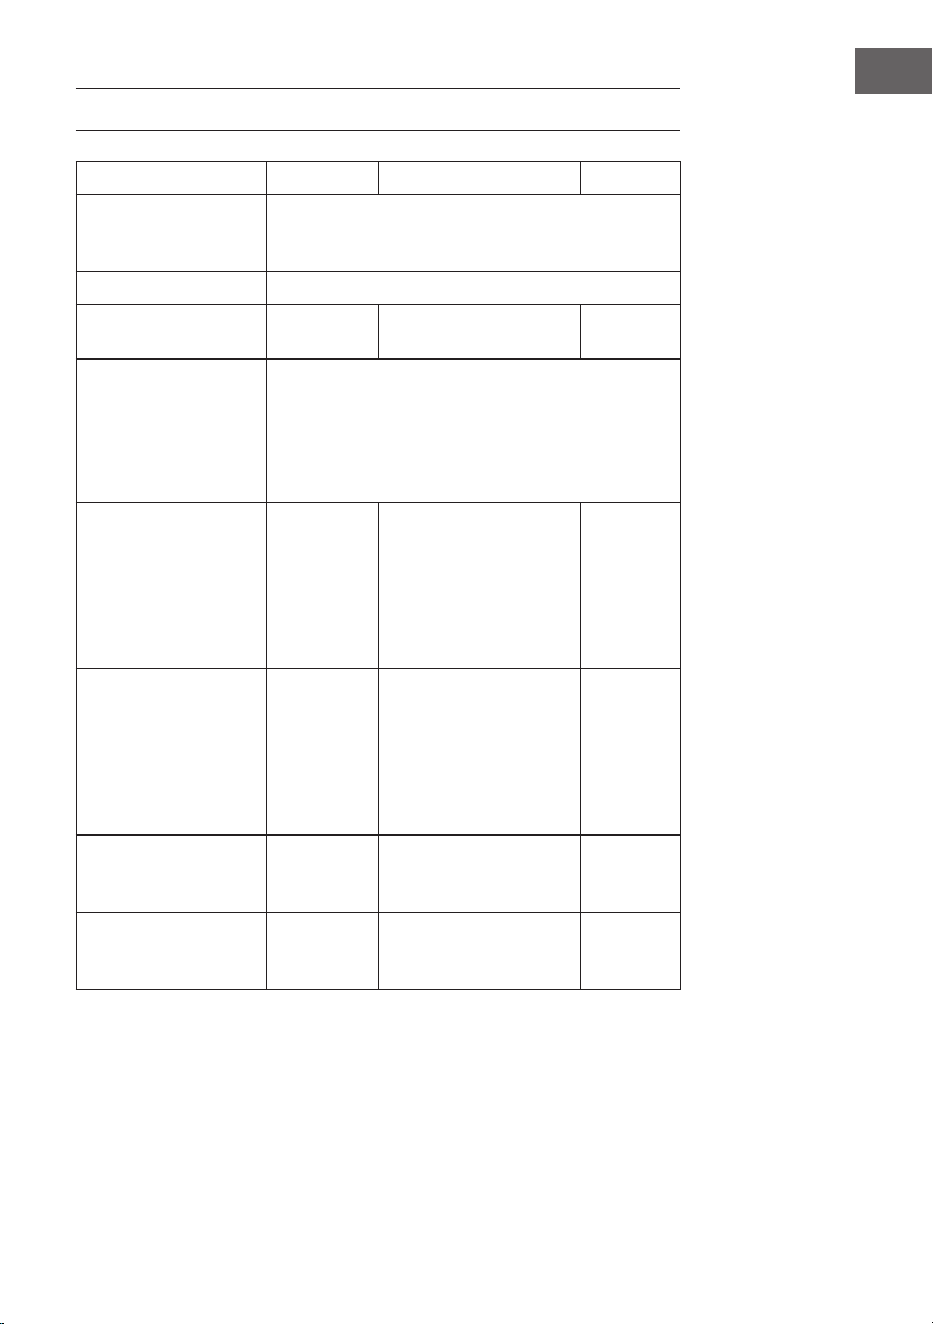
63
IT
SCHEDA INFORMATIVA DEL PRODOTTO
Simbolo Valore Unità
Numero di
riconoscimento del
modello
10033283
Tipo di piano cottura
Indipendente
Numero di zone e/o aree
di cottura
2
Tecnologia di
riscaldamento (zone di
cottura a induzione e
aree di cottura, zona di
cottura radiante, piastre
solide)
Piano cottura a infrarossi
Per zone o aree di
cottura circolari: il
diametro dell’area utile
per ogni zona di cottura
riscaldata elettricamente,
arrotondato sui 5 mm più
prossimi
Ø 19,0 / 19,0 cm
Per zone o aree di cottura
non circolari: lunghezza e
larghezza dell’area utile
per ogni zona di cottura
riscaldata elettricamente,
arrotondate sui 5 mm più
prossimi
L
A
__
__
cm
Consumo energetico per
zona o area di cottura
calcolato per kg
EC
Piano di cottura
elettrico
190,5 / 187,0 Wh/kg
Consumo energetico per
il piano cottura calcolato
per kg
EC
Piano di cottura
elettrico
188,7 Wh/kg
64
IT
AVVISO DI SMALTIMENTO
Se nel proprio paese si applicano le regolamentazioni
inerenti lo smaltimento di dispositivi elettrici ed elettronici,
questo simbolo sul prodotto o sulla confezione segnala che
questi prodotti non possono essere smaltiti con i riuti normali
e devono essere portati a un punto di raccolta di dispositivi
elettrici ed elettronici. Grazie al corretto smaltimento dei
vecchi dispositivi si tutela il pianeta e la salute delle persone
da possibili conseguenze negative. Informazioni riguardanti il
riciclo e lo smaltimento di questi prodotti si ottengono presso
l’amministrazione locale oppure il servizio di gestione dei
riuti domestici.
PRODUTTORE E IMPORTATORE (UK)
Produttore:
Chal-Tec GmbH, Wallstraße 16, 10179 Berlino, Germania.
Importatore per la Gran Bretagna:
Berlin Brands Group UK Limited
PO Box 42
272 Kensington High Street
London, W8 6ND
United Kingdom