

RainMAC installation note
Introduction
Thank you for selecting the Martin RainMAC. The
RainMAC is a lightweight hood for partial protection of
lighting fixtures from precipitation in temporary outdoor
applications. The RainMAC fits the following fixtures:
If in doubt about whether the RainMAC will suit a
specific fixture or purpose, please contact Martin for advice.
Since fitting a RainMAC affects fixture cooling, use in strong sunshine or ambient temperatures above
30° C (86° F) is not recommended. Painting the top of the RainMAC white will reduce temperatures in
sunny conditions.
For the latest documentation and information about this and all Martin Professional products, please
visit the Martin website at http://www.martin.com
Warning! Read the safety precautions below before installing the RainMAC.
Safety precautions
Warning! This product is for professional use only. It is not for household use.
The RainMAC provides partial protection from rain, snow, etc. for the base of MAC
fixtures, but it does not make fixtures completely waterproof. The presence of
moisture in electrical installations increases the risk of potentially lethal electric
shock. Do not operate lighting equipment if it becomes wet.
Read this installation note before installing the RainMAC, follow the instructions and safety
precautions listed below and observe all warnings on your fixtures, in fixture user manuals and in this
installation note. If you have questions about how to install or use the RainMAC safely, please contact
your Martin dealer or call the Martin 24-hour service hot line at +45 70 200 201.
• Do not use the RainMAC with luminaires that consume more than 1200 watts of power.
• Do not install or operate the RainMAC in strong winds (over 17 m/s or 37 M.P.H.).
• Do not operate fixtures with the RainMAC fitted if the ambient temperature (T
a
) exceeds 30° C
(86° F).
• The RainMAC can become hot when fitted to a fixture in use. Allow to cool before handling.
• Do not modify the RainMAC.
• Do not hang extra weatherproofing material over or around the RainMAC while fixtures are in use.
• Fixtures with the RainMAC fitted must be lifted or carried by a minimum of two people.
• Verify that supporting structures can hold at least 10 times the weight of all installed devices and
hardware.
• Check that all fixtures and rigging hardware are securely fastened and use an approved means of
secondary attachment such as a safety cable to secure both the RainMAC and the fixture.
• Block access below the work area and work from a stable platform whenever installing or removing
fixtures with the RainMAC fitted.
• Do not attempt to fit the RainMAC to a fixture that is suspended overhead. Lower fixtures to ground
level before fitting the RainMAC.
• MAC 550 • MAC 2000 Performance
• MAC 575 Krypton • MAC 2000 Profile
• MAC 700 Profile • MAC 2000 Wash
• MAC 700 Wash • MAC TW1
Martin Professional A/S • Olof Palmes Allé 18 • 8200 Aarhus N • Denmark
Tel: +45 8740 0000 • Fax +45 8740 0010 • www.martin.com
Installation
Note that the RainMAC is not square, and that certain fixtures
can be installed in one direction only.
To install the RainMAC on a MAC series fixture:
1. Measure to determine which rectangular slots in the
RainMAC match the fastener mounting points in the fixture
base, and insert the plastic plugs supplied with the
RainMAC into the slots that will not be used. Ignore the two
smaller safety cable slots for the moment.
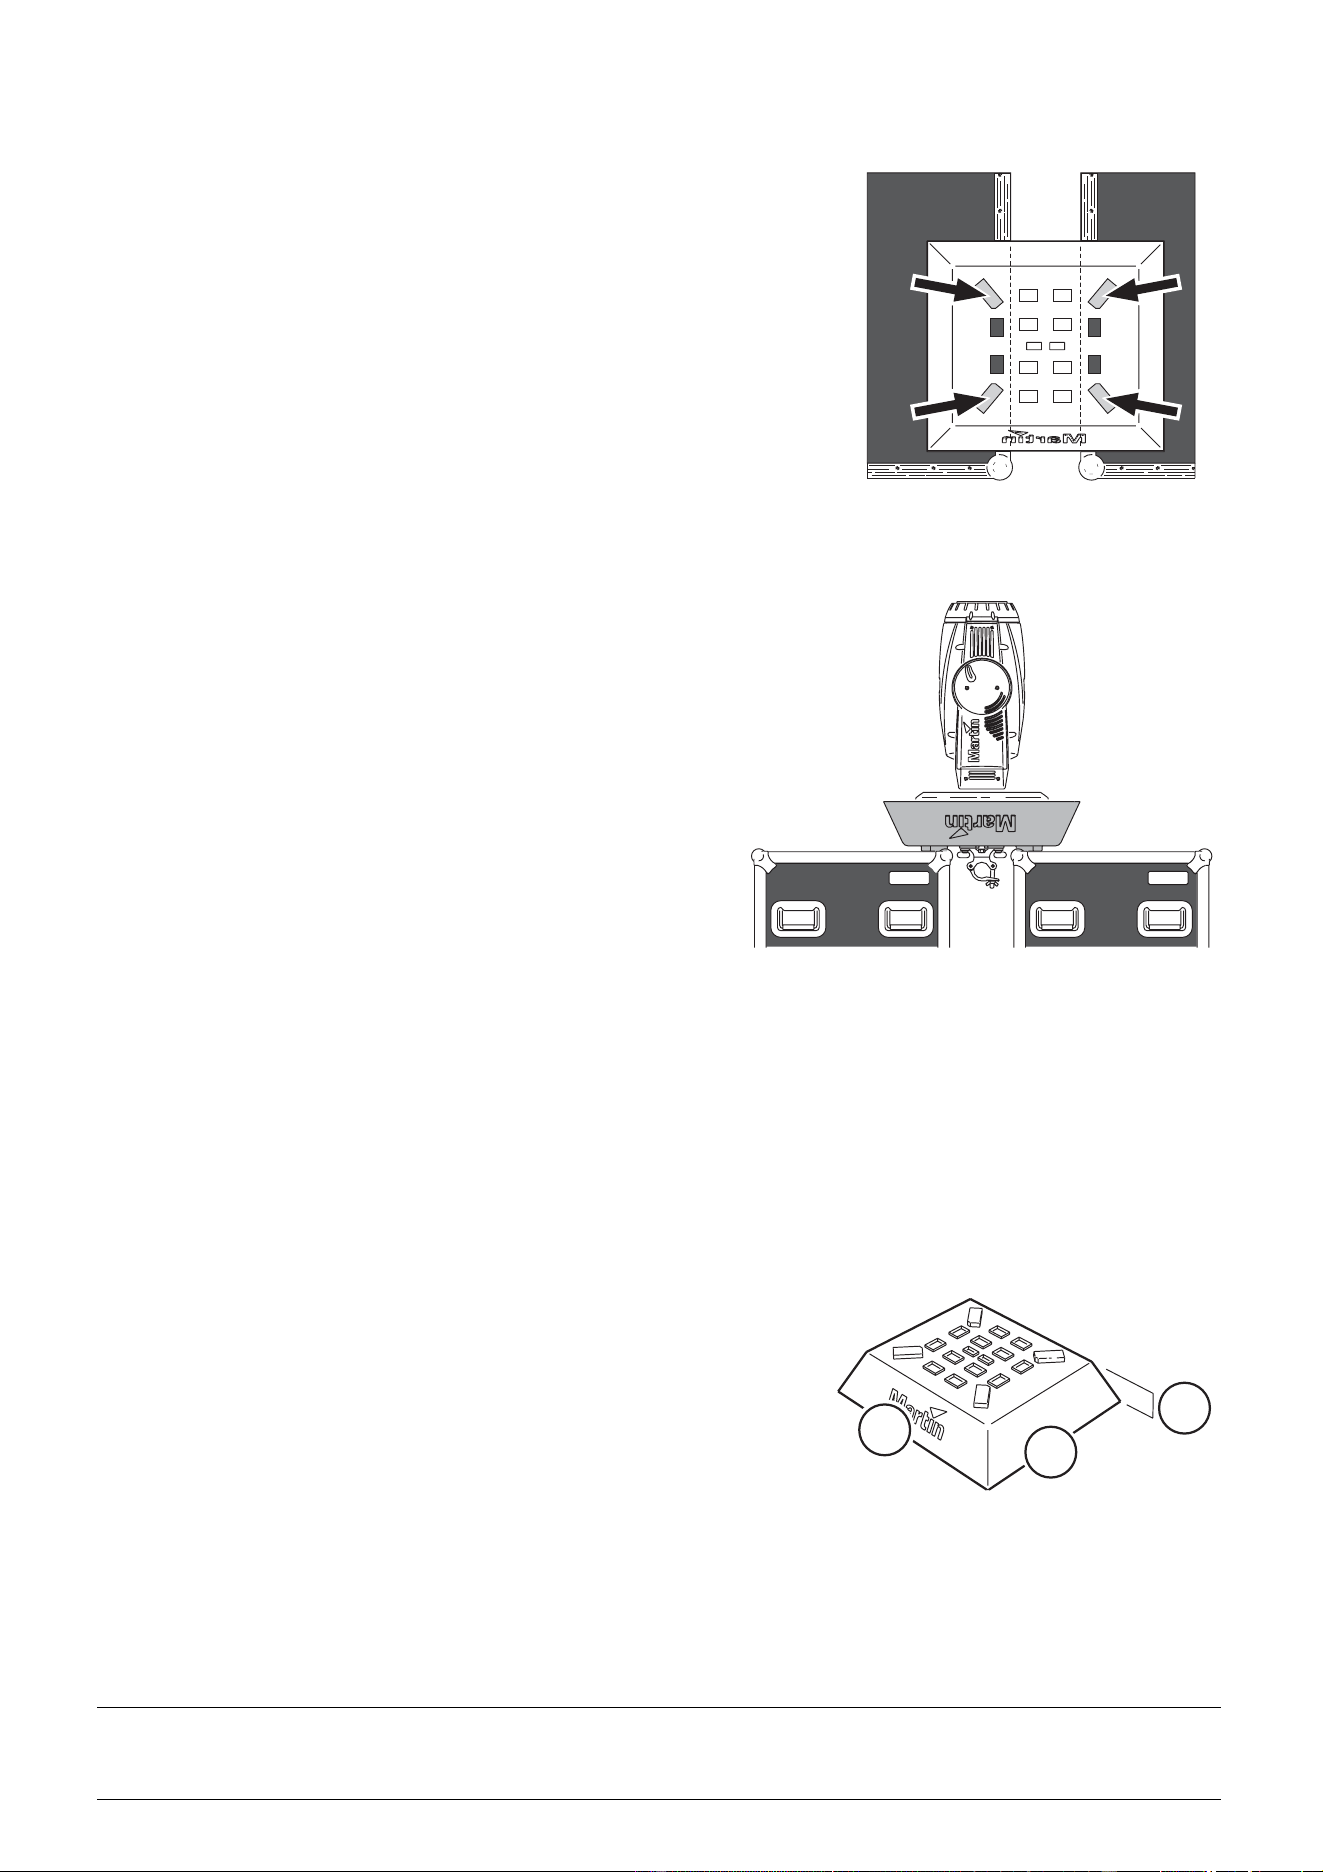
2. See Figure 1. Place the RainMAC upside-down on two flight
cases or similar supports.
Important! Ensure that the raised corner moldings (arrowed in
illustration) are supported.
3. Lower the MAC fixture onto the RainMAC so that
the fixture base is centered.
4. Following the instructions supplied with the
hardware, bolt rigging hardware to Martin omega
brackets.
5. Working from underneath the RainMAC, insert
the omega brackets through the rectangular
cutouts in the RainMAC and fasten them into the
base of the fixture base using their quarter-turn
fasteners. Turn all quarter-turn fasteners fully
clockwise to lock them.
6. Loop a secondary attachment through one of the
two small center slots in the RainMAC, around
the attachment point in the fixture base and back
out through the other center slot.
7. Because safety attachments vary, no plug is
supplied for the safety cable slots. For added weather protection, these slots are easy to seal with
waterproof adhesive tape, for example. The fixture and RainMAC are now ready for rigging. Note
that two people are required to lift and carry the fixture.
Cleaning
Clean the RainMAC with a damp cloth or warm soapy water. Do not use abrasives or solvents.
RainMAC specifications
PHYSICAL
Length (A). . . . . . . . . . . . . . . . . . . . . . 615 mm (24.3 in)
Width (B) . . . . . . . . . . . . . . . . . . . . . . 550 mm (21.7 in)
Height (C). . . . . . . . . . . . . . . . . . . . . . . 155 mm (6.1 in)
Weight . . . . . . . . . . . . . . . . . . . . . . . . . . 1.1 kg (2.4 lbs)
CONSTRUCTION
Flame-retardant ABS
THERMAL
Maximum ambient temperature (T
a
) . . . . 30° C (86° F)
Figure 1: Corner moldings must
be supported
Figure 2: Installing rigging hardware
A
B
C
© 2005-2007 Martin Professional A/S, Denmark. All rights reserved. No part of this document may be reproduced, in any form or by any means,
without permission in writing from Martin Professional A/S, Denmark. Information subject to change without notice. Martin Professional A/S and
all affiliated companies disclaim liability for any injury, damage, direct or indirect loss, consequential or economic loss or any other loss occa-
sioned by the use of, inability to use or reliance on the information contained in this document. P/N 35000569, Rev. B