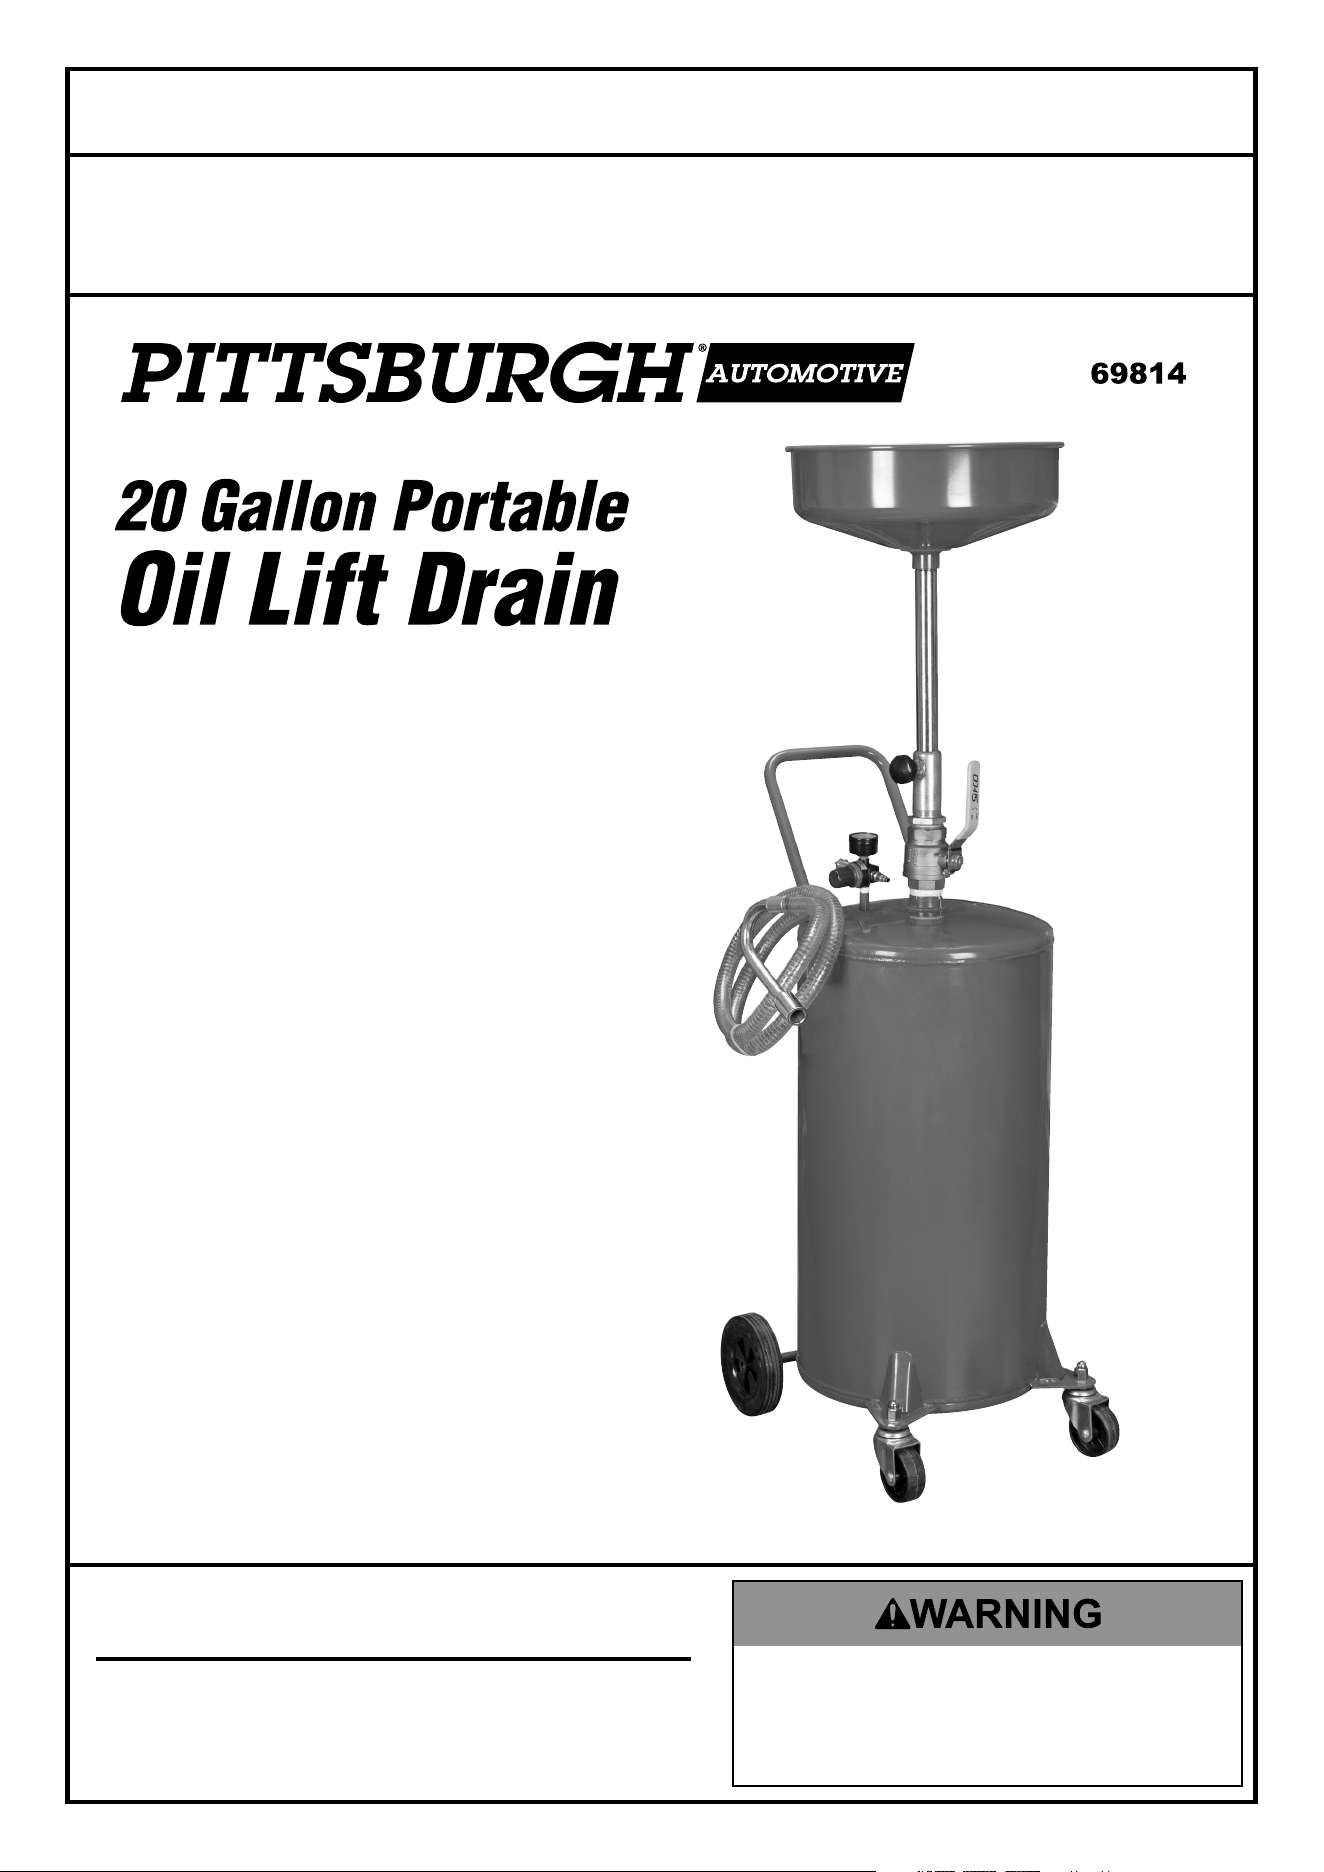
Visit our website at: http://www.harborfreight.com
Email our technical support at: [email protected]
Owner’s Manual & Safety Instructions
Save This Manual Keep this manual for the safety warnings and precautions, assembly,
operating, inspection, maintenance and cleaning procedures. Write the product’s serial number in the
back of the manual near the assembly diagram (or month and year of purchase if product has no number).
Keep this manual and the receipt in a safe and dry place for future reference. 23a
When unpacking, make sure that the product is intact
and undamaged. If any parts are missing or broken,
please call 1-888-866-5797 as soon as possible.
Copyright
©
2013 by Harbor Freight Tools
®
. All rights reserved.
No portion of this manual or any artwork contained herein may be reproduced in
any shape or form without the express written consent of Harbor Freight Tools.
Diagrams within this manual may not be drawn proportionally. Due to continuing
improvements, actual product may differ slightly from the product described herein.
Tools required for assembly and service may not be included.
Read this material before using this product.
Failure to do so can result in serious injury.
SAVE THIS MANUAL.
Owner’s Manual & Safety Instructions
Save This Manual Keep this manual for the safety warnings and precautions, assembly,
operating, inspection, maintenance and cleaning procedures. Write the product’s serial number in the
back of the manual near the assembly diagram (or month and year of purchase if product has no number).
Keep this manual and the receipt in a safe and dry place for future reference.
When unpacking, make sure that the product is intact
and undamaged. If any parts are missing or broken,
please call 1-888-866-5797 as soon as possible.
Copyright
©
2013 by Harbor Freight Tools
®
. All rights reserved.
No portion of this manual or any artwork contained herein may be reproduced in
any shape or form without the express written consent of Harbor Freight Tools.
Diagrams within this manual may not be drawn proportionally. Due to continuing
improvements, actual product may differ slightly from the product described herein.
Tools required for assembly and service may not be included.
Read this material before using this product.
Failure to do so can result in serious injury.
SAVE THIS MANUAL.
Page 2 For technical questions, please call 1-888-866-5797. Item 69814
SAFETy OpERATION MAINTENANcESETUp
Table of contents
Safety ......................................................... 2
Specifications ............................................. 5
Setup .......................................................... 6
Operation .................................................... 9
Maintenance .............................................. 10
Parts List and Diagram .............................. 11
Warranty .................................................... 12
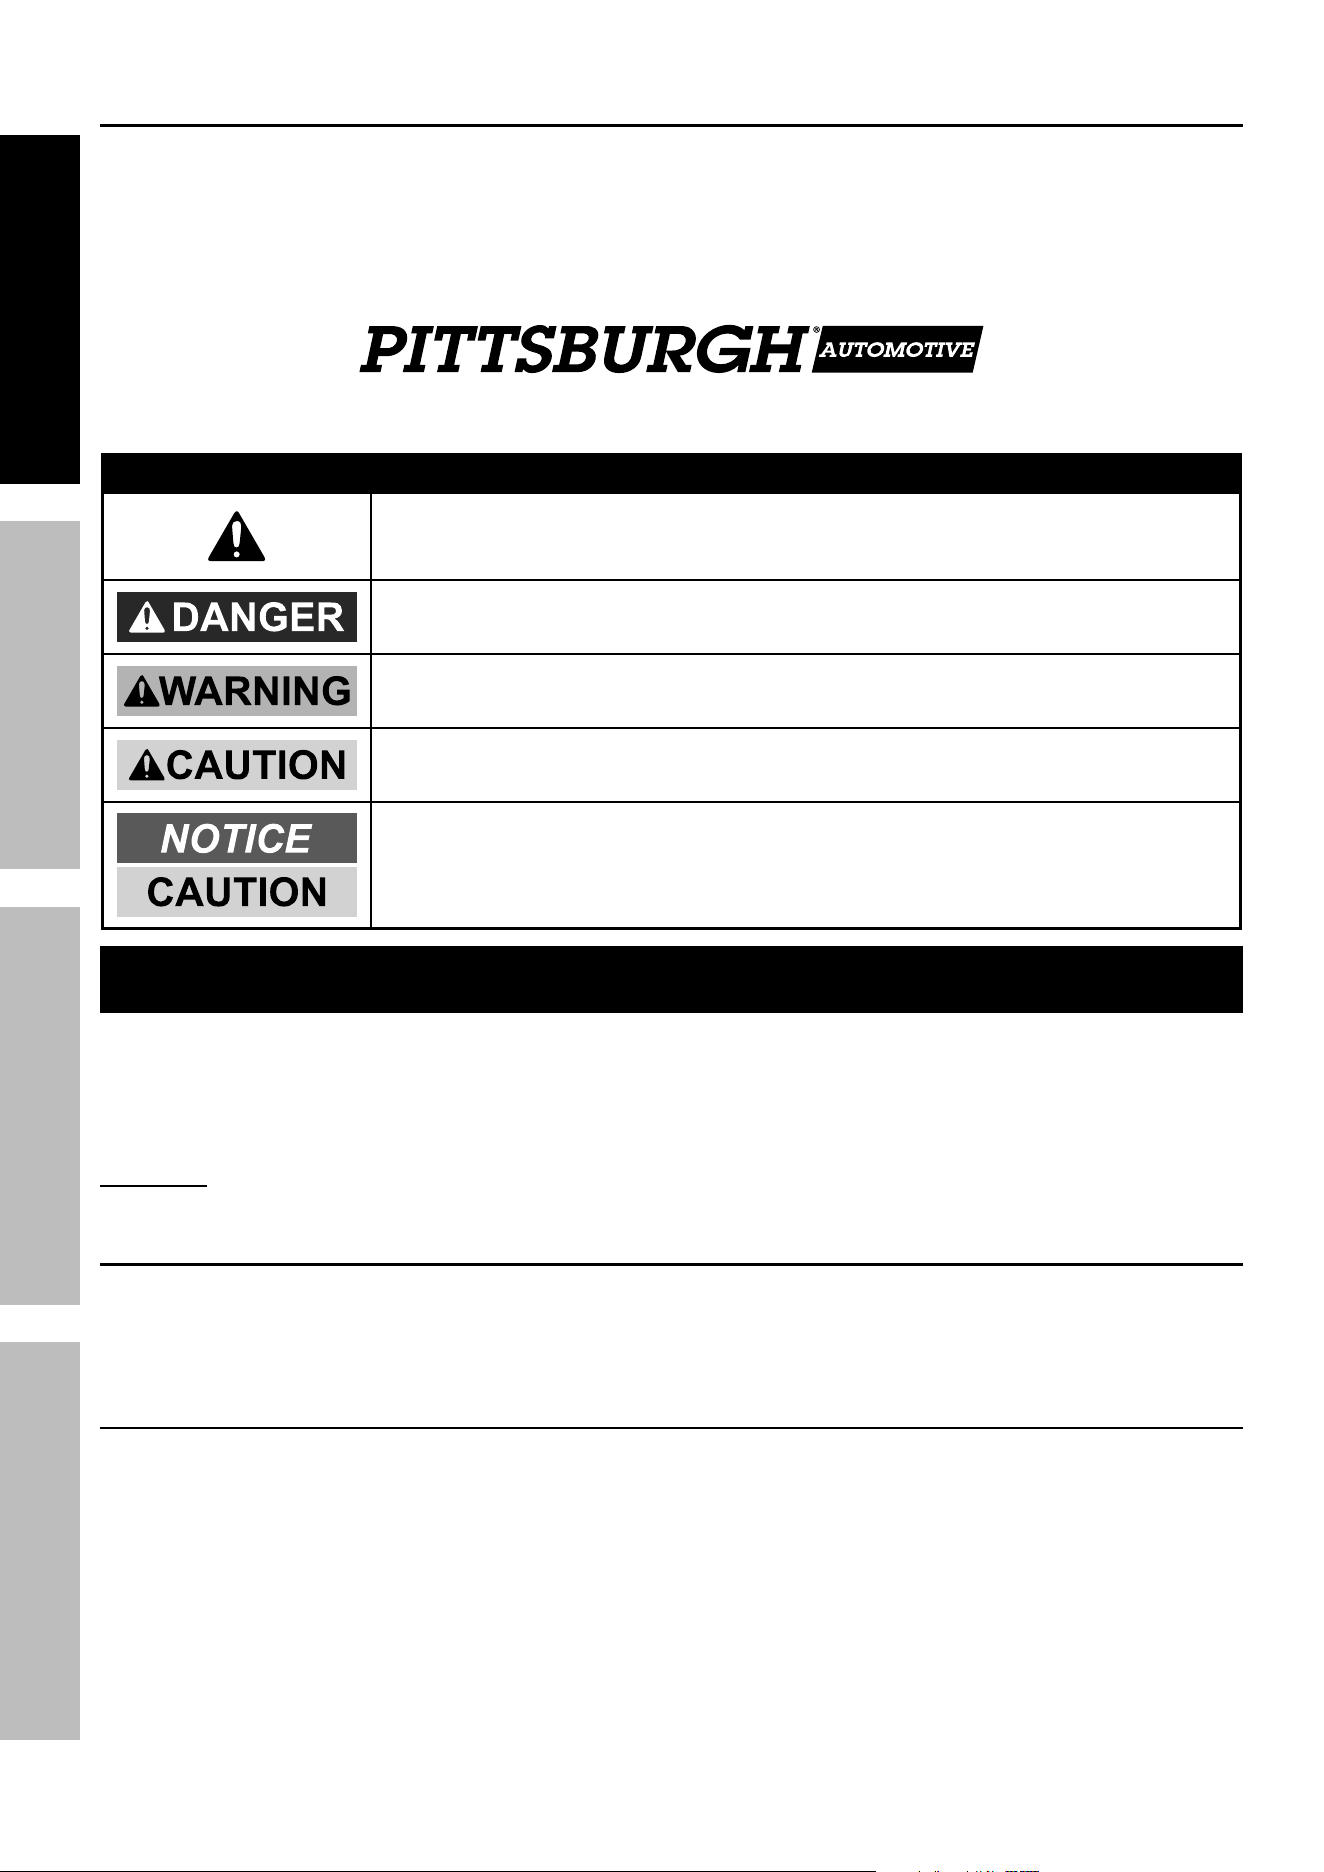
WARNING SyMBOLS AND DEFINITIONS
This is the safety alert symbol. It is used to alert you to potential
personal injury hazards. Obey all safety messages that
follow this symbol to avoid possible injury or death.
Indicates a hazardous situation which, if not avoided,
will result in death or serious injury.
Indicates a hazardous situation which, if not avoided,
could result in death or serious injury.
Indicates a hazardous situation which, if not avoided,
could result in minor or moderate injury.
Addresses practices not related to personal injury.
IMpORTANT SAFETy INSTRUcTIONS
INSTRUcTIONS pERTAINING TO A RISK OF FIRE,
ELEcTRIc SHOcK, OR INJURy TO pERSONS
WARNING – When using tools, basic precautions should always be followed, including the following:
General
To reduce the risks of electric shock,
fire, and injury to persons, read all the
instructions before using the tool.
Work Area
1. Keep the work area clean and well lighted.
Cluttered benches and dark areas increase the
risks of electric shock, fire, and injury to persons.
2. Do not operate the tool in explosive
atmospheres, such as in the presence
of flammable liquids, gases, or dust.
The tool is able to create sparks resulting
in the ignition of the dust or fumes.
3. Keep bystanders, children, and visitors away
while operating the tool. Distractions are
able to result in the loss of control of the tool.
Page 3For technical questions, please call 1-888-866-5797.Item 69814
SAFETyOpERATIONMAINTENANcE SETUp
personal Safety
1. Stay alert. Watch what you are doing and
use common sense when operating the tool.
Do not use the tool while tired or under the
influence of drugs, alcohol, or medication.
A moment of inattention while operating the
tool increases the risk of injury to persons.
2. Dress properly. Do not wear loose
clothing or jewelry. contain long hair.
Keep hair, clothing, and gloves away from
moving parts. Loose clothes, jewelry, or long
hair increases the risk of injury to persons as
a result of being caught in moving parts.
3. Avoid unintentional starting. Be sure the switch
is off before connecting to the air supply.
Do not carry the tool with your finger on the switch or
connect the tool to the air supply with the switch on.
4. Do not overreach.
Keep proper footing and balance at all times.
Proper footing and balance enables better
control of the tool in unexpected situations.
5. Always wear eye protection.
Wear ANSI-approved safety goggles.
Tool Use and care
1. Do not force the tool. Use the correct tool for the
application. The correct tool will do the job better
and safer at the rate for which the tool is designed.
2. Disconnect the tool from the air source
before making any adjustments, changing
accessories, or storing the tool. Such preventive
safety measures reduce the risk of starting the
tool unintentionally. Turn off and detach the air
supply, safely discharge any residual air pressure,
and release the throttle and/or turn the switch to
its off position before leaving the work area.
3. Store the tool when it is idle out of reach
of children and other untrained persons.
A tool is dangerous in the hands of untrained users.
4. check for misalignment or binding of moving
parts, breakage of parts, and any other condition
that affects the tool's operation. If damaged,
have the tool serviced before using. Many accidents
are caused by poorly maintained tools.
There is a risk of bursting if the tool is damaged.
5. Use only accessories that are identified by the
manufacturer for the specific tool model. Use of
an accessory not intended for use with the specific
tool model, increases the risk of injury to persons.
Service
1. Tool service must be performed only
by qualified repair personnel.
2. When servicing a tool, use only identical
replacement parts. Use only authorized parts.
3. Use only the lubricants supplied with the
tool or specified by the manufacturer.
Air Source
1. Never connect to an air source
that is capable of exceeding
200 psi. Over pressurizing the
tool may cause bursting, abnormal
operation, breakage of the tool or
serious injury to persons. Use only clean, dry,
regulated compressed air at the rated pressure
or within the rated pressure range as marked on
the tool. Always verify prior to using the tool that
the air source has been adjusted to the rated air
pressure or within the rated air-pressure range.
2. Never use oxygen, carbon dioxide, combustible
gases or any bottled gas as an air source
for the tool. Such gases are capable of
explosion and serious injury to persons.
SAVE THESE INSTRUcTIONS.
Page 4 For technical questions, please call 1-888-866-5797. Item 69814
SAFETy OpERATION MAINTENANcESETUp
Symbols and Specific Safety Instructions
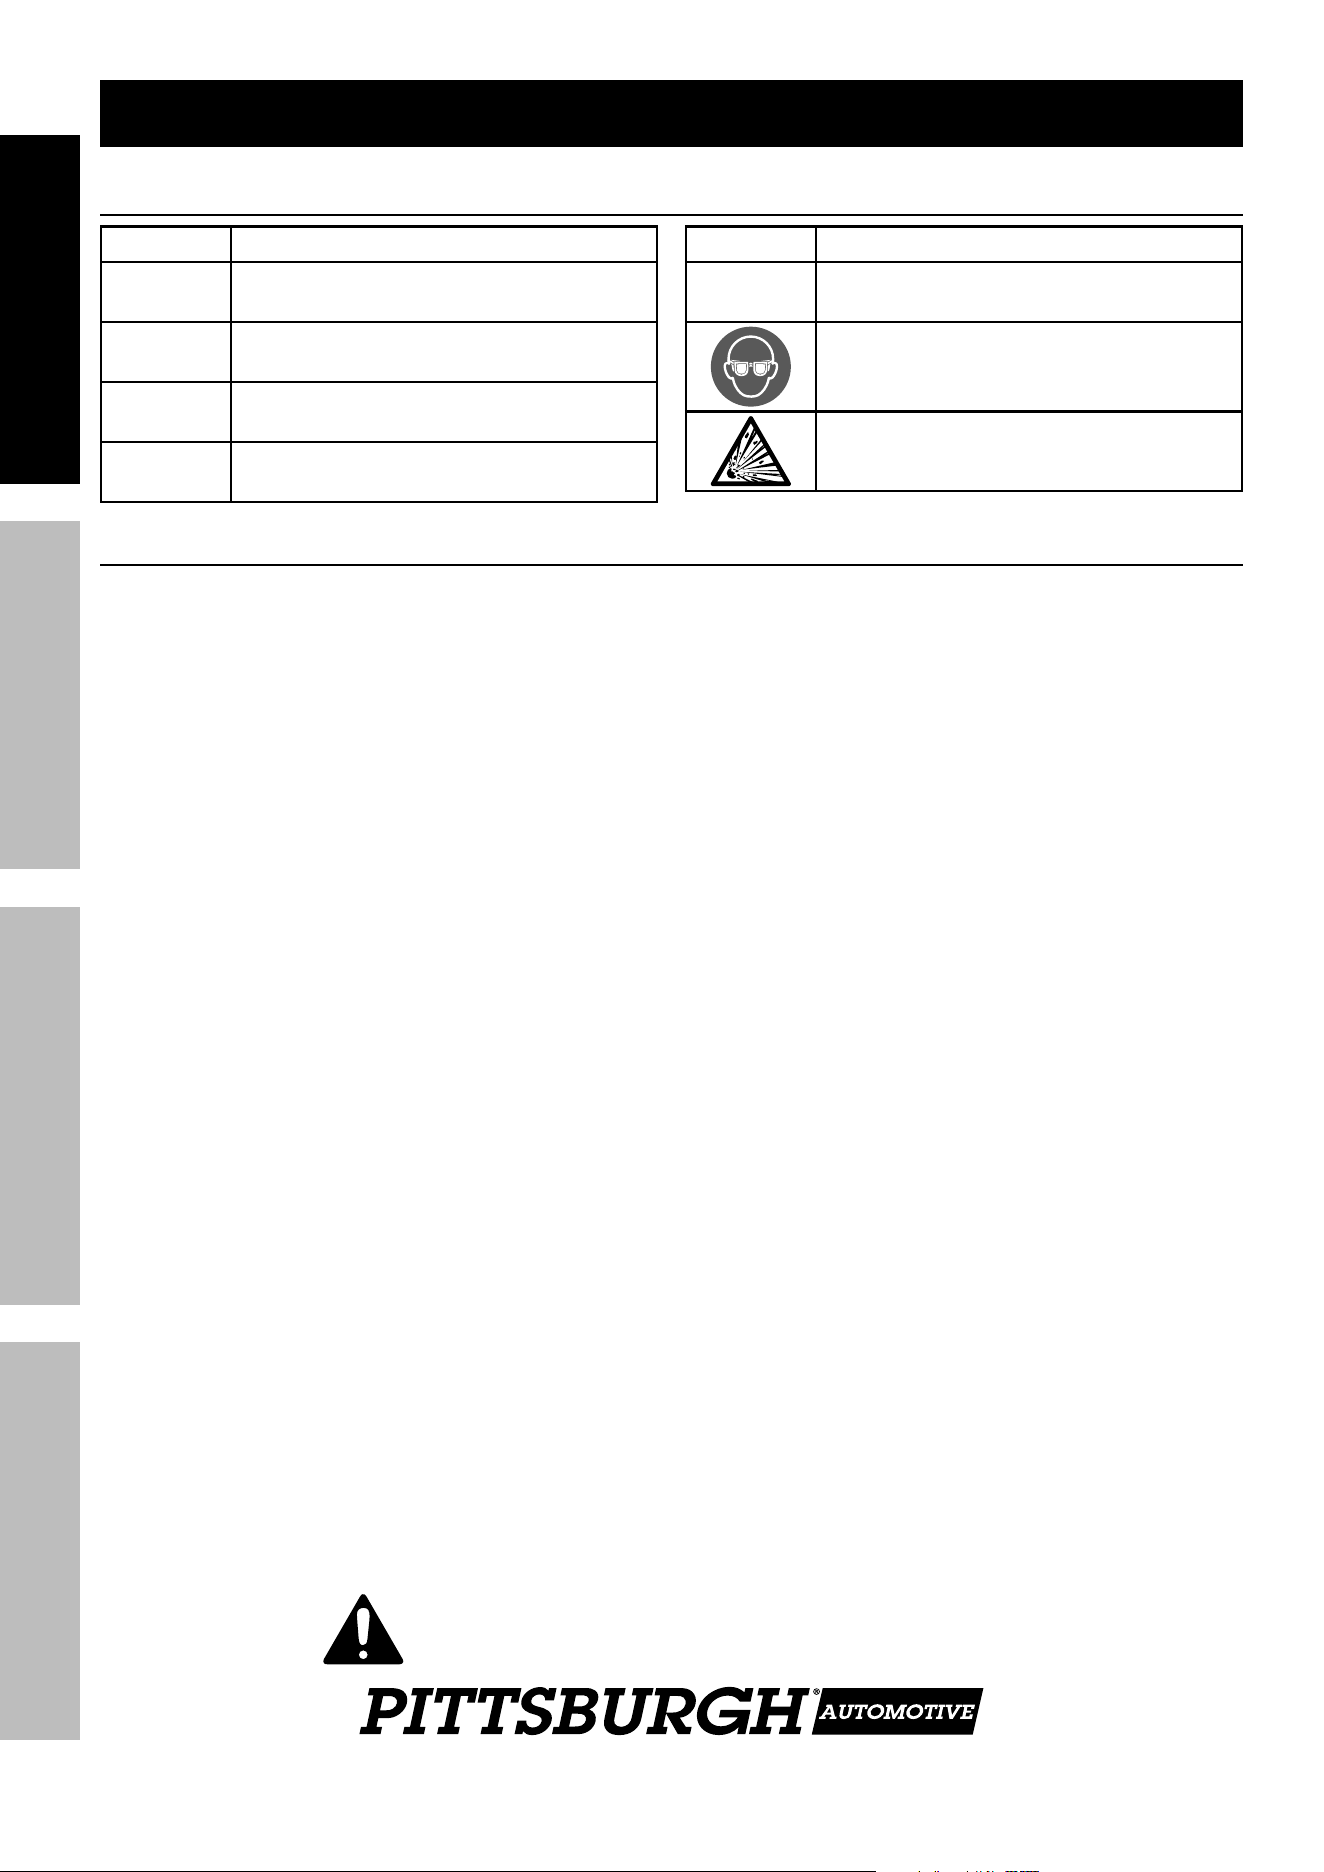
Symbol Definitions
Symbol property or statement
pSI
Pounds per square inch of pressure
cFM
Cubic Feet per Minute flow
ScFM
Cubic Feet per Minute flow
at standard conditions
NpT
National pipe thread, tapered
Symbol property or statement
NpS
National pipe thread, straight
WARNING marking
concerning Risk of Eye Injury.
Wear ANSI-approved eye protection.
WARNING marking concerning
Risk of Explosion.
Specific Safety Instructions
1. Study, understand, and follow all instructions
before operating the device.
2. Do not exceed air pressure rating.
3. Do not use without an air regulator or relief valve.
4. Failure to heed and understand these
instructions and markings may result in
personal injury and/or property damage.
5. Keep handler closed when moving,
to prevent spillage.
6. Do not climb or stand on handler.
7. No alterations shall be made to this product.
8. Use as intended only. Do not
use for any other liquid.
9. Vehicle must be safely supported by a
proper vehicle lift before service.
10. Use on flat, hard, level surface only.
11. Do not use near open flame or heat
sources. Do not smoke during use.
12. Prior to using the Drain, read and understand all
warnings, safety precautions, and instructions
as outlined in the vehicle manufacturer’s and
the support device’s instruction manuals.
13. Do not use the Drain with the
vehicle’s engine running.
14. Keep bystanders away during use.
15. Avoid burns. Allow the engine oil to completely
cool before draining the oil into the Drain.
16. Do not leave unattended when
operating or evacuating oil.
17. Remove the Drain before lowering the vehicle.
18. Recycle used oil according to regulations.
19. Install an in-line shutoff valve to allow
immediate control over the air supply in an
emergency, even if a hose is ruptured.
20. Wear ANSI-approved eye protection and
heavy-duty work gloves during use.
21. If used oil does not evacuate the Tank upon
pressurization, close the Ball Valve fully with the
handle in the horizontal position.
If this does not correct the problem,
remove the unit from service immediately and
contact a qualified service technician for repair.
22. Only use with accessories rated to handle the
forces exerted by this tool during operation.
Other accessories not designed for the forces
generated may break and forcefully launch pieces.
23. Obey the manual for the air compressor
used to power this tool.
24. Attach all accessories properly to the tool before
connecting the air supply. A loose accessory
may detach or break during operation.
25. The warnings and precautions discussed in this
manual cannot cover all possible conditions and
situations that may occur. It must be understood
by the operator that common sense and caution
are factors which cannot be built into this
product, but must be supplied by the operator.
SAVE THESE INSTRUcTIONS.
Page 5For technical questions, please call 1-888-866-5797.Item 69814
SAFETyOpERATIONMAINTENANcE SETUp
Functional Description
Specifications
Capacity 20 Gallons
Working Air Pressure 10 PSI
Air Inlet 1/4 IN. - 18 NPT
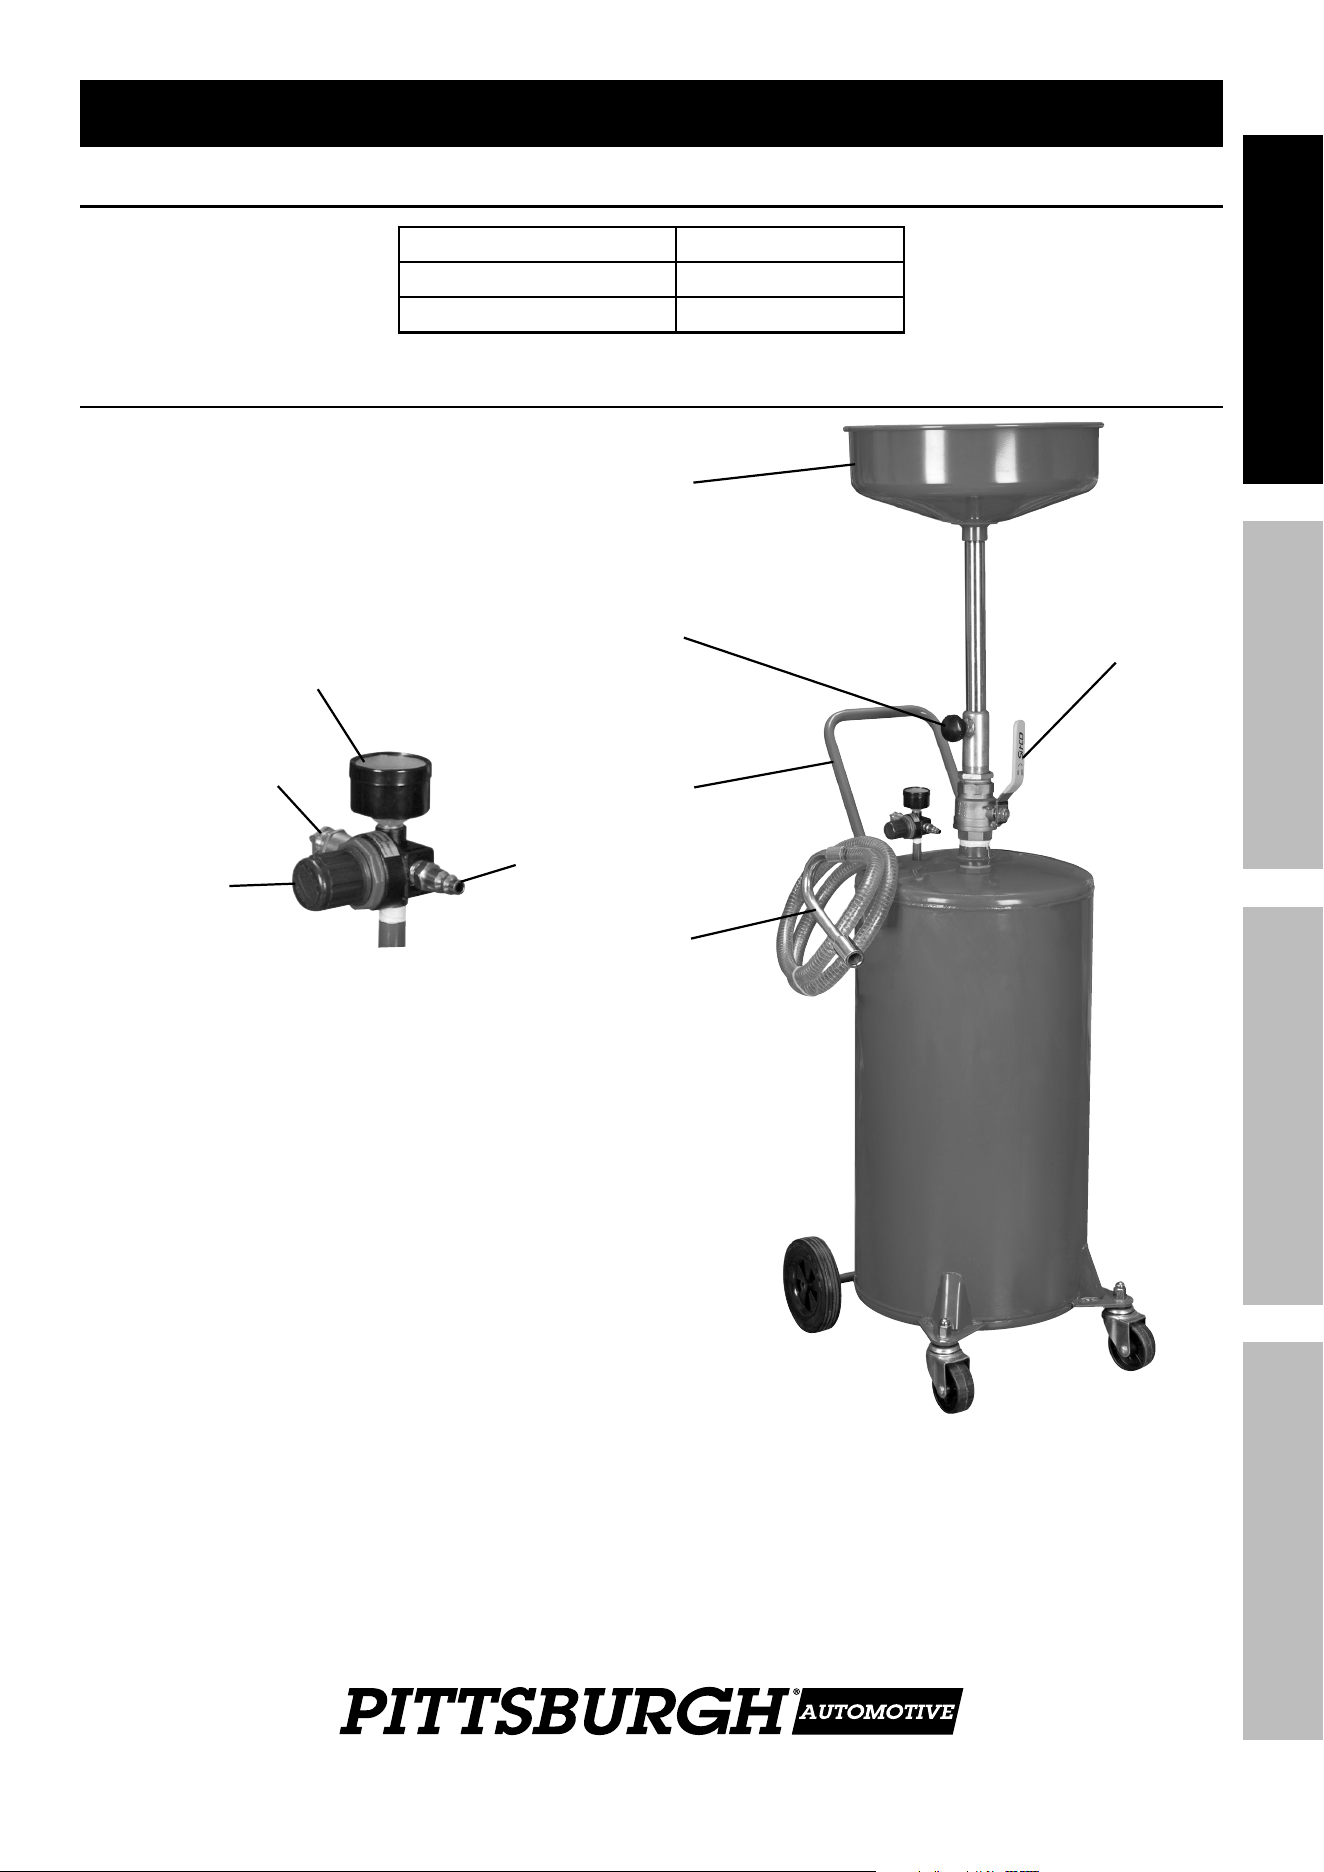
components and controls
Funnel
Knob
Ball
Valve
Handle
Nozzle
Gauge
Safety
Valve
Regulator
Knob
Air
Inlet
Page 6 For technical questions, please call 1-888-866-5797. Item 69814
SAFETy OpERATION MAINTENANcESETUp
Initial Tool Set Up/Assembly
Read the ENTIRE IMpORTANT SAFETy INFORMATION section at the beginning of this
manual including all text under subheadings therein before set up or use of this product.
Note: For additional information regarding the parts listed in the following pages,
refer to the Assembly Diagram near the end of this manual.
Note: This air tool may be shipped with a protective plug covering the air inlet. Remove this plug before set up.
Assembly
1. Assemble the Drain on flat, hard level surface.
2. Slide one Wheel (21) onto each end of the
axle of the Tank (15). Attach Wheels using
Washers (22) and Retaining Rings (23).
3. If Casters are not already attached to Tank,
fasten one Caster (20) to each bracket on the
base of the Tank. Slide on Washer (19), and
then use Acorn Nut (18) to attach it in place.
4. Insert Handle (10) into slot on the Tank.
Fasten in place using Screws (12).
5. Thread Ball Valve (7) into top of Tank.
6. Thread Connector (5) into top of Ball Valve (7)
and thread Sleeve (3) into Connector.
7. Thread Funnel (1) onto Drain Tube (2)
until fastened securely.
8. Insert Drain Tube, with Funnel fastened to
other end, into Sleeve. Adjust to required height
and lock Drain Tube in place using Knob (4).
Air Supply
TO pREVENT SERIOUS INJURy FROM EXpLOSION:
Use only clean, dry, regulated, compressed air to power this tool.
Do not use oxygen, carbon dioxide, combustible gases,
or any other bottled gas as a power source for this tool.
1. Incorporate a filter, regulator with pressure gauge,
oiler, in-line shutoff valve, and quick coupler for
best service, as shown on Figure A on page 7
and Figure B on page 8. An in-line shutoff
ball valve is an important safety device because
it controls the air supply even if the air hose
is ruptured. The shutoff valve should be a
ball valve because it can be closed quickly.
Note: If an automatic oiler system is not used,
add a few drops of Pneumatic Tool Oil to the airline
connection before operation. Add a few more drops
after each hour of continual use.
2. Attach an air hose to the compressor's air outlet.
Connect the air hose to the air inlet of the tool.
Other components, such as a coupler plug
and quick coupler, will make operation
more efficient, but are not required.
Note: Air flow, and therefore tool performance,
can be hindered by undersized air supply components.
The air hose must be long enough to reach
the work area with enough extra length to
allow free movement while working.
3. Close the in-line shutoff valve between
the compressor and the tool.
4. Turn on the air compressor according to
the manufacturer's directions and allow it
to build up pressure until it cycles off.
5. Adjust the air compressor's output regulator
so that the air output is enough to properly
power the tool, but the output will not exceed
the tool's maximum air pressure at any time.
Adjust the pressure gradually, while checking the
air output gauge to set the right pressure range.
6. Inspect the air connections for leaks.
Repair any leaks found.
7. If the tool will not be used at this time,
turn off and detach the air supply.
Note: Residual air pressure should not be present
after the tool is disconnected from the air supply.
However, it is a good safety measure to attempt to
discharge the tool in a safe fashion after disconnecting
to ensure that the tool is disconnected and not powered.
Page 7For technical questions, please call 1-888-866-5797.Item 69814
SAFETyOpERATIONMAINTENANcE SETUp
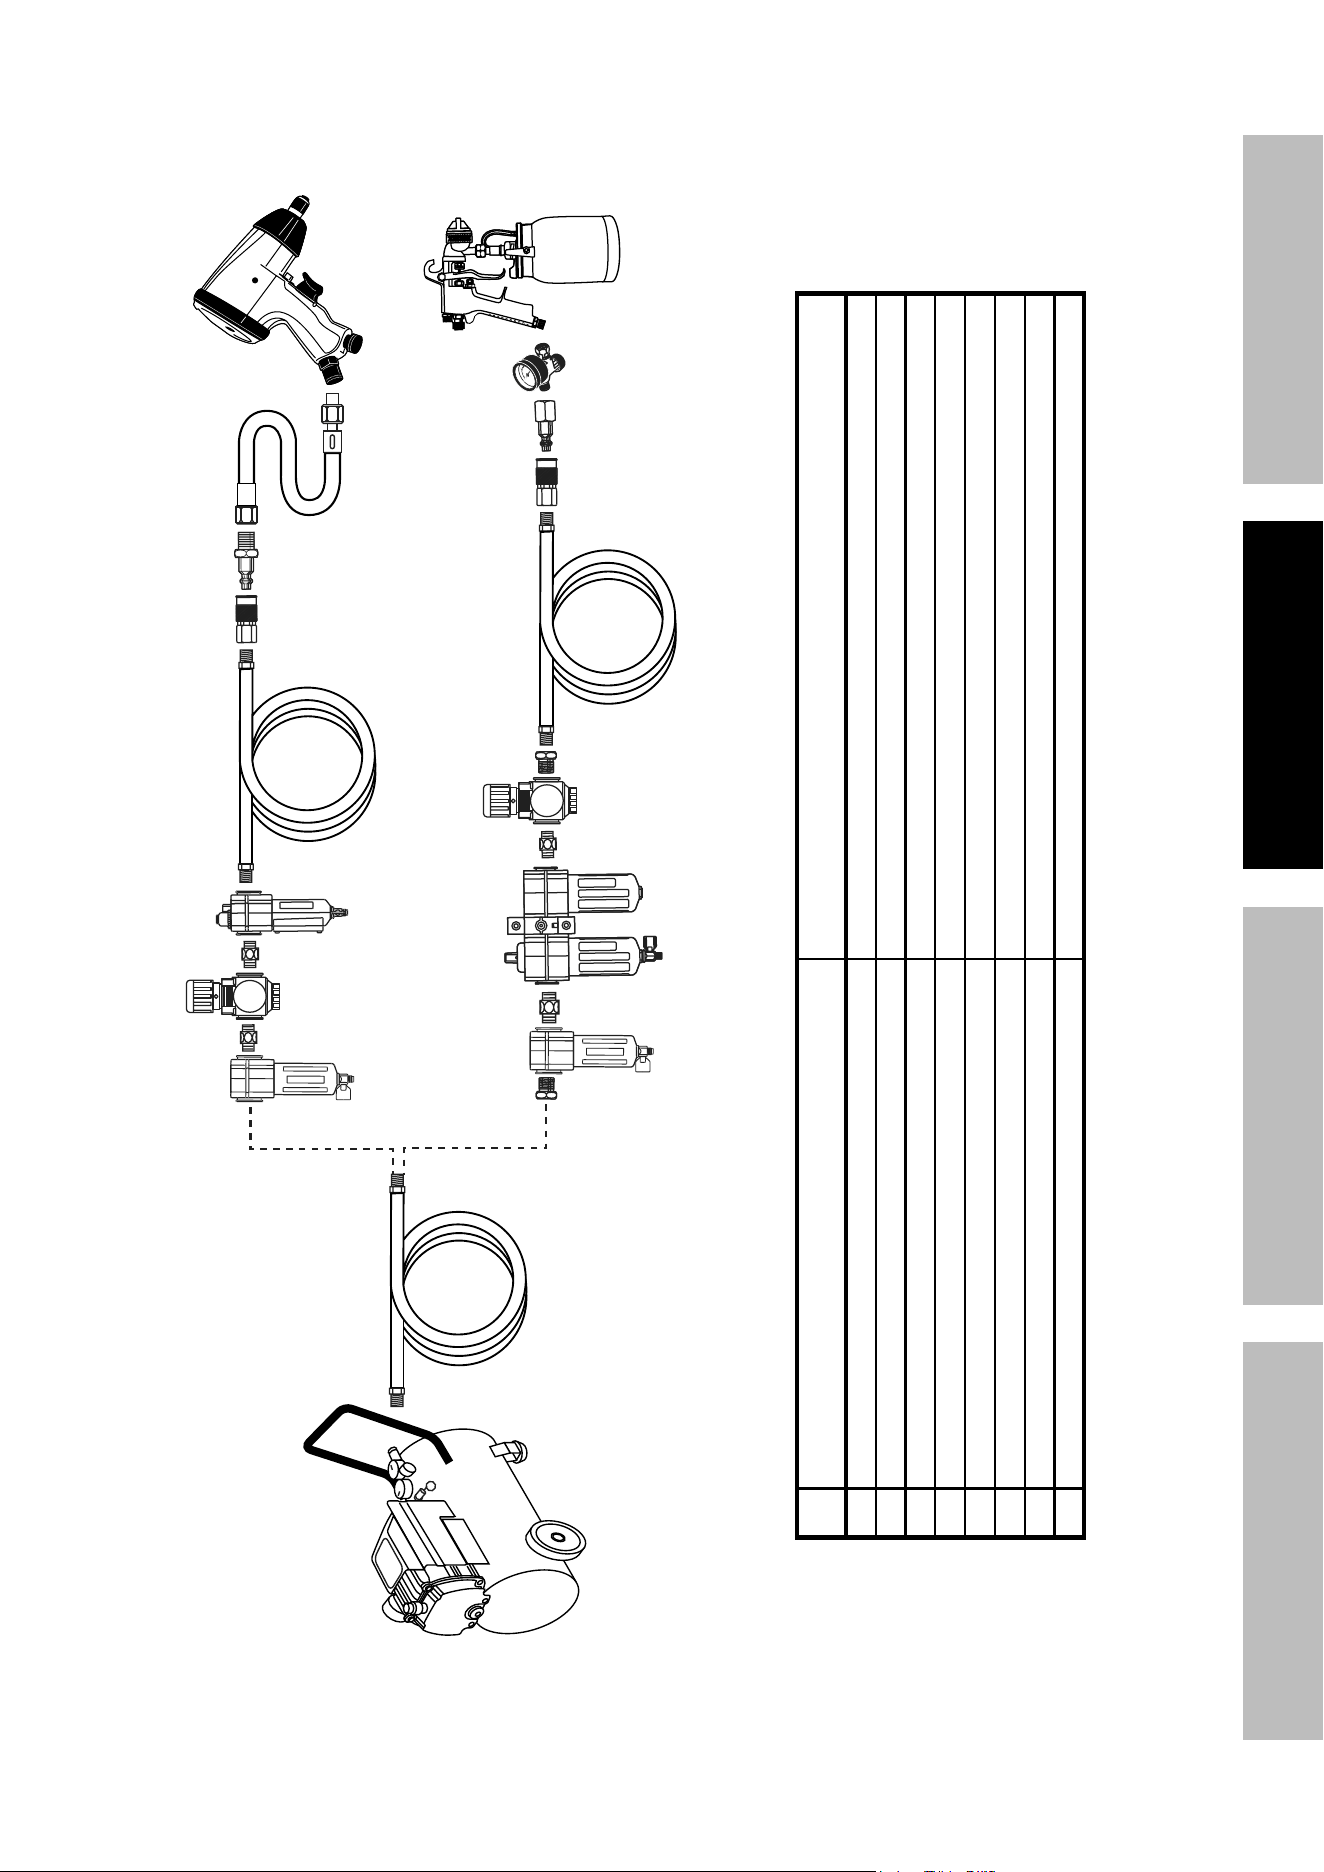
Figure A: portable Air Supply Setup
G
A
E
E
H
F
B
Non-lubricated
Tools
Lubricated
Tools
A
B
C
C
D
A
Description Function
A Air Hose Connects air to tool
B Filter Prevents dirt and condensation from damaging tool or workpiece
C Regulator Adjusts air pressure to tool
D Lubricator (optional) For air tool lubrication
E Coupler and Plug Provides quick connection and release
F Leader Hose (optional) Increases coupler life
G Air Cleaner / Dryer (optional) Prevents water vapor from damaging workpiece
H Air Adjusting Valve (optional) For fine tuning airflow at tool
Page 8 For technical questions, please call 1-888-866-5797. Item 69814
SAFETy OpERATION MAINTENANcESETUp
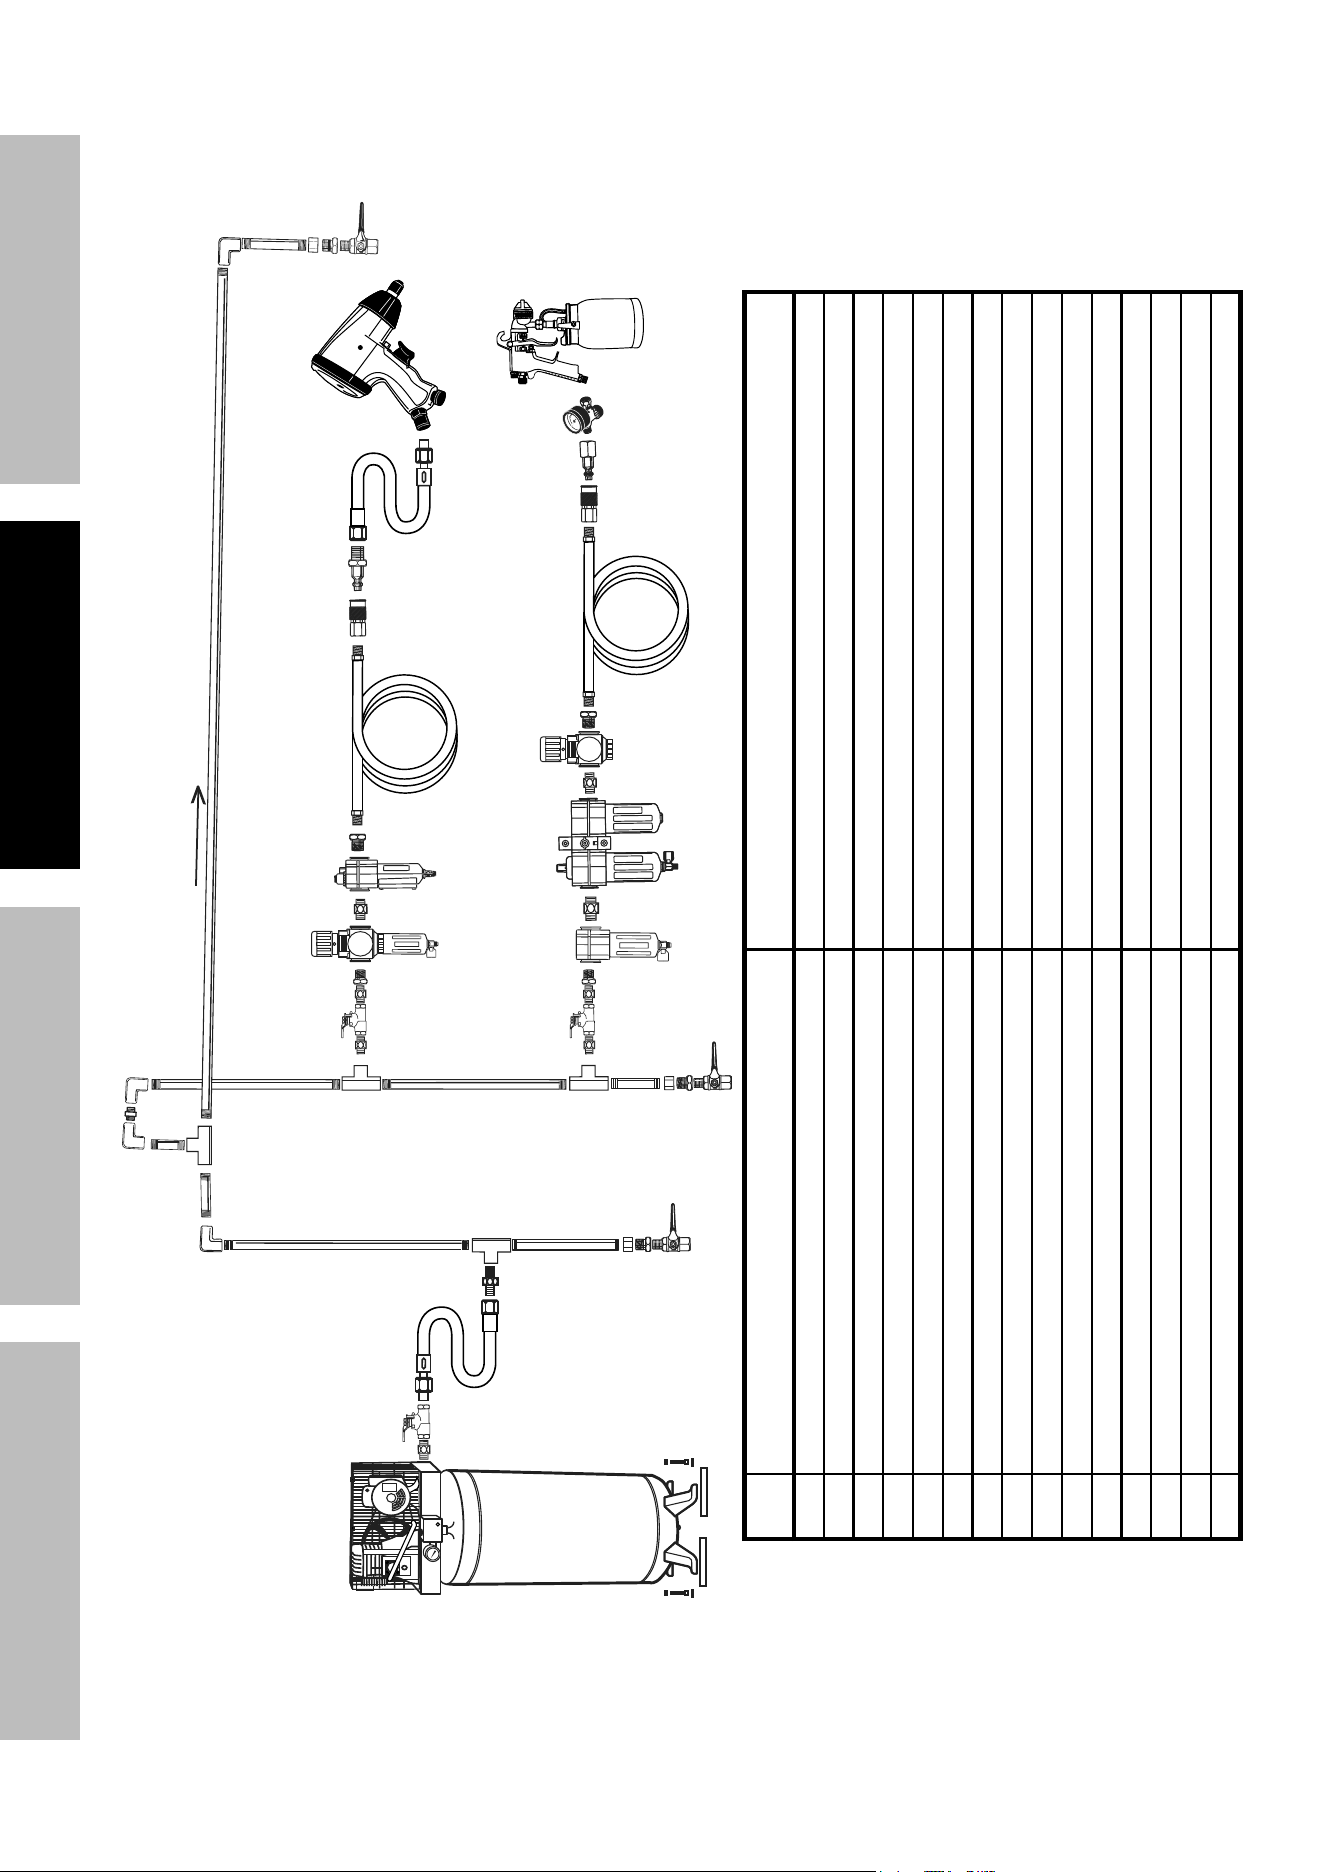
Figure B: Stationary Air Supply Setup
N
L
L O
M
C
C
Non-lubricated Tools
Lubricated
Tools
H
I
I
J
J
K
H
F
G
E
Slope
F
F
B
B
A
A
C
D
Description Function
A Vibration Pads For noise and vibration reduction
B Anchor Bolts Secures air compressor in place
C Ball Valve Isolates sections of system for maintenance
D Isolation Hose For vibration reduction
E Main Air Line - 3/4″ minimum recommended Distributes air to branch lines
F Ball Valve To drain moisture from system
G Branch Air Line -1/2″ minimum recommended Brings air to point of use
H Air Hose Connects air to tool
I Filter Prevents dirt and condensation from damaging tool or workpiece
J Regulator Adjusts air pressure to tool
K Lubricator (optional) For air tool lubrication
L Coupler and Plug Provides quick connection and release
M Leader Hose (optional) Increases coupler life
N Air Cleaner / Dryer (optional) Prevents water vapor from damaging workpiece
O Air Adjusting Valve (optional) For fine tuning airflow at tool

Page 9For technical questions, please call 1-888-866-5797.Item 69814
SAFETyOpERATIONMAINTENANcE SETUp
Operating Instructions
Read the ENTIRE IMpORTANT SAFETy INFORMATION section at the beginning of this
manual including all text under subheadings therein before set up or use of this product.
Inspect tool before use, looking for damaged, loose, and missing parts.
If any problems are found, do not use tool until repaired.
Workpiece and Work Area Set Up
1. Designate a work area that is clean and well-lit.
The work area must not allow access by children
or pets to prevent distraction and injury.
2. Route the air hose along a safe route to reach
the work area without creating a tripping hazard
or exposing the air hose to possible damage.
The air hose must be long enough to reach
the work area with enough extra length to
allow free movement while working.
3. There must not be hazardous objects
(such as utility lines or foreign objects) nearby
that will present a hazard while working.
General Operating Instructions
Filling Tank With Oil
1. Open the Ball Valve by turning Valve’s
handle to a vertical position.
2. Loosen Knob and lower Funnel to lowest position.
3. Move the Drain under the raised vehicle, and
position the Funnel directly below the oil drain plug.
4. Raise the Funnel until the Funnel is
approximately 4″ below the oil drain plug.
Then, tighten Knob to hold the Funnel in place.
5. Remove oil pan plug to drain the oil.
Note: Do not fill the Tank beyond its 20-gallon capacity.
The hose is clear, so the oil in the tube
will indicate the reservoir fill level.
When oil level nears the top, drain the oil.
6. Before transporting the Oil Lift, open the Knob
and lower the Drain Tube all the way. Then lock
Drain Tube in place by turning the Lock Knob.
7. Use the Handle when moving the Oil Lift
from one location to another. Only transport
Oil Lift along flat, hard, level surfaces.
pumping Oil From Tank
1. Raise Drain Tube to above Ball Valve.
Rotate Ball Valve to horizontal position.
2. Place Nozzle securely in
a used oil collection receptacle.
3. pull on the Safety Valve briefly before every use
to make sure it operates smoothly.
The Safety Valve helps to relieve pressure
if the tank is over-pressurized.
4. Connect the compressor’s air supply hose
to the Air Inlet. Turn on the air compressor,
making sure it is set between 7-10 PSI.
WARNING! TO pREVENT SERIOUS INJURy: Do not
leave Oil Lift unattended while it is evacuating oil.
5. Close Regulator by pulling out the knob and rotating
counterclockwise. Pull Regulator’s cap out and
slowly turn it in a clockwise direction while observing
the Pressure Gauge. DO NOT EXcEED 10 pSI.
6. The oil will be pushed from the Tank out the Nozzle.
7. Once oil is no longer being discharged from the
Nozzle, turn off air compressor. Disconnect
compressor air supply hose from the Air Inlet.
Note: Oil discharge rate will be affected by the
ambient temperature and the viscosity of the oil.
8. Clean external surfaces of the tool with
clean, dry cloth. Then store the tool
indoors out of children's reach.
Page 10 For technical questions, please call 1-888-866-5797. Item 69814
SAFETy OpERATION MAINTENANcESETUp
User-Maintenance Instructions
procedures not specifically explained in this manual must
be performed only by a qualified technician.
TO pREVENT SERIOUS INJURy FROM AccIDENTAL OpERATION:
Turn off the tool, detach the air supply, safely discharge any residual air pressure
in the tool, and release the throttle and/or turn the switch to its off position before
performing any inspection, maintenance, or cleaning procedures.
TO pREVENT SERIOUS INJURy FROM TOOL FAILURE:
Do not use damaged equipment. If abnormal noise, vibration,
or leaking air occurs, have the problem corrected before further use.
cleaning, Maintenance, and Lubrication
Note: These procedures are in addition to the regular checks and maintenance
explained as part of the regular operation of the air-operated tool.
1. Once a year after discharging contents of
the Tank, remove the Drain plug (24) to drain
accumulated sludge.
To reattach the Drain plug (24),
wrap three turns of thread seal tape
(not included) on the Drain plug thread and
secure in place. Do not overtighten.
2. Keep the outside of the Tank free of oil or grease.
Use only a mild soap and damp cloth when cleaning.
Do not use flammable or combustible solvents.
3. Before and during each use,
inspect the Hose for damage.
4. After use, store in a dry, secure
area out of reach of children.
Troubleshooting
problem possible causes Likely Solutions
Decreased output. 1. Not enough air pressure and/
or air flow.
2. Blockage of hose.
3. Accumulated sludge.
1. Check for loose connections and make sure that
air supply is providing enough air flow (CFM)
at required pressure (PSI) to the tool’s air inlet.
Do not exceed maximum air pressure.
2. Gently blow air from Nozzle into Tube.
3. After draining the oil, remove Plug and drain out sludge.
Housing heats
during use.
1. Incorrect lubrication or
not enough lubrication.
2. Worn parts.
1. Lubricate using air tool oil according to directions.
2. Have qualified technician inspect internal mechanism
and replace parts as needed.
Severe air leakage.
(Slight air leakage
is normal,
especially on
older tools.)
1. Cross-threaded housing
components.
2. Loose housing.
3. Damaged valve or housing.
4. Dirty, worn or damaged valve.
1. Check for incorrect alignment and uneven gaps.
If cross-threaded, disassemble and
replace damaged parts before use.
2. Tighten housing assembly. If housing cannot tighten
properly, internal parts may be misaligned.
3. Replace damaged components.
4. Clean or replace valve assembly.
Follow all safety precautions whenever diagnosing or servicing the tool.
Disconnect air supply before service.
Page 11For technical questions, please call 1-888-866-5797.Item 69814
SAFETyOpERATIONMAINTENANcE SETUp
pLEASE READ THE FOLLOWING cAREFULLy
THE MANUFACTURER AND/OR DISTRIBUTOR HAS PROVIDED THE PARTS LIST AND ASSEMBLY DIAGRAM
IN THIS MANUAL AS A REFERENCE TOOL ONLY. NEITHER THE MANUFACTURER OR DISTRIBUTOR
MAKES ANY REPRESENTATION OR WARRANTY OF ANY KIND TO THE BUYER THAT HE OR SHE IS
QUALIFIED TO MAKE ANY REPAIRS TO THE PRODUCT, OR THAT HE OR SHE IS QUALIFIED TO REPLACE
ANY PARTS OF THE PRODUCT. IN FACT, THE MANUFACTURER AND/OR DISTRIBUTOR EXPRESSLY
STATES THAT ALL REPAIRS AND PARTS REPLACEMENTS SHOULD BE UNDERTAKEN BY CERTIFIED AND
LICENSED TECHNICIANS, AND NOT BY THE BUYER. THE BUYER ASSUMES ALL RISK AND LIABILITY
ARISING OUT OF HIS OR HER REPAIRS TO THE ORIGINAL PRODUCT OR REPLACEMENT PARTS
THERETO, OR ARISING OUT OF HIS OR HER INSTALLATION OF REPLACEMENT PARTS THERETO.
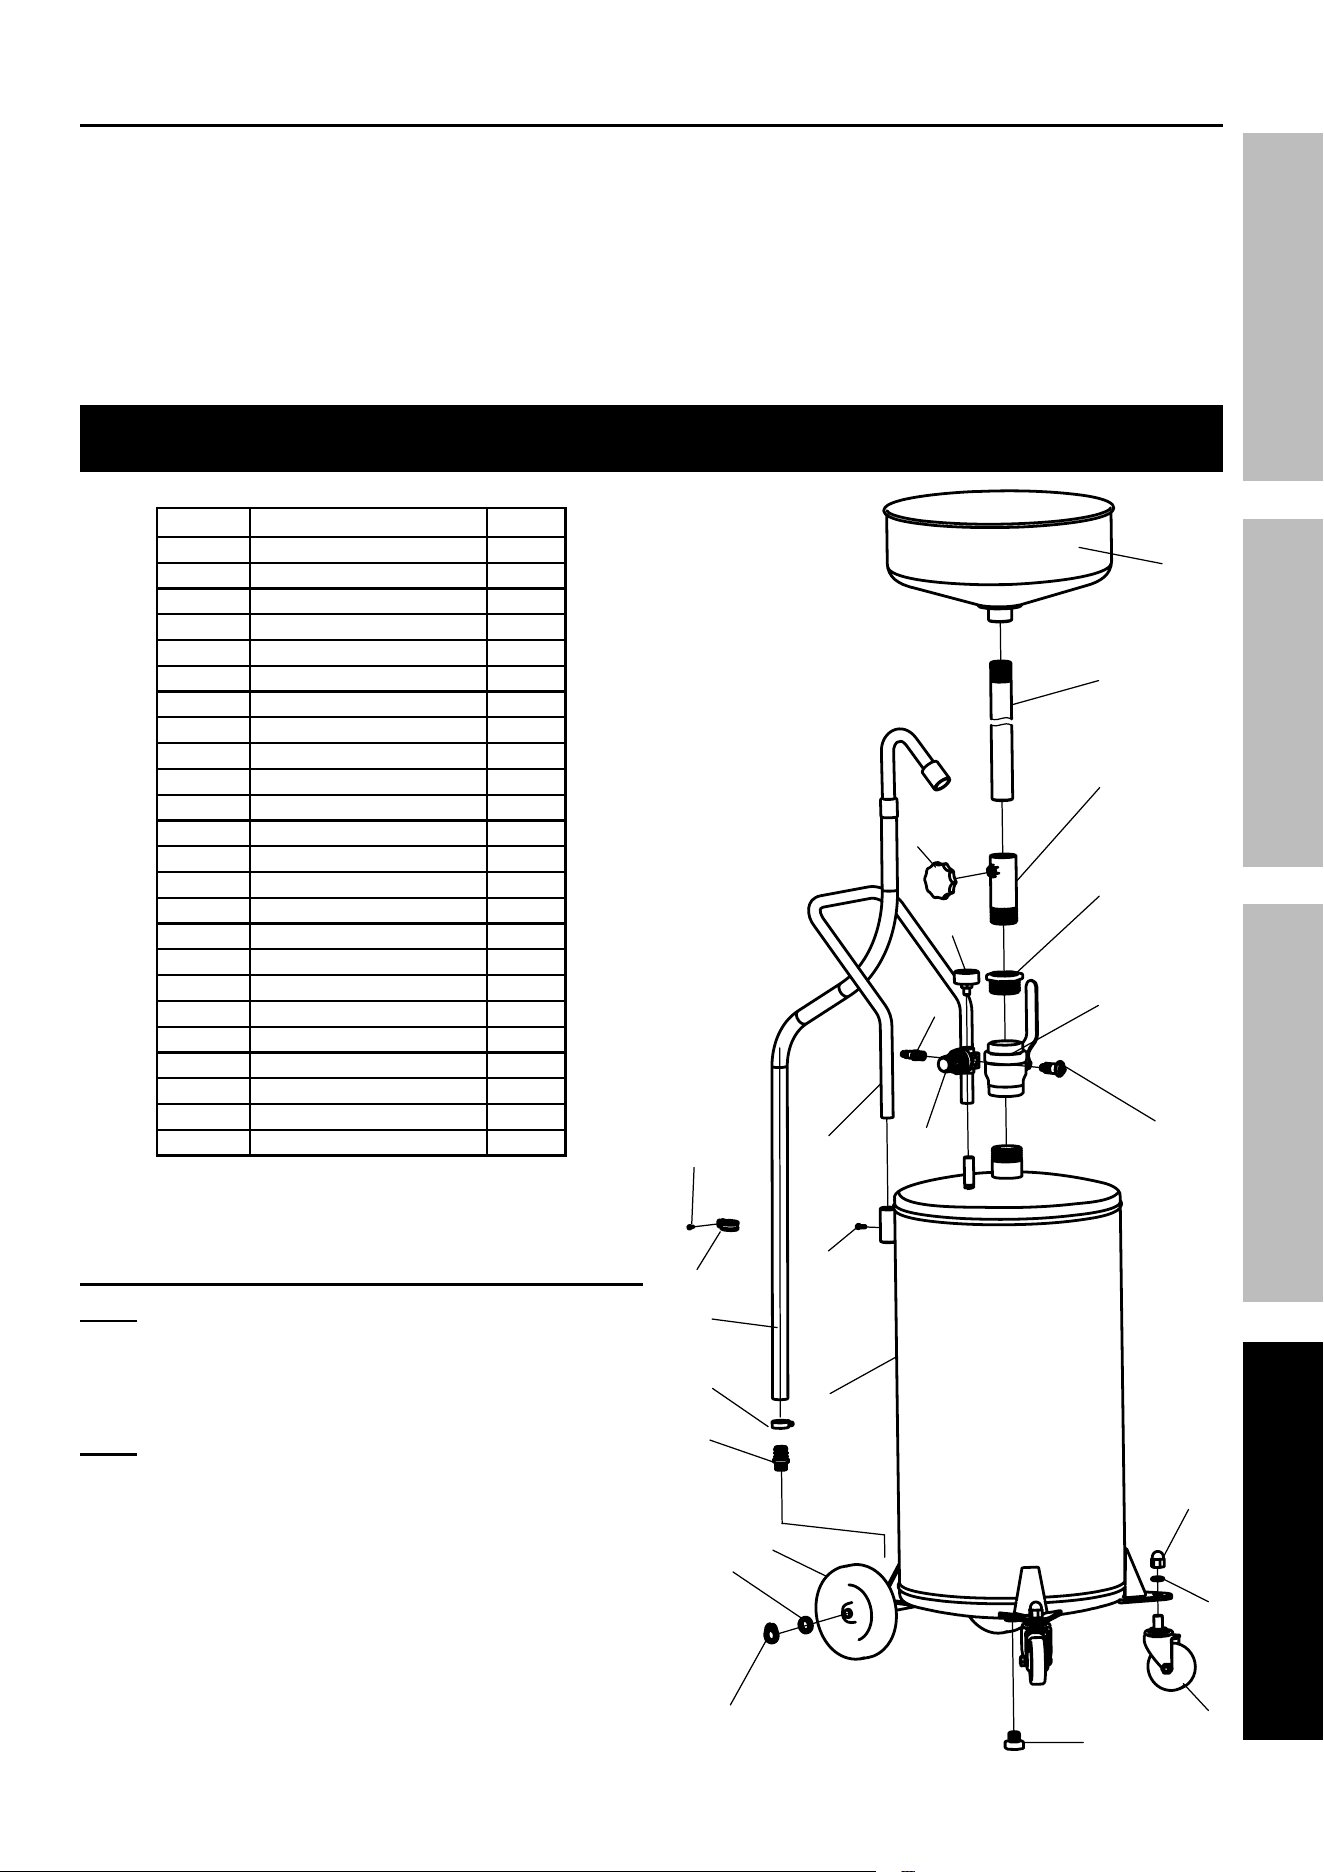
parts List and Diagram
part Description Qty
1 Funnel 1
2 Drain Tube 1
3 Sleeve 1
4 Knob 1
5 Connector 1
6 Pressure Gauge 1
7 Ball Valve 1
8 Tube Connector 1
9 Regulator 1
10 Handle 1
11 Bleeding Valve 1
12 Screw 3
13 Loop Clamp 1
14 Hose/Nozzle Asm. 1
15 Tank 1
16 Loop Clamp 2
17 "Barbed" Fitting 1
18 Acorn Nut 2
19 Washer 2
20 Caster 2
21 Wheel 2
22 Washer 4
23 Retaining Ring 2
24 Drain Plug 1
Record product's Serial Number Here:
Note: If product has no serial number,
record month and year of purchase instead.
Note: Some parts are listed and shown
for illustration purposes only, and are not
available individually as replacement parts.
Specify UPC 193175323569 when ordering parts.
21
15
24
2
0
1
9
18
12
10
9
6
8
11
5
7
23
22
12
13
14
16
17
4
2
1
3

Limited 90 Day Warranty
Harbor Freight Tools Co. makes every effort to assure that its products meet high quality and durability standards,
and warrants to the original purchaser that this product is free from defects in materials and workmanship for the
period of 90 days from the date of purchase. This warranty does not apply to damage due directly or indirectly,
to misuse, abuse, negligence or accidents, repairs or alterations outside our facilities, criminal activity, improper
installation, normal wear and tear, or to lack of maintenance. We shall in no event be liable for death, injuries
to persons or property, or for incidental, contingent, special or consequential damages arising from the use of
our product. Some states do not allow the exclusion or limitation of incidental or consequential damages, so the
above limitation of exclusion may not apply to you. THIS WARRANTY IS EXPRESSLY IN LIEU OF ALL OTHER
WARRANTIES, EXPRESS OR IMPLIED, INCLUDING THE WARRANTIES OF MERCHANTABILITY AND FITNESS.
To take advantage of this warranty, the product or part must be returned to us with transportation charges
prepaid. Proof of purchase date and an explanation of the complaint must accompany the merchandise.
If our inspection verifies the defect, we will either repair or replace the product at our election or we may
elect to refund the purchase price if we cannot readily and quickly provide you with a replacement. We will
return repaired products at our expense, but if we determine there is no defect, or that the defect resulted
from causes not within the scope of our warranty, then you must bear the cost of returning the product.
This warranty gives you specific legal rights and you may also have other rights which vary from state to state.
26677 Agoura Road • calabasas, cA 91302 • 1-888-866-5797