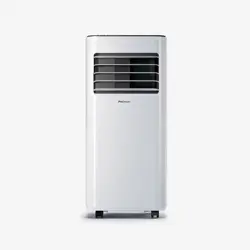
Instruction Manual
Model PB-AC-12-W-UK
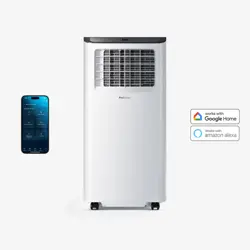
14000 BTU Smart Portable Air Conditioner
IMPORTANT INSTRUCTIONS
- RETAIN FOR FUTURE USE
2 of 24 | English English | 3 of 24
CONTENTS
Safety Instructions...........................................................................Page 3
Specic Information Regarding R290 Refrigerant Gas .....Page 6
Batteries ..............................................................................................Page 7
Symbols Explained ..........................................................................Page 8
Specication ......................................................................................Page 8
Parts ......................................................................................................Page 9
Control Panel ................................................................................... Page 10
Installation ......................................................................................... Page 11
Operating Instructions ................................................................. Page 14
Wi and Smart Life App Set-Up ................................................ Page 15
Emptying the Water Tank and Continuous Drainage ..... Page 17
Cleaning ............................................................................................ Page 18
Storage ............................................................................................. Page 20
Safety Features .............................................................................. Page 20
Troubleshooting ............................................................................ Page 20
Error Codes ....................................................................................... Page 21
Recycling and Disposal ............................................................... Page 21
Declaration of Conformity ......................................................... Page 22
PSTI Statement of Compliance ............................................... Page 22
EN
14000 BTU SMART PORTABLE
AIR CONDITIONER
MODEL PB-AC-12-W-UK
Thank you for choosing to purchase a product from Pro Breeze. Please read the entire manual carefully
prior to rst use and keep in a safe place for future reference.
SAFETY INSTRUCTIONS
―
―
PLEASE READ AND SAVE THESE IMPORTANT SAFETY
INSTRUCTIONS.
When using electrical appliances, basic safety precautions
should always be followed to reduce risk of re, electric
shock, and injury to persons, including the following:
WARNING: TO AVOID THE RISK OF ELECTRICAL SHOCK,
FIRE OR INJURY TO PEOPLE, ALWAYS TURN THE APPLIANCE
OFF, UNPLUG THE POWER CORD FROM THE ELECTRICAL
OUTLET AND EMPTY THE WATER TANK BEFORE HANDLING,
CLEANING OR SERVICING THE APPLIANCE.
CAUTION: THIS APPLIANCE IS HEAVY. TAKE EXTRA CARE
WHEN HANDLING.
• Use this appliance only as described in this manual. Any
other use not recommended by the manufacturer may
cause re, electric shock, or injury to person.
• Do not cover the appliance whilst in use.
• Dispose of water held by the appliance. This water is not
drinkable
• When moving the appliance, ensure it is kept in an
upright position.
• The appliance must have a minimum 50cm clearance
around all sides.
• Never leave the appliance unattended while in use.
• Always turn the appliance off and disconnected from the
power supply when not in use.
• Avoid placing the power cord in areas where it can
become a tripping hazard. Do not place the power cord

4 of 24 | English English | 5 of 24
under carpeting or cover it with rugs, runners or similar.
• Place the appliance on a at, stable and dry surface
and always keep the appliance in an upright position.
Operating the appliance in any other position could
cause a hazard.
• Do not place anything on top of the appliance while it is
in use.
• There may be trace of odour during the rst few minutes
of initial use. This is normal and will quickly disappear.
• Do not cover the appliance or restrict the air ow of the
inlet or exhaust grills whilst in use.
• Do not cover, obstruct or push objects into the vents and
opening of the appliance as this may cause an electric
shock, re or damage the appliance.
• Do not use mechanical devices to accelerate the
appliances defrosting process.
• Do not place the continuous drainage hose outside when
the temperature falls below 1
o
C.
• Do not use the appliance near petrol, paints, ammable
gases, ovens, or other heating sources.
• Do not operate the appliance with the water tank
removed.
• Never insert ngers or metal objects into the vents and
openings of the appliance.
• Do not move the appliance whilst it is in use.
• Always unplug the appliance when not in use.
• Keep the appliance out of reach of children and pets.
• Do not leave children alone or unattended in the area
where the appliance is in use.
• Children shall not play with the appliance.
• Cleaning and user maintenance shall not be made by
children without supervision.
• This appliance can be used by children aged from 8
years and above and persons with reduced physical,
sensory or mental capabilities or lack of experience
and knowledge if they have been given supervision or
instruction concerning use of the appliance in a safe way
and understand the hazards involved.
• Ensure that the mains supply (including voltage,
frequency and power) complies with the rating label of
the appliance.
• Do not operate the appliance with wet hands.
• Do not use this appliance near water or in the immediate
surroundings of a bath, shower or a swimming pool.
Never place the appliance where it may fall into a
bathtub or other water container.
• Do not allow water or other liquids to run into the interior
of the appliance, as this could create a re and/or
electrical hazard.
• This appliance is intended for indoor household use and
similar applications. Do not use outdoors.
• The mains cable should not hang down from the surface
on which the appliance is placed in order to prevent the
appliance from being pulled down.
• To avoid a circuit overload when using this appliance,
do not operate another high-wattage appliance on the
same electrical circuit.
• Always plug the appliance directly into a wall socket.
Avoid using extension leads where possible as they may
overheat and cause a risk of re.
• Do not use this appliance with an external programmer,
timer switch or any other device which would switch the
appliance on automatically unless this has already been
pre-built into the appliance by the manufacturer.
• Do not pull on the power cord. Never move, carry, or hang
the appliance by the power cord.
• Do not kink or wrap the power cord and plug around the
appliance, as this may cause the insulation to weaken or
split, particularly where it enters the appliance.
• Do not operate the appliance with any safety guards
removed.
• Do not operate the appliance if there are signs of
damage to the appliance, power cord, or any of the
accessories supplied. If the supply cord is damaged, it
must be replaced by the manufacturer, its service agent
or a similarly qualied person in order to avoid a hazard.
• Do not attempt to repair or adjust any electrical or
mechanical elements in the appliance. Doing so may be
unsafe and will void your warranty.
6 of 24 | English English | 7 of 24
• The appliance is only to be used with the power adapter
provided. Do not use other chargers or power adapters
as this may damage the appliance.
Specic Information Regarding R290 Refrigerant Gas
WARNING: THE APPLIANCE MUST BE INSTALLED, OPERATED
AND STORED IN A ROOM WITH A FLOOR AREA LARGER
THAN 12M
2
.
• This appliance contains 0.25kg (250g) of R290 refrigerant
gas.
• R290 is a refrigerant gas that complies with the European
directive on the environment.
• Do not puncture any part of refrigerant circuit.
• Be aware R290 refrigerant is odourless and does not
have the odour normally associated with natural gas and
propane tanks.
• Do not use means to accelerate the defrosting process
or to clean, other than those recommended by the
manufacturer.
• The appliance must be placed in an area without any
continuous sources of ignition such as open ames, gas,
or electrical appliances in operation.
• Do not puncture and do not burn.
• If the appliance is installed, operated or stored in a non-
ventilated area, the room must be designed to prevent
the accumulation of refrigerant leaks resulting in a risk of
re or explosion due to ignition of the refrigerant caused
by electric heaters, stoves, or other sources of ignition.
• The appliance must be stored in such a way as to
prevent mechanical failure.
CAUTION
RISK OF FIRE
• Individuals who operate or work on the refrigerant circuit
must have the appropriate certication issued by an
accredited organisation that ensures competence in
handling refrigerants according to a specic evaluation
recognised by associations in the industry.
• Maintenance and repairs that require the assistance
of other qualied personnel must be performed under
the supervision of an individual specied in the use of
ammable refrigerants.
BATTERIES
―
―
This product is supplied with AAA disposable batteries.
PLEASE READ AND SAVE THESE IMPORTANT SAFETY
INSTRUCTIONS.
WARNING: KEEP BATTERIES OUT OF REACH OF CHILDREN.
Choking hazard. Do not swallow. Harmful if swallowed.
Swallowing can lead to chemical burns, perforation of soft
tissue, and death. Severe burns can occur within 2 hours of
ingestion. If you suspect your child has swallowed a battery
seek medical attention immediately.
• This product only uses AAA batteries. It is not compatible
with other battery types.
• Do not allow children to handle batteries.
• If the battery compartment does not close securely, stop
using the product and keep it away from children.
• Ensure that the battery is installed with the correct
polarity (+ and –).
• Remove exhausted battery promptly.
• Always inspect new batteries before use. Damaged or
weak batteries may leak acid. Discontinue use if batteries
show signs of leakage, damage, or weakness at any time.
• Ensure the battery compartment is correctly and
securely closed after installing the batteries.
• Wash hands after handling batteries.
8 of 24 | English English | 9 of 24
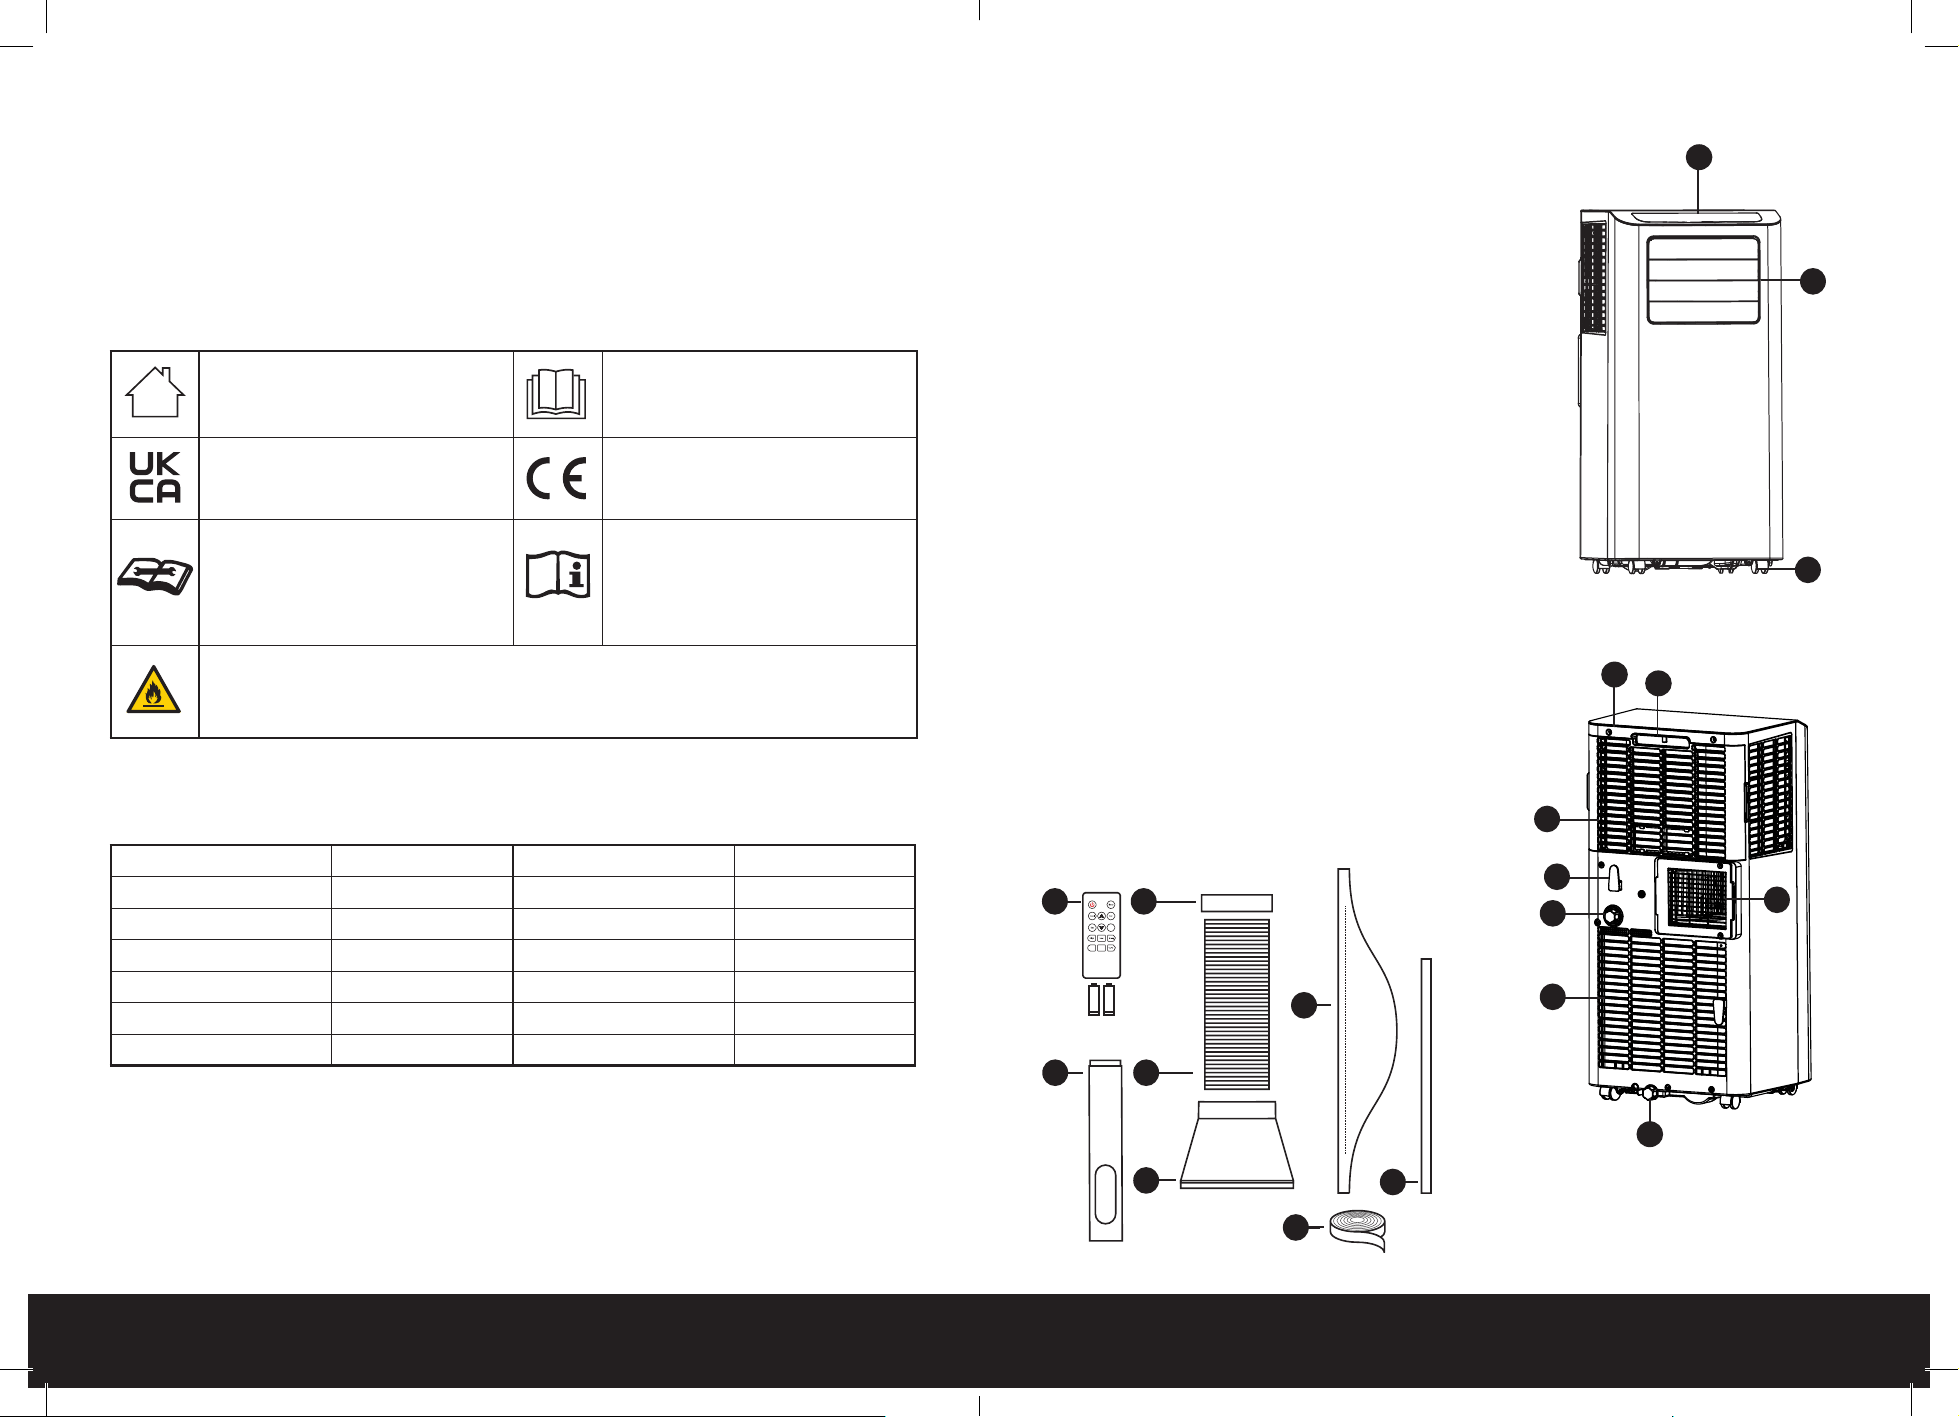
PARTS
―
―
Front View
1. Control panel
2. Horizontal louvre
3. Wheels
Rear View
4. Holder
5. Handle
6. Air inlet grille
7. Air outlet grille
8. Continuous drainage cap/continuous water outlet
9. Bottom drainage cap/bottom water outlet
10. Air inlet grille
11. Power cord tidy
Accessories
12. 2*AAA batteries + remote control
13. Square heat exhaust hose connector
14. Heat exhaust hose
15. Heat exhaust hose short connector
16. Window sealing board kit (Panel A&B + Clip)
17. 600mm water hose
18. Hinged window fabric sealing assembly
19. Sealing Velcro
1
2
3
5
4
6
7
8
9
10
11
12
16
19
17
18
15
14
13
• Disposable batteries are not rechargeable and must
be recycled or disposed of separately from household
waste. Always dispose of batteries at an ofcial collection
point and according to your local environmental laws
and guidelines.
SYMBOLS EXPLAINED
―
―
For indoor use only. Please read instruction manual
and retain for future use.
Equipment complies with the
applicable UK safety requirements
and regulations.
Equipment complies with the
applicable EU safety requirements
and regulations.
CAUTION: This symbol shows
that a service personnel should
be handling this equipment
with reference to the installation
manual.
CAUTION: This symbol shows that
information is available such as the
operating manual or instruction
manual.
WARNING: The symbol shows that this appliance uses a ammable refrigerant.
If the refrigerant leaks and is exposed to an external ignition source, there is a risk of
re.
SPECIFICATIONS
―
―
Model: PB-AC-12-W-UK Refrigerant: R290/250g
Voltage: 220-240V~ Frequency 50Hz
Rated Input Current: A Cooling Capacity: 14000BTU/H
Climate Type: T1 EER: 2.6
Cooling Power: 1575W Noise Level: 65dB
Discharge Side Pressure: 2.8MPa Suction Side Pressure: 0.8MPa
Net Weight: 29.14kg Gross Weight: 32.3kg
10 of 24 | English English | 11 of 24
These images are for reference only, please refer to your product.
If you find you’re missing any parts from your order, please contact our customer care team by
emailing [email protected] for fast and friendly help.
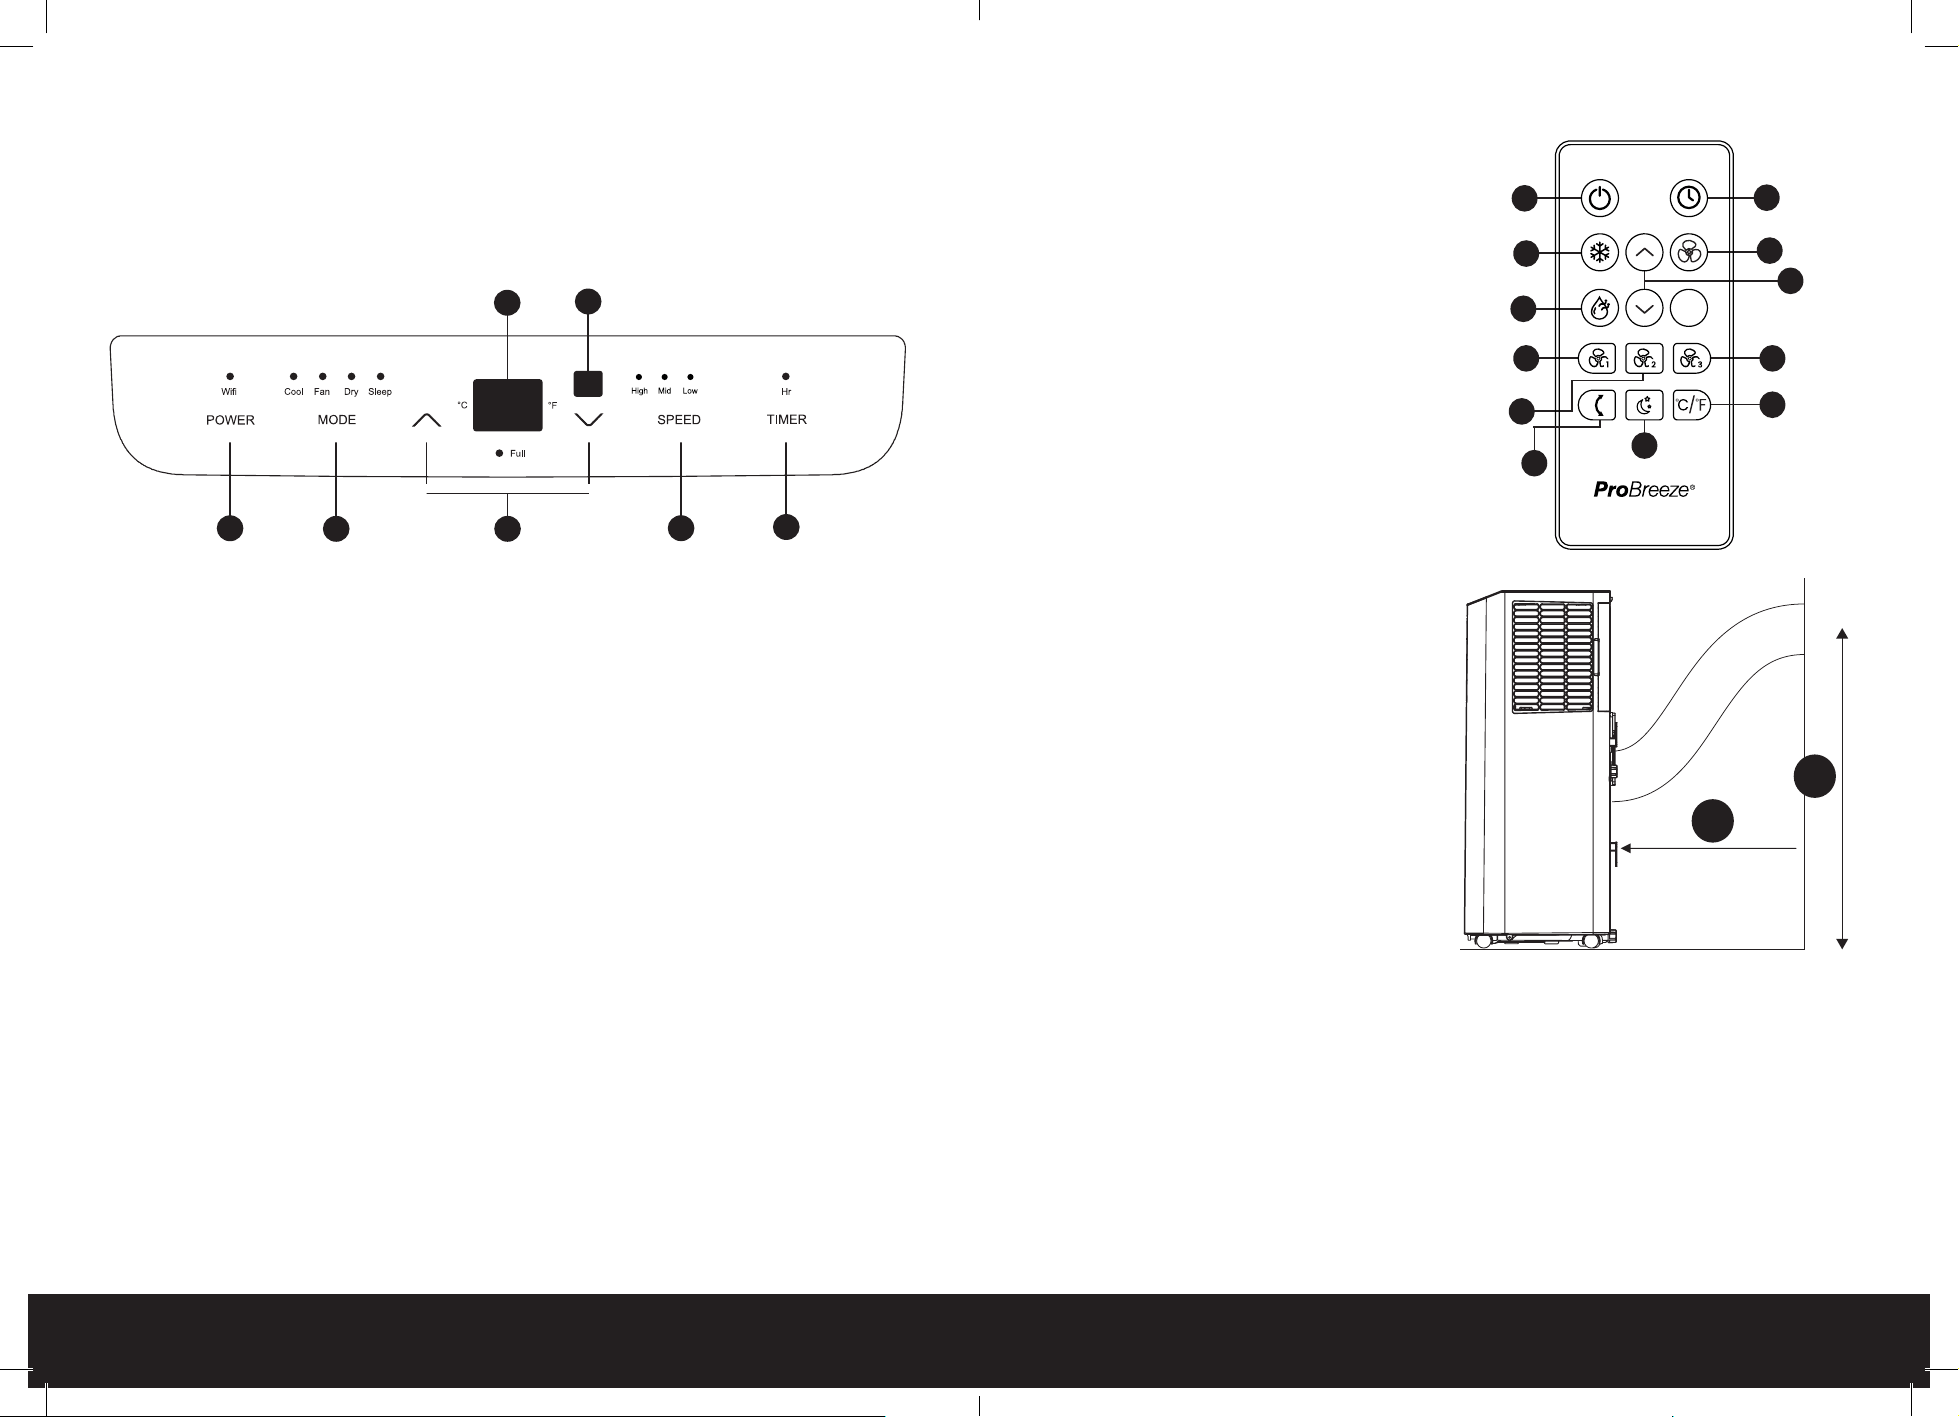
CONTROL PANEL
―
―
1
2 3
5
7
4
6
1. Power button
2. Change mode button
3. Up/Down buttons
4. Display
5. Fan speed button
6. Remote sensor
7. Timer button
Indicator light symbols moving from left to right
• Wi-Fi indicator: Download the "Smart Life" app, then follow the instructions below to connect
to Wi-Fi and to manage the Wi-Fi settings.
• Cooling mode indicator light.
• Fan-only mode indicator light.
• Dry (Dehumidifying) mode indicator light.
• Sleep mode indicator light.
Digital display panel moving from right to left
• Degrees fahrenheit indicator light
• Degrees celsius indicator light
• Water tank full indicator light
• High fan speed indicator light
• Medium fan speed indicator light
• Low fan speed indicator light
• Timer mode indicator light
Remote Control
1. Power button
2. Timer button
3. Cooling mode button
4. Fan-only mode button
5. Dry (dehumidifying) mode button
6. Up/Down buttons
7. High fan speed button
8. Medium fan speed button
9. Low fan speed button
10. Swing button
11. Sleep mode button
12. Temperature unit button
INSTALLATION
―
―
Prior to and after installation adhere to the below:
1. When moving the appliance to the chosen
location, ensure it is kept in an upright
position.
2. Do not place or use the appliance, power
cord, or any accessories in a bathroom, wet,
or damp place.
3. Place the appliance on a at and dry surface.
4. Keep it at least 50cm away from surrounding
walls and/or objects.
5. Leave the appliance in an upright position for
at least two hours before rst use.
6. Keep the heat exhaust hose at least 90cm
away from the oor.
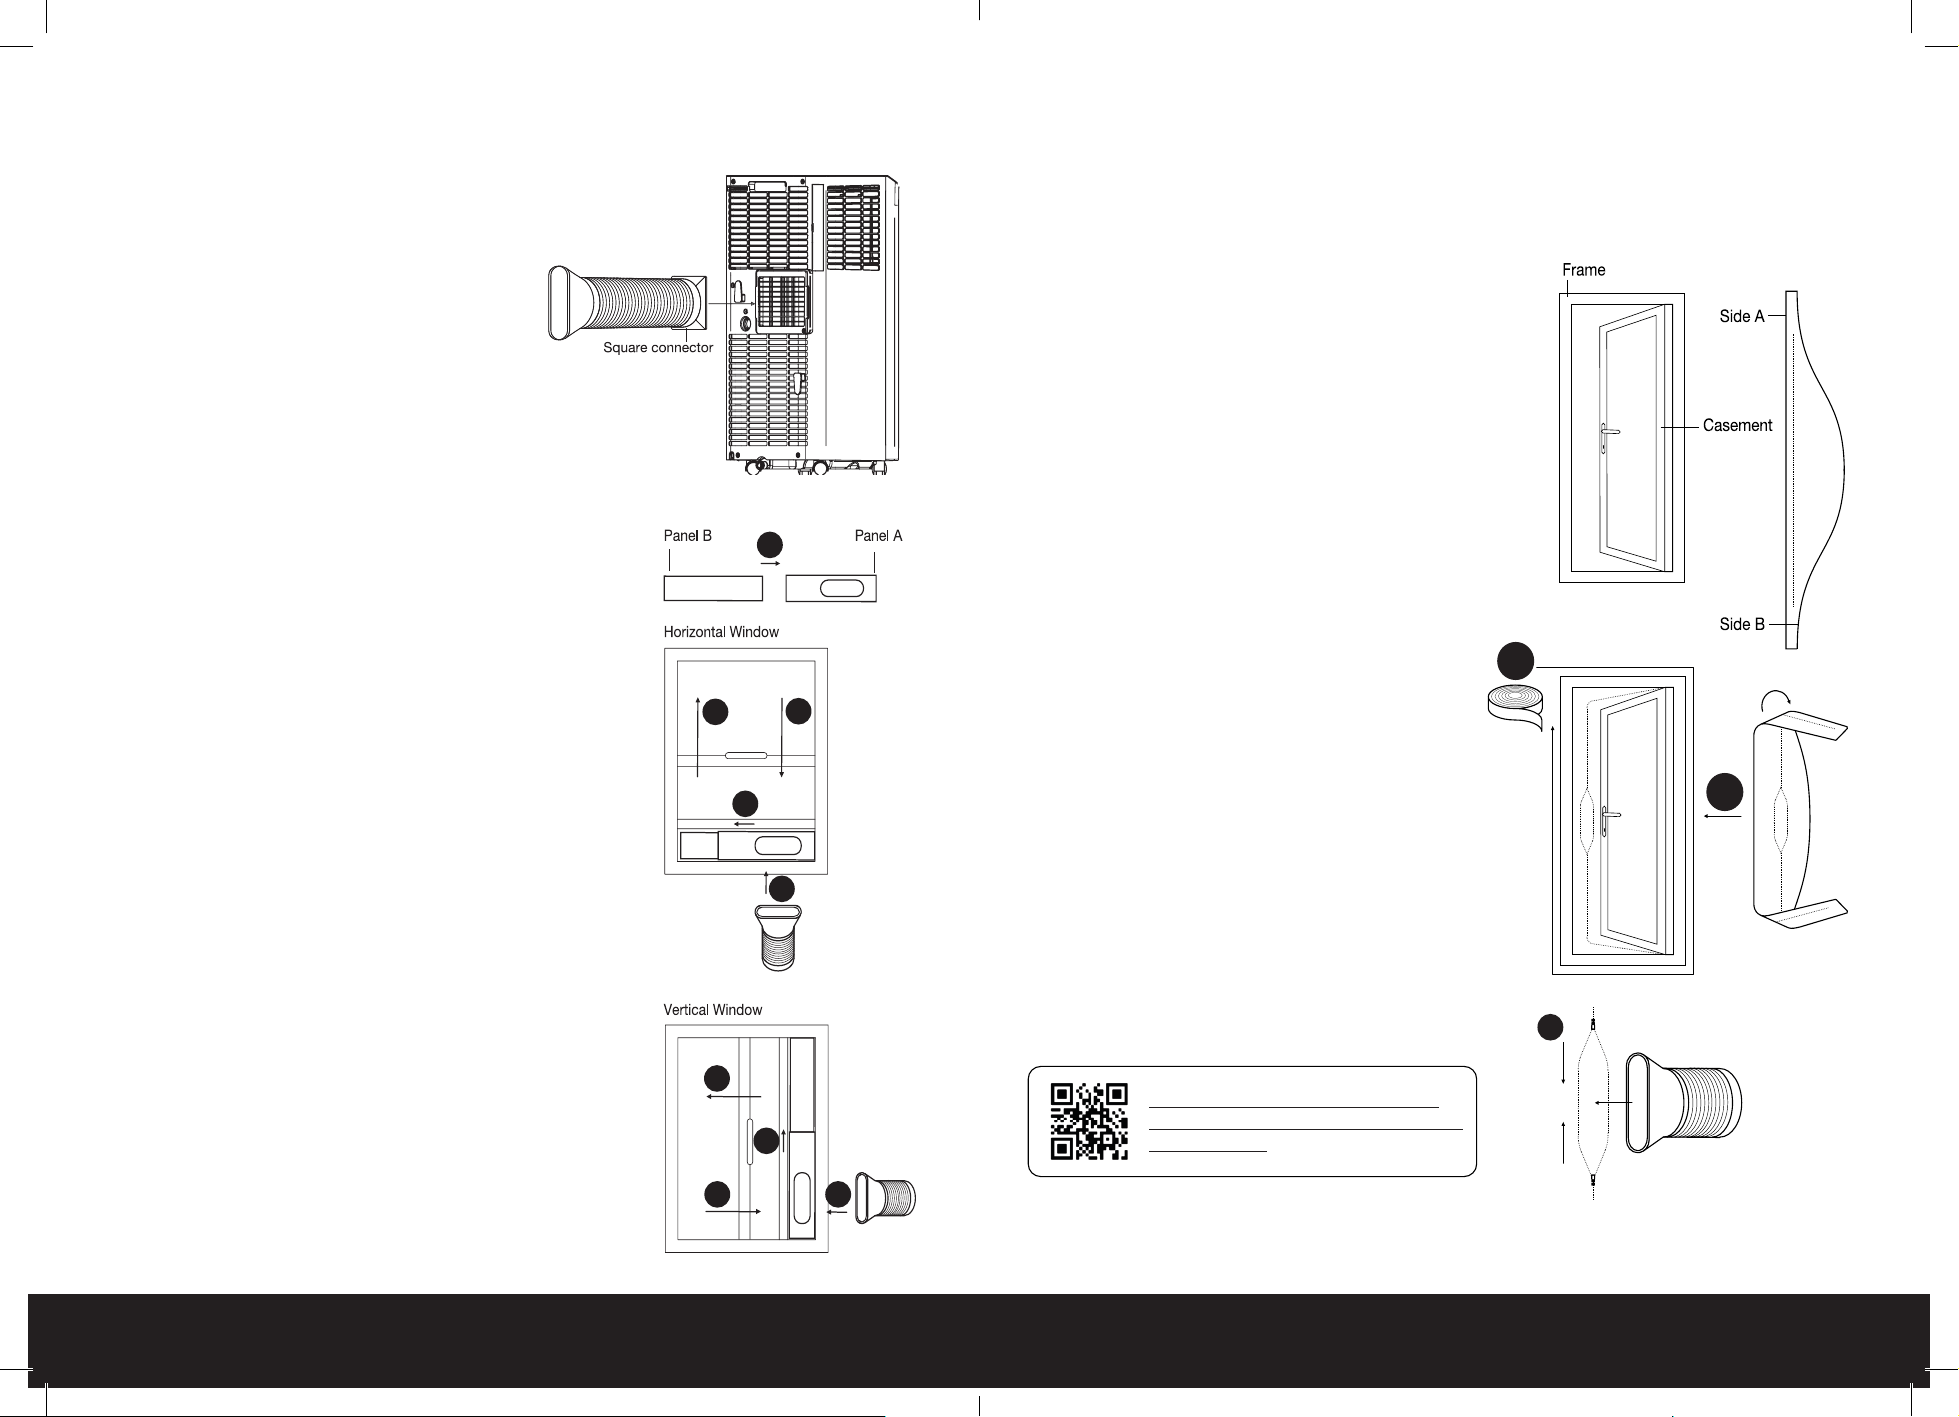
Connecting the Exhaust Hose
In many ways, your new air conditioner is like a refrigerator, but instead of securing the cold air
inside it blows the air around the room. Air conditioners utilise refrigerant gas to cool down warm
air in a room and then blow the now-cooled air around the space with internal fans. They must
vent the hot air outside (usually via a window, ventilation shaft, or dedicated passage) with an
exhaust hose.
1
2
3
4
5
6
7
8
9
10
11
12
50
cm
90
cm
12 of 24 | English English | 13 of 24
To connect you exhaust hose and other accessories, follow the instruction below:
Exhaust Hose Assembly
In this stage, you will be assembling the hose and
will need…
• Square connector
• Heat exhaust hose
• Heat exhaust hose short connector
1. Insert the square connector into the heat
exhaust hose short connector.
2. Rotate the circular connector
counterclockwise to lock it into the end of
the heat exhaust hose.
Exhaust Hose Installation
In this stage, you will need…
• Assembled heat exhaust hose
• Pro Breeze smart portable air conditioner
1. Clip the exhaust hose into the rear panel outlet situated on
the back of your air conditioner. Ensure it is tightly secured
in place.
2. When in Cooling Mode, position your air conditioner close
to a window or door, with the hose outside, to allow the
unit to vent the warm air out of the room.
Sliding Windows Sealing Board Assembly Installation
If your windows slide open, please follow the below instructions:
You will need:
• Window sealing board kit (Panel A&B + Clip)
• Finished heat exhaust hose short connector
1. Insert Panel B into Panel A and adjust to the length or
height of the window (see images).
2. Open your window and place the sealing board assembly
into the open space.
3. Adjust to ensure an exact fit and secure with the clip.
4. Close the window to lock everything into place.
5. Attach the heat exhaust hose short connector to the
elliptical hole.
The sealing board assembly is now ready for use.
1
2
4
3
5
2
3
4
5
Notes:
• If your window opening is smaller than the minimum length of the sealing board assembly
trim to desired length using a hack saw.
• If your window opening is larger than the maximum length of the sealing board assembly
use plywood or similar to fill the gap.
Hinged Window Sealing Fabric Assembly Installation
If your window is hinged, follow the instructions
below:
You will need:
• Hinged window fabric sealing assembly
• Sealing Velcro
• A soft, clean cloth
1. Open window and clean frame and
casement surfaces of dust and particles.
2. Stick the velcro tape around the entire
window frame. Never stick to the window seal
as doing so will prohibit the window from
closing fully.
3. Stick the velcro tape around the entire
window casement (inside or outside). Check
to ensure the window can close fully.
4. Attach side A of the sealing fabric assembly
to the velcro on the window frame working
from the centre outwards.
5. Close and open window to ensure no fabric
gets trapped.
6. Attach side B of the sealing fabric assembly
to the velcro on the window casement
working from the centre outwards.
7. Open the window slightly and insert the heat
exhaust hose short connector into the sealing
fabric assembly securing with the zippers
around its lip.
The sealing fabric assembly is now ready for use.
Scan for Full Video Instructions on
How Best to Fit Your Hinged Door and
Window Seals
7
2 & 3
4 & 6
14 of 24 | English English | 15 of 24
OPERATING INSTRUCTIONS
―
―
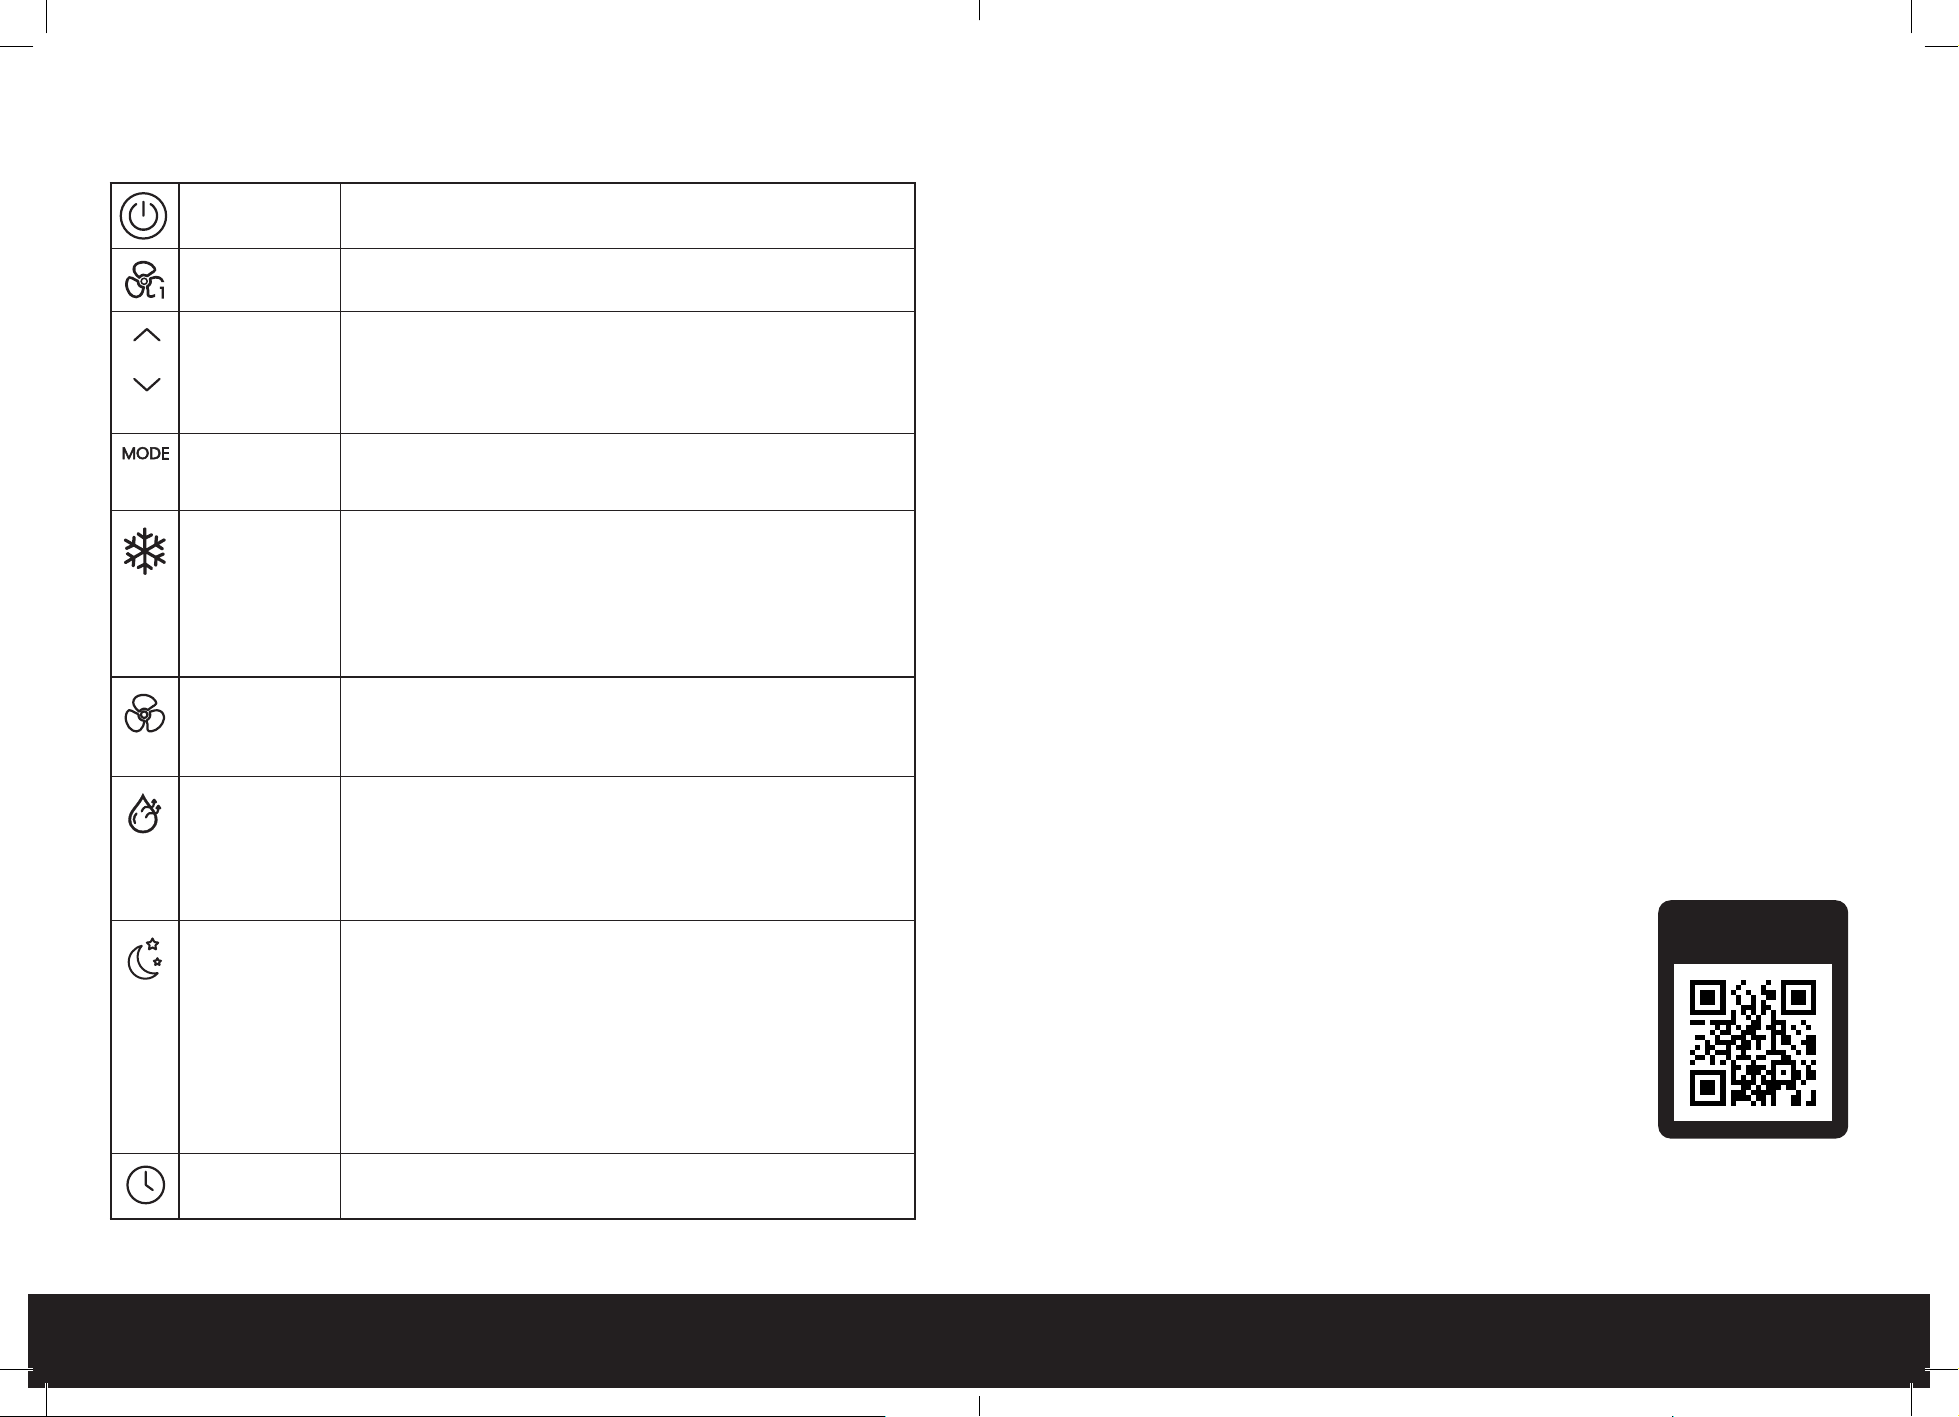
Power Button
Press once to turn your device ON/OFF.
Fan Speed
Button
Press to choose between high, medium and low speed.
Note: You cannot change the fan speed in dry mode
Up and Down
Buttons
Use the up and down buttons to:
1. Set desired temperature when in cooling mode.
2. Set desired hours until turn-on and turn-off when setting a timer.
3. Change between °C and °F by pressing both down at the same time.
Note: Temperature can only be set when in cooling mode.
Mode Button
Press this button to change between cooling, dry (dehumidifying) and fan
modes outlined below. The relevant indicator will illuminate when the mode
has been selected.
Cooling Mode
Perfect for cooling a room in hot weather. Use the up and down buttons
when in cooling mode to set the desired temperature between 16°C (60°F)
and 30°C (80°F). The appliance will cool the room if the room temperature
goes above the set temperature. If the room temperature goes below the set
temperature, cooling mode will pause, but the fan will remain operating at
the set fan speed. IMPORTANT: The heat exhaust hose must be connected to
allow the hot air to be discharged outside. See instructions below.
Fan-Only Mode
The appliance operates at the set fan speed, blowing cold air into the room.
The room temperature is displayed on the digital display panel.
Note: The heat exhaust hose does not have to be connected to the
appliance.
Dry
(Dehumidifying)
Mode
Ideal for reducing room humidity in humid and damp times of year. The
appliance will dehumidify the room if the room temperature is greater
than or equal to 17°C (62°F) and the fan will operate at the low fan speed.
If the room temperature decreases to less than or equal to 15°C (59°F) the
appliance will stop dehumidifying the room, but the fan will continue to
operate.
Sleep Mode
To turn on sleep mode press both the timer and up button. Set sleep mode
to reduce energy consumption when in cooling mode. To activate, press the
sleep button on the remote control or both the timer and down buttons on
the control panel at the same time. The display will blink ve times with SL
to conrm sleep mode has been set then revert to the set temperature. In
sleep mode, after two hours the set temperature will increase automatically
by 1°C (33°F). After another two hours, the set temperature will increase
automatically by a further 1°C (33°F). and the fan speed will change to low
fan speed if it is not already at this fan speed. The appliance will continue to
run at this setting until turned off.
Timer Button
You can set your device to turn on or off automatically in one hour
increments (from 1-24hrs) using the timer button.
Setting a Turn-On Timer
1. Ensure the appliance is plugged in and the power socket is turned on.
2. Press the timer button to activate the timer function.
3. Press the up and down buttons to set the desired time (1-24 hours) until turn-on.
4. The time digits will blink five times to confirm a timer has been set and the timer indicator
light will remain illuminated.
5. Select the desired settings prior to turn-on.
6. To check the remaining time until turn on, press the timer button.
7. To cancel the turn-on timer, set the time to 0 hours or turn the appliance on and off.
Note: If no desired settings are selected the appliance will turn on in the previously set settings.
Setting a Turn-Off Timer
1. Ensure the appliance is plugged in and the power socket is turned on.
2. Press the power button to turn the appliance on.
3. Press the timer button to activate the timer function.
4. Press the up and down buttons to set the desired time (1-24 hours) until turn-off.
5. The time digits will blink five times to confirm a timer has been set and the timer indicator
light will remain illuminated.
6. Select the desired settings prior to turn-off.
7. To check the remaining time till turn- off press the timer button.
8. To cancel the turn-off timer set the time to 0 hours or turn the appliance off and on.
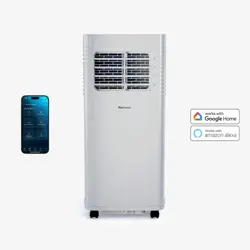
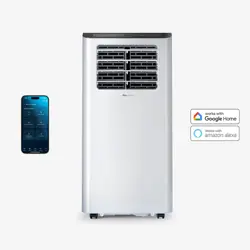
SMART APP SET-UP
―
―
Scan the QR code below to download our centralised app for smart device management.
Control your unit from the app, set up schedules to turn your unit on and off.
Note: Ensure your Wi-Fi network is set to 2.4GHz for successful pairing.
Pair Your Device in 4 Steps:
1. Register: Download the app on the Google Play or Apple app
store. Sign in/register for an account.
2. Prepare your device: Once you're all signed in hold down the fan
speed button for 5 seconds then after a few seconds the WiFi
indicator will show on the control panel.
3. Add your device: Once the unit is in Wi-Fi pairing mode, open
the smart app press “+” in the top right corner and press “add
device”.
4. Pair your device: Then the app will scan for devices and then your
unit (if it is in pairing mode) will show up as shown below. Press
add. Then type in the password for the Wi-Fi your phone is on.
Now your unit is connected to the smart app.
Scan the QR Code
to Download the App

16 of 24 | English English | 17 of 24
Amazon Echo Set-Up
Before connecting the appliance to an Amazon Echo device via WiFi, ensure:
• The Smart Life app must have already been downloaded and the appliance successfully
paired with the Smart Life app.
• The Amazon Alexa app must have already been downloaded.
• An Amazon Echo device must be paired with the Amazon Alexa app.
To connect Pro Breeze Smart Air Conditioner to an Amazon Echo device via Wi-Fi through the
Smart Life app follow the below steps.
1. Link the Amazon Alexa app to the Smart Life app:
Step 1: Open the Amazon Alexa app.
Step 2: Go to Skills.
Step 3: Search for Smart Life by Tuya Inc.
Step 4: Tap Enable.
Step 5: Follow the on-screen instructions to connect your Smart Life account with the Amazon
Alexa app.
2. Pair the Amazon Alexa app to the appliance:
Step 1: Open the Amazon Alexa app.
Step 2: Go to Devices.
Step 3: Tap the “+” symbol to add a new device.
Step 4: Tap the appliances name and follow the on-screen instructions to pair the Amazon Alexa
app to the appliance.
Step 5: Use Amazon Alexa to control the appliance e.g. "Alexa, turn on/off <device name>", "Alexa,
what is the temperature of <device name>", "Alexa, what is the target temperature of the <device
name>", "Alexa, set <device name> to <temperature degree>".
Google Home Set-Up
Before connecting the appliance to a Google Home device via Wi-Fi, ensure:
• The Smart Life app must have already been downloaded and the appliance successfully
paired with the Smart Life app.
• The Google Home app must have already been downloaded.
• A Google Home device must be paired with the Google Home app.
To connect Pro Breeze Smart Air Conditioner to a Google Home device, via Wi-Fi through the
Smart Life app follow the below steps.
Step 1: Open the Google Home app.
Step 2: Tap the + symbol.
Step 3: Tap Set up device.
Step 4: Tap Have something already set up?
Step 5: Search for Smart Life by Tuya Inc.
Step 6: Follow the on-screen instructions to connect your Smart Life account with and the
appliance to the Google Home app.
Step 7: Return to the Google Home screen.
Step 8: Tap the room assigned to the appliance and tap the appliance’s name.
Step 9: Use Google Assistant to control the appliance e.g. "OK Google, turn on/off <device
name>”, "OK Google, what is the temperature of <device name>", "OK Google, set the <device
name> temperature to <temperature degree>".
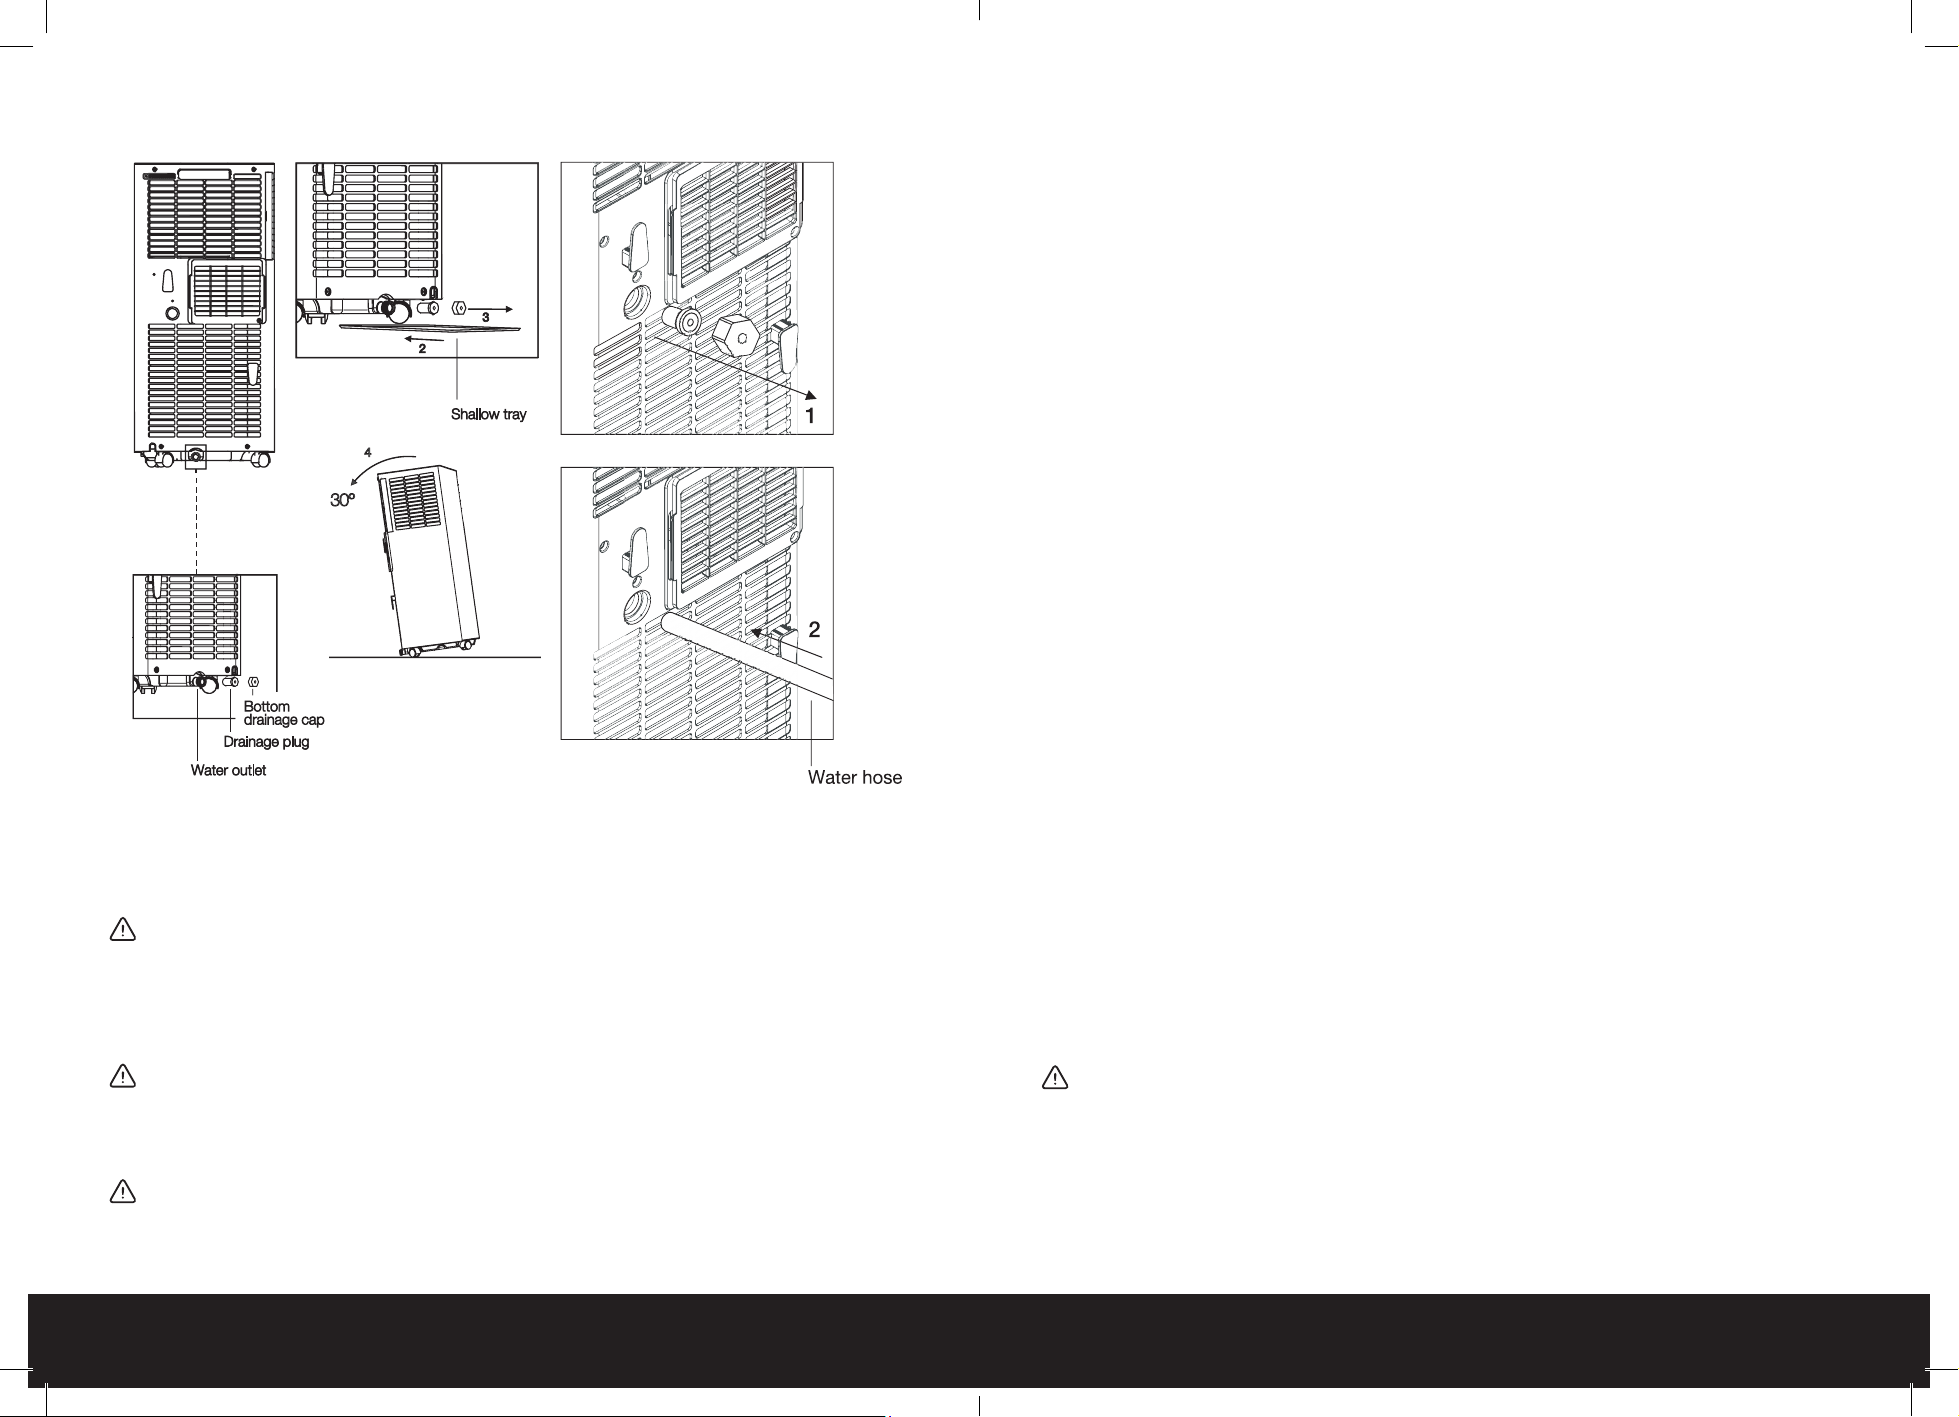
EMPTYING THE WATER TANK AND CONTINUOUS DRAINAGE
―
―
Your smart air conditioner also acts as a dehumidier, extracting moisture from the surrounding
air. This water is either stored in the water tank (and needs emptying) or can be automatically
drained through the continuous drainage hose. For long-term use in humid or warm conditions,
we recommend using the continuous drainage hose.
Instructions
When the water tank is full the warning FL will show on the display and the appliance will pause
operation to prevent the water tank from overowing.
WARNING: NEVER LEAVE WATER IN THE WATER TANK WHEN THE APPLIANCE IS NOT IN USE,
MICROORGANISMS CAN GROW IN STAGNANT WATER, THE WATER TANK SHOULD BE EMPTIED
AND CLEANED REGULARLY.
To empty the water tank:
Step 1: Turn off the appliance and unplug it from the wall socket.
Step 2: Unplug and dismantle the air exhaust hose. Place a shallow tray underneath the water outlet.
Step 3: Unscrew the bottom drainage cap, unplug the drainage plug and allow the water to collect
in the shallow tray. The water will automatically start to ow.
Step 4: To fully empty the water tank gently tilt the appliance back on its rear wheels. Do not tilt
more than 30 degrees.
Step 5: Once empty, return the appliance to a fully upright position and replace the drainage plug
and bottom drainage cap.
Step 6: Empty the shallow tray.
Connecting the Water Hose for Continuous Drainage
For long-term use, it is recommended to connect a water hose for continuous drainage.
To attach the water hose:
Step 1: Unscrew the continuous drain cap, unplug the drain plug, and store safely.
Step 2: Insert the water hose into the water outlet. Tightly secure in place.
Step 3: Feed the other end of the water hose to a suitable drainage outlet (e.g. a drain or bucket).
Note: When the appliance is set at a warm temperature it is recommended to attach the water
hose as the water tank will ll at a faster rate than when set at a cold temperature.
18 of 24 | English English | 19 of 24
CLEANING
―
―
WARNING: NEVER LEAVE WATER IN THE WATER TANK WHEN
THE APPLIANCE IS NOT IN USE, MICROORGANISMS CAN
GROW IN STAGNANT WATER, THE WATER TANK SHOULD BE
EMPTIED AND CLEANED REGULARLY.
WARNING: ALWAYS TURN THE APPLIANCE OFF AND
UNPLUG THE POWER CORD FROM THE ELECTRICAL OUTLET
BEFORE HANDLING OR CLEANING IT.
CAUTION: DO NOT USE ANY ABRASIVE CLEANERS OR
SOLVENTS, AS THIS WILL DAMAGE THE APPLIANCE. DO
NOT ALLOW WATER OR OTHER LIQUIDS TO RUN INTO THE
INTERIOR OF THE APPLIANCE, AS THIS COULD CREATE A
FIRE AND/OR ELECTRICAL HAZARD.
• Do not attempt to clean the appliance in any other way
than that detailed by the manufacturer.
• Cleaning and user maintenance shall not be made by
children.
• Always empty the water tank, clean and dry the
appliance when not in use to prevent mould.
Cleaning the water tank:
• Remove and empty the water tank as per the instructions
above. Empty and clean the appliance before storage.
Clean the appliance before next use.
• Clean the water tank with warm tap water and mild
detergent (e.g. washing up liquid). Note: Do not use
boiling water to clean the water tank.
• Ensure to remove any scale or deposits that have formed
inside the water tank.
• Wipe all surfaces dry before placing the water tank back
into the appliance.
• Empty and clean the appliance before storage. Clean the
appliance before next use.
Exterior Cleaning:
• Clean the exterior surface of the appliance by wiping
it with a soft, damp cloth. Dry the appliance with a soft,
clean cloth.
• Clean the vents and openings of the appliance regularly
with a vacuum cleaner, using the brush attachment to
avoid any dust build-up.
CAUTION: DO NOT OPERATE THE APPLIANCE WITHOUT THE
FILTER. THIS WILL CAUSE IT TO CLOG UP WITH LINT AND
DIRT AND WILL REDUCE PERFORMANCE. ALWAYS INSERT
THE FILTER SECURELY.
Clean the appliance’s evaporator and condenser lter once
every two weeks.
20 of 24 | English English | 21 of 24
To remove and clean the lters:
1. Remove the back lter from the unit.
2. Open up the lter covers on either side of the upper air
inlet grille.
3. Remove both lters from either side.
4. Use a rm brush and or vacuum cleaner to clean the
lter of any dust and particles.
5. Return both the second lter and then the rst lter to the
upper air inlet grille.
STORAGE
―
―
For long-term storage:
1. Empty the water tank and leave both the continuous and bottom drainage caps and drainage plugs
off and unplugged.
2. Run the appliance in fan-only mode on the low fan speed setting for 12 hours to allow the interior of the
appliance to fully dry.
3. Turn off the appliance, replace both the continuous and bottom drainage caps and drainage plugs,
and unplug the power cord.
4. Remove the heat exhaust hose.
5. Remove the batteries from the remote control.
6. Ensure the appliance and water tank are clean and dry before storage.
7. Do not kink or wrap the power cord and plug around the appliance, as this may cause the insulation to
weaken or split, particularly where it enters the appliance.
8. Store the appliance in a safe, clean and dry place, away from direct sunlight and out of reach of
children when not in use. To store your product, we recommend using the original or a similar sized box.
SAFETY FEATURES
―
―
Anti-Frost Protection
If the internal pipe temperature drops too low the unit will pause. The display will show E4 and the
appliance will initiate anti- frost protection rendering the control panel buttons inactive, apart from
the power button. Once the internal pipe temperature has warmed to above 8°C (46.4°F) the anti-
frost protection will cease, and the appliance will return to operating at the chosen settings.
Compressor Delay Protection
To protect the compressor, apart from when the appliance and compressor are activated for the
first time after being turned on via the power button, there will be a three-minute delay between
every occurrence of the compressor turning off and on.
TROUBLESHOOTING
―
―
Please contact a professional serviceman without delay in the following situation.
Note: when abnormal situations occur, turn off the machine and pull out the plug, then contact
with a professional electrician for help.
Problem Cause Solution
The unit doesn’t work
No display Reset the circuit breaker on the
Units cord
The Full Water Tank symbol is
lit. Or the display panel displays
“FL”
Turn the power off and unplug
the unit, then drain the water
tank with the method outlined
in this manual. Plug the unit
back in
Time OFF function has started The unit can be restarted three
minutes after being turned off
The unit stops frequently
Direct Sunlight Move the unit out of direct
sunlight
Doors and windows are open/
there are many heat sources in
the room
Close doors and windows and
remove heat sources
The lter screen is dirty Clean the lter screens or
replace them
The Air inlet or air outlet is
blocked
Remove the blockage
Loud noise coming from the
unit
The machine is not put on at
ground
Place it on at and stable
ground
The compressor doesn’t work
Compressor time-delay
protection turns
Wait for three minutes, then
restart the machine after the
temperature reduces
ERROR CODES
―
―
Error code Problem
E1
Error of the coil’s temperature sensor
E2
Error of the indoor temperature sensor
E3
Anti-freezing protection: temperature of the coil is too low and the whole unit is
off. When temperature excesses 8°C (46.4°F) the protection is released, and the
previous working state is recovered
RECYCLING AND DISPOSAL
―
―
Waste electrical and electronic products (WEEE), batteries, accumulators, and packaging
should not be disposed of with general household waste. This is to prevent possible harm to the
22 of 24 | English English | 23 of 24
environment and human well-being, and to help conserve our natural resources. Most electrical
products with a plug, battery, or cable can be recycled. Contact your local council, household
waste disposal service, or the store where you purchased the product for information regarding
the collection schemes in your area.
Waste Electrical and
Electronic Equipment
(WEEE)
This symbol on the product and/or packaging indicates that
Waste Electrical products (WEEE) under Directive 2012/19/
EU which governs used electrical and electronic appliances,
should not be disposed of with general household waste.
Waste Batteries and
Rechargeable Batteries
This symbol on the batteries supplied with your product
indicates that Waste Batteries under Directive 2006/66/EC
which governs used batteries and accumulators should not
be disposed of with general household waste. If the battery
contains more than 0.004% lead, the battery symbol will be
accompanied by the letters (PB).
The Mobius Loop
This symbol indicates that the product or packaging is
capable of being recycled.
Take-Back Scheme
Waste electrical products (WEEE) can be sent to One Retail Group for recycling and disposal
when you purchase a new product from One Retail Group, on a like-for-like basis. For more
information on how to recycle this product please visit www.probreeze.com
The end-user of electrical and electronic products (WEEE) is responsible for separating old
batteries and lamp bulbs before they are handed over to a designated disposal and recycling
service. Waste batteries can also be disposed of in collection bins, which can be found in most
local supermarkets and household waste recycling centres.
Personal Data Protection
Electrical and electronic products (WEEE) may contain personal user data, depending on
the type of product. This may include app-linked products that connect to wi. The end-user
is responsible for deleting the data on the waste electrical and electronic products prior to
disposal.
DECLARATION OF CONFORMITY
―
―
Hereby, One Retail Group Limited declares that the radio equipment PB-AC-10-UK s in
compliance with the Radio Equipment Regulations 2017. The full text of the UK Declaration of
Conformity is available at the following internet address:
https://probreeze.com/ec-delcaration-of-conformity/
PSTI STATEMENT OF COMPLIANCE
―
―
Hereby, One Retail Group Limited declares that PB-AC-10-UK is in compliance with The
Product Security and Telecommunications Infrastructure (Security Requirements for Relevant
Connectable Products) Regulations 2023. The full text of the UK PSTI Statement of Compliance is
available at the following internet address: https://probreeze.com/pages/psti-compliance/
One Retail Group, Ryland House,
24a Ryland Road, London, NW5 3EH, United Kingdom
EU Authorised Representative: One Retail Group EU Ltd.,
No. 1, Ent. A, St. Racho Dimchev 1, Soa, 1000, Bulgaria
Compliance Contact: [email protected]
© Copyright 2025
www.probreeze.com