instruction manual
mode d'emploi
bedienungsanleitung
manuale di istruzioni
manual de instrucciones
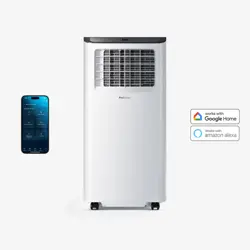
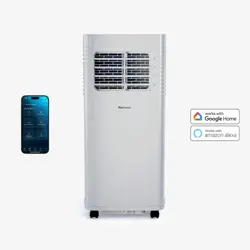
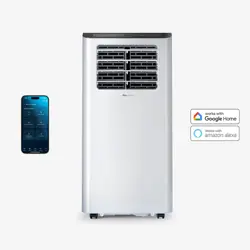
9000 BTU portable air conditioner
MODEL PB�AC01

Portable Air Conditioner
Safety Warning
•
•
•
•
•
•
•
Thank you for choosing to purchase a product from Pro Breeze. Please read the entire
manual carefully prior to first use and keep in a safe place for future reference.
01 | English
Use the appliance only as described in this
instruction manual.
Check that the voltage of the main circuit
corresponds with the rating of the appliance
before operating.
This appliance is suitable for indoor use only.
This appliance is not a toy. Never leave
unattended around children or pets.
Ensure the power cord plug is properly
inserted into the power socket before
operating.
Where there is the need to install a continu-
ous drainage hose ensure the connection of
the drainage hose is in good condition
without flexure.
Do not cover the power cord.
Contents
Safety Warning
Specific Information Regarding R290 Refrigerant Gas
Caution ┃ Specification
Parts
Control Panel
Installation
Controls
Emptying the Water Tank
Connecting the Water Hose for Continuous Draining ┃ Cleaning
Storage
Safety Features ┃ Helpful Information
Disposal
01
03
04
05
06
07
10
12
13
14
15
16
Pg

•
•
•
•
•
•
•
•
•
•
•
•
•
•
•
•
•
•
•
•
•
•
•
•
•
•
This appliance can be used by children
aged from eight years above and persons
with reduced physical, sensory or mental
capabilities or lack of experience and
knowledge if they have been given
supervision or instruction concerning use of
the appliance in a safe way and understand
the hazards involved.
Children shall not play with the appliance.
Cleaning and user maintenance shall not be
made by children without supervision.
Keep the appliance and all parts out of the
reach of children.
This appliance is intended for domestic use
only. It should not be used for commercial
purposes.
Place the appliance on a flat and dry
surface. Keep it at least 50cm away from
surrounding walls and/or objects.
When moving the appliance ensure it is
kept in an upright position.
When adjusting the louvres do so gently so
as not to cause damage.
Do not insert fingers or objects into the air
inlet or air outlet. Be sure to keep the air
inlet and air outlet unblocked.
Do not operate the appliance with wet
hands.
Do not leave the appliance unattended
whilst connected to the power supply.
Do not pull the power cord to stop the
appliance.
Do not unplug the appliance until it has
been switched off.
Do not modify the appliance or use any
accessories other than those supplied.
Do not place or use the appliance, power
cord, or any accessories in a bathroom,
wet, or damp place.
Do not cover the appliance whilst in use.
Do not use pressurised containers (e.g.
aerosol cans) or other flammable substances
near the appliance.
Do not use the appliance near petrol,
flammable gases, ovens, or other heating
sources.
Do not allow water or other liquids to enter
into the appliance or contaminate electrical
parts.
Do not attempt to repair or adjust any
electrical or mechanical elements in the
appliance. Doing so may be unsafe and will
void your warranty.
Do not operate the appliance if there are
signs of damage to the appliance, power
cord, or any of the accessories.
Do not wipe or wash the appliance with
chemical solvents. Prior to cleaning ensure
the appliance is turned off and unplugged
from the power supply.
Avoid placing the power cord in areas where
it can become a tripping hazard.
Avoid using extension cables as they may
overheat and cause a fire risk.
Unplug the appliance and store in a cool and
dry place when not in use.
Never place anything on top of the appliance.
English | 02

•
•
•
•
•
•
•
•
•
•
The appliance must be installed, used and
stored in an area that is greater than 13m².
This appliance contains 270g of R290
refrigerant gas.
R290 is a refrigerant gas that complies with
the European directive on the environment.
Do not puncture any part of refrigerant
circuit.
Be aware R290 refrigerant is odourless and
does not have the odour normally associated
with natural gas and propane tanks.
The appliance must be placed in an area
without any continuous sources of ignition
such as open flames, gas, or electrical
appliances in operation.
Do not puncture and do not burn.
If the appliance is installed, operated or
stored in a non-ventilated area, the room
must be designed to prevent the accumula-
tion of refrigerant leaks resulting in a risk of
fire or explosion due to ignition of the
refrigerant caused by electric heaters,
stoves, or other sources of ignition.
The appliance must be stored in such a way
as to prevent mechanical failure.
Individuals who operate or work on the
refrigerant circuit must have the appropriate
certification issued by an accredited
organisation that ensures competence in
handling refrigerants according to a specific
evaluation recognised by associations in the
industry.
•
Maintenance and repairs that require the
assistance of other qualified personnel must
be performed under the supervision of an
individual specified in the use of flammable
refrigerants.
Specific Information
Regarding R290
Refrigerant Gas
03 | English
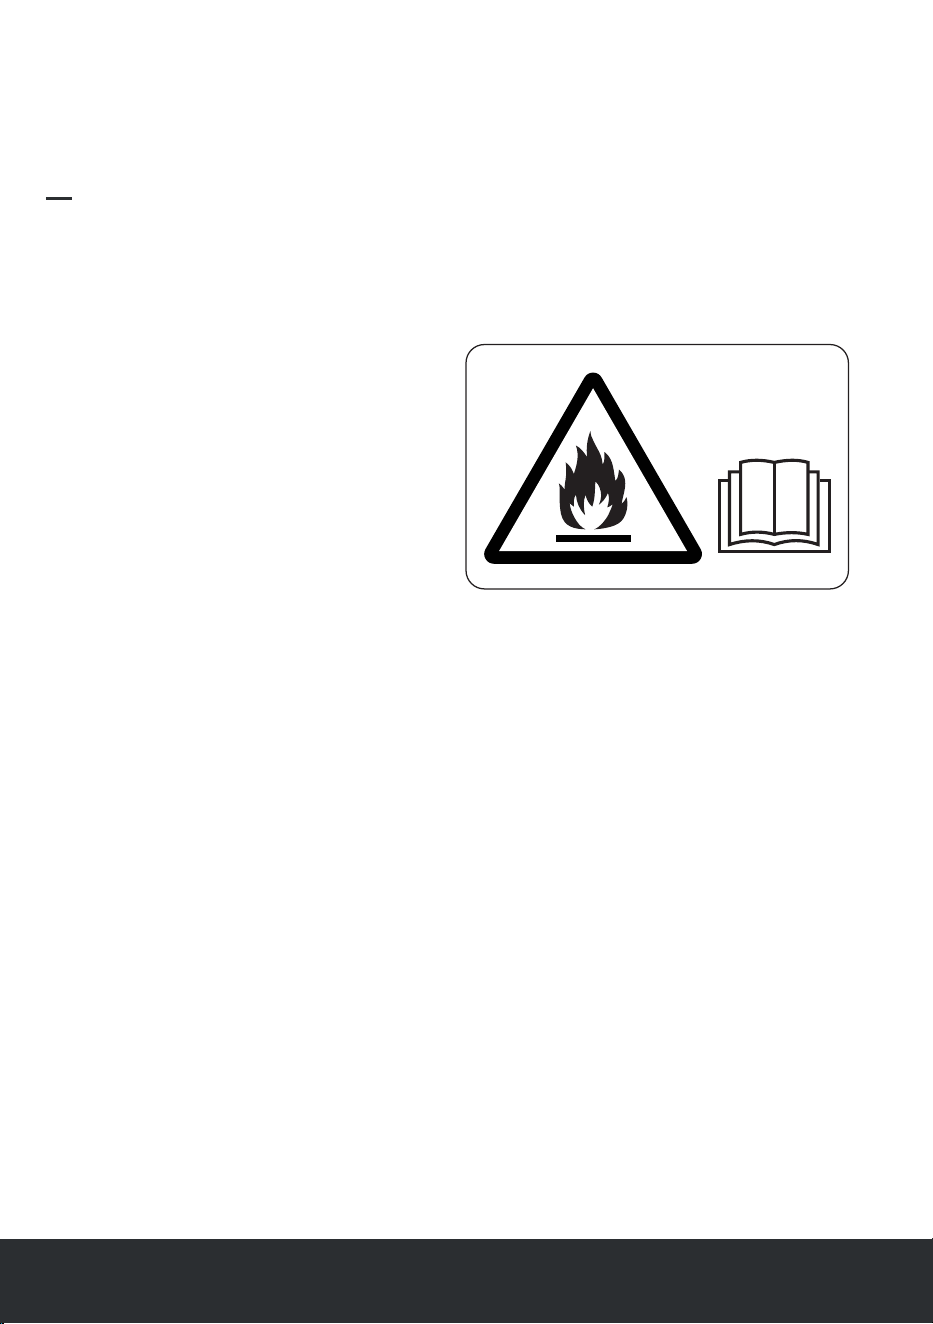
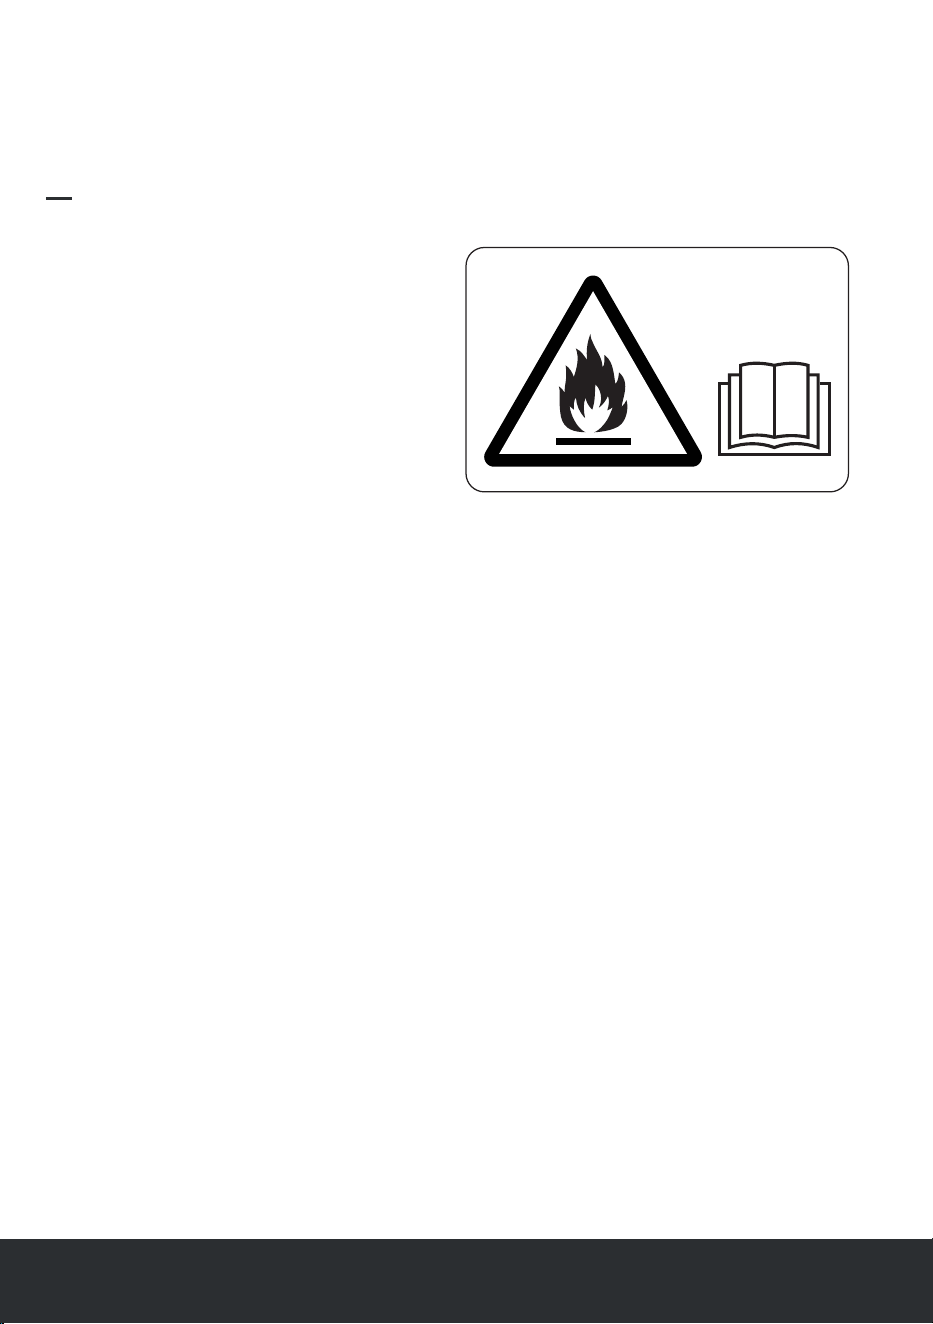
CAUTION
RISK OF FIRE

Caution
Specification
• Do not operate the appliance if the room
temperature is greater than 32°C in
cooling mode or lower than 5°C in
dehumidifying mode.
•
•
•
•
•
•
•
•
•
•
•
•
•
•
•
•
•
•
•
Input Voltage: 220V-240V~
Frequency: 50Hz
Cooling Capacity: 9000 BTU/H
Refrigerant: R290
Energy Efficiency Class: A
Rated Capacity For Cooling: 2640W
Rated Input | Cooling: 1010W
Rated Current | Cooling: 4.4A
Noise Level | 65dB
EER For Cooling: 8.9 BTU/H
EER For Cooling: 2.6 W/W
Moisture Removal: 0.9L/H
Air Flow Volume: 360m³/H
Applicable Area: 18-22m²
Operating Temperature Range: 5-32°C
Available Temperature Settings: 16-30°C
Global Warming Potential: 3kg CO2 eq.
Net Weight: 24.5kg
Size: 30cm x 35.2cm x 75.6cm
English | 04

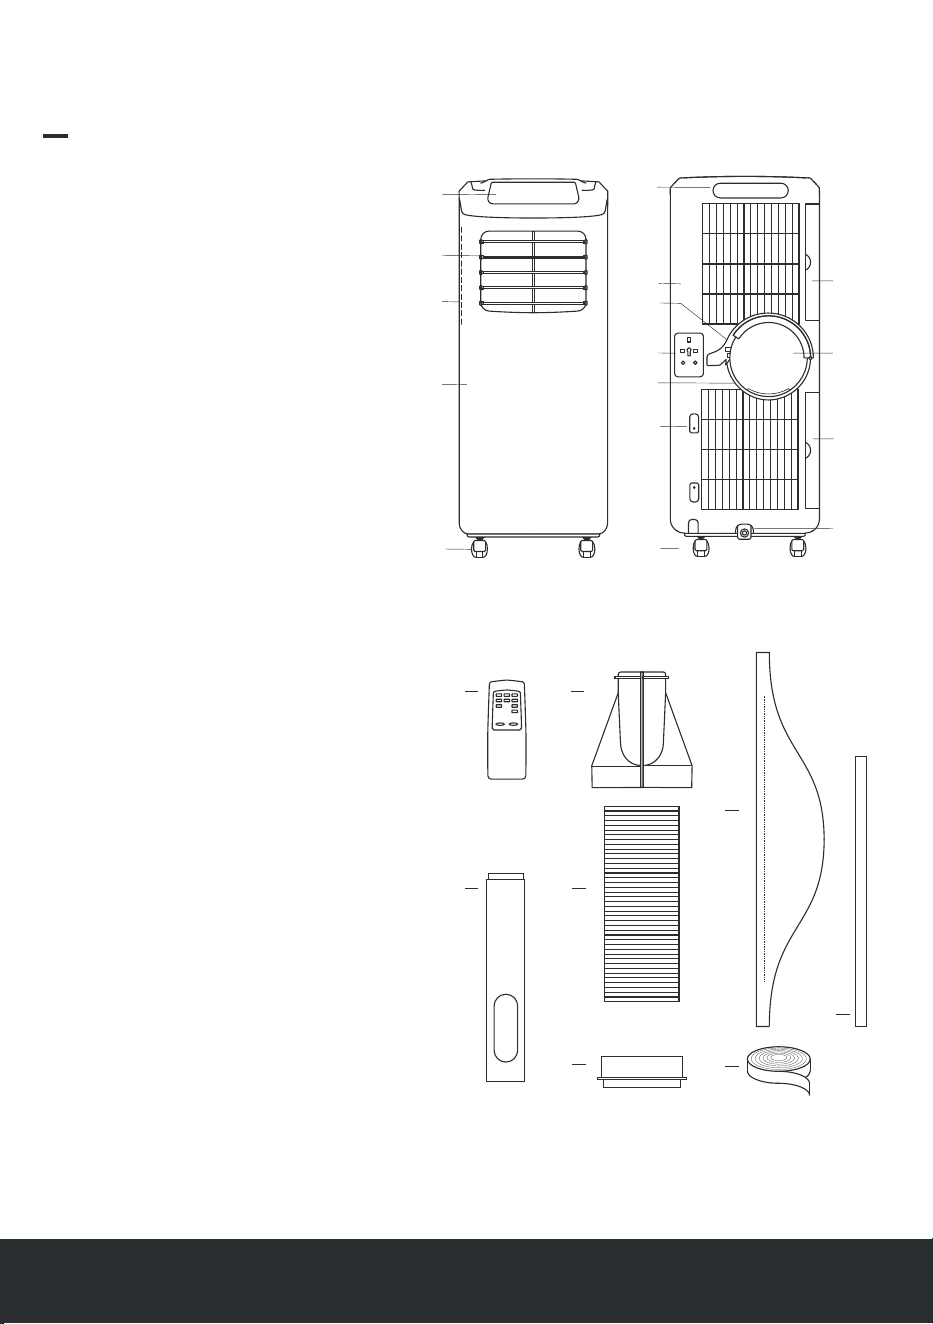
Front View
Control panel
Horizontal louvre
Vertical louvre
Body
Wheels
1.
2.
3.
4.
5.
4
5
3
2
1
Rear View
Handle/remote control storage
Body
C-shaped buckle
Power cord
Heat exhaust hose connector
Power cord tidy
Wheels
Evaporator filter
Radiating filter
Condenser filter
Drain cap.
6.
7.
8.
9.
10.
11.
12.
13.
14.
15.
16.
17.
18.
19.
20.
21.
22.
23.
24.
Accessories
Remote control
Heat exhaust hose short connector
Heat exhaust hose
Sliding window sealing board assembly
Circular connector
Hinged window fabric sealing assembly
Sealing velcro
Water hose
7
12
9
10
14
13
15
16
11
8
6
Parts
05 | English
17
18
21
20
19
22
23
24

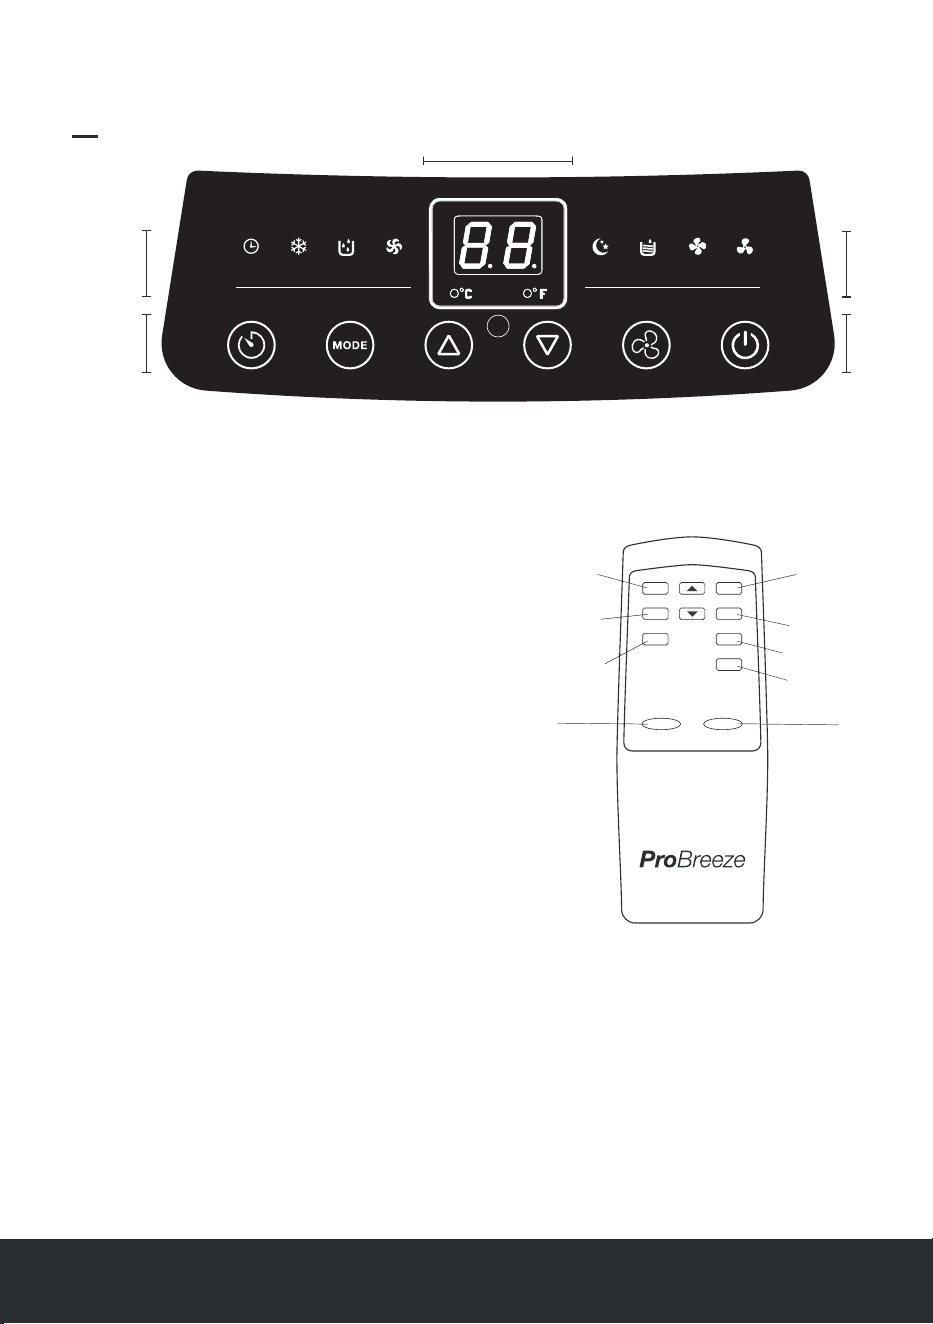
Buttons moving from right to left
Power button
Fan speed Button
Down Button
Up button
Mode Button
Timer button
•
•
•
•
•
•
Remote Control
Digital display panel moving from
right to left
Degrees fahrenheit indicator light
Degrees celsius indicator light
•
•
Indicator light symbols moving
from right to left
Low fan speed indicator light
High fan speed indicator light
Water tank full indicator light
Sleep mode indicator light
Fan-only mode indicator light
Dehumidifying mode indicator light
Cooling mode indicator light
Timer mode indicator light
•
•
•
•
•
•
•
•
1.
2.
3.
TIMER COOL DRY FAN SLEEP FULL HIGH LOW
TEMP
Cool
Dry
Fan
High
Low
Sleep
Timer Power
ºC/ºF
High fan
speed button
Cool mode
button
Dehumidifying
mode button
Fan-only mode
Low fan
speed button
Sleep mode
button
Timer
Power
Temperature
digits change
button
Control Panel
English | 06
22
3
1
1
Note: Two AAA batteries included.

07 | English
Prior to and after installation adhere to
the below:
•
•
•
•
When moving the appliance to the chosen
location ensure it is kept in an upright position.
Do not place or use the appliance, power cord,
or any accessories in a bathroom, wet, or damp
place.
Place the appliance on a flat and dry surface.
Keep it at least 50cm away from surrounding
walls and/or objects.
Leave the appliance in an upright position for
at least two hours before first use.
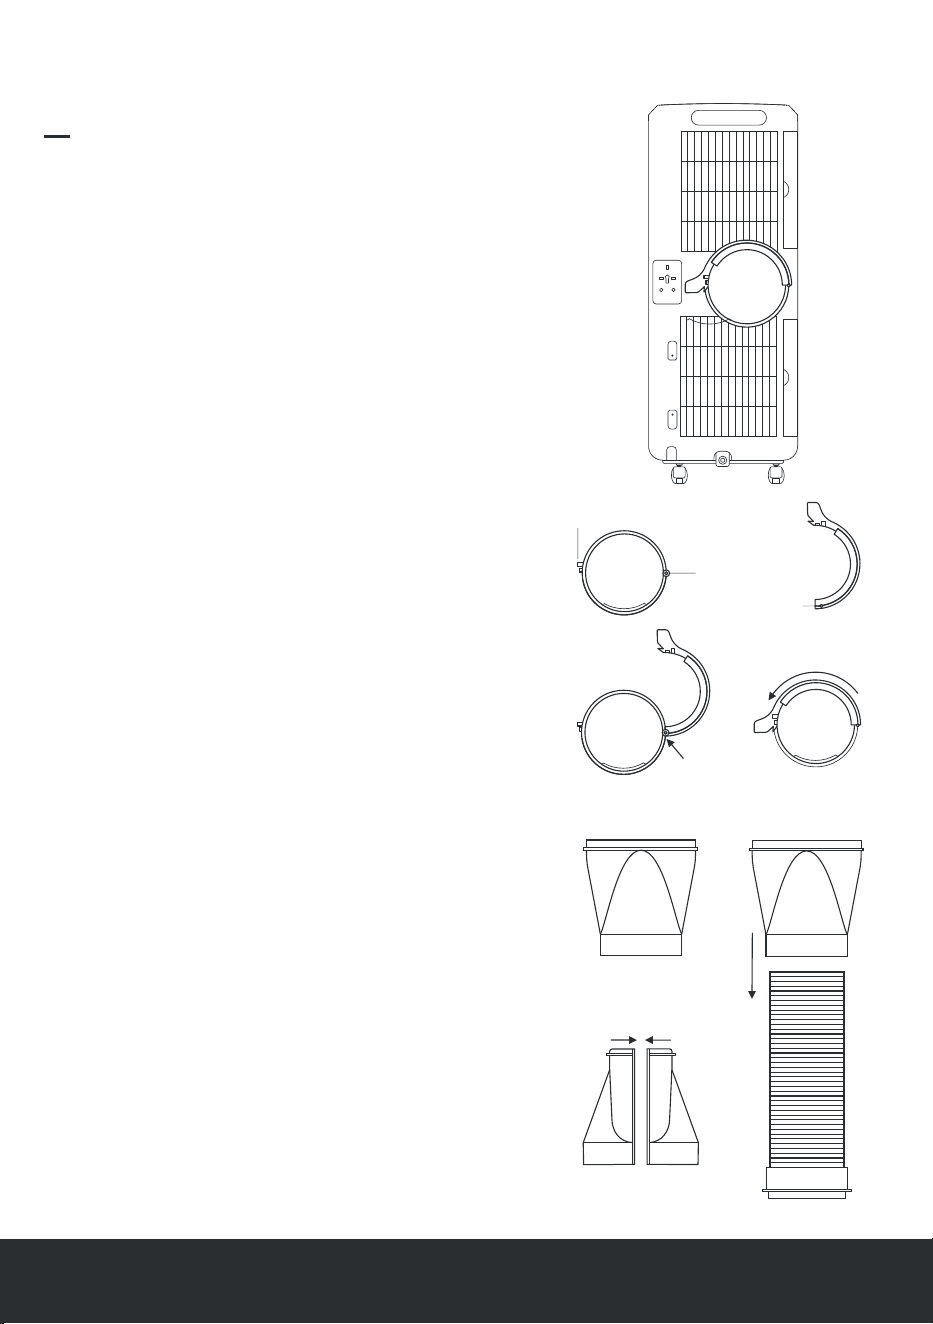
Exhaust Hose Short Connector Installation
Align the two halves and click firmly together.
Stand the heat exhaust hose upright with the
circular connector at the bottom.
Place the exhaust hose short connector on top
of the heat exhaust hose and push down firmly
so that the neck sits over the heat exhaust hose.
Holding the heat exhaust hose firmly at the
bottom rotate the exhaust hose short connector
counterclockwise locking the three screw
threads onto the heat exhaust hose.
C-Shaped Buckle Installation
Align the c-shaped buckles rotary hole with
the rotation shaft and slide fully onto the
rotation shaft.
Rotate the c-shaped buckle counterclockwise
until it locks over the snap joint.
1.
2.
Rotary hole
Rotation shaft
Snap joint
Side view A
Side view B
1
2
1.
2.
3.
4.
2
3
1
Installation
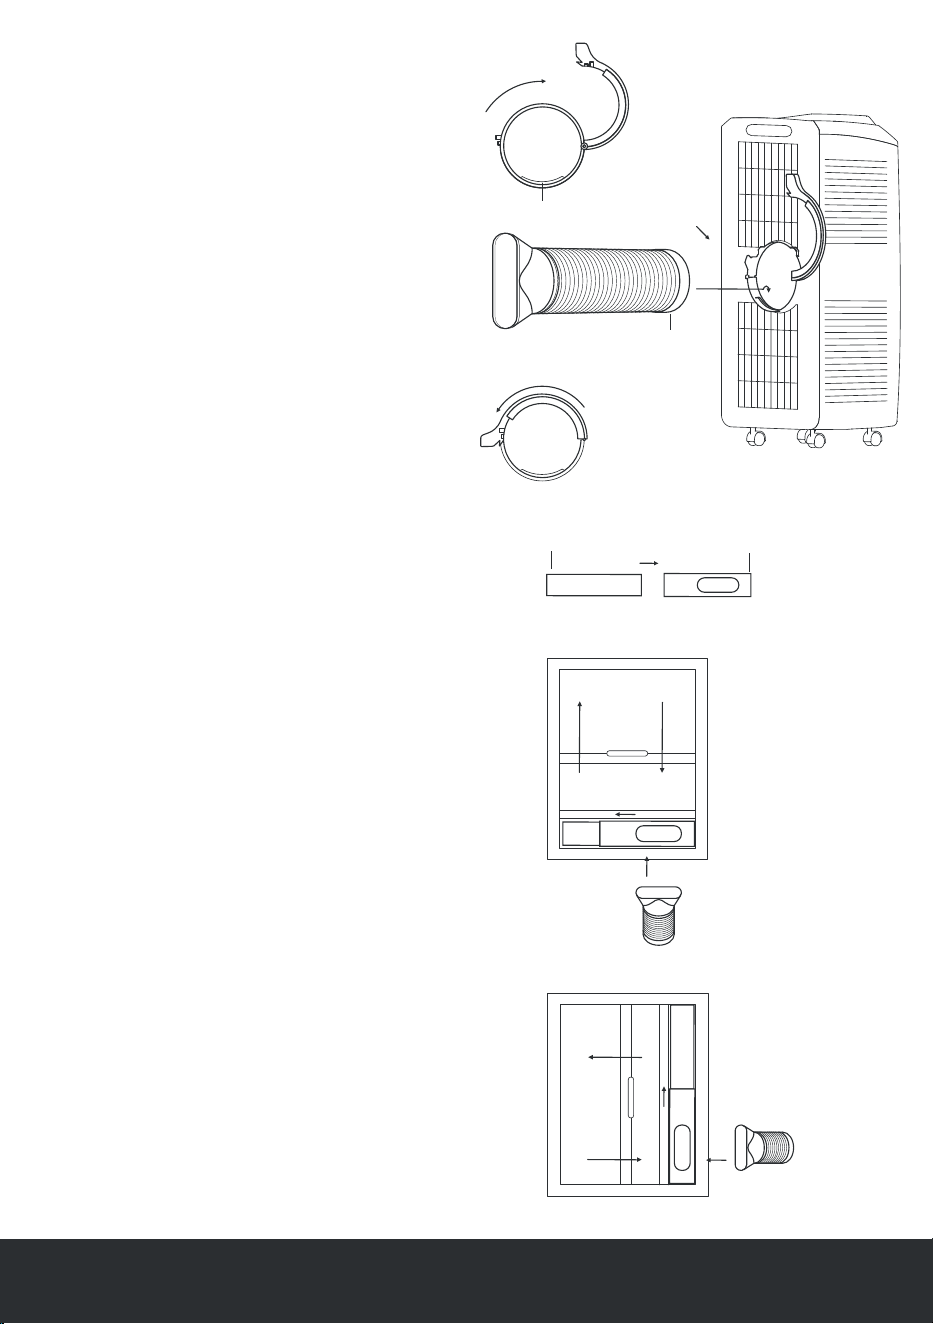
Notes:
•
•
If your window opening is smaller than the
minimum length of the sealing board assembly
trim to desired length using a hack saw.
If your window opening is larger than the
maximum length of the sealing board assembly
use plywood or similar to fill the gap.
Sliding Windows Sealing Board
Assembly Installation
Insert panel B into panel A and adjust to
the length or height of the window.
Open window and place the sealing board
assembly into window.
Adjust to ensure an exact fit and secure
with the provided screw.
Close window to lock everything into
place.
Attach the heat exhaust hose short
connector to the elliptical hole.
The sealing board assembly is now ready
for use.
1.
2.
3.
4.
5.
6.
Unlock and fully open the c-shaped
buckle.
Place the lip of the circular connector over
the bottom step of the heat exhaust hose
connector.
Firmly push the circular connector down
into the heat exhaust hose connector to
lock it into place.
Return the c-shaped buckle to secure.
1.
2.
3.
4.
1
4
Bottom step
Circular connector
2
3
1
3
3
2
5
5
4
2
4
Panel A
Panel B
Horizontal Window
Vertical Window
English | 04
Heat Exhaust Hose Installation
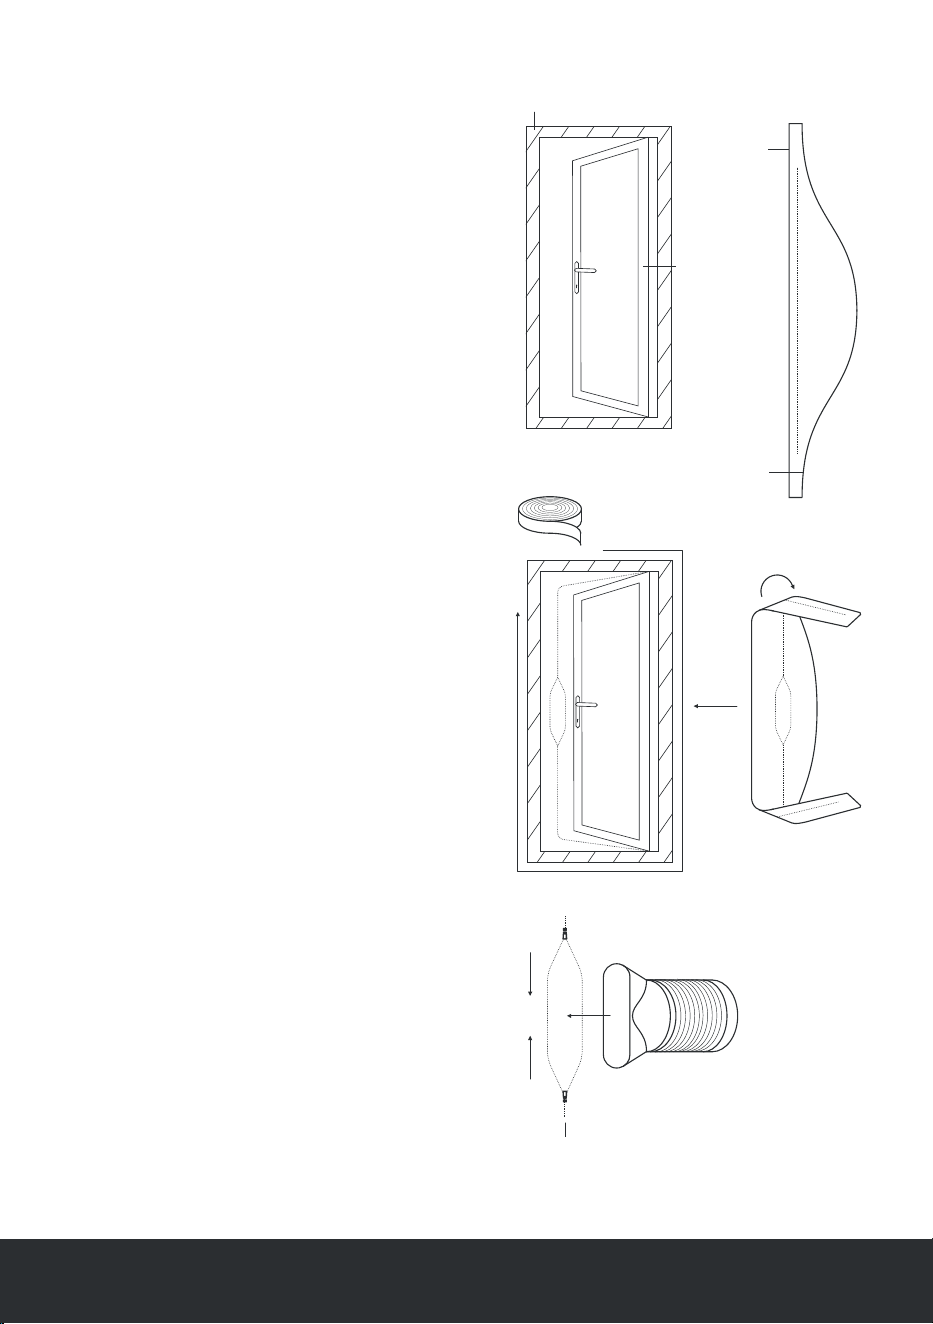
English | 08

Open window and clean frame and
casement surfaces of dust and particles.
Stick the velcro tape around the entire
window frame. Never stick to the window
seal as doing so will prohibit the window
from closing fully.
Stick the velcro tape around the entire
window casement (inside or outside).
Check to ensure the window can close
fully.
Attach side A of the sealing fabric
assembly to the velcro on the window
frame working from the centre outwards.
Close and open window to ensure no
fabric gets trapped.
Attach side B of the sealing fabric
assembly to the velcro on the window
casement working from the centre
outwards.
Open the window slightly and insert the
heat exhaust hose short connector into
the sealing fabric assembly securing with
the zippers around its lip.
The sealing fabric assembly is now ready
for use.
Notes:
•
•
Do not bend the heat exhaust hose in
excess of 45 degrees. It should be as short
and as straight as possible to ensure
efficient air flow.
Do not overstretch the heat exhaust hose as
this may affect the appliances efficiency
Hinged Window Sealing Fabric
Assembly Installation
1.
2.
3.
4.
5.
6.
7.
8.
Frame
Side A
Side B
Casement
7
4 & 6
2 & 3
Hinged window sealing fabric zip
09 | English

Controls
Power Button
Turn the appliance on and off.
Fan Button
Select between high and low fan speeds.
Note: Option not available in dehumidifying
mode.
Mode Button
•
•
•
Cooling Mode - Perfect for cooling a room
in hot weather. Use the up and down
buttons when in cooling mode to set the
desired temperature between 16-30°C. The
appliance will cool the room if the room
temperature goes above the set
temperature. If the room temperature goes
below the set temperature the appliance
will stop cooling the room and the fan will
remain operating at the set fan speed.
Note: The heat exhaust hose must be
connected to allow the hot air to be
discharged outside.
Fan-Only Mode - The appliance operates
at the set fan speed. Room temperature is
displayed on the digital display panel.
Note: The heat exhaust hose does not have
to be connected to the appliance.
Dehumidifying Mode - Ideal for reducing
room humidity in humid and damp times of
year. The appliance will dehumidify the room if
the room temperature is greater than or equal
to 17°C and the fan operates at the low fan
speed. If the room temperature decreases to
less than or equal to 15°C the appliance will
stop dehumidifying the room and the fan
operates at the low fan speed. Note: The heat
exhaust hose must be connected to allow the
hot and humid air to be discharged outside.
Note: Temperature can only be set when in
cooling mode.
Sleep Mode
Set a sleep mode to reduce energy consumption
when in cooling mode.
To activate, press the sleep button on the remote
control or both the timer and down buttons on
the control panel at the same time. The display
will blink five times with SL to confirm sleep
mode has been set then revert to the set
temperature.
After two hours the set temperature will increase
automatically by 1°C. After another two hours,
the set temperature will increase automatically by
a further 1°C and the fan speed will change to
low fan speed if it is not already at this fan speed.
The appliance will continue to run at this setting
until turned off.
To cancel sleep mode press the sleep button on
the remote control or both the timer and down
buttons on the control panel at the same time.
English | 04English | 10

•
•
•
Set desired temperature when in cooling
mode.
Set desired hours till turn-on and turn-off
when setting a timer.
Change between °C and °F by holding
both down at the same time.
Timer Button
Ensure the appliance is plugged in and the
power socket turned on.
Press the timer button to activate the timer
function.
Press the up and down buttons to set the
desired time (1-24 hours) until turn-on.
The time digits will blink five times to
confirm a timer has been set then the
display will revert to the room temperature.
Select the desired settings prior to turn-on.
To check the remaining time prior to turn-on
press the timer button.
To cancel the turn-on timer press the timer
button twice.
Note: If cooling mode is selected and a
temperature is set the display will show the set
temperature. If no desired settings are selected
the appliance will turn on in the previously set
settings.
Setting a turn-off timer:
Note: If cooling mode is selected and a
temperature is set the display will show the set
temperature.
Up And Down Buttons
Use the up and down buttons to:
1.
2.
3.
4.
5.
6.
7.
Ensure the appliance is plugged in and the
power socket turned on.
Press the power button to turn the
appliance on.
Press the timer button to activate the timer
function.
Press the up and down buttons to set the
desired time (1-24 hours) until turn-off.
The time digits will blink five times to
confirm a timer has been set then the
display will revert to the room temperature.
1.
2.
3.
4.
5.
Select the desired settings prior to turn-off
To check the remaining time till turn-off
press the timer button.
To cancel the turn-off timer press the timer
button twice.
6.
7.
8.
11 | English
Set a turn-on or turn-off timer between 1-24 hours.
Setting a turn-on timer:

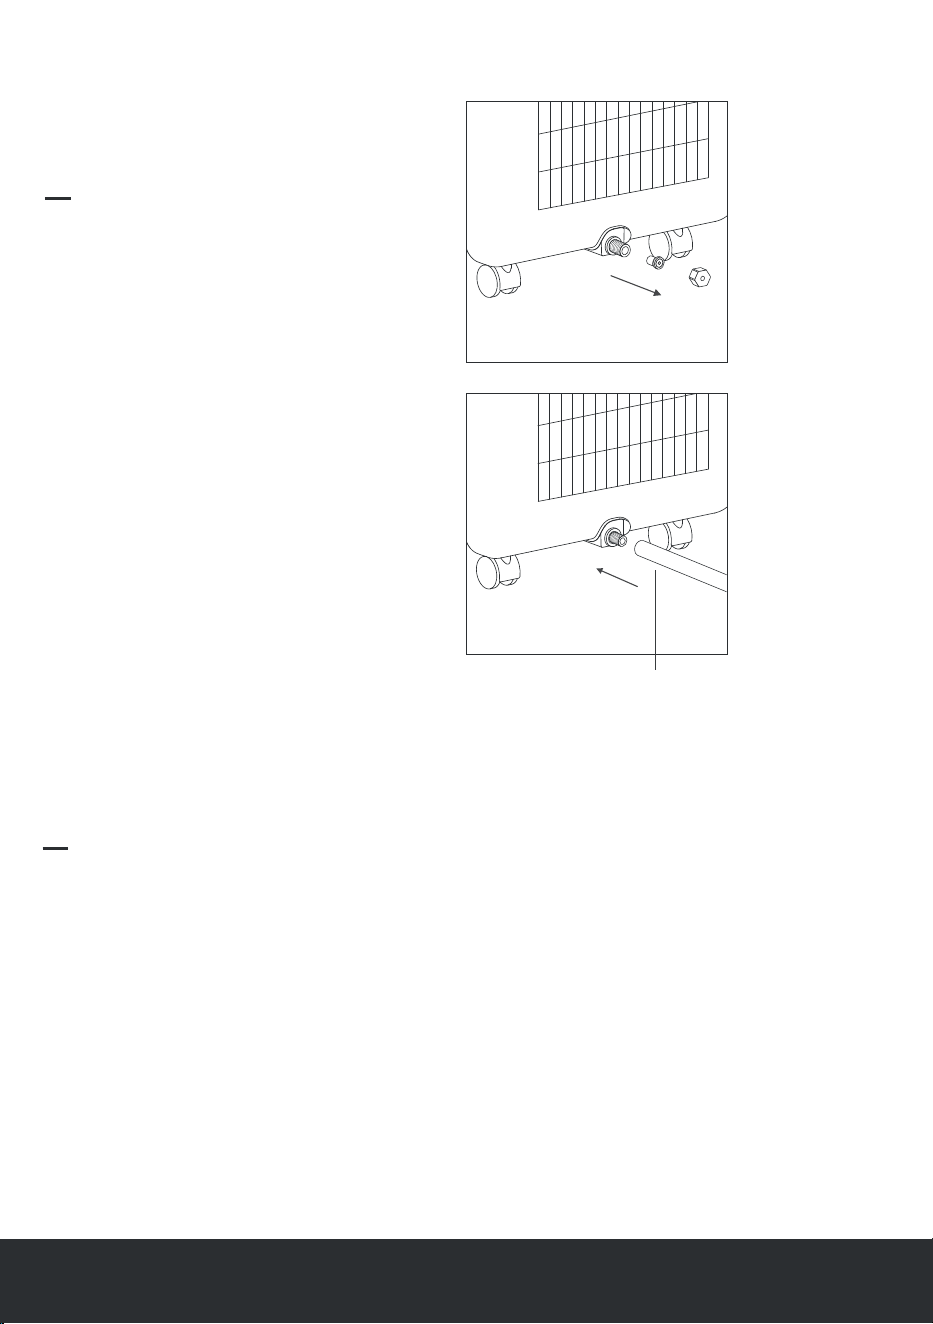
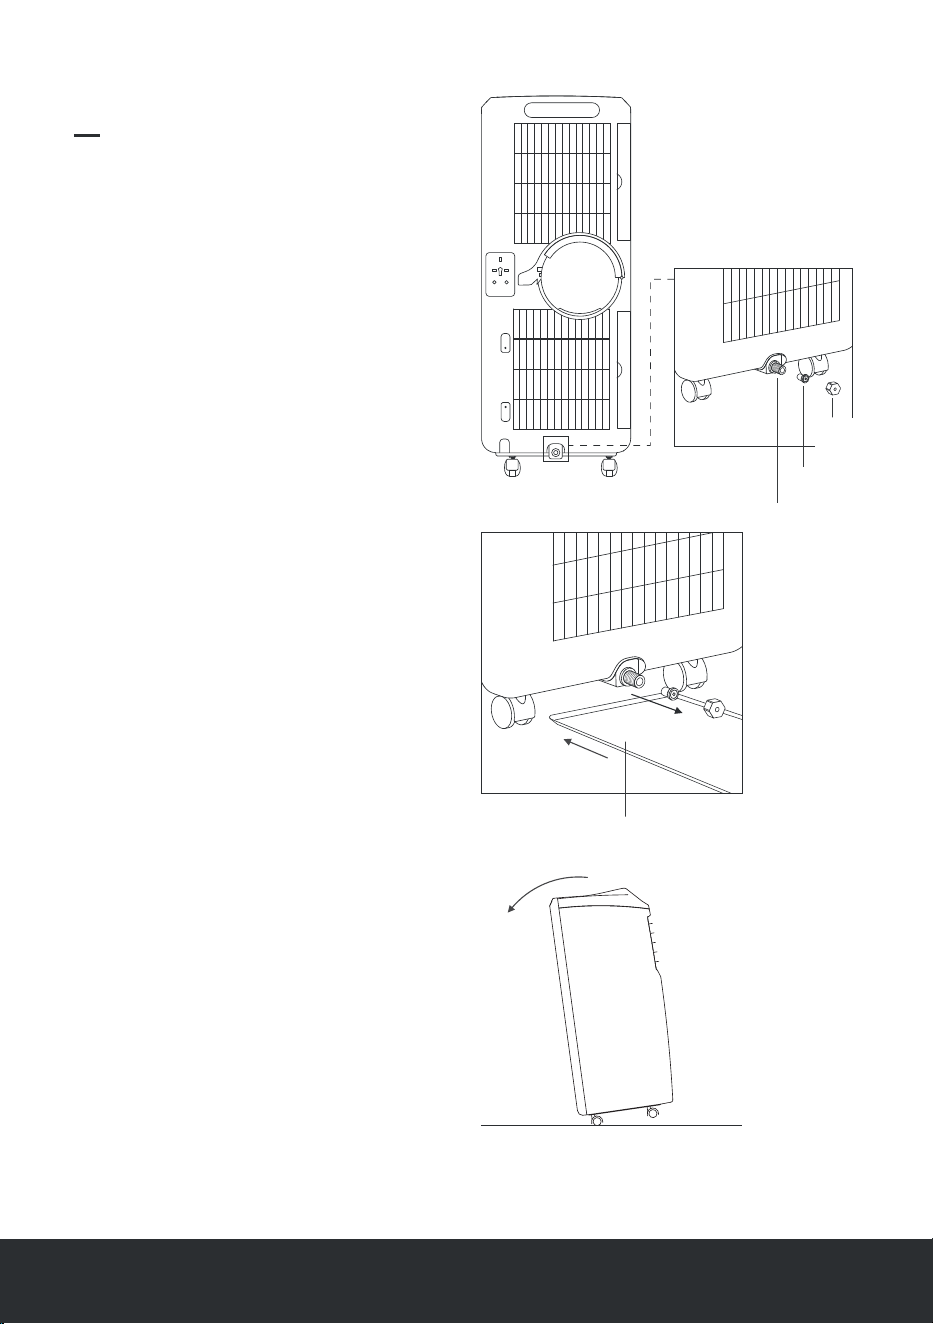
Drain cap
Drain plug
Water outlet
Turn off the appliance and unplug it from
the wall socket.
Place a shallow tray underneath the water
outlet.
Unscrew the drain cap, unplug the drain
plug and allow the water to collect in the
shallow tray.
To fully empty the water tank gently tilt
the appliance back on its rear wheels. Do
not tilt more than 30 degrees.
Once empty, return the appliance to a
fully upright position and replace the drain
plug and cap.
Empty the shallow tray.
When the water tank is full 10 beeps will
sound; the water tank full indicator light
will illuminate, and the appliance will
pause operation to prevent the water tank
from overflowing.
To empty the water tank:
Note: If the shallow tray is not large
enough to hold all of the water from the
appliance replace the drain cap to prevent
water from flowing onto the floor. Empty
the shallow tray and continue from step 2.
1.
2.
3.
4.
5.
6.
3
4
30º
English | 04English | 12
Emptying the Water Tank
Shallow tray
2
1
2
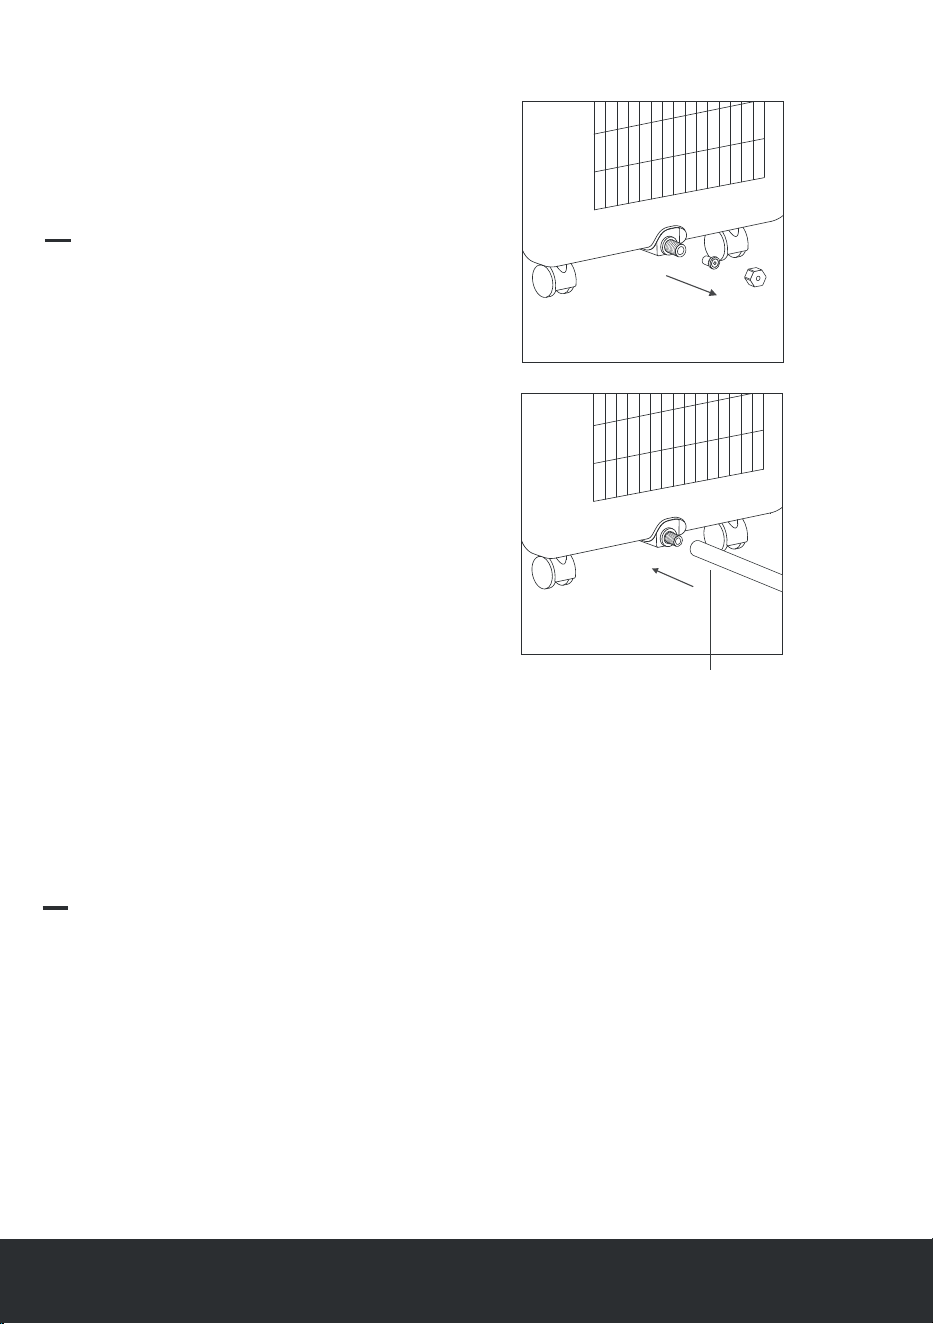
Water hose
Unscrew the drain cap, unplug the drain
plug, and store safely.
Insert the water hose into the water outlet.
Ensure the water hose end has a suitable
drainage outlet (e.g a drain or bucket).
For long-term use, it is recommended to
connect a water hose for continuous drainage.
To attach the water hose:
Note: When the appliance is set at a
warm temperature it is recommended to
attach the water hose as the water tank
will fill at a faster rate than when set at a
cold temperature.
Connecting the Water
Hose for Continuous
Draining
1.
2.
3.
Turn off the appliance and unplug it from the
power socket. Use a soft, dry cloth to clean
away any dust, or debris from the exterior
surface of the appliance.
General cleaning
Cleaning
13 | English
Heat Exhaust Pipe Cleaning:
1.
2.
3.
Remove the heat exhaust pipe from the
rear of the appliance and the respective
window sealing assembly.
Use a soft, dry cloth to clean away any
dust, or debris.
Return the heat exhaust pipe.
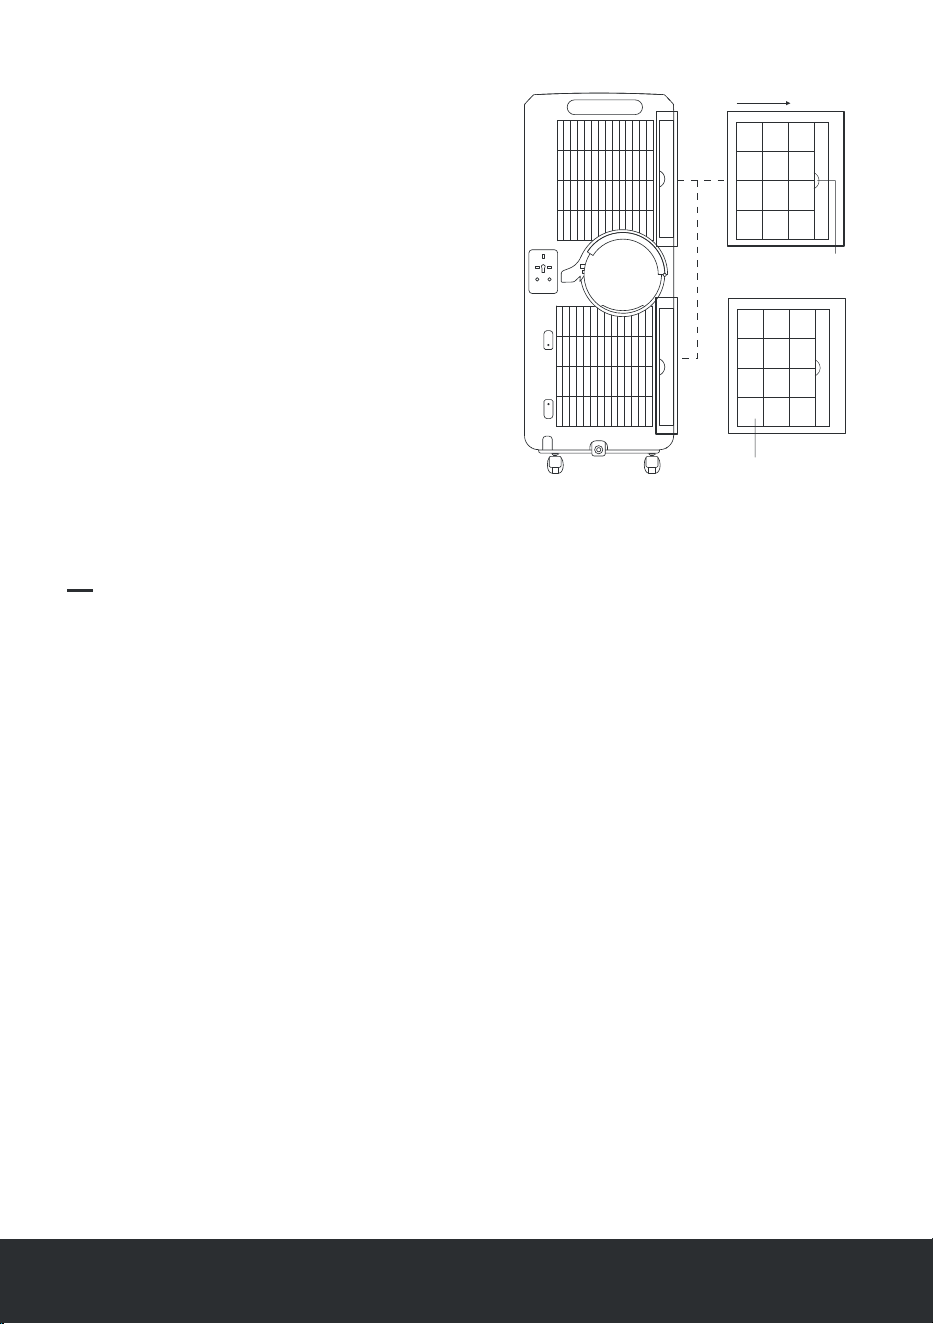
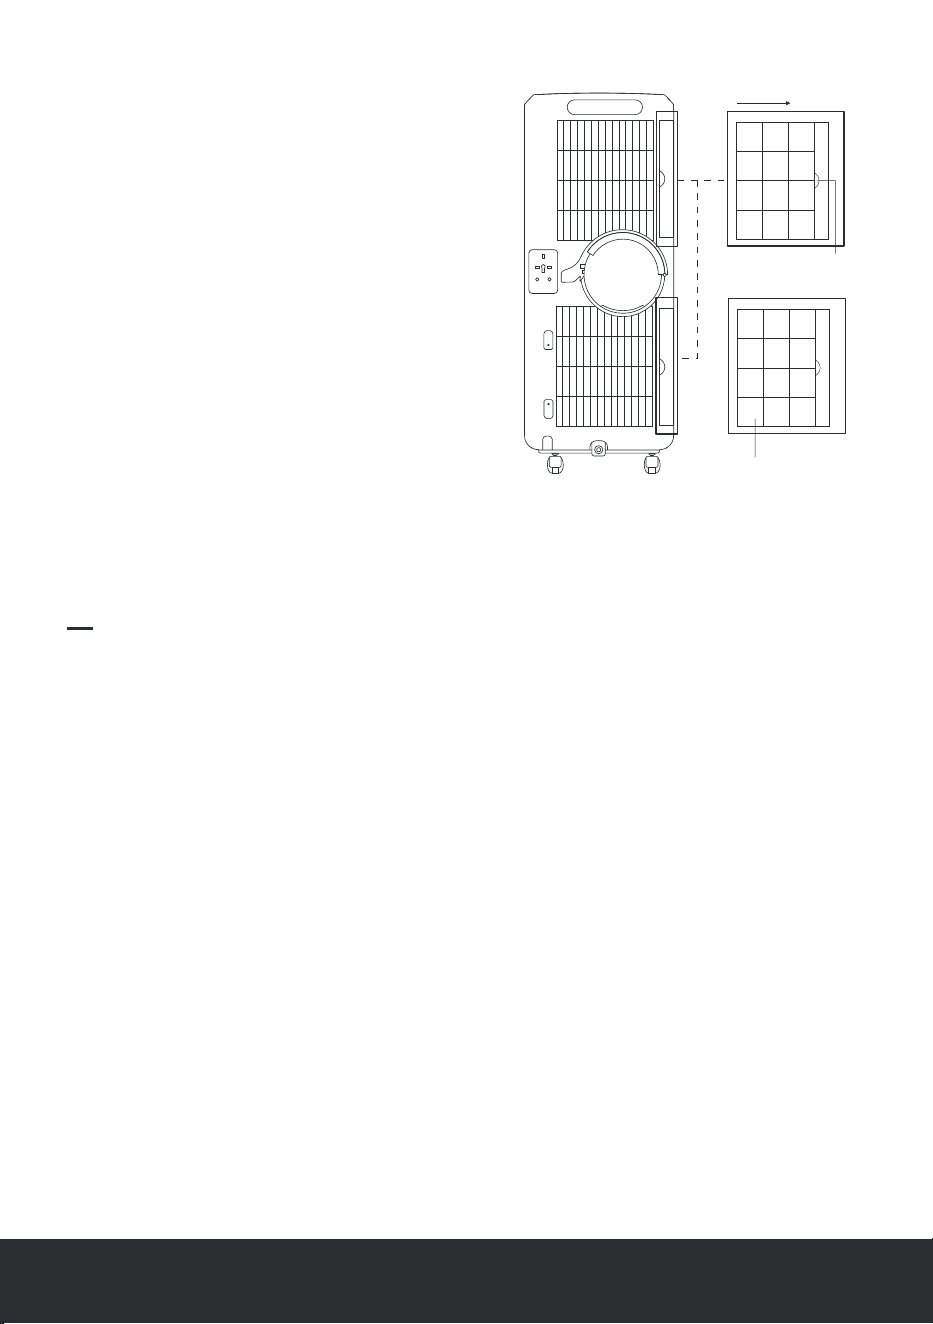
Clean the appliances evaporator and
condenser filter once every two weeks.
To access the filters:
Filter cleaning
1.
2.
3.
Gripping position
Filter
1
2
English | 04English | 14
Storage
Grip the evaporator and condenser filters
at the gripping position and gently
remove.
Use a firm brush and/or vacuum cleaner
to clean the filters of any dust and
particles.
Return the evaporator and condenser
filters.
For long-term storage:
1.
2.
3.
4.
Empty the water tank and leave the drain
cap and drain plug off.
Run the appliance in fan-only mode on the
low fan speed setting for 12 hours to allow
the interior of the appliance to fully dry.
Turn off the appliance, replace the drain
plug and drain cap, and unplug the power
cord and wrap it around the power cord
tidy.
Remove the heat exhaust hose.
5.
6.
Remove the batteries from the remote
control.
Cover the appliance and all accessories with
a waterproof covering and store in a safe,
dry place, out of the reach of children.
Anti-Frost Protection
If the compressor operates continuously for
more than 10 minutes and the internal pipe
temperature drops to below 0°C for more than
20 seconds the compressor and water spraying
motor will turn off. The display will show E4 and
the appliance will initiate anti-frost protection
rendering the control panel buttons inactive
apart from the power button. Once the internal
pipe temperature exceeds 8°C the anti-frost
protection will cease and the appliance will
return to operating at the chosen settings.
Compressor Delay Protection
To protect the compressor, apart from when the
appliance and compressor are activated for the
first time after being turned on via the power
button, there will be a three minute delay
between every occurrence of the compressor
turning off and on.
Safety Features
Helpful Information
15 | English
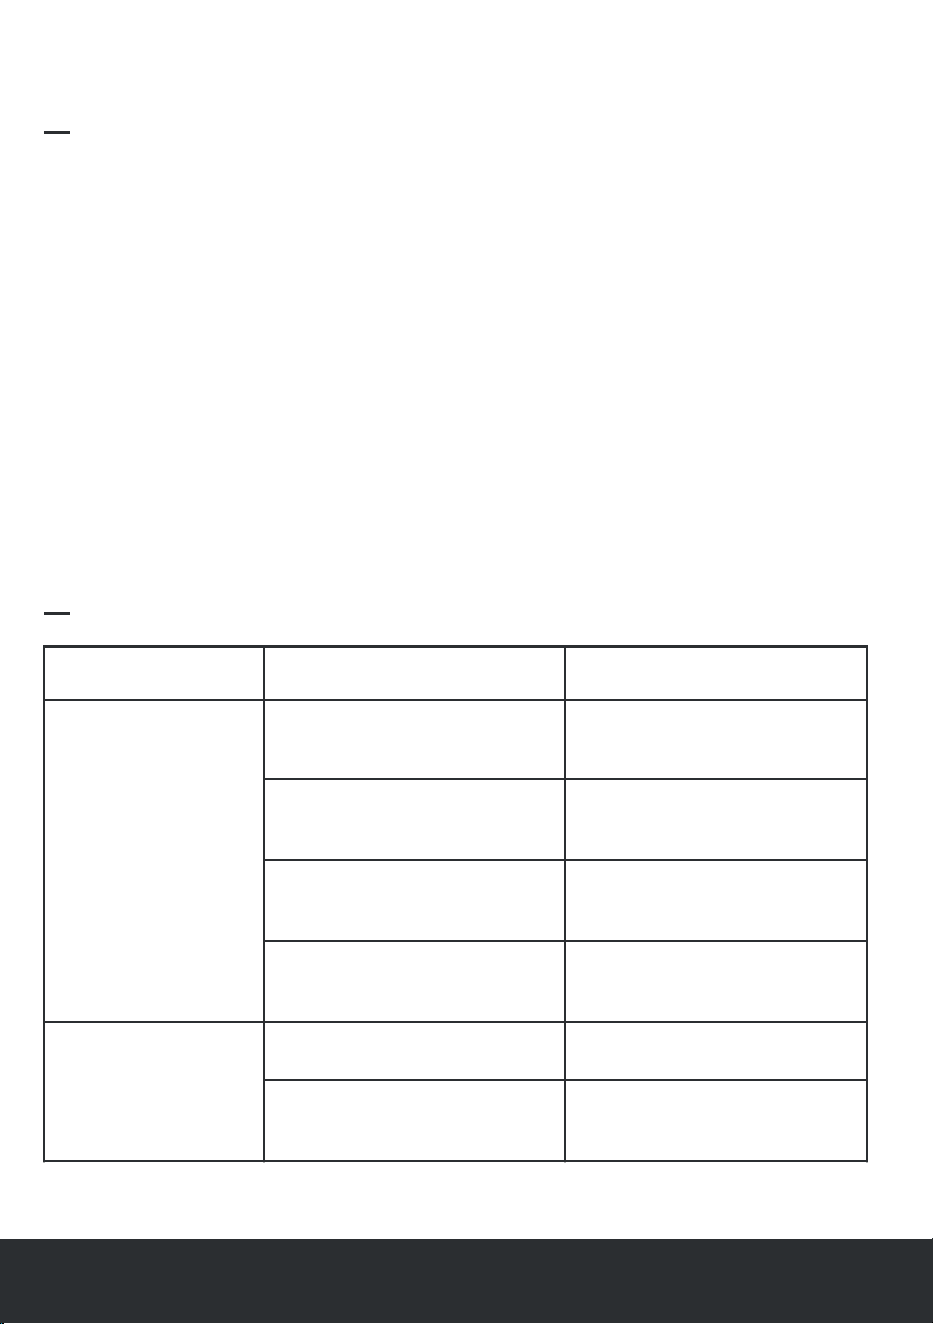
Issue Cause
No power.
Water tank full.
Room temperature too low.
Dirty filters.
Air inlet or air outlet clogged.
Appliance not on a flat surface.
Initiation of overheat protection.
Too far from appliance.
The remote control is not pointing towards
the receiving head of the remote control
The batteries are dead.
Pipe temperature sensor failure.
Room temperature sensor failure.
Anti-frost protection.
Noisey.
The compressor does not
work.
The remote control does
not work.
Display showing E1.
Display showing E2.
Display showing E4.
Drain the water stored in the unit.
Place the appliance on a flat surface.
Wait three minutes until the temperature
decreases and then turn on the unit..
Bring the remote control closer to the
appliance and ensure that the remote
control is pointing toward the receiving
head of the remote control.
Resolution
The air-conditioner
is not operating.
Connect the unit to a live
power socket and turn it on.
It is recommended that this
unit be operated at 5-32°C.
Increase the set temperature
above the room temperature.
Draw curtains.
Close doors and windows and
remove other heat sources.
Clean filters.
Remove the obstruction.
Room temperature lower than the
set temperature cooling mode.
There is direct sunlight.
Doors and windows are open or
there are other heat sources.
Poor cooling.
This marking indicates that this product should not be disposed of with other
household waste throughout the EU. This is to prevent the possible harm to the
environment and human well-being. Contact your local authority for information
regarding the collection systems available. If possible, recycle it responsibly to
promote the sustainable reuse of resources.
Disposal
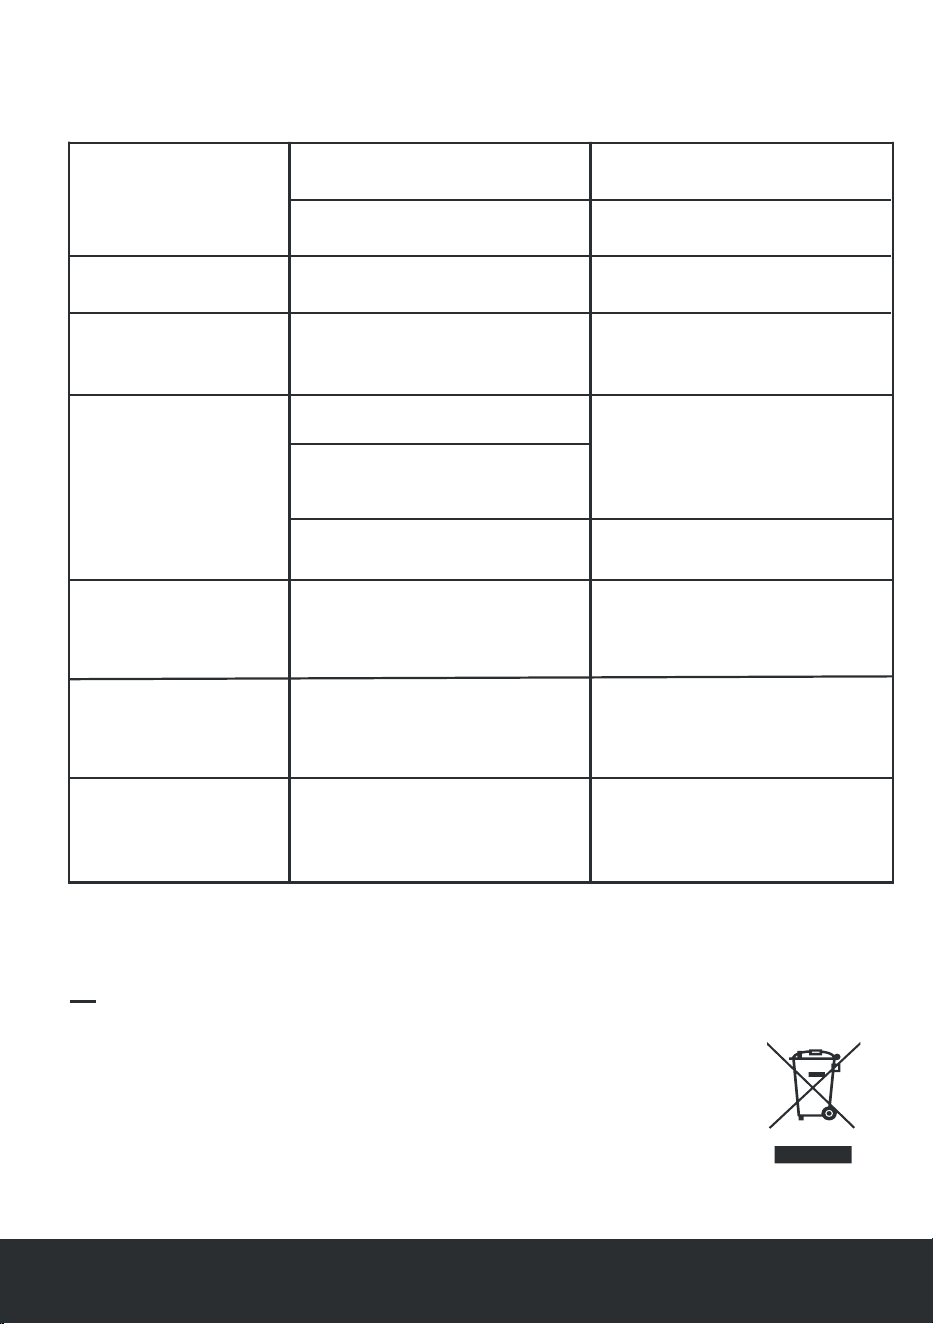
No power.
Water tank full.
Ambient temperature too low.
Ambient temperature lower than the set
temperature cooling mode.
There is direct sunlight.
Doors and windows are open or there are
other heat sources.
Air inlet or air outlet clogged.
Appliance not on a flat surface.
The batteries are dead.
Pipe temperature sensor failure.
Room temperature sensor failure.
Anti-frost protection.
The air-conditioner is not
operating.
Poor cooling.
Noisey.
The compressor does not
work.
The remote control does
not work.
Connect the unit to a live power socket
and turn it on.
Drain the water stored in the unit.
Ambient temperature too low.
It is recommended that this unit be
operated at 5-32°C.
Increase the set temperature above the
ambient temperature.
Draw curtains.
Close doors and windows and remove
other heat sources.
Remove the obstruction.
Place the appliance on a flat surface.
Wait three minutes until the temperature
decreases and then turn on the unit.
Bring the remote control closer to the
appliance and ensure that the remote
control is pointing toward the receiving
head of the remote control.
Replace the batteries.
Arrange for a professional to check the
pipe temperature sensor and related
circuits.
Arrange for a professional to check the
room temperature sensor and related
circuits.
Appliance returns to operating at chosen
settings once the internal pipe
temperature exceeds 8°C.
Clean filters.Dirty filters.
Initiation of overheat protection.
Too far from appliance.
The remote control is not pointing towards
the receiving head of the remote control.
Display showing E1.
Display showing E2.
Display showing E4.
English | 16
Kein Strom.
Voller Wassertank.
Die Raumtemperatur ist zu gering.
Eine Raumtemperatur unter der eingestell-
ten Temperatur im Kühl-Modus.
Türen und Fenster sind offen oder es sind
andere Wärmequellen vorhanden.
Die Filter sind verschmutzt.
Lufteinlass/Luftauslass ist verstopft.
Es gibt direkte Sonneneinstrahlung.
Der Überhitzungsschutz ist aktiv.
Die Frostschutz-Funktion ist aktiv.
Issue Cause
Die Klimaanlage
funktioniert nicht.
Kühlung funktioniert nicht
richtig.
Laute Geräusche.
Der Kompressor
funktioniert nicht.
Resolution
Schließen Sie das Gerät ans Stromnetz
an und schalten es ein.
Entleeren Sie das angesammelte
Wasser.
Wir empfehlen einen Betrieb dieses
Geräts bei Temperaturen zwischen
5-32°C.
Erhöhen Sie die eingestellte Temperatur
über die Umgebungstemperatur.
Schließen Sie Fenster und Türen und
entfernen andere Wärmequellen.
Filter reinigen.
Entfernen Sie alle Fremdkörper.
Vorhänge zuziehen.
Lassen Sie den Kompressor drei Minuten
lang abkühlen, bevor Sie das Gerät
wieder einschalten.
Gehen Sie mit der Fernbedienung näher
an das Gerät heran und richten Sie die
Fernbedienung direkt auf den Sensor
am Gerät.
Batterien ersetzen.

Mobiles Klimagerät
Sicherheitswarnung
•
•
•
•
•
Vielen Dank, dass Sie sich für ein Produkt von Pro Breeze entschieden haben. Wir bitten
Sie, die gesamte Gebrauchsanweisung vor der ersten Inbetriebnahme sorgfältig zu lesen
und für den späteren Gebrauch aufzubewahren.
17 | Deutsch
Inhaltsverzeichnis
Sicherheitswarnung
Spezifische Information zu dem R290 Kältemittel
Achtung ┃ Technische Daten
Teile
Bedienfeld
Installation
Bedienelemente
Wassertank entleeren
Anschließen des Wasserablaufschlauchs für permanenten Wasserablauf ┃ Reinigung
Einlagerung des Geräts
Schutzfunktionen ┃ Nützliche Informationen
Entsorgung
17
19
20
21
22
23
26
28
29
30
31
32
Verwenden Sie das Gerät ausschließlich wie
in dieser Gebrauchsanweisung angegeben.
Kontrollieren Sie, ob die Netzspannung mit
den Angaben der Nennleistung auf dem
Gerät übereinstimmen.
Dieses Gerät ist nur für den Gebrauch im
Gebäudeinneren geeignet.
Dieses Gerät ist kein Spielzeug. Lassen Sie
daher das Gerät niemals mit Kindern oder
Haustieren unbeaufsichtigt.
Dieses Gerät kann von Kindern ab 8 Jahren,
von Personen mit eingeschränkten körperli-
chen, sensorischen oder geistigen Fähigkeit-
en oder mangelnder Erfahrung und Kenntnis-
sen verwendet werden, insofern diese
beaufsichtigt werden und Anweisungen
bezüglich der korrekten und sicheren
Anwendung des Gerätes erhalten und die
damit verbundenen Gefahren verstanden
haben.
Seite

•
•
•
•
•
•
•
•
•
•
•
•
•
•
•
•
•
•
•
•
•
•
•
•
•
•
•
Kinder sollten nicht mit dem Gerät spielen.
Reinigung und Benutzerwartung dürfen
nicht von Kindern ohne Aufsicht durch-
geführt werden.
Bewahren Sie das Gerät und alle Teile
außerhalb der Reichweite von Kindern auf.
Dieses Gerät ist nur für den häuslichen
Gebrauch bestimmt. Es sollte nicht für
kommerzielle Zwecke verwendet werden.
Stellen Sie das Gerät auf eine ebene und
trockene Oberfläche. Platzieren Sie es mit
einem Abstand von mindestens 50 cm zu
den umgebenen Wänden und/oder
Gegenständen.
Achten Sie beim Bewegen des Gerätes
darauf, dass es in einer aufrechten Position
bleibt.
Beim Einstellen der Lamellen gehen Sie
bitte vorsichtig vor, um keine Schäden zu
verursachen.
Stellen Sie vor dem Betrieb sicher, dass der
Netzstecker richtig in der Steckdose
eingesteckt wurde.
Wenn ein kontinuierlicher Abflussschlauch
installiert werden muss, ist sicherzustellen,
dass der Anschluss des Abflussschlauchs
in einem guten Zustand ist und keine
Knicke aufweist.
Decken Sie das Netzkabel nicht ab.
Stecken Sie keine Finger oder Gegen-
stände in den Lufteinlass oder Luftauslass.
Stellen Sie sicher, dass der Lufteinlass und
Luftauslass nicht blockiert sind.
Bedienen Sie das Gerät nicht mit nassen
Händen.
Lassen Sie das Gerät nicht unbeaufsichtigt,
solange es an die Stromversorgung
angeschlossen ist.
Ziehen Sie das Netzkabel nicht aus der
Steckdose, um das Gerät auszuschalten.
Trennen Sie das Gerät nicht vom Strom,
bevor Sie es ausgeschaltet haben.
Nehmen Sie keine Veränderungen an dem
Gerät vor und verwenden Sie nur das vom
Hersteller mitgelieferte Zubehör.
Platzieren oder verwenden Sie niemals das
Gerät, das Netzkabel oder anderen Zubehör
im Badezimmer oder an einem nassen,
feuchten Ort.
Decken Sie das Gerät während des
Gebrauchs nicht ab.
Verwenden Sie keine Druckbehälter (z. B.
Spraydosen) oder andere brennbare
Substanzen in der Nähe des Geräts.
Lassen Sie kein Wasser oder andere
Flüssigkeiten in das Gerät eindringen oder
elektrische Teile verschmutzen.
Versuchen Sie nicht, elektrische oder
mechanische Elemente des Gerätes zu
verstellen oder zu reparieren. Dies kann
unsicher sein und die Garantie des Gerätes
ungültig machen.
Unterlassen Sie das Verwenden des Gerätes,
sobald Anzeichen von Schäden am Gerät,
Netzkabel oder anderen Zubehör festzustel-
len ist.
Wischen oder waschen Sie das Gerät nicht
mit chemischem Lösungsmittel ab. Stellen
Sie vor der Reinigung sicher, dass das Gerät
ausgeschaltet ist und der Netzstecker nicht
in der Steckdose steckt.
Platzieren Sie das Netzkabel nicht in
Bereichen, in denen es zu einer Stolperfalle
kommen kann.
Vermeiden Sie die Verwendung von
Verlängerungskabeln, da diese überhitzen
und ein Brandrisiko verursachen können.
Wenn Sie das Gerät nicht verwenden, ziehen
Sie den Stecker aus der Steckdose und
lagern Sie es an einem kühlen und trockenen
Ort.
Stellen Sie niemals etwas auf das Gerät.
Deutsch | 18
•
•
•
•
•
•
•
•
•
•
Das Gerät muss in einem Bereich mit einer
Fläche größer als 15 m² installiert, verwendet
und gelagert werden.
Dieses Gerät enthält 270 g Kältemittel R290.
R290 ist ein Kältemittel, welches der
europäischen Umweltrichtlinie entspricht.
Durchstechen Sie keineswegs Teile der
Kältemitteleinrichtung.
Bitte beachten Sie, dass das R290 Kältemit-
tel geruchslos ist und nicht den Geruch von
herkömmlichem Erdgas oder Propangas hat.
Das Gerät muss an einem Ort aufgestellt
werden, an dem keine ständigen Zündstellen,
wie offene Flammen, Gas oder Elektrogeräte
in Betrieb sind.
Durchbohren Sie das Gerät nicht.
Wenn das Gerät in einem nicht belüfteten
Bereich installiert, betrieben oder gelagert
wird, muss der Raum so konzipiert sein, dass
sich austretendes Kühlmittel nicht ansam-
meln kann. Ansonsten besteht eine Brand-
oder Explosionsgefahr, falls das Kältemittel
mit entzündlichen Quellen wie elektrischen
Heizkörper, Öfen oder anderen Zündquellen
in Berührung kommt.
Das Gerät muss so gelagert werden, dass
jegliches mechanisches Versagen verhindert
werden kann.
Personen, die an dem Kältemittelkreislauf
arbeiten oder diesen bedienen, benötigen
eine entsprechende Zertifizierung von einer
akkreditierten Organisation, die die Kompe-
tenz mit dem Umgang von Kältemitteln
gemäß einer von Branchenverbänden
•
anerkannten spezifischen Genehmigung
nachweisen.
Wartungen sowie Reparaturen, die die
Unterstützung einer qualifizierten Person
erfordern, müssen unter Aufsicht einer
Person durchgeführt werden, die für die
Verwendung von brennbaren Kältemitteln
ausgebildet ist.
Spezifische Information
zu dem R290
Kältemittel
19 | Deutsch
CAUTION
RISK OF FIRE

Achtung
Technische Daten
• Verwenden Sie das Gerät nicht bei
Raumtemperaturen von mehr als 32 °C im
Kühlmodus und bei nicht weniger als 5 °C
im Entfeuchtungsmodus.
•
•
•
•
•
•
•
•
•
•
•
•
•
•
•
•
•
•
•
Eingangsspannung: 220 V - 240 V ~
Frequenz: 50 Hz
Kühlleistung: 9000 BTU/Stunden
Kühlmittel: R290
Energieeffizienzklasse: A
Nennleistung für Kühlung: 2640 W
Eingangsnennleistung | Kühlung: 1010 W
Eingangsnennleistung | Kühlung: 4,4 A
Geräuschpegel | 65 dB
Energieeffizienzbewertung für Kühlung: 8,9 BTU/Stunden
Energieeffizienzbewertung für Kühlung: 2,6 W/W
Entfeuchtungsleistung: 0,9 L/Stunde
Luftvolumenstrom: 360 m³/Stunde
Anwendungsbereich: 18 -22 m²
Betriebstemperaturbereich: 5-32°C
Verfügbare Temperatureinstellungen: 16–30°C
Treibhauspotenzial: 3kg CO2 eq.
Nettogewicht: 24.5kg
Abmessungen: 30cm x 35.2cm x 75.6cm
Deutsch | 20
Frontansicht
Bedienfeld
Horizontaler Lüftungsschlitz
Vertikaler Lüftungsschlitz
Gehäuse
Rollfüße
1.
2.
3.
4.
5.
4
5
3
2
1
Rückansicht
Griff mit Einschub für die Fernbedienung
Gehäuse
C-förmige Klemme
Netzkabel
Wärmeabluftschlauchanschluss
Netzkabelhalter
Räder
Verdunster-Filter
Feinfilter
Kondensator-Filter
Wasserablaufventil
6.
7.
8.
9.
10.
11.
12.
13.
14.
15.
16.
17.
18.
19.
20.
21.
22.
23.
24.
Zubehör
Fernbedienung
Kurzer Anschluss Wärmeabluftschlauch
Wärmeabluftschlauch
Dichtungsrahmen für Schiebefenster
Rundes Verbindungsstück
Textildichtungsrahmen für Klappfenster
Dichtungsklettband
Wasserschlauch
7
12
9
10
14
13
15
16
11
8
6
Teile
21 | Deutsch
17
18
21
20
19
22
23
24
Tasten von rechts nach links
Ein-/Ausschalter
Lüfter-Geschwindigkeitstaste
Runter'-Taste
Hoch'-Taste
Modus-Taste
Timer-Taste
•
•
•
•
•
•
Fernbedienung
Digitalanzeige von rechts
nach links
Kontrollleuchte Grad Fahrenheit
Kontrollleuchte Grad Celsius
•
•
Kontrollleuchten von rechts
nach links
Kontrollleuchte niedrige
Lüftergeschwindigkeit
Kontrollleuchte hohe Lüftergeschwindigkeit
Kontrollleuchte ‚Wassertank voll'
Kontrollleuchte Schlafmodus
Kontrollleuchte Lüftungsmodus
Kontrollleuchte Entfeuchtungsmodus
Kontrollleuchte Kühlmodus
Kontrollleuchte Timer-Modus
•
•
•
•
•
•
•
•
1.
2.
3.
TIMER COOL DRY FAN SLEEP FULL HIGH LOW
22
3
TEMP
Cool
Dry
Fan
High
Low
Sleep
Timer Power
ºC/ºF
Taste hohe
Lüfterge-
schwindigkeit
Kühlmodus-
Taste
Entfeuchtungs-
modus-Taste
Lüftungsmodus
Taste niedrige
Lüfterge
schwindigkeit
Schlafmodus-
Taste
Timer-
Modus-
Taste
Ein-/
Ausschalter
Temperaturän-
derungstaste
Bedienfeld
Deutsch | 22
1
1
Hinweis: Beinhaltet 2 x AAA Batterien
23 | Deutsch
Bitte befolgen Sie vor und nach der Installation
folgende Hinweise:
•
•
•
•
Achten Sie beim Platzieren des Geräts an der
gewünschten Stelle darauf, dass es in aufrechter
Position bewegt wird.
Platzieren oder verwenden Sie das Gerät, das Netzkabel
oder jegliches Zubehör nicht in einem Badezimmer oder
in einer anderen feuchten oder nassen Umgebung.
Stellen Sie das Gerät auf einen ebenen, trockenen
Untergrund. Lassen Sie um das Gerät herum
mindestens 50 cm Platz zu Wänden oder anderen
Gegenständen.
Lassen Sie das Gerät mindestens zwei Stunden
lang aufrecht stehen, bevor Sie es das erste Mal
benutzen.
Kurzen Anschluss des Abluftschlauchs anbringen
Die beiden Hälften aufeinander ausrichten und fest
zusammenstecken, bis sie mit einem Klick einrasten.
Den Wärmeabluftschlauch aufrecht stellen, mit dem
runden Verbindungsstück nach unten.
Setzen Sie den Abluftschlauchanschluss auf den
Wärmeabluftschlauch und drücken Sie ihn fest herunter,
sodass der Hals über dem Wärmeabluftschlauch sitzt.
Halten Sie den Wärmeabluftschlauch am unteren Ende
fest und drehen Sie den Abluftschlauchanschluss gegen
den Uhrzeigersinn, um das Teil mit den drei
Schraubengewinden fest auf dem Wärmeabluftschlauch
zu verschrauben.
C-förmige Klemme anbringen
Drehen Sie die C-förmige Klemme so, dass das
Drehgewinde nach dem Gewindebolzen ausgerichtet
ist, und dann ganz auf den Gewindebolzen schieben.
Drehen Sie die C-förmige Klemme gegen den
Uhrzeigersinn, bis sie im Schnappverschluss einrastet.
1.
2.
Gewindebolzen
Drehgewinde
Schnappverschluss
Seitenansicht A
Seitenansicht B
1
2
1.
2.
3.
4.
2
3
1
Installation

Hinweis:
•
•
Falls Ihre Fensteröffnung kleiner als die
Mindestlänge des Dichtungsrahmens ist, sägen
Sie ihn mit einer Bügelsäge auf die gewünschte
Länge zurecht.
Falls Ihre Fensteröffnung größer als die
maximale Länge des Dichtungsrahmens ist,
füllen Sie die Lücke mit Sperrholz oder
ähnlichem Material.
Dichtungsrahmen für Schiebefenster
anbringen
Setzen Sie Platte B in Platte A ein und
passen Sie die Montage je nach Länge
oder Höhe des Fensters an.
Öffnen Sie das Fenster und setzen Sie
den Dichtungsrahmen in das Fenster ein.
Passen Sie den Dichtungsrahmen so an,
dass er genau in das Fenster passt und
sichern Sie ihn dann mit der mitgelieferten
Schraube.
Schließen Sie das Fenster, um alles fest
zu verriegeln.
Befestigen Sie den kurzen Anschluss des
Wärmeabluftschlauchs an dem ellipsen-
förmigen Loch.
Jetzt ist der Dichtungsrahmen für das
Gerät einsatzbereit.
1.
2.
3.
4.
5.
6.
Die C-förmige Klemme entriegeln und voll
öffnen.
Den Rand des runden Verbindungsstücks
über die unterste Stufe des Wärmeab-
luftschlauchanschlusses platzieren.
Drücken Sie das runde Verbindungsstück
fest in den Wärmeabluftschlauchan-
schluss herunter, um es fest zu verriegeln.
Dann bringen Sie die C-förmige Klemme
wieder an zum Sichern.
1.
2.
3.
4.
1
4
Untere Stufe
Rundes Verbindungsstück
2
3
1
3
3
2
5
5
4
2
4
Platte A
Platte B
Schiebefenster (horizontal)
Schiebefenster (vertikal)
English | 04
Wärmeabluftschlauch anschließen
Deutsch | 24
Öffnen Sie das Fenster und reinigen Sie den
Rahmen und die Fensterflügel von Staub und
Partikeln.
Kleben Sie das Klettband rund um den
gesamten Fensterrahmen. Kleben Sie das
Klettband niemals an das Fensterbrett, da
sich das Fenster dann nicht mehr ganz
schließen lässt.
Kleben Sie das Klettband rund um den
gesamten Fensterflügel (innen oder außen).
Vergewissern Sie sich, dass sich das Fenster
ganz schließen lässt.
Befestigen Sie Seite A des Textildichtungsrah-
mens an dem Klettband auf dem Fensterrah-
men, wobei Sie von der Mitte nach außen hin
arbeiten.
Schließen und öffnen Sie das Fenster, um
sicherzustellen, dass kein Stoff eingeklemmt
wird.
Befestigen Sie Seite B des Textildichtungsrah-
mens an dem Klettband auf dem Fenster-
flügel, wobei Sie von der Mitte nach außen hin
arbeiten.
Öffnen Sie das Fenster ein wenig und fügen
Sie den kurzen Anschluss des Wärmeablufts-
chlauchs in den Textildichtungsrahmen ein;
sichern Sie die Montage mit den Reißver-
schlüssen rund um den Rand des Schlauchs.
Jetzt ist der Textildichtungsrahmen für das
Gerät einsatzbereit.
Hinweis:
•
•
Den Wärmeabluftschlauch nicht über 45
Grad biegen. Er sollte möglichst kurz und
gerade sein, damit ein effizienter Luftstrom
gewährleistet ist.
Den Wärmeabluftschlauch nicht zu sehr
strecken, da dies den Wirkungsgrad des
Geräts beeinträchtigen kann.
Textildichtungsrahmen für
Klappfenster anbringen
1.
2.
3.
4.
5.
6.
7.
8.
Fensterrahmen
Seite A
Seite B
Fensterflügel
7
4 & 6
2 & 3
Abdichtungs Reißvesschluss
für Klappfenster
25 | Deutsch

Bedienelemente
Hauptschalter (EIN/AUS)
Zum Ein- und Ausschalten des Geräts.
Lüfter-Taste
Zum Einstellen einer hohen oder niedrigen
Lüftergeschwindigkeit.
Hinweis: Diese Option ist im Entfeuchtungsmo-
dus nicht verfügbar.
Zur Wahl zwischen Kühl-, Entfeuchtungs- und
reinem Lüftungsmodus.
Modus-Taste
•
•
•
Kühlmodus - Perfekt für die Kühlung
eines Raumes bei heißem Wetter.
Verwenden Sie im Kühlmodus die Hoch-
und Runter-Tasten, um die gewünschte
Temperatur zwischen 16-30°C einzustellen.
Ist die Raumtemperatur höher als die
eingestellte Temperatur, beginnt das Gerät
zu kühlen. Ist die Raumtemperatur
niedriger als die eingestellte Temperatur,
stoppt die Kühlung. Nur der Ventilator läuft
mit der eingestellten Geschwindigkeit
weiter. Hinweis: Der Wärmeabluftschlauch
muss angeschlossen sein, um die
feuchtheiße Luft nach außen zu leiten.
Entfeuchtungsmodus - Ideal zur
Reduzierung der Luftfeuchtigkeit im Raum
in nasskalten Jahreszeiten. Sobald die
Temperatur gleich oder höher als 17°C ist,
beginnt das Gerät zu entfeuchten, während
der Ventilator bei niedriger
Geschwindigkeit weiter läuft. Sobald die
Raumtemperatur unter 15°C sinkt, stoppt die
Entfeuchtung und der Ventilator läuft bei
niedriger Geschwindigkeit weiter. Hinweis: Der
Wärmeabluftschlauch muss angeschlossen
sein, um die feuchtheiße Luft nach außen zu
leiten.
Lüftungsmodus - Das Gerät läuft mit der
eingestellten Ventilatorgeschwindigkeit. Die
Raumtemperatur wird auf dem Digital-Display
angezeigt. Hinweis: Der Wärmeabluftschlauch
braucht nicht an das Gerät angeschlossen zu
sein.
Hinweis: Die Temperatur kann nur im
Kühlmodus eingestellt werden.
Schlafmodus
Stellen Sie den Schlafmodus ein, um den
Energieverbrauch zu senken, wenn das Gerät im
Kühlmodus ist.
Um den Schlafmodus zu aktivieren, drücken Sie
die Schlafmodus-Taste auf der Fernbedienung
oder die Timer-Taste und die Runter-Taste auf
dem Bedienfeld gleichzeitig. Dann leuchtet die
Anzeige fünfmal mit SL auf, um die Einstellung
des Schlafmodus zu bestätigen; dann wird die
eingestellte Temperatur wieder auf dem Display
angezeigt.
Nach zwei Stunden erhöht sich die eingestellte
Temperatur automatisch um 1°C. Nach weiteren
zwei Stunden erhöht sich die eingestellte
Temperatur automatisch um weitere 1°C und der
Ventilator schaltet auf niedrige Geschwindigkeit
um, wenn er nicht bereits in dieser Geschwindig-
keit läuft. Das Gerät läuft so lange in dieser
Einstellung weiter, bis es ausgeschaltet wird.
English | 04Deutsch | 26

•
•
•
die gewünschte Temperatur im Kühlmodus
einstellen
Die gewünschte Zeit bis zum Ein- oder
Ausschalten bei Verwendung der
Timer-Funktion einstellen.
Zwischen °C und °F wechseln, indem sie
beide gleichzeitig gedrückt halten.
Timer-Taste
Vergewissern Sie sich, dass das Gerät ans
Stromnetz angeschlossen ist.
Drücken Sie die Timer-Taste, um die
Timer-Funktion zu aktivieren.
Drücken Sie die Hoch- und Runter-Tasten,
um die gewünschte Zeit (1-24 Stunden) bis
zum Einschalten einzustellen.
Dann leuchtet die Zeitanzeige fünfmal auf,
um die Einstellung der Timer-Funktion zu
bestätigen; dann wird die Raumtemperatur
wieder auf dem Display angezeigt.
Wählen Sie vor dem Einschalten die
gewünschten Einstellungen.
Zum Prüfen der verbleibenden Zeit bis zum
Einschalten drücken Sie die Timer-Taste.
Um die Einschaltzeituhr zu deaktivieren,
drücken Sie die Timer-Taste zweimal.
Hinweis: Wenn der Kühlmodus gewählt worden
ist und eine Temperatur eingestellt ist, wird die
eingestellte Temperatur angezeigt. Wenn keine
neuen Einstellungen gewählt worden sind,
schaltet sich das Gerät mit den letzten
Einstellungen ein.
Um den Schlafmodus zu deaktivieren, drücken
Sie die Schlafmodus-Taste auf der Fernbedi-
enung oder die Timer-Taste und die
Runter-Taste auf dem Bedienfeld gleichzeitig.
Hinweis: Wenn der Kühlmodus gewählt worden
ist und eine Temperatur eingestellt ist, wird die
eingestellte Temperatur angezeigt.
Hoch- und Runter-Tasten
Mithilfe der Hoch- und Runter-Tasten können Sie:
Einstellung einer Ausschaltzeituhr:
1.
2.
3.
4.
5.
6.
7.
Vergewissern Sie sich, dass das Gerät ans
Stromnetz angeschlossen ist.
Drücken Sie den Hauptschalter, um das
Gerät einzuschalten.
Drücken Sie die Timer-Taste, um die
Timer-Funktion zu aktivieren.
Drücken Sie die Hoch- und Runter-Tasten,
um die gewünschte Zeit (1-24 Stunden) bis
zum Ausschalten einzustellen.
Dann leuchtet die Zeitanzeige fünfmal auf,
um die Einstellung der Timer-Funktion zu
bestätigen; dann wird die Raumtemperatur
wieder auf dem Display angezeigt.
Wählen Sie vor dem Einschalten die
gewünschten Einstellungen.
Zum Prüfen der verbleibenden Zeit bis zum
Ausschalten drücken Sie die Timer-Taste.
Um die Ausschaltzeituhr zu deaktivieren,
drücken Sie die Timer-Taste zweimal.
1.
2.
3.
4.
5.
6.
7.
8.
27 | Deutsch
Einstellung einer Ein- oder Ausschaltzeituhr,
zwischen 1-24 Stunden.
Einstellung einer Einschaltzeituhr:
Verschluss-
kappe
Stopfen
Wasserablaufventil
Schalten Sie das Gerät aus und trennen
Sie es vom Stromnetz.
Stellen Sie ein flaches Tablett unter das
Wasserablaufventil.
Schrauben Sie die Verschlusskappe ab,
entfernen Sie den Stopfen und fangen Sie
das Wasser in dem flachen Tablett auf.
Um den Wassertank vollständig zu
entleeren, neigen Sie das Gerät vorsichtig
auf seinen hinteren Rollen nach hinten.
Neigen Sie das Gerät dafür nicht mehr als
30 Grad.
Wenn der Wassertank entleert ist, stellen
Sie das Gerät wieder ganz in aufrechte
Position. Setzen Sie den Stopfen wieder
auf und schrauben Sie die
Verschlusskappe wieder fest.
Dann entleeren Sie das flache Tablett.
Wenn der Wassertank voll ist, werden Sie
10 Pieptöne hören. Die Kontrollleuchte für
den vollen Wassertank blinkt und das
Gerät hält an, damit der Wassertank nicht
überläuft.
Zum Entleeren des Wassertanks:
Hinweis: Falls das flache Tablett nicht
groß genug ist, um das gesamte Wasser
aus dem Gerät aufzufangen, setzen Sie
die Verschlusskappe wieder auf, damit
kein Wasser auf den Boden läuft.
Entleeren Sie das flache Tablett und
setzen Sie den Vorgang ab Schritt 2 fort.
1.
2.
3.
4.
5.
6.
3
4
30º
English | 04Deutsch | 28
Wassertank entleeren
Flaches Tablett
2
1
2
Wasserschlauch
Schrauben Sie die Verschlusskappe ab,
entfernen Sie den Stopfen und bewahren Sie
beide sorgfältig auf.
Führen Sie den Wasserablaufschlauch in das
Wasserablaufrohr ein.
Darauf achten, dass das Schlauchende in einen
geeigneten Auslass (z. B. einen Abfluss oder
einen Eimer) mündet.
Für den langfristigen Betrieb ist es zu empfehlen,
einen Schlauch für den kontinuierlichen
Wasserablass anzuschließen.
Anbringen des Schlauchs:
Hinweis: Wenn das Gerät auf eine warme Tempera-
tur eingestellt ist, ist es zu empfehlen, den Wasser-
ablaufschlauch anzuschließen, da der Wassertank
schneller voll wird als wenn das Gerät auf eine
kühlere Temperatur eingestellt ist.
Anschließen des
Wasserablaufschlauchs
für permanenten
Wasserablauf
1.
2.
3.
Schalten Sie das Gerät aus und trennen Sie es
vom Stromnetz. Verwenden Sie ein trockenes,
weiches Tuch zum Entfernen von Staub oder
Schmutz von der Außenfläche des Geräts.
Reinigen des Wärmeabluftschlauchs:
Allgemeine Reinigung:
1.
2.
3.
Reinigung
29 | Deutsch
Nehmen Sie den Wärmeabluftschlauch von
der Rückseite des Geräts und von dem
betreffenden Fenster-Dichtungsrahmen ab.
Verwenden Sie ein trockenes, weiches Tuch
zum Entfernen von Staub oder Schmutz.
Montieren Sie den Wärmeabluftschlauch
wieder an.
Reinigen Sie den Verdunster- und den
Kondensator-Filter des Geräts alle zwei
Wochen.
Zugang zu den Filtern:
Filterreinigung:
1.
2.
3.
Greifposition
Filter
1
2
English | 04Deutsch | 30
Einlagerung des Geräts
Ziehen Sie den Verdunster- und den
Kondensator-Filter vorsichtig an den
Griffen heraus.
Verwenden Sie eine feste Bürste und/oder
einen Staubsauger, um Staub und Partikel
vom Filter zu entfernen.
Setzen Sie beide Filter wieder ein.
Für die langfristige Einlagerung:
1.
2.
3.
4.
Entleeren Sie den Wassertank und lassen
Sie den Stopfen und die Verschlusskappe
offen.
Lassen Sie das Gerät 12 Stunden lang im
reinen Lüftungsmodus bei niedriger
Ventilatorgeschwindigkeit laufen, damit das
Innere des Geräts vollständig trocknen
kann.
Schalten Sie das Gerät ab, setzen Sie den
Stopfen wieder ein und schrauben die
Verschlusskappe wieder fest. Ziehen Sie
das Netzkabel aus der Steckdose und
wickeln es um den Kabelhalter.
Entfernen Sie den Wärmeabluftschlauch.
5.
6.
Nehmen Sie die Batterien aus der Fernbedi-
enung.
Decken Sie das Gerät und sämtliches
Zubehör mit einer wasserdichten Abdeckung
ab und lagern Sie es in einem sicheren,
trockenen Raum, außer Reichweite von
Kindern.

No power.
Water tank full.
Room temperature too low.
Dirty filters.
Air inlet or air outlet clogged.
Appliance not on a flat surface.
Initiation of overheat protection.
Too far from appliance.
The remote control is not pointing towards
the receiving head of the remote control
The batteries are dead.
Pipe temperature sensor failure.
Room temperature sensor failure.
Anti-frost protection.
Noisey.
The compressor does not
work.
The remote control does
not work.
Display showing E1.
Display showing E2.
Display showing E4.
Drain the water stored in the unit.
Place the appliance on a flat surface.
Wait three minutes until the temperature
decreases and then turn on the unit..
Bring the remote control closer to the
appliance and ensure that the remote
control is pointing toward the receiving
head of the remote control.
Replace the batteries.
Arrange for a professional to check
the pipe temperature sensor and
related circuits.
Arrange for a professional to check
the room temperature sensor and
related circuits.
Appliance returns to operating at
chosen settings once the internal
pipe temperature exceeds 8°C.
Frostschutz
Falls der Kompressor länger als 10 Minuten
durchgehend läuft und die Temperatur der
Rohrleitung des Geräts über 20 Sekunden lang
unter 0°C sinkt, schalten Kompressor und
Sprühwasseranlage automatisch ab. Das
Display zeigt E4 an und die
Frostschutz-Funktion wird aktiviert; alle Tasten
des Bedienfelds, bis auf den Ein-/Ausschalter,
sind währenddessen deaktiviert. Sobald die
Rohrleitungstemperatur über 8°C steigt, wird
die Frostschutz-Funktion deaktiviert und das
Gerät läuft bei den letzten Einstellungen weiter.
Verzögerter Kompressorstart
Das Gerät verfügt über eine eingebaute Schutz-
funktion für den Kompressor, d. h. er pausiert
nach jedem Abschalten drei Minuten lang, bevor
er erneut startet, außer wenn das Gerät und der
Kompressor nach dem Einschalten des
Hauptschalters zum ersten Mal aktiviert werden.
Schutzfunktionen
Nützliche Informationen
31| Deutsch
Problem Ursache
Kein Strom.
Voller Wassertank.
Die Raumtemperatur ist zu gering.
Die Filter sind verschmutzt.
Lufteinlass/Luftauslass ist verstopft.
Es gibt direkte Sonneneinstrahlung.
Appliance not on a flat surface.
Initiation of overheat protection.
Too far from appliance.
The remote control is not pointing towards
the receiving head of the remote control
The batteries are dead.
Pipe temperature sensor failure.
Room temperature sensor failure.
Anti-frost protection.
Die Klimaanlage
funktioniert nicht.
Kühlung funktioniert nicht
richtig.
Noisey.
The compressor does not
work.
The remote control does
not work.
Display showing E1.
Display showing E2.
Display showing E4.
Entleeren Sie das angesammelte Wasser.
Filter reinigen.
Entfernen Sie alle Fremdkörper.
Vorhänge zuziehen.
Place the appliance on a flat surface.
Wait three minutes until the temperature
decreases and then turn on the unit..
Bring the remote control closer to the
appliance and ensure that the remote
control is pointing toward the receiving
head of the remote control.
Replace the batteries.
Arrange for a professional to check the
pipe temperature sensor and related
circuits.
Arrange for a professional to check the
room temperature sensor and related
circuits.
Appliance returns to operating at chosen
settings once the internal pipe temperature
exceeds 8°C.
Lösung
Schließen Sie das Gerät ans Stromnetz
an und schalten es ein.
Wir empfehlen einen Betrieb dieses
Geräts bei Temperaturen
zwischen 5-32°C.
Erhöhen Sie die eingestellte Temperatur
über die Umgebungstemperatur.
Schließen Sie Fenster und Türen und
entfernen andere Wärmequellen.
Eine Raumtemperatur unter der
eingestellten Temperatur im Kühl-Modus.
Türen und Fenster sind offen oder es sind
andere Wärmequellen vorhanden.

Issue Cause
No power.
Water tank full.
Ambient temperature too low.
Ambient temperature lower than the set
temperature cooling mode.
There is direct sunlight.
Doors and windows are open or there are
other heat sources.
Entrée ou sortie d’air colmatée.
Présence d’un rayonnement solaire direct.
L’appareil n’est pas sur une surface plane.
Trop éloignée de l’appareil.
La télécommande n’est pas orientée vers
le récepteur de signal de l’appareil.
Les piles sont usées.
The air-conditioner is not
operating.
Poor cooling.
Appareil bruyant.
Le compresseur ne
fonctionne pas.
La télécommande ne
fonctionne pas.
Connect the unit to a live power socket
and turn it on.
Drain the water stored in the unit.
Ambient temperature too low.
It is recommended that this unit be
operated at 5-32°C.
Increase the set temperature above the
ambient temperature.
Draw curtains.
Close doors and windows and remove
other heat sources.
Éliminer l’obstruction.
Tirer les rideaux.
Placer l’appareil sur une surface plane.
Remplacer les piles.
Demander à un professionnel de vérifier
le capteur de température des tuyaux et
les circuits associés.
Demander à un professionnel de vérifier
le capteur de température ambiante et
les circuits associés.
L’appareil recommence à fonctionner
selon les réglages choisis dès que la
température interne des tuyaux dépasse
8°C.
Resolution
Diese Kennzeichnung weist darauf hin, dass dieses Produkt EUweit nicht im
Haushaltsabfall entsorgt werden darf. Dies soll mögliche Schäden für die Umwelt
und körperlich Verletzungen verhindern. Setzen Sie sich mit Ihrer örtlichen
Behörde in Verbindung, um Informationen zu den erfügbaren Sammelsystemen
zu erhalten. Recyelen Sie das Produkt wenn möglich nachhaltig, um die
nachhaltige Wiederverwendung von Ressourcen zu fördern.
Entsorgung
Kein Strom.
Voller Wassertank.
Die Raumtemperatur ist zu gering.
Eine Raumtemperatur unter der eingestell-
ten Temperatur im Kühl-Modus.
Türen und Fenster sind offen oder es sind
andere Wärmequellen vorhanden.
Die Filter sind verschmutzt.
Lufteinlass/Luftauslass ist verstopft.
Es gibt direkte Sonneneinstrahlung.
Der Überhitzungsschutz ist aktiv.
Die Frostschutz-Funktion ist aktiv.
Die Klimaanlage
funktioniert nicht.
Kühlung funktioniert nicht
richtig.
Laute Geräusche.
Der Kompressor
funktioniert nicht.
Schließen Sie das Gerät ans Stromnetz
an und schalten es ein.
Entleeren Sie das angesammelte
Wasser.
Wir empfehlen einen Betrieb dieses
Geräts bei Temperaturen zwischen
5-32°C.
Erhöhen Sie die eingestellte Temperatur
über die Umgebungstemperatur.
Schließen Sie Fenster und Türen und
entfernen andere Wärmequellen.
Filter reinigen.
Entfernen Sie alle Fremdkörper.
Vorhänge zuziehen.
Lassen Sie den Kompressor drei Minuten
lang abkühlen, bevor Sie das Gerät
wieder einschalten.
Gehen Sie mit der Fernbedienung näher
an das Gerät heran und richten Sie die
Fernbedienung direkt auf den Sensor
am Gerät.
Batterien ersetzen.
Das Gerät steht uneben.
Die Entfernung zum Gerät ist zu groß.
Die Fernbedienung zeigt
nicht auf den Sensor.
Die Batterien sind leer.
Fehler am Leitungstemperatur-Sensor.
Fehler am Raumtemperatur-Sensor.
Die Fernbedienung
funktioniert nicht.
Display zeigt E1.
Display zeigt E2.
Display zeigt E4.
Stellen Sie das Gerät auf
einen ebenen Untergrund.
Lassen Sie den Sensor und die
Schaltkreise von einem
Fachmann überprüfen.
Lassen Sie den Sensor und die
Schaltkreise von einem
Fachmann überprüfen.
Sobald die Leitungstemperatur auf
über 8°C steigt, läuft das Gerät im
letzten Modus weiter.
Deutsch | 32

Climatiseur Portable | Model PB-AC01
Notice de Sécurité
•
•
•
•
•
•
Merci d’avoir choisi un produit Pro Breeze. Nous vous conseillons de lire le manuel
d’instruction avant le premier usage, et de le conserver soigneusement pour toute
consultation ultérieure.
33 | Français
Utilisez l'appareil uniquement comme décrit
dans ce manuel d'instructions.
Vérifiez que la tension du circuit principal
correspond aux caractéristiques de l'appareil
avant de l'utiliser.
Cet appareil est conçu pour être utilisé à
l'intérieur uniquement.
Cet appareil n'est pas un jouet. Ne le laissez
jamais sans surveillance autour des enfants
ou des animaux domestiques.
Cet appareil peut être utilisé par des enfants
âgés d'au moins 8 ans et par des personnes
ayant des capacités physiques, sensorielles
ou mentales réduites ou par des personnes
manquant d’expérience ou de connaissance,
s'ils (elles) sont correctement surveillé(e)s ou
si des instructions relatives à l'utilisation de
l'appareil en sécurité leur ont été données et
si les risques encourus ont été appréhendés.
Les enfants ne doivent pas jouer avec cet
appareil.
Sommaire
Notice de Sécurité
Informations Spécifiques Concernant le Gaz Réfrigérant R290
Attention ┃ Spécifications
Pièces
Panneau de commande
Installation
Commandes
Vidage du réservoir d’eau
Raccordement du tuyau d’eau pour une vidange en continu ┃ Nettoyage
Stockage
Fonctions de sécurité ┃ Informations utiles
Élimination
33
35
36
37
38
39
42
44
45
46
47
48
Pg

Climatiseur Portable | Model PB-AC01
•
•
•
•
•
•
•
•
•
•
•
•
Français | 34
•
•
•
•
•
•
•
•
•
•
•
•
•
•
•
•
Le nettoyage et l’entretien de l’appareil ne
doivent pas être effectués par des enfants
sans surveillance.
Gardez l'appareil et toutes ses pièces hors
de la portée des enfants.
Cet appareil est destiné à un usage
domestique uniquement. Il ne devrait pas
être utilisé à des fins commerciales.
Placez l'appareil sur une surface plane et
sèche. Conservez-le à au moins 50 cm des
murs et / ou des objets environnants.
Lorsque vous déplacez l'appareil,
assurez-vous qu'il est maintenu en position
verticale.
Lors du réglage des lamelles, procédez
doucement pour ne pas endommager
l’appareil.
Assurez-vous que le cordon d'alimentation
est correctement inséré dans la prise de
courant avant de l'utiliser.
S'il est nécessaire d'installer un tuyau de
drainage continu, assurez-vous que le
raccordement du tuyau de drainage est en
bon état, sans flexion.
Ne couvrez pas le cordon d'alimentation.
Ne pas insérer les doigts ou des objets
dans l'entrée ou la sortie d'air. Veillez à
laisser l'entrée d'air et la sortie d'air
dégagées.
Ne pas manipuler l’appareil les mains
mouillées.
Ne laissez pas l'appareil sans surveillance
lorsqu'il est branché à l'alimentation
électrique.
Ne tirez pas sur le cordon d'alimentation
pour arrêter l'appareil.
Ne débranchez pas l'appareil tant qu'il
n'est pas éteint.
Ne modifiez pas l'appareil et n'utilisez
aucun accessoire autre que ceux fournis.
Ne pas utiliser ou placer l'appareil, le cordon
d'alimentation ou tout autre accessoire dans
une salle de bain ou proche d’un endroit
humide ou mouillé.
Ne couvrez pas l'appareil en cours
d'utilisation.
N'utilisez pas de récipients sous pression
(par exemple des aérosols) ni d'autres
substances inflammables à proximité de
l'appareil.
N'utilisez pas l'appareil à proximité
d'essence, de gaz inflammables, de fours ou
d'autres sources de chaleur.
Ne pas laisser de l’eau ou d'autres liquides
pénétrer l'appareil ou contaminer les
composants électriques.
Ne tentez pas de réparer ou d'ajuster des
éléments électriques ou mécaniques dans
l'appareil. Cela pourrait être dangereux et
annulerait votre garantie.
Ne faites pas fonctionner l'appareil s'il est
endommagé, ou si le cordon d'alimentation
ou l'un de ses accessoires est endommagé.
N'essuyez pas et ne lavez pas l'appareil avec
des solvants chimiques. Avant le nettoyage,
assurez-vous que l'appareil est éteint et
débranché de l'alimentation électrique.
Évitez de placer le cordon d'alimentation
dans des zones où il pourrait devenir
dangereux ou faire basculer l’appareil.
Évitez d'utiliser des rallonges car ils
pourraient surchauffer et constituer un risque
d'incendie.
Débranchez l'appareil et rangez-le dans un
endroit frais et sec lorsqu'il n'est pas utilisé.
Ne rien placer sur l'appareil.
•
•
•
•
•
•
•
•
•
•
L'entretien et les réparations nécessitant
l'assistance d'un personnel qualifié doivent
être effectués sous la supervision d'une
personne spécifiée lors de l'utilisation de
réfrigérants inflammables.
Informations
Spécifiques Concernant
le Gaz Réfrigérant R290
35 | Français
CAUTION
RISK OF FIRE
L'appareil doit être installé, utilisé et stocké
dans une zone à superficie supérieure à 13 m2.
Cet appareil contient 270 g de gaz réfrigérant
R290.
R290 est un gaz réfrigérant conforme à la
directive européenne sur l'environnement. Ne
perforez aucune partie du circuit réfrigérant.
Sachez que le réfrigérant R290 est inodore et
n'a pas l'odeur normalement associée aux
réservoirs de gaz naturel et de propane.
L'appareil doit être placé dans une zone
dépourvue de sources d'inflammation
continues telles que les flammes nues, gaz ou
appareils électriques.
Ne pas percer et ne pas brûler.
Si l’appareil est installé, utilisé ou stocké dans
une zone non ventilée, la pièce doit être
conçue de manière à éviter l’accumulation de
fuites de réfrigérant entraînant un risque
d’incendie ou d’explosion en raison d’une
inflammation provoquée par des radiateurs
électriques, des poêles, ou d'autres sources
d'inflammation.
L'appareil doit être rangé de manière à éviter
les pannes mécaniques.
Les personnes qui opèrent ou qui travaillent
sur le circuit du réfrigérant doivent détenir la
certification appropriée délivrée par une
organisation accréditée garantissant la
compétence en matière de manipulation de
réfrigérants conformément à une évaluation
spécifique reconnue par les associations du
secteur.

Attention
Spécifications
•
Ne pas utilisez l’appareil si la température de
la chambre est supérieure à 32°C en mode
climatiseur ou inférieur à 5°C en mode
déshumidificateur.
•
•
•
•
•
•
•
•
•
•
•
•
•
•
•
•
•
•
•
Tension d’entrée : 220 V-240 V ~
Fréquence : 50 Hz
Capacité de refroidissement : 9000 BTU/heure
Frigorigène : R290
Classe d’efficacité énergétique : A
Puissance nominale pour le refroidissement : 2640 W
Tension nominale | Refroidissement : 1010 W
Courant nominal | Refroidissement : 4,4 A
Niveau sonore | 65 dB
EER pour le refroidissement : 8,9 BTU/heure
EER pour le refroidissement : 2,6 W/W
Élimination de l’humidité : 0,9 L/H
Volume de circulation d’air : 360 m³/H
Surface applicable : 18-22 m²
Plage de température de fonctionnement : 5-32°C
Réglages de température disponibles : 16-30°C
Potentiel de réchauffement planétaire : 3kg CO2 eq.
Poids net : 24.5kg
Dimensions : 30cm x 35.2cm x 75.6cm
Français | 36

Vue Frontale
Panneau de commande
Volets d’aération horizontaux
Volets d’aération verticaux
Corps
Roulettes
1.
2.
3.
4.
5.
4
5
3
2
1
Vue Arrière
Poignée avec compartiment pour
la télécommande
Corps
Support en forme de C pour le conduit
d’évacuation d’air
Cordon d’alimentation
Raccord du tuyau d’évacuation d’air chaud
Support pour cordon d’alimentation
Roulettes
Filtre de l’évaporateur
Filtre diffuseur
Filtre du condensateur
Bouchon d’évacuation
6.
7.
8.
9.
10.
11.
12.
13.
14.
15.
16.
17.
18.
19.
20.
21.
22.
23.
24.
Accessoires
Télécommande
Raccord court du tuyau d’évacuation
d’air chaud
Tuyau d’évacuation d’air chaud
Cadre d’étanchéité pour fenêtre coulissante
Raccord circulaire
Toile de calfeutrage pour fenêtre battante
Ruban velcro de calfeutrage
Tuyau d'eau
7
12
17
18
21
20
19
9
10
14
13
15
16
11
8
6
22
23
24
Pièces
37 | Français

Boutons allant de droite ā gauche
Bouton de marche/arrêt
Bouton de vitesse du ventilateur
Bouton Baisser
Bouton Augmenter
Bouton Mode
Bouton Minuterie
•
•
•
•
•
•
Télécommande
Panneau digital allant de droite ā gauche
Voyant indicateur des degrés Fahrenheit
Voyant indicateur des degrés Celsius
•
•
Voyants allant de droite ā gauche
Voyant indicateur de vitesse de ventilateur faible
Voyant indicateur de vitesse de ventilateur élevée
Voyant indicateur de réservoir d’eau plein
Voyant indicateur du mode veille
Voyant indicateur du mode de ventilation seule
Voyant indicateur du mode de déshumidification
Voyant indicateur du mode de refroidissement
Voyant indicateur du mode de minuterie
•
•
•
•
•
•
•
•
1.
2.
3.
TIMER COOL DRY FAN SLEEP FULL HIGH LOW
TEMP
Cool
Dry
Fan
High
Low
Sleep
Timer Power
ºC/ºF
Bouton de vitesse
élevée du ventilateur
Bouton du mode
de refroidissement
Bouton du mode de
déshumidification
Mode de
ventilation seule
Bouton de vitesse
faible du ventilateur
Bouton du
mode veille
Bouton du mode
de minuterie
Allumer/éteindre
Bouton de
changement des
chiffres de la
température
Panneau de commande
Français | 38
22
3
1
1
Remarque: Deux piles AAA incluses.

39 | Français
Avant et après l’installation, respecter
les instructions ci-dessous :
•
•
•
•
Pour le déplacer vers l’emplacement choisi,
veiller à maintenir l’appareil en position verticale.
Ne pas placer ou utiliser l’appareil, le cordon
d’alimentation ou un des accessoires dans une
salle de bain ou un endroit humide ou mouillé.
Installer l’appareil sur une surface plane et sèche.
Maintenir un espacement d’au moins 50 cm avec
les murs et/ou objets environnants.
Laisser l’appareil en position verticale
pendant au moins deux heures avant la
première mise en marche.
Installation du raccord court du tuyau
d’évacuation d’air chaud
Aligner les deux moitiés et les enclencher fermement
l’une dans l’autre.
Tenir le tuyau d’évacuation d’air chaud à la verticale,
le raccord circulaire étant orienté vers le bas.
Placer le raccord du tuyau d’évacuation d’air chaud
sur le tuyau d’évacuation d’air chaud et pousser
fermement jusqu’à ce que le col s’enfonce sur le
tuyau d’évacuation d’air chaud.
En tenant fermement le tuyau d’évacuation d’air
chaud par le bas, tourner le raccord du tuyau
d’évacuation d’air chaud en sens horaire inverse
pour verrouiller les trois gradins sur le tuyau
d’évacuation d’air chaud.
Installation du support en forme de C
Aligner le filetage du support en forme de C
avec le boulon fileté et faire glisser
complètement sur le boulon fileté.
Tourner le support en forme de C dans le sense
inverse des aiguiles d’une montre jusqu’à ce
qu’il s’enclenche dans le verrouillage à clip.
1.
2.
Boulon fileté
Arbre tournant
Encliquetage
Vue latérale A
Vue latérale B
1
2
1.
2.
3.
4.
2
3
1
Installation

Remarques :
•
•
Si l’ouverture de votre fenêtre est inférieure à la
longueur minimale du cadre d’étanchéité,
couper à la longueur désirée à l’aide d’une scie
à métaux.
Si l’ouverture de votre fenêtre est supérieure à
la longueur maximale du cadre d’étanchéité,
utiliser du contreplaqué ou autre matériau
similaire pour combler l’espacement.
Installation du cadre d’étanchéité pour
fenêtre coulissante
Insérer le panneau B dans le panneau A et
régler à la longueur ou à la hauteur de la
fenêtre.
Ouvrir la fenêtre et placer le cadre
d’étanchéité dans la fenêtre.
Régler avec la vis fournie pour assurer un
ajustement précis et sécurisé.
Fermer la fenêtre pour verrouiller l’ensemble
en position.
Fixer le raccord court du tuyau d’évacuation
d’air chaud à l’orifice elliptique.
Le cadre d’étanchéité est maintenant prêt
pour l’utilisation.
1.
2.
3.
4.
5.
6.
Débloquer et ouvrir complètement le
support en forme de C pour le conduit
d’évacuation d’air.
Placer la lèvre du raccord circulaire sur le
gradin inférieur du raccord du tuyau
d’évacuation d’air chaud.
Pousser fermement le raccord circulaire
dans le raccord du tuyau d’évacuation
d’air chaud pour le bloquer en position.
Tourner le support en forme de C pour
verrouiller.
1.
2.
3.
4.
1
4
Bas
Raccord circulaire
2
3
1
3
3
2
5
5
4
2
4
Panneau A
Panneau B
Fenêtre Horizontale
Fenêtre Verticale
English | 04
Installation du tuyau d’évacuation
d’air chaud
Français | 40
Ouvrir la fenêtre et nettoyer la poussière
et les particules présentes sur les
surfaces du châssis et du vantail.
Coller du ruban velcro tout autour du
châssis de la fenêtre. Ne jamais coller le
ruban velcro sur le joint de la fenêtre car
celle-ci pourrait ne plus se fermer
complètement.
Coller le ruban velcro tout autour du
vantail de la fenêtre (intérieur et extérieur).
S’assurer que la fenêtre peut fermer
complètement.
Fixer le côté A de la toile de calfeutrage
au ruban velcro collé sur le châssis de la
fenêtre en travaillant du centre vers
l’extérieur.
Fermer et ouvrir la fenêtre pour s’assurer
que la toile n’est pas coincée.
Fixer le côté B de la toile de calfeutrage
au ruban velcro collé sur le vantail de la
fenêtre en travaillant du centre vers
l’extérieur.
Ouvrir légèrement la fenêtre et insérer le
raccord court du tuyau d’évacuation d’air
chaud dans la toile de calfeutrage en
fermant les fermetures à glissière autour
de la lèvre.
La toile de calfeutrage est maintenant
prête pour l’utilisation.
Remarques:
•
•
Ne pas tordre le tuyau d’évacuation d’air
chaud au-delà de 45 degrés. Il doit être
aussi court et aussi droit que possible pour
assurer une circulation d’air efficace.
Ne pas étirer excessivement le tuyau
d’évacuation d’air chaud car l’efficacité de
l’appareil pourrait en être affectée.
Installation de la toile de calfeutrage
pour fenêtre battante
1.
2.
3.
4.
5.
6.
7.
8.
Cadre
Côté A
Côté B
Casement
7
4 & 6
2 & 3
Fermeture éclair
scellage fenêtre
41 | Français

Commandes
Bouton de marche/arrêt
Allume et éteint l’appareil.
Bouton de ventilation
Sélectionne la vitesse élevée ou faible du
ventilateur.
Remarque : option non disponible en mode de
déshumidification.
Bouton de mode
•
•
•
Mode de déshumidification - Parfait pour
réduire l’humidité de la pièce pendant les
périodes humides de l’année. L’appareil va
déshumidifier la pièce si la température
ambiante est supérieure ou égale à 17°C et
que le ventilateur fonctionne à faible vitesse. Si
la température ambiante tombe à 15°C ou
moins, l’appareil interrompra le processus de
déshumidification et le ventilateur fonctionnera
à faible vitesse. Remarque : le tuyau
d’évacuation d’air chaud doit être raccordé
pour permettre à l’air humide et chaud d’être
déchargé vers l’extérieur.
Remarque : la température ne peut être
réglée qu’en mode de refroidissement.
Mode veille
Régler un mode veille pour réduire la consomma-
tion d’énergie en mode de refroidissement.
Pour activer, appuyer sur le bouton de veille de la
télécommande ou appuyer en même temps sur
les boutons Minuterie et Baisser du panneau de
commande. Les lettres SL clignotent cinq fois à
l’écran pour confirmer que le mode veille a été
réglé, puis l’écran revient à la température réglée.
Après deux heures, la température réglée
augmente automatiquement de 1°C. Après deux
heures supplémentaires, la température réglée
augmente automatiquement de 1°C supplémen-
taire et la vitesse du ventilateur passe sur faible si
elle n’était pas déjà réglée ainsi. L’appareil
continue à fonctionner sur ce réglage jusqu’à ce
qu’il soit éteint.
Pour annuler le mode veille, appuyer sur le
bouton de veille de la télécommande ou appuyer
en même temps sur les boutons Minuterie et
Baisser du panneau de commande.
English | 04Français | 42
Mode de refroidissement - Parfait pour
refroidir une pièce par temps chaud.
Utiliser les boutons Augmenter et Baisser
en mode de refroidissement pour régler la
température désirée entre 16°C à 30°C.
L’appareil refroidira la pièce dès que la
température ambiante dépassera la
température réglée. Si la température
ambiante descend sous la température
réglée, l’appareil arrêtera de refroidir la
pièce et le ventilateur continuera de
fonctionner à la vitesse réglée du
ventilateur. Remarque : le tuyau
d’évacuation d’air chaud doit être raccordé
pour permettre à l’air humide et chaud
d’être déchargé vers l’extérieur.
Mode de ventilation seule - L’appareil
tourne à la vitesse réglée du ventilateur. La
température ambiante est affichée sur
l’écran numérique. Remarque : le tuyau
d’évacuation d’air chaud n’a pas besoin
d’être raccordé à l’appareil.

•
•
•
Bouton de la minuterie
S’assurer que l’appareil est branché et que la
prise électrique est allumée.
Appuyer sur le bouton de la minuterie pour
activer cette fonction.
Appuyer sur les boutons Augmenter et
Baisser pour régler la durée souhaitée (1-24
heures) avant l’allumage.
Les chiffres du temps clignotent cinq fois
pour confirmer qu’une minuterie a été
programmée, puis l’écran affiche à nouveau
la température ambiante.
Sélectionner les réglages désirés avant que
l’appareil ne s’allume.
Pour vérifier le temps restant avant l’allum-
age, appuyer sur le bouton de la minuterie.
Pour annuler la minuterie d’allumage, appuyer
deux fois sur le bouton de la minuterie.
Remarque : si le mode de refroidissement est
sélectionné et qu’une température est réglée,
l’écran affiche la température réglée. Si aucun
paramètre désiré n’est sélectionné, l’appareil
s’allume en utilisant les réglages précédemment
définis.
Pour programmer l’extinction :
Remarque : si le mode de refroidissement est
sélectionné et qu’une température est réglée,
l’écran affiche la température réglée.
Boutons Augmenter et Baisser
Utiliser les boutons Augmenter et Baisser pour :
1.
2.
3.
4.
5.
6.
7.
1.
2.
3.
Appuyer sur les boutons Augmenter et
Baisser pour régler la durée souhaitée (1-24
heures) avant l’arrêt.
Les chiffres du temps clignotent cinq fois
pour confirmer qu’une minuterie a été
programmée, puis l’écran affiche à nouveau
la température ambiante.
Sélectionner les réglages désirés avant que
l’appareil ne s’allume.
Pour vérifier le temps restant avant
l’extinction, appuyer sur le bouton de la
minuterie.
Pour annuler la minuterie d’extinction,
appuyer deux fois sur le bouton de la
minuterie.
4.
5.
6.
7.
8.
43 | Français
Permet de programmer la minuterie d’allumage
et d’extinction de 1 à 24 heures.
Pour programmer l’allumage :
Régler la température désirée pendant le
mode de refroidissement
Régler les durées désirées avant l’allumage
et l’extinction lors de la programmation
d’une minuterie.
Passer des degrés °C à °F en maintenant
les deux enfoncés en même temps.
S’assurer que l’appareil est branché et que
la prise électrique est allumée.
Appuyer sur le bouton de marche/arrêt pour
allumer l’appareil.
Appuyer sur le bouton de la minuterie pour
activer cette fonction.

Éteindre l’appareil et le débrancher de la
prise murale.
Placer un bac peu profond sous la valve
d’évacuation d’eau.
Dévisser le bouchon d’évacuation,
dévisser l’obturateur d’évacuation et
laisser l’eau s’écouler dans le bac peu
profond.
Pour vidanger entièrement le réservoir
d’eau, incliner doucement l’appareil vers
l’arrière sur ses roulettes arrière. Ne pas
incliner l’appareil de plus de 30 degrés.
Une fois vide, replacer l’appareil en
position verticale stable et revisser
l’obturateur et le bouchon.
Vider le bac peu profond.
Lorsque le réservoir d’eau est plein, 10
bips retentissent ; le voyant indicateur du
réservoir d’eau plein s’allume et l’appareil
interrompt son fonctionnement pour éviter
tout débordement du réservoir d’eau.
Pour vider le réservoir d'eau :
1.
2.
3.
4.
5.
6.
Bouchon de
vidange
Obturateur
d’evacuation
Prise d’eau
Remarque : si le bac peu profond n’est
pas suffisamment grand pour contenir
toute l’eau de l’appareil, replacer le
bouchon pour éviter que l’eau ne coule
sur le sol. Vider le bac peu profond et
reprendre à l’étape 2.
3
4
30º
English | 04Français | 44
Vidage du réservoir
d’eau
Bac peu profond
2
1
2
Tuyau d’eau
Dévisser le bouchon d’évacuation, dévisser
l’obturateur d’évacuation et ranger ces deux
accessoires en toute sécurité.
Insérer le tuyau d’eau dans le tuyau d’évacuation
d’eau.
Veiller à ce que l’extrémité du tuyau d’eau
repose dans une vidange appropriée (p. ex. une
évacuation ou un seau).
En cas d'utilisation à long terme il est recommande
de rattacher un tuyau d'eau port permettre une
vidange en continu.
Pour rattacher le tuyau
Remarque : lorsque l’appareil est réglé sur une
température élevée, il est recommandé de raccorder
le tuyau d’eau car le réservoir d’eau se remplira plus
rapidement qu’avec un réglage sur une température
faible.
Raccordement du tuyau
d’eau pour une vidange
en continu
1.
2.
3.
Éteindre l’appareil et le débrancher de la prise de
courant. Utiliser un chiffon doux et sec pour
retirer la poussière ou les débris de la surface
extérieure de l'appareil.
Nettoyage général :
1.
2.
3.
Nettoyage
45 | Français
Nettoyage du tuyau d’évacuation d’air
chaud :
Retirer le tuyau d’évacuation d’air chaud à
l’arrière de l’appareil ainsi que le cadre
d’étanchéité/la toile de calfeutrage de
fenêtre associé.
Utiliser un chiffon doux et sec pour retirer
la poussière ou les débris.
Remettre en place le tuyau d’évacuation
d’air chaud.

Toutes les deux semaines, nettoyer les
filtres de l’évaporateur et du condensa-
teur de l’appareil.
Pour accéder aux filtres :
Nettoyage des filtres :
1.
2.
3.
Position de grippe
Filtre
1
2
English | 04Français | 46
Stockage
Attraper les filtres de l’évaporateur et du
condensateur par les poignées et tirer
doucement.
Utiliser une brosse dure et/ou un
aspirateur pour nettoyer les filtres de
toutes les poussières et particules.
Remettre en place les filtres de
l’évaporateur et du condensateur.
Pour un stockage à long terme :
1.
2.
3.
4.
Vider le réservoir d'eau et ne pas remettre
en place l’obturateur et le bouchon
d’évacuation.
Faire fonctionner l’appareil en mode de
ventilation seule sur vitesse faible pendant
12 heures pour sécher entièrement
l’intérieur de l’appareil.
Éteindre l’appareil, replacer l’obturateur et
le bouchon d’évacuation, et débrancher le
cordon d’alimentation pour l’enrouler sur
son support.
Retirer le tuyau d’évacuation d’air chaud.
5.
6.
Retirer les piles de la télécommande.
Couvrir l’appareil et tous les accessoires
avec une bâche étanche et ranger dans un
endroit sec et sûr, hors de portée des
enfants.
Protection antigel
Si le compresseur fonctionne en continu
pendant plus de 10 minutes et que la
température interne des tuyaux tombe sous 0°C
pendant plus de 20 secondes, le compresseur
et le système de pulvérisation s’arrêtent.
L’écran affiche E4 et l’appareil déclenche la
protection antigel ce qui rend inutilisables les
boutons du panneau de commande, hormis le
bouton de marche/arrêt. Dès que la
température interne des tuyaux dépasse 8°C, la
protection antigel s’arrête et l’appareil
redémarre selon les réglages choisis.
Lancement différé du compresseur
Afin de protéger le compresseur, hormis lors de
la première activation de l’appareil et du
compresseur à l’aide du bouton de marche/arrêt,
un retard de trois minutes intervient entre chaque
événement d’arrêt/marche du compresseur.
Fonctions de sécurité
Informations utiles
47 | Français
Problème Cause
Aucune alimentation.
Réservoir d’eau plein.
Température ambiante trop basse.
Température ambiante inférieure à la
température réglée en mode de
refroidissement.
Les portes et fenêtres sont ouvertes ou
d’autres sources de chaleur sont
présentes.
Intasamento dell’ingresso o dell’uscita
dell'aria.
Arriva la luce diretta del sole.
Appliance not on a flat surface.
Initiation of overheat protection.
Too far from appliance.
The remote control is not pointing towards
the receiving head of the remote control
The batteries are dead.
Pipe temperature sensor failure.
Room temperature sensor failure.
Anti-frost protection.
Le climatiseur ne
fonctionne pas.
Noisey.
The compressor does not
work.
The remote control does
not work.
Display showing E1.
Display showing E2.
Display showing E4.
Vidanger l’eau stockée dans l’appareil.
Il est conseillé de faire fonctionner
l’appareil à des températures comprises
entre 5°C et 32°C.
Rimuovere l’ostruzione.
Tirare le tende.
Place the appliance on a flat surface.
Wait three minutes until the temperature
decreases and then turn on the unit..
Bring the remote control closer to the
appliance and ensure that the remote
control is pointing toward the receiving
head of the remote control.
Replace the batteries.
Arrange for a professional to check the
pipe temperature sensor and related
circuits.
Arrange for a professional to check the
room temperature sensor and related
circuits.
Appliance returns to operating at chosen
settings once the internal pipe temperature
exceeds 8°C.
Solution
Brancher l’unité à une prise de courant
opérationnelle et allumer l’appareil.
Augmenter le réglage de la température
afin qu’il dépasse la température
ambiante.
Fermer les portes et fenêtres, et retirer
les autres sources de chaleur.
Filtres sales.
Mauvais refroidissement.
Kein Strom.
Voller Wassertank.
Die Raumtemperatur ist zu gering.
Die Filter sind verschmutzt.
Lufteinlass/Luftauslass ist verstopft.
Es gibt direkte Sonneneinstrahlung.
Appliance not on a flat surface.
Initiation of overheat protection.
Too far from appliance.
The remote control is not pointing towards
the receiving head of the remote control
The batteries are dead.
Pipe temperature sensor failure.
Room temperature sensor failure.
Anti-frost protection.
Die Klimaanlage
funktioniert nicht.
Kühlung funktioniert nicht
richtig.
Noisey.
The compressor does not
work.
The remote control does
not work.
Display showing E1.
Display showing E2.
Display showing E4.
Entleeren Sie das angesammelte Wasser.
Filter reinigen.
Entfernen Sie alle Fremdkörper.
Vorhänge zuziehen.
Place the appliance on a flat surface.
Wait three minutes until the temperature
decreases and then turn on the unit..
Bring the remote control closer to the
appliance and ensure that the remote
control is pointing toward the receiving
head of the remote control.
Replace the batteries.
Arrange for a professional to check the
pipe temperature sensor and related
circuits.
Arrange for a professional to check the
room temperature sensor and related
circuits.
Appliance returns to operating at chosen
settings once the internal pipe temperature
exceeds 8°C.
Nettoyer les filtres.

Issue Cause
No power.
Water tank full.
Ambient temperature too low.
Ambient temperature lower than the set
temperature cooling mode.
There is direct sunlight.
Doors and windows are open or there are
other heat sources.
Arriva la luce diretta del sole.
Il telecomando non punta verso la testina
ricevente del telecomando.
Le batterie sono scariche.
The air-conditioner is not
operating.
Poor cooling.
L'apparecchio è rumoroso.
Il compressore non
funziona.
Connect the unit to a live power socket
and turn it on.
Drain the water stored in the unit.
Ambient temperature too low.
It is recommended that this unit be
operated at 5-32°C.
Increase the set temperature above the
ambient temperature.
Draw curtains.
Close doors and windows and remove
other heat sources.
Tirare le tende.
Sostituire le batterie.
Contattare un professionista per
richiedere il controllo del sensore di
temperatura del tubo e dei relativi circuiti.
Resolution
Cette signalisation indique que ce produit ne doit pas être jeté avec le reste des
ordures ménagères, et ce dans toute l’Europe. Ceci afin d'éviter de nuire à
l'environnement et au bien-être humain. Contactez votre autorité locale pour plus
d'informations concernant les systèmes de ramassage disponibles. Si possible,
recyclez-le de manière responsable afin de promouvoir la réutilisation durable des
ressources.
Élimination
No power.
Water tank full.
Ambient temperature too low.
Ambient temperature lower than the set
temperature cooling mode.
There is direct sunlight.
Doors and windows are open or there are
other heat sources.
Entrée ou sortie d’air colmatée.
Présence d’un rayonnement solaire direct.
L’appareil n’est pas sur une surface plane.
Trop éloignée de l’appareil.
La télécommande n’est pas orientée vers
le récepteur de signal de l’appareil.
Les piles sont usées.
The air-conditioner is not
operating.
Poor cooling.
Appareil bruyant.
Le compresseur ne
fonctionne pas.
La télécommande ne
fonctionne pas.
Connect the unit to a live power socket
and turn it on.
Drain the water stored in the unit.
Ambient temperature too low.
It is recommended that this unit be
operated at 5-32°C.
Increase the set temperature above the
ambient temperature.
Draw curtains.
Close doors and windows and remove
other heat sources.
Éliminer l’obstruction.
Tirer les rideaux.
Placer l’appareil sur une surface plane.
Remplacer les piles.
Demander à un professionnel de vérifier
le capteur de température des tuyaux et
les circuits associés.
Demander à un professionnel de vérifier
le capteur de température ambiante et
les circuits associés.
L’appareil recommence à fonctionner
selon les réglages choisis dès que la
température interne des tuyaux dépasse
8°C.
Patienter trois minutes que la
température baisse, puis allumer
l’appareil.
Déclenchement de la protection
contre les surchauffes.
Rapprocher la télécommande de
l’appareil et veiller à pointer la
télécommande vers le récepteur
de signal de l’appareil.
Panne du capteur de
température des tuyaux.
Panne du capteur de
température ambiante.
Protection antigel.
Français | 48
L’écran affiche E1.
L’écran affiche E2.
L’écran affiche E4.
Condizionatore Portatile | Modello PB-AC01
Avvertenze di sicurezza
•
•
•
•
•
•
Grazie per aver acquistato un prodotto di Pro Breeze. Si prega di leggere attentamente
l'intero manuale prima del primo utilizzo e conservarlo in un luogo sicuro per riferimenti futuri.
49 | Italiano
Utilizzare l'apparecchio solo come descritto
in questo manuale di istruzioni.
Verificare che la tensione del circuito
principale corrisponda al valore nominale
dell'apparecchio prima di operare.
Questo apparecchio è adatto solo per uso
interno.
Questo apparecchio non è un giocattolo.
Non lasciarlo mai incustodito vicino a
bambini o animali domestici.
Questo elettrodomestico può essere
utilizzato da bambini di età superiore agli
otto anni e persone con ridotte capacità
fisiche, sensoriali o mentali o mancanza di
esperienza e conoscenza se hanno ricevuto
supervisione o istruzioni sull'uso
dell'apparecchio in modo sicuro e
comprendono i pericoli coinvolti.
I bambini non devono giocare con
l'apparecchio.
Sommario
Avvertenze di sicurezza
Informazioni specifiche relative al gas refrigerante R290
Attenzione ┃ Specifiche
Parti
Pannello di controllo
Installazione
Comandi
Svuotamento del serbatoio dell'acqua
Collegamento del tubo dell'acqua per un drenaggio continuo ┃ Pulizia
Conservazione
Funzioni di sicurezza ┃ Informazioni utili
Smaltimento
49
51
52
53
54
55
58
60
61
62
63
64
Pagina

Condizionatore Portatile | Modello PB-AC01
•
•
•
•
•
•
•
•
•
•
•
•
Italiano | 50
La pulizia e la manutenzione dell'utente non
devono essere eseguite da bambini senza
supervisione.
Tenere l'apparecchio e tutti i componenti
fuori dalla portata dei bambini.
Questo apparecchio è destinato
esclusivamente all'uso domestico. Non
dove essere usato per scopi commerciali.
Posizionare l'apparecchio su una superficie
piana e asciutta. Mantenerlo a una distanza
di almeno 50cm dalle pareti e / o dagli
oggetti circostanti.
Quando si sposta l'apparecchio assicurarsi
che sia tenuto in posizione verticale.
Quando si regolano le lamelle, fare
delicatamente in modo da non causare
danni.
Assicurarsi che la spina del cavo di
alimentazione sia inserita correttamente
nella presa di corrente prima dell’utilizzo.
Laddove è necessario installare un tubo di
drenaggio continuo, assicurarsi che il
collegamento del tubo di scarico sia in
buone condizioni senza flessioni.
Non coprire il cavo di alimentazione.
Non inserire dita o oggetti nell'ingresso
dell'aria o nella presa d'aria. Assicurarsi di
mantenere l'ingresso dell'aria e la presa
d'aria non bloccati.
Non utilizzare l'apparecchio con le mani
bagnate.
Non lasciare l'apparecchio incustodito
mentre è collegato alla presa di
alimentazione.
Non tirare il cavo di alimentazione per
fermare l'apparecchio.
Non scollegare l'apparecchio finché non è
stato spento.
Non modificare l'apparecchio o utilizzare
accessori diversi da quelli in dotazione.
Non posizionare né utilizzare l'apparecchio, il
cavo di alimentazione o altri accessori in un
bagno, in luoghi bagnati o umidi.
Non coprire l'apparecchio mentre è in uso.
Non utilizzare contenitori pressurizzati (ad
esempio bombolette spray) o altre sostanze
infiammabili vicino all'apparecchio.
Non utilizzare l'apparecchio vicino a benzina,
gas infiammabili, forni o altre fonti di calore.
Non permettere che acqua o altri liquidi
penetrino nell'apparecchio o contaminino
parti elettriche.
Non tentare di riparare o regolare alcun
elemento elettrico o meccanico
nell'apparecchio. Farlo potrebbe essere
pericoloso e renderà nulla la garanzia.
Non utilizzare l'apparecchio se vi sono segni
di danni all'apparecchio, al cavo di
alimentazione o a uno qualsiasi degli
accessori.
Non pulire o lavare l'apparecchio con
solventi chimici. Prima della pulizia,
assicurarsi che l'apparecchio sia spento e
scollegato dall'alimentazione elettrica.
Evitare di posizionare il cavo di alimentazione
in aree in cui può rappresentare un pericolo
di inciampo.
Evitare l'uso di prolunghe in quanto
potrebbero surriscaldarsi e causare rischi di
incendio.
Scollegare l'apparecchio e conservare in un
luogo fresco e asciutto quando non è in uso.
Non posizionare mai nulla sopra
l'apparecchio.
•
•
•
•
•
•
•
•
•
•
•
•
•
•
•
•
•
•
•
•
•
•
•
•
•
•
•
•
•
•
•
•

•
•
•
•
•
•
•
•
•
•
La manutenzione e le riparazioni che
richiedono l'assistenza di altro personale
qualificato devono essere eseguite sotto la
supervisione di un individuo specificato
nell'uso di refrigeranti infiammabili.
Informazioni specifiche
relative al gas
refrigerante R290
51 | Italiano
CAUTION
RISK OF FIRE
L'apparecchio deve essere installato,
utilizzato e conservato in un'area superiore a
13m²
Questo apparecchio contiene 270 g di gas
refrigerante R290.
R290 è un gas refrigerante conforme alla
direttiva europea sull'ambiente. Non forare
alcuna parte del circuito del refrigerante.
Si consapevole che il refrigerante R290 è
inodore e non ha l'odore normalmente
associato a serbatoi di gas naturale e
propano.
L'apparecchio deve essere posizionato in
un'area senza fonti di accensione continue
come fiamme libere, gas o apparecchiature
elettriche in funzione.
Non forare e non bruciare.
Se l'apparecchio è installato, utilizzato o
conservato in un'area non ventilata, la stanza
deve essere progettata per prevenire
l'accumulo di perdite di refrigerante con
conseguente rischio di incendio o esplosione
a causa dell'accensione del refrigerante
causata da riscaldatori elettrici, stufe, o altre
fonti di accensione.
L'apparecchio deve essere immagazzinato in
modo tale da prevenire guasti meccanici.
Le persone che operano o lavorano sul
circuito frigorifero devono disporre della
certificazione appropriata rilasciata da
un'organizzazione accreditata che assicuri la
competenza nella gestione dei refrigeranti in
base a una valutazione specifica riconosciuta
dalle associazioni del settore.

Attenzione
Specifiche
•
Non utilizzare l'apparecchio se la
temperatura dell’ambiente è superiore a
32°C in modalità raffreddamento o inferiore
a 5°C in modalità deumidificazione.
•
•
•
•
•
•
•
•
•
•
•
•
•
•
•
•
•
•
•
Tensione d’ingresso: 220 V-240 V ~
Frequenza: 50 Hz
Capacità di raffreddamento: 9000 BTU/h
Refrigerante: R290
Classe di efficienza energetica: A
Capacità nominale per il raffreddamento: 2640 W
Potenza nominale d’ingresso | Raffreddamento: 1010 W
Corrente nominale | Raffreddamento: 4,4 A
Rumorosità | 65 dB
IEE per il raffreddamento: 8,9 BTU/h
IEE per il raffreddamento: 2,6 W/W
Assorbimento dell’umidità: 0,9 l/h
Volume portata dell’aria: 360 m³/h
Superficie applicabile: 18-22 m²
Intervallo temperatura d’esercizio: 5-32°C
Impostazioni della temperatura disponibili: 16-30°C
Potenziale di riscaldamento globale: 3kg CO2 eq.
Peso netto: 24.5kg
Dimensioni: 30cm x 35.2cm x 75.6cm
Italiano | 52

Parte Frontale
Pannello di controllo
Deflettore aria orizzontale
Deflettore aria verticale
Corpo
Ruote
1.
2.
3.
4.
5.
4
5
3
2
1
Parte Posteriore
Manico/alloggiamento per il telecomando
Corpo
Morsetto a C
Cavo di alimentazione
Connettore per il tubo di scarico aria calda
Avvolgicavo
Ruote
Filtro evaporatore
Filtro radiatore
Filtro condensatore
Cappuccio esterno tappo dello scarico
6.
7.
8.
9.
10.
11.
12.
13.
14.
15.
16.
17.
18.
19.
20.
21.
22.
23.
24.
Accessori
Telecomando
Connettore corto per il tubo di
scarico aria calda
Tubo di scarico aria calda
Piastra per fissaggio in finestre
a scorrimento
Connettore circolare
Tessuto per fissaggio in finestre
a battente
Velcro di sigillatura
Tubo dell'acqua
7
12
9
10
14
13
15
16
11
8
6
Parti
53 | Italiano
17
18
21
20
19
22
23
24

Pulsanti che si muovono da sinistra
a destra
Tasto di accensione
Tasto velocità ventola
Tasto Giù
Tasto Su
Tasto modalità
Tasto timer
•
•
•
•
•
•
Telecomando
Pannello di visualizzazione digitale che
si sposta da sinistra a destra
Spia luminosa gradi Fahrenheit
Spia luminosa gradi Celsius
•
•
Spia luminosa velocità della ventola bassa
Spia luminosa velocità della ventola alta
Spia luminosa serbatoio acqua pieno
Spia luminosa modalità “Sleep”
Spia luminosa modalità solo ventola
Spia luminosa modalità deumidificazione
Spia luminosa modalità raffreddamento
Spia luminosa modalità timer
•
•
•
•
•
•
•
•
1.
2.
3.
TIMER COOL DRY FAN SLEEP FULL HIGH LOW
TEMP
Cool
Dry
Fan
High
Low
Sleep
Timer Power
ºC/ºF
Tasto velocità della
ventola alta
Tasto modalità
fresco
Tasto modalità
deumidificazione
Modalità solo
ventola
Tasto velocità della
ventola bassa
Tasto modalità
“Sleep”
Tasto modalità
Accensione/
spegnimento
Tasto modifica
valori temperatura
Pannello di controllo
Italiano | 54
22
3
1
1
Simboli di indicatori che si spostano
da sinistra a destra
Nota: Due batterie AAA incluse.
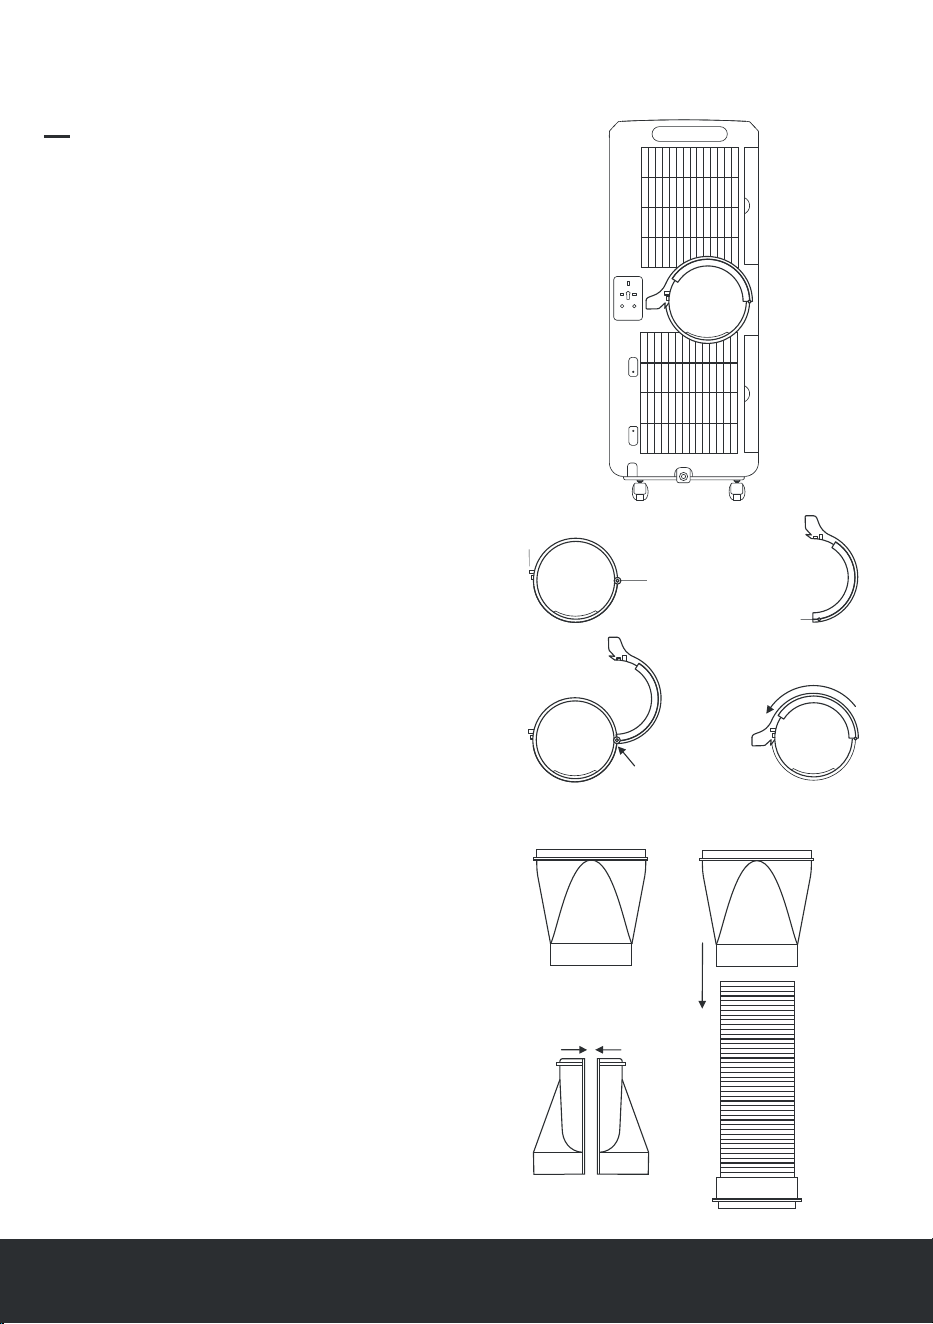
55 | Italiano
Prima e dopo l’installazione, osservare
quanto segue:
•
•
•
•
Quando si movimenta l'apparecchio nella
posizione prescelta, fare in modo che rimanga in
posizione verticale.
Non posizionare l’apparecchio, il cavo di
alimentazione o i relativi accessori in un bagno o
in un luogo bagnato o umido.
Posizionare l'apparecchio su una superficie piana
e asciutta. Tenerlo ad almeno 50 cm di distanza
dalle pareti e/o dagli oggetti circostanti.
Lasciare l'apparecchio in posizione verticale
per almeno due ore prima del primo utilizzo.
Installazione del connettore corto per il
tubo di scarico
Allineare le due metà e fissarle verificando che si
incastrino saldamente.
Posizionare il tubo di scarico aria calda in
posizione verticale con il connettore circolare alla
base.
Sistemare il connettore per il tubo di scarico sopra
il tubo di scarico aria calda e spingerlo verso il
basso fino in fondo fino al collo.
Tenendo saldamente il tubo di scarico aria calda
alla base, ruotare il connettore per il tubo di
scarico in senso antiorario bloccando le tre
filettature sul tubo di scarico aria calda.
Installazione del morsetto a C
Allineare la filettatura del morsetto a C con
l’albero di rotazione e infilarvelo completa-
mente.
Ruotare il morsetto a C in senso antiorario
finché non si blocca sulla chiusura a incastro.
1.
2.
Foro Rotatorio
Albero di rotazione
Giunto a scatto
Vista laterale A
Vista laterale B
1
2
1.
2.
3.
4.
2
3
1
Installazione

Note:
•
•
Se l’apertura della finestra è più piccola
rispetto alla lunghezza minima della piastra
sigillante, tagliare la lunghezza desiderata
usando un seghetto.
Se l'apertura della finestra è più grande rispetto
alla lunghezza massima della piastra sigillante,
usare del compensato o altro materiale simile
per riempire gli spazi vuoti.
Installazione della piastra per
fissaggio in finestre a scorrimento
Inserire il pannello B nel pannello A e
regolare la lunghezza o l’altezza della
finestra.
Aprire la finestra e posizionarvi dentro la
piastra.
Regolare della misura esatta e fissare con la
vite fornita.
Chiudere la finestra per bloccare tutto in
sede.
Attaccare il connettore corto del tubo di
scarico aria calda al foro ellittico.
La piastra di fissaggio è ora pronta per l’uso.
1.
2.
3.
4.
5.
6.
Sbloccare e aprire completamente il
morsetto a C.
Posizionare il bordo del connettore
circolare sul passo inferiore del connet-
tore del tubo di scarico aria calda.
Fissare il connettore circolare spingendo-
lo con fermezza sul connettore per il tubo
di scarico aria calda.
Rimettere il morsetto a C per chiudere il
tutto.
1.
2.
3.
4.
1
4
Parte inferiore
Connettore circolare
2
3
1
3
3
2
5
5
4
2
4
Pannello A
Pannello B
Finestra Orizzontale
Finestra Verticale
English | 04
Installazione del tubo di scarico aria calda
Italiano | 56

Aprire la finestra e pulire il telaio e i
battenti da polvere e particelle.
Fissare il nastro di velcro lungo l’intero
bordo della finestra. Non fissare mai alla
guarnizione della finestra per non
impedirne la chiusura completa.
Fissare il nastro di velcro lungo l’intero
perimetro dei battenti (all’interno e
all'esterno). Verificare che la finestra si
chiuda completamente.
Far aderire il lato A del tessuto sigillante al
velcro sul telaio della finestra partendo dal
centro e procedendo verso i bordi.
Chiudere e aprire la finestra per verificare
che il tessuto non rimanga impigliato.
Far aderire il lato B del tessuto sigillante al
velcro sul perimetro dei battenti partendo
dal centro e procedendo verso i bordi.
Aprire leggermente la finestra e inserire il
connettore corto del tubo di scarico aria
calda nel tessuto sigillante con le cerniere
intorno al suo bordo.
Il tessuto sigillante è ora pronto per l’uso.
Note:
•
•
Non piegare il tubo di scarico aria calda
oltre i 45°: esso deve essere sufficiente-
mente corto e il più diritto possibile per
garantire un flusso dell’aria efficiente.
Non estendere eccessivamente il tubo di
scarico aria calda per non alterare l'efficien-
za dell'apparecchio
Installazione del tessuto per il
fissaggio in finestre a battente
1.
2.
3.
4.
5.
6.
7.
8.
Telaio
Lato A
Lato B
Battenti
7
4 & 6
2 & 3
Cerniera in tessuto con
cerniera per finestre
57 | Italiano

Comandi
Tasto di accensione
Accende o spegne l’apparecchio.
Tasto ventola
Seleziona le velocità alta o bassa della ventola.
NB: opzione non disponibile in modalità di
deumidificazione.
Tasto modalità
•
•
•
Modalità deumidificazione – Ideale per
ridurre l’umidità della stanza nei periodi più
umidi dell'anno. L'apparecchio deumidifica la
stanza se la temperatura ambiente è superiore
o pari a 17°C e la ventola gira a bassa velocità.
Se la temperatura della stanza scende a un
valore pari o inferiore a 15°C, l’apparecchio
cessa di deumidificare l’ambiente e la ventola
gira a bassa velocità. NB: il tubo di scarico aria
calda deve essere collegato per consentire
l’estrazione e lo scarico dell’aria calda e umida
all’esterno.
NB: la temperatura può essere impostata
solo in modalità di raffreddamento.
Modalità “Sleep”
Impostare una modalità “Sleep” per ridurre i
consumi energetici quando l'apparecchio è in
modalità di raffreddamento.
Per attivare questa modalità, premere il tasto
“Sleep” sul telecomando o i tasti timer e Giù del
pannello di controllo contemporaneamente. Il
display lampeggia cinque volte con la scritta SL
per confermare che la modalità “Sleep” è attiva,
prima di tornare alla temperatura impostata.
Dopo due ore, la temperatura impostata aumenta
automaticamente di 1°C. Dopo altre due ore, la
temperatura impostata sale automaticamente di
un ulteriore 1°C e la ventola passa alla bassa
velocità se non vi si trova già. L’apparecchio
continua a girare con questa impostazione fino a
quando non viene spento.
Per annullare la modalità “Sleep”, premere il
tasto “Sleep” sul telecomando o il tasto timer e
Giù sul pannello di controllo contemporanea-
mente.
English | 04
Italiano | 58
Modalità raffreddamento - Perfetta per
raffreddare gli ambienti nella stagione più
calda. Usare i tasti Su e Giù in modalità di
raffreddamento per impostare la
temperatura desiderata fra 16-30°C.
L’apparecchio raffredda la stanza se la
temperatura ambiente sale al di sopra della
temperatura impostata. Se la temperatura
della stanza scende al di sotto della
temperatura impostata, l'apparecchio
cessa di raffreddare l'ambiente e la ventola
rimane in funzione alla velocità impostata.
NB: il tubo di scarico aria calda deve
essere collegato per consentire l’estrazione
e lo scarico dell’aria calda e umida
all’esterno.
Modalità solo ventola – L’apparecchio
funziona alla velocità della ventola
impostata. La temperatura ambiente può
essere visualizzata sul pannello del display
digitale. NB: il tubo di scarico aria calda
non deve essere collegato all'apparecchio.

•
•
•
Tasto timer
Assicurarsi che l'apparecchio sia connesso
alla presa di corrente.
Premere il tasto timer per attivare la relativa
funzione.
Premere i tasti Su e Giù per selezionare il
tempo desiderato (1-24 ore) fino
all'accensione.
I valori dell’ora lampeggiano cinque volte
per confermare l’impostazione del timer,
quindi il display ritorna alla temperatura
della stanza.
Selezionare le impostazioni desiderate
prima dell'accensione.
Per verificare il tempo rimanente
all’accensione, premere il tasto timer.
Per annullare il timer di accensione, premere
il tasto timer due volte.
NB: se è selezionata la modalità di
raffreddamento e la temperatura è stata
impostata, il display mostra la temperatura
impostata. Se non vengono selezionate altre
impostazioni, l’apparecchio si accende con le
impostazioni precedentemente impostate.
Impostazione del timer di spegnimento:
NB: se è selezionata la modalità di
raffreddamento e la temperatura è stata
impostata, il display mostra la temperatura
impostata.
Tasti Su e Giù
Utilizzare i tasti Su e Giù per:
1.
2.
3.
4.
5.
6.
7.
1.
2.
3.
4.
I valori dell’ora lampeggiano cinque volte
per confermare l’impostazione del timer,
quindi il display ritorna alla temperatura
della stanza.
Selezionare le impostazioni desiderate
prima dell'accensione.
Per verificare il tempo rimanente allo
spegnimento, premere il tasto timer due
volte.
Per annullare il timer di spegnimento,
premere il tasto timer due volte.
5.
6.
7.
8.
59 | Italiano
Imposta il timer di accensione o spegnimento fra
1 e 24 ore.
Impostazione del timer di accensione:
Impostare la temperatura desiderata in
modalità di raffreddamento.
Impostare il tempo fino all'accensione o
allo spegnimento quando si regola il timer.
Modificare fra °C e °F tenendo premuti
entrambi i tasti contemporaneamente.
Assicurarsi che l'apparecchio sia connesso
alla presa di corrente.
Premere il tasto di accensione per
accendere l'apparecchio.
Premere il tasto timer per attivare la relativa
funzione.
Premere i tasti Su e Giù per impostare il
tempo desiderato (1-24 ore) fino allo
spegnimento.

Spegnere l’apparecchio e staccare la
spina dalla presa di corrente.
Posizionare un vassoio basso sotto lo
scarico dell'acqua.
Svitare il cappuccio esterno della valvola
di scarico, rimuovere il tappo e
raccogliere l'acqua che fuoriesce nel
vassoio.
Per svuotare completamente il serbatoio
dell'acqua, inclinare delicatamente
l'apparecchio all’indietro sulle ruote
posteriori. Non inclinare di oltre 30°.
Una volta svuotato, riportare l'apparec-
chio in posizione completamente verticale
e rimettere il tappo e il cappuccio esterno.
Svuotare il vassoio.
Quando il serbatoio dell'acqua è pieno,
l’apparecchio emette 10 segnali acustici;
la spia luminosa del serbatoio dell'acqua
pieno si accende e l’apparecchio entra in
pausa per evitare che il serbatoio
dell'acqua trabocchi.
Per svuotare il serbatoio dell'acqua:
1.
2.
3.
4.
5.
6.
Tappo di
scarico
Presa
dell’acqua
Uscita dell’acqua
NB: se il vassoio non è sufficientemente
grande da contenere tutta l'acqua che
fuoriesce dall'apparecchio, rimettere il
cappuccio esterno sulla valvola di scarico
per evitare di allagare il pavimento.
Svuotare il vassoio e riprendere dal
passaggio 2.
3
4
30º
English | 04Italiano | 60
Svuotamento del
serbatoio dell'acqua
Vassoio poco profondo
2

1
2
Tubo dell’acqua
Svitare il cappuccio esterno della valvola di
scarico, togliere il tappo e riporre in modo
sicuro.
Inserire il tubo dell'acqua nel tubo di scarico.
Assicurarsi che l'estremità del tubo abbia uno
sbocco adatto (es. uno scarico o un secchio).
Per un uso prolungato, si consiglia di collegare un
tubo per il drenaggio continuo.
Per collegare il tubo:
NB: quando l'apparecchio è impostato a una
temperatura calda, si raccomanda di fissare il tubo
poiché il serbatoio dell'acqua si riempie a una
velocità maggiore quando è impostato a
temperatura fredda.
Collegamento del tubo
dell'acqua per un
drenaggio continuo
1.
2.
3.
Spegnere l'apparecchio e scollegarlo dalla presa
di corrente. Utilizzare un panno morbido e
asciutto per rimuovere polvere e residui di
sporco dalla superficie esterna dell’apparecchio.
Pulizia generale:
Pulizia
61 | Italiano
Pulizia del tubo di scarico aria calda:
1.
2.
3.
Rimuovere il tubo di scarico aria calda dal
retro dell'apparecchio e dal rispettivo
gruppo di sigillatura sulla finestra.
Usare un panno morbido e asciutto per
rimuovere polvere o residui di sporco.
Rimettere il tubo di scarico aria calda.

Pulire il filtro condensatore ed evapora-
tore ogni due settimane.
Per accedere ai filtri:
Pulizia del filtro:
1.
2.
3.
Posizione di presa
Filtro
1
2
English | 04Italiano | 62
Conservazione
Afferrare filtro condensatore ed
evaporatore nella posizione di presa e
rimuovere delicatamente.
Utilizzare uno spazzolino rigido e/o un
aspirapolvere per pulire il filtro da polvere
e particelle.
Rimettere i filtri condensatore ed
evaporatore.
Prima di riporre l'apparecchio per periodi prolungati:
1.
2.
3.
4.
Svuotare il serbatoio dell'acqua e lasciare
lo scarico aperto senza tappo e cappuccio
esterno di protezione.
Mettere in funzione l'apparecchio in
modalità solo ventola a bassa velocità per
12 ore per asciugare completamente
l'interno.
Spegnere l’apparecchio, rimettere il tappo
dello scarico e il cappuccio esterno, quindi
staccare il cavo di alimentazione dalla
presa e avvolgerlo intorno all’avvolgicavo.
Rimuovere il tubo di scarico aria calda.
5.
6.
Rimuovere le batterie dal telecomando.
Coprire l'apparecchio e tutti gli accessori
con un rivestimento impermeabile e
conservare in luogo sicuro e asciutto, fuori
dalla portata dei bambini.

Protezione antigelo
Se il compressore funziona ininterrottamente
per più di 10 minuti e la temperatura interna del
tubo scende a meno di 0°C per più di 20
secondi, il compressore e il motore del sistema
nebulizzante si spengono. Sul display compare
il codice E4 e l'apparecchio attiva la protezione
antigelo rendendo inutilizzabili i tasti del
pannello di controllo ad esclusione del tasto di
accensione. Appena la temperatura interna del
tubo è sopra gli 8°C, la protezione antigelo si
arresta e l'apparecchio torna a funzionare con
le impostazioni prescelte.
Protezione ritardo compressore
Per proteggere il compressore, a parte nelle
circostanze in cui l'apparecchio e il compressore
vengono messi in funzione per la prima volta
dopo essere stati accesi con il tasto di accen-
sione, c’è un ritardo di tre minuti ogni volta che il
compressore si spegne e accende.
Funzioni di sicurezza
Informazioni utili
63 | Italiano
Problema Causa
Non c’è corrente.
Serbatoio dell’acqua pieno.
Temperatura della stanza troppo bassa.
Filtri sporchi.
Intasamento dell’ingresso o dell’uscita
dell'aria.
Arriva la luce diretta del sole.
Appliance not on a flat surface.
Initiation of overheat protection.
Too far from appliance.
The remote control is not pointing towards
the receiving head of the remote control
The batteries are dead.
Pipe temperature sensor failure.
Room temperature sensor failure.
Anti-frost protection.
Il condizionatore dell'aria
non si mette in funzione.
Noisey.
The compressor does not
work.
The remote control does
not work.
Display showing E1.
Display showing E2.
Display showing E4.
Pulire i filtri.
Rimuovere l’ostruzione.
Tirare le tende.
Place the appliance on a flat surface.
Wait three minutes until the temperature
decreases and then turn on the unit..
Bring the remote control closer to the
appliance and ensure that the remote
control is pointing toward the receiving
head of the remote control.
Replace the batteries.
Arrange for a professional to check the
pipe temperature sensor and related
circuits.
Arrange for a professional to check the
room temperature sensor and related
circuits.
Appliance returns to operating at chosen
settings once the internal pipe temperature
exceeds 8°C.
Risoluzione
Collegare l’unità a una presa
di corrente e accendelo.
Svuotare l'acqua contenuta
all’interno dell’unità.
Si raccomanda di utilizzare l’unità a una
temperatura compresa fra 5°C e 32°C.
Chiudere porte e finestre e rimuovere
le altre fonti di riscaldamento.
Chiudere porte e finestre e rimuovere
le altre fonti di riscaldamento.
Temperatura della stanza inferiore
rispetto alla temperatura impostata
nella modalità di raffreddamento.
Porte e finestre sono aperte o sono
presenti altre fonti di riscaldamento.
Scarso raffreddamento.
Aucune alimentation.
Réservoir d’eau plein.
Température ambiante trop basse.
Température ambiante inférieure à la
température réglée en mode de
refroidissement.
Les portes et fenêtres sont ouvertes ou
d’autres sources de chaleur sont
présentes.
Intasamento dell’ingresso o dell’uscita
dell'aria.
Arriva la luce diretta del sole.
Appliance not on a flat surface.
Initiation of overheat protection.
Too far from appliance.
The remote control is not pointing towards
the receiving head of the remote control
The batteries are dead.
Pipe temperature sensor failure.
Room temperature sensor failure.
Anti-frost protection.
Le climatiseur ne
fonctionne pas.
Noisey.
The compressor does not
work.
The remote control does
not work.
Display showing E1.
Display showing E2.
Display showing E4.
Vidanger l’eau stockée dans l’appareil.
Il est conseillé de faire fonctionner
l’appareil à des températures comprises
entre 5°C et 32°C.
Rimuovere l’ostruzione.
Tirare le tende.
Place the appliance on a flat surface.
Wait three minutes until the temperature
decreases and then turn on the unit..
Bring the remote control closer to the
appliance and ensure that the remote
control is pointing toward the receiving
head of the remote control.
Replace the batteries.
Arrange for a professional to check the
pipe temperature sensor and related
circuits.
Arrange for a professional to check the
room temperature sensor and related
circuits.
Appliance returns to operating at chosen
settings once the internal pipe temperature
exceeds 8°C.

Il presente simbolo indica che, all’interno dell’UE, il prodotto non deve essere
smaltito insieme agli altri rifiuti domestici. Questo per prevenire possibili danni
all'ambiente e al benessere umano. Contattare l'autorità locale per informazioni
sui sistemi di raccolta disponibili. Se possibile, riciclarlo responsabilmente per
promuovere il riutilizzo sostenibile delle risorse.
Smaltimento
No power.
Water tank full.
Ambient temperature too low.
Ambient temperature lower than the set
temperature cooling mode.
There is direct sunlight.
Doors and windows are open or there are
other heat sources.
Arriva la luce diretta del sole.
Il telecomando non punta verso la testina
ricevente del telecomando.
Le batterie sono scariche.
The air-conditioner is not
operating.
Poor cooling.
L'apparecchio è rumoroso.
Il compressore non
funziona.
Connect the unit to a live power socket
and turn it on.
Drain the water stored in the unit.
Ambient temperature too low.
It is recommended that this unit be
operated at 5-32°C.
Increase the set temperature above the
ambient temperature.
Draw curtains.
Close doors and windows and remove
other heat sources.
Tirare le tende.
Sostituire le batterie.
Contattare un professionista per
richiedere il controllo del sensore di
temperatura del tubo e dei relativi circuiti.
Rimuovere l’ostruzione.
Posizionare l'apparecchio su
una superficie piana.
Attendere tre minuti finché la temperatura
non scende, quindi accendere l’unità.
Avvicinare il telecomando all'apparecchio
e verificare che questo sia rivolto verso la
testina ricevente sul telecomando.
Contattare un professionista per
richiedere il controllo del sensore della
temperatura della stanza e dei
relativi circuiti.
L'apparecchio ritorna alle impostazioni
prescelte quando la temperatura interna
del tubo supera gli 8°C.
Intasamento dell’ingresso o
dell’uscita dell'aria.
L’apparecchio non è su
una superficie piana.
Avvio della protezione
da surriscaldamento.
La distanza dall'apparecchio è eccessiva.
Guasto del sensore di
temperatura del tubo.
Guasto del sensore di
temperatura della stanza.
Protezione antigelo.
Il telecomando non funziona.
Sul display è riportato
il codice E1.
Sul display è riportato
il codice E2.
Sul display è riportato
il codice E4.
Italiano | 64
Issue Cause
El aparato no está sobre una superficie plana.
No power.
Water tank full.
Ambient temperature too low.
Ambient temperature lower than the set
temperature cooling mode.
There is direct sunlight.
Doors and windows are open or there are
other heat sources.
Entrada de aire o salida de aire obstruida.
Hay luz solar directa.
Las baterías están agotadas.
The air-conditioner is not
operating.
Poor cooling.
El compresor no funciona.
El control remoto no
funciona.
Se lee E1 en la pantalla.
Se lee E2 en la pantalla.
Se lee E4 en la pantalla.
Connect the unit to a live power socket
and turn it on.
Drain the water stored in the unit.
Ambient temperature too low.
It is recommended that this unit be
operated at 5-32°C.
Increase the set temperature above the
ambient temperature.
Draw curtains.
Close doors and windows and remove
other heat sources.
Retire la obstrucción.
Cierre las cortinas.
Cambie las baterías.
Pida a un profesional que compruebe el
sensor de temperatura del tubo y los
circuitos relacionados.
Pida a un profesional que compruebe el
sensor de temperatura ambiente y los
circuitos relacionados.
Una vez que la temperatura interna del
tubo supere los 8 °C, el aparato volverá a
funcionar según los ajustes establecidos.
Resolution

Acondicionador de Aire Portátil | Modelo PB-AC01
Advertencias de seguridad
•
•
•
•
•
•
Gracias por elegir comprar un producto de Pro Breeze. Lea todo el manual cuidadosamente
antes del primer uso y guárdelo en un lugar seguro para futuras consultas.
65 | Español
Utilice el aparato solo como se describe en
este manual de instrucciones.
Verifique que la tensión del circuito principal
se corresponda con la clasificación del
aparato antes de operar.
Este aparato es apto solo para uso en
interiores.
Este aparato no es un juguete. Nunca deje
desatendido alrededor de niños o mascotas.
Este dispositivo puede ser utilizado por niños
mayores de ocho años y personas con
capacidades físicas, sensoriales o mentales
reducidas o por falta de experiencia y
conocimiento si se les ha dado supervisión o
instrucciones sobre el uso del dispositivo de
manera segura y entienden los peligros
involucrado.
Los niños no deben jugar con el aparato.
Resumen
Advertencias de seguridad
Información específica sobre el gas refrigerante R290
Precaución ┃ Spécifications
Piezas
Panel de control
Instalación
Controles
Vaciar el depósito de agua
Conectar la manguera de agua para un vaciado continuo ┃ Limpieza
Almacenamiento
Características de seguridad ┃ Informatíon útil
Desechos
65
67
68
69
70
71
74
76
77
78
79
80
Página

•
•
•
•
•
•
•
•
•
•
•
•
•
•
•
•
Acondicionador de Aire Portátil | Modelo PB-AC01
•
•
•
•
•
•
•
•
•
•
•
•
Español | 66
•
•
•
•
•
•
•
•
•
•
•
•
•
•
•
La limpieza y el mantenimiento del usuario
no deben ser realizados por niños sin
supervisión.
Mantenga el aparato y todas las piezas
fuera del alcance de los niños.
Este aparato está destinado únicamente
para uso doméstico. No debe ser utilizado
para fines comerciales.
Coloque el aparato sobre una superficie
plana y seca. Manténgalo a una distancia
de al menos 50cm de las paredes y / u
objetos circundantes.
Al mover el aparato, asegúrese de
mantenerlo en posición vertical.
Al ajustar las persianas, hágalo con
cuidado para no causar daños.
Asegúrese de que el enchufe del cable de
alimentación esté correctamente insertado
en la toma de corriente antes de operar.
Donde exista la necesidad de instalar una
manguera de drenaje continuo, asegúrese
de que la conexión de la manguera de
drenaje esté en buenas condiciones sin
flexión.
No cubra el cable de alimentación.
No inserte los dedos y objetos en la
entrada de aire o la salida de aire.
Asegúrese de mantener la entrada de aire y
la salida de aire desbloqueadas.
No haga funcionar el aparato con las
manos mojadas.
No deje el aparato desatendido mientras
esté conectado a la fuente de alimentación.
No tire el cable de alimentación para
apagar el aparato.
No desenchufe el aparato hasta que se
haya apagado.
No modifique el aparato ni utilice accesori-
os que no sean los suministrados.
No coloque ni utilice el aparato, el cable de
alimentación ni ningún otro accesorio en un
lugar de baño, mojado o húmedo.
No cubra el aparato mientras esté en uso.
No utilice recipientes a presión (por ejemplo,
latas de aerosol) y otras sustancias inflama-
bles cerca del aparato.
No utilice el aparato cerca de gasolina,
gases inflamables, hornos y otras fuentes de
calefacción.
No permita que el agua y otros líquidos
entren en el aparato o contaminen las partes
eléctricas.
No intente reparar o ajustar ningún elemento
eléctrico o mecánico del aparato. Hacerlo
puede ser inseguro y anulará su garantía.
No haga funcionar el aparato si hay signos
de daños en el aparato, el cable de aliment-
ación o cualquiera de los accesorios.
No limpie ni lave el aparato con disolventes
químicos. Antes de la limpieza, asegúrese de
que el aparato esté apagado y desenchufado
da la fuente de alimentación.
Evite colocar el cable de alimentación en
áreas donde pueda convertirse en un peligro
de tropiezo.
Evite el uso de cables de extensión, ya que
pueden sobrecalentarse y provocar un riesgo
de incendio.
Desenchufe el aparato y guárdelo en un
lugar fresco y seco cuando no esté en uso.
Nunca coloque nada sobre el aparato.

•
•
•
•
•
•
•
•
•
•
El mantenimiento y las reparaciones que
requieran la asistencia de otro personal
calificado deben realizarse bajo la
supervisión de una persona especificada en
el uso de refrigerantes inflamables.
Información específica
sobre el gas
refrigerante R290
67 | Español
CAUTION
RISK OF FIRE
El aparato debe instalarse, utilizarse y
almacenarse en un área que supere los 13m².
Este aparato contiene 270 g de gas
refrigerante R290.
R290 es un gas refrigerante que cumple con la
directiva europea sobre el medio ambiente. No
perfore ninguna parte del circuito refrigerante.
Tenga en cuenta que el refrigerante R290 es
sin olor y no tiene el olor normalmente
asociado con los tanques de gas natural y
propano.
El aparato debe colocarse en un área sin
fuentes continuas de ignición, como llamas
abiertas, gas o aparatos eléctricos en
funcionamiento.
No pinchar y no quemar.
Si el aparato es instalado, usado y conservado
en un área no ventilada, la habitación debe
estar diseñada para evitar la acumulación de
fugas de refrigerante, lo que puede provocar
un incendio o una explosión debido a la
ignición del refrigerante causada por
calentadores eléctricos, estufas, y otras
fuentes de ignición.
El aparato debe almacenarse de forma que se
eviten fallos mecánicos.
Las personas que operan o trabajan en el
circuito de refrigerante deben tener la
certificación apropiada emitida por una
organización acreditada que garantice la
competencia en el manejo de refrigerantes de
acuerdo con una evaluación específica
reconocida por las asociaciones en la
industria.

Precaución
Spécifications
•
No haga funcionar el aparato si la
temperatura ambiente es superior a 32°C en
modo de refrigeración o inferior a 5°C en
modo deshumidificador.
•
•
•
•
•
•
•
•
•
•
•
•
•
•
•
•
•
•
•
Voltaje de entrada: 220 V-240 V ~
Frecuencia: 50 Hz
Capacidad de refrigeración: 9000 BTU/H
Refrigerante: R290
Clase de eficiencia energética: A
Capacidad nominal para refrigeración: 2640 W
Entrada nominal | Refrigeración: 1010 W
Corriente nominal | Refrigeración: 4,4 A
Nivel de ruido | 65 dB
Coeficiente de eficiencia energética (EER) para refrigeración: 8,9 BTU/H
Coeficiente de eficiencia energética (EER) para refrigeración: 2,6 W/W
Eliminación de humedad: 0,9 L/H
Caudal de aire: 360 m³/H
Área aplicable: 18-22 m²
Rango de temperaturas de funcionamiento: 5-32 °C
Ajustes de temperatura disponibles: 16-30 °C
Potencial de calentamiento global: 3kg CO2 eq.
Peso neto: 24.5kg
Tamaño: 30cm x 35.2cm x 75.6cm
Español | 68

Vista frontal
Panel de control
Persiana horizontal
Persiana vertical
Cuerpo
Ruedas
1.
2.
3.
4.
5.
4
5
3
2
1
Vista trasera
Asa/Almacenamiento de control remoto
Cuerpo
Hebilla en forma de C
Cable de alimentación
Conector de manguera de extracción
de calor
Organizador de cables
Ruedas
Filtro del evaporador
Filtro de radiación
Filtro del condensador
Tapa de drenaje
6.
7.
8.
9.
10.
11.
12.
13.
14.
15.
16.
17.
18.
19.
20.
21.
22.
23.
24.
Accesorios
Control remoto
Conector corto de manguera de
extracción de calor
Manguera de extracción de calor
Montaje de tablero de sellado en
ventana corredera
Conector circular
Montaje de tela de sellado en
ventana de bisagras
Velcro de sellado
Manguera de agua
7
12
9
10
14
13
15
16
11
8
6
Piezas
69 | Español
17
18
21
20
19
22
23
24

Botones que se mueven se
izquierda a derecha
Botón de encendido
Botón de velocidad del ventilador
Botón de bajar
Botón de subir
Botón de modo
Botón del temporizador
•
•
•
•
•
•
Mando a distancia
Panel de visualización digital que
se mueve de izquierda a derecha
Luz indicadora de grados Fahrenheit
Luz indicadora de grados Celsius
•
•
Los indicadores luminosos se
mueven de izquierda a derecha
Luz indicadora de velocidad baja del ventilador
Luz indicadora de velocidad alta del ventilador
Luz indicadora de depósito de agua lleno
Luz indicadora de modo de suspensión
Luz indicadora de modo de solo ventilador
Luz indicadora de modo de deshumidificación
Luz indicadora de modo de refrigeración
Luz indicadora de modo de temporizador
•
•
•
•
•
•
•
•
1.
2.
3.
TIMER COOL DRY FAN SLEEP FULL HIGH LOW
TEMP
Cool
Dry
Fan
High
Low
Sleep
Timer Power
ºC/ºF
Botón de velocidad
alta del ventilador
Botón de modo de
refrigeración
Botón de modo de
deshumidificación
Modo de solo
ventilador
Botón de velocidad
baja del ventilador
Botón de modo
de suspensión
Botón de modo
de temporizador
Alimentación
Botón de cambio
de dígitos de
temperatura
Panel de control
Español | 70
22
3
1
1
Nota: Incluye dos pilas AAA.
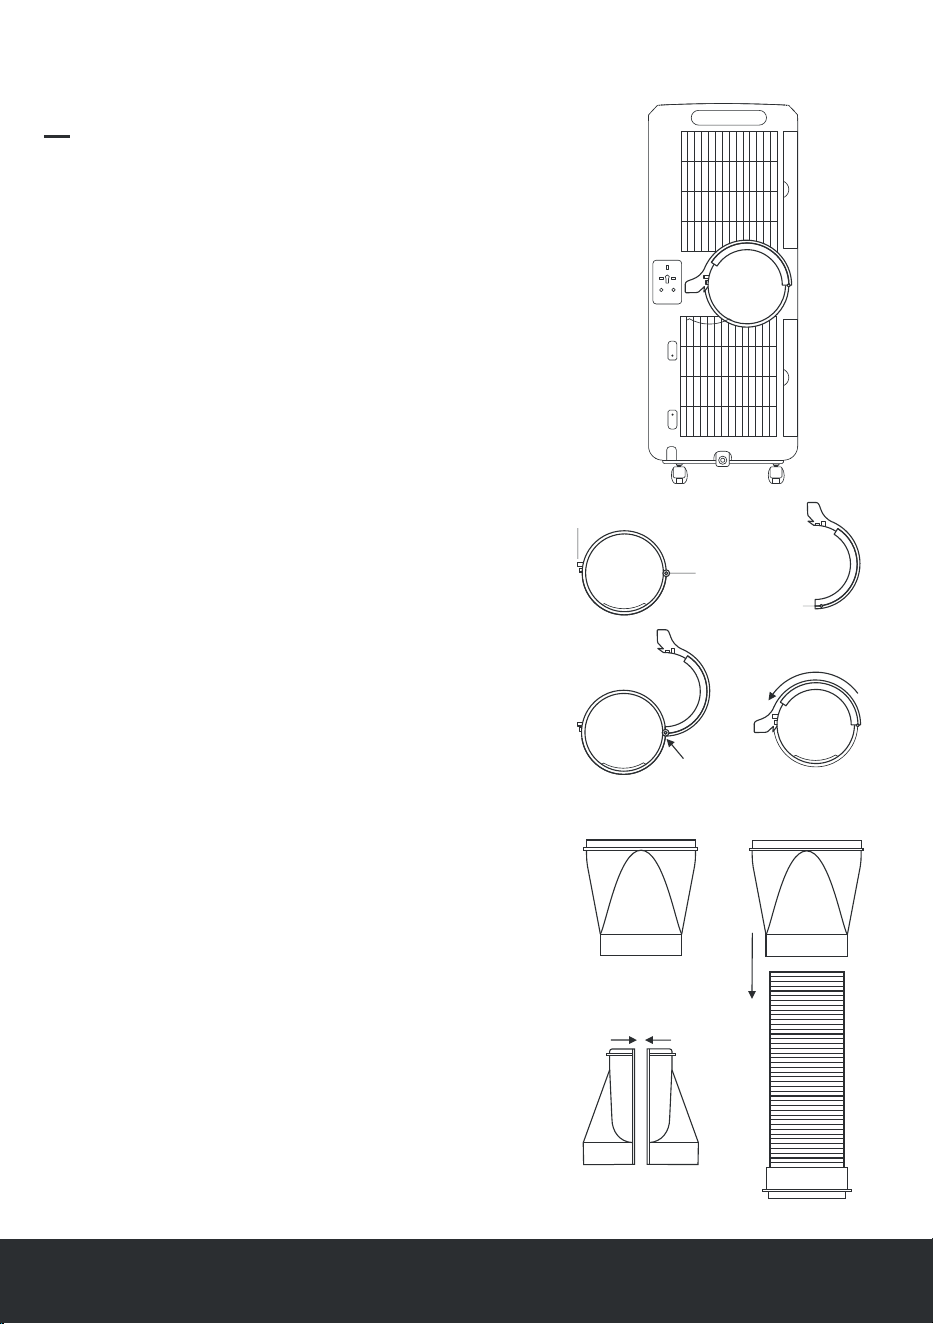
71 | Español
Antes y después de la instalación debe cumplir
con lo siguiente:
•
•
•
•
Cuando mueva el aparato hasta la ubicación elegida
asegúrese de mantenerlo en posición vertical.
No coloque ni utilice el aparato, cables o accesorios en
el cuarto de baño ni en un lugar húmedo o mojado.
Coloque el aparato sobre una superficie plana y seca.
Manténgalo alejado al menos 50 cm de las paredes y/o
objetos circundantes.
Deje el aparato en posición vertical durante al
menos dos horas antes del primer uso.
Instalación del conector corto de la
manguera de extracción
Alinear las dos mitades y haga clic para unirlas con
firmeza.
Mantenga sujeta la manguera de extracción de calor
verticalmente con el conector circular en la parte
inferior.
Coloque el conector de la manguera de extracción en la
parte superior de la manguera de extracción de calor y
empuje hacia abajo firmemente de manera que el cuello
se apoye sobre la manguera de extracción de calor.
Sujetando la manguera de extracción de calor con
firmeza en la parte inferior, gire el conector de la
manguera de extracción en sentido antihorario fijando
las tres roscas de tornillo en la manguera de extracción
de calor.
Instalación de la hebilla en forma de C
Alinee el orificio rotatorio de las hebillas en forma de C
con el eje de rotación y deslice completamente en el
eje de rotación.
Gire la hebilla en forma de C en sentido antihorario
hasta que encaje sobre el empalme de presilla.
1.
2.
1.
2.
3.
4.
Instalación
Agujero rotatorio
Eje de rotación
Junta a presión
Vista lateral A
Vista lateral B
1
2
2
3
1

Notas:
•
•
Si la apertura de su ventana es inferior a la
longitud mínima del montaje del tablero de
sellado, corte a la longitud deseada con una
sierra de mano.
Si la abertura de su ventana es mayor que la
longitud máxima del montaje del tablero de
sellado, utilice madera contrachapada o algo
similar para rellenar el hueco.
Instalación del montaje de tablero de
sellado en ventana corredera
Inserte el panel B en el panel A y ajuste a la
longitud o altura de la ventana.
Abra la ventana y coloque el montaje de
tablero de sellado en la ventana.
Asegúrese de que el ajuste es preciso y fíjelo
con el tornillo que se proporciona.
Cierre la ventana y fije todo en su lugar.
Acople el conector corto de la manguera de
extracción de calor al agujero elíptico.
El montaje de tablero de sellado ya está listo
para usar.
1.
2.
3.
4.
5.
6.
Desbloquee y abra por completo la hebilla
en forma de C.
Coloque el borde del conector circular
sobre la rosca inferior del conector de la
manguera de extracción de calor.
Empuje el conector circular hacia abajo
con firmeza hasta encajarlo en el
conector de manguera de extracción de
calor.
Vuelva a colocar la hebilla en forma de C
para asegurar.
1.
2.
3.
4.
1
4
Parte inferior
Conector circular
2
3
1
3
3
2
5
5
4
2
4
Panel A
Panel B
Ventana Horizontal
Ventana Vertical
English | 04
Instalación de la manguera de extracción
de calor
Español | 72

Abra la ventana y limpie las superficies
del marco y los batientes de polvo y
partículas.
Pegue la cinta de velcro alrededor de
todo el marco de la ventana. Nunca
pegue sobre el sellado de la ventana ya
que impedirá que la ventana se cierre por
completo.
Pegue la cinta de velcro alrededor de
todo el batiente de la ventana (por dentro
y por fuera). Compruebe que la ventana
puede cerrarse completamente.
Acople el lado A del montaje de tela de
sellado al velcro en el marco de la
ventana desde el centro hacia afuera.
Cierre y abra la ventana para asegurar
que la tela no queda atrapada por ningún
sitio.
Acople el lado B del montaje de tela de
sellado al velcro en el batiente de la
ventana desde el centro hacia afuera.
Abra un poco la ventana e inserte el
conector corto de la manguera de
extracción de calor en el montaje de tela
de sellado rodeando el borde con las
cremalleras para sujetarlo.
El montaje de tela de sellado ya está listo
para usar.
Notas:
•
•
No doble la manguera de extracción de
calor más de 45 grados. Debe ser tan corta
y recta como sea posible para garantizar
una buena circulación del aire.
No estire demasiado la manguera de
extracción de calor, ya que podría afectar a
la eficacia del aparato.
Instalación del montaje de tela de
sellado en ventana de bisagras
1.
2.
3.
4.
5.
6.
7.
8.
Cuadro
Lado A
Lado B
Marco de
la ventana
7
4 & 6
2 & 3
Ventanas con bisagras
que cierra la tela
73 | Español

Controles
Botón de encendido
Encender y apagar el aparato.
Botón del ventilador
Seleccionar una velocidad alta o baja.
Nota: Opción no disponible en modo de
deshumidificación.
Botón de modo
•
•
•
Modo de deshumidificación - Ideal para
reducir la humedad de la habitación en épocas
húmedas del año. El aparato deshumidificará
la habitación si la temperatura ambiente es
mayor o igual a 17 °C y el ventilador funciona
a baja velocidad. Si la temperatura ambiente
es igual o inferior a 15 °C, el aparato dejará de
deshumedecer la habitación y el ventilador
funcionará a baja velocidad. Nota: Debe
conectar la manguera de extracción de calor
para que el aire caliente y húmedo pueda
expulsarse de la unidad.
Nota: La temperatura solo se puede ajustar
en el modo de refrigeración.
Modo de suspensión
Seleccione el modo de suspensión para reducir
el consumo energético cuando el aparato está
funcionando en modo de refrigeración.
Para activarlo, pulse el botón de suspensión en
el control remoto o pulse al mismo tiempo los
botones de temporizador y bajar en el panel de
control. La pantalla parpadeará cinco veces
indicando «SL» para confirmar que se ha
seleccionado el modo de suspensión y luego
volverá a mostrar la temperatura establecida.
Después de dos horas la temperatura estableci-
da aumentará automáticamente 1 °C. Tras otras
dos horas, la temperatura aumentará automática-
mente otro 1 °C adicional y la velocidad del
ventilador cambiará a baja si no lo está ya. El
aparato seguirá funcionando con estos ajustes
hasta que se apague.
Para cancelar el modo de suspensión, pulse el
botón de suspensión en el control remoto o
pulse al mismo tiempo los botones de temporiza-
dor y bajar en el panel de control.
English | 04
Español | 74
Modo refrigeración - Ideal para enfriar
una habitación en climas cálidos. Durante
el modo de refrigeración, utilice los
botones de subir y bajar para ajustar la
temperatura deseada entre 16 y 30 °C. El
aparato enfriará la habitación si la
temperatura ambiente es superior a la
temperatura establecida. Si la temperatura
ambiente cae por debajo de la temperatura
establecida, el aparato detendrá la
refrigeración de la habitación y el ventilador
seguirá funcionando a velocidad alta o baja
(según se haya establecido). Nota: Debe
conectar la manguera de extracción de
calor para que el aire caliente y húmedo
pueda expulsarse de la unidad.
Modo de solo ventilador - El ventilador
funciona a velocidad alta o baja según se
haya establecido. La pantalla digital
muestra la temperatura ambiente. Nota: La
manguera de extracción de calor no tiene
que estar conectada al aparato.

•
•
•
Botón del temporizador
Asegúrese de que el aparato esté enchufado
y que la toma de corriente esté encendida.
Puse el botón del temporizador para activar la
función de temporizador.
Pulse los botones de subir y bajar para
ajustar el tiempo deseado (1-24 horas) hasta
el encendido.
Los dígitos horarios parpadearán cinco veces
para confirmar que se ha ajustado un
temporizador, y a continuación la pantalla
volverá a mostrar la temperatura ambiente.
Seleccione los ajustes deseados antes de
encender el aparato.
Puede pulsar el botón del temporizador para
comprobar el tiempo restante hasta el
encendido.
Para cancelar el temporizador de encendido
pulse el botón del temporizador dos veces.
Nota: Si durante el modo de refrigeración se
ajusta la temperatura, la pantalla mostrará la
temperatura establecida. Si no se selecciona
ninguna configuración, el aparato se encenderá
y funcionará según los ajustes establecidos
anteriormente.
Establecer un temporizador de apagado:
Nota: Si durante el modo de refrigeración se
establece una temperatura determinada, esta
aparecerá en la pantalla.
Botones de subir y bajar
Utilice los botones de subir y bajar para:
1.
2.
3.
4.
5.
6.
7.
1.
2.
3.
Pulse los botones de subir y bajar para
ajustar el tiempo deseado (1-24 horas)
hasta el apagado.
Los dígitos horarios parpadearán cinco
veces para confirmar que se ha ajustado un
temporizador, y a continuación la pantalla
volverá a mostrar la temperatura ambiente.
Seleccione los ajustes deseados antes de
encender el aparato.
Puede pulsar el botón del temporizador
para comprobar el tiempo restante hasta el
apagado.
Para cancelar el temporizador de apagado
pulse el botón del temporizador dos veces.
4.
5.
6.
7.
8.
75 | Español
Establezca un temporizador de encendido y
apagado entre 1 y 24 horas.
Establecer un temporizador de encendido:
Establecer la temperatura que desea
durante el modo de refrigeración
Establecer las horas deseadas hasta el
encendido/apagado cuando ajuste un
temporizador.
Alternar entre °C y °F manteniendo
pulsados ambos botones a la vez.
Asegúrese de que el aparato esté
enchufado y que la toma de corriente esté
encendida.
Pulse el botón de encendido para encender
el aparato.
Puse el botón del temporizador para activar
la función de temporizador.

Apague el aparato y desenchúfelo de la
toma de corriente.
Coloque una bandeja de condensados
debajo de la salida de agua.
Desenrosque la tapa de drenaje,
desconecte el tapón de drenaje y deje
que el agua caiga en la bandeja de
condensados.
Para vaciar todo el depósito de agua,
incline ligeramente el aparato hacia atrás
sobre sus ruedas posteriores. No lo
incline más de 30 grados.
Una vez vacío, devuelva el aparato en una
posición totalmente vertical y vuelva a
colocar el tapón y la tapa de drenaje.
Vacíe la bandeja de condensados.
Cuando el depósito de agua se llena
suenan 10 pitidos. La luz indicadora de
tanque de agua lleno se iluminará y el
aparato dejará de funcionar para evitar
que el tanque de agua desborde.
Para vaciar el depósito de agua:
1.
2.
3.
4.
5.
6.
Tara de
drenaje
Tapón de agua
Salida de agua
Nota: Si la bandeja de condensados no
tiene capacidad para recoger todo el
agua del aparato, vuelva a colocar la tapa
de drenaje para evitar que el agua caiga
al suelo. Vacíe la bandeja y continúe
desde el paso 2.
3
4
30º
English | 04Español | 76
Vaciar el depósito de
agua
Bandeja poco profunda
2
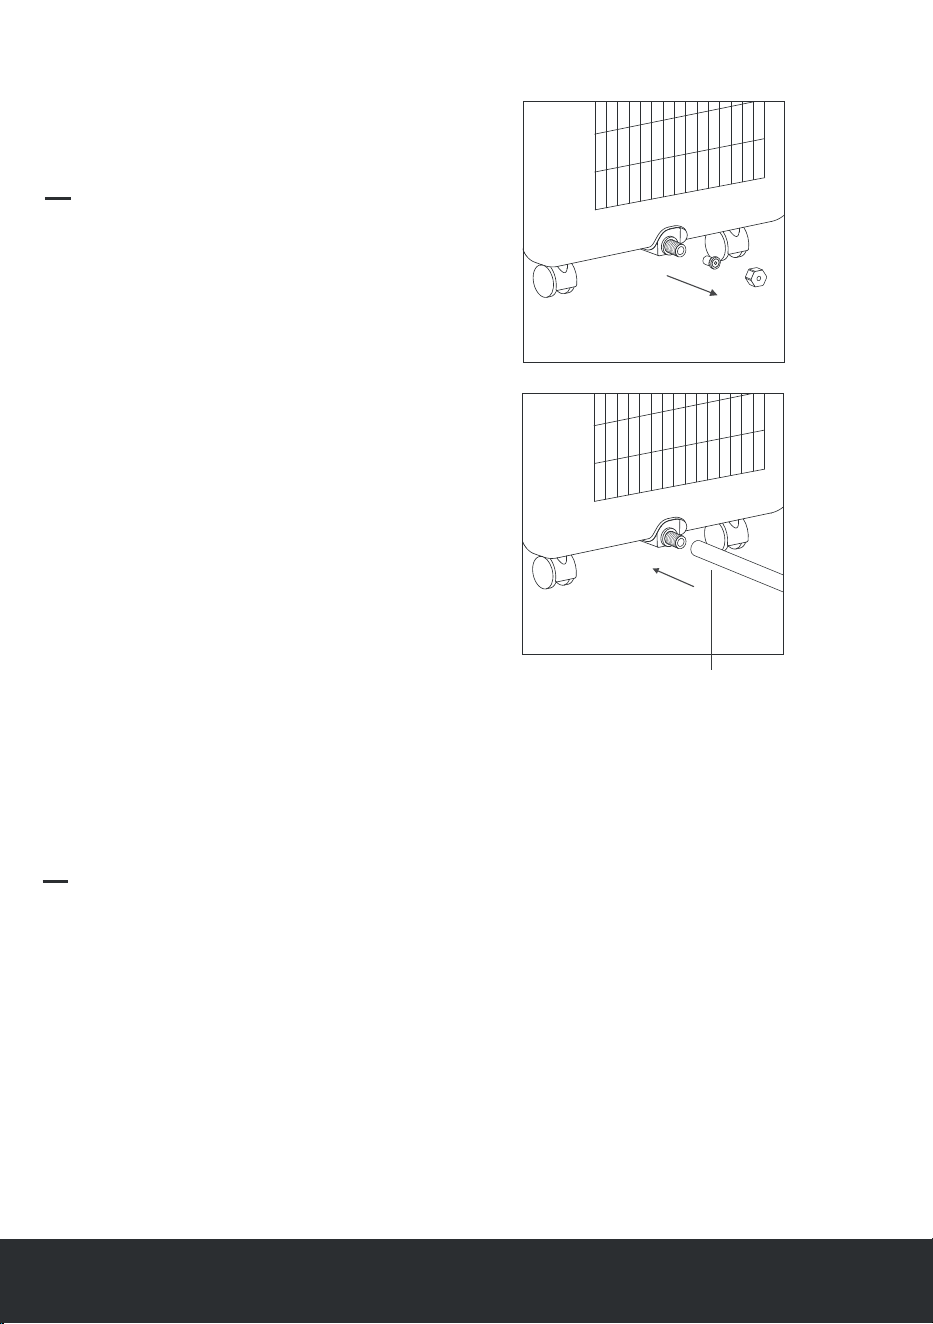
Nota: Cuando el aparato está ajustado a una
temperatura cálida, se recomienda dejar conectada
la manguera de agua, ya que el depósito de agua
se llenará a un ritmo más rápido que cuando el
aparato está ajustado a una temperatura más fría.
1
2
Manguera de agua
Desenrosque la tapa de drenaje, quite el tapón
de drenaje y guárdelos en un lugar seguro.
Inserte la manguera de agua en el tubo de
desagüe.
Asegúrese de que el extremo de la manguera
de agua tenga una salida de drenaje adecuada
(p. ej. un sumidero o cubo).
Se recomienda conectar la manguera para
conseguir un viciado continuo cuando se vaya a
usar durante un period.
Para conectar la manguera de agua:
Conectar la manguera
de agua para un
vaciado continuo
1.
2.
3.
Apague el aparato y desenchúfelo de la toma de
corriente. Utilice un paño suave y seco para
retirar el polvo y la suciedad de la superficie
externa del aparato.
Limpieza general:
Limpieza
77 | Español
Limpieza de la manguera de
extracción de calor:
1.
2.
3.
Quite el tubo de extracción de calor de la
parte trasera del aparato y el montaje de
sellado correspondiente de la ventana.
Utilice un paño suave y seco para retirar
el polvo o suciedad.
Vuelva a colocar el tubo de extracción de
calor.

Limpie los filtros del evaporador y el
condensador del aparato cada dos
semanas.
Para acceder a los filtros:
Limpieza del filtro:
1.
2.
3.
Position de agarre
Filtro
1
2
English | 04Español | 78
Almacenamiento
Sujete los filtros del evaporador y el
condensador y retírelos con cuidado.
Utilice un cepillo duro y/o aspiradora para
limpiar cualquier rastro de polvo o
partículas en los filtros.
Vuelva a colocar los filtros del evaporador
y el condensador.
Para un almacenamiento a largo plazo:
1.
2.
3.
4.
Vacíe el depósito de agua y deje la tapa y el
tapón de drenaje quitados.
Haga funcionar el aparato en modo de solo
ventilador con el ajuste de velocidad baja
durante 12 horas para permitir que el
interior del aparato se seque por completo.
Apague el aparato, vuelva a colocar la tapa
y el tapón de drenaje, desenchufe el cable
de alimentación y enróllelo alrededor del
organizador de cables.
Quite la manguera de extracción de calor.
5.
6.
Quite las baterías del control remoto.
Cubra el aparato y todos sus accesorios con
una funda resistente al agua y guárdelo en
un lugar seguro y seco, fuera del alcance de
los niños.

Non c’è corrente.
Serbatoio dell’acqua pieno.
Temperatura della stanza troppo bassa.
Filtri sporchi.
Intasamento dell’ingresso o dell’uscita
dell'aria.
Arriva la luce diretta del sole.
Appliance not on a flat surface.
Initiation of overheat protection.
Too far from appliance.
The remote control is not pointing towards
the receiving head of the remote control
The batteries are dead.
Pipe temperature sensor failure.
Room temperature sensor failure.
Anti-frost protection.
Il condizionatore dell'aria
non si mette in funzione.
Noisey.
The compressor does not
work.
The remote control does
not work.
Display showing E1.
Display showing E2.
Display showing E4.
Pulire i filtri.
Rimuovere l’ostruzione.
Tirare le tende.
Place the appliance on a flat surface.
Wait three minutes until the temperature
decreases and then turn on the unit..
Bring the remote control closer to the
appliance and ensure that the remote
control is pointing toward the receiving
head of the remote control.
Replace the batteries.
Arrange for a professional to check the
pipe temperature sensor and related
circuits.
Arrange for a professional to check the
room temperature sensor and related
circuits.
Appliance returns to operating at chosen
settings once the internal pipe temperature
exceeds 8°C.
Protección antihielo
Si el compresor funciona continuamente
durante más de 10 minutos y la temperatura
interna del tubo desciende por debajo de 0 °C
durante más de 20 segundos, el compresor y el
motor de pulverización de agua se apagarán.
La pantalla mostrará E4 y el aparato activará la
protección antihielo, dejando todos los botones
del panel de control inactivos menos el botón
de encendido. Una vez que la temperatura
interna del tubo supere los 8 °C, la protección
antihielo se detendrá y el aparato volverá a
funcionar según los ajustes establecidos.
Protección de retardo del compresor
Para proteger el compresor, aparte de cuando el
aparato y el compresor se activan por primera
vez tras encenderlos mediante el botón de
encendido, habrá un retardo de tres minutos
cada vez que el compresor se apague y
encienda.
Características de Seguridad
Informations utiles
79 | Español
Problema Causa
Sin energía.
Depósito de agua lleno.
Temperatura ambiente demasiado baja.
Temperatura ambiente más baja que la
temperatura seleccionada en el modo de
refrigeración.
Intasamento dell’ingresso o dell’uscita
dell'aria.
Arriva la luce diretta del sole.
Appliance not on a flat surface.
Initiation of overheat protection.
Too far from appliance.
The remote control is not pointing towards
the receiving head of the remote control
The batteries are dead.
Pipe temperature sensor failure.
Room temperature sensor failure.
Anti-frost protection.
El aire acondicionado no
funciona.
Noisey.
The compressor does not
work.
The remote control does
not work.
Display showing E1.
Display showing E2.
Drene el agua almacenada en la unidad.
Rimuovere l’ostruzione.
Tirare le tende.
Place the appliance on a flat surface.
Wait three minutes until the temperature
decreases and then turn on the unit..
Bring the remote control closer to the
appliance and ensure that the remote
control is pointing toward the receiving
head of the remote control.
Replace the batteries.
Arrange for a professional to check the
pipe temperature sensor and related
circuits.
Arrange for a professional to check the
room temperature sensor and related
circuits.
Appliance returns to operating at chosen
settings once the internal pipe temperature
exceeds 8°C.
Solución
Conecte la unidad a una toma corriente
que reciba suministro y enciéndalo.
Se recomienda que esta unidad
funcione a entre 5 y 32 °C.
Aumente la temperatura establecida
por encima de la temperatura ambiente.
Cierre puertas y ventanas y elimine
otras fuentes de calor.
Limpie los filtros.
Hay puertas o ventanas abiertas,
u otras fuentes de calor.
Filtros sucios.
Refrigeración deficiente.

Esta marca indica que este producto no se debe desechar en ningún país de la
UE junto con otros residuos domésticos. De esta forma se evitan posibles daños
al medio ambiente y al bienestar del ser humano. Póngase en contacto con las
autoridades locales para obtener más información relacionada con los sistemas
de recogida disponibles. Si es posible, recíclelo de forma responsable para
promover la reutilización sostenible de recursos.
Desechos
No power.
Water tank full.
Ambient temperature too low.
Ambient temperature lower than the set
temperature cooling mode.
There is direct sunlight.
Doors and windows are open or there are
other heat sources.
Entrada de aire o salida de aire obstruida.
Hay luz solar directa.
Las baterías están agotadas.
The air-conditioner is not
operating.
Poor cooling.
El compresor no funciona.
El control remoto no
funciona.
Se lee E1 en la pantalla.
Se lee E2 en la pantalla.
Se lee E4 en la pantalla.
Connect the unit to a live power socket
and turn it on.
Drain the water stored in the unit.
Ambient temperature too low.
It is recommended that this unit be
operated at 5-32°C.
Increase the set temperature above the
ambient temperature.
Draw curtains.
Close doors and windows and remove
other heat sources.
Retire la obstrucción.
Cierre las cortinas.
Cambie las baterías.
Pida a un profesional que compruebe el
sensor de temperatura del tubo y los
circuitos relacionados.
Pida a un profesional que compruebe el
sensor de temperatura ambiente y los
circuitos relacionados.
Una vez que la temperatura interna del
tubo supere los 8 °C, el aparato volverá a
funcionar según los ajustes establecidos.
Coloque el aparato sobre
una superficie plana.
Espere tres minutos hasta que la
temperatura disminuya y luego
encienda la unidad.
Acerque más el control remoto,
asegurándose de que apunta al
cabezal receptor del control remoto
que hay en el aparato.
El aparato no está sobre
una superficie plana.
Inicie la protección contra
sobrecalentamiento.
Está demasiado alejado del aparato.
El control remoto no está apuntando
hacia el cabezal receptor del
control remoto.
Hay un fallo en el sensor de
temperatura de la manguera.
Hay un fallo en el sensor de
temperatura ambiente.
Protección antihielo.
Ruidoso.
Español | 80

65 | Español

Labs Atrium, Stables Market, Chalk Farm
Road, London, NW1 8AH, UK.
www.probreeze.com
© Copyright 2018