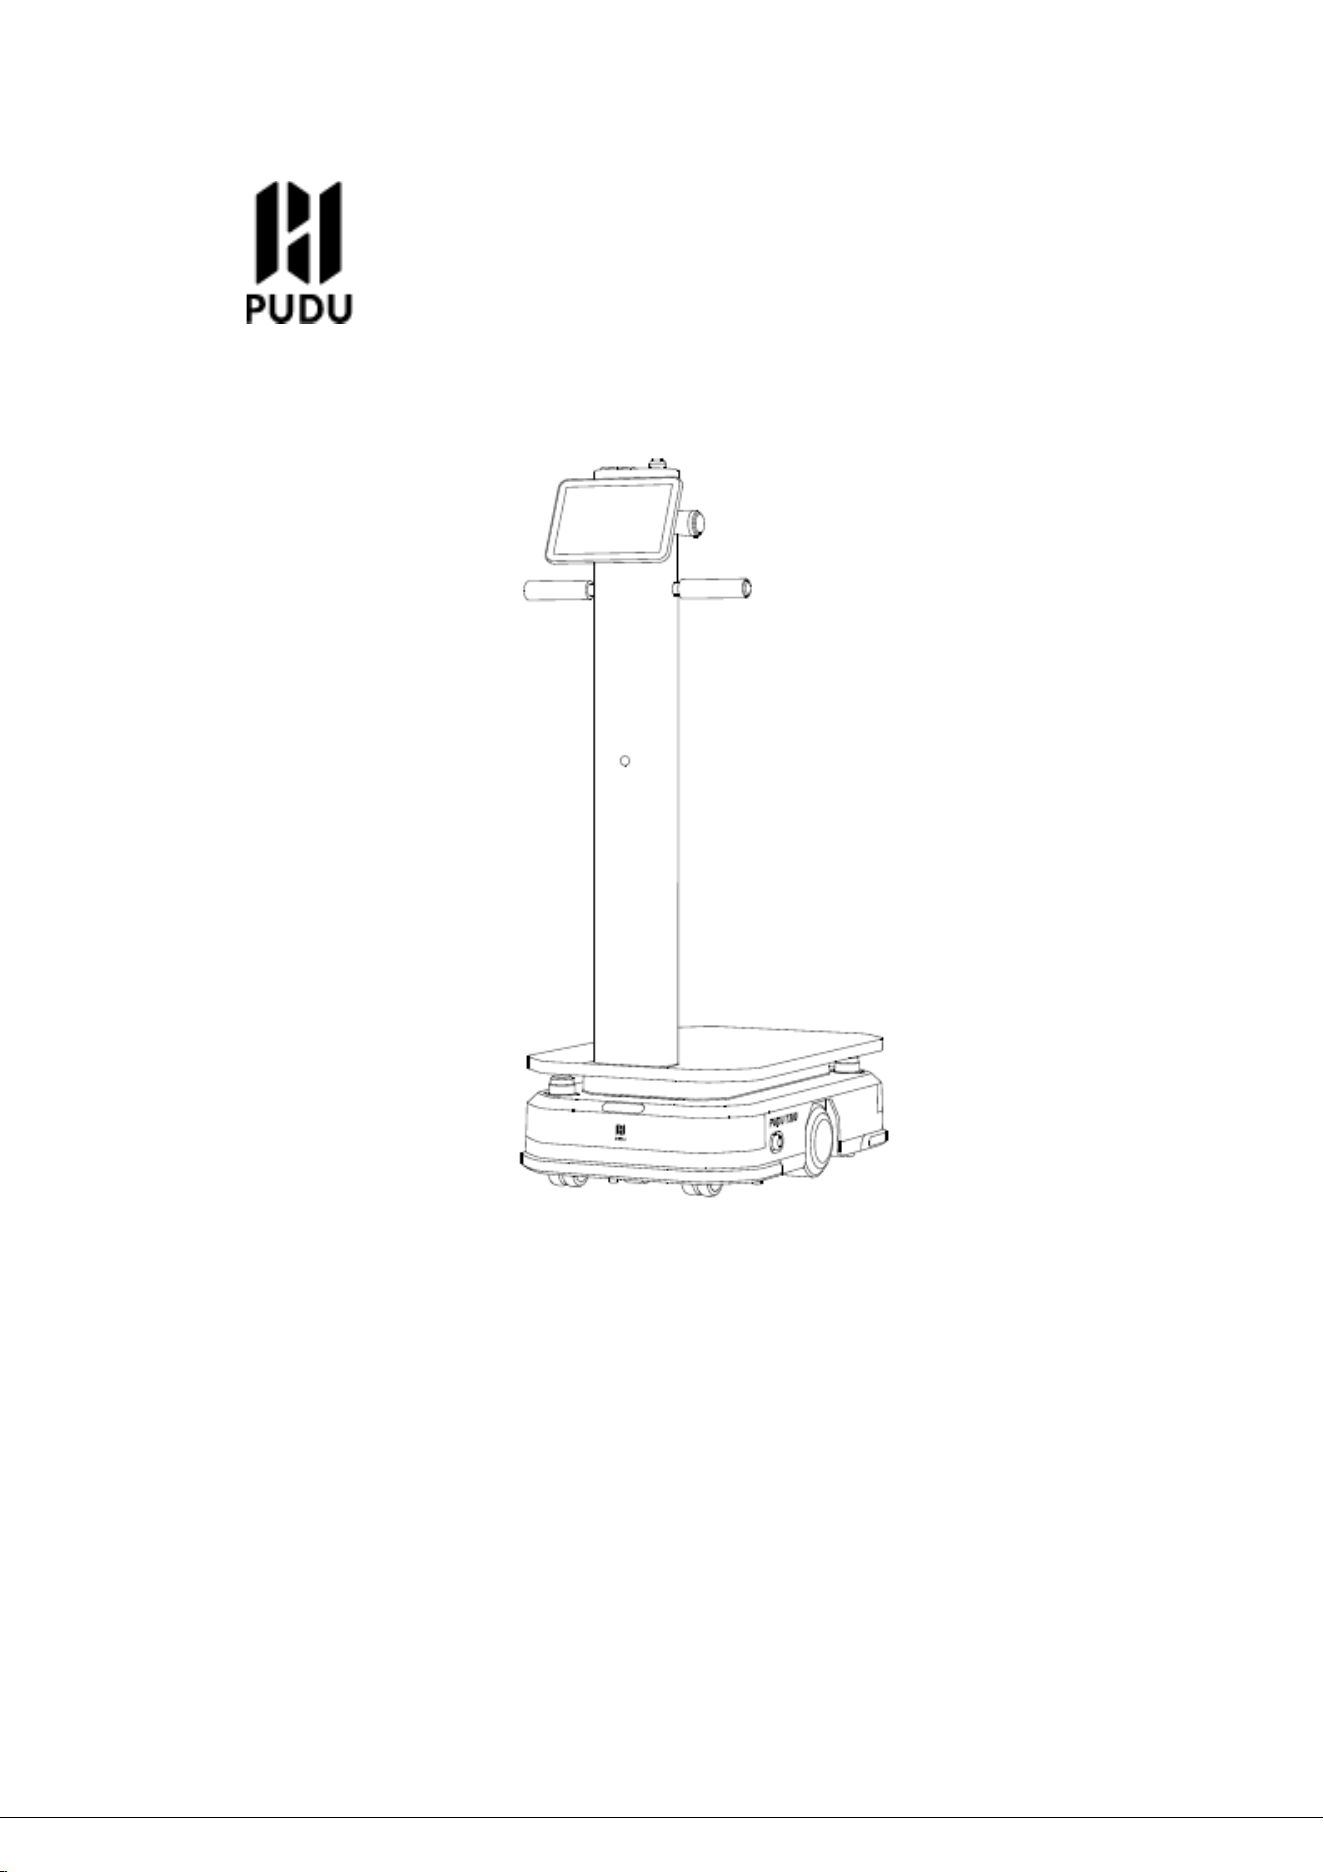
PUDU T300 Operation Guide
Version:V1.0.3
Model:WTID01、WTIDL1
Shenzhen Pudu Technology Co., Ltd.

PUDU T300 Operation Guide
Version: V1.0.3 Operation Guide
1
Copyright © 2024 Shenzhen Pudu Technology Co., Ltd. All rights reserved.
This document may not be copied, reproduced, transcribed or translated, in part or in whole, by any
persons or organizations, or be transmitted in any form or by any means (electronic, photocopy,
recording, etc.) for any commercial purposes without the prior written permission of Shenzhen Pudu
Technology Co., Ltd. The product specifications and information mentioned herein are for reference
only and are subject to change without prior notice. Unless otherwise specified, the manual is
intended as a guide only and all the statements are provided without warranty of any kind.
PUDU T300 Operation Guide
Version: V1.0.3 Operation Guide
2
Introduction
Purpose
This manual describes the usage precautions, the functions, technical specifications, and
detailed operations, daily maintenance of PUDU T300 to help users better understand and work
with the robot.
Signs
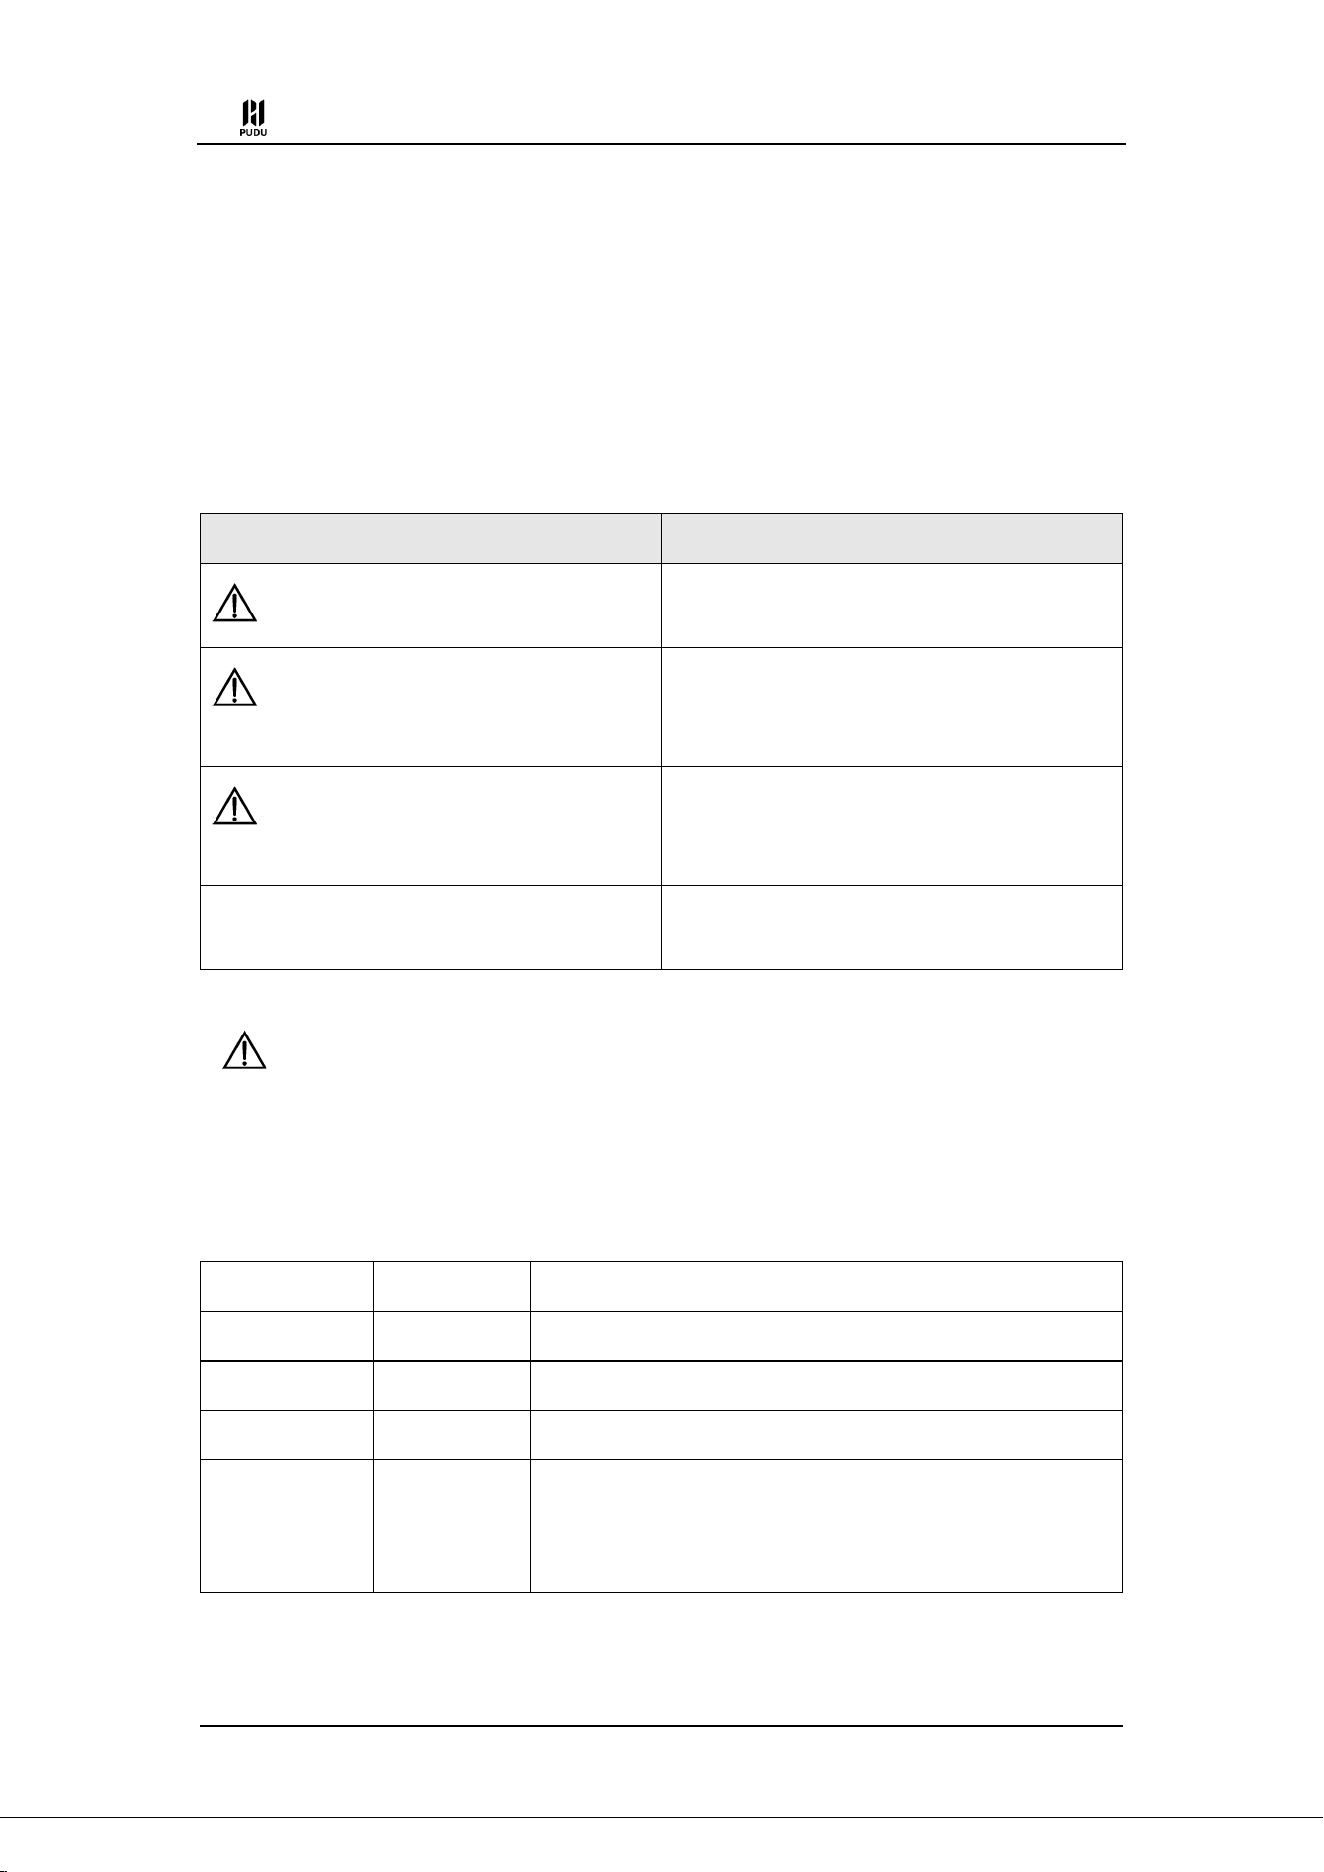
The signs listed below may appear in this manual with the following meanings.
Sign
Description
Danger
Indicates high potential hazards, which could cause
death or serious personal injury if not avoided.
Warning
Indicates moderate or low potential hazards, which
could cause minor personal injury or robot damage if
not avoided.
Caution
Indicates potential risks, which could cause robot
damage, data loss, or unpredictable consequences if
neglected.
Note
Provides additional information as the emphasis and
supplement to the main text.
Caution
Please keep this manual in a safe place, as it contains important safety and operating instructions.
Operator must complete training and read this manual before using the robot..
Changelog
Version
Release Date
Description
v1.0.0
2024/06/14
Initial version
v 1.0.1
2024/07/27
Overall optimization and improvements of the document
v 1.0.2
2024/08/28
Added descriptions related to operating configuration instructions
V1.0.3
2025/02/27
(1) Add descriptions based on the v1.0.3 software content
(2) Enhance the instructions for custom rack production.
(3) Add safety precautions for usage

PUDU T300 Operation Guide
Version: V1.0.3 Operation Guide
3
Contents
1. Safety Instructions ............................................................................................................. 1
1.1 Electrical requirements .............................................................................................. 1
1.2 Use requirements ....................................................................................................... 1
1.3 Environmental requirements ..................................................................................... 2
1.4 Intended Use .............................................................................................................. 2
1.5 Foreseeable Misuse ................................................................................................... 2
1.6 User ........................................................................................................................... 2
2. Product Introduction .......................................................................................................... 4
2.1 Overview ................................................................................................................... 4
2.2 Appearance & Components ....................................................................................... 4
2.3 Technical specifications ............................................................................................ 5
3. Battery and charging.......................................................................................................... 7
3.1 To charge the robot .................................................................................................... 7
3.2 Battery Replacement ................................................................................................. 7
3.3 Battery Storage .......................................................................................................... 8
4. How to use ....................................................................................................................... 10
4.1 Basic operations....................................................................................................... 10
4.1.1 Power On and Power Off ................................................................................ 10
4.1.2 Emergency Stop Switch .................................................................................. 10
4.2 Operating Configuration Instructions ...................................................................... 11
4.2.1 Robot Unloaded Parameters ............................................................................ 11
4.2.2 Parameters related to the lifting function ........................................................ 12
4.3 Mode Introduction ................................................................................................... 15
4.3.1 Delivery mode ................................................................................................. 15
4.3.2 Cruise mode ..................................................................................................... 19
4.3.3 Lifting Mode .................................................................................................... 22
4.3.4 Other Application ............................................................................................ 25
4.4 Setting ...................................................................................................................... 29
4.4.1 General ............................................................................................................ 29

PUDU T300 Operation Guide
Version: V1.0.3 Operation Guide
4
4.4.2 Robot Functions............................................................................................... 29
4.4.3 Map Settings .................................................................................................... 34
4.4.4 Music ............................................................................................................... 35
4.4.5 Password and security ..................................................................................... 35
4.4.6 System Update ................................................................................................. 36
4.4.7 Debug .............................................................................................................. 36
5. Robot Operation .............................................................................................................. 37
5.1 Description of Robot Operation Logic .................................................................... 37
5.2 Obstacle Detection................................................................................................... 37
5.3 Safe Center of Mass Distribution for Loads ............................................................ 38
6. Interface Description ....................................................................................................... 39
7. Troubleshooting ............................................................................................................... 40
7.1 Troubles during Operation ...................................................................................... 40
7.2 Positioning Failure................................................................................................... 40
7.3 Charging Failure ...................................................................................................... 41
7.4 Power-on Failure ..................................................................................................... 41
7.5 Robot Does Not Move Smoothly ............................................................................ 41
8. Maintenance and Care ..................................................................................................... 42
8.1 Component Maintenance ......................................................................................... 42
8.2 Cleaning Method ..................................................................................................... 43
9. Compliance Information .................................................................................................. 44
9.1 Federal Communications Commission Compliance Statement .............................. 44
9.2 Industry Canada Compliance Statement.................................................................. 44
9.3 Disposal and Collecting Information ....................................................................... 44

PUDU T300 Operation Guide
Version: V1.0.3 Operation Guide
1
1. Safety Instructions
1.1 Electrical requirements
Charge the robot using the charger delivered with it. Do not use other chargers. If the charger
is damaged, replace it in a timely manner.
Please charge the battery to 100% before first use.
When the battery is lower than 20%, charge the robot in a timely manner. Do not run the robot
with a low battery for a long time. The battery life may be reduced.
Make sure that the power supply voltage complies with the voltage range specified on the
charger, otherwise the charger may be damaged.
Do not drop the charger or hit it. Otherwise, damage to the charger may be caused.
Please dispose of the battery according to local regulations and do not dispose of it as household
waste. Improper handling may cause the battery to explode.
1.2 Use requirements
Do not block the robot sensor. Otherwise, the robot may fail to move properly or get lost.
Cleaning or maintenance work is prohibited while the robot is powered on.
Do not pick up or place any items while the robot is moving, to avoid property losses or
personal injury caused by accidental collisions.
Do not push or carry the robot while it is moving, to prevent it from running abnormally.
Do not touch the robot when the drive wheels, lifting mechanisms, towing devices, or other
moving parts are in operation.
The robot can be disassembled or repaired only by trained professionals. In case of any fault
with the robot, please contact a technical support engineer immediately.
When moving the robot, please observe the requirements on the maximum allowed weight for
a single person stipulated by local laws or regulations. While the robot is being moved, please
be sure to always keep it in an upright position.
When the robot is in motion, no playing is allowed in front of the robot to avoid unnecessary
harm.
Although the robot features automatic obstacle avoidance, never block the robot moving at a
high speed to avoid any accidents.
Please prevent the robot from violent impact or shock to avoid any damage.
Do not clean the robot with caustic chemicals, cleansers, or detergents. Always clean the robot
by wiping it with a clean and dry cloth.
In case of an emergency while the robot is in motion, please press the emergency stop button
located at the top to stop the robot.
Do not spill any liquids inside the robot to prevent damage.
If the collision sensors are impacted while the robot is moving, the robot will stop and pause
the task. At this point, you can follow the on-screen instructions to resume the task.

PUDU T300 Operation Guide
Version: V1.0.3 Operation Guide
2
1.3 Environmental requirements
Do not use or charge the robot in dangerous environments with high temperature, high pressure,
or risks of flames or explosions, so as to avoid personal injury or damage to the product.
Do not use the robot in a humid environment or in the presence of liquid or viscous substances
on the ground, so as to avoid damage to the robot.
Do not use the robot in locations where wireless devices are explicitly prohibited, as this may
interfere with other electronic devices or cause other hazards.
Do not use the robot in a humid environment or on surfaces covered with fluid or gooey stuff
to avoid damage to the robot.
This robot is suitable for use on dry, flat surfaces. It is not suitable for use in slippery
environments, environments with steps, steep slopes. If the robot gets stuck in a pit, please
push the robot's chassis to help it get out. Please do not forcefully pull or push the handle.
It is necessary to use the robot under the product operating environment declared in this manual.
Otherwise, there may be abnormal operation of the equipment or other hazards.
Do not dispose of the robot and its accessories as ordinary domestic waste. Please comply with
local regulations on the disposal of the robot and its accessories and support recycling.
1.4 Intended Use
The PUDU T300 is designed as a delivery robot for industrial and commercial scenarios
requiring heavy load handling, operated by trained personnel for setup and usage. This product is
equipped with environmental perception capabilities and can perform obstacle avoidance navigation
based on changes in the surrounding environment, allowing it to work collaboratively with people.
1.5 Foreseeable Misuse
Any application of the PUDU T300 in situations inconsistent with its intended use is considered
misuse. This includes but is not limited to:
Exceeding the robot's maximum load capacity.
Placing loads in a manner that does not conform to the load distribution stated in the
manual.
Using the robot to transport people.
Modifying the robot's hardware configuration without training or permission.
Using the robot in scenarios that do not comply with those stated in the manual.
Utilizing safety components such as the collision switch, emergency stop switch, and
obstacle avoidance sensors for other purposes.
1.6 User
Users must receive the necessary training related to the tasks they are expected to perform
before using the PUDU T300. Based on the actual application and maintenance scenarios of the
robot, users can be categorized into three main types: Debugging Personnel, Maintenance Personnel,
General Users and Indirect Users . The responsibilities of each type of user are as follows:
(1) Debugging Personnel
Responsible for assessing the risks associated with the robot's operating environment. Based

PUDU T300 Operation Guide
Version: V1.0.3 Operation Guide
3
on actual environmental conditions, they should make appropriate modifications to ensure the safe
and reliable operation of the robot. Specific tasks include:
Product operation debugging, including mapping and robot parameter configuration.
Installing and removing modules that need to be permanently mounted on the robot.
Conducting necessary safety tests for robot operation in specific scenarios.
(2) Maintenance Personnel
Responsible for the routine upkeep and maintenance of the robot. They also create and modify
maps when the robot's operating environment changes. Specific tasks include:
Maintaining and servicing the robot.
Creating or modifying the robot's map and conducting necessary operational testing.
Creating or modifying robot tasks.
(3) General Users
General users of the robot should familiarize themselves with the relevant safety precautions
outlined in this document and utilize the basic functions of the robot. Specific tasks include:
Sending tasks to the robot.
Loading or unloading goods onto or from the robot.
(4) Indirect Users
Personnel who do not directly operate the robot are considered indirect users. The users of the
robot must clearly inform indirect users of the necessary safety precautions during the robot's
operation.
Caution
General Users and Indirect User are prohibited from maintaining equipment.
PUDU T300 Operation Guide
Version: V1.0.3 Operation Guide
4
2. Product Introduction
2.1 Overview
PUDU T300 is a delivery robot applied to material transfer in industrial scenarios and large
load handling in commercial scenarios. It is equipped with a load carrier chassis as the core and an
operation screen for user-friendly use. The maximum load of the robot can reach 300kg, and the
carrying space is open and flexible, which can be matched with different accessories to meet
different carrying needs. Meanwhile, it has rich interfaces, which is convenient for hardware
expansion and IOT interconnection.
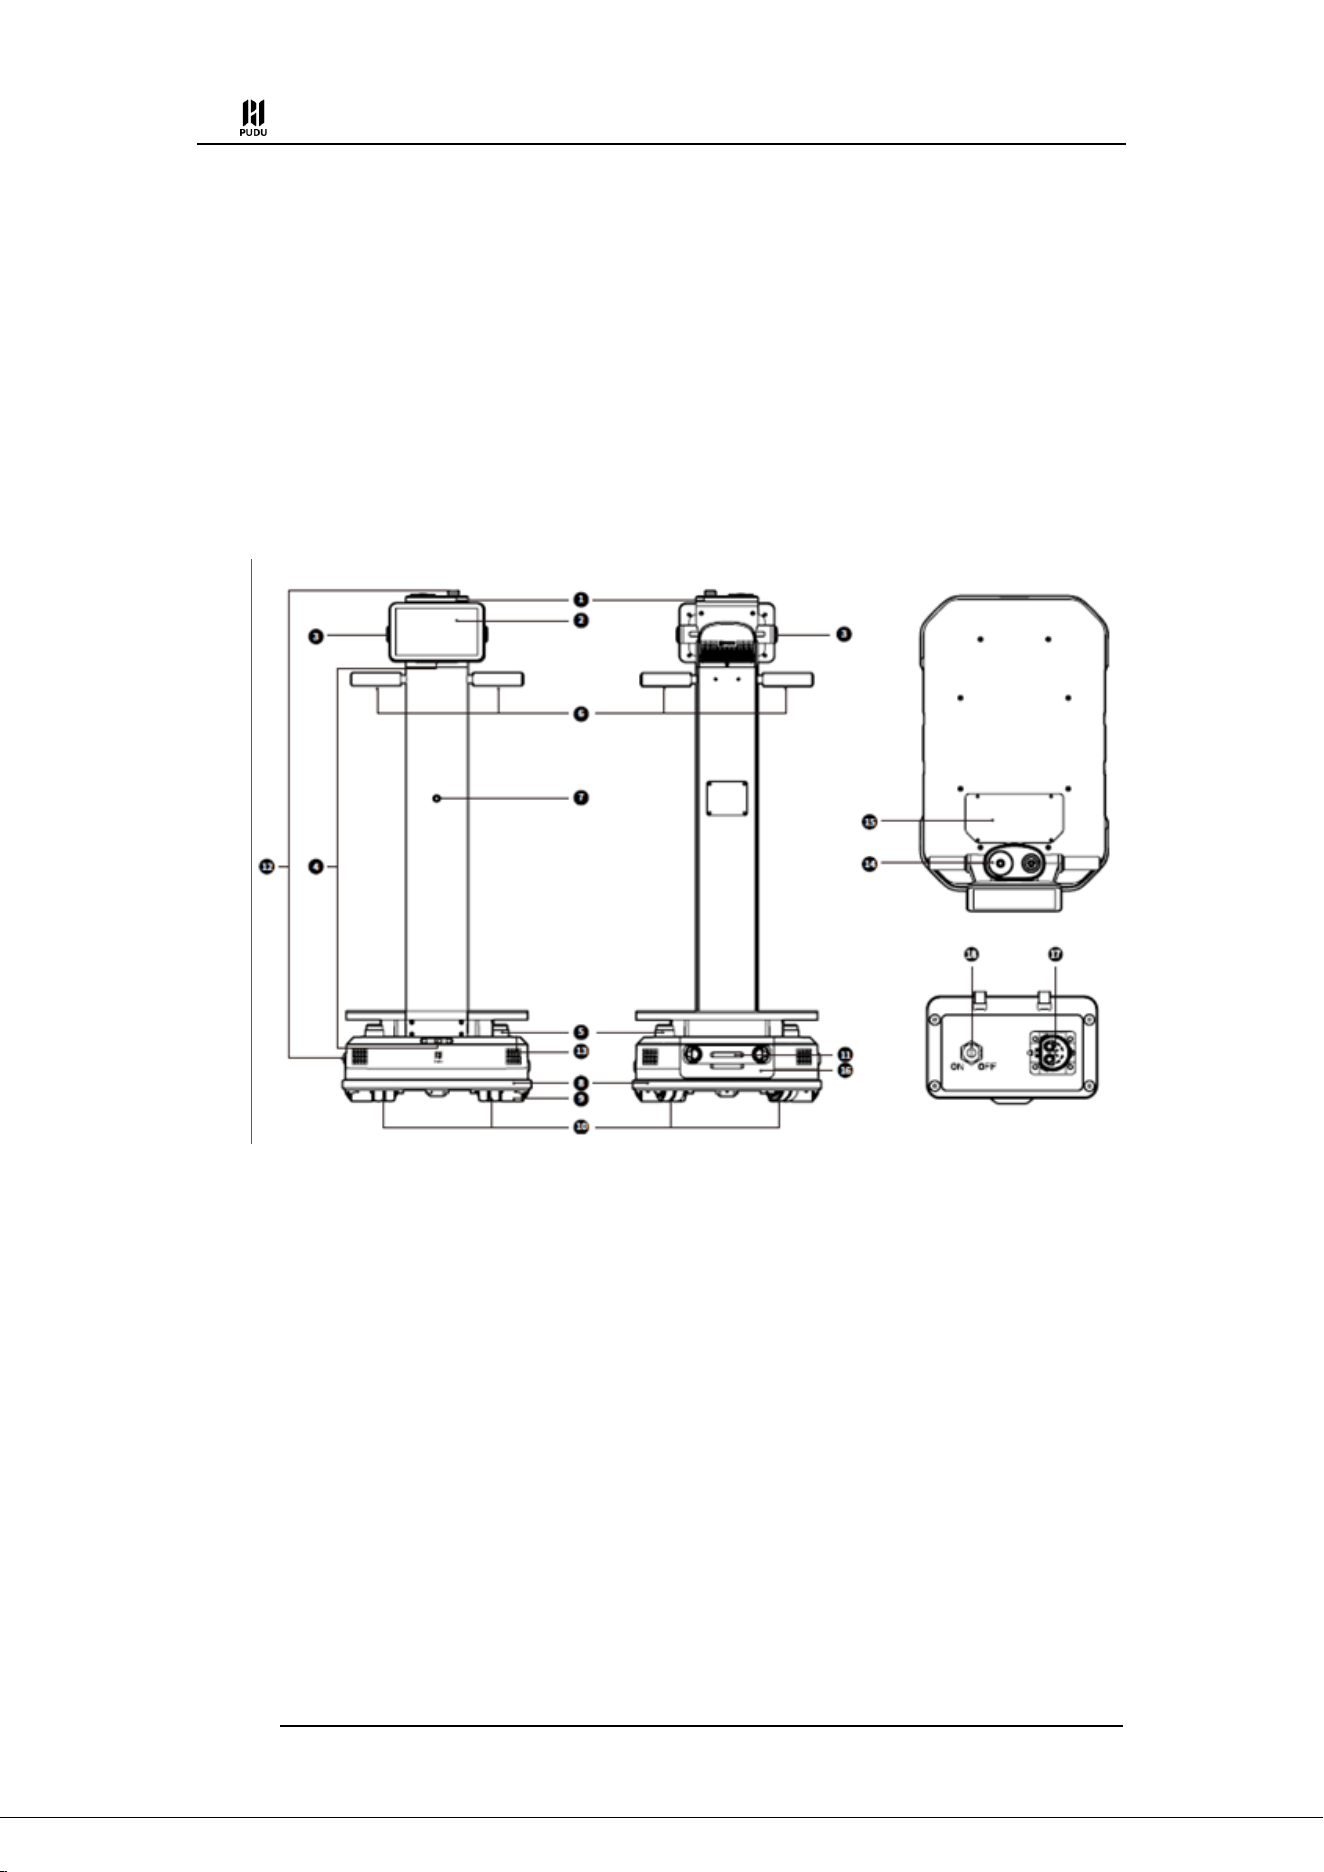
2.2 Appearance & Components
Front
Back
Charging port
PUDU T300 Operation Guide
Version: V1.0.3 Operation Guide
5
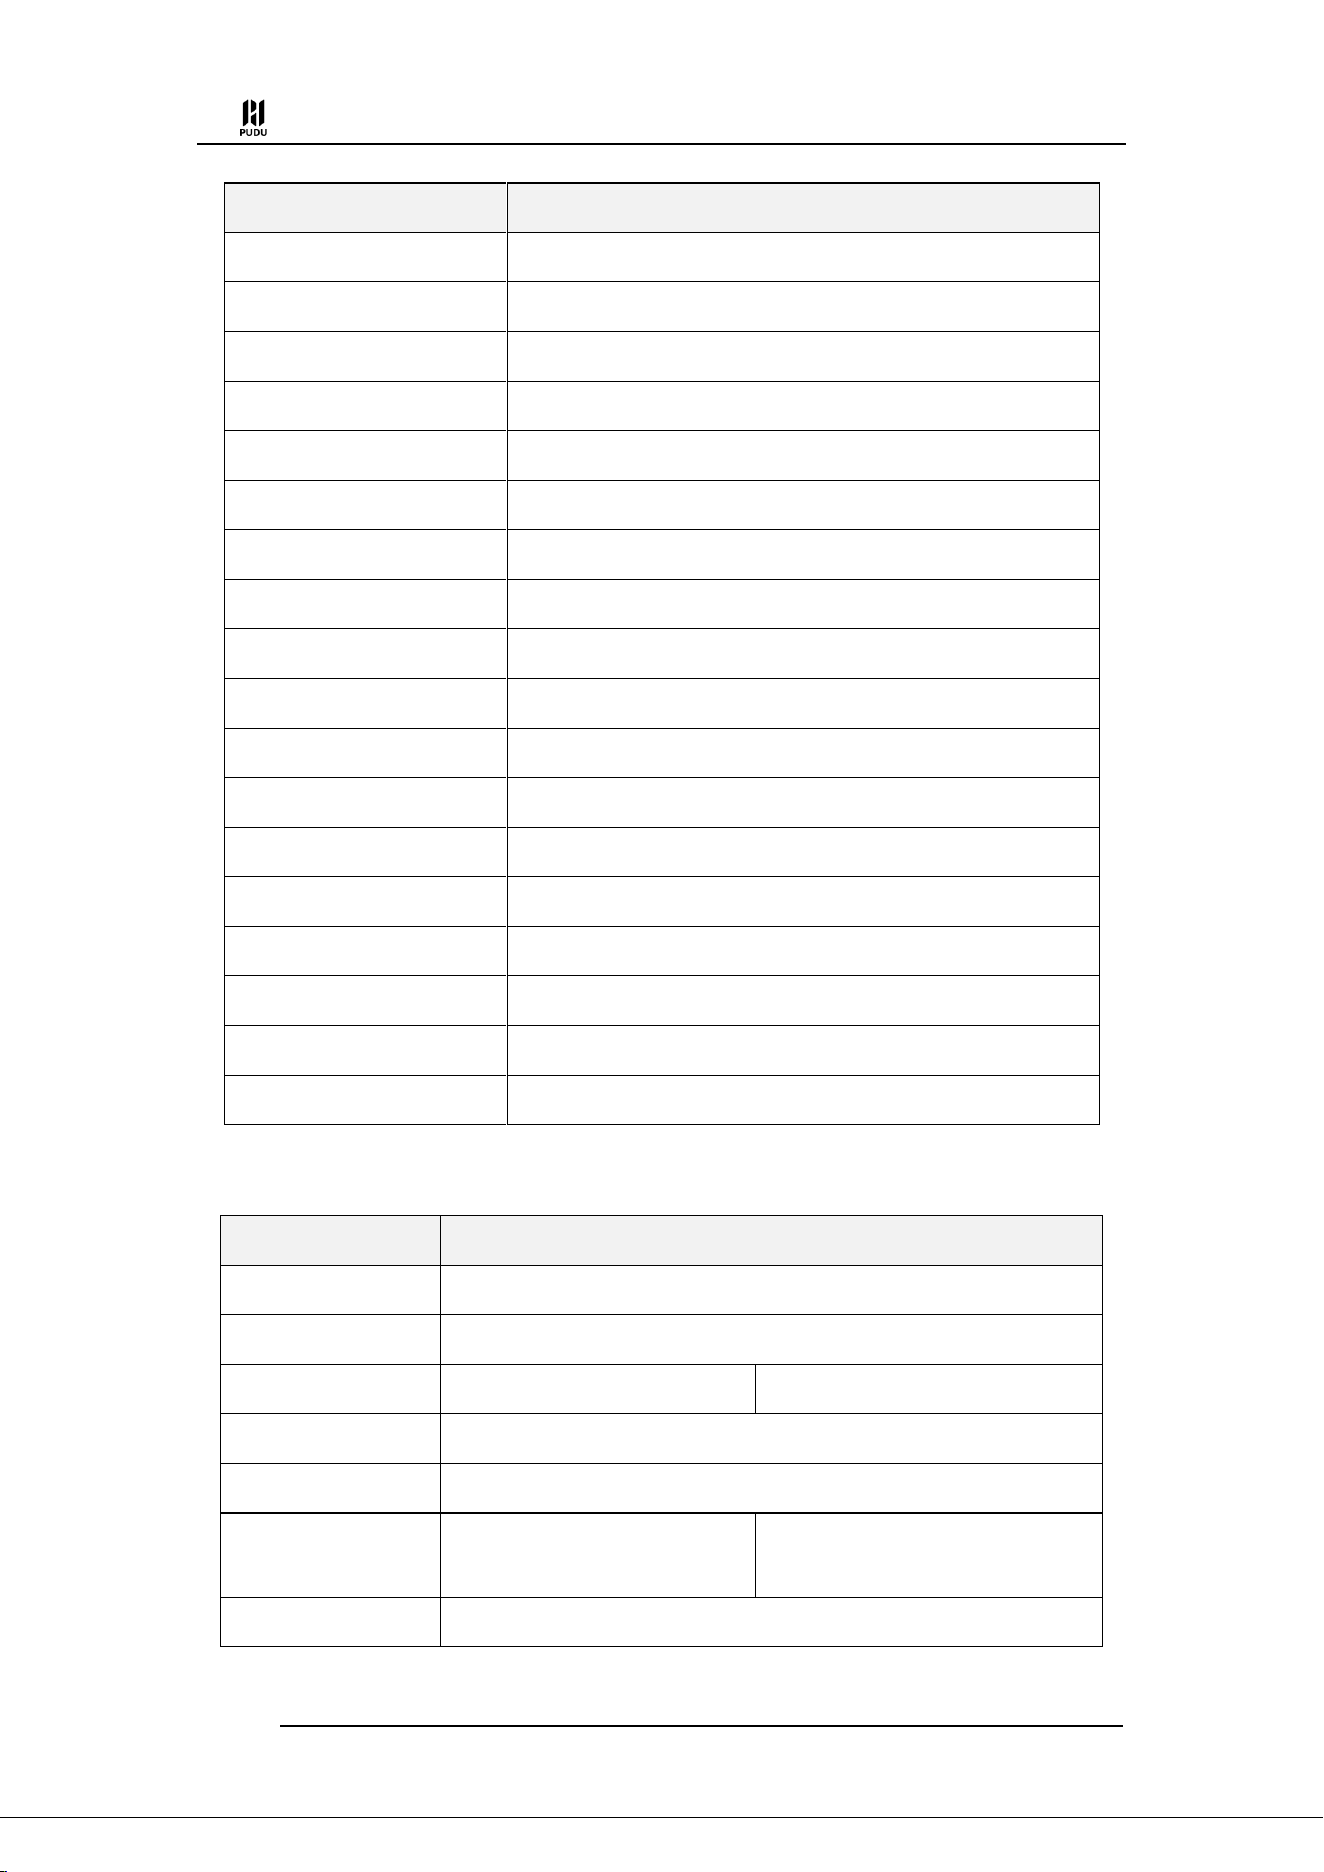
No.
Description
1
Indicator light
2
LCD screen
3
Shortcut button
4
RGBD
5
Lidar
6
Handles
7
Front view camera
8
Collision sensor
9
Drive wheels
10
Auxiliary wheels
11
Charging electrode plate
12
Emergency stop switch
13
Power switch
14
Top view camera
15
Interface window
16
Battery box
17
Charging port
18
Brake switch
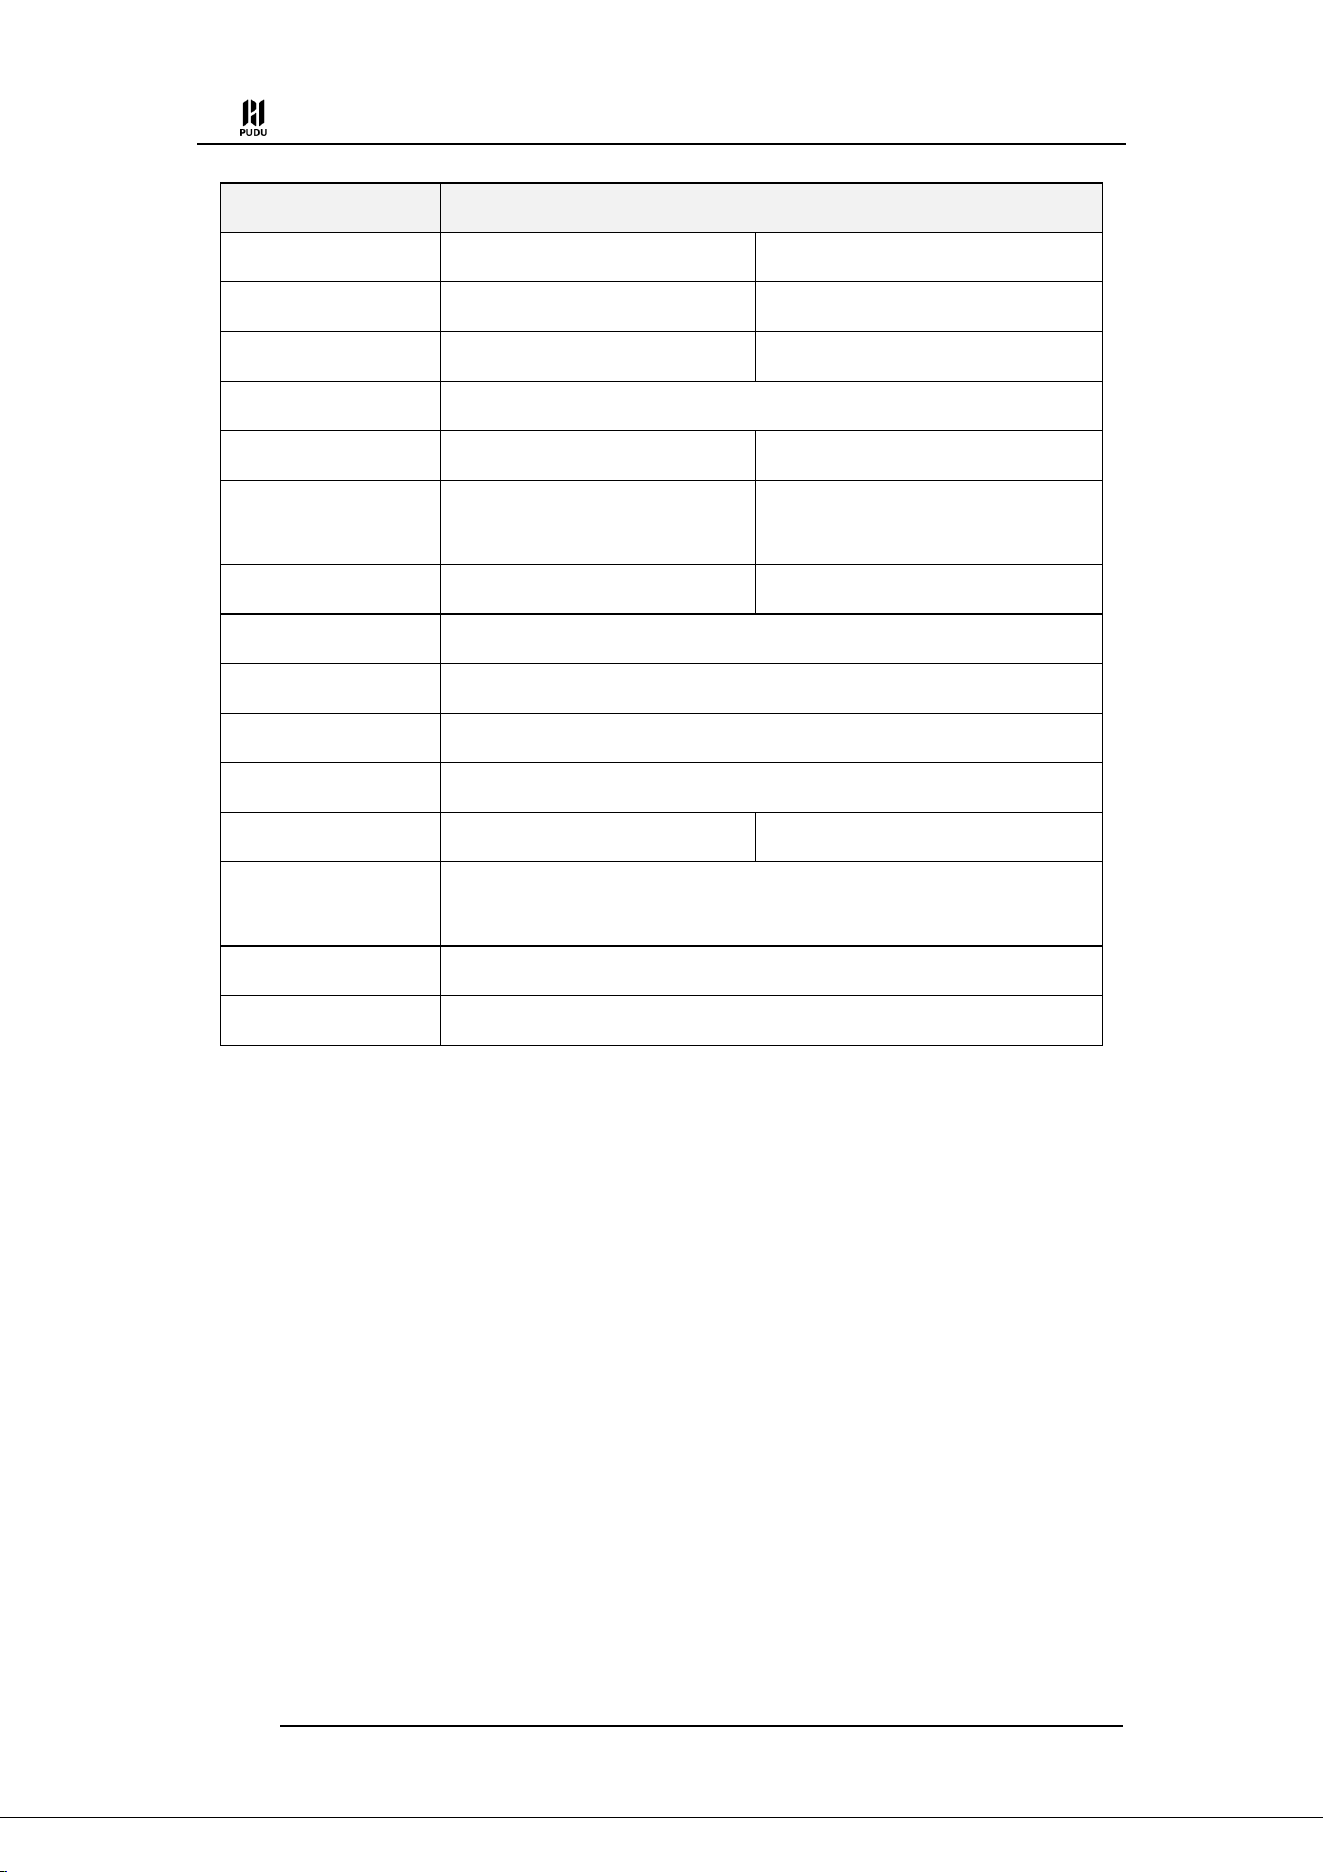
2.3 Technical specifications
Product Feature
Description
Operating voltage
DC 20.8 V~29.2 V
Battery capacity
30 Ah
Max. load
300 kg
661.39 pounds
Charging time
About 2 h (from 0 % to 90 %)
Battery life
12 h (None load); 6 h (Max. load)
Overall weight
65 kg (WTID01); 81 kg (WTIDL1)
143.30 pounds (WTID01); 178.57
pounds (WTIDL1)
Screen specifications
10.1'' LCD screen
PUDU T300 Operation Guide
Version: V1.0.3 Operation Guide
6
Product Feature
Description
Overall dimensions
835 × 500 × 1350 mm
32.87 × 19.69 × 53.15 inches
Chassis dimensions
780 × 500 × 240 mm
30.71 × 19.69 × 9.45 inches
Cruise speed
0.2–1.2 m/s (adjustable)
0.66-3.94 ft/s (adjustable)
Navigation method
Visual-SLAM, Laser-SLAM
Min. Path Clearance
60 cm
23.62 inches
Max. surmountable
height
20 mm
0.79 inch
Max surmountable gap
35 mm
1.38 inches
Operating system
Android
Speaker power
10 W × 2 stereo speaker
Working environment
Temperature: 0 °C to 40 °C; humidity: ≤ 85% RH
Storage environment
Temperature: -20 °C to 60 °C; humidity: ≤ 85% RH
Operating altitude
< 2000 m
6561.68 ft
Road surface
requirements
Indoor environment with flat, smooth surfaces
Charger power input
AC 100 V~240 V, 50/60 Hz
Charger power output
29.2 V, 15 A
PUDU T300 Operation Guide
Version: V1.0.3 Operation Guide
7
3. Battery and charging
The PUDU T300 is powered by a replaceable lithium battery, which can be recharged with a
wired charger or charging post that comes with the robot.
3.1 To charge the robot
Caution
Before using the robot for the first time, it is necessary to fully charge the robot's battery to 100%..
If the robot has not been used for more than a month, it is also necessary to fully charge the battery to 100%
before using it again.
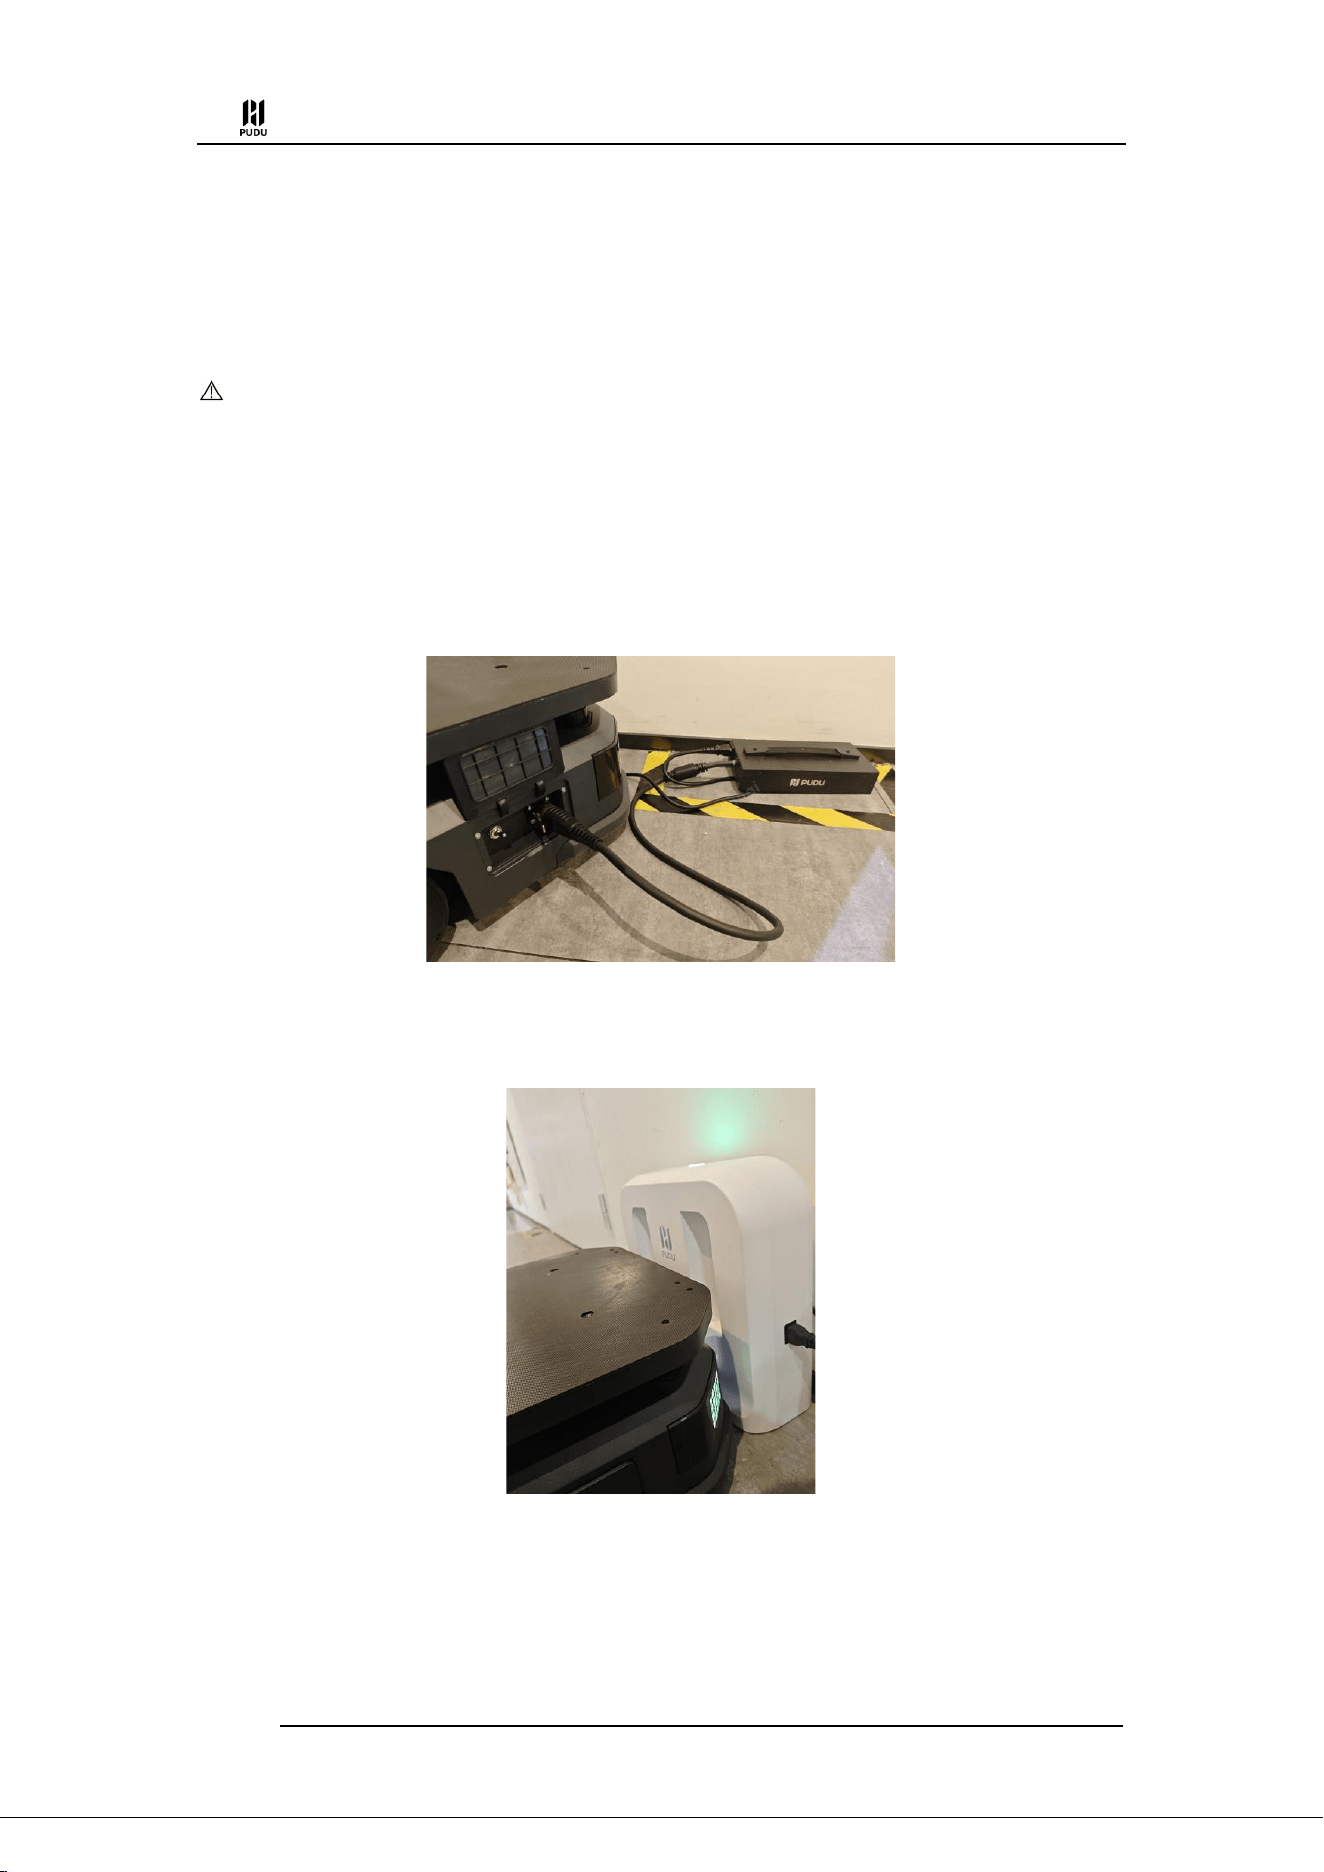
The robot supports charging using both a charger and a charging pile.
a) Charging with charger: Simply insert the provided charger into the robot's charging port to start
the charging process.
b) Charging with a charging pile: After deploying the charging pile according to the instructions,
power on the robot. On the robot's home page interface, click the "Charge Now" button to initiate
automatic charging.
3.2 Battery Replacement
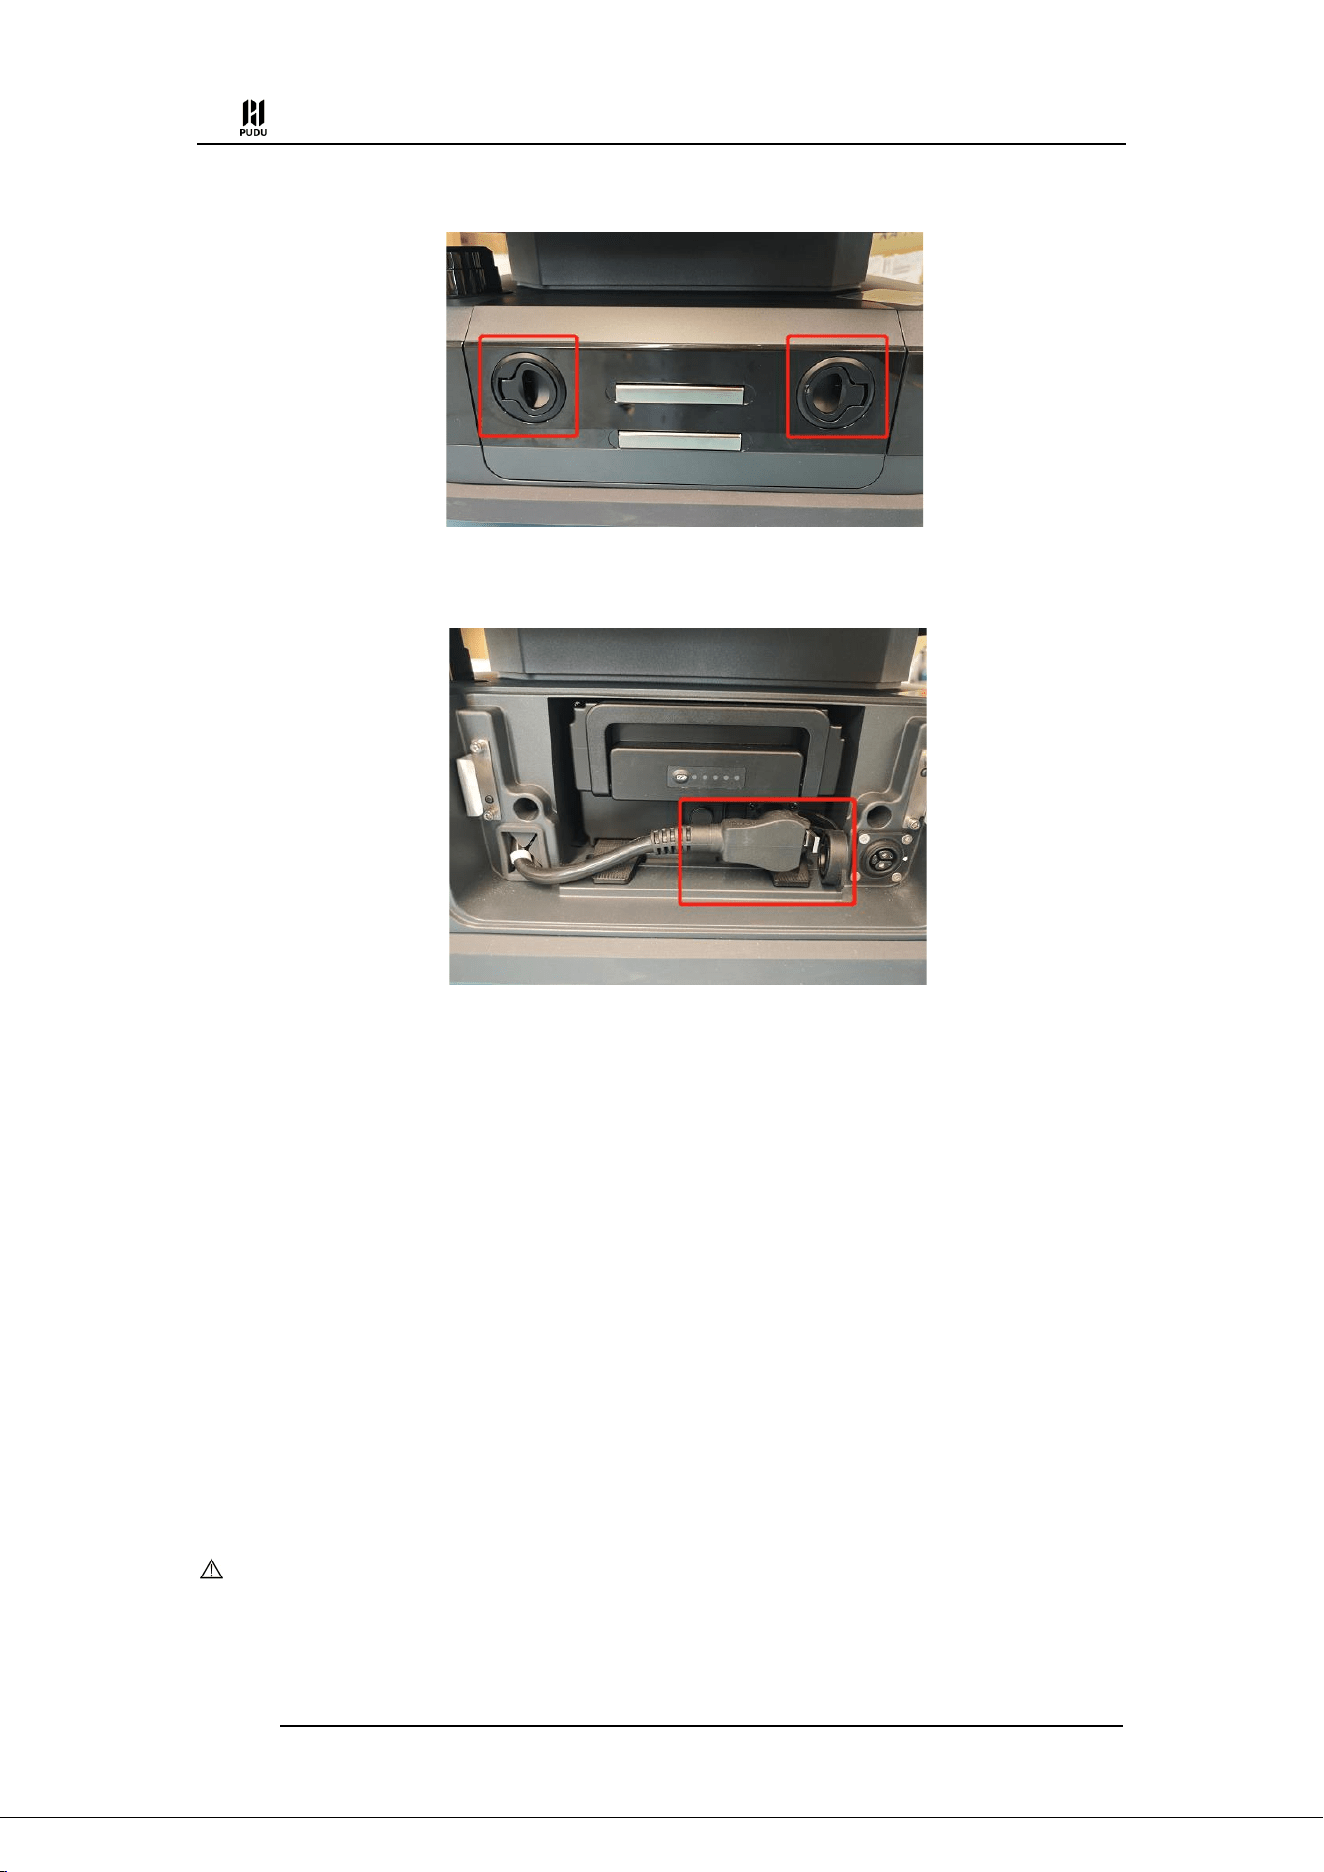
In addition to recharging the robot's battery, it is also possible to directly replace the battery.
The specific steps are as follows:
Step 1 With the robot powered off, use both hands to pull the battery compartment cover
PUDU T300 Operation Guide
Version: V1.0.3 Operation Guide
8
tab and remove the battery compartment cover.
Step 2 Disconnect the power connector attached to the battery and remove the battery from
the robot. Replace it with a new battery.
.
Step 3 After replacing the battery, connect the power connector and cover the battery
compartment. The robot can now be powered on and used.
3.3 Battery Storage
When the battery is removed for independent charging, it is exposed to the environment. Therefore,
during the charging and storage of the battery, the environmental conditions should meet the
requirements for battery usage. If the charging or battery storage environment does not meet the
usage requirements, it may shorten the battery's lifespan. The specific regulations are as follows:
(1) Charging:
⚫ Temperature: 0° C ~ 45 °C
⚫ Humidity:25% RH ~75% RH
(2) Storage
⚫ Temperature: -20℃ ~ 60 ℃ (Whitin 1 month), -20 ℃ ~ 45 ℃ (Whitin 3 months), 20 ℃ ±
5 ℃ (Whitin 6 months).
⚫ Humidity: 25% RH ~50% RH
Caution
The battery should not be exposed to or immersed in any liquids, as this may damage the battery.
It is recommended to charge the battery to a level of 30% to 50% before storing it to maintain the battery's

PUDU T300 Operation Guide
Version: V1.0.3 Operation Guide
9
lifespan.
If the robot is not used for a long period (more than 15 days), it is recommended to remove the battery to avoid
excessive discharge of the battery.
PUDU T300 Operation Guide
Version: V1.0.3 Operation Guide
10
4. How to use
4.1 Basic operations
4.1.1 Power On and Power Off
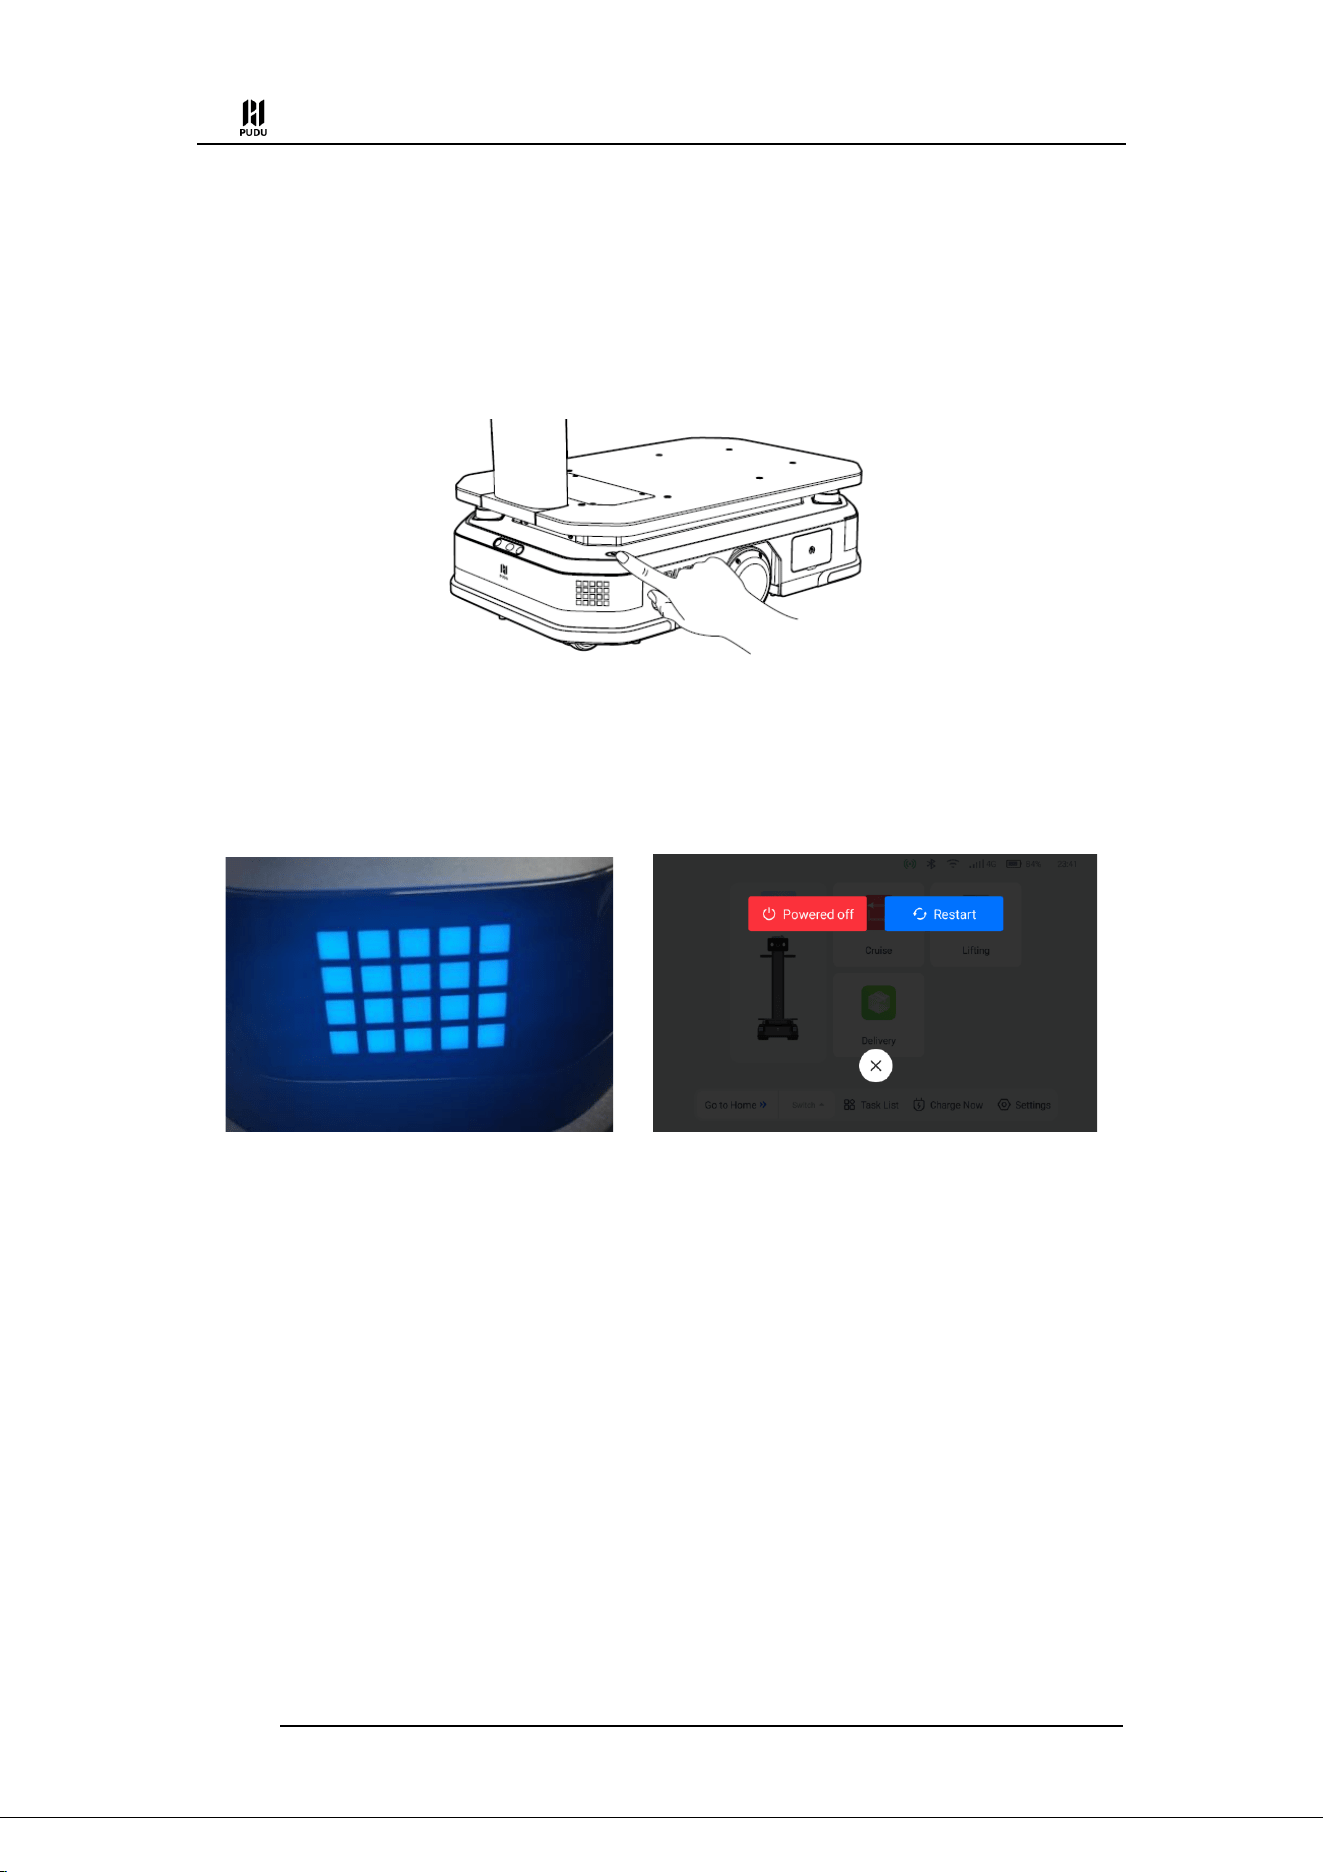
The power on and power off of the robot can be achieved by operating the power switch button.
The power switch button is located on the base of the robot.
Powering on: Move the robot to the startup location. Press and hold the power switch until all
chassis indicator lights turn blue, indicating that the robot has been successfully powered on.
Powered off: Press and hold the power switch for 3 seconds, and a shutdown prompt will pop up.
Click "Power off" and the light strip on the top of the robot and the screen will turn off, indicating
that the robot has been successfully powered off.
Power on — All indicator lights turn on Power off — Shutdown confirmation pop-up
4.1.2 Emergency Stop Switch
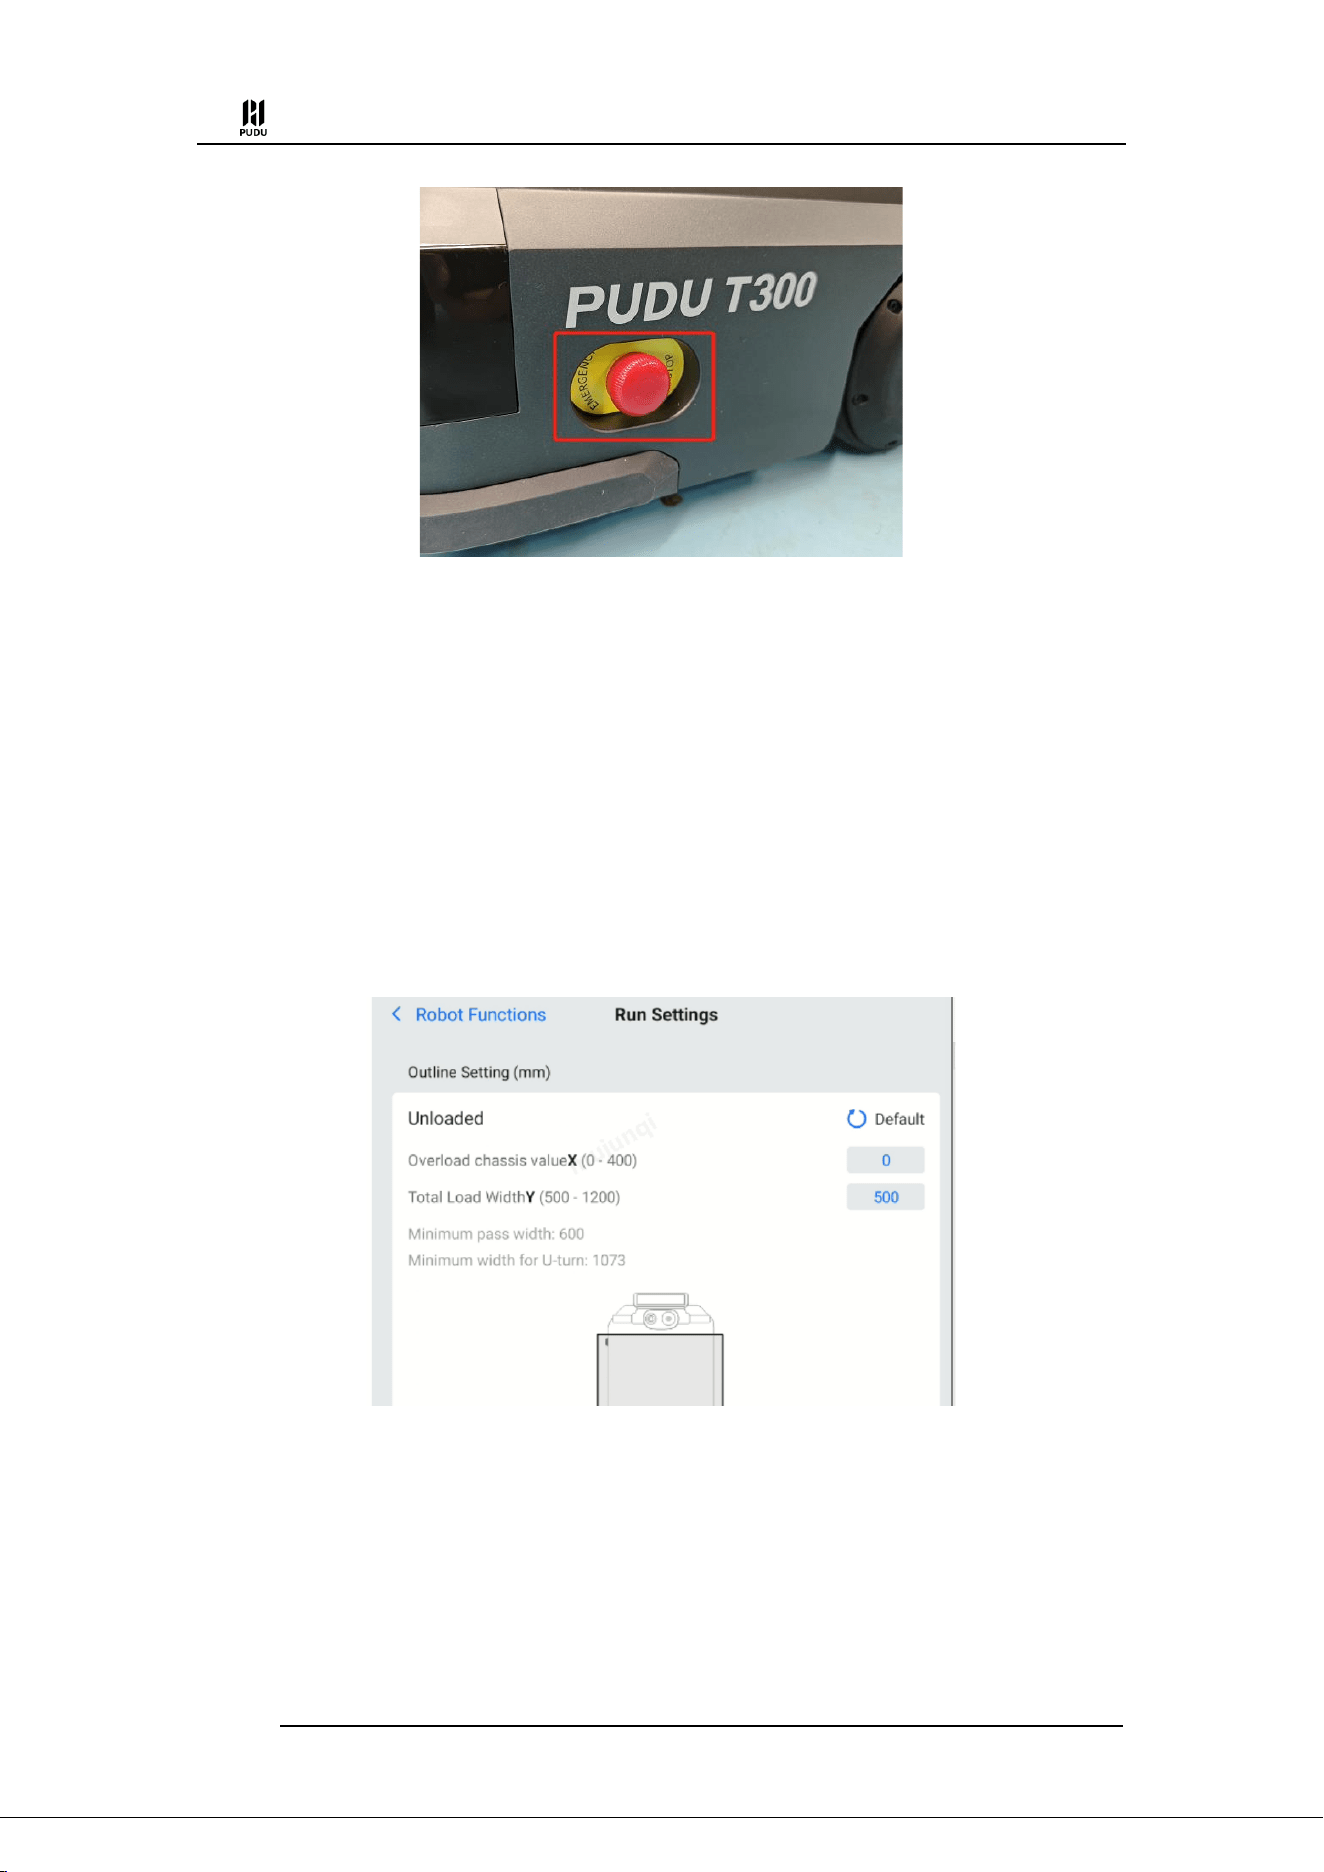
There are emergency stop switches located on the top and on both sides of the base of the robot.
In case of an emergency during operation, the emergency stop switch can be pressed to halt the
robot's movement. To restore the robot's operation, rotate the emergency stop switch clockwise as
indicated on the interface.
PUDU T300 Operation Guide
Version: V1.0.3 Operation Guide
11
4.2 Operating Configuration Instructions
T300 is a product that allows users to flexibly connect external structures and hardware. Before
using the robot, it is necessary to configure the robot's operating parameters correctly by clicking
on "Settings" - "Robot Functions" - "Run Setting" on the robot's homepage.
4.2.1 Robot Unloaded Parameters
Users can fix brackets or other structures on the T300 load surface according to their actual
application needs. We define the state of the robot with the bracket fixed but without any load
attached as the "Unloaded" of the robot.
(1) Default Values
In the "Run Settings" section, the default values have been set for the robot's state without any
brackets installed.
(2) External Structure Size Requirements
To ensure safe use, the following considerations should be taken into account when designing
the installation of external fixed structures:
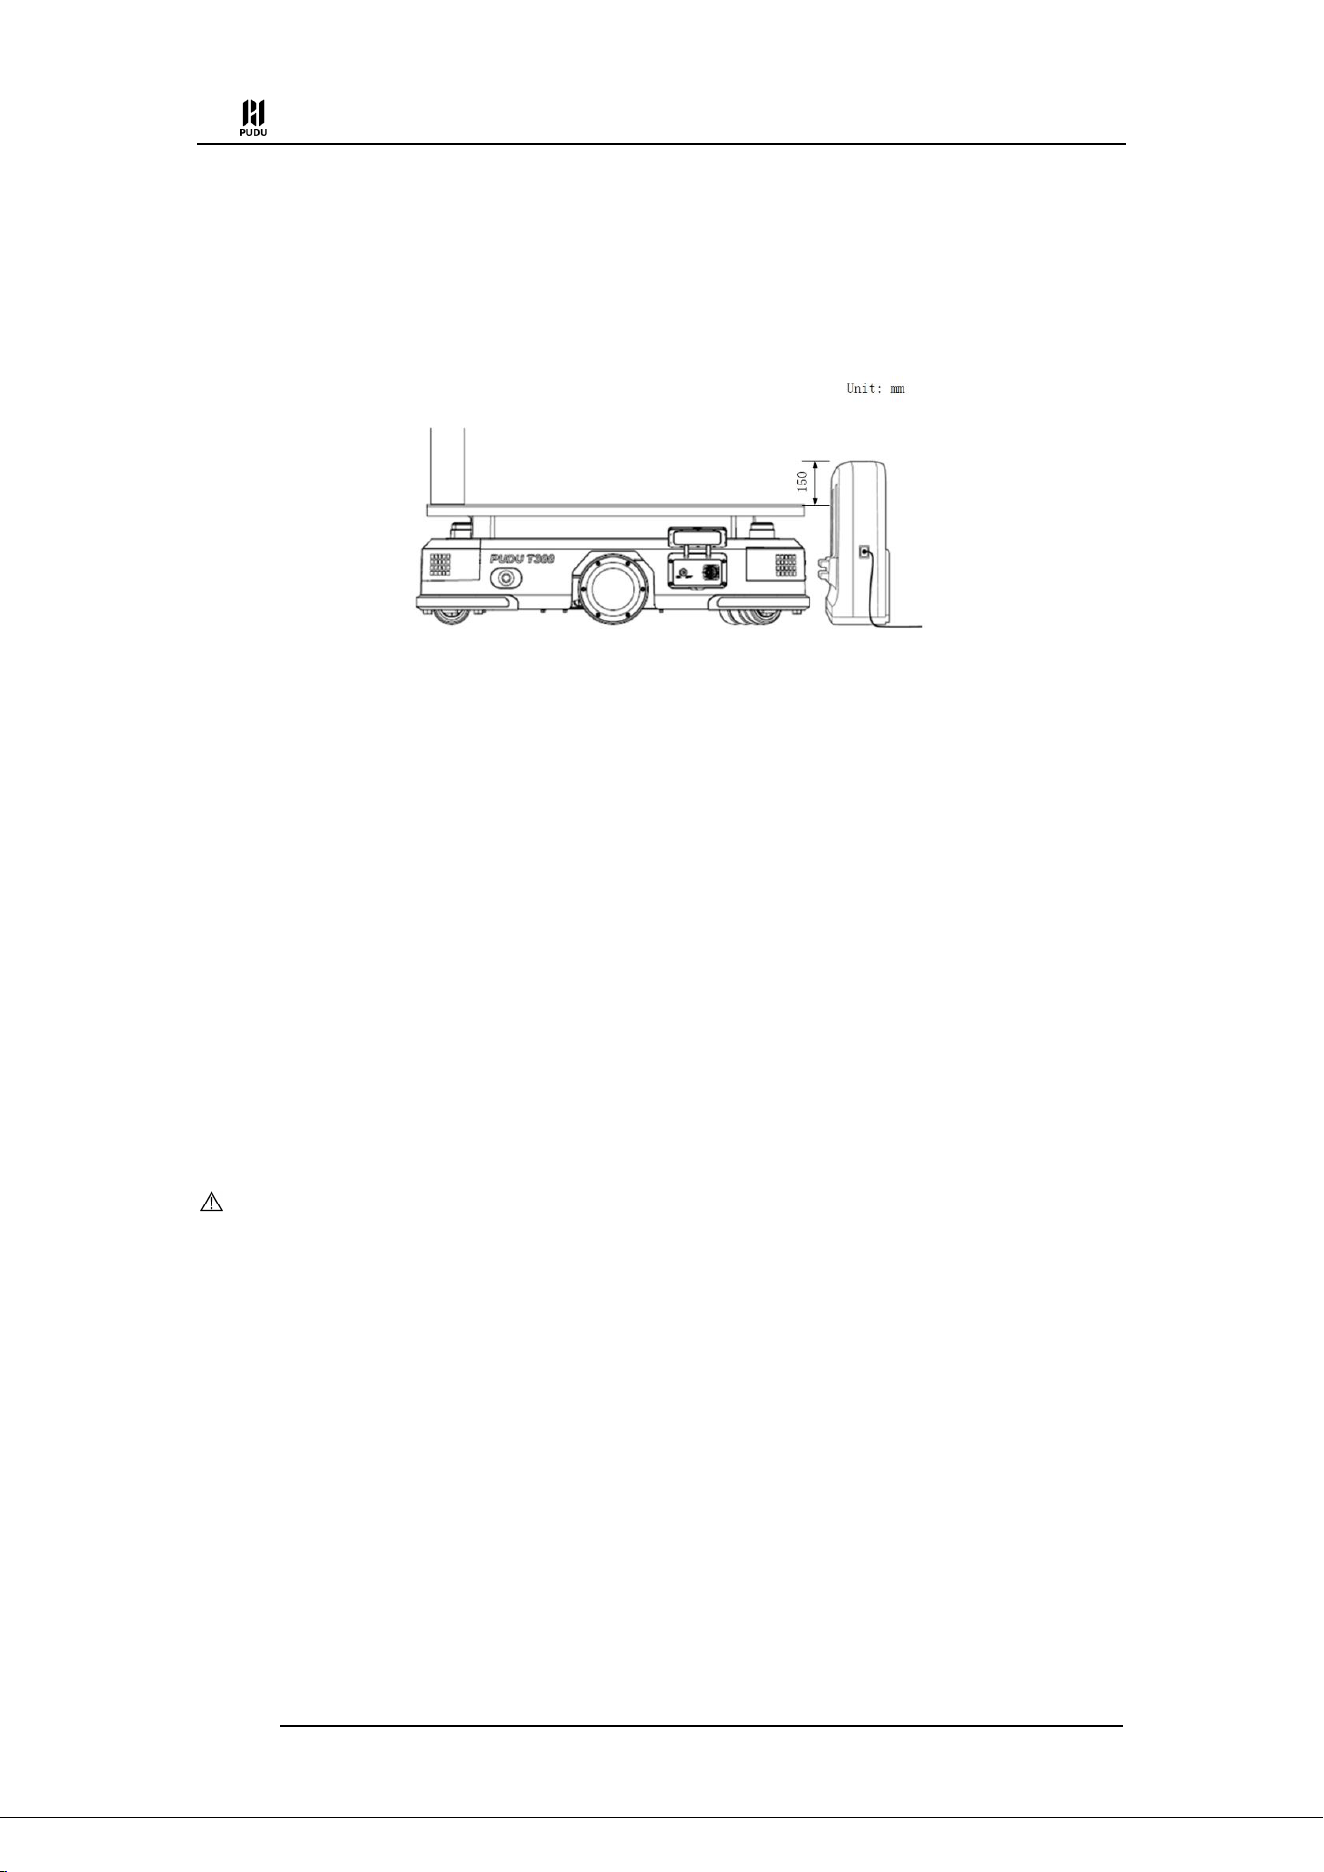
⚫ After the installation of the external structure, the fixed bracket should not exceed 250mm
on either side of the robot's chassis outline
⚫ After the installation of the external structure, it should not extend beyond 400mm at the
rear of the robot
PUDU T300 Operation Guide
Version: V1.0.3 Operation Guide
12
⚫ After the installation of the external structure, it should not extend beyond the front pillar
of the robot.
To ensure that the robot can use the charging station for charging, the position of the charging
station needs to be considered when designing the external structure to avoid obstacles during
automatic return charging.
(3) Configuration process after fixing the external structure
After fixing the external structure, it is necessary to enter the "Settings" - "Robot Settings" - "Run
Settings" to modify the dimensions of the unloaded state after fixing the bracket. The parameters
need to be input based on the actual size of the fixed bracket.
The parameters to be input are:
The dimension value of the fixed bracket protruding from the rear of the robot chassis
after installation. Input range: 0~400, default: 0, unit: mm.
The total width of T300 + the fixed bracket after installation. Input range: 500~1200,
default: 500, unit: mm.
After inputting the corresponding parameters, T300 will take into account the dimensions of
the outline after fixing the bracket to avoid collisions with surrounding obstacles.
During the parameter input process, the current robot's minimum pass width and minimum
width for U-turn will be displayed in real-time.
4.2.2 Parameters related to the lifting function
Caution
The lifting feature is only available on the WTIDL1 model.
When performing lifting tasks, the robot can carry a rack that provides a larger carrying space
than its own chassis. The T300 chassis is designed to fit under the rack and lift it up.
(1) Default parameters
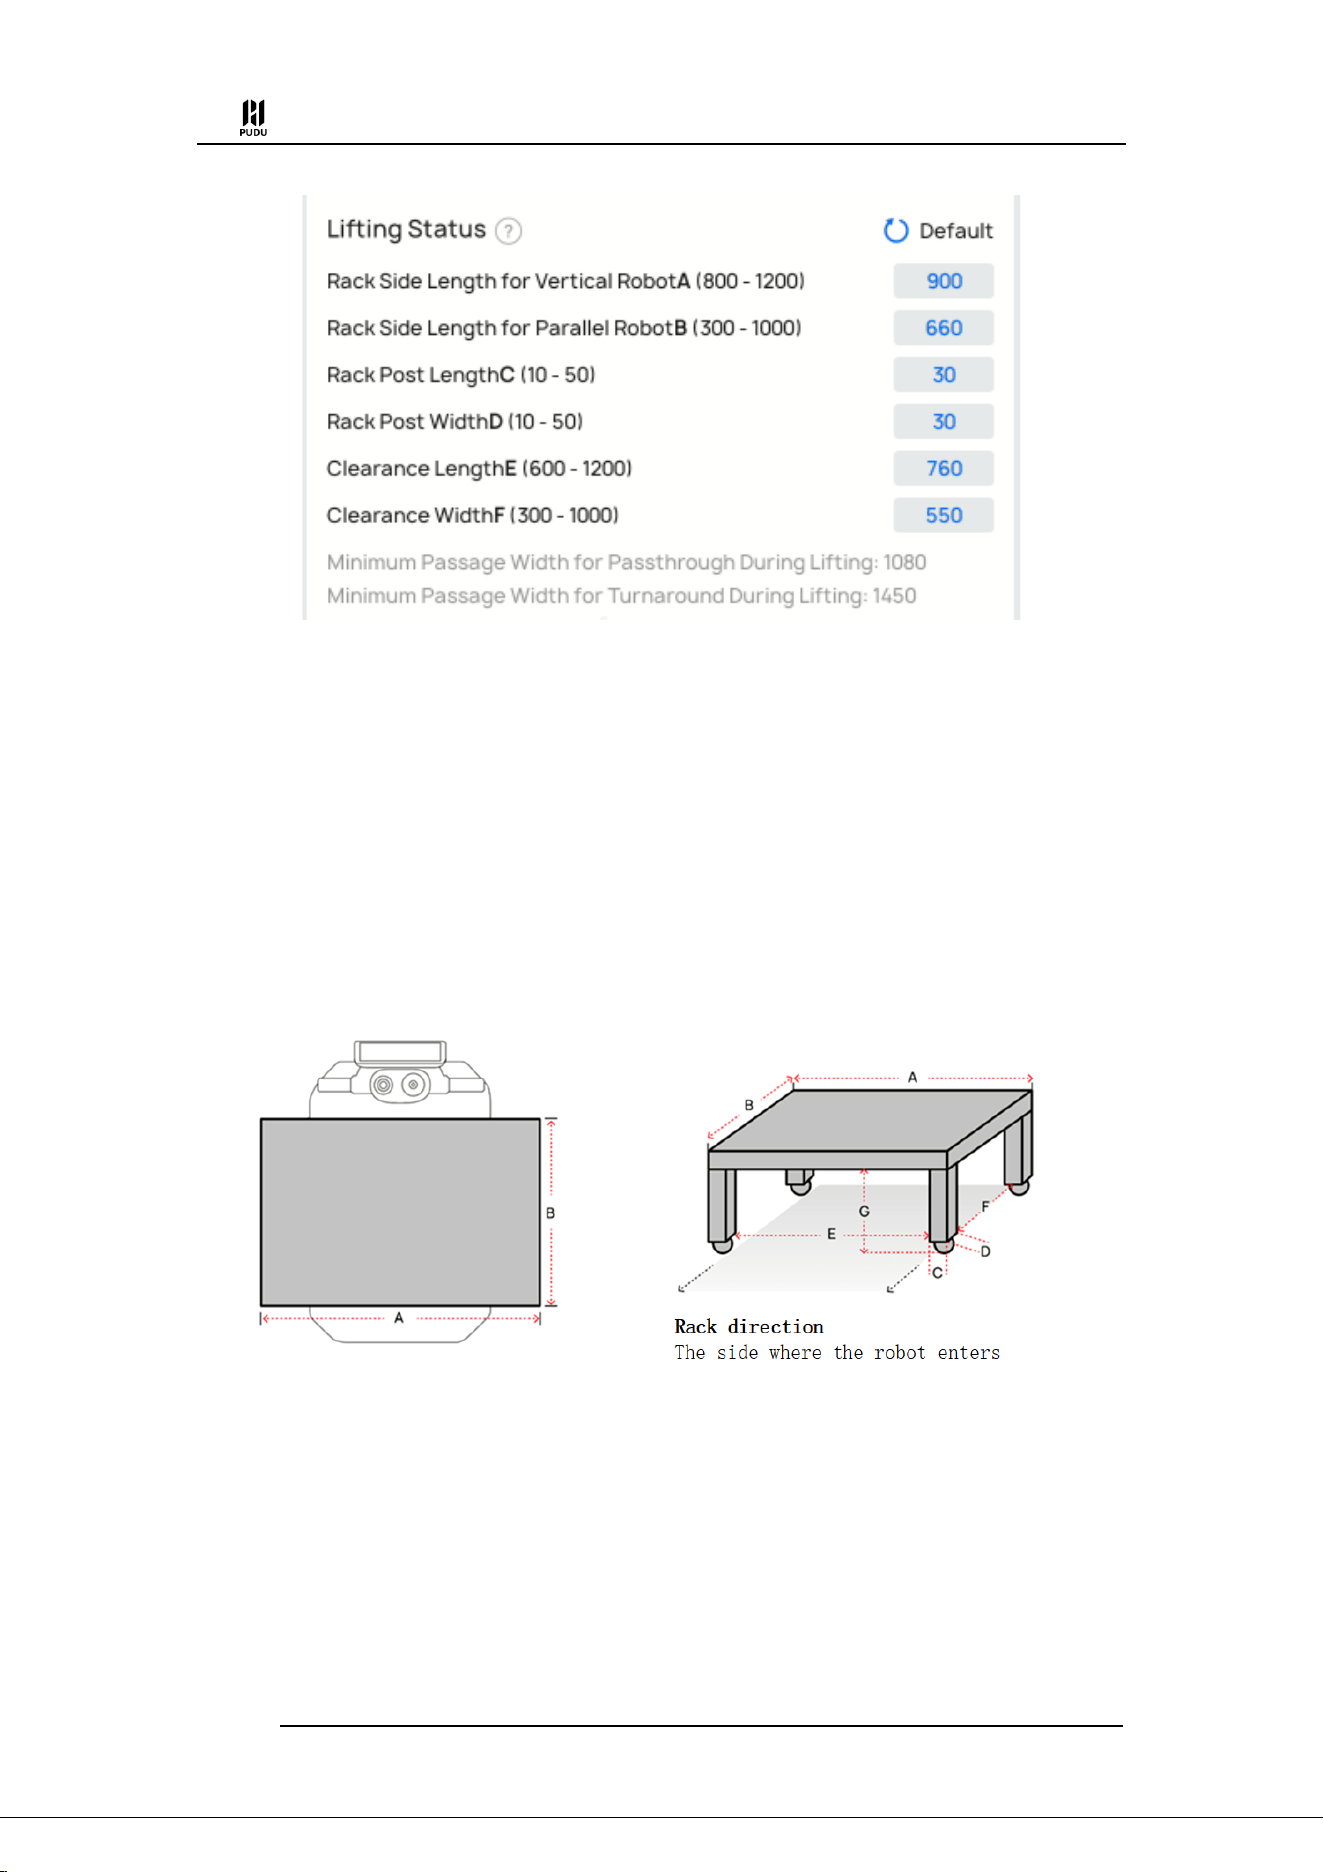
The shelf size parameters provided by Pudu are as follows:
PUDU T300 Operation Guide
Version: V1.0.3 Operation Guide
13
The rack dimensions provided by PUDU are as follows:
⚫ Overall dimensions (length * width * height): 900mm*660mm*308mm
⚫ Load surface dimensions (length * width): 820mm*610mm
⚫ Rack post dimensions (length * width): 30mm*30mm
⚫ Height from the ground to the bottom of the rack load surface: 275mm
(2) Customized lifting rack size requirements
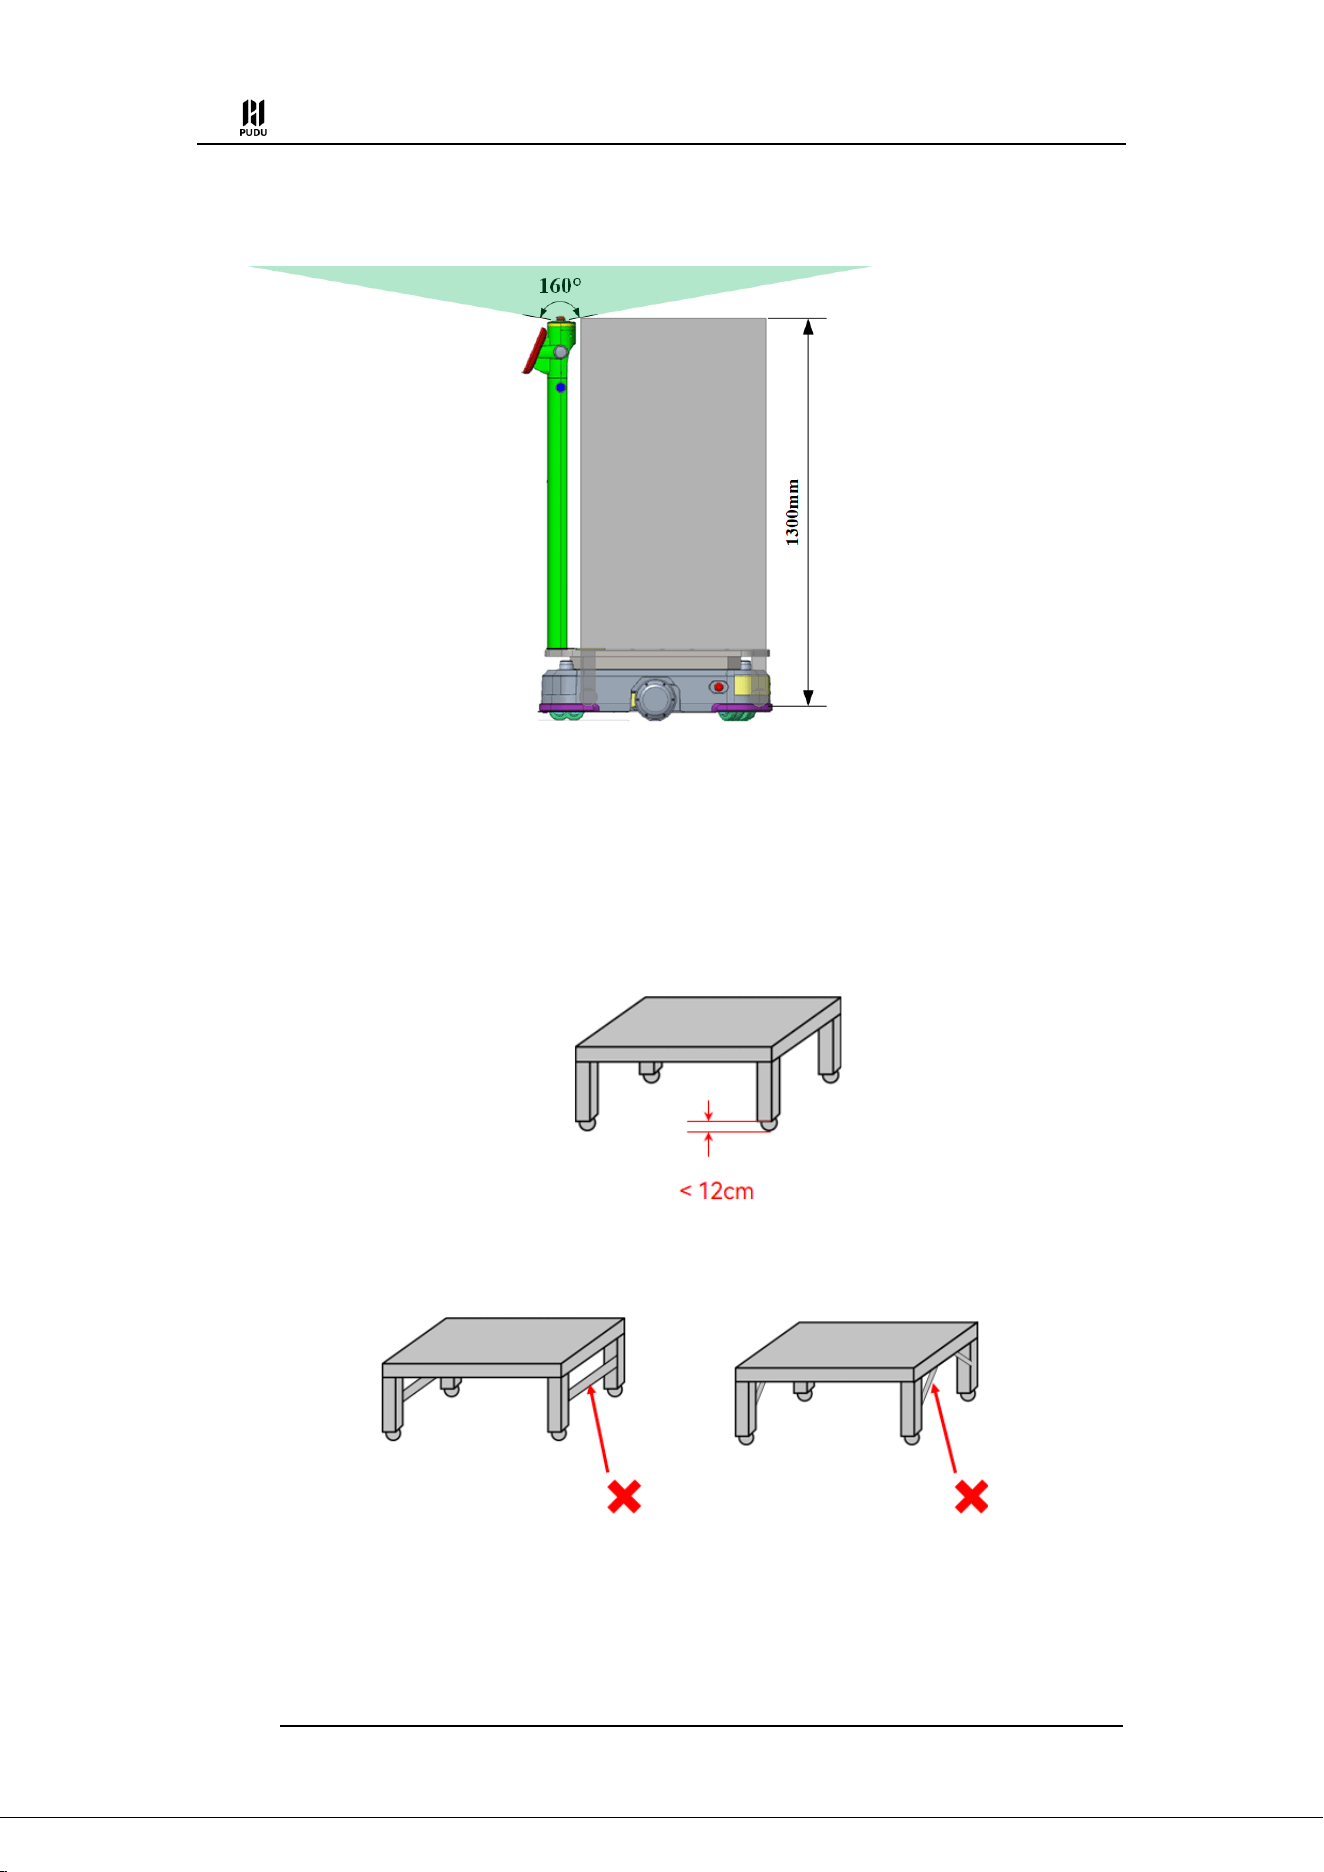
If you have specific requirements for the size of the rack, please follow the guidelines below
to create the rack and configure the parameters accordingly.
⚫ Rack length (dimension A): 600mm ~ 1200mm (recommended 700mm ~ 1000mm)
⚫ Rack width (dimension B): 300mm ~ 1000mm (recommended 500mm ~ 800mm)
⚫ Rack bottom height (dimension G): 260mm ~ 280mm
⚫ Rack posts width (dimension C, dimension D): 10mm ~ 50mm (recommended 30mm ~ 50mm)
⚫ Clearance length (dimension E): 600mm ~ 1200mm (recommended 600mm ~ 940mm)
⚫ Clearance length (dimension F): 300mm ~ 1000mm (recommended 400mm ~ 740mm)
PUDU T300 Operation Guide
Version: V1.0.3 Operation Guide
14
⚫ Rack height:no more than 1300mm (to prevent the robot’s top view camera be obstructed
when lifting status, which could affect the stability of the robot's positioning during operation).
⚫ Others
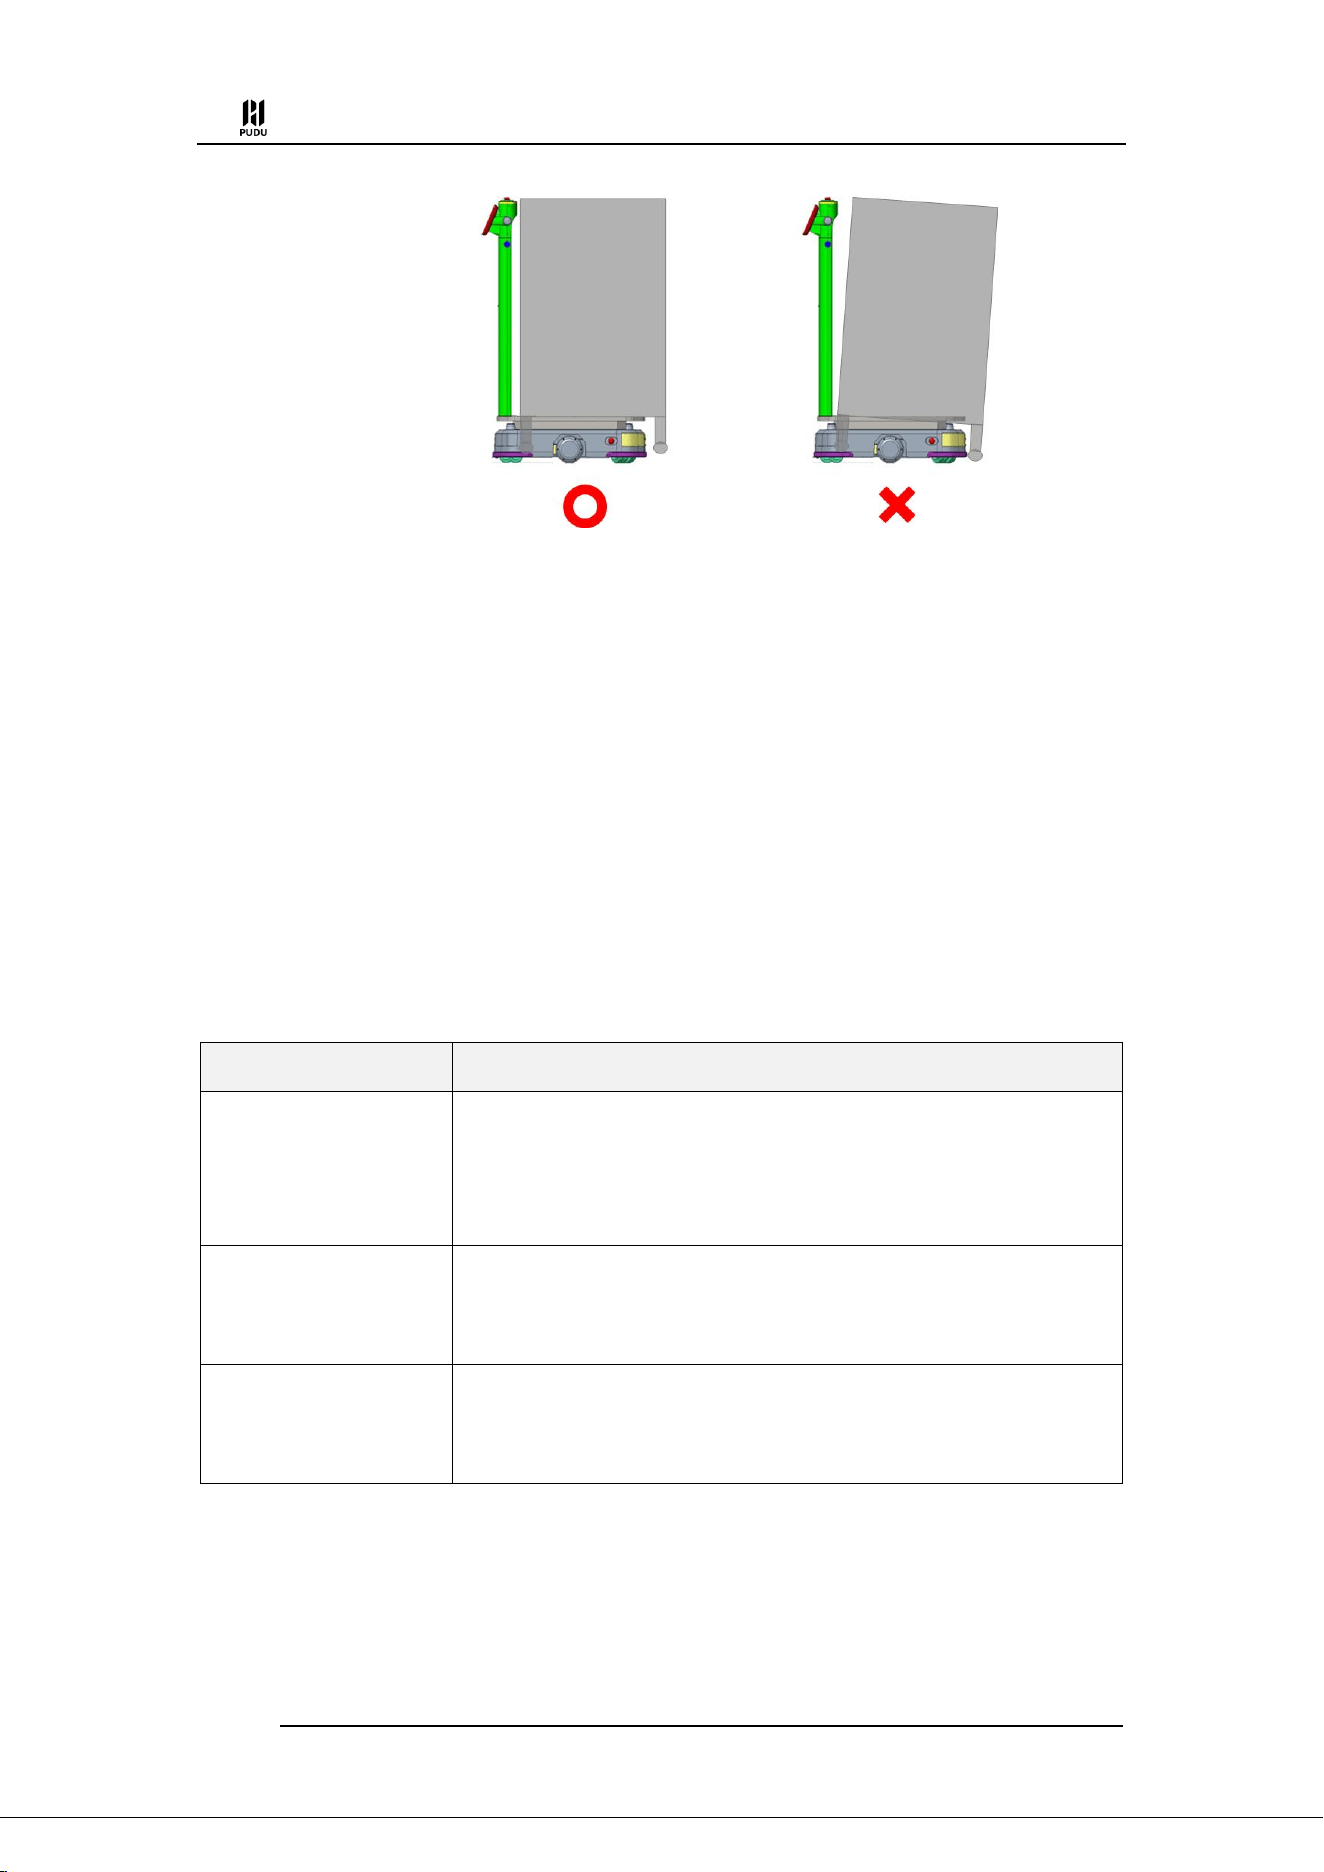
Combined with the structure and operation principle of T300, there are also the following
requirements:
(1) Ensure that there are only rack legs within the horizontal range of 12cm~21cm above the
ground. Specifically:
a. The universal wheels of the rack and its fixed surface need to be lower than 12cm.
b. There should be no supporting triangle structure or reinforcement structure within the
range of 12~21cm, such as:
(2) The bottom of the rack needs to be reasonably designed so that the rack can be placed
firmly on the load surface of T300.
PUDU T300 Operation Guide
Version: V1.0.3 Operation Guide
15
(3) Customized Rack Parameter Configuration Process
If you use customized rack. You need enter “Setting”-“Robot Function”- “Running Setting”,
to modify the parameters of rack.
After inputting the corresponding parameters, the T300 will memorize the profile dimensions
of the lifted rack. This allows the robot to avoid collisions between the rack and surrounding
obstacles during its movement.
During the parameter input process, real-time displays will also show the minimum pass width
and minimum width for U-turn of the T300 in lifting status.
4.3 Mode Introduction
The robot comes with various modes to cater to different scenarios, including Delivery mode,
Cruise mode, and Lifting mode.
Mode
Description
Delivery mode
Users can place materials for multiple destinations on the robot and use the screen
to send tasks for materials delivery. The robot can plan the best path by itself and
deliver the items to all destinations. After the delivery is completed, it will
automatically return to the standby point.
Cruise mode
The user can set the path, and the robot will run along the pre-set path in a cycle.
In addition, the robot can stop at a stop point on the cruise path, to make it easier
for the user to pick up and place materials while the robot is running.
Lifting mode *
Users can set lifting points and lifting down points. The robot will automatically
go to the lifting point to identify and lift the materials, and then automatically
unload the materials after transporting them to the destination.
* The lifting mode is only supported by the WTIDL1 model.
4.3.1 Delivery mode
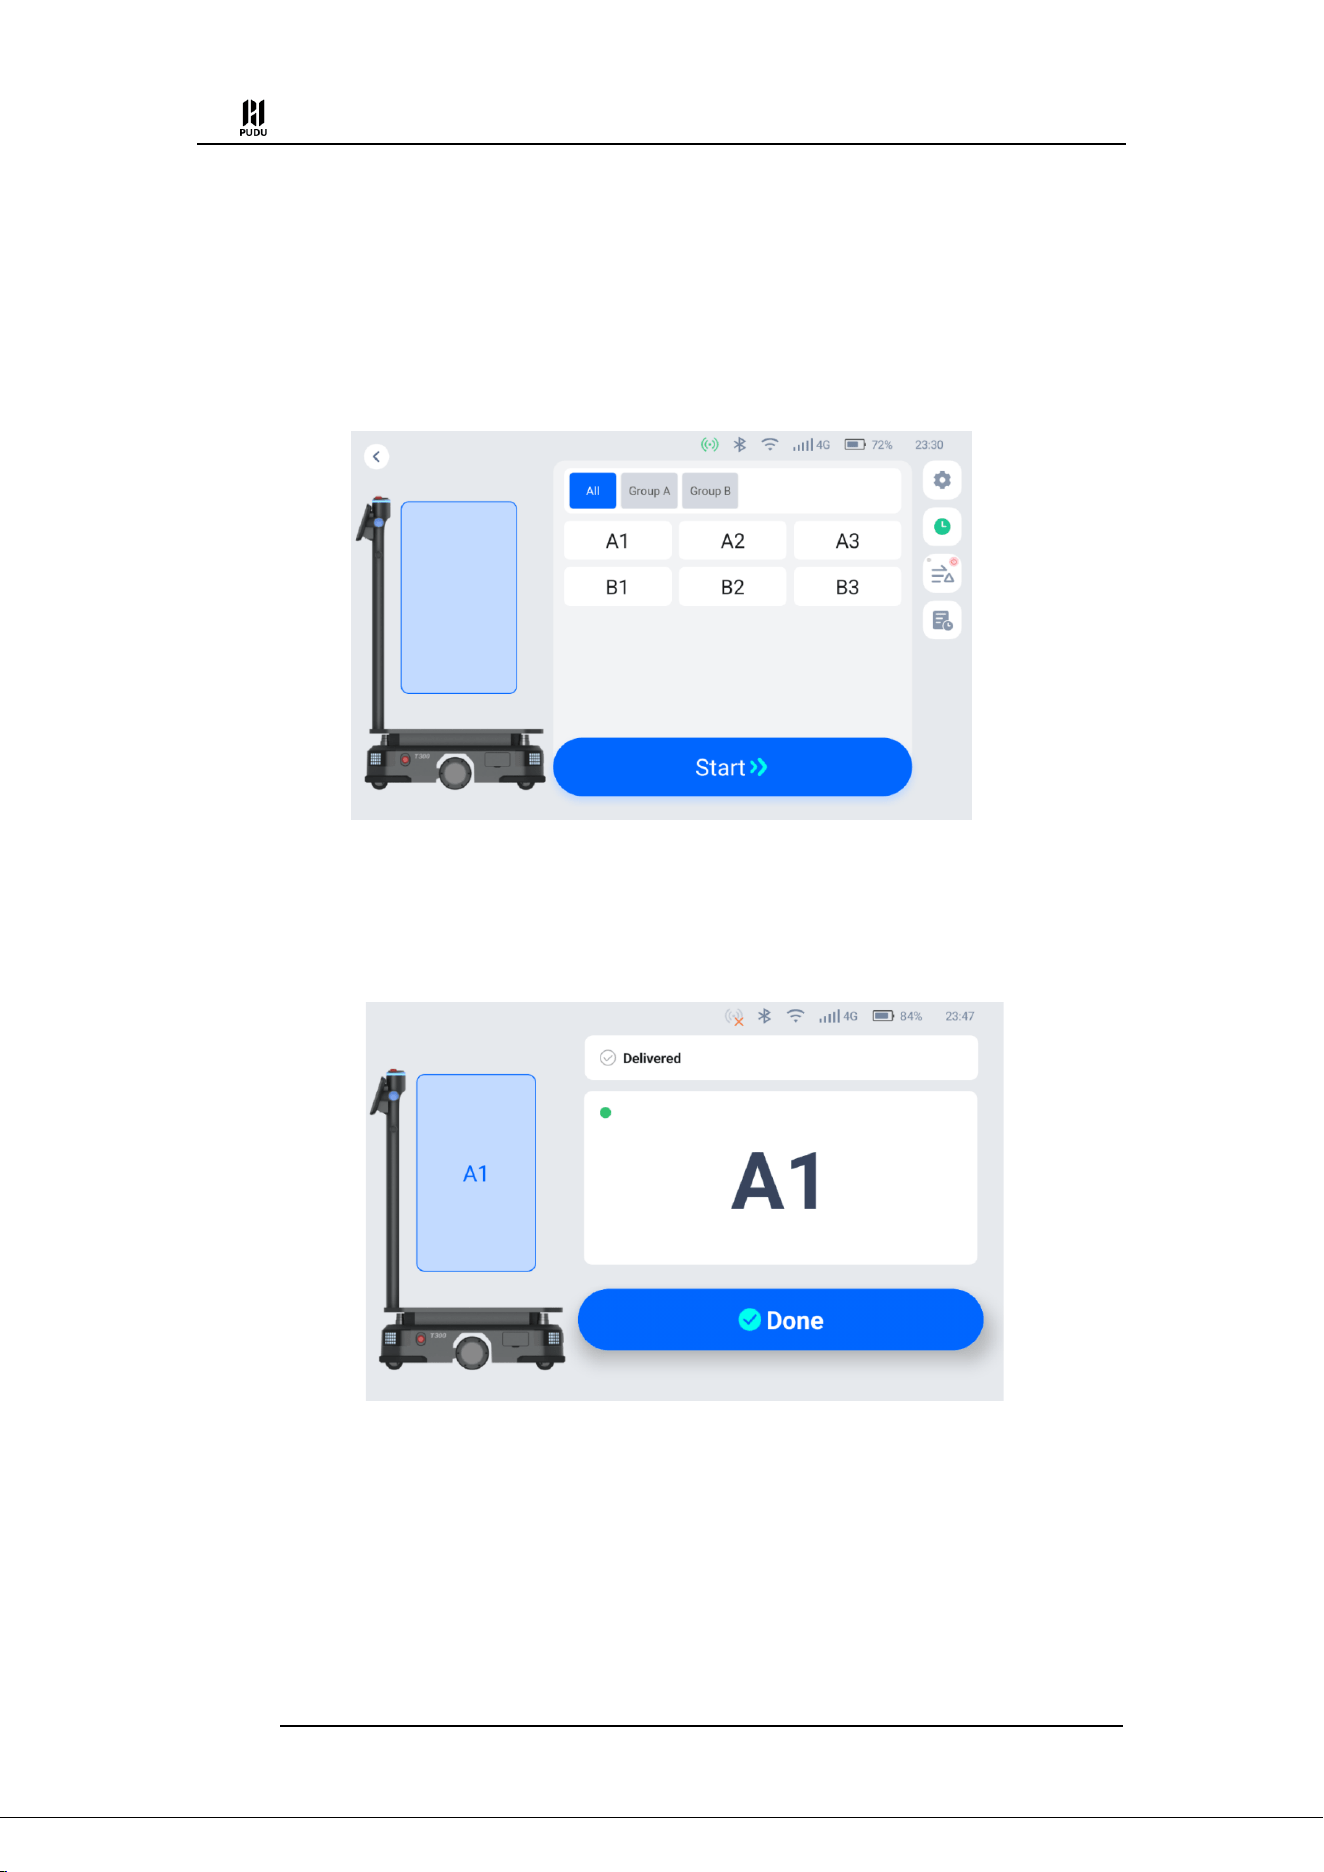
In Delivery Mode, an item is delivered to a specified destination, with automatic return to the
docking location after completing delivery to the final destination.
PUDU T300 Operation Guide
Version: V1.0.3 Operation Guide
16
4.3.1.1 The main processes of delivery mode
Step 1 On the robot's home page, select “Delivery” to access the main interface for delivery
mode. And place the items on the corresponding load area.
Step 2 On the left side of the interface, click on the load area where the item is placed and
select the destination on the right side.
Step 3 Once you have finished entering the destination, tap “Start”. The robot will proceed
to the corresponding destination.
Step 4 Once it reaches its destination, the robot will give a voice prompt. The operator will
remove the item in accordance with the on-screen and voice prompts.
Step 5 Once the operator removes the item, tap “Done”, and the robot will then begin
executing its next task. If the robot has completed all tasks, it will return to the docking location.
During the delivery process, if it is necessary to edit a task, remove a meal in advance, cancel
all tasks, or return, you can tap on the robot’s screen to pause the robot before proceeding with the
operation. If there are no operations during the countdown period, the robot will continue running
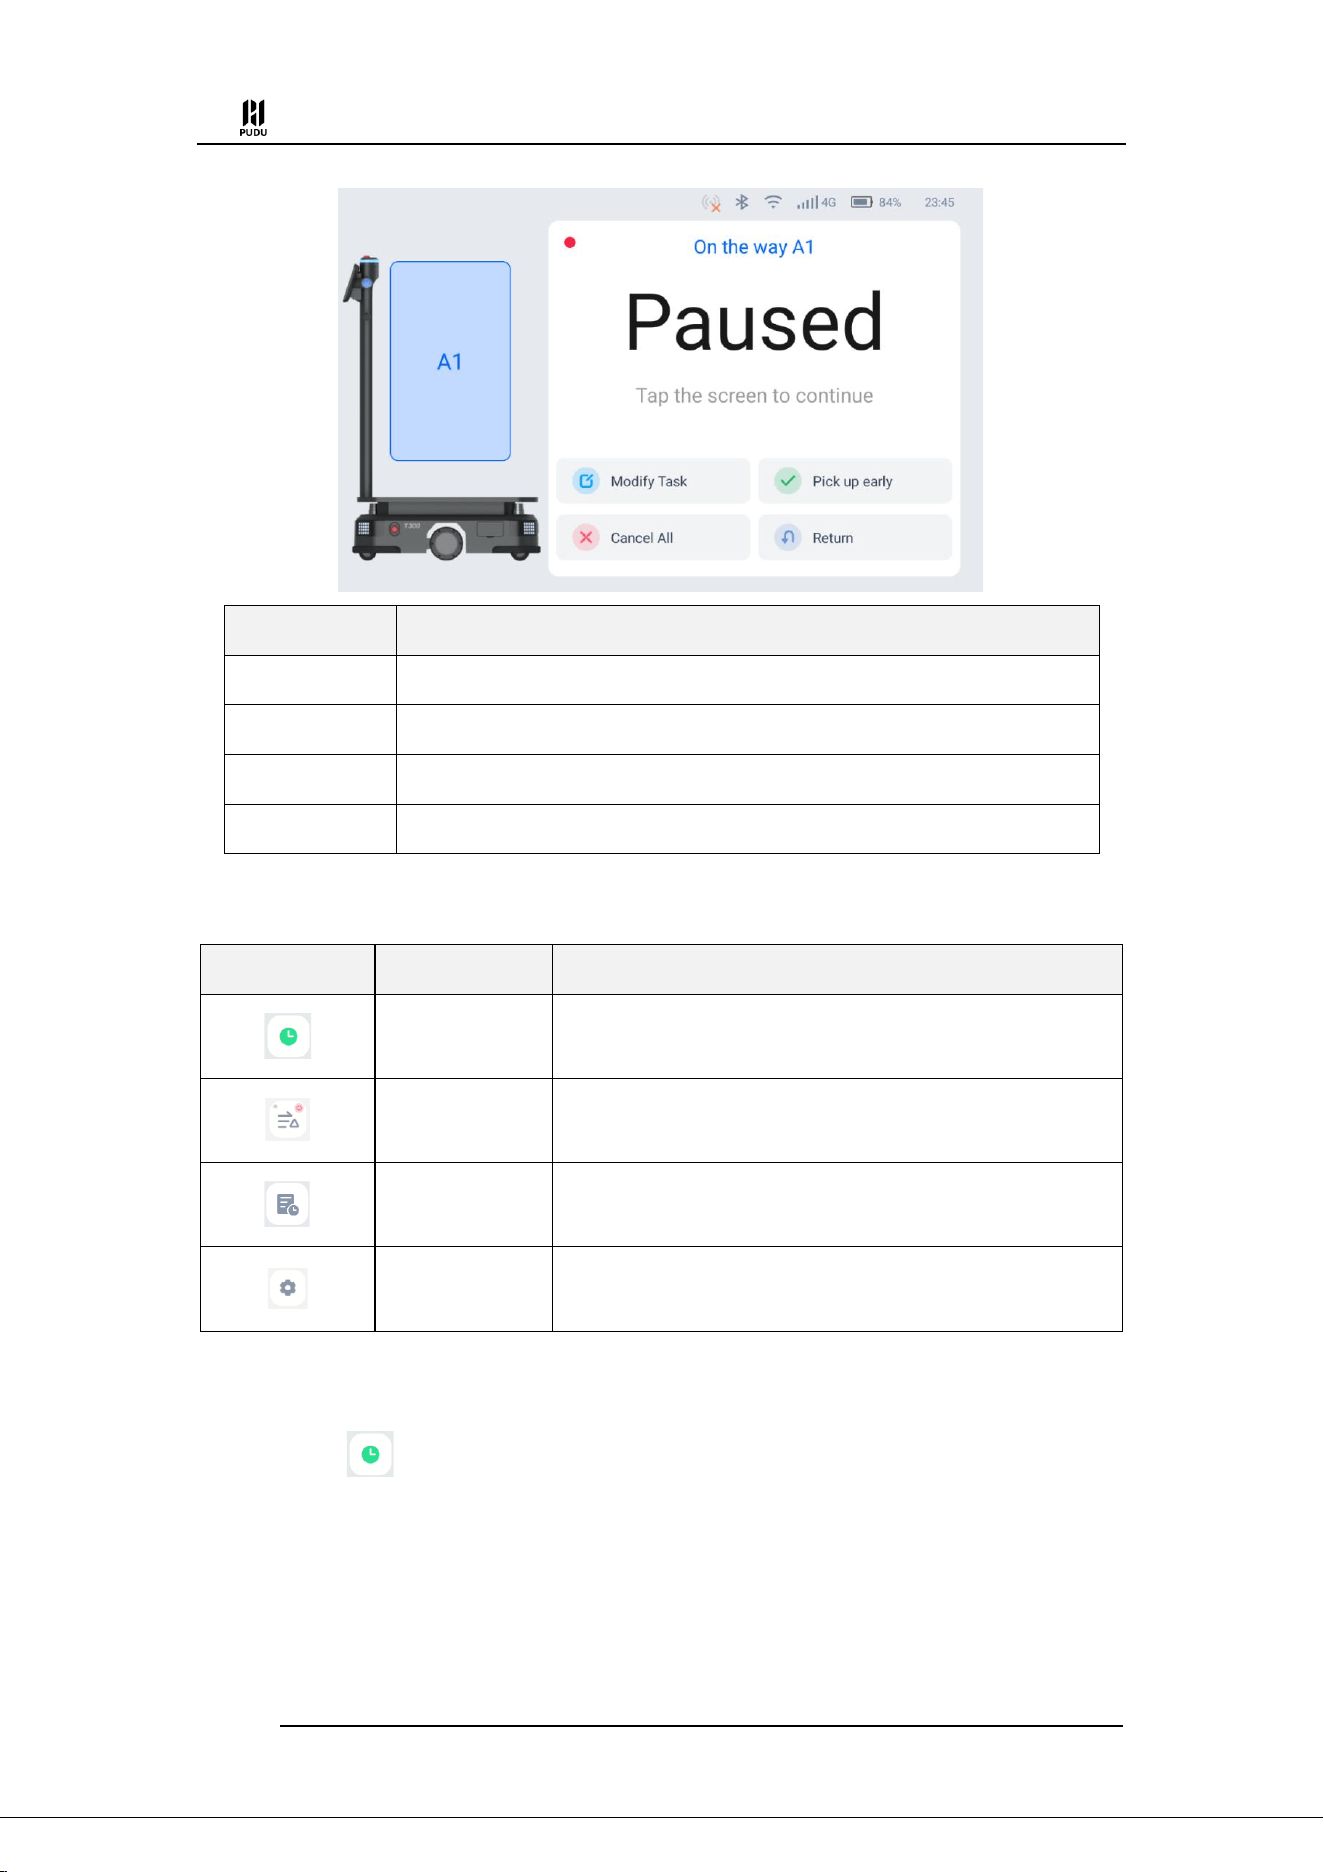
PUDU T300 Operation Guide
Version: V1.0.3 Operation Guide
17
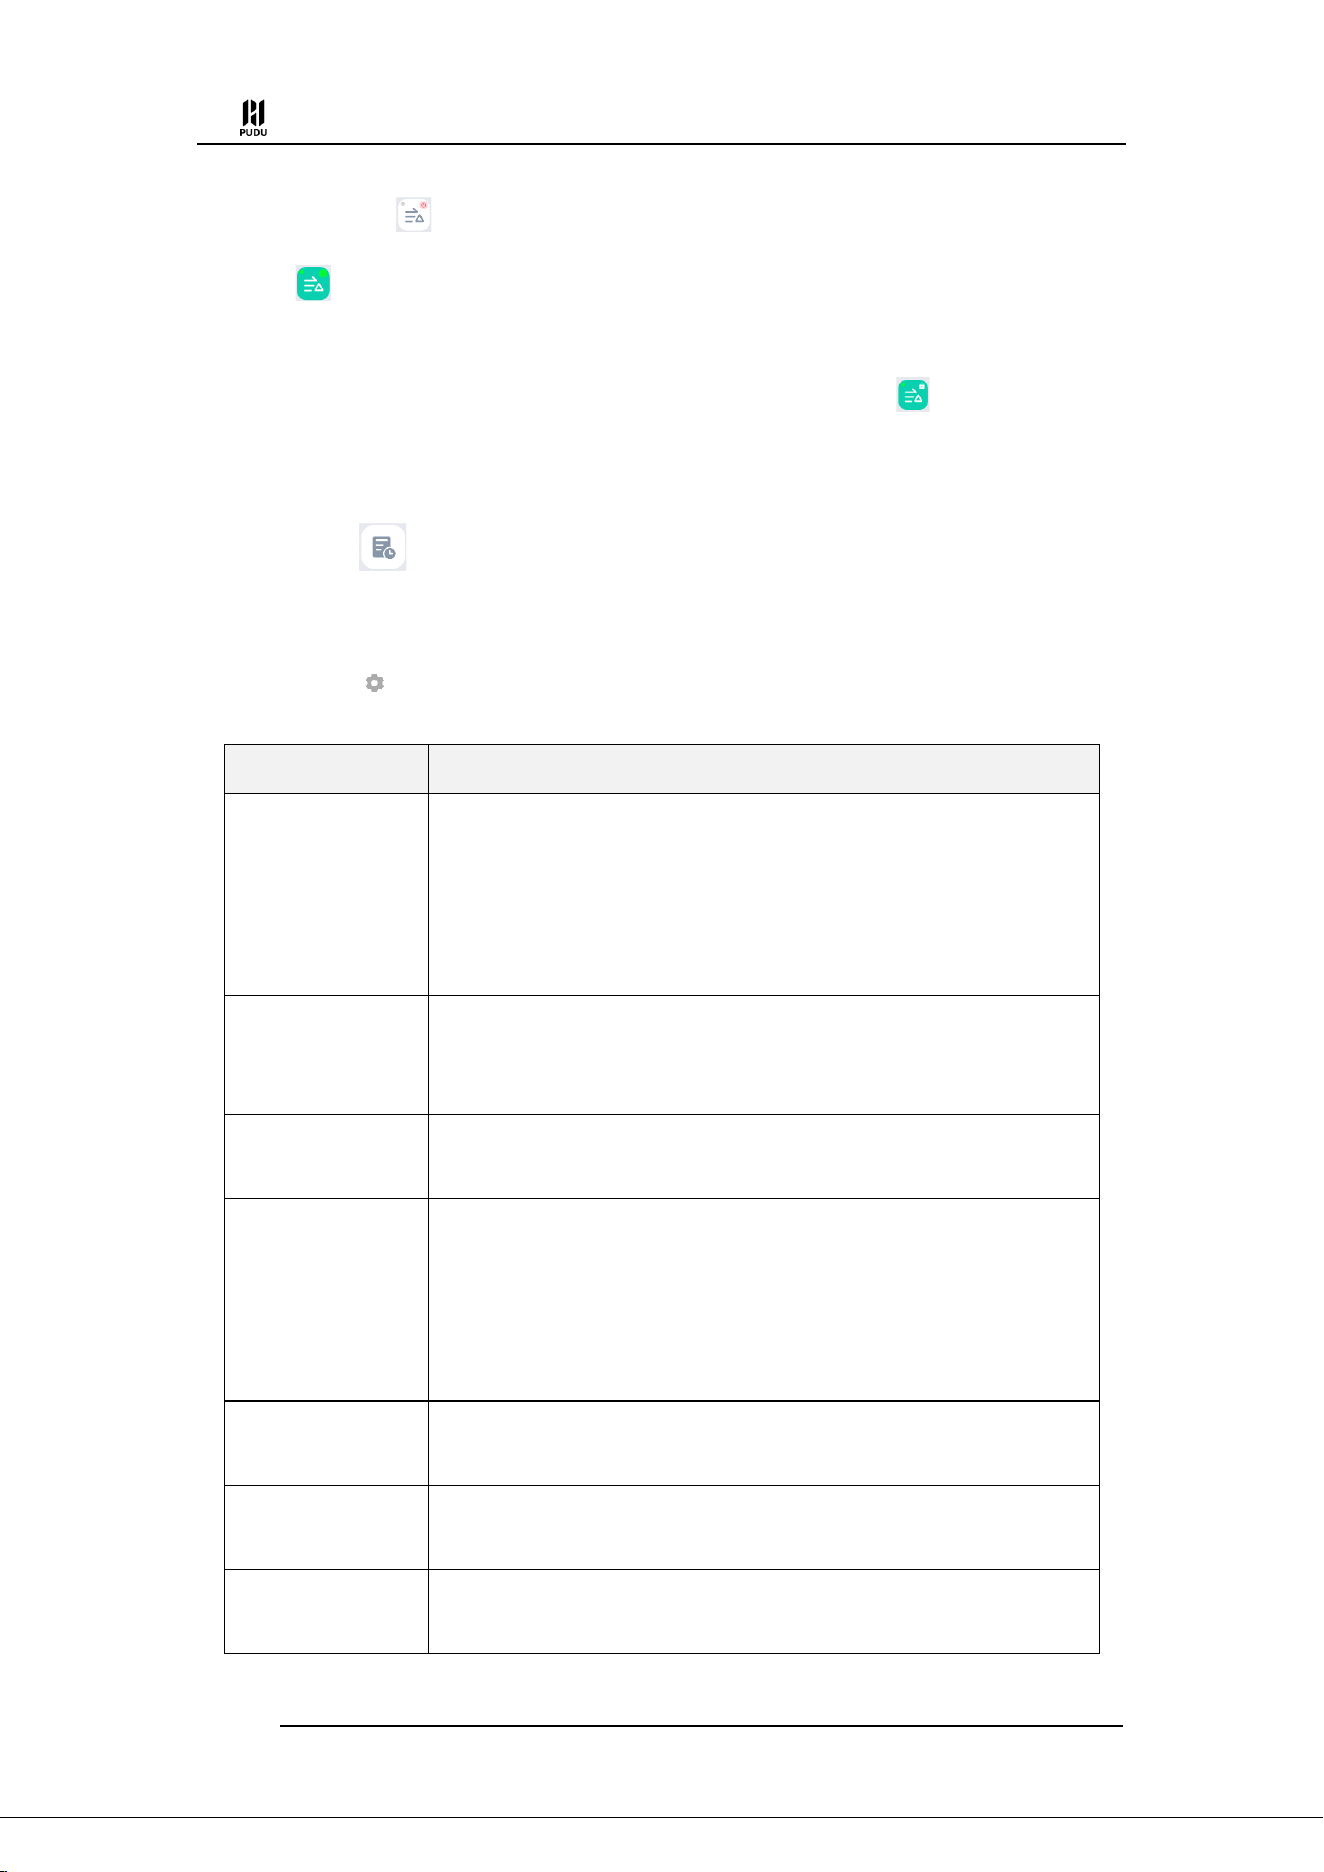
Button
Description
Modify Task
Tap to modify the destination.
Pick up early
Tap to Complete in advance and move on to the next task.
Cancel all
Tap to cancel all delivery tasks and not return to the docking location.
Return
Tap to return to the docking location.
4.3.1.2 Description of Delivery Mode Homepage
The delivery mode homepage features the following buttons:
Illustration
Settings
Descriptions
Previous Task
You can view the previous task.
Steady Mode
When enabled, the robot can travel at a low speed and move
smoothly.
History of Tasks
You can view the previous task executed in the current mode.
Delivery Mode
Settings
You can make configurations for the delivery mode.
Detail explanation:
(1) Previous Task
Click the " " button on the delivery mode homepage to view the robot's last delivery task.
(2) Steady Mode
You can choose whether the robot uses the smooth mode during the delivery process. In steady
mode, the robot will travel at a lower speed. It will start and brake in a relatively gentle manner. It
is suitable for delivering items that require the robot to run smoothly. Usage is as follows:
PUDU T300 Operation Guide
Version: V1.0.3 Operation Guide
18
Click the " " icon on the right side of the delivery interface, and the icon changes to "
", which turns on the smooth mode, which is valid for one time. Click again to turn
off the smooth mode;
Press and hold the delivery icon for 2s, and the icon changes to " ", which turns on the
smooth mode continuously. Click again to turn off the smooth mode.
(3) History of Tasks
Click the " " button on the delivery mode homepage to view the robot's recent historical
delivery tasks.
(4) Delivery Mode settings
There is a " " button on the right side of the delivery mode interface. Click it to set the
delivery mode. The settings are as follows:
Settings
Description
Destination Priority
You can set the way the robot goes to the target point in the case of multiple tasks:
Distance Priority: The robot intelligently finds the shortest route and arrives
at all the selected target points in sequence according to the distance;
Sequence Priority: The robot arrives in sequence according to the order of
the input destinations.
Auto-complete time
after arrival
The robot will count down automatically after arriving at the destination. If no
one is operating the robot, the robot will leave automatically after the countdown
ends.
Delivery Complete,
Returning
You can set the location where the robot returns after the delivery is completed.
Custom Function
Button
Set the robot's action after the shortcut button is pressed:
No action: No action after pressing the shortcut button;
Complete the current task: When the robot is on the delivery arrival page,
press the shortcut button and the robot will automatically complete the
current task.
Play during tasks
When enable, you can select the synthesized voice or music file to play during the
delivery task.
Play upon arrival
When enable, you can select the synthesized voice or music file to play when the
delivery task arrives at the destination
Single Layer Multi-
point
After turning on this function, a single load area can correspond to multiple
locations for delivery.
PUDU T300 Operation Guide
Version: V1.0.3 Operation Guide
19
Settings
Description
Delivery Speed
The robot's scheduled driving speed to the destination can be configured, with a
setting range of 0.2m/s~1.2m/s.
4.3.2 Cruise mode
Cruise mode means cruising in a specific environment and running in a loop. Some voice and
music can be played during the cruise.
4.3.2.1 The main processes of delivery mode
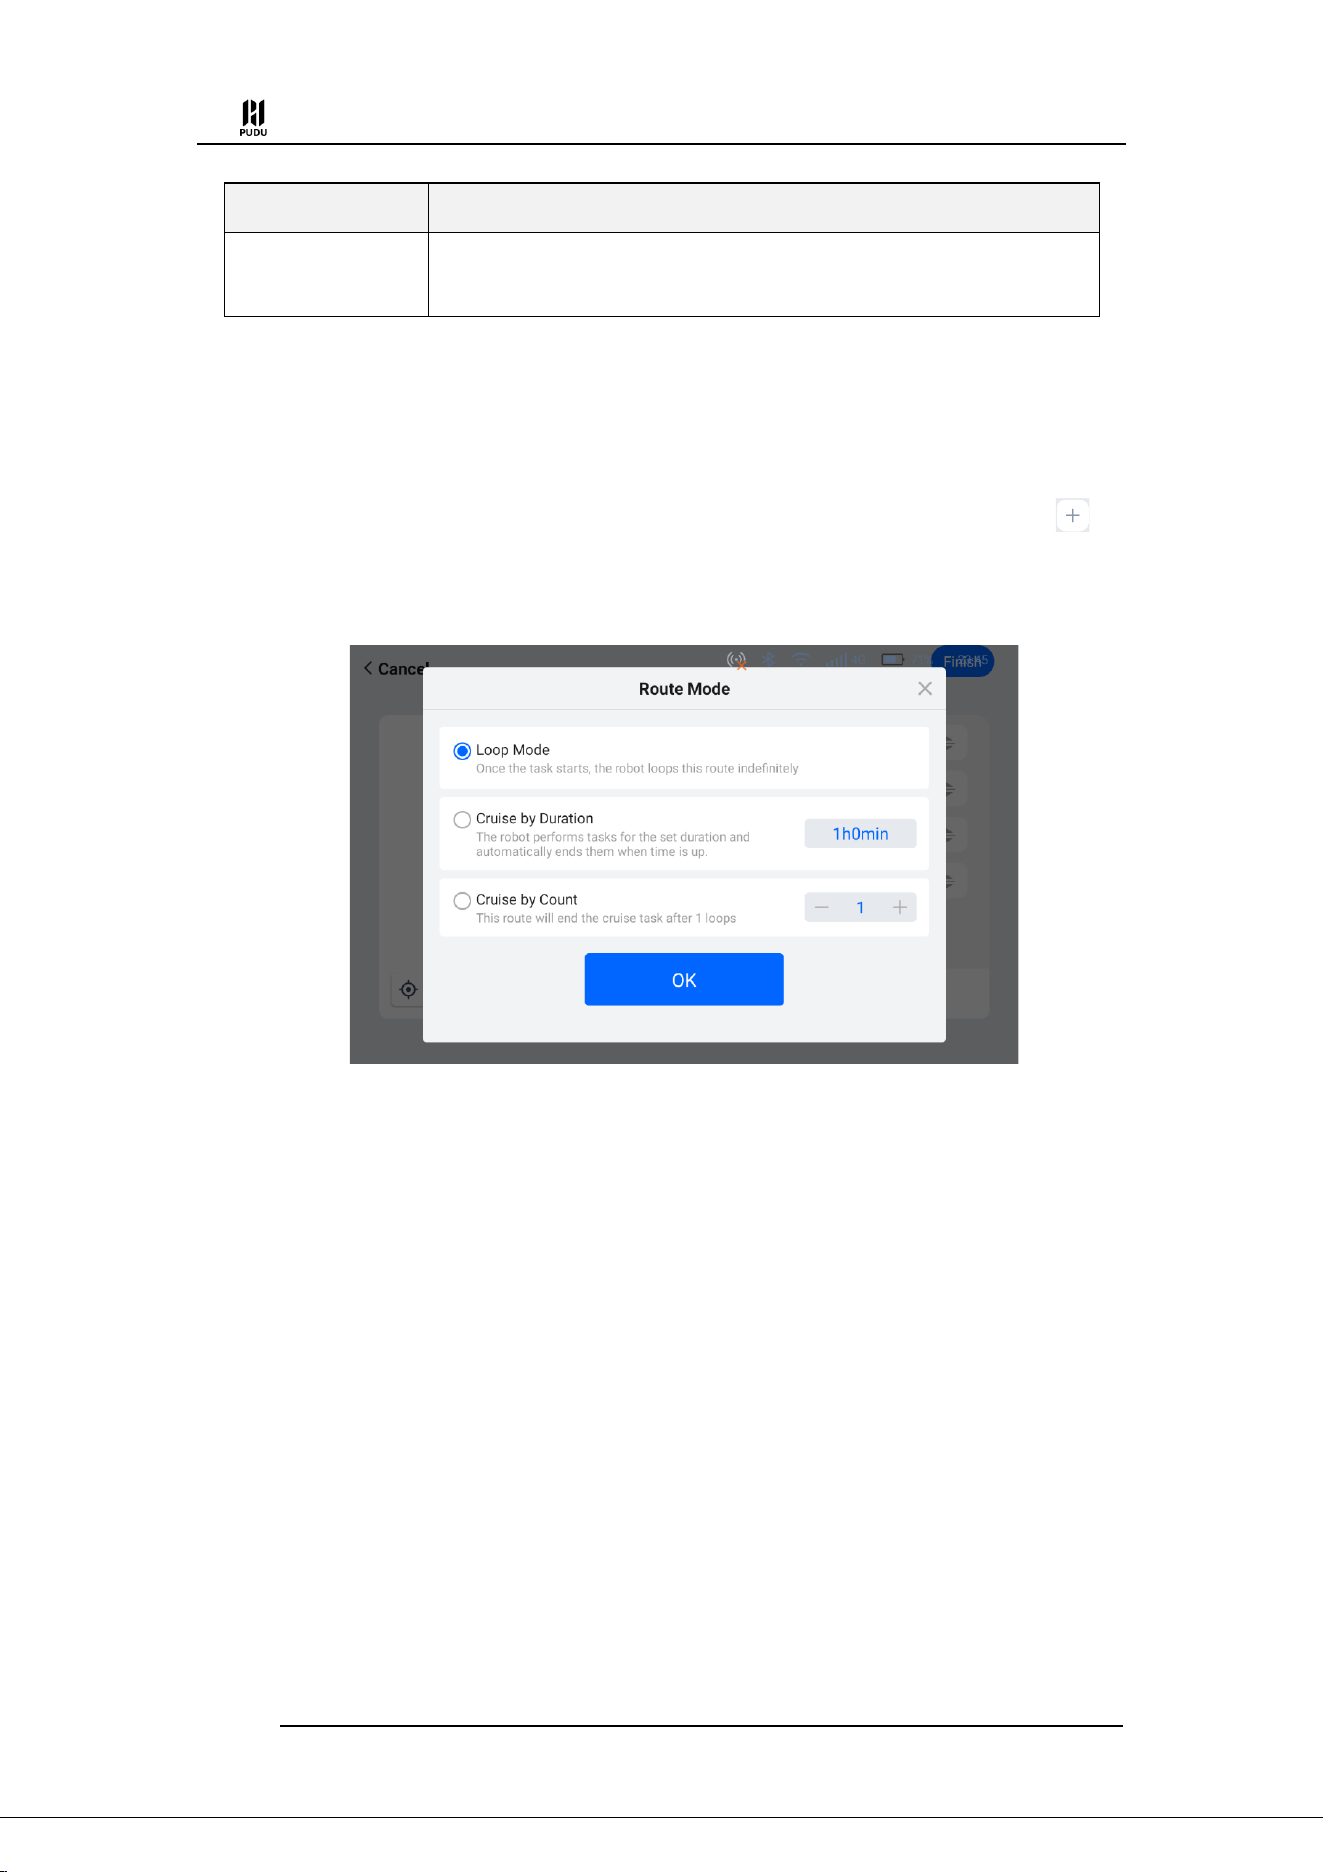
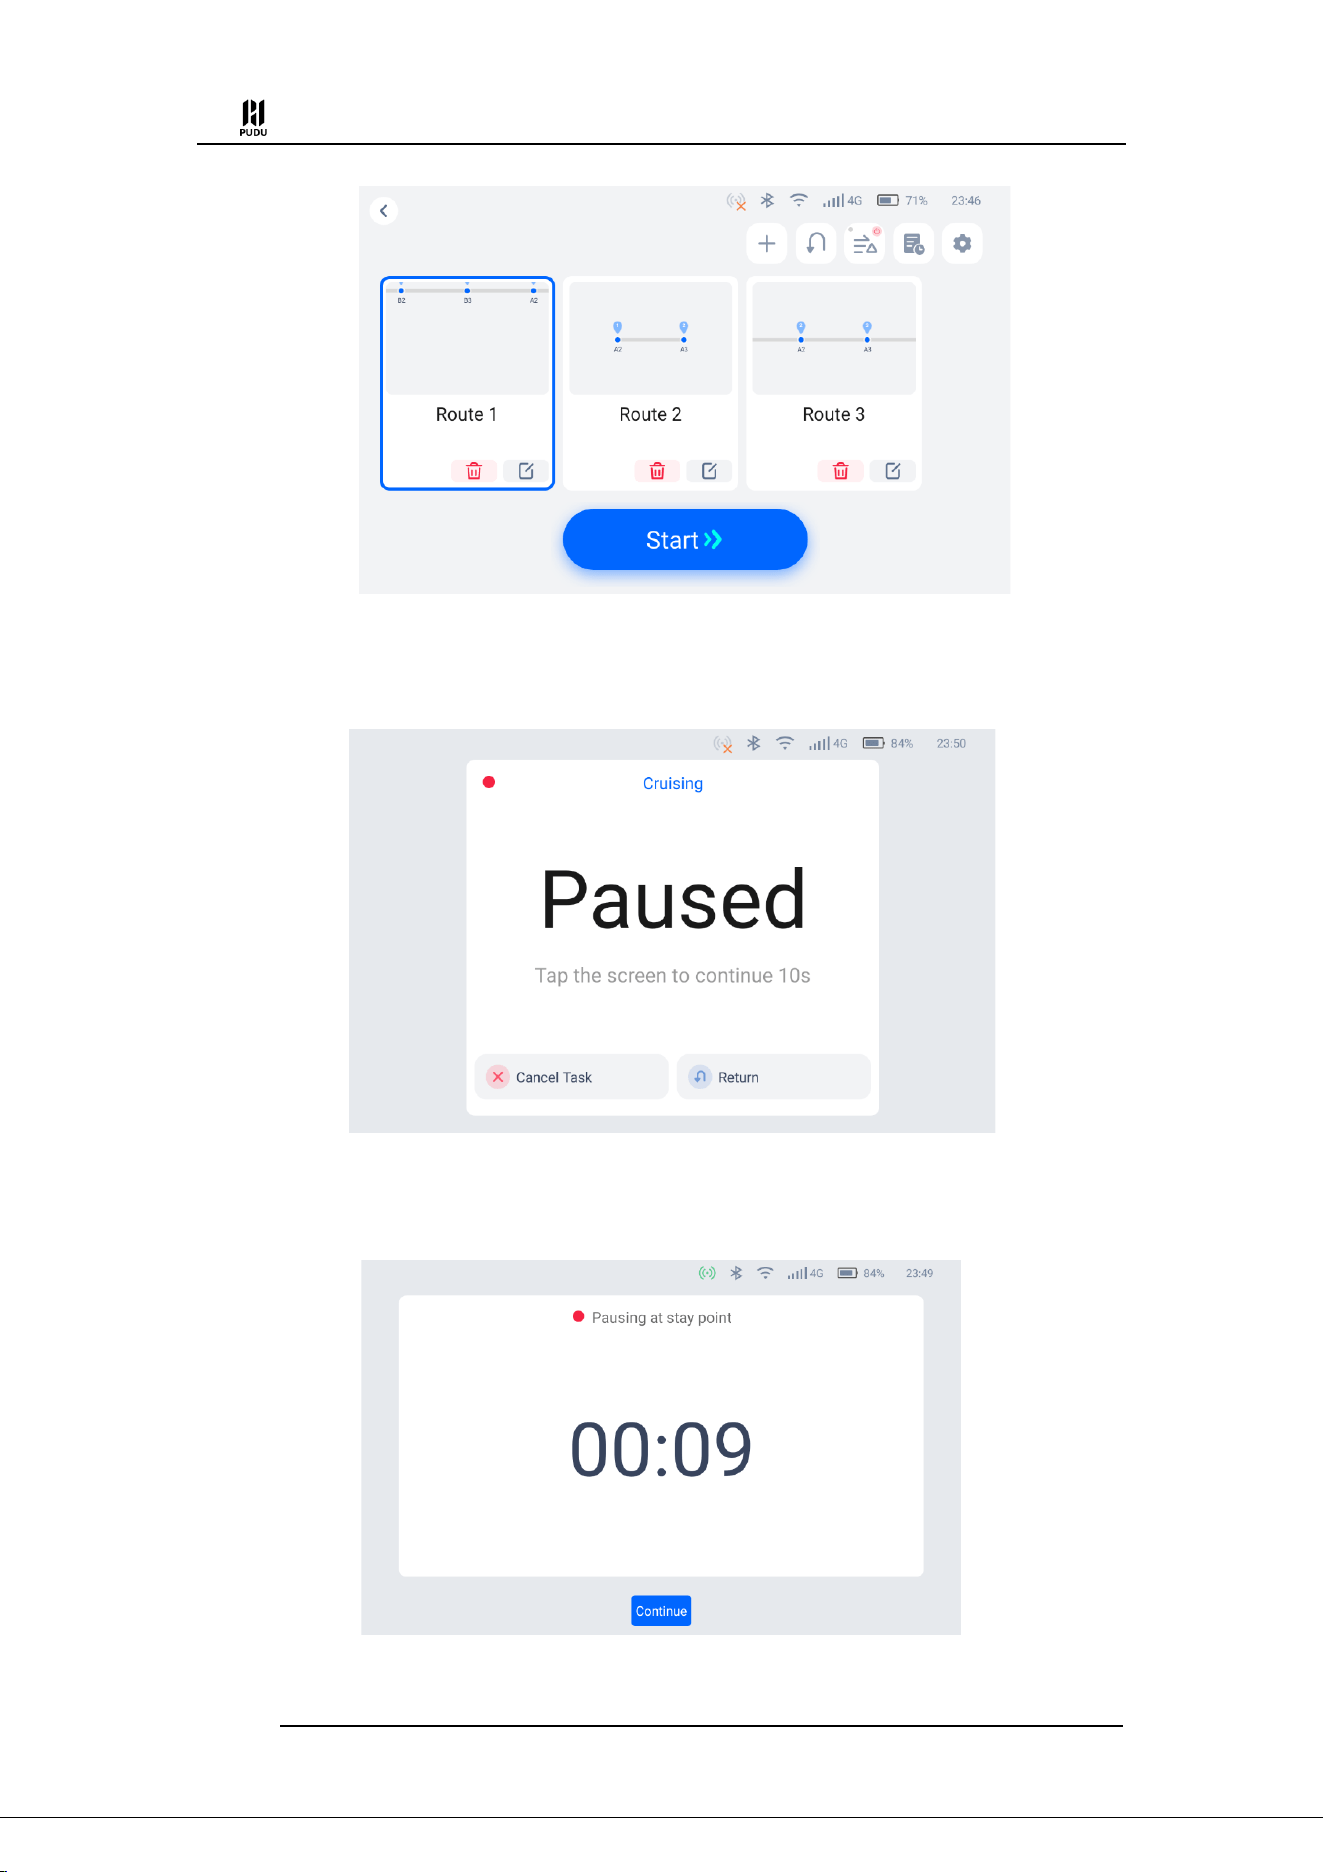
Step 1 Select "Cruise" on the homepage. Enter the cruise mode interface and click " " to
add a cruise path according to the instructions. There are three types of cruise paths that can be
added:
Loop Mode:After the cruise task starts, it will continue to cruise along the set cruise path;
Cruise by Duration:Cruise according to the set time, and automatically end the task after
the cruise ends;
Cruise by Count:After the robot cruises a specified number of laps, it will automatically
end the cruise task.
Step 2 After setting the cruise route, select the cruise route you want to use and click "Start".
The robot starts to run in a cycle along the cruise route.
PUDU T300 Operation Guide
Version: V1.0.3 Operation Guide
20
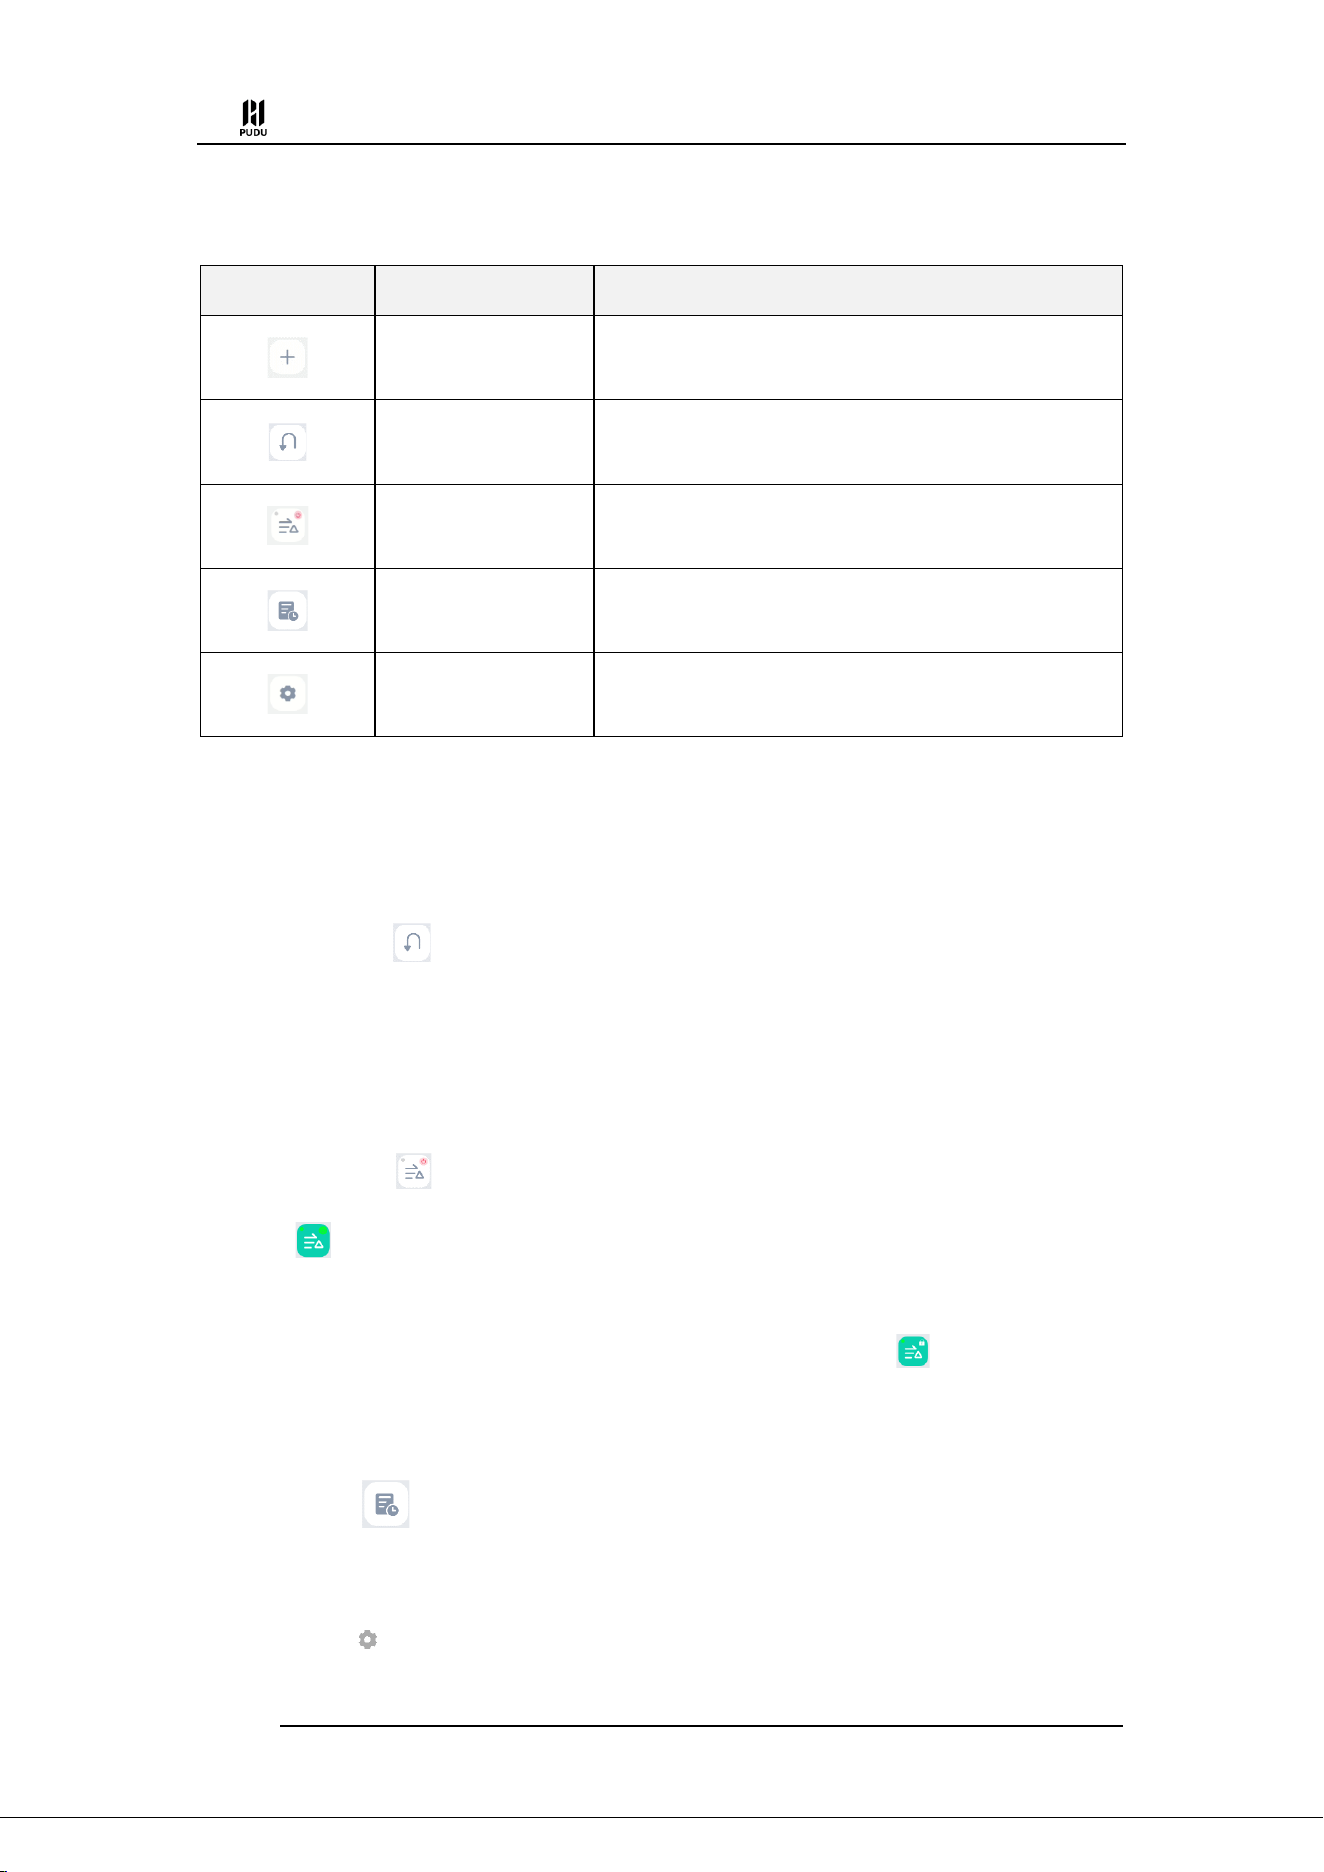
Step 3 During the robot's cruising, the user can click on the robot screen to pause. After the
pause countdown ends, the robot will continue to perform the cruising task.
If you click "Cancel Task" during the pause process, you can end the cruising task.
If a stop point is set on the cruising path, the robot will drive to the stay point and stop.
During the stop process, you can click "Continue" and the machine will go directly to the
next point.。
PUDU T300 Operation Guide
Version: V1.0.3 Operation Guide
21
4.3.2.2 Description of Cruise Mode Homepage
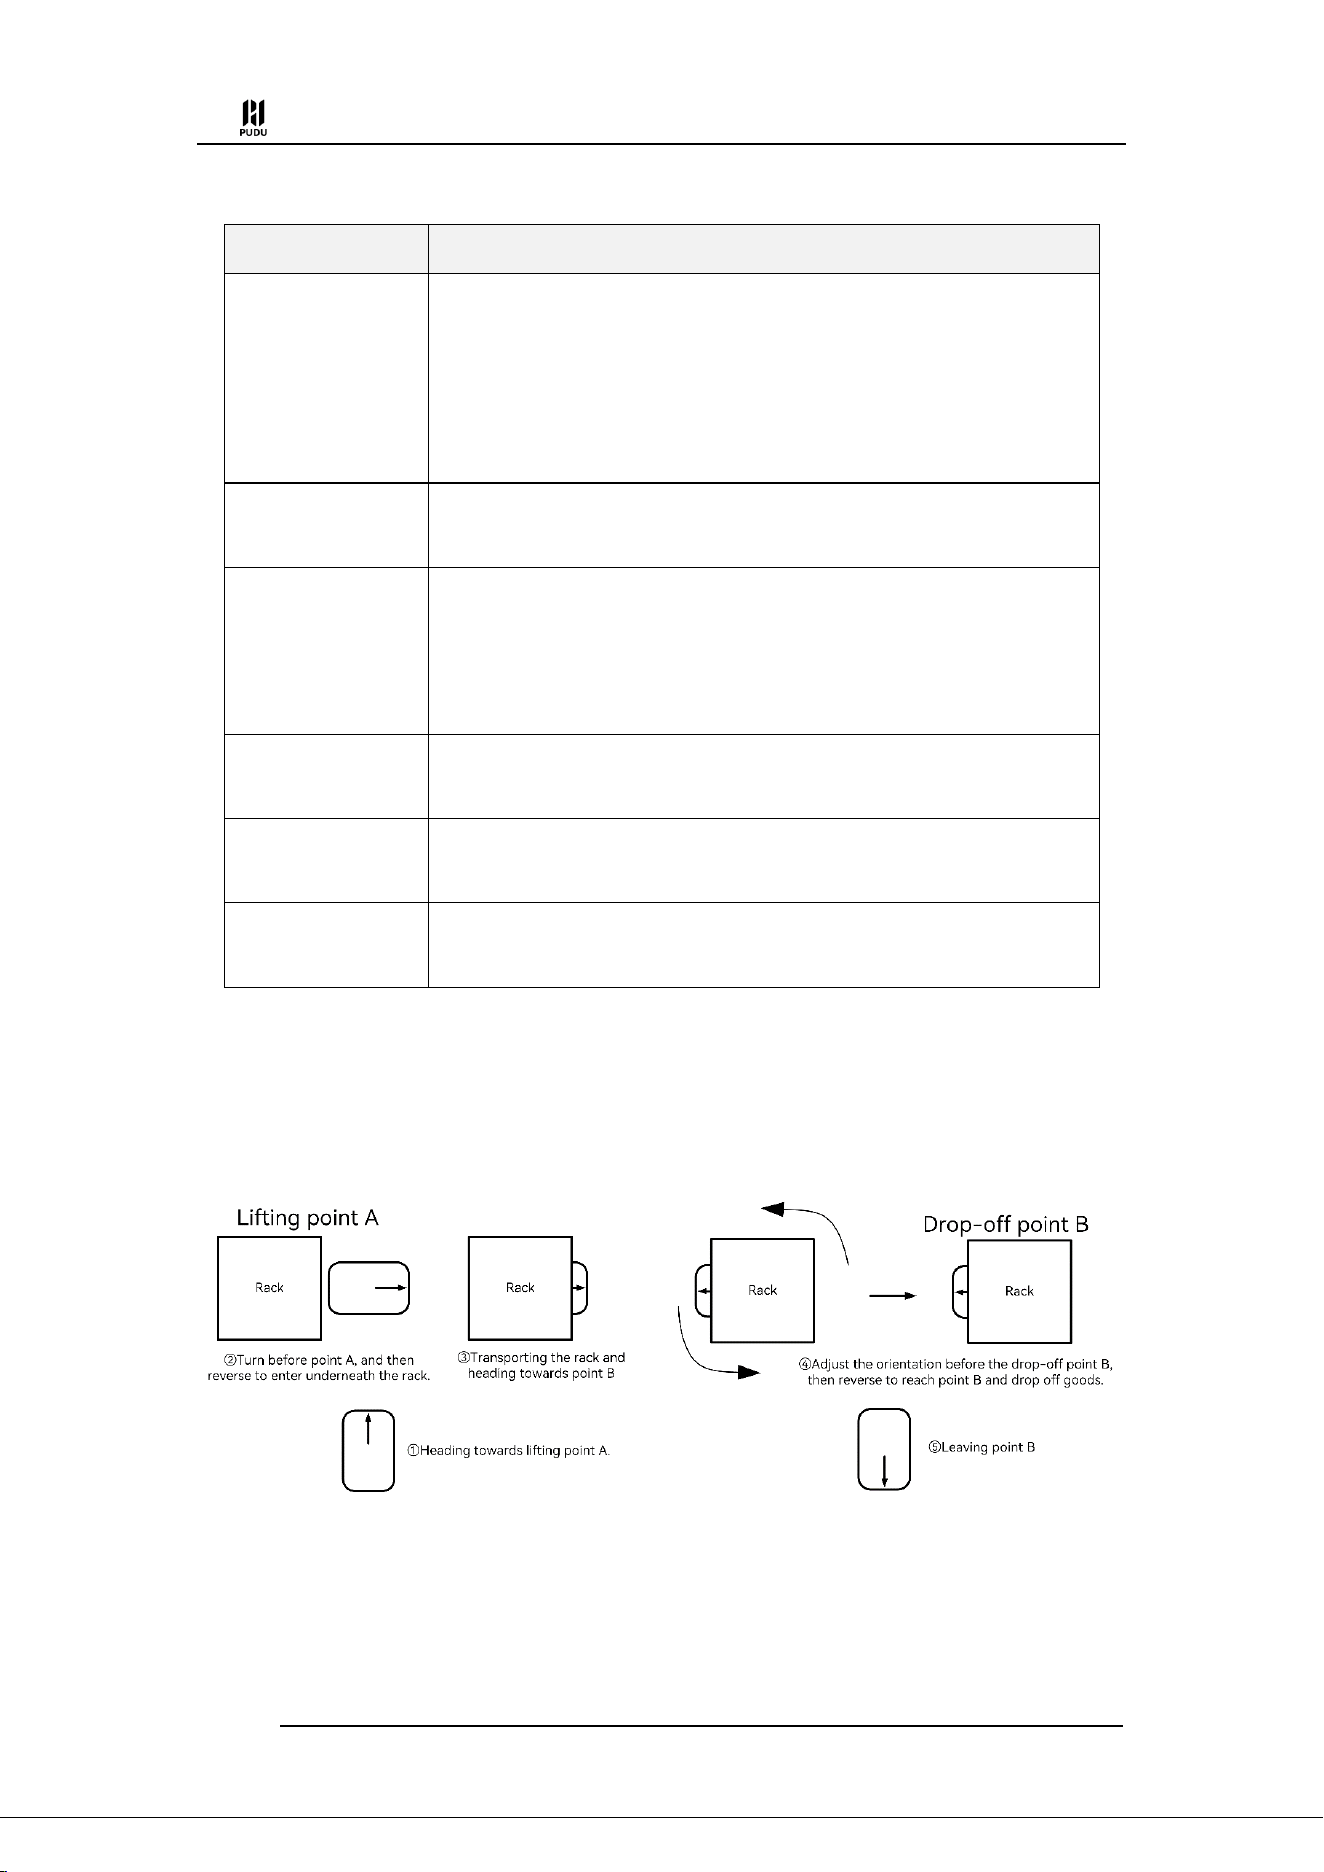
The cruise mode homepage features the following buttons:
Illustration
Settings
Descriptions
Add Cruise Path
Clicking on this option allows you to add a new cruise path for
the robot.
Return
Clicking on this option will initiate the robot's automatic return
to the docking location.
Steady Mode
When enabled, the robot can travel at a low speed and move
smoothly.
History of Tasks
You can view the previous task executed in the current mode.
Cruise Mode Settings
You can make configurations for the cruise mode.
Detail explanation:
(1) Add Cruise Path
Just follow the steps in the previous section.
(2) Return
After clicking “ ”, the robot will automatically return to the standby point.
(3) Steady Mode
You can choose whether the robot uses the smooth mode during the delivery process. In steady
mode, the robot will travel at a lower speed. It will start and brake in a relatively gentle manner. It
is suitable for delivering items that require the robot to run smoothly. Usage is as follows:
Click the " " icon on the right side of the delivery interface, and the icon changes to "
", which turns on the smooth mode, which is valid for one time. Click again to turn
off the smooth mode;
Press and hold the delivery icon for 2s, and the icon changes to " ", which turns on the
smooth mode continuously. Click again to turn off the smooth mode.
(4) History of Tasks
Click the " " button on the cruise mode homepage to view the robot's recent historical
cruise tasks.
(5) Cruise Mode settings
There is a " " button on the right side of the cruise mode interface. Click it to set the cruise
PUDU T300 Operation Guide
Version: V1.0.3 Operation Guide
22
mode. The settings are as follows:
Settings
Description
On arriving at stop
point
Set the action when the robot reaches the stop point. You can choose:
Stay put: The robot stays at the stop point until the user clicks;
Keep moving: The robot does not stop at the stop point;
Stay Time: When the robot arrives at the stop point, it stays for a specified
time and then continues to cruise.
Cruise complete,
returning to position
You can set the location where the robot returns after completing the cruise task.
Custom Function
Button
Set the robot's action after the shortcut button is pressed:
No action: No action after pressing the shortcut button;
Complete the current task: When the robot is on the stop point arrival page,
press the shortcut button and the robot will automatically continue cruising.
Play during tasks
When enable, you can select the synthesized voice or music file to play during the
cruise task.
Play on arrival
When enable, you can select the synthesized voice or music file to play when the
cruise task arrives at the stop point.
Cruise Speed
The robot's scheduled driving speed in cruising can be configured, with a setting
range of 0.2m/s~1.2m/s.
4.3.3 Lifting Mode
Users can set the lifting point and drop-off point. The robot will automatically go to the lifting
point to identify and lift the goods, and then automatically unload the goods after transporting them
to the destination. After completing all the set tasks, the robot will return to the docking location.
4.3.3.1 The main processes of lifting mode
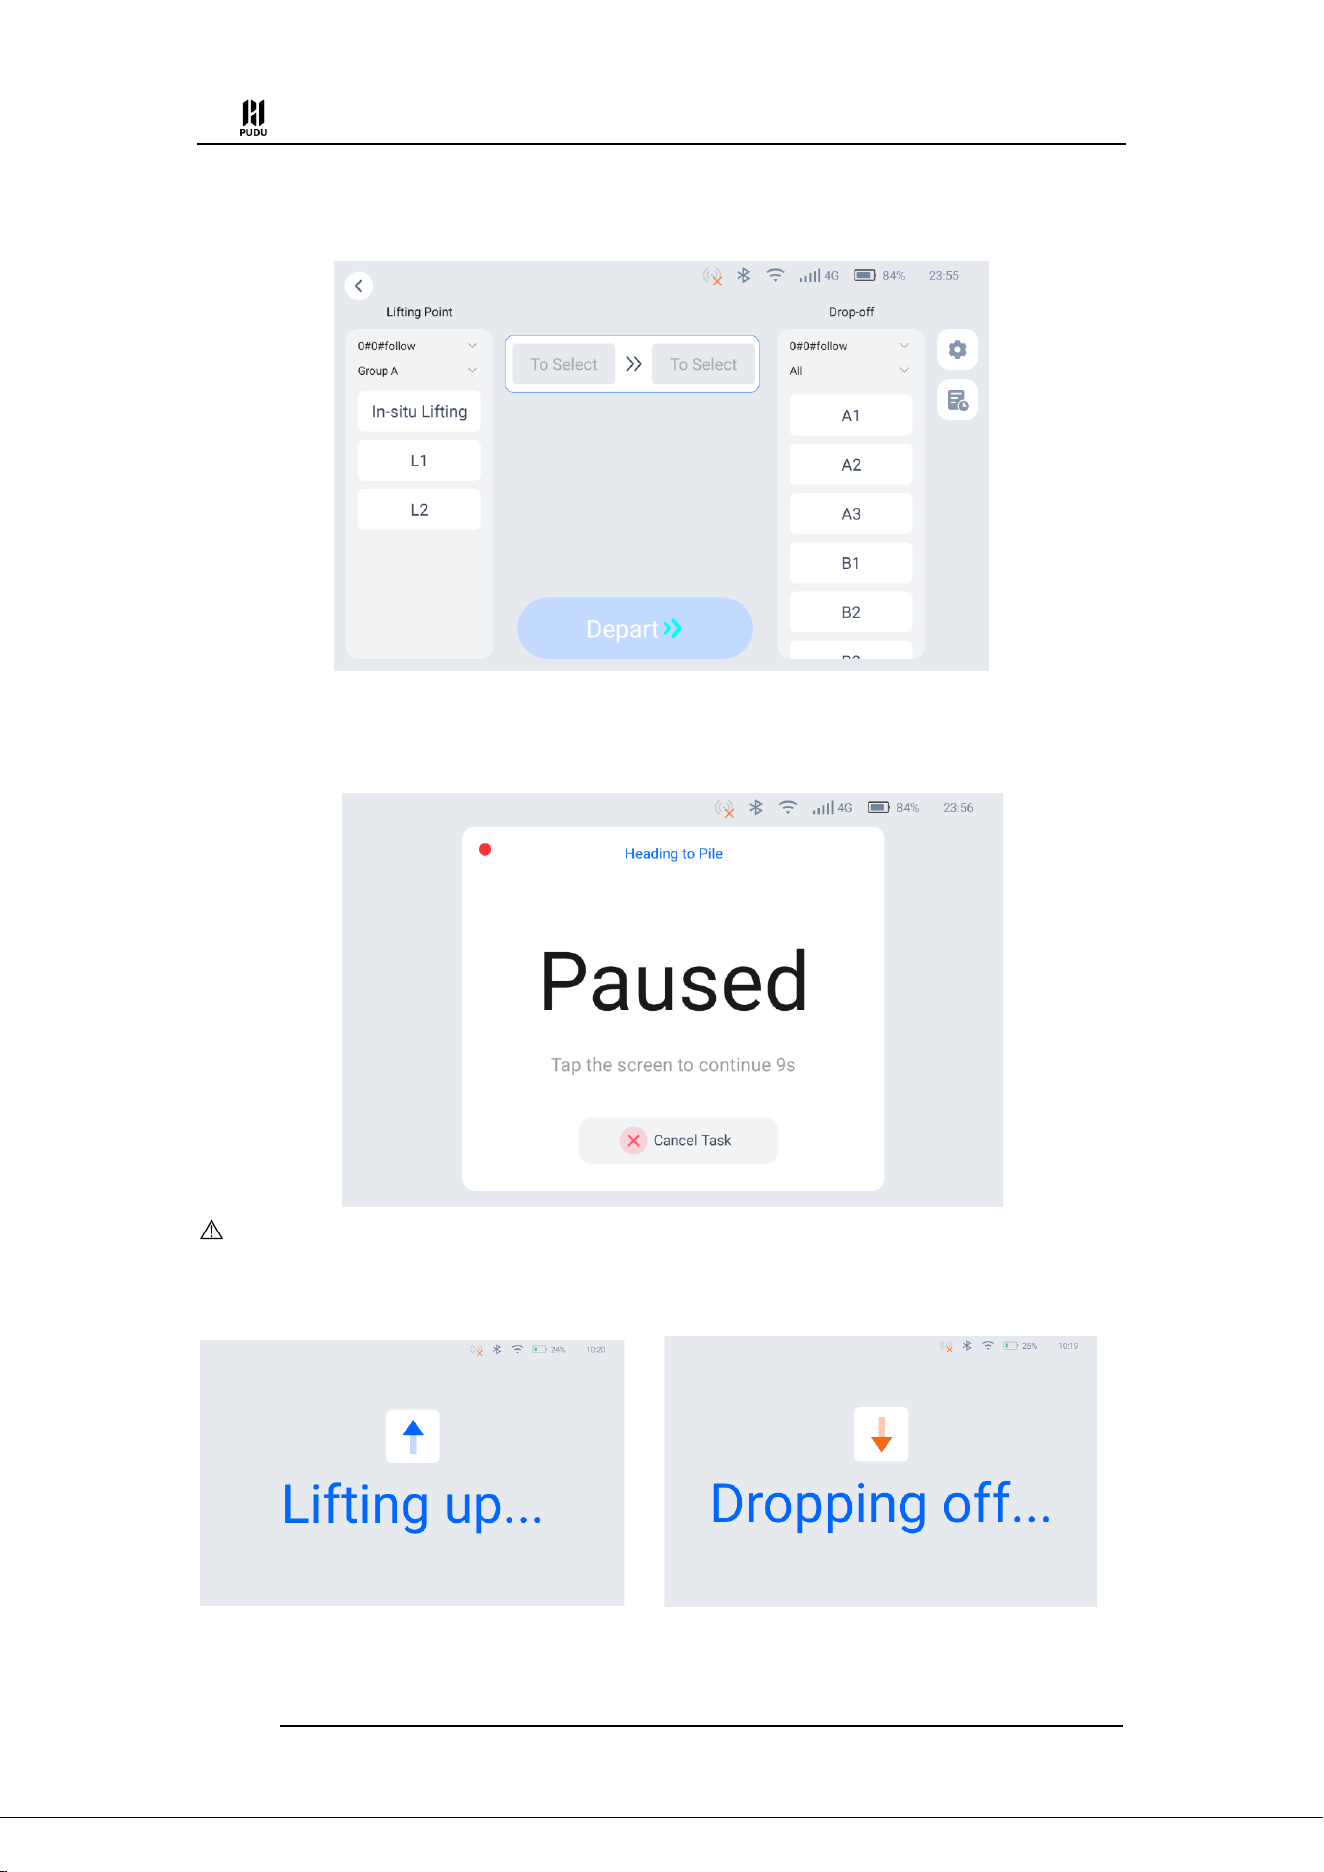
Step 1 Select "Lifting" on the homepage. Enter the lifting mode interface. Choose the
desired lifting point from the list on the left and the drop-off point from the list on the right.
After selecting the points, click "Depart" to initiate the task.
PUDU T300 Operation Guide
Version: V1.0.3 Operation Guide
23
*However, if the robot has already been pushed to the rack to be transported and you want the
robot to lift the rack in place, please select "In-situ Lifting" in the lifting point list.
Step 2 During the lifting task, the user can click on the robot screen to pause. After the pause
countdown ends, the robot will continue to perform the lifting task. If you click "Cancel Task"
during the pause process, you can end the lifting task.
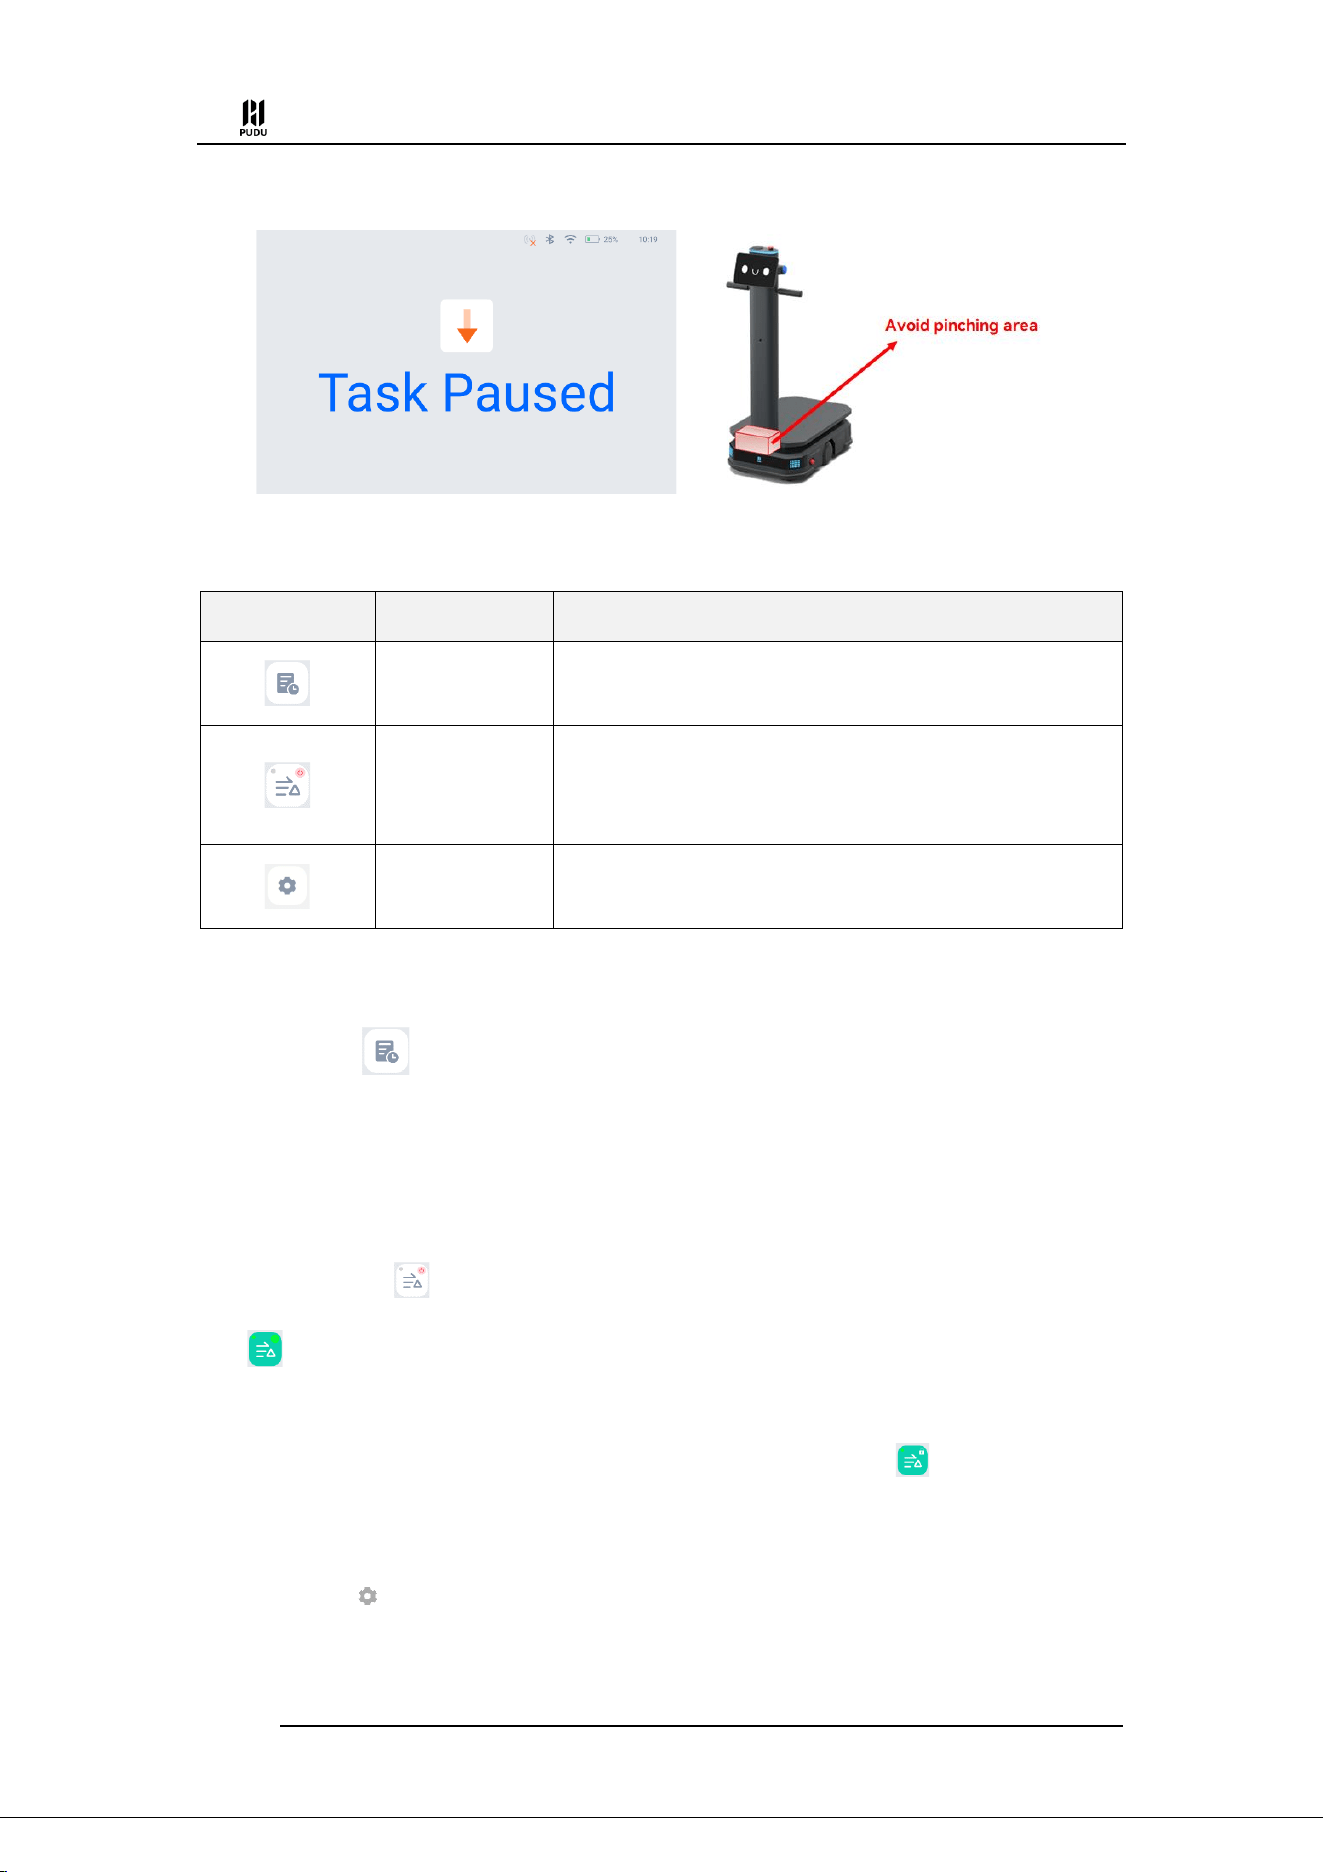
Caution
To ensure the precise operation of the lifting mechanism, the robot cannot be paused when lifting up or drop-
off goods. If you need to stop the lifting mechanism, please press the emergency stop button.
To ensure safety, during the lifting and lowering process, if an object approaches the front end of the robot, the
lifting reset action will pause. Once the object is removed, the lifting mechanism will continue to execute the reset
PUDU T300 Operation Guide
Version: V1.0.3 Operation Guide
24
action.
4.3.3.2 Description of Lifting Mode Homepage
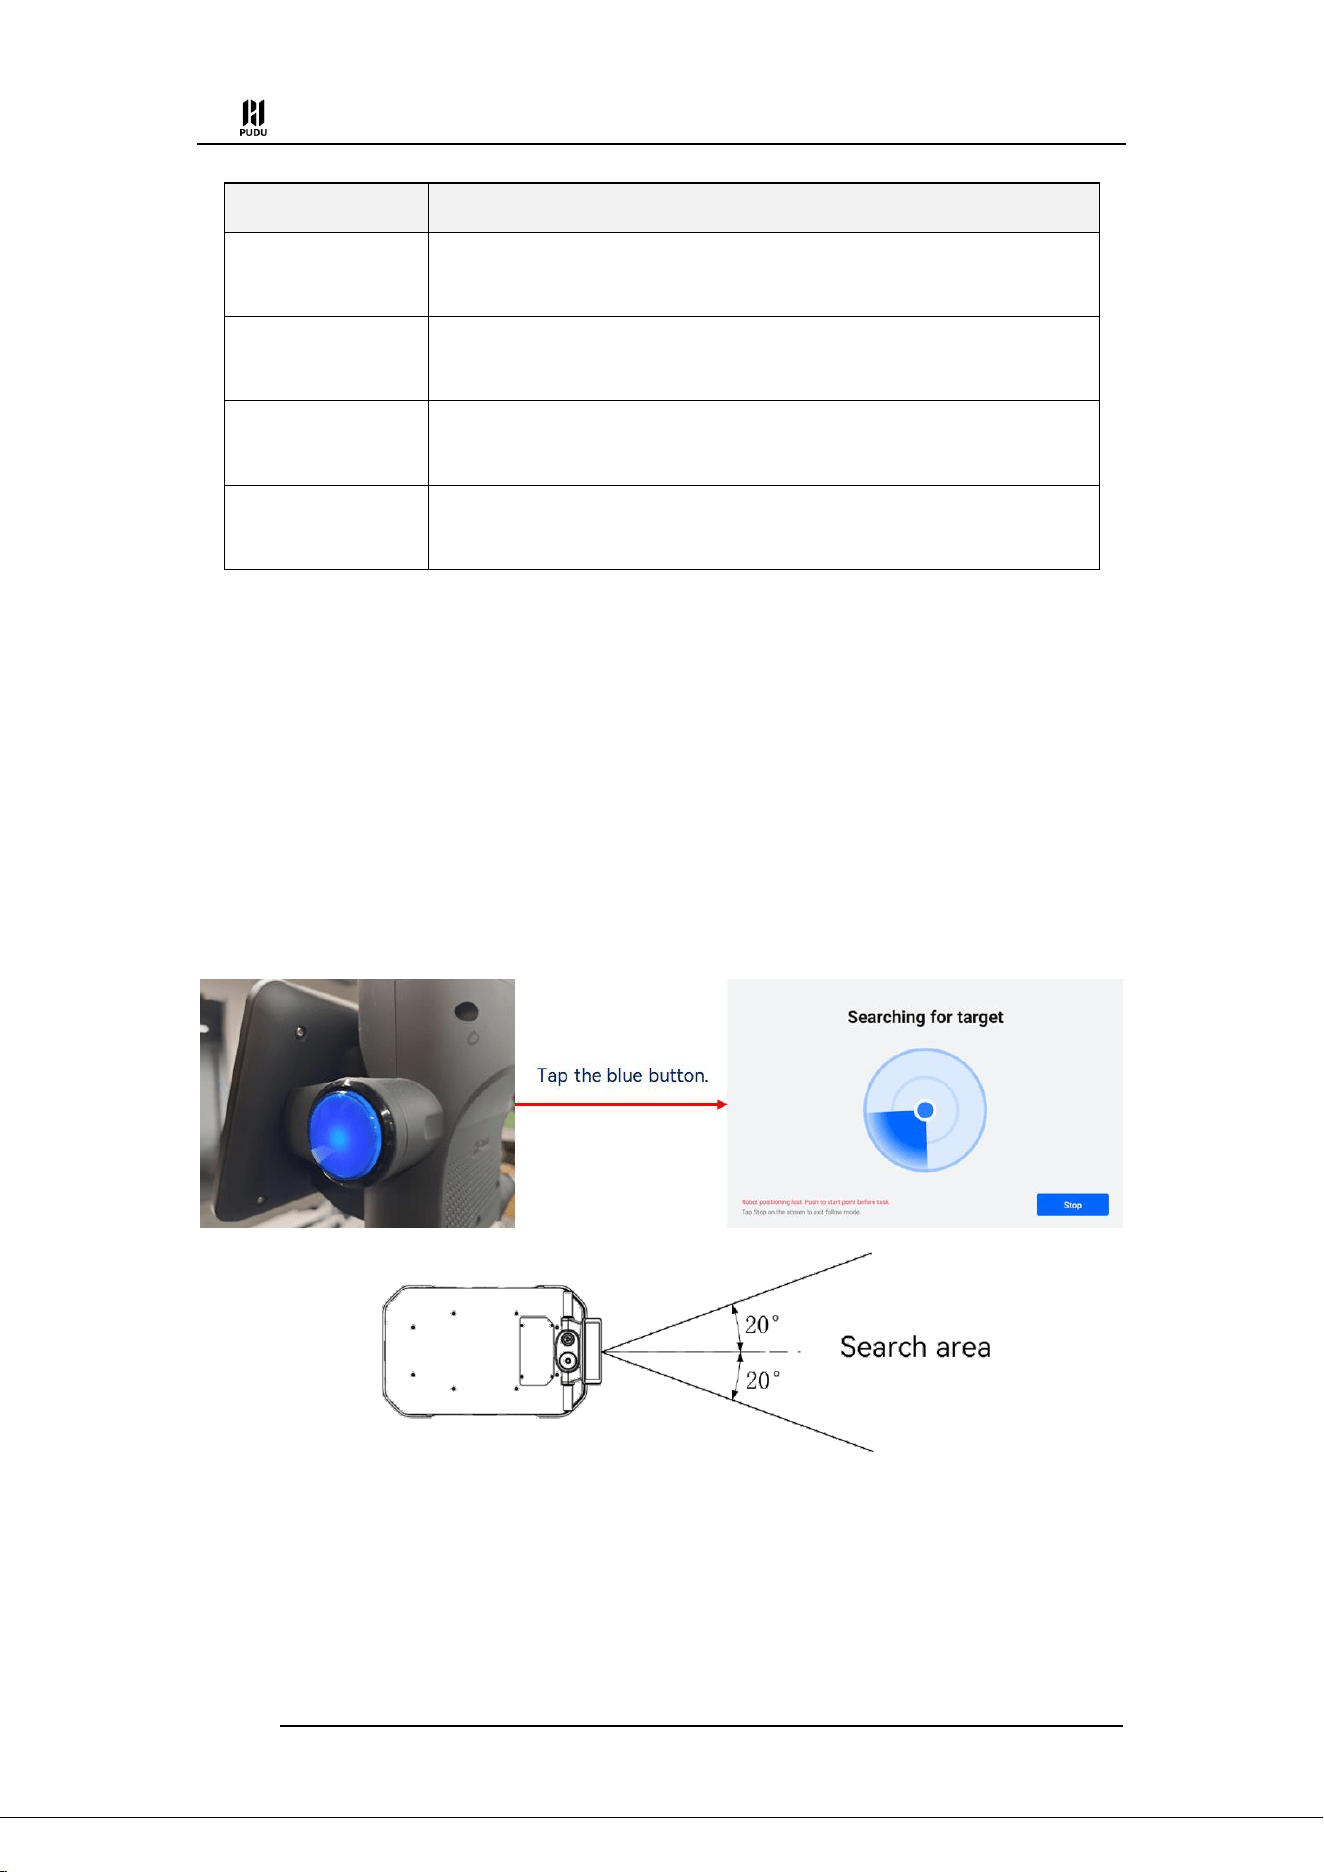
The lifting mode homepage features the following buttons:
Illustration
Settings
Descriptions
History of Tasks
You can view the previous task executed in the current mode.
Steady Mode
When enabled, the robot can operate with a stable control strategy
during lifting transport, optimizing the stability of the robot when
transporting large-sized and heavy-load goods.
Lifting Mode
Settings
You can make configurations for the lifting mode.
Detail explanation:
(1) History of Tasks
Click the " " button on the cruise mode homepage to view the robot's recent historical
cruise tasks.
(2) Steady mode
When enabled, the robot can operate with a stable control strategy during lifting transport,
optimizing the stability of the robot when transporting large-sized and heavy-load goods
Click the " " icon on the right side of the delivery interface, and the icon changes to "
", which turns on the smooth mode, which is valid for one time. Click again to turn off the
smooth mode;
Press and hold the delivery icon for 2s, and the icon changes to " ", which turns on the
smooth mode continuously. Click again to turn off the smooth mode.
(3) Lifting Mode settings
There is a " " button on the right side of the cruise mode interface. Click it to set the cruise
mode. The settings are as follows:
PUDU T300 Operation Guide
Version: V1.0.3 Operation Guide
25
Settings
Description
Play during tasks
When enable, you can select the synthesized voice or music file to play during the
lifting task.
Play upon arrival
When enable, you can select the synthesized voice or music file to play when the
lifting task arrives at the destination
Lifting complete,
returning to position
After the robot completes the lifting task, it will return to the designated location.
Speed
The robot's scheduled driving speed in cruising can be configured, with a setting
range of 0.2m/s~1.2m/s.
4.3.4 Other Application
To facilitate a more flexible application of the PUDU T300, the robot is equipped with additional
modes.
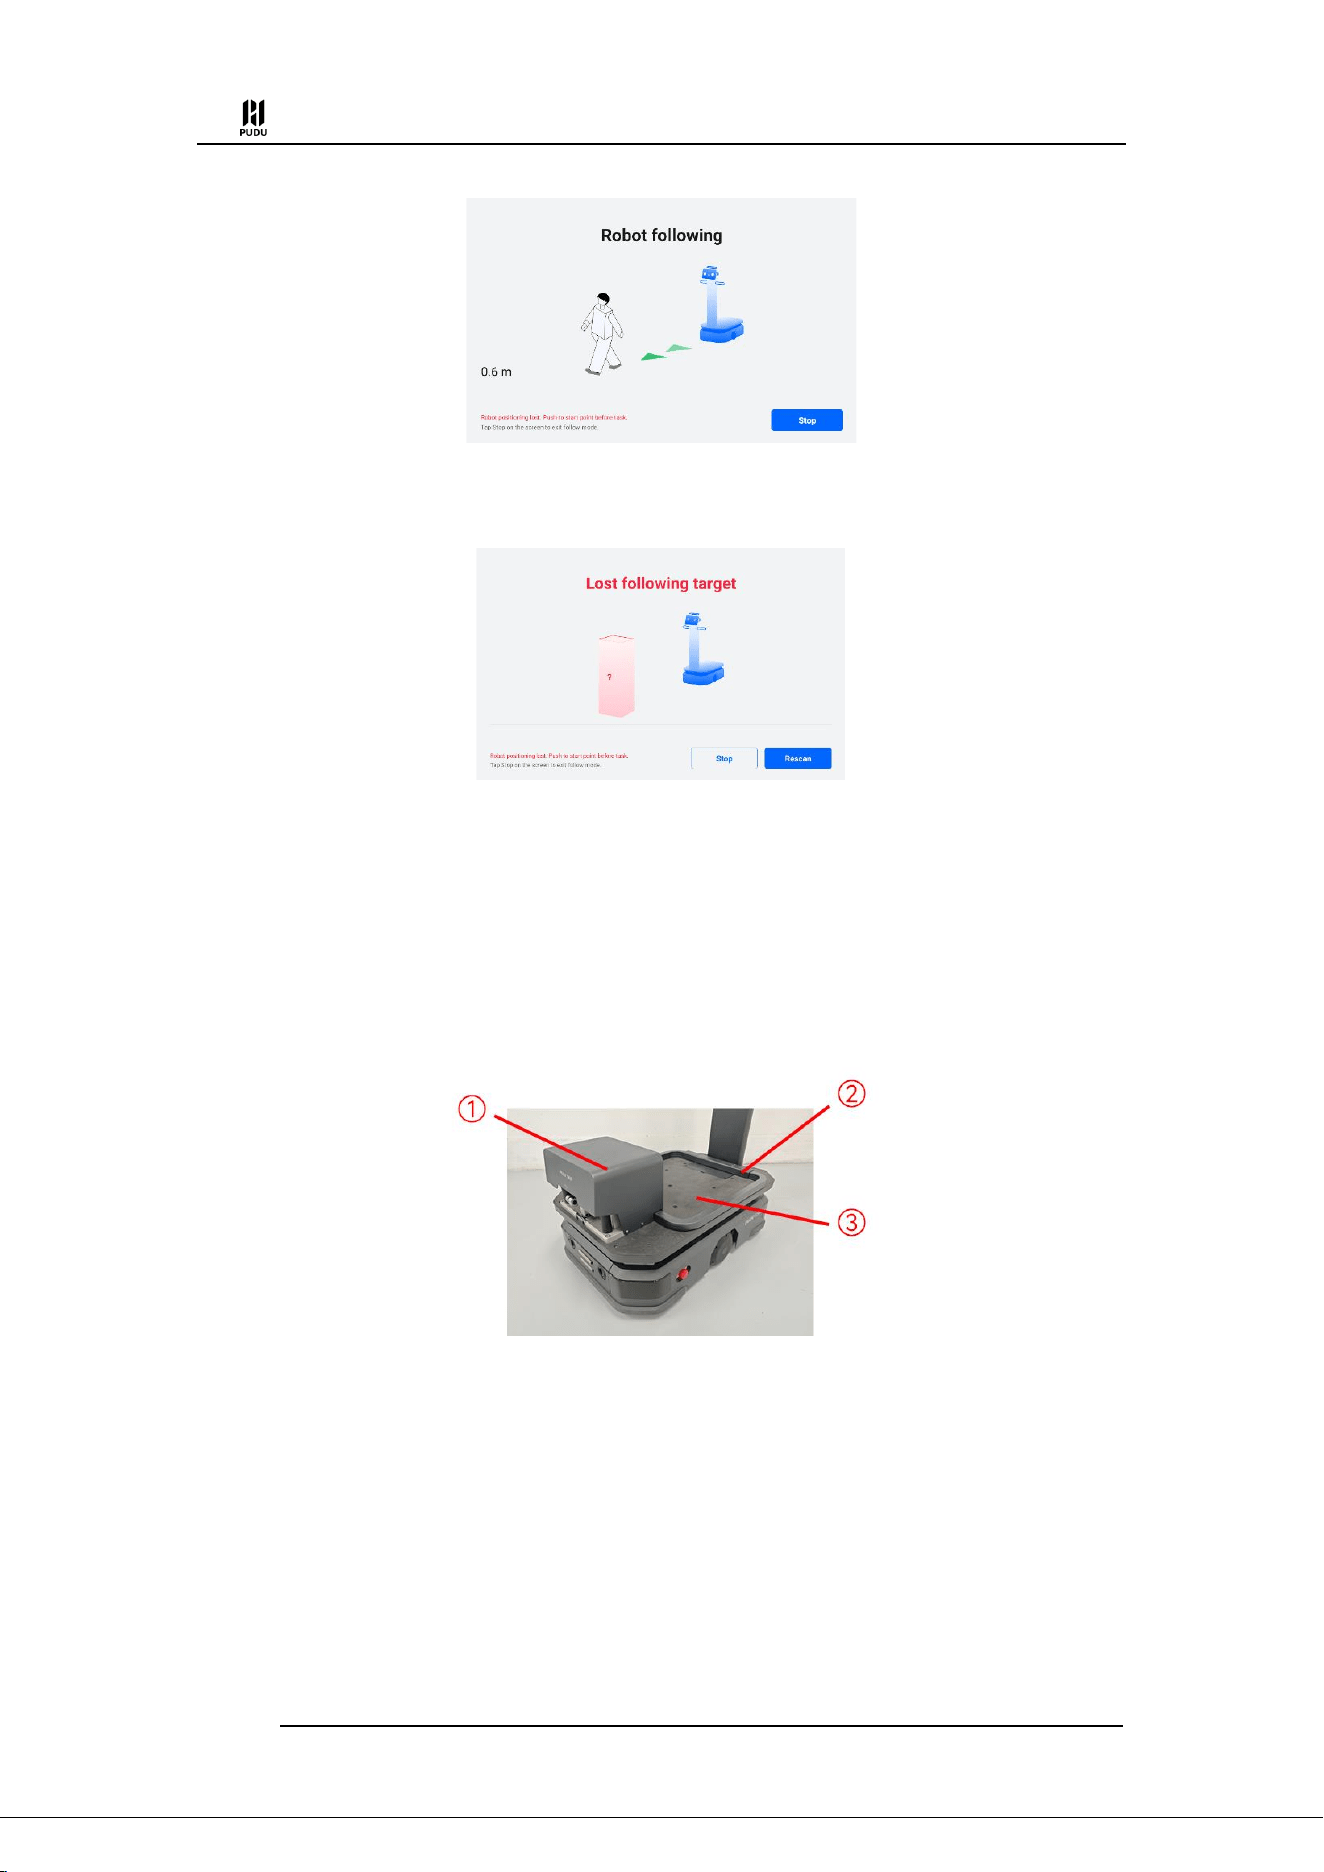
4.3.4.1 Follow mode
In follow mode, the T300 can use its sensors to follow a designated target object, performing
semi-automated assistance for material handling. The specific usage method is as follows:
Step 1 On the robot's homepage or the mode homepage, tap the blue buttons located on both
sides of the T300 screen to enter the target searching state.
Step 2 In the robot's searching state, stand in front of the robot and raise one hand. The robot
will enter follow mode and follow the designated target object.
Step 3 In follow mode, the robot's interface will display the real-time distance between the
robot and the following object. Tap the blue button again or click "Stop" on the screen to exit
the follow mode.
PUDU T300 Operation Guide
Version: V1.0.3 Operation Guide
26
Note:If the following personnel is lost, the robot will announce “Lost following target" At this point, simply stand
in front of the robot and raise one hand to allow the robot to follow again.
4.3.4.2 Towing applications
If the robot is equipped with a towing device and the appropriate configuration is done by
technical support, the towing application can be activated under “Settings” - “Robot Settings” -
“Run Settings”.
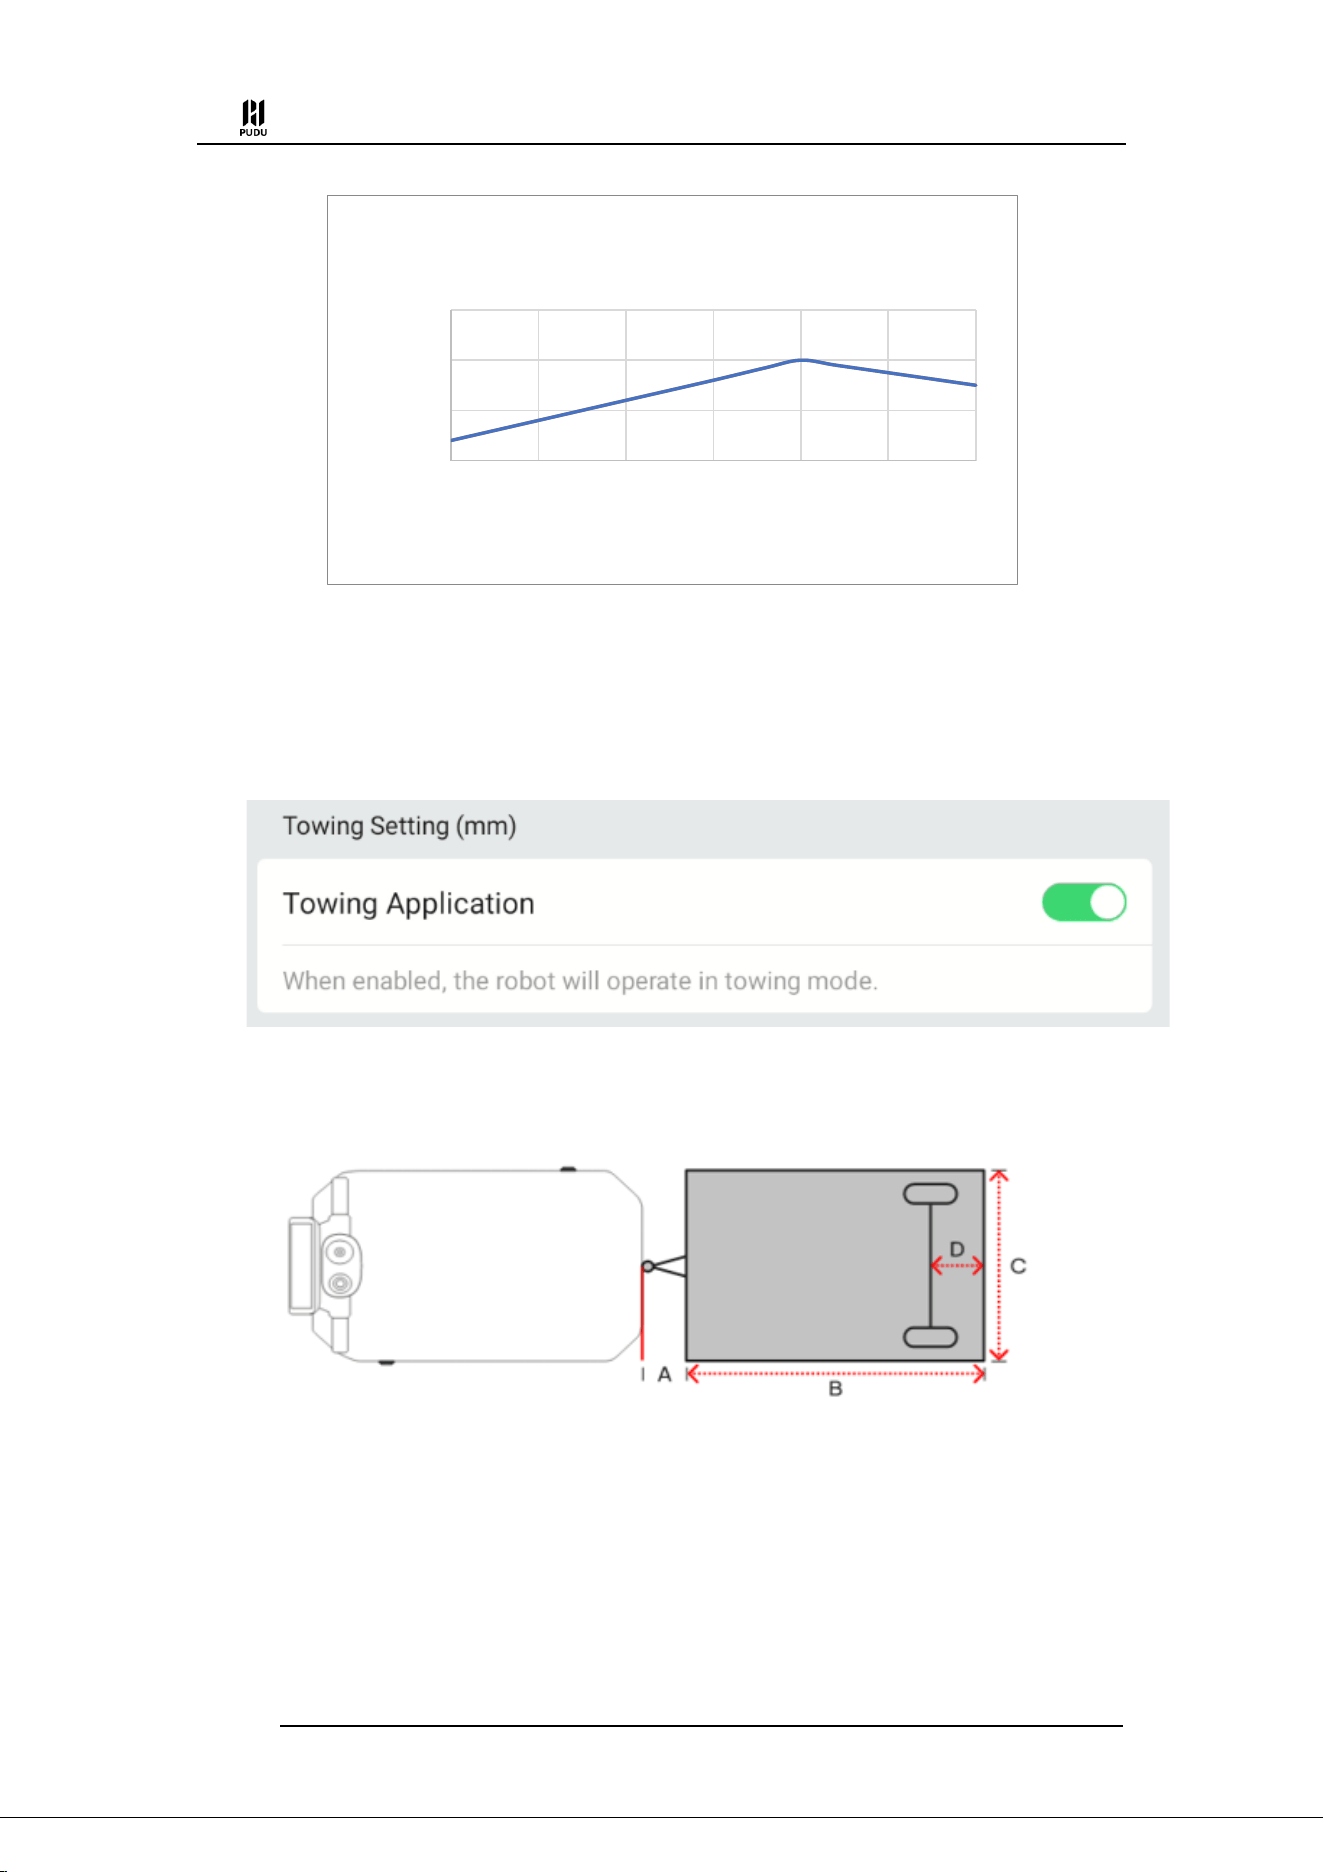
The towing application allows the robot to transport goods in a dragging manner.
Once the compatible towing device for the T300 is installed, the robot can tow goods for
transportation. After installing the towing device, the robot will appear as follows:
①- Towing Device: A towing device can be installed on the robot (expected to be available for sale
in mid-December). This towing device is compatible with most existing towing hooks used on
customer site transport vehicles. After manual attachment, the robot can automatically unload cargo
at destination.
②- Wire trough. Internally laid out to connect the control cables between the T300 and the towing
device.
③- Counterweight area. To ensure sufficient friction between the T300 drive wheels and the ground.
Specific counterweight for the robot end.
PUDU T300 Operation Guide
Version: V1.0.3 Operation Guide
27
The software operation steps are as follows:
Step 1 Turn on the main switch for the "Towing Application." Once the main switch is
activated, you can configure parameters related to the towing function. With this switch
enabled, the robot will take into account the profile of the towing load while performing
delivery and cruising tasks.
Step 2 Configure the type of towing load. Here, you can input the dimensions of all load
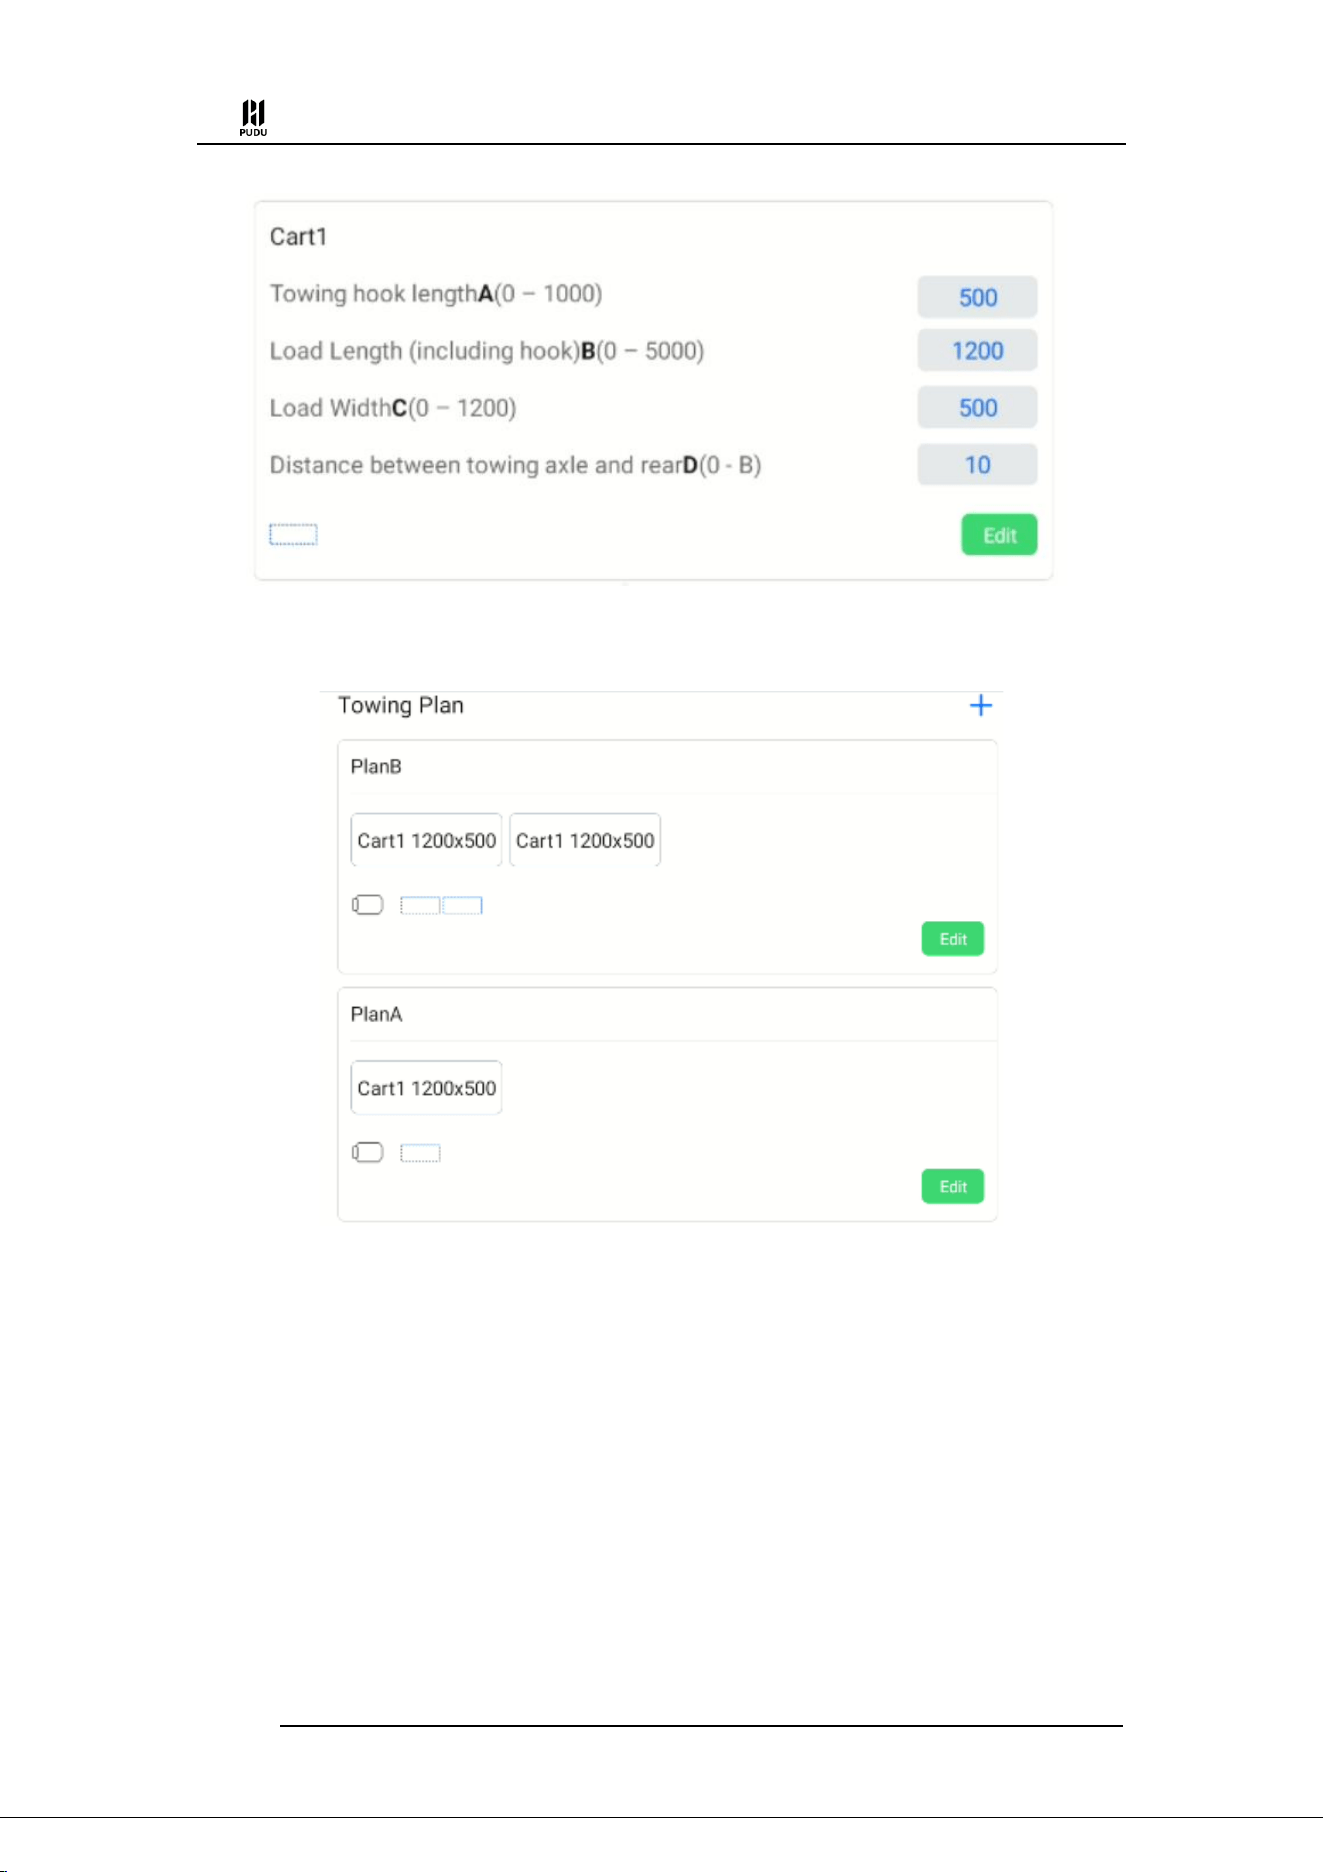
trailers that will be used with the T300 at the operational site here.
0
200
400
600
0 50 100 150 200 250 300
Maximum towing load (kg)
Counterweight weight (kg)
Counterweight-Towing Load Relationship
Chart (μ=0.5)
PUDU T300 Operation Guide
Version: V1.0.3 Operation Guide
28
Step 3 Configure the towing scheme. You can freely combine the recorded towing load
types to create commonly used towing schemes for the operational site here.
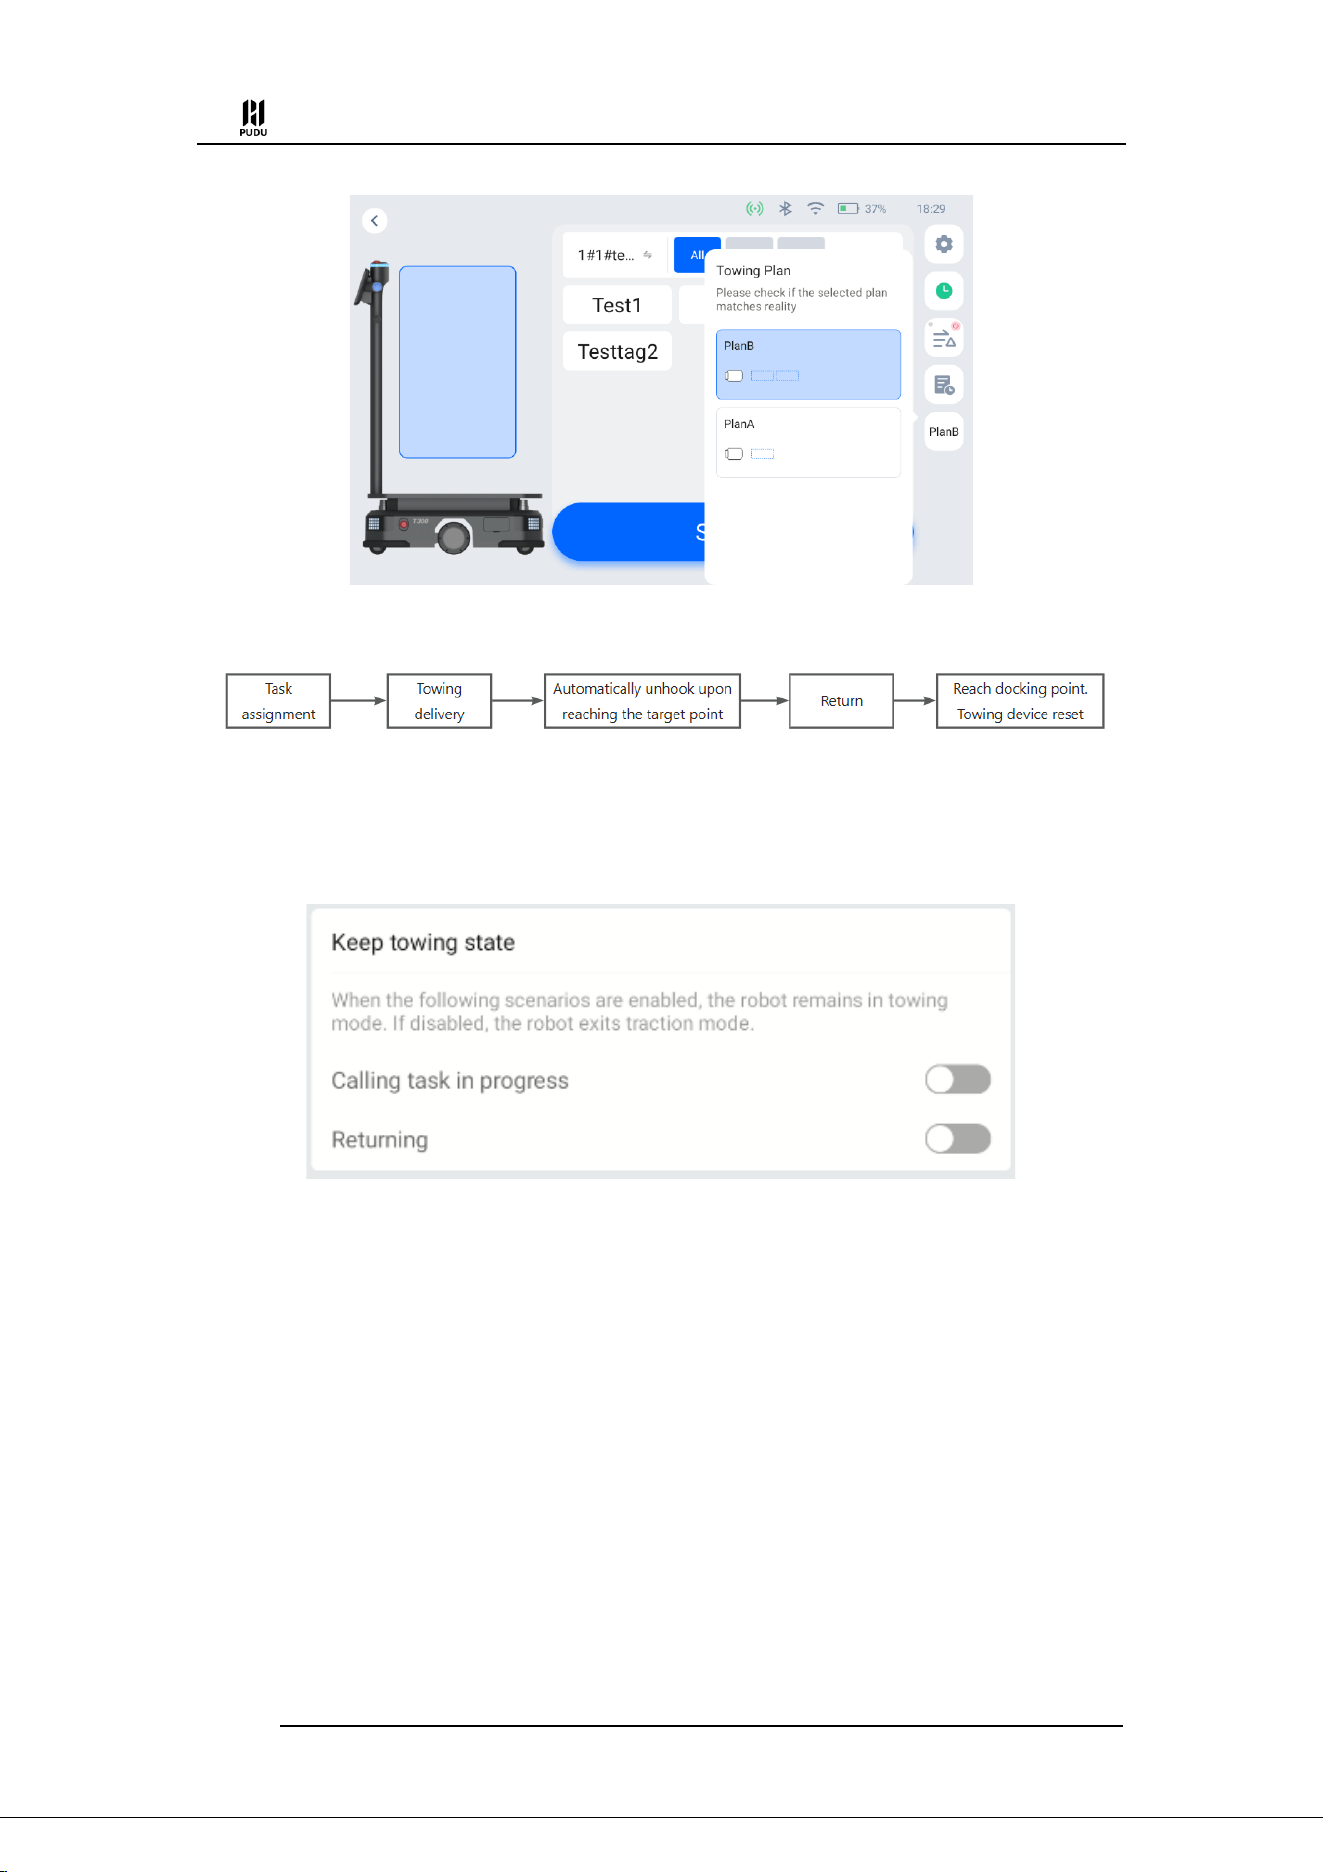
Step 4 Task Assignment. In delivery and cruise mode, before assigning a task to the robot,
you need to select both the delivery destination for the robot and the current towing scheme it
will use (the last selected scheme will be pre-selected by default). After making your selections,
click "Start," and the robot will begin executing the task.
PUDU T300 Operation Guide
Version: V1.0.3 Operation Guide
29
The robot's operating process is as follows:
For your different usage requirements (for example, if you want the robot to remain in towing
mode during both the delivery and return journeys), the robot is equipped with a configuration
switch that allows you to set whether the robot should maintain towing status during certain
processes.
Note: When towing goods, the robot cannot automatically recharge. Therefore, to ensure safety, the robot will
disengage the towing mechanism before executing the automatic recharging task.
4.4 Setting
There is a "Settings" button on the robot's homepage. Clicking it will take you to the robot's
general settings interface, where you can set the robot's operating configuration.
4.4.1 General
In the general settings, you can set basic settings such as language, WLAN, theme, brightness,
volume, etc.
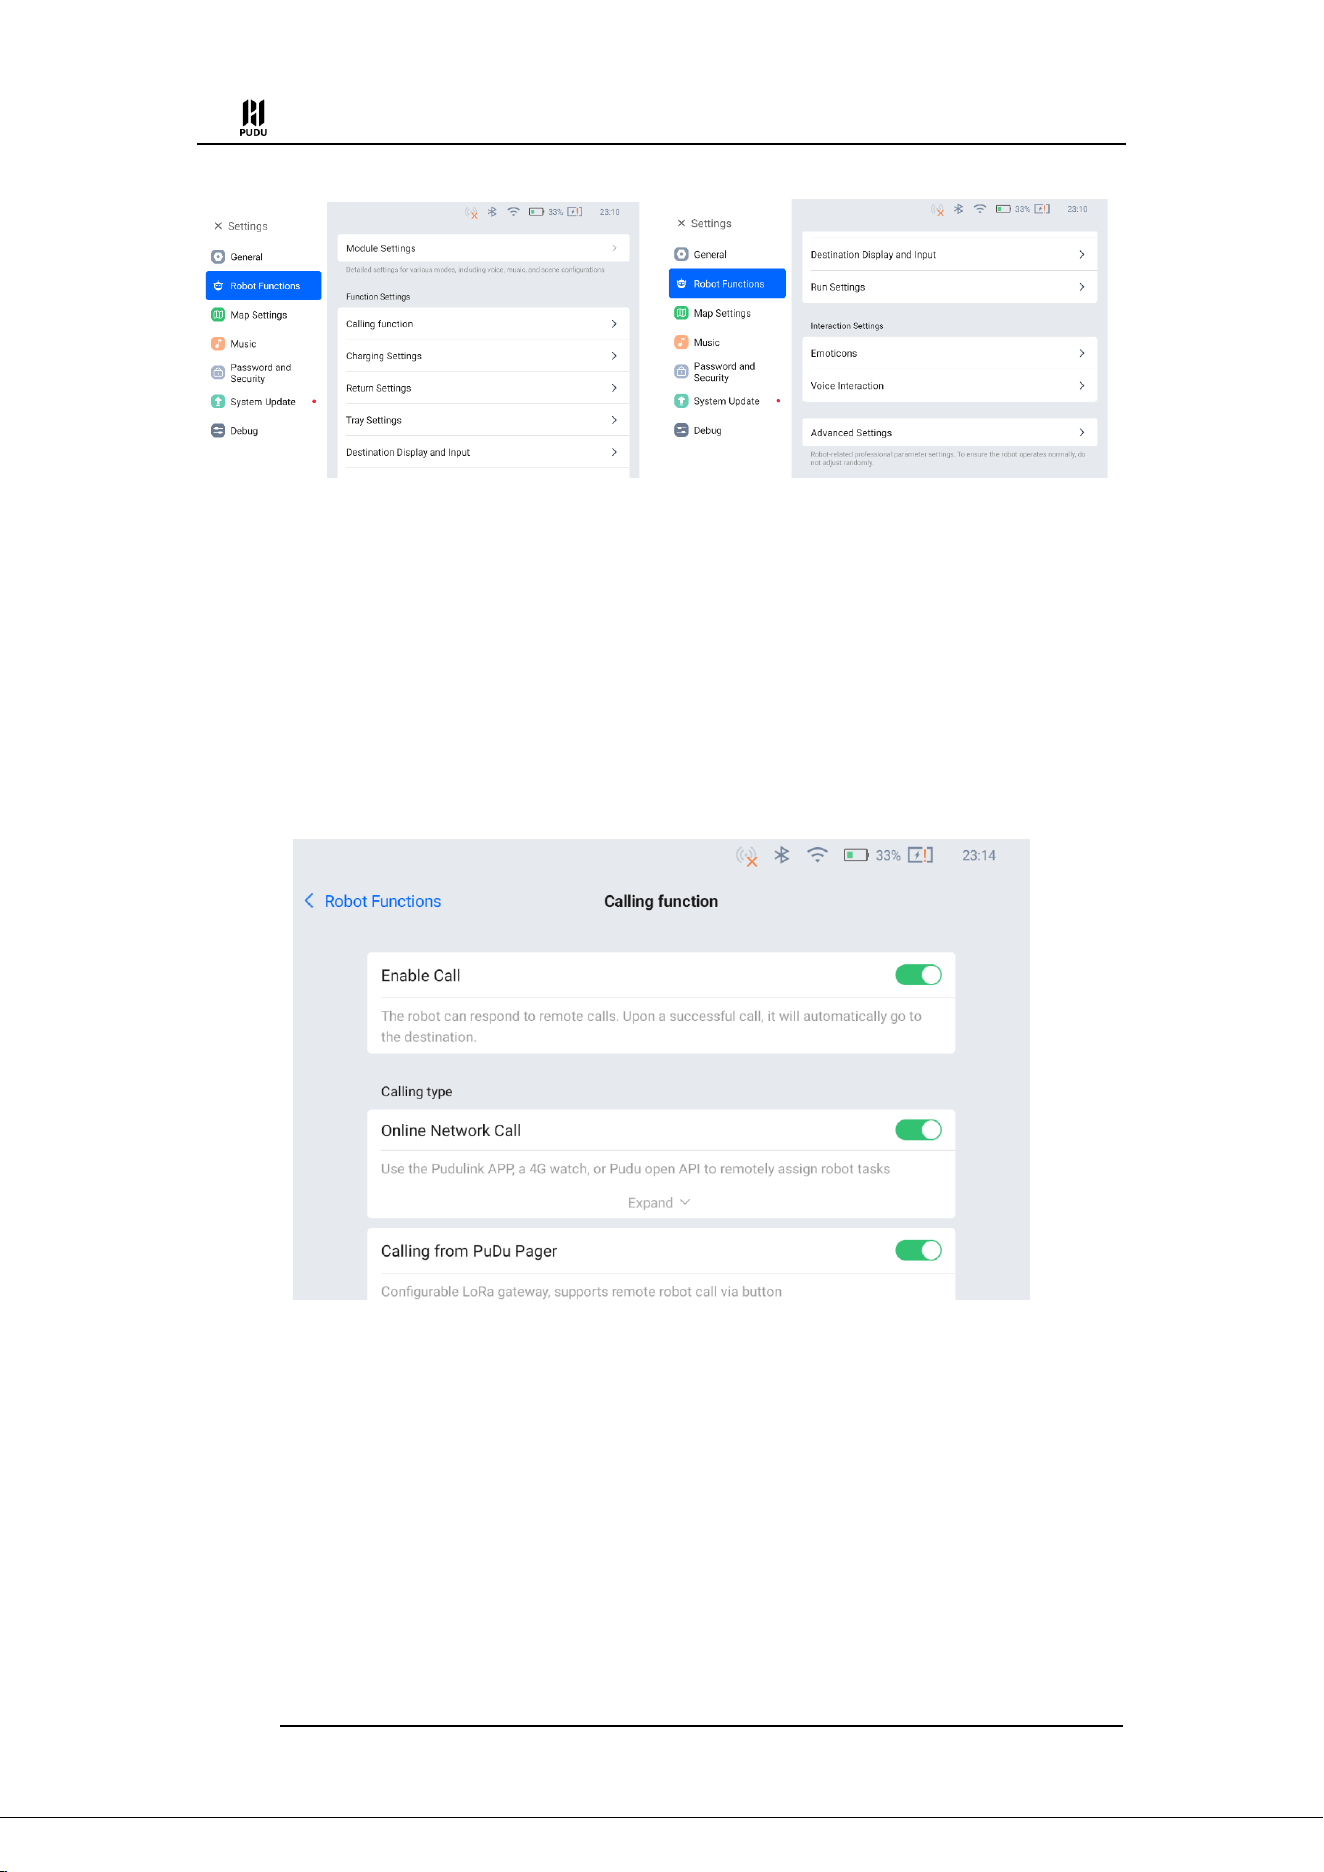
4.4.2 Robot Functions
The robot function includes most of the robot's operating settings.
PUDU T300 Operation Guide
Version: V1.0.3 Operation Guide
30
The details are as follows:
4.4.2.1 Module Settings
Functions of each business module (same as described in Sections 4.1 to 4.3)
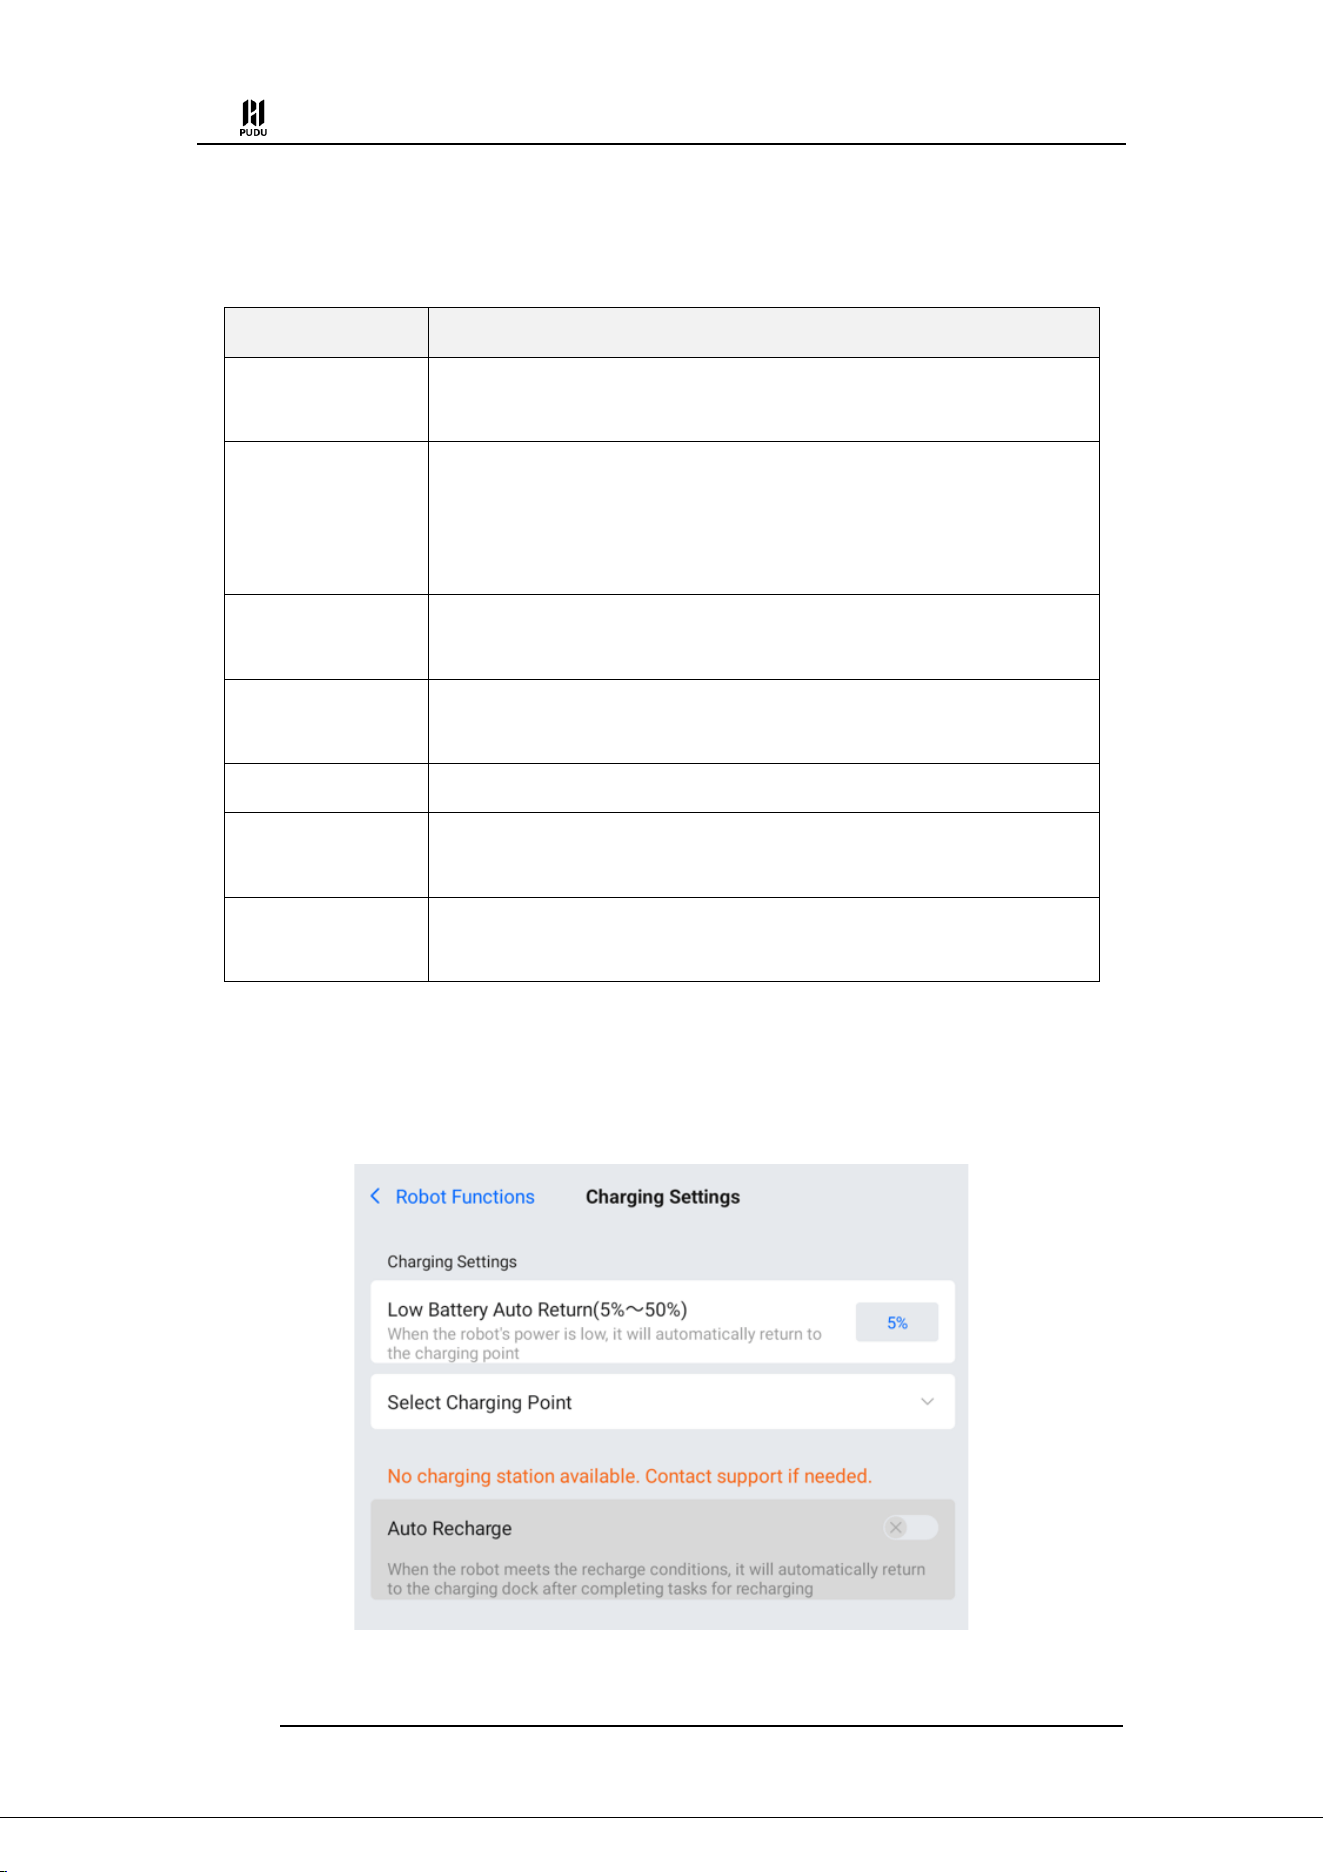
4.4.2.2 Calling function
Remote call related content can be set. Including network call, PUDU pager, microservice, etc.
(1) Enable Call
When enable, the robot can respond to remote calls. If you need to use the call function, you
can turn on this switch.
(2) Online Network Call
When the switch is turned on, the robot can call the robot through pudulink APP, 4G watch,
open interface and other methods that rely on network links.
(3) Calling from PuDu Pager
You can configure the PUDU Pager here. For specific deployment methods, please contact
technical support.
(4) Local Microservice
After turning it on, you can use microservice in LAN to call the robot. For specific deployment
PUDU T300 Operation Guide
Version: V1.0.3 Operation Guide
31
methods, please contact technical support.
(5) Other call setting items
Call settings also include the following setting items:
Setting items
Description
Wait when calling
When enable, when the robot receives a call task, it will count down according to
the set time. And the call task will be executed after the countdown ends.
Call arrival wait
When enable, the robot will count down according to the set time after arriving at
the point. After the countdown ends, the robot returns to the page before the
original call. If this configuration is turned on, it will still stay on the call arrival
page after the countdown ends.
Call Arrival Jump
Mode
After the robot reaches the target point of the call task, the robot will jump to the
corresponding mode;
Task complete,
returning
After the call task is completed, the robot will return to the set location;
Callable Status
The state of the robot that can respond to the call task can be set
Play during tasks
When enable, you can select the synthesized voice or music file to be played
during the call task.
Play on Arrival
When enable, you can select the synthesized voice or music file to be played when
the call task arrives at the destination.
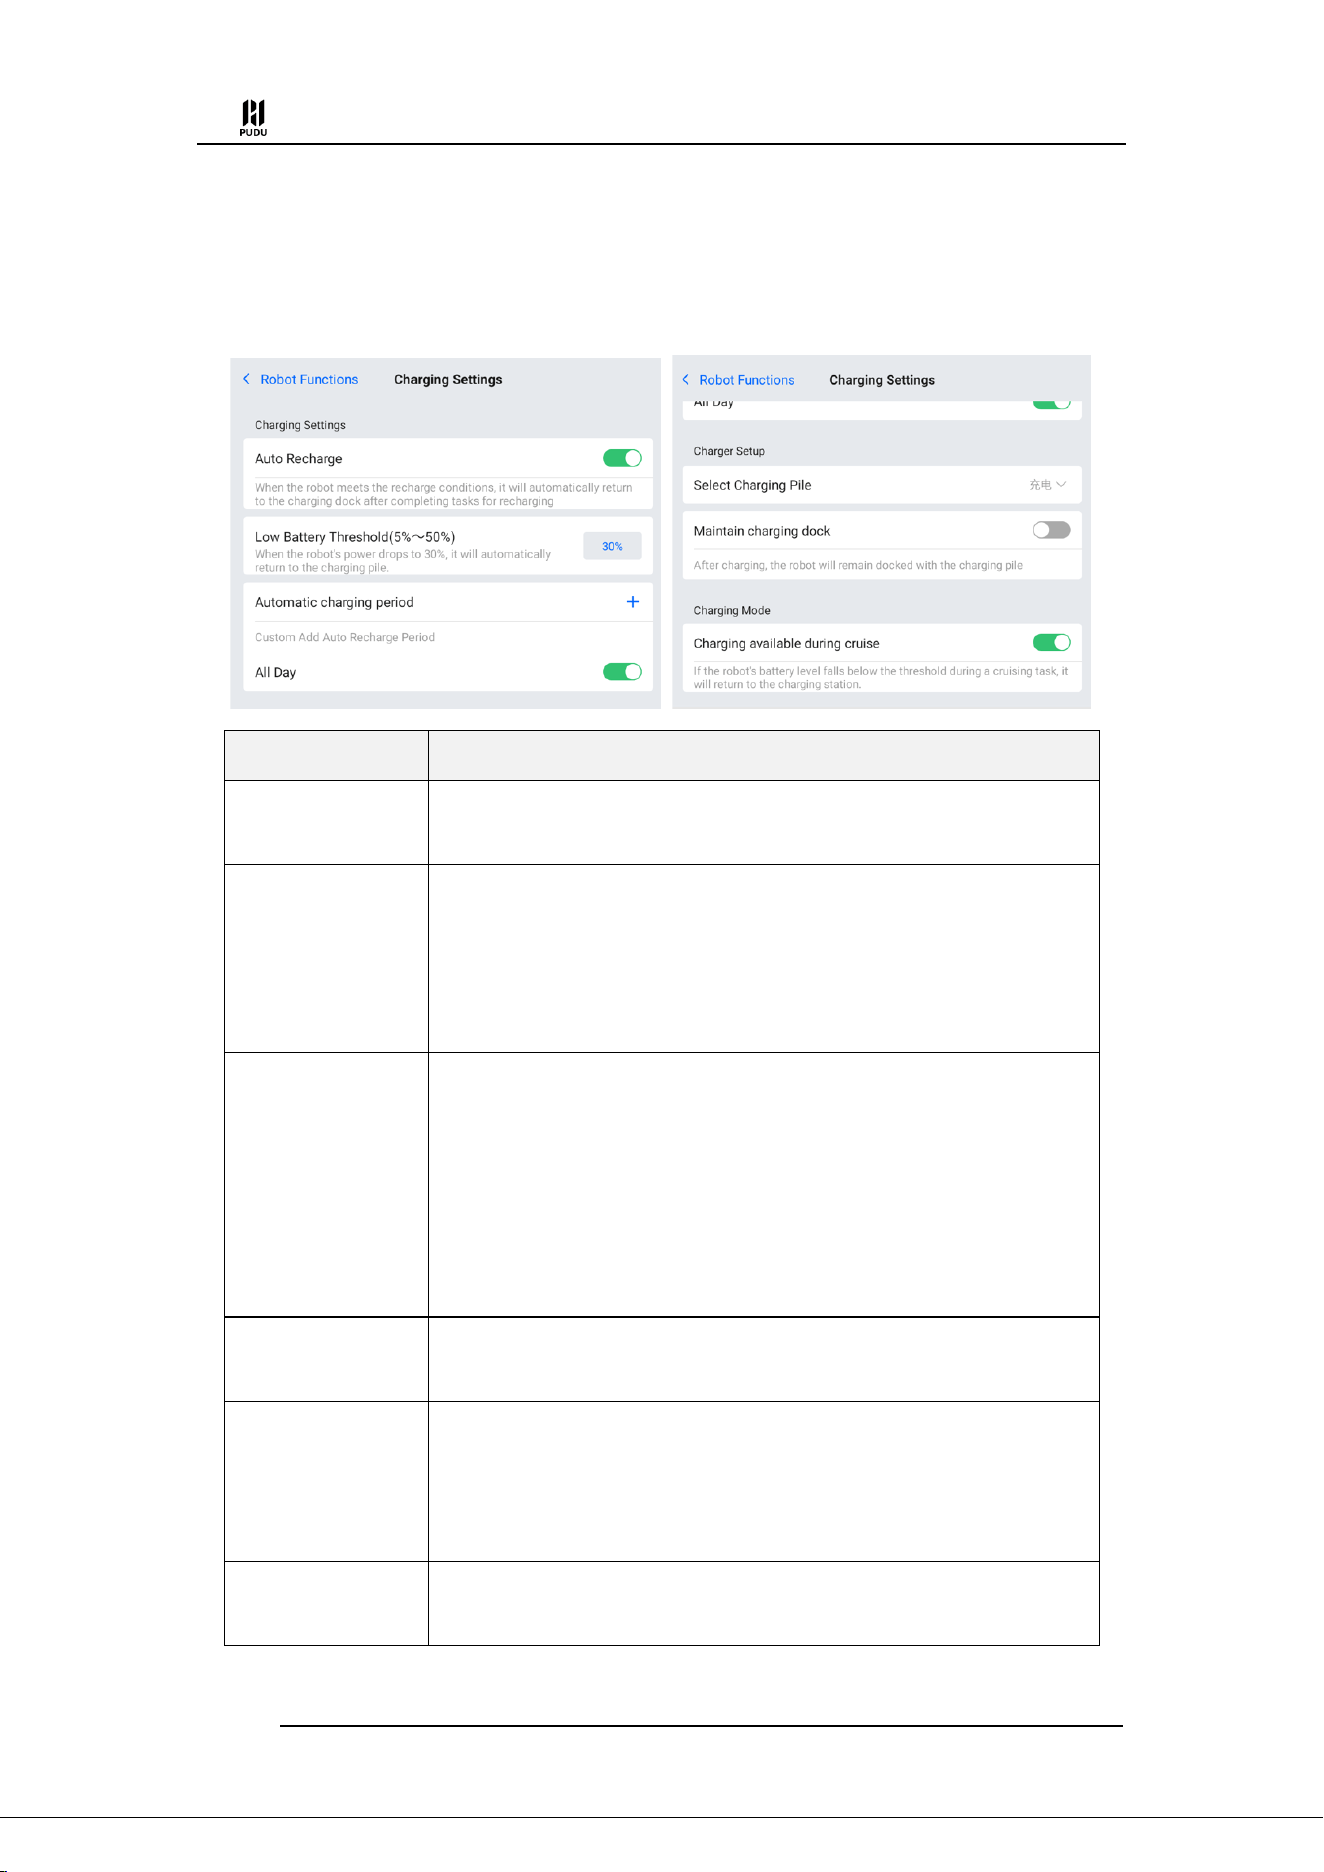
4.4.2.3 Charging Setting
The robot's automatic recharging configuration can be adjusted according to actual usage needs.
(1) When there is no charging point in the map
When the robot's map does not contain a charging point, the page displays as follows:
When the robot's battery power is lower than the "low battery Auto Return" threshold, it will
PUDU T300 Operation Guide
Version: V1.0.3 Operation Guide
32
automatically return to the charging point. (The charging point is the point where the robot is
charged daily, not the location of the charging pile)
(2) When there is a charging pile in the map
When there is a charging pile in the map, the robot will display the following configuration:
Setting items
Description
Auto Recharge
If a charging station is set in the robot map, this switch will be turned on by
default.
Low Battery
Threshold
After the switch is turned on, the robot will automatically perform recharging
according to the configuration parameters. You can set a power threshold. When
the robot power is lower than the threshold (setting range 5%~50%) and the robot
is continuously idle. After 1 minute, the robot will automatically perform
automatic recharging.
Automatic charging
period
You can customize the robot's automatic recharge time period. The robot will only
perform recharge tasks during the set time period. There is a default "all day" time
period in the robot. You can also add time periods by clicking the "+" symbol, and
you can turn each time period on/off by using the switch.
When multiple time periods are turned on at the same time, the robot will
automatically recharge if the current time belongs to any of the time periods
turned on.
Select Charging Pile
If multiple charging point are set in the map, you can select the charging station
for the robot to automatically recharge here.
Maintain charging
dock
When this switch is turned off, the robot will automatically return to the standby
point after it is fully charged.
When this switch is turned off, the robot will stay on the charging pile after it is
fully charged.
Charging Mode
You can configure whether the robot can automatically recharge in some working
states according to actual usage needs.
PUDU T300 Operation Guide
Version: V1.0.3 Operation Guide
33
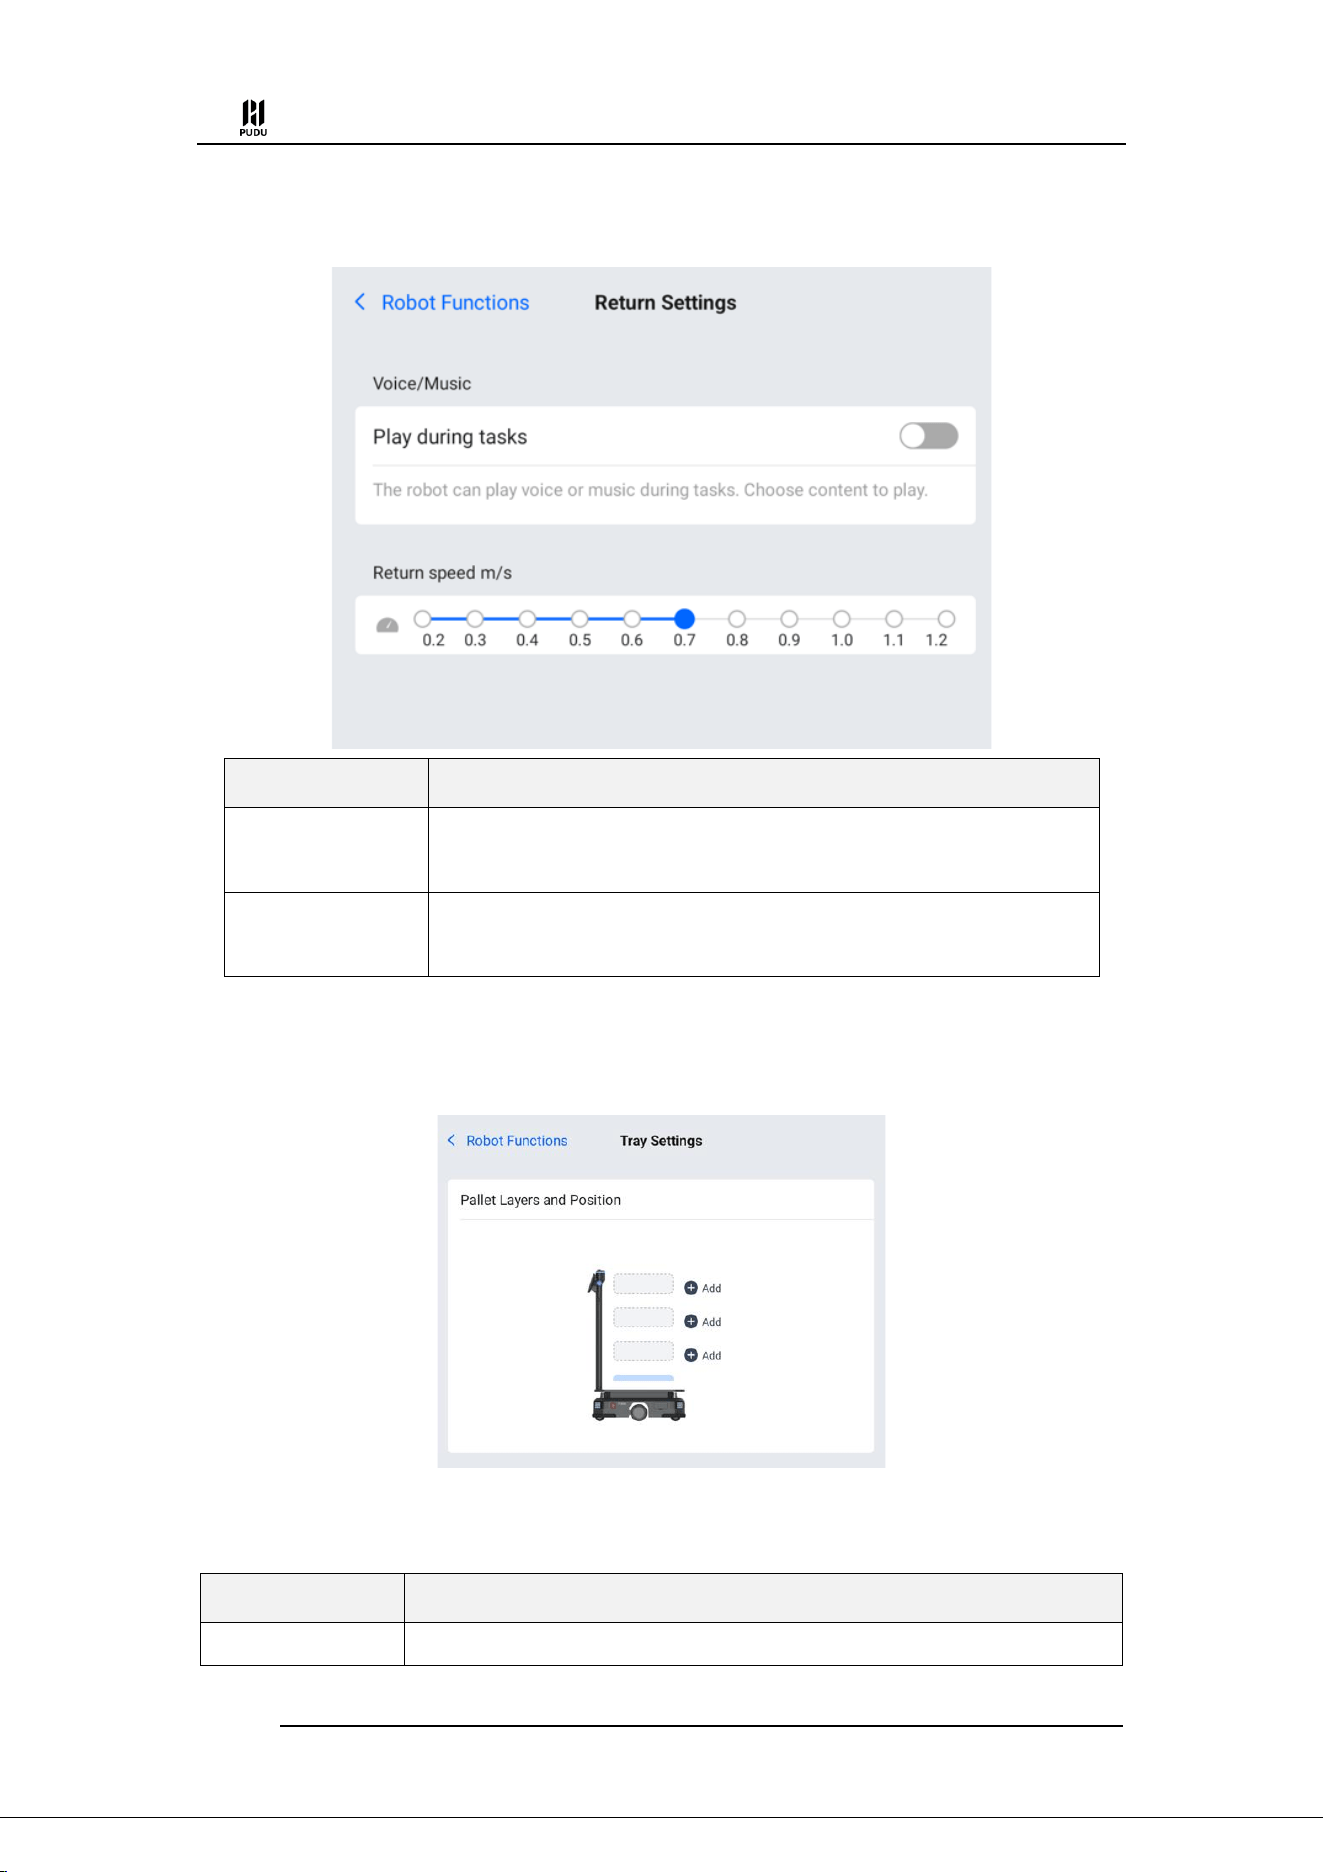
4.4.2.4 Return Settings
Similar to the mode settings, the return settings include the following settings:
Setting items
Description
Play during tasks
When enable, you can select the synthesized voice or music file to play during
returning.
Return speed
The robot's scheduled driving speed in cruising can be configured, with a setting
range of 0.2m/s~1.2m/s.
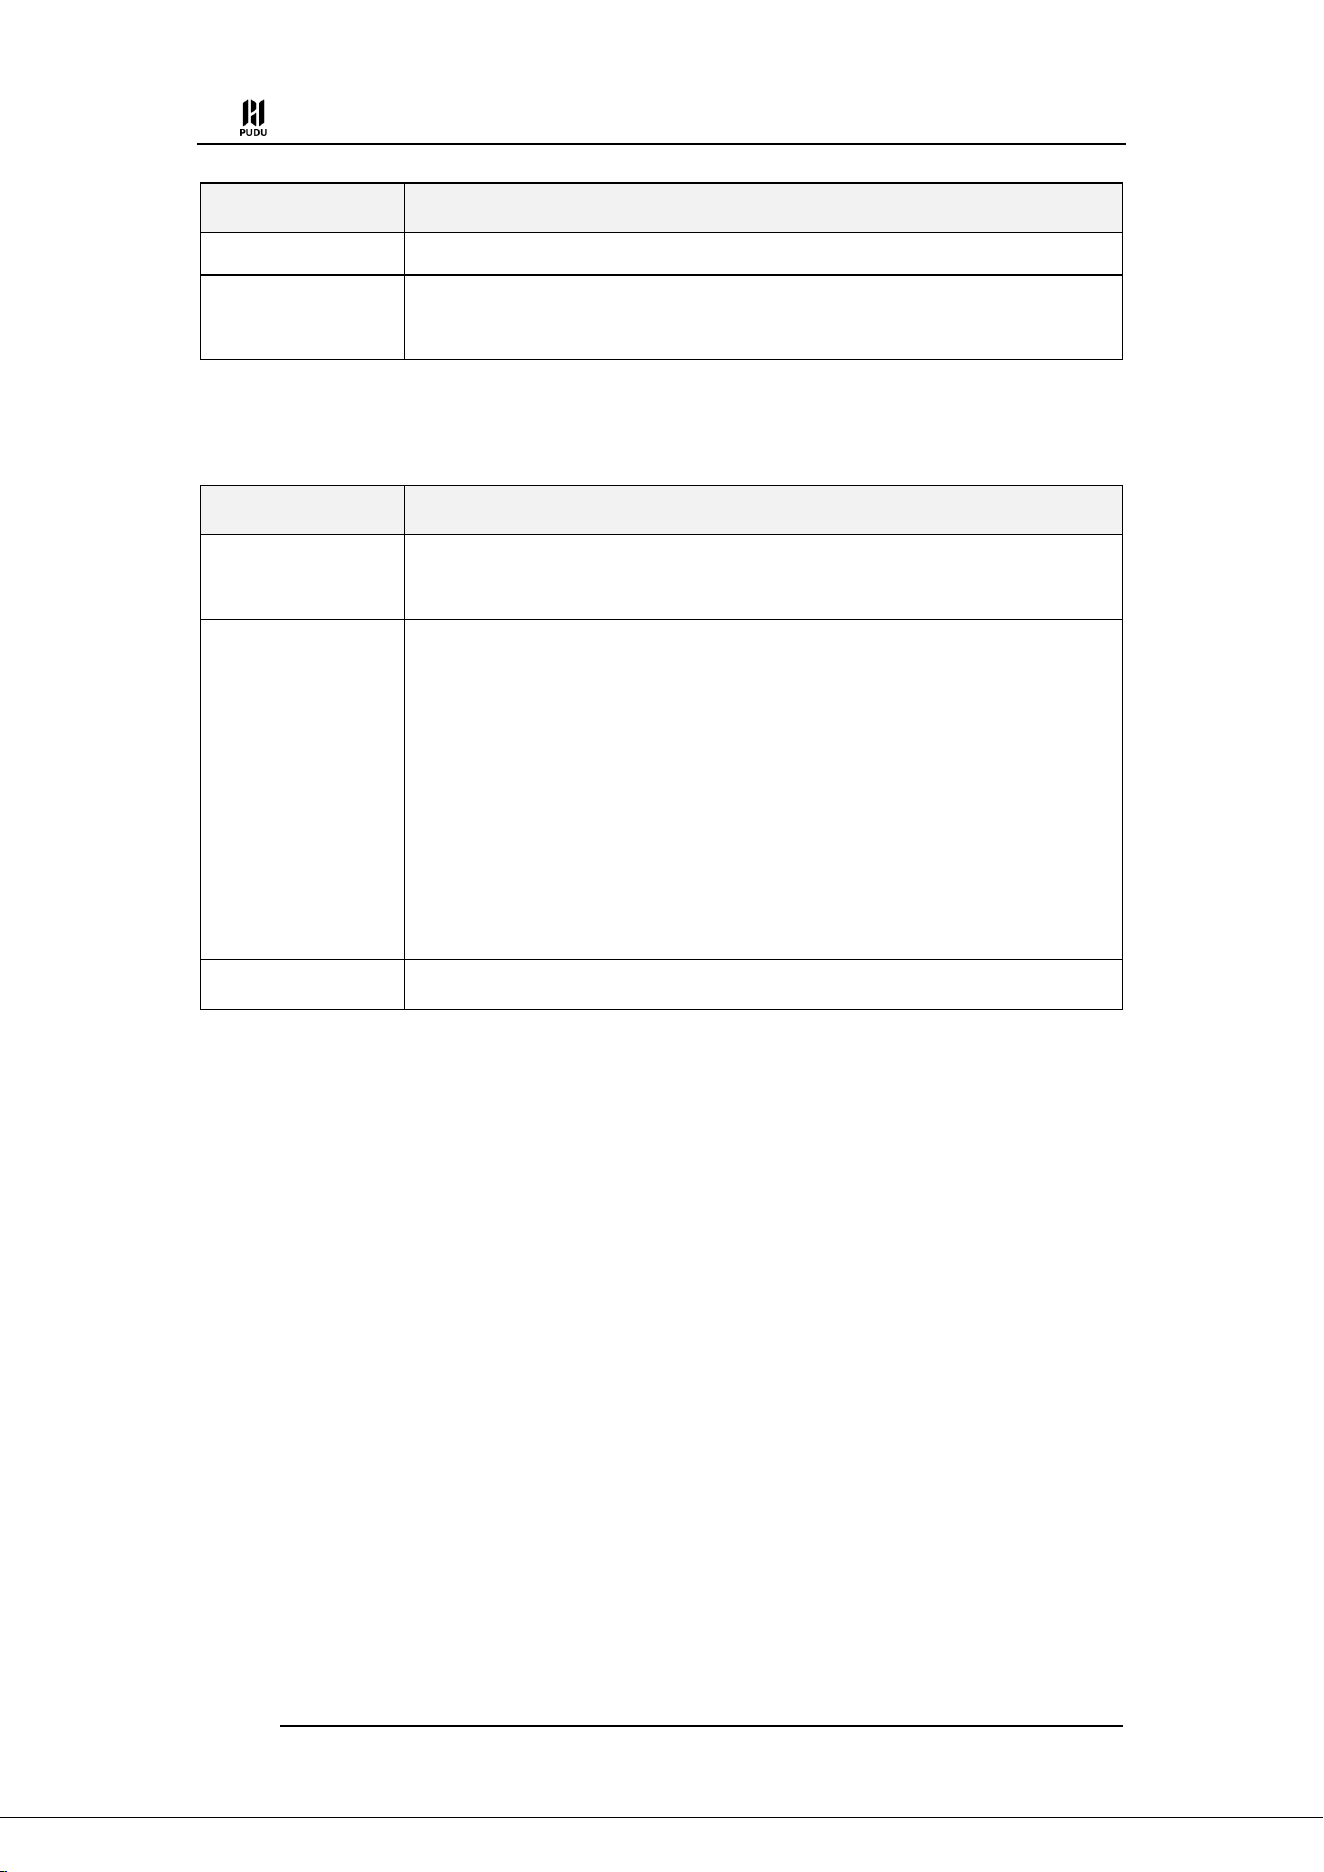
4.4.2.5 Tray Settings
You can set the robot's load area. This is suitable for use when a pallet or bracket is installed
on the robot. After adjustment, the delivery mode page can issue tasks for multiple robot load areas.
4.4.2.6 Destination display and input
The destination display and input include the following settings:
Setting items
Description
Destination column
You can change the number of columns by selecting different column options for the
PUDU T300 Operation Guide
Version: V1.0.3 Operation Guide
34
Setting items
Description
number
point list in the delivery mode.
Destination grouping
filter
You can also hide certain destination groups in the robot map.
4.4.2.7 Running Settings
In the running settings, it includes parameter configuration for the general running status of the
robot.
Setting items
Description
Automatic resume
time paused.
You can set the countdown duration for the robot's pause state..
Replan path when
blocked
Configuration
After the switch is turned on, the robot path blockage replanning related configuration
will take effect. Under this setting, there are two configurations:
Replan route time:When the robot continues to avoid obstacles for the set time,
replanning is triggered. At this time, other paths on the map will be selected to try
to reach the target point. The setting range is 10~600s, and the default is 30s;
Path block lock time:When the robot triggers path replanning, the currently
blocked road will be marked as "unavailable". After the time set by this parameter,
it will automatically return to the "available" state. The setting range is 30~600s,
and the default is 180s.
Outline Setting
Same as described in section 4.2.
4.4.2.8 Emoticons
Choose whether to display emoticons on the robot during running.
4.4.2.9 Voice Interaction
In the voice interaction module, you can perform the following operations:
Choose the voice speaker for the robot.
Download voice packages configured on the cloud platform.
Select locally stored voice packages.
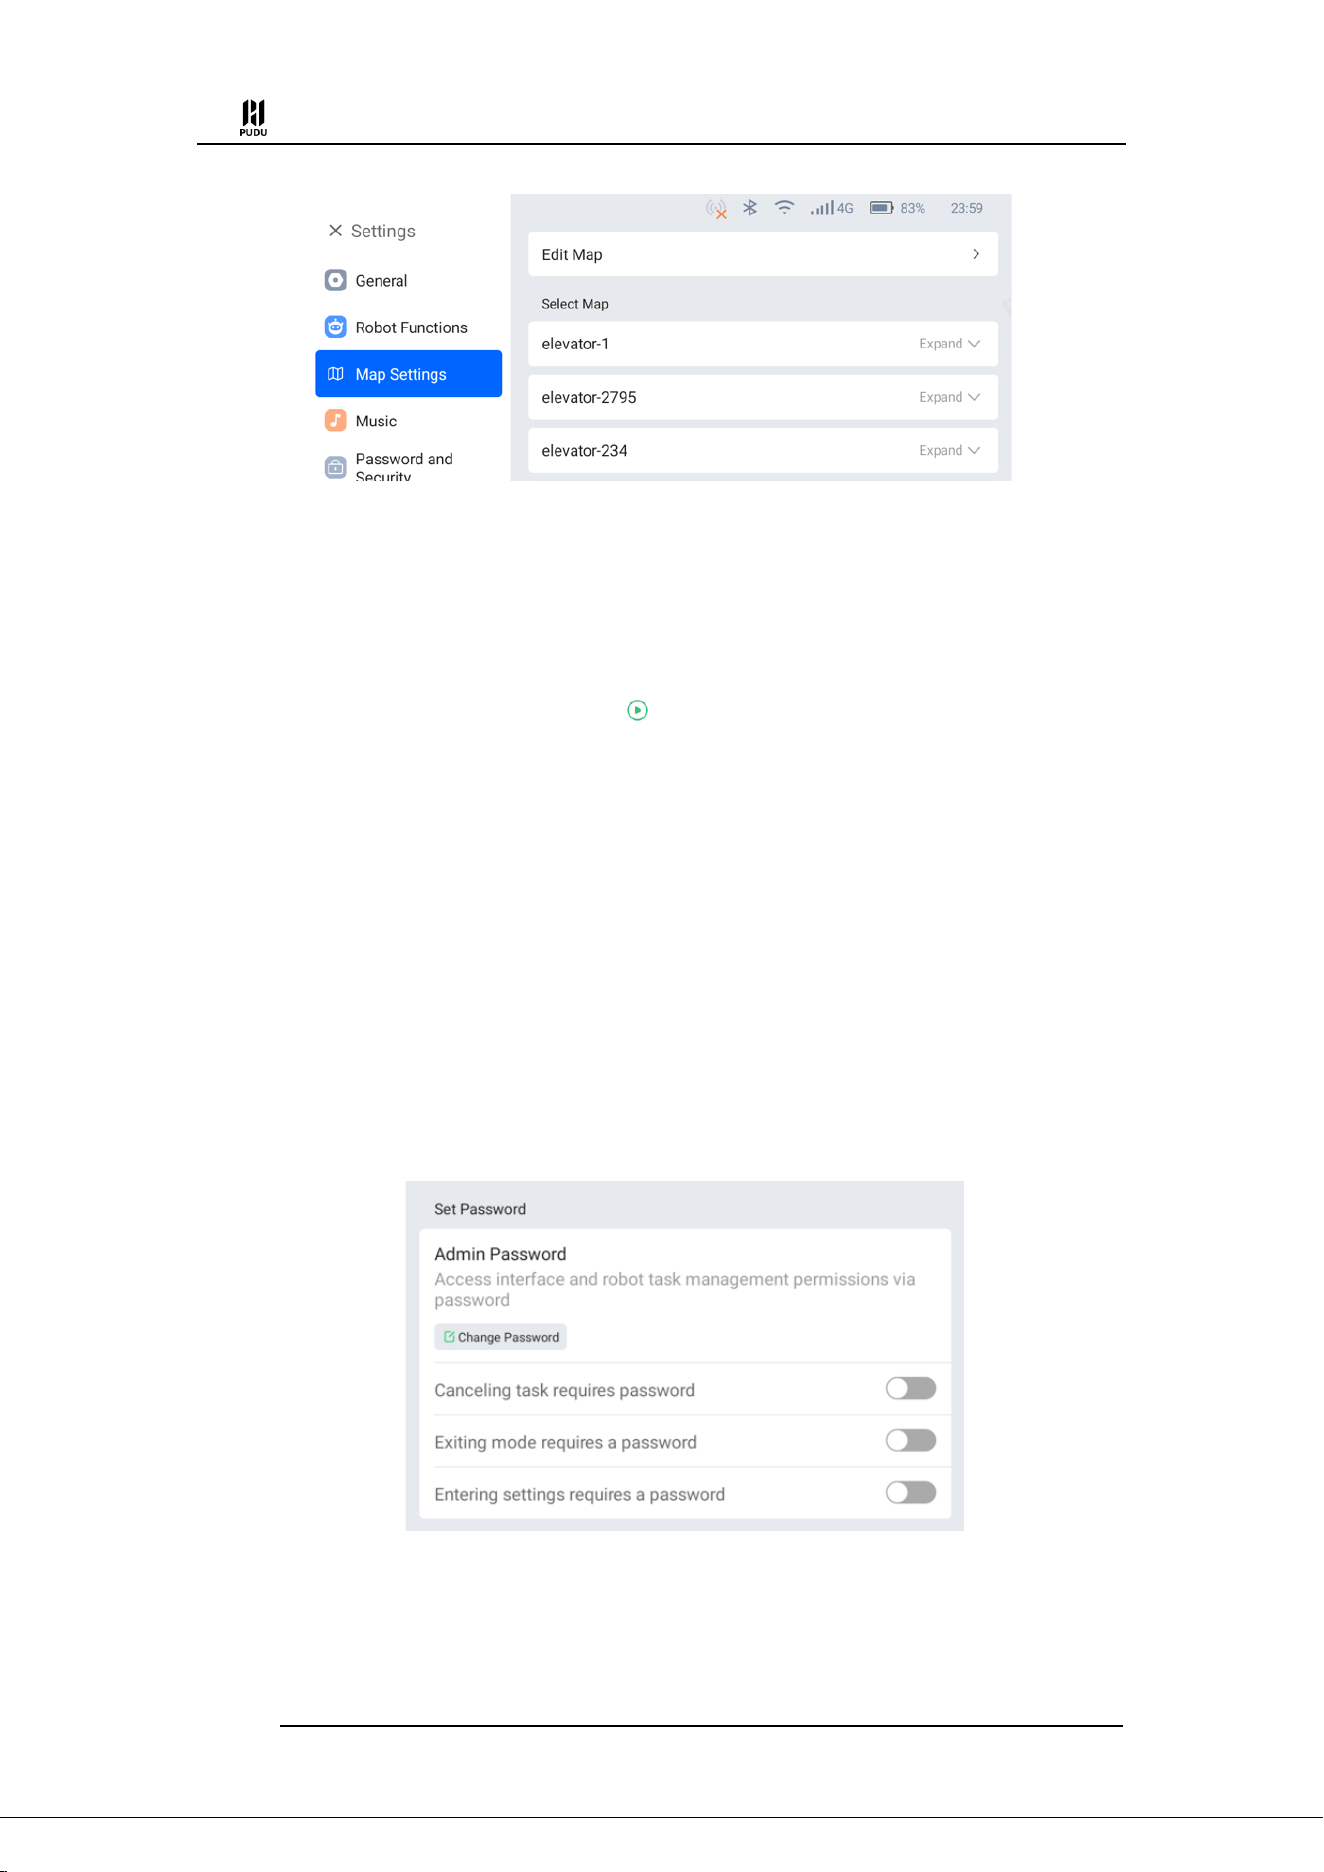
4.4.3 Map Settings
The robot can support the configuration of multiple maps, for use when the usage scenario
changes or when the scenario route changes. When you switch maps, the Happy Delivery robot will
automatically synchronize the destination information, docking location, and other configured
information in the maps. Users can select a map and select a robot docking location based on the
actual scenario.
Tap on the “Edit Map” screen to access the robot Mapping tool software interface and create
maps, edit maps, and more.
PUDU T300 Operation Guide
Version: V1.0.3 Operation Guide
35
4.4.4 Music
In the Music Library module, users can import music for the robot by connecting the robot to
the same Wi-Fi as their phone and scanning the QR code in the “Import Music” module. Imported
music files will be displayed in the “List of All Music.” The robot can store up to 20 music files.
Supported music file formats: MP3, WAV, FLAC, AAC, PCM.
You can test music by tapping the “ ” button to the right of the music file;
By long pressing a song, the “Delete” button will pop up. Tap the button to delete music.
4.4.5 Password and security
(1) Set Password
In the "Admin Password" section, users can set a 4-digit password. They can also set passwords
for different entrances as needed:
Canceling task requires password: When canceling tasks in various modes, a password is
required.
Exiting mode requires a password: When exiting any business mode, a password is
required.
Entering settings requires a password: When accessing settings and mode settings, a
password is required.
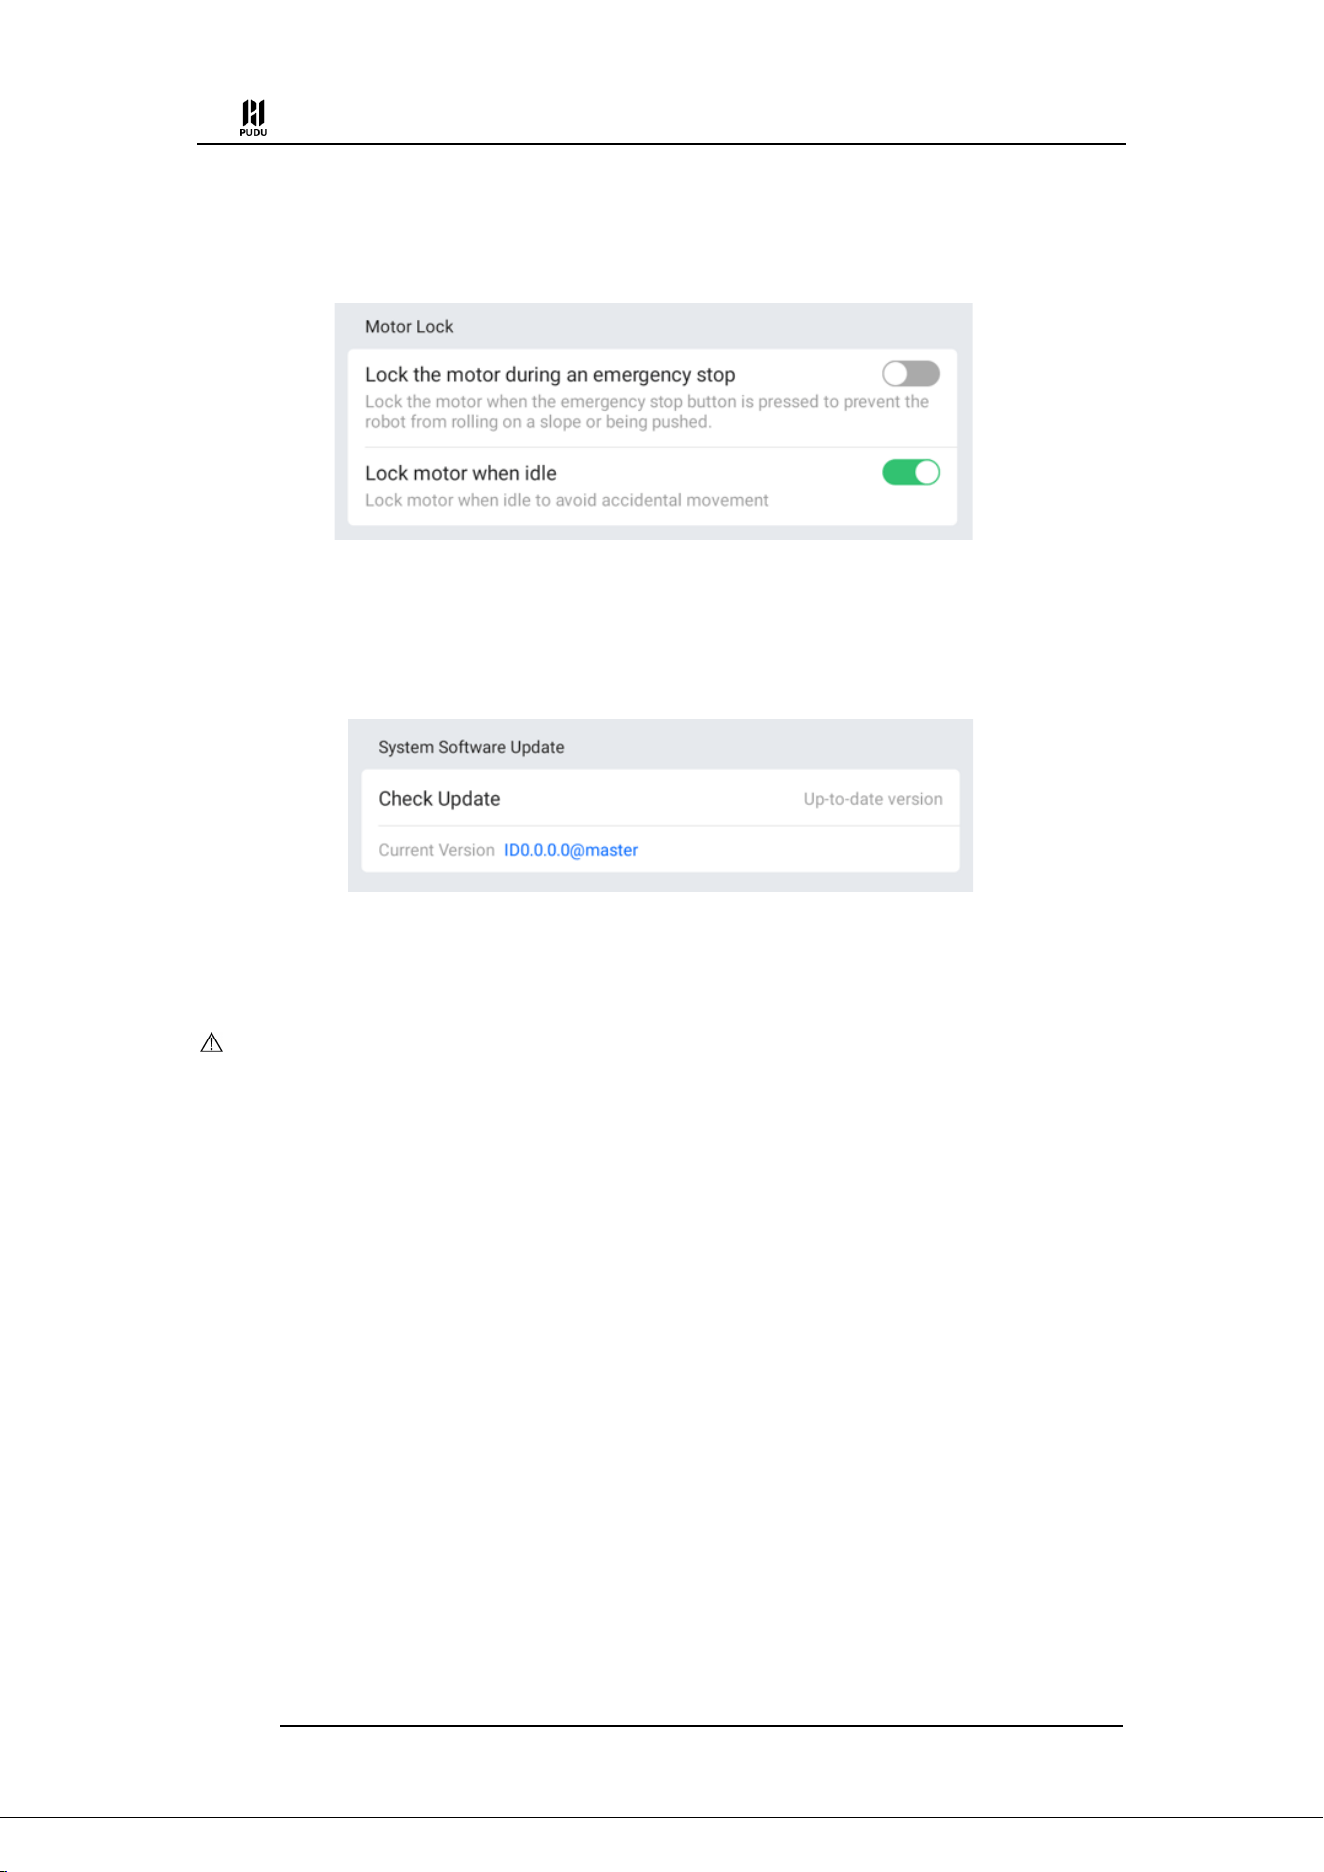
(2) Motor lock
You can set the time point for locking the robot motors in non-task states.
Lock the motor during an emergency stop: After pressing the emergency stop button, the
PUDU T300 Operation Guide
Version: V1.0.3 Operation Guide
36
robot locks the motors to prevent accidental movement.
Lock motor when idle: The robot locks the motors when it is in an idle state without any
tasks to prevent it from being inadvertently pushed away.
4.4.6 System Update
When the robot is connected to the network, it can check whether there are version updates. If
a new version of the robot software is available, there will be a red dot prompt next to “System
Update” as a reminder to perform the update.
After tapping Update, the robot will download the installation package and a prompt for the
download percentage prompt will appear. Once the download is complete for the installation
package, the robot will automatically restart.
Caution
When performing version updates, please ensure that the robot has at least 20% battery remaining.
Please do not manually turn off the robot while performing a version update.。
4.4.7 Debug
The Debugging interface is provided for use by technical support to debug the device. Please
do not use the Debugging interface yourself.
PUDU T300 Operation Guide
Version: V1.0.3 Operation Guide
37
5. Robot Operation
5.1 Description of Robot Operation Logic
The robot uses sensors to determine its position within the map. When a task is given to the
robot, it will autonomously plan the best path to reach the target location based on the topological
path drawn on the map.
As the robot travels along the planned path, it will guide itself to avoid obstacles that are
detected but not recorded on the map, in order to prevent collisions between the robot and the
obstacles.:
5.2 Obstacle Detection
The robot continuously detects obstacles while it is moving to ensure safe operation. The
sensors involved in obstacle detection include:
Lidar
RGBD
Collision switches
(1) Lidar
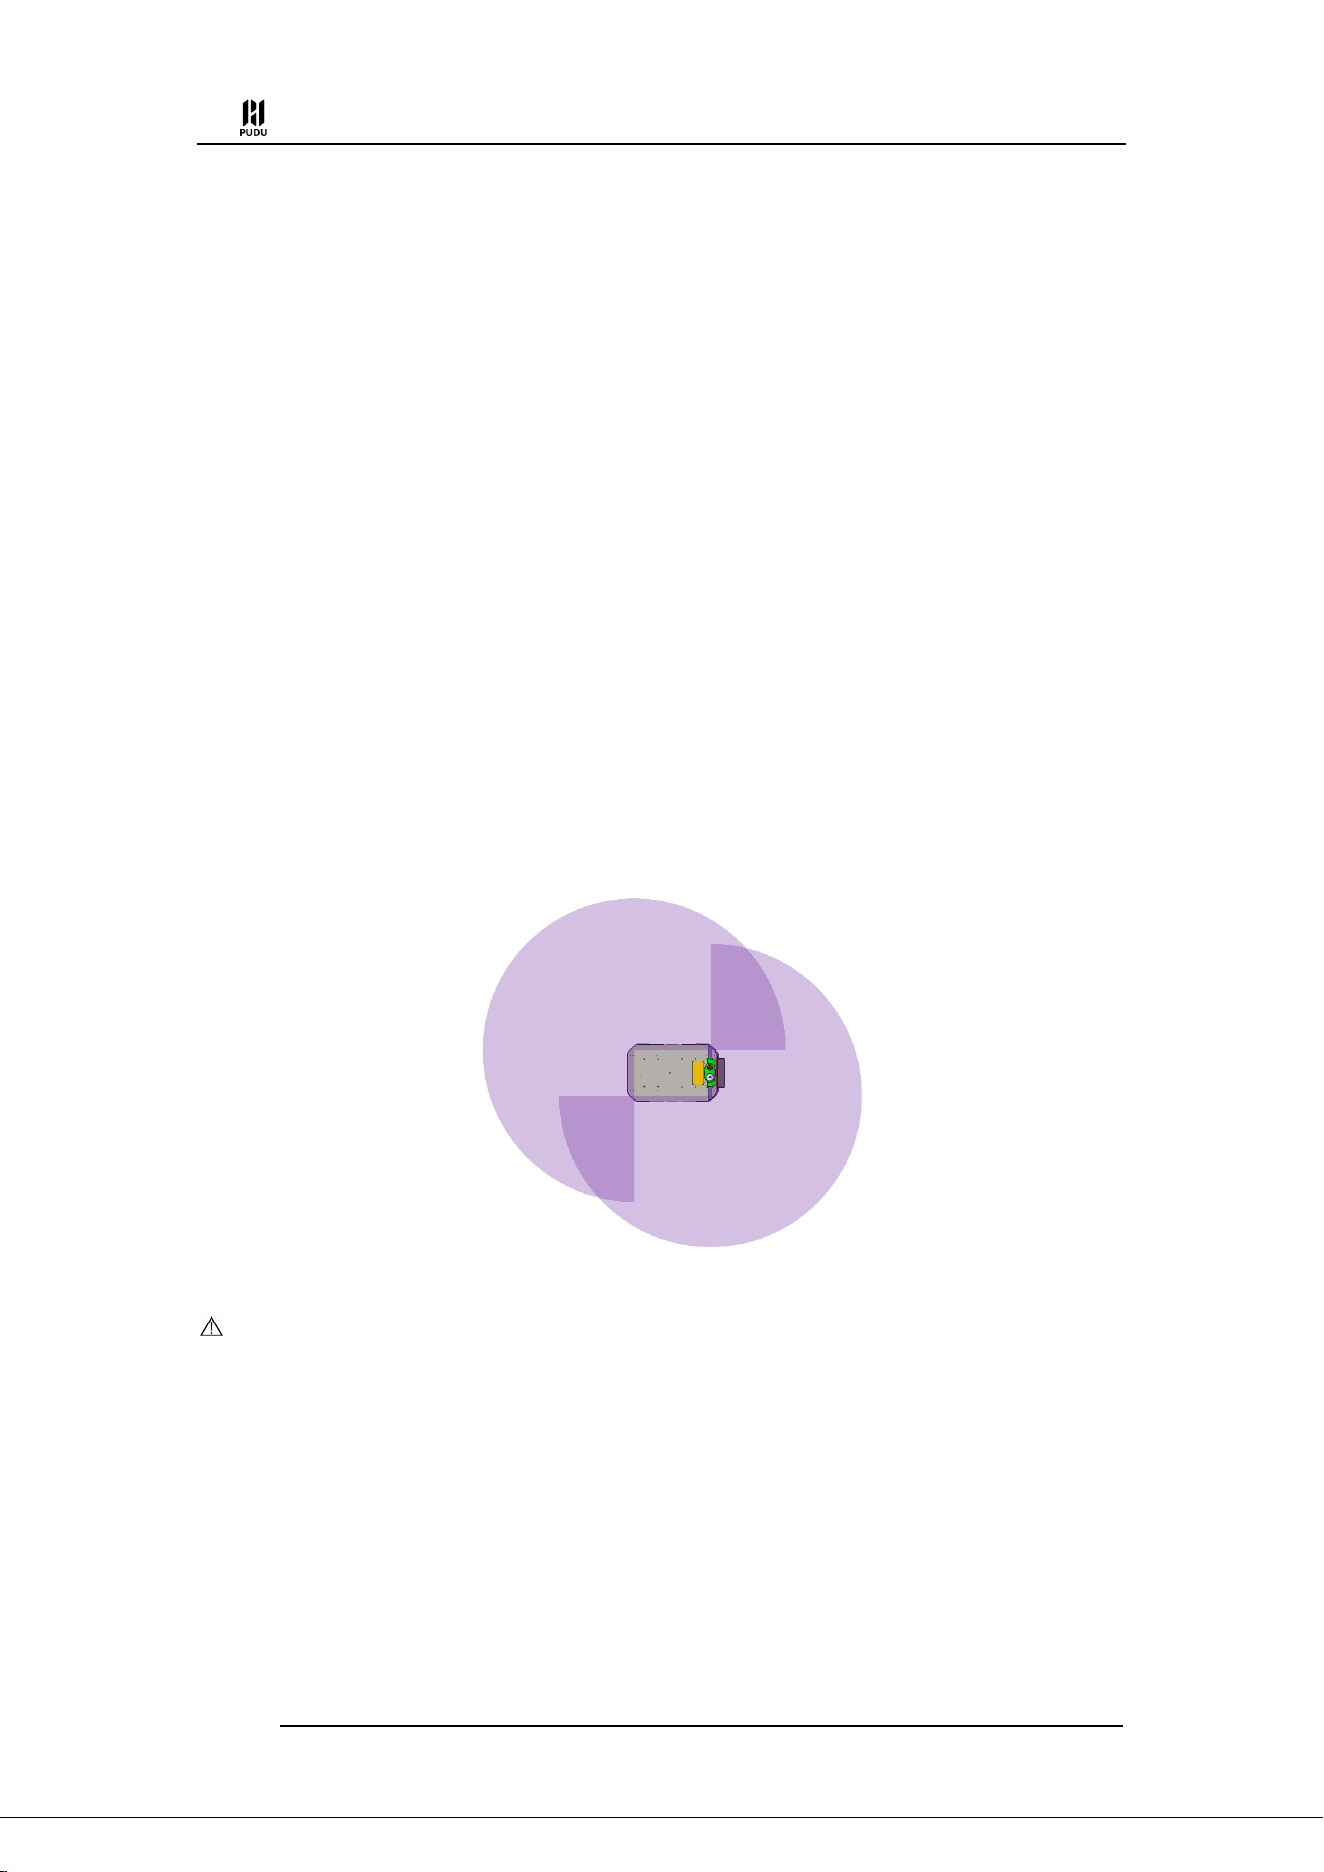
The robot scans the surrounding environment using lidars installed at the diagonals of the
chassis, achieving a 360° detection around the robot. The specific range is as follows:
Caution:
The LiDAR can only scan the ground plane at a height of 19cm.
If there are transparent objects (such as glass) or reflective obstacles (such as mirrors) in the environment, the
data from the LiDAR may have deviations. It is recommended to place frosted stickers or other markers at a height
of 19cm or set up virtual walls on the map.
(2) RGBD
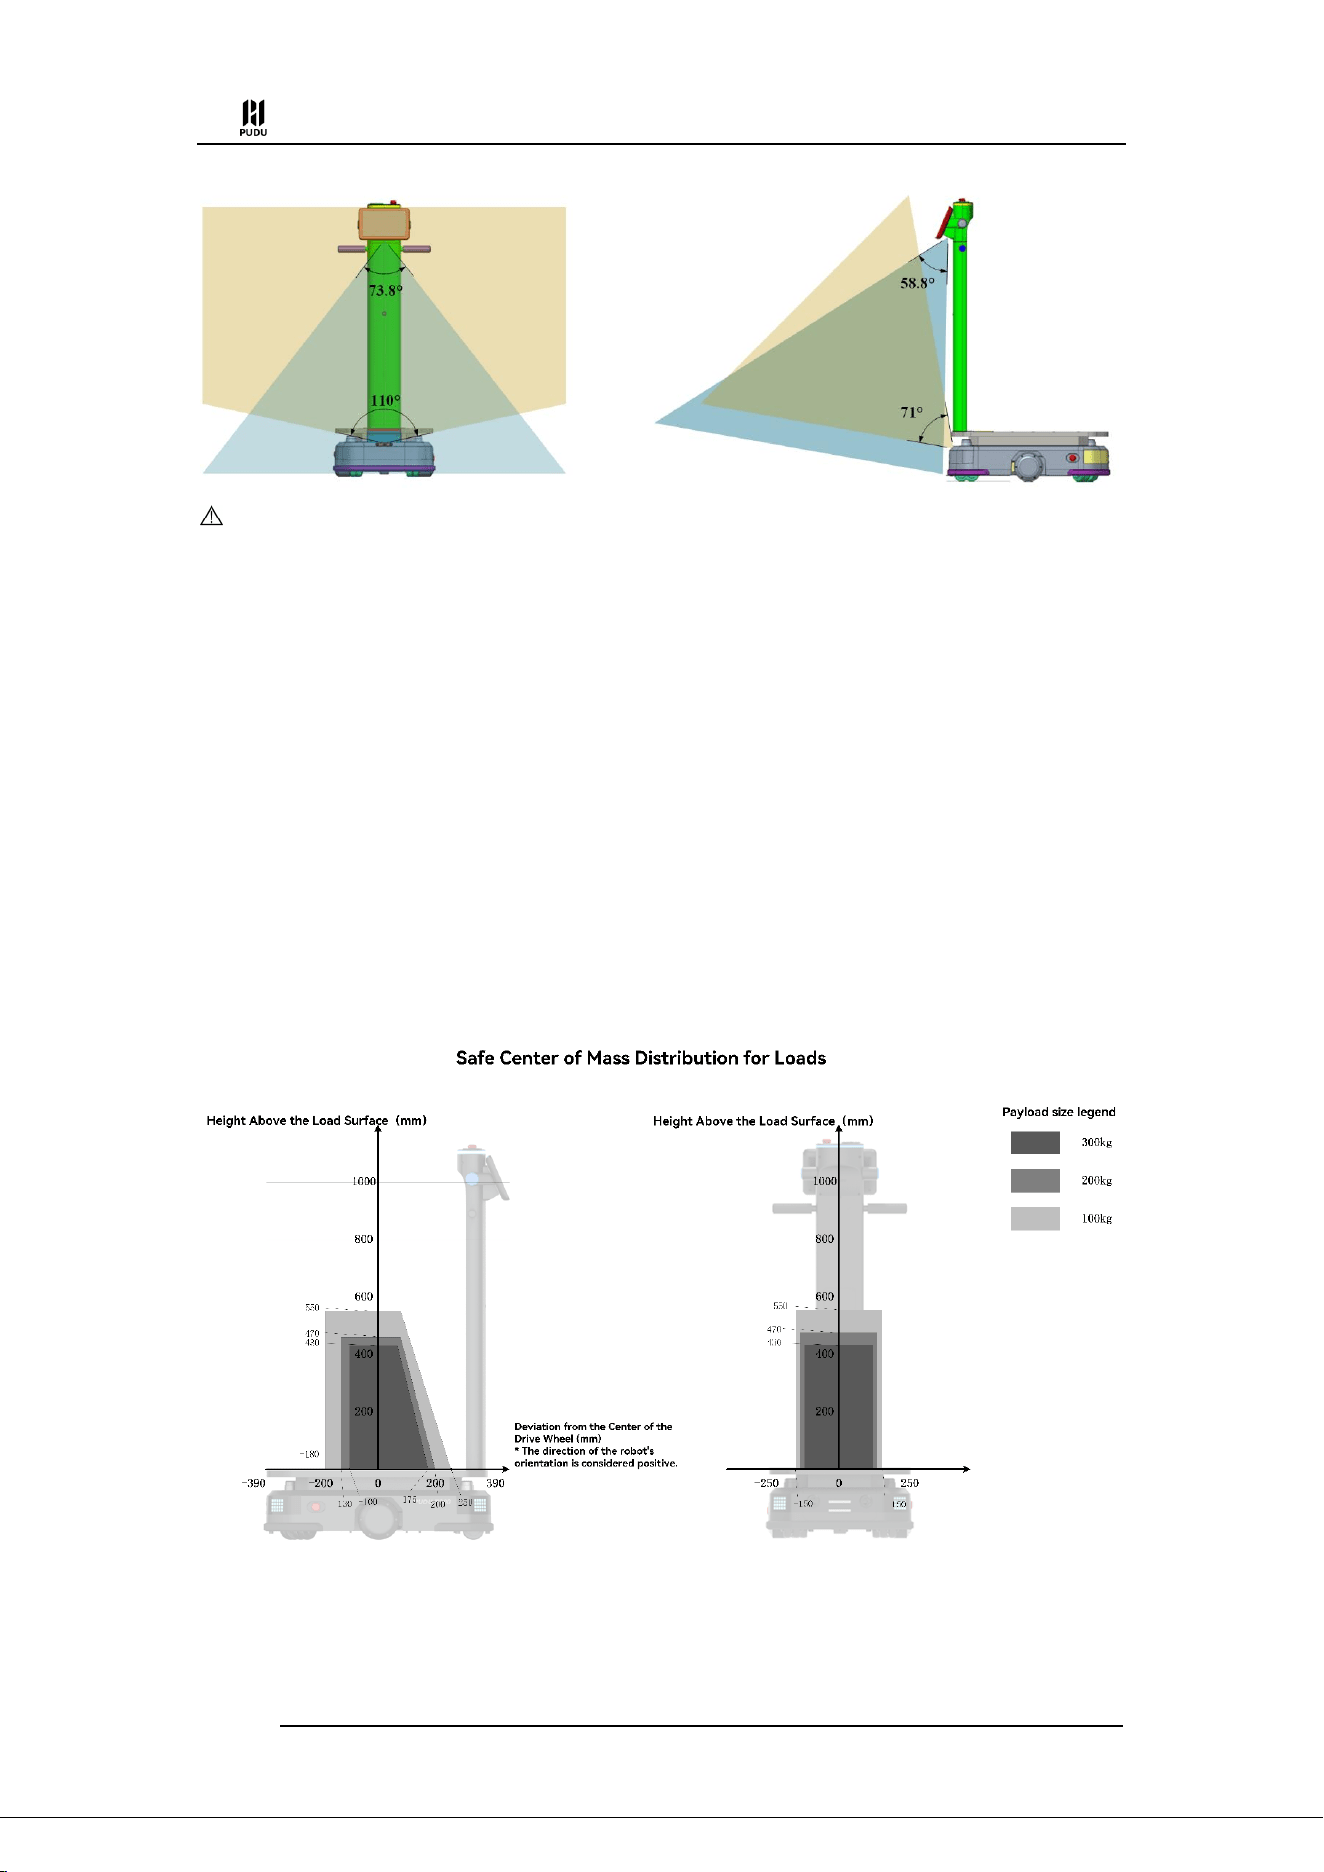
The robot is equipped with two RGBD cameras on the front side, which can perform
stereoscopic detection of obstacles in front of the robot. The specific range of detection for the robot
is as follows:
PUDU T300 Operation Guide
Version: V1.0.3 Operation Guide
38
Caution
In environments with direct sunlight, the RGBD cameras may have abnormal detection. It is recommended to
avoid running the robot in environments with direct sunlight.
If there are transparent objects (such as glass) or reflective obstacles (such as mirrors) in the environment, the
RGBD cameras may not accurately detect them. It is recommended to avoid running the robot in such environments
or set up virtual walls on the map.
(3) Collision switches
The collision switches are located at the front and rear edges of the robot's chassis. If the collision
sensors are hit during robot operation, the robot will stop moving and pause the task. Follow the
instructions on the interface to resume the task.
5.3 Safe Center of Mass Distribution for Loads
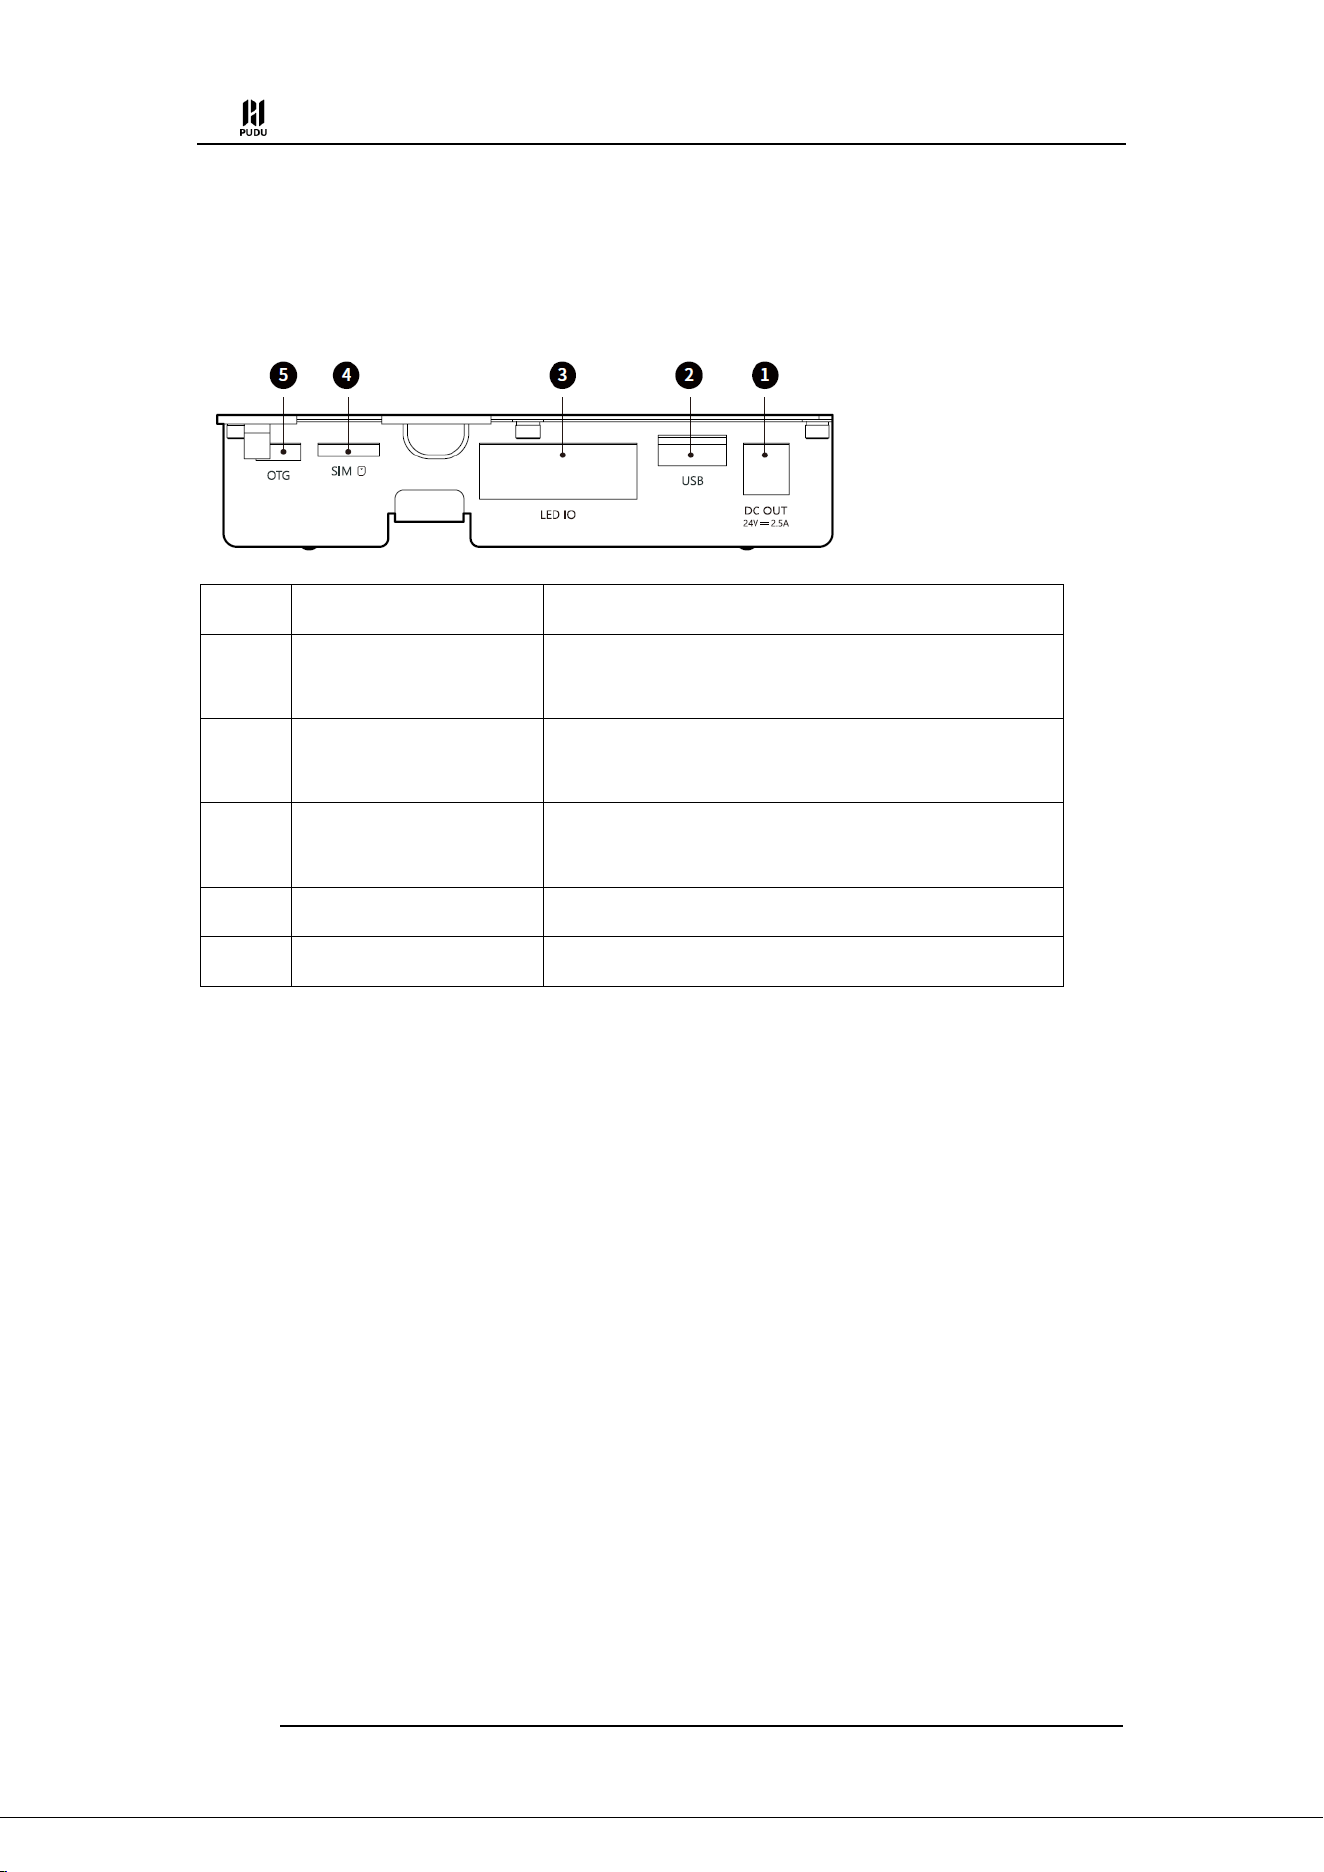
To ensure the safe and stable operation of the robot during cargo transport, please ensure that
the weight distribution of the goods being carried is even. Additionally, the center of gravity of the
load must meet the following illustrated requirements.
PUDU T300 Operation Guide
Version: V1.0.3 Operation Guide
39
6. Interface Description
Under the interface window, there are external interfaces that can be used for hardware expansion
and device debugging. The specific interface specifications are as follows:
No.
Name
Description
1
Power supply interface
24V (battery voltage), maximum output current of
2.5A. DC plug pin diameter: Ø2.5mm
2
USB
USB 2.0, for data communication with external
devices
3
IO
Used for signal communication of external optional
accessories
4
SIM card slot
Supports Nano SIM card
5
OTG
Used for device debugging
PUDU T300 Operation Guide
Version: V1.0.3 Operation Guide
40
7. Troubleshooting
7.1 Troubles during Operation
Troubles
The following errors may be reported during the robot operation:
Motor parameters error
Sensor parameters error
Sensor connection error
Motor rotation anomaly
Solution
Step 1 Following the prompts on the screen, tap OK or Continue operation to see if the
robot can continue operation.
Step 2 If not, reboot the robot and re-enter the task.
Step 3 If the problem persists after the reboot, please contact our technical engineers.
7.2 Positioning Failure
Troubles
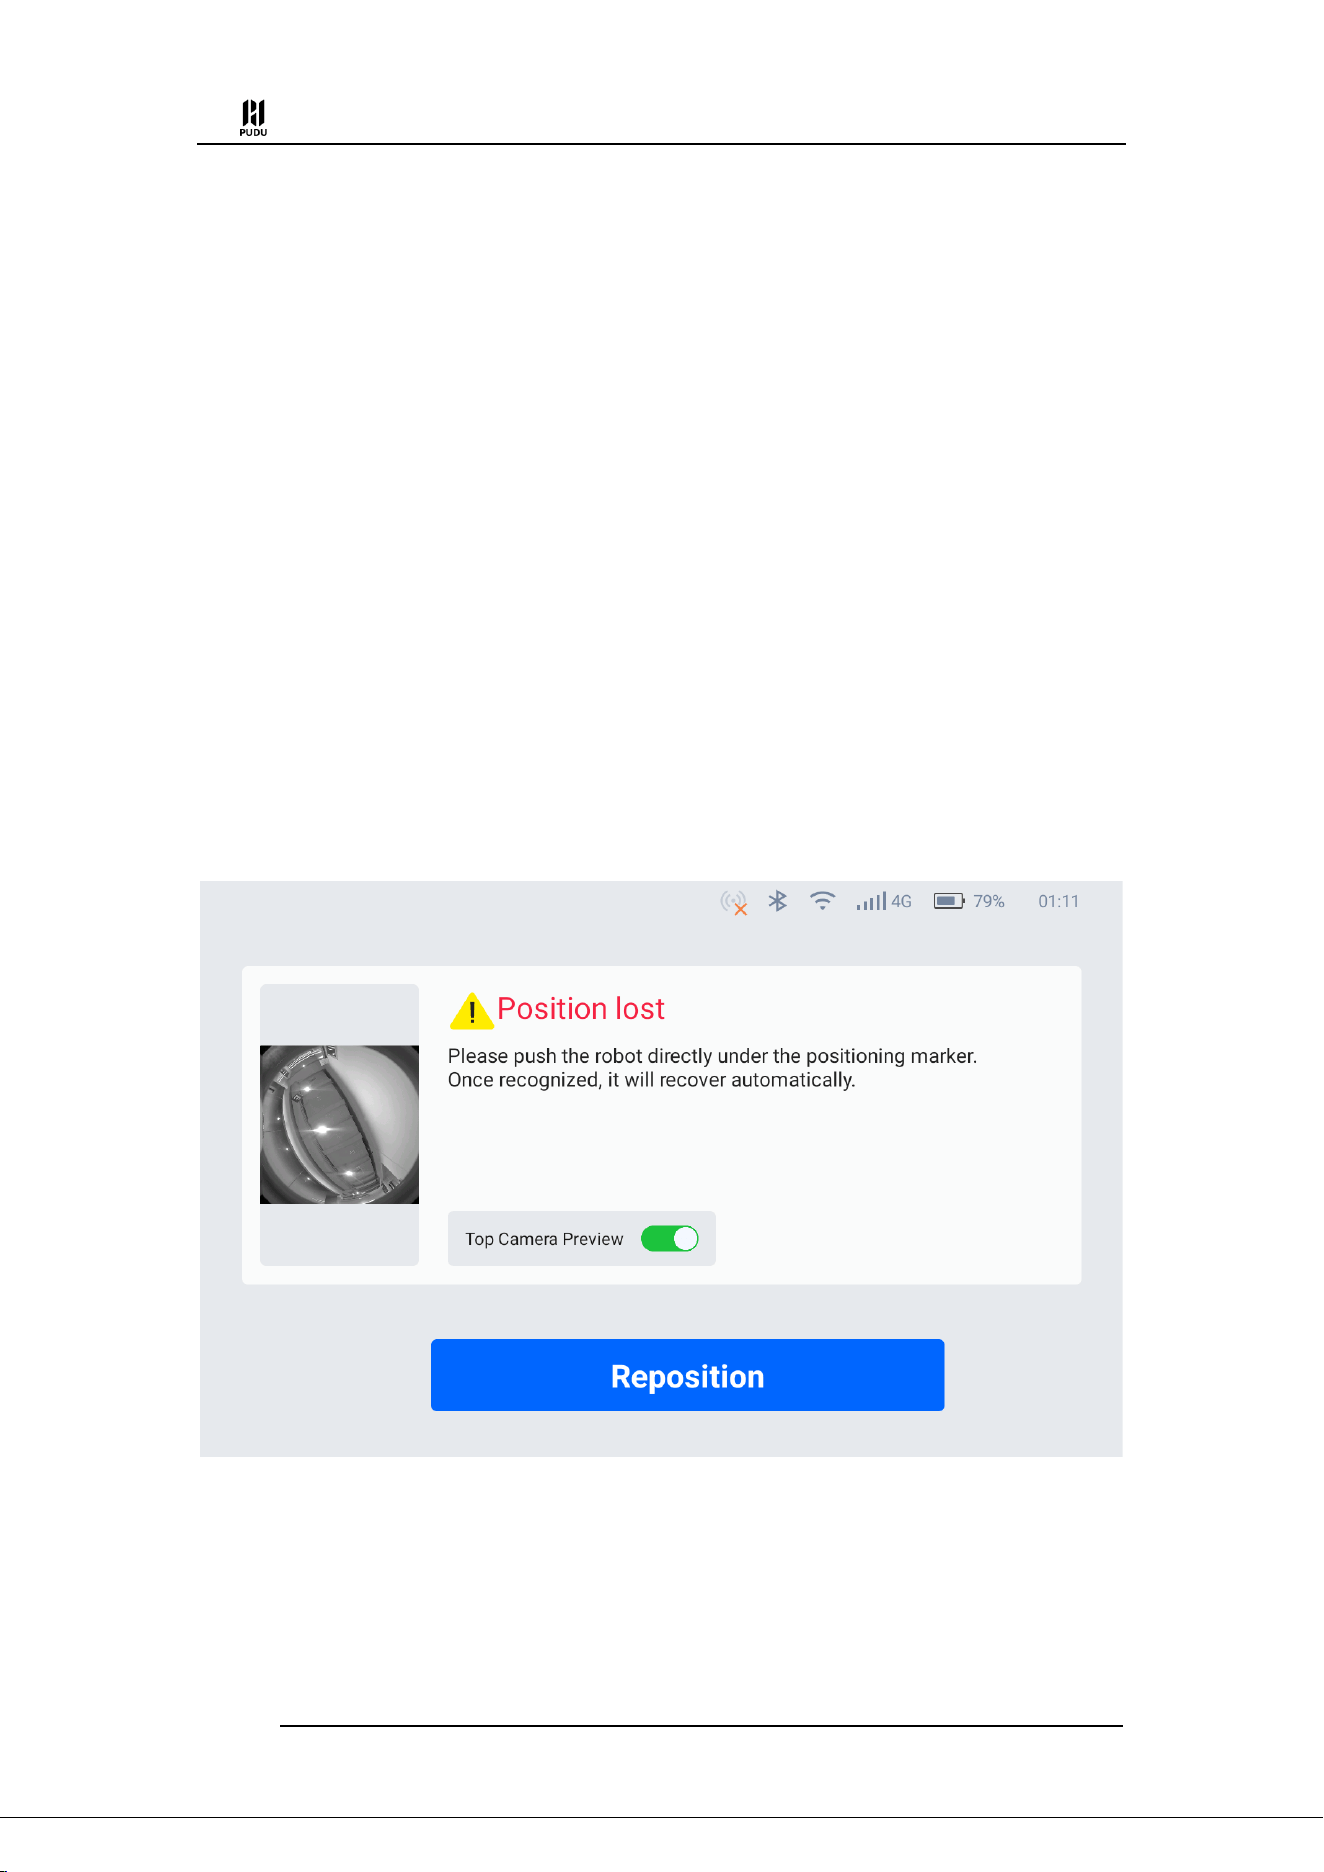
The robot screen prompts Position lost.
Possible Causes
The robot fails to recognize the positioning feature.
The map selected on the robot does not match the actual site.
Solution

PUDU T300 Operation Guide
Version: V1.0.3 Operation Guide
41
Step 1 If the current map of the robot does not match the actual site, tap Map selection to
select the correct map of the current site.
Step 2 Check if the robot is directly below the boot point. If the robot deviates too far from
the boot point, move the robot right below the boot point. If the problem persists, please adjust
the orientation of the robot..
Step 3 Check if the vision sensor is blocked by obstacles such as oil stains. If so, clean it
with a lens cleaning kit.
7.3 Charging Failure
Troubles
Charging failure
Solution
Check if the power switch is turned to “➖”.
Check if the charger indicator is on. If not, the charging failure may be caused by a
damaged charger. Please contact our technical engineers in time.
7.4 Power-on Failure
Troubles
Power-on failure
Solution
If the battery is low, please charge the robot in time.
If the battery level is normal, please check if the power switch is turned to “➖”.
If the problem persists, please contact our technical engineers.
7.5 Robot Does Not Move Smoothly
Troubles
The robot does not move smoothly or stops moving.
Solution
Check if there are obstacles in front of the robot.
Check if there are stains like oil or soup on the depth vision sensors.
Check if the passageway is wider than the minimum travel width.
Check if there are mirrored and reflective metal surfaces on either side of the
passageway that may affect the robot's operation. If so, attach matte stickers 5cm~6cm
above the ground.
PUDU T300 Operation Guide
Version: V1.0.3 Operation Guide
42
8. Maintenance and Care
To prevent injuries during operations, debugging and maintenance personnel must wear
protective equipment such as safety helmets, safety gloves, and safety shoes when performing
maintenance or caring on the robot.
8.1 Component Maintenance
Components
Robot Status
Inspection Interval
Method
Drive wheels and
auxiliary wheels
Powered off
One week
Please wipe the surface with a
clean cloth. Check the wheel
surface for wear and replace if
necessary.
Visual sensor, and
LiDAR
Powered off
One week
Please wipe the surface with a
clean cloth.
If there is sudden dirt or damage,
please handle it in time to avoid
blocking the sensor and causing
abnormal operation of the robot.
Robot body
Powered off
One month
Please wipe the surface with a
clean cloth. And check the
installation. Make sure the housing
is flat and securely fixed.
Indicator lights and
sound
Powered on
One month
Check that all indicator lights and
audible warnings are working
properly.
Emergency stop
switch
Powered on
One month
Check that the emergency stop
button is working properly.
Battery
Charging
Three months / Six
months
To avoid over-discharged state,
battery shall be charged
periodically to maintain 20~50%
of capacity. Built-in battery shall
be charged with terminal every 3
months while removable battery
shall be charged every 6 months
are recommended.
Brake switch
Powered on
Six months
Put the brake switch to the "OFF"
position and gently push the robot
forward to check that the brake
switch is working properly.
PUDU T300 Operation Guide
Version: V1.0.3 Operation Guide
43
Note: Turn the brake to the "ON"
again after checking.
Safety stickers and
nameplates
Powered off
Six months
Check that the safety stickers,
labels and nameplates on the robot
are intact and clearly visible
8.2 Cleaning Method
Warning
Do not use water or any other liquid to clean the robot. Always make sure that the robot is kept dry.
Step 1 Press and hold the power switch for 3 seconds to ensure that the robot is powered
off.
Step 2 Wipe the robot surface with a clean cloth.
Step 3 Wipe the chassis, drive wheels, and auxiliary wheels with a clean cloth.
Note
If the drive wheels or auxiliary wheels are entangled or stuck with debris, please place the
robot down on its side for cleaning. Keep the ground clean and tidy (a mat can be used) to avoid
scratches on the robot surface when placing the robot down on its side.
If there are oil stains on the tray pad, take it out and wash it separately. Put back the tray pad
after it dries off completely.
Step 4 Clean the vision sensor, depth vision sensors, and Lidar with a clean cloth or
specialized lens cleanser.
Note
In case of unexpected contamination, address it immediately to avoid blocking the sensor
and preventing the robot from working improperly.

PUDU T300 Operation Guide
Version: V1.0.3 Operation Guide
44
9. Compliance Information
9.1 Federal Communications Commission Compliance Statement
The following information applies to Pudu robotic.
This equipment has been tested and found to comply with the limits for a Class B digital device,
pursuant to part 15 of the FCC Rules. These limits are designed to provide reasonable protection
against harmful interference in a residential installation. This equipment generates, uses and can
radiate radio frequency energy and, if not installed and used in accordance with the instructions,
may cause harmful interference to radio communications. However, there is no guarantee that
interference will not occur in a particular installation. If this equipment does cause harmful
interference to radio or television reception, which can be determined by turning the equipment off
and on, the user is encouraged to try to correct the interference by one or more of the following
measures:
Reorient or relocate the receiving antenna.
Increase the separation between the equipment and receiver.
Connect the equipment into an outlet on a circuit different from that to which the
receiver is connected.
Consult the dealer or an experienced radio/TV technician for help.
This device complies with Part 15 of the FCC rules. Operation is subject to the following two
conditions:
This device may not cause harmful interference.
This device must accept any interference received, including interference that may cause
undesired operation.
9.2 Industry Canada Compliance Statement
This device complies with Industry Canada licence-exempt RSS standard(s). Operation is subject
to the following two conditions:
This device may not cause interference.
This device must accept any interference, including interference that may cause
undesired operation of the device.
9.3 Disposal and Collecting Information
The Waste Electrical and Electronic Equipment (WEEE) Directive aims to minimize the impact of
electrical and electronic goods on the environment, by increasing re-use and Collecting and by
reducing the amount of WEEE going to landfill. The symbol on this product or its packaging
signifies that this product must be disposed separately from ordinary household wastes at its end of
life. Be aware that this is your responsibility to dispose of electronic equipment at Collecting centers

PUDU T300 Operation Guide
Version: V1.0.3 Operation Guide
45
in order to conserve natural resources. Each country should have its collection centers for electrical
and electronic equipment Collecting. For information about your Collecting drop off area, please
contact your related electrical and electronic equipment waste management authority, your local city
office, or your house hold waste disposal service.
Before placing electrical and electronic equipment (EEE) in the waste collection stream or in
waste collection facilities, the end user of equipment containing batteries and/or accumulators must
remove those batteries and accumulators for separate collection.