P 1
Operation Manual
Electric air pump
Model:AP-101

Made in China

Contents
English
Operation Manual
Product Structure
Technical Parameters
Note
Advice To Users
Portable Electric Inflator Guide
01
01
03
03
04
05
04
Deutsch
Bedienungsanleitung
Produktstruktur
Technische Daten
Hinweis
Hinweise für Anwender
Handbuch der tragbaren und elektrischen Luftpumpe
08
08
10
10
11
12
11
Italia
Manuale d’uso
Struttura del prodotto
Parametri Tecnici
Nota
Avviso per gli utenti
Guida pompa elettrica portatile
13
13
15
15
16
17
16

Español
Manual de uso
Descripción
Parámetros técnicos
Nota
Aviso a los usuarios
Guía del inflador portátil eléctrico
18
18
20
20
21
22
21
Contents
Français
Mode d’emploi
Structure du produit
Paramètres techniques
Notes
Avertissements
Guide du gonfleur électrique portable
23
23
24
25
26
27
25
日本語
取扱説明書
製品構造
技術仕様
注記
ユーザーへのアドバイス
携帯型電動エアコンプレッサーガイド
28
28
29
30
30
31
30

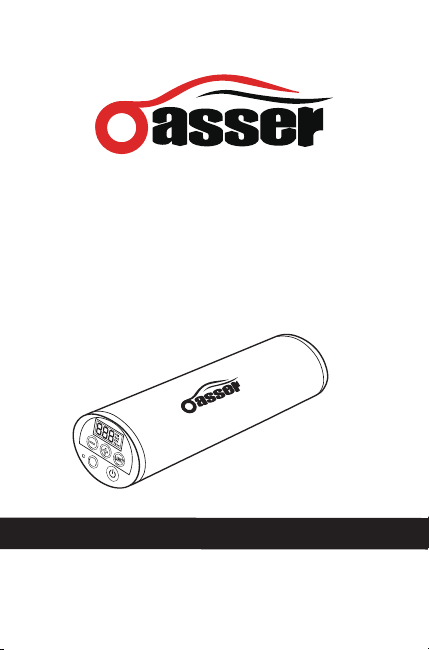
Operation Manual
English
Thanks for choosing Oasser P1 Mini Electric Inflator.
Please read this manual carefully before using it.
This inflator can be applied to cars, bicycles, moto-
rbikes, balls, inflatable toys and etc. Digital inflator can
measure the tyre pressure and be used as flashlight.
1. Rechargeable inflator should be well charged in
advance.
2. Please connect one end of air tube to inflator and
plug the other end of it to tyre valve core. For
French valve, it should be connected to the French
inflator at first.
3. Please press “UNIT” button to set pressure in PSI,
BAR, KPA, or kg/cm2 on activated screen.
4. Please press “+” & “-” to set the desired pressure.
5. Please press power switch to start inflating.
1
6. Repeatedly press “UNIT” button, the ATMOS will
transform to PSI, BAR, KPA, or kg/cm2. The screen
will show the real data.
7. “+” & “—” are preset keys. You can shortly press
them to set the desired pressure slowly, and long
press to set the desired pressure quickly (Reference
pressure : ordinary bicycle is 30~35psi,mountain
bicycle is 50~60psi,road bicycle is 80~100psi,car
is 32~38psi). Setting will be completed after the
screen flashes for 4 seconds. Or you can press the
“UNIT” button to finish the setting. Then please
press power switch for inflating.

English
8. Digital inflator will stop inflating automatically when it
inflates the tyre to the preset pressure. Please press
power switch to turn off the LED light.
9. Please note that the tube will get hot after the
inflator has worked for a long time. So please don’t
pull out the tube from valve core and from inflator
until it’s cooled down. And then please store the
inflator and keep it dry.
2
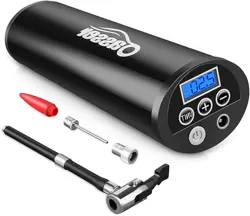
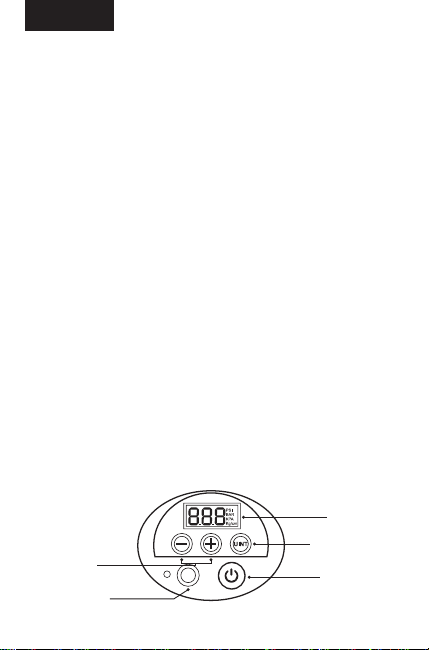
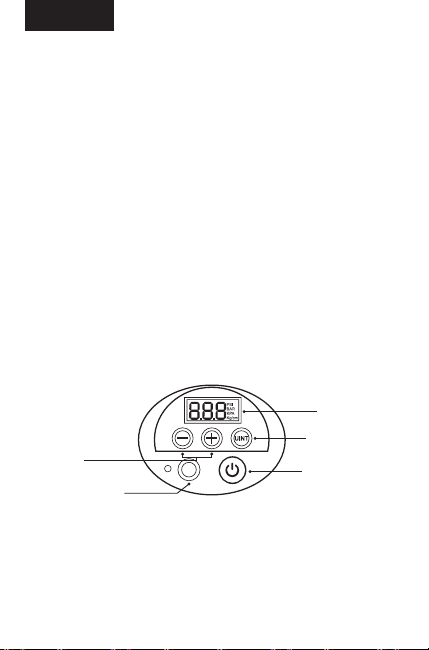
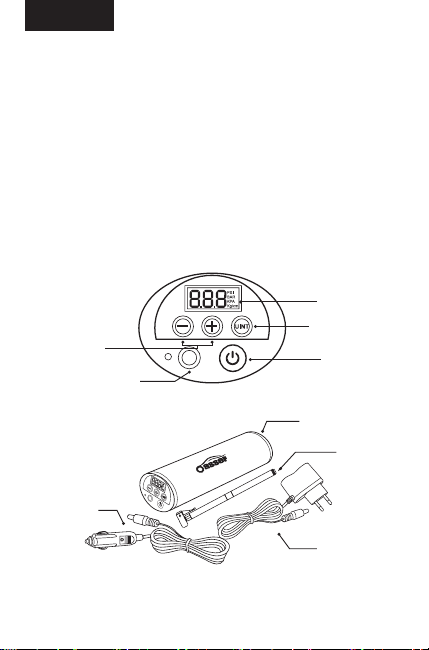
Product Structure
“+” and “—”
”UNIT” key
Power switch
Charging port
LCD screen
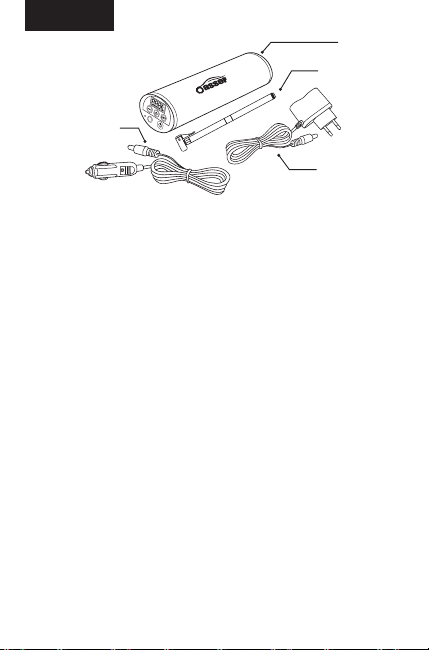
Inflator
Air tube
Home adaptor
Car charger

1. Input:15V 0.2A
2. Max current: 5A.
3. Inflator efficiency: Inflate 26*1.95 mountain bicycle
tire from 0 to 50 psi in 2.5 minutes.
4. Max pressure: 150psi.
5. Operation temperature: -20
℃~+60℃.
6. Size: 54.8(L)×44.8(W)×198(H)mm.
Technical Parameters
English
3
1. Children are forbidden to use this inflator. Please
keep it away from children.
2. Do not use it at inflammable and explosive areas.
(eg. Oil station)
3. To ensure the product has a long lifetime, please
have it rest for 8 minutes in every 8 minutes inflating
time.
4. Please stop the products for 15 minutes when the
temperature is too high or it has unnormal noise
when inflating.
5. Please keep it away from rain, water, falling, and
bumping.
6. Please have it charged every half year.
7. Please make sure the power is enough before using
the rechargeable inflator. If not, please check the
cigarette plug and fuse and ensure the inflator is
charging while inflating
Note

For your and other’s safety, please use the inflator and
accessories according to the the manual provided by
manufacturer. It may cause danger if you use methods
not mentioned in the manual.
Advice To Users
English
4
1. Tire pressure value is based on the recommended
value of the car factory, and the tire sidewall will
only shows the maximum inflation pressure in the
case of tire cooling; where you can find the standard
tire pressure information: Vehicle User Manual,
Driver Door Stickers, Storage Drawer, and Cylinder
Door.
2. Note: This electric inflator cannot be used for trucks,
vans, and buses.
3. 1PSI = 0.07Kgf/cm²= 0.07BAR = 7KPA
1Kgf/cm² = 1BAR = 98KPa = 14.22PSI
Portable Electric Inflator Guide
English
5
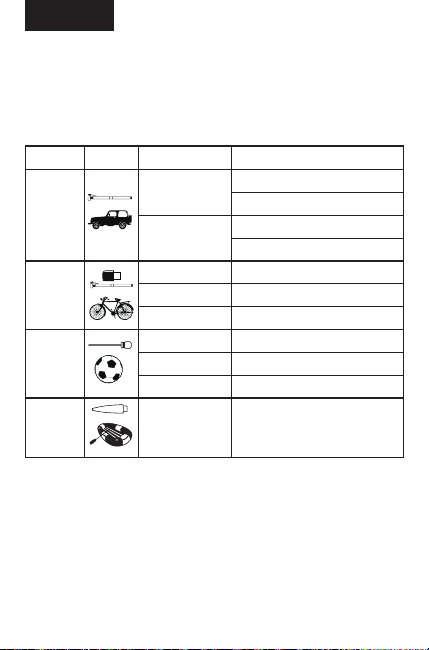
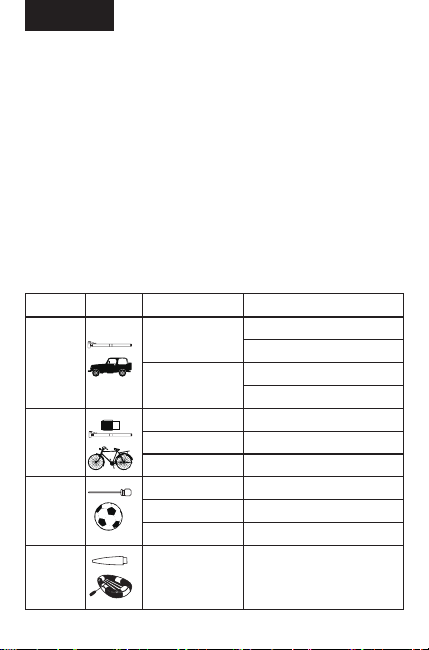
Category
Car
Bicycle
Ball
Kids Toys
Situation
Winter
Summer
Ordinary Vehicle
Mountain Bike
Road Bike
Volleyball
Basketball
Football
Normal pressure (for reference only)
The Front Tire: 2.5kg/cm²
The Rear Tire: 2.8kg/cm²
The Front Tire: 2.2kg/cm²
The Rear Tire: 2.5kg/cm²
30-35 PSI
50-60 PSI
80-100 PSI
6PSI (0.0425MPa)
9PSI(0.06MPa)
10PSI(0.07MPa)
6PSI
Picture

6
Operation is subject to the following three conditions:
(1) This device may not cause harmful interference,
and
(2) this device must accept any interference received,
including interference that may cause undesired
operation.
Note: This equipment has been tested and found to
comply with the limits for a Class B digital device,
pursuant to part 15 of the FCC Rules. These limits are
designed to provide reasonable protection against
harmful interference in a residential installation. This
equipment generates, uses and can radiate radio
frequency energy and, if not installed and used in
accordance with the instructions, may cause harmful
interference to radio communications. However, there
is no guarantee that interference will not occur in a
particular installation. If this equipment does cause
harmful interference to radio or television reception,
which can be determined by turning the equipment off
and on, the user is encouraged to try to correct the
interference by one or more of the following measures:
—Reorient or relocate the receiving antenna.
—Increase the separation between the equipment and
receiver.
—Connect the equipment into an outlet on a circuit
different from that to which the receiver is connected.
—Consult the dealer or an experienced radio/TV
technician for help.
7
Correct Disposal of this product
This marking indicates that this product
should not be disposed with other
household wastes throughout the EU. To
prevent possible harm to the environment
or human health from uncontrolled waste
disposal, recycle it responsibly to promote
the sustainable reuse of material
resources. To return your used device,
please use the return and collection
systems or contact the retailer where the
product was purchased. They can take this
product for environmental safe recycling.

Bedienungsanleitung
Deutsch
Vielen Dank, dass Sie sich für unsere elektrische,
tragbare Luftpumpe entschieden haben.
Das Produkt kann angewendet werden: bei Autos,
Fahrrädern, Motorrädern, Bällen, aufblasbares
Spielzeug usw. Digitaler Inflator kann den Reifendruck
messen und als Taschenlampe verwendet werden.
1. Wiederaufladbare Luftpumpe sollte im Voraus gut
aufgeladen werden.
8
2. Verbinden Sie ein Ende des Luftschlauches mit der
Luftpumpe, stecken Sie das andere Ende an das
Reifenventil. Für das französische Ventil verbinden
Sie es erst mit dem passenden französischen
Adapter.
3. Drücken Sie die Taste "UNIT", um den Druck in PSI,
BAR, KPA oder kg/cm2 auf dem aktivierten
Bildschirm einzustellen.
4. Drücken Sie "+" und "-" um den gewünschten Druck
auszuwählen.
5. Drücken Sie nun den Netzschalter um mit dem
Aufpumpen zu beginnen.
6. Drücken Sie wiederholt die Taste „Unit (Einheit)“,
um zwischen den Einheiten PSI, Bar, KPA oder
kg/cm² zu wechseln. Der Bildschirm zeigt die
genauen Daten an.
Deutsch
9
Produktstruktur
“+” und “—”
„Unit“
(Einheit) Taste
Netzstecker
Aufladestation
LCD
7. "+" und "-" sind voreingestellte Tasten. Sie können
sie kurz drücken, um den gewünschten Druck
langsam einzustellen, und lange drücken, um
den gewünschten Druck schnell einzustellen.
(Referenzdruck: normales Fahrrad: 30 ~ 35psi,
Mountainbike ist 50 ~ 60psi, Straßenrad ist 80
~ 100psi, Auto ist 32 ~ 38psi). Sobald der Bildschirm 4
Sekunden flackert ist die Einstellung abgeschlos-
sen oder wenn Sie die Taste “Unit (Einheit)” drücken,
um die Einstellungen zu beenden. Danach drücken
Sie den Netzschalter zum Aufpumpen.
8. Durch die intelligente Digitalmessung wird der
Aufpumpvorgang abgebrochen, sobald der Sollwert
erreicht ist. Wenn jetzt der Netzschalter gedrückt
wird, erlischt das LED-Licht.
9. Bitte beachten Sie, dass der Schlauch sehr heiß wird,
nachdem die Pumpe für eine lange Zeit gearbeitet hat.
Bitte schrauben Sie den Schlauch nicht vom Ventil
und von der Pumpe ab, bis es abgekühlt ist. Halten
Sie bitte die Luftpumpe trocken.

1. Kinder ist es untersagt, diese Luftpumpe zu
benutzen. Bitte halten Sie ihre Kinder fern.
2. Bitte benutzen Sie es nicht in brennbaren und
explosionsgefährdeten Bereichen (Beispiel
Tankstelle).
3. Um eine lange Lebensdauer des Produktes zu
gewährleisten, empfiehlt es sich das Gerät alle 8
Minuten für 8 Minuten ruhen zu lassen.
Hinweis
1. Eingangsspannung: Adapter 15V DC, Zigarette
nanzünder 12V DC.
2. Max. Strom: 5A.
4. Max. Aufblasdruck: 150psi.
5. Betrieb-Temperatur: -20℃~+60℃.
6. Größe: 54.8(L)×44.8(W)×198(H)mm.
Technische Daten:
Deutsch
10
Luftpumpe
Luftschlauch
Hauptadapter
(für zu Hause)
Autoladegerät
3. Inflator-Effizienz: Aufpumpen 26 * 1.95 Mountain-
bike-Reifen von 0 bis 50 psi in 2,5 Minuten.

Für Ihre und die Sicherheit anderer benutzen Sie bitte
die Luftpumpe und das Zubehör entsprechend der
Anweisung des Herstellers. Bitte für keine anderen
Anwendungen nutzen, die nicht in der Anleitung
erwähnt sind.
4. Sollte das Gerät zu heiß werden oder außergewöhnliche
Geräusche von sich geben, stoppen Sie bitte den Gebrauch
des Gerätes für 15 Minuten.
5. Halten Sie es fern von Regen oder Wasser und
vermeiden Sie, dass das Gerät runterfällt bzw.
irgendwo gegenstößt.
6. Bitte laden Sie es jedes halbe Jahr auf.
7. Stellen Sie sicher, dass die Energie genügend
Energie vorhanden ist und überprüfen Sie den
Zigarettenstopfen und -sicherung, bevor Sie die
Luftpumpe benutzen. Bitte nicht den Motor
ausschalten, während des Aufpumpvorgangs.
Hinweise für Anwender:
Deutsch
11
1. Der Reifendruckwert basiert auf dem empfohlenen
Wert der Autofabrik und die Reifenseitenwand zeigt
nur den maximalen Aufblasdruck im Fall der
Reifenkühlung an; Wo Sie die Informationen des
Standard-Reifendruckes: Fahrzeug-Benutzerhand
buch, Aufkleber auf der Fahrertür, Aufbewahrungss
chublade und Türzylinder.
Handbuch der tragbaren und
elektrischen Luftpumpe
2. Hinweis: Diese elektrische Luftpumpe kann nicht für
Lastkraftwagen, Transporter und Busse verwendet
werden.
3. 1PSI = 0.07Kgf/cm²= 0.07BAR = 7KPA
1Kgf/cm² = 1BAR = 98KPa = 14.22PSI
Deutsch
12
Kategorie
Auto
Fahrrad
Ball
Kinderspiel-
zeuge
Situation
Winter
Sommer
Normales Fahrzeug
Mountainbike
Straßenrad
Volleyball
Basketball
Fußball
Normaldruck (nur als Referenz)
Vorderreifen: 2.5kg/cm²
Hinterreifen:2.8kg/cm²
Vorderreifen: 2.2kg/cm²
Hinterreifen:2.5kg/cm²
30-35 PSI
50-60 PSI
80-100 PSI
6PSI (0.0425MPa)
9PSI(0.06MPa)
10PSI(0.07MPa)
6PSI
Foto

Manuale d’uso
Italiana
Grazie per aver scelto Oasser P1 Mini Pompa Elettrica.
Si prega di leggere questo manuale con attenzione prima
di usarla.
Questa pompa può essere usata con le macchine,
biciclette, moto, palloni, giocattoli gonfiabili etc. La pompa
digitale può misurare la pressione degli pneumatici ed
essere usata come una torcia.
1. La pompa ricaricabile deve essere caricata bene in
anticipo.
13
2. Si prega di collegare un'estremità del tubo dell'aria
della pompa e collegare l'altra estremità di esso con
il nucleo della valvola del pneumatico. Per la valvola
francese, deve essere collegato prima alla pompa
francese.
3. Si prega di premere il pulsante “UNIT” per
impostare la pressione in PSI, BAR, KPA, o kg/cm2
sullo schermo attivato.
4. Si prega di premere “+” & “-” per impostare la
pressione desiderata.
5. Si prega di premere l’interruttore di alimentazione
per iniziare a gonfiare.
6. Premendo ripetutamente il pulsante “UNIT”, ATMOS
cambierà in PSI, BAR, KPA, or kg/cm2. Lo schermo
mostrerà i dati reali.

7. “+” & “—” sono tasti preimpostati. Puoi premerli
brevemente per impostare la pressione desiderata
lentamente, e premere a lungo per impostare la
pressione velocemente. ( Pressione di riferimento :
bicicletta normale 30~35psi,mountain bike 50~
60psi,bicicletta da strada 80~100psi, macchina
32~38psi). L’impostazione sarà completata dopo
che lo schermo avrà lampeggiato per 4 secondi. O
puoi premere il pulsante “UNIT” per terminare
l’impostazione. Quindi premi l’interruttore per
gonfiare.
Italiana
14
Struttura del prodotto
“+” e “—”
Pulsante ”UNIT”
Interruttore
Porta carica batteria
Schermo LCD
8.
La pompa digitale smetterà di gonfiare automaticamente
quando il pneumatico sarà gonfiato alla pressione
prestabilita. Si prega di premere l’interruttore per spegnere
il LED.
9.
Si prega di notare che il tubo diventerà caldo dopo il
gonfiaggio perchè ha lavorato per un lungo periodo di
tempo. Quindi per favore non tirare fuori il tubo dal
nucleo della valvola e dal gonfiaggio fino a quando non
si sarà raffreddato. E quindi si prega di riporre la pompa
e tenerla in un luogo asciutto.

Nota
1. Input voltaggio: adattatore 15V DC, accendi sigari
12V DC
2. Corrente massima: 5A
3. Efficienza pompa: gonfiaggio 26*1.95 pneumatico
mountain bike da 0 to 50 psi in 2.5 minuti.
4. Pressione massima: 150psi
5. Temperatura in uso: -20℃~+60℃
6. Grandezza : 54.8(L)×44.8(W)×198(H)mm
Parametri Tecnici
Italiana
15
Pompa
Tubo dell’aria
Adattatore
Carica batteria
per la macchina
1. I bambini non possono usare questa pompa. Si
prega di tenerla lontana dalla portata dei bambini.
2. Non usare in aree infiammabili. (es. distributore
di benzina)
3. Per garantire al prodotto una lunga durata, farlo
riposare per 8 minuti ogni 8 minuti ditempo di
gonfiaggio.

Per la vostra ed altrui sicurezza, si prega di utilizzare
la pompa e gli accessori seguendo il manuale fornito
dal produttore. Può causare pericolo se si utilizzano
metodi non menzionati nel manuale.
Avviso per gli utenti
Italiana
16
Guida pompa elettrica portatile
1. Il valore di pressione della gomma è basato sul
valore raccomandato della fabbrica di automobili,
e il fianco del pneumatico mostrerà solo la
massima pressione di gonfiaggio in caso di
raffreddamento del pneumatico; dove è possibile
trovare le informazioni di pressione dei pneumatici
di serie: Manuale dell'utente, Driver Door Stickers,
Storage Drawer, and Cylinder Door.
4. Si prega di interrompere l’uso del prodotto per
15 minuti quando la temperatura è troppo alta o
ha rumore inusuale durante il gonfiaggio.
5. Si prega di tenerlo lontano da pioggia, acqua,
cadute e urti.
6. Si prega di caricarlo ogni 6 mesi.
7. Si prega di accertarsi che l'alimentazione sia
sufficiente prima di utilizzare la pompa ricaricabile.
In caso contrario, si prega di controllare la spina
dell’accendi sigari e fusibile ed accertarsi che
la pompa sia carica durante il gonfiaggio.

Italiana
17
Categoria
Macchina
Bicicletta
Palloni
Giochi
Situazione
Inverno
Estate
Veicolo ordinario
Mountain Bike
Road Bike
Volleyball
Basketball
Football
Pressione normale (solo per informazione)
The Front Tire: 2.5kg/cm²
The Rear Tire:2.8kg/cm²
The Front Tire: 2.2kg/cm²
The Rear Tire:2.5kg/cm²
30-35 PSI
50-60 PSI
80-100 PSI
6PSI (0.0425MPa)
9PSI(0.06MPa)
10PSI(0.07MPa)
6PSI
2. Nota: Questa pompa elettrica non può essere
utilizzata per camion, furgoni e autobus.
3. 1PSI = 0.07Kgf/cm²= 0.07BAR = 7KPA
1Kgf/cm² = 1BAR = 98KPa = 14.22PSI
Foto

Manual de uso
Español
Graciar por escoger Oasser P1 Mini Inflador Eléctrico.
Por favor lea este manual con detenimiento antes de
usar el producto.
Este inflador puede ser usado en coches, bicicletas,
motocicletas, balones, juguetes hinchables, etc… El
inflador digital puede medir la presión del neumático y
ser usado también como linterna.
18
1. La batería del inflador debe estar previamente
correctamente cargada. para ser usado sin
conectar al enchufe.
2. Por favor conecte un extremo de la tubería al inflador
y el otro extremo a la válvula del neumático.Para el
tipo de válvula francesa o Presta hay que conectar
también el adaptador suministrado especialmente
para este tipo de válvula.
3. Pulsar el botón “UNIT” para fijar la presión en PSI,
BAR, KPA, or kg/cm2 en la pantalla.
4. Pulsar el botón “+” o “-” para fijar la presión deseada.
5. Pulsar el botón de encendido para comenzar a inflar.
6. Pulsar repetidamente el botón “UNIT”, y el valor en
ATMOS pasará a PSI, BAR, KPA, or kg/cm2. La pantalla
mostrará el dato real.
7. “+” o “—” son los botones para fijar un valor. Para
ajustar el valor despacio hay que pulsar brevemente
esos botones. Para ajustar el valor rápidamente
hay que pulsar prolongadamente esos botones.
Descripción
“+” y “-”
Botón ”UNIDAD”
Botón encendido
Puerto de carga
Pantalla LCD
Español
19
(Las presiones de referencia son: Bicicleta convencional
30~35psi,bicicleta de montaña 50~60psi,bicicleta de
carretera 80~100psi,coche 32~38psi).
La configuración se habrá completado cuando la
pantalla parpadea 4 segundos. O bien presionando
el botón “UNIT” para finalizar. Por ultimo para
empezar a inflar hay que presionar el botón de
encendido.
8. Por último El Inflador digital parará de inflar
automáticamente cuando ha inflado el neumático
a la presión fijada. Pulsar el botón de encendido
para apagar la luz LED.
9. Desmontar el tubo de aire de la válvula y
del inflador y guardar en lugar seco.
Parámetros técnicos
Español
20
Inflador
Tubo de aire
Adaptador
corriente
Cargador de
coche
Nota
1. Prohibido usar por niños, mantener alejado el
inflador de los niños.
1. Tensión de entrada: adaptador 15V DC,
encendedor de coche 12V DC
2. Corriente máxima: 5A
3. Eficiencia del Inflador 26*1.95 neumático de
bicicleta de montaña de 0 to 50 psi in 2.5
minutes.
4. Presión máxima: 150psi
5.
Temperatura de funcionamiento: -20℃~+60℃
6. Tamaño: 54.8(L)×44.8(W)×198(H)mm
2. No usar en zonas inflamables o explosivas.
(ej. Gasolinera)
3. Para garantizar una larga vida útil del aparato,
por favor dejar descansar durante 8 minutos
por cada 8 minutos de inflado.

Guía del inflador portátil eléctrico
1. El valor de la presión de los neumáticos está
basada en el valor recomendado por el fabricante
del vehículo. La presión indicada en el lateral
del neumático es el valor máximo en caso de
neumático frío. Los lugares dónde puede
encontrar la presión de sus neumáticos son
Manual de usuario del vehículo, pegatinas en
las puertas, en la guantera, etc…
Para su seguridad y la de los demás usar el inflador y
sus accesorios de acuerdo al manual proporcionado
por el fabricante, puede causar daños si usa métodos
no indicados en las instrucciones.
Aviso a los usuarios
Español
21
4. Si se nota un ruido anormal o una temperatura
muy elevada durante el inflado dejar resposar
el aparato 15 minutos.
5. Evitar el agua, la lluvia, golpes y caídas.
6. Cargar cada 6 meses de manera completa.
7. Hay que asegurarse que la potencia es
suficiente antes de usar el inflador recargable
y verificar que el enchufe del mechero y el
fusible están correctos antes de usar el
inflador, y no parar el motor del coche
mientras se infla.

Español
22
Clase
Coche
Bicicleta
Pelota
Juguetes
Tipo
Invierno
Verano
Normal
Montaña
Carretera
Volleyball
Baloncesto
Fútbol
Presión Normal ( solo para referencia)
Neumático delantero: 2.5kg/cm²
Neumático trasero:2.8kg/cm²
Neumático delantero: 2.2kg/cm²
Neumático trasero:2.5kg/cm²
30-35 PSI
50-60 PSI
80-100 PSI
6PSI (0.0425MPa)
9PSI(0.06MPa)
10PSI(0.07MPa)
6PSI
2. Nota: este inflador no se puede usar para
furgonetas, camiones o autobuses.
3. 1PSI = 0.07Kgf/cm²= 0.07BAR = 7KPA
1Kgf/cm² = 1BAR = 98KPa = 14.22PSI
Foto

Mode d’emploi
Français
Merci d’avoir choisi le mini gonfleur électrique P1 OASSER.
Veuillez lire ce manuel avec attention avant la première
utilisation.
Ce gonfleur peut être utilisé pour les voitures, vélos, motos,
balles, jouets gonflables, etc… Le gonfleur digital peut
mesurer la pression et peut être utilisé comme lampe torche.
1. Le gonfleur est rechargeable et doit être bien
chargé avant chaque utilisation.
2. Connectez un côté du tube à air au gonfleur, puis
branchez l’autre côté à la valve de gonflage. Pour les
valves françaises, il doit être connecté à un gonfleur
français en premier.
3.
Appuyez sur le bouton « Unit » pour régler la pression
en PSI, BAR, KPA ou kg/cm2 sur l’écran
activé.
4.
Appuyez sur « + » et «- » pour régler la pression désirée.
5.
Appu
yez sur l’interrupteur « Power » pour commenc
er à gonfler.
23
6. Appuyez de façon répétitive sur le bouton « Unit »,
l’unité de pression passera de PSI à BAR, KPA ou
kg/cm2. L’écran montrera la véritable valeur.
7.
« + » et « - » sont les boutons de réglage. Vous pouvez
faire un appui court pour régler lentement ou un appui long
pour régler la pression désirée plus rapidement (pour
référence, la pression d’un vélo ordinaire est entre 30/35
PSI, pour un VTT c’est environ 50/60 PSI, pour un vélo de
route c’est environ 80/100 PSI, pour une voiture 32/38
PSI). Les réglages seront complets lorsque l’écran clignote
pendant 4 secondes. Ou vous pouvez appuyer sur le
bouton « Unit » pour finir les réglages. Ensuite, vous

Français
pouvez appuyer sur l’interrupteur « Power » pour gonfler.
8.
Le gonfleur digital s’arrêtera de gonfler automatiquement
lorsque la pression sera à la valeur définie. Appuyez sur
l’interrupteur « Power » pour éteindre la lumière
rouge.
9. Notez que le tube peut chauffer après que le
gonfleur ait fonctionné pendant un long moment.
Donc, ne pas enlever le tuyau de la valve et du
gonfleur avant qu’il ne soit froid. Ensuite, ranger le
gonfleur dans un endroit sec.
24
Structure du produit
« + » et « - »
Bouton « Unit »
Interrupteur
Port de chargement
Ecran LCD
Gonfleur
Tube à air
Prise
Prise allume-cigare

1.
Tension d’entrée : Adaptateur 15V DC, Allume-cigare
12V DC
2. Courant max : 5A
3. Efficacité du gonfleur : Gonfler 26x1.95 pour un VTT
de 0 à 50 PSI en 2 minutes 30.
4. Pression maximale : 150 PSI.
5. Température d’utilisation : de -20° à +60°.
6. Taille : 54.8(L)×44.8(W)×198(H)mm.
Paramètres techniques
Français
25
1. Tenir hors de portée des enfants. Les enfants ne
doivent pas utiliser le gonfleur.
2. Ne pas utiliser dans les endroits inflammables ou
explosives (Stations services, etc…)
3. Pour assurer une longue vie au produit, faites une
pause de 8 minutes, toutes les 8 minutes
d’utilisation.
4. Arrêtez l’utilisation du gonfleur pendant 15 minutes
si la température devient trop élevée ou s’il y a un
bruit anormal lorsque vous gonflez.
5. Ne pas mouiller ou approcher d’une source d’eau,
ne pas cogner ou faire tomber le gonfleur.
6. Chargez la batterie tous les 6 mois.
7. Assurez-vous que la batterie soit suffisamment
chargée avant utilisation. Sinon, branchez la prise
allume-cigare et assurez-vous que le gonfleur soit
en charge pendant qu’il gonfle.
NOTES

Pour votre sécurité et celle des autres personnes,
utilisez le gonfleur et ses accessoires en accord avec
le manuel fourni par le fabricant. Si vous utilisez le
gonfleur de manière non conforme, vous pourriez
l’endommager.
AVERTISSEMENTS
Français
26
1.
La valeur de la pression des pneus est basée sur les
valeurs recommandées par le fabriquant de voiture, et
les valeurs indiquées sur le côté du pneu sont les
valeurs maximales dans le cas d’un pneu gonflé à
froid. Vous pouvez trouver les valeurs de pression pour
votre véhicule dans le manuel utilisateur de votre
voiture/moto, les étiquettes présentes sur la portière,
dans un tiroir de rangement ou près de la serrure.
2. Note : Ce gonfleur électrique ne peut être utilisé
pour les camions, vans ou bus.
3. 1PSI = 0.07 Kgf/cm2=0.07BAR=7KPA
1Kgf/cm²=1BAR=98KPA=14.22PSI
Guide du gonfleur électrique portable

Français
27
Catégorie
Voiture
Vélo
Ballon
Jouets
enfant
Situation
Hiver
Été
Ordinaire
VTT
Route
VolleyBall
Basketball
Football
Pression normale (pour référence seulement)
Pneus avant : 2.5 kg/cm2
Pneus arrière : 2.8 kg/cm2
Pneus avant : 2.2 kg/cm2
Pneus arrière : 2.5 kg/cm2
30-35 PSI
50-60 PSI
80-100 PSI
6PSI (0.0425MPa)
9PSI(0.06MPa)
10PSI(0.07MPa)
6PSI
Image

取扱説明書
日本語
28
「Oasser P1 Mini Electric Inflator」をお買い上げいただき、
誠にありがとうございます。ご使用前に本説明書をよくお読み
ください。
この電動エアコンプレッサーは、自動車、自転車、モーター
バイク、ボール、インフレータブルおもちゃなどに適用します
。デジタルエアコンプレッサーは、タイヤの圧力を測定し、懐
中電灯として使用することができます。
1. 充電式エアコンプレッサーは事前に充分充電していた必要
があります。
2. 空気チューブの端部をエアコンプレッサーに接続し、他端を
タイヤバルブコアに差し込んでください。仏式バルブの場合は
、最初に仏式エアコンプレッサーに接続する必要があります。
3.「UNIT」ボタンを押して、画面でPSI、BAR、KPA、または
kg/cm²の圧力を設定してください。
4.「+」と「-」を押して、希望の圧力を設定してください。
5. 電源スイッチを押して空気注入を開始してください。
6. 繰り返し「UNIT」ボタンを押すと、ATMOSはPSI、BAR、
KPA、またはkg/cm² に変換します。スクリーンに実際のデー
タが表示されます。
7.「+」と「-」はプリセットキーです。短く押すと希望の圧力
がゆっくりセットされ、長く押すと希望の圧力が素早く設定で
きます。(参考圧力:普通の自転車は30〜35psiです。マウン
テンバイクは50〜60psiです。ロードバイクは80〜100psiです
。自動車は32〜38psiです)。画面が4秒間点滅したら設定が完
了します。また、「UNIT」ボタンを押して設定を終了するこ
ともできます。次に、電源スイッチを押して空気注入させてく
ださい。
29
製品構造
「+」と「ー」
「UNIT」ボタン
電源スイッチ
充電口
LCD画面
エアコンプレッサー
エアチューブ
アダプター
車用充電器
日本語
8. デジタルエアコンプレッサーは予め設定された圧力値に達す
ると、自動的に空気注入を停止します。電源スイッチを押して
、LEDライトをオフにしてください。
9. 長時間使用した後、チューブは熱くなることに注意してくだ
さい。また、エアコンプレッサーが冷却されるまでに、バルブ
のコアから引き抜かないようにしてください。エアコンプレッ
サーは乾燥場所に置いてください。

技術仕様
30
注記
ユーザーへのアドバイス
日本語
1. 入力電圧:アダプター15V DC、シガレットライター12V DC。
2. 最大電流:5A。
3. 空気注入効率:空気注入26*1.95マウンテンバイクタイヤ0か
ら50 psiまで2.5分で膨らませます。
4. 最大圧力:150psi。
5. 動作温度:-20℃~+ 60℃。
6. サイズ:54.8(L)×44.8(W)×198(H)mm。
1. 子供使用禁止。子供の手の届かない場所に置いてください。
2. 可燃性および爆発性のある場所では使用しないでください。
(例:ガソリンステーションなど)
お客様と他の人の安全のため、説明書に従って、メーカーの提
供するエアコンプレッサーと付属品を使用してください。説明書
3. 製品が長く使えるように、作業時間8分以上経ってから、8分
程に休むことをお勧めします。
4. 温度が高すぎる場合や、空気注入時に異常な音がする場合は、
使用をやめて15分程休ませてください。
5. 落下させたり、強い衝撃を与えたりしないでください。雨、水
などで濡らさないでください。
6. 長期間使わない場合、半年ごとに充電してください。
7. 充電式エアコンプレッサーを使用する前に、電池残量が十分で
あることを確認してください。不足の場合は、タバコのプラグと
ヒューズをチェックして、作業中エアコンプレッサーが充電して
いることを確保してください。
携帯型電動エアコンプレッサーガイド
31
カテゴリー
車
自転車
ボール
子供の
おもちゃ
場合
冬
夏
普通自転車
マウンテンバイク
ロードバイク
バレーボール
バスケットボール
サッカー
正常圧(参考のみ)
前輪用タイヤ:2.5kg/cm²
後輪用タイヤ:2.8kg/cm²
前輪用タイヤ:2.2kg/cm²
後輪用タイヤ:2.5kg/cm²
30-35 PSI
50-60 PSI
80-100 PSI
6PSI (0.0425MPa)
9PSI(0.06MPa)
10PSI(0.07MPa)
6PSI
写真
日本語
に書いていない方法を使用すると、危険が生じる可能性があります。
1. タイヤの圧力値は、自動車工場のおすすめ圧力値に基づいてお
り、タイヤのサイドウォールにはタイヤ冷却の場合の最大膨張圧
力値のみが表示されます。タイヤ圧力基準値の情報は、車両ユー
ザーマニュアル、運転席ドアステッカー、ストレージドロアー、
シリンダードアなどところにあります。
2. 注:この電動エアコンプレッサーは、トラック、バン、バスに
は使用できません。
3. 1PSI = 0.07Kgf/cm²= 0.07BAR = 7KPA
1Kgf/cm² = 1BAR = 98KPa = 14.22PSI
