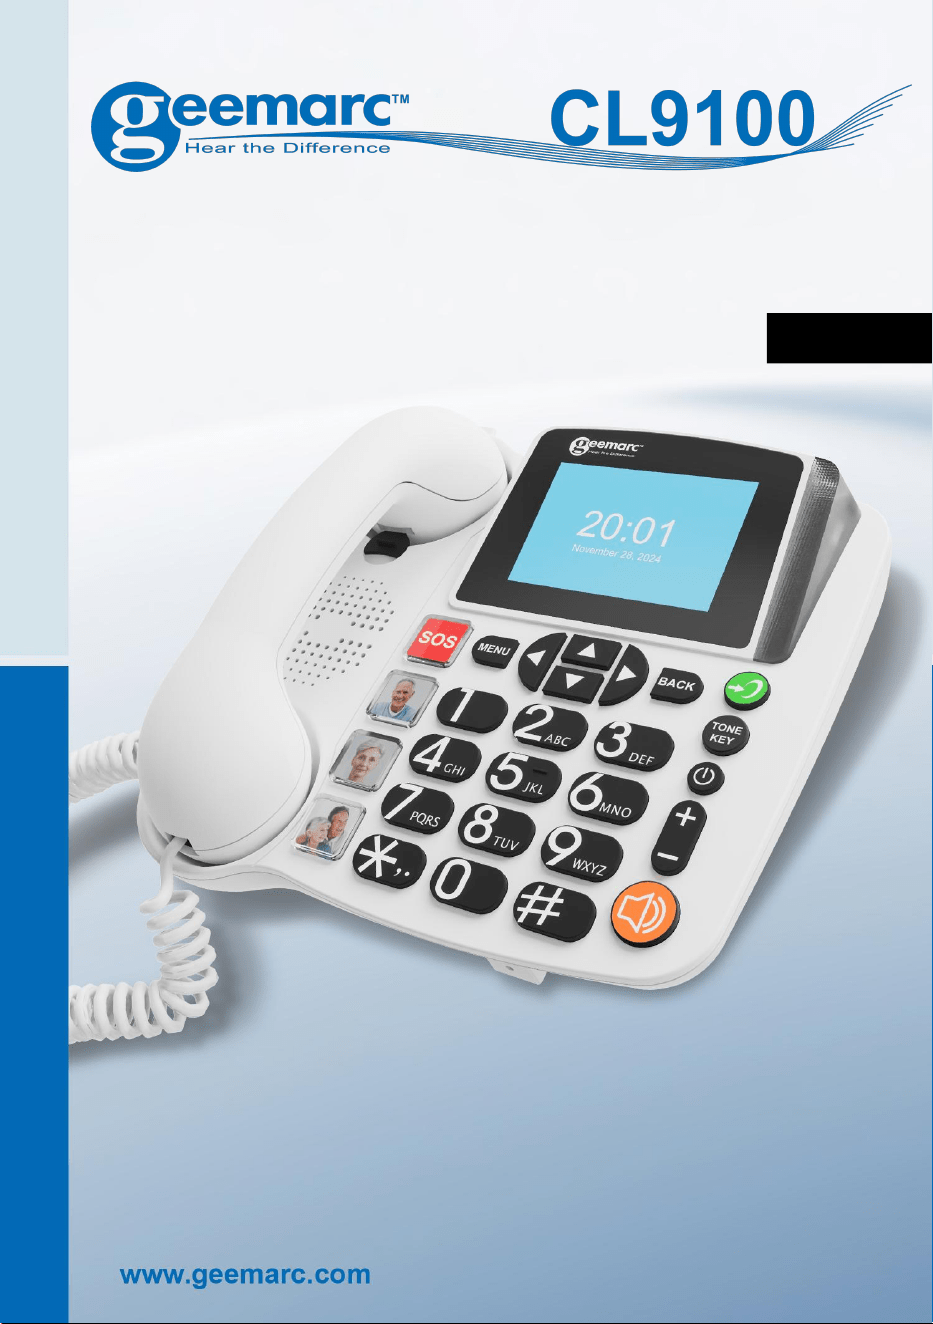
4G Phone with SOS Emergency
Call
NOTE:
This phone can be used by people with mild to moderate
hearing loss. The headset volume can be adjusted, to make
it louder (up to 40dB). On first use, set the handset volume
to minimum, then gradually increase it to a level that is
comfortable.
English

1
Please refer to our website: www.geemarc.com for an up-to-
date user guide, as there may be important updates and
changes you need to be aware of!
Contents
...............................................................................
1
Before Use
...........................................................................
5
- Congratulations ..........................................................................5
- Safety Precautions
....................................................................
6
- Setting Up ................................................................................... 7
● Check the contents of the box ....................................................7
● Choosing a location ......................................................................7
● Battery and Adapter installation ................................................. 7
- Connecting the Telephone ...................................................... 8
- Wall mounting
............................................................................
9
- Location of controls .................................................................10
- Keys description
......................................................................
11
- Display (LCD) ...........................................................................13
Settings
..............................................................................
15
- Phone settings .........................................................................15
● Time and Date
..............................................................................
15
● Language settings
........................................................................
15
● Restore factory setting
................................................................
16
- Call settings
................................................................................
16
● Voicemail (mobile network service provider)........................... 16
● Divert Call...................................................................................... 16
● Call waiting.................................................................................... 16
● Call barred.....................................................................................17
● Reply SMS after reject................................................................ 17
● Call time reminder........................................................................ 17
- Display.........................................................................................17
● Contrast......................................................................................... 17
● Backlight Auto Off time Setting.................................................. 18
Contents

2
- Security
.......................................................................................
18
● Pin...................................................................................................18
● Blacklist..........................................................................................18
- Network Connection................................................................. 19
● Network selection.........................................................................19
● Network type................................................................................. 19
● Volte............................................................................................... 19
● Access point name (APN)...........................................................19
- Version........................................................................................ 19
- Led indicator...............................................................................19
- Low battery warning to SMS
...................................................
19
- Boost setting.............................................................................. 20
● Tone Control................................................................................. 20
● Boost lock...................................................................................... 20
- Auto Answer mode....................................................................20
- Update software
......................................................................
21
- Short key, Silence mode..........................................................21
Profiles
................................................................................
21
- Ring settings.............................................................................. 21
- Adjust ringtone volume
.............................................................
23
- Other alert rings.........................................................................22
Using the telephone ........................................................22
- Outgoing call
..............................................................................
22
- Incoming call & answering a call............................................ 25
- Dial from Contacts
..................................................................
25
- Speed dial .................................................................................25
- Photo key dialing.......................................................................26
- Dialing a Number from the Redial List
..................................
26
- Dialing a Number from the Missed Calls List.......................26
- Dialing a Number from the Received Call List.....................26
- Muting the Microphone
.............................................................
27
Contents

3
- Using the handset volume boost
............................................
27
- Using your Phone with hearing aids
......................................
27
- Hands-free (Speakerphone)....................................................28
- Tone Response......................................................................... 28
Phonebook ........................................................................ 28
- Contacts
......................................................................................
28
- Create a Phone Book Entry.................................................... 29
- View Contacts Entries.............................................................. 30
- Options within Contacts
...........................................................
30
- Store number in Speed dial or Photo key.............................31
SMS
......................................................................................
32
- Message (SMS).........................................................................32
- Send a Text Message.............................................................. 32
- Receiving a Text Message
......................................................
33
- Reviewing Stored Text Messages (Inbox)............................33
- Sentbox.......................................................................................34
- Drafts
...........................................................................................
34
- Delete one or Delete all SMS..................................................34
- Templates...................................................................................35
- Broadcast Messages
................................................................
35
- SMS Settings............................................................................. 35
- Messages Capacity.................................................................. 35
Call Record
........................................................................
36
- Missed Calls (Call logs)........................................................... 36
- Display Missed Calls
................................................................
37
- Display Outgoing Calls.............................................................37
- Display Received Calls
............................................................
38
- Delete All.....................................................................................38
- Call duration
...............................................................................
38
Contents

4
Application
........................................................................
38
- Application.................................................................................. 38
● Alarm
..............................................................................................
39
● Timer
..............................................................................................
40
● Bluetooth
®
......................................................................................
40
- Record your own ringtone or voice name
.............................
41
SOS ......................................................................................42
- Using the SOS Function in an Emergency
...........................
42
- SOS call type selection............................................................ 42
- SOS Emergency Contact Number Settings
.........................
42
- SOS Message Record............................................................. 43
- SOS Text Message...................................................................43
- Set Alarm volume
......................................................................
44
Technical specifications
................................................
44
Features
..............................................................................
44
Troubleshooting
................................................................
45
Safety Information
.............................................................
46
Hearing Aid Compatibility
...............................................
48
Network services
...............................................................
49
Guarantee
............................................................................
45
Recycling Directives
.........................................................
51
Contents
5
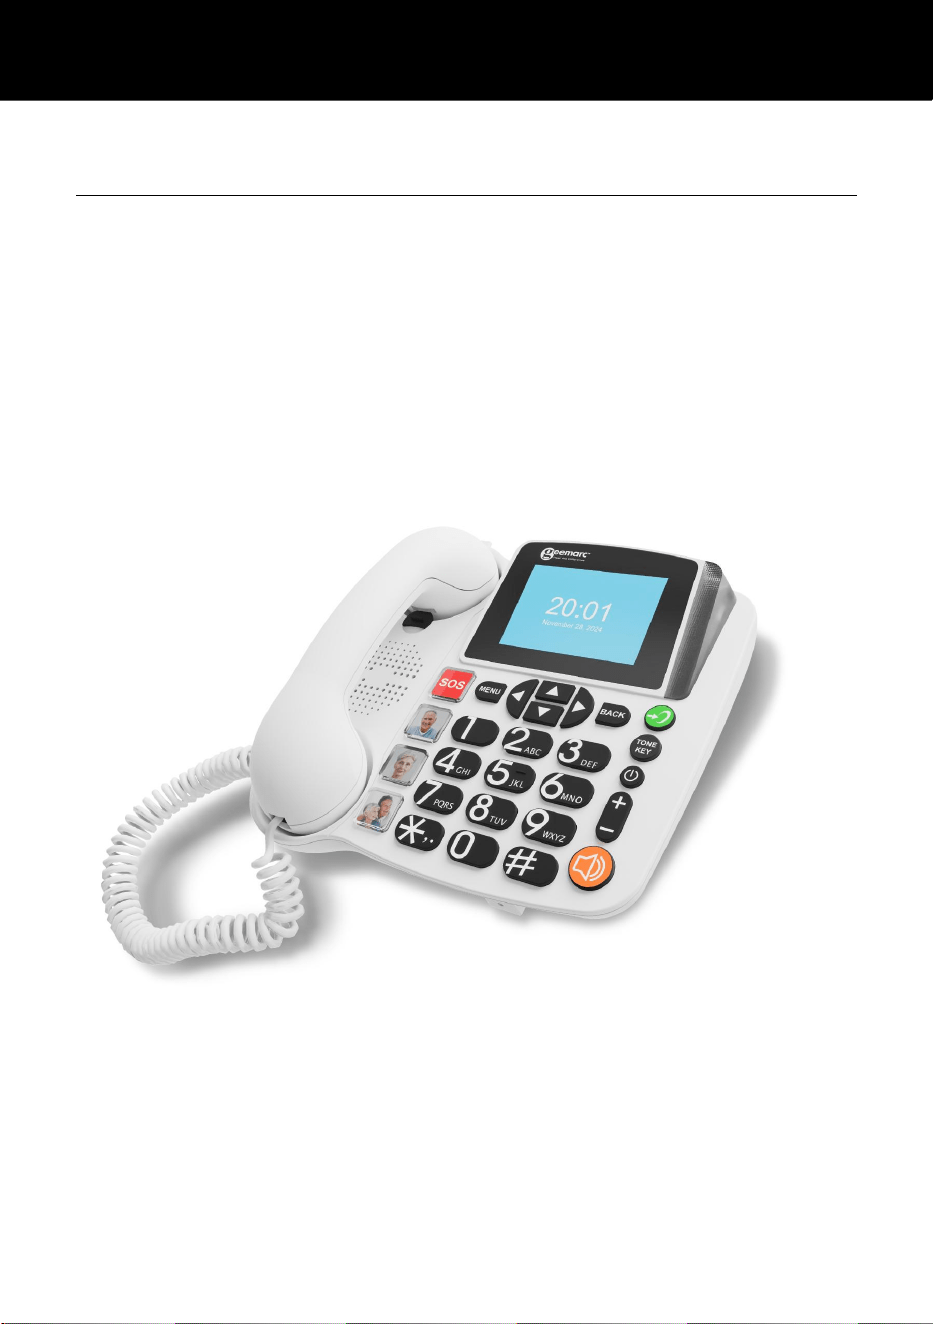
Congratulations
Congratulations on purchasing our product.
Please read this manual carefully to learn all about the features
available and how your telephone works. This will help you get the
best use of your new phone.
Before Use

6
Safety Precautions
To prevent any risk of electrical shock and injury, please follow
these basic safety precautions before using the phone:
1. Carefully read and observe the instructions in this manual.
2. The phone can be adjusted to loud sound levels through the
handset earpiece. It is important to instruct all users of the
phone’s correct operation. Adjust the volume control to its
minimum level (LOW) when not in use, and alert other users
that hearing damage can potentially result from misuse.
3. Unplug the phone before cleaning. Then use a damp cloth to
wipe it. Do not use liquid or aerosol cleaners.
4. Do not place objects on the line cord as this may damage it.
5. Do not use this phone in wet surroundings or environments
where there is a risk of explosion.
6. Refer servicing to qualified service personnel only.
7. Use only the power supply provided.
8. Install the telephone where no one will step or trip on the line
cord.
9. Do not overload mains electrical wall outlets sockets or extension
cords as this can increase the risk of fire or electrical shock.
10. Never push any objects through the slots in the telephone. They
can touch dangerous voltage points or short out parts that could
result in a risk of fire or electrical shock.
11. Never spill liquid of any kind on the telephone.
Prior To UsePrior To Use
Before Use

7
Setting Up
CHECK THE CONTENTS OF THE BOX
Box should contain:
Handset with handset curly cord and phone base.
3.7V, 4000mAh Li-polymer rechargeable battery.
User's manual.
Power adapter (5V DC 1.0A, 5W).
Type A to type C USB cable (length 1.5m).
NOTE : To function, the phone requires a Nano sized SIM
card. This is not supplied but is available from network
providers and retail outlets.
CHOOSE A LOCATION
The unit should be placed in an area where it is easy to see the
visual display and visual ringer.
To reduce the risk of knocking the phone or tripping over cables,
choose a location that is out of the way of normal daily activities.
BATTERY AND ADAPTER INSTALLATION
To be able to use all the features, e.g., hands-free and amplification,
it is essential that the phone ispowered by the supplied power supply.
Make sure the telephone is disconnected from the mains electrical
outlet socket before fitting or replacing the battery.
Unclip the battery compartment door with a small flathead screw
driver in the hole.
Connect the rechargeable battery plug to the battery socket in the
open battery compartment. Pay attention to the correct polarity.
Only use the rechargeable battery provided with the phone.
Close the battery compartment cover.
NOTE : Battery low alert: If the battery is low, the phone will emit
a loud BEEP, and show “battery low” in the display. It will also
send an SMS to a stored phone number. Plug in the supplied USB
Type C power adapter into the phone for charging.
Before Use
8
Connecting the telephone
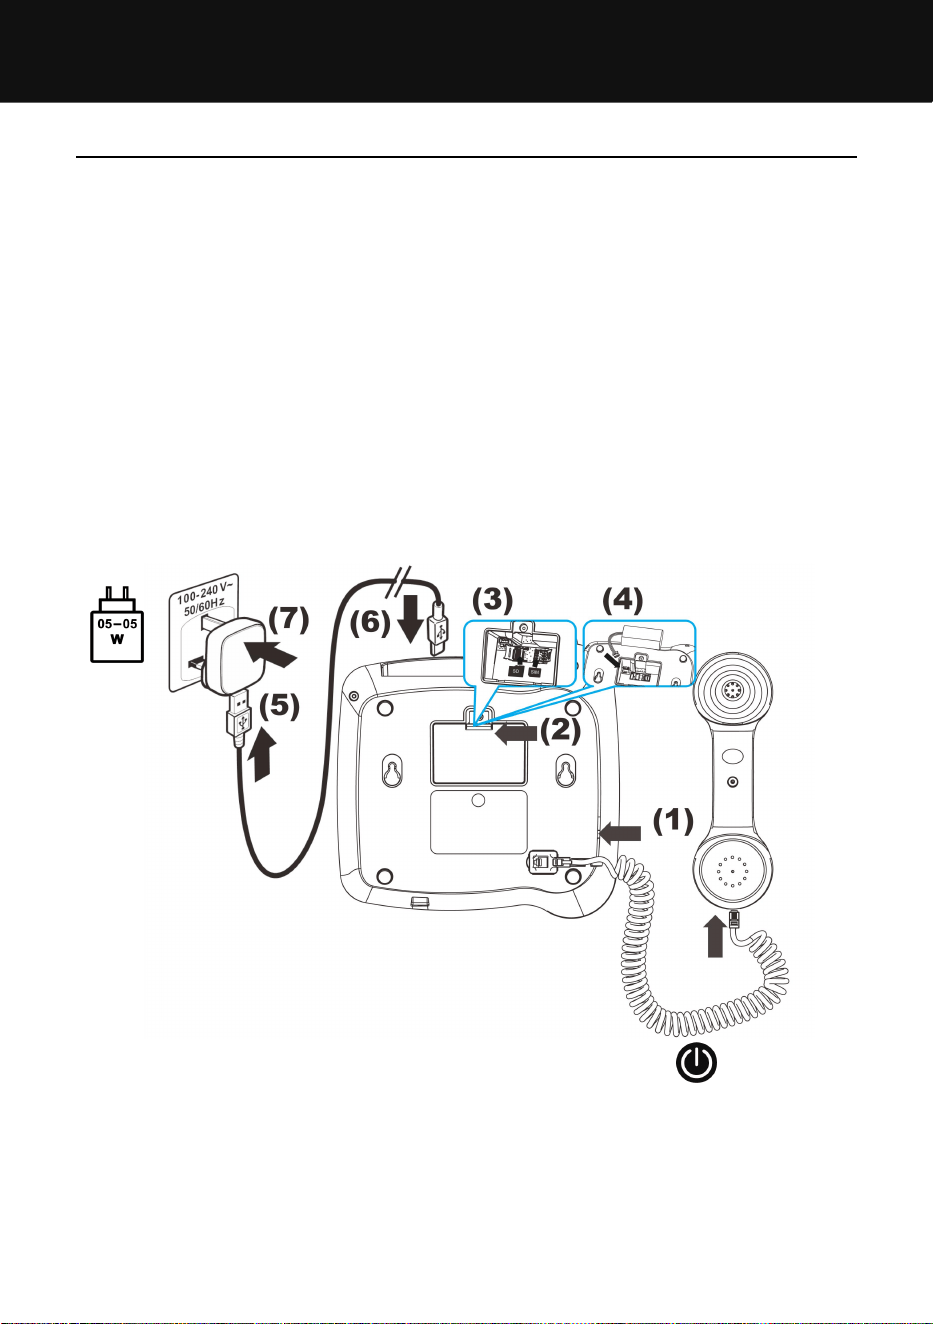
- Connect the handset curly cord (RJ9 plug) to the handset and
telephone (1).
- Carefully insert your Nano size SIM card to SIM slot or SD
card to SD slot at the rear of the base (2-3
)
.
- Unclip the battery compartment door with a suitable sized flathead
screw driver in the hole.
Connect the rechargeable battery plug to the battery socket (4).
NOTE : The battery is required so that the ring continues to
function in the event of a mains power supply failure.
- Snap the battery door back in place.
- Connect the USB cable (type A plug) to the adapter (5).
- Connect the adapter cord (type C plug) to the telephone (6).
- Connectthe adapterto your mains electricalwall outlet socket(*)(7).
- Press and hold the POWER(MUTE) ON/OFF key , the phone
will turn ON.
(*) Classified “hazardous voltage” according to EN62368-1 standard.
IMPORTANT NOTE: The rechargeable battery provides power
back-up in case of mains power failure. The USB type C power
adaptor should be plugged in and connected to the phone at
all times.
Before Use
9
Wall mounting
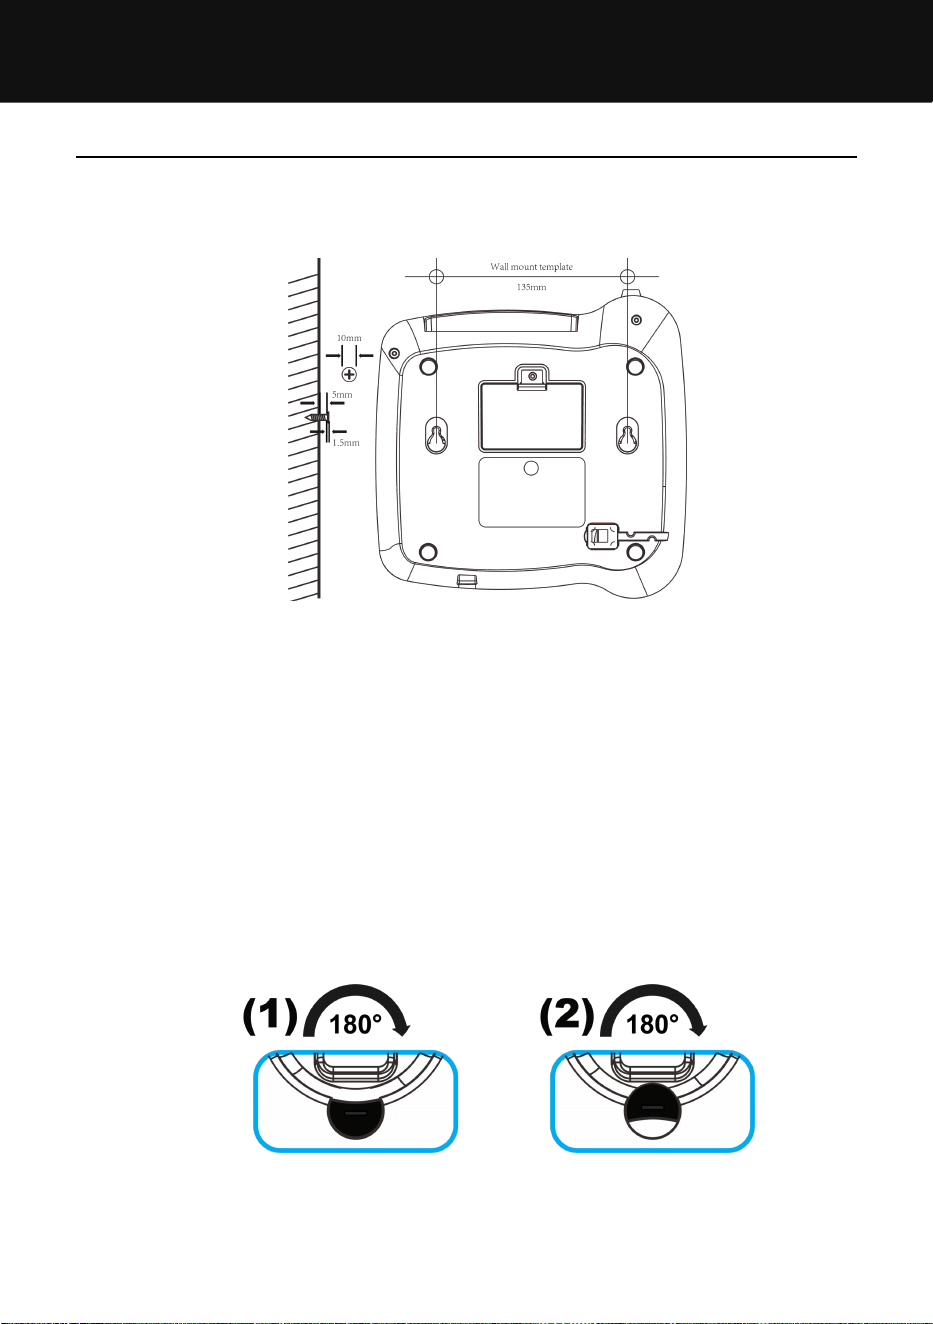
The telephone can also be wall-mounted with the supplied wall
mount bracket. Two suitable screws and raw plugs (not supplied)
are required to fix the wall-mount bracket securely to a wall.
Hang up the telephone on the wall in the slots on the rear side of
the telephone.
Warning: Ensure that there are no cables or pipes etc. under
the surface of the wall where you want to drill the holes.
Drill two holes whose distance 135mm in vertical, insert
the screws and allow them to project 5mm from the wall.
Position the telephone on the bracket, fit the screws in the slots
and slide the telephone downwards a little.
Turn the receiver hook (2) in the receiver cradle 180
o
so that
the receiver can be hooked in.
Before Use
10
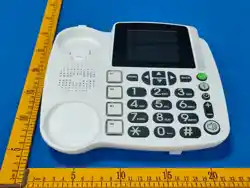
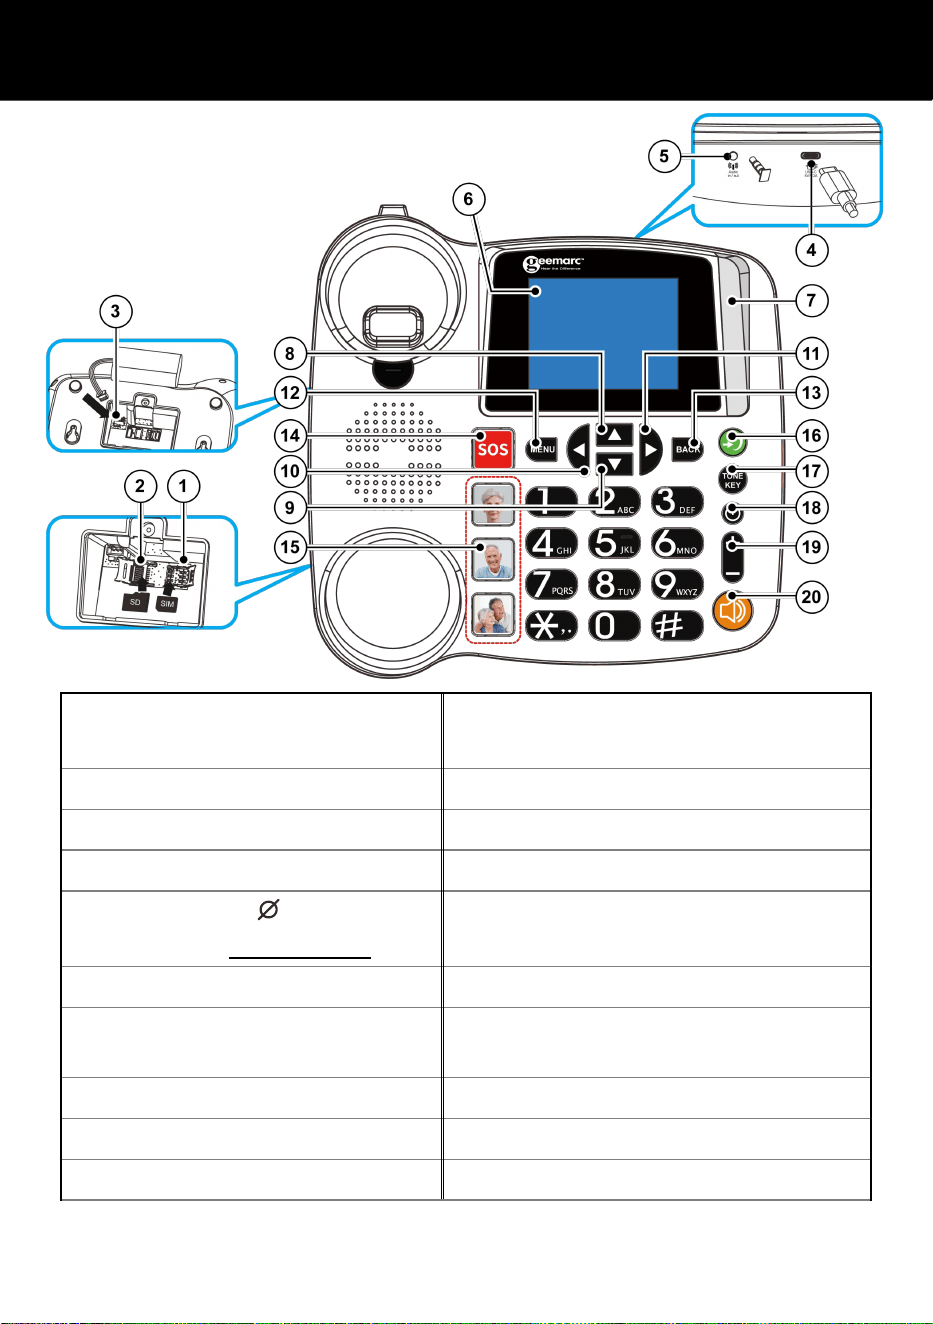
1. Nano SIM card slot
11. Right / Write SMS
2. SD card slot
12. Menu / OK button
3. Battery Connector
13. Call log / Backspace / Delete
4. DC IN (type-C)
14. SOS button
5. Audio In/Out( 3.5mm)CTIA
To connect a voice to text
15. Photo keys (x3)
6. LCD screen
16. Receiver +40 dB Boost button
7. Incoming ring indicator/new
call
17. TONE KEY
8. Up / Adjust Volume setting
18. Power on/off
9. Down /Adjust Volume setting
19. Volume up/down
10. Left / Contacts
20. Handsfree
Before Use
11
Keys Description
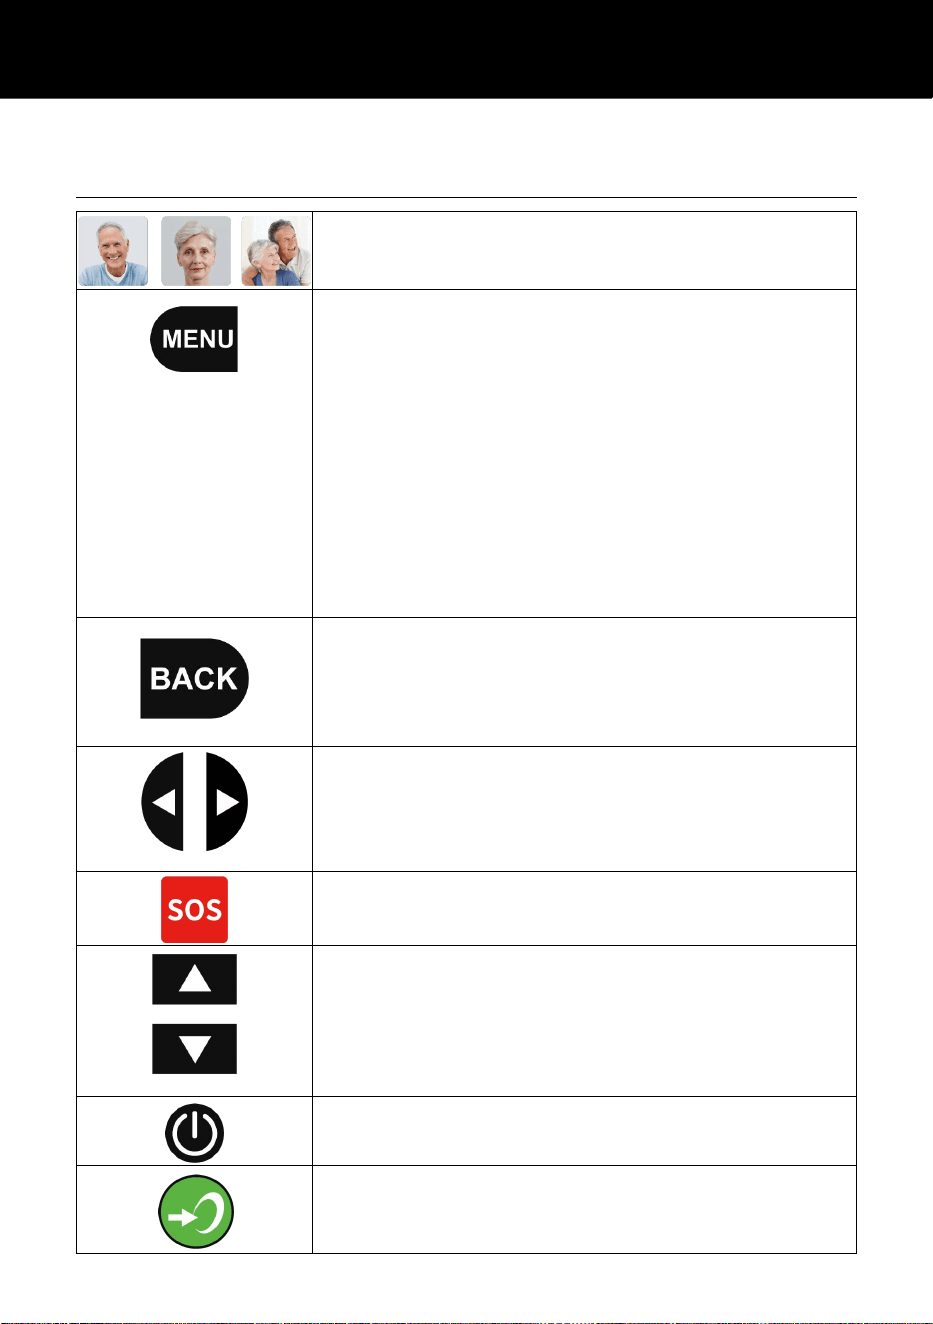
The 3 pictures keys are used as one-touch
speed dial keys.
Press this key to enter in the MENU
settings.
Press this key to access to the EDIT
function when you are in Phonebook
contact.
Press this key to access at the DELETE or
DELETE ALL function when you are
positioned
on CID number.
Press OK to confirm your selection.
Press OK to start a call when the contact
is selected.
Call logs / Backspace / Delete
Call logs list, as described in page 36.
When you dial a phone number, press this
key to delete the last digit(s).
Left / Right keys, short cut in standby
mode:
Left key: to enter CONTACTS list.
Right key: To write an SMS.
SOS key for emergency dialling.
Highlight or scroll through the MENU
options.
Short cut: Adjust handset or
speakerphone volume setting (during a
call)
POWER ON / OFF key - Long press to
power the telephone on and off.
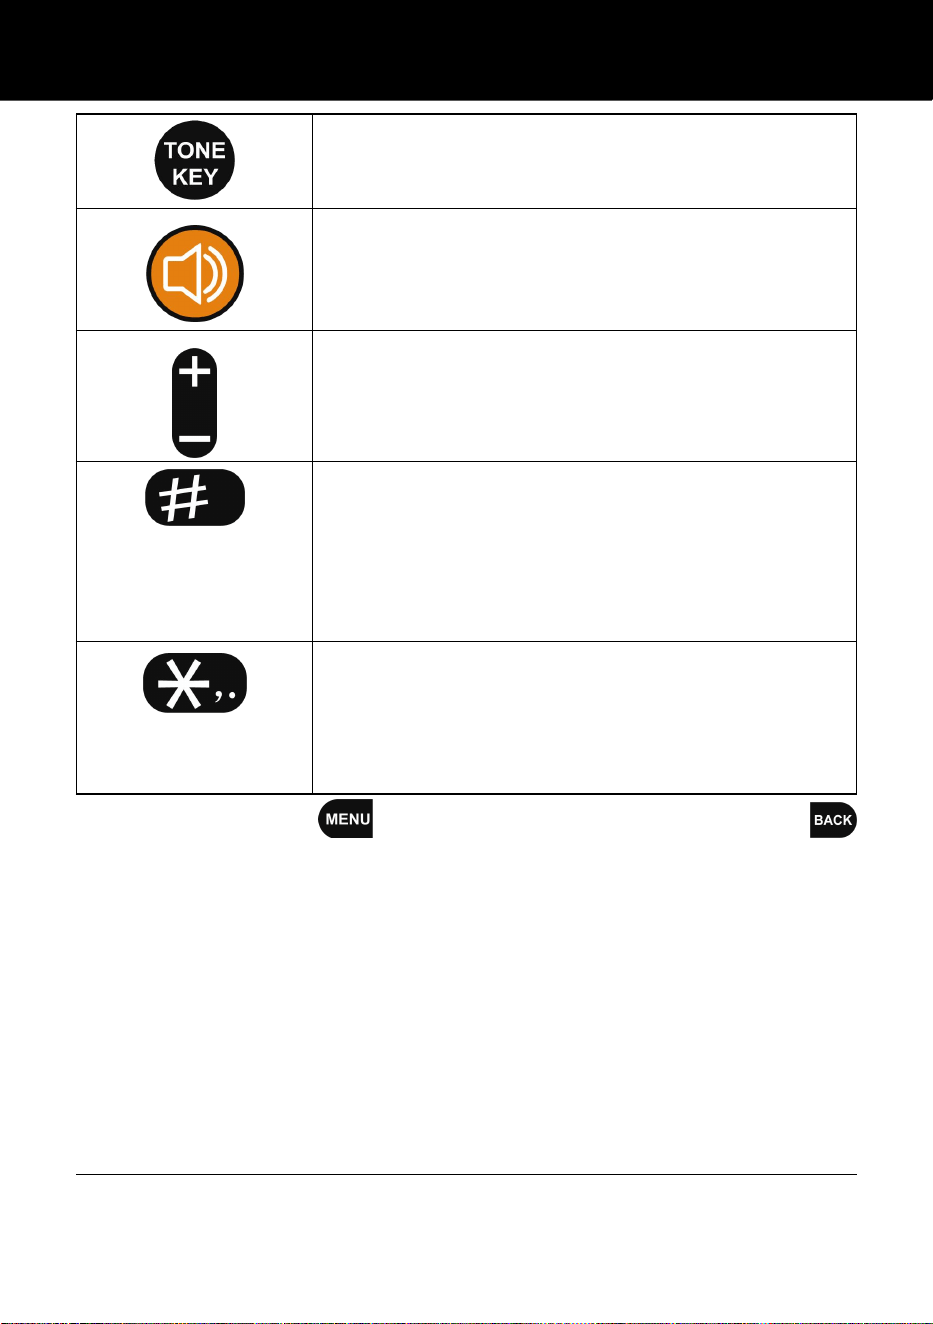
Press this key during a call to activate
handset BOOST mode (louder volume).
Before Use
12
When the boost is activated during a call,
you can use this key to change the tone
response (Bass, Normal or Treble).
Handsfree / Make / Answer / End a call.
Pressthis key to activate the
SPEAKERPHONE during a call, as described
inpage 25: Hands-free.
Allert volume up/down
Press + to increase the volume.
Press – to decrease the volume.
Hash key
Press to switch between different input
modes while composing a text message or
editing a contact name.
In standby status, Press and Hold to enable
/ disable silent mode.
Asterisk key
Press this key to insert one or more symbol
while composing a message or editing a
phonebook entry name.
(more detail please see P24: Asterisk key).
NOTE : Menu (OK) key and Call logs (Back space)
key also work as soft keys i.e., they take on different functions
depending on the menu displayed. The current function is always
displayed at the lower left and right corner of the display.
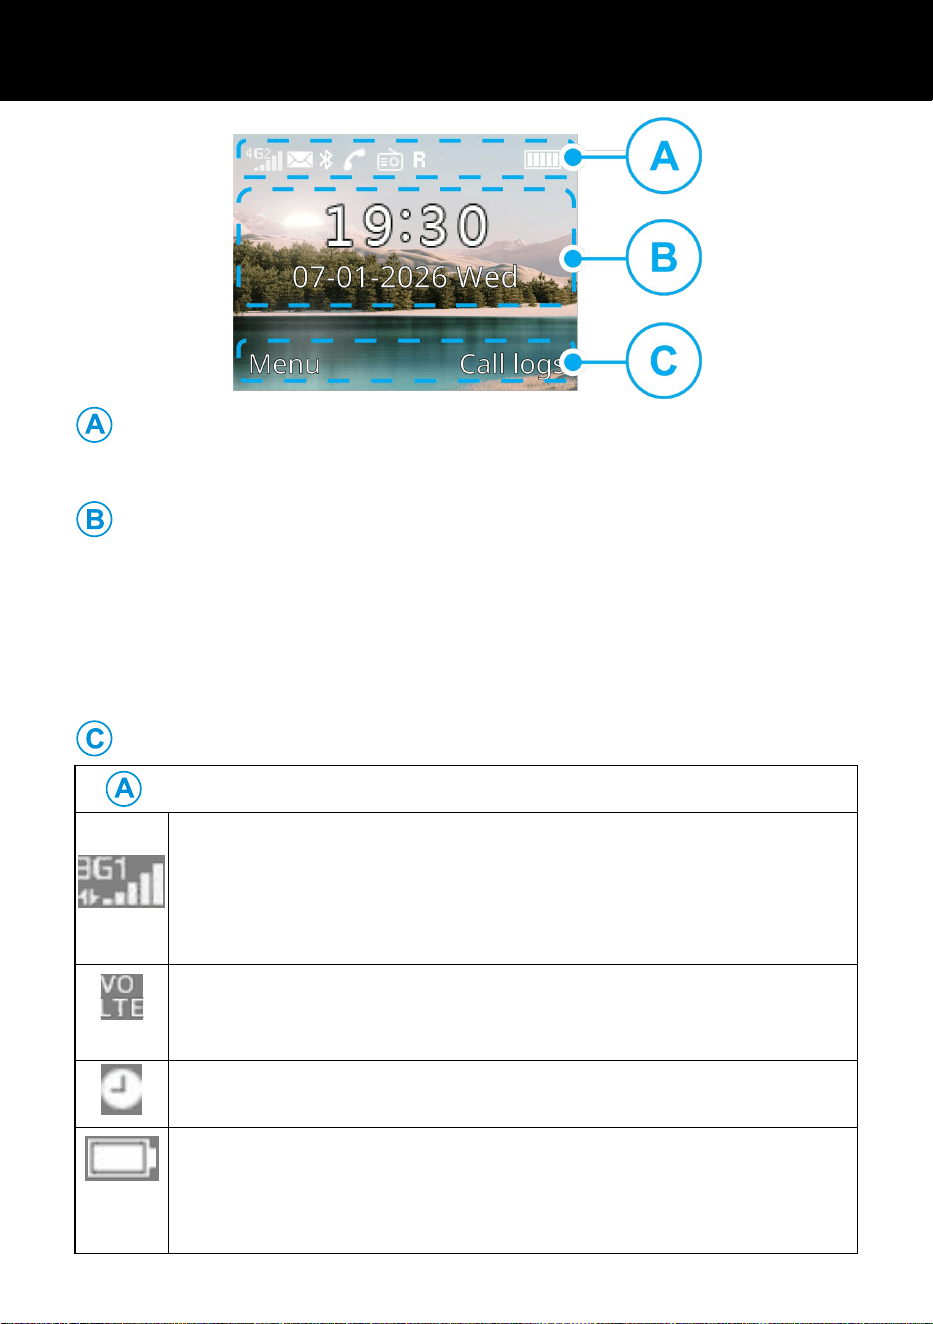
Display (LCD)
The LCD screen has three areas A / B / C :
Before Use
13
The icon area (status bar). This is found at the top of the
screen. This displays the various system icons which help
you to use the telephone.
The main area. This is found across the centre of the screen.
It displays the following:
number being dialed
caller ID information
phonebook
menu information
in standby mode current time, date and service provider name.
The soft key area. This is found at the bottom of the screen.
Status Bar Icon Identification
Signal Strength icon
This is always displayed when your telephone is switched
on. It shows the current mobile network signal strength.
More bars indicate more signal strength. There is one of
these icons per SIM. E means the network is 2G.
VoLTE
This indicates the mobile network is 4G (for best call
quality). E means that the network is in 2G.
Alarm icon
The alarm has been set to ring at a specified time.
Battery Status icon
This is always displayed when your telephone is switched
on. It shows the level of battery charge. More bars indicate
more battery charge.
Before Use
14
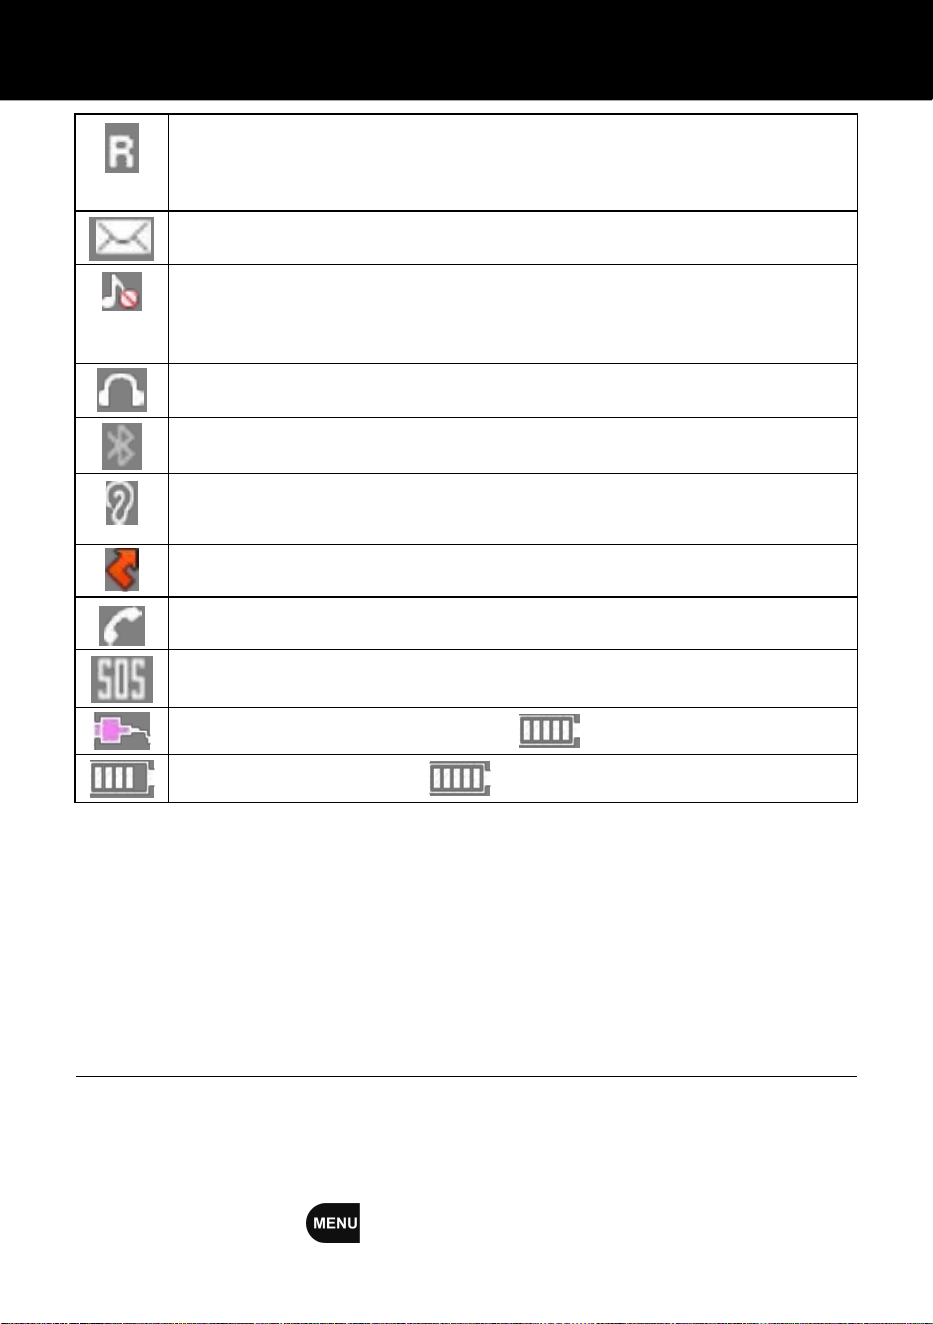
Roaming icon
This indicates an outgoing or incoming international call
(roaming).
SMS icon:A new SMS(text message) has been received.
Silent icon
(press and hold # key to activate / disable)
The telephone is in silent mode. There will be no ringer
alert to notify an incoming call.
Headset icon: The headset is plugged in.
Bluetooth
®
icon:
When Bluetooth
®
is ON.
Ear symbol
Indicates the handset volume boost function is ON.
Missed Call
During conversation: You are on line.有 HD 标识
SOS is ON
Use power adaptor only / Use battery only
Battery Charging / Battery full Charged
Phone settings
Time and Date
Time and date is preset and obtained from your mobile network
service provider. You can also set it manually, and select the time
and date format.
Press Menu/OK key to display the main menu.
Settings

15
Press the key to move toSettings
Phone settings
Time & date, and press to select Set time.
Press the key twice, then enter the correct hour and
minutes with the keypad, then press .
Press the key to move to Set date, Press the key,
then enter the correct day, month and year with the or
keys and press .
Press the key to move to Time Format,then press the
key, use or keys to select 12 or 24-hour time
format, then press .
Press the key to move to Date Format, Press key,
use or key to select the Year-Mon-Day / Mon-Day-
Year or Day-Mon-Year format then press .
Press the key to move to Update time settings, Press
the key. Use the or keys to select Auto update
time or Manual update time, then press .
Press the key to confirm.
Press the key to exit time and date settings.
NOTE : if you have CID (identification of the number) on your
mobile network, on the first call, the date & hour will be set
automatically.
Language settings
Menu/OK Settings Language settings
The phone can be set to one of 12 languages: English / French
/ German / Spanish / Portuguese / Arabic / Dutch / Italian / Hebrew
/ Russian / Polish / Czech.
Restore factory setting
Menu/OK Settings Restore
It is possible to restore the phone to its factory setting. This requires
the password: 1-2-3-4.

16
Call settings
Menu/OK Settings Call Settings
Voicemail (mobile network service provider)
A ‘voice mailbox’ is an optional service that may be available from
your mobile network service provider, to which you may need to
subscribe. It allows to listen to voicemail messages that callers may
have left for you. Contact your service provider for further details if
in doubt.
If your service provider offers a voice mailbox service, the telephone
number to access it can be set up from your telephone. If it is not,
you may be able to manually input your voicemail number here:
From standby, press and hold the ‘1’ dial key to connect to the
voicemail service.
Divert Call
Incoming calls can be diverted to a specified telephone number
(usually a voicemail number). There are 5 options available with
this function:
Divert all: Call divert is applied to all incoming calls.
If Busy:Call divert is applied toall incoming calls if the line is busy
(on another call).
If No Answer: Call divert is applied to all incoming calls if you
do not answer the call (select time between 5 to 30 seconds).
If Unreachable: Call divert is applied to all incoming calls if your
phone is switched off or you are not in a service area.
Cancel all diverts.
Call waiting
This can be set to activated, cancel or check status. Please check
whether this service is available from your service provider.
Call barred
There are many settings available:
Settings
Settings

17
Call Barring: Incoming and outgoing calls to and from your phone
can be limited. There are 4 options available with this function:
All outgoing Calls: No outgoing calls can be made.
All incoming Calls: No incoming calls can be received.
Incoming calls when roaming
ISD (international subscriber dialling) calling: If activated,
then all international outgoing calls will be blocked. (Password
is 0000).
Dial when INTERNATIONAL roaming : If activated, then no
outgoing calls can be made during roaming, no outgoing
(Password is 0000).
Cancel all barring: Call barring is off.
Reply SMS after reject:
If set to ON, and an incoming call is rejected, the display will show
“1 missed call” to inform you that you have missed an incoming
call. Select EXIT then “Reply” will be showed. Press OK to send a
template SMS message to reply.
Call time reminder
If set to ON, a regular short ‘beep’ reminds you of how long you
have been on the phone call. There are 4 settings: OFF, 50, 55,
60 seconds, or you can customize the time duration.
Display
Menu/OK Settings Display
Mainmenu Type
Use Up ( ) / Down ( ) keys to set to Matrix or Page.
Contrast
Use Left ( ) / Right ( ) keys to adjust the display
contrast, then press Menu/OK to confirm.
Backlight Auto Off time Setting
Backlight auto off time (15s/30s/1min /5min), default is 15 seconds.
18
Use Up ( ) / Down ( ) keys to set the desired time,
then press Menu/OK to confirm.
Press key to exit.
Security
Menu/OK Settings Security
PIN
This mobile telephone allows you to set up a PIN code to help
protect your telephone from unauthorized use.
The PIN and PIN2 codes are supplied with your SIM card. The PIN
code helps to protect the SIM card from unauthorized use.The PIN2
code is required to access certain services.
The PUK (PIN) and PUK2 (PIN2) codes may be supplied with the
SIM card. If you enter the PIN code incorrectly three times in
succession, the PUK will be required. If the codes are not supplied,
contact your mobile network service provider.
Blacklist
This provides the option to reject and blacklist numbers for
incoming calls (except SOS numbers).
Blacklist: Select Blacklist then Options, use and
keys to select New (enter the name and the phone
number) or Import contacts, then press to confirm.
Select your contact in the list, then press to confirm.
Select Mark, then press to confirm.
Select Options, then press .
Press key to exit.
NOTE : You have the option to delete, delete all, edit an contact
or all contacts of the blacklist entries.
Network Connection
Menu/OK Settings OK Connection
You have the option to set the DATA Service and Data roaming.
Network selection: you have the option to select your mobile
Settings
19
network service provider (network operator).
Network type: you have the option to choose the type of network.
VoLTE: Voice over Long-Term Evolution, set this function for 4G
higher call quality.
Access point name (APN): allows you to set up the gateway
between a mobile data network and another computer network,
often the public Internet.
Version
Menu/OK Settings Version
Hardware and Software version will be showed here. Normally it is
for technical service department.
Led indicator
Menu/OK Settings Led switch
This provides the option to switch ON or OFF the LED display visual
indication that informs you of a new message or new call.
Low battery warning to SMS
Menu/OK Settings Low battery to SMS
This function provides the option to send two low-battery warning
SMS messages to another mobile phone (the SMS message is sent
to a phone number stored in this phone - see section Send a Text
Message on page 32).The second message is sent one hour after
the first.
A low-battery SMS warning message may occur in the event
of a mains power failure, or if the power adapter has become
disconnected from the phone. To resolve the issue, check that the
power adapter is properly connected to the phone, or wait until the
mains power is back on.
Boost setting
Menu/OK Settings Boost setting
Settings
20
The boost setting gives you the option to adjust the tone (audio
frequencies) of the handset earpiece. Adjusting the tone may help
to make the call sound clearer.
Tone Control:
Menu/OK Settings Boost setting ok
Tone
There are 3 tone settings: Normal, Base and Treble.
If you choose Treble, the high audio frequencies are boosted (F,
S and T sounds may sound clearer), if you choose Bass, the low
audio frequencies are boosted.
You can change the tone settings during a call using the Left( ) /
Right ( ) keys. The display shows the tone control setting.
NOTE : The tone control can only be adjusted when the boost
function is ON.
Boost lock
Menu/OK Settings Boost setting ok Boost
The Boost lock function provides the option to activate the boost
and tone settings automatically for every call. This means once
you have set the tone to your preference, it is applied to every call
automatically.
Auto answer mode
Menu/OK
Settings
Auto on hook
ok
On
Allows the caller, if stored in either the photo memory or a speed
dial key, to automatically pick up the line from a distance after
several rings in speakerphone mode. You can set the time before
the phone automatically answers the call from 3 to 60 seconds
after the function is activated.
Update software
Menu/OK Settings Update software ok
Settings
Profiles
21
Allows you to update the software of your phone.
Other settings
Short key
A short key gives you direct access to a function:
Up arrow : Volume adjustment (Profiles)
Down arrow : Volume adjustment (Profiles)
Right arrow : Write an SMS
Left arrow : Contacts list
Silence mode
Press and hold the key to enable silence mode in
standby mode, if silence mode is enabled, the silence mode
icon is displayed. Press and hold the key to disable
silence mode.
In the Menu Profiles, you can set the different volume levels for
alert notifications, ringtones and call volume - for example.
Ring settings
Incoming ringtone
Message ringtone
Talking CID
Adjust volume
Incoming ringtone
Message ringtone
Alarm ringtone
Speaker volume
Handset call volume
Power ringtone
Talking keypad
22
Other alert rings
Battery low alert
Ring settings
You have the option to select a different ringtone for incoming
calls, message and Talking CID.
Incoming ringtone
Menu/OK Profiles Ring settings
Incoming ringtone
Use and keys to select your preferred ringtone.
There are 10 ringtones to choose from, then press to
confirm.
Message ringtone
Menu
/OK
Profiles
Ring settings
Message ringtone
Use and keys to select your preferred message
ringtone. There are 6 to choose from, then press to
confirm.
Talking keypad
Menu
/OK
Profiles
Ring settings
Talking CID
When this function is activated, the phone will announce the
number of the numeric key you have pressed. For example if
you press 3 on the keypad, the phone will announce ‘three’.
Also, when you receive a call, the phone will announce the
telephone number of the incoming call.
Profiles
23
Adjust ringtone volume
Menu/OK Profiles
Alert Volume
OR use the short key to access all the different functions
below.
You can set the alert level from 0 to 9 :
Incoming ringtone: to set the incoming call ringer volume.
Message ringtone: to set the ringtone volume when you receive
a new message.
Alarm ringtone: to set the ringtone volume for the alarm.
Speaker volume: to set the speakerphone volume level.
Handset volume: to set the handset call volume level.
Power ringtone: to set the volume of the animation when you
turn the phone on and off.
Talking keypad: to set the volume level of the ‘talking keypad’.
NOTE : Use Left ( ) / Right ( ) keys to set the volume to your
preferred level, then press to confirm.
NOTE : Level 0 sets the volume to OFF.
During a call: Press the and keys to change the
handset volume, or (in Speakerphone mode) the speaker volume.
Other alert rings.
Menu/OK Profiles other alert rings
Battery low alert: when the battery is low, the phone will sound
a ‘beep’ alarm alert during 30 seconds and message every 10
minutes.
Outgoing call
1. Dial the number using the numeric keypad. The display will show
the number as you press each numeric key. If you press an
incorrect number, use the (Call log / Backspace / Delete)
key to delete it.
Using the telephone

24
2. Pick up the handset, OR for a handfree speakerphone call, press
SPK key .
3. The phone will dial the telephone number you entered in step 1.
OR
Pick up the handset OR press the SPK key , then dial
the number you want to call using the numeric keypad.
NOTE:
When dialing a number, you can put the handset back on to the
cradle, or press the SPK key again to end dialing.
Asterisk key
*
While composing a message or editing a contact entry name,press
the asterisk key * to insert one or more symbols. Then use the
navigation keys to move to the symbols you want to insert.
To edit a telephone number, press the asterisk * key to insert special
digits (e.g * / + / P (pause) / W).
To place an international call you need to press + before the country
code. Simply, press
*
key twice.
Some foreign telephone networks have extension lines that can not
be dialled as dial-through, but need to be entered by the keypad.
To dial these directly, press
*
quickly three times in a row after
the telephone number. The p character will appear and then you
can enter the extension.
Hash Key #
Press to switch between different input modes (Capital, digit or
minuscul) while composing a text message or editing a contact
name.
25
Incoming call & answering a call
When there is an incoming call,
the phone will announce the
callers’ phone number (if the
Talking CID is activated).The
ringer will sound and the WHITE
visual ring indicator LED will flash.
* Go to Menu/OK
Profiles
Ring Settings
Talking
CID to enable Talking CID function.
* Go to Menu/OK
Settings
Led switch to turn the
visual ring indicator LED on or off.
To answer a call
1. To answer a call, lift the handset, or to take the call handsfree
via the speakerphone, press the SPK key.
2. To adjust the volume of the call, press the or keys.
To end a call
1. To end the call, replace the handset on cradle or press the
again.
Dial from Contacts
Menu/OK Contacts or left short key
Use the Up and Down keys to select the desired
contact number to call, or enter the first characters of your
contact’s name.
For example, press the key 3 one time for one contact starts by D.
Pick up the handset, or for a handsfree speakerphone call, press
SPK key .
Speed dial
You can assign telephone numbers to keys 2 to 9 on the numeric
keypad. This provides a quick and easy way to dial regularly used
telephone numbers. E.g., to dial a telephone number that is saved
Using the telephone
26
in key 2, press and hold key 2. The phone will then dial the number
that is stored in key 2.
To store a speed dial key,go to page31(Store a telephone number
in Speed dial).
Photo key dialing
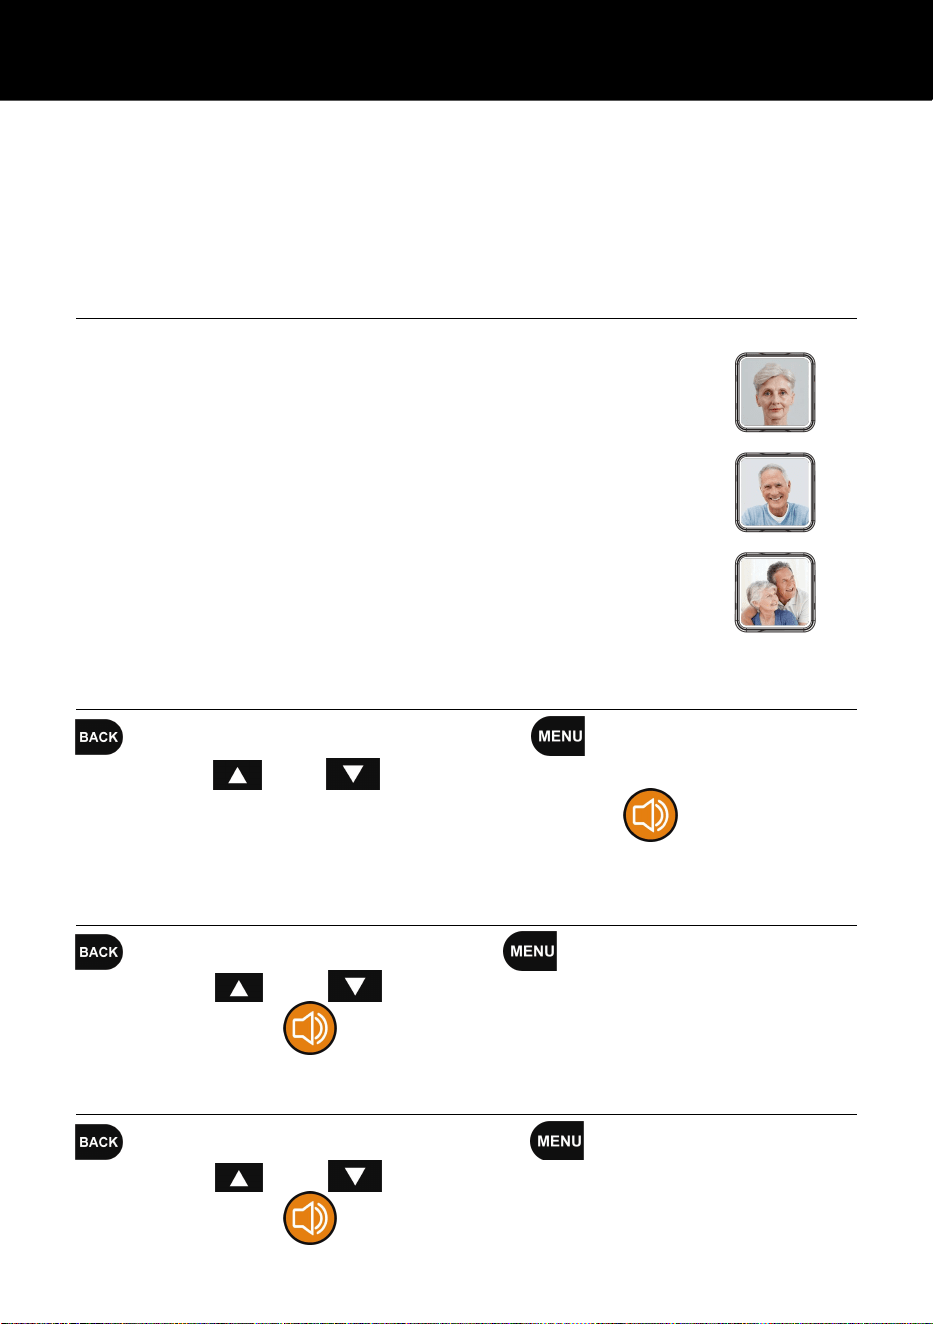
You can assign telephone numbers to the Photo
dialling keys (M1-M3). To make a call, press and hold
the Photo key (NOTE:you do not need to lift the
handset from the cradle, or press the speakerphone
key). The phone will dial the number that is stored in
Photo keys memory.
To store a telephone number into a Photo dialling
key (M1 - M3), go to page 31 (Store number in
Speed dial or Photo key).
Dialing a Number from the Redial
List
(Call logs) Outgoing calls
Press the or keys to select the number that have
been dialed (Outgoing calls), then press SPK key, or pick up
handset.
Dialing a Number from the Missed Calls List
(Call logs) Missed calls
Press the or keys to show and find your contact,
then press SPK key, or pick up handset.
Dialing a Number from the Received Call List
(Call logs) Received calls .
Press the or keys to show and find your contact,
then press SPK key, or pick up handset.
Using the telephone
27
Muting the Microphone
During a conversation, you can temporarily switch your phone's
microphone off. The other party will not be able to hear you.
To mute your microphone, setting by the right menu. The
microphone is now muted. The message ‘Mute’ is shown on the
display.
To unmute your microphone, setting by the right menu again.
You can resume your conversation with the other caller.
Using the handset volume boost
You can increase the volume of the handset earpiece to your
hearing requirements. To make the callers voice louder, press the
volume boost button - this will amplify the call by 40 decibels.
When the function is activated, the boost icon is shown on the
display.
CAUTION : Exposure to high (loud) sound levels can damage
hearing. Gradually adjust the volume to a level that is comfortable.
The handset volume boost function is not intended for people with
normal hearing. Always set the volume control to the MINIMUM
setting after using the phone.
Using your Phone with hearing aids
This phone is hearing aid compatible (HAC). It can be used with
hearing aids that have a telecoil (T-coil) setting or program.To hear
the call through your hearing aid, switch (or press) your hearing
aid to the T position / setting. For best performance, position the
handset earpiece close to your hearing aid.
NOTE: Not all hearing aids have a telecoil, or it may not be enabled.
Consult your audilogist or hearing care professional for further
advice. Also see hearing aid compatibility on page 49.
Using the telephone
28
Hands-free (Speakerphone)
During a call, you can transfer the callers’ voice from the handset
earpiece to the speakerphone.This allows hands-free conversation.
To turns on the speakerphone, press the key during a
call, then replace the handset on the cradle.
To turns off the speakerphone, pick up the handset, to continue
the conversation via the handset.
Adjusting the Speakerphone Volume
To adjust the speakerphone volume (in speakerphone mode) press
the or keys to increase or decrease the volume.
Tone Response
When the boost is activated during a call, you can use key
to change the tone response (Bass, Normal or Treble).
Contacts
Telephone numbers and names can be stored in Phone book. The
information is stored on the SIM and in the phones memory.It allows
you to store frequently used numbers so that you can easily make
a call without having to remember or enter the telephone number.
You can search and recall numbers in order to make a call, send
a message, or store an entry for use as an emergency contact.
The phone book can contain at least 500 entries. If you try to add
a new entry when the memory is full, a warning message is
displayed. You will need to delete an existing entry in order to add
a new telephone number. Contacts saved on the SIM card are
indicated by the Saving contacts to the SIM card makes it is
easy to transfer the information to another device.
Phonebook
29
Create a Phone Book Entry
1. Menu Contacts Options New
2. OK SIM or Phone, then press .
3. On Name, press , to select Edit.
Create a name(15 characters maximum)
for the Phonebook Entry using the
numeric keypad, then press to
confirm your name.
4. Press the key to select Number, then press . Enter
a number (20 digits maximum) for the phonebook entry, then
press to confirm your number.
5. Press the key to select Default Ringtones, then press
OK , select EDIT then press . Select a ringtone in
select phone ringtones from the list of the ringtone available.
You can choose to select from sound files or talking name to
assign an audio file name for the contact.
6. Press the key, then press the key to select SAVE,
then press to confirm.
The numeric keypad also has characters (ABC etc.) printed on the
keys. These characters are for entering text for phonebook entry
names, writing SMS texts, and searching for an entry in the
phonebook.
Press each key the relevant number of times to get the letter
required. For example, for the letter J, press the 5 key once. For
get the letter S, press the 7 key four times in quick succession.
To select the next letter, pause for a second and the cursor will
appear | after the last letter you entered. You may now enter the
next letter. Use the # key to switch between CAPITAL and lowercase
letters. The type of writing is shown on the display. Use the UP
arrow key or DOWN arrow keys to select the input mode, then
Phonebook
30
press to confirm.
To insert an extra space between characters, press 0.
Press the CLEAR (Backspace) key to delete the last
character typed in (while entering a number or a name). Press and
hold the CLEAR(Backspace) soft key to clear the entire row.
View Contacts Entries
1. Menu Contacts Menu or press the short key
to access at the contact list.
2. Use and to scroll through the list until you find
the desired contact, or search for a contact in the phonebook
via an alphabetic search. Simply. Type the first character of
their name to automatically access the relevant part of the
phonebook.
Options within Contacts
1. Menu
Contacts
or press the short key to
access the contact list.
2. Use the and keys to scroll through the list until
you find the desired contact.
3. Press the OK soft key ( ).
4. Options available are as follows:
Call (to call the contact)
Details (to check the contact informations)
New (to add a new contact)
Speed dial or Pictures (to add or check an contact in speed
dial or pictures key)
Delete (delete one contact in the phonebook)
Delete Multiple (delete all the contact of the phonebook)
31
Write Message (to write and message)
Copy contact (to copy the contact in the SIM or Phone memory)
Memory status (to inform you on the place available in the
different memory)
Store number in Speed dial or Photo key
To store a telephone number in Speed dial or Photo key memory,
follow these steps:
1. Menu/OK Contacts Options soft key.
2. Select Speed dial or Pictures, then press to enter the
option items list: M1, M2, M3(3 Photo keys), 2 to 9 (Speed dial
keys), Use the and keys to select either 2 to 9, M1,
M2, M3.
3. Press
Edit
enter the telephone number, then press
.
4. Press Exit .
NOTE: You can assign a speed dial number to a phonebook entry.
This means you can dial a number very easily by pressing the
associated number.
1. Menu/OK
Contacts
Options soft key
Speed dial or Pictures
2. Select either 2 to 9, OR M1, M2, M3.
3. Press OK
Edit
Contacts
4. Use the and keys to select your contact.
5. Press , you can see the phone number, if OK, press to
confirm.
6. Press Exit .
Phonebook
32
Message (SMS)
Menu
Message
Menu
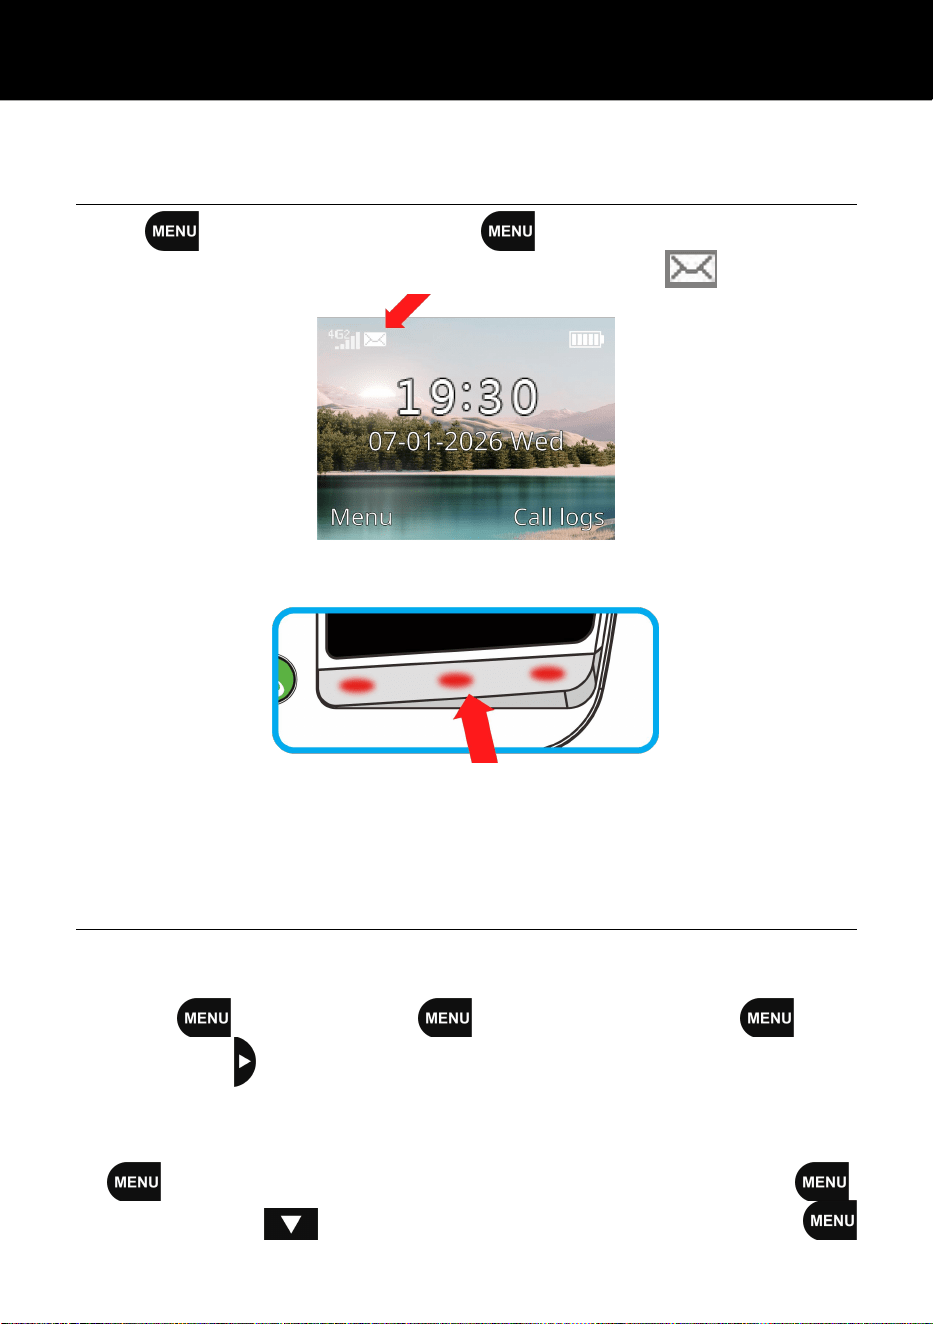
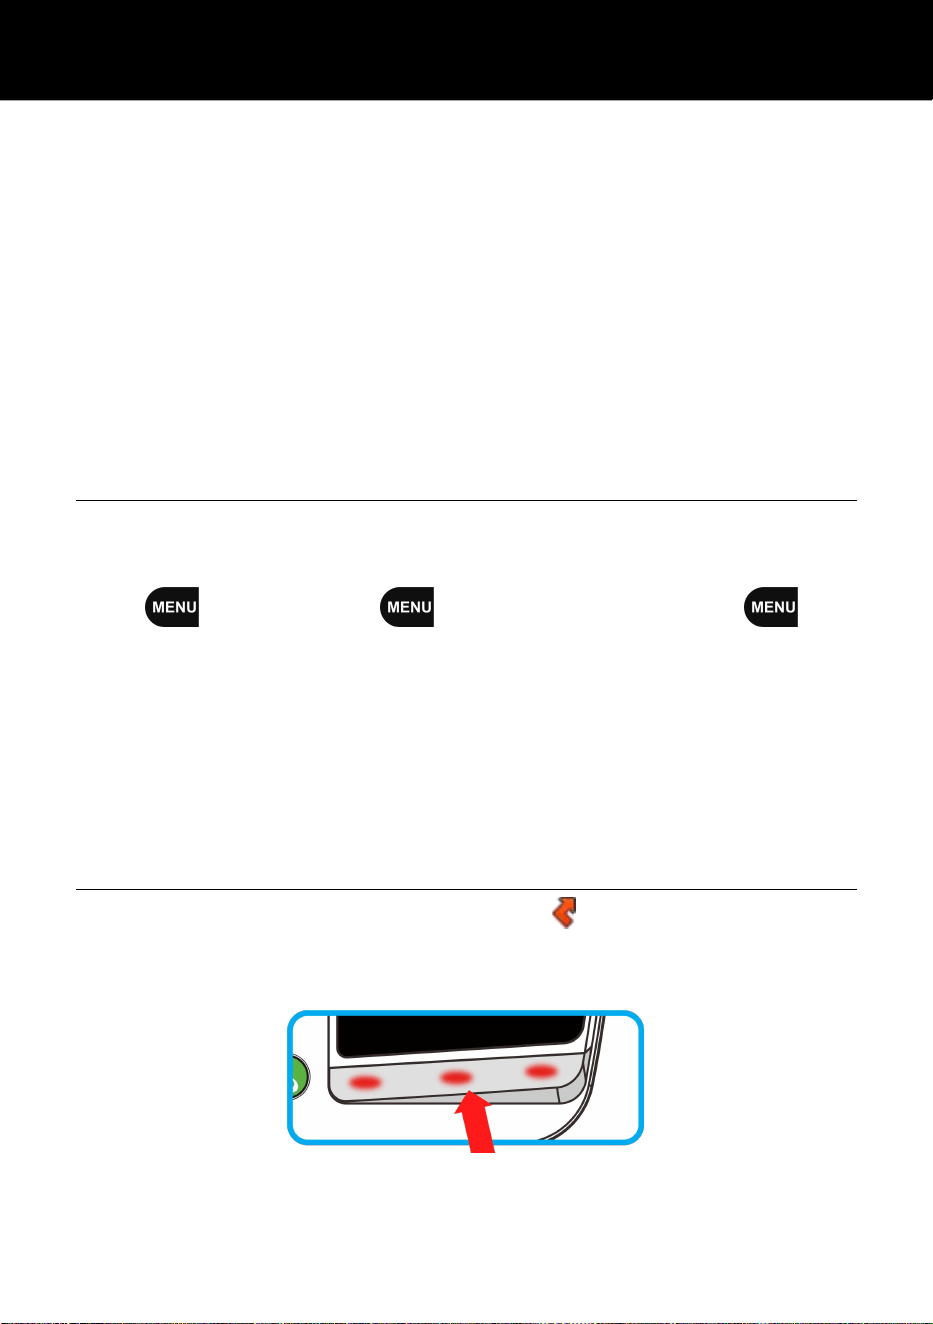
If you receive an SMS message, an envelope icon will appear
on the display.
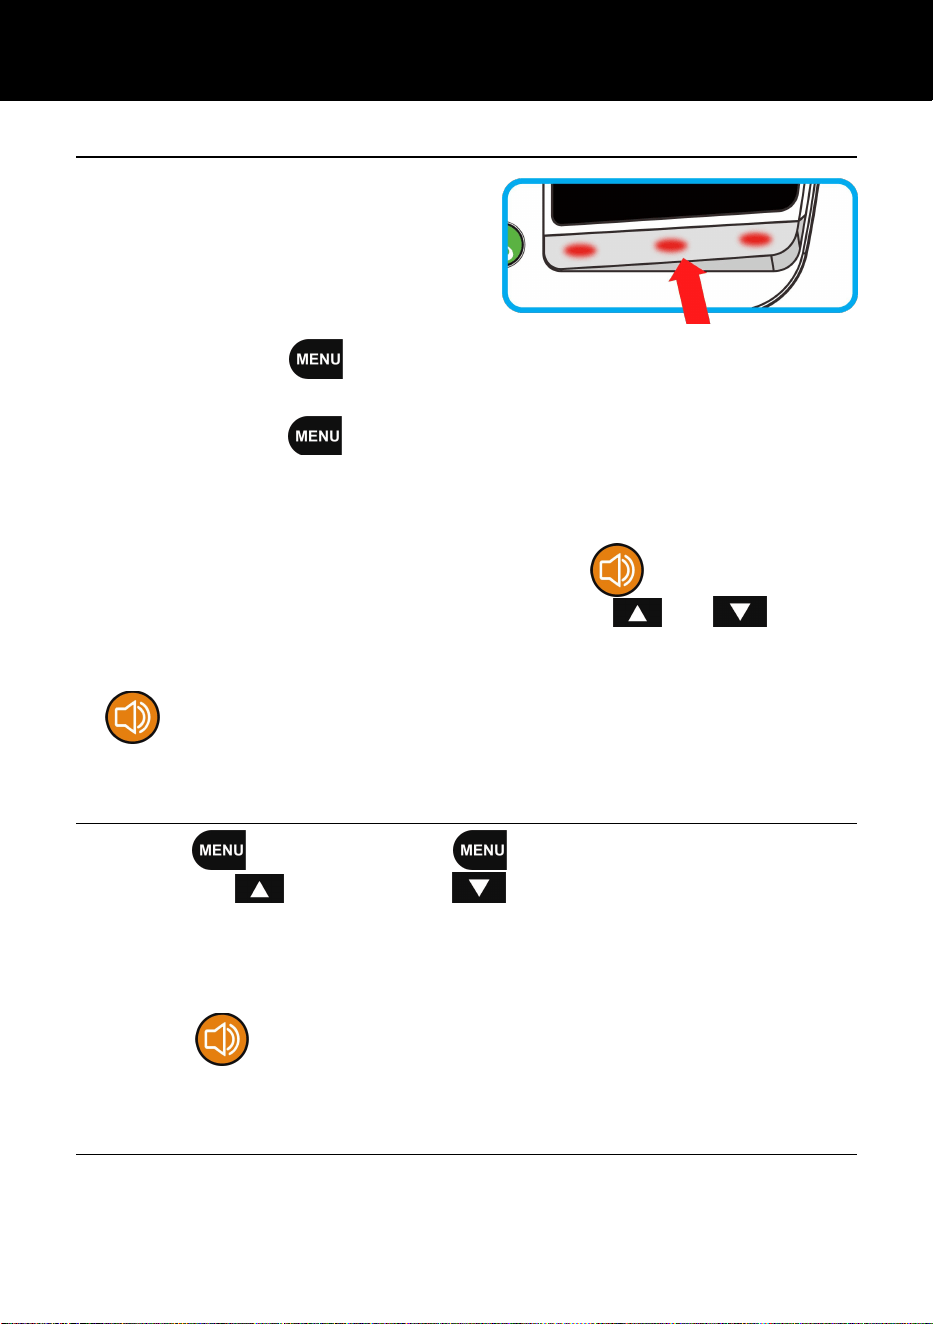
The New message RED LED will also flash (locate in the centre
of the ringer lens).
NOTE : The envelope icon on the display and the flashing (new
message)LED will continue to show until all the new SMS messages
are read.
Send a Text Message
A text message (from this phone) can contain up to 160 characters
(includes spaces).
1. Menu
Message
Write Message
or
press the short key, then select Write message.
2. Write your text message (See text entry at Page 29: Create a
Phone Book Entry).
3. Number Enter Number with the keypad, or press ,
then use the key to select Contacts, then press the
key.
SMS
33
4. Use the and keys to select your contact, then press
Options, select Mark for only one contact or select Mark all to
select all contacts, then press the key.
5. Send
Receiving a Text Message
On receiving a text message, an alert tone will be audible. An
envelop icon and the message ‘1 New message’ will appear
on the display.
1. To read the message, press the key to display the message.
2. Press the key to see all the options available for the
selected text message.
3. These options include:
Delete, Reply, Forward, Call, Move(to save the message in the
SIM or Phone memory), Add sender to(to record your contact
in your phonebook), Details(date & hour of the message)
Reviewing Stored Text Messages (Inbox)
1. Menu Message Inbox or press the
short key, then select Inbox.
2. Scroll to the message you wish to review.
3. Press Options View to view the message.
These functions are also available:
Delete, Reply, Forward, Call, Move(to save the message in the
SIM or Phone memory), Add sender to(to record your contact
in your phonebook), Details(date & hour of the message)
SMS
34
Sentbox
The Sentbox stores sent and saved messages.
1. Menu Message Sentbox or press the
short key, then select Outbox
2. Scroll to the message you wish to review.
3. Press the key to see all the options for the selected text
message.
4. These options include:
View, Delete, Delete All, Forward.
Drafts
The draft box stores messages that you have saved but not yet
sent. You can now choose to send the message, resume editing it
or delete it.
1. Menu Message Draft or press the short
key, then select Drafts.
2. Scroll to the message you wish to review.
3. Press the key to see all the options for the selected text
message.
4. These options include: Delete, Delete All and Edit.
Delete one or Delete all SMS
You can delete messages in the Inbox, Outbox, Drafts or Sentbox
Messages.
1. Menu
Message or press the short key.
2. Select either Inbox, Drafts, Outbox or Sentbox then
OK.
SMS
35
3. Press the key, then select
Delete or Delete All
then to confirm.
Templates
You can access a list of pre-written short messages. (for example:
Please call me!).
You can add your own short message to the list as below:
1. Menu Message Templates or press the
short key, then select Templates
2. Scroll down until you see “Empty” and then press the key.
3. Enter your message, then press the key to save your
new message.
Broadcast Messages
This telephone supports broadcast information messages from
your mobile network service provider.
Menu Message Broadcast Messages
Settings
Broadcast message or Channel settings
or Select Languages
You can select whether to receive these messages, the language
of the message and channel setting.
SMS Settings
Mobile Network Service Providers, or their service centres,
sometimes send SMS information messages to customers. To
receive these messages, this telephone must have the telephone
number of the service centre programmed into memory. Usually,
SMS
SMS
36
this will have already been set up by your Mobile Network Service
provider.
There are many options to store the messages on to the SIM card
or Phone memory. For other settings, please consult your Mobile
Network Service provider.
You can find the information:
Message Center, SMS validity period, Status report,
Reply path, Preferred storage.
Message Capacity
You can find the number of Message registered in SIM or Phone
memory.
Menu
Message
Messages capacity
SIM 1/50 : 1 message in SIM memory on 50 maximum
Phone 6/200 : 6 messages in Phone memory on 200 maximum
Note: when the number is at the máximum, you should delete the
SMS to delivery more place.
Missed Calls (Call logs)
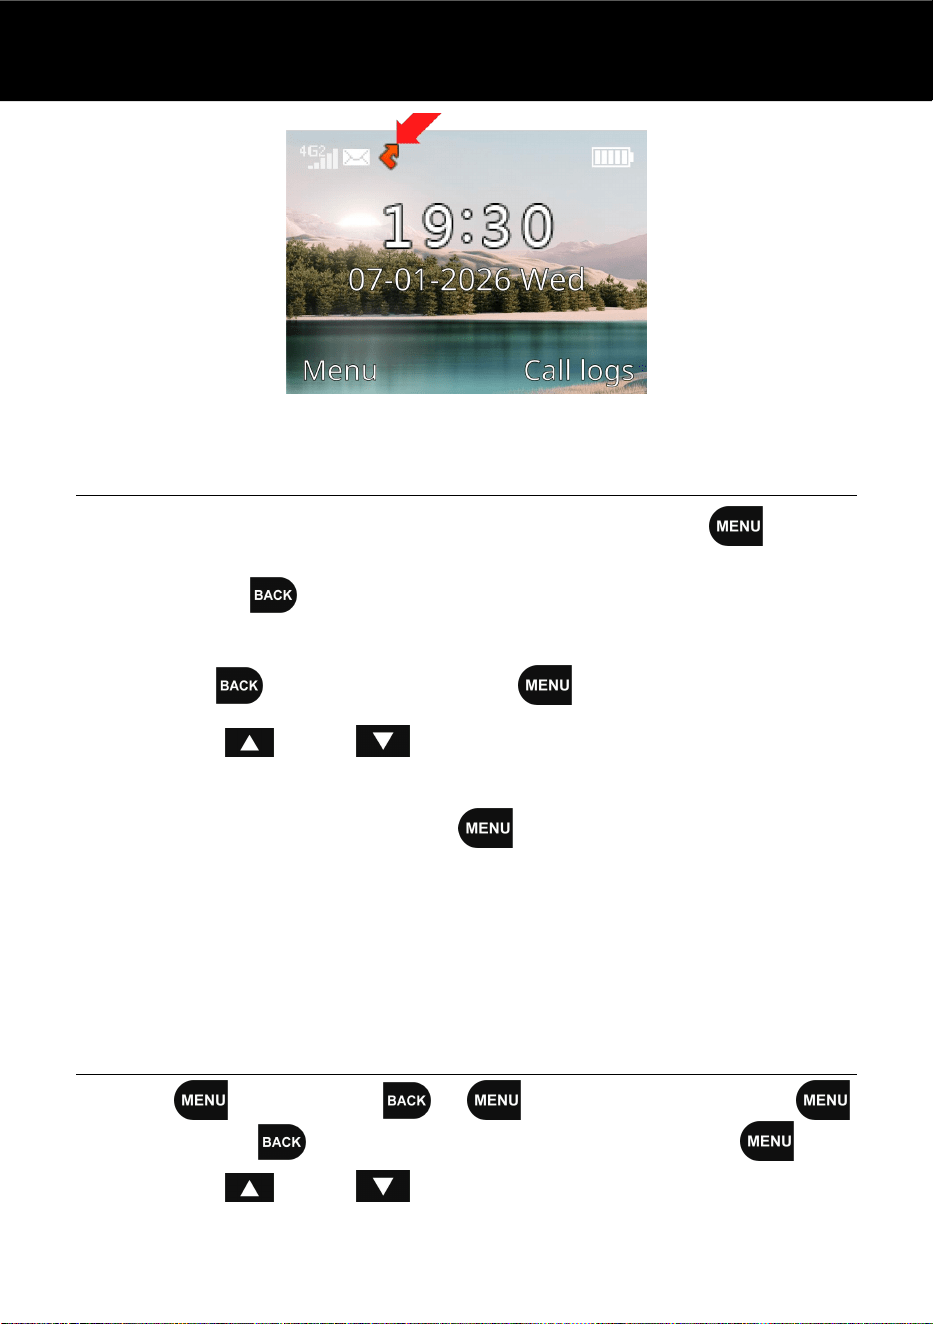
If you have missed calls, the Miss call icon and the message
‘1 Missed Call’ will appear on the display. The New Message/Call
RED LED on the visual ringer will also flash.
Call Record
37
Display Missed Calls
To display missed calls, press the soft key Details ( ) key to
view date, time and phone number of the missed call, or press the
soft key Exit ( ) to exit. You can also review missed calls via
the menu as follows.
1. Call logs Missed Calls .
2. Use the and keys to scroll through the list until
you find the desired contact.
3. Press the soft key Options ( ), the following are available
for the missed call entry:
Details, Call, Write Message, Add to Contacts,
Add to Blacklist, Delete, Delete All
Display Outgoing Calls
1. Menu Call logs Outgoing Calls ,
or press the key then select Outgoing Calls .
2. Use the and keys to scroll through the list until
you find the desired contact.
Call Record
38
3. Press the soft key Options ( ), the following options are
available for outgoing call entry:
Details, Call, Write Message, Add to Contacts,
Add to Blacklist, Delete, Delete All
Display Received Calls
1. Menu
Call logs
Received Calls
, or press the key then select Received Calls
.
2. Use the and keys to scroll through the list until
you find the desired contact.
3. Press the soft key Options ( ), the following options are
available for display received calls:
Details, Call, Write Message, Add to Contacts,
Save to Phonebook, Add to Blacklist, Delete, Delete All
Delete All
1. Call logs Delete all Delete all? or press the
key and select Delete all .
2. Press the key, all calls stored in the call logs will be deleted.
Call duration
Menu Call logs Call duration
This allow you to check the duration of the last call, including
received calls and outgoing calls.
39
Application
The phone has applications including an alarm,timer and Bluetooth
®
.
1. Alarm
You can set or add an alarm. Up to 5 alarms are available.
- Menu
Application
Alarm
- Press Menu to select Options then press Menu to
select ADD.
- Alarm 1 is displayed, you can custom the name of the alarm
in pressing , Press to select EDIT.
- Use key to delete an character. Use the keypad to enter
your name.
- Press key to display the hour of your alarm, enter the
hour in using the digits of the keypad.
- Press key to display Ringtone, press to select
Options, press then use the and keys to
select the desired ringtone. Press to valid.
- Press key to display Repeat mode. press to select
Options, press to select Edit then use the and
keys to select the desired Repeat mode (Once or Daily).
- Press to valid.
- Press to select Options then press the digit 2 to save.
When your Alarm is activated, the “Alarm” icon will appear
on the display.
Application
40
2. Timer
Menu Application Timer
A Countdown timer is available, Press Options ( ) Start
to start the counter.
It is possible to stop or pause the countdown sequence once it
is started. Press the soft key to stop the counter, then
press the key again 2 times to restart.
To make an reset,press then select RESET and press
.
3. Bluetooth
®
(a) Activate the Bluetooth
®
mode
Menu Application Bluetooth
®
The phone can be used with a wireless Bluetooth
®
headset.
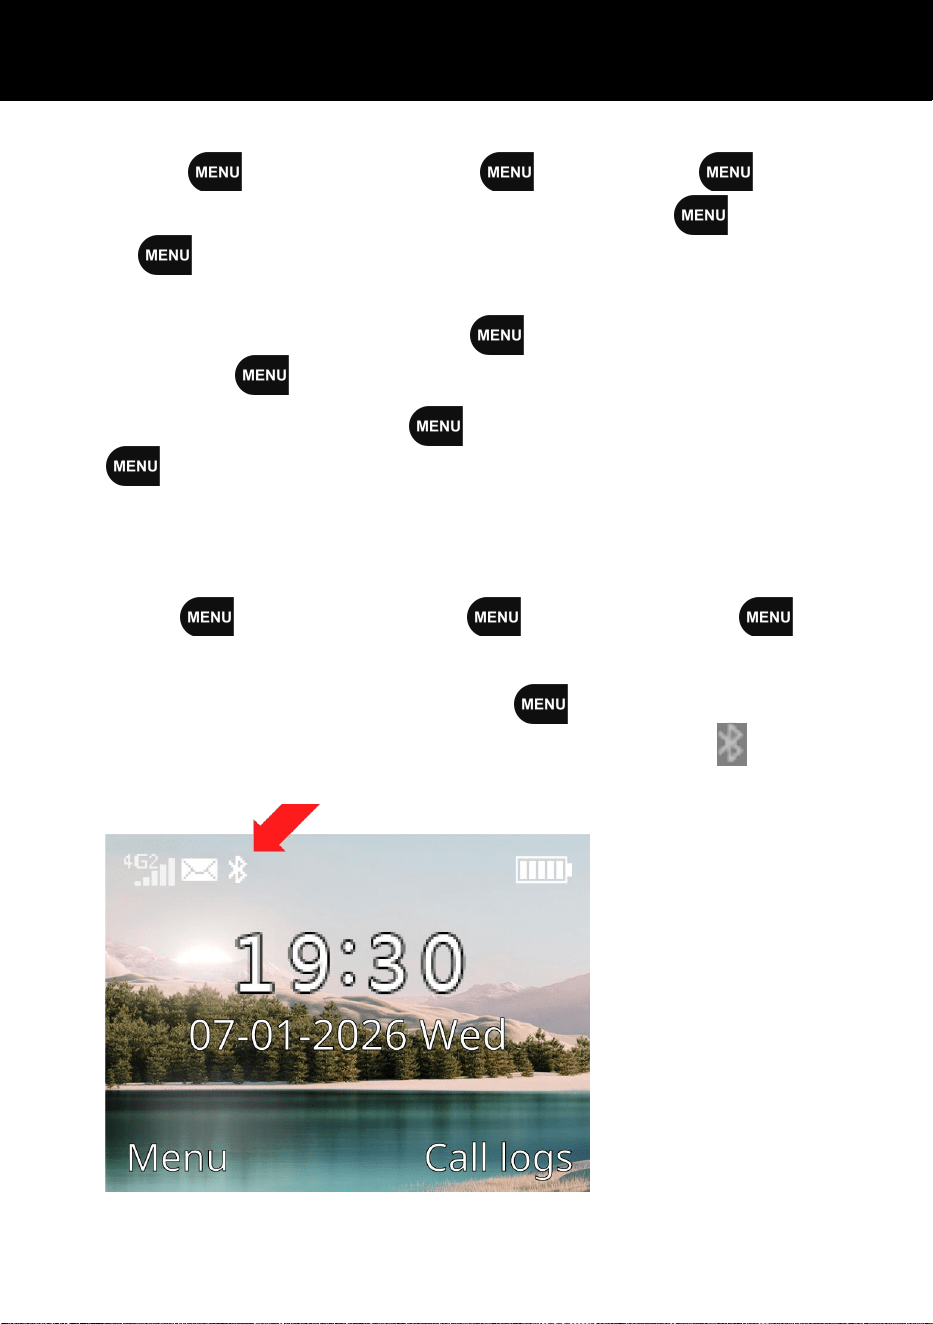
To activate the Bluetooth
®
press to select Activate, one
bar is added in the square and the Bluetooth
®
icon appears
on the display when Bluetooth
®
is ON.
Application
41
(b) Activate the Bluetooth
®
mode
Menu Application Bluetooth
®
Paired device
Add a new device
Put your device in pairing mode then after Select this device
and press short key Pair to pair.
Record your own ringtone or voice name
Menu
Name Recorder
User can record your own files (up to 5 max) in the phone memory
and assign it for Contacts ring tone.
After you record your files, go to Contact then press .
1. Use the and keys to select the desired contact
(doesn’t work with the SIM contacts) then press “Options”
softkey.
2. Press key to select “Details” then press key.
3. Press “Options” softkey, select EDIT then press key.
4. Press key to select “Default Ringtones” then press
key.
5. Select EDIT in pressing key.
6. Press key to select “Select from soundfiles” then
press key.
7. Use and key to assign the sound file for your
contact then press Options softkey, select OK then press
key to valid.
8. Press Options softkey, select SAVE and press key.
9. Press to exit.
Application
42
Using the SOS Function in an Emergency
In an emergency, press the RED SOS button on the phone
for 3 seconds to start the SOS procedure.
Once you press the SOS button, the phone will send your stored
SOS message to the first emergency contact number stored then
the phone will dial the first emergency contact number and play
your stored voice message.
It is possible to store up to 5 emergency contact numbers in
mode SOS 5 numbers or 1 in Set call centre. The phone will dial
each number, one by one, automatically. If a contact number is busy
(engaged tone detected), or a call is aborted by user, the next
number on the list will be dialled. The phone will keep dialing these
numbers until the call is answered, and the receipent presses “0”
to accept the call.
Note: To stop the SOS mode, press the SOS button on the phone
again for 3 seconds.
SOS call type selection
Menu SOS Settings
Select the type of SOS call in using
the and keys to
select “SOS 5 numbers” or
“Set call
centre” then press the
key to valid.
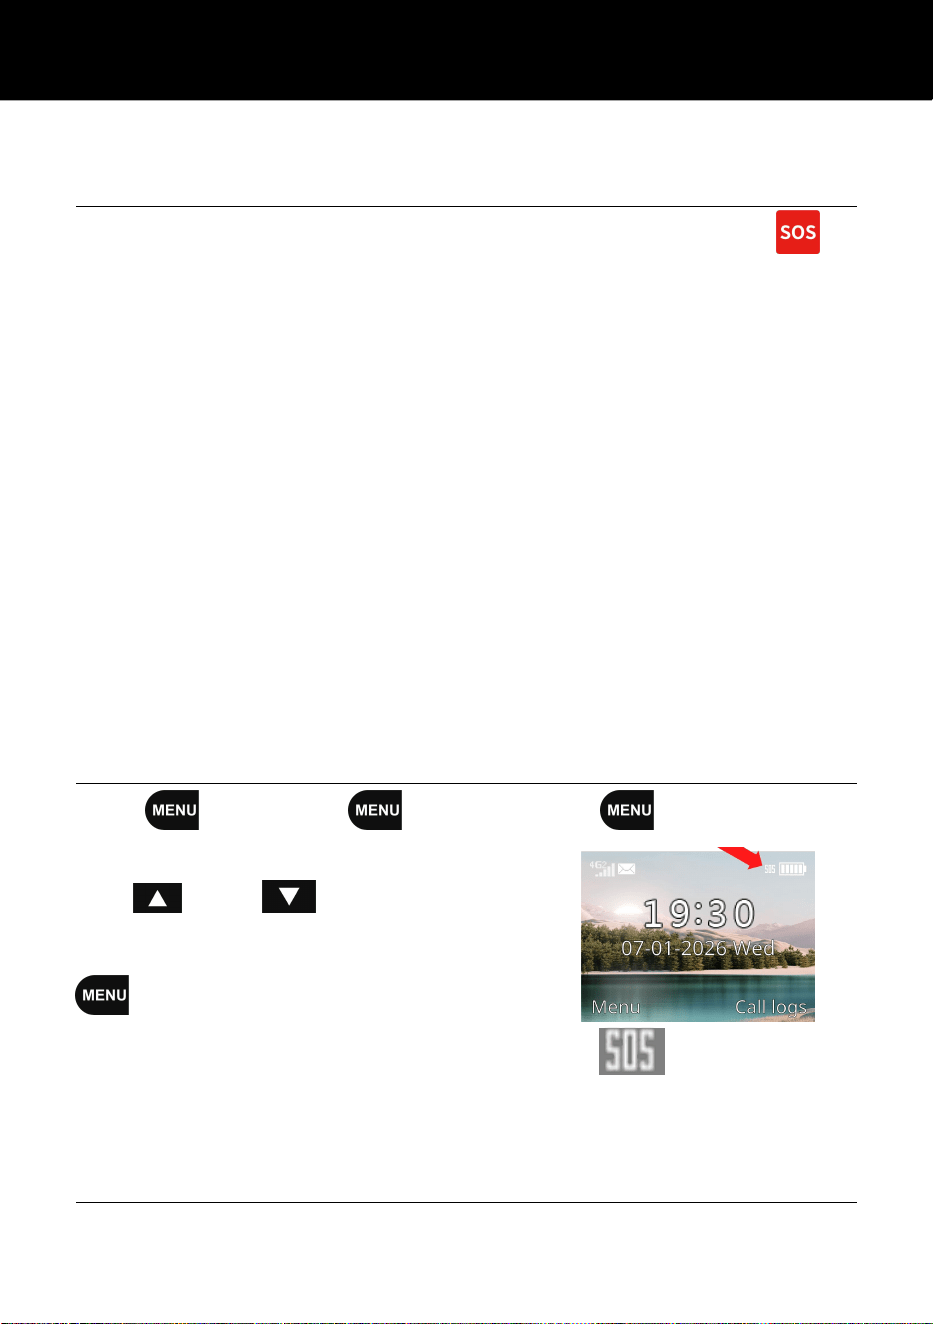
When SOS is activated, the “SOS” icon will appear on
the display.
SOS Emergency Contact Number Settings
You can set up to 5 SOS emergency contact numbers, or set a
number for a call centre.
SOS
43
1. Menu SOS SOS number Select an SOS
number from 1 to 5 Enter the SOS number using the numeric
keypad, then confirm by pressing the key. (Enter an
emergency contact number/s that you’d like the phone to call
at a time of emergency). or
2. Menu
SOS
Call center number
Enter the
call centre number using the numeric keypad, then confirm by
pressing the key. (if you want to make an SOS call to
Emergency call centre, you need to activate “Set call centre”
in SOS
Mode
Set call centre
OK).
SOS Message Record
You can record an informative message that will assist your helpers
in an emergency e.g."This is an emergency call, to accept this
call, press 0”.
NOTE: It is very important you include ‘to accept this call, press0’
in your message.
Menu
SOS
Outgoing voice
Personal Recorder, Press the key to start the
recording. When you finish the recording, press key to
SAVE the message (the message can be up to 20 seconds long).
You can listen to your message in select “PLAY”.
If you prefer the factory default message, select “DEFAULT”
instead of Personal.
Menu SOS Outgoing voice
Default
SOS Text Message
You can enter you own SOS text message. This will be sent to the
mobile phone emergency contact number on your list.
Menu
SOS
SOS message
Type an
informative text message
then press the key.
SOS
44
You can use key to delete a character.
Set Alarm volume
You can set the alert level from 0 to 6.
NOTE: Level 0 sets the SOS volume alarm to OFF.
Menu SOS Set Alarm Vol Press the
and keys to change the SOS volume alarm then press
the to confirm your choice.
+40dB handset amplification receiver volume with LED indicato
Main feature:
4G LTE FDD B2 / 4 / 5 / 7 / 1 2 / 13 / 17 / 66
3G - WCDMA: BII / BIV / BV
2G - 8 5 0 / 1900
NANO SIM socket
3 x Photo keys
Talking keypad / caller ID (talking number/user recordable)
User recordable SOS message
500 phone book memory
90dB Loud ringer
User changeable ringtone
r
button
3.5inch Color LCD, 240x320 Pixels
12 LCD display languages ( English / French / German / Spanish
/ Portuguese / Arabic / Dutch / Italian / Hebrew / Russian /
Polish / Czech )
80 call logs (time/day of call)
200 SMS messages
Real time clock (12/24 Hrs. display)
New call indication: LED and icon
Technical specifications
Features
SOS

45
Caller ID memory call back
2-way speakerphone with LED indication
Last Number Redial
Ringer indicator (WHITE LED)
Hearing aid compatibility (ETS300381 preferred range)
Bluetooth
®V5.0
(supports Bluetooth
®
headset)
Desk top and Wall mountable
3.5mm audio in out socket (to connect voice to text)
Telephone cannot be switched on
Check the battery is inserted, and that it is inserted correctly.
Check the power adaptor is plugged in.
Nothing appears on the display
Check the phone is switched on.
Check the battery and SIM are inserted correctly.
Check that the power adaptor is plugged in.
Display is locked when the telephone is switched on
Enter the PUK to unlock the SIM.
No Service is displayed
There is no network connection. Move the phone to a location
where there is better coverage (stronger signal).
Contact your mobile network service provider.
Message to say that a function is not possible
Your mobile network service provider might not provide this
function, or you may need to subscribe to that service. Contact
your network service provider.
No display during the charging process
The battery charge is very low. Wait a few minutes.
“Insert Sim” or “Limited Service” message is displayed
Ensure the SIM card is inserted correctly.

46
The battery is discharged quickly or cannot be charged
at all.
Charge the battery for 4 hours.
Failure to link to the network
The signal is too weak, or there may be some radio interference.
Is the SIM card installed incorrectly or damaged? If the SIM card
is damaged, please ask your mobile network service provider for
a replacement.
Cannot make a Call
Check that payment is up to date with your mobile network
service provider or that you are not out of contract.
Check that the SIM card is valid.
Ensure you have pressed the button.
Check that the SIM card registered to the network?
Check if the ‘bar outgoing calls’ feature is enabled? (P17)
There may be a problem with the network, call your mobile
network service provider.
Cannot answer a call:
Check that payment is up to date with your mobile network
service provider or that you are not out of contract.
Check that the SIM card is valid.
Is the bar incoming calls feature enabled? (P17)
Is the call diverting function enabled? (P16)
No audible ringer
Make sure the ringer is not set on low position. (P21)
Make sure that the phone is not in Silence mode . (P14)
No handset amplification
Check if the Amplify function is "On". (P19)
Noise, Static, Interference while using the handset
Troubleshooting
Troubleshooting

47
Check that you have a correct network in checking the number
of barr.
Move the phone awary from others electronic equipment or to a
different location.
Caller ID information does not show
You may need to subscribe or enable this service with your
mobile network service provider. The caller may have withheld
their details.
General
Only use the power supply included with this product.
Only use the approved rechargeable battery supplied.
Do not open the phone, handset, or SOS remote bracelet (except
to replace the handset batteries or SIM) or base. Contact the
helpline for all repairs.
Never dispose of batteries in a fire. There is a serious risk of
explosion and / or release of toxic fumes and chemicals.
Remove the battery in the phone if you are not going to use it for
over a month.
Cleaning
Clean the telephone with a soft cloth. Never use polishes or cleaning
agents - they could damage the finish or the electrics inside.
Environmental
Do not expose to direct sunlight.
Always ensure there is a free flow of air over the surfaces of the
telephone.
Do not place any part of your product in water and do not use it in
damp or humid conditions e.g., bathrooms.
Do not expose your product to fire or other hazardous conditions.
Safety information

48
Unplug your phone from the telephone socket during thunderstorms
because it could damage your telephone. Your guarantee does not
cover thunderstorm damage.
The telephone is designed for working within a temperature range
of 5
o
C to 45
o
C.
Usage
In summary, read these simple guidelines. Not following them may
be dangerous or illegal.
SWITCH ON SAFELY
Do not switch on the telephone or use the SOS remote bracelet in
areas where wireless devices are prohibited (for example in
hospitals, near medical equipment, or on aircraft) where it may
cause interference or danger.
ROAD SAFETY COMES FIRST
Obey all local laws. Always keep your hands free to operate the
vehicle while driving. Your first consideration while driving should
be road safety.
INTERFERENCE
All wireless devices may be susceptible to interference. This
could affect performance.
SWITCH OFF IN HOSPITALS
Follow any restrictions. Switch the device off near medical
equipment.
SWITCH OFF IN AIRCRAFT
Follow any restrictions. Wireless devices can cause interference in
aircraft.
SWITCH OFF WHEN REFUELLING
Safety information

49
Do not use the device at a refuelling point. Do not use near fuel or
chemicals.
SWITCH OFF NEAR BLASTING
Follow any restrictions. Do not use the device where blasting is in
progress.
Hearing Aid Compatibility

50
You need to use a wireless network service provider in order to
make and receive calls, send and receive text messages and use
the SOS function of this phone. Many of the features of this phone
depend a wireless network to function. These services may not be
available on all networks, or you may have to make specific
arrangements with your service provider before you can utilize
network services. Your service provider may need to give you
additional instructions for their use and explain what charges will
apply. Some networks may have limitations that affect how you
can use network services. For instance, some networks may not
support all language-dependent characters and services.
Your wireless network service provider may have requested that
certain features be disabled or not activated in your device. If so,
they will not appear on your device menu. Your device may also
have been specially configured. This configuration may include
changes in menu names, menu order and icons. Contact your
service provider for more information.
From the moment your Geemarc CL9100 is purchased, Geemarc
guarantee it for the period of two years. During this time, all repairs
or replacements (at our discretion) are free of charge. Should you
experience a problem then contact our help line or visit our website
at www.geemarc.com. The guarantee does not cover accidents,
negligence or breakages to any parts. The product must not be
tampered with or taken apart by anyone who is not an authorized
Geemarc representative. The Geemarc guarantee in no way limits
your legal rights.
IMPORTANT: YOUR RECEIPT IS PART OF YOUR GUARANTEE
AND MUST BE RETAINED AND PRODUCED IN THE EVENT OF
A WARRANTY CLAIM.
Network services

51
Please note: The guarantee applies to the
United Kingdom only
DECLARATION: Geemarc Telecom SA hereby declares that this
CL9100 is in compliance with the essential requirements and other
relevant provisions of the Radio Equipment Directive 2014/53/UE.
The CE and UKCA declarations of conformity may be consulted
at www.geemarc.com.
Electrical connection: The apparatus is designed to operate
from a 230V 50Hz supply only. (Classified as ‘hazardous voltage’
according to EN62368-1 standard). The apparatus does not
incorporate an integral power on/off switch. To disconnect the
power, either switch off supply at the mains power socket or unplug
the AC adaptor. When installing the apparatus, ensure that the
mains power socket is readily accessible.
The WEEE (Waste Electrical and Electronic Equipment) directive
ensures that electrical products at the end of their useful life are
disposed and recycled in an appropriate way that protects the
environment.
When this product is finished with, please do not put it in your
domestic waste bin.
Please use one of the following disposal options:
- Deposit the product in an appropriate WEEE skip (contact you
SAR Test:
Body : 1.318 W/kg
r
local authority to find out where these are).
- Or, hand the old product to the retailer. If you purchase a new one,
they should accept it.
If you respect these instructions, you ensure human health and
environmental protection.
Recycling directives

FCC Statement
This device complies with part 15 of the FCC rules. Operation is subject to the following two
conditions: (1) this device may not cause harmful interference, and (2) this device must accept
any interference received, including interference that may cause undesired operation.
Changes or modifications not expressly approved by the party responsible for compliance could
void the user's authority to operate the equipment.
NOTE: This equipment has been tested and found to comply with the limits for a Class B digital
device, pursuant to part 15 of the FCC Rules. These limits are designed to provide reasonable
protection against harmful interference in a residential installation. This equipment generates
uses and can radiate radio frequency energy and, if not installed and used in accordance with the
instructions, may cause harmful interference to radio communications. However, there is no
guarantee that interference will not occur in a particular installation. If this equipment does
cause harmful interference to radio or television reception, which can be determined by
turning the equipment off and on, the user is encouraged to try to correct the interference by
one or more of the following measures:
• Reorient or relocate the receiving antenna.
• Increase the separation between the equipment and receiver.
• Connect the equipment into an outlet on a circuit different from that to which the receiver is
connected.
• Consult the dealer or an experienced radio/TV technician for help.
The device has been evaluated to meet general RF exposure requirement. The device can be used
in portable exposure condition without restriction.
The device has been evaluated to meet general RF exposure requirement.
The device can be used in an uncontrolled environment without restriction.
This device meets the government's requirements for exposure to radio waves. The guidelines are based on
standards that were developed by independent scientific organizations through periodic and thorough evaluation of
scientific studies. The standards include a substantial safety margin designed to assure the safety of all persons
regardless of age or health. The SAR limit of USA (FCC) is 1.6 W/kg averaged. Device types: 4G Fixed Wireless Phone
(FCC ID: 2BX8A-FW519) has also been tested against this SAR limit. SAR information can be viewed on‐line at ?http:
//www.fcc.gov/oet/ea/fccid/. Please use the device FCC ID number for search. This device was tested simulation
typical 0mm to body. To maintain compliance with FCC RF exposure requirements, use accessories should maintain a
separation distance between the user's bodies mentioned above, use accessories should not contain metallic
components in its assembly, the use of accessories that do not satisfy these requirements may not comply with FCC
RF exposure requirements, and should be avoided.
52
For product support and help visit our website at
www.geemarc.com
E-mail : help@geemarc.com
Telephone : 01707 387602
Lines are open from 10:00-12:00 then 13:00-14:30 Mon. to Fri.
Parc de l’étoile, 2 rue Galilée, 59760 Grande-Synthe, France.
Made for Geemarc Telecom S.A. in China