USER
MANUAL
ANC Wireless Earbuds
QCY MeloBuds N70
For more languages, please visit
https://www.qcy.com/pages/support-center
BENUTZERHANDBUCH
MANUALE UTENTE
MANUEL D’UTILISATION
MANUAL DEL USUARIO
MANUAL DO USUÁRIO
РУКОВОДСТВО ПОЛЬЗОВАТЕЛЯ
INSTRUKCJA OBSŁUGI
Kullanım Kılavuzu
ΕΓΧΕΙΡΙΔΙΟ ΧΡΗΣΤΗ
PANDUAN PENGGUNA
คู่มือผู้ใช้
使用手冊
ユーザーマニュアル
사용자 설명서

CONTENTS
APP DOWNLOAD..........................................................1
PAIRING.......................................................................3
MULTIPOINT CONNECTION.............................. ...........9
FACTORY RESET........................................................13
HOW TO FIT..............................................................16
POWER ON/OFF........................................................19
CONTROLS................................................................22
INDICATOR BEHAVIOR...............................................24
TROUBLESHOOTING..................................................28
WARRANTY INFORMATION........................................29
SAFETY INSTRUCTIONS.............................................32
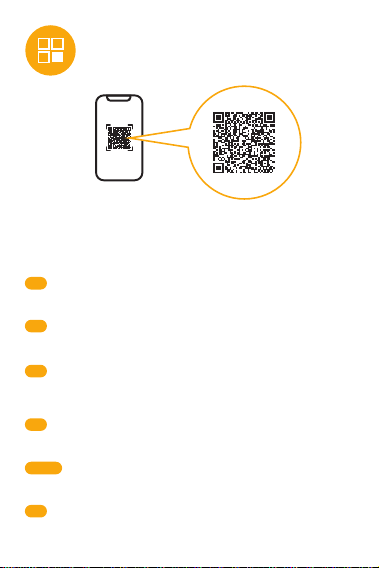
Use your mobile browser to scan the QR code and download the
QCY app to experience custom touch control, EQ settings,
firmware updates, and more.
APP DOWNLOAD
DE
IT
FR
ES
Scannen Sie mit Ihrem mobilen Browser den QR-Code und laden Sie die
QCY-App herunter, um individuelle Touch-Steuerung, EQ-Einstellungen,
Firmware-Updates und mehr zu erleben.
Usa il browser del cellulare per scansionare il codice QR e scaricare l’app
QCY. Grazie all’app potrai personalizzare i controlli touch, regolare
l’equalizzatore, aggiornare il firmware e molto altro.
Scannez le QR code avec le navigateur de votre mobile pour télécharger
l’application QCY et profiter de fonctions telles que la personnalisation des
commandes tactiles, les paramètres EQ, les mises à jour du firmware, et
plus encore.
Usa tu navegador móvil para escanear el código QR y descargar la
applicación de QCY para disfrutar del control táctil personalizado, ajustes
de ecualizador, actualizaciones de firmware y más.
RU
Отсканируйте QR-код в браузере на мобильном устройстве и загрузите
приложение QCY, чтобы надстроить сенсорное управление, эквалайзер,
обновления прошивки и многое другое.
PT-BR
Use o navegador do seu celular para escanear o código QR e baixar o
aplicativo QCY para personalizar o controle por toque, configurar a
equalização, atualizar o firmware e muito mais.
1
AR
JP
KR
ID
モバイルブラウザでQRコードをスキャンし、QCYアプリをダウンロードし
て、カスタムタッチコントロール、EQ設定、ファームウェアアップデート
などを体験してください。
모바일 브라우저로 QR 코드를 스캔하여 QCY 앱을 다운로드하면, 사용자 맞춤
터치 제어, EQ 설정, 펌웨어 업데이트 등 다양한 기능을 경험하실 수 있습니다.
繁中
使用您的手機瀏覽器掃描二維碼,下載 QCY 應用程式以體驗自定義觸控控
制、EQ 設定、韌體更新等功能。
Gunakan peramban ponselmu untuk memindai kode QR dan unduh aplikasi
QCY guna menikmati kontrol sentuh khusus, pengaturan EQ, pembaruan
firmware, dan lainnya.
TH
ใช้เบราว์เซอร์บนโทรศัพท์มือถือของคุณสแกนคิวอาร์โค้ด เพื่อดาวน์โหลดแอป QCY
เพื่อสัมผัสประสบการณ์การควบคุมแบบสัมผัสที่ปรับแต่งได้ การตั้งค่า EQ กา
รอัปเดตเฟิร์มแวร์ และอื่น ๆ
GR
Χρησιμοποιήστε το πρόγραμμα περιήγησης του κινητού σας για να σαρώσετε
τον κωδικό QR και να κατεβάσετε την εφαρμογή QCY. Από εκεί, μπορείτε να
προσαρμόσετε τον αισθητήρα αφής, τις ρυθμίσεις ισορροπίας ήχου (EQ), τις
ενημερώσεις λογισμικού κ.α.
HEB
FA
PL
Zeskanuj kod QR za pomocą przeglądarki w telefonie, aby pobrać aplikację
QCY i skorzystać z funkcji takich jak niestandardowe sterowanie dotykowe,
ustawienia EQ, aktualizacje oprogramowania i inne.
TR
Mobil tarayıcınızla QR kodu tarayarak özel dokunmatik kontrol, EQ ayarları,
ürün yazılımı güncellemeleri ve çok daha fazlası için QCY uygulamasını indirin.
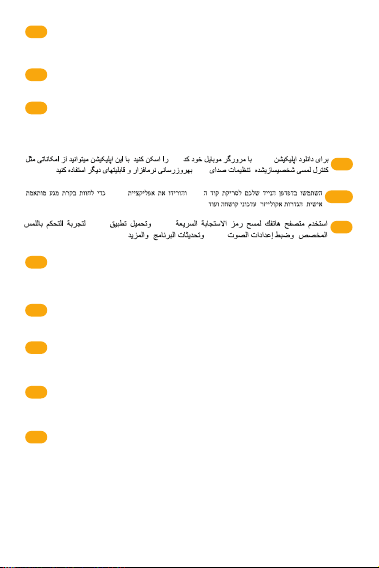
. QR ،QCY
. ،EQ ،
QCY )QR(
، ،EQ)( ،
QCY QR-
. , ,
2
PAIRING
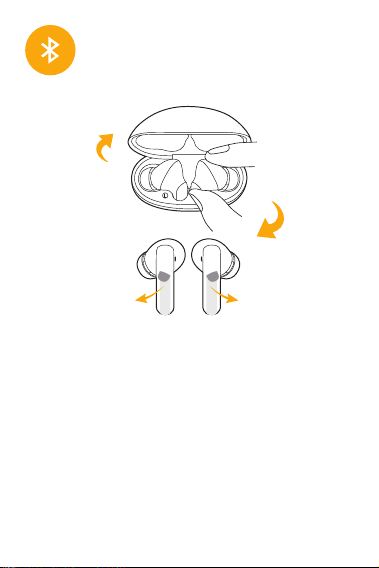
First Time Connection:
1.Activate the earphones by removing them from the case, tear o the
protective film, placing them back, and close the charging case.
2.Take the earbuds out again.
3.Refresh the Bluetooth device list on your device and select "QCY
MeloBuds N70" to connect.
Note: The earbuds power on automatically when the case opens. If they
don’t, recharge and retry.
Quick Pairing Mode:
1.With earbuds in the open charging case and earbuds must have prior
pairing history with a device.
2. With earbuds in the open charging case, hold the case button for 3
seconds, and the earbuds will skip reconnect and enter the pairing mode
(white LED flashes for 30 seconds).
3

DE
Erstmalige Verbindung:
1. Aktivieren Sie die Ohrhörer, indem Sie sie aus dem Etui nehmen, die
Schutzfolie abziehen, sie zurücklegen und das Ladeetui schließen.
2. Nehmen Sie die Ohrhörer wieder heraus.
3. aktualisieren Sie die Bluetooth-Geräteliste auf Ihrem Gerät und wählen Sie
"QCY MeloBuds N70", um eine Verbindung herzustellen.
Hinweis: Die Ohrstöpsel schalten sich automatisch ein, wenn das Etui
geönet wird. Wenn dies nicht der Fall ist, laden Sie sie auf und versuchen
Sie es erneut.
Schnelles Pairing-Modus:
1. Die Ohrstöpsel in der geöneten Ladeschale und die Ohrstöpsel müssen
zuvor mit einem Gerät gepaart worden sein.
2. Halten Sie die Taste im Ladeetui 3 Sekunden lang gedrückt. Die Ohrhörer
überspringen daraufhin die erneute Verbindung und wechseln in den
Pairing-Modus (weiße LED blinkt 30 Sekunden lang).
IT
Primo abbinamento:
1. Per attivare gli auricolari, estrarli dalla custodia, rimuovere la pellicola
isolante, quindi inserire nuovamente gli auricolari nella custodia e chiudere.
2. Estrarre nuovamente gli auricolari.
3. Aggiornare l’elenco dei dispositivi Bluetooth sul cellulare e selezionare
“QCY MeloBuds N70” per eettuare l’abbinamento.
Nota: Gli auricolari si accendono automaticamente quando la custodia viene
aperta. Se non si accendono, ricaricare gli auricolari e riprovare.
Modalità di abbinamento rapido:
1. Utilizzabile quando gli auricolari si trovano nella custodia di ricarica aperta e
sono già abbinati a un dispositivo.
2. Con gli auricolari nella custodia di ricarica aperta, premere il pulsante della
custodia per 3 secondi: gli auricolari salteranno la riconnessione automatica ed
entreranno in modalità abbinamento (LED bianco lampeggia per 30 secondi).
Première connexion :
1. Activez les écouteurs en les retirant du boîtier, retirez le film protecteur,
replacez-les dans le boîtier puis refermez-le.
2. Sortez de nouveau les écouteurs du boîtier.
3. Rafraîchissez la liste des appareils Bluetooth sur votre téléphone et
sélectionnez « QCY MeloBuds N70 » pour vous connecter.
Remarques : Les écouteurs s’allument automatiquement à l’ouverture du
boîtier. S’ils ne s’allument pas, rechargez-les puis réessayez.
Mode d'appairage rapide :
1. Avec les écouteurs dans le boîtier ouvert, et s’ils ont déjà été appairés à un
appareil auparavant.
2. Avec les écouteurs dans le boîtier ouvert, maintenez le bouton du boîtier
enfoncé pendant 3 secondes. Les écouteurs ignorent la reconnexion
automatique et passent en mode d’appairage (la LED blanche clignote
pendant 30 secondes).
FR
4

ES
RU
PT-BR
Conexión por primera vez:
1. Activa los auriculares sacándolos del estuche, retira la película protectora,
colócalos de nuevo y cierra el estuche de carga.
2. Vuelve a sacar los auriculares.
3. Actualiza la lista de dispositivos Bluetooth en tu dispositivo y selecciona
"QCY MeloBuds N70" para conectar.
Nota: Los auriculares se encienden automáticamente cuando se abre el
estuche. Si no es así, recárgalos y vuelve a intentarlo.
Modo de Emparejamiento Rápido:
1. Con los auriculares en el estuche de carga abierto y asegurándote de que
los auriculares tengan historial de emparejamiento con un dispositivo.
2. Con los auriculares en el estuche de carga abierto, mantén presionado el
botón del estuche durante 3 segundos, y los auriculares omitirán la
re-conexión y entrarán en modo de emparejamiento (el LED blanco parpadea
durante 30 segundos).
Primeira conexão:
1. Ative os fones removendo-os do estojo, retire a película protetora,
coloque-os de volta e feche o estojo.
2. Retire novamente os fones.
3. Atualize a lista de dispositivos Bluetooth no seu celular e selecione
"QCY MeloBuds N70" para conectar.
Atenção: Os fones carregam automaticamente com a abertura do estojo.
Caso isso não ocorra, recarregue e tente novamente.
Modo de pareamento rápido:
1. Com os fones dentro do estojo aberto, e com histórico de pareamento
anterior com um dispositivo.
2. Com os fones no estojo de carregamento aberto, pressione o botão do
estojo por 3 segundos para que os fones ignorem a reconexão e entrem
no modo de pareamento (o LED branco piscará por 30 segundos).
Первое подключение:
1. Активируйте наушники, вынув их из кейса, удалите защитную пленку,
верните их на место и закройте зарядный кейс.
2. Снова выньте наушники.
3. Обновите список устройств Bluetooth на вашем устройстве и выберите «QCY
MeloBuds N70» для подключения.
Примечание: наушники включаются автоматически при открытии кейса. Если
этого не произошло, перезарядите кейс и повторите попытку.
Режим быстрого сопряжения:
1. Наушники должны быть в открытом зарядном кейсе, а также ранее уже
выполнялось обычное сопряжение наушников с каким-либо устройством.
2. Когда наушники находятся в открытом зарядном кейсе, удерживайте кнопку
на кейсе в течение 3 секунд – наушники пропустят повторное подключение и
перейдут в режим сопряжения (белый светодиод будет мигать в течение 30
секунд).
5

GR
PL
TR
İlk Bağlantı:
1. Kulaklığı kutudan çıkararak etkinleştirin, koruyucu filmi çıkarın, kulaklığı
tekrar kutuya yerleştirin ve şarj kutusunu kapatın.
2. Kulaklığı tekrar çıkarın.
3. Cihazınızdaki Bluetooth aygıt listesini yenileyin ve “QCY MeloBuds N70”ı
seçerek bağlanın.
Not: Şarj kutusu açıldığında kulaklık otomatik olarak açılır. Açılmıyorsa,
kulaklığı lütfen şarj edip yeniden deneyin.
Hızlı Eşleştirme Modu:
1. Kulaklık açık durumdaki şarj kutusunda ve daha önce bir cihazla
eşleştirilmiş olmalı.
2. Kulaklık açık bir şarj kutusundayken, kutu düğmesine 3 saniye basılı tutun,
kulaklık yeniden bağlanmayı atlayarak eşleştirme moduna geçecektir (Beyaz
LED 30 saniye boyunca yanıp söner).
Pierwsze Połączenie:
1. Aktywuj słuchawki wyjmując je z etui, usuń folię ochronną, umieść z
powrotem w etui i zamknij pokrywę.
2. Ponownie wyjmij słuchawki z etui.
3. Odśwież listę urządzeń Bluetooth na swoim urządzeniu i wybierz "QCY
MeloBuds N70", aby połączyć.
Uwaga: Słuchawki włączają się automatycznie po otwarciu etui. Jeśli się nie
włączą, naładuj je i spróbuj ponownie.
Tryb Szybkiego Pakowania:
1. Umieść słuchawki w otwartym etui ładowania - musiały wcześniej łączyć
się z urządzeniem.
2. Z umieszczonymi w otwartym etui słuchawkami naciśnij i przytrzymaj
przycisk etui przez 3 sekundy — słuchawki pominą ponowne połączenie i
przejdą w tryb parowania (biała dioda LED miga przez 30 sekund).
Σύνδεση για πρώτη φορά:
1. Ενεργοποιήστε τα ακουστικά βγάζοντάς τα από τη θήκη. Αφαιρέστε την
προστατευτική μεμβράνη, τοποθετήστε τα πίσω στη θήκη και κλείστε τη θήκη
φόρτισης.
2. Βγάλτε τα ακουστικά από τη θήκη ξανά.
3. Ανανεώστε τη λίστα συσκευών Bluetooth στη συσκευή σας και επιλέξτε "QCY
MeloBuds N70" για να συνδεθείτε.
Σημείωση: Τα ακουστικά ενεργοποιούνται αυτόματα όταν ανοίγει η θήκη. Αν αυτό
δεν συμβεί, φορτίστε τα και δοκιμάστε ξανά.
Λειτουργία Γρήγορης Σύζευξης:
1. Βεβαιωθείτε ότι τα ακουστικά βρίσκονται στην ανοιχτή θήκη φόρτισης και έχουν
προηγουμένως σύζευγθεί με συσκευή.
2. Tοποθετήστε τα ακουστικα στηνανοιχτή θήκη, κρατήστε πατημένο το κουμπί
της θήκης για 3 δευτερόλεπτα. τα ακουστικά θαδιακόψουν την αυτόματη
επανασύνδεσηκαι θα εισέλθουν σελειτουργία σύζευξης (Η λευκήLED ένδειξη θα
αναβοσβήνει για30 δευτερόλεπτα, υποδεικνύοντας ότι τα ακουστικά είναι έτοιμα
για σύνδεση)
6
AR
HEB
FA
初コネクション:
1. イヤホンをケースから取り出し、保護フィルムを剥がし、ケースに戻して
充電ケースを閉めることで起動します。
2. 再びイヤホンを取り出す。
3. デバイスのBluetoothデバイスリストを更新し、"QCY MeloBuds N70 "を
選択して接続します。
注:ケースを開けるとイヤホンの電源が自動的に入ります。もしダメなら、
再チャージして再挑戦する。
JP
7

ID
TH
최초 연결:
1. 이어폰을 꺼내 보호 필름을 제거하고 다시 케이스에 넣은 뒤 케이스를 닫습니다.
2. 다시 이어폰을 꺼냅니다.
3. 기기에서 블루투스 목록을 새로고침한 후 "QCY MeloBuds N70"을 선택하여
연결하세요.
참고: 케이스를 열면 이어폰이 자동으로 전원이 켜집니다. 켜지지 않으면 충전 후
다시 시도하세요.
빠른 페어링 모드:
1. 이어폰이 열린 충전 케이스 안에 있고, 해당 기기와 페어링한 적이 있으면
자동으로 연결됩니다.
2.열려 있는 충전 케이스에 이어버드를 넣은 상태에서 케이스 버튼을 3초간
누르면, 이어버드가 재연결을 건너뛰고 페어링 모드에 진입합니다(흰색 LED가 30
초 동안 깜빡임).
クイックペアリングモード:
1. イヤホンを充電ケースに入れた状態で、イヤホンとデバイスのペアリング
履歴があること。
2.イヤホンを開いた充電ケースに入れたまま、ケースボタンを3秒間長押しす
ると、イヤホンがスキップ再接続され、ペアリングモードになる(白いLED
が30秒間点滅する)。
KR
Koneksi Pertama Kali:
1. Aktifkan earphone dengan mengeluarkannya dari kotak, lepaskan lapisan
pelindung, masukkan kembali, lalu tutup kotak pengisian daya.
2. Keluarkan earbud kembali.
3. Segarkan daftar perangkat Bluetooth di perangkatmu dan pilih "QCY
Melobuds N70" untuk terhubung.
Catatan: Earbud akan menyala secara otomatis saat kotak dibuka. Jika tidak
menyala, isi ulang daya dan coba kembali.
Mode Pairing Cepat:
1. Dengan earbud berada di dalam kotak pengisian yang terbuka, dan
earbud harus memiliki riwayat pairing sebelumnya dengan perangkat.
2.Dengan earbud di dalam kotak pengisi daya yang terbuka, tekan dan tahan
tombol kotak selama 3 detik, maka earbud akan melewati proses sambung
ulang dan masuk ke mode pairing (lampu LED putih berkedip selama 30
detik).
การเชื่อมต่อครั้งแรก:
1. เปิดใช้งานหูฟังโดยนำออกจากกล่อง ถอดฟิล์มกันรอยออก ใส่กลับเข้าไป และปิด
ฝากล่องชาร์จ
2. นำหูฟังออกอีกครั้ง
3. รีเฟรชรายการอุปกรณ์ Bluetooth บนอุปกรณ์ของคุณ และเลือก "QCY Melobuds
N70" เพื่อเชื่อมต่อ
หมายเหตุ: หูฟังจะเปิดอัตโนมัติเมื่อเปิดกล่องชาร์จ หากไม่เปิด กรุณาชาร์จและลอง
ใหม่อีกครั้ง
8
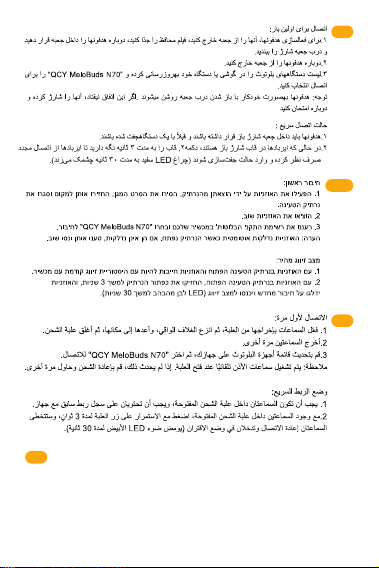
MULTIPOINT CONNECTION
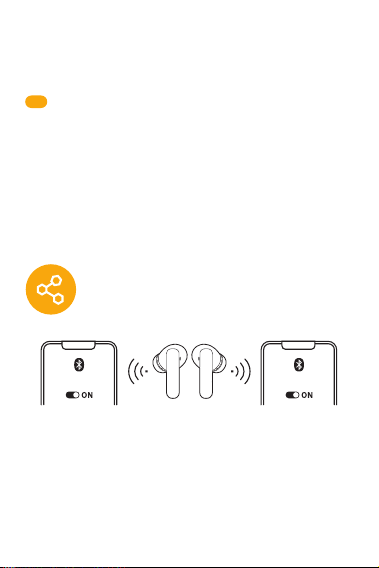
1.The earphones will automatically enter pairing mode when turned on.
Turn o the Bluetooth on your smartphone after device A is connected.
The earphones will enter pairing mode again.
2.Turn on the Bluetooth on device B and select "QCY MeloBuds N70" to
connect.
3.Turn on the Bluetooth on device A and select the paired name to
connect. Now the earphones are connected two devices simultaneously.
Device BDevice A
QCY MeloBuds N70 QCY MeloBuds N70
繁中
首次連接
1.通過將耳機從盒中取出、撕掉保護膜、再放回去並關閉充電盒來啟動耳機。
2.再次取出耳塞。
3.在您的設備上刷新藍牙設備列表,然後選擇「QCY MeloBuds N70」進行連
接。
注意:當充電盒打開時,耳機會自動開機。如果沒有,請充電並重試。
快速配對模式:
1.耳機放在打開的充電盒中,並且耳機必須與設備有過配對歷史。
2. 耳機放入充電盒中,開蓋狀態下,長按充電盒按鍵3秒。耳機不回連手機,
進入配對狀態,白燈閃爍30秒。
โหมดจับคู่แบบรวดเร็ว:
1. วางหูฟังไว้ในกล่องชาร์จที่เปิดฝา และหูฟังจะต้องมีประวัติการเชื่อมต่อกับอุปกรณ์
มาก่อน
2. ขณะหูฟังอยู่ในเคสชาร์จที่เปิดฝา ให้กดปุ่มเคสค้างไว้ 3 วินาที หูฟังจะไม่ทำการ
เชื่อมต่ออัตโนมัติและเข้าสู่โหมดจับคู่ (ไฟ LED สีขาวจะกระพริบเป็นเวลา 30 วินาที)
9

DE
1. Die Ohrhörer werden beim Einschalten automatisch in den Pairing-Modus
versetzt. Schalten Sie die Bluetooth-Funktion auf Ihrem Smartphone aus,
nachdem Gerät A verbunden wurde. Die Ohrhörer werden wieder in den
Pairing-Modus wechseln.
2.Schalten Sie Bluetooth an Gerät B ein und wählen Sie „QCY MeloBuds
N70“, um eine Verbindung herzustellen.
3.Schalten Sie Bluetooth auf Gerät A ein und wählen Sie den gepaarten
Namen, um eine Verbindung herzustellen. Jetzt sind die Ohrhörer mit zwei
Geräten gleichzeitig verbunden.
IT
1. Gli auricolari entreranno automaticamente in modalità abbinamento una
volta accesi. Dopo aver collegato il Dispositivo A, disattivare il suo Bluetooth.
Gli auricolari torneranno in modalità abbinamento.
2. Attivare il Bluetooth sul Dispositivo B e selezionare “QCY MeloBuds N70”
per eettuare l’abbinamento.
3. Riattivare il Bluetooth sul Dispositivo A e selezionare gli auricolari per
riconnetterli. Ora gli auricolari saranno connessi contemporaneamente a due
dispositivi.
1. Les écouteurs passeront automatiquement en mode d’appairage lorsqu’ils
sont allumés. Désactivez le Bluetooth de votre smartphone après la connexion
de l’appareil A. Les écouteurs passeront de nouveau en mode d’appairage.
2. Activez le Bluetooth sur l’appareil B et sélectionnez « QCY MeloBuds N70 »
pour vous connecter.
3. Activez le Bluetooth sur l’appareil A et sélectionnez le nom associé pour
vous connecter. Les écouteurs sont maintenant connectés simultanément à
deux appareils.
FR
ES
1. Los auriculares entrarán automáticamente en modo de emparejamiento
cuando se enciendan. Apaga el Bluetooth de tu smartphone después de que
el dispositivo A se haya conectado. Los auriculares entrarán nuevamente en
modo de emparejamiento.
2. Activa el Bluetooth en el dispositivo B y selecciona "QCY MeloBuds N70"
para conectar.
3. Activa el Bluetooth en el dispositivo A y selecciona el nombre emparejado
para conectar. Ahora los auriculares están conectados a dos dispositivos al
mismo tiempo.
PT-BR
1. Os fones entrarão no modo de pareamento automaticamente ao
serem ligados. Desligue o Bluetooth após a conexão do dispositivo A. Os
fones entrarão novamente no modo de pareamento.
2. Ative o Bluetooth do dispositivo B e selecione "QCY MeloBuds N70"
para conectar.
3. Ative o Bluetooth do dispositivo A e selecione o nome emparelhado
para conectar. Agora os fones estão conectados a dois dispositivos ao
mesmo tempo.
10
HEB
FA
RU
1. При включении наушники автоматически перейдут в режим сопряжения.
После подключения устройства А выключите Bluetooth на смартфоне.
Наушники снова перейдут в режим сопряжения.
2. Включите Bluetooth на устройстве B и выберите «QCY MeloBuds N70» для
подключения.
3. Включите Bluetooth на устройстве A и выберите сопряженное имя для
подключения. Теперь наушники подключены к двум устройствам
одновременно.
GR
PL
TR
1. Kulaklık açıldığında otomatik olarak eşleştirme moduna girer. Cihaz A
bağlandıktan sonra akıllı telefonunuzdaki Bluetooth’u kapatın. Kulaklık tekrar
eşleştirme moduna girer.
2. Cihaz B’nin Bluetooth’unu açın ve “QCY MeloBuds N70”ı seçerek bağlanın.
3. Cihaz A’nın Bluetooth’unu tekrar açın ve eşleştirilmiş ismi seçerek
bağlanın. Artık kulaklık aynı anda iki cihaza bağlıdır.
1. Słuchawki automatycznie przejdą w tryb parowania po włączeniu. Wyłącz
Bluetooth w swoim smartfonie po połączeniu z urządzeniem A. Słuchawki
ponownie przejdą w tryb parowania.
2. Włącz Bluetooth na urządzeniu B i wybierz "QCY MeloBuds N70", aby
połączyć.
3. Włącz Bluetooth na urządzeniu A i wybierz zapisaną nazwę, aby połączyć.
Teraz słuchawki są jednocześnie połączone z dwoma urządzeniami.
1. Τα ακουστικά θα μπουν αυτόματα σε λειτουργία σύζευξης όταν
ενεργοποιηθούν. Απενεργοποιήστε το Bluetooth στο smartphone σας αφότου
γίνει σύνδεση με τη συσκευή Α. Τα ακουστικά θα μπουν ξανά σε λειτουργία
σύζευξης.
2. Ενεργοποιήστε το Bluetooth στη συσκευή Β και επιλέξτε "QCY MeloBuds N70"
για να συνδεθείτε.
3. Ενεργοποιήστε το Bluetooth στη συσκευή Α και επιλέξτε το όνομα της συσκευής
για να συνδεθείτε. Τώρα τα ακουστικά είναι συνδεδεμένα ταυτόχρονα σε δύο
συσκευές.
11
AR
繁中
1.耳機開機時會自動進入配對模式。設備A連接後,請關閉智能手機上的藍牙
。耳機將再次進入配對模式。
2.打開設備B的藍牙,然後選擇「QCY Melobuds N70」進行連接。
3.打開設備A的藍牙,然後選擇已配對的名稱進行連接。現在耳機已同時連接
兩個設備。
ID
TH
1. 이어폰이 켜지면 자동으로 페어링 모드로 진입합니다. 기기 A와 연결된 후
스마트폰의 블루투스를 끄면, 이어폰은 다시 페어링 모드로 전환됩니다.
2. 기기 B의 블루투스를 켜고 “QCY Melobuds N70”을 선택하여 연결하세요
3. 기기 A의 블루투스를 다시 켜고 연결하면 두 장치에 동시에 연결됩니다.
KR
1. Earphone akan otomatis masuk ke mode pairing saat dinyalakan. Matikan
Bluetooth di ponselmu setelah perangkat A terhubung. Earphone akan
masuk kembali ke mode pairing.
2. Nyalakan Bluetooth pada perangkat B dan pilih "QCY Melobuds N70"
untuk terhubung.
3. Nyalakan Bluetooth pada perangkat A dan pilih nama yang sudah
dipasangkan untuk terhubung. Sekarang earphone terhubung ke dua
perangkat secara bersamaan.
1. หูฟังจะเข้าสู่โหมดจับคู่อัตโนมัติเมื่อเปิดใช้งาน ปิด Bluetooth บนสมาร์ตโฟนของ
คุณหลังจากเชื่อมต่อกับ Device A แล้ว หูฟังจะเข้าสู่โหมดจับคู่อีกครั้ง
2. เปิด Bluetooth บน Device B และเลือก "QCY Melobuds N70" เพื่อเชื่อมต่อ
3. เปิด Bluetooth บน Device A และเลือกชื่อที่จับคู่ไว้เพื่อเชื่อมต่อ ขณะนี้หูฟังเชื่อม
ต่อกับสองอุปกรณ์พร้อมกันเรียบร้อยแล้ว
JP
1.電源を入れると、イヤホンは自動的にペアリングモードになります。デバ
イスAを接続した後、スマートフォンのBluetoothをオフにします。イヤホン
は再びペアリングモードになります。
2.デバイスBのBluetoothをオンにし、"QCY Melobuds N70 "を選択して接続
します。
3. デバイスAのBluetoothをオンにし、ペアリングした名前を選択して接続し
ます。これでイヤホンは2つの機器に同時に接続される。
12
FACTORY RESET
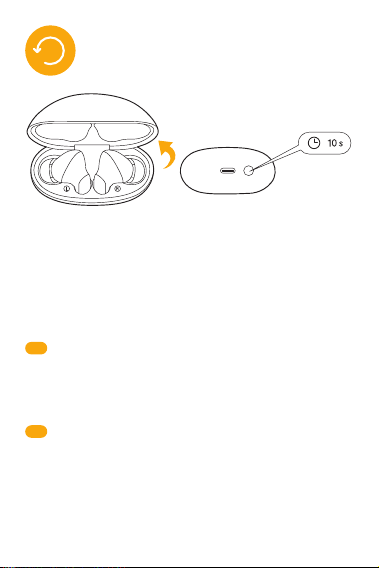
Clear Pairing Records
Keep the earphones in the open case, then long press the case bottom
button for 10 seconds until the red and white LED indicators flashing
alternate for 3 seconds, and the earphones have been reset successfully.
* Apply the pairing method for the first use to connect after reset.
DE
Löschen der Pairing-Datensätze:
Halten Sie die Ohrhörer im geöneten Etui, drücken Sie dann 10 Sekunden
lang die untere Taste des Etuis, bis die rote und die weiße LED-Anzeige 3
Sekunden lang abwechselnd blinken und die Ohrhörer erfolgreich
zurückgesetzt wurden.
* Wenden Sie bei der ersten Verwendung die Pairing-Methode an, um die
Verbindung nach dem Zurücksetzen herzustellen.
IT
Cancella cronologia abbinamenti
Tenere gli auricolari nella custodia aperta e premere il pulsante della custodia
per 10 secondi finché il LED non lampeggia alternativamente in rosso e bianco
per circa 3 secondi. Gli auricolari saranno così resettati con successo.
*Dopo il reset, seguire le istruzioni per il primo abbinamento per connettere di
nuovo i tuoi auricolari.
13

Eacer l’historique d’appariement
Laissez les écouteurs dans le boîtier ouvert, puis maintenez le bouton situé en
bas du boîtier enfoncé pendant 10 secondes, jusqu’à ce que les voyants LED
rouge et blanc clignotent en alternance pendant 3 secondes. Les écouteurs
ont alors été réinitialisés avec succès.
* Après la réinitialisation, utilisez la méthode de première connexion pour
appairer les écouteurs à nouveau.
FR
ES
Borrar los Registros de Emparejamiento
Deja los auriculares en el estuche abierto, luego mantén presionado el botón
inferior del estuche durante 10 segundos hasta que los indicadores LED rojos
y blancos parpadeen alternativamente durante 3 segundos, y los auriculares
se restablecerán correctamente.
* Aplica el método de emparejamiento para la primera conexión después del
restablecimiento.
PT-BR
Limpar registros de pareamento
Com os fones no estojo aberto, pressione o botão do estojo por 10
segundos até que os LEDs vermelho e branco pisquem alternadamente
por 3 segundos. Os fones foram redefinidos com sucesso.
* Após o reset, siga o procedimento de pareamento inicial.
RU
Очистка записей сопряжения
Держите наушники в открытом кейсе, затем нажмите и удерживайте нижнюю
кнопку кейса в течение 10 секунд, пока красный и белый светодиодные
индикаторы не начнут попеременно мигать в течение 3 секунд, что означает,
что настройки наушников успешно сброшены.
* Чтобы подключиться после сброса настроек, примените метод сопряжения
для первого подключения.
PL
TR
Eşleştirme Kayıtlarını Silme
Kulaklık açık durumdaki şarj kutusundayken, kutunun altındaki düğmeye
kırmızı ve beyaz LED göstergeleri 3 saniye boyunca dönüşümlü olarak yanıp
sönünceye kadar 10 saniye boyunca basılı tutun, sonrasında kulaklık başarılı
bir şekilde sıfırlanacaktır.
* Sıfırlama sonrasında tekrar kullanmak için eşleştirme yöntemini uygulayın.
Wyczyść Historię Parowania
Trzymaj słuchawki w otwartym etui, a następnie naciśnij i przytrzymaj dolny
przycisk etui przez 10 sekund, aż czerwony i biały wskaźnik LED zaczną
migać naprzemiennie przez 3 sekundy — słuchawki zostały pomyślnie
zresetowane.
* Po resecie zastosuj metodę parowania jak przy pierwszym użyciu.
14

AR
HEB
FA
GR
Διαγραφή Ιστορικού Σύζευξης
Τοποθετήστε τα ακουστικά στην ανοιχτή θήκη. Κατόπιν πατήστε παρατεταμένα το
κάτω κουμπί της θήκης για 10 δευτερόλεπτα, μέχρι ο κόκκινος και λευκός LED
δείκτης να αναβοσβήνουν εναλλάξ για 3 δευτερόλεπτα και τα ακουστικά έχουν
επαναφερθεί στις αρχικές τους ρυθμίσεις με επιτυχία.
*Μετά την επαναφορά στις αρχικές ρυθμίσεις, ακολουθήστε τη διαδικασία
σύζευξης όπως κατά την πρώτη χρήση.
ID
TH
페어링 기록 삭제
이어폰을 케이스에 넣고 케이스 버튼을 10초간 길게 누릅니다. 빨간색과 흰색 LED
가 번갈아 3초간 깜빡이면 초기화 완료입니다.
* 초기화 후에는 최초 사용 시와 동일한 방식으로 페어링을 진행하세요.
KR
Hapus Riwayat Pairing
Biarkan earphone di dalam kotak yang terbuka, lalu tahan tombol di bagian
bawah kotak selama 10 detik hingga indikator LED merah dan putih
berkedip bergantian selama 3 detik, dan earphone berhasil direset.
* Gunakan metode pairing untuk penggunaan pertama kali setelah reset.
ล้างประวัติการจับคู่
เก็บหูฟังไว้ในกล่องชาร์จที่เปิดฝา จากนั้นกดปุ่มที่ด้านล่างของกล่องค้างไว้ 10 วินาที
จนไฟแสดงสถานะ LED สีแดงและขาวกระพริบสลับกันเป็นเวลา 3 วินาที และการรีเซ็ต
เสร็จสมบูรณ์
* ใช้วิธีการจับคู่สำหรับการใช้งานครั้งแรกเพื่อเชื่อมต่อหลังจากการรีเซ็ต
JP
ペアリングレコードをクリアします
イヤホンをケースに入れたまま、ケース底部のボタンを10秒間長押しし、赤
と白のLEDインジケータが交互に3秒間点滅し、イヤホンが正常にリセットさ
れます。
* リセット後、初回使用時にペアリング方法を適用して接続します。
15
DE
Schritt 1: Wählen Sie die Ohrstöpsel, die am besten zu Ihren Ohren passen.
Schritt 2: Identifizieren Sie den linken und rechten Ohrhörer und führen Sie
ihn in den Gehörgang ein.
Schritt 3: Bitte richten Sie die Mikrofone auf Ihren Mund. Drehen Sie sich und
finden Sie die bequemste und sicherste Position.
Hinweis: Wenn die Ohrstöpsel nicht richtig getragen werden, kann dies die
Klangqualität und das Gehör beeinträchtigen.
繁中
清除配對記錄
將耳機放在打開的盒子中,然後長按盒子底部按鈕10秒,直到紅白LED指示
燈交替閃爍3秒,耳機已成功重置。
* 恢復出廠設定後以首次配對的方法連接即可正常使用。
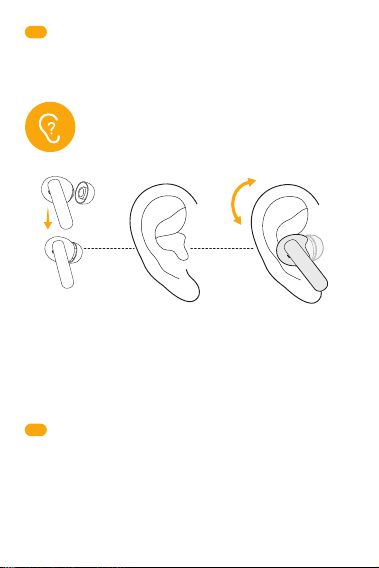
Step 1: Choose the ear tips that fit your ears best.
Step 2: Identify the left and right earbuds, and insert them into the canal
of your ears.
Step 3: Please set the microphones towards your mouth. Turn and find
the most comfortable and secure position.
Note: If the earbuds are not worn correctly, it may aect sound quality
and hearing.
HOW TO FIT
16

IT
Step 1: Scegliere i cuscinetti auricolari più adatti alle proprie orecchie.
Step 2: Individuare l’auricolare sinistro e destro e inserirli nel condotto uditivo.
Step 3: Orientare i microfoni verso la bocca. Ruotare gli auricolari fino a
trovare la posizione più comoda e stabile.
Nota: Se gli auricolari non vengono indossati correttamente, l’esperienza di
ascolto potrebbe risentirne.
Étape 1 : Choisissez les embouts les mieux adaptés à vos oreilles.
Étape 2 : Identifiez les écouteurs gauche (L) et droit (R), puis insérez-les dans
le conduit auditif.
Étape 3 : Dirigez les microphones vers votre bouche. Tournez-les légèrement
jusqu’à trouver une position confortable et stable.
Remarques : Un mauvais positionnement des écouteurs peut aecter la qualité
sonore et votre confort d’écoute.
FR
ES
Paso 1: Elige las puntas para los oídos que mejor se ajusten a tus oídos.
Paso 2: Identifica los auriculares izquierdo y derecho, e insértalos en el canal
auditivo.
Paso 3: Asegúrate de que los micrófonos estén dirigidos hacia tu boca.
Gíralos y encuentra la posición más cómoda y segura.
Nota: Si los auriculares no están puestos correctamente, puede afectar la
calidad del sonido y la audición.
PT-BR
Passo 1: Escolha as pontas de ouvido que melhor se ajustem aos seus
ouvidos.
Passo 2: Identifique os lados esquerdo e direito e insira os fones no canal
auditivo.
Passo 3: Direcione os microfones para sua boca. Gire os fones até
encontrar uma posição confortável e firme.
Atenção: O uso incorreto pode afetar a qualidade sonora e a audição.
RU
Шаг 1. Выберите амбушюры, которые лучше всего подходят вашим ушам.
Шаг 2. Определите, какой наушник левый, а какой правый, и вставьте их в
соответствующий ушной канал.
Шаг 3. Направьте микрофоны в сторону рта. Поверните наушники и найдите
наиболее удобное и безопасное положение.
Примечание: если наушники надеты неправильно, это может повлиять на
качество звука и слух.
PL
Krok 1: Wybierz końcówki douszne najlepiej pasujące do twoich uszu.
Krok 2: Zidentyfikuj lewą i prawą słuchawkę, a następnie włóż je do kanału
usznego.
Krok 3: Ustaw mikrofony w kierunku ust. Obróć i znajdź najbardziej wygodną
i stabilną pozycję.
Uwaga: Nieprawidłowe założenie słuchawek może wpłynąć na jakość dźwięku
i słyszenie.
17
TR
1. Adım Kulaklarına en uygun olan kulak uçlarını seçin.
2. Adım Sol ve sağ kulaklığı belirleyin ve kulak kanalınıza yerleştirin.
3. Adım Lütfen mikrofonları ağzınıza dönük olacak şekilde ayarlayın.
Çevirerek en rahat ve sabit duracak konumu bulun.
Not: Kulaklıkların doğru şekilde takılmaması ses kalitesini ve işitmeyi
etkileyebilir.
AR
HEB
FA
GR
Βήμα 1: Επιλέξτε τις άκρες των ακουστικών που ταιριάζουν καλύτερα στα αυτιά
σας.
Βήμα 2: Βεβαιωθείτε ότι βρήκατε το αριστερό και το δεξί ακουστικό και
τοποθετήστε τα στον σωστό ακουστικό πόρο.
Βήμα 3: Παρακαλώ βεβαιωθείτε ότι τα μικρόφωνα είναι στραμμένα προς το στόμα
σας. Στρίψτε τα ακουστικά για να βρείτε την πιο άνετη και σταθερή θέση για εσάς.
Σημείωση: Αν τα ακουστικά δεν φορεθούν σωστά, αυτό μπορεί να επηρεάσει την
ποιότητα του ήχου που ακούτε.
1 단계: 귀에 잘 맞는 이어팁을 선택하세요.
2 단계: 좌우 구분 후 귓속에 삽입하세요.
3 단계: 마이크가 입을 향하도록 착용 후 가장 편한 위치를 찾으세요.
참고: 올바르게 착용하지 않으면 음질 및 청취에 영향이 있을 수 있습니다.
KR
JP
ステップ1:自分の耳に一番フィットするイヤーチップを選びます。
ステップ2:左右のイヤホンを確認し、耳の穴に挿入します。
ステップ3:マイクを口に向けてください。体を回転させ、最も快適で安全
なポジションを見つけます。
注:イヤホンが正しく装着されていないと、音質や聴力に影響を与える可能
性があります。
18

POWER ON/OFF
Power on Power o
Power on
(if earbuds are outside the case)
ID
TH
Langkah 1: Pilih ear tip yang paling sesuai dengan telingamu.
Langkah 2: Identifikasi earbud kiri dan kanan, lalu masukkan ke dalam
saluran telingamu.
Langkah 3: Silakan arahkan mikrofon ke mulutmu. Putar dan temukan posisi
yang paling nyaman dan aman.
Catatan: Jika earbud tidak dipakai dengan benar, hal ini dapat memengaruhi
kualitas suara dan pendengaran.
ขั้นตอนที่ 1: เลือกจุกหูฟังที่เหมาะกับหูของคุณมากที่สุด
ขั้นตอนที่ 2: แยกหูฟังข้างซ้ายและขวา และสอดเข้าไปในช่องหูของคุณ
ขั้นตอนที่ 3: กรุณาหันไมโครโฟนเข้าหาปากของคุณ หมุนและหาตำแหน่งที่ใส่ได้
กระชับและสบายที่สุด
หมายเหตุ: หากสวมใส่หูฟังไม่ถูกต้อง อาจส่งผลต่อคุณภาพเสียงและการได้ยิน
繁中
步驟 1:選擇最適合您耳朵的耳塞。
步驟 2:識別左耳和右耳耳機,並將其插入耳道。
步驟 3:請將麥克風朝向您的嘴巴。轉動並找到最舒適和安全的位置。
注意:如果耳機佩戴不正確,可能會影響音質和聽力。
19

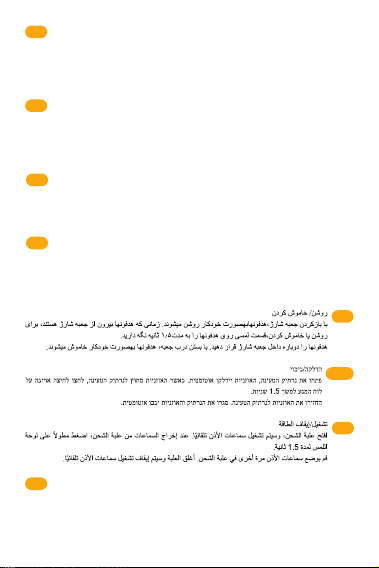
Power on/o
Open the charging case, the earbuds will automatically power on. When
earphones are outside the charging box, long press the touch panel for
1.5 seconds.
Place the earbuds back into the charging case. Close the case and the
earbuds will automatically power o.
DE
Einschalten/Ausschalten
Önen Sie das Ladeetui, die Ohrhörer schalten sich automatisch ein. Wenn
sich die Ohrhörer außerhalb der Ladebox befinden, drücken Sie 1,5
Sekunden lang auf das Touchpanel.
Legen Sie die Ohrhörer zurück in die Ladeschale. Schließen Sie das Etui und
die Ohrhörer schalten sich automatisch aus.
IT
Accensione e spegnimento
Aprendo la custodia di ricarica, gli auricolari si accenderanno
automaticamente. Quando gli auricolari si trovano fuori dalla custodia di
ricarica, toccare il comando touch per 1,5 secondi.
Inserire gli auricolari nella custodia di ricarica. Chiudendo la custodia di
ricarica, gli auricolari si spegneranno automaticamente.
Allumage/Extinction
Ouvrez le boîtier de charge, les écouteurs s’allumeront automatiquement.
Lorsque les écouteurs sont hors du boîtier, appuyez longuement sur le pavé
tactile pendant 1,5 seconde pour les allumer.
Replacez les écouteurs dans le boîtier de charge. Fermez le boîtier, et les
écouteurs s’éteindront automatiquement.
FR
ES
Encendido/apagado
Abre el estuche de carga, los auriculares se encenderán automáticamente.
Cuando los auriculares estén fuera del estuche de carga, mantén presionado
el panel táctil durante 1.5 segundos.
Coloca los auriculares nuevamente en el estuche de carga. Cierra el estuche
y los auriculares se apagarán automáticamente.
PT-BR
Ligar/Desligar
Abra o estojo de carregamento e os fones ligarão automaticamente. Se
estiverem fora do estojo, pressione o painel de toque por 1,5 segundo.
Coloque os fones de volta no estojo. Feche-o, e os fones desligarão
automaticamente.
20
RU
Включение/выключение питания
Откройте зарядный кейс, наушники автоматически включатся. Когда наушники
находятся вне зарядного устройства, нажмите и удерживайте сенсорную
панель в течение 1,5 секунд.
Поместите наушники обратно в зарядный кейс. Закройте кейс, наушники
автоматически выключатся.
PL
Włącz/wyłącz zasilanie
Otwórz etui ładujące, słuchawki włączą się automatycznie. Gdy słuchawki są
poza etui ładującym, naciśnij i przytrzymaj panel dotykowy przez 1,5
sekundy.
Umieść słuchawki z powrotem w etui ładującym. Zamknij etui, a słuchawki
wyłączą się automatycznie.
JP
電源オン/オフ
充電ケースを開けると、イヤホンの電源が自動的に入ります。イヤホンが充
電ボックスの外にある場合は、タッチパネルを1.5秒間長押ししてください。
イヤホンを充電ケースに戻します。ケースを閉じると、イヤホンの電源は自
動的にオフになります。
AR
HEB
FA
TR
Açma/Kapama
Şarj kutusunu açtığınızda kulaklık otomatik olarak açılır. Kulaklık şarj
kutusunun dışındaysa, dokunmatik panele 1,5 saniye basılı tutun.
Kulaklığı şarj kutusuna tekrar yerleştirin. Kutuyu kapattığınızda kulaklık
otomatik olarak kapanacaktır.
GR
Ενεργοποίηση/Απενεργοποίηση
Ανοίξτε τη θήκη φόρτισης και τα ακουστικά θα ενεργοποιηθούν αυτόματα. Όταν
τα ακουστικά είναι έξω από τη θήκη, πατήτε παρατεταμένα τον αισθητήρα αφής
για 1,5 δευτερόλεπτα.
Τοποθετήστε τα ακουστικά πίσω στη θήκη φόρτισης. Κλείστε τη θήκη και τα
ακουστικά θα απενεργοποιηθούν αυτόματα.
21
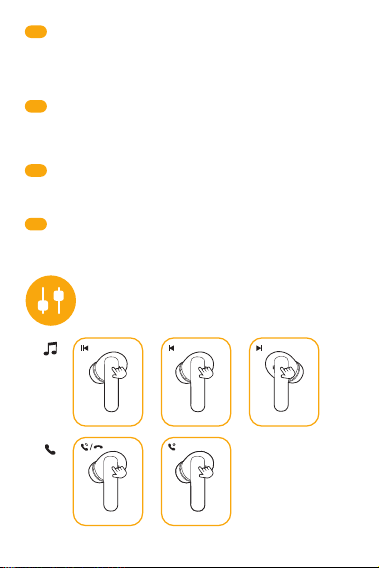
CONTROLS
ID
전원 켜기/끄기
케이스를 열면 자동으로 전원이 켜집니다. 이어폰이 충전 케이스 밖에 있을 때,
터치 패널을 1.5초간 길게 누르세요.
이어폰을 충전 케이스에 다시 넣으세요. 케이스를 닫으면 이어폰이 자동으로
꺼집니다.
KR
Nyala/Mati
Buka kotak pengisian daya, earbud akan otomatis menyala. Saat earphone
berada di luar kotak pengisian daya, tahan panel sentuh selama 1,5 detik.
Masukkan kembali earbud ke dalam kotak pengisian daya. Tutup kotak, dan
earbud akan otomatis mati.
繁中
開機/關機
1.打開充電盒,耳機將自動開機。當耳機在充電盒外時,長按觸控面板1.5秒。
2.將耳塞放回充電盒中。關閉盒子,耳塞將自動關閉電源。
TH
เปิด/ปิดเครื่อง
เมื่อเปิดกล่องชาร์จ หูฟังจะเปิดเครื่องโดยอัตโนมัติ เมื่อหูฟังอยู่นอกกล่องชาร์จ ให้กด
แผงสัมผัสค้างไว้ 1.5 วินาที
ใส่หูฟังกลับเข้าไปในกล่องชาร์จ ปิดฝากล่อง หูฟังจะปิดเครื่องโดยอัตโนมัติ
L/R
x2
L
x3
R
x3
L/R
x2
L/R
1.5s
22
DE
x2: Zweimal tippen x3: Dreifach tippen 1.5s: 1,5s lang drücken
IT
x2: Doppio tocco x3: Triplo tocco 1.5s: Tenere premuto per 1,5 sec
x2: Appuyer deux fois x3: Appuyer trois fois 1.5s: Appui long de 1,5 seconde
x2: Stuknij Dwukrotnie x3: Stuknij trzykrotnie 1.5s: Naciśnij i przytrzymaj przez 1,5 s
FR
ES
x2: Toca dos veces x3: Toca tres veces 1.5s: Mantén presionado durante 1.5 s
PT-BR
x2: Toque duplo x3: Toque triplo 1.5s: Pressione por 1,5s
x2: İki Kez Dokun x3: Üç Kez Dokun 1.5s: 1,5 saniye basılı tutun
RU
x2: Двойное нажатие x3: Тройное нажатие 1.5s: Длительное нажатие 1,5с
PL
L
1.5s
ID
x2: 두 번 탭 x3: 세 번 탭 1.5s:1.5초 길게 누르기
KR
x2: Tekan Dua Kali x3: Tekan Tiga Kali 1.5s:Tahan selama 1,5 detik
JP
x2: タップ2回 x3: トリプルタップ 1.5s: 1.5秒間長押し
FA
HEB
AR
TR
GR
x2: Διπλό πάτημα x3: Τριπλό πάτημα 1.5s: Πατήτε παρατεταμένα για 1,5
δευτερόλεπτα
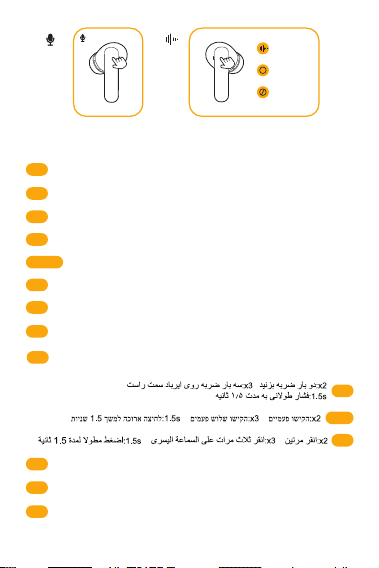
x2: Tap twice x3: Tap triple 1.5s: Long press for 1.5s
R
1.5s
Noise Reduction
Transparency
Normal
23
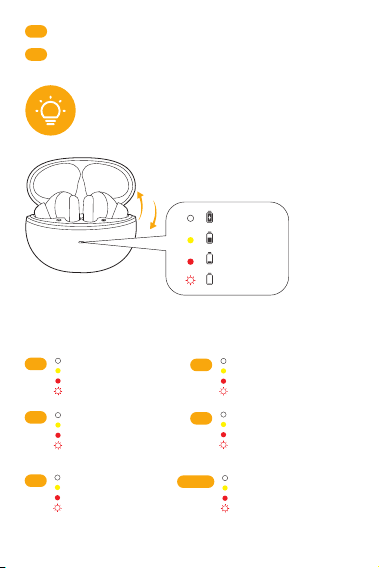
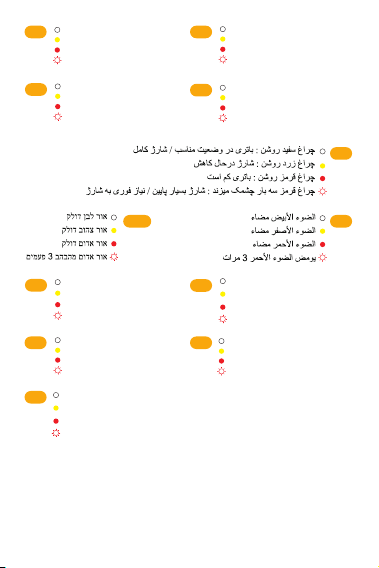
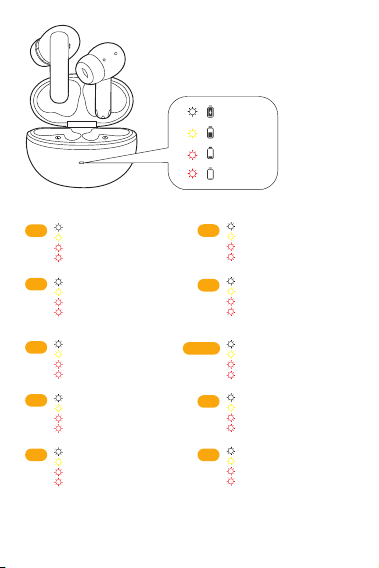
INDICATOR BEHAVIOR
or
Open or close
Battery indication when opening/closing
the case, or clicking the button
Note: Yellow light flashes slowly during charging, and white light is always
on when fully charged.
60%-100%
59%-20%
19%-5%
<5%
TH
x2: แตะสองครั้ง x3:แตะสามครั้ง 1.5s: กดค้างไว้ 1.5 วินาที
繁中
x2: 兩次輕觸 x3: 三次輕觸 1.5s: 長按1.5秒
FR
Voyant blanc allumé
Voyant jaune allumé
Voyant rouge allumé
Voyant rouge clignote 3 fois
x3
IT
Luce bianca accesa
Luce gialla accesa
Luce rossa accesa
Luce rossa che lampeggia
3 volte
x3
PT-BR
Luz branca acesa
Luz amarela acesa
Luz vermelha acesa
Luz vermelha pisca 3 vezes
x3
DE
Weißes Licht leuchtet
Gelbes Licht leuchtet
Rotes Licht leuchtet
Rotes Licht blinkt 3-mal
x3
ES
Luz blanca encendida
Luz amarilla encendida
Luz roja encendida
Luz roja parpadea 3 veces
x3
White light on
Yellow light on
Red light on
Red light flashes 3 times
EN
x3
x3
24
PL
Białe światło — włączone
Żółte światło — włączone
Czerwone światło — włączone
Czerwone światło miga 3 razy
x3
RU
Белый свет горит
Желтый свет горит
Красный свет горит
Красный свет мигает 3 раза
x3
TR
Beyaz ışık yandığında
Sarı ışık yandığında
Kırmızı ışık yandığında
Kırmızı ışık 3 kez yanıp
söndüğünde
繁中
白光亮起
黃光亮起
紅光亮起
紅光閃爍3次
x3
ID
Lampu putih menyala
Lampu kuning menyala
Lampu merah menyala
Lampu merah berkedip 3 kali
x3
TH
ไฟสีขาวติดค้าง
ไฟสีเหลืองติดค้าง
ไฟสีแดงติดค้าง
ไฟสีแดงกระพริบ 3 ครั้ง
x3
AR
x3
흰색
노란색
빨간색
빨간색 3회 깜빡임
KR
x3
HEB
x3
JP
ホワイトライト点灯
黄色点灯
赤ランプ点灯
赤ランプが3回点滅
x3
GR
Η λευκή ένδειξη παραμένει φωτισμένη
Η κίτρινη ένδειξη παραμένει φωτισμένη
Η κόκκινη ένδειξη παραμένει φωτισμένη
Η κόκκινη ένδειξη αναβοσβήνει 3 φορές
x3
x3
FA
x3
25
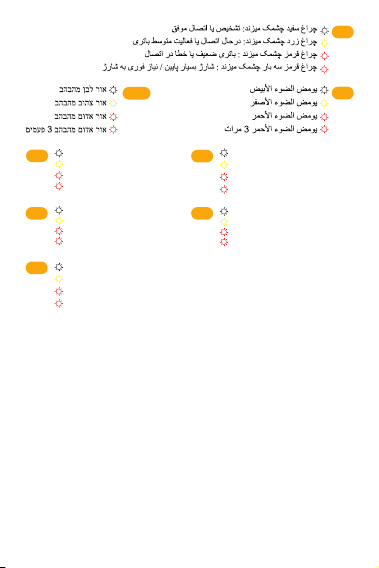
Battery indication when the earbuds
in and out
TR
Beyaz ışık yanıp söndüğünde
Sarı ışık yanıp söndüğünde
Kırmızı ışık yanıp söndüğünde
Kırmızı ışık 3 kez yanıp
söndüğünde
x3
White light flashes
Yellow light flashes
Red light flashes
Red light flashes 3 times
EN
GR
Η λευκή ένδειξη αναβοσβήνει
Η κίτρινη ένδειξη αναβοσβήνει
Η κόκκινη ένδειξη αναβοσβήνει
Η κόκκινη ένδειξη αναβοσβήνει
3 φορές
x3
x3
DE
Weißes Licht blinkt
Gelbes Licht blinkt
Rotes Licht blinkt
Rotes Licht blinkt 3-mal
x3
IT
Luce bianca lampeggiante
Luce gialla lampeggiante
Luce rossa lampeggiante
Luce rossa che lampeggia
3 volte
x3
FR
Voyant blanc clignote
Voyant jaune clignote
Voyant rouge clignote
Voyant rouge clignote 3 fois
x3
ES
Luz blanca parpadea
Luz amarilla parpadea
Luz roja parpadea
Luz roja parpadea 3 veces
x3
PT-BR
Luz branca pisca
Luz amarela pisca
Luz vermelha pisca
Luz vermelha pisca 3 vezes
x3
RU
Белый свет мигает
Желтый свет мигает
Красный свет мигает
Красный свет мигает 3 раза
x3
PL
Białe światło miga
Żółte światło miga
Czerwone światło miga
Czerwone światło miga 3 razy
x3
>60%
59%-20%
19%-5%
<5%
x3
26
繁中
白光閃爍
黃光閃爍
紅光閃爍
紅光閃爍3次
x3
ID
Lampu putih berkedip
Lampu kuning berkedip
Lampu merah berkedip
Lampu merah berkedip 3 kali
x3
TH
ไฟสีขาวกระพริบ
ไฟสีเหลืองกระพริบ
ไฟสีแดงกระพริบ
ไฟสีแดงกระพริบ 3 ครั้ง
x3
흰색 깜빡임
노란색 깜빡임
빨간색 깜빡임
빨간색 3회 깜빡임
KR
x3
JP
白色光の点滅
黄色のライトが点滅
赤いライトが点滅
赤ランプが3回点滅
x3
FA
x3
HEB
x3
AR
x3
27

TROUBLESHOOTING
Q: Why can't earphones pair with my mobile phone?
A: Please check if your earphone is in pairing mode or re-connection
mode,check if Bluetooth search function of your Bluetooth device is
turned on, if all done, then go to Bluetooth menu of your Bluetooth
device, delete/ignore the earphone Bluetooth pairing name. After that,
you can try to reconnect Bluetooth according to above steps.
Q: Why is the connection not stable and cuts out intermittently?
A: Please check if there are any metal materials or obstacles within a
relatively close range or your surroundings that perhaps interfering with
Bluetooth connection. This may happen because Bluetooth is a radio
technology which is sensitive to objects between earphone and other
devices.
Q: What can I do if there is only one earphone produce sound?
A: Please place the two earphones into the charging case, close the case,
and take them out to check if both of them produce sounds. If there is
still sound from only one earphone, please reset both of them.
Q: Why do I experience a delay in video watching or game playing?
A: Aected by factors such as environment, network, and mobile phone
codec, there will be varying degrees of delay when the mobile phone
transmits audio data to the earphone.
Q: Why can't my earphone turn on?
A: Please recharge it and make sure it has enough battery power. If it is
fully charged and still nothing happens or if you are not able to charge
the unit, please contact our customer support for warrant cover.
28

WARRANTY INFORMATION
Warranty Period
QCY products come with a 12-month warranty period from the date of
delivery.
How to Solve My Problem
Online purchase: When applying for after-sales service, please give
priority to contacting the customer service of the purchase
channel/platform. The service support of QCY will provide technical
support services and solutions to process your after-sales questions.
Oine purchase: Please contact the store/distributor or agent directly to
assist with your after-sale question.
Valid proof of purchase to claim warranty
Products purchased from online: Please provide with order number or
information that clearly show the sales channel, product details, price,
sales date.
Products purchased from non-ocial channels: Please provide with
sales store information, order number, or product information evidence
confirmed by QCY service team.
Not Covered under Warranty
The manufacturer's warranty is avoid under the following circumstances
but not limited to:
• Lost, stolen, or free products.
• Items that have expired their warranty period.
• Products without sucient proof of purchase.
• Improper or inadequate maintenance or modification.
• Accident, misuse, abuse, contamination, or other external causes.
• The use of unspecified adapter and accessories.
• Malfunctions or damages resulting from natural disasters, earthquakes,
lightning, abnormal voltage, or environmental factors.
• Damages that occur as a result of one's failure to follow the
instructions.
29

FCC
Contact Details
For FAQS and more information
Please email to [email protected] or visit
https://www.qcy.com/
This equipment has been tested and found to comply with the limits for a
Class B digital device, pursuant to Part 15 of the FCC Rules. These limits
are designed to provide reasonable protection against harmful
interference in a residential installation.
This equipment generates uses and can radiate radio frequency energy
and, if not installed and used in accordance with the instructions, may
cause harmful interference to radio communications. However, there is
no guarantee that interference will not occur in a particular installation. If
this equipment does cause harmful interference to radio or television
reception, which can be determined by turning the equipment o and on,
the user is encouraged to try to correct the interference by one or more
of the following measures:
--Reorient or relocate the receiving antenna.
--Increase the separation between the equipment and receiver.
--Connect the equipment into an outlet on a circuit dierent from that to
which the receiver is connected.
--Consult the dealer or an experienced radio/TV technician for help.
This device complies with part 15 of the FCC Rules. Operation is subject
to the following two conditions:
(1)This device may not cause harmful interference, and (2) this device
must accept any interference received, including interference that may
cause undesired operation.
Changes or modifications not expressly approved by the party
responsible for compliance could void the user's authority to operate the
equipment.
30

IC STATEMENT
This device contains licence-exempt transmitter(s)/receiver(s) that
comply with Innovation, Science and Economic Development
Canada’s licence-exempt RSS(s). Operation is subject to the
following two conditions:
(1) This device may not cause interference.
(2) This device must accept any interference, including interference
that may cause undesired operation of the device
Cet appareil contient des émetteurs / récepteurs exemptés de
licence conformes aux RSS (RSS)d'Innovation, Sciences et
Développement économique Canada. Le fonctionnement est soumis
aux deux conditions suivantes :
(1) Cet appareil ne doit pas causer d'interférences.
(2) Cet appareil doit accepter toutes les interférences, y compris
celles susceptibles de provoquer un fonctionnement indésirable de
l'appareil.
Este equipamento não tem direito à proteção contra interferência
prejudicial e
não pode causar interferência em sistemas devidamente autorizados.
31
SAFETY INSTRUCTIONS
1.Please carefully read and retain this user manual before using the
product.
2.If the product is not used for an extended period (more than 2 weeks),
please recharge it.
3.You must choose a charger produced by a legitimate manufacturer and
certified by the national safety authority.
4. If your phone cannot detect the Bluetooth earbuds, either re-enter
pairing mode or perform a factory reset on the Bluetooth earbuds. If
there is a phone program error, close and reopen Bluetooth on the phone
or restart the phone.
5. Do not disassemble or modify the battery, insert foreign objects,
expose it to high temperatures, or immerse it in water or other liquids to
prevent battery leakage, overheating, ignition, or explosion. Battery
replacement should only be done by the manufacture.
6. Do not drop, crush, or puncture the battery. Prevent external pressure
that may lead to internal short circuits and overheating.
7. Do not dismantle or modify the earbuds for any reason, as it may result
in fire, electronic breakdown, or permanent damage to the product.
8. Do not expose the product to extremely low or high temperatures
(below 0°C or above 45°).
9. Do not the product indicator light near the eyes of children or animals.
10. Do not use the product during thunderstorms, as it may cause
abnormal operation and increase the risk of electric shock.
11. Do not use oil or other volatile liquids to clean the product.
12. Please do not use this device for long periods of time and at high
volume, as there is a risk of hearing damage.
WARNING! Prolonged exposure to loud noise can cause temporary or perma-
nent hearing damage or hearing loss. As a consequence, avoid listening for long
periods at high volume and keep the volume at an appropriate setting.
32
This marking indicates that this product should not be disposed with other
household wastes throughout the EU. To prevent possible harm to the
environment or human health from uncontrolled waste disposal, recycle it
responsibly to promote the sustainable reuse of material resources. To
return your used device, please use the return and collection systems or
contact the retailer where the product was purchased. They can take this
product for environmental safe recycling.
Notice:
the power delivered by the charger must be between min 2 Watts
required by the radio equipment, and max 5 Watts in order to achieve the
maximum charging speed
2-5
W
Manufacturer: Dongguan Hele Electronics Co., Ltd
Address: Room 101, Block 1, No.38, Daojiao Daohou Road, Daojiao
Town, Dongguan City, Guangdong Province, China
E-mail: [email protected]
Website: www.qcy.com
Wireless frequency: 2.402~2.480GHz
RF power of transmission: <4dBm
33