
https://ium-pim.bsh-digital.com/8001358635
[de]
Weitere Informationen und Erklärungen finden Sie online. Scannen Sie den QR-Code auf der Titelseite.
[en]
You can find additional information and explanations online. Scan the QR code on the title page.
[fr]
Vous pouvez trouver d'autres informations et explications en ligne. Scannez le code QR sur la page de titre.
[it]
Puoi trovare ulteriori info e spiegazioni online. Scansiona il codice QR sul frontespizio.
2
1
2
3
4
5
7
8
9
10
1516
12
13
14
6
11
1
2
3
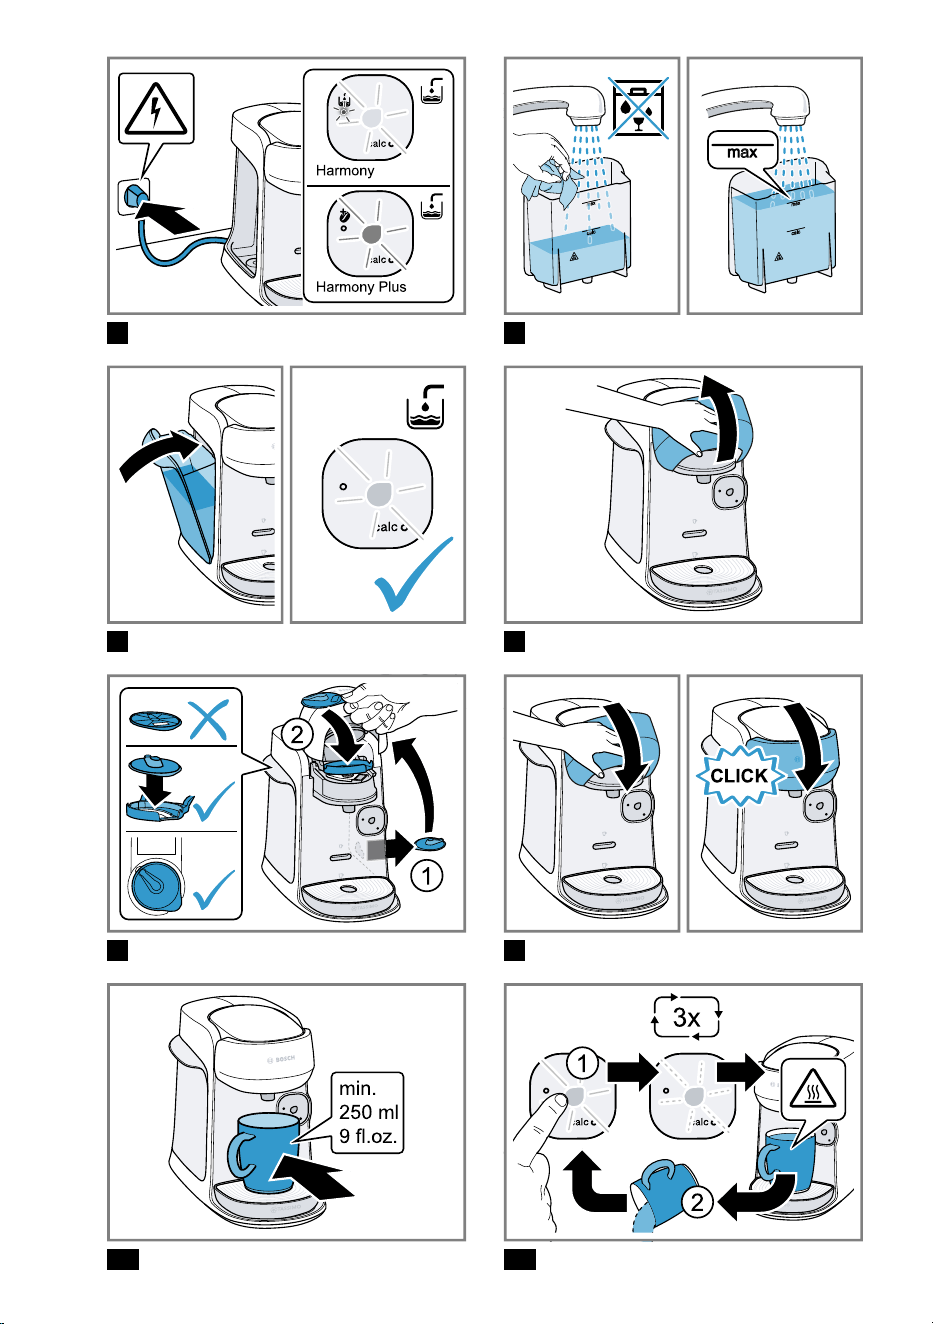
4 5
6 7
8 9
10 11
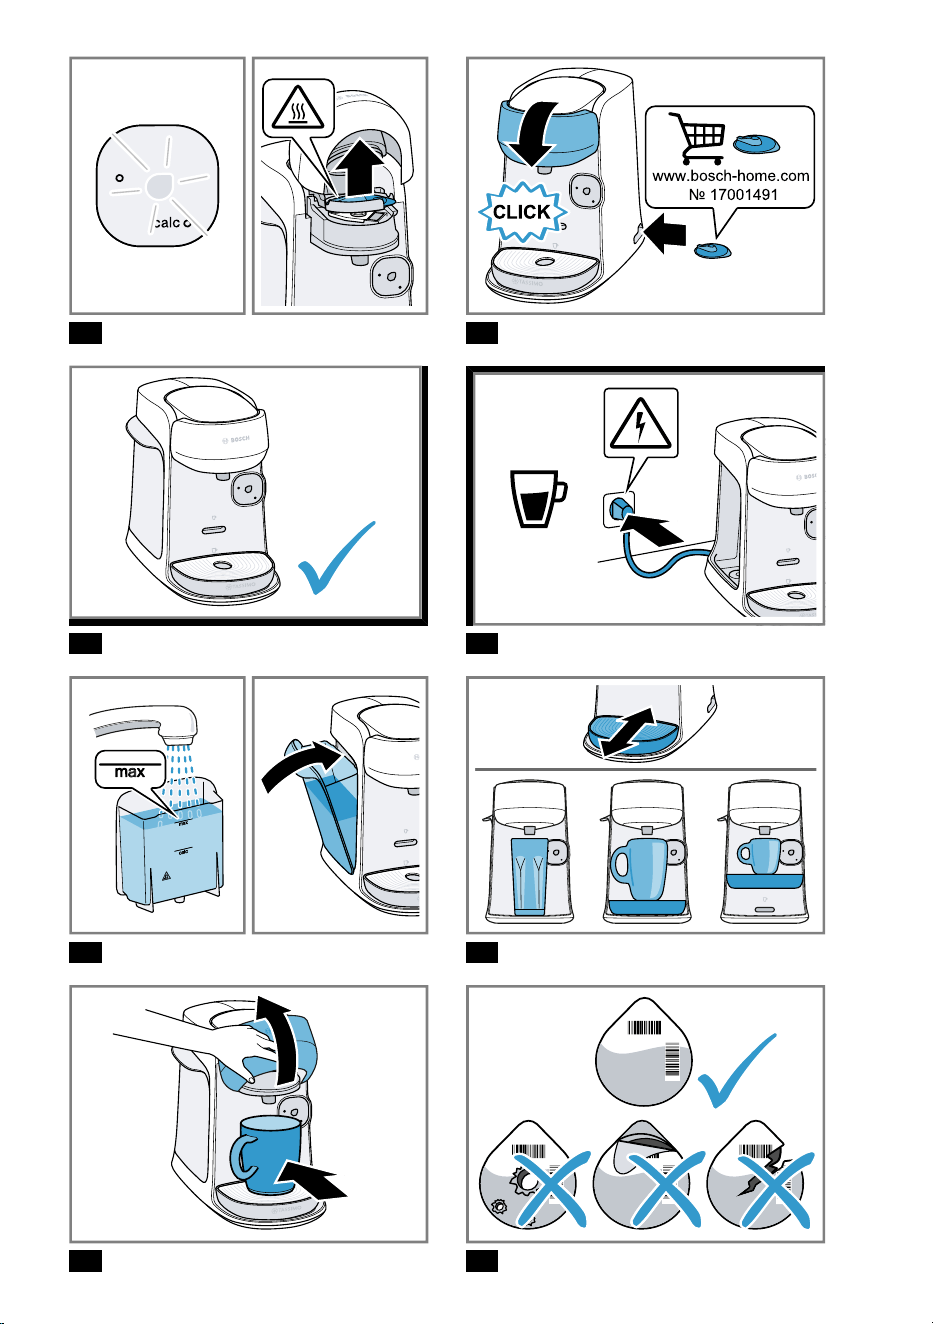
12 13
14 15
16 17
18
19
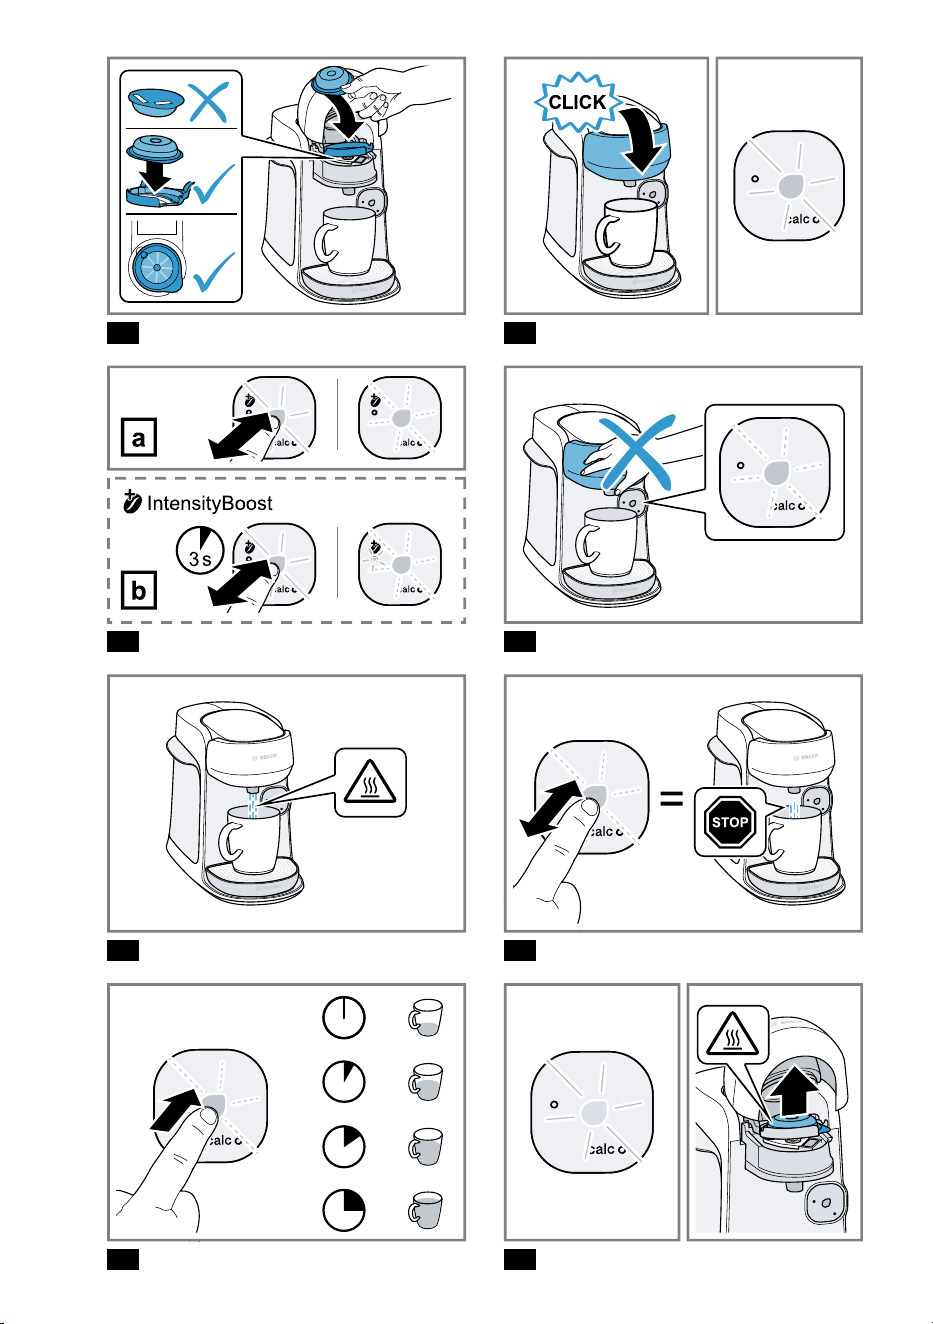
20 21
22 23
24 25
26 27
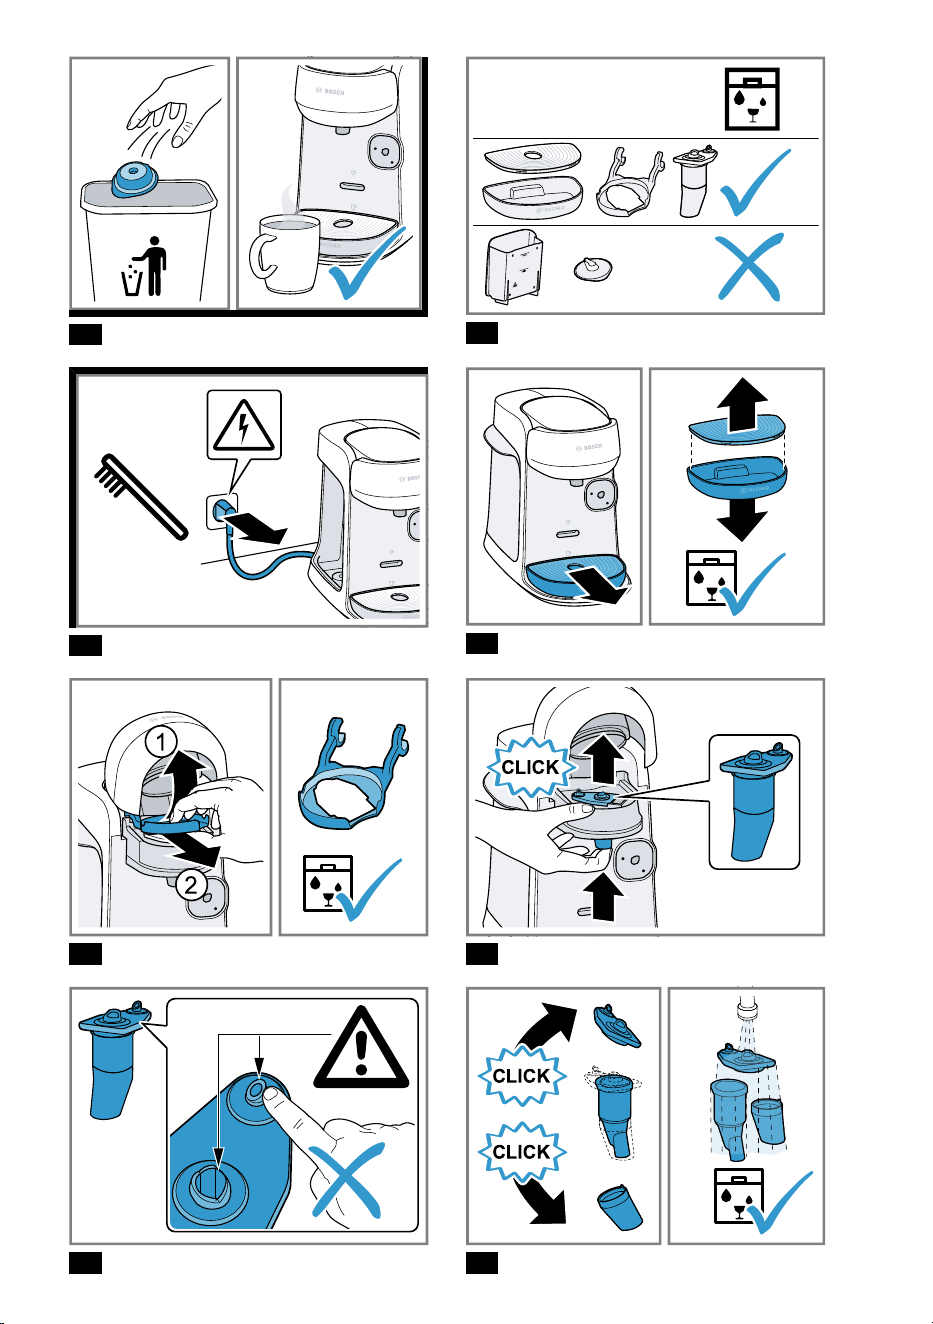
28
29
30
31
32 33
34 35
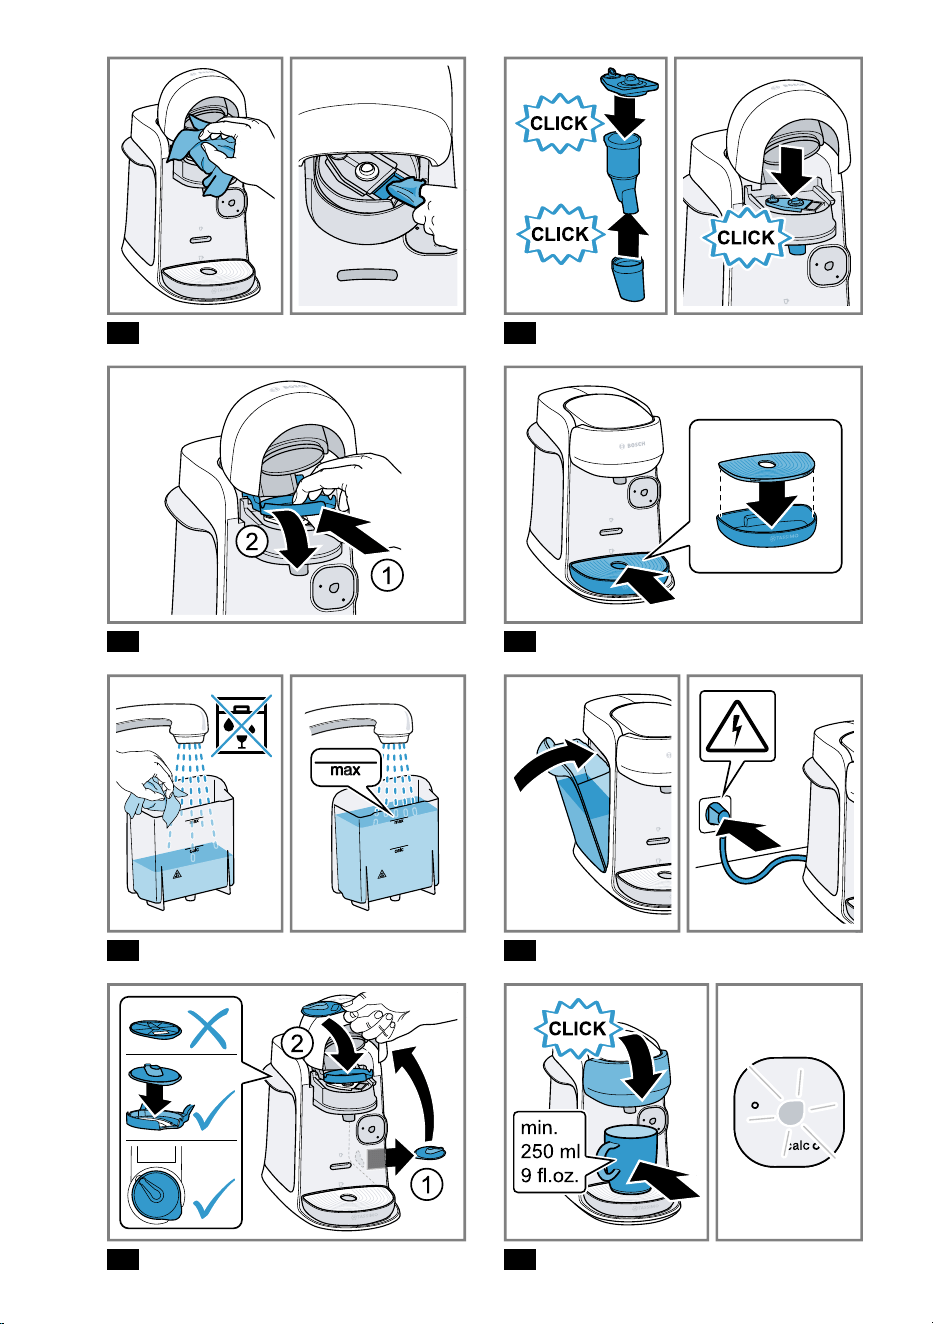
36 37
38 39
40 41
42 43
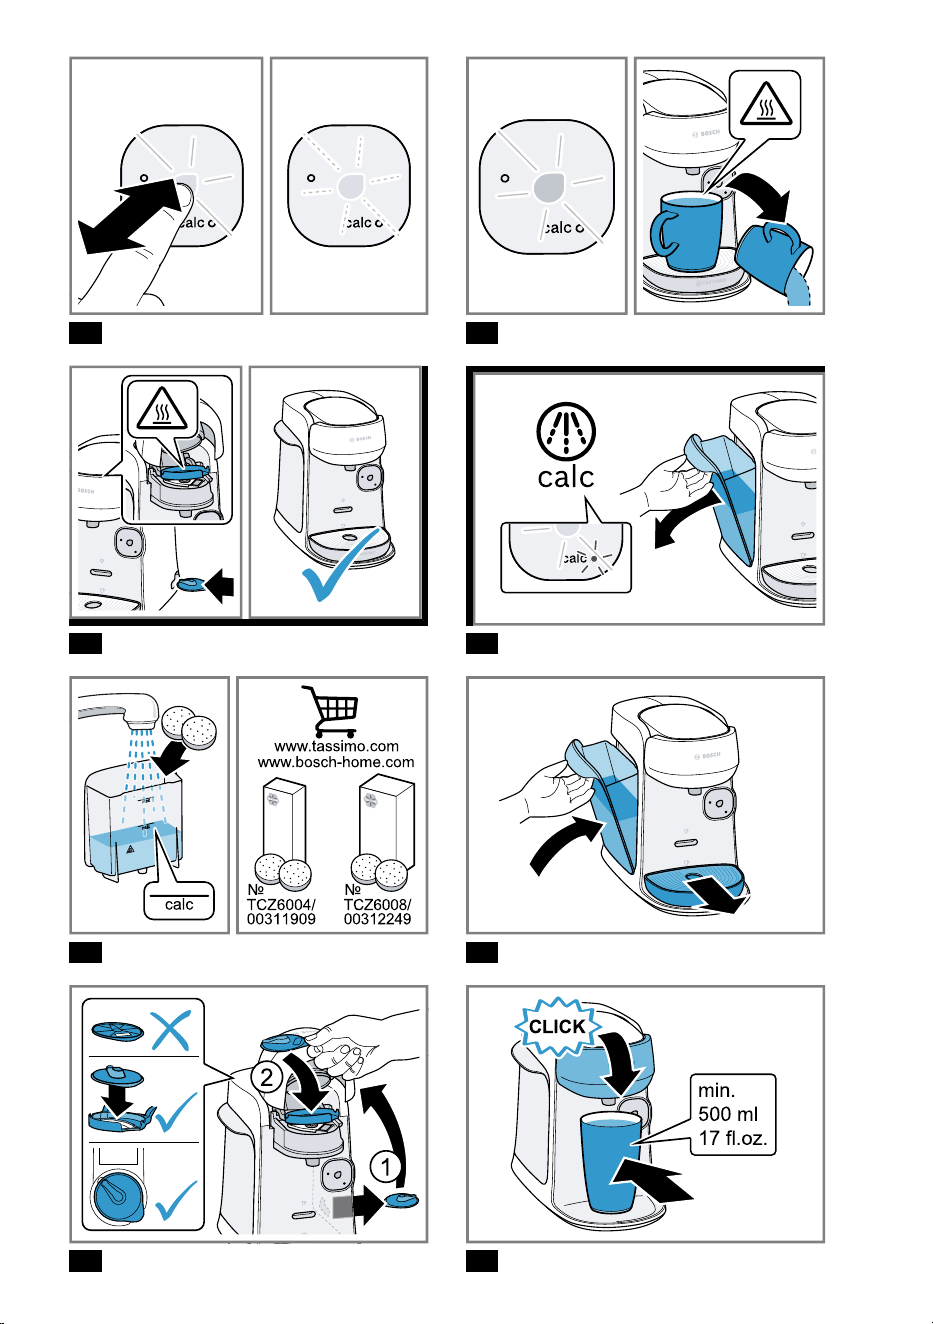
44 45
46 47
48 49
50 51
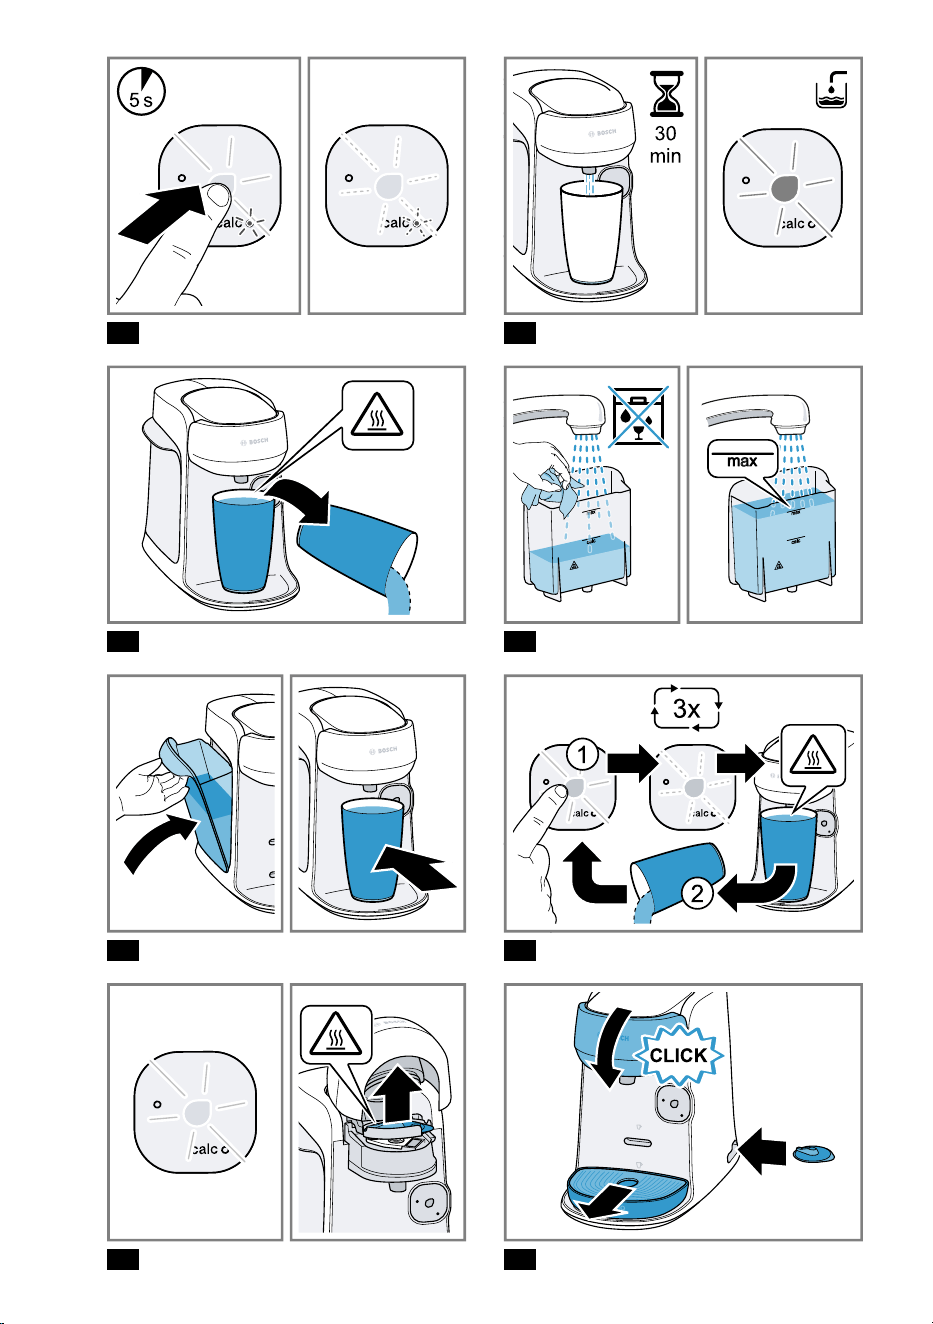
52 53
54 55
56 57
58 59
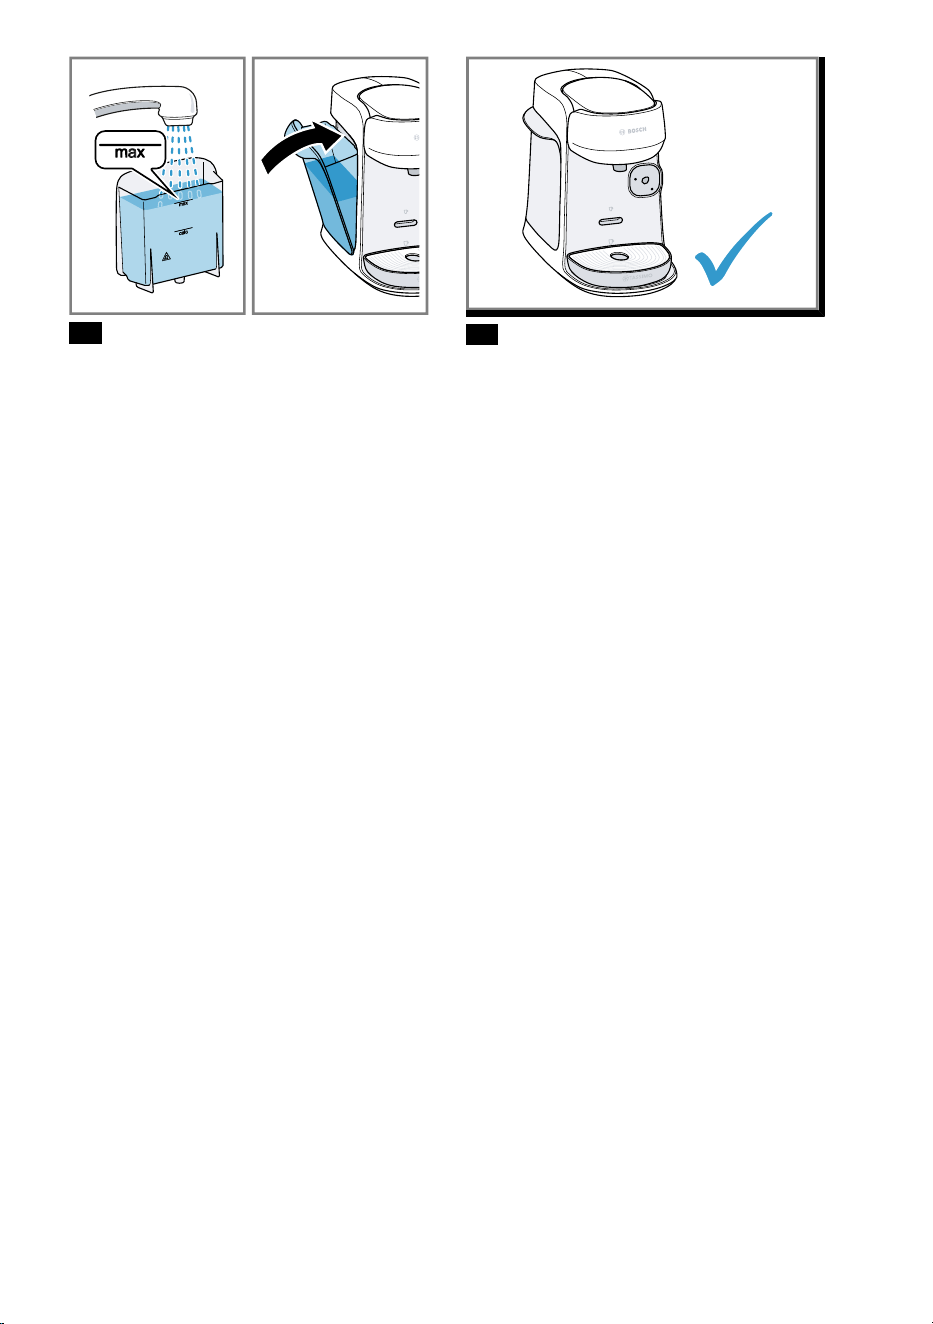
60
61

de Inhaltsverzeichnis
InhaltsverzeichnisInhaltsverzeichnis
Sicherheit ............................................... 12
Übersicht ................................................ 14
Bedienfeld ................................................... 14
Erste Inbetriebnahme vornehmen ........ 15
Bedienung .............................................. 15
Getränk zubereiten .................................... 15
IntensityBoost
1
...................................... 15
Reinigen und Pflegen ............................ 15
Geschirrspülertauglichkeit ........................ 15
Gerät reinigen ............................................. 15
Gerät entkalken .......................................... 15
Störungen beheben ............................... 15
Technische Daten .................................. 18
Altgerät entsorgen ................................. 18
Kundendienst ......................................... 18
Sicherheit Sicherheit
¡ Lesen Sie diese Anleitung sorgfältig.
¡ Bewahren Sie die Anleitung sowie die Produktinformationen für
einen späteren Gebrauch oder Nachbesitzer auf.
¡ Schließen Sie das Gerät bei einem Transportschaden nicht an.
Verwenden Sie das Gerät nur:
¡ um Heißgetränke zuzubereiten.
¡ unter Aufsicht.
¡ im privaten Haushalt und in geschlossenen Räumen des häusli-
chen Umfelds.
¡ bis zu einer Höhe von 2000m über dem Meeresspiegel.
Dieses Gerät kann von Kindern ab 8 Jahren und darüber und von
Personen mit reduzierten physischen, sensorischen oder mentalen
Fähigkeiten oder Mangel an Erfahrung und/oder Wissen benutzt
werden, wenn sie beaufsichtigt oder bezüglich des sicheren Ge-
brauchs des Geräts unterwiesen wurden und die daraus resultie-
renden Gefahren verstanden haben.
Kinder dürfen nicht mit dem Gerät spielen.
Reinigung und Benutzerwartung dürfen nicht durch Kinder durch-
geführt werden, es sei denn, sie sind 8 Jahre oder älter und wer-
den beaufsichtigt.
Kinder jünger als 8 Jahre vom Gerät und der Anschlussleitung
fernhalten.
Verpackungsmaterial von Kindern fernhalten.
Kinder nicht mit Verpackungsmaterial spielen lassen.
Kleinteile von Kindern fernhalten.
Kinder nicht mit Kleinteilen spielen lassen.
1
Je nach Geräteausstattung
12

Sicherheit de
Das Gerät nur gemäß den Angaben auf dem Typenschild an-
schließen und betreiben.
Das Gerät nur über eine vorschriftsmäßig installierte Steckdose
mit Erdung an ein Stromnetz mit Wechselstrom anschließen.
Das Schutzleitersystem der elektrischen Hausinstallation muss
vorschriftsmäßig installiert sein.
Nie ein beschädigtes Gerät betreiben.
Nie ein Gerät mit gerissener oder gebrochener Oberfläche be-
treiben.
Nie an der Netzanschlussleitung ziehen, um das Gerät vom
Stromnetz zu trennen. Immer am Netzstecker der Netzanschluss-
leitung ziehen.
Wenn das Gerät oder die Netzanschlussleitung beschädigt ist,
sofort den Netzstecker der Netzanschlussleitung ziehen oder die
Sicherung im Sicherungskasten ausschalten.
Den Kundendienst rufen.
Seite18
Nur dafür geschultes Fachpersonal darf Reparaturen am Gerät
durchführen.
Nur Original-Ersatzteile dürfen zur Reparatur des Geräts verwen-
det werden.
Wenn die Netzanschlussleitung dieses Geräts beschädigt wird,
muss sie durch den Hersteller oder seinen Kundendienst oder
eine ähnlich qualifizierte Person ersetzt werden, um Gefährdun-
gen zu vermeiden.
Nie das Gerät oder die Netzanschlussleitung in Wasser tauchen.
Auf die Gerätesteckverbindung darf keine Flüssigkeit überlaufen.
Das Gerät nur in geschlossenen Räumen verwenden.
Nie das Gerät großer Hitze und Nässe aussetzen.
Keinen Dampfreiniger oder Hochdruckreiniger verwenden, um
das Gerät zu reinigen.
Das Gerät ausreichend belüften.
Nie das Gerät in einem Schrank betreiben.
Das Gerät während des Betriebs stets beaufsichtigen.
Keine Verlängerungskabel oder Mehrfachsteckdosenleisten ver-
wenden.
Nur vom Hersteller zugelassene Adapter und Netzanschlusslei-
tungen verwenden.
Wenn die Netzanschlussleitung zu kurz ist und keine längere
Netzanschlussleitung verfügbar ist, Elektrofachbetrieb kontaktie-
ren, um die Hausinstallation anzupassen.
13
de Übersicht
Nie das Brühsystem während des Betriebs öffnen.
Nur die originalen Tassimo TDISCs benutzen.
Nie eine beschädigte T DISC benutzen.
Nie eine Getränke-T DISC mehrmals benutzen.
Nie die heißen Geräteteile berühren.
Nach dem Gebrauch die heißen Geräteteile vor dem Berühren
abkühlen lassen.
Die Getränke bei Bedarf abkühlen lassen.
Den Hautkontakt mit austretenden Flüssigkeiten und Dämpfen
vermeiden.
Um Verletzungen zu vermeiden, das Gerät nur bestimmungsge-
mäß verwenden.
Beim Einlegen der T DISC oder dem Reinigen auf die Finger
achten.
Personen mit elektronischen Implantaten müssen 10cm Min-
destabstand zum Gerät und zum entnommenen Wassertank ein-
halten.
Die Reinigungshinweise zur Hygiene zum Gerät beachten.
Das Gerät ausschließlich mit frischem, kaltem Trinkwasser ohne
Kohlensäure verwenden.
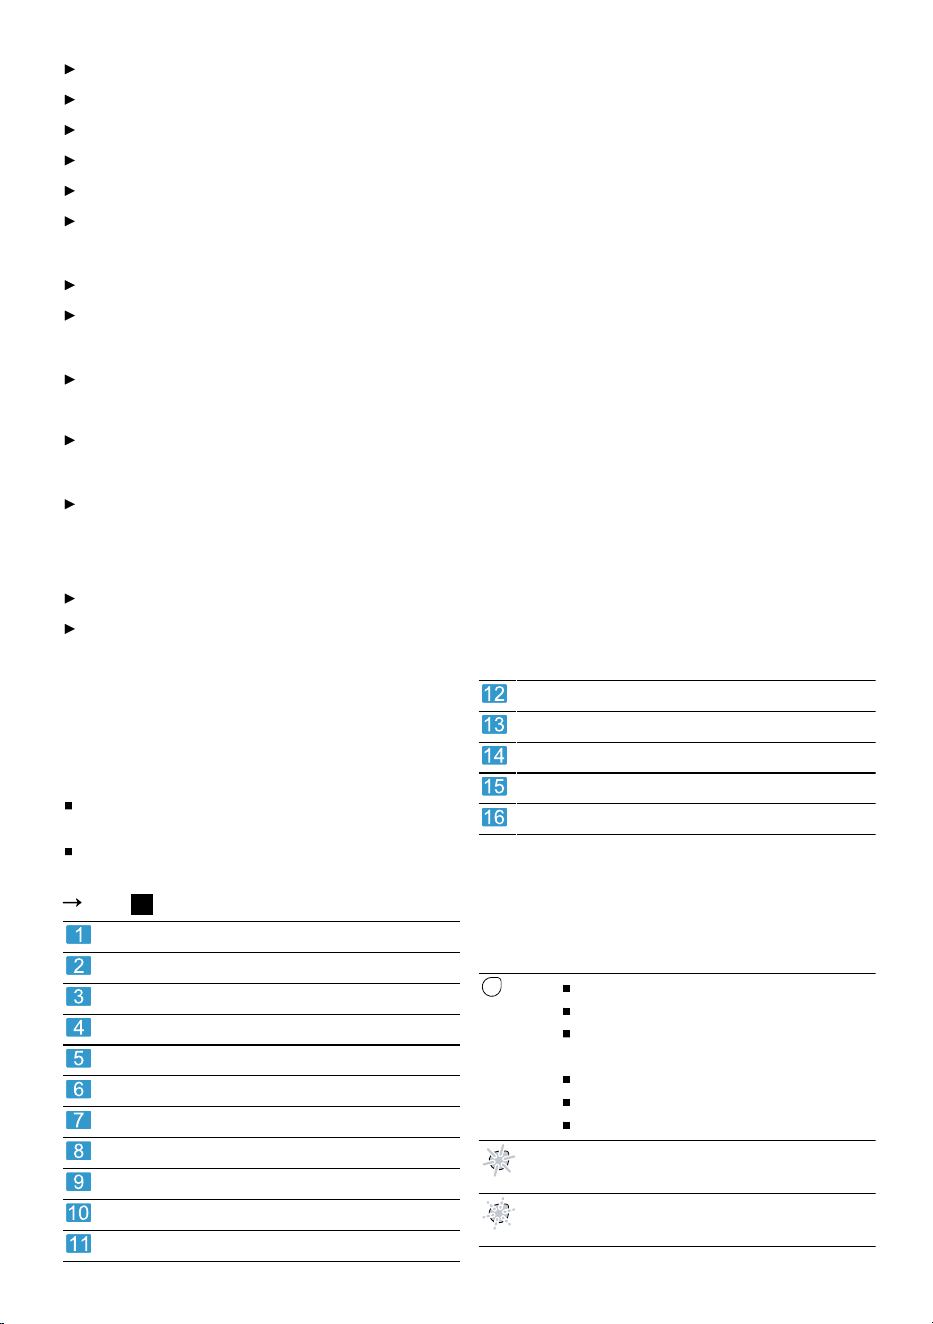
ÜbersichtÜbersicht
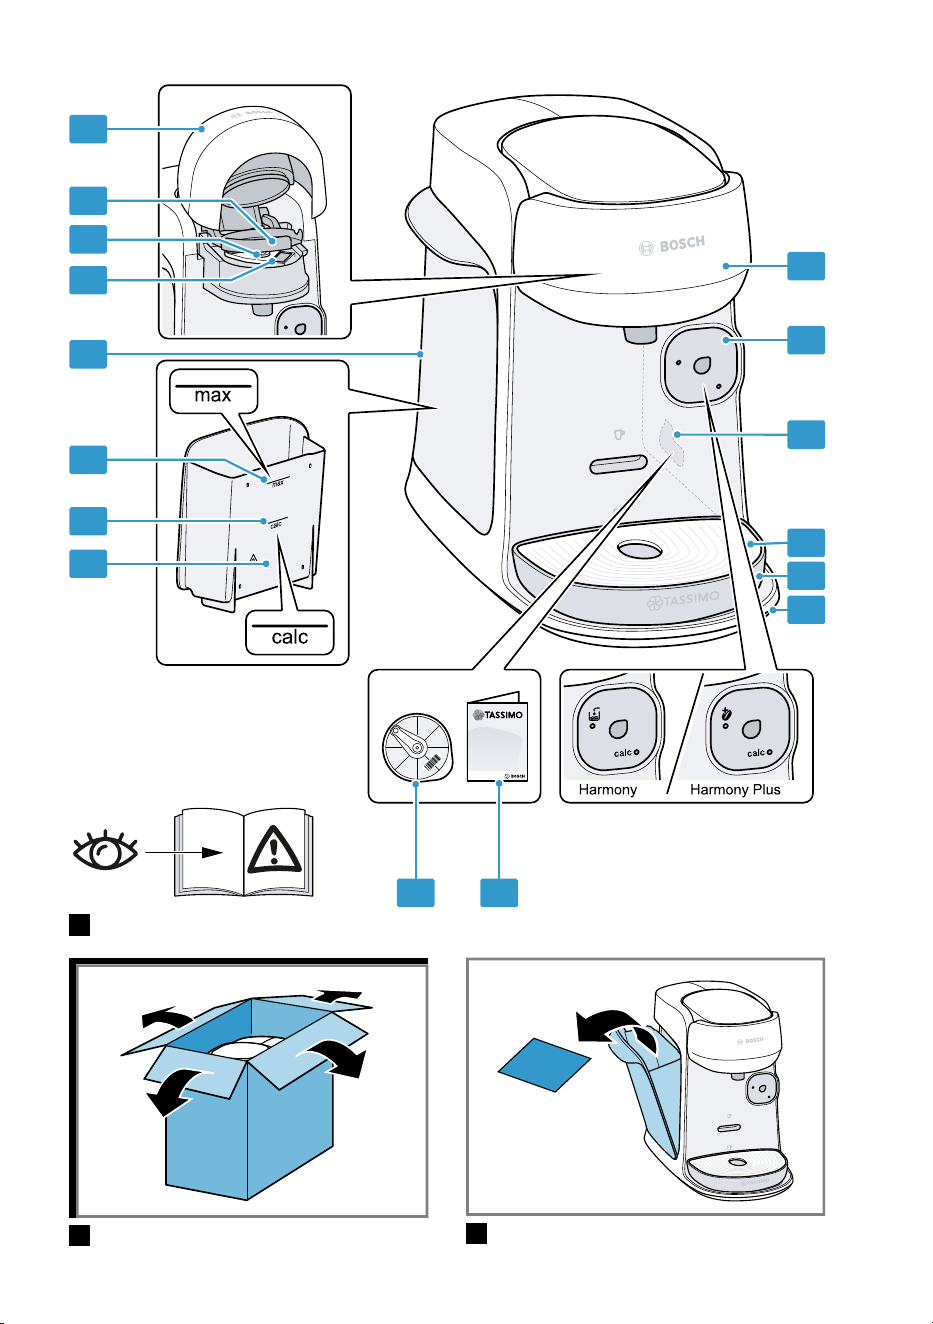
Hier finden Sie eine Übersicht über die Be-
standteile Ihres Geräts.
Hinweise
Diese Anleitung umfasst 2 Ausstattungs-
varianten: harmony und harmony plus.
Je nach Gerätetyp sind Abweichungen in
den Farben und Einzelheiten möglich.
Abb.
1
Schwimmer
Markierung calc
Markierung max
Wassertank
T DISC-Lesefenster
T DISC-Stanzvorrichtung
T DISC-Träger
Verschluss
Brühsystem
Bedienfeld
Aufbewahrungsfach
Tropfgitter
Tassenpodest
Auffangbehälter
Kurzanleitung Reinigen / Entkalken
Service T DISC
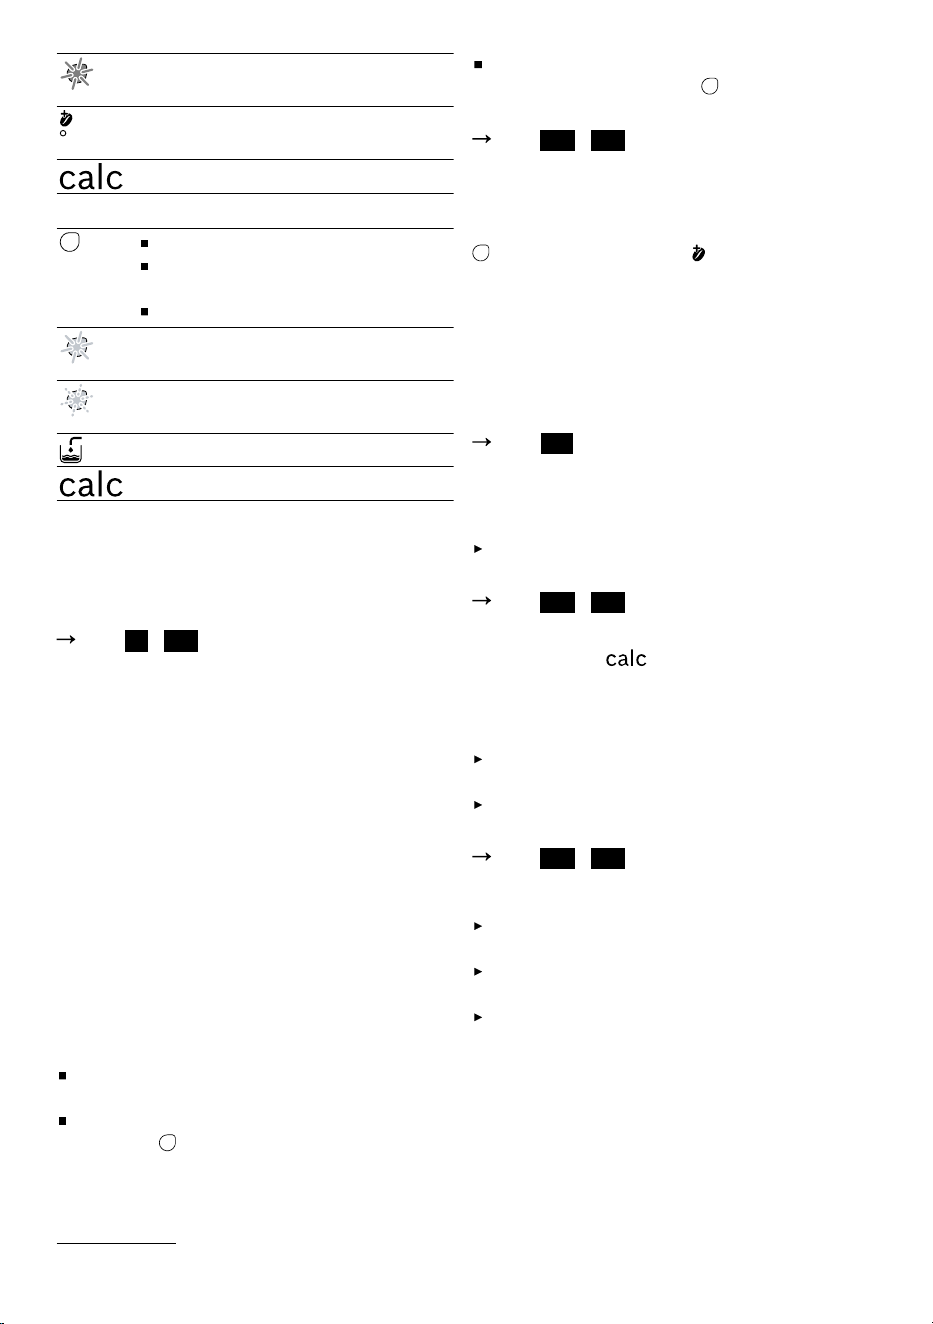
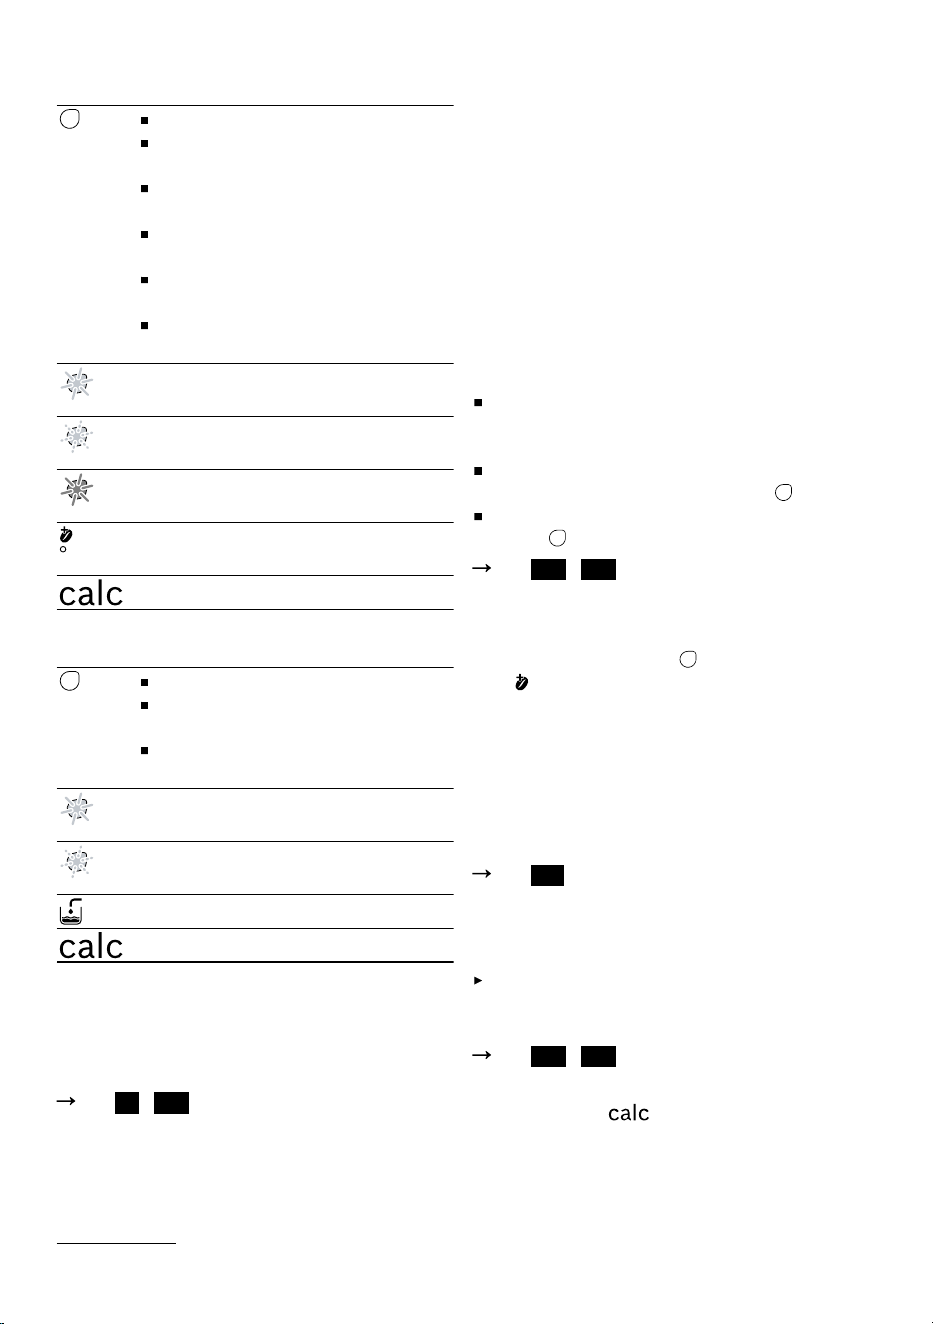
Bedienfeld
Über das Bedienfeld stellen Sie alle Funk-
tionen Ihres Geräts ein und erhalten Infor-
mationen zum Betriebszustand.
Geräte mit IntensityBoost: harmony plus
Gerät aktivieren.
Getränkebezug starten.
Getränkebezug mit Intensity-
Boost starten.
Getränkebezug stoppen.
Getränkebezug verlängern.
Service-Programm starten.
LED leuchtet gelb, Gerät ist be-
triebsbereit.
LED blinkt gelb, Getränkebezug
läuft.
14
Erste Inbetriebnahme vornehmen de
LED leuchtet rot, Wassertank fül-
len.
LED leuchtet gelb, IntensityBoost
ist aktiviert.
Gerät entkalken.
Geräte ohne IntensityBoost: harmony
Gerät aktivieren.
Getränkebezug starten, stop-
pen und verlängern.
Service-Programm starten.
LED leuchtet gelb, Gerät ist be-
triebsbereit.
LED blinkt gelb, Getränkebezug
läuft.
Wassertank füllen.
Gerät entkalken.
Erste Inbetriebnahme vornehmenErste Inbetriebnahme vorneh-
men
Folgen Sie der Bildanleitung am Anfang
dieser Anleitung.
Abb.
2
-
14
Hinweis: Mit dem Gerät können Sie eine
Vielzahl von Heißgetränken zubereiten.
Wenn Sie eine TDISC einlegen, liest das
IntelliBrew
TM
System den Barcode der
TDISC und stellt automatisch die optimale
Wassermenge, Brühtemperatur und Brüh-
dauer für dieses Getränk ein.
BedienungBedienung
Getränk zubereiten
Erfahren Sie, wie Sie sich ein Getränk Ihrer
Wahl zubereiten. Folgen Sie der Bildanlei-
tung am Anfang dieser Anleitung.
Hinweis: Füllen Sie den Wassertank täglich
mit frischem, kaltem Trinkwasser ohne Koh-
lensäure.
Tipps
Sie können die Tassen vor dem Bezug
auch mit Heißwasser vorwärmen.
Um den Bezug vorzeitig zu beenden,
kurz auf drücken.
Um den Bezug zu verlängern, bis zur ge-
wünschten Füllmenge gedrückt hal-
ten.
Abb.
15
-
28
IntensityBoostIntensityBoost
1
Um einen Kaffee mit intensiverem Ge-
schmack zu erhalten, drücken Sie die Taste
3Sekunden. Die LED leuchtet und Ihr
Gerät passt den Brühvorgang automatisch
an.
Reinigen und PflegenReinigen und Pflegen
Geschirrspülertauglichkeit
Hier finden Sie eine Übersicht der Bauteile,
die Sie im Geschirrspüler reinigen können.
Abb.
29
Gerät reinigen
Folgen Sie der Bildanleitung am Anfang
dieser Anleitung.
Beim Einlegen der T DISC oder dem Rei-
nigen auf die Finger achten.
Abb.
30
-
46
Gerät entkalken
Wenn die LED leuchtet, führen Sie das
Entkalkungsprogramm durch. Folgen Sie
der Bildanleitung am Anfang dieser Anlei-
tung.
Den Entkalkungsvorgang nach Anwei-
sung sofort durchführen.
Keine Entkalkungsmittel mit Phosphor-
säure verwenden.
Abb.
47
-
61
Störungen behebenStörungen beheben
Nur dafür geschultes Fachpersonal darf
Reparaturen am Gerät durchführen.
Nur Original-Ersatzteile dürfen zur Repa-
ratur des Geräts verwendet werden.
Wenn die Netzanschlussleitung dieses
Geräts beschädigt wird, muss sie durch
den Hersteller oder seinen Kundendienst
oder eine ähnlich qualifizierte Person er-
setzt werden, um Gefährdungen zu ver-
meiden.
Gerät funktioniert nicht.
LEDs leuchten nicht.
1
Je nach Geräteausstattung
15

de Störungen beheben
Gerät hat keine Stromversorgung.
Prüfen Sie, ob das Gerät an die Strom-
versorgung angeschlossen ist.
Brühvorgang startet, Getränk wird
nicht ausgegeben.
Wassertank wurde während des Brühvor-
gangs entnommen und wieder eingesetzt
oder Gerät wurde längere Zeit nicht be-
nutzt.
Starten Sie einen Reinigungsvorgang mit
der Service TDISC.
"Gerät reinigen", Seite15
Schwimmer im Wassertank hängt fest.
1.
Entkalken Sie das Gerät.
"Gerät entkalken", Seite15
2.
Greifen Sie in den Wassertank und be-
wegen Sie den Schwimmer auf und ab.
Brühvorgang startet nicht.
1
Wassertank ist nicht ausreichend gefüllt.
1.
Füllen Sie den Wassertank bis zur Mar-
kierung mit frischem, kaltem Was-
ser.
"Getränk zubereiten", Seite15
2.
Setzen Sie den Wassertank ein.
Brühvorgang startet nicht, Statusan-
zeige leuchtet rot.
2
Wassertank ist nicht ausreichend gefüllt.
1.
Füllen Sie den Wassertank bis zur Mar-
kierung mit frischem, kaltem Was-
ser.
"Getränk zubereiten", Seite15
2.
Setzen Sie den Wassertank ein.
Brühvorgang startet nicht, Statusan-
zeige leuchtet rot.
1
TDISC ist nicht richtig eingelegt.
Prüfen Sie, ob die TDISC eingelegt ist.
"Getränk zubereiten", Seite15
Strichcode der TDISC wird nicht erkannt.
Säubern Sie das TDISC-Lesefenster mit
einem weichen, feuchten Tuch.
"Gerät reinigen", Seite15
Streichen Sie die Folie der TDISC glatt.
Besteht das Problem weiterhin, kontak-
tieren Sie die TASSIMO Infoline.
Gerät war beim Einlegen der TDISC nicht
an die Stromversorgung angeschlossen.
Schließen Sie das Gerät an die Stromver-
sorgung an, bevor Sie die TDISC einle-
gen.
"Getränk zubereiten", Seite15
Brühvorgang startet nicht, Statusan-
zeige blinkt rot.
2
TDISC ist nicht richtig eingelegt.
Prüfen Sie, ob die TDISC eingelegt ist.
"Getränk zubereiten", Seite15
Strichcode der TDISC wird nicht erkannt.
Säubern Sie das TDISC-Lesefenster mit
einem weichen, feuchten Tuch.
"Gerät reinigen", Seite15
Streichen Sie die Folie der TDISC glatt.
Entfernen Sie die benutzte T DISC.
"Getränk zubereiten", Seite15
Besteht das Problem weiterhin, kontak-
tieren Sie die TASSIMO Infoline.
Gerät war beim Einlegen der TDISC nicht
an die Stromversorgung angeschlossen.
Schließen Sie das Gerät an die Stromver-
sorgung an, bevor Sie die TDISC einle-
gen.
"Getränk zubereiten", Seite15
Brühsystem lässt sich nicht schlie-
ßen.
TDISC-Stanzvorrichtung oder TDISC-Trä-
ger ist nicht richtig eingesetzt.
1.
Drücken Sie die TDISC-Stanzvorrichtung
in die Halterung, bis sie hörbar einrastet.
"Gerät reinigen", Seite15
2.
Kontrollieren Sie die Position des
TDISC-Trägers.
TDISC ist nicht richtig eingelegt.
1.
Legen Sie die TDISC mit der bedruckten
Seite nach unten ein.
"Getränk zubereiten", Seite15
2.
Prüfen Sie, ob die Lasche der TDISC in
der Aussparung liegt.
1
Gilt nur für Geräte der Ausstattungsvariante harmony.
2
Gilt nur für Geräte der Ausstattungsvariante harmony plus.
16

Störungen beheben de
Brühsystem lässt sich nicht öffnen.
Brühsystem ist verriegelt.
Öffnen Sie das Brühsystem erst, wenn
die Statusanzeige permanent leuchtet.
"Getränk zubereiten", Seite15
Bleibt das Brühsystem weiterhin verrie-
gelt, kontaktieren Sie die TASSIMO Infoli-
ne.
Aus dem Brühsystem tropft Wasser.
TDISC ist beschädigt oder nicht richtig ein-
gesetzt.
Verwenden Sie eine neue TDISC.
"Getränk zubereiten", Seite15
T DISC-Stanzvorrichtung ist nicht richtig ein-
gesetzt.
Drücken Sie die TDISC-Stanzvorrichtung
in die Halterung, bis sie hörbar einrastet.
"Gerät reinigen", Seite15
Unter dem Tassenpodest befindet
sich Wasser.
Technisch bedingt hat sich Kondensations-
wasser gebildet oder Ventile sind verkalkt.
Entkalken Sie das Gerät.
"Gerät entkalken", Seite15
Keine LED leuchtet.
Gerät ist ausgeschaltet.
Drücken Sie auf oder öffnen oder
schließen Sie das Brühsystem.
Alle LEDs blinken.
Probleme bei der Spannungsversorgung
bestehen.
1.
Ziehen Sie den Netzstecker, warten Sie
5Minuten und stecken Sie den Netzste-
cker wieder ein.
2.
Wenn das Problem weiterhin besteht,
kontaktieren Sie die TASSIMO Infoline.
LED leuchtet, obwohl enthärte-
tes Wasser verwendet wurde.
Enthärtetes Wasser enthält noch geringe
Mengen an Kalk.
Entkalken Sie das Gerät.
"Gerät entkalken", Seite15
Getränkequalität hat sich verschlech-
tert, z.B. Crema oder Volumen.
Getränkeauslauf ist verschmutzt.
Reinigen Sie den Getränkeauslauf.
Reinigen Sie das Brühsystem mit der
TDISC.
"Gerät reinigen", Seite15
Gerät ist verkalkt.
Entkalken Sie das Gerät.
"Gerät entkalken", Seite15
Getränkevolumen hat sich verringert.
Getränkebezug stoppt.
Wassertank ist nicht ausreichend gefüllt.
1.
Füllen Sie den Wassertank bis zur Mar-
kierung mit frischem, kaltem Was-
ser.
"Getränk zubereiten", Seite15
2.
Halten Sie gedrückt, bis die ge-
wünschte Füllmenge erreicht ist.
LED leuchtet, obwohl sich genug
Wasser im Wassertank befindet.
1
Schwimmer im Wassertank hängt fest.
1.
Entkalken Sie das Gerät.
"Gerät entkalken", Seite15
2.
Greifen Sie in den Wassertank und be-
wegen Sie den Schwimmer auf und ab.
LED leuchtet rot, obwohl sich ge-
nug Wasser im Wassertank befindet.
2
Schwimmer im Wassertank hängt fest.
1.
Entkalken Sie das Gerät.
"Gerät entkalken", Seite15
2.
Greifen Sie in den Wassertank und be-
wegen Sie den Schwimmer auf und ab.
LED und LED leuchten gleich-
zeitig und kein Brühvorgang ist
möglich.
1
Gerät hat eine Störung.
1.
Ziehen Sie den Netzstecker.
"Gerät reinigen", Seite15
2.
Kontaktieren Sie die TASSIMO Infoline.
1
Gilt nur für Geräte der Ausstattungsvariante harmony.
2
Gilt nur für Geräte der Ausstattungsvariante harmony plus.
17
de Technische Daten
LED und LED blinken, kein
Brühvorgang ist möglich.
1
Gerät hat eine Störung.
1.
Ziehen Sie den Netzstecker.
"Gerät reinigen", Seite15
2.
Kontaktieren Sie die TASSIMO Infoline.
Technische DatenTechnische Daten
Spannung 220–240V∼
Frequenz 50Hz
Anschlusswert 1400W
Altgerät entsorgenAltgerät entsorgen
Das Gerät umweltgerecht entsorgen.
Informationen über aktuelle Entsor-
gungswege erhalten Sie bei Ihrem Fach-
händler sowie Ihrer Gemeinde- oder
Stadtverwaltung.
Dieses Gerät ist entsprechend
der europäischen Richtlinie
2012/19/EU über Elektro-
und Elektronikaltgeräte (waste
electrical and electronic
equipment – WEEE) gekenn-
zeichnet.
Die Richtlinie gibt den Rah-
men für eine EU-weit gültige
Rücknahme und Verwertung
der Altgeräte vor.
KundendienstKundendienst
Die Informationen gemäß Verordnung (EU)
2023/826 finden Sie online unter
www.bosch-home.com
auf der Produktseite
und der Serviceseite Ihres Geräts bei den
Gebrauchsanleitungen und zusätzlichen
Dokumenten.
Gedruckt auf 100% Recyclingpapier
1
Gilt nur für Geräte der Ausstattungsvariante harmony plus.
18 Gedruckt auf 100% Recyclingpapier

Table of contents en
Table of contentsTable of contents
Safety .................................................... 19
Overall view .......................................... 21
Control panel ........................................... 21
Performing initial start-up ................... 22
Operation .............................................. 22
Preparing a drink ..................................... 22
IntensityBoost
1
.................................... 22
Cleaning and servicing ........................ 22
Dishwasher-safe components ............... 22
Cleaning the appliance ........................... 22
Descale the appliance ............................ 22
Troubleshooting .................................. 22
Technical specifications ..................... 24
Disposing of old appliance ................. 24
Customer Service ................................ 25
Safety Safety
¡ Read this instruction manual carefully.
¡ Keep the instruction manual and the product information safe for
future reference or for the next owner.
¡ Do not connect the appliance if it has been damaged in transit.
Only use this appliance:
¡ for preparing hot drinks.
¡ under supervision.
¡ in private households and in enclosed spaces in a domestic en-
vironment.
¡ up to an altitude of max. 2000m above sea level.
This appliance may be used by children aged 8 or over and by
people who have reduced physical, sensory or mental abilities or
inadequate experience and/or knowledge, provided that they are
supervised or have been instructed on how to use the appliance
safely and have understood the resulting dangers.
Do not let children play with the appliance.
Children must not perform cleaning or user maintenance unless
they are at least 8 years old and are being supervised.
Keep children under the age of 8 years away from the appliance
and power cable.
Keep packaging material away from children.
Do not let children play with packaging material.
Keep small parts away from children.
Do not let children play with small parts.
Connect and operate the appliance only in accordance with the
specifications on the rating plate.
1
Depending on the appliance specifications
19

en Safety
Connect the appliance to a power supply with alternating current
only via a properly installed socket with earthing.
The protective conductor system of the domestic electrical in-
stallation must be properly installed.
Never operate a damaged appliance.
Never operate an appliance with a cracked or fractured surface.
Never pull on the power cord to unplug the appliance. Always
unplug the appliance at the mains.
If the appliance or the power cord is damaged, immediately un-
plug the power cord or switch off the fuse in the fuse box.
Call customer service.
Page25
Repairs to the appliance should only be carried out by trained
specialist staff.
Only use genuine spare parts when repairing the appliance.
If the power cord of this appliance is damaged, it must be re-
placed by the manufacturer, the manufacturer's Customer Ser-
vice or a similarly qualified person in order to prevent any risk.
Never immerse the appliance or the power cord in water.
Liquids must not be spilled on the appliance plug connection.
Only use the appliance in enclosed spaces.
Never expose the appliance to intense heat or humidity.
Do not use steam- or high-pressure cleaners to clean the appli-
ance.
Ventilate the appliance adequately.
Never operate the appliance in a cabinet.
Never leave the appliance unattended while it is switched on.
Do not use extension cables or multiple socket strips.
Only use adapters and power cords approved by the manufac-
turer.
If the power cord is too short and a longer one is not available,
please contact an electrician to have the domestic installation
adapted.
Never open the brewing system during operation.
Only use the original Tassimo TDISCs.
Never use a damaged T DISC.
Never use a drinks T DISC more than once.
Never touch hot appliance parts.
After use, allow hot appliance parts to cool down before touch-
ing.
20
Overall view en
Leave drinks to cool down if necessary.
Do not let escaping liquids or steam come into contact with your
skin.
To avoid injuries, only use the appliance for its intended purpose.
Be careful of your fingers when inserting or cleaning the T DISC.
Persons with electronic implants must stay at least 10cm away
from the appliance and the water tank when removed.
To ensure hygiene, follow the cleaning instructions for the appli-
ance.
Only ever use the appliance with fresh, cold, non-carbonated
drinking water.
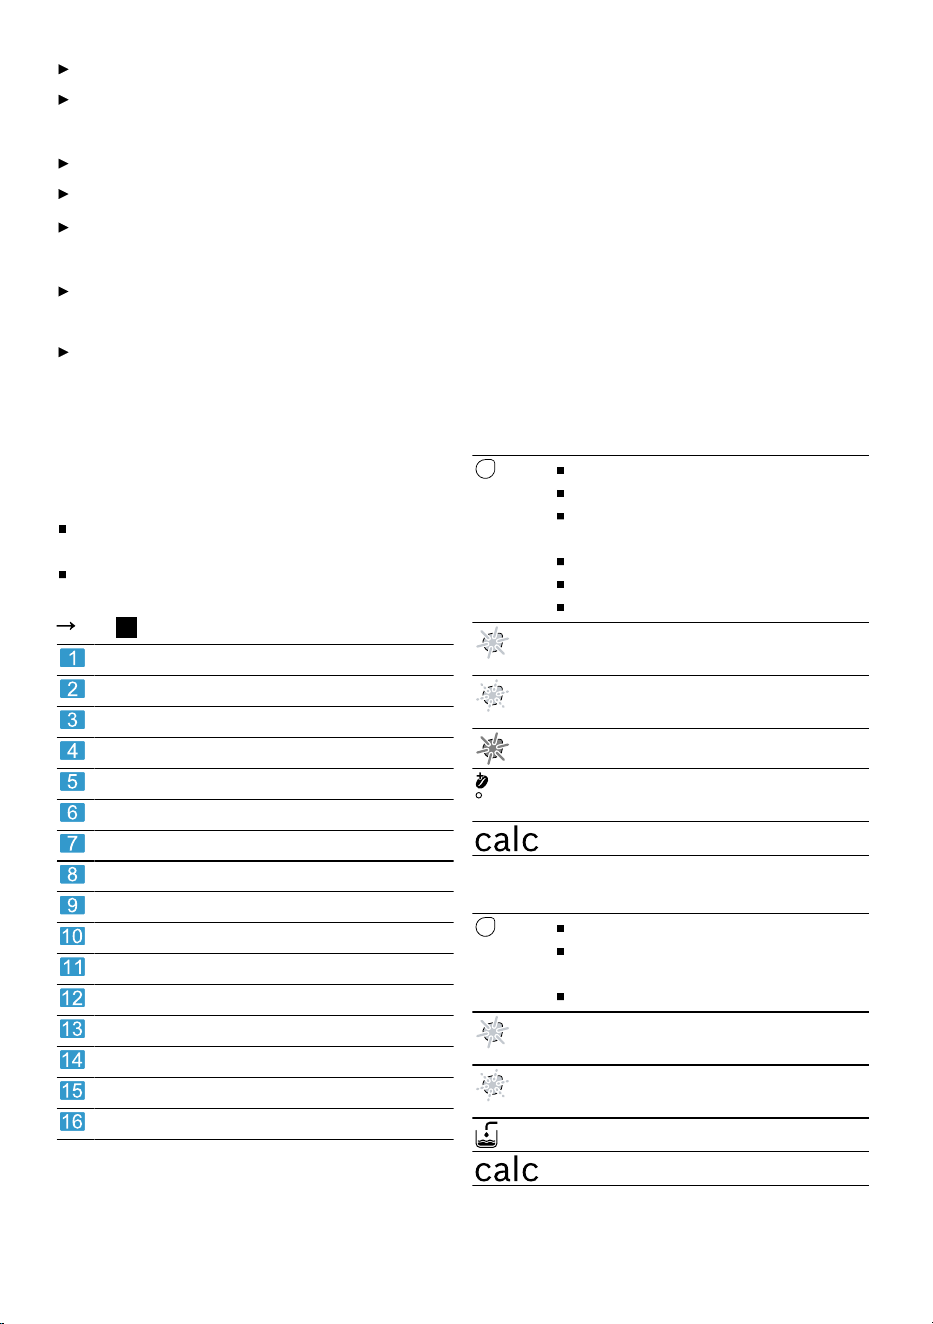
Overall viewOverall view
You can find an overview of the parts of
your appliance here.
Notes
This manual covers 2 versions: harmony
and harmony plus.
Individual details and colours may differ,
depending on the appliance model.
Fig.
1
Float
Calc mark
Max mark
Water tank
TDISC reading window
T DISC piercing unit
T DISC holder
Lock
Brewing system
Control panel
Storage compartment
Drip grate
Cup stand
Bowl
Brief cleaning / descaling instructions
Service T DISC
Control panel
You can use the control panel to configure
all functions of your appliance and to obtain
information about the operating status.
Appliances with IntensityBoost: harmony
plus
Activate the appliance.
Start drinks dispensing.
Start drinks dispensing with In-
tensityBoost.
Stop drinks dispensing.
Prolong drinks dispensing.
Start service programme.
LED lights up yellow, appliance is
ready for use.
LED flashes yellow, drinks dis-
pensing is running.
LED lights up red, fill water tank.
LED lights up yellow, Intensity-
Boost is activated.
Descale appliance.
Appliances without IntensityBoost: har-
mony
Activate the appliance.
Start, stop and prolong dis-
pensing of drinks.
Start service programme.
LED lights up yellow, appliance is
ready for use.
LED flashes yellow, drinks dis-
pensing is running.
Fill water tank.
Descale appliance.
21

en Performing initial start-up
Performing initial start-upPerforming initial start-up
Follow the pictorial instructions at the start
of these instructions.
Fig.
2
-
14
Note: You can prepare a wide range of hot
beverages with the appliance. When you in-
sert a TDISC, the IntelliBrew
TM
system
reads the barcode on the TDISC and auto-
matically sets the ideal amount of water,
brewing temperature and brewing time for
that beverage.
OperationOperation
Preparing a drink
Find out how to prepare a drink of your
choice. Follow the pictorial instructions at
the start of these instructions.
Note: Fill the water tank with fresh, cold,
non-carbonated drinking water every day.
Tips
You can also pre-heat cups before dis-
pensing using hot water.
To interrupt the dispensing process,
briefly press .
To prolong dispensing, press and hold
until the required quantity is reached.
Fig.
15
-
28
IntensityBoostIntensityBoost
1
To obtain coffee with a stronger flavour,
press button for 3seconds. The LED
lights up and your appliance automatically
adjusts the brewing process.
Cleaning and servicingCleaning and servicing
Dishwasher-safe components
Here you can find an overview of the com-
ponents you can clean in the dishwasher.
Fig.
29
Cleaning the appliance
Follow the pictorial instructions at the start
of these instructions.
Be careful of your fingers when inserting
or cleaning the T DISC.
Fig.
30
-
46
Descale the appliance
If the LED lights up, run the descaling
programme. Follow the illustrated instruc-
tions at the beginning of this manual.
Immediately perform the descaling pro-
cess in accordance with the instructions.
Do not use descaling agent with phos-
phoric acid.
Fig.
47
-
61
TroubleshootingTroubleshooting
Repairs to the appliance should only be
carried out by trained specialist staff.
Only use genuine spare parts when re-
pairing the appliance.
If the power cord of this appliance is
damaged, it must be replaced by the
manufacturer, the manufacturer's Cus-
tomer Service or a similarly qualified per-
son in order to prevent any risk.
The appliance is not working.
LEDs do not light up.
The appliance has no power supply.
Check to see whether the appliance is
connected to the mains.
Brewing process starts, drink is not
dispensed.
Water tank was removed during brewing
and inserted again or appliance has not
been used for a long time.
Start cleaning with the Service TDISC.
"Cleaning the appliance", Page22
Float is stuck in the water tank.
1.
Descale the appliance.
"Descale the appliance", Page22
2.
Reach into the water tank and move the
float up and down.
Brewing process does not start.
2
Water tank has not been sufficiently filled.
1.
Fill the water tank with fresh, cold water
up to the mark .
"Preparing a drink", Page22
2.
Insert the water tank.
1
Depending on the appliance specifications
2
Only applies to the appliance version harmony.
22

Troubleshooting en
Brewing process does not start,
status display lights up red.
1
Water tank has not been sufficiently filled.
1.
Fill the water tank with fresh, cold water
up to the mark .
"Preparing a drink", Page22
2.
Insert the water tank.
Brewing process does not start,
status display lights up red.
2
TDISC has not been correctly inserted.
Check whether the T DISC is inserted.
"Preparing a drink", Page22
The T DISC bar code is not recognised.
Clean the T DISC reading window with a
soft, damp cloth.
"Cleaning the appliance", Page22
Smooth out the film of the T DISC.
Contact the TASSIMO careline if the
problem persists.
The appliance was not connected to the
power supply when the TDISC was inser-
ted.
Connect the appliance to the power sup-
ply before inserting the T DISC.
"Preparing a drink", Page22
Brewing process does not start,
status display flashes red.
1
TDISC has not been correctly inserted.
Check whether the T DISC is inserted.
"Preparing a drink", Page22
The T DISC bar code is not recognised.
Clean the T DISC reading window with a
soft, damp cloth.
"Cleaning the appliance", Page22
Smooth out the film of the T DISC.
Remove the used TDISC.
"Preparing a drink", Page22
Contact the TASSIMO careline if the
problem persists.
The appliance was not connected to the
power supply when the TDISC was inser-
ted.
Connect the appliance to the power sup-
ply before inserting the T DISC.
"Preparing a drink", Page22
Brewing unit cannot be closed.
TDISC piercing unit or TDISC holder is not
correctly inserted.
1.
Press the TDISC piercing unit into the
holder until it clicks audibly into place.
"Cleaning the appliance", Page22
2.
Check the position of the TDISC holder.
TDISC has not been correctly inserted.
1.
Insert the T DISC with the printed side fa-
cing downwards.
"Preparing a drink", Page22
2.
Check whether the tab of the T DISC is in
the recess.
Brewing unit cannot be opened.
Brewing unit is locked.
Only open the brewing unit when the
status display remains lit continuously.
"Preparing a drink", Page22
If the brewing unit remains locked, con-
tact the TASSIMO careline.
Water is dripping from the brewing
unit.
TDISC is damaged or not correctly inser-
ted.
Use a new TDISC.
"Preparing a drink", Page22
TDISC piercing unit is not correctly inser-
ted.
Press the TDISC piercing unit into the
holder until it clicks audibly into place.
"Cleaning the appliance", Page22
There is water under the cup stand.
Condensation has formed due to technical
reasons or valves are clogged with limes-
cale.
Descale the appliance.
"Descale the appliance", Page22
1
Only applies to the appliance version harmony plus.
2
Only applies to the appliance version harmony.
23
en Technical specifications
No LED is lit.
The appliance is switched off.
Press or open or close the brewing
system.
All LEDs flashing.
There are problems with the power supply.
1.
Pull out the mains plug, wait 5minutes
and plug it back in.
2.
If the problem persists, contact the
TASSIMO careline.
LED lights up although softened
water has been used.
Decalcified water still contains small
amounts of lime.
Descale the appliance.
"Descale the appliance", Page22
Quality of beverages has deterior-
ated, e.g. crema or volume.
Beverage outlet is soiled.
Clean the beverage outlet.
Clean the brewing unit with the TDISC.
"Cleaning the appliance", Page22
Build-up of limescale in the appliance.
Descale the appliance.
"Descale the appliance", Page22
Drink volume has reduced.
Drink dispensing halts.
Water tank has not been sufficiently filled.
1.
Fill the water tank with fresh, cold water
up to the mark .
"Preparing a drink", Page22
2.
Keep pressed until the desired fill
volume is reached.
LED lights up even though there is
enough water in the water tank.
1
Float is stuck in the water tank.
1.
Descale the appliance.
"Descale the appliance", Page22
2.
Reach into the water tank and move the
float up and down.
LED lights up red even though
there is enough water in the water
tank.
2
Float is stuck in the water tank.
1.
Descale the appliance.
"Descale the appliance", Page22
2.
Reach into the water tank and move the
float up and down.
LED and LED are simultan-
eously lit and the brewing process is
not possible.
1
Appliance has a fault.
1.
Pull out the mains plug.
"Cleaning the appliance", Page22
2.
Contact the TASSIMO careline.
LED and LED flash, brewing is
not possible.
2
Appliance has a fault.
1.
Pull out the mains plug.
"Cleaning the appliance", Page22
2.
Contact the TASSIMO careline.
Technical specificationsTechnical specifications
Voltage 220–240V∼
Frequency 50Hz
Power rating 1400W
Disposing of old applianceDisposing of old appliance
Dispose of the appliance in an environ-
mentally friendly manner.
Information about current disposal meth-
ods are available from your specialist
dealer or local authority.
This appliance is labelled in
accordance with European
Directive 2012/19/EU con-
cerning used electrical and
electronic appliances (waste
electrical and electronic
equipment - WEEE).
The guideline determines the
framework for the return and
recycling of used appliances
as applicable throughout the
EU.
1
Only applies to the appliance version harmony.
2
Only applies to the appliance version harmony plus.
24

Customer Service en
Customer ServiceCustomer Service
You can find the information required as
per Regulation (EU) 2023/826 online at
www.bosch-home.com
on the product and
service pages for your appliance, in the
area of user manuals and additional docu-
ments.
Printed on 100% recycled paper
Printed on 100% recycled paper 25

fr Table des matières
Table des matièresTable des matières
Sécurité .................................................. 26
Élimination de l'emballage .................... 28
Aperçu .................................................... 28
Bandeau de commande ........................... 29
Première mise en service ...................... 29
Utilisation ............................................... 29
Préparer une boisson ................................ 29
IntensityBoost
1
...................................... 29
Nettoyage et entretien ........................... 30
Nettoyage au lave-vaisselle ...................... 30
Nettoyer l‘appareil ...................................... 30
Détartrer l’appareil ..................................... 30
Dépannage ............................................. 30
Données techniques .............................. 32
Mettre au rebut un appareil usagé ........ 32
Service après-vente ............................... 32
Sécurité Sécurité
¡ Lisez attentivement cette notice.
¡ Conservez la notice ainsi que les informations produit en vue
d’une réutilisation ultérieure ou pour un futur nouveau proprié-
taire.
¡ Ne branchez pas l’appareil si ce dernier a été endommagé du-
rant le transport.
Utilisez l‘appareil uniquement:
¡ pour préparer des boissons chaudes.
¡ sous surveillance.
¡ pour un usage privé et dans les pièces fermées d’un domicile.
¡ jusqu'à une altitude maximale de 2000m au-dessus du niveau
de la mer.
Les enfants de 8 ans et plus, les personnes souffrant d’un handi-
cap physique, sensoriel ou mental ou ne détenant pas l’expérience
et/ou les connaissances nécessaires pourront utiliser cet appareil
à condition de le faire sous surveillance, ou que son utilisation sûre
leur ait été enseignée et qu’ils aient compris les dangers qui en
émanent.
Les enfants ne sont pas autorisés à jouer avec l'appareil.
Les enfants ne doivent en aucun cas s’occuper du nettoyage et de
la maintenance utilisateur, sauf s’ils sont âgés de 8ans et plus et
agissent sous surveillance.
Les enfants de moins de 8ans doivent être tenus à distance de
l’appareil et du cordon d’alimentation secteur.
Conserver les matériaux d’emballage hors de portée des en-
fants.
1
Selon l'équipement de l'appareil
26

Sécurité fr
Ne jamais laisser les enfants jouer avec les emballages.
Conserver les petites pièces hors de portée des enfants.
Ne pas laisser les enfants jouer avec les petites pièces.
Pour le raccordement et l’utilisation de l’appareil, respectez im-
pérativement les indications figurant sur la plaque signalétique.
L’appareil doit être branché uniquement à une source d'alimen-
tation avec courant alternatif à l'aide d'une prise murale correcte-
ment installée et reliée à la terre.
Le système à conducteur de protection de l’installation élec-
trique de la maison doit être conforme.
N'utilisez jamais un appareil endommagé.
Ne jamais faire fonctionner l’appareil avec une surface fissurée
ou cassée.
Ne tirez jamais sur le cordon d'alimentation secteur pour débran-
cher l'appareil du secteur. Débranchez toujours la fiche du cor-
don d'alimentation secteur.
Si l'appareil ou le cordon d'alimentation secteur est endommagé,
débranchez immédiatement le cordon d'alimentation secteur ou
coupez le fusible dans le boîtier à fusibles.
Appelez le service après-vente.
Page32
Seul un personnel dûment qualifié peut entreprendre des répara-
tions sur l'appareil.
Seules des pièces de rechange d'origine peuvent être utilisées
pour réparer l'appareil.
Afin d’écarter tout danger quand le cordon d’alimentation sec-
teur de cet appareil est endommagé, seul le fabricant ou son
service après-vente ou toute autre personne de qualification
équivalente est habilité à le remplacer.
Ne jamais plonger l’appareil ou le cordon d’alimentation secteur
dans l’eau.
Veiller à ce qu’aucun liquide ne coule sur le raccordement de
l’appareil.
Utiliser l’appareil uniquement dans des pièces fermées.
Ne jamais exposer l’appareil à une forte chaleur ou humidité.
Ne pas utiliser de nettoyeur vapeur ou haute pression pour net-
toyer l’appareil.
Aérer suffisamment l’appareil.
Ne jamais utiliser l’appareil dans une armoire.
Toujours surveiller l’appareil pendant qu’il marche.
Ne pas utiliser de rallonge ni de bloc multiprise.
27

fr Élimination de l'emballage
Utiliser uniquement des adaptateurs et cordons d’alimentation
secteur agréés par le fabricant.
Si le cordon d’alimentation secteur est trop court et qu’aucun
cordon d’alimentation plus long n’est disponible, contacter un
électricien spécialisé pour adapter l’installation domestique.
Ne jamais d’ouvrir le système de percolation alors que l’appareil
fonctionne.
Utiliser uniquement les TDISC Tassimo d’origine.
Ne jamais utiliser un T DISC endommagé.
Ne jamais utiliser un TDISC de boisson à plus d’une reprise.
Ne touchez jamais les pièces chaudes de l’appareil.
Laisser refroidir les pièces chaudes de l’appareil après utilisation
et avant de les toucher.
Si nécessaire, laisser refroidir les boissons.
Éviter tout contact entre la peau et les liquides et vapeurs qui
s'échappent.
Pour éviter des blessures, utiliser l‘appareil uniquement confor-
mément à son emploi prévu.
Faire donc attention aux doigts lors de l’insertion ou du net-
toyage du TDISC.
Les personnes portant un implant électronique doivent respecter
une distance minimum de 10cm par rapport à l’appareil et au
réservoir d'eau retiré.
Respecter les consignes de nettoyage relatives à l‘hygiène.
Utiliser l’appareil uniquement avec de l’eau potable fraîche et
froide, non gazeuse.
Élimination de l'emballageÉlimination de l'emballage
Les emballages sont écologiques et recy-
clables.
Veuillez éliminer les pièces détachées
après les avoir triées par matière.
Eliminez l'emballage en res-
pectant l'environnement.
AperçuAperçu
Cette section contient une vue d'ensemble
des composants de votre appareil.
Remarques
Ce mode d’emploi couvre 2variantes
d’équipement: harmony et harmony
plus.
Des variations de détails et de couleurs
sont possibles selon le type d’appareil.
Fig.
1
Flotteur
Repère calc
Repère max
Réservoir d'eau
Fenêtre de lecture TDISC
Couronne de perçage du T DISC
Support du T DISC
Bouchon
Système de percolation
Bandeau de commande
28
Première mise en service fr
Case de rangement
Grille de l'égouttoir
Support de tasse
Récipient de récupération
Mémento Nettoyage / Détartrage
T DISC de service
Bandeau de commande
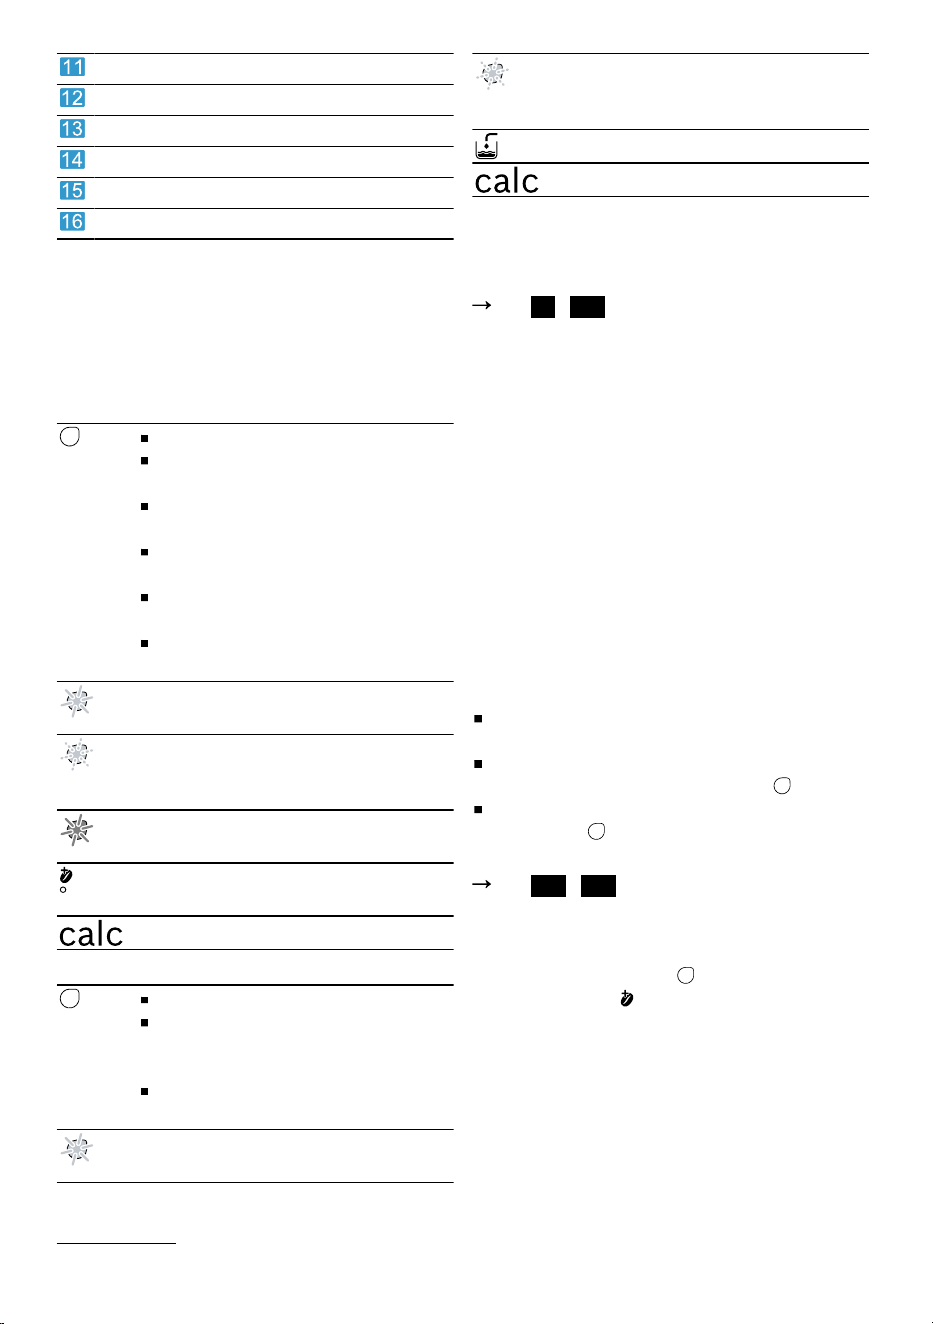
Le bandeau de commande vous permet de
configurer toutes les fonctions de votre ap-
pareil et vous donne des informations sur
l’état de fonctionnement.
Appareils avec IntensityBoost: harmony
plus
Activation de l’appareil.
Démarrer la préparation de
boisson.
Démarrer la préparation de
boisson avec IntensityBoost.
Arrêter le prélèvement de bois-
son.
Prolonger le prélèvement de
boisson.
Démarrer le programme d’en-
tretien.
La LED est allumée en jaune
lorsque l’appareil est prêt.
La LED clignote en jaune lorsque
le prélèvement de boisson s’effec-
tue.
Lorsque la LED est allumée en
rouge, remplir le réservoir d’eau.
La LED est allumée en jaune
lorsque IntensityBoost est activé.
Détartrer l’appareil.
Appareils sans IntensityBoost: harmony
Activation de l’appareil.
Démarrer, interrompre et pro-
longer le prélèvement de bois-
son.
Démarrer le programme d’en-
tretien.
La LED est allumée en jaune
lorsque l’appareil est prêt.
La LED clignote en jaune lorsque
le prélèvement de boisson s’effec-
tue.
Remplir le réservoir d’eau.
Détartrer l’appareil.
Première mise en servicePremière mise en service
Suivez les instructions de la figure au début
de la présente notice.
Fig.
2
-
14
Remarque : L’appareil vous permet de pré-
parer une grande variété de boissons
chaudes. Lorsque vous insérez un TDISC,
le système IntelliBrew
TM
lit le code-barres du
TDISC et règle automatiquement la quanti-
té d’eau, la température d’infusion et la du-
rée d’infusion optimales pour cette boisson.
UtilisationUtilisation
Préparer une boisson
Apprenez comment préparer la boisson de
votre choix. Suivez les instructions de la fi-
gure au début de la présente notice.
Remarque : Remplissez le réservoir d‘eau
potable fraîche non gazeuse tous les jours.
Conseils
Vous pouvez préchauffer les tasses en
prélevant de l‘eau chaude.
Pour arrêter la préparation prématuré-
ment, appuyer brièvement sur .
Afin de prolonger la préparation, ap-
puyer sur jusqu’à ce que la quantité
souhaitée soit atteinte.
Fig.
15
-
28
IntensityBoostIntensityBoost
1
Pour obtenir un café au goût plus intense,
appuyez sur la touche pendant 3se-
condes. La LED s’allume et votre appareil
adapte automatiquement le processus de
percolation.
1
Selon l'équipement de l'appareil
29

fr Nettoyage et entretien
Nettoyage et entretienNettoyage et entretien
Nettoyage au lave-vaisselle
Vous trouverez ici un aperçu des compo-
sants qui peuvent être lavés au lave-vais-
selle.
Fig.
29
Nettoyer l‘appareil
Suivez les instructions de la figure au début
de la présente notice.
Faire donc attention aux doigts lors de
l’insertion ou du nettoyage du TDISC.
Fig.
30
-
46
Détartrer l’appareil
Lorsque la LED est allumée, exécutez
le programme de détartrage. Suivez les ins-
tructions de la figure au début de la pré-
sente notice.
Effectuer le processus de détartrage im-
médiatement après l'apparition de la
consigne.
Ne pas utiliser de détartrant contenant
de l'acide phosphorique.
Fig.
47
-
61
DépannageDépannage
Seul un personnel dûment qualifié peut
entreprendre des réparations sur l'appa-
reil.
Seules des pièces de rechange d'origine
peuvent être utilisées pour réparer l'ap-
pareil.
Afin d’écarter tout danger quand le cor-
don d’alimentation secteur de cet appa-
reil est endommagé, seul le fabricant ou
son service après-vente ou toute autre
personne de qualification équivalente est
habilité à le remplacer.
L'appareil ne fonctionne pas.
Les LED ne s'allument pas.
L'appareil n'est pas alimenté en électricité.
Assurez-vous que l'appareil est branché
à une prise électrique.
La percolation commence mais la
boisson ne coule pas.
Le réservoir d’eau a été retiré ou remis en
place pendant la préparation ou l’appareil
n’a pas été utilisé pendant une période pro-
longée.
Lancer le processus de nettoyage à
l’aide du TDISC de service.
"Nettoyer l‘appareil", Page30
Le flotteur qui se trouve dans le réservoir
d'eau est grippé.
1.
Détartrez l’appareil.
"Détartrer l’appareil", Page30
2.
Avec la main, déplacer le flotteur de haut
en bas.
La séquence de percolation
démarre.
1
Le réservoir d'eau n'est pas suffisamment
rempli.
1.
Remplissez le réservoir d’eau jusqu’au
repère avec de l’eau fraîche et
froide.
"Préparer une boisson", Page29
2.
Mettez le réservoir d'eau en place.
La percolation ne démarre pas, l’affi-
chage d’état s’allume en rouge.
2
Le réservoir d'eau n'est pas suffisamment
rempli.
1.
Remplissez le réservoir d’eau jusqu’au
repère avec de l’eau fraîche et
froide.
"Préparer une boisson", Page29
2.
Mettez le réservoir d'eau en place.
La percolation ne démarre pas, l’affi-
chage d’état s’allume en rouge.
1
Le TDISC n'est pas bien positionné.
Assurez-vous que le TDISC est bien pla-
cé.
"Préparer une boisson", Page29
Le code-barres du TDISC n'est pas recon-
nu.
Nettoyez la fenêtre de lecture du TDISC
avec un chiffon doux et humide.
"Nettoyer l‘appareil", Page30
1
Valable uniquement pour les appareils de la variante harmony.
2
Valable uniquement pour les appareils de la variante harmony plus.
30

Dépannage fr
Aplanissez le film du T DISC.
Si le problème persiste, veuillez contac-
ter la ligne d'assistance de TASSIMO.
L'appareil n'était pas raccordé au secteur
lorsque vous avez inséré le TDISC.
Branchez l'appareil au secteur avant de
poser le TDISC.
"Préparer une boisson", Page29
La percolation ne démarre pas, l’affi-
chage d’état clignote en rouge.
1
Le TDISC n'est pas bien positionné.
Assurez-vous que le TDISC est bien pla-
cé.
"Préparer une boisson", Page29
Le code-barres du TDISC n'est pas recon-
nu.
Nettoyez la fenêtre de lecture du TDISC
avec un chiffon doux et humide.
"Nettoyer l‘appareil", Page30
Aplanissez le film du T DISC.
Retirez le TDISC usagé.
"Préparer une boisson", Page29
Si le problème persiste, veuillez contac-
ter la ligne d'assistance de TASSIMO.
L'appareil n'était pas raccordé au secteur
lorsque vous avez inséré le TDISC.
Branchez l'appareil au secteur avant de
poser le TDISC.
"Préparer une boisson", Page29
Le système de percolation ne peut
être fermé.
La couronne de perçage ou le support du
TDISC sont mal placés.
1.
Enfoncer la couronne de perçage TDISC
dans son support jusqu’à ce qu’un clic
retentisse.
"Nettoyer l‘appareil", Page30
2.
Contrôler la position du support du
TDISC.
Le TDISC n'est pas bien positionné.
1.
Placez le TDISC côté imprimé vers le
bas.
"Préparer une boisson", Page29
2.
Assurez-vous que la languette du TDISC
est bien placée dans l'encoche.
Le système de percolation ne s'ouvre
pas.
Le système de percolation est verrouillé.
Ouvrez le système de percolation uni-
quement lorsque l'affichage d'état s'al-
lume de façon permanente.
"Préparer une boisson", Page29
Si le système de percolation demeure
verrouillé, contacter la ligne d’assistance
de TASSIMO.
Des gouttes s'échappent du système
de percolation.
Le TDISC est endommagé ou en mauvaise
position.
Utilisez un nouveau TDISC.
"Préparer une boisson", Page29
La couronne de perçage TDISC n’est pas
bien positionnée.
Enfoncer la couronne de perçage TDISC
dans son support jusqu’à ce qu’un clic
retentisse.
"Nettoyer l‘appareil", Page30
De l'eau se trouve sous le support de
tasse.
Pour des raisons techniques, de l’eau de
condensation se forme ou les valves s’en-
tartrent.
Détartrez l’appareil.
"Détartrer l’appareil", Page30
Aucune LED n'est allumée.
L’appareil est hors tension.
Appuyer sur et ouvrir ou fermer le sys-
tème de percolation.
Toutes les LED clignotent.
Problèmes associés à l‘alimentation élec-
trique.
1.
Débrancher la fiche de la prise de cou-
rant, attendre 5minutes, puis rebrancher
la fiche dans la prise de courant.
2.
Si le problème persiste, contacter la
ligne d’assistance de TASSIMO.
1
Valable uniquement pour les appareils de la variante harmony plus.
31
fr Données techniques
La LED s’allume bien que de
l’eau déminéralisée ait été utilisée.
L‘eau déminéralisée contient encore de
faibles quantités de calcaire.
Détartrez l’appareil.
"Détartrer l’appareil", Page30
La qualité des boissons s’est détério-
rée, p.ex. perte de crème ou volume.
La buse d'écoulement est encrassée.
Nettoyez la buse d'écoulement.
Nettoyez le système de percolation avec
le TDISC.
"Nettoyer l‘appareil", Page30
L'appareil est entartré.
Détartrez l’appareil.
"Détartrer l’appareil", Page30
Le volume de boisson a été réduit.
Le prélèvement de boisson s'arrête.
Le réservoir d'eau n'est pas suffisamment
rempli.
1.
Remplissez le réservoir d’eau jusqu’au
repère avec de l’eau fraîche et
froide.
"Préparer une boisson", Page29
2.
Maintenez enfoncé jusqu'à ce que la
quantité souhaitée soit atteinte.
La LED s’allume bien qu’il y ait suf-
fisamment d’eau dans le réservoir.
1
Le flotteur qui se trouve dans le réservoir
d'eau est grippé.
1.
Détartrez l’appareil.
"Détartrer l’appareil", Page30
2.
Avec la main, déplacer le flotteur de haut
en bas.
La LED s’allume en rouge bien
qu’il y ait suffisamment d’eau dans le
réservoir.
2
Le flotteur qui se trouve dans le réservoir
d'eau est grippé.
1.
Détartrez l’appareil.
"Détartrer l’appareil", Page30
2.
Avec la main, déplacer le flotteur de haut
en bas.
Les LED et s'allument en
même temps et la percolation est
impossible.
1
L'appareil présente un dérangement.
1.
Débranchez la fiche secteur.
"Nettoyer l‘appareil", Page30
2.
Contactez la ligne d'assistance
TASSIMO.
Les LED et clignotent, la per-
colation est impossible.
2
L'appareil présente un dérangement.
1.
Débranchez la fiche secteur.
"Nettoyer l‘appareil", Page30
2.
Contactez la ligne d'assistance
TASSIMO.
Données techniquesDonnées techniques
Tension 220–240V∼
Fréquence 50Hz
Puissance raccor-
dée
1400W
Mettre au rebut un appareil usagéMettre au rebut un appareil
usagé
Éliminez l’appareil dans le respect de
l’environnement.
Vous trouverez des informations sur les
circuits actuels d'élimination auprès de
votre revendeur spécialisé ou de l’admi-
nistration de votre commune/ville.
Cet appareil est marqué selon
la directive européenne
2012/19/UE relative aux ap-
pareils électriques et électro-
niques usagés (waste electri-
cal and electronic equipment -
WEEE).
La directive définit le cadre
pour une reprise et une récu-
pération des appareils usagés
applicables dans les pays de
la CE.
Service après-venteService après-vente
Vous trouverez les informations relatives au
règlement(EU) 2023/826 en ligne sous
1
Valable uniquement pour les appareils de la variante harmony.
2
Valable uniquement pour les appareils de la variante harmony plus.
32


it Indice
IndiceIndice
Sicurezza ................................................ 34
Panoramica ............................................ 36
Pannello di comando ................................ 36
Procedura per la prima messa in fun-
zione ....................................................... 37
Funzionamento ...................................... 37
Preparazione di una bevanda .................. 37
IntensityBoost
1
...................................... 37
Pulizia e cura .......................................... 37
Idoneità per il lavaggio in lavastoviglie ... 37
Pulizia dell’apparecchio ............................ 37
Decalcificazione dell’apparecchio .......... 37
Sistemazione guasti .............................. 38
Dati tecnici .............................................. 40
Rottamazione di un apparecchio di-
smesso ................................................... 40
Servizio di assistenza clienti ................. 41
Sicurezza Sicurezza
¡ Leggere attentamente le presenti istruzioni.
¡ Conservare le istruzioni e le informazioni sul prodotto per il suc-
cessivo utilizzo o per il futuro proprietario.
¡ Non collegare l'apparecchio se ha subito danni durante il tra-
sporto.
Utilizzare l'apparecchio soltanto:
¡ per preparare bevande calde.
¡ sotto sorveglianza;
¡ in case private e in locali chiusi in ambito domestico;
¡ fino a un'altitudine di massimo 2000m sul livello del mare.
Questo apparecchio può essere utilizzato da bambini di età pari o
superiore a 8 anni e da persone con ridotte facoltà fisiche, senso-
riali o mentali o prive di sufficiente esperienza e/o conoscenza se
sorvegliati o già istruiti in merito all'utilizzo sicuro dell'apparecchio
e se hanno compreso i rischi da esso derivanti.
I bambini non devono giocare con l'apparecchio.
La pulizia e la manutenzione di competenza dell’utente non devo-
no essere eseguite da bambini, a meno che non abbiano un’età di
8 anni o superiore e non siano sorvegliati.
Tenere lontano dall'apparecchio e dal cavo di alimentazione i bam-
bini di età inferiore agli 8 anni.
Tenere lontano il materiale di imballaggio dai bambini.
Vietare ai bambini di giocare con materiali d’imballaggio.
Tenere i bambini lontano dalle parti piccole.
Non lasciare che i bambini giochino con le parti piccole.
1
In funzione dell'allestimento dell'apparecchio
34

Sicurezza it
Collegare e utilizzare l’apparecchio solo in conformità con i dati
indicati sulla targhetta identificativa.
Collegare l'apparecchio a una rete a corrente alternata soltanto
con una presa con messa a terra installata a norma.
Ilsistema delconduttore diprotezione dell’impianto elettrico do-
mestico deve essere installato anorma.
Non azionare mai un apparecchio danneggiato.
Non utilizzare mai un apparecchio con la superficie danneggiata.
Non tirare mai il cavo di collegamento alla rete elettrica per stac-
care l'apparecchio dalla rete elettrica. Staccare sempre la spina
del cavo di alimentazione.
Se l'apparecchio o il cavo di alimentazione è danneggiato, stac-
care subito la spina di alimentazione del cavo di alimentazione e
spegnere il fusibile nella scatola dei fusibili.
Rivolgersi al servizio di assistenza clienti.
Pagina41
Solo il personale adeguatamente specializzato e formato può
eseguire riparazioni sull'apparecchio.
Per la riparazione dell'apparecchio possono essere impiegati
soltanto pezzi di ricambio originali.
Al fine di evitare pericoli, se il cavo di alimentazione di questo
apparecchio subisce danni deve essere sostituito dal produttore,
dal suo servizio di assistenza clienti o da persona in possesso di
simile qualifica.
Non immergere mai l'apparecchio o il cavo di alimentazione
nell'acqua.
Il connettore dell'apparecchio non deve venire a contatto con li-
quidi.
Utilizzare l'apparecchio esclusivamente in luoghi chiusi.
Non esporre mai l'apparecchio a calore e umidità eccessivi.
Non lavare l'apparecchio con pulitori a vapore o idropulitrici.
Aerare sufficientemente l'apparecchio.
Non mettere mai in funzione l'apparecchio all'interno di un mobi-
le.
Sorvegliare sempre l’apparecchio durante ilfunzionamento.
Non utilizzare cavi di prolunga o prese multiple.
Utilizzare esclusivamente gli adattatori e i cavi di alimentazione
approvati dal produttore.
Se il cavo di alimentazione è troppo corto e non è disponibile un
cavo di alimentazione più lungo, contattare un elettricista per
modificare l'installazione domestica.
35
it Panoramica
Non aprire mai l'unità di infusione durante l'esercizio.
Utilizzare solo i TDISC Tassimo originali.
Non utilizzare mai un T DISC danneggiato.
Non utilizzare mai un T DISC di una bevanda più di una volta.
Non toccare mai le parti calde dell'apparecchio.
Dopo l'uso lasciar raffreddare le parti calde dell'apparecchio pri-
ma di toccarle.
Eventualmente lasciar raffreddare le bevande.
Evitare il contatto della pelle con i liquidi e i vapori che fuoriesco-
no.
Per evitare lesioni, utilizzare l'apparecchio soltanto conforme-
mente all'uso previsto.
Durante l'inserimento del T DISC o durante la pulizia prestare at-
tenzione alle dita.
I portatori di impianti elettronici devono mantenersi a una distan-
za minima di 10cm dall'apparecchio e dal serbatoio dell'acqua
rimosso.
Osservare le istruzioni per la pulizia dell'apparecchio per assicu-
rare l'igiene.
Usare l'apparecchio esclusivamente con acqua potabile fresca
fredda non gassata.
PanoramicaPanoramica
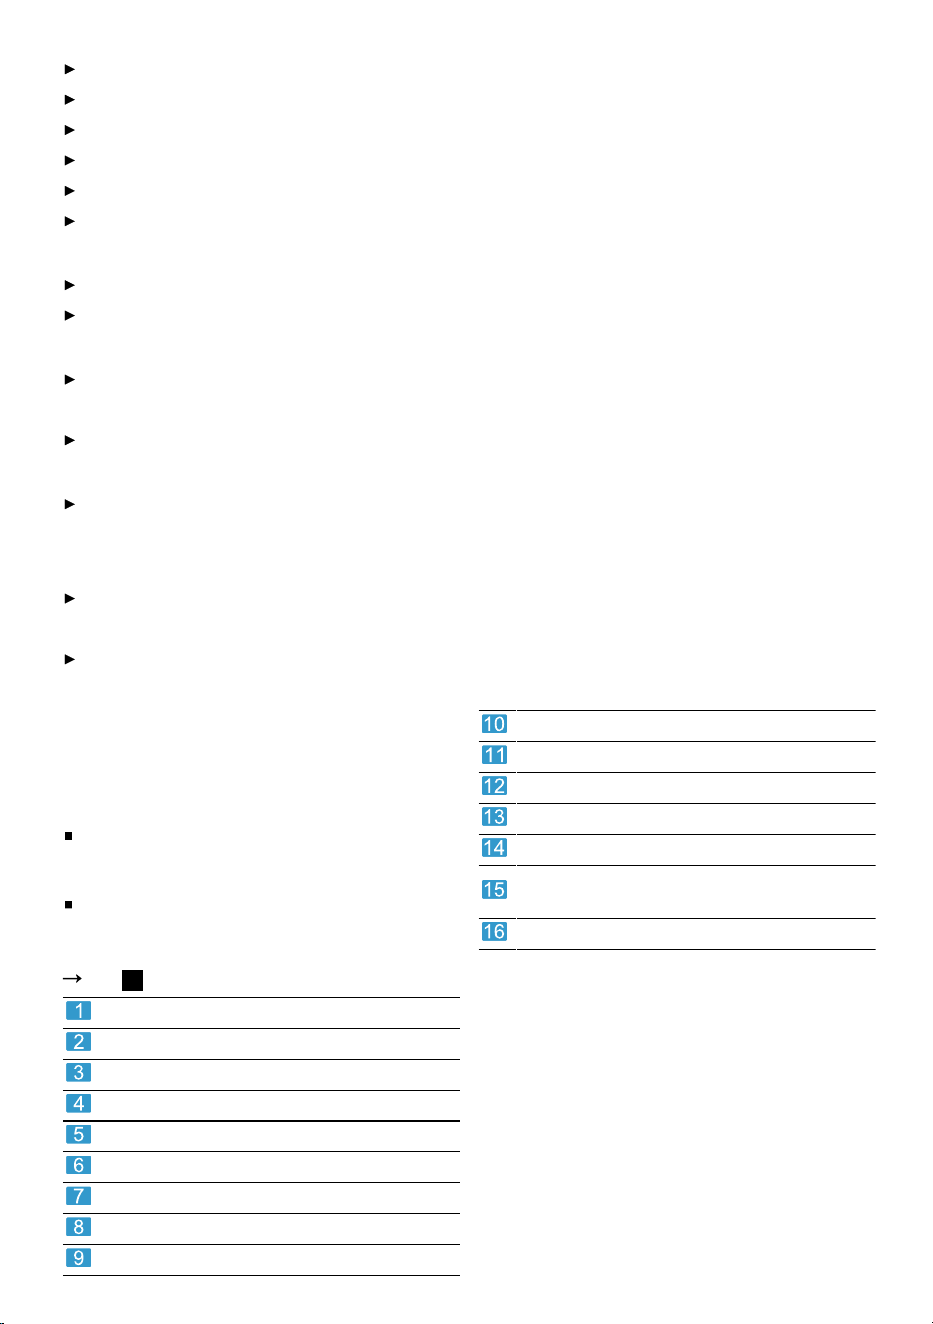
Di seguito è riportata una panoramica dei
componenti dell'apparecchio.
Note
Questa guida comprende 2 varianti di
equipaggiamento: harmony e harmony
plus.
A seconda del modello è possibile che vi
siano alcune differenze per quanto con-
cerne colori e vari dettagli.
Fig.
1
Galleggiante
Marcatura calc
Marcatura max
Serbatoio dell’acqua
Finestra di lettura T DISC
Fora-capsule per T DISC
Supporto T DISC
Coperchio
Sistema di infusione
Pannello di comando
Vano di conservazione
Griglia di gocciolamento
Portatazze
Contenitore di raccolta
Istruzioni rapide pulizia/decalcificazio-
ne
Service T DISC
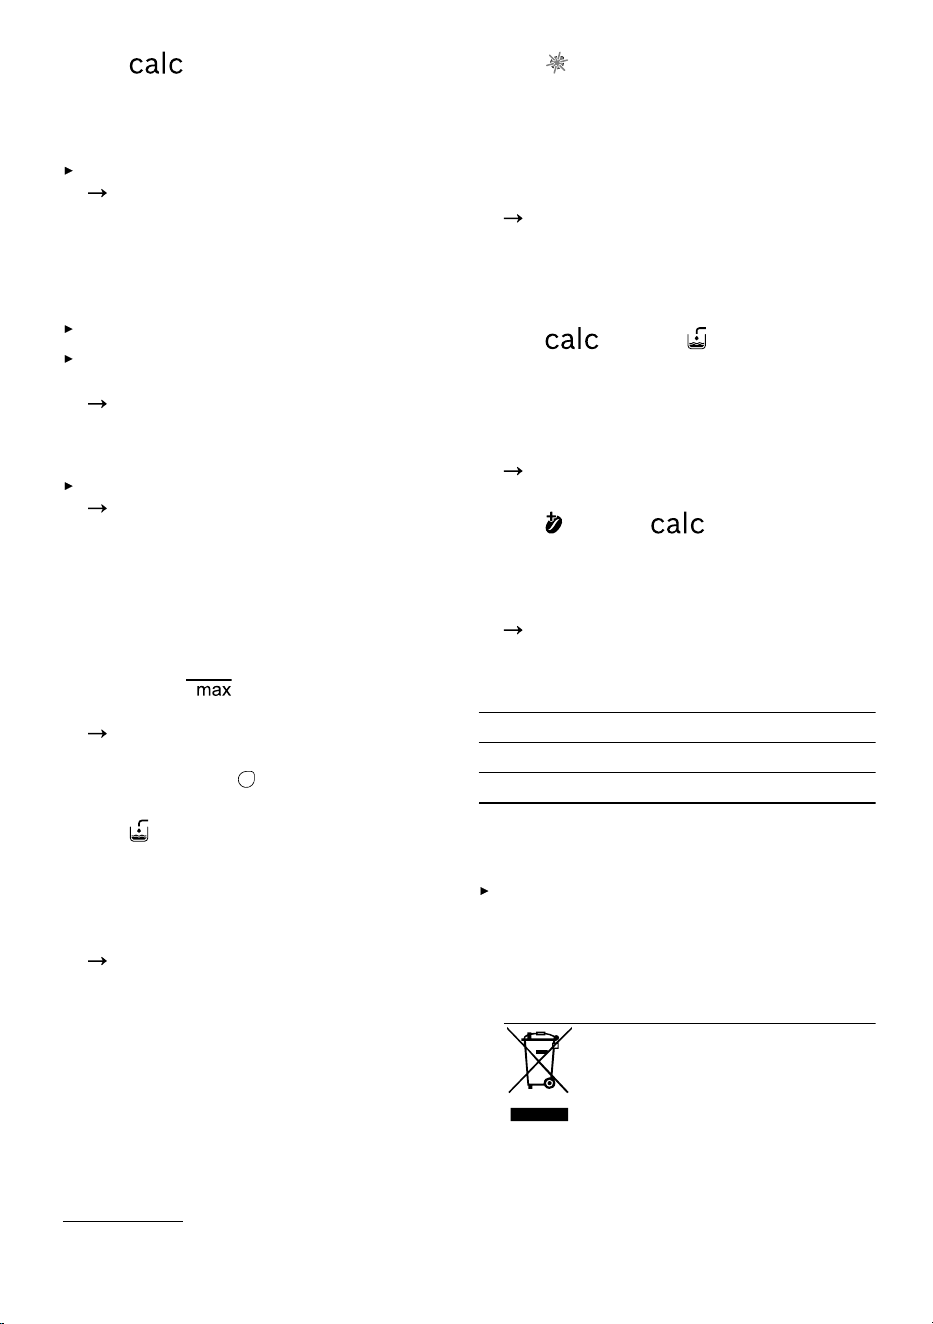
Pannello di comando
Il pannello di comando consente di impo-
stare tutte le funzioni dell'apparecchio e di
ottenere informazioni sullo stato di eserci-
zio.
36
Procedura per la prima messa in funzione it
Apparecchi con IntensityBoost: harmony
plus
Attivare l'apparecchio.
Avviare l'erogazione della be-
vanda.
Avviare l'erogazione della be-
vanda con IntensityBoost.
Arrestare l'erogazione della be-
vanda.
Prolungare l'erogazione della
bevanda.
Avviare il programma di servi-
zio.
Il LED è acceso di colore giallo,
l'apparecchio è pronto per l'uso.
Il LED lampeggia di colore giallo,
la bevanda viene erogata.
Il LED è acceso di colore rosso,
riempire il serbatoio dell'acqua.
Il LED è acceso di colore giallo, In-
tensityBoost è attivato.
Decalcificare l’apparecchio.
Apparecchi senza IntensityBoost: harmo-
ny
Attivare l'apparecchio.
Avviare, arrestare e prolungare
l'erogazione della bevanda.
Avviare il programma di servi-
zio.
Il LED è acceso di colore giallo,
l'apparecchio è pronto per l'uso.
Il LED lampeggia di colore giallo,
la bevanda viene erogata.
Riempire il serbatoio dell’acqua.
Decalcificare l’apparecchio.
Procedura per la prima messa in funzioneProcedura per la prima messa
in funzione
Seguire le indicazioni riportate nelle figure
all'inizio delle presenti istruzioni.
Fig.
2
-
14
Nota: L'apparecchio consente di preparare
diverse bevande calde. Quando si inserisce
un TDISC, il sistema IntelliBrew
TM
legge il
codice a barre del TDISC e imposta auto-
maticamente i valori ottimali di quantità
d'acqua, temperatura di preparazione e du-
rata di preparazione di questa bevanda.
FunzionamentoFunzionamento
Preparazione di una bevanda
Di seguito è descritta la procedura per pre-
parare una bevanda a scelta. Seguire le in-
dicazioni riportate nelle figure all'inizio delle
presenti istruzioni.
Nota: Riempire ogni giorno il serbatoio
dell'acqua con acqua potabile fresca fred-
da non gassata.
Consigli
Prima dell'erogazione si possono preri-
scaldare le tazze anche con acqua cal-
da.
Per interrompere anticipatamente l'ero-
gazione, premere brevemente .
Per prolungare l'erogazione, tenere pre-
muto fino alla quantità desiderata.
Fig.
15
-
28
IntensityBoostIntensityBoost
1
Per ottenere un caffè con un gusto più in-
tenso, premere il tasto per 3secondi. Il
LED si accende e l'apparecchio adatta
automaticamente il processo di infusione.
Pulizia e curaPulizia e cura
Idoneità per il lavaggio in lavastovi-
glie
Qui si trova una panoramica dei compo-
nenti lavabili in lavastoviglie.
Fig.
29
Pulizia dell’apparecchio
Seguire le indicazioni riportate nelle figure
all'inizio delle presenti istruzioni.
Durante l'inserimento del T DISC o du-
rante la pulizia prestare attenzione alle
dita.
Fig.
30
-
46
Decalcificazione dell’apparecchio
Quando il LED è acceso, eseguire il
programma di decalcificazione. Seguire la
guida per immagini all'inizio di queste istru-
zioni.
1
In funzione dell'allestimento dell'apparecchio
37

it Sistemazione guasti
Eseguire subito il processo di decalcifi-
cazione seguendo le istruzioni.
Non utilizzare decalcificanti contenenti
acido fosforico.
Fig.
47
-
61
Sistemazione guastiSistemazione guasti
Solo il personale adeguatamente specia-
lizzato e formato può eseguire riparazio-
ni sull'apparecchio.
Per la riparazione dell'apparecchio pos-
sono essere impiegati soltanto pezzi di
ricambio originali.
Al fine di evitare pericoli, se il cavo di ali-
mentazione di questo apparecchio subi-
sce danni deve essere sostituito dal pro-
duttore, dal suo servizio di assistenza
clienti o da persona in possesso di simi-
le qualifica.
L'apparecchio non funziona.
I LED non si accendono.
L'apparecchio non riceve alimentazione
elettrica.
Controllare se l'apparecchio è collegato
all'alimentazione elettrica.
Processo di infusione iniziato, la be-
vanda non viene erogata.
Il serbatoio dell'acqua è stato rimosso e
reinserito durante il processo di infusione
oppure l'apparecchio non è stato utilizzato
per un periodo prolungato.
Avviare una procedura di pulizia con il
Service TDISC.
"Pulizia dell’apparecchio", Pagina37
Il galleggiante nel serbatoio dell'acqua è
bloccato.
1.
Decalcificare l'apparecchio.
"Decalcificazione dell’apparecchio",
Pagina37
2.
Inserire la mano nel serbatoio dell'acqua
e muovere il galleggiante verso l'alto e
verso il basso.
Il processo di infusione non si avvia.
1
Il serbatoio dell'acqua non è abbastanza
pieno.
1.
Riempire il serbatoio dell'acqua fino alla
marcatura con acqua fresca fred-
da.
"Preparazione di una bevanda",
Pagina37
2.
Inserire il serbatoio dell'acqua.
L'erogazione non si avvia, l'indicatore
di stato è acceso di colore rosso.
2
Il serbatoio dell'acqua non è abbastanza
pieno.
1.
Riempire il serbatoio dell'acqua fino alla
marcatura con acqua fresca fred-
da.
"Preparazione di una bevanda",
Pagina37
2.
Inserire il serbatoio dell'acqua.
L'erogazione non si avvia, l'indicatore
di stato è acceso di colore rosso.
1
Il TDISC non è inserito correttamente.
Controllare che il TDISC sia inserito.
"Preparazione di una bevanda",
Pagina37
Il codice a barre del TDISC non viene rico-
nosciuto.
Pulire la finestra di lettura del TDISC con
un panno morbido inumidito.
"Pulizia dell’apparecchio", Pagina37
Lisciare la pellicola del TDISC.
Se il problema persiste, contattare la
TASSIMO Infoline.
L'apparecchio non era collegato all'alimen-
tazione elettrica al momento dell'inserimen-
to del TDISC.
Collegare l'apparecchio all'alimentazione
elettrica prima di inserire il TDISC.
"Preparazione di una bevanda",
Pagina37
1
Applicabile solo agli apparecchi della variante di equipaggiamento harmony.
2
Applicabile solo agli apparecchi della variante di equipaggiamento harmony plus.
38

Sistemazione guasti it
L'erogazione non si avvia, l'indicatore
di stato lampeggia di colore rosso.
1
Il TDISC non è inserito correttamente.
Controllare che il TDISC sia inserito.
"Preparazione di una bevanda",
Pagina37
Il codice a barre del TDISC non viene rico-
nosciuto.
Pulire la finestra di lettura del TDISC con
un panno morbido inumidito.
"Pulizia dell’apparecchio", Pagina37
Lisciare la pellicola del TDISC.
Rimuovere il T DISC utilizzato.
"Preparazione di una bevanda",
Pagina37
Se il problema persiste, contattare la
TASSIMO Infoline.
L'apparecchio non era collegato all'alimen-
tazione elettrica al momento dell'inserimen-
to del TDISC.
Collegare l'apparecchio all'alimentazione
elettrica prima di inserire il TDISC.
"Preparazione di una bevanda",
Pagina37
Il sistema di infusione non si chiude.
Il fora-capsule o il supporto TDISC non so-
no inseriti correttamente.
1.
Premere il fora-capsule per TDISC nel
supporto fino a sentire uno scatto.
"Pulizia dell’apparecchio", Pagina37
2.
Controllare la posizione del supporto
TDISC.
Il TDISC non è inserito correttamente.
1.
Inserire il TDISC con il lato stampato ri-
volto verso il basso.
"Preparazione di una bevanda",
Pagina37
2.
Controllare che la linguetta del TDISC
sia inserita nell'incavo.
Non è possibile aprire il sistema di in-
fusione.
Il sistema di infusione è bloccato.
Aprire il sistema di infusione soltanto
quando l'indicatore di stato è acceso
permanentemente.
"Preparazione di una bevanda",
Pagina37
Se il sistema di infusione è ancora bloc-
cato, contattare la TASSIMO Infoline.
Dal sistema di infusione fuoriesce ac-
qua.
Il TDISC è danneggiato o non inserito cor-
rettamente.
Utilizzare un TDISC nuovo.
"Preparazione di una bevanda",
Pagina37
Il fora-capsule per TDISC non è inserito
correttamente.
Premere il fora-capsule per TDISC nel
supporto fino a sentire uno scatto.
"Pulizia dell’apparecchio", Pagina37
È presente acqua sotto il portatazze.
Si è formata condensa per motivi tecnici o
le valvole sono calcificate.
Decalcificare l'apparecchio.
"Decalcificazione dell’apparecchio",
Pagina37
Nessun LED è acceso.
L'apparecchio è spento.
Premere oppure aprire o chiudere il si-
stema di infusione.
Tutti i LED lampeggiano.
Problemi di alimentazione elettrica.
1.
Staccare la spina di alimentazione, atten-
dere 5minuti e riattaccarla.
2.
Se il problema persiste, contattare la
TASSIMO Infoline.
1
Applicabile solo agli apparecchi della variante di equipaggiamento harmony plus.
39
it Dati tecnici
Il LED è acceso anche se è stata
utilizzata acqua demineralizzata.
L'acqua decalcificata contiene ancora pic-
cole quantità di calcare.
Decalcificare l'apparecchio.
"Decalcificazione dell’apparecchio",
Pagina37
La qualità delle bevande è peggiora-
ta, ad es. crema o volume.
L'erogatore bevanda è sporco.
Pulire l'erogatore bevanda.
Pulire il sistema di infusione con il TDI-
SC.
"Pulizia dell’apparecchio", Pagina37
L’apparecchio presenta incrostazioni di cal-
care.
Decalcificare l'apparecchio.
"Decalcificazione dell’apparecchio",
Pagina37
Il volume delle bevande si è ridotto.
Erogazione delle bevande arrestata.
Il serbatoio dell'acqua non è abbastanza
pieno.
1.
Riempire il serbatoio dell'acqua fino alla
marcatura con acqua fresca fred-
da.
"Preparazione di una bevanda",
Pagina37
2.
Tenere premuto fino a raggiungere la
quantità desiderata.
Il LED è acceso anche se è presen-
te acqua nel serbatoio dell'acqua.
1
Il galleggiante nel serbatoio dell'acqua è
bloccato.
1.
Decalcificare l'apparecchio.
"Decalcificazione dell’apparecchio",
Pagina37
2.
Inserire la mano nel serbatoio dell'acqua
e muovere il galleggiante verso l'alto e
verso il basso.
Il LED è acceso di colore rosso an-
che se vi è abbastanza acqua nel ser-
batoio dell'acqua.
2
Il galleggiante nel serbatoio dell'acqua è
bloccato.
1.
Decalcificare l'apparecchio.
"Decalcificazione dell’apparecchio",
Pagina37
2.
Inserire la mano nel serbatoio dell'acqua
e muovere il galleggiante verso l'alto e
verso il basso.
Il LED e il LED sono accesi
contemporaneamente e non è possi-
bile erogare bevande.
1
L'apparecchio presenta un guasto.
1.
Staccare la spina di alimentazione.
"Pulizia dell’apparecchio", Pagina37
2.
Contattare la TASSIMO Infoline.
Il LED e il LED lampeggiano,
non è possibile erogare bevande.
2
L'apparecchio presenta un guasto.
1.
Staccare la spina di alimentazione.
"Pulizia dell’apparecchio", Pagina37
2.
Contattare la TASSIMO Infoline.
Dati tecniciDati tecnici
Tensione 220–240V∼
Frequenza 50Hz
Potenza assorbita 1400W
Rottamazione di un apparecchio dismessoRottamazione di un apparec-
chio dismesso
Smaltire l'apparecchio nel rispetto
dell'ambiente.
Per informazioni sulle attuali procedure
di smaltimento rivolgersi al rivenditore
specializzato o al comune di competen-
za.
Questo apparecchio dispone
di contrassegno ai sensi della
direttiva europea 2012/19/UE
in materia di apparecchi elet-
trici ed elettronici (waste elec-
1
Applicabile solo agli apparecchi della variante di equipaggiamento harmony.
2
Applicabile solo agli apparecchi della variante di equipaggiamento harmony plus.
40

Servizio di assistenza clienti it
trical and electronic equip-
ment - WEEE).
Questa direttiva definisce le
norme per la raccolta e il rici-
claggio degli apparecchi di-
smessi valide su tutto il territo-
rio dell’Unione Europea.
Servizio di assistenza clientiServizio di assistenza clienti
Le informazioni conformi alla normativa
(EU) 2023/826 sono disponibili online alla
voce
www.bosch-home.com
nella pagina
del prodotto e nella pagina di assistenza
dell'apparecchio nelle istruzioni per l'uso e
nei documenti aggiuntivi.
Stampato su carta riciclata al 100%
Stampato su carta riciclata al 100% 41

HELLO!
Looking for help?
You'll find it here.
Expert advice for your Bosch home
appliances, need help with problems
or a repair from Bosch experts.
Find out everything about the many
ways Bosch can support you:
www.bosch-home.com/service
Contact data of all countries are listed
in the attached service directory.
Visit tassimo.com
for registration,
accessories and
more.
BSH Hausgeräte GmbH
Carl-Wery-Straße 34
81739 München, GERMANY
www.bosch-home.com
A Bosch Company
Valid within Great Britain:
Imported to Great Britain by
BSH Home Appliances Ltd.
Grand Union House
Old Wolverton Road
Wolverton, Milton Keynes
MK12 5PT
United Kingdom
*8001358633*
8001358633
(060407)
de, en, fr, it