Manual 10325-SB Rev 0 (11/21)
$21.00
GAS FIRED STEAM TILTING KETTLES
MANUAL SECTION CO
IMPORTANT FOR FUTURE REFERENCE
Please complete this information and retain this
manual for the life of the equipment:
Model #:
___________________________
Serial #:
___________________________
Date Purchased:
_____________________
WARNING
Improper installation, adjustment, alteration, service or maintenance can cause property damage, injury
or death. Read the installation, operating and maintenance instructions thoroughly before installing or
servicing this equipment.
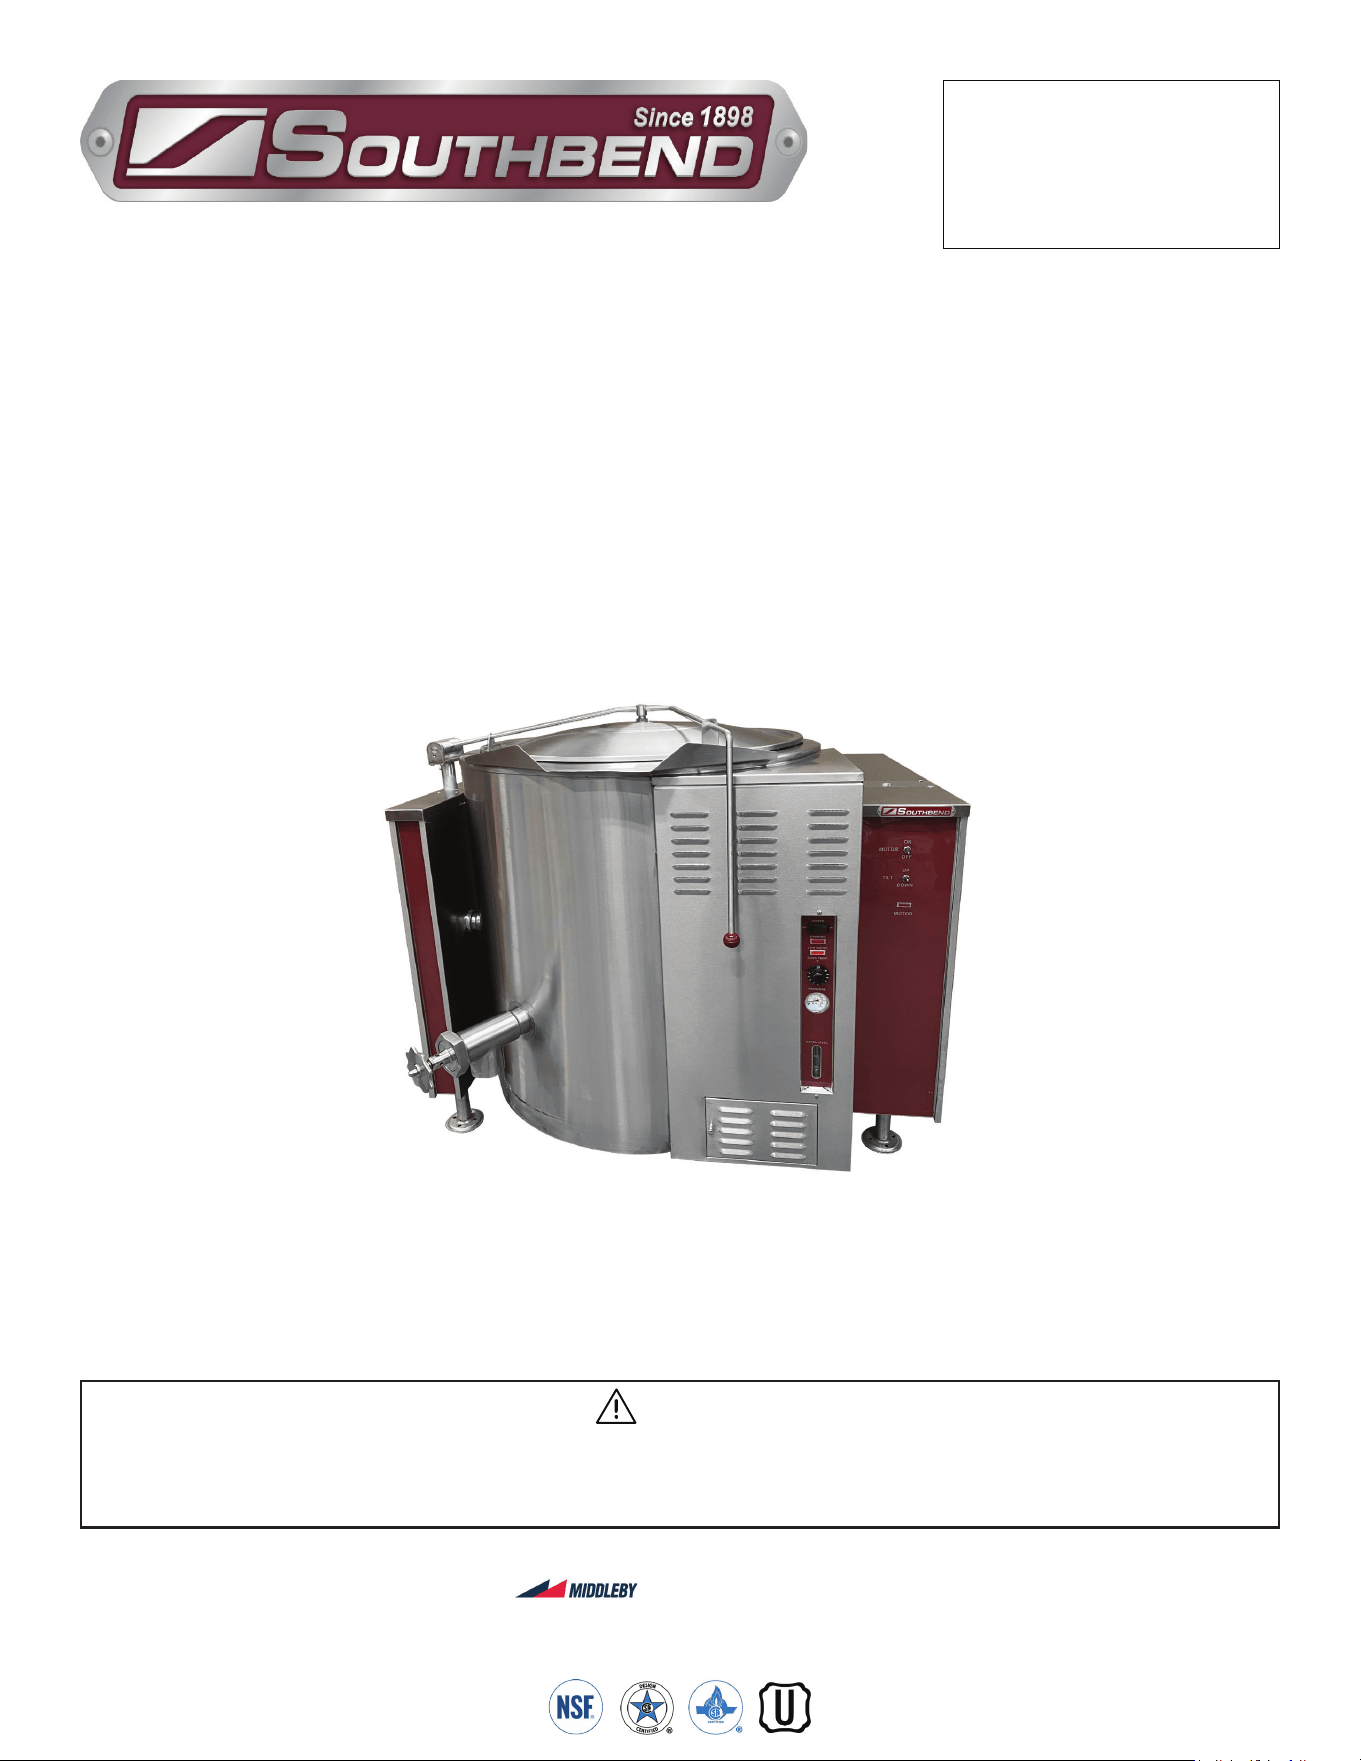
Model KTLG-80
Gas Fired Steam Tilting Kettles
KTLG-80 and KTLG-100
Installation & Operation Manual
SOUTHBEND STEAM
A Middleby Company
1100 Old Honeycutt Road Fuquay-Varina, North Carolina 27526 USA
www.southbendnc.com
INSTALLATION & OPERATION MANUAL 10325-SB REV 0 (11/21)
PAGE
2
OF 32
Gas Fired Steam Tilting Kettles
SAFETY PRECAUTIONS
Before installing and operating this equipment, be sure everyone involved in its operation is fully trained and aware of
precautions. Accidents and problems can be caused by failure to follow fundamental rules and precautions.
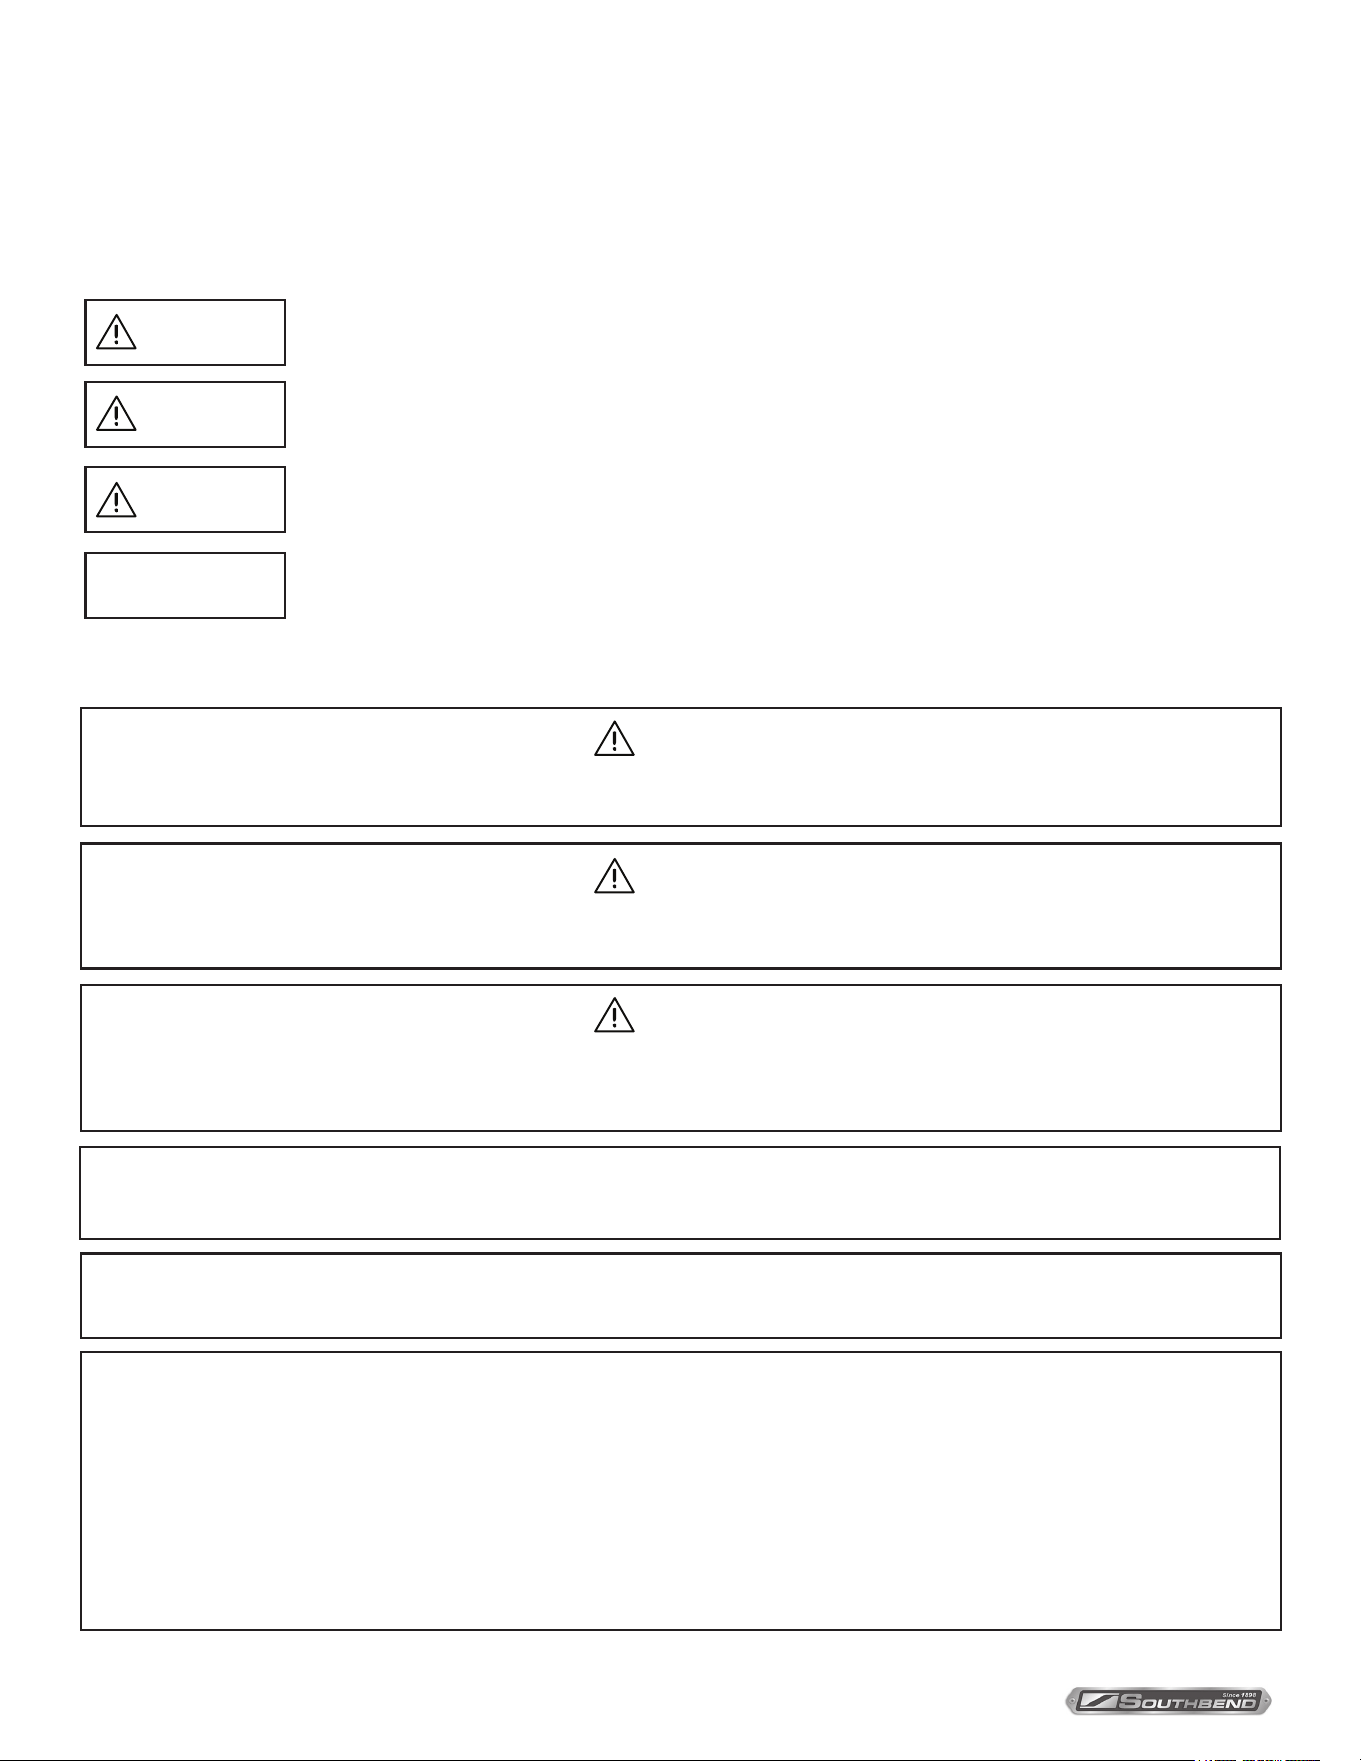
The following symbols, found throughout this manual, alert you to potentially dangerous conditions to the operator,
service personnel, or to the equipment.
CAUTION
WARNING
NOTICE
This symbol warns of immediate hazards that will result in severe injury or death.
This symbol refers to a potential hazard or unsafe practice that could result in injury or death.
This symbol refers to a potential hazard or unsafe practice that could result in injury, product
damage, or property damage.
This symbol refers to information that needs special attention or must be fully
understood, even though not dangerous.
DANGER
WARNING
Improper installation, operation, adjustment, alteration, service or maintenance can cause property damage, injury
or death. Read the installation, operating and maintenance instructions thoroughly before installing, operating or
servicing this equipment.
NOTICE
This manual should be retained for future reference.
NOTICE
This product is intended for commercial use only. NOT FOR HOUSEHOLD USE.
Copyright © 2021 by Southbend Steam. All rights reserved. Published in the United States of America.
SPECIFICATIONS
IMPORTANT NOTES FOR INSTALLATION AND OPERATION
WARNING
This is the safety alert symbol. It is used to alert you to potential personal injury hazards. Obey all safety messages
that follow this symbol to avoid possible injury or death.
WARNING
FOR YOUR SAFETY:
Do not store or use gasoline or other ammable vapors or liquids in the vicinity of this or any other appliance.
PURCHASER: Instructions to be followed in the event the operator of this appliance smells gas must be posted
in a prominent location. This information shall be obtained by consulting the local gas supplier.
Do not attempt to operate this unit in the event of a power failure.
Keep the appliance area free and clear from combustibles.
DO NOT obstruct the ow of combustion and ventilation air.
Adequate clearances MUST be maintained for servicing and proper operation.
Contact the factory, the factory representative or a local service company to perform maintenance and repairs
should the appliance malfunction. Refer to warranty terms.

INSTALLATION & OPERATION MANUAL 10325-SB REV 0 (11/21)
PAGE
3
OF32
Gas Fired Steam Tilting Kettles
RETAIN THIS MANUAL FOR FUTURE REFERENCE.
Table of Contents
Important Notes For Installation and Operation .................................................................... 2
Service Connections ............................................................................................................. 4
Installation ............................................................................................................................. 5
Performance Check .............................................................................................................. 8
Operation .............................................................................................................................. 9
Maintenance ......................................................................................................................... 12
Cleaning ................................................................................................................................ 13
Service .................................................................................................................................. 15
Troubleshooting .................................................................................................................... 20
Appendix A, Material Safety Data Sheet ............................................................................... 21
Table of Contents
INSTALLATION & OPERATION MANUAL 10325-SB REV 0 (11/21)
PAGE
4
OF 32
Gas Fired Steam Tilting Kettles
Service Connections
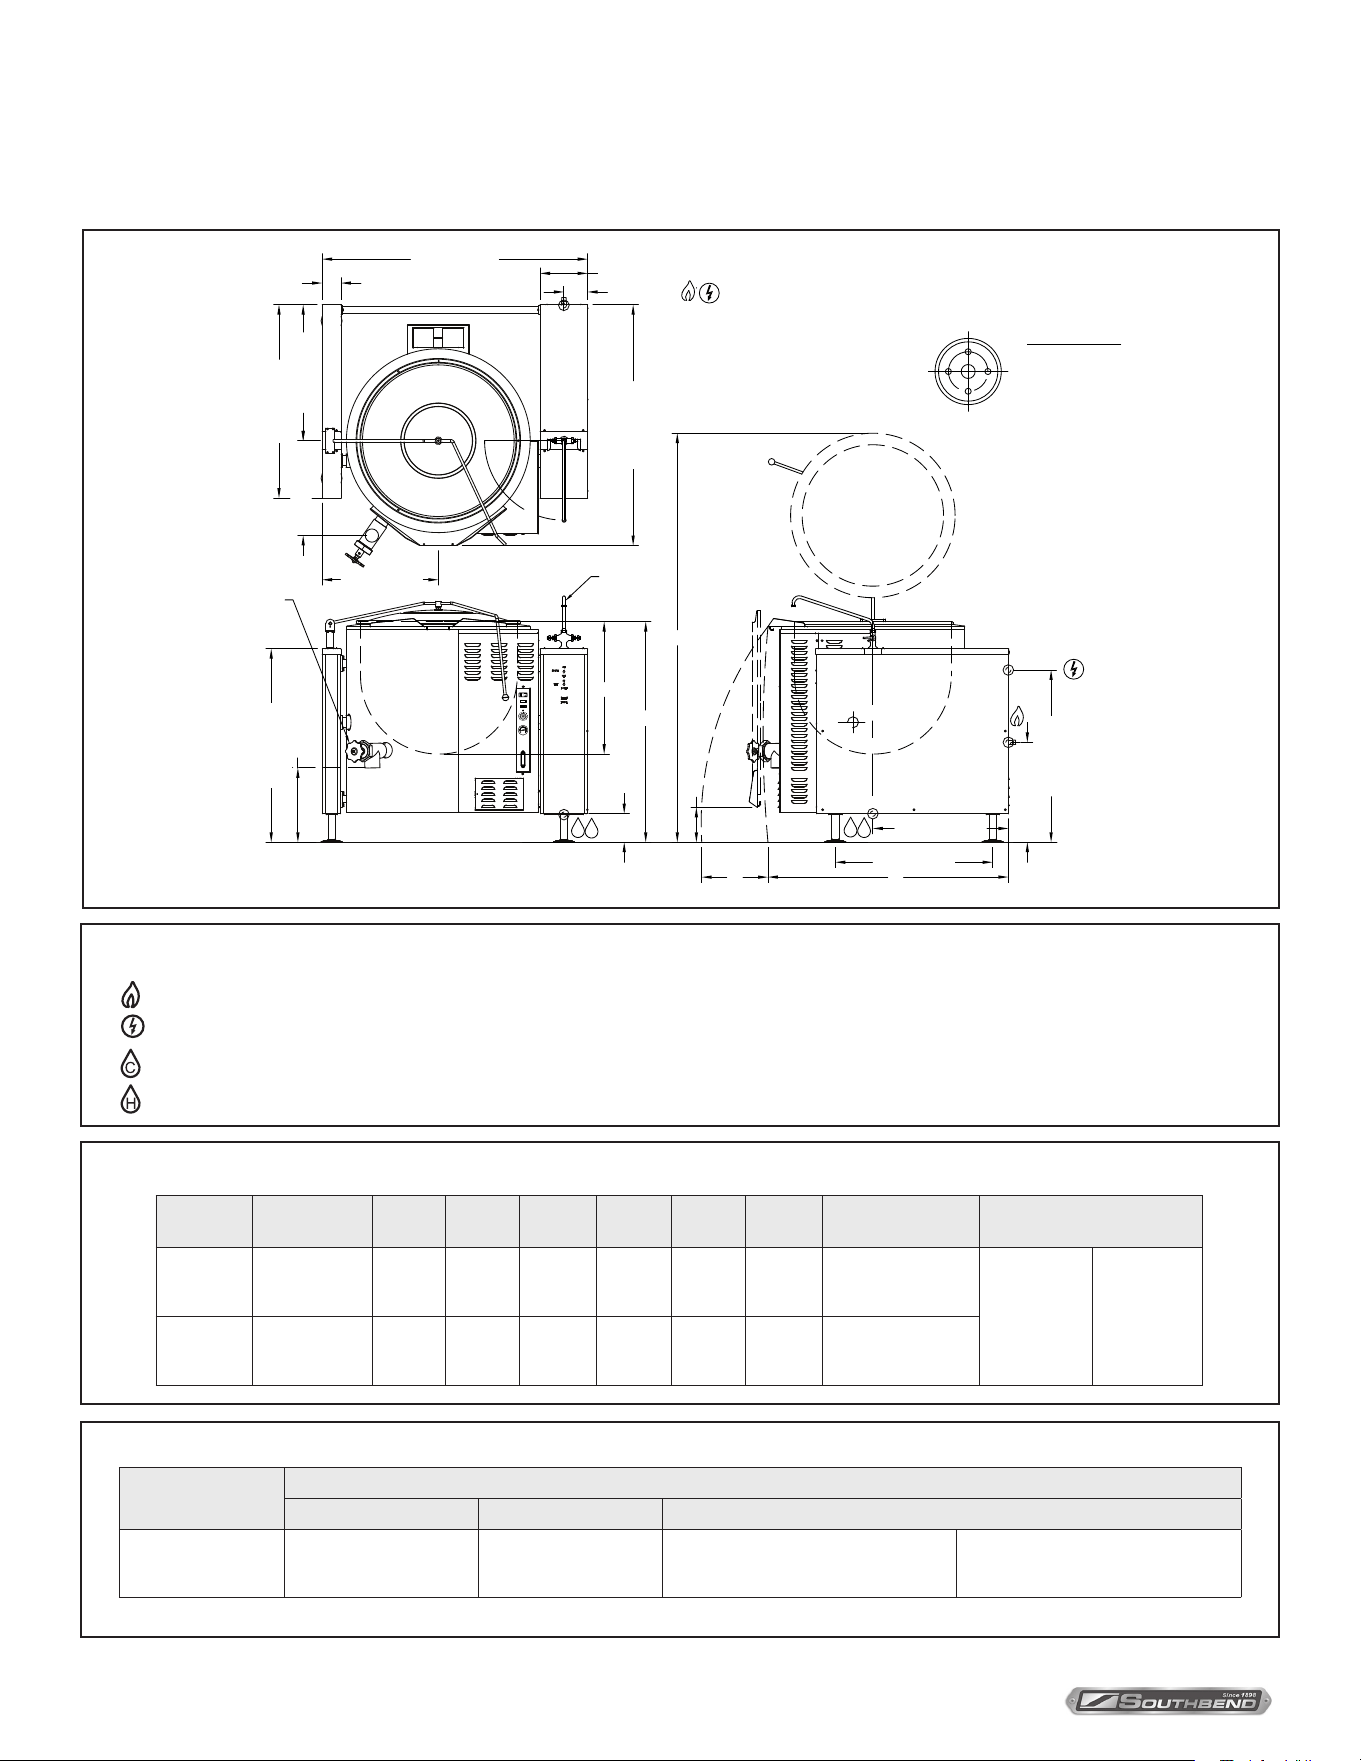
SERVICE CONNECTIONS
GAS CHARACTERISTICS
DIMENSIONS
* For use on non-combustible floors only.
SERVICE CONNECTIONS
– GAS CONNECTION: Supply Gas through 3/4” pipe. A gas shut o valve must be installed in supply piping convenient and adjacent to appliance.
– ELECTRICAL CONNECTION : Unless otherwise specied, eld wire electrical connection to be 120 volts, 60 Hz, 1 phase with grounding wire. Unit
furnished with 8’ cord and 3 prong plug. Total maximum amps 4.0.
– COLD WATER: 3/8” (10 mm) tubing to faucet (optional)
– HOT WATER: 3/8” (10 mm) tubing to faucet (optional)
As continued product improvement is a policy of Southbend Steam, specications are subject to changge without notice.
8971R0
IN [mm]
FLANGED FEET DETAIL
ON 2.835" [72mm] B.C.
Ø7/16" [11mm] HOLES
* Use on non-combustible oors only.
35.63 [905]
22.62 [575]
60.87 [1456]
4.26 [108]
10.76 [273]
5.38 [137]
30.81 [782]
43.81 [1113]
26.30 [668]
3" DRAW-OFF
VALVE
16.83 [428]
OPTIONAL
FAUCET
A
7.91 [201]
B
C
D
E
6.50 [165]
31.00 [787.4]
C
H
C
H
39.00 [991]
WATER LEVEL
PRESSURE
COOK TEMP.
LOW WATER
COOKING
POWER
OFF ON
VENT AIR
20
100
psi
kPa
80
40
TUBE AND CONNECTION
200
0
100
316 SS
300
400
600
500
60
1
OFF
2
3
4
5
6
7
8
9
10
21.48 [546]
54.55 [1386]
43.83 [1113]
Model Capacity Units A B C D E Shipping Weight Minimum Clearance
KTLG-80
80 gallons
(302.8 liters)
in
(mm)
45.18”
(1147)
52.0”
(1321)
22.0”
(559)
89.63”
(2277)
25.38”
(645)
1253 lbs. [569 kg]
SIDES
BACK
0” [0 mm]
4” [102 mm]
KTLG-100
30 gallons
(378.5 liters)
in
(mm)
49.8”
(1265)
54.5”
(1383)
23.5”
(597)
92.6”
(2353)
30”
(762)
1403 lbs. [637 kg]
Model
Gas Supply
BTU/HR. kW/HR. Supply Pipe Pressure (W.C.)
KTLG-80/100 150,000 44.0
Natural
6”-14” (152-356 mm)
Propane
11”-14” (279-356 mm)
INSTALLATION & OPERATION MANUAL 10325-SB REV 0 (11/21)
PAGE
5
OF32
Gas Fired Steam Tilting Kettles
UNPACKING
IMMEDIATELY INSPECT FOR SHIPPING DAMAGE
Immediately after unpacking the steamer, check for possible shipping damage. If the steamer is found to be damaged,
save the packaging material and contact the carrier within 15 days of delivery.
Prior to installation, verify that the type of gas supply (natural or propane) and electrical service agree with the
specications on the rating plate located on the left side panel as you face the front of the braising pan. If the supply
and equipment requirements do not agree, contact your dealer immediately.
Installation
INSTALLATION
Installation Codes and Standards
Installation must conform with local codes, or in the absence of local codes, with the National Fuel Gas Code, ANSI
Z223.1/NFPA 54, or the Natural Gas and Propane Installation Code, CSA B149.1, as applicable.
1. The appliance and its individual shut o valve must be disconnected from the gas supply piping system during any
pressure testing of that system at pressures in excess of ½ psi (3.5 kPa).
2. The appliance must be isolated from the gas supply piping system by closing its individual manual shut o valve
during any pressure testing of the gas supply piping system at test pressures equal to or less than ½ psi (3.5 kPa).
Electrical grounding must be provided in accordance with local codes, or in the absence of local codes, with the National
Electrical Code, ANSI/NFPA 70, or the Canadian Electrical Code, CSA C22.2, as applicable.
The electrical diagram is located on the inside of the console control cover.
EXHAUST FANS AND CANOPIES: Canopies are set over ranges, ovens and kettles for ventilation purposes. It is
recommended that a canopy extend 6” past appliance and be located 7.5 feet from the oor. Filters should be installed at
an angle of 45 degrees or more with the horizontal. This position prevents dripping of grease and facilitates collecting the
run-o grease in a drip pan, usually installed with the lter. A strong exhaust fan tends to create a vacuum in the room and
may interfere with burner performance or may extinguish pilot ames. Makeup air openings approximately equal to the fan
area will relieve such vacuum. In case of unsatisfactory performance on any appliance, check operation with exhaust fan
in the “OFF” position.
WALL EXHAUST FAN: The exhaust fan should be installed at least 2 feet above the vent opening at the top of the unit.
CLEARANCES: Adequate clearance must be provided in aisle and at the side and back. Adequate clearances for
air openings into the combustion chamber must be provided, as well as for serviceability.
SIDES 0 INCHES
BACK 4 INCHES AT FLUE BOX
FLOORS NON-COMBUSTIBLE
All units must be installed in such a manner that the ow of combustion and ventilation air are not obstructed. Provisions
for an adequate air supply must also be provided. Do not obstruct the lower front or right side of the unit, as combustion
air enters through these areas. The bottom of the control area must also remain unobstructed.
Information on the construction and installation of ventilating hoods may be obtained from the standard for
“Vapor Removal from Cooking Equipment”, NFPA No. 96 (latest edition), available from the National Fire
Protection Association, Batterymarch Park, Quincy, MA, USA, 02269.
INSTALLATION & OPERATION MANUAL 10325-SB REV 0 (11/21)
PAGE
6
OF 32
Gas Fired Steam Tilting KettlesINSTALLATION
WARNING
All connections must be checked for leaks, after the unit has been put in operation. Use soapy water only for
testing on all gases. Never use an open ame to check for gas leaks.
NOTICE
If applicable, the vent line from the gas appliance pressure regulator shall be installed to the outdoors in accordance
with local codes or, in the absence of local codes, with the National Fuel Gas Code, ANSI Z223.1/NFPA 54, or the
Natural Gas and Propane Installation Code CSA B149.1, as applicable.
To Install
1. Uncrate carefully. Report any hidden freight damage to the freight company immediately.
2. The pressure relief valve is located at the right rear of the unit. This area should be kept clear and should not be in an area
where operators will normally stand. The elbow on the relief valve should be turned toward the oor. A maximum 3 foot, 3/4”
diameter pipe may be used to extend to the oor, but must not be piped directly to a drain. It must vent to the atmosphere.
3. Set the unit in place. Be certain to maintain minimum clearances as stated above.
4. To level the unit use a spirit level in all directions on the top of the kettle (lid up). Adjust the bottom foot on each leg to
overcome an uneven oor.
5. Mark hole locations on oor through anchoring holes provided in anged adjustable feet.
6. Remove appliance and drill holes in locations marked on oor and insert proper anchoring devices.
7. Set unit back in position and re-level left to right and front to back.
8. Bolt and anchor appliances securely to the oor.
9. Seal bolts and anged feet with silastic or equivalent compound.
10. Appliance location must allow air supply to unit and obstruction free clearance for air opening into the combustion chamber.
11. Make service connections as indicated.
12. Check the pressure gauge on the front panel before operating. If the pressure gauge does not indicate green vacuum
zone (below 0 psi), see “Re-establishing Vacuum” section under SERVICE, after completing installation instructions.
GAS CONNECTION
The serial plate on the lower right side of the unit indicates the type of gas your unit is equipped to burn. Do NOT connect
to any other gas type.
A 3/4” NPT line is provided at the rear for the connection. Each unit is equipped with an internal pressure regulator
which is set for 4” W.C. manifold pressure for natural gas and 10” W.C. for propane gas. Use 1/8” pipe tap on the burner
manifold for checking pressure.
An adequate gas supply is imperative. Undersized or low pressure lines will restrict the volume of gas required for
satisfactory performance. A steady pressure, minimum 6” W.C. for natural gas and minimum 11” W.C. for propane gas, is
recommended. With all units operating simultaneously, the manifold pressure on all units should not show any appreciable
drop. Fluctuations of more than 25% on natural gas, and 10% on propane gas, will create pilot problems and aect burner
operating characteristics. Contact your gas company for correct supply line sizes. Purge the supply line to clean out any
dust, dirt, or other foreign matter before connecting the line to the unit. It is recommended that an individual manual shut
o valve be installed in the gas supply line to the unit. Use pipe joint compound which is suitable for use with LP gas on all
threaded connections. Test pipe connections thoroughly for gas leaks.
NOTICE
If this equipment is being installed at over 2,000 feet altitude and was not so specied on order, contact service
department. Failure to install with proper orice sizing may void the warranty.
INSTALLATION & OPERATION MANUAL 10325-SB REV 0 (11/21)
PAGE
7
OF32
Gas Fired Steam Tilting Kettles
WARNING
Do not connect the appliance to the electrical supply until after the gas connection has been made.
INSTALLATION
Water Connection
On units equipped with an optional water ll valve connect a water line (minimum 1/4”) to the valve with a 1/4” NPT female tting.
Units with dual (hot and cold) valves must have the hot water line connected to side with the hot water valve (red) and cold water
line to the cold water valve (blue). Plastic or rubber hose is not recommended, as it may melt against the hot kettle side.
Electrical Connection
WARNING
ELECTRICAL GROUNDING INSTRUCTIONS
This appliance is equipped with a three-prong (grounding) plug for your protection against shock hazard
and should be plugged directly into a properly grounded three-prong receptacle. Do not cut or remove the
grounding prong from this plug. (120V units only).
1. 120 VAC - 60 Hz - Single Phase
Units with this electrical rating are factory supplied with a three-wire cord and three-prong plug which ts any standard
120V, three-prong grounded receptacle. A separate 15 amp supply is needed for each unit.
2. 208/240 VAC - 60 Hz - Single and Three Phase.
Units with this electrical rating are factory equipped with a transformer. To connect supply wires remove cover from
transformer box at right rear of unit. Route supply wires and ground wire through the hole in the cover with a strain
relief tting. Connect wires to the primary transformer terminals as required by your power supply voltage. Connect
ground wire to ground lug. Replace cover. Three-phase units are wired as above, using only two supply wires. The
third supply wire is not connected and must be properly terminated.
3. 220 VAC - 50 Hz - Single Phase.
Units equipped with this voltage rating should be wired exactly as in (Step 2) above.

INSTALLATION & OPERATION MANUAL 10325-SB REV 0 (11/21)
PAGE
8
OF 32
Gas Fired Steam Tilting KettlesPerformance Check
Performance Check
The following items should be checked before or within the rst 30 days of operation by a qualied service technician.
1. Verify correct gas type.
2. Verify correct voltage, cycle and phase.
3. Gas pressure.
4. Internal gas connections.
5. Internal electrical connections.
6. Pilots - adjustment and ignition.
7. Burners - adjustment and ignition.
8. Thermostat - cycle for operation check.
9. Supply valve - check for operation.
10. Check hinge and lid assembly.
11. Draw-o valve - check operation.
12. Advise user on cleaning procedures.
13. Tilt Mechanism - make sure the unit is levelled in all directions and anchored to the oor. See page 6.
INSTALLATION & OPERATION MANUAL 10325-SB REV 0 (11/21)
PAGE
9
OF32
Gas Fired Steam Tilting Kettles
Operation
NOTICE
Contact the factory, the factory representative or a local service company to perform maintenance and repairs
should the appliance malfunction.
OPERATION
WARNING
In the event of main burner ignition failure, a 5 minute purge period must be observed prior
to re-establishing ignition source.
CAUTION
If you smell gas during the lighting procedure, immediately shut o the gas supply until the leak has been corrected.
WARNING
In the event you smell gas, shut down equipment at the main shut o valve and contact the
local gas company or gas supplier for service.
Gas Control Instructions
Appliance does not require “Lighting” the pilot with a ame.
Start-Up
1. Turn thermostat to “OFF” position and main power switch to “OFF” position.
2. Open control panel access door located on right side at bottom.
3. Turn dial on gas combination control valve to “ON” position by rotating control knob counterclockwise. (NOTE: Any
gas service valves exterior to the unit should be open.)
4. Turn main power switch to “ON” position.
5. Set “COOK TEMP” to desired setting. The red “COOKING” pilot will be on until desired setting has been reached.
6. At this time the spark igniter will begin sparking at the pilot until the pilot is ignited, or for ninety seconds (an audible
clicking sound will be evident).
7. When the pilot is ignited the spark igniter will automatically stop and within 15 seconds main burner gas will come on.
If ignition does not occur, after a total of ninety seconds, the unit will lockout, shutting o all gas although the spark
igniter will continue to spark. New installations (where there may be a considerable amount of air in the gas line) may
require the unit to be turned o and immediately back on numerous times after each lockout period until the air is
purged from the gas line.
Shutdown
A. Standby
1. Place main power switch and thermostat to “OFF” position.

INSTALLATION & OPERATION MANUAL 10325-SB REV 0 (11/21)
PAGE
10
OF 32
Gas Fired Steam Tilting Kettles
B. Complete
1. Place main power switch and thermostat to “OFF” position.
2. Turn dial on gas combination control valve from “ON” position to “OFF” position.
3. Turn any main gas service valves supplying gas to “OFF” position.
C. Relighting
1. Turn main power switch to “ON” position.
It should be noted that the pilot and electronic ignition do not cycle with the thermostat. A standing pilot is
automatically established and monitored each time the power switch is turned ON. If the pilot is ever extinguished by
a momentary external interruption, the spark igniter will automatically relight it without disturbing the cooking cycle,
unless lockout occurs.
Spark Igniter Failure
In the event the spark igniter module fails the unit may still be operated by carefully following these instructions.
1. Turn thermostat to OFF position; completely counterclockwise.
2. Turn power switch to OFF position.
3. WAIT A MINIMUM OF 5 MINUTES BEFORE PROCEEDING.
4. Turn dial on combination control to ON position (if not already on).
5. Turn power switch to ON position.
6. Wait two minutes and ten seconds and then immediately light pilot with long match or taper.
7. After 10 - 15 seconds gas valve will allow main burner gas to ow when thermostat is turned on.
8. The pilot will now stay ignited as long as the power switch remains ON. If power switch is turned OFF, repeat
the above instructions. It is intended that the unit be operated in this manner only in emergency situations and
only while it is attended. (Do not leave pilot lit overnight; shut off power switch). A qualified serviceman must
be called promptly.
FRONT PANEL CONTROLS
MAIN POWER SWITCH: .............. This switch turns the main power to the unit on and o. It must be turned on to heat the
kettle. It should be turned o when the kettle will not be in use for long periods.
COOKING LIGHT (RED): ............. This light is on whenever the main burner gas is on.
LOW WATER LIGHT (AMBER): .. All kettles are supplied with sucient distilled water in the pressurized jacket. If at any
time the water level falls below that required for proper operation, the kettle will not
heat and this light will come on. See “Adding Water” section of service instructions.
THERMOSTAT: ............................. The thermostat selects the desired internal kettle operating temperature.
PRESSURE GAUGE:.................... The pressure gauge indicates the internal operating pressure of the kettle. When cold,
the gauge should be in the green vacuum zone. If it is not, refer to “Re-establishing
Vacuum” section of service instructions. Under normal operation with the kettle empty
(thermostat set at 275 degrees Fahrenheit) the pressure shall reach 30 psi. When
loaded the pressure may be considerably less.
SIGHT GLASS: ............................. The sight glass indicates the minimum and maximum water level within the kettle.
If water level falls below minimum level more distilled water should be added. See
“Adding Water” section of service instructions.
PRESSURE RELIEF VALVE: ....... The pressure relief valve is a safety device which prevents the internal kettle pressure
from ever exceeding 50 psi. It should never be tampered with.
OPERATION

INSTALLATION & OPERATION MANUAL 10325-SB REV 0 (11/21)
PAGE
11
OF32
Gas Fired Steam Tilting Kettles OPERATION
Daily Operation
Daily operation should consist of turning on the main power switch and setting the thermostat for the desired temperature.
It is recommended the kettle be preheated prior to use. Milk or egg based products should be placed in the kettle before
heating, however, to prevent sticking. The kettle is preheated when the cooking light goes o the rst time.
At the end of each day, or if the kettle will not be used for some time, shut the unit down by turning the main power switch
to OFF.
Clean as required or on a daily basis. See “Cleaning” section under MAINTENANCE.
Turning on the main power switch initiates a pilot lighting sequence. The spark igniter will begin sparking. The spark igniter
will spark until the pilot is ignited. After ninety seconds lockout will occur. Lockout shuts down all pilot (and main burner)
gas ow although the spark igniter will continue to spark. The power switch must be turned o and back on to restart the
pilot lighting sequence once lockout has occurred.
If the pilot blows out during operation, the unit will go through the same sequence to re-ignite itself.
Once the pilot is ignited, main burner gas will ow when the thermostat is turned on.
End Use Tips
For easier cleaning add cold water to the kettle immediately after removing contents.
When preparing foods containing vinegar or tomatoes, or those which have a high salt content, clean the kettle
immediately after using to prevent pitting.
Do not use salt to clean the kettle. This will scratch the surface.
If using saltwater to cook shellsh, be sure to rinse and wash the kettle thoroughly.
Bring milk and egg products slowly up to temperature in a cold kettle to prevent product adhering to the sides.
When planning actual cooking capacity, allow room at top for stirring without spilling.
When preparing puddings from a mix, place the powder in a cold kettle, add a small amount of the liquid, and stir to form a
thin paste. Turn on the kettle and add the remainder of the liquid. Continue as per recipe instructions.
When browning meat bring the kettle up to temperature before adding. This seals in the juices in the meat.
VENT SYSTEM: At least twice a year the unit venting system should be examined and cleaned.
Gas Saving Tips
Use these reminders to help develop energy-saving procedures and habits. Using less natural or propane gas saves
energy as well as money.
1. Turn o when not in use.
2. Limit preheat times.
3. Use lid when possible.
4. Maintain equipment.
INSTALLATION & OPERATION MANUAL 10325-SB REV 0 (11/21)
PAGE
12
OF 32
Gas Fired Steam Tilting Kettles
Maintenance
WARNING
Disconnect the power supply to the appliance before cleaning or servicing.
Maintenance
NOTICE
Contact the factory, the factory representative or a local service company to perform maintenance and repairs.
Daily
1. Wash exposed cleanable areas.
Monthly
1. Clean around burner air mixers, louvered panels and pilots if grease or lint have accumulated.
Twice a Year (minimum)
Have an authorized service person clean and adjust the unit for maximum performance.
It is NOT RECOMMENDED to use cleaning agents that are corrosive.
Use of cleaning agents that contain chloride, acids or salts are corrosive and may cause pitting and corrosion when used
over a period of time; this will reduce life of the appliance.
Should pitting or corrosion occur this is not covered by warranty.
Follow the recommended cleaning instructions. Use a mild detergent, warm water and rinse thoroughly.
Never spray water into electric controls.
NOTICE
Draw-o valve has a vulcanized rubber coated stem for better sealing. Do not over tighten. This may cause the
rubber to pull away from stem and permanently damage it. This is not covered under warranty.
INSTALLATION & OPERATION MANUAL 10325-SB REV 0 (11/21)
PAGE
13
OF32
Gas Fired Steam Tilting Kettles Cleaning
Cleaning
WARNING
Disconnect the power supply to the appliance before cleaning or servicing.
Your kettle should be cleaned immediately after each use or when cooking a dierent product. Before cleaning, check that
the kettle has cooled enough to touch it.
1. Rinse the inside of the kettle thoroughly and drain to remove any food particles.
2. Using a nylon brush, clean the kettle with a mild detergent and water. Never use steel wool or scouring powder as it
will scratch stainless steel. Plain steel wool can leave small pieces of steel which can rust.
3. Rinse the inside of the kettle thoroughly with clean water. Drain the kettle by tilting or through the tangent draw-o
valve, depending on model, to allow the detergent and water solution to drain.
4. Wipe the exterior of the kettle with a clean, damp cloth.
WARNING
Never spray water into electric controls or components!
CAUTION
Do not use cleaning agents that are corrosive.
WARNING
The equipment and its parts are hot. Use care when operating, cleaning and servicing.
WARNING
If you are cleaning a valve that is assembled to a kettle, be sure the kettle is completely empty of any product.
Draw-Off Valve Cleaning
1. If equipped with a tangent draw-o valve, turn the large hex nut on the draw-o valve counterclockwise until it is
completely disengaged from the threads. Grasp the valve knob and slowly pull out the valve stem and disk. Do not
allow the disk to come in contact with hard surfaces as it can be damaged and cause valve leakage. Wash the valve
stem, disk and handle. Insert a nylon brush, wet with detergent and water, into the valve body and tangent draw-o
tube. Brush vigorously.
2. Replace the valve stem assembly and turn the hex nut until snug. Rinse the kettle with clean warm water.
3. Leave the draw-o valve open when the kettle is not in use.
Dairy Draw-Off Valve Cleaning
1. Remove the plug by rst removing the handle, then turn the plug to line up with the pin and pull with both hands. It is
important to use both hands because the plug is heavy.
2. Put the plug in a plastic pail that contains a mild soap solution. A plastic pail works best, as it reduces the possibility of
nicking or scratching the plug. If the plug gets scratched it may not seal correctly and could leak.

INSTALLATION & OPERATION MANUAL 10325-SB REV 0 (11/21)
PAGE
14
OF 32
Gas Fired Steam Tilting Kettles
3. Use a soft cloth or soft brush and clean all surfaces.
4. Using both hands remove the valve from the soap and rinse well in another plastic pail that contains fresh water.
5. Wash out the kettle as normal.
6. Once the kettle is washed out, return the plug into the body. Be sure the plug is inserted into the notch and turned.
Ensure the plug is tight and secure before letting go of it.
If you are cleaning a body and plug assembly, remove the plug and follow the above procedures. When nished with the
plug, follow the same instructions for washing the body. Always use both hands when handling the plugs. Reassemble the
plug into the body and use as normal.
What to Do if Surface Rust Appears
Metal utensils should never be used as they will scratch the surface of the equipment and rust may begin to form. To
remove surface accumulation of rust from the inadvertent use of such utensils, the following procedure may be used.
CAUTION
Improper use of this procedure may damage your appliance!
1. Use undiluted white vinegar with a non-abrasive scouring pad (plastic) or cloth on the aected area to remove the rust
stain. The appliance should not be heated and remain at room temperature during the entire cleaning process.
2. If the stain resists removal, additional exposure time with vinegar may be required, to a maximum of one hour.
3. Thoroughly wash all of the vinegar away with fresh clear water. Dry the surface completely and allow one hour before
using the appliance to cook.
Following daily and period maintenance procedures will prolong the life for your equipment. Climatic conditions -
salt air - may require more thorough and frequent cleaning or the life of the equipment could be adversely aected.
Stainless Steel
To remove normal dirt, grease or product residue from stainless steel, use ordinary soap and water (with or without detergent)
applied with a sponge or cloth. Dry thoroughly with a clean cloth. Never use vinegar or any other corrosive cleaner.
To remove grease and food splatters or condensed vapors that have baked on the equipment, apply cleanser to a
damp cloth or sponge and rub cleanser on the metal in the direction of the polishing lines. Rubbing cleanser as gently
as possible in the direction of the polished lines will not mar the nish of the stainless steel. NEVER RUB WITH A
CIRCULAR MOTION.
Soil and burn deposits which do not respond to the above procedure can usually be removed by rubbing the surface
with SCOTCH-BRITE™ scouring pads or STAINLESS scouring pads. DO NOT USE ORDINARY STEEL WOOL as any
particles left on the surface will rust and further spoil the appearance of the nish. NEVER USE A WIRE BRUSH, STEEL
SCOURING PADS (EXCEPT STAINLESS), SCRAPER, FILE OR OTHER STEEL TOOLS. Surfaces which are marred
collect dirt more rapidly and become more dicult to clean. Marring also increases the possibility of corrosive attack.
Renishing may then be required.
TO REMOVE HEAT TINT: Darkened areas sometimes appear on stainless steel surfaces where the area has been
subjected to excessive heat. These darkened areas are caused by thickening of the protective surface of the stainless
steel and is not harmful. Heat tint can normally be removed by the foregoing, but tint which does not respond to this
procedure calls for a vigorous scouring in the direction of the polish lines using SCOTCH-BRITE™ scouring pads or a
STAINLESS scouring pad in combination with a powdered cleanser. Heat tint action may be lessened by not applying or
by reducing heat to equipment during slack periods.
All food contact surfaces must be thoroughly drained and ushed prior to cooking in the kettle.
CONTROL PANEL: The textured control panel should be cleaned with warm water and mild soap. Never use an abrasive
cloth or steel wool. Never use cleaning solvents with a hydrocarbon base.
Cleaning
INSTALLATION & OPERATION MANUAL 10325-SB REV 0 (11/21)
PAGE
15
OF32
Gas Fired Steam Tilting Kettles
Service
General
When any diculty arises always check that the unit has been connected to the gas supply type and voltage for which it
was supplied. This can be done by examining the serial plate on the lower right side of the unit. It will list the gas type and
voltage for which the unit was manufactured.
Wiring diagrams for the unit are located in a small envelope axed to the side panel of left hand console.
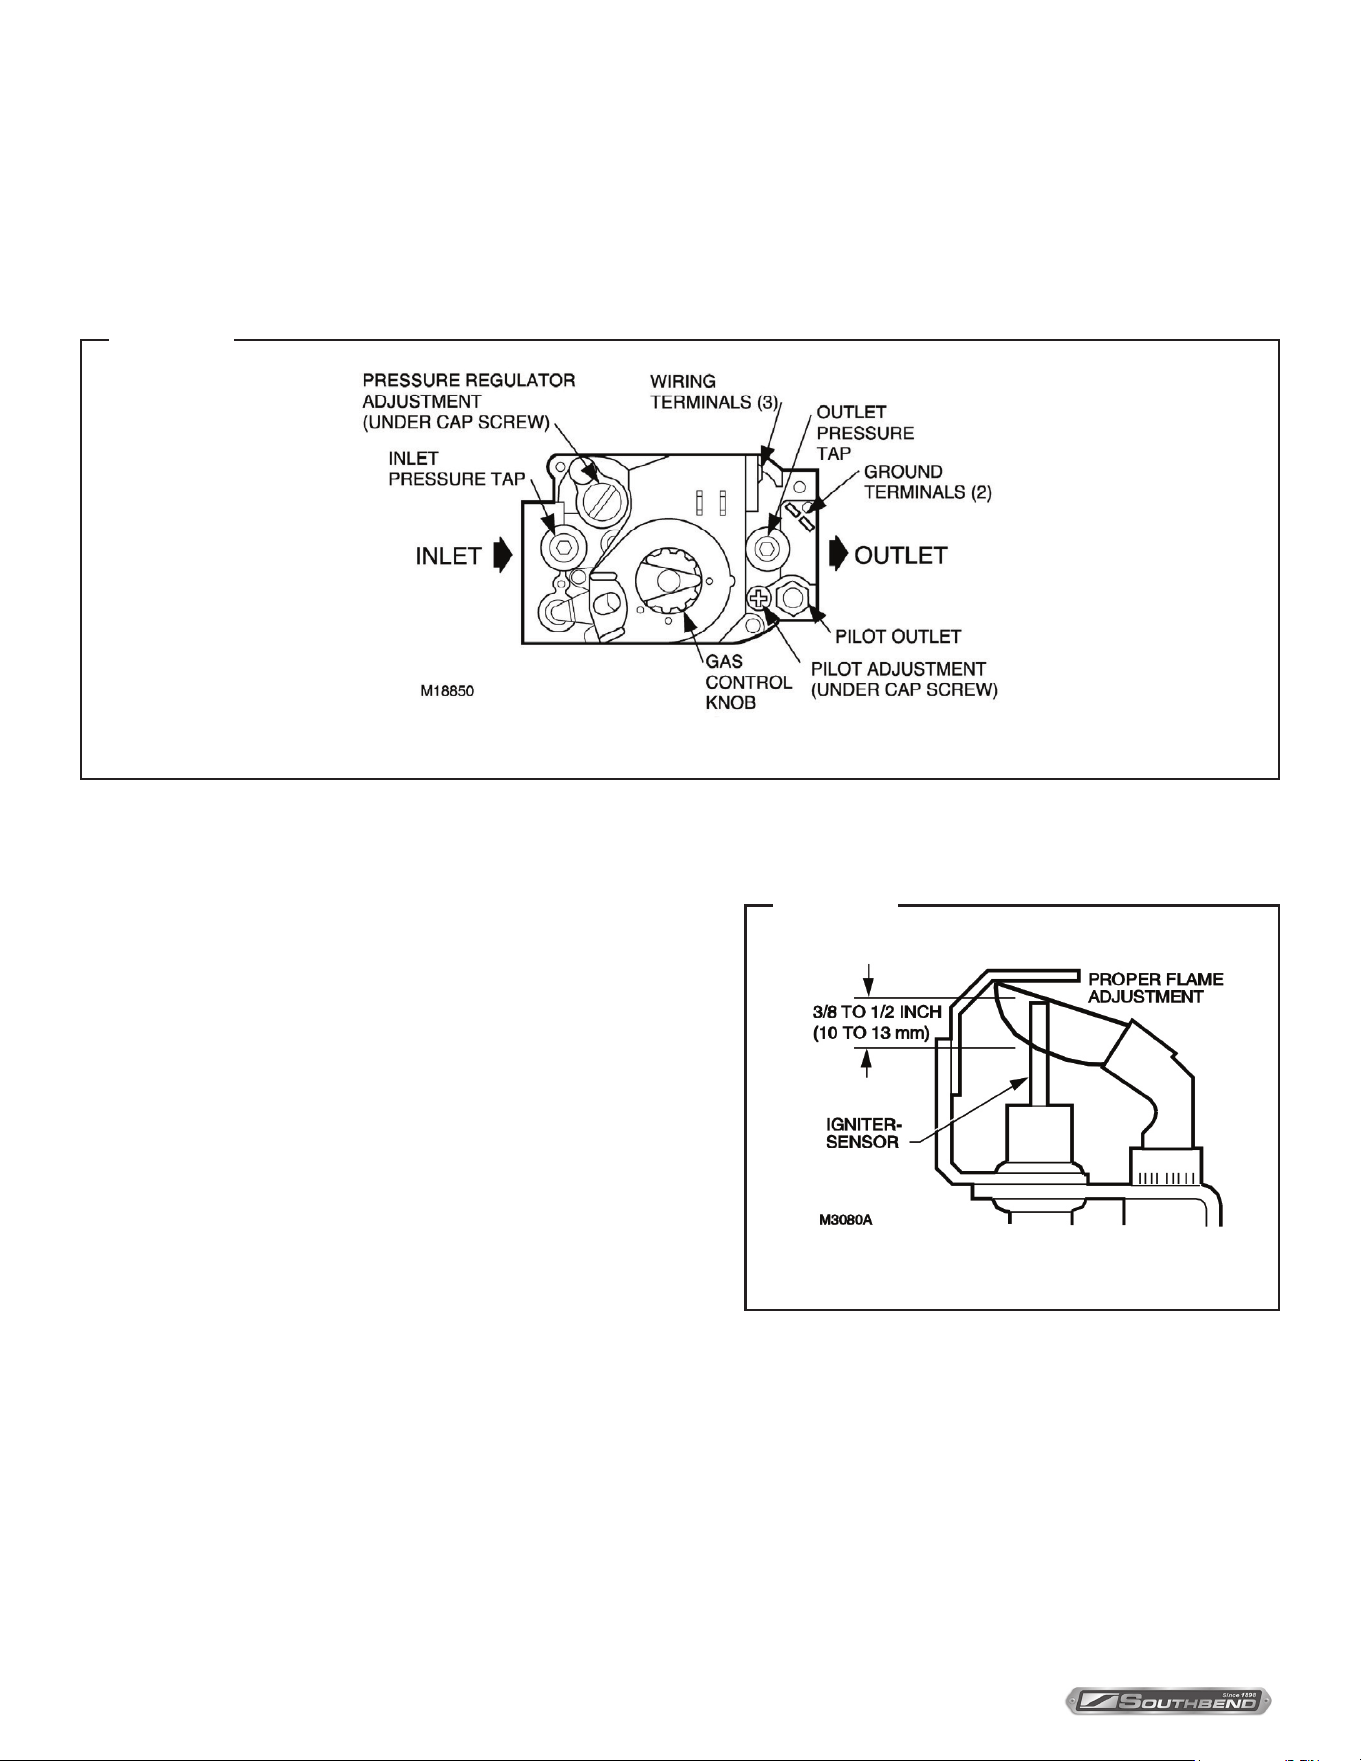
UNIT TOTAL INPUT
ORIFICE SIZE
NATURAL PROPANE
KTLG-80 150,000 BTU/Hour 30 45
KTLG-100 150,000 BTU/Hour 30 45
Manifold Pressure
Natural Gas - 4 inches W.C. LP Gas - 10 inches W.C.
Service
CAUTION
Under normal operating conditions a “try lever test” should be performed every two months. Under severe service
conditions, or if corrosion and/or deposits are noticed within the valve body, testing must be performed more often.
A “try lever test” should also be performed at the end of any non-service period.
CAUTION
Hot, high pressure uid may be discharged from body drain and vent during “try lever” test. Care must be taken
to avoid any bodily contact.
WARNING
Disconnect unit from power supply before cleaning or servicing appliance.
CAUTION
High sound levels may be experienced during “try lever” test. Wear proper safety equipment and exercise extreme
care! Test at, or near, half of the operating pressure by holding the test lever fully open for at least two seconds to
ush the valve seat free of sediment and debris. Then release lever and permit the valve to snap shut.
If lift lever does not activate, or there is no evidence of discharge, turn o equipment immediately and contact a
licensed contractor or qualied service personnel.
INSTALLATION & OPERATION MANUAL 10325-SB REV 0 (11/21)
PAGE
16
OF 32
Gas Fired Steam Tilting Kettles
Adjustments
Pilots
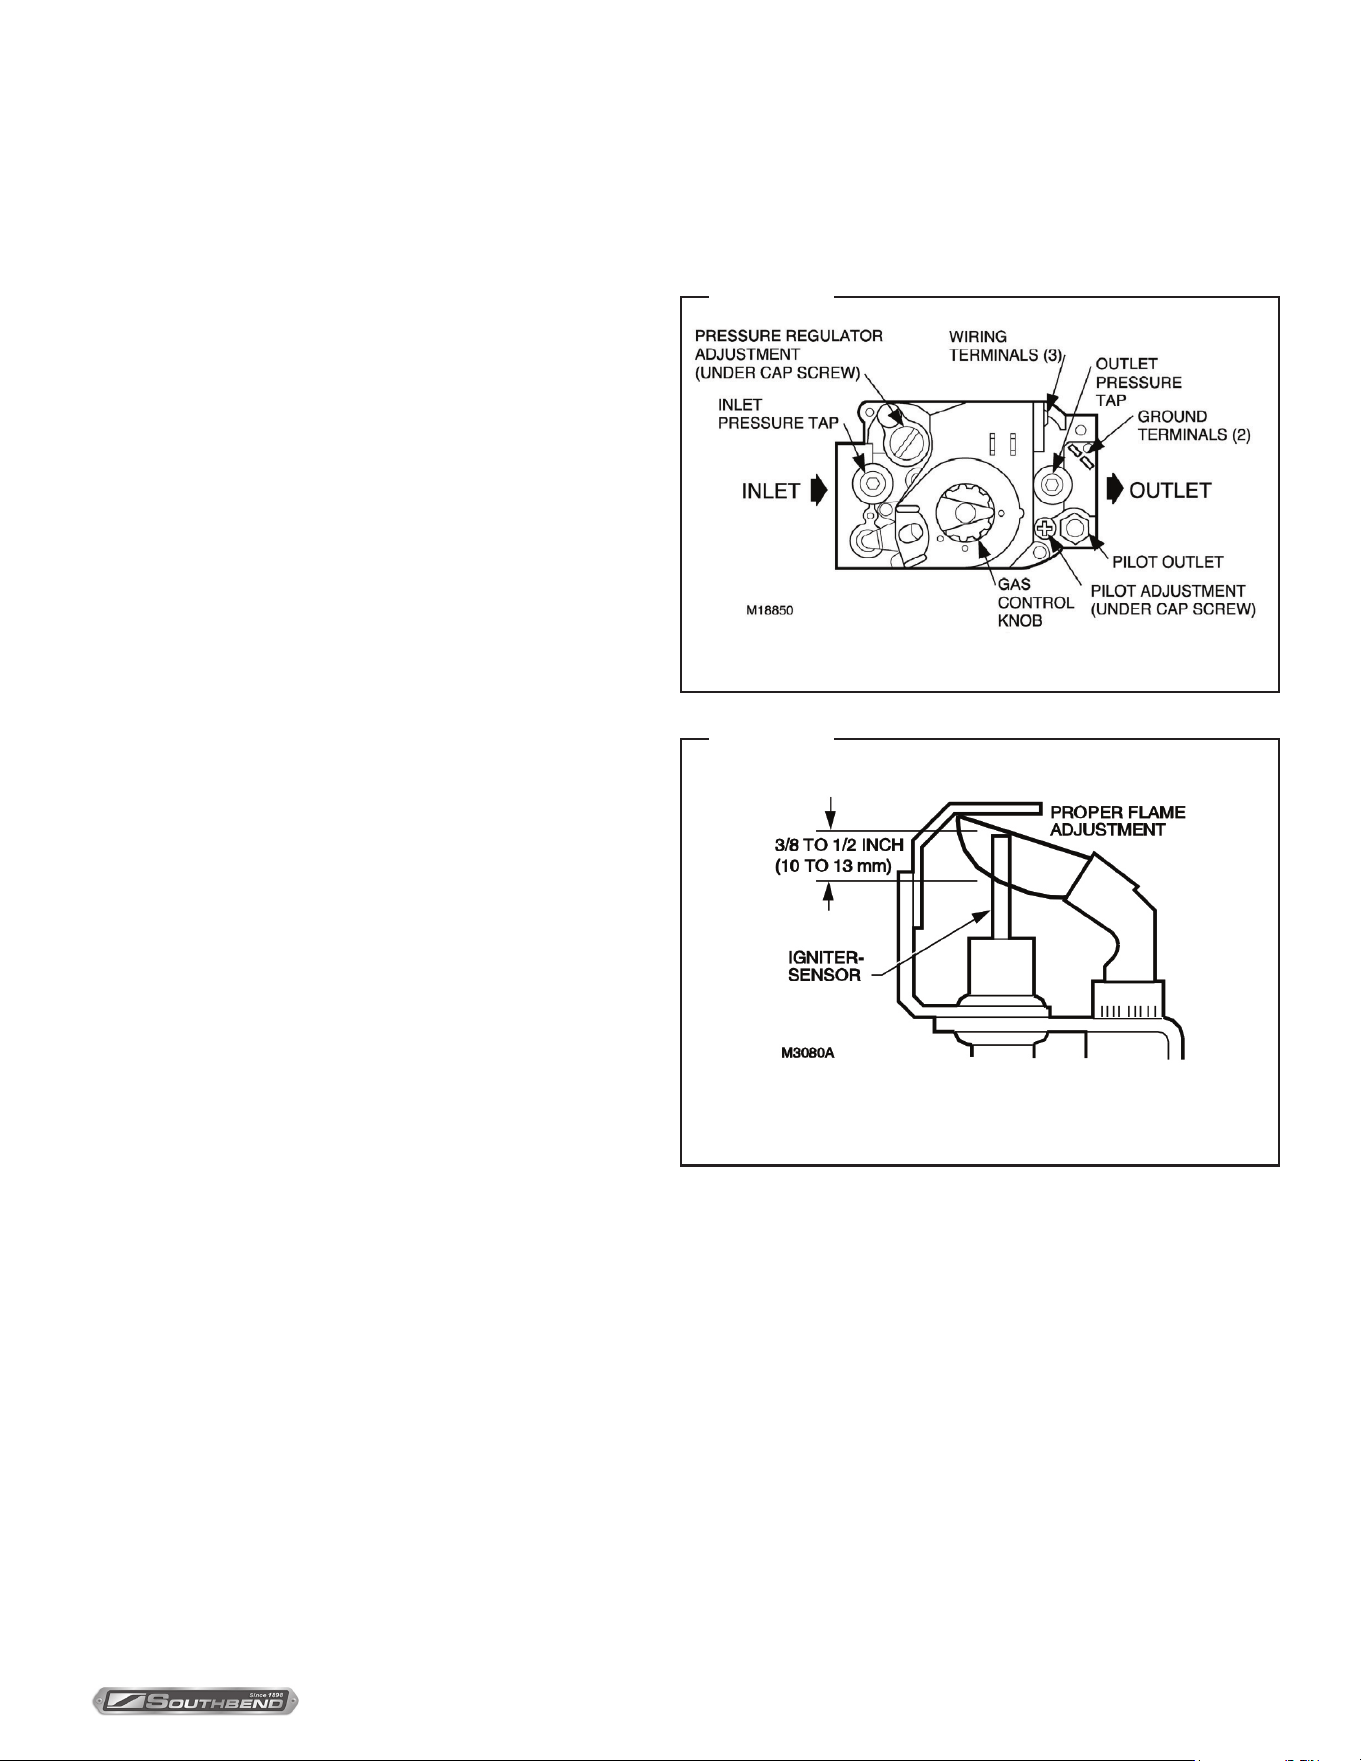
The pilot adjustment is part of the combination control valve located just behind the lower front access door. It is located
on the centre left side of the control just below the large slotted screw head. (See Figure 1). Remove the large slotted
screw; below this is a second slotted screw used for adjustment of the pilot burner ame.
FIGURE 1
Top View of Gas Control
The front burner shield should be removed to see the pilot. The pilot should be adjusted as follows:
Adjust the Pilot Burner Flame
The pilot ame should envelop 3/8 to 1/2 inch [10 to 13 mm] of the
igniter-sensor tip. Refer to Figure 2. To adjust the pilot ame:
1. Remove the pilot adjustment cover screw. Refer to Figure 1.
2. Turn the inner adjustment screw clockwise to decrease or
counterclockwise to increase the pilot ame.
3. Always replace the cover screw after adjustment and tighten
rmly to ensure proper operation.
PILOT ORIFICE SIZES
Natural Propane
0.018 IN. 0.010 IN.
GAS PRESSURE REGULATOR
The gas pressure regulator is an integral part of the combination gas control located just behind the lower front access
door. The pressure regulator adjustment is on the lower right side of the gas control. (See Figure 1). The large slotted cap
must be removed to access the adjustment screw.
To check the manifold pressure a pressure gauge (manometer) must be connected to the 1/8” NPT pressure tap on the gas manifold.
With the gas o, connect your pressure indicating instrument to the manifold with a tting appropriate for your instrument.
1. Turn the unit on; with main burners on, read the manifold pressure. The pressure should be 4 inches water column (W.C.)
(±) .2 inches W.C. for natural gas or 10 inches W.C. for propane gas. Adjust the pressure regulator to obtain the appropriate
pressure. Check serial plate on lower right side of unit to conrm exact gas type and manifold pressure for your unit.
When pressure has been correctly adjusted turn unit o. Remove pressure indicating instrument and replace the 1/8” NPT
plug in manifold. Replace regulator cap and close access door.
FIGURE 2
Proper Flame Adjustment
Service

INSTALLATION & OPERATION MANUAL 10325-SB REV 0 (11/21)
PAGE
17
OF32
Gas Fired Steam Tilting Kettles Service
Thermostat
The thermostat adjustment should not be changed. Check the following before changing the thermostat:
1. With kettle cool, the pressure reading on the pressure gauge should be in the green vacuum zone (below 0 psi). If not,
see “Re-establishing Vacuum” section.
2. Check that the pressure switch is not set too high or too low and causing the out of adjustment condition. A voltmeter
should be used by a properly trained serviceman to determine if the pressure switch or thermostat is actually cycling
the burners. If the pressure switch is found to be the problem, see “Pressure Switch” section.
After verifying that the pressure switch is set and operating properly, the thermostat may be adjusted using the set screw
inside the stem. The thermostat should cycle o at a gauge pressure reading of 30 psi. Turn set screw clockwise to
decrease pressure and counterclockwise to increase pressure.
Pressure Switch
The pressure switch should not be adjusted until it is determined to be the cause of an operating pressure deciency. See
“Thermostat” section to determine if the source of diculty is the pressure switch or thermostat.
The major diculties caused by pressure switch mis-adjustment are:
1. Pressure relief valve opening, especially on preheat from a cold start to 275 degrees Fahrenheit (135 °C). (Pressure
switch set too high.)
2. Burners are being shut down by pressure switch, not the thermostat. (Pressure switch set too low.)
The pressure switch is preset for proper operation from the factory. It is adjusted to the maximum pressure, however
not high enough to cause the pressure relief valve to open. This setting will be slightly dierent on dierent kettles due
to variations in the pressure relief valves. During preheat to the maximum thermostat setting (275 degrees Fahrenheit)
(135 °C), from either a cold condition or a lower temperature setting, the temperature may overshoot the thermostat
setting and shut down the burners by the pressure switch. This is normal, however, after the kettle cycles several times
(empty) the thermostat will begin cycling the unit.
To Adjust Pressure Switch
1. To obtain access to the pressure switch, the front panel must be removed. Remove the screws on either side of the
panel. Be sure to support the panel to avoid excessive strain on the wiring.
2. To increase the pressure setting turn the white ribbed knob clockwise; to decrease the pressure, turn it
counterclockwise. Use the centre of the black ring as an indicator.
3. With the kettle empty and completely cold, bypass the thermostat by moving the single terminal side wire to the
double terminal side connector on the thermostat. Turn kettle on.
4. Pressure in kettle (read pressure gauge on front panel) should reach a maximum of 35 psi and pressure relief valve
should not open. Kettle pressure may rise 3 or 4 psi even after burners shut down.
5. Relief valve should not open when kettle pressure is 40 psi; pressure switch setting is satisfactory.
6. If relief valve opens, reduce setting on pressure switch, cool kettle completely by running cold water through it and
repeat steps 3 - 6.
7. If pressure in kettle is below 30 psi when burners shut o, increase setting of pressure switch, cool kettle completely
by running cold water through it and repeat steps 3 - 7.
8. When adjustment is complete, move wire from shorted terminal on the thermostat back to the appropriate terminal
and replace the front panel.

INSTALLATION & OPERATION MANUAL 10325-SB REV 0 (11/21)
PAGE
18
OF 32
Gas Fired Steam Tilting Kettles
Adding Water
It may be necessary to replenish water in the jacket when the low water indicator comes on. Do so as follows:
1. Unit should be completely cold and o.
2. Lift handle of pressure relief valve to release vacuum in kettle. (Relief valve is at right rear of kettle).
3. Remove air vent nut on the tee located between kettle and relief valve.
4. Using pure distilled water only, pour the water into the opening. (A funnel will be helpful). Water will enter the kettle
slowly, as air must escape through the same hole. Water should be added until the water level at the sight glass is half
way between the minimum and maximum levels.
5. When sucient water has been added, replace and tighten the nut.
6. Vacuum must be re-established. (See Re-establishing Vacuum).
For reference, the total amount of distilled water contained in each unit, and amount to be added in a low water condition
are listed below:
Model Total Amount of Distilled Water
Amount of Water to be Added
in a Low Water Condition
KTLG-80 16.3 Gallons (61.71 L) 721 Fluid Ounces (21.32 L)
KTLG-100 16.3 Gallons (61.71 L) 721 Fluid Ounces (21.32 L)
Re-Establishing Vacuum
With the kettle completely cold a vacuum of 25 to 30 inches Hg (630 - 730 mm Hg) should be maintained as indicated
in the green zone on the pressure gauge on the front control panel. If at any time the vacuum is not in the green zone,
vacuum should be re-established.
With the kettle empty, turn the thermostat knob to the highest temperature. When the temperature pilot light goes o, open
air vent nut one (1) full turn for 30 seconds and then close and tighten the nut. This should remove the air and any loss in
performance should return.
Should the kettle fail to maintain a vacuum after repeated attempts to establish it, further checks should be made to see
if the pressure relief valve is leaking or if there are any leaks in the pressure relief valve piping, copper lines going to the
pressure switch, pressure gauge or thermostat tting.
Control Circuit Fuses
The control circuit is protected by a 3 amp. fuse which is located inside control panel, top right side above transformer.
Should the unit fail to turn on, check this fuse by removing it and either replacing it or testing it with a continuity tester. If
the fuse is good, check the main power circuit breaker, which should be external to the kettle.
Service
INSTALLATION & OPERATION MANUAL 10325-SB REV 0 (11/21)
PAGE
19
OF32
Gas Fired Steam Tilting Kettles Service
Converting Between Natural and Propane Gas
To convert the kettle from natural gas to LP or LP to natural gas use OEM Conversion Kits. Contact manufacturer or your
authorised service company for the kits part numbers.
To convert gas combination control from one gas to another:
1. Turn o main gas supply to the appliance.
2. Remove the regulator cap screw and pressure
regulator adjusting screw. See Figure 3.
3. Remove the existing spring.
4. Insert the replacement spring with tapered end down.
See Figure 4.
5. Install the new plastic pressure regulator
adjustment screw so that the top of the screw is
flush (level) with the top of the regulator. Turn the
pressure regulator adjustment screw clockwise
six complete turns. This provides a preliminary
pressure setting of about 10 inch (254 mm) W.C.
for LP regulator and 4 inch (102 mm) W.C. for
natural gas regulator.
6. Check the regulator setting either with a manometer or
by clocking the gas meter.
7. Install the new cap screw.
8. Mount conversion label on control.
9. Install control and appliance according to appliance
manufacturer’s instructions.
Top View of Gas Control
FIGURE 3
FIGURE 4
Installation of Conversion Kit in
Regulated Gas Control.
INSTALLATION & OPERATION MANUAL 10325-SB REV 0 (11/21)
PAGE
20
OF 32
Gas Fired Steam Tilting KettlesTroubleshooting
Troubleshooting
PROBLEM PROBABLE CAUSE
Unit will not come on
Main power switch is o.
Unit not plugged in.
Main power supply o.
Bad electronic module.
Bad low water control.
Bad spark igniter.
Bad intermittent pilot burner.
Fuse in unit blown.
Unit will turn on electrically
but will not heat
Lockout has occurred.
Thermostat not on.
Gas control valve o.
Main gas supply o.
Low water.
Bad thermostat.
Bad pressure switch.
Bad gas control valve.
Bad spark igniter.
Bad igniter cable.
Bad intermittent pilot burner.
Faulty gas control.
Excessive ame rollout on
ignition, carboning
Natural gas unit on propane.
Excessive gas pressure.
Incorrect orice size.
Faulty regulator in gas control.
Unit slow to preheat and
slow to recover
Propane gas on natural.
Low gas pressure.
Incorrect orice sizes.
Loss of vacuum.
Faulty regulator in gas control.
Unit continuously locks out
Pilot gas adjusted too low.
Excessive draft condition.
Excessive steam around bottom of unit during operation of cleaning.
Faulty transformer.
Faulty electronic module.
Faulty ignitor cable.
Faulty spark igniter.
Faulty gas control.
NOTICE
Loose, broken or grounded wiring may cause many of the symptoms listed.
Check all wiring and make sure it is intact.
INSTALLATION & OPERATION MANUAL 10325-SB REV 0 (11/21)
PAGE
21
OF32
Gas Fired Steam Tilting Kettles Material Safety Data Sheets
Appendix ‘A’
INSTALLATION & OPERATION MANUAL 10325-SB REV 0 (11/21)
PAGE
22
OF 32
Gas Fired Steam Tilting KettlesMaterial Safety Data Sheets
INSTALLATION & OPERATION MANUAL 10325-SB REV 0 (11/21)
PAGE
23
OF32
Gas Fired Steam Tilting Kettles Material Safety Data Sheets
INSTALLATION & OPERATION MANUAL 10325-SB REV 0 (11/21)
PAGE
24
OF 32
Gas Fired Steam Tilting KettlesMaterial Safety Data Sheets
INSTALLATION & OPERATION MANUAL 10325-SB REV 0 (11/21)
PAGE
25
OF32
Gas Fired Steam Tilting Kettles Material Safety Data Sheets
INSTALLATION & OPERATION MANUAL 10325-SB REV 0 (11/21)
PAGE
26
OF 32
Gas Fired Steam Tilting KettlesMaterial Safety Data Sheets
INSTALLATION & OPERATION MANUAL 10325-SB REV 0 (11/21)
PAGE
27
OF32
Gas Fired Steam Tilting Kettles Material Safety Data Sheets
INSTALLATION & OPERATION MANUAL 10325-SB REV 0 (11/21)
PAGE
28
OF 32
Gas Fired Steam Tilting KettlesMaterial Safety Data Sheets
INSTALLATION & OPERATION MANUAL 10325-SB REV 0 (11/21)
PAGE
29
OF32
Gas Fired Steam Tilting Kettles Material Safety Data Sheets
INSTALLATION & OPERATION MANUAL 10325-SB REV 0 (11/21)
PAGE
30
OF 32
Gas Fired Steam Tilting KettlesMaterial Safety Data Sheets

INSTALLATION & OPERATION MANUAL 10325-SB REV 0 (11/21)
PAGE
31
OF32
Gas Fired Steam Tilting Kettles
Notes
Notes
INSTALLATION & OPERATION MANUAL 10325-SB REV 0 (11/21)
PAGE
32
OF 32
Gas Fired Steam Tilting Kettles
KTLG-80 and KTLG-100
Gas Fired Steam Tilting Kettles
A product with the Southbend Steam name incorporates the best in durability and low maintenance. We all recognize,
however, that replacement parts and occasional professional service may be necessary to extend the useful life of this
appliance. When service is needed, contact a Southbend Steam Authorized Service Agency, or your dealer. To avoid
confusion, always refer to the model number, serial number, and type of your appliance.
SOUTHBEND STEAM
A Middleby Company
1100 Old Honeycutt Road Fuquay-Varina, North Carolina 27526 USA
www.southbendnc.com