INSTRUCTION MANUAL
Model# 31200 ENGLISH

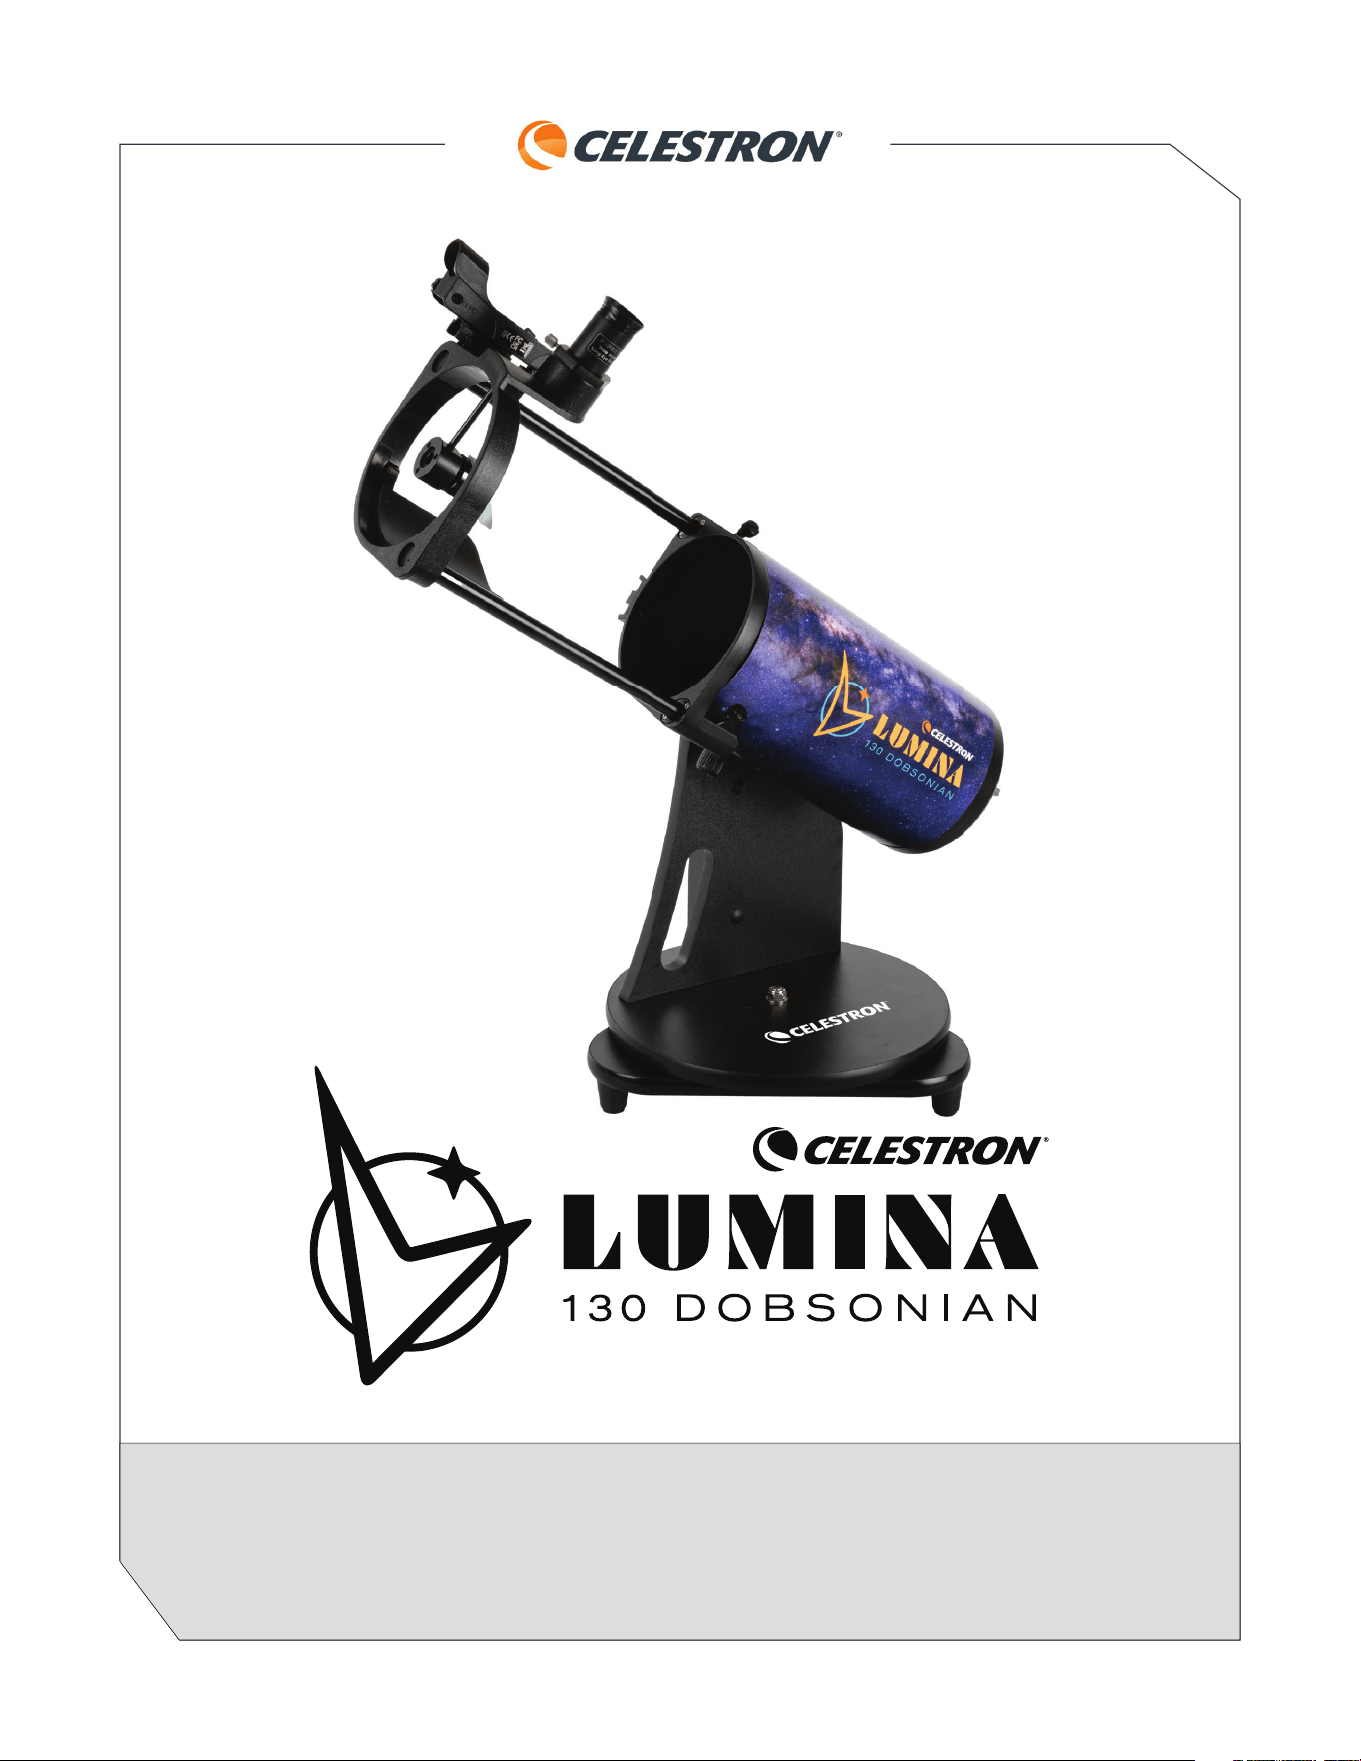
LUMINA 130 DOBSONIAN
2 | ENGLISH
TABLE OF CONTENTS
What's in the Box . . . . . . . . . . . . . . . . . . . . . . . . . . . . . . . . . . . . . . . . . . . . . . . . . . . 1
Parts List . . . . . . . . . . . . . . . . . . . . . . . . . . . . . . . . . . . . . . . . . . . . . . . . . . . . . . . . . . . . 1
Assembling the Telescope . . . . . . . . . . . . . . . . . . . . . . . . . . . . . . . . . . . . . . . . . . . . 2
Operating the Telescope . . . . . . . . . . . . . . . . . . . . . . . . . . . . . . . . . . . . . . . . . . . . . 3
Balancing Your Telescope . . . . . . . . . . . . . . . . . . . . . . . . . . . . . . . . . . . . . . . . . . . . . . . . . . 3
Positioning Your Telescope . . . . . . . . . . . . . . . . . . . . . . . . . . . . . . . . . . . . . . . . . . . . . . . . . 3
Using the Tension Control Knob . . . . . . . . . . . . . . . . . . . . . . . . . . . . . . . . . . . . . . . . . . . . . . 3
Focusing Your Telescope . . . . . . . . . . . . . . . . . . . . . . . . . . . . . . . . . . . . . . . . . . . . . . . . . . 3
Aligning Your Finderscope . . . . . . . . . . . . . . . . . . . . . . . . . . . . . . . . . . . . . . . . . . . . . . . . . 4
Accessing the Finderscope Battery . . . . . . . . . . . . . . . . . . . . . . . . . . . . . . . . . . . . . . . . . . . . 4
Your First Night Out: The Moon . . . . . . . . . . . . . . . . . . . . . . . . . . . . . . . . . . . . . . . . . . . . . . 5
Celestial Observing Tips . . . . . . . . . . . . . . . . . . . . . . . . . . . . . . . . . . . . . . . . . . . . . . 6
Magnifi cation . . . . . . . . . . . . . . . . . . . . . . . . . . . . . . . . . . . . . . . . . . . . . . . . . . . . . . . . . . 6
Field of View . . . . . . . . . . . . . . . . . . . . . . . . . . . . . . . . . . . . . . . . . . . . . . . . . . . . . . . . . . 6
The Planets . . . . . . . . . . . . . . . . . . . . . . . . . . . . . . . . . . . . . . . . . . . . . . . . . . . . . . . . . . . 6
Deep-Sky Objects . . . . . . . . . . . . . . . . . . . . . . . . . . . . . . . . . . . . . . . . . . . . . . . . . . . . . . . 6
Sky Conditions . . . . . . . . . . . . . . . . . . . . . . . . . . . . . . . . . . . . . . . . . . . . . . . . . . . . . . . . 6
Selecting an Observing Site . . . . . . . . . . . . . . . . . . . . . . . . . . . . . . . . . . . . . . . . . . . . . . . . 7
Choosing the Best Time to Observe . . . . . . . . . . . . . . . . . . . . . . . . . . . . . . . . . . . . . . . . . . . . 7
Cooling the Telescope . . . . . . . . . . . . . . . . . . . . . . . . . . . . . . . . . . . . . . . . . . . . . . . . . . . . 7
Adapting Your Eyes . . . . . . . . . . . . . . . . . . . . . . . . . . . . . . . . . . . . . . . . . . . . . . . . . . . . . . 7
Star Hopping . . . . . . . . . . . . . . . . . . . . . . . . . . . . . . . . . . . . . . . . . . . . . . . . . . . . . . . . . . 7
Proper Care for Your Telescope . . . . . . . . . . . . . . . . . . . . . . . . . . . . . . . . . . . . . . . . 8
Collimation . . . . . . . . . . . . . . . . . . . . . . . . . . . . . . . . . . . . . . . . . . . . . . . . . . . . . . . . . . . 8
Aligning the Secondary Mirror . . . . . . . . . . . . . . . . . . . . . . . . . . . . . . . . . . . . . . . . . . . . . . . . 8
Aligning the Primary Mirror . . . . . . . . . . . . . . . . . . . . . . . . . . . . . . . . . . . . . . . . . . . . . . . . . 9
Cleaning Your Telescope . . . . . . . . . . . . . . . . . . . . . . . . . . . . . . . . . . . . . . . . . . . . . . . . . . . 9
Software and App . . . . . . . . . . . . . . . . . . . . . . . . . . . . . . . . . . . . . . . . . . . . . . . . . . . 10
LUMINA 130 DOBSONIAN
ENGLISH | 1
We recommend saving your telescope box so you can use it to store the telescope when not in use. Unpack the box carefully as some
parts are small. Use the parts list below to verify that all parts and accessories are present.
WHAT'S IN THE BOX
What's in the Box . . . . . . . . . . . . . . . . . . . . . . . . . . . . . . . . . . . . . . . . . . . . . . . . . . . 1
Parts List . . . . . . . . . . . . . . . . . . . . . . . . . . . . . . . . . . . . . . . . . . . . . . . . . . . . . . . . . . . . 1
Assembling the Telescope . . . . . . . . . . . . . . . . . . . . . . . . . . . . . . . . . . . . . . . . . . . . 2
Operating the Telescope . . . . . . . . . . . . . . . . . . . . . . . . . . . . . . . . . . . . . . . . . . . . . 3
Balancing Your Telescope . . . . . . . . . . . . . . . . . . . . . . . . . . . . . . . . . . . . . . . . . . . . . . . . . . 3
Positioning Your Telescope . . . . . . . . . . . . . . . . . . . . . . . . . . . . . . . . . . . . . . . . . . . . . . . . . 3
Using the Tension Control Knob . . . . . . . . . . . . . . . . . . . . . . . . . . . . . . . . . . . . . . . . . . . . . . 3
Focusing Your Telescope . . . . . . . . . . . . . . . . . . . . . . . . . . . . . . . . . . . . . . . . . . . . . . . . . . 3
Aligning Your Finderscope . . . . . . . . . . . . . . . . . . . . . . . . . . . . . . . . . . . . . . . . . . . . . . . . . 4
Accessing the Finderscope Battery . . . . . . . . . . . . . . . . . . . . . . . . . . . . . . . . . . . . . . . . . . . . 4
Your First Night Out: The Moon . . . . . . . . . . . . . . . . . . . . . . . . . . . . . . . . . . . . . . . . . . . . . . 5
Celestial Observing Tips . . . . . . . . . . . . . . . . . . . . . . . . . . . . . . . . . . . . . . . . . . . . . . 6
Magnifi cation . . . . . . . . . . . . . . . . . . . . . . . . . . . . . . . . . . . . . . . . . . . . . . . . . . . . . . . . . . 6
Field of View . . . . . . . . . . . . . . . . . . . . . . . . . . . . . . . . . . . . . . . . . . . . . . . . . . . . . . . . . . 6
The Planets . . . . . . . . . . . . . . . . . . . . . . . . . . . . . . . . . . . . . . . . . . . . . . . . . . . . . . . . . . . 6
Deep-Sky Objects . . . . . . . . . . . . . . . . . . . . . . . . . . . . . . . . . . . . . . . . . . . . . . . . . . . . . . . 6
Sky Conditions . . . . . . . . . . . . . . . . . . . . . . . . . . . . . . . . . . . . . . . . . . . . . . . . . . . . . . . . 6
Selecting an Observing Site . . . . . . . . . . . . . . . . . . . . . . . . . . . . . . . . . . . . . . . . . . . . . . . . 7
Choosing the Best Time to Observe . . . . . . . . . . . . . . . . . . . . . . . . . . . . . . . . . . . . . . . . . . . . 7
Cooling the Telescope . . . . . . . . . . . . . . . . . . . . . . . . . . . . . . . . . . . . . . . . . . . . . . . . . . . . 7
Adapting Your Eyes . . . . . . . . . . . . . . . . . . . . . . . . . . . . . . . . . . . . . . . . . . . . . . . . . . . . . . 7
Star Hopping . . . . . . . . . . . . . . . . . . . . . . . . . . . . . . . . . . . . . . . . . . . . . . . . . . . . . . . . . . 7
Proper Care for Your Telescope . . . . . . . . . . . . . . . . . . . . . . . . . . . . . . . . . . . . . . . . 8
Collimation . . . . . . . . . . . . . . . . . . . . . . . . . . . . . . . . . . . . . . . . . . . . . . . . . . . . . . . . . . . 8
Aligning the Secondary Mirror . . . . . . . . . . . . . . . . . . . . . . . . . . . . . . . . . . . . . . . . . . . . . . . . 8
Aligning the Primary Mirror . . . . . . . . . . . . . . . . . . . . . . . . . . . . . . . . . . . . . . . . . . . . . . . . . 9
Cleaning Your Telescope . . . . . . . . . . . . . . . . . . . . . . . . . . . . . . . . . . . . . . . . . . . . . . . . . . . 9
Software and App . . . . . . . . . . . . . . . . . . . . . . . . . . . . . . . . . . . . . . . . . . . . . . . . . . . 10
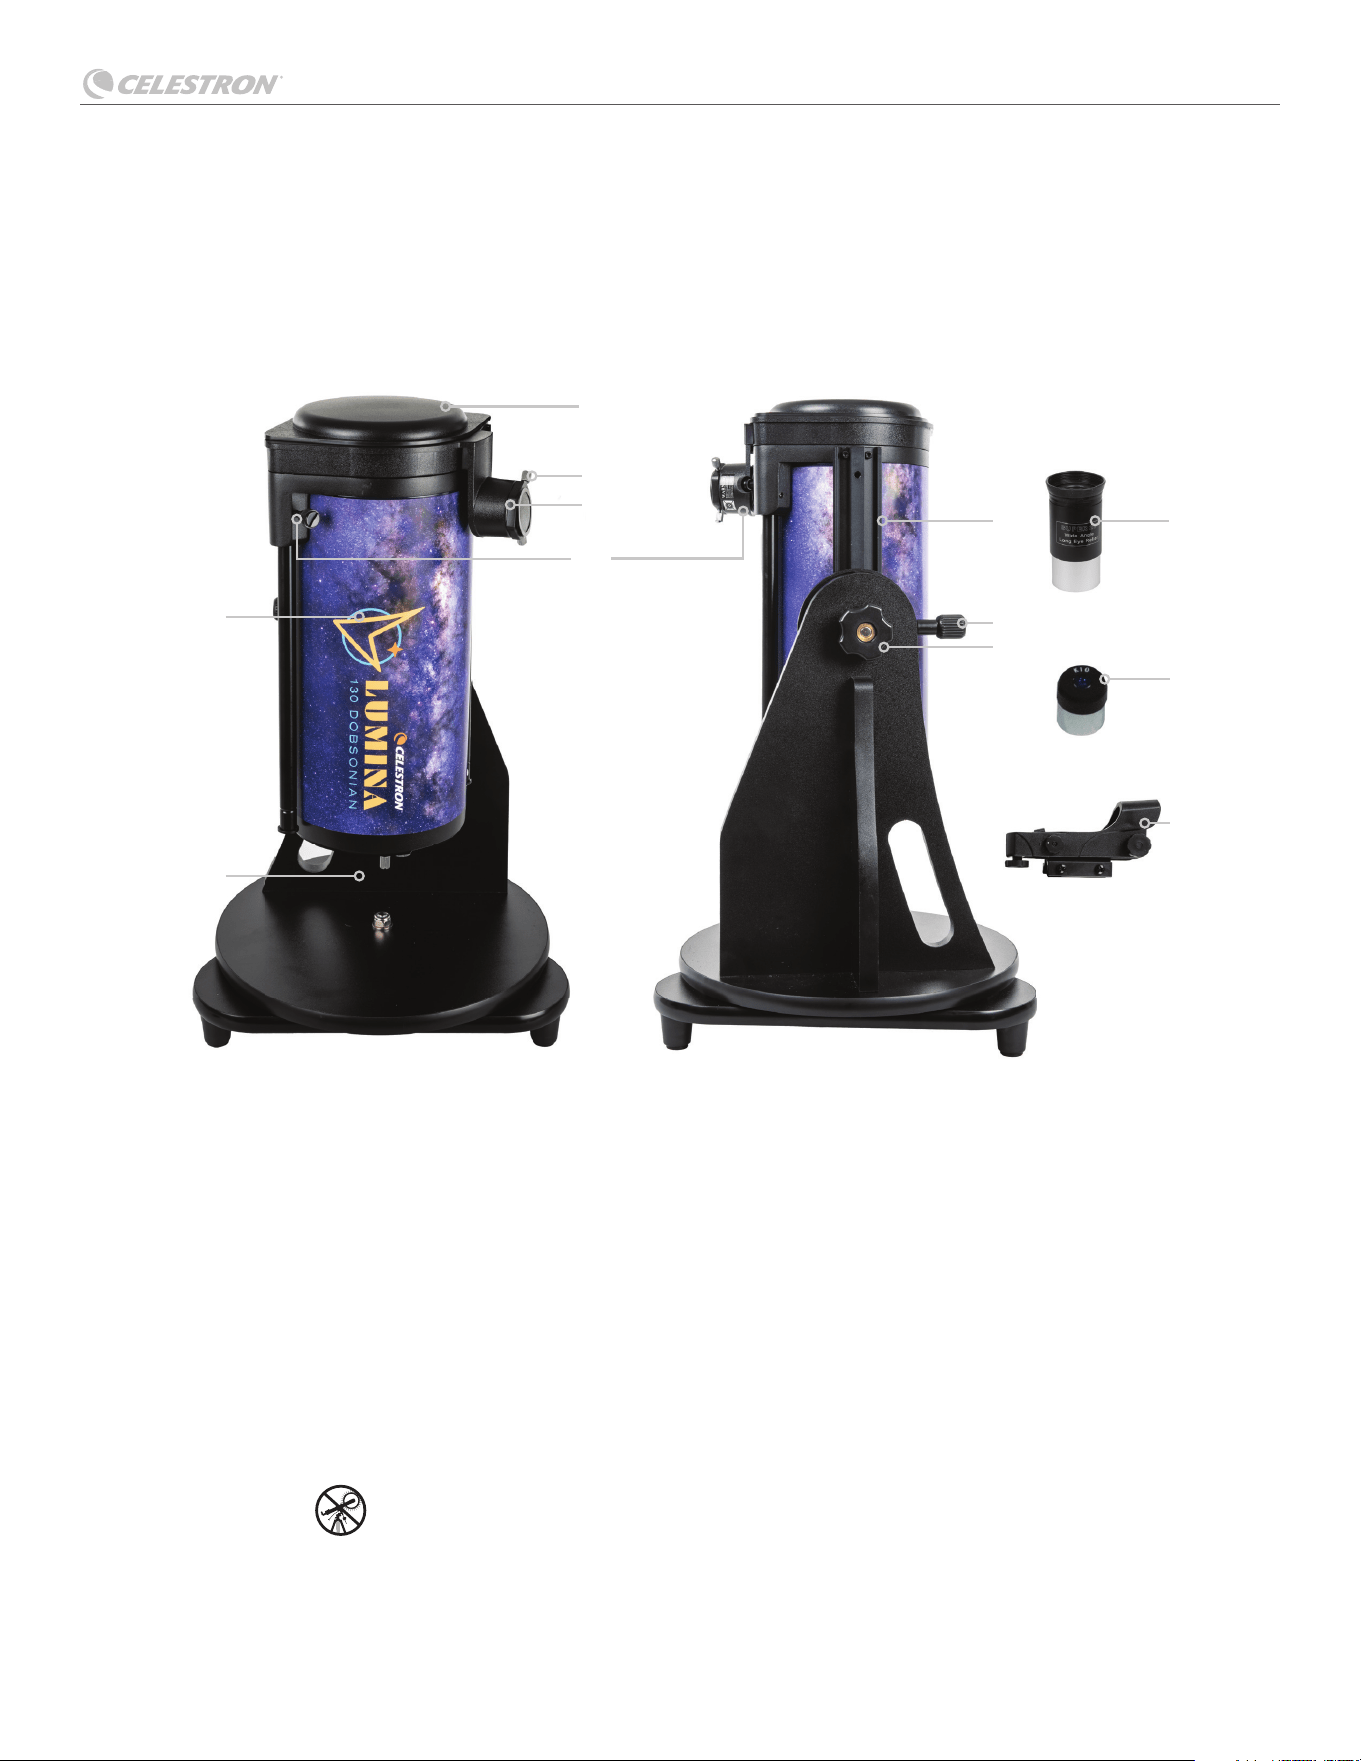
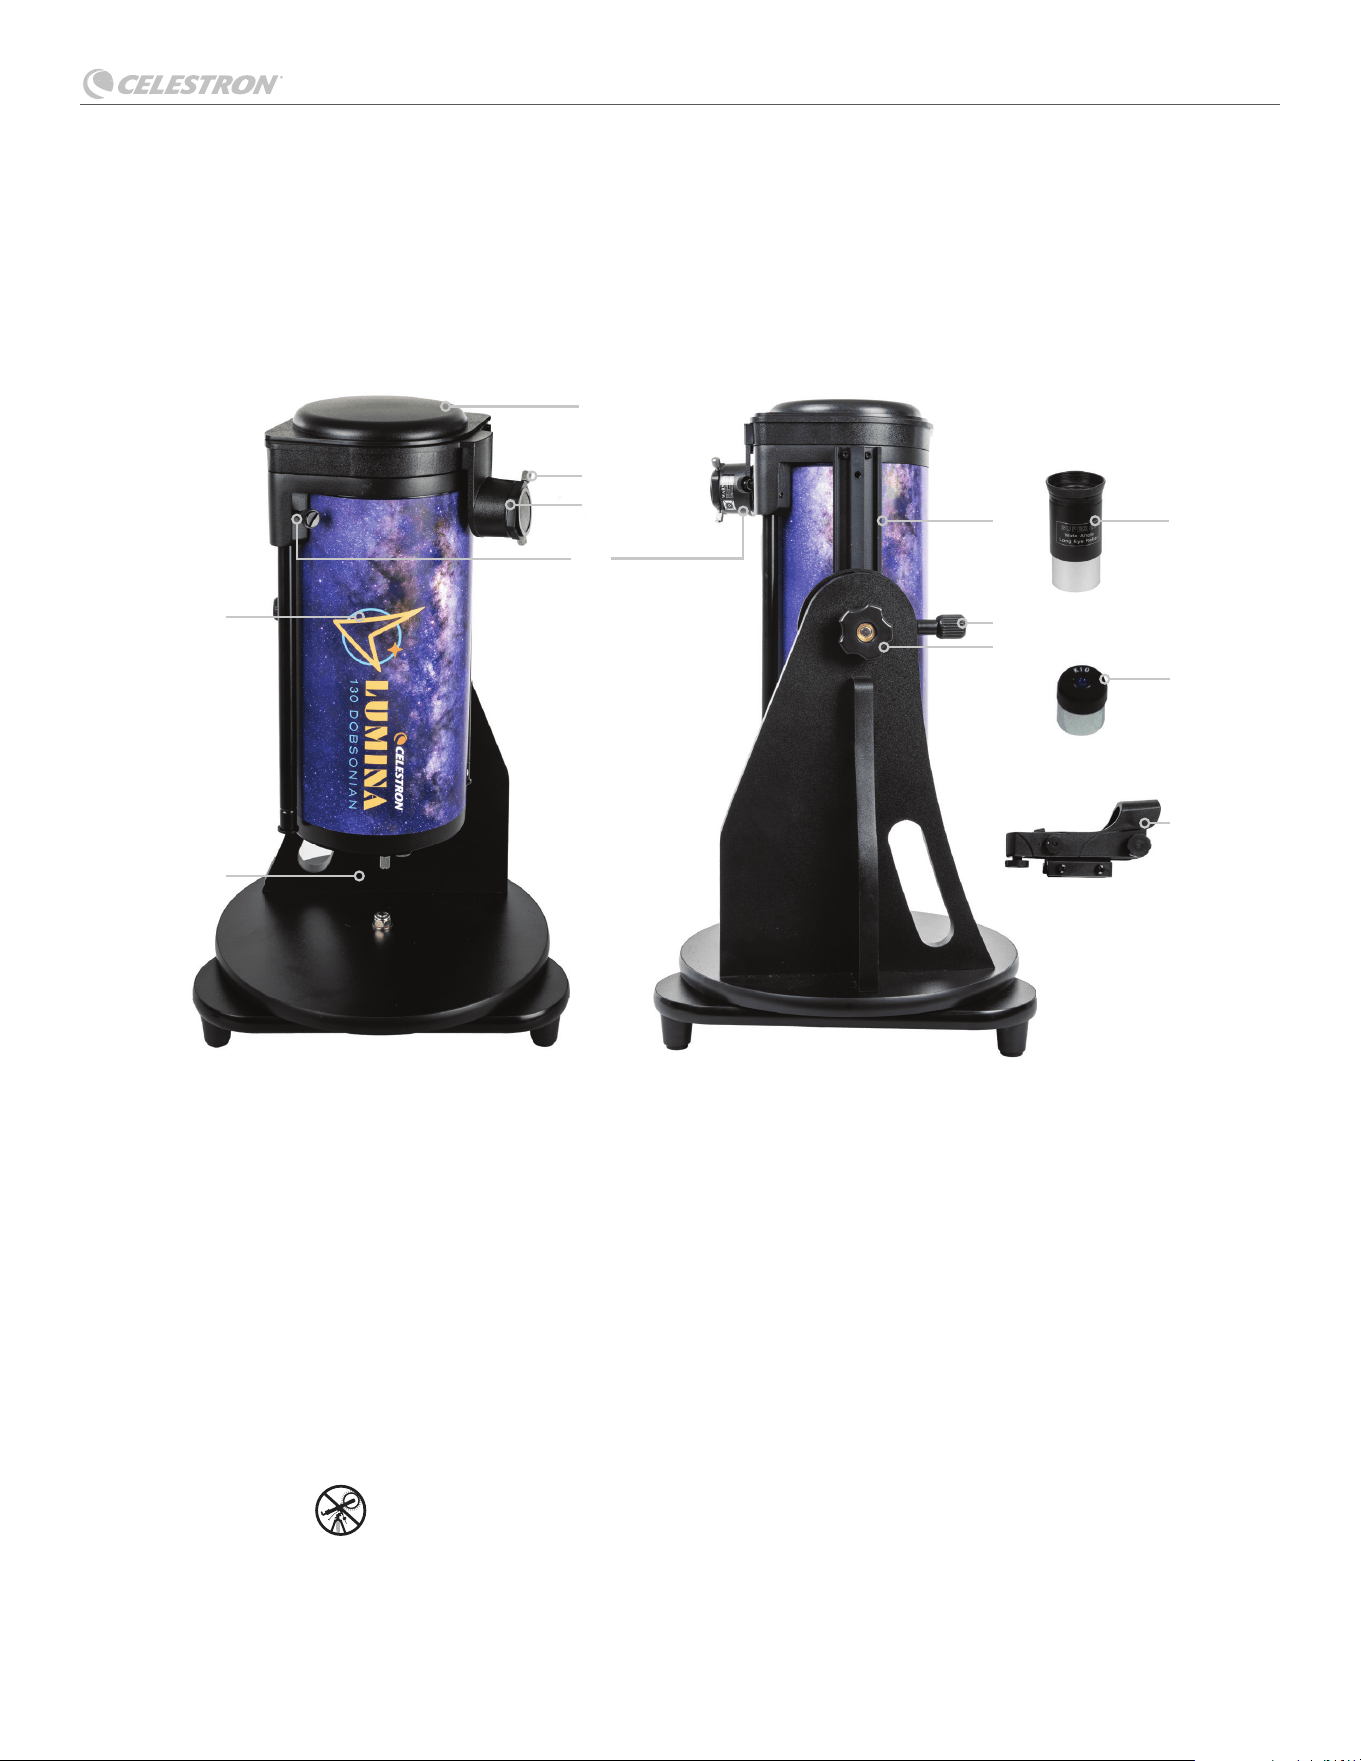
Parts List
1. Optical Tube
2. Base
3. Dust Cap
4. Eyepiece Lock Screw
5. Focuser Ring
6. Slide Lock Screws
7. Dovetail Bar
8. Dovetil Locking Screw
9. Tension Control Knob
10. 25mm Eyepiece
11. 10mm Eyepiece
12. StarPointer
TM
Red Dot Finderscope
YOU WILL NEED: (1) Small Phillips-head screwdriver to replace the StarPointer fi nderscope’s battery
* SOLAR WARNING! Never attempt to view the Sun through any telescope
without a solar fi lter!
1
2
6
4
5
7 10
11
12
9
8
3
LUMINA 130 DOBSONIAN
2 | ENGLISH
ASSEMBLING YOUR TELESCOPE
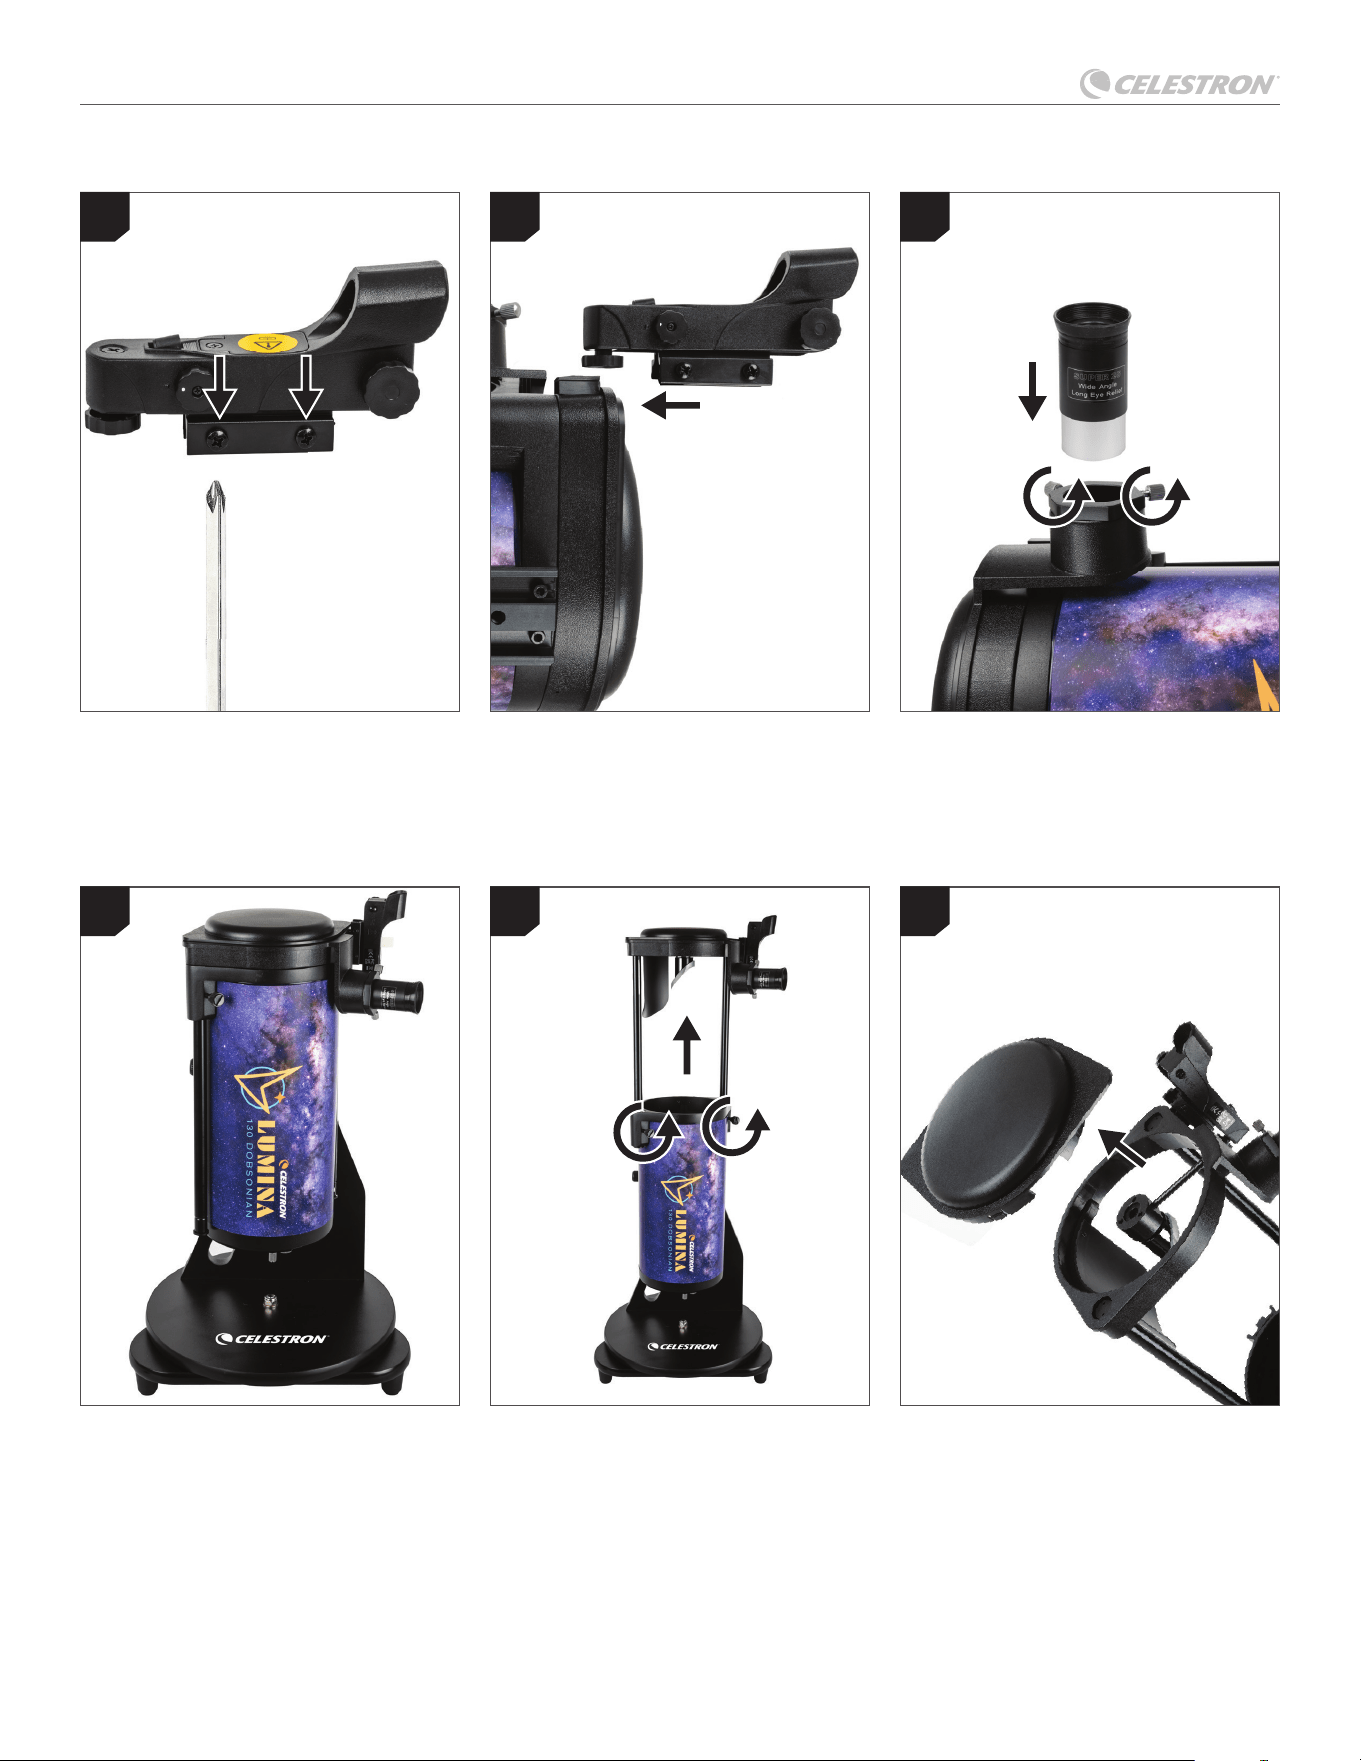
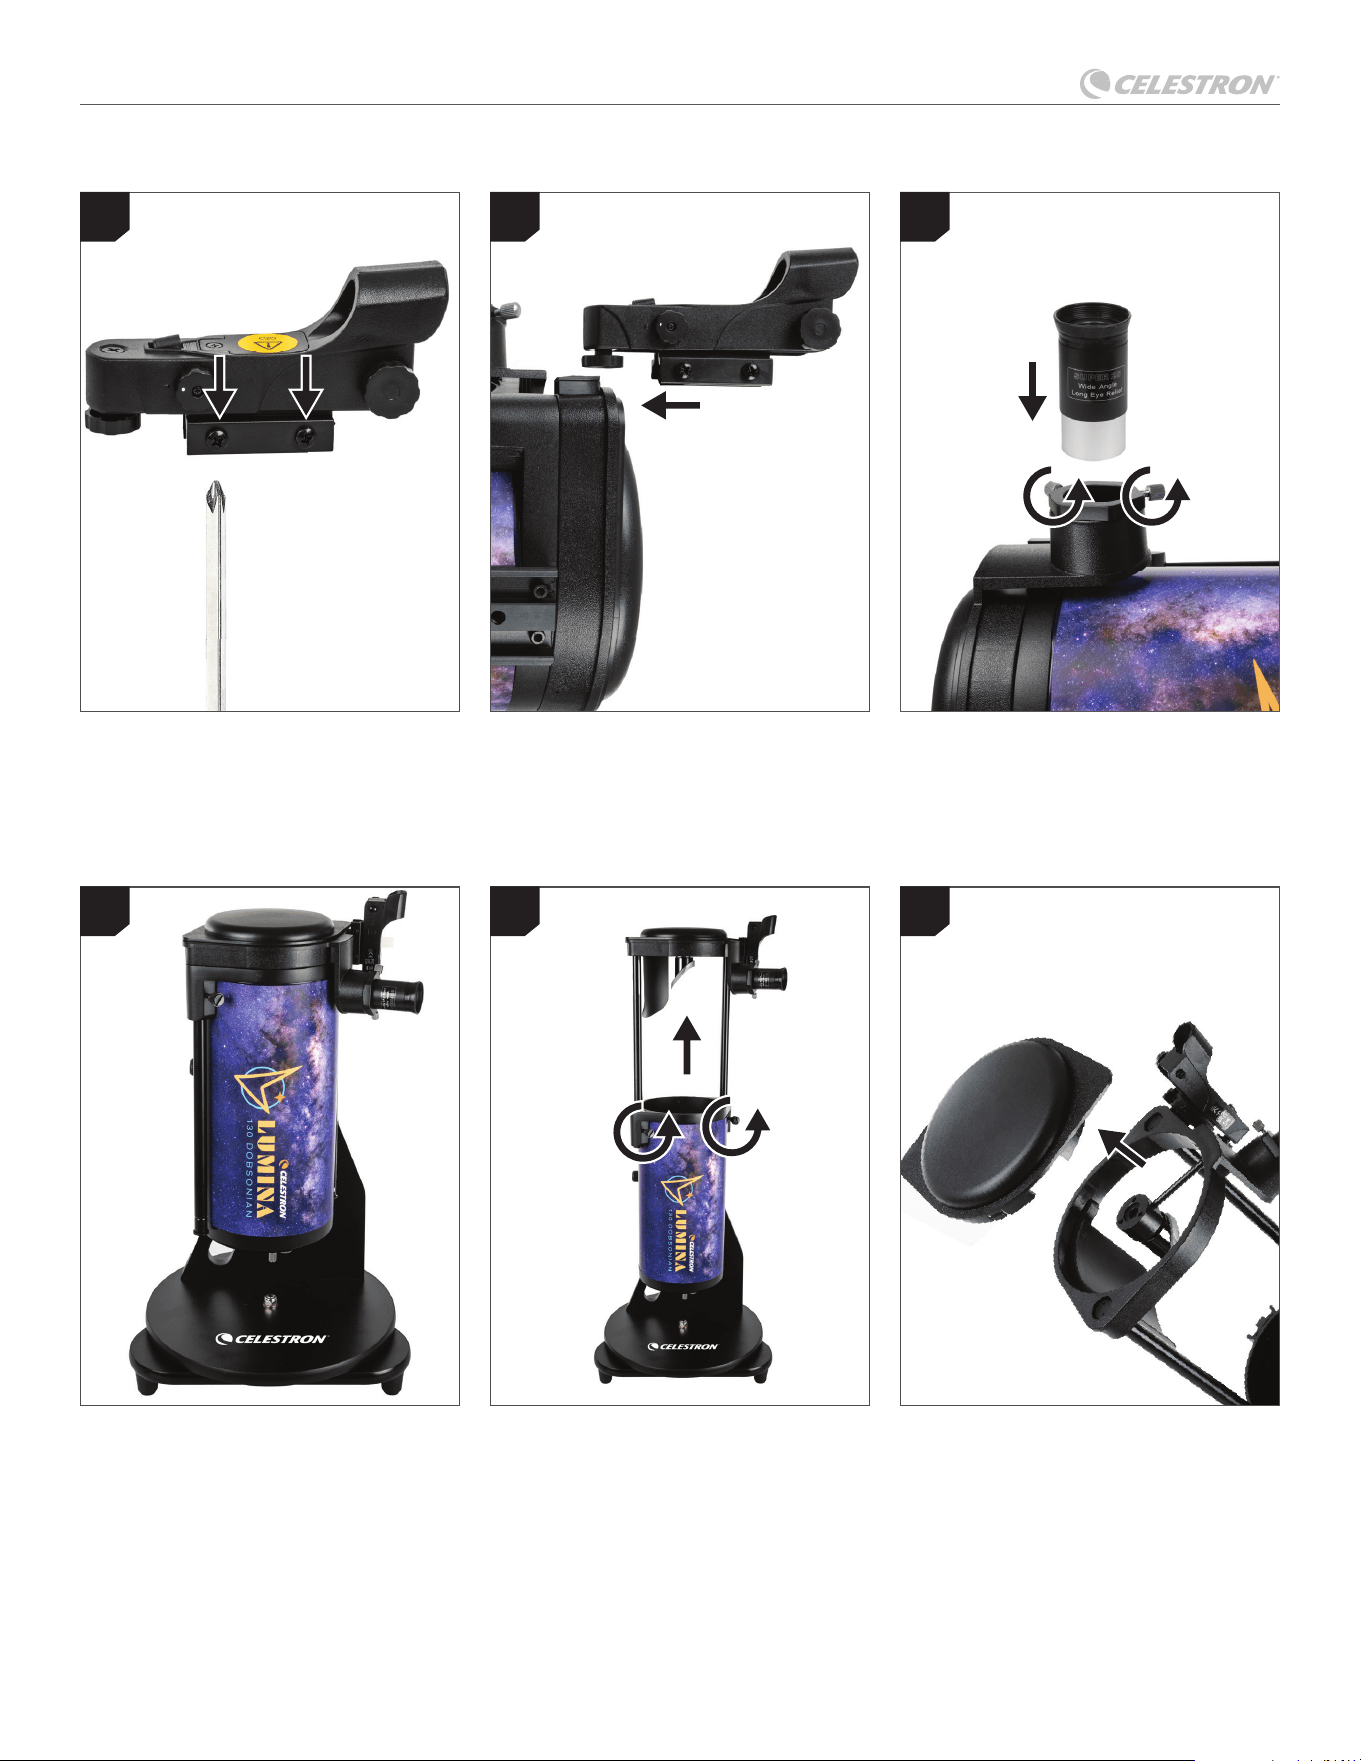
Locate the red dot fi nderscope. Slightly
loosen the screws on the side of the fi nder.
Locate the small fi nderscope base near
the front opening of the tube. Slide the
fi nderscope onto the base and tighten the
screws to secure it in place. Do not over-
tighten the screws.
Locate the eyepiece. Loosen the eyepiece
lock screws and slide the eyepiece into the
holder. Slightly tighten the screws to hold
the eyepiece in place. Do not overtighten the
screws.
When not in use, store the telescope in the
confi guration shown.
Remove the dust cap before viewing
.
To extend the telescope tube, loosen the
two slider lock screws and pull the top part
of the telescope assem bly up until it clicks in
place. Tighten the slider lock screws. Do not
overtighten.
1
4
2
5 6
3
LUMINA 130 DOBSONIAN
ENGLISH | 3
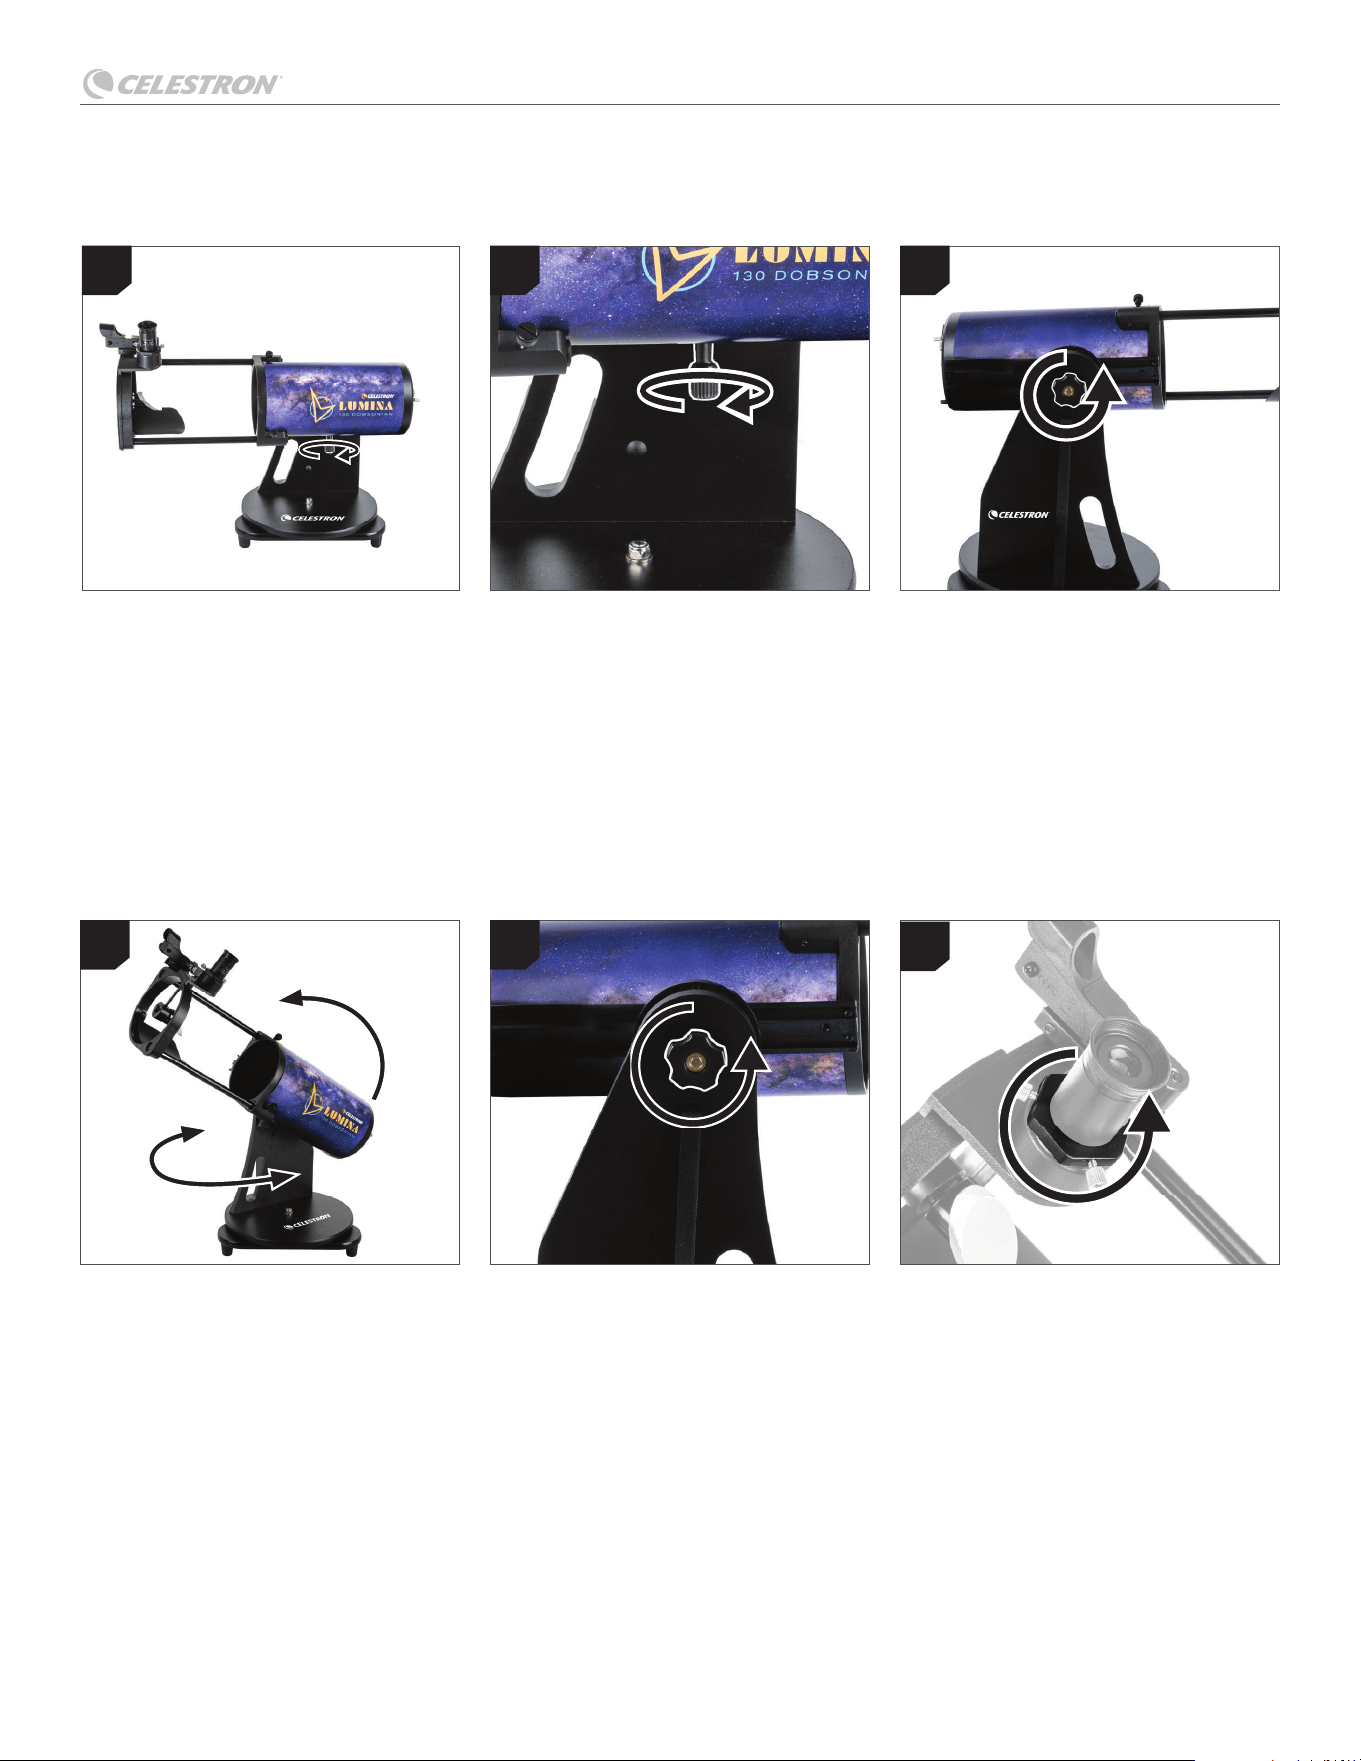
Balancing Your Telescope
Positioning Your
Telescope
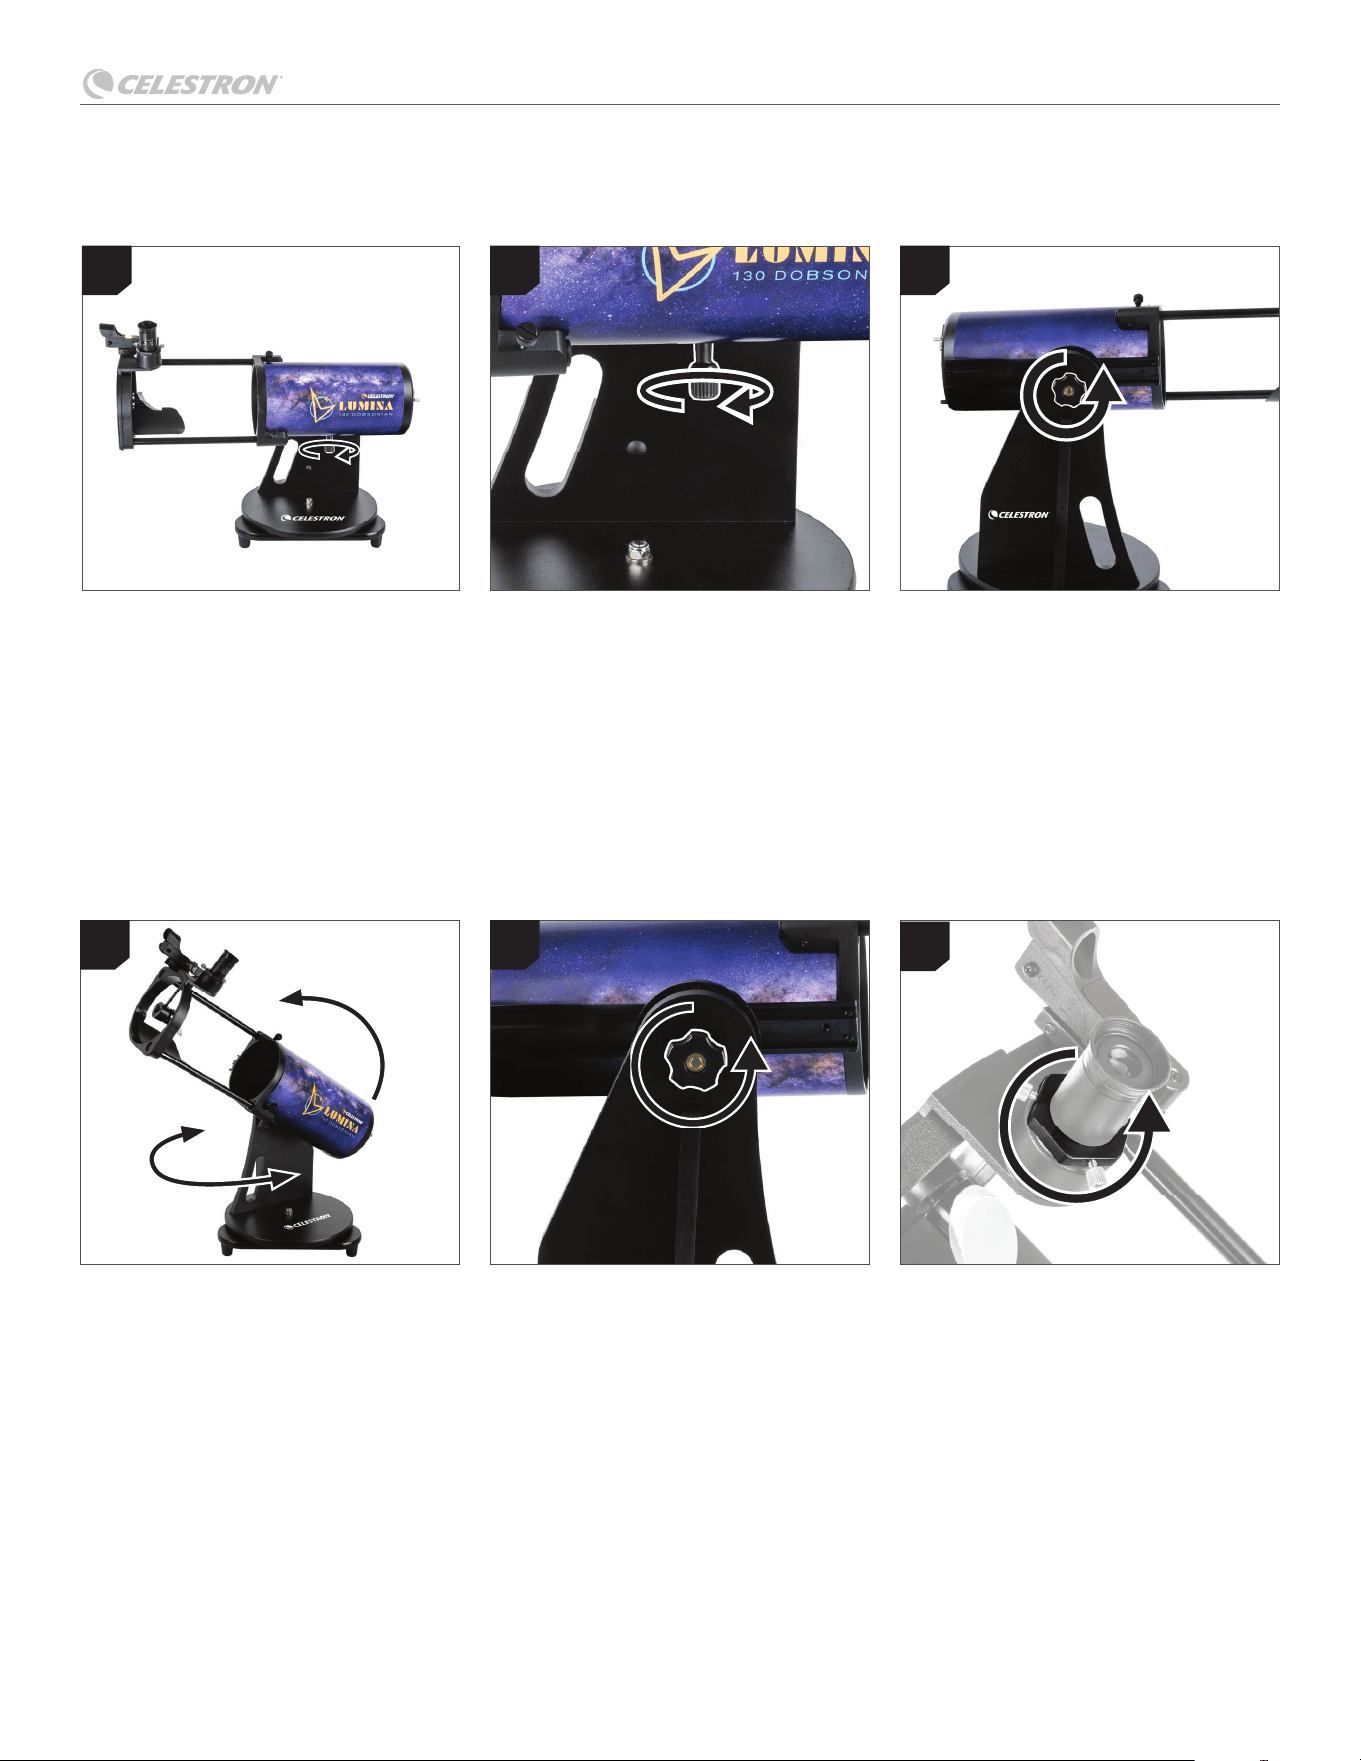
To balance the telescope, loosen the
dovetail locking screw and slide the tube to
a point where the tube no longer moves on
its own.
To point the telescope, simply move the
telescope tube up and down in altitude (up
and down position) or swivel the telescope
around the base in azimuth (left to right
position)..
Loosen or tighten the tension control
knob to add just enough friction to allow
the tube to move easily when nudged
but to stay in position when not. It may be
neces sary to re-adjust the tension control
knob when you add or remove accessories
from the tube.
If you are using heavier accessories, you may
need to rebalance the scope after adding or
removing them.
Slowly turn the focus wheel, one way or
the other, until the image in the eyepiece is
sharp. You may need to fi ne-tune the focus
over time as temperature changes, fl exure,
and other factors cause slight shifts. Fast
(short focal ratio) telescopes are especially
prone to this, particularly before they reach
ambient temperature. You should also
refocus whenever you change eyepieces or
add or remove a Barlow lens.
Tighten the dovetail locking screw to hold
the tube in place. Do not overtight en.
Using the Tension
Control Knob
Tighten the tension control knob until the
tube requires a slight effort to move. You
want a small amount of friction to hold the
telescope in place. Do not overtighten the
knob. The tube should still move smoothly
with very little effort.
Focusing Your
Telescope
1
1 1
1
2 3
OPERATING YOUR TELESCOPE
LUMINA 130 DOBSONIAN
4 | ENGLISH
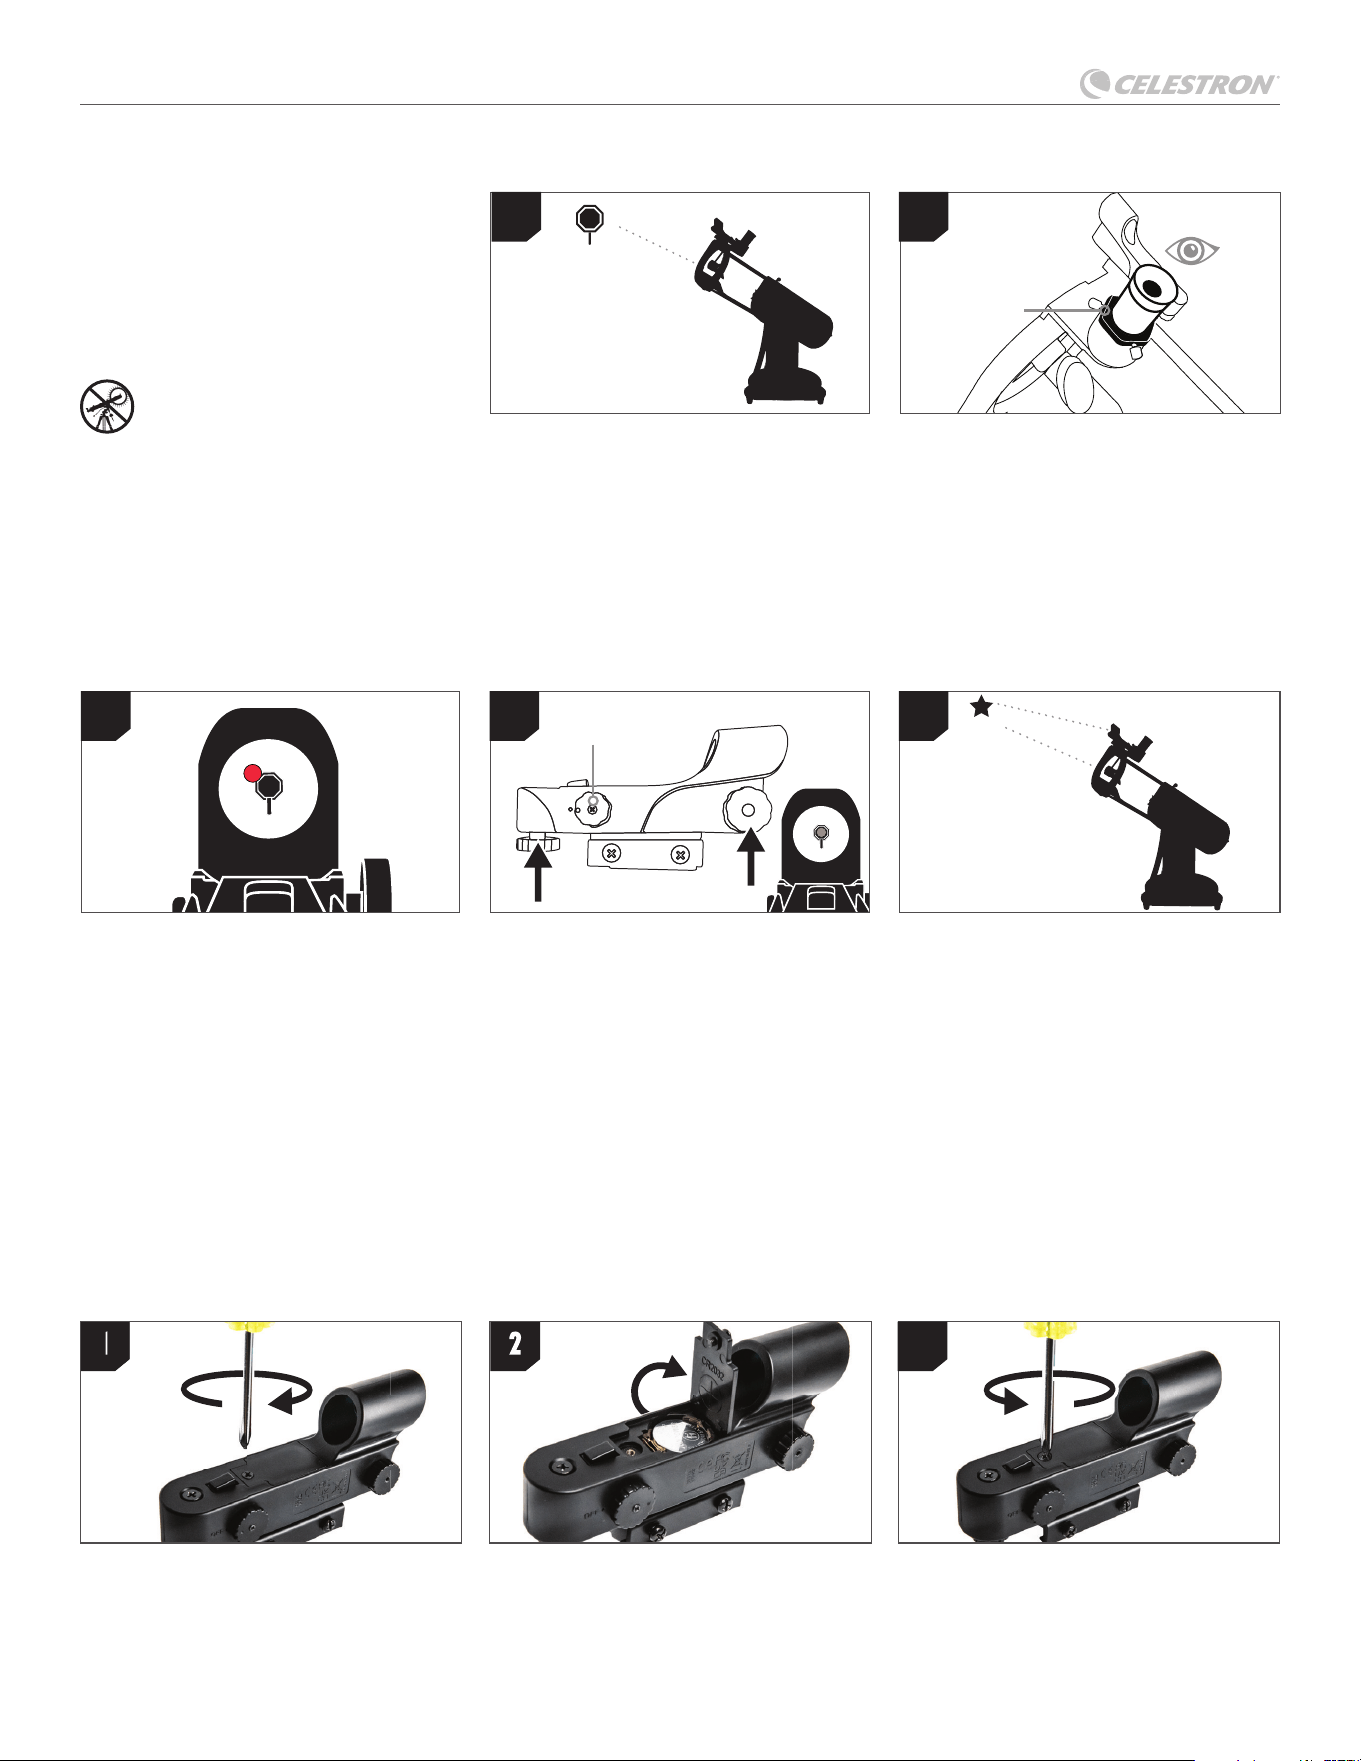
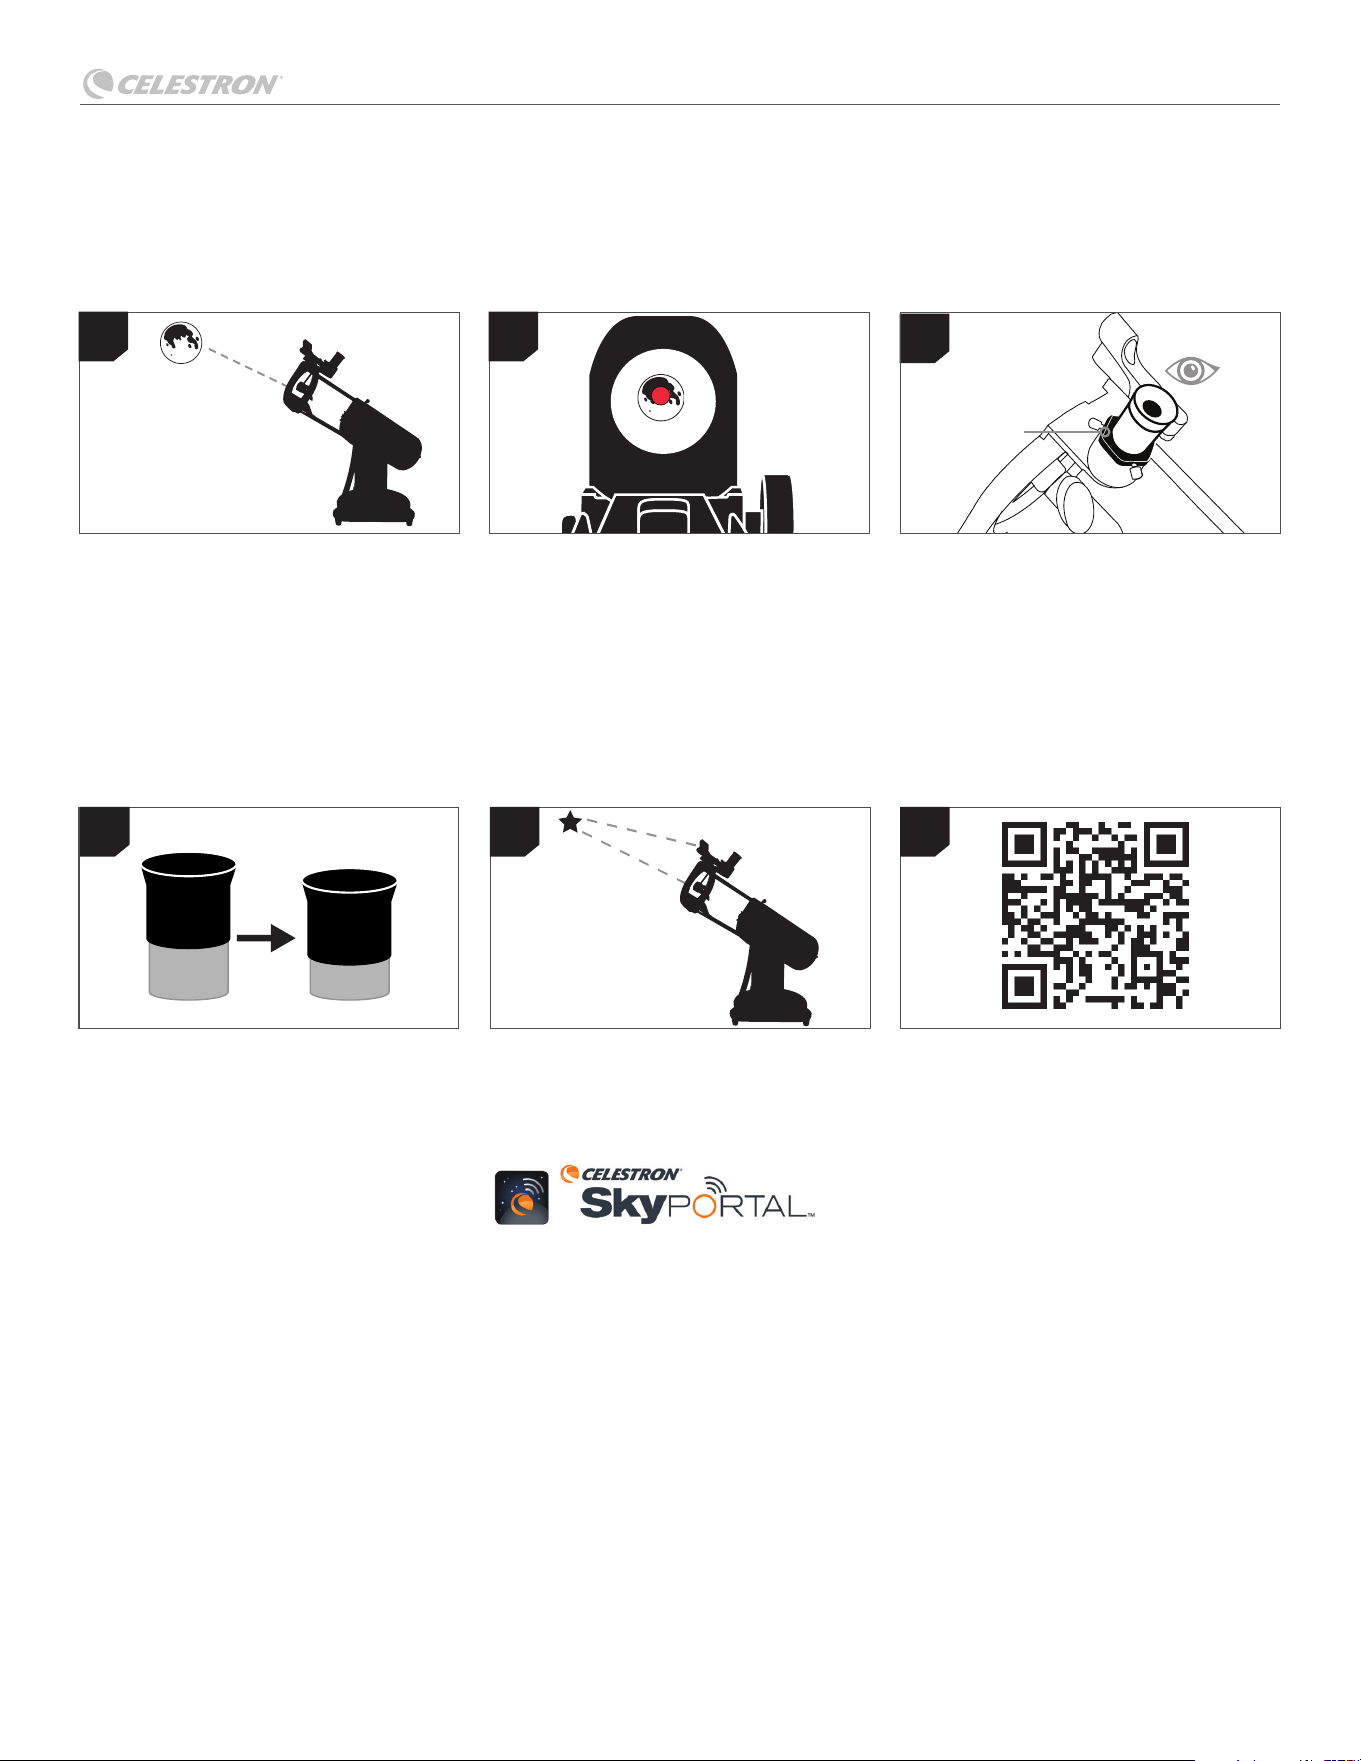
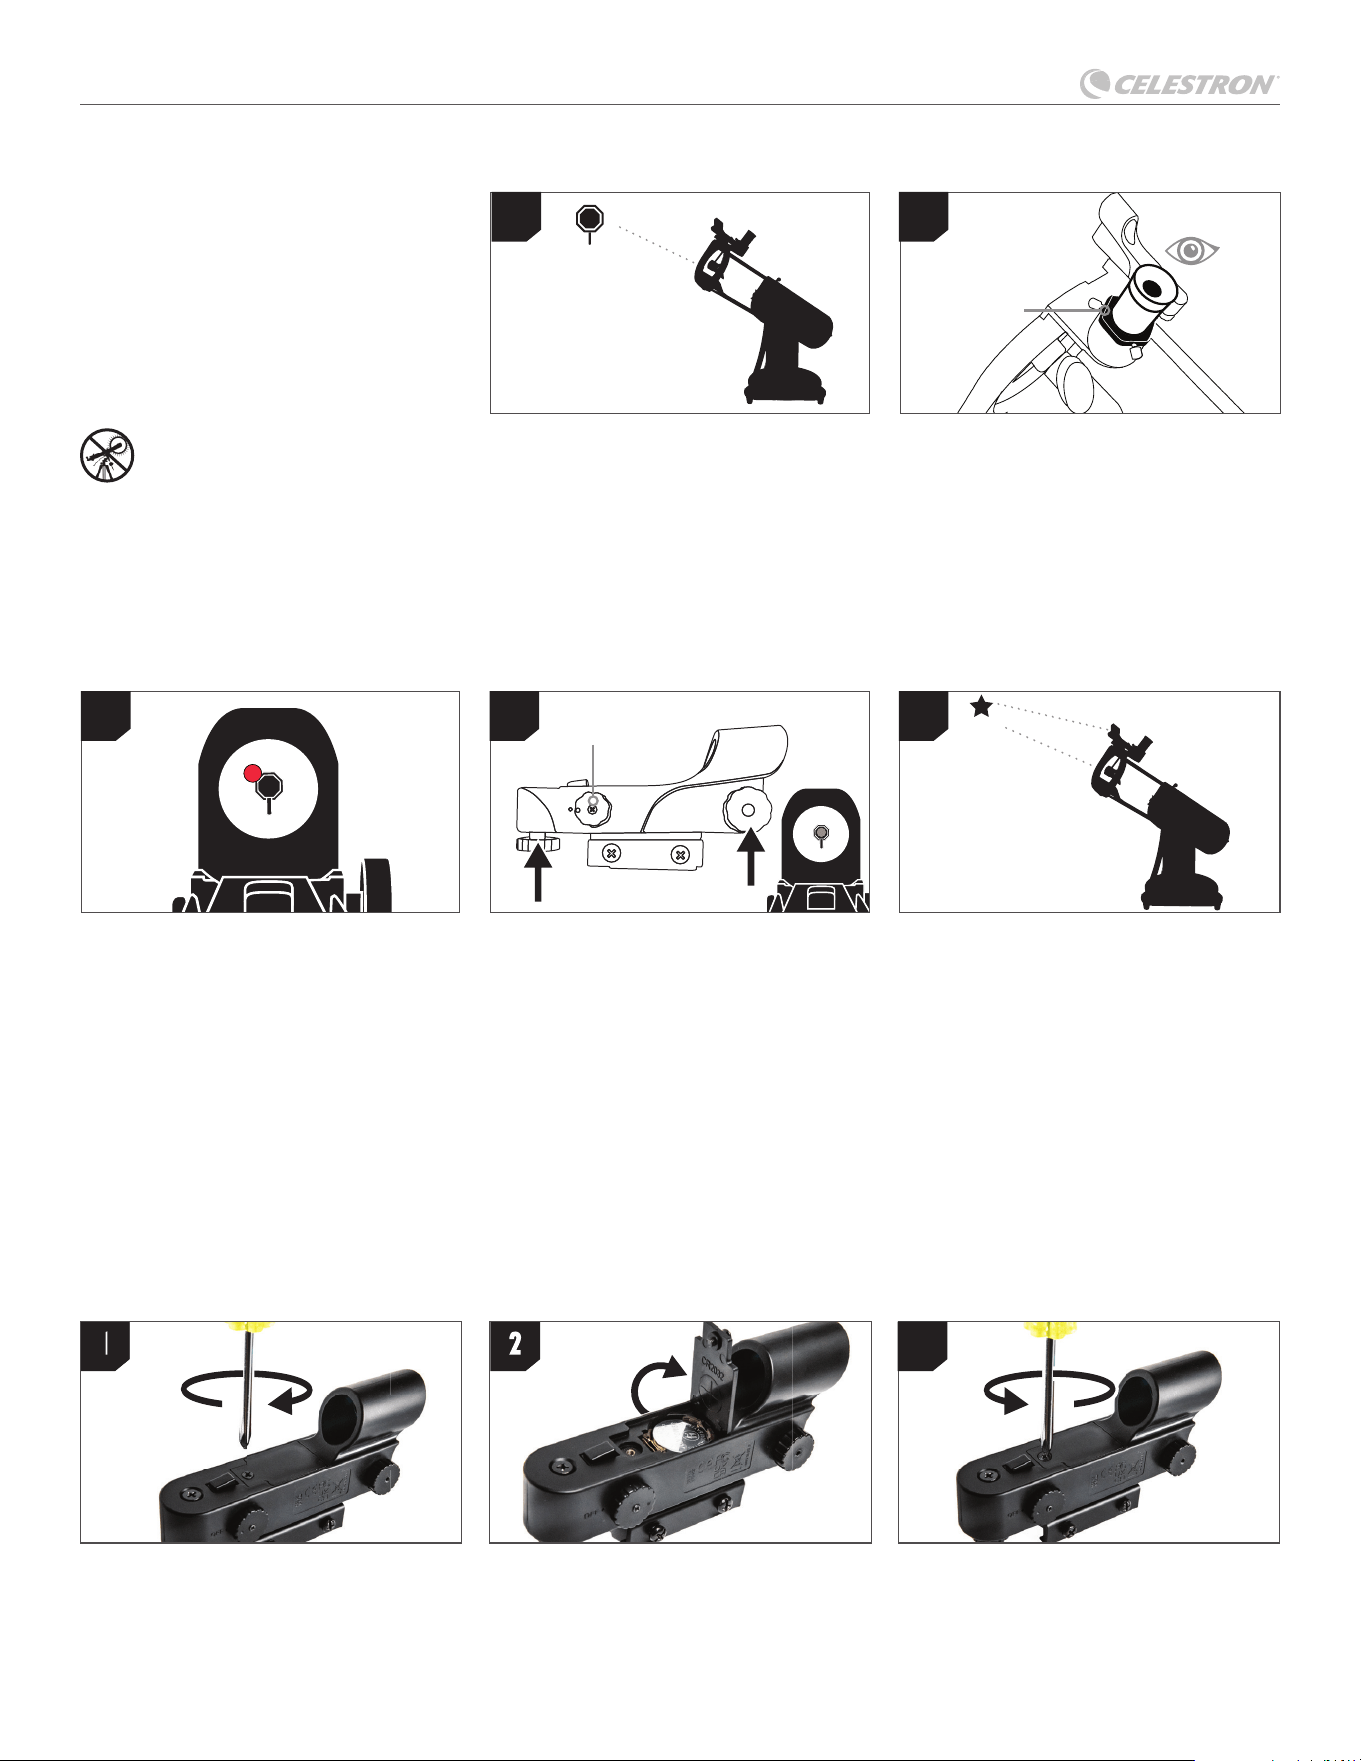
Adjust the Finderscope
Without moving the telescope, use the two
adjustment knobs to move the red dot until
it appears over the same object you are
observing in the telescope’s low-power
eyepiece.
Your Finderscope is Now Aligned!
It should not require realignment unless it is
bumped or dropped. Now, when you look
through the StarPointer, the red dot will
indicate where the telescope is pointing.
Don’t forget to turn off the red dot when you
are fi nished to conserve battery.
Look Through Finderscope
Pull the battery protection tab out of the
StarPointer and turn it on to maximum
brightness using the on/off knob. Look
through the StarPointer and locate the
red dot.
Center the Target in the Eyepiece
Look through the telescope using the 25mm
eyepiece. Move the telescope until the object
you chose lies in the center of the view. If the
image is blurry, gently turn the focus knobs
until it comes into sharp focus.
NOTE: The image in your telescope may
appear inverted. This is perfectly normal in an
astronomical telescope.
The StarPointer red dot fi nderscope is
one of the most important parts of your
telescope. The fi rst time you assemble your
telescope, you need to align the fi nder to the
telescope’s main optics. It’s best to do this
during the day.*
*SOLAR WARNING! Never attempt
to view the Sun through any telescope
without a proper solar fi lter!
Choose a Target
Take the telescope outside during the day
and fi nd an easily recognizable object, such
as a streetlight, car license plate or sign. The
object should be as far away as possible, but
at least a quarter mile away.
FOCUSER
ON/OFF KNOB
1
1
4 5
2
2
Aligning the Finderscope
Accessing the Finderscope Battery
The StarPointer fi nderscope uses a long-life 3V lithium battery (#CR2032), which is located on the StarPointer’s top surface. If you plan on
not using your telescope for an extended period, we recommend removing the battery for storage. To remove or replace the battery, follow
these instructions:
Note: You will need a small Philips-head screwdriver to replace the StarPointer fi nderscope’s battery.
Using a Phillips-head screwdriver, loosen
the battery cover screw and fl ip the
cover open.
If you are replacing the battery, install the
new one with the (+) terminal facing outward.
Place the cover back onto the fi nderscope
and retighten the screw with the Phillips-
head screwdriver.
1
2
3
3
LUMINA 130 DOBSONIAN
ENGLISH | 5
FOCUSER
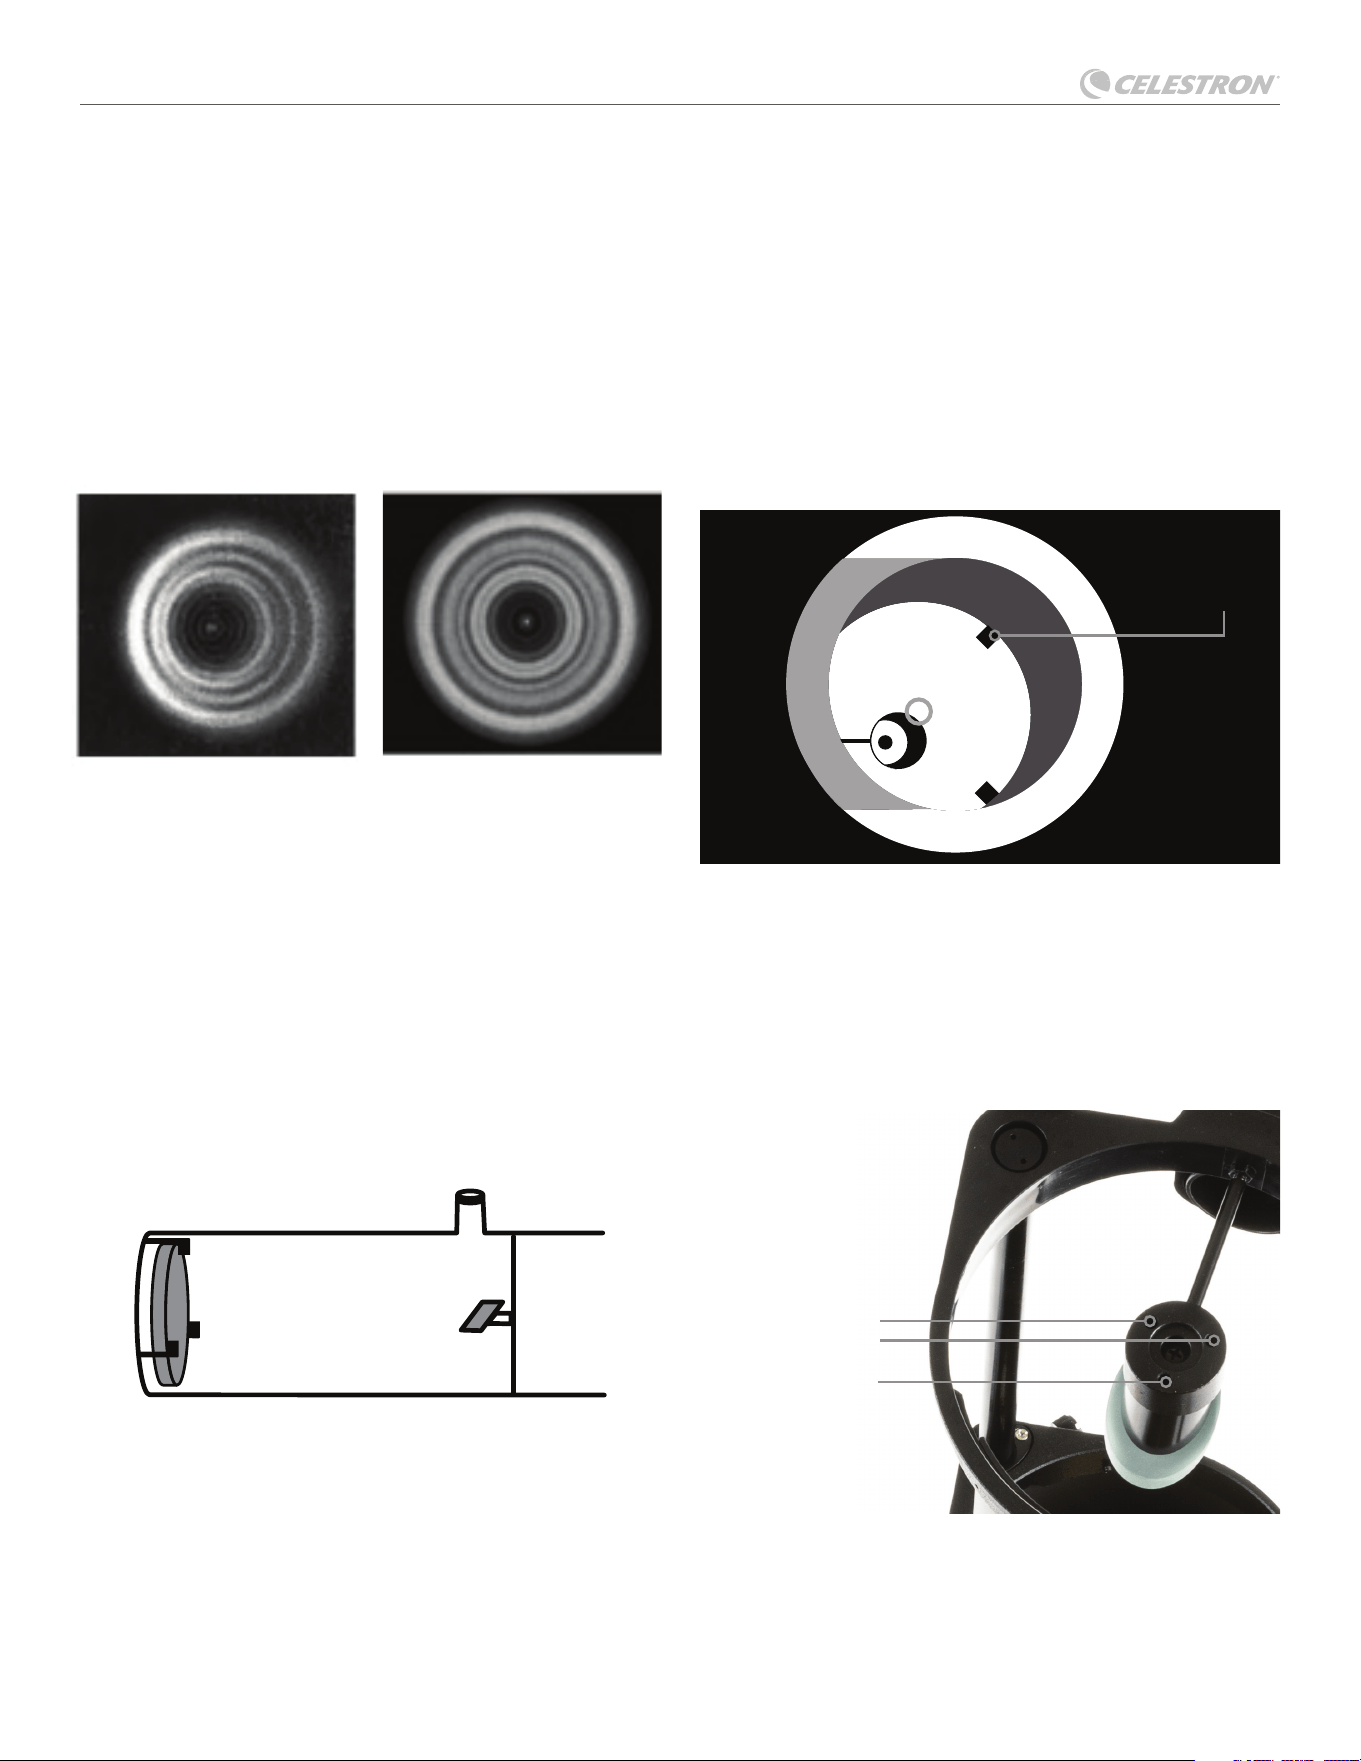
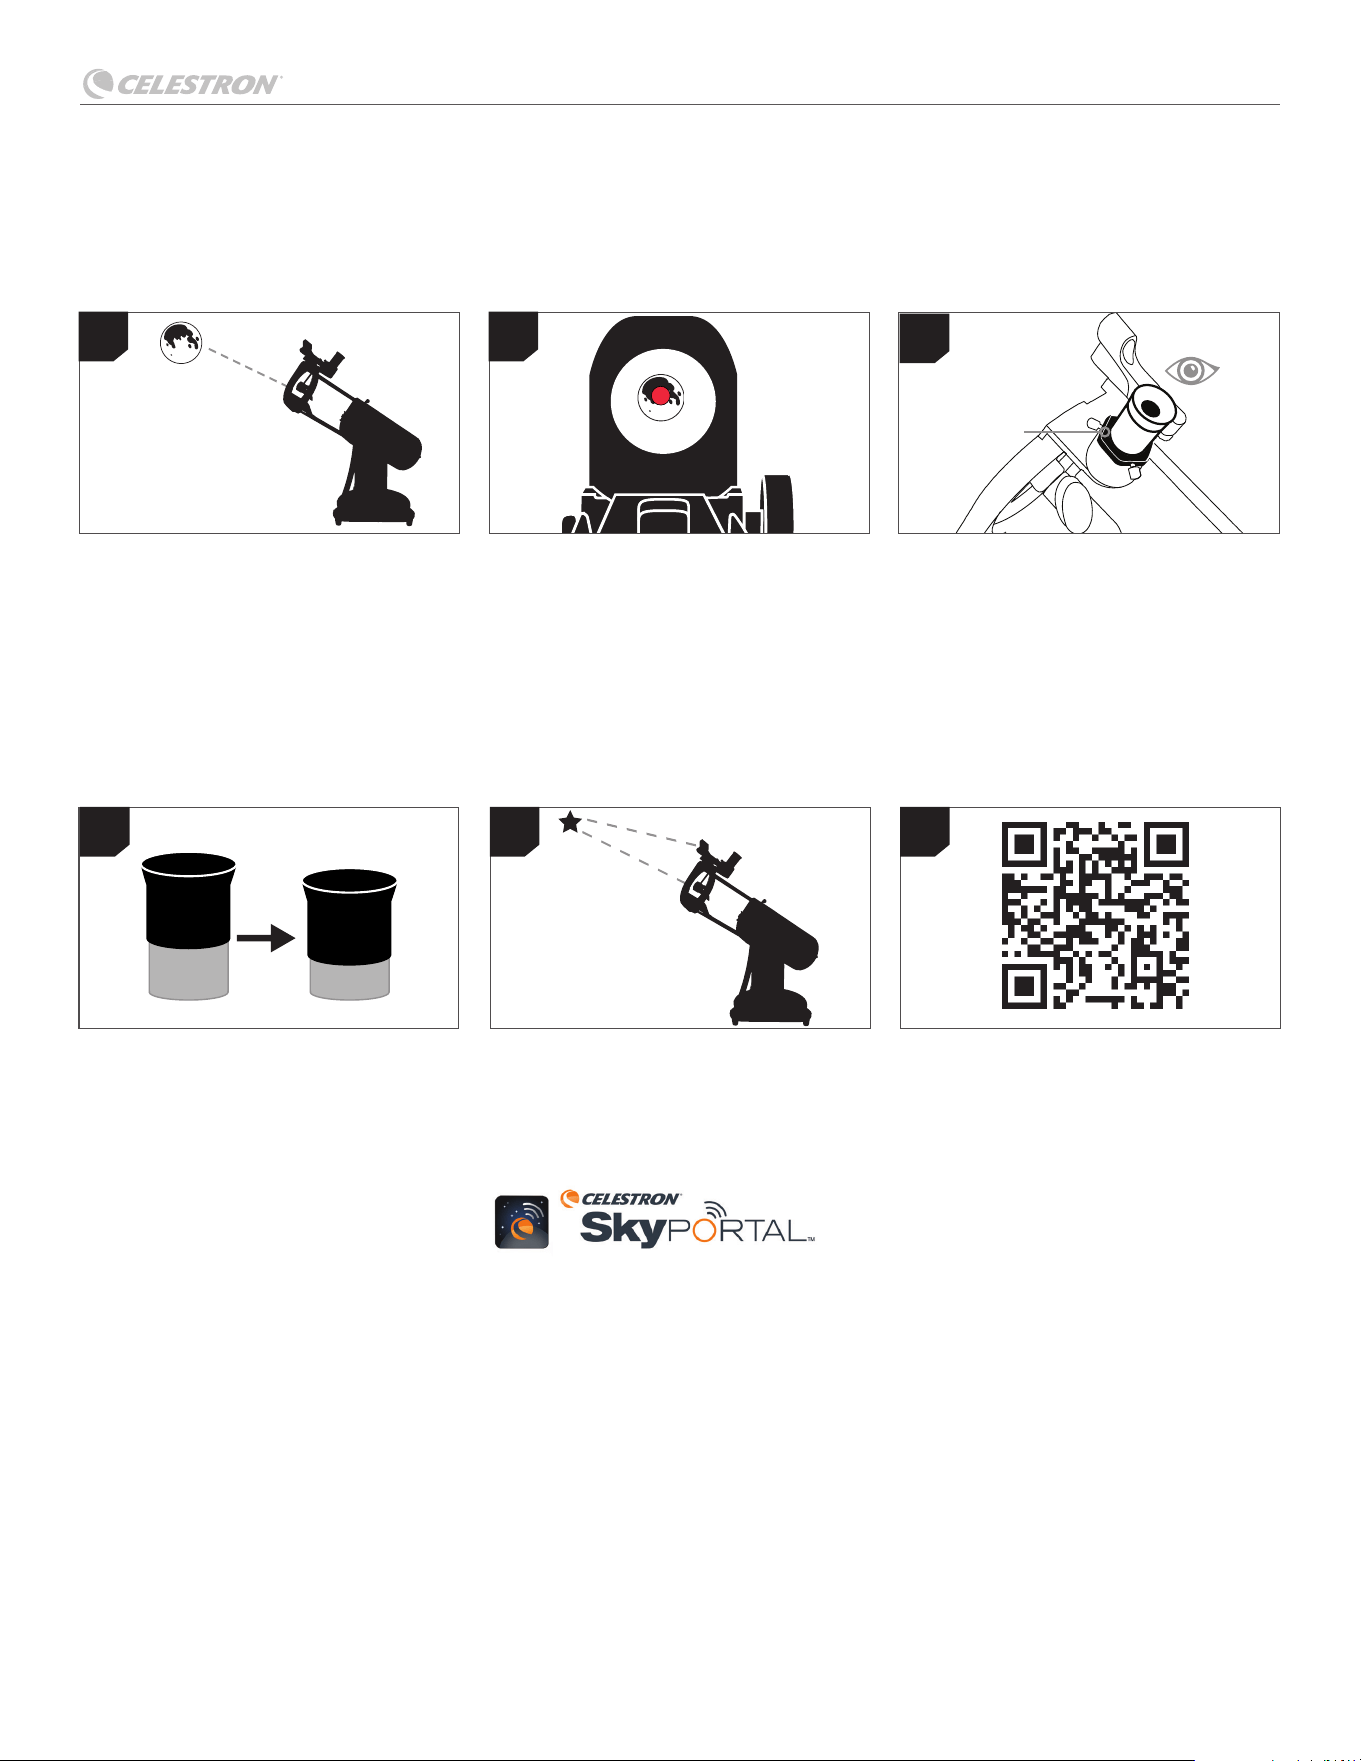
To get a closer look at the Moon, loosen the
setscrew on the star diagonal and remove
the 25mm eyepiece. Replace it with the
10mm eyepiece and tighten the setscrew
to secure the new eyepiece in place. The
10mm eyepiece will signifi cantly boost
magnifi cation, making the Moon appear
much larger. You may need to adjust focus
when you change eyepieces to ensure the
sharpest image possible.
Using this same technique, you can view
many other celestial objects, like planets,
star clusters, and nebulae.
Your telescope purchase includes a free
download of Celestron SkyPortal Powered
by SkySafari
TM
. Available for iOS and
Android, this planetarium app can help you
locate and identify celestial objects currently
visible from your exact location. Give it a try!
Look through the 25mm eyepiece. Gently
turn the focus knobs until the image comes
in sharp.
Congratulations! You have observed
your fi rst celestial object!
Look through the fi nderscope and locate the
red dot. Continue moving the telescope until
the dot is centered over the Moon.
The best and easiest celestial target for you to view fi rst is the Moon. Try observing the Moon at different points in its phase cycle. The best
time to view the Moon is from two days after a New Moon to a few days before a Full Moon. During this period, you will see the most detail in
the craters and lunar mountain ranges.
With the Moon visible in the sky, set up
your telescope with the 25mm eyepiece
installed and the fi nderscope aligned. Move
the telescope so that it is roughly pointing
toward the Moon. Turn on the fi nderscope.
1
4 5 6
2
3
Your First Night Out - The Moon
Scan the QR code to visit the Celestron
Tools for Astronomers resource center.
There, you’ll fi nd observing guides, tips and
tricks, and free downloads to guide you on
your astronomy journey.
25mm
10mm

LUMINA 130 DOBSONIAN
6 | ENGLISH
This section provides tips for observing both Solar System and deep-
sky objects, along with an explanation of how viewing conditions can
affect what you see.
Magnifi cation
You can change the magnifi cation of your telescope by simply
changing eyepieces. Both telescopes and eyepieces have
focal lengths that are measured in millimeters. To calculate the
magnifi cation of a given telescope and eyepiece combination, take
the focal length of the telescope and divide it by the focal length of
the eyepiece. The resulting number is the magnifi cation factor.
For example, the Lumina 130mm Dobsonian has a focal length of
650mm. Using the 10mm eyepiece:
Field of View
Determining the fi eld of view is important if you want to get an idea
of the angular size of the object you are observing. To calculate
the actual fi eld of view, divide the apparent fi eld of the eyepiece
(supplied by the eyepiece manufacturer) by the magnifi cation it
gives you in the scope you are using.
Using the example in the previous section, we can determine the
fi eld of view using the same telescope and 10mm eyepiece. The
10mm eyepiece has an apparent fi eld of view of 40°.
The 10mm eyepiece has an apparent fi eld of view of 40°.
Divide the 40° by the magnifi cation, which is 65 power.
This yields an actual fi eld of view of 0.6 degrees.
The Planets
In addition to the Moon, your telescope is capable of observing the
fi ve brightest planets. Since planets change their positions against
the background stars, you will need to consult sources on the web
or use a planetarium app on a smart device to help you locate them.
Here are the planets you can fi nd:
• Mercury and Venus- Just like the Moon, the two inner planets
will go through phases ranging from thin crescents to gibbous
phases.
• Mars- When it is near opposition (the point in its orbit where it
is closest to Earth) you should be able to discern the polar cap
and possibly some larger surface features that appear as dark
markings on the surface.
magnifi cation 65x= = =
Focal length of the telescope
Focal length of the eyepiece
650mm
10mm
Actual Field
of View
0.6º of arc
= = =
Apparent Field of
View of Eyepiece
Magnifi cation
40º
65x
• Jupiter- Look for the darker methane cloud bands that circle the
planet just above and below the equator. If the Great Red Spot is
facing the Earth, you may be able to catch a glimpse of it. You will
also see the four brightest moons of Jupiter – Io, Europa, Ganymede,
and Callisto. These moons are fun to watch because they can
move appreciably over just a couple of hours. Occasionally they
will travel behind Jupiter or into its shadow and disappear for
periods of time. They can also cross the face of Jupiter and you
may even see a shadow of the moon crossing with it. Planetarium
smartphone apps can help you predict when the Great Red Spot
will be visible and alert you to interesting events involving Jupiter’s
moons.
• Saturn- The rings! Saturn is arguably one of the most beautiful
objects to look at in a telescope. If seeing conditions are stable
enough, you may even catch the shadow of the rings on the planet
and the shadow of the planet on the rings. You should be able to
see Titan, the brightest moon of Saturn.
Deep-sky Objects
Deep-sky objects are celestial objects outside of our Solar System.
They include star clusters, planetary nebulae, diffuse nebulae, double
stars and other galaxies outside our own Milky Way. Objects such as
nebulae and galaxies can be quite large, but they are also very faint.
In order to get the best view, you will need to make sure you are in
the darkest skies possible. The farther you are away from city lights,
the better you will see these objects in the eyepiece. In photographs
of nebulae and galaxies, you will see vivid reds and blues. These
colors are not visible when you look through the eyepiece. The
colorful images were captured using long exposures—typically 15
to 60 minutes or more—while your eye only gathers light moment
by moment. Digital sensors are much more sensitive to reds and
blues than the human eye, which is most sensitive in the green part
of the spectrum. Still, you will be able to see the soft glow of the
Andromeda Galaxy and the expanse of the Orion Nebula.
Sky Conditions
Sky conditions can signifi cantly affect the performance of your
telescope in three ways.
• Steadiness of the air- On windy days, images of the Moon and
planets will appear to wave or jump around in the eyepiece; as
if you are looking at them through moving water. Nights where
winds are calm will offer the best higher magnifi cation views of
the planets and the Moon. The best way to judge the stability of
the atmosphere is to look at bright stars with the naked eye. If they
are “twinkling” or rapidly changing colors, the air is unstable and
you are better off using lower powers and looking for deep-sky
objects. If the stars are sharp and not twinkling, the air is stable
and should offer great high magnifi cation planetary views.
• Transparency- How clear is the air you are looking through? If
there is a high amount of humidity in the air, the faint light from
galaxies and nebulae can be scattered and diffused before reaching
your telescope, causing a loss of brightness in your image. Debris
in the air from local forest fi res or even distant volcanic eruptions
CELESTIAL OBSERVING TIPS

LUMINA 130 DOBSONIAN
ENGLISH | 7
can contribute to loss of brightness. Sometimes this humidity or
debris can help stabilize the air, making for good planetary and
lunar images, but the loss of light would make it diffi cult to see
fainter deep-sky objects.
• Sky Brightness- The amount of ambient light in the atmosphere
can also affect deep-sky observing. The sky's darkness depends
on your local surroundings. In the middle of a city, sky-glow
caused by city lights being refl ected back to Earth from the sky
can overpower the faint light from distant galaxies. Getting away
from the bright lights of a major city can make the difference
between seeing a faint deep-sky object and missing it altogether.
The Moon and planets are plenty bright on their own, so the effect
on observing them is minimal.
Selecting an Observing Site
If you are going to be observing deep-sky objects, such as galaxies
and nebulae, you should consider traveling to a dark-sky site that is
reasonably accessible. It should be away from city lights and upwind
of any air pollution, and offer a relatively unobstructed view of the
horizon. Always choose as high an elevation as possible; this can
lower the effects of atmospheric instability and ensure that you are
above any ground fog.
While it can be desirable to take your telescope to a dark-sky site,
it is not always necessary. If you plan to view the planets, the Moon
or even some of the brighter deep-sky objects, you can do this from
any location, such as your own backyard. Try to set up the scope in a
location that is out of the direct path of streetlights or house lights to
help protect your night vision. Try to avoid observing anything within
fi ve to 10 degrees of the roof of a building. Rooftops absorb heat
during the day and radiate this heat out at night. This can cause a
layer of turbulent air directly over the building that can degrade your
image. It is best to set up your telescope directly on a dirt or grassy
surface. Avoid setting up on raised platforms like wooden decks or
hard surfaces such as concrete or sidewalks, as they easily transmit
vibrations to the telescope.
Don’t observe through a window—glass distorts the image
signifi cantly. An open window can be even worse, as warm indoor
air escapes and creates turbulence that further degrades the view.
For the best results, take your telescope outside—astronomy is an
outdoor activity.
Choosing the Best Time to Observe
Avoid viewing immediately after sunset. As the ground cools, it creates
air turbulence that can distort your view. Conditions usually improve
as the night progresses—seeing gets steadier, and both air pollution
and ground lighting often decrease. Some of the best observing time
is often in the early morning hours before dawn. Objects are best
observed as they cross the meridian, the imaginary line that runs
from north to south through a point directly over your head. This is
the point at which objects are highest in the sky and your telescope
is looking through the least amount of atmosphere. Objects near the
horizon—either rising or setting—appear less sharp because you’re
viewing them through a thicker layer of Earth’s atmosphere, which
increases turbulence. You don’t always need perfectly clear skies to
observe the Moon or planets. In fact, partly cloudy conditions can
sometimes offer surprisingly good seeing.
Cooling the Telescope
Telescopes require at least 10 minutes to cool down to outside
air temperature. You may need to allow more time if there is a big
difference between the temperature of the telescope and the ambient
air. Allowing your telescope to cool completely minimizes heat wave
distortion inside the telescope tube (tube currents).
Adapting Your Eyes
If you’re planning to observe deep-sky objects at a dark-sky site,
give your eyes time to fully adapt to the darkness. Avoid white light
sources like fl ashlights, car headlights, and streetlights, as they can
hinder your night vision. It takes about 30 minutes for your pupils to
dilate fully and for your eyes to build up the optical pigments needed
to detect faint light from distant objects.
If you need light while setting up your telescope, use a red LED
fl ashlight on the lowest brightness setting, and avoid looking directly
at the beam. This will help preserve your night vision and improve
your chances of spotting faint deep-sky targets.
When observing, keep both eyes open to reduce eye strain. If that
feels distracting, cover your unused eye with your hand or an eye
patch. Also, keep in mind that the center of your eye isn’t as sensitive
in low light. To see faint objects more clearly, look slightly to the side
of them rather than directly at them—this technique is called averted
vision and makes subtle details stand out.
Star Hopping
The easiest way to navigate the night sky is by using a technique
called star hopping. To get started, you’ll fi rst need to measure your
fi nderscope’s fi eld of view.
Start by choosing a constellation with bright stars—use a planisphere
or astronomy app to help identify one. Then fi nd the same constellation
in your star atlas.
Next, center your fi nderscope on a bright star you recognize from
the star map. Position your eye about 12 inches behind the refl ective
window of your StarPointer fi nderscope, and move the telescope until
the star appears at the edge of the window’s fi eld of view (any direction
is fi ne). Without moving the telescope, look through the window and
note another star near the opposite edge.
Now, fi nd both stars on your star chart. Use a ruler to measure the
distance between them on the map—this distance represents one
fi eld of view of your fi nderscope.
You can now use this measurement as a guide to hop from star to star
on the chart, helping you locate celestial objects with greater accuracy.
LUMINA 130 DOBSONIAN
8 | ENGLISH
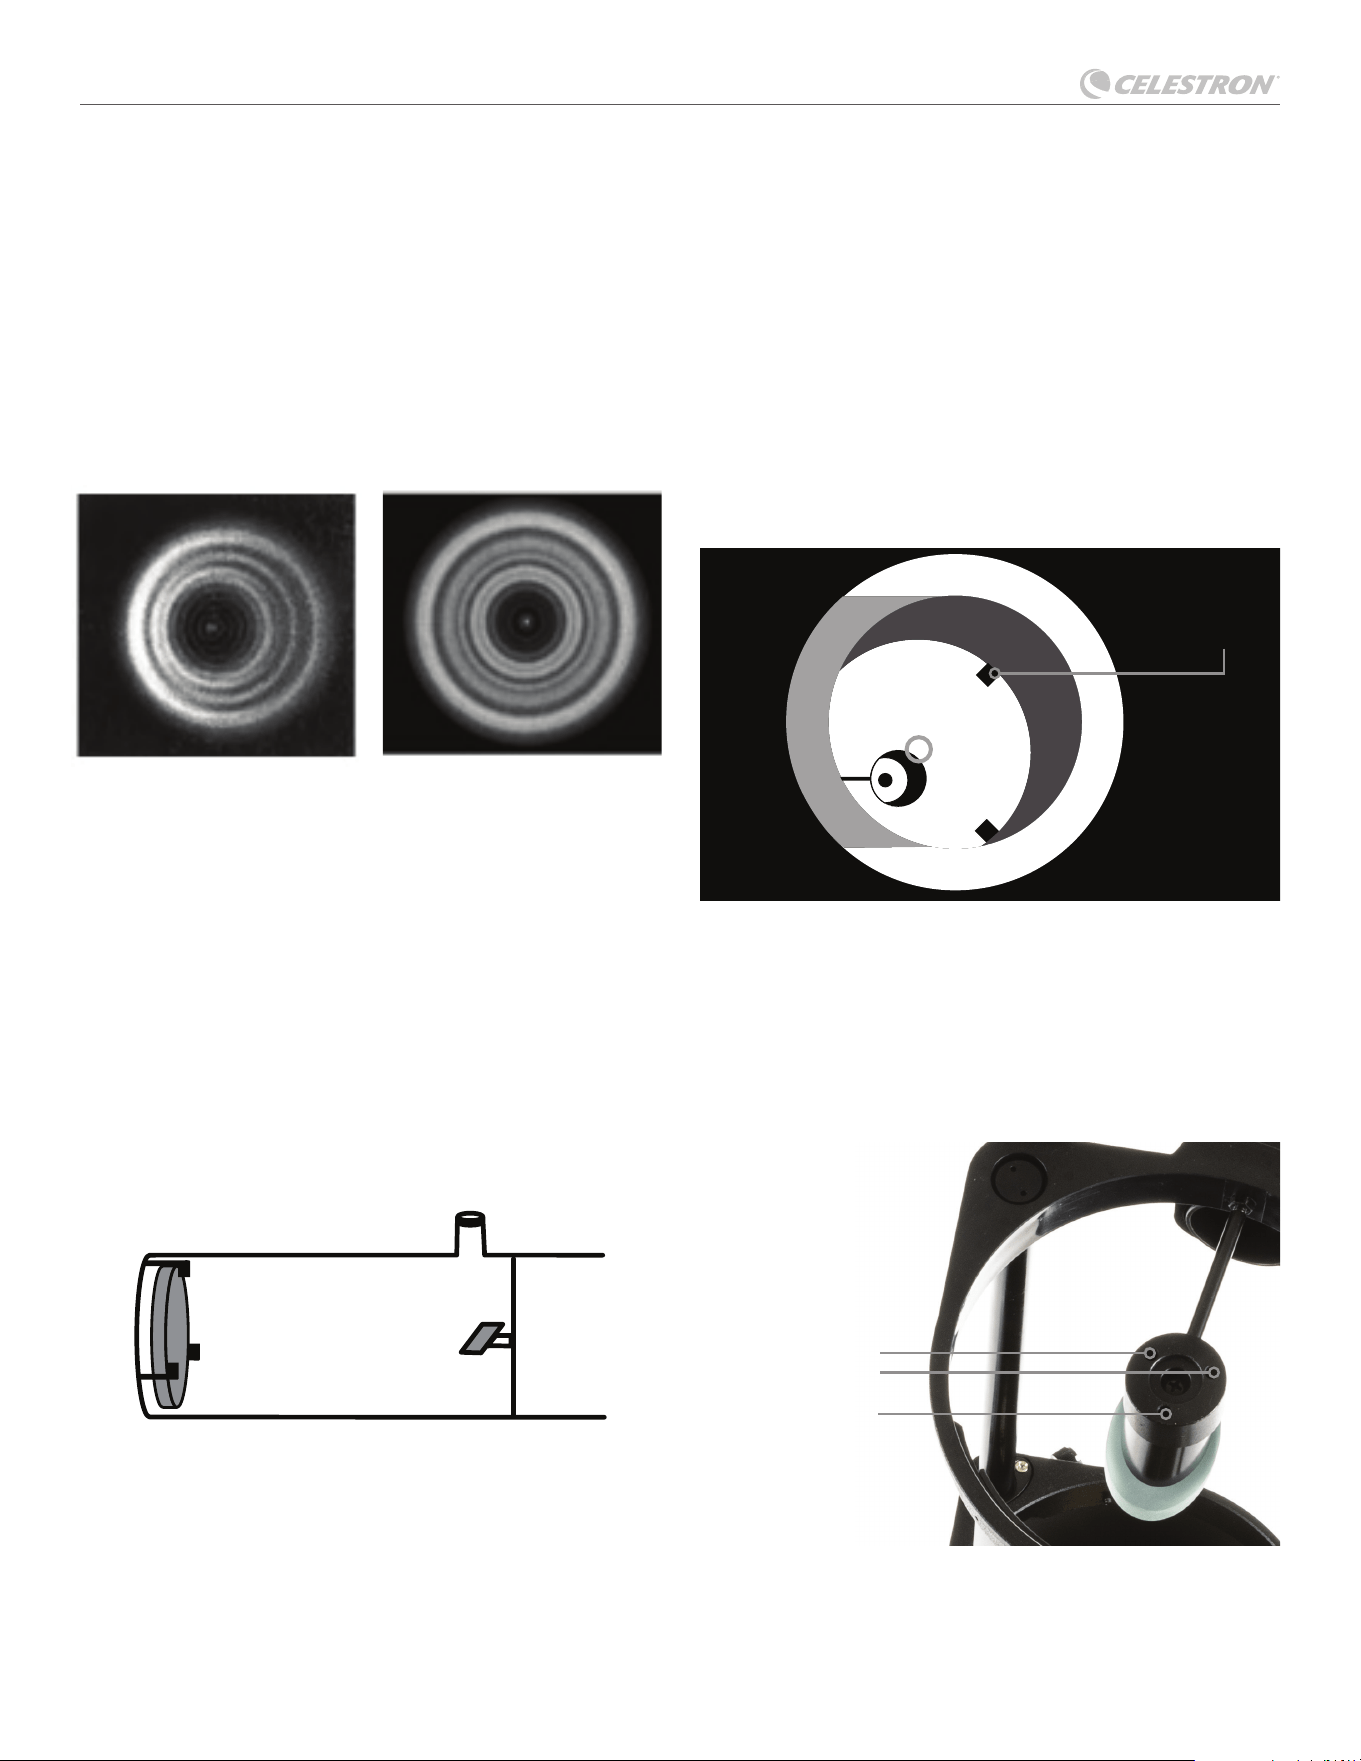
Collimation is the process of aligning the mirrors of your tele-
scope so that they work in concert to deliver properly focused light
to your eyepiece. By observing out- of-focus star images, you can
test whether your telescope’s optics are aligned. Place a star in the
center of the fi eld of view and move the focuser so that the image is
slightly out of focus. If the seeing conditions are good, you will see
a central circle of light (the Airy disc) surrounded by a number of
diffraction rings. If the rings are symmetrical about the Airy disc, the
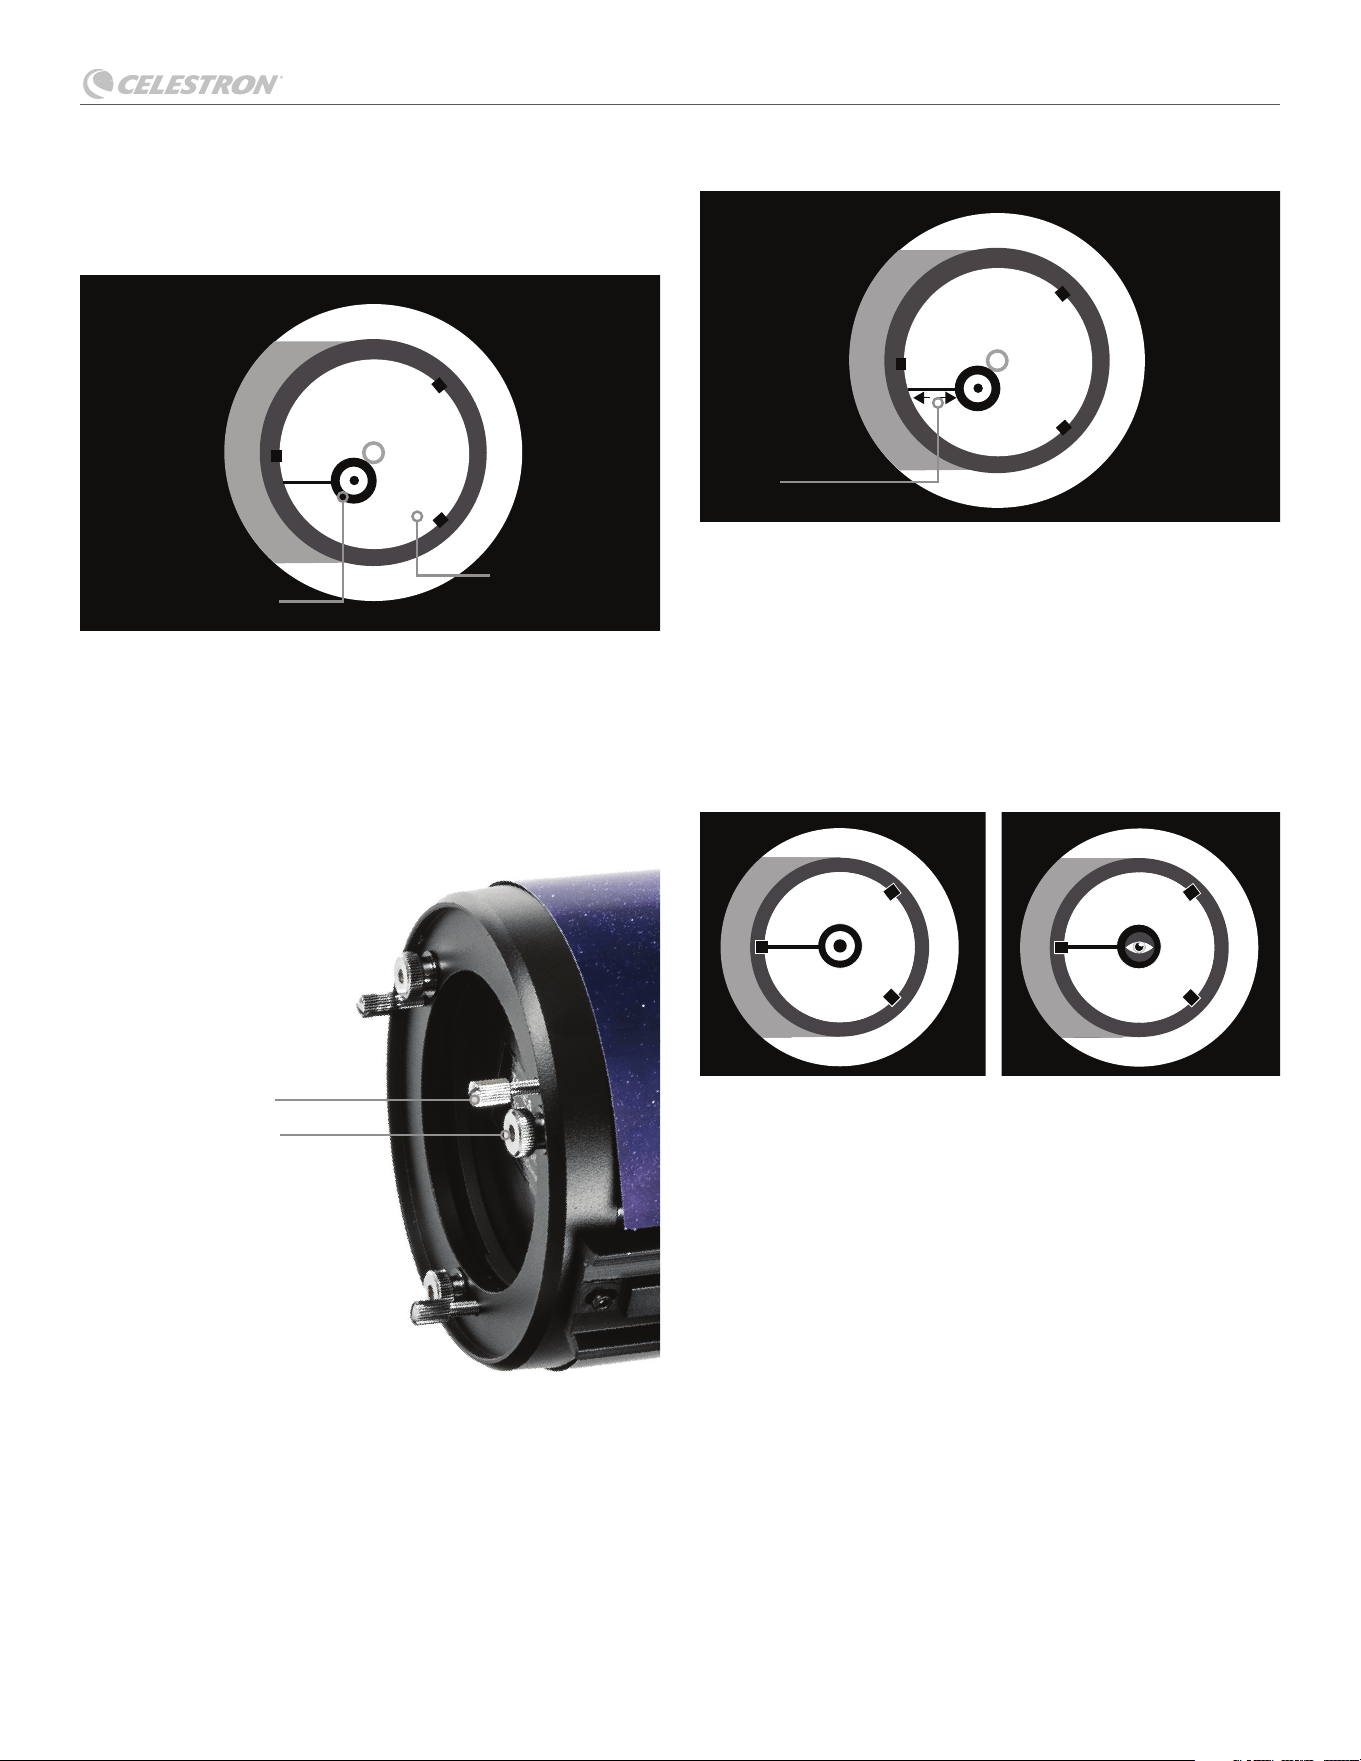
telescope’s optics are correctly collimated. Fig. A
If you do not have a collimating tool, we suggest that you make a
“collimating cap” out of a plastic 35mm fi lm canister (black with
gray lid). Drill or punch a small pinhole in the exact center of the lid
and cut off the bottom of the canister. This device will keep your
eye centered in the focuser tube. Insert the collimating cap into the
focuser in place of a regular eyepiece.
Here's how to collimate your telescope:
Pull off the lens cap that covers the front of the telescope and look
down the optical tube. At the bottom, you will see the primary mirror
held in place by three clips 120° apart, and at the top the small oval
secondary mirror held in a support and tilted 45° toward the focuser
outside the tube wall. (Fig. B)
The secondary mirror is aligned by adjusting the three small er
screws surrounding the central bolt. The primary mirror is adjusted
by the three adjusting screws at the back of your scope. The three
locking screws beside them serve to hold the mirror in place after
collimation.
PROPER CARE FOR YOUR TELESCOPE
GOOD COLLIMATIONNEEDS ADJUSTMENT
Aligning the Secondary Mirror Collimation
Mirror Clips
Primary Mirror
Fig. A:
The "Airy disc" that is created by a slightly out-of-focus star
Secondary Mirror
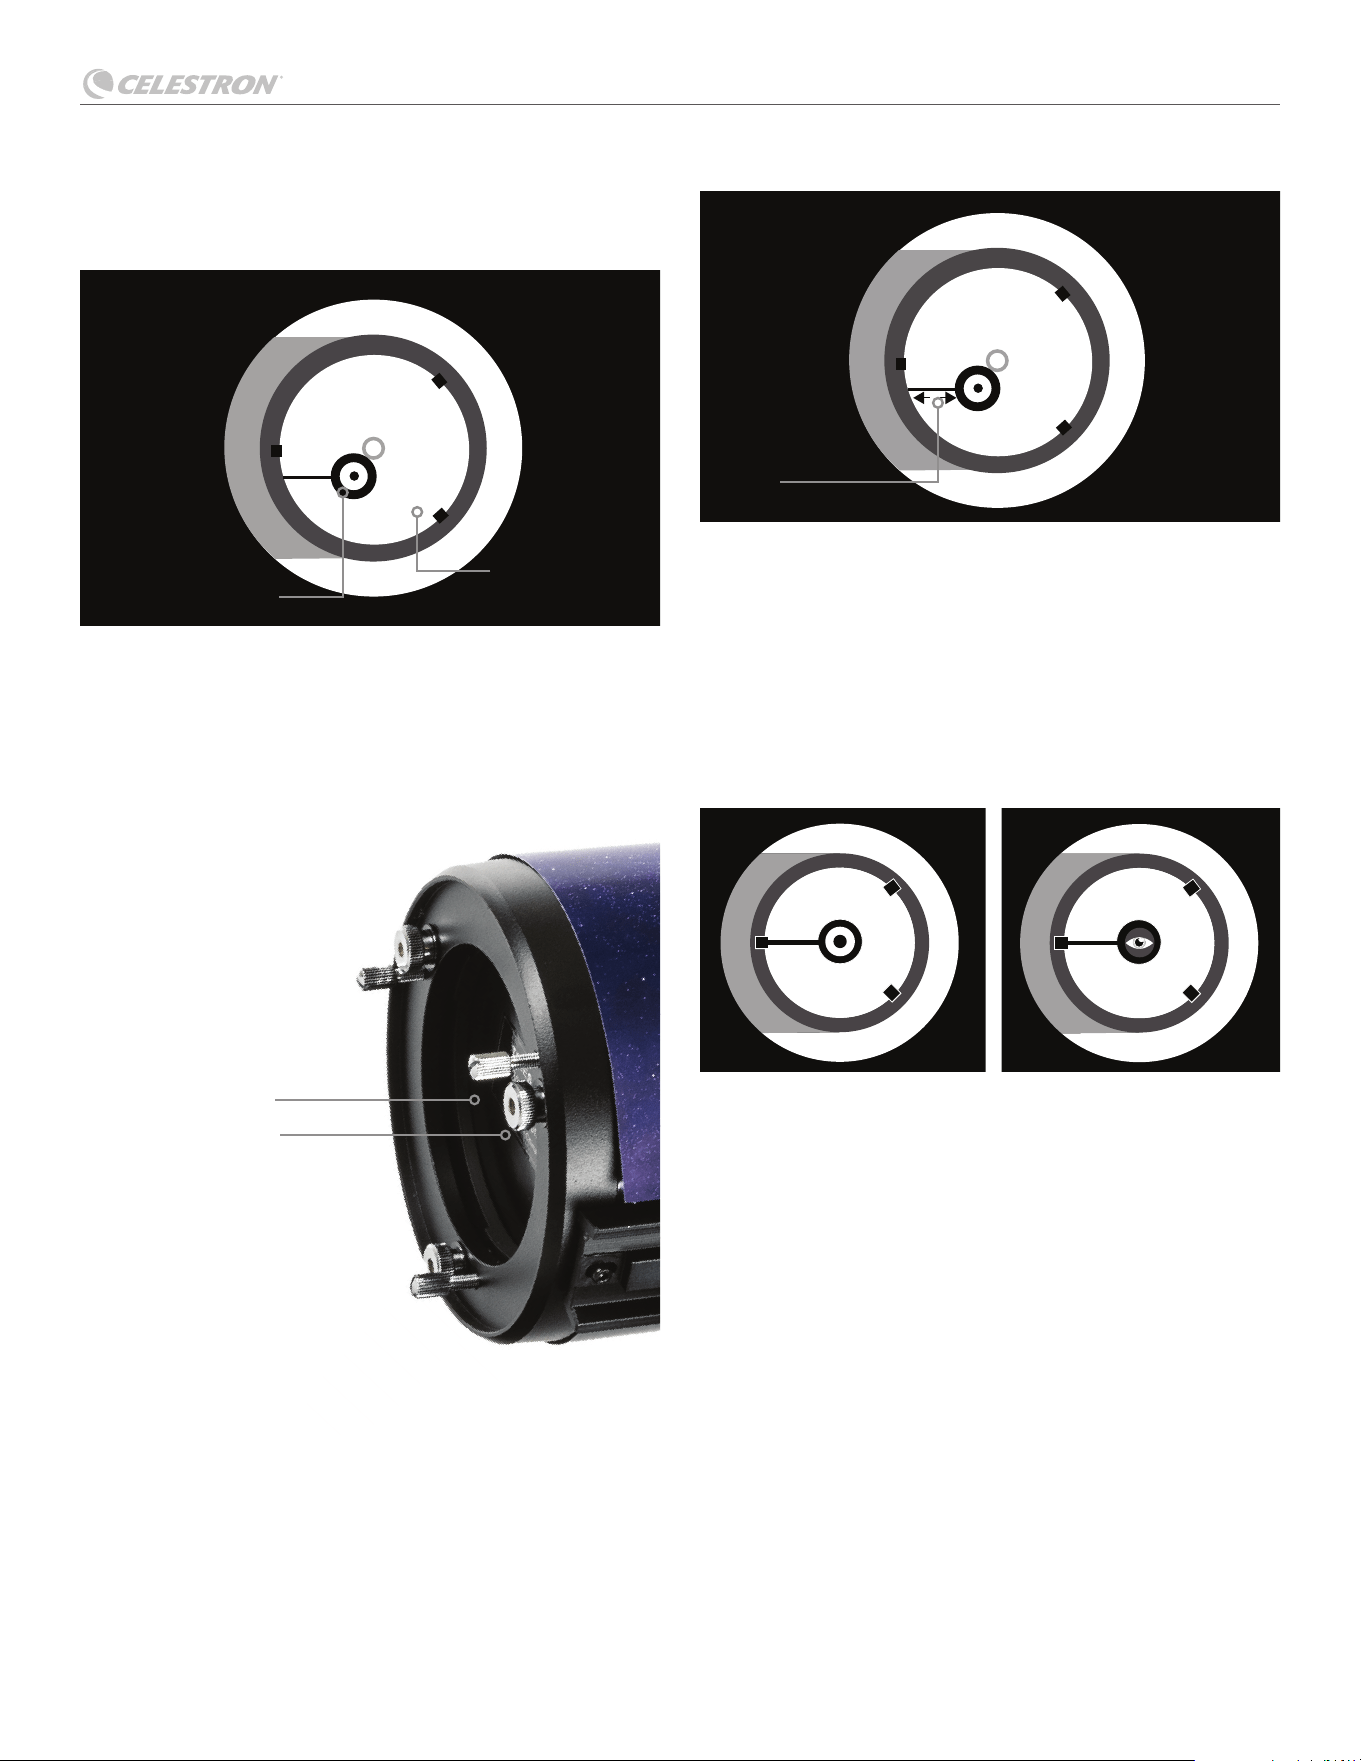
Point the telescope at a lit wall and insert the collimating cap into
the focuser in place of a regular eyepiece. Look into the focuser
through your collimating cap. You may have to twist the focus knob a
few turns until the refl ected image of the focuser is out of your view.
NOTE: Keep your eye against the back of the focus tube if collimating
without a collimating cap.
Ignore the refl ected image of the collimating cap or your eye for now.
Instead look for the three clips holding the primary mirror in place. If
you can’t see them, your telesope is out of collimation. (Fig. C)
Secondary mirror
adjustment bolts
To align the secondary mirror, adjust the three bolts on the top
of the secondary mirror holder with an Allen wrench or Phillips-
head screwdriver. You will have to alternately loosen one and then
compensate for the slack by tightening the other two. (Fig. D)
Fig. C:
View through focuser, showing refl ection of primary mirror and
mirror clips
Fig. D: Location of secondary mirror adjustment bolts
Fig. B: Side view of the inside of the telescope
LUMINA 130 DOBSONIAN
ENGLISH | 9
Refl ection of
primary mirror
Refl ection of
secondary mirror
Locking Screw
Adjusting Screw
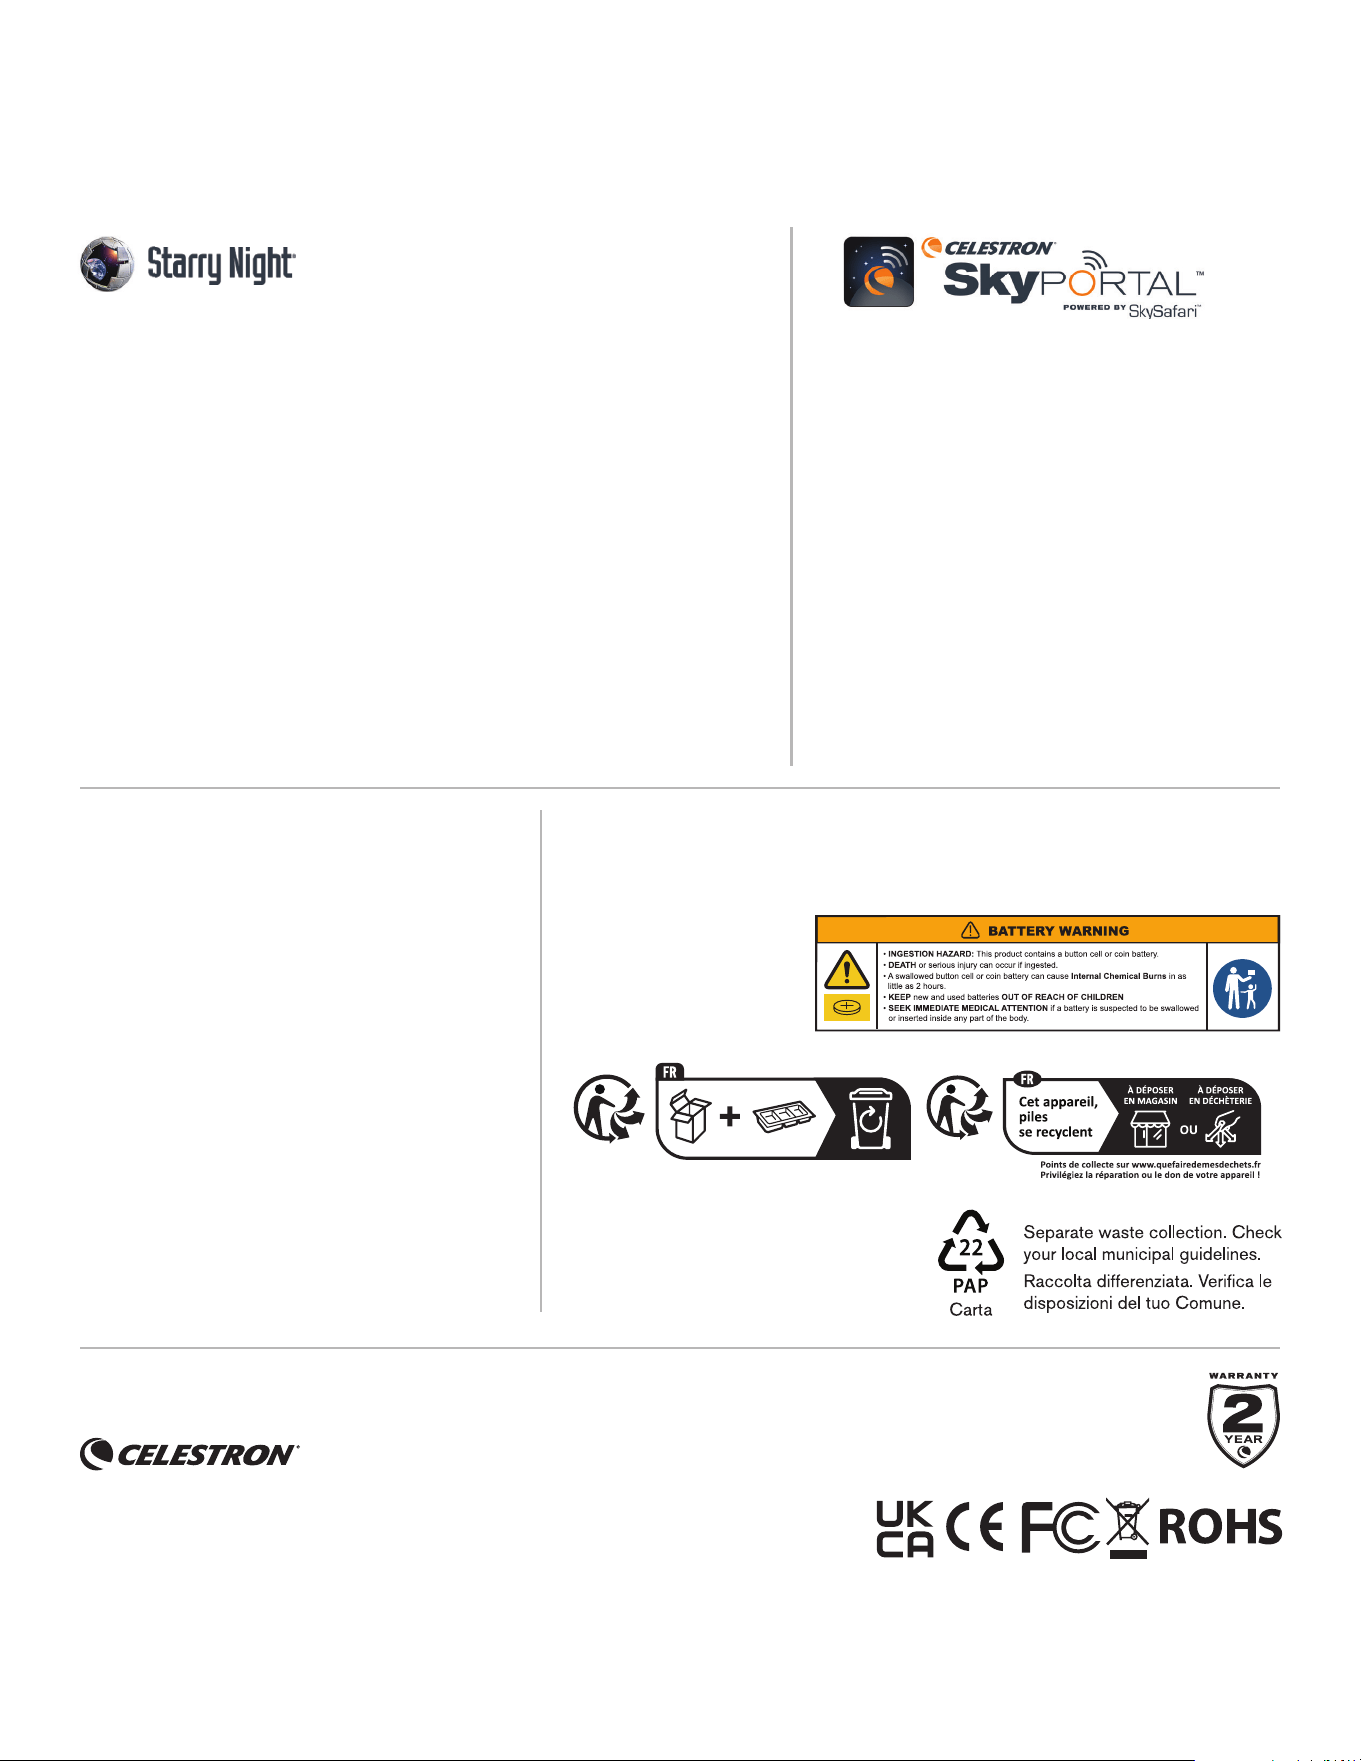
Stop when you see all three mirror clips. (Fig. E) Make sure that all
three small alignment screws are tightened to secure the secondary
mirror in place.
Aligning the Primary Mirror
There are three large bolts and three small screws at the back of
your telescope. The large bolts are the adjusting screws and the
small screws are the locking screws. (Fig. F)
Loosen the large bolts by a few turns. Now run your hand around the
front of your telescope, keeping your eye to the focuser. You will see
the refl ected image of your hand. The idea here is to see which way
the primary mirror is defected. You do this by stopping at the point
where the refl ected image of the secondary mirror is closest to the
primary mirror’s edge. (Fig.G)
When you get to that point, stop and keep your hand there while
looking at the back end of your telescope. Is there an adjusting
screw there? If there is, you will want to loosen it (turn the screw
to the left) to bring the mirror away from that point. If there isn't, go
across to the other side and tighten the adjusting screw on the other
side. This will gradually bring the mirror into line until it looks like Fig.
H. (It helps to have a friend to help with primary mirror collimation.
Have your partner adjust the screws according to your directions
while you look in the focuser.)
After dark, go out and point your telescope at Polaris, the North Star.
With an eyepiece in the focuser, take the image out of focus. You
will see the same image only now, it will be illuminated by starlight. If
necessary, repeat the collimating process. This time, keep the star
centered while tweaking the mirror.
Cleaning Your Telescope
Place the dust cap over the end of your telescope whenever you
aren’t using it.This prevents dust from settling on mirror or lens
surfaces. Do not clean your telescope’s optical components unless
you are familiar with optical surfaces. Clean your fi nderscope and
eyepieces with special lens paper only. Handle your eyepieces
with care. Do not touch any optical surfaces on your telescope or
accessories.
Fig. E:
View through the focuser (all three mirror clips are visible)
Fig. G: View through the eyepice showing hand placement
Fig. H: View through the focuser, showing both mirrors aligned with and
without collimating eyepiece
Fig. F: Rear view of telescope showing adjustment bolts and locking screws
Place hand
here
Using focuserUsing collimating eyepiece
Made in China | 05/25
SOFTWARE & APP
Your purchase includes software for your computer and an app for your smartphone. You don’t need to download these tools to use your
telescope, but they can enhance your experience.
MINIMUM SYSTEM REQUIREMENTS
Windows:
• Windows 7 or higher
• 500MHz or higher processor
• 128 MB RAM
• 850 MB hard disk space
• 32 MB OpenGL-capable graphics card
• Monitor with 1024x768 pixel resolution
(recommended)
MINIMUM SYSTEM REQUIREMENTS
Android devices: Android 4.0 and higher
Apple iOS devices: iOS 4.3 and higher
Mac:
• Universal binary (PPC/Intel-compatible)
• OS X 10.4 or higher
(10.5 or higher for Elementary)
• G3 450 MHz or higher processor
• 128 MB RAM
• 850 MB hard disk space
• 32 MB OpenGL-capable graphics card
• Monitor with 1024x768 pixel resolution
(recommended)
celestron.com/pages/warranty
Celestron SkyPortal Powered by
SkySafari™ Astronomy App
The telescope experts at Celestron have partnered
with SkySafari to redefi ne how you experience the night
sky. Explore a database of more than 120,000 celestial
objects, including stars, planets, star clusters, nebulae,
galaxies, asteroids, comets, and satellites—including
the International Space Station! You can even listen to
audio descriptions of the most popular objects while
you observe. SkyPortal includes everything you need to
stargaze in an exciting new way.
SAFETY INSTRUCTIONS
• There is a risk of explosion if the battery is replaced with
an incorrect type.
• The included battery is not rechargeable.
• Only use the battery as originally intended to avoid
a short circuit. Connecting the conductive material
directly to the battery’s positive and negative sides will
cause a short circuit.
• Do not use a damaged battery.
• Do not store the battery in an extremely cold or hot
environment. Doing so can reduce battery life.
• When replacing the battery, refer to the instruction
manual and ensure the positive and negative sides are
oriented correctly.
• Do not put the battery in fi re.
• Dispose of the battery according to local regulations.
FCC NOTICE: This device complies with Part 15 of the FCC Rules. Operation is subject to
the following two conditions: (1) This device may not cause harmful interference, and (2) this
device must accept any interference received, including interference that may cause undesired
operation.
Celestron Starry Night Astronomy Software
Celestron Starry Night, the premier astronomy software on the market, takes you
on a guided tour of our Solar System’s past, present, and future. It can help you
learn about the night sky and plan your next observing session. Use Starry Night
to model exactly how the night sky will appear from your backyard, a neighboring
town, or anywhere on Earth.
NEED ASSISTANCE? Contact Celestron Technical Support
celestron.com/pages/technical-support
©2025 Celestron. Celestron and Symbol are trademarks of Celestron, LLC. All rights reserved.
Celestron.com
US: 2835 Columbia Street, Torrance, CA 90503 USA
UK: Unit 2 Transigo, Gables Way, Thatcham RG19 4JZ, United Kingdom
This product is designed and intended for use by those 14 years of age and older.
MODE D'EMPLOI
Modèl# 31200 FRANÇAIS

TABLE DES MATIÈRES
Contenu de la boîte . . . . . . . . . . . . . . . . . . . . . . . . . . . . . . . . . . . . . . . . . . . . . . . 1
Liste des pièces . . . . . . . . . . . . . . . . . . . . . . . . . . . . . . . . . . . . . . . . . . . . . . . . . . . . . 1
Assembler le télescope . . . . . . . . . . . . . . . . . . . . . . . . . . . . . . . . . . . . . . . . . . . . 2
Mode d'emploi du télescope . . . . . . . . . . . . . . . . . . . . . . . . . . . . . . . . . . . . . . . . 3
Équilibrer votre télescope . . . . . . . . . . . . . . . . . . . . . . . . . . . . . . . . . . . . . . . . . . . . . . . . 3
Positionner votre télescope . . . . . . . . . . . . . . . . . . . . . . . . . . . . . . . . . . . . . . . . . . . . . . . 3
Utiliser la molettes de tension . . . . . . . . . . . . . . . . . . . . . . . . . . . . . . . . . . . . . . . . . . . . . 3
Mise au point de votre télescope . . . . . . . . . . . . . . . . . . . . . . . . . . . . . . . . . . . . . . . . . . . 3
Aligner votre chercheur . . . . . . . . . . . . . . . . . . . . . . . . . . . . . . . . . . . . . . . . . . . . . . . . . 4
Accès à la pile du chercheur . . . . . . . . . . . . . . . . . . . . . . . . . . . . . . . . . . . . . . . . . . . . . . 4
Votre première nuit d'observation: La Lune . . . . . . . . . . . . . . . . . . . . . . . . . . . . . . . . . . . . . 5
Conseils pour l'observation céleste . . . . . . . . . . . . . . . . . . . . . . . . . . . . . . . . . . 6
Grossissement . . . . . . . . . . . . . . . . . . . . . . . . . . . . . . . . . . . . . . . . . . . . . . . . . . . . . . 6
Champ de vision . . . . . . . . . . . . . . . . . . . . . . . . . . . . . . . . . . . . . . . . . . . . . . . . . . . . . 6
Les planètes . . . . . . . . . . . . . . . . . . . . . . . . . . . . . . . . . . . . . . . . . . . . . . . . . . . . . . . . 6
Objets du ciel profond . . . . . . . . . . . . . . . . . . . . . . . . . . . . . . . . . . . . . . . . . . . . . . . . . . 6
Conditions du ciel . . . . . . . . . . . . . . . . . . . . . . . . . . . . . . . . . . . . . . . . . . . . . . . . . . . . 6
Sélectionner un site d'observation . . . . . . . . . . . . . . . . . . . . . . . . . . . . . . . . . . . . . . . . . . . 7
Choisir le meilleur moment pour l'observation . . . . . . . . . . . . . . . . . . . . . . . . . . . . . . . . . . . . 7
Refroidir le télescope . . . . . . . . . . . . . . . . . . . . . . . . . . . . . . . . . . . . . . . . . . . . . . . . . . 7
Adaptation de la vision . . . . . . . . . . . . . . . . . . . . . . . . . . . . . . . . . . . . . . . . . . . . . . . . . . 7
Étoiles référentes . . . . . . . . . . . . . . . . . . . . . . . . . . . . . . . . . . . . . . . . . . . . . . . . . . . . . 7
Prendre soin de votre télescope . . . . . . . . . . . . . . . . . . . . . . . . . . . . . . . . . . . . . 8
Collimation . . . . . . . . . . . . . . . . . . . . . . . . . . . . . . . . . . . . . . . . . . . . . . . . . . . . . . . . . 8
Aligner le miroir secondaire . . . . . . . . . . . . . . . . . . . . . . . . . . . . . . . . . . . . . . . . . . . . . . . 8
Aligner le miroir primaire . . . . . . . . . . . . . . . . . . . . . . . . . . . . . . . . . . . . . . . . . . . . . . . . . 9
Nettoyer votre télescope . . . . . . . . . . . . . . . . . . . . . . . . . . . . . . . . . . . . . . . . . . . . . . . . 9
Logiciel et application . . . . . . . . . . . . . . . . . . . . . . . . . . . . . . . . . . . . . . . . . . . . . 10
LUMINA 130 DOBSONIAN
FRANÇAIS | 1
Nous vous recommandons de conserver la boîte de votre télescope pour son rangement quand vous ne vous en servez pas. Déballez la
boîte avec précautions car certaines pièces sont petites. Reportez-vous à la liste des pièces ci-dessous pour vous assurer que toutes les
pièces et les accessoires sont présents.
CONTENU DE LA BOÎTE
Liste des pièces
1. Tube optique
2. Base
3. Capuchon anti-poussière
4. Vis de verrouillage de l'oculaire
5. Anneau de mise au point
6. Vis de verrouillage de verrouillage de la glissière
7. Queue d'aronde
8. Vis de verrouillage de la queue d'aronde
9. Molettes de contrôle de la tension
10. Oculaire de 25mm
11. Oculaire de 10mm
12. Chercheur à point rouge StarPointer
TM
VOUS AUREZ BESOIN DE: (1) Un tournevis cruciforme de petite taille pour remplacer la pile du chercheur StarPointer
* AVERTISSEMENT SUR LE SOLEIL ! N’essayez jamais d’observer le soleil à
l’aide d’un télescope sans utiliser de fi ltre solaire.
1
2
6
4
5
7 10
11
12
9
8
3
LUMINA 130 DOBSONIAN
2 | FRANÇAIS
ASSEMBLER VOTRE TÉLESCOPE
Localiser le chercheur à point rouge.
Desserrez légèrement les vis sur le côté du
chercheur.
Localisez la petite base du chercheur près
de l'ouverture avant du tube. Glissez le
chercheur sur la base et serrez les vis pour
le fi xer. Ne serrez pas excessivement ces vis.
Localisez l'oculaire. Desserrez les vis de
blocage de l'oculaire et glissez-le dans son
support. Serrez légèrement les vis pour
maintenir l'oculaire en place. Ne serrez pas
excessivement les vis!
Lorsque vous ne vous en servez pas, rangez
le télescope de la manière illustrée.
Retirez le capuchon anti-poussière avant
d'observer
.
Pour étendre le tube du télescope, desserrez
les deux vis de blocage du curseur et tirez la
partie supérieure du télescope vers le haut
jusqu'à ce qu'elle s'enclenche. Serrez les vis
de blocage de la glissière. Ne serrez pas
excessivement.
1
4
2
5 6
3
LUMINA 130 DOBSONIAN
FRANÇAIS | 3
Équilibrer votre télescope
Positionner votre
télescope
Pour équilibrer le télescope, desserrez la
vis de blocage en queue d'aronde et faites
glisser le tube jusqu'à ce qu'il reste immobile
lorsque vous ne le touchez pas.
Pour pointer le télescope, déplacez
simplement le tube du télescope de haut en
bas en altitude (position haut/bas) ou faites
pivoter le télescope autour de la base en
azimut (position gauche/droite).
Desserrez ou serrez le bouton de réglage
de la tension pour augmenter la friction
suffi samment afi n que le tube puisse être
aisément orienté,et qu'il maintienne sa
position lorsqu'il n'est pas touché. Il peut
être nécessaire de réajuster la molette
de réglage de la tension lorsque vous
ajoutez ou retirez des accessoires du tube.
Si vous utilisez des accessoires plus lourds,
vous devrez peut-être rééquilibrer la lunette
après les avoir ajoutés ou retirés.
Tournez lentement la molette de mise au
point, dans un sens ou dans l'autre, jusqu'à
ce que l'image dans l'oculaire soit nette.
Vous devrez peut-être affi ner la mise au
point au fi l du temps, car les variations de
température, la fl exion et d'autres facteurs
entraînent de légers décalages. Les
télescopes rapides (à rapport focal court)
sont particulièrement sujets à ce problème,
surtout avant d'atteindre la température
ambiante. Vous devez également refaire la
mise au point chaque fois que vous changez
d'oculaire ou que vous ajoutez ou retirez une
lentille de Barlow.
Serrez la vis de blocage en queue d'aronde
pour maintenir le tube en place. Ne serrez
pas excessivement.
Utiliser la molettes de
tension
Vissez le bouton de réglage de la tension
jusqu'à ce qu'il faille exercer une pression
légère pour l'orientation. Une légère friction
est nécessaire pour maintenir le télescope
en place. Ne serrez pas la molette trop
fortement. Le tube doit continuer à se
déplacer en douceur et sans effort.
Mise au point de votre
télescope
1
1 1
1
2 3
MODE D'EMPLOI DE VOTRE TÉLESCOPE
LUMINA 130 DOBSONIAN
4 | FRANÇAIS
Ajuster le chercheur
Sans déplacer le télescope, utilisez les deux
molettes d’ajustement pour déplacer le
chercheur jusqu’à que le point rouge s’aligne
sur l’objet observé dans l’oculaire de 32mm
du télescope.
VOTRE CHERCHEUR EST
MAINTENANT ALIGNÉ!
Il n'aura pas besoin d'être aligné de nouveau
tant qu'il n'aura pas subi un choc ou qu'il sera
tombé. Maintenant, quand vous regarderez
dans le StarPointer, le point rouge indiquera
la direction de visée du télescope. N’oubliez
pas d’éteindre le point rouge quand vous
avez terminé, pour préserver la pile.
Regarder dans le chercheur
Tirez sur la languette de protection de
la pile du StarPointer et activez-le à la
luminosité maximale avec la molette On/
Off. Regardez dans le StarPointer et
localisez le point rouge.
Centrer la cible dans l'oculaire
Regardez dans le télescope en utilisant votre
oculaire de 25 mm. Déplacez le télescope
jusqu'à que l'objet choisi se trouve au centre
du champ de vision. Si l’image est fl oue,
faites doucement tourner la molette de mise
au point jusqu’à ce que l’image soit nette.
REMARQUE: L'image observée dans votre
télescope peut apparaître inversée. Cela
est parfaitement normal pour un télescope
astronomique.
Le chercheur à point rouge StarPointer est
l'un des composants les plus importants
de votre télescope. La première fois que
vous assemblez votre télescope, vous
devez aligner le chercheur avec le système
optique principal du télescope. Il est plus
facile d'effectuer cette opération pendant la
journée*.
* AVERTISSEMENT SUR LE
SOLEIL! N’essayez jamais
d’observer le soleil à l’aide d’un
télescope sans utiliser un fi ltre solaire
adéquat.
Choisir une cible
Installez le télescope à l’extérieur en journée,
et repérez un objet aisément reconnaissable,
comme un feu de signalisation, une plaque
d’immatriculation ou un panneau. L’objet doit
se situer aussi loin que possible, mais à au
moins un quart de mile de vous.
SYSTÈME
DE MISE AU
POINT
MOLETTE ON/OFF
1
1
4 5
2
2
Aligner le chercheur
Accès à la pile du chercheur
Le chercheur StarPointer utilise une pile au lithium 3V longue durée (#CR2032), qui est située sur la surface supérieure du StarPointer. Si
vous prévoyez de ne pas utiliser votre télescope pendant une période prolongée, nous vous recommandons de retirer la batterie pour le
stockage. Si vous devez retirer ou remplacer la pile, suivez ces instructions:
Remarque: Vous aurez besoin d'un petit tournevis cruciforme pour remplacer la pile du chercheur StarPointer.
À l'aide d'un tournevis cruciforme, desserrez
la vis du couvercle de la batterie et
ouvrez le couvercle.
Si vous remplacez la pile, installez la nouvelle
en orientant le pôle (+) vers l'extérieur.
Remettez le couvercle sur le chercheur et
resserrez la vis avec le tournevis cruciforme.
1
2
3
3
LUMINA 130 DOBSONIAN
FRANÇAIS | 5
SYSTÈME
DE MISE AU
POINT
Pour obtenir une meilleure vue de la Lune,
desserrez les vis de fi xation du système de
mise au point et retirez l'oculaire de 25mm.
Replacez-le par l'oculaire de 10mm et serrez
les vis de fi xation pour le fi xer. L'oculaire
de 10mm permettra un grossissement
notablement plus important, faisant
apparaître la Lune en bien plus grand. Vous
devrez peut-être ajuster la mise au point
lorsque vous changez d'oculaires pour
garantir l'image la plus nette possible.
En utilisant cette même technique, vous
pouvez voir de nombreux autres objets
célestes, comme des planètes, des amas
d'étoiles et des nébuleuses.
L'achat de votre télescope vous permet
de télécharger gratuitement SkyPortal de
Celestron, rendu possible par SkySafari
TM
.
Disponible pour iOS et Android, cette
application de planétarium peut vous
aider à localiser et à identifi er les objets
célestes actuellement visibles depuis votre
emplacement exact. Essayez!
Regardez dans l'oculaire de 25 mm. Tournez
doucement les molettes de mise au point
jusqu'à ce que l'image soit nette.
Félicitations! Vous avez maintenant
observé votre premier objet céleste!
Regardez dans le chercheur et localisez le
point rouge. Continuez à orienter le télescope
jusqu'à ce que le point soit superposé sur la
Lune.
La meilleure cible céleste et la plus facile à observer en premier est la Lune. Essayez d'observer la Lune à différents moments de ses phases.
Le meilleur moment pour observer la Lune est deux jours après la nouvelle Lune et jusqu’à quelques jours avant la pleine Lune. Pendant cette
période, verrez la plus grande quantité de détails dans les cratères et les chaînes de montagnes lunaires.
Lorsque la Lune est visible dans le ciel,
installez votre télescope avec l'oculaire
de 25 mm après avoir aligné le chercheur.
Déplacez le télescope de manière qu'il
pointe plus ou moins vers la Lune. Allumez
le chercheur
1
4 5 6
2
3
Votre première nuit d’observation - La LUNE
Scannez le code QR pour visiter le
centre de ressources Celestron Tools for
Astronomers. Vous y trouverez des guides
d'observation, des conseils et astuces et
des téléchargements gratuits pour vous
guider dans votre voyage d'astronomie.
25mm
10mm

LUMINA 130 DOBSONIAN
6 | FRANÇAIS
Cette section fournit des conseils pour observer les objets du
système solaire et du ciel profond, ainsi qu'une explication de
l'impact des conditions d'observation sur ce que vous voyez.
Grossissement
Vous pouvez modifi er le grossissement de votre télescope en
changeant simplement d'oculaire. Télescopes et oculaires ont
des distances focales mesurées en millimètres. Pour calculer le
grossissement d'une combinaison télescope-oculaire donnée,
divisez la distance focale du télescope par la distance focale de
l'oculaire. Le résultat est le facteur de grossissement.
Par exemple, le télescope Dobson Lumina 130 mm a une distance
focale de 650 mm. Avec l'oculaire de 10 mm:
Champ de vision
Déterminer le champ de vision est important si vous voulez avoir
une idée de la taille angulaire de l'objet observé. Pour calculer le
champ de vision réel, divisez le champ apparent de l'oculaire (fourni
par le fabricant) par le grossissement qu'il vous donne dans la
lunette que vous utilisez.
En utilisant l'exemple de la section précédente, nous pouvons
déterminer le champ de vision avec le même télescope et l'oculaire
de 10 mm. L'oculaire de 10mm à un champ de vision apparent de
40°.
L'oculaire de 10 mm à un champ de vision apparent de 40°.
Divisez 40° par le grossissement, qui est d’une puissance de 65.
Cela donne un champ de vision réel de 0,6 degrés.
Les planètes
Outre la Lune, votre télescope est capable d'observer les cinq
planètes les plus brillantes. Comme les planètes changent de
position par rapport aux étoiles en arrière-plan, vous devrez
consulter des sources sur le web ou utiliser une application de
planétarium sur un smartphone pour les localiser. Voici les planètes
que vous pouvez trouver:
• Voici les planètes que vous pouvez trouver - Tout comme
la Lune, les deux planètes intérieures traversent des phases
allant de fi ns croissants à des phases gibbeuses.
• Mars- À proximité de l’opposition (le point de son orbite le plus
proche de la Terre), vous devriez pouvoir distinguer la calotte
polaire et peut-être des éléments de surface plus importants qui
apparaissent comme des marques sombres à la surface.
• Jupiter- Recherchez les bandes de nuages de méthane plus
sombres qui entourent la planète juste au-dessus et en dessous
de l’équateur. Si la Grande Tache Rouge est face à la Terre,
vous pourrez peut-être l’apercevoir. Vous verrez également
les quatre lunes les plus brillantes de Jupiter : Io, Europe,
grossissement 65x= = =
Distance focale du télescope
Distance focale de l'oculaire
650mm
10mm
Champ de
vision réel
0,6° d'arc
= = =
Champ de vision
apparent de l'oculaire
Grossissement
40º
65x
Ganymède et Callisto. Ces lunes sont intéressantes à observer
car elles peuvent se déplacer sensiblement en seulement
quelques heures. Parfois, ils se déplacent derrière Jupiter ou
dans son ombre et disparaissent pendant un certain temps. Ils
peuvent également traverser la face de Jupiter et vous pourriez
même apercevoir l'ombre de la Lune la croiser. Les applications
de planétarium pour smartphone peuvent vous aider à prédire
quand la Grande Tache Rouge sera visible et vous alerter des
événements intéressants impliquant les lunes de Jupiter.
• Saturne - Les anneaux ! Saturne est sans doute l'un des
plus beaux objets à observer au télescope. Si les conditions
d'observation sont suffi samment stables, vous pourriez même
apercevoir l'ombre des anneaux sur la planète et l'ombre de la
planète sur les anneaux. Vous devriez pouvoir apercevoir Titan, la
lune la plus brillante de Saturne.
Objets du ciel profond
Les objets du ciel profond sont des objets célestes situés hors
de notre système solaire. Ils comprennent les amas d'étoiles,
les nébuleuses planétaires, les nébuleuses diffuses, les étoiles
doubles et d'autres galaxies situées hors de notre Voie lactée.
Les objets du ciel profond sont des objets célestes situés hors de
notre système solaire. Pour obtenir la meilleure vue, assurez-vous
d'être dans le ciel le plus sombre possible. Plus vous êtes loin des
lumières de la ville, mieux vous verrez ces objets dans l'oculaire. Sur
les photographies de nébuleuses et de galaxies, vous verrez des
rouges et des bleus vifs. Ces couleurs ne sont pas visibles à travers
l'oculaire. Les images colorées ont été capturées avec de longues
expositions – généralement de 15 à 60 minutes ou plus – pendant
lesquelles votre œil ne capte la lumière que momentanément. Les
capteurs numériques sont beaucoup plus sensibles aux rouges et
aux bleus que l'œil humain, qui est plus sensible dans la partie verte
du spectre. Vous pourrez néanmoins voir la douce lueur de la galaxie
d'Andromède et l'étendue de la nébuleuse d'Orion.
Conditions du ciel
Les conditions du ciel peuvent affecter considérablement les
performances de votre télescope de trois manières:
• Stabilité de l'air- par temps venteux, les images de la Lune
et des planètes sembleront onduler ou sauter dans l'oculaire ;
Comme si vous les observiez à travers de l'eau en mouvements.
Les nuits calmes permettent les meilleures observations des
planètes et de la Lune à fort grossissement. La meilleure façon
d'évaluer la stabilité de l'atmosphère est d'observer les étoiles
brillantes à l'œil nu. Si elles scintillent ou changent rapidement
de couleur, l'air est instable et il est préférable d'utiliser des
grossissements plus faibles et de rechercher des objets du ciel
profond. Si les étoiles sont nettes et ne scintillent pas, l'air est
stable et devrait offrir d'excellentes observations planétaires à
fort grossissement.
• Transparence- L'air est-il suffi samment transparent? Si
l'humidité de l'air est élevée, la faible lumière des galaxies et des
nébuleuses peut être dispersée et diffuse avant d'atteindre votre
télescope, entraînant une perte de luminosité de votre image.
Les débris présents dans l'air, provenant d'incendies de forêt
proches ou même d'éruptions volcaniques lointaines, peuvent
contribuer à la perte de luminosité. Parfois, cette humidité ou
CONSEILS POUR L'OBSERVATION CÉLESTE

LUMINA 130 DOBSONIAN
FRANÇAIS | 7
ces débris peuvent contribuer à stabiliser l'air, permettant ainsi
d'obtenir de bonnes images planétaires et lunaires, mais la perte
de lumière rendrait diffi cile l'observation des objets plus faibles
du ciel profond.
• Luminosité du ciel- La quantité de lumière ambiante dans
l'atmosphère peut également affecter l'observation du ciel
profond. L'obscurité du ciel dépend de votre environnement local.
En pleine ville, la lueur du ciel causée par les lumières de la ville
réfl échies vers la Terre peut masquer la faible lumière des galaxies
lointaines. S'éloigner des lumières d'une grande ville peut faire la
différence entre ne rien voir du tout et observer une image, même
peu claire. La Lune et les planètes sont suffi samment brillantes
quoi qu'il arrive, l'impact sur leur observation est donc minime.
Sélectionner un site d'observation
Si vous prévoyez d'observer des objets du ciel profond, tels que des
galaxies et des nébuleuses, il est conseillé de choisir un site de ciel
sombre et accessible. Il doit être éloigné des lumières de la ville et au
vent de toute pollution atmosphérique, et offrir une vue relativement
dégagée sur l'horizon. Choisissez toujours un site aussi élevé que
possible; cela peut atténuer les effets de l'instabilité atmosphérique
et vous assurer d'être au-dessus du brouillard au sol.
S'il peut être souhaitable d'emporter votre télescope sur un site
offrant un ciel plus sombre, ce n'est pas toujours nécessaire. Si
vous prévoyez d'observer les planètes, la Lune ou même certains
des objets les plus brillants du ciel profond, vous pouvez le faire
depuis n'importe quel endroit, comme votre jardin. Essayez
d'installer le télescope à un endroit éloigné des lampadaires ou des
lumières de la maison pour préserver votre vision nocturne. Essayez
d'éviter d'observer quoi que ce soit à moins de 5 à 10 degrés du
toit d'un bâtiment. Les toits absorbent la chaleur pendant la journée
et la rayonnent la nuit. Cela peut créer une couche d'air turbulente
directement au-dessus du bâtiment, ce qui peut dégrader votre
image. Il est préférable d'installer votre télescope directement sur une
surface en terre ou herbeuse. Évitez de l'installer sur des plateformes
surélevées comme des terrasses en bois ou des surfaces dures
comme le béton ou les trottoirs, car elles transmettent facilement les
vibrations au télescope.
N'observez pas à travers une fenêtre: le verre déforme
considérablement l'image. Une fenêtre ouverte peut être encore
pire, car l'air chaud intérieur s'échappe et crée des turbulences qui
dégradent encore davantage la vue. Pour de meilleurs résultats,
positionnez votre télescope en extérieur: l'astronomie est une
activité de plein air.
Choisir le meilleur moment pour
l'observation
Évitez d'observer immédiatement après le coucher du soleil. Le
refroidissement du sol crée des turbulences qui peuvent déformer
votre vue. Les conditions s'améliorent généralement à mesure
que la nuit avance: la visibilité se stabilise, tandis que la pollution
atmosphérique et l'éclairage au sol diminuent souvent. Les
meilleures heures d'observation se situent souvent aux premières
heures du matin, avant l'aube. L'observation des objets se fait le
mieux lorsqu'ils franchissent le méridien, cette ligne imaginaire qui
traverse le ciel du nord au sud et passe par un point situé juste
au-dessus de votre tête. C'est le point où les objets sont les plus
hauts dans le ciel et où votre télescope observe à travers la plus
fi ne couche d'atmosphère possible. Les objets proches de l'horizon,
qu'ils se lèvent ou se couchent, apparaissent moins nets car vous les
observez à travers une couche plus épaisse d'atmosphère terrestre,
ce qui augmente les turbulences. Un ciel parfaitement dégagé n'est
pas toujours nécessaire pour observer la Lune ou les planètes. En
fait, des conditions partiellement nuageuses peuvent parfois offrir
une visibilité étonnamment bonne.
Refroidissement du télescope
Les télescopes ont besoin d'au moins 10 minutes pour refroidir
à la température de l'air extérieur. Un délai plus long peut être
nécessaire en cas de différence importante entre la température du
télescope et celle de l'air ambiant. Laisser votre télescope refroidir
complètement minimise la distorsion due aux ondes de chaleur à
l'intérieur du tube (courants tubulaires).
Adaptation de la vision
Si vous prévoyez d'observer des objets du ciel profond sur un site
sombre, laissez à vos yeux le temps de s'adapter complètement à
l'obscurité. Évitez les sources de lumière blanche comme les lampes
de poche, les phares de voiture et les lampadaires, car elles peuvent
gêner votre vision nocturne. Il faut environ 30 minutes pour que vos
pupilles se dilatent complètement et que vos yeux développent les
pigments optiques nécessaires à la détection de la faible lumière
provenant d'objets lointains.
Si vous avez besoin de lumière pour installer votre télescope, utilisez
une lampe de poche à LED rouge réglée sur la luminosité la plus
faible et évitez de regarder directement le faisceau. Cela contribuera
à préserver votre vision nocturne et à augmenter vos chances de
repérer des objets du ciel profond peu visibles.
Lors de l'observation, gardez les deux yeux ouverts pour réduire la
fatigue oculaire. Si cela vous distrait, couvrez votre œil non utilisé
avec votre main ou un cache-œil. N'oubliez pas que le centre
de votre œil est moins sensible en basse lumière. Pour voir plus
clairement les objets faibles, regardez légèrement sur le côté plutôt
que directement vers eux. Cette technique est appelée vision
détournée et fait ressortir les détails subtils.
Étoiles référentes
La méthode la plus simple pour s'orienter dans le ciel nocturne est
d'utiliser une technique appelée «star hopping ». Pour commencer,
vous devez d'abord mesurer le champ de vision de votre chercheur.
Commencez par choisir une constellation avec des étoiles brillantes;
utilisez un planisphère ou une application d'astronomie pour vous aider
à en identifi er une. Repérez ensuite la même constellation dans votre
atlas stellaire.
Centrez ensuite votre chercheur sur une étoile brillante que vous
reconnaissez sur la carte du ciel. Placez votre œil à environ 30 cm
derrière la fenêtre réfl échissante de votre chercheur StarPointer et
déplacez le télescope jusqu'à ce que l'étoile apparaisse au bord du
champ de vision de la fenêtre (n'importe quelle direction convient).
Sans déplacer le télescope, regardez à travers la fenêtre et remarquez
une autre étoile près du bord opposé.
Repérez maintenant les deux étoiles sur votre carte du ciel. Utilisez
une règle pour mesurer la distance qui les sépare sur la carte; cette
distance représente un champ de vision de votre chercheur.
Vous pouvez maintenant utiliser cette mesure comme guide pour
passer d'une étoile à l'autre sur la carte, vous aidant ainsi à localiser les
objets célestes avec plus de précision.
LUMINA 130 DOBSONIAN
8 | FRANÇAIS
La collimation consiste à aligner les miroirs de votre télescope afi n
qu'ils fonctionnent de concert pour fournir une lumière correctement
focalisée à votre oculaire. En observant des images d'étoiles fl oues,
vous pouvez vérifi er l'alignement de l'optique de votre télescope.
Placez une étoile au centre du champ de vision et déplacez le porte-
oculaire de manière à ce que l'image soit légèrement fl oue. Si les
conditions de visibilité sont bonnes, vous verrez un cercle lumineux
central (le disque d'Airy) entouré de plusieurs anneaux de diffraction.
Si les anneaux sont symétriques par rapport à un disque de tache
d'Airy, l'optique du télescope est correctement collimatée. Fig. A
Si vous ne disposez pas d'outil de collimation, nous vous suggérons
de fabriquer un « capuchon de collimation » à partir d'une boîte
de pellicule 35 mm en plastique (les boîtes noires au couvercle
gris). Percez un petit trou d'épingle au centre exact du couvercle
et découpez le fond de la boîte. Ce dispositif maintiendra votre
œil centré dans le tube de mise au point. Insérez le capuchon de
collimation dans le porte-oculaire à la place d'un oculaire classique.
Voici comment effectuer la mise en collimation de votre
télescope:
Retirez le capuchon de l'objectif qui recouvre l'avant du télescope et
regardez dans le tube optique. En bas, vous verrez le miroir primaire
maintenu en place par trois clips espacés de 120°, et en haut, le
petit miroir secondaire ovale, maintenu par un support et incliné à
45° vers le porte-oculaire, à l'extérieur de la paroi du tube. (Fig. B)
L'alignement du miroir secondaire s'effectue en ajustant les trois
petites vis entourant le boulon central. Le miroir primaire s'ajuste à
l'aide des trois vis de réglage situées à l'arrière de votre télescope.
Les trois vis de blocage situées à côté servent à maintenir le miroir
en place après la collimation.
ENTRETIEN ADÉQUAT DE VOTRE TÉLESCOPE
COLLIMATION CORRECTENÉCESSITE UN RÉGLAGE
Aligner le miroir secondaire
Collimation
Fixations de
miroir
Miroir primaire
Fig. A: Le «disque d'Airy» créé par une étoile légèrement fl oue
Miroir secondaire
Pointez le télescope vers un mur éclairé et insérez le capuchon
de collimation dans le porte-oculaire à la place d'un oculaire
classique. Regardez dans le porte-oculaire à travers le capuchon
de collimation. Vous devrez peut-être tourner la molette de mise
au point de quelques tours jusqu'à ce que l'image réfl échie par le
porte-oculaire disparaisse de votre champ de vision.
REMARQUE: Gardez l'œil collé à l'arrière du tube de mise au point
si vous effectuez la mise en collimation sans capuchon de collimation.
Ignorez l'image réfl échie par le capuchon de collimation ou votre œil
pour l'instant. Recherchez plutôt les trois clips qui maintiennent le
miroir primaire en place. Si vous ne les voyez pas, la collimation de
votre télescope est incorrecte. (Fig. C)
Miroir secondaire
boulons de
réglage des clips
du miroir
Pour aligner le miroir secondaire, ajustez les trois boulons situés
sur le dessus du support du miroir secondaire à l'aide d'une clé
Allen ou d'un tournevis cruciforme. Vous devrez alternativement
desserrer l'un des boulons, puis compenser le jeu en resserrant les
deux autres. (Fig. D)
Fig. C:
Vue à travers le porte-oculaire, montrant le refl et du miroir
primaire et des
Fig. D: Emplacement des boulons de réglage du miroir secondaire
Fig. B: Vue latérale de l'intérieur du télescope
LUMINA 130 DOBSONIAN
FRANÇAIS | 9
Refl et du
miroir primaire
Refl et du
miroir secondaire
Vis de blocageVis de verrouillage
de la queue d'aronde
Vis de réglage
Arrêtez lorsque vous voyez les trois clips du miroir. (Fig. E) Assurez-
vous que les trois petites vis d'alignement sont bien serrées pour
fi xer le miroir secondaire en place.
Alignement du miroir primaire
Vous trouverez trois gros boulons et trois petites vis à l'arrière de
votre télescope. Les gros boulons sont les vis de réglage et les
petites vis sont les vis de blocage. (Fig. F)
Desserrez les gros boulons de quelques tours. Passez maintenant
votre main devant votre télescope, en gardant un œil sur le porte-
oculaire. Vous verrez l'image de votre main en refl et. Le principe est
de déterminer dans quel sens le miroir primaire est déformé. Pour ce
faire, arrêtez-vous au point où l'image réfl échie du miroir secondaire
est la plus proche du bord du miroir primaire. (Fig.G)
Une fois arrivé à ce point, arrêtez-vous et gardez votre main à cet
endroit tout en regardant l'arrière de votre télescope. Y a-t-il une
vis de réglage? Si oui, desserrez-la (tournez la vis vers la gauche)
pour éloigner le miroir de ce point. Si non, passez de l'autre côté et
resserrez la vis de réglage de l'autre côté. Cela permettra d'aligner
progressivement le miroir jusqu'à ce qu'il ressemble à la Fig. H. (ce
processus est simplifi é si vous pouvez vous faire aider d'un ami.
Demandez à votre partenaire d'ajuster les vis selon vos instructions
pendant que vous regardez dans le porte-oculaire.)
À la nuit tombée, sortez et pointez votre télescope vers l'étoile
Polaire, l'étoile Polaire. Avec un oculaire dans le porte-oculaire,
défocalisez l'image. Vous verrez la même image, mais elle sera
dorénavant illuminé par la lumière stellaire. Si nécessaire, répétez
le processus de collimation. Cette fois, maintenez l'étoile centrée
pendant le réglage du miroir.
Nettoyage de votre télescope
Remettez le capuchon anti-poussière sur l'extrémité de votre
télescope lorsque vous ne l'utilisez pas. Cela empêche la poussière
de se déposer sur les surfaces du miroir ou de la lentille. Ne nettoyez
pas les composants optiques de votre télescope si vous n'êtes
pas familier avec les surfaces optiques. Nettoyez votre chercheur
et vos oculaires uniquement avec du papier spécial pour lentilles.
Manipulez vos oculaires avec précaution. Ne touchez aucune
surface optique de votre télescope ni de ses accessoires.
Fig. E:
Vue à travers le porte-oculaire (les trois clips du miroir sont
visibles)
Fig. G: Vue à travers l'oculaire montrant le placement de la main
Fig. H: Vue à travers le porte-oculaire, montrant les deux miroirs alignés
avec et sans l'oculaire de collimation
Fig. F: Vue arrière du télescope montrant les boulons de réglage et les vis de
verrouillage
Positionner
la main ici
Utilisation du porte-oculaireUtilisation de l'oculaire de mise
en collimation
LUMINA 130 DOBSONIAN
10 | FRANÇAIS
Fabriqué en Chine | 05-25
LOGICIEL ET APPLICATION
Votre achat comprend un logiciel pour votre ordinateur et une application pour votre smartphone. Vous n'avez pas besoin de télécharger
ces outils pour utiliser votre télescope; Ils permettent simplement d'améliorer votre expérience.
CONFIGURATION MINIMALE REQUISE
Windows:
• Windows 7 ou version ultérieure
• Processeur de 500 MHz ou plus
• 128 Mo RAM
• 850 Mo d’espace sur le disque dur
• Carte graphique compatible OpenGL de 32 Mo
• Moniteur d’une résolution de 1024x768 pixels
(recommandé)
CONFIGURATION MINIMALE REQUISE
Appareils Android: Version 4.0 et plus récent
Appareils iOS Apple: iOS 4.3 et plus récent
Mac:
• Binaire universel (compatible PC/Intel)
• OS X 10,4 ou version ultérieure
(10,5 ou version ultérieure pour la version
Elementary)
• Processeur G3 450 MHz ou plus
• 128 Mo RAM
• 850 Mo d’espace sur le disque dur
• Carte graphique compatible OpenGL de 32 Mo
• Moniteur d’une résolution de 1024x768 pixels
(recommandé)
celestron.com/pages/warranty
Celestron SkyPortal, rendu possible par
l'application d'astronomie SkySafari™
Les experts en télescopes de Celestron se sont associés
à SkySafari pour redéfi nir votre expérience du ciel
nocturne. Explorez une base de données de plus de 120
000 objets célestes, y compris des étoiles, des planètes,
des amas d'étoiles, des nébuleuses, des galaxies, des
astéroïdes, des comètes, des satellites, et même la Station
spatiale internationale! Vous pouvez même écouter des
descriptions audio des objets les plus populaires pendant
que vous observez. SkyPortal comporte tout ce dont
vous avez besoin pour observer d’une manière nouvelle
et excitante.
INSTRUCTIONS DE SÉCURITÉ
• Risque d’explosion si la pile est remplacée par un type
incorrect.
• La pile incluse n’est pas rechargeable.
• N’utilisez la pile que de la manière prévue pour éviter
les court-circuits. Si un matériau conducteur met
directement en contact les pôles positifs et négatifs
d’une pile, cela crée un court-circuit.
• N’utilisez pas une pile endommagée.
• Ne stockez pas la pile dans un lieu extrêmement froid
ou chaud. Ceci pourrait réduire sa durée de vie.
• Avant de remplacer la pile, consultez le mode d'emploi
et faites attention au sens positif et négatif de la pile.
• Ne jetez pas la pile au feu.
• Jetez la pile dans le respect de la réglementation
Déclaration de la FCC Cet appareil respecte la section 15 des règles de la FCC. Son
utilisation est sujette aux deux conditions suivantes: (1) Cet appareil ne doit pas causer
d'interférences nuisibles et (2) cet appareil doit accepter toutes les interférences reçues, y
compris celles pouvant entraîner un fonctionnement indésirable.
Logiciel d'astronomie Celestron Starry Night
Celestron Starry Night, le logiciel d'astronomie leader sur le marché, vous emmène dans
une visite guidée du passé, du présent et du futur de notre système solaire. Cela peut vous
aider à en savoir plus sur le ciel nocturne et à planifi er votre prochaine session d'observation.
Utilisez Starry Night pour modéliser exactement comment le ciel nocturne apparaîtra depuis
votre jardin, une ville voisine ou n'importe où sur Terre.
BESOIN D'ASSISTANCE? Contactez le support technique de Celestron
celestron.com/pages/technical-support
©2025 Celestron. Celestron et le Symbol sont des marques déposées de Celestron, LLC. Tous
droits réservés. Celestron.com
US: 2835 Columbia Street • Torrance, CA 90503 USA
UK: Unit 2 Transigo, Gables Way, Thatcham RG19 4JZ, Royaume Uni
Ce produit est conçu et prévu pour être utilisé par des personnes âgées de 14 ans et plus.
BEDIENUNGSANLEITUNG
Modell# 31200 DEUTSCH

INHALTSVERZEICHNIS
Lieferumfang . . . . . . . . . . . . . . . . . . . . . . . . . . . . . . . . . . . . . . . . . . . . . . . . . . . . 1
Teileliste . . . . . . . . . . . . . . . . . . . . . . . . . . . . . . . . . . . . . . . . . . . . . . . . . . . . . . . . . . 1
Zusammenbau des Teleskops . . . . . . . . . . . . . . . . . . . . . . . . . . . . . . . . . . . . . . . 2
Bedienung des Teleskops . . . . . . . . . . . . . . . . . . . . . . . . . . . . . . . . . . . . . . . . . . 3
Ausbalancieren Ihres Teleskops . . . . . . . . . . . . . . . . . . . . . . . . . . . . . . . . . . . . . . . . . . . . 3
Aufstellen Ihres Teleskops . . . . . . . . . . . . . . . . . . . . . . . . . . . . . . . . . . . . . . . . . . . . . . . 3
Verwendung des Spannungsreglers . . . . . . . . . . . . . . . . . . . . . . . . . . . . . . . . . . . . . . . . . 3
Fokussieren Ihres Teleskops . . . . . . . . . . . . . . . . . . . . . . . . . . . . . . . . . . . . . . . . . . . . . . 3
Ausrichten Ihres Sucherfernrohrs . . . . . . . . . . . . . . . . . . . . . . . . . . . . . . . . . . . . . . . . . . . 4
Zugriff auf die Batterie des Sucherfernrohrs . . . . . . . . . . . . . . . . . . . . . . . . . . . . . . . . . . . . . 4
Ihr erster Beobachtungsnacht: Der Mond . . . . . . . . . . . . . . . . . . . . . . . . . . . . . . . . . . . . . 5
Tipps zur Himmelsbeobachtung . . . . . . . . . . . . . . . . . . . . . . . . . . . . . . . . . . . . . 6
Vergrößerung . . . . . . . . . . . . . . . . . . . . . . . . . . . . . . . . . . . . . . . . . . . . . . . . . . . . . . . 6
Sichtfeld . . . . . . . . . . . . . . . . . . . . . . . . . . . . . . . . . . . . . . . . . . . . . . . . . . . . . . . . . . 6
Die Planeten . . . . . . . . . . . . . . . . . . . . . . . . . . . . . . . . . . . . . . . . . . . . . . . . . . . . . . . 6
Deep-Sky-Objekte . . . . . . . . . . . . . . . . . . . . . . . . . . . . . . . . . . . . . . . . . . . . . . . . . . . . 6
Bedingungen am Himmel . . . . . . . . . . . . . . . . . . . . . . . . . . . . . . . . . . . . . . . . . . . . . . . . 6
Auswahl eines Beobachtungsorts . . . . . . . . . . . . . . . . . . . . . . . . . . . . . . . . . . . . . . . . . . 7
Beste Zeit für Beobachtungen wählen . . . . . . . . . . . . . . . . . . . . . . . . . . . . . . . . . . . . . . . . 7
Abkühlen des Teleskops . . . . . . . . . . . . . . . . . . . . . . . . . . . . . . . . . . . . . . . . . . . . . . . . . 7
Ihre Augen anpassen . . . . . . . . . . . . . . . . . . . . . . . . . . . . . . . . . . . . . . . . . . . . . . . . . . 7
Starhopping . . . . . . . . . . . . . . . . . . . . . . . . . . . . . . . . . . . . . . . . . . . . . . . . . . . . . . . 7
Die richtige Pflege Ihres Teleskops . . . . . . . . . . . . . . . . . . . . . . . . . . . . . . . . . . 8
Kollimation . . . . . . . . . . . . . . . . . . . . . . . . . . . . . . . . . . . . . . . . . . . . . . . . . . . . . . . . . 8
Ausrichten des Sekundärspiegels . . . . . . . . . . . . . . . . . . . . . . . . . . . . . . . . . . . . . . . . . . . 8
Ausrichten des Hauptspiegels . . . . . . . . . . . . . . . . . . . . . . . . . . . . . . . . . . . . . . . . . . . . . 9
Reinigen Ihres Teleskops . . . . . . . . . . . . . . . . . . . . . . . . . . . . . . . . . . . . . . . . . . . . . . . . 9
Software und App . . . . . . . . . . . . . . . . . . . . . . . . . . . . . . . . . . . . . . . . . . . . . . . . 10
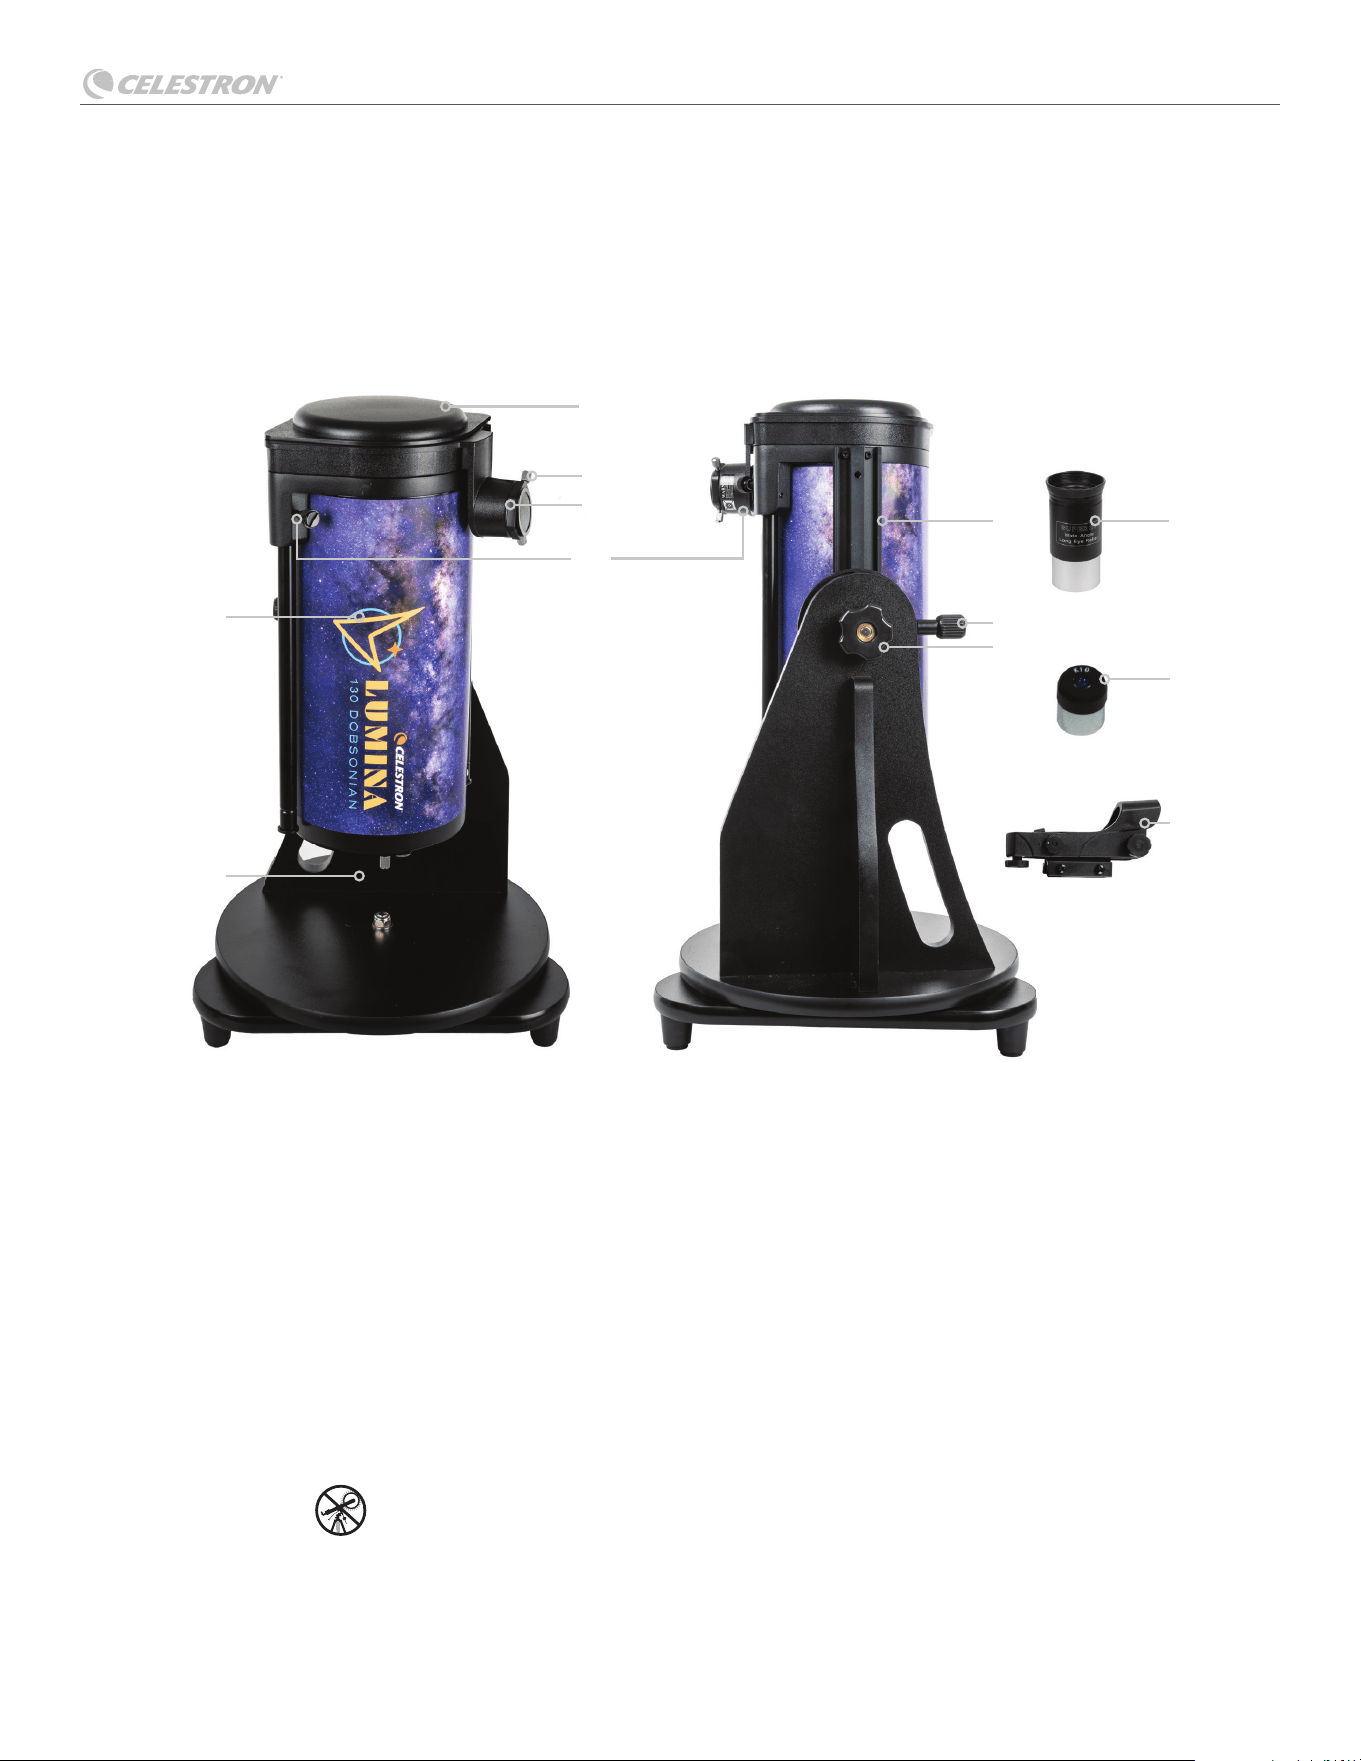
LUMINA 130 DOBSONIAN
DEUTSCH | 1
Wir empfehlen, die Verpackung Ihres Teleskops aufzubewahren, damit Sie es darin lagern können, wenn es nicht in Gebrauch ist.
Entpacken Sie den Karton vorsichtig, da einige Teile klein sind. Überprüfen Sie anhand der untenstehenden Teileliste die Vollständigkeit
aller Teile und Zubehörteile.
LIEFERUMFANG
Teileübersicht
1. Optischer Tubus
2. Sockel
3. Staubschutzkappe
4. Okular-Feststellschraube
5. Fokussierring
6. Schienen-Feststellschrauben
7. Schwalbenschwanzschiene
8. Schwalbenschwanz-Feststellschraube
9. Spannungsregler
10. 25-mm-Okular
11. 10-mm-Okular
12. StarPointer
TM
Leuchtpunkt-Sucherfernrohr
SIE BENÖTIGEN: (1) Zum Ersetzen der Batterie des StarPointer-Sucherfernrohrs benötigen Sie einen kleinen Kreuzschlitzschraubendreher
* WARNUNG BEI SONNENBEOBACHTUNG! Versuchen Sie niemals die
Sonne ohne einen Sonnenfi lter durch ein Teleskop zu beobachten!
1
2
6
4
5
7 10
11
12
9
8
3
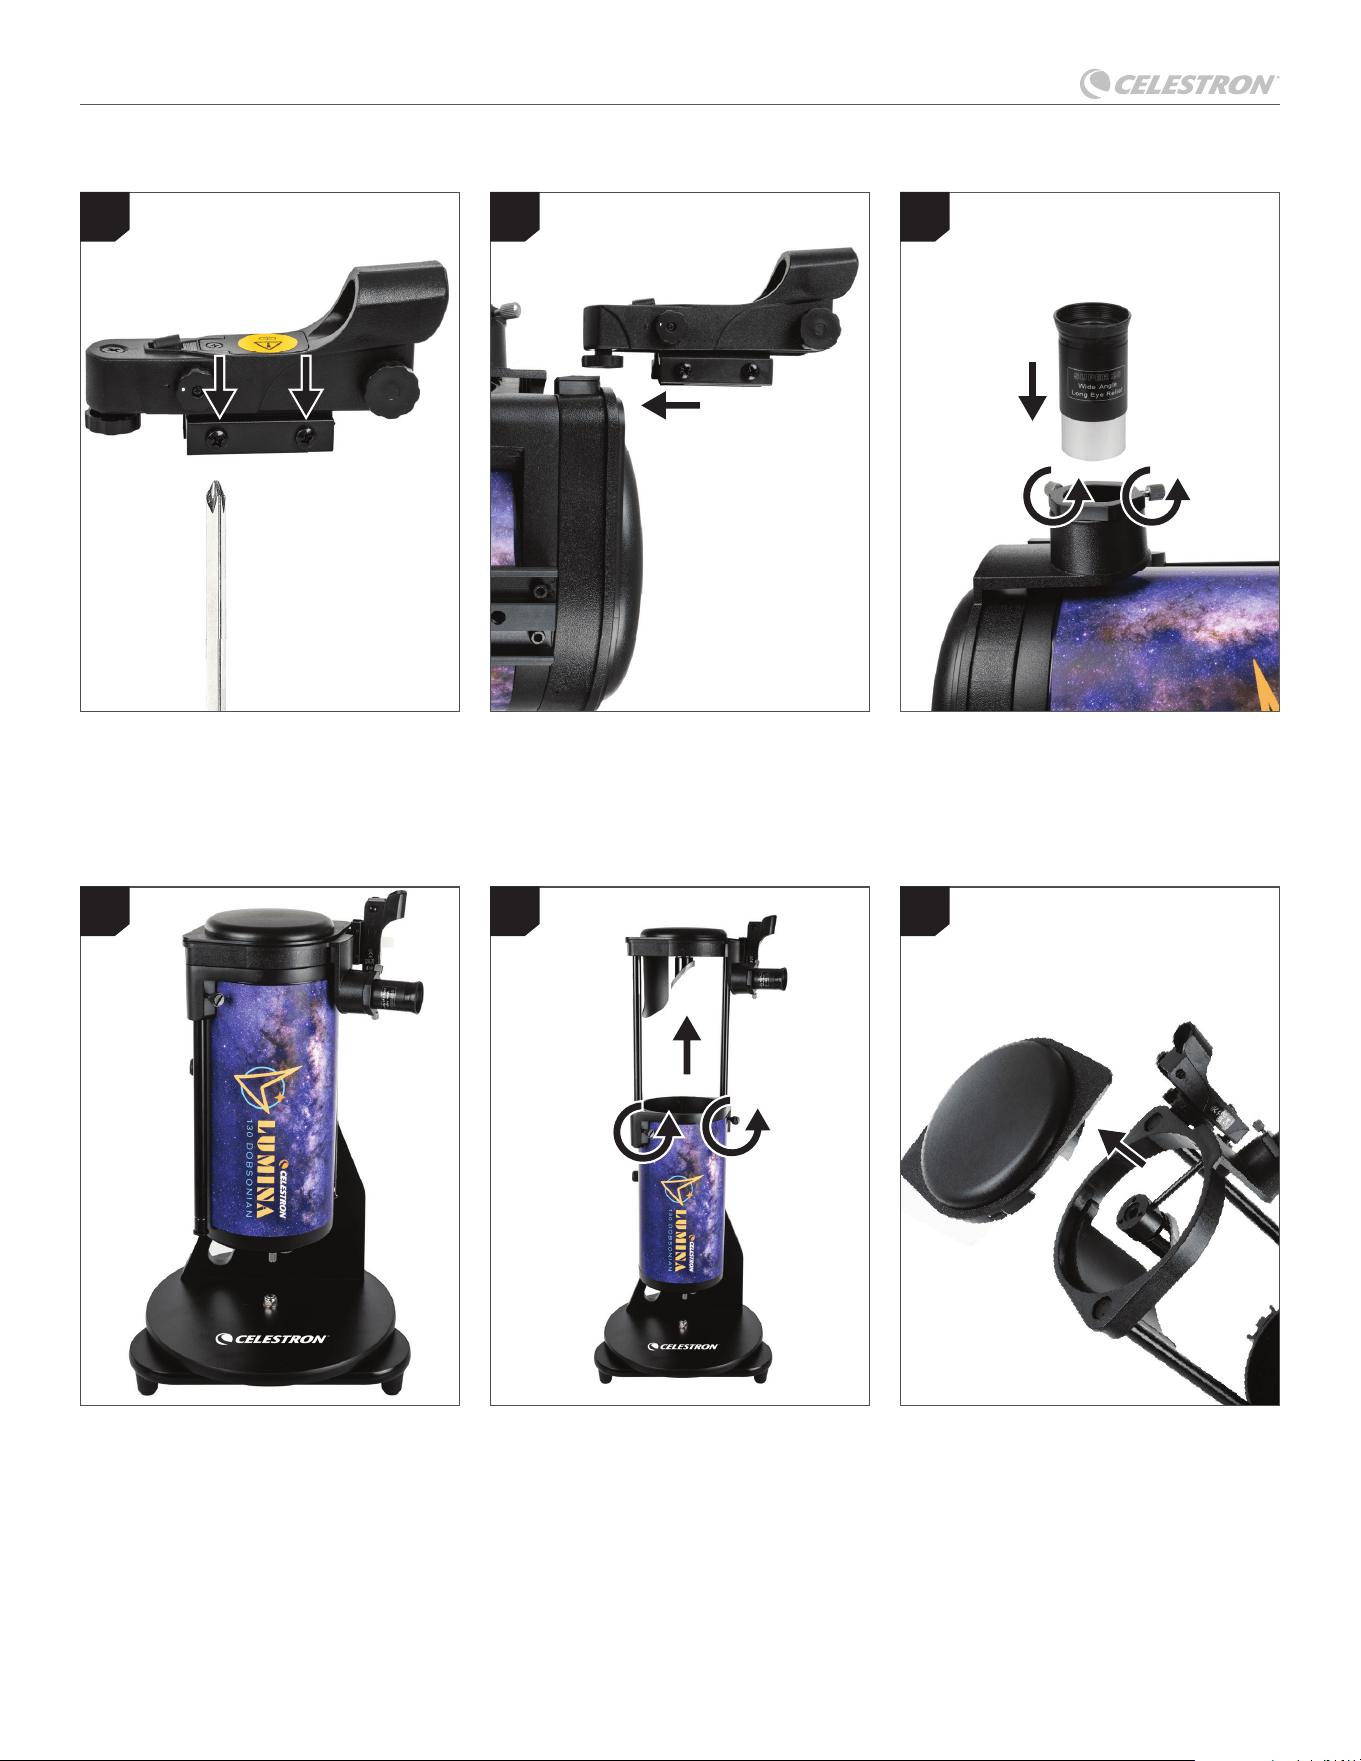
LUMINA 130 DOBSONIAN
2 | DEUTSCH
ZUSAMMENBAU IHRES TELESKOPS
Leuchtpunkt-Sucherfernrohr suchen Lösen
Sie die Schrauben an der Seite des Suchers
leicht.
Suchen Sie die kleine Sucherfernrohrbasis
nahe der vorderen Öffnung des Tubus.
Schieben Sie den Sucher auf die Basis und
ziehen Sie die Schrauben fest, um ihn zu
sichern. Ziehen Sie die Schrauben nicht zu
fest an.
Suchen Sie das Okular. Lösen Sie die
Okular-Feststellschrauben und schieben
Sie das Okular in die Halterung. Ziehen Sie
die Schrauben leicht fest, um das Okular zu
befestigen. Ziehen Sie die Schrauben nicht
zu fest an.
Wenn das Teleskop nicht in Gebrauch ist,
lagern Sie es in der gezeigten Konfi guration.
Nehmen Sie vor der Beobachtung die
Staubschutzkappe ab
.
Um den Teleskoptubus auszufahren, lösen
Sie die beiden Schienen-Feststellschrauben
und ziehen den oberen Teil des Teleskops
nach oben, bis er einrastet. Ziehen Sie die
Schienen-Feststellschrauben fest. Nicht
überdrehen.
1
4
2
5 6
3
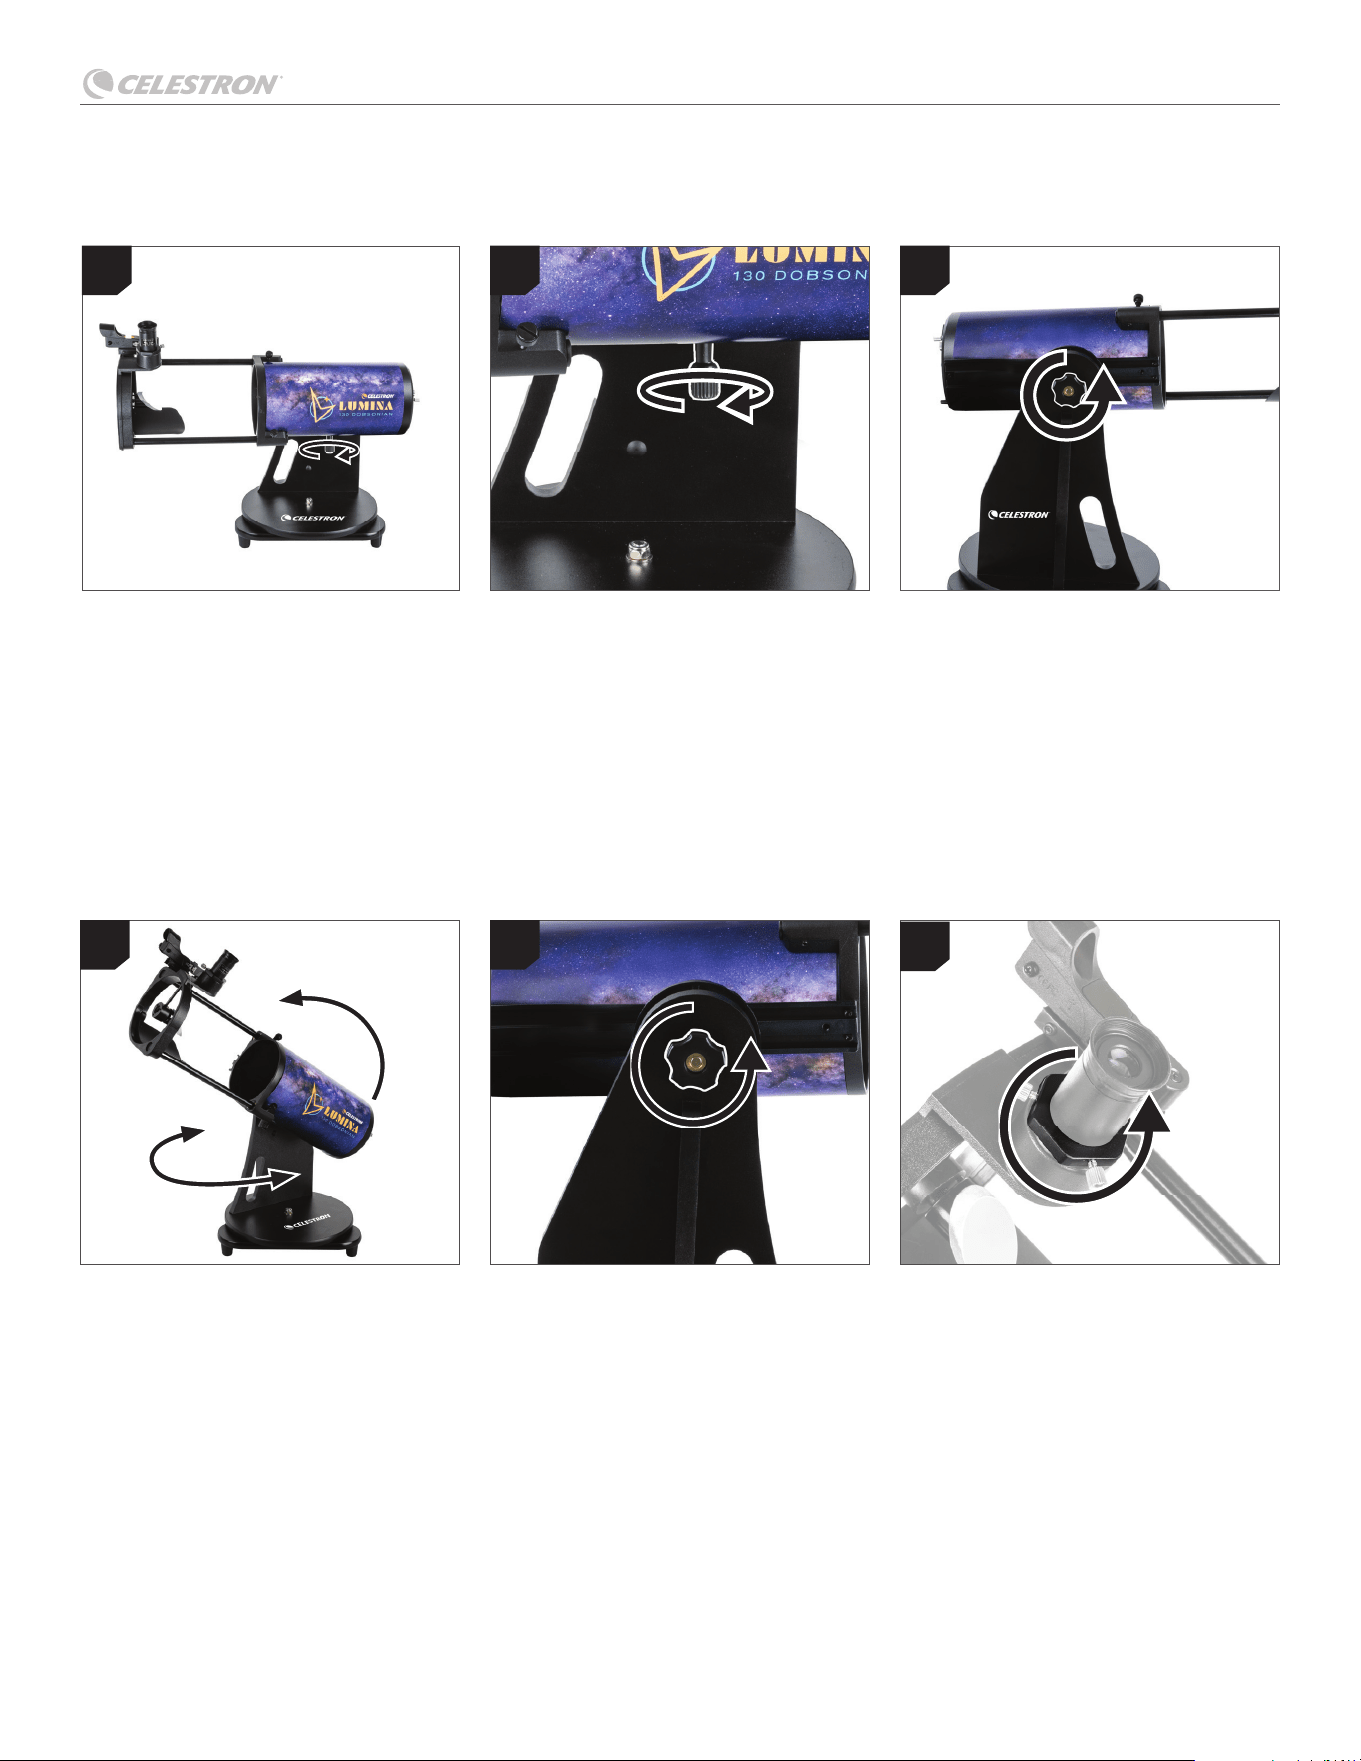
LUMINA 130 DOBSONIAN
DEUTSCH | 3
Ausbalancieren Ihres Teleskops
Aufstellen Ihres
Teleskops
Um das Teleskop auszubalancieren,
lösen Sie die Schwalbenschwanz-
Feststellschraube und schieben den Tubus
an einen Punkt, an dem er sich nicht mehr
von selbst bewegt.
Um das Teleskop auszurichten, bewegen Sie
den Teleskoptubus einfach nach oben und
unten in der Höhe (Auf- und Ab-Position)
oder schwenken das Teleskop um die Basis
in Azimutrichtung (Links-Rechts-Position).
Lösen oder ziehen Sie den Spannungsregler
an, um gerade so viel Reibung zu erzeugen,
dass sich der Tubus bei leichter Berührung
leicht bewegen lässt, aber in Position
bleibt, wenn er nicht bewegt wird. Es kann
notwendig sein, den Spannungsregler neu
einzustellen, wenn Sie Zubehör am Tubus
anbringen oder entfernen.
Wenn Sie schwereres Zubehör verwenden,
müssen Sie das Teleskop möglicherweise
neu ausbalancieren, nachdem Sie es
hinzugefügt oder entfernt haben.
Drehen Sie das Fokussierrad langsam in
die eine oder andere Richtung, bis das
Bild im Okular scharf ist. Möglicherweise
müssen Sie den Fokus im Laufe der Zeit
fein einstellen, da Temperaturänderungen,
Flexion und andere Faktoren zu leichten
Verschiebungen führen können. Schnelle
(kurze Brennweiten) Teleskope sind hierfür
besonders anfällig, insbesondere bevor sie
die Umgebungstemperatur erreicht haben.
Sie sollten auch dann neu fokussieren, wenn
Sie Okulare wechseln oder eine Barlow-
Linse hinzufügen oder entfernen.
Ziehen Sie die Schwalbenschwanz-
Feststellschraube fest, um den Tubus zu
sichern. Nicht überdrehen.
Verwendung des
Spannungsreglers
Ziehen Sie den Spannungsregler an, bis
der Tubus nur einen leichten Kraftaufwand
erfordert, um ihn zu bewegen. Sie möchten
eine geringe Reibung, um das Teleskop in
Position zu halten. Ziehen Sie den Knopf
nicht zu fest an. Der Tubus sollte sich
weiterhin reibungslos und mit sehr geringem
Kraftaufwand bewegen lassen.
Fokussieren Ihres
Teleskops
1
1 1
1
2 3
BEDIENUNG DES TELESKOPS
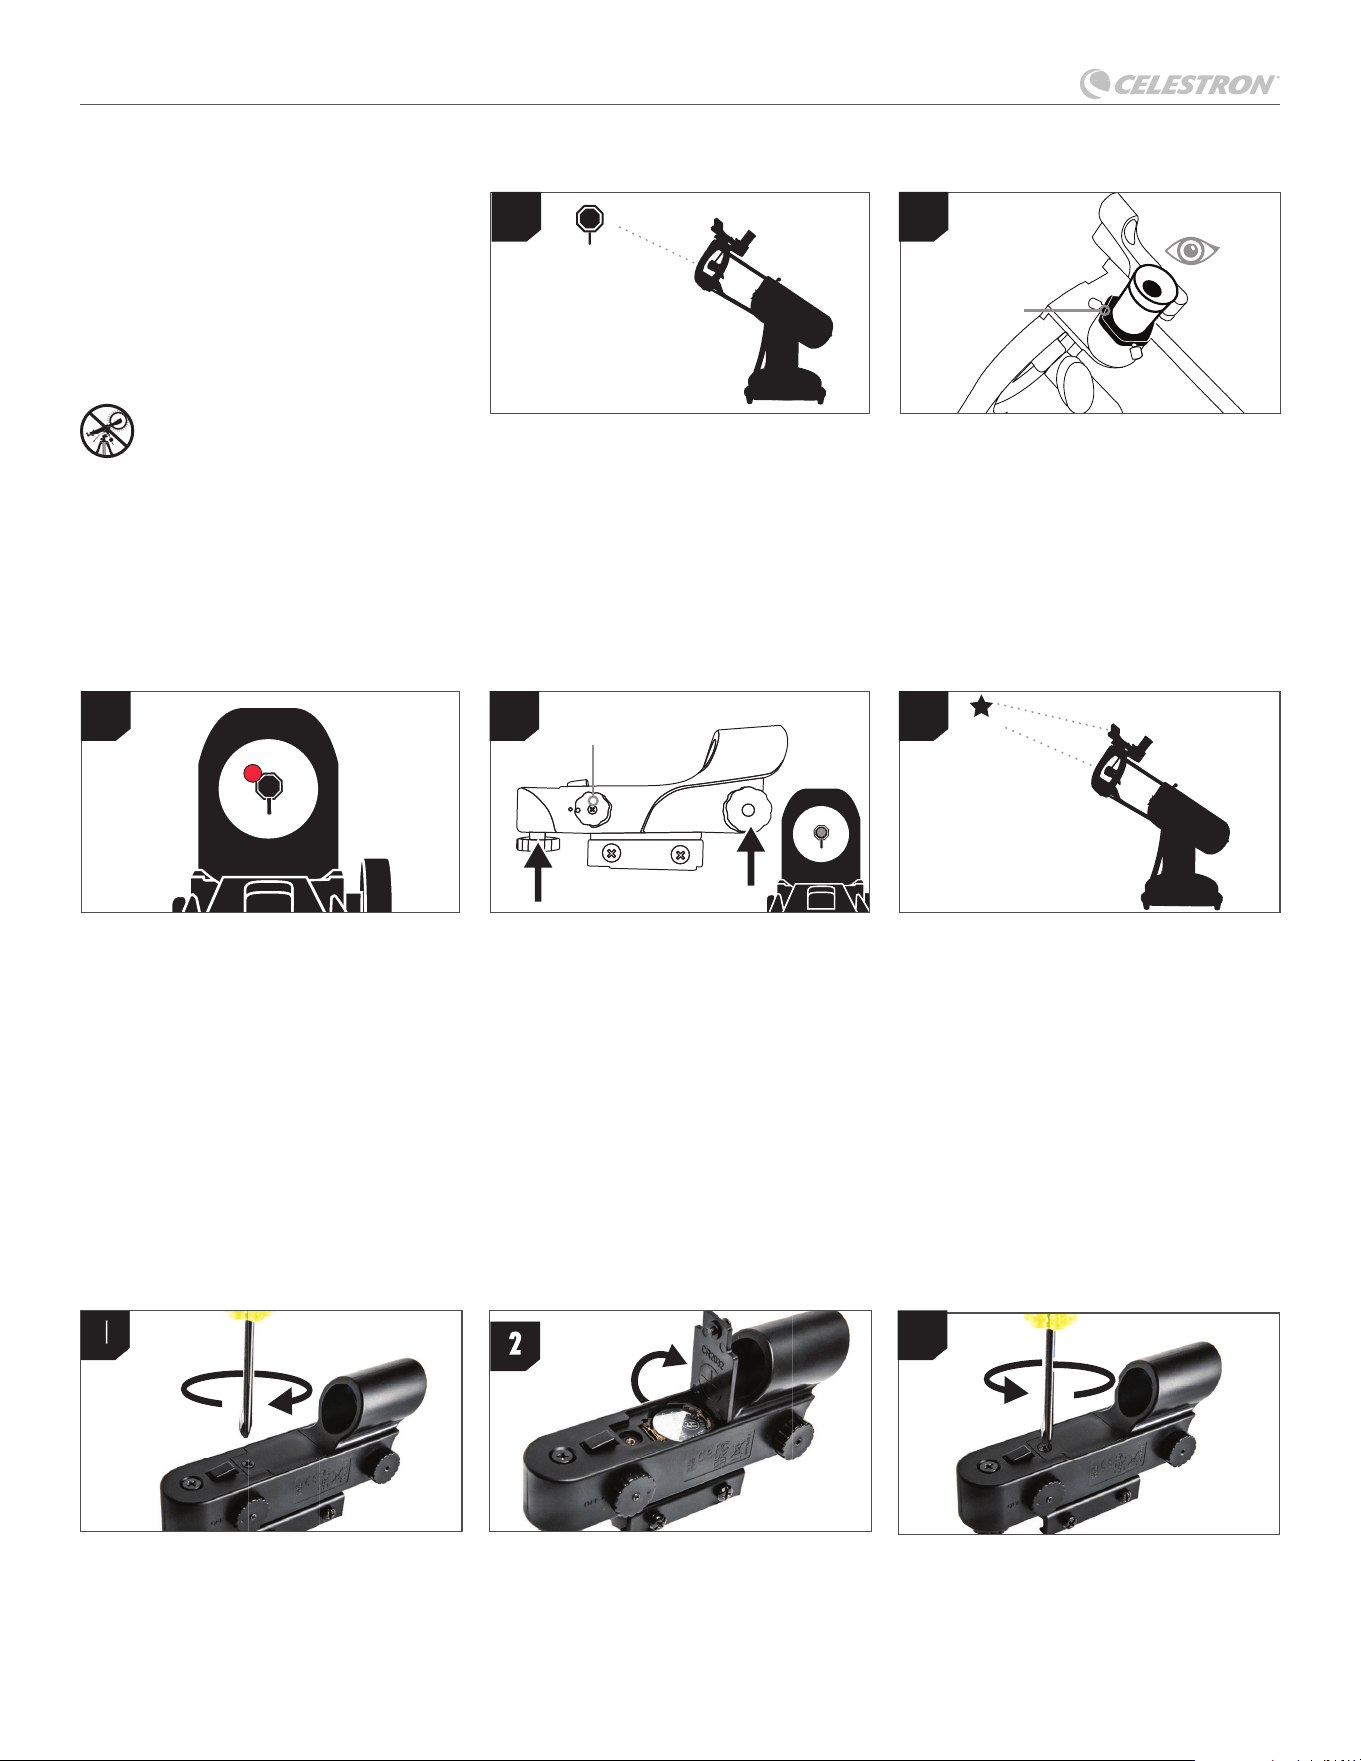
LUMINA 130 DOBSONIAN
4 | DEUTSCH
Sucherfernrohr ausrichten
Ohne das Teleskop zu bewegen, verwenden
Sie die beiden Einstellschrauben, um den
roten Punkt so zu verschieben, dass er
über demselben Objekt erscheint, das Sie
im Teleskop mit dem Okular mit geringer
Vergrößerung beobachten.
Ihr sucherfernrohr ist jetzt
ausgerichtet!
Es ist keine Neuausrichtung erforderlich, es
sei denn, es wurde einem Stoß ausgesetzt
oder fi el um. Wenn Sie jetzt durch den
StarPointer blicken, zeigt der rote Punkt an,
wohin das Teleskop zeigt. Vergessen Sie
nicht, den roten Punkt auszuschalten, wenn
Sie fertig sind, um den Akku zu schonen.
Durch das sucherfernrohr schauen
Ziehen Sie die Batterieschutzlasche aus
dem StarPointer und schalten ihn mit dem
Ein-/Ausschalter auf maximale Helligkeit.
Schauen Sie durch den StarPointer und
suchen den roten Punkt.
Zentrieren sie den zielpunkt im okular
Schauen Sie jetzt durch das 25-mm-Okular
des Teleskops. Schwenken Sie das Teleskop,
bis das ausgewählte Objekt im Zentrum des
Sichtfelds liegt. Ist das Bild unscharf, drehen
Sie langsam am Fokussierknopf, bis das Bild
scharf gestellt ist.
HINWEIS: Das Bild in Ihrem Teleskop
erscheint möglicherweise invertiert. Dies ist
bei einem astronomischen Teleskop völlig
normal.
Der StarPointer Sucher mit rotem Punkt
ist einer der wichtigsten Teile Ihres
Teleskops. Wenn Sie Ihr Teleskop zum
ersten Mal zusammenbauen, müssen Sie
das Sucherfernrohr auf die Hauptoptik des
Teleskops ausrichten. Am besten tun Sie
dies tagsüber.*
*SONNENWARNUNG ! Versuchen
Sie niemals die Sonne ohne einen
geeigneten Sonnenfi lter durch ein
Teleskop zu beobachten.
Wählen sie ein zielpunkt aus
Nehmen Sie das Teleskop tagsüber mit nach
draußen und suchen ein leicht erkennbares
Objekt wie eine Straßenlaterne, ein
Nummernschild oder ein Schild. Das Objekt
sollte 400 Meter oder weiter entfernt sein.
FOKUSSIERER
EIN-/AUS-KNOPF
1
1
4 5
2
2
Ausrichten des Sucherfernrohrs
Zugriff auf die Batterie des Sucherfernrohrs
Das StarPointer-Sucherfernrohr verwendet eine langlebige 3-V-Lithiumbatterie (#CR2032), die sich auf der Oberseite des StarPointer
befi ndet. Wenn Sie Ihr Teleskop über einen längeren Zeitraum nicht verwenden möchten, empfehlen wir Ihnen, die Batterie zur Lagerung
herauszunehmen. Um die Batterie zu entfernen oder auszutauschen, befolgen Sie diese Anweisungen:
Hinweis: Zum Ersetzen der Batterie des StarPointer-Sucherfernrohrs benötigen Sie einen kleinen Kreuzschlitzschraubendreher.
Lösen Sie mit einem
Kreuzschlitzschraubendreher die Schraube
der Batterieabdeckung und klappen die
Abdeckung auf.
Wenn Sie die Batterie austauschen, legen
Sie die neue Batterie so ein, dass der
(+)-Anschluss nach außen zeigt.
Setzen Sie die Abdeckung wieder auf das
Sucherfernrohr und ziehen die Schraube
mit dem Kreuzschlitzschraubendreher
wieder fest.
1
2
3
3
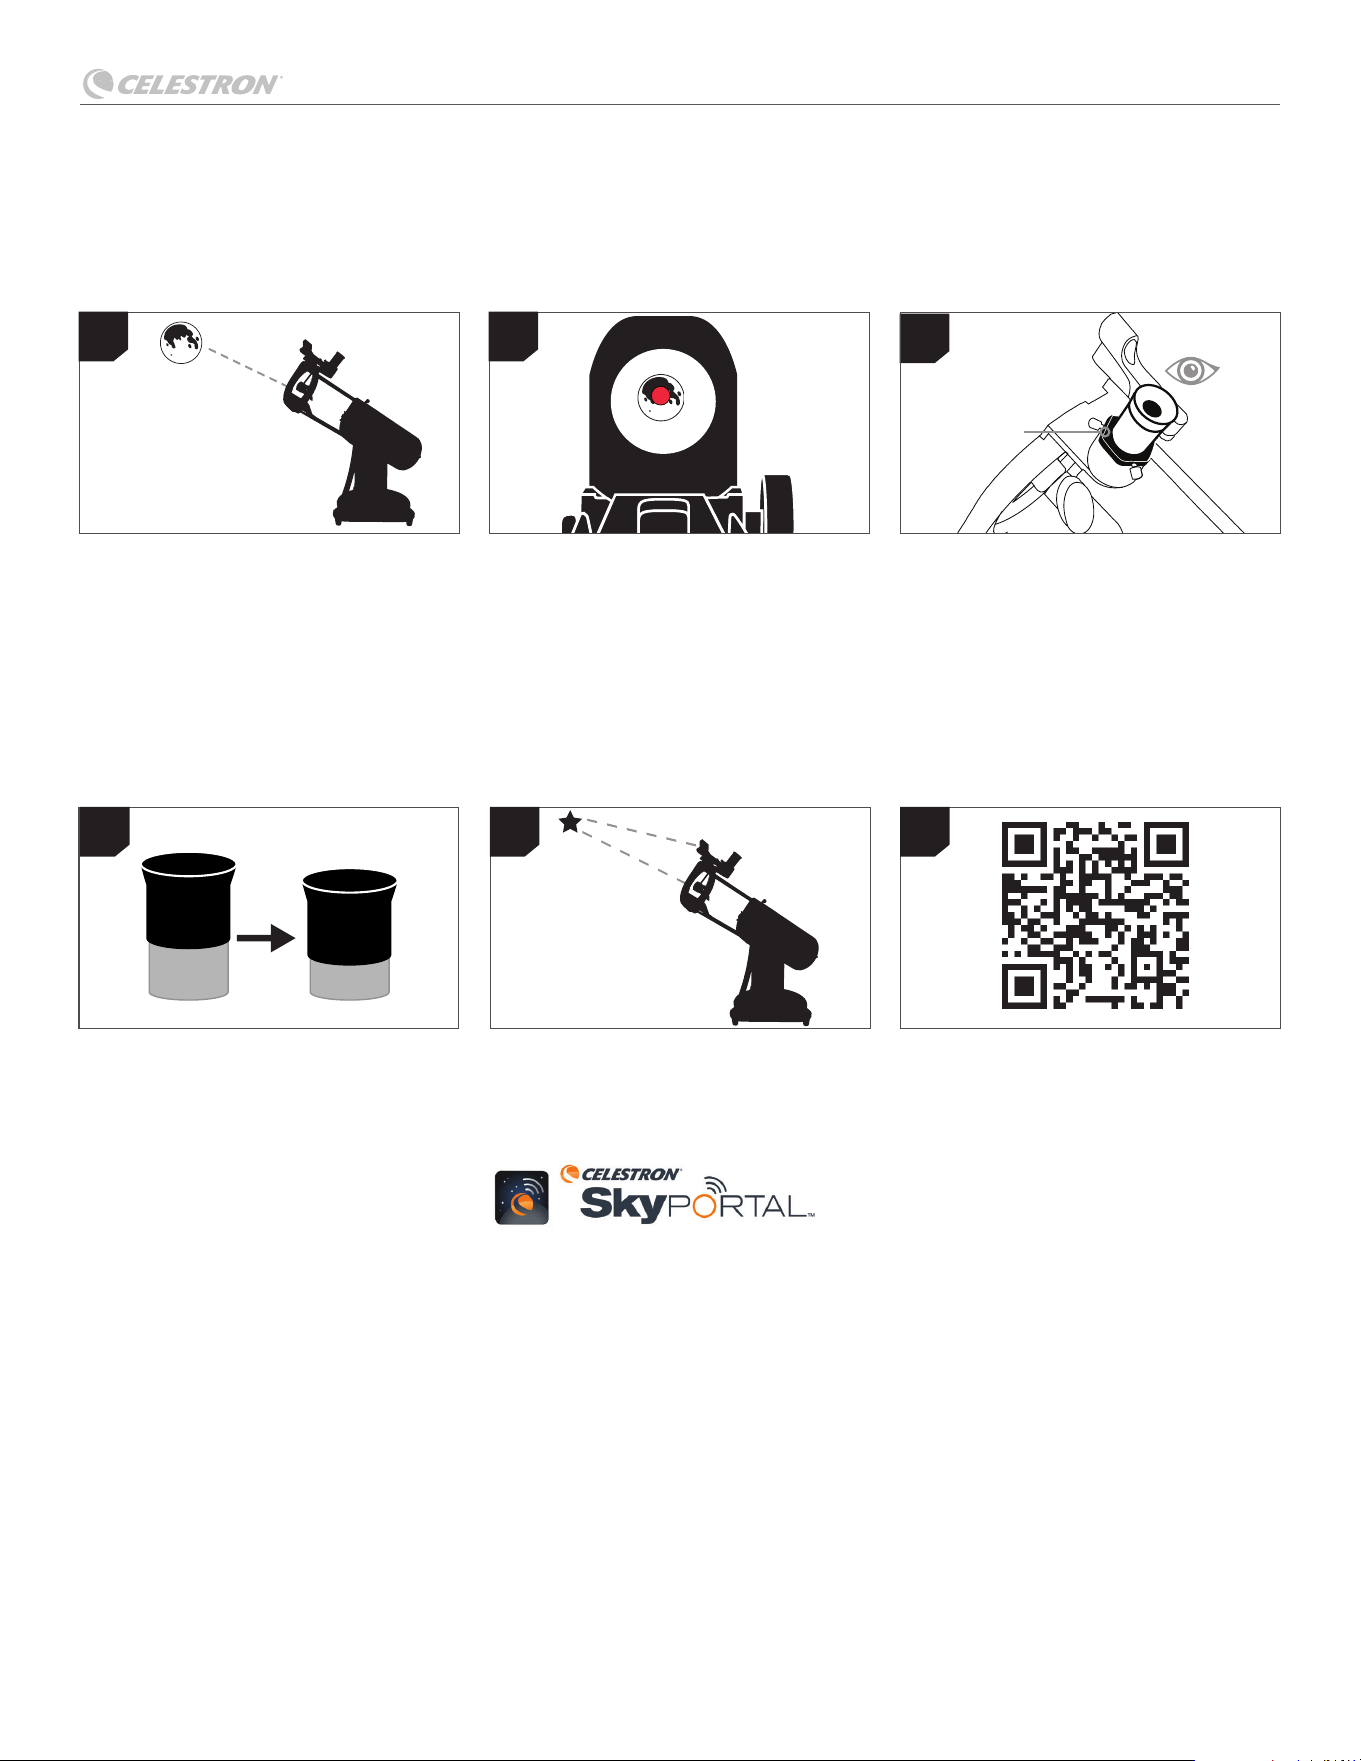
LUMINA 130 DOBSONIAN
DEUTSCH | 5
FOKUSSIERER
Um den Mond genauer zu betrachten, lösen
Sie die Stellschraube am Zenitspiegel und
nehmen das 25-mm-Okular heraus. Ersetzen
Sie es durch das 10-mm-Okular und ziehen
die Stellschraube fest, um das neue Okular
zu fi xieren. Das 10-mm-Okular erhöht die
Vergrößerung deutlich und lässt den Mond
deutlich größer erscheinen. Möglicherweise
müssen Sie beim Okularwechsel den Fokus
anpassen, um ein möglichst scharfes Bild zu
gewährleisten.
Mit derselben Technik können Sie viele
andere Himmelsobjekte wie Planeten,
Sternhaufen und Nebel beobachten.
Im Lieferumfang Ihres Teleskops ist ein
kostenloser Download von Celestron
SkyPortal Powered by SkySafariTM
enthalten. Diese Planetariums-App ist
für iOS und Android verfügbar und hilft
Ihnen, Himmelsobjekte zu fi nden und zu
identifi zieren, die aktuell von Ihrem genauen
Standort aus sichtbar sind. Probieren Sie es
aus!
Schauen Sie jetzt durch das 25-mm-Okular
des Teleskops. Drehen Sie vorsichtig die
Fokusknöpfe, bis das Bild scharf ist.
Herzlichen Glückwunsch! SIE HABEN
JETZT IHR ERSTES HIMMELSOBJEKT
BEOBACHTET!
Schauen Sie durch das Sucherfernrohr und
suchen Sie den roten Punkt. Bewegen Sie
das Teleskop weiter, bis der Punkt über dem
Mond zentriert ist.
Das beste und am einfachsten zu betrachtende Himmelsziel ist für Sie zunächst der Mond. Versuchen Sie, den Mond an verschiedenen
Punkten in seinem Phasenzyklus zu beobachten. Die beste Zeit zum Betrachten des Mondes ist zwei Tage nach dem Neumond bis einige
Tage vor dem Vollmond. Während dieser Zeit können Sie die meisten Details der Krater und Mondgebirge sehen.
Wenn der Mond am Himmel sichtbar ist,
richten Sie Ihr Teleskop mit dem installierten
25-mm-Okular und dem ausgerichteten
Sucherfernrohr aus. Schwenken Sie das
Teleskop so, dass es ungefähr auf den Mond
zeigt. Schalten Sie das Sucherfernrohr ein.
1
4 5 6
2
3
Ihre erste Nacht draußen - Der Mond
Scannen Sie den QR-Code, um das
Celestron-Ressourcenzentrum „Tools für
Astronomen“ zu besuchen. Dort fi nden Sie
Beobachtungsleitfäden, Tipps und Tricks
sowie kostenlose Downloads, die Sie auf
Ihrer Reise in die Astronomie begleiten.
25mm
10mm

LUMINA 130 DOBSONIAN
6 | DEUTSCH
Dieser Abschnitt enthält Tipps zur Beobachtung des Sonnensys-
tems und von Deep-Sky-Objekten sowie eine Erklärung, wie sich
die Beobachtungsbedingungen auf Ihre Beobachtung auswirken
können.
Vergrößerung
Sie können die Vergrößerung Ihres Teleskops durch einfachen
Okularwechsel ändern. Sowohl Teleskope als auch Okulare
haben Brennweiten, die in Millimetern gemessen werden. Um die
Vergrößerung einer bestimmten Teleskop-Okular-Kombination zu
berechnen, dividieren Sie die Brennweite des Teleskops durch die
Brennweite des Okulars. Das Ergebnis ist der Vergrößerungsfaktor.
Beispiel: Das Lumina 130-mm-Dobson-Teleskop hat eine
Brennweite von 650 mm. Mit dem 10-mm-Okular:
Gesichtsfeld
Die Bestimmung des Gesichtsfelds ist wichtig, wenn Sie sich eine
Vorstellung von der Winkelgröße des beobachteten Objekts machen
wollen. Um das tatsächliche Gesichtsfeld zu berechnen, teilen Sie
das scheinbare Gesichtsfeld des Okulars (vom Okularhersteller
angegeben) durch die Vergrößerung, die es in dem verwendeten
Teleskop bietet.
Unter Verwendung des Beispiels aus dem vorherigen Abschnitt
können wir das Gesichtsfeld mit demselben Teleskop und dem
10-mm-Okular bestimmen. Das 10-mm-Okular hat ein scheinbares
Gesichtsfeld von 40°.
Das 10-mm-Okular hat ein scheinbares Gesichtsfeld von 40°.
Teilen Sie die 40° durch die Vergrößerung, die bei 65-fach liegt.
Dies ergibt ein tatsächliches Gesichtsfeld von 0,6 Grad.
Die Planeten
Neben dem Mond können Sie mit Ihrem Teleskop die fünf hellsten
Planeten beobachten. Da sich die Positionen der Planeten
im Vergleich zu den Hintergrundsternen ändern, müssen Sie
Onlinequellen konsultieren oder eine Planetariums-App auf einem
Smart-Gerät verwenden, um sie zu fi nden. Hier sind die Planeten,
die Sie fi nden können:
• Merkur und Venus - Wie der Mond durchlaufen diese beiden
inneren Planeten Phasen, die von dünnen Sicheln bis hin zu fast
vollen Phasen reichen.
• Mars - Wenn er sich in der Nähe der Opposition befi ndet (der
Punkt seiner Umlaufbahn, an dem er der Erde am nächsten
ist), sollten Sie den Polarkappen und möglicherweise einige
größere Oberfl ächenmerkmale erkennen können, die als dunkle
Markierungen auf der Oberfl äche erscheinen.
• Jupiter - Achten Sie auf die dunkleren Methanwolkenbänder,
die den Planeten knapp oberhalb und unterhalb des Äquators
umkreisen. Wenn der Große Rote Fleck der Erde zugewandt ist,
könnten Sie einen Blick darauf erhaschen. Sie werden auch die
vier hellsten Monde des Jupiters sehen – Io, Europa, Ganymed
Vergrößerung 65x= = =
Brennweite des Teleskops
Brennweite des Okulars
650mm
10mm
Tatsächliches
Sichtfeld
0,6
Bogengrad
= = =
Scheinbares Gesichtsfeld
des Okulars
Vergrößerung
40º
65x
und Kallisto. Diese Monde machen Spaß sie zu beobachten,
da sie sich innerhalb weniger Stunden deutlich bewegen.
Gelegentlich wandern sie hinter Jupiter oder in dessen Schatten
und verschwinden für eine gewisse Zeit. Sie können auch über
die Vorderseite des Jupiters ziehen, und Sie könnten sogar
den Schatten eines Mondes dabei sehen. Planetarium-Apps
für Smartphones können Ihnen helfen, vorherzusagen, wann
der Große Rote Fleck sichtbar sein wird, und warnen Sie vor
interessanten Ereignissen, die Jupiters Monde betreffen.
• Saturn - Die Ringe! Saturn ist zweifellos eines der schönsten
Objekte, die man durch ein Teleskop betrachten kann. Wenn die
Beobachtungsbedingungen stabil genug sind, können Sie sogar
den Schatten der Ringe auf dem Planeten und den Schatten des
Planeten auf den Ringen erkennen. Sie sollten Titan, den hellsten
Mond des Saturn, sehen können.
Deep-Sky-Objekte
Deep-Sky-Objekte sind Himmelsobjekte außerhalb unseres
Sonnensystems. Dazu gehören Sternhaufen, planetarische Nebel,
diffuse Nebel, Doppelsterne und andere Galaxien außerhalb unserer
eigenen Milchstraße. Objekte wie Nebel und Galaxien können
ziemlich groß sein, aber sie sind auch sehr lichtschwach. Um die
bestmögliche Sicht zu erhalten, sollten Sie sicherstellen, dass Sie
sich unter möglichst dunklen Himmelsbedingungen befi nden. Je
weiter Sie von städtischen Lichtquellen entfernt sind, desto besser
werden Sie diese Objekte im Okular sehen. Auf Fotos von Nebeln
und Galaxien sehen Sie lebendige Rottöne und Blautöne. Diese
Farben sind nicht sichtbar, wenn Sie durch das Okular schauen. Die
farbenfrohen Bilder wurden mit Langzeitbelichtungen aufgenommen
– typischerweise 15 bis 60 Minuten oder länger –, während Ihr Auge
nur Moment für Moment Licht sammelt. Digitale Sensoren sind viel
empfi ndlicher gegenüber Rot- und Blautönen als das menschliche
Auge, das am empfi ndlichsten im grünen Teil des Spektrums ist.
Dennoch werden Sie das sanfte Leuchten der Andromeda-Galaxie
und die Ausdehnung des Orionnebels erkennen können.
Bedingungen am Himmel
Himmelsbedingungen können die Leistung Ihres Teleskops auf drei
Arten erheblich beeinfl ussen.
• Stabilität der Luft - An windigen Tagen erscheinen die Bilder
des Mondes und der Planeten im Okular wellenförmig oder
springen herum, als würden Sie sie durch bewegtes Wasser
betrachten. Nächte mit ruhigen Windverhältnissen bieten die
besten hochaufl ösenden Ansichten der Planeten und des
Mondes. Der beste Weg, die Stabilität der Atmosphäre zu
beurteilen, ist, helle Sterne mit bloßem Auge zu beobachten.
Wenn sie „funkeln" oder ihre Farben schnell ändern, ist die
Luft instabil, und Sie sollten besser niedrigere Vergrößerungen
verwenden und nach Deep-Sky-Objekten suchen. Wenn die
Sterne scharf und nicht funkelnd erscheinen, ist die Luft stabil
und sollte großartige hochaufl ösende Ansichten der Planeten
bieten.
• Transparenz - Wie klar ist die Luft, durch die Sie schauen?
Wenn eine große Menge Feuchtigkeit in der Luft vorhanden ist,
kann das schwache Licht von Galaxien und Nebeln gestreut
und diffundiert werden, bevor es Ihr Teleskop erreicht, das führt
zu einem Helligkeitsverlust in Ihrem Bild. Luftschwebstoffe aus
lokalen Waldbränden oder sogar fernen Vulkanausbrüchen
können ebenfalls zu einem Helligkeitsverlust beitragen.
Manchmal kann diese Feuchtigkeit oder diese Schwebstoffe die
TIPPS ZUR HIMMELSBEOBACHTUNG

LUMINA 130 DOBSONIAN
DEUTSCH | 7
Luft stabilisieren, was gute Bilder von Planeten und Monden
ermöglicht, aber der Lichtverlust würde es schwierig machen,
lichtschwächere Deep-Sky-Objekte zu sehen.
• Himmelshelligkeit - Die Menge an Umgebungslicht in der
Atmosphäre kann auch die Beobachtung von Deep-Sky-
Objekten beeinfl ussen. Die Dunkelheit des Himmels hängt von
Ihrer lokalen Umgebung ab. In der Mitte einer Stadt kann das von
den Stadtlichtern refl ektierte Licht, das als Himmelsglanz zurück
zur Erde geworfen wird, das schwache Licht entfernter Galaxien
überstrahlen. Das Entfernen von den hellen Lichtern einer
Großstadt kann den Unterschied zwischen dem Sehen eines
lichtschwachen Deep-Sky-Objekts und dem völligen Verpassen
ausmachen. Der Mond und die Planeten sind von sich aus hell
genug, sodass die Auswirkungen auf die Beobachtung minimal
sind.
Auswahl eines Beobachtungsorts
Wenn Sie Deep-Sky-Objekte wie Galaxien und Nebel beobachten
möchten, sollten Sie in Erwägung ziehen, zu einem dunklen
Standort zu reisen, der leicht zugänglich ist. Dieser sollte fernab von
Stadtlichtern und windaufwärts von jeglicher Luftverschmutzung
liegen und einen relativ unbehinderten Blick auf den Horizont
bieten. Wählen Sie immer eine möglichst hohe Position; dies kann
die Auswirkungen atmosphärischer Instabilität verringern und
sicherstellen, dass Sie über eventuellem Bodennebel liegen.
Während es wünschenswert sein kann, Ihr Teleskop zu einem
dunklen Standort mitzunehmen, ist dies nicht immer notwendig.
Wenn Sie planen, Planeten, den Mond oder sogar einige der helleren
Deep-Sky-Objekte zu beobachten, können Sie dies von jedem Ort
aus tun, wie zum Beispiel von Ihrem eigenen Garten. Versuchen
Sie, das Teleskop an einem Ort aufzustellen, der nicht direkt im
Bereich von Straßenlaternen oder Hauslichtern liegt, um Ihre
Nachtsicht zu schützen. Vermeiden Sie es, irgendetwas im Umkreis
von fünf bis zehn Grad zum Dach eines Gebäudes zu beobachten.
Dächer absorbieren tagsüber Wärme und strahlen diese nachts ab.
Dies kann eine Schicht turbulenter Luft direkt über dem Gebäude
erzeugen, die Ihr Bild beeinträchtigt. Stellen Sie Ihr Teleskop am
besten direkt auf einer Erd- oder grasbewachsenen Oberfl äche auf.
Vermeiden Sie es, auf erhöhten Plattformen wie Holzdecks oder
harten Oberfl ächen wie Beton oder Bürgersteigen aufzustellen, da
diese Vibrationen leicht an das Teleskop weitergeben.
Beobachten Sie nicht durch ein Fenster – Glas verzerrt das Bild
erheblich. Ein offenes Fenster kann noch schlimmer sein, da warme
Raumluft entweicht und Turbulenzen erzeugt, die die Sicht weiter
verschlechtern. Für die besten Ergebnisse nehmen Sie Ihr Teleskop
nach draußen – Astronomie ist eine Outdoor-Aktivität.
Beste Zeit für Beobachtungen wählen
Vermeiden Sie Beobachtungen unmittelbar nach Sonnenuntergang.
Während der Boden abkühlt, entstehen Luftturbulenzen, die Ihre
Sicht verzerren können. Die Bedingungen verbessern sich oft
im Laufe der Nacht – das Beobachten wird stabiler, und sowohl
Luftverschmutzung als auch Bodenbeleuchtung nehmen häufi g
ab. Einige der besten Beobachtungszeiten liegen oft in den frühen
Morgenstunden vor der Morgendämmerung. Objekte lassen sich
am besten beobachten, wenn sie den Meridian überqueren, die
imaginäre Linie, die von Norden nach Süden durch einen Punkt
direkt über Ihrem Kopf verläuft. Dies ist der Punkt, an dem Objekte
am höchsten am Himmel stehen, und Ihr Teleskop blickt durch
die geringste Menge an Atmosphäre. Objekte nahe am Horizont
– sowohl aufgehend als auch untergehend – erscheinen weniger
scharf, da Sie sie durch eine dickere Schicht der Erdatmosphäre
betrachten, was die Turbulenzen erhöht. Sie benötigen nicht immer
perfekt klare Himmel, um den Mond oder Planeten zu beobachten.
Tatsächlich können teilweise bewölkte Bedingungen manchmal
überraschend gutes Beobachten bieten.
Abkühlen des Teleskops
Teleskope benötigen mindestens 10 Minuten, um auf die
Außentemperatur abzukühlen. Sie müssen möglicherweise
mehr Zeit einplanen, wenn es einen großen Unterschied
zwischen der Temperatur des Teleskops und der Umgebungsluft
gibt. Das vollständige Abkühlen Ihres Teleskops minimiert
Wärmewellenverzerrungen im Teleskoptubus (Tubenströme).
Ihre Augen anpassen
Wenn Sie planen, Deep-Sky-Objekte an einem dunklen Standort
zu beobachten, geben Sie Ihren Augen Zeit, sich vollständig an
die Dunkelheit anzupassen. Vermeiden Sie weiße Lichtquellen
wie Taschenlampen, Autoreifen oder Straßenlaternen, da sie Ihre
Nachtsicht beeinträchtigen können. Es dauert etwa 30 Minuten,
bis sich Ihre Pupillen vollständig geweitet haben und Ihre Augen
die optischen Pigmente aufgebaut haben, die benötigt werden, um
schwaches Licht von entfernten Objekten wahrzunehmen.
Wenn Sie während des Aufbaus Ihres Teleskops Licht benötigen,
verwenden Sie eine rote LED-Taschenlampe mit der niedrigsten
Helligkeitseinstellung, und vermeiden Sie es, direkt in den
Lichtstrahl zu schauen. Dies hilft, Ihre Nachtsicht zu erhalten und
erhöht Ihre Chancen, lichtschwache Deep-Sky-Ziele zu entdecken.
Beim Beobachten halten Sie beide Augen offen, um Augenmüdigkeit
zu reduzieren. Falls dies ablenkend wirkt, bedecken Sie Ihr
ungenutztes Auge mit Ihrer Hand oder einem Augenpatch. Denken
Sie auch daran, dass das Zentrum Ihres Auges bei schlechten
Lichtverhältnissen weniger empfi ndlich ist. Um lichtschwache
Objekte klarer zu sehen, schauen Sie leicht zur Seite davon, anstatt
direkt darauf – diese Technik nennt sich „abgewandte Vision" und
lässt subtile Details besser hervortreten.
Starhopping
Die einfachste Möglichkeit, den Nachthimmel zu navigieren, ist die
Verwendung einer Technik namens „Starhopping“. Um zu beginnen,
müssen Sie zunächst das Sichtfeld Ihres Sucherfernrohrs messen.
Beginnen Sie damit, ein Sternbild mit hellen Sternen auszuwählen –
verwenden Sie dazu ein Planisphäre oder eine Astronomie-App, um
eines zu identifi zieren. Finden Sie dann dasselbe Sternbild in Ihrem
Sternatlas.
Zentrieren Sie als Nächstes Ihren Sucher auf einen hellen Stern, den
Sie von der Sternkarte wiedererkennen. Positionieren Sie Ihr Auge
etwa 30 cm hinter dem refl ektierenden Fenster Ihres StarPointer-
Suchers, und bewegen Sie das Teleskop, bis der Stern am Rand des
Fensters erscheint (jede Richtung ist in Ordnung). Ohne das Teleskop
zu bewegen, schauen Sie durch das Fenster und notieren Sie einen
weiteren Stern nahe dem gegenüberliegenden Rand.
Suchen Sie nun beide Sterne auf Ihrer Sternkarte. Verwenden Sie ein
Lineal, um den Abstand zwischen ihnen auf der Karte zu messen –
dieser Abstand entspricht einem Gesichtsfeld Ihres Suchers.
Sie können diese Messung nun als Leitfaden verwenden, um von Stern
zu Stern auf der Karte zu hüpfen, was Ihnen hilft, Himmelsobjekte mit
größerer Genauigkeit zu lokalisieren.
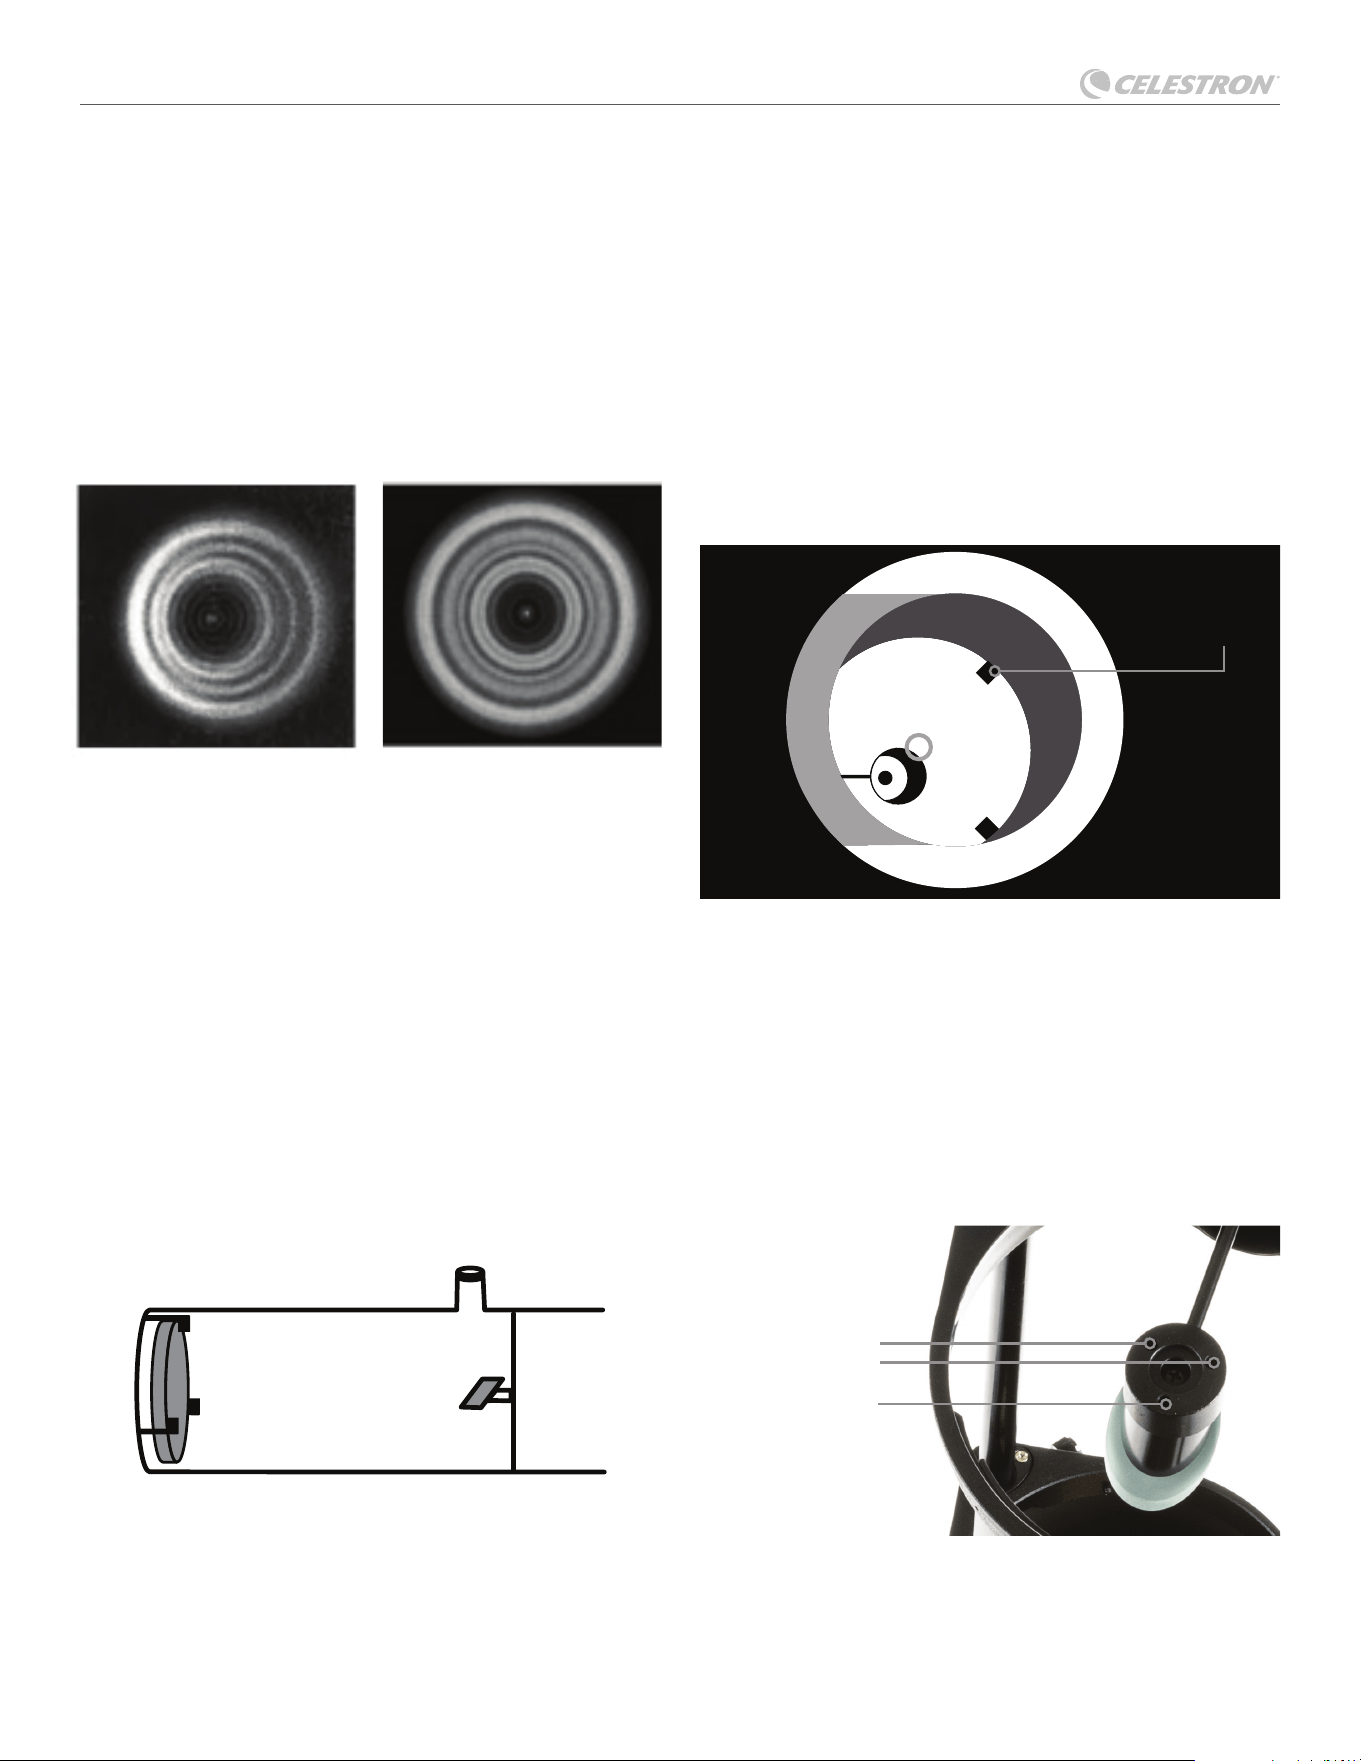
LUMINA 130 DOBSONIAN
8 | DEUTSCH
Die Kollimation ist der Prozess, die Spiegel Ihres Teleskops so
auszurichten, dass sie gemeinsam korrekt fokussiertes Licht an Ihr
Okular liefern. Durch die Beobachtung von außerhalb des Fokus
liegenden Sternbildern können Sie testen, ob die Optik Ihres
Teleskops korrekt ausgerichtet ist. Platzieren Sie einen Stern in
der Mitte des Gesichtsfelds und bewegen Sie den Fokussierer,
sodass das Bild leicht außerhalb des Fokus liegt. Wenn die
Sichtbedingungen gut sind, sehen Sie einen zentralen Lichtkreis
(die Airy-Scheibe), umgeben von einer Reihe von Beugungsringen
oder Beugungsscheiben. Wenn die Ringe symmetrisch um die Airy-
Scheibe angeordnet sind, sind die Optiken des Teleskops korrekt
kollimiert. Abb. A
Wenn Sie kein Kollimationstool haben, empfehlen wir Ihnen, eine
„Kollimationskappe" aus einem 35-mm-Plastikfi lmbehälter (schwarz
mit grauem Deckel) zu basteln. Bohren oder stanzen Sie ein kleines
Nadelöhr genau in die Mitte des Deckels und schneiden Sie den
Boden des Behälters ab. Dieses Gerät hält Ihr Auge zentriert im
Fokussierrohr. Setzen Sie die Kollimationskappe anstelle eines
regulären Okulars in den Fokussierer ein.
So kollimieren Sie Ihr Teleskop:
Ziehen Sie die Objektivkappe ab, die die Vorderseite des Teleskops
bedeckt und schauen Sie an dem Tubus entlang. Am Boden sehen
Sie den Hauptspiegel, der durch drei Klammern im Abstand von
120° gehalten wird und oben den kleinen ovalen Sekundärspiegel,
der in einer Halterung sitzt und um 45° in Richtung des Fokussierers
außerhalb der Rohrwand geneigt ist. (Abb. B)
Der Sekundärspiegel wird durch Anpassen der drei kleineren
Schrauben um die mittlere Schraube herum ausgerichtet. Der
Primärspiegel wird durch die drei Einstellschrauben am hinteren
DIE RICHTIGE PFLEGE FÜR IHR TELESKOP
GUTE KOLLIMATIONMUSS ANGEPASST WERDEN
Kollimation
Spiegel-
klammern
Hauptspiegel
Abb. A:
Die „Airy-Scheibe", die durch einen leicht außerhalb des Fokus
liegenden Stern erzeugt wird
Sekundärspiegel
Ende Ihres Teleskops eingestellt. Die drei Feststellschrauben
daneben dienen dazu, den Spiegel nach der Kollimation in Position
zu halten.
Ausrichten des Sekundärspiegels
Richten Sie das Teleskop auf eine beleuchtete Wand und setzen
Sie die Kollimationskappe anstelle eines regulären Okulars in den
Fokussierer ein. Schauen Sie durch Ihre Kollimationskappe in den
Fokussierer. Sie müssen möglicherweise den Fokussierknopf einige
Umdrehungen drehen, bis das refl ektierte Bild des Fokussierers aus
Ihrem Blickfeld verschwindet.
Sekundärspiegel
Einstellschrauben
EinstellschraubenEinstellschrauben
HINWEIS: Halten Sie Ihr Auge gegen das hintere Ende des
Fokussierrohrs, wenn Sie ohne Kollimationskappe kollimieren.
Ignorieren Sie zunächst das refl ektierte Bild der Kollimationskappe
oder Ihres Auges. Suchen Sie stattdessen nach den drei Klammern,
die den Hauptspiegel halten. Wenn Sie diese nicht sehen können,
ist Ihr Teleskop nicht kollimiert. (Abb. C)
Abb. C:
Ansicht durch den Fokussierer, zeigt die Refl exion des Hauptspie-
gels und der Spiegelklammern
Abb. D: Position der Einstellschrauben für den Sekundärspiegel
Abb. B Seitenansicht des Teleskopinneren
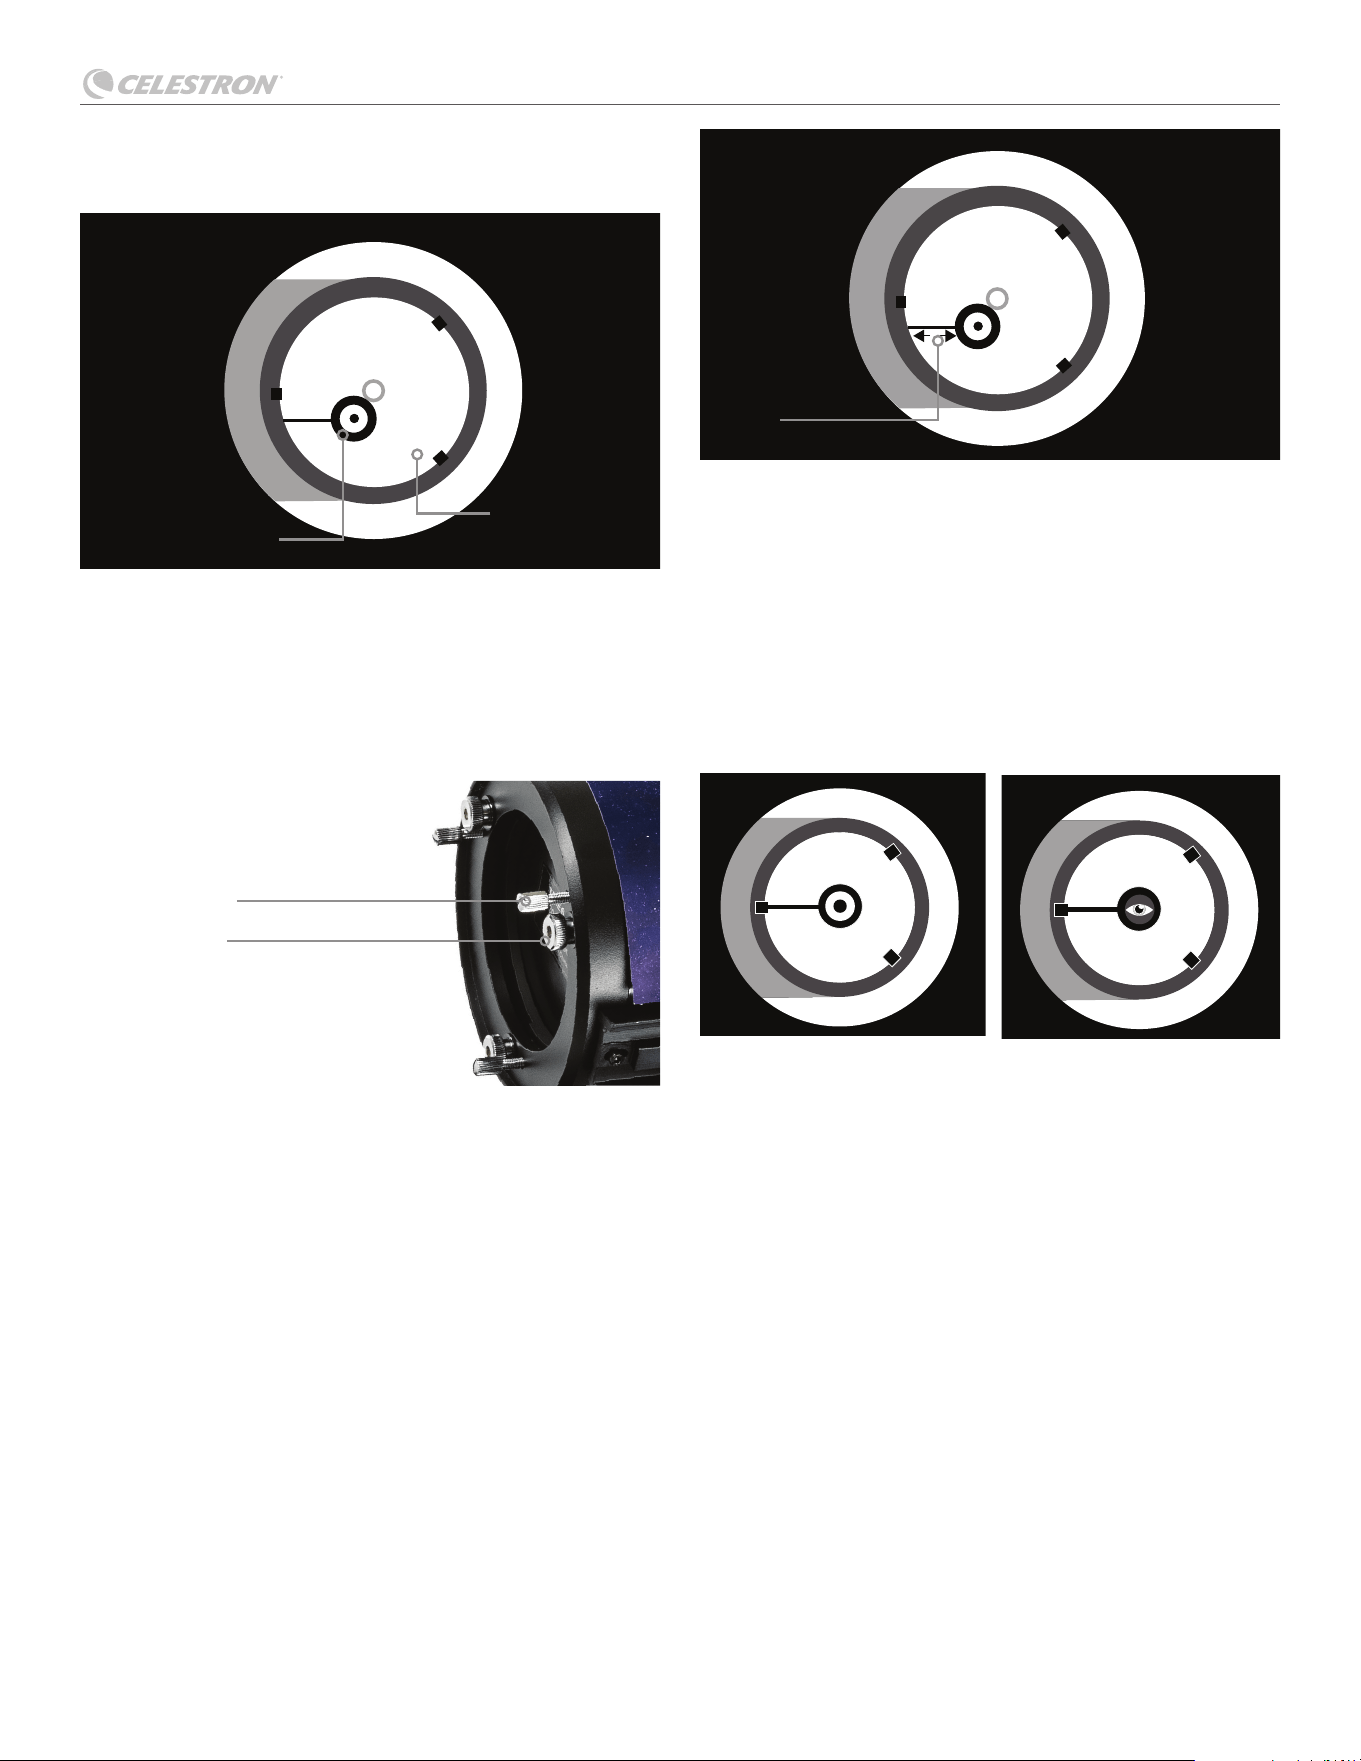
LUMINA 130 DOBSONIAN
DEUTSCH | 9
Refl exion des
Hauptspiegels
Refl exion des
Sekundärspiegels
Feststellschraube
Einstellschraube
Um den Sekundärspiegel auszurichten, passen Sie die drei
Bolzen an der Oberseite der Sekundärspiegelhalterung mit einem
Inbusschlüssel oder Kreuzschlitz-Schraubendreher an. Sie müssen
abwechselnd eine Schraube lockern und dann die anderen beiden
anziehen, um den entstandenen Spielraum auszugleichen. (Abb. D)
Stoppen Sie, wenn Sie alle drei Spiegelklammern sehen. (Abb. E)
Stellen Sie sicher, dass alle drei kleinen Ausrichtungsschrauben
angezogen sind, um den Sekundärspiegel sicher zu fi xieren.
Ausrichten des Hauptspiegels
Es gibt drei große Bolzen und drei kleine Schrauben am hinteren
Ende Ihres Teleskops. Die großen Bolzen sind die Einstellschrauben,
und die kleinen Schrauben sind die Feststellschrauben. (Abb. F)
Lösen Sie die großen Schrauben um einige Umdrehungen.
Fahren Sie nun mit Ihrer Hand um die Vorderseite Ihres Teleskops,
während Sie Ihren Blick auf den Fokussierer richten. Sie werden
das refl ektierte Bild Ihrer Hand sehen. Die Idee hierbei ist es,
festzustellen, in welche Richtung der Hauptspiegel gekrümmt ist.
Sie tun dies, indem Sie an der Stelle stoppen, an der das refl ektierte
Bild des Sekundärspiegels dem Rand des Hauptspiegels am
nächsten ist. (Abb. G)
Wenn Sie an dieser Stelle angelangt sind, stoppen Sie und
halten Sie Ihre Hand dort, während Sie auf das hintere Ende Ihres
Teleskops schauen. Ist dort eine Einstellschraube? Wenn ja,
sollten Sie diese lösen (die Schraube nach links drehen), um den
Spiegel von diesem Punkt wegzubewegen. Wenn nicht, gehen Sie
zur gegenüberliegenden Seite und ziehen die Einstellschraube auf
der anderen Seite an. Dies bringt den Spiegel allmählich in Linie,
bis er wie in Abb. H aussieht. (Es hilft, wenn ein Freund bei der
Kollimation des Hauptspiegels assistiert. Lassen Sie Ihren Partner
die Schrauben entsprechend Ihren Anweisungen anpassen,
während Sie in den Fokussierer schauen.)
Nach Einbruch der Dunkelheit gehen Sie nach draußen und richten
Sie Ihr Teleskop auf Polaris, den Polarstern. Mit einem Okular im
Fokussierer bringen Sie das Bild außer Fokus. Sie werden dasselbe
Bild sehen, nur dass es jetzt von Sternenlicht beleuchtet wird. Falls
nötig, wiederholen Sie den Kollimationsprozess. Diesmal halten Sie
den Stern zentriert, während Sie den Spiegel justieren.
Reinigen Ihres Teleskops
Setzen Sie die Staubschutzkappe über das Ende Ihres Teleskops,
wenn Sie es nicht verwenden. Dies verhindert, dass Staub sich
auf den Spiegel- oder Linsenoberfl ächen absetzt. Reinigen Sie
die optischen Komponenten Ihres Teleskops nur, wenn Sie mit
optischen Oberfl ächen vertraut sind. Reinigen Sie Ihren Sucher
und Ihre Okulare ausschließlich mit speziellem Linsenpapier. Gehen
Sie vorsichtig mit Ihren Okularen um. Berühren Sie keine optischen
Oberfl ächen an Ihrem Teleskop oder Zubehör.
Abb. E:
Ansicht durch den Fokussierer (alle drei Spiegelklammern sind
sichtbar)
Abb. G: Ansicht durch das Okular, zeigt die Platzierung der Hand
Abb. H: Ansicht durch den Fokussierer, zeigt beide Spiegel ausgerichtet
mit und ohne Kollimationsokular
Abb. F: Rückansicht des Teleskops, zeigt die Einstellschrauben und
Feststellschrauben
Hand hierher
legen
Mit Fokussierer
Mit Kollimationsokular
LUMINA 130 DOBSONIAN
10 | DEUTSCH
Hergestellt in China | 05/25
SOFTWARE UND APP
Ihr Kauf enthält Software für Ihren Computer und eine App für Ihr Smartphone. Sie müssen diese Tools nicht herunterladen, um Ihr Teles-
kop zu verwenden, aber sie können Ihr Erlebnis verbessern.
MINDESTANFORDERUNGEN AN DAS GERÄT
Windows:
• Windows 7 oder höher
• Prozessor mit 500 MHz oder mehr
• 128 MB RAM
• 850 MB Festplattenspeicher
• 32 MB OpenGL-fähige Grafi kkarte
• Monitor mit einer Aufl ösung von 1024 x 768
Pixeln (empfohlen)
MINDESTANFORDERUNGEN AN DAS GERÄT:
Android-Gerät: Android 4.0 oder höher
Apple iOS Geräte: iOS 4.3 und höher
Mac:
• Universal Binary (PPC/Intel-kompatibel)
• OS X 10.4 oder höher
(10.5 oder höher für Elementary)
• G3 Prozessor mit 450 MHz oder mehr
• 128 MB RAM
• 850 MB Festplattenspeicher
• 32 MB OpenGL-fähige Grafi kkarte
• Monitor mit einer Aufl ösung von 1024 x 768 Pixeln
(empfohlen)
celestron.com/pages/warranty
Celestron SkyPortal mit Unterstützung von
SkySafari™ Astronomie-App
Die Teleskopexperten von Celestron haben sich
mit
SkySafari zusammengetan, um zu revolutionieren,
wie Sie das Nachthimmel-Erlebnis wahrnehmen.
Entdecken Sie eine Datenbank mit mehr als 120.000
Himmelsobjekten, darunter Sterne, Planeten,
Sternhaufen, Nebel, Galaxien, Asteroiden, Kometen und
Satelliten – einschließlich der Internationalen Raumstation
(ISS)! Sie können sogar Audio-Beschreibungen der
beliebtesten Objekte anhören, während Sie diese
beobachten. SkyPortal bietet alles, was Sie brauchen,
um auf spannende neue Art und Weise die Sterne zu
beobachten.
SICHERHEITSHINWEISE
• Es besteht eine Explosionsgefahr, wenn die Batterie
durch einen falschen Batterietyp ersetzt wird.
• Die mitgelieferte Batterie ist nicht wiederaufl adbar.
• Verwenden Sie die Batterie nur wie ursprünglich
vorgesehen, um einen Kurzschluss zu vermeiden. Das
direkte Anschließen des leitenden Materials an die
positiven und negativen Seiten der Batterie führt zu
einem Kurzschluss.
• Verwenden Sie keine beschädigte Batterie.
• Lagern Sie die Batterie nicht in einer extrem kalten oder
heißen Umgebung. Dies kann die Batterielebensdauer
verringern.
• Beachten Sie beim Ersetzen der Batterie die
Bedienungsanleitung und sorgen Sie dafür, dass die
positiven und negativen Pole richtig ausgerichtet sind.
• Werfen Sie die Batterie nicht ins Feuer.
• Entsorgen Sie die Batterie gemäß den örtlichen
Vorschriften.
FCC-HINWEIS: Dieses Gerät entspricht Teil 15 der FCC-Bestimmungen. Der Betrieb
unterliegt den folgenden beiden Bedingungen: (1) Dieses Gerät darf keine schädlichen
Störungen erzeugen und (2) dieses Gerät muss Störungen von außen akzeptieren, dazu
gehören solche Störungen, die einen unerwünschten Betrieb verursachen.
Celestron Sternennacht-Astronomiesoftware
Celestron Starry Night, die führende Astronomiesoftware auf dem Markt, nimmt Sie
mit auf eine geführte Tour durch die Vergangenheit, Gegenwart und Zukunft unseres
Sonnensystems. Sie kann Ihnen dabei helfen, mehr über den Nachthimmel zu erfahren
und Ihre nächste Beobachtungssitzung zu planen. Sie kann Ihnen dabei helfen, mehr
über den Nachthimmel zu erfahren und Ihre nächste Beobachtungssitzung zu planen.
BENÖTIGEN SIE UNTERSTÜTZUNG? Wenden Sie sich an die technische Unterstützung von
Celestron unter
celestron.com/pages/technical-support
©2025 Celestron. Celestron und Symbol sind Warenzeichen von Celestron, LLC. Alle Rechte
vorbehalten. Celestron.com
USA: 2835 Columbia Street, Torrance, CA 90503, USA
UK: Einheit 2 Transigo, Gables Way, Thatcham RG19 4JZ, Vereinigtes Königreich
Dieses Produkt ist für Personen ab 14 Jahren konzipiert und vorgesehen.
MANUALE DI ISTRUZIONI
Modello # 31200 ITALIANO

INDICE
Contenuto della confezione . . . . . . . . . . . . . . . . . . . . . . . . . . . . . . . . . . . . . . . . 1
Elenco parti . . . . . . . . . . . . . . . . . . . . . . . . . . . . . . . . . . . . . . . . . . . . . . . . . . . . . . . . 1
Assemblaggio del telescopio . . . . . . . . . . . . . . . . . . . . . . . . . . . . . . . . . . . . . . . 2
Funzionamento del telescopio . . . . . . . . . . . . . . . . . . . . . . . . . . . . . . . . . . . . . . 3
Bilanciamento del bianco . . . . . . . . . . . . . . . . . . . . . . . . . . . . . . . . . . . . . . . . . . . . . . . . 3
Posizionamento del telescopio . . . . . . . . . . . . . . . . . . . . . . . . . . . . . . . . . . . . . . . . . . . . 3
Utilizzo della manopola di controllo della tensione . . . . . . . . . . . . . . . . . . . . . . . . . . . . . . . . . 3
Messa a fuoco del telescopio . . . . . . . . . . . . . . . . . . . . . . . . . . . . . . . . . . . . . . . . . . . . . 3
Allineamento del cercatore . . . . . . . . . . . . . . . . . . . . . . . . . . . . . . . . . . . . . . . . . . . . . . . 4
Accesso alla batteria del cercatore . . . . . . . . . . . . . . . . . . . . . . . . . . . . . . . . . . . . . . . . . . 4
La prima notte fuori: La Luna . . . . . . . . . . . . . . . . . . . . . . . . . . . . . . . . . . . . . . . . . . . . . . 5
Suggerimenti per l'osservazione celeste . . . . . . . . . . . . . . . . . . . . . . . . . . . . . . 6
Ingrandimento . . . . . . . . . . . . . . . . . . . . . . . . . . . . . . . . . . . . . . . . . . . . . . . . . . . . . . 6
Campo visivo . . . . . . . . . . . . . . . . . . . . . . . . . . . . . . . . . . . . . . . . . . . . . . . . . . . . . . . 6
I Pianeti . . . . . . . . . . . . . . . . . . . . . . . . . . . . . . . . . . . . . . . . . . . . . . . . . . . . . . . . . . 6
Oggetti deep-sky . . . . . . . . . . . . . . . . . . . . . . . . . . . . . . . . . . . . . . . . . . . . . . . . . . . . . 6
Condizioni del cielo . . . . . . . . . . . . . . . . . . . . . . . . . . . . . . . . . . . . . . . . . . . . . . . . . . . 6
Selezione di un sito di osservazione . . . . . . . . . . . . . . . . . . . . . . . . . . . . . . . . . . . . . . . . . 7
Scegliere il momento migliore per osservare . . . . . . . . . . . . . . . . . . . . . . . . . . . . . . . . . . . . 7
Raffreddamento del telescopio . . . . . . . . . . . . . . . . . . . . . . . . . . . . . . . . . . . . . . . . . . . . . 7
Adattamento degli occhi. . . . . . . . . . . . . . . . . . . . . . . . . . . . . . . . . . . . . . . . . . . . . . . . . 7
Star Hopping . . . . . . . . . . . . . . . . . . . . . . . . . . . . . . . . . . . . . . . . . . . . . . . . . . . . . . . 7
Cura idonea per il proprio telescopio . . . . . . . . . . . . . . . . . . . . . . . . . . . . . . . . . 8
Collimazione . . . . . . . . . . . . . . . . . . . . . . . . . . . . . . . . . . . . . . . . . . . . . . . . . . . . . . . . 8
Allineamento dello specchio secondario . . . . . . . . . . . . . . . . . . . . . . . . . . . . . . . . . . . . . . . 8
Allineamento dello specchio principale . . . . . . . . . . . . . . . . . . . . . . . . . . . . . . . . . . . . . . . 9
Pulizia del telescopio . . . . . . . . . . . . . . . . . . . . . . . . . . . . . . . . . . . . . . . . . . . . . . . . . . . 9
Software App . . . . . . . . . . . . . . . . . . . . . . . . . . . . . . . . . . . . . . . . . . . . . . . . . . . 10
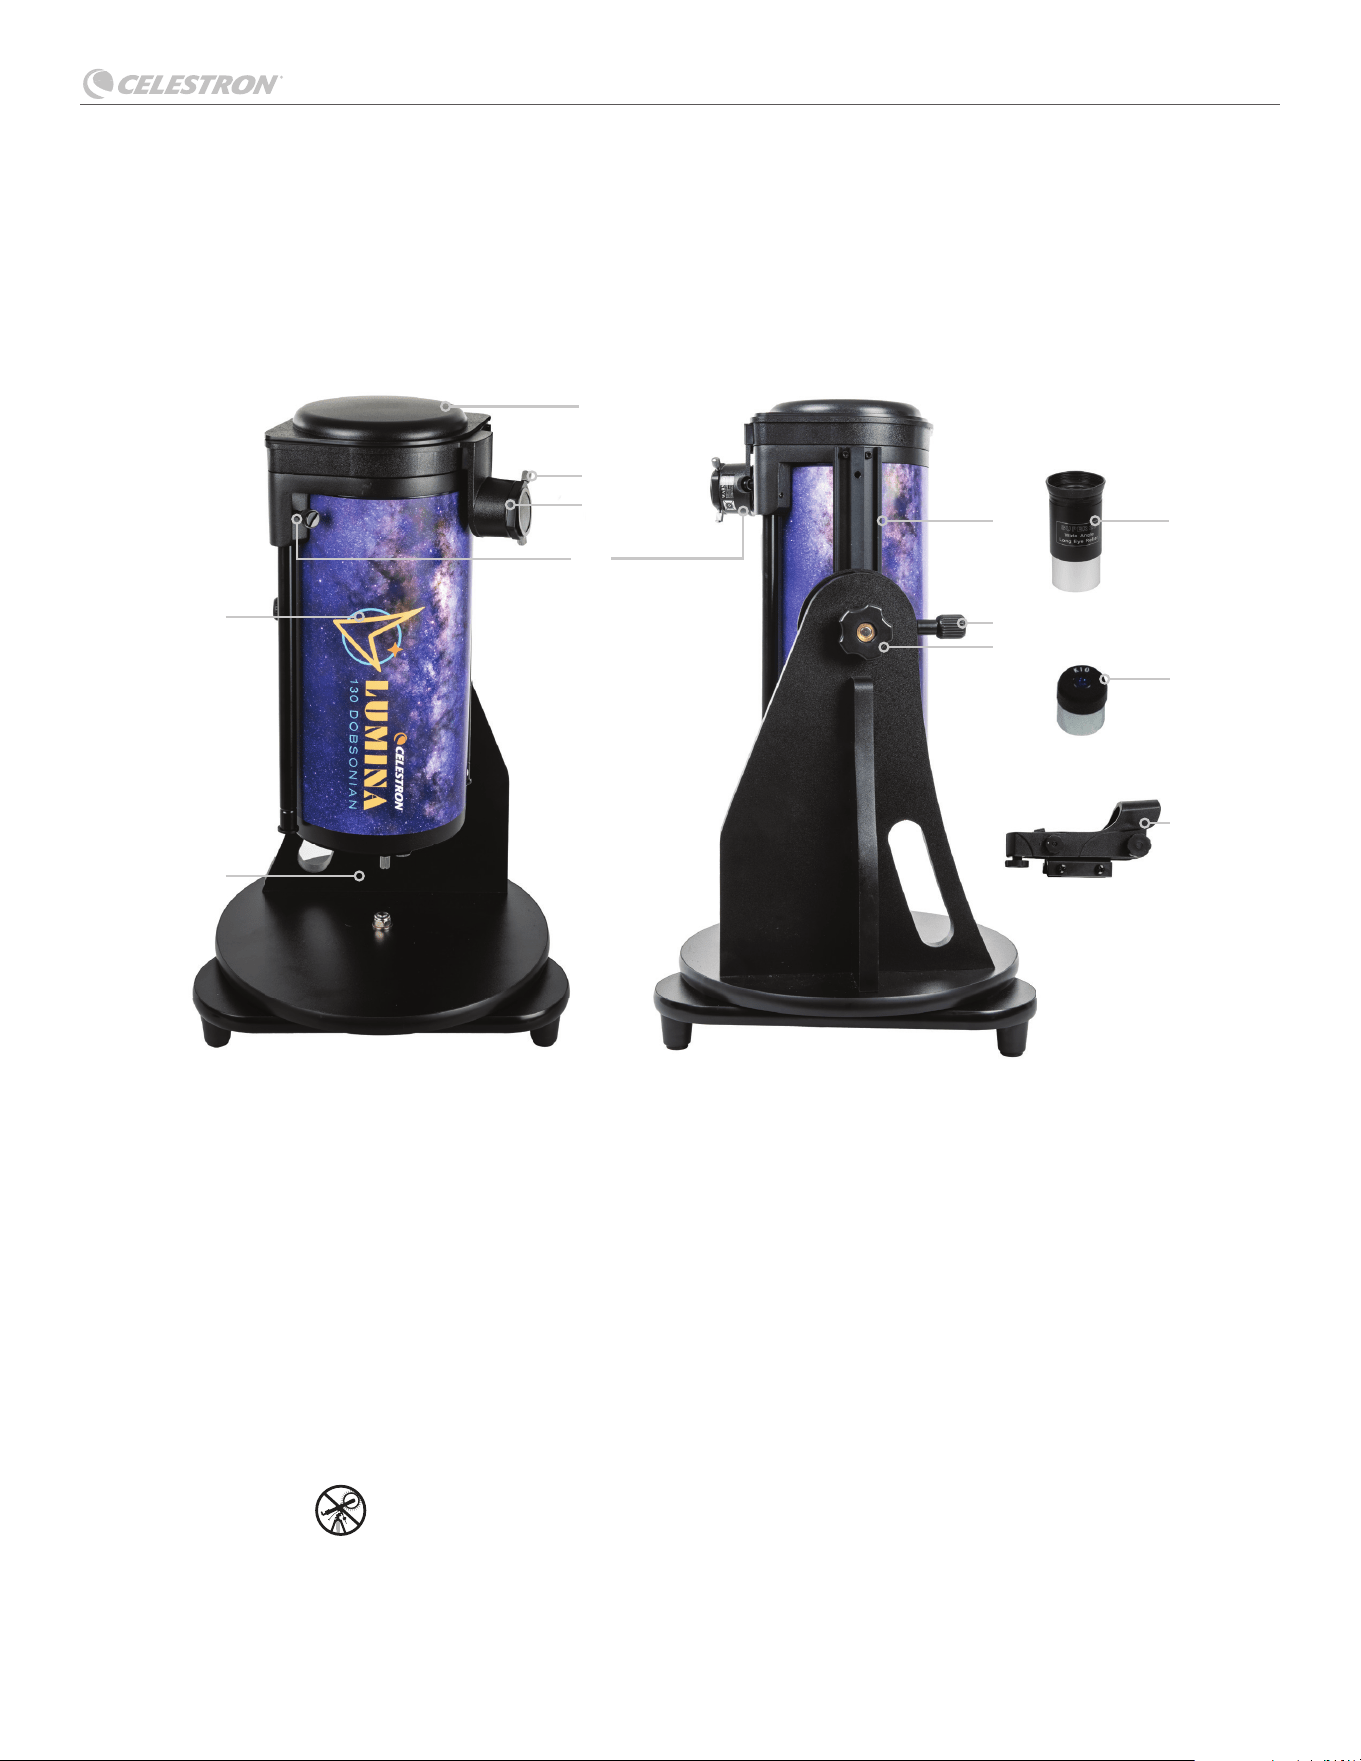
LUMINA 130 DOBSONIAN
ITALIANO | 1
Consigliamo di conservare la scatola del telescopio in modo da poterlo utilizzare per riporre il telescopio quando non lo si utilizza.
Rimuovere con attenzione in quanto alcune parti sono PICCOLE. Usare l'elenco delle parti seguente per verifi care che tutte le parti o
accessori sono presenti.
CONTENUTO DELLA CONFEZIONE
Elenco parti
1. Tubo ottico
2. Base
3. Cappuccio antipolvere
4. Vite di bloccaggio dell'oculare
5. Anello focalizzatore
6. Viti blocco laterale
7. Barra a coda di rondine
8. Vite di bloccaggio Dovetil
9. Manopola controllo tensione
10. Oculare 25 mm
11. Oculare 10 mm
12. Cercatore StarPointer
TM
a puntino rosso
AVRAI BISOGNO DI: 1) Piccolo cacciavite a croce per sostituire la batteria del cercatore StarPointer
* AVVERTENZA SOLARE! Non cercare mai di guardare il Sole attraverso un
qualsiasi telescopio senza un fi ltro solare.
1
2
6
4
5
7 10
11
12
9
8
3
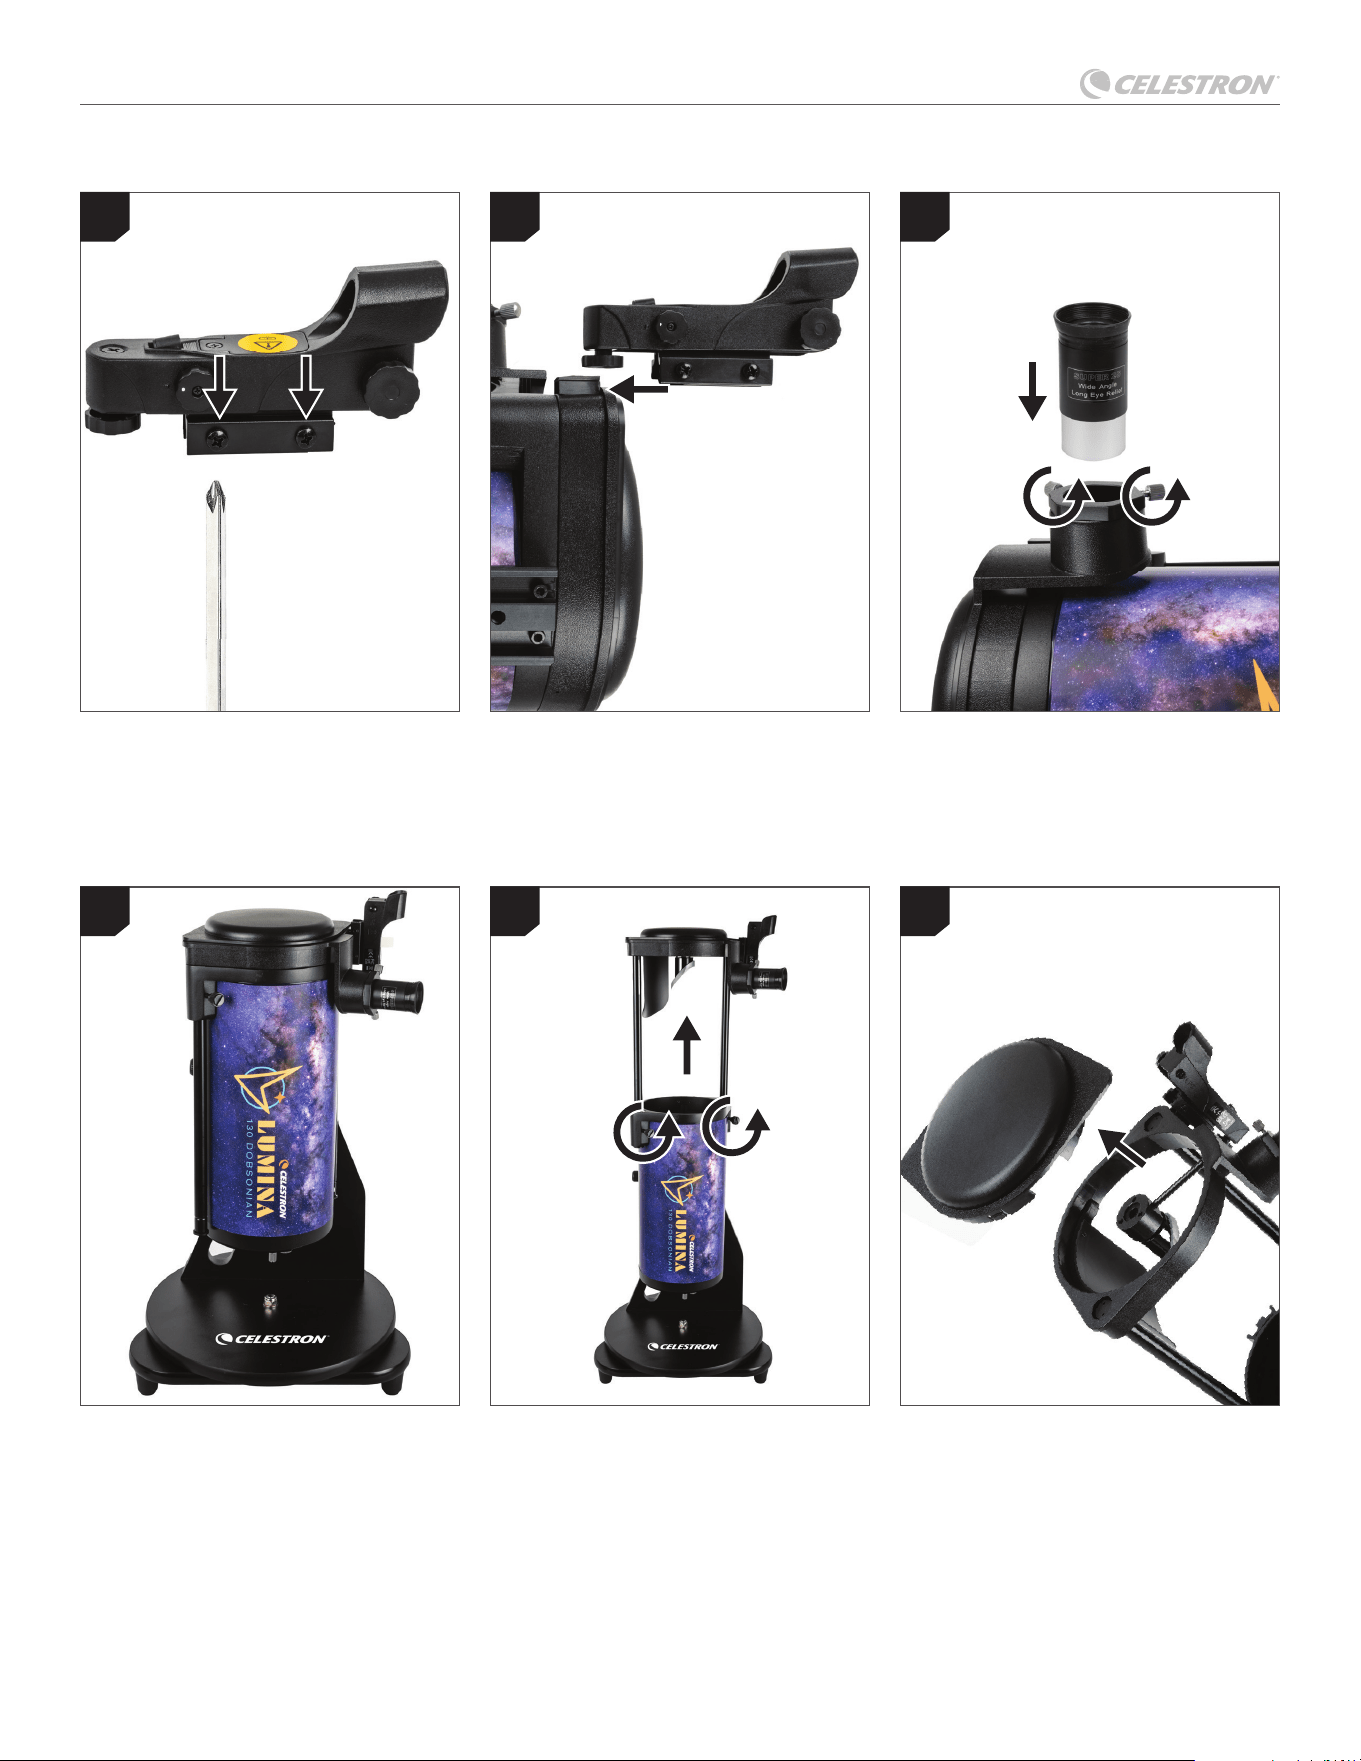
LUMINA 130 DOBSONIAN
2 | ITALIANO
ASSEMBLAGGIO DEL TELESCOPIO
Individuare il cercatore a puntino rosso.
Allentare leggermente le viti sul lato del
cercatore.
Individuare la piccola base del cercatore
vicino all'apertura anteriore del tubo. Inserire
il cercatore sulla base e stringere le viti
per fi ssarlo in posizione. Non stringere
eccessivamente le viti.
Individuare l'oculare. Allentare le viti di
bloccaggio dell'oculare e far scorrere
l'oculare nel supporto. Stringere leggermente
le viti per tenere l'oculare in posizione. Non
serrare eccessivamente le viti.
Quando non in uso, riporre il telescopio nella
confi gurazione mostrata.
Rimuovere il tappo antipolvere prima della
visione
.
Per estendere il tubo del telescopio, allentare
le due viti di bloccaggio a scorrimento e tirare
verso l'alto la parte superiore del gruppo del
telescopio fi nché non scatta in posizione.
Stringere le viti di bloccaggio a scorrimento.
Non serrare eccessivamente.
1
4
2
5 6
3
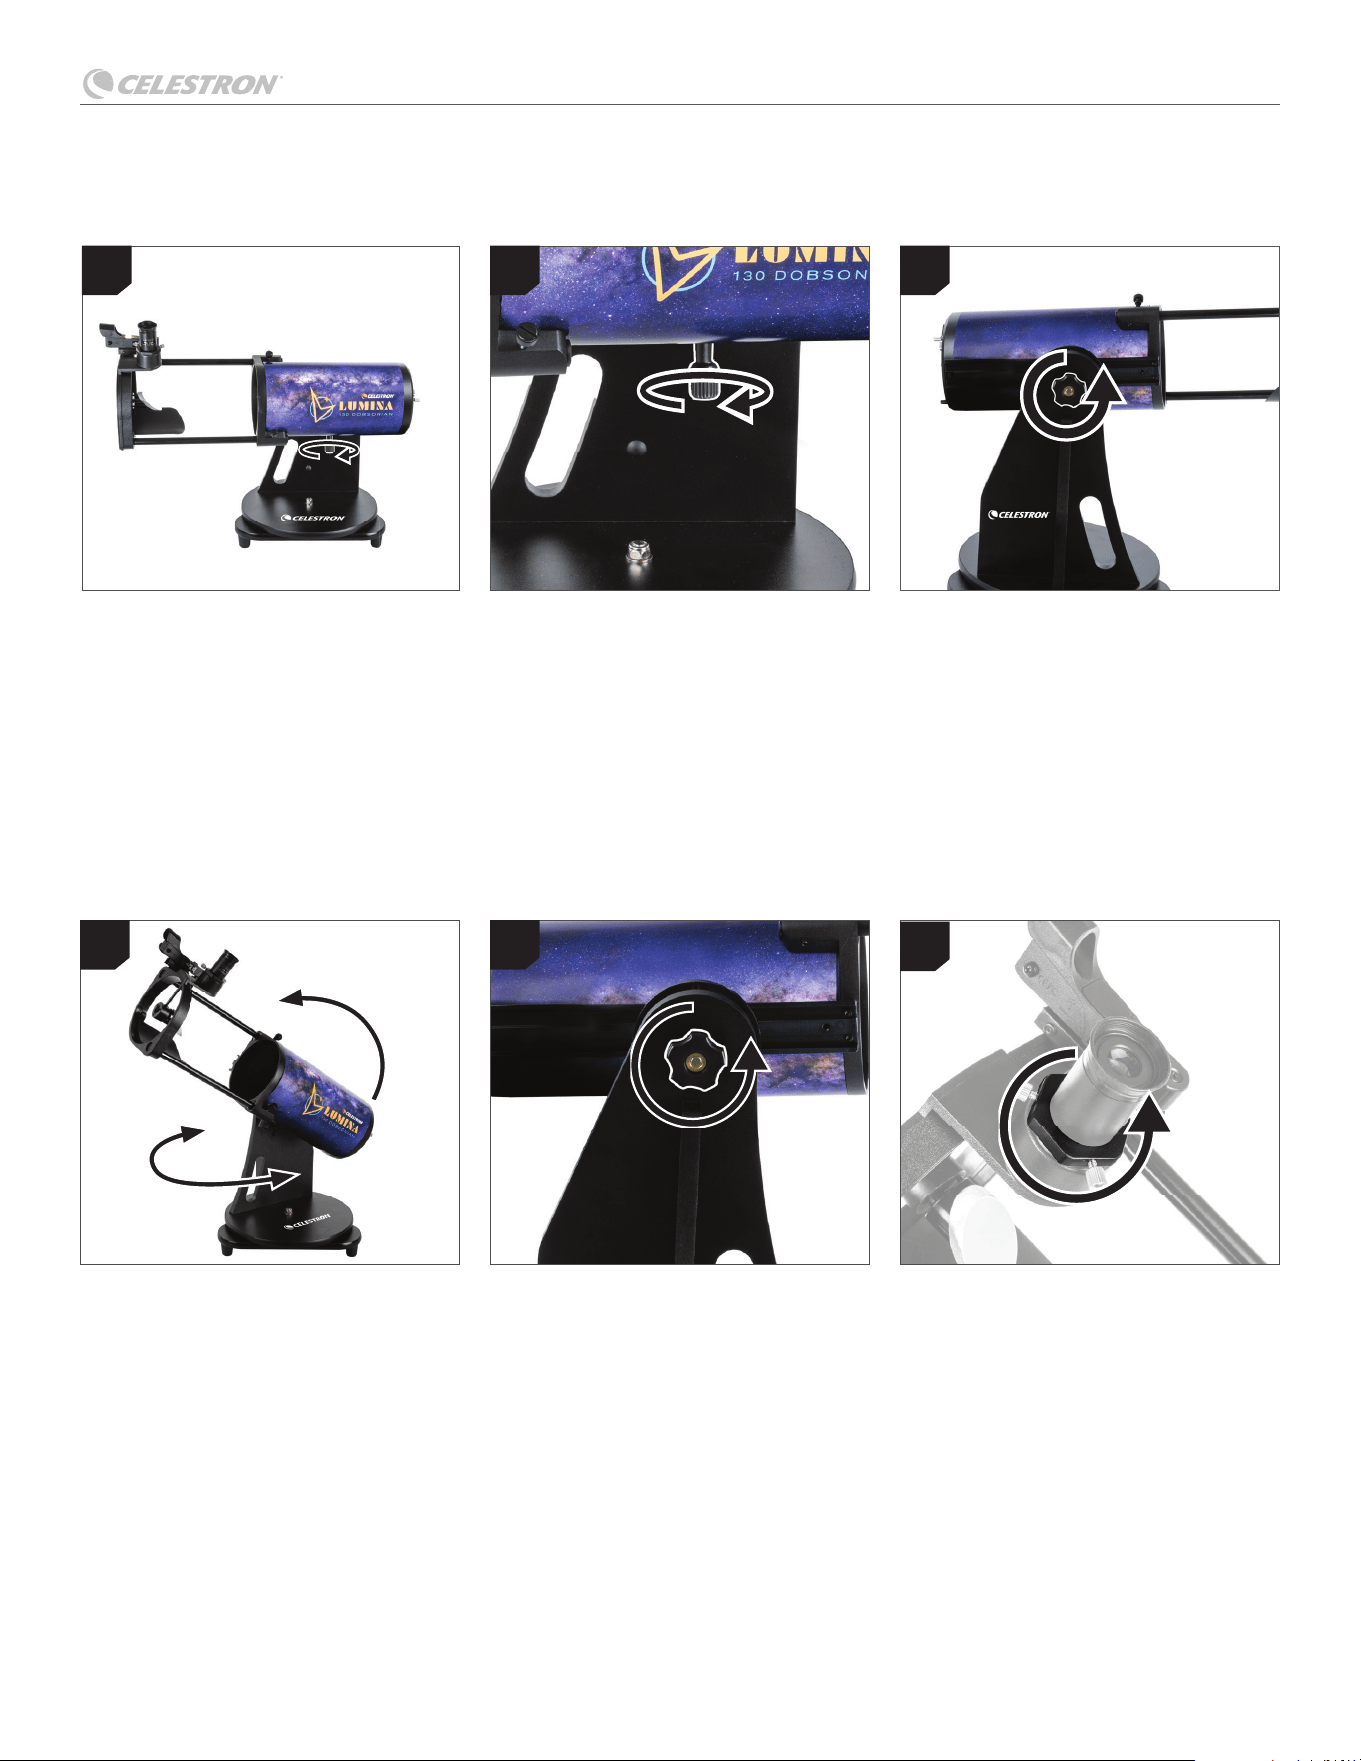
LUMINA 130 DOBSONIAN
ITALIANO | 3
Bilanciamento del telescopio
Posizionamento del
telescopio
Per bilanciare il telescopio, allentare la vite di
bloccaggio a coda di rondine e far scorrere
il tubo fi no a un punto in cui non si muova
più da solo.
Per puntare il telescopio, è suffi ciente
spostare il tubo del telescopio verso l'alto e
verso il basso in altezza (posizione su e giù)
o ruotare il telescopio attorno alla base in
azimut (posizione da sinistra a destra).
Allentare o stringere la manopola di
controllo della tensione per aggiungere la
frizione suffi ciente a consentire al tubo di
muoversi facilmente quando viene spinto
ma di rimanere in posizione quando non viene
spinto. Potrebbe essere necessario regolare
nuovamente la manopola di controllo della
tensione quando si aggiungono o rimuovono
accessori dal tubo.
Se si utilizzano accessori più pesanti,
potrebbe essere necessario riequilibrare il
cannocchiale dopo averli aggiunti o rimossi.
Ruotare lentamente la rotella di messa
a fuoco, in un senso o nell'altro, fi nché
l'immagine nell'oculare non è nitida. Potrebbe
essere necessario regolare con precisione la
messa a fuoco nel corso del tempo, poiché
le variazioni di temperatura, la fl essione e altri
fattori causano lievi spostamenti. I telescopi
veloci (a corto rapporto focale) sono
particolarmente soggetti a questo problema,
soprattutto prima che raggiungano la
temperatura ambiente. È inoltre necessario
rifare la messa a fuoco ogni volta che si
cambia oculare o si aggiunge o toglie una
lente di Barlow.
Serrare la vite di bloccaggio a coda di
rondine per tenere il tubo in posizione. Non
serrare eccessivamente.
Utilizzo della
manopola di controllo
della tensione
Stringere la manopola di regolazione della
tensione fi no a quando il tubo richiede un
leggero sforzo per muoversi. Si desidera
una piccola quantità di attrito per mantenere
il telescopio in posizione. Non serrare
eccessivamente la manopola. Il tubo deve
comunque muoversi agevolmente con uno
sforzo minimo.
Messa a fuoco del
telescopio
1
1 1
1
2 3
FUNZIONAMENTO DEL TELESCOPIO
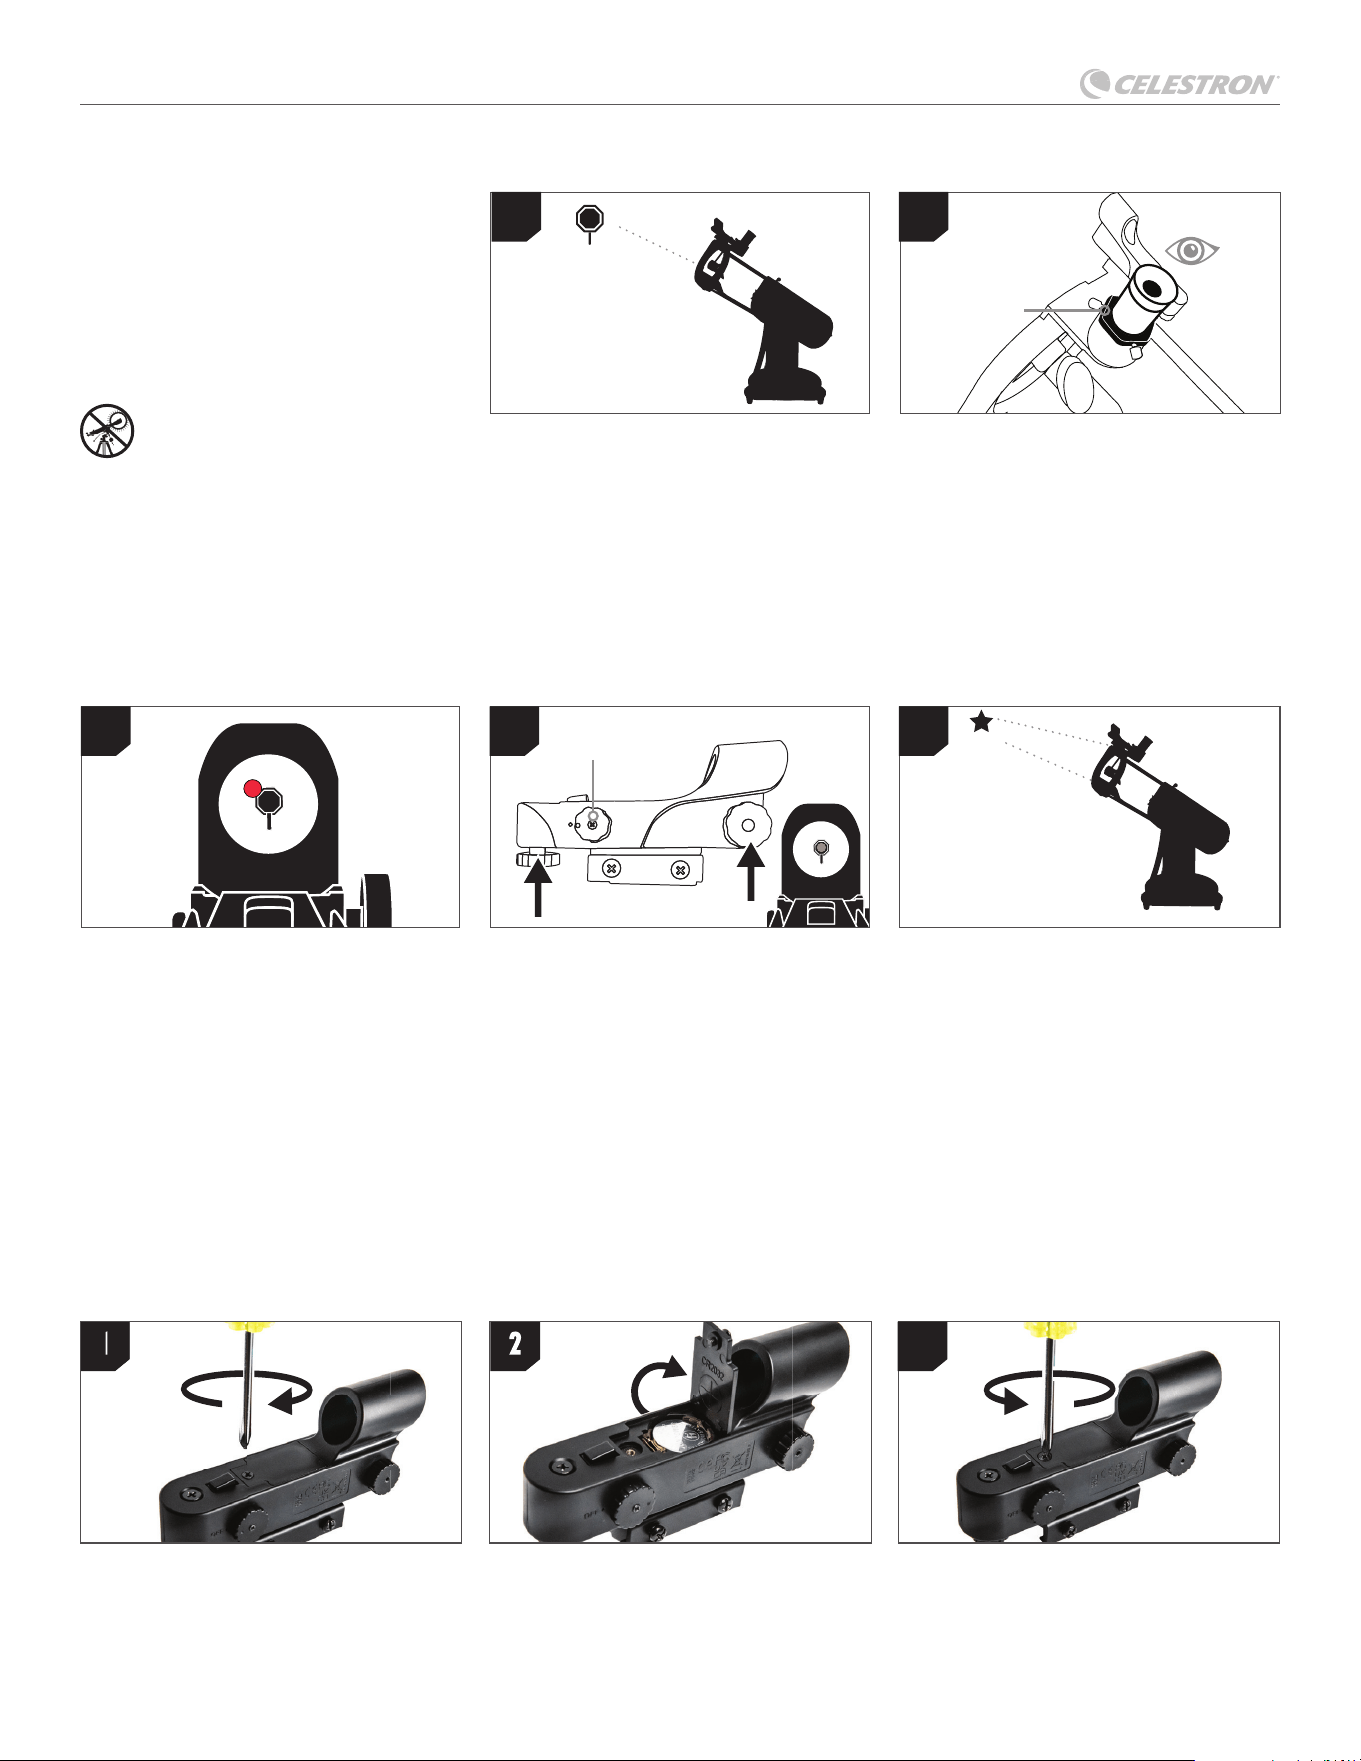
LUMINA 130 DOBSONIAN
4 | ITALIANO
Regolare il cercatore
Senza muovere il telescopio, utilizzare le
due manopole di regolazione per spostare il
punto rosso fi nché non appare sullo stesso
oggetto che si sta osservando nell'oculare a
basso ingrandimento del telescopio.
Il cercatore è ora allineato!
Non occorre effettuare un nuovo allineamento
salvo colpi o cadute. Ora, quando si guarda
attraverso lo StarPointer, il puntino rosso
indica dove sta puntando il telescopio. Non
dimenticare di spegnere il mirino al termine
per preservare la batteria.
Guardare attraverso il cercatore
Estrarre la linguetta protettiva della batteria
dello StarPointer e accenderlo alla massima
luminosità mediante la manopola on/
off. Guardare attraverso StarPointer e
individuare il puntino rosso.
Centrare l'obiettivo nell'oculare
Guardare attraverso il telescopio con
l'oculare da 25 mm. Muovere il telescopio
fi no a quando l'oggetto prescelto si trova
al centro del campo visivo. Se l'immagine è
sfocata, ruotare con delicatezza le manopole
di messa a fuoco fi no a quando l'immagine
non è nitida.
NOTA: L'immagine del telescopio potrebbe
apparire capovolta. Ciò è perfettamente
normale per un telescopio astronomico.
Il cercatore a puntino rosso StarPointer
è una delle parti più importanti del tuo
telescopio. Al primo assemblaggio del
telescopio è necessario allineare il cercatore
con le ottiche principali del telescopio.
È preferibile eseguire questa operazione
durante il giorno.*
*AVVERTENZA SOLARE! Non
tentare mai di osservare il Sole
attraverso un telescopio senza un
fi ltro solare adeguato.
Scegliere un oggetto
Portare il telescopio all'esterno durante il
giorno e individuare un oggetto facilmente
riconoscibile, come ad esempio un semaforo,
la targa di un'auto o un cartello. L'oggetto
dovrebbe trovarsi il più lontano possibile,
minimo a 400 metri.
FOCALIZZATORE
MANOPOLA ON/OFF
1
1
4 5
2
2
Allineamento del cercatore
Accesso alla batteria del cercatore
Il cercatore StarPointer utilizza una batteria al litio da 3V a lunga durata (#CR2032), che si trova sulla superfi cie superiore dello StarPointer.
Se si pensa di non utilizzare il telescopio per un periodo prolungato, si consiglia di rimuovere la batteria prima di conservarlo. Per rimuovere
o sostituire la batteria, seguire le istruzioni riportate sotto.
Nota: Per sostituire la batteria del cercatore StarPointer è necessario un piccolo cacciavite a croce.
Utilizzando un cacciavite a croce, allentare
la vite del coperchio della batteria e aprirlo.
In caso di sostituzione della batteria,
installare la batteria nuova con la faccia (+)
rivolta verso l’esterno.
Sistemare nuovamente il coperchio sul
cercatore e serrare nuovamente la vite con
il cacciavite a croce.
1
2
3
3
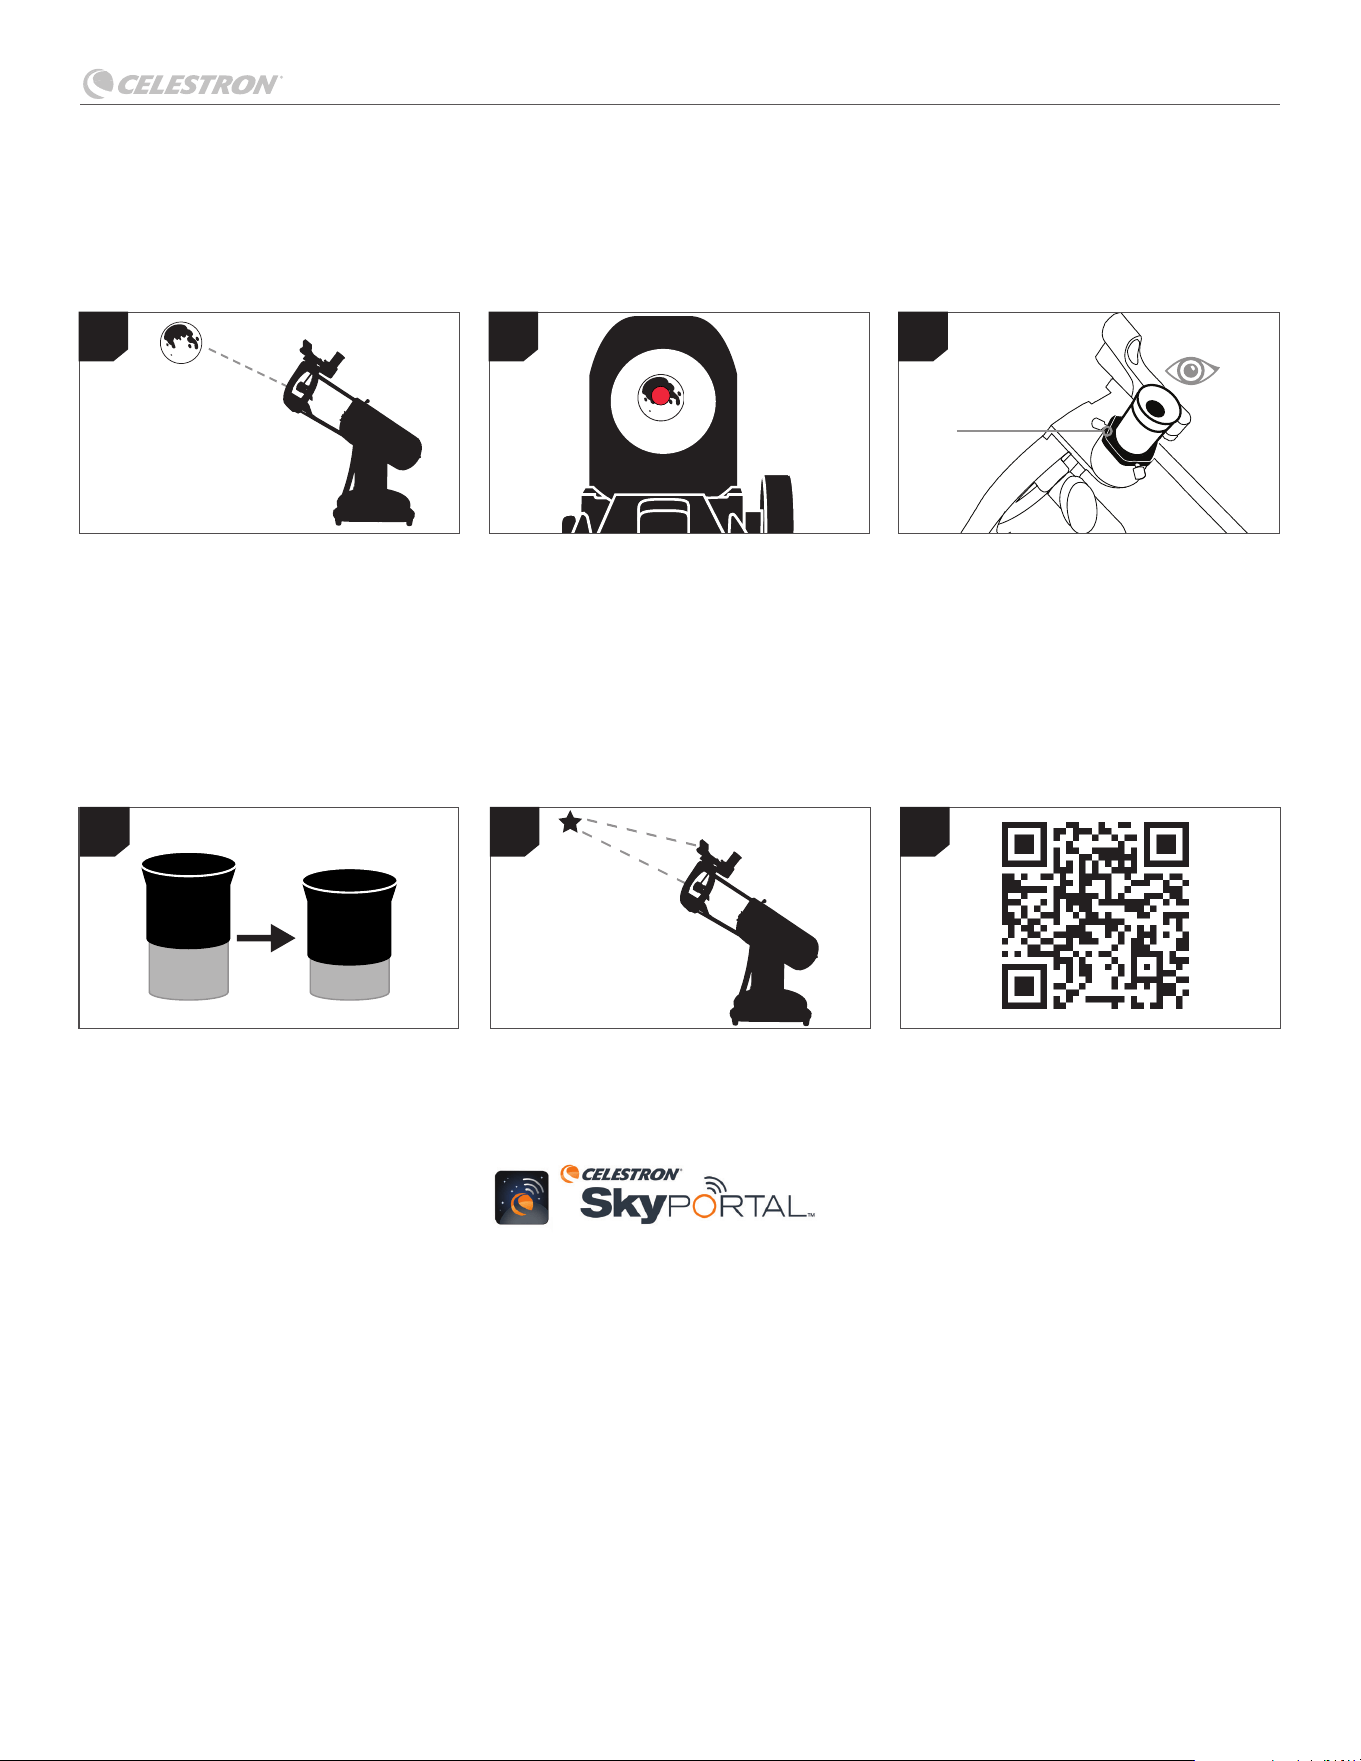
LUMINA 130 DOBSONIAN
ITALIANO | 5
FOCALIZZATORE
Per ottenere una vista più ravvicinata della
Luna, allentare la vite a testa zigrinata del
focalizzatore e rimuovere l'oculare da 25
mm. Sostituirlo con l'oculare da 10 mm e
stringere la vite di fermo per fi ssare il nuovo
oculare in posizione. L'oculare da 10 mm
aumenta notevolmente l'ingrandimento,
facendo apparire la Luna molto più grande.
Potrebbe essere necessario regolare la
messa a fuoco quando si cambia oculare
per garantire l'immagine più nitida possibile.
Con questa stessa tecnica si possono
osservare molti altri oggetti celesti, come
pianeti, ammassi stellari e nebulose.
L'acquisto del telescopio include il download
gratuito di Celestron SkyPortal Powered by
SkySafariTM. Disponibile per iOS e Android,
questa applicazione planetaria può aiutare a
localizzare e identifi care gli oggetti celesti
attualmente visibili dalla propria posizione
esatta. Provare!
Guardare attraverso l'oculare da 25mm
del telescopio. Ruotare delicatamente le
manopole di messa a fuoco fi nché l'immagine
non diventa nitida.
Congratulazioni! È stato osservato il
primo oggetto celeste!
Guardare attraverso il cercatore e individua
il puntino rosso. Continuare a muovere il
telescopio fi nché il punto non è centrato
sulla Luna.
L'obiettivo celeste migliore e più facile da osservare per la prima volta è la Luna. Provare a osservare la Luna in diversi momenti delle sue fasi.
Il periodo migliore per osservare la Luna va da due giorni dopo la Luna Nuova a qualche giorno prima della Luna Piena. In questo periodo si
possono osservare i crateri e le catene montuose lunari con maggiore dettaglio.
Quando la Luna è visibile nel cielo,
impostare il proprio telescopio con l'oculare
da 25mm installato e il cercatore allineato.
Spostare il telescopio in modo che punti
approssimativamente verso la Luna.
Accendere il cercatore.
1
4 5 6
2 3
La prima notte fuori casa - La Luna
Scansire il codice QR per visitare il centro
risorse Celestron Tools for Astronomers.
Qui si trovano guide all'osservazione,
suggerimenti e trucchi e download gratuiti
che vi guideranno nel vostro viaggio
astronomico.
25 mm
10 mm

LUMINA 130 DOBSONIAN
6 | ITALIANO
Questa sezione fornisce suggerimenti per l'osservazione di oggetti
del Sistema Solare e del cielo profondo, insieme a una spiegazio-
ne di come le condizioni di osservazione possono infl uenzare ciò
che si vede.
Ingrandimento
È possibile modifi care l'ingrandimento del telescopio semplicemente
cambiando oculare. Sia i telescopi che gli oculari hanno lunghezze
focali misurate in millimetri. Per calcolare l'ingrandimento di una
determinata combinazione di telescopio e oculare, prendere la
lunghezza focale del telescopio e dividerla per la lunghezza focale
dell'oculare. Il numero risultante è il fattore di ingrandimento.
Ad esempio, il Lumina Dobsonian 130 mm ha una lunghezza focale
di 650 mm. Utilizzando l'oculare da 10 mm:
Campo visivo
La determinazione del campo visivo è importante se si intende
avere un'idea della dimensione angolare dell'oggetto che si sta
osservando. Per calcolare il campo visivo effettivo, dividete il
campo visivo apparente dell'oculare (fornito dal produttore) per
l'ingrandimento che fornisce nel telescopio che state utilizzando.
Utilizzando l'esempio della sezione precedente, possiamo
determinare il campo visivo utilizzando lo stesso telescopio e
l'oculare da 10 mm. L'oculare da 10 mm ha un campo visivo
apparente di 40°.
L'oculare da 10 mm ha un campo visivo apparente di 40°.
Dividere i 40° per l'ingrandimento, che è pari a 65 potenze.
Si ottiene così un campo visivo effettivo di 0,6 gradi.
I Pianeti
Oltre alla Luna, il telescopio è in grado di osservare i cinque pianeti
più luminosi. Poiché i pianeti cambiano posizione rispetto alle stelle
di sfondo, è necessario consultare le fonti sul web o utilizzare
un'applicazione per planetari su uno smart device per localizzarli.
Ecco i pianeti che si possono trovare:
• Mercurio e Venere - Proprio come la Luna, i due pianeti interni
attraverseranno fasi che vanno da sottili crescenti a fasi gibbose.
• Marte - Quando è vicino all'opposizione (il punto della sua
orbita in cui è più vicino alla Terra) dovresti essere in grado
di distinguere la calotta polare e possibilmente alcune
caratteristiche superfi ciali più grandi che appaiono come segni
scuri sulla superfi cie.
• Gioia Giove - cercate le fasce di nubi di metano più scure
che circondano il pianeta, appena sopra e sotto l'equatore. Se
la Grande Macchia Rossa è rivolta verso la Terra, è possibile
intravederla. Si vedranno anche le quattro lune più luminose
ingrandimento 65x= = =
Lunghezza focale del
telescopio
Lunghezza focale
dell'oculare
650 mm
10 mm
Campo visivo
apparente
dell'oculare
0,6º di arco
= = =
Campo visivo
apparente dell'oculare
Ingrandimento
40º
65x
di Giove: Io, Europa, Ganimede e Callisto. Queste lune sono
divertenti da osservare perché possono spostarsi sensibilmente
nel giro di un paio d'ore. Occasionalmente si spostano dietro
Giove o nella sua ombra e scompaiono per periodi di tempo più
o meno lunghi. Possono anche attraversare la faccia di Giove
e si può persino vedere l'ombra della luna che la attraversa. Le
applicazioni per smartphone del Planetario possono aiutarvi a
prevedere quando la Grande Macchia Rossa sarà visibile e ad
avvisarvi di eventi interessanti riguardanti le lune di Giove.
• Saturno- Gli anelli! Saturno è probabilmente uno degli oggetti
più belli da osservare al telescopio. Se le condizioni di seeing
sono suffi cientemente stabili, si può persino scorgere l'ombra
degli anelli sul pianeta e l'ombra del pianeta sugli anelli. Si
dovrebbe riuscire a vedere Titano, la luna più luminosa di Saturno.
Oggetti deep-sky
Gli oggetti deep-sky sono oggetti celesti al di fuori del nostro
Sistema Solare. Comprendono ammassi stellari, nebulose
planetarie, nebulose diffuse, stelle doppie e altre galassie al di
fuori della nostra Via Lattea. Oggetti come nebulose e galassie
possono essere molto grandi, ma anche molto deboli. Per ottenere
una visione ottimale, è necessario assicurarsi di trovarsi nel cielo
più buio possibile. Più si è lontani dalle luci della città, meglio si
vedranno questi oggetti nell'oculare. Nelle fotografi e di nebulose
e galassie si vedono rossi e blu vividi. Questi colori non sono
visibili quando si guarda attraverso l'oculare. Le immagini colorate
sono state catturate con lunghe esposizioni, in genere da 15 a 60
minuti o più, mentre l'occhio raccoglie la luce solo momento per
momento. I sensori digitali sono molto più sensibili ai rossi e ai blu
rispetto all'occhio umano, che è più sensibile alla parte verde dello
spettro. Tuttavia, potrete vedere il tenue bagliore della Galassia di
Andromeda e la distesa della Nebulosa di Orione.
Condizioni del cielo
Le condizioni del cielo possono infl uenzare in modo signifi cativo le
prestazioni del telescopio in tre modi.
• Stabilità dell'aria - Nelle giornate di vento, le immagini della Luna
e dei pianeti sembrano ondeggiare o saltellare nell'oculare, come
se le si guardasse attraverso l'acqua in movimento. Le notti in cui
i venti sono calmi offrono le migliori visioni ad alto ingrandimento
dei pianeti e della Luna. Il modo migliore per valutare la stabilità
dell'atmosfera è osservare le stelle luminose a occhio nudo. Se
le stelle “scintillano” o cambiano rapidamente colore, l'aria è
instabile ed è meglio usare potenze inferiori e cercare oggetti
deep-sky. Se le stelle sono nitide e non scintillano, l'aria è stabile
e dovrebbe offrire ottime visioni planetarie ad alto ingrandimento.
• Trasparenza - Quanto è limpida l'aria che state guardando? Se
l'umidità dell'aria è elevata, la debole luce delle galassie e delle
nebulose può essere dispersa e diffusa prima di raggiungere il
telescopio, causando una perdita di luminosità nell'immagine. I
detriti presenti nell'aria a causa di incendi boschivi locali o anche
di lontane eruzioni vulcaniche possono contribuire alla perdita
di luminosità. A volte l'umidità o i detriti possono contribuire a
stabilizzare l'aria, permettendo di ottenere buone immagini
planetarie e lunari, ma la perdita di luce renderebbe diffi cile la
visione degli oggetti deep-sky più deboli.
SUGGERIMENTI PER L'OSSERVAZIONE CELESTE

LUMINA 130 DOBSONIAN
ITALIANO | 7
• Luminosità cielo - Anche la quantità di luce ambientale
nell'atmosfera può infl uire sull'osservazione del cielo profondo.
L'oscurità del cielo dipende dall'ambiente circostante. Nel centro
di una città, il bagliore del cielo causato dalle luci cittadine che si
rifl ettono sulla Terra può sovrastare la debole luce delle galassie
lontane. Allontanarsi dalle luci di una grande città può fare la
differenza tra vedere un debole oggetto deep-sky e non vederlo
affatto. La Luna e i pianeti sono già molto luminosi di per sé,
quindi l'effetto sull'osservazione è minimo.
Selezione di un sito di osservazione
Se si intende osservare oggetti deep-sky, come galassie e nebulose,
è bene recarsi in un sito dark-sky ragionevolmente accessibile.
Dovrebbe essere lontano dalle luci della città e sopravento rispetto
all'inquinamento atmosferico, e offrire una vista relativamente libera
dell'orizzonte. Scegliere sempre un'altitudine il più possibile elevata,
per ridurre gli effetti dell'instabilità atmosferica e assicurarsi di
essere al di sopra della nebbia al suolo.
Anche se può essere auspicabile portare il telescopio in un sito
dark-sky, non è sempre necessario. Se si intende osservare i pianeti,
la Luna o alcuni degli oggetti deep-sky più luminosi, è possibile
farlo da qualsiasi luogo, come il giardino di casa. Per proteggere
la visione notturna, cercate di posizionare il cannocchiale in una
posizione lontana dal percorso diretto dei lampioni o delle luci di
casa. Cercare di evitare di osservare tutto ciò che si trova a meno di
5-10 gradi dal tetto di un edifi cio. I tetti assorbono il calore durante
il giorno e lo irradiano di notte. Questo può causare uno strato di
aria turbolenta direttamente sopra l'edifi cio che può degradare
l'immagine. È meglio posizionare il telescopio direttamente su una
superfi cie sterrata o erbosa. Evitare di posizionare il telescopio su
piattaforme rialzate come i ponti di legno o su superfi ci dure come il
cemento o i marciapiedi, perché trasmettono facilmente le vibrazioni
al telescopio.
Non osservare attraverso una fi nestra: i vetri distorcono
notevolmente l'immagine. Una fi nestra aperta può essere anche
peggiore, poiché l'aria calda dell'interno fuoriesce e crea turbolenze
che degradano ulteriormente la vista. Per ottenere i migliori risultati,
portate il telescopio all'esterno: l'astronomia è un'attività da svolgere
all'aperto.
Scegliere il momento migliore per
osservare
Evitare di osservare subito dopo il tramonto. Quando il terreno
si raffredda, si creano turbolenze d'aria che possono distorcere
la vista. Le condizioni di solito migliorano con il passare della
notte: la visione diventa più stabile e l'inquinamento atmosferico e
l'illuminazione del suolo spesso diminuiscono. I momenti migliori per
l'osservazione sono spesso le prime ore del mattino, prima dell'alba.
Gli oggetti si osservano meglio quando attraversano il meridiano,
la linea immaginaria che va da nord a sud passando per un punto
direttamente sopra la testa. Questo è il punto in cui gli oggetti
sono più alti nel cielo e il telescopio sta guardando attraverso la
minor quantità di atmosfera. Gli oggetti vicini all'orizzonte, che
sorgono o tramontano, appaiono meno nitidi perché vengono
osservati attraverso uno strato più spesso dell'atmosfera terrestre,
che aumenta la turbolenza. Non è sempre necessario un cielo
perfettamente limpido per osservare la Luna o i pianeti. In effetti,
condizioni di cielo parzialmente nuvoloso possono talvolta offrire una
visione sorprendentemente buona.
Raffreddamento del telescopio
I telescopi necessitano di almeno 10 minuti per raffreddarsi alla
temperatura dell'aria esterna. Potrebbe essere necessario un
tempo maggiore se c'è una grande differenza tra la temperatura del
telescopio e quella dell'aria ambiente. Il raffreddamento completo
del telescopio riduce al minimo la distorsione delle onde di calore
all'interno del tubo del telescopio (correnti del tubo).
Adattare gli occhi
Se si ha intenzione di osservare oggetti deep-sky in un sito dark-
sky, date agli occhi il tempo di adattarsi completamente all'oscurità.
Evitare le fonti di luce bianca come torce, fari di auto e lampioni,
perché possono ostacolare la visione notturna. Ci vogliono circa
30 minuti perché le pupille si dilatino completamente e gli occhi
accumulino i pigmenti ottici necessari per rilevare la debole luce
degli oggetti lontani.
Se si ha bisogno di luce mentre si prepara il telescopio, utilizzare
una torcia LED rossa con l'impostazione di luminosità più bassa ed
evitare di guardare direttamente il fascio di luce. In questo modo
si preserva la visione notturna e si aumentano le possibilità di
individuare i deboli obiettivi del cielo profondo.
Durante l'osservazione, tenere entrambi gli occhi aperti per ridurre
l'affaticamento degli occhi. Se questo distrae, coprire l'occhio non
utilizzato con la mano o con una benda. Inoltre, tenere presente
che il centro dell'occhio non è così sensibile in condizioni di
scarsa illuminazione. Per vedere meglio gli oggetti deboli, guardare
leggermente di lato anziché direttamente verso di loro: questa
tecnica si chiama visione distolta e fa risaltare i dettagli più sottili.
Salto tra le stelle
Il modo più semplice per navigare nel cielo notturno è utilizzare una
tecnica chiamata star hopping. Per iniziare, devi prima misurare il
campo visivo del cercatore.
Iniziare scegliendo una costellazione con stelle luminose, utilizzando un
planisfero o un'applicazione di astronomia per identifi carla. Poi cercare
la stessa costellazione nel proprio atlante stellare.
Poi, centra il cercatore su una stella luminosa che riconosci dalla mappa
stellare. Posizionare l'occhio a circa 30 cm dietro la fi nestra rifl ettente
del cercatore StarPointer e muovi il telescopio fi nché la stella non
appare sul bordo del campo visivo della fi nestra (qualsiasi direzione va
bene). Senza spostare il telescopio, guardare attraverso la fi nestra e
notare un'altra stella vicino al bordo opposto.
Ora trovare entrambe le stelle sulla carta stellare. Utilizzare un righello
per misurare la distanza tra i due sulla mappa: questa distanza
rappresenta un campo visivo del cercatore.
Ora è possibile utilizzare questa misura come guida per spostarsi da
una stella all'altra sulla mappa, aiutandosi a localizzare gli oggetti celesti
con maggiore precisione.
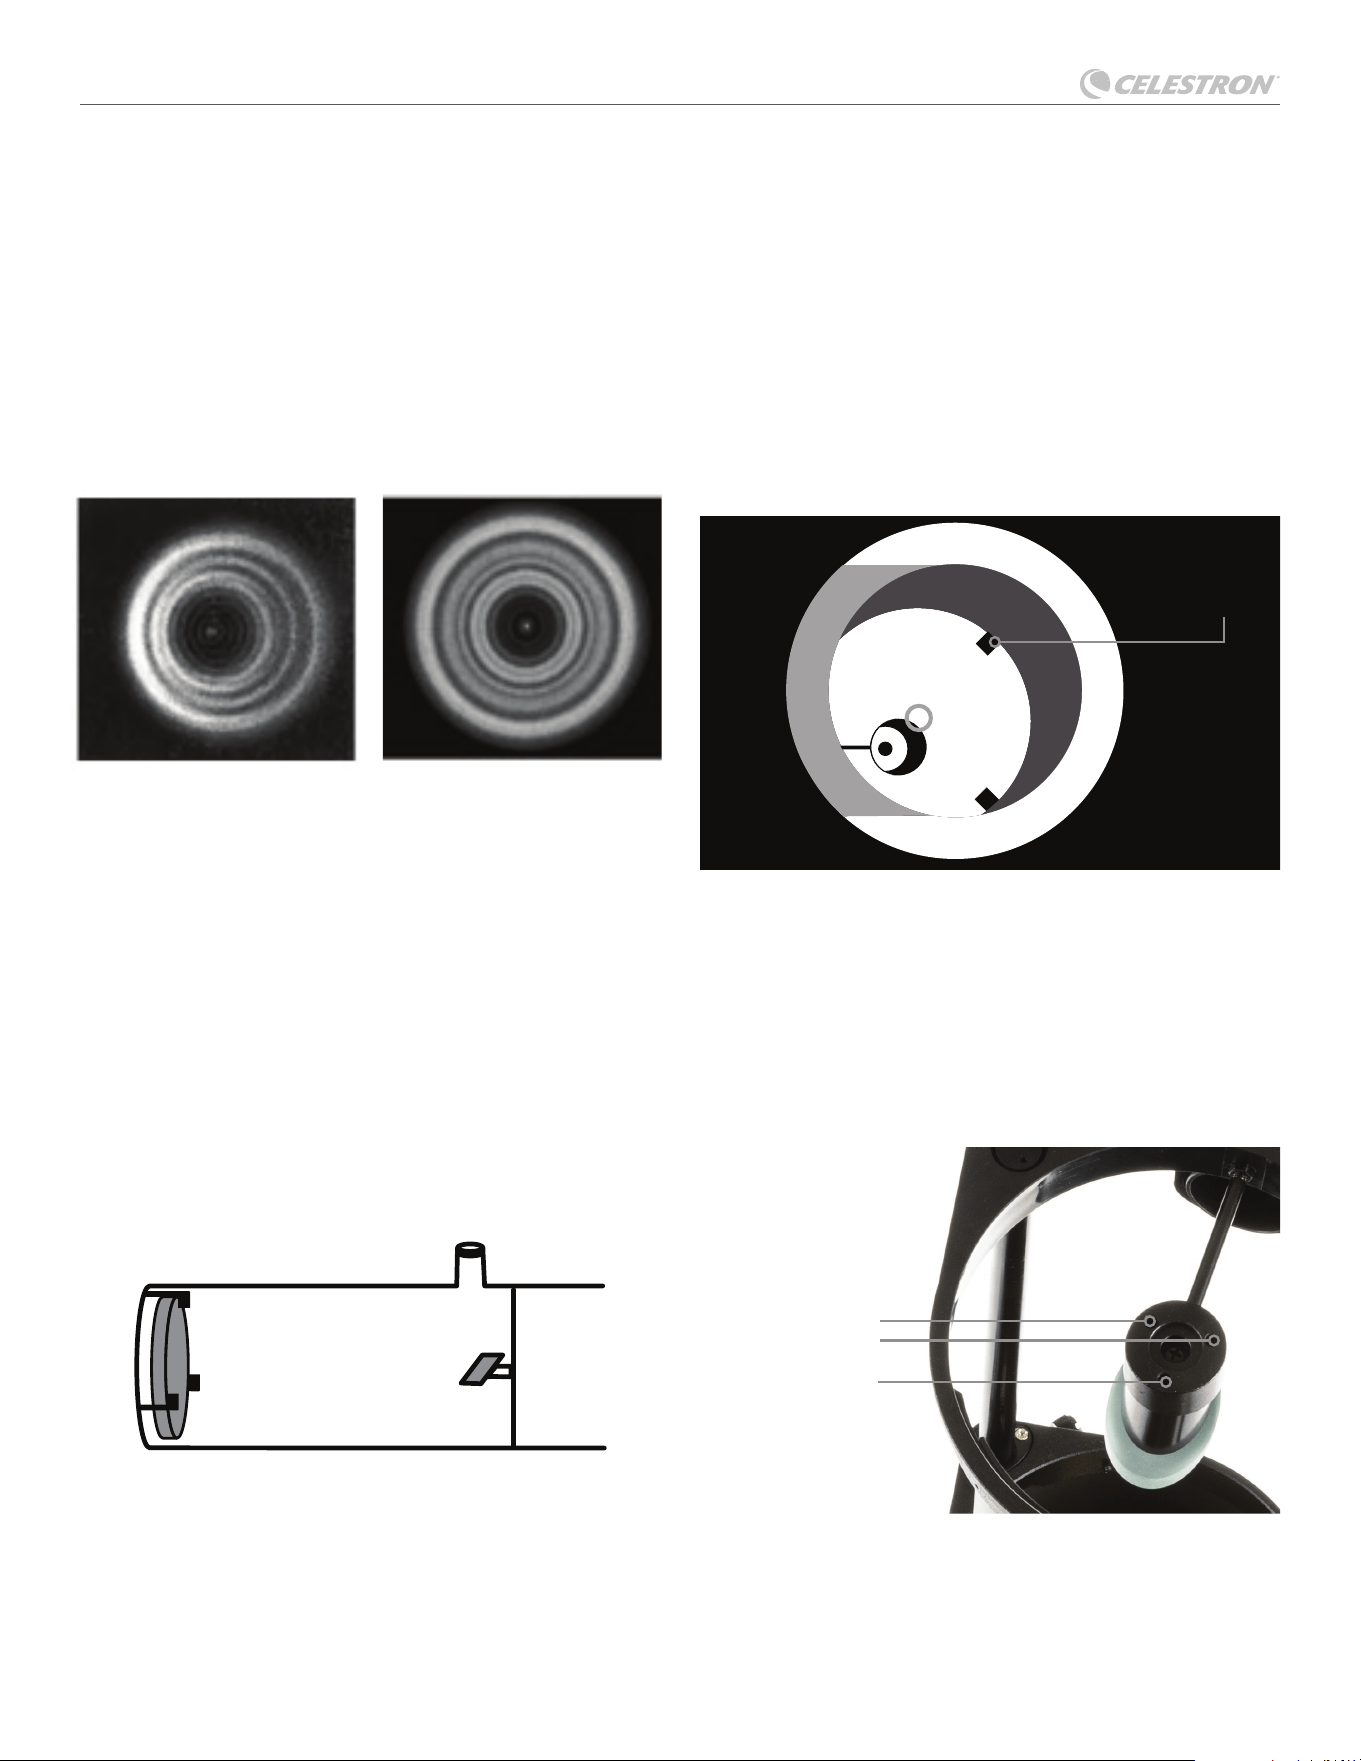
LUMINA 130 DOBSONIAN
8 | ITALIANO
La collimazione è il processo di allineamento degli specchi del
telescopio in modo che lavorino di concerto per fornire una luce
correttamente focalizzata all'oculare. Osservando le immagini di
stelle sfocate, si può verifi care se le ottiche del telescopio sono
allineate. Posizionare una stella al centro del campo visivo e spostare
il focalizzatore in modo che l'immagine sia leggermente sfocata. Se
le condizioni di vista sono buone, si vedrà un cerchio di luce centrale
(il disco d'aria) circondato da una serie di anelli di diffrazione. Se gli
anelli sono simmetrici rispetto al disco d'aria, l'ottica del telescopio
è collimata correttamente. Fig. A
Se non si dispone di uno strumento di collimazione, si consiglia di
realizzare un “tappo di collimazione” con un contenitore di plastica
per pellicole da 35 mm (nero con coperchio grigio). Praticare un
piccolo foro nel centro esatto del coperchio e tagliare il fondo del
contenitore. Questo dispositivo mantiene l'occhio centrato nel tubo
del focalizzatore. Inserire il tappo di collimazione nel focalizzatore al
posto di un normale oculare.
Ecco come collimare il telescopio:
Togliere il coprilente che copre la parte anteriore del telescopio e
guardare il tubo ottico. In basso, si vedrà lo specchio primario tenuto
in posizione da tre clip distanti 120° l'una dall'altra, e in alto il piccolo
specchio secondario ovale tenuto in un supporto e inclinato di 45°
verso il focalizzatore all'esterno della parete del tubo. (Fig. B)
L'allineamento dello specchio secondario si effettua regolando le
tre viti più piccole che circondano il bullone centrale. Lo specchio
primario viene regolato dalle tre viti di regolazione poste sul retro del
CURA DEL TELESCOPIO
COLLIMAZIONE CORRETTAREGOLAZIONE NECESSARIA
telescopio. Le tre viti di bloccaggio accanto servono a mantenere lo
specchio in posizione dopo la collimazione.
Collimazione
Clip dello
specchio
Specchio principale
Fig. A:
Il “disco d'aria” creato da una stella leggermente fuori fuoco
Specchio secondario
Allineamento dello specchio
secondario
Puntate il telescopio verso una parete illuminata e inserite la calotta
di collimazione nel focalizzatore al posto di un normale oculare.
Guardare nel focalizzatore attraverso il tappo di collimazione.
Potresti dover ruotare la manopola di messa a fuoco di qualche
giro fi nché l'immagine rifl essa del focalizzatore non scompare dal
tuo campo visivo.
Specchio
secondario
viti di regolazione
viti di regolazioneviti di regolazione
NOTA: Tenere l'occhio contro la parte posteriore del tubo di messa a
fuoco se stai collimando senza tappo di collimazione.
Ignorare per ora l'immagine rifl essa del tappo di collimazione o il
tuo occhio. Cercare invece le tre clip che tengono in posizione lo
specchio primario. Se non riesci a vederle, il tuo telescopio non è in
collimazione. (Fig. C)
Fig. C:
Vista attraverso il focalizzatore, che mostra il rifl esso dello spec-
chio primario e delle clip dello specchio
Fig. D: Posizione dei bulloni di regolazione dello specchio secondario
Fig. B: Vista laterale dell'interno del telescopio
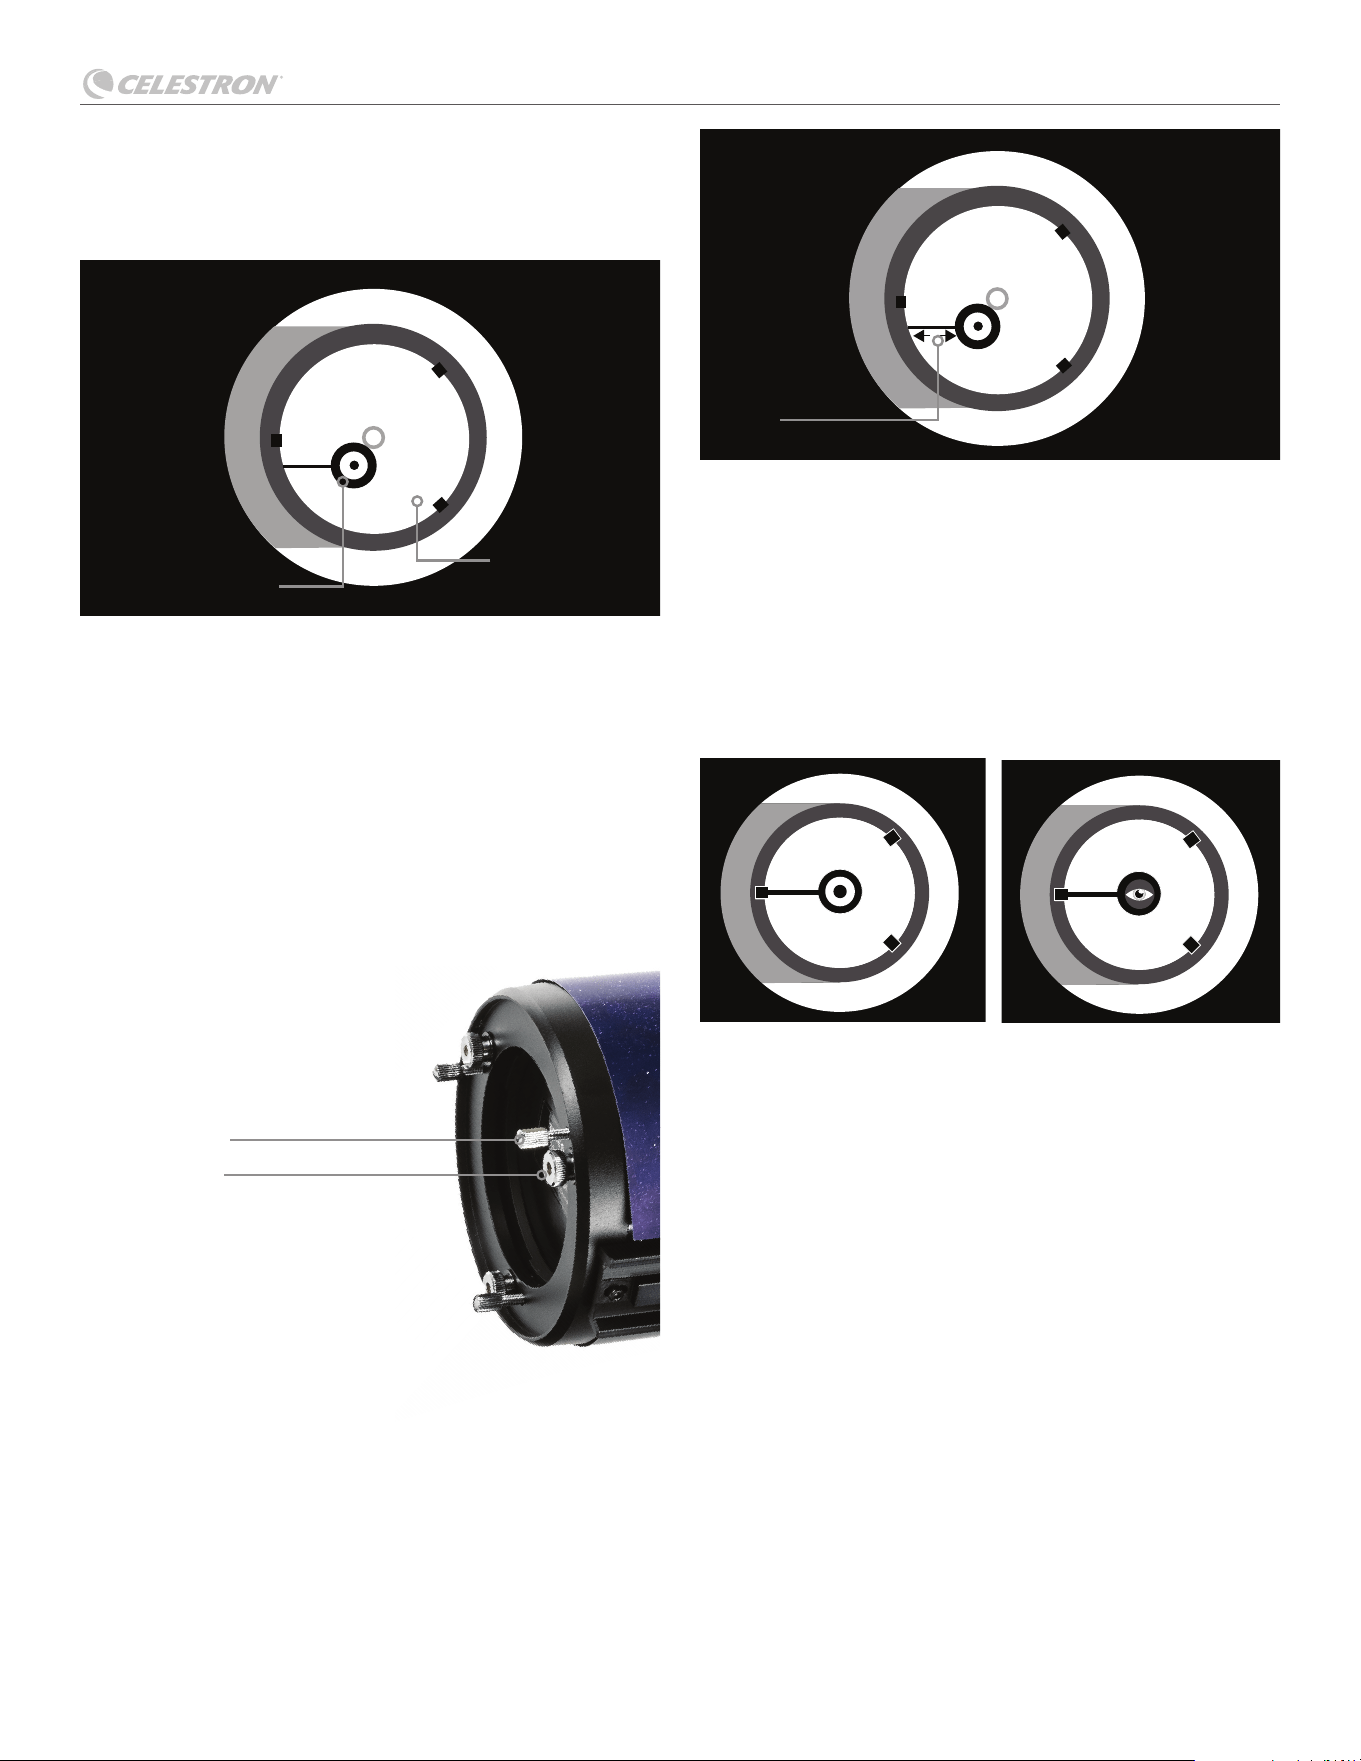
LUMINA 130 DOBSONIAN
ITALIANO | 9
Rifl esso
dello specchio
primario
Rifl esso dello
specchio secondario
Vite di bloccaggio
Vite di regolazione
Per allineare lo specchio secondario, regolare i tre bulloni sulla
parte superiore del supporto dello specchio secondario con una
chiave a brugola o un cacciavite a croce. Dovrai allentarne uno
alternativamente e poi compensare il gioco stringendo gli altri due.
(Fig. D)
Fermarsi quando si vedono tutti e tre i fermagli dello specchio. (Fig.
E) Assicurarsi che tutte e tre le piccole viti di allineamento siano
serrate per fi ssare lo specchio secondario in posizione.
Allineamento dello specchio
principale
Ci sono tre bulloni grandi e tre viti piccole sul retro del telescopio. I
bulloni grandi sono le viti di regolazione e le viti piccole sono le viti
di bloccaggio. (Fig. F)
Allentare i bulloni grandi di qualche giro. Ora far scorrere la mano
intorno alla parte anteriore del telescopio, tenendo l'occhio sul
focalizzatore. Si vedrà l'immagine rifl essa della propria mano.
L'obiettivo è vedere in che modo lo specchio primario è difettoso.
Per farlo, bisogna fermarsi nel punto in cui l'immagine rifl essa dello
specchio secondario è più vicina al bordo dello specchio primario.
(Fig.G)
Una volta raggiunto quel punto, fermati e tieni la mano lì mentre
guardi la parte posteriore del telescopio. C'è una vite di regolazione?
Se c'è, dovrai allentarla (ruotandola verso sinistra) per allontanare lo
specchio da quel punto. In caso contrario, spostati dall'altro lato
e stringi la vite di regolazione sul lato opposto. Questo allineerà
gradualmente lo specchio fi no a ottenere l'aspetto mostrato in Fig.
H. Chiedere al proprio collaboratore di regolare le viti secondo le
indicazioni fornite mentre si guarda nel focalizzatore.
Dopo il tramonto, uscire e puntare il telescopio su Polaris, la stella
polare. Con un oculare nel focalizzatore, togliere l'immagine dalla
messa a fuoco. Si vedrà la stessa immagine, solo che ora sarà
illuminata dalla luce delle stelle. Se necessario, ripetere il processo
di collimazione. Questa volta, mantenere la stella centrata mentre si
regola lo specchio.
Pulizia del telescopio
Quando non si utilizza il telescopio, posizionare il tappo antipolvere
sulla sua estremità, per evitare che la polvere si depositi sulle
superfi ci degli specchi e delle lenti. Non pulire i componenti ottici
del telescopio se non si ha familiarità con le superfi ci ottiche. Pulire
il cercatore e gli oculari esclusivamente con carta speciale per lenti.
Maneggiare con cura gli oculari. Non toccare le superfi ci ottiche del
telescopio o degli accessori.
Fig. E:
Vista attraverso il focalizzatore (sono visibili tutti e tre i fermi dello
specchio)
Fig. G: Vista attraverso l'oculare che mostra il posizionamento della mano
Fig. H: Vista attraverso il focalizzatore, che mostra entrambi gli specchi
allineati con e senza l'oculare di collimazione
Fig. F: Vista posteriore del telescopio che mostra i bulloni di regolazione e
le viti di bloccaggio
Porre la mano
qui
Utilizzo del focalizzatoreUtilizzo dell'oculare di collimazione
LUMINA 130 DOBSONIAN
10 | ITALIANO
Prodotto in Cina | 05/25
SOFTWARE & APP
Il vostro acquisto include un software per il computer e un'applicazione per lo smartphone. Non è necessario scaricare questi strumenti
per utilizzare il telescopio, ma possono migliorare la tua esperienza.
REQUISITI MINIMI DI SISTEMA
Windows:
• Windows 7 o superiore
• Processore 500MHz o superiore
• 128 MB RAM
• 850 MB di spazio su disco rigido
• Scheda grafi ca da 32 MB compatibile con
OpenGL
• Monitor con risoluzione 1024x768 pixel
(raccomandato)
REQUISITI MINIMI DI SISTEMA
Dispositivi Android: Android 4.0 e superiore
Dispositivi Apple iOS: iOS 4.3 e superiore
Mac:
• Universal binary (compatibile PPC/Intel)
• OS X 10.4 o superiore
(10.5 o superiore per Elementary)
• Processore G3 450 MHz o superiore
• 128 MB RAM
• 850 MB di spazio su disco rigido
• Scheda grafi ca da 32 MB compatibile con OpenGL
• Monitor con risoluzione 1024x768 pixel (racco-
mandato)
celestron.com/pages/warranty
Celestron SkyPortal Powered by
SkySafari™ Astronomy App
Gli esperti di telescopi Celestron hanno collaborato
con SkySafari per ridefi nire il modo
in cui vivi il cielo
notturno.
Esplorare un database di oltre 120.000
oggetti celesti, tra cui stelle, pianeti, ammassi stellari,
nebulose, galassie, asteroidi, comete e satelliti, inclusa la
Stazione Spaziale Internazionale! Puoi persino ascoltare
le descrizioni audio degli oggetti più popolari durante
l'osservazione. SkyPortal include tutto ciò di cui hai
bisogno per osservare le stelle in un modo nuovo ed
entusiasmante.
ISTRUZIONI DI SICUREZZA
• Rischio di esplosione se la batteria è sostituita con un
tipo di batteria non corretto.
• La batteria in dotazione non è ricaricabile.
• Utilizzare la batteria esclusivamente come previsto
originariamente per evitare un corto circuito. Quando
il materiale conduttivo è in contatto diretto con il polo
positivo e negativo della batteria si ha un corto circuito.
• Non usare una batteria danneggiata.
• Non conservare la batteria in un ambiente
eccessivamente freddo o caldo. Ciò può ridurre la
durata della batteria.
• Quando si sostituisce la batteria, consultare il manuale
di istruzioni e assicurarsi che i poli positivo e negativo
siano orientati correttamente.
• Non gettare la batteria nelle fi amme.
• Smaltire la batteria in conformità ai regolamenti locali.
NOTA FCC: Il presente dispositivo è conforme alla Parte 15 delle Norme FCC. L'utilizzo
è soggetto alle seguenti due condizioni: (1) Il presente dispositivo non deve causare
interferenze dannose, e (2) il presente dispositivo deve accettare qualsiasi interferenza
ricevuta, comprese interferenze che potrebbero causare un funzionamento indesiderato.
Software di astronomia Celestron Starry Night
Celestron Starry Night, software di astronomia premier nel mercato, conduce l’utente in
un viaggio nel sistema solare passato, presente e futuro. Fornisce informazioni sulla volta
stellata e aiuta a pianifi care le successive sessioni di osservazione. Utilizzare Starry Night
per creare un modello esatto del cielo notturno osservato dal proprio cortile, da una città
vicina o da un qualsiasi punto sulla Terra.
BISOGNO DI AIUTO? Contattare l'Assistenza Tecnica Celestron
celestron.com/pages/technical-support
©2025 Celestron. Celetron e Symbol sono marchi di Celestron, LLC. Tutti i diritti riservati.
Celestron.com
Stati Uniti: 2835 Columbia Street, Torrance, CA 90503 USA
Regno Unito: Unit 2 Transigo, Gables Way, Thatcham RG19 4JZ, Regno Unito
Questo prodotto è progettato per essere utilizzato da persone di età pari o superiore ai 14 anni.
MANUAL DE INSTRUCCIONES
Modelo# 31200 ESPAÑOL

ÍNDICE
Contenido de la caja . . . . . . . . . . . . . . . . . . . . . . . . . . . . . . . . . . . . . . . . . . . . . . 1
Lista de piezas . . . . . . . . . . . . . . . . . . . . . . . . . . . . . . . . . . . . . . . . . . . . . . . . . . . . . . 1
Montaje del telescopio . . . . . . . . . . . . . . . . . . . . . . . . . . . . . . . . . . . . . . . . . . . . 2
Uso del telescopio . . . . . . . . . . . . . . . . . . . . . . . . . . . . . . . . . . . . . . . . . . . . . . . . 3
Equilibrar su telescopio . . . . . . . . . . . . . . . . . . . . . . . . . . . . . . . . . . . . . . . . . . . . . . . . . 3
Posicionar su telescopio . . . . . . . . . . . . . . . . . . . . . . . . . . . . . . . . . . . . . . . . . . . . . . . . 3
Usar el mando de control de tensión . . . . . . . . . . . . . . . . . . . . . . . . . . . . . . . . . . . . . . . . . 3
Enfocar su telescopio . . . . . . . . . . . . . . . . . . . . . . . . . . . . . . . . . . . . . . . . . . . . . . . . . . 3
Alinear su localizador . . . . . . . . . . . . . . . . . . . . . . . . . . . . . . . . . . . . . . . . . . . . . . . . . . 4
Acceder a la batería del localizador . . . . . . . . . . . . . . . . . . . . . . . . . . . . . . . . . . . . . . . . . 4
Su primera noche en el exterior: La Luna . . . . . . . . . . . . . . . . . . . . . . . . . . . . . . . . . . . . . . 5
Recomendaciones de observación celeste . . . . . . . . . . . . . . . . . . . . . . . . . . . . 6
Aumento . . . . . . . . . . . . . . . . . . . . . . . . . . . . . . . . . . . . . . . . . . . . . . . . . . . . . . . . . . 6
Campo visual . . . . . . . . . . . . . . . . . . . . . . . . . . . . . . . . . . . . . . . . . . . . . . . . . . . . . . . 6
Los planetas . . . . . . . . . . . . . . . . . . . . . . . . . . . . . . . . . . . . . . . . . . . . . . . . . . . . . . . 6
Objetos del espacio profundo . . . . . . . . . . . . . . . . . . . . . . . . . . . . . . . . . . . . . . . . . . . . . 6
Condiciones del firmamento . . . . . . . . . . . . . . . . . . . . . . . . . . . . . . . . . . . . . . . . . . . . . . 6
Seleccionar un lugar de observación . . . . . . . . . . . . . . . . . . . . . . . . . . . . . . . . . . . . . . . . . 7
Elegir el mejor momento para observar . . . . . . . . . . . . . . . . . . . . . . . . . . . . . . . . . . . . . . . . 7
Refrigerar el telescopio . . . . . . . . . . . . . . . . . . . . . . . . . . . . . . . . . . . . . . . . . . . . . . . . . 7
Adaptar sus ojos . . . . . . . . . . . . . . . . . . . . . . . . . . . . . . . . . . . . . . . . . . . . . . . . . . . . . 7
Salto estelar . . . . . . . . . . . . . . . . . . . . . . . . . . . . . . . . . . . . . . . . . . . . . . . . . . . . . . . 7
Cuidados adecuados para su telescopio . . . . . . . . . . . . . . . . . . . . . . . . . . . . . . 8
Colimado . . . . . . . . . . . . . . . . . . . . . . . . . . . . . . . . . . . . . . . . . . . . . . . . . . . . . . . . . . 8
Alinear el espejo secundario . . . . . . . . . . . . . . . . . . . . . . . . . . . . . . . . . . . . . . . . . . . . . . 8
Alinear el espejo primario . . . . . . . . . . . . . . . . . . . . . . . . . . . . . . . . . . . . . . . . . . . . . . . . 9
Limpiar su telescopio . . . . . . . . . . . . . . . . . . . . . . . . . . . . . . . . . . . . . . . . . . . . . . . . . . 9
Software y aplicación . . . . . . . . . . . . . . . . . . . . . . . . . . . . . . . . . . . . . . . . . . . . . 10
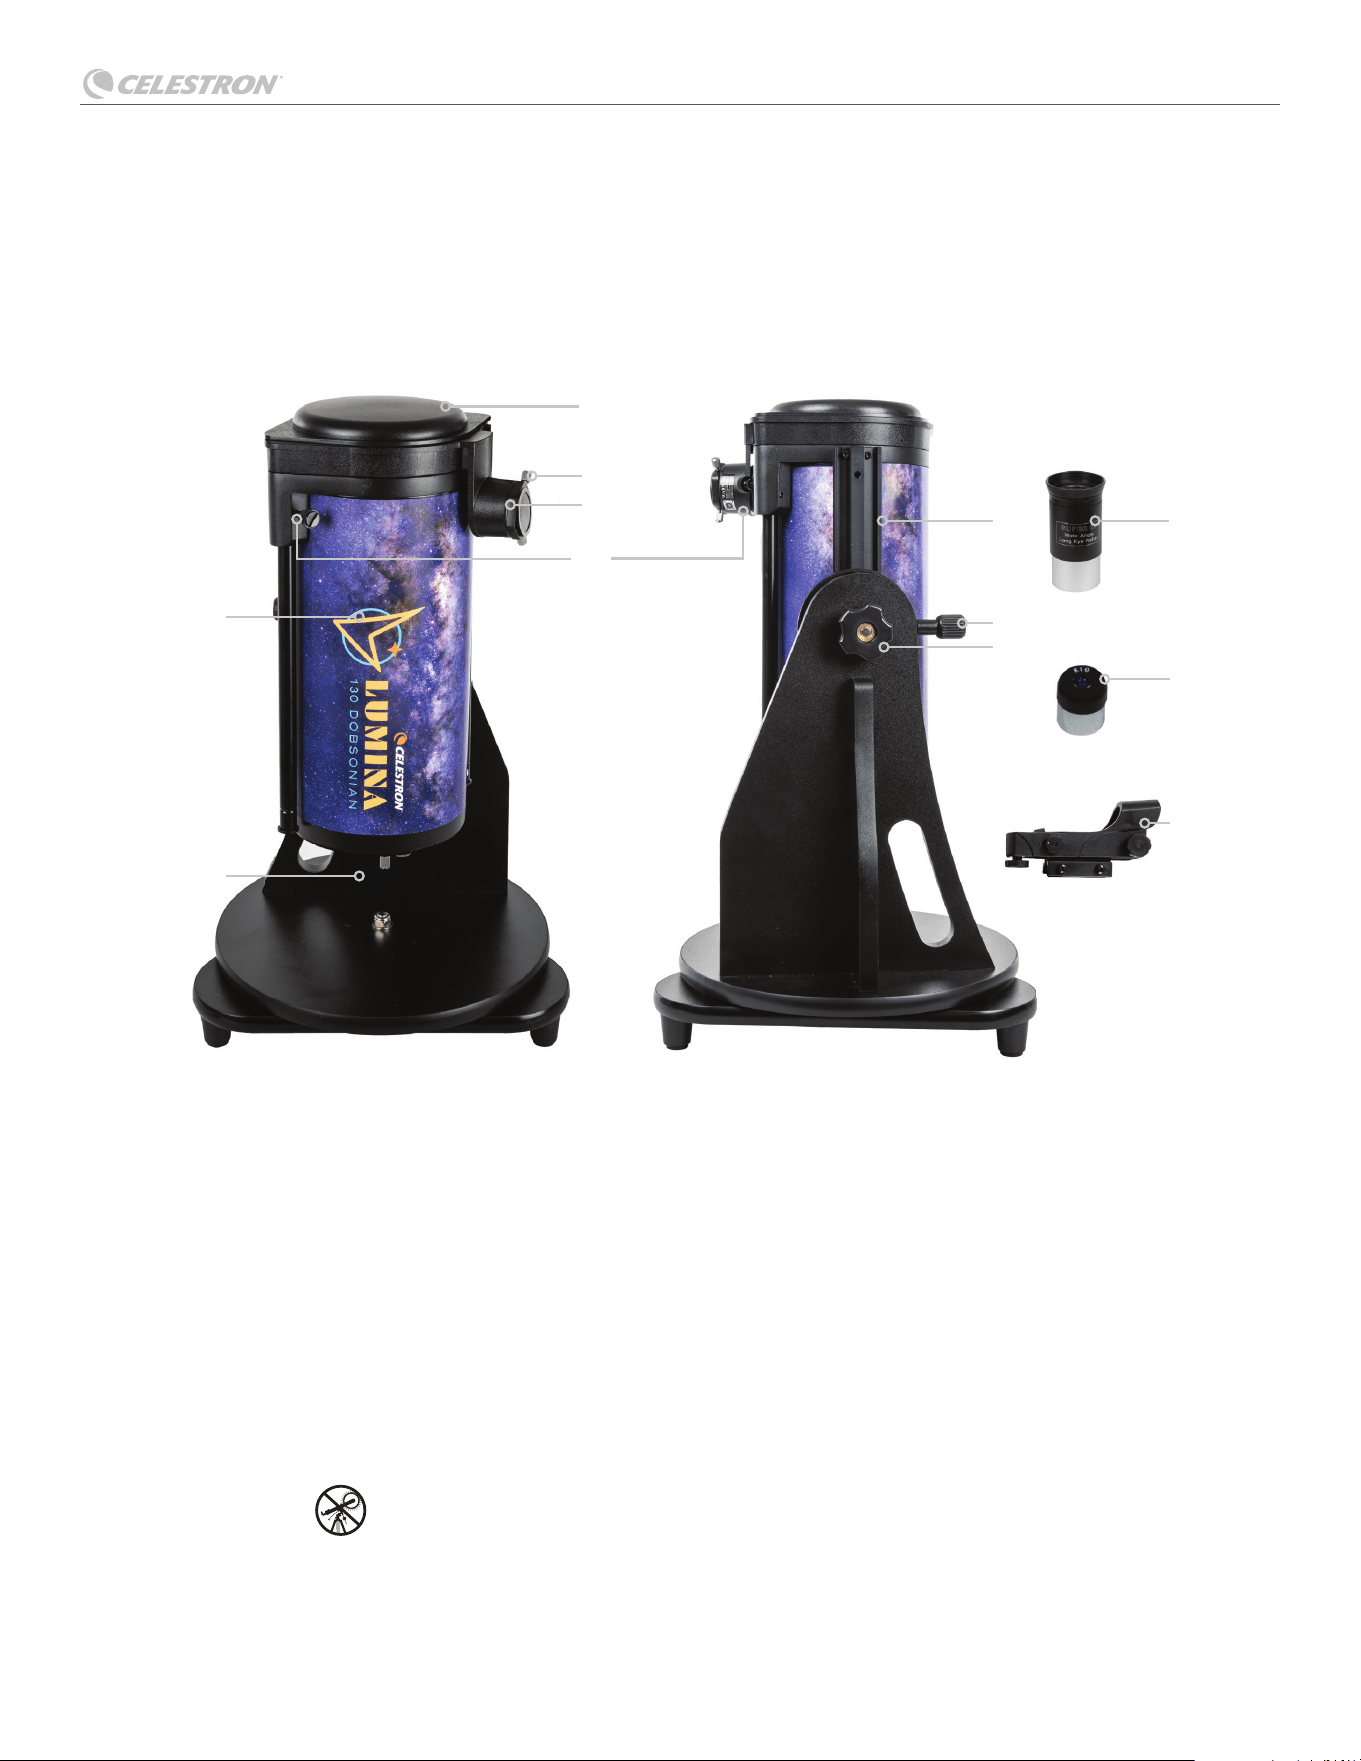
LUMINA 130 DOBSONIAN
ESPAÑOL | 1
Recomendamos guardar la caja de su telescopio para poder usarla para guardarlo cuando no lo use. Desembale cuidadosamente la caja,
algunas piezas son pequeñas. Use la lista de piezas siguiente para comprobar que dispone de todas las piezas y accesorios.
CONTENIDO DE LA CAJA
Lista de piezas
1. Tubo óptico
2. Base
3. Tapa para polvo
4. Tornillo de bloqueo de ocular
5. Arandela de enfoque
6. Tornillos de bloqueo de deslizamiento
7. Barra machihembrada
8. Tornillo de bloqueo de machihembrado
9. Mando de control de tensión
10. Ocular de 25mm
11. Ocular de 10mm
12. Localizador de punto rojo StarPointer™
NECESITARÁ: (1) Destornillador de cabezal Phillips pequeño para sustituir la batería del localizador StarPointer
* ¡AVISO SOLAR! No intente nunca observar el Sol por un telescopio
sin un fi ltro solar.
1
2
6
4
5
7 10
11
12
9
8
3
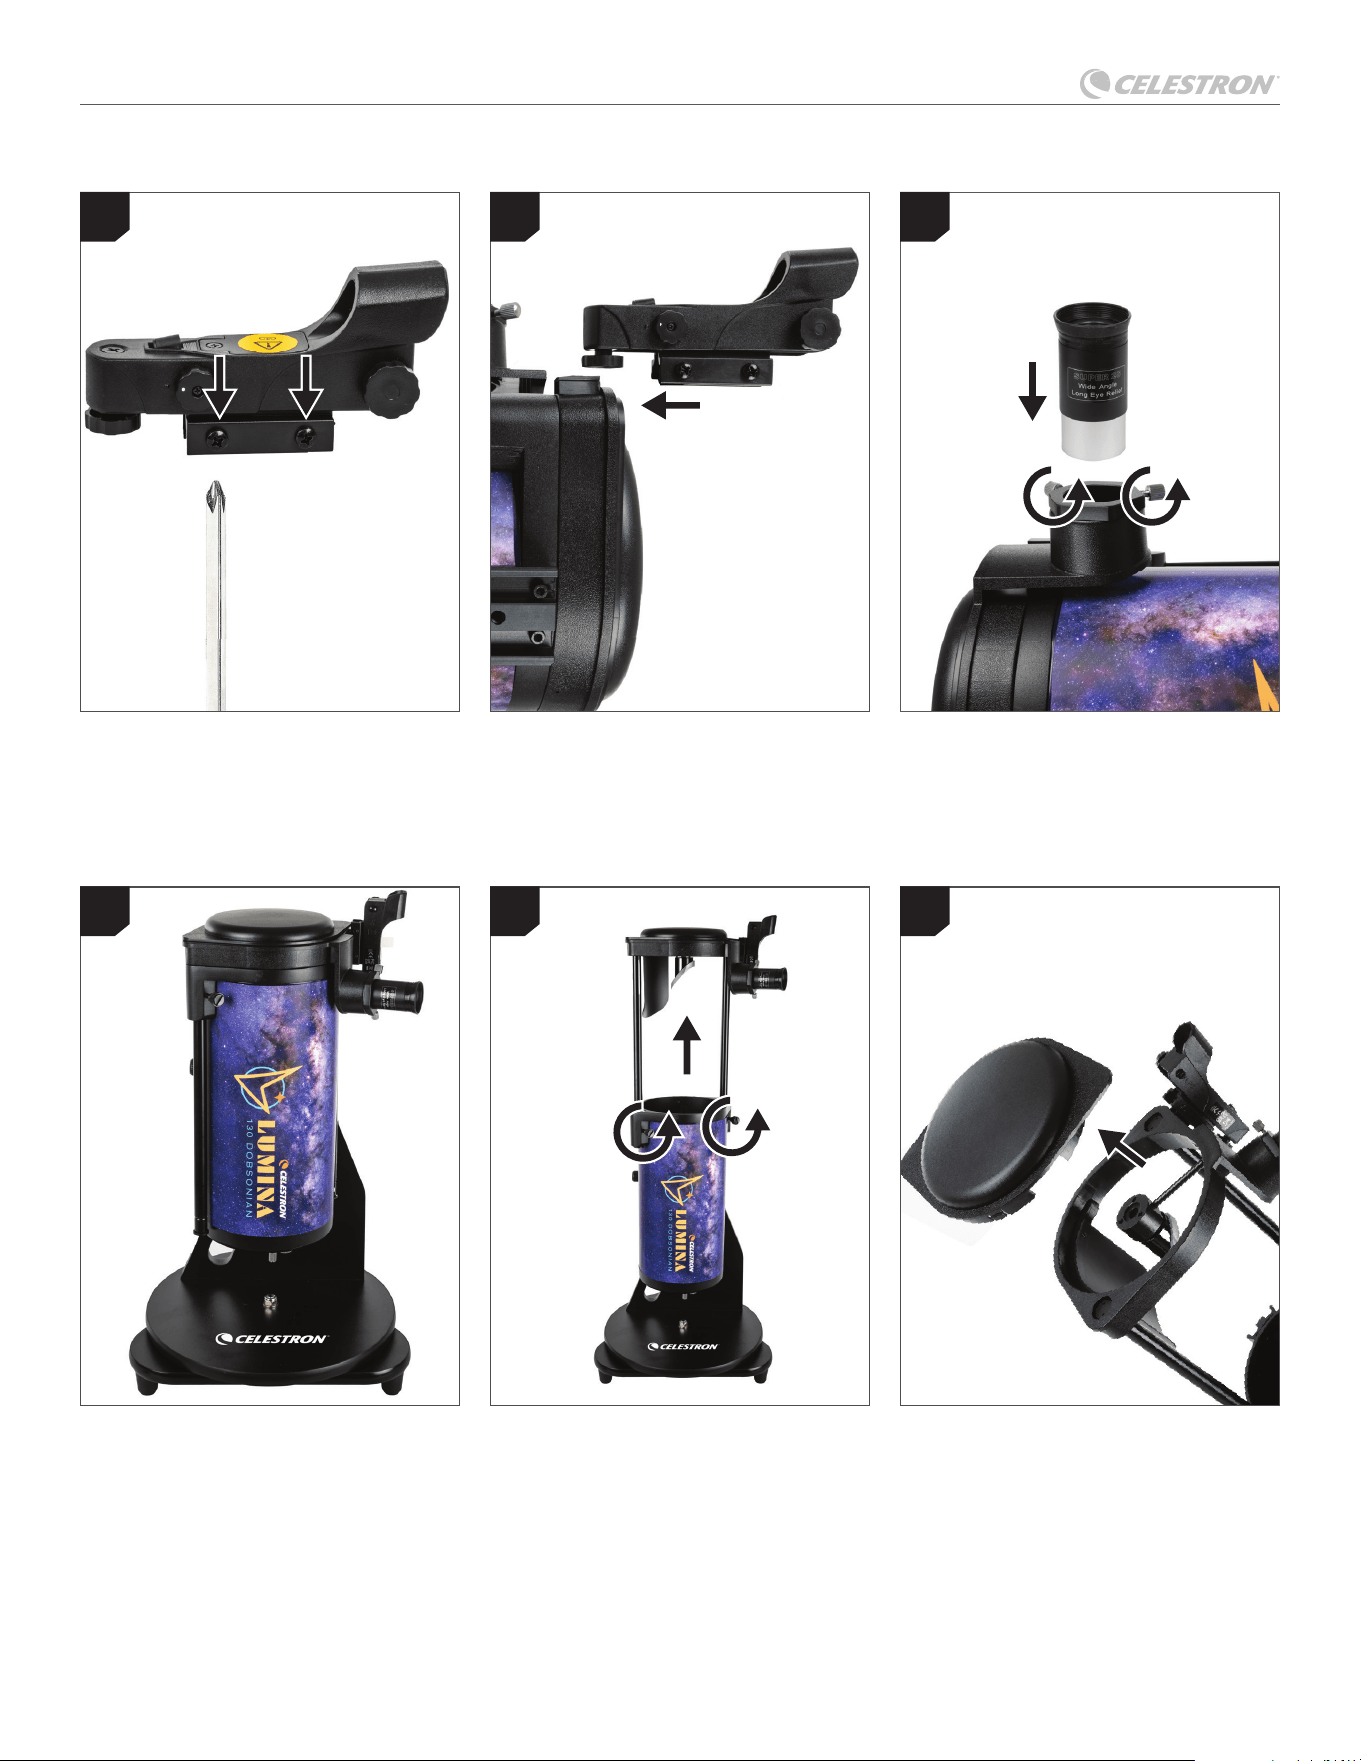
LUMINA 130 DOBSONIAN
2 | ESPAÑOL
MONTAJE DEL TELESCOPIO
Localice el localizador de punto rojo. Afl oje
ligeramente los tornillos del lateral del
localizador.
Localice la base pequeña del localizador
cerca de la apertura anterior del tubo.
Deslice el localizador en la base y apriete
los tornillos para asegurarlo en posición. No
apriete en exceso los tornillos.
Localice el ocular. Afl oje los tornillos de
bloqueo del ocular y deslice el ocular en
el soporte. Apriete ligeramente los tornillos
para mantener el ocular en posición. No
apriete los tornillos en exceso.
Cuando no lo use, guarde el telescopio en la
confi guración mostrada.
Retire la tapa para polvo antes de observar
.
Para extender el tubo del telescopio,
afl oje los dos tornillos de bloqueo de
deslizamiento y tire de la parte superior de la
estructura del telescopio hasta que encaje
en posición. Apriete los tornillos de bloqueo
de deslizamiento. No lo apriete en exceso.
1
4
2
5 6
3
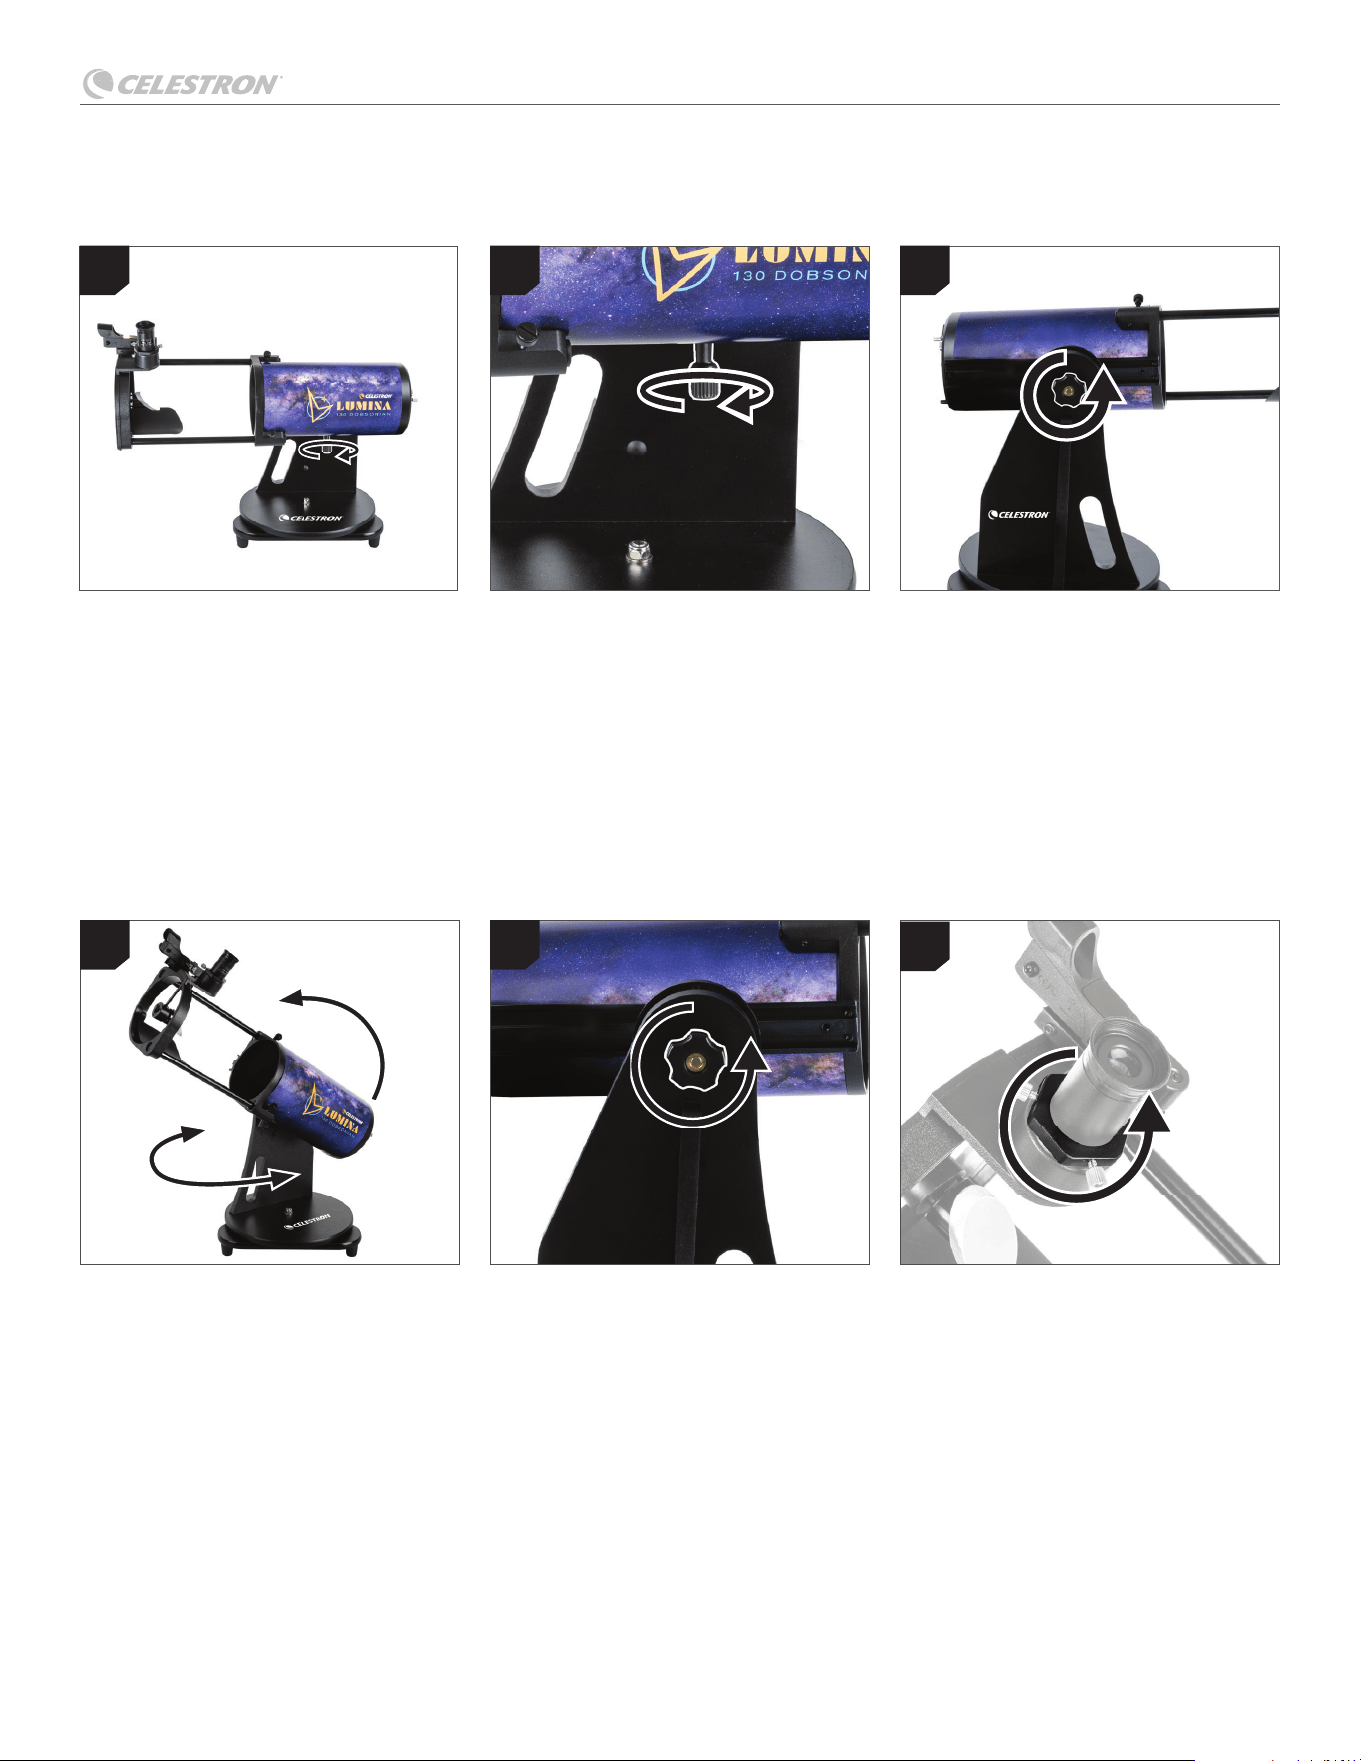
LUMINA 130 DOBSONIAN
ESPAÑOL | 3
Equilibrar su telescopio
Posicionar su
telescopio
Para equilibrar el telescopio, afl oje el tornillo
de bloqueo del machihembrado y deslice
el tubo hasta el punto en que no pueda
moverse solo.
Para apuntar el telescopio, mueva el tubo
del telescopio arriba y abajo en altitud
(posición arriba y abajo) o haga oscilar el
telescopio sobre la base en azimut (posición
a izquierda y derecha).
Afl oje o apriete el mando de control de
tensión para añadir la fricción precisa
para dejar que el tubo se mueva con
facilidad cuando se presione pero se
mantenga en posición cuando no. Puede
ser necesario volver a ajustar el mando de
control de tensión cuando añada o retire
accesorios del tubo.
Si usa accesorios pesados, puede tener que
volver a equilibrar el telescopio tras añadir o
retirar el elemento.
Gire lentamente la rueda de enfoque en uno
u otro sentido hasta que la imagen del ocular
esté defi nida. Puede tener que ajustar con
precisión el enfoque con el tiempo a medida
que cambie la temperatura, torsión y otros
factores que causen leves cambios. Los
telescopios rápidos (relación focal corta)
son especialmente susceptibles a ello, en
especial antes de alcanzar temperatura
ambiente. También debería volver a enfocar
siempre que cambie oculares o añada o
retire una lente Barlow.
Apriete el tornillo de bloqueo del
machihembrado para fi jar el tubo en
posición. No lo apriete en exceso.
Usar el mando de
control de tensión
Apriete el mando de control de tensión hasta
que el tubo precise de un ligero esfuerzo
para moverlo. Querrá un poco de fricción
para aguantar el telescopio en posición. No
apriete en exceso el mando. El tubo debería
seguir moviéndose con suavidad con muy
poco esfuerzo.
Enfocar su telescopio
1
1 1
1
2 3
USO DEL TELESCOPIO
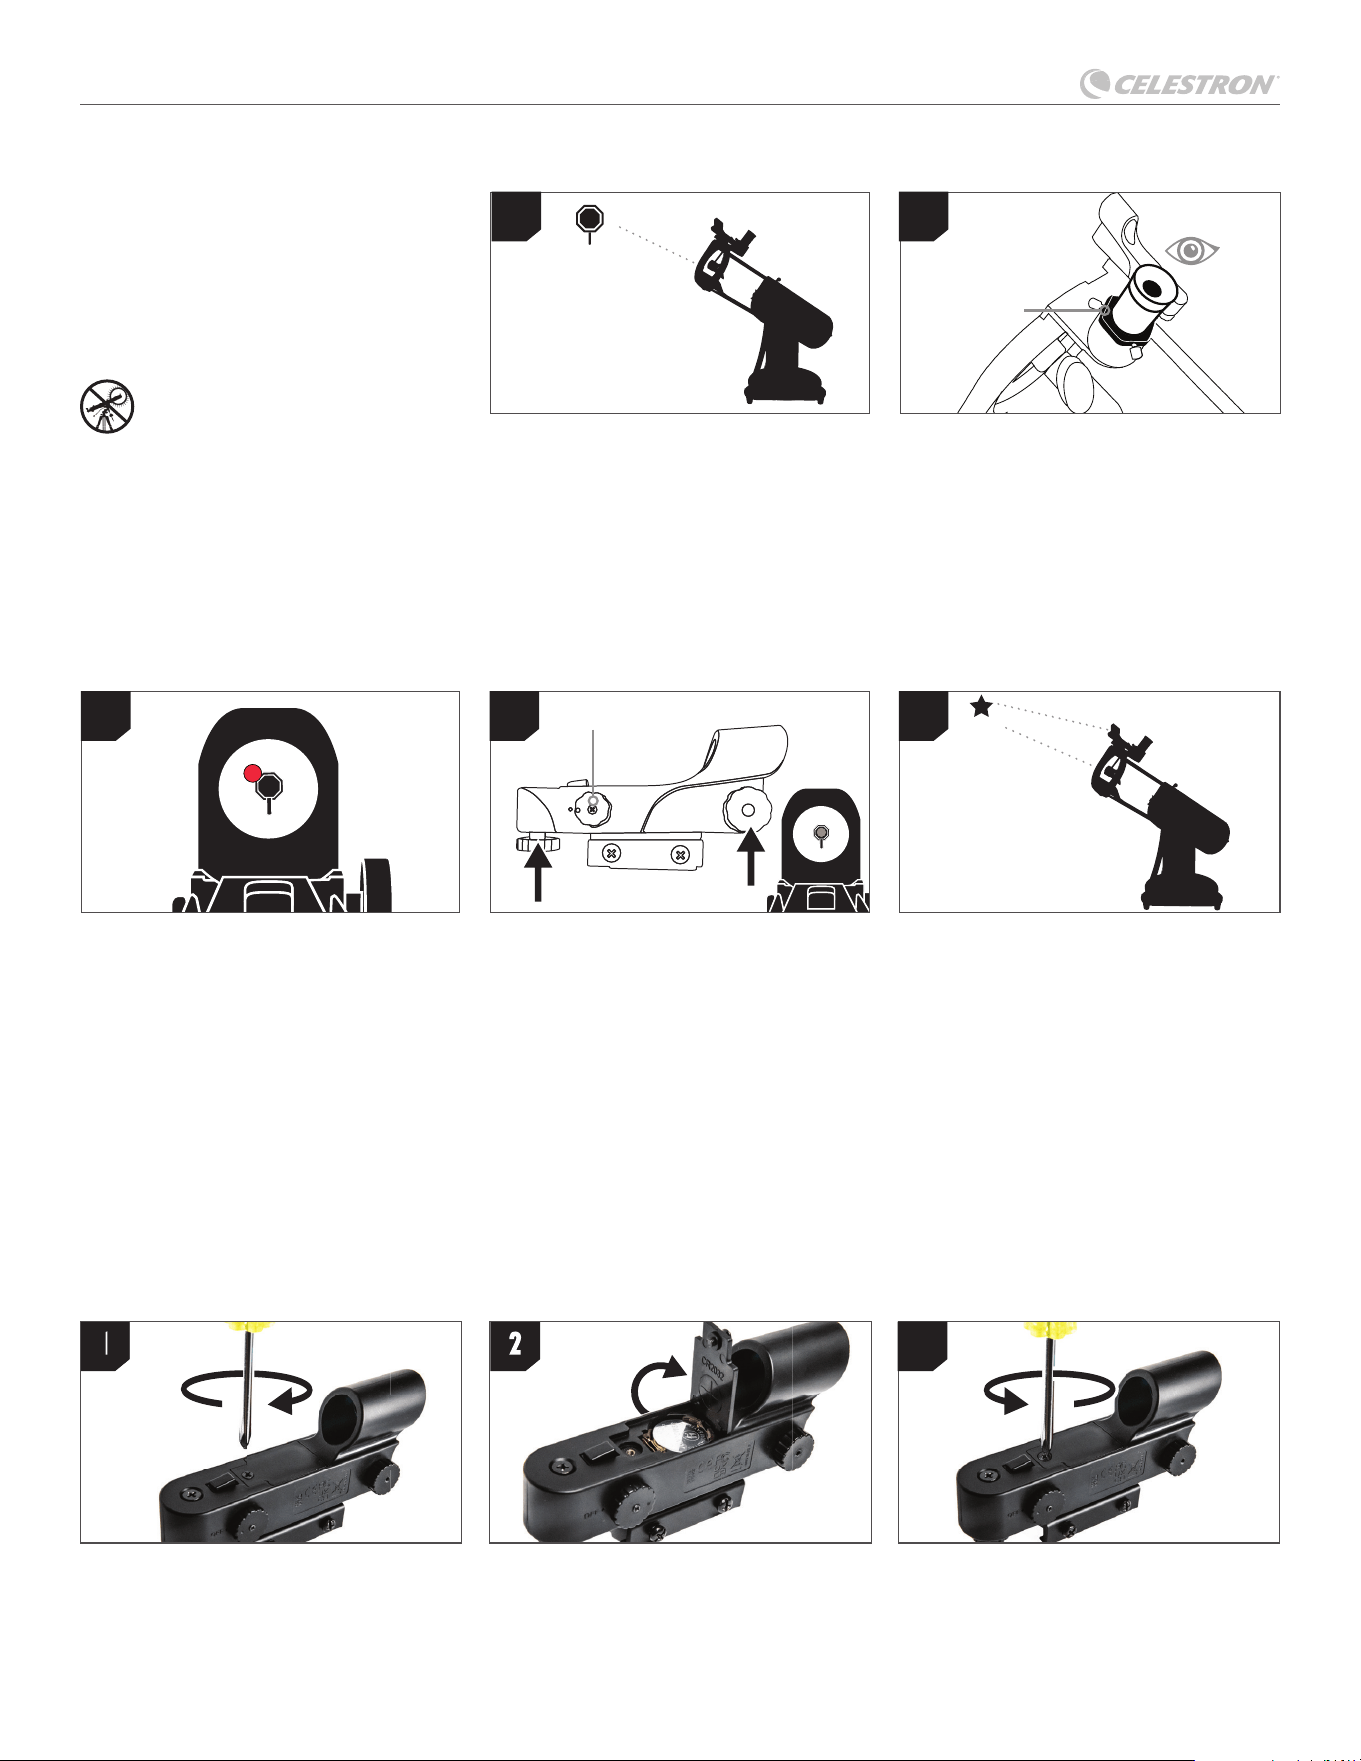
LUMINA 130 DOBSONIAN
4 | ESPAÑOL
Ajustar el localizador
Sin mover el telescopio, use los dos mandos
de ajuste para mover el punto rojo hasta que
aparezca sobre el mismo objeto que esté
observando en el ocular de baja potencia del
telescopio.
Su localizador está alineado.
No debería necesitar realinearse a menos
que reciba golpes o caiga. Ahora, cuando
mire por el StarPointer, el punto rojo indicará
a dónde apunta el telescopio. No olvide
apagar el punto rojo cuando termine para
conservar batería.
Mirar por el localizador
Saque la pestaña de protección de la
batería de StarPointer y póngalo al máximo
brillo usando el mando de encendido/
apagado. Mire por el StarPointer y localice el
punto rojo.
Centrar el objeto en el ocular
Mire por el telescopio usando el ocular de
25mm. Mueva el telescopio hasta que el
objeto elegido quede en el centro del campo
de visión. Si la imagen está borrosa, gire
suavemente los mandos de enfoque hasta
que quede enfocada.
NOTA: La imagen del telescopio puede
aparecer invertida. Es normal en un telescopio
astronómico.
El localizador de punto rojo StarPointer es
una de las piezas más importantes de su
telescopio. La primera vez que monte el
telescopio, deberá alinear el localizador
con la óptica principal del telescopio. Es
preferible hacerlo de día.*
*¡AVISO SOLAR! No intente nunca
observar el sol por ningún telescopio
sin un fi ltro solar adecuado.
Elegir un objetivo
Saque el telescopio de día y localice un
objeto fácilmente reconocible, como una
farola, una matrícula de coche, o una señal.
El objeto debe estar lo más lejos posible, al
menos a 400 m.
ENFOQUE
MANDO DE ENCENDIDO/APAGADO
1
1
4 5
2
2
Alinear el localizador
Acceder a la batería del localizador
El localizador StarPointer usa una batería de litio de 3V de larga duración (#CR2032), situada en la superfi cie superior del StarPointer. Si
no va a usar su telescopio durante un tiempo prolongado, recomendamos retirar la batería para guardarlo. Para retirar o sustituir la batería,
siga estas instrucciones:
Nota: Necesitará un destornillador de cabezal Phillips pequeño para sustituir la batería del localizador StarPointer.
Usando un destornillador con cabezal
Phillips, afl oje el tornillo de la cubierta
de la batería y abra la tapa.
Si está sustituyendo la batería, instale la
nueva con el terminal (+) hacia fuera.
Vuelva a colocar la tapa en el localizador y
apriete el tornillo con el destornillador de
cabezal Phillips.
1
2
3
3
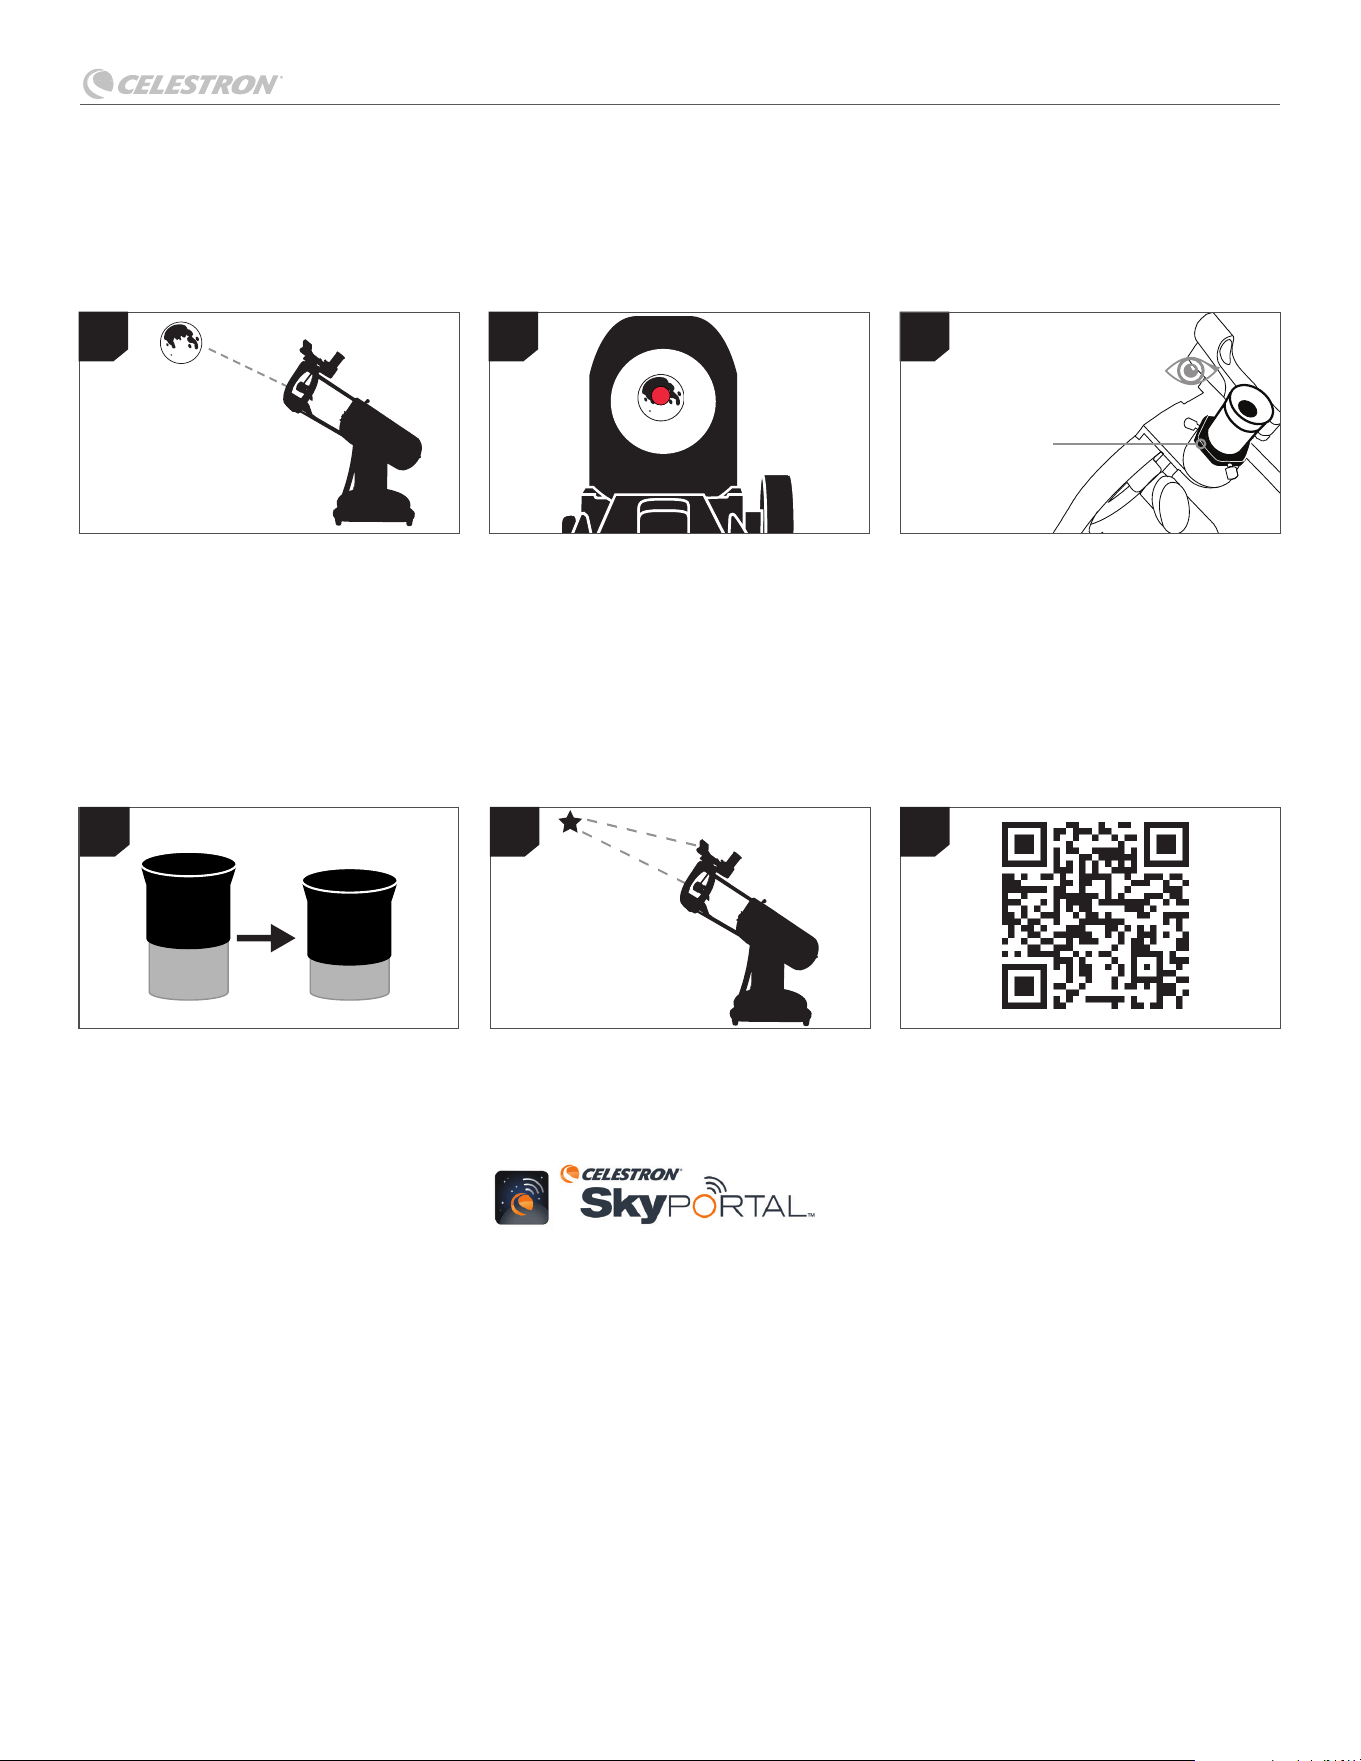
LUMINA 130 DOBSONIAN
ESPAÑOL | 5
Para obtener una vista más cercana de la
Luna, afl oje el tornillo de la diagonal estelar
y saque el ocular de 25mm. Cámbielo por
el ocular de 10mm y apriete el tornillo para
asegurar el nuevo ocular en posición. El
ocular de 10mm incrementará notablemente
el aumento, haciendo que la Luna aparezca
mucho más grande. Puede tener que ajustar
el enfoque cuando cambie oculares, para
asegurarse de obtener la imagen más
defi nida posible.
Usando esta misma técnica, puede observar
muchos otros objetos celestes, como
planetas, cúmulos estelares y nebulosas.
La adquisición de su telescopio incluye una
descarga gratuita de Celestron SkyPortal
Powered by SkySafari
TM
. Disponible para
iOS y Android, esta app de planetario puede
ayudarle a localizar e identifi car objetos
celestes visibles actualmente desde su
ubicación exacta. ¡Pruébelo!
Mire por el ocular de 25mm. Gire suavemente
los mandos de enfoque hasta que la imagen
quede defi nida.
Felicidades. ¡Ha observado su primer
objeto celeste!
Mire por el localizador y localice el punto
rojo. Siga moviendo el telescopio hasta que
el punto rojo esté centrado en la Luna.
El mejor y más sencillo objetivo para su primera observación es la Luna. Pruebe a observer la Luna en distintos puntos de sus fases. El mejor
momento para observar la Luna es desde dos días después de Luna nueva hasta unos días antes de Luna llena. Durante este periodo podrá
ver el máximo detalle de los cráteres y riscos lunares.
Con la Luna visible en el fi rmamento,
instale el telescopio con el ocular de
25mm instalado y el localizador alineado.
Mueva el telescopio de forma que apunte
aproximadamente a la Luna. Encienda el
localizador.
1
4 5 6
2 3
Su primera noche fuera - La Luna
Escanee el código QR para visitar el centro
de recursos Herramientas Celestron para
Astrónomos. Aquí encontrará guías de
observación, recomendaciones y trucos, y
descargas gratuitas para guiarle en su viaje
astronómico.
25 mm
10 mm
ENFOQUE

LUMINA 130 DOBSONIAN
6 | ESPAÑOL
Esta sección ofrece recomendaciones para observar objetos del
sistema solar y del espacio profundo, junto con una explicación
sobre el modo en que las condiciones de observación pueden
afectar a lo que vea.
Aumento
Puede cambiar el aumento de su telescopio cambiando los
oculares. Tanto los telescopios como los oculares tienen distancias
focales medidas en milímetros. Para calcular el aumento de una
combinación de telescopio y ocular, tome la longitud focal del
telescopio y divídala por la longitud focal del ocular. El número
resultante es el factor de aumento.
Por ejemplo, el Lumina 130mm Dobsoniano tiene una longitud focal
de 650mm. Usando el ocular de 10mm:
Campo de visión
Determinar el campo de visión es importante si quiere tener una
idea del tamaño angular del objeto que está observando. Para
calcular el campo visual real, divida el campo aparente del ocular
(proporcionado por el fabricante del ocular) por el aumento dado
en el telescopio que esté usando.
Usando el ejemplo de la sección anterior, podemos determinar el
campo de visión usando el mismo telescopio y ocular de 10mm. El
ocular de 10mm tiene un campo de visión aparente de 40º.
El ocular de 10mm tiene un campo de visión aparente de
40º. Divida los 40º por el aumento, que es de potencia 65.
Esto dará un campo real de 0,6 grados.
Los planetas
Además de la Luna, su telescopio puede observar los cinco planetas
más brillantes. Como los planetas cambian de posición respecto a
las estrellas del fondo, deberá consultar fuentes en la red o usar
una aplicación de planetario en un dispositivo para ayudarle a
localizarlos. Aquí están los planetas que puede encontrar:
• Mercurio y Venus- Al igual que la Luna, los dos planetas
interiores tendrán fases, variance de crecientes a menguantes.
• Marte- Cuando esté cerca de su oposición (el punto en su órbita
donde está más cercano a la Tierra) debería poder discernir el
casquete polar y posiblemente algunas de las características de
superfi cie más grandes, que aparecen como marcas oscuras en
la superfi cie.
• Júpiter- Busque las bandas de nubes de metano más oscuras
que rodean el planeta justo encima y debajo del ecuador. Si la
Gran Mancha Roja está orientada hacia la Tierra, debería poder
aumento 65x= = =
Longitud focal del telescopio
Longitud focal del ocular
650 mm
10 mm
Campo
visual
real
0,6º de arco
= = =
Campo aparente
del ocular
Aumento
40º
65x
entreverla. También verá las cuatro lunas más grandes de Júpiter
- Io, Europa, Ganímedes y Calisto. Estas lunas son entretenidas
de observar porque pueden moverse de forma apreciable en
solo un par de horas. Ocasionalmente se desplazarán detrás de
Júpiter o en su sombra y desaparecerán durante cierto tiempo.
También pueden cruzar la cara de Júpiter e incluso puede ver
una sombra de la luna cruzando con ésta. Las aplicaciones para
teléfono de planetario pueden ayudarle a predecir el momento
en que la Gran Mancha Roja estará visible y avisarle de eventos
interesantes relacionados con las lunas de Júpiter.
• Saturno- ¡Los anillos! Saturno es posiblemente uno de los
objetos más hermosos para su observación con un telescopio.
Si las condiciones de observación son sufi cientemente estables,
puede incluso ver la sombra de los anillos sobre el planeta y la
sombra del planeta en los anillos. Debería poder ver Titán, la luna
más brillante de Saturno.
Objetos del espacio profundo
Los objetos del espacio profundo son objetos celestes fuera
de nuestro sistema solar. Incluyen grupos estelares, nebulosas
planetarias, nebulosas difusas, estrellas dobles y otras galaxias
fuera de la Vía Láctea. Los objetos como nebulosas y galaxias
pueden ser considerablemente grandes, pero también son muy
tenues. Para obtener la mejor vista, deberá asegurarse de estar con
el fi rmamento más oscuro posible. Cuanto más lejos esté de las
luces urbanas mejor verá estos objetos en el ocular. En fotografías
de nebulosas y galaxias verá vivos rojos y azules. Estos colores no
son visibles cuando observa por el ocular. Las coloridas imágenes
se han capturado usando largas exposiciones (normalmente 15 a 60
minutos o más), mientras que sus ojos solo capturan luz de momento
a momento. Los sensores digitales son mucho más sensibles a rojos
y azules que el ojo humano, que es más sensible al sector verde del
espectro. Igualmente, debería poder ver el suave resplandor de la
galaxia de Andrómeda y la expansión de la nebulosa de Orión.
Condiciones del fi rmamento
Las condiciones del fi rmamento pueden afectar notablemente al
rendimiento de su telescopio de tres formas.
• Estabilidad del aire- En días con viento, las imágenes de
la Luna y los planetas parecerán oscilar o saltar en el ocular,
como si los estuvieria viendo a través de agua en movimiento.
Las noches con vientos calmos ofrecerán las mejores vistas con
aumento elevado de planetas y la Luna. La mejor forma de evaluar
la estabilidad de la atmósfera es observar estrellas brillantes con
el ojo desnudo. Si "parpadean" o cambian rápidamente de color,
el aire es inestable y será mejor usar potencias menores y buscar
objetos del espacio profundo. Si las estrellas están defi nidas
y no parpaden, el aire es estable y debería ofrecer excelentes
vistas planetarias con gran aumento.
• Transparencia- ¿Cuánta claridad tiene el aire por el que está
mirando? Si hay una humedad elevada en el aire, la tenue luz de
las galaxias y nebulosas puede dispersarse y difuminarse antes
de llegar a su telescopio, causando una pérdida de brillo de la
imagen. Los residuos en el aire de incendios forestales locales
o incluso erupciones volcánicas lejanas pueden contribuir a la
pérdida de brillo. A veces esta humedad o restos pueden ayudar
a estabilizar el aire, ofreciendo buenas imágenes planetarias y
RECOMENDACIONES DE OBSERVACIÓN CELESTE

LUMINA 130 DOBSONIAN
ESPAÑOL | 7
lunares, pero la pérdida de luz difi cultará ver objetos más tenues
del espacio profundo.
• Brillo del fi rmamento- La cantidad de luz ambiente en la
atmósfera también puede afectar a la observación del espacio
profundo. La oscuridad del fi rmamento depende de su entorno
local. En medio de una ciudad, el brillo del fi rmamento causado
por la iluminación urbana que se refl eja hacia la Tierra desde
el fi rmamento puede superar la tenue luz de galaxias distantes.
Alejarse de la luz de una ciudad grande puede ser la diferencia
entre ver un objeto del espacio profundo tenue o perdérselo por
completo. La Luna y los planetas son brillantes por sí mismos,
por lo que el efecto en su observación es mínimo.
Seleccionar un lugar de observación
Si va a observar objetos del espacio profundo, como galaxias y
nebulosas, debería pensar en ir a un lugar con fi rmamento oscuro
que sea razonablemente accesible. Debe estar alejado de luces
urbanas y a contraviento de cualquier contaminación del aire, y
ofrecer una vista relativamente sin obstrucciones del horizonte.
Seleccione siempre una elevación lo más alta posible; esto puede
reducir los efectos de la inestabilidad atmosférica y garantizar que
se encuentre por encima de cualquier niebla.
Aunque puede ser deseable llevar su telescopio a una ubicación
con fi rmamento oscuro, no siempre es necesario. Si tiene planeado
observar los planetas, la Luna o incluso algunos de los objetos del
espacio profundo más brillantes, puede hacerlo desde cualquier
ubicación, como su propio patio. Intente colocar el telescopio en
una ubicación fuera de la línea directa de luces de la calle o de
domicilios para ayudarle a proteger su visión nocturna. Intente evitar
observar nada que esté entre cinco y 10 grado del techo de un
edifi cio. Los techos absorben calor durante el día y lo emiten por
la noche. Esto puede causar una capa de aire con turbulencias
directamente encima del edifi cio que puede degradar la imagen.
Es preferible instalar el telescopio sobre una superfi cie de tierra o
hierba. Evite instalarlo en plataformas elevadas, como tarimas de
madera o superfi cies rígidas como aceras de hormigón, dado que
transmiten con facilidad vibraciones al telescopio.
No observe por una ventana - el cristal distorsiona la imagen
considerablemente. Una ventana abierta puede ser aún peor, dado
que el aire caliente del interior sale y crea turbulencias, degradando
más la vista. Para obtener los mejores resultados, lleve el telescopio
fuera - la astronomía es una actividad de exterior.
Elegir el mejor momento para
observar
Evite observar inmediatamente después del anochecer. A medida
que se enfría el suelo, crea turbulencias de aire que pueden
perturbar su vista. Las condiciones normalmente mejoran a medida
que avanza la noche - la vista se estabiiza, y la contaminación del
aire y la iluminación terrestre normalmente se reducen. Entre los
mejores momentos de observación se encuentra la madrugada
antes del amanecer. Los objetos se observan mejor cuando cruzan
el meridiano, la línea imaginaria que va de norte a sur por un punto
directamente sobre su cabeza. Es el punto en el que los objetos
están más altos en el fi rmamento y su telescopio mira por la menor
cantidad de atmósfera. Los objetos cerca del horizonte (levante o
poniente) aparecen menos defi nidos porque los está observando
por una capa más gruesa de la atmósfera terrestre, que aumenta
la turbulencia. No siempre necesita fi rmamentos perfectamente
claros para observar la Luna o los planetas. De hecho, condiciones
parcialmente nubosas pueden ofrecer a veces una observación
sorprendentemente buena.
Refrigerar el telescopio
Los telescopios precisan como mínimo de 10 minutos para enfriarse
a la temperatura del aire exterior. Puede tener que dejar más tiempo
si hay una gran diferencia entre la temperatura del telescopio y el aire
ambiente. Dejar que su telescopio se enfríe por completo minimiza
las distorsiones por ondas de calor en el tubo del telescopio
(corrientes del tubo).
Adaptar sus ojos
Si tiene planeado observar objetos del espacio profundo en un
lugar con fi rmamento oscuro, deje tiempo para que sus ojos se
adapten completamente a la oscuridad. Evite fuentes de luz blanca
como linternas, faros de coches y luces urbanas, dado que pueden
afectar a su visión nocturna. Sus pupilas tardan aproximadamente
30 minutos en dilatarse por completo y para que sus ojos acumulen
los pigmentos ópticos necesarios para detectar luz tenue de objetos
distantes.
Si necesita luz al instalar su telescopio, use una linterna LED roja
en la posición de brillo más baja, y evite mirar directamente a la luz.
Ayudará a preservar su visión nocturna y mejorará las oportunidades
de ver objetivos tenues del espacio profundo.
Cuando observe, mantenga abiertos ambos ojos para reducir el
esfuerzo ocular. Si le distrae, cubra el ojo no usado con la mano o
un parche. Igualmente, tenga en cuenta que el centro de su ojo no
es tan sensible a la luz tenue. Para ver con mayor claridad objetos
tenues, mire ligeramente a su lado en lugar de directamente - esta
técnica se llama visión desviada y destaca los detalles sutiles.
Salto estelar
La forma más sencilla de navegar por el fi rmamento nocturno es
usando una técnica llamada salto estelar. Para comenzar debe medir
el campo visual de su localizador.
Comience observando una constelación con estrellas brillantes -
use un planisferio o aplicación de astronomía para identifi car una. A
continuación localice la misma constelación en su atlas estelar.
A continuación, centre su localizador en una estrella brillante que
reconozca del mapa estelar. Posicione su ojo a aproximadamente
12 pulgadas (30cm) tras la ventana refl ectora de su localizador
StarPointer, y mueva el telescopio hasta que la estrella aparezca en el
borde del campo visual de la ventana (sirve cualquier dirección). Sin
mover el telescopio, mire por la ventana y detecte otra estrella cerca
del borde opuesto.
Ahora localice ambas estrellas en su carta estelar. Use una regla para
medir la distancia entre ellas en el mapa - esta distancia representa un
campo visual de su localizador.
Ahora puede usar esta medición como guía para saltar de estrella a
estrella en la carta, ayudándole a localizar objetos celestes con mayor
precisión.
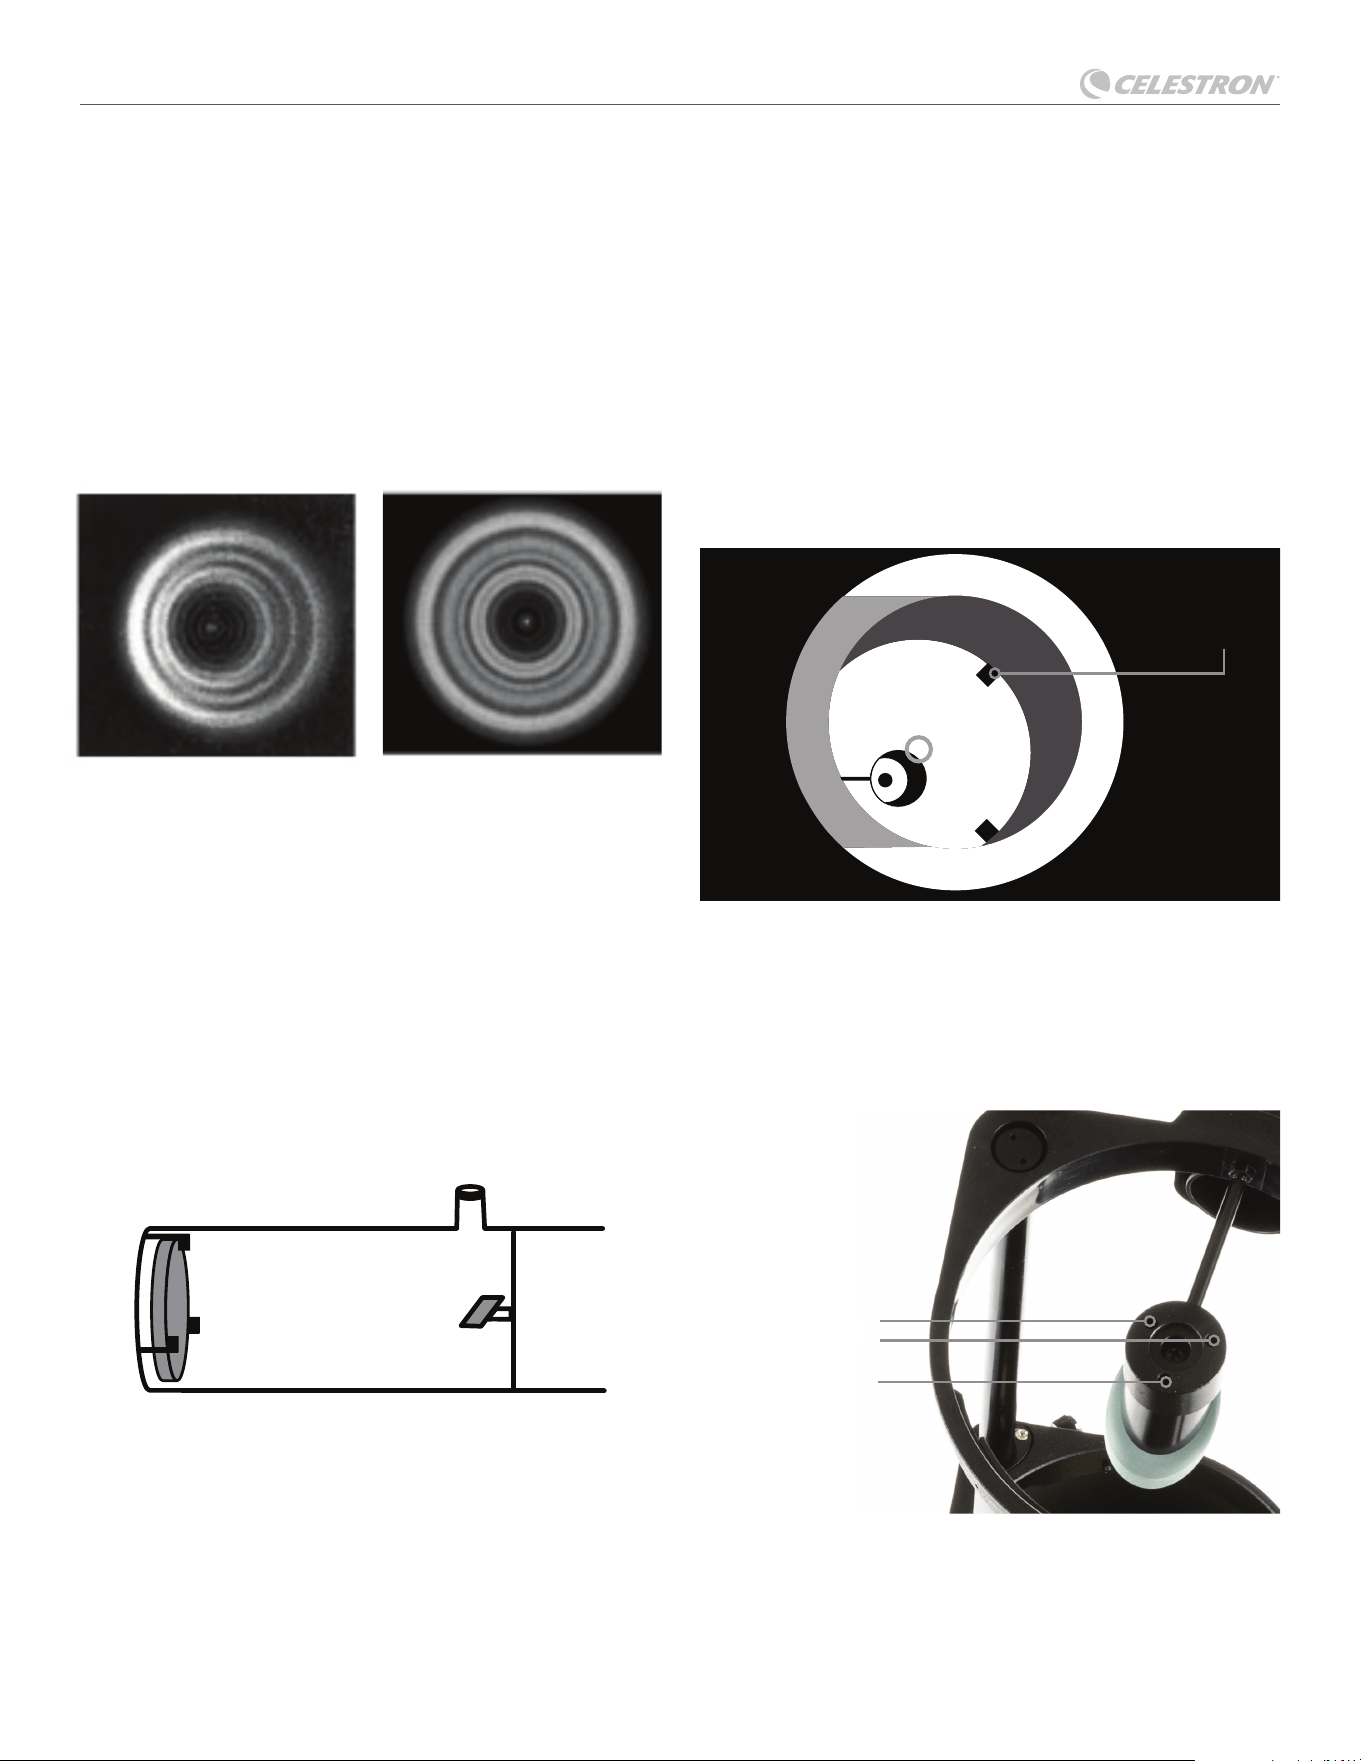
LUMINA 130 DOBSONIAN
8 | ESPAÑOL
El colimado es el proceso de alineación de los espejos de su
telescopio, de forma que trabajen conjuntamente para ofrecer
luz correctamente enfocada al ocular. Observando imágenes de
estrellas desenfocadas puede probar si la óptica de su telescopio
está alineada. Ponga una estrella en el centro del campo visual
y mueva el enfoque de forma que la imagen esté ligeramente
desenfocada. Si las condiciones de observación son buenas, verá
un círculo central de luz (el disco aéreo) rodeado por diversos
anillos de difracción. Si los anillos son simétricos respecto al disco
aéreo, la óptica del telescopio está correctamente colimada. Fig. A
Si no tiene herramienta de colimado, recomendamos que realice una
"tapa de colimado" con un cilindro de plástico de película de 35mm
(negro con tapa gris). Taladre o perfore un pequeño agujero en el
centro exacto de la tapa y corte el fondo del cilindro. Este dispositivo
mantendrá su ojo centrado en el tubo del enfoque. Inserte la tapa de
colimado en el enfoque en lugar de un ocular normal.
Aquí tiene cómo colimar su telescopio:
Saque la tapa de la lente que cubre la parte anterior del telescopio
y mire por el tubo óptico. En la parte inferior verá el espejo primario
sujetado por tres clips a 120° de distancia, y en la parte superior
el pequeño espejo secundario ovalado sujetado por un soporte
e inclinado 45° respecto al enfoque fuera de la pared del tubo.
(Fig. B)
El espejo secundario se alinea ajustando los tres tornillos más
pequeños que rodean el perno central. El espejo primario se justa
con los tres tornillos de ajuste en la parte posterior de su telescopio.
Los tres tornillos de bloqueo a su lado sirven para sujetar el espejo
en posición tras el colimado.
CUIDADOS ADECUADOS PARA SU TELESCOPIO
BUEN COLIMADONECESITA AJUSTE
Alinear el espejo secundario Colimado
Clips de es-
pejo
Espejo primario
Fig. A:
El "Disco aéreo" creado por una estrella ligeramente desenfocada
Espejo secundario
Apunte el telescopio a una pared iluminada e inserte la tapa de
colimado en el enfoque en lugar de un ocular normal. Mire por el
enfoque, a través de su tapa de colimado. Puede tener que girar el
mando de enfoque algunas veces hasta que la imagen refl ejada del
enfoque salga de la vista.
NOTA: Mantenga el ojo contra la parte posterior del tubo de enfoque
si colima sin tapa de colimado.
Ignore la imagen refl ejada de la tapa de colimado o su ojo por el
momento. En su lugar, busque los tres clips que sujetan el espejo
primario en posición. Si no puede verlos, su telescopio ha perdido
el colimado. (Fig. C)
Espejo secundario
Pernos de ajuste
Espejo secundarioEspejo secundario
Para alinear el espejo secundario, ajuste los tres pernos de la parte
superior del soporte del espejo secundario con una llave allen o
destornillador con cabezal Phillips. Tendrá que afl ojar alternamente
uno y a continuación compensar apretando los otros dos. (Fig. D)
Fig. C:
Vista por el enfoque, mostrando el refl ejo del espejo primario y los
clips del espejo
Fig. D: Ubicación de pernos de ajuste del espejo secundario
Fig. B: Vista lateral del interior del telescopio
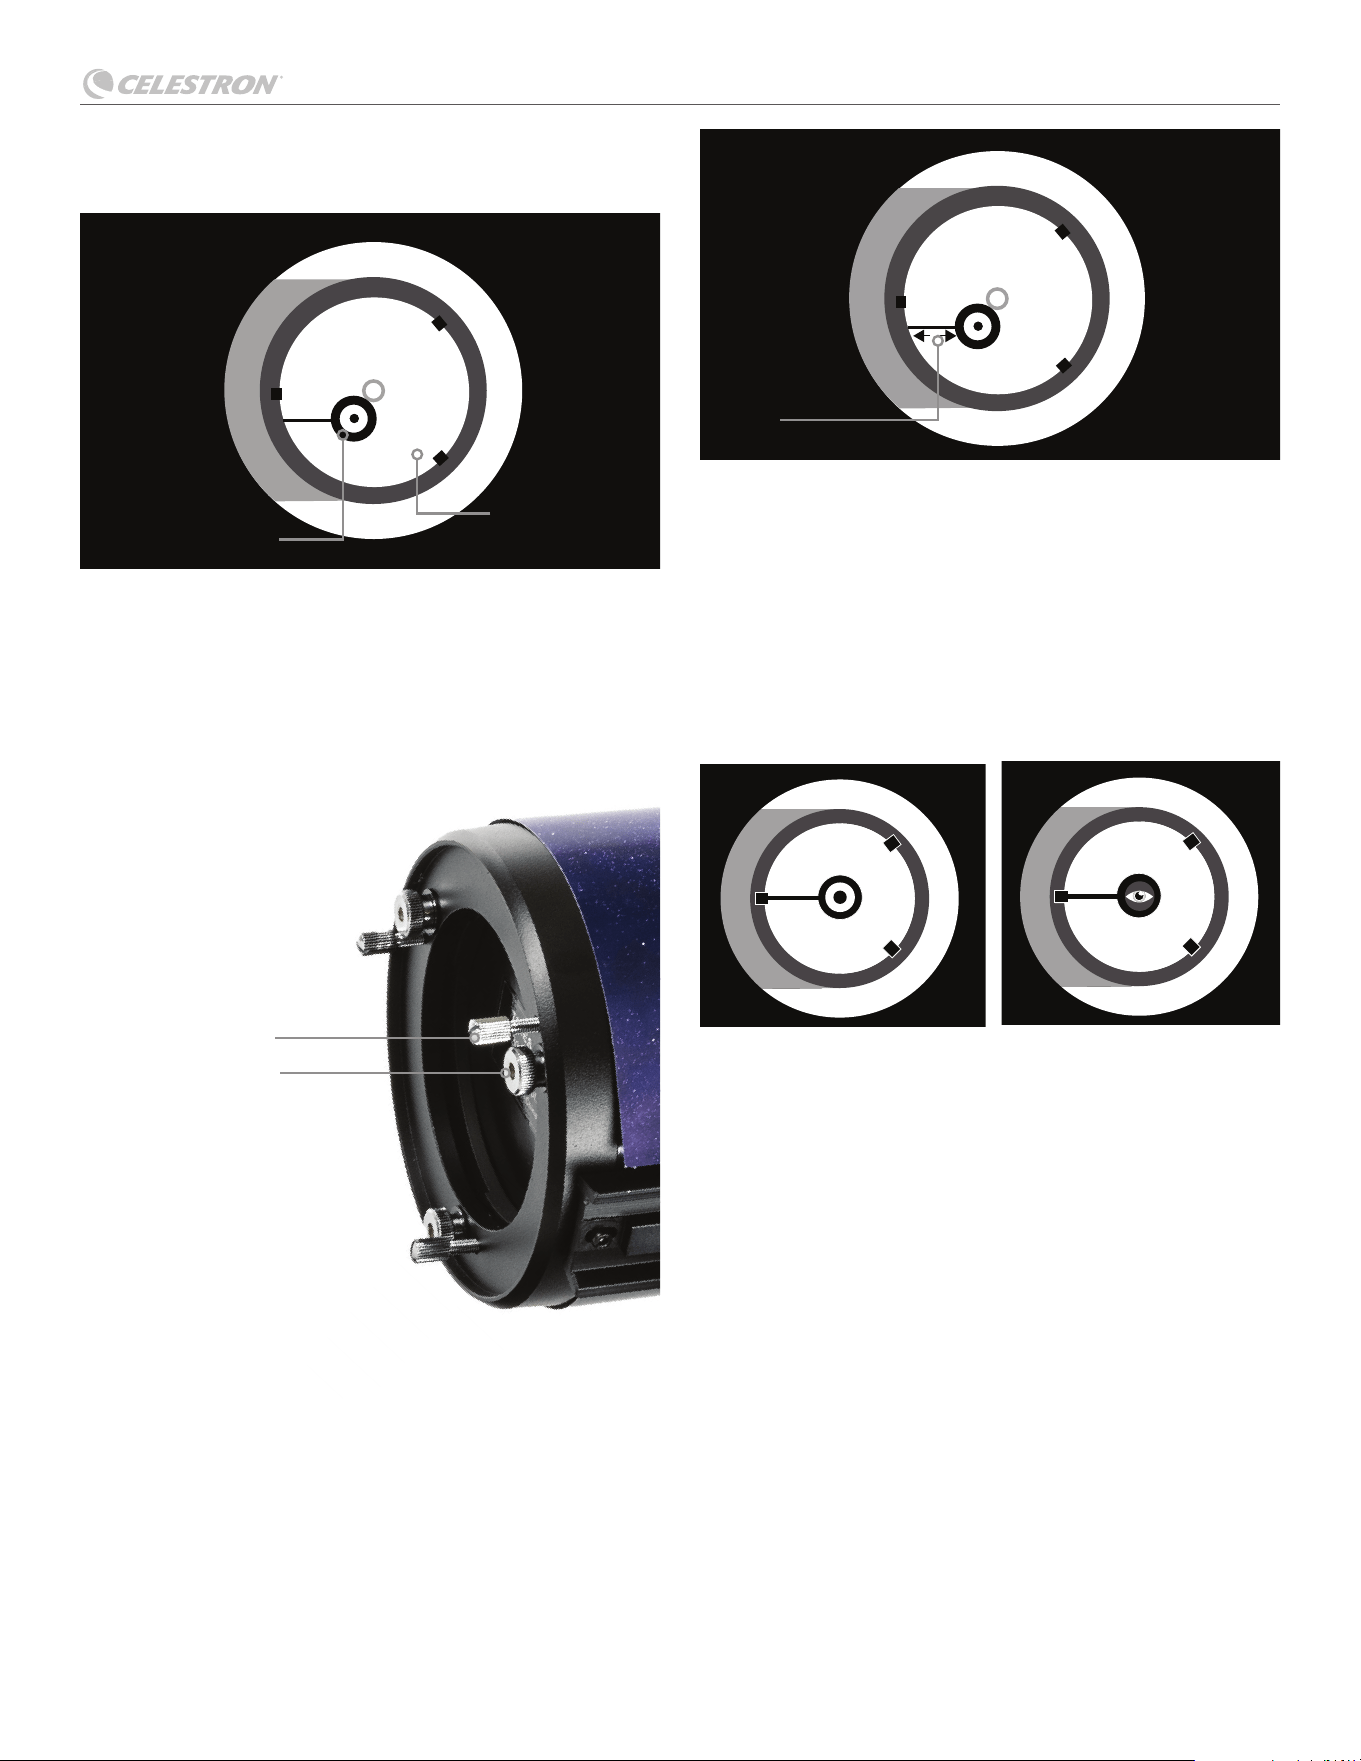
LUMINA 130 DOBSONIAN
ESPAÑOL | 9
Refl ejo del
espejo primario
Refl ejo del
espejo secundario
Tornillo de bloqueo
Tornillo de ajuste
Deténgase cuando vea los tres clips del espejo. (Fig. E) Asegúrese
de que los tres tornillos de alineación pequeños estén apretados
para asegurar el espejo secundario en posición.
Alinear el espejo primario
En la parte posterior de su telescopio hay tres pernos grandes y tres
tornillos pequeños. Los pernos grandes son los tornillos de ajuste, y
los tornillos pequeños son los tornillos de fi jación. (Fig. F)
Afl oje los pernos grandes algunas vueltas. Ahora pase la mano
por la parte anterior de su telescopio, manteniendo el ojo en
el enfoque. Verá la imagen refl ejada de su mano. La idea es ver
en qué orientación está desalineado el espejo. Lo puede hacer
deteniéndose en el punto en el que la imagen refl ejada del espejo
secundario esté más cerca del borde del espejo primario. (Fig.G)
Cuando llegue a este punto, deténgase y mantenga la mano alli,
mientras mira el extremo posterior de su telescopio. ¿Hay allí un
tornillo de ajuste? Si es el caso, querrá afl ojarlo (girar el tornillo a
la izquierda) para alejar el espejo de ese punto. Si no, pase al otro
lado y apriete el tornillo de ajuste del lado opuesto. Esto alineará
gradualmente el espejo hasta que tenga el aspecto de Fig. H. (Ayuda
tener un amigo que asista con el colimado del espejo primario. Haga
que su amigo ajuste los tornillos según sus instrucciones mientras
mira el enfoque).
Cuando oscurezca, salga y apunte su telescopio a la estrella
polar. Con un ocular en el enfoque, desenfoque la imagen. Verá la
misma imagen, solo que ahora estará iluminada por luz estelar. Si
es necesario repita el proceso de colimado. Esta vez, mantenga
centrada la estrella mientras ajusta el espejo.
Limpiar su telescopio
Ponga la tapa para polvo sobre el extremo de su telescopio cuando
no lo use. Esto evitará que se asiente polvo en las superfi cies
de espejos o lentes. No limpie los componentes ópticos de su
telescopio a menos que esté familiarizado con superfi cies ópticas.
Limpie el localizador y oculares exclusivamente con papel para
lentes. Manipule los oculares con cuidado. No toque ninguna
superfi cie óptica del telescopio ni de accesorios.
Fig. E:
Mire por el enfoque (los tres clips del espejo son visibles)
Fig. G: Vista por el ocular mostrando la ubicación de la mano
Fig. H: Vista por el enfoque, mostrando ambos espejos alineados con y
sin ocular de colimado.
Fig. F: Vista posterior del telescopio mostrando los pernos de ajuste y
tornillos de bloqueo
Colocar la
mano aquí
Usando enfoque
Usando ocular de colimado
LUMINA 130 DOBSONIAN
10 | ESPAÑOL
Fabricado en China | 05/25
SOFTWARE Y APP
Su compra incluye software para su ordenador y una app para su teléfono. No es necesario descargar estas herramientas para usar su
telescopio, pero pueden mejorar su experiencia.
REQUISITOS MÍNIMOS DEL SISTEMA
Windows:
• Windows 7 o superior
• Procesador de 500MHz o superior
• 128 MB RAM
• Espacio en el disco duro de 850 MB
• Tarjeta gráfi ca de 32 MB con capacidad de
OpenGL
• Monitor con resolución de 1024x768 píxeles
(recomendado)
REQUISITOS MÍNIMOS DEL SISTEMA
Dispositivos Android: Android 4.0 o superior
Dispositivos Apple iOS: iOS 4.3 o superior
Mac:
• Binario universal (PPC/compatible con Intel)
• OS X 10.4 o superior
(10.5 o superior para Elementary)
• Procesador G3 450 MHz o superior
• 128 MB RAM
• Espacio en el disco duro de 850 MB
• Tarjeta gráfi ca de 32 MB con capacidad de OpenGL
• Monitor con resolución de 1024x768 píxeles
(recomendado)
celestron.com/pages/warranty
App de astronomía Celestron SkyPortal Powered
by SkySafari™
Los expertos en telescopios de Celestron se han asociado
SkySafari para redefi nir su experiencia del fi rmamento
nocturno. Explore una base de datos de más de 120000
objetos celestes, incluyendo estrellas, planetas, cúmulos
estelares, nebulosas, galaxias, asteroides, cometas y
satélites - ¡incluyendo la estación espacial internacional!
Incluso puede escuchar descripciones en audio de los
objetos más populares mientras observa. SkyPortal
incluye todo lo que necesita para observar astros de una
forma nueva y emocionante.
INSTRUCCIONES DE SEGURIDAD
• Riesgo de explosión si se sustituye la batería por un
tipo incorrecto.
• La batería incluida no es recargable.
• Use la batería exclusivamente del modo originalmente
pretendido para evitar un cortocircuito. Cuando el
material conductor se conecte directamente al positivo
y negativo de la batería causará un cortocircuito.
• No use una batería dañada.
• No guarde la batería en un entorno extremadamente
frío o cálido. Hacerlo puede reducir la duración de la
batería.
• Cuando cambie la batería, consulte el manual de
instrucciones y asegúrese de que los lados positivo y
negativo estén correctamente orientados.
• No ponga las baterías en el fuego.
• Deseche la batería según la normativa local.
NOTIFICACIÓN FCC: Este dispositivo cumple con el apartado 15 de las normas FCC.
Su uso está sujeto a las dos condiciones siguientes: (1) este dispositivo no puede causar
interferencias nocivas, y (2) este dispositivo debe admitir cualquier interferencia recibida,
incluidas las interferencias que puedan causar un funcionamiento indeseado.
Software de astronomía Celestron Starry Night
Celestron Starry Night, el principal software de astronomía del mercado, le lleva en una
visita guiada del pasado, presente y futuro de nuestro sistema solar. Puede ayudarle a
aprender sobre el fi rmamento nocturno y a planifi car su siguiente sesión de observación.
Use Starry Night para modelar con exactitud el aspecto del fi rmamento nocturno desde
su patio trasero, una ciudad cercana, o cualquier lugar de la Tierra.
¿NECESITA AYUDA? Contacte con el soporte técnico de Celestron
celestron.com/pages/technical-support
©2025 Celestron. Celestron y su símbolo son marcas comerciales de Celestron, LLC. Todos los
derechos reservados. Celestron.com
EE.UU.: 2835 Columbia Street, Torrance, CA 90503 EE.UU.
GB: Unit 2 Transigo, Gables Way, Thatcham RG19 4JZ, Reino Unido
Este producto ha sido diseñado y está pensado para ser usado por personas de 14 años o más
de edad.