USER GUIDE
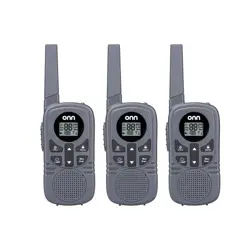
23 Mile Walkie Talkie 3 Pack
100111927_EN_10302026
Find more at Walmart.com
THIS GUIDE CONTAINS
IMPORTANT SAFETY
INFORMATION.
WE CAN HELP
PLEASE READ AND KEEP
FOR FUTURE REFERENCE
For product assistance &
missing or replacement parts:
7 DAYS/WEEK 7:00am-9:00pm CST
Content & Information
Overview
2
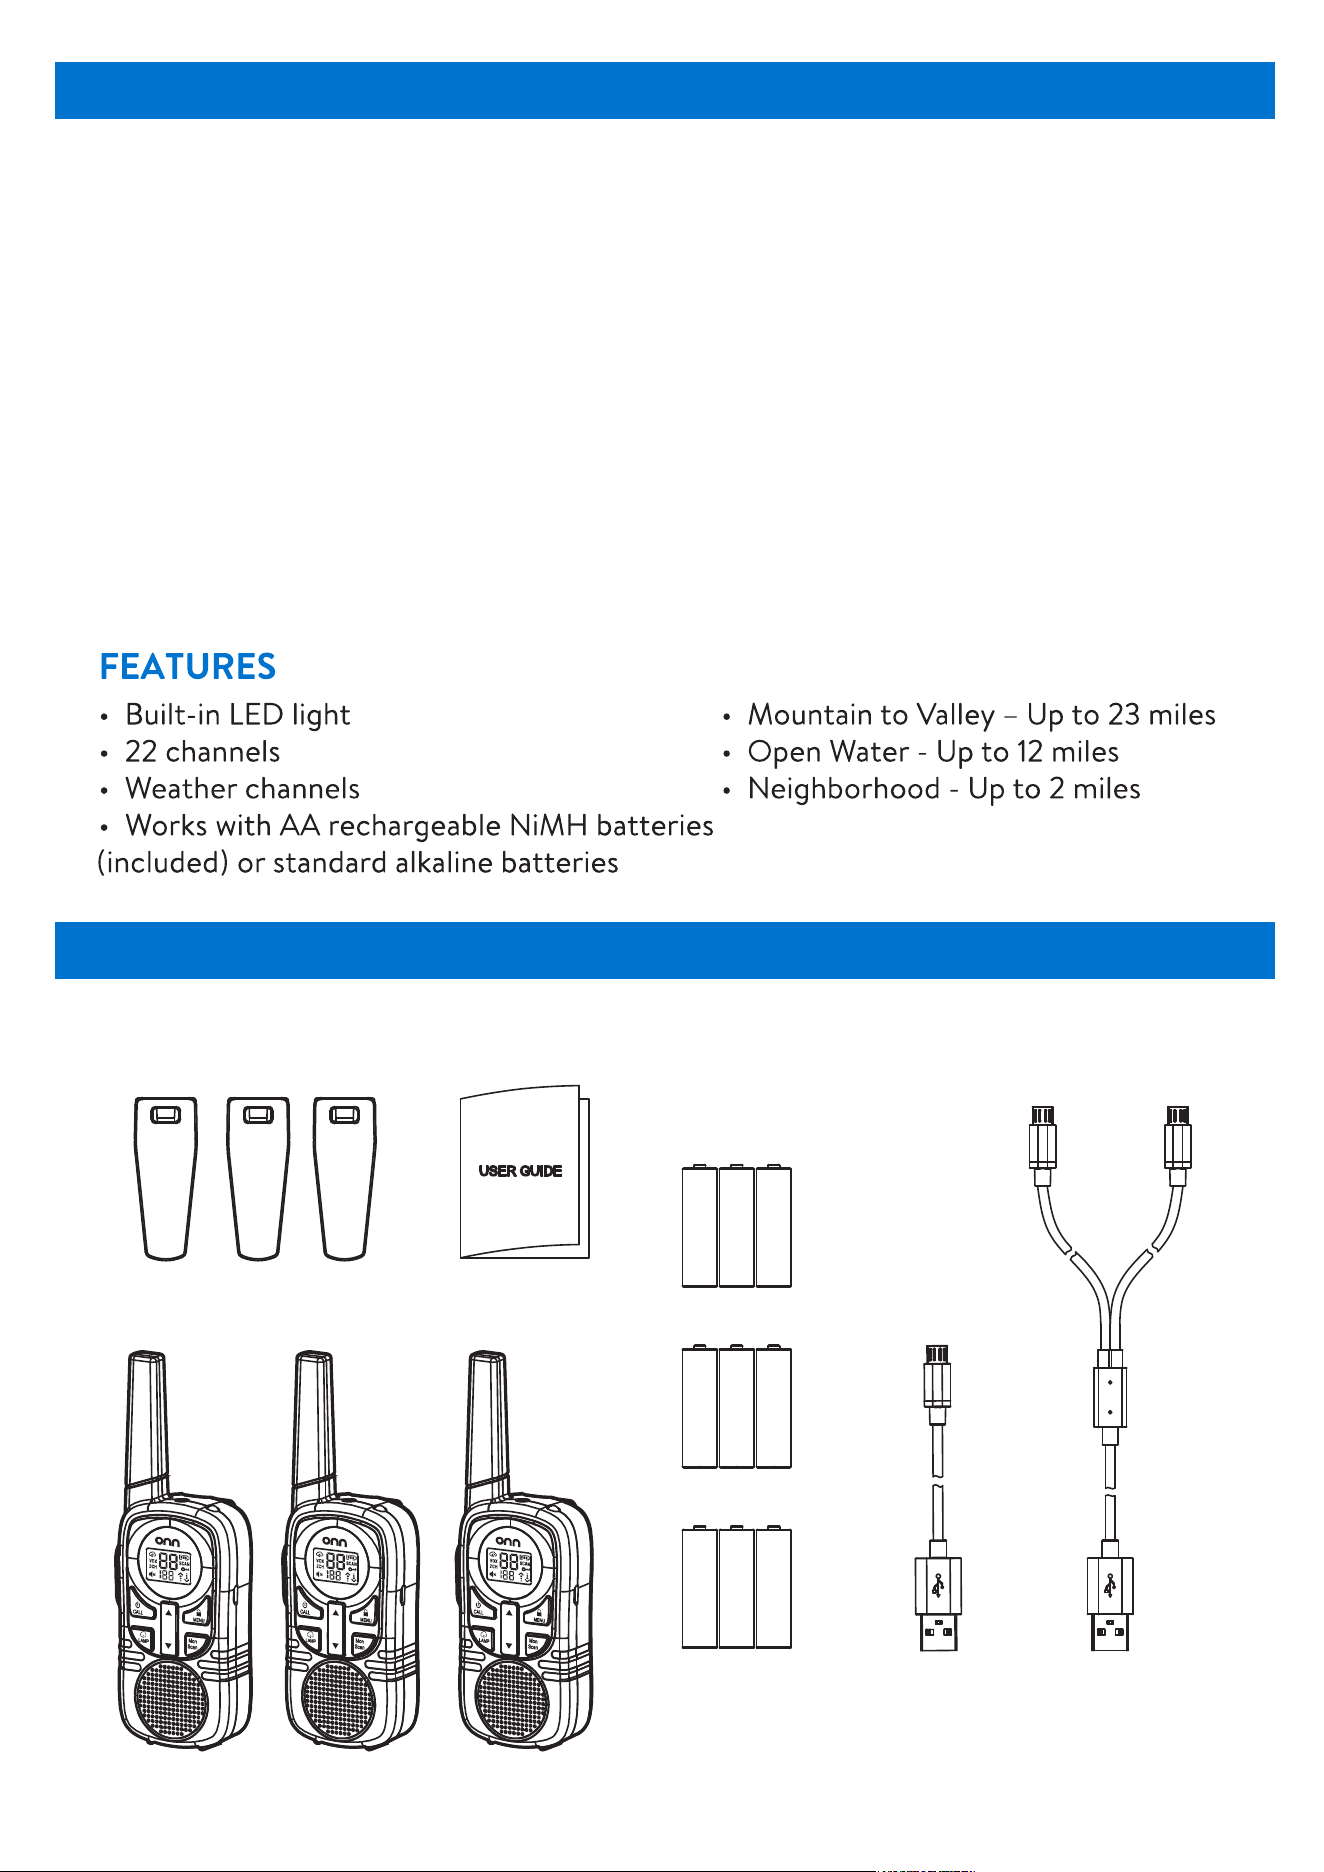
3 Belt clips
1 Split Micro-USB
to USB charging
cable
1 Micro-USB
to USB
charging cable
9 AA NiMH
batteries
( rechargeable )3 Walkie Talkies
What's in the Box?
User Manual
Content & Information
Features
Overview
What's in the Box?
Safety Precautions
Getting Started
Battery Installing
Turning the Device On/Off
Basic Operations
Adjusting Volume
Changing Channels
Making a Call
.........................2
........................................................2
..............................................2-4
....................................2
.............................4-5
......................................6
............................................6
.........................6
....................................7
..........................................7
......................................7
..................................................7
..............................7-8
........7
...........................................................8
.........8
.8
.............................8-10
.....................................10
......................................10
.....................................................11
..........................................11
..................................11-12
Advanced Features
Setting Interference Eliminator Code
Call Tones
VOX (Voice-Operated Transmission)
2CH Dual Watch (Dual Channel Monitor)
Specifical Features
Weather Options
Cleaning & Care
Warranty
Specifications
Troubleshooting / Frequently Asked
Questions (FAQ)
3
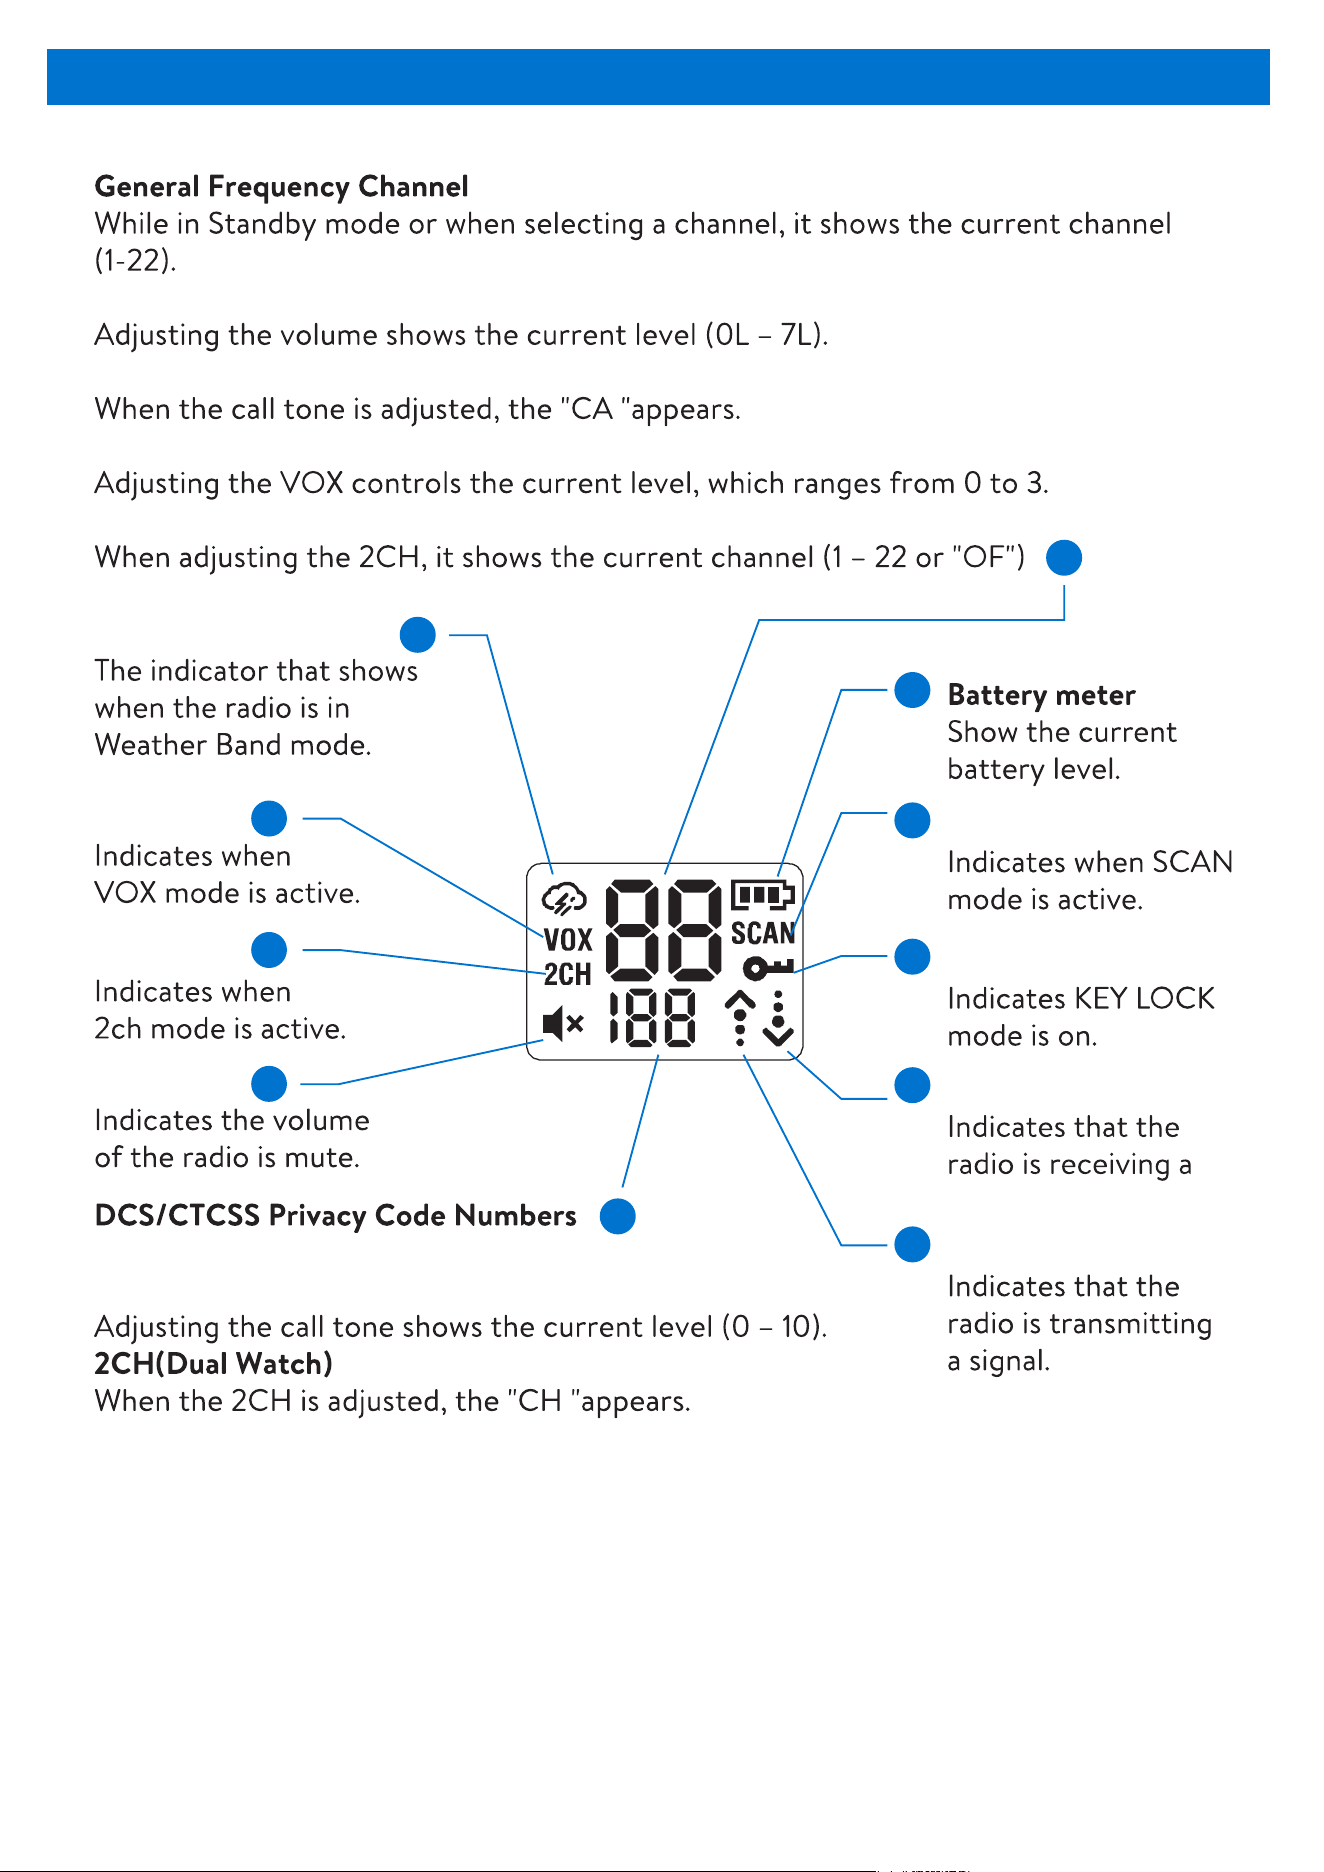
VOX Icon
Scan Icon
Receive Icon
transmission.
Weather Icon
2CH Icon
Mute Icon
Changer from 0~121
Tones Numbers
Volume Numbers
CA Icon
VOX Sensitivity Numbers
2CH Channel Numbers
Transmit Icon
Key Lock Icon
RF Exposure and Product Safety Instructions for Portable Two-Way Radios In General
Populated and Uncontrolled Environments
Follow battery installation instructions carefully to avoid overheating.
Do not use in prohibited areas.
Keep the device dry and clean.
Avoid extreme temperatures.
Safety Precautions
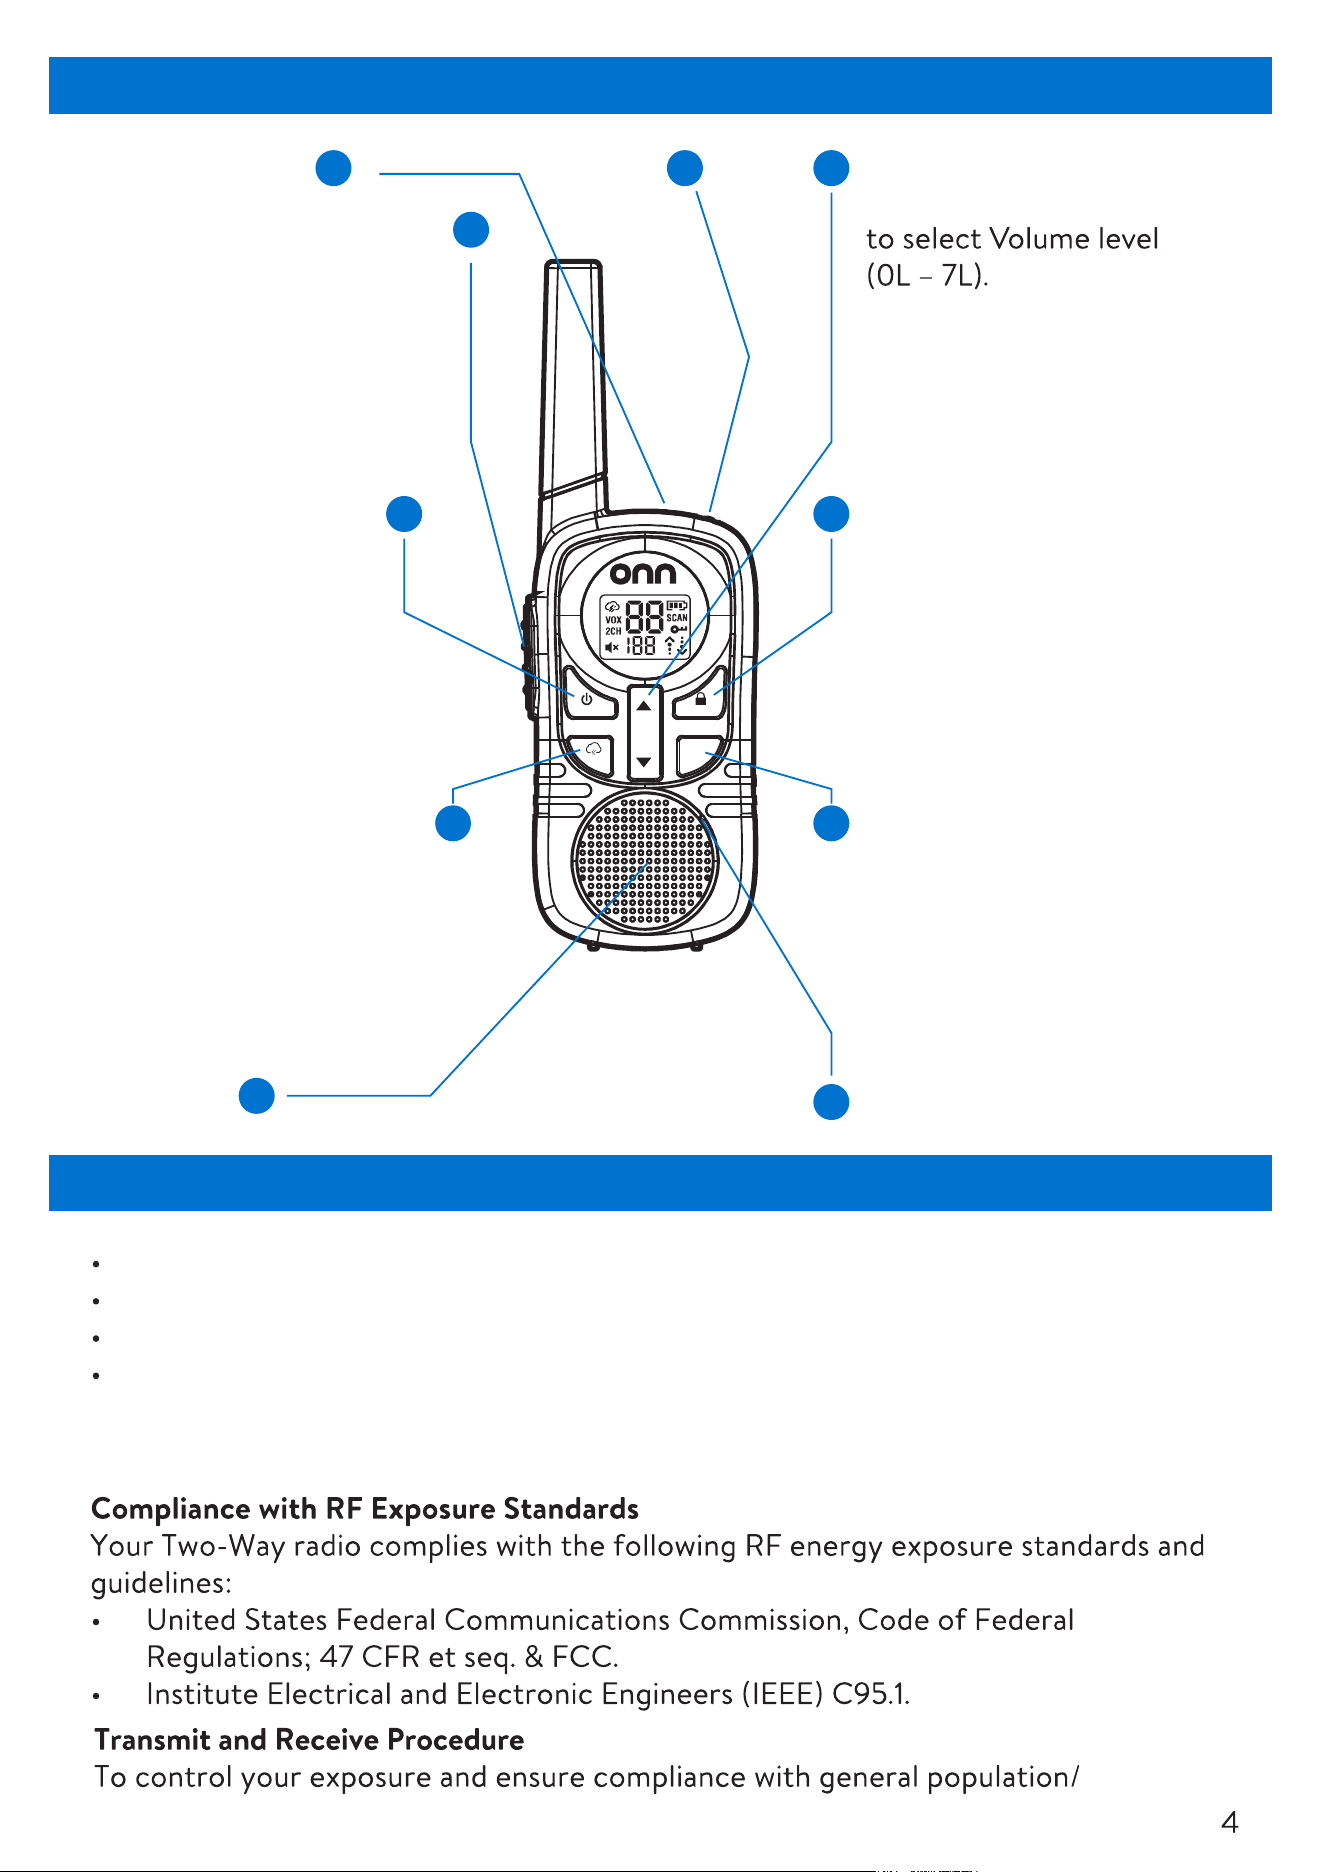
Lamp
CALL MENU
LAMP
Scan
Mon
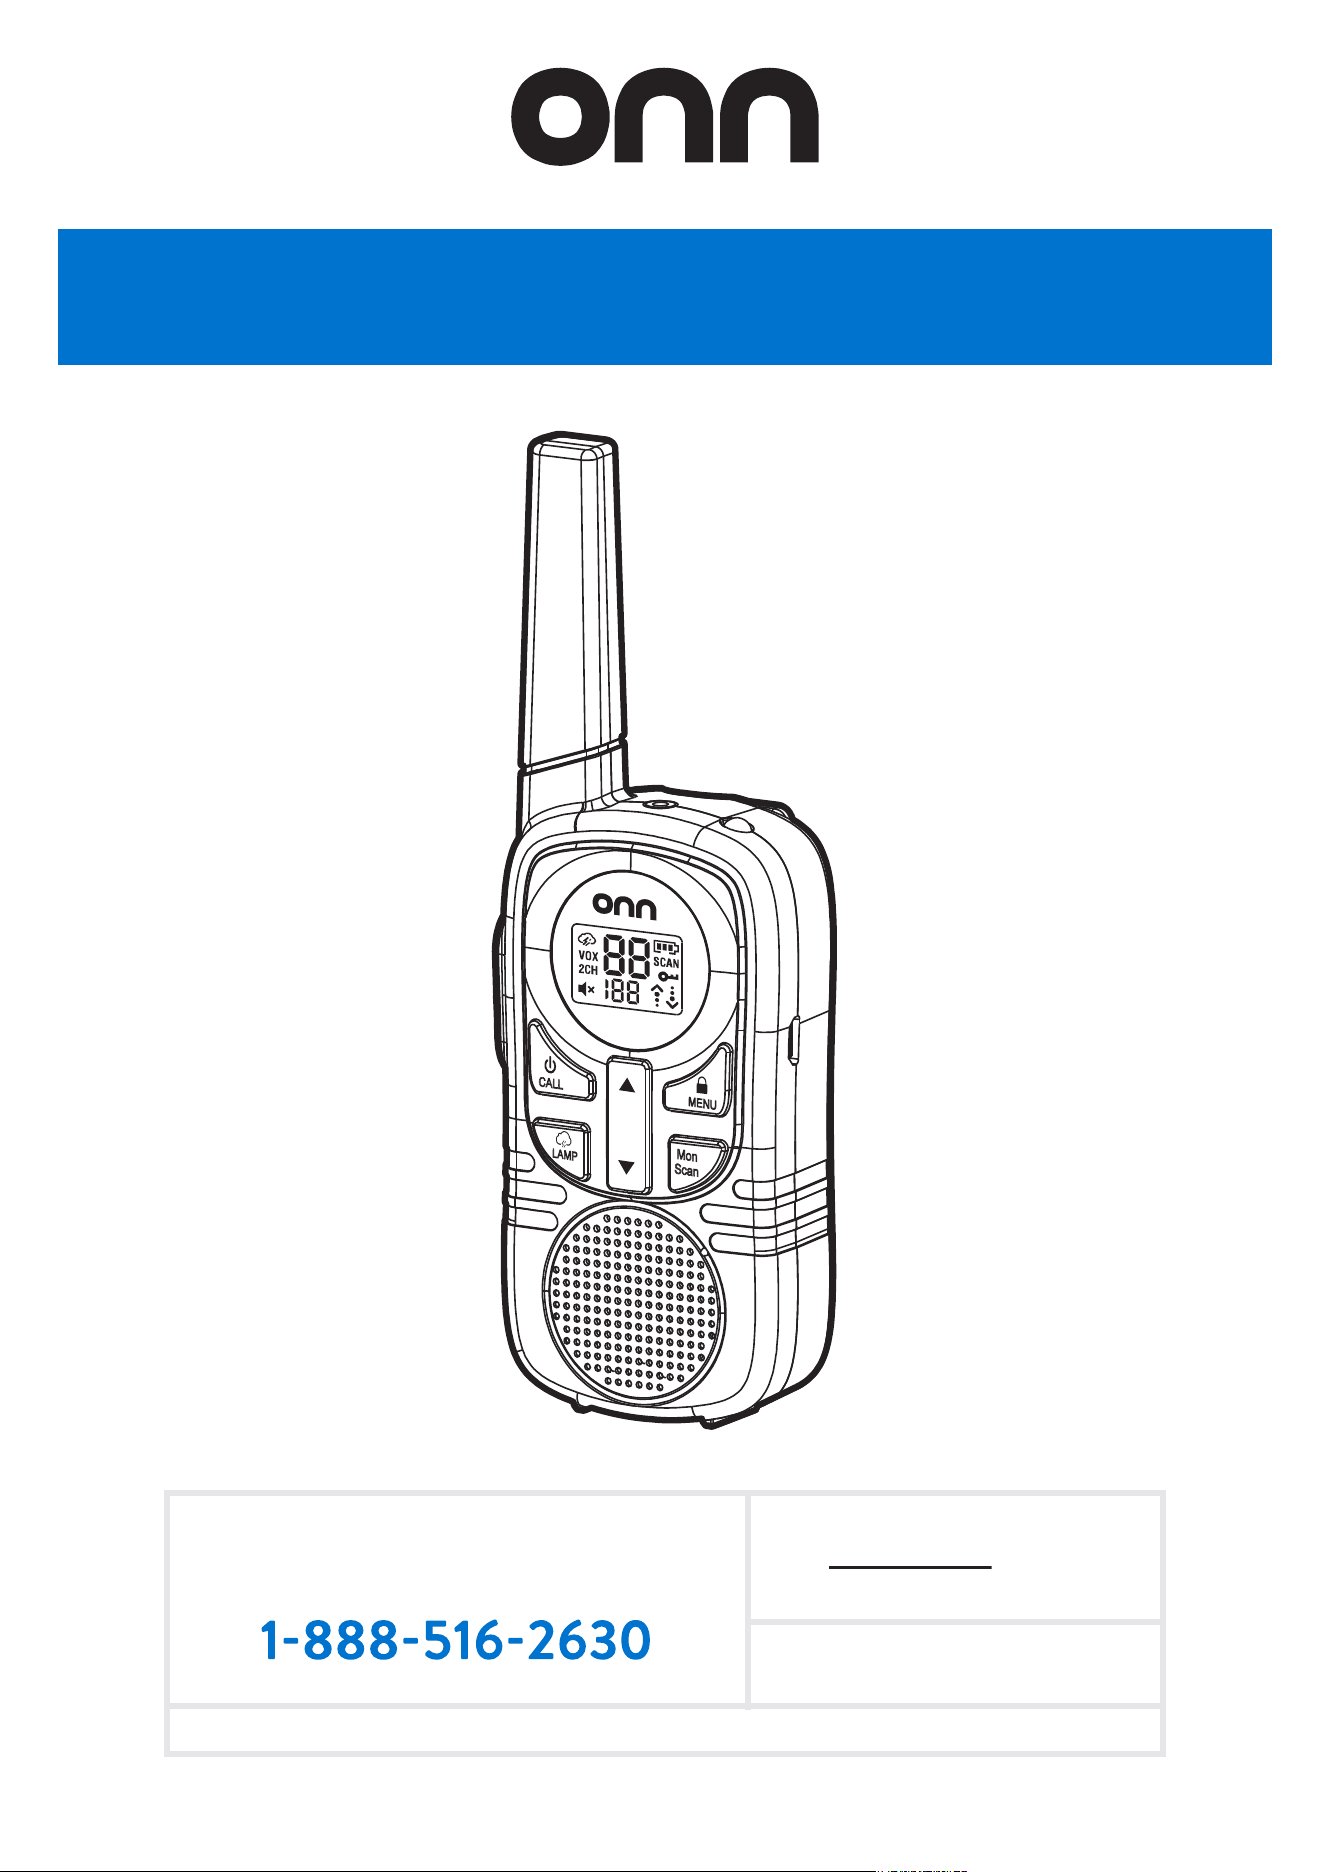
Call / Power Button
· Press and hold the
button for 3 seconds
until a tone sounds,
turn on/off the intercom.
· Press the button to
call the other party.
PTT Button
·Press and hold the button
to talk and transmit.
· Press the button to save
the settings and exit menu.
(In menu options)
Lamp / Weather Button
· Press the button to turn
built in LED lamp On/Off.
· Press and hold the button
for 3 seconds to enter
Weather mode.
Earphone Jack
Speaker
Lock / Menu Button
· Press and hold the button
for 3 seconds to lock/
unlock.
· Press the button to enter
Menu and flip menu
options.
Mon / Scan Button
· Press and hold the button
for 3 seconds to hear the
volume level.
· Press the button to turn
on/off the Scan
Up / Down Buttons
· Use the Up/Down buttons
· Use the Up/Down buttons
to select a channel /
Interference Eliminator
Code / sensitivity level /call
tone when in the menu.
Microphone
All controls, adjustments, and switches are specified in the manual or follow-up
instructions provided by the manufacturer, which can be operated or adjusted
without violating FCC rules.
Changes or modification to this unit not expressly approved by party responsible
for compliance could void user’s authority to operate equipment.
NOTE
WARNING
LR6
LR6
This equipment complies with FCC radiation exposure limits set forth for an
uncontrolled environment. End user must follow specific operating instructions for
satisfying RF exposure compliance. This transmitter must not be co-located or
operating in conjunction with any other antenna or transmitter. Portable device is
designed to meet requirements for exposure to radio waves established by Federal
Communications Commission (USA). These requirements set a SAR limit of 1.6 W/kg
averaged over one gram of tissue. Highest SAR value reported under this standard
during product certification for use when properly worn on body and front of face
with minimum distance 5mm(for body) and 25mm(for face).
FCC SAR Statement
press and hold the PTT button.
Note: FCC ID Label is in battery compartment, it could be easily found by removing
the battery cover.
CALL MENU
LAMP
Scan
Mon
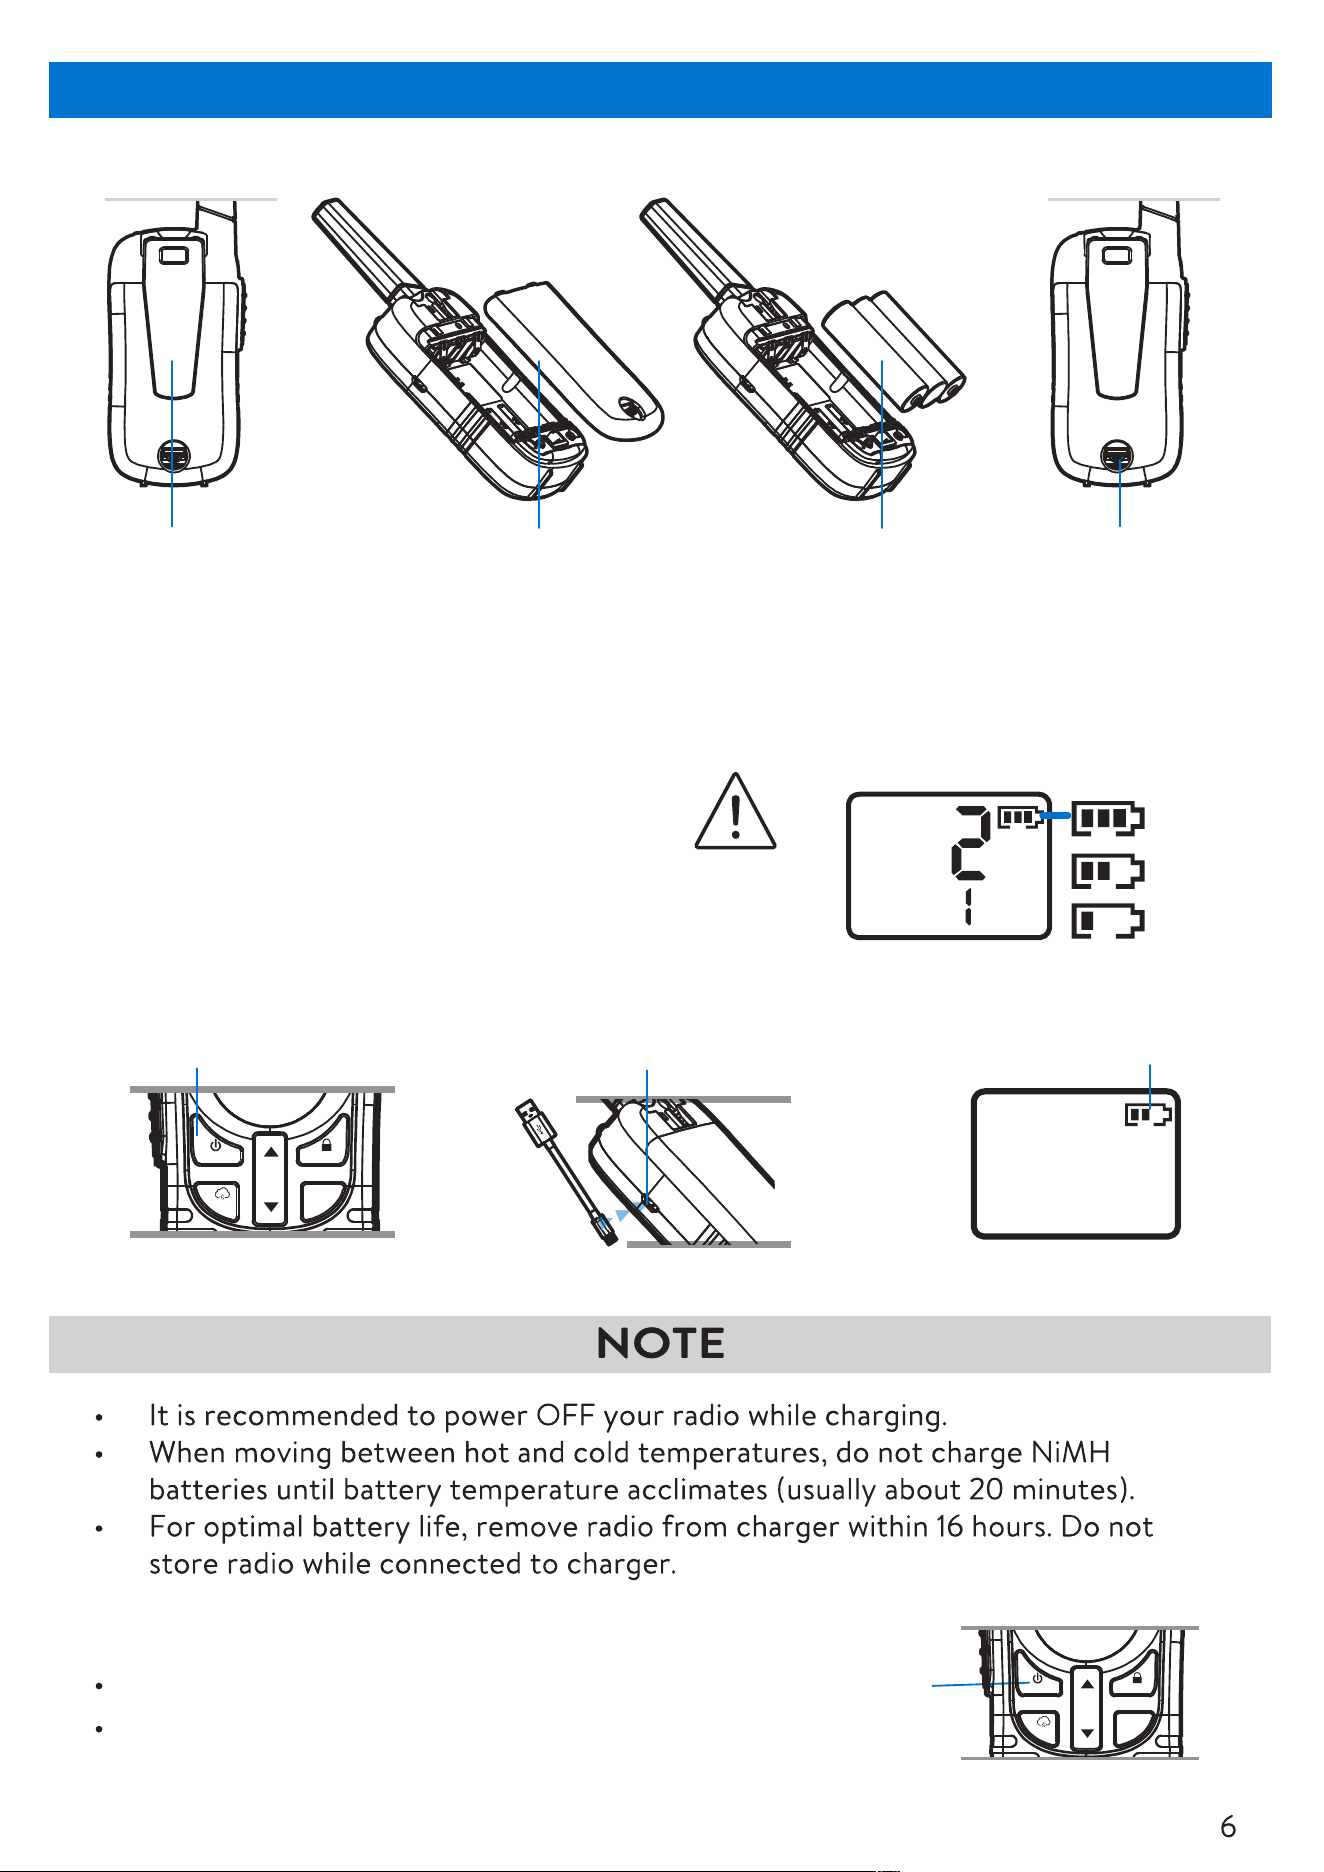
2. Plug in Micro-USB cable
2. Locate the battery
compartment on the
back of the unit.
1. Take off clip 4. Close the
battery
compartment.
Note: The device is compatible with rechargeable Ni-MH batteries.
3. Insert 3 AA batteries,
observing the polarity
markings (+ and -).
Getting Started
Battery Installing
Low Battery Level
Charging
To turn on: Press and hold the Power button for 3 seconds.
To turn off: Press and hold the Power button for 3 seconds.
Turning the Device On/Off
1. Turn the Device Off
CAUTION
Only charge
NiMH batteries
3.Charging
Full
Med
Low
When In battery low status, radio will sound
(Low Battery Alert) every 20 seconds or
after releasing PTT button.
CALL MENU
LAMP
Scan
Mon
Advanced Features
3. Press the PTT button
to confirm.
2. Use the Up/Down
buttons to select a
code (0-121).
Note: 0 disables the code, allowing all signals on the channel.
1. Press the Menu button
Code
3. Press the PTT button to
confirm.
2. Use the Up/Down buttons
to select a channel (1-22).
1. Press the Menu button
until the channel number
flashes.
Do not hold near ear!
High volumes cause
hearing loss
Changing Channels
Making a Call
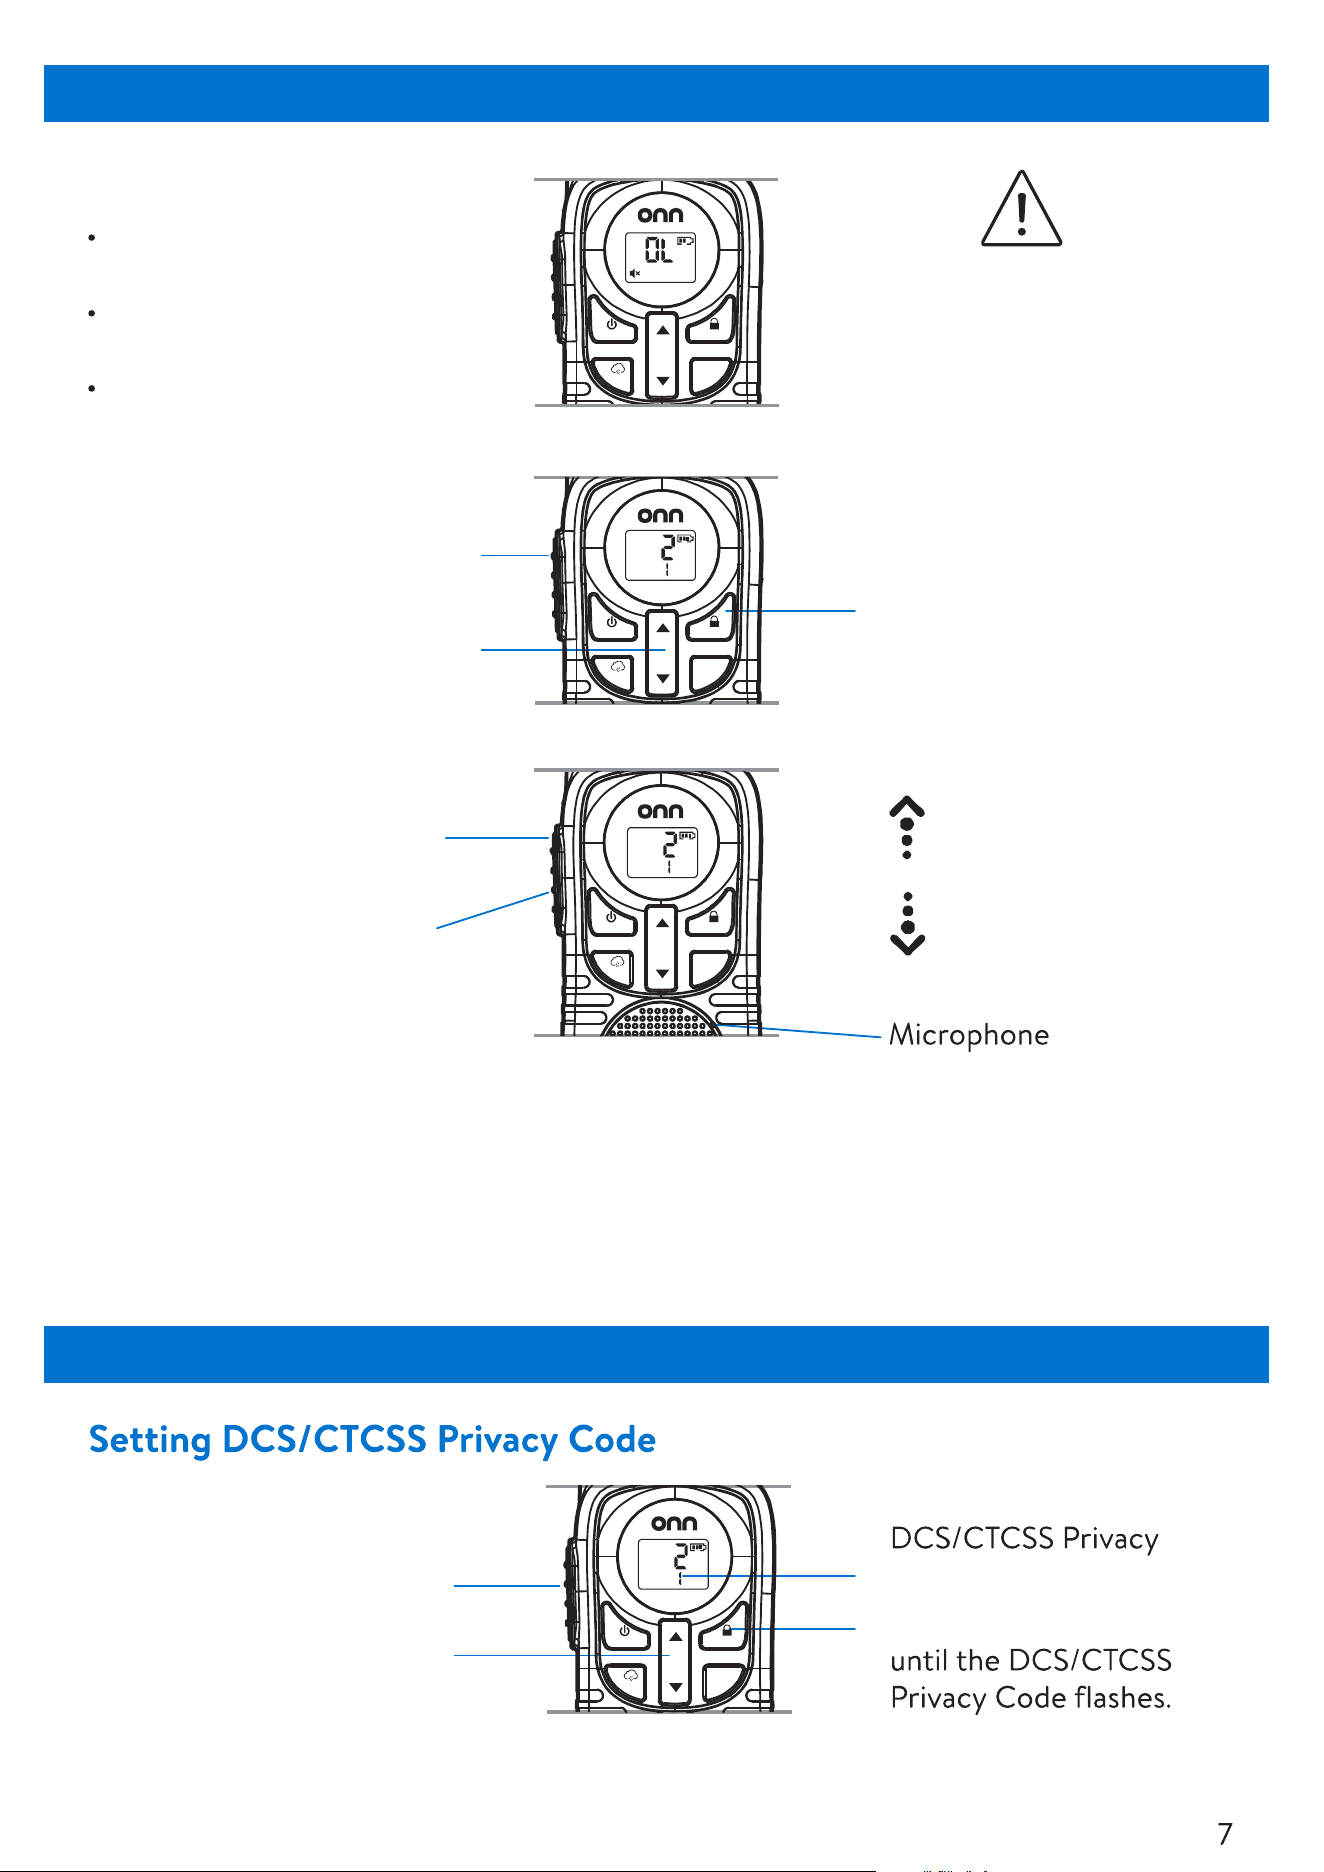
Press the Up/Down buttons
to adjust the volume.
Press the PTT button to
confirm.
Volume ranges from 0
(Mute) to 7 (Loudest).
Basic Operations
Adjusting Volume
1. Press and hold the PTT
button to talk.
2. Release the PTT button
to listen.
When
transmitting, this
icon appear in LCD
When
receiving, this icon
appear in LCD
CALL MENU
LAMP
Scan
Mon
CALL MENU
LAMP
Scan
Mon
Warning
CALL MENU
LAMP
Scan
Mon
Push-to-Talk Timeout Timer
To prevent accidental transmissions and save battery life, radio will stop transmitting
if you press PTT button for 60 seconds continuously.
Note: Do not hold radios less that 5 feet apart.
Note: Do not cover microphone while talking.
CALL MENU
LAMP
Scan
Mon
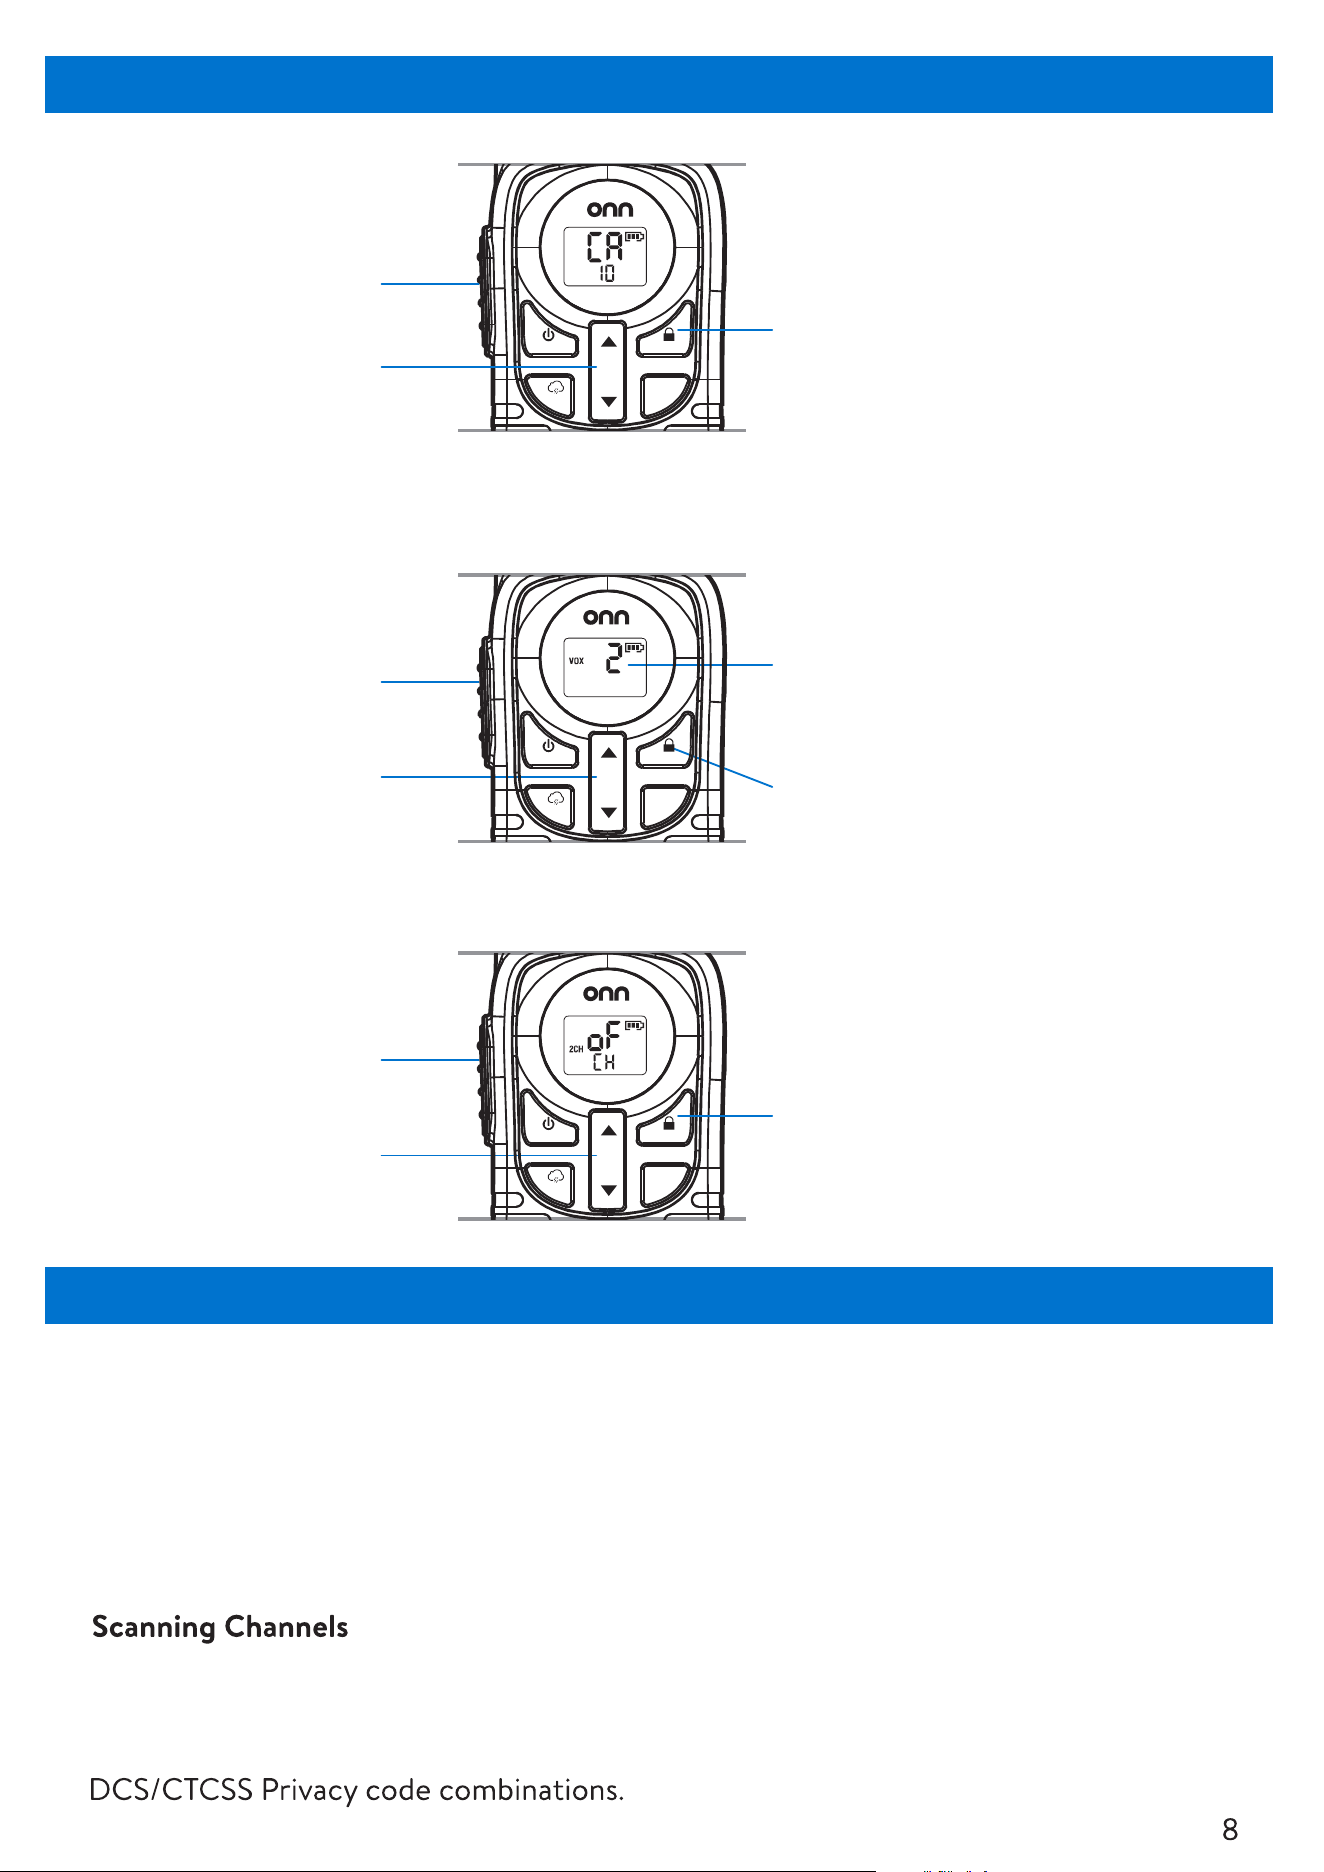
3. Press the PTT
button to confirm.
Note: 0 turns off Call Tones and Call function.
2. Use the Up/Down
buttons to select a
tone (0-10).
1. Press the Menu button
until “CA” appears.
3. Press the PTT
button to confirm.
2. Use the Up/Down
buttons to select
sensitivity (0-3).
1. Press the Menu button
until “VOX” appears.
0: Off
1: Low (noisy environments)
2: Medium (most environments)
3: High (quiet environments)
3. Press the PTT
button to confirm.
2. Use the Up/Down
buttons to select the
second channel (1-22)
or "OF"to turn off.
1. Press the Menu button
until “2CH” appears.
Call Tones
VOX (Voice-Operated Transmission)
2CH Dual Watch (Dual Channel Monitor)
Automatic Power Save
When the radio is on standby for 5 seconds (when there is no receiving transmission),
the radio will switch to power-saving mode. It can receive and transmit in this mode.
Roger Tone
In the power-off state, press and hold the (Power & UP) button at the same time to
turn on/off the Roger Beep.
Use SCAN mode to search all channels for transmissions or to find unused channels
to use. To Start Scanning:
1. Press Scan button,SCAN icon will appear and LCD will scroll through Channel and
Specifical Features
CALL MENU
LAMP
Scan
Mon
CALL MENU
LAMP
Scan
Mon
CALL MENU
LAMP
Scan
Mon
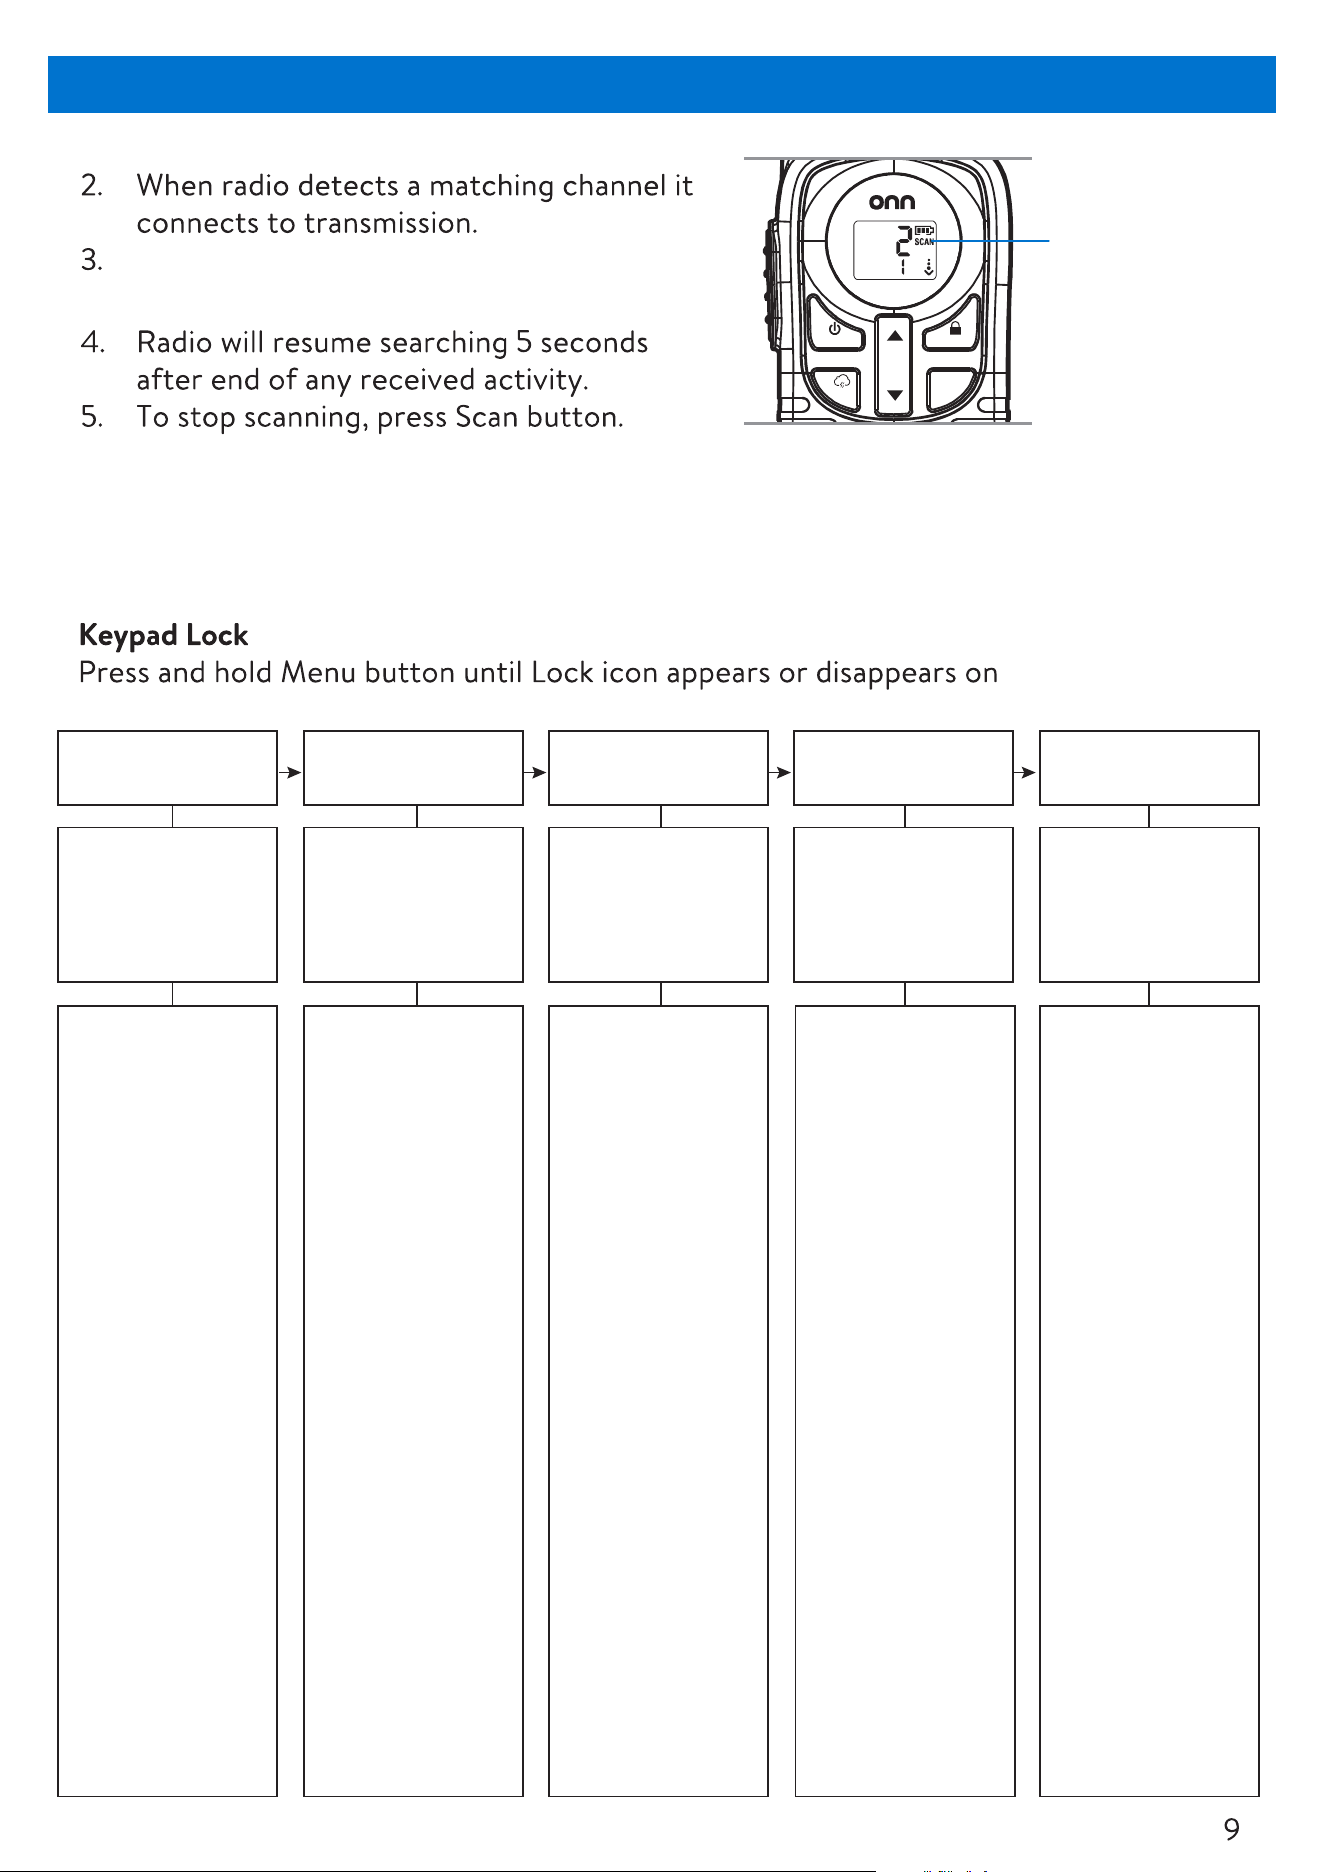
To talk, press PTT button within 5 seconds
of transmission.
Keypad Tones
When powered off, press and hold the (Call/Power and Down) keys at the same time
to turn on/off the keyboard ringtone.
LCD.
Channel
Selection
Set CTCSS/DCS
Privacy Codes
Set Call Tones Set Vox Set Dual Watch
Tap the menu
button once,
when the
display channel
number display
position
flashes, press
the up and
down keys to
set any of the
1-22 CH
Tap the menu
key twice, and
when the
privacy code
display location
flashes, press
the up and
down keys to
set any of the
0-121 privacy
codes.
0 indicates that
the privacy
code is off1-38
is CTCSS 39-121
is DCS
Tap the menu
button three
times, when
the channel
number
position shows
CA and the
privacy code
display position
flashes, press
the up and
down keys to
set any of the
0-10 call tones.
0 indicates that
the call tone is
off and this
state prohibits
the call.
Tap the menu
button four
times, and
when the VOX
is displayed on
the left side of
the display and
the channel
number display
is flashing,
press the up
and down
buttons to set
any of the VOX
0-3 levels 0
means VOX is
off.
Number 3 is
the most
sensitive
Number 1 is the
least sensitive
Press the menu
button five
times, when the
left side of the
display shows
2CH, the
privacy code
display position
shows CH, and
the channel
number
position flashes,
press the up
and down
buttons to set
the
dual-frequency
monitoring
OF-22 any
channel
1-22
0-121
(0:OFF)
1-38: CTCSS
39-121:DCS
0-10
(0:OFF)
0-3
(0:OFF)
(1-3 is
Sensitivity)
OF-22
(OF indicates
OFF)
CALL MENU
LAMP
Scan
Mon
Scrolling
through
channels
Cleaning & Care
Weather Options
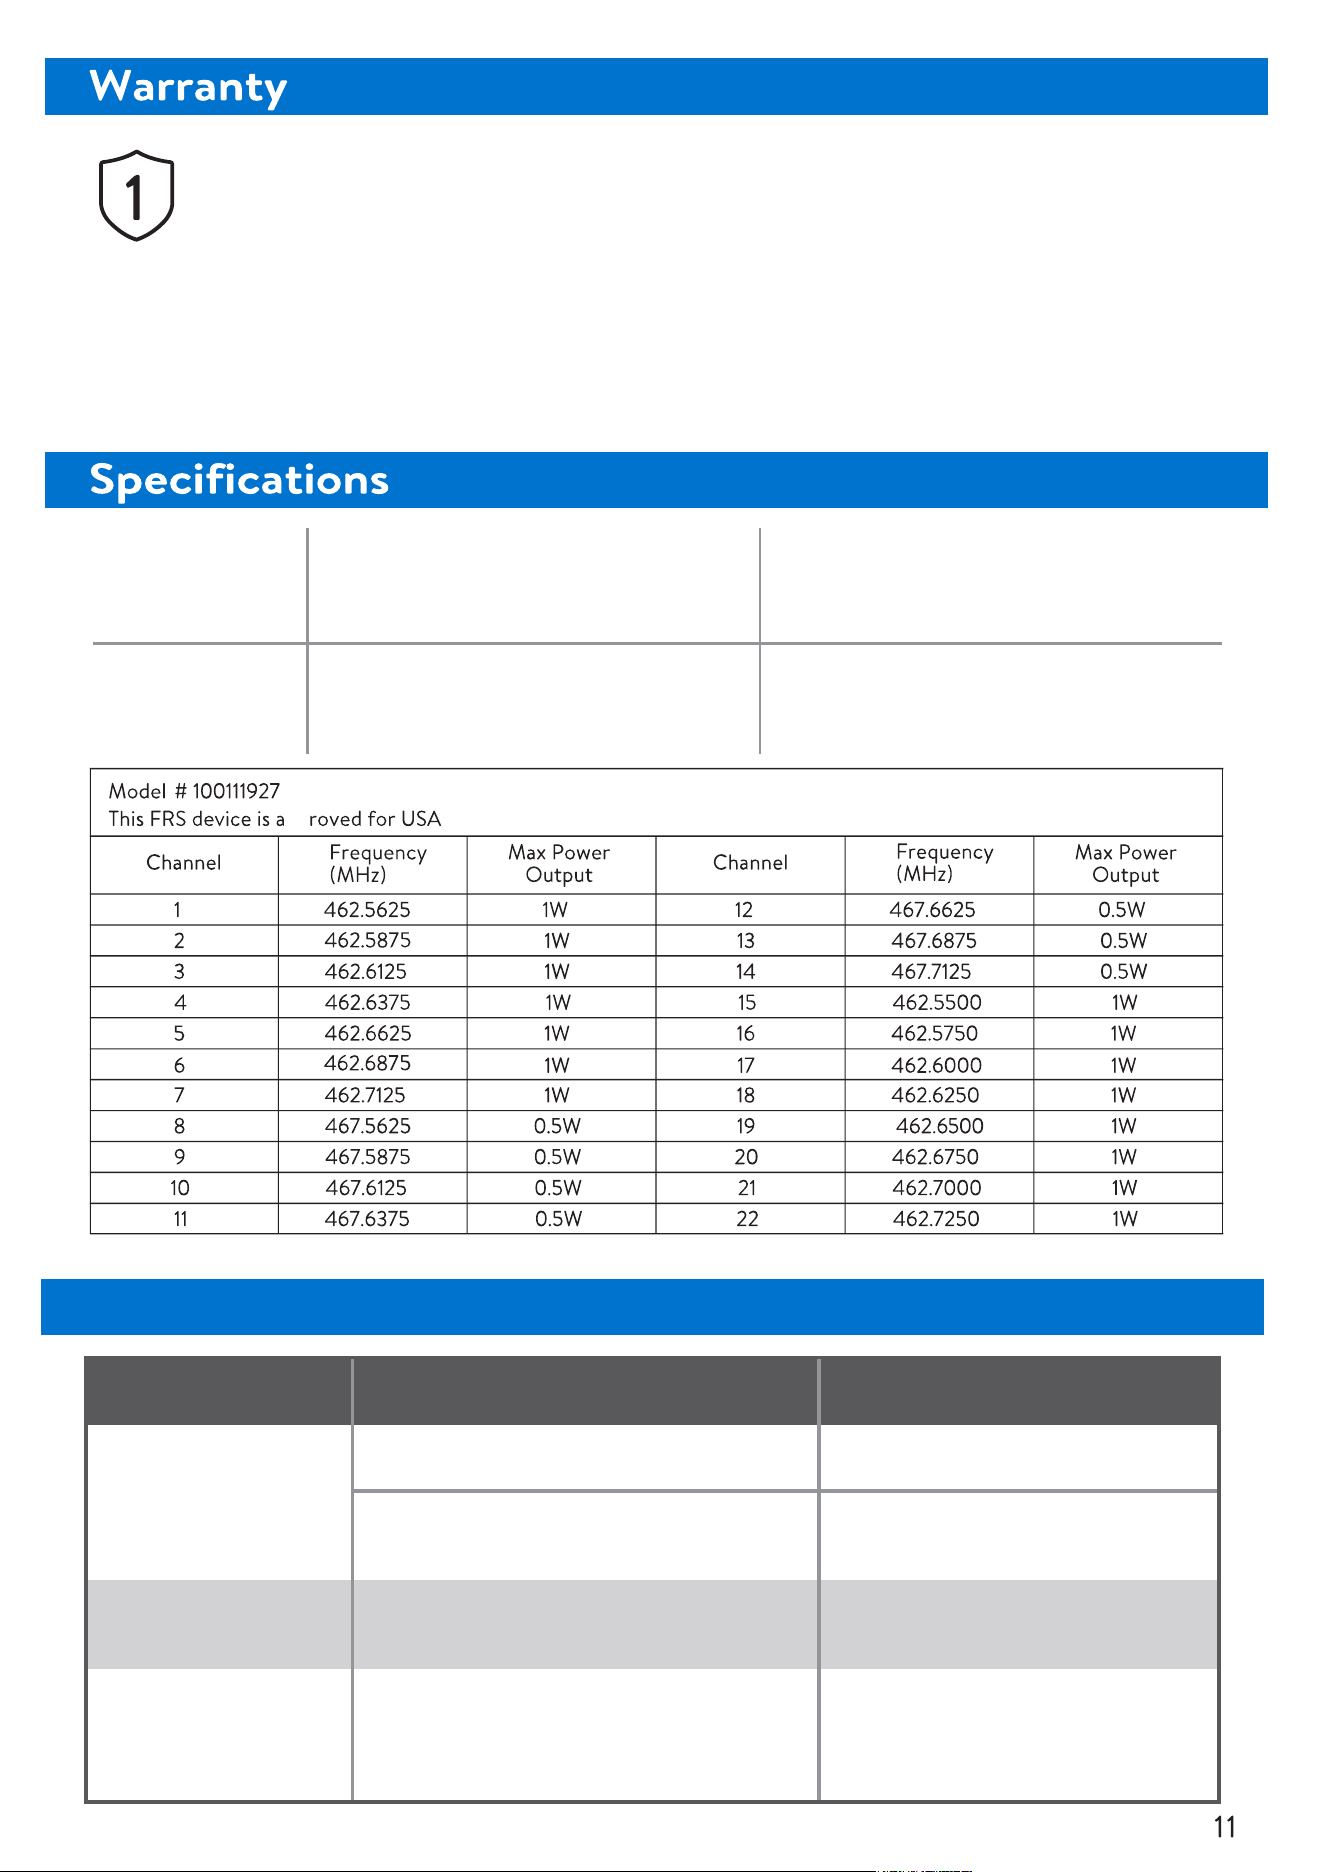
Channels:
22
Interference Eliminator Codes:
121 Privacy Codes(38 CTCSS
codes / 83 DCS codes)
Battery:
NiMH batteries
Range:
Up to 23 miles (ideal conditions),
about 2 mile in urban areas
Power Source:
3 AA batteries
Speaker:
1.0W
Warranty Period lasts for 1 year (365 days) from date you purchased product. Your
purchase date is printed on receipt you received with product. This limited warranty
applies only to hardware components of Device that are not subject to accident,
misuse, neglect, fire or damage from other external causes, alteration, repair, or
commercial use.
YEAR LIMITED WARRANTY
COVERING DEFECTIVE PARTS
Problem
Cannot hear
incoming
transmission
Transmission is
unclear/crackling
Volume too low/muted
Radio not set to correct channel
Receiving signal is weak
Ensure volume is above 0
Set radio to same channel
as transmission
Ensure radio is within range
for current environment
Transmission is
muffled
Mic/Speaker is covered
Ensure mic/speaker is
uncovered when
transmitting
Cause Solution/Prevention
Troubleshooting / Frequently Asked Questions (FAQ)
Q: Are the walkie-talkie batteries rechargeable?
A: The NiMH batteries included in the package are rechargeable. You can charge the
device using the rechargeable NIMH battery through the device's charging port.
Q How far is the actual call distance of the walkie-talkie?
A The 23-miles range is achievable in ideal conditions without obstacles. In urban or
suburban areas, obstacles can reduce the range to about 1.5~2miles.
When battery capacity is low, the receiving distance will also be affected.
Q How can we improve the sound quality of the walkie-talkie?
A The signal is blocked or interfered with by the surrounding environment. Holding
the device too close or far from your mouth can affect audio clarity.
Obstacles and interference radio waves will affect the rustling sound. Use it in an
open area as much as possible.
Produced for
Wal-Mart Stores, Inc.
Bentonville, AR 72716
Walmart.com
This device complies with part 15 of the FCC Rules. Operation is subject to the
following two conditions: (1) This device may not cause harmful interference,
and (2) this device must accept any interference received, including interference
that may cause undesired operation.
NOTE: This equipment has been tested and found to comply with the limits for a Class B
digital device, pursuant to part 15 of the FCC Rules. These limits are designed to provide
reasonable protection against harmful interference in a residential installation.
This equipment generates, uses and can radiate radio frequency energy and, if not
installed and used in accordance with the instructions, may cause harmful interference
to radio communications. However, there is no guarantee that interference will not occur
in a particular installation. If this equipment does cause harmful interference to radio or
television reception, which can be determined by turning the equipment off and on,
the user is encouraged to try to correct the interference by one or more of the
following measures:
—Reorient or relocate the receiving antenna.
—Increase the separation between the equipment
and receiver.
—Connect the equipment into an outlet on a circuit
different from that to which the receiver is connected.
—Consult the dealer or an experienced radio/TV
technician for help.
We‘d love to hear from you.
scan with your walmart
app and let us know what
you think.