For all GoChek Max series meters.
MicroTech Medical (Hangzhou) Co., Ltd.
Address: No.108 Liuze St., Cangqian, Yuhang District,
Hangzhou, 311121 Zhejiang, P.R.China
Website: http://www.microtechmd.com
CMC Medical Devices & Drugs S.L
C/Horacio Lengo Nº 18 CP 29006,
Málaga-Spain
Name: XXXXXXX
Address: XXXXXXXXX
Document: 1059-PMTL-012
Revision: V02
Issued: 2026-05-13
2797
INSTRUCTION MANUAL
BLOOD GLUCOSE METER
血糖仪使用说明书(英文CE版)
����-PMTL-���
V��
�.品牌修改为GoChek Max
�.CExxxx改为CE����
�.内容修改
封面:封面封底200g铜版纸
内页:70g轻涂纸
黑白印刷
105*155mm
For all GoChek Max series meters.
MicroTech Medical (Hangzhou) Co., Ltd.
Address: No.108 Liuze St., Cangqian, Yuhang District,
Hangzhou, 311121 Zhejiang, P.R.China
Website: http://www.microtechmd.com
CMC Medical Devices & Drugs S.L
C/Horacio Lengo Nº 18 CP 29006,
Málaga-Spain
Name: XXXXXXX
Address: XXXXXXXXX
Document: 1059-PMTL-012
Revision: V02
Issued: 2026-05-13
2797
INSTRUCTION MANUAL
BLOOD GLUCOSE METER

Dear User:
Thank you for choosing the GoChek Max Series blood glucose meter.
Monitoring your blood glucose level is an integral partof treating diabetes.
MicroTech Medical is committed to helping you ccontrol your condition so you
can live a healthy and active life.
Please read this user manual to help master the simple fiunctions of your
GoChek Max Series meter. If used properly, the blood glucose meter will give
you accurate results.
The GoChek Max Series blood glucose monitoring system will give yoou
accurate readings from fresh capillary or venous whole blood. This product is
for professional use in medical institutes or for self-testing by diabetics. Test
results serve only as helpful information, not as proof for clinical diagnoses.
Thank you for choosing the GoChek Max Series blood glucose meter,This
instruction manual contains all the information you need to know, including the
blood glucose testing procedures and precautions for use. Please be sure to
read it carefully and in full.
Important safety instructions before use:
Only use the meter as directed by this instruction manual.
Do not use accessories that are not provided or recommended by our
company.
Only our company or its authorized agencies are permitted to inspect or
supply any parts and components.
Do not use this product if it malfunctions or is damaged.
Do not expose this product to surfaces that are too hot to touch.
Do not place any objects on top of this product.
Unless specifically required by the Instructions for Use, do not allow any
objects to fall into or be inserted into the openings, tubing, or joints of this
product.
Do not use this product in areas where aerosol sprays are in use or
oxygen is administered.
Failure to use the device in accordance with the manufacturer’s specified
method may impair the protection provided by the device.
This blood glucose meter is for in vitro diagnostic use only.
This blood glucose meter is suitable for both self-testing and professional
monitoring.
The blood glucose meter is intended for use with blood glucose test strips
to quantitatively measure the blood glucose concentration in human body.
Consult your doctor or diabetes care specialist before adjusting your
medication, diet, or daily activities.
Keep this blood glucose meter out of the reach of children and pets.
Do not use the device outdoors.
i
▼
Specification
▼
Index
Product Name: MCM-4 / MCM-6 / MCM-7 Connect Blood Glucose Meter
Size: 87 mm (L) x 54 mm (W) x 25 mm (Thickness)
Glucose Test Range: 0.6-33.3 mmol/L (10-600 mg/dL)
Minimum Sample Volume: 0.6μL
Test Time: 5 seconds
Battery: 2×AAA(LR03)
Battery Life: >1,000 readings(bluetooth functions disabled)
Glucose Concentration Units: mmol/L or mg/dL depending on the
standard of your country
Memory Storage: 700(MCM-4) and 1100 (MCM-6, MCM-7) test results with
date and time stamp
Auto Shutdown: Automatic shutdown after 2 minutes
Display Size: 40mm × 42mm
Weight: about 75 grams (including battery)
Operating Temperature: 5-45°C (41-113°F)
Operating Altitude: 0-3048 m above sea level
Operating Humidity: 10-90% (non-condensing)
Hematocrit Range: 10-70%
Valid Period: 5 years
Storage and Transportation Temperature: -40-55°C
Storage and Transportation Humidity: 10-90% (non-condensing)
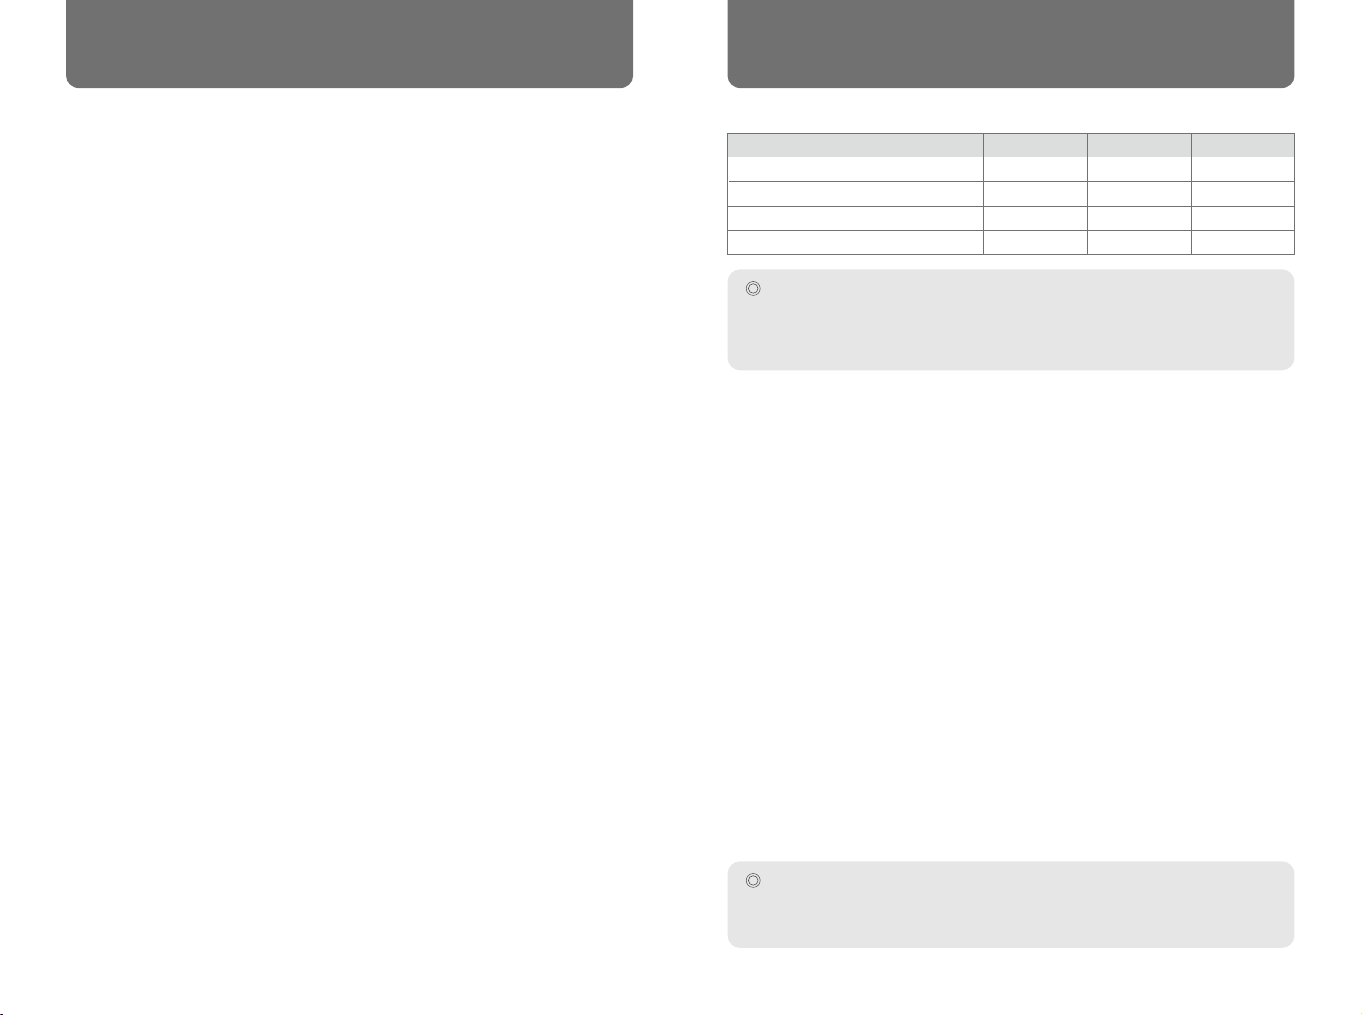
Model No.
Data Storage Capacity
Voice Prompt Function
Wireless Transmission Function
Backlit Display
MCM-4
700
NO
NO
NO
MCM-6
1100
YES
NO
YES
MCM-7
1100
YES
YES
YES
Note:
The data storage capacity refers to the total number of stored blood sample data and
control solution data. Among them, the MCM-4 blood glucose meter can store 200
sets of control solution data, while both the MCM-6 and MCM-7 models can store
100 sets of control solution data each.
Note:
Blood containing high levels of vitamin C or other reducing agents can lead to
inaccurate test results. Triglycerides above 3,000 mg/dL and cholesterol above 500
mg/dL will lead to inaccurate test results.
Specification .................................................................................................
Intended Use.................................................................................................
Product components....................................................................................
Component Descriptions.............................................................................
Blood Glucose Meter..............................................................................................
Display .................................................................................................................
Test Strips.............................................................................................................
Control Solution .....................................................................................................
Meter Setup Before Use...............................................................................
Battery Installation .................................................................................................
Meter Setup ..........................................................................................................
Quality Control Tests ..............................................................................................
Testing Your Blood .......................................................................................
Blood Sampling .....................................................................................................
Lancet Removal.....................................................................................................
Testing Blood Glucose ............................................................................................
Understanding Test Results ........................................................................
Suggested Test Times and Target Goals ...................................................................
“HI” and “LO” Messages .........................................................................................
Meter Memory .......................................................................................................
Memory Mode .......................................................................................................
Display stored data of control solution test results ......................................................
Clearing the Memory ..............................................................................................
Memory Data Transfer............................................................................................
Maintenance..................................................................................................
Storage ................................................................................................................
Replacing the Battery .............................................................................................
Cleaning ...............................................................................................................
Troubleshooting ..............................................................................
Warranty .........................................................................................
Symbol Index ..................................................................................
Electromagnetic Compatibility ..........................................................
Compliance Statements....................................................................
EU Conformity Statement .................................................................
1
2
3
3
3
4
5
7
8
8
8
11
14
14
18
18
21
20
22
22
22
23
23
24
25
25
25
26
27
28
28
29
29
29
1ii
Intended Use: The Blood Glucose Monitoring System is intended to
quantitative detect glucose in whole blood samples, as an aid inmonitoring the
effectiveness of controlling glucose for diabetic patientsWhen used for
self-testing(over-the-counter testing), the system canaccept fresh human
capillary whole blood obtained from the fingertipforearm, and/or palm by
non-professional users. Healthcare professionals can also use venous, and
neonatal blood specimen with the Blood Glucose Monitoring System in a
hospital environment. The Blood Glucose Monitoring System is
non-automatic.
Intended User: The system can be used both for self-testing and near patient
testing. When used for self-testing, the system can only accept fresh human
capillary whole blood obtained from the fingertip, forearm, and/or palm
bynon-professional users. In addition to whole capillary blood, healthcare
professionals can also usevenous blood, and neonatal blood for
measurement in a hospital environment.
Test Principle: Reagents consisting of glucose dehydrogenase and mediator
are deposited onto the reaction cell section of the test strip with printed
electrodes. When a drop of whole blood sample(or control solution) is applied
to the reaction cell section on the test strip, glucose in the blood sample reacts
in the presence of glucose dehydrogenase and mediator, and the reaction
yields electrons. Thus, a current signal is produced from the reaction and
detected by the meter. The detected current signal is then calculated by the
meter, and the glucose concentration reading is then displayed on the meter
display.
▼
Intended Use
WARNING:
1. Do not ingest battery, Chemical Burn Hazard.
2. This product contains a button cell battery.
If the button cell battery is swallowed, it can cause severe internal burns in just 2
hours and can lead to death.
3. Keep new and used batteries away from children.
If the battery compartment does not close securely, stop using the product and
keep it away from children. If you think batteries might have been swallowed or
placed inside any part of the body, seek immediate medical attention.
4. This equipment is not suitable for use in locations where children are likely to be
present.
Important Reminder:
Upon receiving the product, please inspect it according to the following steps to
ensure the product you received is complete and undamaged:
Open the outer packaging with care to avoid damaging the contents due to rough
handling. Check carefully whether all items in the package are included. Visually
inspect the blood glucose meter: check if the main unit has a cracked or deformed
casing, and verify that the display screen is free of scratches, damage or display
malfunctions.
▼
Product Components
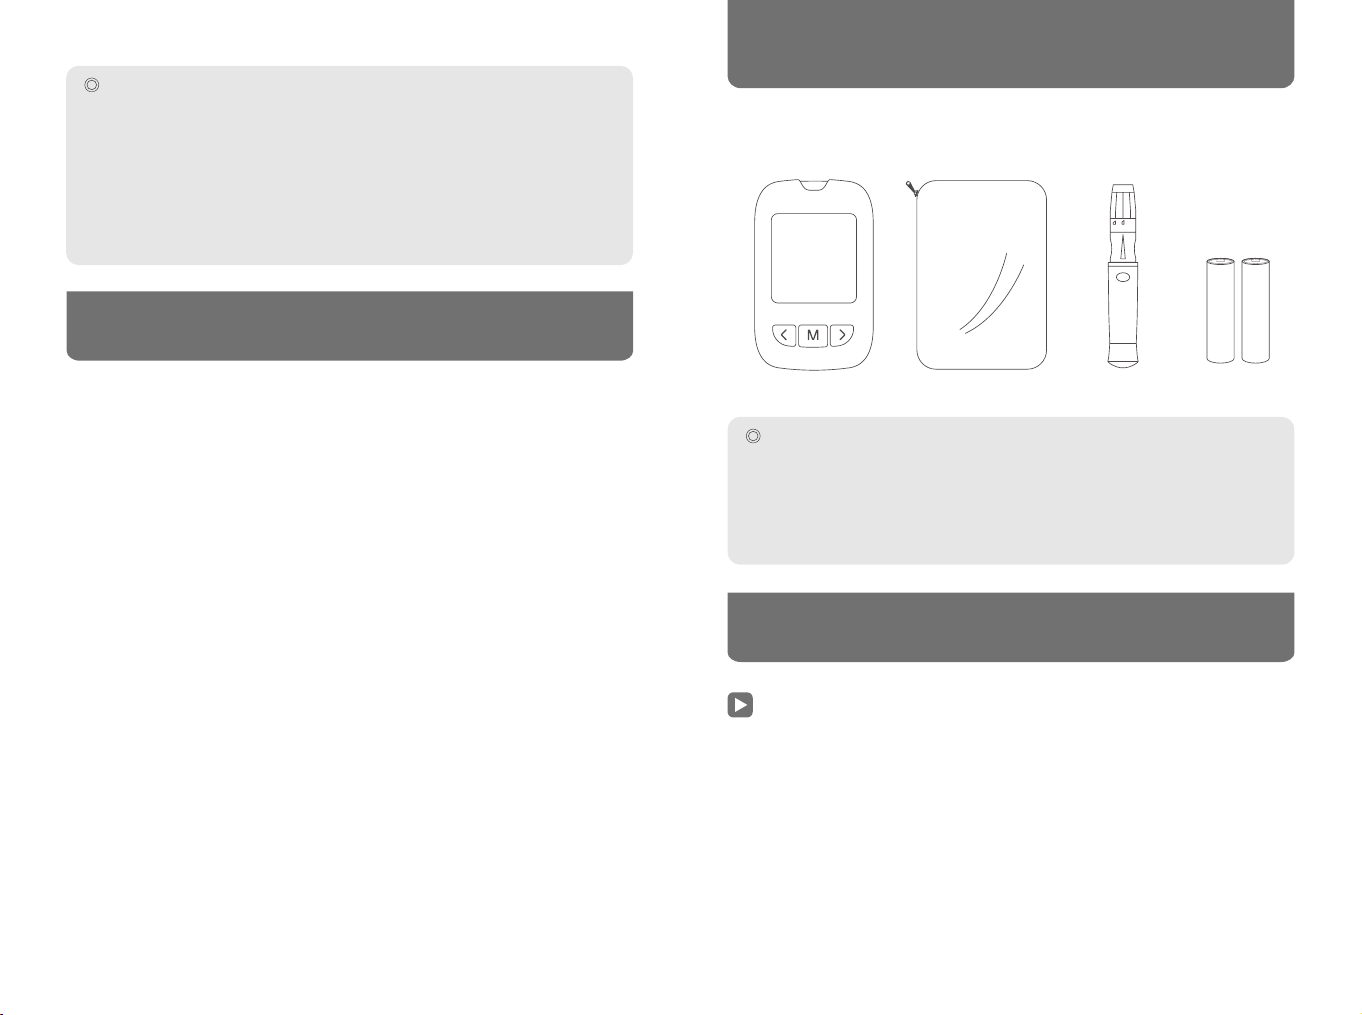
Included components: Glucose meter, batteries, carrying case
Optional components (purchased separately): Lancets, lancing device
Component Descriptions
Blood Glucose Meter
The meter reads the test strips and displays the blood glucose concentration.
Use this diagram to become familiar with all of the parts of your meter.
BatteriesLancing DeviceCarrying CaseBlood Glucose Meter
32
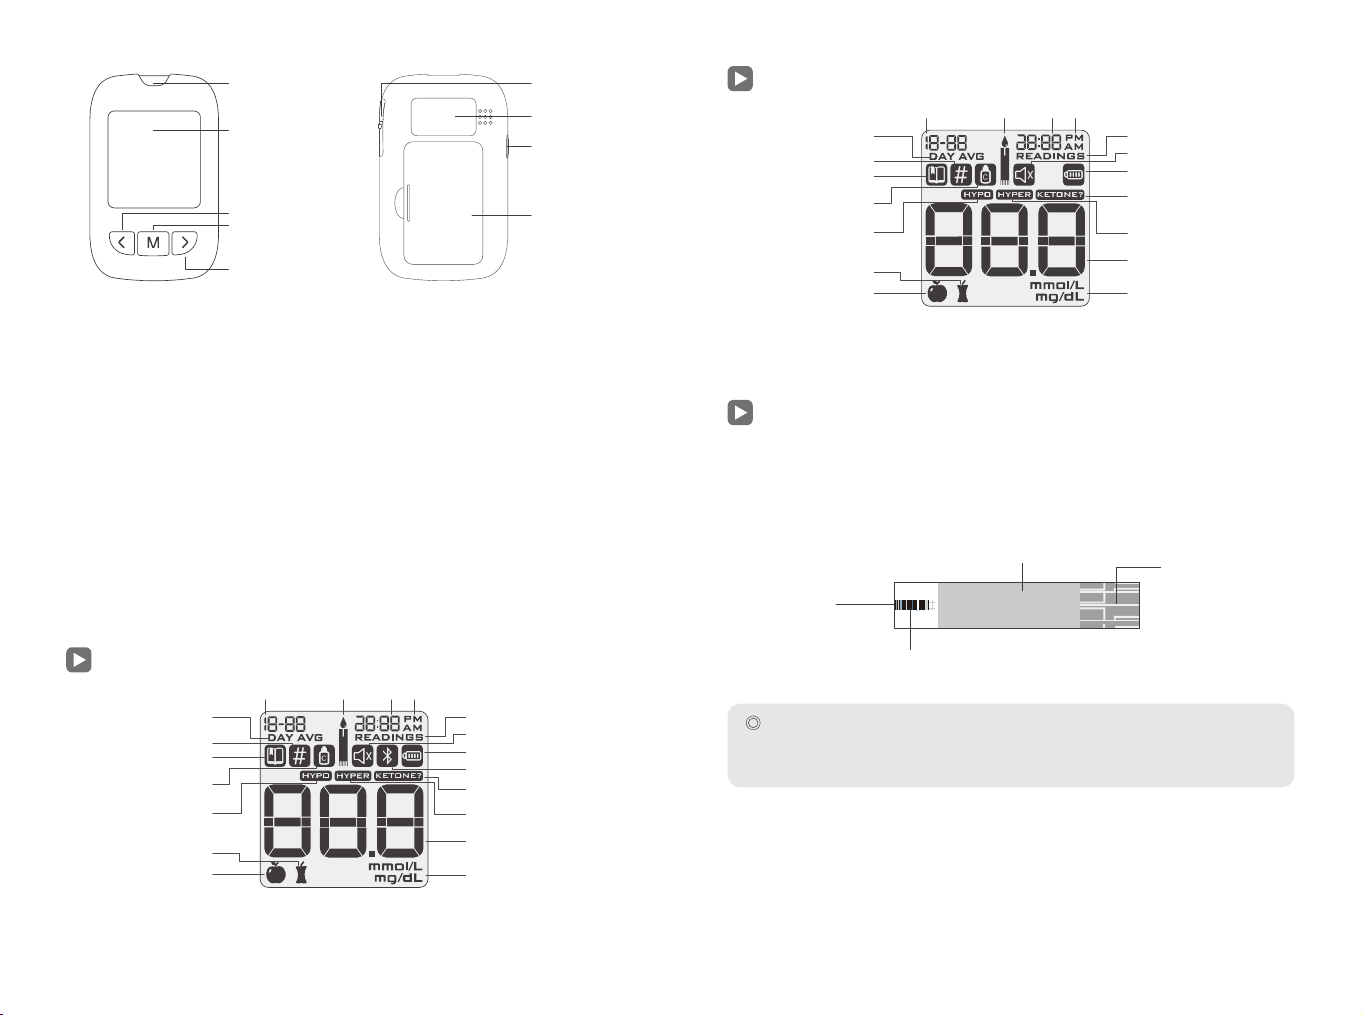
Fingerhold Area Use this area to grip the strip
Sample Area
Apply blood or
control solution here
Test Window Check to confirm an
adequate sample has been applied
Contacts
Insert this side into
the test strip port
Test Strip Port: Test strips are inserted into this area to perform a test.
Display: Shows test results, settings, and other information.
“<” Button: When the meter is off, holding the “<” button will turn the meter
on and enter the system settings menu.
“M” Button: When the meter is off, holding the “M” button will enter memory
mode. This button also is used to select/confirm.
“>” Button: When the meter is off, press and hold the ">" button for about 2
seconds. The meter will turn on and enter the control solution memory mode.
Battery Door: Remove the battery door to install 2×AAA (LR03) battery.
Label: Contains product information.
Test Strip Ejector: Slide the ejector forward to discard a used test strip.
Data Port: Connecting the data cable enables the export of raw data for
internal product debugging by the Manufacture.
IMPORTANT:
Make sure that the blood sample is applied at the edge of the test strip, never on the
top surface. Applying blood to the top surface of the strip will lead to inaccurate
results.
Test Strip Port
Display
(LCD)
“<” Button
“M” Button
“>” Button
Data Port
Test Strip
Ejector
Label
Battery Door
Test Strips
GoChek Max blood glucose test strips contain chemical reagents. After the
test strip is placed into the test strip port and a blood sample is applied, the
blood automatically wicks into the test window. A transient electrical current is
generated, and this current is measured to determine the correct blood
glucose level reading.
Display1
Display 1 applies to MCM-7 Blood Glucose Meters, which are provided with
the function of bluetooth data transfer.
Readings Icon
Mute
Low Battery Icon
BlueTooth Icon
Check Ketone Alert
Hyper Icon
Test Result Display Area
Blood Glucose
Measurement Units
Day Average
Pound Sign (#)
Memory
Control Solution
Before Meal Icon
After Meal Icon
Hypo Icon
Date
Apply Blood
Icon
Time AM/PM
Display2
Display 2 only applies to MCM-4 and MCM-6 Blood Glucose Meters which do
not have the function of bluetooth data transfer.
Readings Icon
Mute
Low Battery Icon
Check Ketone Alert
Hyper Icon
Test Result Display Area
Blood Glucose
Measurement Units
Day Average
Pound Sign (#)
Memory
Control Solution
Before Meal Icon
After Meal Icon
Hypo Icon
Date
Apply Blood
Icon
Time AM/PM
54
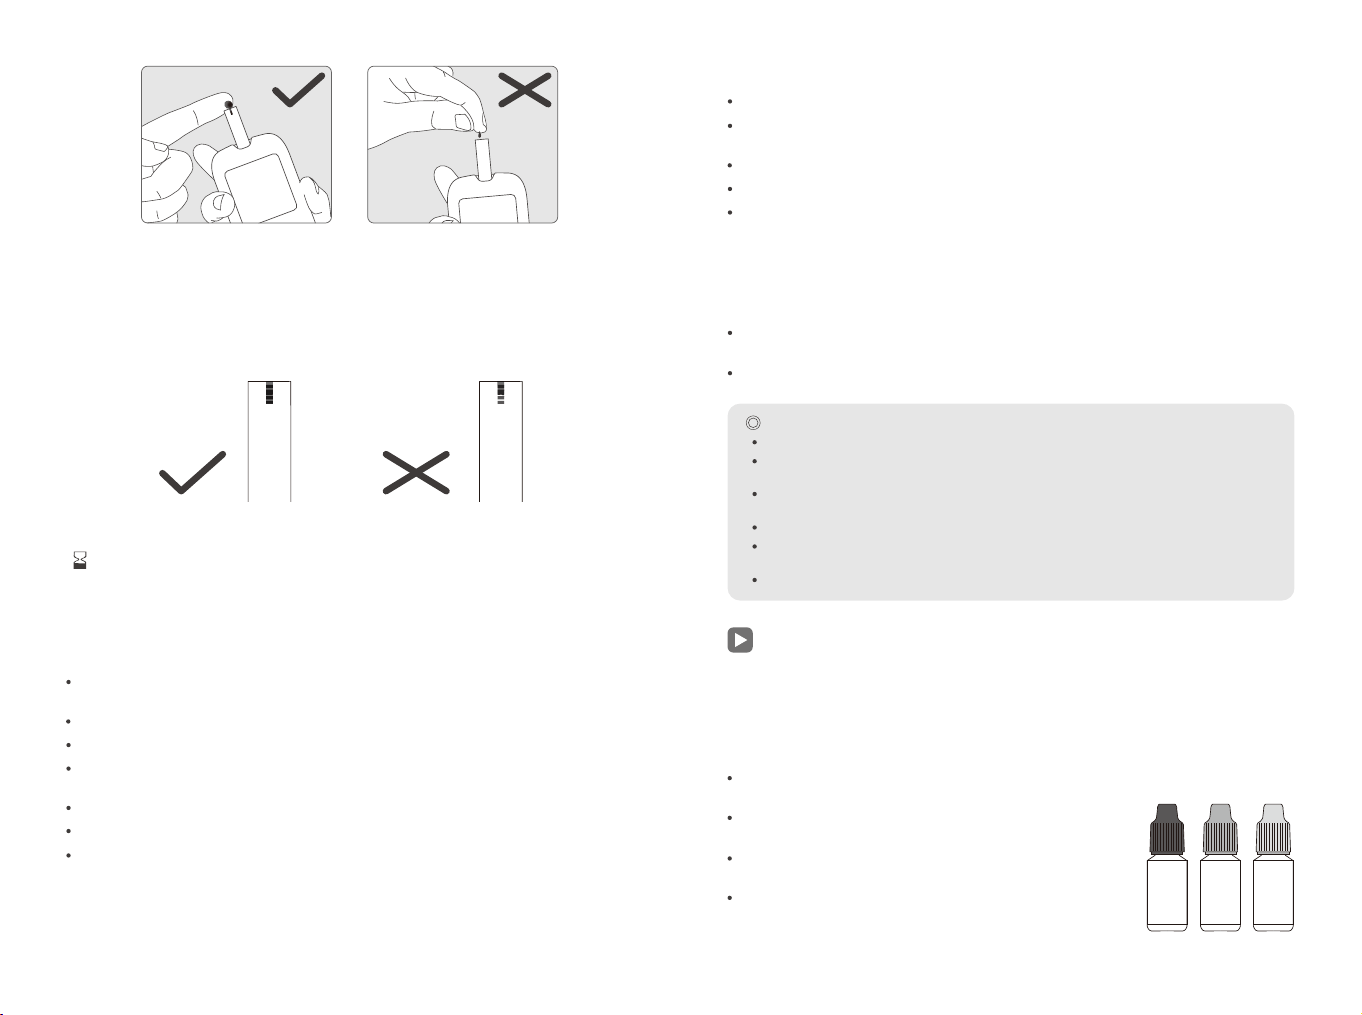
Apply blood samples to the edge of the strip until the test window is full. The
blood glucose meter will begin to count down when there is adequate blood. If
the test window is not full, you may add additional blood within three seconds.
If you see that the test window is not full, but the countdown begins anyway,
please discard and use a new test strip.
Each test strip package is marked with a batch number (LOT), expiration date
( ) and a control solution range (CTRL0 and CTRL1 and CTRL2). Please use
the correct strips recommended for your meter. The use of non-approved
strips will result in the meter not turning on or an error.
▷ Storage and Handling
Please read and follow the storage and handling conditions below:
Store test strips in a clean, dry environment at 2-35°C (36-95°F). Do not
store test strips in heat or direct sunlight.
Do not refrigerate or freeze test strips.
Do not store or use strips in a humid environment, such as a bathroom.
Do not store the meter, test strips, or control solution near bleach or
cleaning agents that contain bleach.
Close the cap on the vial immediately after removing a test strip.
Use the test strip immediately after removing it from the package.
Do not use expired test strips. Doing so may lead to inaccurate results.
Tip: The test strip label contains the expiration date in year-month-day format. For
example, 2017-01-01 indicates that the test strips are valid until January 1st, 2017.
Test Strip Precautions
For in vitro diagnostic use.
Use the test strip immediately after removing it from the package, otherwise the
test results may not be accurate.
Do not use test strips that are torn, bent, or damaged in any way. Do not reuse
test strips.
Keep the test strip packaging away from children and pets.
Consult your physician or healthcare professional before making any changes in
your treatment plan based on your blood glucose test results.
Please refer to the test strip instructions for more detailed information.
Control Solution
The control solution is a glucose solution of known concentration that is used
to confirm that your meter and test strips are working properly. It is important
to run a quality control test regularly to make sure that you are getting
accurate results.
You should perform a quality control test in the following situations:
When you suspect that the meter or test strips are
not working properly.
When you suspect that your test results are
inaccurate, or inconsistent with how you feel.
When you suspect that your meter has been
damaged.
After cleaning your meter.
Refer to page 11 for instructions on how to perform a
quality control test.
Correct Incorrect
▷ Special Instructions for Test Strips Sold in a Vial
Test strips should be stored in the tightly capped vial that is provided.
Do not store test strips outside of the provided vial. Test strips must be
stored inside the original vial with the lid tightly sealed closed.
Do not transfer test strips from the provided vial into another container.
Close the cap on the vial immediately after removing a test strip.
A new vial of test strips may be used for 6 months after first being
opened. Please take note of the date that the vial was first opened, and
discard it after 6 months.
▷ Special Instructions for Test Strips Sold in Single Use
Packets
Tear the packet open carefully beginning from the tear gap. Do not
damage or bend the test strip.
Use the test strip immediately after removing it from the packet.
76
▷ Storage and Handling
Please review the following storage and handling instructions:
Store the control solution in the temperature range 2-35°C (36-95°F).
Do not refrigerate or freeze the control solution.
If the control solution is cold, do not use until it has warmed to room
temperature.
Do not use expired control solution.
Tip: The control solution label contains the expiration date in year-month-day format. For
example, 2017-01-01 indicates that the control solution are valid until January 1st, 2017.
Control solution may be used for 6 months after the bottle is opened for the
first time. Please take note of the date that the bottle was first opened, and
discard after 6 months. Do not use beyond the expiration date.
Control Solution Precautions
For in vitro diagnostic use. The control solution is for testing only outside of the
body. Do not swallow or inject.
Control solution should be shaken before use.
Quality control tests should be carried out at 5-45°C.
Do not let the control solution bottle touch the test strip.
Use only the control solution that is recommended for your meter.
The control ranges shown on the test strip package are not recommended
ranges for your blood glucose level. Your personal glucose range should be
determined by your healthcare professional.
Battery Installation
No batteries are pre-installed in the blood glucose meter. This meter requires
two AAA alkaline batteries, which are included in the package. Please install
them following the steps below before use:
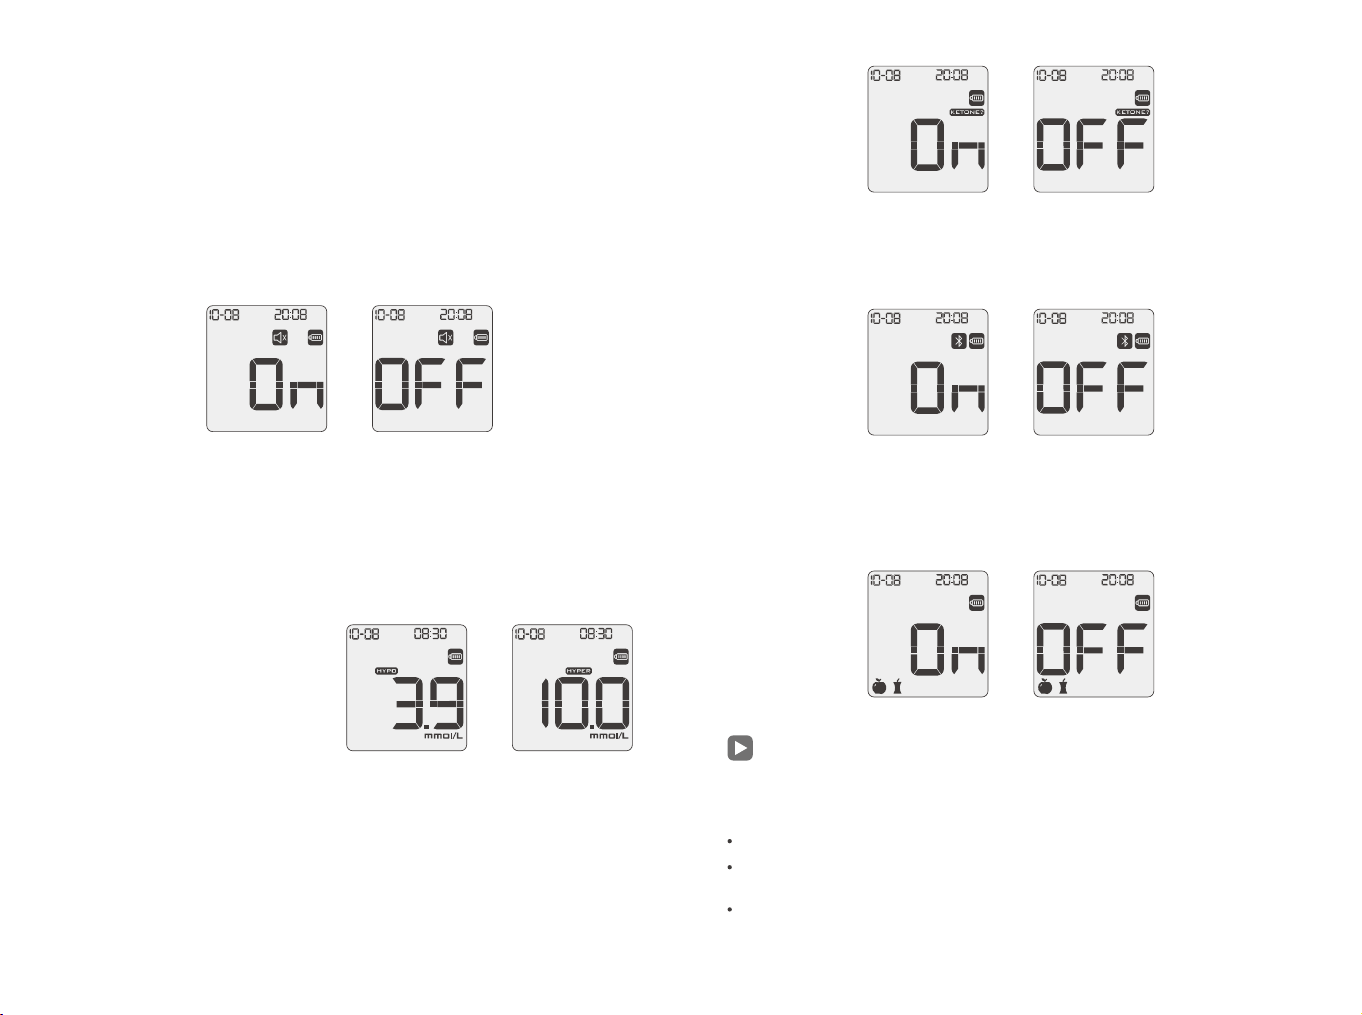
1. Turn the meter over with its back facing upwards and open the battery
compartment cover as shown in the figure.
2. Install the batteries, ensuring correct alignment of the positive (+) and
negative (-) poles.
3. Replace the battery compartment cover and make sure it is securely
fastened.
Meter Setup
Follow the steps below to set up your meter:
▷ System Settings
Before using your meter for the first time, make sure all system settings are
correct. For example, setting the correct time is essential for the history
function to work properly.
Press the “<” button for 2 seconds to enter the system settings menu.
◎ Time Settings
3. Next, set the correct time. By default, the meter will show the time in 24
hour display mode. Press “M” to save the correct time. The meter will now
allow you to change to either 24 hour or 12 hour display mode by pressing
“<” or “>”. Press “M” to save and continue to the next step.
◎ Audio Settings
You can turn your meter’s sound on and off in the audio settings menu. This
setting. your meter will sound. Press the “M” button to save.
When the sound is powered on, the meter will provide a beep occurs:
▼
Meter Setup Before Use
1. The display will show the month, day, and year. In the
upper right portion of the screen, the year will flash.
Press the “<” or “>” buttons to change the year, and then
the “M” button to save your choice.
2. The display will now show the month and day in the top
left corner. Change the month and day by pressing the
“<” or “>” buttons . Press “M” to save.
98
or
a. The meter is powered on.
b. The blood sample is adequate.
c. The test results are displayed.
d. The test strip insertion prompt is
inserted test strip.
e. An error occurs
f. The battery is low
You will hear a beeping warning sound when the meter is powered on, if the
blood sample is adequately applied, and when the test results are displayed.
You will hear 2 short beep warning sounds if an error occurs. Please refer to
the error code table included in this instruction manual.
After you have chosen the alarm settings, the meter will enter the high and low
blood glucose alarm settings.
◎ High and Low Blood Glucose Alarm Settings
The meter has high (Hyper) and low (Hypo) blood sugar warning alerts. You
should set these high and low alerts according to your healthcare
professional’s advice. When your test result is lower than the Hypo alert value
(the meter can be set to a maximum Hypo value of 5.6 mmol/L (100 mg/dL)),
the symbol “HYPO” will be displayed. When your test result is higher than the
Hyper alert value (the meter can be set to a minimum Hyper value of 6.7
mmol/L (120 mg/dL)), the symbol “HYPER” will be displayed.
Factory default blood sugar warning values:
Low sugar alert:
3.9 mmol/L (70 mg/dL)
High sugar alert:
10.0 mmol/L (180 mg/dL)
◎ Ketone Test Warning Settings
To turn on or off the blood ketone test warning, press the “<” or “>” buttons and
then the “M” button to save. When the blood ketone test warning function is
on, the “KETONE?” symbol will show in the upper right section of the display
if your test result is higher than 16.7 mmol/L (300 mg/dL).
After choosing the ketone test warning setting, the system will enter the meal
marker setting.
◎ Bluetooth On/Off Settings
The meter ( MCM-7) is equipped with a Bluetooth data transmission function.
Press the “<” or “>” button to select Bluetooth On or Off, then press
the M button to save the settings. The default setting is On.
◎ Meal Marker Settings
The meter has a meal marker function that allows you to mark your test result
as before or after a meal. To turn on or off meal marker function, press the “<”
or “>” buttons and then the “M” button to save. The meter will power off after
this setting is chosen.
Quality Control Tests
Quality control testing is done to verify that the blood glucose meter and test
strips are working correctly, and to ensure the accuracy of the test results.
Please conduct quality control tests in the following situations:
When you suspect that the meter or test strips are not working properly.
When you suspect that your test results are inaccurate, or if they are
inconsistent with the way you feel.
When you suspect the meter is damaged.
or
or
or
or
or
1110
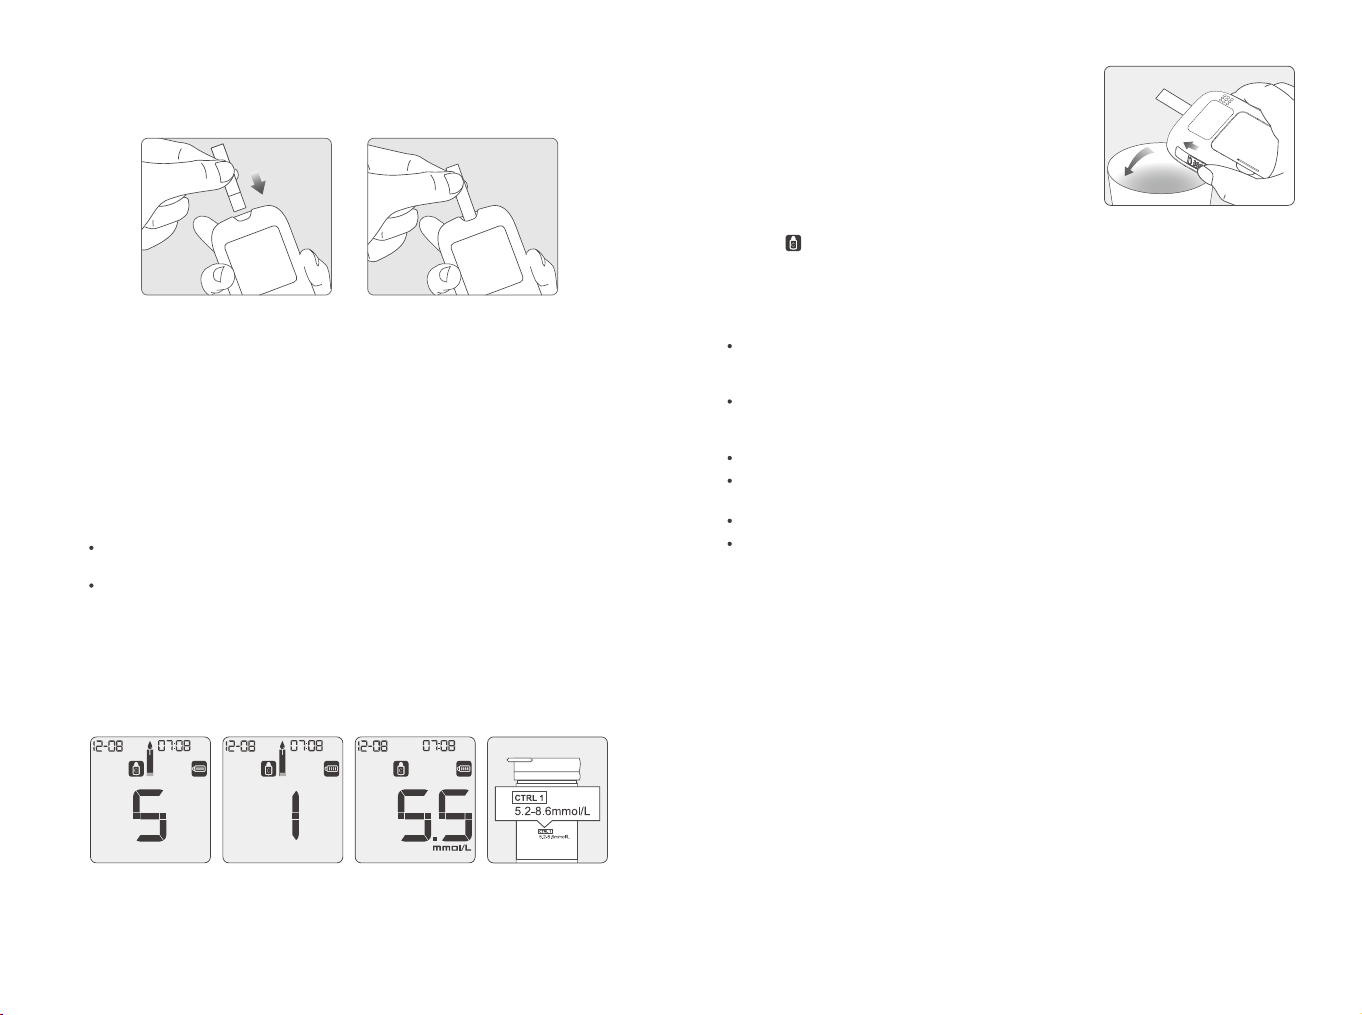
When “ ” and “ # ” are displayed simultaneously, the result is from a control
solution test, and it will not be included in the 7, 14, 30, 60, or 90 day average.
When you access your test history, the control solution results are not
displayed.
If the control solution results are outside of the reference range:
Confirm you are matching the correct range. Control Solution results
should be matched to the relevant CTRL range printed on the test strip vial
(or foil pouch).
Check the expiration date of the test strip and control solution. Make sure
that the packages have not been opened for more than 6 months. Discard
any expired test strips and control solution.
Confirm that you are testing within the correct temperature range (5-45 °C).
Make sure that the test strip vial and control solution bottle have been
tightly closed.
Make sure that you are using the correct brand of control solution.
Make sure you are following the user guide instructions properly.
After checking all of the conditions above, repeat the quality control test with
a new test strip. If the quality control test results are still outside of the range
printed on the test vial (or foil pouch), there may be a problem with your meter.
Please seek help and contact your dealer.
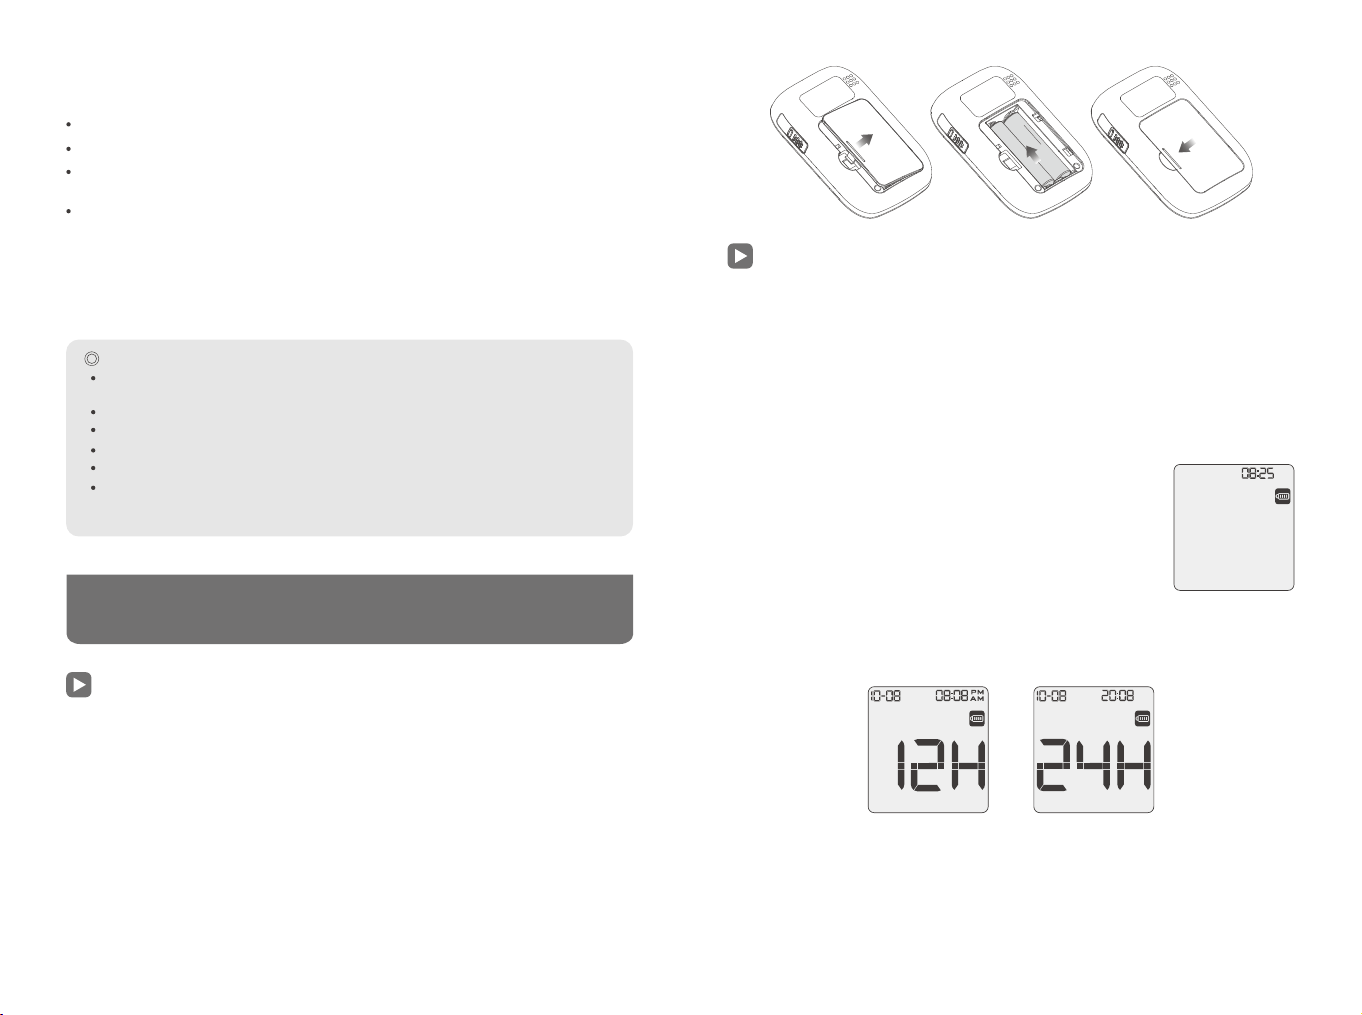
Three levels of control solution are available labeled Control Solution 0,
Control Solution 1 and Control Solution 2. Control Solution 1 is sufficient for
most self testing needs. lf you think your meter or strips may not be working
correctly, you may also want to do a level 2 test. The ranges for all (CTRL 0,
CTRL 1 and CTRL 2) are displayed on the test strip vial (or on the foil pouch).
Simply repeat the above steps, strip vial (or on the foil pouch). Simply repeat
the above steps, using Control Solution. For confirmation of results, Control
Solution 0 tests should fall within the CTRL0 range, Control Solution 1 tests
should fall within the CTRL1 range, and Control Solution 2 tests should fall
within the CTRL2 range. lf the control solution test results do not fall within the
respective ranges, DO NOT use the system to test blood, as the system may
not be working properly. lf you cannot fix the problem, contact your dealer for
help.
Please contact your dealer to purchase control solution.
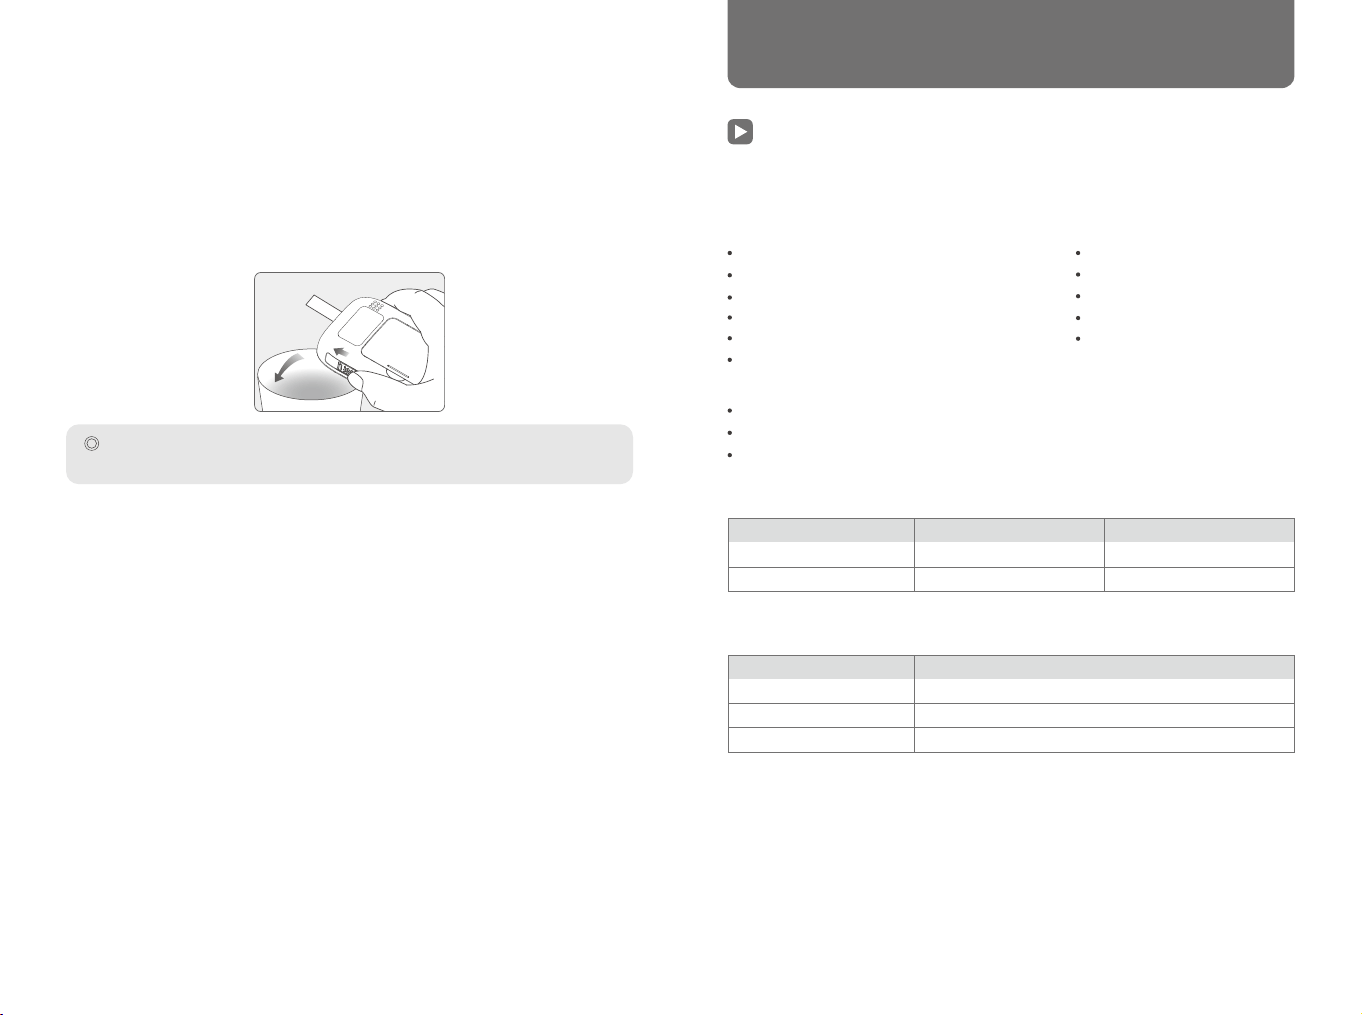
5. After the test has been completed, slide the
test strip ejector to pop out the test strip, and
the glucose meter will automatically turn off.
1. Insert the test strip completely into the blood glucose meter. If the audio
prompt function has been enabled, an audio alert will be triggered. The
meter will fail to initiate the test if the test strip is inserted upside down.
2. The screen will now display the date, time, and the flashing blood drop icon.
The test strip icon and flashing blood drop icon show that the test strip has
been inserted correctly.
Tip: If the test strip is not inserted correctly, the meter will not power
on.
3. Shake the control solution bottle, gently squeeze out the control solution,
discard the first drop, and drop the second drop onto a clean nonabsorbent
surface. Now touch the second drop to the sample area of the test strip. Do
not let the bottle come into contact with the test strip. If the audio is on, the
meter will beep, telling you that enough control solution has been applied.
Tips:
If a big bubble forms, wipe it with clean cotton paper, and then do the
following steps.
If one drop of control solution does not fill the test window, please add
another drop within 3 seconds. Otherwise discard the test strip, and try
again.
4. After applying enough control solution, the display will count down 5
seconds and the control solution test result will be displayed on the screen.
If the control solution test result falls within the control range that is printed
on the package (CTRL1 on test strip vial or foil pouch), this indicates that
the meter is working normally, and the system is functioning properly.
Caution:
The control solution range refers to the numerical range for quality control
testing, and shall not be used as a reference value for the control range of
the relevant test item.
1312
◎ Recommending Alternative Site Testing to Patients
Decisions about whether to recommend Alternative Site Testing (AST) should
take into account the motivation and knowledge level of the patient and his or
her ability to understand the considerations relative to diabetes and AST. If
you are considering recommending AST for your patients, you need to
▼
Testing Your Blood
The following steps show how to use the meter, test strips, lancing device and
sterile lancets together to measure your blood glucose concentration.The
main steps are as follows:
Insert the test strip face up into the test strip port. The meter will
automatically turn on and flash “Apply Blood” icon.
You can choose the blood collection site. Usually a tiny amount of
blood is collected from the fingers, hands. Touch the blood drop
lightly to the edge of the sample area. Complete the test within two
minutes, or the meter will automatically power off.
After the meter detects that there is an adequate amount of blood,
the meter will count down 5 seconds and display the glucose test
results. The test result will be stored in the history automatically.
Slide the test strip ejector to eject the test strip, and the meter shuts
off automatically.
Step1:
Step2:
Step3:
Blood Sampling
◎ Healthcare Professional Information:
A blood drop is required to perform a blood glucose test. Capillary blood
can be used. Venous, or neonatal blood may be used, but must be
obtained by healthcare professional.
Take caution to clear lines before the blood sample is obtained and applied
to the test strip.
The system has been tested with neonatal blood. As a matter of good
clinical practice, caution is advised in the interpretation of neonate blood
glucose values below 50 mg/dL (2.8 mmol/L). Follow the recommendations
for follow-up care that have been set by your institution for critical blood
glucose values inneonates. Blood glucose values in neonates suspected
of galactosemia should be confirmed by an alternative glucose
methodology.
The manufacturer has confirmed that various anticoagulants, including
Sodium Heparin, Lithium Heparin, K2-EDTA, and Sodium Citrate, when
stored at room temperature, do not significantly impact the accuracy of the
GoChek Max blood glucose monitoring system over a period of 7 days.
However, due to glycolysis, it is recommended to use anticoagulated blood
samples within 30 minutes for optimal reliability.
understand that there is a potential for a significant difference between
fingertip or palm test results and test results obtained from the forearm. The
difference in capillary bed concentration and blood perfusion throughout the
body can lead to sample site-to-site differences in blood glucose results.
These physiological effects vary between individuals and can vary within a
single individual based upon his or her behavior and relative physical
condition.
Before testing, first become familiar with how to collect blood and then choose
a clean and dry place to conduct the test.
IMPORTANT:
Prior to testing, use with either alcohol or soapy water to disinfect the sampling site.
Use warm water to increase blood flow if necessary. Dry your hands and the
sampling site, ensuring that there is no soap residue remaining.
▷ Fingertip Testing:
Adjust the penetration depth to reduce the discomfort. You do not need the
clear cap for fingertip sampling.
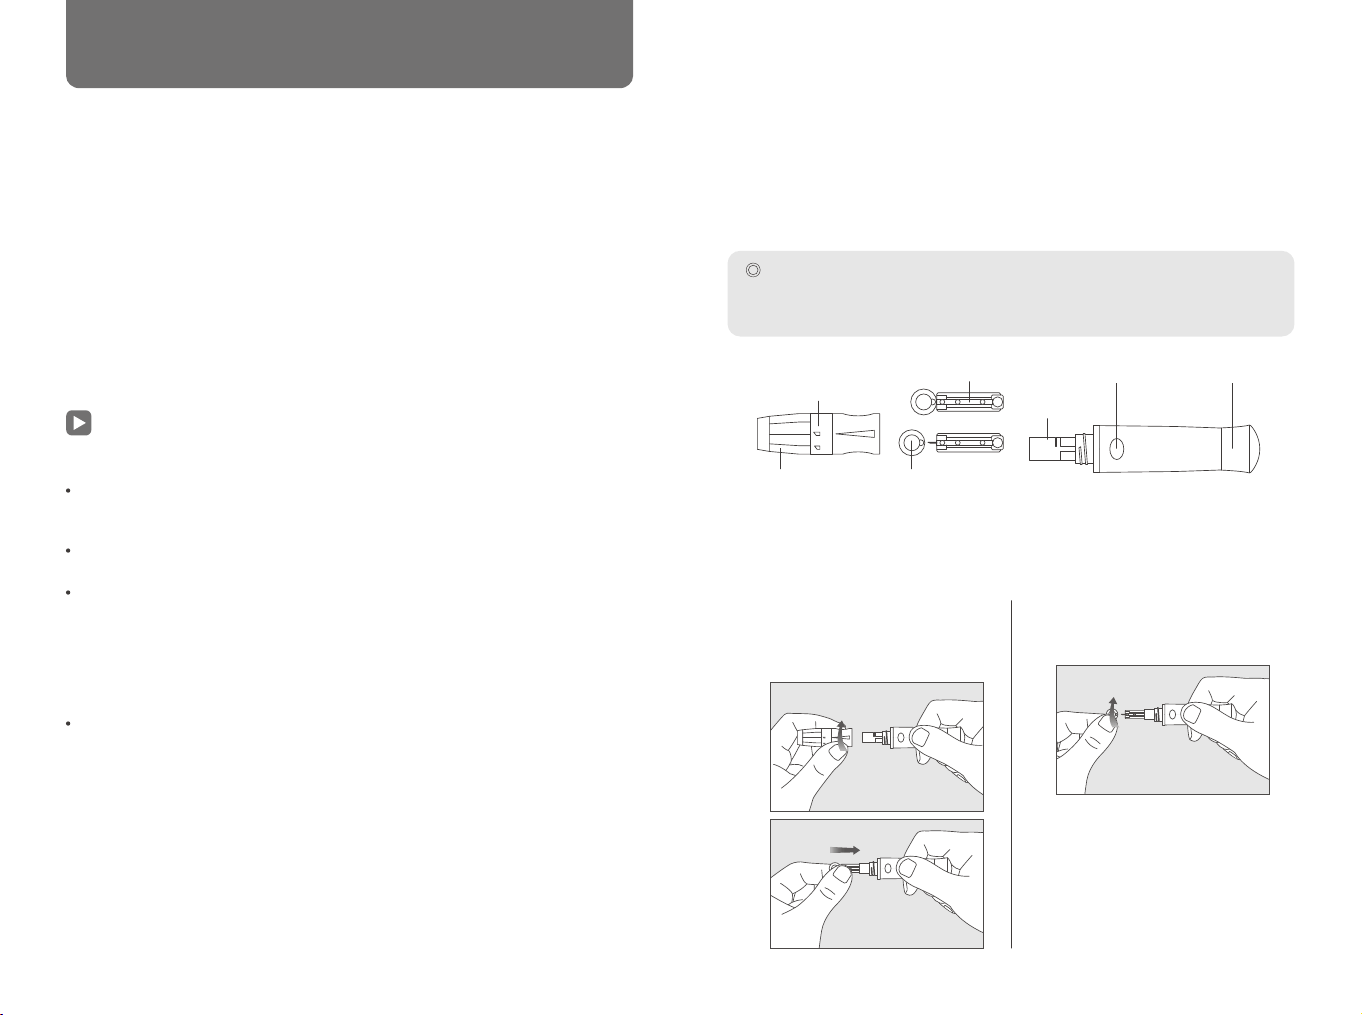
1. Remove the lancing device cap.
Insert the lancet into the lancet
holder until it comes to a
complete stop.
2. Twist off the safety cap from the
lancet, save the safety cap for
lancet disposal.
1514
Depth Adjustor
Lancing Device Cap
Safety Cap
Lancet
Release Button Cocking Barrel
Lancet
Holder
▷ Alternative Site Testing:
Performing a Blood Glucose Test with Blood from Your Palm, Forearm
(Alternative Site Testing)
You have the option of obtaining a blood sample from other sites on your body
besides the fingertip.
Alternative sites include the palm, forearm.
Blood obtained from the fingertip and palm can be used at any time to perform
a blood glucose test.
If blood from the forearm is used, there are certain times when testing is not
appropriate. This is because your blood glucose level changes faster in your
fingertip and palm than in the forearm. These differences may cause you to
misinterpret your actual blood glucose level, leading to improper therapy and
potential adverse health effects.
◎ You may perform a forearm test
immediately before a meal.
while fasting.
◎ You may NOT perform a forearm test
up to 2 hours following a meal, when blood glucose values can rise quickly.
after injecting bolus insulin, when blood glucose values can decrease
rapidly.
after exercise.
if you are sick.
if you think your blood glucose is low (hypoglycemia).
if you sometimes do not notice when your blood glucose is low.
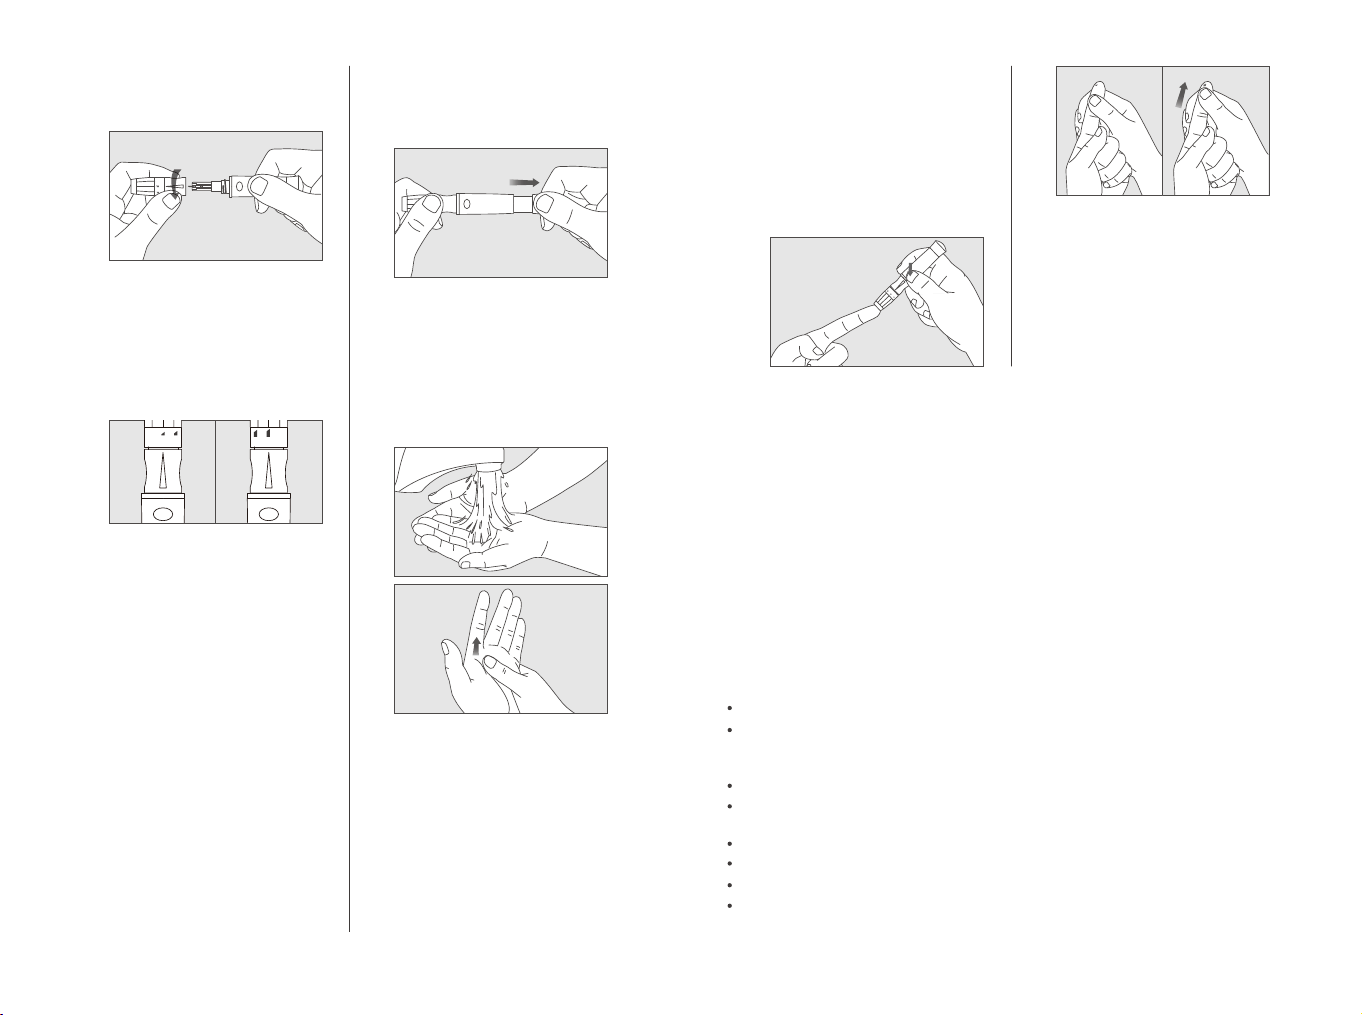
3. Carefully install the lancing device
cap onto the lancing device, avoid
touching the lancet needle tip.
4. Adjust the puncture depth by
rotating the depth adjuster. To
reduce discomfort, choose the
lowest setting that still produces
an adequate blood sample.
Depth Adjustment (for reference
only)
5. Pull back the cocking barrel until
you hear a click. Now the lancing
device is loaded and ready to
draw blood.
6. Before taking a blood sample,
wash your hands or use an
alcohol swab to clean the area.
Washing your hands in hot water
increases blood circulation. You
can also massage from wrist to
finger to promote better blood
circulation.
7. Holding the lancing device against
the side of the finger to be lanced,
press the release button and then
put down the lancet.Massage
forward slowly from the base of
your finger to the tip to increase
the sample size. Wipe away the
first drop of blood and use the
second drop for the test strip.
Notes:
1.The penetration depth to get
blood samples will vary for
people with different skin
types. Select a shallow
puncture for delicate skin. lf
your skin is calloused or thick,
you may need to try a deep
puncture.
The lancing device's adjustable
tip allows the best depth of skin
penetration to get an adequate
sample size.
2.Creater pressure between the
lancing device against the
finger will also increase the
puncture depth.
1716
Shallow Puncture Deep Puncture
Tip:
To reduce pain, lance on the
sides of the fingertips, where
there are less nerve endings.
Rotate finger locations as much
as possible to accelerate wound
healing and decrease callouses.
If you are interested in AST, talk to your healthcare professional first.
To obtain an AST cap and detailed AST instructions, contact MicroTech.
Lancet Removal
1. Unscrew the lancing device cap.
Firmly push the needle into the
safety cap.
2. Pull out the lancet from the lancet
holder. Please dispose of the
used lancet properly.
Lancet Precautions:
Do not use a lancet if the safety cap is loose or missing.
Do not use a lancet if the needle is bent.
Use caution whenever a lancet needle is exposed.
Do not share lancets with other people.
To avoid cross contamination, always use a new sterilized lancet. Do not reuse
lancets.
Avoid contaminating lancets with hand lotion, detergents, oil, and other debris.
◎ Reminder:
Lancing devices and lancets should not be shared. Each person should
have his own lancing device and lancets.
Clean your lancing device before and after use with alcohol or a
disinfectant wipe. Be sure to clean the part of the device that touches the
finger. Do not immerse the lancing device in water.
Control excess bleeding and disinfect your wound after use.
DO NOT:
Apply blood to the front or back of the test
strip.
Smear the blood drop onto the test strip.
Press your finger against the test strip.
Testing Blood Glucose
When you insert the test strip, the meter will automatically turn on (except in
data transfer mode).
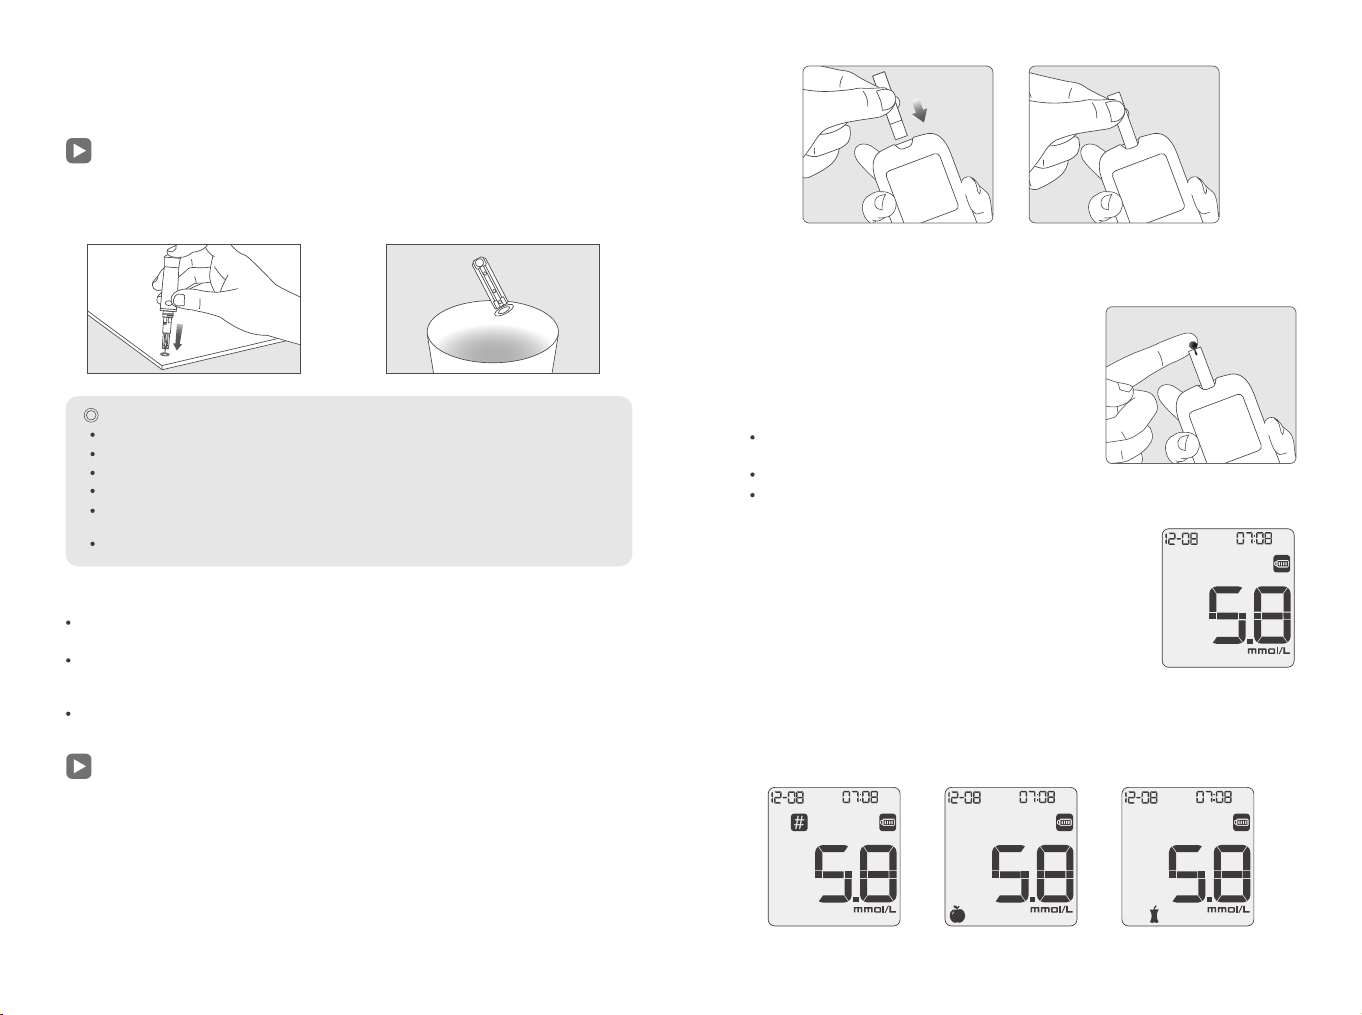
1. Insert the test strip all of the way into the test strip port, and the meter will
turn on automatically. If the audio is on, you will hear a “beep” sound, and
all of the icons on the display will turn on at the same time. If the strip is
inserted upside down, the meter will not turn on.
2. The test strip has been inserted correctly when you see the “Apply Blood”
icon flashing. If the test strip is not correctly inserted, the meter will not turn
on – repeat the steps above.
average calculations. If you accidentally mark your result with the “#” icon,
simply press the “>” button again to cancel the mark. After marking a result
with “#”, please test again with a new strip.
If the before/after meal marker setting is on, you can press the “<” button to
tag the reading before or after meal, as shown in the figure:
3. Apply blood to the sample area of the test
strip. If the audio is on, the meter will beep,
telling you that enough blood has been
applied and the meter will start to to measure.
4. The display will count down 5 seconds during the
measurement process. If the audio is on, the test will
end with a beep. If you applied a blood sample but
the meter does not begin a countdown, you may
reapply a second drop of blood within 3 seconds.
If you press the “>” button, the test results will be
marked with the “#” icon. Results marked with “#”
symbol will not be used in the 7, 14, 30, 60 or 90 day
1918
◎ After Use
1. Please dispose of the used test strips properly. The blood sample is a
source of infection, please refer to local laws and regulations to handle it
carefully.
2. Please dispose of the meters and batteries after use properly according to
the local laws and regulations.
Suggested Test Times and Target Goals
Tracking your glucose concentrations with regular blood glucose testing is an
important part of managing diabetes. Your healthcare professional will help
you decide the normal target range for your glucose levels and how often you
should test according to your situation. Suggested times to test include:
More frequent tests may be required when:
You adjust your medication dosage.
You think your glucose levels may be too high or too low.
You feel ill.
Normal blood glucose target ranges (from Standards of Medical
Care in Diabetes-2024).
How many times per day should I test?
Research indicates that measuring your blood glucose at least three times per
day will help you control you glucose level. Please discuss the number of tests
and test times with your healthcare professional.
Record your blood sugar levels and other relevant information in your log
book. Bring your records when you visit your healthcare professional. It will
help him understand your condition, and help him modify your treatment plan.
Press the “M” button to confirm.
If an error code is displayed, please check the troubleshooting instructions
(page 27). If “HI” or “LO” symbol is displayed, refer to the “HI” and “LO”
Messages section (page 22).
5. Record valid results in your logbook with the date and time, and compare
them to the target goals set by your healthcare professional. (Refer to
Suggested Testing Times and Target Goals on page 21)
6. After the test has been completed, slide the test strip ejector to pop out the
test strip, and the glucose meter will automatically turn off.
Note:
For self-testing and near-patient testing with whole blood sample.
▼
Understanding Test Results
Time
Empty stomach
2 hours after a meal
(Note: 1 mmol/L = 18 mg/dL)
Target Range (mg/dL)
70-100
<140
Target Range (mmol/L)
3.9-5.6
<7.8
Diabetes Type
Type 1
Type 2
Prenatal Diabetes
Number of Tests With Empty Stomach
At least 3 times per day
Test frequently to achieve your target range
At least twice per day
When you wake up (before eating)
1-2 hours after breakfast
1-2 hours after lunch
Before dinner
Before bedtime
2-3 o'clock in the morning (if taking insulin)
Before breakfast
Before lunch
Before and after exercises
1-2 hours after dinner
After a snack
2120
“HI” and “LO” Messages
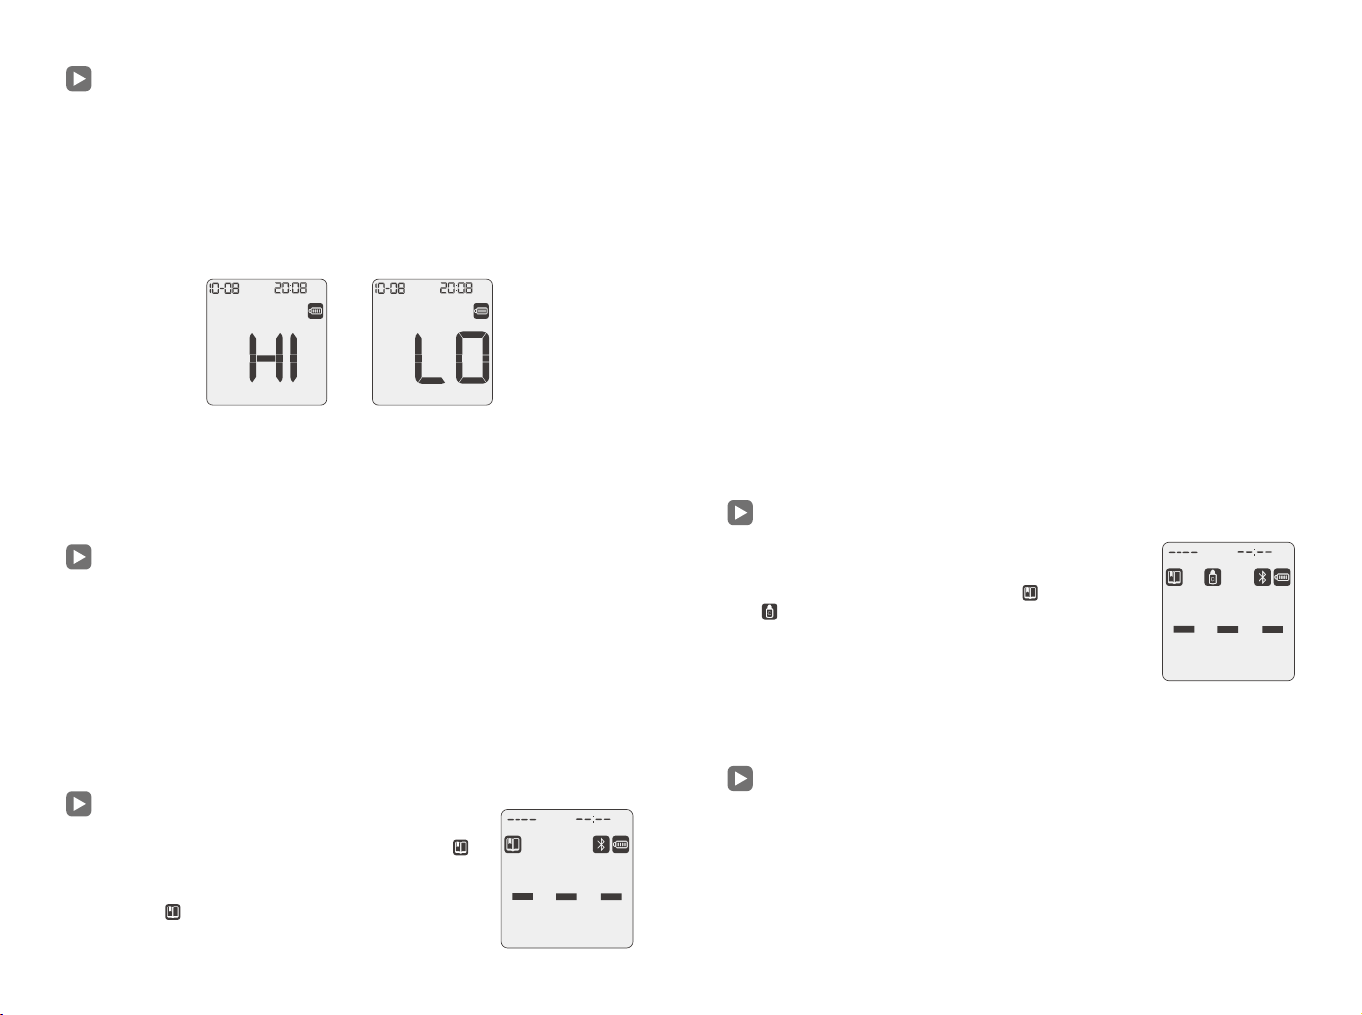
Your meter can accurately measure blood glucose concentrations between
0.6-33.3 mmol/L (10-600 mg/dL). “HI” and “LO” messages indicate that the
test measurement was outside of this range.
If “HI” is displayed, it indicates the test result is above 33.3 mmol/L (600
mg/dL). You should test again to ensure that no mistake was made in the
procedure. If you are sure your glucose meter is functioning properly, no
mistakes were made, and the test results still show “HI”, then you may be in a
state of severe hyperglycemia, please contact your healthcare professional
immediately.
The test results of this instrument are only intended for monitoring the efficacy
of blood glucose control in diabetic patients, and shall not be used for the
diagnosis or screening of diabetes, nor as a basis for adjusting therapeutic
medications. If persistent abnormal results are observed in measurements,
further examinations are recommended in conjunction with doctors' advice.
Do not make any medical decisions without first consulting a healthcare provider.
Meter Memory
The storage capacities of blood glucose test results and control solution test
results vary among different models of this blood glucose meter. The glucose
meter can store up to 1000 test results of blood glucose with the
corresponding time and date. The MCM-4 blood glucose meter can store 200
sets of control solution data, while both the MCM-6 and MCM-7 models can
store 100 sets of control solution data each. For example, the Model MCM-7
blood glucose meter can store up to 1000 most recent blood glucose test
results and 100 control solution test results.When the 1001st blood glucose
data or the 101st control solution data is saved, the earliest stored blood
glucose data or control solution data will be automatically overwritten.
Clearing the Memory
Please be careful when using the clear memory function because the action
is irreversible. Once the memory is deleted, it cannot be restored. The clear
memory function will erase all test records.
Memory Mode
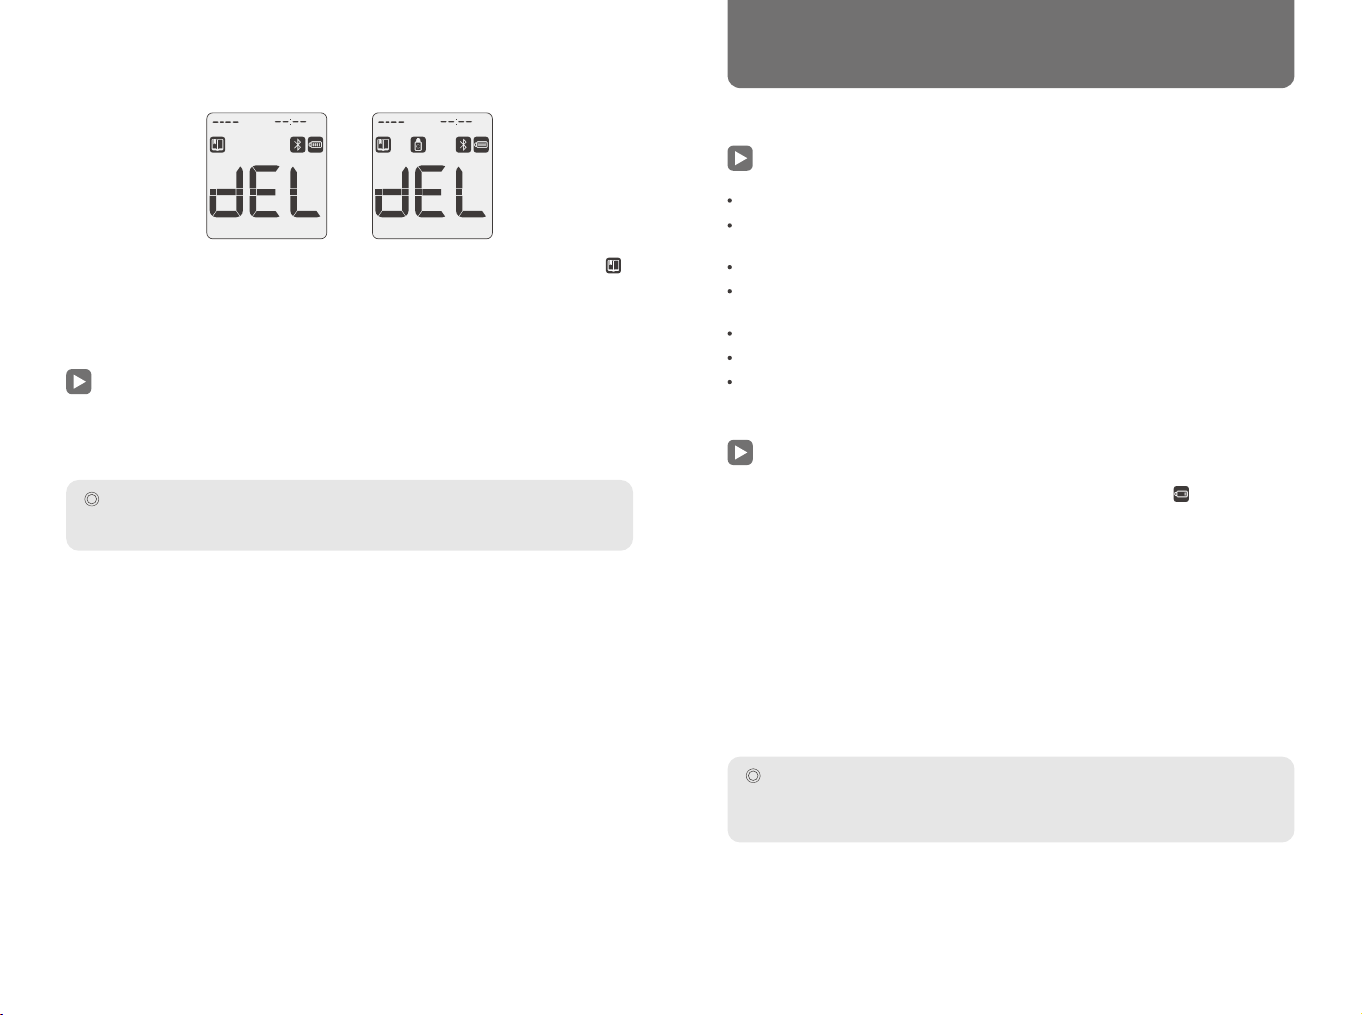
1. Press the “M” button to enter memory mode. The “ ”
icon and latest test result will be displayed.
If the blood glucose meter is used for the first time,
“---” and “ ” will be displayed. The date will not be
shown for the first test.
Display stored data of control solution test results
1. Press the ">" button to power on the meter and enter
the control solution test memory mode. The most
recent test result, together with the “ ” symbol and “
” will appear on the display screen.
2. Press the "<" or ">" button to scroll through all stored
control solution test results. The "M" button will power
off the meter.
2. The stored test result along with the associated time and date are displayed
at the same time. Test results marked with “#” icon will not be included in
the 7, 14, 30, 60 and 90 day averages.
3. Press the “<” or “>” button to review all stored test results.
4. Press button “M” again to enter the data average screen. The number of
days (“DAY AVG”) and number of readings (“READINGS”) used in the
average calculation will be displayed. If no data has been recorded, then
the meter will turn off.
5. Press the “M” button again, and then use the “<” or “>” buttons to scroll
through the 7, 14, 30, 60, and 90 day averages. Press the “M” button to
see the before meal and after meal marker averages. The meter will
calculate the historical averages according to the parameters that you
choose and the meter will show how many records are used to calculate
the average.
6. If the meter has not been used for the amount of time indicated as the “day
average”, the meter will not show an average.
7. Finally, press “M” one last time to turn off the meter.
Note: Test results marked as quality control test or with the “#” symbol will
not be used in the calculated average.
3. If no quality control data is stored, pressing the "<" / ">" or "M" button will
power off the meter.
2322
Proper maintenance of your meter is recommended for the best results.
Storage
Keep the test strip port area clean.
Keep the meter dry. Do not allow liquids to enter the housings. Avoid
extreme temperatures and humidity.
Do not leave the meter in your car.
Avoid dropping the meter. If you accidentally drop it, perform a quality
control test (see page 11) to verify the system is working properly.
Keep the meter and components away from children and pets.
Do not disassemble the meter. Disassembly will void the warranty.
Please follow the local regulations to dispose of the meter and battery
properly.
Memory Data Transfer
Blood glucose meters Models MCM-4/MCM-6 are equipped with a wired data
transmission function, while Models MCM-7 feature both wired data
transmission and Bluetooth
®
functionality.
◎ Wired Data Transmission Operation Steps:
1. Contact our customer service to obtain the compatible software.
2. Insert the data cable when the meter is in sleep mode—the meter will then
enter wired transmission mode.
3. Use the compatible software to retrieve the current blood glucose data
stored in the meter.
◎ Wired Data Transmission Operation Steps:
1. Contact our customer service to obtain the compatible software.
2. Enter the meter’s historical data query mode, or complete a blood glucose
test (the meter will activate Bluetooth
®
automatically).
3. Use the compatible software to search for and pair with the corresponding
blood glucose meter.
4. Once the connection is successful, retrieve the current blood glucose data
stored in the meter.
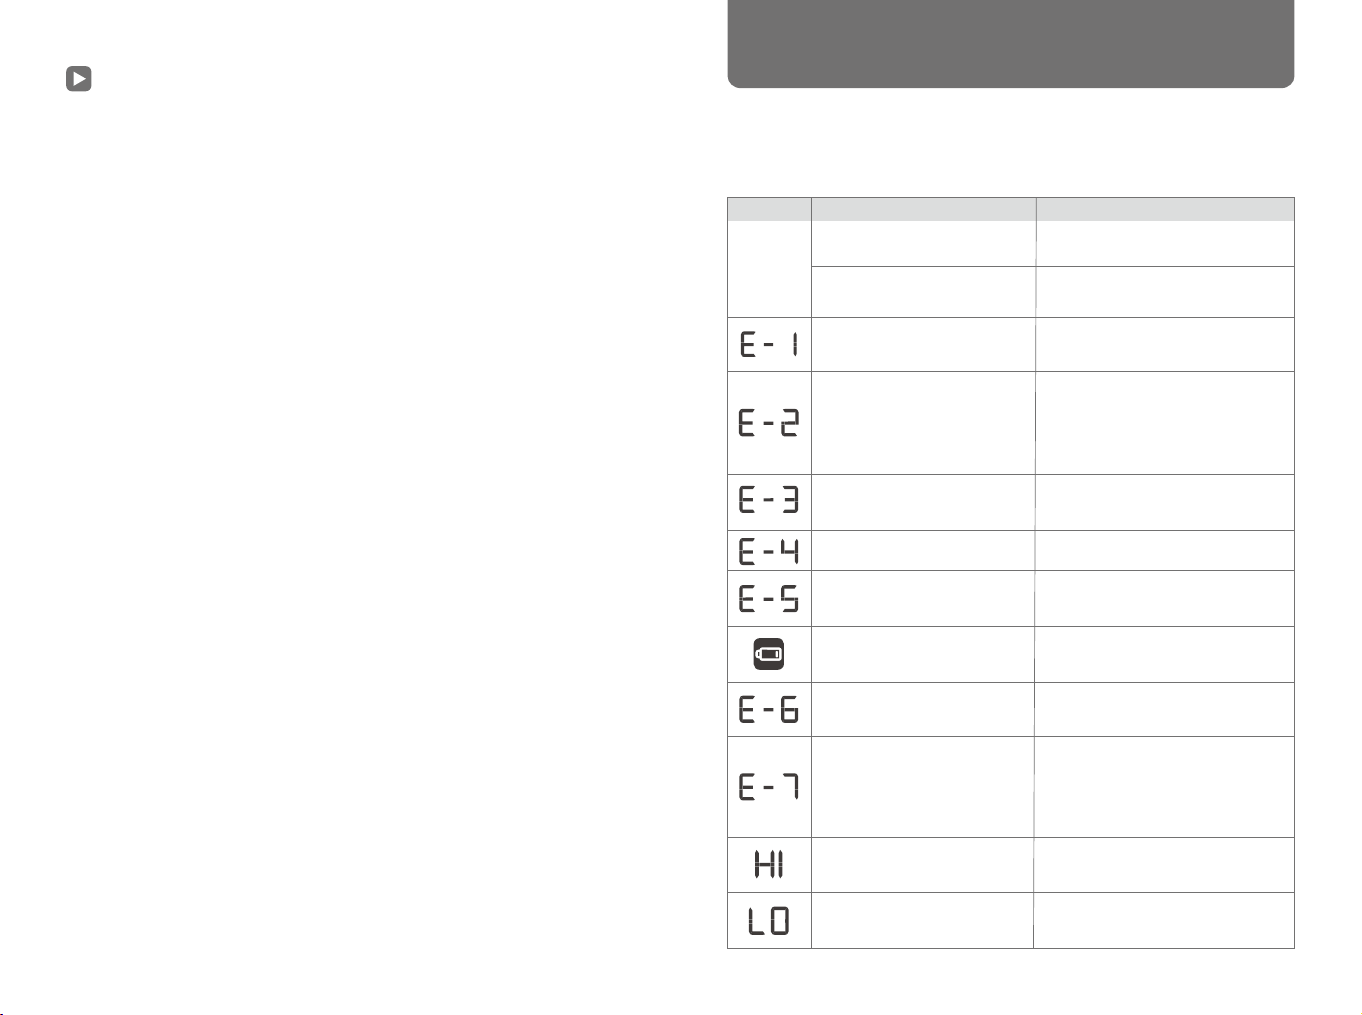
1. While in the memory mode, press the “<” and “>” buttons at the same time
enter the clear memory mode.
2. Press “M” to confirm that you would like all records to be erased. The “ ”
and "---" icons will display at the same time, and the meter will turn off
automatically after a few seconds.
3. Press the “<” or “>” button to review all stored test results.
▼
Maintenance
Replacing the Battery
When the blood glucose meter displays the battery symbol ( ), it indicates
that the battery is low on power. Please replace it with a new battery as soon
as possible.If the error code "E-6" appears, it means the battery power is too
low to perform any test operations. A new battery must be replaced
immediately.
◎ How to replace the battery:
1. Make sure the meter is off.
2. Open the battery door on the back of the meter.
3. Remove the old batteries and replace them with two new AAA batteries.
4. Replace the battery cover.
5. After replacing with new batteries, please recheck and reset the time of the
blood glucose meter.
Note:
Please connect this blood glucose meter only with designated Bluetooth
®
receiving
devices or computers with CCC certification.
Note:
When the meter is powered on (or after exiting sleep mode), it will automatically
power off after 2 minutes (± 5 seconds) of inactivity.Once the test strip is removed
after a measurement, the meter will power off within 2 seconds.
2524
Cleaning
▷ Glucose Meter
Under normal circumstances, no special cleaning is required. If cleaning is
needed, wear gloves before applying a mild detergent and water with a soft
damp cloth. Be careful not to allow water, dirt, blood, or control solution
inside of the meter. We recommend that you store the meter in the carrying
case after use.
Your blood glucose meter is a precision instrument. Please be careful.
▷ Lancing Device
As needed, use a soft damp cloth moistened with soap and hot water to
wipe the surface. Do not immerse the lancing device in water.
▼
Troubleshooting
Failure may occur if it is not used according to the guidance.
The meter has built-in messages to alert you of problems. When error
messages appear, note the error number, turn off the meter, and then follow
these instructions.
Display Causes Solution
Meter
does not
turn on
Battery may be damaged or
not have enough charge
Meter is too cold
Strip error
Test strip is wet,
contaminated, or used
Meter self test error
Sample applied to the test
strip too soon
Insufficient sample
Test strip was removed during
the test
Temperature exceeds the
normal operating range (5°C
~ 45°C)
The battery is low, but may be
used for another 20 tests (if
bluetooth function is disabled)
The battery has been fully
discharged - no more tests
are possible
Strip testing error
The meter has recorded a
level that is higher than the
meter test range
The meter has recorded a
level that is lower than the
meter test range
Replace the battery.
Allow the meter to warm to room
temperature for 30 minutes, then
use.
Please be sure to use GoChek Max
strip and repeat test with a new test
strip.
Make sure that the strip has not
expired, is not damp, or used. If the
test strip is ok, remove the battery
for 30 seconds, and retest with a
new strip. If the problem persists,
contact customer service.
Retest with a new strip. Make sure
there is enough blood to fill the test
window.
Repeat the test and ensure test strip
remains in place.
Move to a place within the normal
operating temperature range and
repeat the test.
The next 20 results will still be
accurate, but replace the battery as
soon as possible.
Replace the battery and repeat the
test.
Repeat test. Please make sure fresh
blood sample with intended
hematocrit level is used. Please
make sure blood sample is not
contaminated. If problem persists,
please contact local dealer.
Repeat test. If you see HI again,
contact your doctor immediately.
Repeat test. If you see LO again,
contact your doctor immediately.
2726
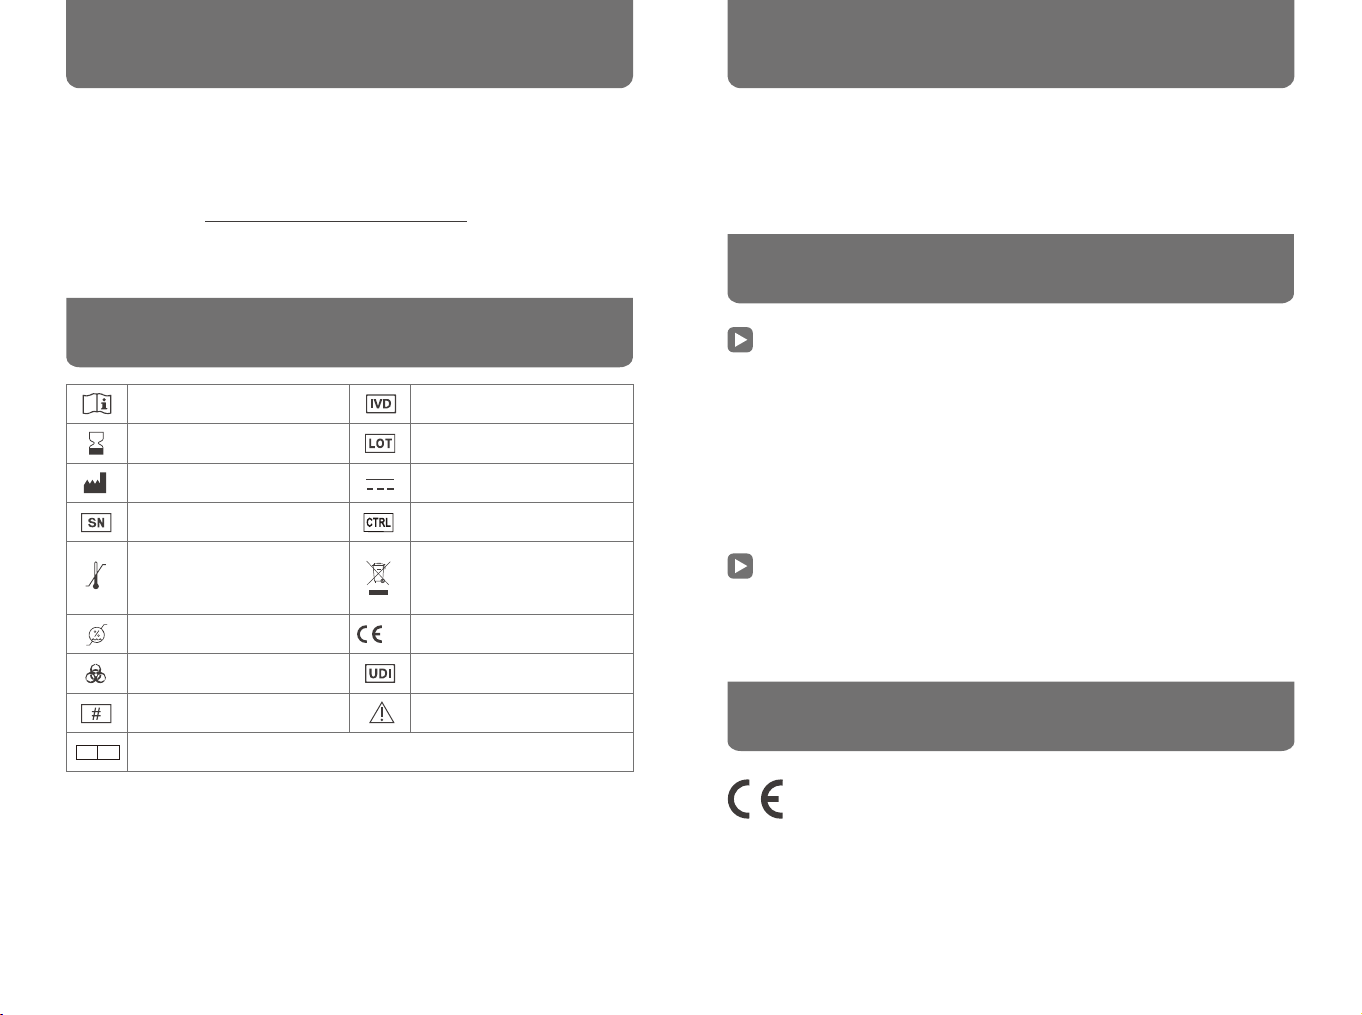
Any serious injury or death that has occurred in relation to the device should
be reported to the manufacturer and the competent authority of the Member
State in which the user and/or patient is established.
Consult instructions for use
Use-by date
Manufacturer
Serial Number
Humidity limitation
Biohazard
Model number Caution
Authorised representative in the European Union.
Unique Device Identifier
European Conformity
Storage and Transportation
Temperature
Waste Electrical and Electronic
Equipment (WEEE)-
Follow local requirements for
proper disposal
Control Range
DC Power
Lot Number
For in vitro diagnostic use
10 %
90 %
-40°C
55°C
Please complete the warranty card that came with this product and mail it to
your dealer to register your purchase. Please keep your sales receipt and
other related purchase documents. If the meter fails for any reason other than
obvious abuse within the warranty period, we will repair or replace it free of
charge. Please note the date of purchase.
Date of Purchase:
Note: The warranty covers only the blood glucose meter and does not include
the battery
▼
Symbol Index
▼
Compliance Statements
▼
Warranty
This meter meets the electromagnetic immunity requirements as per ISO
15197 Annex A. The chosen basis for electrostatic discharge immunity testing
was basic standard IEC 61000-4-2. In addition, it meets the electromagnetic
emissions requirements as per EN 61326. Its electromagnetic emission is
thus low. Interference from other electrically driven equipment is not to be
anticipated.
▼
Electromagnetic Compatibility
FCC Compliance
Please take attention that changes or modification not expressly approved by
the party responsible for compliance could void the user’s authority to operate
the equipment.
This device complies with Part 15 of the FCC Rules.Operation is subject to the
following two conditions:
1. This device may not cause harmful interference, and
2. This device must accept any interference received,including interference
that may cause undesired operation.
RF Exposure Statement
This device has been tested and meets applicable limits for Radio
Frequency(RF)exposure.
Power:2402MHz to 2480MHz :4 .42dBm for EU
Hereby, [Microtech Medical (Hangzhou) Co.,Ltd. declares that the
radio equipment type [Blood glucose meter is in compliance with
Directive 2014/53/EU.
The full text of the EU declaration of conformity is available at the
following internet address: https://www.microtechmd.com/DoC.pdf
▼
EU Conformity Statement
2797
EU REP
28 29