
Technical Support and E-Warranty Certificate www.vevor.com/support
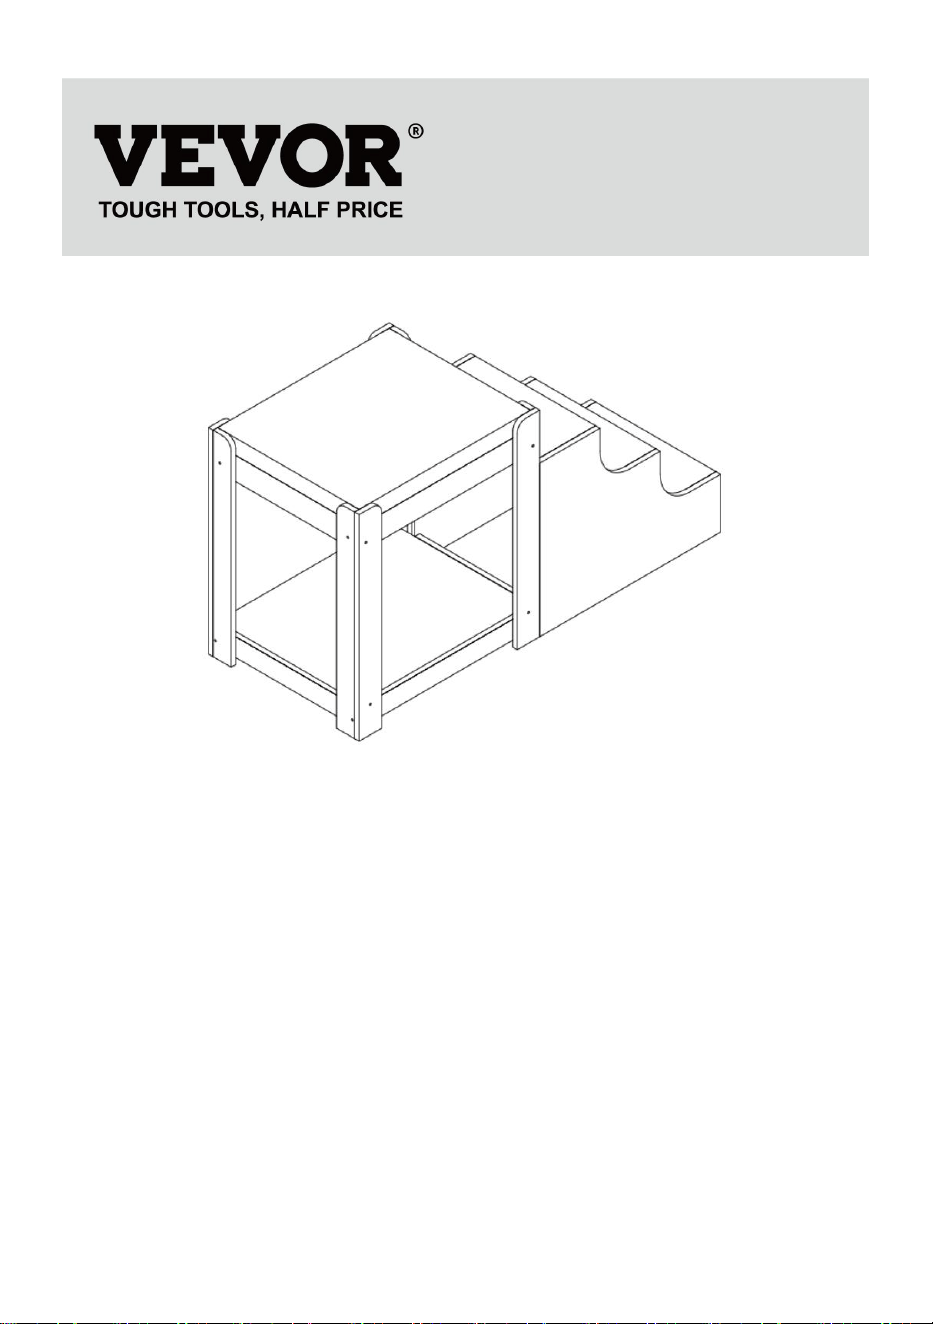
PET BUNK BED
User manual
We continue to be committed to provide you tools with competitive price.
"Save Half", "Half Price" or any other similar expressions used by us only represents an
estimate of savings you might benefit from buying certain tools with us compared to the major top
brands and does not necessarily mean to cover all categories of tools offered by us. You are
kindly reminded to verify carefully when you are placing an order with us if you are actually saving
half in comparison with the top major brands.

1
Model:099-1A
NEED HELP? CONTACT US!
Have product questions? Need technical support? Please feel free to contact us:
Technical Support and E-Warranty Certificate www.vevor.com/support
This is the original instruction, please read all manual instructions carefully before
operating. VEVOR reserves a clear interpretation of our user manual. The
appearance of the product shall be subject to the product you received. Please
forgive us that we won't inform you again if there are any technology or software
updates on our product.
PET BUNK BED

2
INSTRUCTIONS
Thank you very much for choosing this product. Please read all the instructions
before using it.The information will help you achieve the best possible results.
PLEASE NOTE! Drawings in this manual are for illustration purposes only and in
some details may differ from the actual product.
ATTENTION! Read all safety warnings and all instructions. Failure to follow the
warnings and instructions may result in serious injury or even death. The device or
product used in the warning instructions is referred to pet bunk bed.
This product is not a toy or a toy chest. Do not allow children to play with this item.
Please place in a position that children cannot climb to avoid injury from falling
from a height.
USAGE SAFETY
1.Two people are required to assemble this product.
2. Select an area for assembly that is clean and free of any debris that might cause
persons working on the assembly to trip.
3. Do not lift heavy parts or assemblies. Use crane, jack, tackle, fork trucks or
other mechanical devices.
4. Preview the assembly instructions in your operator’s manual before proceeding
further.
5. After completing assembly, thoroughly inspect the machine to be sure that all
nuts, bolts, hydraulic fittings or any other fastener assemblies have been
thoroughly tightened.
6. This product is not a climbing frame or sports equipment, and should not be
used for use other than pet bunk bed.
7. Products for wood products can not be waterproof, outdoor use or long-term wet
easily lead to damage, it is recommended to dry as soon as possible after contact
with water, to ensure that the product can provide you with longer service.
8. The pet bunk bed must be checked to ensure that it is in proper working order
and is operating safely prior to use. Otherwise , the appliance must not be used.
Before using the product - if you have any questions regarding the proper
assembly or operation, contact your dealer or representative.
SAVE THESE INSTRUCTIONS
3
TECHNICAL PARAMETERS
Model
099-1A
Color
beige
Material
chipboard
Product size (mm)
1200*500*650
Net weight (kg)
17.7
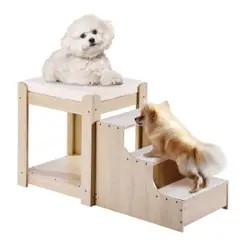
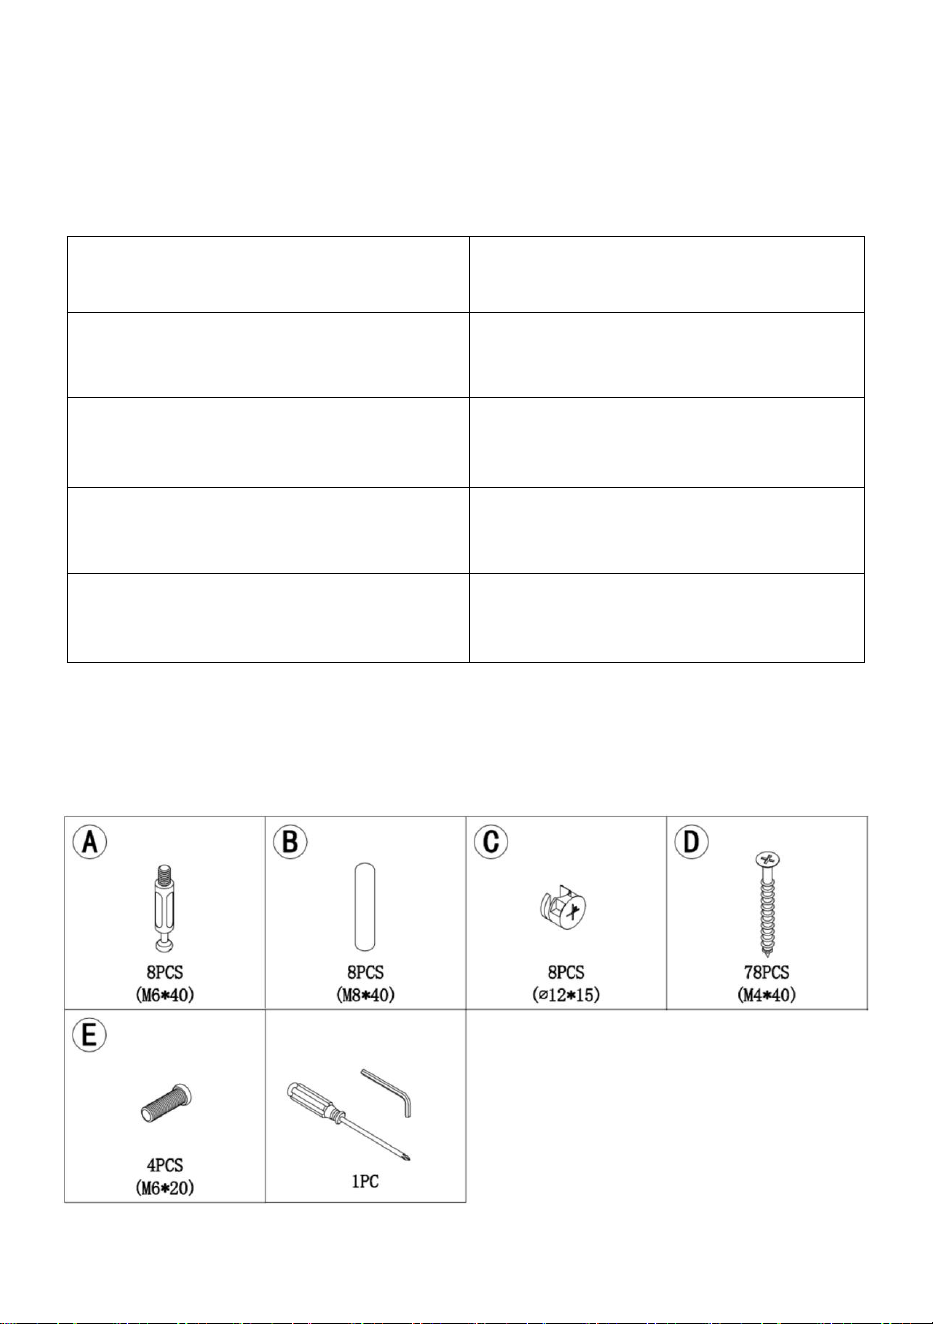
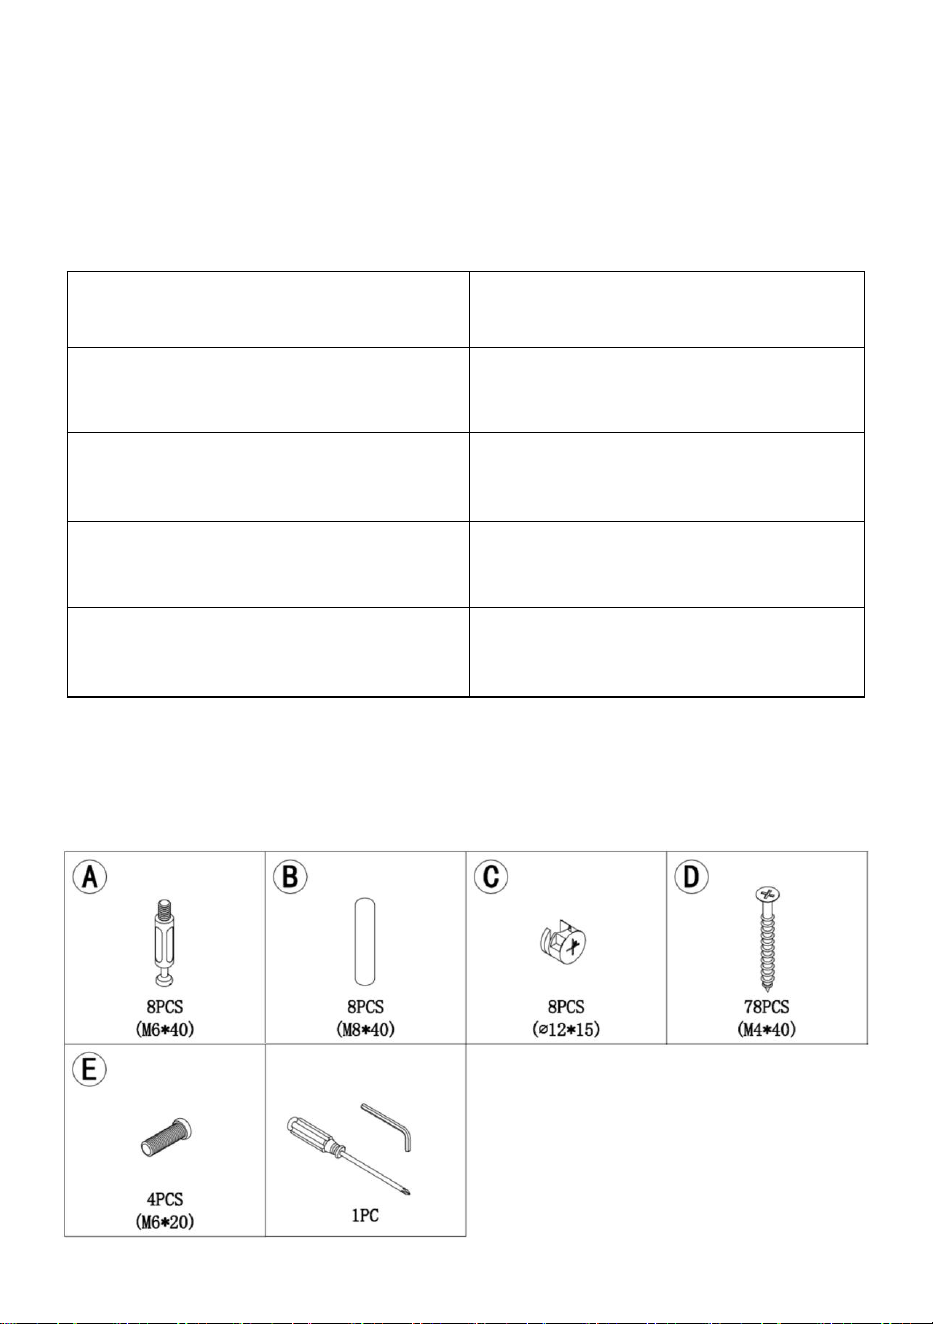
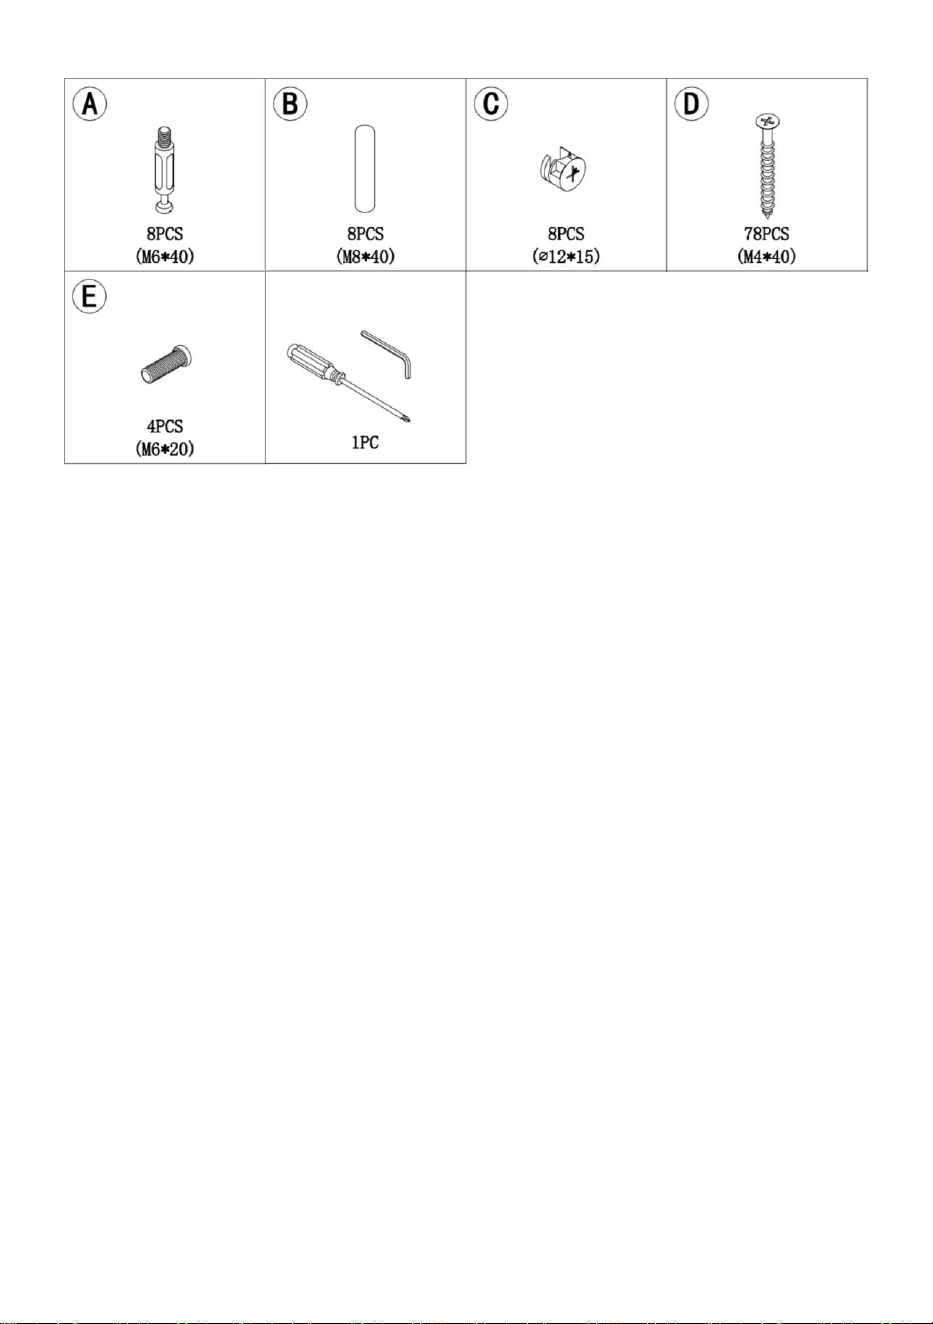
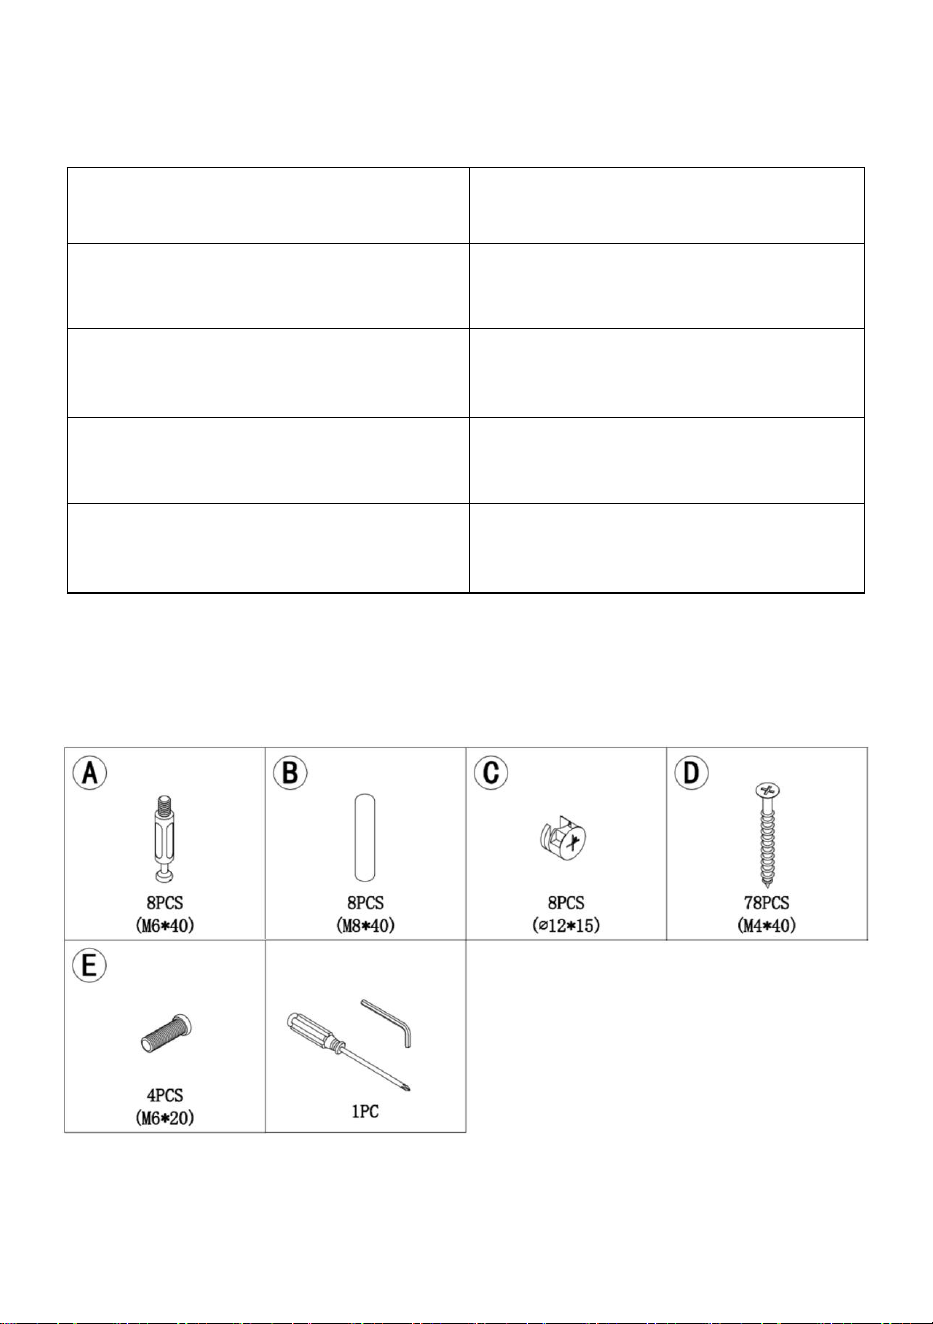
Hardware
List
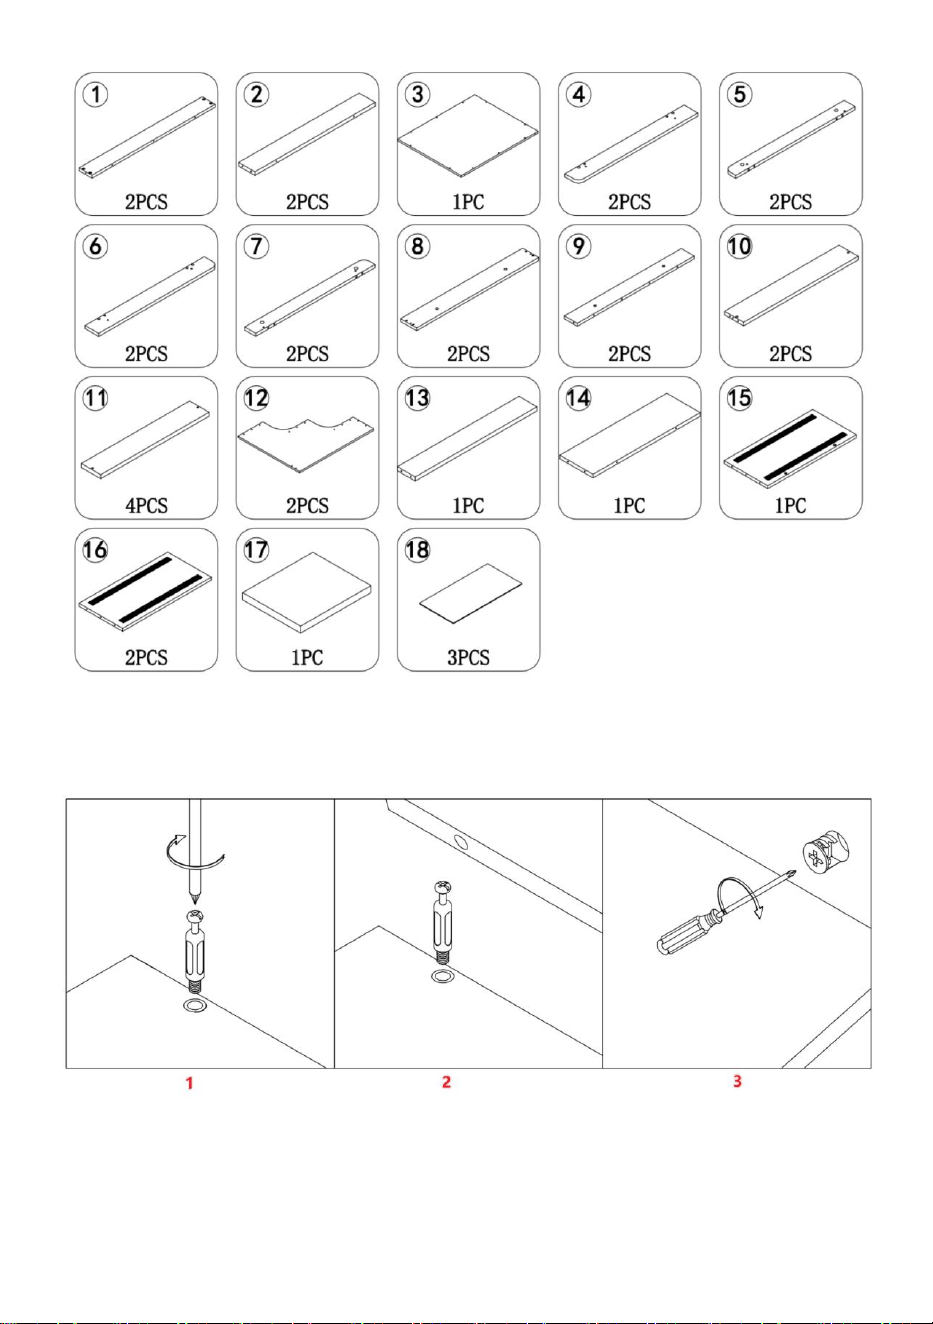
4
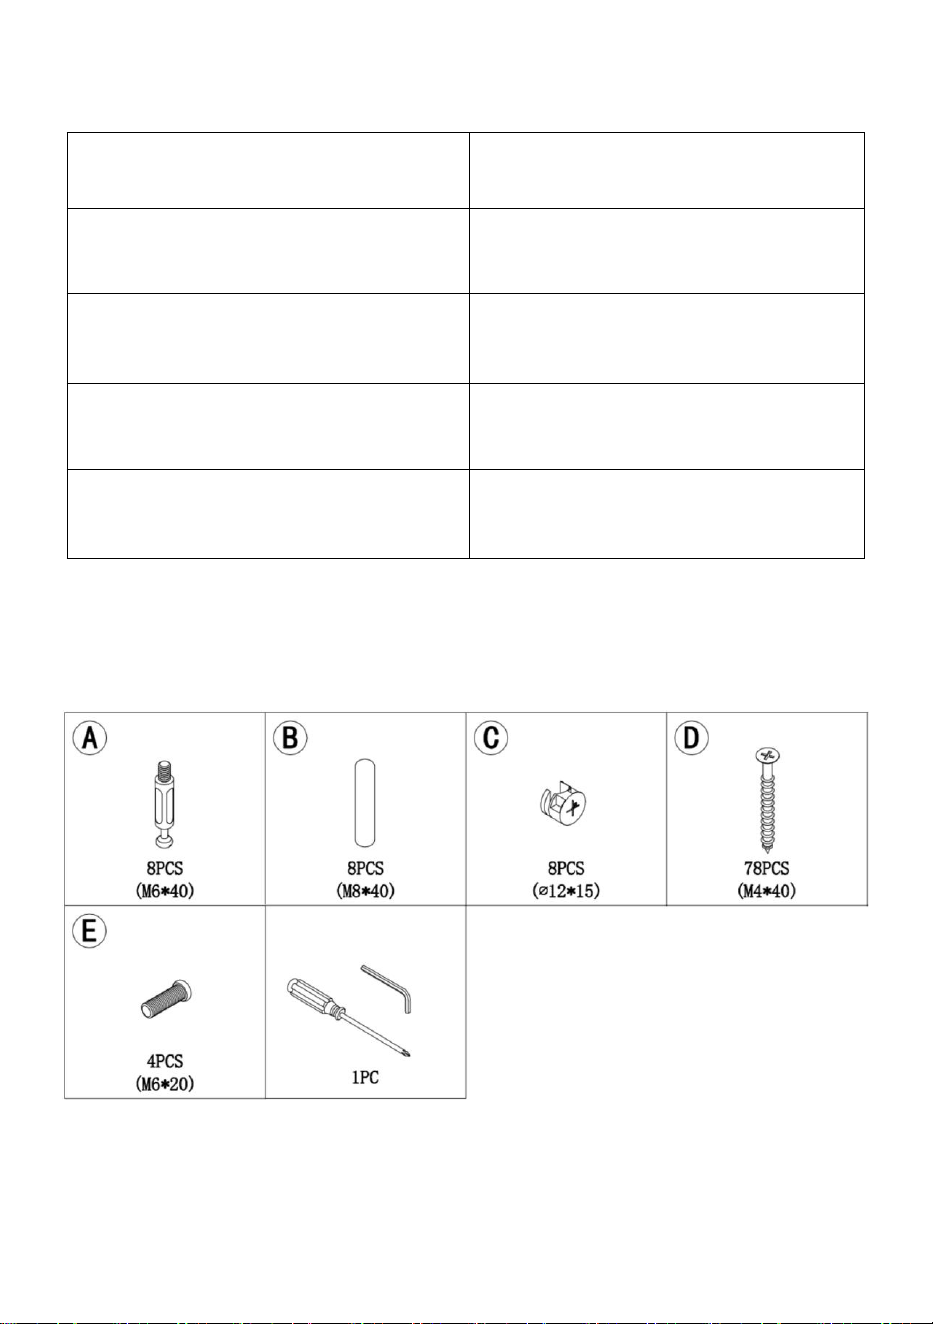
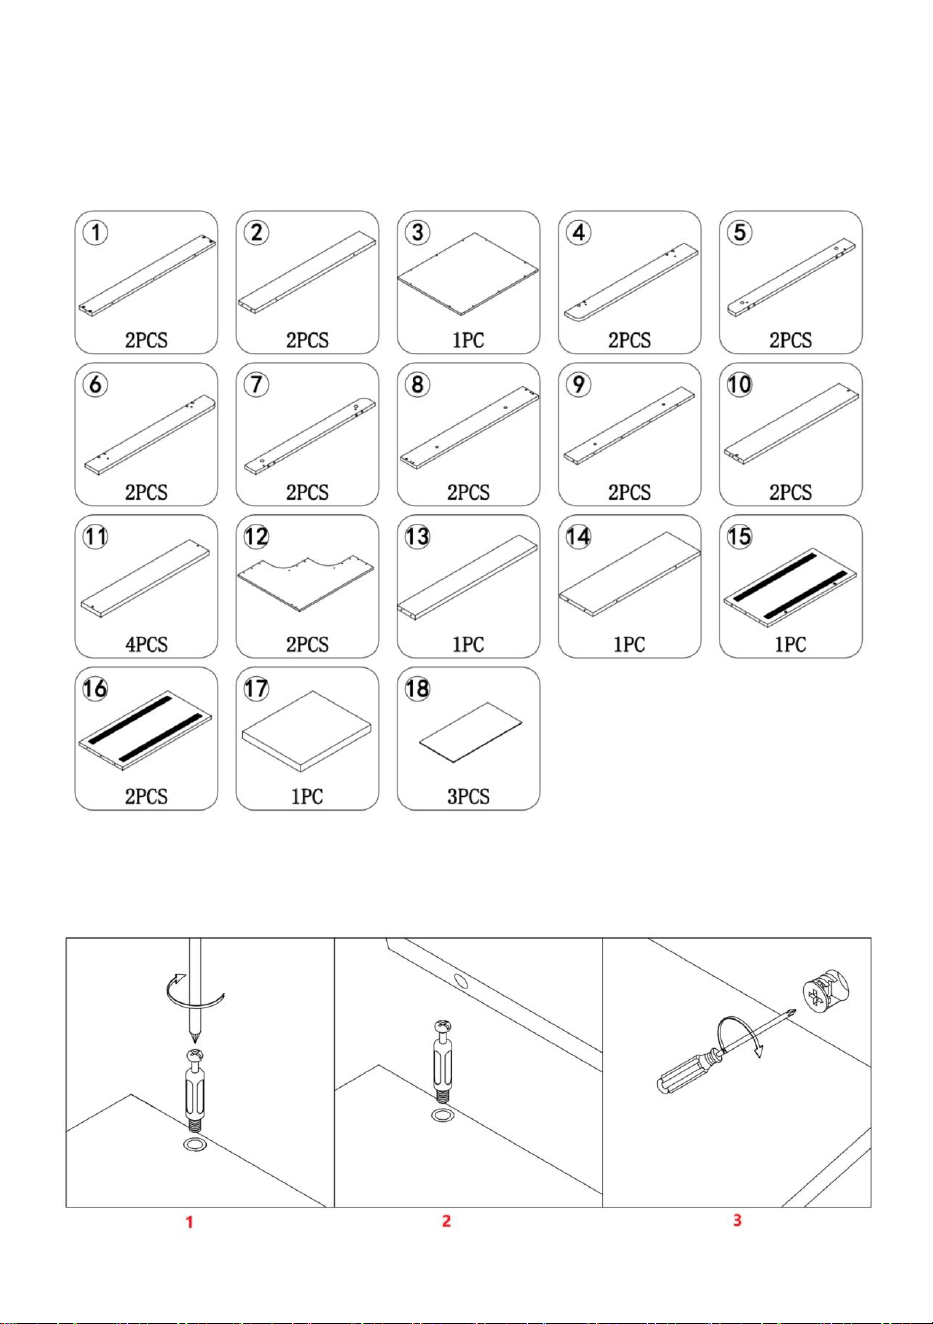
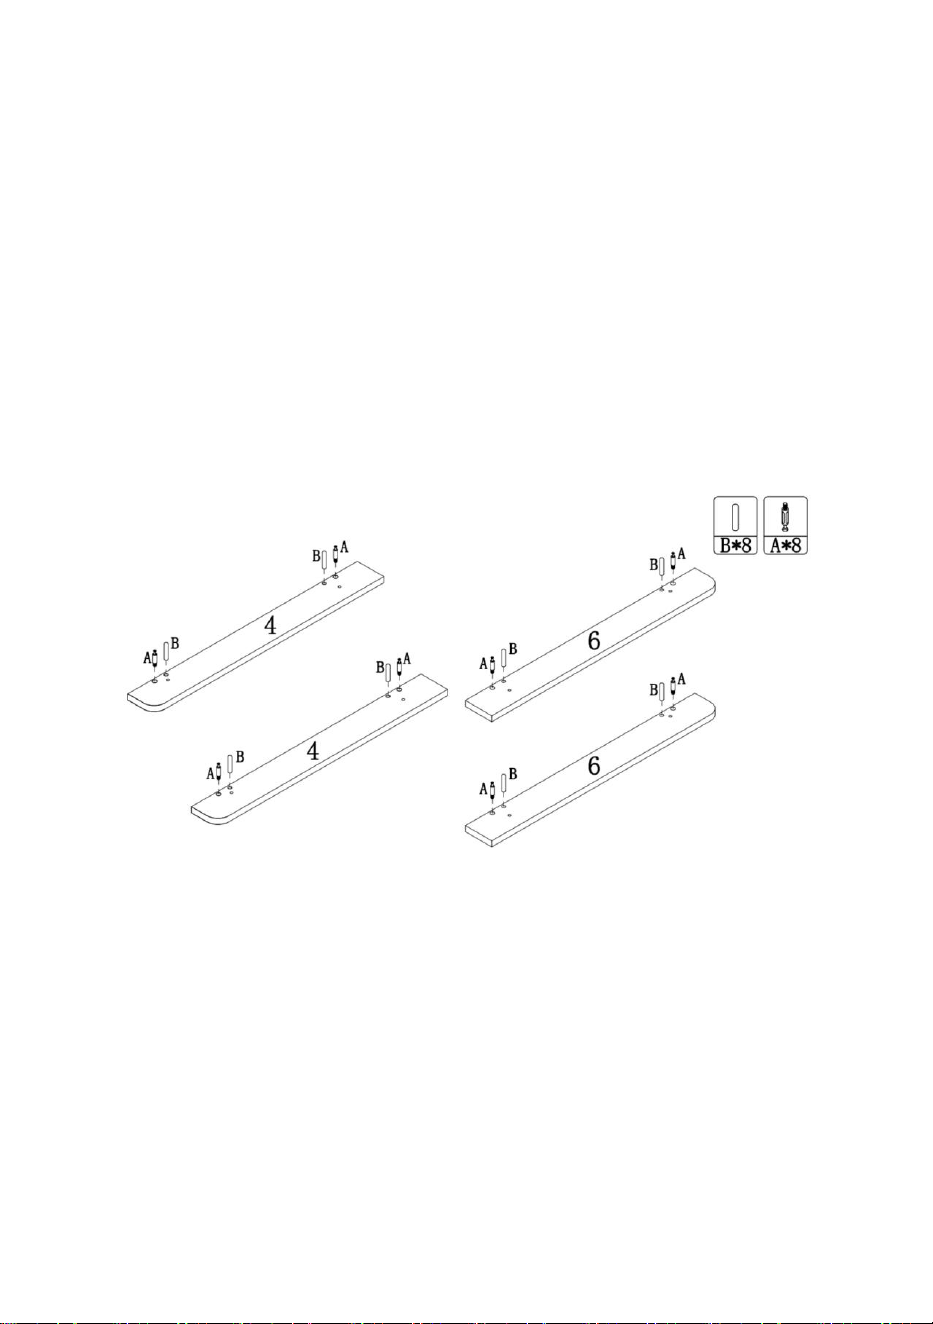
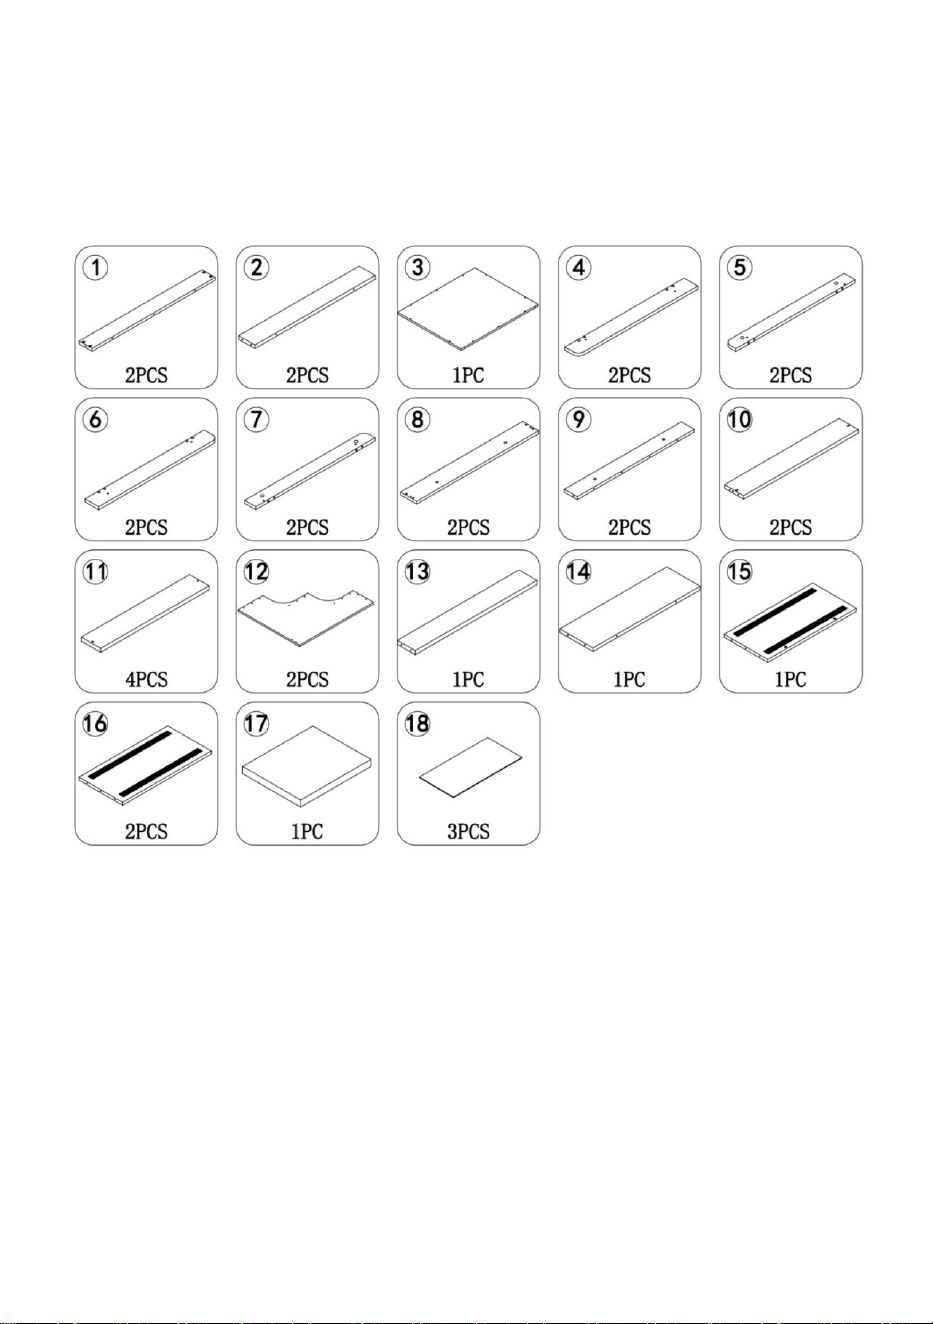
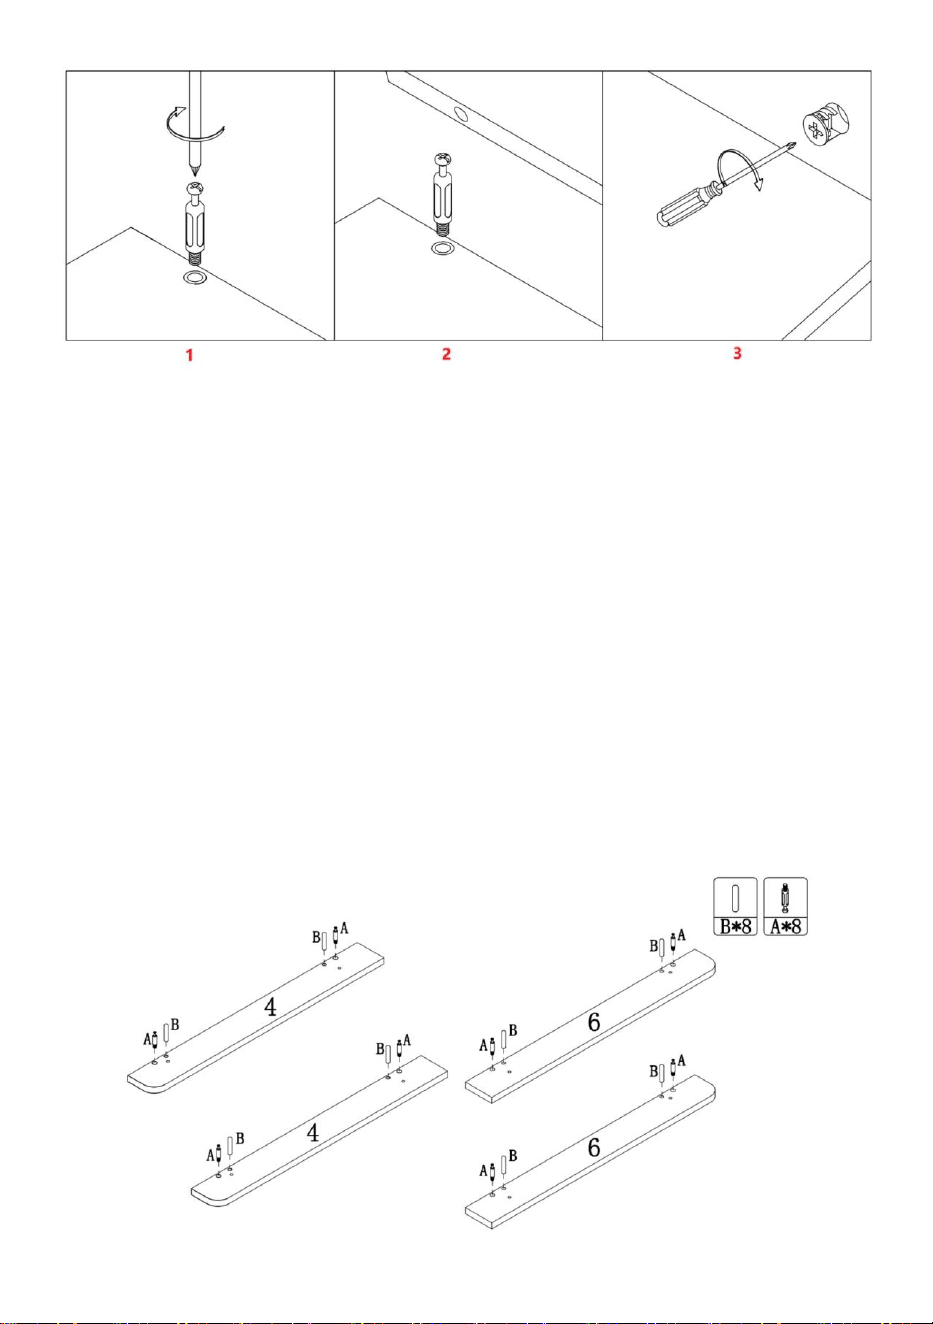
Part List
How to install boards with
Hardware
A and C
1. Use a screwdriver to fit the hardware A into the corresponding holes in
the board.
5
2. Align the holes of the other board to be installed so that hardware A is
inserted into the holes. Note that when installing, make sure the two
boards are aligned.
3. Put hardware C into the corresponding hole of the board just installed,
and tighten it with a screwdriver to achieve assembly.
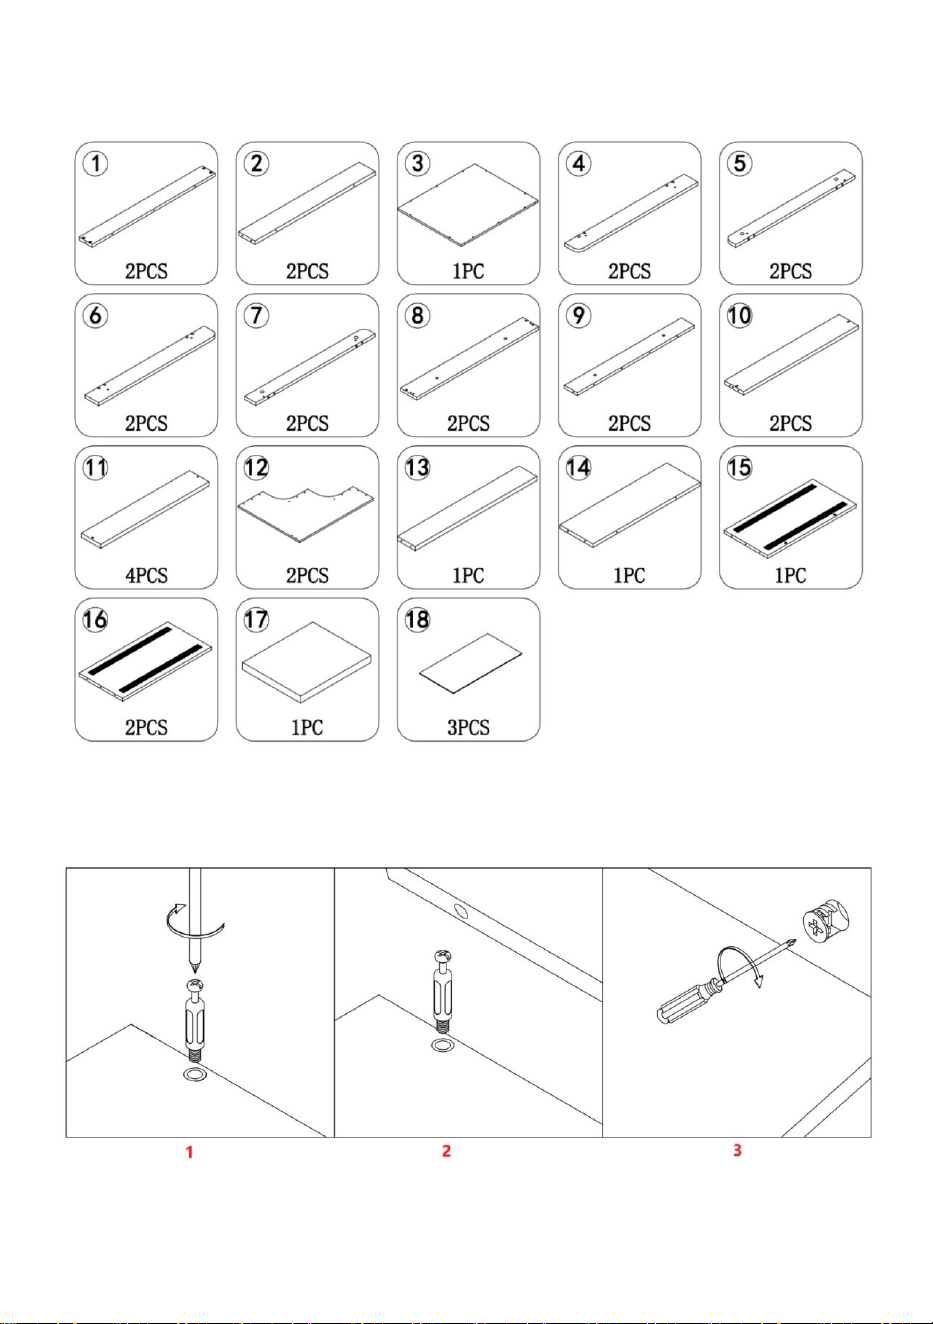
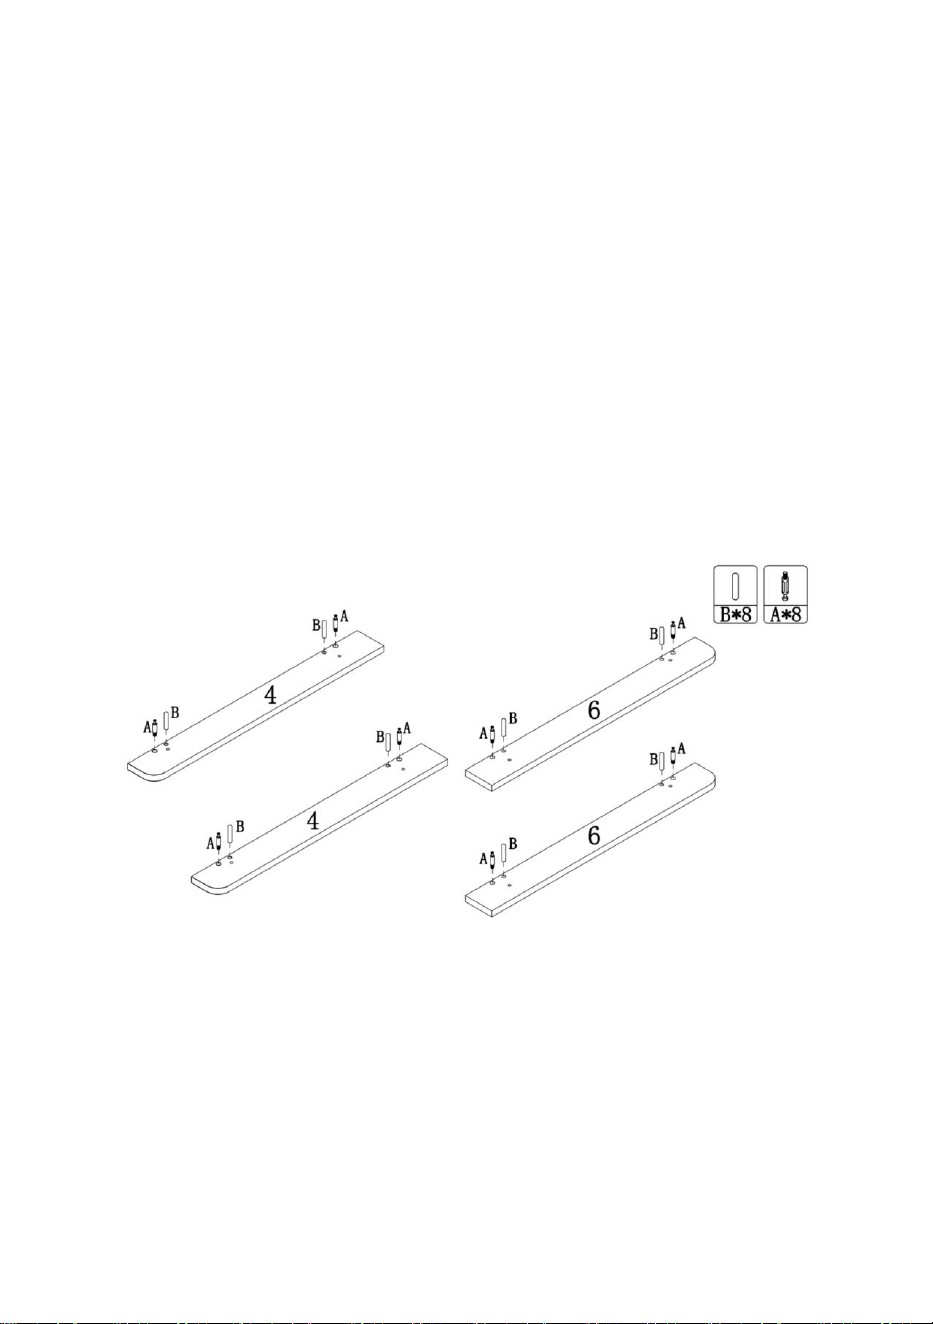
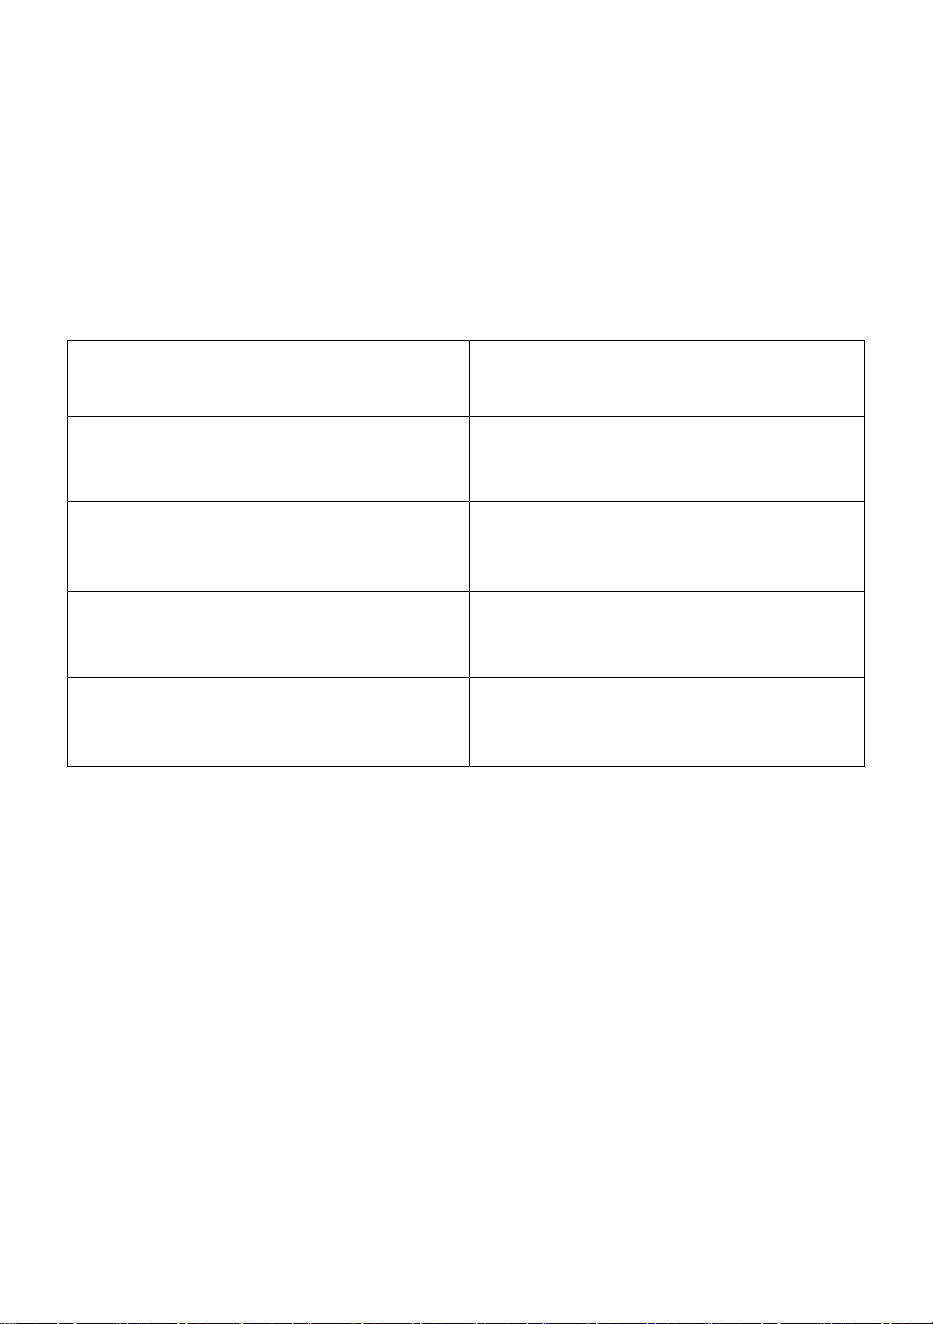
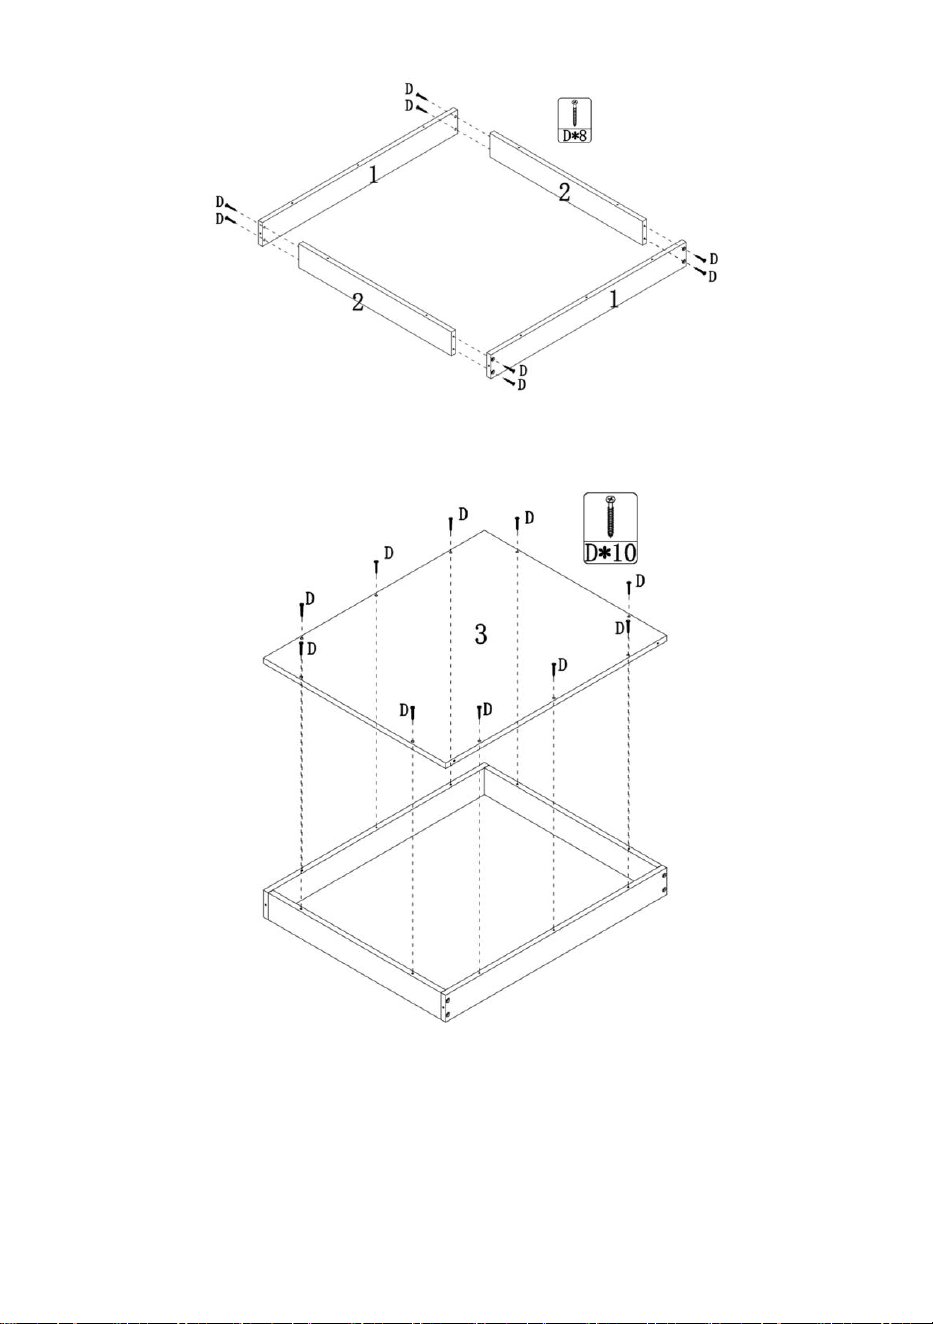
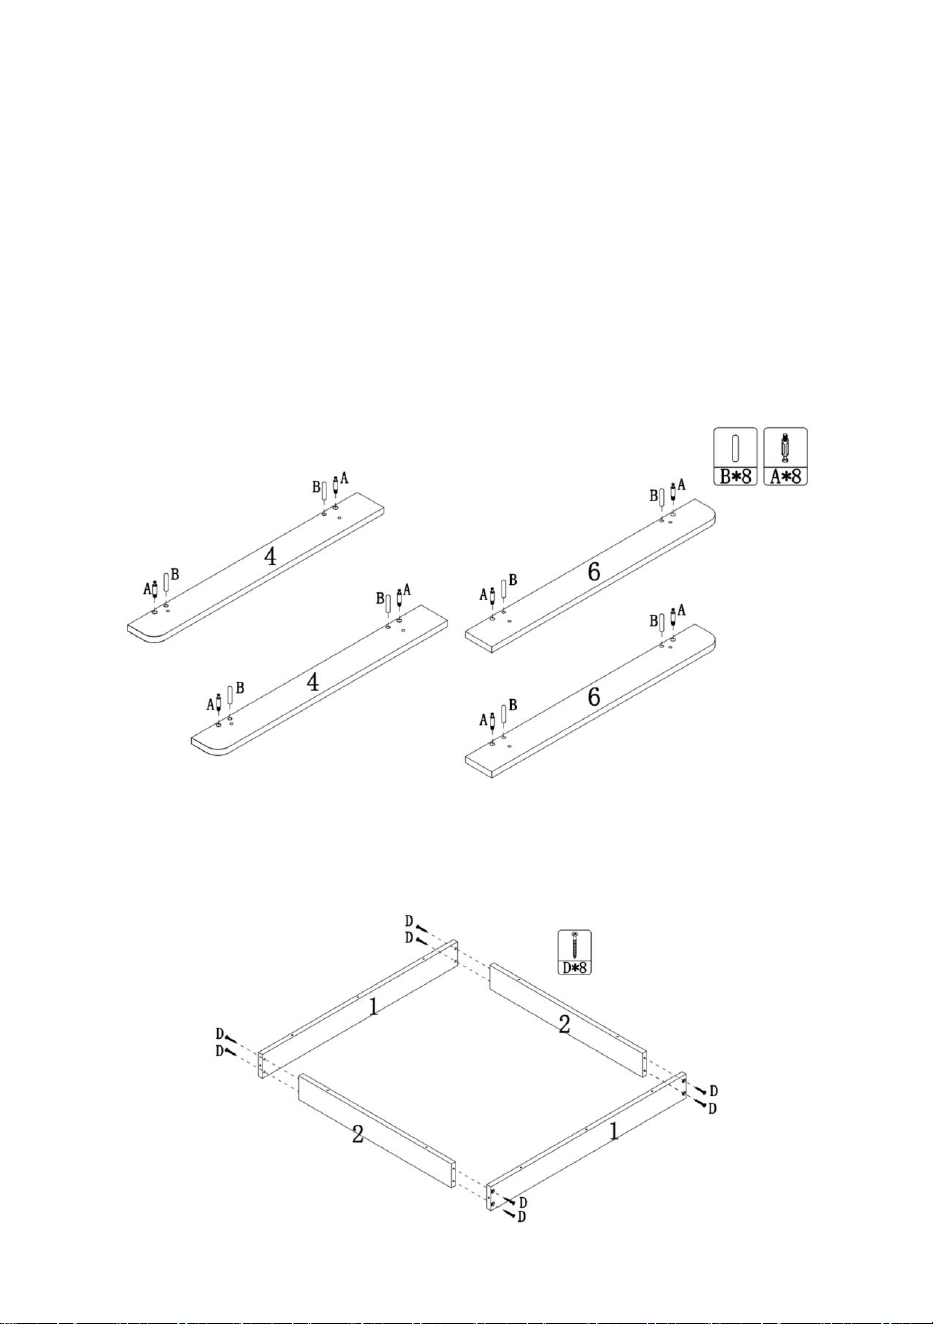
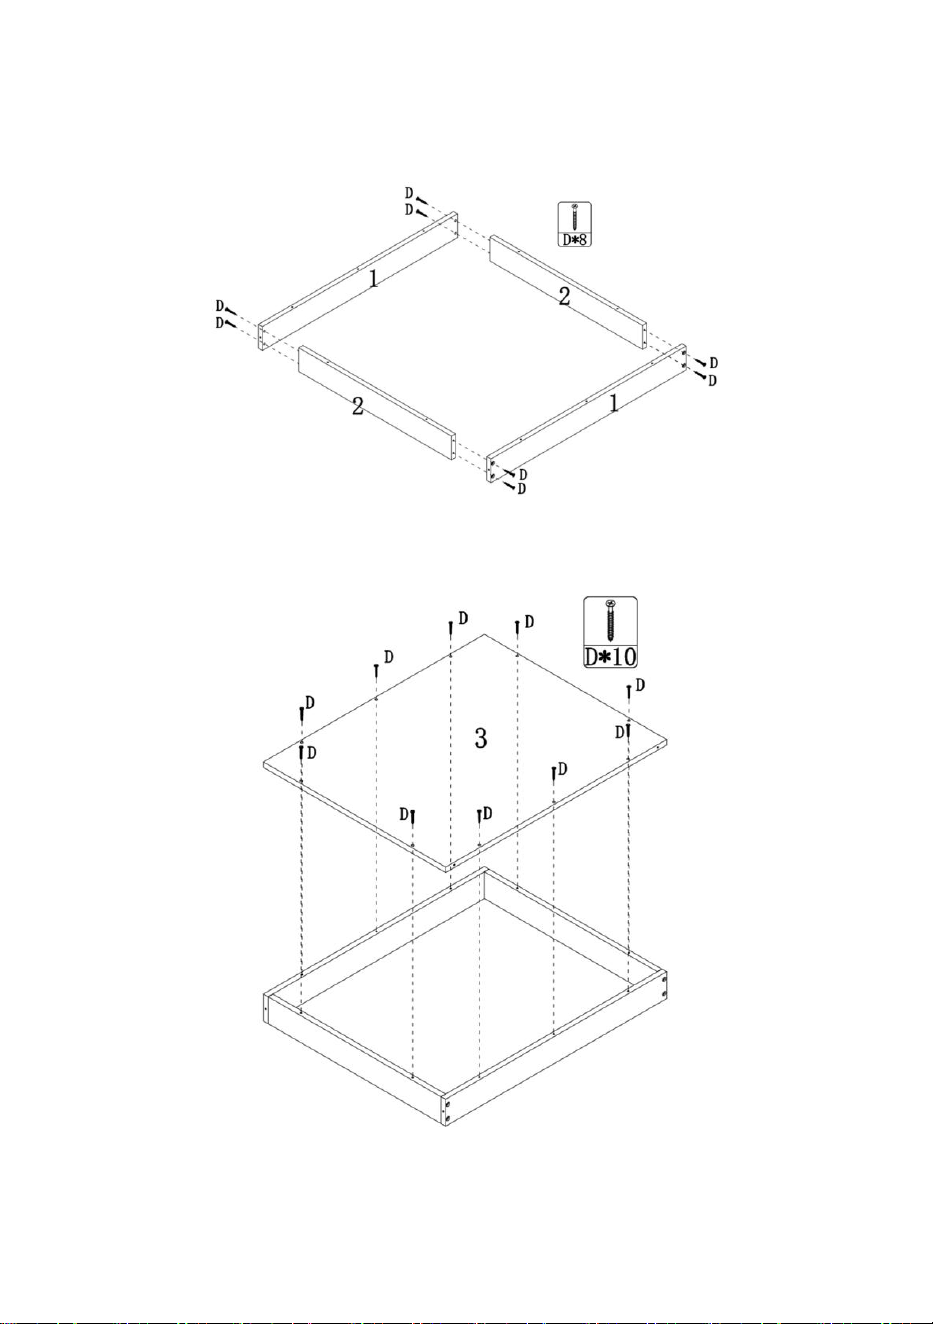
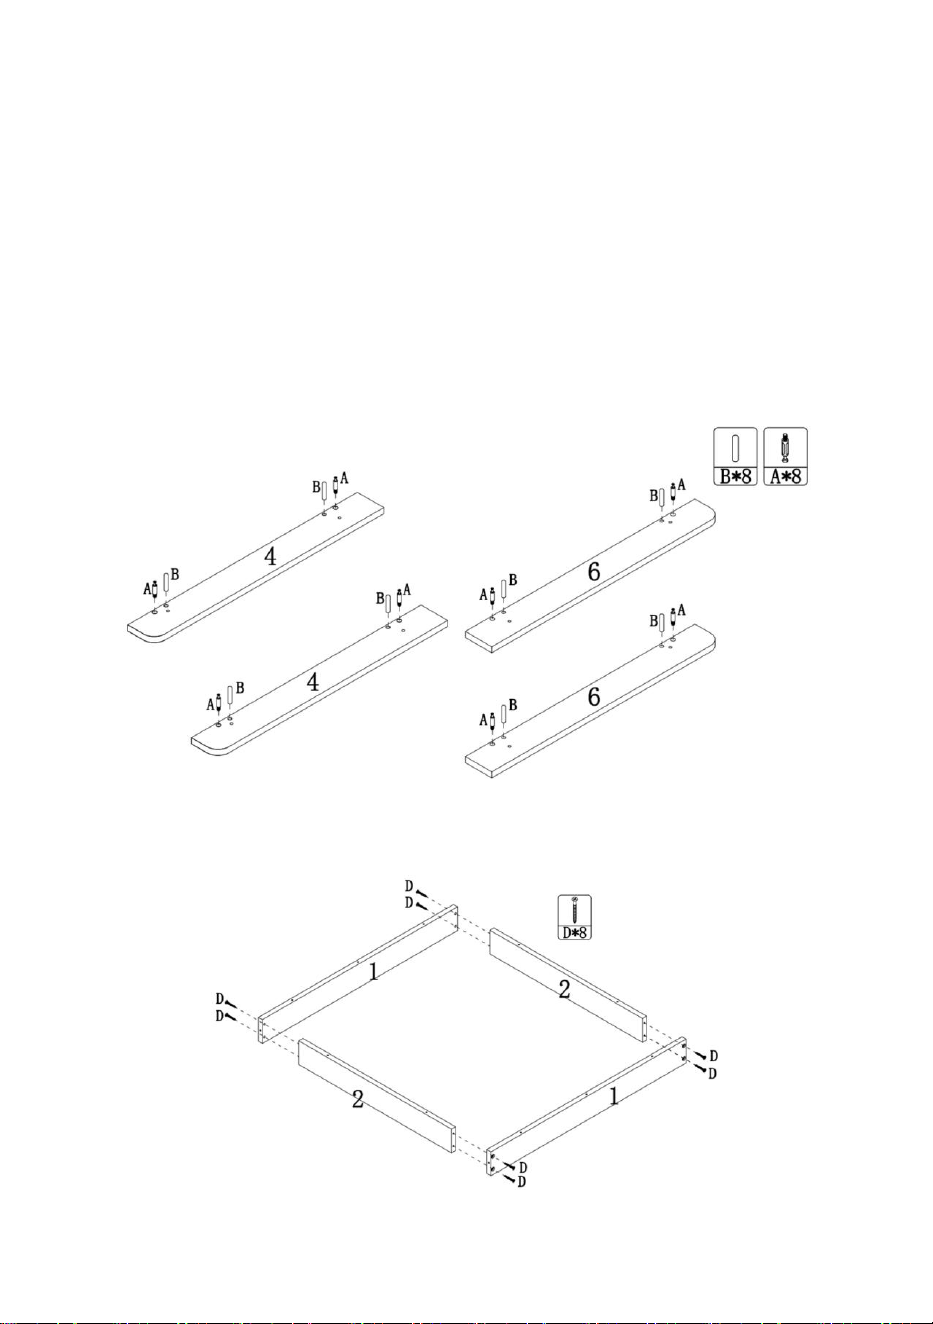
Bed frame assembly
Step 1:Install hardware A and B into the corresponding holes in
the board as shown. These parts are used to assemble the bed.
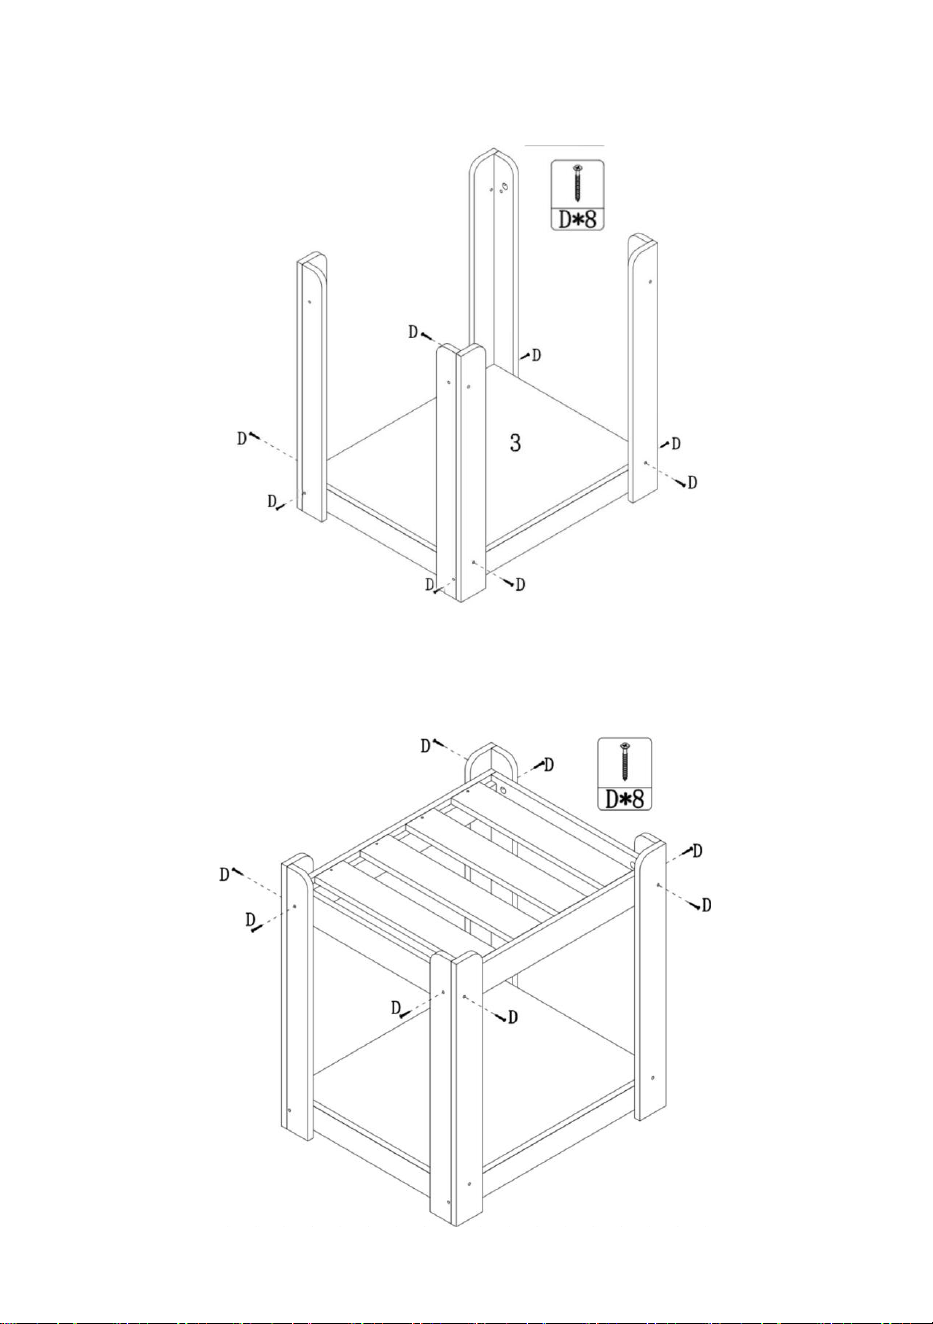
Step 2: Assemble Parts 1 and 2 as shown using hardware D.

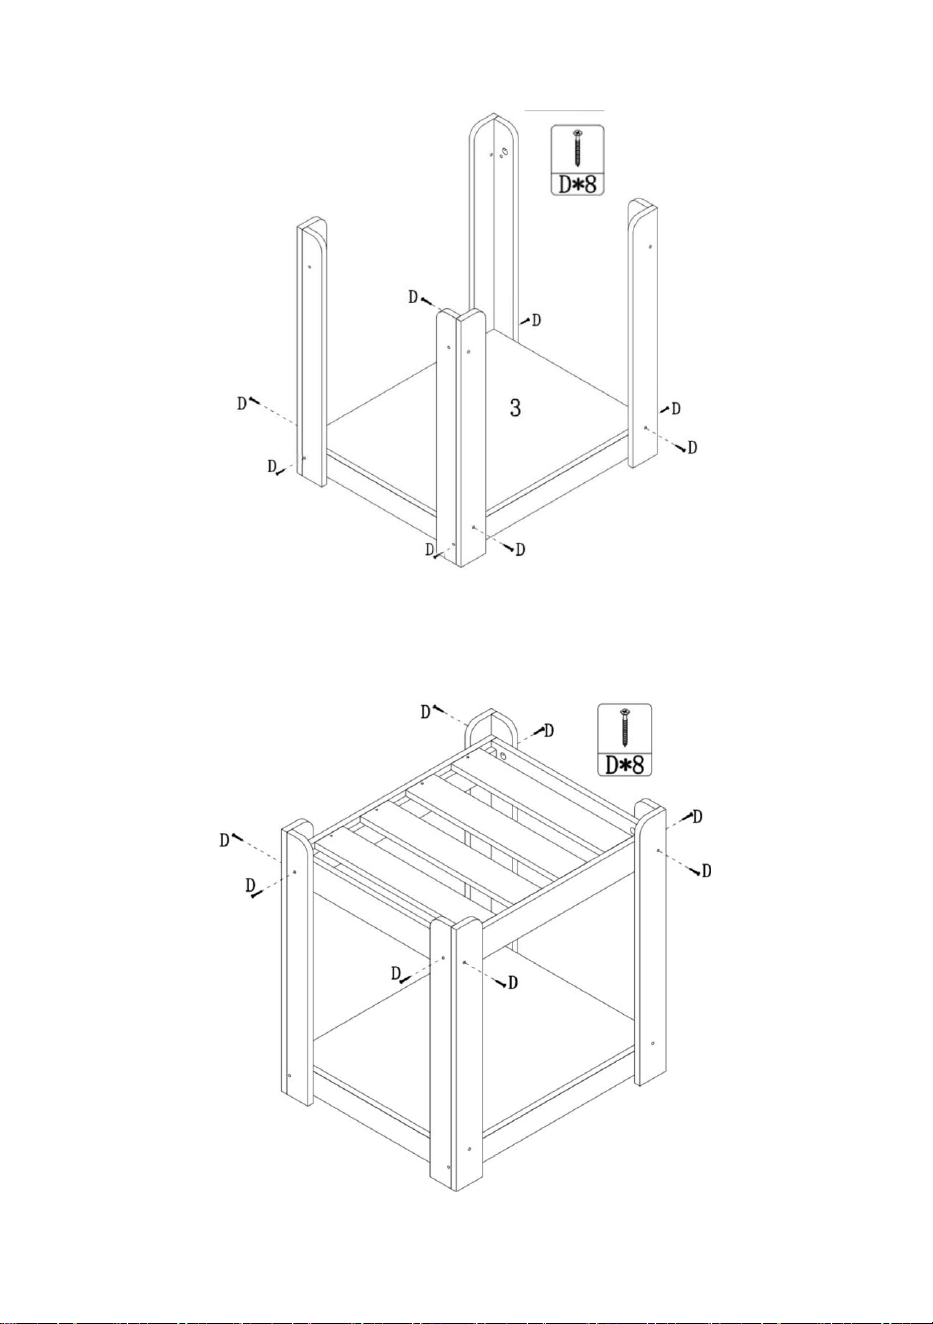
6
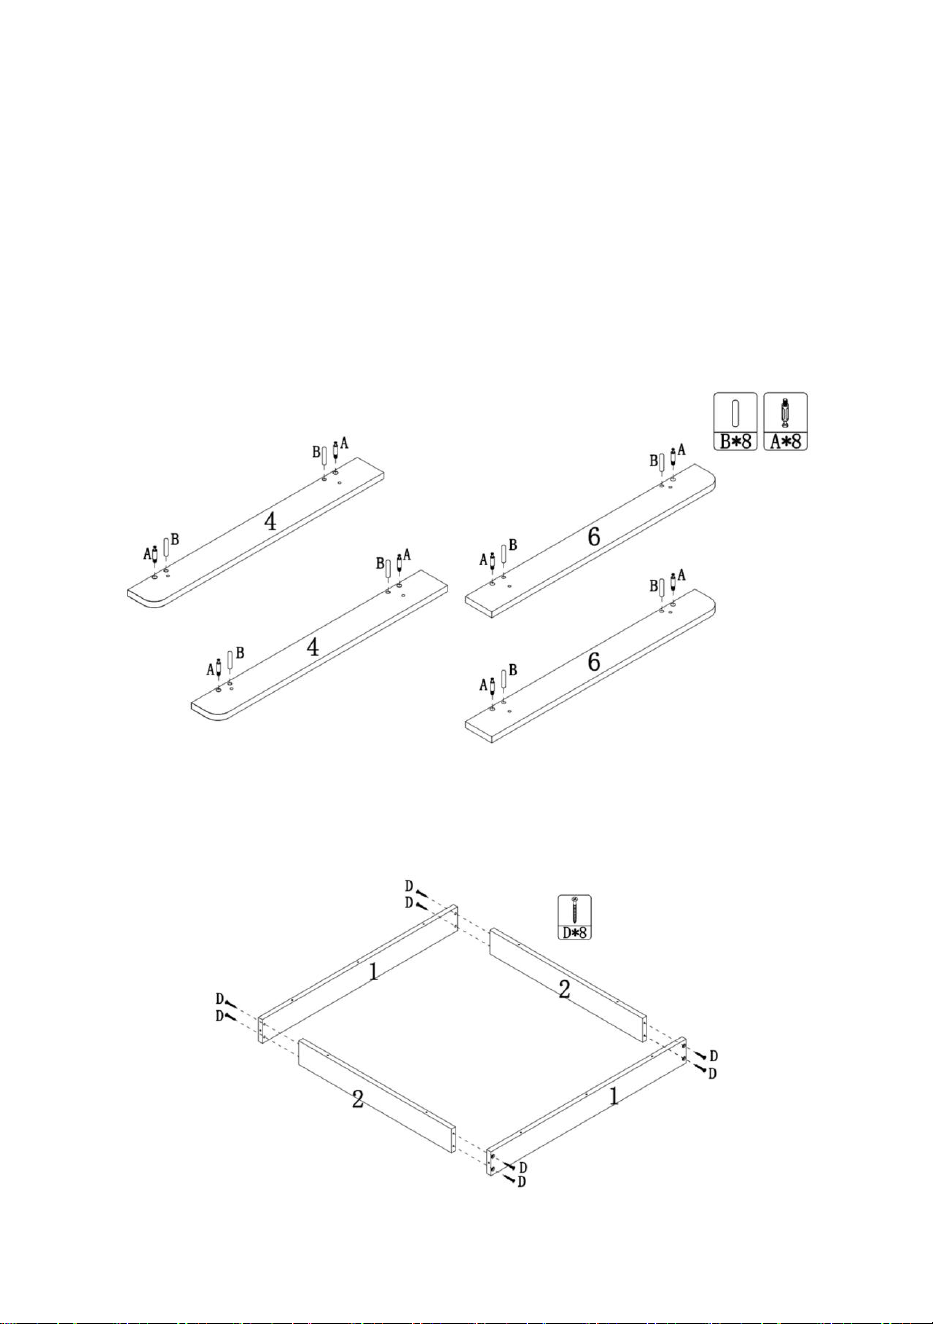
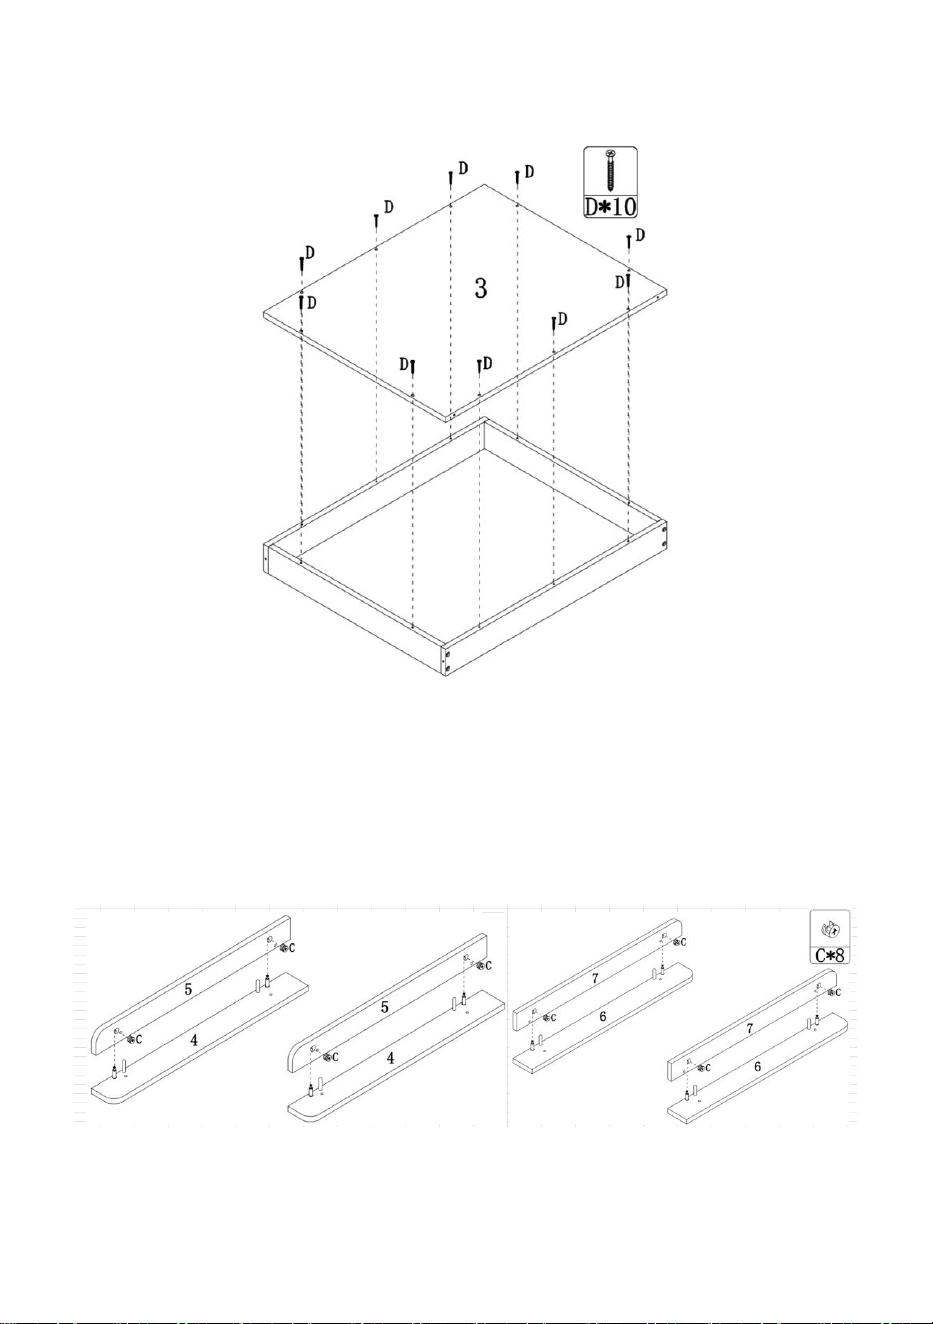
Step 3: Using hardware D, install part 3 with the components
completed in step 2.
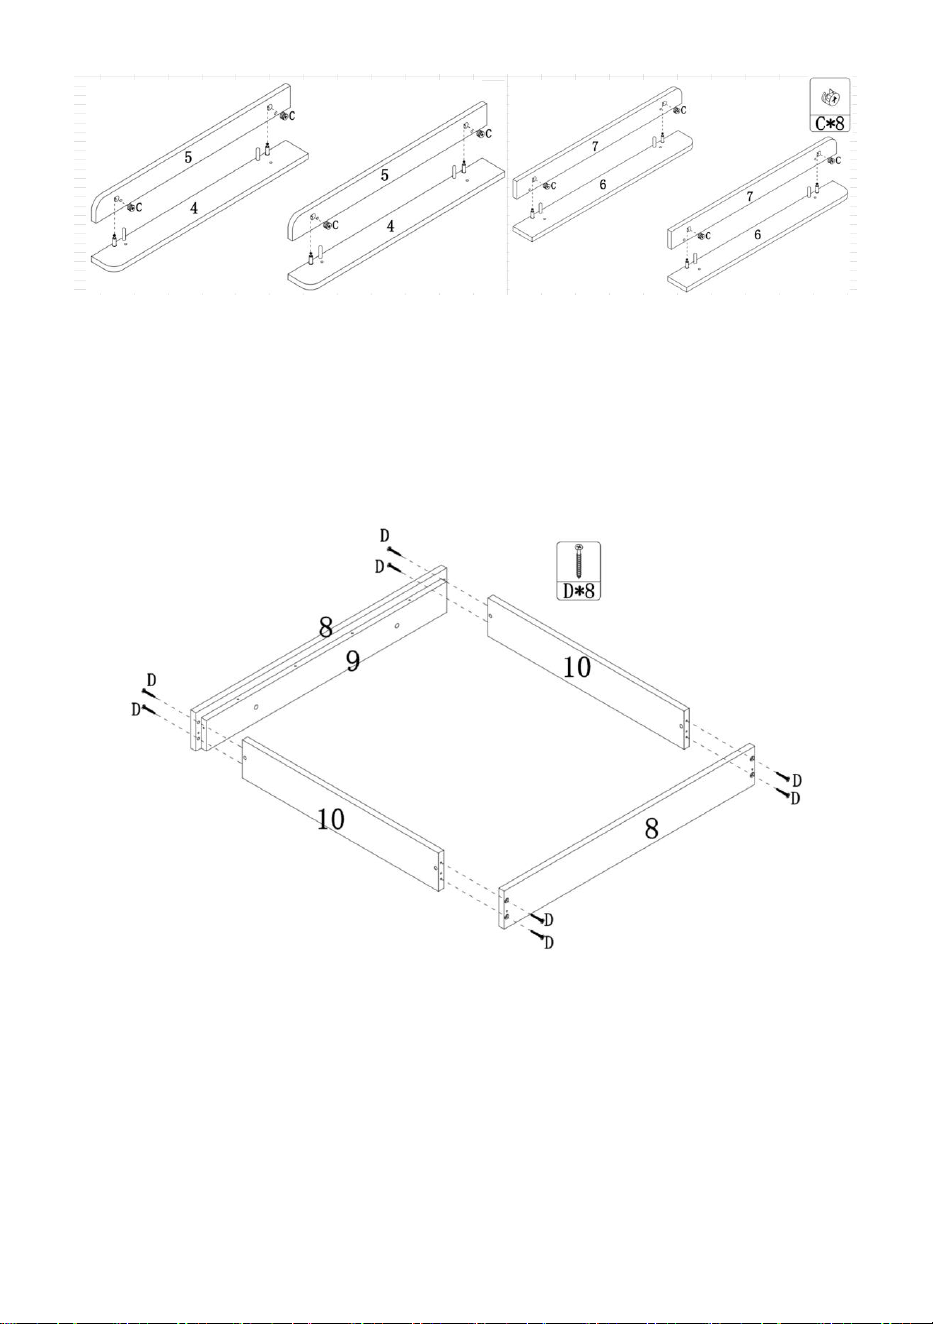
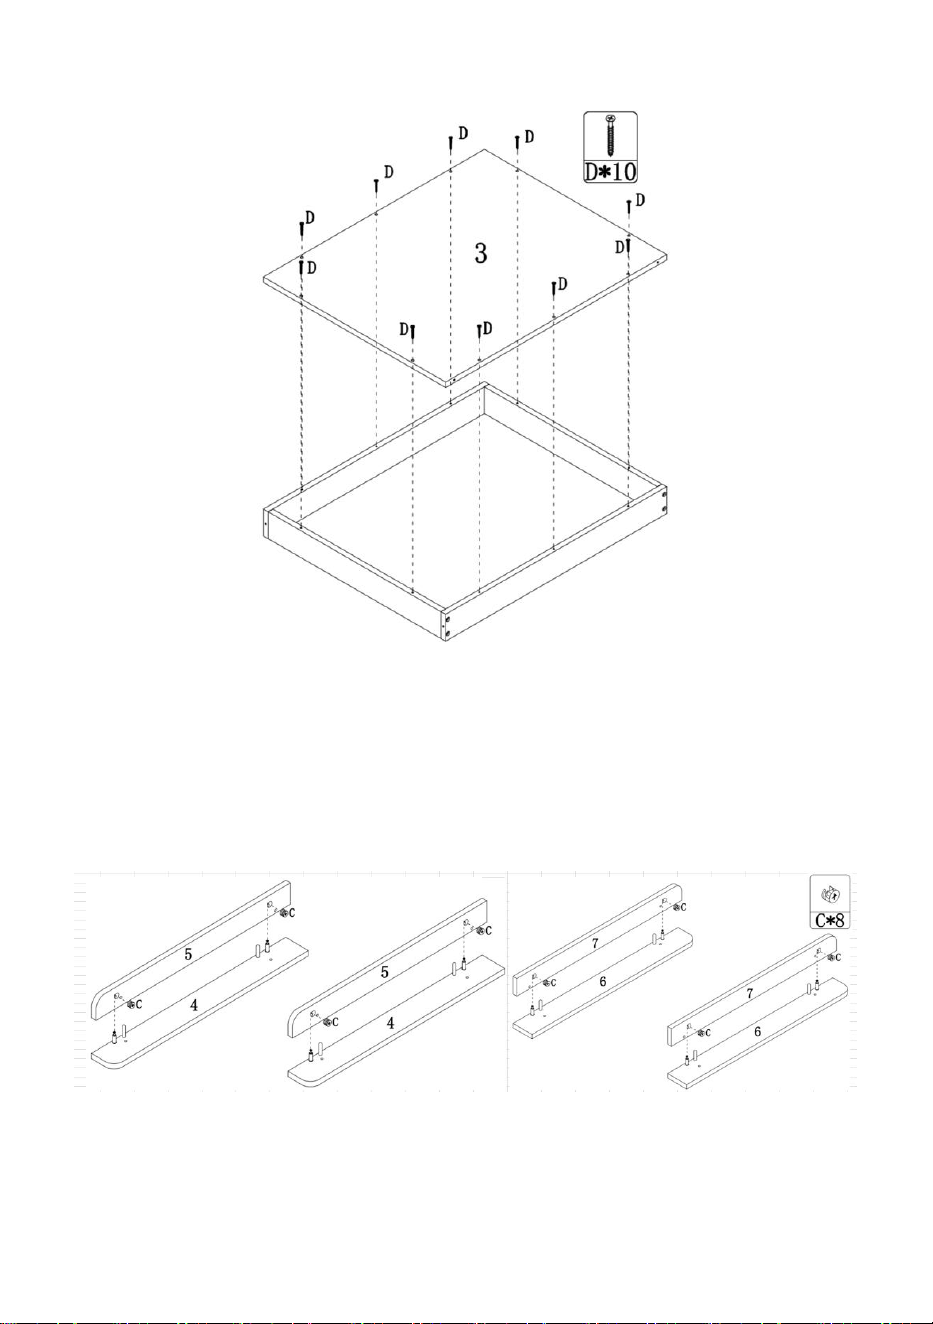
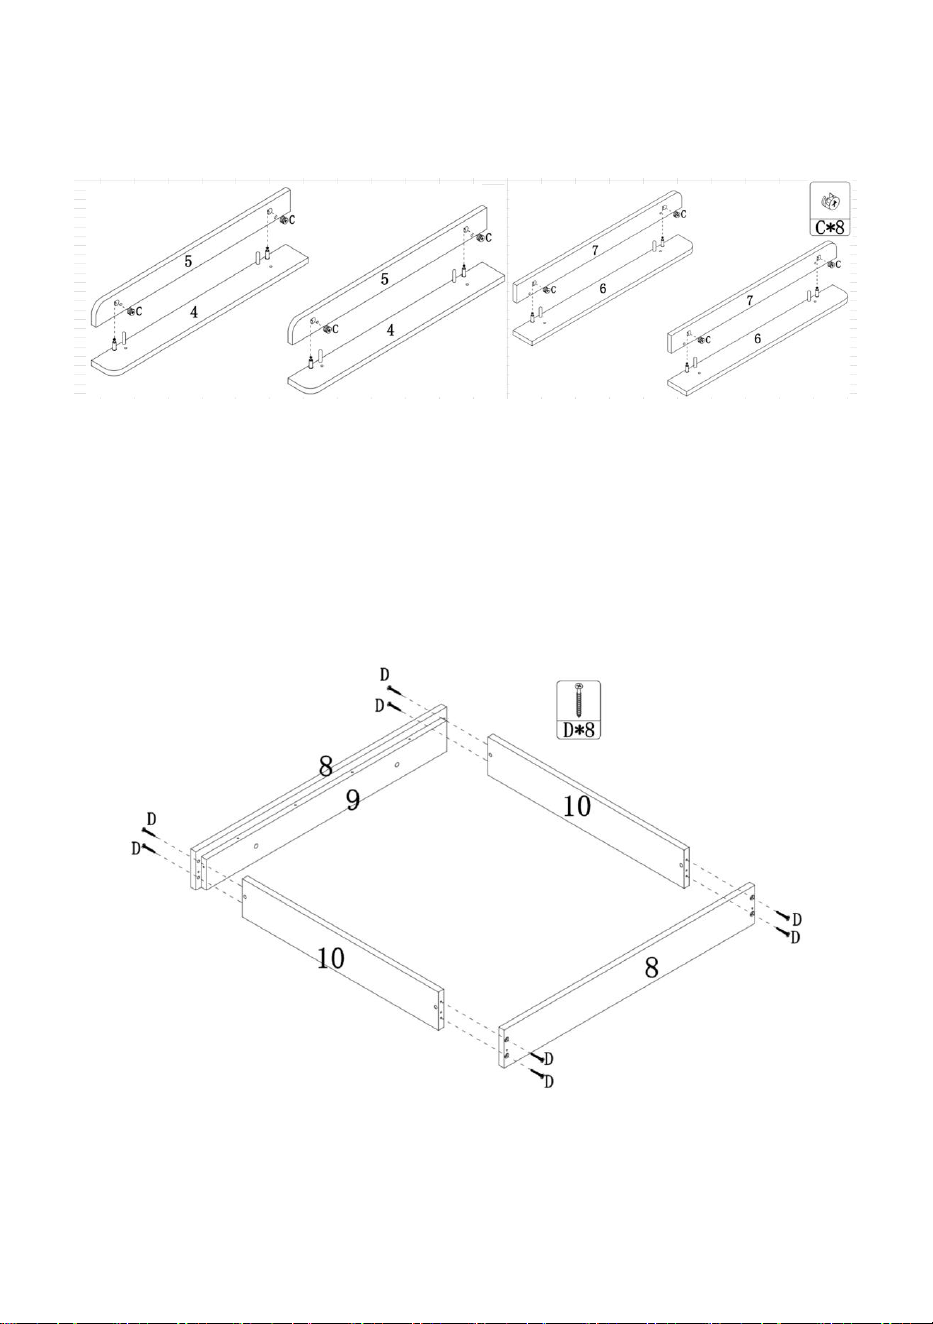
Step 4: Using hardware C, assemble parts 4 and 5, parts 6 and 7
together according to the diagram, paying attention to the
position of the rounded corners of the board.
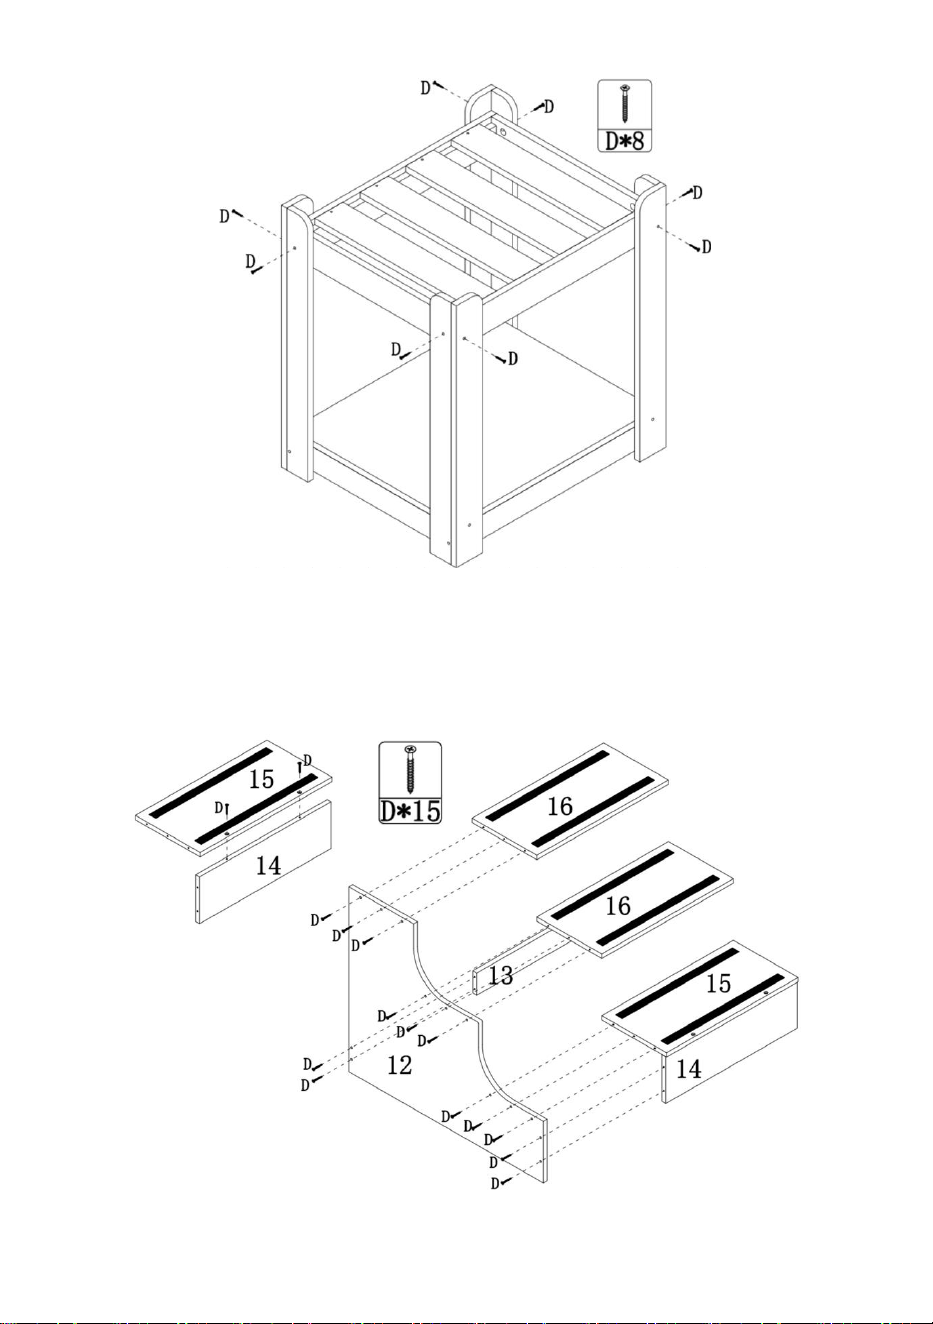
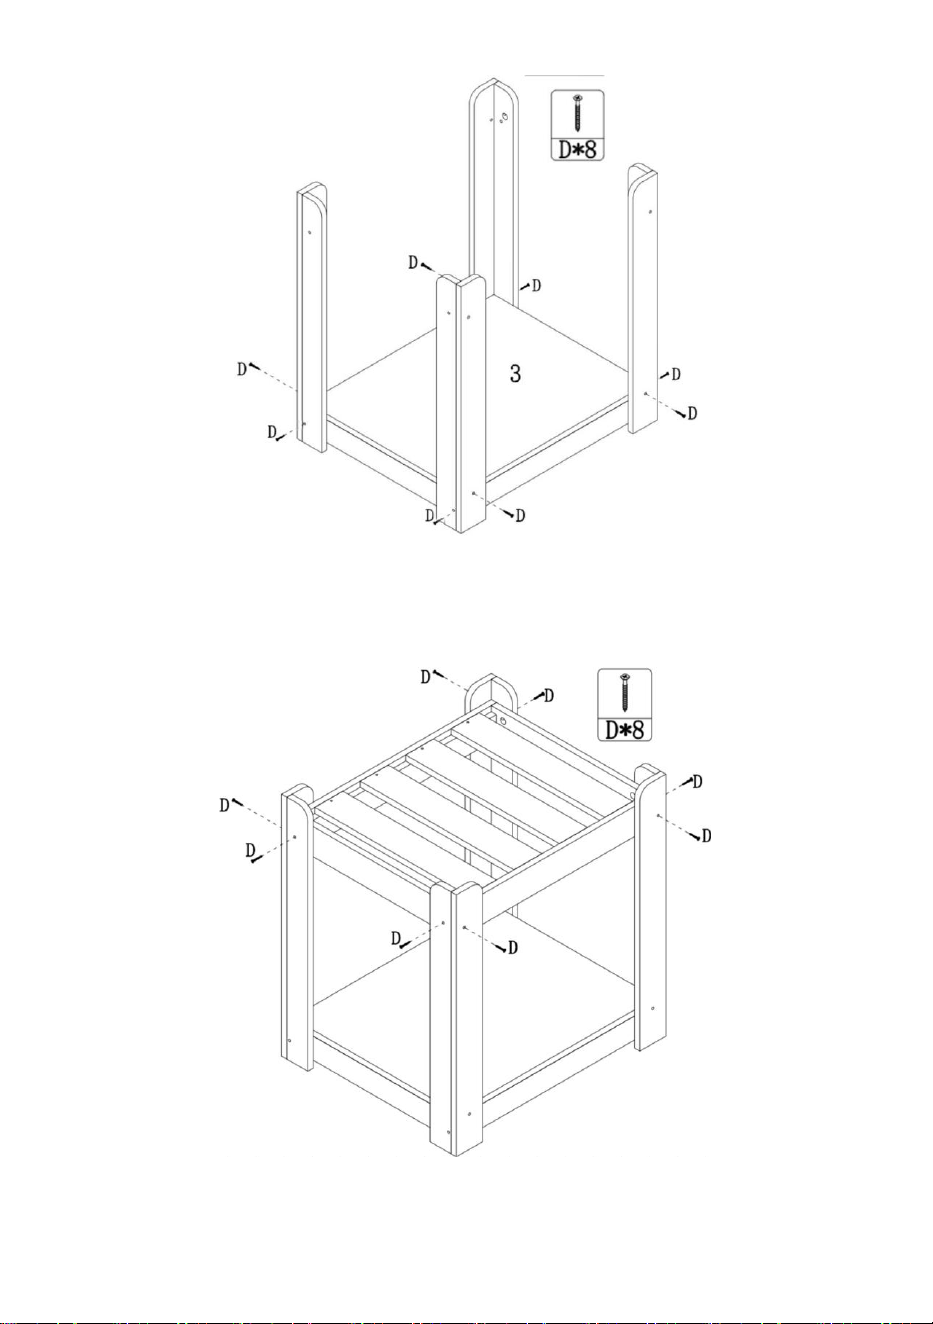
7
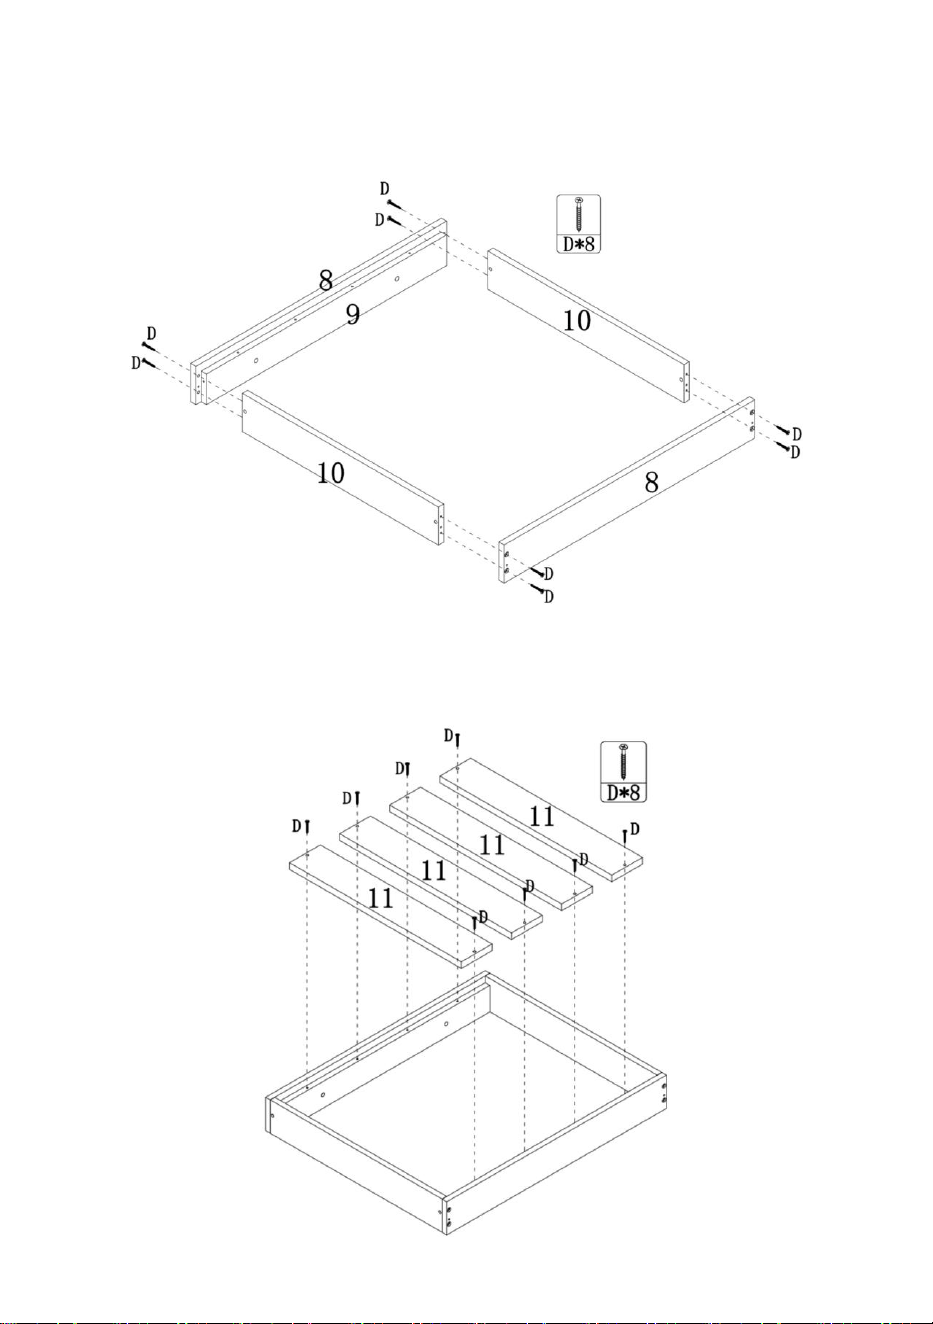
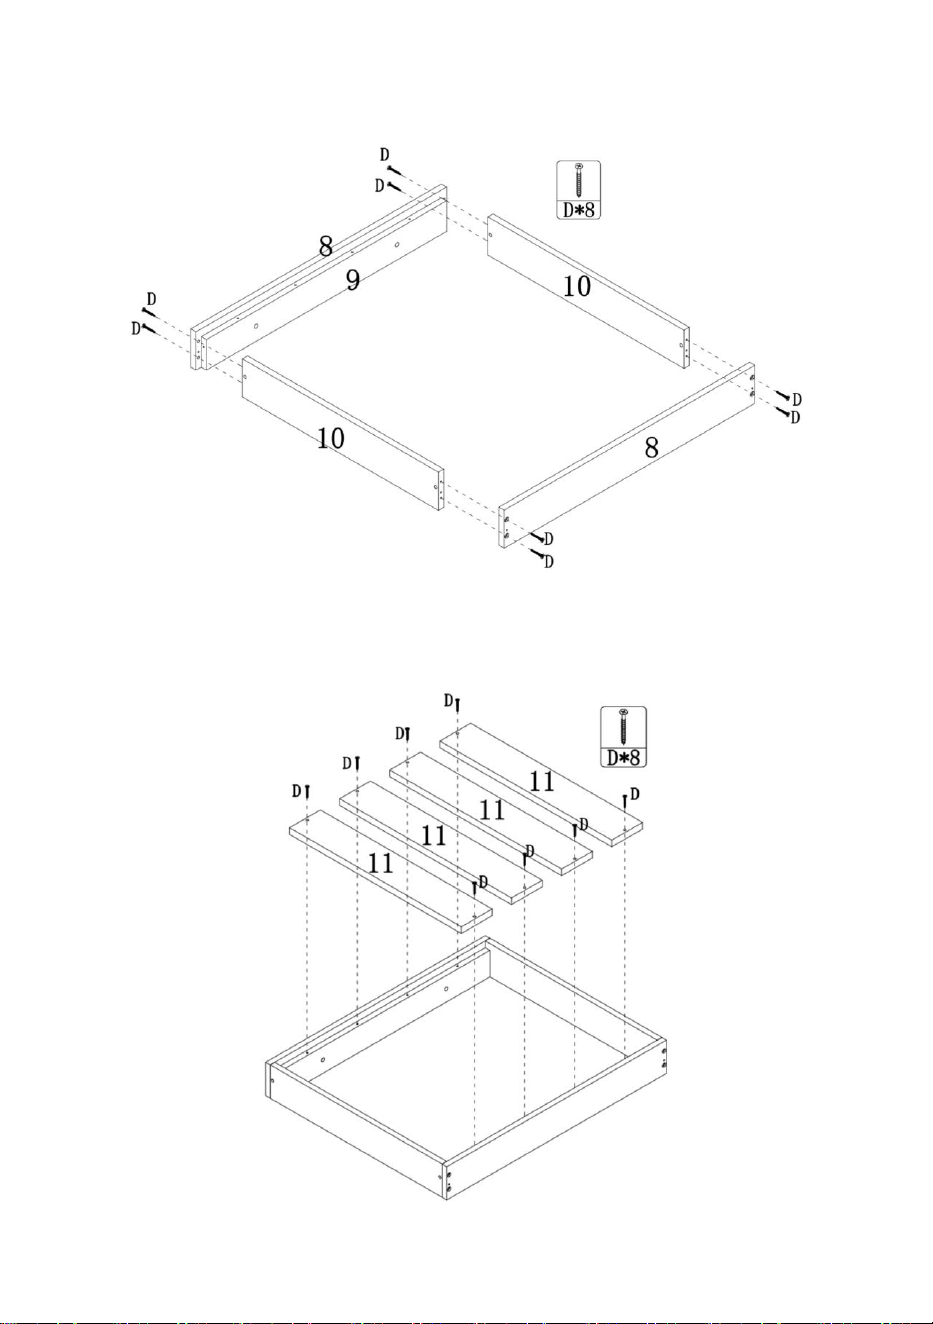
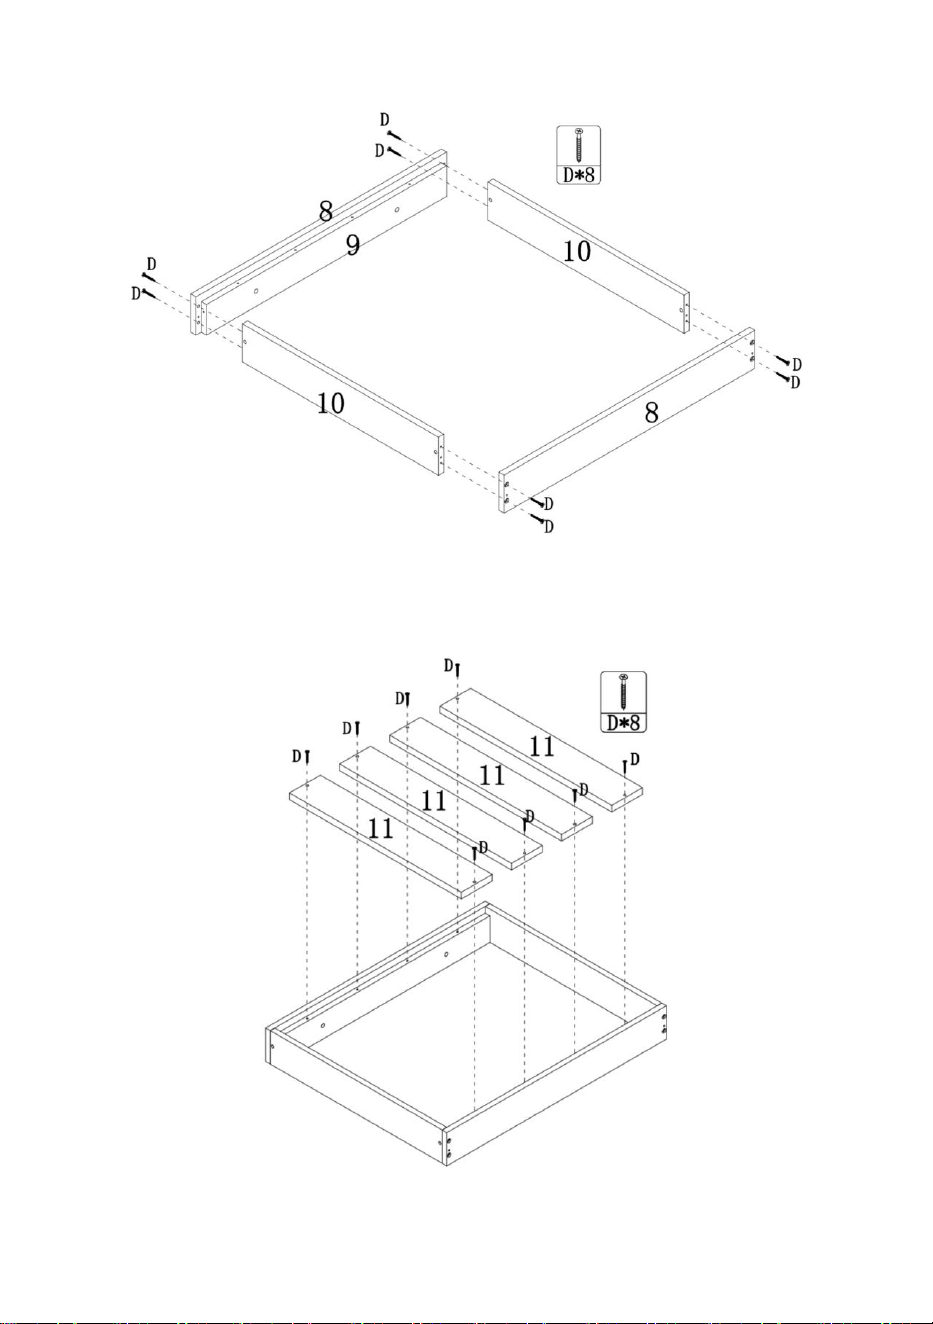
Step 5: Using hardware D, assemble Part 8 and 10 together as
shown.
Note: part 8 and 9 have been pre-installed for users.
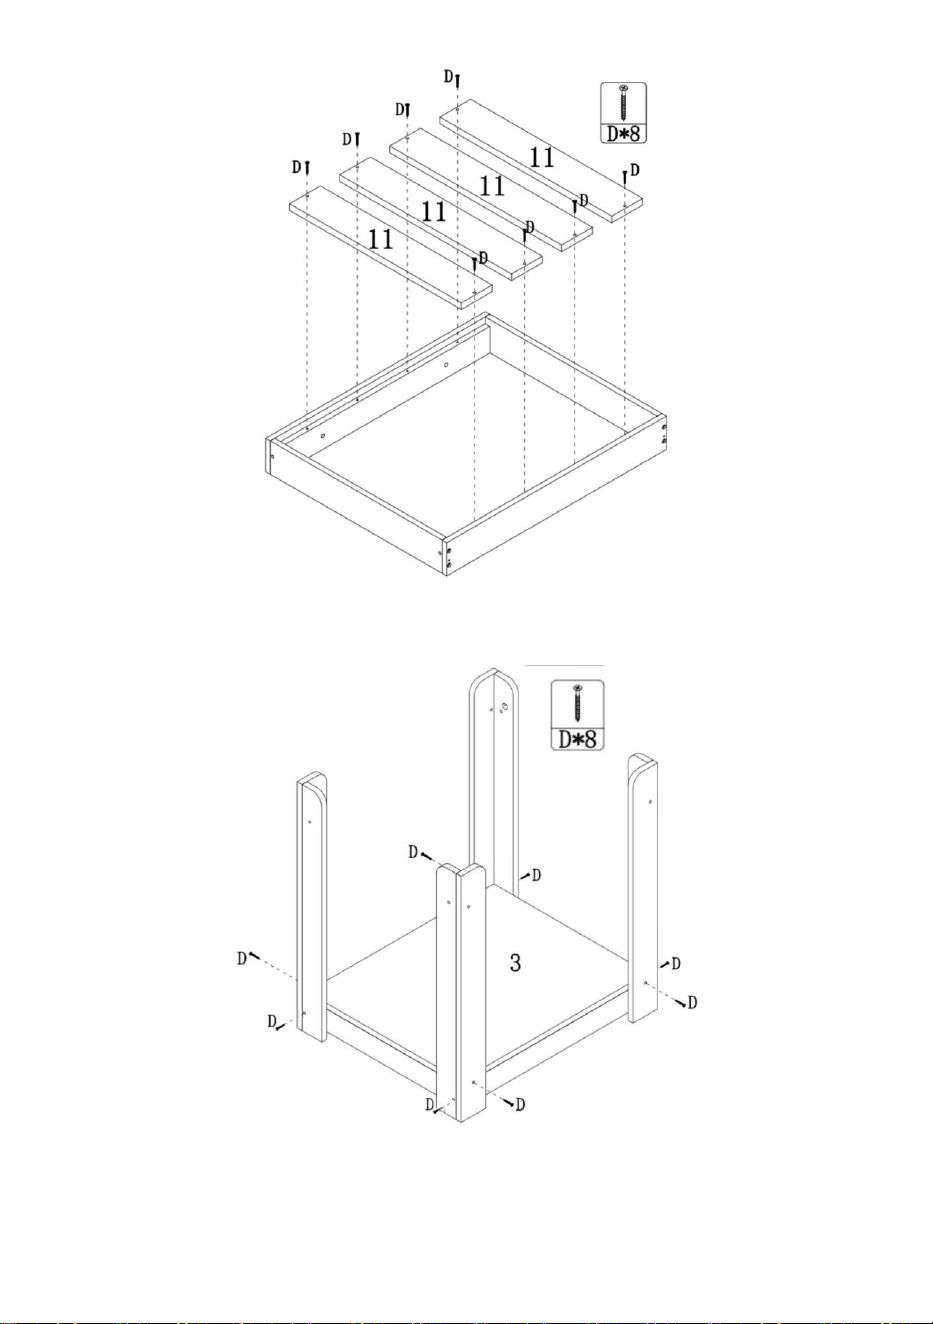
Step 6: Using hardware D, install part 11 with the components
completed in step 5.

8
Step 7: Using hardware D, install the components from step 3
and 4 together as shown.
Step 8: Using hardware D, install the components from steps 6
and 7 together as shown. The bed frame is completely
assembled.

9
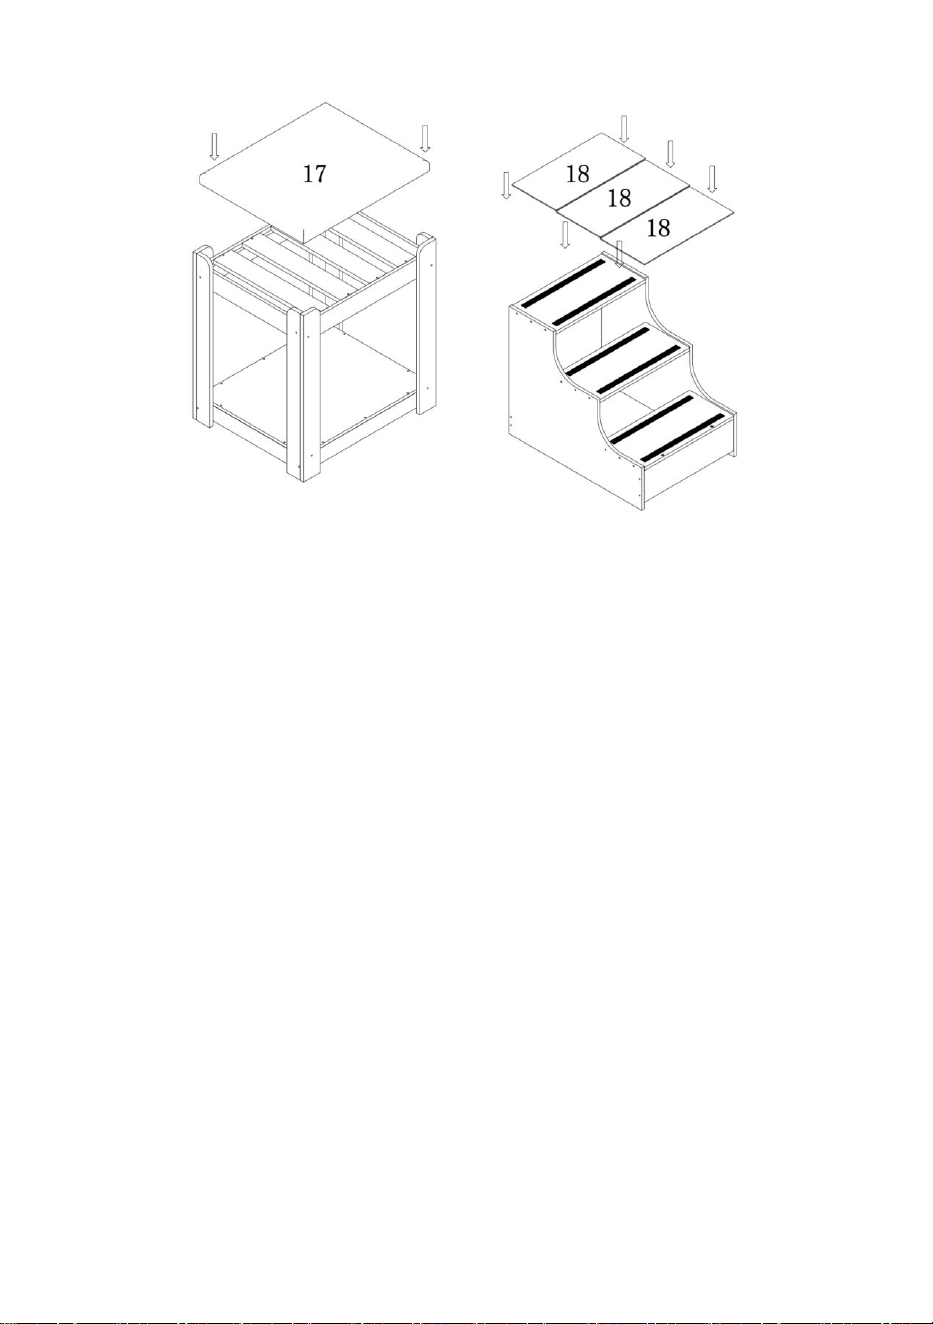
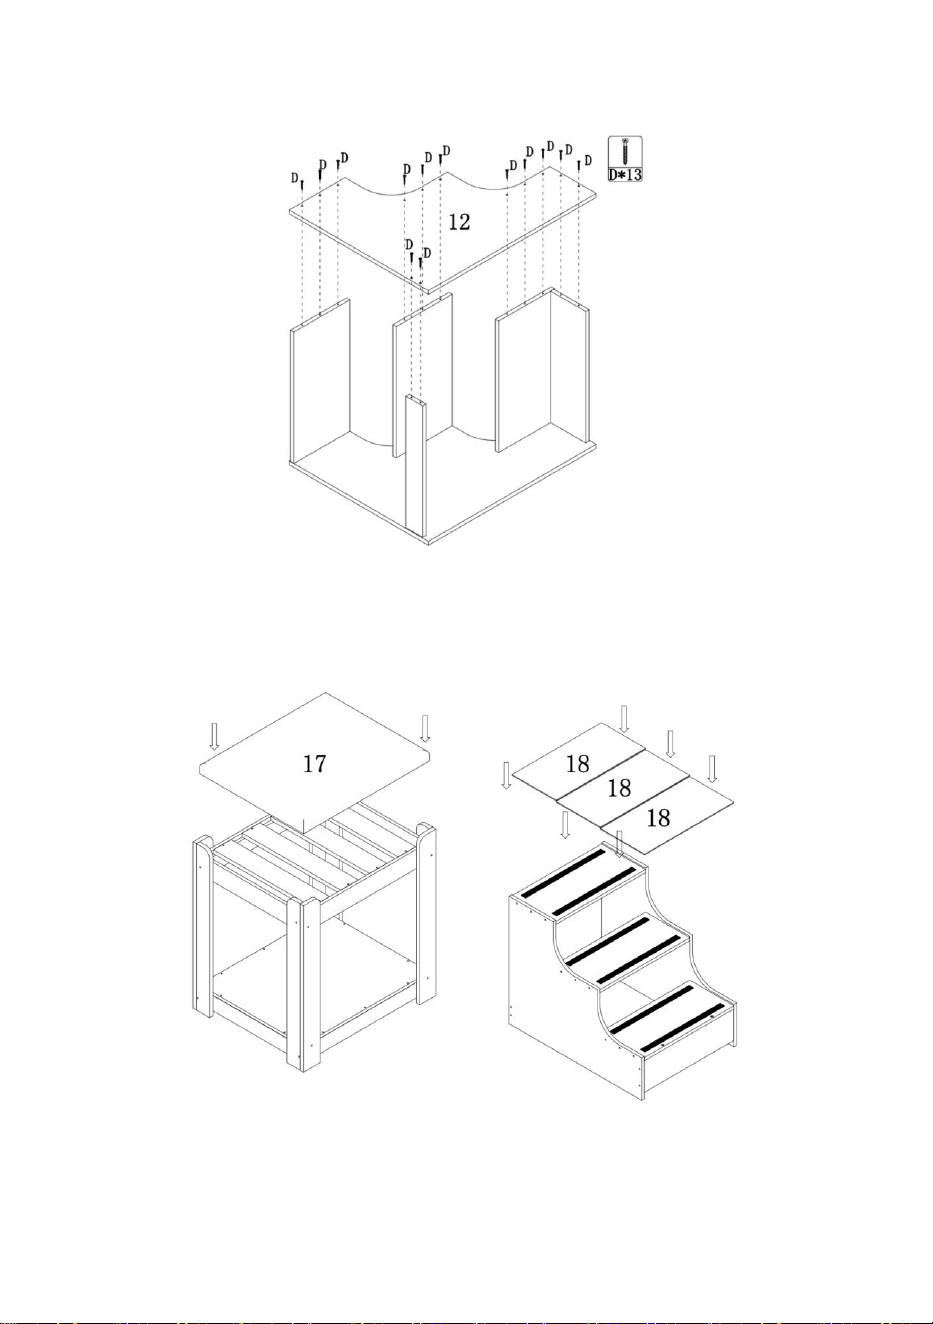
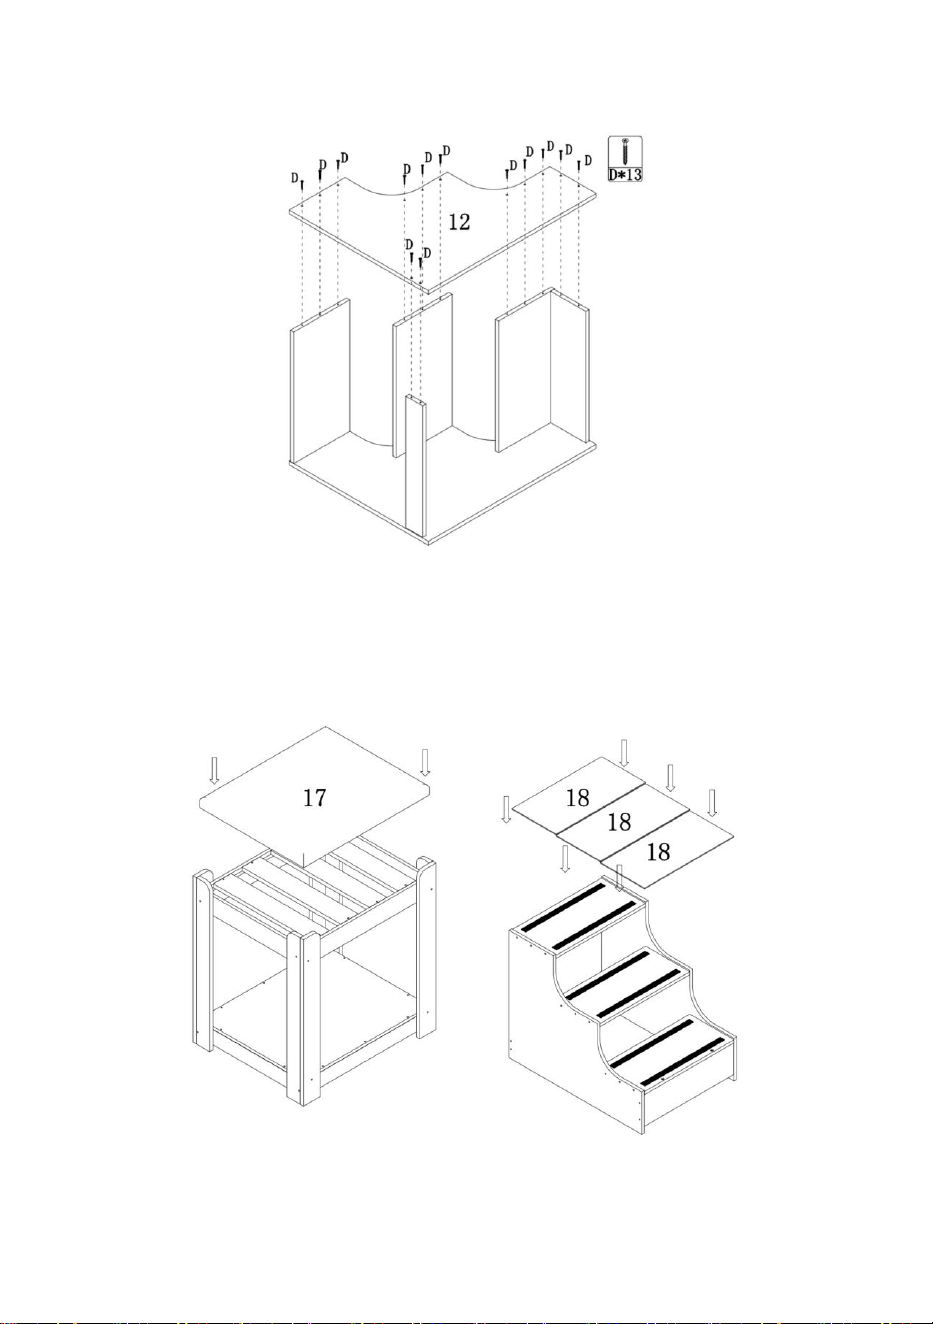
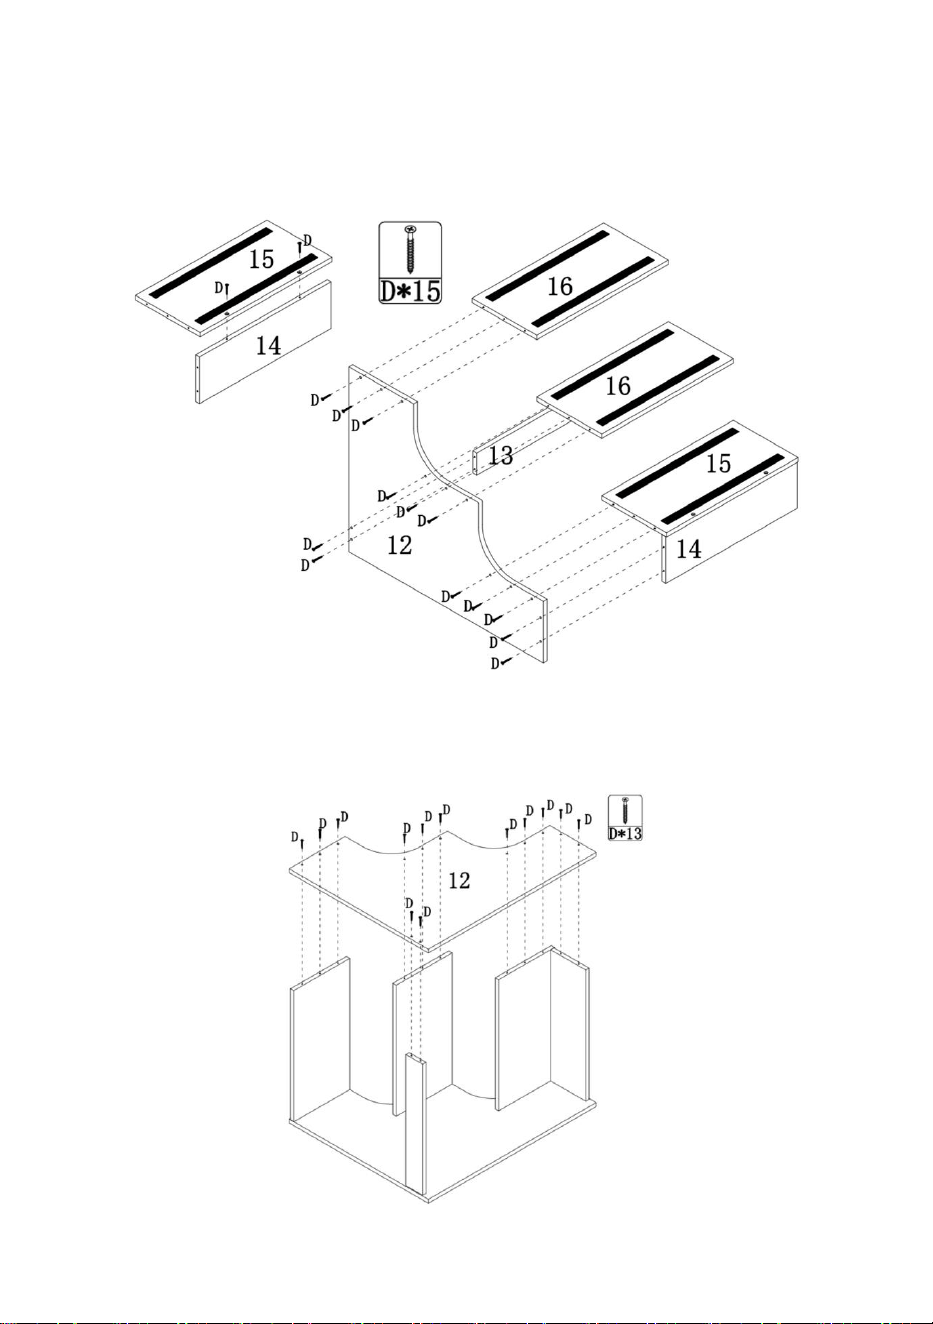
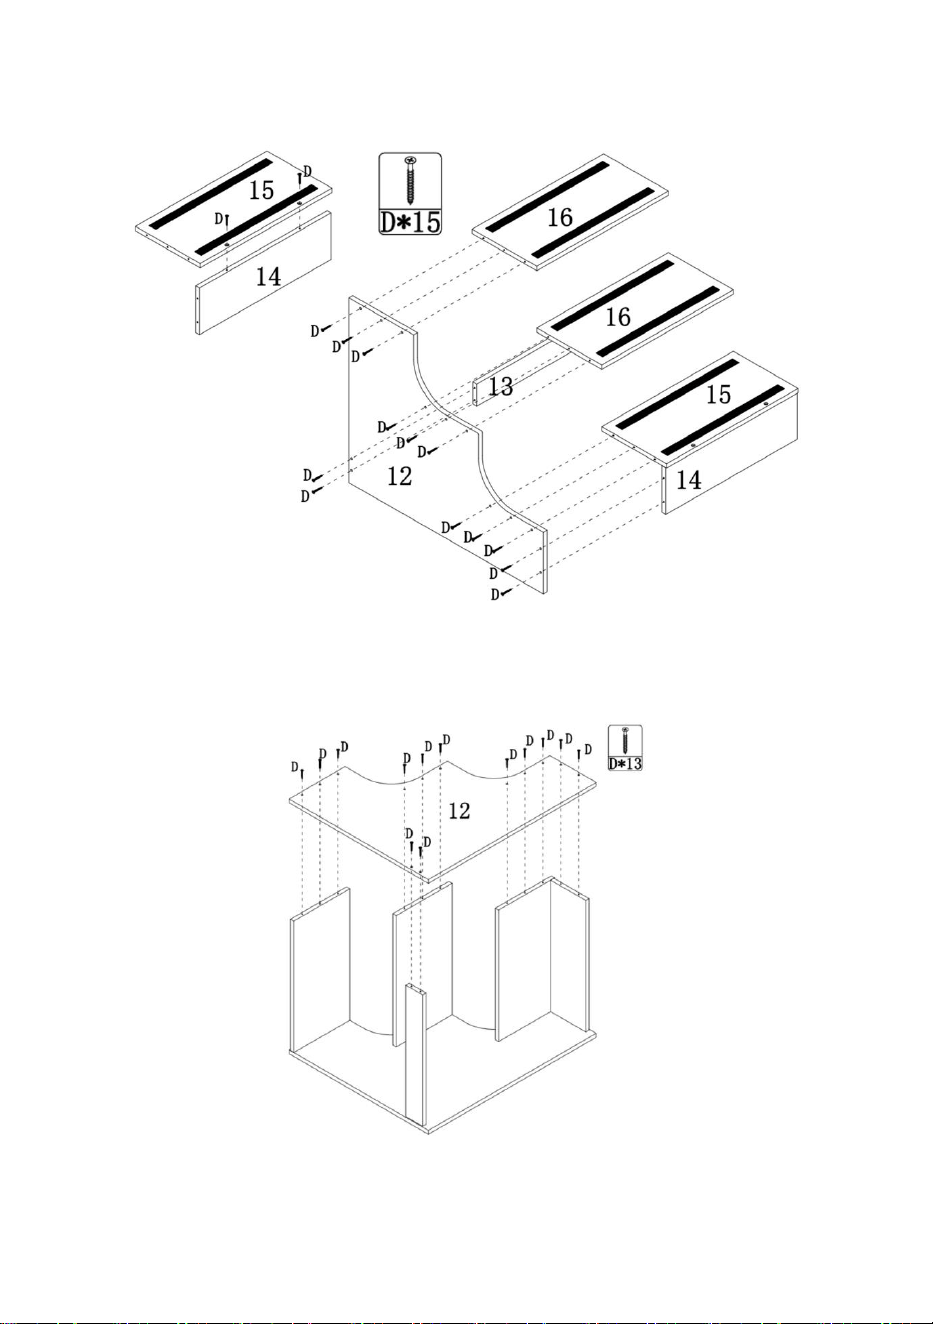
Stair framing
Step 1: Assemble Part 12,13,14,15 and 16 as shown using
hardware D.
Step 2: Install the components from the previous step and Part
12 using hardware D.
10
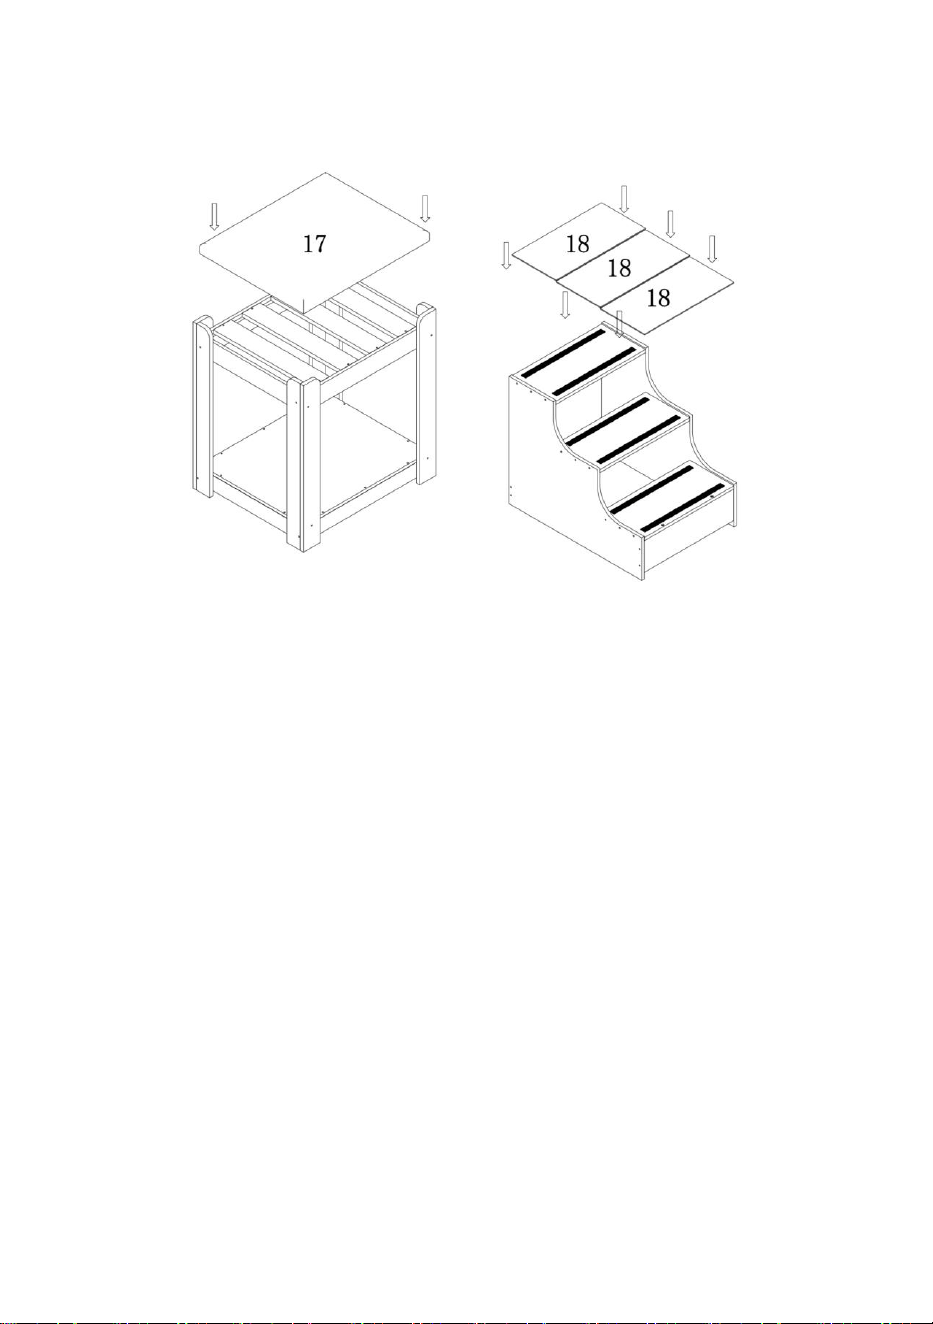
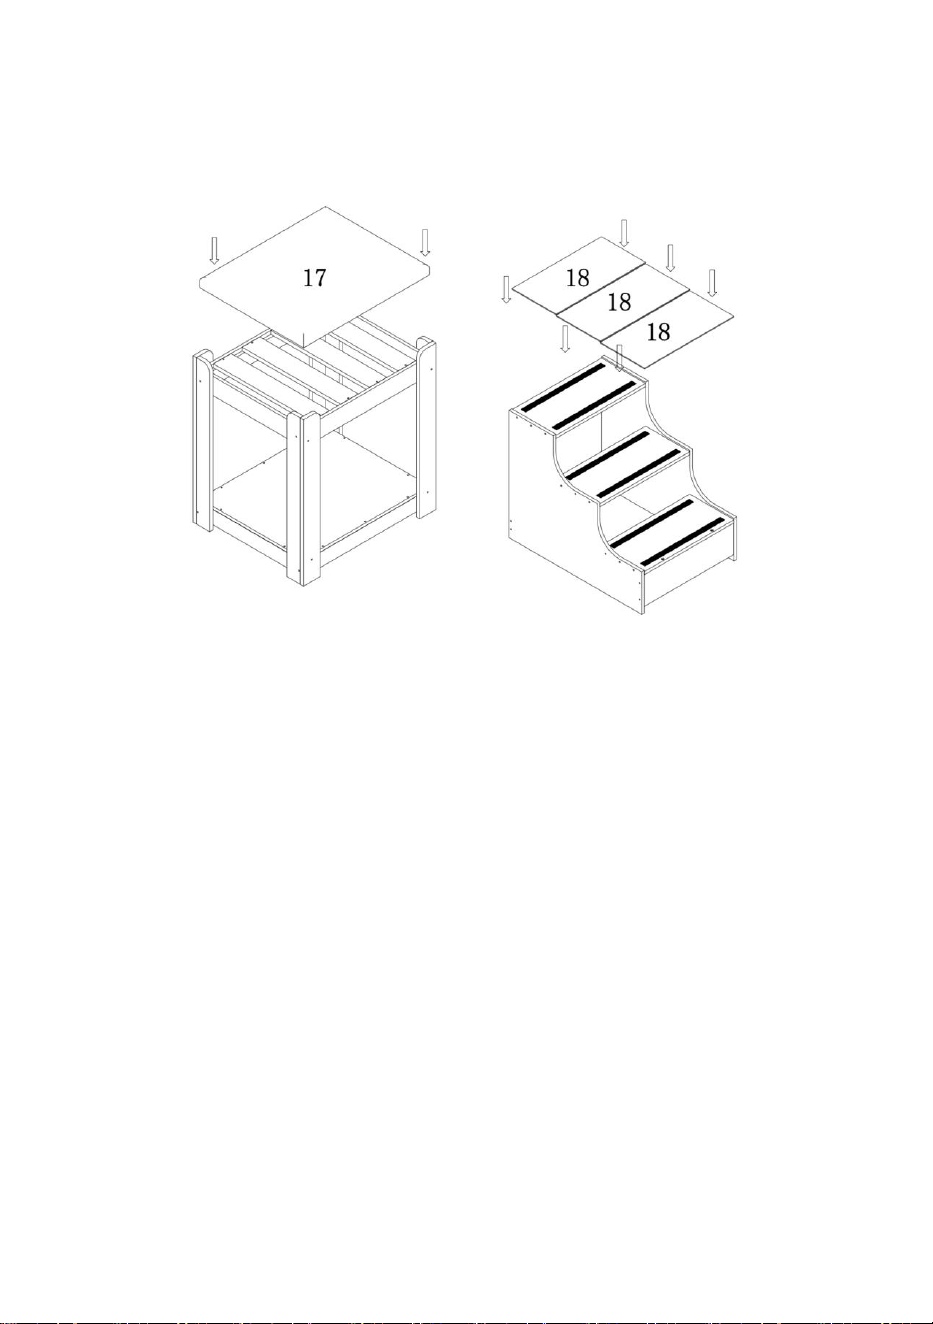
Place parts 17 and 18 in the corresponding positions as shown
in the figure to complete the assembly. The bed frame and
stairs can be combined according to your needs.
Manufacturer: Shanghaimuxinmuyeyouxiangongsi
Address: Shuangchenglu 803nong11hao1602A-1609shi, baoshanqu,
shanghai 200000 CN.
EC REP: E-CrossStu GmbH.
Mainzer Landstr.69, 60329 Frankfurt am Main.
UK REP: YH CONSULTING LIMITED.
C/O YH Consulting Limited Office 147, Centurion House, London Road,
Staines-upon-Thames, Surrey, TW18 4AX
Imported to AUS: SIHAO PTY LTD.
1 ROKEVA STREETEASTWOOD NSW 2122 Australia
Imported to USA: Sanven Technology Ltd.
Suite 250, 9166 Anaheim Place, Rancho Cucamonga, CA 91730


2
Soporte técnico y certificado de garantía electrónica www.vevor.com/support
LITERA PARA MASCOTAS
Manual de usuario
Seguimos comprometidos a proporcionarle herramientas a precios competitivos.
"Ahorre a mitad de precio", "A mitad de precio" o cualquier otra expresión similar utilizada por
nosotros solo representa una estimación de los ahorros que podría beneficiarse al comprar
ciertas herramientas con nosotros en comparación con las principales marcas principales y no
necesariamente significa cubrir todas las categorías de herramientas ofrecidas. por nosotros. Le
recordamos que, cuando realice un pedido con nosotros, verifique cuidadosamente si realmente
está ahorrando la mitad en comparación con las principales marcas.

1
Modelo: 099-1A
¿ NECESITAS AYUDA? ¡CONTÁCTENOS!
¿Tiene preguntas sobre el producto? ¿Necesita soporte técnico? Siéntete libre de
contactarnos:
Soporte técnico y certificado de garantía electrónica www.vevor.com/support
Estas son las instrucciones originales; lea atentamente todas las instrucciones del
manual antes de operar. VEVOR se reserva una interpretación clara de nuestro
manual de usuario. La apariencia del producto estará sujeta al producto que
recibió. Perdone que no le informaremos nuevamente si hay actualizaciones de
tecnología o software en nuestro producto.
PET BUNK BED

2
INSTRUCCIONES
Muchas gracias por elegir este producto. Lea todas las instrucciones antes de
usarlo. La información le ayudará a lograr los mejores resultados posibles.
¡TENGA EN CUENTA! Los dibujos de este manual tienen fines ilustrativos
únicamente y en algunos detalles pueden diferir del producto real.
¡ATENCIÓN! Lea todas las advertencias de seguridad y todas las instrucciones. El
incumplimiento de las advertencias e instrucciones puede provocar lesiones
graves o incluso la muerte. El dispositivo o producto utilizado en las instrucciones
de advertencia se refiere a litera para mascotas .
Este producto no es un juguete ni un baúl de juguetes. No permita que los niños
jueguen con este artículo. Colóquelo en una posición en la que los niños no
puedan trepar para evitar lesiones al caer desde una altura.
SEGURIDAD DE USO
1. Se necesitan dos personas para montar este producto.
2. Seleccione un área para el ensamblaje que esté limpia y libre de residuos que
puedan causar tropiezos a las personas que trabajan en el ensamblaje.
3. No levante piezas o conjuntos pesados. Utilice grúa, gato, aparejos, carretillas
elevadoras u otros dispositivos mecánicos.
4. Revise las instrucciones de montaje en el manual del operador antes de
continuar.
5. Después de completar el ensamblaje, inspeccione minuciosamente la máquina
para asegurarse de que todas las tuercas, pernos, accesorios hidráulicos o
cualquier otro conjunto de sujetadores hayan sido apretados completamente.
6. Este producto no es un columpio ni un equipo deportivo, y no debe utilizarse
para ningún otro uso que no sea una litera para mascotas.
7. Los productos para productos de madera no pueden ser impermeables, el uso
en exteriores o la humedad prolongada pueden provocar daños fácilmente, se
recomienda secar lo antes posible después del contacto con el agua, para
garantizar que el producto pueda brindarle un servicio más prolongado.
8. Se debe revisar la litera para mascotas para garantizar que esté en buenas
condiciones de funcionamiento y que funcione de manera segura antes de su uso.
De lo contrario, no se debe utilizar el aparato.
Antes de usar el producto: si tiene alguna pregunta sobre el montaje o el

3
funcionamiento adecuado, comuníquese con su distribuidor o representante.
GUARDA ESTAS INSTRUCCIONES
PARÁMETROS TÉCNICOS
Modelo
099-1A
Color
beige
Material
cartón madera
Tamaño del producto (mm)
1200*500*650
Peso neto / kg)
17.7
Lista
de hardware

4
Lista de
Cómo instalar placas con
Hardware
A y C
5
4. Utilice un destornillador para colocar el hardware A en los orificios
correspondientes del tablero.
5. Alinee los orificios de la otra placa que se instalará de modo que el
hardware A se inserte en los orificios. Tenga en cuenta que al instalar,
asegúrese de que las dos tablas estén alineadas.
6. Coloque el hardware C en el orificio correspondiente del tablero que
acaba de instalar y apriételo con un destornillador para lograr el
ensamblaje.
Montaje del marco de la cama
Paso 1: Instale los accesorios A y B en los orificios
correspondientes del tablero como se muestra. Estas piezas se
utilizan para montar la cama.
Paso 2: Ensamble las piezas 1 y 2 como se muestra usando el
hardware D.

6
Paso 3: Usando el hardware D, instale la parte 3 con los
componentes completados en el paso 2.
Paso 4: Usando el hardware C, ensamble las partes 4 y 5, las
partes 6 y 7 de acuerdo con el diagrama, prestando atención a
la posición de las esquinas redondeadas del tablero.
7
Paso 5: Usando el hardware D, ensamble las Partes 8 y 10 como
se muestra.
Nota: las partes 8 y 9 han sido preinstaladas para los usuarios.
Paso 6: Usando el hardware D, instale la pieza 11 con los
componentes completados en el paso 5.

8
Paso 7: Usando el hardware D, instale los componentes de los
pasos 3 y 4 juntos como se muestra.
Paso 8: Usando el hardware D, instale los componentes de los
pasos 6 y 7 juntos como se muestra. La estructura de la cama
está completamente montada.

9
Estructura de escalera
Paso 1: Ensamble las piezas 12,13,14,15 y 16 como se muestra
usando los accesorios D.

10
Paso 2: Instale los componentes del paso anterior y la Parte 12
usando el hardware D.
Coloque las piezas 17 y 18 en las posiciones correspondientes
como se muestra en la figura para completar el montaje. La
estructura de la cama y las escaleras se pueden combinar
según sus necesidades.

11
Fabricante: Shanghaimuxinmuyeyouxiangongsi
Dirección: Shuangchenglu 803nong11hao1602A-1609shi, baoshanqu,
shanghai 200000 CN.
REPRESENTANTE CE: E-CrossStu GmbH.
Mainzer Landstr.69, 60329 Fráncfort del Meno.
REPRESENTANTE DEL REINO UNIDO: YH CONSULTING LIMITED.
C/O YH Consulting Limited Oficina 147, Centurion House, London Road,
Staines-upon-Thames, Surrey, TW18 4AX
Importado a AUS: SIHAO PTY LTD.
1 ROKEVA STREET ASTWOOD NSW 2122 Australia
Importado a EE. UU.: Sanven Technology Ltd.
Suite 250, 9166 Anaheim Place, Rancho Cucamonga, CA 9173 0


2
Supporto tecnico e certificato di garanzia elettronica www.vevor.com/support
LETTO A CASTELLO PER ANIMALI DOMESTICI
Manuale d'uso
Continuiamo a impegnarci per fornirvi strumenti a prezzi competitivi.
"Risparmia la metà", "Metà prezzo" o qualsiasi altra espressione simile da noi utilizzata
rappresenta solo una stima del risparmio che potresti trarre dall'acquistare determinati strumenti
con noi rispetto ai principali marchi più importanti e non significa necessariamente coprire tutte le
categorie di strumenti offerti da noi. Ti ricordiamo di verificare attentamente quando effettui un
ordine con noi se stai effettivamente risparmiando la metà rispetto ai migliori marchi principali.

1
Modello: 099-1A
HO BISOGNO DI AIUTO? CONTATTACI!
Hai domande sul prodotto? Hai bisogno di supporto tecnico? Non esitate a
contattarci:
Supporto tecnico e certificato di garanzia elettronica www.vevor.com/support
Queste sono le istruzioni originali, leggere attentamente tutte le istruzioni del
manuale prima dell'uso. VEVOR si riserva una chiara interpretazione del nostro
manuale d'uso. L'aspetto del prodotto sarà soggetto al prodotto ricevuto. Ti
preghiamo di perdonarci se non ti informeremo più se sono presenti aggiornamenti
tecnologici o software sul nostro prodotto.
PET BUNK BED

2
ISTRUZIONI
Grazie mille per aver scelto questo prodotto. Si prega di leggere tutte le istruzioni
prima di utilizzarlo. Le informazioni ti aiuteranno a ottenere i migliori risultati
possibili.
NOTARE CHE! I disegni contenuti in questo manuale sono solo a scopo illustrativo
e in alcuni dettagli potrebbero differire dal prodotto reale.
ATTENZIONE! Leggere tutte le avvertenze di sicurezza e tutte le istruzioni. La
mancata osservanza delle avvertenze e delle istruzioni può provocare lesioni gravi
o addirittura la morte. Il dispositivo o prodotto utilizzato nelle istruzioni di
avvertenza si riferisce al letto a castello per animali domestici .
Questo prodotto non è un giocattolo o una cesta portagiochi. Non permettere ai
bambini di giocare con questo oggetto. Si prega di posizionarlo in una posizione in
cui i bambini non possano arrampicarsi per evitare lesioni dovute a cadute
dall'alto.
SICUREZZA D'USO
1. Per assemblare questo prodotto sono necessarie due persone.
2. Selezionare un'area per l'assemblaggio che sia pulita e priva di detriti che
potrebbero far inciampare le persone che lavorano sull'assemblaggio.
3. Non sollevare parti o gruppi pesanti. Utilizzare gru, martinetti, paranchi, carrelli
a forche o altri dispositivi meccanici.
4. Visualizza in anteprima le istruzioni di montaggio nel manuale dell'operatore
prima di procedere ulteriormente.
5. Dopo aver completato il montaggio, ispezionare attentamente la macchina per
accertarsi che tutti i dadi, i bulloni, i raccordi idraulici o qualsiasi altro gruppo di
fissaggio siano stati serrati accuratamente.
6. Questo prodotto non è una struttura per l'arrampicata o un'attrezzatura sportiva
e non deve essere utilizzato per usi diversi dal letto a castello per animali
domestici.
7. I prodotti in legno non possono essere impermeabili, l'uso esterno o l'umidità a
lungo termine possono facilmente danneggiarsi, si consiglia di asciugarli il prima
possibile dopo il contatto con l'acqua, per garantire che il prodotto possa fornire un
servizio più lungo.
8. Il letto a castello per animali domestici deve essere controllato per assicurarsi
3
che sia in buone condizioni di funzionamento e funzioni in sicurezza prima dell'uso.
In caso contrario l'apparecchio non deve essere utilizzato.
Prima di utilizzare il prodotto: in caso di domande relative al corretto assemblaggio
o funzionamento, contattare il rivenditore o il rappresentante.
CONSERVA QUESTE ISTRUZIONI
PARAMETRI TECNICI
Modello
099-1A
Colore
beige
Materiale
truciolare
Dimensioni del prodotto (mm)
1200*500*650
Peso netto (kg)
17.7
Elenco
dell'hardware

4
Elenco delle parti

5
Come installare le schede con
Hardware
A e C
7. Utilizzare un cacciavite per inserire l'hardware A nei fori corrispondenti
sulla scheda.
8. Allineare i fori dell'altra scheda da installare in modo che l'hardware A
sia inserito nei fori. Tieni presente che durante l'installazione, assicurati
6
che le due schede siano allineate.
9. Inserire l'hardware C nel foro corrispondente della scheda appena
installata e serrarlo con un cacciavite per completare l'assemblaggio.
Assemblaggio struttura letto
Passaggio 1: installare l'hardware A e B nei fori corrispondenti
sulla scheda, come mostrato. Queste parti vengono utilizzate
per assemblare il letto.
Passaggio 2: assemblare le parti 1 e 2 come mostrato
utilizzando l'hardware D.
Passaggio 3: utilizzando l'hardware D, installare la parte 3 con i
7
componenti completati nel passaggio 2.
Passaggio 4: utilizzando l'hardware C, assemblare insieme le
parti 4 e 5, le parti 6 e 7 secondo lo schema, prestando
attenzione alla posizione degli angoli arrotondati della tavola.
Passaggio 5: utilizzando l'hardware D, assemblare insieme le
8
parti 8 e 10 come mostrato.
Nota: le parti 8 e 9 sono state preinstallate per gli utenti.
Passaggio 6: utilizzando l'hardware D, installare la parte 11 con
i componenti completati nel passaggio 5.
Passaggio 7: utilizzando l'hardware D, installare insieme i
9
componenti dei passaggi 3 e 4, come mostrato.
Passaggio 8: utilizzando l'hardware D, installare insieme i
componenti dei passaggi 6 e 7, come mostrato. Il giroletto è
completamente assemblato.
Inquadratura delle scale

10
Passaggio 1: assemblare le parti 12,13,14,15 e 16 come
mostrato utilizzando l'hardware D.
Passaggio 2: installare i componenti del passaggio precedente
e della Parte 12 utilizzando l'hardware D.
Posizionare le parti 17 e 18 nelle posizioni corrispondenti come
mostrato in figura per completare il montaggio. Il giroletto e la
11
scala possono essere abbinati a seconda delle vostre esigenze.
Produttore: Shanghaimuxinmuyeyouxiangongsi
Indirizzo: Shuangchenglu 803nong11hao1602A-1609shi, baoshanqu,
shanghai 200000 CN.
RAPPRESENTANTE CE: E-CrossStu GmbH.
Mainzer Landstr.69, 60329 Francoforte sul Meno.
REP. DEL REGNO UNITO: YH CONSULTING LIMITED.
C/O YH Consulting Limited Office 147, Centurion House, London Road,
Staines-upon-Thames, Surrey, TW18 4AX
Importato in AUS: SIHAO PTY LTD.
1 ROKEVA STREETEASTWOOD NSW 2122 Australia
Importato negli Stati Uniti: Sanven Technology Ltd.
Suite 250, 9166 Anaheim Place, Rancho Cucamonga, CA 9173 0


2
Wsparcie techniczne i certyfikat e-gwarancji www.vevor.com/support
ŁÓŻKO PIĘTROWE ZWIERZĘTA
Instrukcja obsługi
Nadal dokładamy wszelkich starań, aby zapewnić Państwu narzędzia w konkurencyjnej cenie.
„Zaoszczędź połowę”, „połowa ceny” lub inne podobne wyrażenia używane przez nas
przedstawiają jedynie szacunkową oszczędność, jaką możesz zyskać kupując u nas określone
narzędzia w porównaniu z głównymi najlepszymi markami i niekoniecznie oznaczają
uwzględnienie wszystkich kategorii oferowanych narzędzi przez nas. Przypominamy, aby
podczas składania zamówienia u nas dokładnie sprawdzić, czy rzeczywiście oszczędzasz
połowę w porównaniu z czołowymi markami.

1
Model: 099-1A
POTRZEBUJĘ POMOCY? SKONTAKTUJ SIĘ Z NAMI!
Masz pytania dotyczące produktu? Potrzebujesz wsparcia technicznego? Śmiało
możesz się z nami skontaktować:
Wsparcie techniczne i certyfikat e-gwarancji www.vevor.com/support
To jest oryginalna instrukcja. Przed przystąpieniem do obsługi prosimy o dokładne
zapoznanie się ze wszystkimi instrukcjami. VEVOR zastrzega sobie jasną
interpretację naszej instrukcji obsługi. Wygląd produktu zależy od produktu, który
otrzymałeś. Proszę wybaczyć nam, że nie będziemy ponownie informować
Państwa, jeśli pojawią się jakieś aktualizacje technologii lub oprogramowania
naszego produktu.
PET BUNK BED

2
INSTRUKCJE
Dziękujemy bardzo za wybór tego produktu. Przed użyciem przeczytaj całą
instrukcję. Informacje te pomogą Ci osiągnąć najlepsze możliwe rezultaty.
PROSZĘ ZANOTOWAĆ! Rysunki zawarte w tej instrukcji służą wyłącznie celom
ilustracyjnym i w niektórych szczegółach mogą różnić się od rzeczywistego
produktu.
UWAGA! Przeczytaj wszystkie ostrzeżenia dotyczące bezpieczeństwa i wszystkie
instrukcje. Niezastosowanie się do ostrzeżeń i instrukcji może spowodować
poważne obrażenia, a nawet śmierć. Urządzenie lub produkt użyte w instrukcjach
ostrzegawczych odnosi się do łóżka piętrowego dla zwierząt .
Ten produkt nie jest zabawką ani skrzynią na zabawki. Nie pozwalaj dzieciom
bawić się tym przedmiotem. Aby uniknąć obrażeń w wyniku upadku z wysokości,
należy umieścić urządzenie w pozycji niedostępnej dla dzieci.
BEZPIECZEŃSTWO UŻYTKOWANIA
1. Do montażu tego produktu potrzebne są dwie osoby.
2. Wybierz miejsce do montażu, które jest czyste i wolne od zanieczyszczeń ,
które mogłyby spowodować potknięcie się osób pracujących przy montażu.
3. Nie podnoś ciężkich części ani zespołów. Używaj dźwigu, podnośnika, sprzętu,
wózków widłowych lub innych urządzeń mechanicznych.
4. Przed kontynuowaniem przejrzyj instrukcje montażu w instrukcji obsługi.
5. Po zakończeniu montażu dokładnie sprawdź maszynę, aby upewnić się, że
wszystkie nakrętki, śruby, złącza hydrauliczne i inne elementy złączne zostały
dokładnie dokręcone.
6. Ten produkt nie jest platformą wspinaczkową ani sprzętem sportowym i nie
powinien być używany do celów innych niż łóżko piętrowe dla zwierząt.
7. Produkty do wyrobów drewnianych nie mogą być wodoodporne, użytkowane na
zewnątrz lub długotrwałe zamoczenie łatwo doprowadzić do uszkodzeń, zaleca
się jak najszybsze wyschnięcie po kontakcie z wodą, aby produkt mógł służyć
dłużej.
8. Przed użyciem łóżko piętrowe dla zwierząt należy sprawdzić, czy jest w dobrym
stanie i czy działa bezpiecznie. W przeciwnym razie nie wolno używać urządzenia.
Przed użyciem produktu – jeśli masz jakiekolwiek pytania dotyczące prawidłowego
3
montażu lub obsługi, skontaktuj się ze sprzedawcą lub przedstawicielem.
ZACHOWAJ TE INSTRUKCJE
PARAMETRY TECHNICZNE
Model
099-1A
Kolor
beżowy
Materiał
płyta wiórowa
Rozmiar produktu (mm)
1200*500*650
Masa netto (kg)
17,7
Lista
sprzętu
4
Lista części
Jak zainstalować płyty za pomocą
sprzętu
A i C
5
10. Za pomocą śrubokręta wpasuj element A w odpowiednie otwory w
płycie.
11. Wyrównaj otwory drugiej płyty, która ma zostać zainstalowana, tak aby
element A został włożony w otwory. Należy pamiętać, że podczas
instalacji upewnij się, że obie deski są wyrównane.
12. Umieść element C w odpowiednim otworze właśnie zainstalowanej płytki
i dokręć go śrubokrętem, aby zakończyć montaż.
Montaż ramy łóżka
Krok 1: Zainstaluj sprzęt A i B w odpowiednich otworach w
płycie, jak pokazano. Części te służą do montażu łóżka.
Krok 2: Zmontuj części 1 i 2, jak pokazano, używając sprzętu D.
6
Krok 3: Używając sprzętu D, zainstaluj część 3 z komponentami
ukończonymi w kroku 2.
Krok 4: Używając okucia C, zmontuj części 4 i 5, części 6 i 7
zgodnie ze schematem, zwracając uwagę na położenie
zaokrąglonych rogów deski.

7
Krok 5: Używając sprzętu D, złóż razem część 8 i 10, jak
pokazano.
Uwaga: części 8 i 9 zostały preinstalowane dla użytkowników.
Krok 6: Używając sprzętu D, zainstaluj część 11 z
komponentami ukończonymi w kroku 5.

8
Krok 7: Używając sprzętu D, zainstaluj razem komponenty z
kroków 3 i 4, jak pokazano.
Krok 8: Używając sprzętu D, zainstaluj razem komponenty z
kroków 6 i 7, jak pokazano. Rama łóżka jest całkowicie
zmontowana.
9
Obramowanie schodów
Krok 1: Zmontuj część 12,13,14,15 i 16, jak pokazano, używając
sprzętu D.
10
Krok 2: Zainstaluj komponenty z poprzedniego kroku i części 12,
używając sprzętu D.
Umieść części 17 i 18 w odpowiednich pozycjach, jak pokazano
na rysunku, aby zakończyć montaż. Rama łóżka i schody
można zestawiać według własnych potrzeb.

11
Producent: Shanghaimuxinmuyeyouxiangongsi
Adres: Shuangchenglu 803nong11hao1602A-1609shi, baoshanqu,
szanghaj 200000 CN.
Przedstawiciel KE: E-CrossStu GmbH.
Mainzer Landstr.69, 60329 Frankfurt nad Menem.
REPUBLIKA WIELKIEJ BRYTANII: YH CONSULTING LIMITED.
C/O YH Consulting Limited Office 147, Centurion House, London Road,
Staines-upon-Thames, Surrey, TW18 4AX
Import do AUS: SIHAO PTY LTD.
1 ROKEVA STREETEASTWOOD NSW 2122 Australia
Import do USA: Sanven Technology Ltd.
Suite 250, 9166 Anaheim Place, Rancho Cucamonga, Kalifornia 9173 0


2
Technischer Support und E-Garantie-Zertifikat www.vevor.com/support
Etagenbett für Haustiere
Benutzerhandbuch
Wir sind weiterhin bestrebt, Ihnen Werkzeuge zu wettbewerbsfähigen Preisen anzubieten.
„Sparen Sie die Hälfte“, „Halber Preis“ oder andere ähnliche Ausdrücke, die wir verwenden,
stellen nur eine Schätzung der Ersparnis dar, die Sie beim Kauf bestimmter Werkzeuge bei uns
im Vergleich zu den großen Topmarken erzielen können, und decken nicht unbedingt alle von
uns angebotenen Werkzeugkategorien ab. Wir möchten Sie freundlich daran erinnern, bei Ihrer
Bestellung bei uns sorgfältig zu prüfen, ob Sie im Vergleich zu den großen Topmarken tatsächlich
die Hälfte sparen.

1
Modell: 099-1A
SIE HILFE? KONTAKTIEREN SIE UNS!
Sie haben Fragen zu unseren Produkten? Sie benötigen technischen Support?
Dann kontaktieren Sie uns gerne:
Technischer Support und E-Garantie-Zertifikat www.vevor.com/support
Dies ist die Originalanleitung. Bitte lesen Sie alle Anweisungen sorgfältig durch,
bevor Sie das Gerät in Betrieb nehmen. VEVOR behält sich eine klare Auslegung
unserer Bedienungsanleitung vor. Das Erscheinungsbild des Produkts richtet sich
nach dem Produkt, das Sie erhalten haben. Bitte verzeihen Sie uns, dass wir Sie
nicht erneut informieren, wenn es Technologie- oder Software-Updates für unser
Produkt gibt.
PET BUNK BED

2
ANWEISUNGEN
Vielen Dank, dass Sie sich für dieses Produkt entschieden haben. Bitte lesen Sie
vor der Anwendung alle Anweisungen sorgfältig durch. Die Informationen helfen
Ihnen, die bestmöglichen Ergebnisse zu erzielen.
BITTE BEACHTEN! Die Zeichnungen in dieser Anleitung dienen nur zur
Veranschaulichung und können in einigen Details vom tatsächlichen Produkt
abweichen.
ACHTUNG! Lesen Sie alle Sicherheitshinweise und Anweisungen. Die
Nichtbeachtung der Hinweise und Anweisungen kann zu schweren Verletzungen
oder sogar zum Tod führen. Das in den Warnhinweisen verwendete Gerät oder
Produkt bezieht sich auf ein Etagenbett für Haustiere .
Dieses Produkt ist kein Spielzeug und auch keine Spielzeugkiste. Erlauben Sie
Kindern nicht, mit diesem Artikel zu spielen. Bitte stellen Sie es an einer Stelle auf,
an der Kinder nicht hochklettern können, um Verletzungen durch Stürze aus
großer Höhe zu vermeiden.
SICHERHEIT BEI DER VERWENDUNG
1. Zum Zusammenbau dieses Produkts sind zwei Personen erforderlich.
2. Wählen Sie für die Montage einen Bereich aus, der sauber und frei von
Fremdkörpern ist , über die an der Montage arbeitende Personen stolpern
könnten.
3. Heben Sie keine schweren Teile oder Baugruppen an. Verwenden Sie dazu
Kran, Wagenheber, Flaschenzug, Gabelstapler oder andere mechanische Geräte.
4. Sehen Sie sich die Montageanleitung in Ihrer Bedienungsanleitung an, bevor
Sie fortfahren.
5. Überprüfen Sie die Maschine nach Abschluss der Montage gründlich, um
sicherzustellen, dass alle Muttern, Schrauben, Hydraulikanschlüsse und sonstigen
Befestigungselemente ordnungsgemäß festgezogen wurden.
6. Bei diesem Produkt handelt es sich nicht um ein Klettergerüst oder Sportgerät
und es darf nur als Etagenbett für Haustiere verwendet werden.
7. Holzprodukte können nicht wasserdicht sein. Bei Verwendung im Freien oder
längerer Nässe kommt es leicht zu Schäden. Es wird empfohlen, das Produkt
nach Kontakt mit Wasser so schnell wie möglich zu trocknen, um sicherzustellen,
3
dass es Ihnen länger gute Dienste leisten kann.
8. Das Tier-Etagenbett muss vor der Benutzung auf seine Funktionstüchtigkeit und
Betriebssicherheit geprüft werden. Andernfalls darf das Gerät nicht benutzt
werden.
Bevor Sie das Produkt verwenden – wenn Sie Fragen zur ordnungsgemäßen
Montage oder Bedienung haben, wenden Sie sich an Ihren Händler oder Vertreter.
ANLEITUNG AUFBEWAHREN
TECHNISCHE PARAMETER
Modell
099-1A
Farbe
Beige
Material
Spanplatte
Produktgröße (mm)
1200*500*650
Nettogewicht / kg)
17,7
Hardwareliste

4
Stückliste
5
So installieren Sie Karten mit
Hardware
A und C
13. Benutzen Sie einen Schraubendreher, um die Hardware A in die
entsprechenden Löcher in der Platine einzupassen.
14. Richten Sie die Löcher der anderen zu installierenden Platine so aus,
dass die Hardware A in die Löcher eingesetzt wird. Achten Sie bei der
6
Installation darauf, dass die beiden Platinen ausgerichtet sind.
15. Setzen Sie die Hardware C in das entsprechende Loch der gerade
installierten Platine ein und ziehen Sie sie mit einem Schraubendreher
fest, um die Montage durchzuführen.
Montage des Bettrahmens
Schritt 1: Installieren Sie die Hardware A und B wie gezeigt in
die entsprechenden Löcher im Brett. Diese Teile werden zum
Zusammenbau des Bettes verwendet.
Schritt 2: Montieren Sie die Teile 1 und 2 wie gezeigt mit
Hardware D.
7
Schritt 3: Installieren Sie mithilfe der Hardware D Teil 3 mit den
in Schritt 2 fertiggestellten Komponenten.
Schritt 4: Mit der Hardware C die Teile 4 und 5 sowie die Teile 6
und 7 gemäß der Abbildung zusammenfügen und dabei auf die
Position der abgerundeten Ecken der Platte achten.

8
Schritt 5: Montieren Sie Teil 8 und 10 mithilfe der Hardware D
wie gezeigt.
Hinweis: Teil 8 und 9 wurden für Benutzer vorinstalliert.
Schritt 6: Installieren Sie mithilfe der Hardware D Teil 11 mit den
in Schritt 5 fertiggestellten Komponenten.
9
Schritt 7: Installieren Sie mithilfe der Hardware D die
Komponenten aus Schritt 3 und 4 wie gezeigt zusammen.
Schritt 8: Montieren Sie die Komponenten aus Schritt 6 und 7
mit Hilfe der Hardware D wie gezeigt zusammen. Der
Bettrahmen ist nun vollständig montiert.

10
Treppenrahmen
Schritt 1: Montieren Sie Teil 12, 13, 14, 15 und 16 wie gezeigt mit
Hardware D.
Schritt 2: Installieren Sie die Komponenten aus dem vorherigen
Schritt und Teil 12 mithilfe von Hardware D.

11
Platzieren Sie die Teile 17 und 18 an den entsprechenden
Positionen wie in der Abbildung gezeigt, um die Montage
abzuschließen. Bettrahmen und Treppe können je nach Bedarf
kombiniert werden.
Hersteller: Shanghaimuxinmuyeyouxiangongsi
Adresse: Shuangchenglu 803nong11hao1602A-1609shi, Baoshanqu,
Shanghai 200000 CN.
EG-Vertreter: E-CrossStu GmbH.
Mainzer Landstr.69, 60329 Frankfurt am Main.
UK-VERTRETER: YH CONSULTING LIMITED.
C/O YH Consulting Limited Office 147, Centurion House, London Road,
Staines-upon-Thames, Surrey, TW18 4AX
Nach AUS importiert: SIHAO PTY LTD.
1 ROKEVA STREETEASTWOOD NSW 2122 Australien
In die USA importiert: Sanven Technology Ltd.
Suite 250, 9166 Anaheim Place, Rancho Cucamonga, CA 9173 0


2
Assistance technique et certificat de garantie électronique www.vevor.com/support
LIT SUPERPOSÉ POUR ANIMAUX DE COMPAGNIE
Manuel de l'Utilisateur
Nous continuons à nous engager à vous fournir des outils à des prix compétitifs.
"Économisez la moitié", "Moitié prix" ou toute autre expression similaire que nous utilisons ne
représente qu'une estimation des économies dont vous pourriez bénéficier en achetant certains
outils chez nous par rapport aux grandes marques et ne signifie pas nécessairement couvrir
toutes les catégories d'outils proposés. par nous. Nous vous rappelons de bien vouloir vérifier
attentivement lorsque vous passez une commande chez nous si vous économisez réellement la
moitié par rapport aux grandes marques.
1
Modèle : 099-1A
BESOIN D'AIDE? CONTACTEZ-NOUS!
Vous avez des questions sur les produits ? Besoin d'une assistance technique ?
N'hésitez pas à nous contacter:
Assistance technique et certificat de garantie électronique www.vevor.com/support
Il s'agit des instructions originales, veuillez lire attentivement toutes les instructions
du manuel avant de l'utiliser. VEVOR se réserve une interprétation claire de notre
manuel d'utilisation. L'apparence du produit dépend du produit que vous avez reçu.
Veuillez nous pardonner que nous ne vous informerons plus s'il y a des mises à
jour technologiques ou logicielles sur notre produit.
PET BUNK BED

2
INSTRUCTIONS
Merci beaucoup d'avoir choisi ce produit. Veuillez lire toutes les instructions avant
de l'utiliser. Les informations vous aideront à obtenir les meilleurs résultats
possibles.
VEUILLEZ NOTER! Les dessins de ce manuel sont uniquement à des fins
d’illustration et dans certains détails peuvent différer du produit réel.
ATTENTION! Lisez tous les avertissements de sécurité et toutes les instructions.
Le non-respect des avertissements et des instructions peut entraîner des
blessures graves, voire la mort. L'appareil ou le produit utilisé dans les instructions
d'avertissement fait référence au lit superposé pour animaux de compagnie .
Ce produit n'est pas un jouet ni un coffre à jouets. Ne laissez pas les enfants jouer
avec cet article. Veuillez le placer dans une position que les enfants ne peuvent
pas grimper pour éviter les blessures causées par une chute de hauteur.
SÉCURITÉ D'UTILISATION
1. Deux personnes sont nécessaires pour assembler ce produit.
2. Sélectionnez une zone d'assemblage propre et exempte de tout débris
susceptible de faire trébucher les personnes travaillant sur l'assemblage.
3. Ne soulevez pas de pièces ou d'assemblages lourds. Utilisez une grue, un cric,
un palan, des chariots élévateurs ou d'autres appareils mécaniques.
4. Prévisualisez les instructions d'assemblage dans votre manuel d'utilisation
avant de continuer.
5. Une fois l'assemblage terminé, inspectez minutieusement la machine pour vous
assurer que tous les écrous, boulons, raccords hydrauliques ou tout autre
ensemble de fixations ont été soigneusement serrés.
6. Ce produit n'est pas un cadre d'escalade ni un équipement de sport et ne doit
pas être utilisé à d'autres fins qu'un lit superposé pour animaux de compagnie.
7. Les produits pour produits en bois ne peuvent pas être imperméables, une
utilisation en extérieur ou une humidité à long terme peuvent facilement entraîner
des dommages, il est recommandé de sécher dès que possible après le contact
avec l'eau, pour garantir que le produit peut vous fournir un service plus long.
8. Le lit superposé pour animaux de compagnie doit être vérifié pour s'assurer qu'il
est en bon état de fonctionnement et qu'il fonctionne en toute sécurité avant
utilisation. Dans le cas contraire, l'appareil ne doit pas être utilisé.
3
Avant d'utiliser le produit - si vous avez des questions concernant le montage ou le
fonctionnement correct, contactez votre revendeur ou représentant.
CONSERVEZ CES INSTRUCTIONS
PARAMÈTRES TECHNIQUES
Modèle
099-1A
Couleur
beige
Matériel
panneaux de particules
Taille du produit (mm)
1200*500*650
Poids net / kg)
17.7
Liste
du matériel
4
Liste des pièces
Comment installer des cartes avec
le matériel
A et C
5
16. Utilisez un tournevis pour insérer le matériel A dans les trous
correspondants de la carte.
17. Alignez les trous de l'autre carte à installer de manière à ce que le
matériel A soit inséré dans les trous. Notez que lors de l'installation,
assurez-vous que les deux cartes sont alignées.
18. Placez le matériel C dans le trou correspondant de la carte que vous
venez d'installer et serrez-le avec un tournevis pour réaliser
l'assemblage.
Assemblage du cadre de lit
Étape 1 : installez le matériel A et B dans les trous
correspondants de la carte, comme indiqué. Ces pièces servent
à assembler le lit.
6
Étape 2 : Assemblez les pièces 1 et 2 comme indiqué à l'aide du
matériel D.
Étape 3 : À l'aide du matériel D, installez la partie 3 avec les
composants complétés à l'étape 2.
Étape 4 : À l'aide de la quincaillerie C, assemblez les pièces 4 et
7
5, les pièces 6 et 7 ensemble selon le schéma en faisant
attention à la position des coins arrondis de la planche.
Étape 5 : À l'aide du matériel D, assemblez les parties 8 et 10
ensemble comme indiqué.
Remarque : les parties 8 et 9 ont été préinstallées pour les
utilisateurs.
Étape 6 : À l'aide du matériel D, installez la partie 11 avec les
composants complétés à l'étape 5.
8
Étape 7 : À l'aide du matériel D, installez ensemble les
composants des étapes 3 et 4, comme indiqué.
Étape 8 : À l'aide du matériel D, installez ensemble les
composants des étapes 6 et 7, comme indiqué. Le cadre de lit
est entièrement assemblé.

9
Encadrement d'escalier
Étape 1 : Assemblez les pièces 12, 13, 14, 15 et 16 comme
indiqué à l'aide du matériel D.
10
Étape 2 : Installez les composants de l'étape précédente et de la
partie 12 à l'aide du matériel D.
Placez les pièces 17 et 18 dans les positions correspondantes
comme indiqué sur la figure pour terminer l'assemblage. Le
cadre de lit et les escaliers peuvent être combinés selon vos
besoins.

11
Fabricant : Shanghaimuxinmuyeyouxiangongsi
Adresse : Shuangchenglu 803nong11hao1602A-1609shi, baoshanqu,
Shanghai 200000 CN.
REPRÉSENTANT CE : E-CrossStu GmbH.
Mainzer Landstr.69, 60329 Francfort-sur-le-Main.
REPRÉSENTANT DU ROYAUME-UNI : YH CONSULTING LIMITED.
C/O YH Consulting Limited Bureau 147, Centurion House, London Road,
Staines-upon-Thames, Surrey, TW18 4AX
Importé en Australie : SIHAO PTY LTD.
1 ROKEVA STREETASTWOOD NSW 2122 Australie
Importé aux États-Unis : Sanven Technology Ltd.
Bureau 250, 9166 Anaheim Place, Rancho Cucamonga, CA 9173 0


2
Technische ondersteuning en e-garantiecertificaat www.vevor.com/support
HUISDIEREN STAPELBED
Handleiding
We blijven ons inzetten om u gereedschap tegen een concurrerende prijs te bieden.
"Bespaar de helft", "Halve prijs" of andere soortgelijke uitdrukkingen die door ons worden
gebruikt vertegenwoordigt slechts een schatting van de besparingen die u zou kunnen profiteren
als u bepaalde gereedschappen bij ons koopt in vergelijking met de grote topmerken en betekent
niet noodzakelijkerwijs dat deze alle categorieën van aangeboden gereedschappen omvatten
door ons. Wij verzoeken u vriendelijk om bij het plaatsen van een bestelling bij ons goed na te
gaan of u daadwerkelijk de helft bespaart in vergelijking met de grote topmerken.

1
Model: 099-1A
NODIG ? NEEM CONTACT MET ONS OP!
Heeft u productvragen? Technische ondersteuning nodig? Neem dan gerust
contact met ons op:
Technische ondersteuning en e-garantiecertificaat www.vevor.com/support
Dit is de originele instructie. Lees alle instructies in de handleiding zorgvuldig door
voordat u ermee aan de slag gaat. VEVOR behoudt zich een duidelijke
interpretatie van onze gebruikershandleiding voor. Het uiterlijk van het product is
afhankelijk van het product dat u heeft ontvangen. Vergeef ons alstublieft dat we u
niet opnieuw zullen informeren als er technologie- of software-updates zijn voor
ons product.
PET BUNK BED

2
INSTRUCTIES
Hartelijk dank voor het kiezen van dit product. Lees alle instructies voordat u het
gebruikt. De informatie zal u helpen de best mogelijke resultaten te bereiken.
HOUD ER REKENING MEE DAT! De tekeningen in deze handleiding dienen
uitsluitend ter illustratie en kunnen op sommige details afwijken van het
daadwerkelijke product.
AANDACHT! Lees alle veiligheidswaarschuwingen en alle instructies. Het niet
opvolgen van de waarschuwingen en instructies kan leiden tot ernstig letsel of
zelfs de dood. Het apparaat of product dat in de waarschuwingsinstructies wordt
gebruikt, wordt verwezen naar het stapelbed voor huisdieren .
Dit product is geen speelgoed of speelgoedkist. Laat kinderen niet met dit artikel
spelen. Plaats het apparaat in een positie waarin kinderen niet kunnen klimmen
om letsel door vallen van een hoogte te voorkomen.
GEBRUIKSVEILIGHEID
1. Er zijn twee mensen nodig om dit product te monteren.
2. Kies een plaats voor de montage die schoon is en vrij van vuil waardoor
personen die aan de montage werken kunnen struikelen.
3. Til geen zware onderdelen of constructies op. Gebruik een kraan, krik, takel,
vorkheftrucks of andere mechanische apparaten.
4. Bekijk een voorbeeld van de montage-instructies in de gebruikershandleiding
voordat u verder gaat.
5. Nadat de montage is voltooid, inspecteert u de machine grondig om er zeker
van te zijn dat alle moeren, bouten, hydraulische fittingen of andere
bevestigingsmiddelen goed zijn vastgedraaid.
6. Dit product is geen klimrek of sportuitrusting en mag niet worden gebruikt voor
ander gebruik dan een stapelbed voor huisdieren.
7. Producten voor houtproducten kunnen niet waterdicht zijn, gebruik buitenshuis
of langdurig nat kunnen gemakkelijk tot schade leiden. Het wordt aanbevolen om
na contact met water zo snel mogelijk te drogen, om ervoor te zorgen dat het
product u langer van dienst kan zijn.
8. Het stapelbed voor huisdieren moet vóór gebruik worden gecontroleerd om er
zeker van te zijn dat het in goede staat verkeert en veilig werkt. Anders mag het
3
apparaat niet worden gebruikt.
Voordat u het product gebruikt: als u vragen heeft over de juiste montage of
bediening, neem dan contact op met uw dealer of vertegenwoordiger.
BEWAAR DEZE INSTRUCTIES
TECHNISCHE PARAMETERS
Model
099-1A
Kleur
beige
Materiaal
spaanplaat
Productgrootte (mm)
1200*500*650
Netto gewicht / kg)
17.7
Hardwarelijst
4
Onderdelen lijst

5
Boards installeren met
hardware
A en C
19. Gebruik een schroevendraaier om hardware A in de overeenkomstige
gaten in de kaart te plaatsen.
20. Lijn de gaten van de andere te installeren kaart zo uit dat hardware A in
de gaten wordt gestoken. Let er bij het installeren op dat de twee planken

6
op één lijn liggen.
21. Plaats hardware C in het overeenkomstige gat van het zojuist
geïnstalleerde bord en draai het vast met een schroevendraaier om de
montage te voltooien.
Montage van het bedframe
Stap 1: Installeer hardware A en B in de overeenkomstige gaten
in het bord, zoals weergegeven. Deze onderdelen worden
gebruikt om het bed in elkaar te zetten.
Stap 2: Monteer onderdelen 1 en 2 zoals afgebeeld met behulp
van hardware D.

7
Stap 3: Installeer met behulp van hardware D deel 3 met de
componenten voltooid in stap 2.
Stap 4: Monteer met behulp van hardware C de delen 4 en 5, de
delen 6 en 7 volgens het diagram, waarbij u let op de positie van
de afgeronde hoeken van het bord.

8
Stap 5: Monteer onderdeel 8 en 10 met behulp van hardware D,
zoals weergegeven.
Let op: deel 8 en 9 zijn vooraf geïnstalleerd voor gebruikers.
Stap 6: Installeer met behulp van hardware D deel 11 met de
componenten voltooid in stap 5.

9
Stap 7: Installeer met behulp van hardware D de componenten
uit stap 3 en 4 samen, zoals weergegeven.
Stap 8: Installeer met behulp van hardware D de componenten
uit stap 6 en 7 samen, zoals weergegeven. Het bedframe is
volledig gemonteerd.
10
Trap inlijsten
Stap 1: Monteer onderdeel 12,13,14,15 en 16 zoals afgebeeld
met behulp van hardware D.
Stap 2: Installeer de componenten uit de vorige stap en Deel 12
met behulp van hardware D.
11
Plaats onderdelen 17 en 18 in de overeenkomstige posities
zoals weergegeven in de afbeelding om de montage te
voltooien. Het bedframe en de trap kunnen naar eigen wens
worden gecombineerd.
Fabrikant: Shanghaimuxinmuyeyouxiangongsi
Adres: Shuangchenglu 803nong11hao1602A-1609shi, baoshanqu,
shanghai 200000 CN.
EG-REP: E-CrossStu GmbH.
Mainzer Landstr.69, 60329 Frankfurt am Main.
VK REP: YH CONSULTING LIMITED.
C/O YH Consulting Limited Office 147, Centurion House, London Road,
Staines-upon-Thames, Surrey, TW18 4AX
Geïmporteerd naar AUS: SIHAO PTY LTD.
1 ROKEVA STREETEASTWOOD NSW 2122 Australië
Geïmporteerd naar de VS: Sanven Technology Ltd.
Suite 250, 9166 Anaheim Place, Rancho Cucamonga, CA 9173 0


2
Teknisk support och e-garanticertifikat www.vevor.com/support
VÅNINGSSÄNG FÖR DET
Användarmanual
Vi fortsätter att vara engagerade i att ge dig verktyg till konkurrenskraftiga priser.
"Spara hälften", "halva priset" eller andra liknande uttryck som används av oss representerar
bara en uppskattning av besparingar du kan dra nytta av att köpa vissa verktyg hos oss jämfört
med de stora toppmärkena och betyder inte nödvändigtvis att täcka alla kategorier av verktyg
som erbjuds av oss. Du påminns vänligen om att noggrant kontrollera när du gör en beställning
hos oss om du faktiskt sparar hälften i jämförelse med de främsta stora varumärkena.

1
Modell:099-1A
BEHÖVS HJÄLP? KONTAKTA OSS!
Har du produktfrågor? Behöver du teknisk support? Kontakta oss gärna:
Teknisk support och e-garanticertifikat www.vevor.com/support
Detta är den ursprungliga instruktionen, läs alla instruktioner noggrant innan du
använder den. VEVOR reserverar sig för en tydlig tolkning av vår användarmanual.
Utseendet på produkten är beroende av den produkt du fått. Ursäkta oss att vi inte
kommer att informera dig igen om det finns någon teknik eller
mjukvaruuppdateringar på vår produkt.
INSTRUKTIONER
PET BUNK BED

2
Tack så mycket för att du valde denna produkt. Läs alla instruktioner innan du
använder den. Informationen hjälper dig att uppnå bästa möjliga resultat.
VÄNLIGEN NOTERA! Ritningarna i denna bruksanvisning är endast för
illustrationsändamål och i vissa detaljer kan det skilja sig från den faktiska
produkten.
UPPMÄRKSAMHET! Läs alla säkerhetsvarningar och alla instruktioner.
Underlåtenhet att följa varningarna och instruktionerna kan leda till allvarliga
skador eller till och med dödsfall. Den enhet eller produkt som används i
varningsinstruktionerna hänvisas till våningssäng för husdjur .
Denna produkt är inte en leksak eller en leksakskrin. Tillåt inte barn att leka med
detta föremål. Vänligen placera i en position så att barn inte kan klättra för att
undvika skador från fall från höjd.
ANVÄNDNINGSSÄKERHET
1.Två personer krävs för att montera denna produkt.
2. Välj ett område för montering som är rent och fritt från skräp som kan få
personer som arbetar på enheten att snubbla.
3. Lyft inte tunga delar eller enheter. Använd kran, domkraft, redskap, gaffeltruckar
eller andra mekaniska anordningar.
4. Förhandsgranska monteringsinstruktionerna i din bruksanvisning innan du
fortsätter.
5. Efter avslutad montering, inspektera maskinen noggrant för att vara säker på att
alla muttrar, bultar, hydrauliska kopplingar eller andra fästanordningar har dragits
åt ordentligt.
6. Denna produkt är inte en klätterställning eller sportutrustning och bör inte
användas för annat än husdjursvåningssäng.
7. Produkter för träprodukter kan inte vara vattentäta, utomhusbruk eller långvarig
blöt leder lätt till skador, det rekommenderas att torka så snart som möjligt efter
kontakt med vatten, för att säkerställa att produkten kan ge dig längre service.
8. Våningssängen för husdjur måste kontrolleras för att säkerställa att den är i gott
skick och fungerar säkert före användning. I annat fall får apparaten inte
användas.
Innan du använder produkten - om du har några frågor angående korrekt
montering eller användning, kontakta din återförsäljare eller representant.
SPARA DESSA INSTRUKTIONER
3
TEKNISKA PARAMETRAR
Modell
099-1A
Färg
beige
Material
spånskiva
Produktstorlek (mm)
1200*500*650
Nettovikt (kg)
17.7
Hårdvarulista

4
Dellista
Hur man installerar kort med
hårdvara
A och C
22. Använd en skruvmejsel för att passa in hårdvaran A i motsvarande hål i
kortet.
5
23. Rikta in hålen på det andra kortet som ska installeras så att hårdvara A
förs in i hålen. Observera att när du installerar, se till att de två brädorna
är i linje.
24. Sätt hårdvara C i motsvarande hål på brädet som just installerats, och
dra åt det med en skruvmejsel för att uppnå montering.
Montering av sängram
Steg 1: Installera hårdvara A och B i motsvarande hål i kortet
som visas. Dessa delar används för att montera sängen.
Steg 2: Montera delarna 1 och 2 som visas med hårdvara D.
Steg 3: Använd hårdvara D, installera del 3 med komponenterna

6
som slutfördes i steg 2.
Steg 4: Använd hårdvara C, montera delarna 4 och 5, delarna 6
och 7 tillsammans enligt diagrammet, var uppmärksam på
placeringen av brädets rundade hörn.
Steg 5: Använd hårdvara D, sätt ihop del 8 och 10 enligt bilden.
7
Obs: del 8 och 9 har förinstallerats för användare.
Steg 6: Använd hårdvara D, installera del 11 med
komponenterna som slutfördes i steg 5.
Steg 7: Använd hårdvara D, installera komponenterna från steg
3 och 4 tillsammans enligt bilden.
8
Steg 8: Använd hårdvara D, installera komponenterna från steg
6 och 7 tillsammans enligt bilden. Sängramen är
färdigmonterad.
Trappinramning
9
Steg 1: Montera del 12,13,14,15 och 16 som visas med hårdvara
D.
Steg 2: Installera komponenterna från föregående steg och del
12 med hårdvara D.
Placera delarna 17 och 18 i motsvarande positioner som visas i
figuren för att slutföra monteringen. Sängstommen och trappan

10
kan kombineras efter dina behov.
Tillverkare: Shanghaimuxinmuyeyouxiangongsi
Adress: Shuangchenglu 803nong11hao1602A-1609shi, baoshanqu,
shanghai 200000 CN.
EC REP: E-CrossStu GmbH.
Mainzer Landstr.69, 60329 Frankfurt am Main.
UK REP: YH CONSULTING LIMITED.
C/O YH Consulting Limited Office 147, Centurion House, London Road,
Staines-upon-Thames, Surrey, TW18 4AX
Importerad till AUS: SIHAO PTY LTD.
1 ROKEVA STREETEASTWOOD NSW 2122 Australien
Importerad till USA: Sanven Technology Ltd.
Suite 250, 9166 Anaheim Place, Rancho Cucamonga, CA 9173 0


