Descent
™
X30
Owner’s Manual

© 2025 Garmin Ltd. or its subsidiaries
All rights reserved. Under the copyright laws, this manual may not be copied, in whole or in part, without the written consent of Garmin. Garmin reserves the right to change
or improve its products and to make changes in the content of this manual without obligation to notify any person or organization of such changes or improvements. Go to
www.garmin.com for current updates and supplemental information concerning the use of this product.
Garmin
®
, the Garmin logo, ANT+
®
, inReach
®
, and QuickFit
®
are trademarks of Garmin Ltd. or its subsidiaries, registered in the USA and other countries. Descent
™
, Garmin Connect
™
,
Garmin Dive
™
, and Garmin Express
™
are trademarks of Garmin Ltd. or its subsidiaries. These trademarks may not be used without the express permission of Garmin.
The Bluetooth
®
word mark and logos are owned by the Bluetooth SIG, Inc. and any use of such marks by Garmin is under license. Other trademarks and trade names are those of
their respective owners.
M/N: A05071

Table of Contents
Introduction......................................1
Getting Started........................................ 1
Device Overview...................................... 1
Controls................................................... 2
Diving............................................... 2
Warning................................................0
Dive Warnings...................................... 3
Dive Modes.............................................. 4
Using the Pool Dive Mode................... 4
Dive Setup................................................ 4
Dive Mode Advanced Settings............5
Setting Up Your Breathing Gases....... 5
Setting a Custom Dive Alert................ 6
Setting PO2 Thresholds...................... 6
No-Fly Time.......................................... 7
Customizing the Data Screens........... 7
Dive Data Screens................................... 7
Single-Gas Data Screens.....................8
Multi-Gas Data Screens...................... 9
Gauge Data Screens..........................10
Going Diving.......................................... 11
Navigating with the Dive Compass.. 12
Using the Gauge Dive Stopwatch..... 12
Switching Gases During a Dive.........12
Performing a Safety Stop..................13
Performing a Decompression Stop..14
Viewing Your Dynamic Depth........... 15
Marking a Dive Event.........................15
Viewing the Surface Interval App......... 16
Viewing the Dive Log App..................... 17
Dive Planning......................................... 17
Calculating NDL Time....................... 17
Calculating Your Breathing Gas....... 18
Creating a Decompression Plan....... 18
Using Decompression Plans............ 18
Finding Nearby Dive Sites................. 19
Altitude Diving....................................... 19
Dive Alerts..............................................20
Dive Terminology.................................. 22
Compass........................................ 22
Setting the Compass Heading............. 22
Setting the North Reference................. 22
Calibrating the Compass...................... 22
Navigation...................................... 23
Navigating to a Location.......................23
Editing a Saved Location.................. 23
Connectivity................................... 23
Phone Connectivity Features............... 23
Pairing Your Phone............................24
Garmin Dive App................................24
Wireless Sensors...................................24
inReach® Remote............................. 24
Settings..........................................24
Display and Brightness Settings.......... 25
System Settings.................................... 25
Setting Your Device Passcode......... 25
Satellite Settings............................... 26
Disabling the Auto-boot When Wet
Setting................................................ 26
Resetting All Default Settings........... 26
Viewing Device Information..............26
Device Information......................... 27
Charging the Device.............................. 27
Wearing the Dive Computer..................27
Changing the Bands.......................... 28
Applying the Screen Protector............. 29
Specifications........................................31
Battery Information........................... 31
Device Care............................................31
Cleaning the Device...........................32
Data Fields............................................. 32
Troubleshooting............................. 34
Product Updates................................... 34
Getting More Information..................... 34
My device is in the wrong language.....34
Is my smartphone compatible with my
device?................................................... 34
My phone will not connect to the
device..................................................... 35
Diving..................................................... 35
Resetting Your Tissue Load..............35
Resetting the Surface Pressure........35
Acquiring Satellite Signals.................... 35
Improving GPS Satellite Reception.. 35
Table of Contents i

Introduction
WARNING
See the Important Safety and Product Information guide in the product box for product warnings and other
important information.
Getting Started
When using your dive computer for the first time, you should complete these tasks to set it up and get to know
the basic features.
1 Hold PWR for at least one second to turn on the dive computer (Device Overview, page1).
2 Follow the on-screen instructions to complete the initial setup.
During the initial setup, you can pair your phone with your dive computer to receive notifications, sync your
data, and more (Pairing Your Phone, page24).
3 Charge the dive computer (Charging the Device, page27).
4 Start a dive (Going Diving, page11).
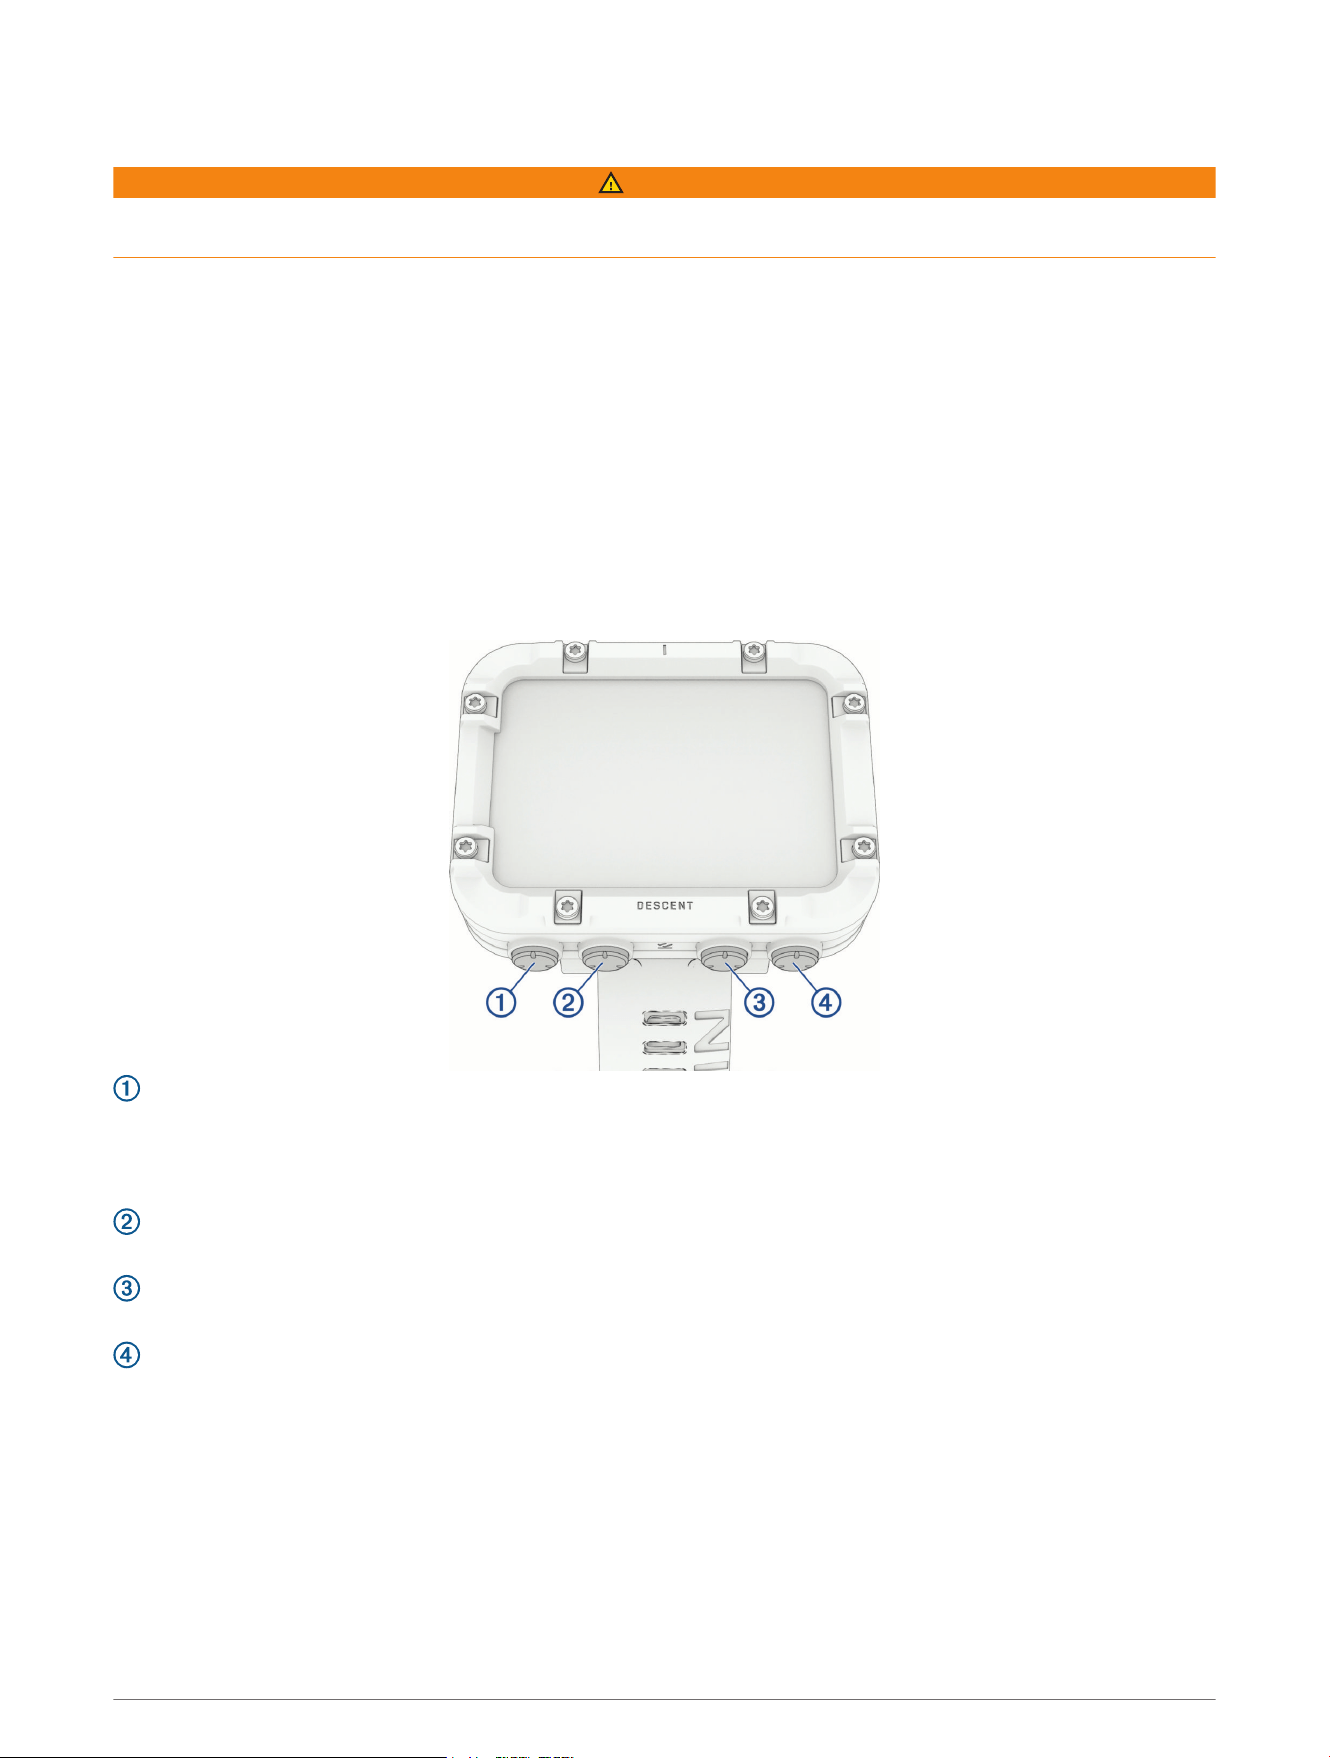
Device Overview
BACK / PWR
• Press to return to the previous screen.
• Hold to turn on the dive computer.
• Hold to view the controls menu (Controls, page2).
PREV
• Press to scroll through menus or data screens.
NEXT
• Press to scroll through menus or data screens.
ENTER
• Press to choose an option in a menu.
• During a dive, press to view the in-dive menu.
Introduction 1
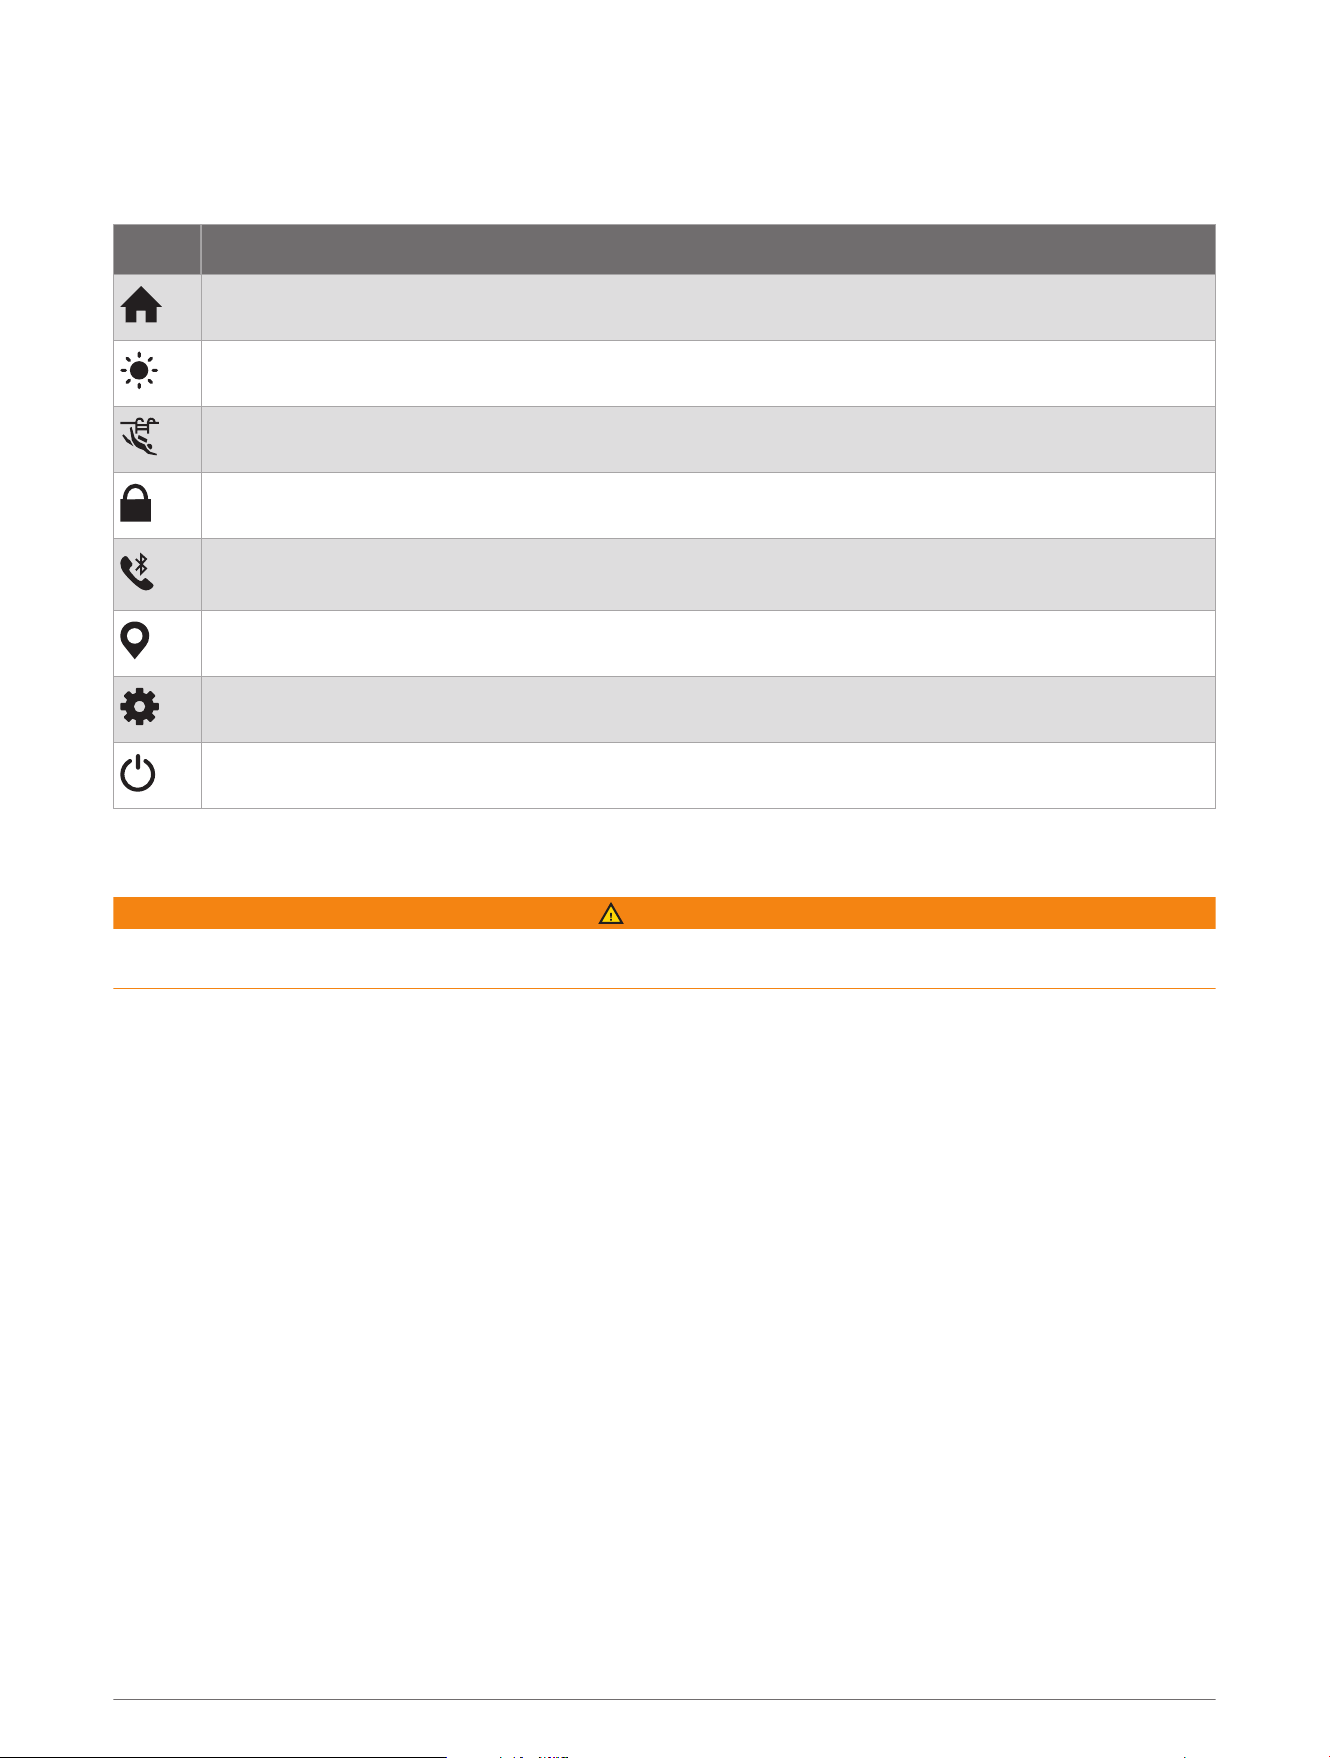
Controls
The controls menu lets you quickly access device features and options.
From any screen, hold BACK.
Control Description
Select to return to the home screen.
Select to adjust the brightness and display settings (Display and Brightness Settings, page25).
Select to enable pool dive mode (Using the Pool Dive Mode, page4).
Select to lock the buttons to prevent inadvertent presses.
Select to enable Bluetooth
®
technology and connect to a compatible phone (Pairing Your Phone,
page24).
Select to save your current location to navigate back to it later (Navigation, page23).
Select to open the settings menu (Settings, page24).
Select to turn off the dive computer.
Diving
WARNING
Failure to heed the following warnings could result in an accident or medical event resulting in death or serious
injury.
2 Diving

Dive Warnings
• The diving features of this device are for use by certified divers only. This device should not be used as a sole
dive computer. Failure to input the appropriate dive-related information into the device can lead to serious
personal injury or death.
• Do not exceed the maximum dive depth rating for the device (Specifications, page31).
• Make sure that you fully understand the use, displays, and limitations of your device. If you have questions
about this manual or the device, always resolve any discrepancies or confusion before diving with the device.
Always remember that you are responsible for your own safety.
• There is always a risk of decompression illness (DCI) for any dive profile even if you follow the dive plan
provided by the dive tables or a diving device. No procedure, diving device, or dive table will eliminate the
possibility of DCI or oxygen toxicity. An individual's physiological make up can vary from day to day. This
device cannot account for these variations. You are strongly advised to remain well within the limits provided
by this device to minimize the risk of DCI. You should consult a physician regarding your fitness before
diving.
• Always use backup instruments, including a depth gauge, submersible pressure gauge, and timer or watch.
You should have access to decompression tables when diving with this device.
• Perform pre-dive safety checks, such as checking proper device function and settings, display function,
battery level, tank pressure, and bubble checks to check hoses and connections for leaks.
• This device should not be shared between multiple users for diving purposes. Diver profiles are user specific,
and using another diver's profile can result in misleading information that could lead to injury or death.
• For safety reasons, you should never dive alone. Dive with a designated buddy, even if you have someone
monitoring your dive from the surface. You should also stay with others for an extended time after a dive,
because the potential onset of decompression illness (DCI) may be delayed or triggered by surface activities.
• This device is not intended for commercial or professional dive activities. It is for recreational purposes only.
Commercial or professional dive activities can expose the user to extreme depths or conditions that increase
the risk of DCI.
• Do not dive with a gas if you have not personally verified its contents and input the analyzed value to
the device. Failure to verify tank contents and input the appropriate gas values to the device will result in
incorrect dive planning information and could result in serious injury or death.
• Diving with more than one gas mixture presents a much greater risk than diving with a single gas mixture.
Mistakes related to the use of multiple gas mixtures may lead to serious injury or death.
• Always ensure a safe ascent. A rapid ascent increases the risk of DCI.
• Disabling the deco lockout feature on the device can result in an increased risk of DCI, which can result in
personal injury or death. Disable this feature at your own risk.
• Violating a required decompression stop may result in serious injury or death. Never ascend above the
displayed decompression stop depth.
• Always perform a safety stop between 3 and 5 meters (9.8 and 16.4 feet) for 3 minutes, even if no
decompression stop is required.
Diving 3

Dive Modes
The Descent X30 dive computer supports multiple dive modes. Each dive mode has four phases: dive pre-check,
surface display, in-dive, and post-dive. During the pre-dive check, you can confirm the dive settings before you
start diving (Dive Setup, page4). The surface phase shows the data screens for the dive mode (Dive Data
Screens, page7). The in-dive phase shows data about the dive in progress, and other device features, such
as GPS, are disabled (Going Diving, page11). During the post-dive review, you can view a summary of the
completed dive (Viewing the Dive Log App, page17).
Single-Gas: This mode allows you to dive with a single gas blend. You can set up to 11 additional gases as
backup gases.
Multi-Gas: This mode allows you to configure multiple gas blends and switch gases during your dive. You can
set the oxygen content from 5–100%. This mode supports one bottom gas, and up to 11 additional gases as
decompression or backup gases.
NOTE: No-decompression limit (NDL) and time to surface (TTS) decompression calculations include the use
of bottom gas and decompression gas. Backup gases are not used in NDL and TTS calculations until you
activate them during a dive.
Gauge: This mode allows you to dive with basic bottom timer features.
NOTE: After diving in gauge mode, the dive computer can only be used in gauge mode for 24 hours.
Using the Pool Dive Mode
When the device is in pool dive mode, the tissue load and decompression lockout features function normally,
but dives are not saved to the dive log.
1 Hold BACK to view the controls menu.
2 Select .
The pool dive mode turns off automatically at midnight.
Dive Setup
You can customize the dive settings based on your needs. Not all settings are applicable for all dive modes. You
can also edit the settings before you start a dive.
Select Dive Setup.
Gases: Sets the gas blends used in the gas dive modes (Setting Up Your Breathing Gases, page5). You can
have up to twelve gases for each gas dive mode.
Conservatism: Sets the level of conservatism for decompression calculations. Higher conservatism provides a
shorter bottom time and a longer ascent time. The Custom option sets a custom gradient factor.
NOTE: Make sure you understand gradient factors before entering a custom level of conservatism.
Water Type: Sets the water type.
PO2: Sets the partial pressure of oxygen (PO2) thresholds, in bar, for the maximum operating depth (MOD),
decompression, warnings, and critical alerts (Setting PO2 Thresholds, page6).
Scuba Alerts: Sets custom alerts for gas dives (Setting a Custom Dive Alert, page6).
Display Settings: Customizes the data screens for each dive mode (Dive Data Screens, page7). .
Safety Stop: Changes the safety stop duration.
Last Deco Stop: Sets the depth of the final decompression stop.
End Dive Delay: Sets the length of time before the device ends and saves a dive after surfacing.
Dive Shortcuts: Assigns button shortcuts for use during dives (Dive Setup, page4).
Advanced Settings: Customizes advanced dive mode settings (Dive Mode Advanced Settings, page5).
4 Diving

Dive Mode Advanced Settings
Select Dive Setup > Advanced Settings.
Double Tap to Scroll: Enables a double-tap on the dive computer to scroll through the dive data screens. If you
notice accidental scrolling, you can use the Sensitivity option to adjust the responsiveness.
Silent Diving: Disables all tones and vibrations for alerts during dive activities.
Compass: Calibrates and set the north reference of the dive compass (Calibrating the Compass, page22).
No-Fly Time: Sets the no-fly countdown timer mode (No-Fly Time, page7).
Units: Sets the distance, depth, and temperature units of measure for diving.
Deco Lockout: Disables the decompression lockout feature. This feature prevents gas dives for 24 hours if you
violate a decompression ceiling for more than three minutes.
NOTE: You can still disable the decompression lockout feature after violating a decompression ceiling.
Setting Up Your Breathing Gases
You can enter up to twelve gases for each gas dive mode. Decompression calculations include your
decompression gases, but do not include your backup gases.
1 Select Dive Setup > Gases.
2 Select a dive mode.
3 Select the first gas in the list.
For single-gas or multi-gas dive modes, this is the bottom gas.
4 Select Oxygen, and enter the oxygen percentage of the gas blend.
5 Select Helium, and enter the helium percentage of the gas blend.
The dive computer calculates the remaining percentage as the nitrogen content.
6 Press BACK.
7 Select an option:
NOTE: Not all options are available for all dive modes.
• Select Add Backup, and enter the oxygen and helium percentage for your backup gas.
• Select Add New, enter the oxygen and helium percentage, and select Mode to set the intended use for the
gas, such as decompression or backup.
NOTE: For the multi-gas dive mode, you can select Set as Travel Gas to set your intended gas for
descending.
Diving 5

Setting a Custom Dive Alert
1 Select Dive Setup > Scuba Alerts
2 Select an option:
• Select Add Alert to add a new alert.
• Select the alert name to edit an existing alert.
3 If necessary, enable the alert.
4 Select an option:
NOTE: Not all options are available for all alert types.
• Select Depth to specify the depth that should trigger the alert.
• Select Label to enter a name for the alert.
• Select Time to specify the time interval that should trigger the alert.
• Select Interval to specify if the alert should trigger once or at a repeat interval.
• Select Direction to specify if the alert should be enabled for ascending, descending, or both.
• Select Dive Types to specify which dive modes should allow the alert to trigger.
• Select Sound and Vibe to set the alert tone, vibration, or neither.
• Select Pop-up to enable a pop-up notification for the alert.
• Select Preview Alert to see how the alert appears and sounds during a dive.
Setting PO2 Thresholds
You can configure the partial pressure of oxygen (PO2) alert message thresholds, in bar.
1 Select Dive Setup > PO2.
2 Select an option:
• Select MOD/Deco PO2 to set the maximum operating depth (MOD) and decompression PO2 threshold for
your planned bottom gas before you should begin your ascent and switch to the decompression gas with
the highest percentage of oxygen.
NOTE: The dive computer does not switch gases for you automatically. You must select the gas.
• Select PO2 Warning to set the threshold for the highest oxygen concentration level that you are
comfortable reaching.
• Select PO2 Critical to set the threshold for the maximum oxygen concentration level that you should
reach.
3 Enter a value.
If you reach the PO2 Critical threshold value during a dive, the dive computer displays an alert message (Dive
Alerts, page20).
6 Diving
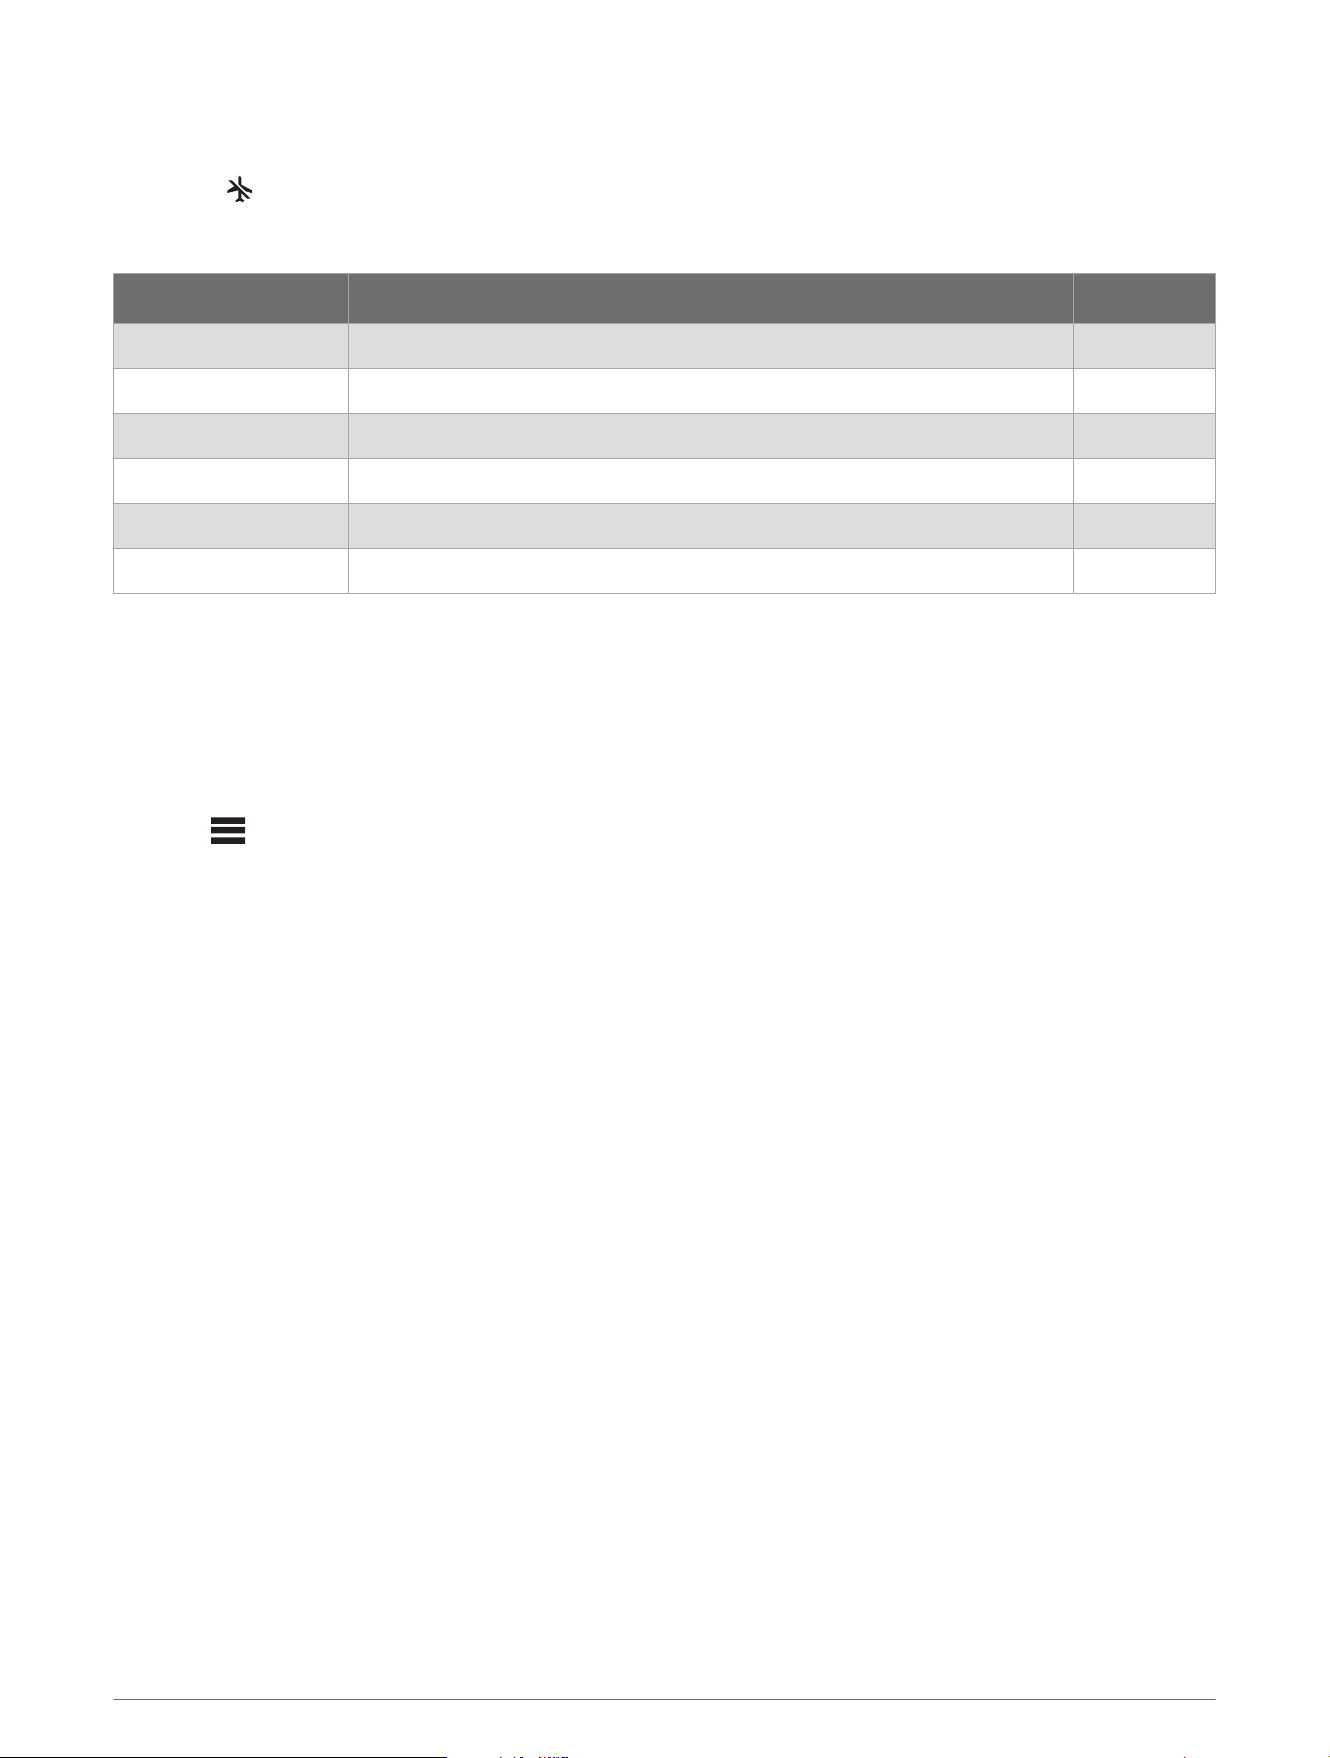
No-Fly Time
After a dive, you may need to wait several hours before it is safe to fly on an airplane. To indicate your remaining
no-fly time, appears on the home screen. You can view more details in the surface interval app (Viewing the
Surface Interval App, page16).
Select Dive Setup > Advanced Settings > No-Fly Time.
No-Fly Time Mode Dive Type No-Fly Time
Standard or 24 Hours Dive duration of 3 minutes or less or depth of 5 m (15 ft.) or less. 0 hours
Standard Non-decompression dive more than 48 hours since the previous dive. 12 hours
Standard Multiple non-decompression dives within 48 hours. 18 hours
Standard Dive with a completed decompression stop. 24 hours
24 Hours Non-gauge dive that did not violate the decompression plan. 24 hours
Standard or 24 Hours Gauge dive or a dive that violated the decompression plan. 48 hours
Customizing the Data Screens
You can show, hide, and change the layout and content of data screens for each dive mode.
1 Select Dive Setup > Display Settings.
2 Select a dive mode to customize.
3 Select Data Screens.
4 Select a data screen to customize.
5 Select .
6 Select an option:
• Select Layout to adjust the number of data fields on the data screen.
• Select Data Fields, and select a field to change the data that appears in the field.
TIP: For a list of all the available data fields, go to Data Fields, page32.
• Select Reorder to change the location of the data screen in the loop.
• Select Remove to remove the data screen from the loop.
NOTE: Not all options are available for each data screen.
7 If necessary, select Add New to add a data screen to the loop.
You can add a custom data screen, or select one of the predefined data screens.
Dive Data Screens
You can press NEXT or double-tap the device to scroll through the data screens.
In the activity settings, you can reorder the default data screens, add a dive stopwatch, and add custom data
screens (Customizing the Data Screens, page7). You can customize the data fields on some of the data
screens.
Diving 7

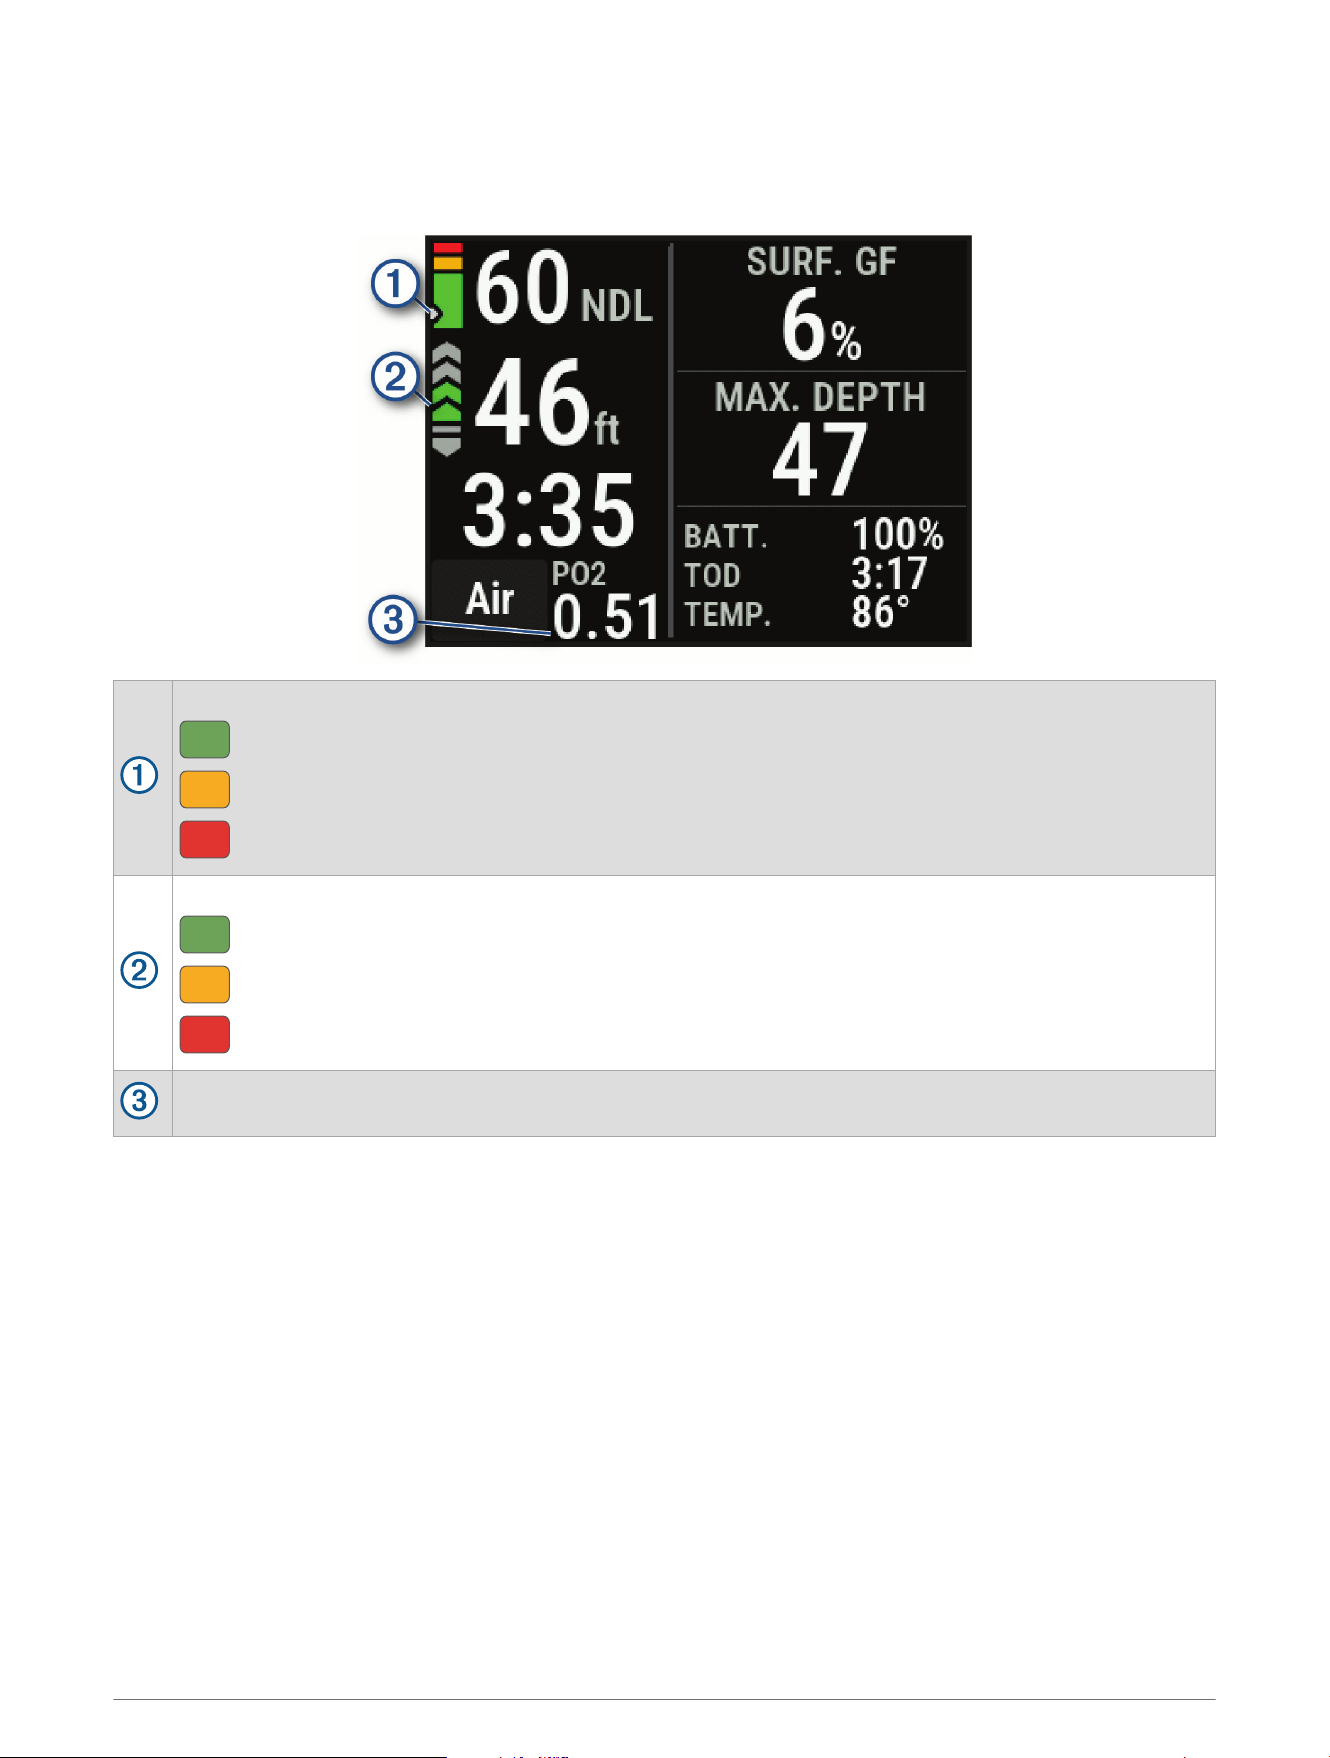
Single-Gas Data Screens
The primary data screen for the single-gas dive mode displays the main dive data, including your breathing gas,
rate of ascent or descent, and current depth. You can press NEXT to view the dive compass (Navigating with the
Dive Compass, page12) and additional data, such as your maximum depth, time to surface (TTS), the time of
day, and the current temperature.
Your nitrogen (N2) and helium (He) tissue load level.
Green: 0 to 79% tissue load.
Yellow: 80 to 99% tissue load.
Red: 100% or greater tissue load.
Your rate of ascent.
Green: Good. Ascent is less than 7.9 m (26 ft.) per minute.
Yellow: Moderately high. Ascent is between 7.9 and 10.1 m (26 and 33 ft.) per minute.
Red: Too high. Ascent is greater than 10.1 m (33 ft.) per minute.
Your partial pressure of oxygen (PO2) level.
8 Diving
Multi-Gas Data Screens
The primary data screen for the multi-gas dive mode displays the main dive data, including your breathing gas,
rate of ascent or descent, maximum depth, surface gradient factor, the time of day, and the current temperature.
You can press NEXT to view the dive compass (Navigating with the Dive Compass, page12).
Your nitrogen (N2) and helium (He) tissue load level.
Green: 0 to 79% tissue load.
Yellow: 80 to 99% tissue load.
Red: 100% or greater tissue load.
Your rate of ascent.
Green: Good. Ascent is less than 7.9 m (26 ft.) per minute.
Yellow: Moderately high. Ascent is between 7.9 and 10.1 m (26 and 33 ft.) per minute.
Red: Too high. Ascent is greater than 10.1 m (33 ft.) per minute.
Your partial pressure of oxygen (PO2) level.
Diving 9
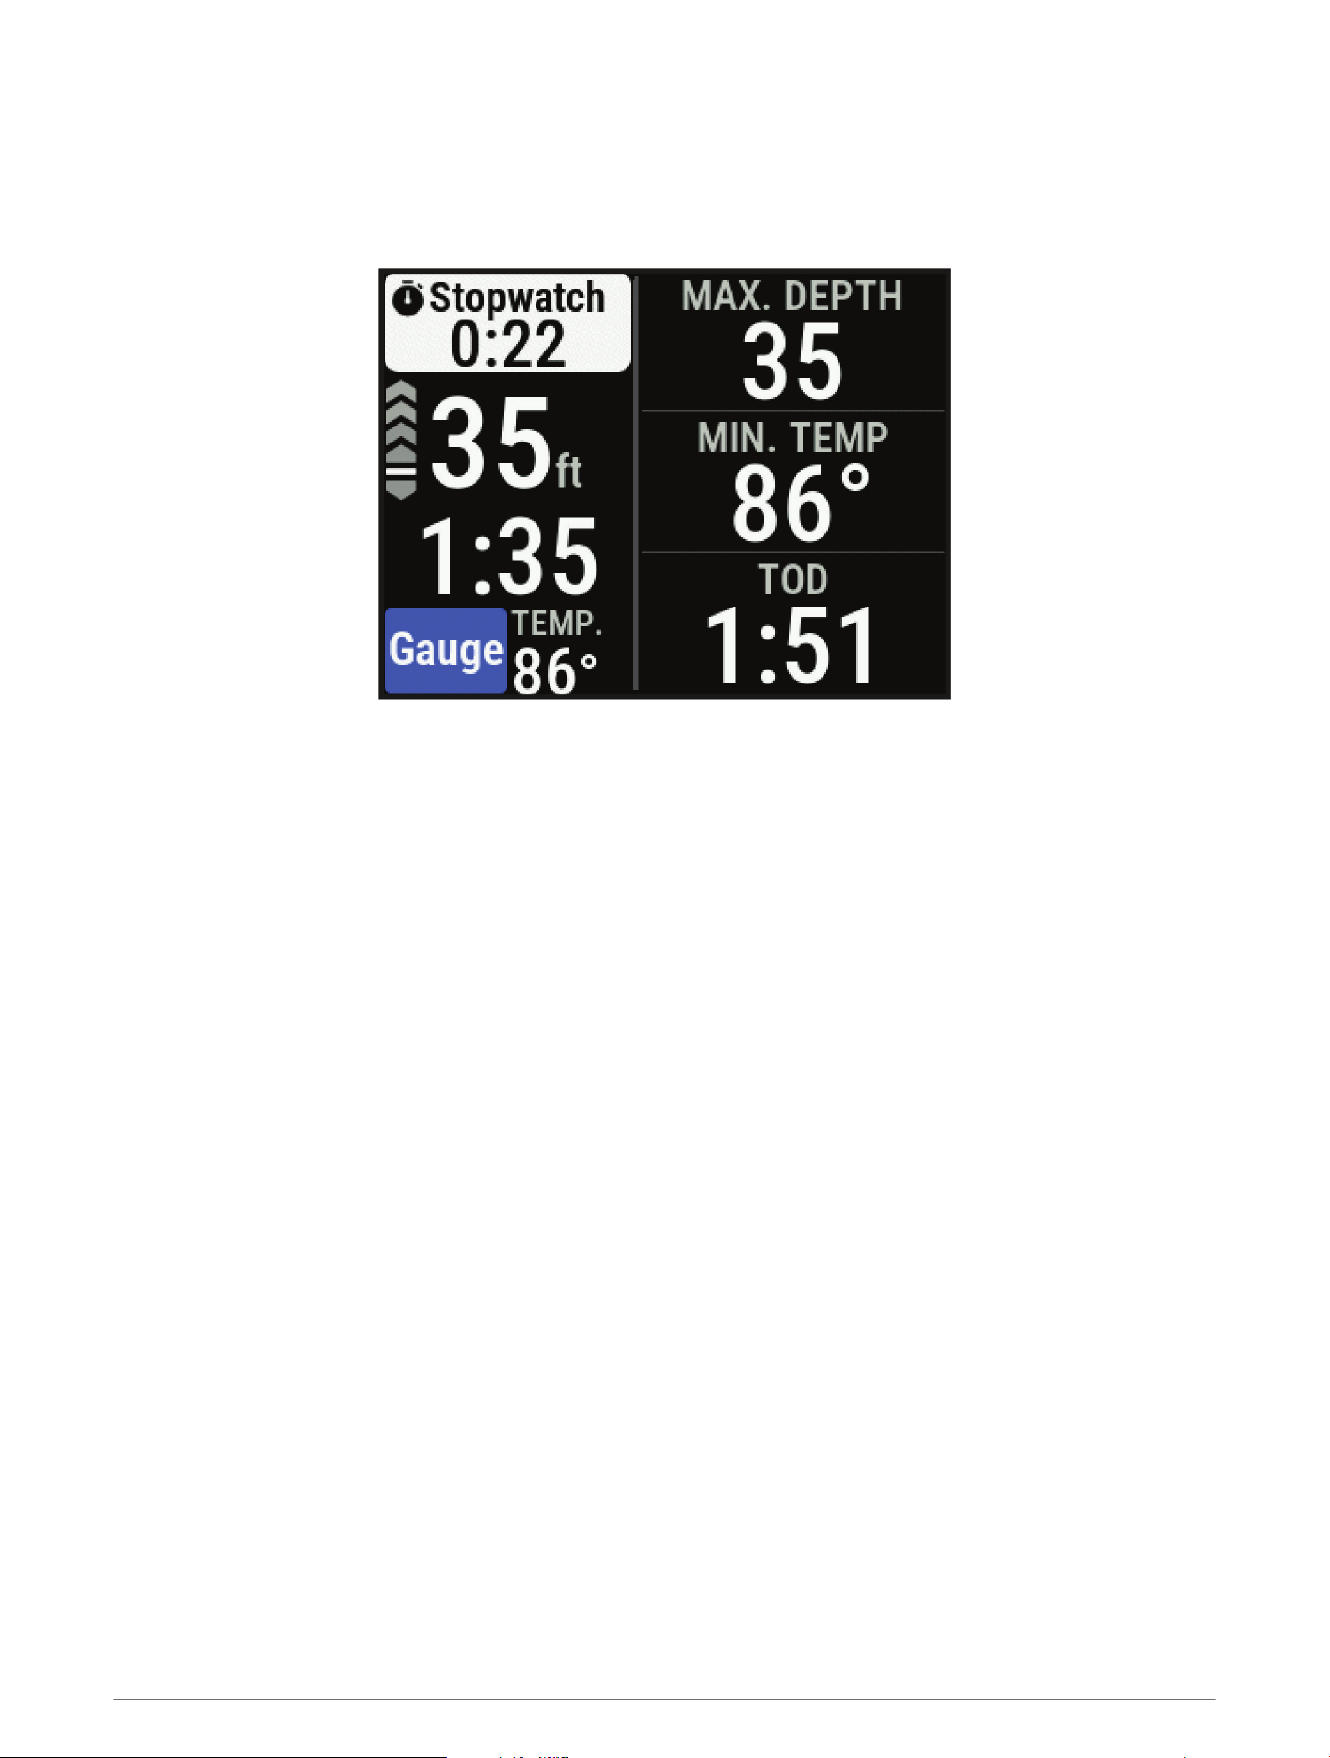
Gauge Data Screens
The primary data screen for the gauge dive mode displays data for the current dive, including your maximum
depth, the lowest temperature during the dive, the time of day, and the stopwatch (Using the Gauge Dive
Stopwatch, page12). You can press NEXT to view the full screen dive compass (Navigating with the Dive
Compass, page12).
10 Diving

Going Diving
NOTICE
If you store the dive computer while it is still wet, it may inadvertently turn on and drain the battery.
NOTE: By default, the dive computer turns on automatically when it detects water (Disabling the Auto-boot When
Wet Setting, page26).
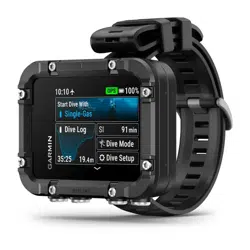
1 If necessary, select Dive Mode, and select a dive mode.
2 Select Start Dive With.
3 Review the dive setup options, and if necessary, select View All Setup to edit the dive settings (Dive Setup,
page4).
4 Wait with your arm out of the water until the dive computer acquires GPS signals and GPS turns green
(optional).
The dive computer requires GPS signals to save your dive entry location.
5 Select Confirm.
6 Descend to start your dive.
The activity timer starts automatically when you reach a depth of 1.2 m (4 ft.).
NOTE: If you start a dive without selecting a dive mode, the dive computer uses the most recently used dive
mode and settings.
7 Select an option:
• Press NEXT to scroll through the data screens and dive compass.
TIP: You can also double tap the device to scroll through the data screens.
• Press ENTER to view the in-dive menu.
8 When you are ready to end the dive, ascend to the surface.
9 Keep your arm out of the water so the dive computer can acquire GPS signals and save your dive exit
location (optional).
10 Wait for the DIVE END timer to count down.
NOTE: When you ascend to 1 m (3.3 ft.), the DIVE END timer begins counting down (Dive Setup, page4). You
can press ENTER, and select Stop Dive to stop the dive before the timer elapses.
The dive computer saves the dive activity.
TIP: You can view your diving history in the dive log app (Viewing the Dive Log App, page17).
Dry off the dive computer.
Diving 11
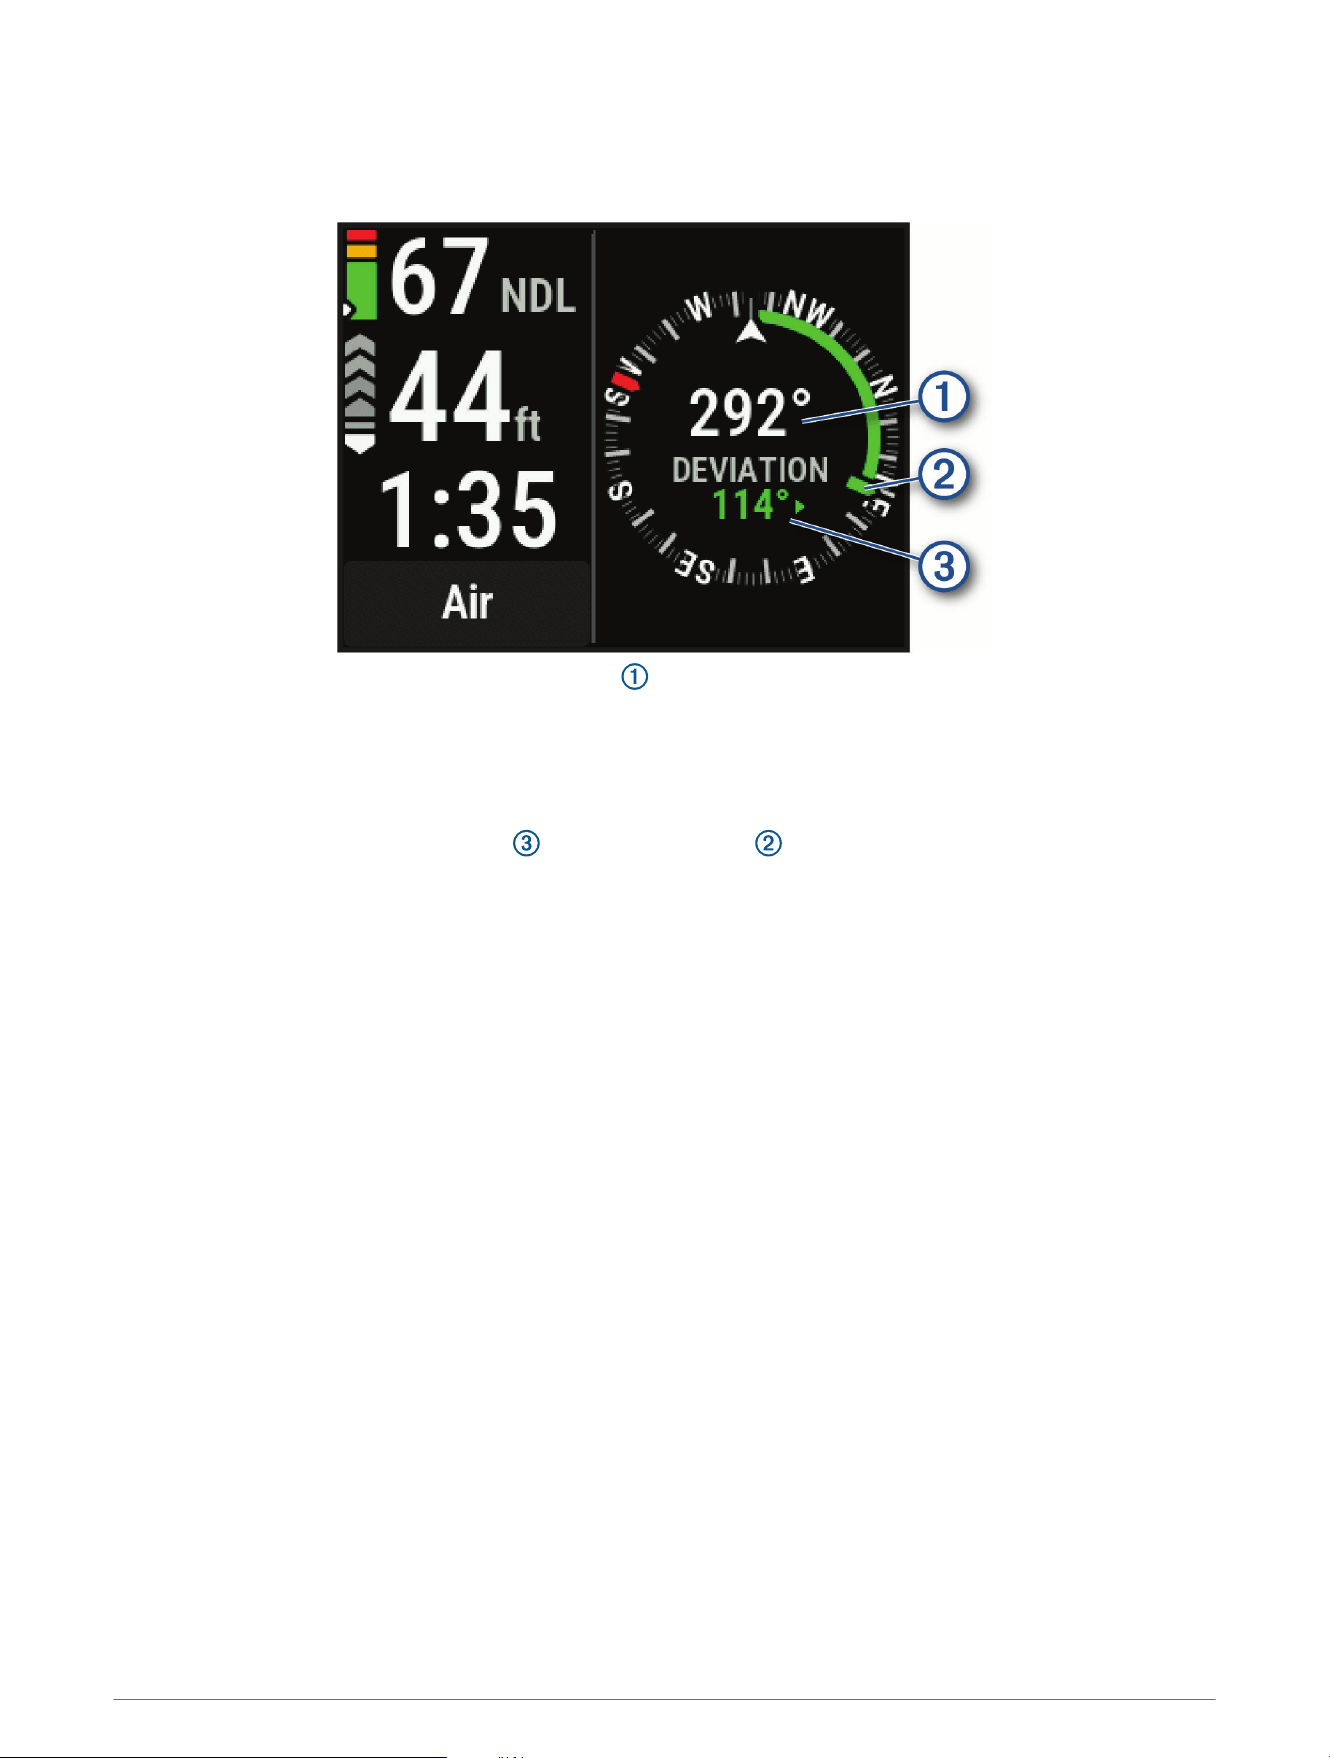
Navigating with the Dive Compass
1 During a dive, scroll to the dive compass.
NOTE: The appearance of the dive compass may vary if you view it in a data field.
The compass indicates your directional heading .
2 Press ENTER.
3 Select Compass.
4 Select an option:
• To set the heading, select Set Heading.
The compass indicates deviations from the set heading .
• To set the heading again, select Change Heading.
• To change the heading by 180 degrees, select Set to Recip..
NOTE: The compass indicates the reciprocal heading with a red mark.
• To set to a 90-degree heading left or right, select Set to 90L or Set to 90R.
• To delete the heading, select Clear Heading.
Using the Gauge Dive Stopwatch
1 Start a Gauge dive.
2 Press ENTER.
3 Select Start Stopwatch.
4 Select an option:
• To stop using the stopwatch, press ENTER, and select Stop Stopwatch.
• To restart the stopwatch, press ENTER, and select Reset Stopwatch.
Switching Gases During a Dive
1 Start a gas dive activity.
2 Select an option:
• Press ENTER, select Gas, and select a backup or decompression gas.
NOTE: If necessary, you can select Add New and enter a new gas.
• Dive until you reach the MOD/Deco PO2 threshold (Setting PO2 Thresholds, page6).
The dive computer prompts you to switch to the gas with the highest percentage of oxygen.
NOTE: The dive computer does not switch gases for you automatically. You must select the gas.
12 Diving
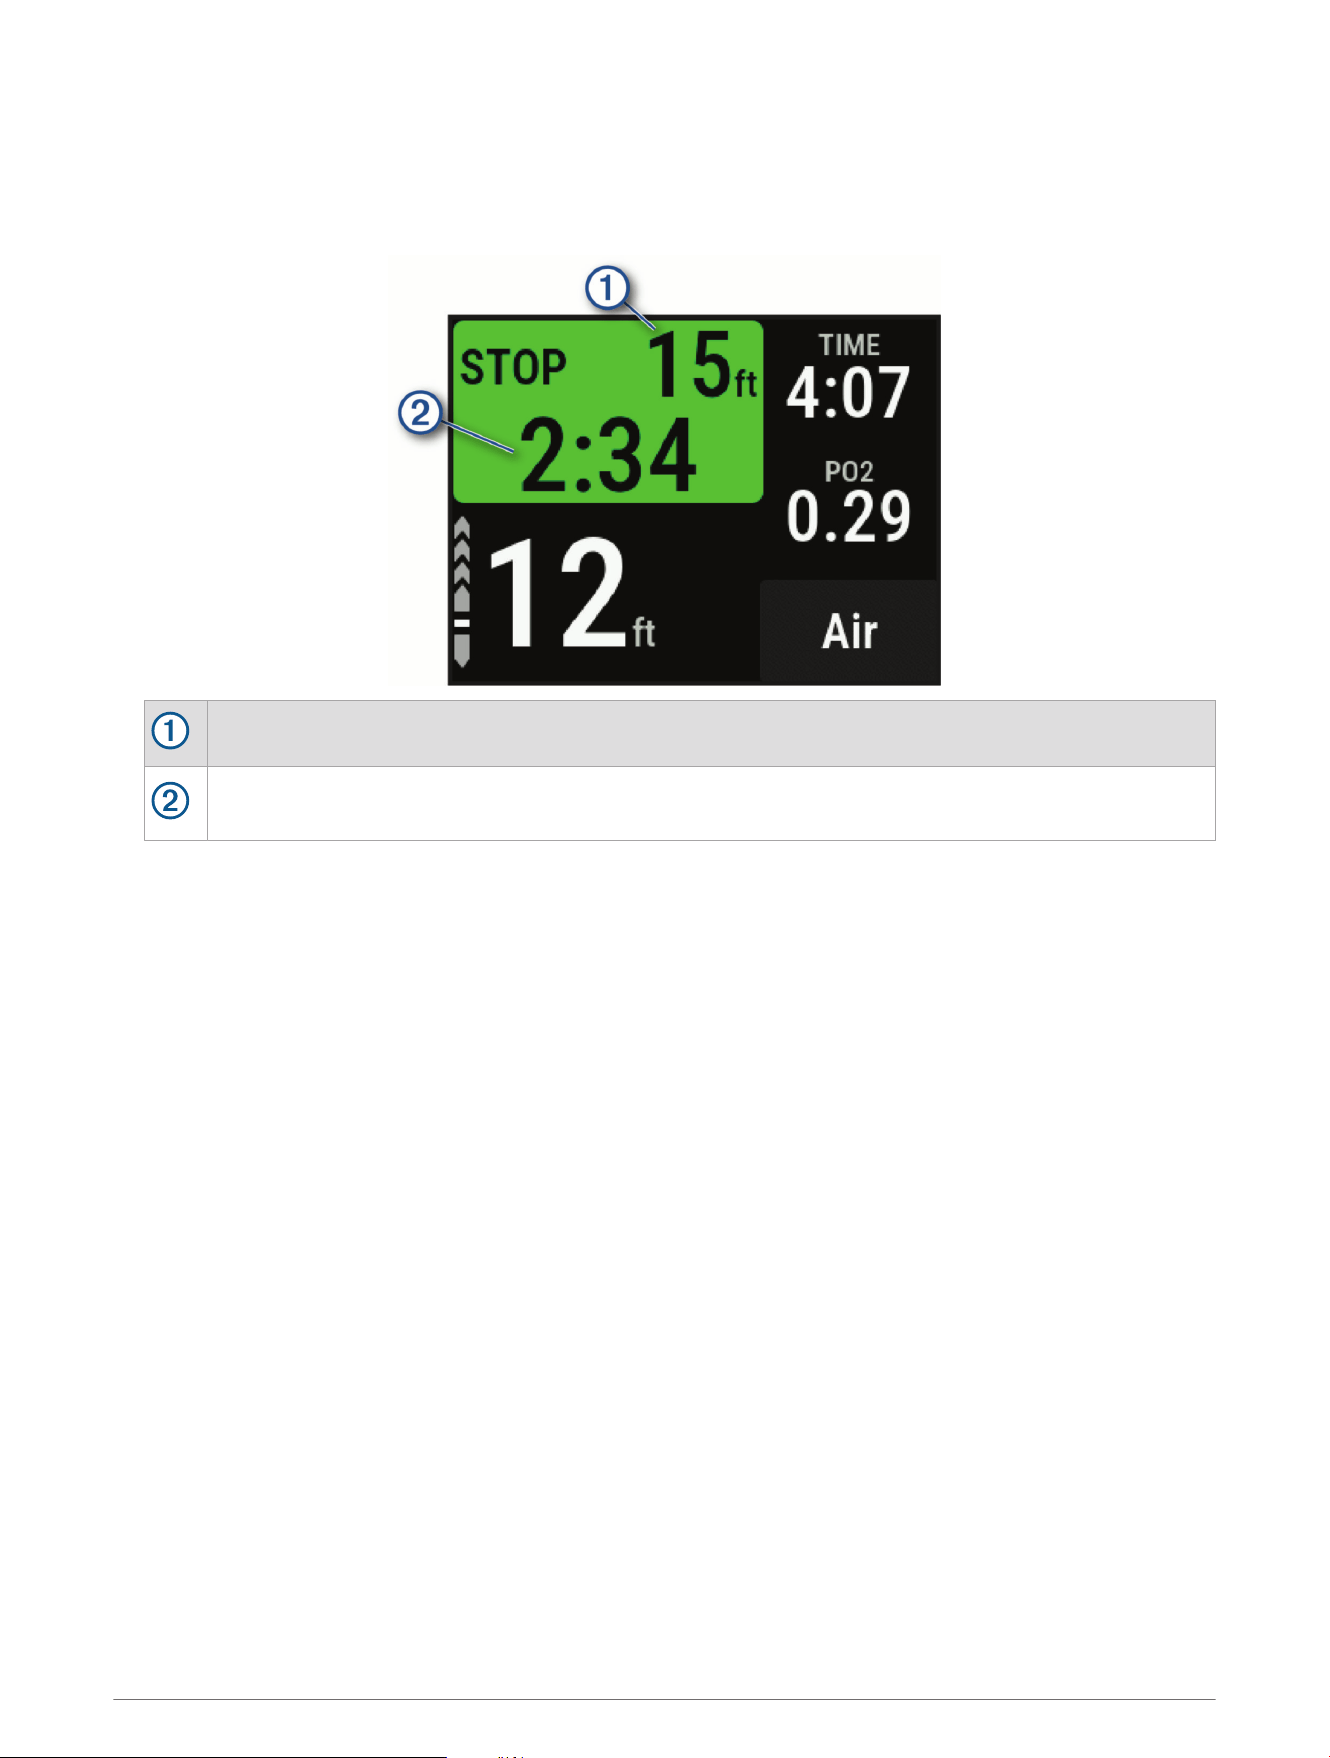
Performing a Safety Stop
You should perform a safety stop during every dive to help reduce the risk of decompression sickness.
1 After a dive of at least 11 m (35 ft.), ascend to 5 m (15 ft.).
Safety stop information appears on the data screens.
The safety stop ceiling depth.
The safety stop timer.
When you are within 1 m (5 ft.) of the ceiling depth, the timer starts counting down.
2 Stay within 2 m (8 ft.) of the safety stop ceiling depth until the safety stop timer reaches zero.
NOTE: If you ascend more than 3 m (8 ft.) above the safety stop ceiling depth, the safety stop timer pauses,
and the device alerts you to descend below the ceiling depth. If you descend below 11 m (35 ft.), the safety
stop timer resets.
3 Continue ascending to the surface.
Diving 13
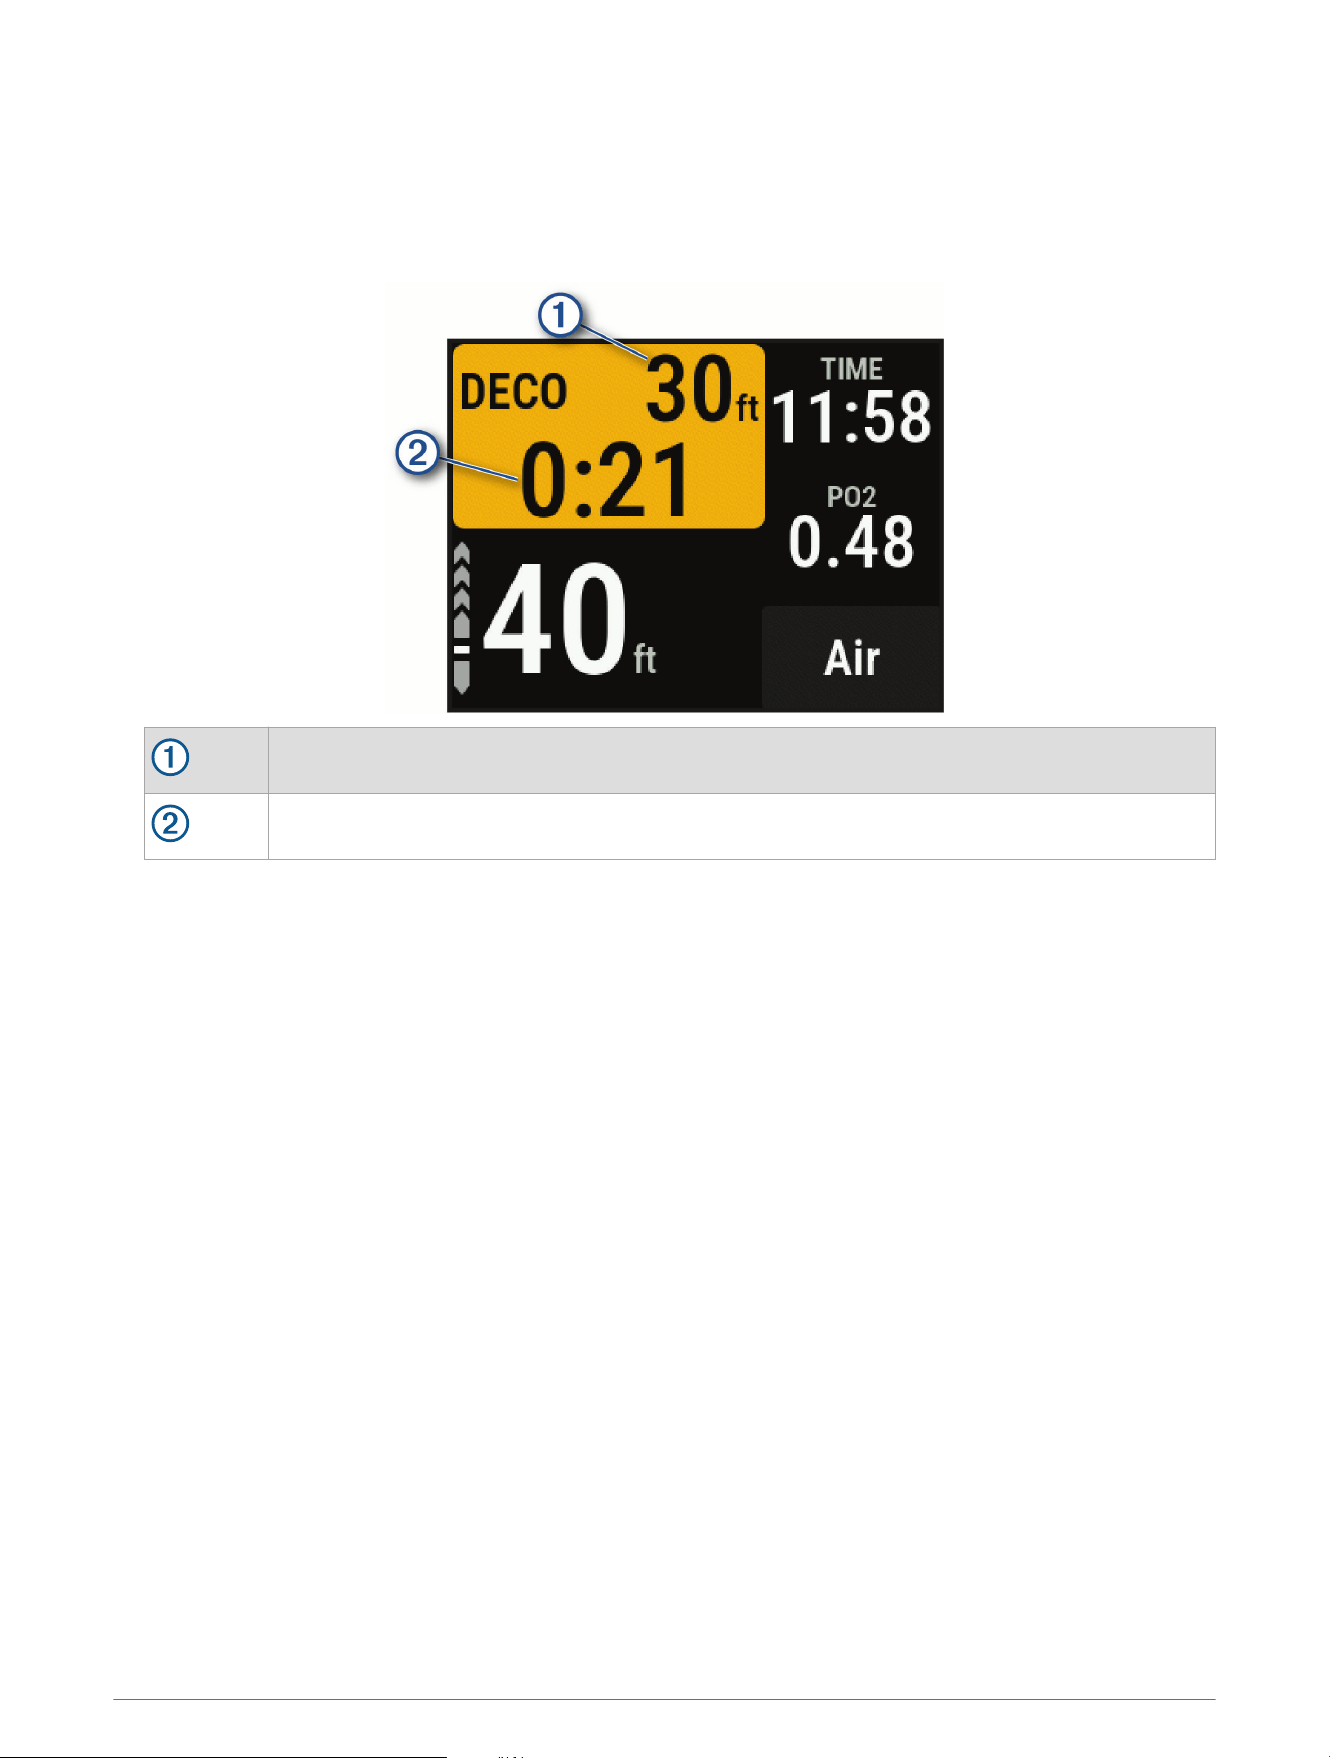
Performing a Decompression Stop
You should always perform all the required decompression stops during a dive to help reduce the risk of
decompression sickness. Missing a decompression stop adds significant risk.
1 When you exceed the no-decompression limit (NDL) time, begin your ascent.
Decompression stop information appears on the data screens.
The decompression stop ceiling depth.
The decompression stop timer.
2 Stay within 0.6 m (2 ft.) of the decompression stop ceiling depth until the decompression stop timer reaches
zero.
NOTE: If you ascend more than 0.6 m (2 ft.) above the decompression stop ceiling depth, the decompression
stop timer pauses, and the device alerts you to descend below the ceiling depth. The depth and ceiling depth
flash red until you are within the safe margin.
3 Continue ascending to the surface or the next decompression stop.
14 Diving
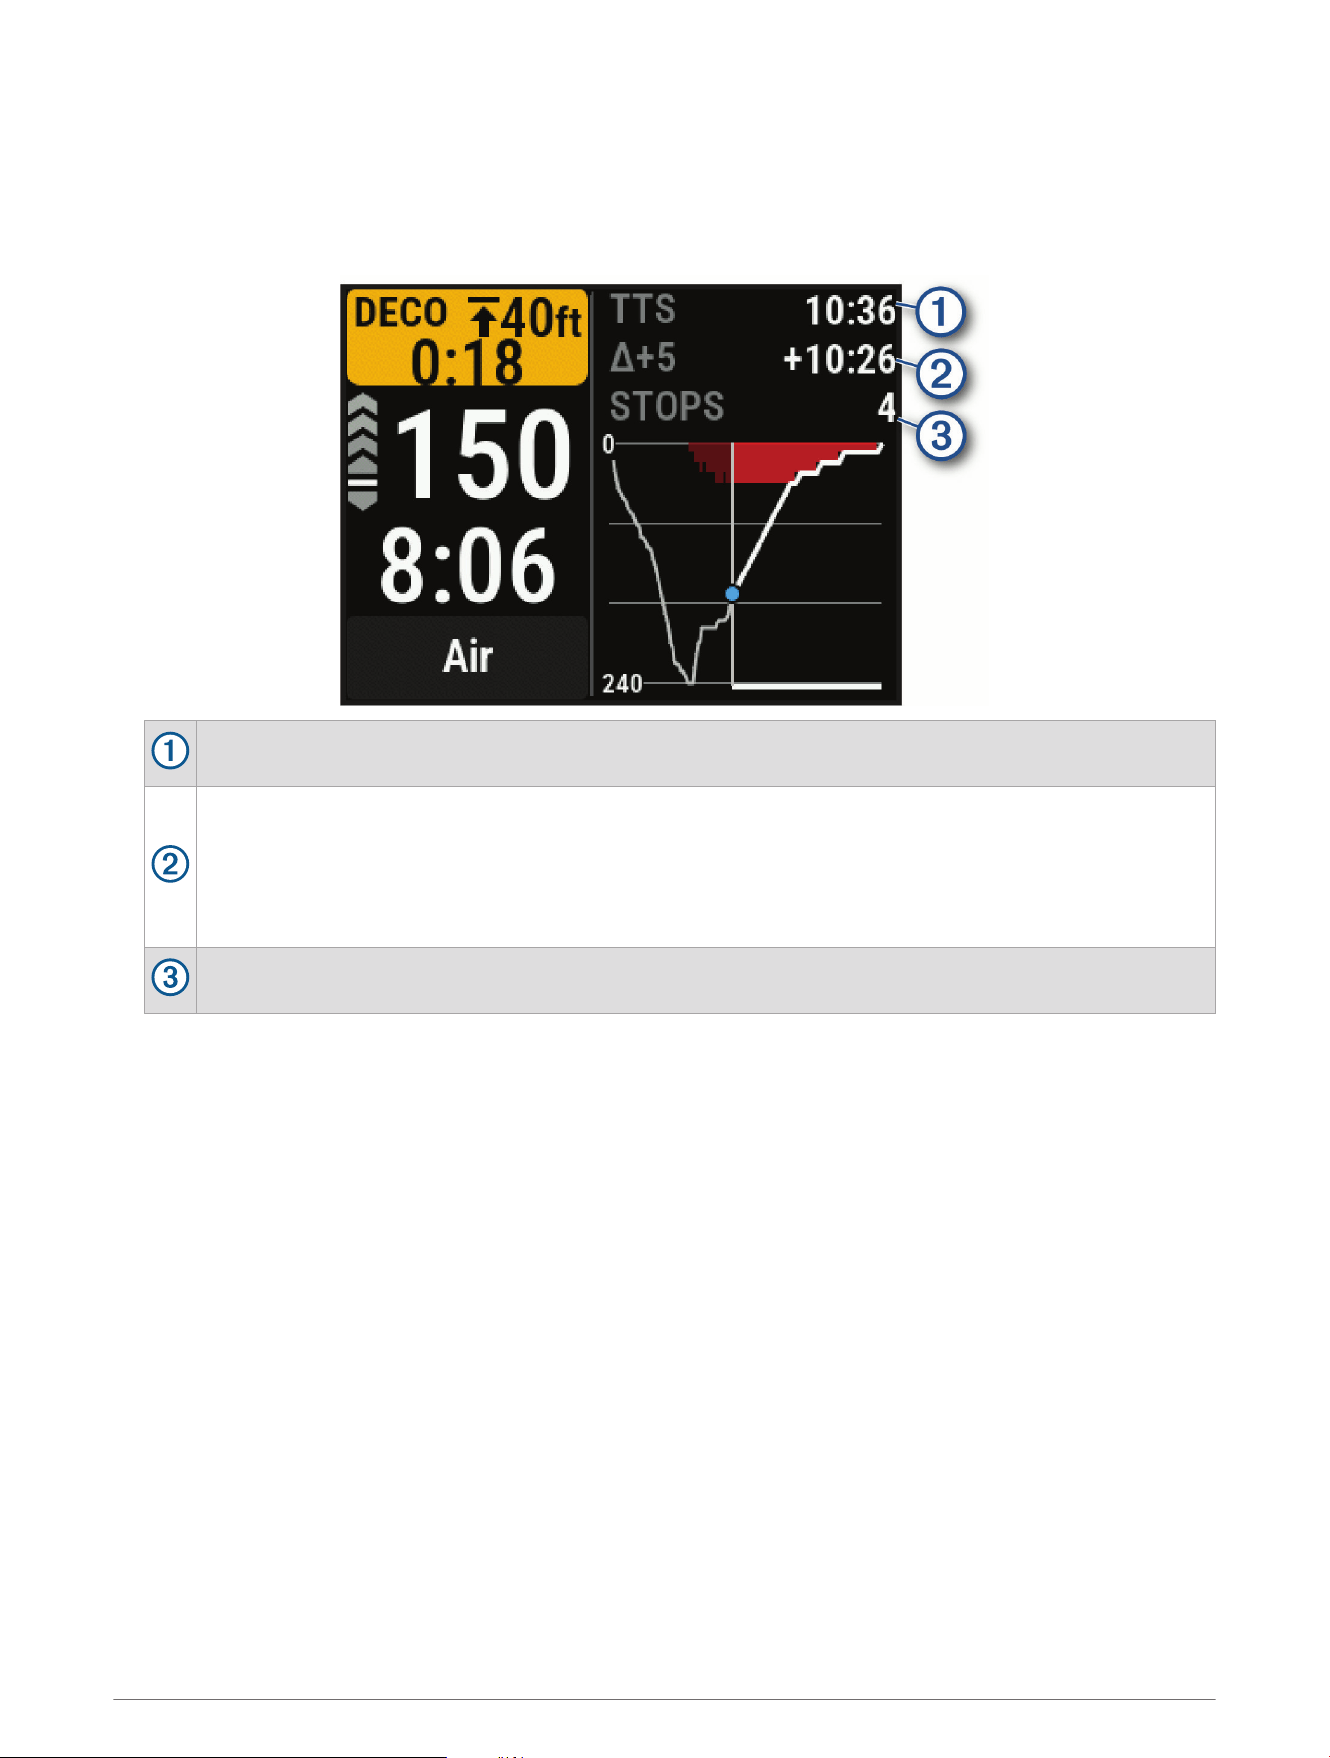
Viewing Your Dynamic Depth
During a gas dive, the dynamic depth data screen displays your depth profile for the dive so far, along with the
projected ascent plan to the surface. The ascent plan shows required decompression stops or the safety stop
(if configured), as well as upcoming gas switches.
During a gas dive, press NEXT to view the dynamic depth data screen.
The amount of time required to safely ascend to the surface, including decompression stops.
The difference between the amount of time required to safely ascend to the surface, and the amount
of time required to safely ascend to the surface if you remain at your current depth for five minutes.
When you are not in a decompression stop, this field is replaced with the NDL Δ 3M or NDL Δ 10FT
data field. This is your No Decompression Limit (NDL) time if you ascend 3 m (10 ft.) from your
current depth.
Your upcoming stops.
Marking a Dive Event
You can use the bookmark shortcut to mark an event during your dive. For example, you can use it to mark when
you see a point of interest or reach a specific point in the dive.
1 Customize a button combination for the bookmark feature (Dive Setup, page4).
2 During a dive, hold the button combination you customized to bookmark an event.
A log is created, and the bookmark appears as an event for the dive in the dive log app (Viewing the Dive Log
App, page17).
Diving 15

Viewing the Surface Interval App
The surface interval app shows your nitrogen (N2) and helium (He) tissue load level, current oxygen toxicity
units (OTU), and central nervous system (CNS) percentage.
NOTE: The OTU accumulated during a dive expire after 24 hours.
1 Select SI.
Green: 0 to 79% tissue load.
Yellow: 80 to 99% tissue load.
Red: 100% or greater tissue load.
Green: 0 to 249 OTU.
Yellow: 250 to 299 OTU.
Red: 300 or greater OTU.
Green: 0 to 79% CNS oxygen toxicity.
Yellow: 80 to 99% CNS oxygen toxicity.
Red: 100% or greater CNS oxygen toxicity.
2 Press NEXT to view your no-fly time remaining and the time of day the no-fly period ends.
16 Diving

Viewing the Dive Log App
The dive log app displays summaries of your recently recorded dives.
1 Select Dive Log to view your most recent dive.
2 If necessary, press NEXT to select a different dive.
3 Press ENTER to view an overview and depth graph of the activity.
4 Select an option:
• To view a timeline of significant events for the dive, such as when you reached your maximum depth and
when a decompression stop began, select Events.
• To view a temperature graph for the dive, select Temperature.
• To view the entry and exit locations for the dive, select Location.
NOTE: The dive computer only shows your entry and exit locations if you waited for GPS signals before
and after the dive.
• To view additional information for the dive, select All Stats.
• To remove the activity from your dive computer, select Menu > Delete.
NOTE: Deleting an activity from the dive log app does not impact tissue loading calculations.
Dive Planning
You can plan for future dives using your dive computer, such as calculating your breathing gas or no-
decompression limit (NDL) times.
Calculating NDL Time
You can calculate the no-decompression limit (NDL) time or maximum depth for a future dive. These
calculations are not saved or applied to your next dive.
1 From the home screen, scroll down to the extended app list.
2 Select Plan Dive > Compute NDL.
3 Select an option:
• To calculate NDL based on your current tissue load, select Diving Now.
• To calculate NDL based on your tissue load at a future time, select Enter Surf. Interval, and enter your
surface interval time.
4 Enter an oxygen percentage.
5 Select an option:
• To calculate the NDL time, select Enter Depth, and enter the planned depth for your dive.
• To calculate the maximum depth, select Enter Time, and enter your planned dive time.
The NDL countdown clock, depth, and maximum operating depth (MOD) appear.
NOTE: If the planned depth exceeds the MOD of the dive computer or the breathing gas, the planned depth
appears in red.
6 Press ENTER.
7 Select an option:
• To exit, select Done.
• To add intervals to your dive, select Add Repeat Dive, and follow the on-screen instructions.
Diving 17

Calculating Your Breathing Gas
You can calculate the PO2 value, oxygen percentage, or maximum depth for a dive by adjusting two of the three
values. The calculations are affected by the water type setting in the Dive Setup menu (Dive Setup, page4).
1 From the home screen, scroll down to the extended app list.
2 Select Plan Dive > Calculate Gas.
3 Press PREV or NEXT, and select an option to calculate:
• Select PO2.
• Select O2%.
• Select Depth.
4 Press PREV or NEXT to edit the first value.
5 Press ENTER, then press PREV or NEXT to edit the second value.
As you edit the values, the device calculates an adjusted value for the highlighted option.
6 If necessary, press BACK to calculate the value for a different option.
Creating a Decompression Plan
You can create open-circuit decompression plans and save them for future dives.
1 From the home screen, scroll down to the extended app list.
2 Select Plan Dive > Deco Plans > Add New.
3 Enter a name for the decompression plan.
4 Select an option:
• To enter the maximum partial pressure of oxygen in bars, select PO2.
NOTE: The dive computer uses the PO2 value for gas switching.
• To enter your level of conservatism for decompression calculations, select Conservatism.
• To enter your gas blends, select Gases.
• To enter the depth of your last decompression stop, select Last Deco Stop.
• To enter the maximum dive depth, select Bottom Depth.
• To enter the time at the bottom depth, select Bottom Time.
5 Select Save.
Using Decompression Plans
1 From the home screen, scroll down to the extended app list.
2 Select Plan Dive > Deco Plans.
3 Select a decompression plan.
4 Select an option:
• To view the decompression plan, select View.
• To use the decompression plan settings for a dive mode, select Apply.
• To change the decompression plan details, select Edit.
• To edit the name of the decompression plan, select Rename.
• To remove the decompression plan, select Delete > Yes.
18 Diving

Finding Nearby Dive Sites
You can search for nearby dive sites and points of interest.
1 From the home screen, scroll down to the extended app list.
2 Select Plan Dive > Nearby Dive Sites.
3 Select an option:
• To search for a dive site by name, select Spell Search, and enter the name.
• To search for dive sites by category, select a category.
• To search the list of all dive sites, select All Categories.
A list of dive sites near your current location appears.
4 Select a location from the search results.
5 Select .
6 Select an option:
• To save the location of the dive site, select .
• To navigate to the dive site, select Navigate To.
Altitude Diving
At higher altitudes, the atmospheric pressure is lower, and your body contains a larger amount of nitrogen than
it would at the start of a dive at sea level. The dive computer accounts for altitude changes automatically using
the barometric pressure sensor. The absolute pressure value used by the decompression model is not affected
by the altitude or the gauge pressure displayed on the dive computer.
Diving 19
Dive Alerts
Alert Message Cause Dive Computer Action
None You completed the decompression stop.
The decompression stop depth and
time flash.
None
Your partial pressure of oxygen (PO2)
value is above the specified warning value.
Your PO2 value flashes yellow.
%1 OTU accumulated.
Your oxygen toxicity units are above the
safe limit. During a dive, "%1" is replaced
with the number of units accumulated.
The alert appears every two minutes,
up to three times.
250 OTU accumulated.
Your oxygen toxicity units (OTU) are at 250
units, and you are nearing the safe limit of
300 units.
None
5 minutes to NDL.
You have 5 minutes of no decompression
limit (NDL) time remaining.
None
10 minutes to NDL.
You have 10 minutes of no decompression
limit (NDL) time remaining.
None
Approaching deco stop.
You are within one stop interval (3m or
9.8ft.) of the decompression stop depth.
None
ASCEND OR SWITCH
GAS
PO2 is high.
Your PO2 value is above the specified
critical value.
Your PO2 value flashes red. The alert
appears every 30 seconds, up to three
times, until you ascend to a safe level.
Battery is low. Less than 20% battery power remains.
The alert appears when the dive
computer is below 20% battery power.
Continuing on %1. Switch
at any time.
You selected Not Now when prompted
to switch to a higher-oxygen gas, or you
ignored the prompt.
The gas does not change. You will be
prompted again in two minutes.
CNS toxicity at 80%.
Your central nervous system (CNS) oxygen
toxicity is at 80% of the safe limit.
The alert appears during a dive and on
the dive pre-check screen for your next
dive.
CNS toxicity at %1%.
Your CNS oxygen toxicity is too high.
During a dive, "%1" is replaced with your
current CNS percentage.
The alert appears every two minutes,
up to three times.
Decompression cleared. You completed all decompression stops. None
DESCEND OR SWITCH
GAS
PO2 is low.
Your PO2 value is below 0.18 bar.
If you are within the first two minutes
of your dive, your PO2 value flashes
yellow. Otherwise, your PO2 value
flashes red.
The alert appears every 30 seconds, up
to three times, until you descend to a
safe level or switch gases.
DESCEND TO %1
You are above your deco
ceiling.
You are more than 0.6m (2ft.) above
the decompression ceiling. During a dive,
"%1" is replaced with the depth you should
descend to.
The current depth and stop depth flash
red. If you remain above the decom
pression ceiling for more than three
minutes, the decompression lockout
feature goes into effect.
20 Diving

Alert Message Cause Dive Computer Action
Descend to complete
safety stop.
You are more than 2 m (8 ft.) above the
safety stop ceiling.
The current depth and stop depth turn
yellow.
Dive will end in %1
seconds.
The dive computer will automatically end
and save the dive. During a dive, "%1" is
replaced by the number of seconds.
None
Do not dive. Failed to
read depth sensor.
The dive computer has invalid or missing
depth sensor data before you start a dive
activity.
Do not start a dive. Call Garmin
®
Product Support.
EVALUATE DIVE CONDI
TIONS
Dive computer was
rebooted.
The dive computer rebooted during the
dive.
The dive computer simulates the
dive for the time it was rebooting.
Since other alerts may not have been
triggered, evaluate your current depth
and dive conditions.
NDL exceeded. Deco
required.
You have exceeded your NDL time.
The dive computer begins providing
decompression stop guidance.
SAFELY END DIVE
Battery critically low.
Less than 10% battery power remains.
The alert appears when the dive
computer is below 10% battery power.
SAFELY END DIVE
Dive computer error.
The computer encountered an issue that it
could not recover from.
Use a backup dive computer or dive
plan and end your dive. Residual
tissue loading was cleared. If the
issue continues, call Garmin Product
Support.
SAFELY END DIVE
Failed to read depth
sensor.
The dive computer has invalid or missing
depth sensor data after you have started a
dive activity.
Use a backup dive computer or dive
plan and end your dive. Call Garmin
Product Support.
Safety stop cleared. You completed the safety stop. None
Safety stop started.
You ascended above 6 m (20 ft.) without
other decompression guidance.
The safety stop countdown timer
begins, if configured.
SLOW YOUR ASCENT
Ascending too fast.
You are ascending faster than 9.1m/min.
(30ft./min.) for more than 5 seconds.
None
Switch to %1 now?
In a multi-gas dive, a gas with a higher
oxygen content is now safe to breathe.
During a dive, "%1" is replaced with the
name of the gas.
You can switch gases now, or wait
to switch gases later in the dive. A
confirmation message for your choice
appears.
This pool dive will not be
saved to the dive log.
The dive computer is in pool dive mode.
The dive computer will not save the
current dive to the dive log.
Diving 21
Dive Terminology
Central nervous system (CNS): A measure of central nervous system oxygen toxicity caused by exposure to
increased partial pressure of oxygen (PO2) while diving.
Maximum operating depth (MOD): The greatest depth at which a breathing gas can be used before the partial
pressure of oxygen (PO2) exceeds the safe limit.
No decompression limit (NDL): A dive that does not require decompression time while ascending to the
surface.
Oxygen toxicity units (OTU): A measure of pulmonary oxygen toxicity caused by exposure to increased partial
pressure of oxygen (PO2) while diving. One OTU is equivalent to breathing 100% oxygen at 1 ATM for 1
minute.
Partial pressure of oxygen (PO2): The pressure of the oxygen in the breathing gas, based on depth and oxygen
percentage.
Surface interval (SI): The amount of time that has elapsed since the completion of the last dive.
Time to surface (TTS): The estimated amount of time required to safely ascend to the surface.
CAUTION
Decompression stops are included in the calculations, but safety stops are not.
Compass
Setting the Compass Heading
1 From the home screen, scroll down to the extended app list.
2 Select Compass.
3 Point the top of the dive computer toward your heading.
4 Select > Set Heading.
When you deviate from the heading, the compass displays the direction from the heading and degree of
deviation. If you begin a dive, the compass heading is retained.
Setting the North Reference
You can set the directional reference used in calculating heading information.
1 From the home screen, scroll down to the extended app list.
2 Select Compass > > Heading Setup > North Reference.
3 Select an option:
• To set magnetic north as the heading without declination, select Magnetic.
• To set grid north (000º) as the heading reference, select Grid.
• To set the magnetic variation value manually, select User > Enter Magnetic Variation, and enter the
magnetic variation.
• To set geographic north as the heading reference, select True.
Calibrating the Compass
NOTICE
Calibrate the electronic compass outdoors. To improve heading accuracy, do not stand near objects that
influence magnetic fields, such as vehicles, buildings, and overhead power lines.
If you experience irregular compass behavior, for example, after moving long distances or after extreme
temperature changes, you can manually calibrate the compass.
1 From the home screen, scroll down to the extended app list.
2 Select Compass > > Calibrate Compass.
3 Follow the on-screen instructions.
22 Compass

Navigation
You can use the GPS navigation features on your device to save locations, navigate to locations, and find your
way home.
Navigating to a Location
1 From the home screen, scroll down to the extended app list.
2 Select Navigate > .
3 Select an option:
• To mark your current location so you can navigate back to it later, select Current Location.
• To set a bearing to use as a reference point for navigation, select Set Bearing, and enter the heading and
distance for the bearing.
• To navigate to the entry point for your most recent dive activity, select Last Entry Point.
• To navigate to the exit point for your most recent dive activity, select Last Exit Point.
• To navigate to a dive site, select Nearby Dive Sites, and search for a dive site (Finding Nearby Dive Sites,
page19).
• To navigate to the entry or exit point for a previous dive activity, select Dive Log, select a dive activity, and
select the entry or exit point.
• To navigate to a saved location, select the location.
You can save a location in the controls menu (Controls, page2).
Editing a Saved Location
You can view, edit, and delete saved locations.
1 From the home screen, scroll down to the extended app list.
2 Select Waypoint Manager.
3 Select a location.
4 Select > Edit Location.
5 Select an option to edit.
Connectivity
Connectivity features are available for your dive computer when you pair with your compatible phone (Pairing
Your Phone, page24).
Phone Connectivity Features
Phone connectivity features are available for your Descent dive computer when you pair it using the Garmin
Dive
™
app (Pairing Your Phone, page24).
Data uploads to the Garmin Dive app: Automatically syncs your data with the Garmin Dive app and your Garmin
Connect
™
account.
Software updates: Downloads and installs the latest software.
Notifications: Alerts you to notifications from your phone, including calls, texts, and apps, based on your phone
notification settings.
Navigation 23

Pairing Your Phone
To use the connected features on your dive computer, you must pair it directly through the Garmin Dive app,
instead of from the Bluetooth settings on your phone.
1 Select an option:
• During the initial setup on your dive computer, scan the QR code with your phone.
• If you previously skipped the pairing process, scroll down from the home screen to view the extended app
list, select Settings > Connectivity > Phone > Pair Phone, and scan the QR code with your phone.
2 Follow the on-screen instructions to complete the pairing and setup process.
Garmin Dive App
The Garmin Dive app allows you to upload your dive logs from your compatible Garmin device. You can
add more detailed information about your dives, including environmental conditions, photos, notes, and dive
buddies. You can use the map to browse for new dive locations, and view the location details and photos shared
by other users.
The Garmin Dive app syncs your data with your Garmin Connect account. You can download the Garmin Dive
app from the app store on your phone (garmin.com/diveapp).
Wireless Sensors
Your dive computer can be paired and used with compatible wireless sensors using ANT+
®
or Bluetooth
technology.
For information about specific Garmin sensor compatibility, purchasing, or to view the owner's manual, go to
buy.garmin.com for that sensor.
inReach
®
Remote
The inReach remote function allows you to control your inReach device using your Descent device. Go to
buy.garmin.com to purchase a compatible inReach device.
Using the inReach Remote
1 Turn on the inReach satellite communicator.
2 From the home screen on your dive computer, scroll down to the extended app list.
3 Select inReach Remote > Yes.
The dive computer searches for your inReach satellite communicator.
4 Select your inReach satellite communicator.
5 Once your inReach satellite communicator is paired, select an option:
• To send an SOS message, select SOS > Initiate SOS.
NOTE: You should only use the SOS function in a real emergency situation.
• To send a text message, select Messages > Type Message, select the message contacts, and enter the
message text or select a quick text option.
• To send a preset message, select Messages > Send Preset, and select a message from the list.
• To view the timer and distance traveled during an activity, select Tracking.
Settings
From the home screen, scroll down to the extended app list, and select Settings.
Dive Setup: Customizes the dive settings (Dive Setup, page4).
Sound and Vibe: Sets the dive computer sounds, such as button tones, alerts, and vibrations.
Display: Adjusts the screen settings (Display and Brightness Settings, page25).
Connectivity: Pairs your dive computer to a phone or wireless sensor (Connectivity, page23).
System: Sets the system settings, such as device language, satellite preferences, and time format (System
Settings, page25).
24 Settings

Display and Brightness Settings
From the home screen, scroll down to the extended app list, and select Settings > Display.
Brightness: Sets the brightness level of the screen.
Auto Backlight: Automatically adjusts the backlight brightness based on the ambient light.
Surface Screen Timeout: Sets the length of time before the screen turns off when not in dive mode.
NOTE: The dive computer turns off entirely when there are no button presses for 30 minutes outside of a
dive.
Flip Screen: Rotates the screen by 180 degrees, and reverses the button functions.
System Settings
From the home screen, scroll down to the extended app list, and select Settings > System.
Language: Sets the language displayed on the dive computer (My device is in the wrong language, page34).
Shortcuts: Assigns button shortcuts for use on the surface.
Compass: Calibrates the compass and sets the north reference of the compass (Compass, page22).
Satellites: Sets the default satellite system (Satellite Settings, page26).
Time: Sets the time format and time zone.
Passcode: Sets a four-digit passcode to secure your personal information (Setting Your Device Passcode,
page25).
Advanced: Sets the unit and position format preferences, sets the dive computer to use MTP (media transfer
protocol) or Garmin mode when connected to a computer, and sets whether the dive computer automatically
powers on when it detects water.
Reset: Resets tissues, deletes data, and resets settings (Resetting All Default Settings, page26).
Check for Updates: Downloads and installs software updates when your dive computer is paired to your phone.
About: Displays device, software, license, and regulatory information.
Setting Your Device Passcode
NOTICE
If you enter your passcode incorrectly three times, the dive computer locks temporarily. After five incorrect
attempts, the dive computer locks until you reset your passcode in the Garmin Dive app. If you have not paired
your dive computer with your phone, the dive computer deletes your data and resets to the factory default
settings after five incorrect attempts.
You can set up a passcode to secure your personal information.
After setting up a passcode, you can still start a dive without entering the passcode.
1 From the home screen, scroll down to the extended app list.
2 Select Settings > System > Passcode > Set Passcode.
3 Enter a four-digit passcode.
By default, you must enter the passcode immediately after you turn on the dive computer or when the screen
turns back on. You can set a time interval before a passcode is required using the Require Passcode setting.
Changing Your Device Passcode
You must know your existing passcode to change it. If you forget your passcode or make too many incorrect
passcode attempts, you must reset it in the Garmin Dive app.
1 From the home screen, scroll down to the extended app list.
2 Select Settings > System > Passcode > Change Passcode.
3 Enter your existing four-digit passcode.
4 Enter a new four-digit passcode.
Settings 25

Satellite Settings
You can change the satellite systems used by the dive computer. For more information about satellite systems,
go to garmin.com/aboutGPS.
From the home screen, scroll down to the extended app list, and select Settings > System > Satellites.
Off: Disables satellite systems.
GPS Only: Enables the GPS satellite system.
All Systems: Enables multiple satellite systems. Using multiple satellite systems together offers increased
performance in challenging environments and faster position acquisition than using GPS only. However,
using multiple systems can reduce battery life more quickly than using GPS only.
Disabling the Auto-boot When Wet Setting
When the Auto-boot When Wet setting is enabled, the dive computer turns on automatically when it detects
water. If you start a dive without turning on your dive computer, the dive computer uses the most recent surface
pressure to determine depth. For the most accurate depth information, turn on your dive computer manually,
especially after traveling. If necessary, you can disable the Auto-boot When Wet setting.
1 From the home screen, scroll down to the extended app list.
2 Select Settings > System > Advanced > Auto-boot When Wet.
A confirmation message appears.
The dive computer no longer turns on automatically when it is wet.
NOTE: Even when the Auto-boot When Wet setting is disabled, if the dive computer has turned off due to being
idle for 30 minutes, it still turns on automatically the next time it detects water.
Resetting All Default Settings
Before you reset all default settings, you should sync the dive computer with the Garmin Dive app to upload your
dive data.
You can reset all of the device settings to the factory default values.
1 From the home screen, scroll down to the extended app list.
2 Select Settings > System > Reset.
3 Select an option:
• To reset all of the device settings to the factory default values and save all user-entered information and
activity history, select Reset Default Settings.
• To delete your tissue load data for scuba diving, select Reset Tissues.
NOTE: You should reset your tissue load only if you do not plan to use the dive computer again in the
future. This can be useful for dive shops that provide dive computers for rent.
• To reset all of the device settings to the factory default values and delete all user-entered information and
activity history, select Delete Data and Reset Settings.
Viewing Device Information
You can view device information, such as the unit ID, software version, regulatory information, and license
agreement.
1 Hold BACK.
2 Select Settings > System > About.
Viewing E-label Regulatory and Compliance Information
The label for this device is provided electronically. The e-label may provide regulatory information, such as
identification numbers provided by the FCC or regional compliance markings, as well as applicable product and
licensing information.
1 Hold BACK.
2 From the settings menu, select System.
3 Select About.
26 Settings
Device Information
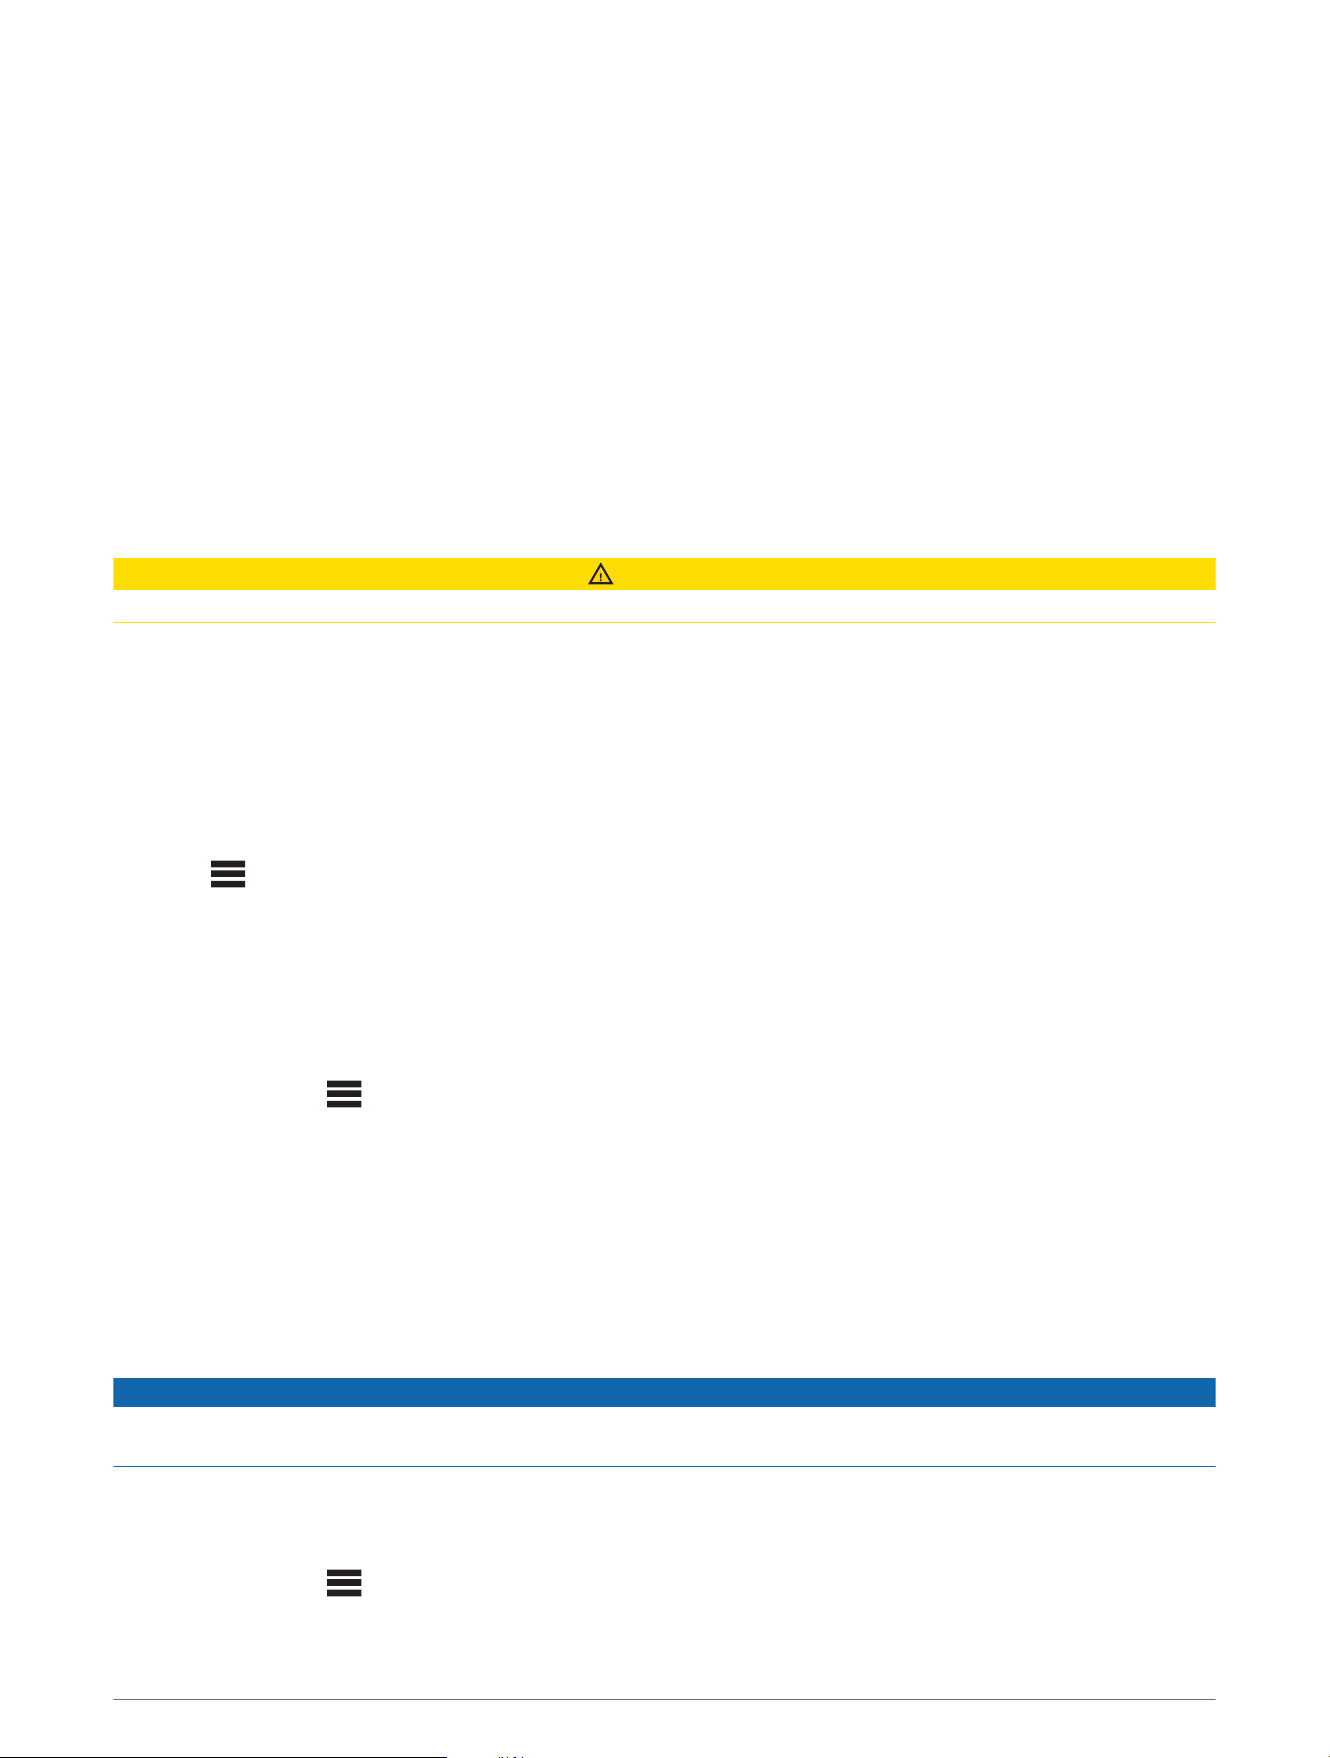
Charging the Device
WARNING
This device contains a lithium-ion battery. See the Important Safety and Product Information guide in the product
box for product warnings and other important information.
NOTICE
To prevent corrosion, thoroughly clean and dry the contacts and the surrounding area before charging or
connecting to a computer. Refer to the cleaning instructions (Device Care, page31).
1 Pinch the charging clip.
2 Align the clip with the contacts on the back of the device, and release the clip.
3 Plug the USB cable into a USB charging port.
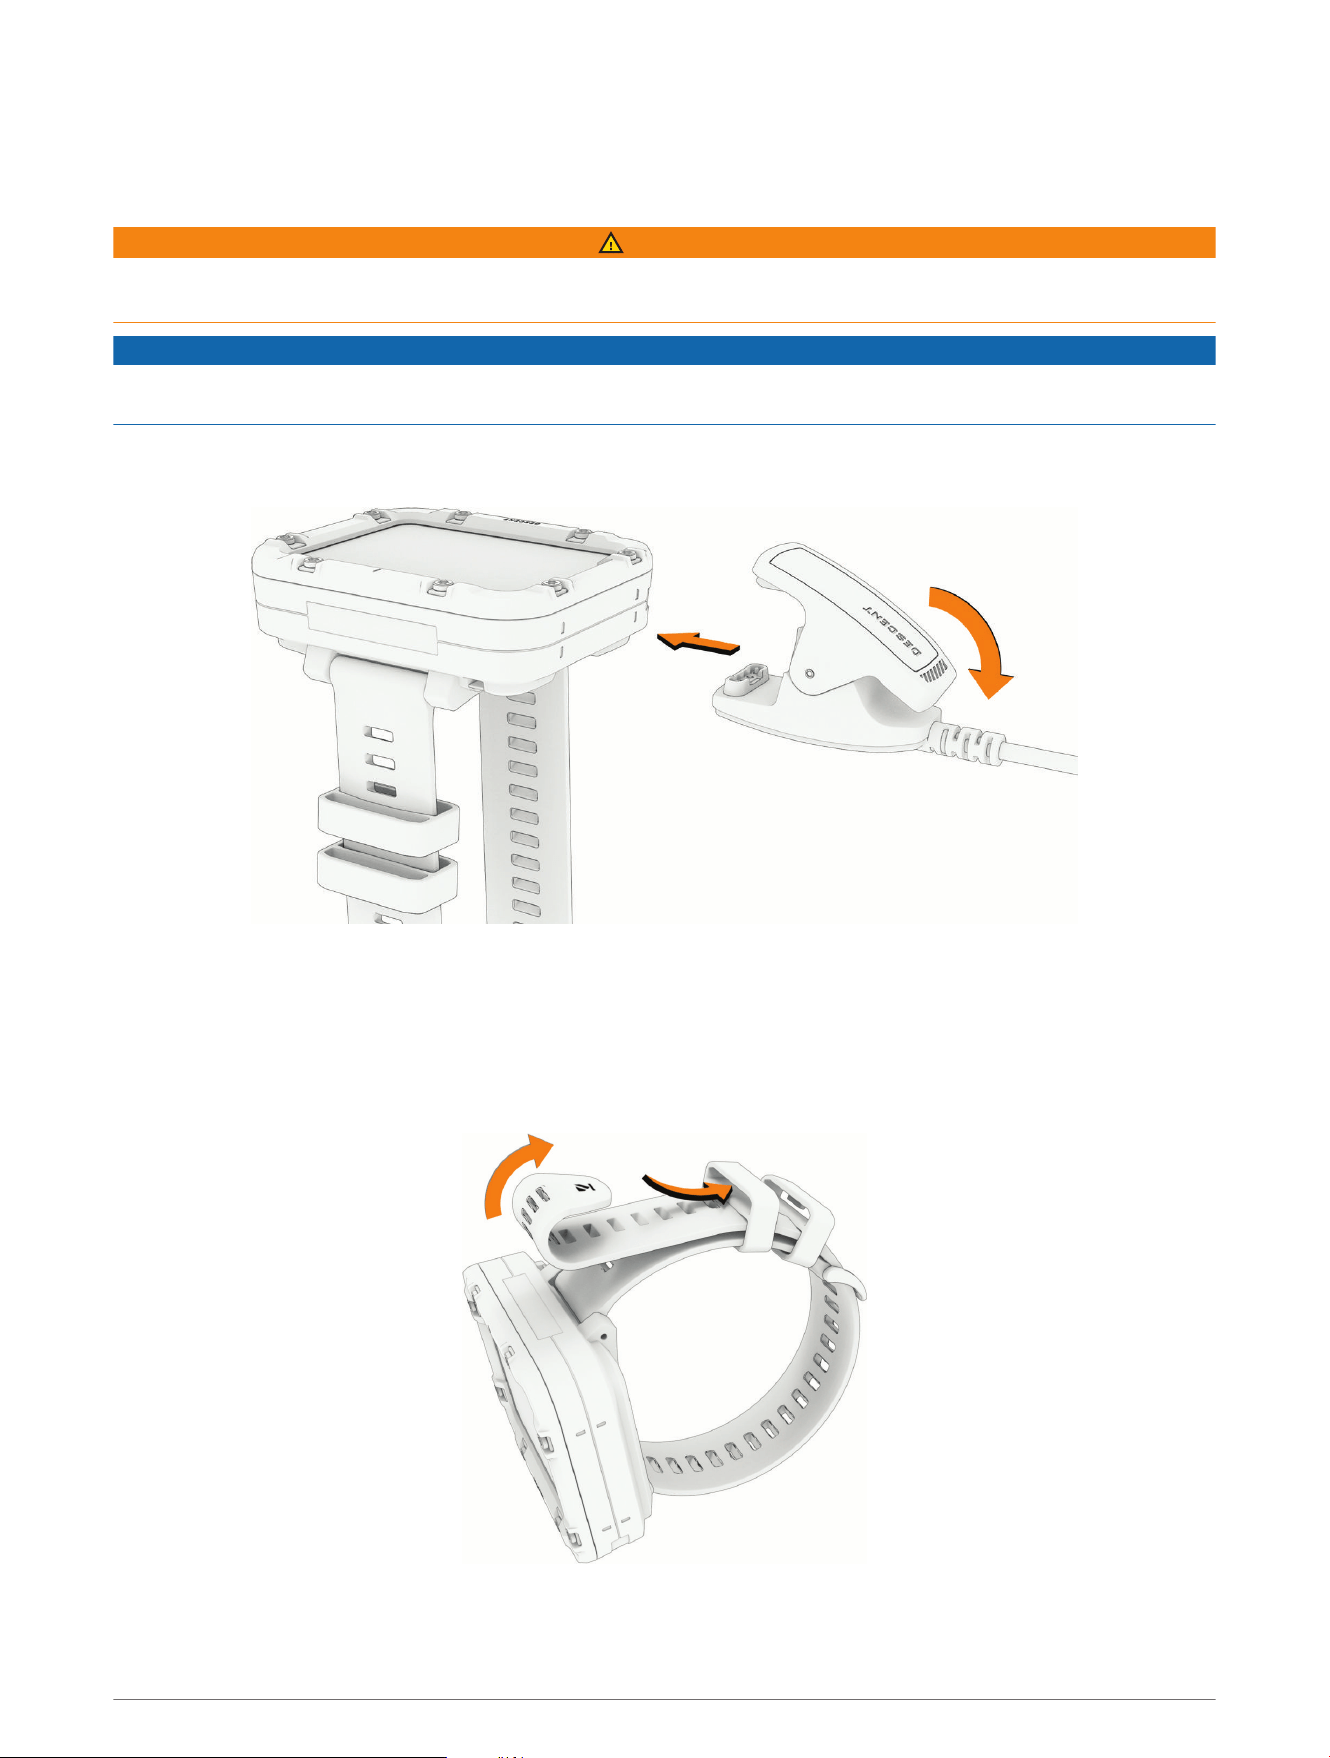
Wearing the Dive Computer
The dive computer has an extra long band that can be worn over a thick exposure suit.
1 Fasten the dive computer onto your wrist.
2 If necessary, route the end of the long band back through the top channel in the band keepers.
Device Information 27
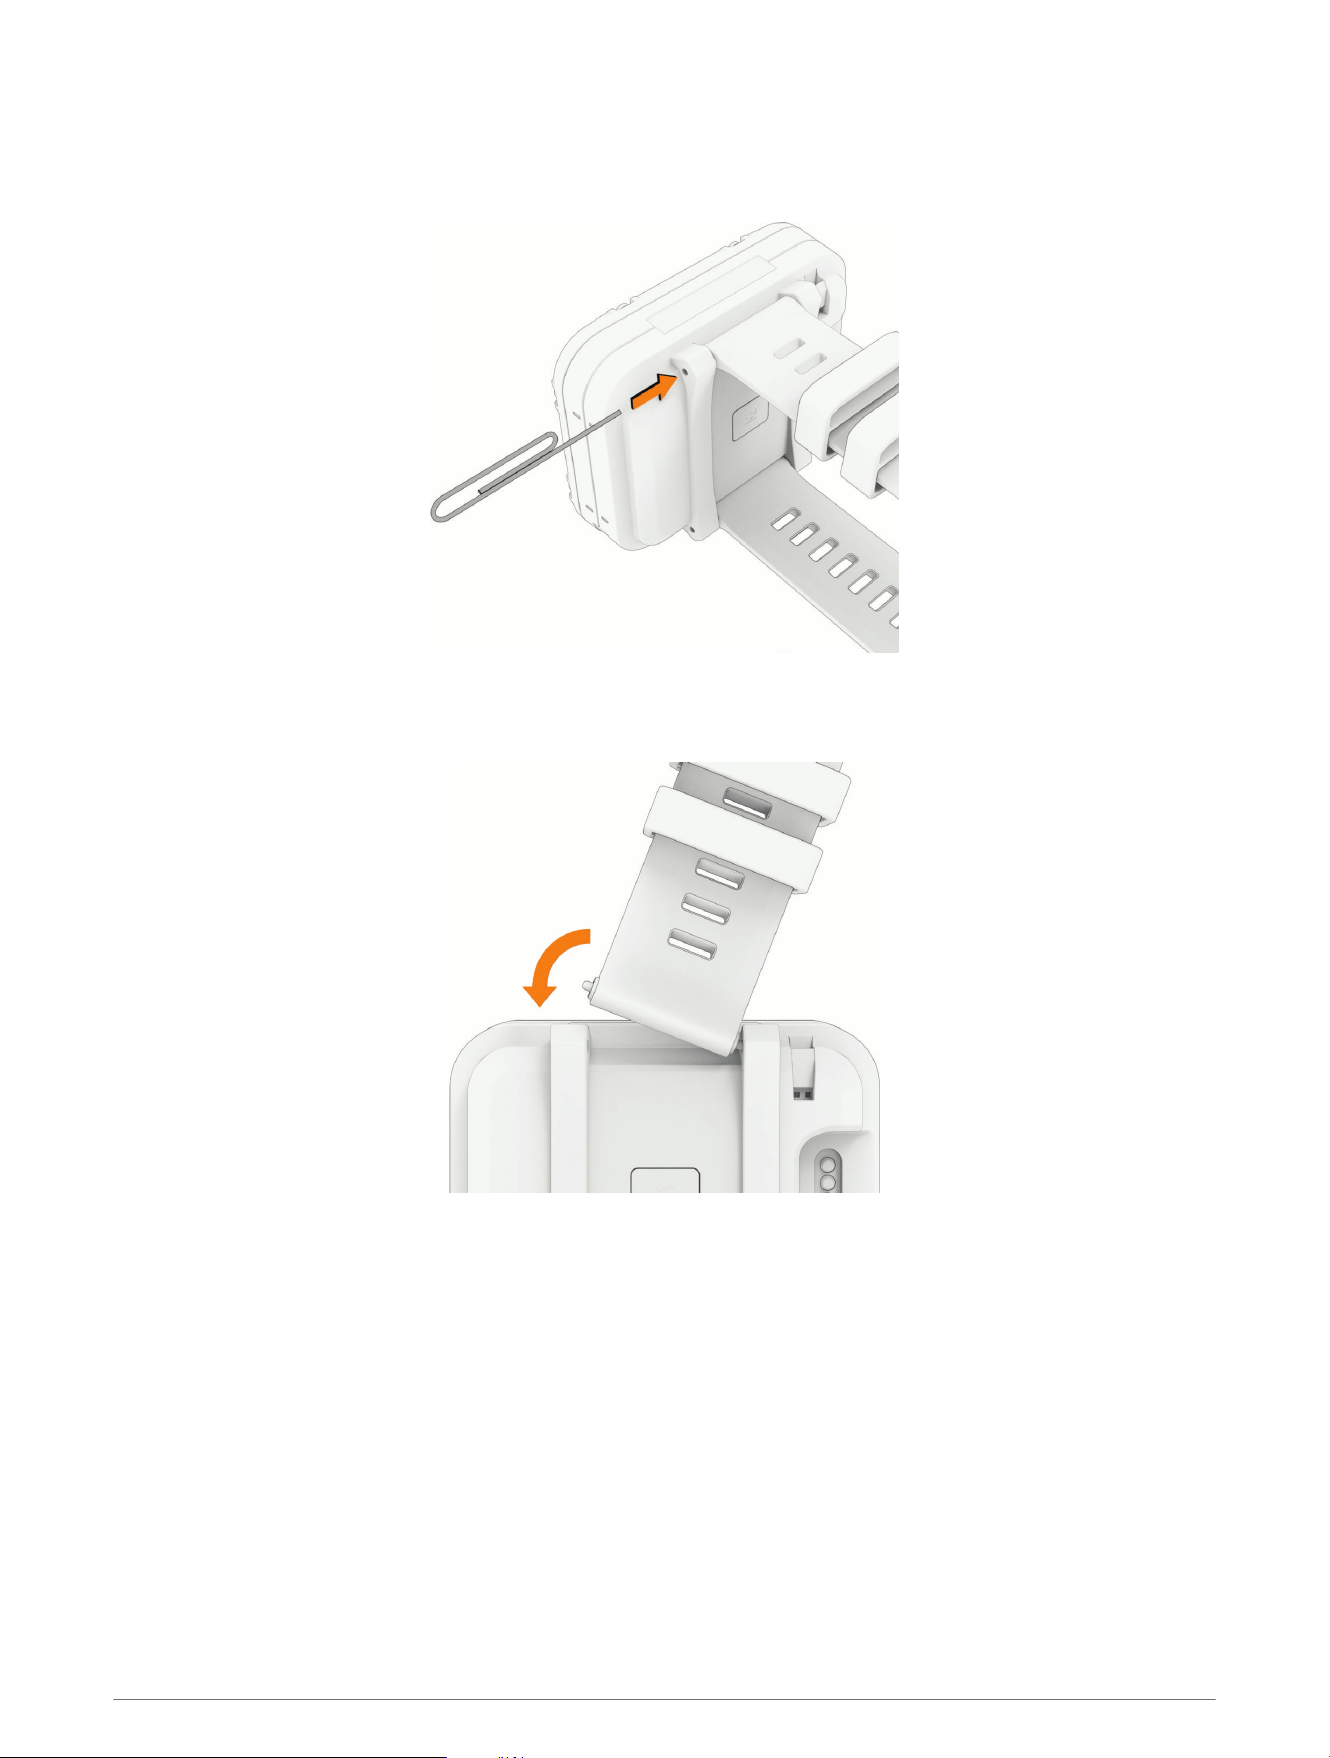
Changing the Bands
You can replace the bands with new Descent X30 bands or compatible QuickFit
®
26 mm bands.
1 Use a paper clip to push in one of the band pins, and remove the band from the device.
2 Select an option:
• To install a new Descent X30 band, align one side of the new band with the holes on the dive computer,
push in the exposed pin, and press the band into place.
NOTE: Make sure the band is secure. The pin should align with the holes on the dive computer.
• To install a compatible QuickFit band, remove the pin from the Descent X30 band, replace the pin on the
dive computer, and press the new band into place.
NOTE: Make sure the band is secure. The latch should close over the pin.
3 Repeat the steps to change the other band.
28 Device Information
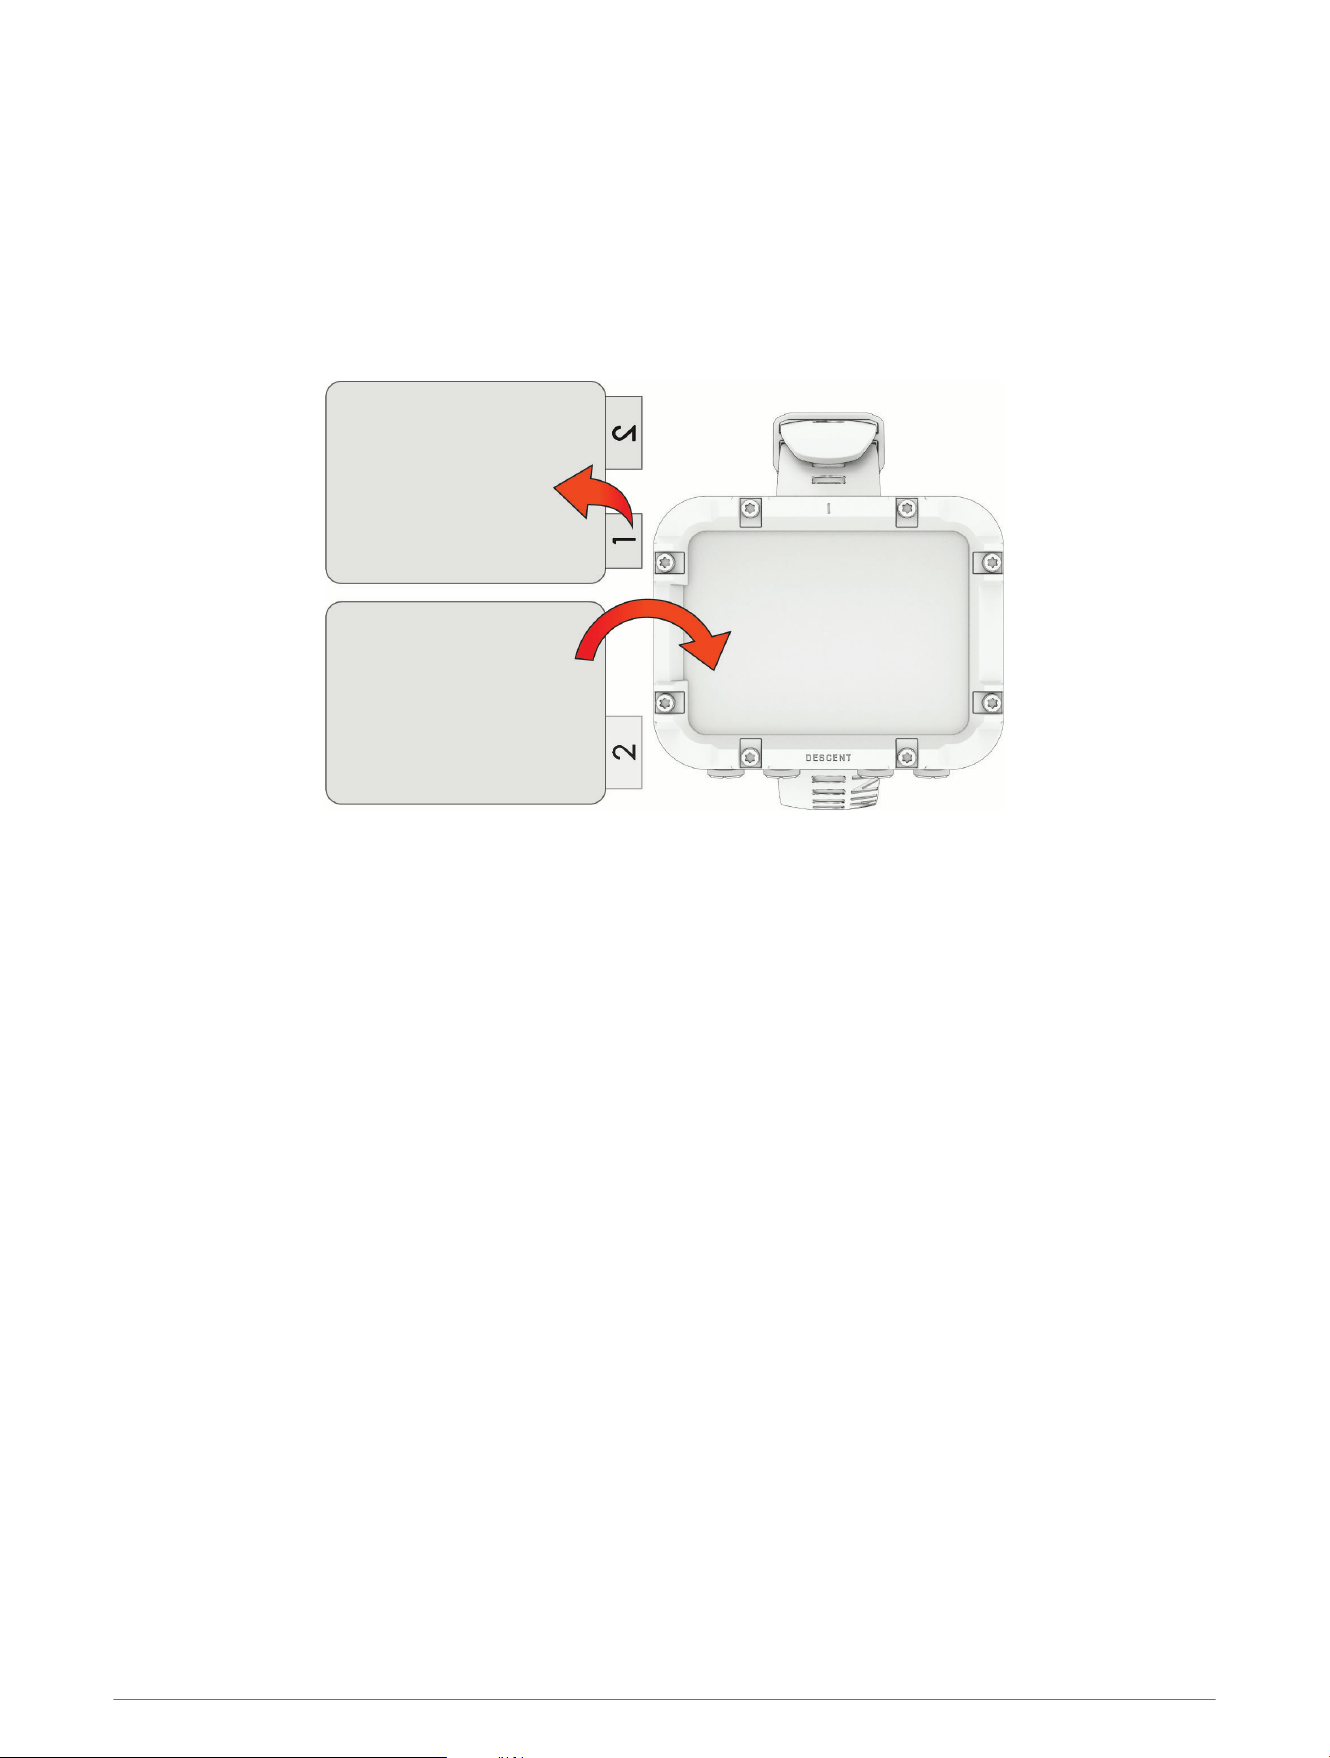
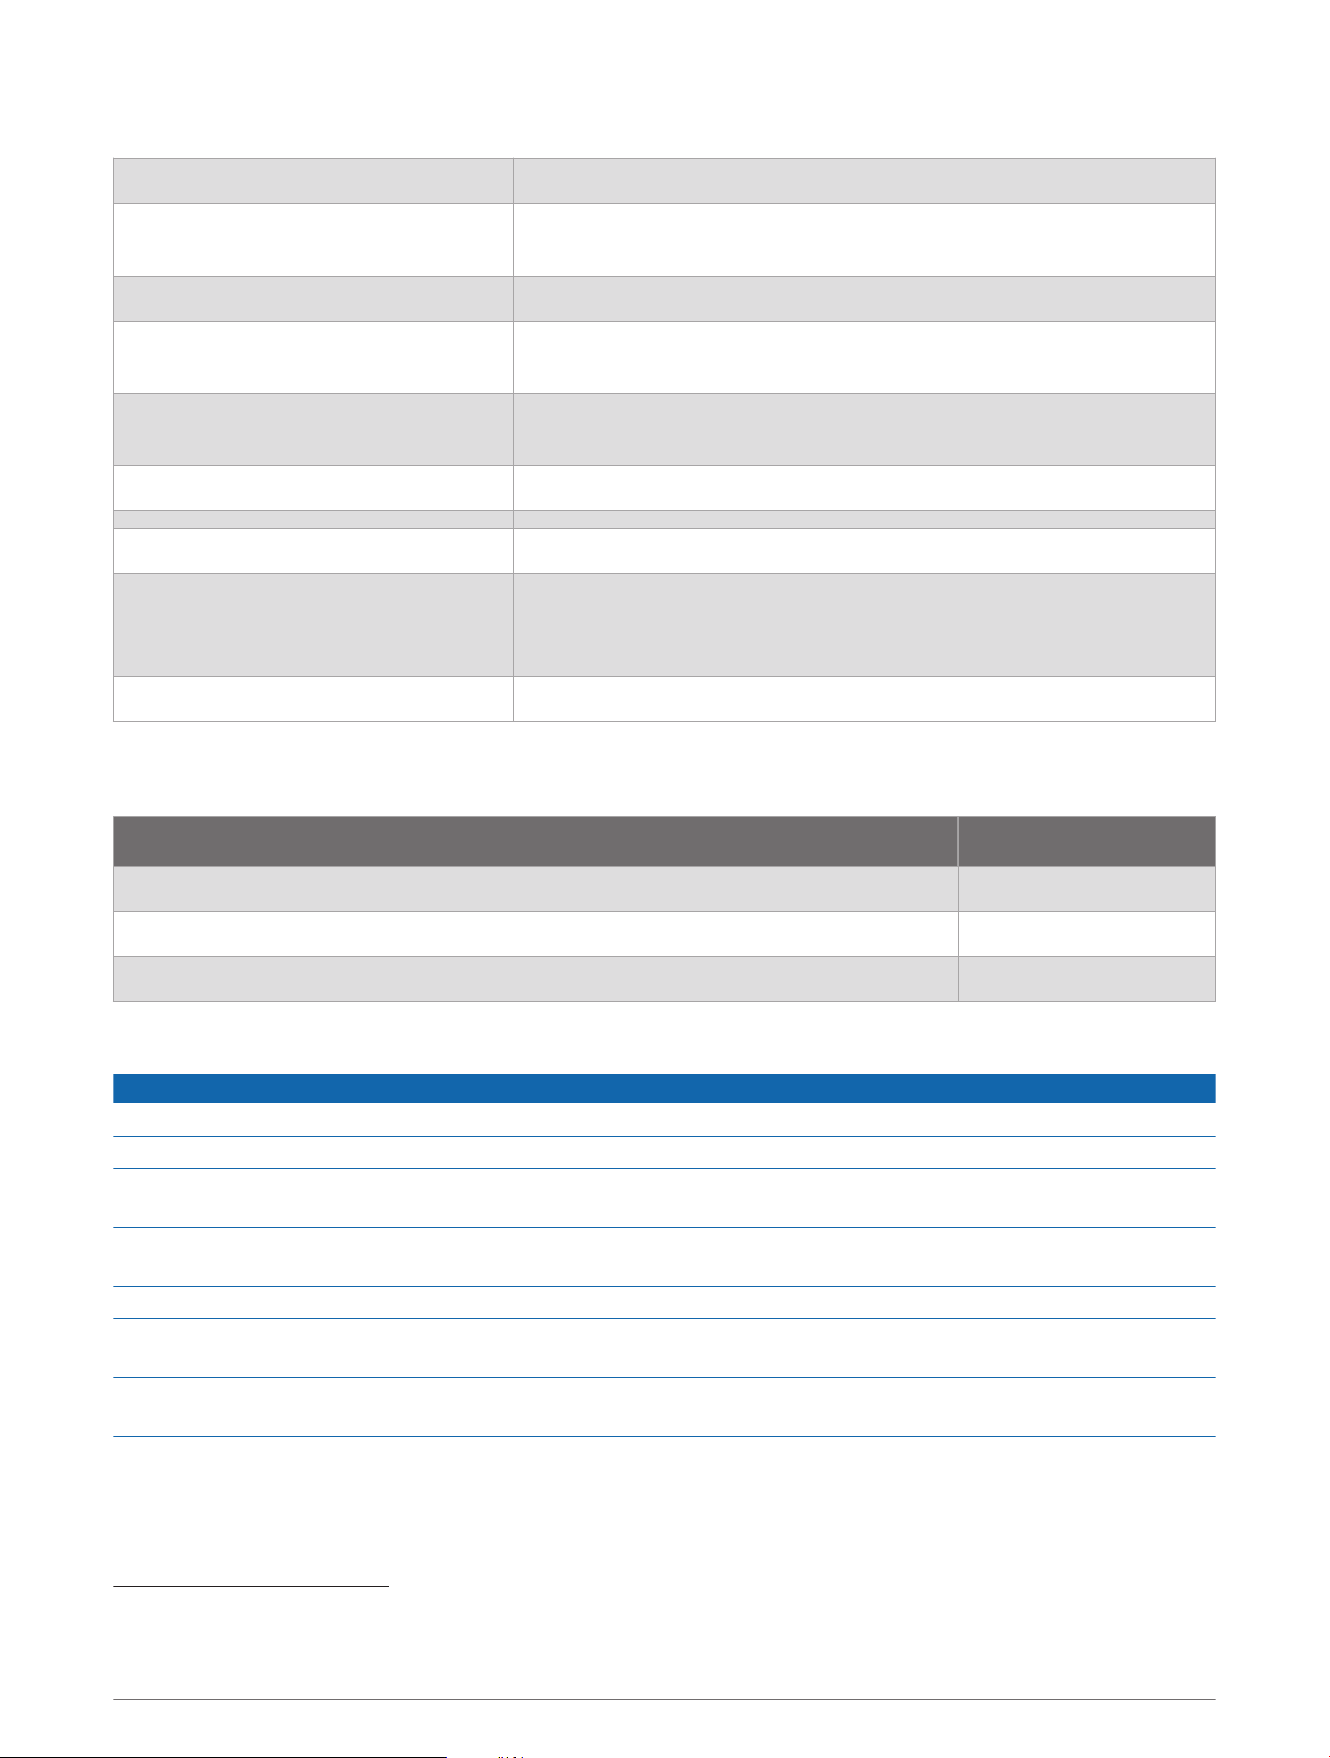
Applying the Screen Protector
To watch a video showing how to apply the screen protector, go to garmin.com/videos
/DescentX30ScreenProtectorInstall.
1 If necessary, use the dust removal sticker to remove particles of dust or debris from the dive computer
screen.
2 Clean the dive computer screen with the wet wipe.
3 Dry the screen with the dry wipe.
4 Peel the protective film from the adhesive side (tab 1) of the screen protector.
5 Carefully apply the screen protector onto the dive computer screen, making sure the edges of the screen
protector line up with the screen edges of the dive computer.
6 If you notice any issues with the application, carefully peel the screen protector off from one corner of the
screen and re-apply.
Device Information 29
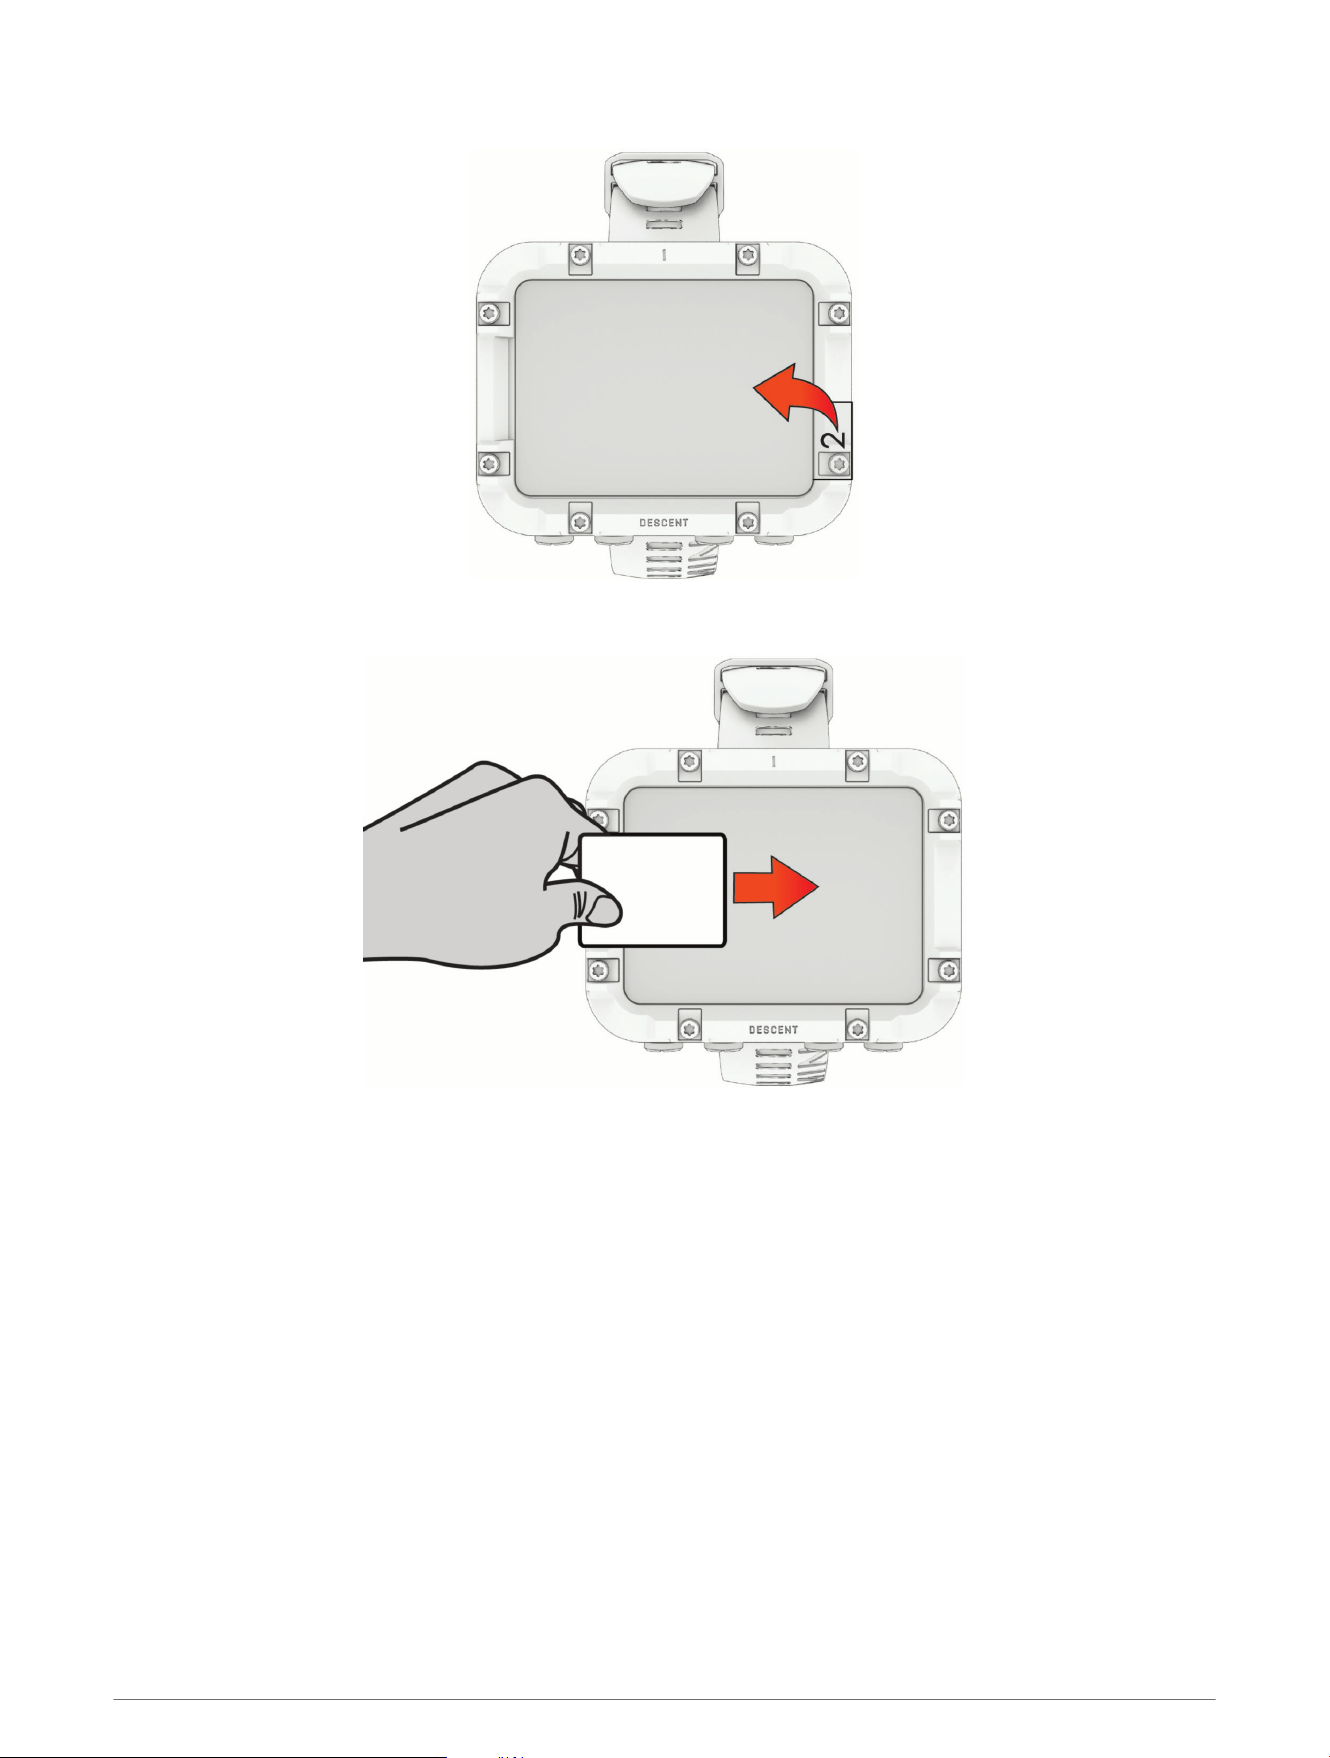
7 Remove the liner from the top side (tab 2) of the screen protector.
8 Slide the applicator card across the screen protector to remove air bubbles and firmly adhere it to the dive
computer screen.
30 Device Information
Specifications
Battery type Rechargeable, built-in lithium-ion battery
Water rating
10ATM
1
Dive (EN 13319)
2
Decompression model Bühlmann ZHL-16C
Operating and storage temperature
range
From -20º to 60ºC (from -4º to 140ºF)
Underwater operating temperature
range
From 0° to 40°C (from 32° to 104°F)
Charging temperature range From 0º to 45ºC (from 32º to 113ºF)
Wireless frequency and transmit power 2.4 GHz: < 5.4 dBm maximum
Depth sensor
Accurate from 0 m to 100 m (0 ft. to 328 ft.) complying with EN 13319
Resolution (m): 0.1 m until 99.9 m, 1 m at 100 m
Resolution (ft.): 1 ft.
Inspection interval Inspect parts before each use for damage. Replace parts as needed.
3
Battery Information
The actual battery life depends on how much you use GPS, optional wireless sensors, and the backlight.
Mode Battery Life
Dive mode with display brightness set to High Up to 10 hours
Dive mode with display brightness set to Medium Up to 30 hours
Dive mode with display brightness set to Night Dive Up to 47 hours
Device Care
NOTICE
Do not use a sharp object to clean the device.
Avoid chemical cleaners, solvents, and insect repellents that can damage plastic components and finishes.
Thoroughly rinse the device with fresh water after exposure to chlorine, salt water, sunscreen, cosmetics,
alcohol, or other harsh chemicals. Prolonged exposure to these substances can damage the case.
Do not wash the device under high pressure, because jets of water or air may cause damage to the depth
sensor or barometer.
Avoid extreme shock and harsh treatment, because it can degrade the life of the product.
Do not store the device where prolonged exposure to extreme temperatures can occur, because it can cause
permanent damage.
Discontinue use if the device is damaged or if it is stored at a temperature outside the specified storage
temperature range.
1
The device withstands pressure equivalent to a depth of 100m. For more information, go to www.garmin.com/waterrating.
2
Designed to comply with CSN EN 13319.
3
Aside from normal wear and tear, performance is not affected by aging.
Device Information 31

Cleaning the Device
CAUTION
Some users may experience skin irritation after prolonged use of the dive computer, especially if the user has
sensitive skin or allergies. If you notice any skin irritation, remove the dive computer and give your skin time to
heal. To help prevent skin irritation, ensure the dive computer is clean and dry, and do not overtighten the dive
computer on your arm.
NOTICE
Even small amounts of sweat or moisture can cause corrosion of the electrical contacts when connected to a
charger. Corrosion can prevent charging and data transfer.
If you store the dive computer while it is still wet, it may inadvertently turn on and drain the battery.
TIP: For more information, go to garmin.com/fitandcare.
1 Rinse with water, or use a damp lint-free cloth.
2 Allow the dive computer to dry completely.
Data Fields
NOTE: Not all data fields are available for all activity types. Some data fields appear in more than one category
on the dive computer.
32 Device Information

Name Description
Ascent Rate The current rate of ascent toward the surface.
Average Depth The average depth descended during a dive.
Avg Temperature The average temperature during the dive.
Battery Percentage The percentage of the battery power remaining.
Battery, Time, & Temp.
The percentage of the battery power remaining, the time of day based on your
current location and time settings (format, time zone, daylight saving time), and the
temperature of the air.
Compass A visual representation of the direction in which the device is pointing.
Compass Heading The direction you are moving based on the compass.
Conservatism The level of conservatism for decompression calculations.
CNS Your current central nervous system (CNS) oxygen toxicity percentage.
Current Gas PO2 The partial pressure of oxygen (PO2) of the current gas.
Maximum Depth The maximum depth descended during a dive.
Max Temperature The maximum temperature during the activity.
Min Temperature The minimum temperature during the activity.
N2/He% The nitrogen/helium tissue loading percentage.
NDL ↑3M / NDL ↑10FT
Your No Decompression Limit (NDL) time if you ascend 3 m (10 ft.) from your
current depth.
NDL ↓3M / NDL ↓10FT Your NDL time if you descend 3 m (10 ft.) from your current depth.
NDL Δ 3M / NDL Δ 10FT Your NDL time if you ascend or descend 3 m (10 ft.) from your current depth.
None This is a blank data field.
OTU Your current oxygen toxicity units (OTU).
Raw Ceiling The unrounded depth the diver should not ascend past.
Stopwatch The stopwatch time for the current dive.
Sunrise The time of sunrise based on your GPS position.
Sunset The time of sunset based on your GPS position.
Surface Gradient Factor The expected gradient factor if the diver were to instantaneously surface.
Temperature
The temperature of the water. Your body temperature affects the temperature
sensor.
Time of Day
The time of day based on your current location and time settings (format, time zone,
daylight saving time).
Time of Day (Seconds) The time of day including seconds.
Time to Surface
The amount of time required to safely ascend to the surface, including decompres
sion stops.
Device Information 33

Name Description
Tissue Graph (GF)
A bar chart displaying simulated values for nitrogen and helium in the body, with the
y-axis of the field adjusted to your conservatism.
Tissue Graph (Raw) A bar chart displaying simulated values for nitrogen and helium in the body.
TTS @ +5 min.
The amount of time required to safely ascend to the surface if you remain at your
current depth for five minutes.
TTS Δ +5 min.
The difference between the amount of time required to safely ascend to the surface,
and the amount of time required to safely ascend to the surface if you remain at your
current depth for five minutes.
Troubleshooting
Product Updates
Your device automatically checks for updates when connected to Bluetooth. You can manually check for
updates from the system settings (System Settings, page25). On your computer, install Garmin Express
™
(www.garmin.com/express).
This provides easy access to these services for Garmin devices:
• Software updates
• Map updates
• Product registration
Getting More Information
You can find more information about this product on the Garmin website.
• Go to support.garmin.com for additional manuals, articles, and software updates.
• Go to buy.garmin.com, or contact your Garmin dealer for information about optional accessories and
replacement parts.
My device is in the wrong language
You can change the device language selection if you have accidently selected the wrong language on the dive
computer.
1 From the home screen, scroll down to the extended app list.
2 Select .
3 Scroll down to the last item in the list, and press ENTER.
4 Press ENTER.
5 Select your language.
Is my smartphone compatible with my device?
The Descent X30 device is compatible with smartphones using Bluetooth technology.
Go to garmin.com/ble for compatibility information.
34 Troubleshooting

My phone will not connect to the device
If your phone will not connect to the device, you can try these tips.
• Turn off your phone and your device, and turn them back on again.
• Enable Bluetooth technology on your phone.
• Update the Garmin Dive app to the latest version.
• Remove your device from the Garmin Dive app and the Bluetooth settings on your phone to retry the pairing
process.
• If you bought a new phone, remove your device from the Garmin Dive app on the phone you intend to stop
using.
• Bring your phone within 10m (33ft.) of the device.
• On your phone, open the Garmin Dive app, select , and select Garmin Devices > Add Device to enter
pairing mode.
Diving
Resetting Your Tissue Load
You can reset your current tissue load saved on the dive computer. You should reset your tissue load only if you
do not plan to use the dive computer again in the near future. This can be useful for dive shops that provide dive
computers for rent.
1 From the home screen, scroll down to the extended app list.
2 Select Settings > System > Reset > Reset Tissues.
Resetting the Surface Pressure
The device automatically determines the surface pressure using the barometric altimeter. Large pressure
changes, such as during a flight, can cause the dive computer to automatically start a dive activity. If the dive
computer starts a dive activity incorrectly, you can reset the surface pressure by connecting the dive computer
to a computer. If you do not have access to a computer, you can reset the surface pressure manually.
1 Hold PWR until the dive computer turns off.
2 Hold PWR to turn on the dive computer.
3 When the product logo appears, hold NEXT until you are prompted to reset the surface pressure.
Acquiring Satellite Signals
The device may need a clear view of the sky to acquire satellite signals. The time and date are set automatically
based on the GPS position.
TIP: For more information about GPS, go to garmin.com/aboutGPS.
1 Go outdoors to an open area.
The front of the device should be oriented toward the sky.
2 Wait while the device locates satellites.
It may take 30–60 seconds to locate satellite signals.
Improving GPS Satellite Reception
• Frequently sync the device to your Garmin account:
◦ Connect your device to a computer using the USB cable and the Garmin Express application.
◦ Sync your device to the Garmin Dive app using your Bluetooth enabled phone.
While connected to your Garmin account, the device downloads several days of satellite data, allowing it to
quickly locate satellite signals.
• Take your device outside to an open area away from tall buildings and trees.
• Remain stationary for a few minutes.
Troubleshooting 35

support.garmin.com
GUID-EBD9D9CA-112E-4044-A2C9-354D565B9A10 v1September 2025
