1 ForgenFlame.comWoodPro Wood Stove • 8390-086B • 09/25
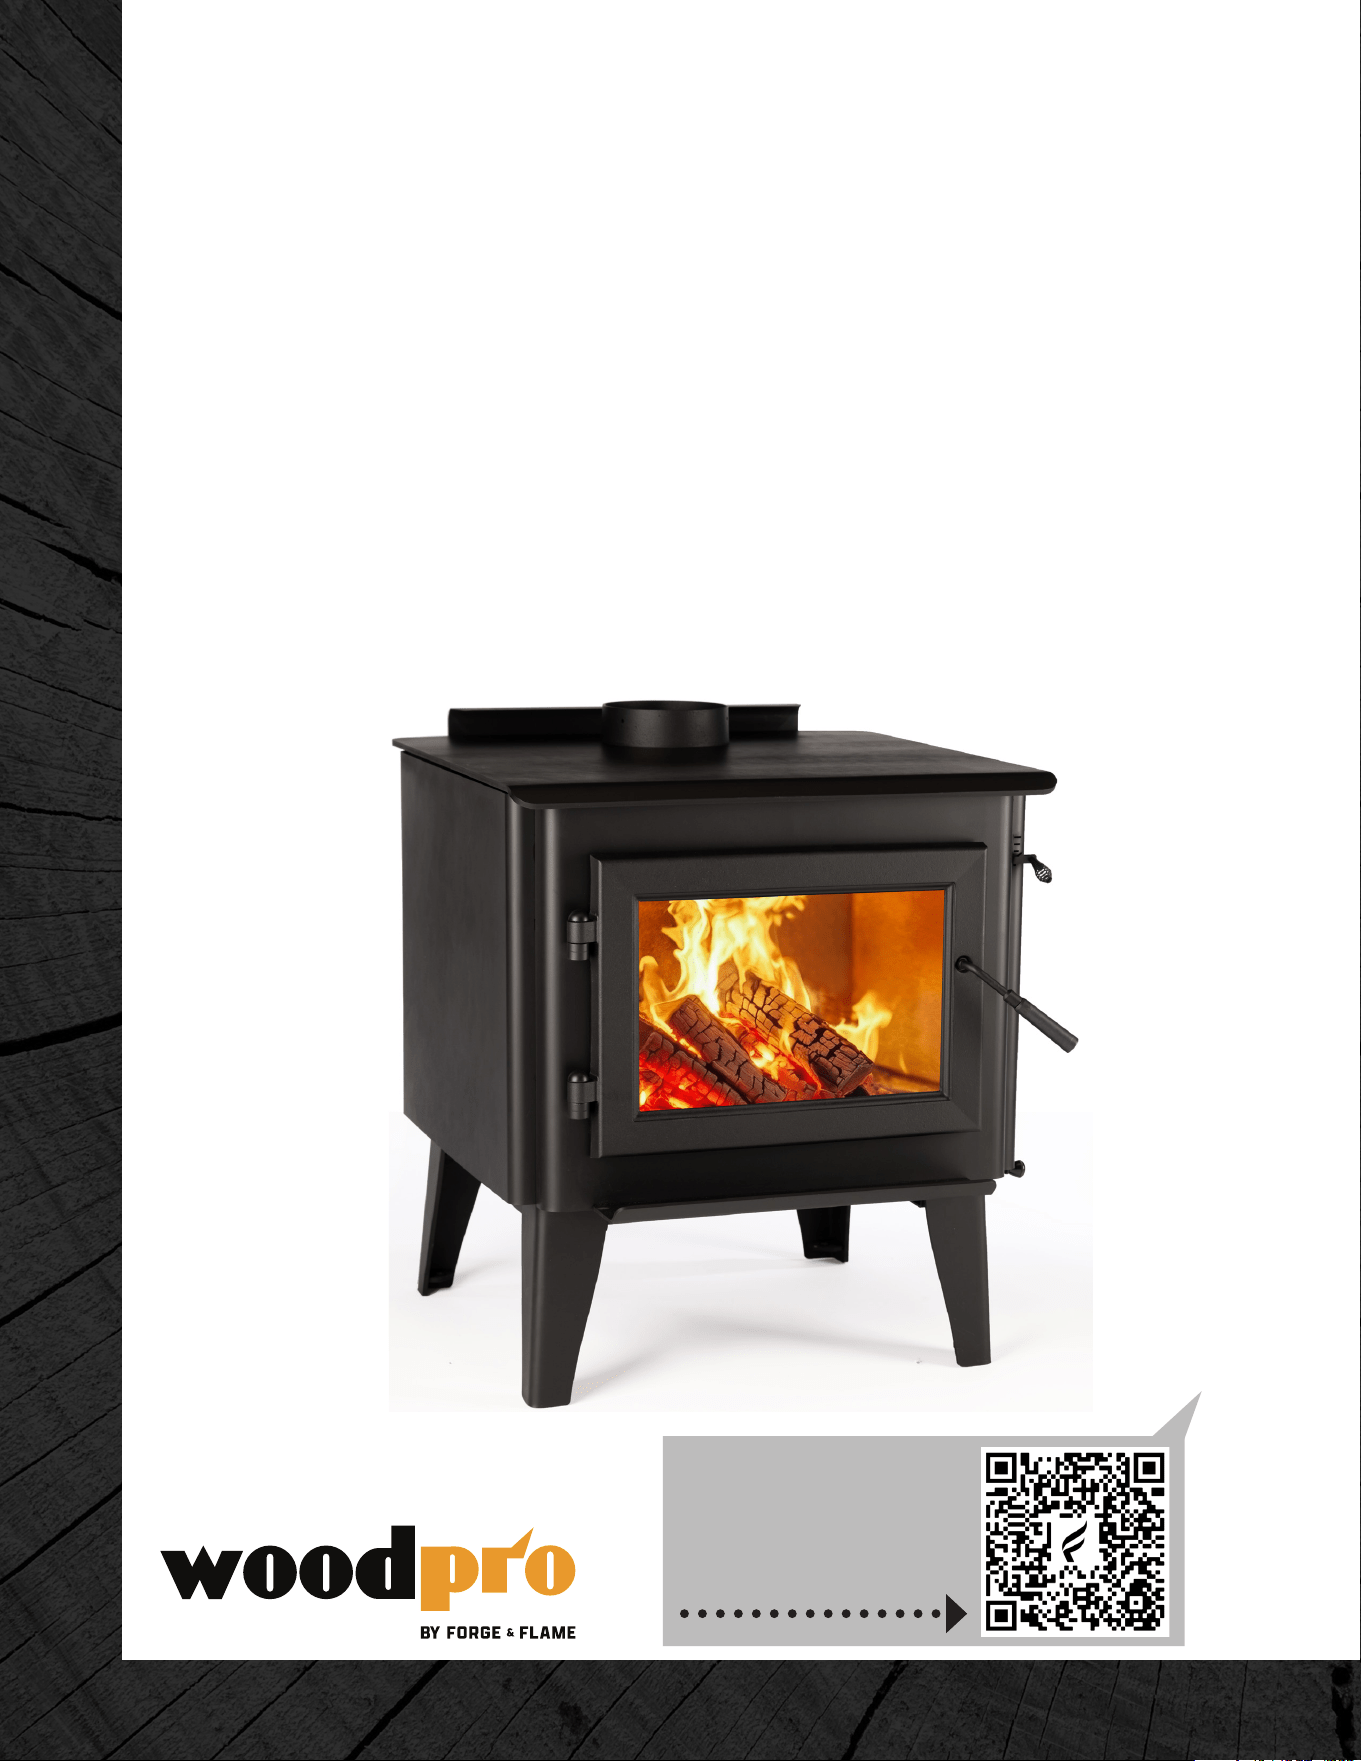
MODELS:
FF-WP-100
FF-WP-200
FF-WP-300
WOOD STOVE
OWNER’S MANUAL
Find helpful videos
and information on our
Geing Started page
Scan Here
2 ForgenFlame.comWoodPro Wood Stove • 8390-086B • 09/25
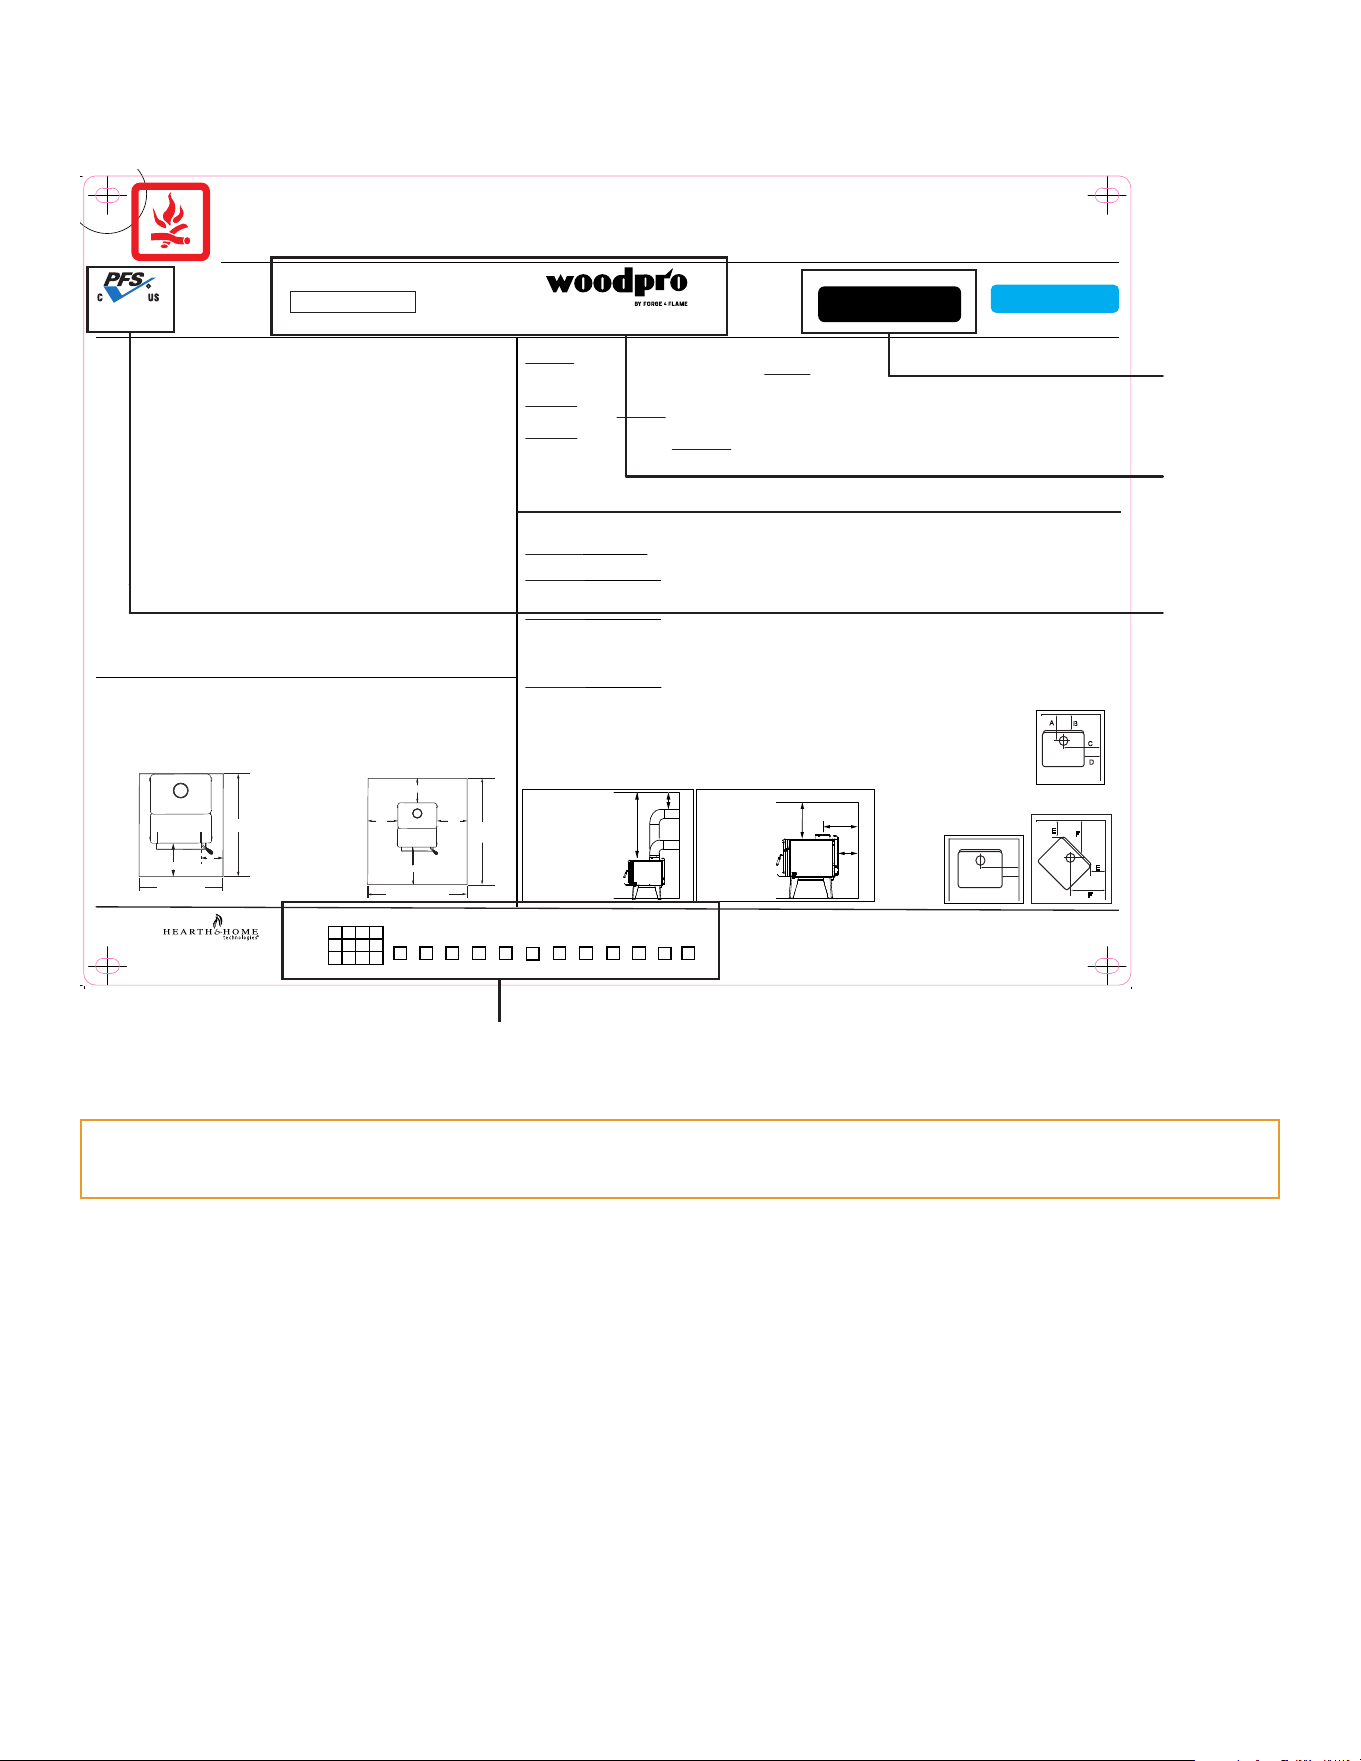
A. Sample of Serial Number / Safety LabelA. Sample of Serial Number / Safety Label
LOCATION: Back of appliance
NOTE: Clearances may only be reduced by means approved by the regulatory authority having
jurisdiction
8.50
352 Moutain House Road,
Halifax, PA 17032
www.forgenflame.com
CAUTION
:
HOT WHILE IN OPERATION DO NOT TOUCH, KEEP CHILDREN AND CLOTHING AWAY. CONTACT MAY CAUSE SKIN BURNS. KEEP
FURNISHINGS AND OTHER COMBUSTIBLE MATERIAL FAR AWAY FROM THE APPLIANCE. SEE NAMEPLATE AND INSTRUCTIONS
8390-179B
CHAUD LORS DE L'OPÉRATION. NE PAS TOUCHER. GARDEZ LES ENFANTS ET LES VÊTEMENTS LOIN DE L'ESPACE DÉSIGNÉ DE L'INSTALLATION. LE CONTACT PEUT CAUSER
DES BRÛLURES À LA PEAU. GARDEZ LES MEUBLES ET LES MATÉRIAUX COMBUSTIBLES LOIN DE L'ESPACE DÉSIGNÉ DE L'APPAREIL. VOIR L'ÉTIQUETTE ET LES INSTRUCTIONS.
ATTENTION:
Manufactured by:
Fabriqué par:
U.S. ENVIRONMENTAL PROTECTION AGENCY
Certified to comply with 2020 particulate emission standards at 1.6 g/hr EPA Method 28 and 5G.
Serial No. / N° de série
VN
BARCODE LABEL
FF-WP-300
TESTED TO: / TESTÉ À:
ASTM E2515, UL 1482-11 (R2015), ULC S627-00
Made in Vietnam / Fabriqué au Vietnam
DO NOT REMOVE THIS LABEL / NE PAS ENLEVER L'ÉTIQUETTE
YEAR CODE
20
25 28
31
34
26
29
32
35
27
30
33
36
JAN FEB MAR APR
MAY
JUNE
JULY AUG
SEPT OCT NOV DEC
Date of Manufacture / Date de fabrication:
Report / Rapport
19-538
This wood heater needs periodic inspection and repair for proper operation.
Consult the owner’s manual for further information. It is against federal
regulations to operate this wood heater in a manner inconsistent with the
operating instructions in the owner’s manual.
LISTED ROOM HEATER, SOLID FUEL TYPE. ALSO FOR USE IN MOBILE HOMES. (UM) 84 HUD / APPAREIL DE CHAUFFAGE DE
PIÈCE, DE TYPE DE COMBUSTIBLE SOLIDE, POUR USAGE DANS LES MAISONS MOBILES. (UM) 84 HUD. "Pour Usage Avec
Bois Solide Seulement". To be installed as a freestanding room heater with the clearances in the manufacturer's
installation instructions. Not to be installed in any factory-built fireplace / À installer comme radiateur
d'ambiance autonome avec les dégagements indiqués dans les instructions d'installation du fabricant. Ne
pas installer dans un foyer préfabriqué.
PREVENT HOUSE FIRES / PRÉVENTION DES FEUX DE MAISON
Install and use only in accordance with manufacturer's installation and operating instructions. Contact local building or fire officials
about restrictions and installation inspections in your area. Do not obstruct the space beneath heater. For use only with leg and
pedestal options intended for this model, refer to owner’s manual for appropriate part numbers and installation instructions.
WARNING - For Mobile Homes: Do not install in a sleeping room. An outside combustion air inlet must be provided and unrestricted
while unit is in use. The structural integrity of the mobile home floor, ceiling and walls must be maintained. The stove needs to be
properly grounded to the frame of the mobile home. Components required for mobile home installation: Outside Air Kit, Part Number
OAK-ACC. Refer to manufacturer's instructions and local codes for precautions required for passing chimney through a combustible
wall or ceiling and maximum offsets. Inspect and clean chimney frequently - Under Certain Conditions of Use, Creosote Buildup May
Occur Rapidly. Do not connect this unit to a chimney serving another appliance. Optional Components: Replace glass only with
5mm ceramic. Do not use grate or elevate fire. Build wood fire directly on hearth. Do not overfire - if heater or chimney connector
glows, you are overfiring. Operate only with the fuel loading door closed. Open only to add fuel to the fire. / Installez et utilisez en
accord avec les instructions d'installation et d'opération du fabricant. Contactez le bureau de la construction ou le bureau des
incendies au sujet des restrictions et des inspections d'installation dans votre voisinage. Ne pas obstruez l'espace en dessous de
l'appareil. AVIS - Pour Les Maisons Mobiles: Ne pas installer dans une chambre à coucher. Un tuyau extérieur de combustion d'air
doit être installé et ne doit pas être obstrué lorsque l'appareil est en usage. La structure intégrale du plancher, du plafond et des
murs de la maison mobile doit être maintenue intacte. L'appareil de chauffage doit être fixé à la charpente de la maison mobile. Les
composants requis pour l'installation des maisons mobiles: Assemblage d'air extérieur, Numéro de Pièce OAK-ACC. Référez vous
aux instructions du fabricant et des codes locaux pour les précautions requises pour passer une cheminée à travers un mur ou un
plafond combustibles, et les compensations maximums. Inspectez et nettoyez la cheminée fréquemment. Sous certaines conditions,
il se peut que la créosote s'accumule rapidement. Ne pas connecter cet appareil à une cheminée servant un autre appareil.
Composants Optionnels: Remplacer le verre uniquement par de la céramique de 5 mm. N'élevez pas le feu. Bâtissez le feu de bois
directement sur l'âtre. Ne pas surchauffer. Si l'appareil de chauffage ou le tuyau de cheminée rougissent, vous surchauffez. Opérez
l'appareil seulement lorsque la porte de chargement est fermée. Ouvrez la porte seulement lorsque vous devez ajouter des
combustibles dans le feu.
EMBER PROTECTION:
It is necessary to install a Type I floor protector.
Floor protector must be non-combustible material, extending beneath
appliance and to front/sides/rear as indicated on the diagram below.
Exception: Non-combustible floor protections must extend beneath
the flue pipe when installed with horizontal venting and extend 2
inches (51mm) beyond each side.
PROTECTION DU PLANCHER:
Le protecteur de plancher doit être d'un minimum de 3/8 inch
(10mm) d'épaisseur de matériel incombustible ou équivalent,
s'étendant du dessous de l'appareil de chauffage à l'avant, aux
cotés et à l'arrière comme indiqué sur le diagramme suivant.
Exception : Les protections incombustibles du plancher doivent
s'étendre en dessous du conduit de cheminée lorsqu'installées
avec une ventilation à l'horizontale et s'étendre de 2 inches
(51mm) de chaque côté.
CANADA
203mm (8")
203mm
(8")
203mm
(8")
457mm (18")
1295mm
(51")
minimum
1066mm (42") minimum
16" from glass
8"
USA
Fuel loading door
31-5/8" minimum
41"
minimum
VENT SPECIFICATIONS: / SPÉCIFICATIONS DE LA VENTILATION :
SINGLE WALL: Six inch (6 inches) (152mm) diameter, minimum 24 MSG black or blued steel connector pipe, with a listed factory-built UL103HT* Class "A" chimney, suitable for use
with solid fuels, or a masonry chimney, and the referenced clearances. / MUR SIMPLE: De six (6 inches) (152mm) de diamètre le connecteur de conduit de minimum d'acier noir ou
bleu de minimum de 24MSG, avec une cheminée bâtit en usine UL103HT* de Classe "A", adéquate pour usage avec les combustions solides, ou une cheminée de briques, avec
espaces libres référés.
DOUBLE WALL: Six inch (6 inches) (152mm) diameter, listed double wall air insulated connector pipe with listed factory-built UL103HT* Class "A" chimney, or a masonry chimney and
the referenced clearances / MUR DOUBLE: De six (6 inches) (152mm) de diamètre, le connecteur du conduit d'air isolé pour mur double avec une cheminée bâtit en usine UL103HT*
de Classe "A:, ou une cheminée de briques, avec espaces libres alloués.
MOBILE HOME: Use double wall pipe by Dura-Vent DVL, Selkirk Metalbestos DS or Security DL double wall connector pipe. Must be equipped with a spark arrestor. Apply double
wall clearances below when installing unit. / MAISON MOBILE: Utiliser un conduit de mur double par Dura-Vent DVL, Selkirk Metalbestos DS ou Security DL. Doit être équipé d'un
arrêt d'étincelle. Utiliser les espaces libres pour mur double comme mentionné ci-bas.
MINIMUM CLEARANCES TO COMBUSTIBLE MATERIALS: In Inches & (Millimeters) / ESPACES LIBRES MINIMUM DES MATÉRIAUX COMBUSTIBLES:En Pouces &
(millimètres)
NOTE: All "A" , "C" and "F" Dimensions are to inside diameter of the flue collar. / NOTE: Toutes les dimensions "A", "C", et "F" sont à partir du diamètre intérieur de
l'entrée du conduit.
INSTALLATION: FULL VERTICAL OR HORIZONTAL WITH MINIMUM 2 FT VERTICAL OFF STOVE TOP /
INSTALLATION : ENTIÈREMENT VERTICALE OU HORIZONTALE AVEC 609mm VERTICAL MINIMUM DU HAUT DU POÊLE
SINGLE WALL PIPE /
TUYAU MURAL À AILES
A B C D E F G H
FF-WP-300 18.5 (470) 11.75 (298) 27.5 (699) 14.5 (368) 8 (203) 20.5 (521) 53.5 (1359) 12 (305)
DOUBLE WALL PIPE /
CONDUIT DU MUR DOUBLE
FF-WP-300 12 (305) 5.25 (133) 27.5 (699) 14.5 (368) 8 (203) 20.5 (521) 53.5 (1359) 12 (305)
INSTALLATION: 90° ELBOW OFF TOP OF STOVE THROUGH BACKWALL / INSTALLATION: 90° DU COURBURE AU DESSUS DE HAUT DU POÊLE A TRAVERS LE MUR ARRIÈRE
DOUBLE WALL PIPE /
CONDUIT DU MUR DOUBLE
FF-WP-300 11.5 (292) 4.75 (121) 27.5 (699) 15 (381) 14.5 (368) 20.5 (521) 53.5 (1359) N/A
INSTALLATION: ALCOVE - Six inch (6 inches) (152mm) diameter listed DOUBLE WALL air insulated connector pipe with UL103 HT** listed factory-built Class "A" chimney, or a masonry chimney. (Mobile Home must be equipped with a
spark arrestor.) Maximum depth of Alcove shall be no more than 48 inches (1219mm) and the referenced alcove clearances.
INSTALLATION : ALCÔVE -
Six pouces (6 pouces) (152mm) de diamètre listé air isolé tuyau de raccordement à double paroi avec UL103 HT ** cotée Classe usine construite "A" cheminée ou une cheminée de maçonnerie. (Mobile Home
doit être équipé d' un pare-étincelles.) Profondeur maximale de Alcove ne doit pas être plus de 48 pouces (1219mm) et les dégagements en alcôve référencés
.
DOUBLE WALL PIPE /
CONDUIT DU MUR DOUBLE
FF-WP-300
16 (406) 9.375 (238) 27 (686) 13.875 (352) N/A N/A 53.5 (1359)
12 (305)
*In Canada must comply with Standard CAN/ULC-S629-M87 for the 650°C Factory-built chimney.
*Au Canada doit conformer a CAN/ULC-S629-M87 la norme pour 650°C cheminée bâtit en usine.
90° OFF TOP
UP & OUT CEILING CLEARANCE
ESPACE LIBRE DU DESSUS DE
L'APPAREIL AU PLAFOND AVEC
90° DE COURBURE
STOVE TO CEILING CLEARANCE
ESPACE LIBRE DU POÊLE AU
PLAFOND
G
H
ALCOVE SIDE VIEW /
VUE DE CÔTÉ DE
L'ALCÔVE
G
A
B
ALCOVE TOP VIEW /
VUE DU HAUT DE
L'ALCÔVE
C
D
BACKWALL/SIDEWALL
MUR ARRIÈRE/MUR DE CÔTÉ
A
B
C
D
CORNER INSTALLATION/
INSTALLATION DU COIN
E
F
E
F
Serial No.
Safety&
Emissions
Test
Report
Name
Test Lab
& Report
Numbers
Mfg. Date
SAMPLE

3 ForgenFlame.comWoodPro Wood Stove • 8390-086B • 09/25
WoodPro by Forge & Flame is a registered trademark of Hearth & Home Technologies.
A. Sample of Serial Number / Safety Label ....... 2
B. Warranty Policy .......................... 4
C. Quick Start Guide......................... 5
1 Listing and Code Approvals1 Listing and Code Approvals
A. Appliance Certication . . . . . . . . . . . . . . . . . . . . . 6
B. BTU & Eciency Specications .............. 6
C. Glass Specications....................... 7
D. Mobile Home Approved . . . . . . . . . . . . . . . . . . . . 7
E. Sleeping Room........................... 7
F. California - Prop65 ........................ 7
2 Operating Instructions2 Operating Instructions
A. Overring Your Appliance................... 8
B. Wood Selection & Storage.................. 8
C. Burning Process.......................... 8
D. Burn Rates and Operating Eciency.......... 9
E. Building A Fire ...........................11
F. Opacity (Smoke)......................... 12
G. Clear Space............................ 12
H. Negative Pressure ....................... 13
I. Frequently Asked Questions . . . . . . . . . . . . . . . . 13
3 Maintenance and Service3 Maintenance and Service
A. Quick Reference Maintenance Guide ........ 14
B. General Maintenance..................... 15
C. Correct Bae & Blanket Placement.......... 17
4 Troubleshooting Guide4 Troubleshooting Guide ................... 18
5 Service Parts Replacement5 Service Parts Replacement
A. Glass ................................. 19
B. Firebrick ............................... 20
C. Door Handle Assembly ................... 20
D. Bae Removal.......................... 22
E. Tube Channel Assembly .................. 23
6 Reference Materials6 Reference Materials
A. Service & Maintenance Log ................ 24
B. Service Parts List
FF-WP-100 ............................ 25
FF-WP-200 ............................ 29
FF-WP-300 ............................ 33
= Contains updated information
Safety Alert Key:
• DANGER! Indicates a hazardous situation which, if not avoided will result in death or serious injury.
• WARNING! Indicates a hazardous situation which, if not avoided could result in death or serious injury.
• CAUTION! Indicates a hazardous situation which, if not avoided, could result in minor or moderate injury.
• NOTICE: Indicates practices which may cause damage to the appliance or to property.
Table of Table of
ContentsContents
Table of Content
Register your product online to stay informed with important
updates and essential product information.
https://myhht.my.site.com/registration/forge-n-ame
4 ForgenFlame.comWoodPro Wood Stove • 8390-086B • 09/25
18999-004A 09/24
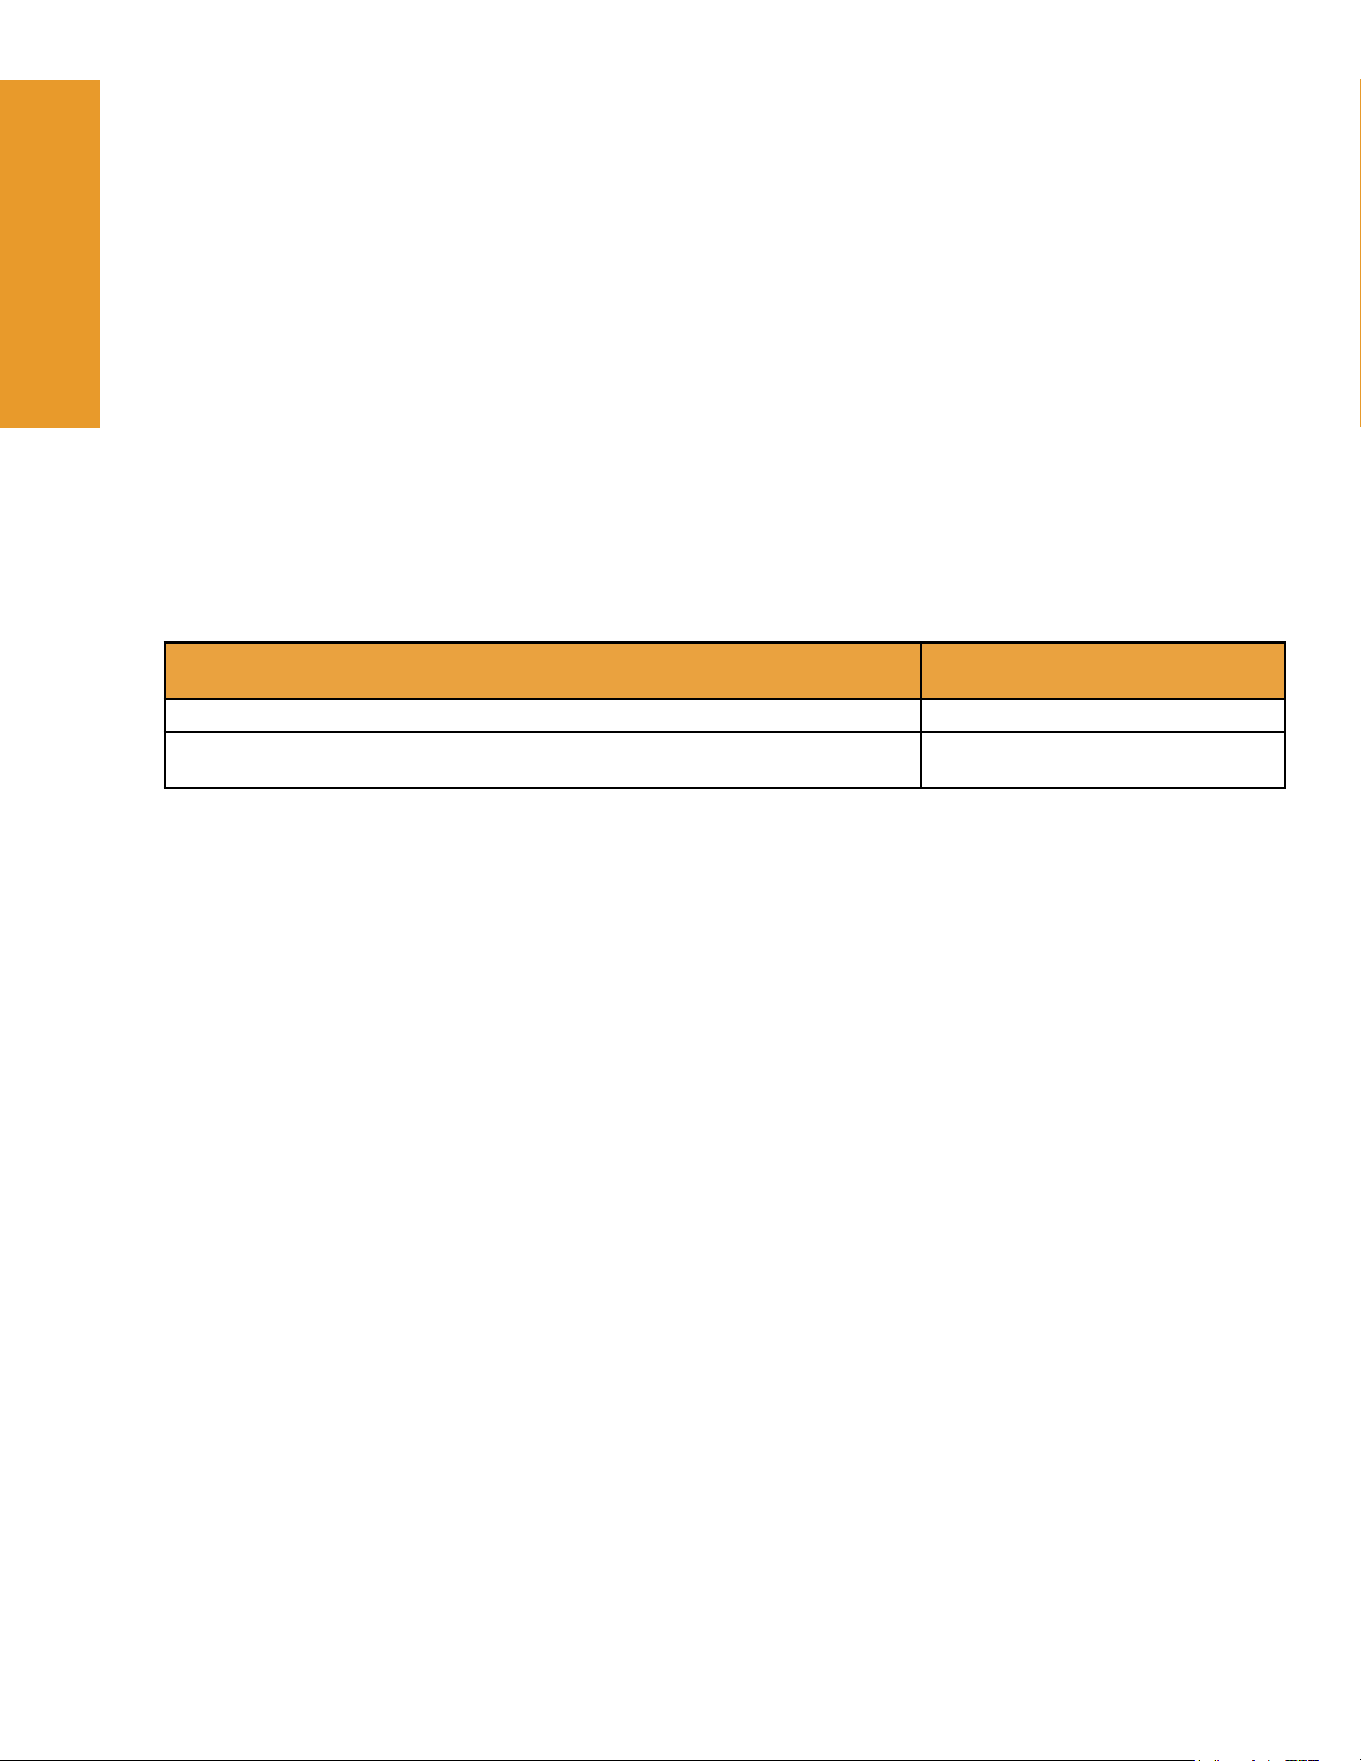
Components Covered
Warranty Period
(Parts only, Labor not included)
Steel Parts 5 Years
All steel replacement parts are covered for remainder of original 5-year warranty
period or 90 days, whichever is longer.
90 Days
Hearth & Home Technologies, LLC
WoodPro Limited Warranty
Hearth & Home Technologies, LLC (HHT), on behalf of its WoodPro brand, extends the following warranty for WoodPro
stoves purchased from an authorized retailer.
If you experience issues with your WoodPro stove, Consumer Care is available to assist you with troubleshooting technical
issues.
This warranty covers components of the WoodPro stoves as listed in the table below.
Warranty Coverage:
Subject to the table below, HHT warrants to the owner of the WoodPro stove that the stove will be free from defects in
materials and workmanship at the time of manufacture. After installation, if covered components are found to be defective
in materials or workmanship during the applicable warranty period, HHT will replace the covered components. HHT, at its
own discretion, may fully discharge all of its obligations under such warranties by replacing the product itself or refunding the
veried purchase price of the product itself. The maximum amount recoverable under this warranty is limited to the purchase
price of the product. This warranty is subject to conditions, exclusions, and limitations as described below.
Warranty Period: Warranty coverage begins on the date of original purchase. The warranty period for covered components
is as follows:
Parts Service & Returns:
HHT is proud to oer the best technical and sales support in the industry. If you have any
questions about how to operate your stove or if you need service parts, please visit ForgenFlame.com.
Warranty Exclusions:
Warranty does not cover damage or breakage due to product misuse, improper handling or
modications. There is no warranty on the paint, glass, re pot, re brick, or any gaskets, or against damage caused
from corrosion. There is no expressed or implied performance warranty on WoodPro units as HHT has no control over
the installation, operation, cleaning, maintenance, or type of fuel burned.
Warranty is void if the WoodPro stove has not been installed, operated, cleaned and maintained in strict accordance
with the guidance and instructions in the product manual.
THE REMEDIES DESCRIBED ABOVE ARE YOUR SOLE AND EXCLUSIVE REMEDIES AND THERE ARE NO
WARRANTIES WHICH EXTEND BEYOND WHAT IS DESCRIBED HEREIN. HHT’S ENTIRE LIABILITY FOR
ANY BREACH OF THIS LIMITED WARRANTY SHALL UNDER NO CIRCUMSTANCES EXCEED THE ACTUAL
AMOUNT PAID FOR THE PRODUCT, NOR SHALL HHT UNDER ANY CIRCUMSTANCES BE LIABLE FOR
ANY CONSEQUENTIAL, INCIDENTAL, SPECIAL OR PUNITIVE DAMAGES OR LOSSES, WHETHER DIRECT
OR INDIRECT. SOME STATES DO NOT ALLOW THE EXCLUSION OR LIMITATION OF INCIDENTAL OR
CONSEQUENTIAL DAMAGES, SO THE ABOVE LIMITATION OR EXCLUSION MAY NOT APPLY TO YOU. THIS
LIMITED WARRANTY GIVES YOU SPECIFIC LEGAL RIGHTS AND YOU MAY HAVE OTHER RIGHTS, WHICH
VARY FROM STATE TO STATE.
WarrantyWarranty
PolicyPolicy
B. Warranty PolicyB. Warranty Policy
5 ForgenFlame.comWoodPro Wood Stove • 8390-086B • 09/25
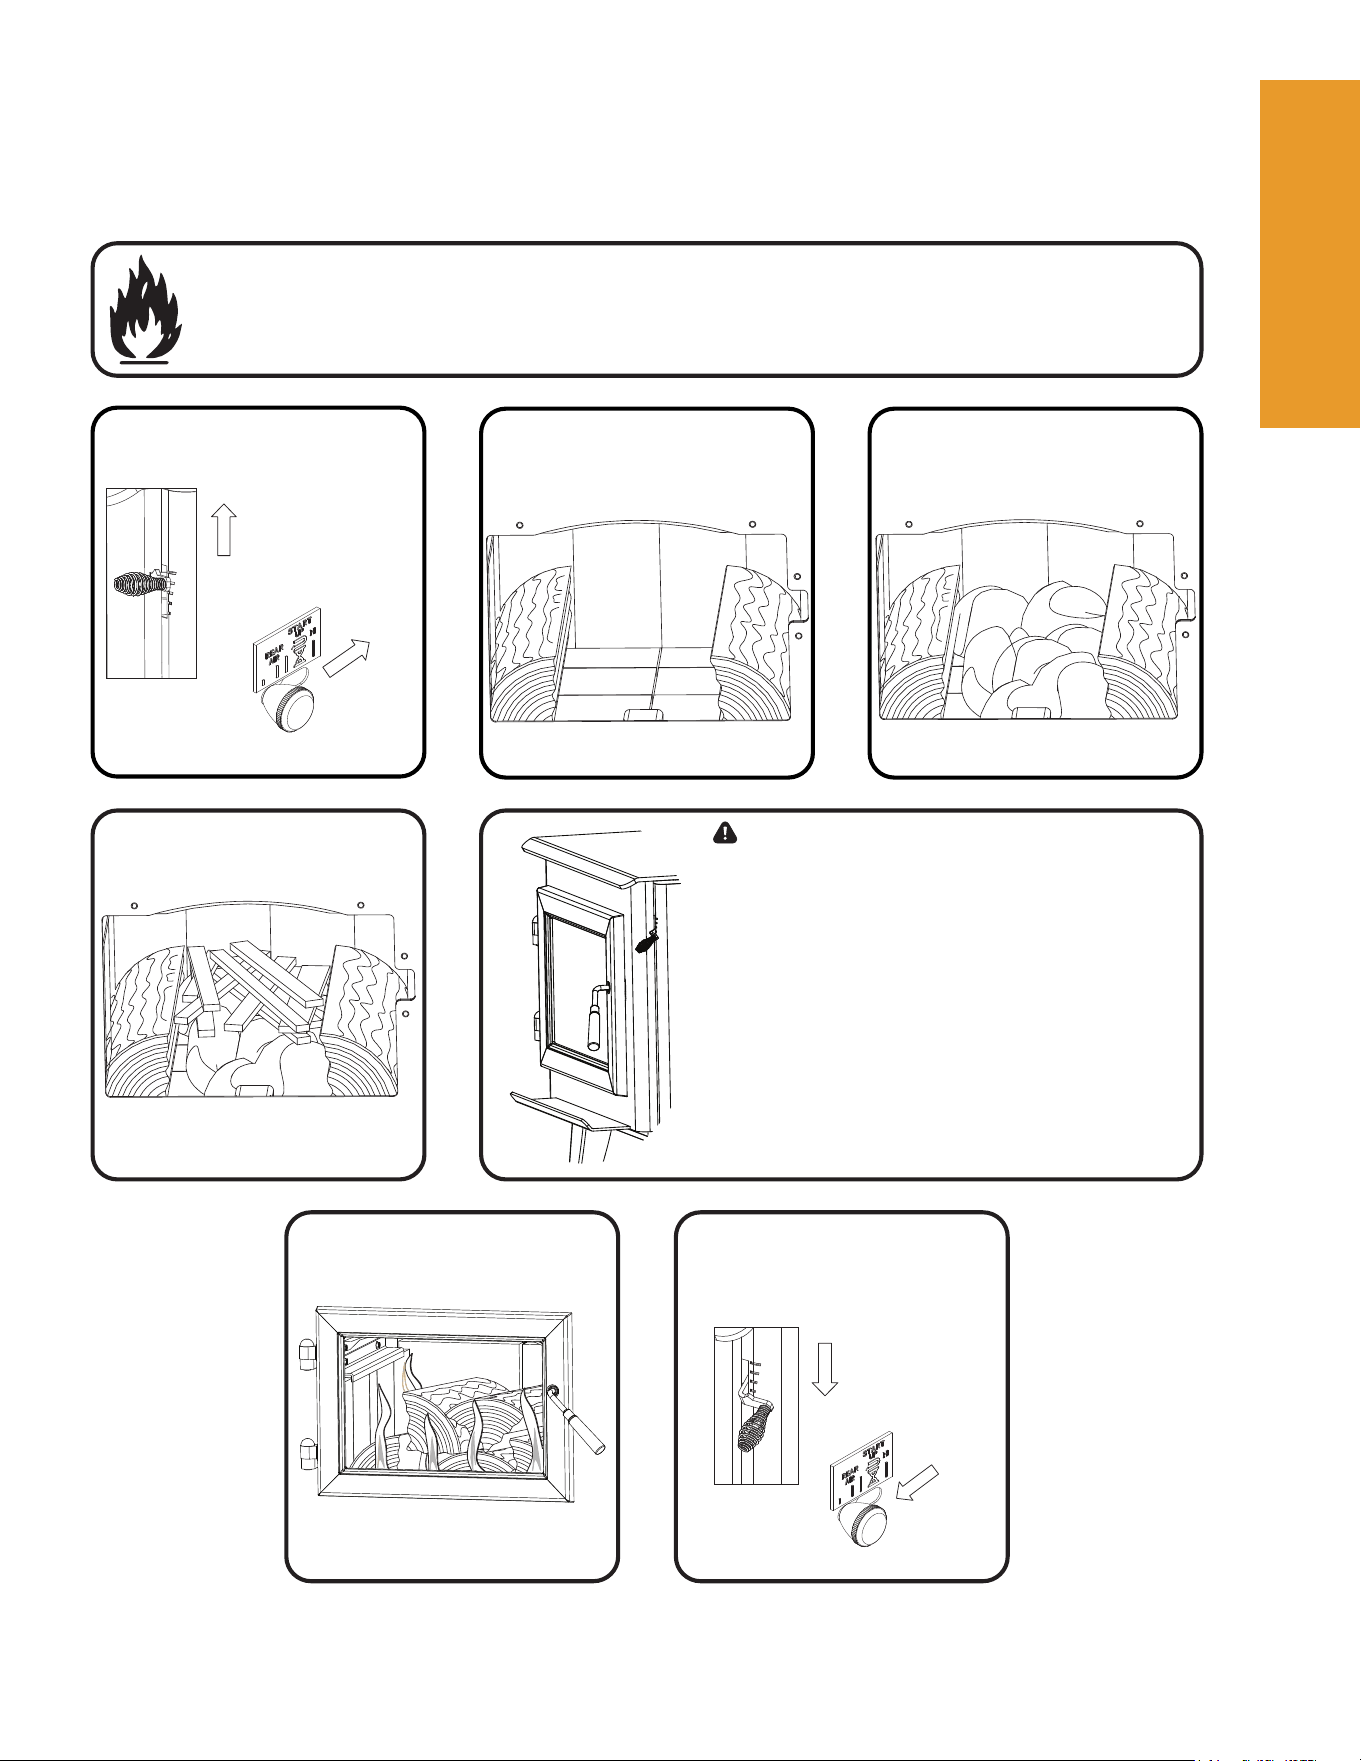
The appliance is ready for normal operation.
Set-Up and First Fire
Note: These are generic drawings and may not represent your speci c model.
Items needed for rst re: 10 Pieces of Newspaper, 10-20 Pieces of Dry Kindling and Few Pieces of Dry Split Wood.
OPEN AIR
CONTROLS
HIGH
BURN RATE
CONTROL
(Upper Right
Corner)
Smart Air Control
(Lower right side)
HIGH
2
LOAD WOOD
3
ADD NEWSPAPER
4
ADD KINDLING
LIGHT THE PAPER
5
ADD MORE WOOD
7
REDUCE AIR
CONTROLS
Set to desired heat output.
LOW
BURN RATE
CONTROL
(Upper Right
Corner)
LOW
Smart Air Control
(Lower right side)
8
Prior to rst re be sure to remove all packaging and labeling. Follow all clearance guidlines and read
all safety warnings.
1
Warning! Risk of Fire.
Close and securely latch the door after the re has
started, and after refueling, to prevent:
- Spillage of smoke, ame and carbon monoxide
- Spillage of sparks, coals, and logs
- Over ring
DO NOT leave the appliance unattended with the
door open.
Starting a re may not require an open door for draft.
The air control should supply adequate draft.
6
Quick StartQuick Start
GuideGuide
C. Quick Start GuideC. Quick Start Guide
6 ForgenFlame.comWoodPro Wood Stove • 8390-086B • 09/25
Listing and Listing and
Code ApprovalsCode Approvals
11
A. Appliance CerticationA. Appliance Certication B. BTU & Eciency SpecicationsB. BTU & Eciency Specications
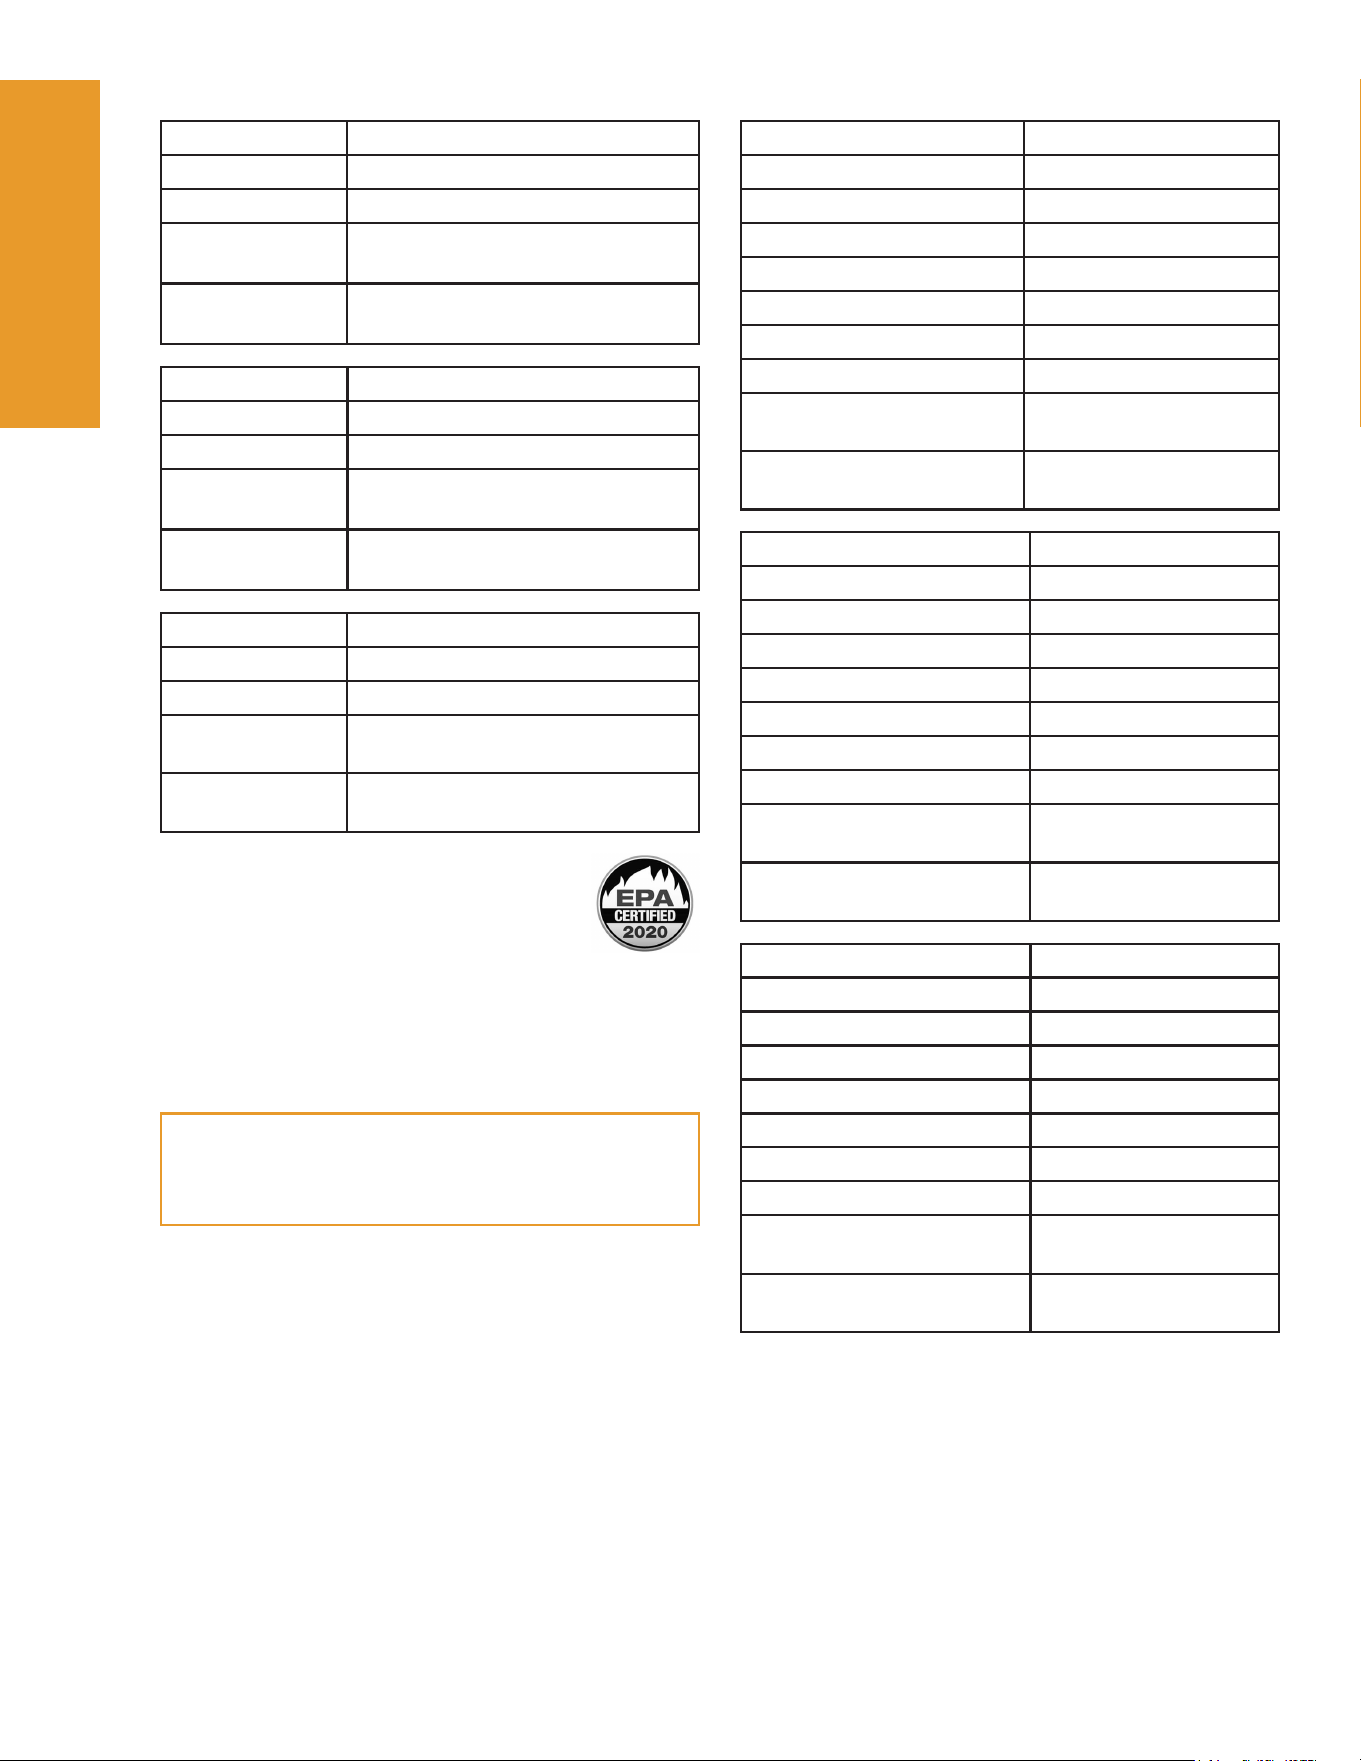
Model: FF-WP-300
Laboratory: PFS-TECO
Report Number: 25-409
Type:
Listed Room Appliance, Solid
Fuel Type
Standard:
UL1482, ULC S627 and (UM) 84-
HUD, Mobile Home Approved.
This wood appliance needs periodic inspection and
repair for proper operation. Consult the owner’s manual
for further information. It is against federal regulations
to operate this wood heater in a manner inconsistent
with the operating instructions in the owner’s manual.
NOTE: This installation must conform with local
codes. In the absence of local codes you must comply
with (UM) 84-HUD and NFPA211 in the U.S.A. and
CAN/CSA-B365 Installation Codes in Canada.
Model: FF-WP-300
EPA Certication #: 247-20
EPA Certied Emissions: 1.6 grams per hour
HHV Tested Eciency: 74.2%
EPA BTU Output: 13,240 to 36,760 / hr.
Peak BTU/Hour Output: 61,700
Vent Size: 6 inches
Firebox Size: 2.26 cubic feet
Recommended Log
Length
18 inches
Fuel:
Seasoned Cordwood
(20% moisture)
The WP-100, WP-200, WP-300 are
Certied to comply with 2020 crib wood
particulate emission standards.
This room heater shall not be installed in a factory
built replace.
Model Number: FF-WP-100
Laboratory: PFS-TECO
Report Number: 25-408
Type:
Listed Room Appliance, Solid
Fuel Type
Standard:
UL1482, ULC S627 and (UM) 84-
HUD. Mobile Home Approved.
Model Number: FF-WP-200
Laboratory: PFS-TECO
Report Number: 24-338
Type:
Listed Room Appliance, Solid
Fuel Type
Standard:
UL1482, ULC S627 and (UM) 84-
HUD. Mobile Home Approved.
Model: FF-WP-100
EPA Certication #: 250-20
EPA Certied Emissions: 1.7 grams per hour
HHV Tested Eciency: 76.1%
EPA BTU Output: 13,590 to 29,320 / hr.
Peak BTU/Hour Output: 44,400
Vent Size: 6 inches
Firebox Size: 1.48 cubic feet
Recommended Log
Length:
16 inches
Fuel
Seasoned Cord Wood
(20% moisture)
Model: FF-WP-200
EPA Certication #: 86-17
EPA Certied Emissions: 1.9 grams per hour
HHV Tested Eciency: 72.5%
EPA BTU Output: 13,950 to 29,080 / hr
Peak BTU/Hour Output: 51,000
Vent Size: 6 inches
Firebox Size: 1.89 cubic feet
Recommended Log
Length:
16 inches
Fuel:
Seasoned Cord Wood
(20% moisture)
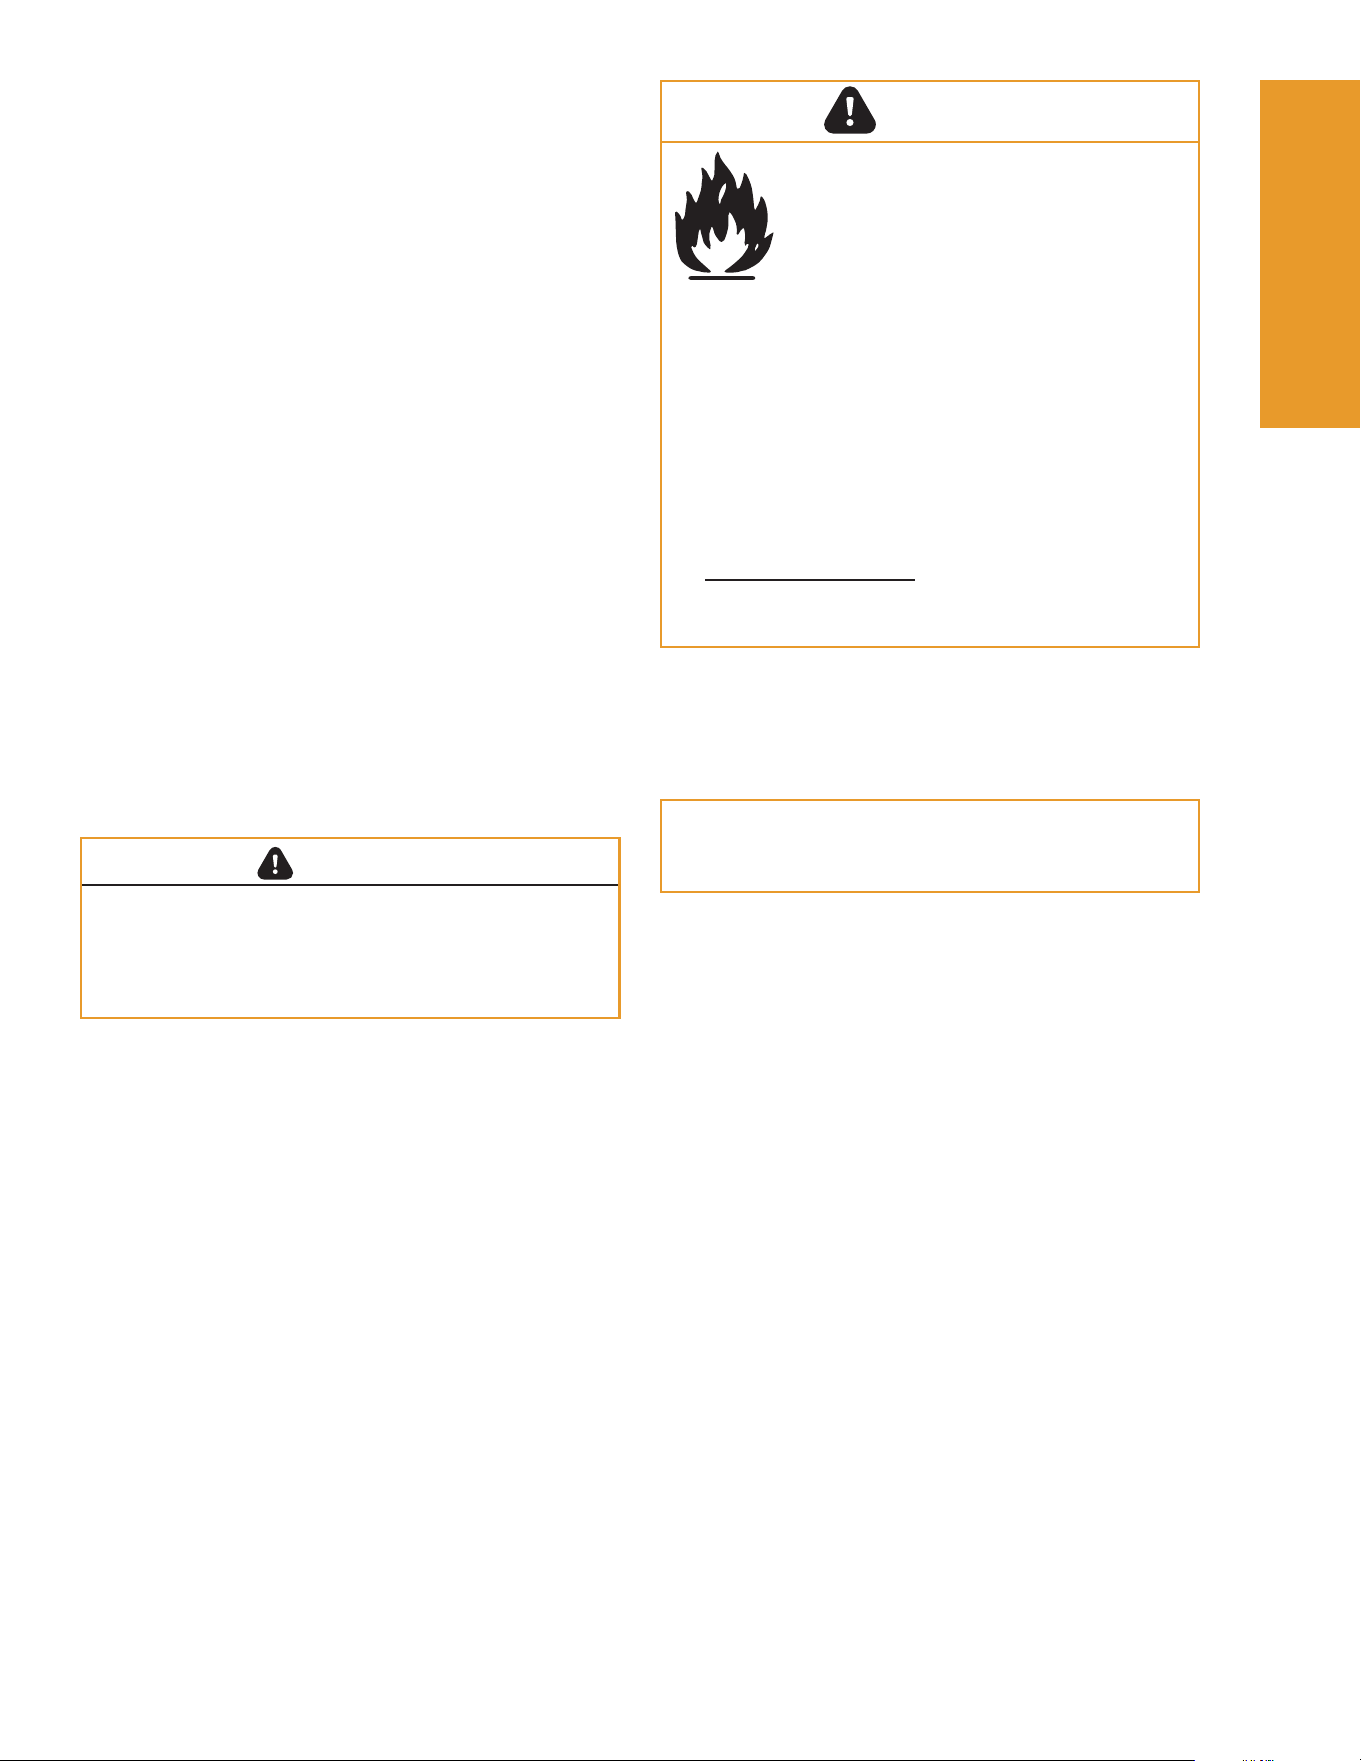
7 ForgenFlame.comWoodPro Wood Stove • 8390-086B • 09/25
This product and the fuels used to operate this product (wood), and the
products of combustion of such fuels, can expose you to chemicals
including carbon black, which is known to the State of California to
cause cancer, and carbon monoxide, which is known to the State of
California to cause birth defects or other reproductive harm. For more
information go to: WWW.P65Warnings.ca.gov
WARNING
NOTE: Hearth & Home Technologies, manufacturer of
this appliance, reserves the right to alter its products,
their specications and/or price without notice.
Improper installation, adjustment, alteration, service or
maintenance can cause injury or property damage.
For assistance or additional information, consult a
qualied installer or service agency.
C. Glass SpecicationsC. Glass Specications
This appliance is equipped with 5mm ceramic glass.
Replace glass only with 5mm ceramic glass.
D. Mobile Home ApprovedD. Mobile Home Approved
• This appliance is approved for mobile home
installations when not installed in a sleeping room
and when an outside combustion air inlet is provided.
• The structural integrity of the mobile home oor,
ceiling, and walls must be maintained.
• The appliance must be properly grounded to the
frame of the mobile home with #8 copper ground
wire, and chimney must be listed to UL103 HT or a
listed UL-1777 full length six inch (152mm) diameter
liner must be used.
• Outside Air Kit, part OAK-ACC must be installed in
a mobile home installation. Note: Shipping brackets
are also used as Mobile Home brackets.
E. Sleeping RoomE. Sleeping Room
When installed in a sleeping room it is recommended
that a smoke and/or CO alarm be installed in the
bedroom. The size of the room must be at least 50ft³
per 1,000 Btu/hr stove input, if the stove exceeds the
room size, outside air must be installed.
F. California - Prop65F. California - Prop65
Fire Risk.
Hearth & Home Technologies disclaims
any responsibility for, and the warranty
will be voided by, the following actions:
• Installation and use of any damaged appliance.
• Modication of the appliance.
• Installation other than as instructed by Hearth &
Home Technologies.
• Installation and/or use of any component part not
approved by Hearth & Home Technologies.
• Operating appliance without fully assembling
all components.
• Operating appliance without legs attached (if
supplied with appliance).
• Do NOT OVERFIRE - If appliance or chimney
connector glows, you are overring.
Any such action that may cause a re hazard.
WARNING
Listing and Listing and
Code ApprovalsCode Approvals
11

8 ForgenFlame.comWoodPro Wood Stove • 8390-086B • 09/25
A. Overring Your ApplianceA. Overring Your Appliance
B. Wood Selection & StorageB. Wood Selection & Storage
Burn only dry seasoned wood. Store wood under cover,
out of the rain and snow. Dry and well-seasoned wood
will not only minimize the chance of creosote formation,
but will give you the most ecient re. Even dry wood
contains at least 15% moisture by weight, and should
be burned hot enough to keep the chimney hot for as
long as it takes to dry the wood out - about one hour. It
is a waste of energy to burn unseasoned wood of any
kind.
Dead wood lying on the forest oor should be considered
wet, and requires full seasoning time. Standing dead
wood can be considered to be about 2/3 seasoned. To
tell if wood is dry enough to burn, check the ends of the
logs. If there are cracks radiating in all directions from
the center, it is dry. If your wood sizzles in the re, even
though the surface is dry, it may not be fully cured.
1. Symptoms of Overring
Symptoms of overring may include one or more of
the following:
- Chimney connector or appliance glowing
- Roaring, rumbling noises
- Loud cracking or banging sounds
- Metal warping
- Chimney re
2. What To Do if Your Appliance is Overring
- Immediately close the door and air controls to
reduce air supply to the re.
- If you suspect a chimney re, call the re
department and evacuate your house.
- Contact your local chimney professional and have
your appliance and appliance pipe inspected for
any damage.
- Do not use your appliance until the chimney
professional informs you it is safe to do so.
Hearth & Home Technologies WILL NOT warranty
appliances that exhibit evidence of overring.
Evidence of overring includes, but is not limited to:
• Warped air tube
• Deteriorated refractory brick retainers
• Deteriorated bae and other interior components
Fire Risk. Do not overre.
Overring may ignite creosote or will damage
the appliance and chimney.
To prevent overring your appliance, DO NOT:
• Use ammable liquids
• Overload with wood
• Burn trash or large amounts of scrap lumber
• Permit too much air to the re
WARNING
Splitting wood before it is stored reduces drying time.
Wood should be stacked so that both ends of each
piece are exposed to air, since more drying occurs
through the cut ends than the sides. This is true even
with wood that has been split. Store wood under cover,
such as in a shed, or covered with a tarp, plastic, tar
paper, sheets of scrap plywood, etc., as uncovered
wood can absorb water from rain or snow, delaying the
seasoning process.
C. Burning ProcessC. Burning Process
In recent years there has been an increasing concern
about air quality. Much of the blame for poor air
quality has been placed on the burning of wood for
home heating. In order to improve the situation, we at
Forge & Flame have developed cleaner-burning wood
appliances that surpass the requirements for emissions
established by our governing agencies. These wood
appliances, like any other appliances, must be properly
operated in order to insure that they perform the way
they are designed to perform. Improper operation
can turn most any wood appliance into a smoldering
environmental hazard.
1. Kindling or First Stage: It helps to know a little
about the actual process of burning in order to
understand what goes on inside a appliance. The
rst stage of burning is called the kindling stage. In
this stage, the wood is heated to a temperature high
enough to evaporate the moisture which is present
in all wood. The wood will reach the boiling point of
water (212°F) and will not get any hotter until the
water is evaporated. This process takes heat from
the coals and tends to cool the appliance.
Fire requires three things to burn; fuel, air and heat.
So, if heat is robbed from the appliance during the
drying stage, the new load of wood has reduced the
chances for a good clean burn. For this reason, it is
always best to burn dry, seasoned rewood. When
the wood isn’t dry, you must open the air controls
and burn at a high burn setting for a longer time to
start it burning. The heat generated from the re
should be warming your home and establishing the
ue draft, not evaporating the moisture out of wet,
unseasoned wood, resulting in wasted heat.
2. Second Stage: The next stage of burning, the
secondary stage, is the period when the wood gives
o ammable gases which burn above the fuel with
bright ames. During this stage of burning it is very
important that the ames be maintained and not
allowed to go out. This will ensure the cleanest
possible re. If the ames tend to go out, it is set
too low for your burning conditions. The air control
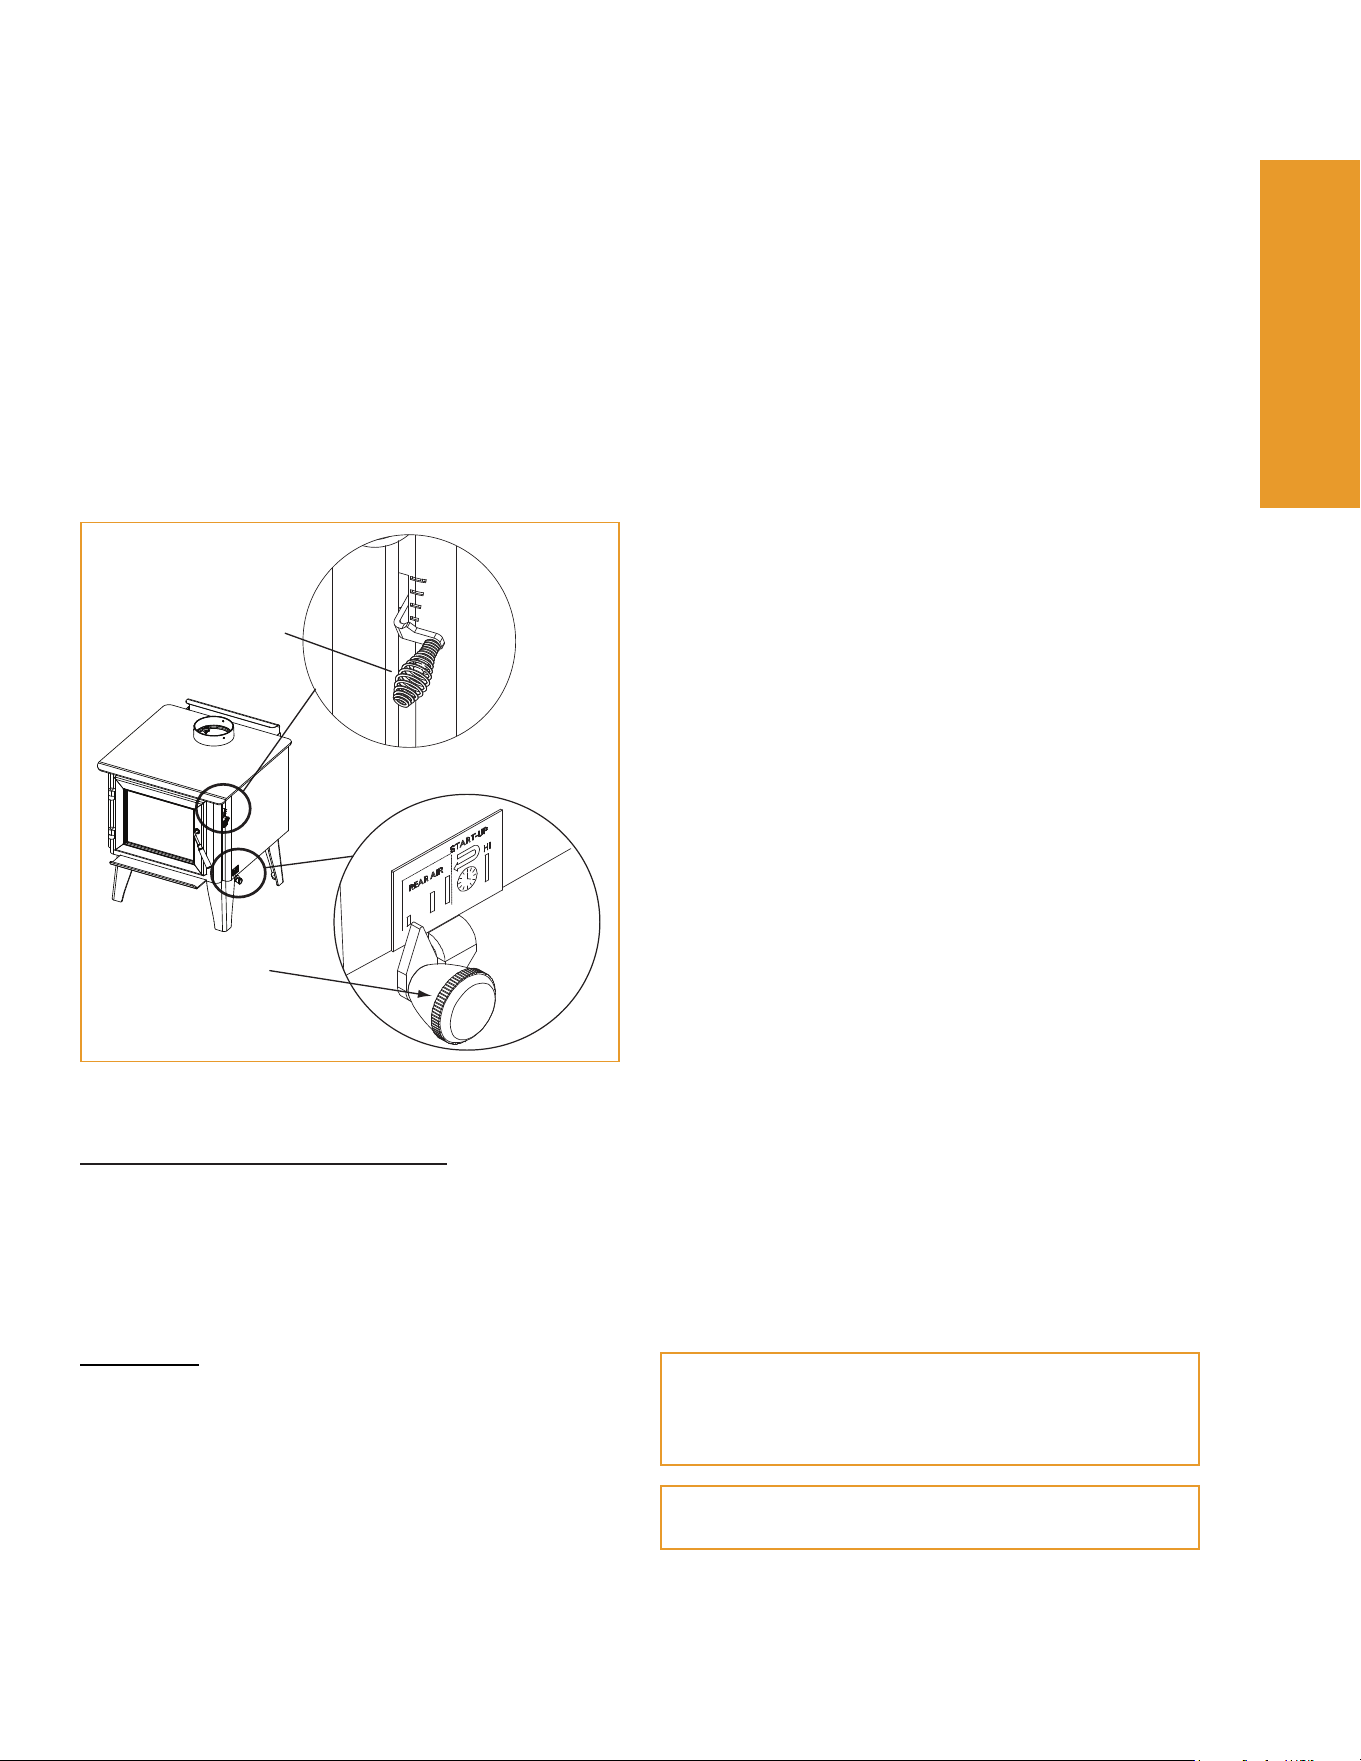
located at the upper right hand corner is used to
adjust for burn rates. This is called the Burn Rate
Air Control (Figure 9.1).
3. Final Stage: The nal stage of burning is the
charcoal stage. This occurs when the ammable
gases have been mostly burned and only charcoal
remains. This is a naturally clean portion of the
burn. The coals burn with hot blue ames.
Operating
Instructions
2
9 ForgenFlame.comWoodPro Wood Stove • 8390-086B • 09/25
Figure 9.1
Burn Rate
Air Control
Smart Air
Control
It is very important to reload your appliance while
enough lively hot coals remain in order to provide
the amount of heat needed to dry and rekindle
the next load of wood. It is best to open the Burn
Rate Air and Smart Air Controls before reloading.
This livens up the coal bed and reduces excessive
emissions (opacity/smoke). Open door slowly so
that ash or smoke does not exit appliance through
opening. You should also break up any large chunks
and distribute the coals so that the new wood is laid
on hot coals.
Air quality is important to all of us, and if we choose
to use wood to heat our homes we should do so
responsibly. To do this we need to learn to burn our
appliances in the cleanest way possible. Doing this
will allow us to continue using our wood appliances
for many years to come.
2. Medium low burn setting:
- Burn Rate Air Control spring handle up to
high position for 5 minutes.
- Then activate the Smart Air Control by pushing
the knob all the way back toward the appliance
to “HI” then pull forwards towards the front of the
appliance until the knob stops.
- At that point move the Burn Rate Air Control
spring handle to 1/8”-1/2” from the low setting.
3. Medium high burn setting:
- Burn Rate Air Control spring handle up to
high position.
- Then activate the Smart Air Control by pushing
the knob all the way back toward the appliance
to “HI” then pull forwards towards the front of the
appliance until the knob stops.
- At that point move the Burn Rate Air Control
spring handle to 1/2” – high.
4. High burn setting:
- Burn Rate Air Control spring handle up to
high position
- Also activate Smart Air Control knob pushed back
to the “HI” position.
Surface Thermometer is a Valuable Guide to
Operation
A surface thermometer tells you when to adjust the air
control, and when to refuel.
For example, when the thermometer registers at least
450°F (230°C) on the stove top after start-up you know
the stove is hot enough and it may be time to adjust
the air control if a sucient ember bed has also been
established. Note that the stove will warm up much
sooner than the chimney, though; a warm chimney
is the key to easy, eective stove operation. When
thermometer readings drop below 350°F. (175°C) it’s
time to adjust the air control for a higher burn rate or
to reload the stove. A temperature reading over 650°F.
(340°C) is a sign to reduce the air supply to slow the
burn rate.
Use the following temperature ranges as a guide:
• Readings in the 350°-500°F. (175°-260°C) range
indicate low to medium heat output.
• 500°-600°F. (260°-315°C) readings indicate medium
heat output.
• Readings of 600°-650°F. (315-340°C) indicate high
heat output. Operating your wood stove continuously
at stove top temperatures higher than 650° F (340°C)
may damage your wood stove.
NOTE: The above information is provided as a
guideline only. Altitude and other circumstances may
require control adjustments to achieve the desired
burn rates.
NOTE: Operate appliance on High Burn 45 minutes
a day to help keep ue/chimney clean.
D. Burn Rates and Operating EciencyD. Burn Rates and Operating Eciency
For maximum operating eciency
This wood appliance has a manufacturer-set minimum
low burn rate that must not be altered. It is against
federal regulations to alter this setting or otherwise
operate this wood appliance in a manner inconsistent
with operating instructions in this manual.
• Burn dry, well-seasoned wood.
Burn Rates
1. Low burn setting:
- Burn Rate Air Control spring handle up to high
position for 5 minutes.
- Then activate the Smart Air Control by pushing
the knob all the way back toward the appliance
to “HI” then pull forwards towards the front of the
appliance until the knob stops (Figure 9.1).
- At that point close the Burn Rate Air Control by
moving the spring handle to the low setting.
Operating Operating
InstructionsInstructions
22
10 ForgenFlame.comWoodPro Wood Stove • 8390-086B • 09/25
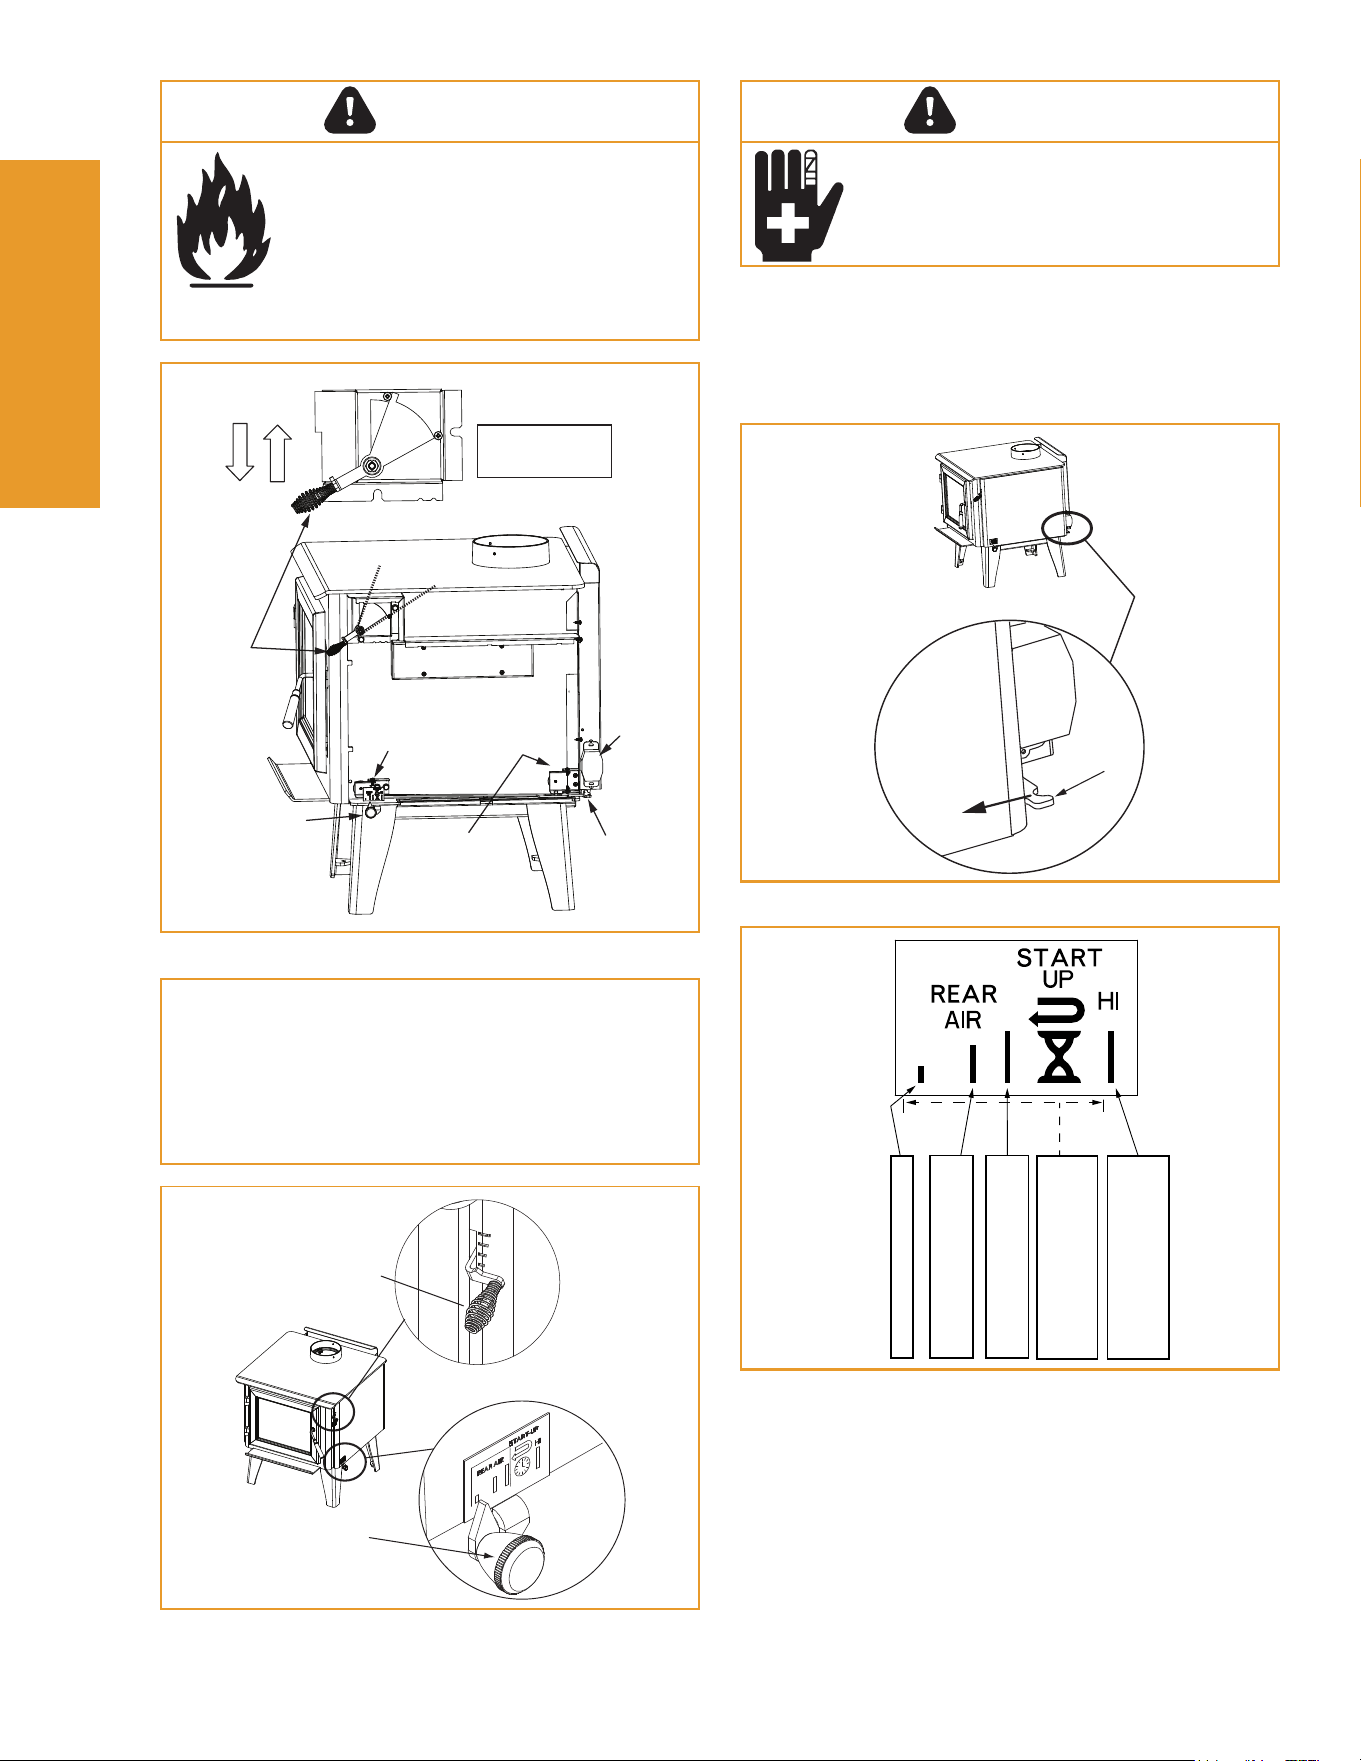
Figure 10.1
High (Open)
Low (Closed)
Smart Air
Control
Timer
Rear Air Channel
Operates independently
from Timer
Front Air Channel
Operated by Timer
LOW
HIGH
Smart Air Control
Shut down
Shown with Side
Shields Removed
Burn Rate
Air Control
After activating the timer (Smart Air Control), if the
control is placed within the rear air section on the
label it will allow rear air to enter the rebox. This will
not interfere with the timer gradually closing the front
air channel in 25 minutes. If the control is set to “HI”,
it overrides the Smart Air Control timer and keeps the
front air channel from closing.
Risk of Fire.
When set on High Burn Rate and
overriding the Smart Air Control system
an over re situation can occur and may
result in a chimney re.
Over ring will void the appliance
warranty.
WARNING
Injury Risk.
• Gloves recommended
CAUTION
Figure 10.2
Burn Rate
Air Control
Smart Air
Control
Figure 10.3
Smart Air
Control
Shut Down
Pull Forward
to Shut Down
Manual Timer Override: If you need to shut the Smart
Air Control o before it goes through the cycle of
shutting itself o; 25 minutes, reach towards the back
of the appliance on the right side and pull the lever
towards the front of the appliance (Figure 10.3).
Figure 10.4
Overrides timer & opens
rear air to open locked
position
Open rear air medium air
flow
Engages timer push knob
towards HI then back to
any point within dotted line
Open rear air medium-low
air flow
Closes front and rear air
Operating Operating
InstructionsInstructions
22
11 ForgenFlame.comWoodPro Wood Stove • 8390-086B • 09/25
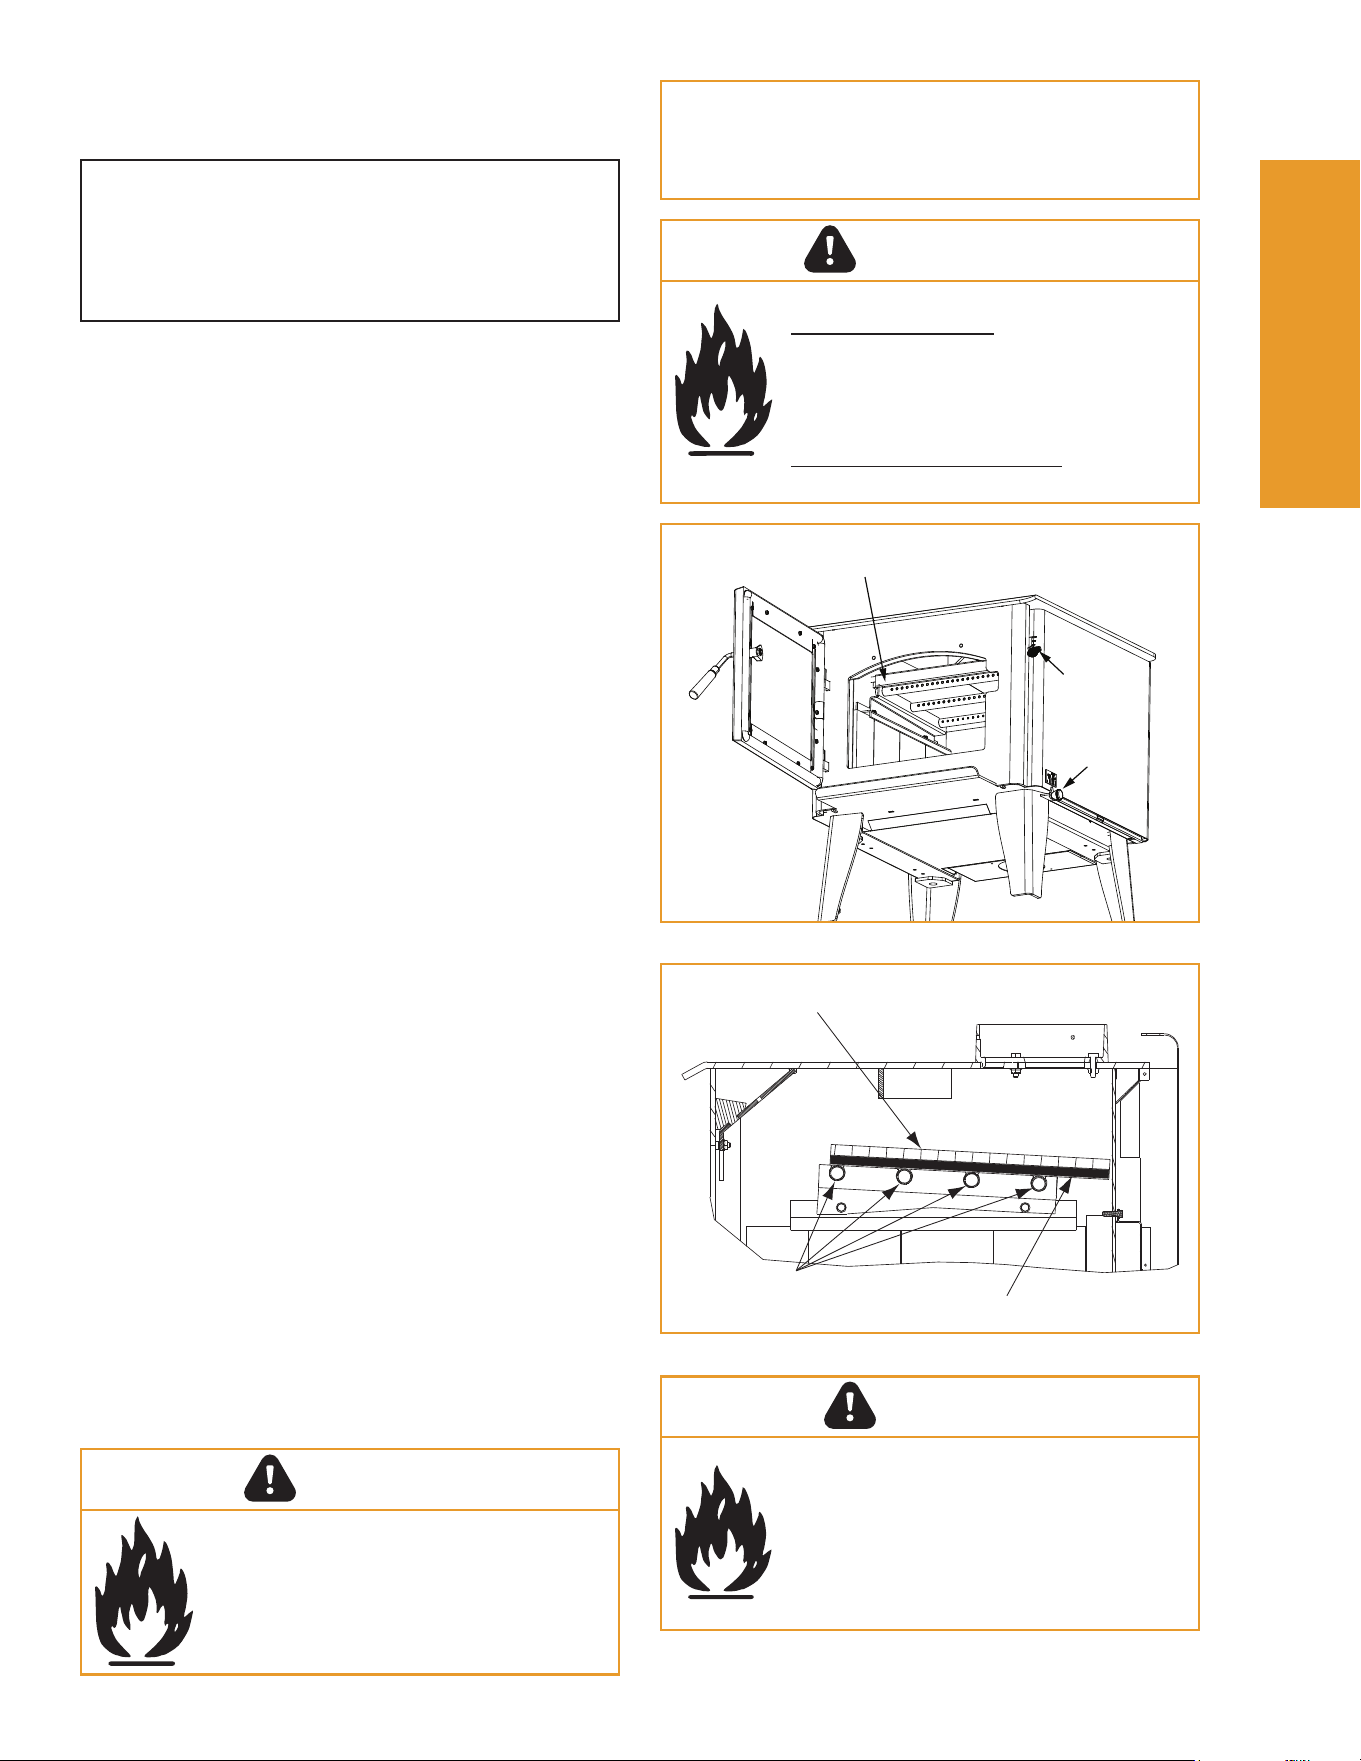
Baffle Board even with front
tube & resting on all tubes
Burn Rate Air
Control
Smart Air
Control
Figure 11.1
E. Building A FireE. Building A Fire
Before lighting your rst re in the appliance:
NOTE: The special high temperature paint that your
appliance is nished with will cure as your appliance
heats. You will notice an odor and perhaps see some
vapor rise from the appliance surface; this is normal.
We recommend that you open a window until the
odor dissipates and paint is cured.
Tube Channels
Ceramic Blanket on Top
2 pc Baffle Board
Figure 11.2
NOTE:
• Build re on brick rebox oor.
• Do NOT use grates, andirons or other methods
to support fuel. It will adversely aect emissions.
1. Conrm the bae is correctly positioned. It should
be even with the front tube and resting on all tubes
(Figure 11.1 and Figure 11.2).
2. Remove all labels from glass and inside of appliance.
There are many ways to build a re. The basic principle
is to light easily-ignitable tinder or paper, which ignites
the fast burning kindling, which in turn ignites the slow-
burning rewood. Here is one method that works well:
1. Open the Burn Rate Air and Smart Air Control fully
(Refer to the Quick Start Guide).
2. Place several wads of crushed paper on the
rebox oor. Heating the ue with slightly crumpled
newspaper before adding kindling keeps smoke to a
minimum.
3. Lay small dry sticks of kindling on top of the paper.
4. Make sure that no matches or other combustibles
are in the immediate area of the appliance. Be
sure the room is adequately ventilated and the
ue unobstructed.
5. Light the paper in the appliance. NEVER light or
rekindle re with kerosene, gasoline, or charcoal
lighter uid; the results can be fatal.
6. Once the kindling is burning quickly, add several full-
length logs 3 inches (76mm) or 4 inches (102mm) in
diameter. Be careful not to smother the re. Stack
the pieces of wood carefully; near enough to keep
each other hot, but far enough away from each other
to allow adequate air ow between them.
7. Set the Burn Rate Air Control and activate the Smart
Air Control.
8. When ready to reload, It is best to fully open both
the Burn Rate Air and Start-up Air Controls before
reloading. This livens up the coal bed and reduces
excessive emissions (opacity/smoke). Open door
slowly so that ash or smoke does not exit appliance
through opening. Large logs burn slowly, holding a
re longer. Small logs burn fast and hot, giving quick
heat.
9. As long as there are hot coals, repeating steps 6
through 8 will maintain a continuous re.
Fire Risk.
• Do not leave the re unattended when the
door is unlatched.
• Unstable rewood could fall out of the
rebox creating a re hazard to your home.
WARNING
Fire Risk.
Do NOT store wood:
• Closer than required clearances to
combustibles to appliance
• Within space required for loading or
ash removal.
Do NOT operate appliance:
• With appliance door open.
WARNING
Fire Risk.
• Do NOT burn wet or green wood.
• Store wood in dry location.
• Stack wood so both ends are exposed
to air.
Wet, unseasoned wood can cause
accumulation of creosote.
WARNING
Operating Operating
InstructionsInstructions
22
12 ForgenFlame.comWoodPro Wood Stove • 8390-086B • 09/25
F. Opacity (Smoke)F. Opacity (Smoke)
This is the measure of how cleanly your appliance is
burning. Opacity is measured in percent; 100% opacity
is when an object is totally obscured by the smoke
column from a chimney, and 0% opacity means that no
smoke column can be seen. As you become familiar
with your appliance, you should periodically check the
opacity. This will allow you to know how to burn as
nearly smoke-free as possible (goal of 0% opacity).
Fire Risk.
• DO NOT BURN GARBAGE OR
FLAMMABLE FLUIDS SUCH AS
GASOLINE, NAPHTHA OR ENGINE
OIL.
• Do NOT burn treated wood or wood
with salt (driftwood).
• May generate carbon monoxide if
burn material other than wood.
• May result in illness or possible death.
WARNING
When burning your rst re, you will experience
smoke and odor from the appliance resulting from the
curing of paint and burning o of any oils remaining
from manufacturing.
OPEN WINDOWS DURING INITIAL BURN TO
DISSIPATE SMOKE AND ODORS!
• Odors may be irritating to sensitive individuals.
• Smoke detectors may activate.
CAUTION
WARNING
Fire Risk.
Keep combustible materials, gasoline
and other ammable vapors and liquids
clear of appliance.
• Do NOT store ammable materials in
the appliance’s vicinity.
• DO NOT USE GASOLINE, LANTERN FUEL,
KEROSENE, CHARCOAL LIGHTER FLUID OR
SIMILAR LIQUIDS TO START OR “FRESHEN
UP” A FIRE IN THIS Appliance.
• Keep all such liquids well away from the appliance
while it is in use.
• Combustible materials may ignite.
G. Clear SpaceG. Clear Space
Figure 12.1
Maintain 4 ft (1.22m) clearance to
combustibles in front of appliance
NOTE: Do NOT place combustible objects within
4 ft (1.2m) of the front of appliance (Figure 12.1).
• Mantel: Avoid placing candles and other heat-
sensitive objects on mantel or hearth. Heat may
damage these objects.
Do NOT place combustible objects in front of the
appliance. High temperatures may ignite clothing,
furniture or draperies.
WARNING
Operating Operating
InstructionsInstructions
22
13 ForgenFlame.comWoodPro Wood Stove • 8390-086B • 09/25
Negative pressure results from the imbalance of air
available for the appliance to operate properly. It can be
strongest in lower levels of the house.
Causes include:
• Exhaust fans (kitchen, bath, etc.)
• Range hoods
• Combustion air requirements for furnaces, water
appliances and other combustion appliances
• Clothes dryers
• Location of return-air vents to furnace or air
conditioning
• Imbalances of the HVAC air handling system
• Upper level air leaks such as:
- Recessed lighting
- Attic hatch
- Duct leaks
To minimize the eects of negative air pressure:
• Install the outside air kit with the intake facing
prevailing winds during the heating season
• Ensure adequate outdoor air for all combustion
appliances and exhaust equipment
• Ensure furnace and air conditioning return vents are
not located in the immediate vicinity of the appliance
• Avoid installing the appliance near doors, walkways
or small isolated spaces
• Recessed lighting should be a “sealed can” design
• Attic hatches weather stripped or sealed
• Attic mounted duct work and air handler joints and
seams taped or sealed
H. Negative Pressure
Asphyxiation Risk.
• Negative pressure can cause spillage
of combustion fumes, soot and
carbon monoxide.
• Appliance needs to draft properly
for safety.
WARNING
ISSUES SOLUTIONS
Odor from appliance
When rst operated, this
appliance may release an
odor for the rst several hours.
This is caused by the curing
of the paint and the burning
o of any oils remaining from
manufacturing.
Metallic noise
Noise is caused by metal
expanding and contracting as
it heats up and cools down,
similar to the sound produced
by a furnace or heating duct.
This noise does not aect the
operation or longevity of the
appliance.
Table 13.1
I. Frequently Asked Questions
Fire Risk.
• DO NOT BURN GARBAGE OR
FLAMMABLE FLUIDS SUCH AS
GASOLINE, NAPHTHA OR ENGINE
OIL.
• Do NOT burn treated wood or wood
with salt (driftwood).
• May generate carbon monoxide if
burn material other than wood.
May result in illness or possible death.
WARNING
WARNING
Fire Risk.
Keep combustible materials, gasoline
and other ammable vapors and liquids
clear of appliance.
• Do NOT store ammable materials in
the appliance’s vicinity.
• DO NOT USE GASOLINE, LANTERN FUEL,
KEROSENE, CHARCOAL LIGHTER FLUID OR
SIMILAR LIQUIDS TO START OR “FRESHEN
UP” A FIRE IN THIS APPLIANCE.
• Keep all such liquids well away from the appliance
while it is in use.
• Combustible materials may ignite.
Operating Operating
InstructionsInstructions
22
14 ForgenFlame.comWoodPro Wood Stove • 8390-086B • 09/25
A. Quick Reference Maintenance GuideA. Quick Reference Maintenance Guide
When properly maintained, your replace will give you
many years of trouble-free service.
Allow the appliance to completely cool down before
performing any cleaning or maintenance. Start the
rst inspection after the rst 2 months of use, or if
performance changes, and adjust your schedule
accordingly. Maintenance is required for safe
operation and must be performed to maintain your
warranty.
CAUTION
Table 14.1
Maintenance Maintenance
and Serviceand Service
33
FREQUENCY TASK
Bae & Blanket
MONTHLY
or after every
one (1) cord of
wood
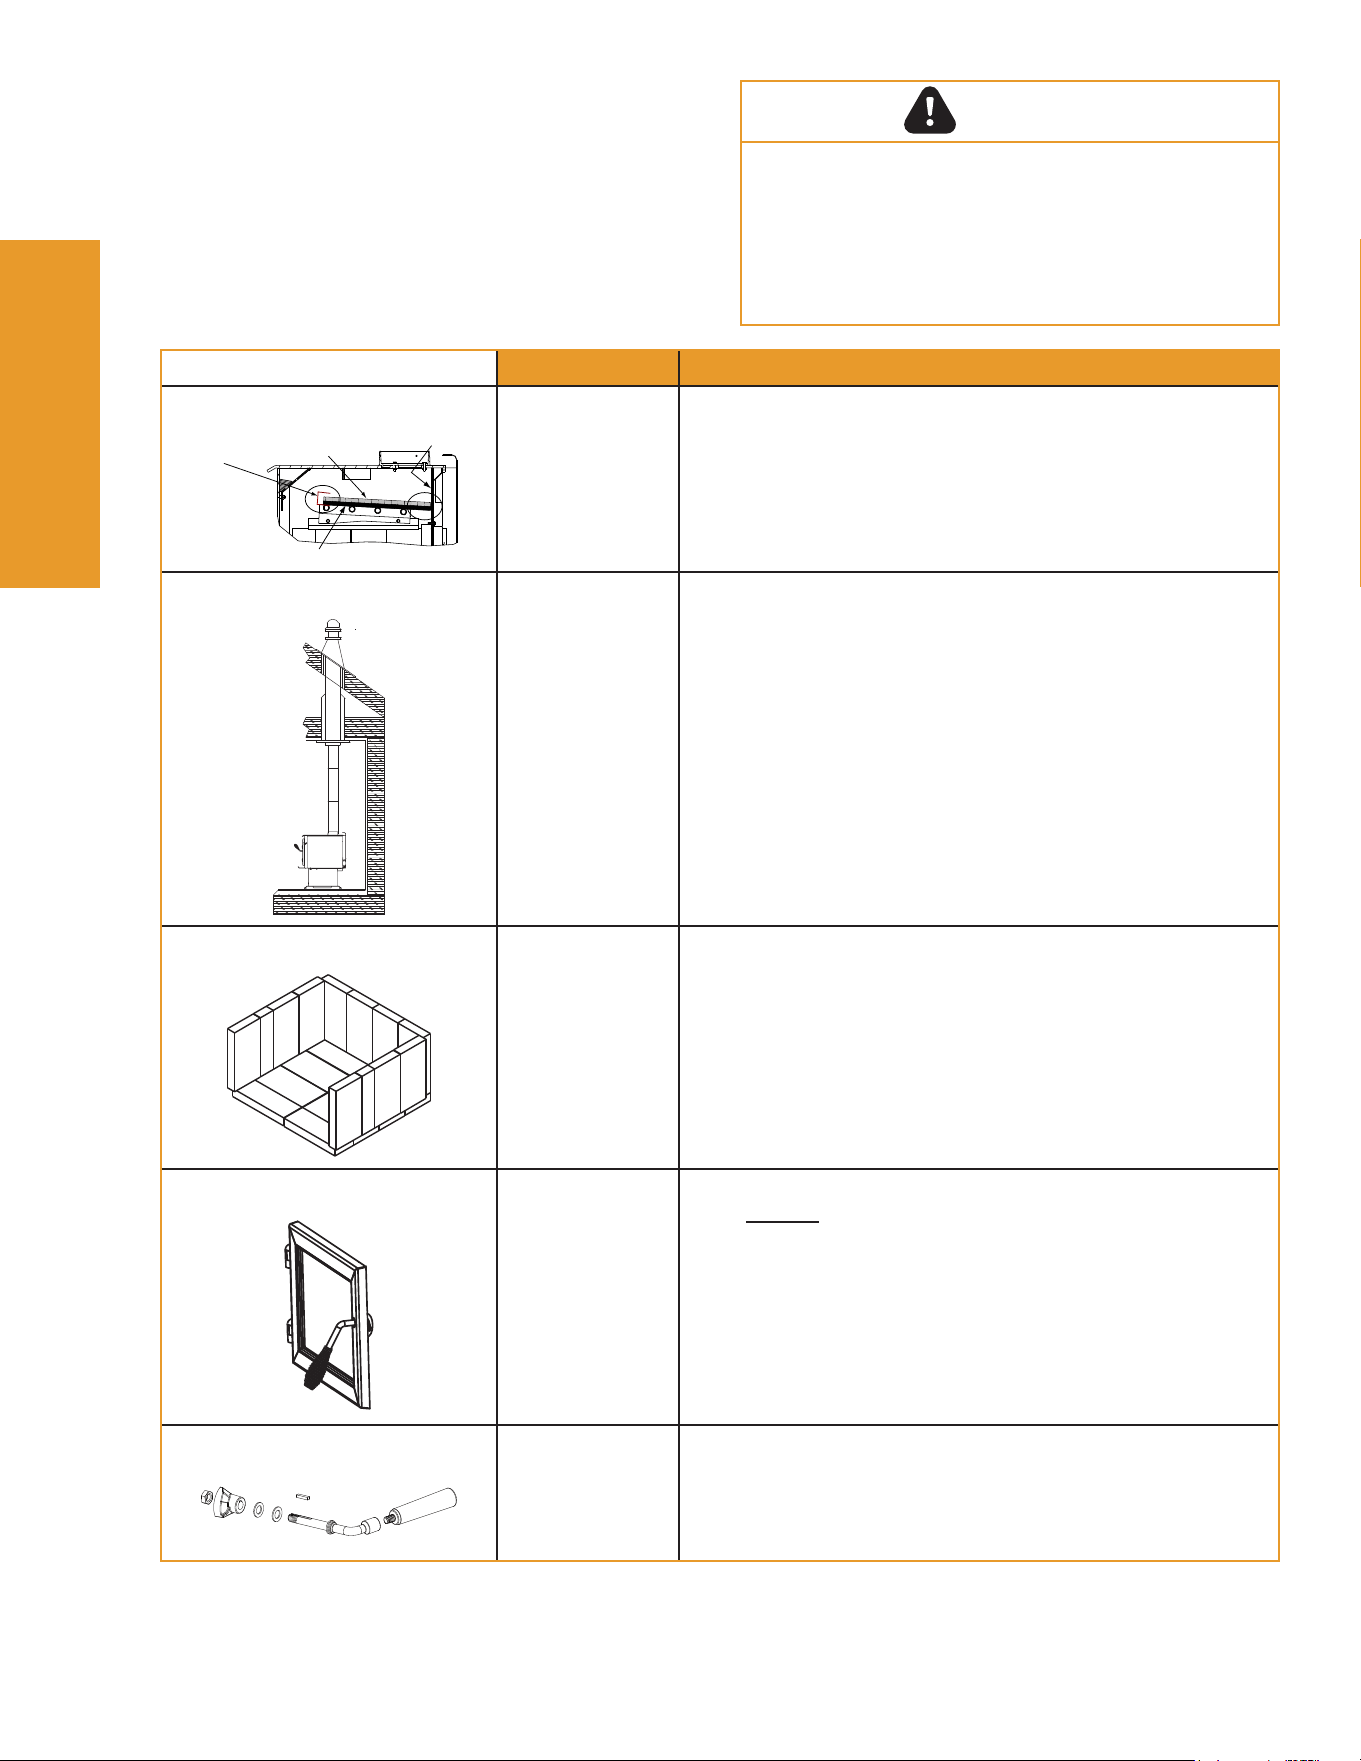
Bae and blanket placement is critical to heat output,
eciency and overall life of the appliance. Make sure the
bae is pushed all of the way to the back of the rebox and
the blanket is laying at. Inspect bae for cracks.
Ceramic Blanket
Back of Firebox
Baffle Board
Baffle Retainer
Bracket
Chimney System
EVERY TWO
MONTHS
or after every
four (4) cords of
wood
The chimney and chimney cap must be inspected for soot
and creosote every two months during the burn season or
more frequency if chimney exceeds or is under 14-16 ft
(4.3m-4.8m) measured from bottom of appliance.
This will prevent pipe blockage, poor draft, and chimney
res.
Always burn dry wood to help prevent cap blockage and
creosote build-up.
Firebrick & Ash Removal
WEEKLY
or after every 25
loads of wood
Ashes must be cool before you can dispose of the ashes in
a non-combustible container.
Firebrick is designed to protect your rebox. After ashes are
removed, inspect the rebrick and replace rebricks that are
crumbling, cracked or broken.
Door & Glass Assemblies
WEEKLY
or after every 25
loads of wood
Keep door and glass gasket in good shape to maintain good
burn. To test: place a dollar bill between the appliance and
door and then shut the door. If you can pull the dollar out,
remove one washer from door handle behind latch cam and
try again. If you can still pull it out, replace the door gasket.
Check the glass frame for loose screws to prevent air
leakage.
Check glass for cracks.
Door Handles
WEEKLY
or after every 25
loads of wood
Check the door latch for proper adjustment. This is very
important especially after the door rope has formed to the
appliance face.
Check door handle for smooth cam operation.
These are generic drawings and may not represent your model.
15 ForgenFlame.comWoodPro Wood Stove • 8390-086B • 09/25
B. General MaintenanceB. General Maintenance
1. Creosote (Chimney) Cleaning
• Frequency: Every 2 months during heating season
or as recommended by a certied chimney sweep;
more frequently if chimney exceeds or is under 14-16
ft. (measured from bottom of appliance)
• By: Certied Chimney Sweep
Remove all ash from the rebox and extinguish all hot
embers before disposal. Allow the appliance to cool
completely. Disconnect ue pipe or remove bae and
ceramic blanket from appliance before cleaning chimney.
Otherwise residue can pile up on top of the bae and
ceramic blanket and the appliance will not work properly.
(See section 5D Bae Removal). Close the door tightly.
The creosote or soot should be removed with a brush
specically designed for the type of chimney in use.
Clean out fallen ashes from the rebox.
It is also recommended that before each heating season
the entire system be professionally inspected, cleaned
and repaired if necessary.
Inspection: Inspect the system at the appliance
connection and at the chimney top. Cooler surfaces
tend to build creosote deposits quicker, so it is important
to check the chimney from the top as well as from the
bottom.
Formation and Need For Removal: When wood is
burned slowly, it produces tar and other organic vapors
which combine with expelled moisture to form creosote.
The creosote vapors condense in the relatively cool
chimney ue of a newly-started or a slow-burning re.
As a result, creosote residue accumulates on the ue
lining. When ignited, this creosote creates an extremely
hot re which may damage the chimney or even destroy
the house.
The chimney connector and chimney should be inspected
once every 2 months during the heating season to
determine if a creosote or soot buildup has occurred. If
creosote or soot has accumulated, it should be removed
to reduce the risk of a chimney re.
3. Appliance Inspection
• Frequency: Every 2 months at the same time the
chimney and chimney connector are inspected.
• By: Homeowner
Check for:
• Cracks in glass
• Door handle - smooth cam operation
• Bae and ceramic blanket correct placement
• Bae for warpage
• Firebrick for cracks, broken or crumbly
• Door gasket (Dollar bill test): Place a dollar bill
between the stove and the door and then shut the
door. If you can pull the dollar bill out, replace the
door gasket.
• Glass frame for loose screws
Ashes should be placed in a metal container with a
tight tting lid. The closed container of ashes should
be placed on a non-combustible oor or on the ground,
well away from all combustible materials, pending nal
disposal. If the ashes are disposed of by burial in soil
or otherwise locally dispersed, they should be retained
in the closed container until all cinders have thoroughly
cooled.
2. Disposal of Ashes
• Frequency:
When ash is within 1-3/4 in. (44mm) of
rebox lip
• By: Homeowner
Fire Risk.
Prevent creosote buildup.
• Inspect chimney connector and
chimney once every two months
during heating season.
• Remove creosote to reduce risk of
chimney re.
• Ignited creosote is extremely HOT.
WARNING
Fire Risk.
• Do not use chimney cleaners or
ame colorants in your appliance. Will
corrode chimney pipe.
WARNING
Fire Risk.
Ashes could contain hot embers.
WARNING
Fire Risk. Disposal of Ashes
• Ashes should be placed in metal
container with tight tting lid.
• Do not place metal container on
combustible surface.
• Ashes should be retained in closed
container until all cinders have
thoroughly cooled.
WARNING
Maintenance Maintenance
and Serviceand Service
33
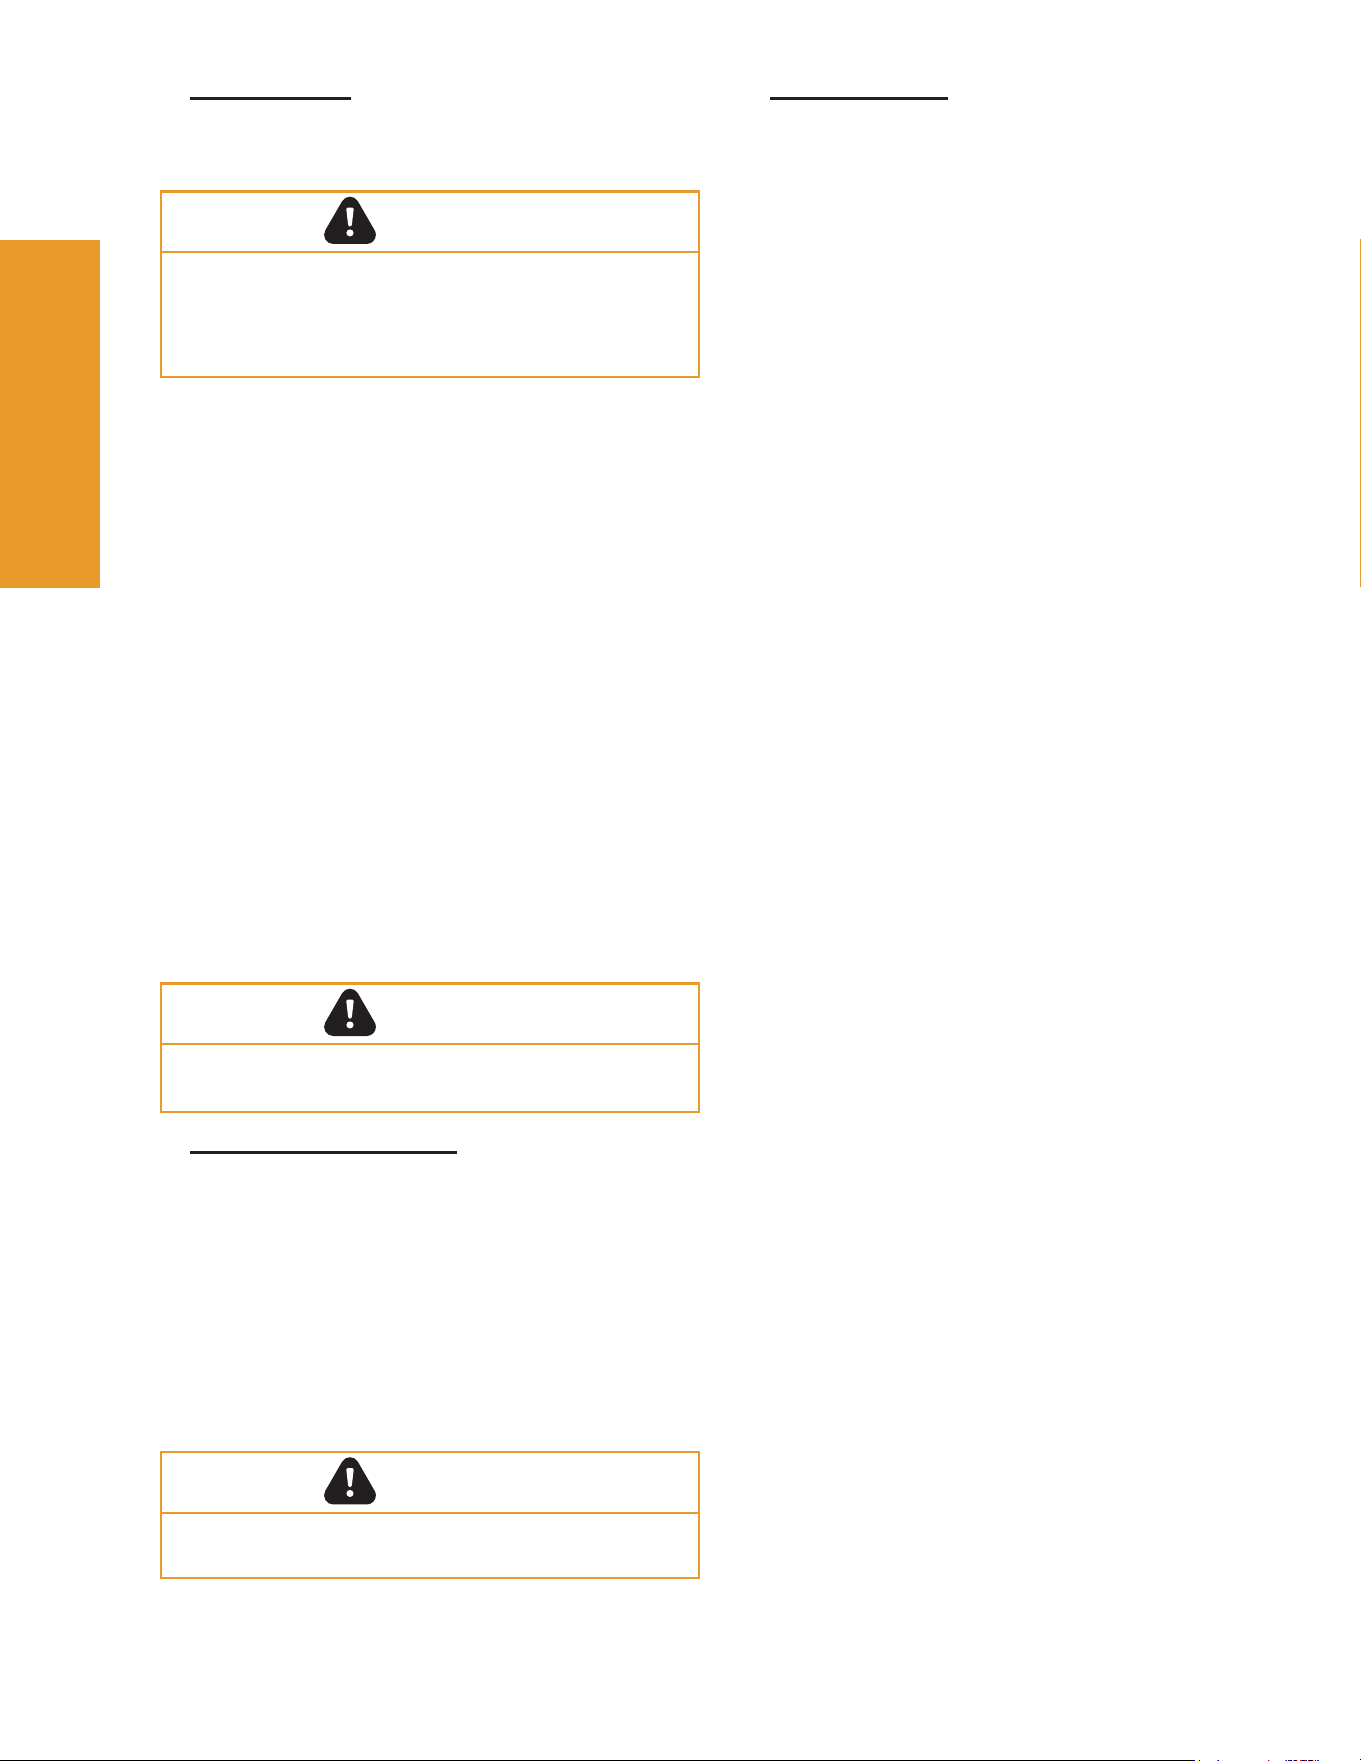
16 ForgenFlame.comWoodPro Wood Stove • 8390-086B • 09/25
6. Inspect Firebrick
• Frequency: After each ash removal
• By: Homeowner
Replace the rebrick if they become crumbly and/or if
there is a 1/4 inch (6.35mm) gap between the bricks.
The rebox is lined with rebrick, which has exceptional
insulating properties. Do not use a grate; simply build
a re on the rebox oor. Do not operate appliance
without rebrick.
1. After the coals have completely cooled, remove all
old brick and ash from unit and vacuum rebox.
2. Remove new brick set from box and lay out to the
diagram shown in the instructions that come with the
brick set or refer to the diagram on the service parts
list at the end of this manual.
3. Lay bottom bricks in unit.
4. Install rear bricks on the top of the bottom bricks.
Slide top of bricks under clip on back of rebox wall
and push bottom of bricks back.
5. Install side bricks. Slide top of brick under clips on
side of rebox and push the bottom of the brick until
it is ush with the side of the unit.
5. Cleaning Plated Surfaces
• Frequency: Prior to first burn and then as desired
• By: Homeowner
Clean all the ngerprints and oils from plated surfaces
BEFORE ring the appliance for the rst time. If not
cleaned properly before lighting your rst re, the oils
can cause permanent markings on the plating.
After the plating is cured, the oils will not aect the
nish and little maintenance is required. Wipe clean as
needed.
Clean glass with a non-abrasive glass cleaner. Abrasive
cleaners may scratch and cause glass to crack. If the
deposits on the glass are not very heavy, normal glass
cleaners work well. Heavier deposits may be removed
by using a damp cloth dipped in wood ashes or by using
a commercially available oven cleaner.
After using an oven cleaner, it is advisable to remove any
residue with a glass cleaner or soap and water. Oven
cleaner left on during the next ring can permanently
stain the glass and damage the nish on metal surfaces.
A portion of the combustion air entering the rebox is
deected down over the inside of the door glass. This
air ow “washes” the glass, helping to keep smoke from
adhering to its surface.
When operated at a low burn rate, less air will be owing
over the glass and the smokey, relatively cool condition
of a low re will cause the glass to become coated.
Operating the appliance with the Burn Rate Air Control
and Smart Air Control all the way open for 30-45 minutes
should remove the built up coating.
4. Glass Cleaning
• Frequency: As desired
• By: Homeowner
Handle glass assembly with care. Glass is breakable.
• Avoid striking, scratching or slamming glass
• Avoid abrasive cleaners
• Do not clean glass while it is hot
CAUTION
• Do not use polishes with abrasives. It will scratch
plated surfaces.
CAUTION
• Do not use polishes with abrasives. It will
scratch surfaces.
CAUTION
Maintenance Maintenance
and Serviceand Service
33
17 ForgenFlame.comWoodPro Wood Stove • 8390-086B • 09/25
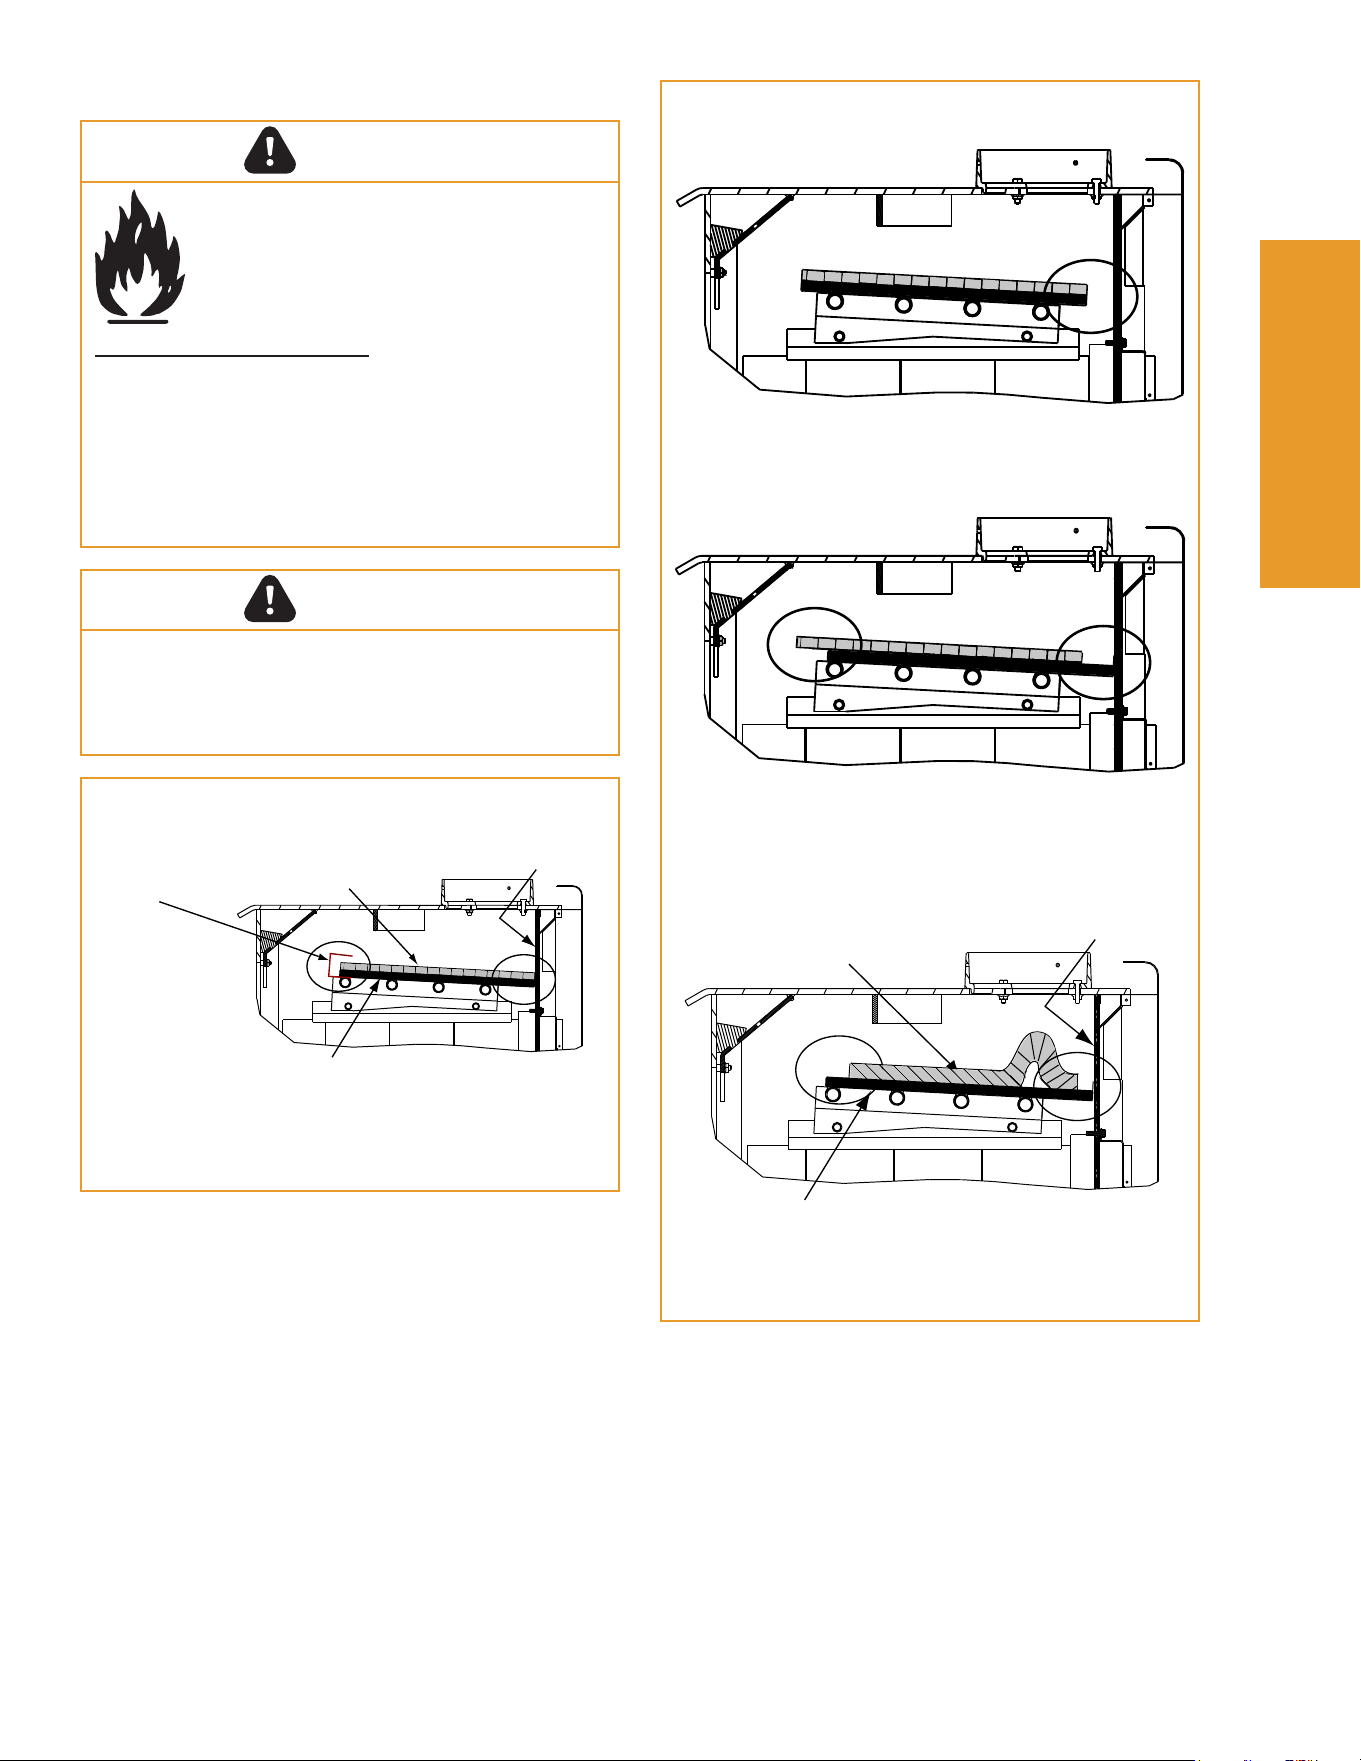
C. Correct Bae & Blanket PlacementC. Correct Bae & Blanket Placement
INCORRECT POSITIONS
Ceramic Blanket and Bae Board are NOT in
contact with the back of the rebox.
Ceramic Blanket is NOT in contact with the back of
the rebox and NOT even with the Bae Board in
the front.
Ceramic Blanket is bunched up at the back of the
rebox and NOT even with the Bae Board in the
front.
Ceramic Blanket
Back of
Firebox
Baffle Board
Figure 17.2
Figure 17.1
CORRECT POSITION
Ceramic Blanket and Bae Board MUST be in
contact with the back of the rebox and even with
each other in the front.
Ceramic Blanket
Back of Firebox
Baffle Board
Baffle Retainer
Bracket
The bae boards are FRAGILE. Use extreme
caution when loading rewood to prevent cracking,
breaking or damaging the bae boards
DO NOT operate the appliance without bae boards
CAUTION
Fire Risk.
Firebox damage due to improper bae
placement is not covered by warranty.
Operate the wood burning appliance with
the bae in the correct position only.
WARNING
Not doing so could result in:
• Reduced eciency
• Overheating the chimney
• Overheating the rear of the rebox
• Poor performance
Ensure correct bae placement and replace bae
components if damaged or missing.
Maintenance Maintenance
and Serviceand Service
33

18 ForgenFlame.comWoodPro Wood Stove • 8390-086B • 09/25
With proper installation, operation, and maintenance your wood appliance will provide years of trouble-free service.
If you do experience a problem, this troubleshooting guide will assist you or a qualied service person in the
diagnosis of a problem and the corrective action to be taken.
Table 18.1
Start Fire Problems Possible Cause Solution
Can not get re started
Excessive smoke or spillage
Burns too slowly
Not enough heat output
Not enough kindling/paper or
no kindling/paper
Use dry kindling, more paper. Arrange
kindling & wood for air movement.
Not enough air for re to ignite
Check for restricted termination cap
Check for blockage of outside air kit; if
installed.
Check for ue blockage.
Pre-warm ue before starting re (refer to
section 2E Building a Fire).
Check for adequate vent height (refer to
Chimney Height / Rise and Run of the
Installation manual).
Open window below the appliance towards
the wind.
Wood condition is too wet,
too large
Use dry, seasoned wood (refer to section 2B
Wood Selection & Storage).
Bed of coals not established
before adding wood
Start with paper & kindling to establish bed of
coals (refer to section 2E Building a Fire).
Flue blockage such as birds’
nests or leaves in termination
cap
Have chimney inspected for creosote and
cleaned by a certied chimney sweep.
Down draft or negative
pressure
Competition with exhaust
devices
Do not use exhaust fans during start-up (refer
to section 2H Negative Pressure).
Open window below the appliance towards
the wind.
Fire burns too fast
Extremely dry or soft wood
Mix in hardwood.
Mix in less seasoned wood after re is
established (refer to section 2B Wood
Selection & Storage).
Over drafting
Check for correct vent height; too much
vertical height creates over drafting.
Check location of vent termination
Troubleshooting Troubleshooting
GuideGuide
44
19 ForgenFlame.comWoodPro Wood Stove • 8390-086B • 09/25
A. GlassA. Glass
NOTE: Replace with 5mm ceramic glass only.
Service Part: SRV7039-061- FF-WP-100
Service Part: SRV7044-027 - FF-WP-200, 300
1. Ensure that the re is out and the appliance is cool
to the touch.
2. Protect a table or counter top with padding or towels.
Protect your hands and wear gloves to prevent injury.
3. Remove the door with the broken glass by lifting the
door up and o of the hinges.
4. Lay door face down on a table or counter making sure
the handle hangs over the edge so the door lays at,
on a soft surface.
5. Remove the screws from each glass retainer and
remove the glass. (If screws are dicult to remove,
soak with penetrating oil rst).
6. Center the glass with edges evenly overlapping
the opening in the door, (i.e. same space top and
bottom, left and right sides).
7. Replace the glass retainers. Be careful not to cross
thread the screws.
8. Tighten each retainer just a few turns until each is
secured. Check again for centering of glass in door
frame. Continue to tighten each retainer alternately,
a few turns at a time, until the glass is secure.
NOTE: DO NOT OVER TIGHTEN RETAINERS -
can cause glass to break.
9. Replace the door on the appliance.
Forge & Flame appliances are equipped with ceramic
super heat-resistant glass, which can only be broken by
impact or misuse.
Handle glass assembly with care.
When cleaning glass:
Glass
Assembly
• Avoid striking, scratching or slamming glass.
• Do NOT clean glass when hot.
• Do NOT use abrasive cleaners.
• Use a hard water deposit glass cleaner on white
lm.
• Use commercial oven cleaner on heavier
deposits.
• Remove all residue of oven cleaner or will
permanently stain glass on next ring.
Refer to maintenance instructions.
CAUTION
Injury Risk.
• Use only glass specied in manual.
• DO NOT REPLACE with any
other material.
WARNING
Service Parts Service Parts
ReplacementReplacement
55
20 ForgenFlame.comWoodPro Wood Stove • 8390-086B • 09/25
Service Part: SRV7033-006 - FF-WP-200
Replace the rebrick if they become crumbly and/or if
there is a 1/4 inch (6.35mm) gap between the bricks.
Inspect the rebrick after each ash removal.
The rebox is lined with high quality rebrick, which has
exceptional insulating properties. There is no need to
use a grate; simply build a re on the rebox oor. Do
not operate appliance without rebrick.
1. After the coals have completely cooled, remove
all old brick and ash from appliance and vacuum
rebox.
2. Remove new brick set from box and lay out to
diagram shown.
3. Lay bottom bricks in appliance.
4. Install rear bricks on the top of the bottom bricks.
Slide top of bricks under clip on back of rebox wall
and push bottom of brick back.
5. Install side bricks. Slide top of brick under clips on
side of rebox and push the bottom of the brick until
it is ush with the side of the appliance.
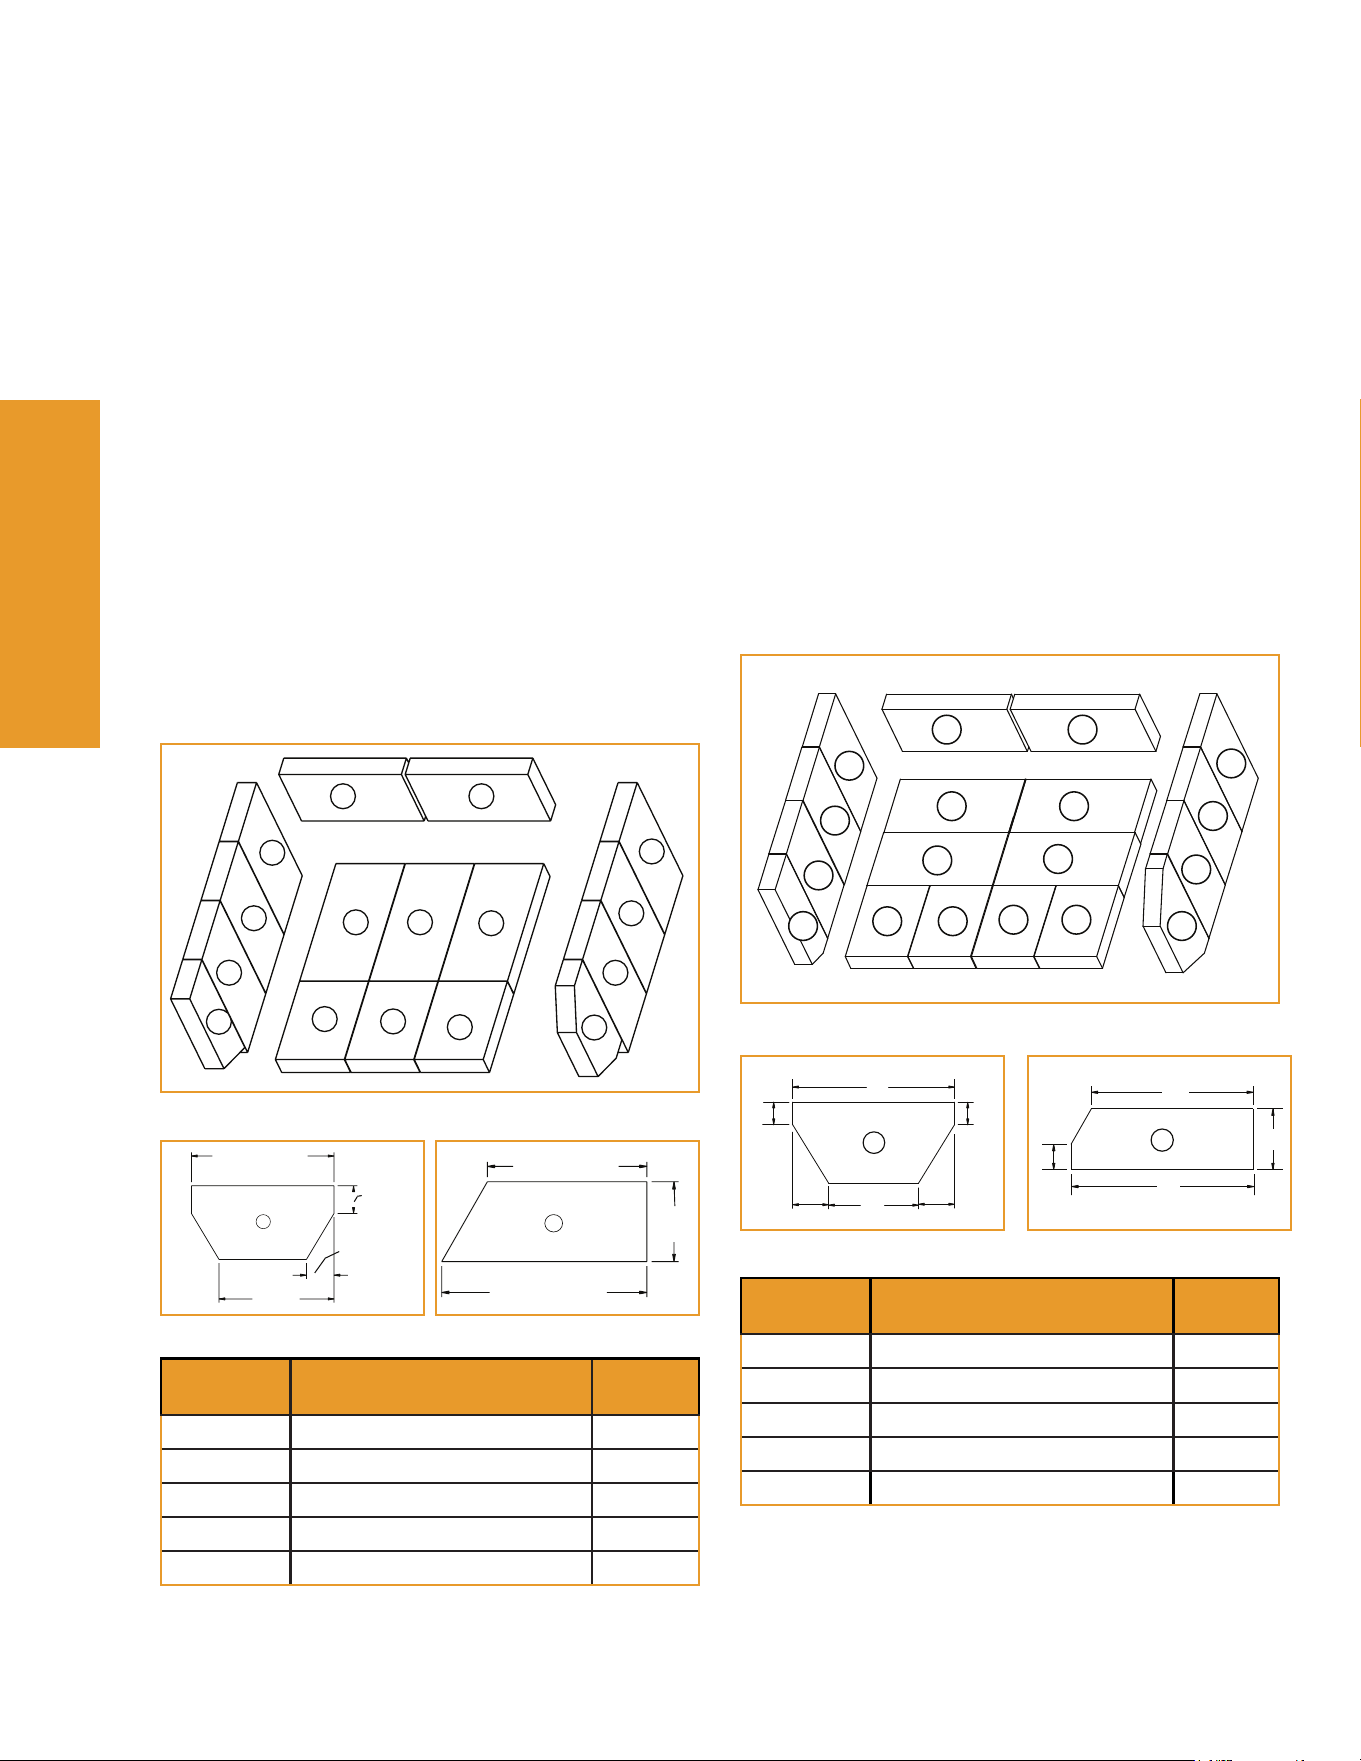
Figure 20.4
1
11
1
1
1
1
1
1
1
1
1
4 3
2 2
2 2
Figure 20.5
5”
2”
2”
1-1/4”
9”
1-1/4”
3
Figure 20.6
8”
3”
1-1/4”
9”
4
Table 20.2
Placement Dimensions
Qty
Required
1 9” x 4.5” x 1.25” 12
2 6” x 4.5” x 1.25” 4
3 9” x 4.5” x 1.25” w/Angles 1
4 9” x 3” x 1.25” w/Angle 1
5 8-1/2” x 3” x 1.25” w/Angle 1
B. FirebrickB. Firebrick
Service Part: SRV7039-007 - FF-WP-100
Replace the rebrick if they become crumbly and/or if
there is a 1/4 inch (6.35mm) gap between the bricks.
Inspect the rebrick after each ash removal.
The rebox is lined with high quality rebrick, which has
exceptional insulating properties. There is no need to
use a grate; simply build a re on the rebox oor. Do
not operate appliance without rebrick.
1. After the coals have completely cooled, remove
all old brick and ash from appliance and vacuum
rebox.
2. Remove new brick set from box and lay out to
diagram shown.
3. Lay bottom bricks in appliance.
4. Install rear bricks on the top of the bottom bricks.
Slide top of bricks under clip on back of rebox wall
and push bottom of brick back.
5. Install side bricks. Slide top of brick under clips on
side of rebox and push the bottom of the brick until
it is ush with the side of the appliance.
Figure 20.1
1
11
1
1
1
1
1
1
2
2
2
4
3
3
5
Figure 20.2
4
1-3/8 in
(35mm)
1-3/4 in
(44mm)
5-1/4 in
(159mm)
7-3/4 in (197mm)
Figure 20.3
8-1/2 in (216mm)
3 in
(76mm)
7 in (178mm)
5
Table 20.1
Placement Dimensions
Qty
Required
1 9” x 4.5” x 1.25” 9
2 5-3/4” x 4.5” x 1.25” 3
3 8” x 4.5” x 1.25” 2
4 7-3/4” x 4-1/2 ” x 1.25” w/Angles 1
5 8-1/2” x 3” x 1.25” w/Angle 1
Service Parts Service Parts
ReplacementReplacement
55
21 ForgenFlame.comWoodPro Wood Stove • 8390-086B • 09/25
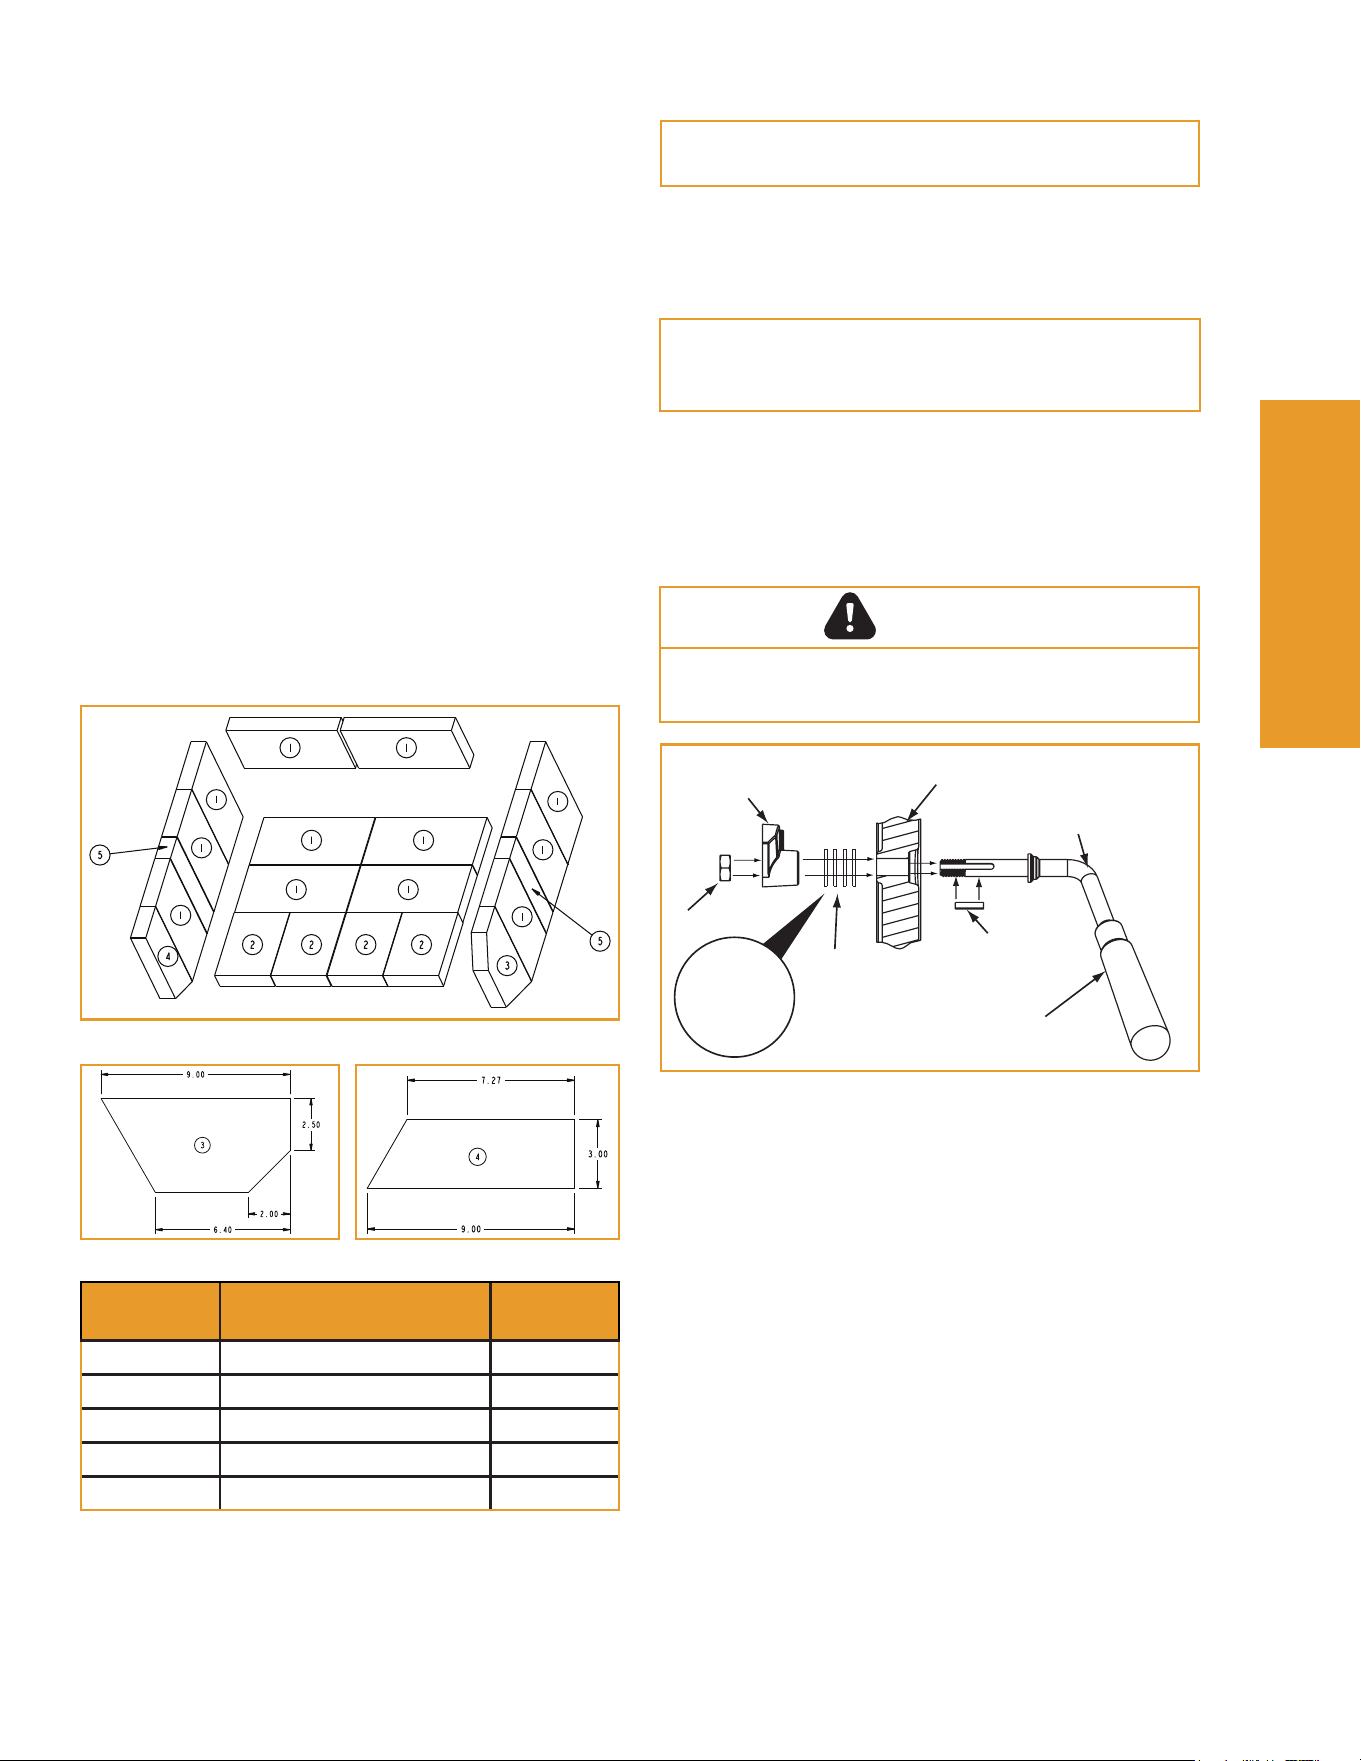
Service Part: SRV7037-003 - FF-WP-300
Replace the rebrick if they become crumbly and/or if
there is a 1/4 inch (6.35mm) gap between the bricks.
Inspect the rebrick after each ash removal.
The rebox is lined with high quality rebrick, which has
exceptional insulating properties. There is no need to
use a grate; simply build a re on the rebox oor. Do
not operate appliance without rebrick.
1. After the coals have completely cooled, remove
all old brick and ash from appliance and vacuum
rebox.
2. Remove new brick set from box and lay out to
diagram shown below.
3. Lay bottom bricks in appliance.
4. Install rear bricks on the top of the bottom bricks.
Slide top of bricks under clip on back of rebox wall
and push bottom of brick back.
5. Install side bricks. Slide top of brick under clips on
side of rebox and push the bottom of the brick until
it is ush with the side of the appliance.
Figure 21.2 Figure 21.3
Table 21.1
Placement Dimensions
Qty
Required
1 9” x 4.5” x 1.25” 12
2 6” x 4.5” x 1.25” 4
3 9” x 4.5” x 1.25” w/Angles 1
4 9” x 3” x 1.25” w/Angle 1
5 9” x 2” x 1.25” 2
Figure 21.1
C. Door Handle AssemblyC. Door Handle Assembly
NOTE: DO NOT over tighten locking nut; door handle
needs to move smoothly!
Service Part: SRV8001-002
1. Slide door handle shaft through hole on door.
2. Add up to four 3/8 washers on the inside of the door.
Figure 21.4
Locknut
Latch Cam
Spacing
Washers
Door Cross
Section
Square Key
Door Handle Shaft
Fiber Handle
Add up to 4
washers on
this side of
the door
Service Parts Service Parts
ReplacementReplacement
55
3. Add square key to door handle shaft; may need to
use a rubber mallet to ensure key sits rmly into
groove of door handle shaft.
4. Slide cast iron cam latch over door handle shaft and
locking key.
NOTE: The quantity of washers added will change
how the door seals. You many need to tear down the
handle assembly a few times to gain the correct seal.
CAUTION
DO NOT over tighten locking nut; door handle needs
to move smoothly!
22 ForgenFlame.comWoodPro Wood Stove • 8390-086B • 09/25
D. BaeD. Bae
Fiber Blanket Service Part: 832-3390
Bae Board Service Part:
WP-100: SRV7039-111
WP-200: SRV7033-209
WP-300: SRV7037-112
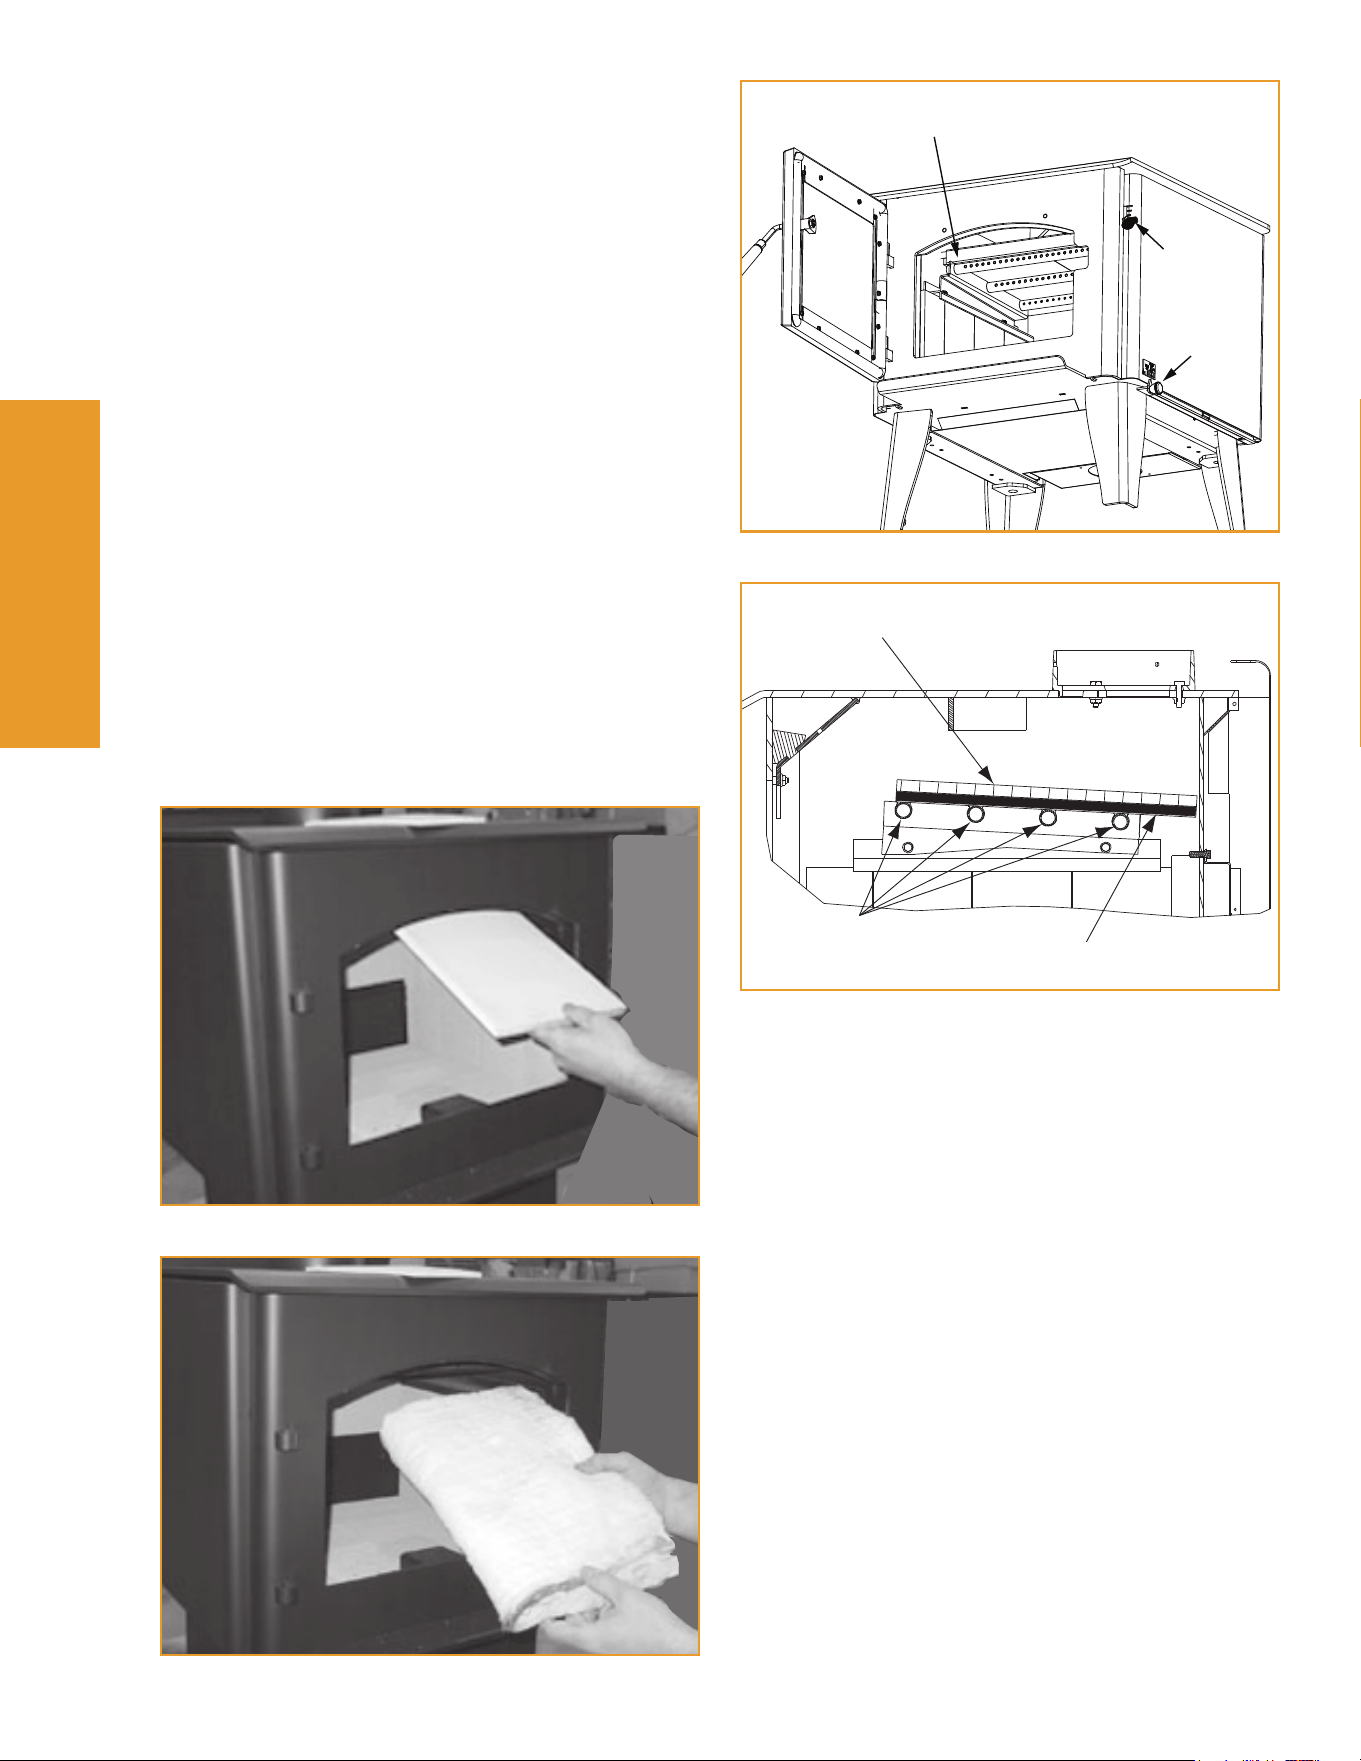
1. Remove all ash from the rebox, and extinguish all hot
embers before disposal into a metal container.
2. The bae board has 2 pieces. With the ceramic
blanket still in place, slide one bae piece over the
top of other one and pull out top piece through the
door opening and then remove bottom bae piece
(Figure 22.1).
3. Remove the ceramic blanket (Figure 22.2).
4. Re-install the bae pieces one piece at a time. Be
sure the bae boards are even with the front manifold
tube and are resting on all tubes (Figure 22.3 and
Figure 22.4).
5. To re-install the ceramic blanket, it is easier to fold it in
half rst (Figure 22.2 and Figure 22.4). Place on top
of bae board, open up and atten and smooth out
the blanket. Verify the bae board for correct position
(Figure 22.3 and Figure 22.4).
Figure 22.3
Baffle Board even with front
tube & resting on all tubes
Burn Rate Air
Control
Smart Air
Control
Figure 22.4
Tube Channels
Ceramic Blanket on Top
2 pc Baffle Board
Figure 22.2 - Ceramic Blanket
Figure 22.1 - Bae Board
Service Parts Service Parts
ReplacementReplacement
55
23 ForgenFlame.comWoodPro Wood Stove • 8390-086B • 09/25
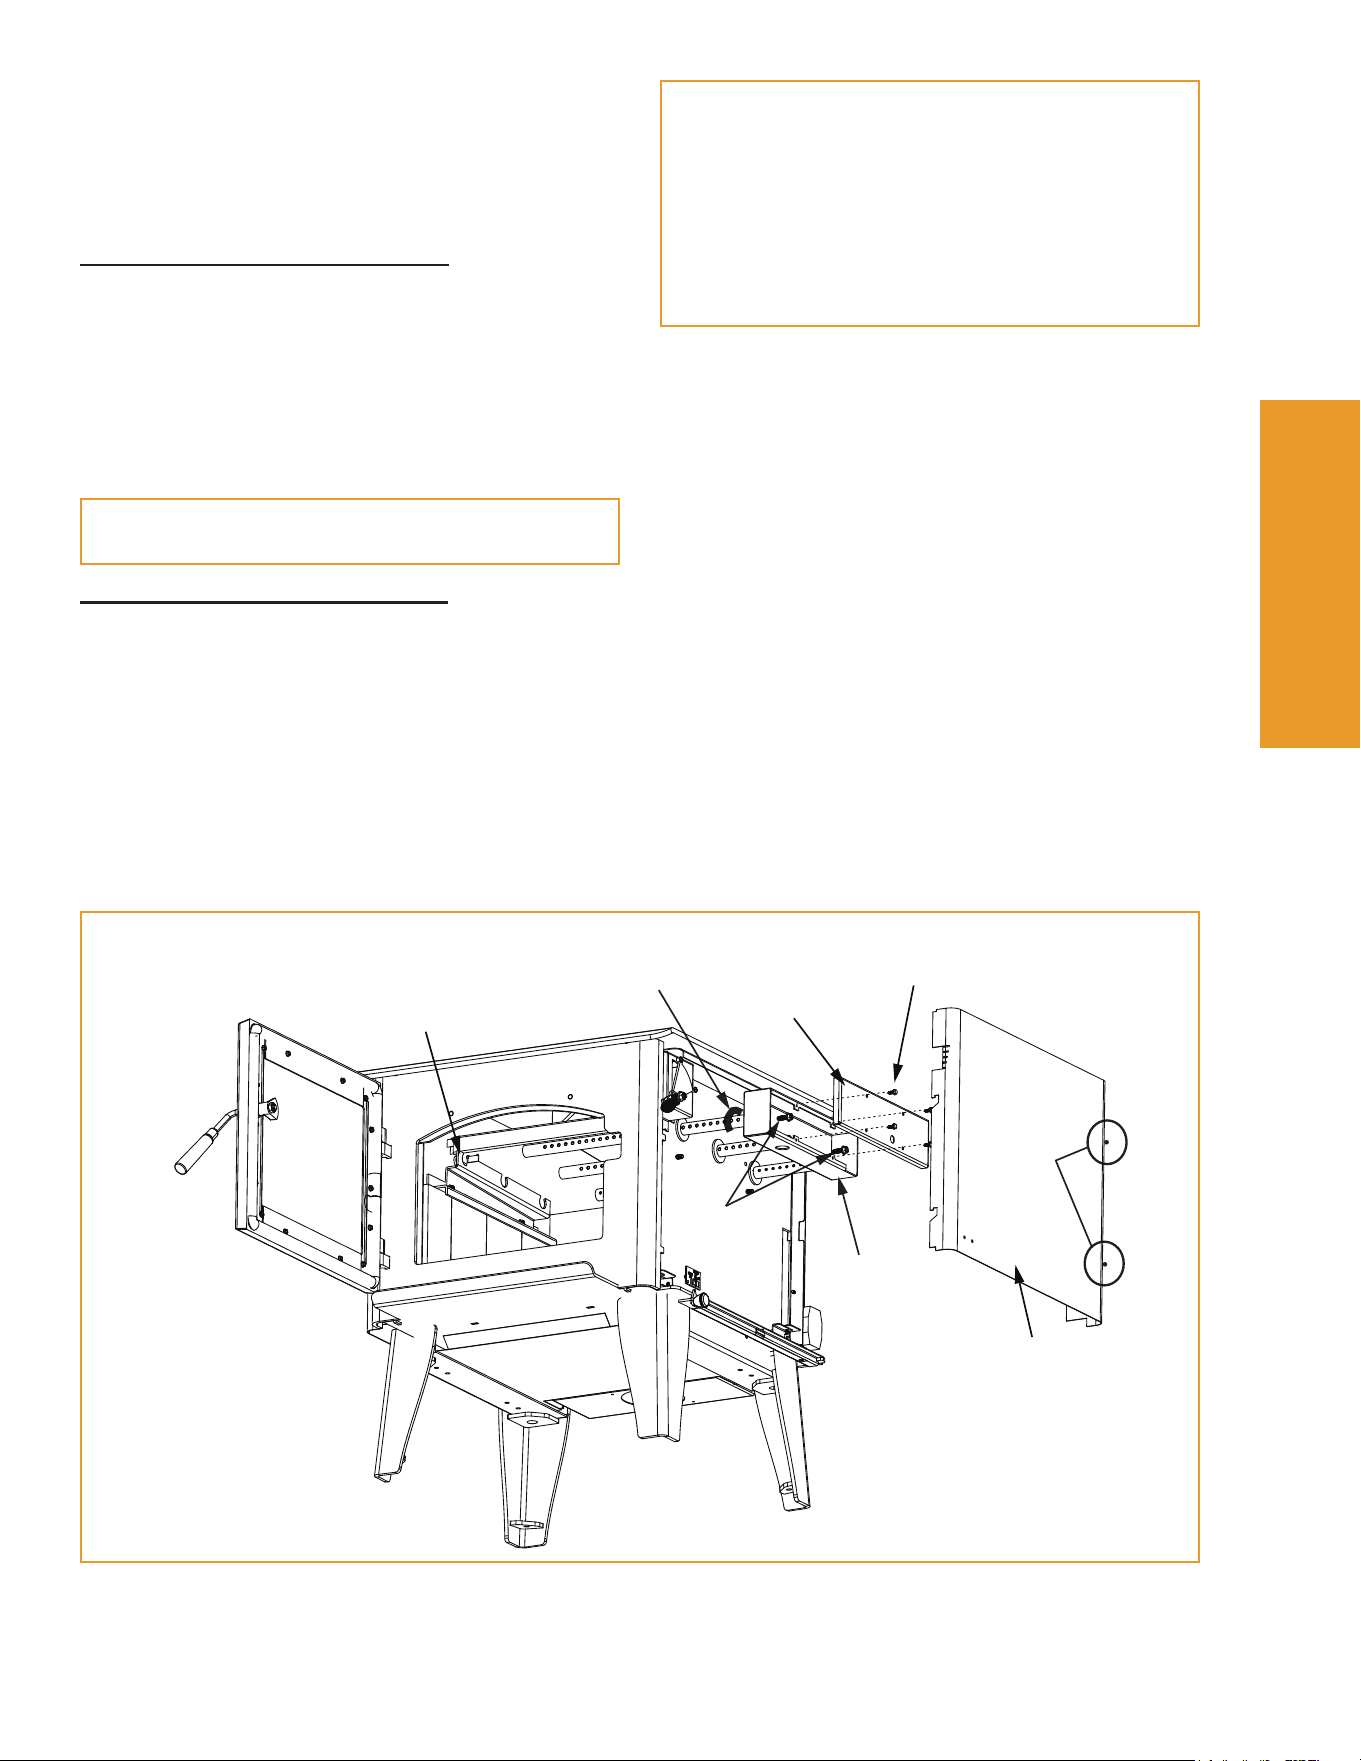
Figure 23.1
Side Panel
Remove
2 Screws
Channel Cover
Screws (4)
Channel
Access Cover
Channel
Nuts (2)
Tube Channel
Assembly
Slide one gasket
over each tube
Tube Channel Rack
E. Tube Channel AssemblyE. Tube Channel Assembly
Service Part:
WP-100: SRV7039-004
WP-200: SRV7033-023
WP-300: SRV7033-023
Removing Tube Channel Assembly
1. Remove the right side panel by removing 2 screws
in the back using a Phillips head screw driver.
2. Remove 4 screws from channel access cover and
remove cover.
3. Locate 2 channel nuts inside of chamber and
remove using a 7/16 socket wrench. Slide out tube
channel assembly.
NOTE: Service Space
In order to replace the tube channel assembly a
clearance of 19 inches (483mm) is required on the
right side of appliance in order to remove the tubes
with the appliance in place.
If space is not available, the appliance will have to be
disconnected from the chimney to proceed with the
tube replacement.
NOTE: Soak the bolts with penetrating oil for at
least 15 minutes before trying to remove them.
Replacing Tube Channel Assembly
1. Slide one gasket onto each tube.
2. Slide the tube channel assembly into side of rebox
and insert each tube into the corresponding hole in
the tube channel rack starting with the back hole
rst.
3. Make sure tube channel assembly is ush against
the side of the appliance and secure with channel
nuts.
4. Re-install channel cover and side shield.
Service Parts Service Parts
ReplacementReplacement
55

24 ForgenFlame.comWoodPro Wood Stove • 8390-086B • 09/25
A. Service & Maintenance LogA. Service & Maintenance Log
Date of Service Performed By Description of Service
ReferenceReference
MaterialsMaterials
66
25 ForgenFlame.comWoodPro Wood Stove • 8390-086B • 09/25
ReferenceReference
MaterialsMaterials
66
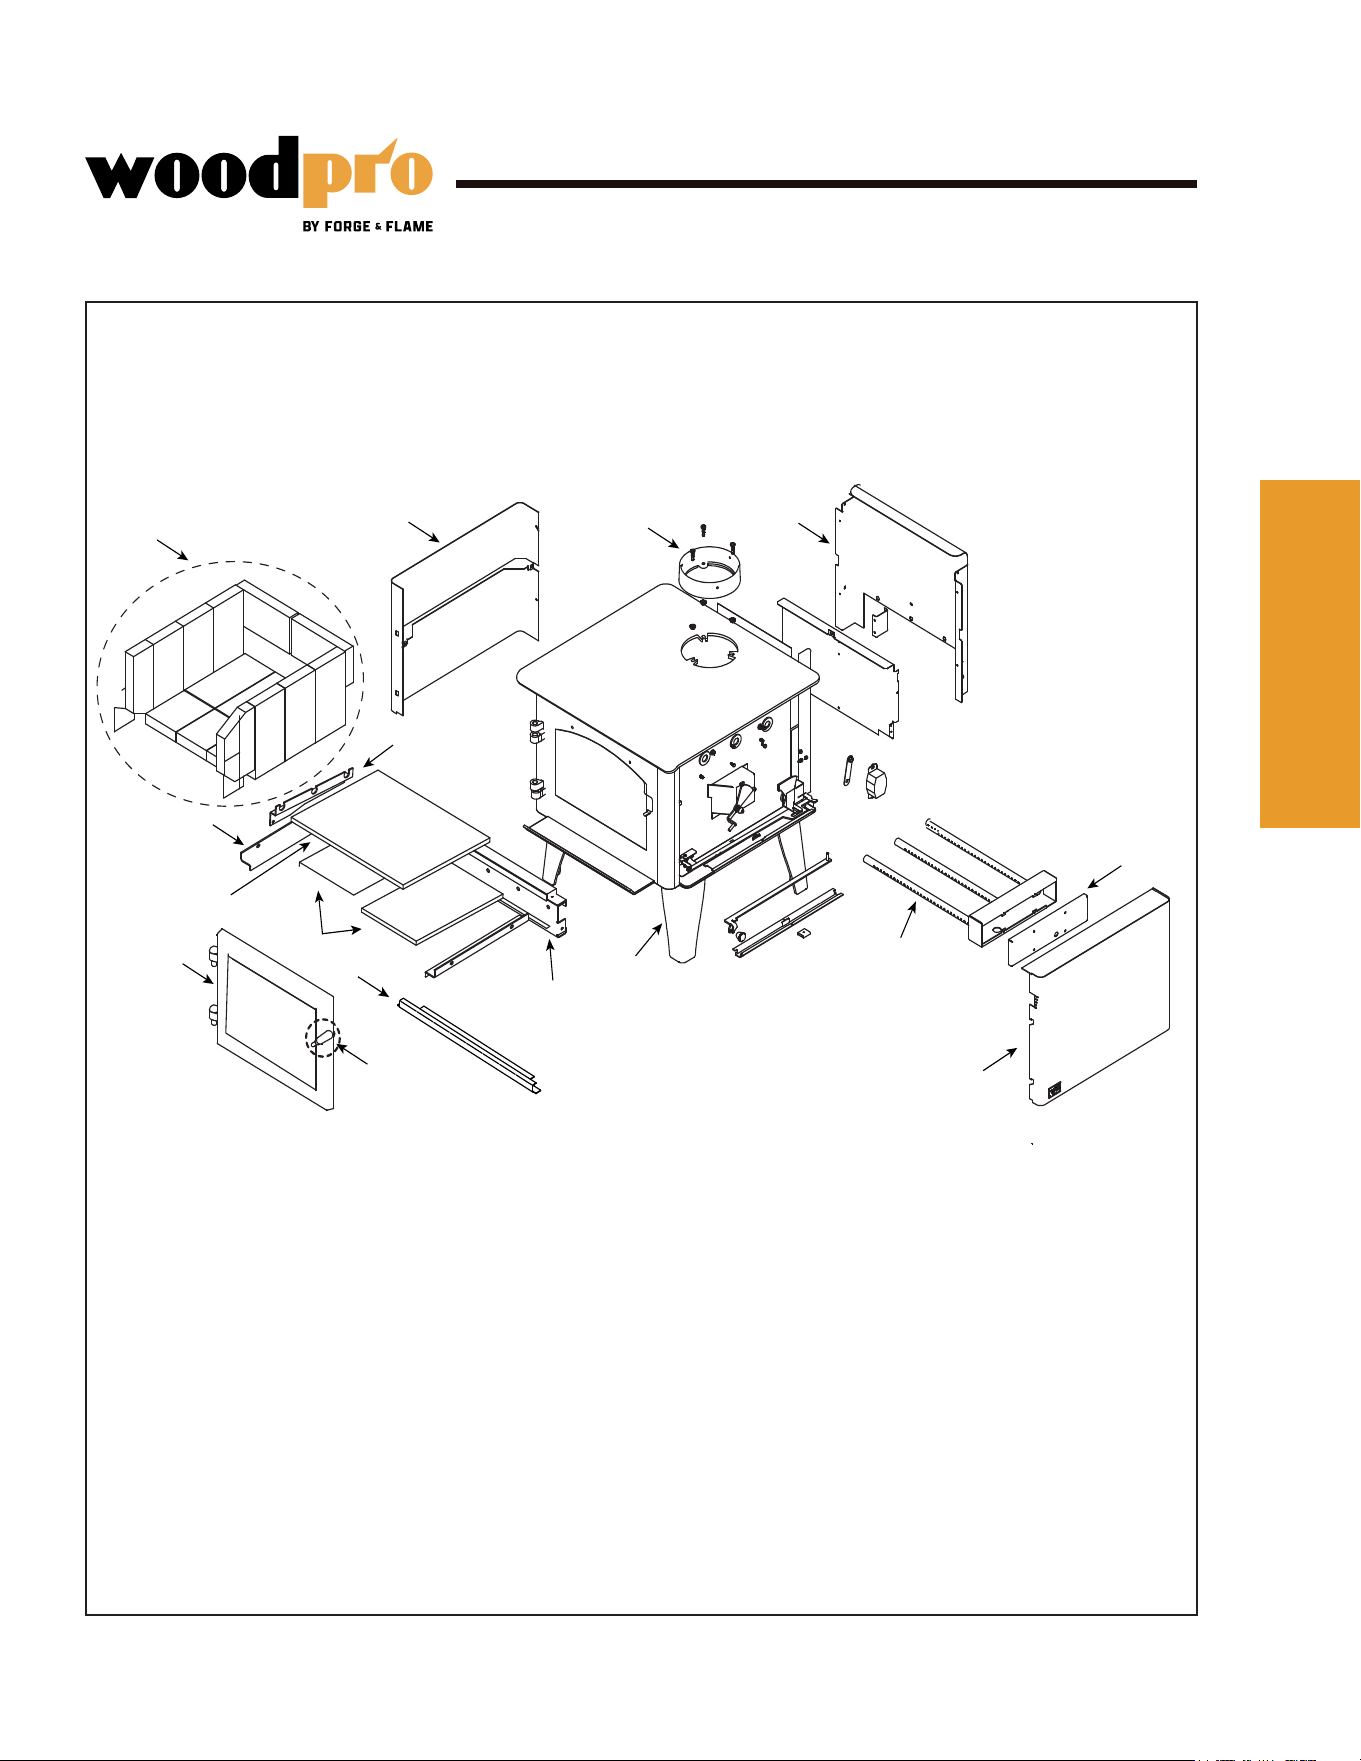
B. Service Parts ListB. Service Parts List
Service Parts
FF-WP-100
Beginning Manufacturing Date: Sept 2024
Ending Manufacturing Date: Active
Part number list on following pages.
Forge & Flame Wood Pro 100
1
2
3
4
5
6
7
8
9
10
11
12
13
14
15
16
26 ForgenFlame.comWoodPro Wood Stove • 8390-086B • 09/25
ReferenceReference
MaterialsMaterials
66
Service Parts
FF-WP-100
Beginning Manufacturing Date: Sept 2024
Ending Manufacturing Date: Active
IMPORTANT: THIS IS DATED INFORMATION. When requesting service or replacement parts for
your appliance please provide model number and serial number.
Stocked
at Depot
ITEM DESCRIPTION COMMENTS PART NUMBER
1 Convection Air Channel - Retain Originial Serial Number SRV7039-107
2 Flue Collar SRV7000-302
Y
3 Panel Assembly, Side, Left SRV7039-003
4 Brick Assembly - Complete Set SRV7039-007
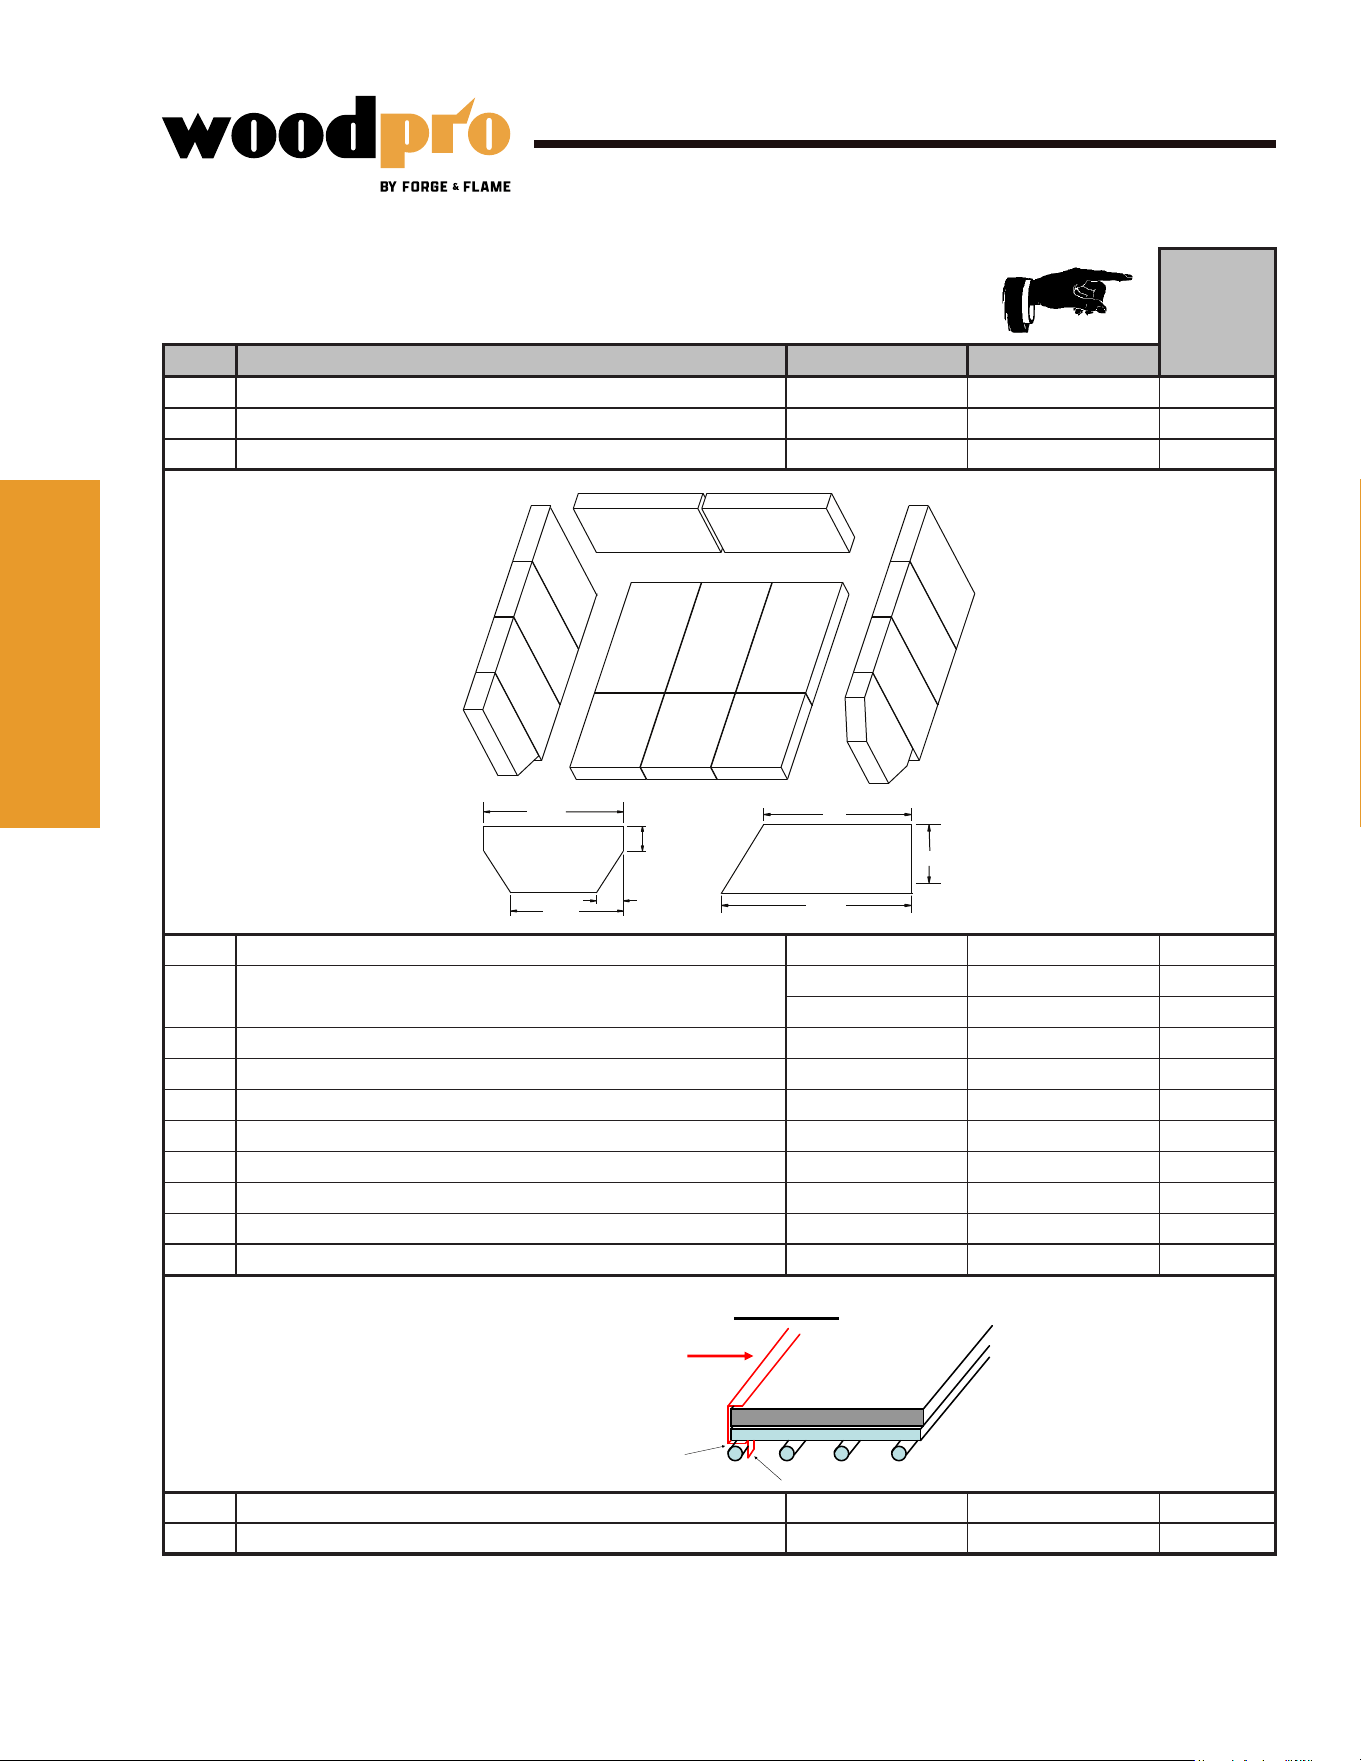
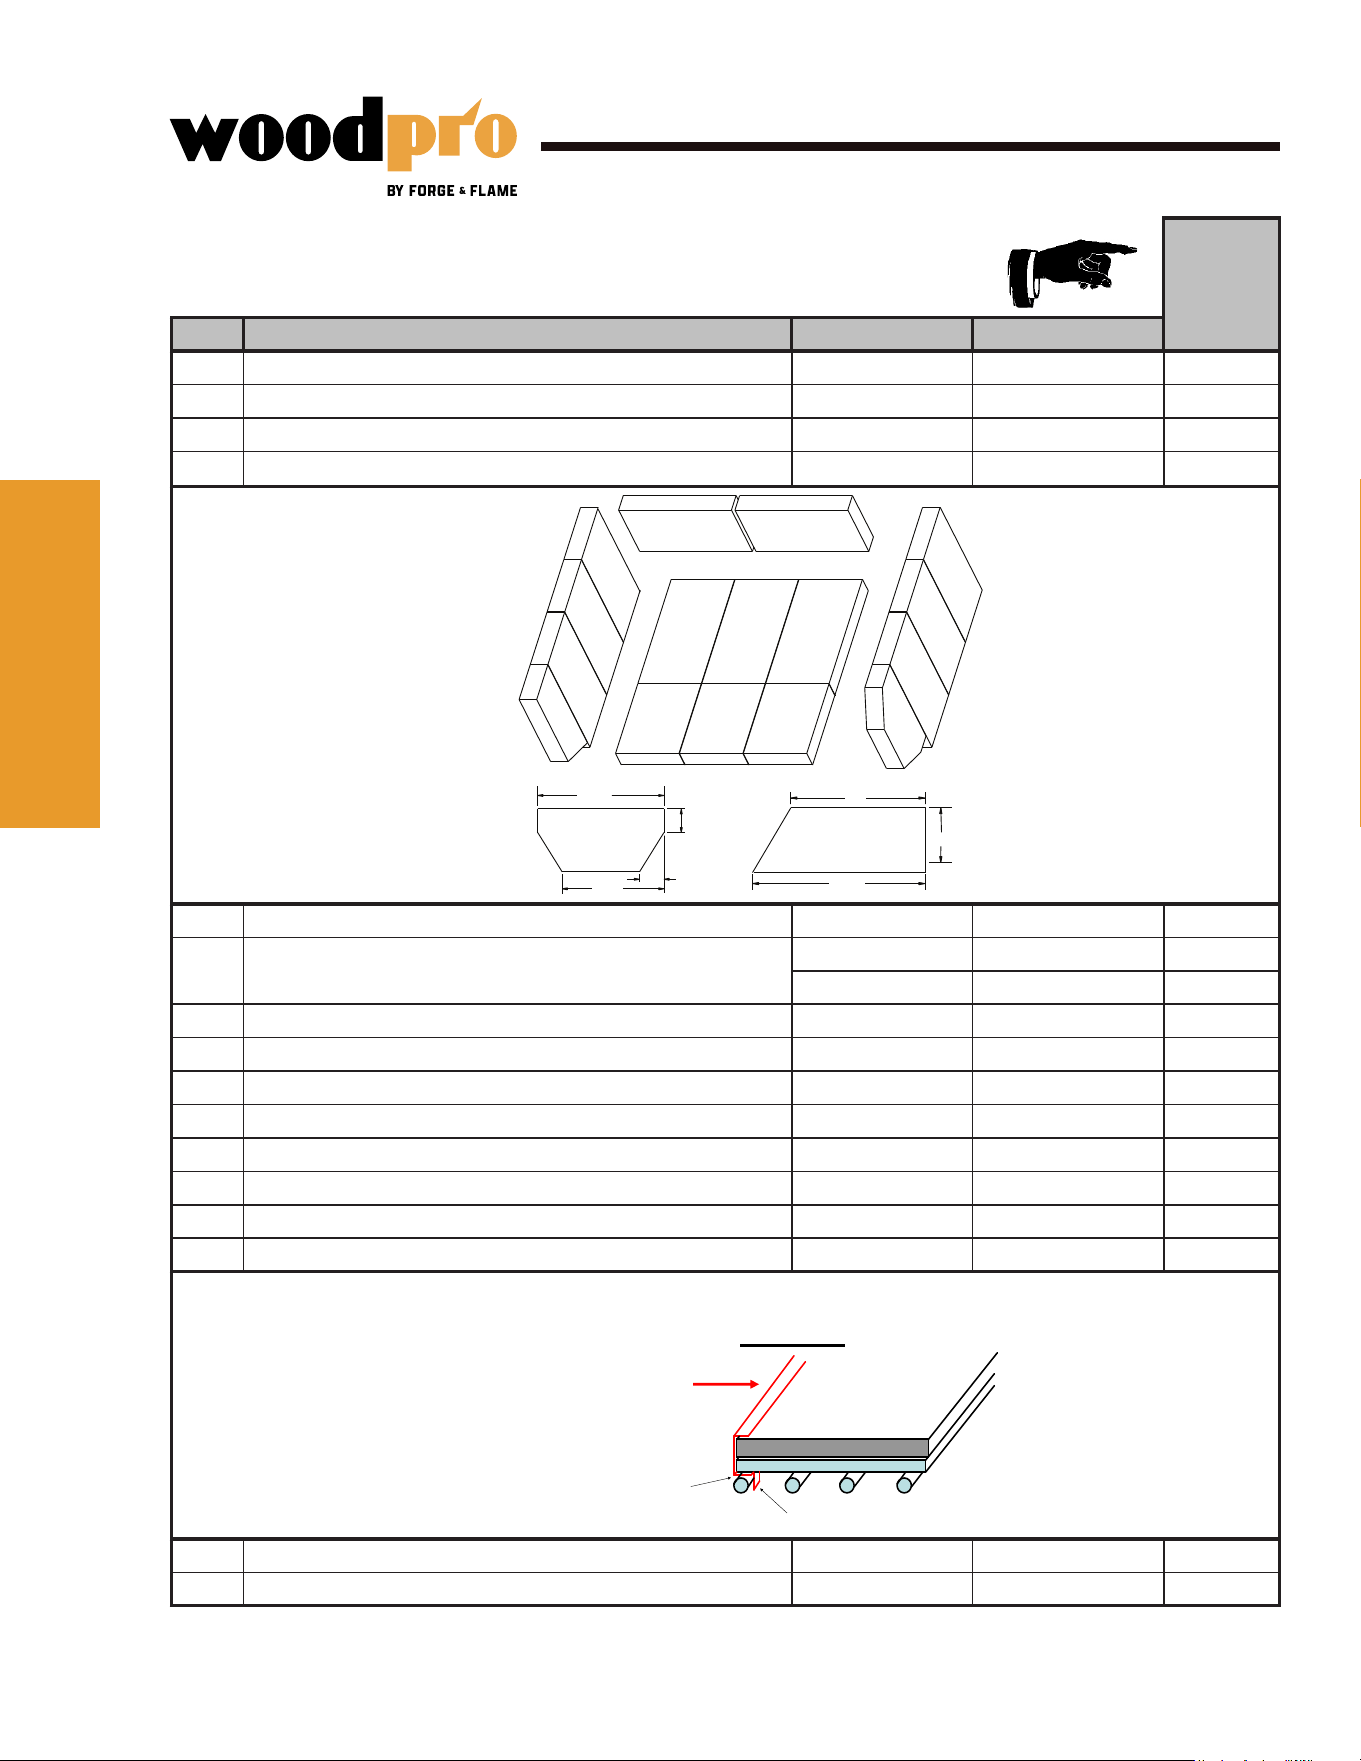
4.1 Brick, 9 x 4-1/2 x 1-1/4”
Qty. 9 Req. 832-0550
Pkg of 6 832-3040
4.2 Brick, 5-3/4 x 4-1/2 x 1-1/4” Qty. 3 Req. SRV7128-039
4.3 Brick, 8 x 4-1/2 x 1-1/4” Qty. 2 Req. SRV7128-022
4.4 Brick, see diagram Qty. 1 Req. SRV7128-807
4.5 Brick, see diagram Qty. 1 Req. SRV7128-619
5 Tube Support Rack SRV7039-108
6 Brick Retainer Qty. 2 Req. SRV7033-149
7 Ceramic Fiber Blanket, 1/2” Thick 832-3390
Y
8 Bae Board, 8-1/8 in. W x 13 in. H Pkg of 2 SRV7039-111
Y
9 Bae Protection Channel SRV7039-144 Y
Mobile Home Brackets SRV7039-208/4
Additional service part numbers appear on following page.
#4 Brick Assembly
#9 Bae Protection Channel
4.4
1-3/8”
1-3/4”
5-1/4”
7-3/4”
4.1
4.1
4.1
4.1
4.1
4.1
4.1
4.1
4.1
4.2
4.2 4.2
4.4
4.3
4.3
4.5
8-1/2”
3”
7”
4.5
Fiber baffle
Ceramic blanket
Side view
Front, looking into unit
This tab sits behind the front tube.
Baffle protection channel sits in
between front tube and fiber baffle.
27 ForgenFlame.comWoodPro Wood Stove • 8390-086B • 09/25
Service Parts
FF-WP-100
Beginning Manufacturing Date: Sept 2024
Ending Manufacturing Date: Active
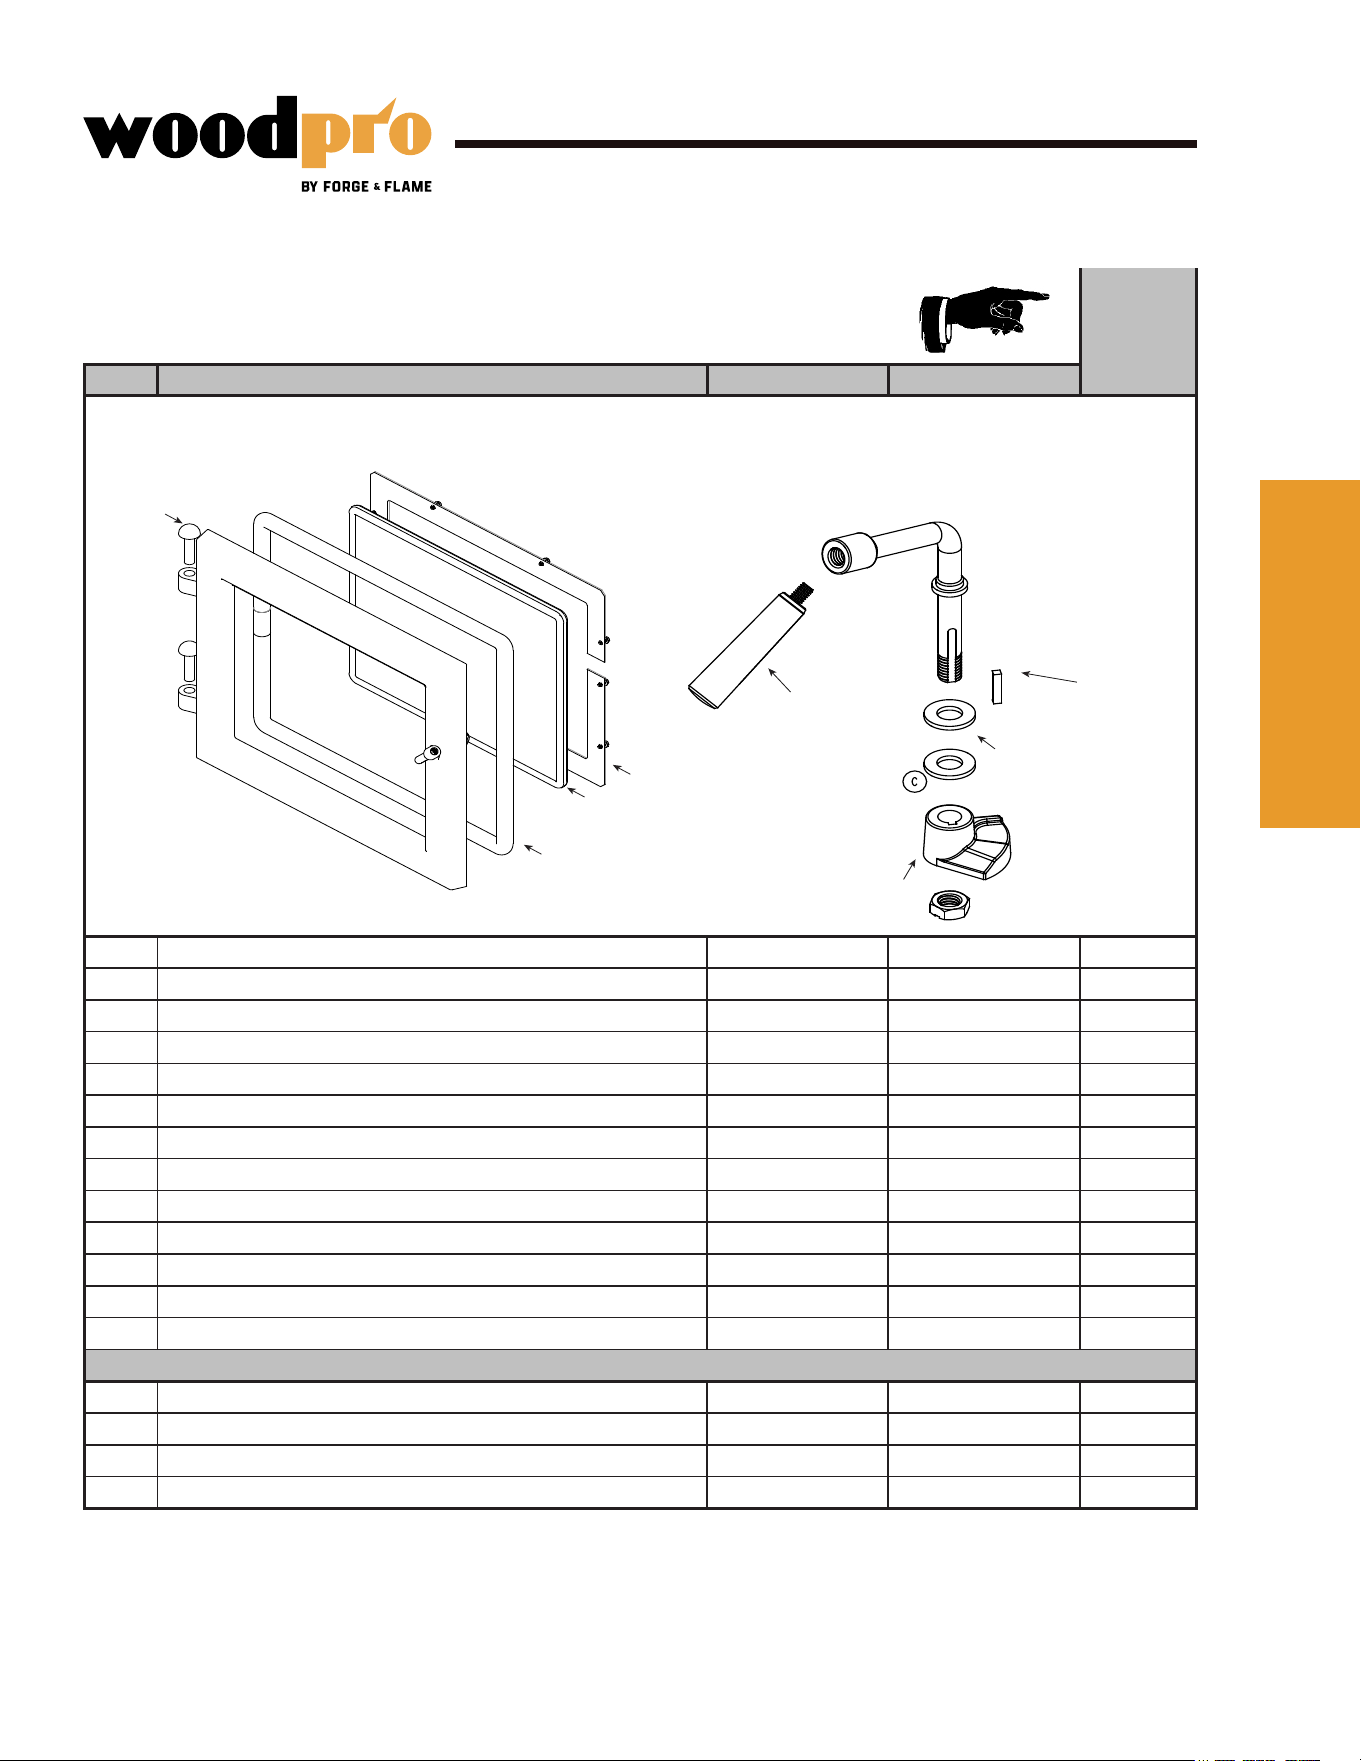
#10 Door Assembly #11 Door Handle Assembly
10.1
10.2
10.3
10.4
11.4
11.3
11.2
11.1
IMPORTANT: THIS IS DATED INFORMATION. When requesting service or replacement parts for
your appliance please provide model number and serial number.
Stocked
at Depot
ITEM DESCRIPTION COMMENTS PART NUMBER
Door Assembly SRV7039-049
10.1 Hinge Pins, 1/2” Black 7000-606/2
10.2 Rope, Door, 3/4” x 84” - Field cut to Size 7 Ft Length 832-1680 Y
10.3 Glass Assembly - 14-1/8 in. W x 9-13/16 in. H SRV7039-061 Y
Gasket, Glass Tape - Field cut to Size 5 Ft Length 832-0460 Y
10.4 Frame, Glass SRV7039-207
11 Door Handle Assembly SRV8001-002
11.1 Door Handle Only Fiber Handle SRV7000-948
11.2 Key, Cam Latch SRV430-1151
11.3 Washer, SAE, 3/8 Pkg of 3 832-0990 Y
11.4 Cam Latch SRV430-1141
12 Legs - Painted SRV7039-060
Paint Touch - Up 3-42-19905
FASTENERS
AVK Rivnut Repair Kit - 1/4-20 & 3/8-16 Rivnut Tools RIVNUT-REPAIR
Y
Bolt, Hex Head, 1/4-20 X 1 Pkg of 10 25221A/10
Y
Screw, Sheet Metal #8 X 1/2 S-Grip Pkg of 40 12460/40
Y
Washer, SAE, 3/8 Pkg of 3 832-0990
Y
Additional service part numbers appear on following page.
ReferenceReference
MaterialsMaterials
66
28 ForgenFlame.comWoodPro Wood Stove • 8390-086B • 09/25
Service Parts
FF-WP-100
Beginning Manufacturing Date: Sept 2024
Ending Manufacturing Date: Active
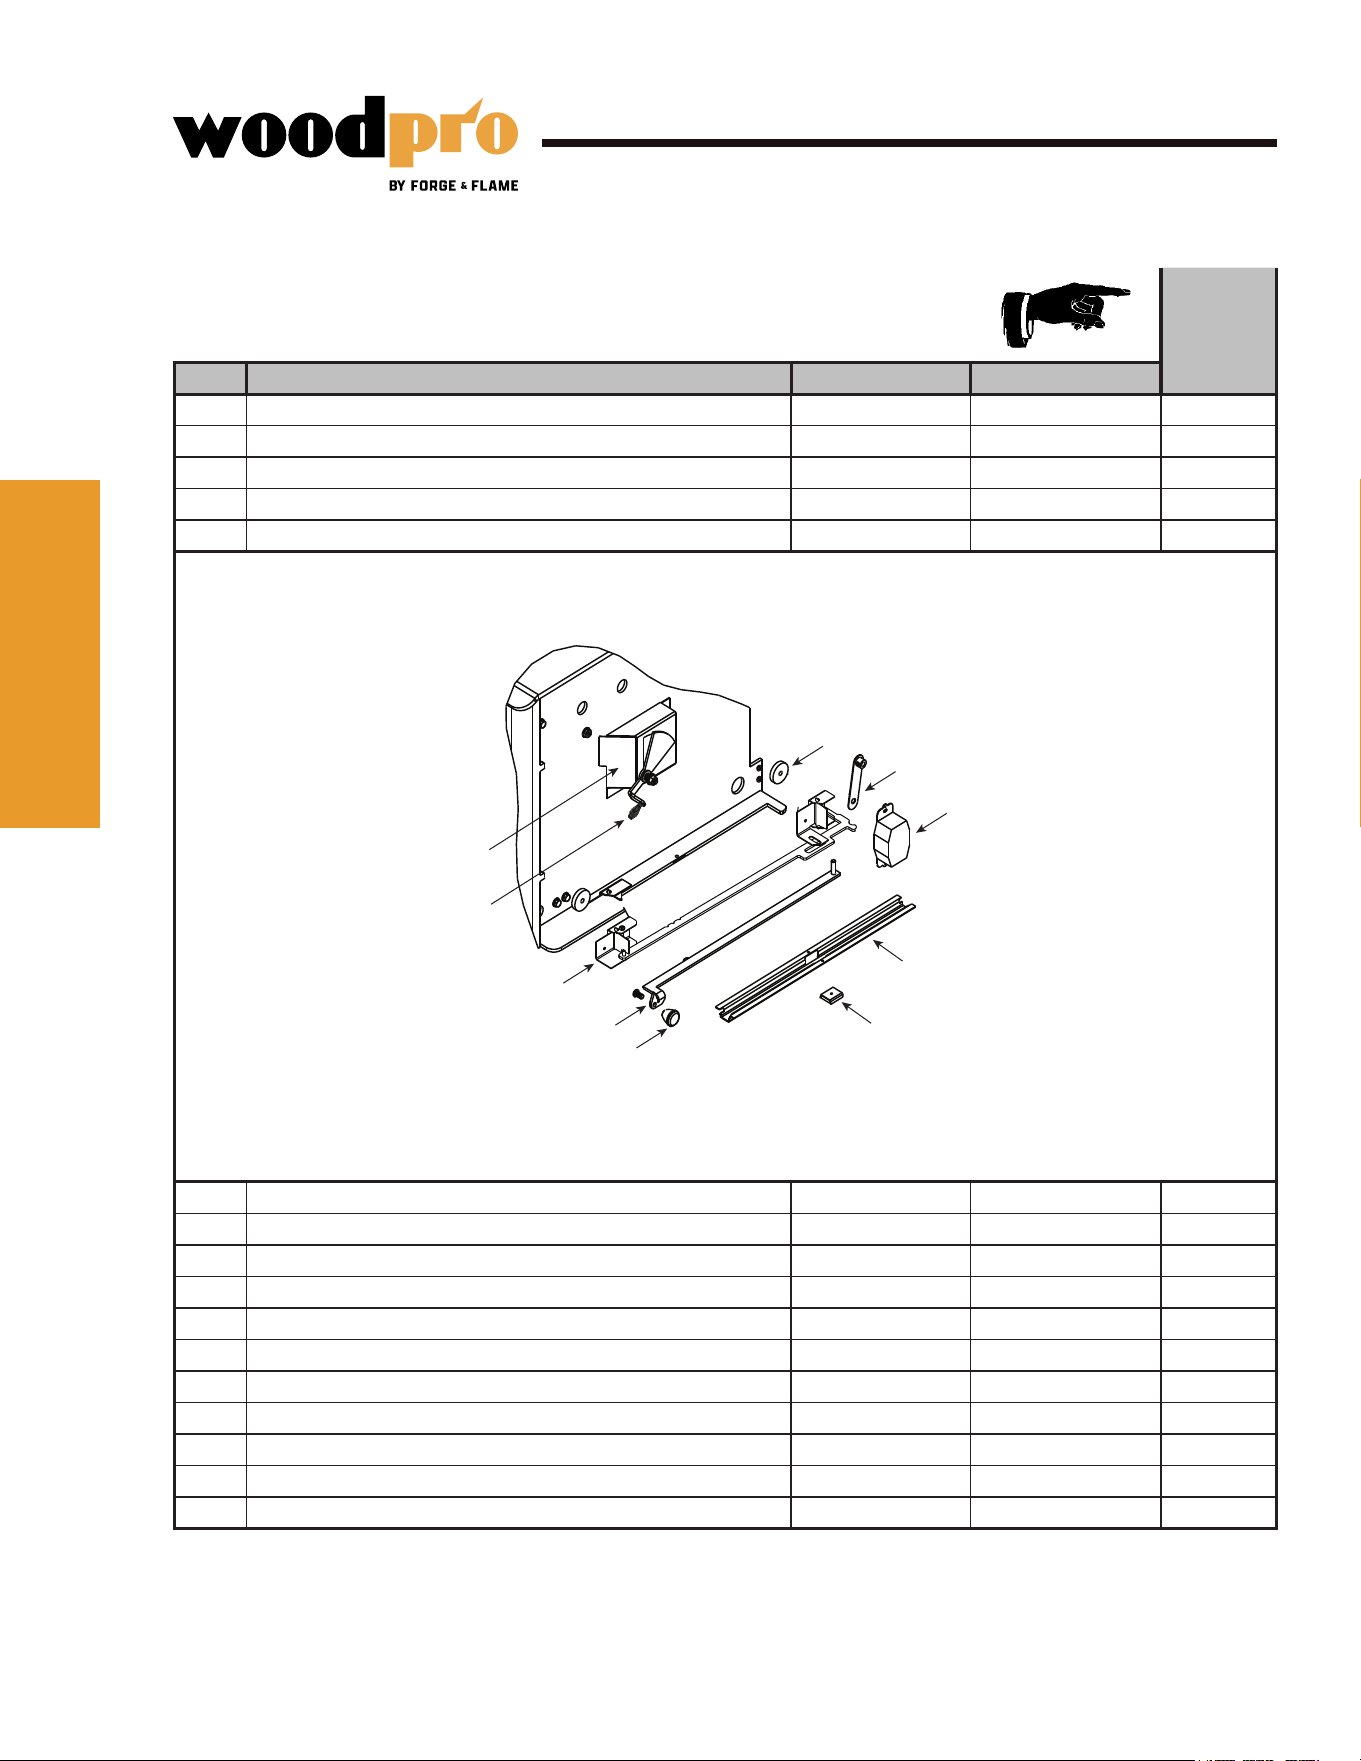
#17 Burn Rate Control Assembly
17.1
17.2
17.10
17.3
17.4
17.5
17.6
17.7
17.9
17.8
IMPORTANT: THIS IS DATED INFORMATION. When requesting service or replacement parts for
your appliance please provide model number and serial number.
Stocked
at Depot
ITEM DESCRIPTION COMMENTS PART NUMBER
13 Rear Channel Assembly SRV7039-047
14 Tube Channel Assembly - Manifold Tubes SRV7039-004
Y
Manifold Tube Gasket Pkg of 4 7038-168/4
Y
15 Panel Assembly, Side, Right SRV7039-002
16 Tube Channel Top - Access Cover SRV7039-190
17.1 Burn Rate Control Assembly SRV7039-016
17.2 Spring Handle, 1/4” Black SRV7000-614 Y
17.3 Timer Air Control Assembly SRV7039-015
Y
Rear Air Door Assembly SRV7037-013
Y
17.4
Rear Air Control Arm Assembly SRV7039-053
17.5 Start-Up Control Knob SRV7000-343
17.6 Latch, Magnet - for Air Control SRV229-0631
17.7 Air Control Rod Guide SRV7033-210
17.8 Timer (Only) Replacement Assembly SRV480-1940
Y
17.9 Timer Arm Assembly SRV7033-034
Y
17.10 Door Gasket - Front & Rear Air Timer Doors 7033-282
Y
ReferenceReference
MaterialsMaterials
66
29 ForgenFlame.comWoodPro Wood Stove • 8390-086B • 09/25
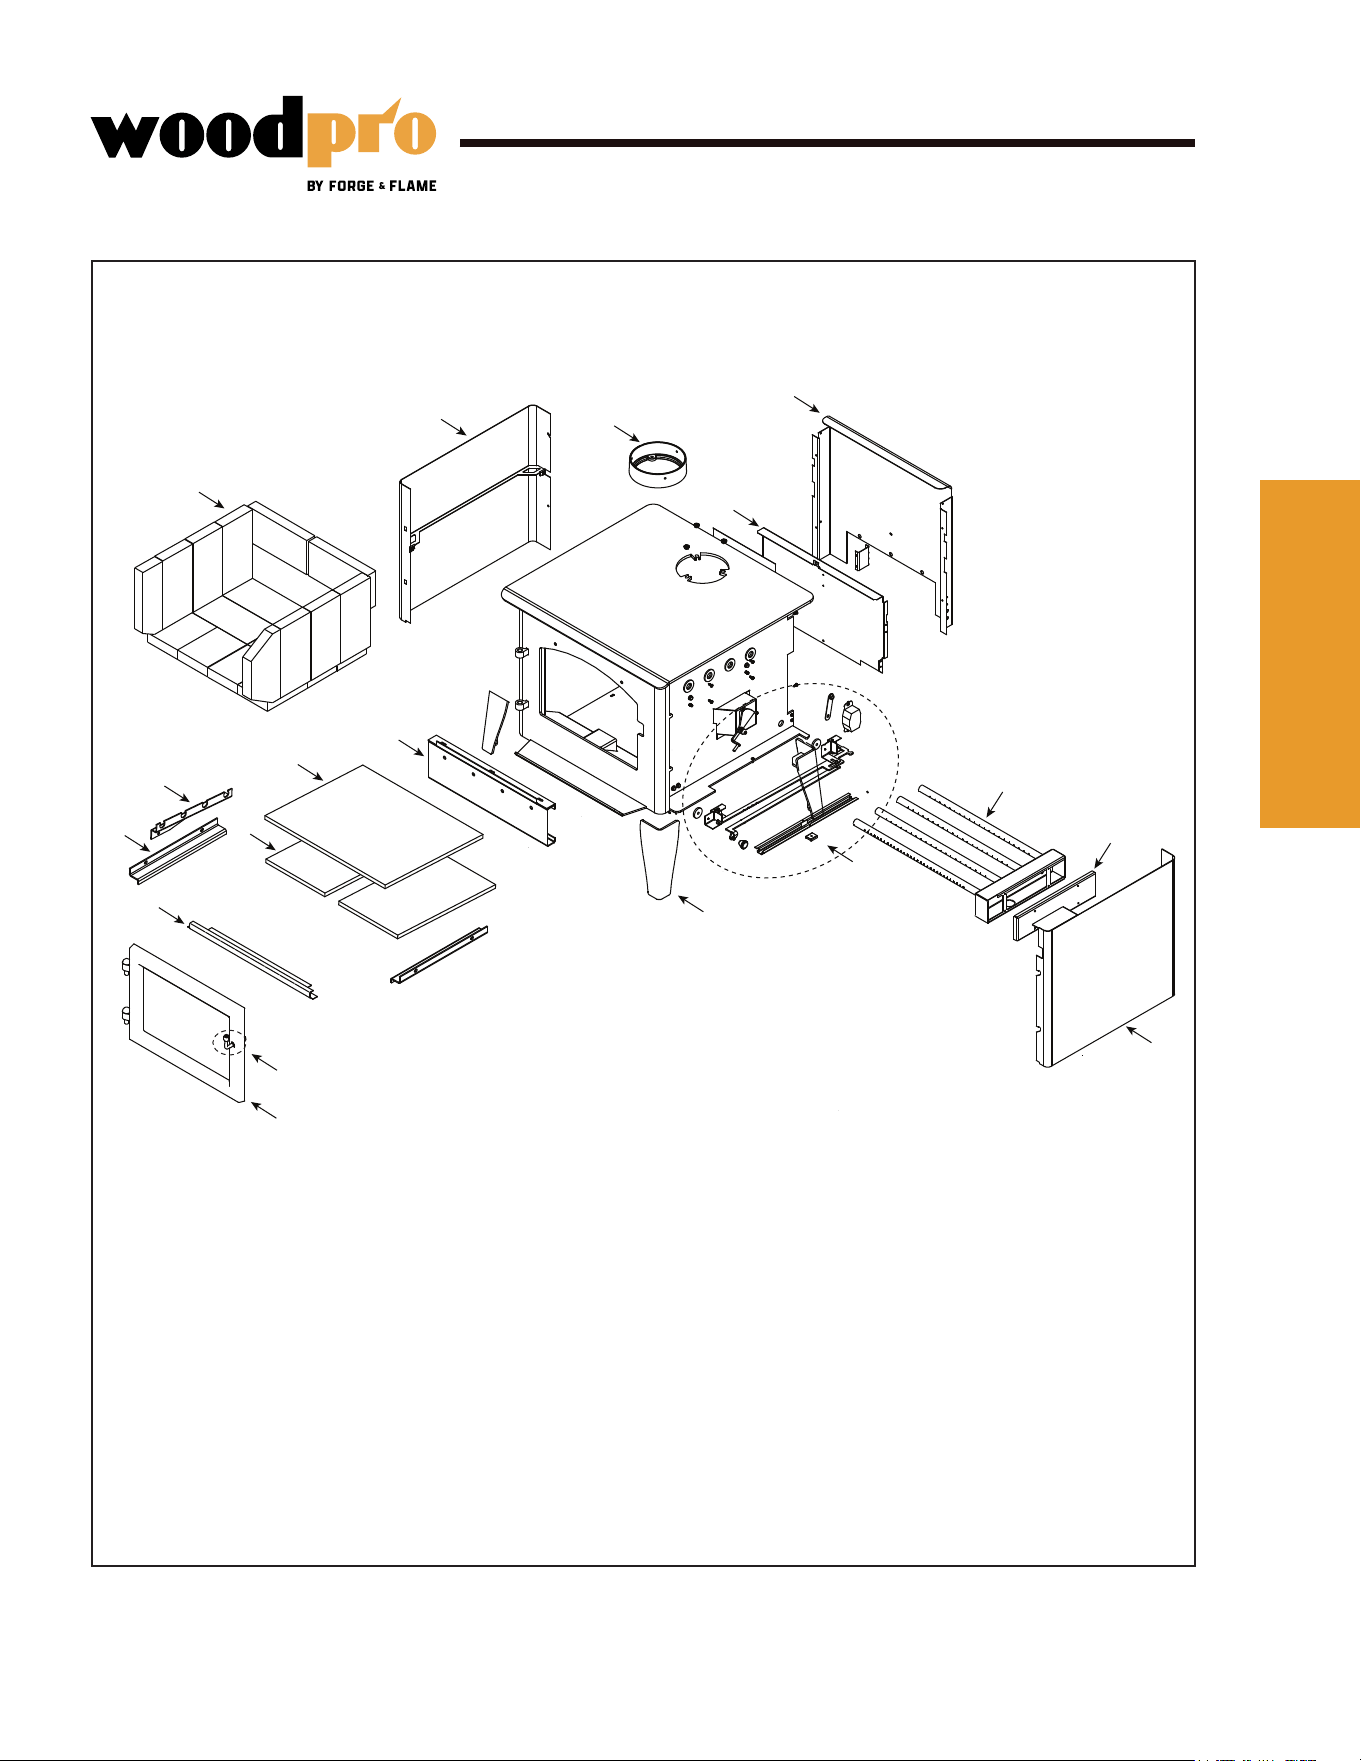
Service Parts
FF-WP-200
Beginning Manufacturing Date: Sept 2024
Ending Manufacturing Date: Active
Part number list on following pages.
Forge & Flame Wood Pro 200
1
2
3
4
5
6
7
8
9
12
11
10
13
16
17
18
14
15
ReferenceReference
MaterialsMaterials
66
30 ForgenFlame.comWoodPro Wood Stove • 8390-086B • 09/25
Service Parts
FF-WP-200
Beginning Manufacturing Date: Sept 2024
Ending Manufacturing Date: Active
IMPORTANT: THIS IS DATED INFORMATION. When requesting service or replacement parts for
your appliance please provide model number and serial number.
Stocked
at Depot
ITEM DESCRIPTION COMMENTS PART NUMBER
1 Air Channel, Convection
w/Bracket (Retain Original SN Label) SRV7033-144
2 Air Supply Back SRV7033-134
3 Flue Collar SRV7000-302
Y
4 Panel Assembly, Side, Left SRV7033-019
5 Brick Assembly - Complete Set Pkg of 18 SRV7033-006
5.1 Brick, 9 x 4-1/2 x 1-1/4” (Qty. 12 Req.)
Pkg of 1 832-0550
Pkg of 6 832-3040
5.2 Brick, 6 x 4-1/2 x 1-1/4” Qty. 4 Req. SRV7128-002
5.3 Brick, 9 x 4-1/2 x 1-1/4” w/angles, see diagram Qty. 1 Req. SRV7128-805
5.4 Brick, 9 x 3 x 1-1/4” w/angle, see diagram Qty. 1 Req. SRV7128-617
6 Rear Channel Assembly SRV7033-002
Y
7 Ceramic Fiber Blanket, 1/2“ Thick (19” W x 13-3/4” H) 832-3390
Y
8 Bae Board - 9-1/2 in W x 13-3/4 in H Pkg of 2 SRV7033-209
Y
9 Tube Support Rack SRV7033-148
10 Brick Retainer Qty. 2 Req. SRV7033-149
11 Bae Protection channel SRV7033-298
Mobile Home Brackets SRV7039-208/4
Additional service part numbers appear on following page.
#4 Brick Assembly
#11 Bae Protection Channel
4.4
1-3/8”
1-3/4”
5-1/4”
7-3/4”
4.1
4.1
4.1
4.1
4.1
4.1
4.1
4.1
4.1
4.2
4.2 4.2
4.4
4.3
4.3
4.5
8-1/2”
3”
7”
4.5
Fiber baffle
Ceramic blanket
Side view
Front, looking into unit
This tab sits behind the front tube.
Baffle protection channel sits in
between front tube and fiber baffle.
ReferenceReference
MaterialsMaterials
66
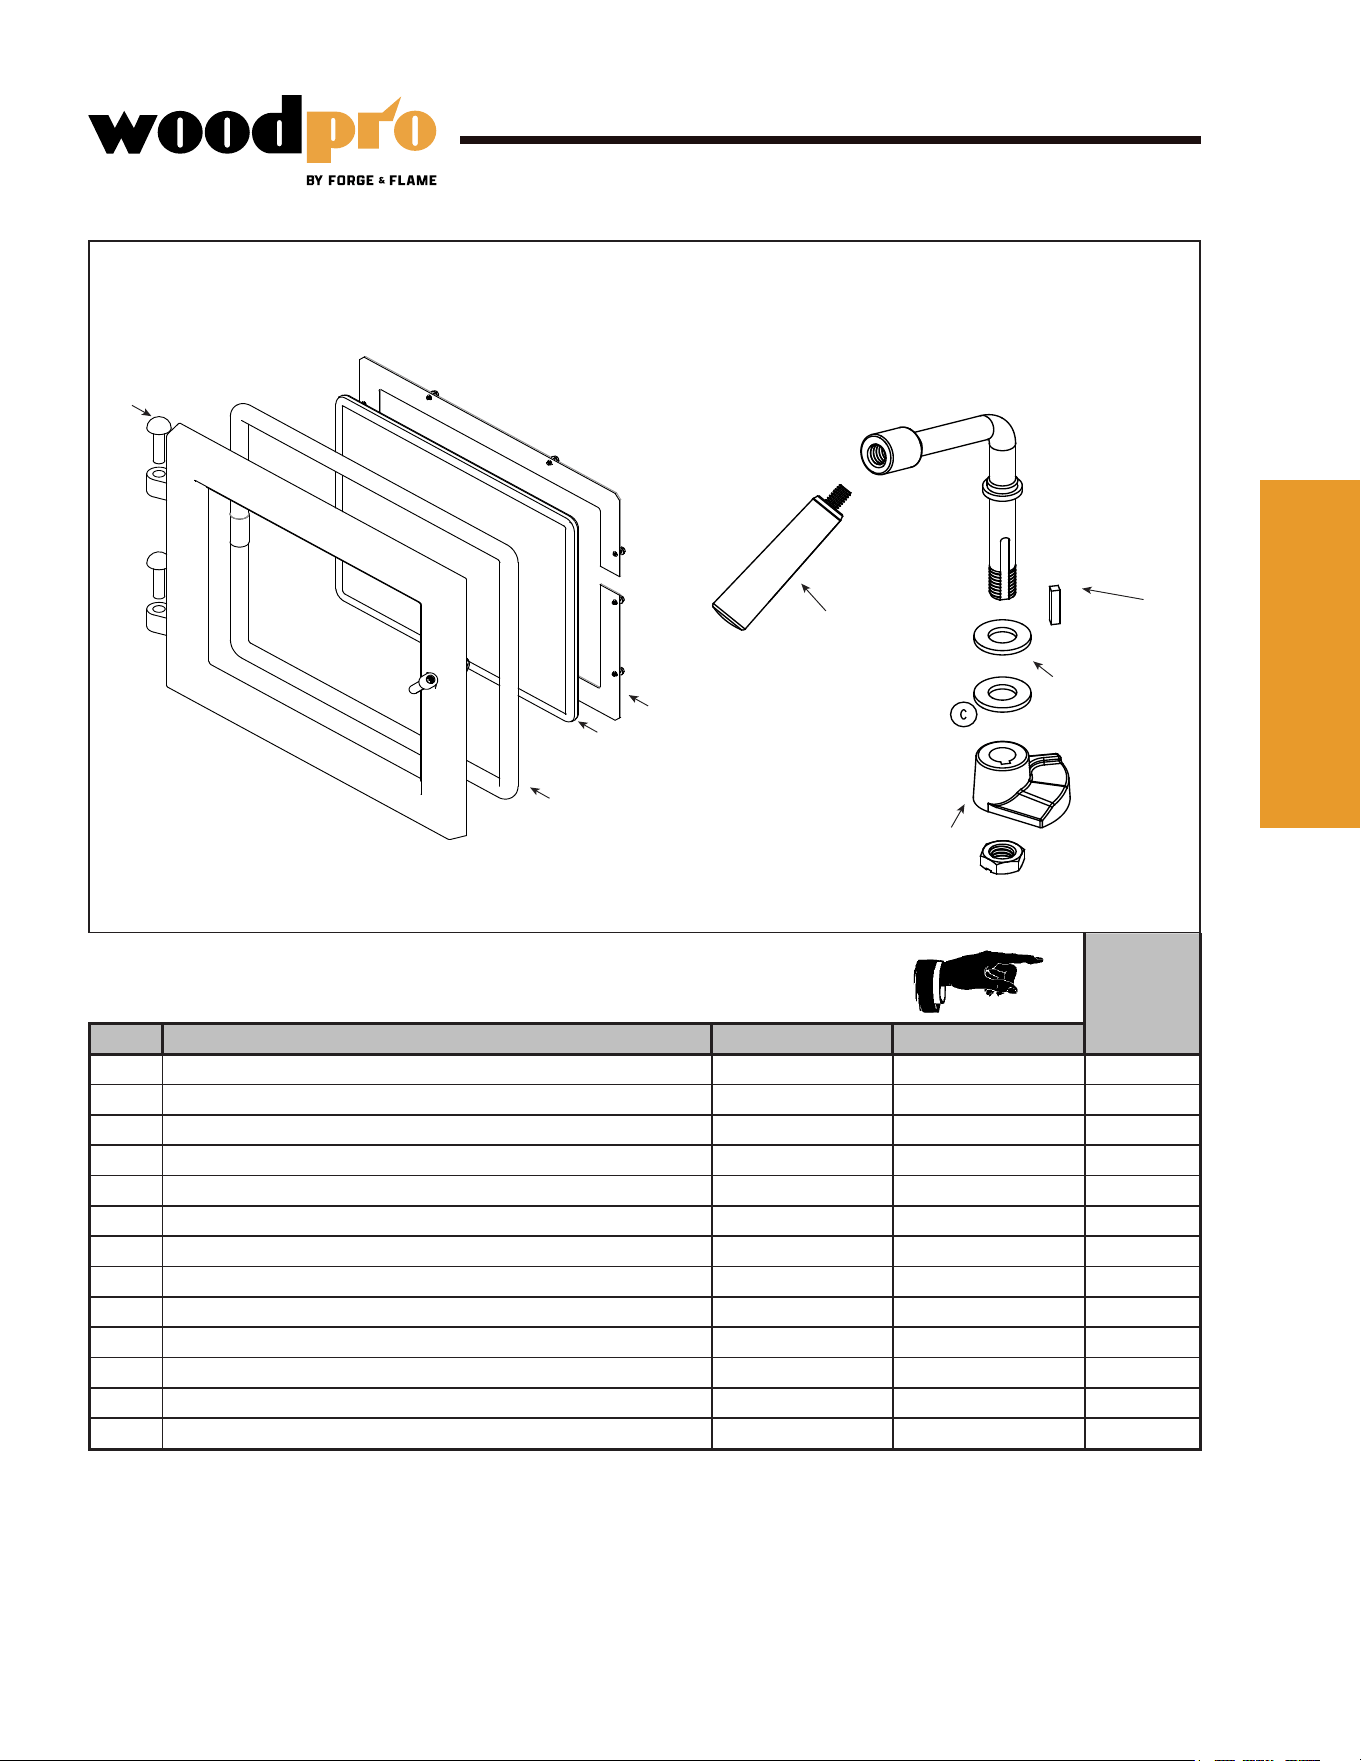
31 ForgenFlame.comWoodPro Wood Stove • 8390-086B • 09/25
Service Parts
FF-WP-200
Beginning Manufacturing Date: Sept 2024
Ending Manufacturing Date: Active
#12 Door Assembly #13 Door Handle Assembly
IMPORTANT: THIS IS DATED INFORMATION. When requesting service or replacement parts for
your appliance please provide model number and serial number.
Stocked
at Depot
ITEM DESCRIPTION COMMENTS PART NUMBER
12 Door Assembly SRV7037-061
12.1 Hinge Pins, 1/2” Black 7000-606/2
Y
12.2 Rope, Door, 3/4” x 84” - Field cut to Size 7 Ft Length 832-1680 Y
12.3 Door Glass Assembly - 15-1/2” W x 13-3/8” H SRV7044-027 Y
Gasket, Glass Tape - Field cut to Size 5 Ft Length 832-0460 Y
12.4 Glass Frame Set SRV7044-191
12.5 Screw, Flat Head Philips 8-32 x 1/2 Pkg of 12 220-0490/12
Y
13 Door Handle Assembly SRV8001-002
13.1 Door Handle, Formed Fiber Handle SRV7000-948 Y
13.2 Key, Cam Latch SRV430-1151
13.3 Washer, SAE, 3/8 Pkg of 3 832-0990 Y
13.4 Cam Latch SRV430-1141
14 Leg - Painted SRV7039-060
Additional service part numbers appear on following page.
12.1
12.2
12.3
12.4
13.4
13.3
13.2
13.1
ReferenceReference
MaterialsMaterials
66
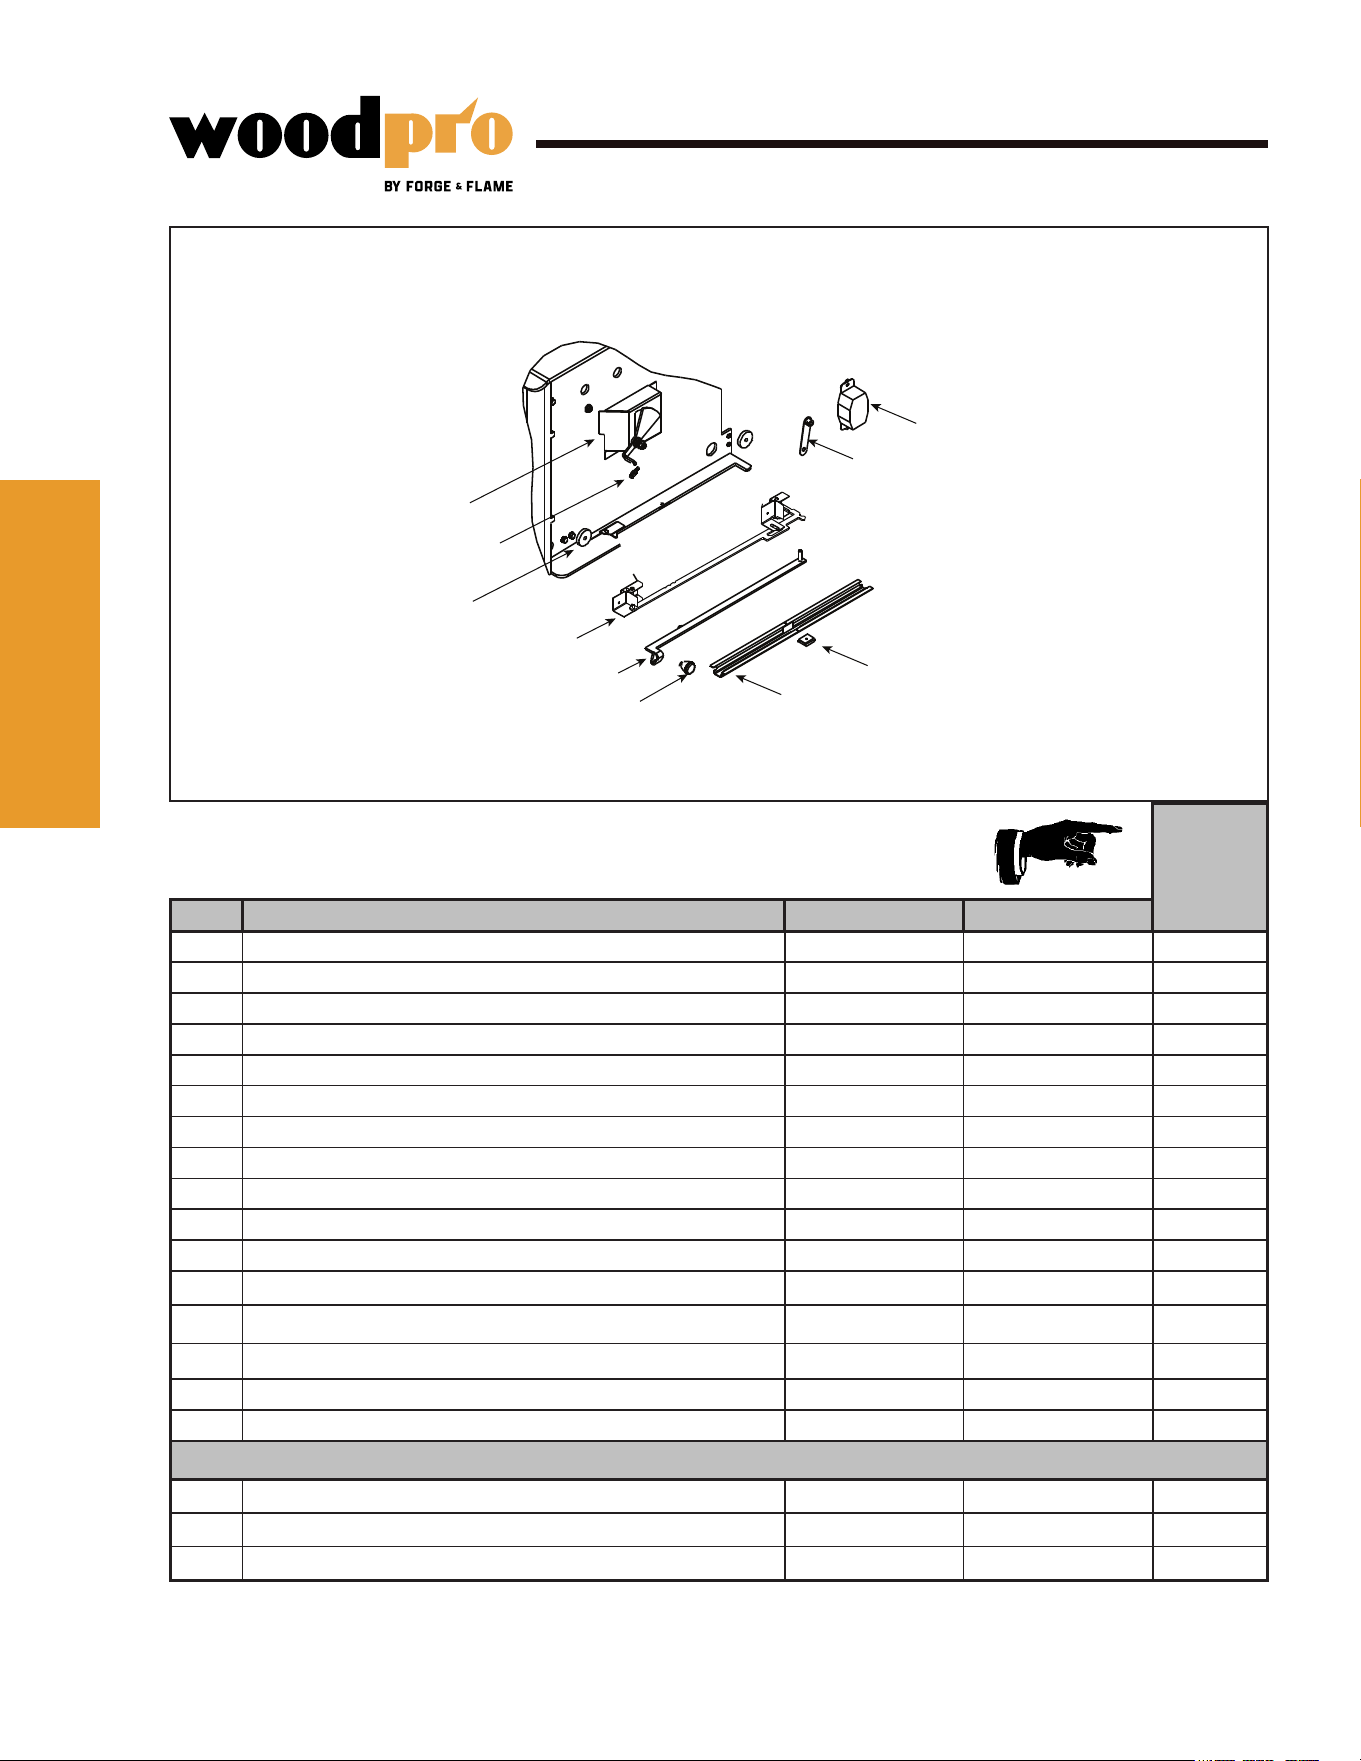
32 ForgenFlame.comWoodPro Wood Stove • 8390-086B • 09/25
Service Parts
FF-WP-200
Beginning Manufacturing Date: Sept 2024
Ending Manufacturing Date: Active
#15 Burn Rate Control Assembly
IMPORTANT: THIS IS DATED INFORMATION. When requesting service or replacement parts for
your appliance please provide model number and serial number.
Stocked
at Depot
ITEM DESCRIPTION COMMENTS PART NUMBER
15.1 Burn Rate Control Assembly SRV7033-033
Y
15.2 Spring Handle, 1/4”, Black SRV7000-614 Y
15.3 Door Gasket - Front & Rear Air Timer Doors 7033-282
Y
15.4 Timer Air Control Assembly SRV7033-052
Y
Rear Air Door Assembly SRV7033-024
Y
15.5 Rear Air Control Arm Assembly SRV7033-035
Y
15.6 Start-Up Control Knob SRV7000-343
15.7 Air Control Rod Guide SRV7033-210
15.8 Latch, Magnet For Air Control SRV229-0631
15.9 Timer Arm Assembly SRV7033-034
Y
15.10 Timer (Only) Replacement Assembly SRV480-1940
Y
16
Panel Assembly, Side, Right SRV7033-017
17
Tube Channel Top - Tube Channel Access Cover SRV7033-237
18
Tube, Channel Assembly Manifold Tubes SRV7033-023
Y
Gasket, Manifold Pkg of 4 7038-168/4
Y
Paint Touch-Up 3-42-19905
FASTENERS
Avk Rivnut Repair Kit - 1/4-20 & 3/8-16 Rivnut Tools RIVNUT-REPAIR
Y
Bolt, Hex Head, 1/4-20 x 1 Pkg of 10 25221A/10
Y
Screw, Sheet Metal #8 x 1/2 S-Grip Pkg of 40 12460/40
Y
15.10
15.5
15.6
15.7
15.8
15.9
15.1
15.2
15.3
15.4
ReferenceReference
MaterialsMaterials
66
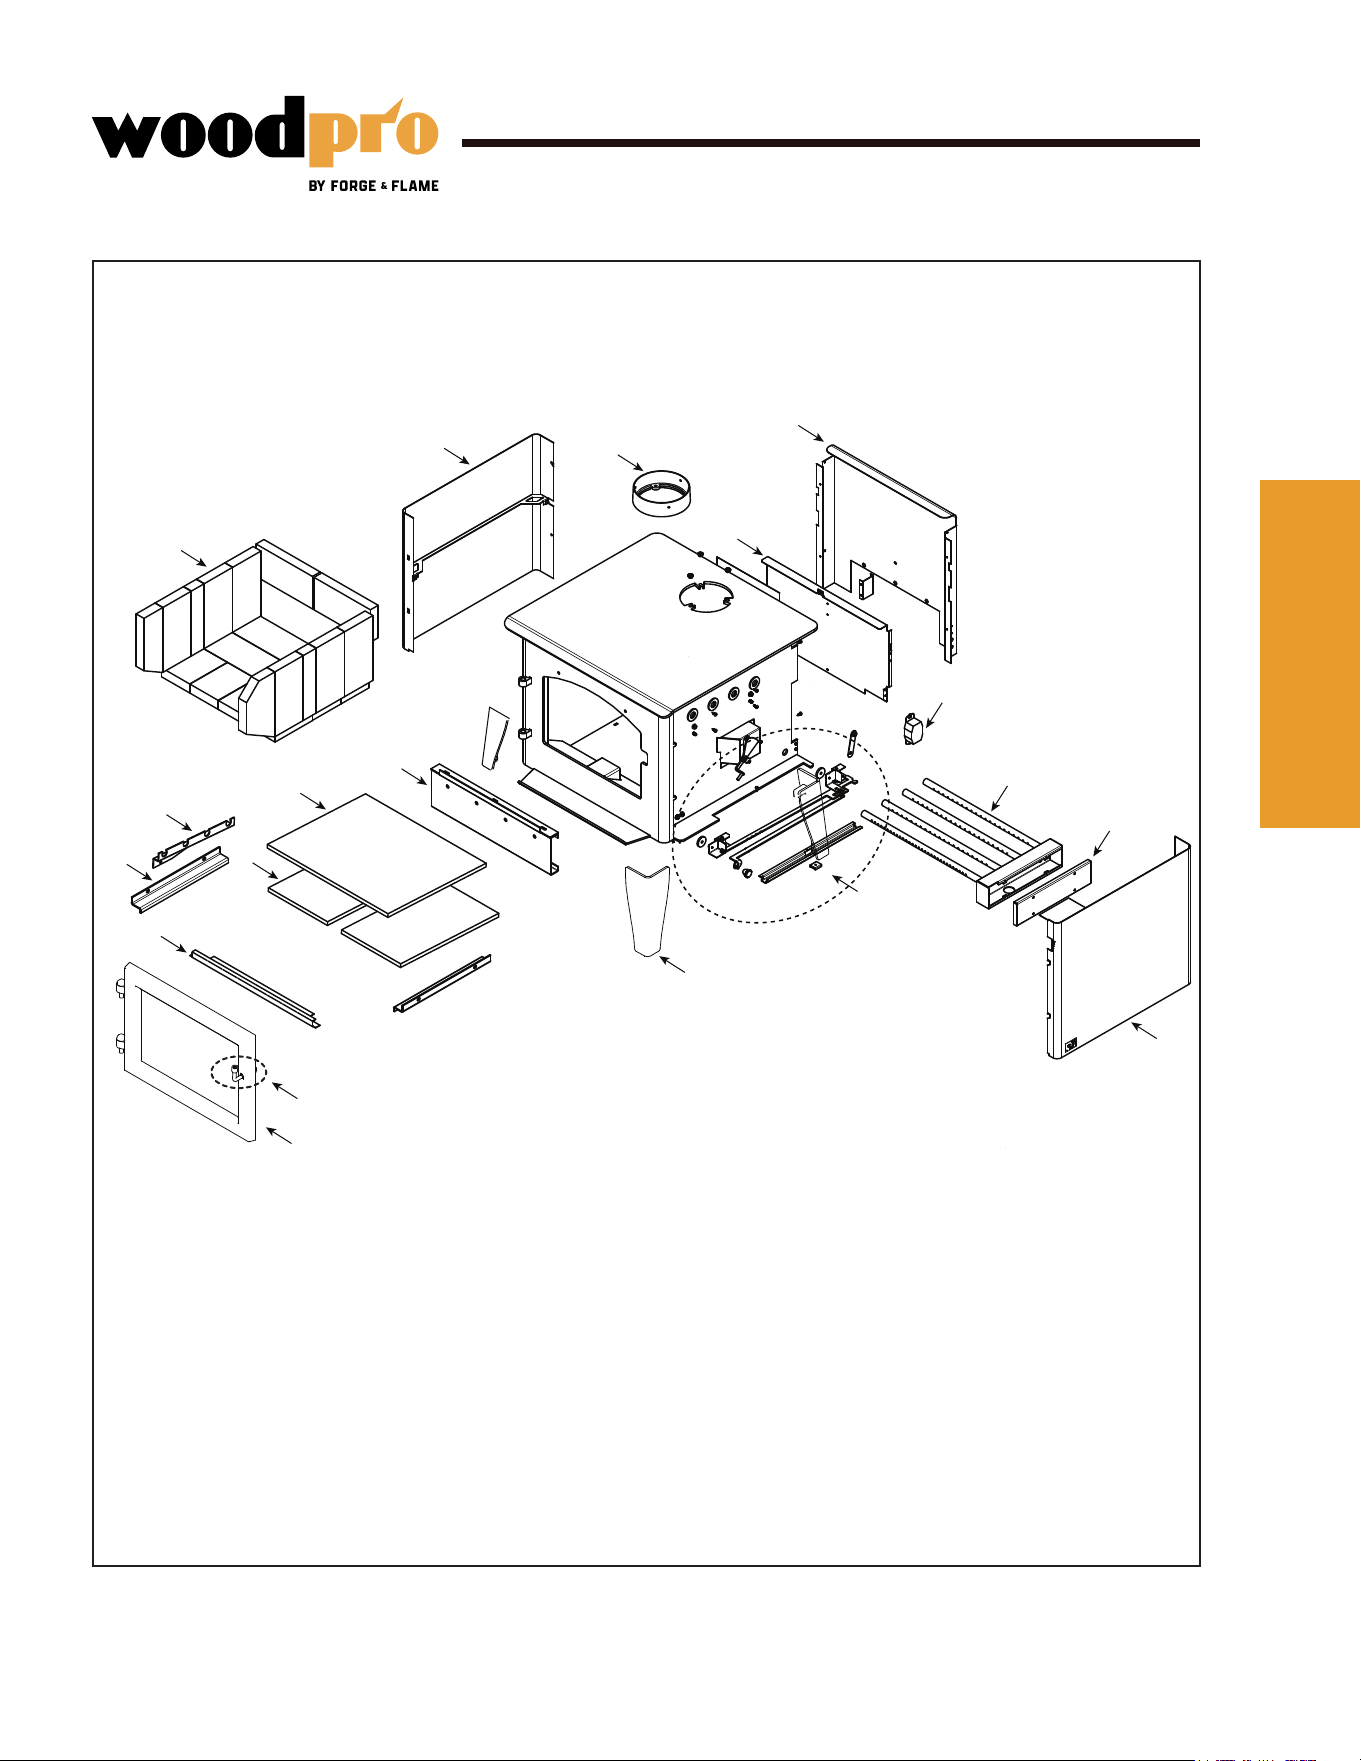
33 ForgenFlame.comWoodPro Wood Stove • 8390-086B • 09/25
Service Parts
FF-WP-300
Beginning Manufacturing Date: Sept 2024
Ending Manufacturing Date: Active
Part number list on following pages.
Forge & Flame Wood Pro 300
1
2
3
4
5
6
7
8
9
12
11
10
13
16
17
18
19
15
14
ReferenceReference
MaterialsMaterials
66
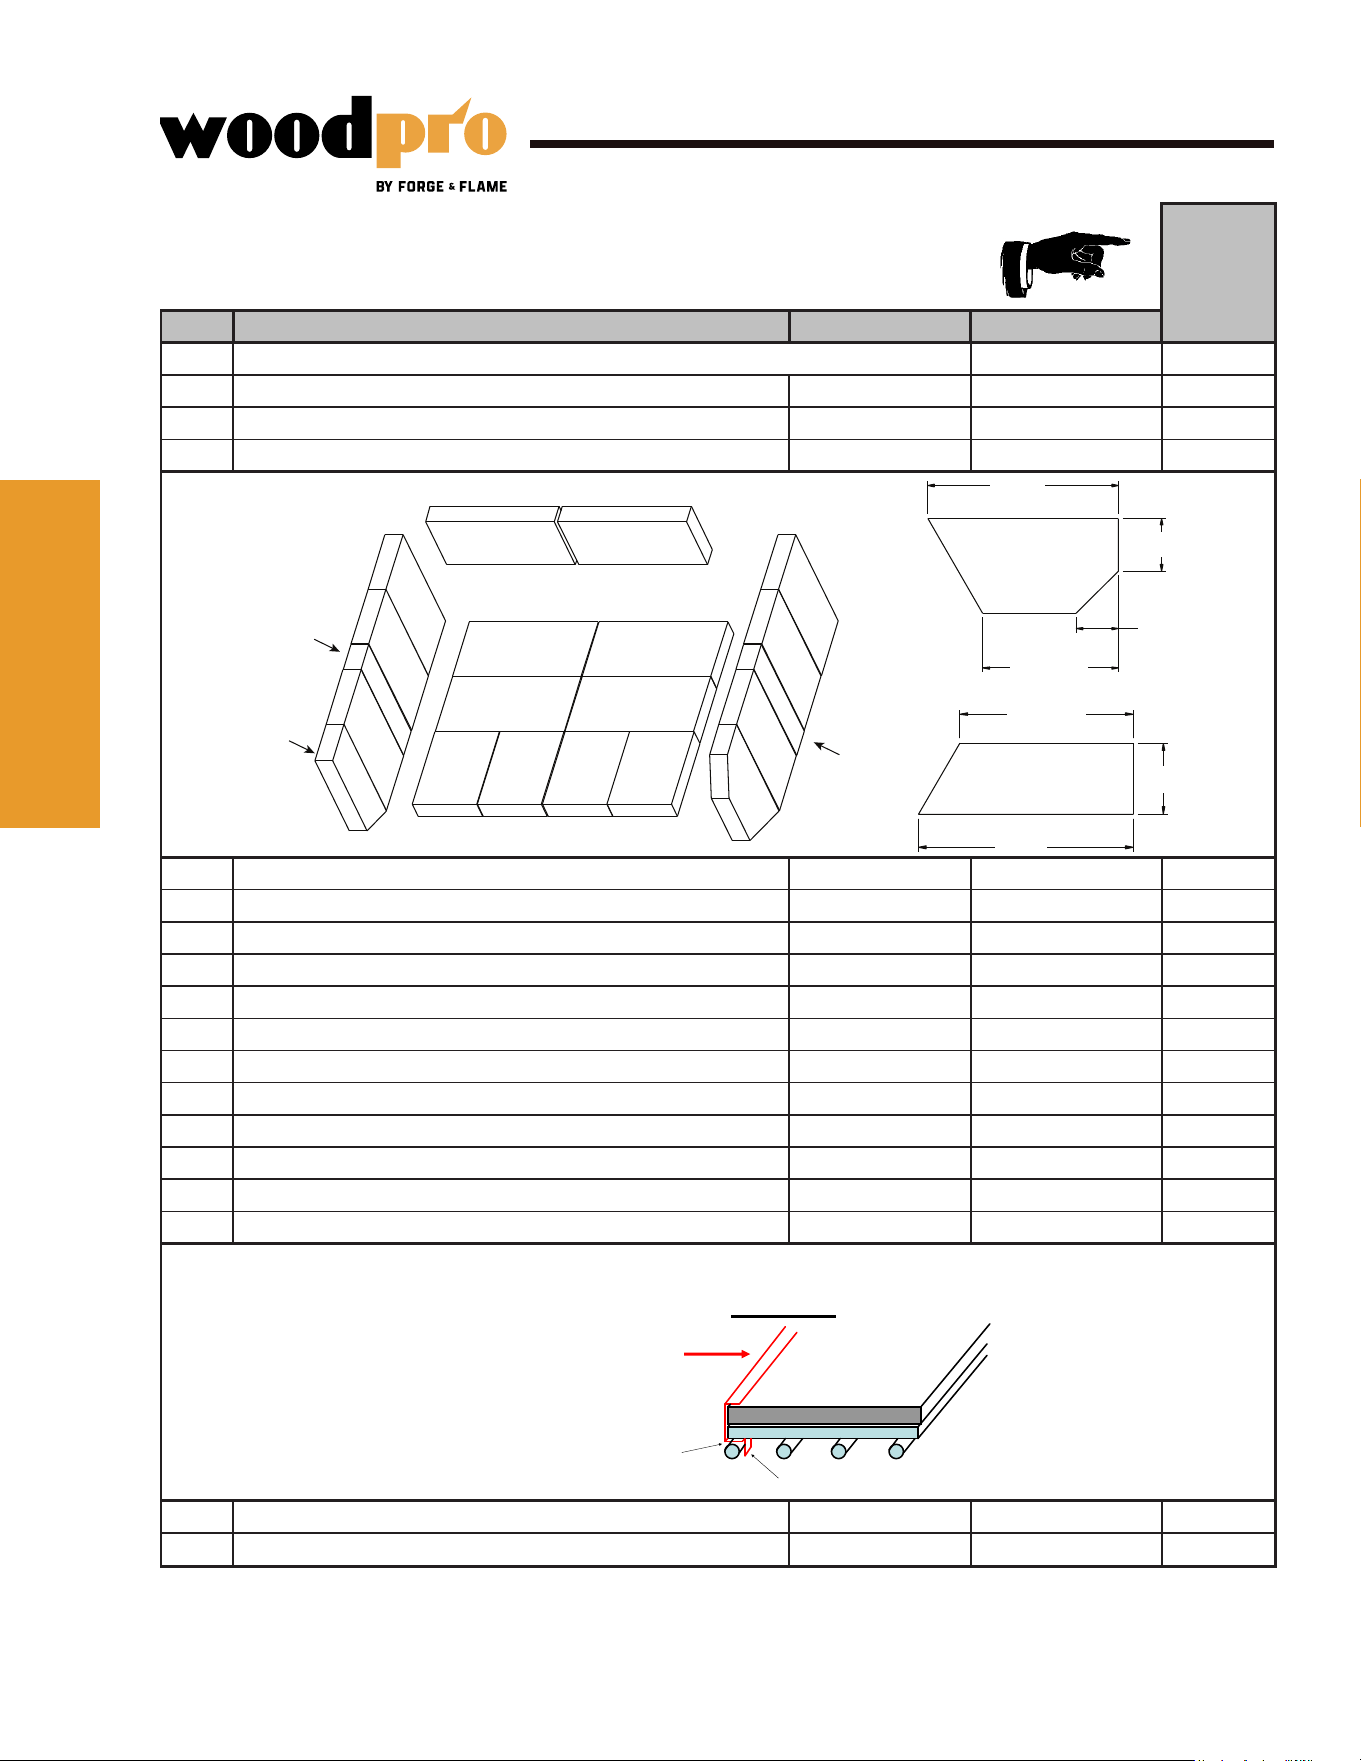
34 ForgenFlame.comWoodPro Wood Stove • 8390-086B • 09/25
Service Parts
FF-WP-300
Beginning Manufacturing Date: Sept 2024
Ending Manufacturing Date: Active
IMPORTANT: THIS IS DATED INFORMATION. When requesting service or replacement parts for
your appliance please provide model number and serial number.
Stocked
at Depot
ITEM DESCRIPTION COMMENTS PART NUMBER
1 Air Channel, Convection w/Bracket - Retain original serial # label SRV7033-144
2 Air Supply Back SRV7033-134
3 Flue Collar SRV7000-302 Y
4 Panel Assembly, Side, Left SRV7037-007
5 Brick Assembly, Complete Set Pkg of 20 SRV7037-003
5.1 Brick, 9 x 4.5 x 1.25” Qty. 12 Req 832-0550
Y
5.2 Brick, 6 x 4.5 x 1.25” Qty. 4 Reg.
SRV7128-002
5.3 Brick, 9 x 4.5 x 1.25” w/Angle Qty. 1 Reg.
SRV7128-806
5.4 Brick, 9 x 3 x 1.25” w/Angle Qty. 1 Reg.
SRV7128-618
5.5 Brick, small 9 x 2 x 1.25” Qty. 2 Reg.
SRV7128-018
Brick, Uncut Pkg of 6 832-3040
Y
6 Rear Air Channel Assembly SRV7033-002
Y
7 Ceramic Fiber Blanket, 1/2 “ Thick 15 1/2” x 19 1/2” 832-3390
Y
8 Bae Fiber Board - 9-1/2” W x 15-3/4” H Pkg of 2 SRV7037-112
Y
9 Tube Support Rack SRV7033-148
10 Brick Retainer Qty. 2 Reg. SRV7033-149
11 Bae Protection Channel SRV7033-298
Mobile Home Brackets SRV7039-208/4
Additional service part numbers appear on following page.
#5 Brick Assembly
#11 Bae Protection Channel
Fiber baffle
Ceramic blanket
Side view
Front, looking into unit
This tab sits behind the front tube.
Baffle protection channel sits in
between front tube and fiber baffle.
5.1
5.1
5.1
5.1
5.1
5.1
5.1
5.1
5.1
5.1
5.1
5.1
5.2 5.2 5.2
5.2
9 in.
2-1/2 in.
2 in.
6-3/8 in.
5.3
5.3
7-1/4 in.
3 in.
9 in.
5.4
5.4
5.5
5.5
ReferenceReference
MaterialsMaterials
66
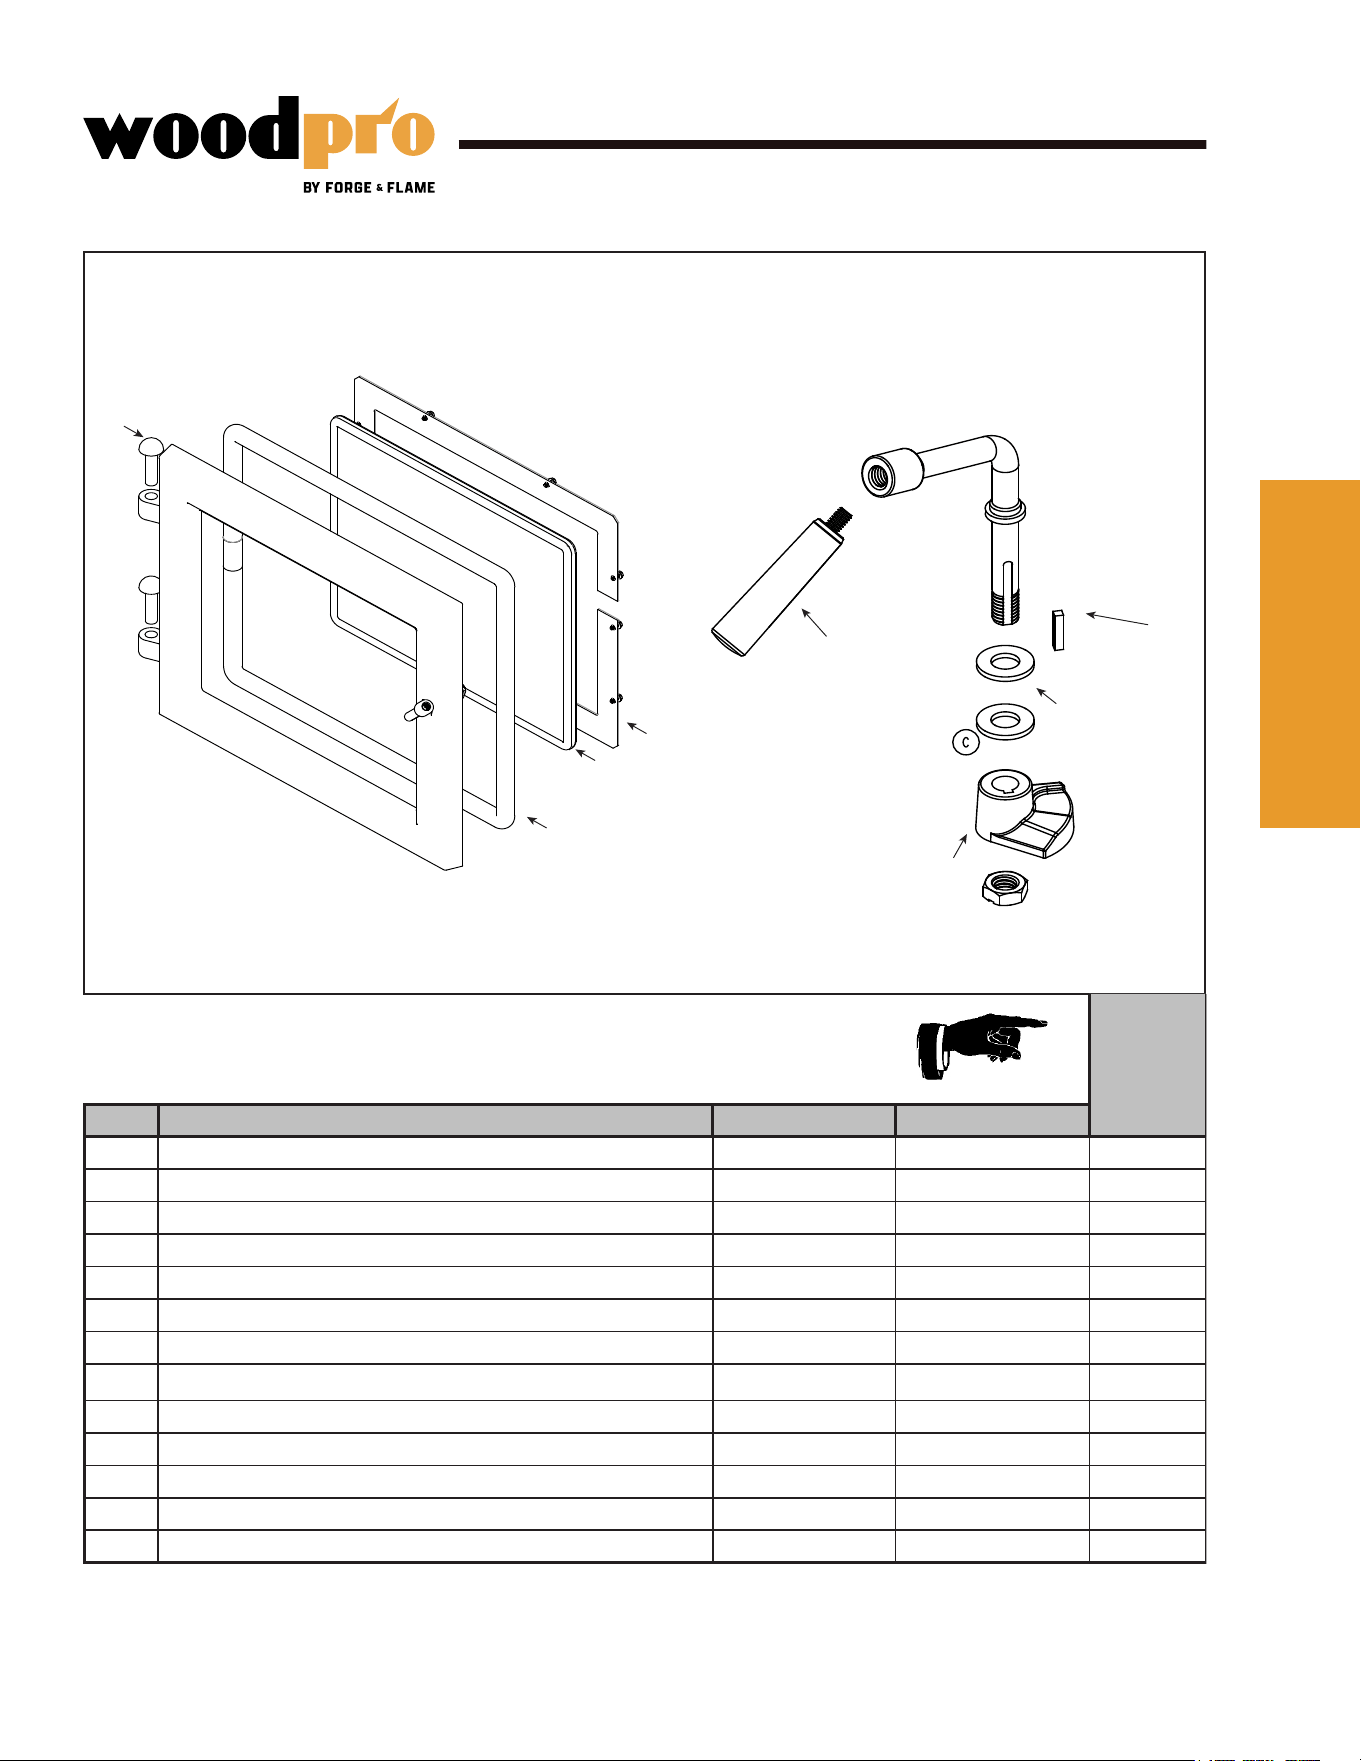
35 ForgenFlame.comWoodPro Wood Stove • 8390-086B • 09/25
Service Parts
FF-WP-300
Beginning Manufacturing Date: Sept 2024
Ending Manufacturing Date: Active
#12 Door Assembly #13 Door Handle Assembly
12.1
12.2
12.3
12.4
13.4
13.3
13.2
13.1
IMPORTANT: THIS IS DATED INFORMATION. When requesting service or replacement parts for
your appliance please provide model number and serial number.
Stocked
at Depot
ITEM DESCRIPTION COMMENTS PART NUMBER
12 Door Assembly SRV7037-061
12.1 Hinge Pins, 1/2” Black 7000-606/2
Y
12.2 Rope, Door, 3/4” x 84” - Field cut to Size 7 Ft Length 832-1680 Y
12.3 Door Glass Assembly - 15-1/2” W x 13-3/8” H SRV7044-027 Y
Gasket, Glass Tape - Field cut to Size 5 Ft Length 832-0460 Y
12.4 Glass Frame Set SRV7044-191
12.5 Screw, Flat Head Philips 8-32 x 1/2 Pkg of 12 220-0490/12
Y
13 Door Handle Assembly
(Does not include Spring Handle) SRV8001-002
13.1 Door Handle Fiber Handle SRV7000-948 Y
13.2 Key, Cam Latch SRV430-1151
13.3 Washer, SAE, 3/8 Pkg of 3 832-0990 Y
13.4 Cam Latch SRV430-1141
14 Leg - Painted SRV7039-060
Additional service part numbers appear on following page.
ReferenceReference
MaterialsMaterials
66
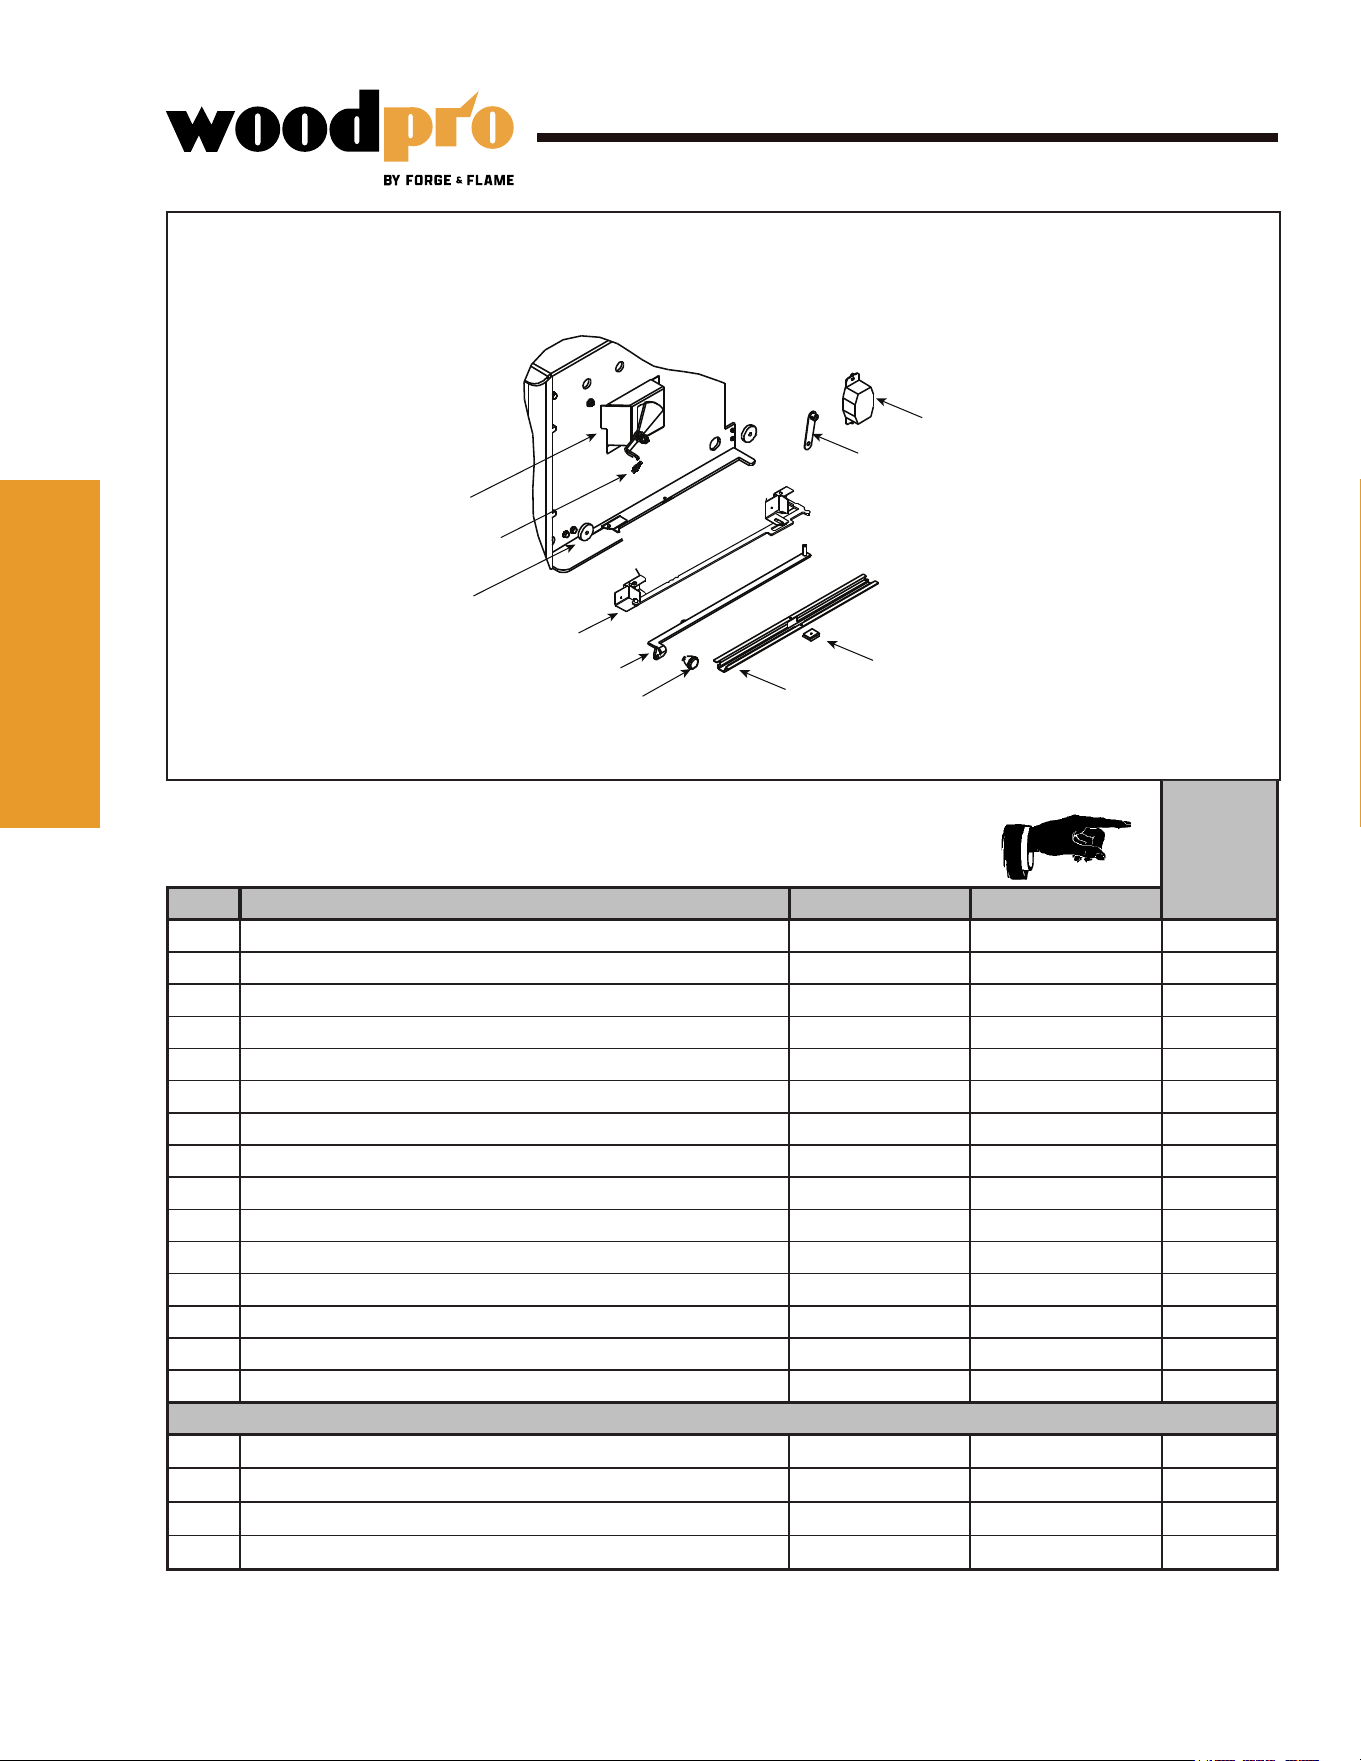
36 ForgenFlame.comWoodPro Wood Stove • 8390-086B • 09/25
Service Parts
FF-WP-300
Beginning Manufacturing Date: Sept 2024
Ending Manufacturing Date: Active
#15 Burn Rate Control Assembly
15.10
15.5
15.6
15.7
15.8
15.9
15.1
15.2
15.3
15.4
IMPORTANT: THIS IS DATED INFORMATION. When requesting service or replacement parts for
your appliance please provide model number and serial number.
Stocked
at Depot
ITEM DESCRIPTION COMMENTS PART NUMBER
15.1 Burn Rate Control Assembly SRV7037-054
Y
15.2 Spring Handle, 1/4” Nickel 250-8340
Y
15.3 Door Gasket - Front & Rear Air Timer Doors 7033-282
Y
15.4 Timer Air Control Assembly SRV7037-018
Y
Rear Air Door Assembly SRV7037-013
Y
15.5 Rear Air Control Arm Assembly SRV7037-005
Y
15.6 Knob - Start-Up Control Knob SRV7000-343
15.7 Air Control Rod Guide SRV7033-210
15.8 Latch, Magnet - For Air Control SRV229-0631
15.9 Timer Arm Assembly SRV7033-034
Y
16 Panel Assembly, Right Side SRV7037-006
17 Tube Channel Access Cover (Top) SRV7033-237
18 Tube, Channel Assembly Manifold Tubes SRV7033-023
Y
19 Timer (Only) Replacement Assembly SRV480-1940
Y
Paint, Touch-Up Black 3-42-19905
FASTENERS
Avk Rivnut Repair Kit - 1/4-20 & 3/8-16 Rivnut Tools RIVNUT-REPAIR Y
Bolt, Hex Head, 1/4-20 X 1 Pkg of 10 25221A/10 Y
Screw, Pan Head Philips Tc 8-32X1/2 Pkg of 12 220-0490/12 Y
Washer, Sae, 3/8 Pkg of 3 ea. 832-0990 Y
ReferenceReference
MaterialsMaterials
66

37 ForgenFlame.comWoodPro Wood Stove • 8390-086B • 09/25

38 ForgenFlame.comWoodPro Wood Stove • 8390-086B • 09/25