www.auna-multimedia.com
Stockton
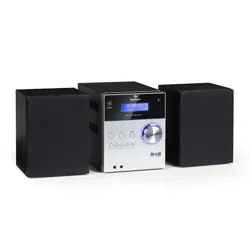
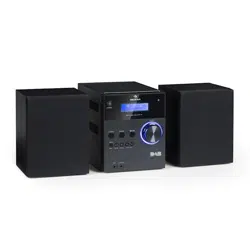
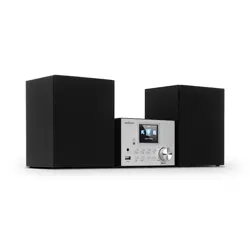
DAB+ Radio mit CD-Player
DAB+ Radio with CD Player
Radio DAB+ avec lecteur CD
Radio DAB+ con reproductor de CD
Radio DAB+ con lettore CD
10034517


3
DE
English 29
Français 53
Español 77
Italiano 101
Sehr geehrter Kunde,
wir gratulieren Ihnen zum Erwerb Ihres Gerätes.
Lesen Sie die folgenden Hinweise sorgfältig durch
und befolgen Sie diese, um möglichen Schäden
vorzubeugen. Für Schäden, die durch Missachtung der
Hinweise und unsachgemäßen Gebrauch entstehen,
übernehmen wir keine Haftung. Scannen Sie den
folgenden QR-Code, um Zugri auf die aktuellste
Bedienungsanleitung und weitere Informationen rund
um das Produkt zu erhalten:
INHALTSVERZEICHNIS
Sicherheitshinweise 4
Geräteübersicht 6
Fernbedienung 8
Installation 9
Inbetriebnahme und Bedienung 10
DAB-Radio-Funktionen 13
FM-Radio-Funktionen 15
CD/USB 16
BT 18
AUX-IN 18
Weitere Funktionen und Einstellungen 19
Reinigung und Pege 22
Fehlersuche und Fehlerbehebung 23
Technische Daten 25
Spezielle Entsorgungshinweise für Verbraucher in Deutschland 26

4
DE
SICHERHEITSHINWEISE
• Lesen Sie sich die Bedienungsanleitung vor der Installation und
Inbetriebnahme des Geräts aufmerksam durch und bewahren Sie diese
für den zukünftigen Gebrauch auf.
• Stellen Sie sicher, dass das Gerät in einem gut belüfteten Bereich
aufgestellt wird und dass zu den Seiten und der Oberseite des Geräts
ein Mindestabstand von 10 cm eingehalten wird.
• Stellen Sie das Gerät auf eine stabile und vibrationsarme Oberäche.
• Stellen Sie das Gerät mindestens 30 cm entfernt von CRT-Fernsehern
auf, um Bildstörungen zu vermeiden. Sollten dennoch Bildstörungen
auftreten, stellen Sie das Gerät noch weiter weg. LCD-Fernseher sind
hierfür nicht anfällig.
• Stellen Sie das Gerät nicht in der Nähe einer Wärmequelle
(z.B. Heizkörper) auf. Halten Sie das Gerät fern von direkter
Sonneneinstrahlung, starken Magnetfeldern, übermäßigem Staub,
Feuchtigkeit und elektrischen Geräten, die elektrisches Rauschen
verursachen.
• Stellen Sie keine Gegenstände auf dem Gerät ab.
• Bewegen Sie das Gerät vorsichtig, vermeiden Sie Stöße.
• Setzen Sie das Gerät keiner Feuchtigkeit oder extremen Temperaturen
über 40°C oder sehr niedrigen Temperaturen aus.
• Achten Sie darauf, dass die Belüftungsönungen nicht durch
Gegenstände, wie beispielsweise Zeitungen, Tischdecken, Vorhänge
etc., blockiert werden.
• Stellen Sie keine Gegenstände mit oener Flamme, wie beispielsweise
Kerzen, auf dem Gerät ab.
• Verwenden Sie das Gerät ausschließlich im moderaten Temperatur-
bereich zwischen 5 °C und 35 °C.
• Das Gerät darf nicht in der Nähe von Wasser verwendet oder mit
Feuchtigkeit in Berührung gebracht werden.
• Setzen Sie das Gerät keinem tropfenden oder spritzenden Wasser aus
und stellen Sie keine mit Flüssigkeit gefüllten Gegenstände auf dem
Gerät ab.
VORSICHT
Explosionsgefahr! Wenn die Batterien nicht richtig
ausgetauscht werden, besteht Explosionsgefahr. Ersetzen Sie
Batterien immer durch Batterien desselben Typs. Der
Netzstecker dient als Trennvorrichtung und sollte deshalb
immer leicht zugänglich sein.

5
DE
• Verwenden Sie ausschließlich das im Lieferumfang enthaltene
oder explizit vom Hersteller empfohlenes Zubehör. Verwenden
Sie den Netzadapter ausschließlich für seinen vorgesehenen
Verwendungszweck.
• Ziehen Sie den Netzstecker aus Sicherheitsgründen bei Gewitter aus der
Steckdose und wenn Sie das Gerät längere Zeit nicht benutzen.
• Versuchen Sie nicht das Gerät selbst zu reparieren. Das Gerät ist von
einer qualizierten Person zu reparieren, wenn:
a. das Netzkabel beschädigt ist.
b. Gegenstände in das Gerät gefallen sind oder eine Flüssigkeit in das
Gerät eingedrungen ist.
c. das Gerät dem Regen ausgesetzt war.
d. das Gerät nicht korrekt bzw. ohne nennenswerte äußere
Veränderungen funktioniert.
e. das Gerät defekt ist.
• Um die Stromzufuhr vollständig zu trennen, muss der Netzstecker
des Gerätes vom Netz getrennt werden, da der Netzstecker als
Trennvorrichtung des Gerätes fungiert. Achten Sie darauf, dass der
Netzstecker leicht zugänglich ist.
WARNUNG
Brandgefahr! Die Stromspannung muss, mit der auf dem
Typenschild des Geräts angegebenen Spannung,
übereinstimmen. Die Verwendung einer höheren Spannung,
als auf dem Typenschild angegeben, kann zu Bränden oder
anderen Unfällen, welche Schäden verursachen, führen. Der
Hersteller des Geräts übernimmt für Schäden, welche durch
die Verwendung einer falschen Stromspannung entstehen,
keine Haftung.
Lautstärkeregelung
Die Lautstärke bei einer bestimmten Einstellung hängt von der Eizienz des
Lautsprechers, des Standorts und einer Vielzahl von anderen Faktoren ab.
Drehen Sie die Lautstärke beim Einschalten nicht vollständig auf. Hören Sie
bei gemäßigter Lautstärke Musik. Ein Hören von Musik bei hoher Lautstärke
über einen längeren Zeitraum kann zum Verlust des Hörvermögens führen.

6
DE
GERÄTEÜBERSICHT
1
2 3 4
5
6
7
8
17
18
16 15 14
13 12 11
10
9
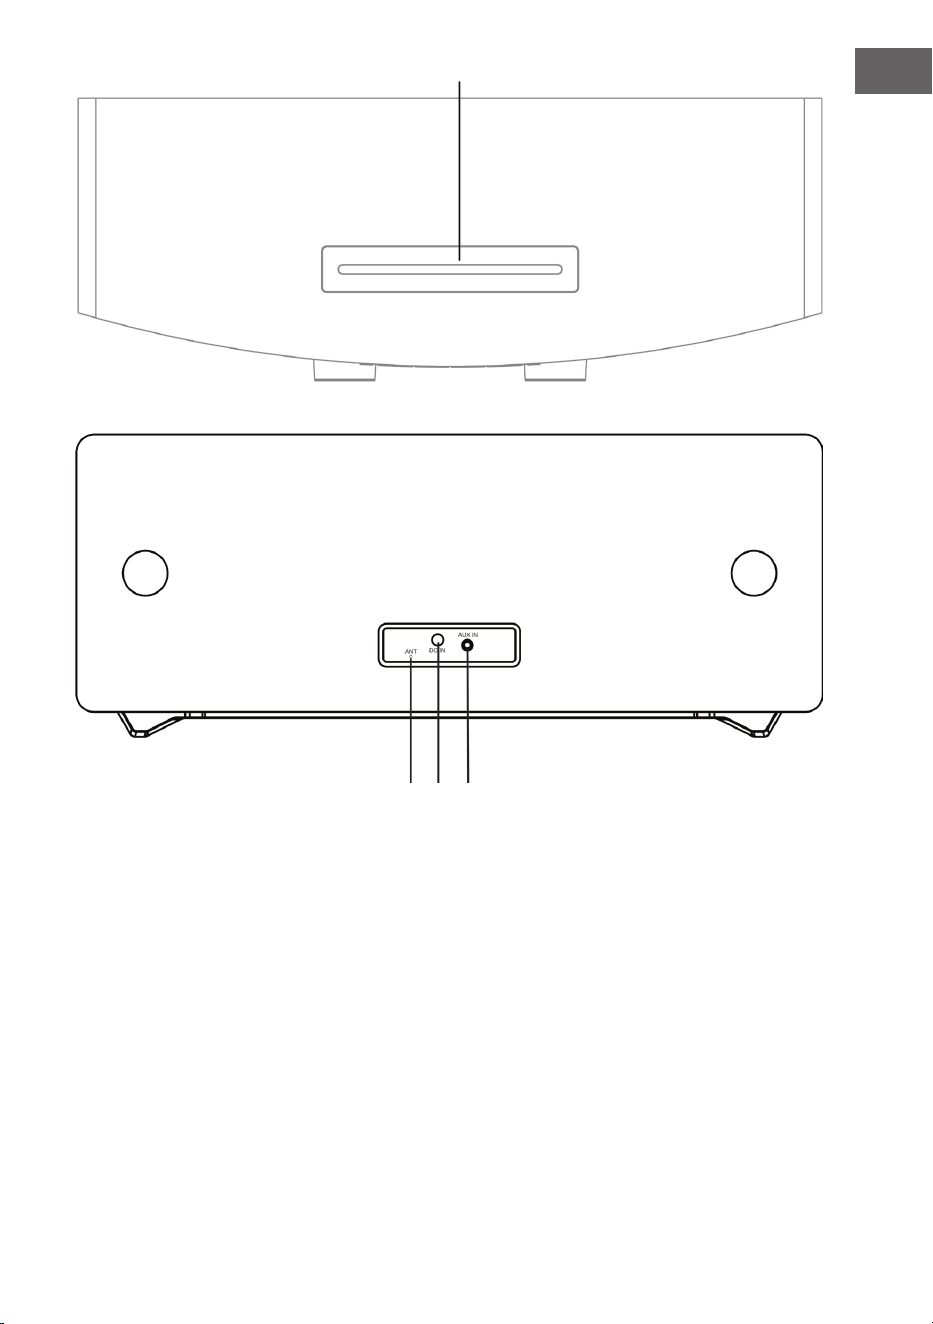
7
DE
1 Titel überspringen, vorspulen 12 MENU/INFO (Menü/Info)
2 Standby 13 SOURCE (Quelle)
3 LCD-Bildschirm 14 Telefonanschluss
4 CD-Fach önen 15 Speicherplatz 1
5 Fernbedienungssensor 16 Lautstärkeregelung
6 Titel überspringen, zurückspulen 17 Linker Lautsprecher
7 Rechter Lautsprecher 18 Speicherplatz 2, Stopp (USB-/CD-Modus)
8 Wiedergabe/Pause/Speicherplatz 3 19 CD-Fach
9 Auswahlregler 20 FM-/ DAB-Antenne
10 Speichern 21 DC-IN-Anschluss
11 USB-Anschluss 22 AUDIO-IN-Anschluss
19
20 21 22
8
DE
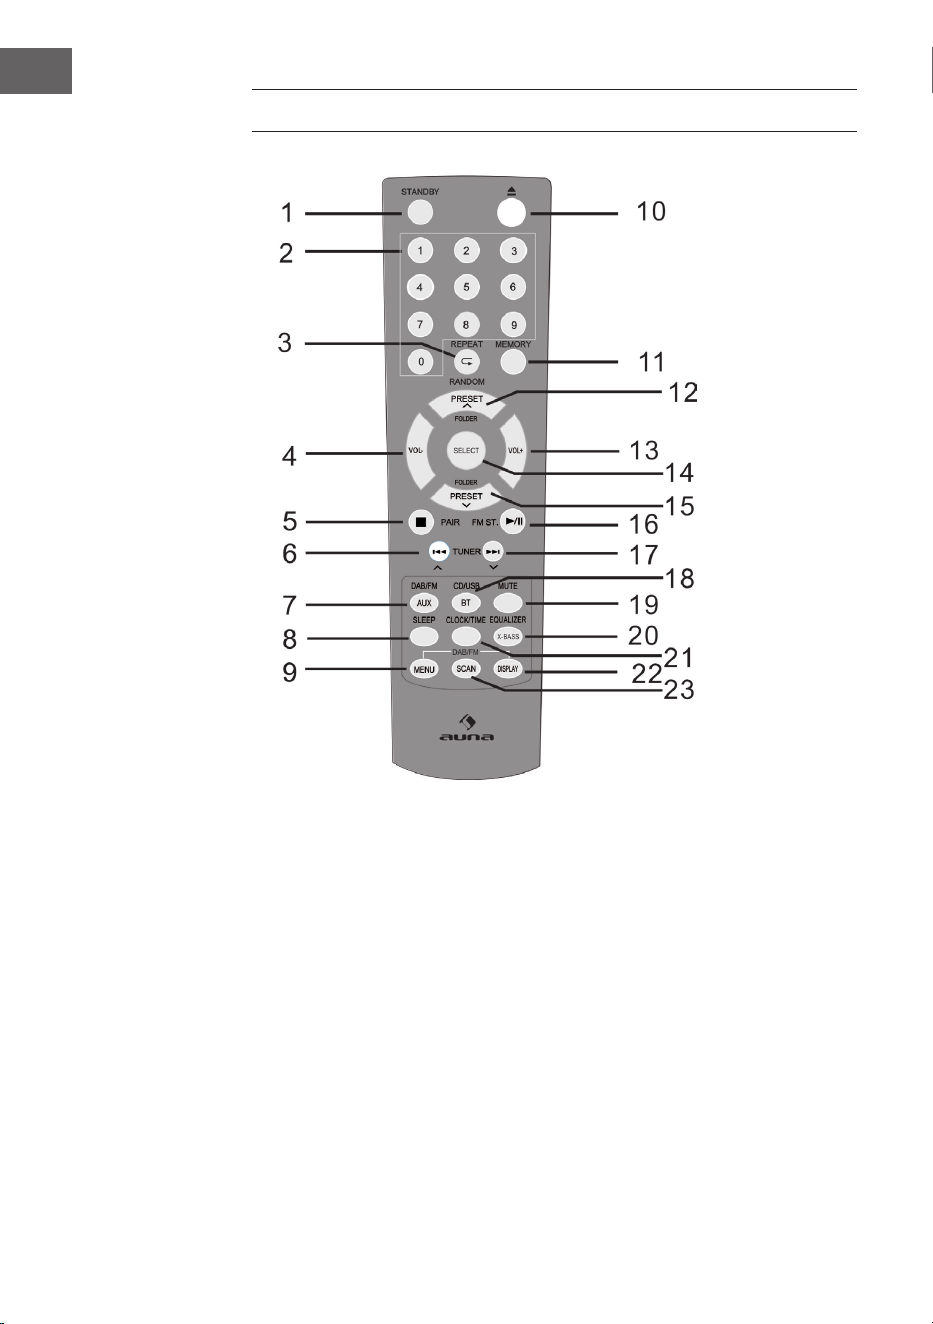
FERNBEDIENUNG
1 Einschalten / Standby 9 DAB-/FM-Menü 17 Nach oben überspringen,
schnell vorspulen,
Zeit hinzufügen
2 Zierntasten 10 Önen
3 Wiederholen /
Zufallswiedergabe
11 Speichern 18 CD / USB / BT
4 Lautstärke senken 12 Einen Speicherplatz/
Ordner nach oben
(Radiomodus)
19 Stummschalten
5 Stopp, Verbinden 20 EQ / X-BASS
6 Nach unten überspringen,
schnell zurückspulen,
Zeit reduzieren
13 Lautstärke erhöhen 21 Uhrzeit / Timer
14 SELECT (Auswahltaste) 22 RDS-Anzeige (DAB),
ID3 (CD / USB)
7 DAB / FM / AUX 15 Einen Speicherplatz /
Ordner nach unten
23 Suchen
8 Sleeptimer 16 Wiedergabe / Pause;
Stereo (FM)

9
DE
INSTALLATION
Batterien in die Fernbedienung einlegen
1. Önen Sie die Abdeckung des Batteriefachs.
2. Legen Sie die im Lieferumfang enthaltenen Batterien, der richtigen
Polarität entsprechend, in das Batteriefach ein. Drücken Sie die
Batterien beim Einlegen oder Entnehmen in Richtung des Minuspols (-).
3. Schließen Sie die Abdeckung des Batteriefachs.
Sicherheitshinweise zur Verwendung von Batterien
• Entnehmen Sie die Batterien, wenn Sie das Gerät über einen längeren
Zeitraum nicht verwenden. Dadurch können potenzielle, durch
auslaufende Batteriesäure entstehende Schäden, verhindert werden.
• Verwenden Sie keine wiederauadbaren Batterien (Nickel-Kadmium-
Batterien etc.).
• Ein falsches Einlegen der Batterien kann zu Fehlfunktionen des Geräts
führen.
• Setzen Sie Batterien (sowohl eingelegt als auch in der Verpackung)
keiner übermäßigen Hitzeeinwirkung, wie beispielsweise Sonnenlicht,
aus.
Hinweise zur Verwendung der Fernbedienung
• Ersetzen Sie Batterien, wenn die Reichweite der Fernbedienung
reduziert wird oder die Bedienung unregelmäßig funktioniert.
Verwenden Sie Batterien der Größe AAA (UM-4/ SUM-4).
• Reinigen Sie den Transmitter der Fernbedienung und den
Fernbedienungssensor des Geräts regelmäßig mit einem weichen Tuch.
• Wenn der Sensor starker Lichteinstrahlung ausgesetzt wird, kann dies
die Bedienung beeinträchtigen. Reduzieren Sie die Lichteinstrahlung
oder stellen Sie das Gerät an einen anderen Ort, falls dieses Problem
auftreten sollte.
• Setzen Sie die Fernbedienung keiner Feuchtigkeit, Hitze,
Erschütterungen oder Vibrationen aus.

10
DE
Systemanschlüsse
Hinweis: Ziehen Sie das Netzkabel des Gerätes aus der Steckdose,
bevor Sie Anschlüsse vornehmen.
INBETRIEBNAHME UND BEDIENUNG
Stummschalten
Durch Drücken der MUTE-Taste auf der Fernbedienung oder durch
Drücken des Lautstärkereglers des Geräts wird die Lautstärke kurzzeitig
stummgeschaltet. Drücken Sie diese Taste erneut, um die normale
Lautstärke wiederherzustellen.
Lautstärkeregelung
Drehen Sie am Lautstärkeregler des Geräts oder drücken Sie auf die
Lautstärketasten der Fernbedienung, um die Lautstärke zu erhöhen oder zu
verringern.
DAB-/FM-Radio
Stecken Sie den Anschluss des im Lieferumfang enthaltenen Netzadapters
in den DC-Anschluss an der Rückseite des Geräts und stecken Sie den
Netzstecker in die Steckdose. Der Bildschirm zeigt dann „Scan Time“ an.
Das Gerät aktualisiert nun die Uhrzeit des Geräts auf die vom Sender zur
Verfügung gestellten Uhrzeit. Warten Sie, bis der Aktualisierungsvorgang
abgeschlossen ist und die tatsächliche Uhrzeit auf dem Bildschirm
angezeigt wird.
NetzadapterNetzadapter
Wandsteckdose
AC 230 V

11
DE
Drücken Sie zum Einschalten des Geräts die STANDBY-Taste des Geräts.
Drücken Sie zum Ausschalten erneut die STANDBY-Taste .
DAB/FM/CD/AUX/BT
Drücken Sie die DAB/FM-Taste auf der Fernbedienung oder mehrfach die
SOURCE-Taste auf dem Gerät, um die verschiedenen Quellen auszuwählen.
Anpassung der Antenne
Die Antenne an der Rückseite des Geräts sollte vollständig ausgefahren
werden, um einen guten DAB-/FM-Empfang zu gewährleisten. Passen Sie
für einen guten Empfang die Ausrichtung der Antenne an.
DAB-RADIO-BEDIENUNG
Bei der ersten Auswahl des DAB-Modus wird automatisch nach
allen verfügbaren DAB-Sendern gesucht. Warten Sie, bis die Suche
abgeschlossen ist. Auf dem Bildschirm wird der Suchfortschritt angezeigt.
Nachdem die Suche abgeschlossen ist, wird der erste gefundene Sender
eingestellt.
Automatische Sendersuche (DAB)
1. Schalten Sie das Gerät ein und wählen Sie den DAB-Modus aus.
2. Drücken Sie die SCAN-Taste, um die automatische Suche nach allen
verfügbaren Sendern zu starten.
Manuelle Sendersuche (DAB)
1. Schalten Sie das Gerät ein und stellen Sie den DAB-Modus ein.
2. Drücken Sie die MENU-Taste, um in das Kontrollmenü zu gelangen.
3. Drehen und drücken Sie den Auswahlregler des Geräts oder drücken Sie
so lange die Tasten oder auf der Fernbedienung, bis auf dem
Bildschirm „Manual tune“ angezeigt wird. Bestätigen Sie Ihre Auswahl
durch Drücken der SELECT-Taste.
4. Drehen und drücken Sie zur Auswahl des gewünschten Senders (5A –
13F) den Auswahlregler des Geräts oder drücken Sie die Tasten oder
auf der Fernbedienung,.
5. Bestätigen Sie Ihre Auswahl durch Drücken der SELECT-Taste.
6. Drehen und drücken Sie den Auswahlregler des Geräts oder drücken
Sie die Tasten oder auf der Fernbedienung, um einen anderen
Sender auszuwählen und drücken Sie zum Bestätigen die SELECT-Taste.
7. Drücken Sie, sobald der gewünschte Sender gefunden wurde, die
SELECT-Taste.
8. Die Suche kann durch Drücken der MENU-Taste abgebrochen werden.
12
DE
Sendereinstellung (DAB)
Drehen und drücken Sie den Auswahlregler des Geräts oder drücken Sie
die Tasten oder auf der Fernbedienung, um die Informationen des
nächsten Senders anzuzeigen. Drücken Sie die SELECT-Taste, um diesen
Sender innerhalb von wenigen Sekunden einzustellen.
FM-RADIO-BEDIENUNG
Automatische Sendersuche (FM)
1. Schalten Sie das Gerät ein und stellen Sie den FM-Modus ein.
2. Halten Sie die SCAN-Taste gedrückt, um den automatischen
Sendersuchlauf zu starten und die verfügbaren Sender (maximal 20) zu
speichern.
Manuelle Sendersuche (FM)
1. Drücken Sie die Tasten
oder des Geräts oder verwenden
Sie die Tasten oder auf der Fernbedienung, um eine andere
Frequenz einzustellen.
2. Halten Sie alternativ die Tasten
oder des Geräts gedrückt
oder drücken Sie die Tasten oder auf der Fernbedienung, um
den nächsten verfügbaren Sender einzustellen.
DAB/FM-RADIOSENDER SPEICHERN
A) Mit der Fernbedienung:
1. Stellen Sie den Sender, den Sie speichern möchten, ein.
2. Halten Sie die MEMORY-Taste gedrückt. Der Bildschirm blinkt auf.
3. Drücken Sie die Tasten Preset+ und Preset-, um die gewünschte
Speicherplatznummer einzustellen. Drücken Sie zum Speichern die
SELECT-Taste.
HINWEIS: Es können bis zu 20 DAB- und FM-Sender gespeichert werden.
Gespeicherte DAB-/FM-Sender aufrufen
• Drücken Sie die Tasten Preset+ oder Preset-, um direkt zu einem
gespeicherten Sender zu gelangen oder drücken Sie einmal die
MEMORY-Taste und wählen Sie anschließend mit den Tasten Preset+
oder Preset- den gewünschten Speicherplatz, den Sie aufrufen möchten,
aus und bestätigen Sie durch Drücken der SELECT-Taste.

13
DE
• Um den gespeicherten Sender direkt aufzurufen, können Sie ebenfalls
die Zierntasten verwenden. Wenn Sie beispielsweise die Zier
„3“ und dann die SELECT-Taste drücken, wird der auf Speicherplatz
3 gespeicherte Sender aufgerufen. Wenn Sie die Zier „1“ und
anschließend die Zier „2“ sowie die SELECT-Taste drücken, wird der
auf Speicherplatz 12 gespeicherte Sender aufgerufen.
B) Über das Bedienfeld auf der Gerätevorderseite:
Schnelle Senderspeicherung (1 – 3)
• Stellen Sie den DAB-/FM-Sender, den Sie speichern möchten, ein.
• Drücken und halten Sie einer der nummerierten Preset (1-3)-Tasten
für zwei Sekunden gedrückt, bis auf dem Bildschirm die Nachricht
angezeigt wird, dass der Sender auf diesem Speicherplatz gespeichert
wurde.
Senderspeicherung in der Speicherliste (4 – 20)
1. Stellen Sie den DAB-/FM-Sender, den Sie speichern möchten, ein.
2. Halten Sie die Taste 4+ gedrückt, um die Speicherliste anzuzeigen.
Drehen und drücken Sie den Auswahlregler (oder drücken Sie die
Tasten oder auf der Fernbedienung), um einen beliebigen
Speicherplatz auswählen. Bereits gespeicherte Sender können
überschrieben werden.
3. Drücken Sie zum Speichern des ausgewählten Senders auf den
Auswahlregler (oder auf die SELECT-Taste auf der Fernbedienung).
DAB-RADIO-FUNKTIONEN
DAB-Senderinformationen anzeigen
Mehrere Informationen werden vom Sender zur Verfügung gestellt. Drücken
Sie zum Wechseln der angezeigten Informationen mehrfach die INFO-Taste:
1. Radiotext: Zeigt Musiktitel oder Programmdetails an.
2. Signalstärke: Je mehr das Sternsignal abgebildet wird, desto stärker ist
das empfangene Signal. Passen Sei die Antenne an, um den Signal-
empfang zu verbessern.
3. Programmart (PTY): Art des Programms.
4. Multiplexname: Zeigt den Namen der Multiplex an, zu welcher der
aktuelle Sender gehört.
5. Frequenz: Zeigt die aktuelle Senderfrequenz an.
6. Signalfehlerrate: Zeigt die Signalfehlerrate an. Je höher dieser Wert ist,
desto mehr Fehler werden empfangen. Passen Sie für einen besseren
Empfang die Position der Antenne an.
7. Audio Bit Rate: Zeigt die aktuelle Audio-Bitrate an.
14
DE
Weitere DAB-Optionen
Drücken Sie die MENU-Taste, um in das Menü zu gelangen. Drehen und
drücken Sie den Auswahlregler oder verwenden Sie die Tasten oder
auf der Fernbedienung, um eine der im weiteren Verlauf folgenden
Optionen auszuwählen:
Dynamikbereichssteuerung (DRC)
In lauter Umgebung können mithilfe von DRC leise Töne hörbarer gemacht
werden. Die DRC-Stufe hängt von den Einstellungen des Senders ab. Sie
können den DRC-Wert an Ihrem Gerät folgendermaßen verändern.
Es gibt 3 Kompressionsstufen:
DRC hoch: Maximale Komprimierung.
DRC niedrig: Komprimierung um die Hälfte (1/2) des vom Sender zur
Verfügung gestellten Komprimierung.
DRC aus: Keine Komprimierung.
1. Drücken Sie die MENU-Taste, um in das Menü zu gelangen.
2. Drehen und drücken Sie den Auswahlregler des Geräts oder drücken Sie
die Tasten oder auf der Fernbedienung, bis auf dem Bildschirm
„DRC“ angezeigt wird und drücken Sie anschließend zum Bestätigen die
SELECT-Taste.
3. Drehen und drücken Sie den Auswahlregler des Geräts oder drücken
Sie die Tasten oder auf der Fernbedienung, stellen Sie den
gewünschten DRC-Wert ein und drücken Sie anschließend zum
Bestätigen die SELECT-Taste.
4. Drücken Sie zum Verlassen des Menüs erneut die MENU-Taste.
HINWEIS: Nicht alle DAB-Sender können die DRC-Funktion verwenden.
Wenn ein Sender DRC nicht unterstützt, hat die DRC-Einstellung am Gerät
keinen Eekt. Nachdem die DRC-Einstellung vorgenommen wurde, kann es
vorkommen, dass der Ton lauter ist.
Inaktive Sender löschen
Mit dieser Funktion können inaktive Sender gelöscht werden.
1. Drücken Sie die MENU-Taste, um in das Menü zu gelangen.
2. Drehen und drücken Sie den Auswahlregler des Geräts oder drücken Sie
die Tasten oder auf der Fernbedienung, bis auf dem Bildschirm
„<Prune>“ angezeigt wird und drücken Sie anschließend zum Bestätigen
die SELECT-Taste.

15
DE
3. Drehen und drücken Sie den Auswahlregler des Geräts oder drücken
Sie die Tasten oder auf der Fernbedienung, um „<YES>“
auszuwählen und drücken Sie anschließend zum Bestätigen die SELECT-
Taste.
4. Drücken Sie zum Verlassen des Menüs erneut die MENU-Taste.
FM-RADIO-FUNKTIONEN
Auswahl Stereo/Force Mono
Drücken Sie, während Sie einen Stereo-FM-Sender empfangen, die FM ST.-
Taste. Das Gerät wechselt dann zwischen Stereo und Mono.
FM-Senderinformationen
Mehrere Informationen werden vom Sender zur Verfügung gestellt. Drücken
Sie zum Wechseln der angezeigten Informationen mehrfach die INFO-Taste:
1. Radiotext: Zeigt Musiktitel oder Programmdetails an.
2. Programmart (PTY): Art des Programms.
3. Audio: Stereo oder Mono.
Weitere FM-Menü-Funktionen aufrufen
• Drücken Sie die MENU-Taste, um auf das Menü aufzurufen.
• Drehen und drücken Sie den Auswahlregler oder verwenden Sie die
Tasten oder auf der Fernbedienung zur Auswahl weiterer
Funktionen, die nachfolgend beschrieben sind:
Sendersuche-Einstellungen
1. Drücken Sie die MENU-Taste, um in das Menü zu gelangen.
2. Drehen und drücken Sie den Auswahlregler des Geräts oder drücken Sie
die Tasten oder auf der Fernbedienung, bis auf dem Bildschirm
„Scan setting“ angezeigt wird und drücken Sie anschließend zum
Bestätigen die SELECT-Taste.
3. Drehen und drücken Sie den Auswahlregler des Geräts oder drücken
Sie die Tasten oder auf der Fernbedienung, um zwischen
den Auswahlmöglichkeiten „All stations“ oder „Strong stations“
auszuwählen und drücken Sie anschließend zum Bestätigen die
SELECT-Taste. Wenn Sie „All stations“ auswählen, werden bei der
Suche alle Sender berücksichtigt, auch wenn diese rauschen. Wenn Sie
„Strong stations“ auswählen, werden nur Sender mit starkem Signal
berücksichtigt und rauschende Sender werden bei der Suche ignoriert.
4. Bei der nächsten Suche werden die von Ihnen vorgenommenen
Einstellungen berücksichtigt.
16
DE
Audio-Einstellung
1. Drücken Sie die MENU-Taste, um in das Menü zu gelangen.
2. Drehen und drücken Sie den Auswahlregler des Geräts oder drücken Sie
die Tasten oder auf der Fernbedienung, bis auf dem Bildschirm
„Audio setting“ angezeigt wird und drücken Sie anschließend zum
Bestätigen die SELECT-Taste.
3. Drehen und drücken Sie den Auswahlregler des Geräts oder drücken
Sie die Tasten oder auf der Fernbedienung, um zwischen
den Auswahlmöglichkeiten „Stereo allowed“ oder „Forced mono“
auszuwählen und drücken Sie anschließend zum Bestätigen die SELECT-
Taste.
CD/USB
CD einlegen und CD-Wiedergabe
Legen Sie eine CD mit der beschrifteten Seite nach oben in das CD-Fach
ein. Der Bildschirm zeigt für einige Sekunden „Reading“ an, während die CD
lädt. Anschließend wird die CD-Wiedergabe automatisch gestartet.
USB
Stecken Sie ein USB-Gerät in den USB-Anschluss. Drücken Sie die USB-
Taste auf der Fernbedienung oder mehrfach die SOURCE-Taste des
Geräts, bis auf dem Bildschirm „USB“ angezeigt wird. Nachdem das Gerät
eingelesen wurde, wird die Gesamtanzahl der Titel auf dem Bildschirm
angezeigt. Drücken Sie zum Starten der Wiedergabe die Taste
.
Wiedergabe/Pause
Drücken Sie zum Pausieren der Wiedergabe die Taste
. Drücken Sie
zum Fortsetzen der Wiedergabe erneut die Taste
.
Stopp
Drücken Sie zum Stoppen der Wiedergabe die Taste
.
Titel überspringen
Drücken Sie die Tasten
oder , um zum vorherigen oder zum
nächsten Titel zu gelangen.
17
DE
Titel-Direktwahl
Verwenden Sie die Zierntasten, um den gewünschten Titel direkt für die
Wiedergabe auszuwählen. Wenn Sie beispielsweise die Taste „3“ drücken
und dann die SELECT-Taste drücken, startet die Wiedergabe unmittelbar
bei Titel 3. Oder wenn Sie erst die Tasten „1“ und „2“ und dann die SELECT-
Taste drücken, startet die Wiedergabe von Track 12.
Schnelle Musiksuche
Halten Sie während der Wiedergabe die Tasten
oder gedrückt,
um die Schnellsuche zu starten. Wenn Sie die Tasten
oder
loslassen, wird die Musikwiedergabe an der entsprechenden Stelle
fortgesetzt.
Wiederholen/ Zufallswiedergabe
• Drücken Sie während der Wiedergabe einmal die Taste REPEAT
/
RANDOM. Der Bildschirm zeigt dann „REP_ONE“ an, was bedeutet,
dass der aktuelle Titel in Dauerschleife wiederholt wird.
• Wenn Sie die Taste REPEAT
/RANDOM erneut drücken, zeigt der
Bildschirm „REP_ALL“ an, was bedeutet, dass alle Titel wiederholt
werden.
• Wenn Sie die Taste REPEAT
/RANDOM erneut drücken, zeigt der
Bildschirm „Random“ an, was bedeutet, dass alle Titel in zufälliger
Reihenfolge wiedergegeben werden.
• Wenn Sie die Taste REPEAT
/RANDOM erneut drücken, wird die
normale Wiedergabe fortgesetzt.
Gespeicherte Wiedergabeliste
Dieses Gerät kann Musiktitel in beliebiger Reihenfolge speichern.
1. Legen Sie im Stopp-Modus eine CD ein und drücken Sie die MEMORY-
Taste. „P-01“ wird angezeigt, und die Anzeige „01“ blinkt.
2. Wählen Sie mit den Tasten
oder den gewünschten Titel aus.
3. Drücken Sie zum Speichern der gewünschten Titel die MEMORY-Taste.
4. Wiederholen Sie die Schritte 2-3, um bis zu 20 Titel (CD) und bis zu
99Titel (MP3) zu speichern.
5. Drücken Sie zur Wiedergabe der gespeicherten Titel die Taste
.
6. Löschen Sie die gespeicherte Liste durch zweimaliges Drücken der Taste
, oder durch Wechseln in einen anderen Modus.
7. Während der Wiedergabe der gespeicherten Liste können Sie die
Wiederholungsfunktion für einen oder alle Titel verwenden. Die
Zufallswiedergabe ist bei dieser Funktion nicht möglich.
18
DE
BT
Befolgen Sie die folgenden Informationen, um Ihr mobiles BT-Gerät mit
dem Gerät zu koppeln:
1. Drücken Sie die BT-Taste der Fernbedienung oder mehrfach die
SOURCE-Taste der Fernbedienung, um in den BT-Modus zu gelangen.
Auf dem Bildschirm wird „BT“ angezeigt. Die Suche nach verfügbaren
Geräten wird gestartet und auf dem Bildschirm blinkt „BT AUDIO“ auf.
2. Falls das Gerät noch nie mit einem BT-Gerät verbunden wurde, oder
das zuletzt verbundene Gerät nicht verfügbar ist, blinkt das BT-Symbol
weiterhin auf dem Bildschirm auf. Aktivieren Sie die BT-Funktion Ihres
mobilen BT-Geräts und suchen Sie in der Geräteliste nach „Stockton“.
Wählen Sie zur Kopplung „Stockton“ aus. Geben Sie, falls erforderlich,
das Passwort „0000“ an.
3. Nachdem die Kopplung erfolgreich hergestellt wurde, leuchtet das BT-
Symbol permanent auf dem Bildschirm auf.
4. Sie können nun die Musikwiedergabe auf dem mobilen Endgerät
starten und die Musik wird über den Lautsprecher des Geräts
abgespielt.
5. Sie können zum Pausieren oder Fortsetzen der Wiedergabe die Taste
drücken.
6. Zum Abspielen des vorherigen oder nächsten Titels können Sie die
Tasten
oder drücken.
HINWEIS: Halten Sie die PAIR-Taste auf dem Gerät gedrückt, um die
aktuelle Verbindung zu trennen und die Suche nach einem anderen BT-
Gerät zu starten.
AUX-IN
Mit dieser Funktion können Sie den Ton eines externen Wiedergabegeräts
über das Gerät wiedergeben lassen.
1. Stecken Sie den Anschluss eines 3,5-mm-Audiokabels (nicht im
Lieferumfang enthalten) an den Line-Out-Anschluss des externen
Geräts und den AUX-IN-Anschluss des Geräts an.
2. Drücken Sie die AUX-Taste auf der Fernbedienung oder mehrfach die
SOURCE-Taste auf dem Gerät, um in den AUX-Modus zu gelangen. Auf
dem Bildschirm wird „AUX“ angezeigt.
3. Starten Sie die Musikwiedergabe auf Ihrem externen Gerät.
4. Der Ton wird über das Gerät abgegeben.
19
DE
WEITERE FUNKTIONEN UND EINSTELLUNGEN
EQ
Sie können über diese Funktion verschiedene Toneekte einstellen.
• Drücken Sie mehrfach die EQ-Taste, um einen der verschiedenen
Eekte auszuwählen: FLAT/CLASSIC/ROCK/POP/JAZZ.
X-BASS
Über diese Funktion können Sie den Basseekt der Musik verstärken.
• Halten Sie die X-BASS-Taste gedrückt, um den X-Bass-Eekt ein- und
auszuschalten.
Sleep-Funktion
1. Drücken Sie, während das Gerät eingeschaltet ist, mehrfach die SLEEP-
Taste, um die Zeit bis zum automatischen Ausschalten des Geräts
einzustellen. Sie können zwischen 90, 80, 70, 60, 50, 40, 30, 20 oder
10Minuten auswählen.
2. Wenn der Timer bei „0“ angelangt ist, schaltet sich das Gerät
automatisch aus.
3. Drücken Sie zum Abbrechen der Funktion die STANDBY-Taste , um
das Gerät auszuschalten oder drücken Sie mehrfach die SLEEP-Taste,
bis auf dem Bildschirm „sleep o“ angezeigt wird.
Uhrzeiteinstellung
1. Versetzen Sie das Gerät in den Standby-Modus.
2. Drücken Sie zur Uhrzeiteinstellung die CLOCK SET-Taste. Auf dem
Bildschirm wird „Clock Set“ angezeigt.
3. Drücken Sie zur Stundenanpassung die Tasten
oder und
bestätigen Sie Ihre Auswahl mit der CLOCK SET-Taste.
4. Drücken Sie zur Minutenanpassung die Tasten
oder und
drücken Sie zum Abschließen die CLOCK SET-Taste.
HINWEISE:
- Die eingestellte Zeit kann automatisch von der DAB+- oder FM-Echtzeit-
einstellung überschrieben werden.
- Wenn das Gerät eingeschaltet wird und Sie in einem beliebigen Modus die
CLOCK SET-Taste drücken, wird auf dem Bildschirm für einige Sekunden die
Uhrzeit angezeigt.
20
DE
Timer ein-/ausschalten
1. Versetzen Sie das Gerät in den Standby-Modus.
2. Halten Sie die TIMER-Taste gedrückt, um den Timer ein-/auszuschalten.
Auf dem Bildschirm wird „On Timer“ angezeigt.
3. Drücken Sie zum Einstellen des Stundenwerts, an dem der Timer
aktiviert werden soll, die Tasten
oder und bestätigen Sie
durch Drücken der TIMER-Taste.
4. Drücken Sie zum Einstellen des Minutenwerts, an dem der Timer
aktiviert werden soll, die Tasten
oder und bestätigen Sie
durch Drücken der TIMER-Taste. Auf dem Bildschirm wird „O Timer“
angezeigt.
5. Drücken Sie die TIMER-Taste, um zur nächsten Auswahl zu gelangen.
6. Drücken Sie zum Einstellen des Stundenwerts, an dem der Timer
deaktiviert werden soll, die Tasten
oder und bestätigen Sie
durch Drücken der TIMER-Taste.
7. Drücken Sie zum Einstellen des Minutenwerts, an dem der Timer
deaktiviert werden soll, die Tasten
oder und bestätigen Sie
durch Drücken der TIMER-Taste.
8. Stellen Sie mit den die Tasten
oder die Timerquelle (CD/
USB/DAB/FM) ein und bestätigen Sie durch Drücken der TIMER-Taste.
9. Stellen Sie mit den Tasten
oder die Lautstärke des Timers ein
und bestätigen Sie durch Drücken der TIMER-Taste.
10. Drücken Sie zum Aktivieren des Timerzeitplans die TIMER-Taste. Auf
dem Bildschirm wird das Timer-Symbol angezeigt.
HINWEIS: Wenn Sie die TIMER-Taste erneut drücken, wird der Timerzeitplan
deaktiviert.
Spracheinstellung
Sie können die gewünschte Sprache einstellen.
1. Aktivieren Sie den DAB- oder FM-Modus.
2. Drücken Sie die MENU-Taste, um in das Menü zu gelangen.
3. Drehen und drücken Sie den Auswahlregler oder drücken Sie die Tasten
oder auf der Fernbedienung bis „Language“ angezeigt wird und
drücken Sie zum Bestätigen die SELECT-Taste.
4. Drehen und drücken Sie den Auswahlregler oder drücken Sie die Tasten
oder auf der Fernbedienung, um zwischen den verschiedenen
Sprachen auszuwählen. Wählen Sie die gewünschte Sprache aus und
bestätigen Sie die Sprache durch Drücken der SELECT-Taste.
5. Drücken Sie die MENU-Taste, um das Menü zu verlassen.

21
DE
Softwareversion prüfen
Sie können die Softwareversion überprüfen.
1. Stellen Sie den FM- oder DAB-Modus ein.
2. Drücken Sie die MENU-Taste, um in das Menü zu gelangen.
3. Drehen und drücken Sie den Auswahlregler oder drücken Sie die Tasten
oder auf der Fernbedienung bis „SW version“ angezeigt wird
und drücken Sie zum Anzeigen der Softwareversionsnummer die
SELECT-Taste.
4. Drücken Sie die MENU-Taste, um das Menü zu verlassen.
Zurücksetzen auf Werkseinstellung
Mit dieser Funktion kann das Gerät auf Werkseinstellung zurückgesetzt
werden.
1. Stellen Sie den FM- oder DAB-Modus ein.
2. Drücken Sie die MENU-Taste, um in das Menü zu gelangen.
3. Drehen und drücken Sie den Auswahlregler oder drücken Sie die Tasten
oder auf der Fernbedienung bis „Factory Reset“ angezeigt wird
und drücken Sie zum Bestätigen die SELECT-Taste.
4. Drücken Sie die Tasten oder bis „<YES>“ angezeigt wird und
drücken Sie zum Bestätigen die SELECT-Taste.
22
DE
REINIGUNG UND PFLEGE
CD-Reinigung
CDs sind gegenüber Schäden ziemlich resistent, es kann jedoch
durch Verschmutzungen auf der CD-Oberäche zu Störungen bei der
CD-Wiedergabe kommen. Befolgen Sie die nachfolgend genannten
Pegehinweise, um das bestmögliche Ergebnis bei der CD-Wiedergabe zu
erzielen.
• Schreiben Sie auf keine der beiden CD-Seiten, insbesondere nicht
auf die nicht-beschriftete Seite, da von dieser die Signale ausgelesen
werden.
• Die CDs dürfen keinem direkten Sonnenlicht, Hitze oder extremer
Feuchtigkeit ausgesetzt werden.
• Halten Sie CDs immer an den Kanten fest. Fingerabdrücke, Schmutz
oder Wasser auf der CD können Rauschen oder eine fehlerhafte
Wiedergabe zur Folge haben.
• Wenn eine CD verschmutzt ist oder nicht richtig wiedergegeben wird,
reinigen Sie diese mit einem weichen, trockenen Tuch und wischen Sie
diese von der Mitte nach außen ab.
NEIN
JA - RICHTIG!
23
DE
Gehäusereinigung
• Reiben Sie das Gehäuse regelmäßig mit einem weichen Tuch und
einer milden Seifenlösung und reiben Sie es anschließend mit einem
trockenen Tuch ab.
• Verwenden Sie keine Chemikalien zur Reinigung (Benzin, Verdünner,
etc.). Es besteht die Gefahr, dass das Gehäuse beschädigt wird.
• Tragen Sie kein Öl auf die Innenseite des Gehäuses auf, da dies
Fehlfunktionen verursachen kann.
FEHLERSUCHE UND FEHLERBEHEBUNG
Problem Mögliche Ursache
Das Radio macht kontinuierlich
seltsame Geräusche.
• Bendet sich das Gerät in der
Nähe von Fernsehern oder
Computern?
• Ist die Antenne richtig
ausgerichtet? Verändern Sie die
Ausrichtung der Antenne.
Die Fernbedienung funktioniert
nicht.
• Ist die Polarität der Batterie
richtig?
• Ist die Batterie leer?
• Ist der Abstand oder der
Winkel falsch?
• Fällt helles Licht auf den
Fernbedienungssensor.
Die CD-Wiedergabe startet nicht.
Oder: Die CD-Wiedergabe stoppt
in der Mitte oder wird nicht richtig
wiedergegeben.
• Wurde die CD falsch herum
eingelegt?
• Entspricht die CD den
Wiedergabestandards?
• Ist die CD verschmutzt oder
zerkratzt?
Die Musikwiedergabe ist
sprunghaft oder stoppt in der Mitte
des Titels.
• Ist das Gerät starken
Vibrationen ausgesetzt?
• Ist die CD stark verschmutzt?
• Hat sich im Geräteinneren
Kondensation gebildet?

24
DE
Problem Mögliche Ursache
USB-Gerät wird nicht erkannt. • Benden sich MP3/WMA-
Dateien auf dem USB-Gerät?
• Wurde das Gerät richtig
angeschlossen?
• Handelt es sich um ein MTP-
Gerät?
• Enthält das Gerät nur AAC-
Dateien?
Die USB-Wiedergabe startet nicht. • Handelt es sich um eine
kopiergeschützte WMA-Datei?
• Handelt es sich um eine falsche
MP3-Datei?
Im BT-Modus ist die Tonwiedergabe
unterbrochen oder gestört.
• Bendet sich das Gerät zu nah
an einem anderen elektrischen
Gerät, das Störungen
verursacht?
• Bendet sich zwischen dem
BT-Gerät und dem Gerät ein
Hindernis?
Es ist kein Ton zu hören. • Ist die Lautstärkeeinstellung auf
„Min“ (Minimal) eingestellt?
• Sind Kopfhörer angeschlossen?
• Bendet sich das mobile BT-
Gerät zu weit weg vom Gerät?
• Ist das Gerät mit einem
anderen BT-Gerät verbunden?
Wenn eine Taste gedrückt wird,
reagiert das Gerät nicht.
• Versetzen Sie das Gerät in den
Standby-Modus und schalten
Sie es erneut ein.

25
DE
TECHNISCHE DATEN
Artikelnummer 10034517
Stromversorgung Netzteil-Adapter (mitgeliefert)
Eingang: AC 100-240V ~ 50/60Hz
Ausgang: DC 12V
3.0A
Standby-Verbrauch < 1 W
Lautsprecherimpedanz 4 Ω
Ausgangsleistung 2 x 10 W RMS
Tuner:
Frequenzbereich: FM: 87,5 - 108 MHz,
DAB: 174,9 - 239,2 MHz
BT
BT-Frequenz 2402-2480 MHz
BT-Sendeleistung (max.) 4 dBm
CD-Wiedergabe
Typ Single Disc Multi Play CD-Player
USB-Host
Schnittstelle Kompatibel mit USB 1.1 /
2.0 Massenspeicher-Klasse
Unterstützte Dateiformate: MPEG 1 Layer 3 WMA (ohne DRM)
Unterstützte Bitraten: MP3 (32 ~ 320 kbps) WMA (64 ~ 160 kbps)

26
DE
SPEZIELLE ENTSORGUNGSHINWEISE FÜR
VERBRAUCHER IN DEUTSCHLAND
Entsorgen Sie Ihre Altgeräte fachgerecht. Dadurch wird gewährleistet,
dass die Altgeräte umweltgerecht verwertet und negative Auswirkungen
auf die Umwelt und menschliche Gesundheit vermieden werden. Bei der
Entsorgung sind folgende Regeln zu beachten:
• Jeder Verbraucher ist gesetzlich verpichtet, Elektro- und
Elektronikaltgeräte (Altgeräte) sowie Batterien und Akkus
getrennt vom Hausmüll zu entsorgen. Sie erkennen die
entsprechenden Altgeräte durch folgendes Symbol der
durchgestrichene Mülltonne (WEEE-Symbol).
• Sie haben Altbatterien und Altakkumulatoren, die nicht vom Altgerät
umschlossen sind, sowie Lampen, die zerstörungsfrei aus dem
Altgerät entnommen werden können, vor der Abgabe an einer
Entsorgungsstelle vom Altgerät zerstörungsfrei zu trennen.
• Bestimmte Lampen und Leuchtmittel fallen ebenso unter das Elektro-
und Elektronikgesetz und sind dementsprechend wie Altgeräte zu
behandeln. Ausgenommen sind Glühbirnen und Halogenlampen.
Entsorgen Sie Glühbirnen und Halogenlampen bitte über den Hausmüll,
sofern sie nicht das WEEE-Symbol tragen.
• Jeder Verbraucher ist für das Löschen von personenbezogenen Daten
auf dem Elektro- bzw. Elektronikgerät selbst verantwortlich.
Rücknahmepicht der Vertreiber
Vertreiber mit einer Verkaufsäche für Elektro- und Elektronikgeräte von
mindestens 400 Quadratmetern sowie Vertreiber von Lebensmitteln mit
einer Gesamtverkaufsäche von mindestens 800 Quadratmetern, die
mehrmals im Kalenderjahr oder dauerhaft Elektro- und Elektronikgeräte
anbieten und auf dem Markt bereitstellen, sind verpichtet,
1 bei der Abgabe eines neuen Elektro- oder Elektronikgerätes an einen
Endnutzer ein Altgerät des Endnutzers der gleichen Geräteart, das
im Wesentlichen die gleichen Funktionen wie das neue Gerät erfüllt,
am Ort der Abgabe oder in unmittelbarer Nähe hierzu unentgeltlich
zurückzunehmen und
2 auf Verlangen des Endnutzers Altgeräte, die in keiner äußeren
Abmessung größer als 25 Zentimeter sind, im Einzelhandelsgeschäft
oder in unmittelbarer Nähe hierzu unentgeltlich zurückzunehmen; die
Rücknahme darf nicht an den Kauf eines Elektro- oder Elektronikgerätes
geknüpft werden und ist auf drei Altgeräte pro Geräteart beschränkt.

27
DE
• Bei einem Vertrieb unter Verwendung von Fernkommunikationsmitteln
ist die unentgeltliche Abholung am Ort der Abgabe auf Elektro- und
Elektronikgeräte der Kategorien 1, 2 und 4 gemäß § 2 Abs. 1 ElektroG,
nämlich „Wärmeüberträger“, „Bildschirmgeräte“ (Oberäche von mehr
als 100 cm²) oder „Großgeräte“ (letztere mit mindestens einer äußeren
Abmessung über 50 Zentimeter) beschränkt. Für andere Elektro- und
Elektronikgeräte (Kategorien 3, 5, 6) ist eine Rückgabemöglichkeit in
zumutbarer Entfernung zum jeweiligen Endnutzer zu gewährleisten.
• Altgeräte dürfen kostenlos auf dem lokalen Wertstohof oder in
folgenden Sammelstellen in Ihrer Nähe abgegeben werden: www.take-
e-back.de
• Für Elektro- und Elektronikgeräte der Kategorien 1, 2 und 4 bieten
wir auch die Möglichkeit einer unentgeltlichen Abholung am Ort der
Abgabe. Beim Kauf eines Neugeräts haben Sie die Möglichkeit, eine
Altgerätabholung über die Webseite auszuwählen.
• Batterien können überall dort kostenfrei zurückgegeben werden, wo sie
verkauft werden (z. B. Super-, Bau-, Drogeriemarkt). Auch Wertsto- und
Recyclinghöfe nehmen Batterien zurück. Sie können Batterien auch per
Post an uns zurücksenden. Altbatterien in haushaltsüblichen Mengen
können Sie direkt bei uns von Montag bis Freitag zwischen 08:00 und
16:00 Uhr unter der folgenden Adresse unentgeltlich zurückgeben:
Chal-Tec Fulllment GmbH
Norddeutschlandstr. 3
47475 Kamp-Lintfort
• Wichtig zu beachten ist, dass Lithiumbatterien aus Sicherheitsgründen
vor der Rückgabe gegen Kurzschluss gesichert werden müssen (z. B.
durch Abkleben der Pole).
• Finden sich unter der durchgestrichenen Mülltonne auf der Batterie
zusätzlich die Zeichen Cd, Hg oder Pb ist das ein Hinweis darauf, dass
die Batterie gefährliche Schadstoe enthält. (»Cd« steht für Cadmium,
»Pb« für Blei und »Hg« für Quecksilber).
Hinweis zur Abfallvermeidung
Indem Sie die Lebensdauer Ihrer Altgeräte verlängern, tragen Sie dazu
bei, Ressourcen eizient zu nutzen und zusätzlichen Müll zu vermeiden.
Die Lebensdauer Ihrer Altgeräte können Sie verlängern, indem Sie defekte
Altgeräte reparieren lassen. Wenn sich Ihr Altgerät in gutem Zustand
bendet, könnten Sie es spenden, verschenken oder verkaufen.

28
DE
HINWEISE ZUR ENTSORGUNG
Wenn es in Ihrem Land eine gesetzliche Regelung
zur Entsorgung von elektrischen und elektronischen
Geräten gibt, weist dieses Symbol auf dem Produkt
oder auf der Verpackung darauf hin, dass dieses
Produkt nicht im Hausmüll entsorgt werden darf.
Stattdessen muss es zu einer Sammelstelle für
das Recycling von elektrischen und elektronischen
Geräten gebracht werden. Durch regelkonforme
Entsorgung schützen Sie die Umwelt und die
Gesundheit Ihrer Mitmenschen vor negativen
Konsequenzen. Informationen zum Recycling
und zur Entsorgung dieses Produkts, erhalten
Sie von Ihrer örtlichen Verwaltung oder Ihrem
Hausmüllentsorgungsdienst.
Dieses Produkt enthält Batterien. Wenn es in Ihrem
Land eine gesetzliche Regelung zur Entsorgung
von Batterien gibt, dürfen die Batterien nicht im
Hausmüll entsorgt werden. Informieren Sie sich
über die örtlichen Bestimmungen zur Entsorgung
von Batterien. Durch regelkonforme Entsorgung
schützen Sie die Umwelt und die Gesundheit Ihrer
Mitmenschen vor negativen Konsequenzen.
KONFORMITÄTSERKLÄRUNG
Hersteller:
Chal-Tec GmbH, Wallstraße 16, 10179 Berlin,
Deutschland.
Importeur für Großbritannien:
Berlin Brands Group UK Limited
PO Box 42
272 Kensington High Street
London, W8 6ND
United Kingdom
Hiermit erklärt Chal-Tec GmbH, dass der
Funkanlagentyp Stockton der Richtlinie 2014/53/
EU entspricht. Der vollständige Text der EU-
Konformitätserklärung ist unter der folgenden
Internetadresse verfügbar: use.berlin/10034517

29
EN
Dear Customer,
Congratulations on purchasing this device. Please read
the following instructions carefully and follow them to
prevent possible damages. We assume no liability for
damage caused by disregard of the instructions and
improper use. Scan the QR code to get access to the
latest user manual and more product information.
CONTENTS
Safety Instructions 30
Device Overview 32
Remote Control 34
Installation 35
Initial Use and Operation 36
DAB Radio Functions 39
FM Radio Functions 41
CD/USB 42
BT 43
AUX IN 44
Further Functions and Settings 44
Cleaning and Care 46
Troubleshooting 48
Technical Data 50

30
EN
SAFETY INSTRUCTIONS
• Read the operating instructions carefully before installing and
commissioning the device and keep them for future use.
• Ensure that the equipment is positioned in a well ventilated area and
ensure that there is at least 10 cm (4”) of free space along the sides and
top of the equipment.
• Use the unit on a rm, level surface free from vibration.
• Place the unit at least 30 cm (12”) away from any CRT TV to avoid colour
variations across the TV screen. If the variations persist, move the unit
further away from the TV. LCD TV is not prone to such variation.
• Keep the unit away from direct sunlight, strong magnetic elds,
excessive dust, humidity and electronic/electrical equipment (home
computers, facsimiles, etc.) which generate electrical noise.
• Do not place anything on top of the unit.
• Move device carefully, avoid shocks.
• Do not expose the unit to moisture, to temperatures higher than 40°C
or to extremely low temperatures.
• The ventilation should not be impeded by covering the ventilation
openings with items, such as newspapers, tablecloths, curtains, etc.
• No naked ame sources, such as lighted candles, should be placed on
the device.
• This unit should only be used within the range of 5°C – 35°C. The
device is designed for use in moderate climates.
• The device must not be used near water or brought into contact with
moisture. The device shall not be exposed to dripping or splashing and
that no objects lled with liquids, such as vases, shall be placed on the
device.
CAUTION
Danger of explosion! If the batteries are not replaced
correctly, there is a risk of explosion. Replace only with the
same or equivalent type. The mains plug is used as the
disconnect device, the disconnect device shall remain readily
operable.

31
EN
• Use only power supply listed in these user manual/user instructions to
power the equipment and do not use the power supply for any other
purpose.
• In case of an electrical storm, unplug the unit for safety and when not in
use for long periods of time.
• Device shall be repaired by a qualied person when:
a. the power cord is damaged,
b. objects have fallen into the apparatus or a liquid has been spilled
into device,
c. device was exposes to the rain,
d. device does not work correctly without notable exterior change,
e. device is broken.
• Do not attempt to repair the unit yourself.
• To completely disconnect the power supply, unplug the appliance from
the wall outlet, as the mains plug acts as a disconnecting device for the
appliance. Make sure that the power plug is easily accessible.
WARNING
Fire hazard! The voltage used must be the same as that
specied on this unit. Using this product with a higher
voltage other than that which is specied is dangerous and
may result in a re or other type of accident causing damage.
manufacturers will not be held responsible for any damage
resulting from use of this unit with a voltage other than that
which is specied.
Volume control
• The sound level at a given volume setting depends on speaker
eiciency, location, and various other factors. It is advisable to avoid
exposure to high volume levels.
• Do not turn the volume on to full at switch on. Listen to music at
moderate levels. Excessive sound pressure from can cause hearing loss.

32
EN
DEVICE OVERVIEW
1
2 3 4
5
6
7
8
17
18
16 15 14
13 12 11
10
9

33
EN
1 Skip up, Fast forward button 12 MENU/INFO button
2 Standby button 13 SOURCE button
3 LCD display 14 Phone jack
4 CD open button 15 Preset 1
5 Remote sensor 16 Volume control
6 Skip down, Fast reverse button 17 L-speakers
7 R-speakers 18 Preset 2 button, USB / CD stop button
8 Play/Pause, Preset 3 button 19 CD door
9 Select dial 20 FM/DAB antenna
10 Preset button 21 DC IN jack
11 USB jack 22 AUDIO IN jack
19
20 21 22

34
EN
REMOTE CONTROL
1 ON / STANDBY button 9 DAB / FM menu button 17 Skip up button,
Fast forward button,
Time up button
2 Numeric button 10 Open button
3 REPEAT / RANDOM button 11 Memory button 18 CD/USB/BT button
4 Volume down button 12 Tuner preset up button,
Folder up button
19 MUTE button
5 STOP / PAIR button 20 EQ / X-BASS button
6 Skip down button,
Fast reverse button,
Time down button
13 Volume up button 21 Clock / Timer button
14 SELECT button 22 DAB/RDS display button,
CD/USB ID3 Tag display
button
7 DAB / FM / AUX button 15 Tuner preset down /
Folder down button
23 SCAN button
8 SLEEP button 16 PLAY/PAUSE button,
FM Stereo button

35
EN
INSTALLATION
Putting the batteries into the remote
1. Open the battery cover.
2. Insert the supplied battery according to the terminal indicated in the
battery compartment. When inserting or removing the battery, push it
towards the (–) battery terminals.
3. Close the cover.
Safety notes for the use of batteries
• Remove the battery if the unit will not be used for a long period of time.
This will prevent potential damage due to battery leakage.
• Do not use rechargeable battery (nickel-cadmium battery, etc.).
• Installing the battery incorrectly may cause the unit to malfunction.
• Batteries (battery pack or batteries installed) shall not be exposed to
excessive heat such as sunshine, re or the like.
Notes on using the remote control
• Replace the battery if the operating distance is reduced or if the
operation becomes erratic. Purchase an “AAA” size battery (UM-4/SUM-
4 size similar).
• Periodically clean the transmitter on the remote control and the sensor
on the unit with a soft cloth.
• Exposing the sensor on the unit to strong light may interfere with
operation. Change the lighting or the direction of the unit if this occurs.
• Keep the remote control away from moisture, heat, shock, and
vibrations.
36
EN
System conncections
Note: Make sure to unplug the AC/DC power lead before making any
connections
INITIAL USE AND OPERATION
Muting
The volume is muted temporarily when pressing the MUTE button on the
remote control. Press again to restore the volume.
Volume control
Turn the Volume dial or press the Volume +/- buttons on the remote to
increase or decrease the volume. Press the Volume dial or press the Mute
button on the remote to mute.
DAB/FM radio operation
Insert the jack of the supplied mains adapter into the socket on the rear of
the main radio The display will show “Scan Time”. The unit is now updating
the time from the broadcaster. Wait for a while until it is nished and the
real time will be display.
Press the STANDBY button to turn on the unit. To turn o, press the
STANDBY button again.
AC/DC AC/DC
ADAPTERADAPTER
WALL SOCKET
AC 230 V

37
EN
DAB/FM/CD/AUX/BT
Press the DAB/FM button on the remote control or SOURCE button
repeatedly on the main unit to select dierent sources.
Adjusting the antenna
The antenna at the rear panel of the unit should be extended to ensure a
good DAB/FM reception. Alter the antenna position for the best reception.
DAB Radio Operation
The rst time the DAB mode is selected, it will automatically scan for
available DAB stations. Wait until the scanning has nished. The display will
show the scanning progress. After scanning it will tune to the rst station.
Auto scan (DAB)
1. Turn on the unit in DAB mode.
2. Press the SCAN button to start auto-scanning the available stations.
Manual scan (DAB)
1. Turn on the unit in DAB mode.
2. Press the MENU button to access the menu control.
3. Turn and press the Select dial or use the TUNE or TUNE button
on the remote control until “Manual tune” is displayed and then press
the SELECT button.
4. Turn and press the Select dial or use the TUNE or TUNE button
on the remote control to select the desired channel (5A-13F).
5. Press the SELECT button to conrm.
6. To select another channel (5A-13F), Turn and press the Select dial or use
the TUNE or TUNE button on the remote control and then press
the SELECT button to conrm.
7. When the station is found, press the SELECT button to select.
8. To quit manual scan, press the MENU button.
Tuning (DAB)
Turn and press the Select dial or use the TUNE or TUNE button to
display the information of the next station. Then press the SELECT button to
tune to this station within a few seconds.
38
EN
FM RADIO OPERATION
Auto scan (FM)
1. Turn on the unit in FM mode.
2. Press and hold the SCAN button to start auto-scanning and saving the
available stations (max. 20 storage).
Manual scan (FM)
1. Press the PREVIOUS
or NEXT button or use the TUNE or
TUNE button on the remote control repeatedly to tune to a dierent
frequency.
2. Alternatively press and hold the PREVIOUS
or NEXT button or
use the TUNE or TUNE button on the remote control to tune to
the next available station.
STORING DAB / FM RADIO PRESETS
A) Using the remote control:
1. Tune to the station you wish to store.
2. Press and hold the MEMORY button to access the menu control. The
Display will ash.
3. Press the Preset- or Preset+ button to a preset number that you want to
store. Then press the SELECT button to save.
NOTE: You can store up to 20 DAB, 20 FM radio stations for quick access.
Recall stored DAB / FM radio presets
• Press the Preset- or Preset+ button directly tune to the preset channel.
Or press the MEMORY button once. Then press the Preset- or Preset+
button to a preset number that you want to recall and press the SELECT
button to conrm.
• To directly recall the preset channel by using the numeric buttons, press
the numeric buttons. For example when the button “3” is pressed and
then followed by pressing the SELECT button, it will tune to preset
channel 3. Or when the button “1” and then button “2” are pressed and
then followed by pressing the SELECT button, it will tune to preset
channel 12.

39
EN
B) Using the front panel controls:
To quick-store a station to a preset button (1 – 3)
• Tune to the DAB, FM radio station you want to store.
• Press and hold one of the numbered Preset buttons (1-3) for two
seconds until you see a message to conrm that the preset has been
stored.
To store a station to the preset list (4 – 20)
1. Tune to the DAB, FM radio station you want to store.
2. Hold the 4+ button to view the numerical list of stored presets, then
turn and press the Select dial (or use the buttons or on the
remote control) to choose any preset number between 4 and 20. You
can overwrite existing presets.
3. Press the Select dial (or the SELECT button on the remote control) to
store the preset.
DAB RADIO FUNCTIONS
Displaying DAB station information
There are several types of information as listed below. To change the
display information, press the INFO button repeatedly.
1. Radio Text scrolling: Shows music titles or program details provided
by the broadcaster.
2. Signal Bar: Transmission signal level. The more the star mark is
displayed, the stronger the signal is received. To improve the reception
adjust the wire antenna position.
3. Program Type (PTY): Type of program provided by the broadcaster.
4. Multiplex Name: Displays name of multiplex to which the current
station belongs.
5. Frequency: Current channel frequency.
6. Signal Error Rate: Shows the error rate. The larger this value, the more
errors it receives. To improve the reception, adjust the antenna position.
7. Audio Bit Rate: This is the current channel audio Bitrate.
Other DAB menu operations
Press the MENU button to access the menu control. Turn and press the
Select dial or use the TUNE or TUNE button on the remote control
for dierent options as described below.
40
EN
Dynamic Range Control (DRC)
DRC can make quieter sounds easier to hear when the unit is used in a noisy
environment. The DRC level of a broadcast is set by the broadcaster and
transmitted with the service. Changing the DRC value on your unit enables
you to apply a scaling factor to this level.
There are three levels of compression:
DRC high: Maximum compression as sent with the transmitted
service.
DRC low: Set to 1/2 that of the sent transmitted service.
DRC o: No compression.
1. Press the MENU button to access the menu control.
2. Turn and press the Select dial or use the TUNE or TUNE button
on the remote control until “DRC” is displayed and then press the
SELECT button.
3. Turn and press the Select dial or use the TUNE or TUNE button
on the remote control to select the DRC value and then press the
SELECT button to conrm.
4. Press the MENU button to exit the menu control.
NOTE: Not all DAB broadcasts are able to use DRC function. If the
broadcast does not support DRC then the DRC setting in the unit will have
no eect. After you have adjusted the DRC level the sound may be louder.
Prune
This function removes inactive stations.
1. Press MENU button to access the menu control.
2. Turn and press the Select dial or use the TUNE or TUNE button
on the remote control to until “<Prune>” is displayed and then press the
SELECT button.
3. Turn and press the Select dial or use the TUNE or TUNE button
on the remote control to select “<Yes>” and then press the SELECT
button to prune the unit.
4. Press the MENU button to exit the menu control.

41
EN
FM RADIO FUNCTIONS
Stereo/Force Mono Selection
When receiving a Stereo FM radio station, press the FM ST. button will
switch between stereo audio and force mono audio.
Displaying FM station information
1. Radio Text: Scrolling text which shows information on music titles or
program details provided by the radio station.
2. Program Type (PTY): Type of program provided by the broadcaster
3. Audio Type: Stereo or Mono.
Access other FM menu functions
• Press the MENU button to access the menu control.
• Turn and press the Select dial or use the TUNE or TUNE button
on the remote control for dierent options as described below.
Scan setting
1. Press the MENU button to access the menu control.
2. Turn and press the Select dial or use the TUNE or TUNE on the
remote control to until “Scan setting” is displayed and then press the
SELECT button.
3. Turn and press the Select dial or use the TUNE or TUNE button
on the remote control to toggle between “All stations” or “Strong
station” selections and then press the SELECT button conrm. When
“All stations” is selected, all stations will be detected during FM
scanning even if the radio station is noisy. When the “Strong station” is
selected, only the strong stations are detected. Scanning will ignore the
noisy stations.
4. The next time doing a FM scan the unit will search for the stations
based on this conrmed setting.
Audio Setting
1. Press the MENU button to access the menu control.
2. Turn and press the Select dial or use the TUNE or TUNE button
on the remote control until “Audio setting” is displayed and then press
the SELECT button.
3. Turn and press the Select dial or use the TUNE or TUNE button
on the remote control to toggle between “Stereo allowed” or “Forced
mono” selection and then press the SELECT button conrm.
42
EN
CD/USB
Loading and playing CD disc
Insert your CD label side front. When you rst insert a CD, Displays
‘Reading’ for a few seconds while the CD loads. After a few seconds, your
CD will start to play automatically.
Reading and playing USB device
Insert a USB device into the USB input jack. Press the USB button on the
remote control or SOURCE button repeatedly on the main unit to USB
mode. After reading the total number of tracks will be shown on the display.
Press the CD/USB PLAY/PAUSE
button to play.
Play/Pause control
To pause playback press the CD PLAY/PAUSE button. Press the CD
PLAY/PAUSE button again to resume playback.
Stop control
To stop playback press the STOP
button.
Skip track
During playback press the PREVIOUS
or NEXT button to search to
the previous or next track.
Direct select track
Press the numeric buttons to directly select the desired track to play. For
example when the button “3“ is pressed and then followed by pressing
the SELECT button, it will jump to track 3 to play. Or when the button “1”
and then button “2” are pressed and then followed by pressing the SELECT
button, it will jump to track 12 to play.
High-speed music search
During playback press & hold the PREVIOUS
or NEXT button to
start high-speed searching. When you release the PREVIOUS
or NEXT
button normal speed playback will resume.
Repeat/random playing
• During playback press the REPEAT
/RANDOM button once the
display shows “REP_ONE”. The current track will be played repeatedly.
43
EN
• Press the REPEAT
/RANDOM button again the display shows “REP_
ALL”. All tracks will be played repeatedly.
• Press the REPEAT
/RANDOM button again The display will show
“RANDOM” to play music in random order.
• Press the REPEAT
/RANDOM button again to resume normal
playback.
Programmed playback
This unit can be programmed to play a sequence of tracks selected.
1. Insert a disc and in stop mode press the MEMORY button. “P-01” is
shown with “01” ashing in “T-01” shown.
2. Press the PREVIOUS
or NEXT button to select the desired
track.
3. Press the MEMORY button to save the desired track.
4. Repeat steps 2-4 to program up to 20 tracks (CD) and up to 99 tracks
(MP3).
5. Press the CD PLAY/PAUSE button to play according to the
programmed track.
6. To clear the program play, press the STOP button twice or change to
another mode.
7. During program play you can also do the “Repeat One” or “Repeat All”
operation. But during the program play, random play is not supported.
BT
Please follow the pairing instructions below to link the unit to your BT
device:
1. Press the BT button on the remote control or SOURCE button
repeatedly on the main unit to enter the BT mode. The display will show
“BT”. It will start searching and will display a ashing “BT AUDIO”.
2. If the unit has never been paired with a BT device before or cannot
nd the last paired device, the display and the BT status indicator will
keep on ashing. Turn on the BT function of your device and enable the
search until “Stockton” is found. Select “Stockton” on the BT device to
make connection. Enter the pass code “0000” if required.
3. After successfully paired the unit will display steady “BT AUDIO”.
4. You can now start playing music from your smart phone wirelessly to
the speaker.
5. You can press the BT PLAY/PAUSE button to pause or resume the
playback.
6. You can press the BT PREVIOUS
or NEXT button to search to
the previous or next song.
NOTE: Press and hold the PAIR button on the unit will disconnect the
current connection and start to search another new BT device.
44
EN
AUX IN
This allows you to connect an external player’s sound through your unit.
1. Plug a 3.5 mm audio cable (not included) into your external player’s line
out and the other end into the AUX IN jack.
2. Press the AUX button on the remote control or SOURCE button
repeatedly on the main unit to enter AUX mode. Display shows “AUX”
3. Start your external player to play music.
4. The unit will output the sound.
FURTHER FUNCTIONS AND SETTINGS
EQ operation
You can enjoy dierent EQ sound eect modes.
• Press the EQUALIZER button will change to dierent sound eects of
FLAT/CLASSIC/ROCK/POP/JAZZ.
X-BASS
This function allows you to boost the bass eect of the music.
• Press and hold the X-BASS button to toggle the X-Bass eect between
On and O.
Sleep function
1. When the unit is switched on, press the SLEEP button repeatedly to
select a sleep duration from either sleep o, 90, 80, 70, 60, 50, 40, 30,
20 or 10 minutes.
2. When the sleep timer is zero, the unit will turn o automatically.
3. To cancel the sleep function, press the STANDBY button to turn o
the unit. Or press the SLEEP button repeatedly to select “sleep o”.
Clock setup
1. Turn o the unit in Standby mode.
2. Press the CLOCK SET button to set the clock. It will display “Clock Set”.
3. Press the PREVIOUS
or NEXT button to adjust the hour. Press
the CLOCK SET button to conrm.
4. Press the PREVIOUS
or NEXT button to adjust the minute.
Press the CLOCK SET button to nish the clock set.

45
EN
NOTES:
- The time set may automatically be overriden by the DAB+ or FM station
real time information.
- When the unit is turned on in any mode of operation, pressing the CLOCK
SET button will display the time on the display for a few seconds.
Timer on/o setup
1. Turn o the unit in Standby mode.
2. Press and hold the TIMER button to set the timer on/o. It will display
“On Timer”.
3. Press the PREVIOUS
or NEXT button to set the on timer hour
value. Then press the TIMER button to conrm.
4. Press the PREVIOUS
or NEXT button to set the on timer
minute value. Then press the TIMER button to conrm. It will display
“O Timer”.
5. Press the TIMER button to the next selection.
6. Press the PREVIOUS
or NEXT button to set the o timer hour
value. Then press the TIMER button to conrm.
7. Press the PREVIOUS
or NEXT button to set the o timer on
minute value. Then press the TIMER button to conrm.
8. Press the PREVIOUS
or NEXT button to set the timer on
source (DISC, USB, DAB, FM ). Then press the TIMER button to conrm.
9. Press the PREVIOUS
or NEXT button to set the timer on
volume level. The press the TIMER button to nish the timer on/o
setup.
10. Press the TIMER button to activate the timer schedule. A timer symbol
will be shown on the display.
NOTE: Press the TIMER button again will deactivate the timer schedule.
Language setup
You can set the unit’s language.
1. Turn on the unit in DAB mode or FM mode.
2. Press the MENU button to access the menu control.
3. Turn and press the Select dial or use the TUNE or TUNE button
on the remote control until “Language” is displayed and then press the
SELECT button.
4. Turn and press the Select dial or use the TUNE or TUNE button
on the remote control to toggle between dierent languages. Select
your desired language and then press the SELECT button to conrm.
5. Press the MENU button to exit the menu control.

46
EN
Software version check
You can check the unit software version.
1. Turn on the unit in DAB mode or FM mode.
2. Press the MENU button to access the menu control.
3. Turn and press the Select dial or use the TUNE or TUNE button
on the remote control until “SW version” is displayed and then press
the SELECT button to show the software version number.
4. Press the MENU button to exit the menu control.
Factory reset
This function resets the unit to the original factory settings.
1. Turn on the unit in DAB mode.
2. Press the MENU button to access the menu control.
3. Turn and press the Select dial or use the TUNE or TUNE button
on the remote control until “Factory Reset” is displayed and then press
the SELECT button.
4. Turn and press the Select dial or use the TUNE or TUNE button
on the remote control until “<Yes>“ is displayed and then press the
SELECT button to reset the unit.
CLEANING AND CARE
CD cleaning
Compact discs are fairly resistant to damage, however mistracking can
occur due to an accumulation of dirt on the disc surface. Follow the
guidelines below for maximum enjoyment from your CD collection and
player.
• Do not write on either side of the disc, particularly the non-label side
from which signals are read. Do not mark this surface.
• Keep your discs away from direct sunlight, heat, and excessive moisture.
• Always hold the CDs by the edges. Fingerprints, dirt, or water on the
CDs can cause noise or mistracking.
• If a CD is dirty or does not play properly, clean it with a soft, dry cloth,
wiping straight out from the centre, along the radius.

47
EN
NO
YES - CORRECT!
Cleaning the cabinet
• Periodically wipe the cabinet with a soft cloth and a diluted soap
solution, then with a dry cloth.
• Do not use chemicals for cleaning (petrol, paint thinner, etc.). It may
damage the cabinet.
• Do not apply oil to the inside of the unit. It may cause malfunctions.

48
EN
TROUBLESHOOTING
Problem Possible Cause
The radio makes unusual
noises continuously.
• Is the unit placed near the TV or
computer?
• Is the DAB/FM aerial placed
properly? Move the aerial away
from the AC/DC power it is
located nearby.
The remote control does not
operate.
• Is the battery polarity correct?
• Is the battery dead?
• Is the distance or angle
incorrect?
• Does the remote control sensor
receive strong light?
Disc playback does not start.
Disc playback stops in the middle
or is not performed properly.
• Is the disc loaded face down?
• Does the disc satisfy the
standards?
• Is the disc distorted or
scratched?
Disc playback sounds are
skipped, or stopped in the
middle of a track.
• Is the unit located near
excessive vibrations?
• Is the disc very dirty?
• Has condensation formed
inside the unit?
USB device cannot be detected. • Is there any MP3/WMA le
available?
• Is the device properly
connected?
• Is it an MTP device?
• Does the device contain AAC
le only?
USB playback does not start. • Is it a copyright protected WMA
le?
• Is it a false MP3 le?
Bluetooth sound is interrupted or
distorted.
• Is the unit too near to a device
that generates electromagnetic
radiation?
• Is there any obstacle between
the unit and the Bluetooth
stereo audio source device?

49
EN
Problem Possible Cause
No sound is heard. • Is the volume level set to “Min”
(minimal)?
• Are the headphones
connected?
• Is the unit too far from the
Bluetooth stereo audio source
device?
• Is the unit paired with the
Bluetooth stereo audio source
device?
When a button is pressed, the unit
does not respond.
• Set the unit to the power stand-
by mode and then turn it back
on.

50
EN
TECHNICAL DATA
Item number 10034517
Power supply AC/DC adapter (included)
Input AC 100-240V ~ 50/60Hz
Output DC 12V
3.0A
Power standby: < 1 W
Speaker impedance 4 Ω
Output power 2 x 10 W RMS
Tuner:
Frequency range: FM 87.5 - 108 MHz,
DAB 174.928 - 239.2 MHz
BT
Frequency band: 2.402 GHz - 2.480 GHz
Compatible BT Prole: A2DP (Advanced Audio Distribution Prole),
AVRCP (Audio/Video Remote Control Prole)
BT 2.1 +EDR
CD player
Type: Single disc multi-play compact disc player
USB host
Interface: Complies with USB 1.1 /
2.0 Mass Storage Class
Support le: MPEG 1 Layer 3 WMA (Non DRM)
Bitrate support: MP3 (32 ~ 320 kbps) WMA (64 ~ 160 kbps)

51
EN
DISPOSAL CONSIDERATIONS
If there is a legal regulation for the disposal of
electrical and electronic devices in your country,
this symbol on the product or on the packaging
indicates that this product must not be disposed of
with household waste. Instead, it must be taken to
a collection point for the recycling of electrical and
electronic equipment. By disposing of it in accordance
with the rules, you are protecting the environment and
the health of your fellow human beings from negative
consequences. For information about the recycling
and disposal of this product, please contact your local
authority or your household waste disposal service.
This product contains batteries. If there is a legal
regulation for the disposal of batteries in your country, the
batteries must not be disposed of with household waste.
Find out about local regulations for disposing of batteries.
By disposing of them in accordance with the rules, you are
protecting the environment and the health of your fellow
human beings from negative consequences.
DECLARATION OF CONFORMITY
Manufacturer:
Chal-Tec GmbH, Wallstrasse 16, 10179 Berlin,
Germany.
Importer for Great Britain:
Berlin Brands Group UK Limited
PO Box 42
272 Kensington High Street
London, W8 6ND
United Kingdom
Hereby, Chal-Tec GmbH declares that the radio
equipment type Stockton is in compliance with Directive
2014/53/EU. The full text of the EU declaration of
conformity is available at the following internet address:
use.berlin/10034517
For Great Britain: Hereby, Chal-Tec GmbH declares that
the radio equipment type Stockton is in compliance with
the relevant statutory requirements. The full text of the
declaration of conformity is available at the following
internet address: use.berlin/10034517

52
EN

53
FR
Chère cliente, cher client,
Toutes nos félicitations pour l’acquisition de ce nouvel
appareil. Veuillez lire attentivement et respecter
les instructions de ce mode d’emploi an d’éviter
d’éventuels dommages. Nous ne saurions être tenus
pour responsables des dommages dus au non-respect
des consignes et à la mauvaise utilisation de l’appareil.
Scannez le QR-Code pour obtenir la dernière version
du mode d‘emploi et des informations supplémentaires
concernant le produit.
SOMMAIRE
Consignes de sécurité 54
Aperçu de l’appareil 56
Télécommande 58
Installation 59
Mise en marche et utilisation 60
Fonctions de la radio DAB 63
Fonctions de la radio FM 65
CD/USB 66
BT 68
AUX-IN 68
Autres fonctions et paramètres 69
Nettoyage et entretien 72
Identication et résolution des problèmes 73
Fiche technique 75

54
FR
CONSIGNES DE SÉCURITÉ
• Lisez attentivement le mode d‘emploi avant d‘installer et de mettre en
service l‘appareil et conservez-le pour vous y référer ultérieurement.
• Assurez-vous que l’appareil est placé dans un endroit bien ventilé et
que ses côtés et le haut de l’appareil se trouvent à au moins 10 cm des
autres objets ou murs.
• Placez l‘appareil sur une surface stable et peu soumise aux vibrations.
• Placez l‘appareil à au moins 30 cm des téléviseurs à tube cathodique
pour éviter les interférences d‘images. En cas de problème d’image,
éloignez l‘appareil. Les téléviseurs LCD ne sont pas concernés par ce
phénomène.
• Ne placez pas l‘appareil près d‘une source de chaleur (radiateurs par
exemple). Gardez l‘appareil à l‘abri de l‘ensoleillement direct, des
champs magnétiques puissants, de la poussière excessive, de l‘humidité
et des équipements électriques générant des parasites.
• Ne placez aucun objet sur l‘appareil.
• Déplacez l‘appareil doucement, évitez les chocs.
• N‘exposez pas l‘appareil à l‘humidité ou à des températures extrêmes
supérieures à 40°C ou à des températures très basses.
• Assurez-vous que les ouvertures de ventilation ne sont pas obstruées
par des objets tels que des journaux, des nappes, des rideaux, etc.
• Ne placez pas d‘objets avec une amme nue sur l‘appareil, tels que des
bougies.
• Utilisez uniquement l‘appareil dans une plage de température modérée
comprise entre 5°C et 35°C.
• L‘appareil ne doit pas être utilisé près de l‘eau ni exposé à l‘humidité.
• N‘exposez pas l‘appareil à un écoulement d‘eau ni aux éclaboussures et
ne placez aucun objet contenant du liquide sur l‘appareil.
ATTENTION
Risque d‘explosion ! Si les piles ne sont pas remplacées
correctement, il existe un risque d‘explosion. Remplacez
toujours les piles par des piles du même type. La che
d’alimentation sert d‘interrupteur et doit donc toujours être
facilement accessible.

55
FR
• Utilisez uniquement les accessoires fournis ou explicitement
recommandés par le fabricant. Utilisez l’adaptateur secteur uniquement
pour l’usage auquel il est destiné.
• Pour des raisons de sécurité, débranchez le cordon d’alimentation de
la prise en cas d’orage ou si vous prévoyez de ne pas utiliser l’appareil
pendant une période prolongée.
• N’essayez pas de réparer l’appareil vous-même. L’appareil doit être
réparé par une personne qualiée si :
a. Le câble secteur est endommagé.
b. Des objets ou des liquides sont tombés à l’intérieur de l’appareil.
c. L’appareil a été exposé à la pluie.
d. L’appareil ne fonctionne pas correctement sans modication
externe visible.
e. L’appareil est défectueux.
• Pour déconnecter complètement l’alimentation électrique, vous devez
débrancher la che secteur de l’appareil, car elle sert de dispositif de
déconnexion. Assurez-vous que la che d’alimentation reste facilement
accessible.
MISE EN GARDE
Risque d’incendie ! La tension utilisée doit être identique à
celle indiquée sur la plaque signalétique de l’appareil.
L’utilisation d’une tension supérieure à celle indiquée sur la
plaque signalétique peut provoquer un incendie ou d’autres
accidents susceptibles de causer des dommages. Le
fabricant de l’appareil n’assume aucune responsabilité pour
les dommages résultant de l’utilisation d’une tension
incorrecte.
Réglage du volume
Le bon réglage du volume dépend de l’eicacité de l’enceinte, de
l’emplacement et de divers autres facteurs. Ne mettez pas le volume au
maximum lorsque vous allumez l’appareil. Écoutez la musique à un volume
modéré. Écouter de la musique à fort volume pendant une longue période
peut entraîner une perte d’audition.

56
FR
APERÇU DE L’APPAREIL
1
2 3 4
5
6
7
8
17
18
16 15 14
13 12 11
10
9

57
FR
1 Saut de titre, avance rapide 12 MENU/INFO
2 Veille 13 SOURCE
3 Ecran LCD 14 Prise téléphone
4 Ouverture du tiroir à CD 15 Emplacement mémoire 1
5 Capteur de la télécommande 16 Réglage du volume
6 Saut de titre, retour rapide 17 Enceinte de gauche
7 Enceinte de droite 18 Emplacement mémoire 2,
Stop (modes USB/CD)
8 Lecture/Pause/Emplacement mémoire3 19 Lecteur CD
9 Sélecteur 20 Antenne FM/ DAB
10 Mémorisation 21 Prise DC-IN
11 Port USB 22 Prise AUDIO-IN
19
20 21 22

58
FR
TÉLÉCOMMANDE
1 Allumer / Veille 9 Menu DAB/FM 17 Saut vers le haut,
Avance rapide,
augmenter la durée
2 Touches numériques 10 Ouvrir
3 Lecture / lecture aléatoire 11 Mémoriser 18 CD / USB / BT
4 Diminuer le volume 12 Un emplacement mémoire/
dossier vers le haut (mode
radio)
19 Fonction Muet
5 Stop, connecter 20 EQ / X-BASS
6 Saut vers le bas,
retour rapide,
réduire la durée
13 Augmenter le volume 21 Heure / minuterie
14 SELECT
(touche de sélection)
22 Aichage RDS (DAB),
ID3 (CD / USB)
7 DAB / FM / AUX 15 Un emplacement mémoire /
dossier vers le bas
23 Recherche
8 Minuterie d‘arrêt 16 Lecture / Pause;
Stéréo (FM)

59
FR
INSTALLATION
Insertion des piles dans la télécommande
1. Ouvrez le couvercle du compartiment à piles.
2. Insérez les piles fournies dans le compartiment en respectant la
polarité. Lors de l‘insertion ou du retrait, poussez les piles vers le pôle
négatif (-).
3. Fermez le couvercle du compartiment à piles.
Consignes de sécurité concernant l‘utilisation des piles
• Retirez les piles si vous n‘utilisez pas l’appareil pendant une longue
période. Cela peut éviter les dommages potentiels causés par une fuite
d‘acide des piles.
• N‘utilisez pas de piles rechargeables (piles nickel-cadmium, etc.).
• Une insertion incorrecte des piles peut entraîner un dysfonctionnement
de l‘appareil.
• N‘exposez pas les piles (insérées ou dans l‘emballage) à une chaleur
excessive, par exemple au soleil.
Remarques sur l‘utilisation de la télécommande
• Remplacez les piles si la portée de la télécommande est réduite ou si le
fonctionnement est irrégulier. Utilisez des piles AAA (UM-4 / SUM-4).
• Nettoyez régulièrement l’émetteur et le capteur de télécommande de
l‘appareil avec un chion doux.
• L‘exposition du capteur à une lumière intense peut en aecter le
fonctionnement. Réduisez l‘exposition à la lumière ou déplacez
l‘appareil si ce problème se produit.
• N‘exposez pas la télécommande à l‘humidité, à la chaleur, aux
secousses ou aux vibrations.
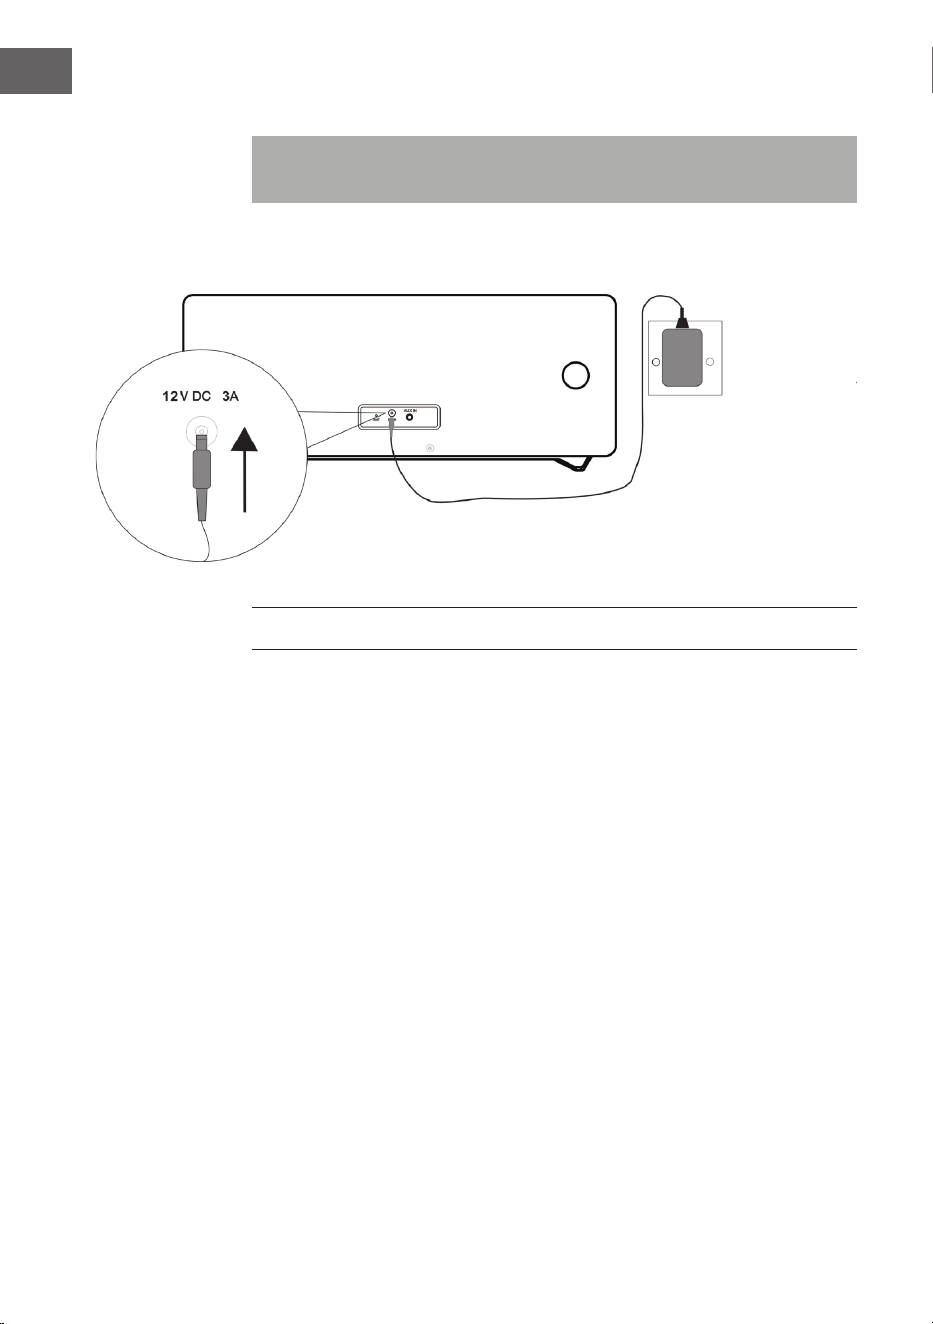
60
FR
Connexions du système
Remarque : Débranchez le cordon d’alimentation avant d’eectuer les
connexions.
MISE EN MARCHE ET UTILISATION
Fonction muet
Appuyez sur la touche MUTE de la télécommande ou sur la commande
de volume de l‘appareil pour couper le son momentanément. Appuyez à
nouveau sur cette touche pour rétablir le volume normal.
Réglage du volume
Tournez le bouton de volume de l‘appareil ou appuyez sur les touches de
volume de la télécommande pour augmenter ou diminuer le volume.
Radio DAB/FM
Branchez la che de l‘adaptateur secteur fourni sur la prise DC à l‘arrière
de l‘appareil et branchez le cordon d‘alimentation dans la prise de secteur.
L‘écran aiche «Scan Time».
L‘appareil actualise maintenant l‘heure de l‘appareil grâce à l‘heure fournie
par la station. Attendez que le processus de mise à jour soit terminé et que
l‘heure actuelle soit aichée à l‘écran.
Adaptateur Adaptateur
secteursecteur
Prise de secteur
AC 230 V

61
FR
Pour allumer l‘appareil, appuyez sur la touche STANDBY de l‘appareil.
Appuyez à nouveau sur la touche STANDBY pour l‘éteindre.
DAB/FM/CD/AUX/BT
Appuyez sur la touche DAB / FM de la télécommande ou plusieurs fois sur la
touche SOURCE de l’appareil pour sélectionner les diérentes sources.
Réglage de l‘antenne
L‘antenne à l‘arrière de l‘appareil doit être complètement déployée pour
assurer une bonne réception DAB/FM. Ajustez l‘orientation de l‘antenne
pour une bonne réception.
FONCTIONNEMENT DE LA RADIO DAB
La première fois que le mode DAB est sélectionné, l‘appareil recherche
automatiquement toutes les stations DAB disponibles. Attendez que la
recherche soit terminée. La progression de la recherche est aichée à
l‘écran. Une fois la recherche terminée, la première station trouvée est lue.
Recherche automatique des stations (DAB)
1. Allumez l‘appareil et sélectionnez le mode DAB.
2. Appuyez sur la touche SCAN pour lancer la recherche automatique de
toutes les stations disponibles.
Recherche manuelle des stations (DAB)
1. Allumez l‘appareil et sélectionnez le mode DAB.
2. Appuyez sur la touche MENU pour accéder au menu de contrôle.
3. Tournez et appuyez sur le sélecteur de l‘appareil ou appuyez sur les
touches ou de la télécommande jusqu‘à ce que «Manual tune»
apparaisse à l‘écran. Conrmez votre choix en appuyant sur la touche
SELECT.
4. Tournez et pour sélectionner la station désirée (5A – 13F), tournez le
bouton sélecteur de l‘appareil ou appuyez sur les touches ou de
la télécommande.
5. Conrmez votre choix en appuyant sur la touche SELECT.
6. Tournez et appuyez sur le sélecteur de l‘appareil ou appuyez sur les
touches ou sur la télécommande pour choisir une autre station
et appuyez sur la touche SELECT pour conrmer.
7. Lorsque la station désirée est trouvée, appuyez sur la touche SELECT.
8. Vous pouvez annuler la recherche en appuyant sur la touche MENU.
62
FR
Réglage d‘une station (DAB)
Tournez et appuyez sur le sélecteur de l‘appareil ou appuyez sur les touches
ou de la télécommande pour aicher les informations relatives à la
station suivante. Appuyez sur la touche SELECT pour régler cette station en
quelques secondes.
FONCTIONNEMENT DE LA RADIO FM
Recherche automatique des stations (FM)
1. Allumez l‘appareil et choisissez le mode FM.
2. Appuyez sur la touche SCAN et maintenez-la pour lancer la recherche
automatique et enregistrer les stations disponibles (maximum 20).
Recherche manuelle des stations (FM)
1. Appuyez sur les touches
ou de l‘appareil ou utilisez les
touches ou de la télécommande pour choisir une fréquence
diérente.
2. Vous pouvez également maintenir les touches
ou de
l‘appareil ou appuyer sur les touches ou de la télécommande
pour rechercher la station disponible suivante.
MÉMORISATION DE STATIONS DE RADIO DAB/FM
A) Avec la télécommande :
1. Réglez la station que vous souhaitez enregistrer.
2. Maintenez la touche MEMORY. L‘écran clignote.
3. Appuyez sur les touches Preset + et Preset pour dénir le numéro de
préréglage souhaité. Appuyez sur la touche SELECT pour enregistrer.
REMARQUE : vous pouvez mémoriser jusqu‘à 20 stations DAB et FM.
Rappel de stations DAB/FM mémorisées
• Appuyez sur les touches Preset + ou Preset - pour accéder directement à
une station préréglée, ou appuyez une fois sur la touche MEMORY, puis
utilisez les touches Preset + ou Preset - pour sélectionner le préréglage
que vous souhaitez rappeler, et appuyez sur SELECT pour conrmer.
Appuyez sur le bouton SELECT.

63
FR
• Vous pouvez également utiliser les touches numériques pour rappeler
directement la station mémorisée. Par exemple, si vous appuyez sur
le chire «3» puis sur le bouton SELECT, vous rappelez la station
mémorisée dans la mémoire 3. Si vous appuyez sur le chire «1»
suivi du chire «2» et de la touche SELECT, vous rappelez la station
mémorisée dans l‘emplacement de mémoire 12.
B) Par le panneau de commande à l‘avant de l‘appareil :
Mémorisation rapide des stations (1 – 3)
• Dénissez la station DAB/FM que vous souhaitez enregistrer.
• Appuyez sur l‘une des touches numérotées Preset (1-3) et maintenez-la
pendant deux secondes jusqu‘à ce que le message à l‘écran indique que
la station a été enregistrée dans cet emplacement de mémoire.
Enregistrement des stations dans la liste mémorisée (4 – 20)
1. Dénissez la station DAB/FM que vous souhaitez enregistrer.
2. Appuyez sur la touche 4+ et maintenez-la pour aicher la liste de
mémoire. Tournez et appuyez sur le sélecteur (ou appuyez sur
ou sur la télécommande) pour sélectionner un emplacement de
mémoire. Vous pouvez écraser les stations déjà mémorisées.
3. Appuyez sur le sélecteur (ou sur la touche SELECT de la télécommande
pour enregistrer la station sélectionnée).
FONCTIONS DE LA RADIO DAB
Aichage des inrmations de la station DAB
Plusieurs informations sont fournies par la station. Appuyez plusieurs fois
sur la touche INFO pour modier les informations aichées :
1. Radio texte : aiche les titres des chansons ou les détails du
programme.
2. Force du signal : Plus le symbole étoile est aiché, plus le signal reçu
est puissant. Ajustez l‘antenne pour améliorer la réception du signal.
3. Type de programme (PTY) : type de programme.
4. Nom du multiplexe : aiche le nom du multiplexe auquel appartient la
station en cours d‘écoute.
5. Fréquence : aiche la fréquence de la station en cours.
6. Taux d‘erreur du signal : Aiche le taux d‘erreur du signal. Plus cette
valeur est élevée, plus le nombre d‘erreurs reçues sera élevé. Ajustez la
position de l‘antenne pour une meilleure réception.
7. Bit Rate audio : Aiche le débit audio actuel.
64
FR
Autres options DAB
Appuyez sur la touche MENU pour accéder au menu. Tournez et appuyez
sur le sélecteur, ou utilisez les touches ou de la télécommande pour
sélectionner l’une des options ci-dessous :
Contrôle de plage dynamique (DRC)
Dans un environnement bruyant, le DRC peut rendre des sons faibles
plus audibles. Le niveau de DRC dépend des paramètres de la radio. Vous
pouvez modier la valeur DRC sur votre appareil comme suit.
3 options de compression sont disponibles :
DRC haut : Compression maximale.
DRC bas : Compression pour moitié (1/2) du niveau de compression
autorisé par la station.
Pas de DRC : Pas de compression.
1. Appuyez sur la touche MENU pour accéder au menu.
2. Tournez et appuyez sur le sélecteur de l‘appareil ou appuyez sur
la touche ou de la télécommande jusqu‘à ce que «DRC»
apparaisse à l‘écran, puis appuyez sur la touche SELECT pour conrmer.
3. Tournez et appuyez sur le sélecteur de l‘appareil ou appuyez sur
ou sur la télécommande, dénissez la valeur DRC souhaitée, puis
appuyez sur la touche SELECT pour conrmer.
4. Appuyez à nouveau sur la touche MENU pour quitter le menu.
REMARQUE : Toutes les stations DAB n‘utilisent pas la fonction DRC.
Si une station ne prend pas en charge le DRC, le réglage du DRC sur le
périphérique n‘aura aucun eet. Une fois le réglage DRC déni, il se peut
que le son soit plus fort.
Suppression des stations inactives
Cette fonction permet de supprimer les stations inactives.
1. Appuyez sur la touche MENU pour accéder au menu.
2. Tournez et appuyez sur le sélecteur de l‘appareil ou appuyez sur les
touches ou de la télécommande jusqu‘à ce que «<Prune>»
apparaisse à l‘écran, puis appuyez sur la touche SELECT pour conrmer.
3. Tournez et appuyez sur le sélecteur de l‘appareil ou appuyez sur les
touches ou de la télécommande pour sélectionner «<OUI>»,
puis appuyez sur la touche SELECT pour conrmer.
4. Appuyez à nouveau sur la touche MENU pour quitter le menu.

65
FR
FONCTIONS DE LA RADIO FM
Sélection Stéréo/ Mono forcé
Lorsque vous recevez une station FM stéréo, appuyez sur la touche FM ST.
L‘appareil bascule ensuite entre stéréo et mono.
Informations de la station FM
Plusieurs informations sont fournies par la station. Appuyez plusieurs fois
sur la touche INFO pour parcourir les informations aichées :
1. Radio texte : aiche le titre de la chanson ou des détails sur le
programme.
2. Type de programme (PTY) : type du programme.
3. Audio : Stéréo ou Mono.
Appel d‘autres fonctions du menu FM
• Appuyez sur la touche MENU pour accéder au menu.
• Tournez et appuyez sur le sélecteur, ou utilisez les touches ou
de la télécommande pour sélectionner des fonctions supplémentaires,
comme décrit ci-dessous :
Paramètres de recherche de stations
1. Appuyez sur la touche MENU pour accéder au menu.
2. Tournez et appuyez sur le sélecteur de l‘appareil, ou appuyez sur les
touches ou de la télécommande jusqu‘à ce que «Scan setting»
apparaisse à l‘écran, puis appuyez sur la touche SELECT pour conrmer.
3. Tournez et appuyez sur le sélecteur de l‘appareil ou appuyez sur les
touches ou de la télécommande pour sélectionner «All les
stations» ou «Strong stations», puis appuyez sur la touche SELECT
pour conrmer. Si vous sélectionnez «All stations» toutes les stations
trouvées sont prises en compte, même si elles sont parasitées. Si vous
sélectionnez «Strong stations», seules les stations avec un signal
puissant sont prises en compte et les stations avec des parasites sont
ignorées lors de la recherche.
4. La prochaine recherche prendra en compte les paramètres que vous
avez dénis.
Paramètres audio
1. Appuyez sur la touche MENU pour accéder au menu.
2. Tournez et appuyez sur le sélecteur de l‘appareil ou appuyez sur les
touches ou de la télécommande jusqu‘à ce que l‘écran de
réglage audio apparaisse, puis appuyez sur la touche SELECT pour
conrmer.
66
FR
3. Tournez et appuyez sur le sélecteur de l‘appareil ou appuyez sur les
touches ou de la télécommande pour sélectionner «Stereo
allowed» ou «Forced mono», puis appuyez sur la touche SELECT pour
conrmer.
CD/USB
Insertion et lecture d‘un CD
Insérez un CD avec l‘étiquette vers le haut dans le lecteur CD. L‘écran aiche
«Reading» pendant quelques secondes pendant le chargement du CD.
Ensuite, la lecture du CD commence automatiquement.
USB
Branchez un périphérique USB sur le port USB. Appuyez plusieurs fois sur
la touche USB de la télécommande ou sur la touche SOURCE de l‘appareil
jusqu‘à ce que «USB» apparaisse à l‘écran. Une fois l’appareil parcouru, le
nombre total de pistes s’aiche à l’écran. Pour lancer la lecture, appuyez sur
la touche
.
Lecture /Pause
Pour mettre en pause la lecture, appuyez sur la touche
. Pour reprendre
la lecture, appuyez de nouveau sur la touche
.
Stop
Pour arrêter la lecture, appuyez sur la touche
.
Saut de titre
Appuyez sur les touches
ou pour passer au titre précédent ou
suivant.

67
FR
Sélection directe d‘un titre
Utilisez les touches numériques pour sélectionner directement la piste que
vous souhaitez écouter. Par exemple, si vous appuyez sur la touche «3»
puis sur la touche SELECT, la lecture commence immédiatement à partir
de la piste 3. Sinon, si vous appuyez sur les touches «1» et «2», puis sur la
touche SELECT, la lecture de la piste 12 commence.
Recherche rapide de musique
Pendant la lecture, maintenez les touches
ou pour lancer la
recherche rapide. Lorsque vous relâchez les touches
ou , la lecture
reprend au point correspondant.
Répétition / lecture aléatoire
• Appuyez une fois sur la touche REPEAT
/RANDOM pendant la
lecture. L‘écran aiche ensuite «REP_ONE», ce qui signie que la piste
en cours est répétée en boucle continue.
• Si vous appuyez à nouveau sur la touche REPEAT
/RANDOM, l‘écran
aiche «REP_ALL», ce qui signie que toutes les pistes seront répétées.
• Si vous appuyez à nouveau sur la touche REPEAT
/RANDOM , l‘écran
aiche «Random», ce qui signie que toutes les pistes seront lues dans
un ordre aléatoire.
• Appuyez à nouveau sur la touche REPEAT
/RANDOM pour reprendre
la lecture normale.
Liste de lecture mémorisée
Cet appareil peut mémoriser une liste de titres audio dans l‘ordre de votre
choix.
1. Le lecteur étant à l‘arrêt, insérez un CD et appuyez sur la touche
MEMORY. «P-01» s‘aiche et l‘indicateur «01» clignote.
2. Utilisez les touches
ou pour sélectionner une piste.
3. Appuyez sur la touche MEMORY pour sauvegarder les pistes.
4. Répétez les étapes 2 et 3 pour sauvegarder jusqu‘à 20 pistes (CD) et
jusqu‘à 99 pistes (MP3).
5. Appuyez sur la touche
pour lire les pistes mémorisées.
6. Supprimez la liste enregistrée en appuyant deux fois sur la touche
ou en passant à un autre mode.
7. Pendant la lecture de la liste sauvegardée, vous pouvez utiliser la
fonction de répétition pour une ou toutes les pistes. La lecture aléatoire
n‘est pas possible avec cette fonctionnalité.
68
FR
BT
Suivez les instructions ci-dessous pour appairer un appareil mobile BT avec
l‘appareil :
1. Appuyez plusieurs fois sur la touche BT ou sur la touche SOURCE de
la télécommande pour passer en mode BT. L‘écran aiche «BT».
La recherche des appareils disponibles commence et «BT AUDIO»
clignote à l‘écran.
2. Si l‘appareil n‘a jamais été connecté à un appareil BT ou si le dernier
appareil connecté n‘est pas disponible, l‘icône BT continue de
clignoter à l‘écran. Activez la fonction BT de votre appareil mobile BT
et recherchez «Stockton» dans la liste des appareils. Sélectionnez
«Stockton» pour l‘appariement. Si nécessaire, entrez le mot de passe
«0000».
3. Une fois l’appariement terminé, le voyant BT s’allume en permanence
sur l’écran.
4. Vous pouvez maintenant démarrer la lecture de musique sur le
périphérique mobile pour écouter la musique sur l‘enceinte de
l‘appareil.
5. Vous pouvez appuyer sur la touche pour suspendre ou reprendre
la lecture.
6. Pour lire la piste précédente ou suivante, appuyez sur
ou .
REMARQUE : Appuyez sur la touche PAIR de l‘appareil et maintenez-la pour
quitter la connexion en cours et lancer la recherche d‘un autre appareil BT.
AUX-IN
Cette fonction vous permet d’écouter le son d’un appareil de lecture
externe sur cet appareil.
1. Branchez un câble audio de 3,5 mm (non fourni) sur le port de sortie
ligne du périphérique externe et sur le connecteur AUX IN de l‘appareil.
2. Appuyez sur la touche AUX de la télécommande ou à plusieurs reprises
sur la touche SOURCE de l‘appareil pour passer en mode AUX. L‘écran
aiche «AUX».
3. Commencez la lecture de musique sur votre appareil externe.
4. Le son est émis par l‘appareil.

69
FR
AUTRES FONCTIONS ET PARAMÈTRES
EQ
Cette fonction vous permet de régler diérents eets audio.
• Appuyez plusieurs fois sur la touche EQ pour sélectionner l’un des
diérents eets : FLAT/CLASSIC/ROCK/POP/JAZZ.
X-BASS
Cette fonction cous permet de renforcer les basses de votre musique.
• Maintenez la touche X-BASS pour activer et désactiver l‘eet X-Bass.
Arrêt programmable
1. L’appareil étant allumé, appuyez plusieurs fois sur la touche SLEEP pour
régler l’heure d‘arrêt automatique. Vous pouvez choisir entre 90, 80, 70,
60, 50, 40, 30, 20 ou 10 minutes.
2. Lorsque la minuterie atteint «0», l‘appareil s‘éteint automatiquement.
3. Pour annuler la fonction, appuyez sur la touche STANDBY pour
éteindre l‘appareil ou appuyez plusieurs fois sur la touche SLEEP jusqu‘à
ce que «sleep o» apparaisse à l‘écran.
Réglage de l‘heure
1. Mettez l‘appareil en mode veille.
2. Appuyez sur la touche CLOCK SET pour régler l‘horloge. L‘écran aiche
«Clock Set».
3. Pour régler les heures, appuyez sur
ou et conrmez votre
sélection avec la touche CLOCK SET.
4. Pour régler les minutes, appuyez sur les touches
ou , puis sur
la touche CLOCK SET pour terminer.
REMARQUES :
- L‘heure réglée peut être automatiquement remplacée par la
synchronisation en temps réel avec DAB+ ou FM.
- Lorsque l‘appareil est sous tension et que vous appuyez sur la touche
CLOCK SET dans n‘importe quel mode, l‘horloge s‘aiche à l‘écran pendant
quelques secondes.
70
FR
Activer/désactiver la minuterie
1. Mettez l‘appareil en mode veille.
2. Maintenez la touche TIMER pour activer / désactiver la minuterie.
L‘écran aiche «On Timer».
3. Pour dénir l‘heure à laquelle le minuteur doit être activé, appuyez sur
ou et conrmez en appuyant sur la touche TIMER.
4. Pour dénir la valeur de minute à laquelle le minuteur doit être activé,
appuyez sur
ou et conrmez en appuyant sur la touche
TIMER. L‘écran aiche «O Timer».
5. Appuyez sur la touche TIMER pour passer à la sélection suivante.
6. Pour dénir l’heure à laquelle la minuterie doit être désactivée, appuyez
sur
ou sur et conrmez en appuyant sur la touche TIMER.
7. Pour dénir la valeur de minute à laquelle la minuterie doit être
désactivée, appuyez sur
ou et conrmez en appuyant sur la
touche TIMER.
8. Utilisez les touches
ou pour régler la source de la minuterie
(CD/USB/DAB/FM) et conrmez en appuyant sur la touche TIMER.
9. Utilisez les touches
ou pour régler le volume de la minuterie
et conrmez en appuyant sur la touche TIMER.
10. Appuyez sur la touche TIMER pour activer le programme de la
minuterie. L‘icône de la minuterie s‘aiche à l‘écran.
REMARQUE : Si vous appuyez à nouveau sur la touche TIMER, la
programmation est désactivée.
Réglage de la langue
Vous pouvez régler la langue de votre choix.
1. Activez le mode DAB ou FM.
2. Appuyez sur la touche MENU pour accéder au menu.
3. Tournez et appuyez sur le sélecteur ou appuyez sur les touches ou
de la télécommande jusqu‘à ce que «Language» apparaisse, puis
appuyez sur la touche SELECT pour conrmer.
4. Tournez et appuyez sur le sélecteur ou appuyez sur les touches ou
de la télécommande pour basculer entre les diérentes langues.
Choisissez votre langue et conrmez en appuyant sur la touche SELECT.
5. Appuyez sur la touche MENU pur quitter le menu.

71
FR
Vérication de la version de logiciel
Vous pouvez vérier la version de logiciel.
1. Activez le mode FM ou DAB.
2. Appuyez sur la touche MENU pour accéder au menu.
3. Tournez et appuyez sur le sélecteur ou appuyez sur les touches
ou de la télécommande jusqu‘à ce que «Version SW» s‘aiche et
appuyez sur la touche SELECT pour aicher le numéro de version du
logiciel.
4. Appuyez sur la touche MENU pur quitter le menu.
Réinitialisation aux paramètres d‘usine
Cette fonction vous permet de réinitialiser l‘appareil aux paramètres
d‘usine.
1. Activez le mode DAB ou FM.
2. Appuyez sur la touche MENU pour accéder au menu.
3. Tournez et appuyez sur le sélecteur ou appuyez sur les touches ou
de la télécommande jusqu‘à ce que «Factory Reset» s‘aiche, puis
appuyez sur la touche SELECT pour conrmer.
4. Appuyez sur la touche ou jusqu‘à ce que «<YES>» apparaisse,
puis appuyez sur la touche SELECT pour conrmer.

72
FR
NETTOYAGE ET ENTRETIEN
Nettoyage des CD
Les CD sont assez résistants mais des poussières peuvent entraîner des
parasites pendant la lecture du CD en raison de la contamination de sa
surface. Suivez les instructions d’entretien ci-dessous pour obtenir les
meilleurs résultats possibles lors de la lecture d’un CD.
• N‘écrivez sur aucun côté du CD, surtout pas du côté non étiqueté, car
c‘est sur ce côté que les signaux sont lus.
• Les CD ne doivent pas être exposés à la lumière directe du soleil, à la
chaleur ou à une humidité extrême.
• Tenez toujours les CD par les bords. Les empreintes digitales, la saleté
ou l’eau sur le CD peuvent causer des parasites ou une lecture erronée.
• Si un CD est sale ou n‘est pas lu correctement, nettoyez-le avec un
chion doux et sec et essuyez-le du centre vers l‘extérieur.
NON
OUI – CORRECT !
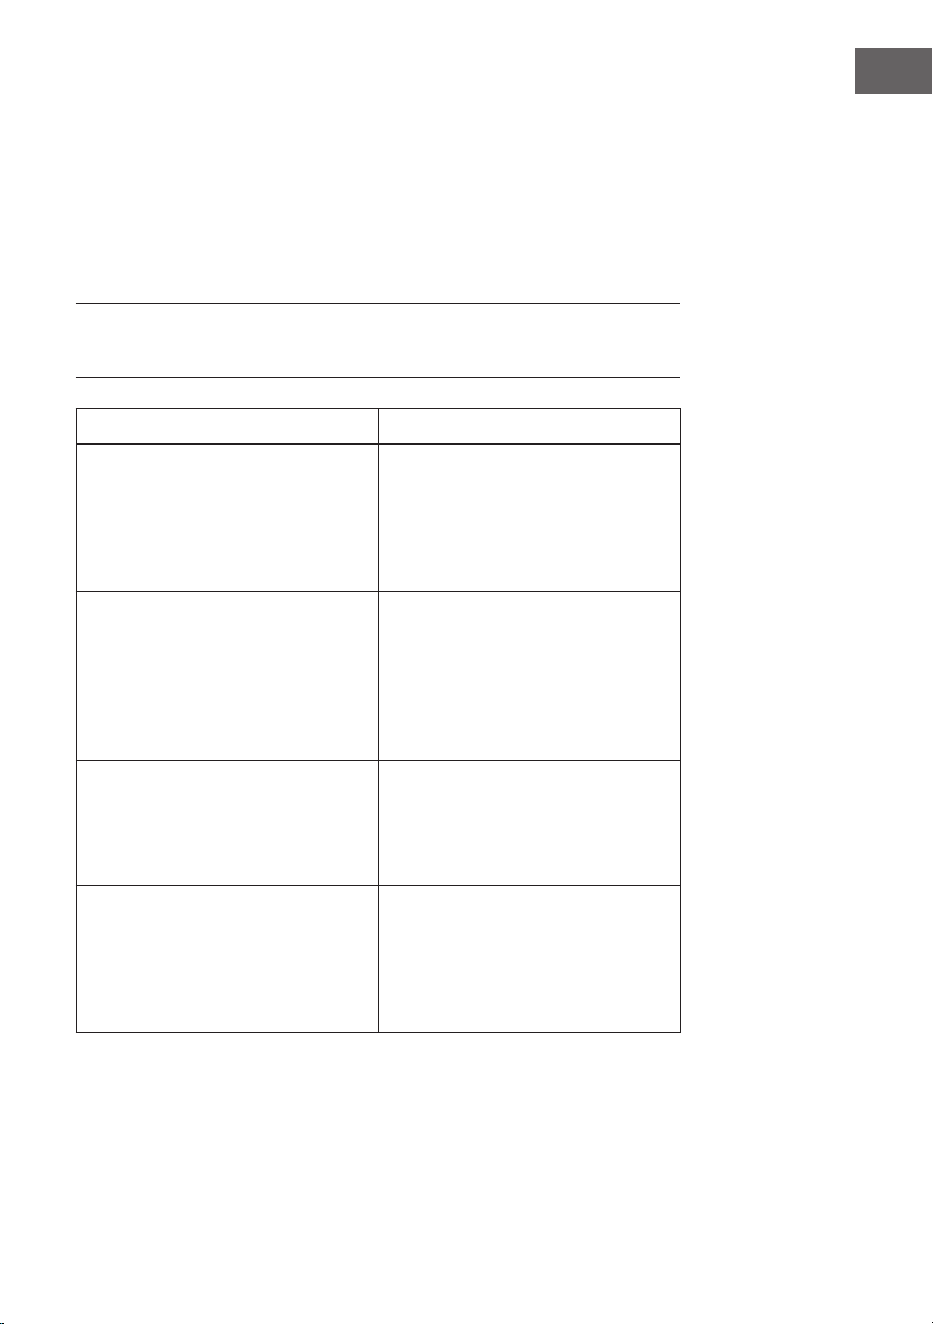
73
FR
Nettoyage de l‘appareil
• Essuyez régulièrement l‘appareil avec un chion doux et une solution
de savon doux, puis essuyez-le avec un chion sec.
• N‘utilisez pas de produits chimiques pour le nettoyage (essence, diluant,
etc.). Vous risquez d‘endommager le boîtier.
• N‘appliquez pas d’huile à l’intérieur du boîtier car cela pourrait
provoquer un dysfonctionnement.
IDENTIFICATION ET RÉSOLUTION DES
PROBLÈMES
Problème Cause possible
La radio ne cesse de faire des bruits
bizarres.
• L‘appareil se trouve-t-il à
proximité d‘un ordinateur ou
d‘un téléviseur ?
• L‘antenne est-elle bien
orientée? Modiez l‘orientation
de l‘antenne.
La télécommande ne fonctionne
pas.
• La polarité des piles est-elle
exacte ?
• Les piles sont-elles vides ?
• L‘angle ou la distance ne sont
peut-être pas corrects ?
• Une forte lumière éclaire-t-elle
le capteur ?
La lecture du CD ne démarre pas.
Ou bien : La lecture du CD s‘arrête
au milieu ou ne fonctionne pas
correctement.
• Le CD est-il inséré dans le
mauvais sens ?
• Le CD correspond-il aux
normes de lecture ?
• Le CD est-il sale ou rayé ?
La lecture de musique est
irrégulière ou s’arrête au milieu du
titre.
• L‘appareil est-il soumis à des
vibrations importantes ?
• Le CD est-il très sale ?
• De la condensation s‘est-
elle formée à l‘intérieur de
l‘appareil ?

74
FR
Problème Cause possible
L‘appareil USB n‘est pas reconnu. • Le périphérique USB contient-il
des chiers MP3 / WMA ?
• L’appareil a-t-il été connecté
correctement ?
• Est-ce un périphérique MTP ?
• Le périphérique contient-il
uniquement des chiers AAC ?
La lecture en USB ne démarre pas. • Est-ce un chier WMA protégé
contre la copie ?
• Le chier MP3 est-il
endommagé ?
En mode BT, le son est interrompu
ou perturbé.
• L’appareil est-il trop proche
d’un autre appareil électrique
provoquant des interférences ?
• Y a-t-il un obstacle entre
l’appareil BT et l’appareil ?
Aucun son n‘est émis. • Le volume est-il réglé sur
«Min»?
• Les écouteurs sont-ils
branchés?
• L’appareil mobile BT est-il trop
éloigné de l’appareil ?
• L’appareil est-il connecté à un
autre appareil BT ?
Lorsqu‘on appuie sur une touche,
l‘appareil ne réagit pas.
• Mettez l’appareil en mode
veille et rallumez-le.

75
FR
FICHE TECHNIQUE
Numéro d‘article 10034517
Alimentation Adaptateur secteur (fourni)
Entrée : AC 100-240V ~ 50/60Hz
Sortie : DC 12V
3.0A
Consommation en veille < 1 W
Impédance des enceintes 4 Ω
Puissance de sortie 2 x 10 W RMS
Tuner :
Plage de fréquences : FM 87,5 - 108 MHz,
DAB 174,9 - 239,2 MHz
BT
Fréquence BT 2402-2480 MHz
Puissance radiofréquence
BT (max.)
4 dBm
Lecture d‘un CD
Type Single Disc Multi Play CD-Player
Port USB
Interface Compatible avec les supports de stockage
USB 1.1 / 2.0
Formats de chiers
compatibles :
MPEG 1 Layer 3 WMA (sans DRM)
Taux d‘échantillonnage
compatibles :
MP3 (32 ~ 320 kbps) WMA (64 ~ 160 kbps)

76
FR
CONSEILS POUR LE RECYCLAGE
S‘il existe une réglementation pour l‘élimination ou le
recyclage des appareils électriques et électroniques
dans votre pays, ce symbole sur le produit ou sur
l‘emballage indique que cet appareil ne doit pas
être jeté avec les ordures ménagères. Vous devez le
déposer dans un point de collecte pour le recyclage
des équipements électriques et électroniques.
La mise au rebut conforme aux règles protège
l‘environnement et la santé de vos semblables des
conséquences négatives. Pour plus d‘informations
sur le recyclage et l‘élimination de ce produit, veuillez
contacter votre autorité locale ou votre service de
recyclage des déchets ménagers.
Ce produit contient des piles. S‘il existe une
réglementation pour l‘élimination ou le recyclage
des piles dans votre pays, vous ne devez pas les
jeter avec les ordures ménagères. Renseignez-vous
sur les dispositions locales relatives à la collecte
des piles usagées. La mise au rebut conforme aux
règles protège l‘environnement et la santé de vos
semblables des conséquences négatives.
DÉCLARATION DE CONFORMITÉ
Fabricant :
Chal-Tec GmbH, Wallstraße 16, 10179 Berlin,
Allemagne.
Importateur pour la Grande Bretagne :
Berlin Brands Group UK Limited
PO Box 42
272 Kensington High Street
London, W8 6ND
United Kingdom
Le soussigné, Chal-Tec GmbH, déclare que
l’équipement radioélectrique du type Stockton est
conforme à la directive 2014/53/UE. Le texte complet
de la déclaration UE de conformité est disponible à
l’adresse internet suivante : use.berlin/10034517

77
ES
Estimado cliente,
Le felicitamos por la adquisición de este producto.
Lea atentamente las siguientes instrucciones y
sígalas para evitar posibles daños. No asumimos
ninguna responsabilidad por los daños causados
por el incumplimiento de las instrucciones y el uso
inadecuado. Escanee el siguiente código QR para
obtener acceso a la última guía del usuario y más
información sobre el producto.
ÍNDICE
Indicaciones de seguridad 78
Descripción del aparato 80
Mando a distancia 82
Instalación 83
Puesta en marcha y uso 84
Funcionamiento de la radio DAB 87
Funcionamiento de la radio FM 89
CD/USB 90
BT 92
AUX-IN 92
Otras funciones y ajustes 93
Limpieza y cuidado 96
Detección y resolución de problemas 97
Datos técnicos 99

78
ES
INDICACIONES DE SEGURIDAD
• Lea con detenimiento las instrucciones antes de la instalación y puesta
en marcha del aparato y consérvelas para consultas posteriores.
• Asegúrese de que el aparato se encuentre en una zona bien ventilada
y se cumpla la distancia mínima de 10 cm hacia todos los lados del
aparato.
• Coloque el aparato en una supercie estable y sin vibraciones.
• Coloque el aparato a un mínimo de 30 cm de televisores para evitar
interferencias en la imagen. Si todavía se producen interferencias,
reubique el aparato. Los televisores LCD no se ven afectados por este
fenómeno.
• No coloque el aparato cerca de una fuente de calor (p. ej. radiadores).
Mantenga el aparato lejos de la luz directa del sol, de campos
magnéticos potentes, de polvo excesivo, de la humedad y de
dispositivos eléctricos que provoquen interferencias.
• No coloque ningún objeto sobre el aparato.
• Mueva el aparato con cuidado y evite golpearlo.
• No exponga el aparato a la humedad ni a temperaturas superiores a
40°C o demasiado bajas.
• Asegúrese de que los oricios de ventilación del aparato no estén
bloqueados por objetos como periódicos, manteles, cortinas, etc.
• No coloque ningún objeto sobre el aparato con llamas abiertas, como
velas.
• Utilice el aparato exclusivamente en un rango moderado de
temperatura entre 5°C y 35°C.
• El aparato no debe utilizarse cerca del agua ni en entornos húmedos.
• No exponga el aparato a salpicaduras y asegúrese de que no se
coloquen encima del aparato ningún tipo de objeto lleno de líquido.
ATENCIÓN
Existe riesgo de explosión. Si no se han sustituido las pilas
correctamente, existe riesgo de explosión. Sustituya las pilas
viejas solamente por otras del mismo tipo. El enchufe se
utiliza como separador y por tanto debe estar siempre
accesible.

79
ES
• Utilice exclusivamente los accesorios contenidos en el envío o
explícitamente recomendados por el fabricante. Utilice exclusivamente
el adaptador de red para el n concebido.
• Desconecte el enchufe de la toma de corriente cuando haya tormenta o
si no lo usa durante un periodo prolongado de tiempo.
• No intente reparar el aparato usted mismo. El aparato deberá ser
reparado por una persona cualicada cuando:
a. El cable de alimentación esté dañado.
b. Hayan caído objet os sobre el aparato o se haya ltrado un líquido
a su interior.
c. El aparato se haya visto expuesto a la lluvia.
d. El aparato no funcione correctamente sin haber sido modicado
su exterior.
e. El aparato esté averiado.
• Para desconectar completamente el suministro eléctrico, el enchufe
del aparato debe desconectarse de la red eléctrica, pues el enchufe
del aparato actúa como separador. Asegúrese de que el enchufe quede
fácilmente accesible.
ADVERTENCIA
Riesgo de incendio. La tensión eléctrica debe coincidir con la
tensión indicada en la placa técnica del aparato. El uso de
una tensión superior a la indicada en la placa técnica puede
provocar incendios u otros accidentes, que causarán daños.
El fabricante del aparato no se responsabiliza por los daños
provocados por un uso de una tensión eléctrica errónea.
Regulador de volumen
El volumen a un determinado nivel depende de la ecacia del altavoz,
de la ubicación y de una variedad de factores. No suba completamente
el volumen al encender el aparato. Escuche música a un nivel moderado.
Escuchar música a un volumen elevado y durante mucho tiempo puede
provocar la pérdida de la capacidad auditiva.
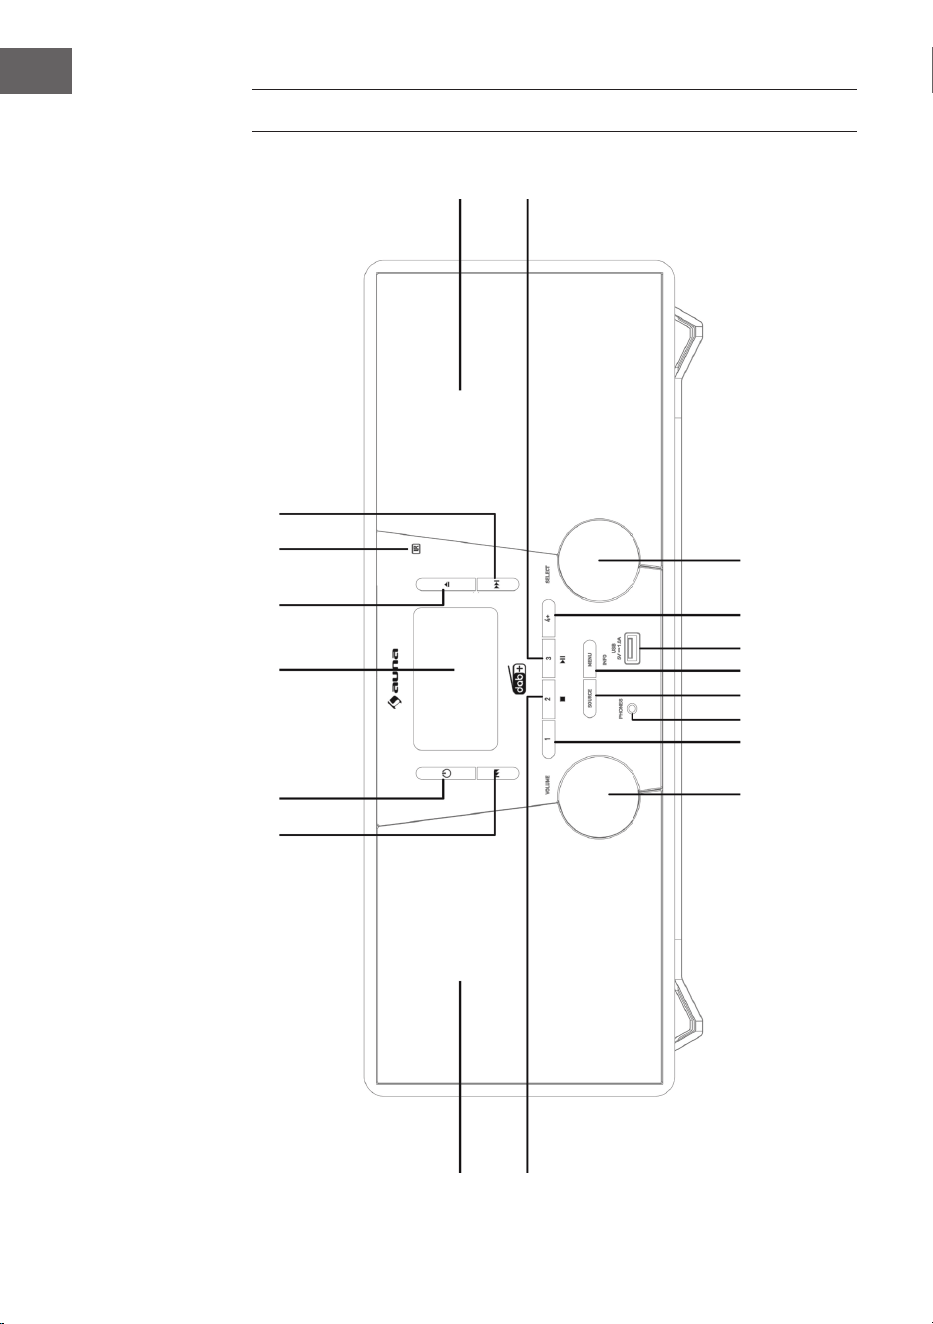
80
ES
DESCRIPCIÓN DEL APARATO
1
2 3 4
5
6
7
8
17
18
16 15 14
13 12 11
10
9

81
ES
1 Saltar pista, avanzar 12 MENU/INFO (Menú/Info)
2 Standby 13 SOURCE (Fuente)
3 Monitor LCD 14 Conexión telefónica
4 Abrir/cerrar compartimento de CD 15 Espacio de memoria 1
5 Sensor del mando a distancia 16 Regulador de volumen
6 Saltar pista, retroceder 17 Altavoz izquierdo
7 Altavoz derecho 18 Espacio de memoria 2, Stop (Modo USB/CD)
8 Reproducción/Pausa/Espacio de
memoria 3
19 Compartimento para CD
9 Regulador de selección 20 Antena FM/DAB
10 Guardar 21 Conexión CC-IN
11 Conexión USB 22 Conexión AUDIO-IN
19
20 21 22

82
ES
MANDO A DISTANCIA
1 Encender/Standby 9 Menú DAB/FM 17 Ir hacia arriba,
avanzar rápidamente,
añadir tiempo
2 Teclado numérico 10 Abrir
3 Repetir/
reproducción aleatoria
11 Guardar 18 CD/USB/BT
4 Bajar volumen 12 Espacio de memoria/
carpeta hacia arriba
(modo radio)
19 Silencio
5 Stop, conectar 20 EQ/X-BASS
6 Ir hacia abajo,
retroceder rápidamente,
reducir tiempo
13 Subir volumen 21 Hora/Temporizador
14 SELECT
(botón de selección)
22 Indicador RDS (DAB), ID3
(CD/USB)
7 DAB/FM/AUX 15 Espacio de memoria/
carpeta hacia abajo
23 Buscar
8 Temporizador de apagado 16 Reproducción/Pausa;
Estéreo (FM)

83
ES
INSTALACIÓN
Colocación de las pilas en el mando a distancia
1. Abra la tapa del compartimento de las pilas.
2. Coloque las pilas incluidas en el envío en su compartimento con la
polaridad correcta. Para quitar o encajar las pilas, presiónelas en
dirección al polo negativo (-).
3. Cierre la tapa del compartimento de las pilas.
Indicaciones de seguridad para el uso de las pilas
• Retire las pilas si no utiliza el aparato durante un periodo de tiempo
prolongado. Así se evitarán potenciales daños provocados por el ácido
de la pila vertido.
• No utilice pilas recargables (baterías de níquel-cadmio, etc.)
• Una colocación errónea de las pilas puede provocar fallos en el
funcionamiento del aparato.
• No exponga las pilas (tanto las colocadas como las del embalaje) a un
calor excesivo, como a la luz del sol.
Indicaciones de uso del mando a distancia
• Sustituya las pilas cuando el alcance del mando a distancia se reduzca o
el control funcione de manera irregular. Utilice las pilas del tamaño AAA
(UM-4S/SUM-4).
• Limpie el transmisor del mando a distancia y el sensor del mando a
distancia del aparato con frecuencia con un paño suave.
• Si el sensor está expuesto a una interferencia de luz puede afectar
negativamente al uso. Reduzca las interferencias de luz o reubique el
aparato si el problema persiste.
• No exponga el mando a distancia a humedad, calor, vibraciones o
sacudidas.

84
ES
Conexiones del sistema
Nota: Desconecte el cable de alimentación del aparato de la toma de
corriente antes de realizar cualquier conexión.
PUESTA EN MARCHA Y USO
Silencio
Pulsando el botón MUTE en el mando a distancia o presionando el
regulador de volumen del aparato, el volumen se silencia temporalmente.
Pulse de nuevo el botón para recuperar el volumen normal.
Regulador de volumen
Gire el regulador de volumen del aparato o pulse los botones de volumen
del mando a distancia para aumentar o reducir el nivel de volumen.
Radio FM/DAB
Enchufe el conector del adaptador de red incluido en el envío a la toma CC-
IN de la parte trasera del aparato y conecte el enchufe del adaptador de red
a la toma de corriente. El display muestra “Scan Time”. El aparato actualiza
su hora a partir de la hora facilitada por las emisoras. Espere hasta que haya
nalizado el proceso de actualización y aparezca la hora real en pantalla.
Fuente de Fuente de
alimentaciónalimentación
Toma de corriente
CA 230 V

85
ES
Para encender el aparato, pulse el botón STANDBY . Pulse de nuevo
STANDBY para apagarlo.
DAB/FM/CD/AUX/BT
Pulse el botón DAB/FM del mando a distancia o varias veces el botón
SOURCE del aparato para elegir entre las distintas fuentes.
Ajustar la antena
La antena de la parte trasera del aparato debe desplegarse completamente
para garantizar una buena recepción DAB/FM. Para una buena recepción,
ajuste la orientación de la antena.
USO DE RADIO DAB
Al seleccionar el modo DAB por primera vez se buscan automáticamente
todas las emisoras DAB disponibles. Espere hasta que la búsqueda haya
nalizado. En pantalla se muestra la barra de progreso. Cuando la búsqueda
haya nalizado, se sintoniza la primera emisora encontrada.
Búsqueda automática de emisoras (DAB)
1. Encienda el aparato y seleccione el modo DAB.
2. Pulse el botón SCAN para iniciar una búsqueda automática de emisoras
disponibles.
Búsqueda manual de emisoras (DAB)
1. Schalten SieEncienda el aparato y seleccione el modo DAB.
2. Pulse el botón MENU para acceder al menú de control.
3. Gire y presione el regulador de selección del aparato o mantenga
pulsados los botones o del mando a distancia hasta que en
pantalla aparezca „Manual tune“. Conrme la selección pulsando el
botón SELECT.
4. Gire y presione el regulador de selección del aparato o pulse los
botones o para elegir la emisora deseada (5A – 13F).
5. Bestätigen Sie Ihre Auswahl durch Drücken der SELECT-Taste.
6. Gire y presione el regulador de selección del aparato o pulse los
botones o del mando a distancia para elegir otra emisora y
pulse SELECT para conrmar la acción.
7. En cuanto haya encontrado la emisora deseada, pulse el botón SELECT.
8. La búsqueda puede interrumpirse pulsando el botón MENU.
86
ES
Sintonización de emisoras (DAB)
Gire y presione el regulador de selección del aparato o pulse los botones
o del mando a distancia para mostrar la información de la siguiente
emisora. Pulse el botón SELECT para sintonizar dicha emisora en pocos
segundos.
CONTROL DE RADIO FM
Búsqueda automática de emisoras (FM)
1. Encienda el aparato y seleccione el modo FM.
2. Mantenga pulsado el botón SCAN para iniciar automáticamente
la búsqueda de emisoras y para guardar las emisoras disponibles
(máximo 20).
Búsqueda manual de emisoras (FM)
1. Pulse los botones
o del aparato o los botones o del
mando a distancia para sintonizar otra frecuencia.
2. Como alternativa, mantenga pulsados los botones
o del
aparato o pulse los botones o del mando a distancia para
sintonizar la próxima emisora disponible.
GUARDAR EMISORAS DE RADIO DAB/FM
A) Con el mando a distancia:
1. Sintonice la emisora que desea guardar.
2. Mantenga pulsado MEMORY. La pantalla parpadea.
3. Pulse los botones Preset+ y Preset- para regular el número deseado de
espacio de memoria. Pulse el botón SELECT para guardar.
NOTA: Puede guardar hasta 20 emisoras DAB y FM.
Acceder a las emisoras DAB/FM guardadas
• Pulse los botones Preset+ o Preset- para acceder directamente a una
emisora guardada, o bien pulse una vez el botón MEMORY y seleccione
a continuación el espacio de memoria deseado con los botones Preset+
o Preset- y conrme pulsando SELECT.
87
ES
• Para acceder directamente a las emisoras guardadas también puede
utilizar el teclado numérico. Si, por ejemplo, pulsa la tecla „3“ y
luego SELECT, se accederá al espacio de memoria 3 de las emisoras
guardadas. Si, por ejemplo, pulsa la tecla „1“, luego „2“ y por último
SELECT, se accederá al espacio de memoria 12 de emisoras guardadas.
B) A través del panel de control en la parte delantera del aparato:
Almacenamiento rápido de emisoras (1 – 3)
• Sintonice la emisora DAB/FM que desea guardar.
• Mantenga pulsado uno de los botones numerados de memoria (1 – 3)
durante dos segundos hasta que en pantalla aparezca el mensaje de
que la emisora se ha guardado en este espacio.
Memoria de emisoras en la lista de memoria (4 – 20)
1. Sintonice la emisora DAB/FM que desea guardar.
2. Mantenga pulsado el botón 4+ para visualizar la lista de
almacenamiento. Gire y presione el regulador de selección del aparato
(o pulse los botones o del mando a distancia) para elegir el
espacio de memoria que desee. Las emisoras ya guardadas se pueden
sobrescribir.
3. Para guardar la emisora seleccionada, pulse el regulador de selección
(o bien el botón SELECT del mando a distancia).
FUNCIONAMIENTO DE LA RADIO DAB
Visualizar información de emisoras DAB
Las emisoras facilitan varias informaciones. Para navegar entre toda la
información mostrada, pulse varias veces el botón INFO:
1. Radiotexto: Muestra las pistas de música o detalles de un programa.
2. Intensidad de la señal: Cuantas más estrellas aparezcan, más fuerte
será la señal recibida. Ajuste la antena para mejorar la recepción de la
señal.
3. Tipo de programa (PTY): Tipo de programa.
4. Nombre multiplex: Muestra el nombre del Multiplex al que pertenece
la emisora.
5. Frecuencia: Muestra la frecuencia actual de emisión.
6. Tasa de error en la señal: Muestra la tasa de error en la señal. Cuanto
más elevado sea este valor, más errores se recibirán. Para una buena
recepción, ajuste la posición de la antena.
7. Tasa de bits de audio: Muestra la tasa de bits actual.
88
ES
Otras opciones DAB
Pulse el botón MENU para acceder al menú. Gire y presione el regulador de
selección del aparato o pulse los botones o del mando a distancia
para elegir entre las opciones que aparecen a continuación:
Compresión del Rango Dinámico (DRC)
En entornos ruidosos puede hacer que los tonos más débiles sean más
audibles gracias al DRC. El nivel de DRC depende de los ajustes de la
emisora. Puede modicar el valor DRC en su aparato del siguiente modo.
Hay 3 niveles de compresión:
DRC alta: Compresión máxima.
DRC baja: Compresión a la mitad (1/2) de la compresión facilitada por
la emisora.
DRC o: Sin compresión.
1. Pulse el botón MENU para acceder al menú.
2. Gire y presione el regulador de selección del aparato o pulse los
botones o del mando a distancia hasta que aparezca en
pantalla „DRC“ y, a continuación, pulse SELECT para conrmar la acción.
3. Gire y presione el regulador de selección del aparato o pulse los
botones o del mando a distancia, seleccione el valor DRC
deseado y, a continuación, pulse SELECT para conrmar la acción.
4. Para abandonar el menú, pulse de nuevo el botón MENU.
NOTA: No todas las emisoras DAB pueden utilizar la función DRC. Si una
emisora no es compatible con DRC, el ajuste del aparato no tiene efecto.
Después de que se haya realizado el ajuste DRC, puede ocurrir que el
volumen sea más alto.
Eliminar emisoras inactivas
Con esta función puede eliminar emisoras inactivas.
1. Pulse el botón MENU para acceder al menú.
2. Gire y presione el regulador de selección del aparato o pulse los
botones o del mando a distancia hasta que aparezca en
pantalla “<Prune>” y, a continuación, pulse SELECT para conrmar la
acción.
3. Gire y presione el regulador de selección del aparato o pulse los
botones o del mando a distancia para elegir „<YES>“ y pulse
SELECT para conrmar la acción.
4. Para abandonar el menú, pulse de nuevo el botón MENU.

89
ES
FUNCIONAMIENTO DE LA RADIO FM
Selección Stereo/Forced Mono
Mientras se recibe una emisora FM Stereo, pulse el botón FM ST. El aparato
cambia entre estéreo y mono.
Información de las emisoras FM
Las emisoras facilitan varias informaciones. Para navegar entre toda la
información mostrada, pulse varias veces el botón INFO:
1. Radiotexto: Muestra las pistas de música o detalles de un programa.
2. Tipo de programa (PTY): Tipo de programa.
3. Audio: Estéreo o mono.
Acceder a otras funciones del menú FM
• Pulse el botón MENU para acceder al menú.
• Gire y presione el regulador de selección del aparato o pulse los
botones o del mando a distancia para elegir entre otras
funciones que se describen a continuación:
Ajustes de la búsqueda de emisoras
1. Pulse el botón MENU para acceder al menú.
2. Gire y presione el regulador de selección del aparato o pulse los
botones o del mando a distancia hasta que aparezca en
pantalla “<Scan Setting>” y, a continuación, pulse SELECT para
conrmar la acción.
3. Gire y presione el regulador de selección del aparato o pulse los
botones o del mando a distancia para elegir entre las
opciones “All stations” o “Strong stations” y, a continuación, pulse
SELECT para conrmar la acción. Si selecciona “All stations”, en la
búsqueda se considerarán todas las emisoras, incluso las que tengan
interferencias. Si selecciona “Strong stations”, solamente se tendrán en
cuenta las emisoras con una señal intensa y se ignorarán aquellas con
interferencias.
4. En la próxima búsqueda solamente se tendrán en cuenta los ajustes
que ha realizado.
Ajustes de audio
1. Pulse el botón MENU para acceder al menú.
2. Gire y presione el regulador de selección del aparato o pulse los
botones o del mando a distancia hasta que aparezca en
pantalla „Audio Setting“ y, a continuación, pulse SELECT para conrmar
la acción.
90
ES
3. Gire y presione el regulador de selección del aparato o pulse los
botones o del mando a distancia para elegir entre las opciones
„Stereo allowed“ o „Forced mono“ y pulse SELECT para conrmar la
acción.
CD/USB
Introducir y reproducir CD
Introduzca un CD con la cara impresa hacia arriba dentro del
compartimento. La pantalla muestra durante algunos segundos “Reading”
mientras carga el CD. A continuación, se inicia automáticamente la
reproducción del CD.
USB
Conecte el dispositivo USB a la conexión USB. Pulse el botón USB del
mando a distancia o varias veces el botón SOURCE del aparato hasta que
aparezca “USB” en pantalla. Después de que el dispositivo se haya leído,
aparece el número total de pistas en pantalla. Para iniciar la reproducción,
pulse el botón
.
Reproducción/pausa
Para pausar la reproducción, pulse el botón
. Para continuar con la
reproducción, pulse de nuevo el botón
.
Stop
Pulse el botón para detener la reproducción.
Saltar pista
Pulse los botones
o para acceder a la pista anterior/siguiente.
Selección directa de pista
Utilice el teclado numérico para seleccionar la pista deseada para la
reproducción. Si, por ejemplo, pulsa el botón “3” y luego “SELECT”, la
reproducción se inicia automáticamente en la pista 3. O si primero pulsa “1”
y “2” y luego SELECT, se iniciará la reproducción de la pista 12.
91
ES
Búsqueda rápida de música
Durante la reproducción, mantenga pulsados los botones
o para
iniciar la búsqueda rápida. Cuando suelte el botón
o se continúa
con la reproducción musical en el punto correspondiente.
Repetir /reproducción aleatoria
• Pulse durante la reproducción el botón REPEAT
/RANDOM. El
monitor muestra “REP_ONE“, lo que signica que se repetirá la pista
actual en bucle.
• Si pulsa de nuevo el botón REPEAT
/RANDOM, la pantalla muestra
“REP_ALL“, que signica que se repiten todas las pistas.
• Si pulsa de nuevo el botón REPEAT
/RANDOM, la pantalla muestra
“Random“, que signica que se reproducirán todas las pistas en orden
aleatorio.
• Si pulsa de nuevo el botón REPEAT
/RANDOM, se continúa con la
reproducción normal.
Lista de reproducción guardada
Este aparato puede guardar pistas musicales en el orden que desee.
1. Introduzca un CD en modo Stop y pulse el botón MEMORY. Aparecerá
“P-01“ y en pantalla parpadea “01“.
2. Seleccione la pista deseada con los botones
o .
3. Para guardar las pistas deseadas, pulse el botón MEMORY.
4. Repita los pasos 2-3 hasta haber guardado 20 pistas (CD) y 99 pistas
(MP3).
5. Para reproducir las pistas guardadas, pulse el botón
.
6. Elimine la lista guardada pulsando dos veces el botón o cambiando
a otro modo.
7. Durante la reproducción de la lista guardada puede utilizar la función de
repetición para una o todas las pistas. La reproducción aleatoria no está
disponible en este modo.
92
ES
BT
Siga la información que aparece a continuación para sincronizar su
dispositivo BT con su aparato:
1. Pulse el botón BT del mando a distancia o varias veces el botón
SOURCE del mando a distancia para acceder al modo BT. En pantalla
aparece “BT“. Se inicia la búsqueda de dispositivos disponibles y en
pantalla parpadea “BT AUDIO“.
2. Si el aparato todavía no se ha conectado a un dispositivo BT o bien el
último dispositivo conectado no está disponible, el símbolo BT continúa
parpadeando en el monitor. Active la función BT de su dispositivo
BT móvil y busque “Stockton“ en la lista de dispositivos. Seleccione
“Stockton“ para sincronizar. Introduzca la contraseña “0000“ si fuera
necesario.
3. Cuando la sincronización se haya realizado correctamente, el símbolo
BT se ilumina permanentemente en pantalla.
4. Puede iniciar la reproducción musical en su dispositivo móvil y la música
se reproducirá a través de los altavoces del aparato.
5. Para pausar o continuar con la reproducción, pulse el botón .
6. Para reproducir la pista anterior o siguiente, puede pulsar el botón
o .
NOTA: Mantenga pulsado el botón PAIR del aparato para interrumpir la
conexión actual e iniciar una búsqueda de otro dispositivo BT.
AUX-IN
Con esta función puede reproducir el audio de un dispositivo de
reproducción externo a través del aparato.
1. Conecte el conector de un cable de audio de 3,5 mm (no incluido) a la
toma Line Out del dispositivo externo y a la toma AUX IN del aparato.
2. Pulse el botón AUX del mando a distancia o varias veces el botón
SOURCE del aparato para acceder al modo AUX. En pantalla aparece
“AUX“.
3. Inicie la reproducción de música de su dispositivo externo.
4. El sonido se emite a través del aparato.
93
ES
OTRAS FUNCIONES Y AJUSTES
EQ
Puede regular varios efectos de sonido con esta función.
• Pulse varias veces el botón EQ para seleccionar uno de los siguientes
efectos: FLAT/CLASSIC/ROCK/POP/JAZZ.
X-BASS
Con esta función puede intensicar el efecto de los graves de la música.
• Mantenga pulsado el botón X-BASS para activar y desactivar el efecto
X-Bass.
Función Sleep
1. Mientras el aparato esté encendido, pulse varias veces el botón
SLEEP para seleccionar el tiempo después del cual se debe apagar
automáticamente el aparato. Puede elegir entre 90, 80, 70, 60, 50, 40,
30, 20 o 10 minutos.
2. Cuando el temporizador llegue a “0“, el aparato se apaga
automáticamente.
3. Para cancelar la función, pulse el botón STANDBY para apagar el
aparato o varias veces el botón SLEEP hasta que en pantalla se muestre
“sleep o“.
Conguración de la hora
1. Cambie el aparato al modo standby.
2. Pulse el botón CLOCK para congurar la hora. En pantalla aparece
“Clock Set“.
3. Para congurar las horas, pulse los botones
o y conrme la
selección con CLOCK SET.
4. Para congurar los minutos, pulse el botón
o y para conrmar
pulse CLOCK SET.
NOTAS:
- La hora congurada se puede sobrescribir automáticamente a partir de la
conguración en tiempo real de DAB+ o FM.
- Si el aparato está encendido y pulsa el botón CLOCK SET en cualquier
modo, en pantalla aparece la hora durante unos segundos.
94
ES
Apagar/encender temporizador
1. Cambie el aparato al modo standby.
2. Mantenga pulsado el botón TIMER para activar/desactivar el
temporizador. En pantalla aparece “ON Timer“.
3. Para congurar el valor de la hora a la que se debe activar el
temporizador, pulse los botones
o y conrme pulsando
TIMER.
4. Para congurar el valor de los minutos a los que se debe activar el
temporizador, pulse los botones
o y conrme pulsando
TIMER. En pantalla aparece “O Timer“.
5. Pulse el botón TIMER para acceder a la siguiente selección.
6. Para congurar el valor de la hora a la que se debe desactivar el
temporizador, pulse los botones
o y conrme pulsando
TIMER.
7. Para congurar el valor de los minutos a los que se debe desactivar
el temporizador, pulse los botones
o y conrme pulsando
TIMER.
8. Con los botones
o , seleccione la fuente del temporizador
(CD/USB/DAB/FM) y conrme pulsando el botón TIMER.
9. Con los botones
o regule el volumen del temporizador y
conrme pulsando el botón TIMER.
10. Para activar la planicación del temporizador, pulse TIMER. En pantalla
se muestra el símbolo del temporizador.
NOTA: Si pulsa de nuevo el botón TIMER, la planicación se desactiva.
Ajustes de idioma
Puede seleccionar el idioma que desee.
1. Active el modo DAB o FM.
2. Pulse el botón MENU para acceder al menú.
3. Gire y presione el regulador de selección o pulse los botones o
del mando a distancia hasta que aparezca en pantalla “Language“ y, a
continuación, pulse SELECT para conrmar la acción.
4. Gire y presione el regulador de selección del aparato o pulse los
botones o del mando a distancia para elegir uno de los idiomas
disponibles. Seleccione el idioma deseado y conrme su selección
pulsando SELECT.
5. Pulse el botón MENU para abandonar el menú.

95
ES
Comprobar versión de software
Puede comprobar la versión de software.
1. Seleccione el modo FM o DAB.
2. Pulse el botón MENU para acceder al menú.
3. Gire y presione el regulador de selección o pulse los botones o
del mando a distancia hasta que aparezca en pantalla “SW Version“
y, a continuación, pulse SELECT para visualizar el número de versión de
software.
4. Pulse el botón MENU para abandonar el menú.
Restablecer los valores de fábrica
Con esta función, el aparato restablece los valores de fábrica.
1. Seleccione el modo FM o DAB.
2. Pulse el botón MENU para acceder al menú.
3. Gire y presione el regulador de selección o pulse los botones o
del mando a distancia hasta que aparezca en pantalla “Factory Reset“ y,
a continuación, pulse SELECT para conrmar la acción.
4. Pulse el botón o hasta que aparezca “<YES>“ y, a continuación,
pulse SELECT para conrmar la acción.
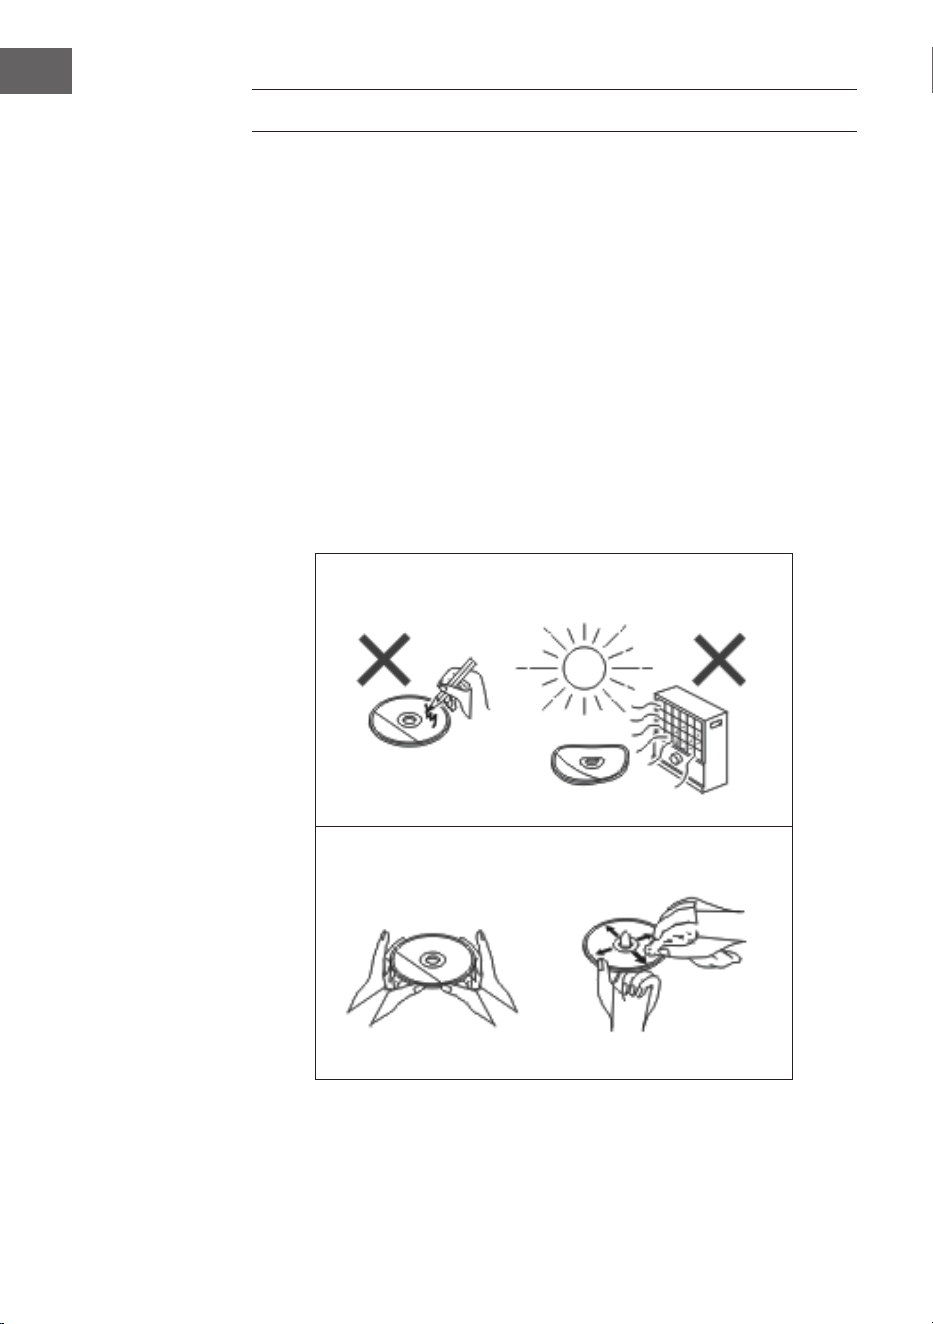
96
ES
LIMPIEZA Y CUIDADO
Limpieza del CD
Los CD son bastante resistentes a los daños; no obstante, pueden
producirse interferencias en su reproducción debido a la suciedad en su
supercie. Siga las indicaciones de cuidado que aparecen a continuación
para obtener el mejor resultado posible al reproducir un CD.
• No escriba en ninguna de las caras del CD, especialmente en la no
impresa, pues ahí es donde se leen las señales.
• Los CD no deben exponerse a la luz del sol, al calor ni a humedad
extrema.
• Sostenga los CD siempre por su esquina. Las marcas de dedos, la
suciedad o el agua en el CD pueden provocar interferencias o una
reproducción deciente.
• Si un CD está sucio o no se reproduce bien, límpielo con un paño seco y
suave desde el interior hacia el exterior.
NO
SÍ- CORRECTO

97
ES
Limpieza de la carcasa
• Limpie regularmente la carcasa con un paño suave y con una solución
jabonosa y, a continuación, séquela con un paño seco.
• No utilice productos químicos para limpiarla (gasolina, disolvente, etc.)
Existe el peligro de que la carcasa se dañe.
• No aplique aceites al interior de la carcasa, podrían averiar el aparato.
DETECCIÓN Y RESOLUCIÓN DE PROBLEMAS
Problema Posible causa
La radio hace ruidos extraños
continuamente
• ¿El aparato se encuentra cerca
de televisores u ordenadores?
• ¿La antena se ha posicionado
correctamente? Modique la
orientación de la antena.
El mando a distancia no funciona. • ¿La polaridad de las pilas es la
correcta?
• ¿Las pilas están agotadas?
• ¿La distancia o el ángulo son
erróneos?
• Luz clara incidiendo en el
sensor del mando a distancia.
No se inicia la reproducción de CD.
O: La reprosducción de CD se
detiene repentinamente y no se
reproduce correctamente.
• ¿El CD se ha colocado de
manera incorrecta?
• ¿El CD cumple con los
estándares de reproducción?
• ¿El CD está sucio o arañado?
La reproducción musical salta o se
detiene en medio de una pista.
• ¿El aparato está expuesto a
vibraciones?
• ¿El CD está muy sucio?
• ¿Se ha formado condensación
en el interior del aparato?
El dispositivo USB no se reconoce. • ¿Existen archivos MP3/WMA en
el dispositivo USB?
• ¿Se ha conectado el aparato
correctamente?
• ¿Se trata de un dispositivo
MTP?
• ¿Contiene solamente archivos
ACC?

98
ES
Problema Posible causa
No se inicia la reproducción de
USB.
• ¿Se trata de un archivo WMA
protegido?
• ¿Se trata de un archivo MP3
erróneo?
En el modo BT se interrumpe la
reproducción del sonido o presenta
interferencias.
• ¿El aparato se encuentra
demasiado cerca de otros
dispositivos eléctricos que
provocan interferencias?
• ¿Existe un obstáculo entre el
dispositivo BT y el aparato?
No hay sonido. • ¿Ha regulado el volumen a
“Min” (mínimo)?
• ¿Están conectados los
auriculares?
• ¿El dispositivo BT móvil está
demasiado lejos del aparato?
• ¿El aparato se ha sincronizado
con otros dispositivos BT?
Si se pulsa un botón, el aparato no
responde.
• Cambie el aparato al modo
standby y enciéndalo de nuevo.

99
ES
DATOS TÉCNICOS
Número de artículo 10034517
Suministro eléctrico Adaptador de red (incluido)
Entrada: CA 100-240V ~ 50/60Hz
Salida: CC 12V
3.0A
Consumo en standby < 1 W
Impedancia de altavoces 4 Ω
Potencia de salida 2 x 10 W RMS
Sintonizador:
Respuesta de frecuencia: FM 87,5 - 108 MHz,
DAB 174,9 - 239,2 MHz
BT
BT frecuencia 2402-2480 MHz
BT potencia de radiofrecuencia
(max.)
4 dBm
Reproducción de CD
Tipo Single Disc Multi Play CD-Player
Host USB
Ranura Compatible con USB 1.1 /
2.0 clase de almacenamiento masivo
Tipos de archivos compatibles: MPEG 1 Layer 3 WMA (sin DRM)
Tasas de bits compatibles: MP3 (32 ~ 320 kbps)
WMA (64 ~ 160 kbps)

100
ES
RETIRADA DEL APARATO
Si en su país existe una disposición legal relativa a
la eliminación de aparatos eléctricos y electrónicos,
este símbolo estampado en el producto o en
el embalaje advierte que no debe eliminarse
como residuo doméstico. En lugar de ello, debe
depositarse en un punto de recogida de reciclaje
de aparatos eléctricos y electrónicos. Una gestión
adecuada de estos residuos previene consecuencias
potencialmente negativas para el medio ambiente
y la salud de las personas. Puede consultar más
información sobre el reciclaje y la eliminación de este
producto contactando con su administración local o
con su servicio de recogida de residuos.
Este producto contiene baterías. Si en su país existe
una disposición legal relativa a la eliminación de
baterías, estas no deben eliminarse como residuo
doméstico. Infórmese sobre la normativa vigente
relacionada con la eliminación de baterías. Una
gestión adecuada de estos residuos previene
consecuencias potencialmente negativas para el
medio ambiente y la salud de las personas.
DECLARACIÓN DE CONFORMIDAD
Fabricante:
Chal-Tec GmbH, Wallstraße 16, 10179 Berlín, Alemania.
Importador para Gran Bretaña:
Berlin Brands Group UK Limited
PO Box 42
272 Kensington High Street
London, W8 6ND
United Kingdom
Por la presente, Chal-Tec GmbH declara que el tipo
de equipo radioeléctrico Stockton es conforme con
la Directiva 2014/53/UE. El texto completo de la
declaración UE de conformidad está disponible en la
dirección Internet siguiente: use.berlin/10034517

101
IT
Gentile cliente,
La ringraziamo per aver acquistato il dispositivo.
La preghiamo di leggere attentamente le seguenti
istruzioni per l’uso e di seguirle per evitare possibili
danni tecnici. Non ci assumiamo alcuna responsabilità
per danni scaturiti da una mancata osservazione delle
avvertenze di sicurezza e da un uso improprio del
dispositivo. Scansionare il codice QR seguente, per
accedere al manuale d’uso più attuale e per ricevere
informazioni sul prodotto.
INDICE
Avvertenze di sicurezza 102
Descrizione del dispositivo 104
Telecomando 106
installazione 107
Messa in funzione e utilizzo 108
Funzioni radio DAB 111
Funzioni radio FM 113
CD/USB 114
BT 116
AUX-IN 116
Ulteriori funzioni e impostazioni 117
Pulizia e manutenzione 120
Ricerca e correzione degli errori 121
Dati tecnici 123

102
IT
AVVERTENZE DI SICUREZZA
• Leggere attentamente il manuale d’uso prima di installazione e messa
in funzione del dispositivo e conservarlo per future consultazioni.
• Assicurarsi di posizionare il dispositivo in un’area ben ventilata e di
mantenere una distanza minima di 10 cm su lati e parte superiore.
• Posizionare il dispositivo su una supercie stabile e con basse
vibrazioni.
• Posizionare il dispositivo ad almeno 30 cm di distanza da televisori CRT,
in modo da evitare interferenze all’immagine. Se dovessero comunque
risultare interferenze all’immagine, allontanare ulteriormente il
dispositivo. Questo non vale per televisori LCD.
• Non posizionare il dispositivo vicino a fonti di calore (ad es.
termosifoni). Tenere il dispositivo lontano dalla luce del sole diretta,
da forti campi magnetici, polvere eccessiva, umidità e dispositivi che
causano ronzii elettrici.
• Non poggiare oggetti sopra al dispositivo.
• Spostare il dispositivo facendo attenzione e evitare colpi.
• Non esporre il dispositivo a umidità, a temperatura oltre i 40°C o
temperature molto basse.
• Assicurarsi che le aperture di ventilazione non siano bloccate da
oggetti, come giornali, tovaglie, tende, ecc.
• Non poggiare sul dispositivo oggetti con amme libere, come ad es.
candele accese.
• Utilizzare il dispositivo solo in ambienti con temperature moderate tra
5 e 35°C.
• Il dispositivo non deve essere utilizzato vicino all’acqua e non deve
entrare in contatto con umidità.
• Non esporre il dispositivo a spruzzi o gocce d’acqua e non poggiarci
sopra oggetti pieni d’acqua.
ATTENZIONE
Pericolo di esplosione! Se le batterie non vengono sostituite
correttamente, si corre il rischio di esplosioni! Sostituire le
batterie sempre con batterie dello stesso tipo. La spina serve
a scollegare il dispositivo dall’alimentazione e deve quindi
essere sempre facilmente accessibile.

103
IT
• Utilizzare solo accessori inclusi in consegna o espressamente consigliati
dal produttore. Utilizzare l’adattatore solo per gli scopi previsti.
• In caso di temporale e se il dispositivo non viene utilizzato per lunghi
periodi di tempo, staccare la spina dalla presa elettrica per motivi di
sicurezza.
• Non cercare di riparare autonomamente il dispositivo. Il dispositivo
deve essere riparato da una persona qualicata se:
a. Il cavo di alimentazione è danneggiato.
b. Sono caduti oggetti nel dispositivo o è penetrato liquido al suo
interno.
c. Il dispositivo è stato esposto a pioggia.
d. Il dispositivo non funziona correttamente senza valori nominali di
modiche esterne.
e. Il dispositivo è guasto.
• Per interrompere completamente l’alusso di corrente, è necessario
staccare la spina dalla presa elettrica. Assicurarsi che la spina sia
sempre facilmente accessibile.
AVVERTENZA
Pericolo di incendio! La tensione di rete deve corrispondere
alla tensione indicata sulla targhetta del dispositivo.
L’utilizzo di tensione maggiore a quella indicata può causare
incendi o incidenti, con conseguenti danni. Il produttore del
dispositivo non si assume alcuna responsabilità per danni
scaturiti dall’utilizzo di una tensione errata.
Regolazione del volume
Il volume in una determinata impostazione dipende dall’eicienza
dell’altoparlante, dal luogo di posizionamento e da altri fattori. Non
impostare il volume al massimo quando si accende il dispositivo. Ascoltare
la musica a un volume moderato. L’ascolto di musica a volume elevato per
tempi prolungati può causare la perdita dell’udito.

104
IT
DESCRIZIONE DEL DISPOSITIVO
1
2 3 4
5
6
7
8
17
18
16 15 14
13 12 11
10
9

105
IT
1 Saltare titolo, avanzare velocemente 12 MENU/INFO
2 Standby 13 SOURCE (fonte)
3 Schermo LCD 14 Connessione telefono
4 Aprire vano CD 15 Posizione di salvataggio 1
5 Sensore telecomando 16 Regolazione volume
6 Saltare titolo, tornare indietro velocemente 17 Altoparlante sinistro
7 Altoparlante destro 18 Posizione di salvataggio 2,
Stop (modalità USB/CD)
8 Play/Pausa/Posizione di salvataggio 3 19 Vano CD
9 Manopola di selezione 20 Antenna FM/DAB
10 Salvare 21 Connessione DC-IN
11 Connessione USB 22 Connessione AUDIO-IN
19
20 21 22
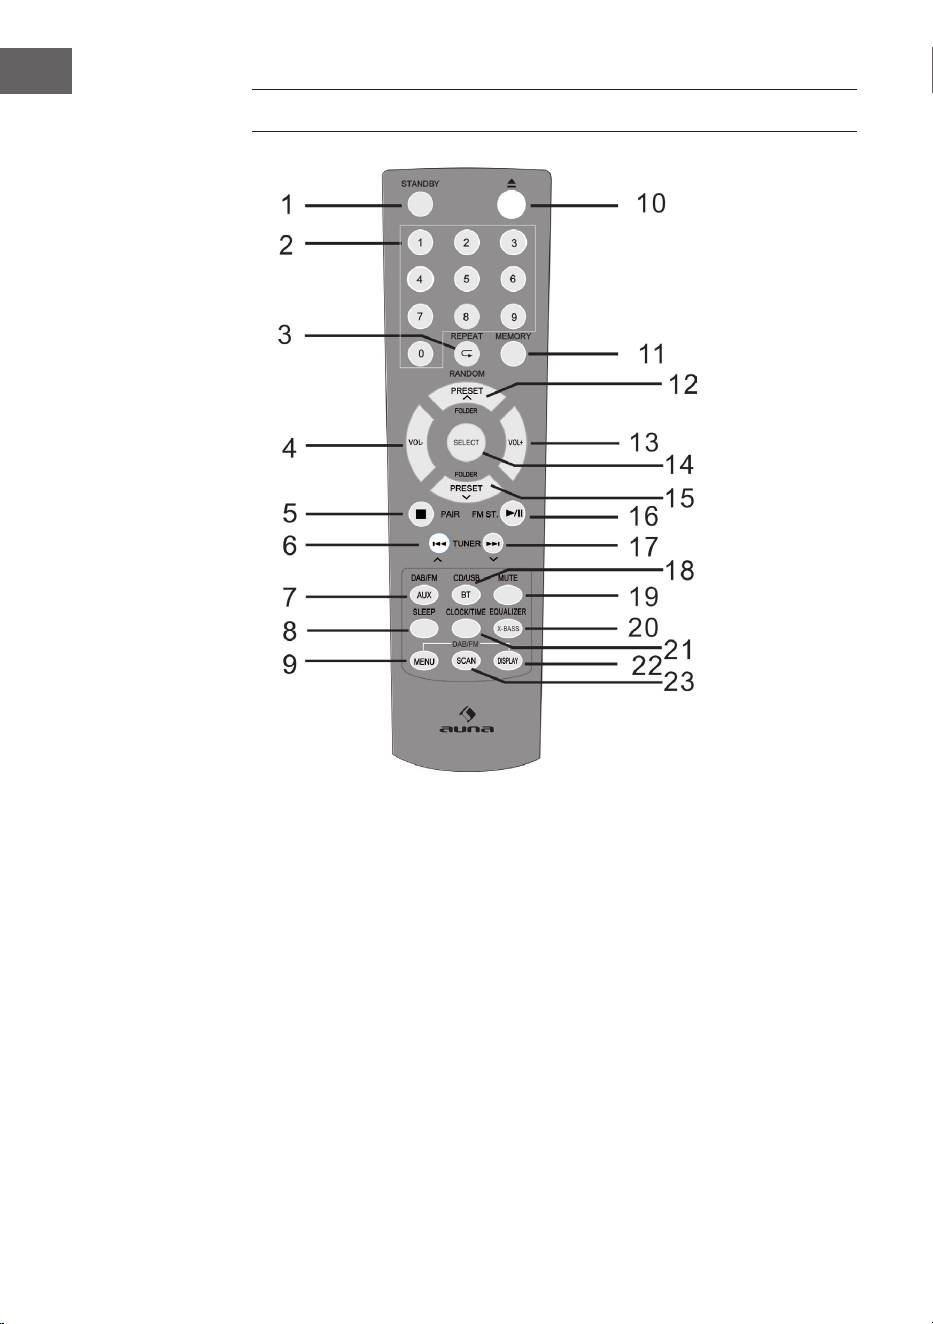
106
IT
TELECOMANDO
1 Accendere/Standby 9 Menu DAB/FM 17 Saltare verso l’alto,
avanzare velocemente,
aumentare il tempo
2 Tasti numerici 10 Aprire
3 Ripetere/
Riproduzione casuale
11 Salvare 18 CD/USB/BT
4 Abbassare il volume 12 Una posizione di
salvataggio/
Cartella verso l’alto
(modalità radio)
19 Muto
5 Stop, Collegare 20 EQ/X-BASS
6 Saltare verso il basso,
tornare indietro velocemente,
ridurre il tempo
13 Alzare il volume 21 Ora/Timer
14 SELECT
(tasto di selezione)
22 Indicazione RDS (DAB),
ID3 (CD/USB)
7 DAB/FM/AUX 15 Una posizione di
salvataggio/
Cartella verso il basso
23 Cerca
8 Timer di autospegnimento
(Sleep)
16 Play/Pausa; Stereo (FM)

107
IT
INSTALLAZIONE
Inserire le batterie nel telecomando
1. Aprire la copertura del vano delle batterie.
2. Inserire le batterie incluse in consegna nel vano, rispettando la polarità.
Quando si inseriscono e si tolgono le batterie, premere in direzione del
polo negativo (-).
3. Chiudere la copertura del vano.
Avvertenze di sicurezza relative all’utilizzo delle batterie
• Togliere le batterie, se il dispositivo non viene utilizzato per lunghi
periodi di tempo. In questo modo si evitano eventuali danni dovuti a
perdite di acido delle batterie.
• Non utilizzare batterie ricaricabili (nichel-cadmio, ecc.).
• Se le batterie vengono inserite in modo sbagliato, possono risultare
malfunzionamenti del dispositivo.
• Non esporre le batterie (inserite nel dispositivo o ancora nella
confezione) a calore eccessivo, come ad es. luce del sole.
Avvertenze sull’utilizzo del telecomando
• Sostituire le batterie, se la portata del telecomando si riduce o se il
telecomando non funziona regolarmente. Utilizzare batterie AAA (UM-
4/SUM-4).
• Pulire regolarmente il trasmettitore del telecomando e il sensore del
telecomando sul dispositivo con un panno morbido.
• L’esposizione del sensore a luce intensa può interferire sull’utilizzo.
Ridurre l’intensità della luce o spostare il dispositivo, se dovesse
comparire il problema.
• Non esporre il telecomando a umidità, calore, colpi e vibrazioni.
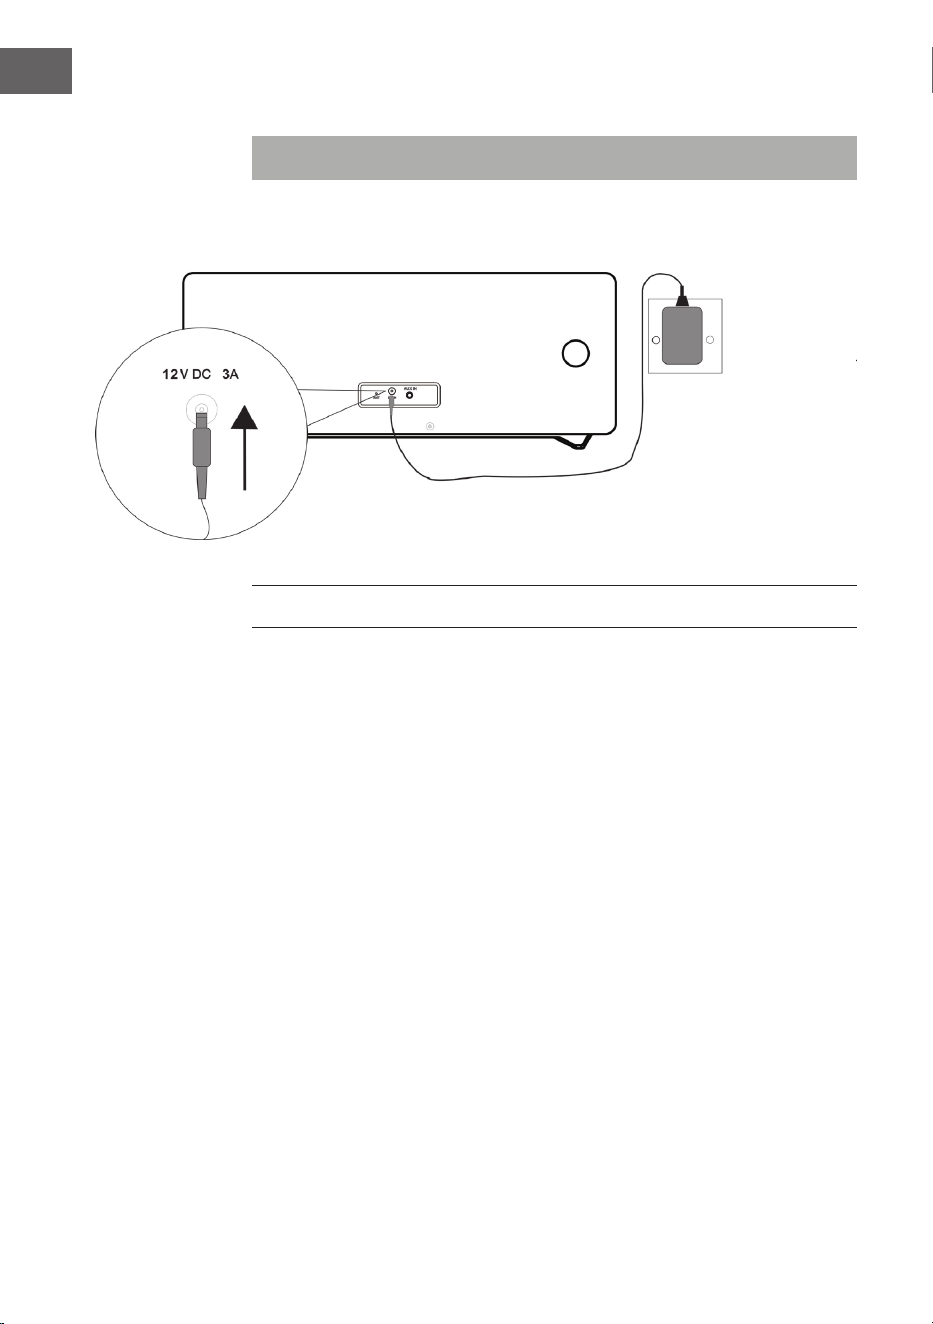
108
IT
Connessioni dell’impianto
Nota: staccare la spina prima di eettuare collegamenti.
MESSA IN FUNZIONE E UTILIZZO
Muto
Premere MUTE sul telecomando o premere la manopola del volume sul
dispositivo per disattivare temporaneamente il volume. Premere di nuovo
per riattivare il volume.
Regolare il volume
Ruotare la manopola sul dispositivo o premere i tasti del volume sul
telecomando per alzare o abbassare il volume.
Radio DAB/FM
Inserire il connettore dell’adattatore incluso in consegna nella connessione
DC sul retro del dispositivo e la spina nella presa elettrica. Lo schermo
mostra “Scan Time”. Il dispositivo aggiorna l’ora del dispositivo utilizzando
l’orario messo a disposizione dalle emittenti. Attendere no a quando
termina l’aggiornamento e sullo schermo viene mostrata l’ora corretta.
AdattatoreAdattatore
Presa elettrica a parete
AC 230 V

109
IT
Premere STANDBY (POWER) per accendere il dispositivo. Premere di
nuovo STANDBY (POWER) per spegnere il dispositivo.
DAB/FM/CD/AUX/BT
Premere DAB/FM sul telecomando o premere più volte SOURCE sul
dispositivo per selezionare tra le diverse fonti.
Regolare l’antenna
L’antenna sul retro del dispositivo deve essere estratta completamente per
garantire una buona ricezione DAB/FM. Muovere l’antenna per cercare la
migliore posizione di ricezione.
UTILIZZO DELLA RADIO DAB
Quando si seleziona la modalità DAB per la prima volta, vengono cercate
automaticamente le emittenti DAB disponibili. Attendere che la ricerca sia
conclusa. Sullo schermo vengono mostrati i progressi di ricerca. Terminata
la ricerca, viene impostata la prima emittente trovata.
Ricerca automatica delle emittenti (DAB)
1. Accendere il dispositivo e selezionare la modalità DAB.
2. Premere SCAN per iniziare la ricerca automatica di tutte le emittenti
disponibili.
Ricerca manuale delle emittenti (DAB)
1. Accendere il dispositivo e selezionare la modalità DAB.
2. Premere MENU per entrare nel menu di controllo.
3. Ruotare e premere la manopola di selezione o premere o sul
telecomando, no a quando sullo schermo compare “Manual Tune”.
Confermare con SELECT.
4. Ruotare e premere la manopola di selezione o premere o sul
telecomando per selezionare l’emittente desiderata (5A – 13F).
5. Confermare con SELECT.
6. Ruotare e premere la manopola di selezione o premere o
sul telecomando per selezionare un’altra emittente e confermare con
SELECT.
7. Una volta trovata l’emittente desiderata, premere SELECT.
8. La ricerca viene interrotta premendo MENU.
110
IT
Impostare un’emittente (DAB)
Ruotare e premere la manopola di selezione o premere o sul
telecomando per selezionare l’emittente per mostrare le informazioni
dell’emittente successiva. Premere SELECT entro qualche secondo per
impostare tale emittente.
UTILIZZO DELLA RADIO FM
Ricerca automatica delle emittenti (FM)
1. Accendere il dispositivo e selezionare la modalità FM.
2. Tenere premuto SCAN per iniziare la ricerca automatica e salvare
(massimo 20) emittenti disponibili.
Ricerca manuale delle emittenti (FM)
1. Premere REW
o FFW o oppure o sul telecomando
per impostare un’altra frequenza.
2. In alternativa, tenere premuti REW
o FFW do oppure premere
o sul telecomando per impostare l’emittente successiva
disponibile.
SALVARE EMITTENTI RADIO DAB/FM
A) Con il telecomando:
1. Impostare l’emittente che si desidera salvare.
2. Tenere premuto MEMORY. Lo schermo lampeggia.
3. Premere Preset+ e Preset- per impostare la posizione di salvataggio.
Premere SELECT per salvare.
NOTA: possono essere salvate no a 20 emittenti DAB e FM.
Aprire emittenti DAB/FM salvate
• Premere Preset+ o Preset- per raggiungere un’emittente salvata o
premere una volta MEMORY e selezionare la posizione di salvataggio
da raggiungere con Preset+ o Preset-. Confermare con SELECT.
• Per aprire direttamente le emittenti salvate, è possibile anche usare
i tasti numerici. Ad esempio, se si preme il tasto “3” e poi SELECT, si
aprirà l’emittente salvata in posizione 3. Se si premono i tasti “1” e poi
“2” e poi SELECT, si aprirà l’emittente salvata in posizione 12.

111
IT
B) Con il pannello di controllo sul lato frontale del dispositivo:
Salvataggio rapido delle emittenti (1 – 3)
• Impostare l’emittente DAB/FM che si desidera salvare.
• Tenere premuto uno dei tasti Preset numerati (1 – 3) per due secondi,
no a quando compare un messaggio sullo schermo che indica il
salvataggio dell’emittente in questa posizione.
Salvataggio emittente nella lista di memoria (4 – 20)
1. Impostare l’emittente DAB/FM che si desidera salvare.
2. Tenere premuto 4+ per mostrare la lista di memoria. Ruotare la
manopola di selezione (o premere o sul telecomando) per
selezionare una posizione di salvataggio. Le emittenti già salvate
possono essere sovrascritte.
3. Premere la manopola di selezione (o SELECT sul telecomando) per
salvare l’emittente selezionata.
FUNZIONI RADIO DAB
Mostrare le informazioni delle emittenti DAB
Le emittenti mettono a disposizione diverse informazioni. Premere più volte
INFO per cambiare le informazioni mostrate.
1. Radio testo: mostra titolo musicale o dettagli sul programma.
2. Intensità del segnale: più viene mostrato il segnale a stella, maggiore
l’intensità del segnale ricevuto. Regolare l’antenna per migliorare la
ricezione.
3. Tipo di programma (PTY): tipo di programma.
4. Nome Multiplex: mostra il nome del Multiplex a cui appartiene
l’emittente.
5. Frequenza: mostra la frequenza attuale dell’emittente.
6. Tasso di errore nel segnale: mostra il tasso di errore nel segnale.
Maggiore il valore, maggiori gli errori ricevuti. Regolare l’antenna per
migliorare la ricezione.
7. Audio Bit Rate: mostra l’attuale Audio-Bitrate.
112
IT
Ulteriori opzioni DAB
Premere MENU per accedere al menu. Ruotare e premere la manopola di
selezione o premere o sul telecomando per selezionare una delle
seguenti opzioni:
Controllo della gamma dinamica (DRC)
Con l’aiuto del DRC è possibile rendere udibili suoni a basso volume in
ambienti rumorosi. Il livello DRC dipende dalle impostazioni dell’emittente.
È possibile modicare il livello DRC sul dispositivo in questo modo:
Ci sono 3 livelli di compressione:
DRC alto: compressione massima.
DRC basso: compressione a metà (1/2) della compressione messa a
disposizione dall’emittente.
DRC basso: nessuna compressione.
1. Premere MENU per accedere al menu.
2. Ruotare e premere la manopola di selezione o premere o sul
telecomando no a quando sullo schermo compare “DRC”. Confermare
con SELECT.
3. Ruotare e premere la manopola di selezione o premere o sul
telecomando, impostare il livello DRC desiderato e confermare con
SELECT.
4. Premere MENU per uscire dal menu.
NOTA: non tutte le emittenti DAB possono utilizzare la funzione DRC. Se
un’emittente non supporta il DRC, l’impostazione DRC sul dispositivo non
ha alcun eetto. Dopo aver impostato il DRC, il volume dell’audio può
essere più alto.
Cancellare emittenti inattive
Con questa funzione è possibile cancellare emittenti inattive.
1. Premere MENU per accedere al menu.
2. Ruotare e premere la manopola di selezione o premere o
sul telecomando no a quando sullo schermo compare “Prune”.
Confermare con SELECT.
3. Ruotare e premere la manopola di selezione o premere o sul
telecomando per selezionare “<YES>” e confermare con SELECT.
4. Premere MENU per uscire dal menu.

113
IT
FUNZIONI RADIO FM
Selezionare Stereo/Force Mono
Premere FM ST. mentre si riceve un’emittente FM. Il dispositivo cambia tra
Stereo e Mono.
Informazioni emittente FM
Le emittenti mettono a disposizione diverse informazioni. Premere più volte
INFO per mostrare le diverse informazioni:
1. Radio testo: mostra il titolo musicale o dettagli del programma.
2. Tipo di programma (PTY): tipo di programma.
3. Audio: stereo o mono.
Accedere a ulteriori funzioni del menu FM
• Premere MENU per accedere al menu.
• Ruotare e premere la manopola di selezione o premere o sul
telecomando per selezionare altre funzioni descritte di seguito:
Impostazioni di ricerca emittenti
1. Premere MENU per accedere al menu.
2. Ruotare e premere la manopola di selezione o premere o sul
telecomando no a quando sullo schermo compare “Scan setting” e
confermare con SELECT.
3. Ruotare e premere la manopola di selezione o premere o
sul telecomando per selezionare tra “All stations” e “Strong stations”
e confermare con SELECT. Se si seleziona “All stations, durante la
ricerca vengono prese in considerazione tutte le emittenti, anche
quelle che gracchiano. Se si seleziona “Strong stations” vengono prese
in considerazione solo emittenti con segnale intenso e quelle che
gracchiano vengono ignorate.
4. Alla ricerca successiva, vengono utilizzate le impostazioni inserite.
Impostazione audio
1. Premere MENU per accedere al menu.
2. Ruotare e premere la manopola di selezione o premere o sul
telecomando no a quando sullo schermo compare “Audio setting” e
confermare con SELECT.
3. Ruotare e premere la manopola di selezione o premere o
sul telecomando per scegliere tra “Stereo allowed” e “Forced mono”.
Confermare con SELECT.
114
IT
CD/USB
Inserire e riprodurre CD
Inserire un CD nel vano con il lato stampato verso l’alto. Lo schermo mostra
“Reading” per alcuni secondi mentre viene caricato il CD. La riproduzione
inizia poi automaticamente.
USB
Inserire il dispositivo USB nell’apposito ingresso. Premere USB sul
telecomando o premere più volte SOURCE sul dispositivo, no a quando
sullo schermo compare “USB”. Dopo che il dispositivo è stato rilevato, viene
mostrato sullo schermo il numero totale di titoli. Iniziare la riproduzione
premendo PLAY/PAUSE
.
Play/Pausa
Per mettere in pausa la riproduzione, premere PLAY/PAUSE
. Per
riprendere la riproduzione, premere PLAY/PAUSE
.
Stop
Premere STOP per arrestare la riproduzione.
Saltare un titolo
Premere REW
o FFW per passare al titolo precedente o
successivo.
Selezione diretta di un titolo
Utilizzare i tasti numerici per selezionare direttamente il titolo da riprodurre.
Ad esempio, se si preme “3” e poi SELECT, viene riprodotto il titolo 3. Se si
preme “1”, poi “2” e poi SELECT, viene riprodotto il titolo 12.
Ricerca rapida
Tenere premuto REW
o FFW durante la riproduzione per iniziare
la ricerca rapida. Quando si lascia andare REW
o FFW , la
riproduzione riprende al punto corrispondente.
115
IT
Ripetizione/Riproduzione casuale
• Premere una volta REPEAT
/RANDOM. Lo schermo mostra
“REP_ONE” e il titolo attuale viene ripetuto in loop.
• Se si preme nuovamente REPEAT
/RANDOM, lo schermo mostra
“REP_ALL” e vengono ripetuti tutti i titoli.
• Se si preme nuovamente REPEAT
/RANDOM, lo schermo mostra
“Random” e i titoli vengono riprodotti in ordine casuale.
• Se si preme nuovamente REPEAT
/RANDOM, viene ripresa la
normale riproduzione.
Playlist salvata
Questo dispositivo può salvare titoli musicali in un determinato ordine:
1. In modalità Stop, inserire un CD e premere MEMORY. Compare “P-01” e
l’indicazione “01” lampeggia.
2. Selezionare il titolo desiderato con REW
o FFW .
3. Premere MEMORY per salvare il titolo.
4. Ripetere la procedura dei passaggi 2-3, per salvare no a 20 titoli CD e
no a 99 titoli MP3.
5. Premere PLAY/PAUSE
per iniziare la riproduzione.
6. La playlist viene cancellata premendo due volte STOP o passando in
un’altra modalità.
7. Durante la riproduzione di playlist, è possibile attivare la funzione di
riproduzione per un titolo o per tutti i titoli. La riproduzione casuale non
è disponibile.

116
IT
BT
Seguire queste informazioni per accoppiare il dispositivo mobile BT con
l’impianto:
1. Premere BT sul telecomando o premere più volte SOURCE sul
dispositivo per raggiungere la modalità BT. Sullo schermo compare
“BT”. La ricerca dei dispositivi disponibili viene avviata e sullo schermo
lampeggia “BT AUDIO”.
2. Se il dispositivo non è ancora stato collegato con un dispositivo BT o se
l’ultimo dispositivo collegato non è disponibile, il simbolo BT continua
a lampeggiare sullo schermo. Attivare la funzione BT sul dispositivo
mobile BT e cercare nella lista “Stockton”. Se necessario, inserire la
password “0000”.
3. Una volta realizzato l’accoppiamento, il simbolo BT resta acceso sullo
schermo.
4. Ora è possibile avviare la riproduzione dal dispositivo mobile e la
musica viene emessa dagli altoparlanti del dispositivo.
5. Utilizzare PLAY/PAUSE per avviare e mettere in pausa la
riproduzione.
6. Premere REW
o FFW per riprodurre il titolo precedente o
successivo.
NOTA: tenere premuto PAIR sul dispositivo per interrompere la connessione
attuale e avviare la ricerca di un altro dispositivo BT.
AUX-IN
Con questa funzione è possibile riprodurre l’audio da un dispositivo di
riproduzione esterno tramite l’impianto.
1. Collegare un cavo audio da 3,5 mm (non incluso in consegna) nella
connessione Line-Out del dispositivo esterno e nella connessione AUX-
IN del dispositivo.
2. Premere AUX sul dispositivo o premere più volte SOURCE per passare
in modalità AUX. Sullo schermo compare “AUX”.
3. Iniziare la riproduzione dal dispositivo esterno.
4. Il suono viene emesso dall’impianto.

117
IT
ULTERIORI FUNZIONI E IMPOSTAZIONI
EQ
Con questa funzione è possibile impostare diversi eetti sonori:
• Premere più volte EQ per selezionare tra: FLAT/CLASSIC/ROCK/POP/
JAZZ.
X-BASS
Con questa funzione si incrementa la potenza dei bassi.
• Tenere premuto X-BASS per accendere o spegnere l’eetto X-Bass.
Funzione sleep
1. A dispositivo acceso, premere più volte SLEEP per impostare il tempo
no allo spegnimento automatico. Possono essere impostati 90, 80, 70,
60, 50, 40, 30, 20 o 10 minuti.
2. Quando il timer arriva a “0”, il dispositivo si spegne automaticamente.
3. Premere STANDBY (POWER) per interrompere la funzione e
spegnere il dispositivo o premere più volte SLEEP no a quando sullo
schermo compare “sleep o”.
Impostare l’ora
1. Mettere il dispositivo in standby.
2. Premere CLOCK SET per impostare l’ora. Sullo schermo compare “Clock
Set”.
3. Premere REW
o FFW per impostare le ore e confermare con
CLOCK SET.
4. Premere REW
o FFW per impostare i minuti e confermare con
CLOCK SET.
NOTE:
- L’ora impostata può essere sovrascritta dall’impostazione dell’ora esatta
DAB+ o FM.
- Se si accende il dispositivo e si preme CLOCK SET in una modalità a
piacere, sullo schermo viene mostrata l’ora per qualche secondo.
118
IT
Accendere/spegnere il timer
1. Mettere il dispositivo in standby.
2. Tenere premuto TIMER per accendere/spegnere il timer. Sullo schermo
compare “On Timer”.
3. Premere REW
o FFW per impostare le ore a cui attivare il
timer. Confermare con TIMER.
4. Premere REW
o FFW per impostare i minuti a cui attivare il
timer. Confermare con TIMER. Sullo schermo compare “O Timer”.
5. Premere TIMER per raggiungere la selezione successiva.
6. Premere REW
o FFW per impostare le ore a cui disattivare il
timer. Confermare con TIMER.
7. Premere REW
o FFW per impostare i minuti a cui disattivare il
timer. Confermare con TIMER.
8. Premere REW
o FFW per impostare la fonte del timer (CD/
USB/DAB/FM) e confermare con TIMER.
9. Premere REW
o FFW per impostare il volume del timer e
confermare con TIMER.
10. Premere TIMER per attivare il piano orario del timer. Sullo schermo
compare il simbolo del timer.
NOTA: se si preme di nuovo TIMER, il piano orario del timer viene
disattivato.
Impostare la lingua
È possibile impostare la lingua desiderata.
1. Attivare la modalità DAB o FM.
2. Premere MENU per accedere al menu.
3. Ruotare e premere la manopola di selezione o premere o
sul telecomando no a quando sullo schermo compare “Language” e
confermare con SELECT.
4. Ruotare e premere la manopola di selezione o premere o sul
telecomando per selezionare tra le diverse lingue. Selezionare la lingua
desiderata e confermare con SELECT.
5. Premere MENU per uscire dal menu.

119
IT
Controllare la versione del software
È possibile controllare la versione del software.
1. Attivare la modalità DAB o FM.
2. Premere MENU per accedere al menu.
3. Ruotare e premere la manopola di selezione o premere o sul
telecomando no a quando sullo schermo compare “SW Version” e
premere SELECT per mostrare il numero della versione del software.
4. Premere MENU per uscire dal menu.
Reset alle impostazioni di fabbrica
Con questa funzione è possibile riportare il dispositivo alle impostazioni di
fabbrica.
1. Attivare la modalità DAB o FM.
2. Premere MENU per accedere al menu.
3. Ruotare e premere la manopola di selezione o premere o sul
telecomando no a quando sullo schermo compare “Factory Reset” e
confermare con SELECT.
4. Premere o no a quando compare “<YES>” e confermare con
SELECT.
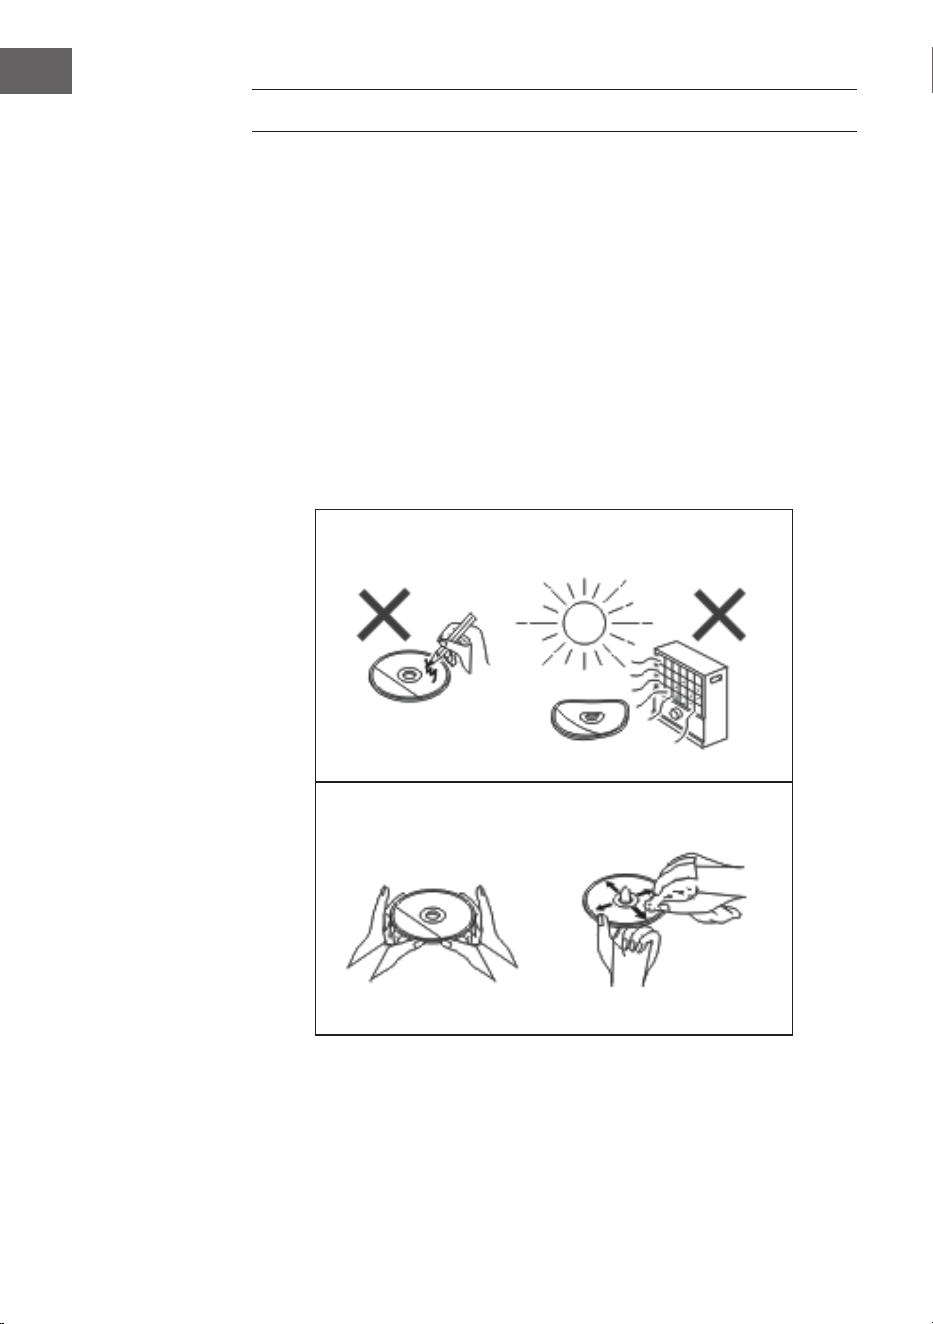
120
IT
PULIZIA E MANUTENZIONE
Pulire i CD
I CD sono abbastanza resistenti, ma eventuale sporcizia sulla supercie
del CD può causare malfunzionamenti nella riproduzione. Seguire queste
indicazioni per ottenere la migliore riproduzione possibile.
• Non scrivere su nessun lato del CD, in particolare sul lato non stampato,
dato che è da questo lato che vengono letti i segnali.
• I CD non devono essere esposti alla luce del sole diretta e a calore o
umidità estremi.
• Tenere sempre i CD dal bordo. Impronte digitali, sporco o acqua sul CD
possono causare interferenze o una riproduzione errata.
• Se un CD è sporco o non viene riprodotto correttamente, pulirlo con un
panno morbido e asciutto, muovendosi dal centro verso l’esterno.
NO
Sì - CORRETTO!
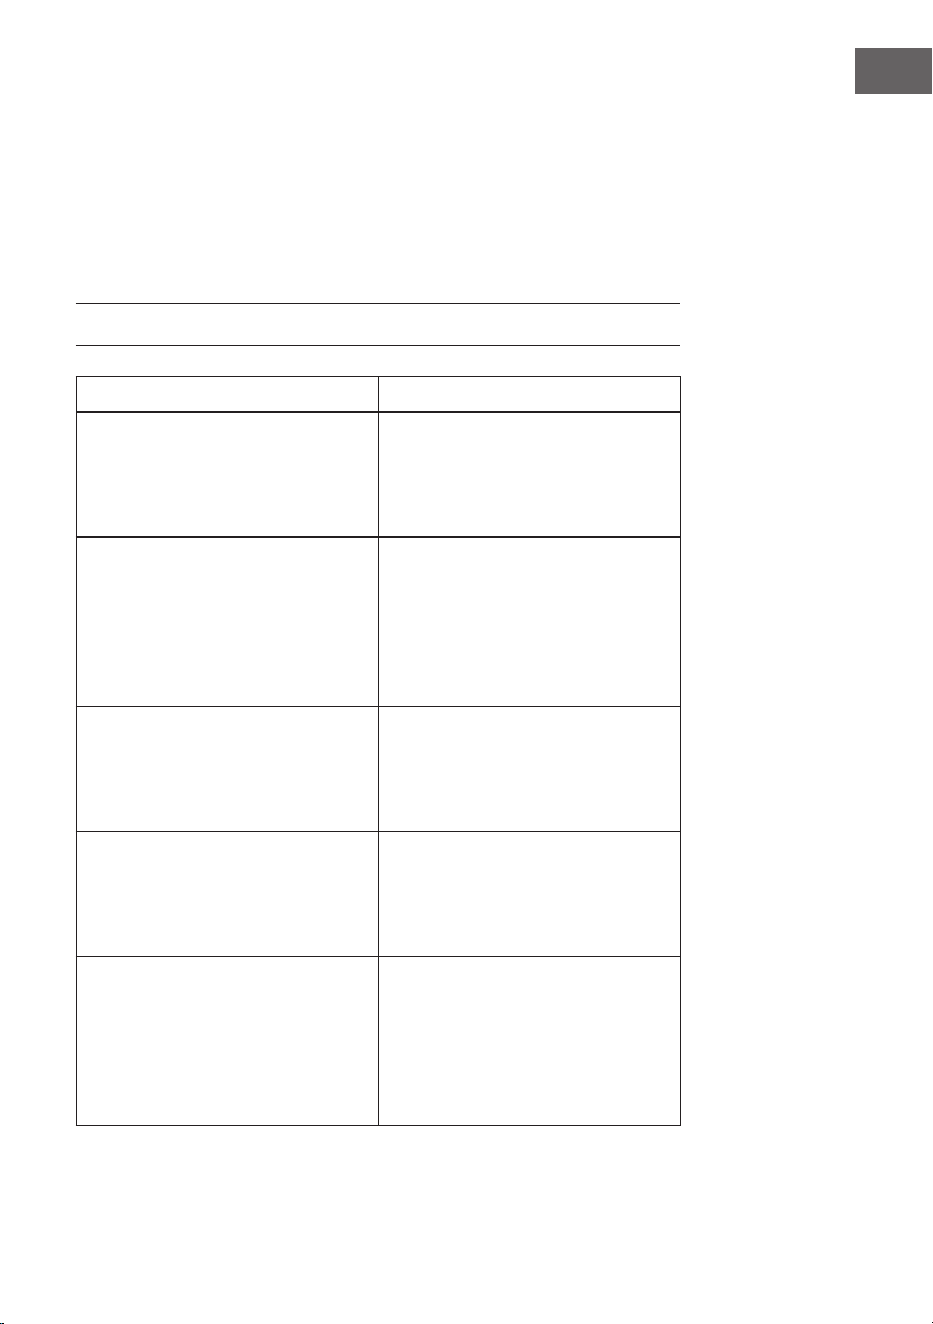
121
IT
Pulire l’alloggiamento
• Stronare regolarmente l’alloggiamento con un panno morbido e una
soluzione saponosa. Procedere poi ad asciugarlo con un panno asciutto.
• Non utilizzare prodotti chimici per la pulizia (benzina, solventi, ecc.). Si
corre il rischio di danneggiare l’alloggiamento.
• Non applicare olio all’interno dell’alloggiamento, altrimenti possono
risultare malfunzionamenti.
RICERCA E CORREZIONE DEGLI ERRORI
Problema Possibile causa
La radio emette di continuo strani
rumori gracchianti.
• Il dispositivo si trova vicino a un
computer o a un televisore?
• L’antenna è posizionata
correttamente? Spostare
l’antenna.
Il telecomando non funziona. • La polarità della batteria è
corretta?
• La batteria è scarica?
• La distanza o l’inclinazione
sono errate?
• C’è luce intensa sul sensore del
telecomando?
La riproduzione CD non si avvia.
La riproduzione CD si blocca
o il CD non viene riprodotto
correttamente.
• Il CD è stato inserito al
contrario?
• Il CD rispetta gli standard di
riproduzione?
• Il CD è sporco o graiato?
La riproduzione salta o si arresta in
mezzo a un titolo.
• Il dispositivo è esposto a forti
vibrazioni?
• Il CD è molto sporco?
• Si è formata condensa
all’interno del dispositivo?
Dispositivo USB non riconosciuto. • Ci sono le MP3/WMA sul
dispositivo USB?
• Il dispositivo è collegato
correttamente?
• Si tratta di un dispositivo MTP?
• Il dispositivo contiene solo le
AAC?

122
IT
Problema Possibile causa
La riproduzione USB non si avvia. • Si tratta di le WMA protetto?
• SI tratta di un le MP3 corrotto?
Audio interrotto o disturbato in
modalità BT.
• Il dispositivo è troppo vicino
a un altro dispositivo elettrico
che causa interferenza?
• Ci sono ostacoli tra dispositivo
BT e dispositivo?
Non viene emesso alcun suono. • Il volume è impostato al
minimo?
• Sono collegate delle cuie?
• Il dispositivo BT è troppo
lontano dal dispositivo.
• Il dispositivo è collegato a un
altro dispositivo BT?
Quando si preme un tasto, il
dispositivo non reagisce.
• Mettere il dispositivo in
standby e riaccenderlo.

123
IT
DATI TECNICI
Numero articolo 10034517
Alimentazione Adattatore (incluso in consegna)
Ingresso: AC 100-240V ~ 50/60Hz
Uscita: DC 12V
3.0A
Consumo in standby < 1 W
Impedenza altoparlanti 4 Ω
Potenza di uscita 2 x 10 W RMS
Tuner:
Intervallo di frequenza: FM 87,5 - 108 MHz,
DAB 174,9 - 239,2 MHz
BT
BT frequenza 2402-2480 MHz
BT potenza a
radiofrequenza (max.)
4 dBm
Riproduzione CD
Tipo Single Disc Multi Play CD-Player
Host USB
Interfaccia Compatibile con supporti USB di classe
1.1/2.0
File supportati: MPEG 1 Layer 3 WMA (senza DRM)
Bitrate supportati: MP3 (32 ~ 320 kbps) WMA (64 ~ 160 kbps)

124
IT
SMALTIMENTO
Se nel proprio paese si applicano le
regolamentazioni inerenti lo smaltimento di
dispositivi elettrici ed elettronici, questo simbolo
sul prodotto o sulla confezione segnala che questi
prodotti non possono essere smaltiti con i riuti
normali e devono essere portati a un punto di
raccolta di dispositivi elettrici ed elettronici. Grazie
al corretto smaltimento dei vecchi dispositivi si
tutela il pianeta e la salute delle persone da possibili
conseguenze negative. Informazioni riguardanti
il riciclo e lo smaltimento di questi prodotti si
ottengono presso l’amministrazione locale oppure il
servizio di gestione dei riuti domestici.
Il prodotto contiene batterie. Se nel proprio
paese si applicano le regolamentazioni inerenti
lo smaltimento di batterie, non possono essere
smaltite con i normali riuti domestici. Preghiamo
di informarvi sulle regolamentazioni vigenti sullo
smaltimento delle batterie. Grazie al corretto
smaltimento dei vecchi dispositivi si tutela l’ambiente
e la salute delle persone da conseguenze negative.
DICHIARAZIONE DI CONFORMITÀ
Produttore:
Chal-Tec GmbH, Wallstraße 16, 10179 Berlino,
Germania.
Importatore per la Gran Bretagna:
Berlin Brands Group UK Limited
PO Box 42
272 Kensington High Street
London, W8 6ND
United Kingdom
Il fabbricante, Chal-Tec GmbH, dichiara che il tipo
di apparecchiatura radio Stockton è conforme
alla direttiva 2014/53/UE. Il testo completo della
dichiarazione di conformità UE è disponibile al
seguente indirizzo Internet: use.berlin/10034517