Visit our website at: https://www.harborfreight.com
email our technical support at: [email protected]
2467E-B
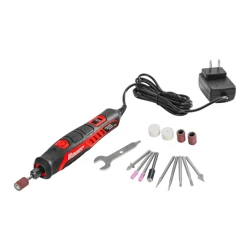
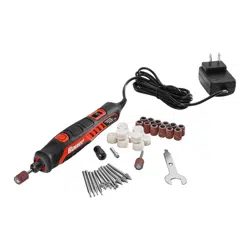
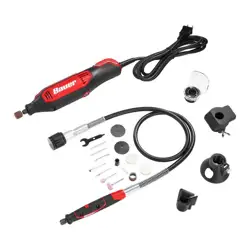
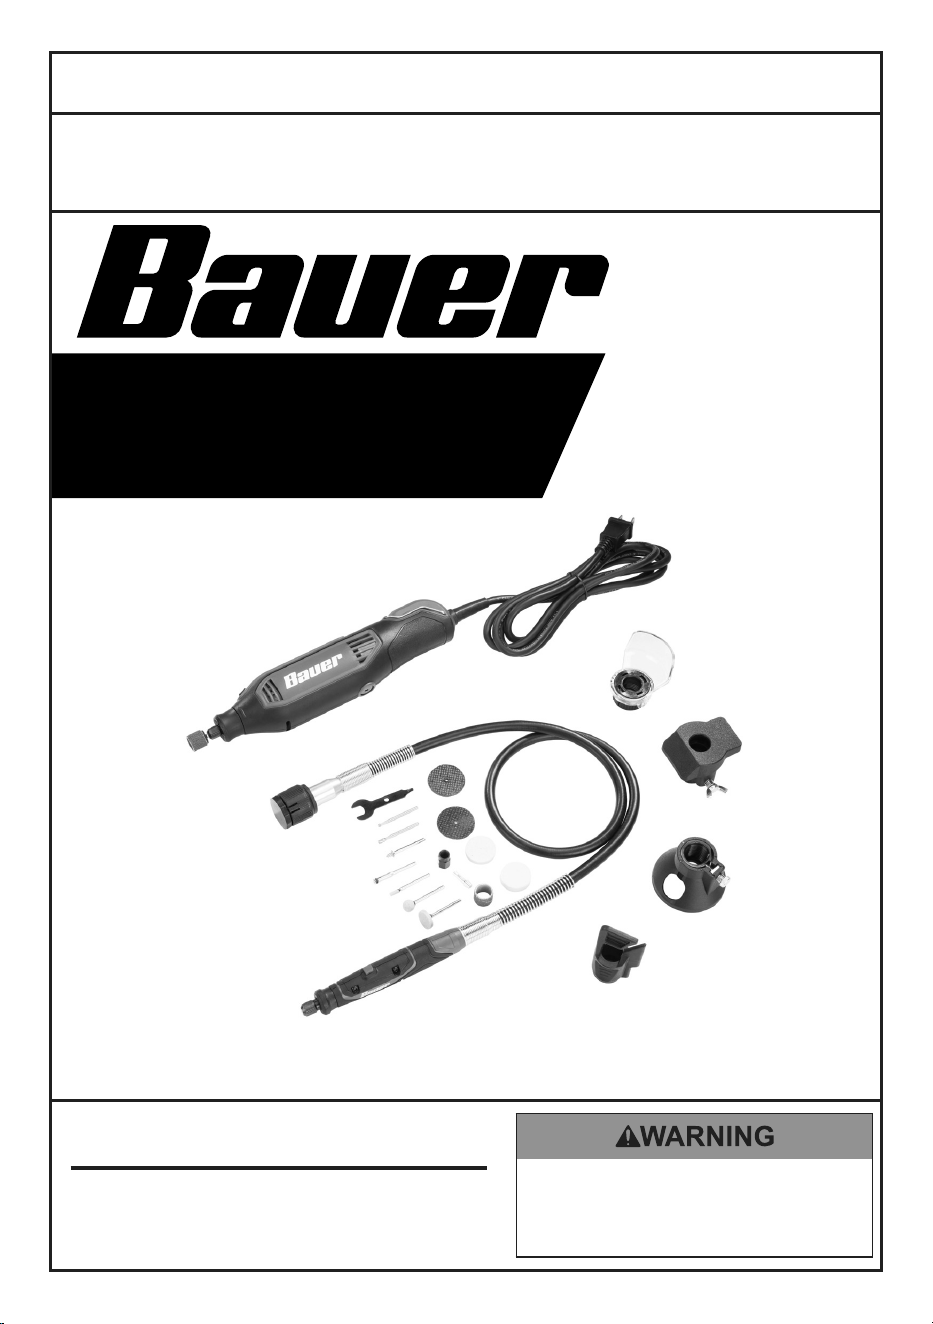
CORDED ROTARY
TOOL KIT
59488
tM
Owner’s Manual & Safety Instructions
Save This Manual Keep this manual for the safety warnings and precautions, assembly,
operating, inspection, maintenance and cleaning procedures. Write the product’s serial number in the back
of the manual (or month and year of purchase if product has no number). Keep this manual and the receipt
in a safe and dry place for future reference. 25b
When unpacking, make sure that the product is intact
and undamaged. If any parts are missing or broken,
please call 1-800-444-3353 as soon as possible.
Copyright
©
2024 by Harbor Freight Tools
®
. All rights reserved.
No portion of this manual or any artwork contained herein may be reproduced in
any shape or form without the express written consent of Harbor Freight Tools.
Diagrams within this manual may not be drawn proportionally. Due to continuing
improvements, actual product may differ slightly from the product described herein.
Tools required for assembly and service may not be included.
read this material before using this product.
Failure to do so can result in serious injury.
SaVe tHiS ManuaL.
Page 2 For technical questions, please call 1-800-444-3353. Item 59488
SaFety OperatiOn MaintenanceSetup
table of contents
Safety ......................................................... 2
Specifications ............................................. 9
Setup .......................................................... 9
Operation ................................................... 12
Maintenance .............................................. 18
Warranty .................................................... 20
WarninG SyMBOLS anD DeFinitiOnS
This is the safety alert symbol. It is used to alert you to potential
personal injury hazards. Obey all safety messages that
follow this symbol to avoid possible injury or death.
Indicates a hazardous situation which, if not avoided,
will result in death or serious injury.
Indicates a hazardous situation which, if not avoided,
could result in death or serious injury.
Indicates a hazardous situation which, if not avoided,
could result in minor or moderate injury.
Addresses practices not related to personal injury.
iMpOrtant SaFety inFOrMatiOn
General power tool Safety Warnings
read all safety warnings and all instructions.
Failure to follow the warnings and instructions may result in electric shock, fire and/or serious injury.
Save all warnings and instructions for future reference.
The term ″power tool″ in the warnings refers to your mains-operated (corded) power tool.
Work area Safety
1. Keep work area clean and well lit.
Cluttered or dark areas invite accidents.
2. Do not operate power tools in explosive
atmospheres, such as in the presence of
flammable liquids, gases or dust. Power tools
create sparks which may ignite the dust or fumes.
3. Keep children and bystanders
away while operating a power tool.
Distractions can cause you to lose control.
electrical Safety
1. power tool plugs must match the outlet.
never modify the plug in any way.
Do not use any adapter plugs with grounded
power tools. Unmodified plugs and matching
outlets will reduce risk of electric shock.
2. avoid body contact with grounded surfaces
such as pipes, radiators, ranges and
refrigerators. There is an increased risk of
electric shock if your body is grounded.

Page 3For technical questions, please call 1-800-444-3353.Item 59488
SaFetyOperatiOnMaintenance Setup
3. Do not expose power tools to rain or wet
conditions. Water entering a power tool
will increase the risk of electric shock.
4. Do not abuse the cord. never use the cord
for carrying, pulling or unplugging the
power tool. Keep cord away from heat, oil,
sharp edges or moving parts. Damaged or
entangled cords increase the risk of electric shock.
5. When operating a power tool outdoors,
use an extension cord suitable for
outdoor use. Use of a cord suitable for outdoor
use reduces the risk of electric shock.
6. if operating a power tool in a damp location
is unavoidable, use a Ground Fault circuit
interrupter (GFci) protected supply.
Use of a GFCI reduces the risk of electric shock.
personal Safety
1. Stay alert, watch what you are doing
and use common sense when operating
a power tool. Do not use a power
tool while you are tired or under the
influence of drugs, alcohol or medication.
A moment of inattention while operating power
tools may result in serious personal injury.
2. use personal protective equipment.
always wear eye protection. Protective
equipment such as dust mask, non-skid safety
shoes, hard hat, or hearing protection used for
appropriate conditions will reduce personal injuries.
3. prevent unintentional starting.
ensure the power Switch is in the off-position
before connecting to power source, picking
up or carrying the tool. Carrying power
tools with your finger on the Power Switch
or energizing power tools that have the
Power Switch on invites accidents.
4. remove any adjusting key or wrench
before turning the power tool on.
A wrench or a key left attached to a rotating part
of the power tool may result in personal injury.
5. Do not overreach. Keep proper footing and
balance at all times. This enables better control
of the power tool in unexpected situations.
6. Dress properly. Do not wear loose clothing or
jewelry. Keep your hair, clothing and gloves
away from moving parts. Loose clothes, jewelry
or long hair can be caught in moving parts.
7. if devices are provided for the connection of
dust extraction and collection facilities, ensure
these are connected and properly used. Use of
dust collection can reduce dust‑related hazards.
8. Only use safety equipment that has been
approved by an appropriate standards agency.
Unapproved safety equipment may not provide
adequate protection. Eye protection must be
ANSI-approved and breathing protection
must be NIOSH-approved for the
specific hazards in the work area.
9. Avoid unintentional starting.
Prepare to begin work before turning on the tool.
10. Do not leave the tool unattended when it is plugged
into an electrical outlet. Turn off the tool, and
unplug it from its electrical outlet before leaving.
11. This product is not a toy.
Keep it out of reach of children.
12. People with pacemakers should consult their
physician(s) before use. Electromagnetic fields in
close proximity to heart pacemaker could cause
pacemaker interference or pacemaker failure.
In addition, people with pacemakers should:
• Avoid operating alone.
• Do not use with Power Switch locked on.
• Properly maintain and inspect to avoid
electrical shock.
• Properly ground power cord. Ground Fault Circuit
Interrupter (GFCI) should also be implemented
– it prevents sustained electrical shock.
13. The warnings, precautions, and instructions
discussed in this instruction manual cannot cover all
possible conditions and situations that may occur.
It must be understood by the operator that
common sense and caution are factors
which cannot be built into this product,
but must be supplied by the operator.
power tool use and care
1. Do not force the power tool. use the
correct power tool for your application.
The correct power tool will do the job better and
safer at the rate for which it was designed.
2. Do not use the power tool if the power Switch
does not turn it on and off.
Any power tool that cannot be controlled with the
Power Switch is dangerous and must be repaired.

Page 4 For technical questions, please call 1-800-444-3353. Item 59488
SaFety OperatiOn MaintenanceSetup
3. Disconnect the plug from the power source
before making any adjustments, changing
accessories, or storing power tools.
Such preventive safety measures reduce the
risk of starting the power tool accidentally.
4. Store idle power tools out of the reach of
children and do not allow persons unfamiliar
with the power tool or these instructions
to operate the power tool. Power tools are
dangerous in the hands of untrained users.
5. Maintain power tools. check for misalignment
or binding of moving parts, breakage of parts
and any other condition that may affect the
power tool’s operation. if damaged, have the
power tool repaired before use. Many accidents
are caused by poorly maintained power tools.
6. Keep cutting tools sharp and clean. Properly
maintained cutting tools with sharp cutting edges
are less likely to bind and are easier to control.
7. use the power tool, accessories and tool bits
etc. in accordance with these instructions,
taking into account the working conditions
and the work to be performed. Use of the
power tool for operations different from those
intended could result in a hazardous situation.
8. Keep handles and grasping surfaces dry, clean
and free from oil and grease. Slippery handles
and grasping surfaces do not allow for safe handling
and control of the tool in unexpected situations.
9. Do not bend flex shaft beyond 6″ radius or
near connection to tool. Do not operate with
excessive bend or with shaft crossed over itself.
Service
1. Have your power tool serviced by a
qualified repair person using only identical
replacement parts. This will ensure that the
safety of the power tool is maintained.
2. Maintain labels and nameplates on
the tool. These carry important safety
information. If unreadable or missing, contact
Harbor Freight Tools for a replacement.
Safety Warnings common for Grinding, Sanding, Wire Brushing,
polishing, carving or abrasive cutting-off Operations
1. this power tool is intended to function as a
grinder, sander, wire brush, polisher, carving
or cut-off tool. read all safety warnings,
instructions, illustrations and specifications
provided with this power tool. Failure to
follow all instructions listed below may result
in electric shock, fire and/or serious injury.
2. Do not use accessories which are not
specifically designed and recommended
by the tool manufacturer. Just because the
accessory can be attached to your power tool,
it does not assure safe operation.
3. the rateD SpeeD of the grinding
accessories must be at least equal to the
maximum speed marked on the power tool.
Grinding accessories running faster than their
RATED SPEED can break and fly apart.
4. the outside diameter and the thickness of
your accessory must be within the capacity
rating of your power tool. Incorrectly sized
accessories cannot be adequately controlled.
5. the arbour size of wheels, sanding drums
or any other accessory must properly fit the
spindle or collet of the power tool. Accessories
that do not match the mounting hardware of
the power tool will run out of balance, vibrate
excessively and may cause loss of control.
6. Mandrel MOunteD WHeeLS, sanding drums,
cutters or other accessories must be fully
inserted into the collet or chuck. If the mandrel
is insufficiently held and/or the overhang of the
wheel is too long, the MOUNTED WHEEL may
become loose and be ejected at high velocity.
7. Do not use a damaged accessory. Before each
use inspect the accessory such as abrasive
wheels for chips and cracks, sanding drum
for cracks, tear or excess wear, wire brush
for loose or cracked wires. if power tool or
accessory is dropped, inspect for damage
or install an undamaged accessory. after
inspecting and installing an accessory,
position yourself and bystanders away from
the plane of the rotating accessory and run
the power tool at maximum no-load speed
for one minute. Damaged accessories will
normally break apart during this test time.
8. Wear personal protective equipment. Depending
on application, use face shield, safety goggles
or safety glasses. as appropriate, wear dust
mask, hearing protectors, gloves and workshop
apron capable of stopping small abrasive or
workpiece fragments. The eye protection must
be capable of stopping flying debris generated by
various operations. The dust mask or respirator
must be capable of filtrating particles generated
by your operation. Prolonged exposure to high
intensity noise may cause hearing loss.

Page 5For technical questions, please call 1-800-444-3353.Item 59488
SaFetyOperatiOnMaintenance Setup
9. Keep bystanders a safe distance away
from work area. anyone entering the
work area must wear personal protective
equipment. Fragments of workpiece or of a
broken accessory may fly away and cause
injury beyond immediate area of operation.
10. Hold power tool by insulated gripping
surfaces only, when performing an operation
where the cutting accessory may contact
hidden wiring or its own cord. Cutting
accessory contacting a “live” wire may make
exposed metal parts of the power tool “live” and
could give the operator an electric shock.
11. always hold the tool firmly in your
hand(s) during the start-up. The reaction
torque of the motor, as it accelerates to
full speed, can cause the tool to twist.
12. use clamps to support workpiece whenever
practical. never hold a small workpiece in
one hand and the tool in the other hand while
in use. Clamping a small workpiece allows you
to use your hand(s) to control the tool. Round
material such as dowel rods, pipes or tubing
have a tendency to roll while being cut, and
may cause the bit to bind or jump toward you.
13. position the cord clear of the spinning
accessory. If you lose control, the cord may
be cut or snagged and your hand or arm may
be pulled into the spinning accessory.
14. never lay the power tool down until the
accessory has come to a complete stop.
The spinning accessory may grab the surface
and pull the power tool out of your control.
15. after changing the bits or making any
adjustments, make sure the collet nut, chuck
or any other adjustment devices are securely
tightened. Loose adjustment devices can
unexpectedly shift, causing loss of control, loose
rotating components will be violently thrown.
16. Do not run the power tool while carrying
it at your side. Accidental contact with the
spinning accessory could snag your clothing,
pulling the accessory into your body.
17. regularly clean the power tool’s air vents.
The motor’s fan will draw the dust inside
the housing and excessive accumulation of
powdered metal may cause electrical hazards.
18. Do not operate the power tool near flammable
materials. Sparks could ignite these materials.
19. Do not use accessories that require liquid
coolants. Using water or other liquid coolants
may result in electrocution or shock.
20. Avoid unintentional starting.
Prepare to begin work before turning on the tool.
21. Do not depress the spindle lock when
starting or during operation.
22. Do not leave the tool unattended when
it is plugged into an electrical outlet
Turn off the tool, before leaving.
23. Use clamps (not included) or other practical
ways to secure and support the workpiece to
a stable platform. Holding the work by hand
or against your body is unstable and may
lead to loss of control and personal injury.
Kickback and related Warnings
Kickback is a sudden reaction to a pinched or
snagged rotating wheel, sanding band, brush or
any other accessory. Pinching or snagging causes
rapid stalling of the rotating accessory which in turn
causes the uncontrolled power tool to be forced in
the direction opposite of the accessory’s rotation.
For example, if an abrasive wheel is snagged or
pinched by the workpiece, the edge of the wheel that
is entering into the pinch point can dig into the surface
of the material causing the wheel to climb out or kick
out. The wheel may either jump toward or away from
the operator, depending on direction of the wheel’s
movement at the point of pinching. Abrasive wheels
may also break under these conditions.
Kickback is the result of power tool misuse and/or
incorrect operating procedures or conditions and can be
avoided by taking proper precautions as given below.
1. Maintain a firm grip on the power tool and
position your body and arm to allow you to
resist kickback forces. The operator can control
kickback forces, if proper precautions are taken.
2. use special care when working corners, sharp
edges etc. avoid bouncing and snagging the
accessory. Corners, sharp edges or bouncing
have a tendency to snag the rotating accessory
and cause loss of control or kickback.
3. Do not attach a toothed saw blade. Such blades
create frequent kickback and loss of control.
4. always feed the bit into the material in
the same direction as the cutting edge is
exiting from the material (which is the same
direction as the chips are thrown). Feeding
the tool in the wrong direction causes the
cutting edge of the bit to climb out of the work
and pull the tool in the direction of this feed.
5. When using rotary files, cut-off wheels, high-
speed cutters or tungsten carbide cutters,
always have the work securely clamped.
These wheels will grab if they become slightly
canted in the groove, and can kickback. When
a cut‑off wheel grabs, the wheel itself usually
breaks. When a rotary file, high-speed cutter or
tungsten carbide cutter grabs, it may jump from
the groove and you could lose control of the tool.

Page 6 For technical questions, please call 1-800-444-3353. Item 59488
SaFety OperatiOn MaintenanceSetup
Safety Warnings Specific For Grinding and
abrasive cutting-Off Operations
1. use only wheel types that are recommended
for your power tool and only for recommended
applications. For example: do not grind with the
side of a cut-off wheel. Abrasive cut‑off wheels
are intended for peripheral grinding, side forces
applied to these wheels may cause them to shatter.
2. For threaded abrasive cones and plugs
use only undamaged wheel mandrels with
an unrelieved shoulder flange that are of
correct size and length. Proper mandrels
will reduce the possibility of breakage.
3. Do not “jam” a cut-off wheel or apply
excessive pressure. Do not attempt to make
an excessive depth of cut. Overstressing the
wheel increases the loading and susceptibility to
twisting or snagging of the wheel in the cut and
the possibility of kickback or wheel breakage.
4. Do not position your hand in line with and
behind the rotating wheel. When the wheel,
at the point of operation, is moving away from
your hand, the possible kickback may propel the
spinning wheel and the power tool directly at you.
5. When wheel is pinched, snagged or when
interrupting a cut for any reason, switch off the
power tool and hold the power tool motionless
until the wheel comes to a complete stop. never
attempt to remove the cut-off wheel from the cut
while the wheel is in motion otherwise kickback
may occur. Investigate and take corrective action to
eliminate the cause of wheel pinching or snagging.
6. Do not restart the cutting operation in
the workpiece. Let the wheel reach full
speed and carefully re-enter the cut. The
wheel may bind, walk up or kickback if the
power tool is restarted in the workpiece.
7. Support panels or any oversized workpiece
to minimize the risk of wheel pinching and
kickback. Large workpieces tend to sag under
their own weight. Supports must be placed under
the workpiece near the line of cut and near the
edge of the workpiece on both sides of the wheel.
8. Use extra caution when making a ″pocket cut″
into existing walls or other blind areas. The
protruding wheel may cut gas or water pipes,
electrical wiring or objects that can cause kickback.
Safety Warnings Specific For Wire Brushing Operations
1. Be aware that wire bristles are thrown by
the brush even during ordinary operation.
Do not overstress the wires by applying
excessive load to the brush. The wire bristles
can easily penetrate light clothing and/or skin.
2. allow brushes to run at operating speed
for at least one minute before using them.
During this time no one is to stand in front or
in line with the brush. Loose bristles or wires
will be discharged during the run‑in time.
3. Direct the discharge of the spinning wire
brush away from you. Small particles and
tiny wire fragments may be discharged at
high velocity during the use of these brushes
and may become imbedded in your skin.
Page 7For technical questions, please call 1-800-444-3353.Item 59488
SaFetyOperatiOnMaintenance Setup
Vibration Safety
This tool vibrates during use. Repeated or
long-term exposure to vibration may cause
temporary or permanent physical injury,
particularly to the hands, arms and shoulders. To
reduce the risk of vibration-related injury:
1. Anyone using vibrating tools regularly or for an
extended period should first be examined by a
doctor and then have regular medical check-ups
to ensure medical problems are not being caused
or worsened from use. Pregnant women or
people who have impaired blood circulation to
the hand, past hand injuries, nervous system
disorders, diabetes, or Raynaud’s Disease should
not use this tool. If you feel any medical or
physical symptoms related to vibration (such as
tingling, numbness, and white or blue fingers),
seek medical advice as soon as possible.
2. Do not smoke during use. Nicotine reduces
the blood supply to the hands and fingers,
increasing the risk of vibration-related injury.
3. Wear suitable gloves to reduce the
vibration effects on the user.
4. Use tools with the lowest vibration when there
is a choice between different processes.
5. Include vibration-free periods each day of work.
6. Grip tool as lightly as possible (while still keeping
safe control of it). Let the tool do the work.
7. To reduce vibration, maintain the tool as
explained in this manual. If any abnormal
vibration occurs, stop use immediately.
SaVe tHeSe inStructiOnS.
Grounding
tO preVent eLectric SHOcK anD DeatH FrOM
incOrrect GrOunDinG Wire cOnnectiOn:
check with a qualified electrician if you are in doubt as to whether the outlet is properly
grounded. Do not modify the power cord plug provided with the tool. never remove the
grounding prong from the plug. Do not use the tool if the power cord or plug is damaged. if damaged,
have it repaired by a service facility before use. if the plug will not fit the outlet, have a proper outlet
installed by a qualified electrician.
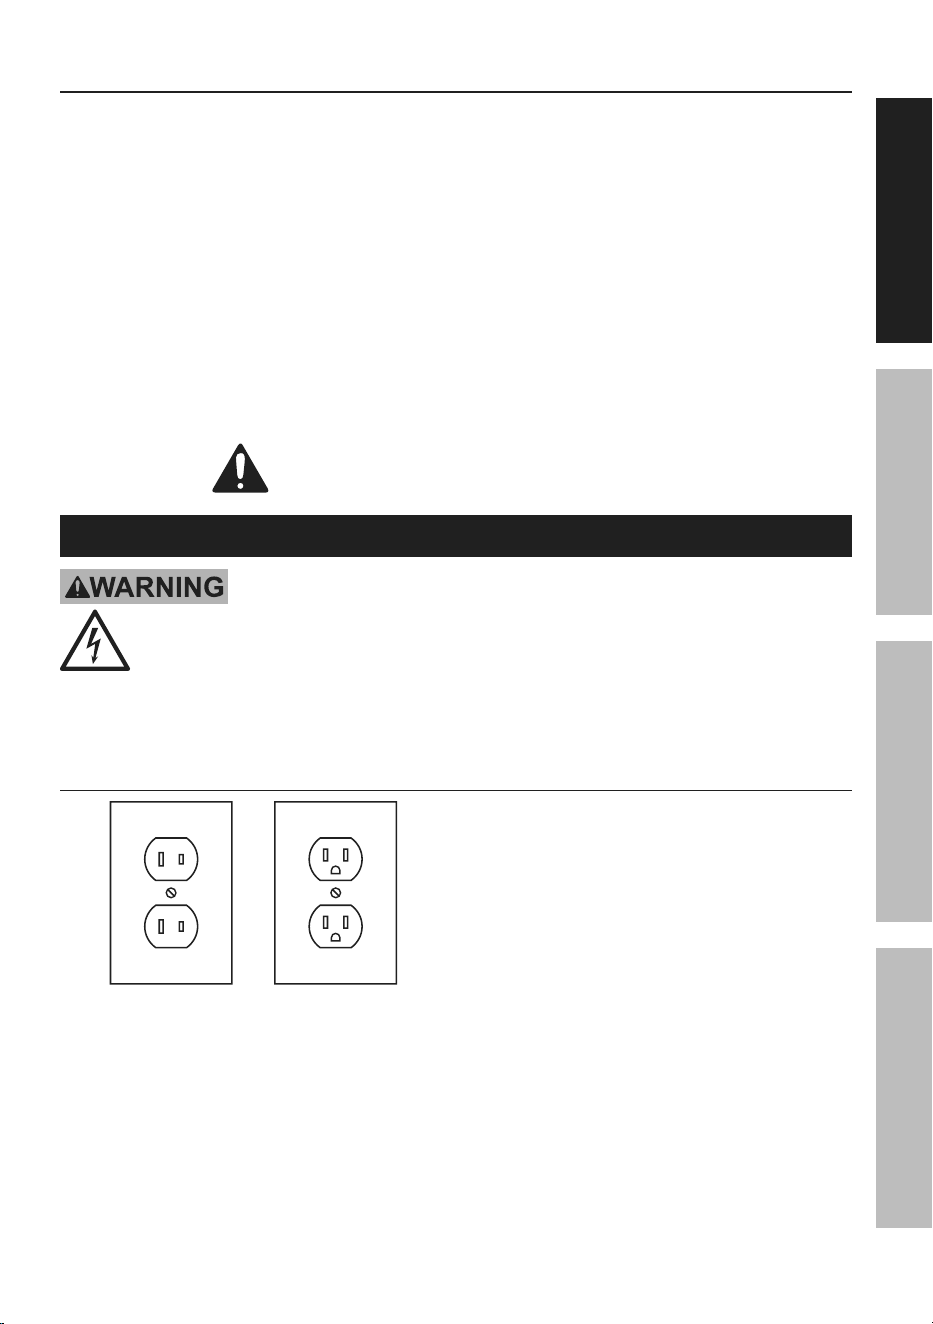
Double insulated tools: tools with two prong plugs
Outlets for 2-prong plug
1. Tools marked “Double Insulated” do not
require grounding. They have a special
double insulation system which satisfies
OSHA requirements and complies with
the applicable standards of Underwriters
Laboratories, Inc., the Canadian Standard
Association, and the National Electrical Code.
2. Double insulated tools may be used in either of the
120 volt outlets shown in the preceding illustration.
(See Outlets for 2-prong plug.)
Page 8 For technical questions, please call 1-800-444-3353. Item 59488
SaFety OperatiOn MaintenanceSetup
extension cords
1. Grounded tools require a three
wire extension cord. Double Insulated tools can
use either a two or three wire extension cord.
2. As the distance from the supply outlet increases,
you must use a heavier gauge extension cord.
Using extension cords with inadequately sized wire
causes a serious drop in voltage, resulting in loss of
power and possible tool damage. (See table a.)
3. The smaller the gauge number of the wire, the
greater the capacity of the cord. For example,
a 14 gauge cord can carry a higher current
than a 16 gauge cord. (See table a.)
4. When using more than one extension cord
to make up the total length, make sure
each cord contains at least the minimum
wire size required. (See table a.)
5. If you are using one extension cord for more
than one tool, add the nameplate amperes
and use the sum to determine the required
minimum cord size. (See table a.)
6. If you are using an extension cord outdoors, make
sure it is marked with the suffix “W-A” (“W” in
Canada) to indicate it is acceptable for outdoor use.
7. Make sure the extension cord is properly wired
and in good electrical condition. Always replace
a damaged extension cord or have it repaired
by a qualified electrician before using it.
8. Protect the extension cords from sharp objects,
excessive heat, and damp or wet areas.
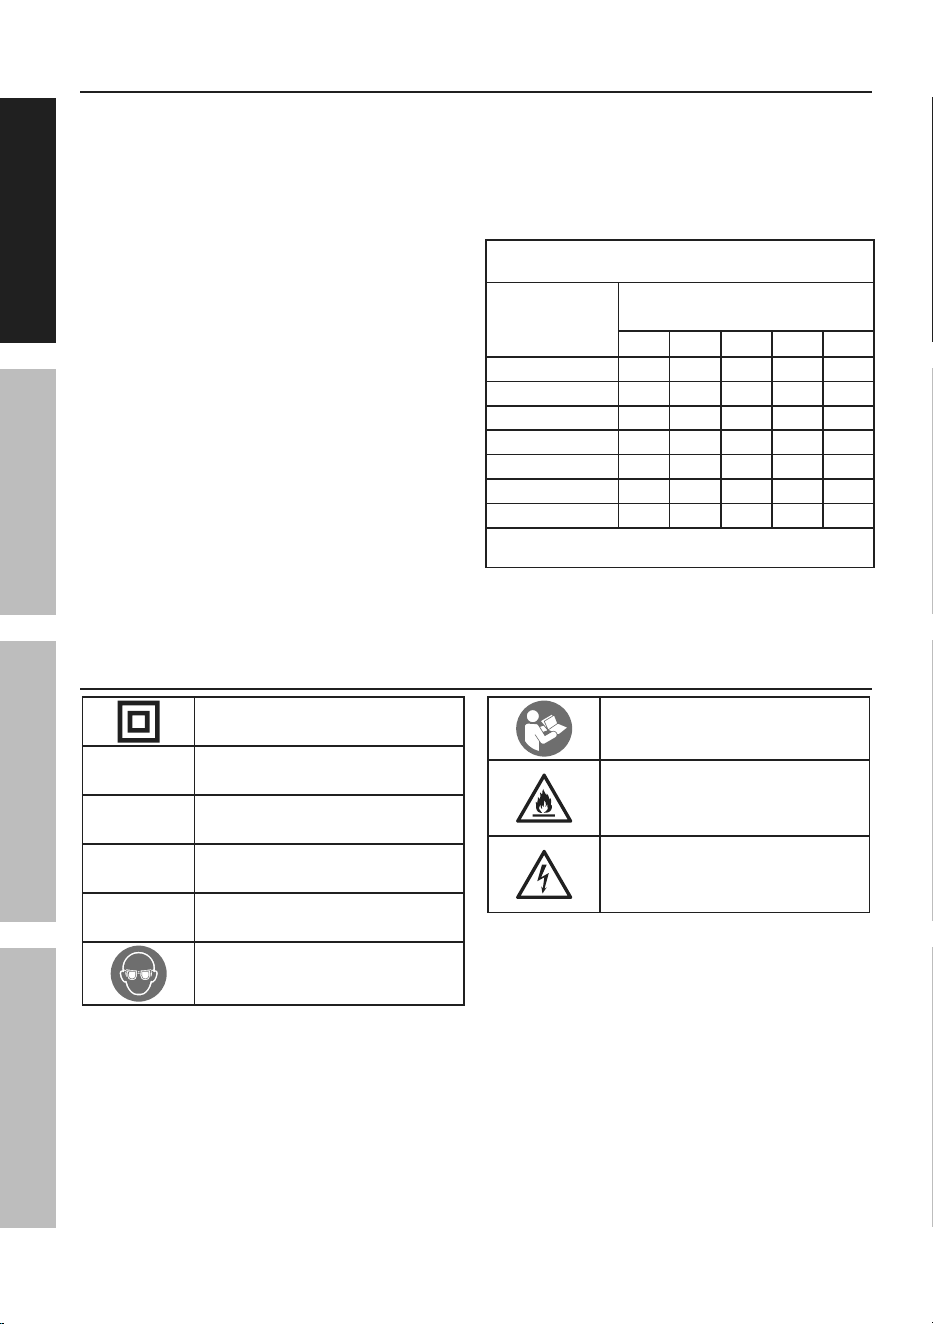
taBLe a: recOMMenDeD MiniMuM Wire
GauGe FOr eXtenSiOn cOrDS* (120/240 VOLt)
naMepLate
aMpereS
(at full load)
eXtenSiOn cOrD
LenGtH
25´ 50´ 75´ 100´ 150´
0 – 2.0 18 18 18 18 16
2.1 – 3.4 18 18 18 16 14
3.5 – 5.0 18 18 16 14 12
5.1 – 7.0 18 16 14 12 12
7.1 – 12.0 18 14 12 10 -
12.1 – 16.0 14 12 10 - -
16.1 – 20.0 12 10 - - -
* Based on limiting the line voltage drop to five volts at
150% of the rated amperes.
Symbology
Double Insulated
V
Volts
~
Alternating Current
a
Amperes
n
0
xxxx/min.
No Load Revolutions
per Minute (RPM)
WARNING marking concerning Risk
of Eye Injury. Wear ANSI-approved
safety goggles with side shields.
Read the manual before
set-up and/or use.
WARNING marking
concerning Risk of Fire.
Do not cover ventilation ducts.
Keep flammable objects away.
WARNING marking concerning
Risk of Electric Shock.
Properly connect power cord
to appropriate outlet.
Page 9For technical questions, please call 1-800-444-3353.Item 59488
SaFetyOperatiOnMaintenance Setup
Specifications
Electrical Rating 120VAC / 60Hz / 1.6A
No Load Speed n
0
: 5000-35000/min
Collet Sizes 1/8″, 3/32″
Maximum Accessory Diameter
Rotary Tool: Ø2″ (Ø51 mm)
Flex Shaft: Ø1″ (Ø25.4mm)
Setup - Before use:
read the entire iMpOrtant SaFety inFOrMatiOn section at the beginning of this
manual including all text under subheadings therein before set up or use of this product.
tO preVent SeriOuS inJury FrOM acciDentaL OperatiOn:
Make sure that the power Switch is in the off-position and unplug the tool from
it’s electrical outlet before performing any procedure in this section.
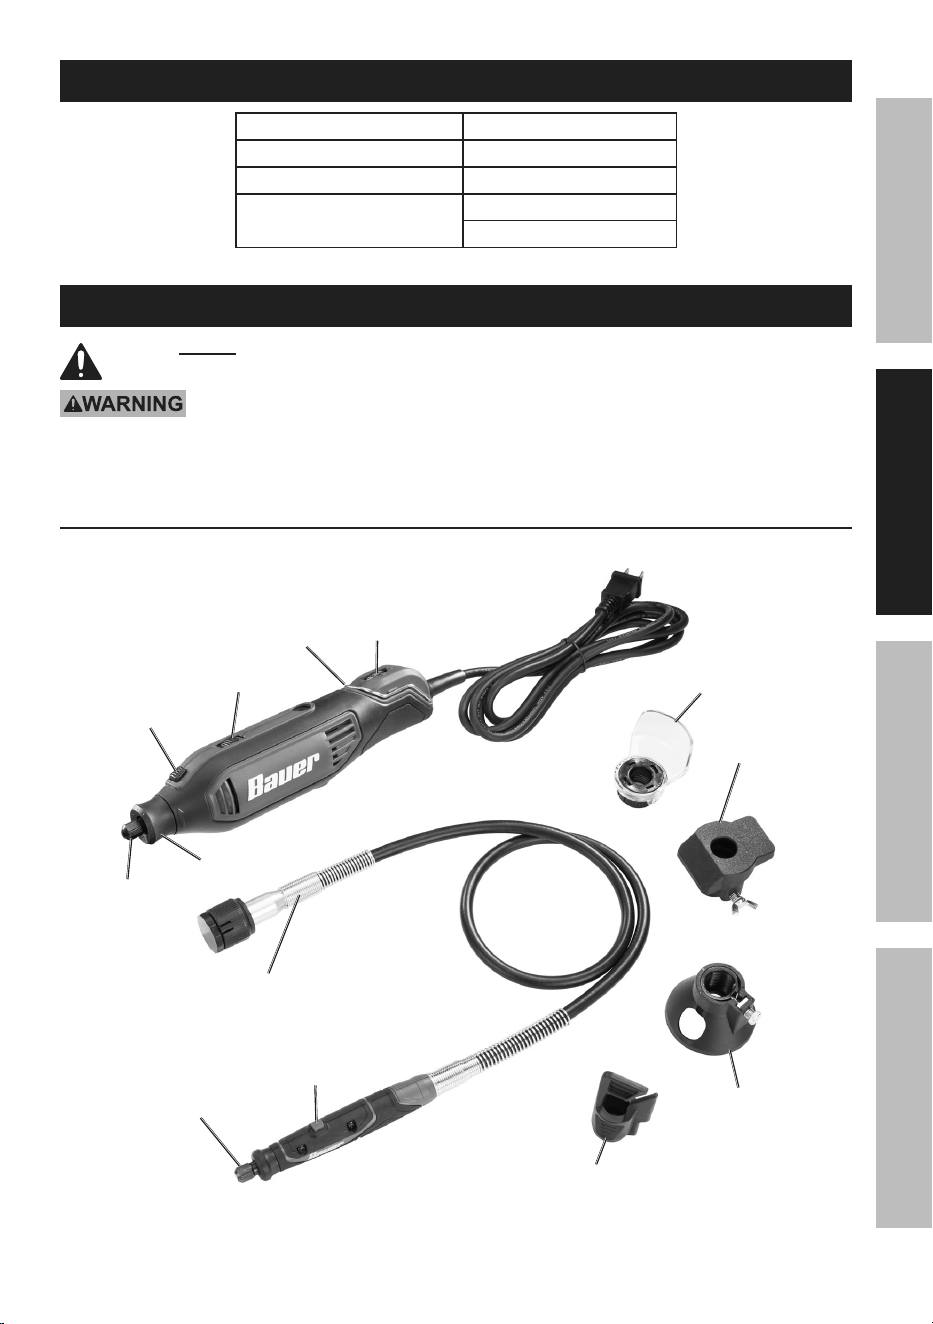
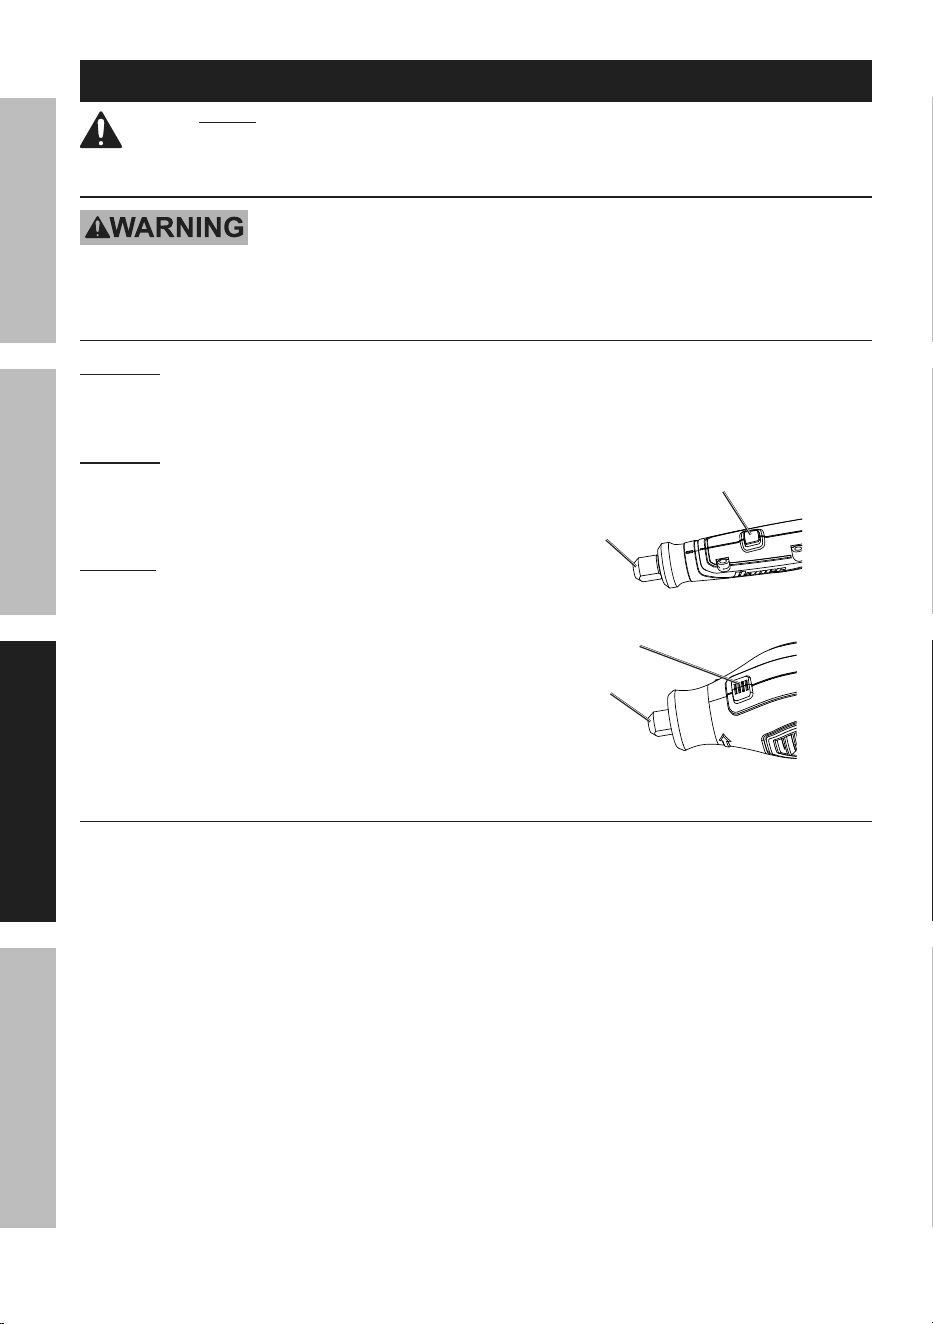
Functions
Spindle
Lock
Speed
Dial
Housing
cap
Hook
power
Switch
cutting Guide
cutting Shield
Flex Shaft
Spindle
Lock
collet
nut
Sanding/
Grinding
Guide
Sharpening Guide
collet
nut
Page 10 For technical questions, please call 1-800-444-3353. Item 59488
SaFety OperatiOn MaintenanceSetup
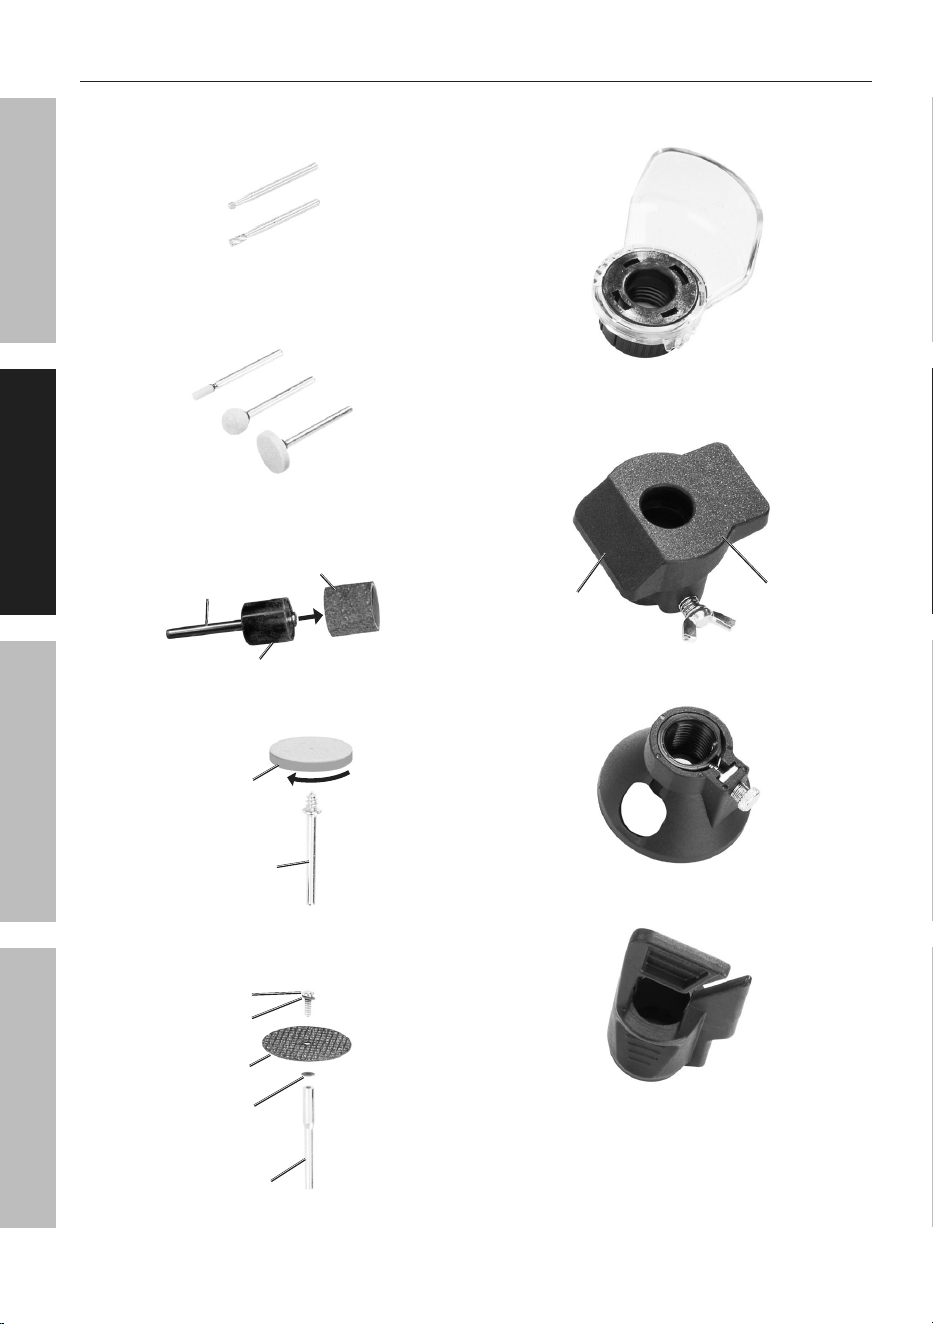
accessories
• Steel Burr Bits - For carving and
engraving wood, laminates, plastics,
and non-ferrous metals.
• Grinding Stones - For sharpening
cutting tools, deburring metal after
cutting, and removing excess
material on metal and ceramics.
• Sanding Drums - For smoothing out rough
areas. Install sanding band on drum. Tighten
the screw on the Drum to hold band in place.
Sanding Drum
Mandrel
Sanding Band
• Buffing Wheels - For polishing. Use
Mandrel with threads for polishing wheels.
Mandrel
Buffing
Wheel
• cut-off Wheels - For cutting, carving and
slotting materials. Use Mandrel with flat
screw tip. Do not overtighten screw.
Mandrel
cut-off
Wheel
Screw
Washer
Washer
• cutting Shield - For shielding from sparks and
debris while allowing workpiece to be viewed.
• Sanding/Grinding Guide - For additional
control and stability while sanding and grinding.
Equipped with 45° and 90° workpiece rests.
90° rest
45° rest
• cutting Guide - For setting cutting
depth up to 3/4″ in the workpiece.
• Sharpening Guide - For
sharpening garden tools.
Page 11For technical questions, please call 1-800-444-3353.Item 59488
SaFetyOperatiOnMaintenance Setup
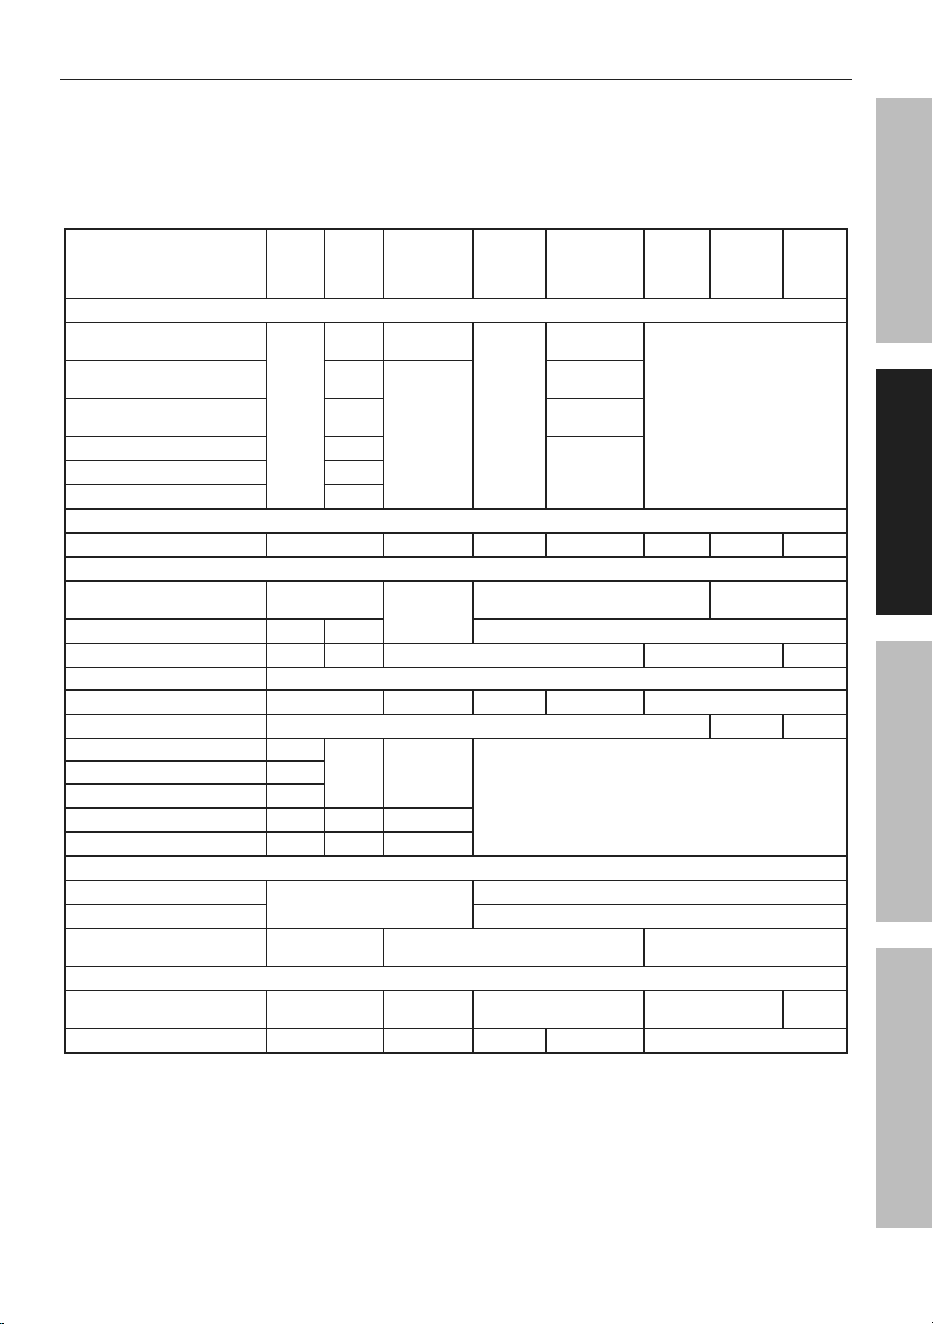
recommended accessory Speeds
When adjusting the Speed Dial, a distinct change in the tool sound will occur at select intervals:
• 5 - 5,000 RPM
• 10 - 10,000 RPM
• 15 - 15,000 RPM
• 20 - 20,000 RPM
• 25 - 25,000 RPM
• 30 - 30,000 RPM
• 35 - 35,000 RPM
part Description
Soft
Wood
Hard
Wood
plastics,
Laminates
Steel
(ferrous
metals)
aluminum,
Brass,
(non-ferrous
metals)
Stone/
Shell
ceramic Glass
High Speed cutting Burrs
Ø 1/4" Spherical /
Semi-Spherical
25 - 35K
25 - 35K 12 - 17K
12 - 17K
18 - 24K
Not Recommended
Ø 5/16" Spherical /
Semi-Spherical
12 - 17K
9 - 11K
12 - 17K
Ø 1/8" - 3/16" Spherical /
Pointed / Cylindrical
25 - 35K 25 - 35K
Ø 1/4" - 7/32" Cylindrical
12 - 17K
12 - 17K
Ø 5/16" Cylindrical
25 - 35K
Ø 3/8" Cylindrical
18 - 24K
aluminum Oxide Grinding Stones (pink, White, Orange, Brown)
All Sizes
25 - 35K Not Rec. 18 - 24K 9 - 11K 12 - 17K 25 - 35K Not Rec.
cutting Wheels and Bits
Ø 1-1/4" to 2" Cut off /
Fiberglass Wheel
Not
Recommended
5 - 11K
25 - 35K Not Recommended
Ø 1" Carbide Cutting Wheel
25 - 35K 18 - 35K Not Recommended
Ø 1-1/2" Diamond Coated Wheel
18 - 35K 18 - 24K Not Recommended 12 - 24K Not Rec.
Ø 1/8" Drywall Cutting Bit
30K
Ø 1/8" Multi-purpose Bit
12 - 35K 5 - 11K Not Rec. 25 - 35K Not Recommended
Ø 1/8" Tile Bit
Not Recommended 25 - 35K Not Rec.
Ø 1-3/4" Rotary Steel Saw Blade
15K
20K 15 - 20K
Not Recommended
Ø 1-3/8" Rotary Steel Saw Blade
20K
Ø 1-1/4" Rotary Steel Saw Blade
15 - 20K
Ø 1" Rotary Steel Saw Blade
15 - 18K 19 - 20K 15 - 18K
Ø 1/8" Rotary Steel Saw Blade
20K 15 - 20K 15 - 20K
polishing accessories
Rubber Polishing Points
Not Recommended
18 - 24K
Ø 1" Felt Wheel / Bob
12 - 17K
Cloth Rotary Wheel Not
Recommended
4.5K Not Recommended
Sanding Drums and Discs
Ø 1/4" - 1/2" Sanding
Drum (All Grits)
5 - 35K 5 - 17K 25 - 35K 5 - 35K Not Rec.
Sanding Discs
12 - 17K 5 - 8K Not Rec. 5 - 8K Not Recommended
Page 12 For technical questions, please call 1-800-444-3353. Item 59488
SaFety OperatiOn MaintenanceSetup
Operating instructions
read the entire iMpOrtant SaFety inFOrMatiOn section at the beginning of this
manual including all text under subheadings therein before set up or use of this product.
tool Set up
tO preVent SeriOuS inJury FrOM acciDentaL OperatiOn:
Make sure that the power Switch is in the off-position and unplug the tool from
its electrical outlet before performing any procedure in this section.
installing accessory
WarninG! tO preVent SeriOuS inJury:
Use only rotary accessories of the correct
shank diameter for the collet. Use only rotary
accessories suitable for the speed of the tool.
WarninG! tO preVent SeriOuS inJury:
Carefully inspect accessories for cracks, chips, or other
damage before installing. Do not use accessories
that have been dropped, cracked, or damaged. The
accessory may shatter causing serious injury.
cautiOn! tO preVent inJury: When
changing an accessory immediately after use,
be careful not to touch the accessory. It may be
very hot from use, possibly causing injury. Allow
the accessory time to cool before handling it.
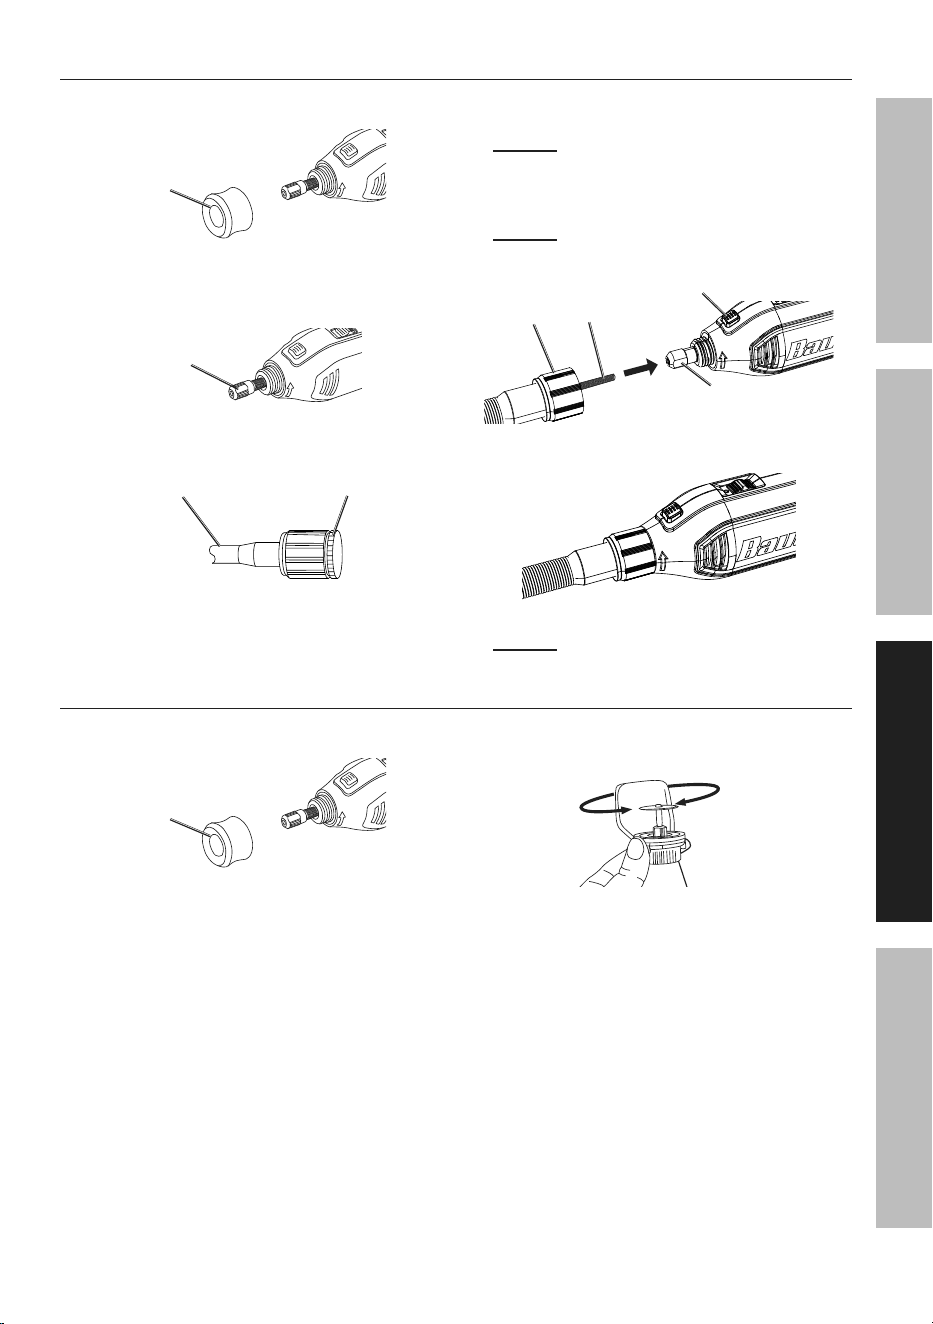
1. Press and hold Spindle Lock.
2. Loosen Collet Nut with Wrench (included).
Release Spindle Lock.
3. Insert the shank end of accessory into Collet.
4. Press and hold Spindle Lock.
5. Tighten Collet Nut with Wrench.
Release Spindle Lock.
6. Pull on Accessory to ensure it is secured in Collet.
collet
nut
Spindle
Lock
Flex Shaft
Spindle
Lock
collet
nut
rotary tool
changing collet
1. Press and hold Spindle Lock.
2. Remove Collet Nut with Wrench then
remove Collet. Release Spindle Lock.
3. Insert new Collet.
4. Press and hold Spindle Lock.
5. Replace and tighten Collet Nut.
Release Spindle Lock.
Page 13For technical questions, please call 1-800-444-3353.Item 59488
SaFetyOperatiOnMaintenance Setup
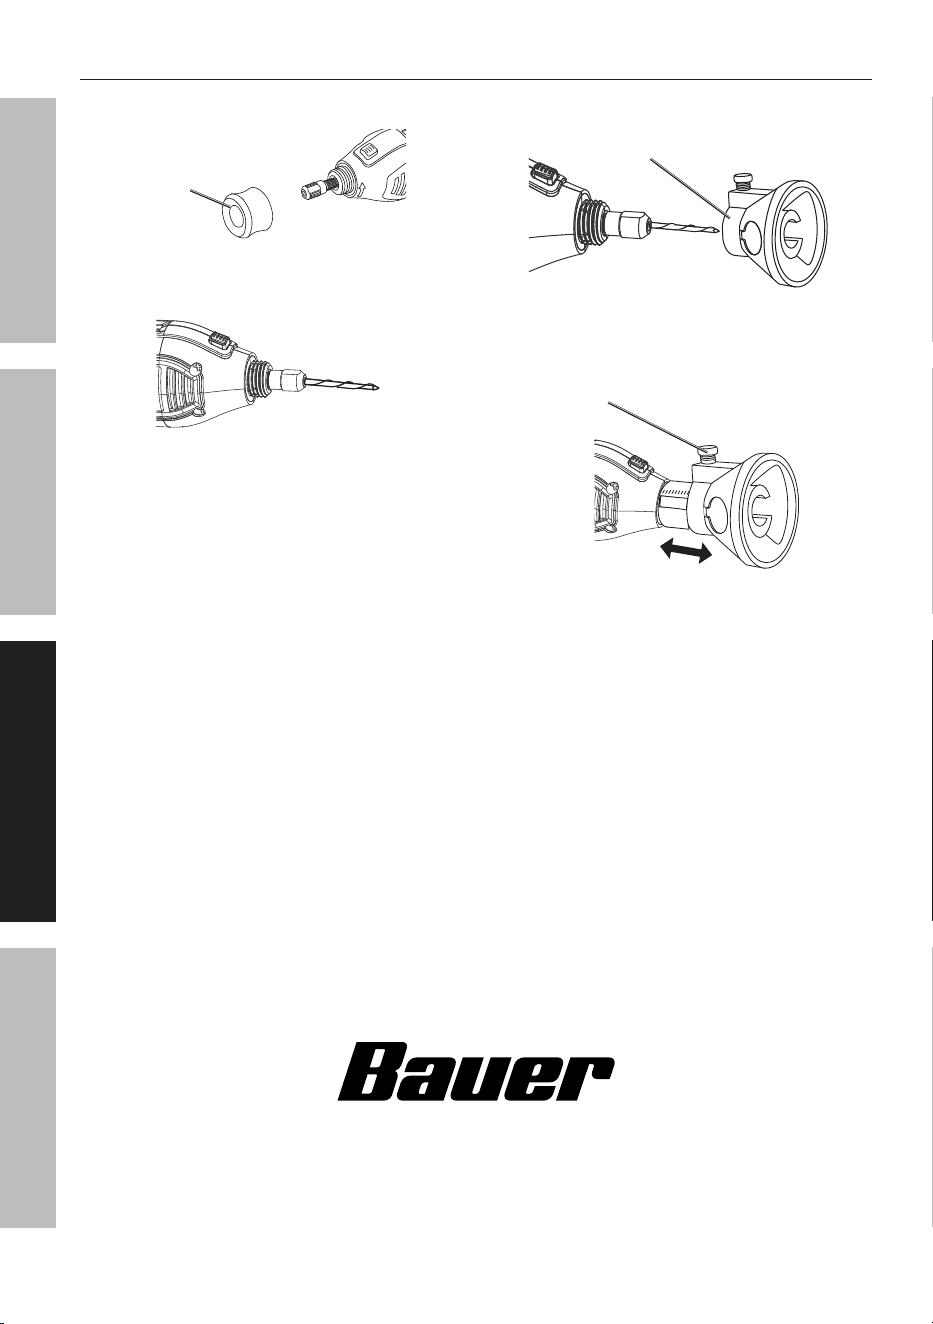
installing Flex Shaft attachment
1. Remove Housing Cap from Rotary Tool.
Housing
cap
2. Press and hold Spindle Lock, then
loosen Collet Nut with Wrench. Remove
accessory. Remove Collet Nut.
collet
nut
3. Remove Cap from Flex Shaft. Replace
Cap whenever Flex Shaft is not in use.
cap
Flex Shaft
4. Press and hold Spindle Lock, then thread Flex Shaft
Adapter onto Rotary Tool, then tighten with Wrench.
nOtice: to prevent damage to
tool, do not overtighten.
5. Pull Inner Shaft out until it protrudes from Collar no
more than 3/4″; insert Inner Shaft into Adapter.
nOtice: to prevent damage to Flex Shaft,
do not pull inner Shaft more than 3/4″ out.
Flex Shaft
adapter
inner Shaft
collar
Spindle Lock
6. Thread Flex Shaft Collar onto tool.
7. nOtice: to prevent property damage
to rotary tool, hang by its Hook.
installing Shield
1. Remove Housing Cap from Rotary Tool.
Housing
cap
2. Thread Shield onto tool. Hand tighten.
3. Select an appropriate accessory
for the job. Install accessory.
4. Adjust Shield to desired position to
protect from debris and sparks.
B
Page 14 For technical questions, please call 1-800-444-3353. Item 59488
SaFety OperatiOn MaintenanceSetup
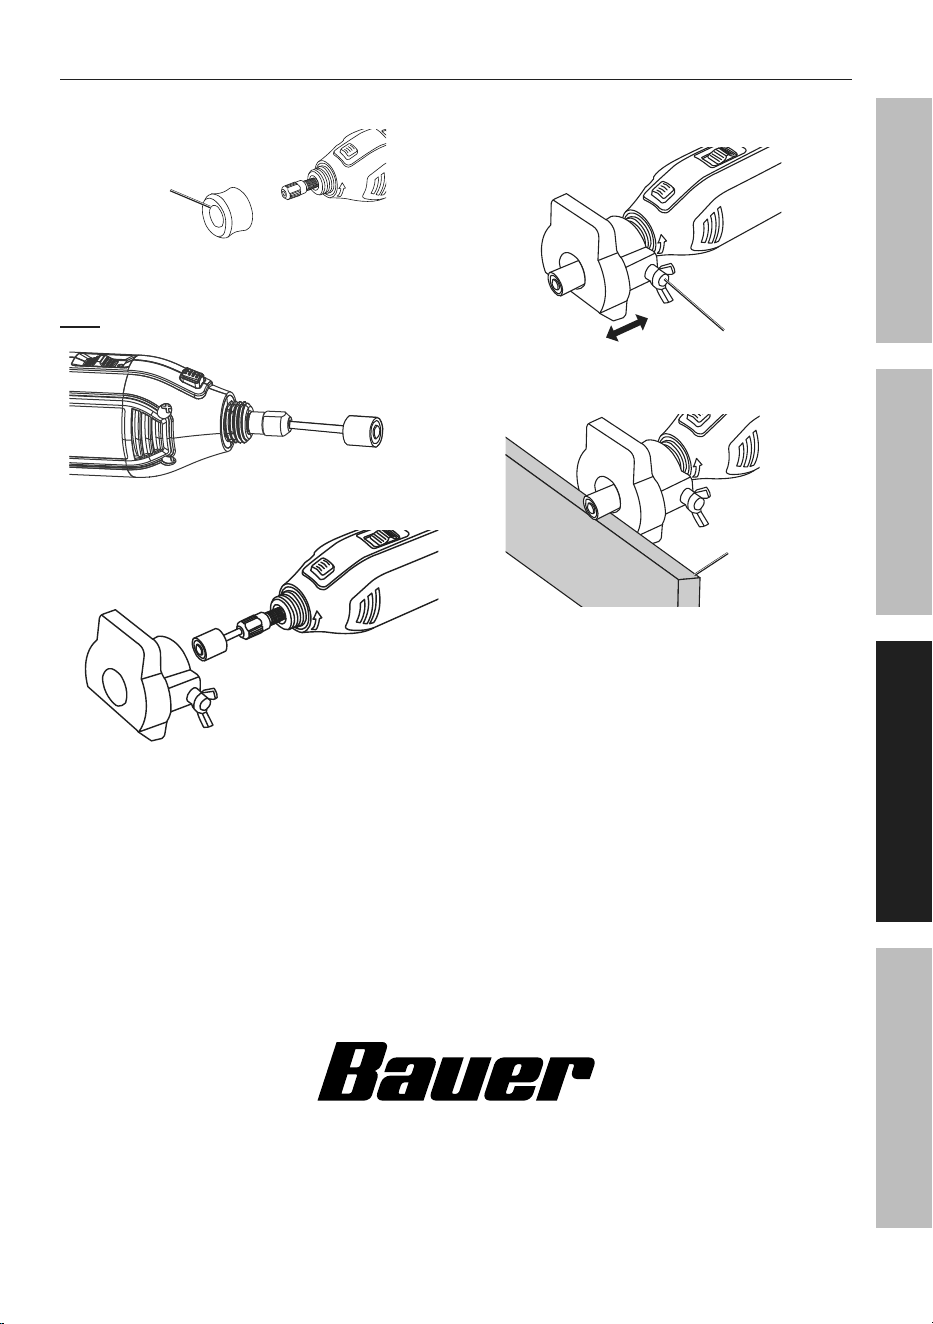
installing cutting Guide
1. Remove Housing Cap from Rotary Tool.
Housing
cap
2. Select an appropriate accessory
for the job. Install accessory.
2
0
15
10
3. Thread Cutting Guide onto tool.
2
0
15
10
cutting
Guide
4. Loosen Thumb Knob. Adjust cutting depth
on Guide. Tighten Thumb Knob.
2
0
15
10
thumb
Knob
tM
Page 15For technical questions, please call 1-800-444-3353.Item 59488
SaFetyOperatiOnMaintenance Setup
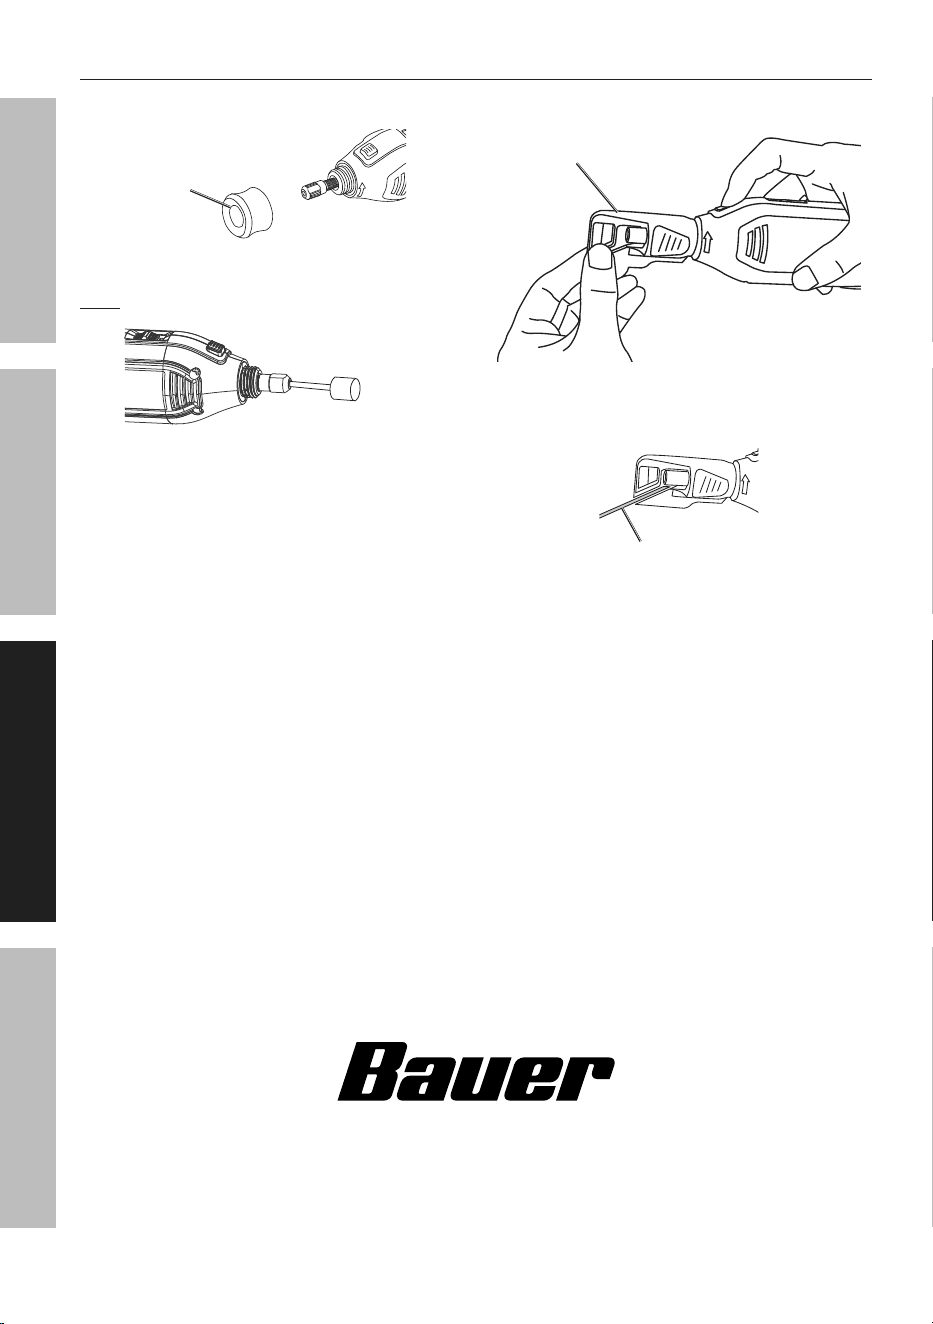
installing Sanding/Grinding Guide
1. Remove Housing Cap from Rotary Tool.
Housing
cap
2. Select an appropriate accessory
for the job. Install accessory.
note: Accessory must be 1/2″ diameter or smaller.
3. Thread Guide onto tool.
4. Loosen Wing Nut. Adjust depth for more or
less accessory exposure. Tighten Wing Nut.
Wing nut
5. Place Guide against workpiece to stabilize tool.
Use even pressure and speed on workpiece.
Workpiece
tM
Page 16 For technical questions, please call 1-800-444-3353. Item 59488
SaFety OperatiOn MaintenanceSetup
installing Sharpening Guide attachment
1. Remove Housing Cap from Rotary Tool.
Housing
cap
2. Install aluminum oxide grinding stone.
note: Grinding stone must be 3/8″ diameter or smaller.
3. Thread Sharpening Guide onto tool.
Sharpening
Guide
4. Insert garden tool into Guide slot with beveled
edge facing grinding stone accessory. Use even
pressure and speed to sharpen beveled edge.
Garden tool
tM
Page 17For technical questions, please call 1-800-444-3353.Item 59488
SaFetyOperatiOnMaintenance Setup
Workpiece and Work area Set up
1. Designate a work area that is clean and well lit.
The work area must not allow access by children
or pets to prevent distraction and injury.
2. Route the power cord along a safe route to reach
the work area without creating a tripping hazard or
exposing the power cord to possible damage. The
power cord must reach the work area with enough
extra length to allow free movement while working.
3. Secure loose workpieces using a vise or clamps
(not included) to prevent movement while working.
4. There must not be objects, such as utility lines,
nearby that will present a hazard while working.
General Operating instructions
tO preVent SeriOuS inJury WHiLe in OperatiOn:
use personal protective equipment. always wear eye protection.
Wear anSi-approved safety goggles with side shields.
1. Make sure tool is unplugged.
2. If using Flex Shaft attachment,
install on Rotary Tool.
3. Select appropriate accessory for
the job. Install accessory.
4. Rotate Speed Dial to desired speed setting.
Reference Recommended Accessory
Speeds on page 11.
5. Plug Power Cord into a grounded
120VAC electrical outlet.
6. Start tool by pushing Power Switch to
ON position. Allow Tool to reach full
speed before beginning work.
7. Apply accessory to workpiece as needed.
nOtice: tO preVent prOperty DaMaGe:
Do not bend Flex Shaft beyond 6″ radius or near
connection to tool. Do not operate with excessive
bend or with shaft crossed over itself.
8. When finished, stop tool by pushing
power switch to OFF position. Wait for
accessory to completely stop spinning.
9. Unplug tool.
10. Remove attachment and accessory.
Replace Housing Cap.
11. Store tool, parts and accessories inside case
to protect from moisture and humidity. Store in
an indoor dry area out of reach of children.
tM

Page 18 For technical questions, please call 1-800-444-3353. Item 59488
SaFety OperatiOn MaintenanceSetup
Maintenance and Servicing instructions
procedures not specifically explained in this manual must
be performed only by a qualified technician.
tO preVent SeriOuS inJury FrOM acciDentaL OperatiOn:
Make sure that the power Switch is in the off-position and before performing any procedure in this section.
tO preVent SeriOuS inJury FrOM tOOL FaiLure:
Do not use damaged equipment. if abnormal noise or vibration
occurs, have the problem corrected before further use.
cleaning, Maintenance, and Lubrication
1. BeFOre eacH uSe, inspect the general
condition of the tool. Check for:
• loose hardware,
• misalignment or binding of moving parts,
• damaged cord/electrical wiring,
• cracked or broken parts, and
• any other condition that may
affect its safe operation.
2. aFter uSe, wipe external surfaces
of the tool with clean cloth.
3. Lubricate Flex Shaft:
a. Gently pull inner shaft out of Flex Shaft.
b. Clean debris and hardened
lubricant with a clean cloth.
c. Add a thin film of high temperature white lithium
grease onto inner shaft with a clean cloth.
note: Do not overgrease inner shaft.
d. Reinsert inner shaft into Flex Shaft.
4. Store tool, parts and accessories inside case
to protect from moisture and humidity. Store in
an indoor dry area out of reach of children.
5. WarninG! tO preVent SeriOuS
inJury: if the supply cord of this power
tool is damaged, it must be replaced only
by a qualified service technician.
Page 19For technical questions, please call 1-800-444-3353.Item 59488
SaFetyOperatiOnMaintenance Setup
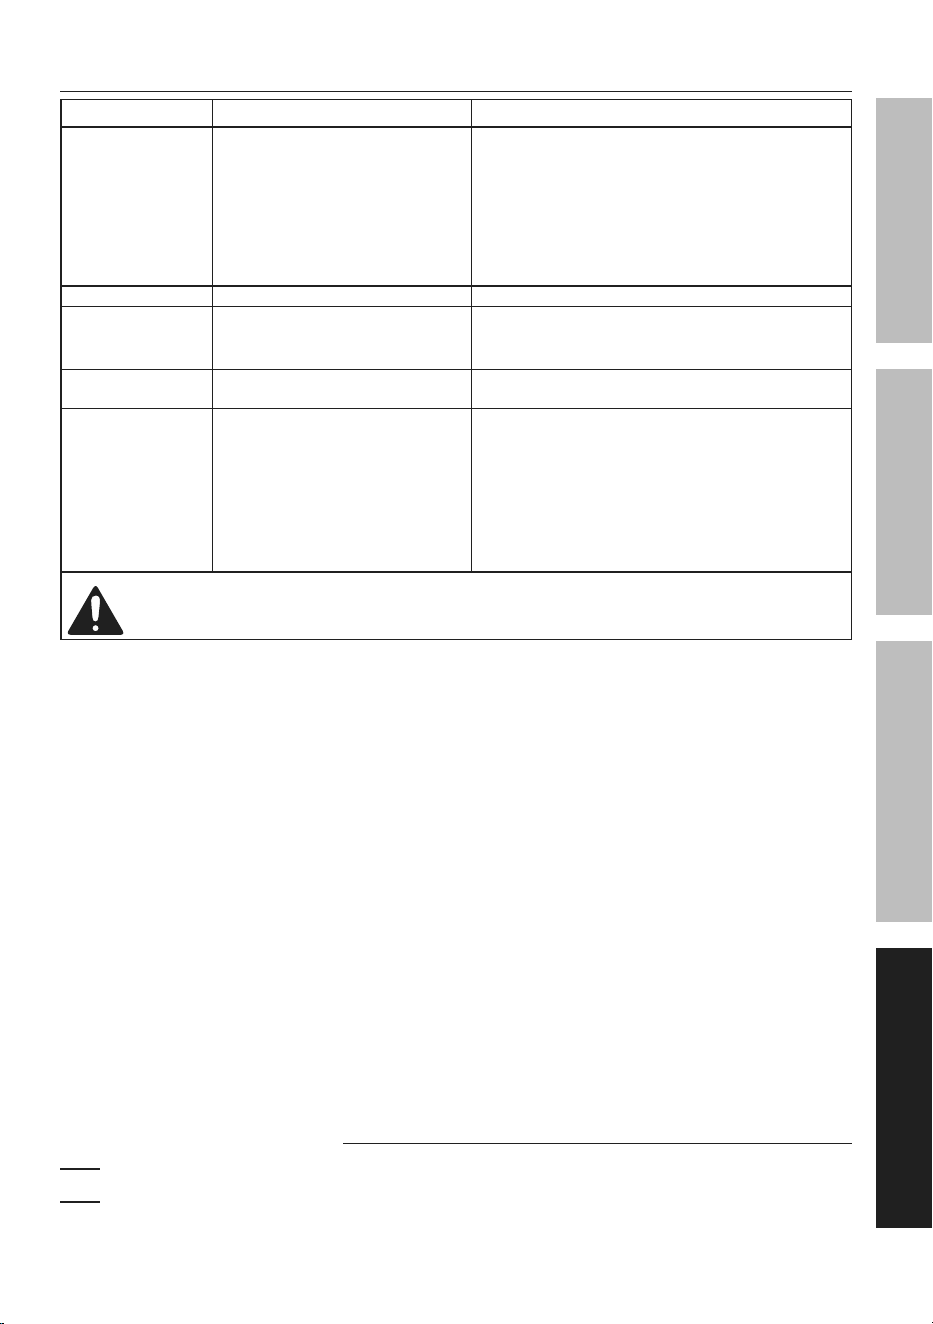
troubleshooting
problem possible causes Likely Solutions
Tool will not start. 1. Cord not connected.
2. No power at outlet.
3. Internal damage or wear.
(Carbon brushes or
Power Switch, for example.)
1. Check that cord is plugged in.
2. Check power at outlet. If outlet is unpowered,
turn off tool and check circuit breaker.
If breaker is tripped, make sure circuit is right
capacity for tool and circuit has no other loads.
3. Have technician service tool.
Tool operates slowly. Forcing tool to work to fast. Allow tool to work at its own rate.
Performance
decreases over time.
1. Accessory dull or damaged.
2. Internal damage or wear.
1. Keep cutting accessories sharp.
Replace as needed.
2. Have technician service tool.
Excessive noise
or rattling.
Internal damage or wear. (Carbon
brushes or bearings, for example.)
Have technician service tool.
Overheating. 1. Forcing tool to work to fast.
2. Accessory dull or damaged.
3. Blocked motor housing vents.
4. Flex Shaft hotter to
touch than normal.
1. Allow tool to work at its own rate.
2. Keep cutting accessories sharp.
Replace as needed.
3. Wear ANSI-approved safety goggles and
NIOSH-approved dust mask/respirator while
blowing dust out of motor using compressed air.
4. Lubricate Flex Shaft as described in Cleaning,
Maintenance, and Lubrication on page 18
Follow all safety precautions whenever diagnosing or servicing the tool.
Disconnect power supply before service.
record product’s Serial number Here:
note: if product has no serial number, record month and year of purchase instead.
note: Some parts are listed and shown for illustration purposes only, and are not available
individually as replacement parts. Specify UPC 193175472205 when ordering parts.

26677 agoura road • calabasas, ca 91302 • 1-800-444-3353
Limited 90 Day Warranty
Harbor Freight Tools Co. makes every effort to assure that its products meet high quality and durability
standards, and warrants to the original purchaser that this product is free from defects in materials
and workmanship for the period of 90 days from the date of purchase. This warranty does not apply to
damage due directly or indirectly, to misuse, abuse, negligence or accidents, repairs or alterations outside
our facilities, criminal activity, improper installation, normal wear and tear, or to lack of maintenance.
We shall in no event be liable for death, injuries to persons or property, or for incidental, contingent,
special or consequential damages arising from the use of our product. Some states do not allow the
exclusion or limitation of incidental or consequential damages, so the above limitation of exclusion
may not apply to you. THIS WARRANTY IS EXPRESSLY IN LIEU OF ALL OTHER WARRANTIES,
EXPRESS OR IMPLIED, INCLUDING THE WARRANTIES OF MERCHANTABILITY AND FITNESS.
To take advantage of this warranty, the product or part must be returned to us with transportation charges
prepaid. Proof of purchase date and an explanation of the complaint must accompany the merchandise.
If our inspection verifies the defect, we will either repair or replace the product at our election or we may
elect to refund the purchase price if we cannot readily and quickly provide you with a replacement. We will
return repaired products at our expense, but if we determine there is no defect, or that the defect resulted
from causes not within the scope of our warranty, then you must bear the cost of returning the product.
This warranty gives you specific legal rights and you may also have other rights which vary from state to state.