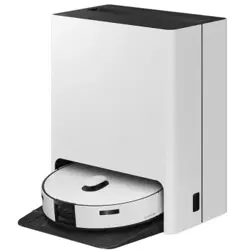
Jet Bot Combo
User manual
VR7MD97**** / VR7MD96****
• Before operating this unit, please read the instructions carefully.
• For indoor use only
Wi-Fi MODEL
Connecting SmartThings
1. Launch the QR Code Reader app to scan the QR image attached to the product.
2. When the SmartThings app is running, tap ‘ Add’ to connect the SmartThings app to the product.
Registering the product / Reading the manual / Customer support
1. Launch the QR Code Reader app to scan the QR image attached to the product.
2. When the SmartThings app is running, press ‘ Product support’.
3. Select ‘ Product registration’, ‘ Manual’ or ‘ Customer support’.
NOTE
Product registration may not be available in all countries.
NON Wi-Fi MODEL
Registering the product / Reading the manual / Customer support
1. Launch the QR Code Reader app to scan the QR image attached to the product.
2. Select ‘ Product registration’, ‘ Manual’ or ‘ Customer support’.
NOTE
Product registration may not be available in all countries.
Untitled-9 1Untitled-9 1 2025-09-25 7:07:542025-09-25 7:07:54

English 2
Contents
Safety information 3
Caution/Warning symbols used 3
Other symbols used 3
State of California Proposition 65 Warning 3
General 4
Regulatory Notice 5
Installation 7
Power 7
Before use 7
Cleaning and maintenance 10
Battery usage 11
Class 1 laser information 12
Preparation 13
Accessories 13
Parts overview 13
Installation 16
Installing the Clean Station 16
Operation 18
Removing the protective covers on the Jet Bot
Combo 18
Preparing the Clean Water Tank 19
Charging the Jet Bot Combo 20
Auto charging 21
Docking (Recharging) 21
Manual Charging (Discharged Jet Bot Combo) 21
What to do if the Jet Bot Combo does not return
for recharging 21
Using the Jet Bot Combo 22
Using the control panel 22
Operation status on the Status Indicator 23
Energy-Saving mode 24
Resetting the Jet Bot Combo 24
SmartThings app 25
Before using SmartThings 25
Using the SmartThings app 28
Open Source Announcement 31
Maintenance 32
Cleaning and maintaining the Clean Station 32
Cleaning the Waste Water Tank 32
Replacing the Dust Bag 33
Cleaning the Fine Dust Filter 34
Cleaning the Washing Plate 34
Cleaning the bottom cover 35
Descaling the Steamer 36
Descaling 36
Rinsing 36
Maintaining and cleaning the Jet Bot Combo 36
Emptying and cleaning the Dustbin 36
Cleaning the Brush 38
Cleaning the Roller 39
Cleaning the Spin Brush 40
Cleaning the Driving Wheel 40
Cleaning the Mops 41
Cleaning and maintaining the sensor 42
Jet Bot Combo 42
Clean Station 43
Troubleshooting 44
Voice Guidance Checklist 44
Checklist before reporting a problem 48
Appendix 53
Product Specification 53
Warranty 55
Warranty 55
Warranty (CANADA) 57
Warranty (CANADA) 57
Untitled-9 2Untitled-9 2 2025-09-25 7:07:552025-09-25 7:07:55
English 3
Safety information
• Before operating the appliance, please read this manual thoroughly
and retain it for your reference.
• Because the following operating instructions cover various models,
the characteristics of your vacuum cleaner may differ slightly from
those described in this manual.
Caution/Warning symbols used
WARNING
Indicates that a danger of death or serious injury exists.
CAUTION
Indicates that a risk of personal injury or material damage exists.
Other symbols used
NOTE
Indicates that the following text contains additional important
information.
Failure to meet these requirements could cause damage to the internal
parts of the vacuum and void your warranty.
State of California Proposition 65 Warning
WARNING
Cancer and Reproductive Harm - www.P65Warnings.ca.gov.
For battery recycling go to call2recycle.org
or call 1-800-822-8837
Untitled-9 3Untitled-9 3 2025-09-25 7:07:552025-09-25 7:07:55

Safety information
English 4
General
1. This appliance is not intended for use by persons (including children)
with reduced physical, sensory or mental capabilities, or lack of
experience and knowledge, unless they have been given supervision
or instruction concerning use of the appliance by a person
responsible for their safety.
2. Children should be supervised to ensure that they do not play with
the appliance.
3. If the supply cord is damaged, it must be replaced by the
manufacturer, its service agent or similarly qualified persons in order
to avoid a hazard.
4. Do not use the vacuum cleaner on a wet rug or floor.
5. Do not pull or carry by the cord, use the cord as a handle, close the
door on the cord, or pull the cord around sharp edges or corners. Keep
the cord away from heated surfaces.
6. Do not unplug by pulling on the cord. To unplug, grasp the plug, not
the cord.
7. Do not use a damaged power plug, a power cord or a loose power
outlet.
Untitled-9 4Untitled-9 4 2025-09-25 7:07:552025-09-25 7:07:55

English 5
Regulatory Notice
1. FCC Notice
WARNING
• Any changes or modifications not expressly
approved by the party responsible for
compliance could void the user’s authority to
operate the equipment.
• This device complies with Part 15 of FCC
Rules. Operation is Subject to following two
conditions:
1. This device may not cause harmful
interference, and
2. This device must accept any interference
received including interference that cause
undesired operation.
• For product available in the USA/Canada
market, only channel 1 ~ 11 can be operated.
Selection of other channels is not possible.
FCC STATEMENT:
• This equipment has been tested and found
to comply within the limits for a Class B
digital device, pursuant to part 15 of the FCC
Rules. These limits are designed to provide
reasonable protection against harmful
interference in a residential installation.
• This equipment generates, uses, and can
radiate radio frequency energy and, if not
installed and used in accordance with the
instructions, may cause harmful interference
to radio communications. However, there is
no guarantee that interference will not occur
in a particular installation. If this equipment
does cause harmful interference to radio or
television reception, which can be determined
by turning the equipment off and on, the user
is encouraged to try to correct the interference
by one or more of the following measures:
- Reorient or relocate the receiving antenna
- Increase the separation between the
equipment and receiver
- Connect the equipment into an outlet on
a different circuit from that to which the
receiver is connected
- Consult the dealer or an experienced radio/
TV technician for help.
Untitled-9 5Untitled-9 5 2025-09-25 7:07:552025-09-25 7:07:55

Safety information
English 6
FCC RADIATION EXPOSURE
STATEMENT:
• This equipment complies with FCC radiation
exposure limits set forth for an uncontrolled
environment. This equipment should be
installed and operated with a minimum
distance of 20 cm between the radiator and
your body. This device and its antenna(s) must
not be co-located or operation in conjunction
with any other antenna or transmitter.
2. IC Notice
• The term “IC” before the radio certification
number only signifies that Industry Canada
technical specifications were met. Operation is
subject to the following two conditions: (1) this
device may not cause interference, and (2) this
device must accept any interference, including
interference that may cause undesired
operation of the device.
• This Class B digital apparatus complies with
Canadian ICES-003.
• Cet appareil numérique de la classe B est
conforme á la norme NMB-003 du Canada.
• For product available in the USA/Canada
market, only channel 1 ~ 11 can be operated.
Selection of other channels is not possible.
IC RADIATION EXPOSURE STATEMENT:
• This equipment complies with IC RSS-102
radiation exposure limits set forth for an
uncontrolled environment. This equipment
should be installed and operated with
minimum distance 20 cm between the
radiator & your body. This device and its
antenna(s) must not be co-located or operation
in conjunction with any other antenna or
transmitter.
Open Source License Notice
• This device uses open source software. Open
Source Licenses are available on the product
menu.
• Tap “Settings > Network > Software Update
> Legal Information” on the device for more
details.
Untitled-9 6Untitled-9 6 2025-09-25 7:07:552025-09-25 7:07:55
English 7
Installation
WARNING
When installing the Clean Station , make sure the
cord does not get damaged in any way.
• There is a risk of fire or electric shock.
CAUTION
When installing the Clean Station , do not leave
the cord carelessly on the floor since the Jet Bot
Combo may get caught by it.
Do not install the Clean Station in an area with a
dark floor.
• If the floor around the Clean Station is dark,
recharging is hindered.
Do not install the Clean Station on a rug or carpet
where contamination may occur.
• If the Jet Bot Combo returns for charging
with the Mops still wet, rug or carpet may be
contaminated.
NOTE
Install the Clean Station in a place where the floor
and wall are level.
If the cleaning area is wooden floors, it is best
to install the Clean Station along the grain of
wooden floors.
Always keep the Clean Station ’s power cord
plugged.
• If power is not supplied to the Clean Station ,
the Jet Bot Combo cannot find it and cannot
automatically recharge.
• If the Jet Bot Combo is left detached from the
Clean Station , the battery will drain naturally.
Do not place the Clean Station in a place where
people pass by frequently, in entrance way or
narrow passage.
• People may trip over it and be injured, or
product damage may occur.
Power
WARNING
Please prevent any risk of electric shock or fire.
• Do not damage the power cord.
• Do not pull the power cord too hard or touch
the power plug with wet hands.
• Do not use a power source other than Rated
voltage of charger and also do not use a multi-
outlet to supply power to a number of devices
at the same time. (Do not leave the cord
carelessly on the floor.)
• Do not use damaged power plugs, power cords,
or loose outlets.
Clean dust or any foreign matter on the pin and
the contact part of the power plug.
• There is a risk of electric shock or malfunction.
Use a socket that is properly grounded for safety.
Do not ground the appliance to a gas pipe, plastic
water pipe, or telephone line.
• This may result in electric shock, fire, an
explosion, or problems with the product.
• Never plug the power cord into a socket that
is not grounded correctly and make sure that
it is in accordance with local and national
regulations.
Before use
WARNING
Do not use the Jet Bot Combo near a heater or
combustible materials.
• Do not use the Jet Bot Combo near fire or
flame such as a movable heater, a candlelight,
a desk lamp, a fireplace, etc. or in a place
where combustible materials such as gasoline,
alcohol, thinner, etc. exist.
Make sure there are no dangerous objects around
the Jet Bot Combo ’s cleaning area to prevent
collision and unplug any electric heaters or fans.
Untitled-9 7Untitled-9 7 2025-09-25 7:07:562025-09-25 7:07:56

Safety information
English 8
The Jet Bot Combo is intended for household
use therefore do not use it in an attic, basement,
storage, an industrial building, out of indoor space,
places with moisture (such as a bathroom, a
laundry room), on the table or shelves.
• The Jet Bot Combo can be damaged or
malfunction.
Be sure the Jet Bot Combo does not suck in or
touch any kind of liquids (water, beverage, filth,
etc.).
• The Jet Bot Combo can be severely damaged
and it may contaminate other areas if the
wheels pass through liquid.
Always keep the Cliff Sensor clean for your safety.
When the power cord is damaged, contact a
customer service to get it replaced by a certified
repairer.
• There is a risk of fire or electric shock.
CAUTION
Be sure the Dustbin is inserted before using the
Jet Bot Combo .
To clean all areas of your house, open all rooms
and follow these recommendations for proper
automatic recharging.
• Always keep the Clean Station ’s power cord
plugged.
• Install the Clean Station where the Jet Bot
Combo can easily find.
• Do not leave any objects in front of the Clean
Station .
Do not use the Jet Bot Combo on black colored
floors.
• The Jet Bot Combo may not be able to operate
normally.
Do not place any objects within 0.5 m of either
side of the Clean Station or within 1 m of the front
of the Clean Station .
Make sure the Clean Station ’s charging contact is
not damaged or have any foreign matter on it.
Move any obstacles that may disturb the Jet Bot
Combo ’s movement (such as children’s indoor
swing or slides) before cleaning.
Do not use the Jet Bot Combo in a place which is
narrower than its turning radius 0.5 m or less.
Before operating the Jet Bot Combo , remove the
objects which could break such as glass, a frame,
a mirror, and porcelain items so that the Jet Bot
Combo works without interruption.
Use both hands to carry the product.
Do not push the Clean Station .
Using the Jet Bot Combo on a thick carpet may
damage both the Jet Bot Combo and the carpet.
• The Jet Bot Combo cannot pass over a carpet
with fiber longer than 2 cm.
• A carpet with pile length over 1.5 cm is not
accessible by the Jet Bot Combo , So remove
the carpet before starting the cleaning.
• Remove any foreign matter caught in the
Driving Wheel or the Spin Brush before
proceeding.
If the carpet is not fixed on the floor, Jet Bot
Combo may not be able to pass over it.
Do not use the Jet Bot Combo on tables or other
high surfaces.
• There is a risk of damage if it falls.
The Jet Bot Combo may bump into chairs or desk
legs, therefore move them away for faster and
efficient cleaning.
When the Jet Bot Combo is operating, do not lift it
up or carry it to another area.
Do not hold by Driving Wheels of the Jet Bot
Combo when carrying it to another area.
Do not allow children to sit on the Jet Bot Combo
and do not place an object on the Jet Bot Combo .
• It may cause malfunction of the LiDAR Sensor
and the Jet Bot Combo .
Untitled-9 8Untitled-9 8 2025-09-25 7:07:562025-09-25 7:07:56

English 9
Remove any large papers or plastic bags
immediately when using the Jet Bot Combo since
they may block the intake.
Do not lie down around the Jet Bot Combo that is
running.
• Your hair may be caught in the Brush , resulting
in physical injury.
Do not allow children to play with the Jet Bot
Combo .
Make sure hair, fingers, towels do not get caught
in the Spin Brush , Brush or the wheels of the Jet
Bot Combo .
Leave over 3 cm space from the inner doorstep
placed in the entrance. The Jet Bot Combo may
climb over it.
Do not clean the Jet Bot Combo by spraying water
directly onto it or use a volatile substance such as
benzene, thinner, or alcohol to clean it.
Do not disassemble or repair the Jet Bot Combo .
This should only be done by a certified repairer.
Do not store the Jet Bot Combo in a car.
Be careful that the LiDAR Sensor is not exposed to
a direct light such as sun light, infrared light, etc.
• The direct light can affect the performance of
the LiDAR Sensor .
When carrying the Jet Bot Combo , be careful not
to let it drop.
• The impact from the drop can affect the
operation or performance of the LiDAR Sensor .
Remove objects that are 1 cm or less in height
and light in weight before cleaning, as they can
be caught and get dragged around or be caught
in the Jet Bot Combo ’s Brush or Driving Wheels
while it is operating. (Only compliant to model
VR7MD97**** )
Remove objects that are 9 cm or less in height
and light in weight before cleaning, as they can
be caught and get dragged around or be caught
in the Jet Bot Combo ’s Brush or Driving Wheels
while it is operating. (Fixed objects are detected
by pressure on the bumper and avoided.) (Only
compliant to model VR7MD96**** )
• However, obstacles in the front center that are
more than 5 cm in height and less than 4 cm in
width are detected.
Entry under furniture lower than approximately 14
cm in height may be blocked as it may be detected
as an obstacle.
If oil such as cooking oil is on the floor, the Jet Bot
Combo may become stationary because the floor
is slippery. Remove the oil first before cleaning
with the Jet Bot Combo .
Watch your hands while placing the Waste Water
Tank and Clean Water Tank , since they may get
stuck in the Clean Station .
Do not drink the water from both Waste Water
Tank and Clean Water Tank .
Take extreme caution while cleaning the Mop as
this emits steam and hot water. Be careful of the
breeze as well, which emits when drying the Mop .
• Do not touch the Mop . Otherwise, this can
cause a low-temperature burn.
NOTE
The Jet Bot Combo may get caught on thresholds
of entrance door or veranda, etc. during cleaning.
• Move the Jet Bot Combo to an area where it
can move easily, and then restart the cleaning.
In a dark area, the Jet Bot Combo may not
recognize an object.
• Before cleaning, remove obstacles on the floor.
The Jet Bot Combo cannot completely clean
areas which it cannot enter, such as small space
between the corner, between the sofas or walls,
etc.
• Please use another cleaning tool to clean.
Untitled-9 9Untitled-9 9 2025-09-25 7:07:562025-09-25 7:07:56

Safety information
English 10
The Jet Bot Combo cannot vacuum clumps of dust,
so some may remain on the floor after cleaning.
• Please use another cleaning tool to clean.
During periods where temperature and humidity
are high, it is recommended to replace the Dust
Bag every 1 ~ 2 months. If the Clean Station
smells, replace the Dust Bag immediately no
matter the fullness of the Dust Bag .
If there is a larva in the suctioned dust, it can
multiply in the Dust Bag . Clean the Clean Station
with a wet tissue and replace the Dust Bag .
When detaching the Waste Water Tank and Clean
Water Tank , a small amount of remaining water
may fall out. If water droplets fall, wipe it off
before use.
Do not put any substances other than water (such
as detergent) into the Clean Water Tank.
• The product can be damaged or malfunction.
If you want to purchase an additional Mop , check
the Mop ’s model name ( VCA-RPW97 ), then contact
your nearest Samsung Electronics retailer.
• Mops are consumables therefore need to be
replaced every 1 ~ 3 months.
If the Mops are contaminated by foreign
substances on the floor, odor may occur.
• If the smell persists, remove the Mops from
the Mop Spin Board , soak it in water with
neutral detergent for about 30 minutes, wash
it, and dry it completely.
Cleaning and maintenance
If you washed the Dustbin and filter with water:
• Completely wipe out the water on the Dustbin .
• Completely dry the filter in the shade before
use.
CAUTION
Watch your fingers when attaching or detaching
the filter, since they may get stuck.
To avoid blockages by foreign matter, do not let
the Jet Bot Combo vacuum up toothpicks, cotton
swabs, etc.
If it is difficult to remove foreign matter from the
Brush , contact an authorized customer service.
Since the Brush sweeps dirt up from the floor
during cleaning, foreign matter such as a thin and
long thread, long hair, etc. may get caught in it, so
check and clean it regularly.
Turn off the Jet Bot Combo before cleaning or
maintenance work.
If a Brush or a Brush Cover is not assembled
correctly after the maintenance work, scratches
may occur on the floor, or product malfunction
may occur. Assemble them correctly by checking
the maintenance method.
Always keep the Obstacle Sensor , Cliff Sensor , and
the Carpet Detect Sensor clear.
• If foreign matter accumulates, sensors may
malfunction.
If you want to purchase an additional Dust Bag ,
check the Dust Bag ’s model name ( VCA-RDB95 ),
then contact your nearest Samsung Electronics
retailer or customer service.
If you want to clean the Mops additionally, use
product’s Sanitization function to clean or dry the
Mops .
Do not dry Mops in the dryer.
• Usage of a high-temperature dryer may cause
shrinkage of the Mops .
The Brush may stop or make a sound temporarily
due to sucking in a large amount of hair or hair
accumulating on the Brush .
• Check and clean it regularly.
Foreign matter such as a thin and long thread,
hair, etc. may get caught in the Spin Brush , so
check and clean it regularly.
Untitled-9 10Untitled-9 10 2025-09-25 7:07:562025-09-25 7:07:56

English 11
Battery usage
If the battery overheats during charging, it may
take longer to charge. When auto charging is not
working, do the following.
• Unplug the Clean Station ’s power plug and
then plug it back on.
• Check whether there is any foreign matter on
the charging pins and clean charging pins of
the Jet Bot Combo and the Clean Station with a
dry cloth or rag.
• Check for any obstacles such as reflective
objects, chairs, etc. near the Clean Station .
If the Jet Bot Combo is left detached from the
Clean Station , the battery will drain naturally.
• Try to keep the Jet Bot Combo charged on the
Clean Station . (However, turn off the power
switch and leave the Clean Station unplugged
when planning to leave the house for long
periods of time by going on a business trip or
vacation, etc.)
NOTE
Please contact Customer Service when replacing
batteries.
• Using batteries from other products can cause
malfunction.
This battery is exclusively for the Samsung
Electronics Jet Bot Combo , do not use it for any
other products or purposes.
Do not disassemble or modify the battery.
Do not throw the battery out in fire or heat it.
Do not connect any metallic object to the charging
contacts (+, -).
Store the battery indoors (at 0 °C ~ 40 °C).
If the battery malfunctions, do not disassemble it
yourself. Contact Customer Service.
As the battery is used over a length of time, the
battery charging time and usage time decreases.
In this case, contact Customer Service.
Do not disassemble the battery yourself and make
sure short circuit of +, - poles does not occur.
When battery leak occurs, make sure it does not
touch your skin or eyes.
If the battery is stored below 0 °C, the battery
protection mode will activate and will not charge.
• Store it at a room temperature for a certain
period of time then charge.
Untitled-9 11Untitled-9 11 2025-09-25 7:07:562025-09-25 7:07:56
Safety information
English 12
Correct disposal of batteries in this
product
This marking on the battery,
manual or packaging indicates that
the batteries in this product should
not be disposed of with other
household waste at the end of
their working life. Where marked,
the chemical symbols Hg, Cd or Pb
indicate that the battery contains
mercury, cadmium or lead above
the reference levels in EC Directive
2006/66.
WARNING
To remove the battery contact an authorised
service centre. To obtain battery removal
instructions please visit samsung.com/global/
ecodesign_energy
You must not remove (or attempt to remove)
the battery incorporated in this product on your
own.
FOR YOUR OWN SAFETY, DO NOT ATTEMPT
TO REMOVE THE BATTERY ON YOUR OWN OR
DISPOSE OF IT IN FIRE. DO NOT DISASSEMBLE,
CRUSH OR PUNCTURE THE BATTERY
Batteries, after use, should not be thrown in
regular trash.
To avoid risks to human health and the
environment, perform environmentally
appropriate disposal in a Samsung Authorized
Service.
Class 1 laser information
Complies with FDA performance standards for
laser products except for conformance with IEC
60825-1 Ed. 3., as described in Laser Notice No. 56,
dated May 8, 2019.
• If the laser sensor is damaged or
malfunctioning, contact customer service for
replacement by a certified technician.
• There is a risk of exposure laser.
• The laser sensor uses a Class 1 laser. During
normal operation, laser exposure is not
possible, but avoid direct viewing of the sensor.
Untitled-9 12Untitled-9 12 2025-09-25 7:07:562025-09-25 7:07:56
English 13
Preparation
Accessories
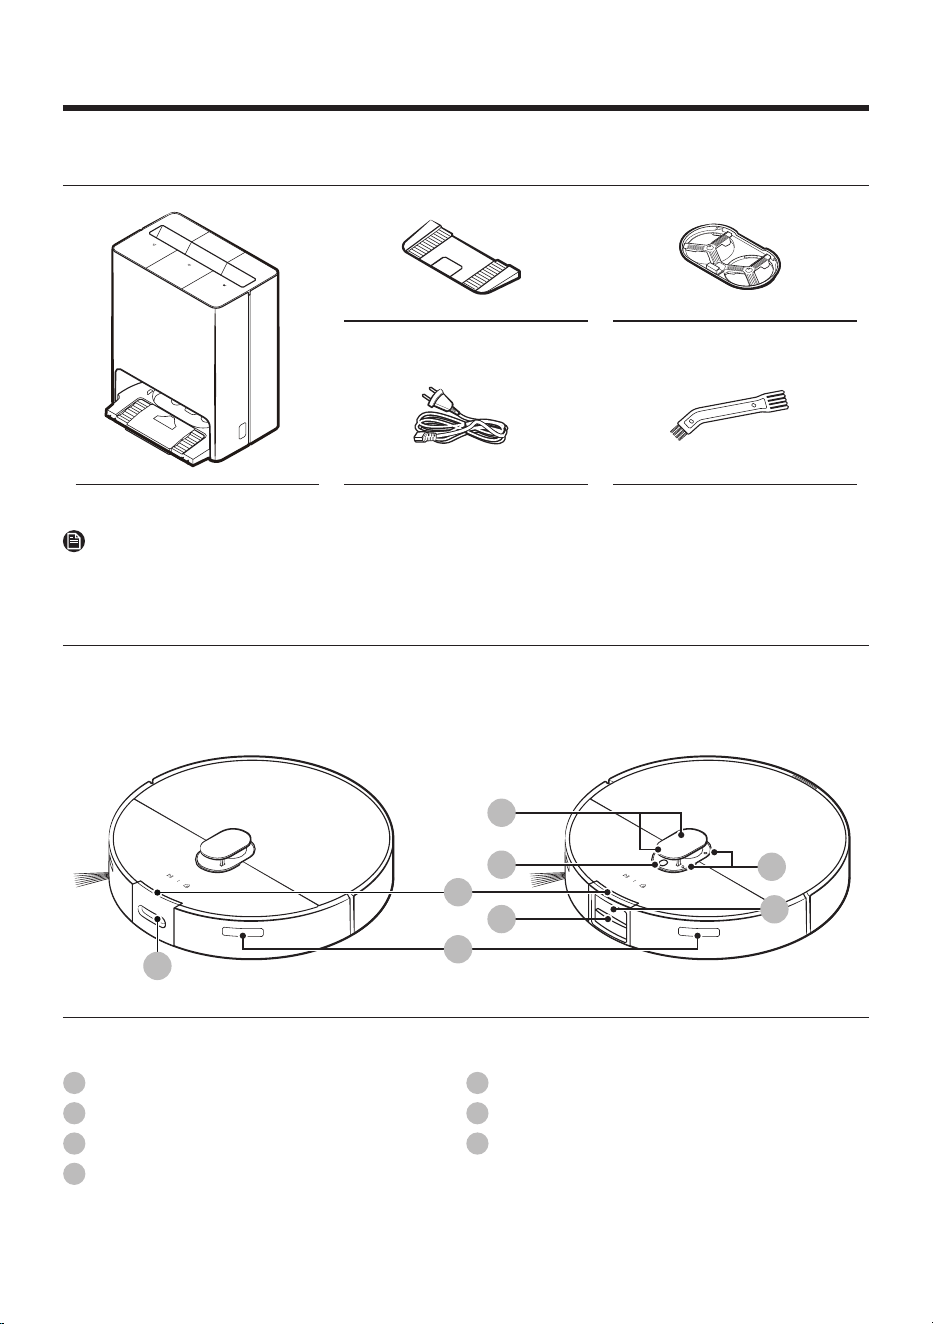
Base Plate Washing Plate
Clean Station Power Cord Cleaning Tool
NOTE
Accessories may differ depending on the models.
Parts overview
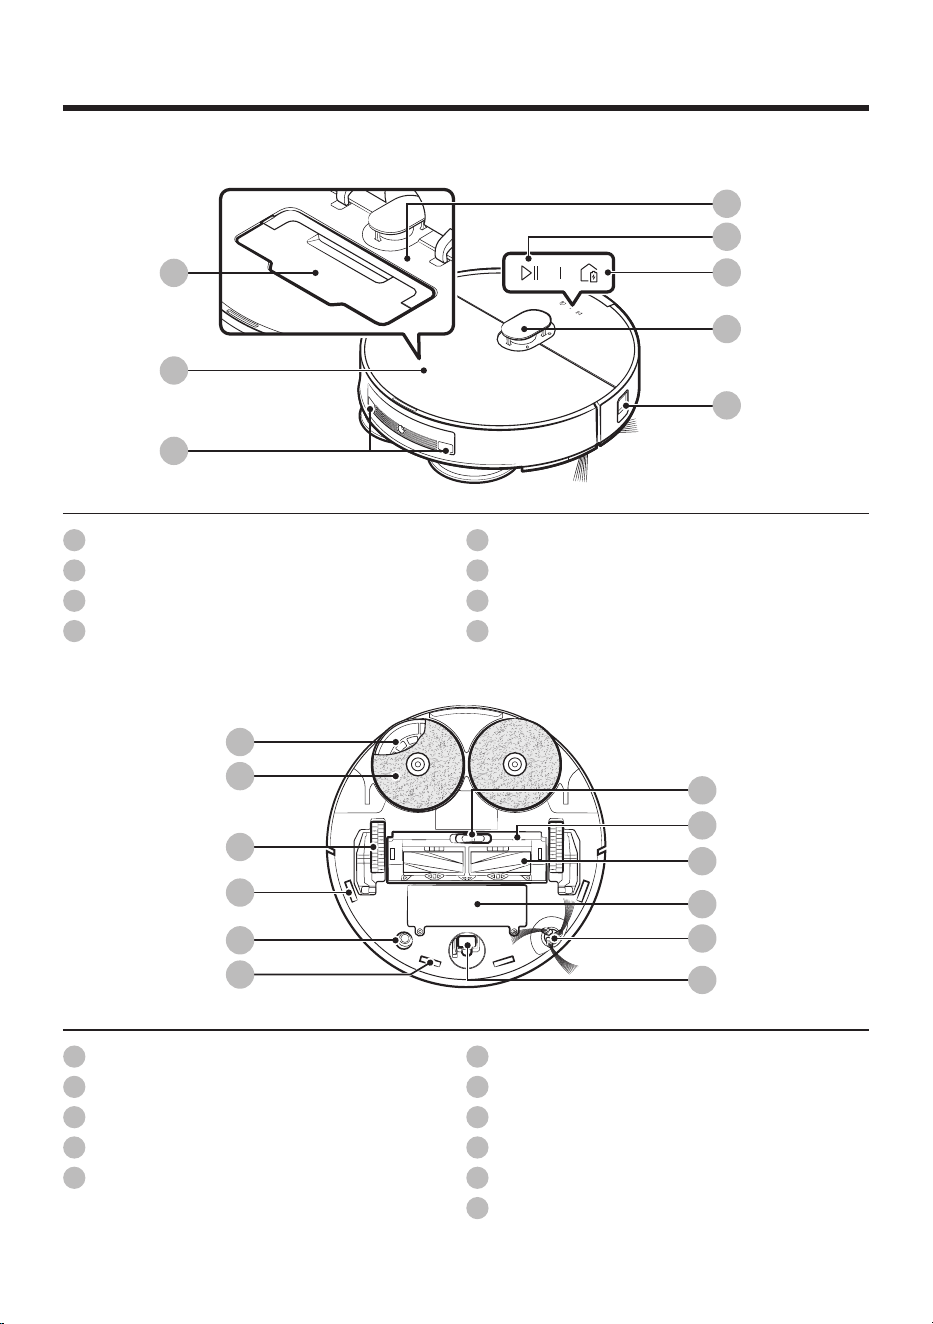
Jet Bot Combo
Top (Front)
01
02
03
05
06
04
01
07
(Model VR7MD96**** ) (Model VR7MD97**** )
01
Microphone
02
Microphone Indicator
03
Status Indicator
04
3D Sensor
05
Signal Transmitter
06
Obstacle Detect ToF Sensor
07
Camera
Untitled-9 13Untitled-9 13 2025-09-25 7:07:582025-09-25 7:07:58
Preparation
English 14
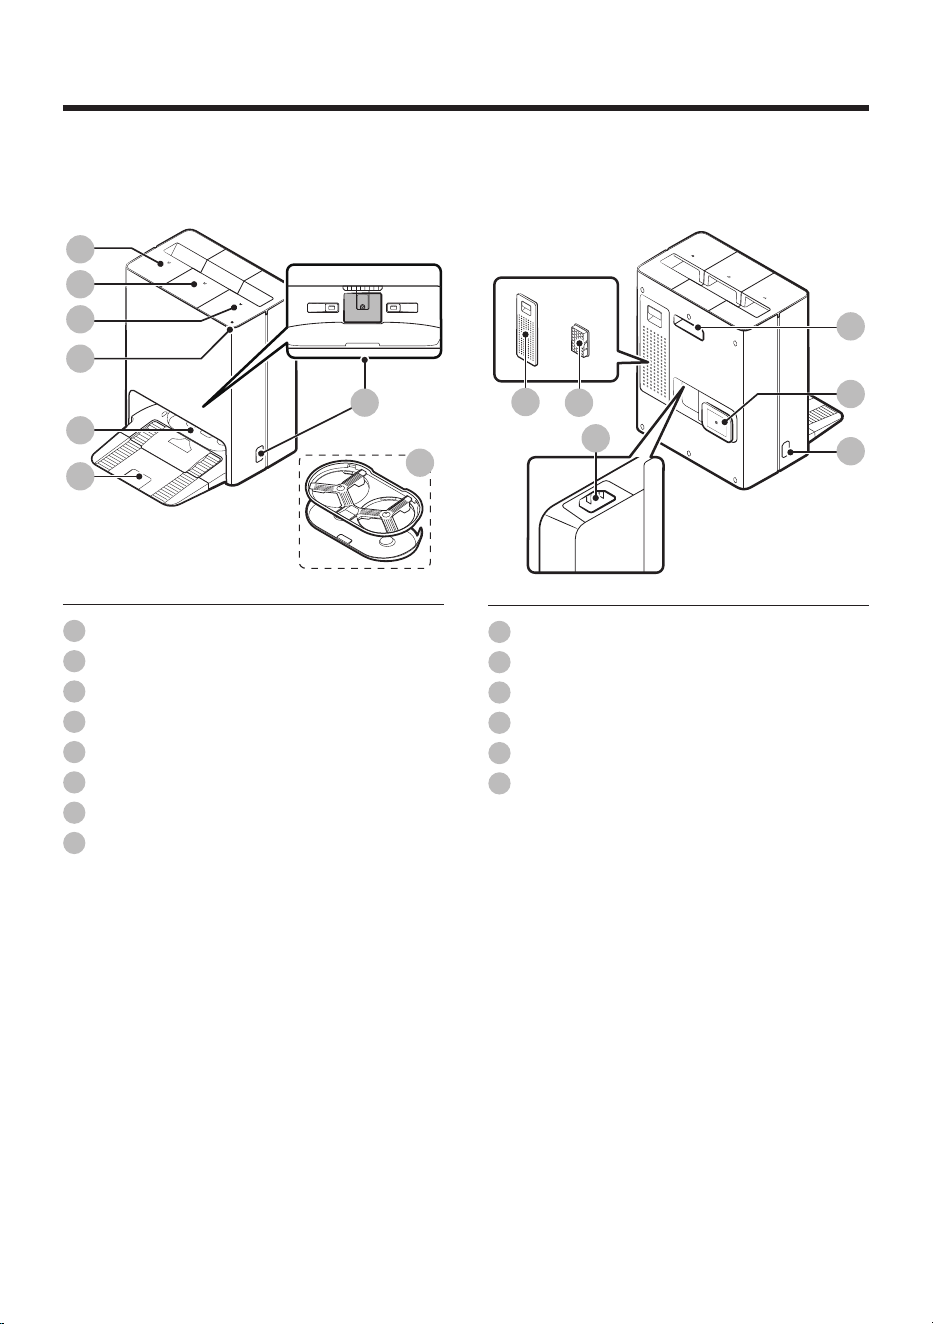
Top (Back)
"0"1
05
04
01
02
03
06
07
08
01
Dustbin
02
Top Cover
03
Charging Pin
04
Reset button
05
Start/Stop button
06
Docking (Recharging) button
07
LiDAR Sensor
08
Obstacle Sensor
Bottom
06
11
07
01
02
03
04
04
05
08
09
10
01
Mop Spin Board
02
Mop
03
Driving Wheel
04
Cliff Sensor
05
Carpet Detect Sensor
06
Brush Cover Lock
07
Brush Cover
08
Brush
09
Battery Cover
10
Spin Brush
11
Roller
Untitled-9 14Untitled-9 14 2025-09-25 7:07:582025-09-25 7:07:58
English 15
Clean Station
Front
05
07
02
03
04
06
01
08
01
Waste Water Tank
02
Clean Water Tank
03
Dustbin
04
Status Indicator
05
Washing Space
06
Base Plate
07
Charging Signal Transmitter
08
Washing Plate
Back
01
03
04
06
02
05
01
Filter Cover
02
Fine Dust Filter
03
Power Cord Port
04
Lifting Handle
05
Power Cord Organizer
06
Charging Signal Transmitter
Untitled-9 15Untitled-9 15 2025-09-25 7:07:592025-09-25 7:07:59
English 16
Installation
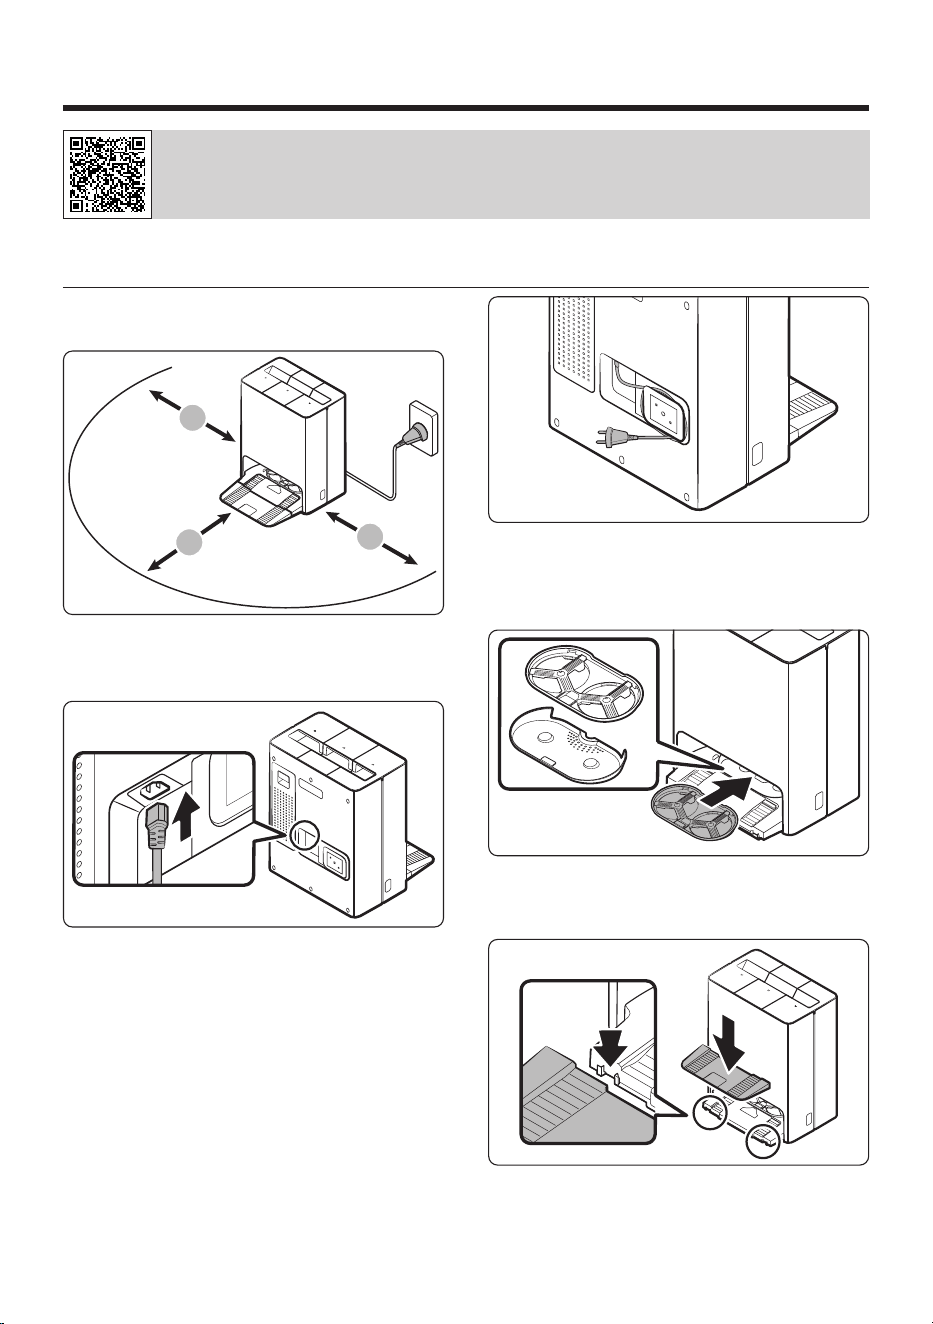
Scan the QR code to see a video on how to use the product.
Installing the Clean Station
Refer to the figure and clear enough space around
the Clean Station .
A
A
B
A: Approximately 0.5 m
B: Approximately 1.0 m
1. Connect the provided power cord to the Power
Cord Port of the Clean Station .
2. Wrap the excess power cord around the
Power Cord Organizer at the back of the Clean
Station .
3. Assemble the Washing Plate to the Clean
Station .
4. Assemble the Base Plate to the Clean Station .
Untitled-9 16Untitled-9 16 2025-09-25 7:08:002025-09-25 7:08:00
English 17
A
B
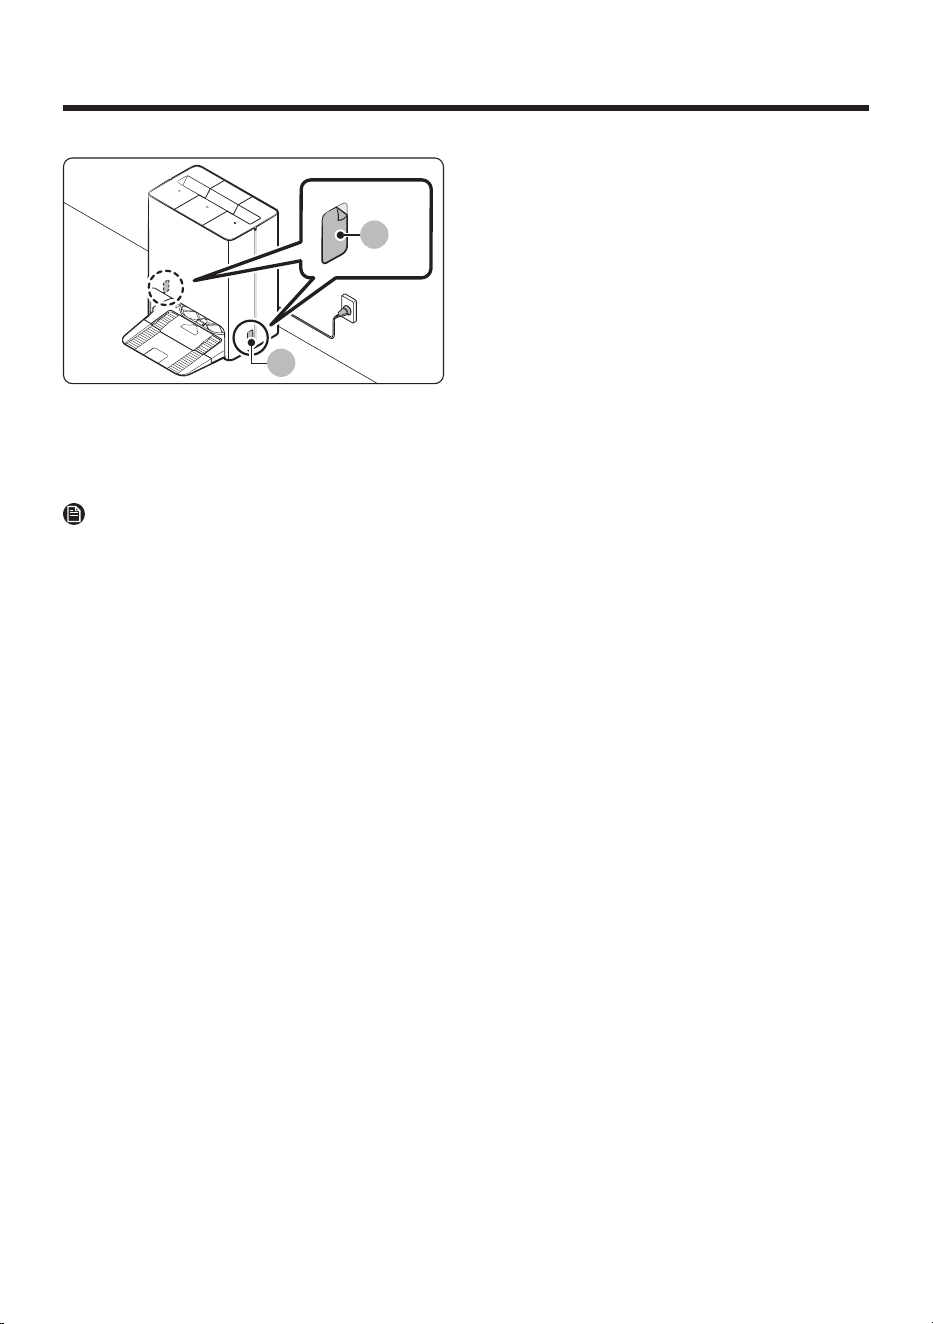
5. Place the Clean Station on an even floor and
near an electrical outlet and plug it in.
- Remove the protection films (A) on the
Charging Signal Transmitters (B).
NOTE
• Install the Clean Station in a place where the
floor and wall are leveled.
• You can wrap the excess power cord around
the Power Cord Organizer at the back of the
Clean Station .
• After installing the Clean Station , if you
rotate it by more than 45 degrees or move
it more than 1 meter from the initially
installed position, recreate the map from the
SmartThings app. (Some areas may not be
cleaned if you use the existing map instead of
using the newly created map.)
Untitled-9 17Untitled-9 17 2025-09-25 7:08:002025-09-25 7:08:00
English 18
Operation
Removing the protective covers on the Jet Bot Combo
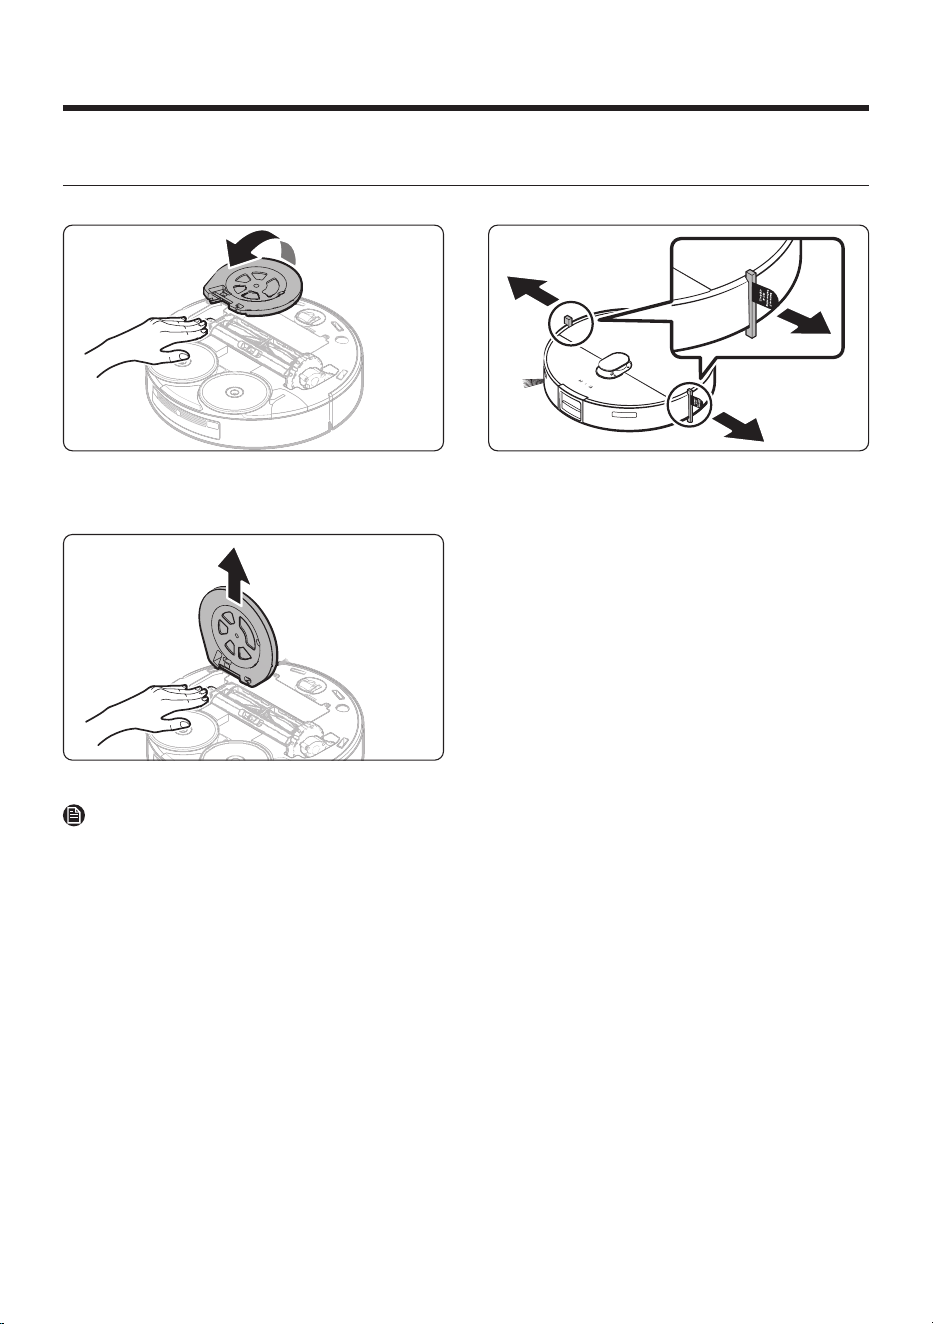
Remove all protective coverings before using the Jet Bot Combo for the first time.
1. Lift the Spin Brush ’s protective cover in the
direction of the arrow as shown in the figure.
2. Detach the Spin Brush ’s protective cover.
NOTE
• Press the Driving Wheels and remove the Spin
Brush ’s protective cover.
• Discard the Spin Brush ’s protective cover after
removing it.
3. Remove the bumper protection gaskets
attached on the left and right sides.
Untitled-9 18Untitled-9 18 2025-09-25 7:08:012025-09-25 7:08:01
English 19
Preparing the Clean Water Tank
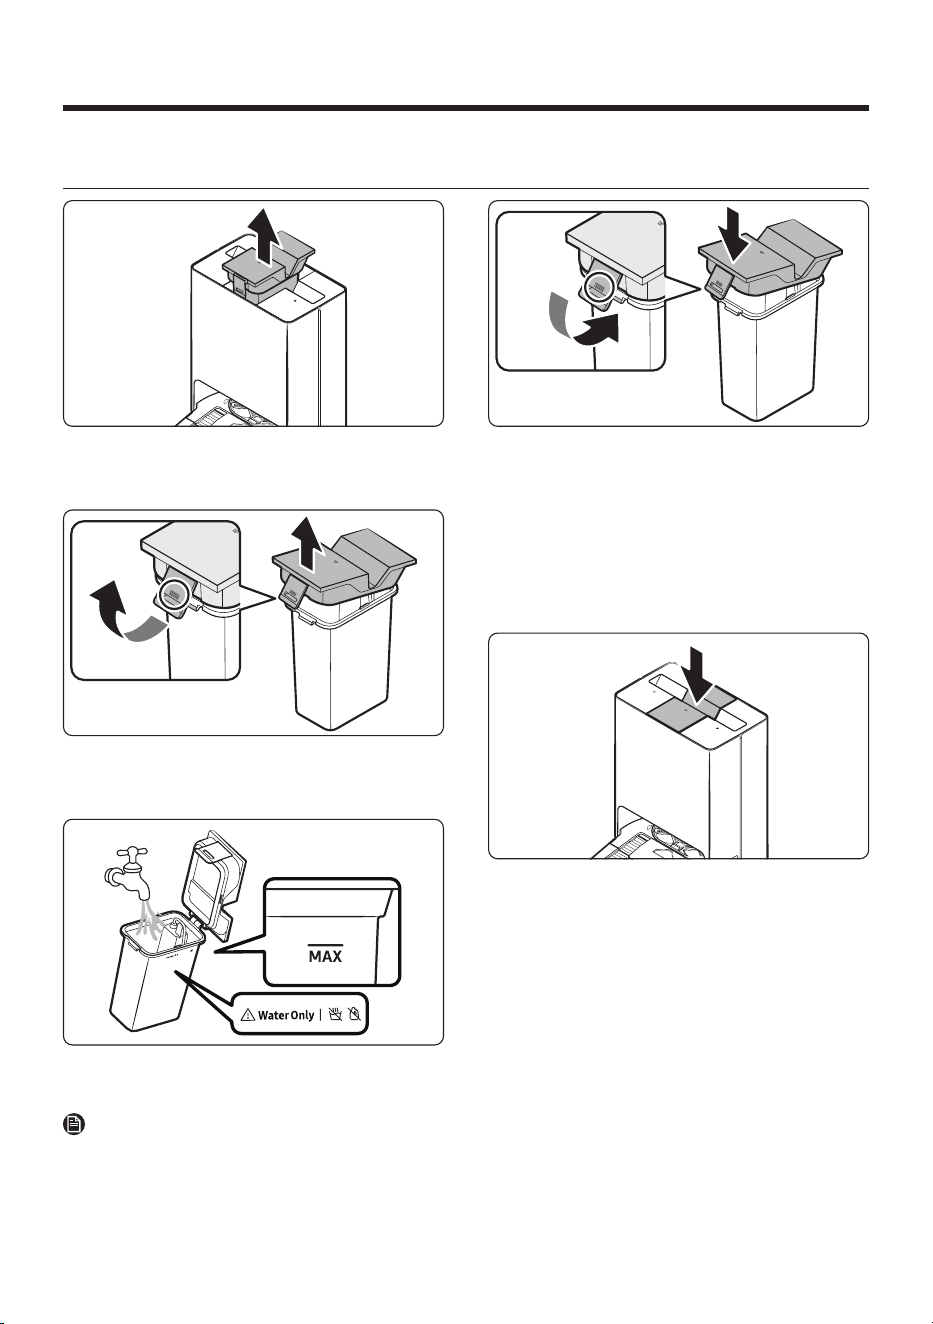
1. Detach the Clean Water Tank from the Clean
Station by pulling the handle on the top.
2. Pull the latch on the lid to unlock it and then
open the lid.
3. Fill the Clean Water Tank with clean water up
to the MAX line.
NOTE
Do not use detergent.
• Product can be damaged or malfunction.
4. Close the lid.
- Press the latch on the lid until you hear
a click, making sure the lid is completely
shut.
- If the lid is not completely shut, the product
may malfunction or may result in problems
with the product.
5. Insert the Clean Water Tank into the Clean
Station .
Untitled-9 19Untitled-9 19 2025-09-25 7:08:022025-09-25 7:08:02
Operation
English 20
Charging the Jet Bot Combo
Before using the Jet Bot Combo for the first time, charge it completely. (For the charging time and usage
time, refer to the Product Specification section.)
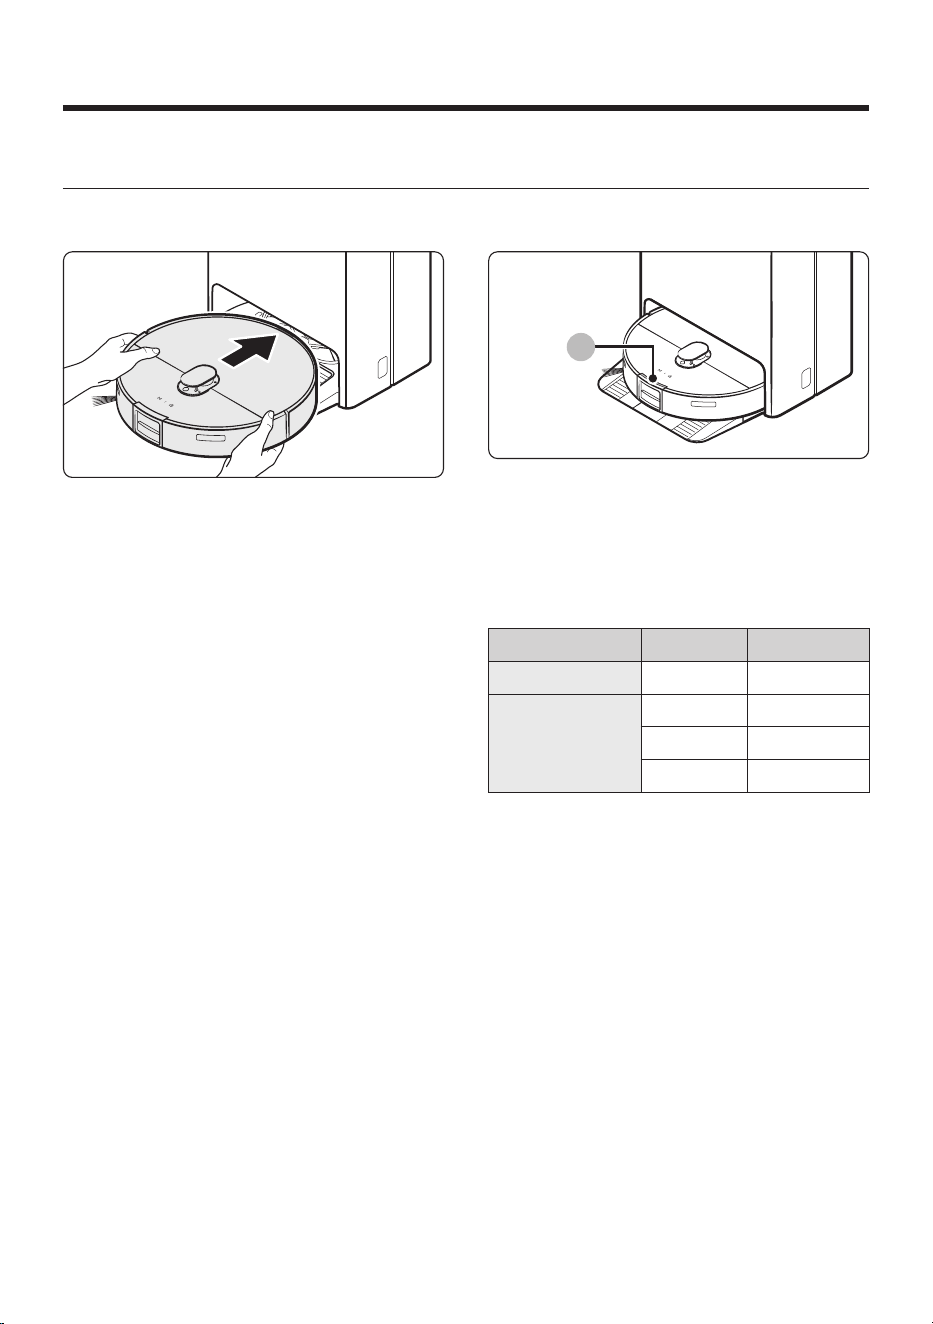
1. Place the Jet Bot Combo on the Clean Station
manually to start charging.
- Make sure the Charging PIns on the Jet Bot
Combo and the Clean Station are aligned.
A
2. Check the charging status.
- When charging starts, the Status Indicator
(A) of the Jet Bot Combo turns on (red,
orange, or yellow depending on charging
progress), it rises gradually, and changes to
green when the charging is complete.
Charge status Color Charge level
Charge complete Green 98 — 100 %
Charge in
progress
Yellow 30 — 97 %
Orange 11 — 29 %
Red 0 — 10 %
Untitled-9 20Untitled-9 20 2025-09-25 7:08:032025-09-25 7:08:03
English 21
Auto charging
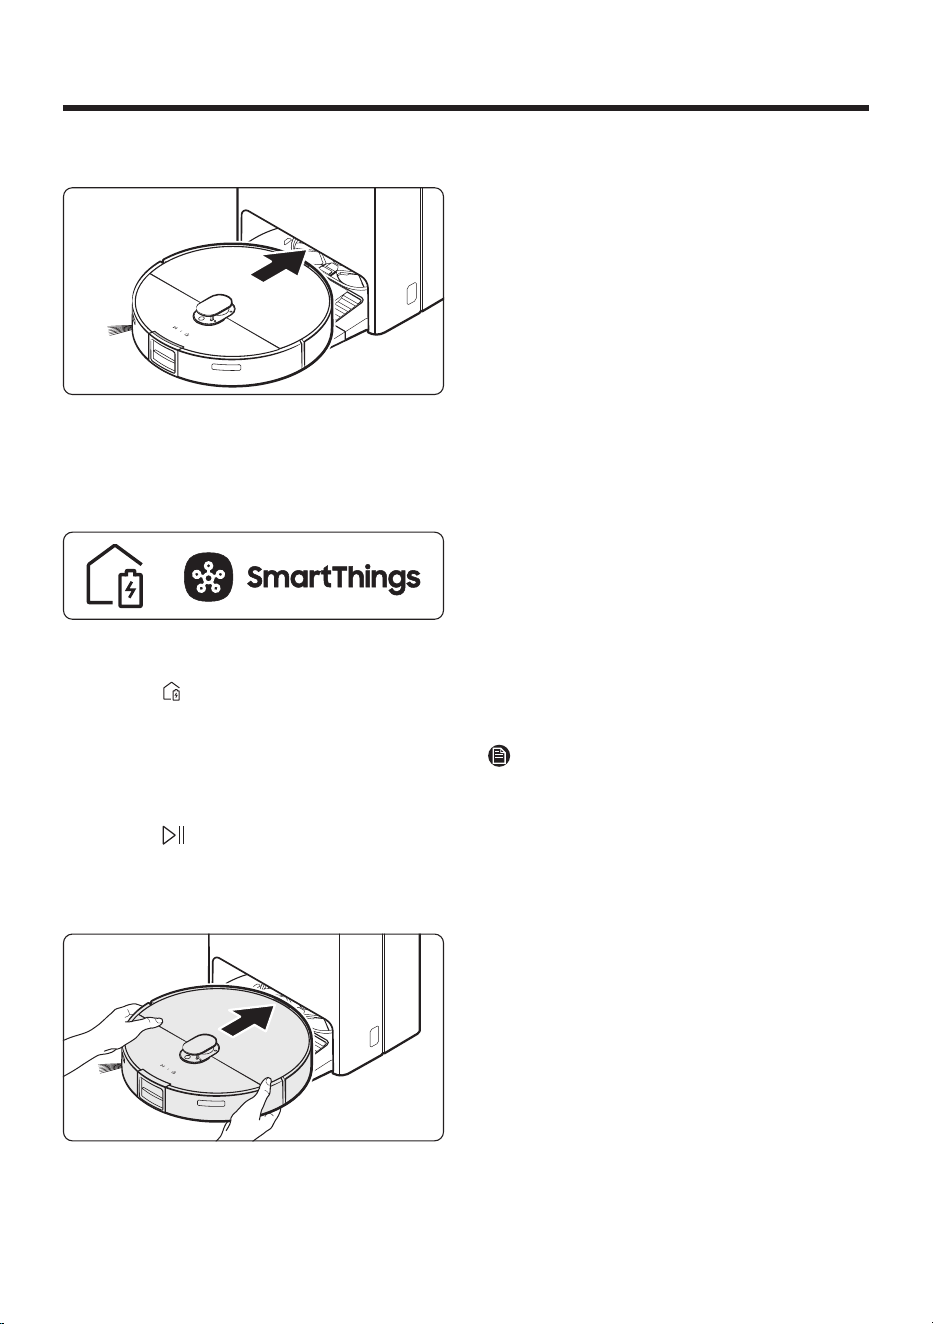
The Jet Bot Combo automatically returns to the
Clean Station to recharge when it completes
cleaning or when the battery is low.
Docking (Recharging)
You can return the Jet Bot Combo to the Clean
Station while cleaning to recharge.
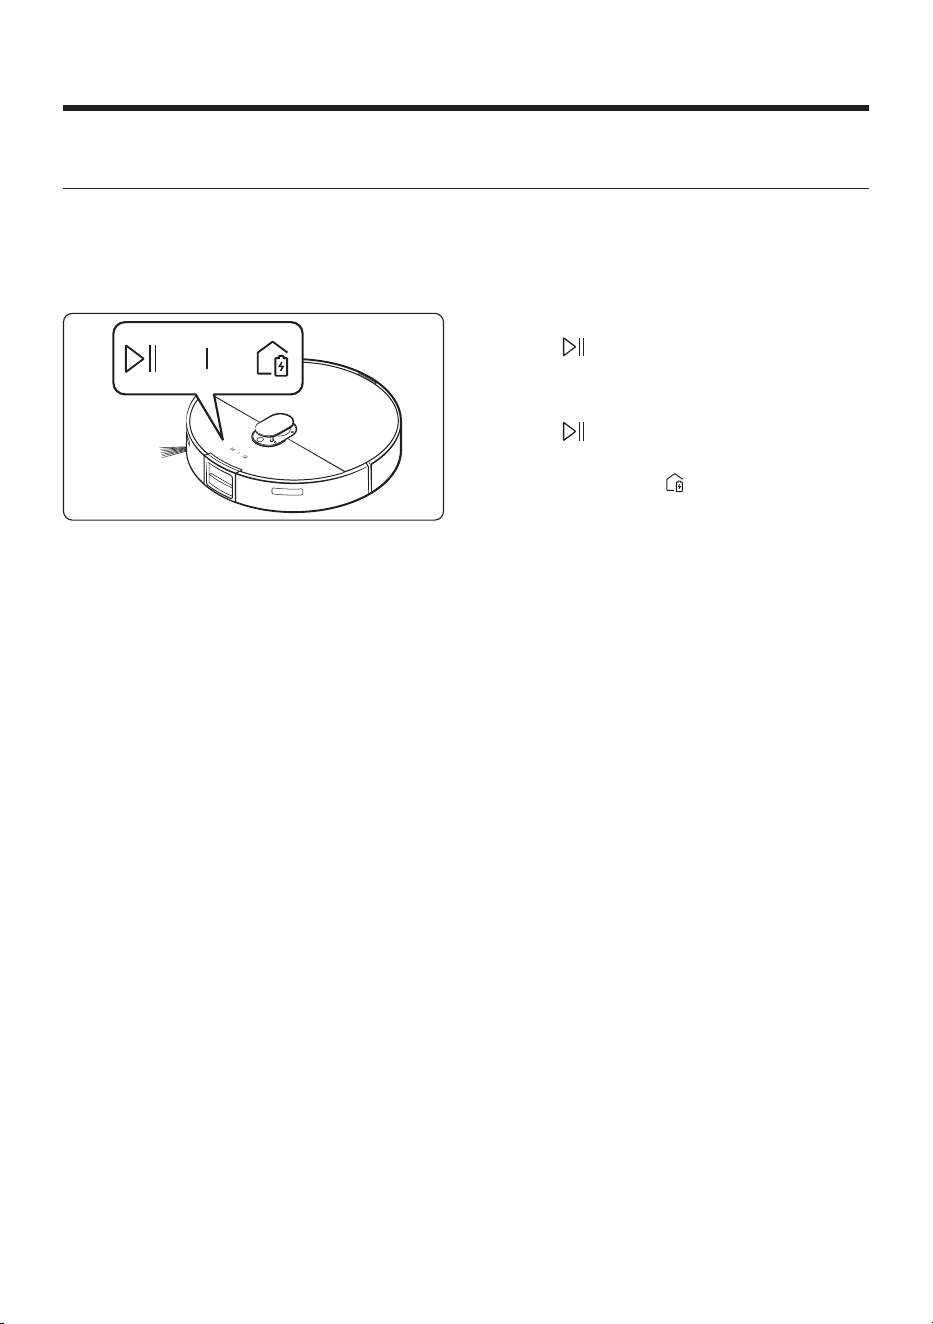
• Press the button on the Jet Bot Combo or
use the SmartThings app to select the Dock
function.
• If the Jet Bot Combo fails to return to the Clean
Station for charging, it turns to Energy-Saving
mode. To cancel the Energy-Saving mode,
press the button.
Manual Charging (Discharged Jet Bot
Combo )
Move the Jet Bot Combo manually onto the Clean
Station to recharge.
What to do if the Jet Bot Combo does
not return for recharging
Cases require to check the Clean Station
• Check whether the Clean Station has been
installed in a place where it cannot guide the
Jet Bot Combo to return.
• Check whether the distance between the Clean
Station and the Jet Bot Combo is over 5 m.
- It may take a longer time for the Jet Bot
Combo to return to the Clean Station .
Cases require to charge the Jet Bot Combo
manually
• When the Clean Station is installed in a corner
• When the battery is completely discharged
• When the Jet Bot Combo is stuck in an obstacle
(such as furniture)
• When the Jet Bot Combo cannot climb a
threshold near the Clean Station . (The height
of the threshold should be less than 1.5 cm.)
• When the Jet Bot Combo ’s Status Indicator
turns and stays red with the Jet Bot Combo not
working.
NOTE
• Keep the Clean Station ’s power on at all times.
• If the power is not supplied to the Clean
Station , the Jet Bot Combo will not be able
to recharge because it cannot find the Clean
Station .
• If the Jet Bot Combo is left detached from the
Clean Station , the battery discharges naturally.
Untitled-9 21Untitled-9 21 2025-09-25 7:08:032025-09-25 7:08:03
Operation
English 22
Using the Jet Bot Combo
You must connect the Jet Bot Combo with the SmartThings app to use its full features.
• For downloading and installing the SmartThings app, refer to the SmartThings app section.
Using the control panel
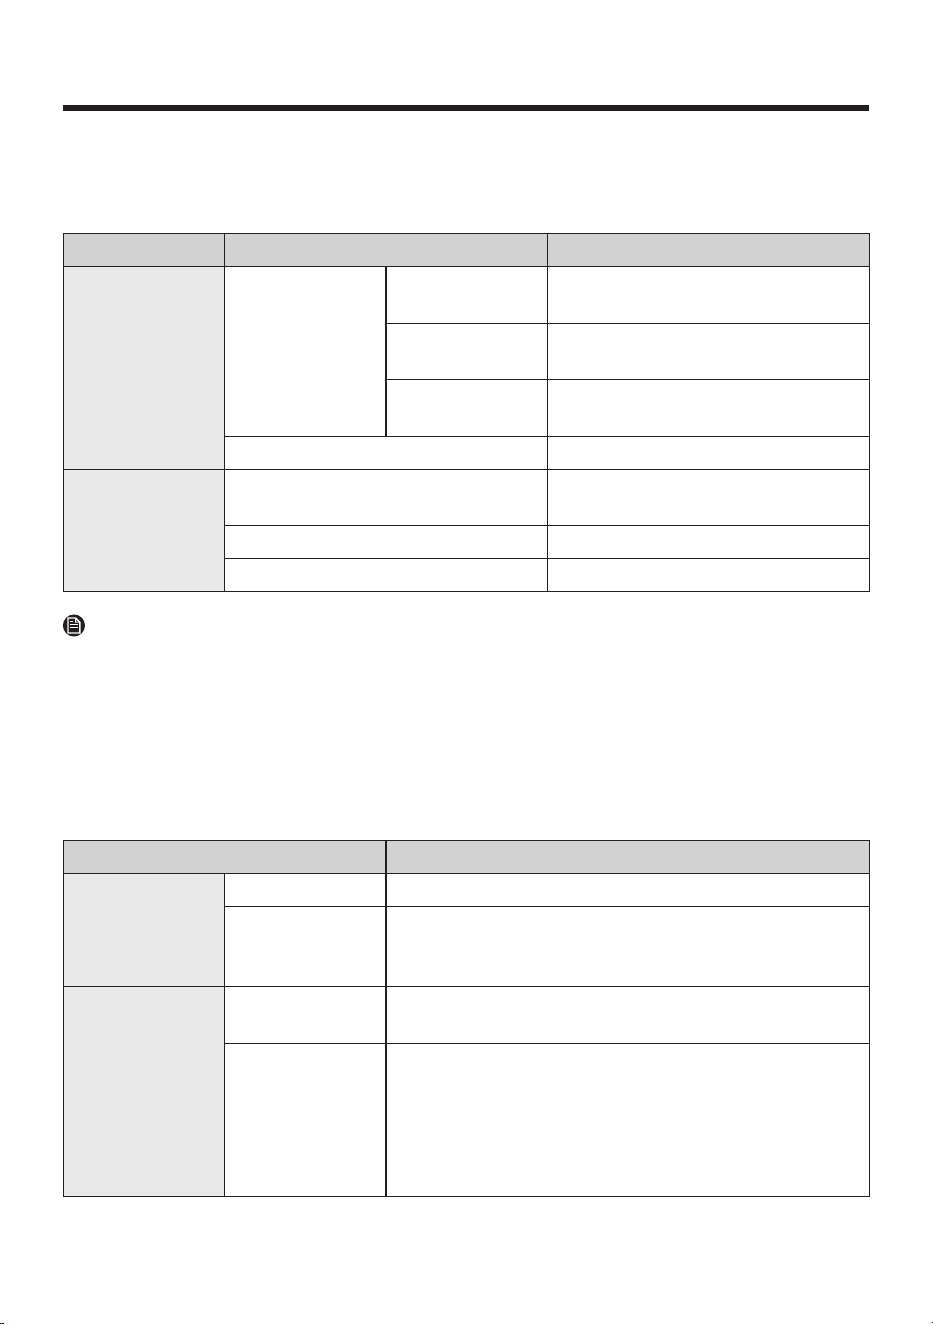
Start cleaning
Press the button on the Jet Bot Combo to start
cleaning in Auto Clean.
Stop cleaning
Press the button on the Jet Bot Combo to stop
operation while cleaning.
• When you press the button, the Jet Bot
Combo returns to the Clean Station and starts
charging.
• If the Jet Bot Combo does not operate
for 20 minutes after it stops operation, it
automatically returns to the Clean Station to
recharge.
Untitled-9 22Untitled-9 22 2025-09-25 7:08:042025-09-25 7:08:04
English 23
Operation status on the Status Indicator
Jet Bot Combo
Classification Color Meaning
While operating
Red
Blinking without
moving
An error occurs
Blinking while
moving
Automatically returning to the Clean
Station because of the low battery level
On
The operation stopped because of the
low battery level
Blue Monitoring
While charging
Red, orange, or yellow (depending on
charging progress)
Charging
Green Charging is complete
Violet Software update in progress
NOTE
• During the first 20 minutes of charging, the Status Indicator turns red.
• If the Jet Bot Combo starts charging after it has been discharged, the Status Indicator turns red and
slowly blinks for about 20 minutes.
• The Jet Bot Combo ’s Night mode (18:00 ~ 06:00) operates only when the Jet Bot Combo is charging,
and in the Night mode, Jet Bot Combo ’s LED brightness is adjusted to 20% within the set time when
time synchronization is set through a smartphone.
Clean Station
Color Meaning
White
On (for 5 seconds) Clean Station ’s power is on.
On
• Empty Dust function is working
• Charging (Turns off after a minute)
• Cleaning and drying the Mops
Red
Blinking
• Dustbin ’s lid is open
• Fine Dust Filter needs cleaning
On
• The Clean Station ’s Dust Bag is full
• The Waste Water Tank is full
• The Clean Water Tank is empty
• The Clean Water Tank is not in place
• The Waste Water Tank is not in place
• The Washing Plate is not in place
Untitled-9 23Untitled-9 23 2025-09-25 7:08:042025-09-25 7:08:04
Operation
English 24
Energy-Saving mode
When charging is complete, the Jet Bot Combo
automatically enters the Energy-Saving mode.
While the Jet Bot Combo is docked on the Clean
Station , press and hold the button for 7
seconds to set it to the Energy-Saving mode, and
to cancel the Energy-Saving mode, start cleaning
or press the button for 7 seconds.
• But, if the Jet Bot Combo is in the Energy-
Saving mode, once booting is complete by
pressing the button, set/cancel the Energy-
Saving mode.
• When the Jet Bot Combo is in the Energy-
Saving mode, the power is turned off after
charging is complete which means the Wi-Fi
reception waiting is not enabled, therefore the
Jet Bot Combo cannot be controlled with the
SmartThings app.
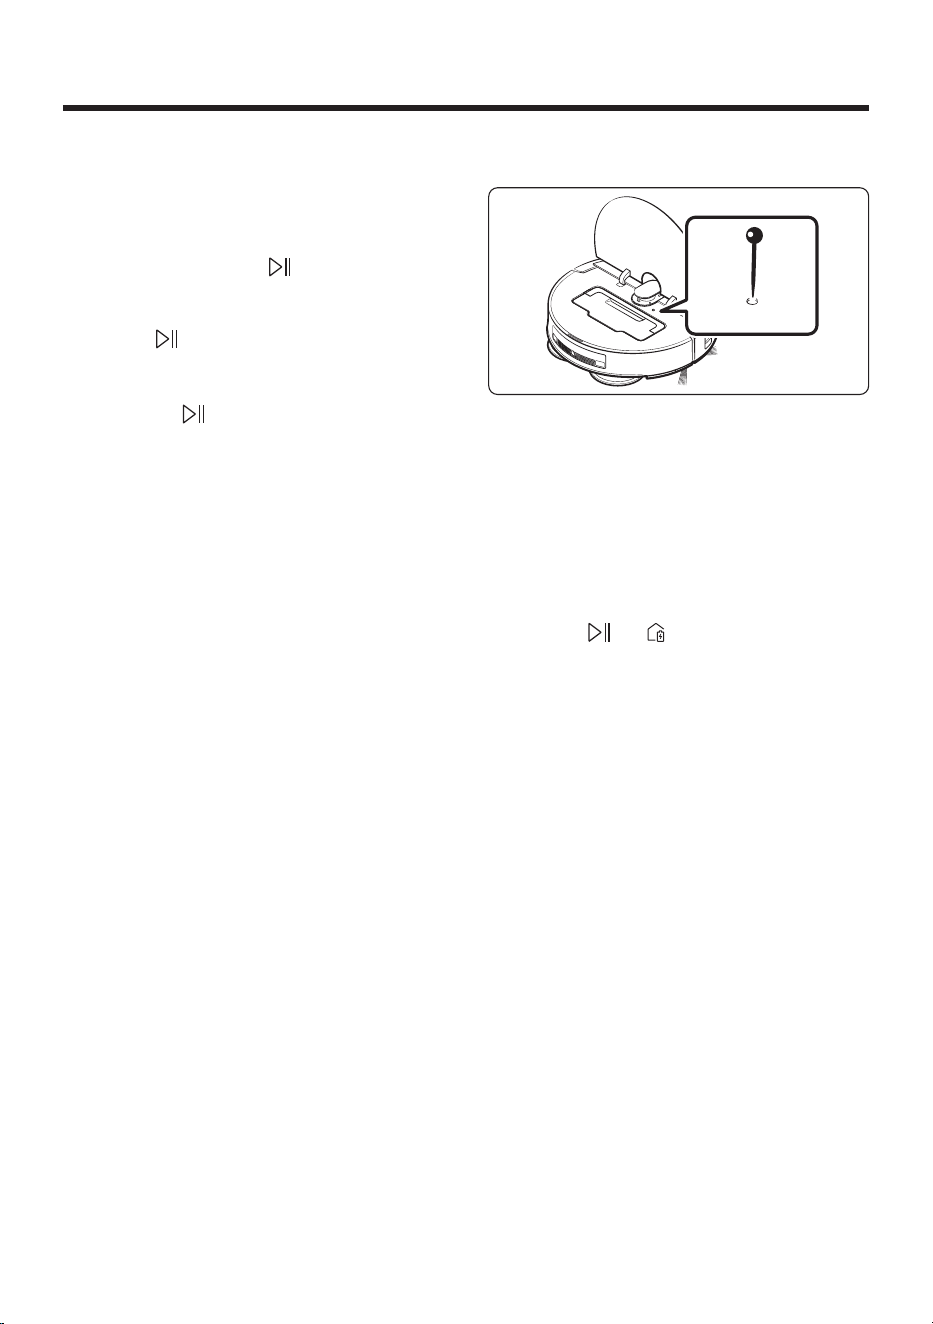
Resetting the Jet Bot Combo
"0"1
"0"1
To reset the Jet Bot Combo , use a clip or needle to
press the Reset button, which is accessible when
you open the Top Cover .
• When the button is properly pressed, you
should feel a click.
How to reset to the factory default
1. Open the Jet Bot Combo ’s Top Cover and press
the Reset button.
2. Press the and buttons simultaneously
for 7 seconds.
- The buttons will blink in white and the
factory default reset process will begin.
- When the factory default setting is
complete, the Jet Bot Combo restarts
automatically.
3. Re-register the Jet Bot Combo to the
SmartThings app.
- After the factory default reset, the Jet Bot
Combo ’s status on the SmartThings app
changes to offline and you need to register
it again.
- You may delete the existing device from
the SmartThings app. Touch and hold the
device card and then delete the device
using the edit action.
Untitled-9 24Untitled-9 24 2025-09-25 7:08:042025-09-25 7:08:04

English 25
SmartThings app
Before using SmartThings
• The SmartThings app is only compatible with models that have a Wi-Fi function.
• If you do not have a Wi-Fi router, you cannot use the SmartThings app.
Setting up the wireless router
• Please refer to the user manual of your wireless
router for the settings of the wireless router.
• Samsung Jet Bot Combo supports both Wi-Fi
2.4GHz and 5GHz.
• Samsung Jet Bot Combo supports IEEE
802.11b/g/n and Soft-AP.
- IEEE 802.11n is recommended.
• Samsung Jet Bot Combo supports only DHCP
(Dynamic Host Configuration Protocol). Check
whether the DHCP server option function is
activated on the wireless router.
• The Jet Bot Combo supports the WEP-OPEN,
WPA-PSK/TKIP, and WPA2-PSK/AES for the
authentication and encryption protocols.
- WPA2-PSK/AES is recommended.
- Confirm that your router has a unique SSID
and password.
• The quality of your wireless network
connection may be influenced by the
surrounding wireless environment.
• If your Internet service provider has
permanently registered the MAC address (a
unique identification number) of your PC or
modem, your Jet Bot Combo may not be able
to connect to the Internet. Ask your Internet
service provider about the procedure to
connect an apparatus other than a PC to the
Internet.
• If your internet service provider requires your
ID or password to connect to the internet, your
Jet Bot Combo may not be able to connect.
If this is the case, you must enter your ID or
password when connecting to the Internet.
• The Jet Bot Combo may not be able to connect
to the Internet because of firewall issues.
Contact your Internet service provider to
resolve these issues.
• Some wireless routers may transmit an
abnormal Domain Name Server (DNS) address
even if the Internet is not connected. If this
occurs, contact the manufacturer of your
wireless router and your Internet service
provider.
• If you still cannot connect to the Internet
even after trying the procedure provided by
your Internet service provider, please contact
Customer Service.
• If your router is not a Wi-Fi certified product,
the Jet Bot Combo may not be able to connect
to the Internet.
NOTE
• To receive the network status by voice guide,
press and hold the button for 3 seconds.
• To turn the Wi-Fi on or off, while the Jet Bot
Combo is in standby or charging, press and
hold the button for 3 seconds and then
press and hold the button for 3 seconds.
Untitled-9 25Untitled-9 25 2025-09-25 7:08:042025-09-25 7:08:04

SmartThings app
English 26
Downloading the SmartThings app
Download and install the SmartThings app from
the markets (Google Play Store, Apple App Store,
or Samsung Galaxy Store).
NOTE
• SmartThings is incompatible with some tablets
and some mobile devices.
• Visit Play Store or App Store to see if your
mobile device is compatible with SmartThings.
• The supporting software version of the
SmartThings app is subject to change
according to the OS supporting policy the
manufacturer provides. In addition, as for the
SmartThings app or the functions that the app
supports, the new application update policy
on the existing OS version can be suspended
because of usability or security reasons.
• The SmartThings app is subject to change
without notice to improve usability or
performance. As the mobile phone OS version
is updated every year, the SmartThings is also
updated continually according to the latest OS.
• If you have enquiries regarding the items
mentioned above, please contact us on
Setting up a Samsung account
• You must sign in to a Samsung account before
using the SmartThings app.
• To set up a Samsung account, you can follow
the directions provided by the SmartThings
app.
• If you have a Samsung smartphone, you can
add your Samsung account in the Settings app
of your smartphone and it will automatically
sign in to your Samsung account, and you can
use the SmartThings app.
Registering a device to the SmartThings
app
1. Connect your smartphone to your wireless
router.
- If the smartphone is not connected, turn on
the Wi-Fi in the Settings app and select a
wireless router you want to connect to.
- Set your smartphone to use Wi-Fi only and
connect a device.
2. Open the SmartThings app on your
smartphone.
3. If a pop-up saying that a new device has been
found appears, tap ADD NOW.
- If the pop-up does not appear, add a device
by selecting the ‘Home appliances’ category
→‘Robot cleaner’ and the Jet Bot Combo to
connect.
- You can add a device by selecting ‘Nearby
search’. (Bespoke Jet Bot)
- If you scan the SmartThings QR code
attached on the Jet Bot Combo , you can
connect to the Jet Bot Combo more easily.
4. Provide the authentication when you are
directed to do so.
5. [Android] The connection to your wireless
router will be progressed automatically.
- [iOS] Open the Settings app, and select the
wireless router in the Wi-Fi list.
6. When the product registration is complete, the
Jet Bot Combo device card is added.
Untitled-9 26Untitled-9 26 2025-09-25 7:08:042025-09-25 7:08:04

English 27
NOTE
• When the Jet Bot Combo cannot be registered
to the SmartThings app:
- Refer to the SmartThings app guide or pop-
up messages.
- Confirm that the UPnP option of your
wireless router is active, and then try the
registration procedure again.
- Confirm that your wireless router is
operating in a wireless mode and if not,
change it to the wireless mode and try
again.
- If you have two or more Jet Bot Combo s,
turn off the other Jet Bot Combo , and then
try to register your Jet Bot Combo again.
- Change the name of the wireless
router which has the same SSID to be
distinguished from each other.
• If the Jet Bot Combo and smartphone are
not connected to the same wireless router, a
response can be delayed depending on the
network environment.
- When the wireless router is changed, the
connection between the Jet Bot Combo and
the SmartThings app is disconnected.
- After changing the wireless router,
register your Jet Bot Combo again at the
SmartThings app.
Software update
• When the Energy-Saving mode is deactivated
on the Jet Bot Combo and is placed on the
Clean Station , the Jet Bot Combo connects to
the server and checks for software updates. If a
new software is found, the Jet Bot Combo will
automatically download and update it.
• If the Status Indicator of the Jet Bot Combo
turns violet and stays violet while charging,
it means that the Jet Bot Combo 's software
update is in progress. Please wait until
rebooting is complete.
Untitled-9 27Untitled-9 27 2025-09-25 7:08:052025-09-25 7:08:05
SmartThings app
English 28
Using the SmartThings app
Functions Explanation
Cleaning mode
• You can choose between the Vacuum + Mop, Vacuum, or Mop mode.
- When using the Vacuum + Mop or Mop mode, be sure to attach the
Mops . If you do not attach the Mops , water will spill on the floor.
Suction power • You can choose between Max, Smart, Normal, or Quiet.
Driving mode
• You can choose between Area then walls, Walls first, or Quick cleaning in
a zigzag pattern.
Water level • You can change the Water level according to the cleaning environment.
Schedule
• You can start designated cleaning at a scheduled time.
- If the Jet Bot Combo is not charging on the Clean Station , or power
is not supplied to the Clean Station , the scheduled cleaning does not
start.
Downtime
• At a designated time, the Jet Bot Combo stops cleaning and returns to the
Clean Station .
- Cleaning can start arbitrarily during Downtime .
Cleaning report • You can check recent cleaning histories and results. (Maximum 50 entries)
Clean staion
• You can check the status of the Clean Water Tank , Waste Water Tank , and
Dust Bag .
• You can perform Mop wash (from washing to drying) or only perform
additional drying.
• You can set the Mop washing interval and Drying time .
• You can set the Jet Bot Combo to empty the Dustbin automatically.
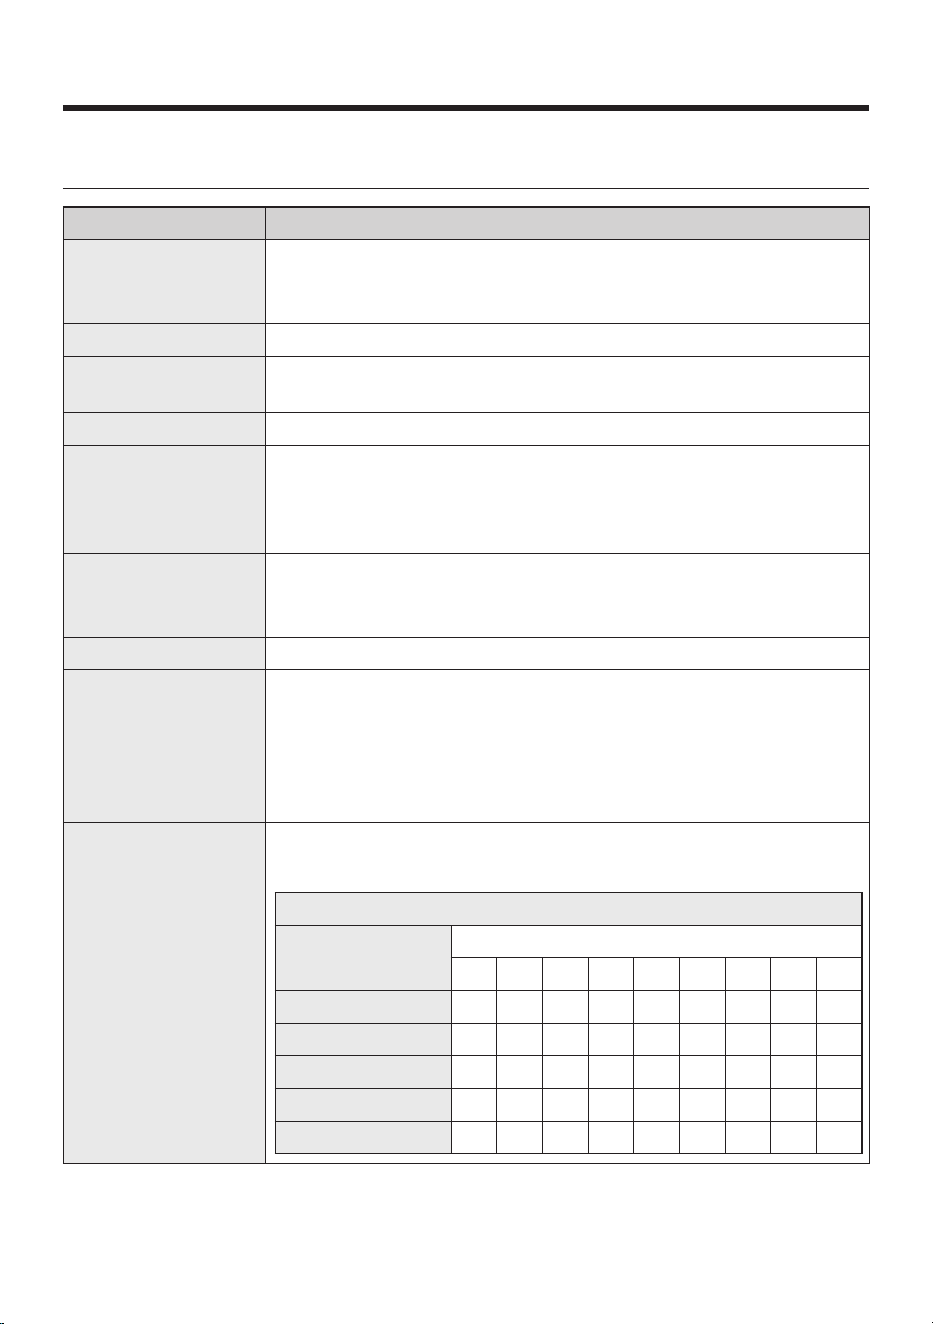
Mop washing interval
• You can set the Mop washing interval .
- Set when and where to start cleaning the Mops .
Available Mop washing interval settings
Water level
Washing interval time (minutes)
10 15 20 25 30 35 40 45 50
High O O - - - - - - -
Medium high O O O - - - - - -
Medium O O O O O - - - -
Medium low O O O O O O O O -
Low O O O O O O O O O
Untitled-9 28Untitled-9 28 2025-09-25 7:08:052025-09-25 7:08:05
English 29
Functions Explanation
Manage maps
• You can manage up to four maps customized to the structure of your
home.
• You can set the followings: No-go zone , Edit room , Edit furniture and
appliances, Delete map, Rename, etc. (Edit furniture and appliances:
VR7MD97**** model only)
Driving settings
• You can set the detailed driving options
- Repeat : Clean repetitively until the battery is used out.
- Continue cleaning after charging : If the battery runs out while in the
process of cleaning, the Jet Bot Combo recharges then continues to
clean any areas left uncleaned.
- Smart charging : If the area left to clean is small, recharges only a
portion and continues to clean.
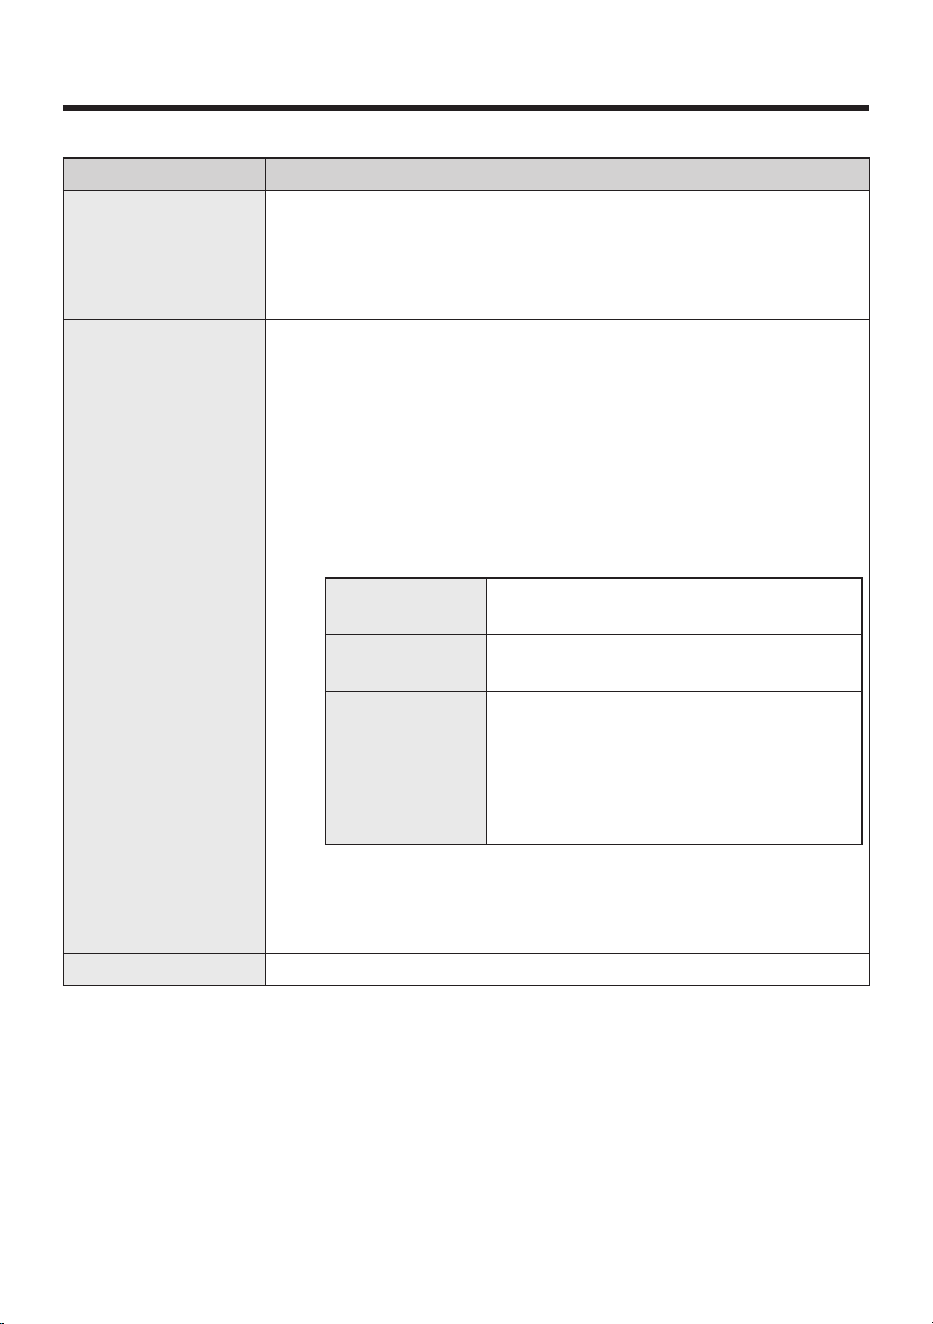
• You can set the Mopping options .
- Carpet cleaning : You can set how the Jet Bot Combo would respond
when it meets a carpet.
Vacuum, but no
mopping
Lift Mops while crossing over the carpet.
Clean while
avoiding carpet
Avoid carpet.
Auto clean by pile
length
When the Jet Bot Combo meets a short-pile
carpet, it lifts the Mop and clean the carpet in
the Vacuum mode. When it meets a long-pile
carpet, it avoids the carpet, cleans around it
first, and then removes the Mop and clean the
carpet in the Vacuum mode.
• You can set the Obstacle options . (only compliant to model VR7MD97**** )
- You can set the Size of the obstacles to avoid , Pet waste detection , etc.
- 3D Sensor can be calibrated to increase the accuracy of obstacle
detection.
Room customization • You can set the cleaning method appropriate for each room.
Untitled-9 29Untitled-9 29 2025-09-25 7:08:052025-09-25 7:08:05
SmartThings app
English 30
Functions Explanation
Home monitoring
(only compliant to
model VR7MD97**** )
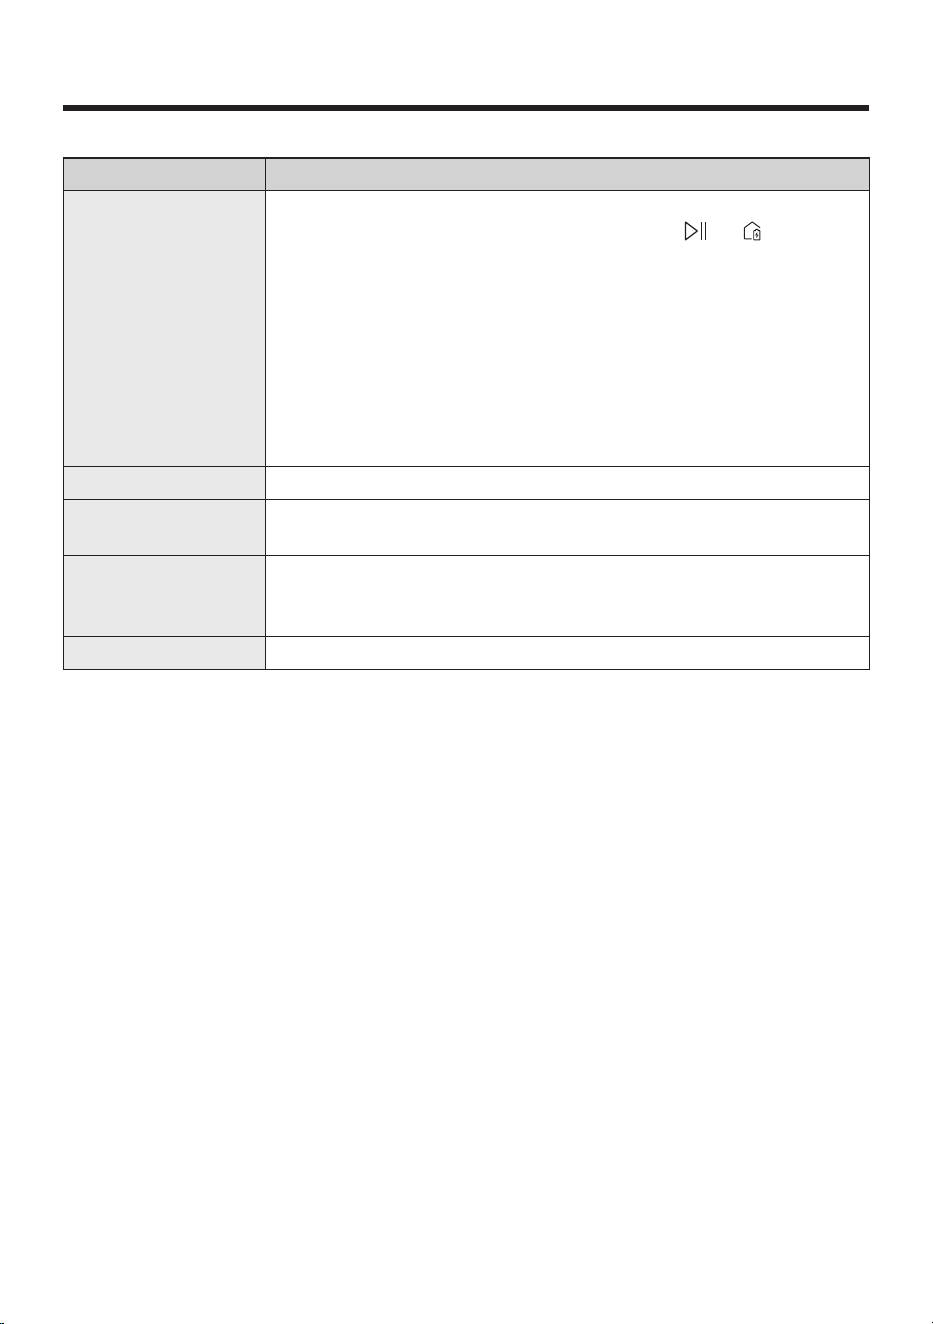
• The Home monitoring function is turned on by default. If you want to deny
access or re-allow this function, press and hold the and buttons
simultaneously for 3 seconds.
- This function is provided specifically for pet care. Therefore, use of this
function for other purposes is prohibited.
- Samsung is not responsible for the usage of this function in other
purposes.
• The camera can be turned on via the SmartThings app when cleaning to
get a stream of the activity.
• Designated area of choice can monitored through the front camera of the
Jet Bot Combo .
Find robot vacuum • The Jet Bot Combo plays a sound to help you locate where it is.
Lights
• You can turn on or off the lighting of the robot vacuum charging on the
station.
Sound mode
• You can set the guidance sound of the Jet Bot Combo from Voice , Sound
effects , or Mute , and you can adjust the volume and select the Voice style
depending on the selected item.
Language • Supports 14 languages.
• When the Jet Bot Combo does not have a saved map, it learns cleaning space through the Auto Clean
function which starts from the Clean Station . Once learning is done, a map is saved.
• Room Clean or Spot Cleaning works regardless of choice sequences of the areas.
• If the Jet Bot Combo cannot recognize its current location, it starts Auto Clean.
• The Jet Bot Combo automatically performs a system check and restarts once a week.
• When the Vacuum + Mop or Mop mode is selected from the Auto clean by pile length of the Carpet
cleaning options , the Jet Bot Combo may not be able to clean beyond the carpet. Change the Carpet
cleaning options or change to Mopping after vacuuming .
• If you use the Around furniture , Spots , or Clean missed areas mode, the Mop washing interval will be set
By time (20 minutes) even if the option is configured By room . ( Around furniture mode : VR7MD97****
models only)
Untitled-9 30Untitled-9 30 2025-09-25 7:08:052025-09-25 7:08:05
English 31
Open Source Announcement
The software included in this product contains open source software. To obtain the source code covered
under licenses which have the obligation of publishing source code (e.g. GPL, LGPL… etc), please visit
http://opensource.samsung.com/ and search by model name.
It is also possible to obtain the complete corresponding source code in a physical medium such as a CD-
ROM; a minimal charge will be required.
The following URL http://10.250.141.155/solve/getTotalProjectList.do leads to open source license
information as related to this product. This offer is valid to anyone in receipt of this information.
Untitled-9 31Untitled-9 31 2025-09-25 7:08:052025-09-25 7:08:05
English 32
Maintenance
Cleaning and maintaining the Clean Station
• Be sure that the power cord of the Clean Station is unplugged before handling with the Clean Station .
• When cleaning the exterior, wipe with water only.
- Do not use detergent.
Cleaning the Waste Water Tank
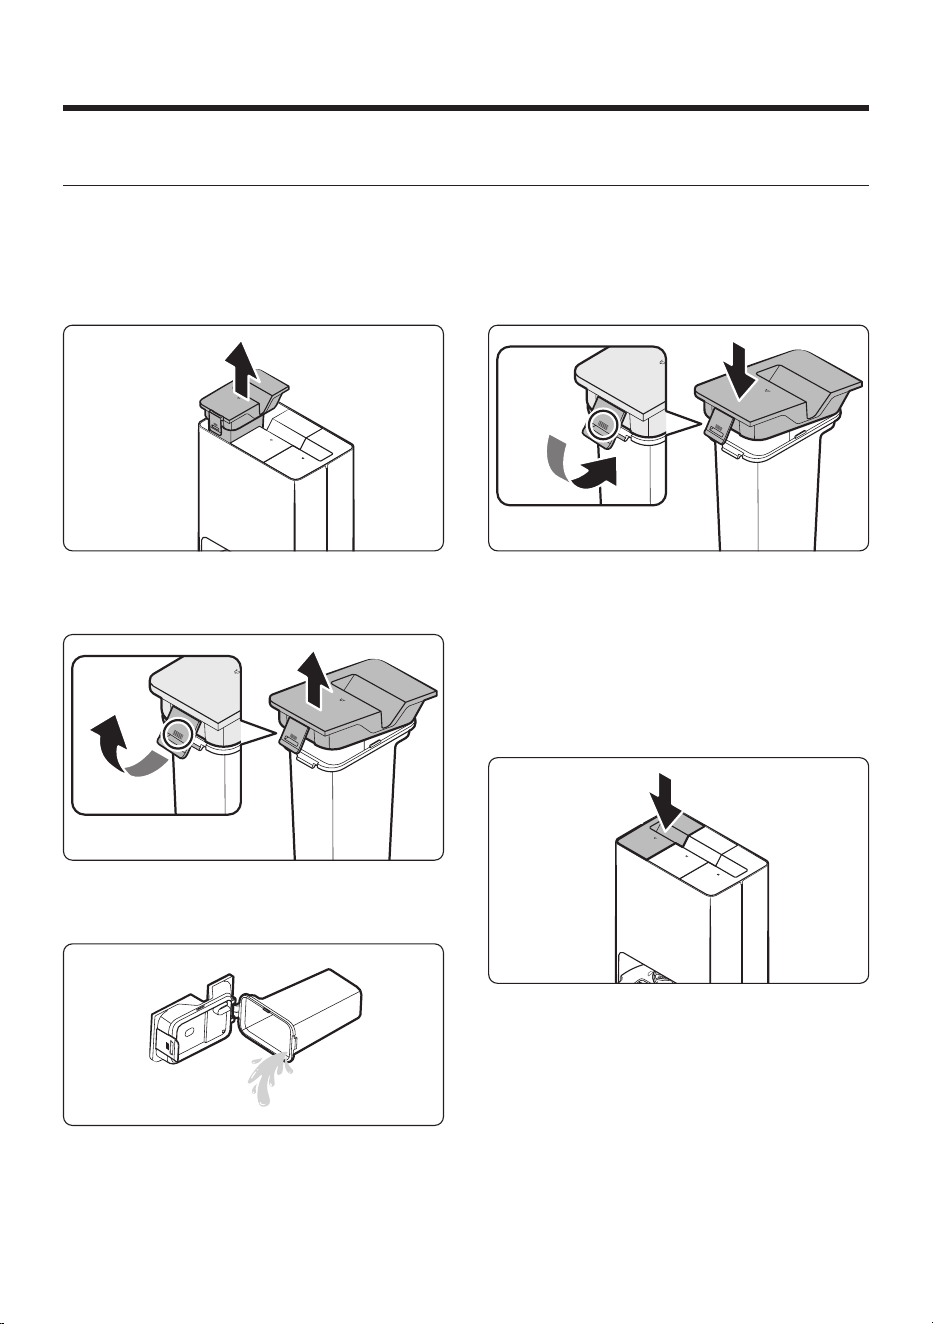
1. Detach the Waste Water Tank from the Clean
Station by pulling the handle on the top.
2. Pull the latch on the lid to unlock it and then
open the lid.
3. Empty the Waste Water Tank and clean it
thoroughly.
4. Close the lid.
- Press the latch on the lid until you hear
a click, making sure the lid is completely
shut.
- If the lid is not completely shut, the product
may malfunction or may result in problems
with the product.
5. Insert the Waste Water Tank in the Clean
Station.
Untitled-9 32Untitled-9 32 2025-09-25 7:08:062025-09-25 7:08:06
English 33
Replacing the Dust Bag
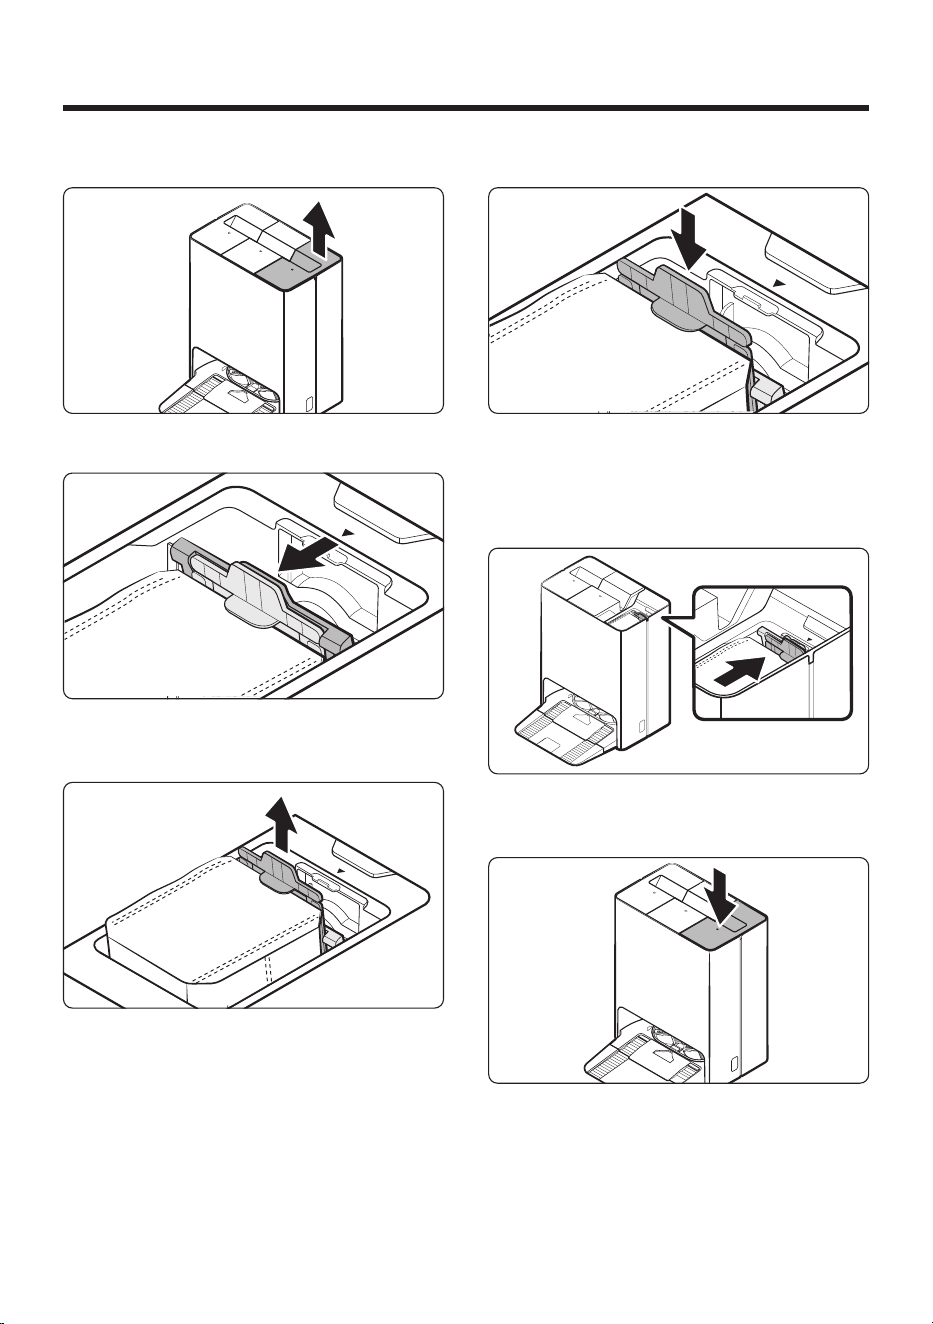
1. Detach the lid by pulling the handle on the top.
2. Hold the Dust Bag guide handle and pull it as
shown in the figure.
3. Detach the Dust Bag from the product by
pulling it upward.
- Dispose of the used Dust Bag in the trash.
4. Insert the new Dust Bag .
- Align the new Dust Bag with the Dust
Bag guide 's grooves, and push it down to
assemble the Dust Bag .
5. Push the Dust Bag guide handle as shown in
the figure until you hear it click.
6. Close the lid.
Untitled-9 33Untitled-9 33 2025-09-25 7:08:072025-09-25 7:08:07
Maintenance
English 34
Cleaning the Fine Dust Filter
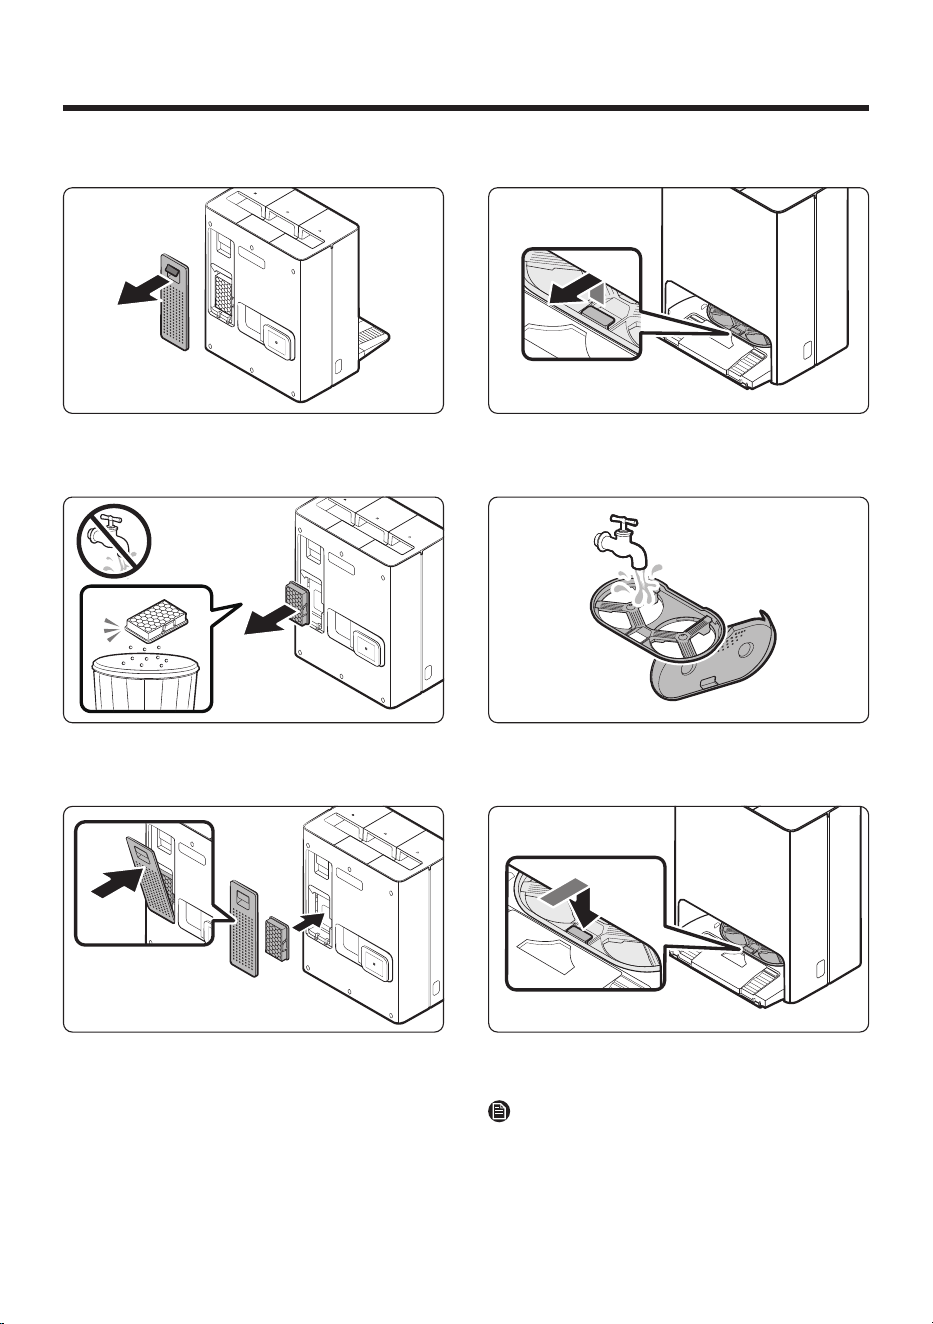
1. Pull the handle on the Filter Cover at the back
of the Clean Station to detach it.
2. Detach the Fine Dust Filter and shake out the
dust.
3. Assemble the Fine Dust Filter and the Filter
Cover until you hear them click.
Cleaning the Washing Plate
1. Detach the Washing Plate by lifting the handle
that says ‘ PULL’.
2. Clean the Washing Plate with water and dry it
completely in the shade.
3. Assemble the Washing Plate back into the
Clean Station .
NOTE
Rinse the Washing Plate only with clean water.
• Do not use detergent.
Untitled-9 34Untitled-9 34 2025-09-25 7:08:082025-09-25 7:08:08
English 35
Cleaning the bottom cover
CAUTION
• You must disassemble the Clean Water Tank and the Waste Water Tank before lying the Clean Station on
its side.
• You must detach the Base Plate and the Washing Plate .
- There is a risk of personal injury or material damage.
• After detaching the Washing Plate , wipe up any water that might have spilled on the floor.
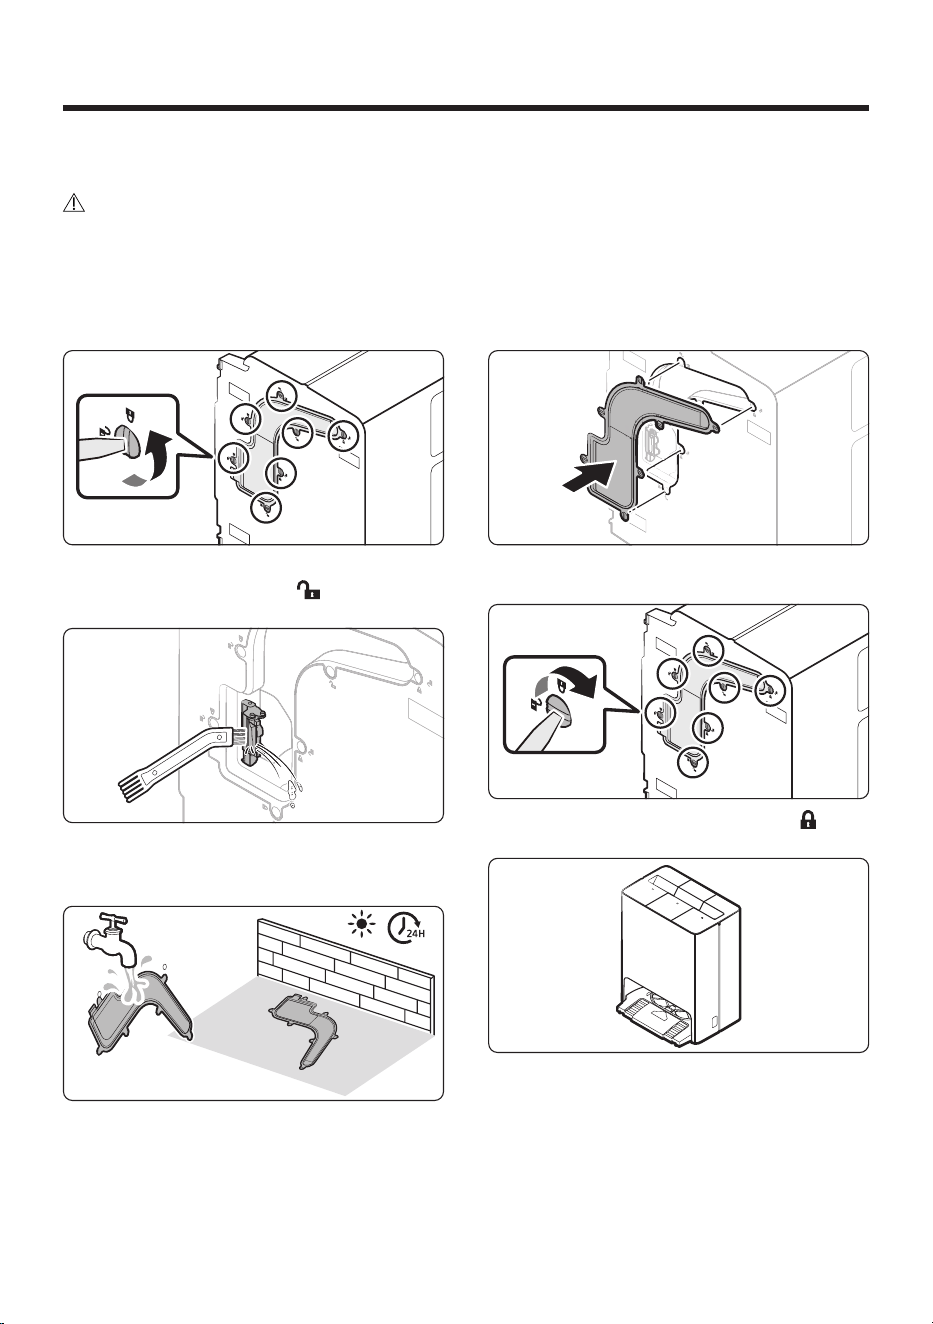
1. Lay the Clean Station on its side and turn the 7
locking screws toward the ( ) icon.
2. Detach the bottom cover and remove any
foreign matter.
3. Clean the cover with water and dry it
completely in the shade.
4. Attach the bottom cover to the Clean Station .
5. Turn the 7 locking screws toward the ( ) icon.
6. Put the Clean Station back in the upright
position.
Untitled-9 35Untitled-9 35 2025-09-25 7:08:102025-09-25 7:08:10
Maintenance
English 36
Descaling the Steamer
Descaling
1. Press the and buttons on the Jet Bot
Combo simultaneously for 7 seconds.
2. Dilute 100 g of citric acid into water (1 L) in the
Clean Water Tank and insert it into the Clean
Station . Then, empty the Waste Water Tank .
3. Press the and buttons on the Jet Bot
Combo simultaneously for 7 seconds.
4. The descaling process takes about 2 hours and
you will be notified by the Voice guidance once
the process is complete.
Rinsing
1. Rinse the Clean Water Tank , and then pour
water into it.
2. Press the and buttons on the Jet Bot
Combo simultaneously for 7 seconds.
3. The rinsing process takes about 15 minutes,
and you will be notified by the Voice guidance
one the process is complete.
NOTE
• To cancel the descaling or rinsing process,
press the and on the Jet Bot Combo
simultaneously for 7 seconds during the
process.
- Canceling during the process will result in
incomplete descaling or rinsing.
• Because of the nature of the product, it is
recommended to carry out descaling once a
year.
• If a descaling alarm goes off, be sure to descale
to maintain product quality.
• The steam cleaning function cannot be used
after a certain period of time has passed after
the descaling alarm goes off.
CAUTION
• Do not put anything other than citric acid and
water when descaling.
• Do not use citric acid other than when
descaling.
Maintaining and cleaning the Jet
Bot Combo
Before maintenance and cleaning, set the Jet Bot
Combo to Energy-Saving mode.
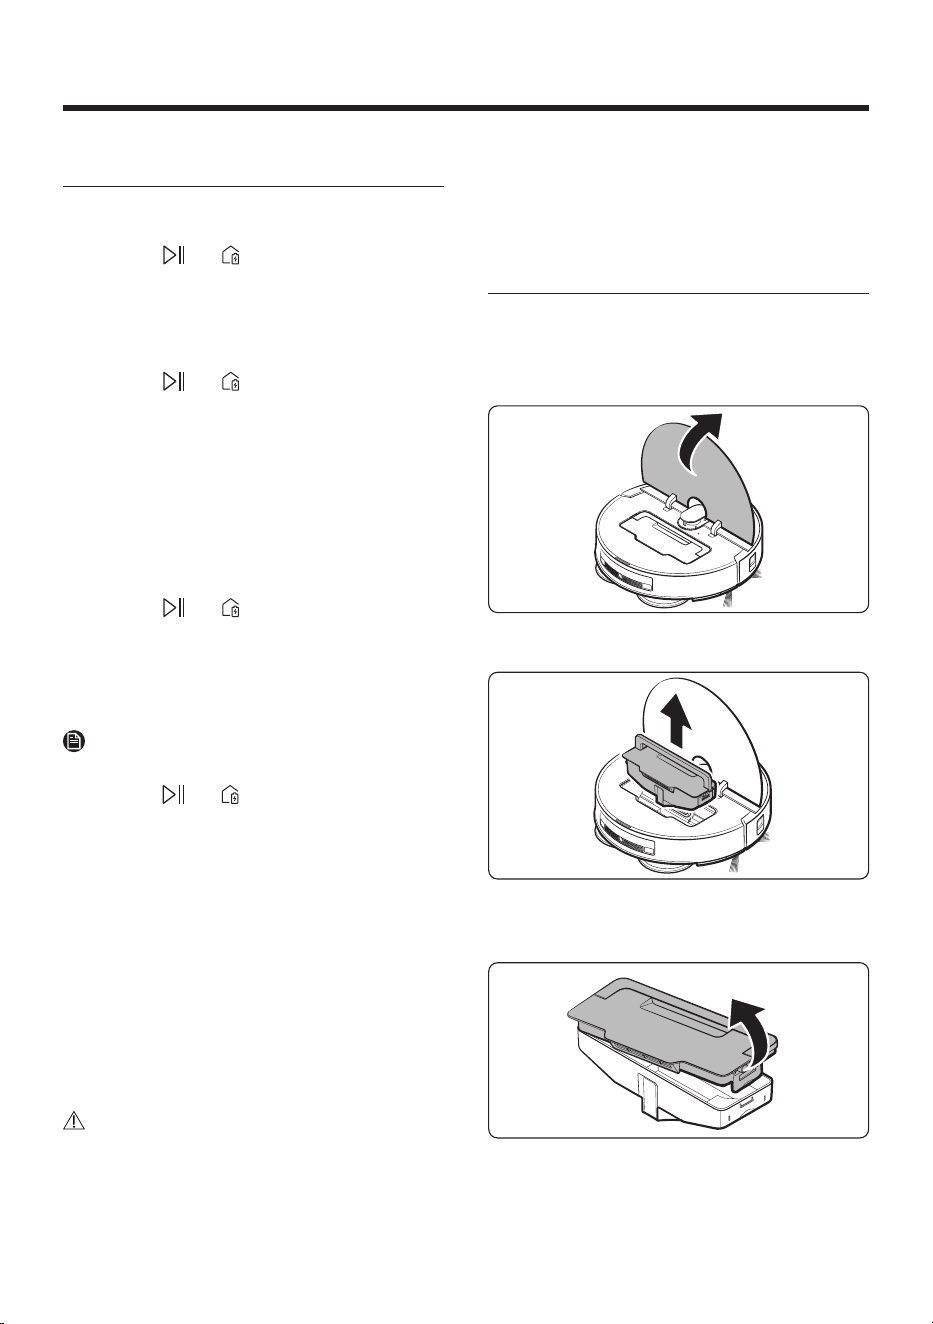
Emptying and cleaning the Dustbin
1. Open the Top Cover .
2. Hold the Dustbin handle and lift the Dustbin to
remove it.
3. While pulling the latch on the right side of the
Dustbin , lift the cover up to open it.
Untitled-9 36Untitled-9 36 2025-09-25 7:08:112025-09-25 7:08:11
English 37
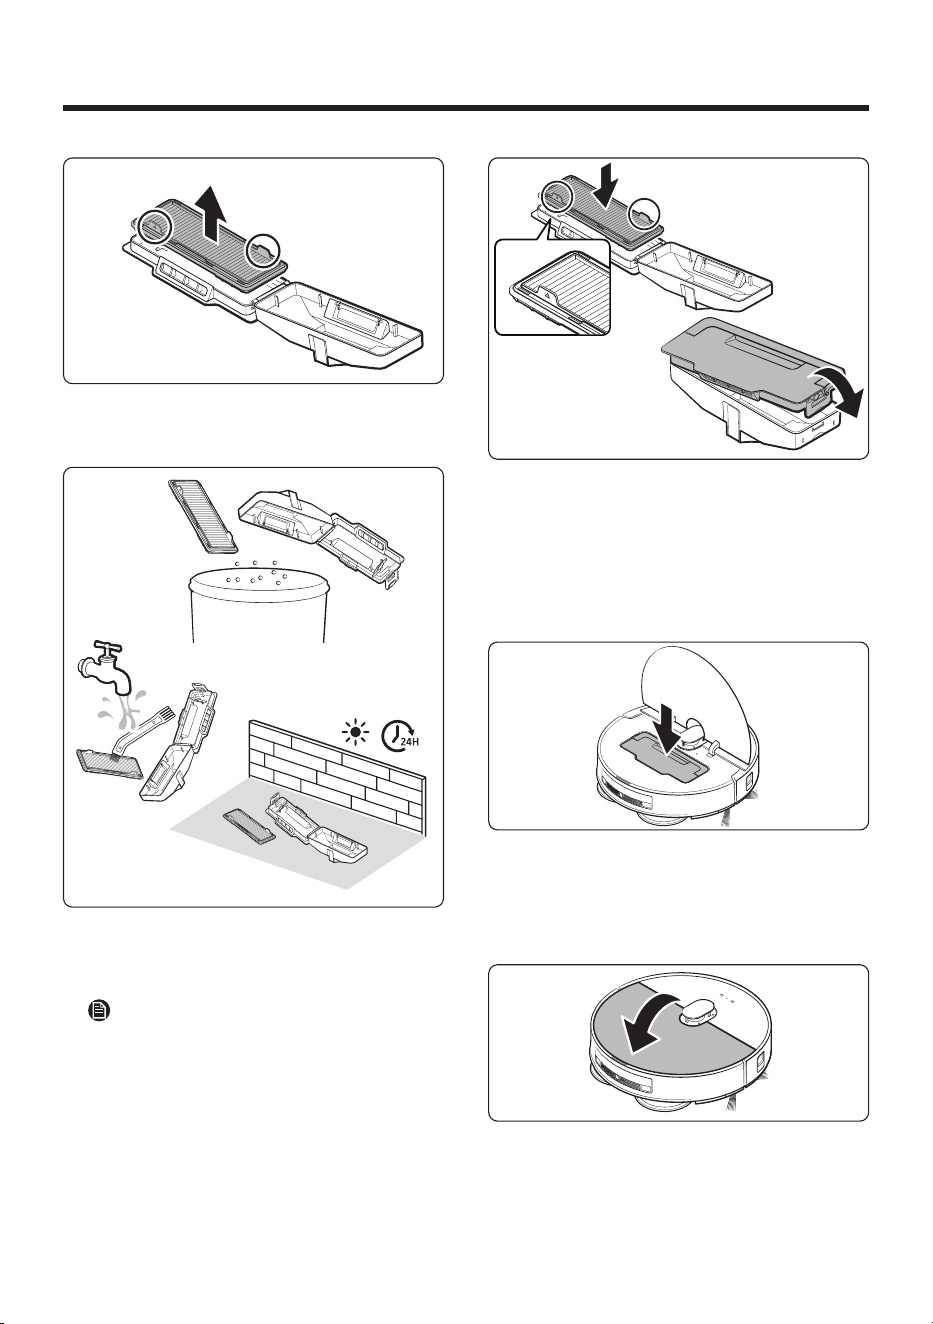
4. Detach the Pre-motor Filter from the Dustbin
cover.
5. Remove the dust from both the Pre-motor
Filter and the Dustbin . Clean them with water
and dry both completely in the shade.
NOTE
You can clean the parts more thoroughly by
soaking them in lukewarm water with a mild
detergent for about 30 minutes. Then, rinse
them under running water using the Cleaning
Tool .
6. Attach the Pre-motor Filter to the Dustbin ’s lid,
then close the cover.
- Insert the Pre-motor Filter with its handles
facing up.
- Push the Dustbin cover until you hear it
click, making sure it is completely shut.
7. Insert the Dustbin into the Jet Bot Combo .
- Hold the Dustbin handle and insert the
Dustbin into the Jet Bot Combo , then put
the handle down.
8. Close the Top Cover .
Untitled-9 37Untitled-9 37 2025-09-25 7:08:122025-09-25 7:08:12
Maintenance
English 38
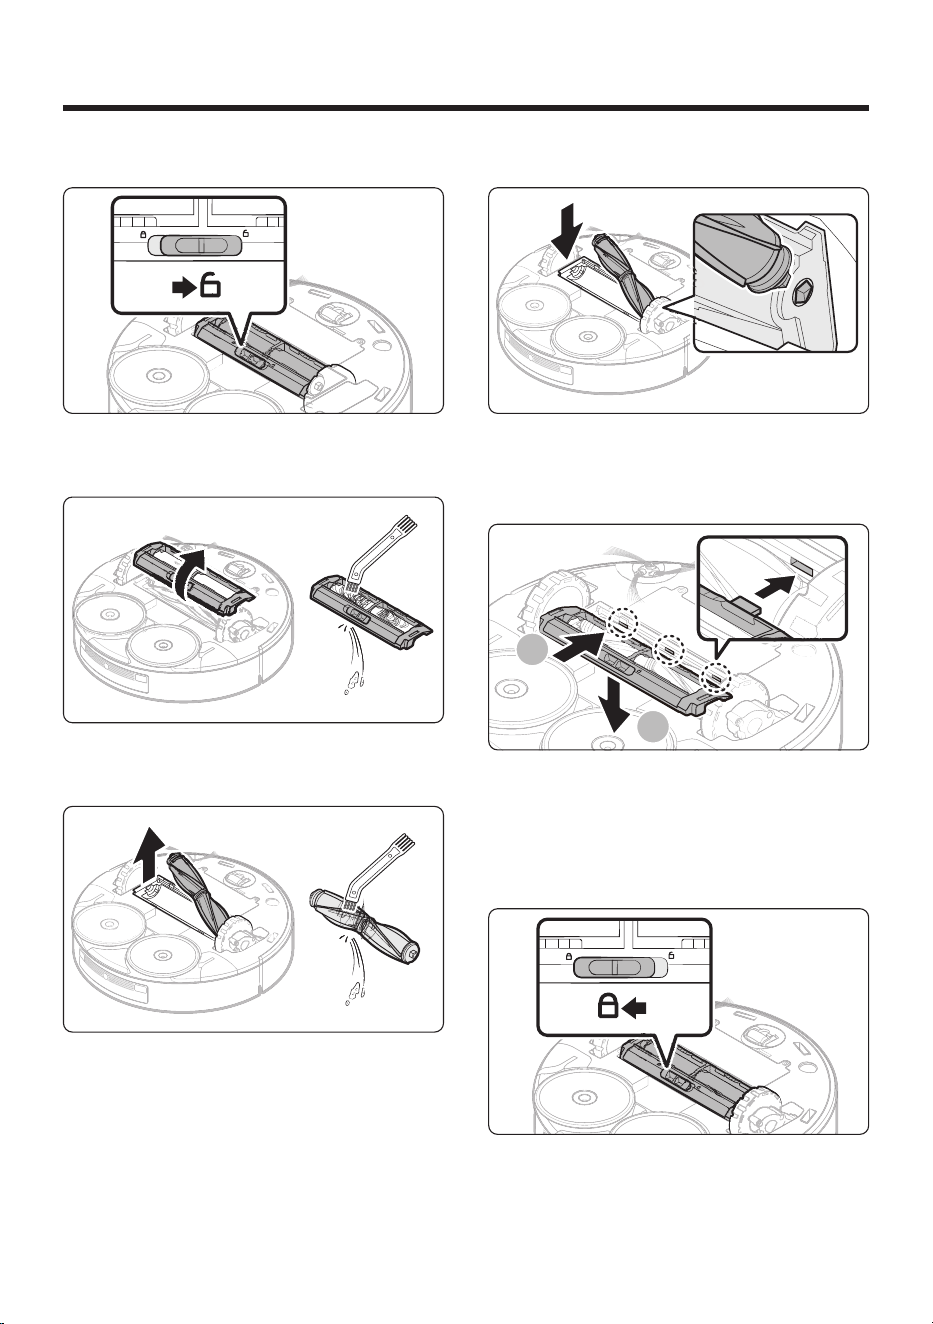
Cleaning the Brush
1. Push the Brush Cover Lock to the right to
unlock.
2. Detach the Brush Cover and use the Cleaning
Tool to clean the cover.
3. Detach the Brush and use the Cleaning Tool to
clean the Brush .
- Lift up the left side of the Brush first, then
pull the Brush from the groove on the right.
4. Attach the Brush .
- Insert the right side of the Brush into the
groove first, then push the left side down.
1
2
5. Insert the 3 hooks at the rear of the Brush
Cover into the grooves, and push the Brush
Cover down to assemble it.
- Be sure that the hooks are aligned with the
grooves.
6. Push the Brush Cover Lock to the left to lock.
Untitled-9 38Untitled-9 38 2025-09-25 7:08:132025-09-25 7:08:13
English 39
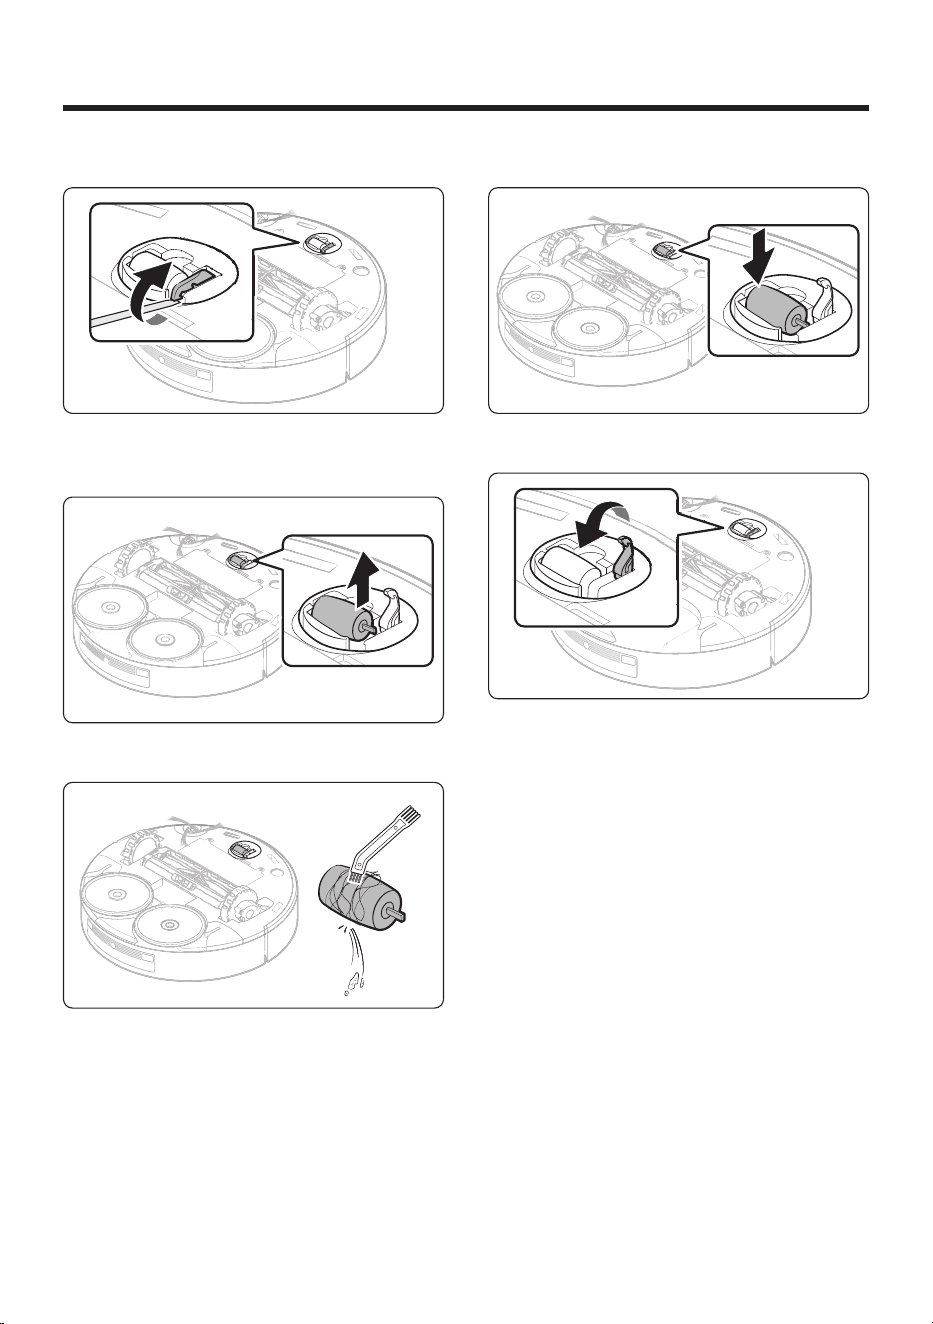
Cleaning the Roller
1. Use a flat-head screwdriver to lift the Roller ’s
Release Lever as shown in the figure.
2. Detach the Roller by lifting it.
3. Use the Cleaning Tool to clean the Roller .
4. Assemble the Roller .
5. Press the Release Lever until you hear a click to
secure the Roller.
Untitled-9 39Untitled-9 39 2025-09-25 7:08:152025-09-25 7:08:15
Maintenance
English 40
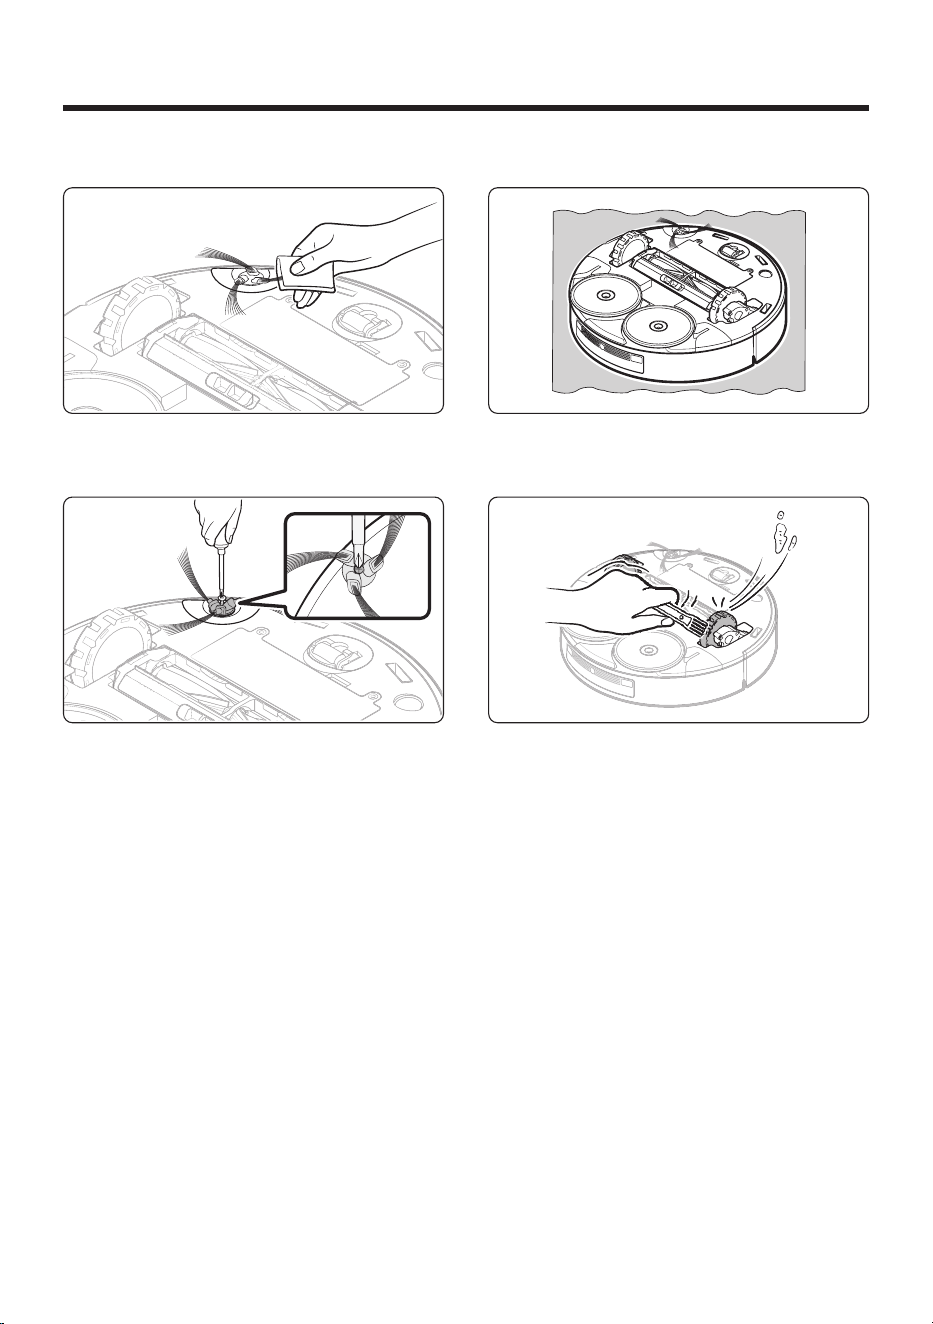
Cleaning the Spin Brush
Wrap the Spin Brush with a warm, damp towel for
about 10 seconds, and then wipe the Spin Brush .
When hair, threads, or other debris are tangled in
the Spin Brush , use a screwdriver to detach the
Spin Brush and remove the tangled items.
Cleaning the Driving Wheel
1. Place a soft cloth on the floor and gently place
the Jet Bot Combo upside down on the cloth.
2. Clean the Driving Wheels using the Cleaning
Tool .
Untitled-9 40Untitled-9 40 2025-09-25 7:08:162025-09-25 7:08:16
English 41
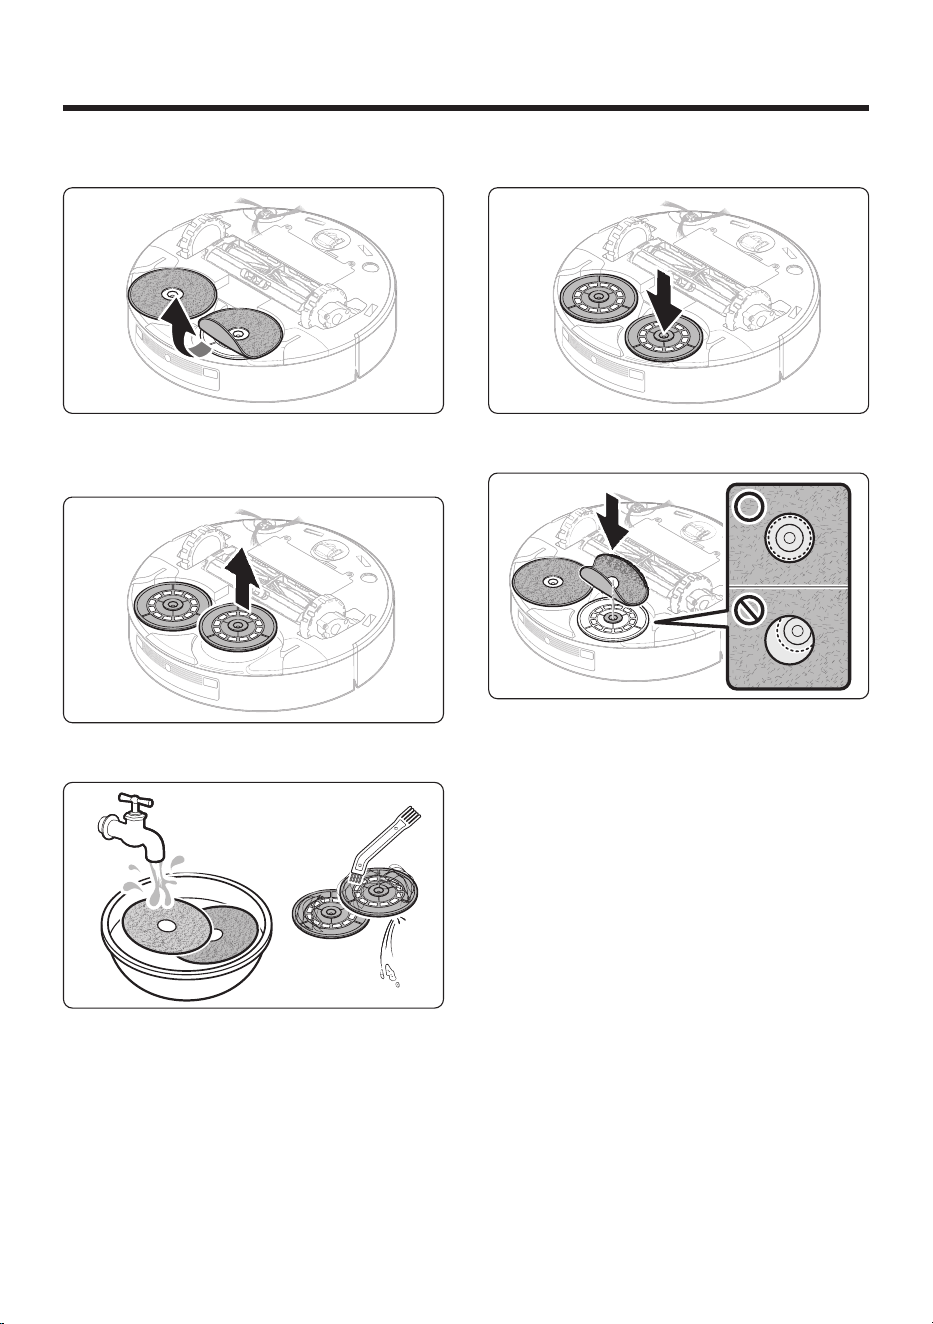
Cleaning the Mops
1. Detach the Mops attached to the bottom of the
Jet Bot Combo .
2. Detach the Mop Spin Boards .
3. Clean the Mops and the Mop Spin Boards .
4. Attach the Mop Spin Boards .
5. Attach the Mops to the Mop Spin Boards .
- Make sure each Mop is centered and does
not overlap each other.
- Folding the ends of the Mop makes it easier
to grasp and position it accurately on the
center the Mop Spin Board .
Untitled-9 41Untitled-9 41 2025-09-25 7:08:172025-09-25 7:08:17
Maintenance
English 42
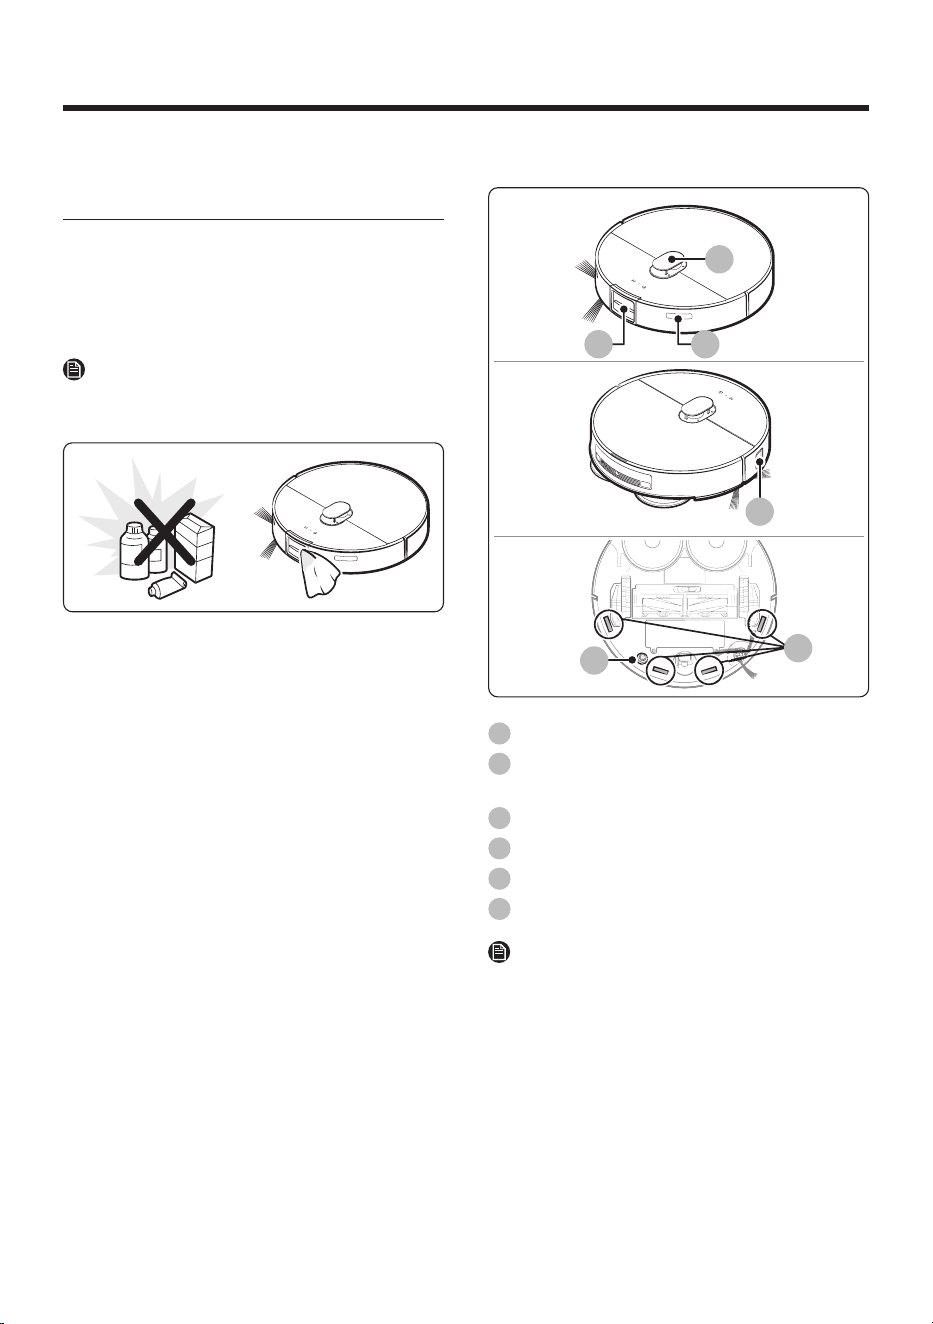
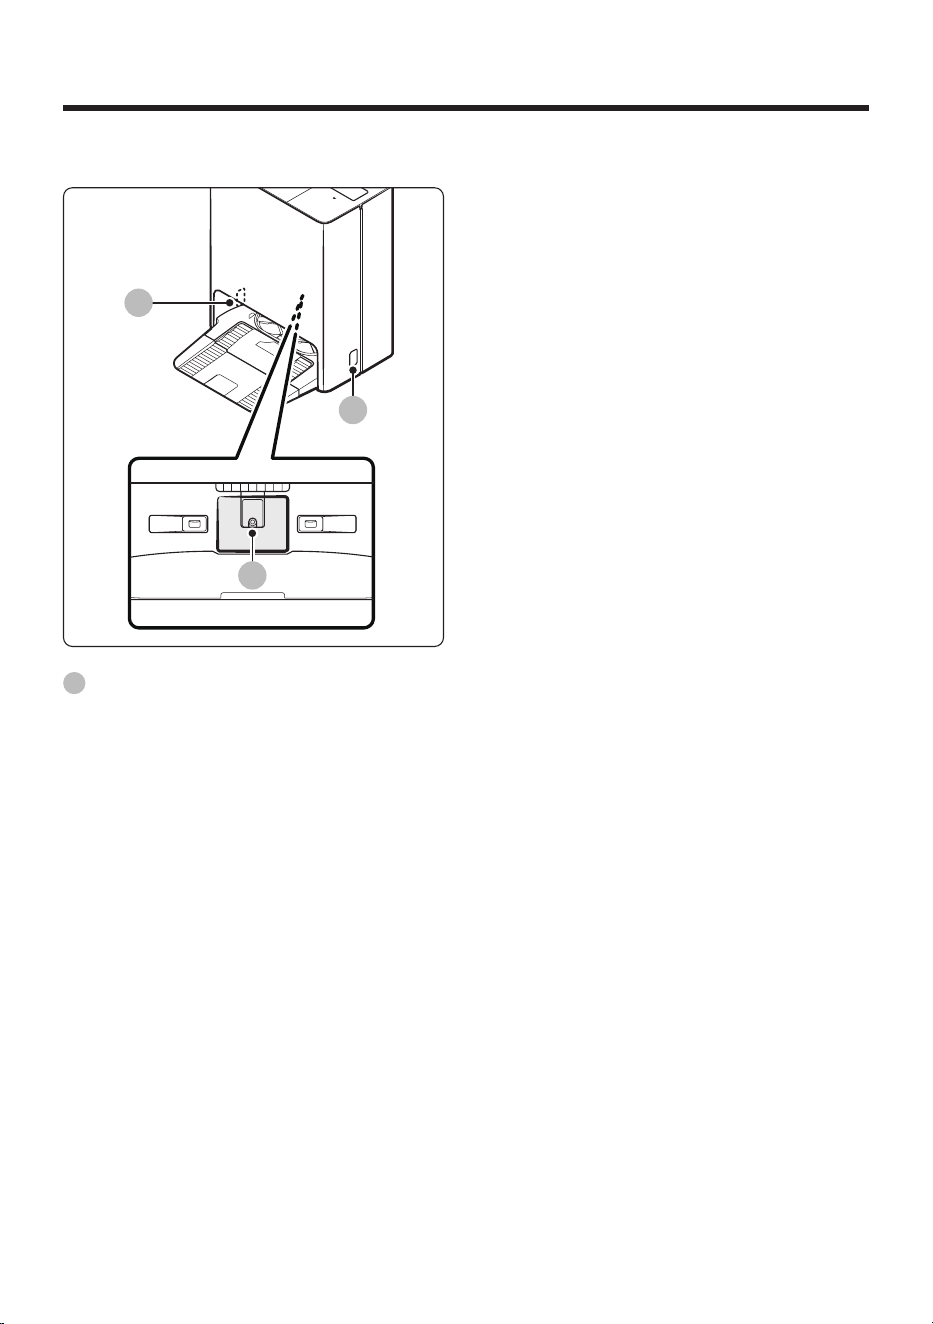
Cleaning and maintaining the
sensor
To maintain optimal performance, clean the
sensors regularly by gently wiping around
them with a soft cloth. If a sensor becomes
contaminated, it may affect performance. Refer to
the figures for the location of each sensor.
NOTE
Do not use any cleaning products to clean the
sensors.
Jet Bot Combo
02 03
04
05
01
06
01
LiDAR Sensor
02
3D Sensor ( VR7MD97**** ) / Obstacle Detect
ToF Sensor ( VR7MD96**** )
03
Signal Transmitter
04
Obstacle Sensor
05
Carpet Detect Sensor
06
Cliff Sensor
NOTE
The product's actual appearance may differ from
the figure in this manual.
Untitled-9 42Untitled-9 42 2025-09-25 7:08:182025-09-25 7:08:18
English 43
Clean Station
01
01
01
01
Charging Signal Transmitter
Untitled-9 43Untitled-9 43 2025-09-25 7:08:182025-09-25 7:08:18
English 44
Troubleshooting
Voice Guidance Checklist
1. The Status Indicator turns red and blinks with a Voice guidance.
2. Press the Reset button and check the instructions below and take appropriate actions.
3. When pressing the Reset button of the Jet Bot Combo , the Status Indicator turns white.
Voice Guidance Checklist
It’s difficult to move.
Please move me somewhere else.
The Jet Bot Combo is caught, stuck or trapped while moving
around.
• Set the Jet Bot Combo to Energy-Saving mode and move
it to another area.
Please remove the Brush and take out
whatever’s stuck in there.
Foreign matter caught in the Brush .
• Set the Jet Bot Combo to Energy-Saving mode and
remove the foreign matter from the Brush .
Something’s stuck in the Spin Brush.
Please remove it.
Foreign matter caught in the Spin Brush .
• Set the Jet Bot Combo to Energy-Saving mode and
remove the foreign matter from the Spin Brush.
Please check the left wheel to see if
there’s something stuck in it.
Foreign matter caught in the left Driving Wheel .
• Set the Jet Bot Combo to Energy-Saving mode and
remove the foreign matter from the left Driving Wheel .
Please check the right wheel to see if
there’s something stuck in it.
Foreign matter caught in the right Driving Wheel .
• Set the Jet Bot Combo to Energy-Saving mode and
remove the foreign matter from the right Driving Wheel .
Something is caught in the left Mop .
Foreign matter caught in the left Mop .
• Set the Jet Bot Combo to Energy-Saving mode and
remove the foreign matter by detaching the Mop Spin
Board .
Something is caught in the right Mop .
Foreign matter caught in the right Mop .
• Set the Jet Bot Combo to Energy-Saving mode and
remove the foreign matter by detaching the Mop Spin
Board .
Something went wrong with the front
bumper sensors. Check if the front
bumper is pressed or something is
stuck.
Bump Sensor needs to be checked.
• Press the Reset button to turn it back on.
• When the Status Indicator remains in red color and blinks,
check if there’s any small foreign matter between the
bumper and the main body. If there is, remove the foreign
matter.
Untitled-9 44Untitled-9 44 2025-09-25 7:08:182025-09-25 7:08:18
English 45
Voice Guidance Checklist
Something’s wrong with the LiDAR
bump sensor. The LiDAR cap might be
jammed, or there might be something
stuck in there.
Bump Sensor needs to be checked.
• Press the Reset button to turn it back on.
• When the Status Indicator remains in red color, check if
there’s any foreign matter between the LiDAR Sensor and
the main body. If there is, remove the foreign matter.
Something’s wrong with the Cliff
Sensor .
Please clean the 4 small black windows
underneath with a soft cloth.
Foreign matter accumulated on the Cliff Sensor .
• Set the Jet Bot Combo to Energy-Saving mode and clean
the 4 small black windows underneath with a soft cloth.
Please insert the bin so cleaning can
start.
Dustbin is not inserted.
• Detach the Dustbin and insert it again.
The LiDAR Sensor needs to be reset.
Press the Reset button to turn it on
again. If that doesn't fix it, contact
Customer Service.
There is a problem with the LiDAR Sensor .
• Press the Reset button to turn it back on.
• If the notice remains, contact Customer Service.
Something's wrong with the main
system. Press the Reset button to turn
it on again. If that doesn't fix it, contact
Customer Service.
There is a problem with the main system.
• Press the Reset button to turn it back on. If the notice
remains, contact Customer Service.
Robot vacuum is in a No-go zone and
can't move. Move it out of this zone.
The result of the location recognition indicates that the Jet
Bot Combo is placed within the No-go zones .
• Check the No-go zones of the mobile App.
The 3D Sensor needs to be reset. Press
the Reset button to turn it on again.
If that doesn't fix it, contact Customer
Service.
There is a problem with the 3D Sensor .
• Press the Reset button to turn it back on.
• If the notice remains, contact Customer Service.
The object recognition sensor needs to
be reset.
Press the Reset button to turn it on
again. If that doesn't fix it, contact
Customer Service.
There is a problem with the object recognition sensor.
• Press the Reset button to turn it back on.
• If the notice remains, contact Customer Service.
The monitoring camera needs to be
reset. Press the Reset button to turn it
on again. If that doesn't fix it, contact
Customer Service.
There is a problem with the monitoring camera sensor.
• Press the Reset button to turn it back on.
• If the notice remains, contact Customer Service.
Untitled-9 45Untitled-9 45 2025-09-25 7:08:182025-09-25 7:08:18
Troubleshooting
English 46
Voice Guidance Checklist
The AI processor isn't working properly.
Press the Reset button to turn it on
again. If that doesn't fix it, contact
Customer Service.
• Press the Reset button to turn it back on.
• If the notice remains, contact Customer Service.
Reset the battery connection by
pressing the Reset button to turn it on
again. If you hear this message again
after that, contact Customer Service.
There is problem with the battery connection.
• Press the Reset button to turn it back on.
• If the notice remains, contact Customer Service.
Something went wrong with the battery
connection. Reinsert the battery or
press the Reset button to turn it on
again. If you hear this message again
after that, contact Customer Service.
There is problem with the battery connection.
• Press the Reset button to turn it back on.
• If the notice remains, contact Customer Service.
Please attach the Waste Water Tank . • Insert the Waste Water Tank .
Insert the Washing Plate . • Insert the Washing Plate .
The Washing Space is full. • Empty the Tub.
The Washing Space of the Clean
Station is full, so the station can’t wash
the robot vacuum’s Mop . Empty the
Washing Space .
• Empty the Tub.
There’s no Clean Water Tank in the
Clean Station , so the station can’t wash
the robot vacuum’s Mop . Insert a Clean
Water Tank and start again.
• Insert the filled Clean Water Tank and restart the cleaning.
There’s no Waste Water Tank in the
Clean Station , so the station can’t wash
the robot vacuum’s Mop . Insert a Waste
Water Tank and start again.
• Insert the Waste Water Tank and restart the cleaning.
There’s no Washing Plate in the Clean
Station , so it can’t wash the robot
vacuum’s Mop . Check if it’s installed
correctly and start again.
• Insert the Washing Plate and restart the cleaning.
The Clean Water Tank of the Clean
Station is empty, so it can’t wash the
robot vacuum’s Mop .
Fill it with water and start again.
• Fill the water and restart the cleaning.
Untitled-9 46Untitled-9 46 2025-09-25 7:08:182025-09-25 7:08:18
English 47
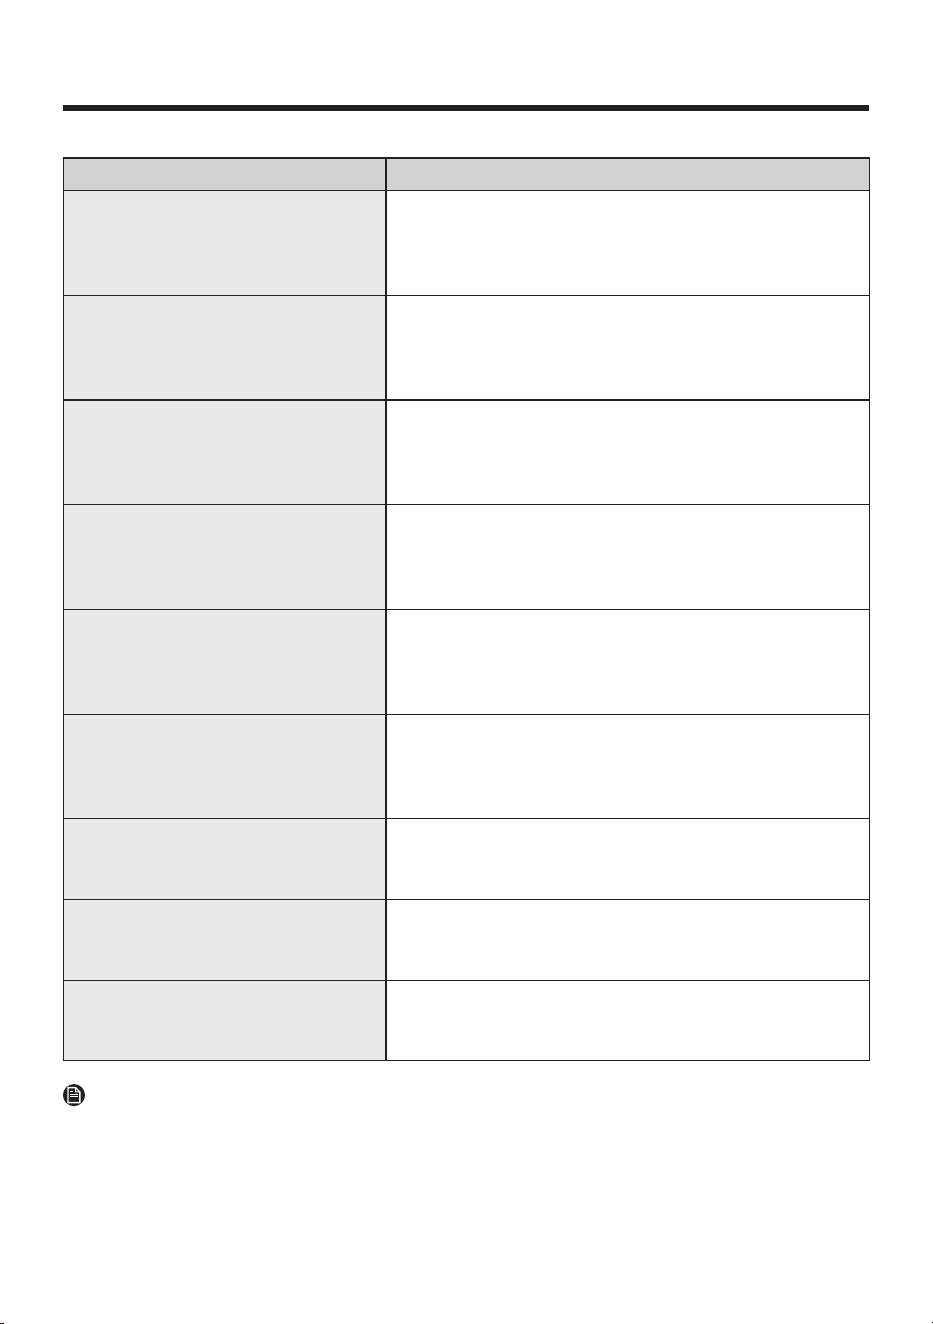
Voice Guidance Checklist
The Waste Water Tank of the Clean
Station is full, so the station can’t wash
the robot vacuum’s Mop . Empty it and
start again.
• Empty the water and restart the cleaning.
The Washing Space of the Clean Station
is full, so the station can’t wash the
robot vacuum’s Mop . Empty it and start
again.
• Empty the water and restart the cleaning.
A leak was detected in the Clean
Station , so the station can’t wash
the robot vacuum’s Mop . If the error
persists, contact Customer Service.
• If the same problem occurs continuously, contact
Customer Service.
There’s no Clean Water Tank in the
Clean Station , so the station can’t wash
the robot vacuum’s Mop . Insert a Clean
Water Tank .
• Insert the filled Clean Water Tank .
There’s no Waste Water Tank in the
Clean Station , so the station can’t wash
the robot vacuum’s Mop . Insert a Waste
Water Tank .
• Insert the Waste Water Tank .
There’s no Washing Plate in the Clean
Station , so the station can’t wash the
robot vacuum’s Mop . Install the plate
properly.
• Insert the Washing Plate .
The Clean Water Tank of the Clean
Station is empty, so it can’t wash the
robot vacuum’s Mop . Fill it with water.
• Fill the water.
The Waste Water Tank of the Clean
Station is full, so the station can’t wash
the robot vacuum’s Mop . Empty it.
• Empty the water.
The Washing Space of the Clean Station
is full, so the station can’t wash the
robot vacuum’s Mop . Empty it.
• Empty the water.
NOTE
You can find details of the checklist on the SmartThings app.
Untitled-9 47Untitled-9 47 2025-09-25 7:08:182025-09-25 7:08:18

Troubleshooting
English 48
Checklist before reporting a problem
If the product is not faulty, a service fee may be charged, therefore make sure to read the manual
thoroughly.
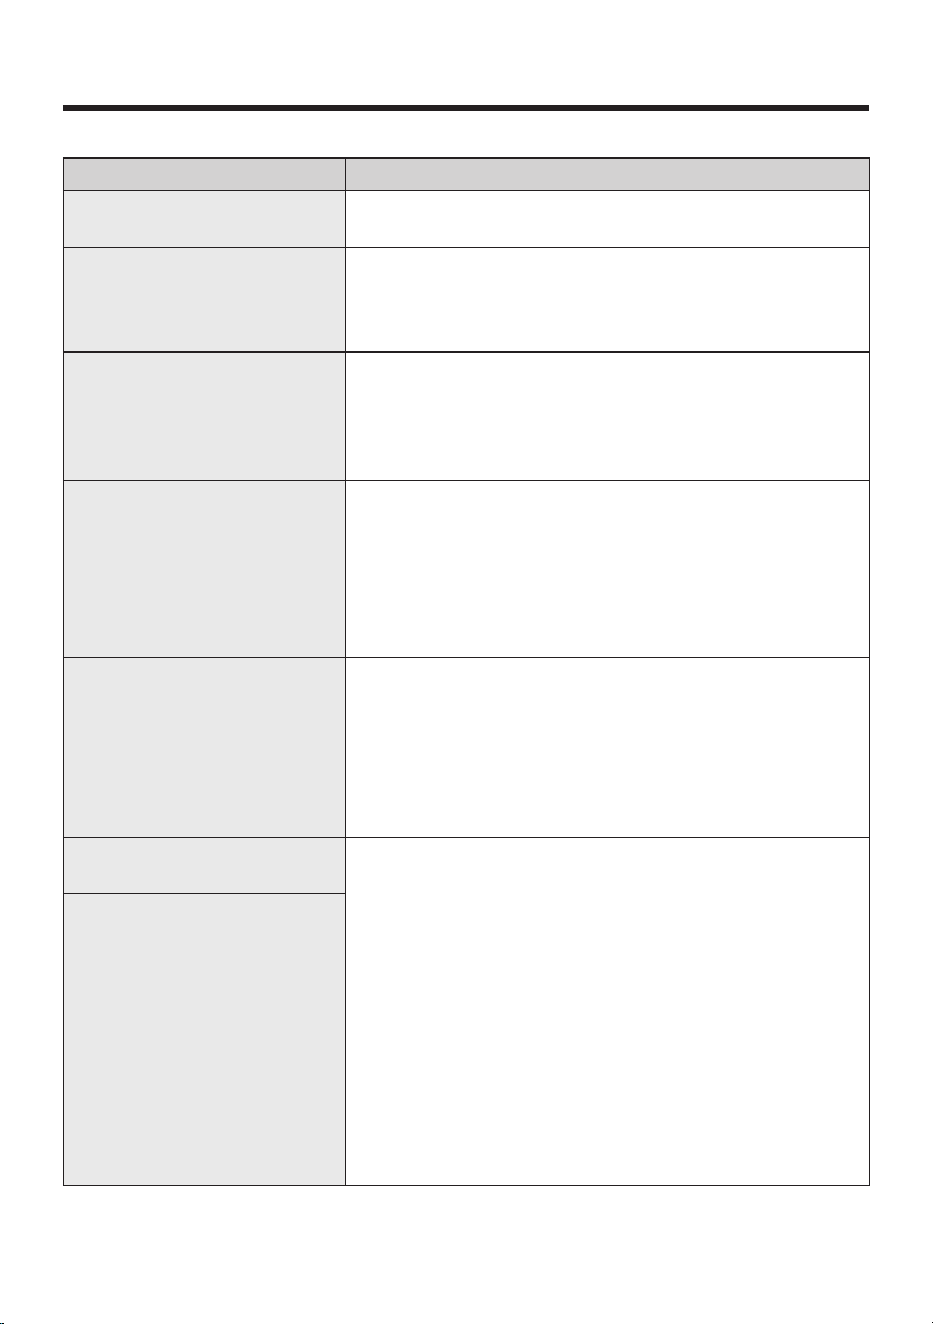
Symptom Checklist
The Jet Bot Combo is not working
at all.
• Check if the Status Indicator is on.
• Check if the Jet Bot Combo ’s battery is discharged.
• When the Jet Bot Combo ’s Status Indicator turns and stays
red, place the Jet Bot Combo manually on the Clean Station to
charge it.
• When you manually charge the Jet Bot Combo because of
the discharged battery, the buttons on the Jet Bot Combo do
not work. When charging is partially complete (about 10-20
minutes later), the Status Indicator is on and the buttons work
again.
The Jet Bot Combo has stopped
during cleaning.
• When the Jet Bot Combo ’s Status Indicator turns and stays
red, place the Jet Bot Combo manually on the Clean Station to
charge it.
• When the Jet Bot Combo is immobilized by an obstacle such as
a cord, obstacles, threshold, a raised spot, etc., pick it up and
move it away from the obstacle.
- If any fabric or string is caught in the Driving Wheel , set the
Jet Bot Combo to Energy-Saving mode and remove the item
caught in the Driving Wheel .
• Check whether the No-go zones are set.
Suction power is weak.
• When there’s too much dust in the Dustbin , suction power may
weaken. Set the Jet Bot Combo to Energy-Saving mode and
empty the Dustbin .
• If the Brush at the bottom of the Jet Bot Combo is blocked by
foreign matter, set the Jet Bot Combo to Energy-Saving mode
and remove foreign matter from the Brush .
• When noise suddenly increases, set the Jet Bot Combo to
Energy-Saving mode and empty the Dustbin .
The Jet Bot Combo cannot find the
Clean Station .
• Check if there’s a power failure or whether the power plug is
unplugged.
• Remove any obstacles around the Clean Station that may
prevent the Jet Bot Combo from returning to the Clean Station .
• When there’s foreign matter on the Charging Pins , clean them
with a soft cloth, as charging can be affected.
• Clean the foreign matter off the Charging Pins .
Untitled-9 48Untitled-9 48 2025-09-25 7:08:192025-09-25 7:08:19
English 49
Symptom Checklist
Something’s wrong with the Mops .
• Detach the Mop Spin Board and check for any debris caught or
tangled to it. Remove the debris and resume cleaning.
The Mops don’t operate properly.
• Detach the Mop Spin Board and check for any debris caught or
tangled to it. Remove the debris and resume cleaning.
• If the same problem occurs continuously, contact Customer
Service.
The Jet Bot Combo is cleaning in
the Vacuum mode although it is
set to the Mop or Vacuum + Mop
mode.
• If the Mop Spin Board is not assembled, the Mop or Vacuum +
Mop mode automatically change to Vacuum mode.
• Check if both sides of the Mop Spin Board are attached.
• If the same problem occurs continuously, contact Customer
Service.
The Jet Bot Combo suddenly
cleans diagonally.
• Check if the Clean Station is installed along the grain of
wooden floors or tiles.
• The Jet Bot Combo may clean in a diagonal direction if it is
moving to another area using the shortest route. It may also
move at a diagonal if it did not make contact with an obstacle
at a right angle, if it was charged in a skewed direction at the
Clean Station , or If the floor material is wooden or tile.
Jet Bot Combo does not clean
some places.
• Check whether the Clean Station is installed in a narrow
passage or near a room door and move it to another place.
- If the Clean Station is installed in a narrow passage or near
a room door, the Jet Bot Combo cannot pass through the
passage or the door.
• Check whether the places the Jet Bot Combo does not clean are
set as No-go zones .
The Jet Bot Combo cannot find a
room.
• The Jet Bot Combo will start to create a new map by cleaning
all areas instead of using the existing map for the following
cases:
- If the Jet Bot Combo has not started cleaning from the
Clean Station .
- If the Clean Station has been either rotated by more than
45 degrees or moved more than 1 meter from the initially
installed position.
• Start cleaning from the Clean Station .
• When the Jet Bot Combo creates a map and the Jet Bot Combo
starts cleaning, make sure the Jet Bot Combo starts operating
parallel to the wall.
• Remove obstacles within 0.5 m of the left and right side and 1
m of the front side of the Clean Station .
The map which the Jet Bot Combo
has created is different from the
saved map and the map is also
drawn askew.
Untitled-9 49Untitled-9 49 2025-09-25 7:08:192025-09-25 7:08:19
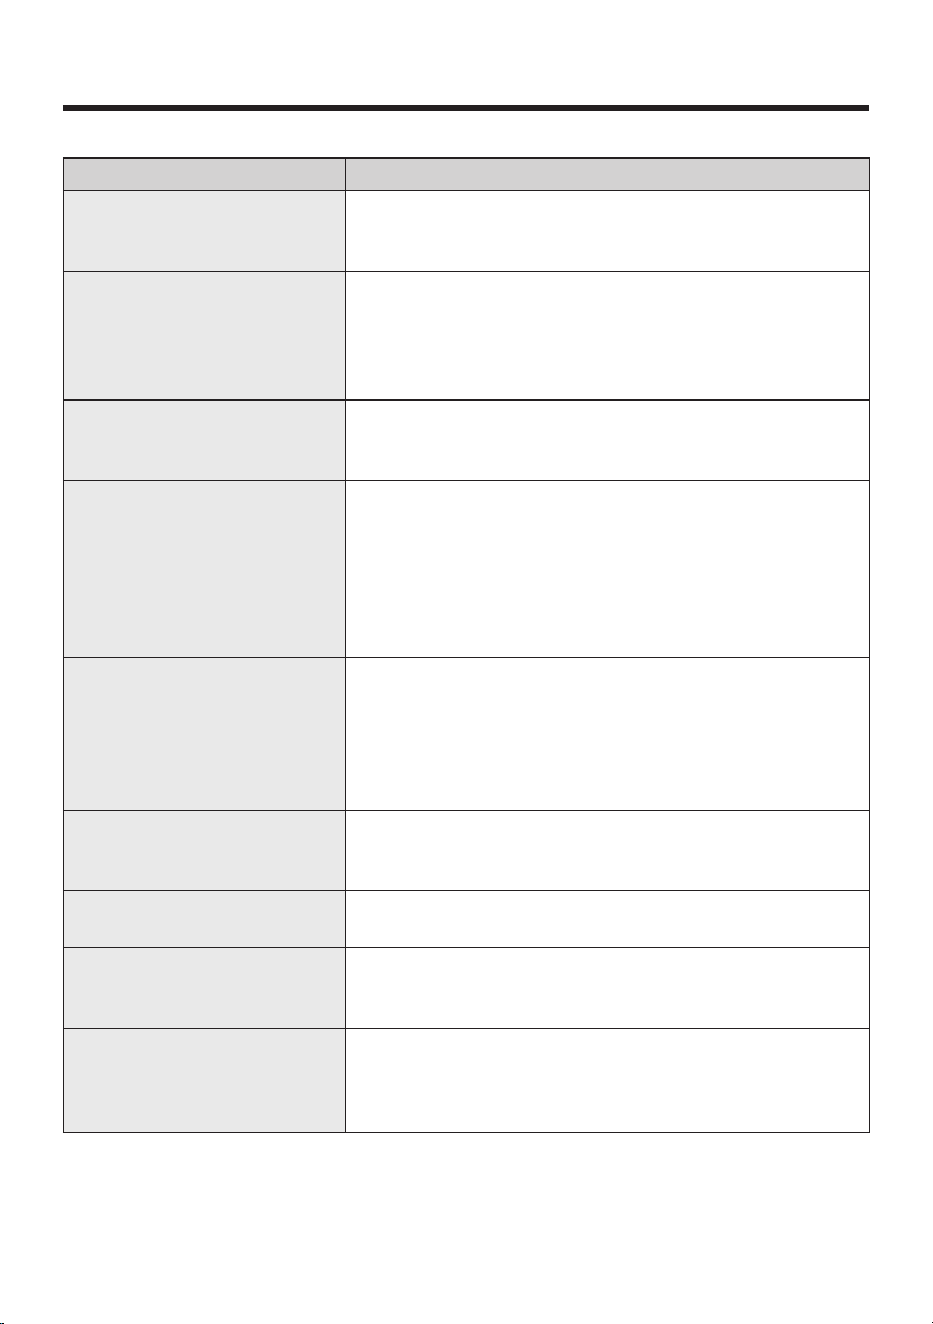
Troubleshooting
English 50
Symptom Checklist
The Jet Bot Combo ignores and
enters No-go zones .
• If the Jet Bot Combo has not started cleaning from the Clean
Station , it will ignore the No-go zones settings. Therefore, start
cleaning from the Clean Station to use the function.
The Intelligent Power Control
function works on a normal floor.
• Check if the floor is uneven, causing the Jet Bot Combo to run
with its body slightly lifted.
• Check whether there are any foreign matter on the Cliff Sensor
which is at the bottom of the Jet Bot Combo .
• Check whether the floor color is dark.
The Intelligent Power Control
function does not work.
• When the Jet Bot Combo cleans a short-pile carpet with a
bright color, it may recognize the carpet as a hard floor, causing
Intelligent Power Control function not to work.
The Jet Bot Combo makes a
squeaking sound while cleaning.
• Check and make sure the Brush Cover on the bottom is properly
assembled.
• The rubber that sweeps away dust may make a sound due to
friction with the floor, however it will disappear after a certain
period of time.
• If the same problem occurs continuously, contact Customer
Service.
SmartThings app cannot be
installed.
• To check the compatibility of the SmartThings app with your
smartphone, visit ‘Play Store’ or ‘App Store’.
• The supporting OS version for the SmartThings app may change
later.
• For rooted smart devices, standard installation and use will not
be guaranteed.
I have installed the SmartThings
app, but the Jet Bot Combo fails to
be connected.
• Connect the Jet Bot Combo to a wireless router by referring to
the SmartThings app of the user manual.
I fail to log into the Samsung
account.
• Check your ID and password on the screen of the Samsung
account.
During product registration, the
wireless router I want to connect
cannot be searched.
• Cancel the product registration, run the SmartThings app again,
and try the product registration again.
During product registration,
the password of the connecting
wireless router is not input
correctly.
• Cancel the product registration, run the SmartThings app again,
and try the product registration again.
• Press and hold the wireless router you want to connect on the
network list, and delete the network to initialize the password.
Untitled-9 50Untitled-9 50 2025-09-25 7:08:192025-09-25 7:08:19
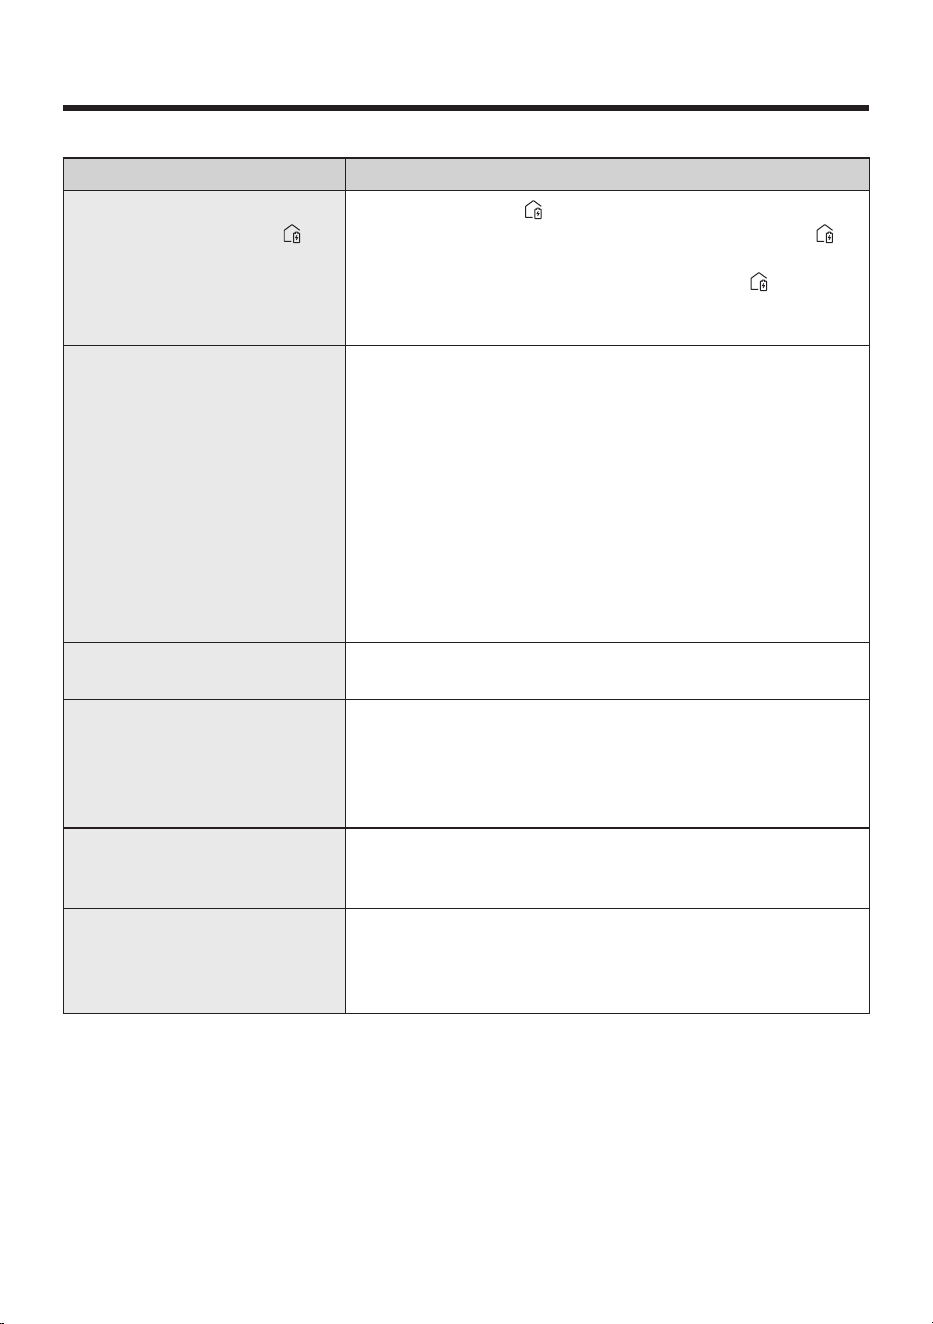
English 51
Symptom Checklist
I have pressed and held the
button as instructed in the app,
but the app does not move on to
the next step.
• Press and hold the button until you hear it beep.
• If the next step does not appear within seconds, press the
button once more.
• If you are using an iOS device, press and hold the button on
the Jet Bot Combo for at least 3 seconds and then tap Next on
the SmartThings app.
A message of the product
registration failure appears.
• Try the product registration procedure again by referring to the
pop-up messages.
• Please refer to the ‘ Setting up the wireless router’ section.
• Please refer to the ' Registering a device to the SmartThings
app — When the Jet Bot Combo cannot be registered to the
SmartThings app' section.
• When the product registration fails repeatedly, restart the
SmartThings app and try the product registration.
• The Samsung account for both app login and the product
registration must be the same.
• All users should use the Samsung account issued by the
country which launches the product.
The Jet Bot Combo fails to connect
to Wi-Fi.
• Check the wireless router's settings.
The Jet Bot Combo is successfully
connected to a smartphone, but
it cannot be controlled from the
smartphone.
• Try restarting the SmartThings app.
• Disconnect and reconnect your smartphone from the wireless
router.
• Activate and then deactivate the Energy-Saving mode, wait for
a few minutes, and then open the SmartThings app again.
The Jet Bot Combo on the
SmartThings app fails to start.
• Check if the Jet Bot Combo is offline on the SmartThings app.
• Connect the Jet Bot Combo to a wireless router to again by
referring to the ‘ SmartThings app’ section.
The Jet Bot Combo has been
successfully registered to the
SmartThings app but appears
‘ Offline’.
• Restart the SmartThings app.
• Check your wireless router's internet connection. Proper
operation may not be guaranteed in environments with a
firewall.
Untitled-9 51Untitled-9 51 2025-09-25 7:08:192025-09-25 7:08:19
Troubleshooting
English 52
Symptom Checklist
The Jet Bot Combo was
successfully connected to the
SmartThings app and operating
normally, but it appears as ' Offline’
on the app.
• If the Jet Bot Combo is distant from a wireless router, it may get
disconnected.
• Restart the SmartThings app.
• If the disconnection is not resolved, try the product registration
again.
• If the wireless router’s SSID/password has been changed, try
the product registration again.
• Check if the Jet Bot Combo is in Energy-Saving mode. Press the
button to cancel the Energy-Saving mode.
A map cannot be saved.
• To create a map, you need to register the device first and then
start creating a map with the SmartThings app.
• When the Jet Bot Combo starts cleaning from the Clean Station
and completes cleaning one time in Auto Clean, a map is saved.
When controlling with a
smartphone, a response is
delayed.
• If the Jet Bot Combo and the smartphone are not connected to
the same wireless router, a response can be delayed depending
on the network environment.
The Jet Bot Combo failed to detect
pet waste and accidentally sucked
it up.
• The Jet Bot Combo may fail to detect pet waste if it is located in
the dead zone of the object recognition sensor.
• The Jet Bot Combo may fail to detect pet waste and recognize
it as a debris that needs to be cleaned if it is smaller than 2 cm
x 3 cm in size.
• The Jet Bot Combo may fail to detect pet waste if its color,
pattern, or shape blends with the floor. Additionally, direct or
reflected light may hinder its ability to recognize pet waste.
※ Software is updated regularly to improve object recognition
performance.
Untitled-9 52Untitled-9 52 2025-09-25 7:08:192025-09-25 7:08:19
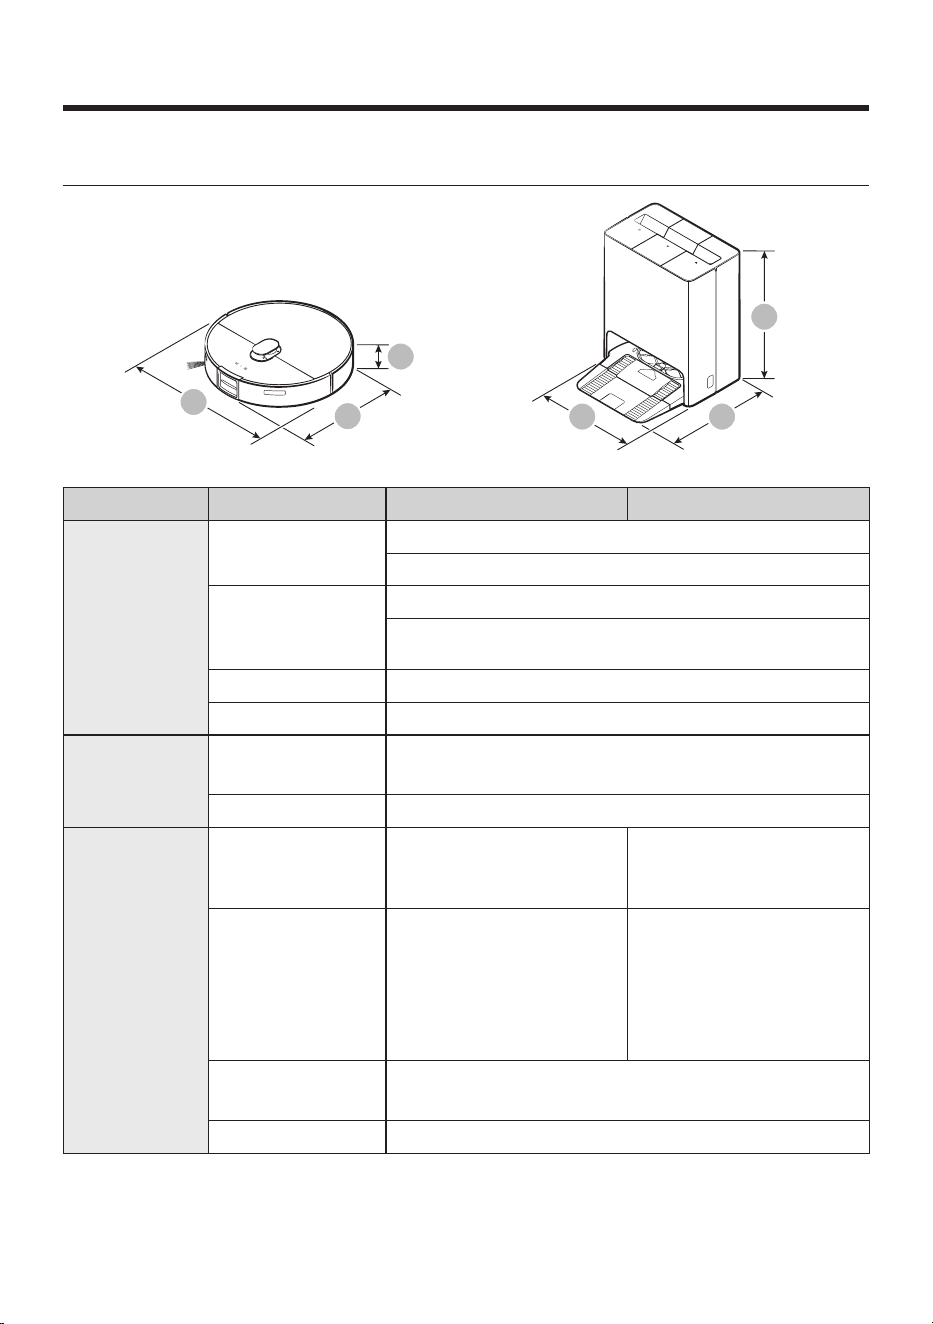
English 53
Appendix
Product Specification
A
C
B
A C
B
Classification Items VR7MD97**** VR7MD96****
Mechanical
specifications
Weight
Jet Bot Combo : 4.8 kg
Clean Station : 14.0 kg
Size
Width (A) X Height
(B) X Depth (C)
Jet Bot Combo : 359 mm X 100 mm X 364 mm
Clean Station : 444 mm X 547 mm X 510 mm
Cleaning Methods LiDar Location detection
Button Methods Touch type
Electrical
specifications
Power consumption
Jet Bot Combo : 70 W (Spot Cleaning)
Clean Station : 1200 W
Battery specification Lithium-ion 14.4 V / 63.36 Wh
Cleaning part
Cleaning functions
Auto Clean, Room Clean,
Spot Cleaning, The robot
cleans by area
Auto Clean, Room Clean,
Spot Cleaning
Additional functions
Energy-Saving Mode,
Downtime Mode, Scheduled
Cleaning, No-go zones,
The Home monitoring, Pet
care service, Bixby Voice
Recognition
Energy-Saving Mode,
Downtime Mode, Scheduled
Cleaning, No-go zones
Charging time
Vacuum + Mop / Mop : About 300 minutes
Vacuum : About 240 minutes
Charging type Auto charging / Manual charging
Untitled-9 53Untitled-9 53 2025-09-25 7:08:202025-09-25 7:08:20
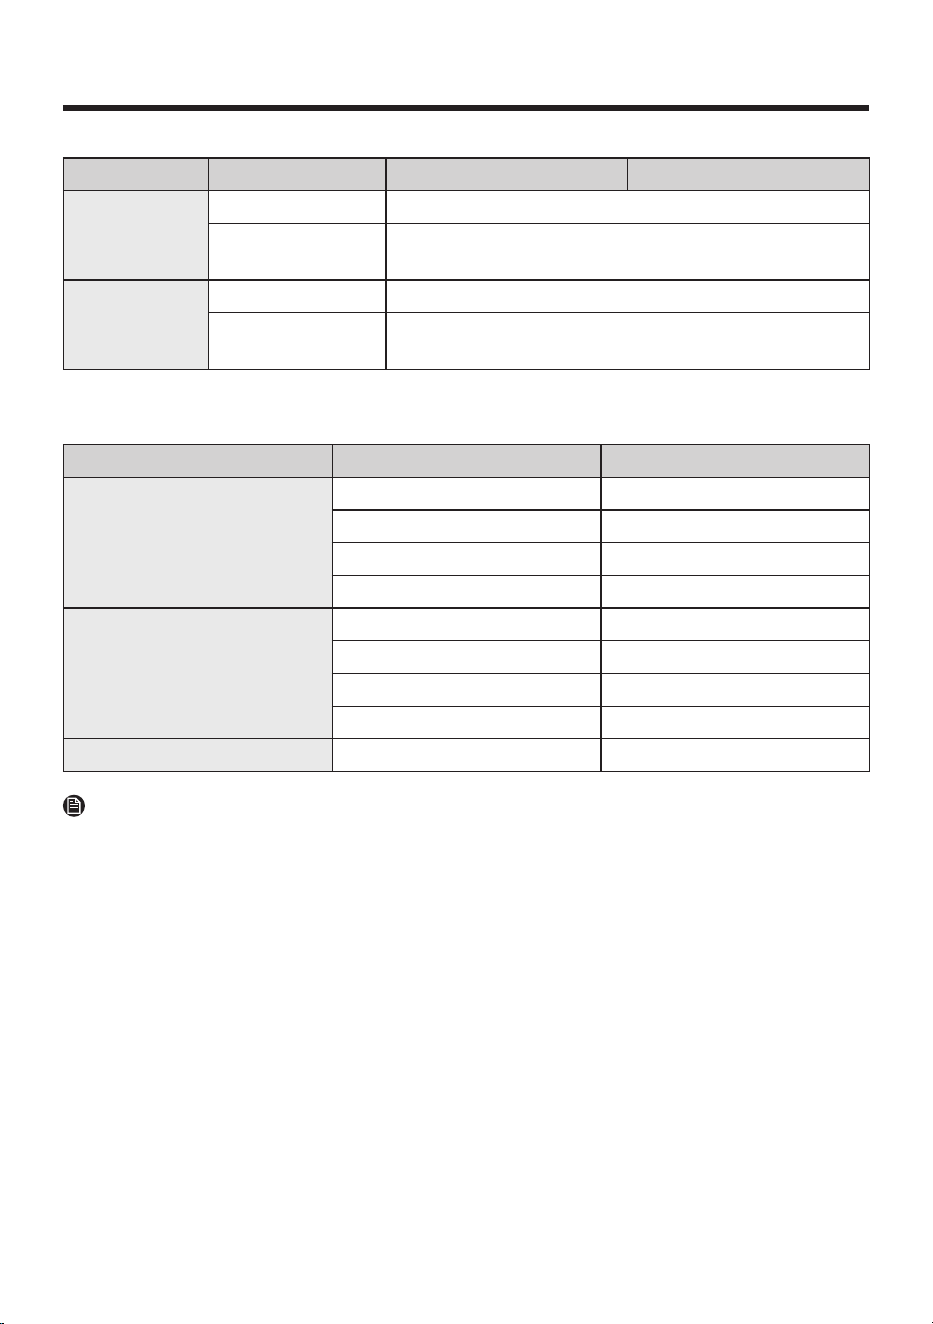
Appendix
English 54
Classification Items VR7MD97**** VR7MD96****
Wi-Fi
Frequency range 2412 - 2472 MHz
Transmitter power
(Max)
20 dBm
Bluetooth (BLE)
Frequency range 2402 - 2480 MHz
Transmitter power
(Max)
20 dBm
Usage Time
Cleaning Mode Suction Power Usage Time
Vacuum + Mop
Max About 70 minutes
Smart About 80 minutes
Normal About 80 minutes
Quiet About 150 minutes
Vacuum
Max About 110 minutes
Smart About 110 minutes
Normal About 120 minutes
Quiet About 180 minutes
Mop - About 130 minutes
NOTE
Charging and usage time may differ depending on the conditions of use.
Untitled-9 54Untitled-9 54 2025-09-25 7:08:202025-09-25 7:08:20

English 55
Warranty
Warranty
SAMSUNG
VACUUM CLEANER
LIMITED WARRANTY TO ORIGINAL CONSUMER PURCHASER WITH PROOF OF PURCHASE
AND/OR PROOF OF DELIVERY
This SAMSUNG br
and product, as supplied and distributed by SAMSUNG ELECTRONICS AMERICA, INC.
(SAMSUNG) and de
livered new, in the original carton to the original consumer purchaser, is warranted by
SAMSUNG against manufacturing defects in materials and
workmanship for the following limited warranty
period, star
ting from the date of delivery to the original consumer purchaser:
One (
1) year parts and labor
Digital Inve
rter motor (Part only) : Ten (10) years
Battery
(Part only) : Two (2) years
This
limited warranty is valid only on products purchased and used in the United States that have been installed,
oper
ated, and maintained according to the instructions attached to or furnished with the product. To receive
warranty
service, the purchaser must contact SAMSUNG at the address or phone number provided below
fo
r problem determination and service procedures. Warranty service can only be performed by a SAMSUNG
authorized service center
. The original dated bill of sale and/or proof of delivery must be presented upon
re
quest to SAMSUNG or SAMSUNG’s authorized service center to receive warranty service.
During the appl
icable warranty period, a product will be repaired, replaced, or the purchase price refunded, at
the sole option of SAMSUNG. SAMSUNG ma
y use new or reconditioned parts in repairing a product, or replace
the pr
oduct with a new or reconditioned product. Replacement parts and products are warranted for the
re
maining portion of the original product’s warranty or ninety (90) days, whichever is longer. All replaced parts
and pr
oducts are the property of SAMSUNG and you must return them to SAMSUNG.
This l
imited warranty covers manufacturing defects in materials or workmanship encountered in normal
household, noncommer
cial use of this product and shall not cover the following: damage that occurs in
shipment, del
ivery, installation, and uses for which this product was not intended; damage caused by
unauthorized modification or
alteration of the product; product where the original factory serial numbers have
been r
emoved, defaced, changed in any way, or cannot be readily determined; cosmetic damage including
scr
atches, dents, chips, and other damage to the product’s finishes; damage caused by abuse, misuse, pest
inf
estations, accident, fire, floods, or other acts of nature or God; damage caused by use of equipment, utilities,
services, pa
rts, supplies, accessories, applications, installations, repairs, external wiring or connectors not
suppl
ied or authorized by SAMSUNG; damage caused by incorrect electrical line current, voltage, fluctuations
and sur
ges; damage caused by failure to operate and maintain the product according to instructions; in-home
instruction on ho
w to use your product; and service to correct installation not in accordance with electrical or
plumbing codes or
correction of household electrical or plumbing (i.e., house wiring, fuses, or water inlet hoses).
The cost of r
epair or replacement under these excluded circumstances shall be the customer’s responsibility.
Untitled-9 55Untitled-9 55 2025-09-25 7:08:202025-09-25 7:08:20

Warranty
English 56
Visits by
an authorized servicer to explain product functions, maintenance or installation are not covered by this
li
mited warranty. Please contact SAMSUNG at the number below for assistance with any of these issues.
EXCLUSION OF IMPLIED WARRANTIES
IMPLIED
WARRANTIES, INCLUDING THE IMPLIED WARRANTIES OF MERCHANTABILITY OR FITNESS FOR A
PA
RTICULAR PURPOSE, ARE LIMITED TO ONE YEAR OR THE SHORTEST PERIOD ALLOWED BY LAW. Some states
do not allow
limitations on how long an implied warranty lasts, so the above limitations or exclusions may not
appl
y to you. This warranty gives you specific rights, and you may also have other rights, which vary from state
to state
.
LIMITATION OF REMEDIES
YO
UR SOLE AND EXCLUSIVE REMEDY IS PRODUCT REPAIR, PRODUCT REPLACEMENT, OR REFUND OF THE
PURCHASE PRICE
AT SAMSUNG’S OPTION, AS PROVIDED IN THIS LIMITED WARRANTY. SAMSUNG SHALL NOT
BE LIABLE FOR SPECIAL
, INCIDENTAL OR CONSEQUENTIAL DAMAGES, INCLUDING BUT NOT LIMITED TO TIME
AWAY
FROM WORK, HOTELS AND/OR RESTAURANT MEALS, REMODELING EXPENSES, LOSS OF REVENUE OR
PROFITS,
FAILURE TO REALIZE SAVINGS OR OTHER BENEFITS REGARDLESS OF THE LEGAL THEORY ON WHICH
THE CLAIM IS BASE
D, AND EVEN IF SAMSUNG HAS BEEN ADVISED OF THE POSSIBILITY OF SUCH DAMAGES.
Some states do not allow
exclusion or limitation of incidental or consequential damages, so the above
li
mitations or exclusions may not apply to you. This warranty gives you specific rights, and you may also have
other
rights, which vary from state to state.
SAMSUNG does not
warrant uninterrupted or error-free operation of the product. No warranty or guarantee
given by
any other person, firm, or corporation with respect to this product shall be binding on SAMSUNG.
To
obtain warranty service, please contact SAMSUNG at:
Samsung Electronics America, Inc.
700 Sylvan Avenue,
Englewood Cliffs, NJ 07632
1-800-SAMSUNG
(726-7864)
www
.samsung.com/us/support
Untitled-9 56Untitled-9 56 2025-09-25 7:08:202025-09-25 7:08:20

English 57
Warranty (CANADA)
Warranty (CANADA)
PLEASE DO NO
T DISCARD. THIS PAGE REPLACES THE WARRANTY PAGE IN THE USE & CARE GUIDE
SAMSUNG
Vacuum Cleaner
LIMITED WARRANTY TO ORIGINAL PURCHASER
This SAMSUNG br
and product, as supplied and distributed by SAMSUNG ELECTRONICS CANADA, INC.
(SAMSUNG) and de
livered new, in the original carton to the original consumer purchaser, is warranted by
SAMSUNG against manufacturing defects in materials and
workmanship for a limited warranty period of:
One (
1) Year Parts and Labor.
Digital Inve
rter motor (Part only) : Ten (10) years
Battery
(Part only) : Two (2) years
This l
imited warranty begins on the original date of purchase, and is valid only on products purchased and used
in CANAD
A. To receive warranty service, the purchaser must contact SAMSUNG for problem determination
and service pr
ocedures. Warranty service can only be performed by a SAMSUNG authorized service center. The
original dated bill of
sale must be presented upon request as Proof of purchase to SAMSUNG or SAMAUNG’s
authorized service center
.
SAMSUNG
will repair or replace this product, at our option and at no charge as stipulated herein, with new or
re
conditioned parts or products if found to be defective during the limited warranty period specified above.
All
replaced parts and products become the property of SAMSUNG and must be returned to SAMSUNG.
Replacement par
ts and products assume the remaining original warranty, or ninety (90) days, whichever is
longer
. This limited warranty covers manufacturing defects in materials and workmanship encountered in
normal household, noncommer
cial use of this product and shall not apply to the following: damage which
occurs in shipment
; delivery and installation;
appl
ications and uses for which this product was not intended; altered product or serial numbers; cosmetic
damage or
exterior or accidents, abuse, neglect, fire, water, lightning or other acts of nature; use of products,
equipment, systems, util
ities, services, parts, supplies, accessories, applications, installations, repairs, external
wiring or
connectors not supplied or authorized by SAMSUNG which damage this product or result in service
pr
oblems;
incorr
ect electrical line voltage, fluctuations and surges; customer adjustments and failure to follow operating
instructions, maintenance and envir
onmental instructions that are covered and prescribed in the instruction
book; pr
oduct removal and reinstallation; problems caused by pest infestations, misuse and abuse by user. This
li
mited warranty shall not cover cases of incorrect electric current, voltage or supply, light bulbs, house fuses,
house
wiring, cost of a service call for instructions, or fixing installation errors. SAMSUNG does not warrant
uninterrupted or
error-free operation of the product.
Untitled-9 57Untitled-9 57 2025-09-25 7:08:212025-09-25 7:08:21

Warranty (CANADA)
English 58
EX
CEPT AS SET FORTH HEREIN THERE ARE NO WARRANTIES ON THIS PRODUCT EITHER EXPRESS OR IMPLIED
AND SAMSUNG DISCLAIMS
ALL WARRANTIES INCLUDING, BUT NOT LIMITED TO, ANY IMPLIED WARRANTIES OF
MERCHANT
ABILITY, INFRINGEMENT OR FITNESS FOR A PARTICULAR PURPOSE.
NO
WARRANTY OR GUARANTY GIVEN BY ANY PERSON, FIRM OR CORPORATION WITH RESPECT TO THIS
PRODUC
T SHALL BE BINDING ON SAMSUNG. SAMSUNG SHALL NOT BE LIABLE FOR LOSS OF REVENUE OR
PROFITS,
FAILURE TO REALIZE SAVINGS OR OTHER BENEFITS, OR ANY OTHER SPECIAL, INCIDENTAL OR
CO
NSEQUENTIAL DAMAGES CAUSED BY THE USE, MISUSE OR INABILITY TO USE THIS PRODUCT, REGARDLESS
OF THE LEGAL
THEORY ON WHICH THE CLAIM IS BASED, AND EVEN IF SAMSUNG HAS BEEN ADVISED OF THE
POSSIBILITY OF SUCH
DAMAGES. NOR SHALL RECOVERY OF ANY KIND AGAINST SAMSUNG BE GREATER IN
AMOUNT
THAN THE PURCHASE PRICE OF THE PRODUCT SOLD BY SAMSUNG AND CAUSING THE ALLEGED
DA
MAGE. WITHOUT LIMITING THE FOREGOING, PURCHASER ASSUMES ALL RISK AND LIABILITY FOR LOSS,
DA
MAGE OR INJURY TO PURCHASER AND PURCHASER’S PROPERTY AND TO OTHERS AND THEIR PROPERTY
ARISING OUT
OF THE USE, MISUSE OR INABILITY TO USE THIS PRODUCT. THIS LIMITED WARRANTY SHALL NOT
EXTEND
TO ANYONE OTHER THAN THE ORIGINAL PURCHASER OF THIS PRODUCT, IS NONTRANSFERABLE AND
ST
ATES YOUR EXCLUSIVE REMEDY.
Some provinces do not allow
limitations on how long an implied warranty lasts, or the exclusion or limitation of
incidental or
consequential damages, so the above limitations or exclusions may not apply to you. This warranty
gives
you specific legal rights, and you may also have other rights which vary from state to state.
To
obtain warranty service, please contact SAMSUNG at:
Samsung Electronics Canada Inc.
2050 Derry Road West, Mississauga, Ontario L5N 0B9 Canada
1-800-SAMSUNG (726-7864) and www.samsung.com/ca/support (English)
www.samsung.com/ca_fr/support (French)
Untitled-9 58Untitled-9 58 2025-09-25 7:08:212025-09-25 7:08:21

Memo
Untitled-9 59Untitled-9 59 2025-09-25 7:08:212025-09-25 7:08:21
CANADA 1-800-Samsung (726-7864)
www.samsung.com/ca/support (English)
www.samsung.com/ca_fr/support (French)
U.S.A
- Consumer
Electronics
- Mobile Phones
1-800-SAMSUNG (726-7864)
1-844-SAM-PAYS (726-7297)
www.samsung.com/us/support
DJ68-00907C-05
Untitled-9 60Untitled-9 60 2025-09-25 7:08:222025-09-25 7:08:22