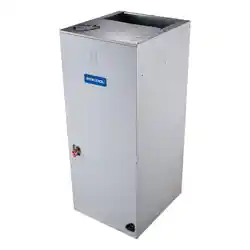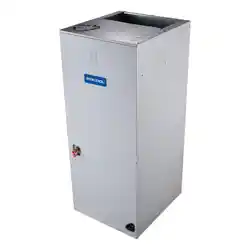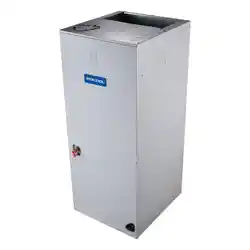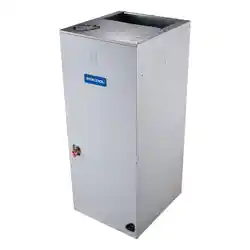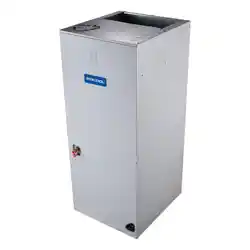
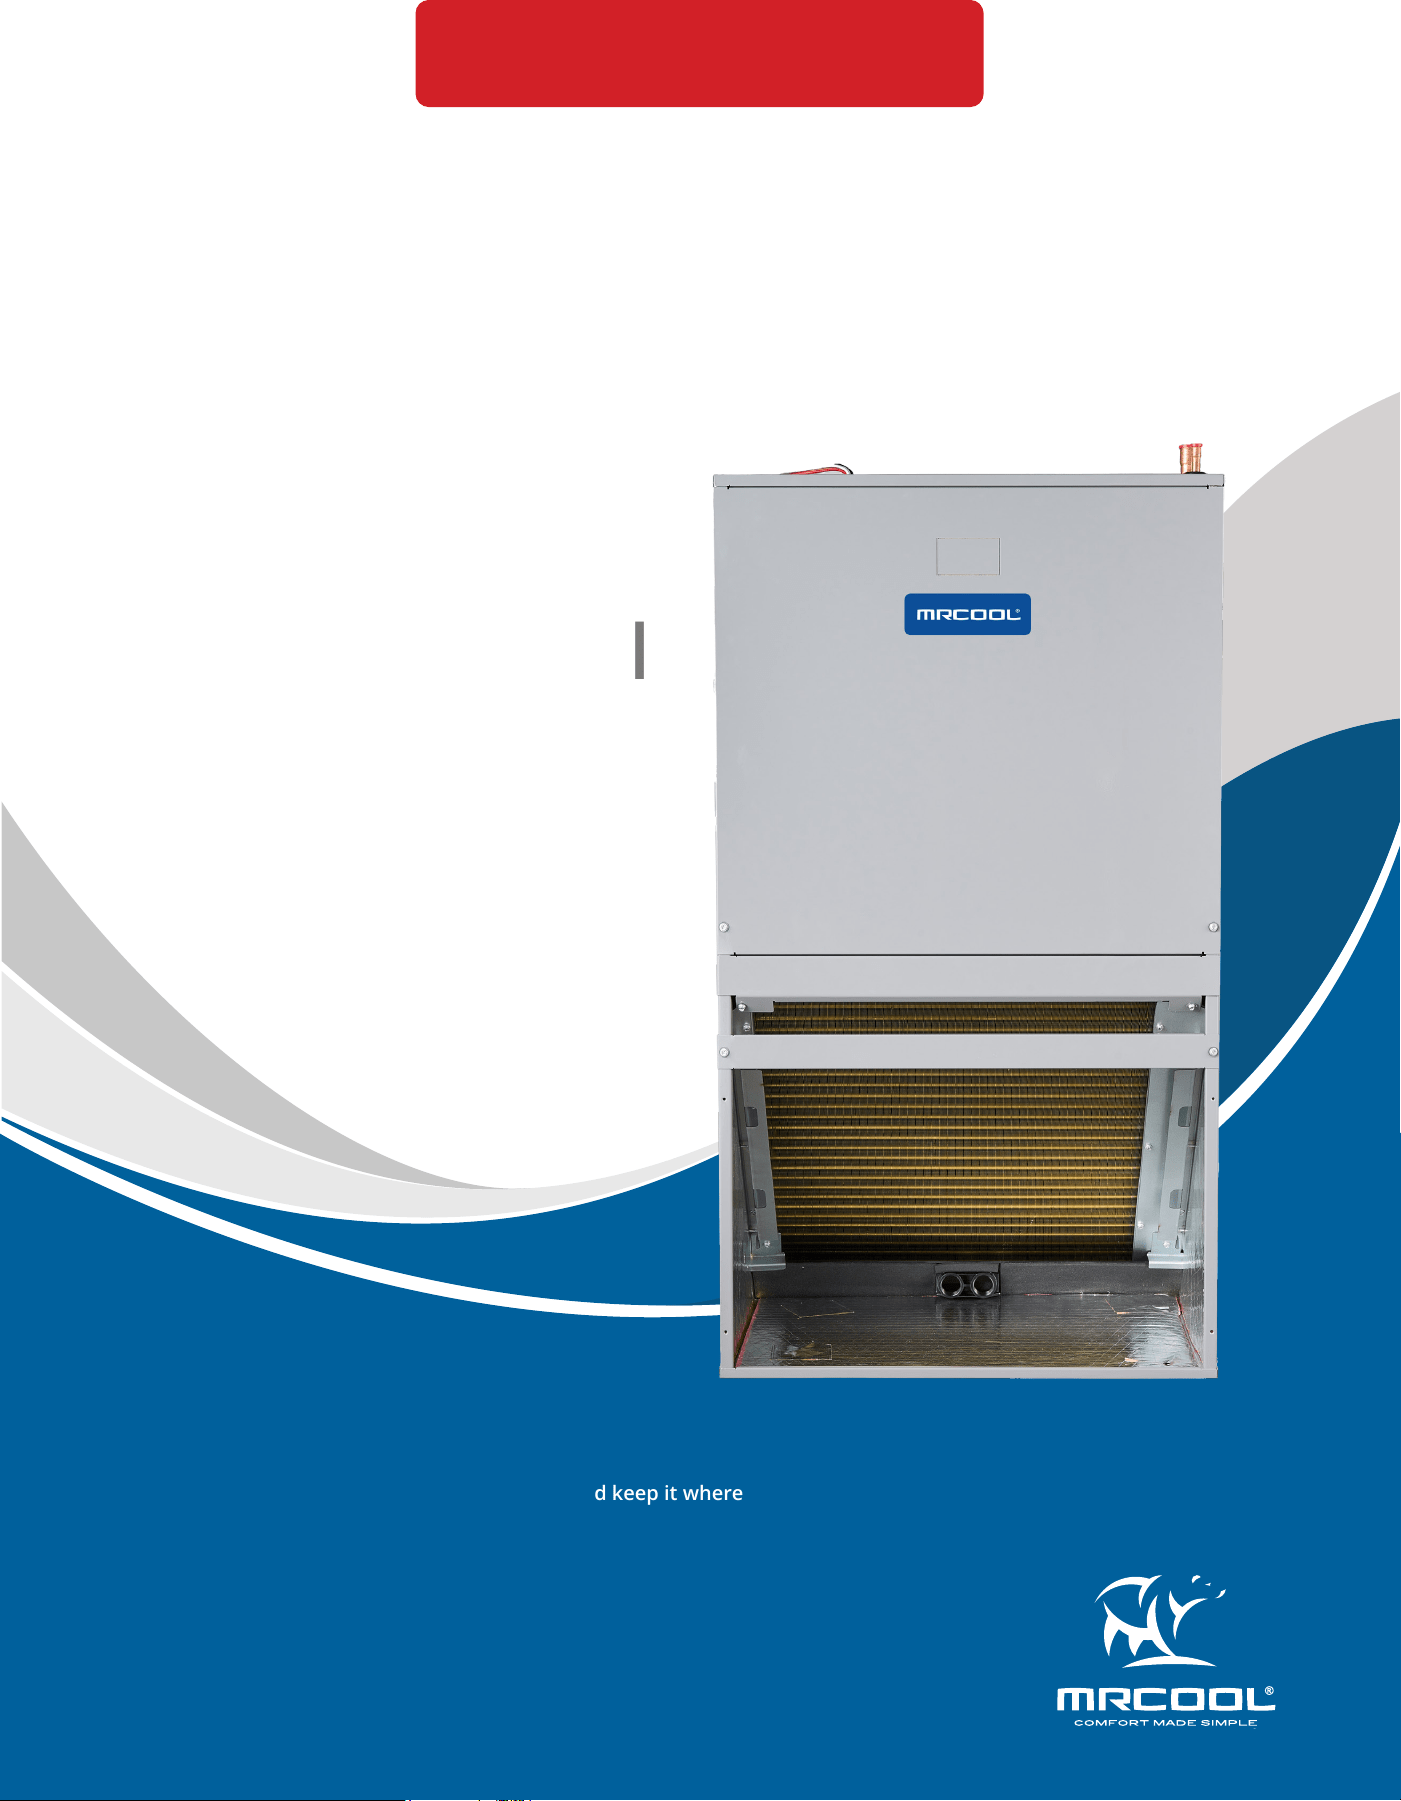
MRCOOL® Signature
Series Stud-Mount
Air Handler
Installation &
Owner’s Manual
Read this manual carefully before installation and keep it where
the operator can easily nd it for future reference.
Due to updates and constantly improving performance, the
information and instructions within this manual are subject to
change without notice.
Version Date: August 26, 2025
Please visit www.mrcool.com/documentation
to ensure you have the latest version of this manual.
MODELS:
MCAEAWPEF*21AA
This product utilizes R-454B refrigerant

mrcool.com1
CONTENTS
SAFETY ................................................................................................................... 2
SPECIFICATIONS ................................................................................................... 9
2.1 Nomenclature .......................................................................................... 9
2.2 Piston Size ................................................................................................. 9
2.3 Unit Dimensions ..................................................................................... 10
2.4 Internal Parts .......................................................................................... 12
INSTALLATION .................................................................................................... 14
3.1 Area Limitations ..................................................................................... 14
3.2 Unpacking ............................................................................................... 17
3.3 Location ................................................................................................... 17
3.4 Ducting .................................................................................................... 18
3.5 Drainage .................................................................................................. 19
3.6 Refrigerant Sensor ................................................................................. 19
3.7 Refrigerant Piping .................................................................................. 20
3.8 Metering Device ..................................................................................... 20
3.9 Air Filter ................................................................................................... 20
WIRING ................................................................................................................ 21
4.1 Power Wiring .......................................................................................... 21
4.2 Grounding ............................................................................................... 21
4.3 Control Wiring ........................................................................................ 21
4.4 Thermostat ............................................................................................. 22
4.5 Sequence of Operation ......................................................................... 22
4.6 Electrical Data ......................................................................................... 23
4.7 Wire Gauge ............................................................................................. 23
4.8 Wiring Diagrams ..................................................................................... 24
4.9 Low Voltage Connection ....................................................................... 26
ELECTRIC HEAT ................................................................................................... 27
BLOWER ............................................................................................................... 28
MAINTENANCE ................................................................................................... 29
7.1 Check Procedures .................................................................................. 29
7.2 Maintenance ........................................................................................... 29
7.3 Error Codes ............................................................................................. 29
1
2
3
CONTENTS
4
5
6
7
mrcool.com 2 2
Incorrect usage may cause serious damage or injury.
The symbols below are used throughout this manual to indicate instructions that should be followed closely
or actions that should be avoided to prevent death, injury, and/or property damage.
Safety Precautions
CAUTION
Indicates a medium level of risk which, if not avoided, may
result in death or serious injury.
Indicates a low degree of risk which, if not avoided, may
result in minor or moderate injury.
Indicates important information but not danger.
Read Before Using
WARNING
NOTICE
SAFETY WARNING
Safety Hazard:
This information is intended for use by individuals possessing adequate backgrounds of electrical and
mechanical experience. Any attempt to repair a central air conditioning product may result in personal
injury and/or property damage. MRCOOL® or the dealer will not be responsible for the interpretation of this
information, nor can it assume any liability in connection with its use.
Sharp Edge hazard. Be careful of sharp edges on equipment or any cuts made on sheet metal while installing
or servicing. Personal injury may result.
Hazardous Voltage:
Disconnect all electrical power, including remote disconnects before installing or servicing. Follow proper
lockout/tag out procedures to ensure the power cannot be inadvertently energized. Failure to disconnect
power before servicing could result in death or injury.
Live Electrical Components:
During installation, testing, servicing, and troubleshooting of this product, it may be necessary to work with
live electrical components. Failure to follow all electrical safety precautions when exposed to live electrical
components could result in death or serious injury.
Explosion Hazard:
Do not store corrosive or combustible materials, gasoline, or other ammable vapors or liquids near the unit.
Failure to follow this warning could result in property damage, serious personal injury, or death.
Electrical Hazard:
Grounding required! Follow proper local and state electrical code on requirements for grounding. Failure to
follow this warning could result in property damage, serious personal injury, or death.
Hazardous Vapors:
Do not install an air handler with a non-ducted return in the same closet, alcove, or utility room as a fossil fuel
device. Hazardous vapors can be distributed throughout the conditioned space and equipment damage can
result.
Corrosion Hazard:
To prevent shortening of its service life, the air handler should not be used during the nishing phases of
construction. The low return air temperatures can lead to the formation of condensation. Condensate in
the presence of chlorides and compounds, and cement creates a corrosive condition which may cause rapid
deterioration of the cabinet and internal components.
SAFETY
1
mrcool.com3
PROPOSITION 65
This appliance contains berglass insulation. Respirable particles of berglass are known to the State of
California to cause cancer. All manufacturer products meet current federal OSHA Guidelines for safety.
California Proposition 65 warnings are required for certain products, which are not covered by OSHA
standards. California's Proposition 65 requires warnings for products sold in California that contain or
produce any of over 600 listed chemicals known to the State of California to cause cancer or birth defects
such as berglass insulation, lead in brass, and combustion products from natural vapor. All "new equipment"
shipped for sale in California will have labels stating that the product contains and/or produces Proposition 65
chemicals. Although we have not changed our processes, having the same label on all our products facilitates
manufacturing and shipping. We cannot always know "when, or if" products will be sold in the California
market. You may receive inquires from customers about chemicals found in, or produced by, some of our
heating and air-conditioning equipment, or found in natural vapor used with some of our products. Listed
below are those chemicals and substances commonly associated with similar equipment in our industry and
other manufacturers.
• Glass Wool (Fiberglass) Insulation
• Carbon Monoxide (CO)
• Formaldehyde
• Benzene
More details are available at the websites for OSHA (Occupational Safety and Health Administration), at www.
osha.gov and the State of California's OEHHA (Oce of Environmental Health Hazard Assessment), at www.
oehha.org. Consumer education is important since the chemicals and substances on the list are found in our
daily lives. Most consumers are aware that products present safety and health risks, when improperly used,
handled and maintained.
LOCATION WARNING
Only use this unit in a well-ventilated area and ensure the unit's airow inlet and outlet will not be impeded by
obstructions. Do not use this unit in the following locations:
• Locations with mineral oil.
• Locations with saline atmospheres, such as a seaside location.
• Locations with sulfurous atmospheres, such as near natural hot springs.
• Where high voltage is present, such as certain industrial locations.
• On vehicles or vessels, such as trucks or ferry boats.
• Where exposure to oily or very humid air may occur, such as kitchens.
• In proximity to sources of electromagnetic radiation, such as high-frequency transmitters or other high
strength radiation devices.
NOTE
• Do not use means to accelerate the defrosting process or to clean, other than those recommended by
MRCOOL®.
• The appliance should be stored in a room that does not have a continuously operating ignition sources (for
example: open ames, an operating gas appliance or an operating electric heater).
• Do not pierce or burn the unit. Be aware that refrigerants may not contain an odor.
• Comply with national gas regulations.
This appliance is not intended for use by people (including children) with reduced physical, sensory or mental
capabilities, or persons that lack experience and knowledge, unless they are supervised or have been given
instructions concerning the use of the appliance by a person responsible for their safety.
SAFETY
1
mrcool.com 4
WARNINGS FOR PRODUCT INSTALLATION
Any person who is involved with working on or operating a refrigerant circuit should hold a current valid
certicate from an industry-accredited assessment authority, which authorizes their competence to handle
refrigerant safely in accordance with an industry recognized assessment credential.
Servicing should only be performed as recommended by MRCOOL®.
Maintenance and repair requiring the assistance of other skilled personnel should be carried out under the
supervision of a person competent in the use of ammable refrigerants.
Prior to beginning work on systems containing ammable refrigerants, safety checks are necessary to
minimize the risk of ignition.
Ensure that the area is in the open or that it is adequately ventilated before opening the system or conducting
any hot work. A degree of ventilation should continue during the period that the work is carried out. The
ventilation should safely disperse any released refrigerant and preferably expel it externally into the
surroundings.
When electrical components are being changed, they should be to the correct specication. At all times
MRCOOL® maintenance and service guidelines shall be followed. If in doubt, consult MRCOOL® Customer
Service at 270-366-0457 or at [email protected].
The following checks need to be followed when installing systems containing ammable refrigerants.
• The actual refrigerant charge is in accordance with the room size within which the refrigerant containing
parts are installed.
• Ventilation, machinery, and outlets are operating adequately and are not obstructed.
• If an indirect refrigerating circuit is being used, the secondary circuit should be checked for the presence of
refrigerant.
• Equipment markings must remain visible and legible. Markings and signs that are illegible should be
corrected.
Make sure that refrigerating pipe or components are installed in a position where they are unlikely to be
exposed to any substances which may corrode refrigerant containing components, unless the components are
constructed of materials that are inherently resistant to corrosion or are suitably protected against corrosion.
Repair and maintenance of electrical components should include initial safety checks and component
inspection procedures. If a fault exists that could compromise safety, then no power supply should be
connected to the circuit until the fault has been dealt with.
• That there is continuity of grounding.
• That capacitors are discharged: this should be done in a safe manner to avoid the possibility of sparking.
• That there are no live electrical components and wiring exposed while charging, recovering, or purging the
system.
SERVICE WARNING
When repairing the refrigerating system, comply with the following precautions prior to conducting work on
the system:
• Work should be undertaken according to controlled procedures to minimize the risk of the presence of
ammable gases or vapors while the work is being preformed.
• All maintenance sta and others working in the local area should be instructed on the nature of the work
being carried out. Work in conned spaces should be avoided.
• The area should be checked with an appropriate refrigerant detector prior to and during work, to ensure
the technician is aware of potentially toxic or ammable environment. Ensure that the leak detection
equipment being used is suitable for use with all applicable refrigerants, i.e. non-sparking, adequately
sealed, or intrinsically safe.
• If any hot work is to be conducted on the refrigerating equipment or any associated parts, appropriate
re extinguishing equipment should be available and easily accessible. Have a dry powder or CO2 re
extinguisher adjacent to the charging area.
• When carrying out work in relation to a refrigerating system that involves exposing any pipe work, no
sources of ignition should be used in such a manner that it may lead to the risk of re or explosion. All
possible ignition sources, including cigarette smoking, should be kept suciently away from the site
SAFETY
1

mrcool.com5
SERVICE WARNING
of installation, repair, or removal and disposal of the unit, during which refrigerant can possibly be released
into the surrounding space. Prior to beginning work, the area around the equipment is to be surveyed
to make sure that there are no ammable hazards or ignition risks. "No smoking" signs shall be clearly
displayed.
• Sealed electrical components shall be replaced.
• Intrinsically safe components must be replaced.
Check that the cabling will not be subject to wear, corrosion, excessive pressure, vibration, sharp edges, or any
other adverse environmental eects. The check shall also take into account the eects of aging or continual
vibration from sources such as compressors or fans.
Under no circumstances should potential sources of ignition be used while searching for or detection of
refrigerant leaks. A halide torch (or any other detector using a naked ame) should not be used.
Electronic leak detectors may be used to detect refrigerant leaks but, in the case of ammable refrigerants,
the sensitivity may not be adequate, or may need recalibration. (Detection equipment should be calibrated
in a refrigerant-free area). Ensure that the detector is not a potential source of ignition and is suitable for the
refrigerant used. Leak detection equipment should be set at a percentage of the LFL of the refrigerant and
should be calibrated for the refrigerant employed, and the appropriate percentage of gas (25% maximum) is
conrmed.
If a leak is suspected, all naked ames should be removed/extinguished.
If a leakage of refrigerant which requires brazing is found, all of the refrigerant should be recovered from the
system, or isolated (by means of shut o valves) in a part of the system remote from the leak.
Leak detection uids are also suitable for use with most refrigerants but the use of detergents containing
chlorine should be avoided as the chlorine may react with the refrigerant and corrode the copper pipe-work.
Note: Examples of leak detection uids are the bubble method.
When breaking into the refrigerant circuit to make repairs - or for any other purpose conventional procedures
should be used. However, for ammable refrigerants it is important that best practice is followed, since
ammability is a consideration.
The following procedure should be adhered to:
• safely remove refrigerant following local and national regulations
• evacuate
• purge the circuit with inert gas
• evacuate
• continuously ush or purge with inert gas when using ame to open circuit
• open the circuit
The refrigerant charge should be recovered into the correct recovery cylinders if venting is not allowed by
local and national codes. For appliances containing ammable refrigerants, the system should be purged with
oxygen-free nitrogen to render the appliance safe for ammable refrigerants. This process might need to be
repeated several times. Compressed air or oxygen should not be used for purging refrigerant systems.
For appliances containing ammable refrigerants, refrigerant purging should be achieved by breaking the
vacuum in the system with oxygen-free nitrogen and continuing to ll until the working pressure is achieved,
then venting to the atmosphere, and nally pulling down to a vacuum. This process should be repeated until
no refrigerant is within the system. When the nal oxygen-free nitrogen charge is used, the system should be
vented down to atmospheric pressure to enable work to take place.
The outlet for the vacuum pump should not be close to any potential ignition sources, and ventilation should
be available.
Ensure that contamination of dierent refrigerants does not occur when using charging equipment. Hoses or
lines should be as short as possible to minimize the amount of refrigerant they contain.
Cylinders should be kept upright. Ensure that the refrigeration system is grounded prior to charging the
system with refrigerant.
Label the system when charging is complete (if it is not already labeled).
Take extreme care to not overll the refrigeration system.
Prior to recharging the system, it should be pressure-tested with the appropriate purging gas. The system
needs to be leak-tested on completion of charging but prior to commissioning. A follow up leak test should be
SAFETY
1

mrcool.com 6
SERVICE WARNING
carried out prior to leaving the site.
Before carrying out this procedure, it is essential that the technician is completely familiar with the equipment
and all its detail. It is recommended that all refrigerants are recovered safely. Prior to the task being carried
out, an oil and refrigerant sample should be taken in case analysis is required prior to reuse of reclaimed
refrigerant. It is essential that electrical power is available before the task is commenced.
• Isolate the system electrically.
• Become familiar with the equipment and its operation.
• Before attempting the procedure ensure that:
• mechanical handling equipment is available, if required, for handling refrigerant cylinders;
• all personal protective equipment is available and used correctly;
• the recovery process is supervised at all times by a competent person;
• recovery equipment and cylinders conform to the appropriate standards.
• Pump down the refrigerant system, if possible.
• If a vacuum is not possible, make a manifold so that refrigerant can be removed form various parts of the
system.
• Make sure that the cylinder is situated on the scales before recovery takes place.
• Start the recovery machine and operate it in accordance with the manufacturer's instructions.
• Do not overll cylinders. (No more than 80% volume liquid charge).
• Do not exceed the maximum working pressure of the cylinder, even temporarily.
• When the cylinders have been lled correctly and the process has been completed, make sure that the
cylinder and the equipment are removed from the site promptly and all isolation valves on the equipment
are closed o.
• Recovered refrigerant should not be charged into another refrigeration system unless it has been cleaned
and checked.
• Equipment should be labeled stating that it has been decommissioned and emptied of refrigerant.
The label should be dated and signed. Ensure that there are labels on the equipment stating that the
equipment contains ammable refrigerant.
• When removing refrigerant from a system, either for servicing or decommissioning, it is recommended that
all refrigerants are removed safely.
• When transferring refrigerant into cylinders, ensure that only the appropriate refrigerant recovery cylinders
are employed. Ensure that the correct number of cylinders for holding the total system charge is available.
All cylinders to be used are designated for the recovered refrigerant and labeled for that refrigerant (i.e.
special cylinders for the recovery of refrigerant). Cylinders should be complete with a pressure-relief valve
and associated shut-o valves in good working order. Empty recovery cylinders are evacuated and, if
possible, cooled before recovery occurs.
• The recovery equipment must be in good working order and come with a set of instructions for proper
usage. Furthermore, the equipment should be suitable for safely recovering ammable refrigerants. If in
doubt, the manufacturer should be consulted. In addition, a set of calibrated weighing scales should be
available and in good working order. Hoses should be complete with leak-free disconnect couplings and in
good condition.
• The recovered refrigerant should be processed according to local legislation in the correct recovery
cylinder, and the relevant water transfer note arranged. Do not mix refrigerants in recovery units and
especially not in cylinders.
• If compressors or compressor oils are to be removed, ensure that they have been evacuated to an
acceptable level to be certain that ammable refrigerant does not remain within the lubricant. The
compressor body should not be heated by an open ame or other ignition sources to accelerate the
process. When oil is drained from a system, it should be carried out safely.
• Do not use the air conditioner for other purposes. In order to avoid any quality deterioration, do not use
the unit for the cooling of precision instruments, food, plants, animals, or works of art. Before cleaning, be
sure to stop the operation, turn the breaker o or unplug the supply cord. Otherwise, electric shock and
injury may occur.
• In order to avoid electric shock or re, make sure that a ground leak detector is installed.
• Never touch the air outlet or the horizontal blades while the swing ap is in operation. Your ngers may
SAFETY
1

mrcool.com7
SERVICE WARNING
become caught or the unit may break down.
• Objects touching the fan at high speeds can be dangerous.
• Never inspect or service the unit by yourself, ask a qualied service person to perform this task.
• If electrical appliances are disposed of in landlls or dumps, hazardous substances can leak into the
groundwater and get into the food chain, harming your health and well-being.
• Do not dispose of this product as unsorted municipal waste. This waste should be collected separately
for special treatment. Do not dispose of electrical appliances as unsorted municipal waste. Use separate
collection facilities. Contact your local government for information regarding the connection systems
available.
• When the system is installed and operated in a small room, it is required to maintain the concentration
of the refrigerant below the limit, in case a leak occurs. Otherwise, oxygen in the room may be aected,
resulting in a serious accident. The refrigerant in the air conditioner is safe and normally does not leak.
• If the refrigerant leaks into the room and comes into contact with the re of a burner, heater, or cooker, a
harmful gas could be released. Turn o any combustible heating devices, ventilate the room, and contact
the dealer from whom you purchased the unit.
• Do not use the air conditioner until a service person conrms that the refrigerant leak is repaired. Keep
ventilation openings clear of obstruction.
• Be sure the system is grounded in order to prevent electric shock and that the ground wire is not
connected to a gas or water pipe, lightning conductor, or telephone ground wire.
• Do not operate the air conditioner with wet hands. An electric shock may happen.
• Do not touch the heat exchanger ns. These ns are sharp and can cut you.
• To avoid oxygen deciency, ventilate the room suciently if equipment with a burner is used together with
the air conditioner.
• Arrange the drain hose to ensure smooth drainage. Incomplete drainage may cause wetting of the
building, furniture, etc.
• Never touch the internal parts of the controller.
• Do not remove the blower access panel. Some parts inside are dangerous to touch, and machine issues
may occur.
• Attention is drawn to the fact that additional transportation regulations may exist with respect to the
equipment containing a ammable gas. The maximum number of pieces of equipment or the conguration
of the equipment permitted to be transported together will be determined by the applicable transport
regulations.
• Signs for similar appliances used in a work area are generally addressed by local regulations and give the
minimum requirements for the provision of safety and/or health signs for a work location. All required
signs are to be maintained and employers should ensure that employees receive suitable and sucient
instruction and training on the meaning of appropriate safety signs and the actions that need to be taken
in connection with these signs. The eectiveness of signs should not be diminished by too many signs
being placed together. Any pictograms used should be as simple as possible and contain only essential
details.
• The storage of the appliance should be in accordance with the applicable regulations or instructions,
whichever is more stringent. Storage package protection should be constructed in such a way that
mechanical damage to the equipment inside the package will not cause a leak of the refrigerant charge.
The maximum number of pieces of equipment permitted to be stored together will be determined by local
regulations.
• Do not operate the air conditioner when using a room fumigation type insecticide. Failure to observe this
precaution could cause the chemicals to become deposited in the unit, which could endanger the health of
those who are hypersensitive to chemicals. It may also cause the refrigerant sensor to alarm.
• Do not place appliances which produce open ames in places exposed to the air ow from the unit or
under the indoor unit. It may cause incomplete combustion or deformation of the unit due to the heat.
• Do not install the air conditioner in a location where ammable gas may leak out. If the gas leaks out and
stays around the air conditioner, a re may break out.
SAFETY
1
mrcool.com 8
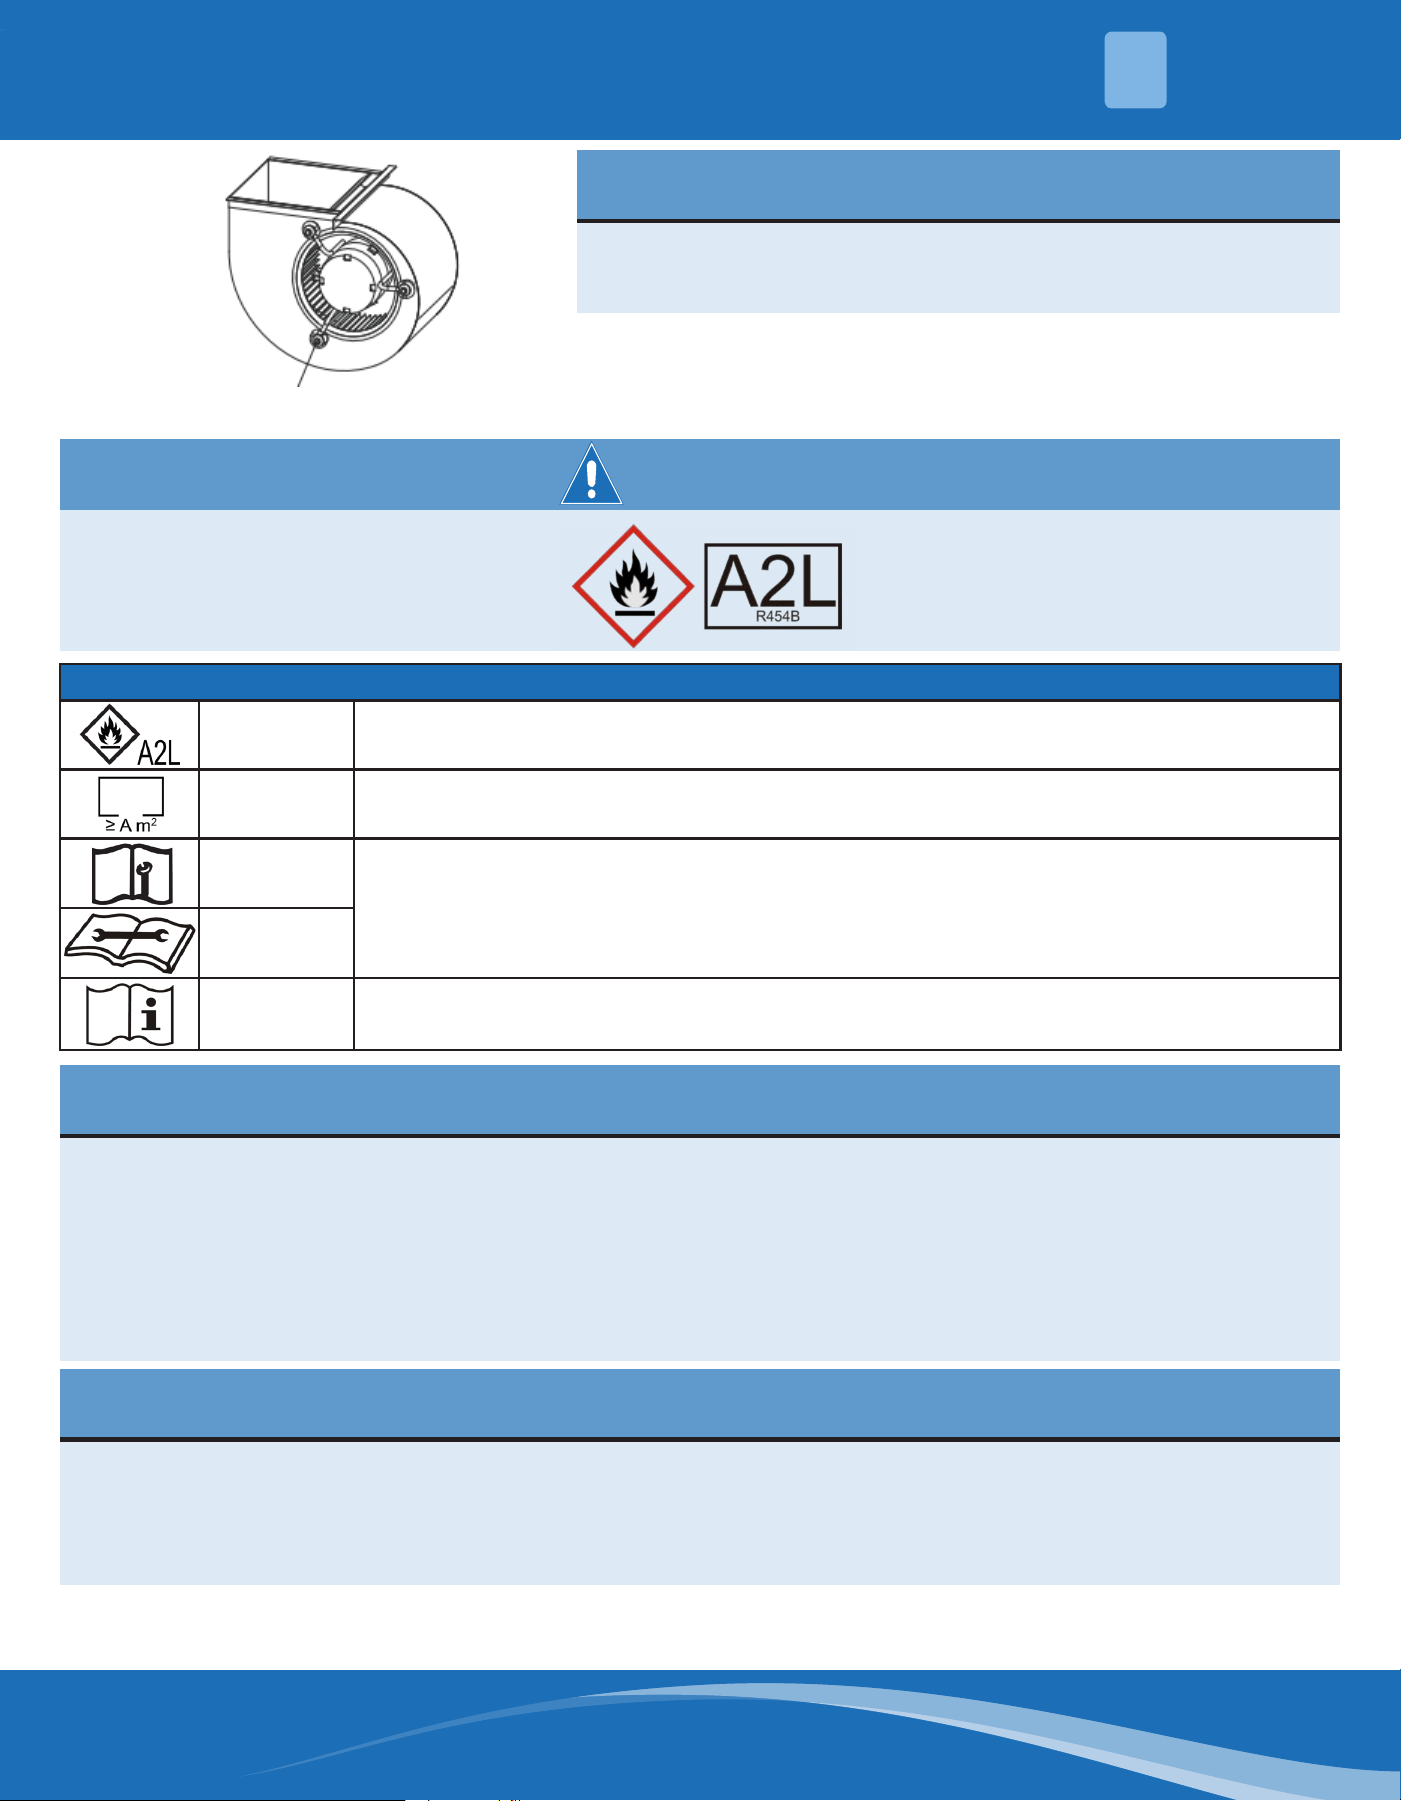
Symbols Displayed on the Unit
WARNING
This symbol shows that this appliance uses a ammable refrigerant. If the refrigerant
is leaked and exposed to an external ignition source, there is a risk of re.
WARNING
This symbol shows that the appliance shall be installed, operated, and stored in a
room with a oor area no less than the minimum room area.
CAUTION
This symbol shows that a service personnel should be handling this equipment with
reference to the installation manual.
CAUTION
CAUTION
This symbol shows that information is available such as the operating manual or
installation manual.
NOTE
Make sure the blower motor support is tight (3-motor mount
bolts) then check to see if the wheel is secured to the motor shaft
before operating the unit.
Blower motor and shipping bolt
WARNING
NOTE
These instructions do not cover all variations in systems nor provide for every possible contingency to be
met in connection with the installation. Should further information be desired or should particular problems
arise which are not covered suciently for the purchaser's purposes, the matter should be referred to your
installing contractor or local dealer.
Installation of this unit should be made in accordance with the National Electric Code, NFPA No. 90A and 90B,
and any other local codes or utilities requirements.
Small air handlers have been evaluated in accordance with the Code of Federal Regulations, Chapter XX, Part
3280 or the equivalent. "SUITABLE FOR MOBILE HOME USE".
SAFETY
1
Disposal
Comply with national regulations. Components and accessories from the units are not part of ordinary
domestic waste. Complete units, compressors, motors, etc. are only to be disposed of via qualied disposal
specialists. This unit uses ammable refrigerant R-454B, please contact a technician when you wish to dispose
of this unit. The law requires that the collection, transportation, and disposal of refrigerants must conform
with the regulations governing the collection and destruction of hydro-uorocarbons.
This appliance uses R454B refrigerant.
mrcool.com9
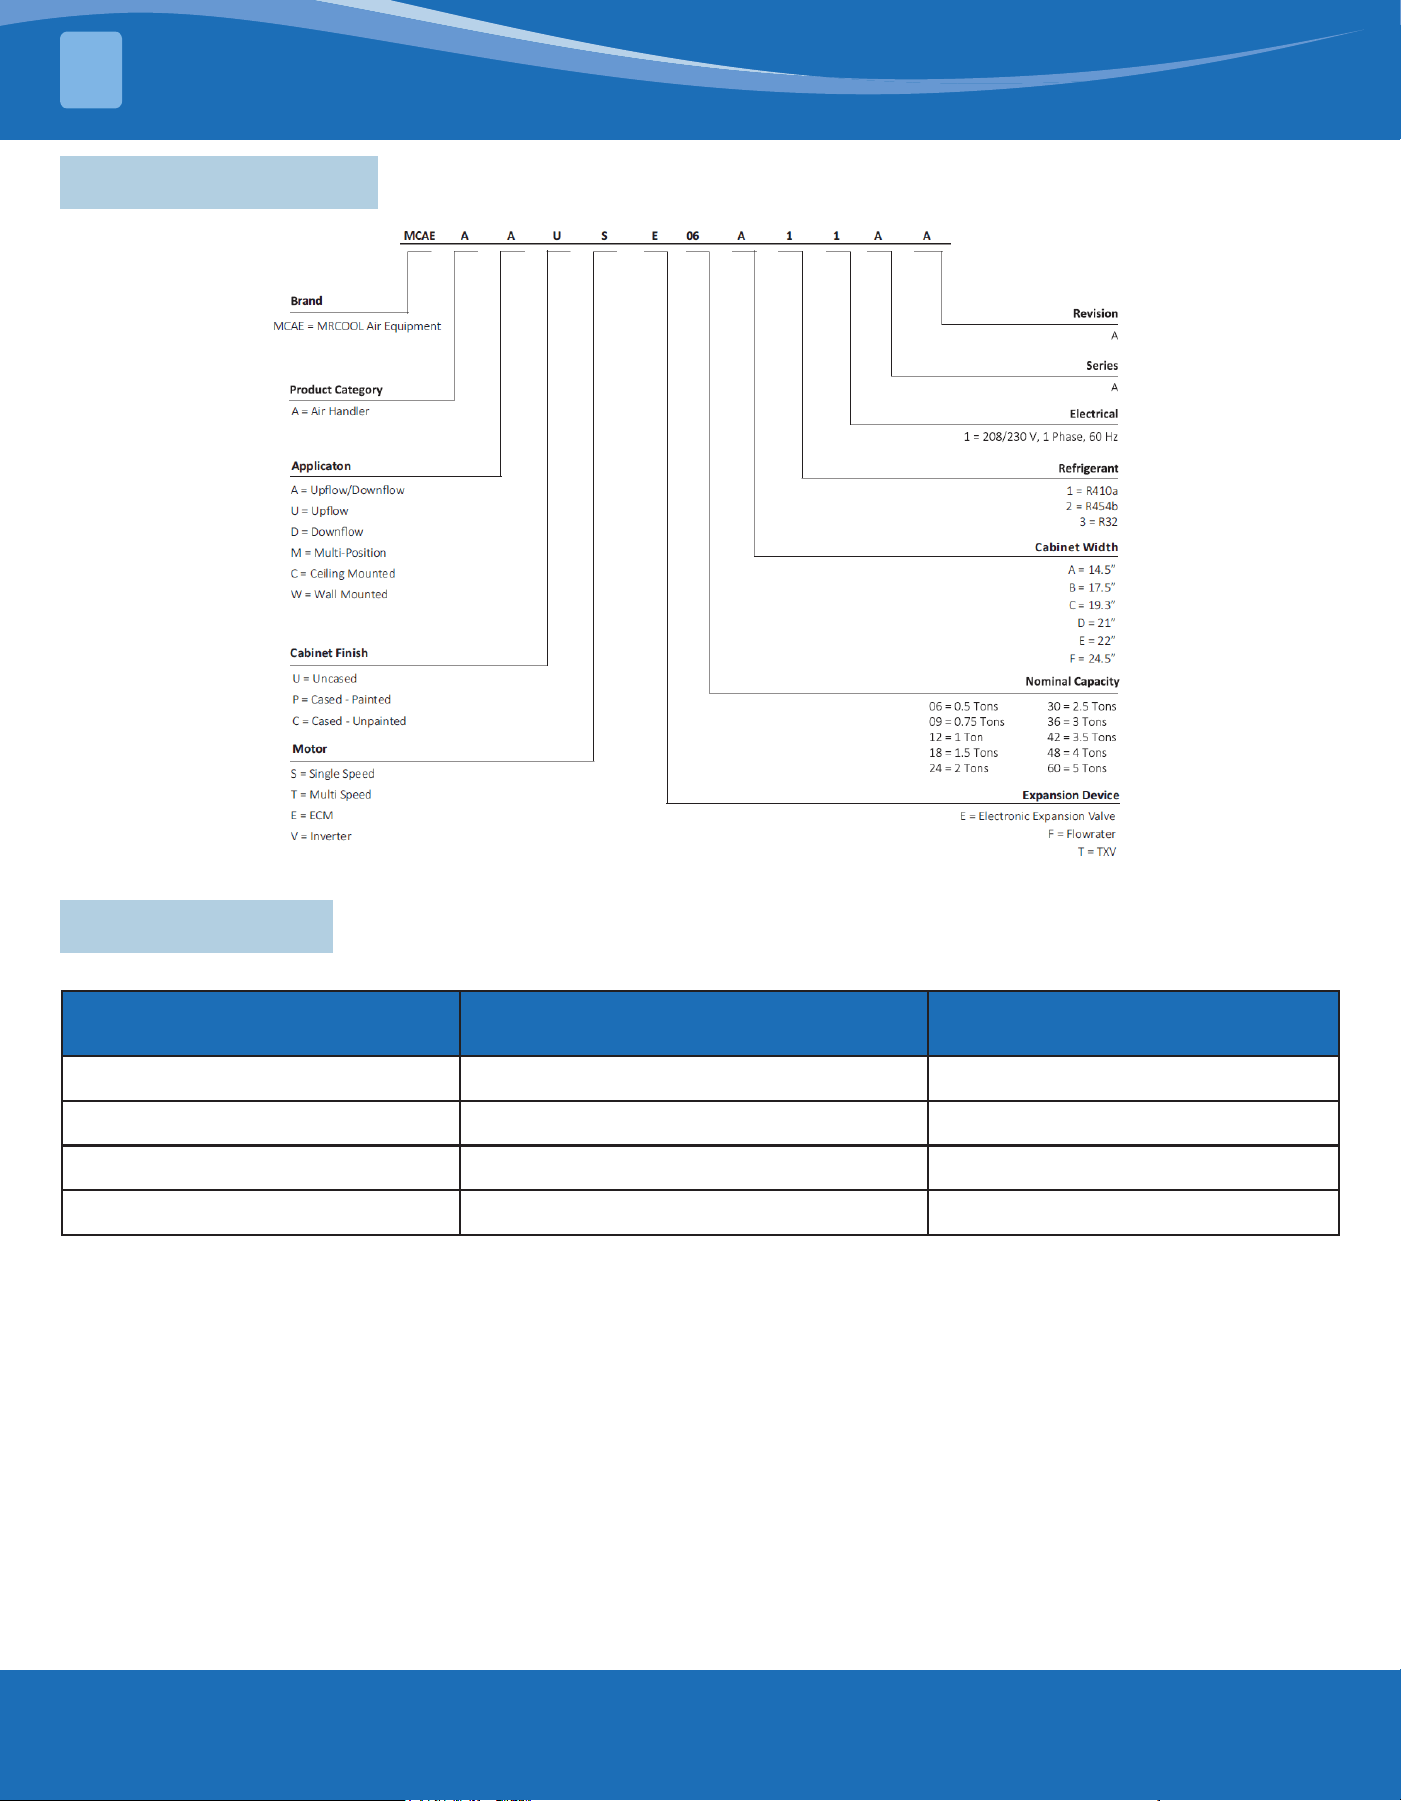
2.1 Nomenclature
SPECIFICATIONS
2
2.2 Piston Size
Condenser Unit Nom. Cooling
(BTUH)
(Orice) Piston Model (Orice) Piston Size (mm)
18K 052 1.3208
24K 054 1.3716
30K 060 .1524
36K 066 1.6764
mrcool.com 10
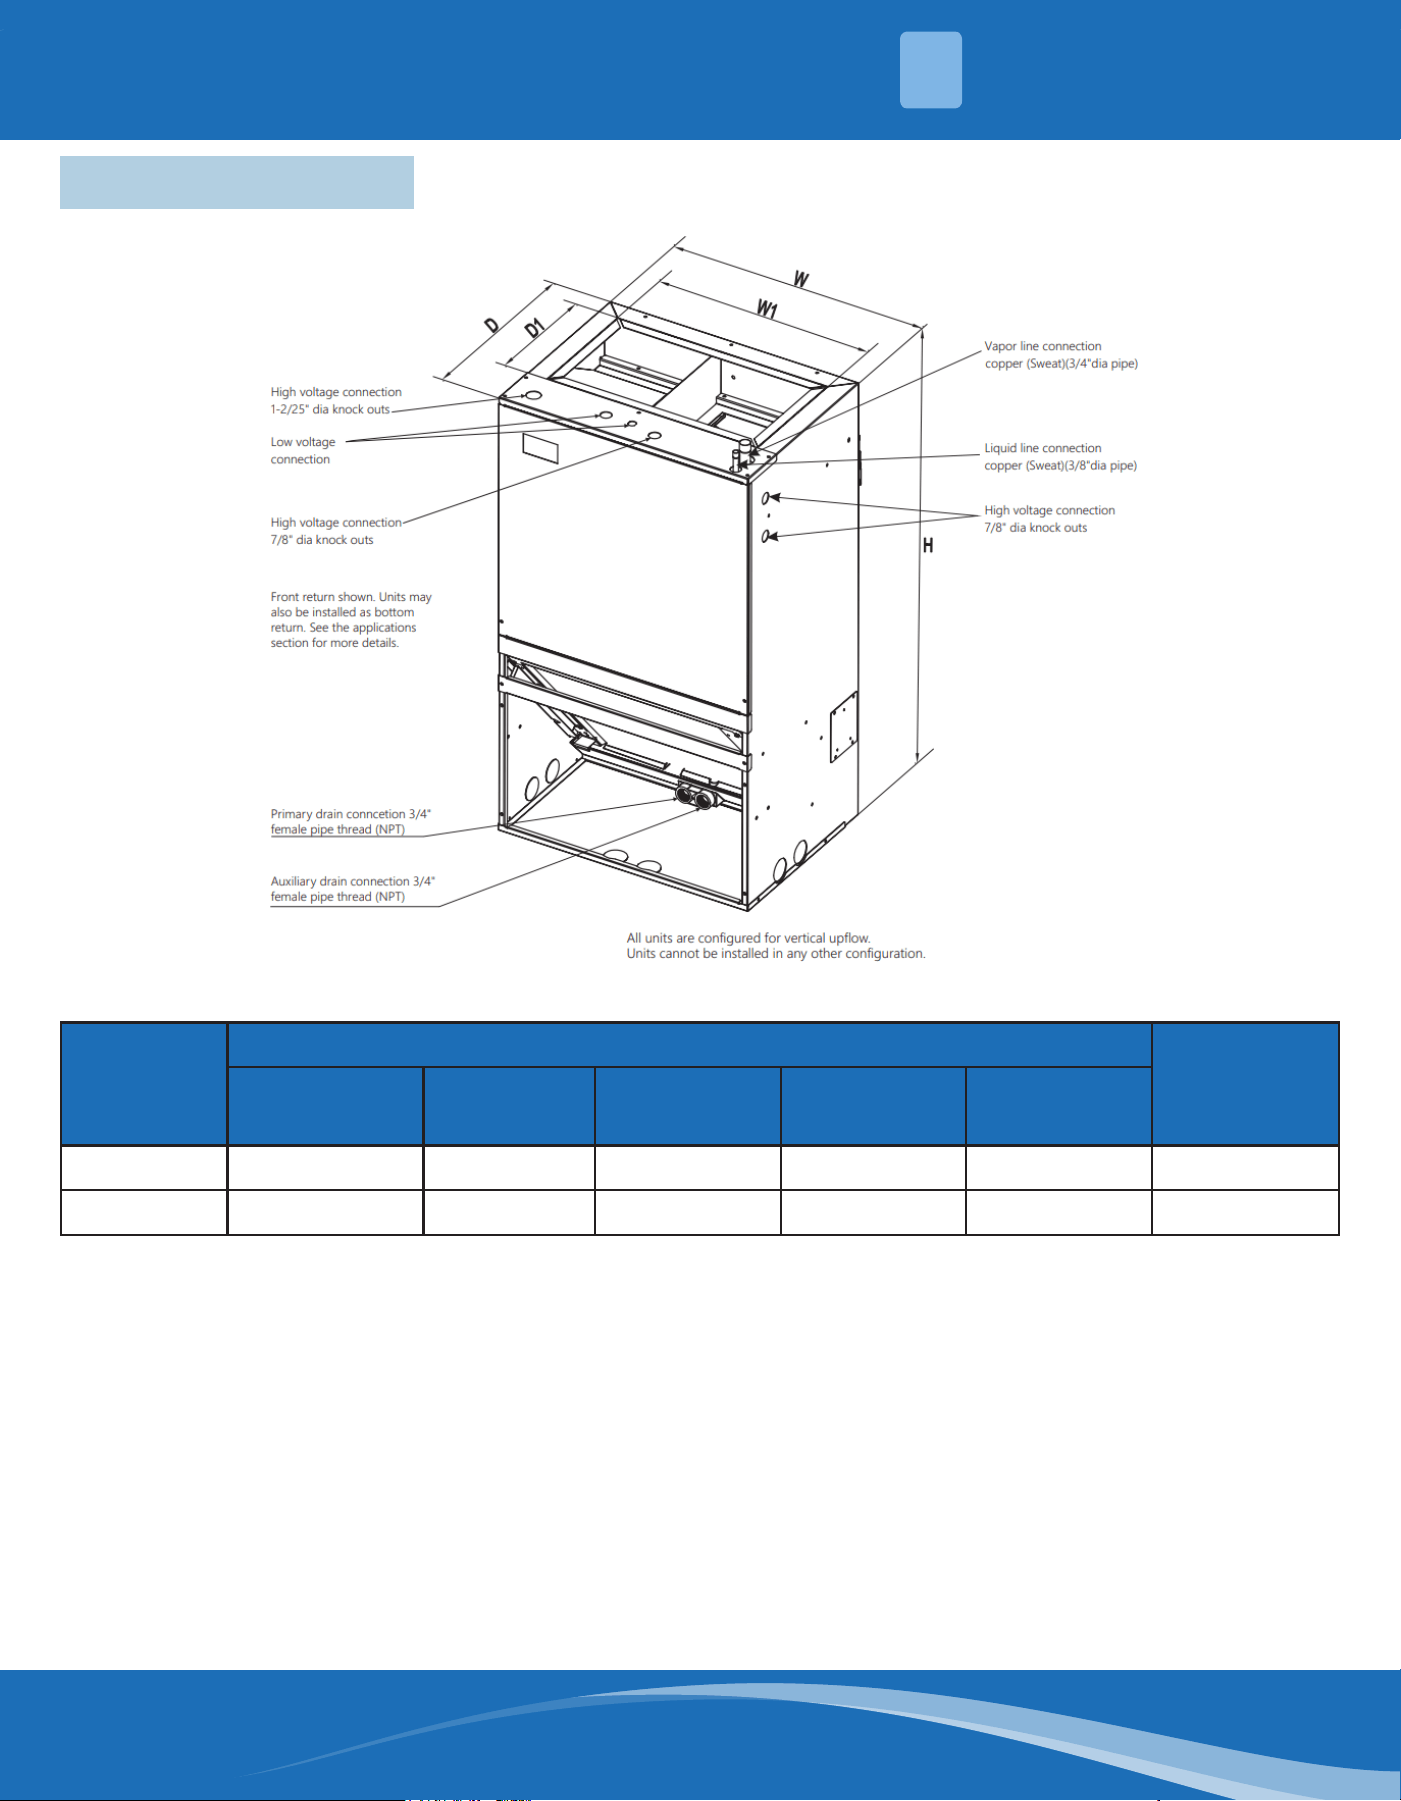
2.3 Unit Dimensions
Model
Dimensions- in (mm)
Unit Weight/
Shipping
Weight lbs
(kg)
Height
H
Width
W
Width
W1
Depth
D
Depth
D1
18K 36 (915) 20.5 (522) 17.4 (422) 15 (381) 9.6 (244) 88/97 (40/44)
24K 36 (915) 20.5 (522) 17.4 (422) 15 (381) 9.6 (244) 88/97 (40/44)
SPECIFICATIONS
2
Fig. 2.1
mrcool.com11
Unit Back Dimensions
Model
Dimensions- in (mm)
A B C
18K 5.375 (136) 2.4 (61) 28.25 (718)
24K 5.375(136) 2.4 (61) 28.25 (718)
30K 6 (151) 2.4 (61) 31.25 (794)
36K 6 (151) 2.4 (61) 31.25 (794)
Fig. 2.3
SPECIFICATIONS
2
Model
Dimensions- in (mm)
Unit Weight/
Shipping
Weight lbs
(kg)
Height
H
Width
W
Width
W1
Depth
D
Depth
D1
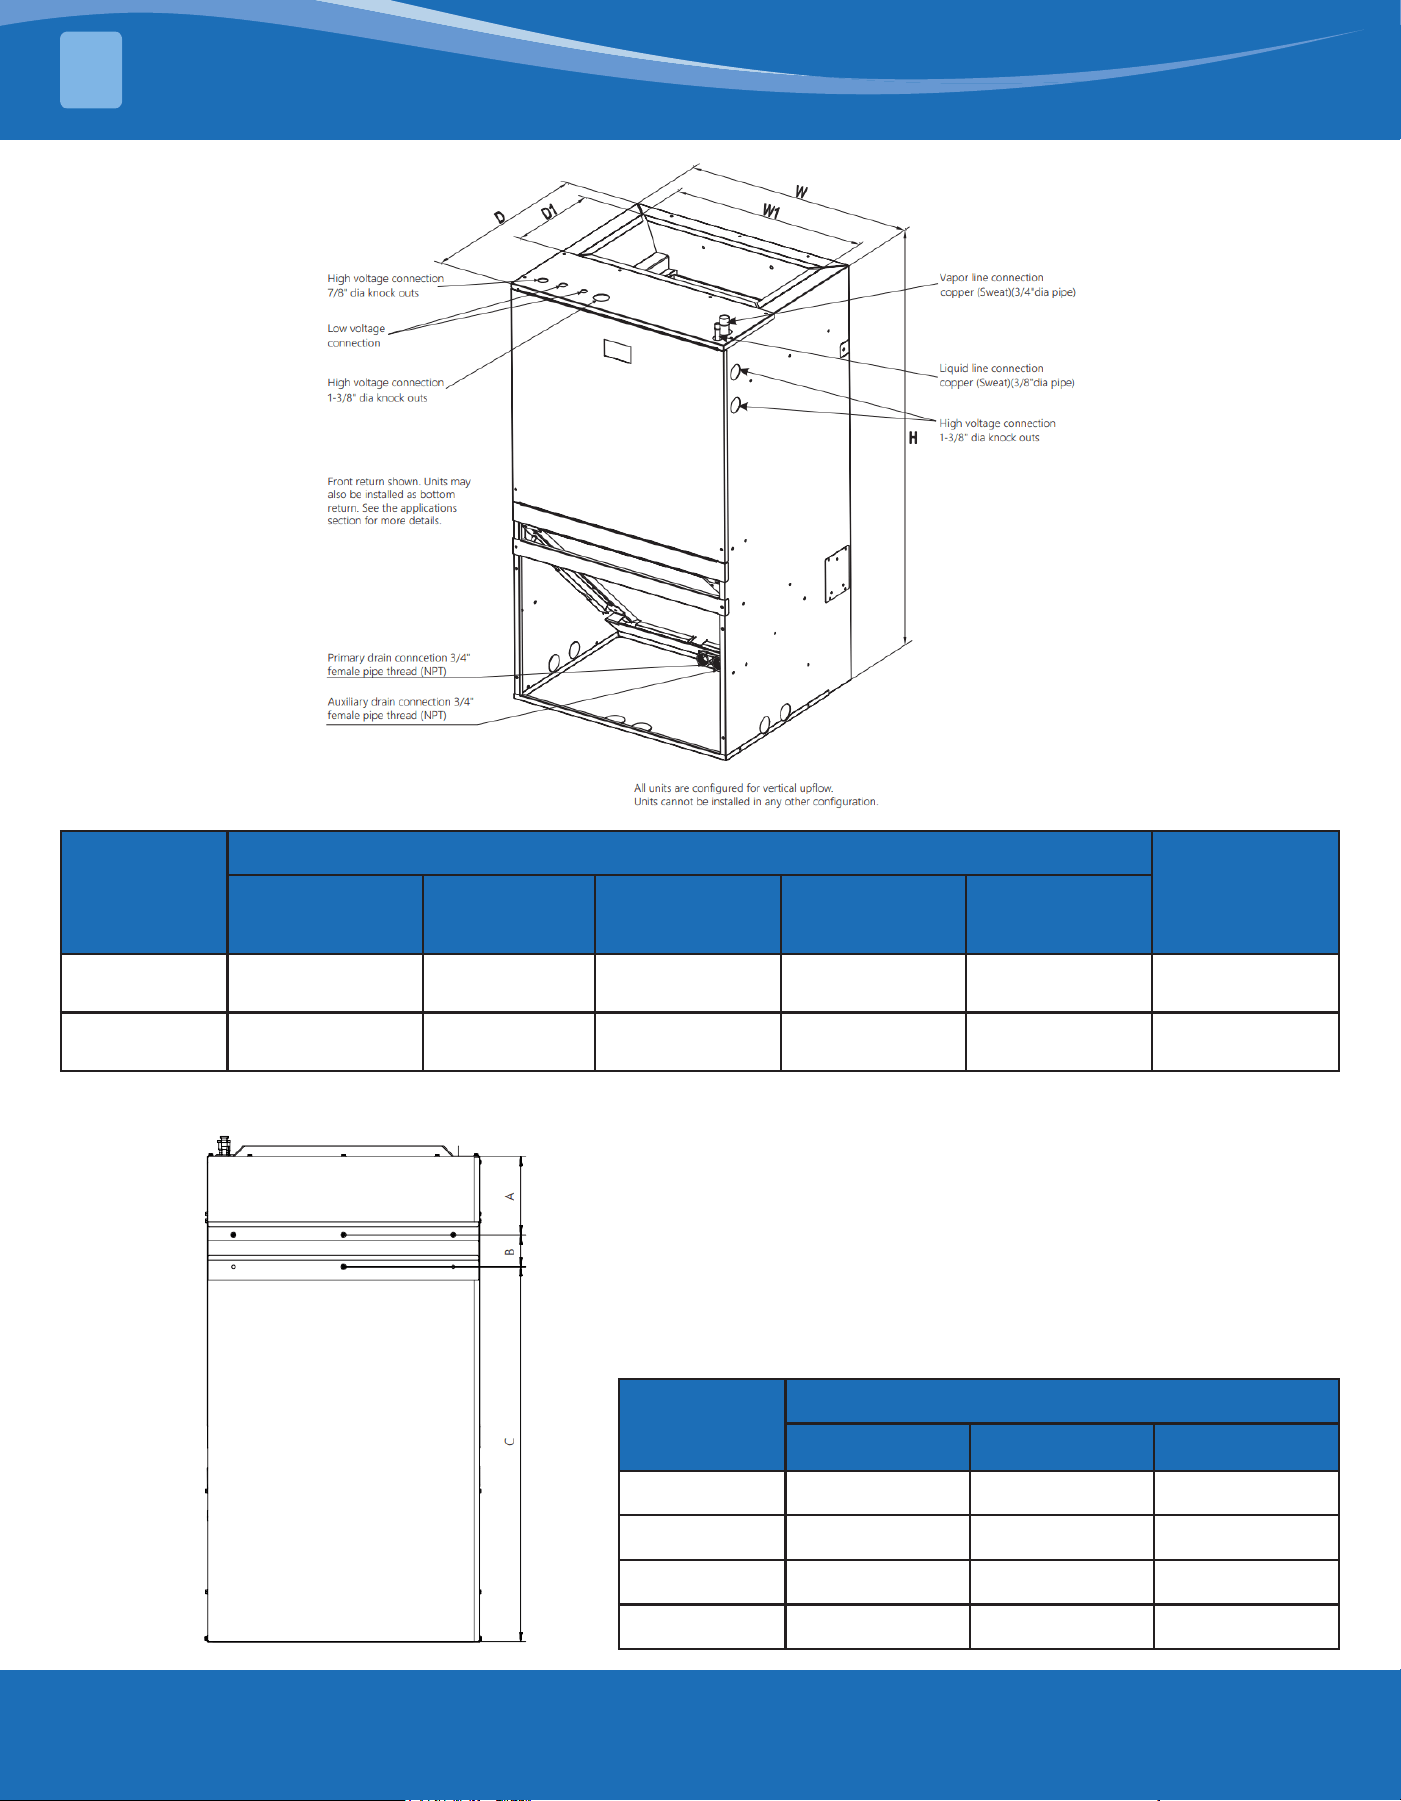
30K 39.6 (1006) 22 (559) 18.8 (477) 19 (485) 10 (251)
122/123
(51/56)
36K 39.6 (1006) 22 (559) 18.8 (477) 19 (485) 10 (251)
122/123
(51/56)
Fig. 2.2
mrcool.com 12
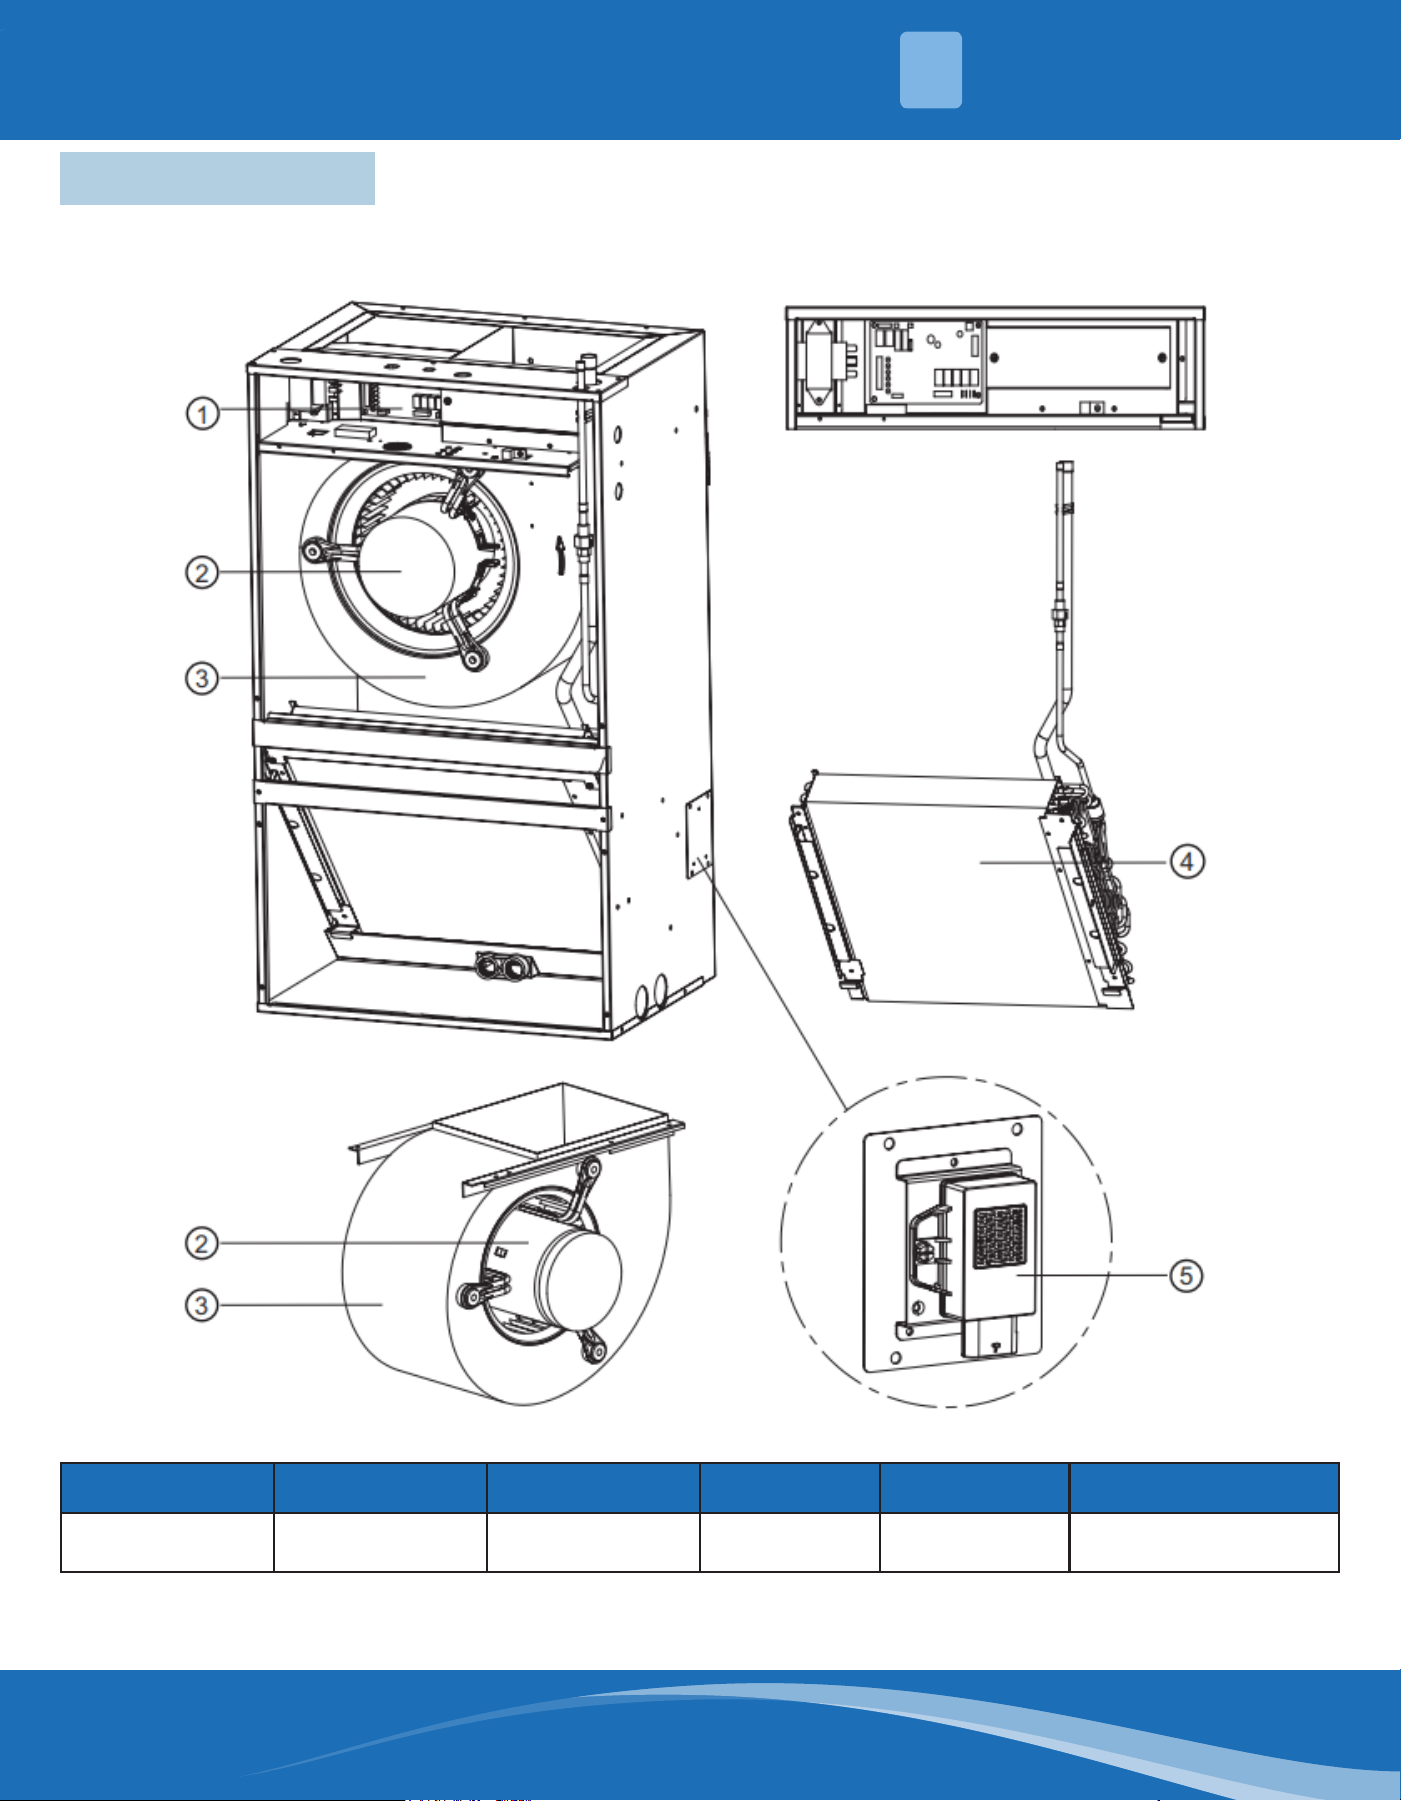
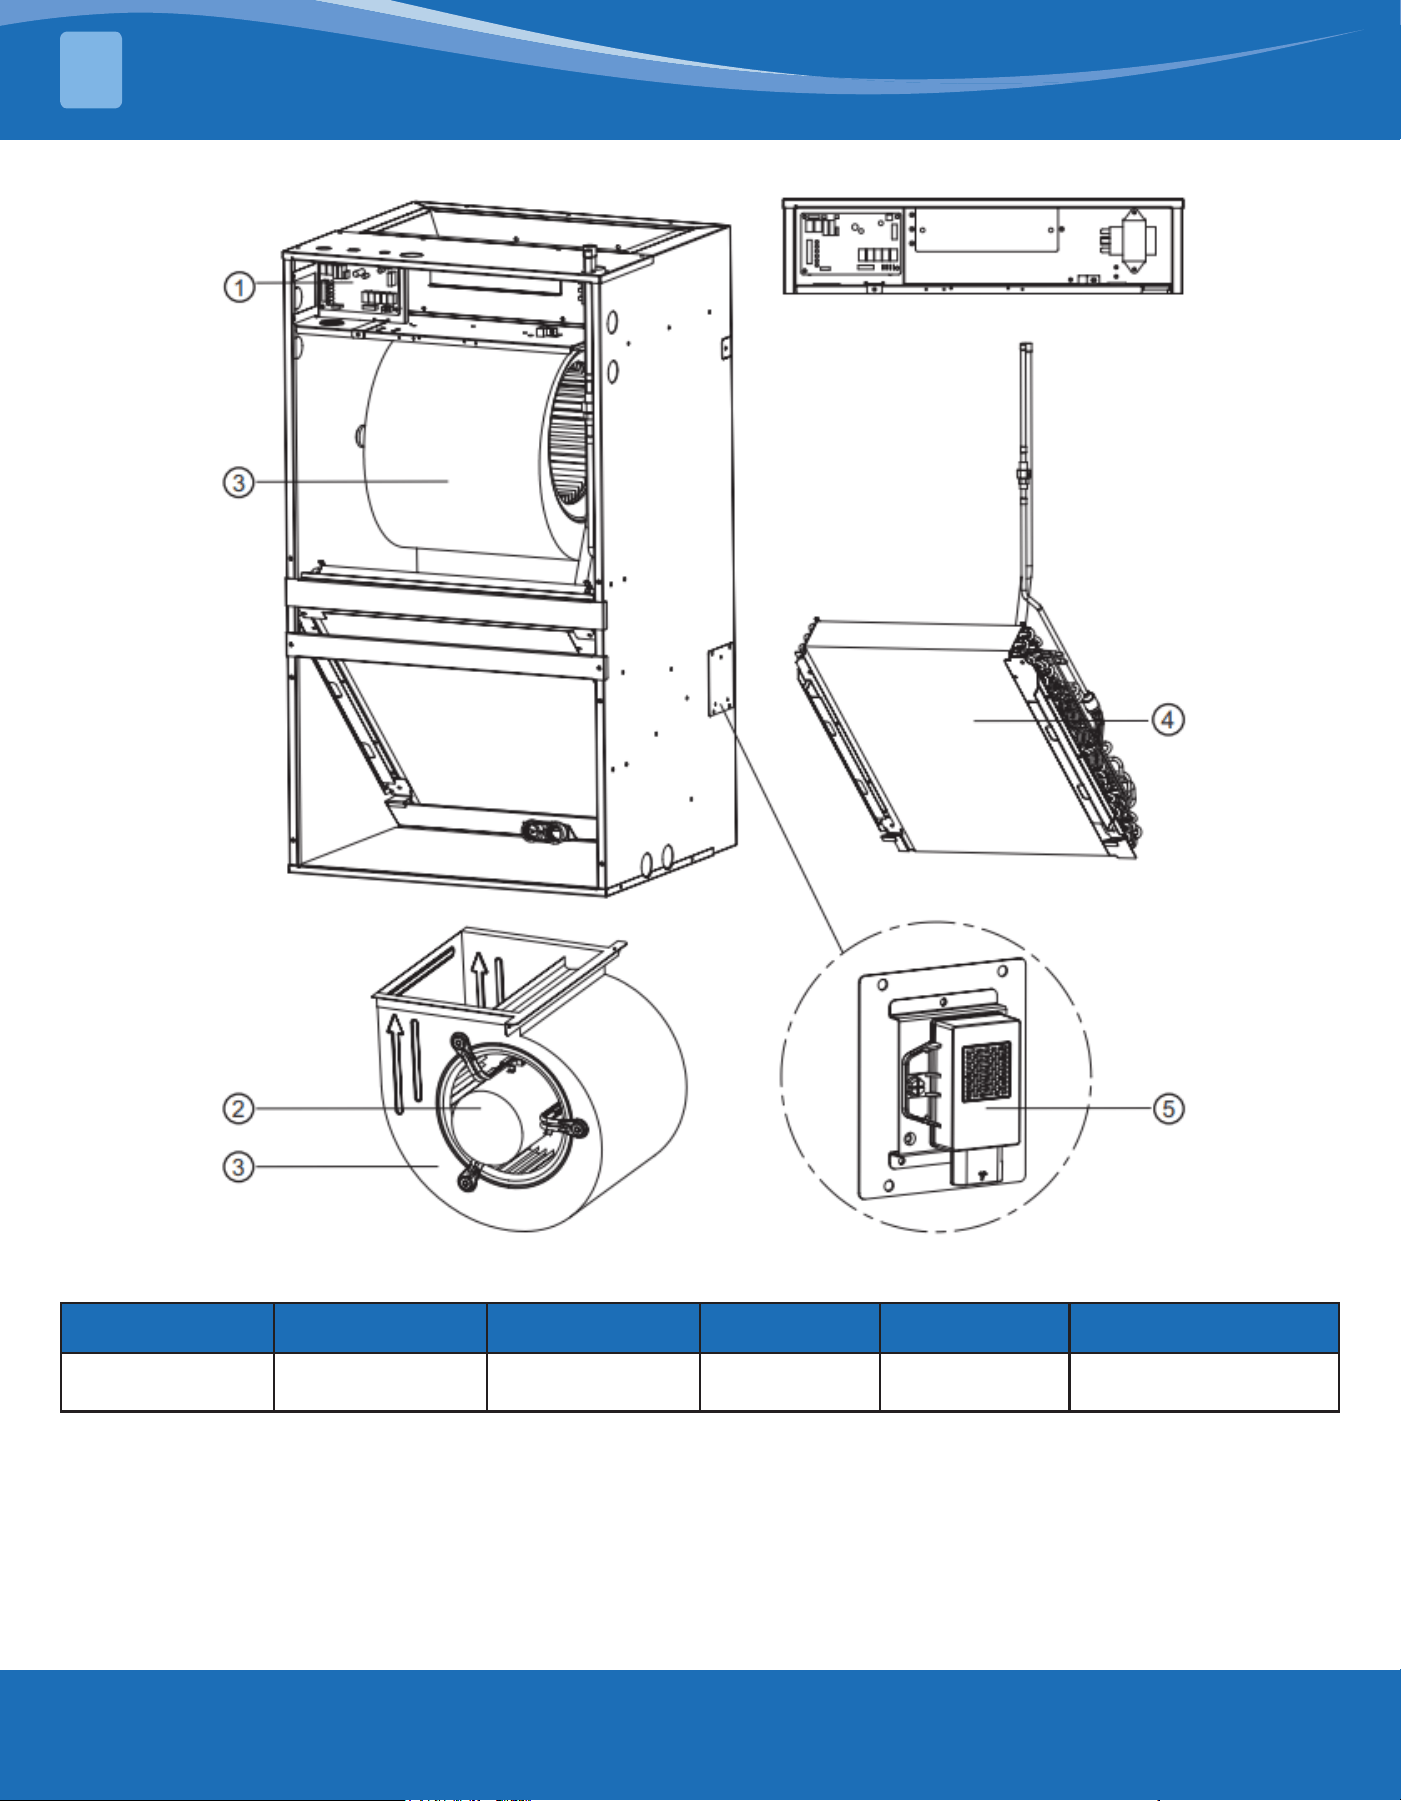
Number 1 2 3 4 5
Parts Control Board AC Motor Blower AL-Evaporator
R454B Refrigerant
Sensor
2.4 Internal Parts
Fig. 2.4
SPECIFICATIONS
2
mrcool.com13
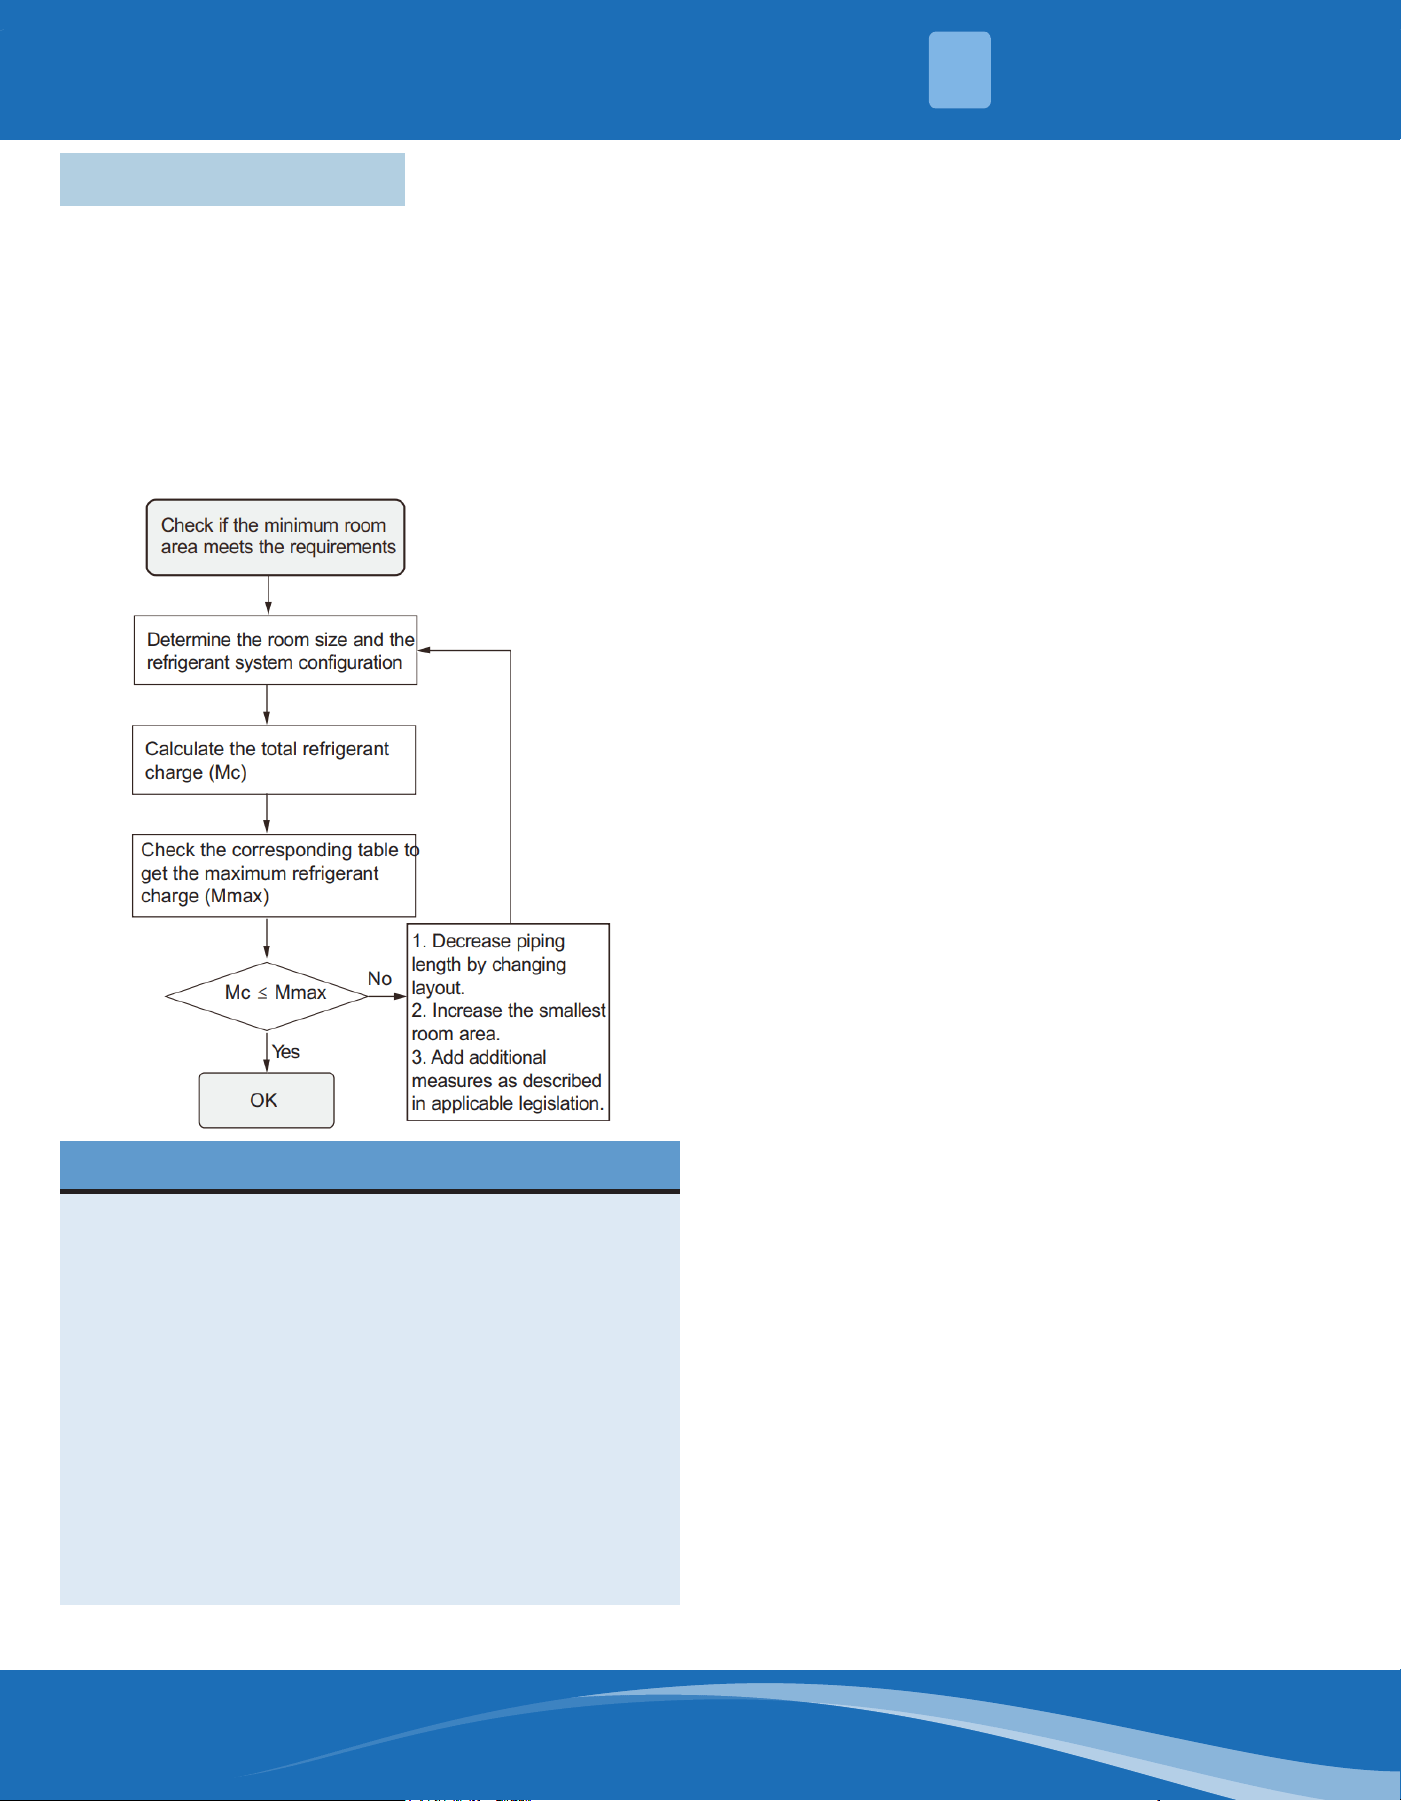
Number 1 2 3 4 5
Parts Control Board AC Motor Blower AL-Evaporator
R454B Refrigerant
Sensor
Fig. 2.5
SPECIFICATIONS
2
mrcool.com 14
In UL/CSA 60335-2-40, R454B refrigerant is classied as
class A2L, which is mildly ammable. Therefore, R454B
refrigerant is suitable for systems needing additional
refrigerant charge and which will limit the area of the
rooms being served by the system.
Similarly, the total amount of refrigerant in the system
should be less than or equal to the allowable maximum
refrigerant charge. The allowable maximum refrigerant
charge depends on the area of the rooms being served
by the system.
3.1 Area Limitations
NOTE
The nouns in this section are explained as follows:
Mc: the actual refrigerant charge in the system.
A: The actual room area where the appliance is
installed.
Amin: The required minimum room area.
Mmax: The allowable maximum refrigerant charge
in a room.
Qmin: The minimum circulation airow.
Anvmin: The minimum opening area for connected
rooms.
TAmin: The total area of the conditioned space (for
appliances serving one or more rooms with an air
duct system).
TA: The total area of the conditioned space
connected by air ducts.
INSTALLATION
3
Fig. 3.1
The space considered should be any space which
contains refrigerant-containing parts or into which
refrigerant could be released.
The room area (A) of the smallest, enclosed, occupied
space should be used in the determination of the
refrigerant quantity limits.
For determination of room area (A) when used to
calculate the refrigerant charge limit, the following will
apply.
The room area (A) should be dened as the room
area enclosed by the projection to the base of the
walls, partitions, and doors of the space in which the
appliances are installed.
Spaces connected by only drop ceilings, ductwork, or
similar connections should not be considered a single
space.
Units mounted higher than 70.86in (179.98cm) and
spaces divided by partitions walls that are no higher
than 62.98in (159.96cm) should be considered a
single space. Rooms on the same oor and connected
by an open passageway between the spaces can
be considered a single room when determining
compliance to Amin if the passageway complies with
all of the following:
1. It is a permanent opening.
2. It extends to the oor.
3. It is intended for people to walk through.
The area of the connected rooms, on the same oor,
connected by permanent opening in the walls and/
or doors between occupied spaces, including gaps
between the wall and the oor, can be considered a
single room when determining compliance to Amin,
provided all of the following conditions are met as Fig.
3.1.
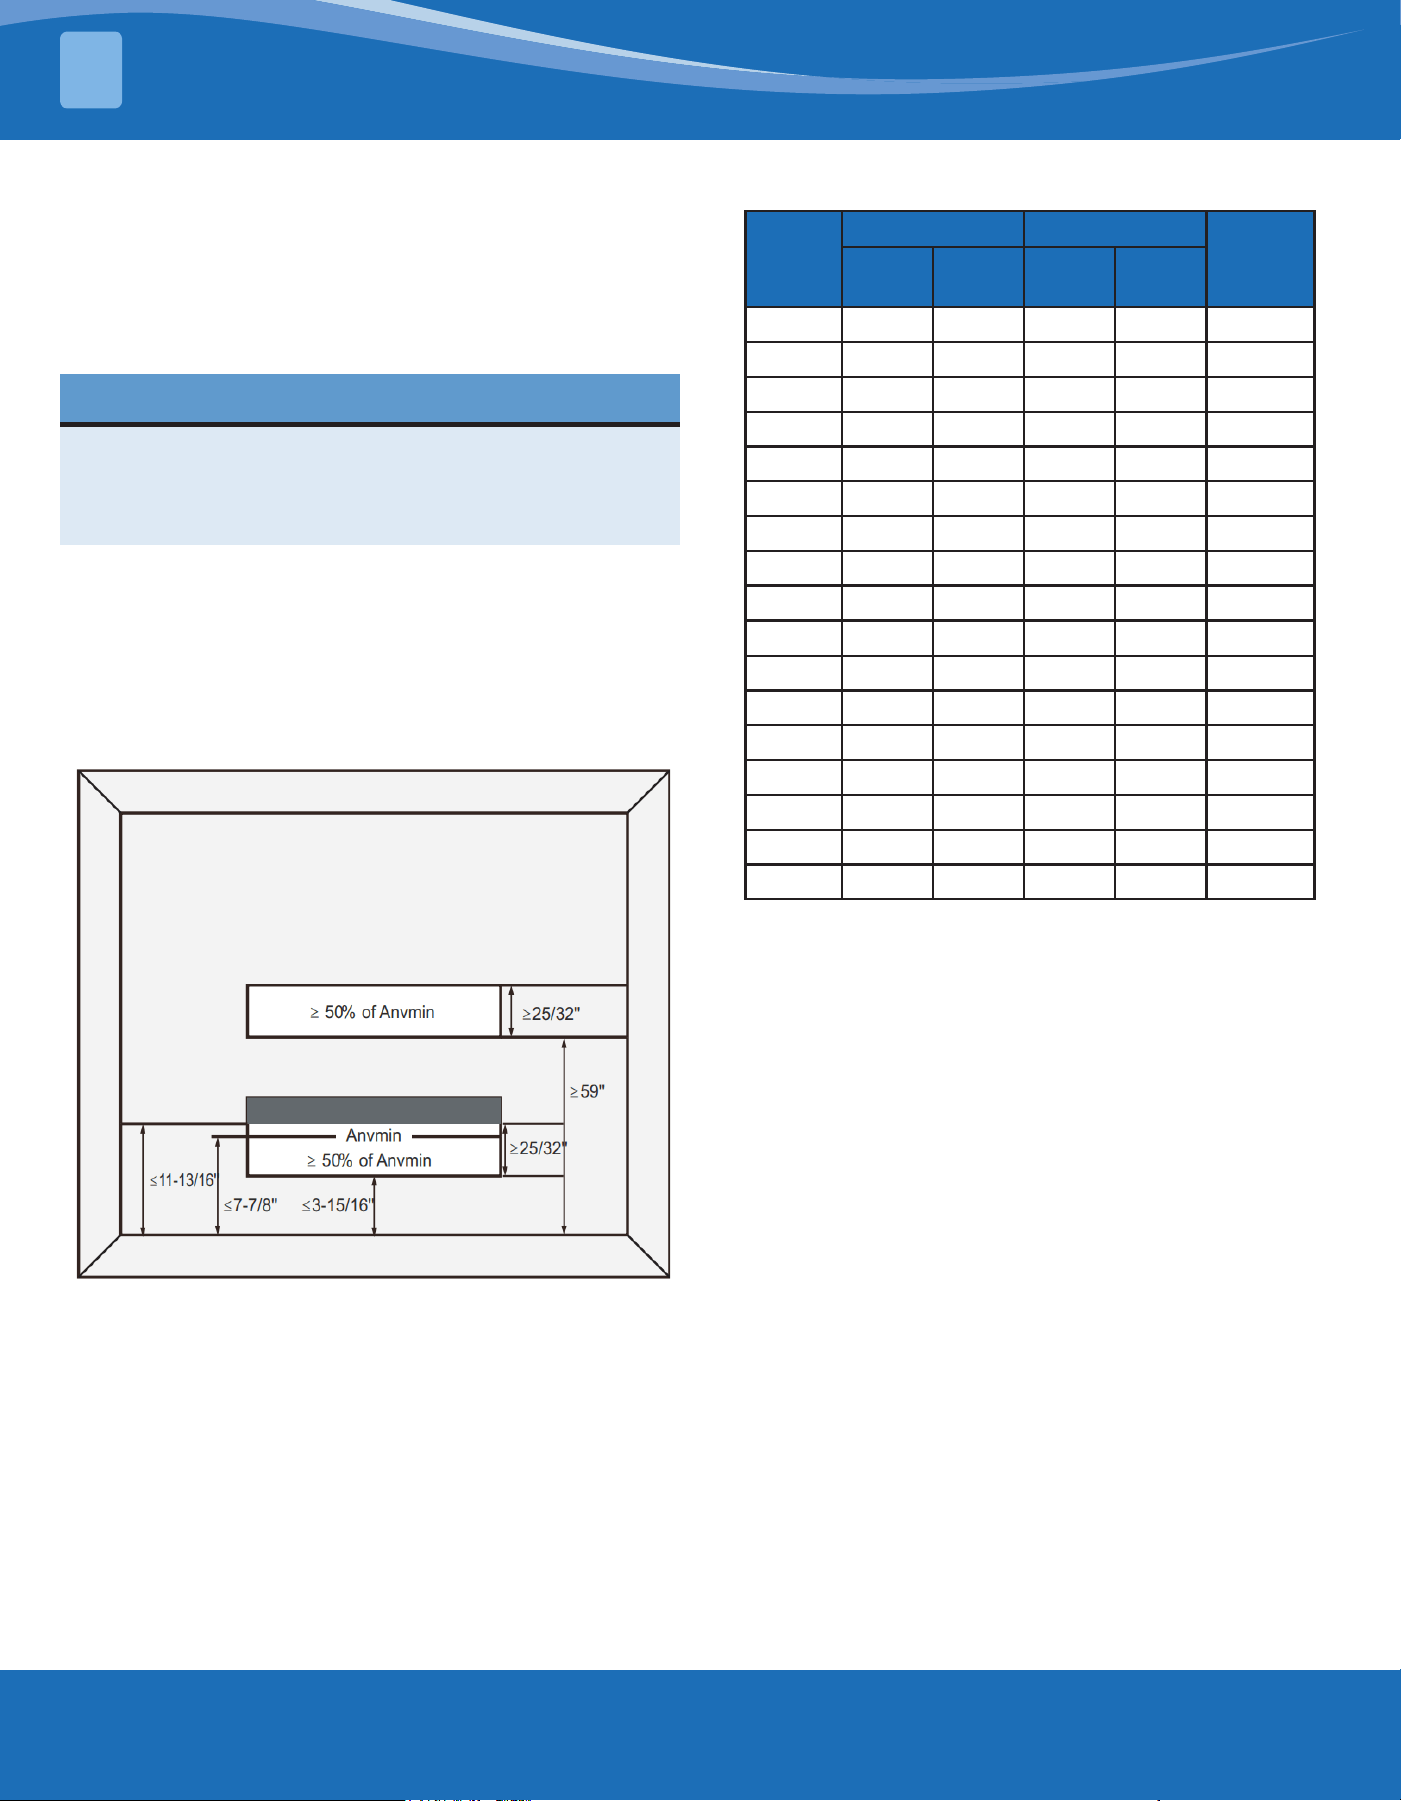
1. Low Level Opening:
• The opening should not be less than Anvmin in
Table 4.
• The area of any openings above 11.81in (29.99cm)
from the oor should not be considered in
determining compliance with Anvmin.
• At least 50% of the opening area of Anvmin should
be below 7.875in (20cm) from the oor.
• The bottom of the opening is no more than 3.94in
(10cm) from the oor.
• The opening is a permanent opening that cannot
be closed.
• For openings extending to the oor the height
should be no less than 0.69in (1.75cm) above the
surface of the oor covering.
2. High Level Opening:
• The opening should be no less than 50% of
Anvmin in Table 2.
• The opening is a permanent opening that cannot
be closed.
• The opening should be at least 59in (149.86cm)
above the oor.
mrcool.com15
• The height of the opening is no less than 0.78in
(1.98cm).
3. Room Size Requirement:
• The room into which refrigerant can leak, plus the
connected adjacent room(s), should have a total
area of no less than Amin.
• The room area in which the unit is installed should
be no less than 20% Amin.
NOTE
The requirement for the second opening can be
met by drop ceilings, ventilation ducts, or similar
arrangements that provide an airow path between
the connected rooms.
The minimum opening for natural ventilation
(Anvmin) in connected rooms is related to the room
area (A), the actual refrigerant charge of refrigerant
in the system (Mc), and the allowable MAXIMUM
REFRIGERANT CHARGE in the system (Mmax), Anvmin
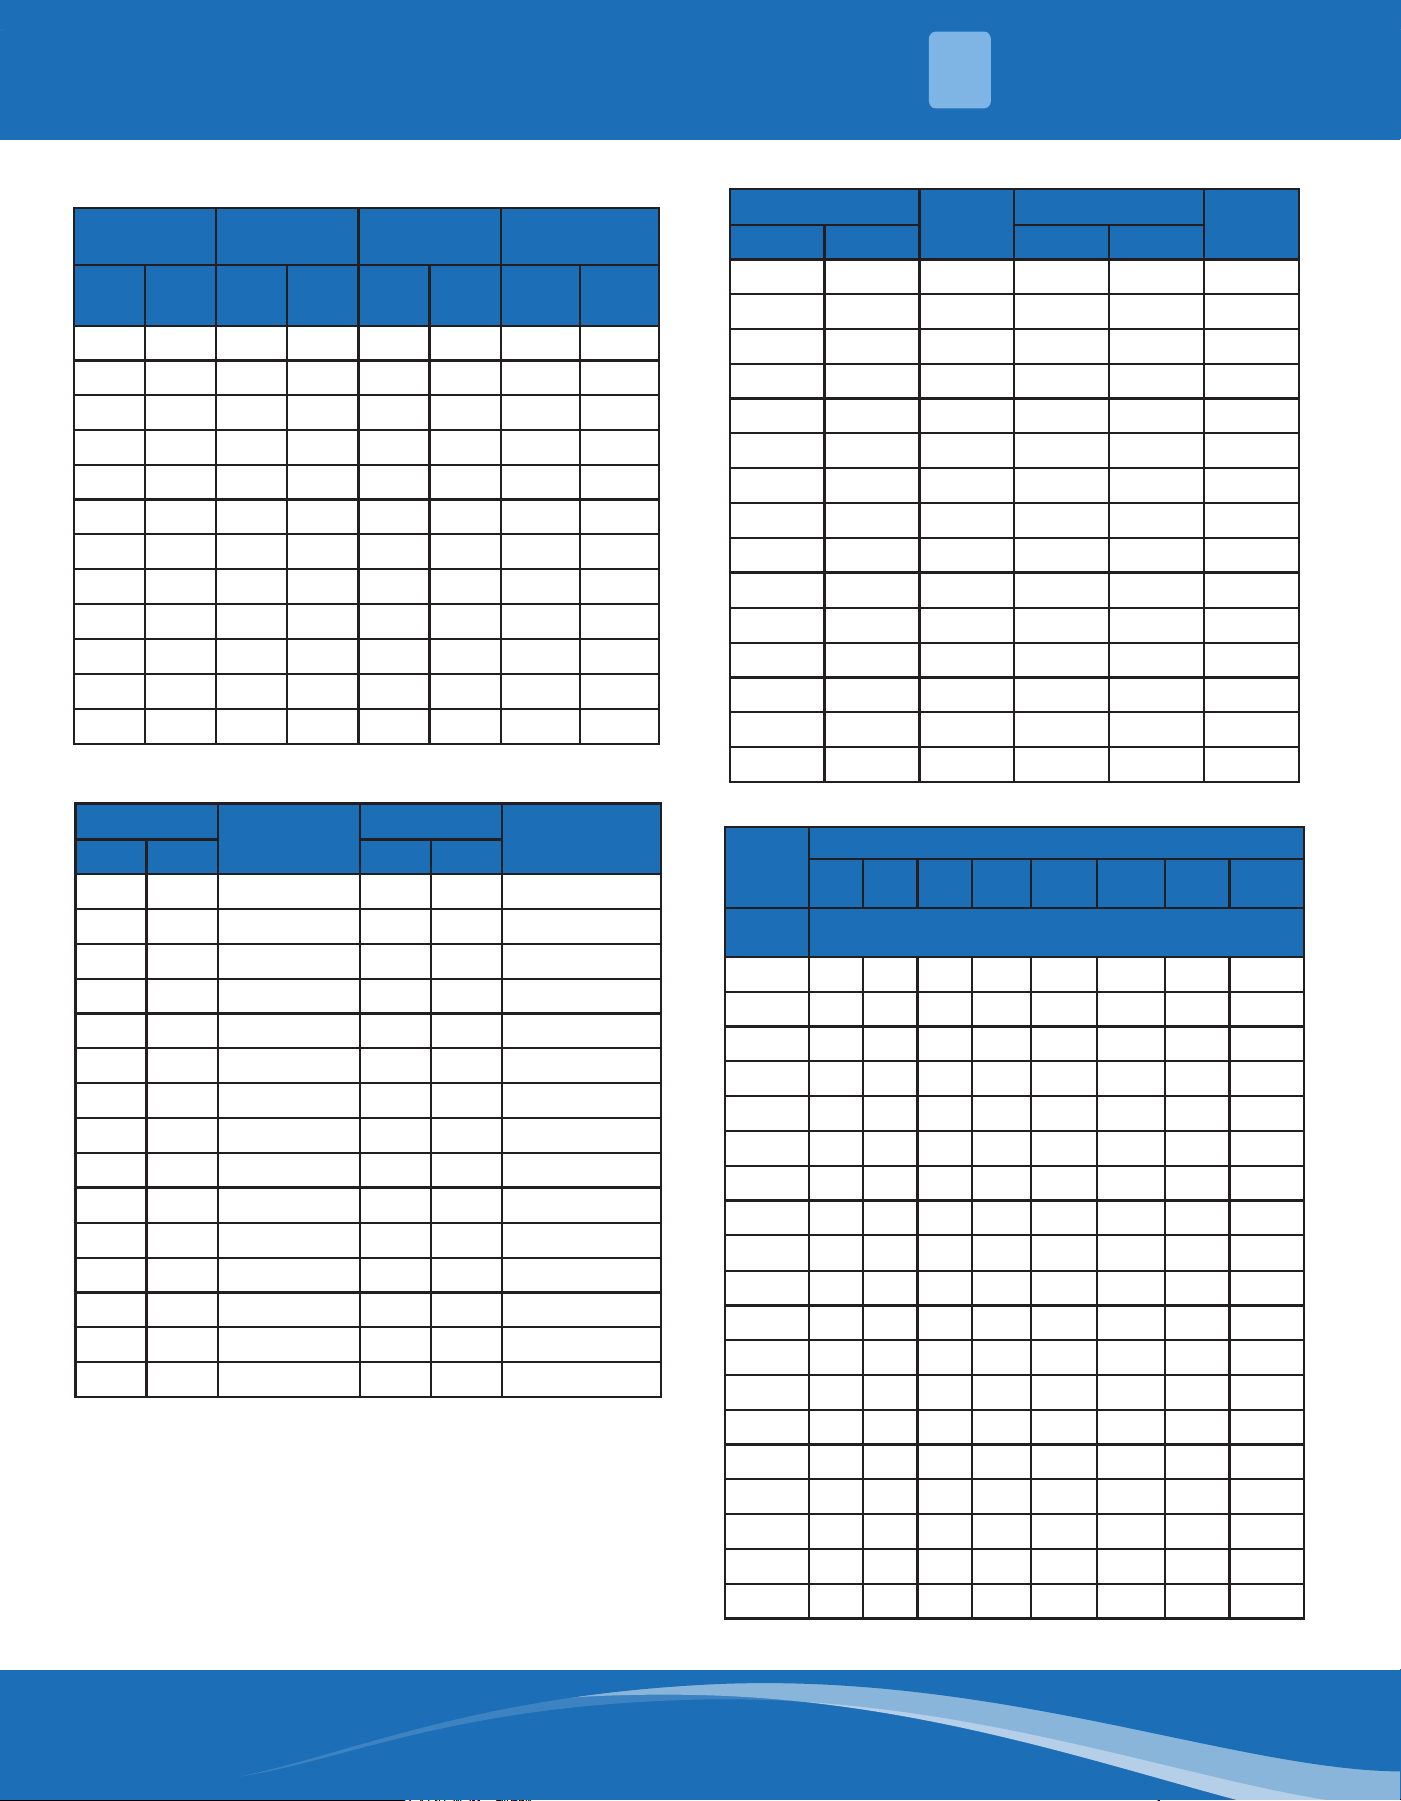
can be determined according to Table 1.
Fig. 3.2 Opening Conditions for Connected Rooms
A (ft
2
)
MC (lb/oz) Mmax (lb/oz)
Anvmin
(ft
2
)
lb oz lb oz
100 17 3 6 10 1.3
110 17 3 7 5 1.2
120 17 3 8 0 1.1
130 17 3 8 10 1.0
140 17 3 9 5 1.0
150 17 3 10 0 0.9
160 17 3 10 10 0.8
170 17 3 11 5 0.7
180 17 3 12 0 0.6
190 17 3 12 10 0.5
200 17 3 13 5 0.5
210 17 3 14 0 0.4
220 17 3 14 10 0.3
230 17 3 15 5 0.2
240 17 3 16 0 0.1
250 17 3 16 10 0.1
260 17 3 17 5 0.0
Table 1: Minimum Opening Area for
Connected Rooms
Note: Take the MC=17 lb 3oz as an example.
For appliances serving one or more rooms with an
air duct system, the room area calculation should
be determined based on the total area of the
conditioned space (TA) connected by ducts taking into
consideration that the circulating airow distributed
to all the rooms by the appliance integral indoor
fan will mix and dilute the leaking refrigerant before
entering any room.
If the fan incorporated in the appliance is continuously
operated or operation is initiated by a REFRIGERANT
DETECTION SYSTEM with a sucient CIRCULATION
AIRFLOW rate, the allowable maximum refrigerant
charge (Mmax) and the required minimum room area
(Amin/TAmin) is shown in Table 2 and Table 3.
INSTALLATION
3
mrcool.com 16
A/TA (ft
2
)
Mmax (lb/
oz)
A/TA (ft
2
)
Mmax (lb/
oz)
ft
2
m
2
lb-oz kg ft
2
m
2
lb-oz kg
30 2.8 2-0 .9 150 13.9 10-0 4.5
40 3.7 2-9 1.2 160 14.9 10-9 4.8
50 4.6 3-5 1.5 170 15.8 11-4 5.1
60 5.6 3-14 1.8 180 16.7 11-15 5.4
70 6.5 4-9 2.1 190 17.7 12-9 5.7
80 7.4 5-3 2.4 200 18.6 13-4 6.0
90 8.4 5-14 2.7 210 19.5 14-0 6.4
100 9.3 6-9 3.0 220 20.4 14-12 6.7
110 10.2 7-5 3.3 230 21.4 15-7 7.0
120 11.1 7-15 3.6 240 22.3 16-0 7.3
130 12.1 8-9 3.9 250 23.2 16-12 7.6
140 13 9-4 4.2 260 24.2 17-13 7.9
Table 2: Allowable Maximum Refrigerant
Charge
Table 3: Required Minimum Room Area
Mc (lb/oz)
Amin/
TAmin (ft
2
)
Mc (lb/oz)
Amin/TAmin
(ft
2
)
lb oz lb oz
4 6 66.1 11 0 165.3
4 13 72.7 11 7 171.9
5 4 79.3 11 14 178.5
5 11 86 12 5 185.1
6 2 92.6 12 12 191.7
6 9 99.2 13 3 198.4
7 0 105.8 13 10 205
7 7 112.4 14 1 211.6
7 15 119 14 8 218.2
8 6 125.6 14 15 224.8
8 13 132.2 15 6 231.4
9 4 1.8.8 15 14 238
9 11 145.5 16 5 244.6
10 2 152.1 16 12 251.2
10 9 157.8 17 3 257.9
Table 4: Minimum Circulation Airow
Mc (lb/oz)
Qmin
(CFM)
Mc (lb/oz)
Qmin
(CFM)
lb oz lb oz
4 6 119 11 0 298
4 13 131 11 7 310
5 4 143 11 14 322
5 11 155 12 5 334
6 2 167 12 12 346
6 9 179 13 3 358
7 0 1919 13 10 370
7 7 203 14 1 382
7 15 215 14 8 394
8 6 227 14 15 406
8 13 239 15 6 418
9 4 251 15 14 430
9 11 263 16 5 442
10 2 275 16 12 454
10 9 287 17 3 466
Table 5: Minimum Room Area Above 2000 ft
Altitude (m)
201-
400
401-
600
601-
800
801-
1000
1001-
1200
1201-
1400
1401-
1600
Above
16000
Charge
lb
Minimum Conditioned Space (m
2
)
2 2.8 2.8 2.8 2.9 3 3.1 3.1 3.2
3 4.2 4.2 4.3 4.4 4.5 4.6 4.7 4.8
4 5.6 5.6 5.7 5.9 6 6.1 6.2 6.4
5 7 7 7.1 7.3 7.5 7.7 7.8 8
6 8.4 8.4 8.5 8.8 8.9 9.2 9.4 9.6
7 9.8 9.8 9.9 10.2 10.4 10.7 10.9 11.2
8 11.1 11.1 11.4 11.7 11.9 12.3 12.5 12.8
9 12.5 12.5 12.8 13.2 13.4 13.8 14 14.4
10 13.9 13.9 14.2 14.6 14.9 15.3 15.6 16
11 15.3 15.3 15.6 16.1 16.4 16.9 17.2 17.6
12 16.7 16.7 17.1 17.6 17.9 18.4 18.7 19.2
13 18.1 18.1 18.5 19 19.4 19.9 20.3 20.8
14 19.5 19.5 19.9 20.5 20.9 21.5 21.8 22.4
15 20.9 20.9 21.3 21.9 22.4 23 23.4 24
16 22.3 22.3 22.7 23.4 23.8 24.5 25 25.6
17 23.7 23.7 24.2 24.9 25.3 26.1 26.5 27.2
18 25.1 25.1 25.6 26.3 26.8 27.6 28.1 28.8
19 26.5 26.5 27 27.8 28.3 29.1 29.6 30.4
20 27.9 27.9 28.4 29.3 29.8 30.6 31.2 32
INSTALLATION
3

mrcool.com17
INSTALLATION
3
CAUTION
The allowable maximum refrigerant charge of Table
2 or the required minimum room area of Table 3 is
available only if the following conditions are met:
Minimum velocity of 3.28 ft/s, which is calculated
as the indoor unit airow divided by the nominal
face area of the outlet. The grill area should not be
deducted.
Minimum airow rate must meet the corresponding
values in Table 4, which is related to the actual
refrigerant charge of the system (Mc).
R454B refrigerant leakage sensor is congured.
The maximum refrigerant limit described above
applies to unventilated areas. If adding additional
measures, such as areas with mechanical ventilation
or natural ventilation, the maximum refrigerant
charge can be increased or the minimum room area
can be reduced.
The R454B refrigerant leakage sensor is congured
for the indoor unit and meets the incorporated
circulation airow requirements.
The maximum refrigerant charge or minimum room
area can be determined according to Table 2 or
Table 3.
If the actual room area, air outlet height, and
refrigerant charge amount are not reected in
the above table, more severe cases need to be
considered according to the data in the Table 1, 2 , 3,
4.
3.2 Unpacking
Unpack the unit and move it to our install location.
Remove the carton while taking care to not damage
the unit. Remove the protective sheet metal from the
base of the unit (if equipped). Inspect the equipment
for any damage prior to installation (if there is damage
le a claim with the shipping company if the shipment
is damaged or incomplete). Locate the rating plate on
the unit as it contains information needed to properly
install the unit. Check the rating plate to make sure it
matches the job specications. A front access panel
is provided, which permits access to the blower
assembly and electrical controls for removal and
servicing.
3.3 Location
allow condensate to properly drain from the unit.
Failure to do this will result in condensate leaking out
from the unit, potentially causing structural damage to
the surrounding support structures, dry wall, carpet,
etc. Also, both mounting structures require the ability
to accommodate a minimum of 150lbs load. Failure
to do this will cause damage to the support structure
and potentially damage the unit.
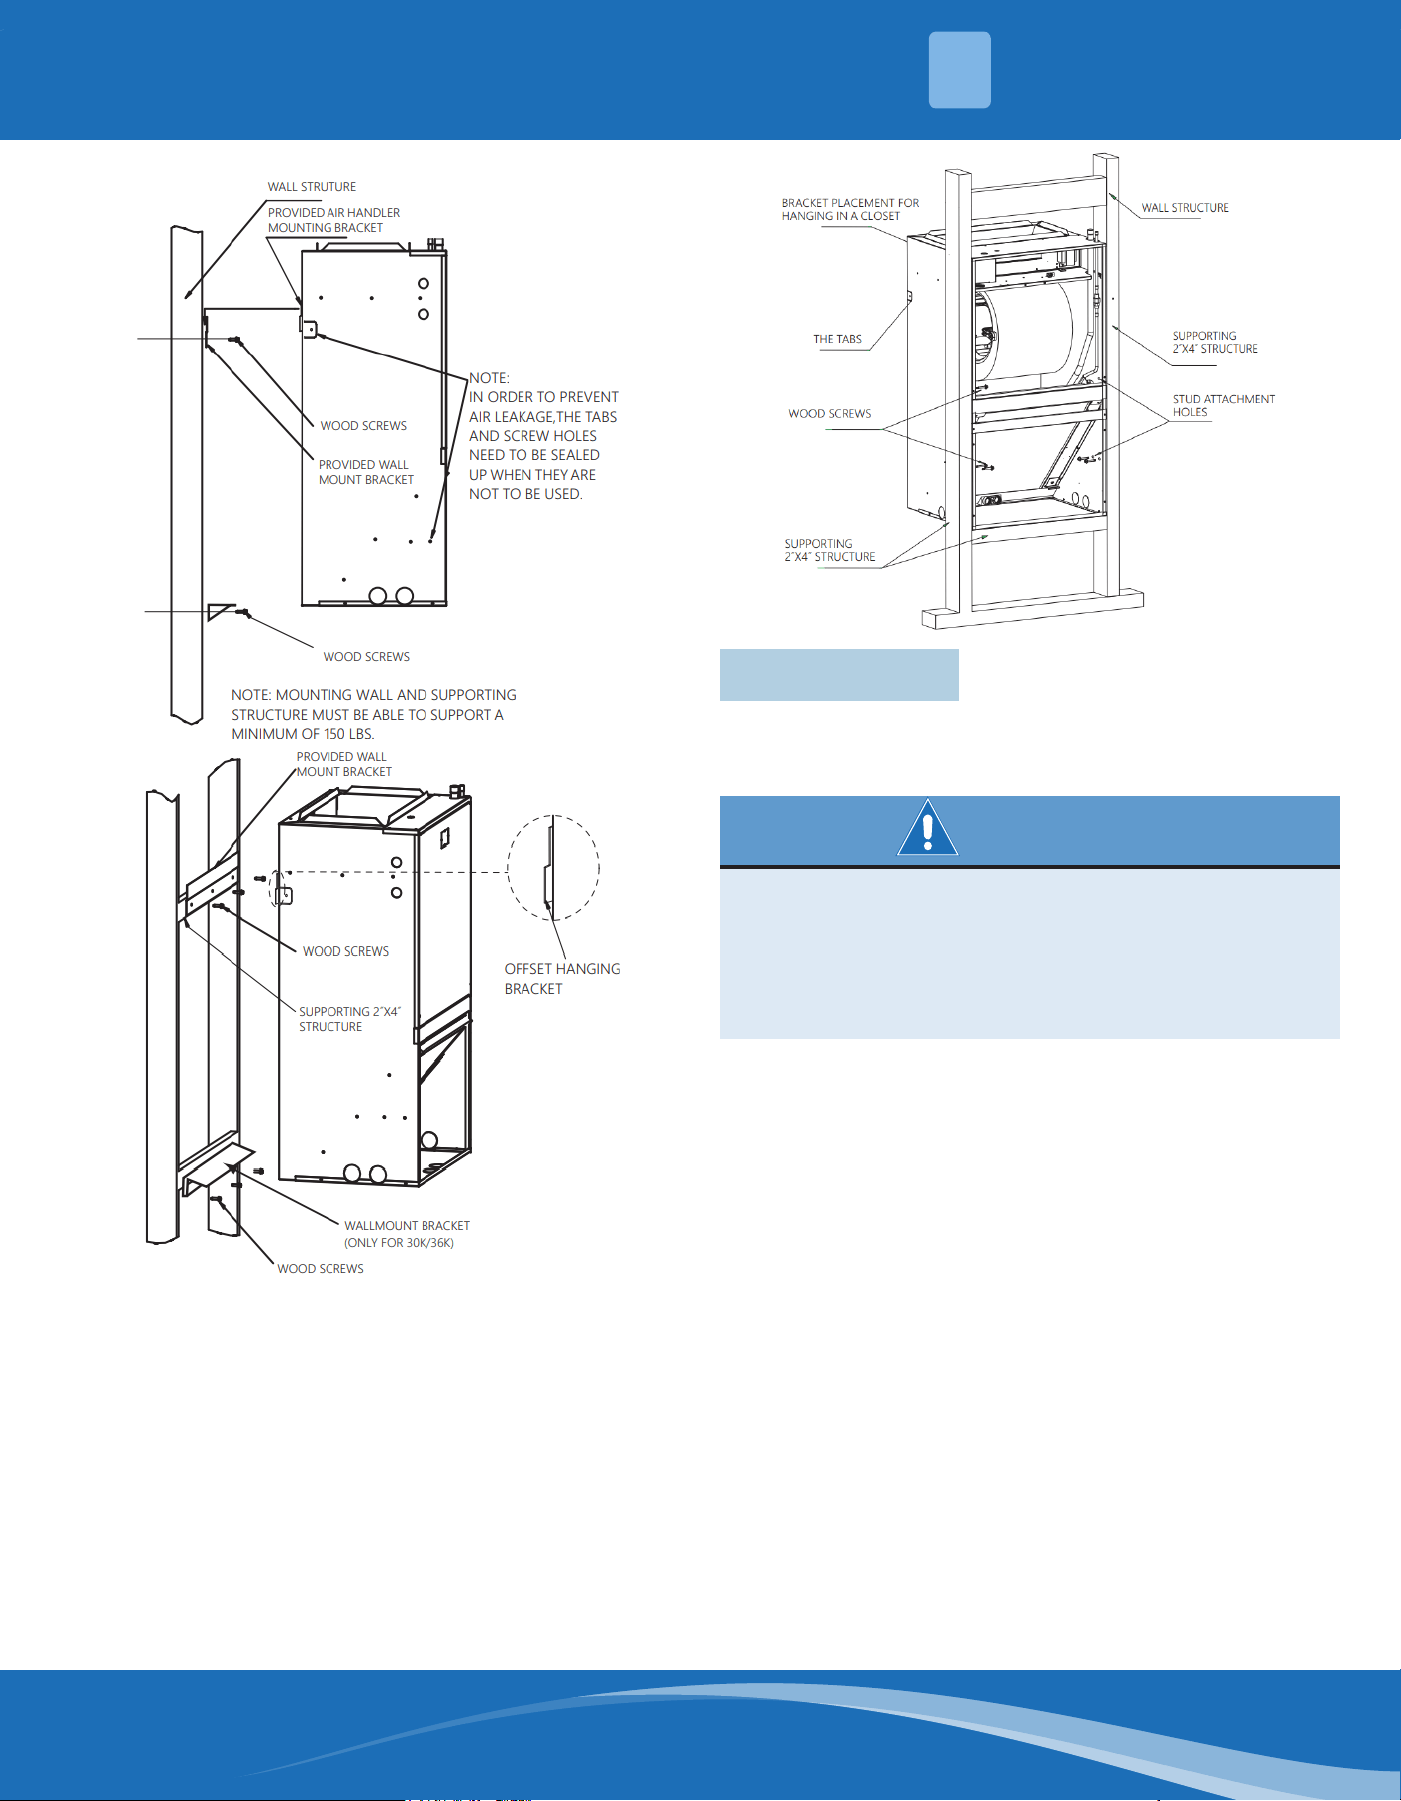
Wall Mount:
The air handler comes standard with a wall mounting
bracket and air handler mounting bracket. Reference
Figure 3.3 for more details.
1. Remove the lower wall mounting bracket from
the back of the unit by removing one screw which
attaches the bracket to the air handler. Note:
Discard the screw after you have removed the wall
mounting bracket.
2. Install the bracket on the wall by using 3 wood
screws (not provided). Make sure the bracket is
level in order to provide proper drainage from
the unit. Note: Do not attach the wall mounting
bracket into unsupported dry wall. Make sure that
the wood screws are going into a structure that
can support a minimum load of 150lbs.
3. Lift the air handler above the wall mounting
bracket and attach the unit to the installed
bracket. Reference Figure 3.3.
4. Install the additional bottom plate for extra
support for this type of mounting (see Figure 3.3).
Note: The additional plate is shipped in the bottom of
the shipping carton.
Frame Mount:
The air handler comes with 8 clearance holes (4
on each side). These holes are used to mount the
air handler inside of a frame structure (see Figure
3.4). When mounting in this fashion, make sure
that the wood screws are mounted from within the
air handler and not from outside the unit in order
to avoid damaging the coil. If the frame does not
provide support in the front of the unit and additional
support is needed, open up the tabs and x the unit
to the frame or other support structure with the
screws. Select a solid and level site to ensure proper
installation of the frame mount. Verify that there is
sucient space for installation and maintenance (see
Figure 3.4).
The air handler should be centrally located and
may be installed in a closet, alcove, utility room, or
basement while retaining the minimum clearances.
The air handler comes standard with two dierent
options for mounting, wall mount or frame mount.
Both mounting options require the unit to be level
from side to side and from front to back in order to
NOTE
The (8) wood screws are not provided with the unit.
#12 x 1.5in wood screws are recommended. When
the unit is installed on a wood frame, the screws
should be used to x the unit to the studs. If they
are not used, the unit may fall down or cause other
damage. See Fig. 3.4 for frame mount installation.
mrcool.com 18
INSTALLATION
3
Fig. 3.3
3.4 Ducting
Field ductwork must comply with the National Fire
Protection Association NFPA 90A, NFPA 90B, and any
applicable local ordinance.
WARNING
Do not, under any circumstances, connect return
ductwork to any other heat producing device such
as replace insert, stove, etc. Unauthorized use of
such devices may result in re, carbon monoxide
poisoning, explosion, personal injury, or property
damage.
Sheet metal ductwork run in unconditioned spaces
must be insulated and covered with a vapor barrier.
Fibrous ductwork may be used if constructed and
installed in accordance with SMACNA Construction
Standard on Fibrous Glass Ducts. Ductwork must
comply with the National Fire Protection Association
as tested by U/L Standard 181 for Class 1 Air Ducts.
Check local codes for requirements on ductwork and
insulation.
• The duct system must be designed within the
range of external static pressure that the unit
is designed to operate against. It is important
that the systems air ow is adequate. Make sure
the supply and return ductwork, grilles, special
lters, accessories, etc. are accounted for in total
resistance. See Performance Data in this manual.
• Design the duct system in accordance with
"ACCA" Manual "0" Design for Residential Winter
and Summer Air Conditioning and Equipment
Selection. Latest editions are available from:
"ACCA" Air Conditioning Contractors of America. If
the duct system incorporates exible air duct, be
sure pressure drop information (straight length
Fig. 3.4
mrcool.com19
INSTALLATION
3
plus all turns) shown in "ACCA" Manual "D" is
accounted for in the system.
• The supply plenum is attached to the 3/4 in duct
anges supplied with the unit.
• Important: If an elbow is included in the plenum
close to the unit, it must not be smaller than the
dimensions of the supply duct ange on the unit.
• Important: If connected to the blower casing,
the front ange on the return duct must not be
screwed into the area where the power wiring is
located. Drills or sharp screw points can damage
the insulation on the wires located inside the unit.
• Secure the supply and return ductwork to the unit
anges, using proper fasteners for the type of duct
used and tape the duct-to-unit joint as required to
prevent air leaks.
3.5 Drainage
The unit is supplied with primary and auxiliary
condensate drains that have 3/4 in NPT connections.
Both drains must be trapped outside the unit and
piped in accordance with applicable materials and
building codes. Do not reduce the drain line size
less than the connection size on the drain pan. The
condensate should be piped to an open drain or to
the outside. All drains must pitch downward and
away from the unit at a minimum of 1/4 in per ft of
line to ensure proper drainage. Insulate the primary
drain line to prevent sweating where dew point
temperature may be met. (Insulation is optional
depending on climate and application needs).
Important: If a clean out Tee is used, the standpipe
must be sealed/capped.
NOTE
The unit can have auxiliary heater installed,
the minimum clearance from the appliance to
combustible surfaces is 0 in.
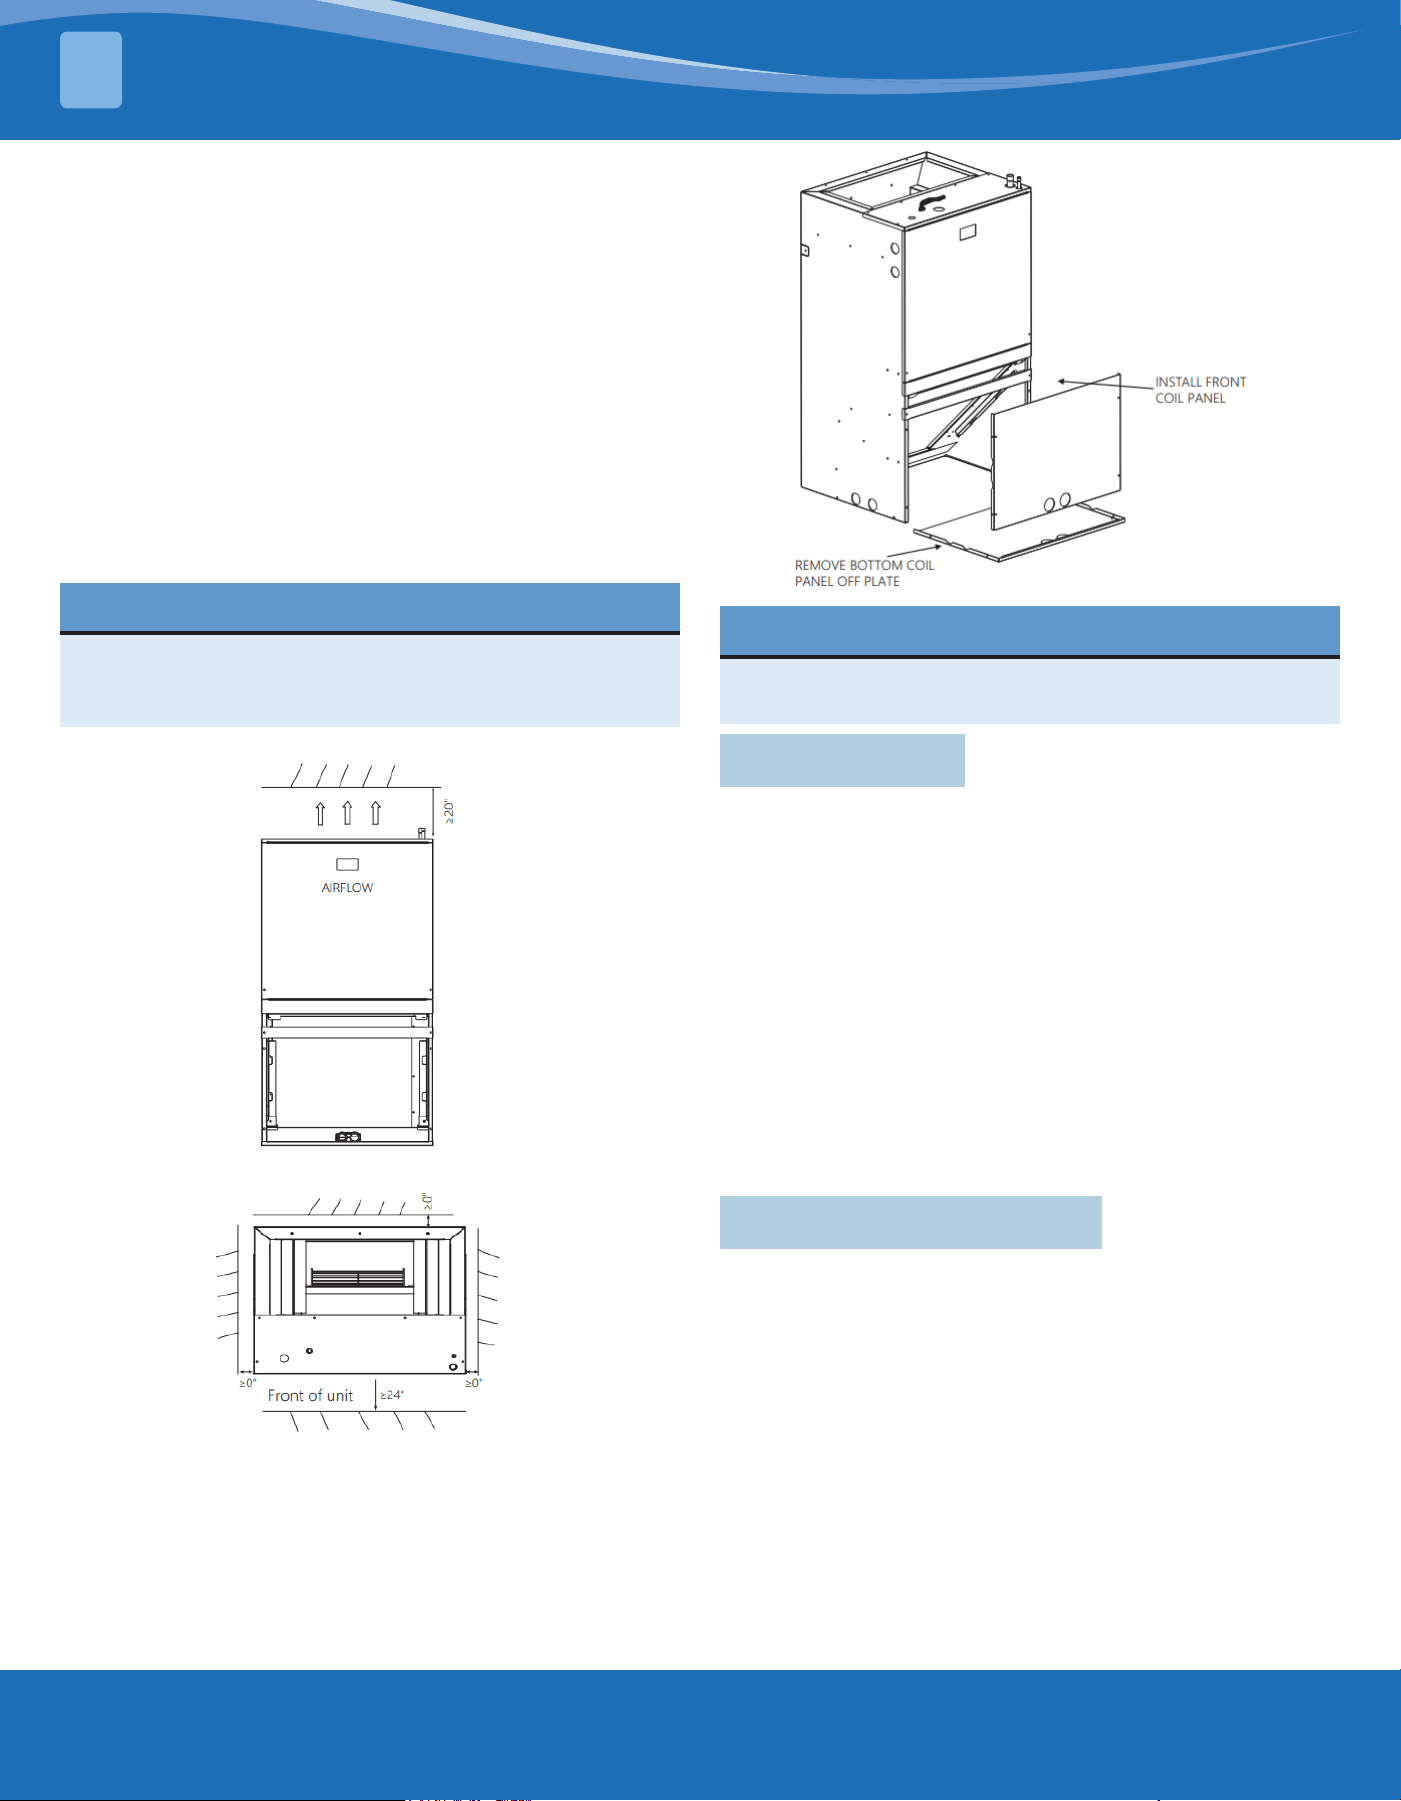
Top view of the indoor unit clearance (including air duct).
Fig. 3.5 Space for Frame Mount
Fig. 3.6 Dierent Air Supply
NOTE
Remove the cross brace when converting the
cabinet to bottom return.
3.6 Refrigerant Sensor
The R454B refrigerant leakage sensor is congured
for the indoor unit. The refrigerant sensor is
factory set for front or bottom return air, and the
refrigerant sensor has only one installation position.
Before installing the indoor unit, check whether the
refrigerant sensor is correctly installed according to
Figure 2.4 and 2.5.
mrcool.com 20
INSTALLATION
3
WARNING
• The refrigerant leakage sensor can only use the
factory model or the specied model indicated in
this manual.
• The R454B refrigerant leakage sensor must be
used to activate the refrigerant shut-o device,
the alarm device, incorporated circulation
airow, or other emergency controls, which will
give an electrical signal at a predetermined alarm
set point in response to leaked refrigerant.
• The installation of the refrigerant leakage
sensor shall allow access for checking, repair, or
replacement by an authorized person.
• The refrigerant leakage sensor should be
installed so its function can be veried easily.
• The refrigerant leakage sensor should be
protected to prevent tampering or unauthorized
resetting of the pre-set value.
• To be eective, the refrigerant leakage sensor
must be electrically powered at all times after
installation, other than when servicing. If the
refrigerant leakage sensor detects a refrigerant
leak, the fan will keep running, the compressor
will stop, and the electric heater will shut o.
Leave immediately from the leak area and notify
a professional for handling.
• The system will return to operation when
refrigerant is no longer detected within 5
minutes.
• The service life of the refrigerant sensor is 15
years, and should be replaced after its service
life.
• To ensure the detection accuracy of the
refrigerant sensor, it is recommended to blow
dust o of the surface of the refrigerant sensor
after it is used for a long period.
• The unit must be powered on except for during
servicing.
• Ensure the apparatus is mounted securely.
• The R454B refrigerant leakage sensor is
congured for the indoor unit. The fan operation
can be initiated by the R454B refrigerant sensor,
ensuring that it meets the required circulation
airow requirements. (The allowed maximum
refrigerant charge (Mmax) and the required
minimum room area (Amin)).
NOTE
These instructions are exclusively intended for
qualied contractors and authorized installers. Work
on refrigerant circuits with ammable refrigerant
in safety group A2L may only be carried out by
authorized contractors. These contractors must be
trained in accordance with UL 60335-2-40, Section
HH. The certicate of competence from an industry
accredited body is required. Work on electrical
equipment may only be carried out by a qualied
electrician. Before initial commissioning, all safety-
related points must be checked by the particular
certied heating contractors. The system must be
commissioned by the system installer or a qualied
person authorized by the installer. If an indoor unit
is installed in an unventilated area, the area should
be constructed that should any refrigerant leak, it
will not stagnate so as to create a re or explosion
hazard. The appliance should be stored so as to
prevent mechanical damage from occurring. Do not
stack combustible materials on the surface of the
indoor unit.
3.7 Refrigerant Piping
Refrigerant pipe connections are located on the top
of the unit. Refrigerant piping external to the unit
should be sized in accordance with the instructions
of the outdoor equipment. When units are recessed
mounted in the wall, make certain that piping
connections are pressure tested prior to the wall
being closed. While brazing, be sure to protect the
cabinet and grommets from heat damage.
3.8 Metering Device
All units are shipped and installed with an orice
designed for air conditioning or heat pump operation.
Pressures equalize after shut down.
3.9 Air Filter
An air lter must be installed before air enters the
evaporator coil in order to protect the coil, blower,
and other internal parts from excessive dirt and dust.
Model Filter Sizes in (mm)
18K/24K 15*19 (381*483)
30K/36K 20*20 (508*508)

mrcool.com21
WIRING
4
4.1 Power Wiring
Field wiring must comply with the National Electric
Code (C.E.C. in Canada) and any applicable local
ordinance.
WARNING
Disconnect all power to the unit before installing or
servicing. More than one disconnect switch may be
required to de-energize the equipment. Hazardous
voltage can cause severe personal injury or death.
Only trained and qualied service personnel should
install or service this equipment. Installation and
service performed by unqualied persons can result
in property damage, personal injury, or death.
Risk of electrical shock: Disconnect all remote power
supplies before installing or servicing any portion of
the system.
Fire Hazard: Use of aluminum wire with this product
may result in a re, causing property damage, severe
injury, or death. Use copper wire only with this
system.
It is important that proper electrical power is available
for connection to the unit model being installed. See
the unit nameplate, wiring diagram, and electrical data
in the instructions.
• If required, install a branch circuit disconnect of
adequate size, located within sight of, and readily
accessible to the unit.
• Important: After the Electric Heater is installed,
units are equipped with one 60 amp. circuit
breaker. These breaker(s) protect the internal
wiring in the event of a short circuit and serve as
a disconnect. Circuit breakers installed within the
unit do not provide over-current protection of the
supply wiring and therefore may be sized larger
than the branch circuit protection.
• Supply circuit power wiring must be 167°F (75°C)
minimum copper conductors only. Supply circuit
protective devices may be either fuses or "HACR"
type circuit breakers.
• Power wiring may be connected to either the
right or left side. Two 7/8in diameter concentric
knockouts are provided for connection of power
wiring to the unit.
• Power wiring is connected to the power cable in
the units electrical cabinet.
4.2 Grounding
WARNING
The unit must be permanently grounded. Failure to
do so can result in electrical shock causing personal
injury or death.
Natural grounding poles embedded in the ground
can be used, but do not connect the ground wire to
the following locations:
a. Pipes of ammable or explosive gases, which
may otherwise lead to an explosion or re.
b. Insulated plastic pipes, otherwise there is no
grounding eect.
c. Telephone line or lightning rod, otherwise it will
be dangerous for increasing the ground potential
during lightning strikes.
• Grounding may be accomplished when installed
in accordance with electrical codes by bonding the
metal conduit to the unit cabinet or by attaching
ground wire(s) to the ground lug(s) provided in the
unit wiring compartment.
• Ground lug(s) are located close to the wire
entrance on the left side of the unit. Lug(s) may be
moved to marked locations near the wire entrance
on the right side of the unit if an alternate location
is more convenient.
• Use of multiple supply circuits require grounding
of each circuit to lug(s) provided in the unit.
4.3 Control Wiring
Important: Class 2 low voltage control wiring should
not be run in conduit with the main power wiring and
must be separated from power wiring, unless class 1
wire of a proper voltage rating is used.
• Low voltage control wiring should be 18 AWG.
color-coded (221°F (105°C) minimum). For lengths
longer than 100ft (30.48m) 16 AWG wire should be
used.
• Low voltage control connections are made to low
voltage pigtails extending from the top of the air
handler. Connections for control wiring are made
with wire nuts. Control wiring knockouts (7/8in) are
also provided on the right and left side of the unit
for side connection.
• Make sure after installing to separate the control
and power wiring.

mrcool.com 22
WIRING
4
4.4 Thermostat
Select a thermostat that is commonly used with a heat
pump or straight a/c single stage heating/cooling with
electric heat. The thermostat will energize the fan on
demand for heating or cooling.
Install the thermostat on an inside wall, away from
drafts, lights, or other heat sources in a location that
has sucient air circulation from other rooms being
controlled by the thermostat. The thermostat should
be mounted 4 to 5 ft above the oor.
4.5 Sequence of Operation
Cooling:
When the thermostat calls for cooling, the circuit from
R to G is completed. The blower motor is energized
directly by the 24VAC signal from the thermostat.
The circuit from R to Y is also completed, energizing
the compressor contactor of the outdoor unit. The
contactor will close and start the compressor and
condenser fan motor. Certain heat pump model
condensers may default to heat on the reversing valve
and have an O connection that needs to be energized
for cooling to function.
Heating (heat pump):
When the thermostat calls for heating, the circuit from
R to G is completed and the blower motor is energized
directly by the 24VAC signal from the thermostat.
The circuit from R to Y is also completed, energizing
the compressor contactor of the outdoor unit. The
contactor will close and start the compressor and
condenser fan motor. Circuit R to B (condenser model
dependent) energizes the reversing valve to the
heating position.
Heating (electric heat only):
Note: the thermostat must be set up to bring the
blower on when the electric heat is energized.
When the thermostat calls for heating, the circuit from
R to G is completed and the blower motor is energized
directly by the 24VAC signal from the thermostat.
The circuit from R to W1 is completed energizing the
heating contactor(s).
If the indoor temperature continues to fall, the R to
W2 circuit is completed, energizing the electric heat
contactor(s).
Defrost:
Supplemental heat during defrost can be provided
by connecting the W1 wire from the outdoor unit to
W1 on the indoor unit. This will prevent cold air from
being discharged from the indoor unit during defrost.
CAUTION
Sharp metal edges can cause injury. When installing
the unit, use care to avoid sharp edges.
Avoid sharp metal edges for wires to prevent wear,
or it may lead to short circuit or electric leakage and
cause danger.
Wires should be xed well otherwise the connectors
can become loose or the terminal may be damaged
when they are pulled.
mrcool.com23
Model Voltage Herts Hp Rpm Speeds
Circuit
Amps.
Maximum
Circuit
Protector
18K 208/230 60 1/3 1050 5 1.8 3 (A)
24K 208/230 60 1/3 1050 5 1.8 3 (A)
30K 208/230 60 1/2 1050 5 3.2 6 (A)
36K 208/230 60 1/2 1050 5 3.2 6 (A)
4.6 Electrical Data
4.7 Wire Gauge
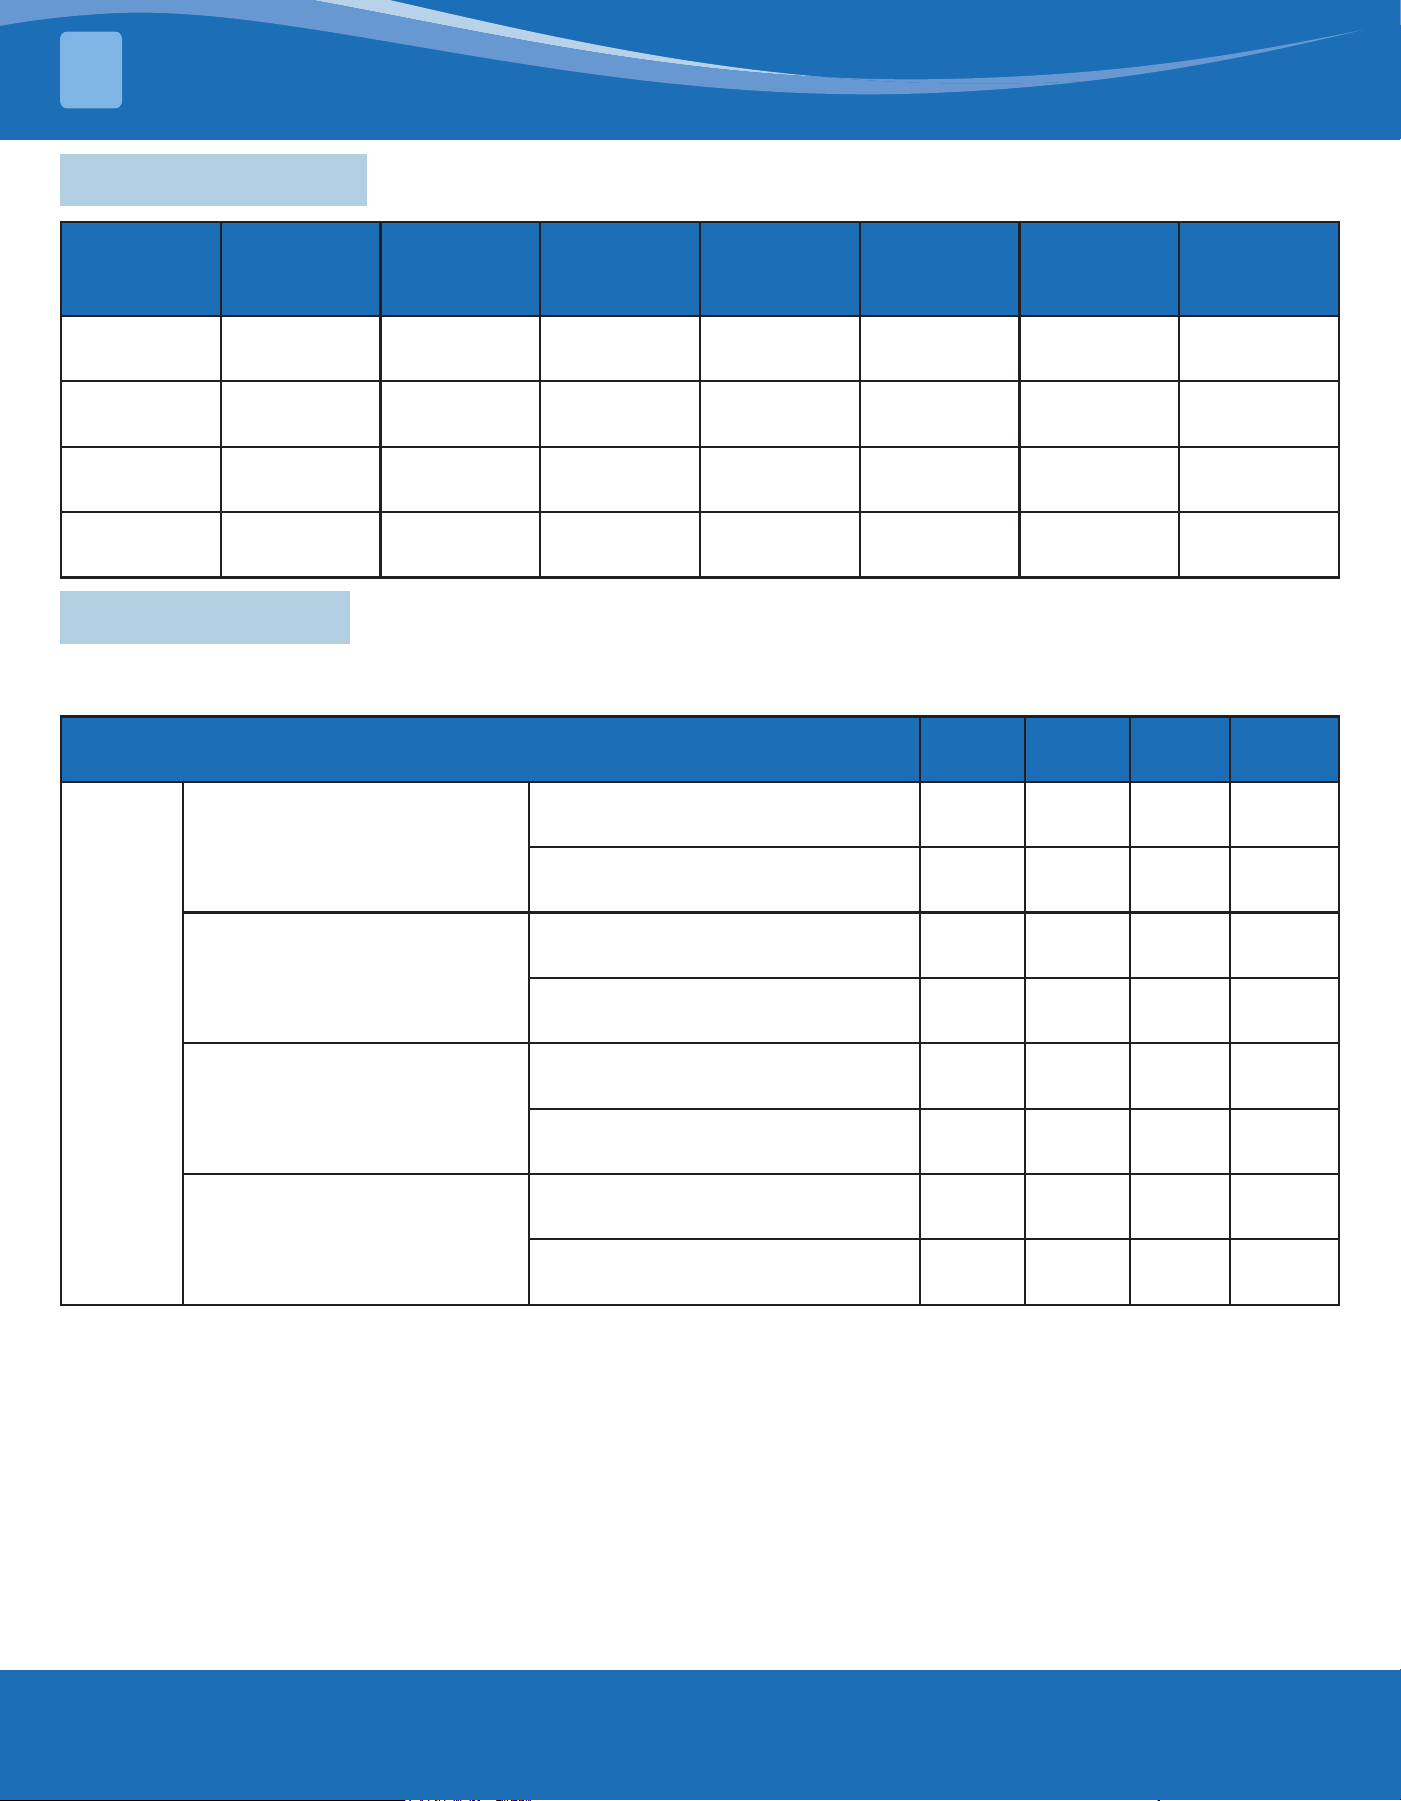
Note: The cross-section areas of wires or lines should not be less than the corresponding ones listed in the table
below.
Model 18K 24K 30K 36K
Line
Gauge
Indoor Unit Power Line
Line Quantity 3 3 3 3
Line Diameter (AWG) 16 16 16 16
Outdoor Unit Power Line
Line Quantity 3 3 3 3
Line Diameter (AWG) 14 14 12 12
Indoor-Thermostat Signal
Line
Line Quantity 5 5 5 5
Line Diameter (AWG) 18 18 18 18
Outdoor-Thermostat Signal
Line
Line Quantity 5 5 5 5
Line Diameter (AWG) 18 18 18 18
WIRING
4
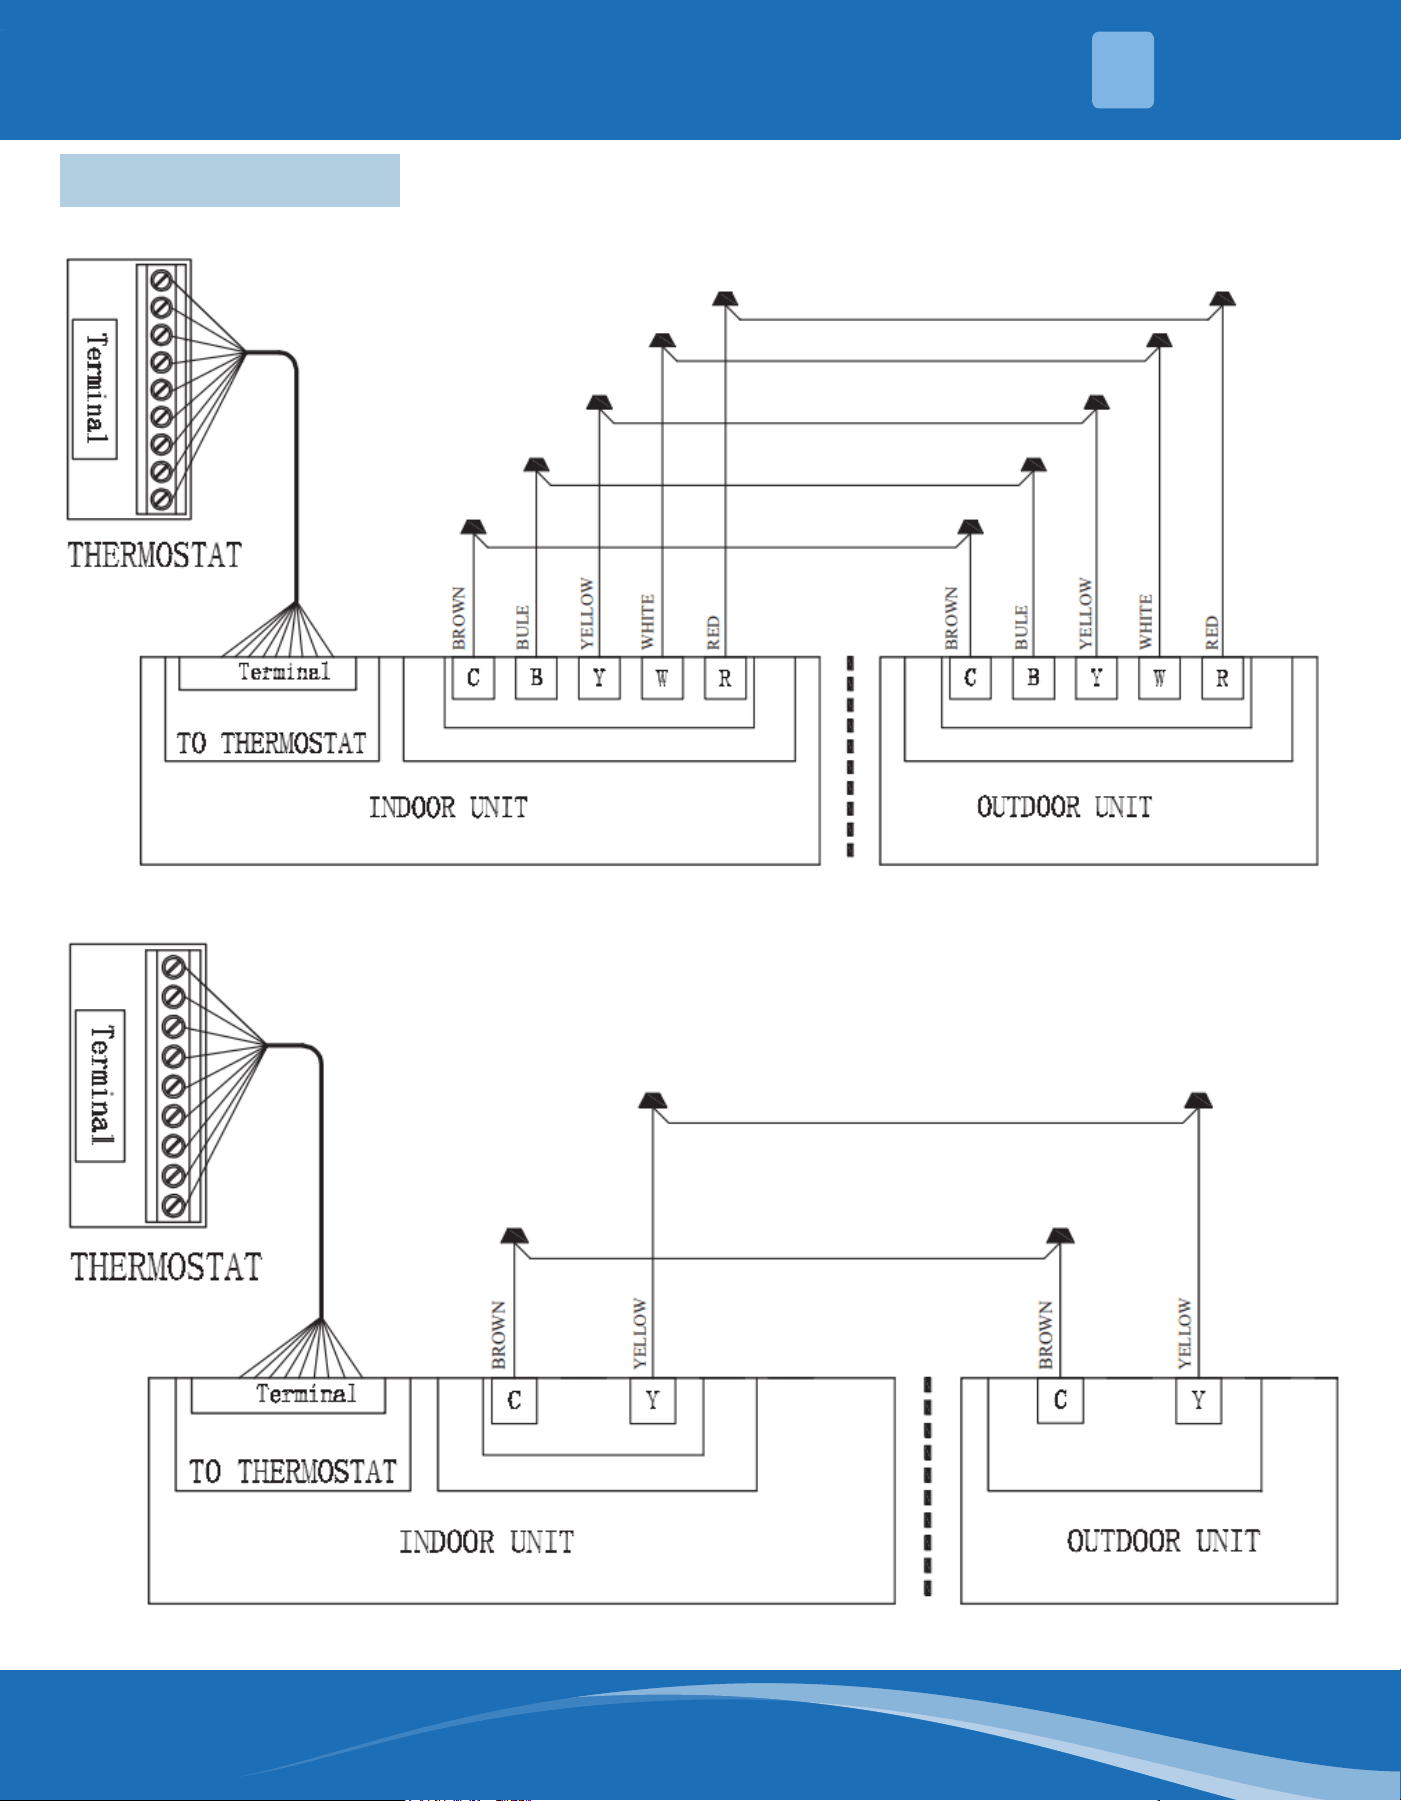
mrcool.com 24
4.8 Wiring Diagrams
WIRING
4
Fig. 4.1 Wiring Connection for Heat Pumps
Fig. 4.2 Wiring Connection for A/C
mrcool.com25
WIRING
4
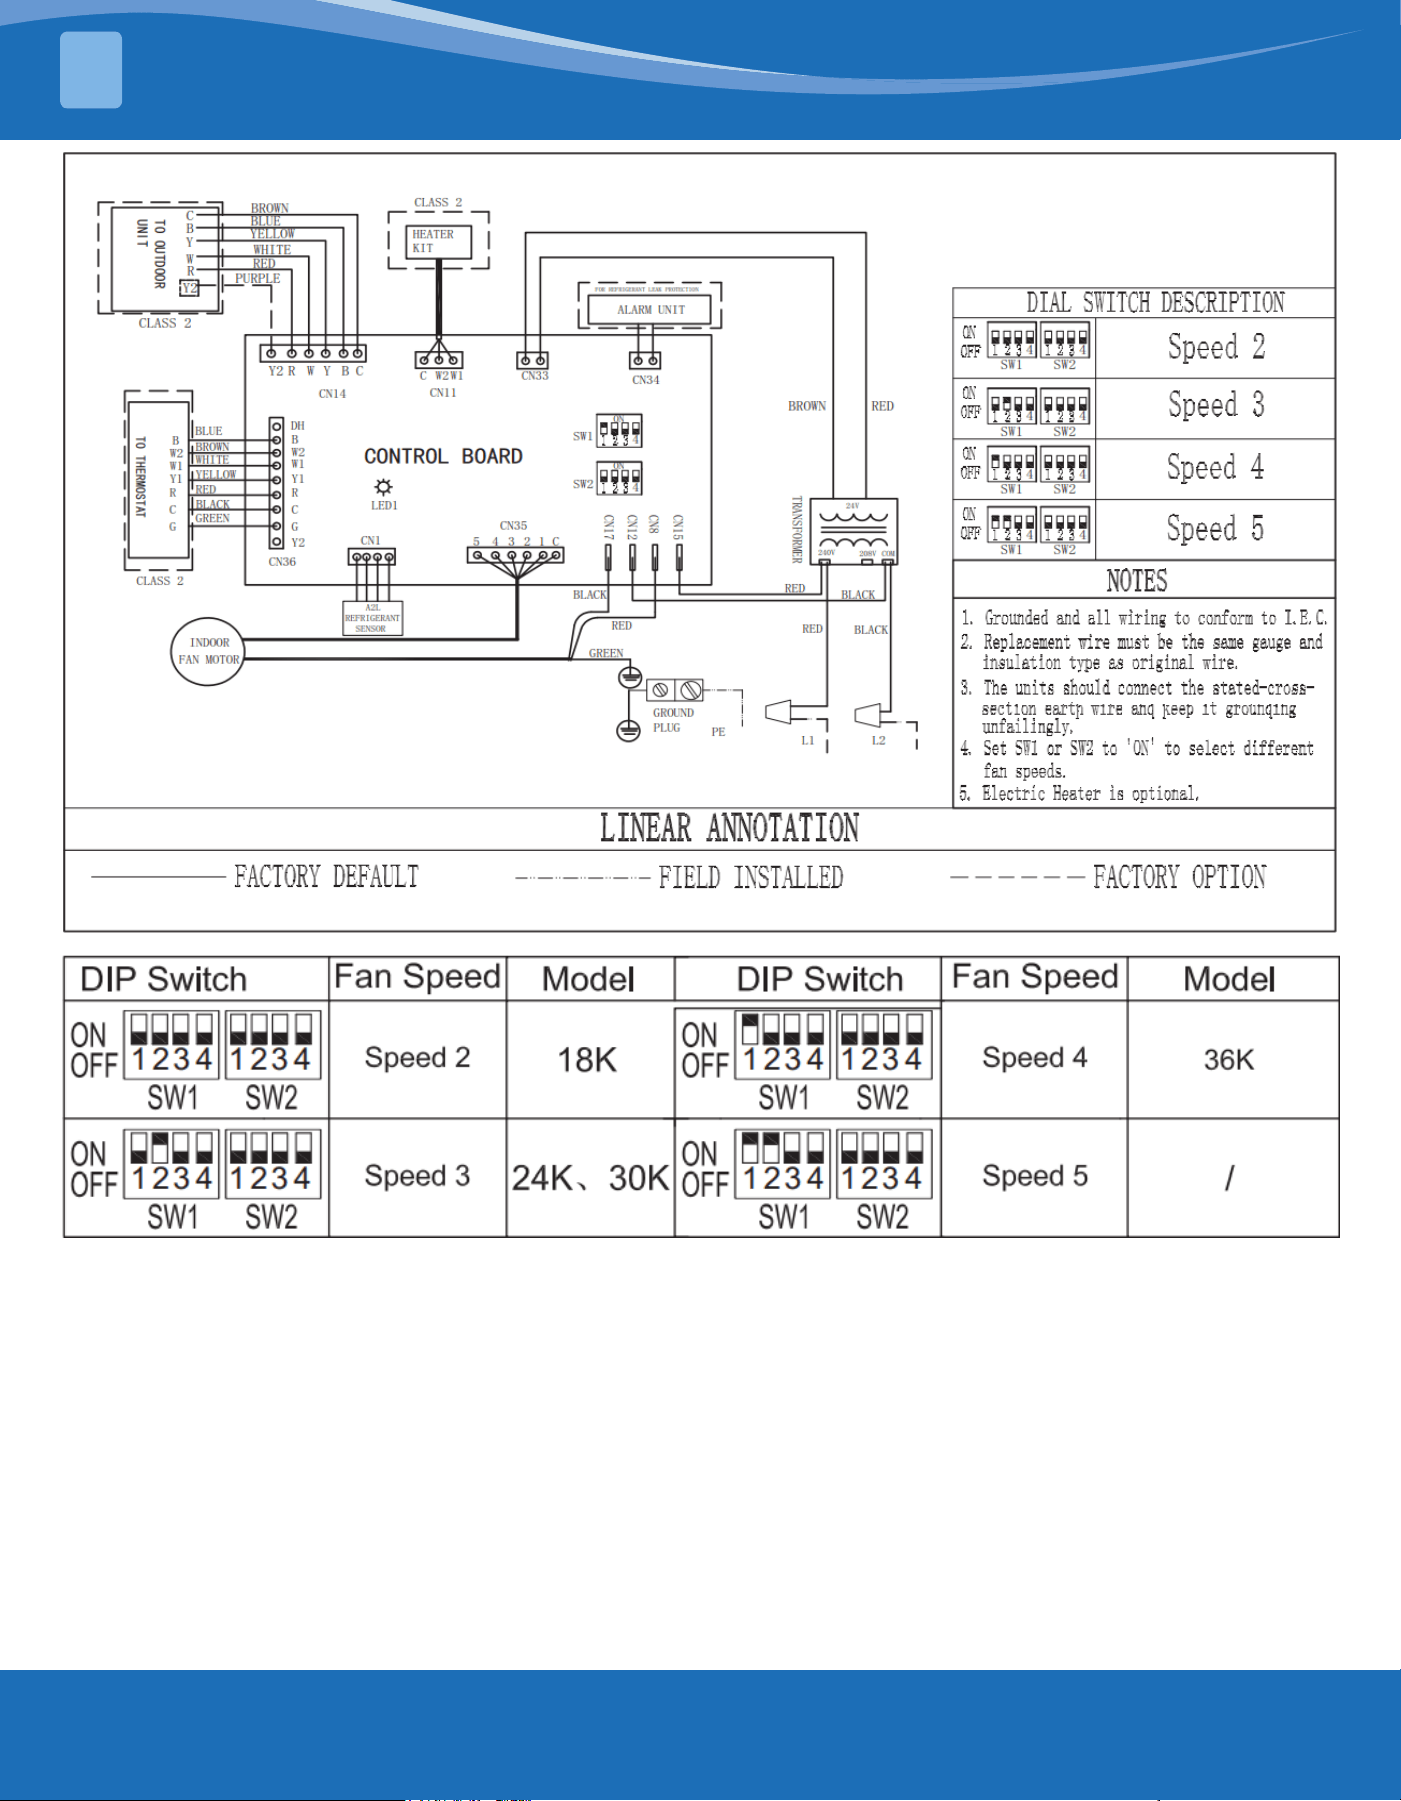
Note: For reference only, the actual wiring diagram shall prevail.
Please refer to the actual wiring diagram
mrcool.com 26
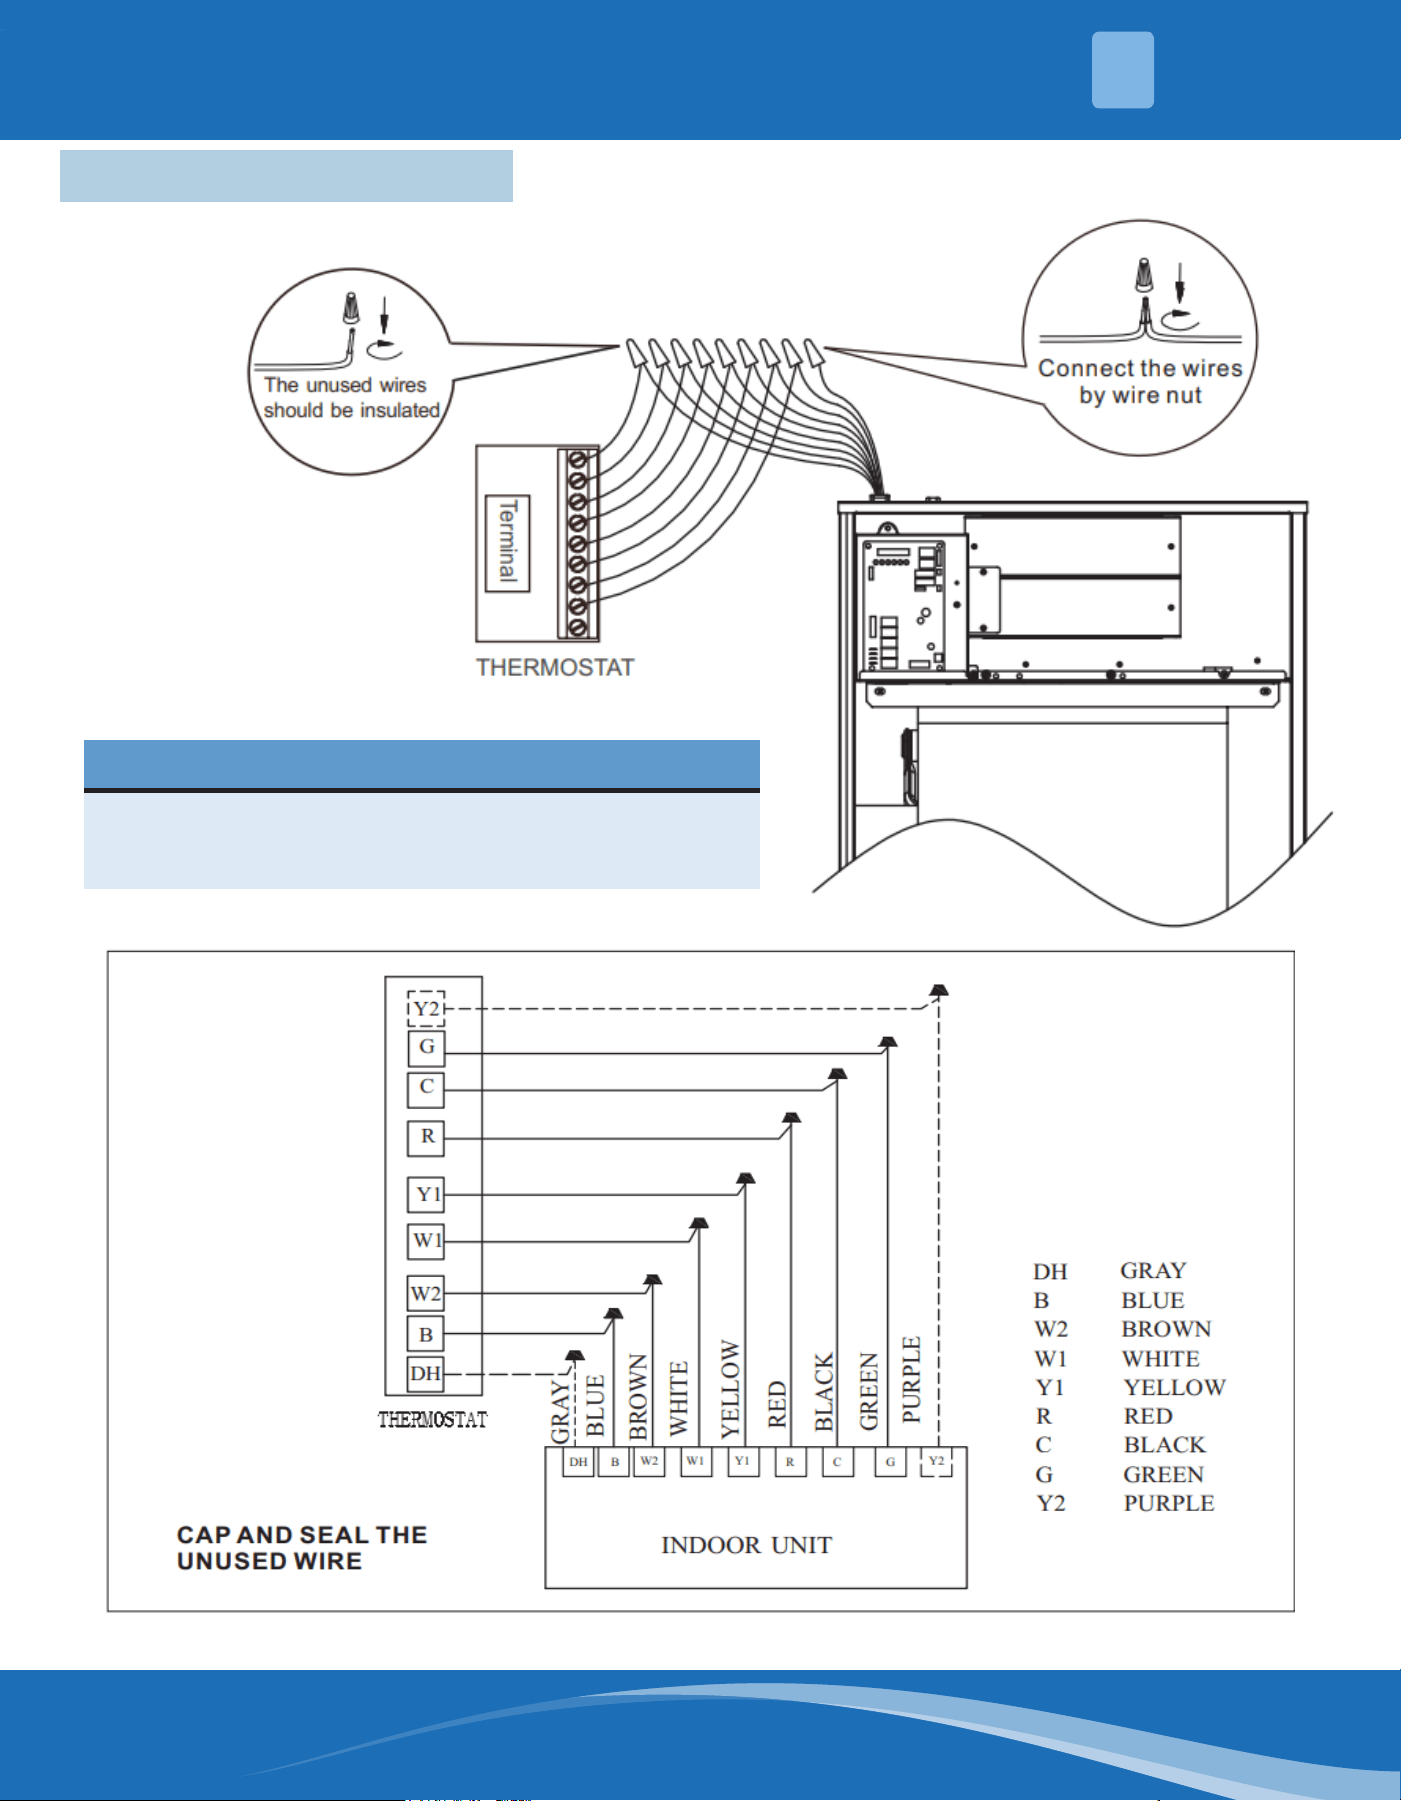
4.9 Low Voltage Connection
NOTE
Secure the cable after it is connected with a wire nut.
WIRING
4
mrcool.com27
ELECTRIC HEAT
5
Heat Kit Model
Air
Handler
Model
Electric
Heater
(kW)
MCA (Min.
Circuit
Ampacity)
MOP (Max.
Fuse or
Breaker
(HACR)
Ampacity)
Fan Speed (AC/HP)
208V 230V 208V 230V 2
3
(Medium)
4 5 (High)
MCAEHWD5X1AA
18K
5 22.8 24.9 25 25 √ x x x
MCAEHWD7X1AA 7.5 34.8 37.9 35 40 √ x x x
MCAEHWD10X1AA 10 45.4 49.8 50 50 √ x x x
MCAEHWD7X1AA
24K
5 22.8 24.9 25 25 √ √ √ √
MCAEWD7X1AA 7.5 34.8 37.9 35 40 √ √ √ √
MCAEHWD10X1AA 10 45.4 49.8 50 50 √ √ √ √
MCAEHWD5X1AA
30K
5 22.8 24.9 25 25 √ √ √ √
MCAEHWD7X1AA 7.5 34.8 37.9 35 40 x √ x √
MCAEHWD10X1AA 10 45.4 49.8 50 50 x √ x √
MCAEHWD5X1AA
36K
5 22.8 24.9 25 25 √ √ √ √
MCAEHWD7X1AA 7.5 34.8 37.9 35 40 x √ √ √
MCAEHWD10X1AA 10 45.4 49.8 50 50 x √ √ √
Note: Heat kit suitable for AHU 4-way position installation.
Ampacities for MCA and Fuse/breaker including the blower motor.
Heat pump systems require a specied airow. Each ton of cooling requires between 350 and 450 cubic feet of
air per minute (CFM), or 400 CFM nominally.
Electrical Heater Kits
Model Description Ref. Air Handler Use
MCAEHWD5X1AA
5kW heater kit, double pole circuit
breaker
18/24/30/36MCAEHWD7X1AA
7.5kW heater kit, double pole circuit
breaker
MCAEHWD10X1AA
10kW heater kit, double pole circuit
breaker
-Electric Heat
mrcool.com 28
BLOWER
6
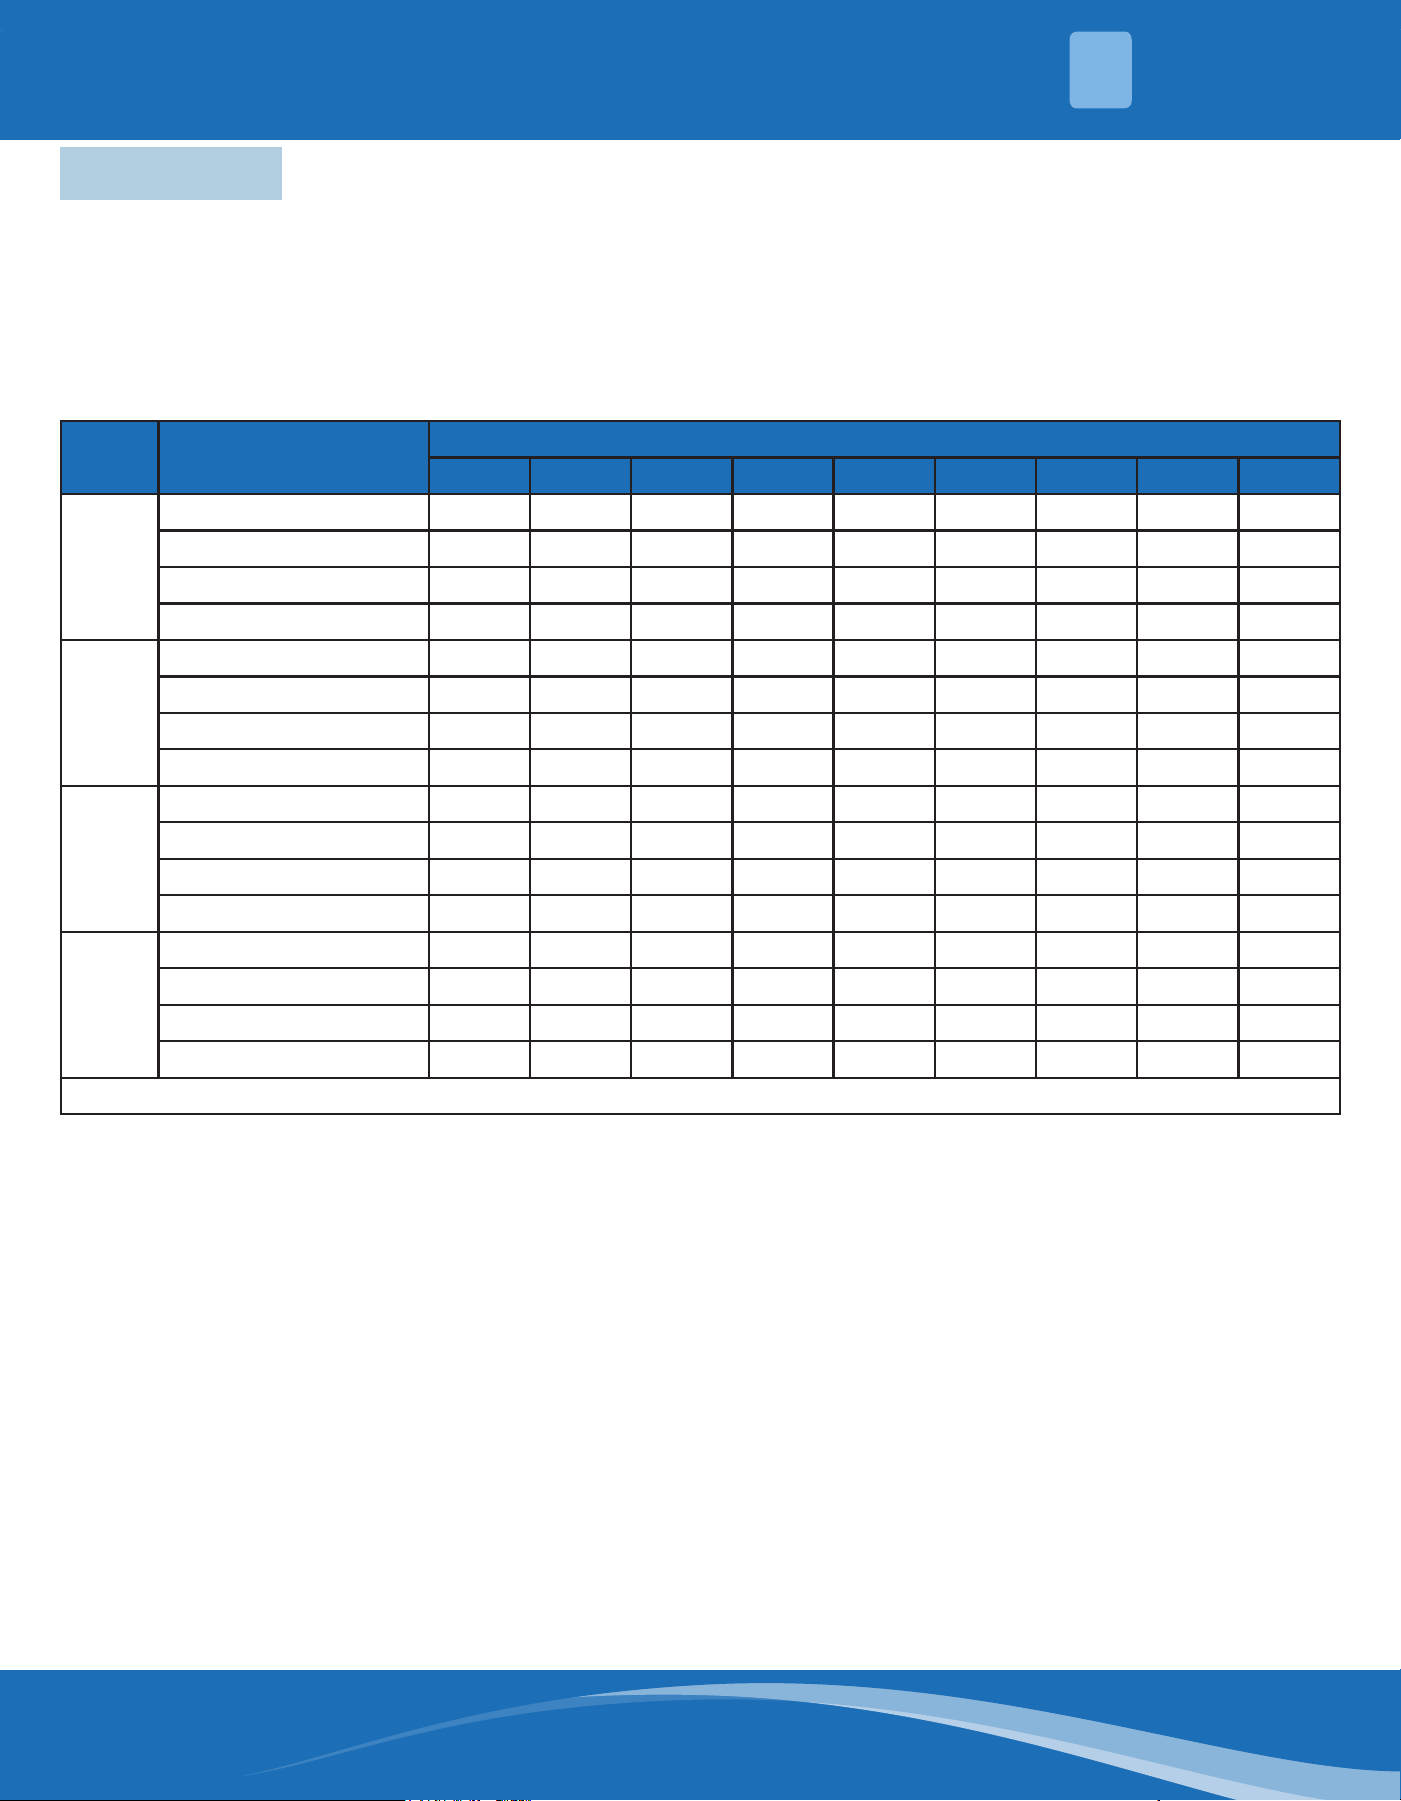
This unit is supplied with a multi-speed motor with a direct drive blower wheel which can obtain various airows.
The unit is shipped with a factory set cooling and heating speed taps. Airow performance tables are available
for additional speed taps. Disconnect all power to the unit before making any adjustments to the motor speed
taps. Be sure to check the air ow and the temperature drop across the evaporator coil to ensure sucient air
ow.
Airow performance data is based on cooling performance with a coil and no lter in place. Select performance
table for appropriate unit size. External static applied to the unit allows operation within the minimum and
maximum limits shown in the table below for both cooling and electric heat operation.
-Blower
Model Blower Speeds
External Static Pressure (in.w.c.)
0 0.1 0.2 0.3 0.4 0.5 0.6 0.7 0.8
18K
2-Factory Default 848 811 774 749 712 685 641 608 565
3 947 914 887 855 829 797 773 742 703
4 1044 1015 990 960 936 904 880 851 814
5 1098 1069 1043 1014 986 958 933 902 848
24K
2 848 811 774 749 712 685 644 608 565
3-Factory Default 947 914 887 855 829 797 773 742 703
4 1044 1015 990 960 936 904 880 851 814
5 1098 1069 1043 1014 986 958 933 902 848
30K
2 1048 1008 979 933 884 836 770 724 680
3-Factory Default 1159 1121 1093 1059 1016 965 915 850 808
4 1257 1231 1199 1169 1140 1095 1051 1000 943
5 1360 1337 1302 1279 1246 1208 1173 1121 1063
36K
2 1048 1008 979 933 884 836 770 724 680
3 1159 1121 1093 1059 1016 965 915 850 808
4-Factory Default 1257 1231 1199 1169 1140 1095 1051 1000 943
5 1360 1337 1302 1279 1246 1208 1173 1121 1063
Note: Shaded boxes represent airow outside the required 30-450 cfm/ton.
Notes:
1. Airow based upon dry coil at 230V with no electric heat and no lter. For 18, 24, 30, 36 sizes, airow at 208V
is approximately the same as 230V because of the multi-tap ECM motor is a constant torque motor. The
torque doesn't drop o at the speed in which the motor operates.
2. Airow is equivalent for front or bottom return congurations.
The air distribution system has the greatest eect on airow. The duct system is totally controlled by the
contractor. For this reason, the contractor should use only industry-recognized procedures.
Heat pump systems require specied airow. Each ton for cooling requires between 350 and 450 cubic feet of
air per minute (CFM), or 400 CFM nominally.
Duct design and construction should be carefully done. System performance can be lowered dramatically
though bad planning or workmanship. Air supply diusers must be selected and located carefully. They must
be sized and positioned to deliver air along the perimeter of the space. If they are too small for their intended
airow, they become noisy. If they are not located properly, they cause drafts. Air grilles must be properly sized
to carry air back to the blower. If they are too small, they also cause noise.
The installers should balance they air distribution system to ensure proper quiet airow to all rooms in the
home. This ensures a comfortable living space.
Important: When model 30 and 36 used with electric heat kit model HF75-01 and HF100-01, you need to ensure
that the air volume is no less than 1103 CFM.
mrcool.com29
To obtain proper performance, all units must be operated and charge adjustments made in accordance with
procedures found in the service document of the outdoor unit.
After installation has been completed, it is recommended that the entire system be checked against the
following list:
• Be sure unit suspension (if used) is secure and there are no tools or loose debris in, around, or on top of the
unit.
• Properly insulate suction lines and ttings.
• Properly secure and isolate all refrigerant lines.
• Verify that all electrical connections are tight.
• Check all duct outlets; they must be open and unrestricted.
• Check drain lines and be sure all joints are tight.
• Be sure the return air lter is installed.
• Operate the system in each mode to verify proper performance. Verify operation of supplementary electric
heater.
MAINTENANCE
7
7.1 Check Procedures
7.2 Maintenance
The system air lter(s) should be inspected, cleaned, or replaced at least once a month. Make sure that the
access panels are replaced and secured properly before placing the unit back in operation. This product is
designed for dependable service; however, periodic maintenance should be scheduled and conducted by
trained professional service personnel. This service should be conducted at least annually, and should include
testing and inspection of electrical and refrigerant components. The heat transfer surface should be cleaned.
The blower motor is permanently lubricated for normal operating conditions.
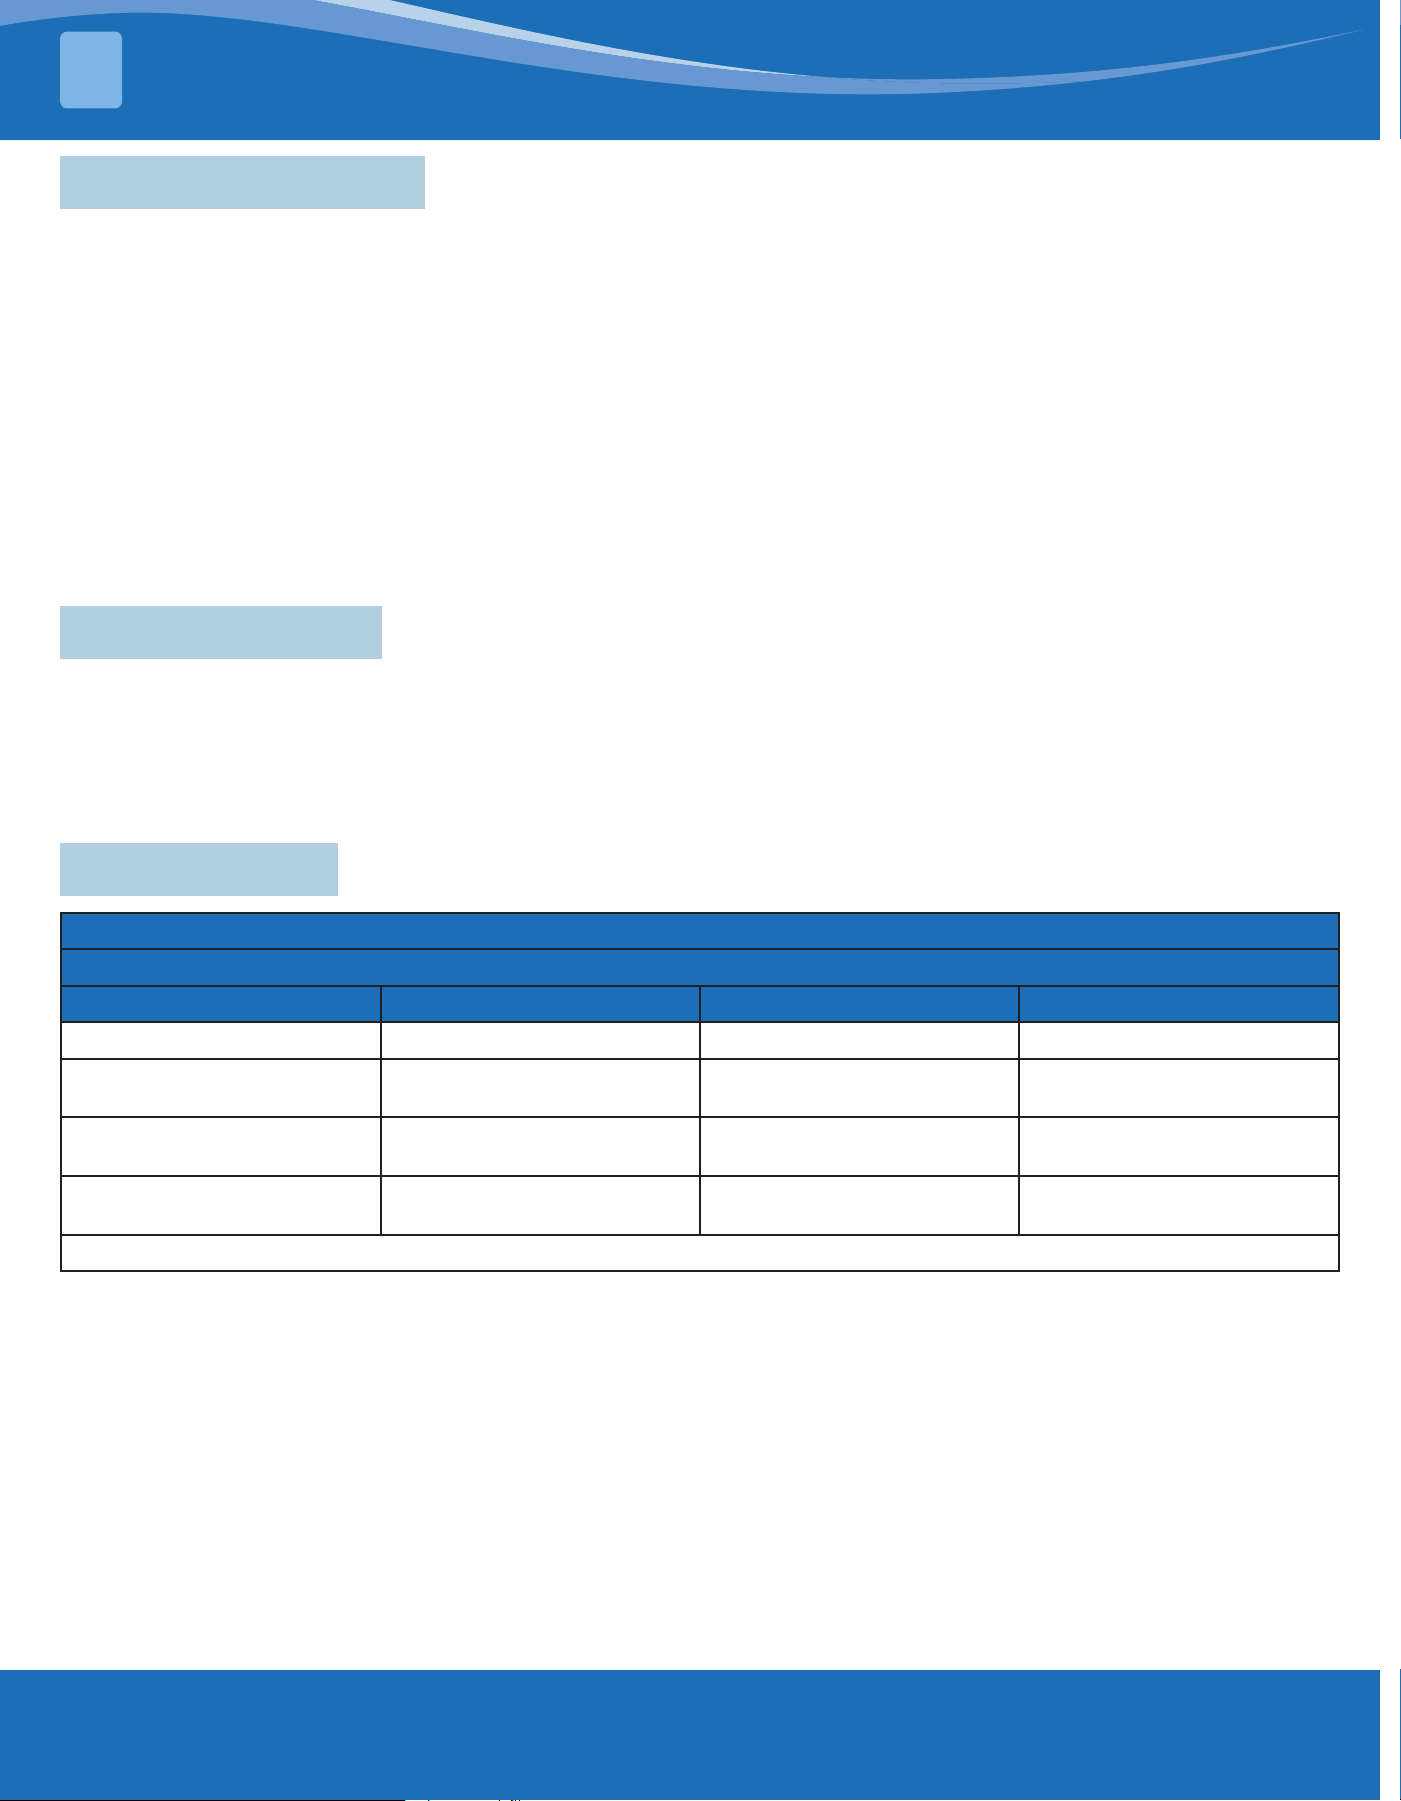
7.3 Error Codes
Leak Detection System Installed. Unit must be powered except for when in service
The LED and the Buzzer's Status
Model Green LED Red LED Buzzer Status
Normal Operation On O Inactive
Refrigerant Sensor Fault On
Flashes 3 times and then
is o for 3 seconds.
Active
Refrigerant Sensor
Communication Fault
On
Flashes 4 times and then
is o for 3 seconds.
Active
Refrigerant Leak Alarm On
Flashes 5 times and then
is o for 3 seconds.
Active
If a refrigerant leakage alarm is observed, DO NOT open the unit or turn it o.

MRCOOL® Signature
Series Stud-Mount
Air Handler
The design and specications of this product and/or manual are subject to change without prior notice.
Consult with the sales agency or manufacturer for details.