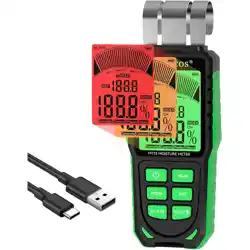
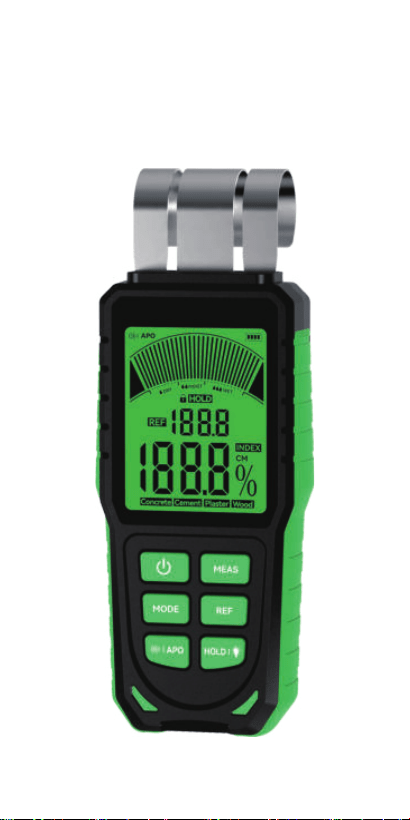
Inductive Moisture Meter
User’s manual
Read this manual carefully before staing
or using the device. Always store the
manual in the immediate vicinity of the
device or its site of use.
Read all safety warnings and all instructions. Failure to
follow the warnings and instructions may result in
electric shock, re or serious inju.
Warning
Do not use the device in potentially explosive rooms
or areas and do not install it there.
Do not expose device to harmful or corrosive
chemicals.
Do not immerse the device in water. Do not allow
liquids to penetrate into the device.
The device may only be used in d surroundings
and must not be used in the rain or at a relative
humidity exceeding the operating conditions.
Protect the device from permanent direct sunlight.
Do not expose the device to strong vibrations.
Do not operate the device near medical equipment
(e.g. pacemakers).
Do not open the device.
Do not operate the device near open electrical
wiring.
1. Safety instructions
Risk of suocation. Do not leave the packaging lying
around. Children may use it as a dangerous toy.
The device is not a toy and does not belong in the
hands of children.
There is a risk of a sho circuit due to liquid
penetrating the housing. Do not immerse the device
and accessories in water.
Work on the electrical components must only be
carried out by an authorised specialist company.
Warning of electrical voltage
EN-01

2. Product description and specications
Probe length
32mm(1.26inch)
≤40mm(1.57 inch)
Concrete: 0% ~ 19%
Cement: 0% ~ 28%
Plaster: 0% ~ 39%
Wood: 0% ~ 52%
2.2 Technical parameters
Penetration depth
Measuring range
2.1 Intended use
This device uses the capacitive measurement principle
and is used for non-destructive location and evaluation
of moisture distribution in walls, oors and ceilings, it
provides an oveiew of the extent, distribution and
severity of the moisture damage as pa of a building
suey. It can be used in the material-independent
INDEX mode or the additional 4 types building material
mode(concrete, cement, plaster and wood).
Building materials of the same type but with
dierent designation/composition/strength/
density may aect the measurement result.
Fuhermore, building materials will va from
manufacturer to manufacturer due to the way they
are produced. This is why, when we measuring
unfamiliar building materials, the measured values
may dier from the actual values. If dierent
measured values occur, the reading should be
viewed as relative values or use the index mode.
For the 4 types building material mode, the reading is
mass%, it is based on the d mass of the measured
material. The moisture content is calculated according
to the following formula: moisture content in mass% =
(mass of water contained in the material / d mass of
the material)x100%. Example: 600g material contains
100g water=20% moisture content.
INDEX: 0 ~ 100
EN-02
Building materials mode: ±2.5%
LCD backlight and buzzer
2.9 inch LCD
320mAh Lithium batte
30 minutes
0~45℃ (32~113℉)
Max. 75%RH
-20~70℃ (-4~158℉)
160g(6.3oz)
Operation temperature
Accuracy
Auto power o
Alarm Mode
Screen
Batte
Operation humidity
Storage temperature
Size
Weight
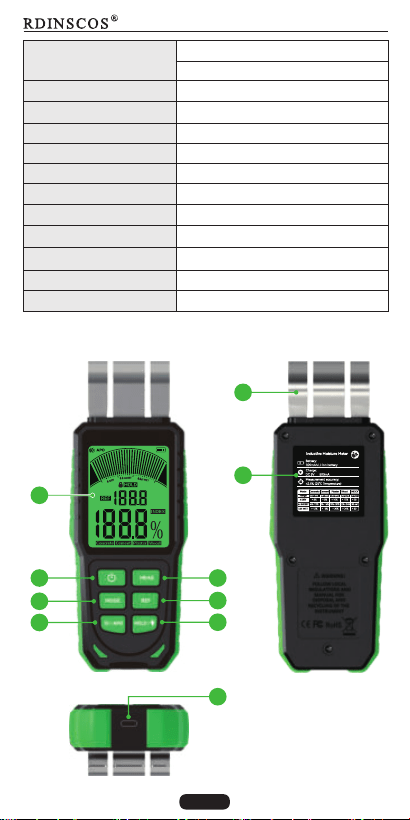
2.3 Description of product component
INDEX mode: relative values
DC 5V
<1A
Charging voltage
Charging current
1
2
3
4
7
6
5
8
9
EN-03
177*67.5*40mm(6.97"*2.6"*1.57")
10
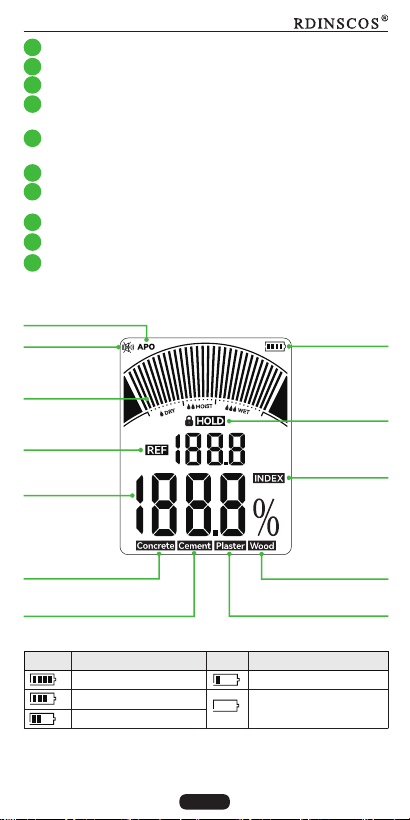
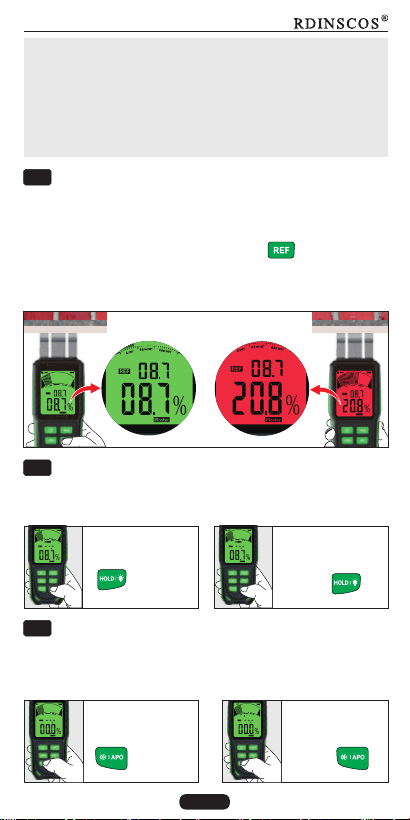
2.4 Display description
Bar-graph of
measured value
Reference value
Mute
Concrete
measuring mode
Hold data
Auto power o
Batte level
2.5 Batte level indicator
Icon
Capacity
Icon
Capacity
75%~100%
50%~75%
25%~50%
<25%
Batte charge
immediately
Display screen
On/o button
Mode select button
1
2
3
Mute /Automatic power o button (press this button to
mute, Hold down to automatic power o )
4
Data hold/turn o LCD backlight button (press this
button to hold data, hold down to turn o LCD backlight)
5
Activate the reference value function button
6
Calibration button (Eve time when the device is turned
on, this button must be pressed rst to use it)
7
Type-C charging socket
8
Product information Label
9
Measured value
Wood
measuring mode
Cement
measuring mode
Plaster
measuring mode
INDEX mode
2.6 Bar-graph display of measured value
In addition to the numerical display of the measured
EN-04
Probe
10
value in % relative material moisture, the bar-graph
display provides an additional visual evaluation of the
moisture.
D
Moist
Wet
3. Use the device
Switching On/o
Press the on/o button " " to switch on/o the
device. When the device is switched on again, the last
selected measuring mode is preset in the device.
3.1
ON OFF
Measuring process
Press the
on/o button
or Automatic
power o
after 30
minutes.
All display
elements
will appear
for approx.
1.5s when
switch on.
The device will switch itself o ally to consee Automatic
batte life after 30mins of power on.
3.2
For optimum measuring results, the material characteri-
stic must be selected before each measurement. Press
the button to" " calibrate first, then press the button
" " . The to select the appropriate measurement mode
latest used mode is retained with each measurement
resta.
Selecting the material characteristic
Select this mode for
materials with low
density and easy water
absorption (density
range 0.5~1.2g/cm³),
such as wooden
beams/wooden oors
Wood
EN-05
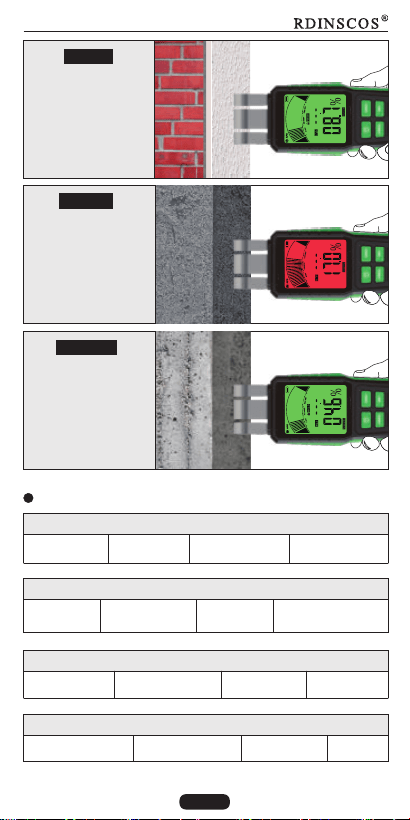
Plaster
Select this mode for
materials with medium
density and easy water
absorption (density
range 1.2~1.8g/cm³),
such as brick/putty
Select this mode for
materials with ve
high-density and low
water absorption rate
(density range 2.4~3.0
g/cm³), such as
Concrete/marbled.
Cement
Select this mode for
materials with high-
density and low water
absorption rate (density
range 1.8~2.4g/cm³),
such as cement screed/
ceramic tile.
Concrete
Wood mode(density range 0.5~1.2g/cm³)
Wooden beam
Putty plaster Gypsum plaster
Clay brick
Lightweight
gray sand brick
Ordina concrete
Cement screed
Marble
Cobblestone
Wooden oor
Wooden furniture Aerated concrete
Plaster mode(density range 1.2~1.8g/cm³)
Cement mode(density range 1.8~2.4g/cm³)
Ceramic tile Shale brick
Concrete mode(density range 2.4~3.0g/cm³)
Building material groups of 4 measurement mode
Cement moar
Anhydrite screed
EN-06
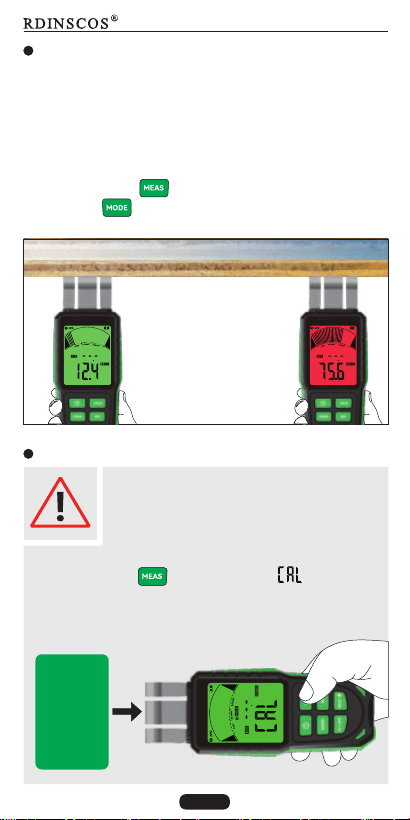
INDEX mode
Index mode is used to rapidly locate moisture with
comparative measurements. The output value (0 ~ 100)
is an indexed value that increases as material moisture
becomes greater. Measurements made in index mode
are independent of material type and paicularly useful
with materials for which no characteristics are stored.
Press the button " " to calibrate first, and then press
the button " " to select the INDEX mode.
D
WET
Quickly locate moisture by
comparative measurements
Reminder on use
Eve time resta the device, it is always
need to be calibrated to zero in mid-air to
compensate environmental inuences,
otherwise the device cannot be used.
Calibration method:
Press the button " ", then the word " " will appear
on the LCD and ashes. During calibration, the Probe
must not be in contact with the user's hands or other
objects.
During
calibration,
keep the
probe away
from any
object at
least 10cm
EN-07
The device has a data hold function and can turn o
the LCD backlight.
Note:
If the probe contact with an object accidentally during
calibration, its moisture will be stored as zero base ,
which will result in a low or zero value measured by the
device. If this event occurs, please recalibrate in the
correct way.
Data hold and turn o LCD backlight
3.4
REF function
3.3
The Reference function allows you to gain an oveiew of
the moisture distribution in the wall. Find a d point on the
material to be measured, fix the measured value as a
reference value by pressing the button " ", then
complete a moisture measurement elsewhere. This gives
you an oveiew from the reference value and current
measured value.
Turn o the buzzer and auto power o
3.5
In order to save batte energy, the device has an
automatic power o (APO) function and can turn o
the buzzer.
Turn o buzzer
APO
Press the button
" "
Hold down the
button " "
Press the button
" "
Data hold Turn o backlight
Hold down the
button " "
EN-08

Batte charge
When the batte is low, serious errors may occur in the
measurement data. Batte charge is required when the
device can no longer be switched on or the batte icon
shows low power " " . Please use a type-C cable to
charge.
3.6
4. Dielectric measurement and notes
Dielectric measurement is an indirect measurement
method, the dielectric permittivity of the measured
material changes with the change of moisture content,
the moisture content of the measured material is
deduced from the changed dielectric permittivity.
The dielectric measurement method can only roughly
measure the moisture value of the material. The
measurement results can be inuenced by various
factors.
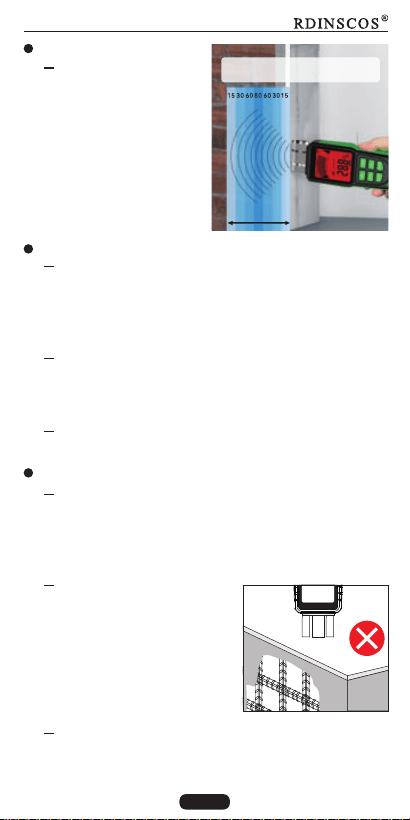
When the probe is held to corners (e.g. window
frames), the measured value is generally higher,
because there is more matter in the measuring
probe's stray eld. Toward a corner a distance of
less than 10cm has to be obseed.
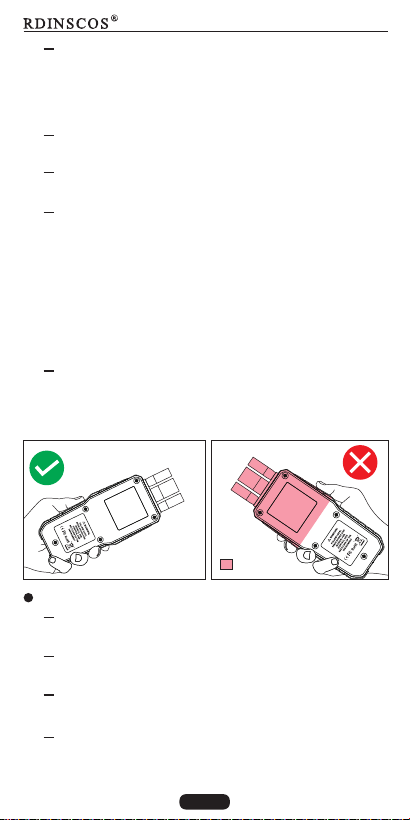
When peorming the measurement, always hold
the probe perpendicular to the material to be
measured. Press the probe rmly against the
suace to be measured and make sure not to tilt it.
Peorming the measurement
EN-09
Depending on the
material's bulk density
and degree of moisture
penetration, the
device's penetration
depth 5 ~ 40 mm.
Ensure the materials
thickness 5mm, ≥
otherwise, the device
may have no reading.
Measuring depth
Material characteristics
Increased occurrences of soluble salts in the
measured material can disto the result of the
measurement. The more salts present, the higher
the conductivity of the material and the higher will
be the displayed measurement value.
If possible, do not measure wood with a
temperature below -5°C. Too low wood
temperatures disto the result of the
measurement.
The material should be preferably homogenous
and not have any air pockets.
Electrically conducting materials or electrical elds
If a construction material contains electrically
conducting substances, the dielectric constant is
also increased, which then simulates high
moisture values. Consequently, a too high
measured value will be displayed.
Measuring depth
5~40mm
Ensure the measured materials
thickness greater than 5mm
Avoid static charge of the material to be measured
due to friction. Static charge distos the
measurement result.
lf the material to be
measured contains metal
(e.g. nails, screws, lines,
pipes, etc.) and is situated
within the sensor's
measuring eld, the
measured value skyrockets
due to intense reections.
Avoid
metal
EN-10
The readings can be inuenced by nearby metal,
or your own ngers. Keep at least 5cm distance
from metal . Keep ngers in the narrower pa of
the bottom when using , well clear of sensor.
From visual inspection it is not always apparent.
whether there are any electrically conducting
substances inside the construction material. Some
of the main error sources here are in paicular
reinforcements, metal laminations and conducting
insulation such as slag in timber beam ceiling
constructions. Especially in case of insulation
materials with metal lamination, measured values
are often misinterpreted.
Suace condition
Before measuring, the measuring point is to be
cleared of any impurities (e.g. paint residues, dust).
Oily and/or aqueous timber preseatives aect
the measurement result.
Rough suaces will always result in a too low
measured value.
The suace of the material to be measured should
be as level as possible to permit thorough contact
of the measuring probe.
With a wood moisture of less than 10 % RH
electrostatic forces may occur at the good to be
measured. This can falsify the result of the
measurement. Experience has shown that this
occurs at the outlet of veneer ding plants.
Remove the static charge by use of suitable
grounding measures.
For optimum conditions neither electrical elds
nor conducting materials should be present.
=Avoid
EN-11
Moisture distribution
With material thicknesses of less than 2cm there is
a danger of humidity values from adjacent
material layers aecting the measured value.
For optimum conditions, the moisture should be
evenly distributed within the material to be
measured.
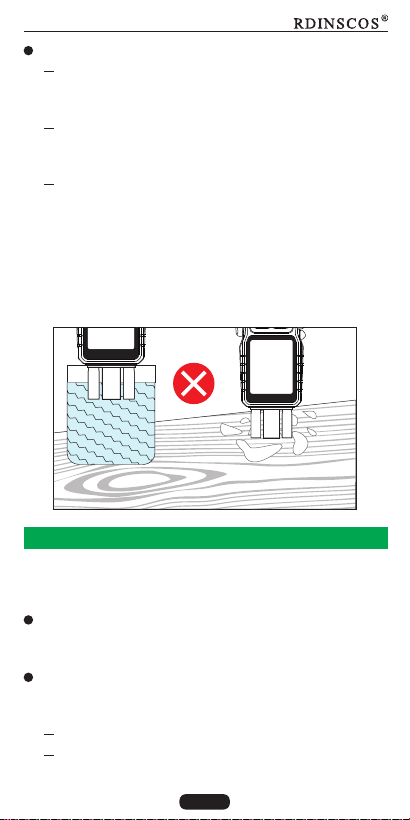
Water
Water attached
to the surface of
the material
Do not use this device measure water or water
attached to the surface of the material that has
not yet been immersed in the material, it is
pointless. Because it is not a instrument which can
detect the presence of water molecules, it works
according to the principle that the dielectric
constant of the material changes with the change
of humidity.
For transpoing the device use a suitable bag to
protect it from external inuences.
Transpo
lf you store or transpo the device improperly, the
device may be damaged. Note the information
regarding transpo and storage of the device.
Storage
When the device is not being used, obsee the
following storage conditions:
5. Transpoation and storage
D and protected from frost and heat.
Protected from dust and direct sunlight.
EN-12

Repair
Do not modify the device or install any spare pas. For
repairsor device testing, contact the manufacturer.
6. Maintenance and repair
Clean the device with a soft, damp and lint-free cloth.
Make sure that no moisture enters the housing. Do not
use any sprays, solvents, alcohol-based cleaning agents
or abrasive cleaners. But only clean water to moisten the
cloth.
Cleaning
7. Waste disposal
At the end of its useful life, the product must
not be disposed of with household waste.
Always dispose of packaging materials,
batteries, and waste electronic devices in an
environmentally friendly manner and in
accordance with local regulations.
The storage temperature complies with the values
specied in the technical data.
EN-13
