
SFN 1054BK
EN
STAND MIST FAN
Translation of the original manual
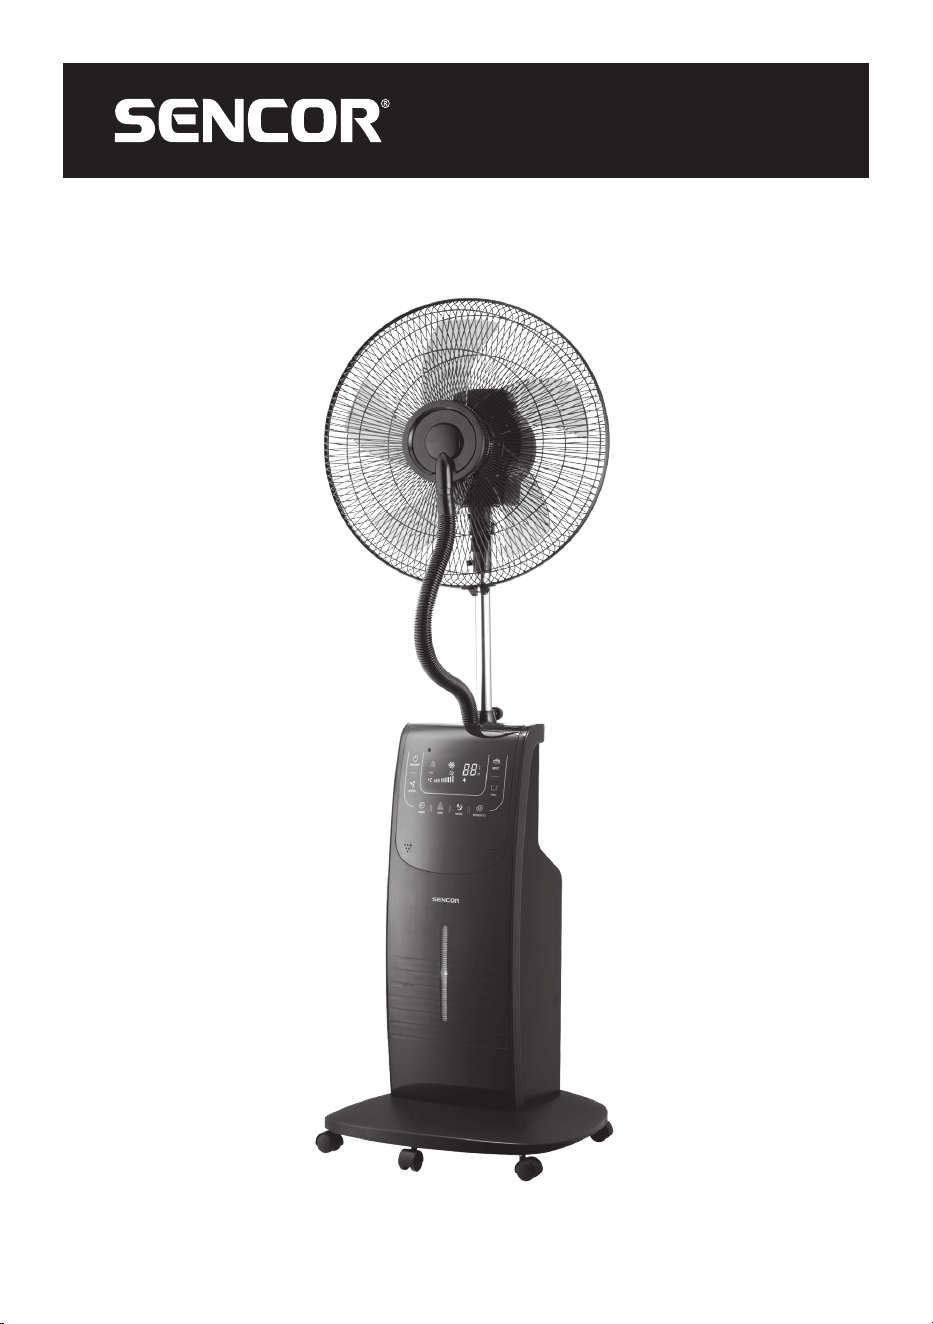
SFN 1054BK
A
23 24
1 2 3 4 5 6
7
8 9
10
11
21
22
14
15
16
17
18
19
20
13
12
C
1
2
3
4
5
6
7
8
B
1
2
8
7
3 4 5 6

- 1 -
02/2024
2024, .
EN Stand Mist Fan
Important safety instructions
READ CAREFULLY AND STORE FOR FUTURE USE.
• This appliance may be used by children 8 years of age
and older and by persons with physical, sensory or mental
impairments or by inexperienced persons, if they are
properly supervised or have been informed about how to
use of the product in asafe manner and understand the
potential dangers.
• Children must not play with the appliance. Cleaning
and maintenance performed by the user must not be
performed by unsupervised children.
• If the power cord is damaged, have it replaced in
aprofessional service centre in order to prevent
adangerous situation. It is forbidden to use the appliance
with the power cord damaged.
• The water tank is marked with minimum and maximum
level lines. Always make sure that the water reaches
at least the minimum mark. Never fill the tank over the
maximum level line.
• Pay attention when using the appliance as it produces
steam.
• When filling or cleaning, disconnect the appliance by
pulling the plug out of the power socket.

- 2 -
02/2024
2024, .
• High humidity values can promote the growth of biological
organisms in the environment.
• Do not allow the area around the appliance to become
damp or wet. If there is increased humidity (dew),
switch the appliance to alower power. If the power of
the appliance cannot be reduced, use the appliance
intermittently. Do not allow absorbent materials such as
carpets, curtains, drapes or tablecloths to get wet.
• Never leave water in the tank when the appliance is not in
use.
• Empty and clean the appliance before storing. Clean the
appliance before further use.
• The appliance is designed for use in household, office and
similar types of areas. It is not intended for commercial
purposes.
• Do not use the appliance in rooms where flammable or
explosive chemicals are stored, in industrial environments
or outdoors.
• Place the appliance only on aclean, flat, dry, smooth and
stable surface. Do not place the appliance on unstable
surfaces such as carpets with very long and thick fibres.
• Do not place the appliance in the vicinity of an open flame
or appliances that are sources of heat.
• Do not use the appliance to support various items.
Clean the water tank every 3 days.
• Before connecting the appliance to apower socket, check that the nominal voltage on the appliance’srating label matches the electrical voltage in
the socket.
• Connect the appliance only to agrounded power socket. The power socket to which you connect the appliance must be freely accessible so that it is
possible to quickly disconnect the power cord from the power source if necessary.
• Install the power cord in such away that it is not tripped over.

- 3 -
02/2024
2024, .
• If the appliance is equipped with castors, take extra care when handling it, e.g. to prevent it from falling down stairs or sliding off asloping surface. To
avoid tipping the appliance over, do not try to roll the castors over the carpet.
• Do not touch an appliance that is connected to the mains socket with wet hands.
• Do not use the appliance near ashower, swimming pool, etc., do not spray water or any other liquid on it or submerge it in water or any other liquid.
• Do not cover the air inlet or outlet openings or insert objects into them. This could damage the appliance.
• Adequate space must be provided for air circulation around the appliance during operation.
• Only fill the tank with clean, cold water. Do not add any other additives such as air fresheners, essential oils, etc. to the appliance. Otherwise damage
to the appliance may occur. Do not fill the tank above the maximum level line.
• Before operating the appliance in cooling and humidifying mode, make sure that the water level in the tank is at least at the minimum level.
• Use the appropriate button on the control panel or remote control to switch off the appliance. Do not switch off the appliance by disconnecting the
power cord from the socket.
• For health reasons, do not expose yourself or animals to direct cold air for long periods of time.
• Always switch off and unplug the appliance before assembling or disassembling it when not in use, before filling, cleaning or moving it.
• Perform the cleaning in accordance with the instructions in the Cleaning and maintenance chapter.
• Move, store and transport the appliance in an upright position.
• Do not attempt to remove the outer case of the appliance.
• Unplug the appliance from the power socket by pulling the plug, not the power cord. Otherwise, damage to the power cord or the socket may occur.
• Do not use the appliance if it is not working correctly, if it has been damaged or has been submerged in water. To avoid the danger of injury by
electrical shock, do not repair the appliance yourself or make any adjustments to it. Have all repairs or adjustments performed at an authorised
service centre. By tampering with the appliance, you expose yourself to the risk of losing your legal rights regarding faulty performance or warranty
for quality.
- 4 -
02/2024
2024, .
• Thank you for purchasing our SENCOR product; we hope you will be
satisfied with it.
• Prior to using this appliance, please read the user’smanual
thoroughly, even in cases where owners have previously familiarised
themselves with using similar types of appliances. Only use the
appliance in the manner described in this user’smanual. Keep the
manual for future reference.
• It is recommended to keep the original shipping carton, packing
material, receipt and confirmation of the extent of the seller’sliability
or warranty certificate at least for the duration of the legal right of
defective performance or quality guarantee. When transporting the
appliance, we recommend packaging it again in the original box
provided by the manufacturer.
. . . . . . . . . . . . . . . . . . . . . . . . . . . . . . . . . . . . . . . . . . . . . . . . . . . . . . . . . . . . . . . . . . . .
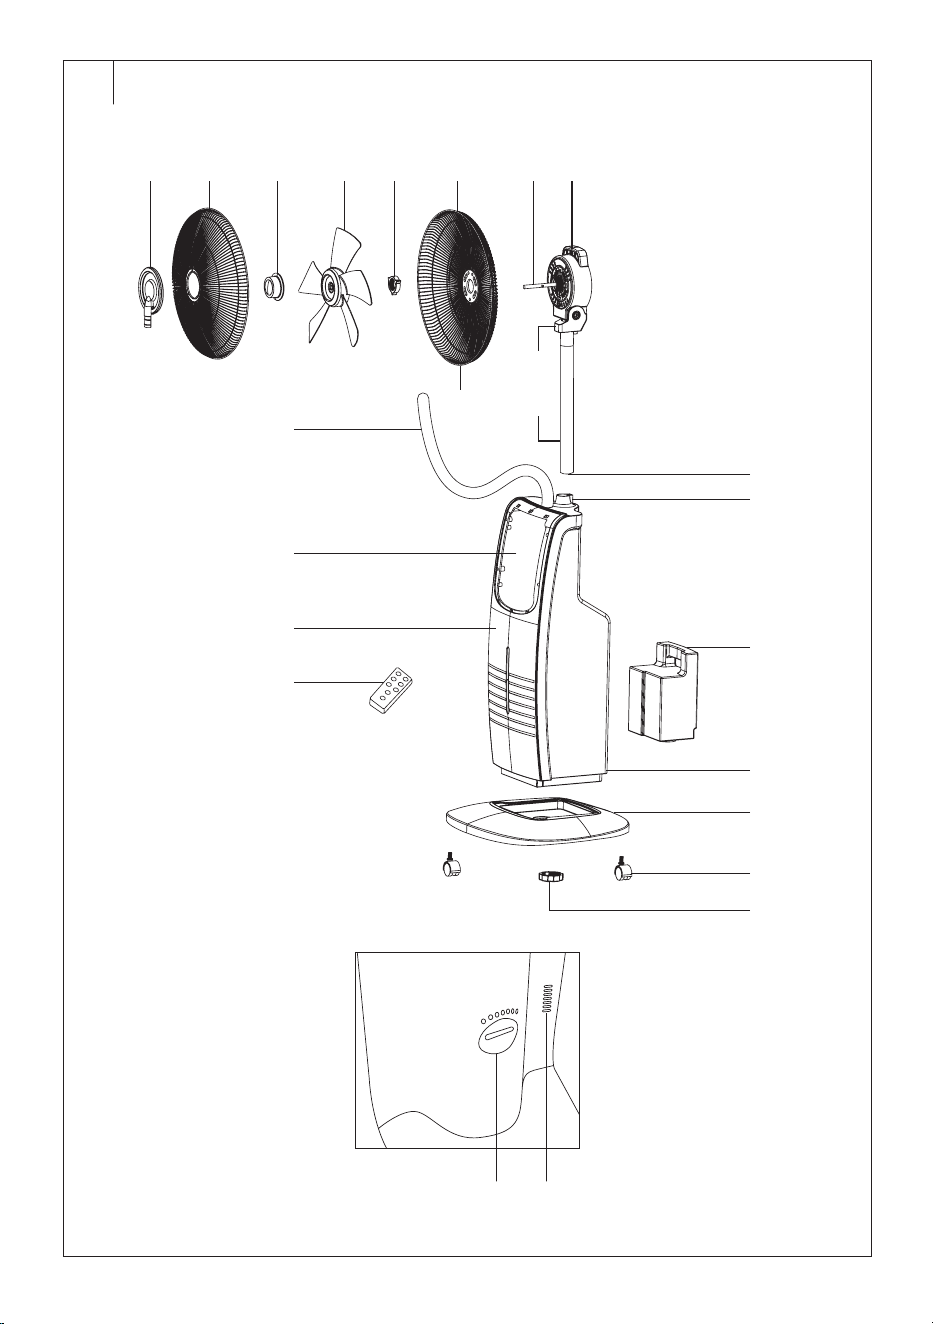
FAN DESCRIPTION
A1 Misting board
A2 Front grille
A3 Blade lock nut
A4 Fan blades
A5 Rear grille lock nut
A6 Rear grille
A7 Hole to fix the front and rear
grille
A8 Motor shaft
A9 Motor unit
A10 Motor unit holder
A11 Fan rod
A12 Power connection line
A13 Rod screw
A14 Control panel
A15 Decorative front panel
A16 Water tank
A17 Fan body
A18 Base
A19 Castors
A20 Fan body lock nut
A21 Misting hose
A22 Remote control
A23 Place for inserting electric
mosquito repellent pads
A24 Aroma box
Not shown: ice box
. . . . . . . . . . . . . . . . . . . . . . . . . . . . . . . . . . . . . . . . . . . . . . . . . . . . . . . . . . . . . . . . . . . .
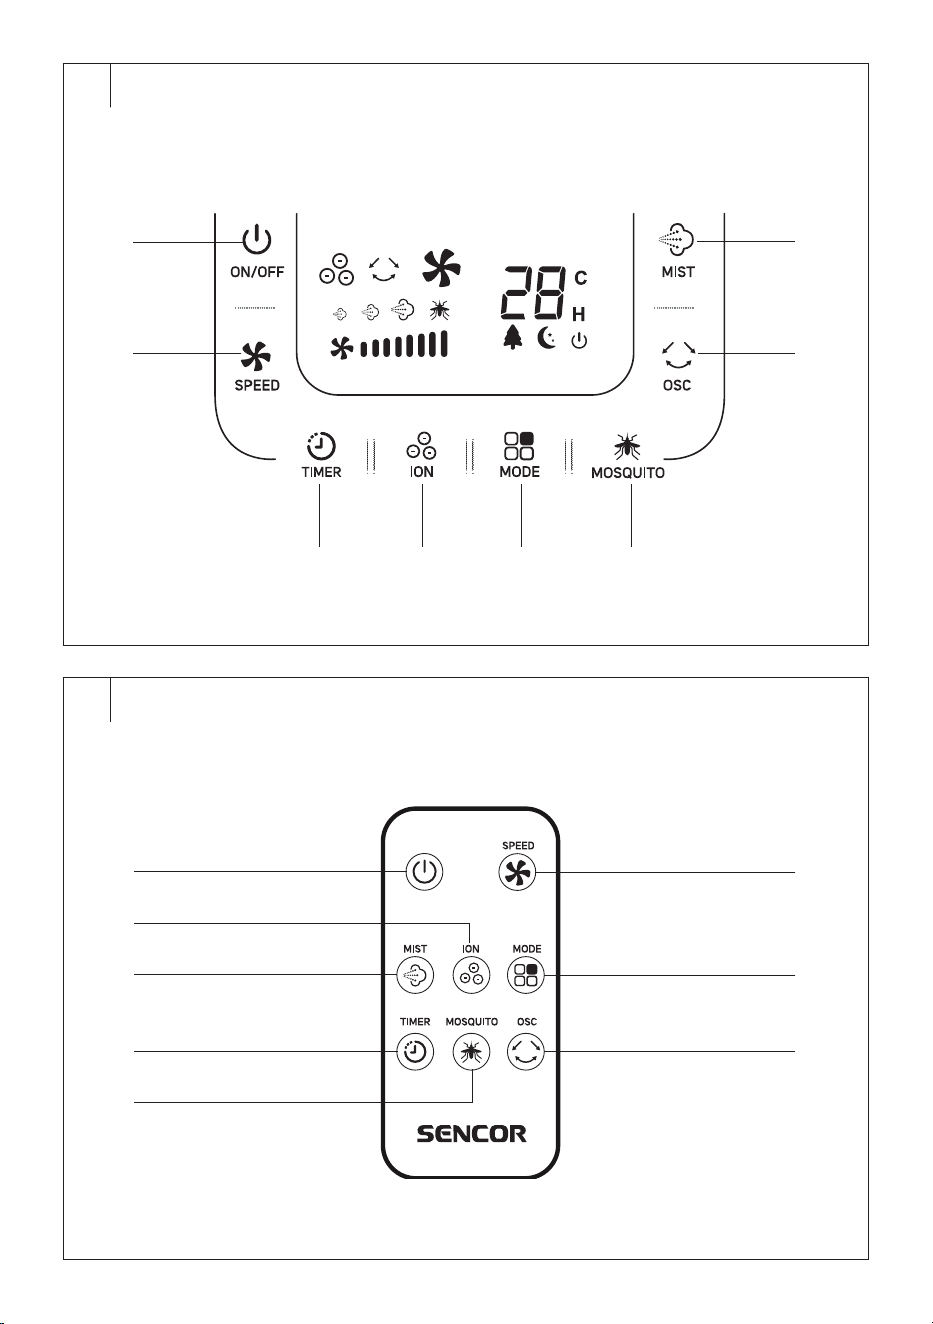
CONTROL PANEL DESCRIPTION
B1 ON/OFF button to switch the
fan on/off
B2 SPEED button to set the fan
speed
B3 TIMER to set the automatic
shutdown time
B4 ION button to switch the
ionisation function on/off
B5 MODE button to select the
operating mode
B6 MOSQUITO button to switch
the mosquito repellent
function on/off
B7 OSC button to switch the
horizontal oscillation on/off
B8 MIST button to switch the
misting effect on/off
. . . . . . . . . . . . . . . . . . . . . . . . . . . . . . . . . . . . . . . . . . . . . . . . . . . . . . . . . . . . . . . . . . . .
REMOTE CONTROL DESCRIPTION
C1 ON/OFF button to switch the
fan on/off
C2 ION button to switch the
ionisation function on/off
C3 MIST button to switch the
misting effect on/off
C4 TIMER to set the automatic
shutdown time
C5 MOSQUITO button to switch
the mosquito repellent
function on/off
C6 SPEED button to set the fan
speed
C7 MODE button to select the
operating mode
C8 OSC button to switch the
horizontal oscillation on/off
. . . . . . . . . . . . . . . . . . . . . . . . . . . . . . . . . . . . . . . . . . . . . . . . . . . . . . . . . . . . . . . . . . . .
BEFORE FIRST USE
Before first use, remove the appliance and its accessories form the
packaging and discard all promotional labels and tags. Check that neither
the appliance nor any of its components is damaged.
. . . . . . . . . . . . . . . . . . . . . . . . . . . . . . . . . . . . . . . . . . . . . . . . . . . . . . . . . . . . . . . . . . . .
ASSEMBLY
Warning:
Before assembling, make sure that you have
unpacked all the components.
1. Insert the castors from below into the holes in the base. Press lightly.
Make sure the castors turn freely.
2. Insert the fan body into the hole in the base. Use the lock nut to
secure the fan body in the base. Make sure the fan body is firmly
attached to the base. Do not over-tighten the lock nut to avoid
stripping the thread.
3. Connect the power line and insert the rod from above into the fan
body. Secure with ascrew.
4. Place the rear grill on the motor unit so that the shaft passes through
the hole in the rear grill. Attach the rear grille with the lock nut.
Tighten properly.
5. Place the fan blades on the shaft. Push all the way to the back grill.
Attach the fan blades with the lock nut.
6. Install the misting board onto the middle of the front grill by screw
and keep the misting hose adown.
7. Install the front grill to the rear grill with the hoop and keep the hoop
holes in the bottom are aligned and fasten by screw.
8. Connect the misting hose of fan body to the misting board.
Installation is finished.
. . . . . . . . . . . . . . . . . . . . . . . . . . . . . . . . . . . . . . . . . . . . . . . . . . . . . . . . . . . . . . . . . . . .
SELECTING THE INSTALLATION LOCATION
• Place the fan on ahorizontal, stable, dry and smooth surface within
easy reach of apower socket.
• Ensure that there is enough free space around the fan.
• Do not place the fan in the vicinity of an open fire, sources of heat (e.g.
heating) or do not expose it to direct sunlight.
. . . . . . . . . . . . . . . . . . . . . . . . . . . . . . . . . . . . . . . . . . . . . . . . . . . . . . . . . . . . . . . . . . . .
FILLING THE WATER TANK
Fill the water tank in case you will use the misting effect of the fan.
1. Pull the water tank slightly from the back upwards.
2. Then remove it from the fan body.
3. Unscrew the water tank lid and pour cold water inside. When filling,
always observe the minimum and maximum lines marked on the
tank.
4. Screw the lid and insert the water tank into the fan.
Warning:
Do not switch the misting effect function on if the
water tank is empty or there is lack of water.
Note:
When the misting effect function is on, the water tank
backlight lights in blue. If there is lack of water in the water
tank, the backlight will change colour to red. In such case, it
is necessary to fill the water tank.
Warning:
Do not leave the water in the tank for more than one
day to prevent the growth of unwanted bacteria,
microorganisms or mold. When filling, make sure that
the water level reaches at least the minimum mark,
but does not exceed the maximum mark.
EN
Stand Mist Fan
User’smanual
- 5 -
02/2024
2024, .
Aroma box
Pull out the aroma box from the fan body. Add afew drops of aroma oil.
Push the aroma box back.
Mosquito box
You can also insert an anti-mosquito cartridge into the mosquito box,
which will gradually release and repel mosquitoes.
Ice box
Place the supplied ice box in the freezer and leave it there for at least
12hours. Then place it in the water tank. This will lower the temperature of
the water in the tank. The ice box is reusable.
. . . . . . . . . . . . . . . . . . . . . . . . . . . . . . . . . . . . . . . . . . . . . . . . . . . . . . . . . . . . . . . . . . . .
POWER SUPPLY CONNECTION
Connect the power cord plug to a.properly earthed power outlet.
Abeep will sound, and the display will light up briefly. It then turns off and
the fan switches to standby mode.
. . . . . . . . . . . . . . . . . . . . . . . . . . . . . . . . . . . . . . . . . . . . . . . . . . . . . . . . . . . . . . . . . . . .
OPERATING VIA THE CONTROL PANEL
Switching the fan on/off
• While the fan is in stand-by mode, press the ON/OFF button once
briefly and the ON/OFF button will light up. Press the ON/OFF button
again, and the fan will start in normal operating mode and the fan
speed will be set to low.
• If you need to switch the fan off, press the button ON/OFF briefly and
the fan will switch to the standby mode.
Warning:
Do not stick fingers, pencils or other objects through
the grille when the fan is connected to the power
supply and especially when it is running. There is
arisk of serious injury.
Note:
Disconnect the power cord from the mains socket only
when the fan is to be stored. Otherwise, you will not be able
to control it via the remote control.
Room temperature display
• The fan is equipped with atemperature sensor that detects the
temperature in the room and displays it on the display. The displayed
temperature is only an indication of the room temperature and may
differ depending on the location of the fan in the room.
• When you set the automatic shutdown function, the display will
show alternatively the temperature and remaining time of automatic
shutdown.
Speed setting
• Press the SPEED button repeatedly to set the desired speed: low
speed – middle speed – high speed. The corresponding number of
light indicators will light up on the speed bar on the display, and they
will flash one by one.
Operating mode selection
• Press the MODE button repeatedly to select the operating mode:
normal mode, natural breeze mode, and sleep mode.
1. Normal mode
Normal operating mode is the default mode. In this mode, no button is lit.
The current room temperature will be shown on the display.
Adjust the fan speed manually as described above.
2. Natural breeze mode
The icon will light up on the display after selecting this mode.
The natural breeze mode creates agentle breeze by simulating the
rhythm of the natural wind and alternating fan speeds automatically
according to pre-programmed cycles.
3. Sleep mode
The icon will light up on the display after selecting this mode.
Sleep mode will automatically adjust the fan speed according to the
ambient temperature in the room. This mode ensures optimal air
circulation with regard to quiet operation and energy savings. Therefore,
it is advisable to use it during sleep or when the fan is switched on for an
extended period of time.
Automatic shutdown
• This function allows to automatically switch off the fan after the set
time has elapsed.
• Press the TIMER mode, and the numeric display will show 01.
• Press the TIMER mode repeatedly to set the time from 01 to 12 hours.
• Wait for awhile till the time is stored in the memory, and the
countdown will start. The digital display will alternately show the room
temperature and the countdown time till automatic shutdown. The °C
icon lights up when the temperature is displayed, and the H icon lights
up when the time is displayed.
• The fan will automatically turn off and switch to standby mode when
the set time has elapsed.
• If you need to cancel the automatic shutdown, press the TIMER
button repeatedly until the display shows “0” and the H icon goes out.
Note:
If you need to ensure continuous fan operation, do not turn
on the automatic power off function.
The automatic shutdown can be set in all operating modes.
Ionisation function
• Press the ION button to switch the ionisation function on. The icon
will light up on the display.
• Press the ION button to switch the ionisation function off. The icon
will go off on the display.
Mosquito repellent function
• Make sure you have inserted an anti-mosquito cartridge into the
aroma box before switching this function on.
• Press the MOSQUITO button to switch the mosquito repellent function
on. The icon will light up on the display.
• Press the MOSQUITO button to switch the mosquito repellent function
off. The icon will go off on the display.
Misting effect function
• Before switching this function on, make sure the water tank is filled
with water and the misting hose is connected to the misting board.
• Press the MIST button repeatedly to set the misting effect level: low
( icon lights up) – middle ( icon lights up) – high ( icon lights
up).
• Press the MIST button again the switch this function off.
• When the misting effect function is on, the water tank backlight lights
in blue. If there is lack of water in the water tank, the backlight will
change colour to red. In such case, it is necessary to fill the water tank.
Follow the instruction in the “FILLING THE WATER TANK” part.
Oscillation setting
• Press the OSC button to switch the oscillation function on. The
icon will light up on the display. The fan head will start turning from
side to side.
• Press the OSC button to switch the oscillation function off. The icon
will go off on the display.
. . . . . . . . . . . . . . . . . . . . . . . . . . . . . . . . . . . . . . . . . . . . . . . . . . . . . . . . . . . . . . . . . . . .
OPERATING VIA THE REMOTE CONTROL
Inserting batteries into the remote Control
1. Push the latch of the battery holder on the rear side of the remote
control and pull out the holder.
2. Insert anew CR2032 type battery into the holder. When inserting,
take care to observe the correct polarity. This is marked on the rear
side of the remote control.
3. Insert the holder back into the remote control.
• To use the remote control, point it at the fan. The maximum
signal range is 6m. If you place the remote in such away that the
transmission of the signal is blocked by barrier, the signal may not be
transmitted at all.
• If you are replacing the batteries, follow the same procedure, but
remove the old batteries first.
- 6 -
02/2024
2024, .
Note:
If you plan not to use the remote control for an extended
period of time, remove the batteries. Never put batteries in
afire, short-circuit or damage in any way. Dispose of them
in an environmentally friendly manner at the end of their
useful life. Never dispose of batteries in municipal waste.
The principle of operating the fan by remote control is the same as that
described in chapter “OPERATION VIA THE CONTROL PANEL”.
. . . . . . . . . . . . . . . . . . . . . . . . . . . . . . . . . . . . . . . . . . . . . . . . . . . . . . . . . . . . . . . . . . . .
CLEANING AND MAINTENANCE
• Before cleaning, make sure the fan is switched off and disconnected
from the power socket.
• Do not use abrasive cleaning agents, solvents, or any substances to
clean any parts of the appliance that could damage the surface of the
appliance.
Warning:
To prevent the risk of electric shock, do not submerge
the appliance, plug or power cord in water or any
other liquid.
Cleaning the fan
• Use aclean, slightly damp cloth to clean the outer surface of the fan.
Then wipe everything dry thoroughly. Make sure that when cleaning,
no water leaks into the ventilation holes.
• You can also use avacuum cleaner with abrush nozzle attached to
clean the fan blades.
• If the fan blades are heavily soiled and need to be wiped, make sure
that the fan is turned off and disconnected from the power socket.
Loosen the screw and then remove the front grill. Wipe the blades with
aslightly damp cloth. Wipe with adry cloth. Then fit the front grille
and secure with screw. Follow the instructions in the “ASSEMBLY”
section.
Warning:
Before reinstalling the front grille, make sure that the
fan blades are completely dry.
Cleaning the water tank
• Empty the water from the water tank after each use.
• Remove the water tank from the fan body. Unscrew the lid and pour
the water from the tank. Leave the lid open to allow the tank to dry.
Cleaning the aroma box
• Pull the aroma box out of the fan body. Wipe the aroma box with
aslightly damp cloth.
Storage
• If you plan not to use the appliance for an extended period of time,
disconnect the power plug from the mains socket and clean the fan
according to the instructions above.
• Before storing, ensure that the appliance and all accessories are
thoroughly clean and dry.
• Store the appliance in adry, clean, and well-ventilated place away
from extreme temperatures and out of the reach of children and pets.
. . . . . . . . . . . . . . . . . . . . . . . . . . . . . . . . . . . . . . . . . . . . . . . . . . . . . . . . . . . . . . . . . . . .
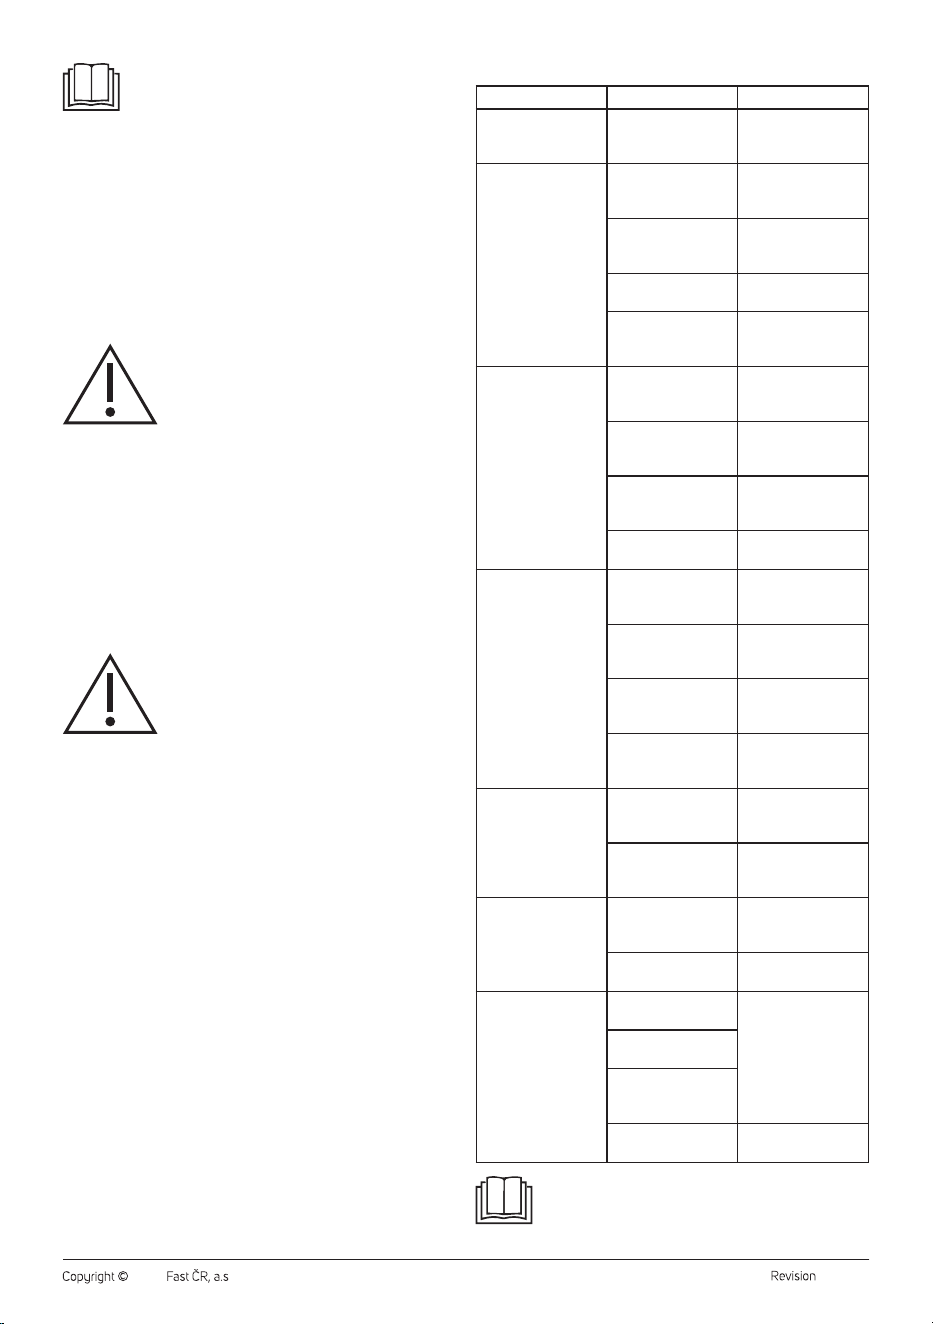
TROUBLESHOOTING
Problem Possible cause Solution
It is not possible to
switch the fan on.
The power cord plug
is not inserted in the
power socket.
Insert the power cord
plug into the power
socket.
The fan blades do not
rotate even though
the fan is on.
The motor does not
work.
Contact the
authorised service
centre.
Low voltage. Have the voltage in
your power socket
checked.
The motor shaft is
blocked.
Remove the cause of
the blockage.
Circuit board fault. Contact the
authorised service
centre.
The fan shakes and
vibrates.
The rear grille is
loosened.
Place the rear grille
properly and tighten
the lock nut.
The fan blades are
loosened.
Place the fan blades
properly and tighten
the lock nut.
The fan blades are
damaged.
Contact the
authorised service
centre.
The fan blades are
not balanced.
Turn the fan blades
180° and fix again.
The misting effect is
on, but the fan does
not produce mist.
The water tank is
empty.
Fill the water tank
with clean and cold
water.
The water tank is
damaged.
Contact the
authorised service
centre.
The misting board or
the misting hose are
blocked.
Remove the cause of
blockage.
The water tank is not
inserted properly.
Insert properly the
water tank into the
fan body.
The fan is on, but the
fan blades do not
rotate, nor the fan
produce mist.
The water tank is
empty.
Fill the water tank
with clean and cold
water.
The fan is broken. Contact the
authorised service
centre.
The mist smells
slightly.
Afine odour may
appear after the first
switching on
The odour will
disappear while using.
The water tank is
dirty.
Clean the water tank.
Other problem The motor smells
burnt.
Stop using the fan
and contact the
authorized service
centre.
Damaged or exposed
isolation.
The rear motor cover
and net hoop are
broken.
The rear motor cover
is overheated.
Switch the fan off and
leave it to cool down.
Note:
If the problem is not listed in the table or if the problem
persists, stop using the fan, turn it off and contact an
authorized service centre.
- 7 -
02/2024
2024, .
TECHNICAL SPECIFICATIONS
Rated voltage...........................................................................................220–240 V~
Rated frequency ..........................................................................................50–60 Hz
Rated power ............................................................................................................90 W
Noise level ............................................................................................................≤53 dB
Fan blade diameter ..........................................................................................37.5 cm
Maximum volume of mist effect ...............................................................200 ml/h
RPM ...................................................................................................................1250 rpm
Water tank capacity ................................................................................................. 3.1 l
Dimensions ........................................................................... 660 × 330 × 455 mm
Weight .........................................................................................................................7 kg
Maximum fan flow rate ....................................................................... 51.48 m
3
/min
Operating value ............................................................................. 0.98 (m
3
/min)/W
Maximum air velocity ......................................................................................5.3 m/s
Contact for further information .......................................................... FAST ČR, a.s.,
..................................................USanitasu 1621, 251 01 Říčany, Czech Republic
We reserve the right to change the text and technical specifications.
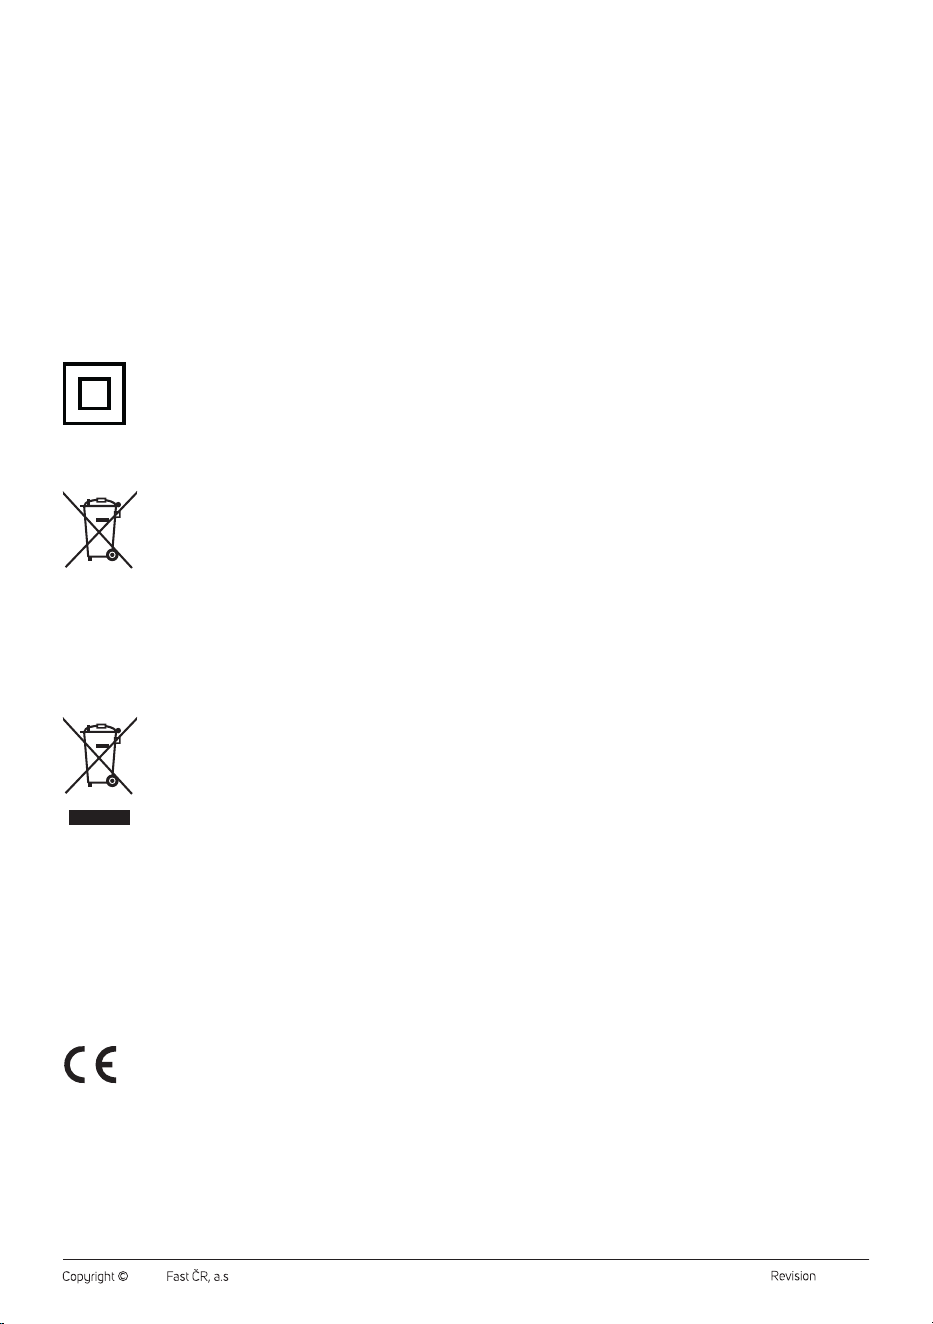
Safety Class for Electric Shock Protection:
Class II – Electric shock protection is provided by double or
heavy-duty insulation.
. . . . . . . . . . . . . . . . . . . . . . . . . . . . . . . . . . . . . . . . . . . . . . . . . . . . . . . . . . . . . . . . . . . .
DISPOSAL OF USED BATTERIES
Batteries contain environmentally damaging compounds
and, therefore, do not belong in standard communal waste.
Hand over used batteries for proper disposal at locations
intended for their collection.
. . . . . . . . . . . . . . . . . . . . . . . . . . . . . . . . . . . . . . . . . . . . . . . . . . . . . . . . . . . . . . . . . . . .
INSTRUCTIONS AND INFORMATION ON DISPOSAL OF USED
PACKAGING MATERIAL
Dispose of used packaging material at asite designated for waste in your
municipality.
DISPOSING OF USED ELECTRICAL AND ELECTRONIC EQUIPMENT
This symbol on the products or accompanying documents
indicates that used electrical and electronic products
should not be disposed of with regular municipal waste.
For proper disposal and recycling, take these products to
designated collection points. Or in some European Union
states or other European countries the products can be
returned to the local retailer when buying an equivalent
new product. Disposing of this product correctly helps save
valuable natural resources and prevents damage to the environment by
improper waste disposal. Ask your local authorities or collection facility for
more details. In accordance with national regulations penalties may be
imposed for the incorrect disposal of this type of waste.
For Business Entities in European Union States
If you want to dispose of electric or electronic devices, ask your retailer or
supplier for the necessary information.
Disposal in Other Countries Outside the European Union
This symbol is valid in the European Union. If you wish to dispose of this
product elsewhere, request the necessary information about the correct
disposal method from the local council or from your retailer.
This product complies with all the essential requirements of
the applicable EU directives.