
42CC MINI BIKE
ITEM#99758(BLACK), 99759 (RED), 99760 (BLUE), 99761 (MINT)
OWNER'S MANUAL AND SAFETY INSTRUCTIONS
SAVE THIS MANUAL. KEEP THIS MANUAL FOR SAFETY WARNINGS, PRECAUTIONS, ASSEMBLY,
OPERATION, INSPECTION, MAINTENANCE AND CLEANING PROCEDURES. WRITE THE PRODUCT'S
SERIAL NUMBER ON THE BACK OF THE MANUAL, OR THE MONTH AND YEAR OF PURCHASE IF
PRODUCT HAS NO SERIAL NUMBER
FOR QUESTIONS, PLEASE CALL CUSTOMER SEICE: 909.628.0880

RNING
SAFETY WARNINGS
This owner's manual contains important information. Each rider of the mini bike
must read this owner's manual thoroughly before riding the mini bike for the first
time and must always follow all of the instructions outlined in this manual. This
manual must remain with the vehicle if the vehicle is transferred to a new owner. Do not discard this
owner's manual as it must be reviewed by each rider prior to his or her operation of the vehicle. If
a minor is operating the vehicle, it is the responsibility of the minor's guardian to ensure that the
minor understands the information contained in this manual. This manual contains the latest product
information available before printing. Due to product improvements or production changes, there
could be discrepancies between the information contained in this owner's manual and actual product
specifications. XtremePowerUS reserves the right to make changes to its products at any time without
notice and without obligation to make the same or similar changes to any vehicle previously built or sold.
It is the responsibility of any rider of this vehicle to be familiar with and fully comply with all laws, rules, and
regulations governing the operation of this vehicle. Laws vary by jurisdiction. XtremePowerUS has no responsibility
or liability for the costs to comply with all applicable laws and regulations or for mini bike damage or human injury
resulting from an owner or operator's failure to follow all relevant laws and regulations. These laws include, but
are not limited to:
»»hicle Operation Laws: It is illegal to operate this o-road vehicle on public streets, roads, and highways.
It is illegal to operate this vehicle under the influence of drugs or alcohol, even on private property. Other vehicle
operation laws might apply in your area.
»»hicle Title & Registration Laws: You may need to title and/or register your new mini bike with one or more
state or municipal government agencies. u are solely responsible for titling and/or registering your mini bike
and for all related costs. Keep your mini bike's Certificate of Origin; it may be required to title and/or register your
vehicle.
»»hicle Modification Laws: Do not modi your mini bike or attach aftermarket accessories. Modifications to
the carburetor and exhaust systems are a violation of the law and are subject to prosecution by the Environmental
Protection Agency.
»»hicle Maintenance Laws: Always follow all relevant vehicle maintenance laws, which include, but are not
limited to, laws regulating the handling and disposal of flammable and dangerous materials such as gasoline
and oil.
A
RNING: Never allow children under the age of 16 to ride the mini bike. The mini bike is designed for
riders who are 16 or older. Riders younger than age 16 should not operate the mini bike.
A
RNING: Never allow unsupervised or unqualified minors to ride the bike. If the operator of the mini
bike is a minor, the rider's guardian is responsible 1) for ensuring that the rider meets the physical and
developmental levels necessary to safely ride the bike and 2) r supervising the minor while he or she is
riding the mini bike.
A
RNING: Always wear protective safety gear while riding the mini bike. Protective safety gear includes,
but is not limited to, a Department of Transportation approved full-face motorcycle helmet with a chin strap,
goggles, boots, gloves, long riding pants with hip and knee pads, and a long sleeved riding jersey with
elbow, chest, and shoulder pads.
A
RNING: Always secure hair while riding the mini bike. Loose hair has the potential to get caught in the
mini bike. Always keep hair tightly secured while operating the bike.
1

SAFETY WARNINGS
A
RNING: Never operate the bike under the influence of alcohol or drugs. The use of alcohol and/or drugs
will impair the rider's ability to safety operate the mini bike.
A
RNING: Never operate the mini bike with a passenger. The mini bike is designed r one rider at a time.
A
RNING: Never ride the mini bike on hard surfaces. The mini bike's tires are designed for operation
in dirt, gravel, or similar materials and are not stable on any hard surfaces including, but not limited to,
concrete or asphalt.
A RNING: Never ride the mini bike alone. Because unexpected situations can occur, always ride in
� proximity of your base and of other people who can provide assistance in case of a problem.
A
RNING: Never ride the mini bike if it is not in proper riding condition. Always inspect your mini bike
before you ride to ensure that it is in proper riding condition. If you have any indication that your mini bike is
not running correctly, stop riding immediately. Do not ride your mini bike back to your base.
A
RNING: Ride within your skill level at comrtable speeds. Be cautious of potential hazards and diicult
terrain. Exercise extra caution in muddy or wet riding conditions. Always keep both hands and feet on the
handlebars and ot pegs. Do not brake or accelerate while turning. Do not attempt tricks or stunts or go o
jumps.
A RNING: Never operate the mini bike in an enclosed space with poor ventilation. The mini bike's exhaust
� gas contains poisonous carbon monoxide which can collect rapidly in an enclosed area and result in illness
or death.
A RNING: Never modify the mini bike or attach aer-market accessories. Modifications and aer-market
� accessories reduce the rider's ability to control and ride the mini bike safely. XtremePowerUS is not liable
for any damage or injury caused by any aer-market accessory.
A
RNING: Always perform the necessary maintenance on the vehicle. Failure to perform necessary
maintenance on the vehicle could result in harm or fatal injury to the operator or others.
A
RNING: Always exercise caution while servicing the mini bike. Performing most maintenance procedures
on the mini bike involves handing potentially dangerous and flammable materials such as oil and gasoline.
Recognize the risk that injury could potentially occur while you are servicing your mini bike and always use
good judgment. Wear the necessary protective gear. Keep flames and cigarettes away from the mini bike.
A
RNING: Never perform maintenance on the vehicle while it is running. To reduce the risk of potential
harm or burns from hot or moving parts, always ensure that the engine stop switch and the fuel valve lever
are both in the "o' position before performing maintenance on your mini bike. Never touch any of the mini
bike's parts while the mini bike is running.
PROP 65 RNING: Operating, servicing and maintaining a passenger vehicle or o-highway motor
vehicle can expose you to chemicals including engine exhaust, carbon monoxide, phthalates, and lead,
which are known to the State of California to cause cancer and birth defects or other reproductive harm.
To minimize exposure, avoid breathing exhaust, do not idle the engine except as necessary, service your
vehicle in a well-ventilated area and wear gloves or wash your hands frequently when servicing your
vehicle.
SAVE THESE WARNINGS.
2
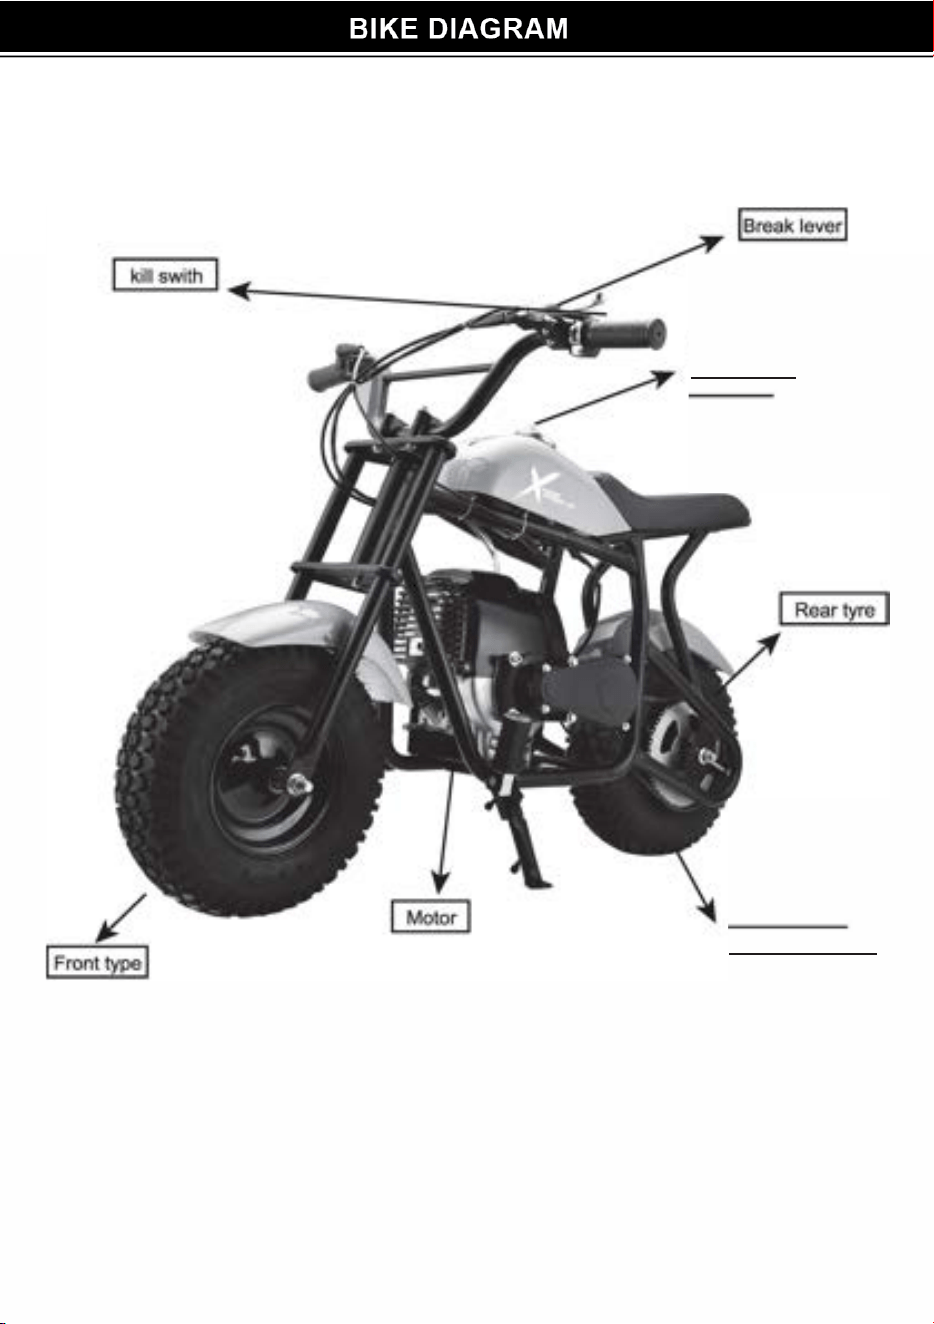
I Tankgap I
I Chian adjuster I
3
PACKAGE CONTENTS
Your motorcycle romes with the following items in the box. Please locate all of the following:
1. Motorcycle
2. Tool Kit
3. Product Handbook
GETTING STARTED
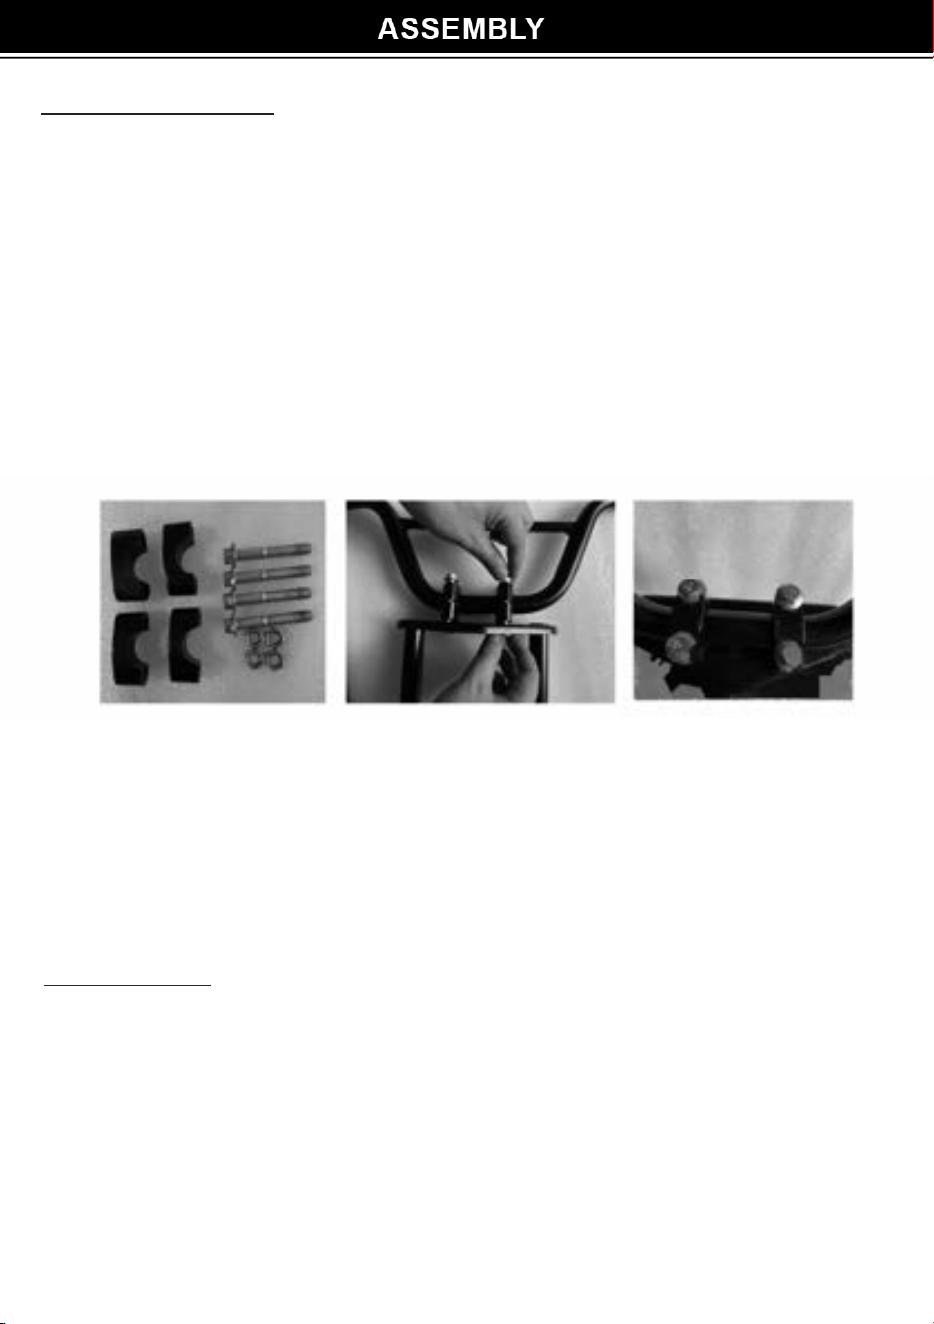
Assembling
1. Open the carton, take out of the motorcycle.
2. Setting up handle bar. Take out the aluminum block from the tool bag. Set up the
handle bar in comfortable position and tighten the bolts.
Fueling
This is a 4-stroke engine. Only run the engine using gasoline >#90. PLEASE READ OPERATING
PROCEDURES BEFORE FUELING. Make sure that the engine is off.
'
�
£� :i -�
� ��
2.
Slowly open the GAS CAP. so that possible over-pressure disappears.
3.
Clean the tank cap area to make sure that it is free from excess dirt and debris. Make sure
that no dirt falls into the gas tank.
4.
After fueling, replace the GAS CAP and tighten.
Starting - Pull Start
Move
at least 10 feet away from where you filled up the gas.
1.
Set the CHOKE LEVER to the CHOKED {UP) position.
2.
Pull the RECOIL STARTER briskly. making sure to hold the handle in your grasp.
Note: Do not allow it to snap back, let it back slowly. You may want to give it a little throttle by gently
sq ueezing the GAS LEVER.
3.
It may be necessary to repeat step 6 several times until the motor starts.
When starting the motorcycle for the first time, it may be necessary to pull the starter handle multiple
times
until
it
starts.
4

1.
Make sure that all of the exposed bolts and screws are tightened.
2.
Raise the kickstand to its upright position.
3.
Make sure the engine is running.
4.
Put one foot on the deck of the motorcycle. While pushing off with the other foot, gently rotate the
THROTTLE toward the rider on the right side of the handlebars. The motorcycle will begin to move on its
own power. Control the speed by rotating the hand throttle either towards the rider or away.
BRAKING
1.
To brake, release the hand throttle and depress the hand brake levers (on the left side of the
handlebars).
Stopping/Shutting down
2.
Gradually decrease the engine speed to idle and turn off the kill switch on handlebar tube. This will
turn the engine OFF.
NOTE: If the lever Is pulled aggressively, the locking spring may become stretched and then the
steering will not lock Into position, It Is also advisable to efl5ure the handlebar locks firmly, prior to riding.
WARNING:
■
Always shut the engine off before refueling.
■
Slowly open the fuel tank, so that possible over-pressure disappears.
■
Before fueling, clean the tank cap area carefully, to insure that no dirt falls into the tank. Make sure that
the fuel is well mixed by shaking the container.
■
Tighten the fuel cap carefully, after fueling.
■
Always move the unit at least 1O feet from the fueling area before starting.
5

CARBURETOR ADJUSTMENT
♦
WARNING!
Never start the engine without the complete clutch cover assembled! Otherwise the clutch can
come loose and cause injuries. When the engine is teated at the factory, the Carburetor is
basically adjusted. Further adjustment may be required from time to time, depending on
climate and altitude.
WARNING!
When the engine Is idling, under no circumstance should your motorcycle be moving. If the
motorcycle continues to move after idle speed adjustment, contact service center.
BRAKING SYSTEM
The motorcycle uses a rear wheel disc/caliper braking system activated by a hand brake lever on
left
side
of
the handlebar. Squeezing the hand brake lever with your left hand activates the rear brake.
Make sure to release the HAND THROTTLE GRIP when engaging the br
akes.
Practice braking on a smooth, dry surface to get used to the feel of the braking system. Braking
distance is
affected
by wet conditions and loose and uneven riding surfaces.
AJUSTING THE BREAKS
The Brakes on
the
motorcycle should come fully adjusted from the factory. However,
it
may be
necessary to adjust the brake from time to time.
1.
With one hand, depress the brake caliper using your thumb and forefinger
2.
With
the other hand, adjust the
tension
screw on the brake line.
a.
Tum the tension screw clockwise to loosen the brake.
b.
Tum the
tension
screw counterclockwise to tighten brake.
6
Squeaky Brakes
The brakes may squeak before they are broken in. This is normal and will not affect the function or
performance of the brakes. With continued us e the squeak should go away.
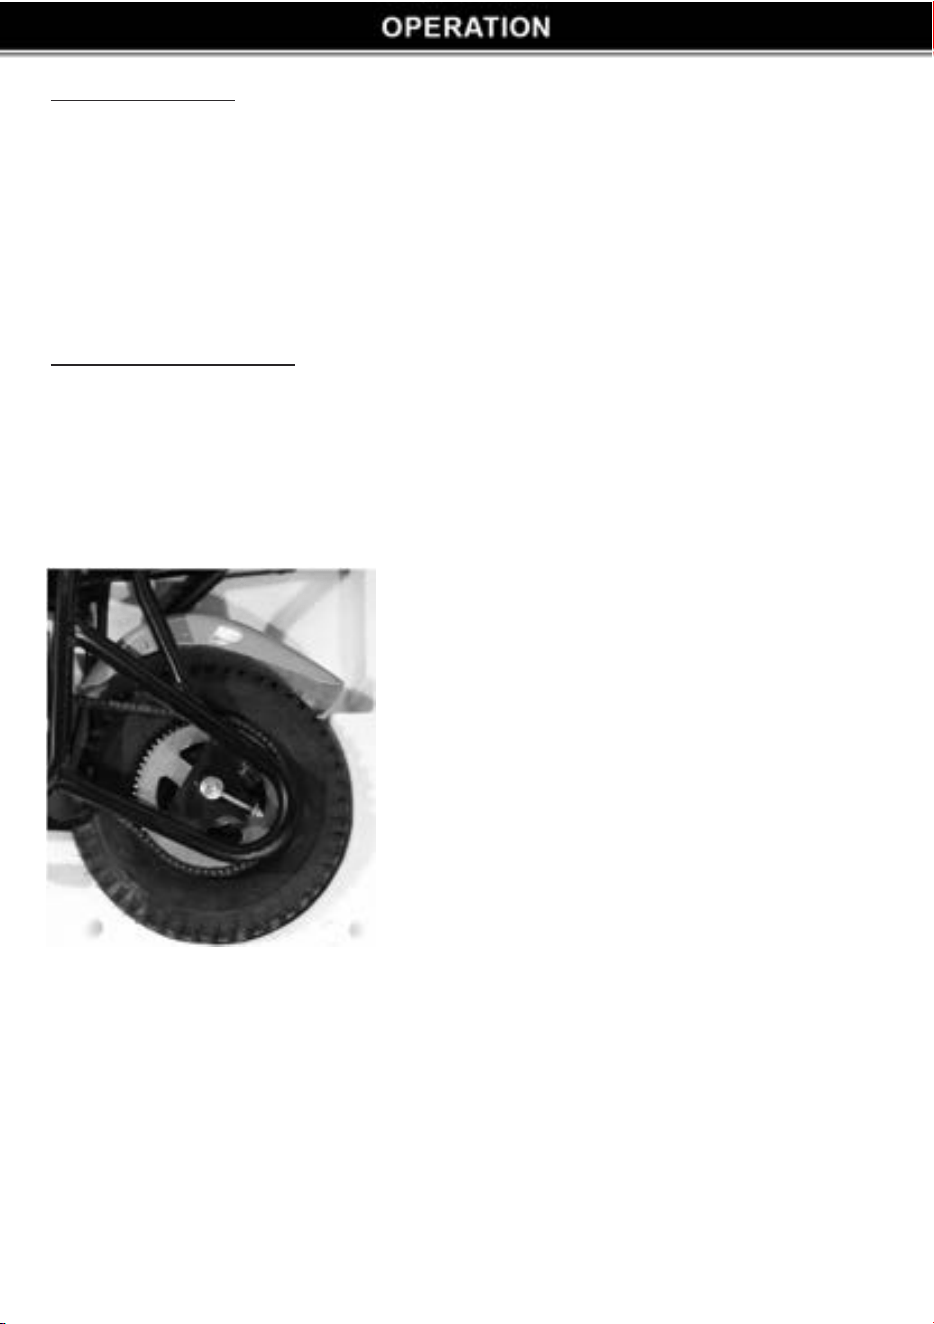
ADJUSTING THE CHAINS
The chains will come adjusted from the factory. However, it may be necessary to adjust the sprockets
from time to time. The chain must be well aligned with the sprockets otherwise they may start to rub
and chafe. Which will result in shortened chain l ife.
How tight should the chain be?
■
If the chain is skipping or jumping on the pulley teeth, it is too loose and may be harmful.
■
If the chain is making a humming sound when the wheel is turning, it is to tight and may cause the
chai
n to snap.
■
The correct tension is achieved by adjusting lt1e chain from Its loose position to when it becomes
lightly tense.
To
tighten the
chains:
1.
Slightly loosen the two Axle bolts
then
slowly
adjust
the
two chain adjusting screws on each
side of the rear tire until the chain
reaches
the
proper
tension. Occasionally rotate the rear tire
to make sure chain is aligned. Then lock and
tighten the rear axle bolts prior to
riding.
7

Daily Maintenance
Perform each time you ride your motorcycle
■
Clean e eeor of e unit with a so. damp g.
■
Check that al
l nuts and lts a srely tighten.
Weekly/Month
l
y Maintenance
■
Check the pull starter, especially the cord and return spring.
■
Remove the spark plug and check the electrode gap. Adjust it to 0.6mm, or change the spark
plug.
■
Clean the cooling fins on the cylinder head and check that the air intake at the starter is not
clogged.
■
Clean the air filter.
Gas pocket STARTING PROCEDURE
To start the motor needs three things:
•
Gas
•
A spark
•
Cylinder compression
1.
Put gas in the tank. Using an approved gas container, add at least a½ gallon of gas to the gas
tank.
2.
move the choke lever to the •on" up position. (make sure fuel line is free of air)
3.
pull the recoils. the choke should be up to start a cold engine.
When starting your motor for the first time, open the throttle a couple of times to get the gas flowing
into the carburetor and the jets inside. Don't over pump the gas it may Hood the engine(need to wait
10mins to restart if en
gine is
flooded) After the engine "pops' the first time, then give it a little
throttle and al
l
ow it to idle till it warms up.
After engine warms up, turn off choke, slowly ride off and check to make sure tires
are at the proper
inflation and all
systems operate.
8
MAINTENANCE SCHEDULE
Proper care of your motorcycle will insure optimal performance and a longer life span. The
following are a few maintenance suggestions that will keep your motorcycle ru
n
ning in top condition:
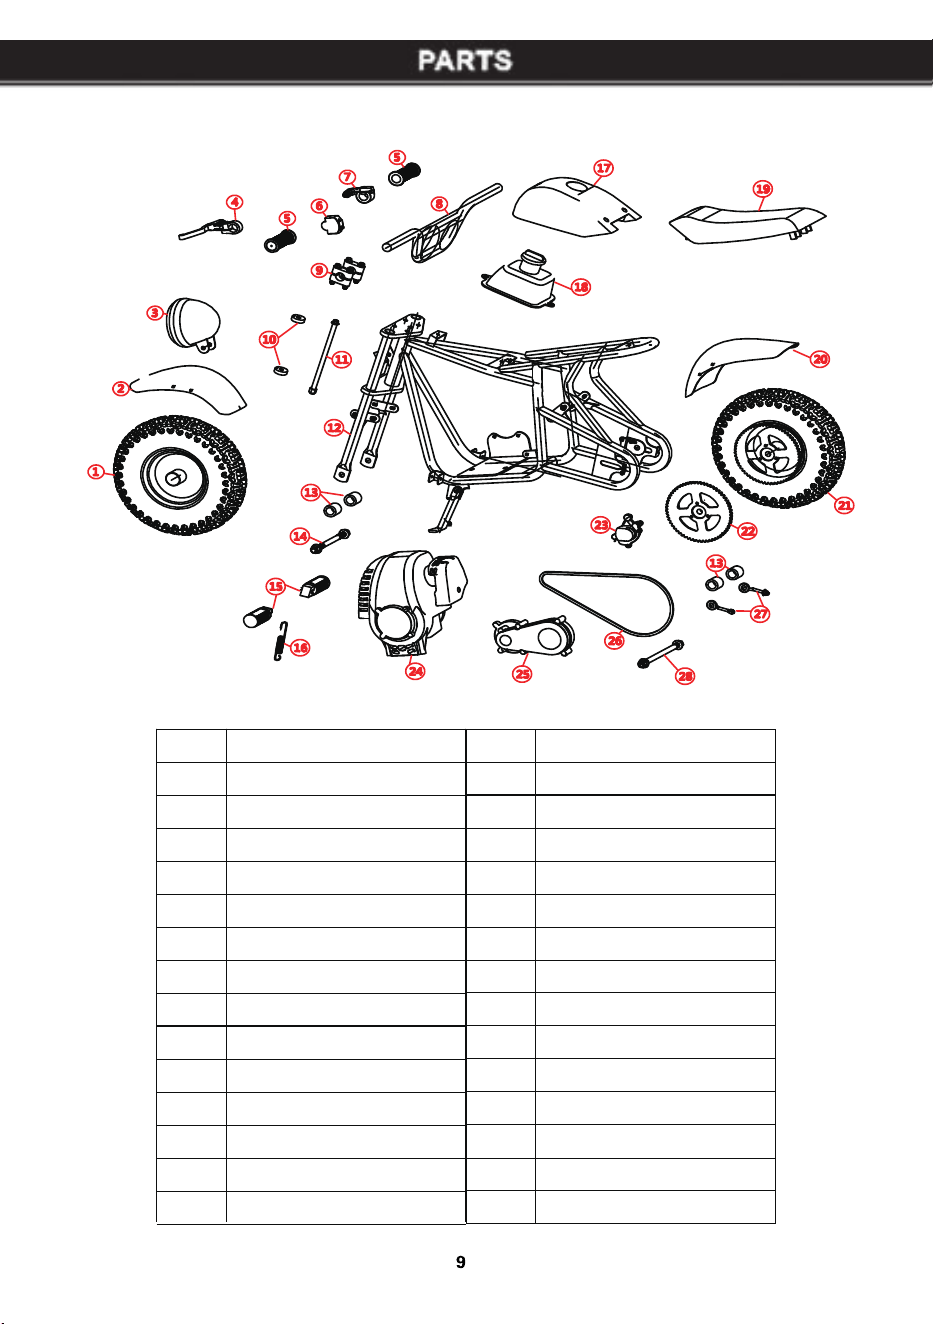
Item
Item
Description
Description
1 Front Wheel
2
Front Fender
3
Headlight
4 Brake Handle
5
Grip
6
Throttle Switch
7
Accelerator
8
Handle Bar
9
Handlebar fixing seat
10
Bearing-6200Z
11 Pole Screw
12 Bike Rack
13 Distance Sleeve
14 The Front Wheel Screw
15
P
edals
16
T
he Pedal Spring
17
F
uel Tank Cover
18
F
uel Tank
19
S
eat
20
B
ack Fender
21
B
ack Wheel
22
C
hain Ring
23
B
rake
24
E
ngine
25
R
eduction Gearbox
26
C
hain
27
C
hain Adjusting Screw
28
R
ear Hub Screw
OF NOTE
PLEASE READ THE FOLLOWING CAREFUL
THE MANUFACTURER AND/OR DISTRIBUTOR HAS PROVIDED THE PARTS LIST AND ASSEMBLY
DIAGRAM IN THIS MANUAL AS A REFERENCE TOOL ONLY. NEITHER THE MANUFACTURER OR
DISTRIBUTOR MAKES ANY REPRESENTATION OR WARRANTY OF ANY KIND TO THE BUYER TH HE
OR SHE IS QUALIFIED TO MAKE ANY REIRS TO THE PRODUCT, OR TH HE OR SHE IS QUALIFIED
TO REPLACE ANY PARTS OF THE PRODUCT. IN FACT, THE MANUFACTURER AND/OR DISTRIBUTOR
EXPRESSLY SES TH ALL REPAIRS AND RTS REPLACEMENTS SHOULD BE UNDERKEN
BY CERTIFIED AND LICENSED TECHNICIANS, AND NOT BY THE BUYER. THE BUYER ASSUMES
ALL RISK AND LIABILITY ARISING OUT OF HIS OR HER REIRS TO THE ORIGINAL PRODUCT OR
REPLACEMENT PARTS THERETO , OR ARISING OUT OF HIS OR HER INSLLION OF REPLACEMENT
PARTS THERETO .
Record Product's Serial Number Here: _________________ _
Note: If product has no serial number, record month and year of purchase instead.
Note: Some parts are listed and shown for illustration purposes only and are not available
individually as replacement parts.
Questions, issues or missing parts?
Before returning to your retailer, our customer seice team is here to help.
Call Us: 909.628.0880
Email Us: [email protected]
Hours of Operation: 9am - 3pm PST Monday - Friday
MADE IN CHINA
