2
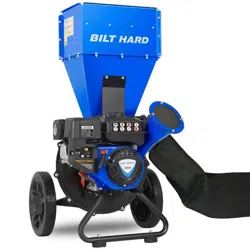
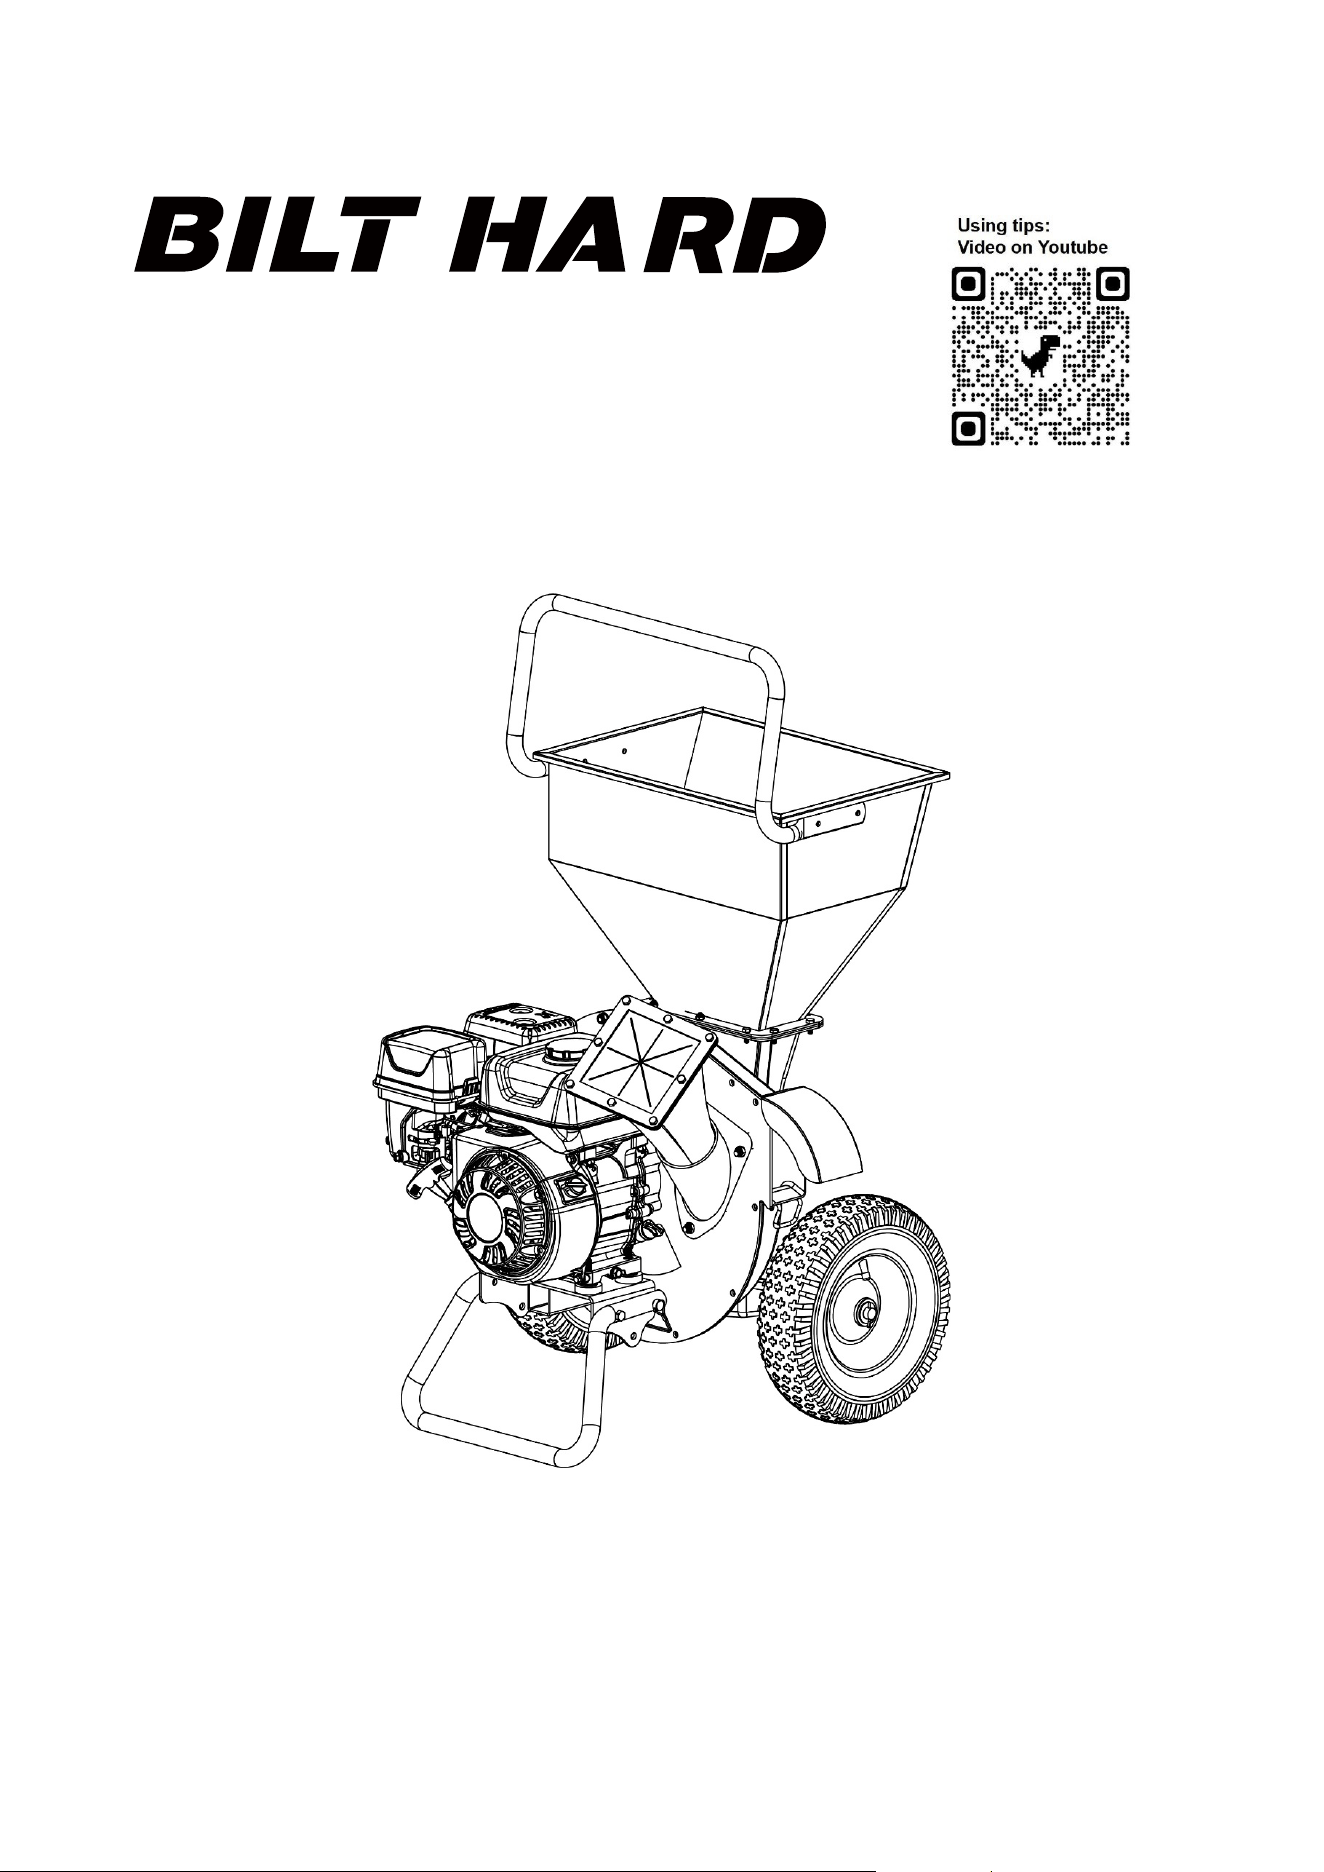
Packing details for BILT HATD Chipper Shredder
CARTON INCLUDE
CARTON 1/2 TRA-0458-1
MAIN BODY ASSEMBLY X 1
WHEEL X 1
CHUTE X 1
CARTON 2/2 TRA-0458-2
HOPPER X 1
SUPPORT & HANDLE X 1
WHEEL & WHEEL BRACKET X 1
ENGINE ASSEMBLE PLATE X 1
TRASH BAG X 1
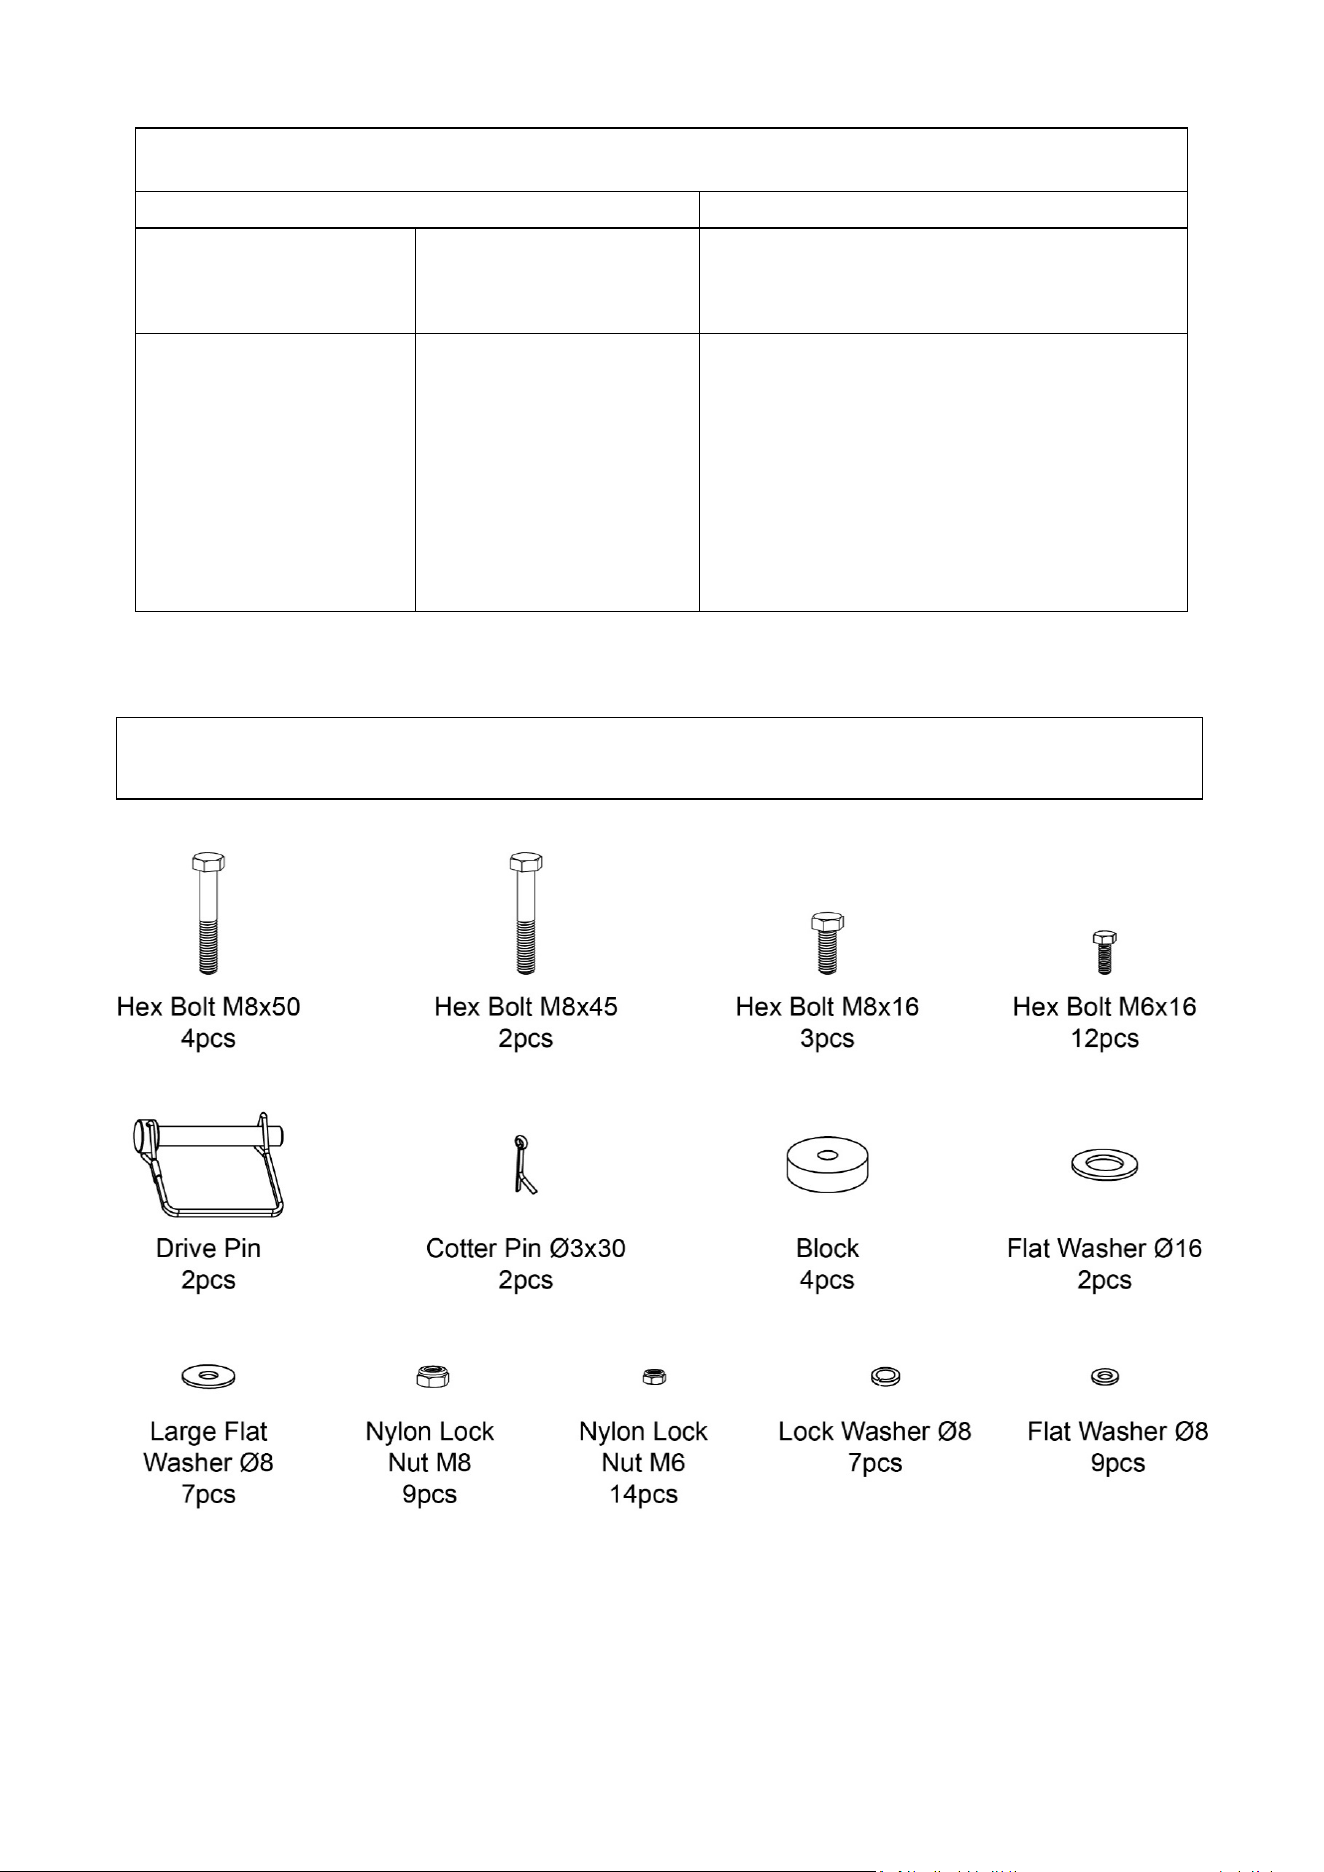
HARDWARE SET X 1
0.6L ENGINE OIL X 1
MANUAL X 2
Component Parts

3
Table of Contents
General Safety Warnings ..................................................................................... 4
Specific Safety Rules and Precautions ................................................................ 5
Controls and Features Identification ................................................................... 7
Assembly Instructions .......................................................................................... 8
Operating Instructions ........................................................................................ 11
Inspection, Maintenance and Cleaning .............................................................. 16
Troubleshooting ................................................................................................. 18
Specifications ..................................................................................................... 20
Drawing and Parts List ....................................................................................... 21
4
WARNING: Read and understand all instructions and safety information in this manual before assembling or
operating the chipper/shredder. Failure to understand and follow all instructions and safety information may
result in serious injury or death. Persons who have not read the manual should never operate the
chipper/shredder. A chipper/shredder can be dangerous when assembled and/or used improperly. Do not
operate the chipper/shredder if you have any questions concerning safe operation. Please call the technical
support department for questions regarding safe machine operation.
WARNING: This product can expose you to chemicals including lead and lead compounds which are
known to the State of California to cause cancer and birth defects or other reproductive harm. For more
information go to www.P65Warnings.ca.gov.
Important General Safety Instructions
1. Keep the work area clean and use bright lighting. Always keep the work area free of debris. Ensure
there is adequate lighting before operating.
2. Do not operate the chipper/shredder in flammable and/or explosive environments, including the
presence of flammable liquids, gases, or dust. The chipper/shredder can create sparks which can
ignite any flammable materials.
3. Keep all children, bystanders and pets away from the machine while operating the
chipper/shredder. To minimize distractions and promote safe operation, the operator alone should be
near the chipper/shredder during use.
4. Stay alert. Never operate the chipper/shredder when under the influence of drugs, alcohol or medication
or when otherwise not alert enough to operate the machine with careful attention. Always exercise
caution and beware that even a moment of inattention while operating the chipper/shredder may result in
serious personal injury.
5. Dress for safety. Do not wear loose clothing or jewelry. Keep hair, clothing, gloves and anything
attached to your body away from moving parts as they may get caught in the chipper/shredder.
6. Beware of unintentional ignition/starting. Always check that the engine ignition is in the “OFF”
position. Be sure the machine is powered off before moving it, performing any service or maintenance, or
cleaning the unit.
7. Remove any adjustment keys and wrenches before operating the chipper/shredder. Leaving
wrenches or keys attached to any rotating parts of the chipper/shredder during operation creates the risk
of personal injury.
8. Do not reach over the chipper/shredder and/or operate it from any positions that could jeopardize
balance. Maintain proper footing and balance at all times when using the chipper/shredder.
9. Use safety equipment. Always wear ANSI-approved safety impact goggles, hearing protection, heavy-
duty work gloves, and a dust mask or respirator when using the chipper/shredder.
10. Do not use the chipper/shredder if the “On/Off” switch malfunctions and fails to start and stop
the machine. A faulty power switch is potentially dangerous and must be replaced.
11. Store the chipper/shredder out of reach of children and other untrained persons. Adults without
proper instruction and operational knowledge should never use the chipper/shredder.
12. Maintain the chipper/shredder by always performing all recommended maintenance procedures.
Proper maintenance extends equipment life and minimizes malfunctions. Do not use the
chipper/shredder if it is damaged, in poor mechanical condition or in need of repairs.
13. Inspect for misaligned or seized moving parts, cracked/broken components, and any other
mechanical defects that may impair machine operation. If parts are damaged, have the chipper/
shredder serviced before using.
General Warnings

5
14. Service must only be performed by qualified repair personnel. Service or maintenance performed by
unqualified personnel could result in damage to the chipper/shredder and may create a risk of injury.
15. When servicing the chipper/shredder, use only identical replacement parts. Follow the replacement
instructions in the “Inspection, Maintenance and Cleaning” section of this manual. Using unauthorized
parts and/or failing to follow maintenance instructions may void the chipper/shredder’s warranty.
NOTE: Failure to add engine oil to the crankcase prior to initial use will void the product warranty.
Before each use, check the oil level. Never run the engine with low oil levels or no engine oil. Running
the engine with low oil levels or with no oil will permanently damage the chipper/shredder.
1. For optimal high-altitude operation, the engine’s carburetor may need to be adjusted by a qualified
mechanic.
2. Check that labels and nameplates on the chipper/shredder are in good condition and are readable as they
c
ontain important information. Immediately replace any missing or damaged labels or nameplates.
3. Make sure to operate the chipper/shredder only on a flat, level, sturdy surface capable of supporting the
weight of the chipper/shredder and any additional tools and equipment.
4. Industrial applications of the chipper/shredder must adhere to OSHA guidelines.
5. Never stand on the chipper/shredder. Serious personal injury may result if the machine tips over.
6. Never leave the chipper/shredder unattended while it is running. Always turn off the engine when the
c
hipper/shredder is unattended.
7. Be extremely
cautious of the rotating blades in the chipper/shredder. Always keep your hands, fingers and
all other body parts outside of the chipper or shredder hopper.
8. Never place your hands, fingers, feet or any other body part close to the discharge opening while using the
chipper/shredder.
9. Never allow metal, stone, glass
or other foreign objects to be fed into the chipper/shredder. Never operate
the unit on sloped or slippery ground.
10. Always feed branches slowly into the machine. Use a stick to pus
h the tree limbs, leaves, etc. into the feed
hopper.
11. Never feed branches larger than 1/2” in diameter into the shredder hopper.
12. Never feed branches larger than 3” in diameter into the chipper hopper.
13. Do not allow processed material to build up in the discharge area. Material build-up may prevent proper
discharge and can result in kickback of material through the feed hopper.
14. If the machine becomes clogged, immediately turn the engine off and wait until the chipper/shredder comes
to a complete stop. Disconnect the spark plug wire from the spark plug. Then clear the machine of the
clogged material.
15. Do not allow children and other untrained people to handle or play with the chipper/shredder. Never allow
unnecessary people and/or animals in the work area.
16. Avoid applying excessive force to the chipper/shredder. Use the chipper/shredder only for chipping and
shredding. Always maintain the specified safe operating speeds and adhere to the capacity limits of the
chipper/shredder.
17. Individuals with pacemakers should consult their physician(s) before operating the chipper/shredder. Elec-
tromagnetic fields in close proximity to a heart pacemaker can cause pacemaker interference and/or
pacemaker failure.
Specific Safety Rules and Precautions

6
FIRE AND EXPLOSION WARNINGS
1. Gasoline fuel and fumes are highly flammable and potentially explosive. Always properly store fuel in
closed containers and handle fuel with caution. The manufacturer recommends keeping multiple ABC
class fire extinguishers nearby when using the chipper/shredder.
2. Always keep the chipper/shredder and all surrounding work areas clean. Diligently check carefully for
potentially flammable materials around the chipper/shredder before operation. Any fuel or oil spills must
be cleaned up immediately. Please dispose of fluids and cleaning materials properly and in compliance
with any and all local, state, or federal codes and regulations. Store all oil rags in a covered metal
container with proper ventilation.
3. Never store fuel and/or other flammable materials near the chipper/shredder.
4. Do not smoke, allow sparks, flames or other sources of ignition to be in the immediate vicinity of the
chipper/shredder.
5. Keep grounded, conductive objects, such as tools, away from exposed, live electrical parts and
connections to avoid sparking or arcing as these events could ignite fumes and/or vapors.
6. Never refuel or add engine oil while the engine is running or hot. Never operate the chipper/shredder if
there are potential or known leaks in the fuel system.
7. Only use the fuel and oil recommended by the engine manufacturer in the chipper/shredder.
MECHANICAL WARNINGS
1. Always set the engine ignition to the “OFF” position before performing any service, maintenance or
cleaning work Allow the engine to cool completely then remove the spark plug from the engine.
2. Do not alter and/or adjust any part of the chipper/shredder or engine that is assembled and supplied by
the manufacturer or distributor.
3. Always follow and complete scheduled engine maintenance.
CHEMICAL WARNINGS
1. Avoid bodily contact with hot fuels, oils and exhaust fumes.
2. Avoid bodily contact with fuels, oils or lubricants used in the engine.
3. If any fuel or chemical is swallowed, seek medical treatment immediately. Do not induce vomiting if fuel
is swallowed. If skin contact occurs, immediately wash with soap and water. If eye contact occurs,
immediately flush eyes with clean water.
4. Carbon Monoxide Warning: The chipper/shredder is designed for outdoor use only. Do not operate the
chipper/shredder in closed or poorly ventilated areas. The chipper/shredder’s engine produces carbon
monoxide, a colorless, odorless, toxic gas that, when inhaled, can cause serious personal injury and/or
death. Whenever possible, use a carbon monoxide detector (not included) to detect excessive carbon
monoxide fumes in the work area and in the surrounding area.
NOISE WARNINGS
Exposure to extreme noise levels may cause permanent hearing damage and/or loss. Always wear
ANSI-approved hearing protection (headphones) when operating or working around the
chipper/shredder.
1. CAUTION: The warnings and precautions discussed in this manual do not cover every possible possible
dangerous conditions and situations that may arise. Every operator must use common sense and
exercise caution as factors which cannot be built into the chipper/shredder and must be supplied by the
operator.
7
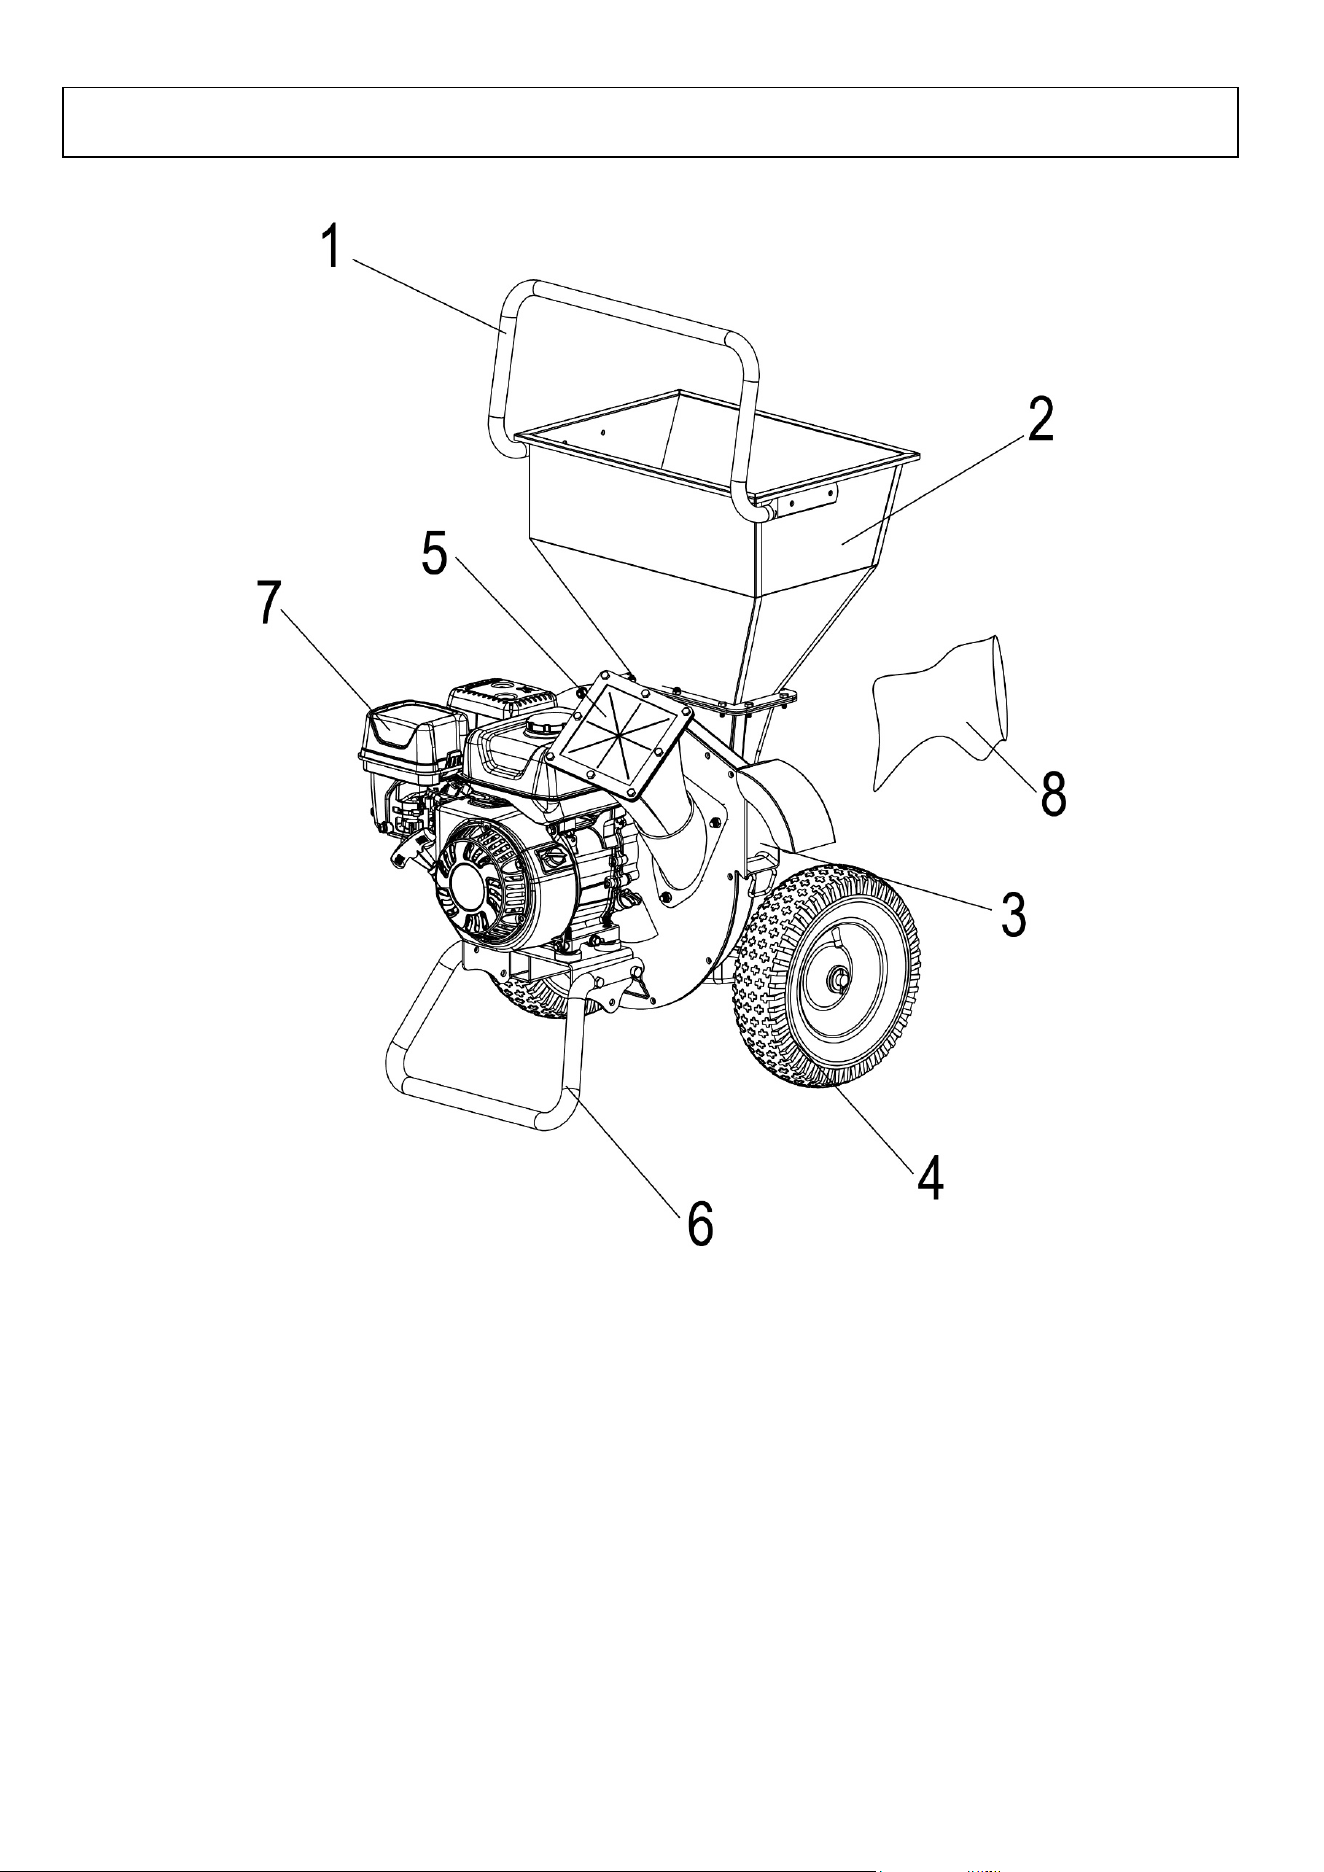
1. Handle: Easy Maneuverability
2. Shredder Hopper: 1/2” Maximum Branch/Limb Diameter
3. Discharge Port: Cover Cap/End
4. Wheels: 12” Pneumatic
5. Chipper Chute: 3’’ Maximum Branch/Limb Diameter
6. Support Leg: Stabilizes the Engine During Operation
7. Engine: 209cc
8. Trash Bag
Controls and Features Identification
8
TOOLS REQUIRED
• 10mm & 13mm Wrenches
• Pliers
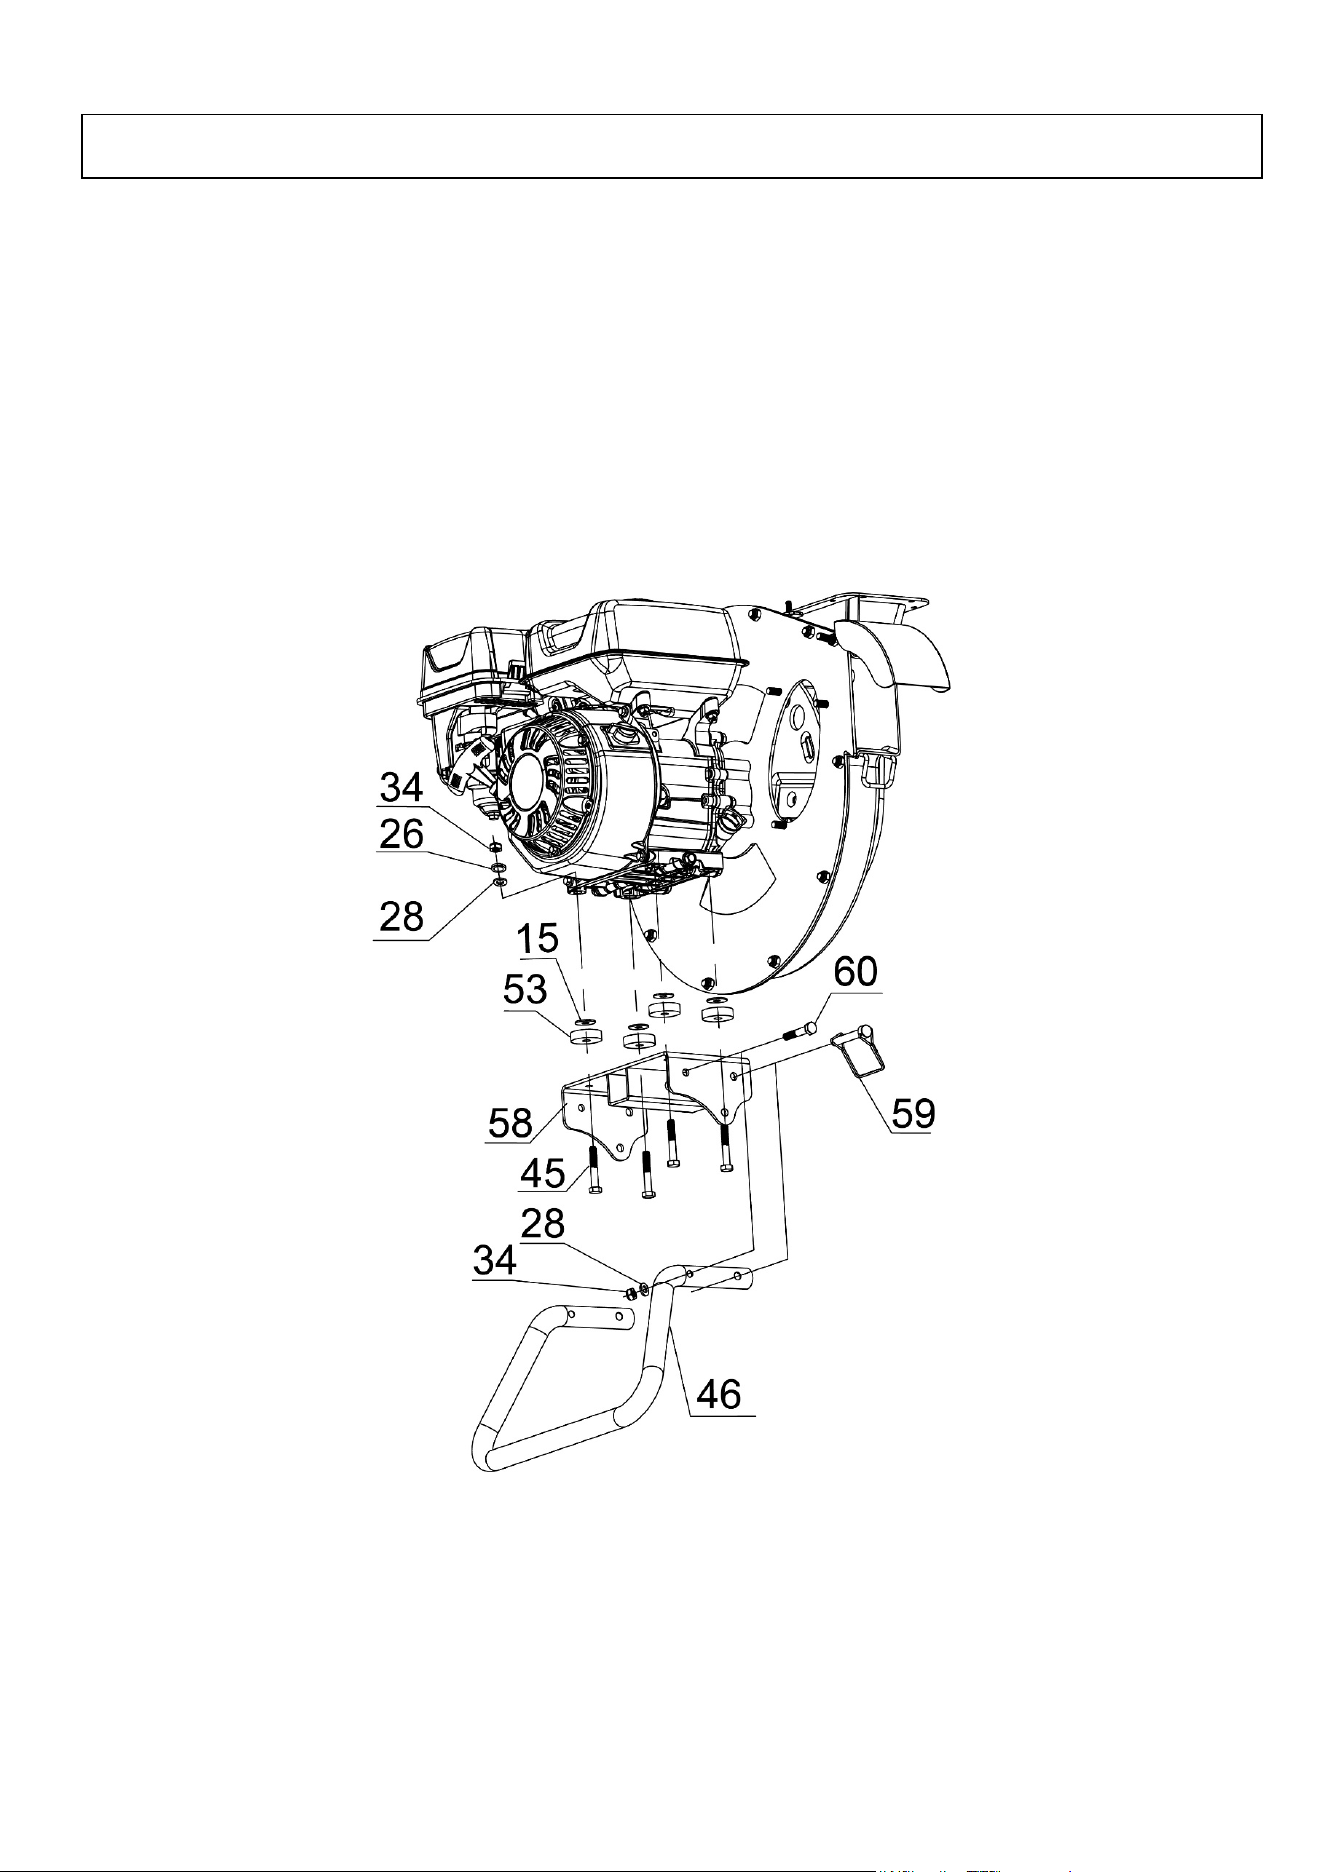
STEP 1: Attach the Support Leg
1. Mount the engine mount plate (#58) onto the engine. Place four polyurethane blocks (#53) and four
large Ø8 flat washers (#15) on top of the engine mount plate. Then tighten with four sets of hex bolts
M8x50 (#45), flat washers Ø8 (#28), lock washers Ø8 (#26) and nylon lock nuts M8 (#34).
2. Attach the support leg (46) to the engine assemble plate with two sets of hex bolts M8x45 (#60), flat
washers Ø8 (#28) and nylon lock nuts M8 (#34). Lock the support leg in place with two drive pins (#59).
Assembly Instructions
9
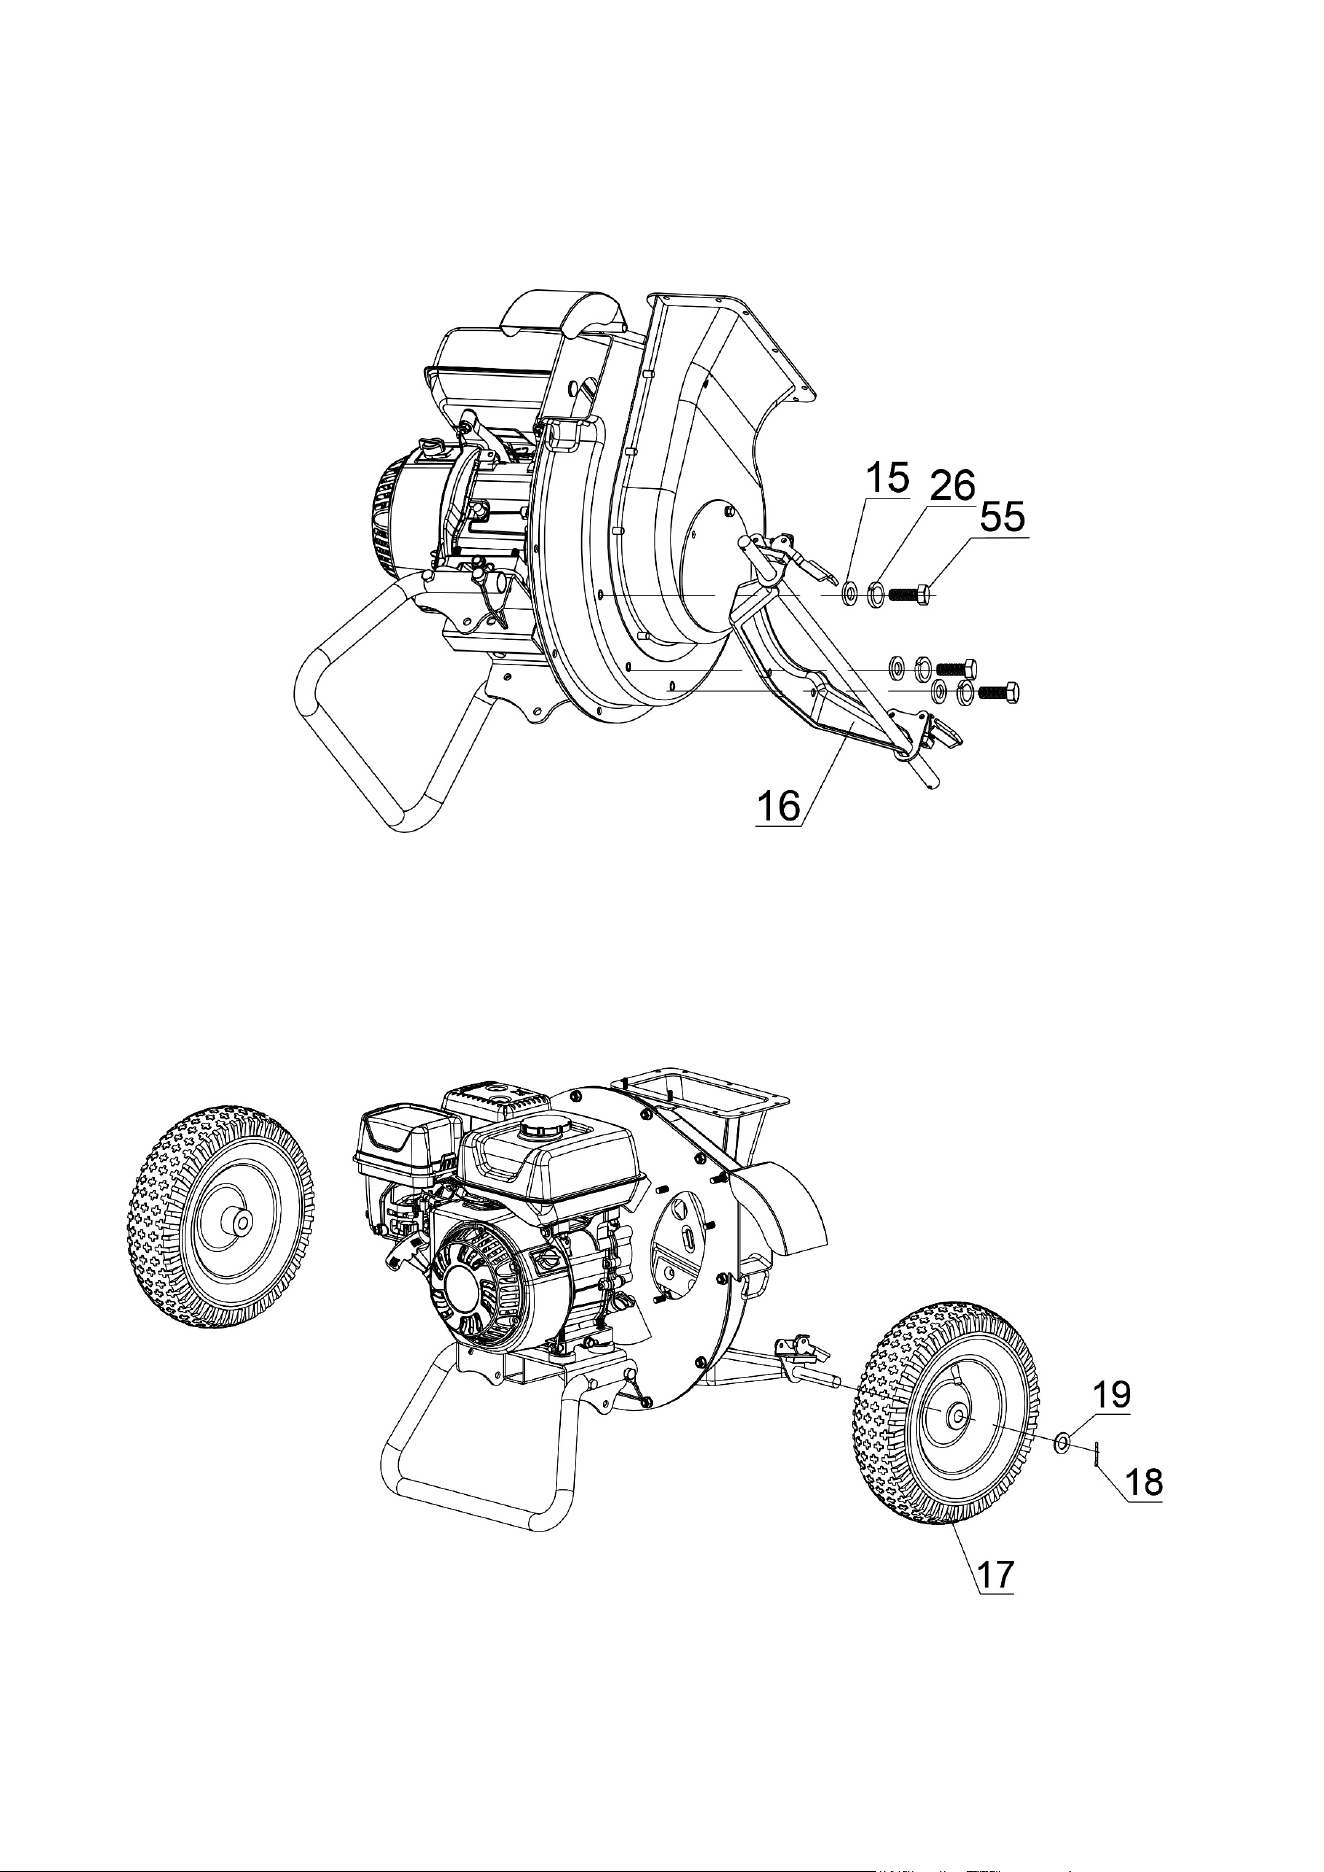
STEP 2: Attach the Wheel Bracket
1. Attach the wheel bracket (#16) to the main housing using three sets of hex bolts M8x16 (#55), lock
washers Ø8 (#26) and large flat washers Ø8 (#15).
STEP 3: Attach the Wheels
1. Attach the wheel (#17) to the wheel axle with a flat washer Ø16 (#19) and a cotter pin Ø3x30 (#18).
Secure the cotter pin with the pliers. Repeat step 3 to attach the second wheel.
10
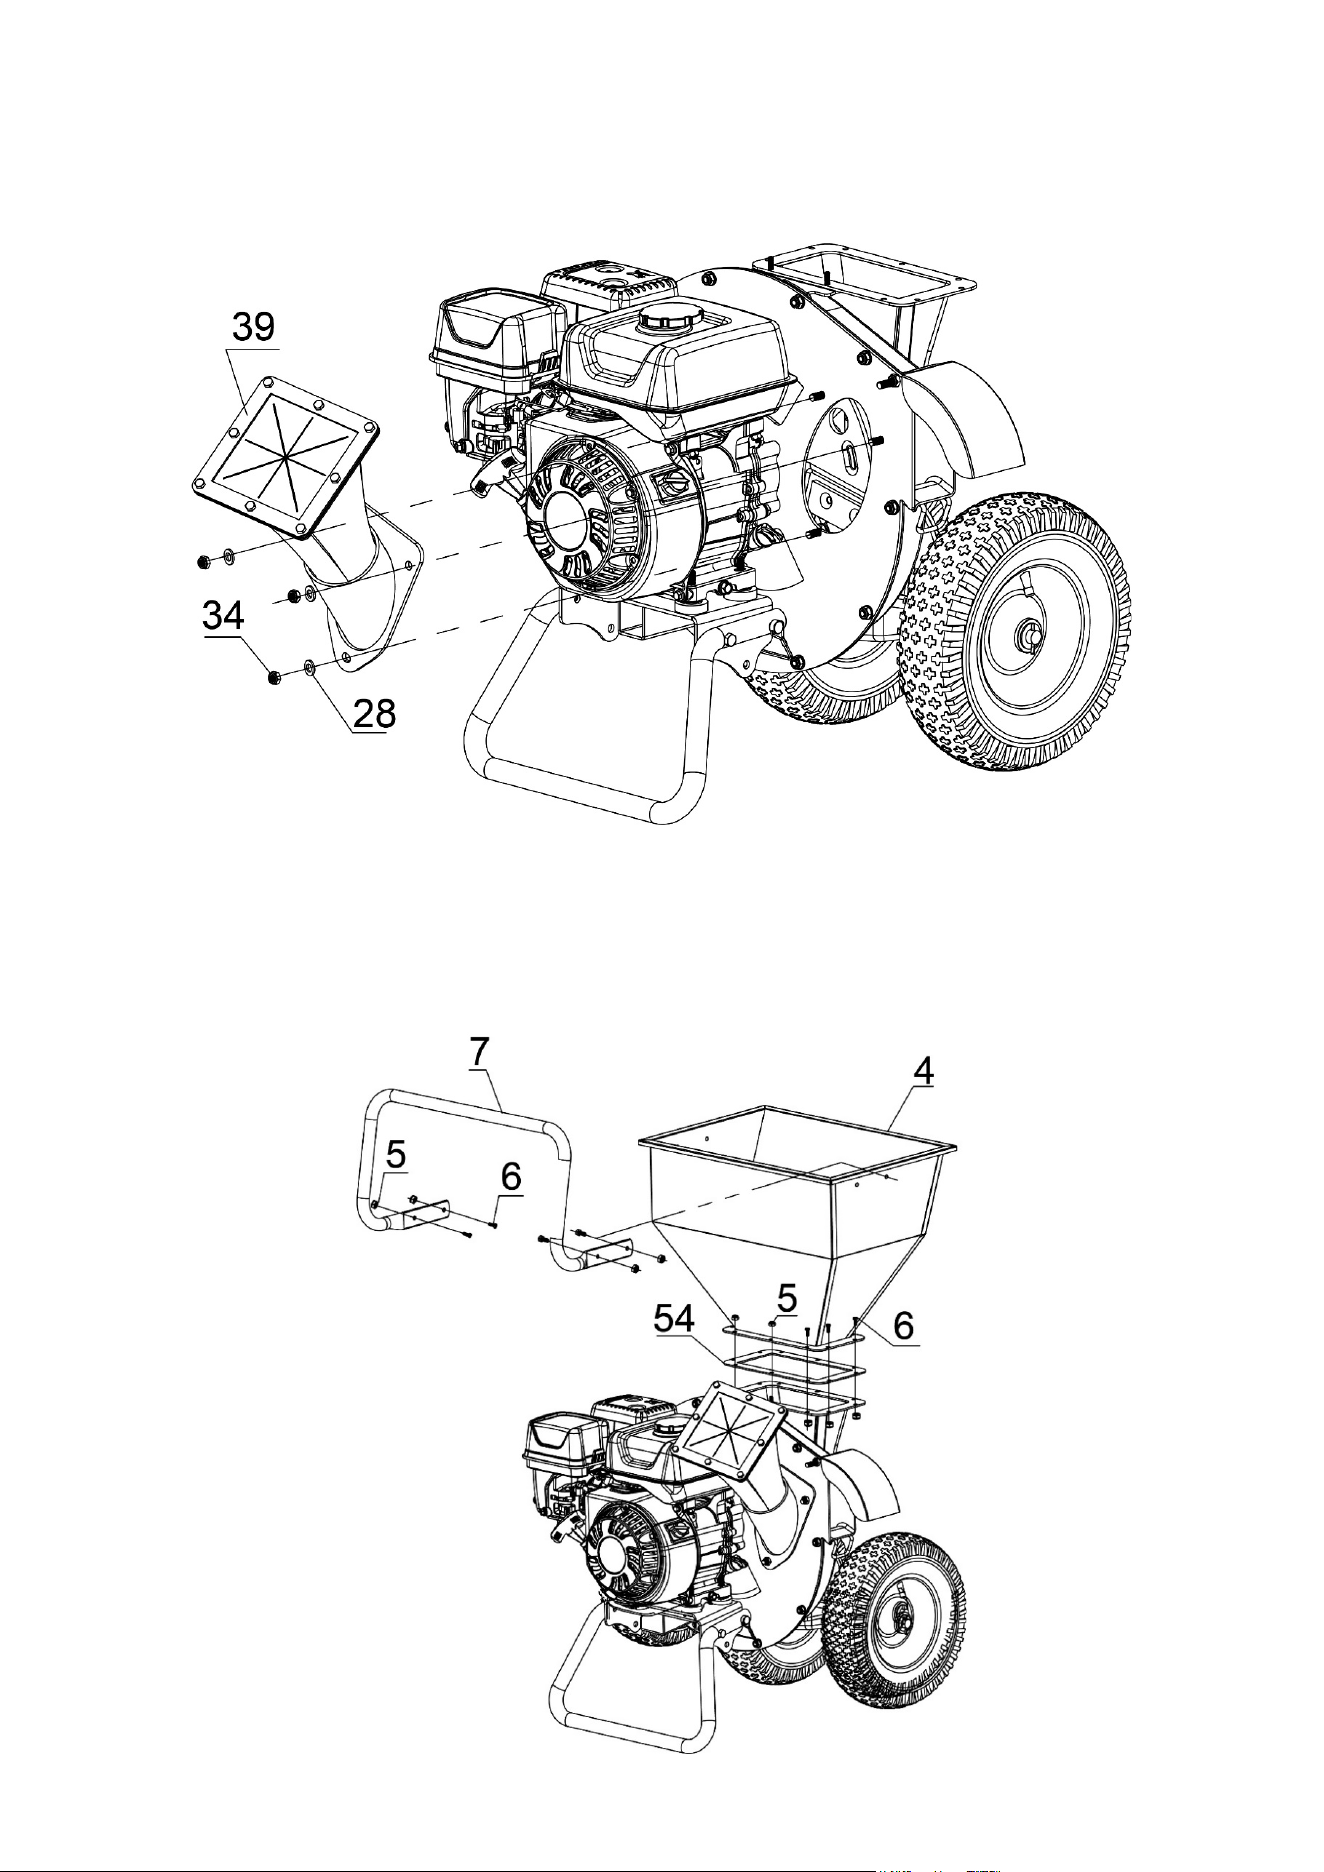
STEP 4: Attach the Chipper Chute
1. Attach the chipper chute (#39) to the main board using three sets of flat washers Ø8 (#28) and nylon
l
ock nuts M8 (#34).
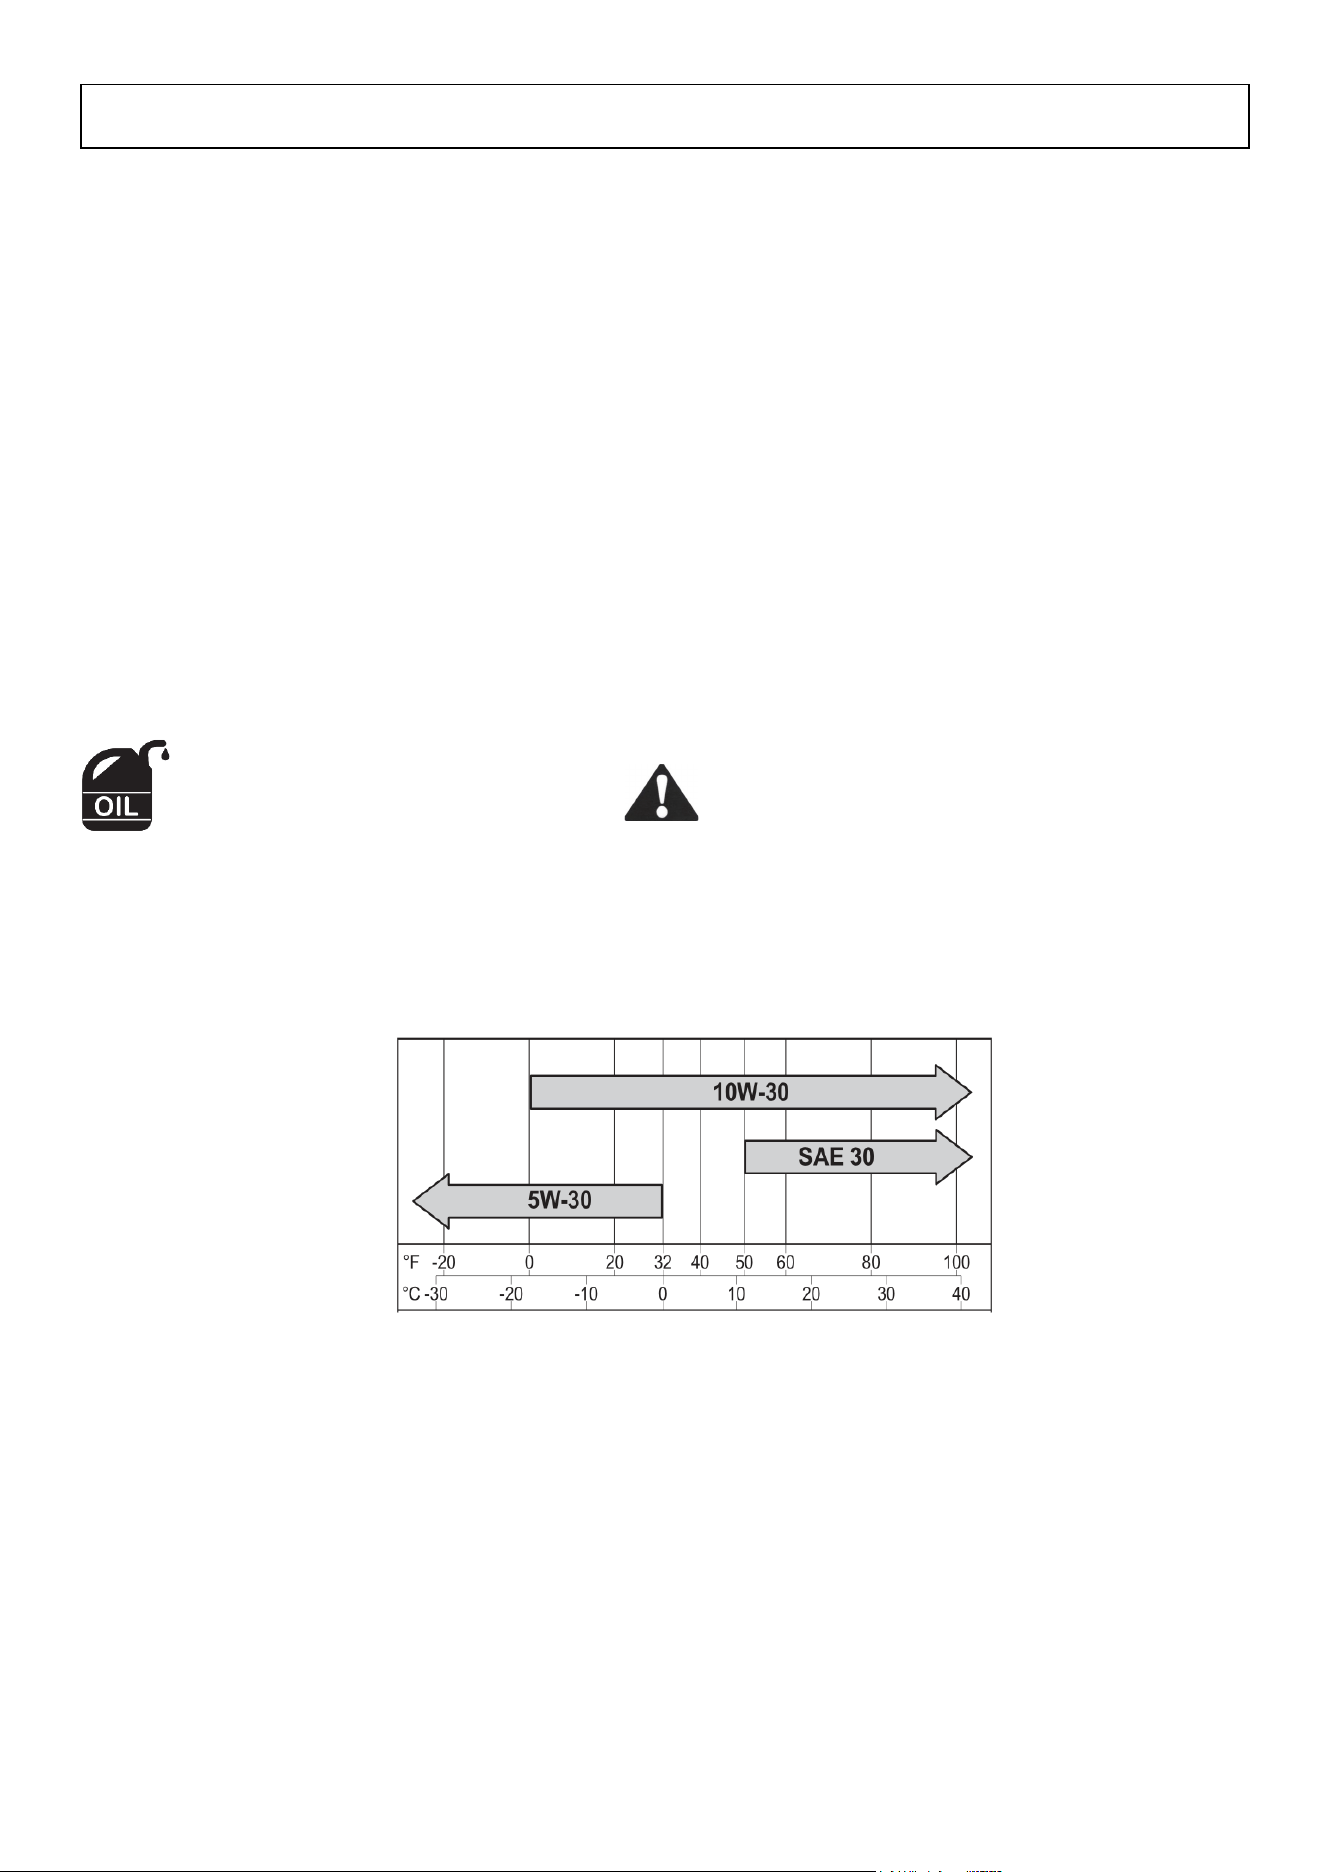
STEP 5: Attach the Shredder Hopper and Handle
1. Attach the shredder hopper (#4) to the main body,Insert the rubber pad (#54) between the shredder
hopper and main body, then fasten it with two M6 nylon lock nuts (#5). Then tighten with eight sets of
hex bolts M6x16 (#6) and nylon lock nuts M6 (#5).
2. Attach the handle (#7) to the hopper with four sets of hex bolts M6x16 (#6) and nylon lock nuts M6 (#5).
11
Before Starting
Always use safety equipment when using the chipper/shredder. Remember to wear ANSI-approved safety
impact goggles, hearing protection, heavy duty work gloves, and a dust mask or respirator when using the
chipper/shredder.
1. Check underneath the chipper/shredder for oil and/or liquid spots indicating an oil or gas leak. If there are
any leaks, do not use the chipper/shredder and contact a qualified repair professional for maintenance.
2. Inspect the operating condition of the chipper/shredder. Check that all shields and covers are properly in
place. Check for loose screws, misaligned or bound moving parts, cracked or broken parts, and any other
condition that may affect the safe operation of the machine. If abnormal noise or vibration occurs, have
the problem corrected before further use. Do not use damaged equipment. Only operate the
chipper/shredder on a flat, level surface.
3. Check the oil level. Never run the engine with low oil levels and/or without engine oil. Running the engine
with low oil levels or without oil will permanently damage the engine.
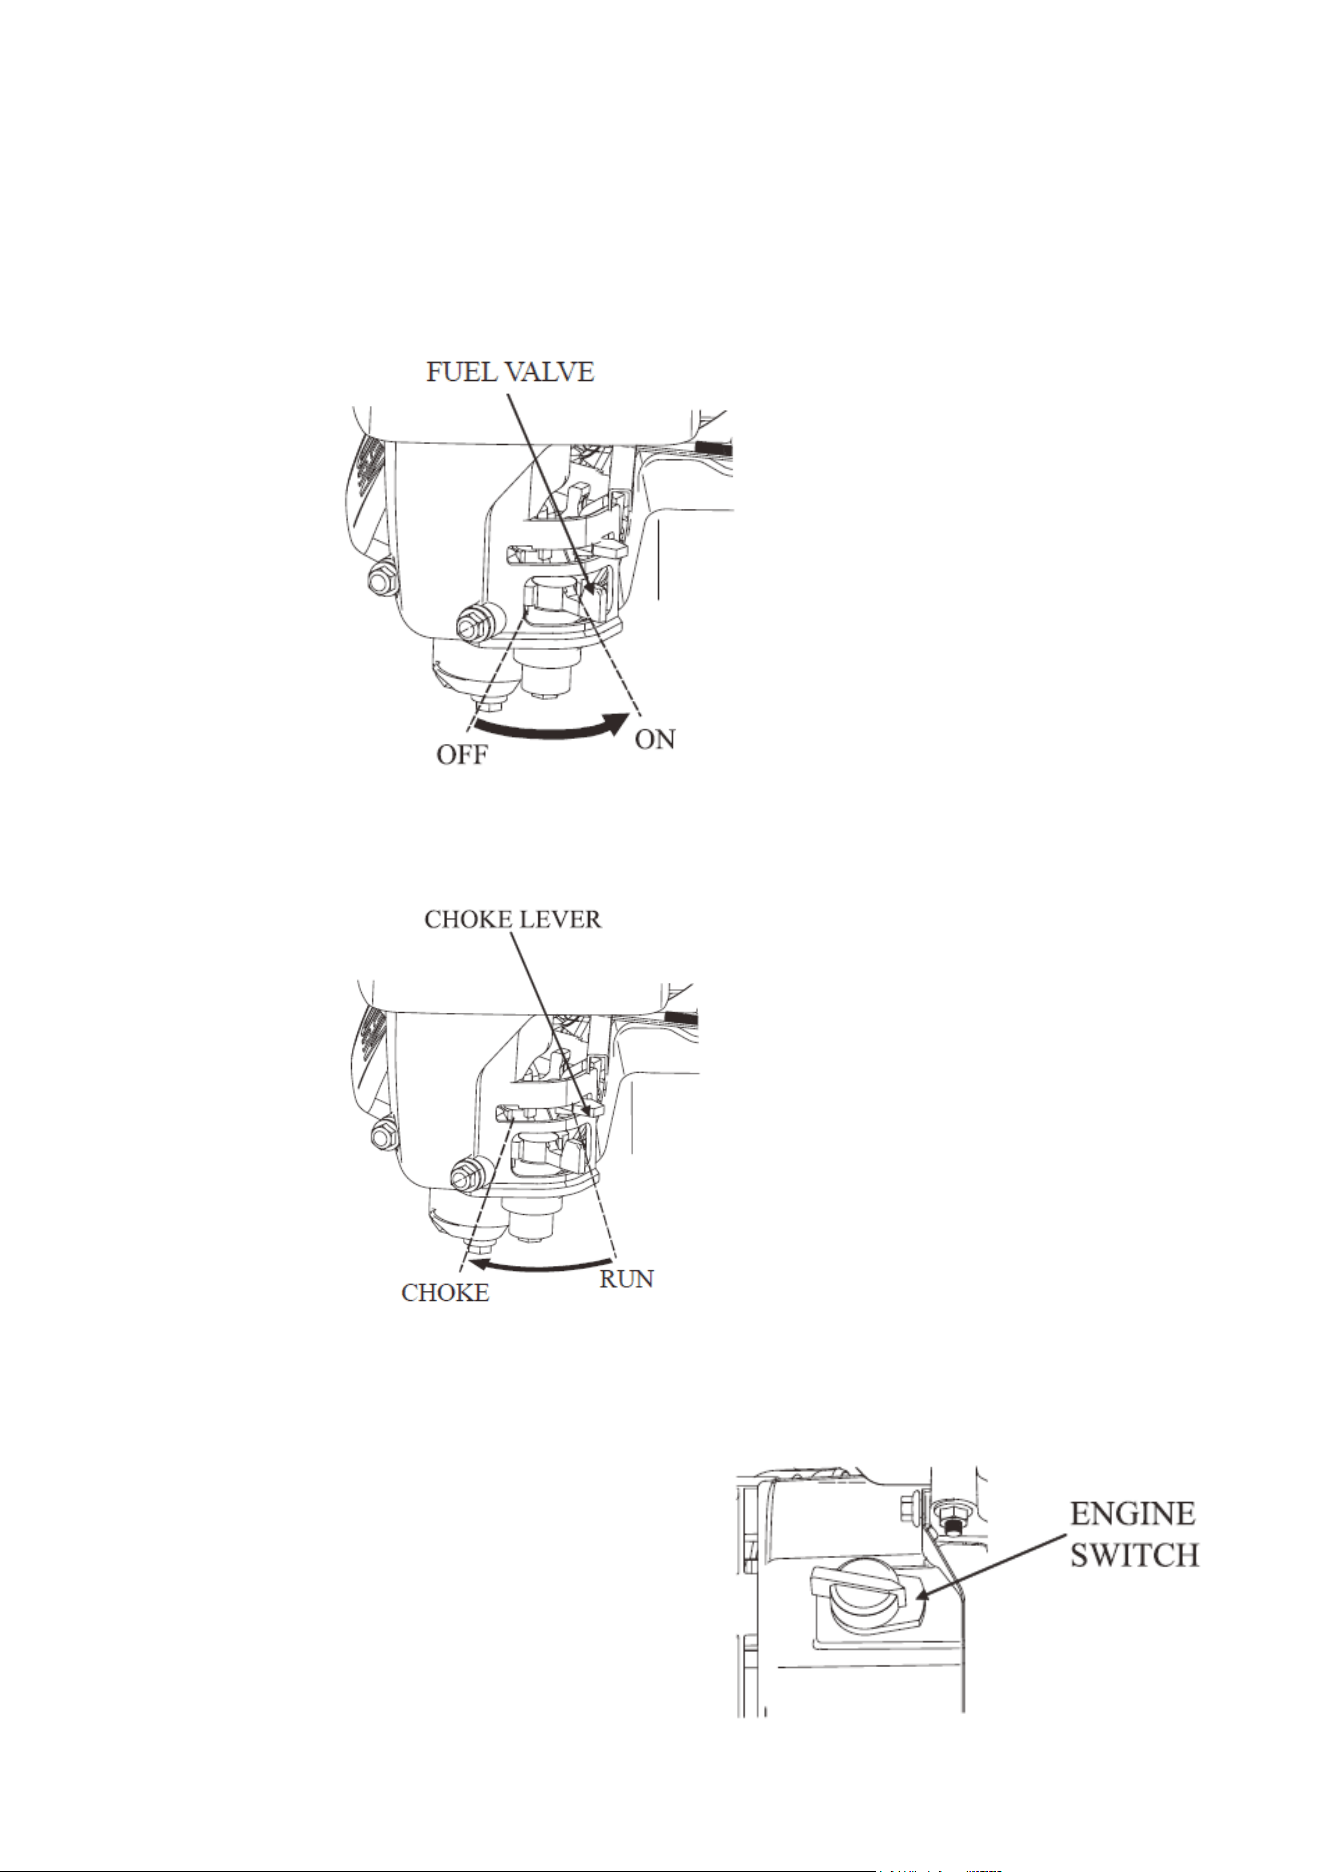
Before starting the engine:1. Add engine oil. Add 17 oz (0.5L) of engine oil.
For best machine performance, the manufacturer recommends using high-quality engine oil. Always use
high-quality detergent oils (including synthetic) of API (American Petroleum Institute) service class SJ or
higher. Please reference the chart below and select engine oil viscosity based on air temperature at time of
operation.
2. Add gasoline.
Do not overfill the fuel tank. Maximum capacity: 88 oz (2.6 L). Leave space for fuel expansion. Always use
c
lean, fresh, regular unleaded fuel with a minimum 87 octane rating.
After adding the proper amount of oil and gasoline operators may safely start the engine.
Operating Instructions
Always add engine oil
and gasoline before
starting the engine.
Do NOT attempt to start the engine
before adding oil to the engine. The
engine is shipped without engine oil.
12
Starting the Engine
Refer to the engine’s user manual for complete information on starting, maintenance and specifications.
209cc Engine
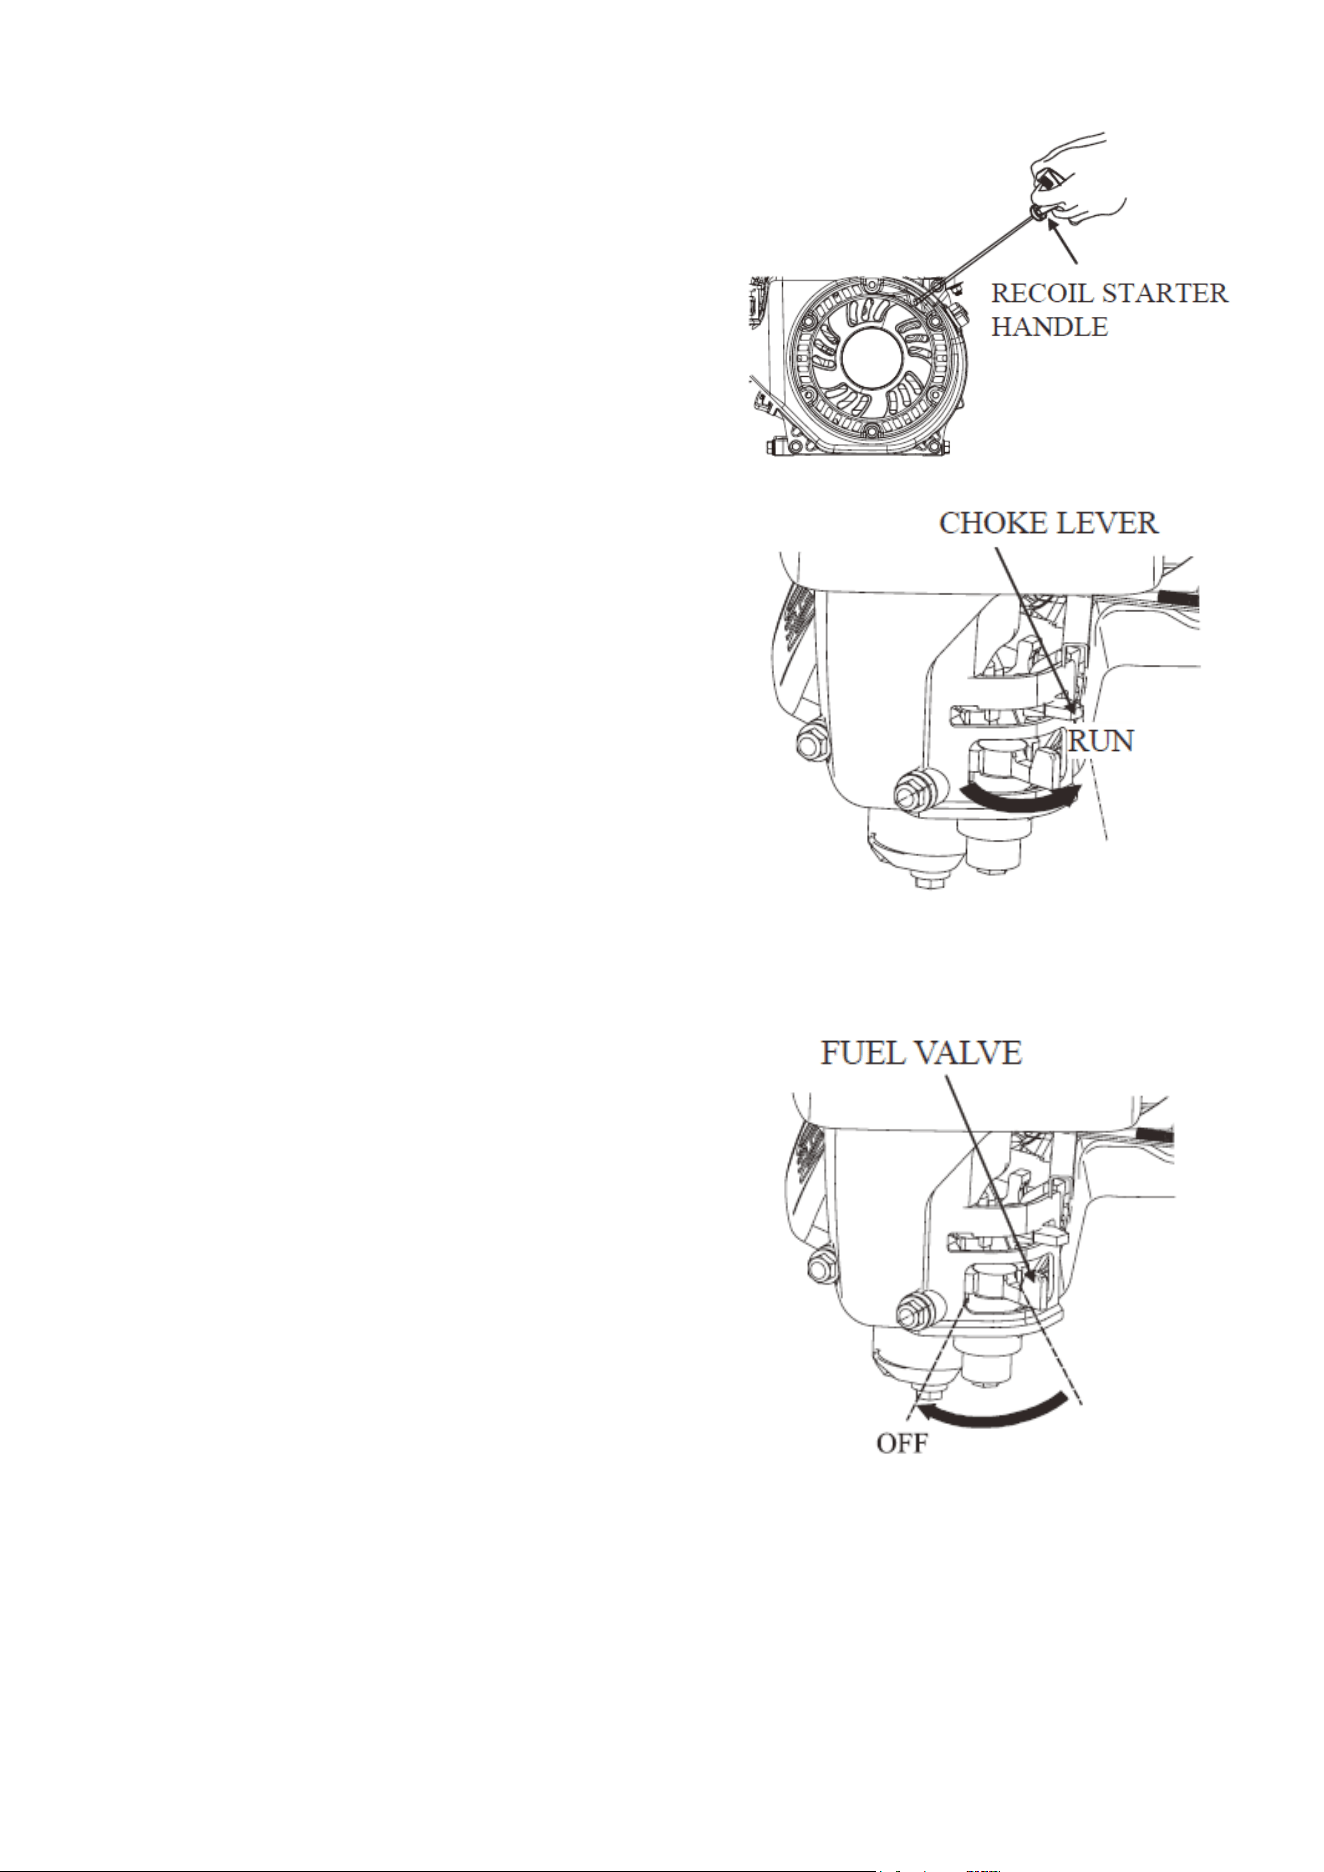
a) Mov
e the fuel valve to the “ON” position.
b) To start a cold engine, move the choke lever to the CHOKE position.
To restart a warm engine, leave the choke lever in the RUN position.
c) Start the engine
Recoil starter: Turn the engine switch to the "ON" (OPEN
)
pos
ition. Pull the starter grip gently until resistance is felt.
Allow cable to retract fully and then pull it quickly. Repeat
until the engine starts.
13
NOTI
CE: Don't allow the Recoil starter handle to snap back
against the engine. Hold it as it recoils so it doesn't hit the
engine.
d) Running the engine. Allow the engine to run for several
seconds. Move the choke lever slowly to the “RUN” position.
NOTE: If
you can’t start engine, check the engine oil level first
before any other inspection.
e) Stopping t
he engine. Turn the engine switch off if an emergency occurs.
Under normal conditions, please use the following procedure:
i.Turn the engine switch off.
ii.Move the fuel valve to OFF position.
NOTE: Abrupt shutdown under high-speed, heavy-load
operating conditions may damage the engine.

14
Shredding and Chipping
1. Always use only dry wood and/or branches for shredding and chipping. Only insert dry wood and branches
that snap completely when bent into the chipper/shredder for proper machine functioning. Inserting fresh,
wet and/or live branches into the chipper/shredder can cause machine malfunction.
a. The chipper/shredder is not designed to process fresh, wet and/or live branches, so they will not
be cut and can jam the machine. If the recoil handle will not pull, the machine may be jammed with
wet and/or live branches.
2. Without putting hands into the shredder (on top), slowly drop material into the hopper (one branch at a
time). The shredder automatically pulls any dropped material further into the machine for processing.
WARNING
Never use hands to feed material directly into the shredder. If necessary, use another stick to push
branches, leaves, etc. into the shredder.
3. The chipper is located on the side of the machine. Carefully feed only one branch at a time into the chipper.
4. Material discharges from the bottom of the chipper/shredder. Stand clear of the discharge areas to avoid
contact with shredded debris.
5. Do not allow processed material to build-up in the discharge zone. Builtup material may prevent proper
discharge and can result in kickback.
6. If the chipper/shredder jams during use, immediately shut the engine off by moving the hrottle control
lever to the far right towards the “STOP” icon. Allow the chipper/shredder to completely stop before
clearing the jam by shifting/pushing the material with a long stick. After the jam is completely cleared the
chipper/shredder is safe to resume operation.
When finished using the chipper/shredder, turn the engine’s throttle to the Stop position. Turn the fuel
valve to the OFF position by rotating it perpendicular to the fuel line. Allow the chipper/shredder to
completely stop before moving or cleaning.
Store the chipper/shredder (with the spark plug removed) in a clean, dry, safe location out of reach of
children and unauthorized people.
15
IMPORTANT:
• Never force material into the chipper/shredder and always be
aware of the size limits of branches when operating the machine.
• The shredder is designed to shred light brush, leaves and other
soft organic material. Material inserted into the shredder should
never be larger than a ½ inch in diameter. The chipper is
designed to handle tree limbs and branches up to 3 inches in
diameter. Inserting material larger than 3” in diameter into the
chipper chute may cause damage to the machine
• Do not force the chipper/shredder or attempt to have the machine
operate more quickly. For safe operation always allow the
machine to pull and process material at its own pace.
TRANSPORTING
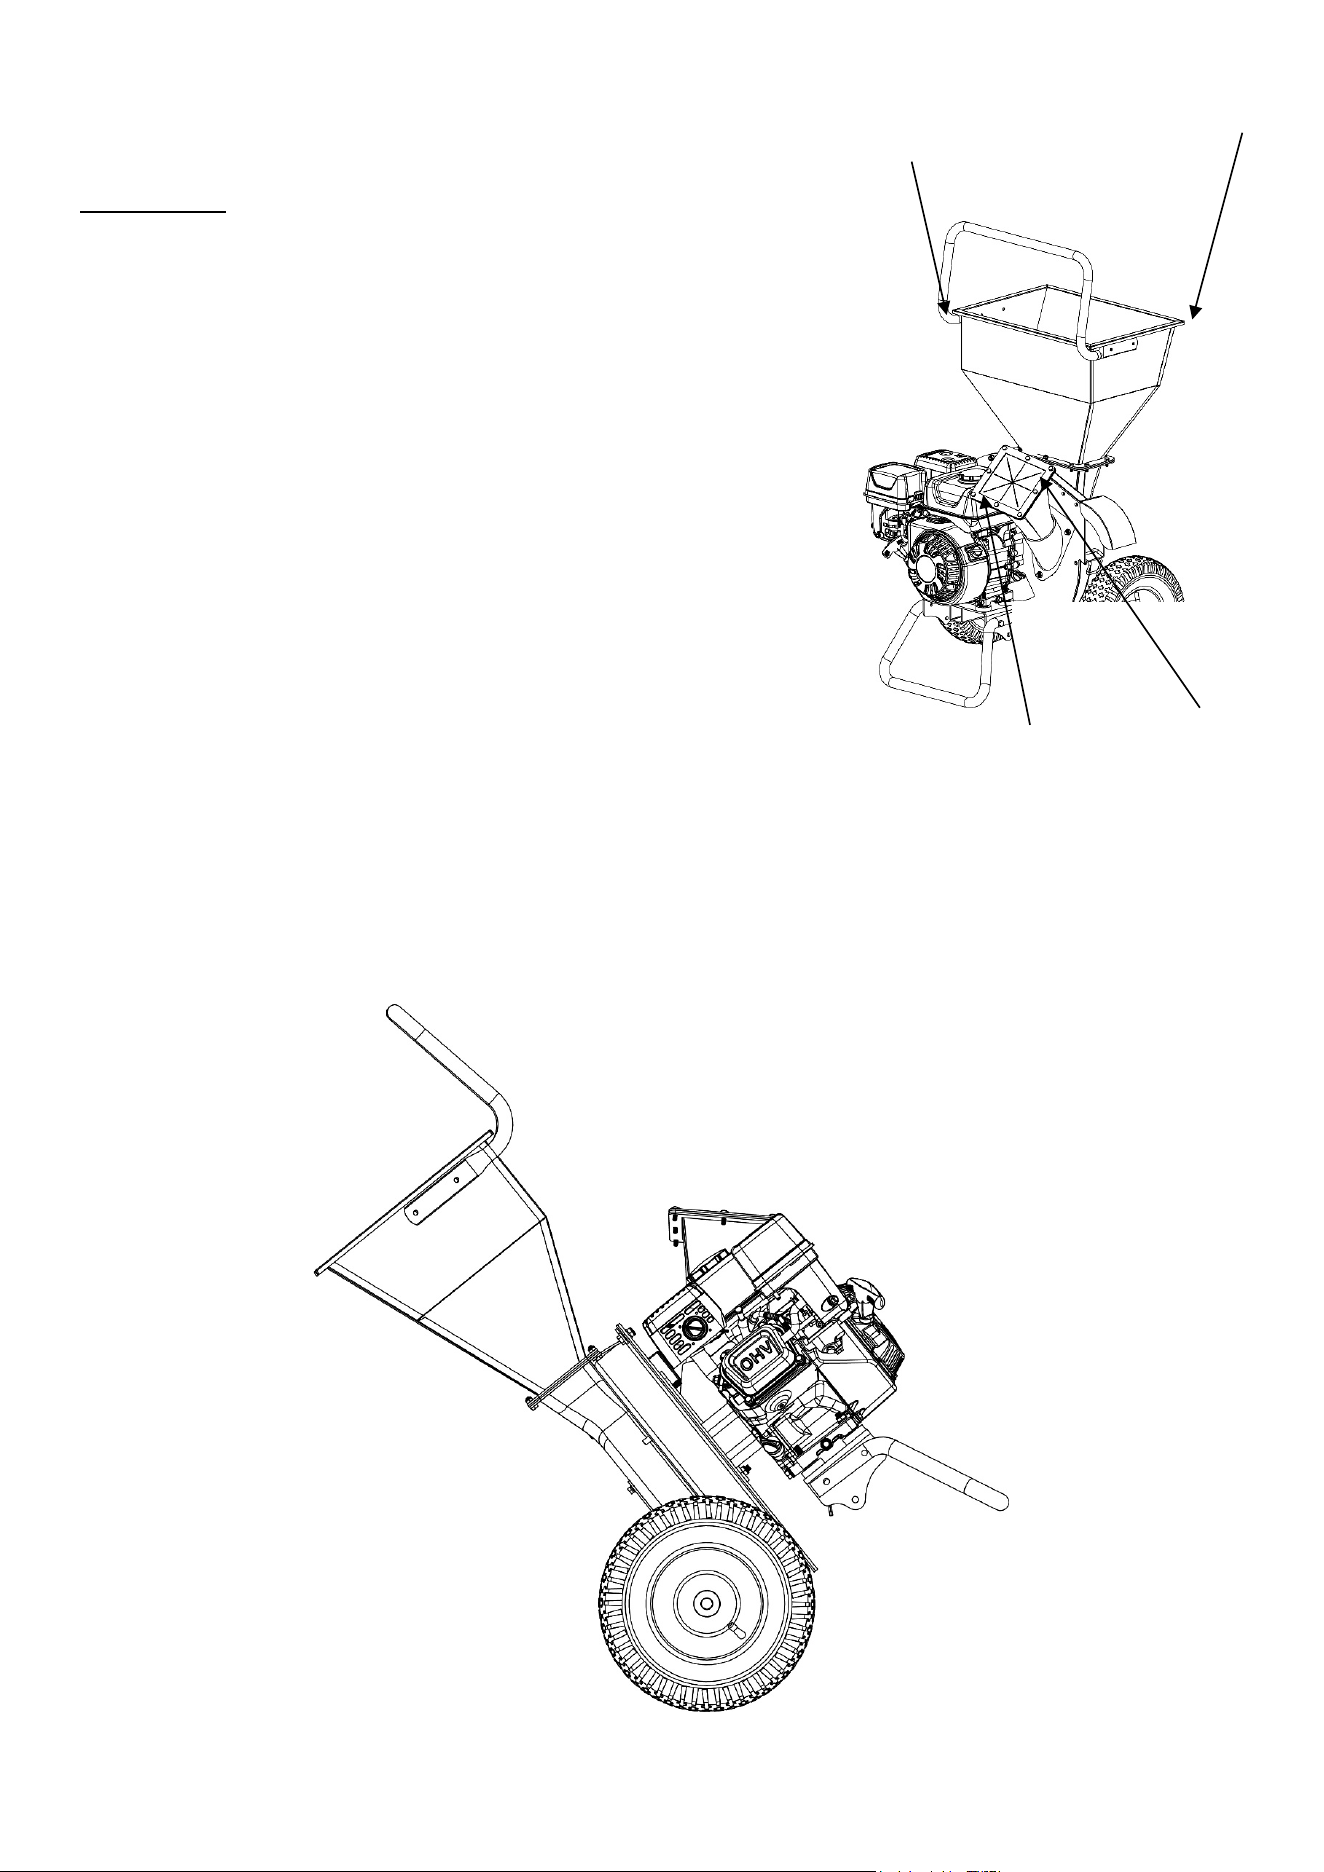
IMPORTANT: Before transporting the chipper/shredder, always turn the fuel valve to the “OFF” position.
NOTE: Always use caution when pushing the chipper/shredder. Avoid large holes and ditches when
transporting.
Chipper
Chute
3’’ diameter
branches max.
Shredder Hopper
1/2’’ diameter
branches max.
16
WARNING
The spark plug wire must be disconnected and the engine must be off, with the control lever moved to the far
right before performing any service, maintenance, or cleaning of the chipper/shredder.
1. Inspection
Before using the chipper/shredder, visually inspect the general condition of the machine. Check for loose
screws, misalignment or binding/sticking of moving parts, cracked or broken parts and any other condition
potentially affecting safe operation. Start the engine and if abnormal noise or vibration occurs, have the problem
corrected before further use. Do not operate the machine if it is damaged or in poor mechanical condition.
2. Maintenance
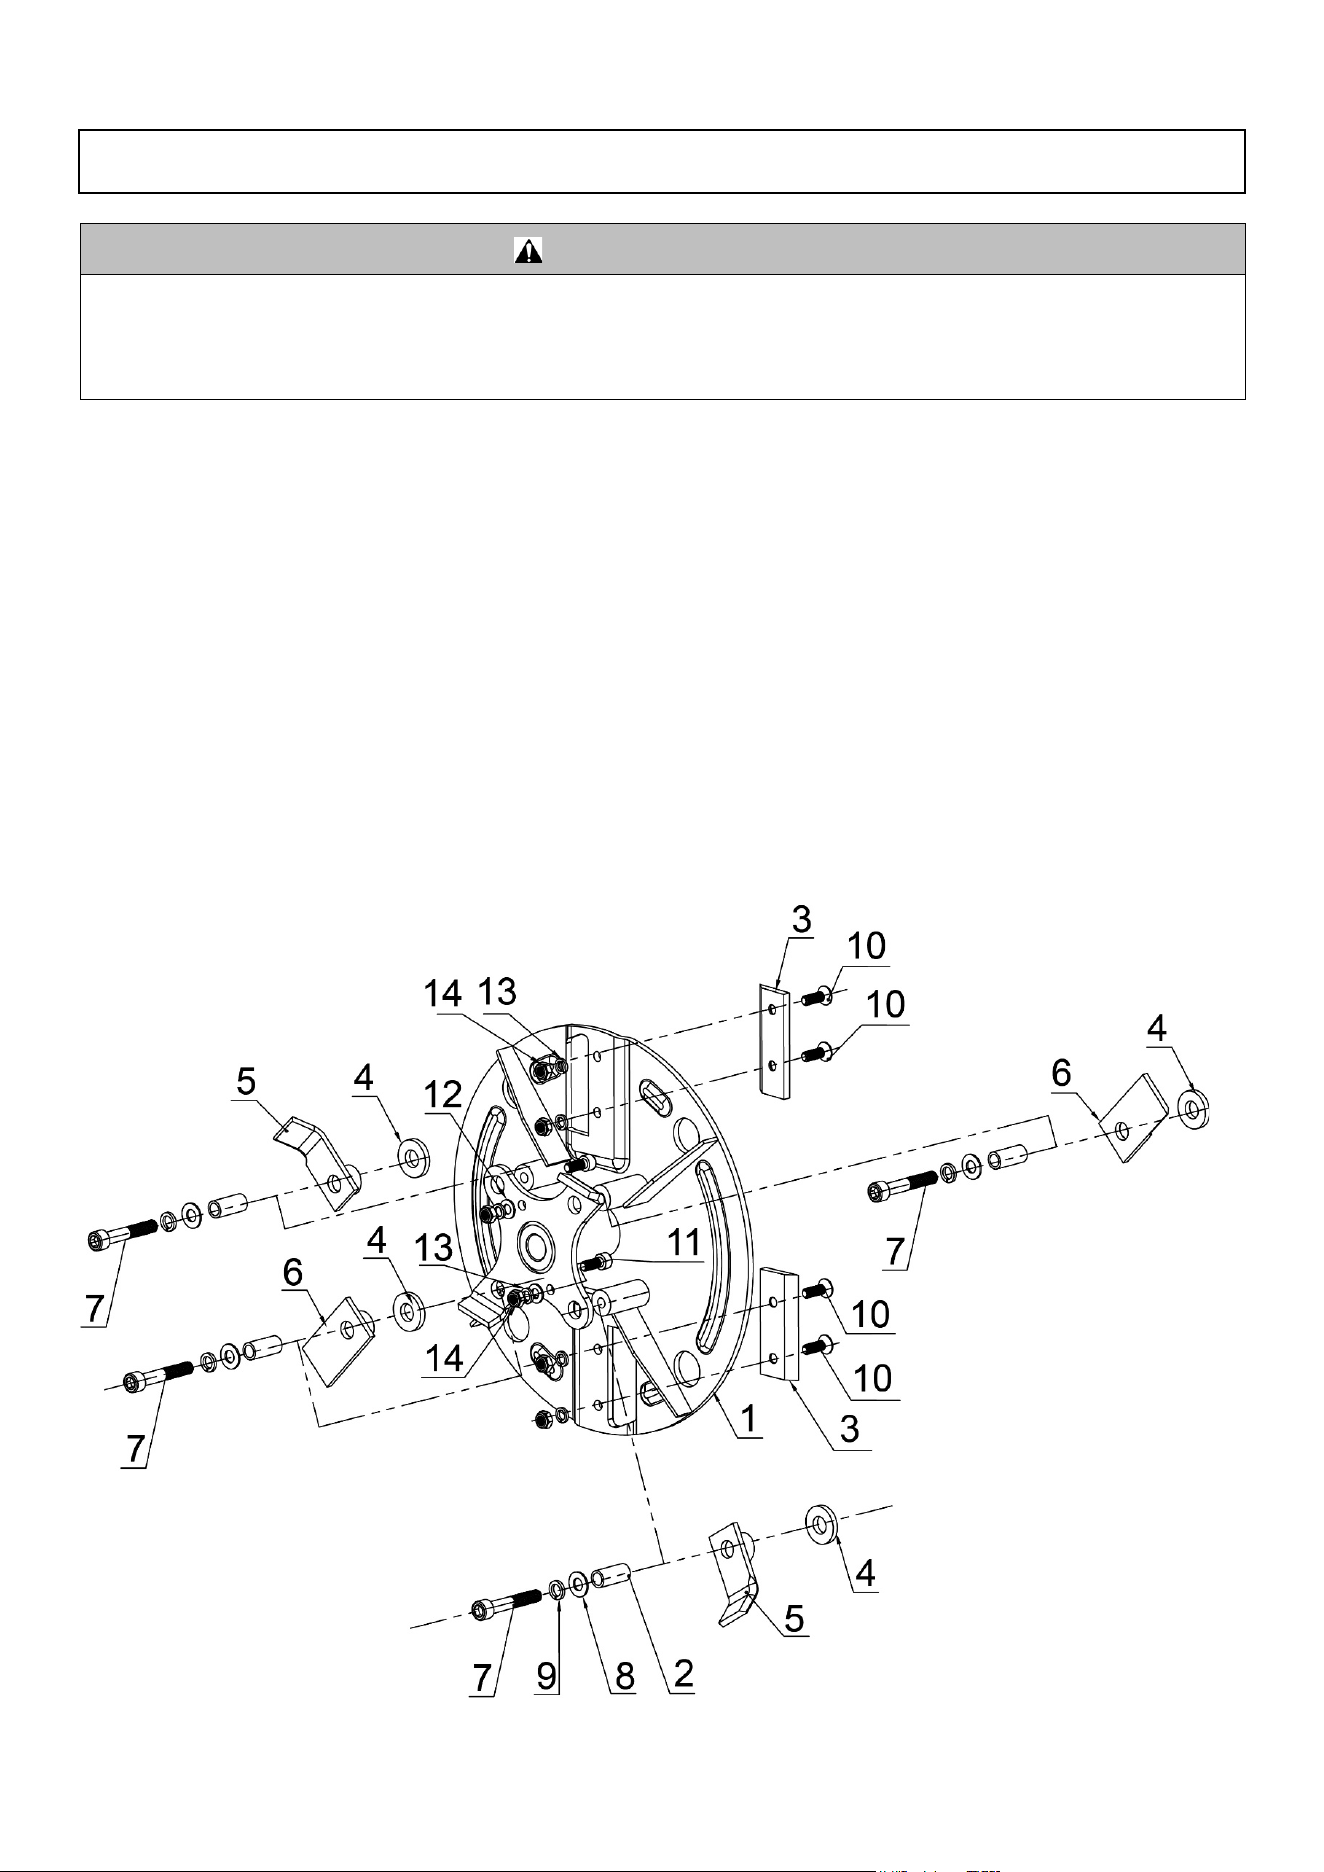
1) If either blade edge becomes worn, disassemble the blade assembly and install replacement blades using
the #10 internal hex bolt. Always apply thread sealant to secure the #10 bolt.Please make sure to use thread
sealant to secure the #10 bolt.
2) When you assemble the #6 rectangle blade and #5 L blade, please use thread sealant to secure the #7 inner
bolt.
3) If you have to assemble the whole blade assembly with engine, please use thread sealant to secure the hex
bolts.
Inspection, Maintenance and Cleaning

17
Part# Drawing Description QTY
1 CP75T-05100 Blade Assembly 1
2 CP75G-05001 Bushing 4
3 CP75T-05001 Blade 2
4 CP75G-05003 Washer 4
5 CP75G-05200 L Blade 2
6 CP75G-05300 Rectangle Blade 2
7 9105-10060-FH12.9 Inner Hex Bolt M10x60 4
8 9301-10000-DX Flat Washer Ø10 4
9 9306-10000 Lock Washer Ø10 4
10 9103-08025-FH10.9 Inner Hex Bolt M8x25 4
11 9105-08020-FH12.9 Inner Hex Bolt M8x20 2
12 9301-08000-DX Flat Washer Ø8 2
13 9306-08000-DX Lock Washer Ø8 6
14 9206-08000-DX Nylon Lock Nut M8 6
3. Cleaning
4. Storage
Before storing the chipper/shredder, unhook the spark plug wire from the spark plug and drain all the fuel out of
the engine’s fuel tank. Leaving old fuel in the fuel tank may clog the carburetor of the engine and prevent it from
starting until all oil is properly drained. Always store the chipper/shredder in a clean, dry, safe location out of
reach of children and other unauthorized people
.

18
PROBLEM
SOLUTION
Engine will not start. • Add gas to the fuel tank.
• Connect spark plug wire to the spark plug.
• For a cold start, the engine control lever must be moved to the
left “choke” position.
Recoil handle will not pull. • Check that the machine is not jammed. Please see steps for
jammed shredder below.
Engine runs rough, floods during
operation.
• Clean or replace the air cleaner.
• Move choke to the “RUN” position.
Engine is hard to start. • Drain old fuel completely and refill with fresh fuel. Use gas
stabilizer at the end of the season.
• Make sure the spark plug wire is securely attached to the spark
plug.
Engine loses or lacks power. • Remove and clean the fuel tank.
• Clean or replace the air cleaner.
• Improper carburetor adjustment, take to an authorized engine
service center.
• Replace the spark plug and adjust gap.
• Drain and refill the gas tank and carburetor.
Engine exhaust is black. • Dirty air filter. Replace or clean the air filter(s).
• Choke closed. Open the choke.
Engine runs, but no material is
discharged.
• Discharge chute is clogged. Stop engine and clear any
obstructions and/or debris.
• Engine not running at full speed. Move the engine control lever to
the left position (rabbit icon).
Excessive branch vibration when
chipping materials. Extra force
required to feed branches into the
chipper.
• Chipper knives are dull. Sharpen or replace the chipper knives.
Unusual noise or vibration when
chipping materials.
• Rotor overloaded with material. Allow the chipper to clear before
adding any more material to the hopper.
• Hammers are broken, bent, or loose. Tighten or replace
hammers as necessary.
• Hammers are stuck/jammed in place. Check for obstructions and
clear as necessary.
Troubleshooting
19
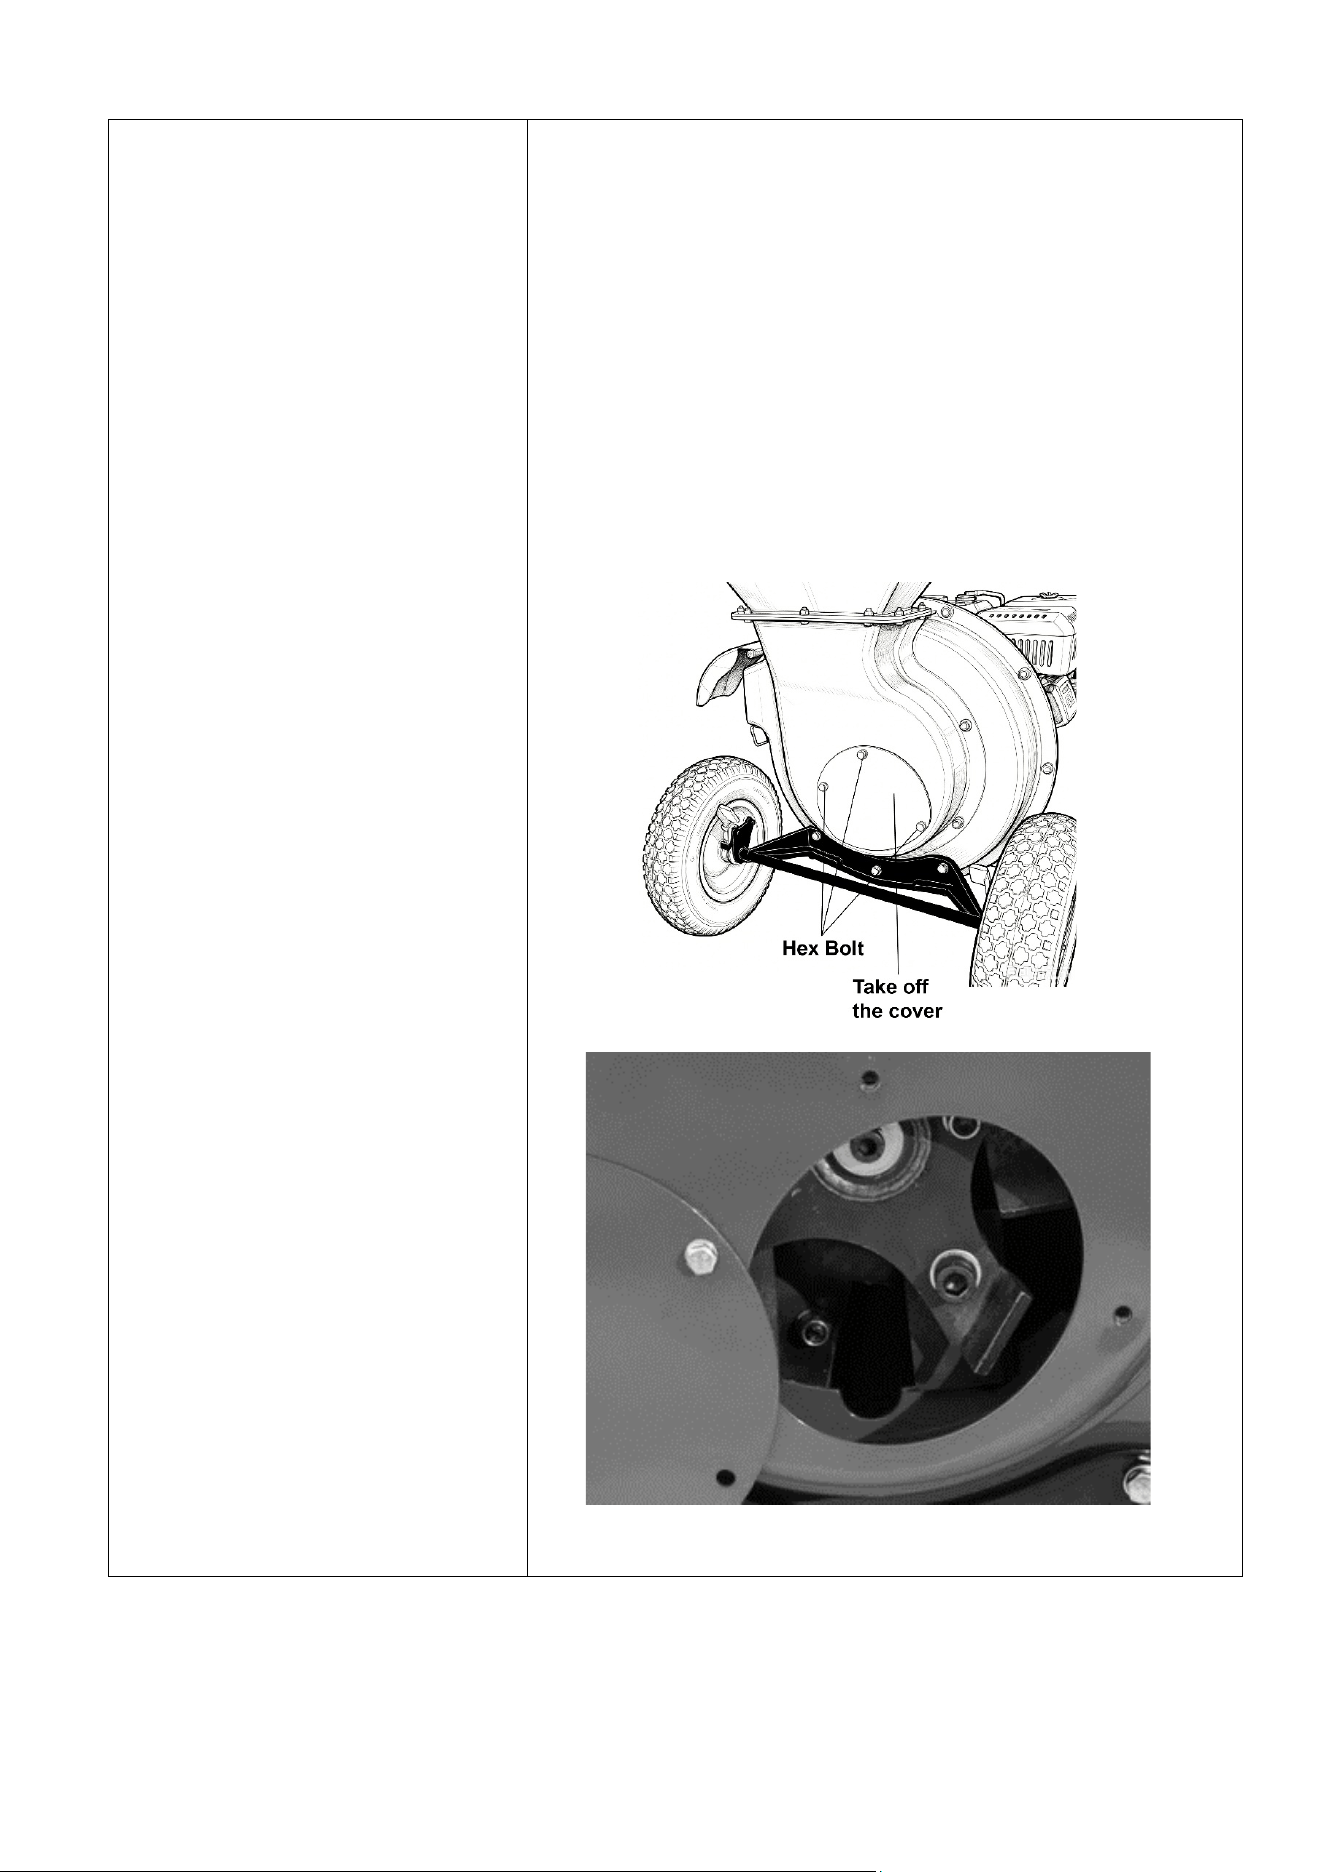
Shredder is jammed or flywheel will
not rotate.
(*If the recoil handle will not pull, the
machine may be jammed.)
• Stop the engine.
• Disconnect the spark plug and wait for the machine to completely
stop.
• Take off the back panel of the machine by removing the three
bolts and the cover plate.
• With the plate removed any material tangled or jammed in the
hammers will be visible.
• Carefully use a stick to clear out any jammed material
• Slowly rotate the blade assembly to check all
material/obstructions are removed, then replace the plate.
Never attempt to shred fresh branches as wet material may
jam the machine.

20
Chipper Capacity…………………………………3’’ Maximum Limb /Branch Diameter
Chipper Chute Opening Dimensions.……….…………………………….17.5” x 11.7”
Shredder Hopper Capacity ……………………1/2” Maximum Limb/Branch Diameter
Shredder Hopper Dimensions………………………...…………………..4.85” x 4.85”
Accessories………………..….Protective Glasses, Ear Protection, Discharge Bag
Wheel Type……………………………………………………………12” Pneumatic Tires
Engine Type…………………………………………….……………………………209cc
Overall Size………………………………………………...………….. 24’’ x 25’’ x 45’’
NOTE: For engine details refer to the engine owner’s manual.
The chipper/shredder requires oil and fuel be added before initial use and before starting the engine.
Attempting to start the engine without oil may destroy the engine and void the warranty.
Specifications
21
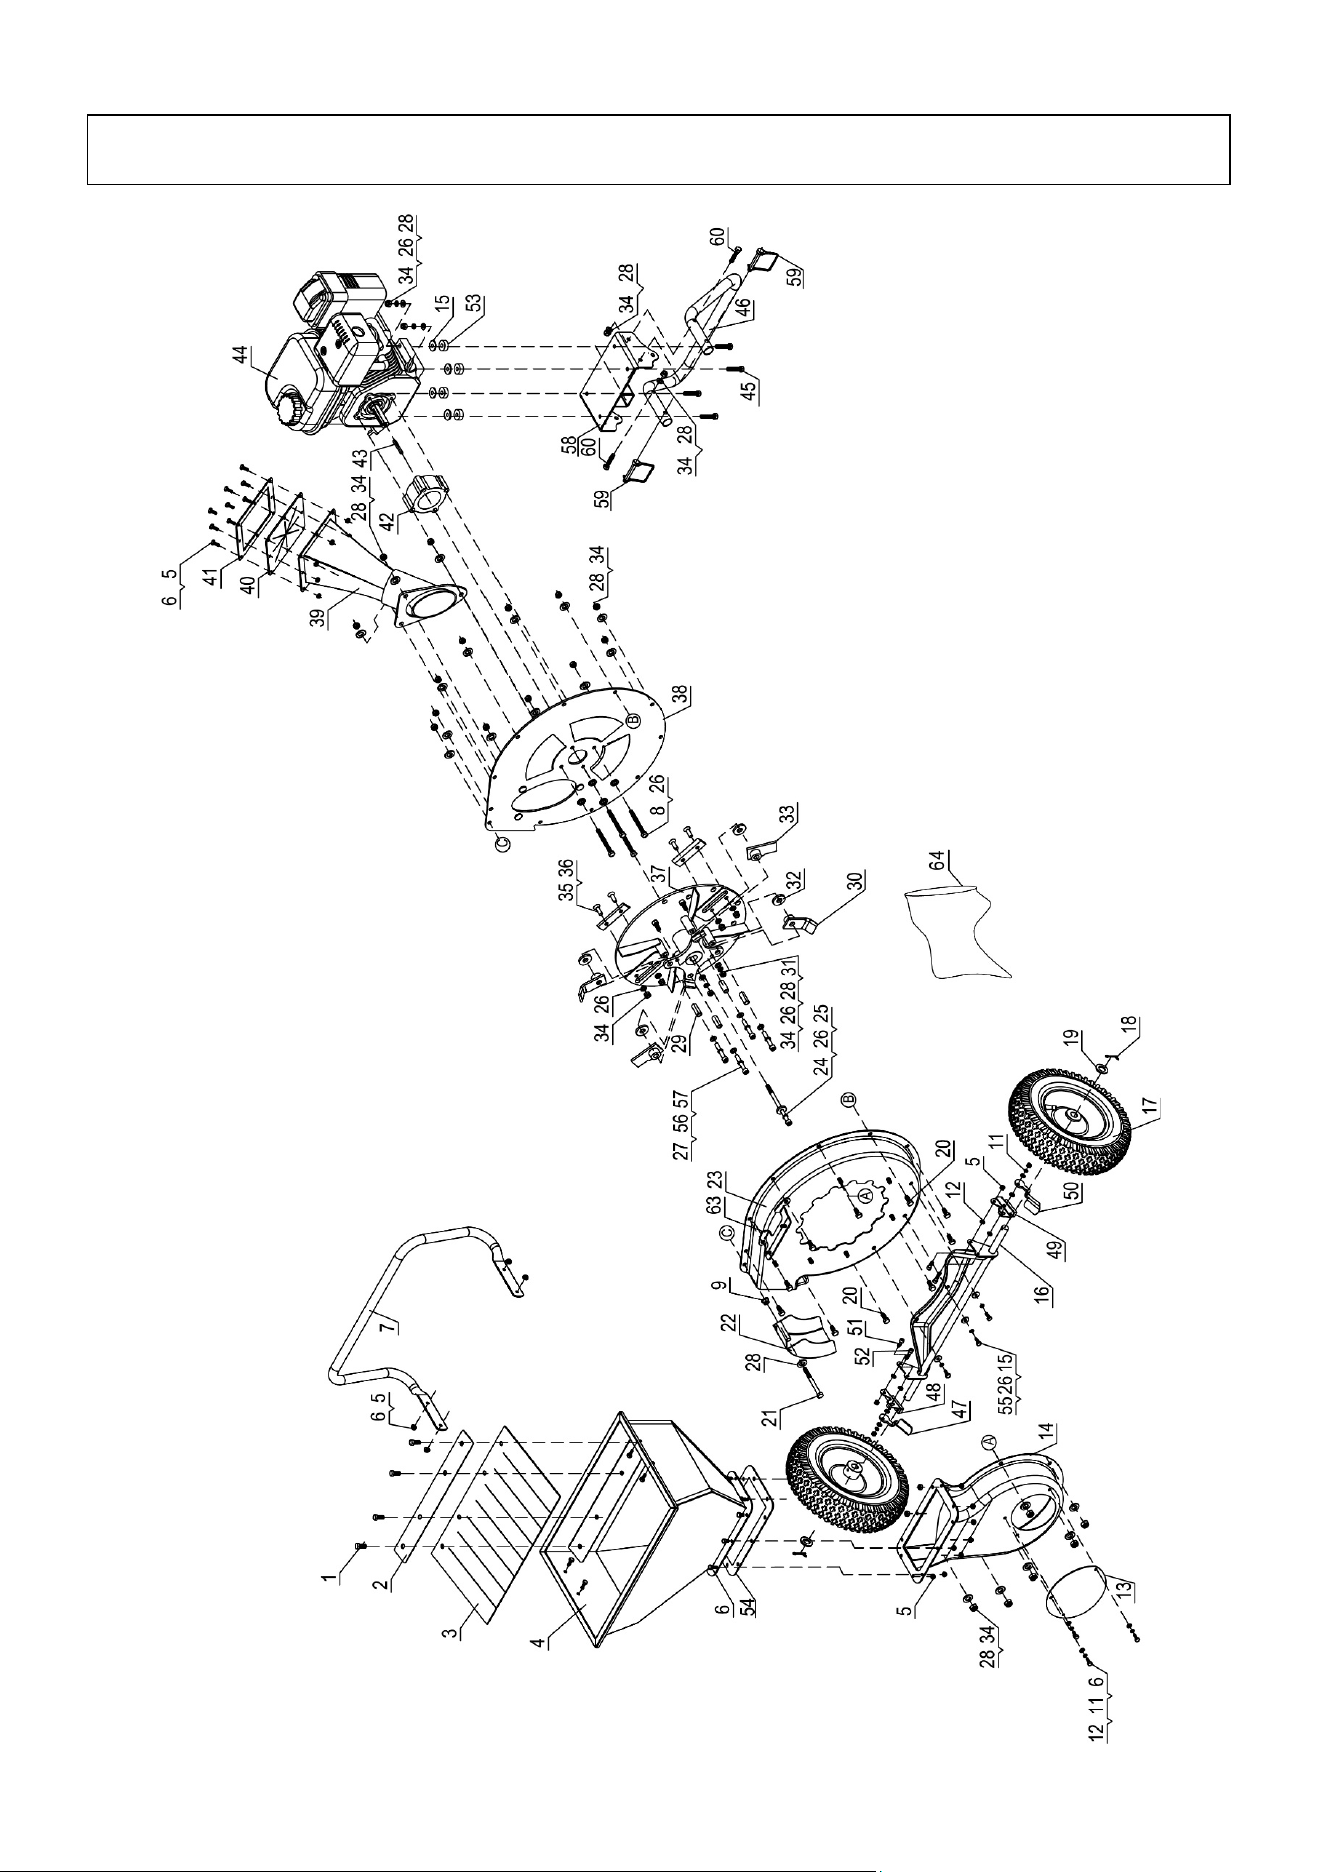
Drawing and Parts List

22
Item# Drawing No. Description Qt y.
1 9115-08016-DX8.8 Hex Flange Bolt M6x16 4
2 CP75-00001 Batten 1
3 CP75T-00002 Shredder Hopper Protective Film 1
4 CP75T-02000 Shredder Hopper 1
5 9206-06000-DX Nylon Lock Nut M6 26
6 9101-06016-DX8.8 Hex Bolt M6x16 23
7 CP75T-00003 Handle 1
8 9101-08070-FH8.8 Hex Bolt M8x70 4
9 9212-08000-DX Hex Flange Nut M8 1
11 9306-06000-DX Lock Washer Ø6 5
12 9301-06000-DX Flat Washer Ø6 11
13 CP75T-00004 Cover Cap 1
14 CP75T-01000 Rotor Housing 1
15 9302-08000-DX Large Flat Washer Ø8 7
16 CP75-03000 Wheel Bracket 1
17 N570-00020 12” Pneumatic Tire 2
18 9404-03030-DX Cotter Pin Ø3x30 2
19 9301-16000-DX Flat Washer Ø16 2
20 9101-08020-DX8.8 Hex Bolt M8x20 10
21 9105-08100-DX12.9Q Inner Hex Bolt M8x100 1
22 CP75-00006 Deflector 1
23 CP75T-06000 Main Housing 1
24 YZ05-08120-FH12.9 Inner Hex Bolt M8x120 1
25 CP75-00009-DX Thick Washer 1
26 9306-08000-DX Lock Washer Ø8 18
27 9105-10060-FH12.9 Inner Hex Bolt M10x60 4
28 9301-08000-DX Flat Washer Ø8 29
29 CP75G-05001 Spacer 4
30 CP75G-05200 L Blade 2
31 9105-08020-FH12.9 Inner Hex Bolt M8x20 2
32 CP75G-05002 Washer 4
Drawing and Parts List

23
Item# Drawing No. Description Qt y.
33 CP75G-05300 Rectangle Blade 2
34 9206-08000-DX Nylon Lock Nut M8 32
35 9103-08025-FH10.9 Inner Hex Bolt M8x25 4
36 CP75T-05001 Blade 2
37 CP75T-05100 Blade Assembly 1
38 CP75-06000 Main Board 1
39 CP75T-07000 Chipper Chute 1
40 CP75M-00003 Chipper Chute Flap 1
41 CP75M-07001 Chipper Chute Mount Ring 1
42 CP75-00007 Spacer (50mm) 1
43 / Engine Flat Key 1
44 / Engine 1
45 9101-08050-DX8.8 Hex Bolt M8x50 4
46 CP6502-00004 Support Leg 1
47 CP75-03001 Left Brake Control Pad 1
48 CP75-03200 Left Wheel Brake Pad Assembly 1
49 CP75-03300 Right wheel brake pad assembly 1
50 CP75-03002 Right brake control pad 1
51 9105-06016-FH8.8 Inner Hex Bolt M6x16 2
52 9105-06025-FH8.8 Inner Hex Bolt M6x25 2
53 CP75-00013 Polyurethane Block 4
54 CP75T-00001 Rubber Pad 1
55 9101-08016-DX8.8 Hex Bolt M8x16 3
56 9306-10000-FH Lock Washer Ø10 4
57 9301-10000-DX Flat Washer Ø10 4
58 CP6502-10000 Engine Assemble Plate 1
59 T680-20000 Drive Pin 2
60 9101-08045-DX8.8 Hex Bolt M8x45 2
63 CP75T-03000 Connecting Plate 1
64 CP75-00008 Collection Bag 1
Drawing and Parts List