User Manual
Product Overview
NanoKVM-Go is an AI-native 4K USB-C KVM designed for remote control, device debugging,
and routine operations and maintenance. It connects to a target device via USB-C, allowing
users to view high-resolution video remotely and operate the device with a keyboard and
mouse. This makes it easy to manage computers, servers, industrial control equipment,
development boards, and other devices.
The product supports 4K high-definition video input and features a compact, portable design
with simple connectivity. It is suitable for local debugging, remote maintenance, unattended
device management, and mobile work in a variety of environments. With its AI-native design,
NanoKVM-Go delivers a smarter, more efficient, and more flexible remote-control experience.
Package Contents
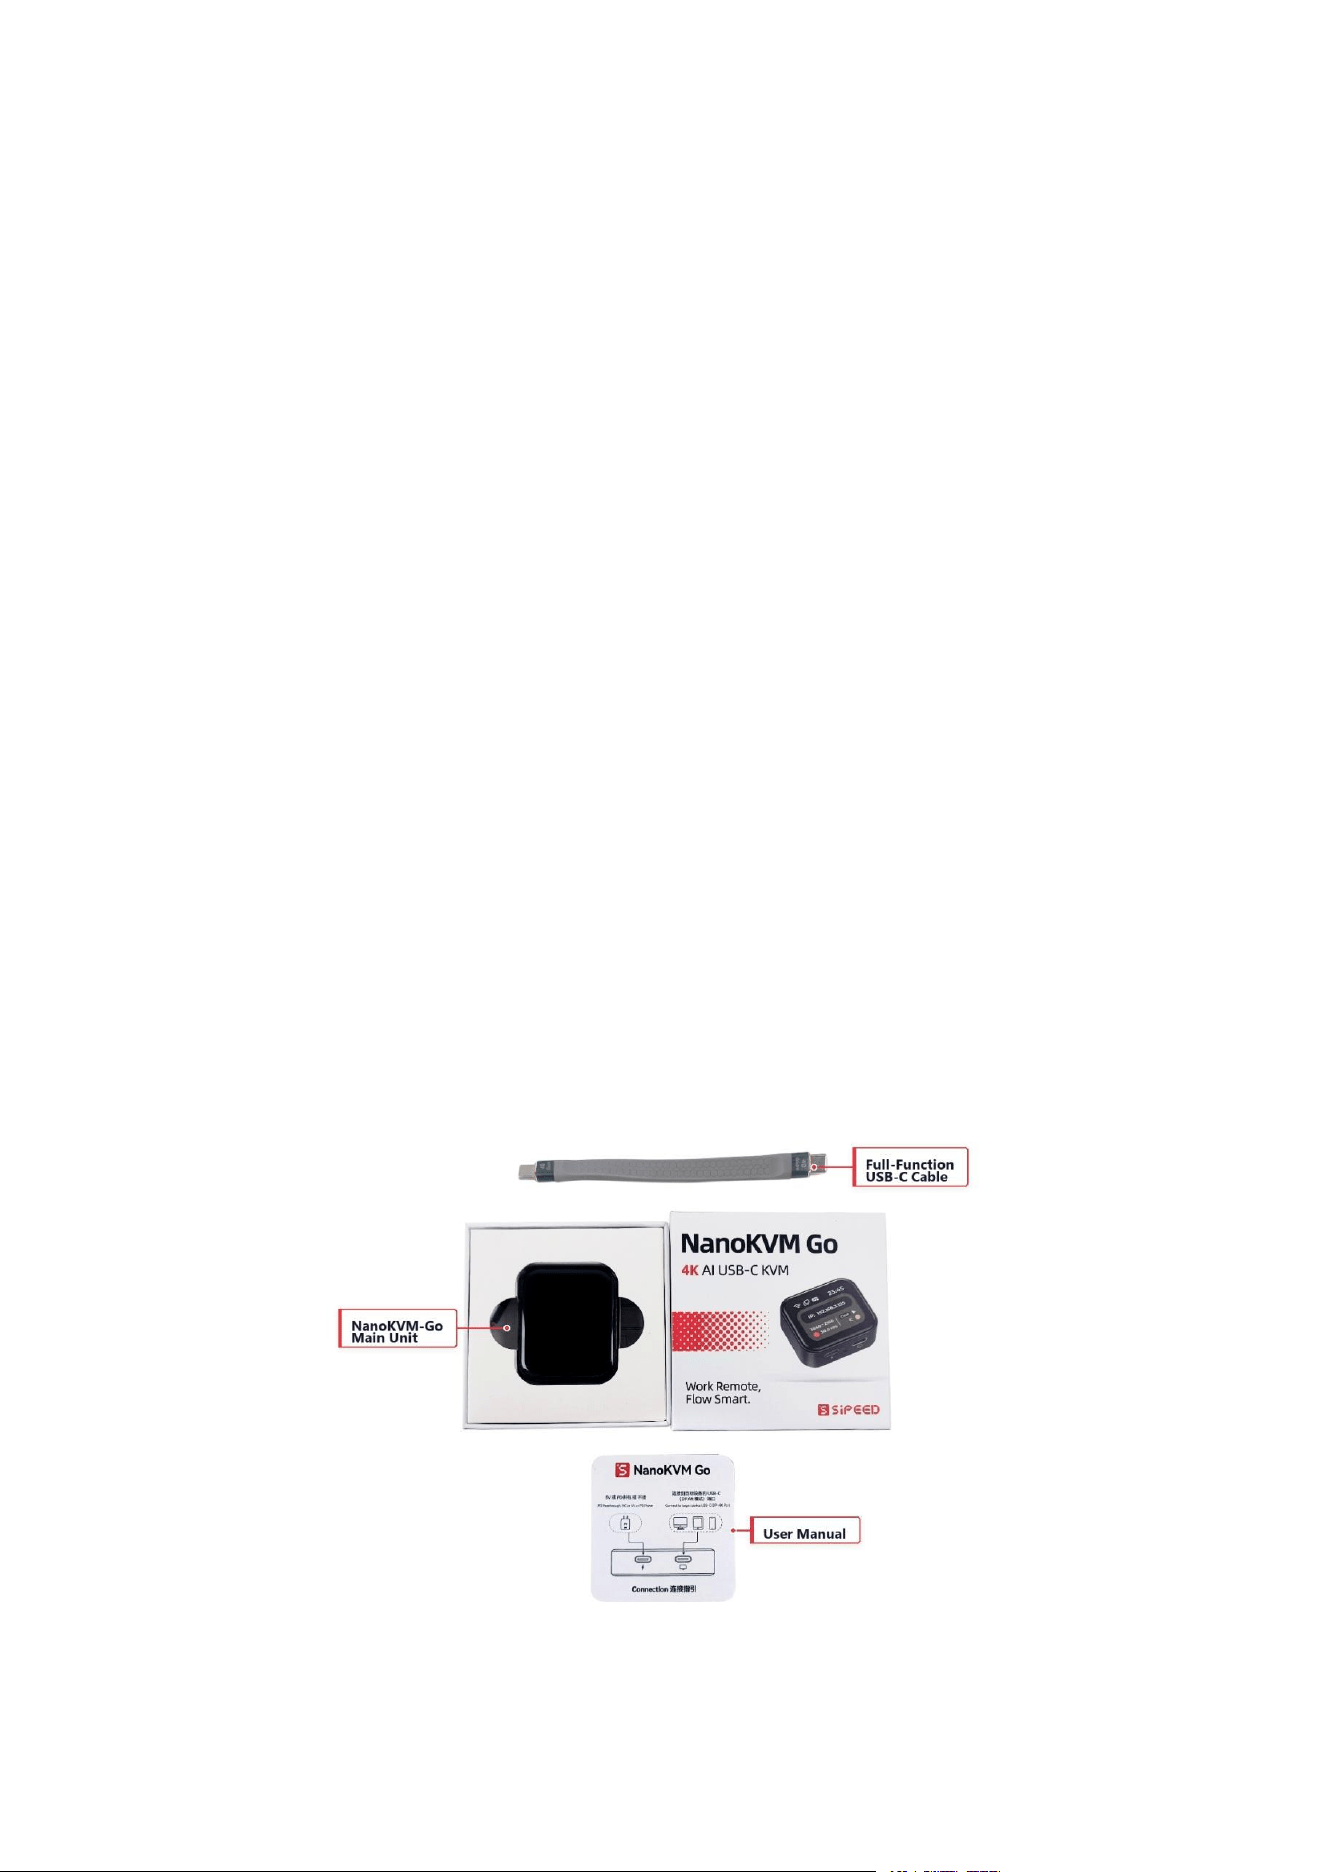
The package includes the following items:
NanoKVM-Go unit
Full-featured USB Type-C cable
User manual
Before use, make sure all items are included.
Product Appearance and Port Description
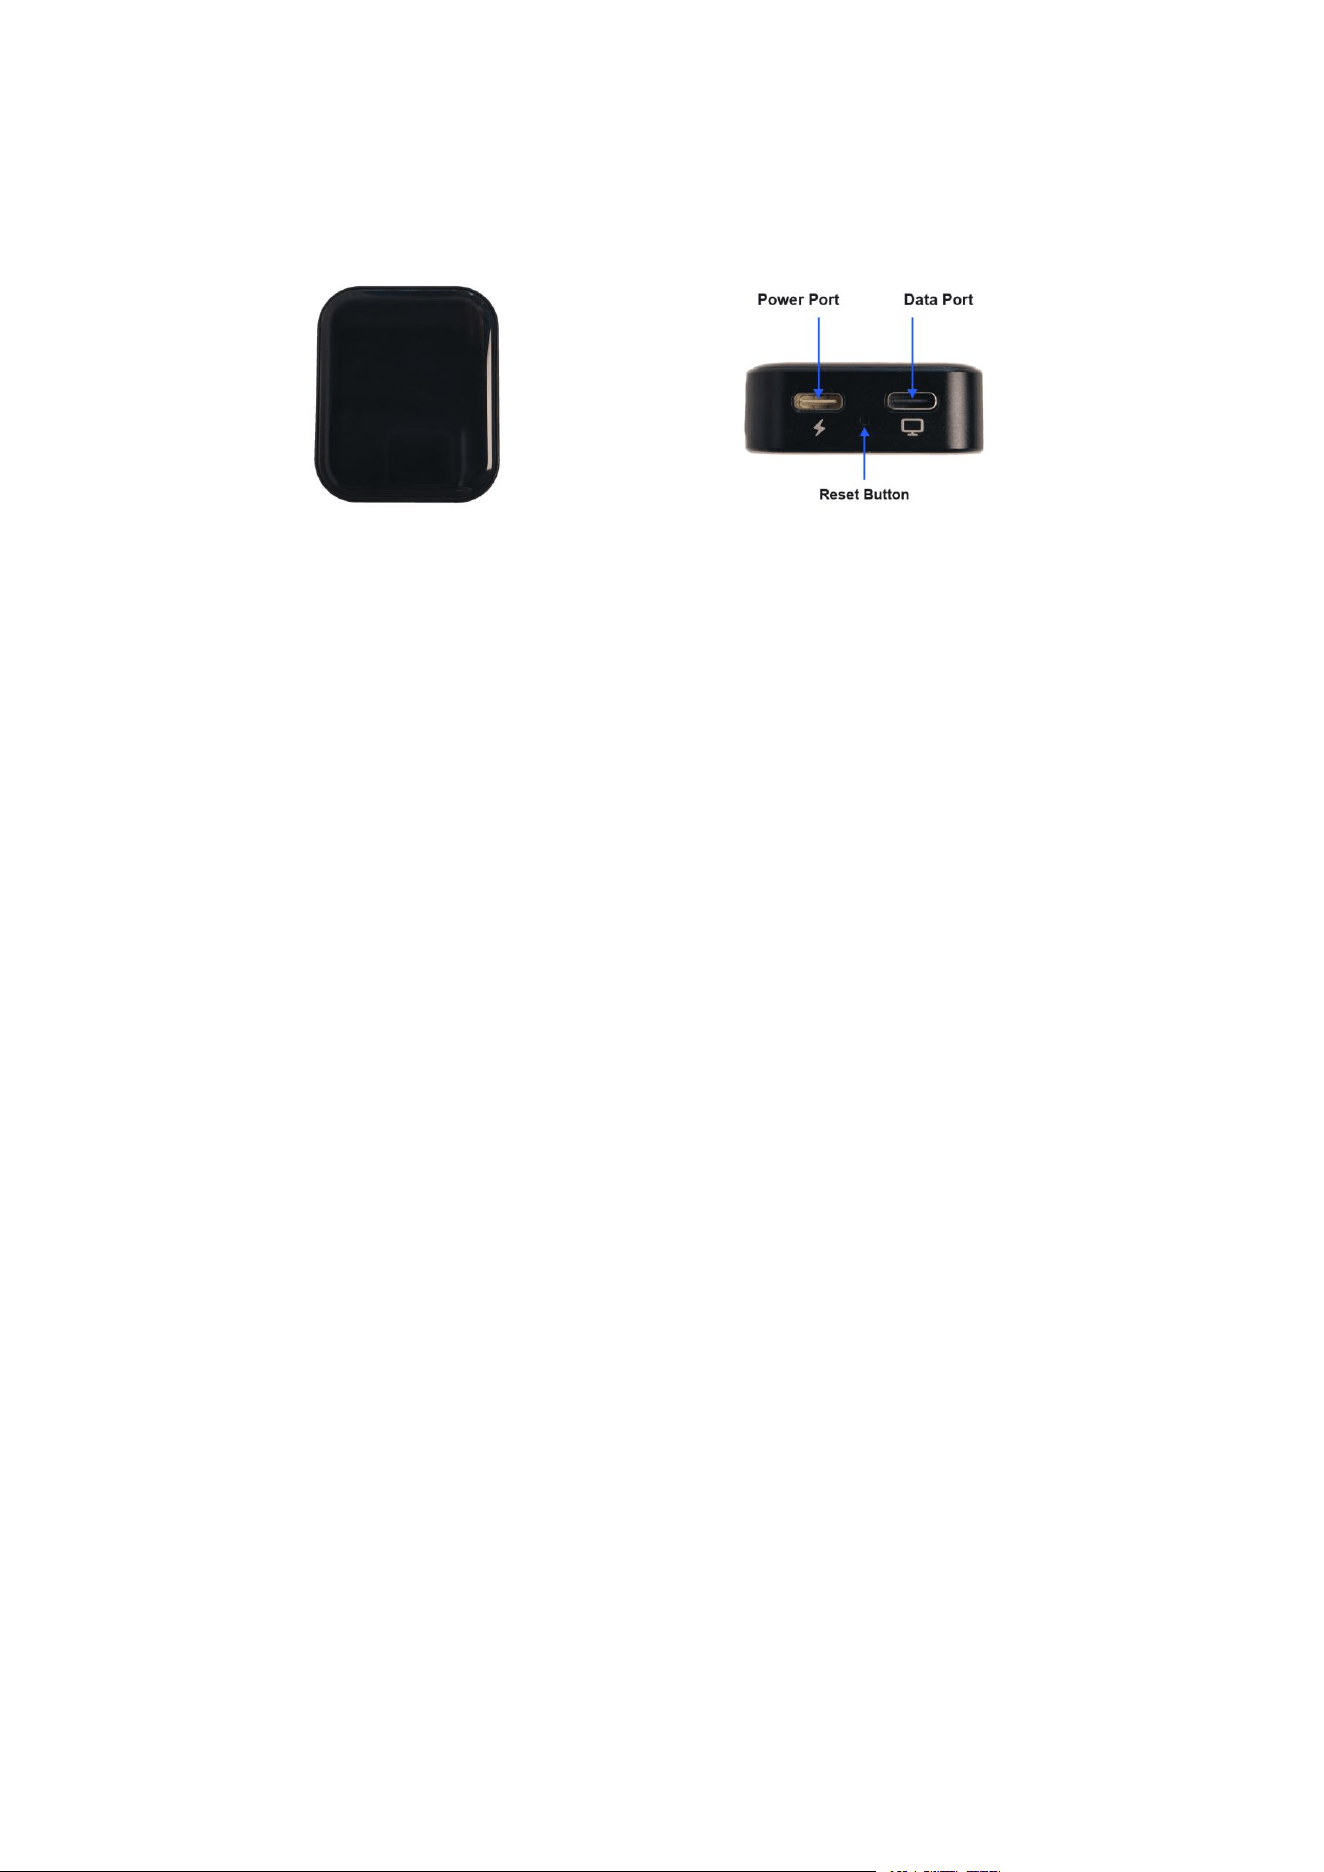
Port description: NanoKVM-Go has two ports and a reset pinhole on its side. The port on the
left, marked with a lightning-bolt icon, is the power input. The port on the right, marked with a
display icon, is the data port. The small hole between the two ports is the Reset button.
Before You Begin
Before using NanoKVM-Go, prepare the following devices and accessories:
One full-featured USB Type-C cable for connecting NanoKVM-Go to the target device.
One target device equipped with a full-featured USB Type-C port that supports video
output.
One control device that can access NanoKVM-Go through a web browser, such as a
computer, tablet, or phone.
Connecting the Device
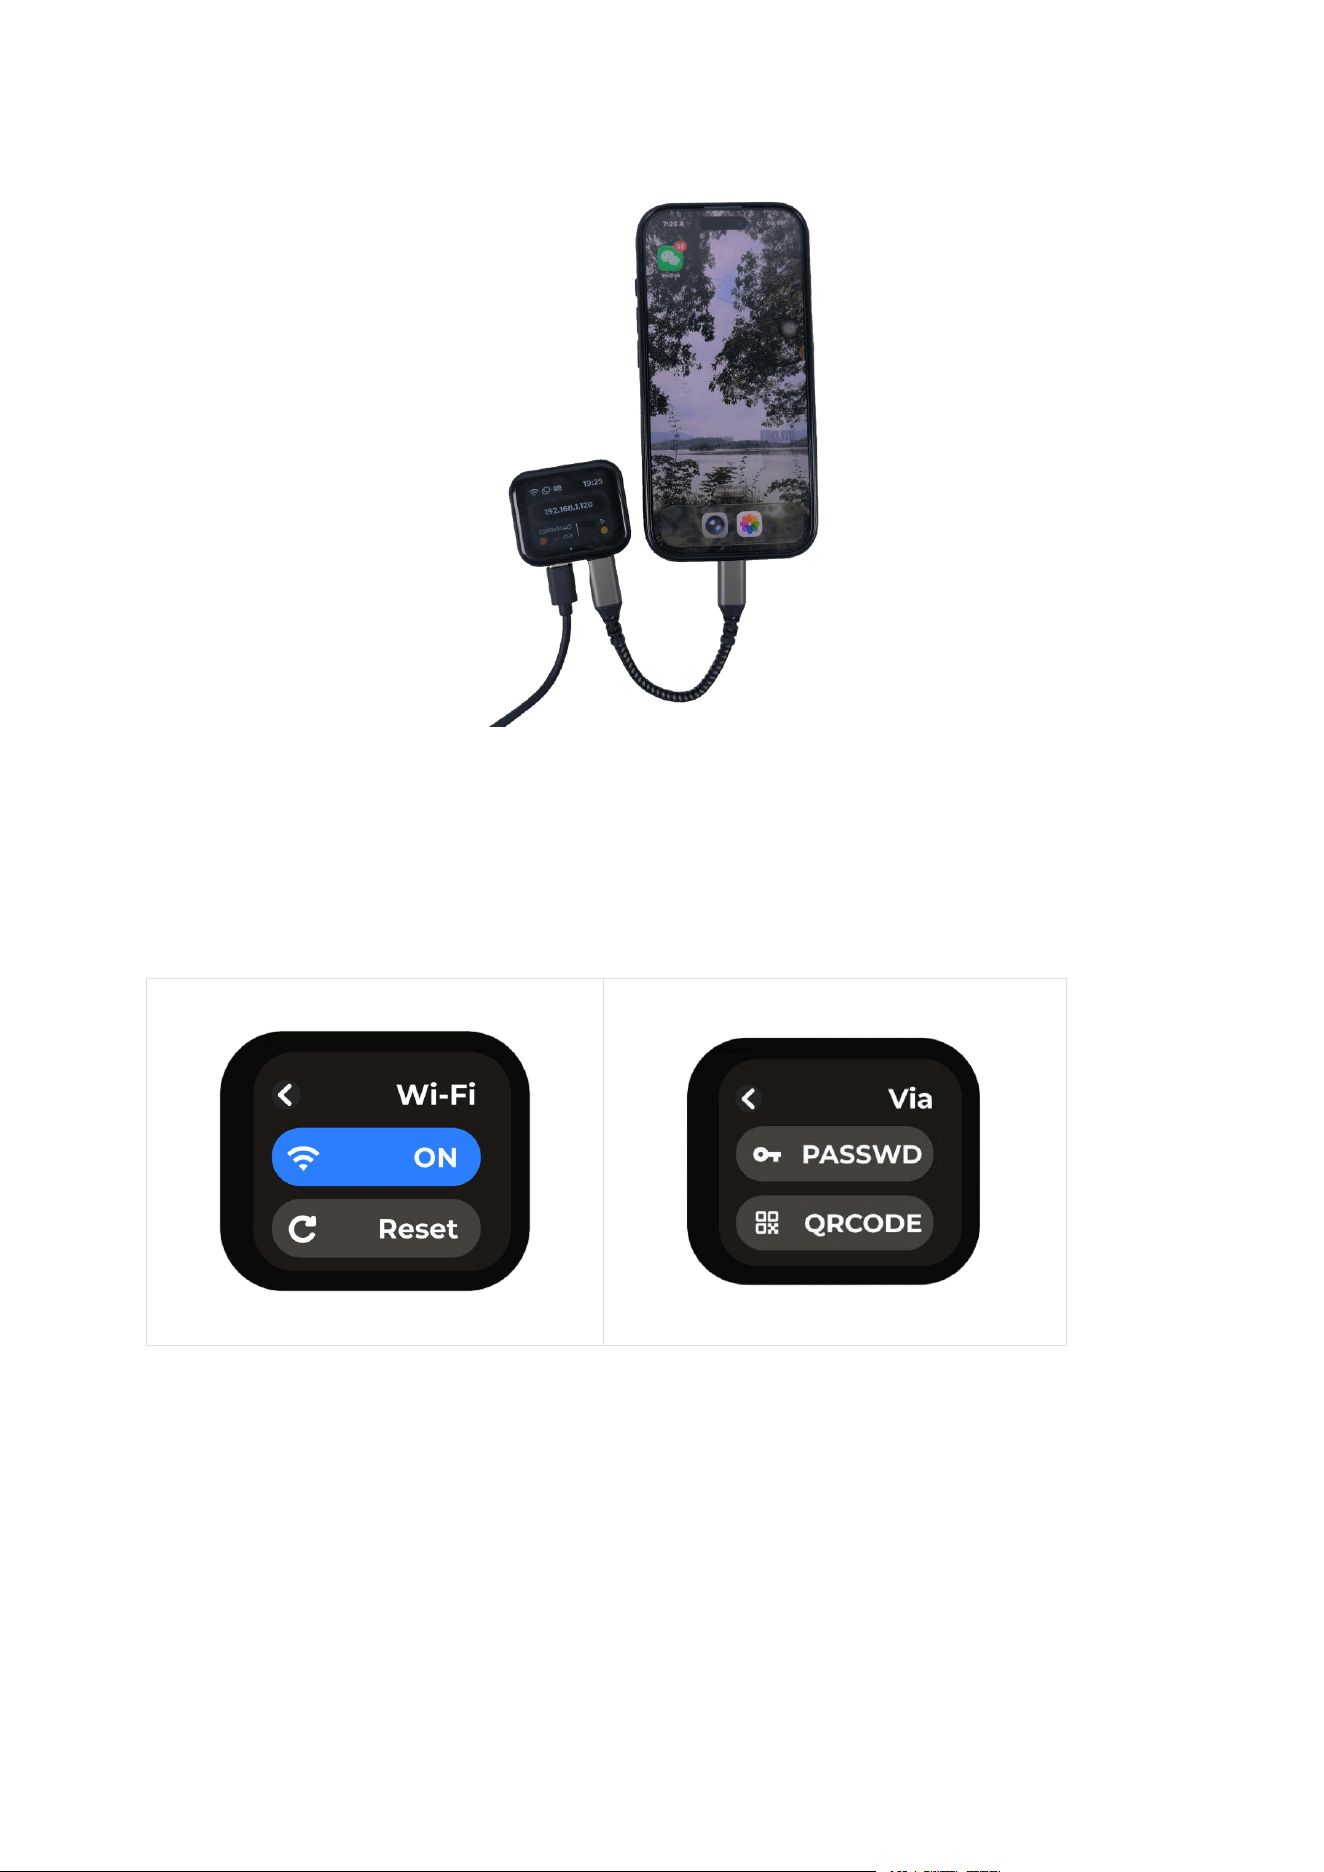
1. Use a full-featured USB Type-C cable to connect the data port marked with a display icon
on NanoKVM-Go to the USB Type-C port on the target device.
2. If the target device requires power or charging, connect a charger or external power
source to the NanoKVM-Go power input. Once connected, the external power source will
supply power to both NanoKVM-Go and the target device.
3. If no external power source is connected, NanoKVM-Go draws power from the target
device through its USB Type-C port.
First Startup and Network Configuration
1. Open the Wi-Fi screen on the device and turn Wi-Fi on
On the configuration method screen, select either PASSWD or QRCODE to configure the
network.
2. Select a Network Configuration Method
NanoKVM-Go supports two Wi-Fi configuration methods:
Method 1: QR Code Configuration
Tap QRCODE on the screen. The device displays a QR code for connecting to its built-in
hotspot. Scan the QR code with your phone and follow the prompts to connect to the built-in
NanoKVM-Go Wi-Fi network.
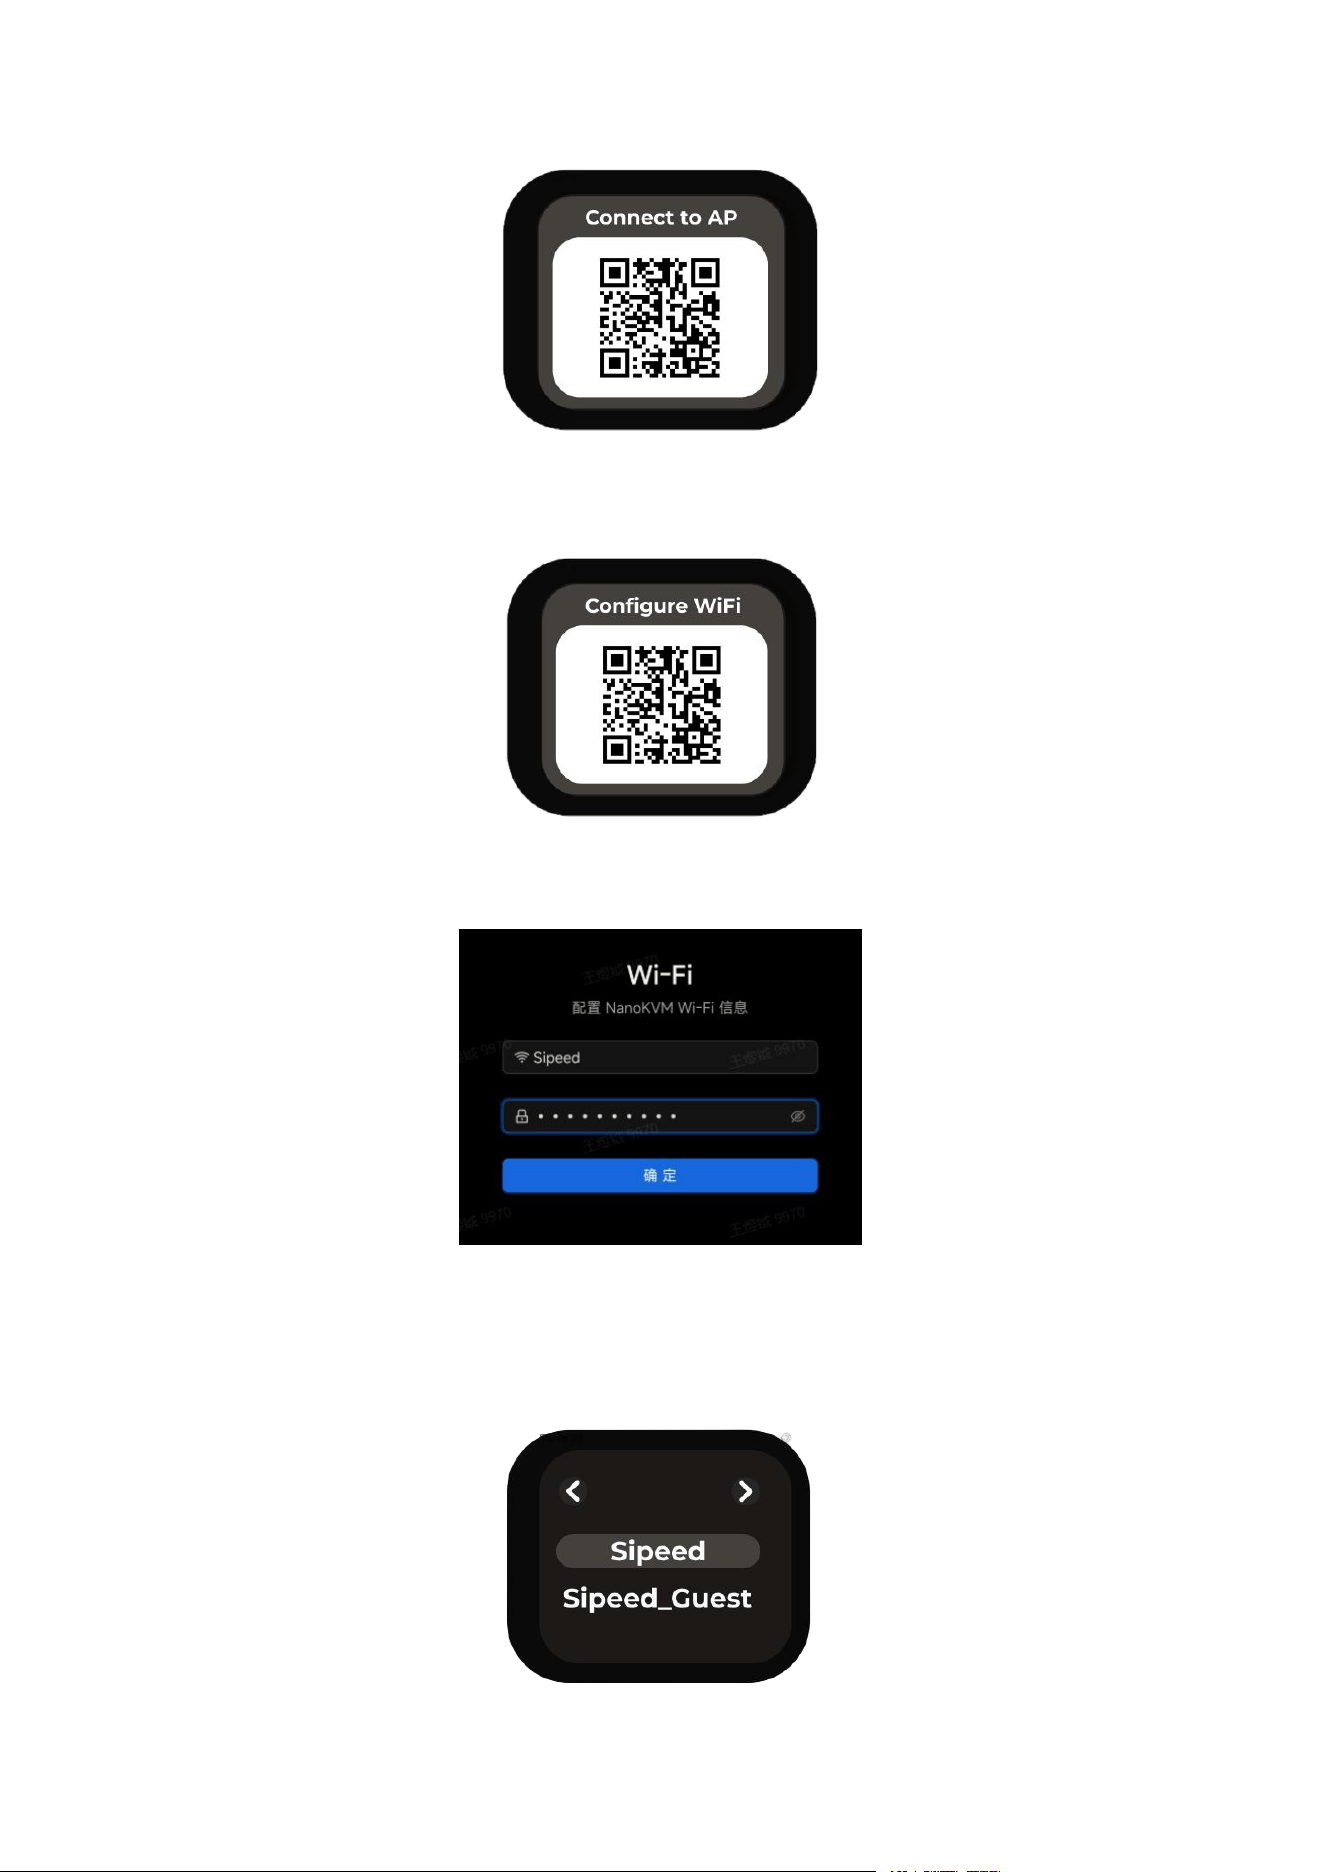
After the connection is established, scan the configuration QR code on the device screen
again. The Wi-Fi configuration page will open in your phone's browser.
Enter the Wi-Fi network name and password on the page, then tap Confirm to complete the
configuration.
Method 2: Button Configuration
Tap PASSWD on the screen to open the Wi-Fi list. Select the Wi-Fi network you want to
connect to, then press the right button to open the password entry screen.
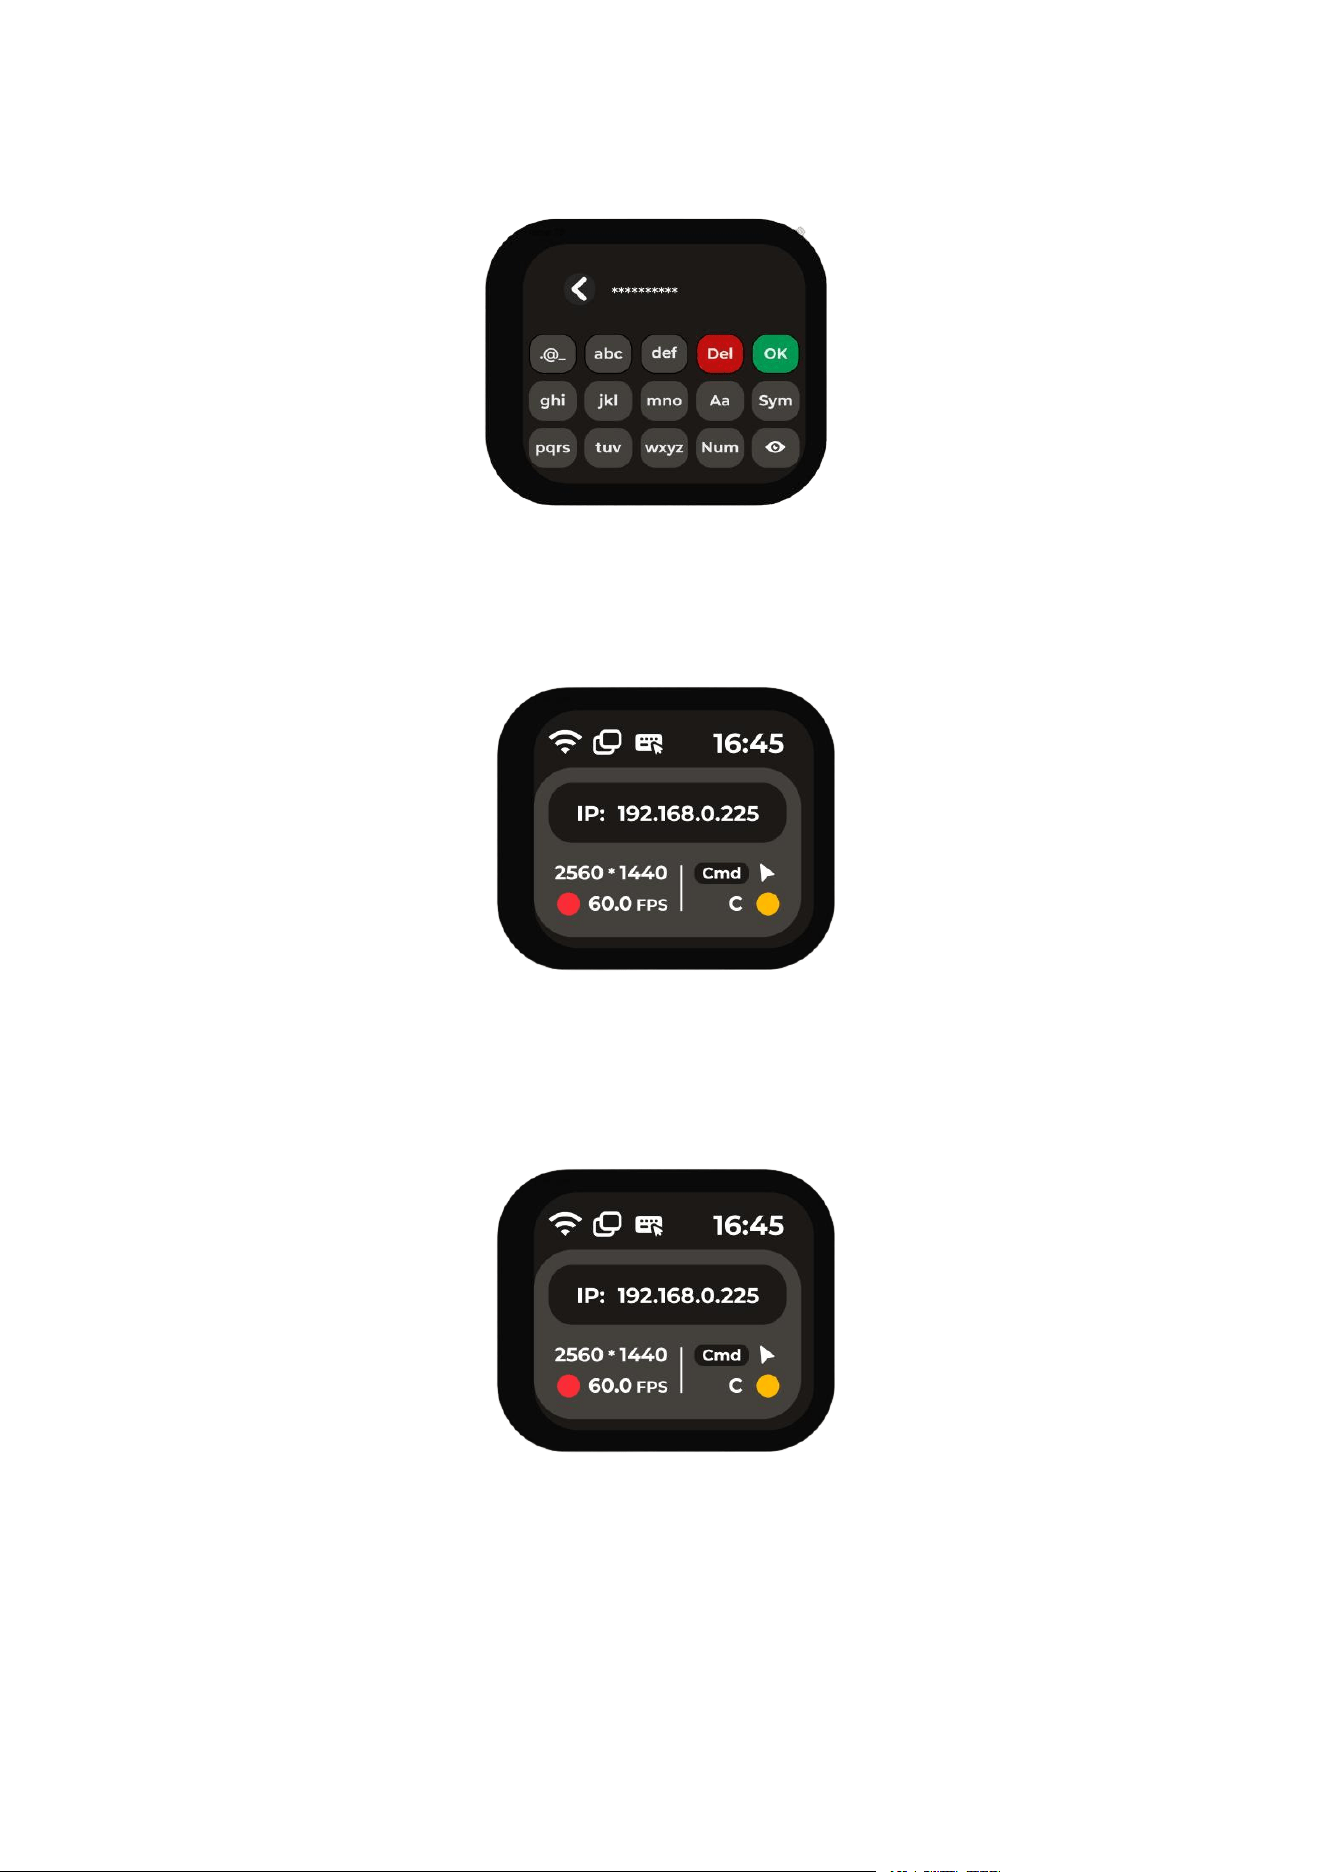
Enter the Wi-Fi password, then tap OK to submit the configuration.
3. Checking the Connection Status
After configuration is complete, return to the home screen.
If the device's IP address appears on the home screen, the connection was successful.
Basic Remote Control
After NanoKVM-Go connects to Wi-Fi, its current IP address appears on the home screen.
Open a browser on the control device and enter the IP address shown on the NanoKVM-Go
screen, such as 192.168.0.225, in the address bar to open the control page.
Enter the username and password on the login page. The default username and password
are both admin.
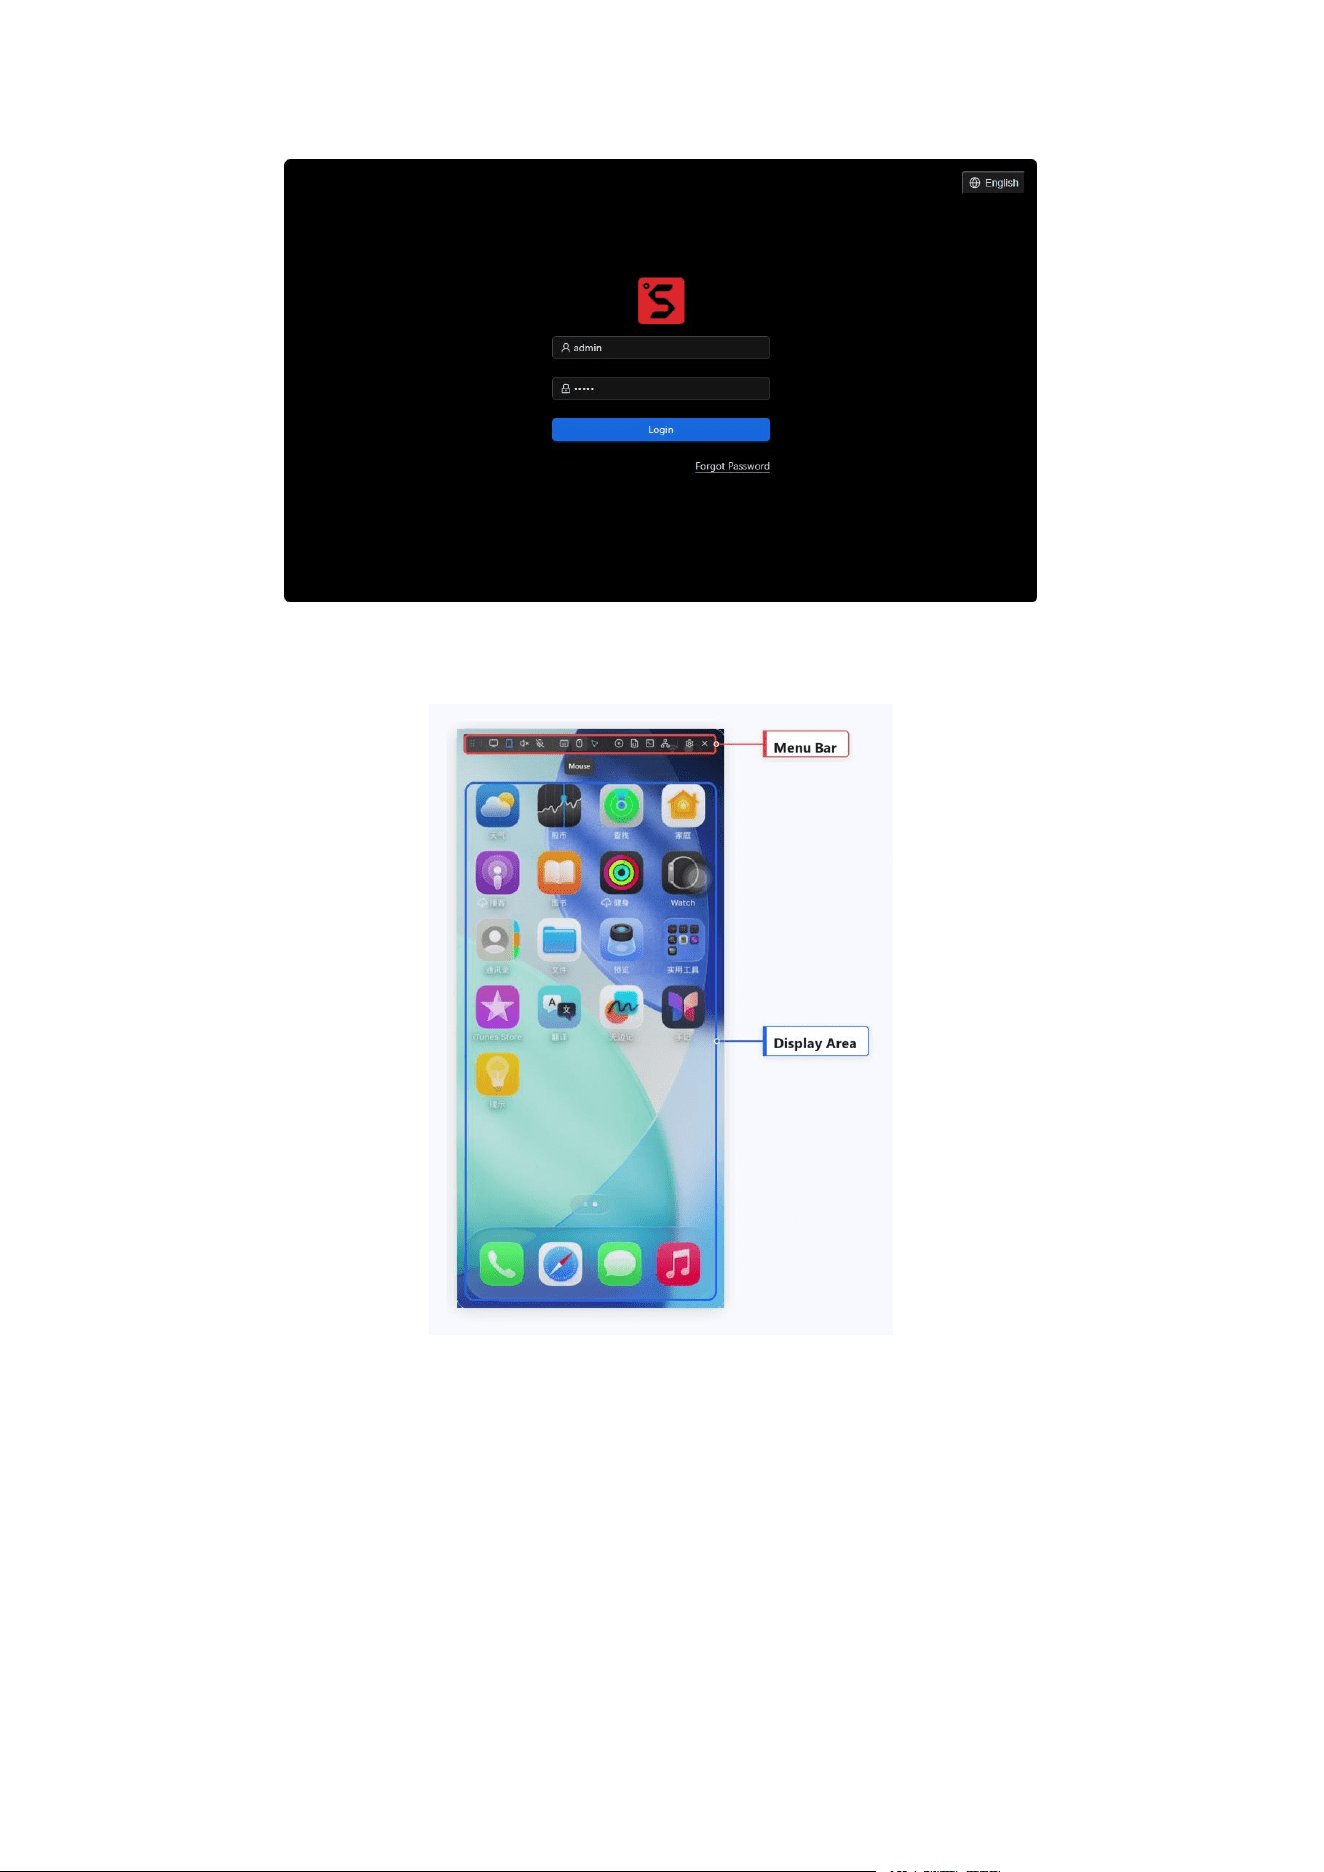
After signing in, the remote-control interface opens, allowing you to view and operate the
target device.
Port Compatibility
NanoKVM-Go has two USB Type-C ports: a data input and a power input.
Data Input Port
The data input connects to the target device. The target device's USB Type-C port must
support DisplayPort Alt Mode video output. A USB Type-C port that supports only charging or
standard data transfer cannot output video, so the NanoKVM-Go remote display function
may not work correctly.

Power Input Port
The power input connects to an external power adapter. It supports standard USB Power
Delivery profiles with input up to 15 V DC, 3 A. Compatible profiles include 5 V DC, 3 A; 9 V
DC, 3 A; and 15 V DC, 3 A, as well as other USB PD profiles that do not exceed 15 V DC, 3
A.
Use a power adapter and cable that meet applicable safety certification requirements, and
make sure the input voltage and current do not exceed the supported range.
Safety Precautions
Keep the device away from water and excessively humid environments.
Do not expose the product to extreme temperatures.
Do not disassemble the device.
Use only recommended accessories.
Stop using the product if it becomes unusually hot, damaged, or malfunctions.
Privacy and Network Security
NanoKVM-Go provides remote access functionality. Users are responsible for:
Protecting account credentials.
Using a secure network environment.
Updating the firmware when updates are available.
Preventing unauthorized access.
Do not expose the device directly to an untrusted network without appropriate security
protections.
Troubleshooting (To Be Completed)
1. No Video Output / No HDMI Signal Detected
Verify that the USB-C port on the target device supports video output and is a full-
featured USB-C port.
Check that the USB-C cable is compatible.
2. HID Keyboard and Mouse Do Not Work
Use the Reset HID function on the web interface.
Some host systems have stricter requirements for USB keyboards and mice and may
require HID-only mode. In this mode, the USB connection emulates only keyboard and
mouse devices. Use the mouse icon on the web interface to switch to this mode.

3. Device Does Not Power On
NanoKVM-Go normally consumes no more than 5 V DC, 0.5 A. A power source rated at
5 V DC, 0.9 A or higher is recommended.
When NanoKVM-Go is powered only by the target device, make sure the target device's
USB-C port provides sufficient output power. If you cannot confirm this or NanoKVM-Go
does not power on properly, connect a power adapter to the NanoKVM-Go power input
to provide stable power.
Specifications
Product Name: NanoKVM-Go
Video:
3840 × 2160 30Hz
3440 × 1440 60Hz
2560 × 1440 60Hz
1920 × 1080 60Hz
Ports:
Data Input Port: USB-C × 1
Data Input Protocol: DisplayPort Alt Mode
Power Input Port: USB-C × 1
Power Input Protocol: USB PD
Supported Power Profiles: 5 V DC, 3 A; 9 V DC, 3 A; 15 V DC, 3 A (max.)
Features:
Remote video viewing
Keyboard and mouse control
Web-based management
Operating Environment:
Operating Temperature: 0°C to 40°C
Operating Humidity: ≤85% RH, non-condensing
Regulatory and Compliance Information
FCC Compliance Statement
This device complies with Part 15 of the FCC Rules. Operation is subject to the following two
conditions:
(1) This device may not cause harmful interference.

(2) This device must accept any interference received, including interference that may cause
undesired operation.
FCC Warning:
Changes or modifications not expressly approved by the party responsible for compliance
could void the user's authority to operate this equipment.
This equipment has been tested and found to comply with the limits for a Class B digital
device, pursuant to part 15 of the FCC Rules. These limits are designed to provide
reasonable protection against harmful interference in a residential installation. This
equipment generates uses and can radiate radio frequency energy and, if not installed and
used in accordance with the instructions, may cause harmful interference to radio
communications. However, there is no guarantee that interference will not occur in a
particular installation. If this equipment does cause harmful interference to radio or television
reception, which can be determined by turning the equipment off and on, the user is
encouraged to try to correct the interference by one or more of the following measures:
(1) Reorient or relocate the receiving antenna.
(2) Increase the separation between the equipment and receiver.
(3) Connect the equipment into an outlet on a circuit different from that to which the receiver
is connected.
(4) Consult the dealer or an experienced radio/TV technician for help.
FCC RF exposure statement:
The equipment complies with FCC radiation exposure limits set forth for an uncontrolled
environment. This equipment should be installed and operated with minimum distance
between 20cm the radiator your body.
Responsible Party:
Shenzhen Sipeed Technology Co., Ltd.
Room 2101D1, Hengfang Technology Building, No. 4008 Xinhu Road, Yongfeng Community,
Xixiang Subdistrict, Bao'an District, Shenzhen, China
+86 0755-27808509
Additional regulatory information may be included depending on the final certified
configuration.
After-Sales Service and Technical Support
For more technical support and product information, visit: wiki.sipeed.com/nanokvmgo