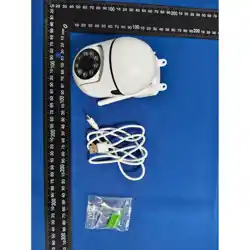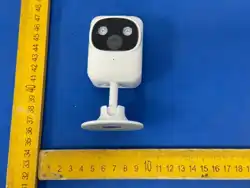

Wireless AI camera
After-Sales Support Manual
Before operating this unit,please read these instructions
carefully,and save them for future use.
Phone: +1(888)688-4148
instaus@isecugroup.com
V2.0

Email: instaus@isecugroup.com
Phone: +1(888)688-4148
support a 30-day no-reason return or
exchange, provided the item is unused and
returned in original packaging.
Warranty:
This product includes a 1-year limited warran-
ty. By contacting customer support within 30
days of purchase, you may activate an
additional 1-year extended warranty.
Warranty Does Not Apply in the Following Cases:
Products without valid proof of purchase
(Order ID);
Normal wear and tear that does not affect
functionality (e.g., scratches, paint fading,
casing deformation, rust);
Products that have been disassembled,
misused, improperly used;

Special Notes:
Replacement units do not extend the warran-
ty period, which is based on the original
purchase date.
The no-reason return and exchange period
follows the sales platform’s policy: if the
platform's policy exceeds 30 days, the
platform policy applies; if it is less than 30
days, 30 days shall apply.
electrical power or any telecom munications
network;
tornado, earthquake, or hurricane;
Products purchased from unauthorized dealers
or distributors, auction websites, second-hand
Lost or stolen products.
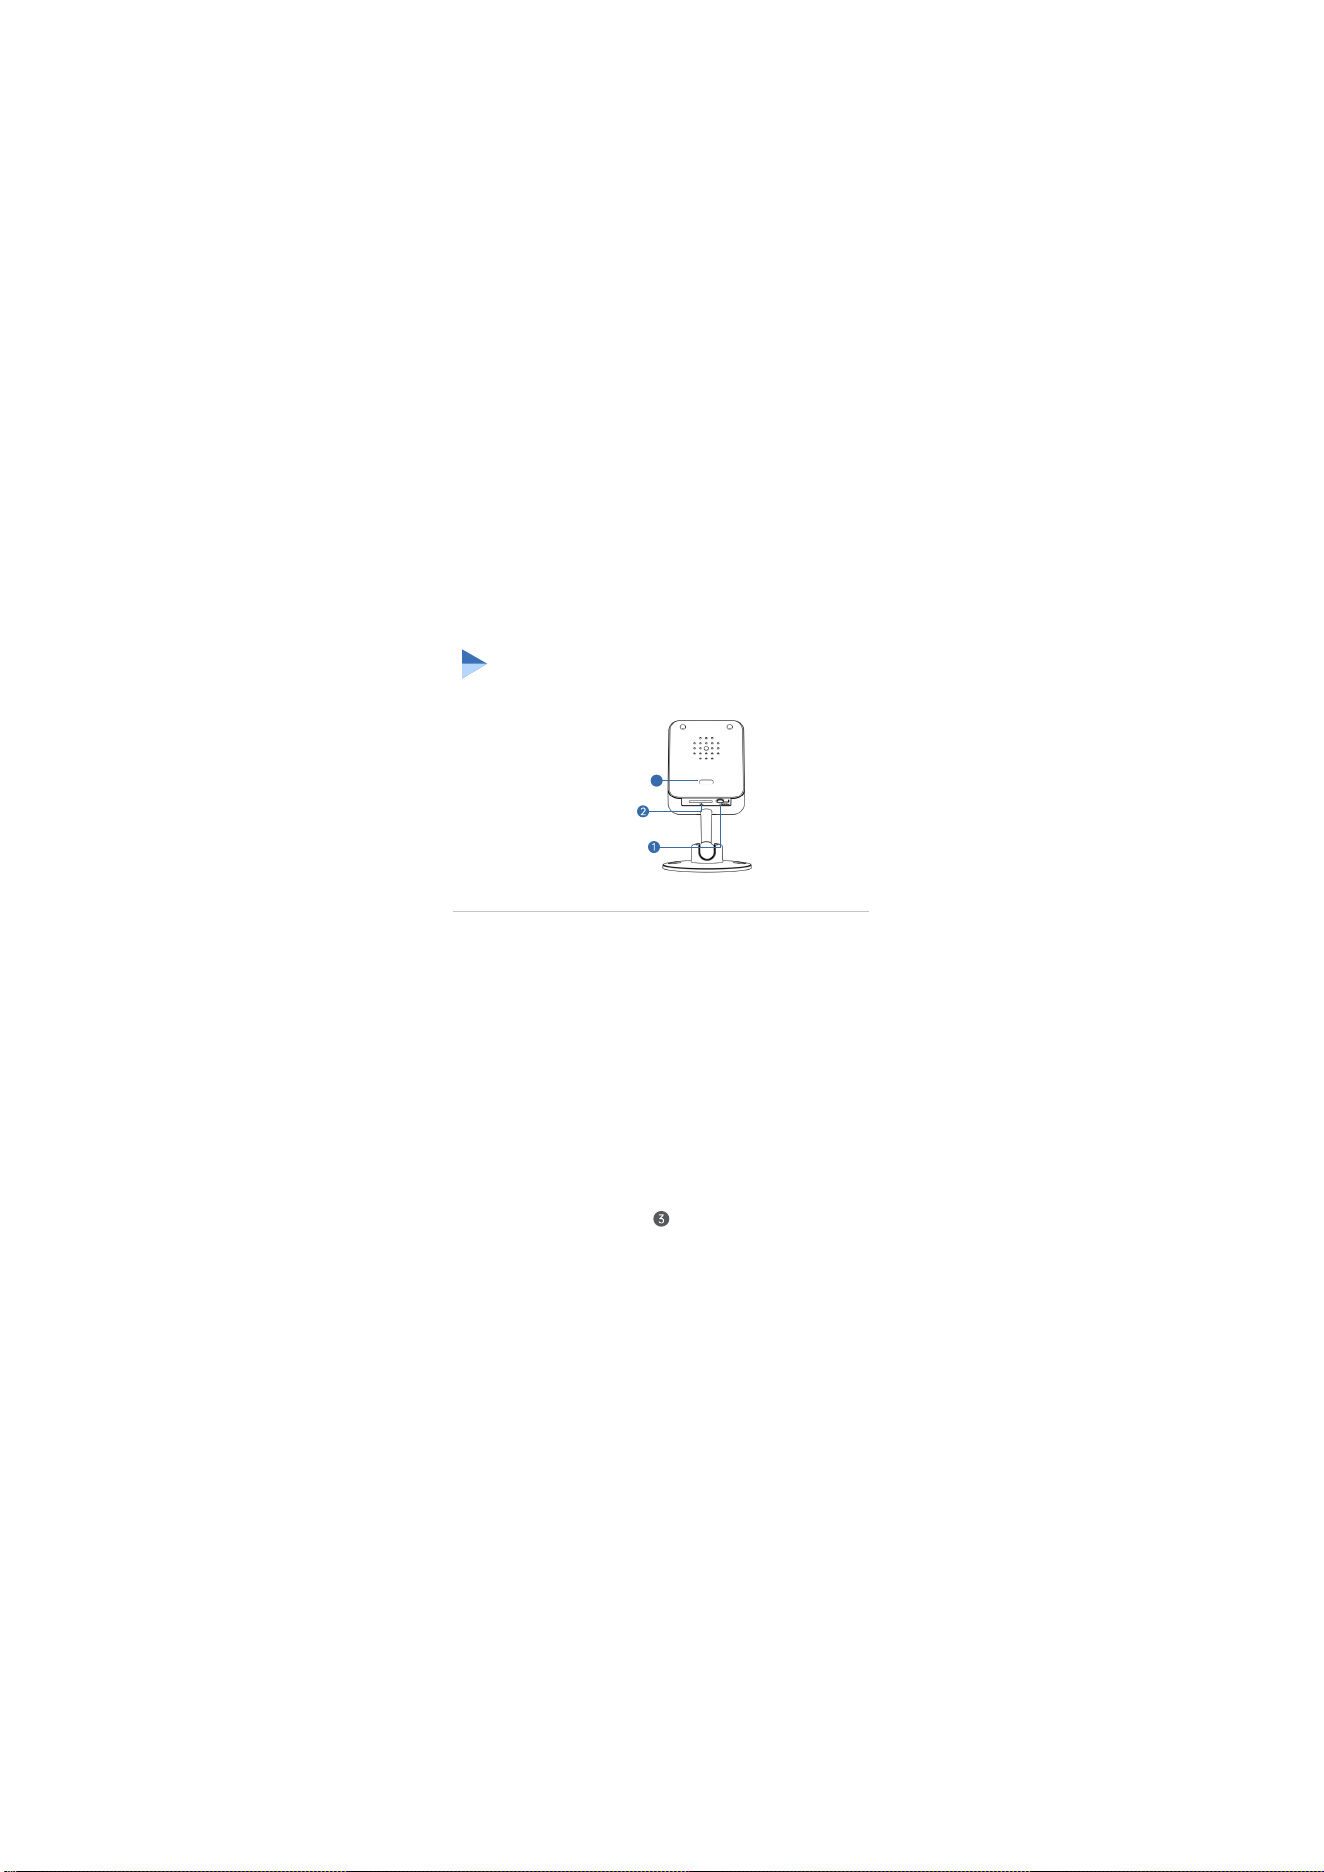
Wireless AI camera
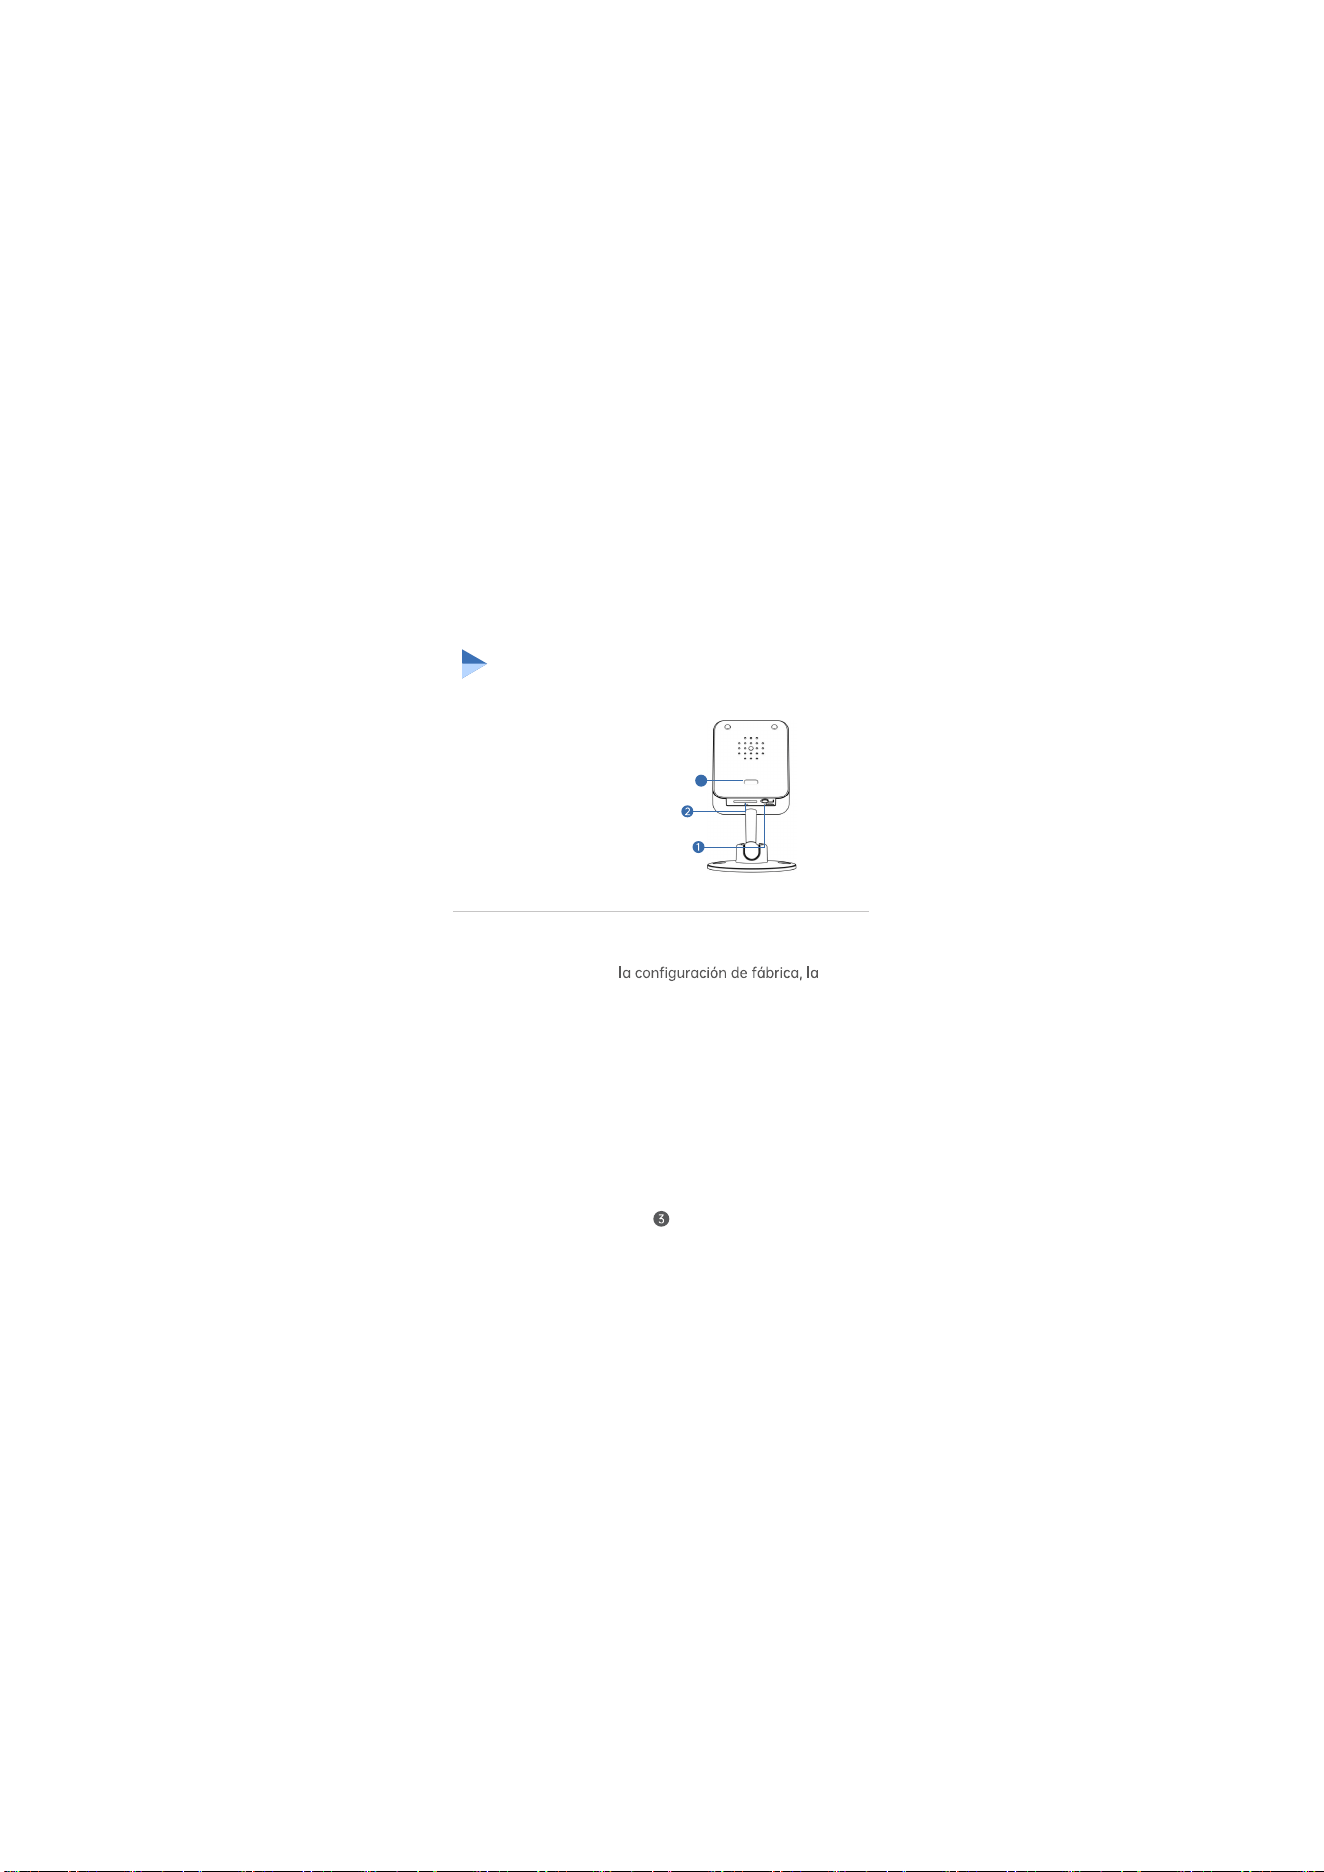
Interface description
SD card slot
Reset button
DC power supply
3
Description
1. Reset button
2. SD card slot
Micro SD card, storage video
and playback video.
3. Power supply
Power input
The working state of the device, long
press 5 seconds to restore the factory
settings, the camera will have a voice
prompt broadcast.
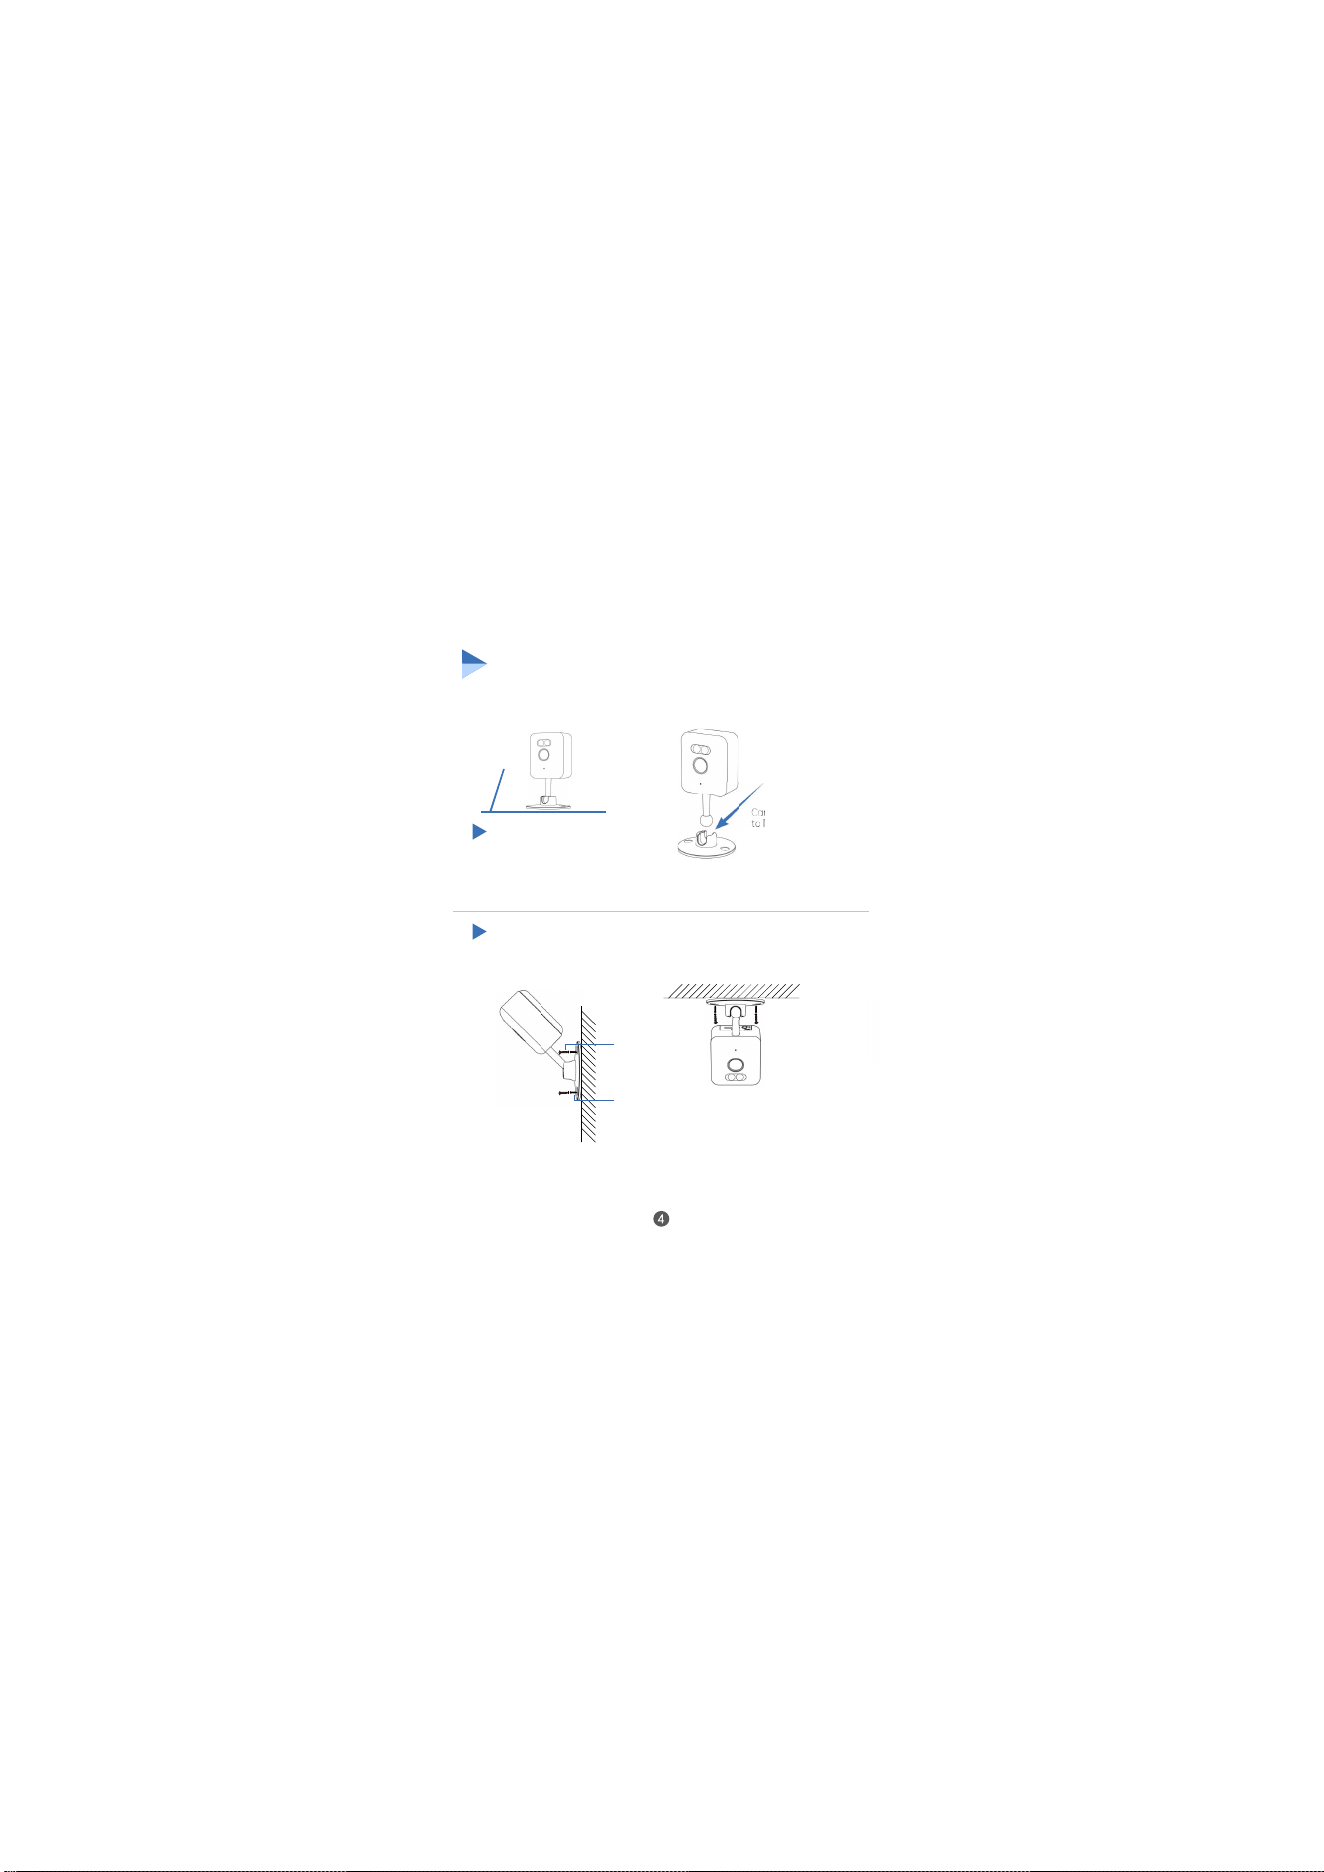
Wireless AI camera
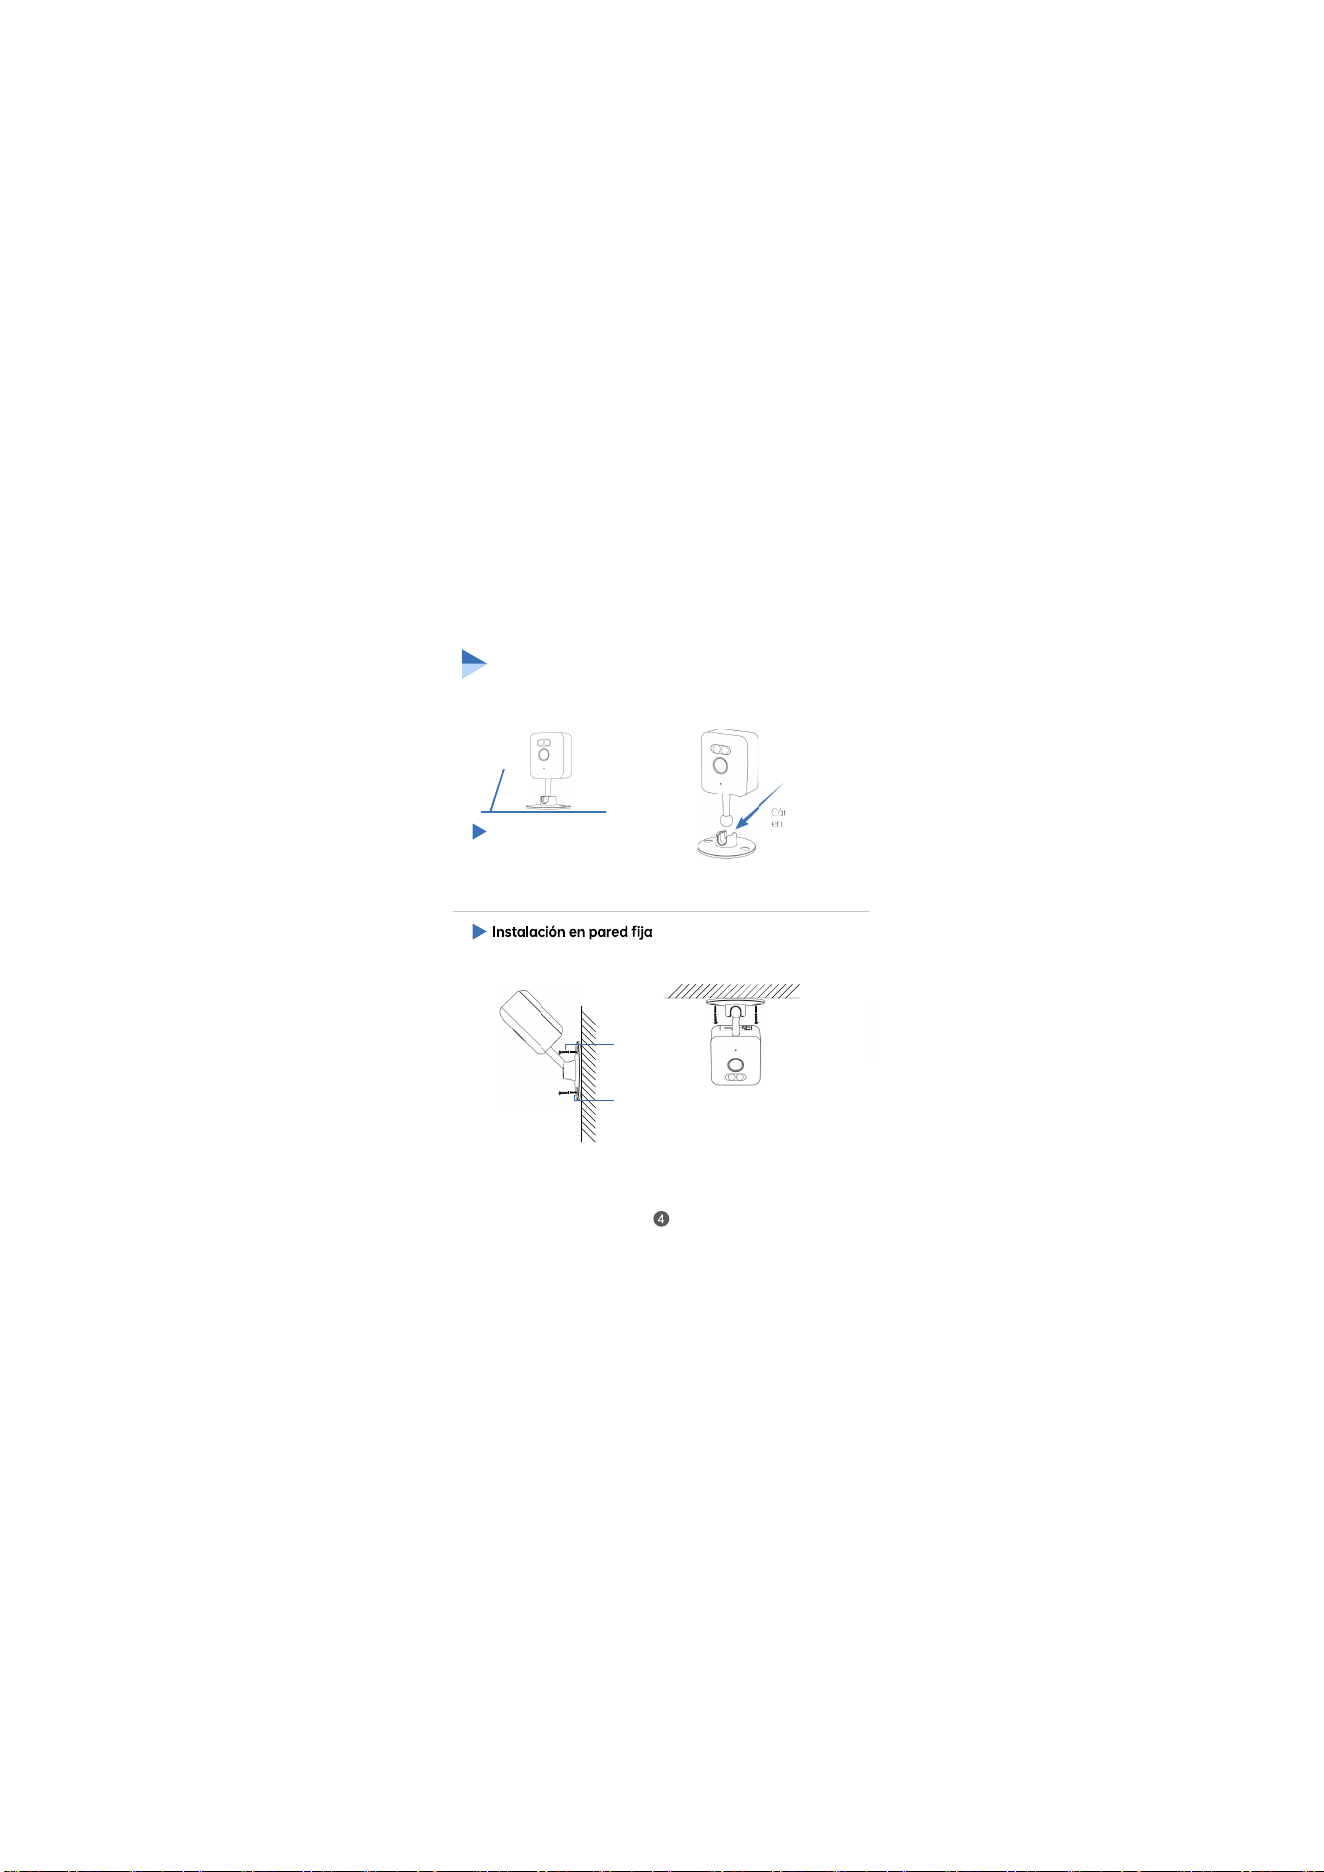
Installation and Placement
Table placement
Place on a desk or table
Camera mounted
to bracket
Rubber stopper
Wall
Screws
Fixed wall installation
Install the camera on the ceiling or on the wall.
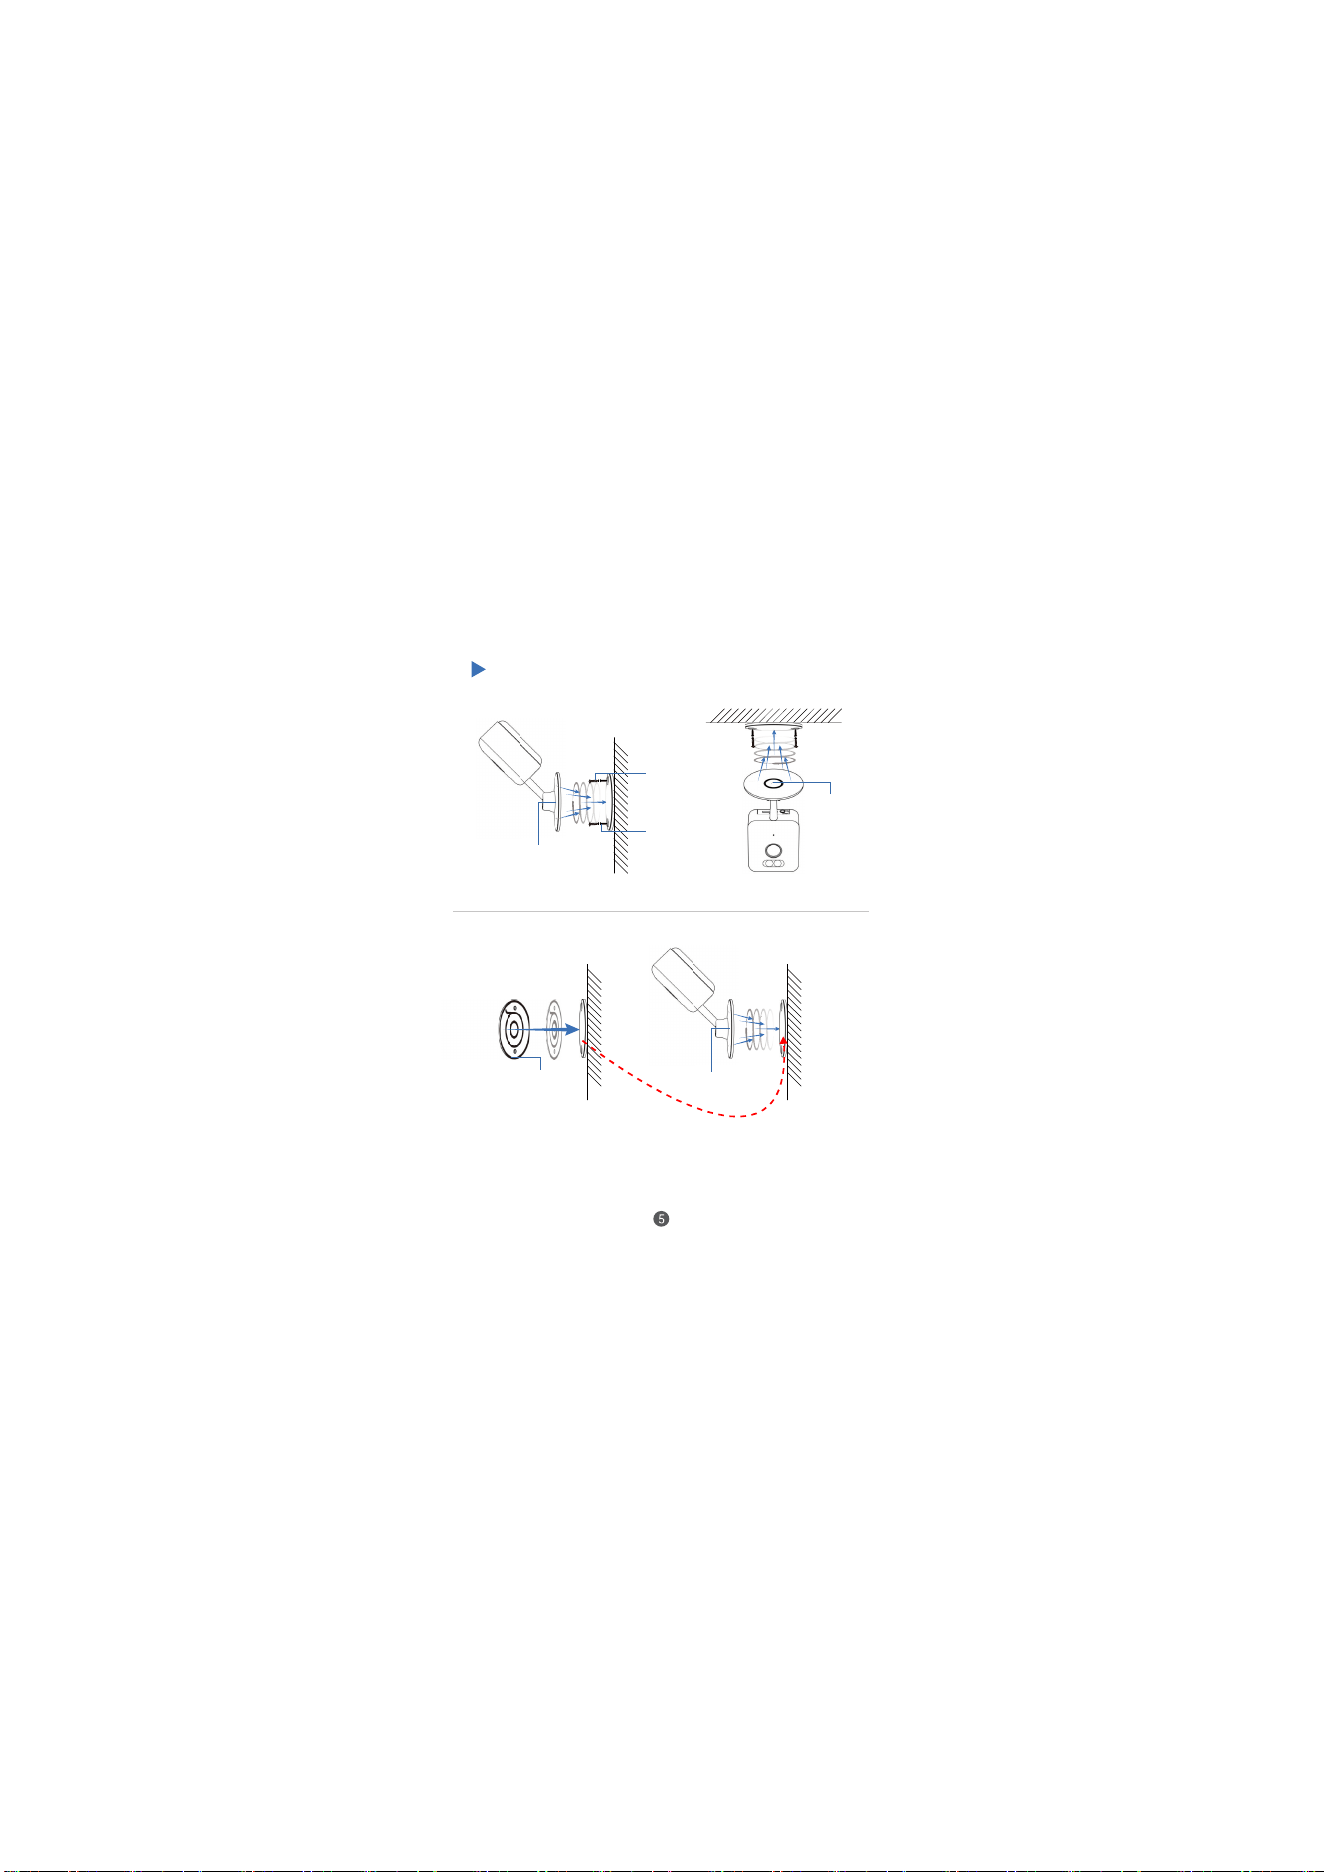
magnet
Rubber stopper
Wall
Screws
Built-in magnet
Fixed wall installation(Base with magnetic attraction)
Install the camera on the ceiling or on the wall.
Built-in magnet
WallWall
double-sided
adhesive
Method 1: Fix the iron sheet with screws
Method 2: Fix the iron sheet with double-sided tape
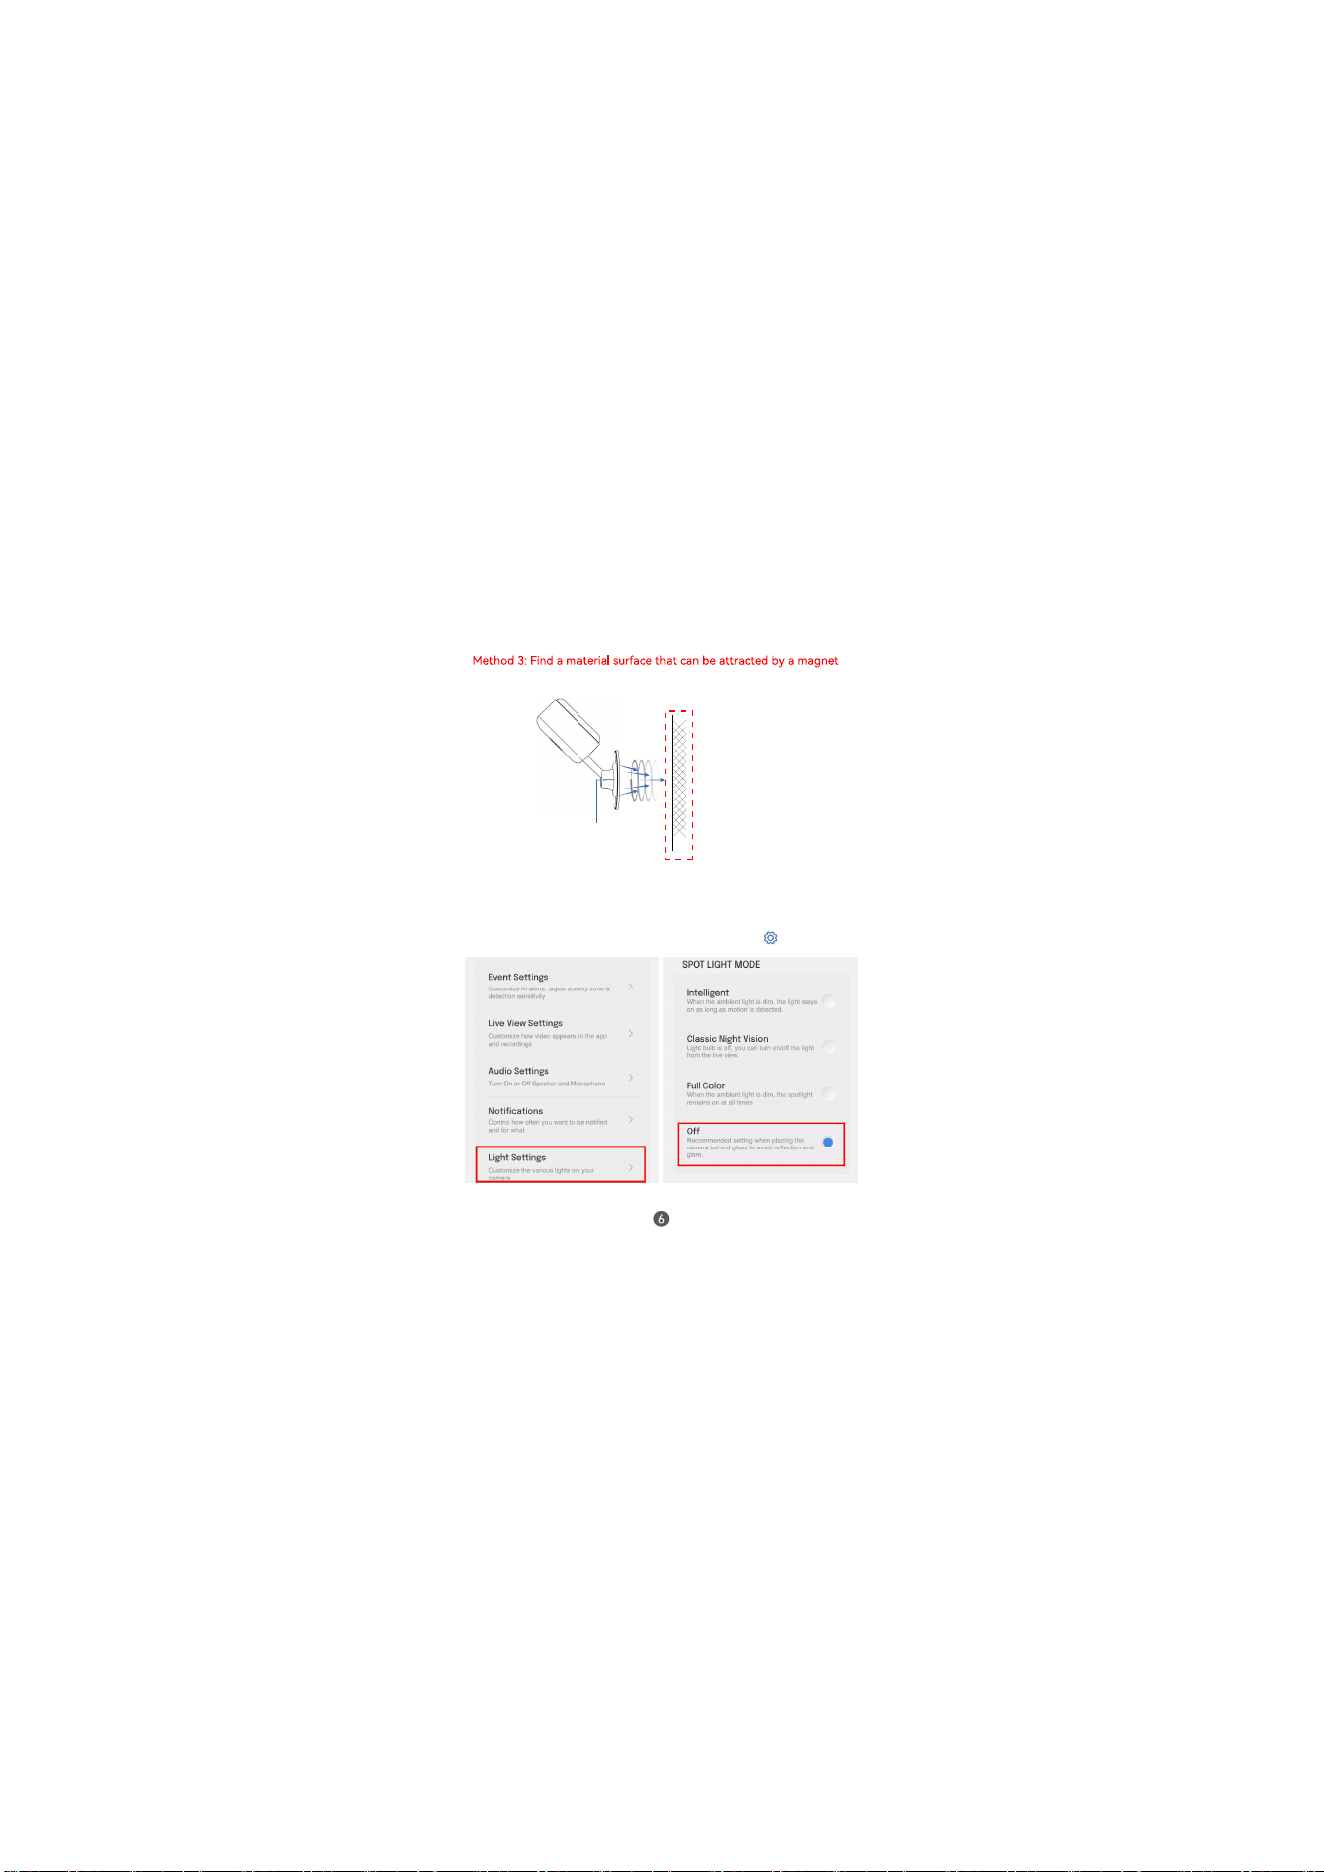
Note: If the camera is installed facing the glass,
you need to go into the menuto turn off the light
mode before you can use it normally. The steps
are as follows: Enter the Setup menu
Built-in magnet
Surface of
magnet-attractable
material
1.
Installation and Setup
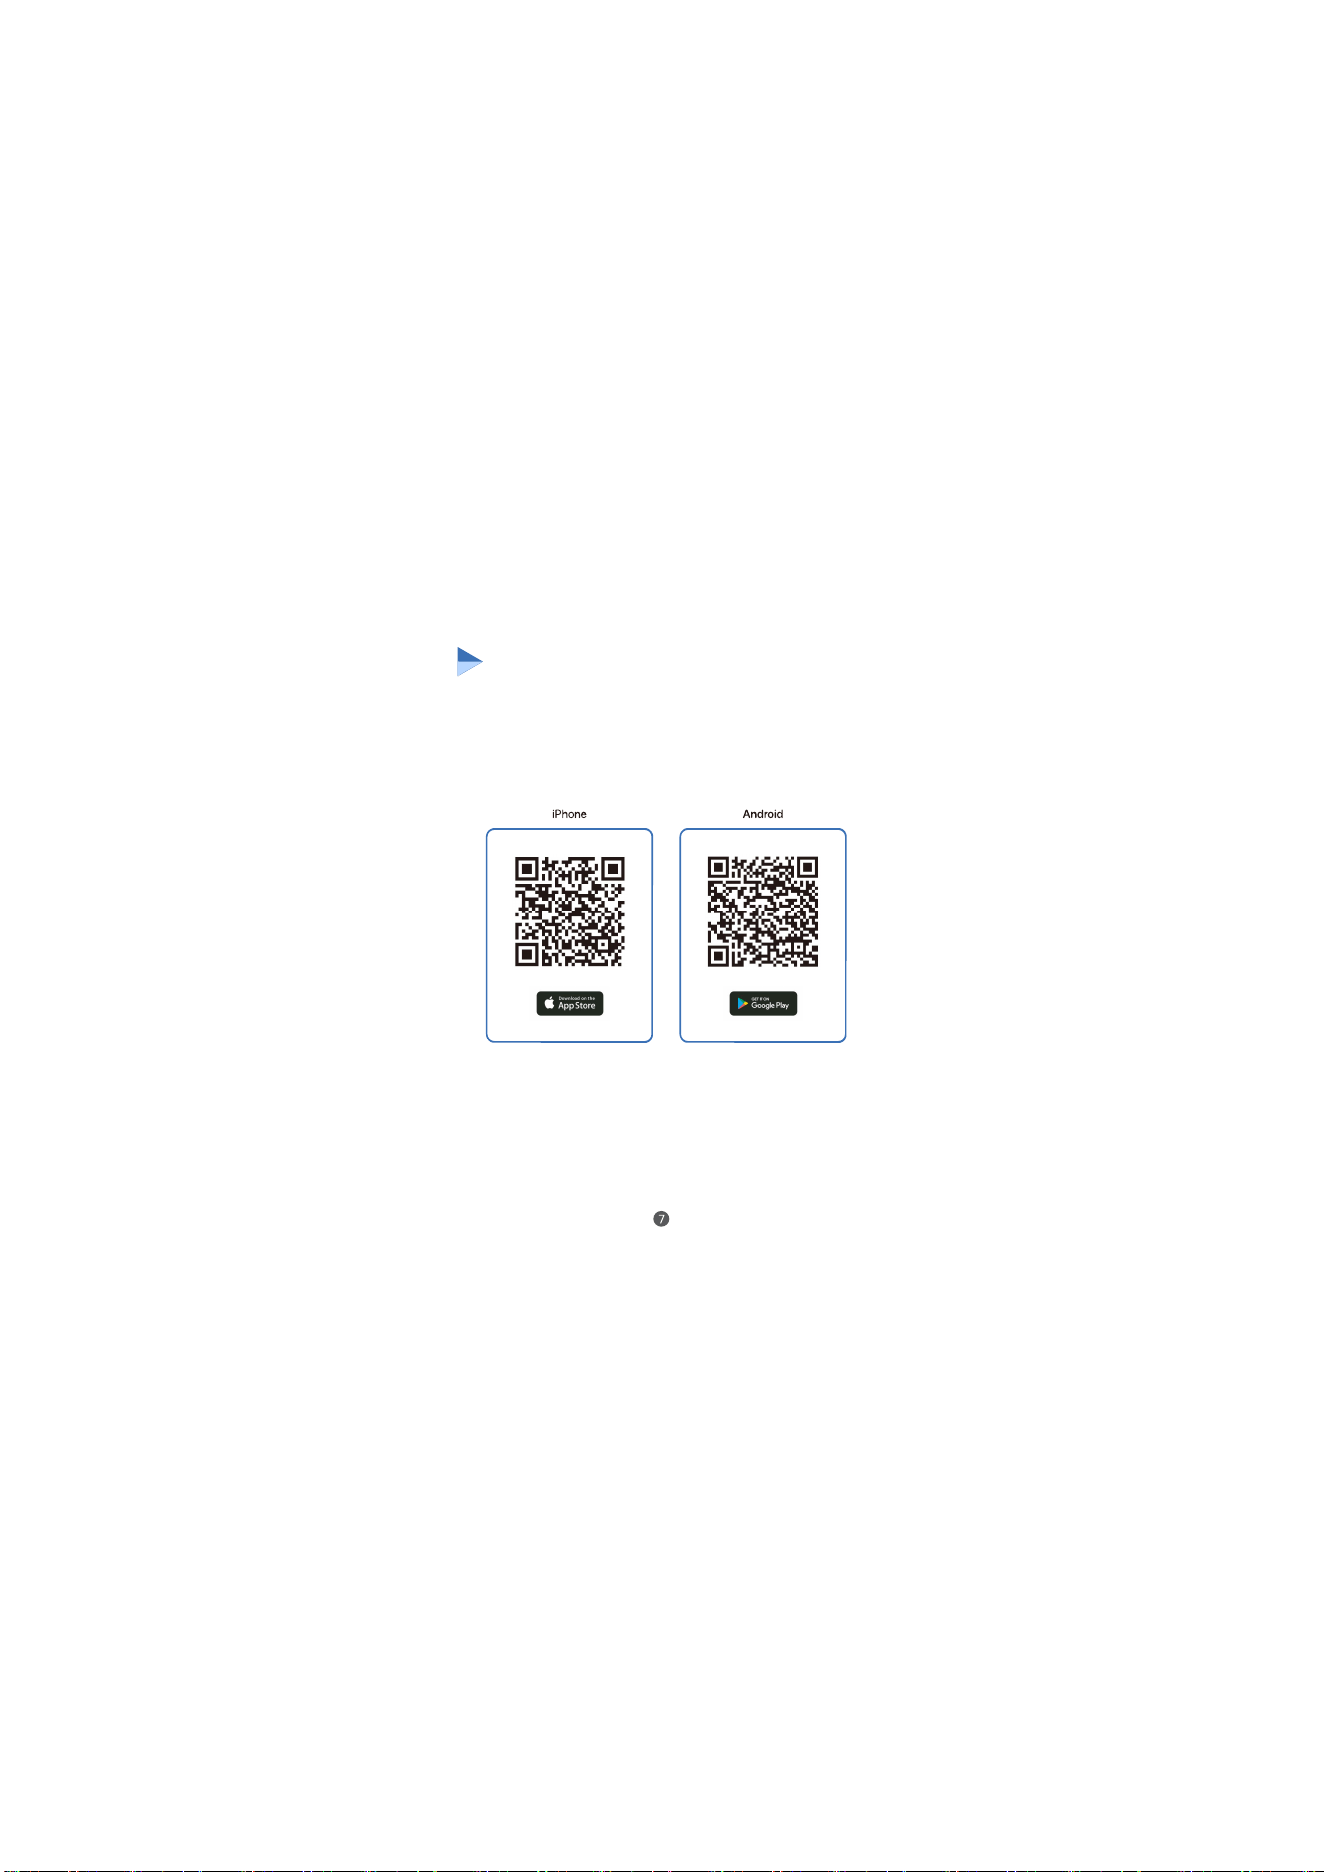
Download and lnstall: Download and install
the "lnstaVision" app by scanning the
QRcode for the AppleStore or Google
play Store.
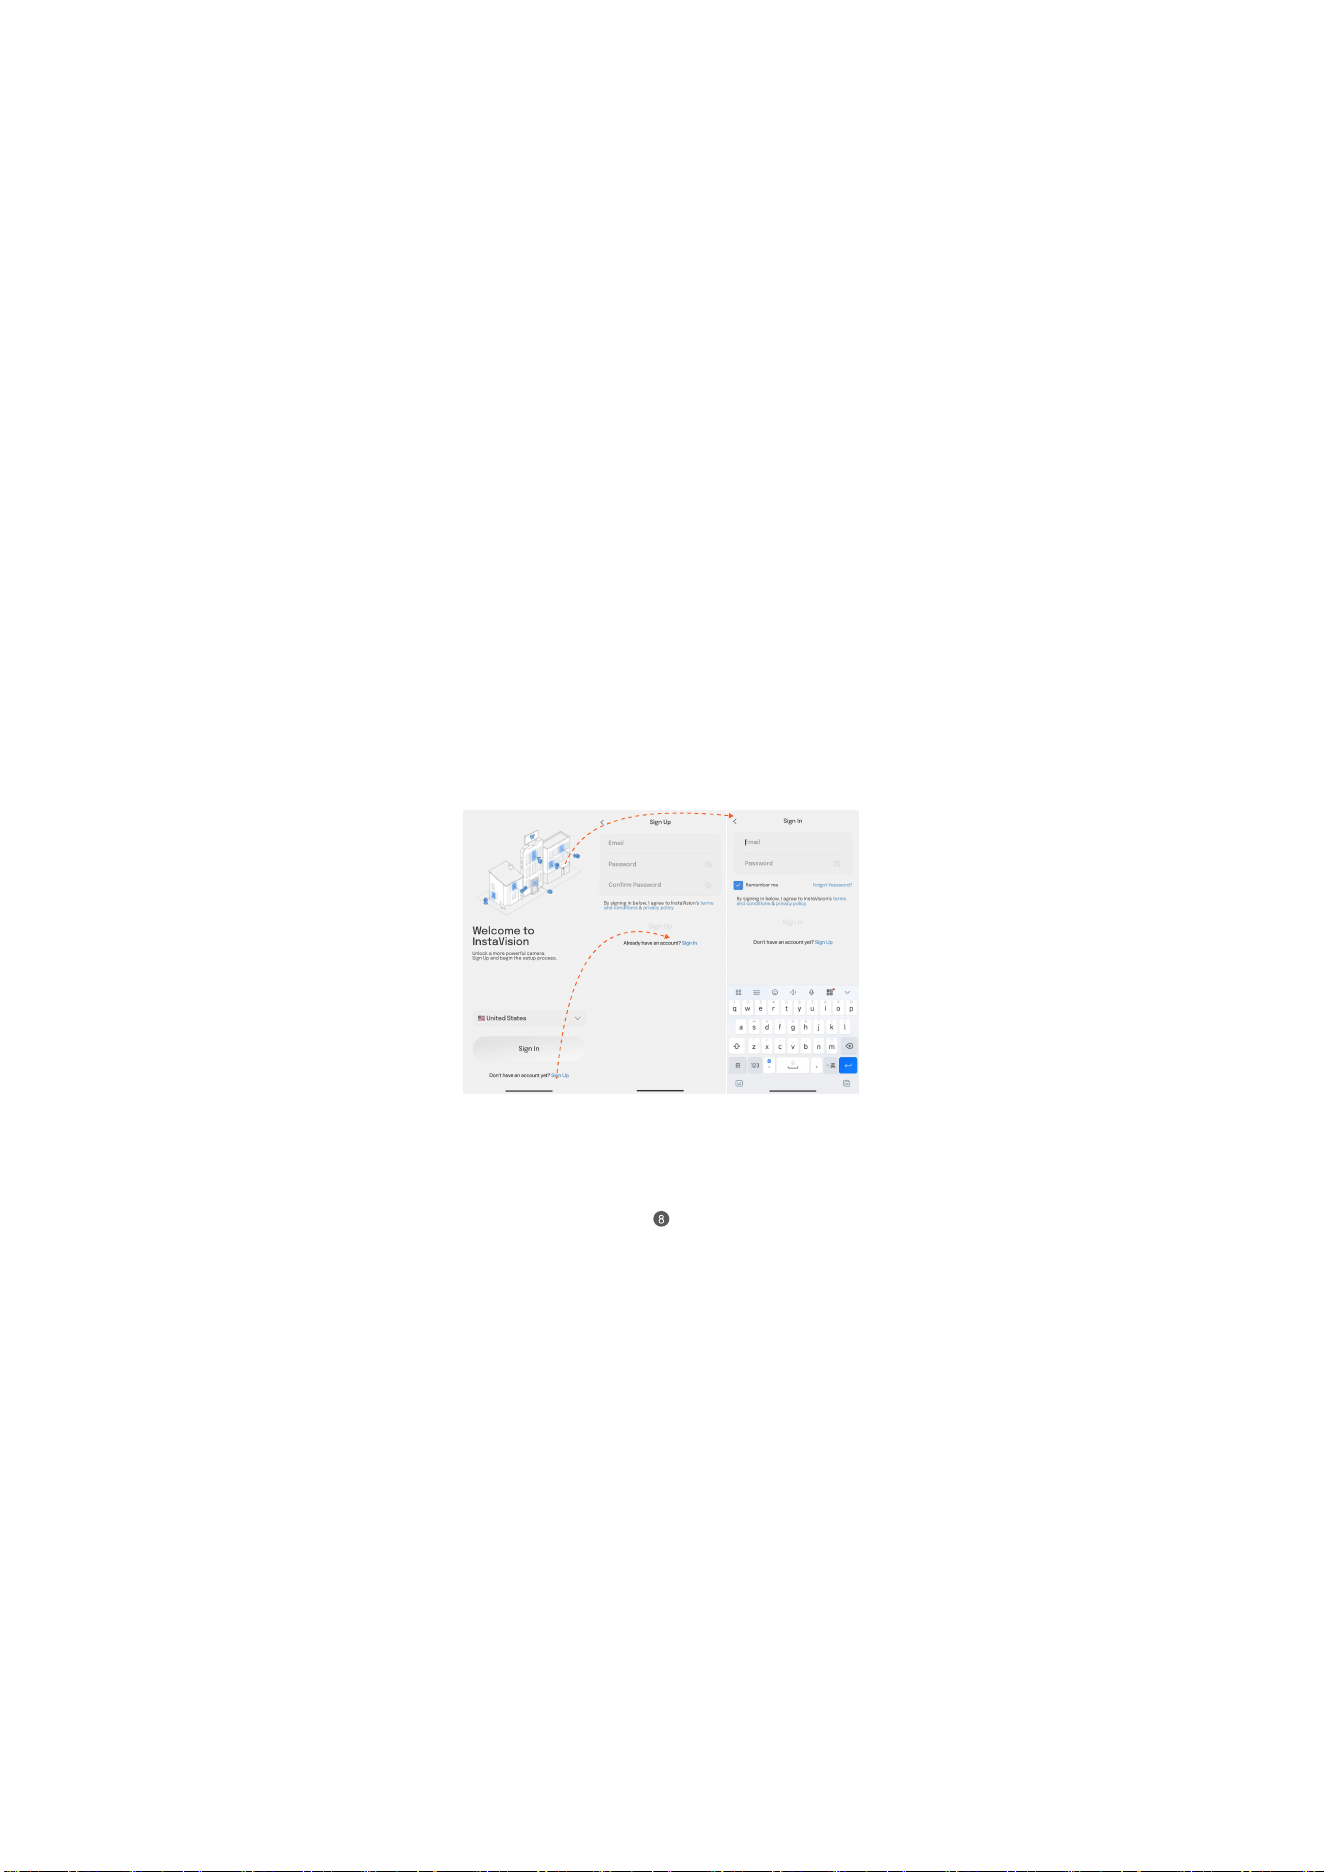
2.Account Registration: Open the app and register
a new account or log in to an existing account.
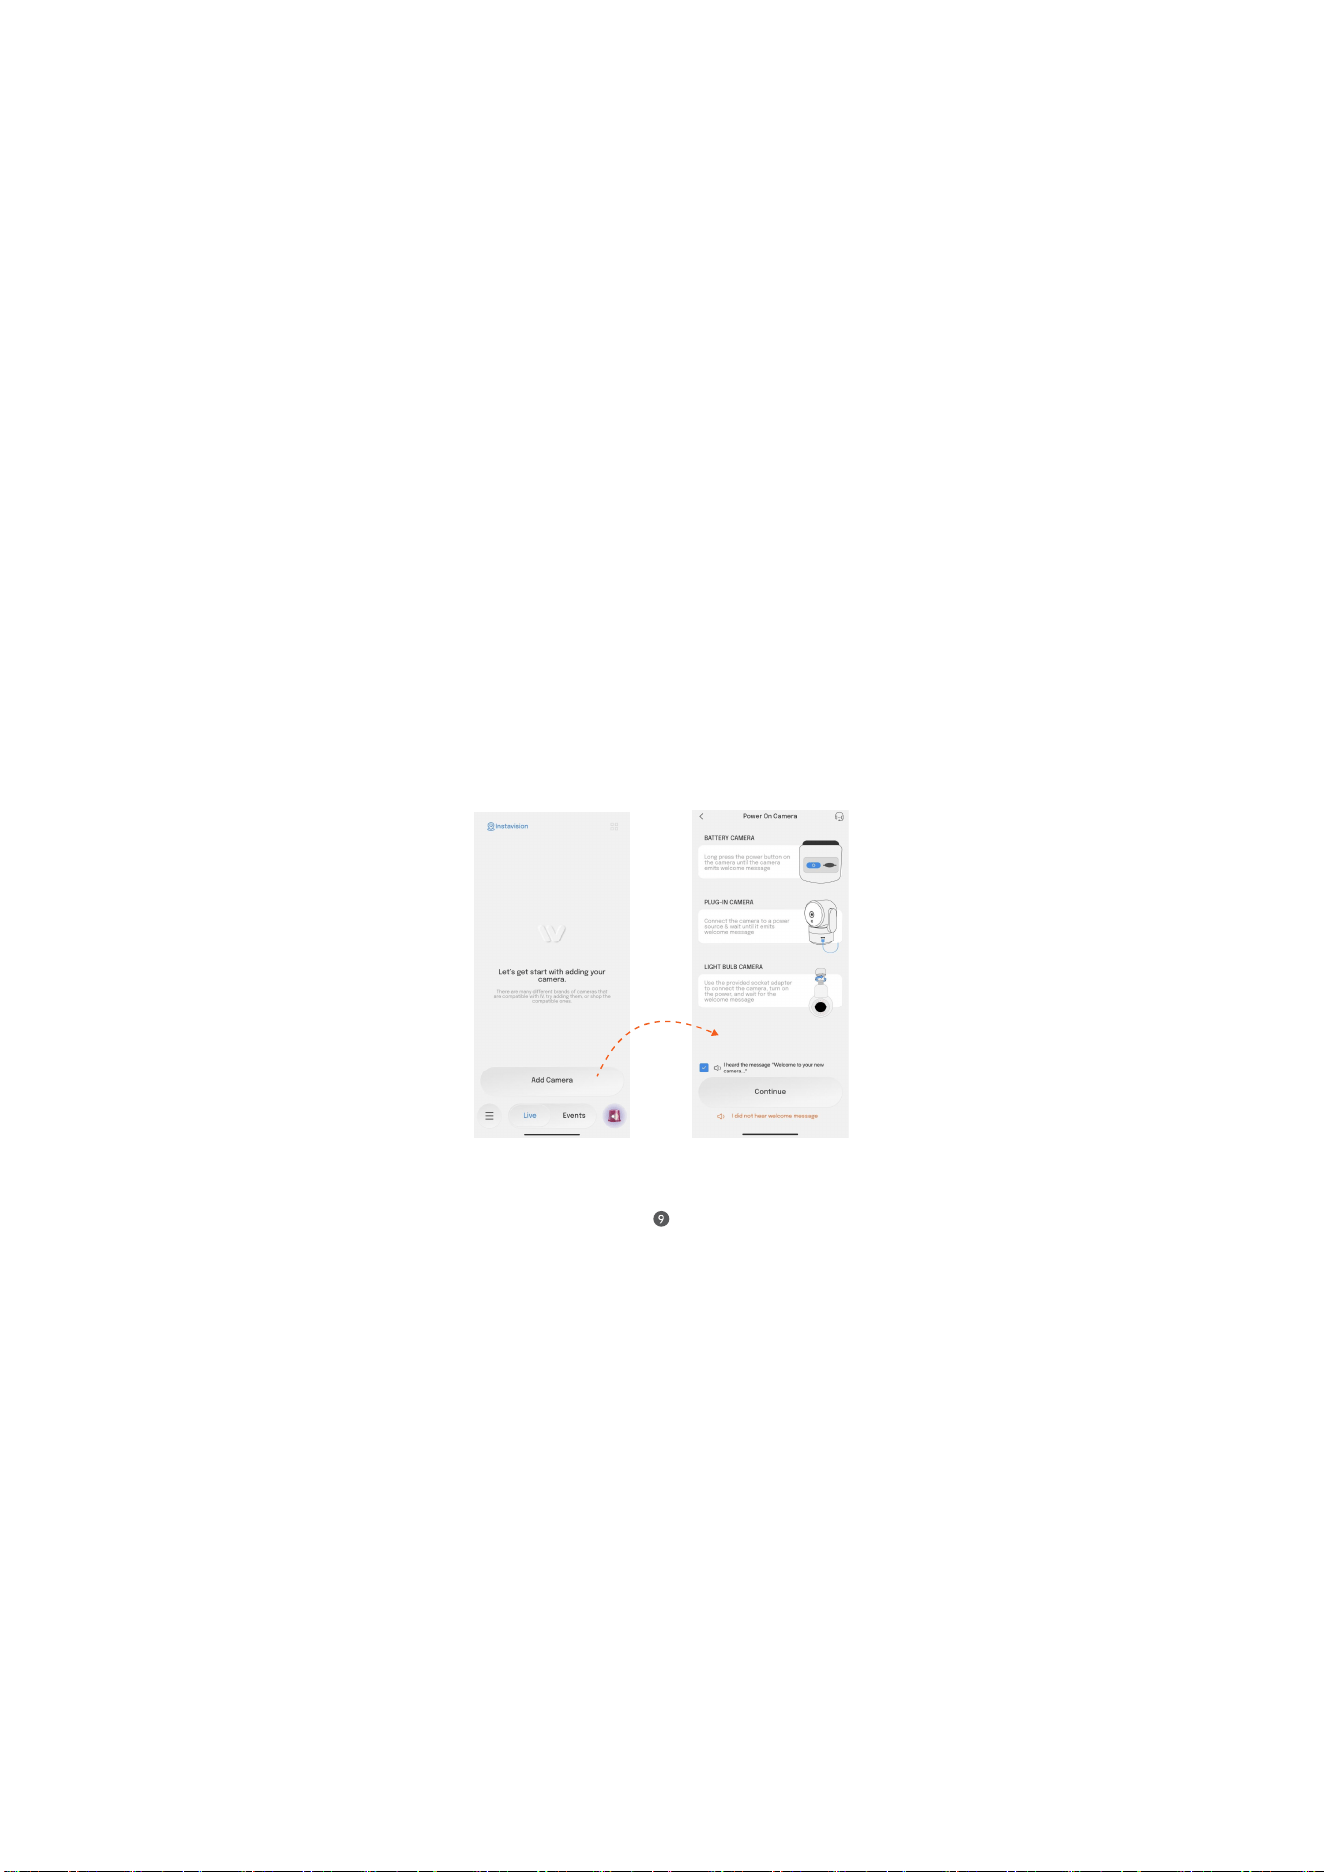
3. Add Camera: Navigate to the Home Page within
the app. Locate and select "Add Camera" then
go through preparation instructions to power on
your camera properly.
10
10
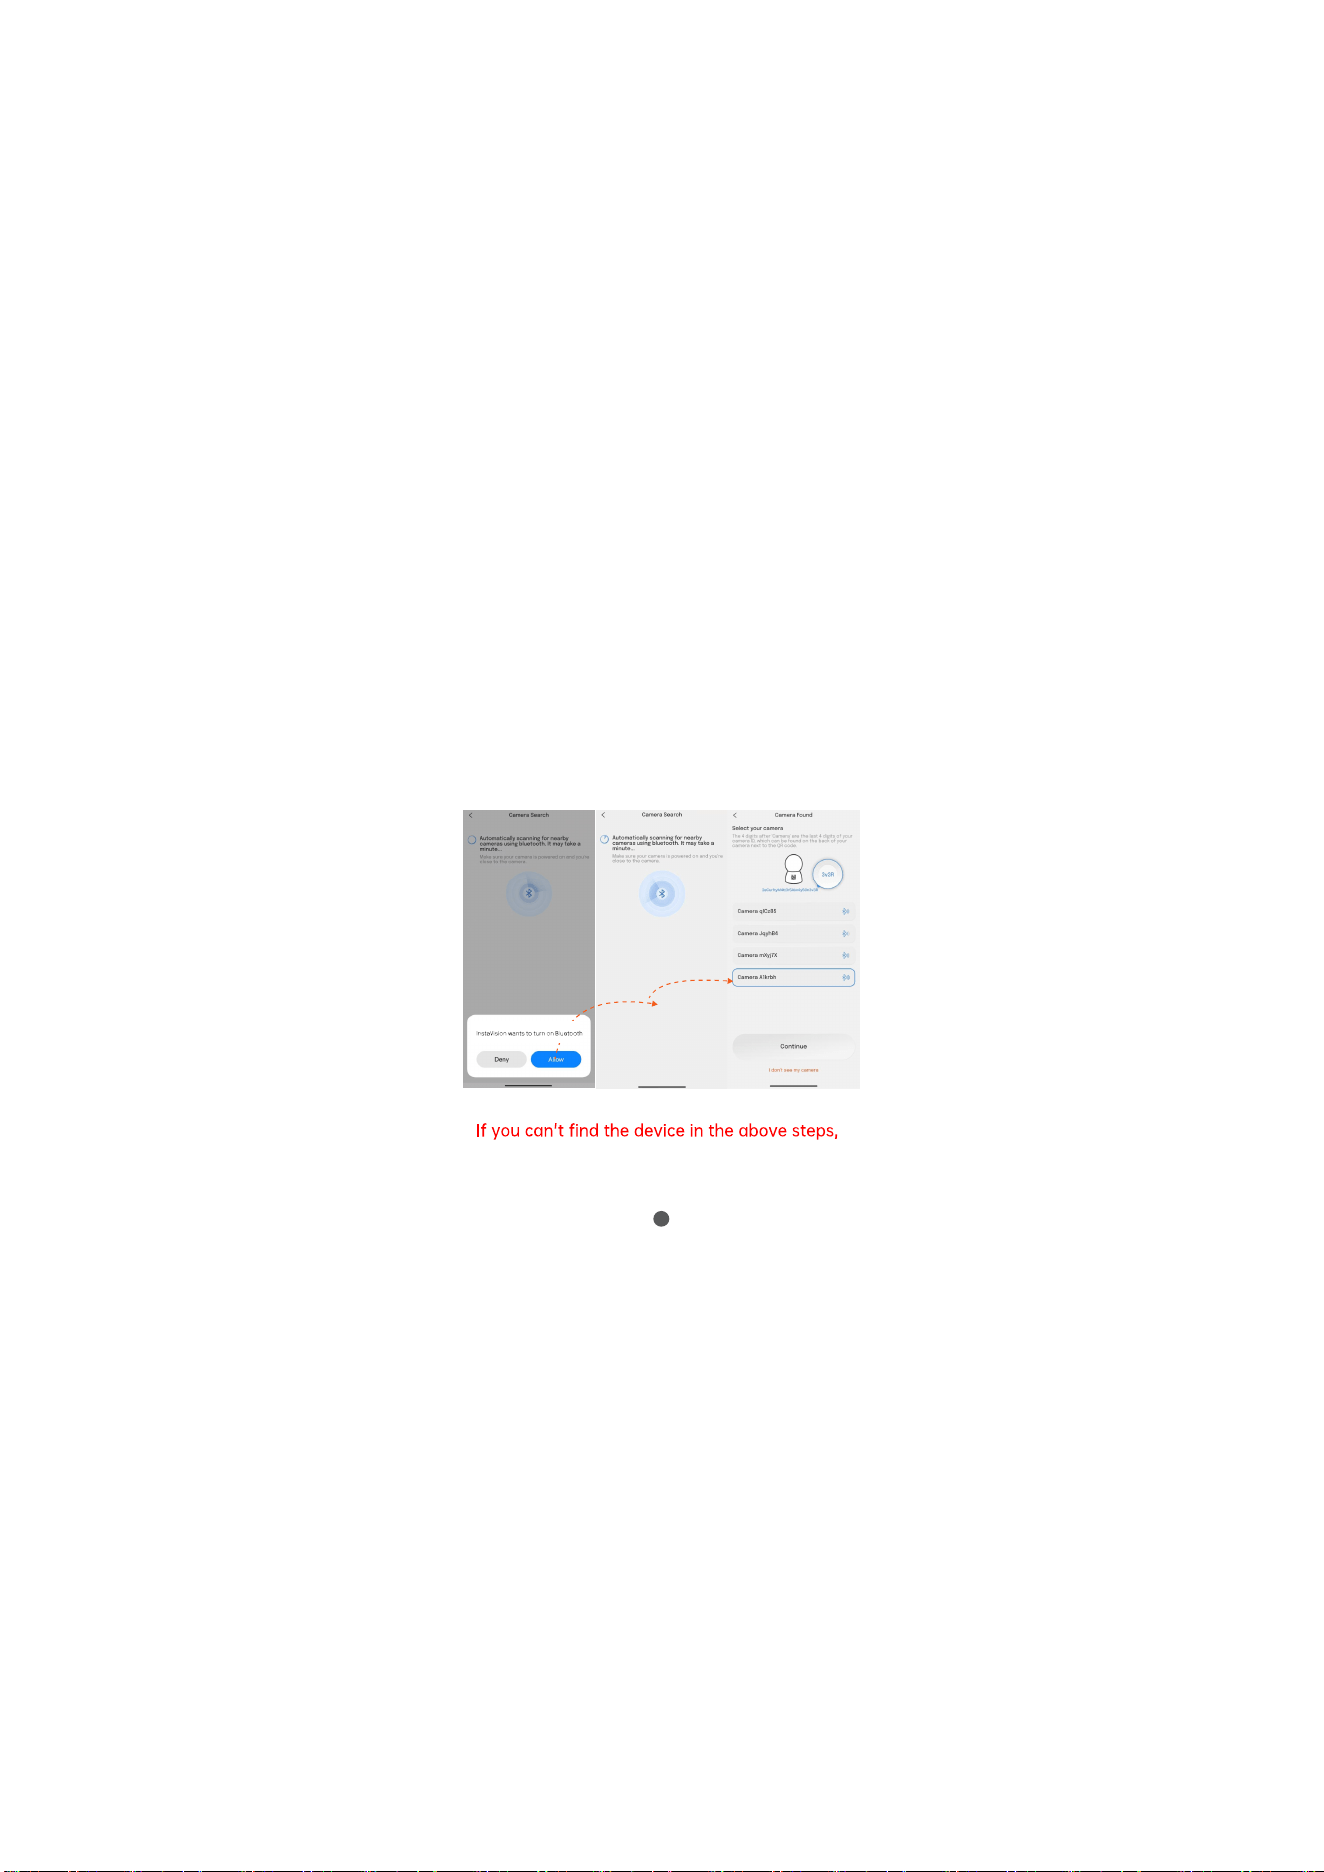
press and hold the reset button for 5 seconds,
restore the camera to factory settings, and try
again.
*
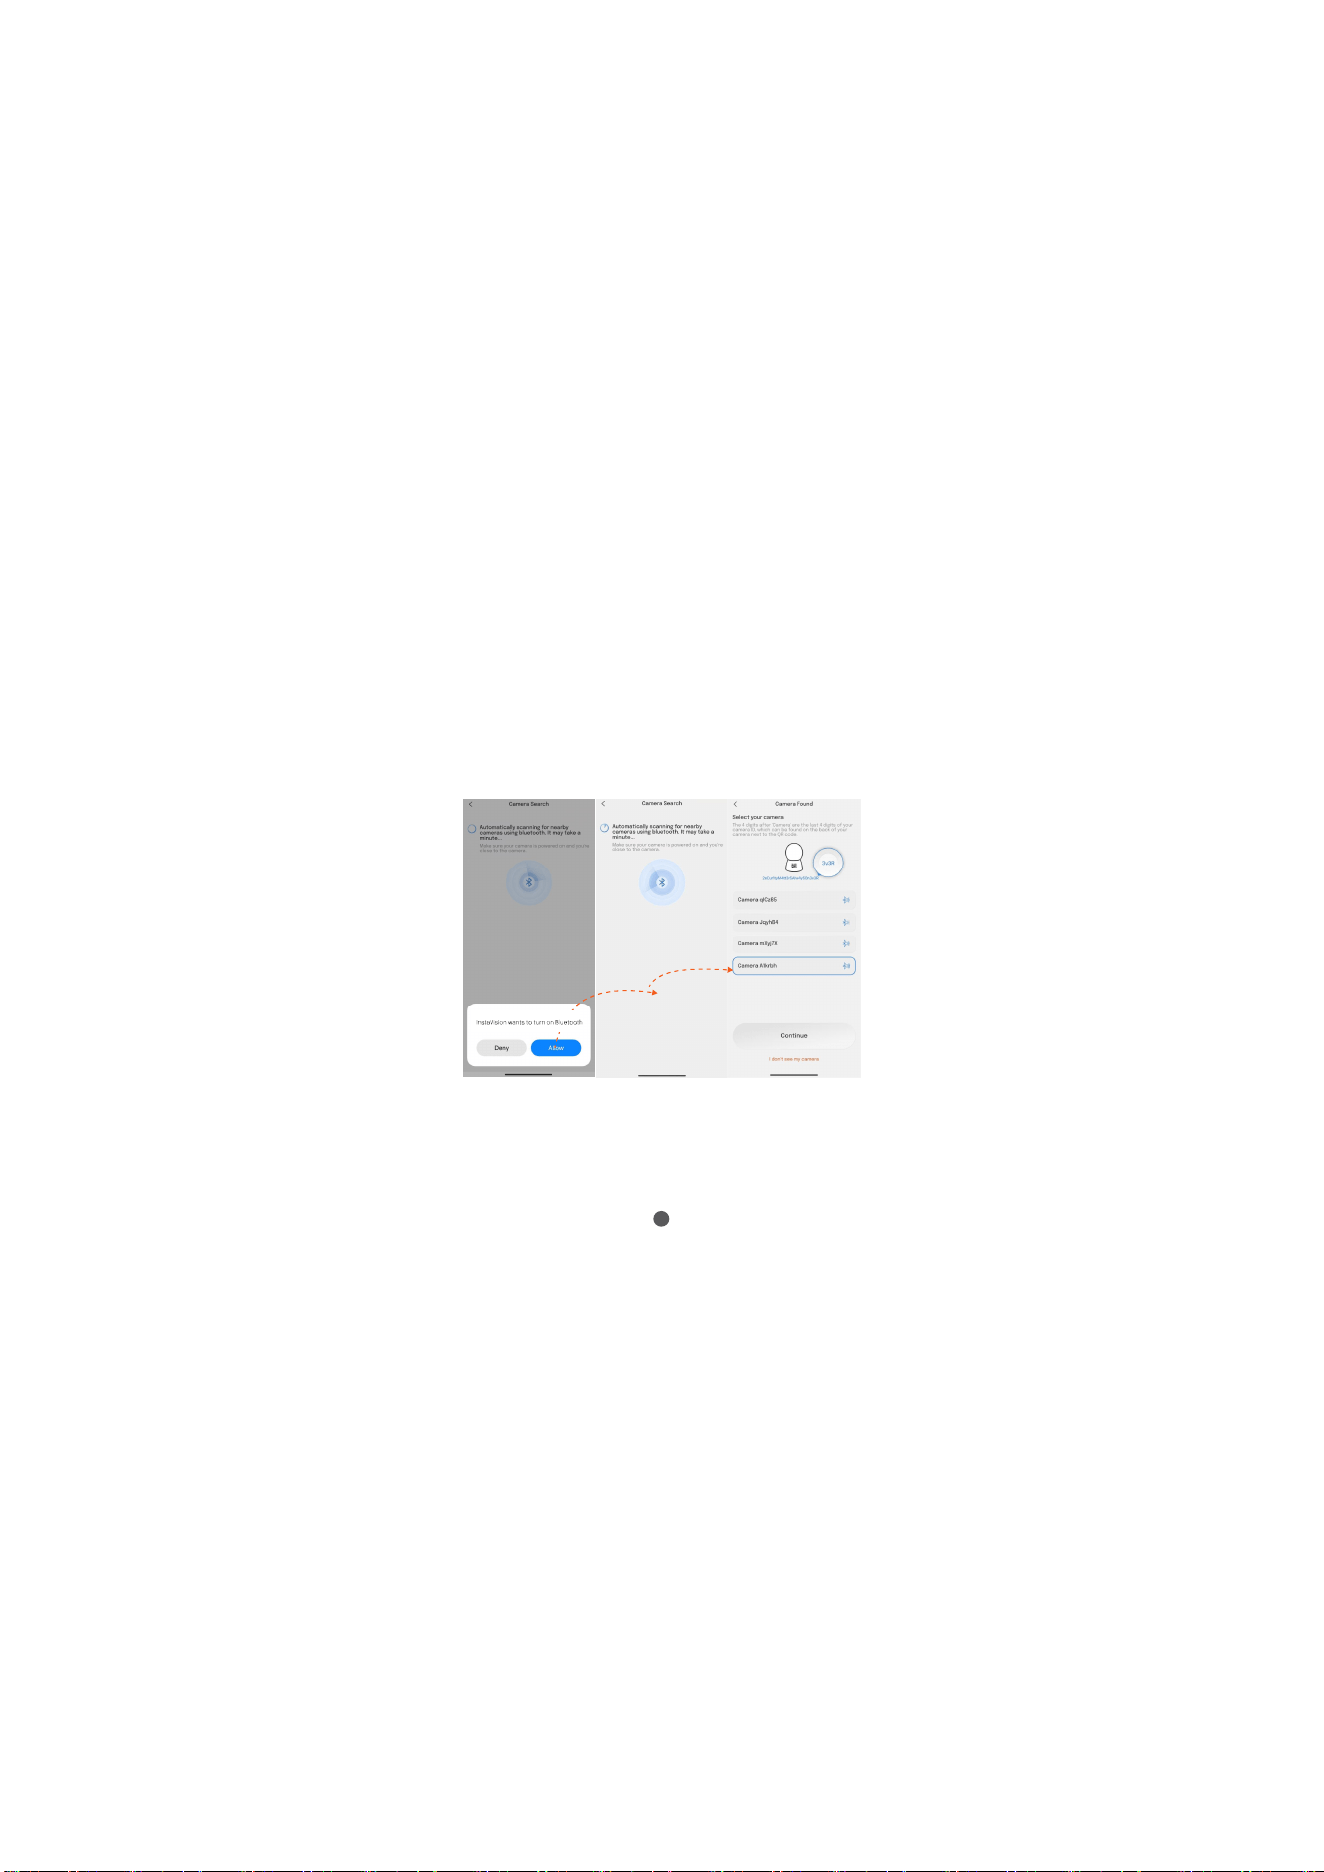
4.Bluetooth Access: Follow the on-screen instructions
to enable Bluetooth access, which is required for
device discovery. Do not skip this step.Ensure
Bluetooth access is enabled as instructed, allowing
the app to discover the device via BLE.
11
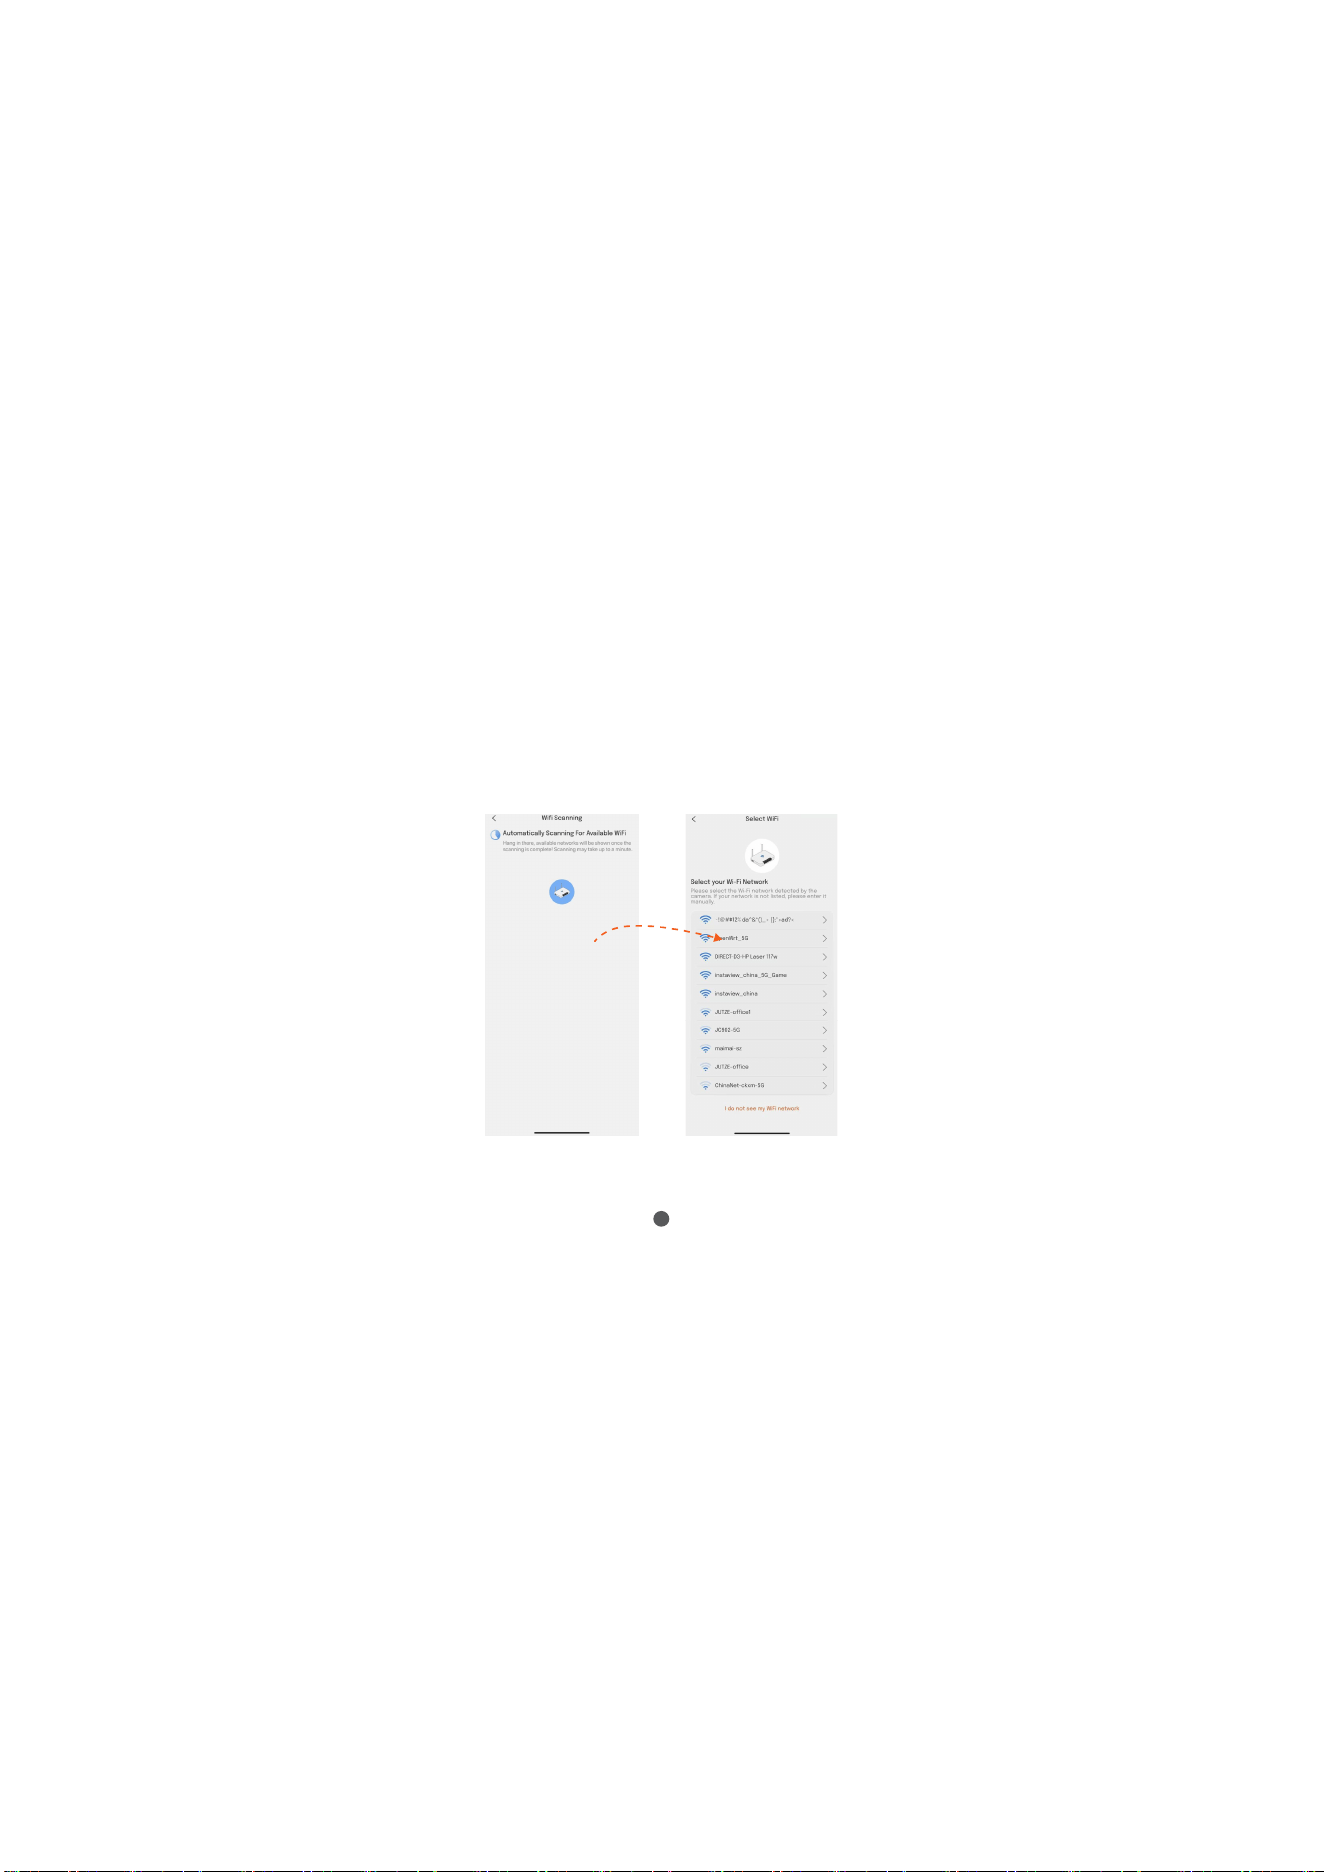
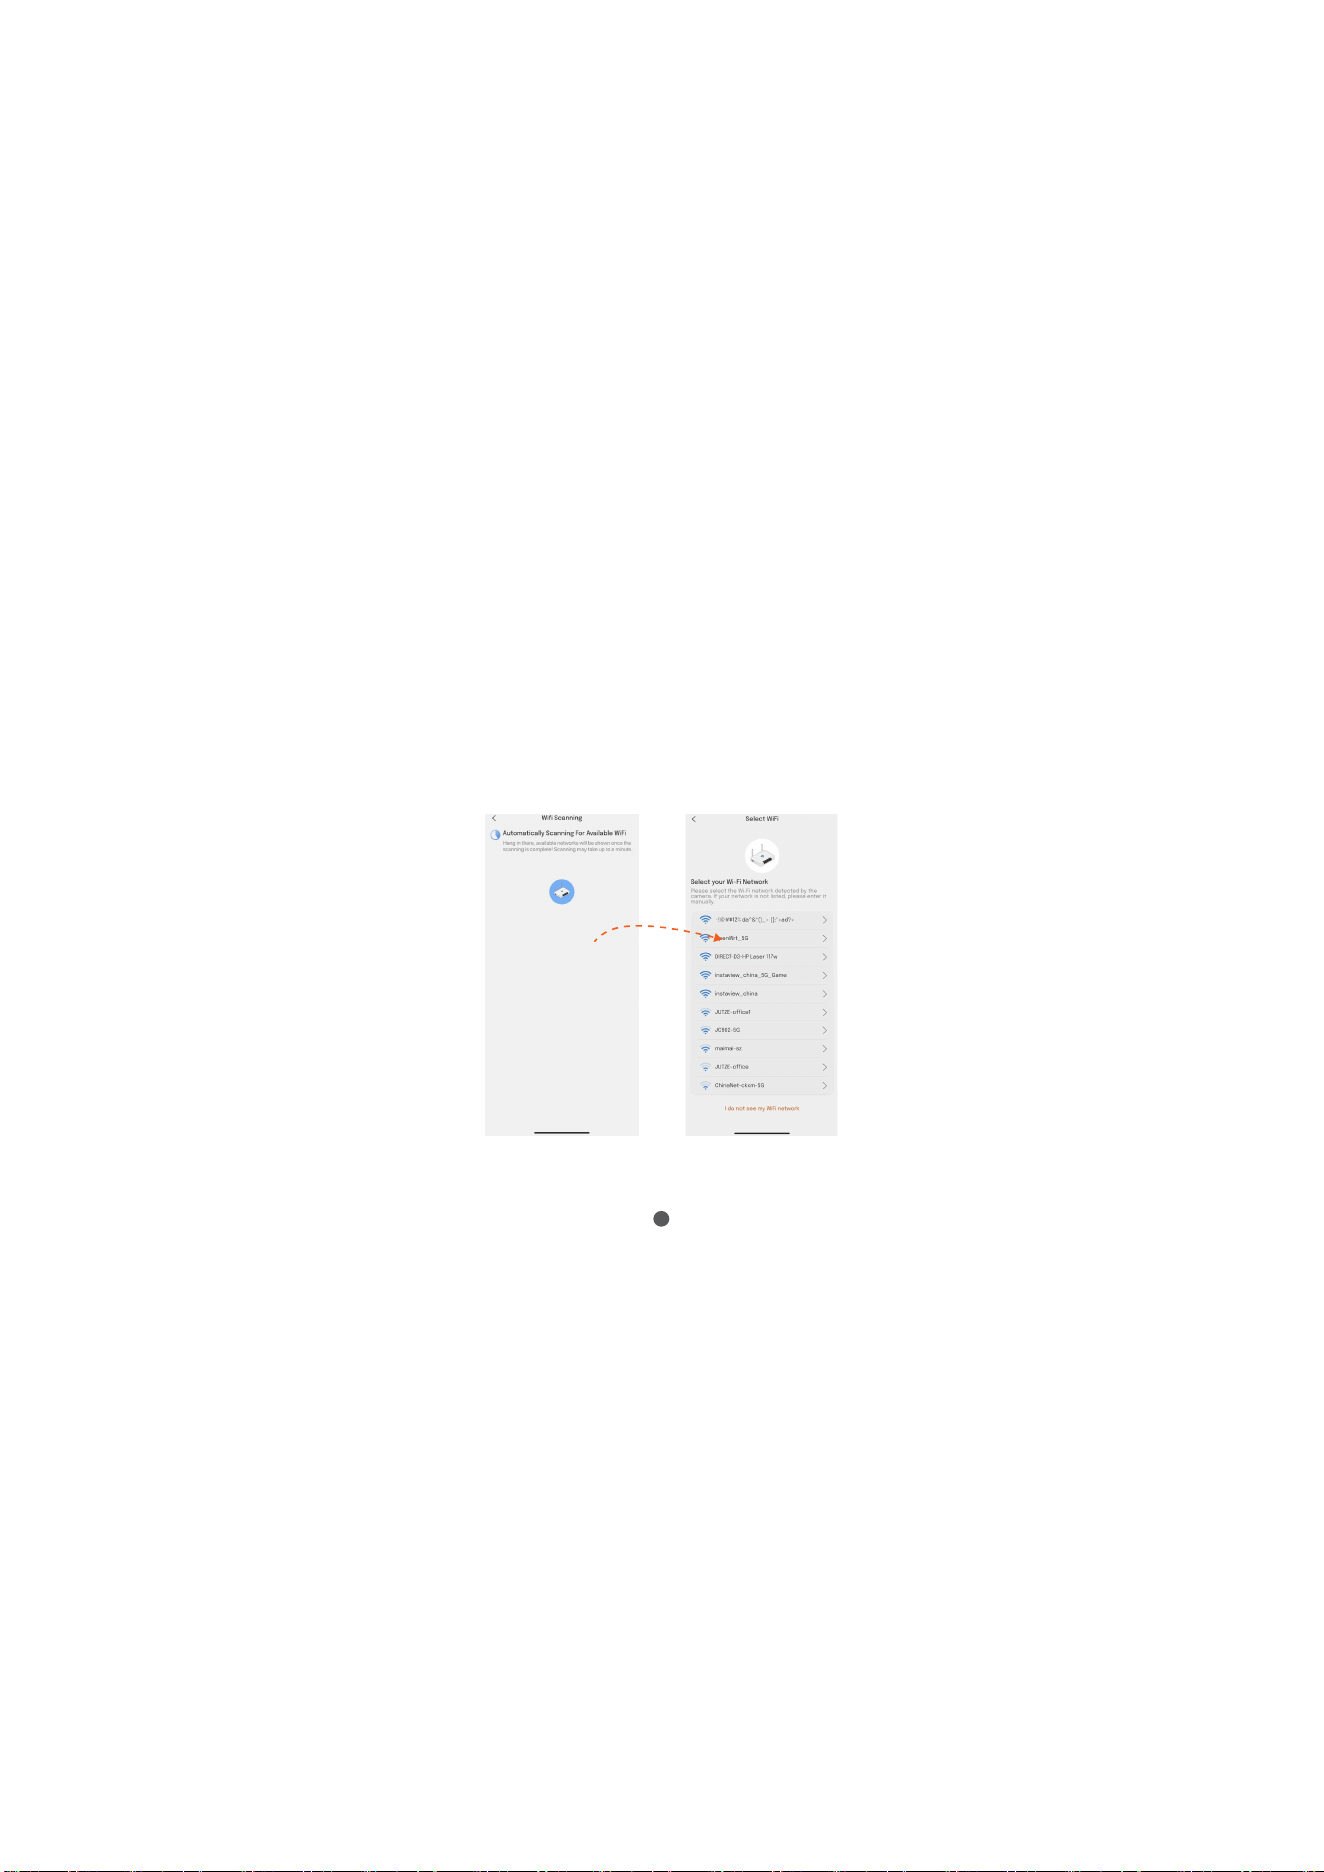
5.Connect to Wi-Fi: The app will automatically scan
for nearby 2.4 GHz & 5 GHz Wi-Fi routers.Choose
your desired Wi-Fi network from the list provided.
Please double-check your Camera's capability in
terms of 2.4 GHz & 5 GHZ.
12
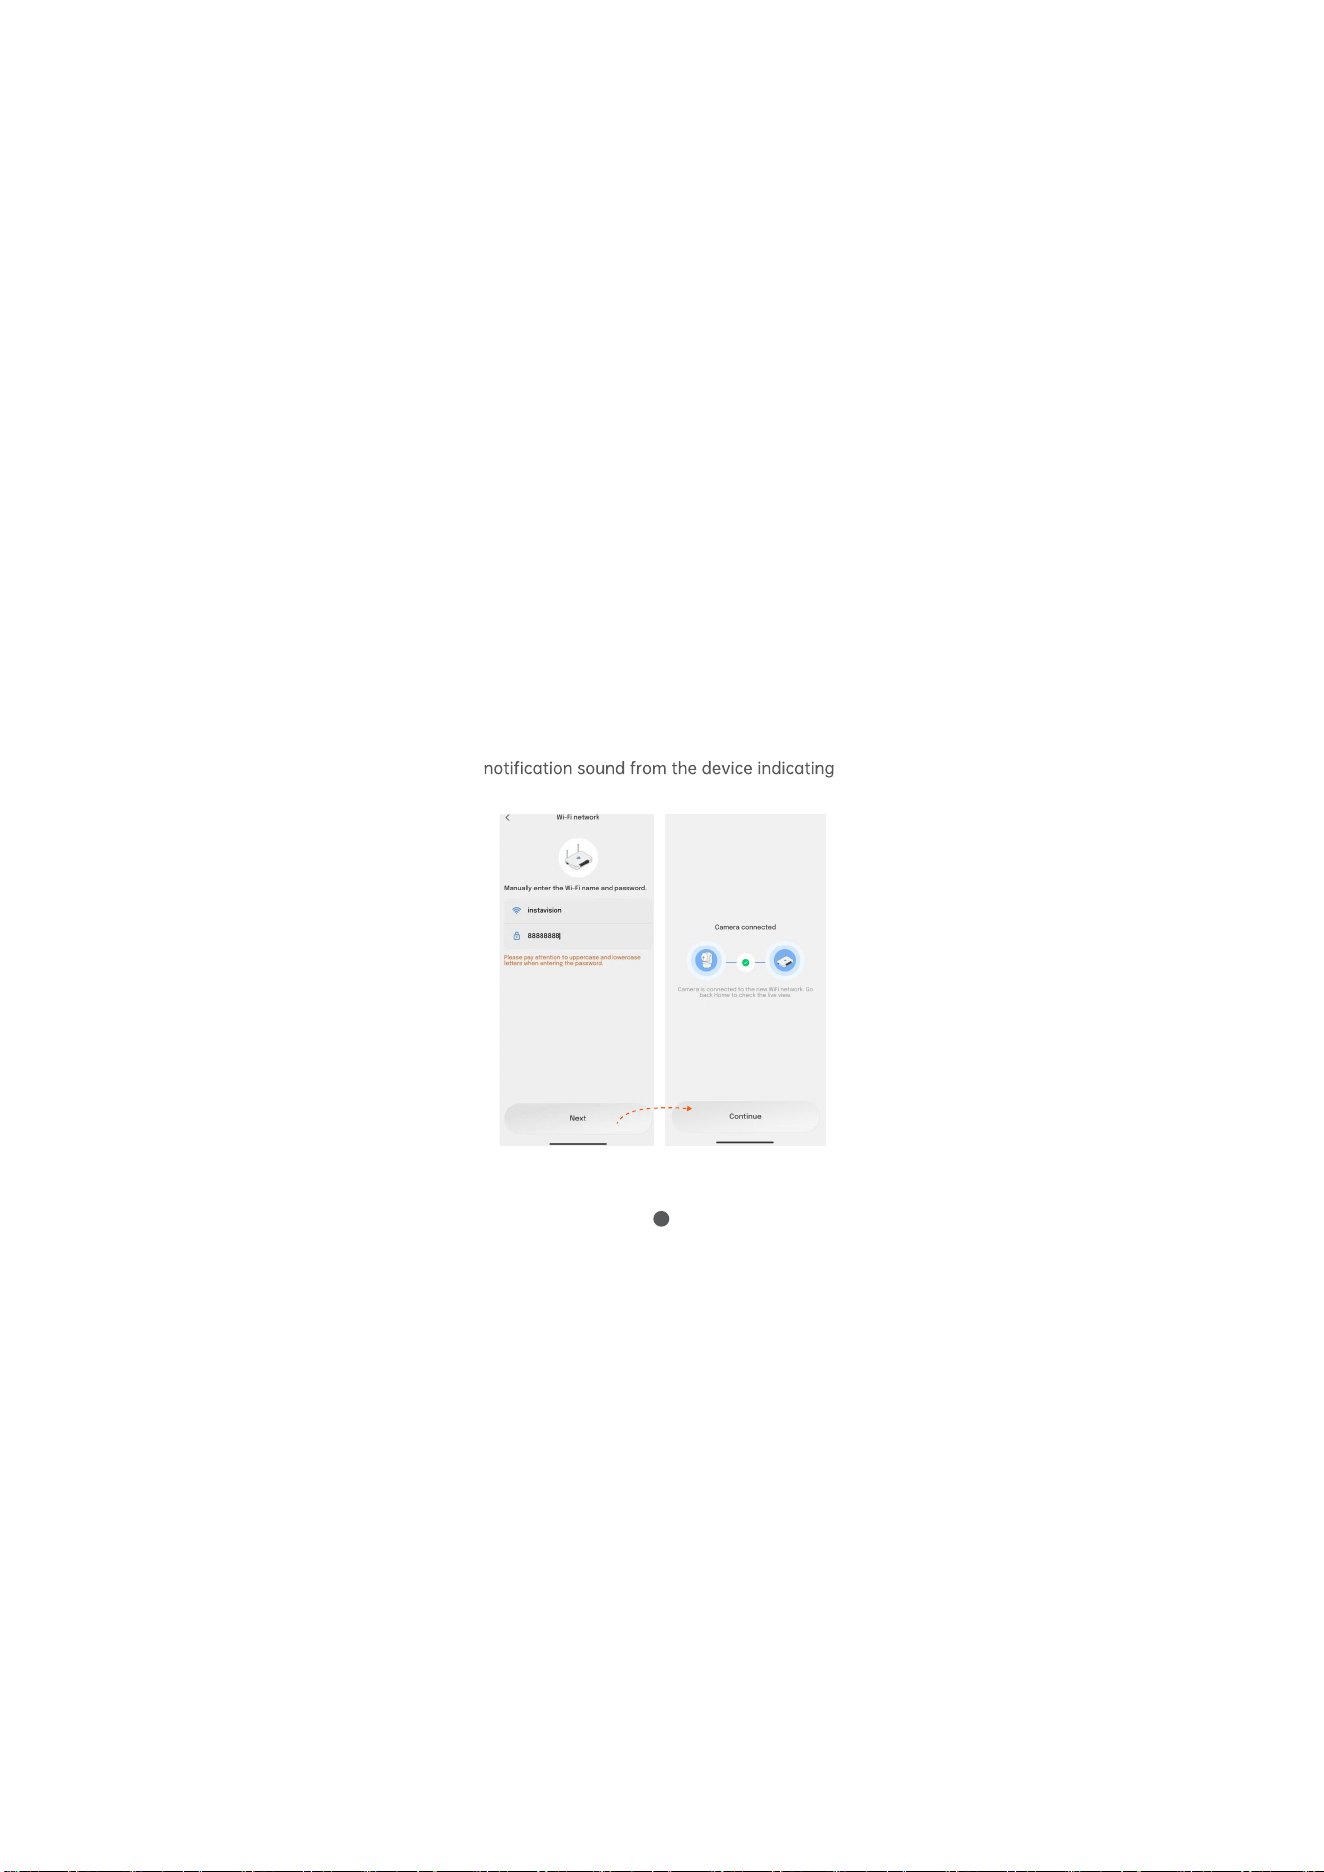
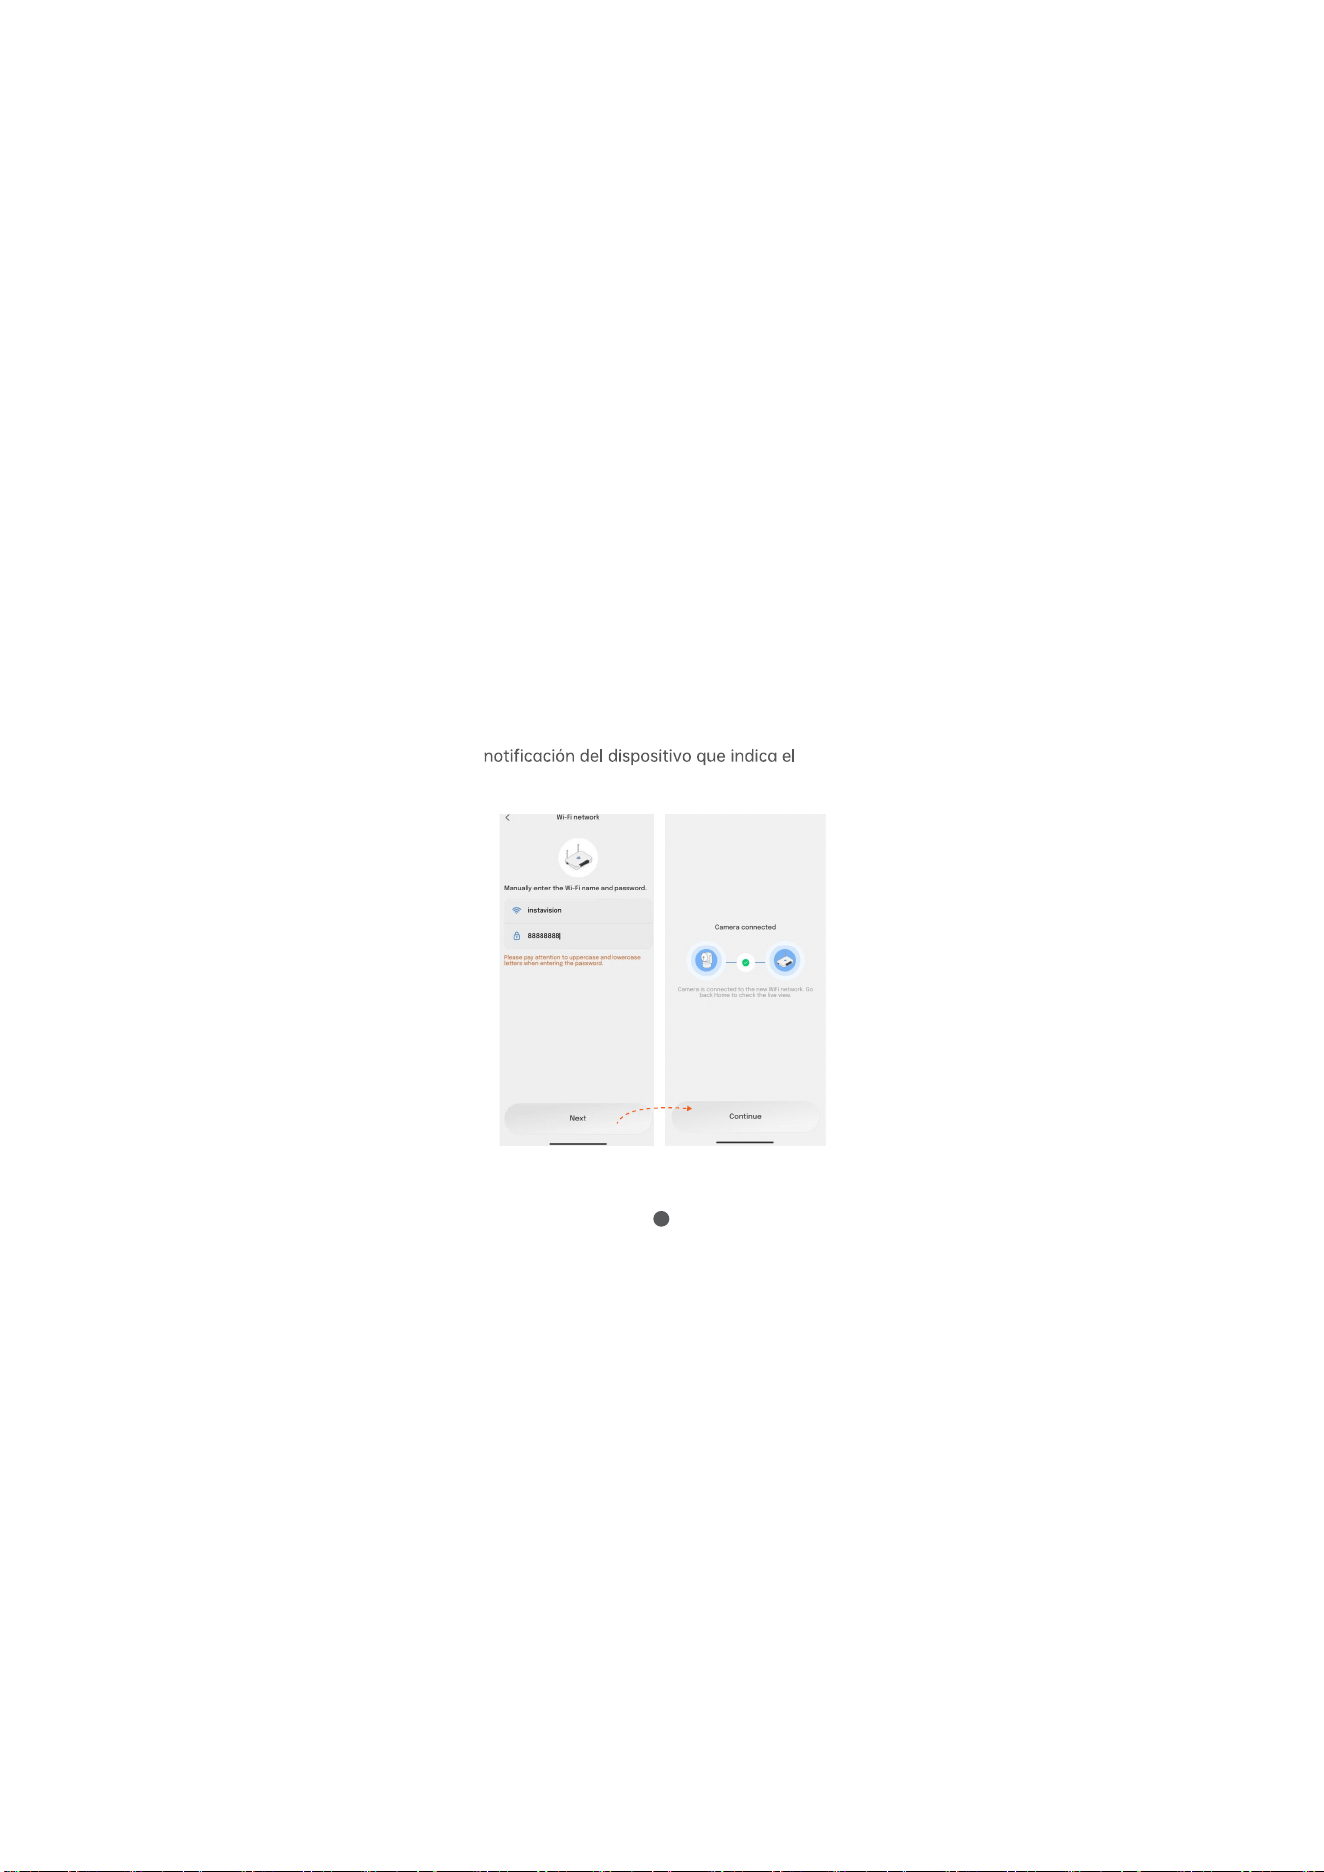
6.Input Wi-Fi Credentials: Enter the password for
your selected Wi-Fi network. Click "Next" to
initiate connection. Wait a few seconds for the
device to connect to the internet. You' hear a
successful progress.
13
*
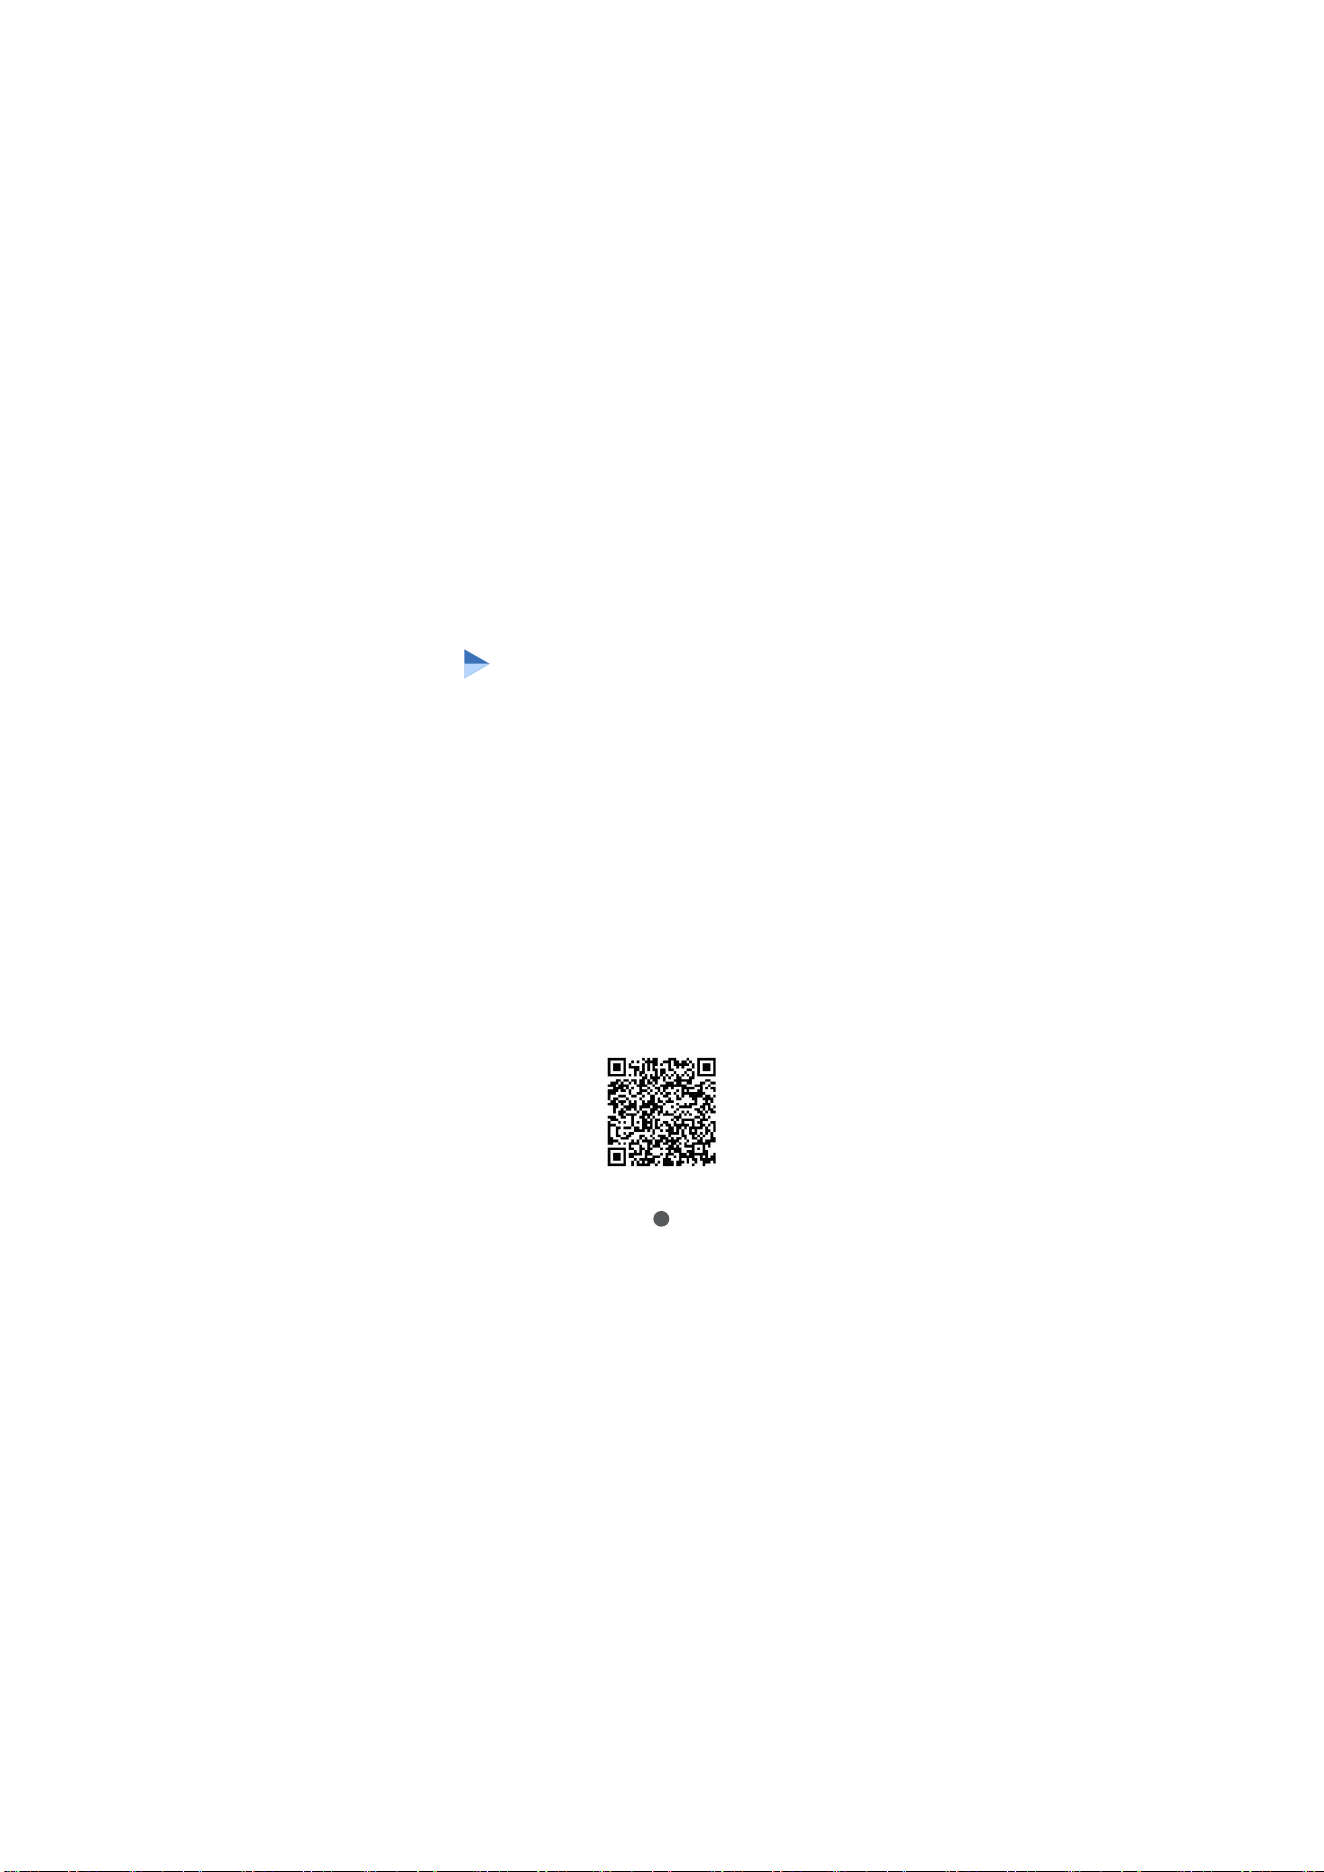
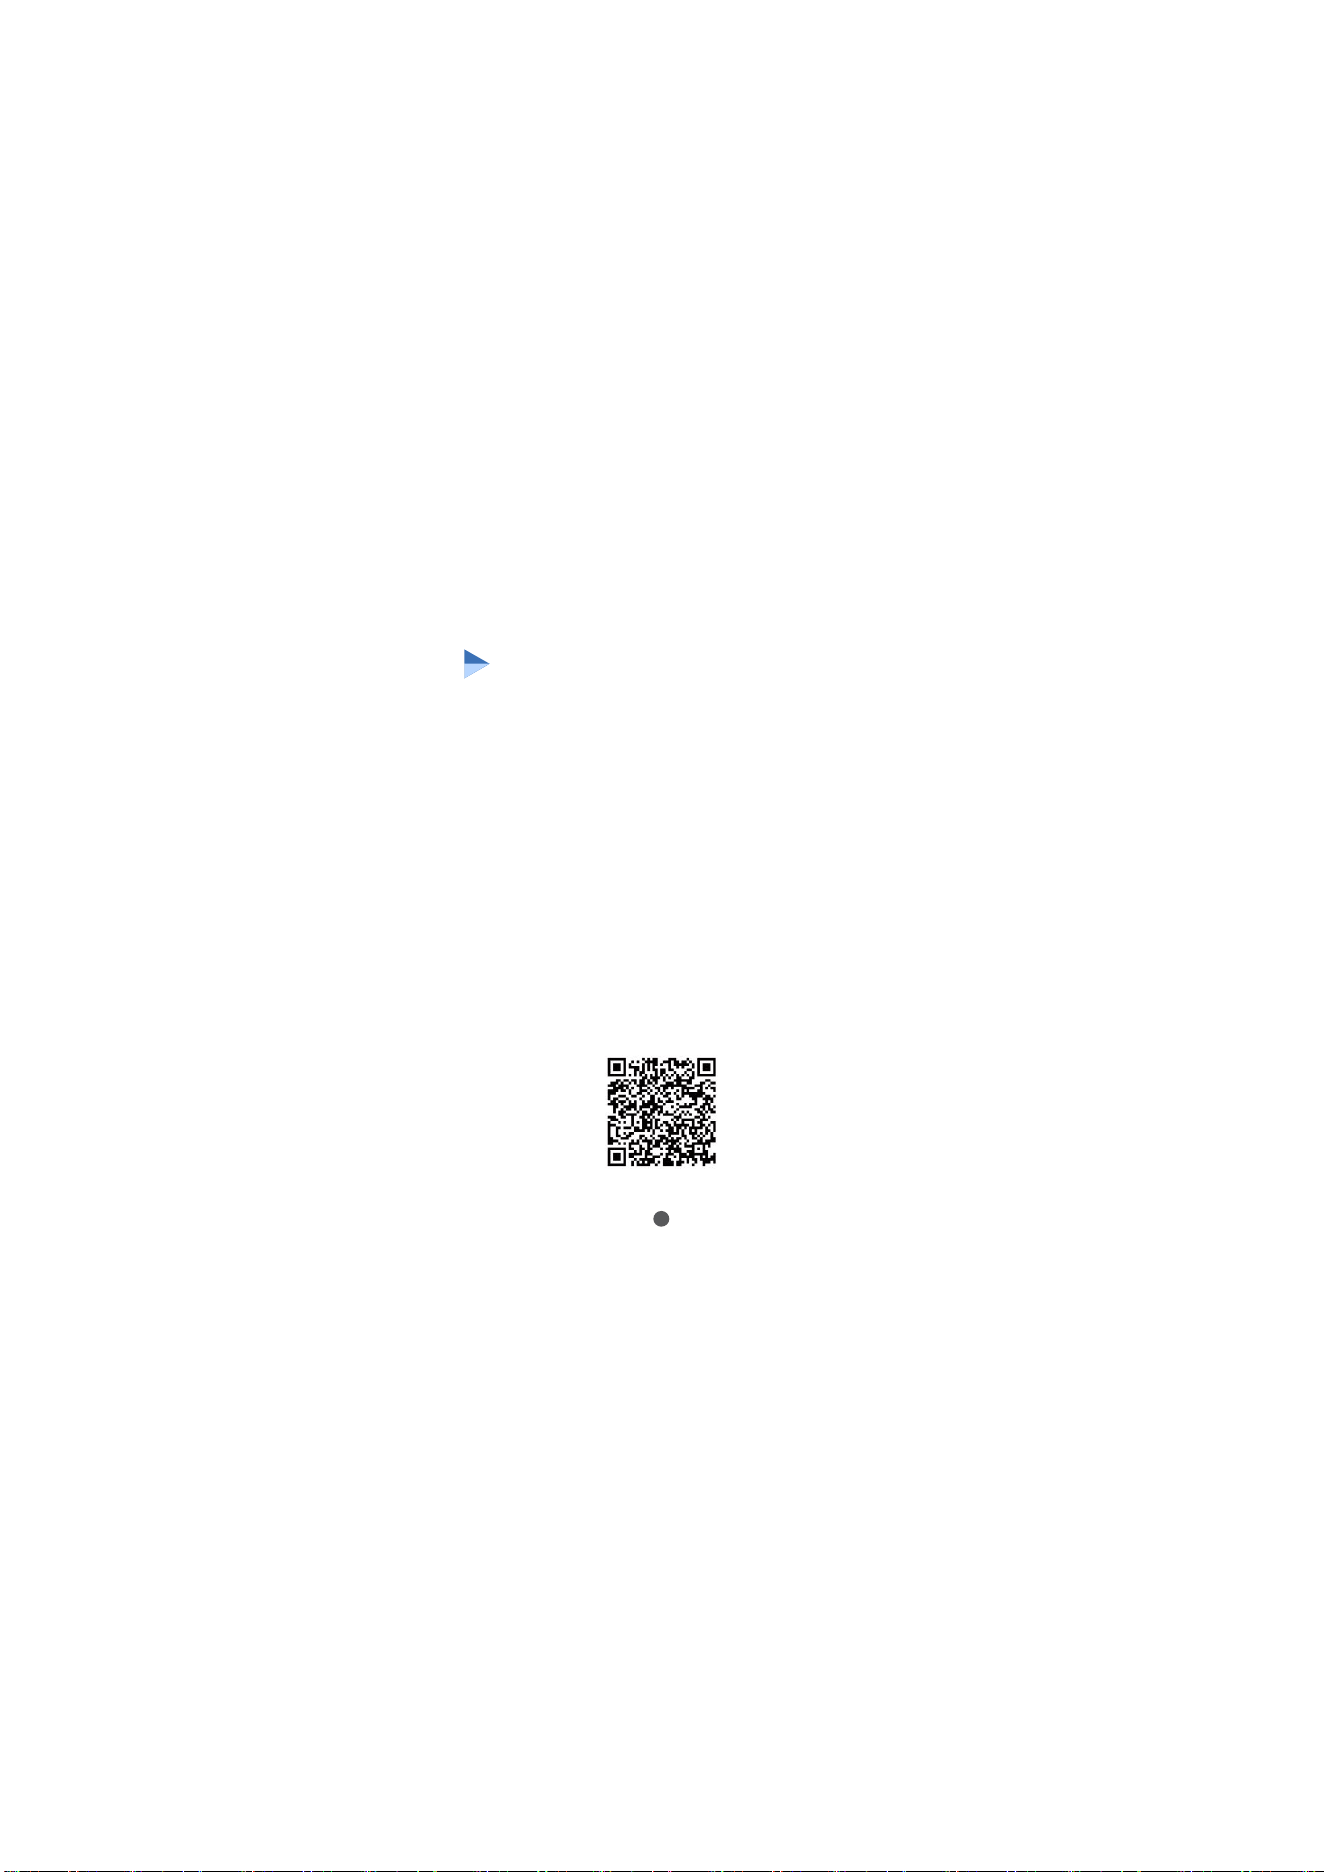
If Bluetooth is not searching for the device, you
can choose to scan the QR code to add it.
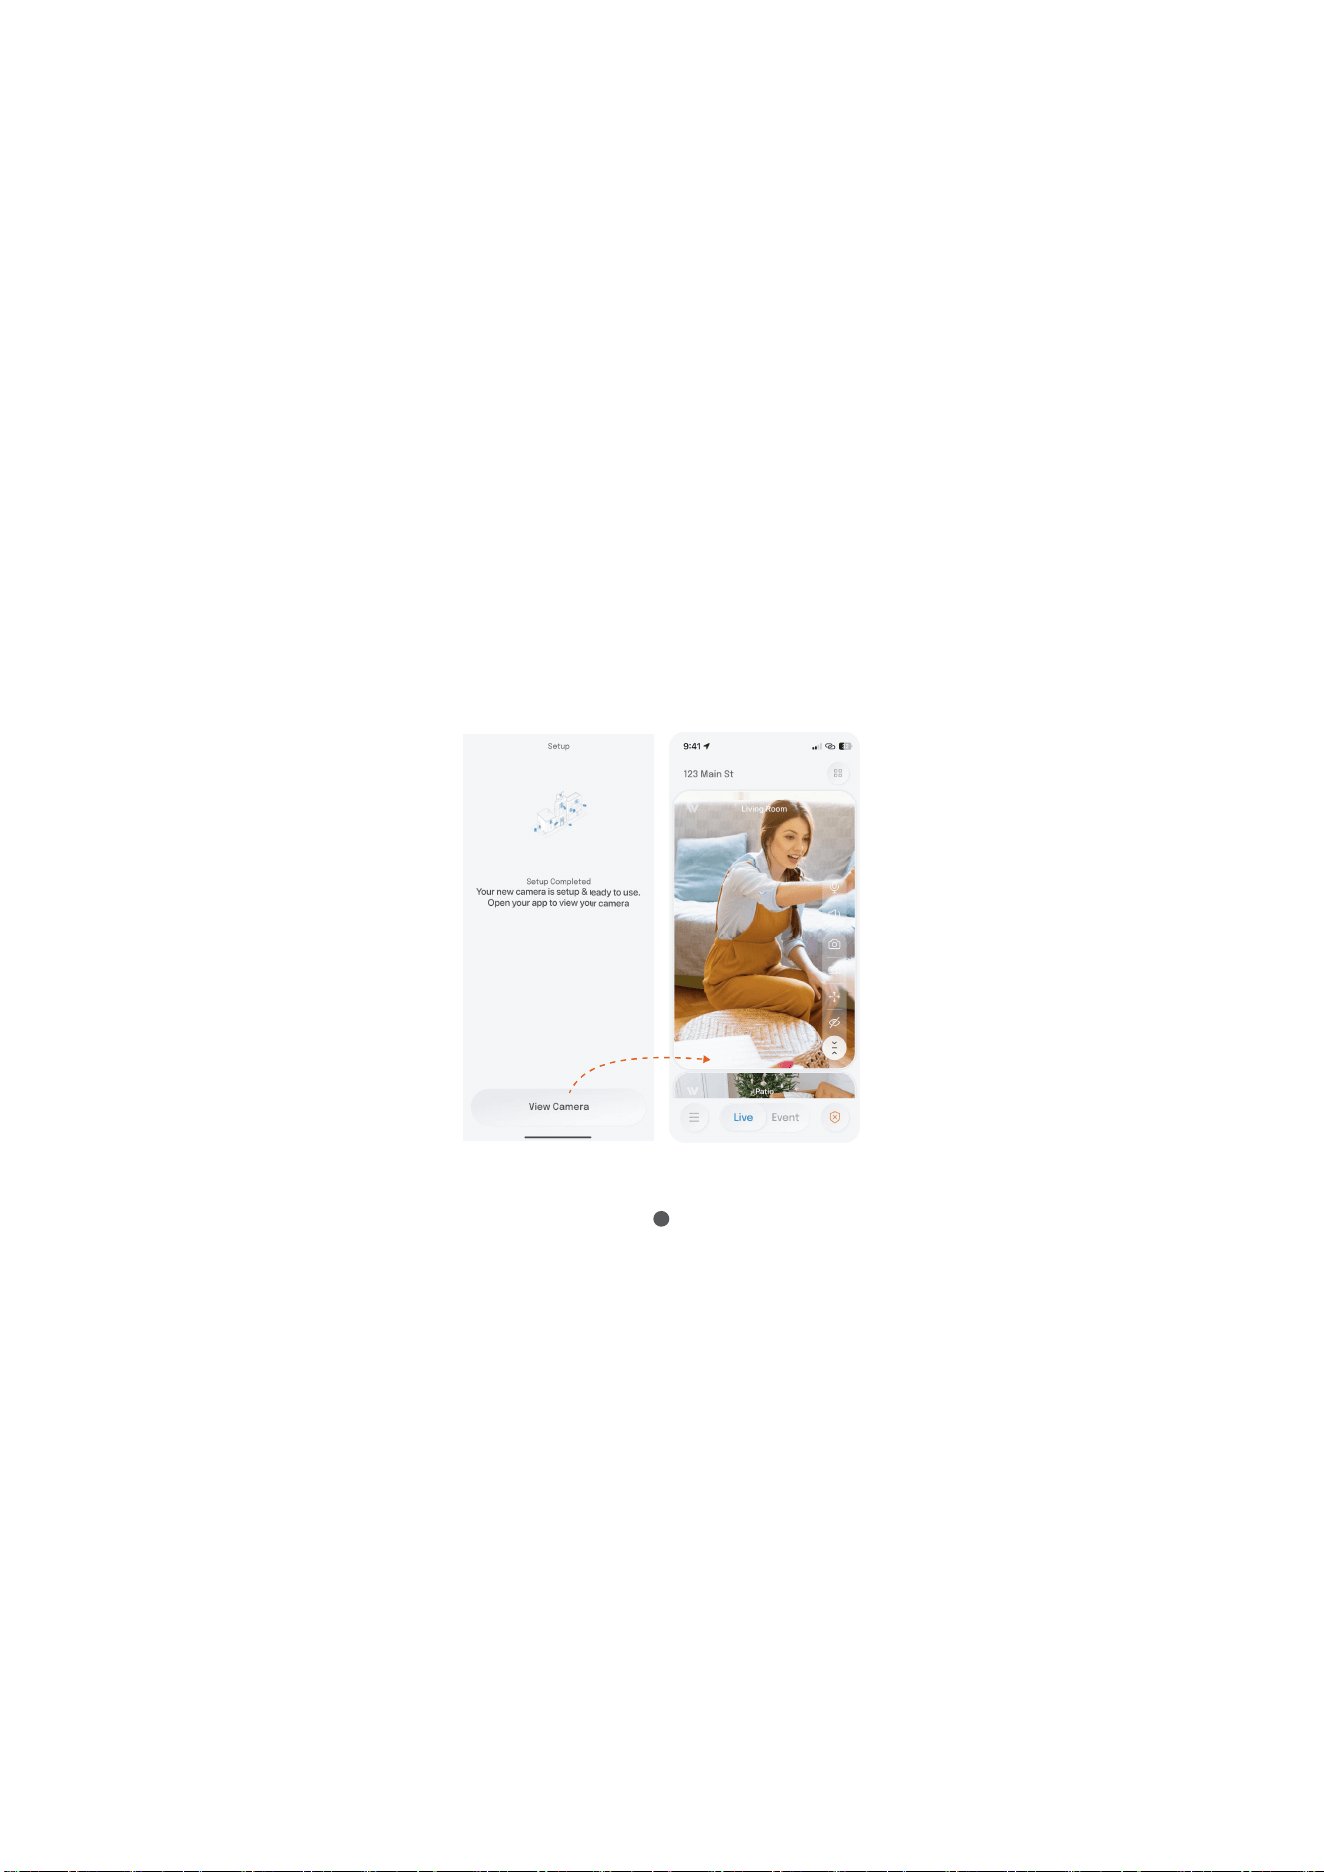
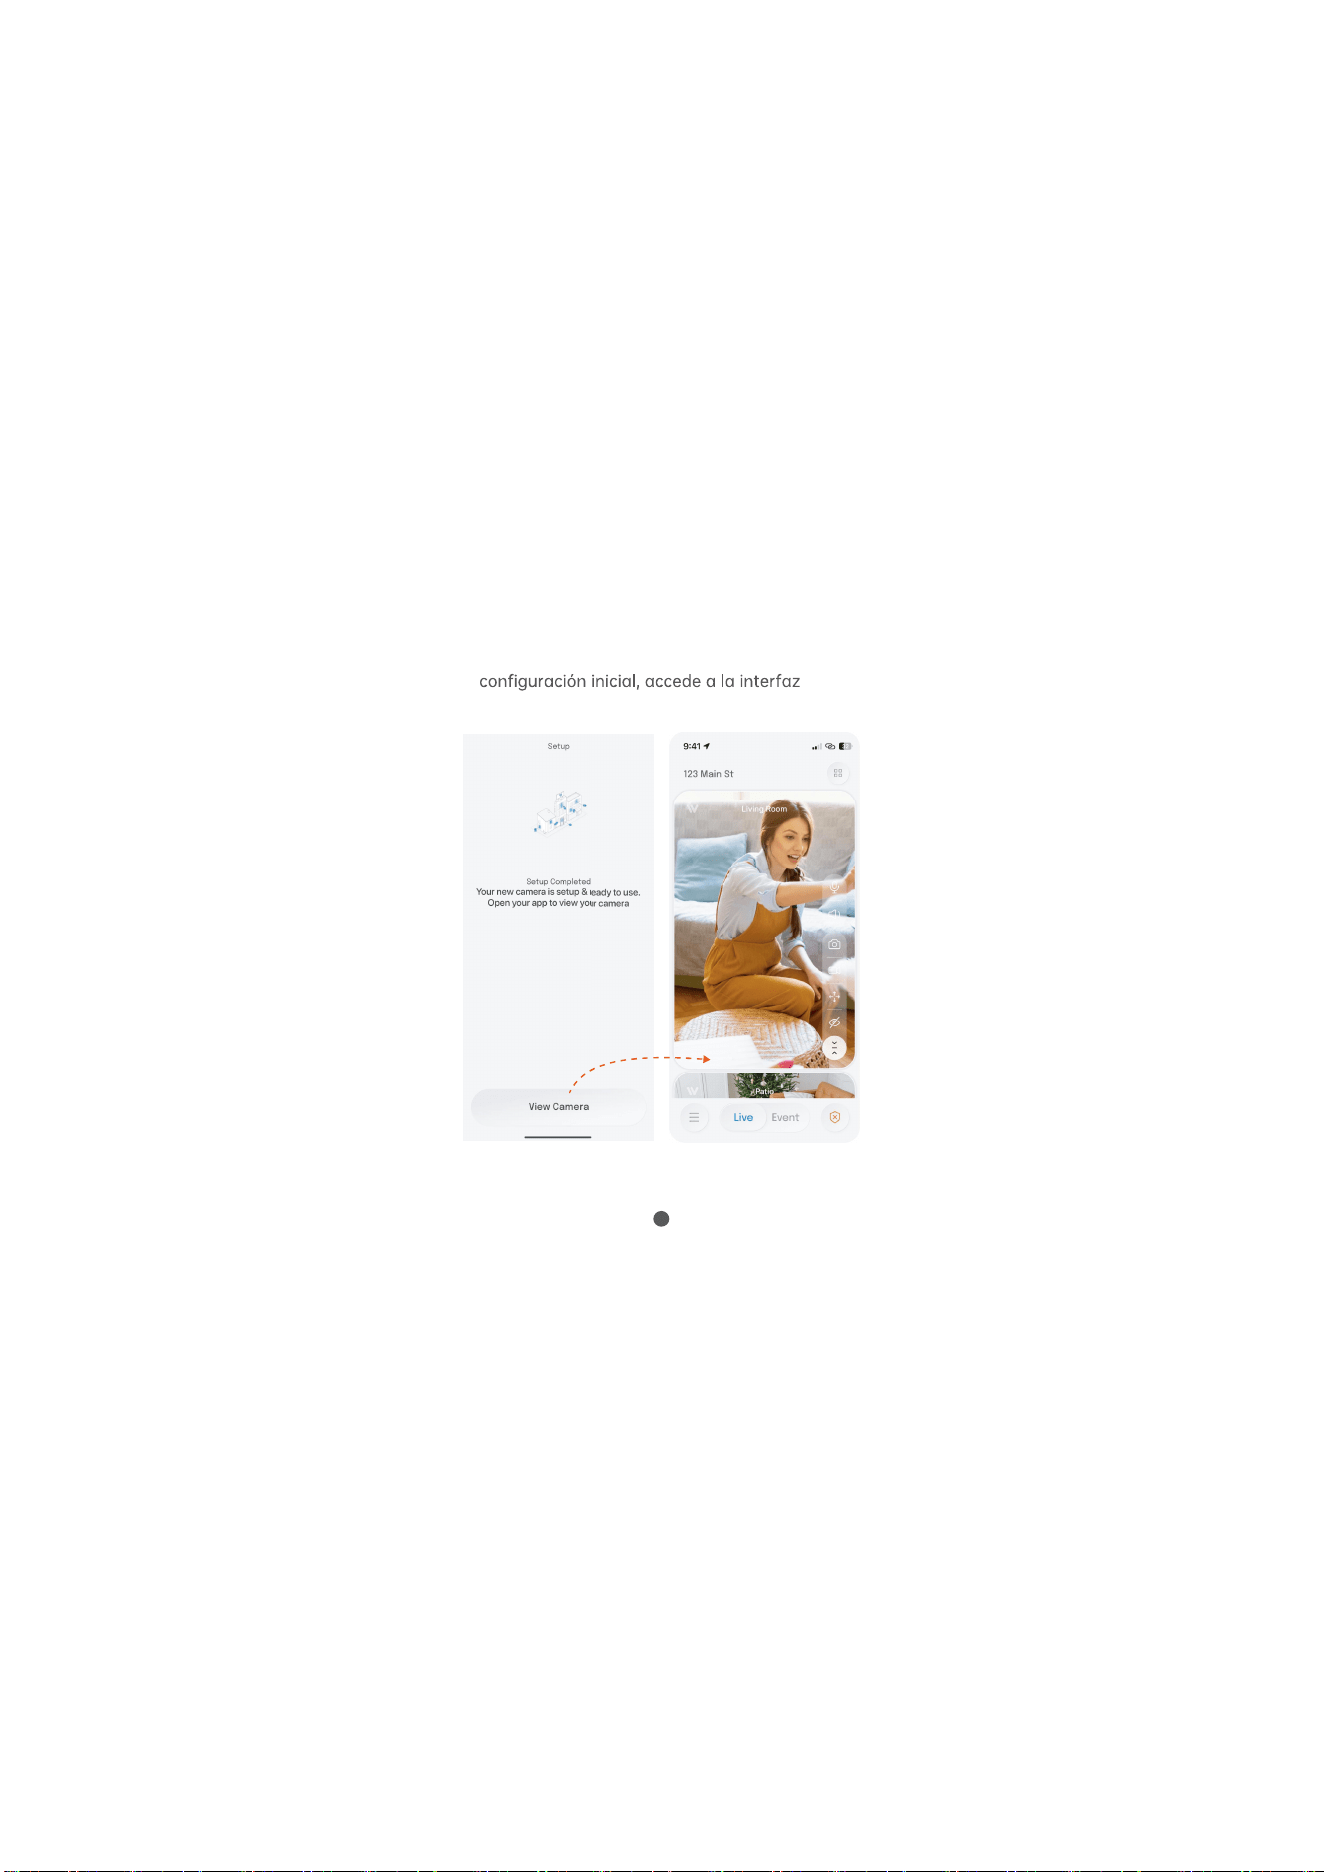
7.See Live View: Upon completing the initial setup,
access the main interface to view the live
camera feed.
14
For additional help, please contact our customer
support team:
If you need further assistance, please contact
our customersupport team. You can send an
email or call customer servicethrough the
"Contact Us" page within the app.
Thank you for choosing InstaVision App. We are
committed toproviding the best user experience
and security protection. lf you have any
suggestions or feedback, please feel
free to contact us.
Phone: +1(888)688-4148
Email: instaus@isecugroup.com
AI Camera use lnstruction video:
Customer Support

15
FCC Statement
NOTE: This equipment has been tested and
found to comply with the limits for a Class B
digital device, pursuant to part 15 of the FCC
Rules. These limits are designed to provide
reasonable protection against harmful interfer-
ence in a residential installation. This equipment
generates, uses and can radiate radio frequen-
cy energy and, if not installed and used in
accordance with the instructions, may cause
harmful interference to radio communications.
However, there is no guarantee that interfer-
ence will not occur in a particular installation. lf
this equipment does cause harmful interference
to radio or television reception, which can be
determined by turning the equipment off and
on, the user is encouraged to try to correct the
interference by one or more of the following
measures:
Reorient or relocate the receiving antenna.
Increase the separation between the equipment
and receiver.
Connect the equipment into an outlet on a
circuit different from that to which the
receiver is connected.
Consult the dealer or an experienced radio/TV
technician for help.
16
This device may not cause harmful interference.
This device must accept any interference received, including
interference that may cause undesired operation.
IMPORTANT:
expressly approved by the
manufacturer responsible for compliance could void the
user's
authority to operate the equipment.
This device complies with part 15 of the
FCC Rules. Operation is
subject to the following two conditions:
Tiktok:superstarcameraclub
superstarcameras_club
SuperStar Cameras Club

Cámara Al inalámbrica
Manual de Soporte
de Postventa
Antes de operar esta unidad, lea estas instrucciones
cuidadosamente y guárdelas para su uso futuro.
Teléfono: +1(888)688-4148
instaus@isecugroup.com
V2.0

Correo electrónico: in[email protected]
Teléfono:+1(888)688-4148
Los productos adquiridos a través de canales
admiten una devolución o cambio
sin motivo dentro de los 30 días, siempre que
el producto esté sin usar y se devuelva en su
embalaje original.
Este producto incluye una garantía limitada
de 1 año. Al ponerse en contacto con el
servicio de atención al cliente dentro de los
30 días posteriores a la compra, puede
activar una extensión de garantía adicional
de 1 año.
La garantía no se aplica en los siguientes casos:
Productos sin un comprobante de compra
válido (ID de pedido);
Desgaste normal o envejecimiento que no
afecte a la funcionalidad (por ejemplo,
arañazos, decolo-ración de la pintura,
deformación de la carcasa, óxido);
Garantía:
Notas especiales:
Productos que hayan sido desmontados,
mal utilizados ;
suministro eléctrico o de cualquier red de
telecomunicaciones;
Accidentes, incluidos incendio, rayo,
inundación, tornado, terremoto u huracán;
Productos comprados a distribuidores
o revende-dores no autorizados, sitios
de subastas, tiendas de segunda mano
Productos perdidos o robados.
Cámara Al inalámbrica
Descripción de la interfaz
Ranura para tarjeta SD
Botón de reinicio
Fuente de alimentación de CC
3
Descripción
1. Botón de reinicio
2. Ranura para
tarjeta SD
Tarjeta Micro SD, almacenamiento
de video y reproducción de video.
3. Alimentación Entrada de energía.
El estado de funcionamiento del
dispositivo, mantenga presionado
durante 5 segundos para restaurar
cámara emitirá un aviso de voz.
Cámara Al inalámbrica
Instalación y colocación
Colocación de la mesa
Coloque en un escritorio o mesa
Cámara montada
en soporte
Instale la cámara en el techo o en la pared.
Tapón de goma
Pared
Tornillos
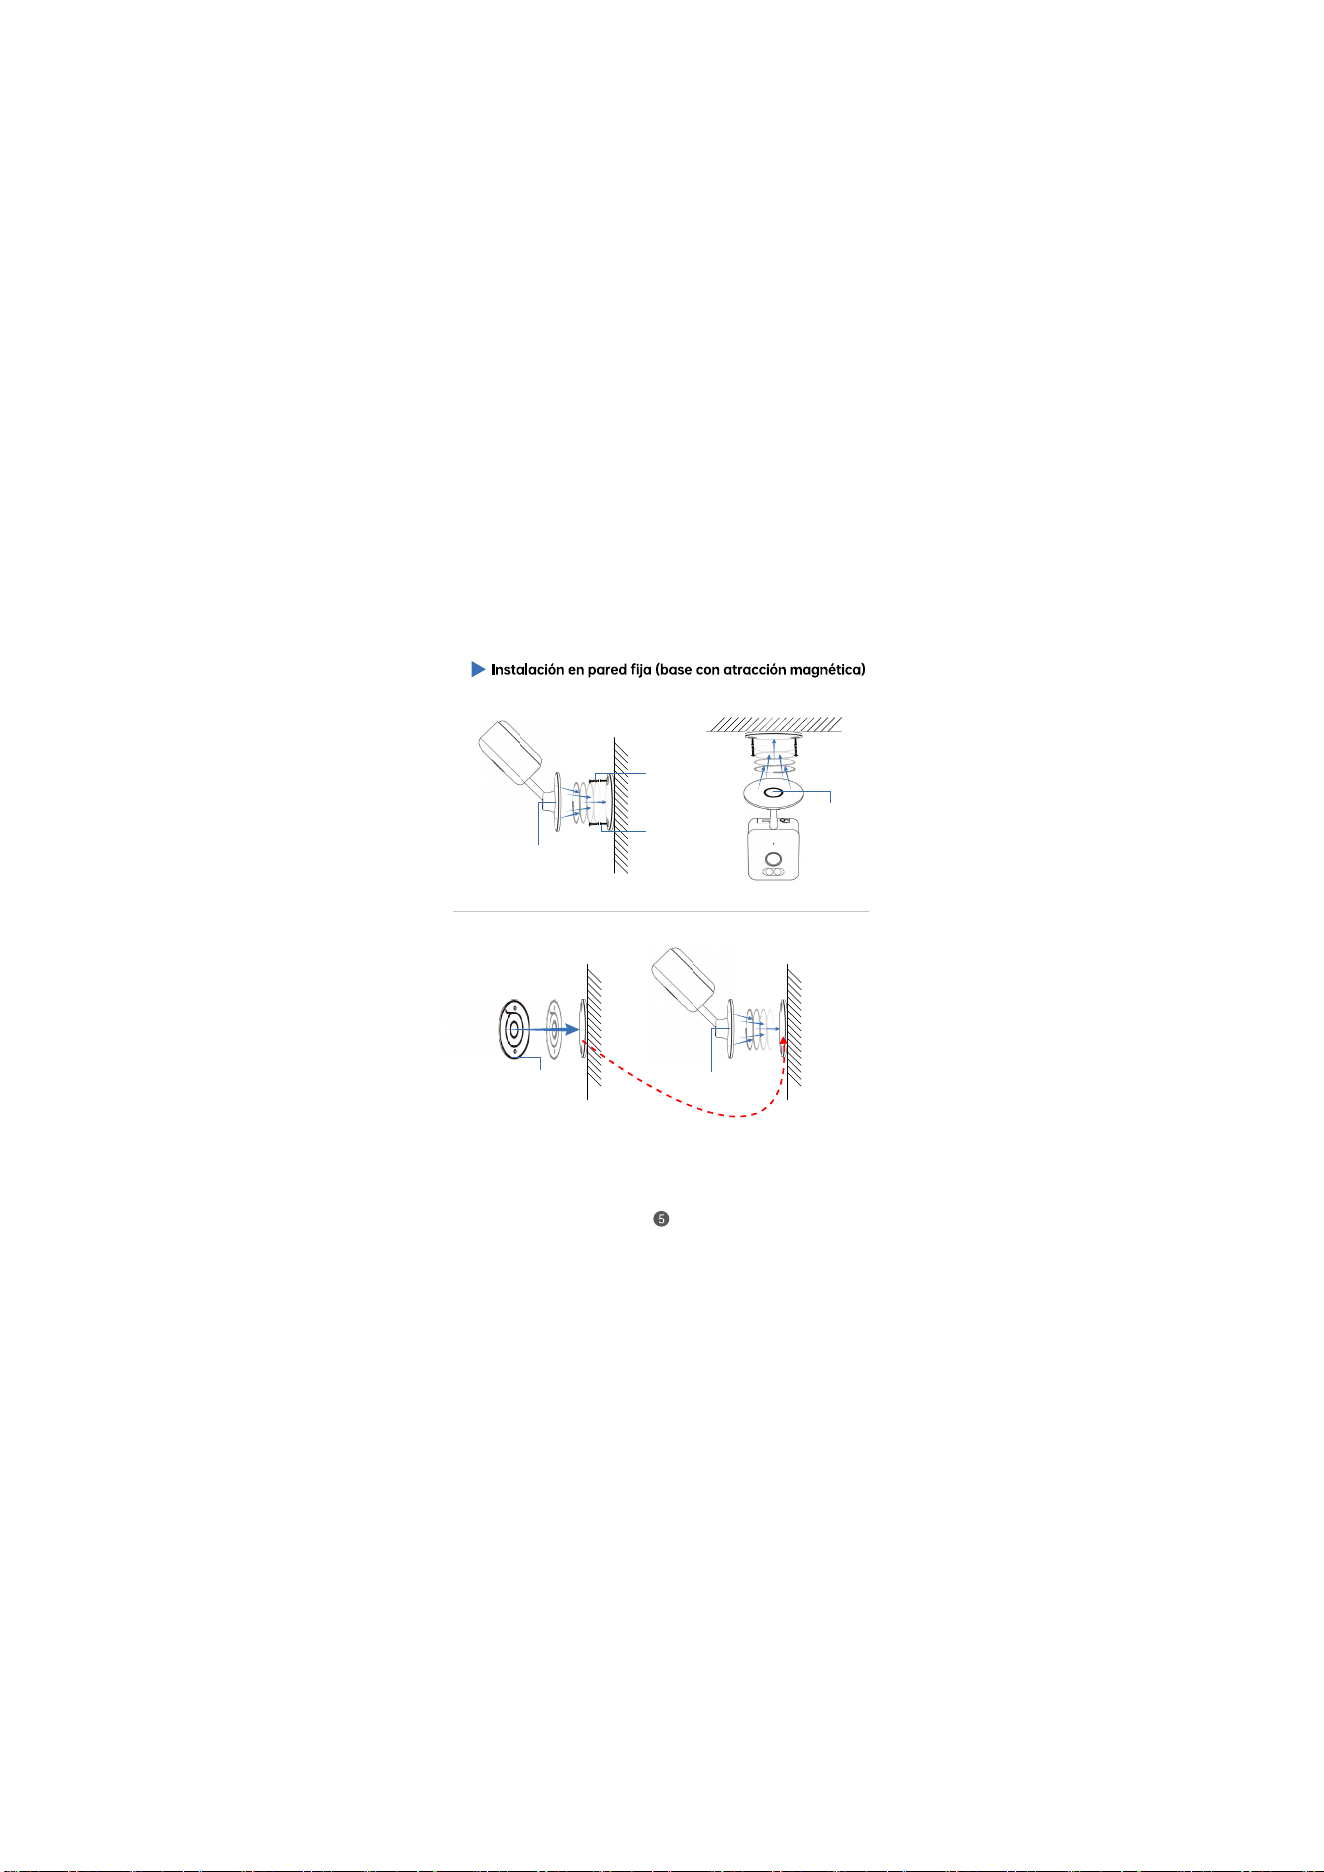
imán
Tapón de goma
Pared
Tornillos
Imán incorporado
Instale la cámara en el techo o en la pared.
Imán incorporado
ParedPared
adhesivo de
doble cara
Método 1: Fije la lámina de hierro con tornillos
Método 2: Fije la lámina de hierro con cinta adhesiva doble cara
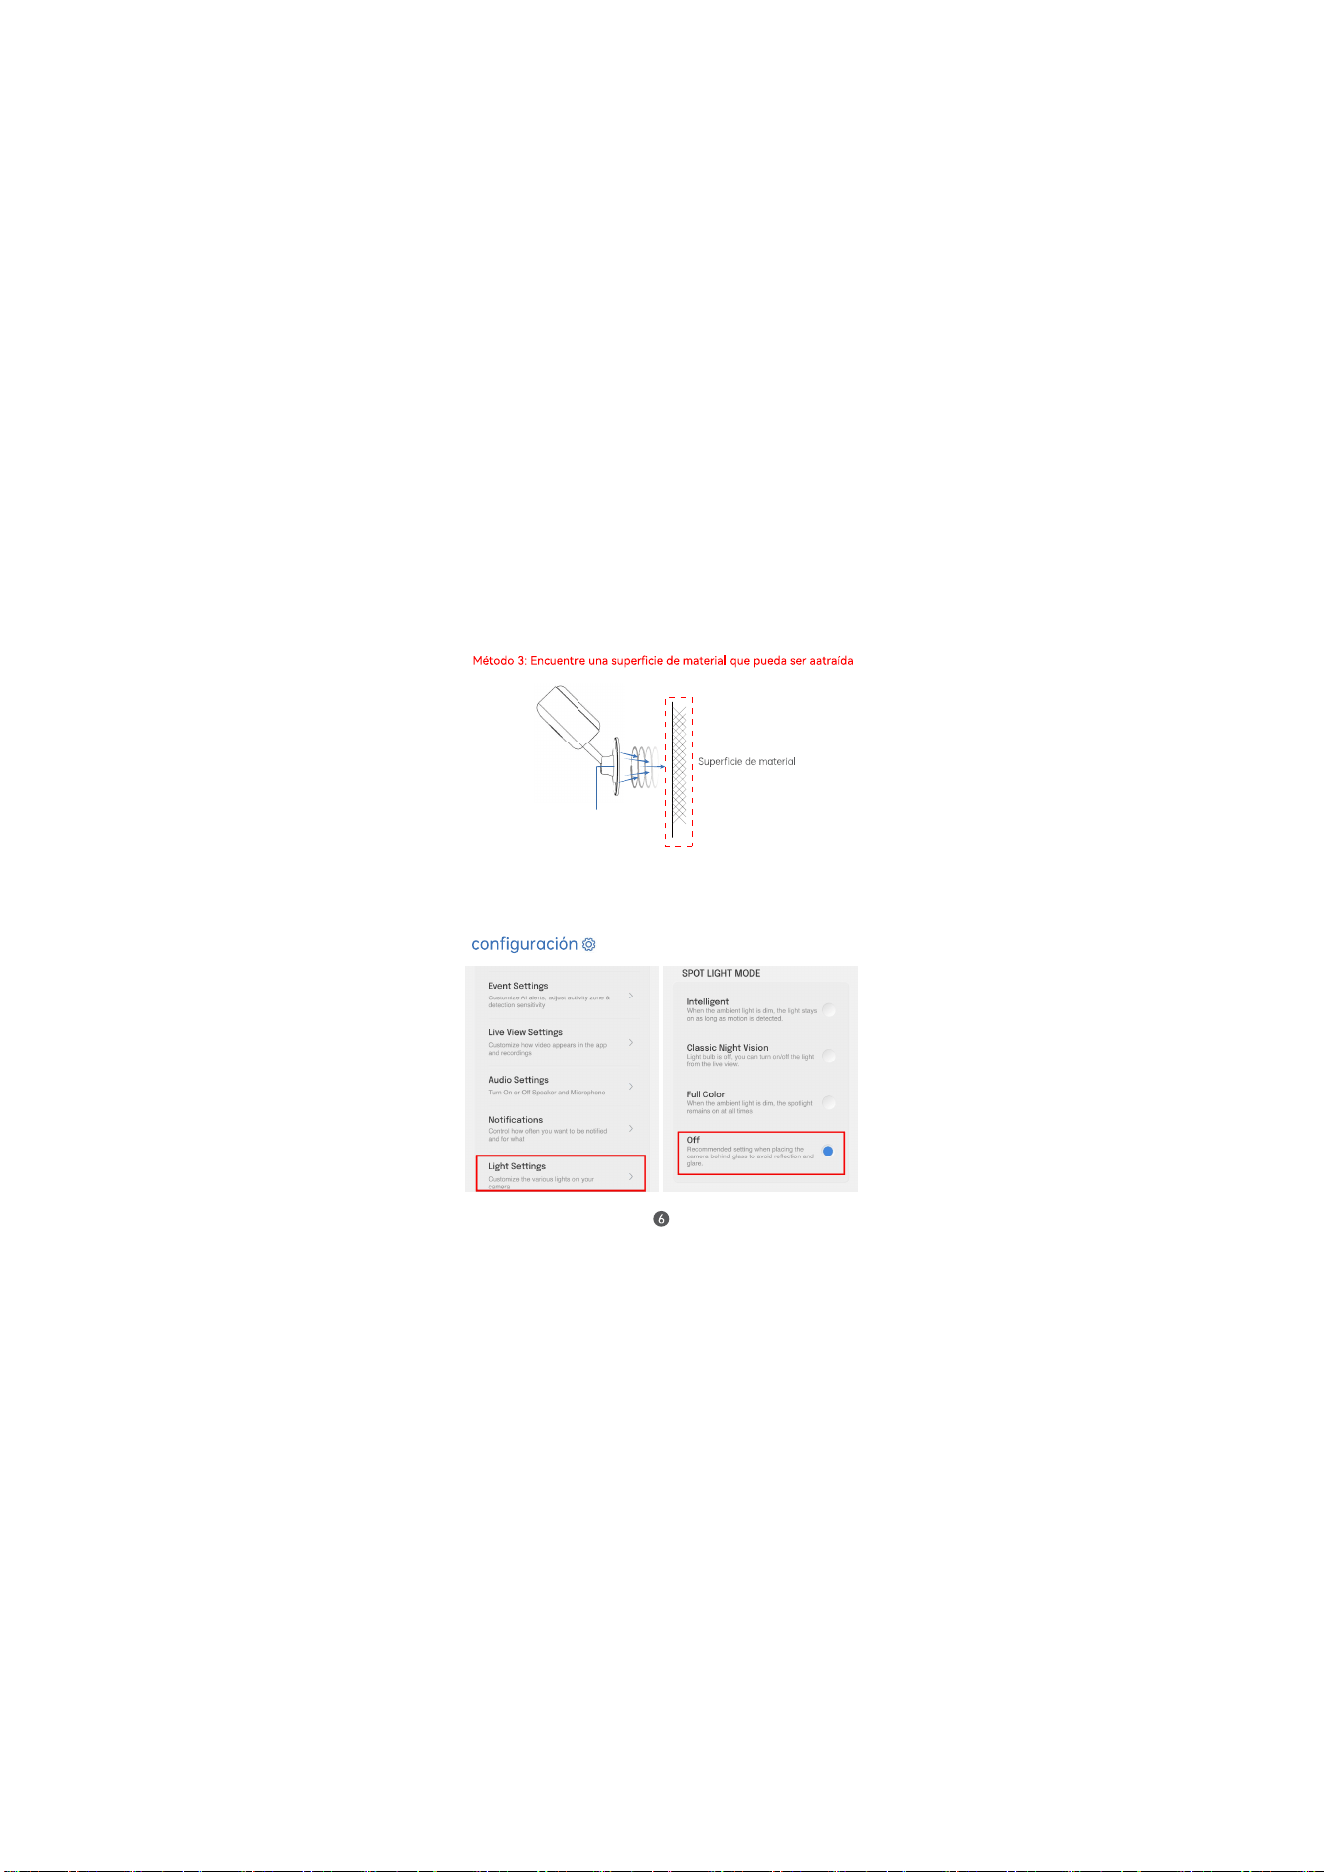
Imán incorporado
atrayente por imán
por un imán
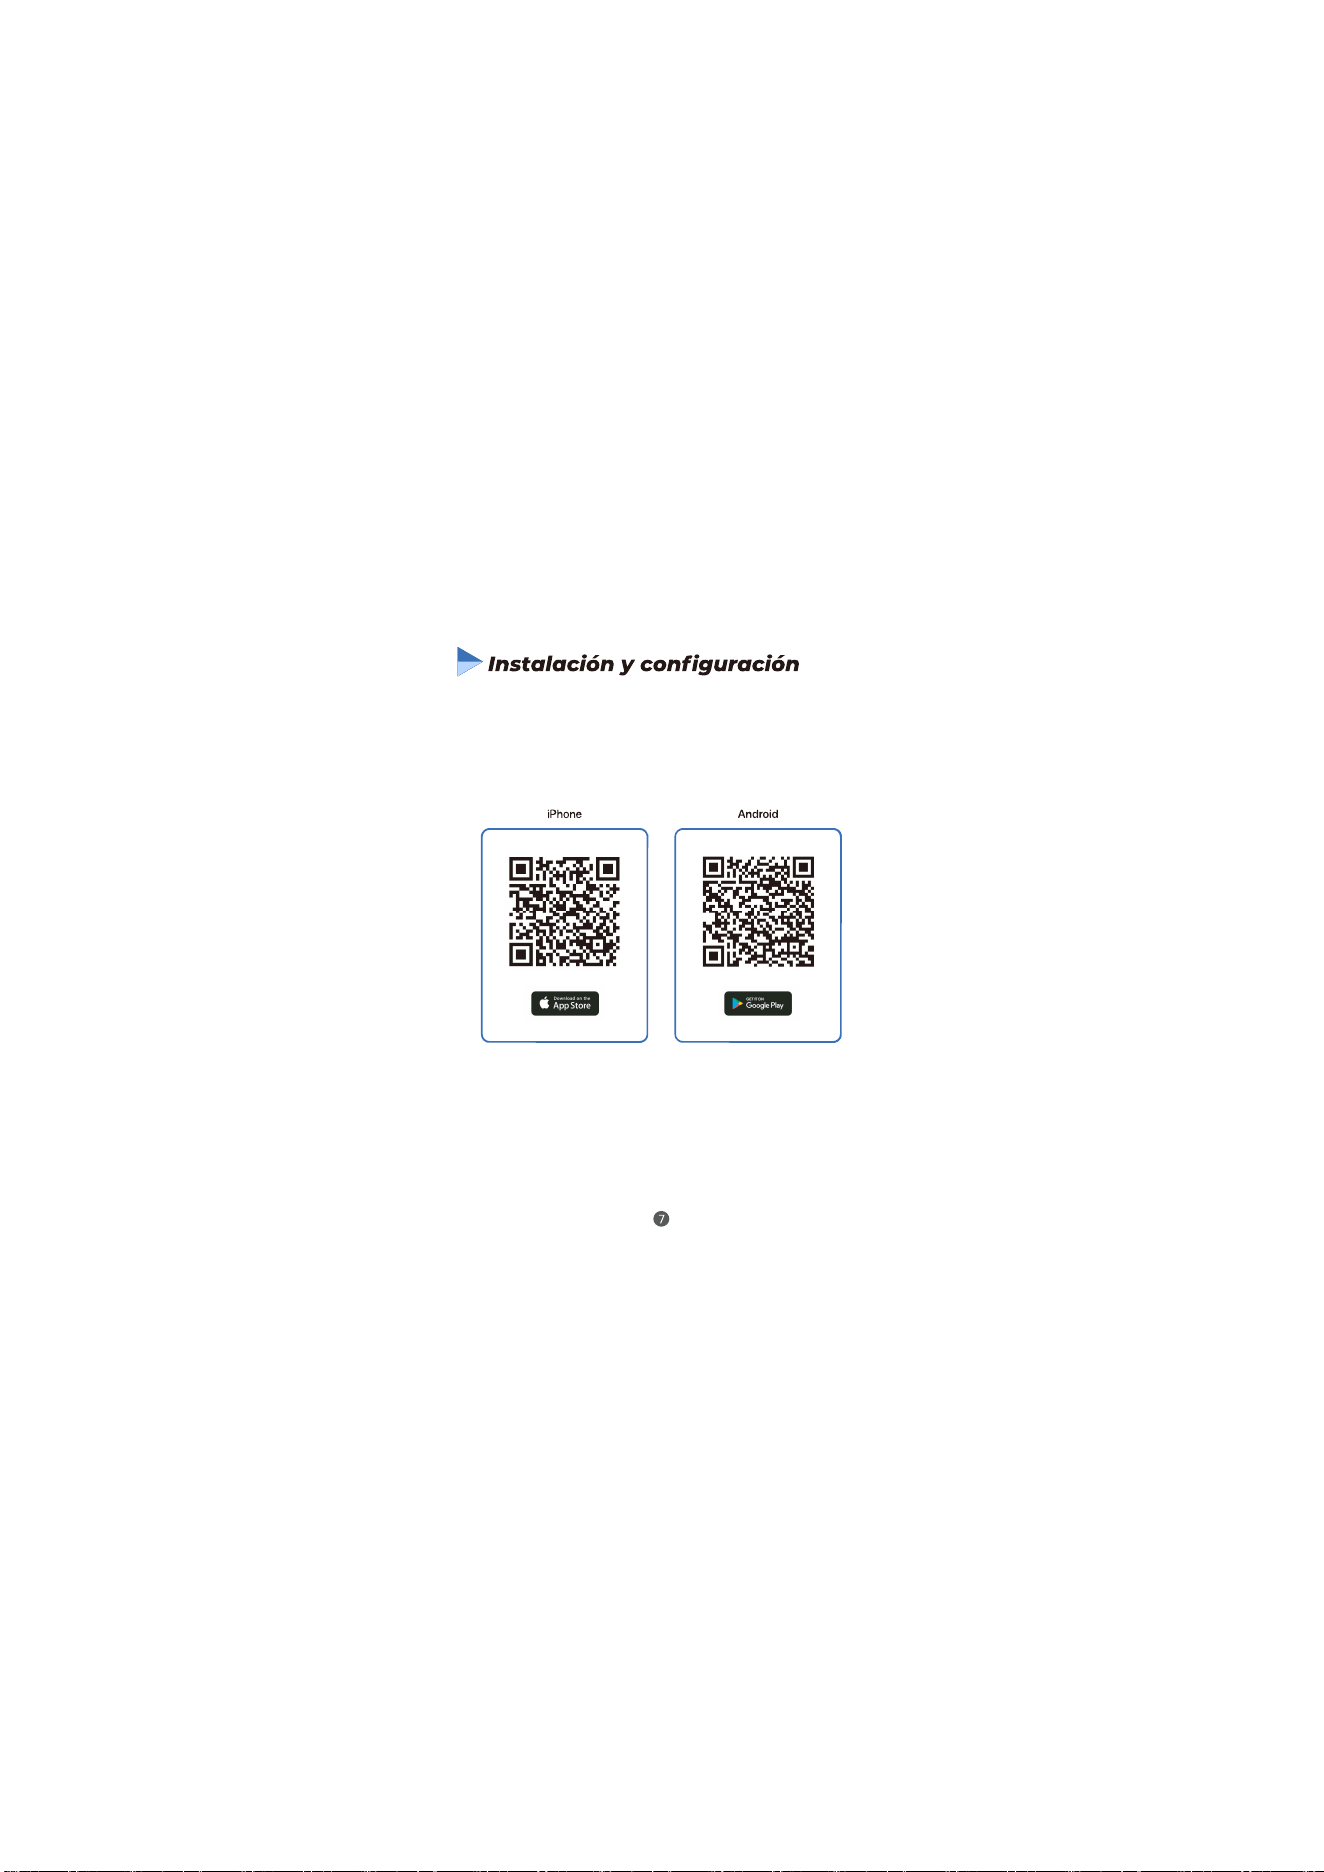
Note: If the camera is installed facing the glass,
debe ir al menú para desactivar el modo de luz
antes de poder usarlo normalmente. Los pasos
son los siguientes: Ingrese al menú de
1. Descargar e instalar: Descargue e instale
la aplicación "InstaVision" escaneando el
código QR de la tienda de aplicaciones
de Apple o Google Play.
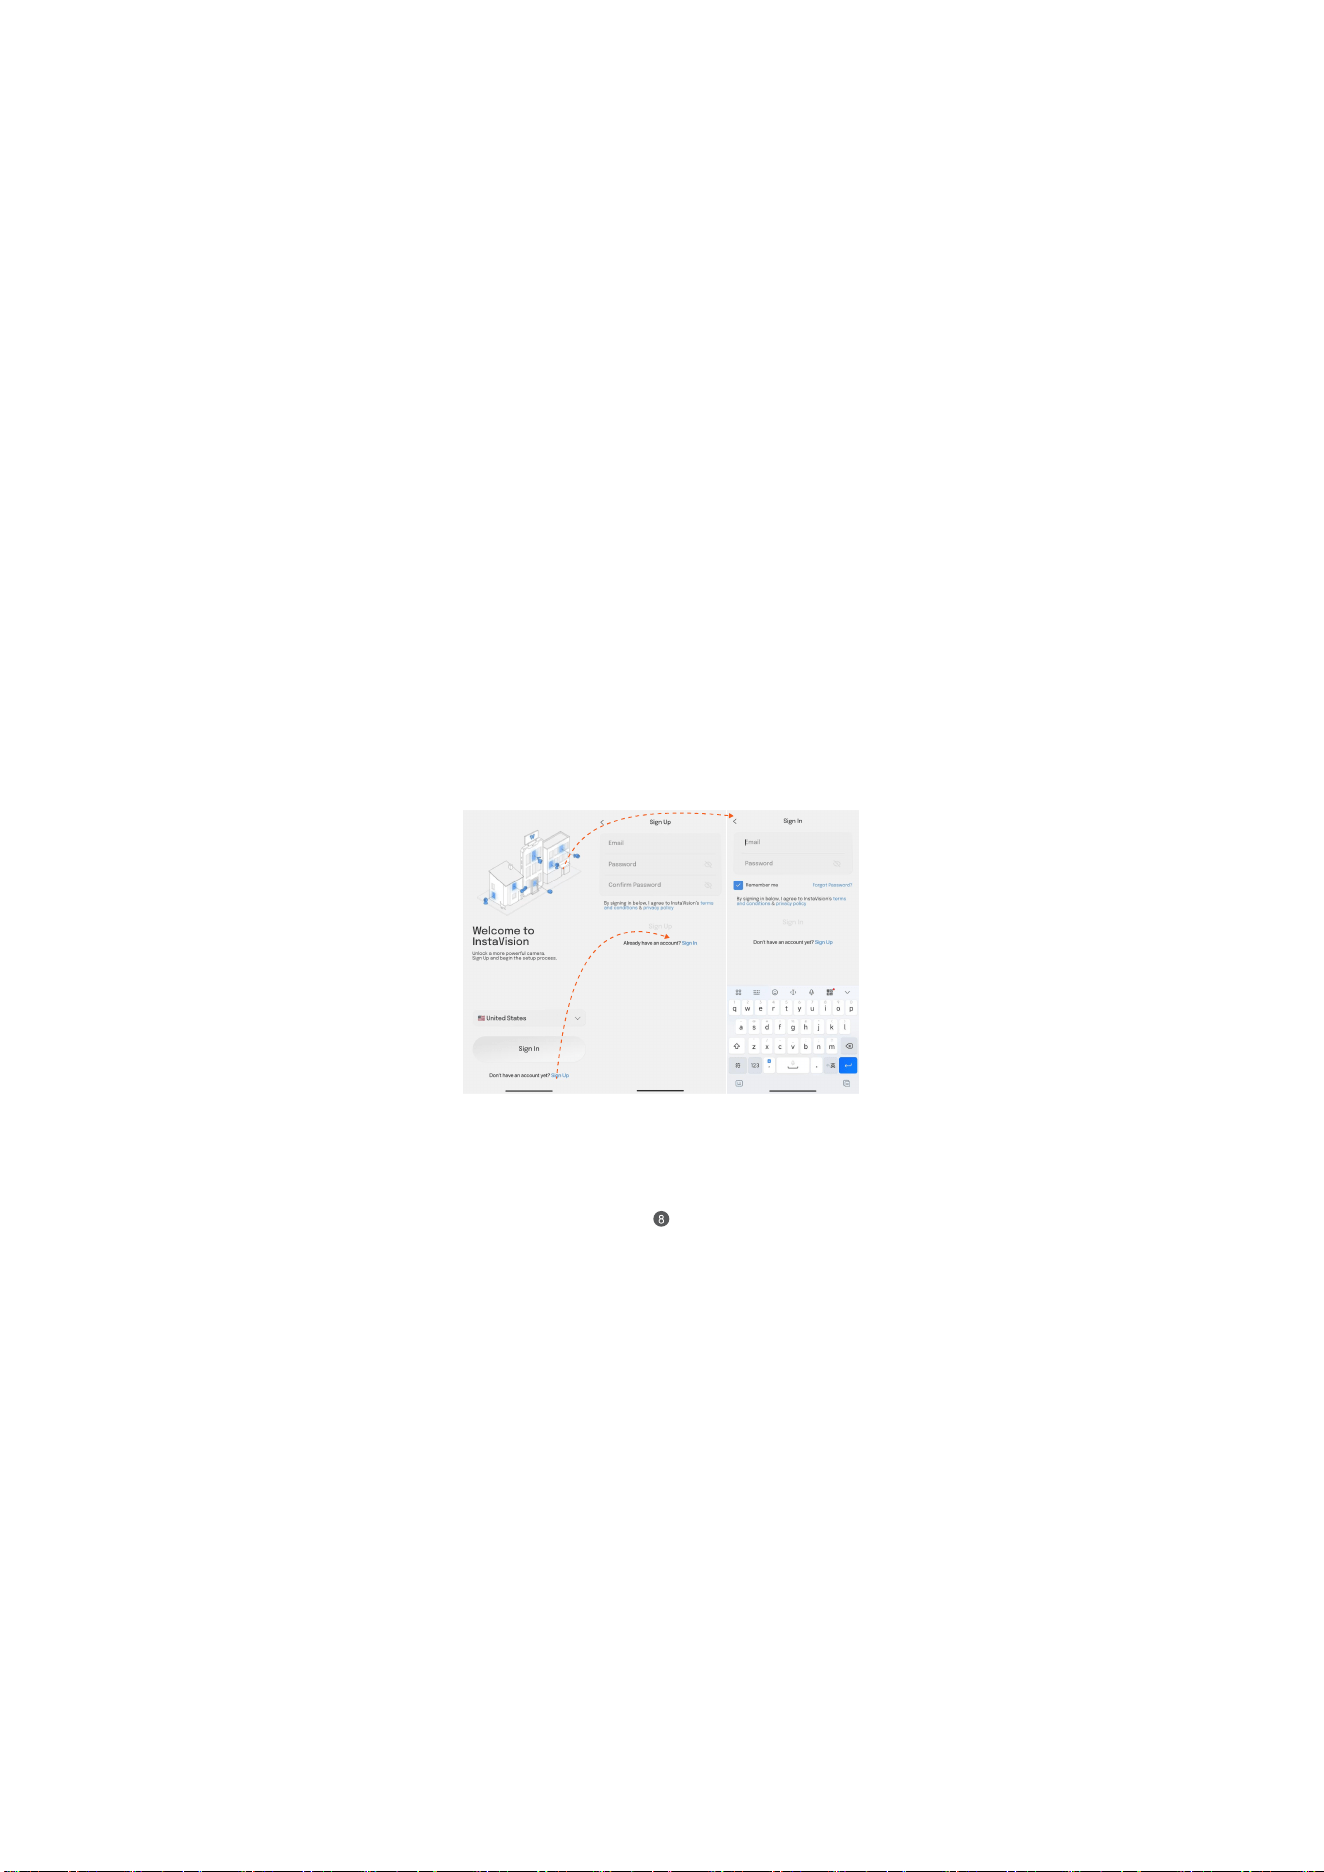
2.Registro de cuenta: Abra la aplicación y registre
una nueva cuenta o inicie sesión en una cuenta
existente.
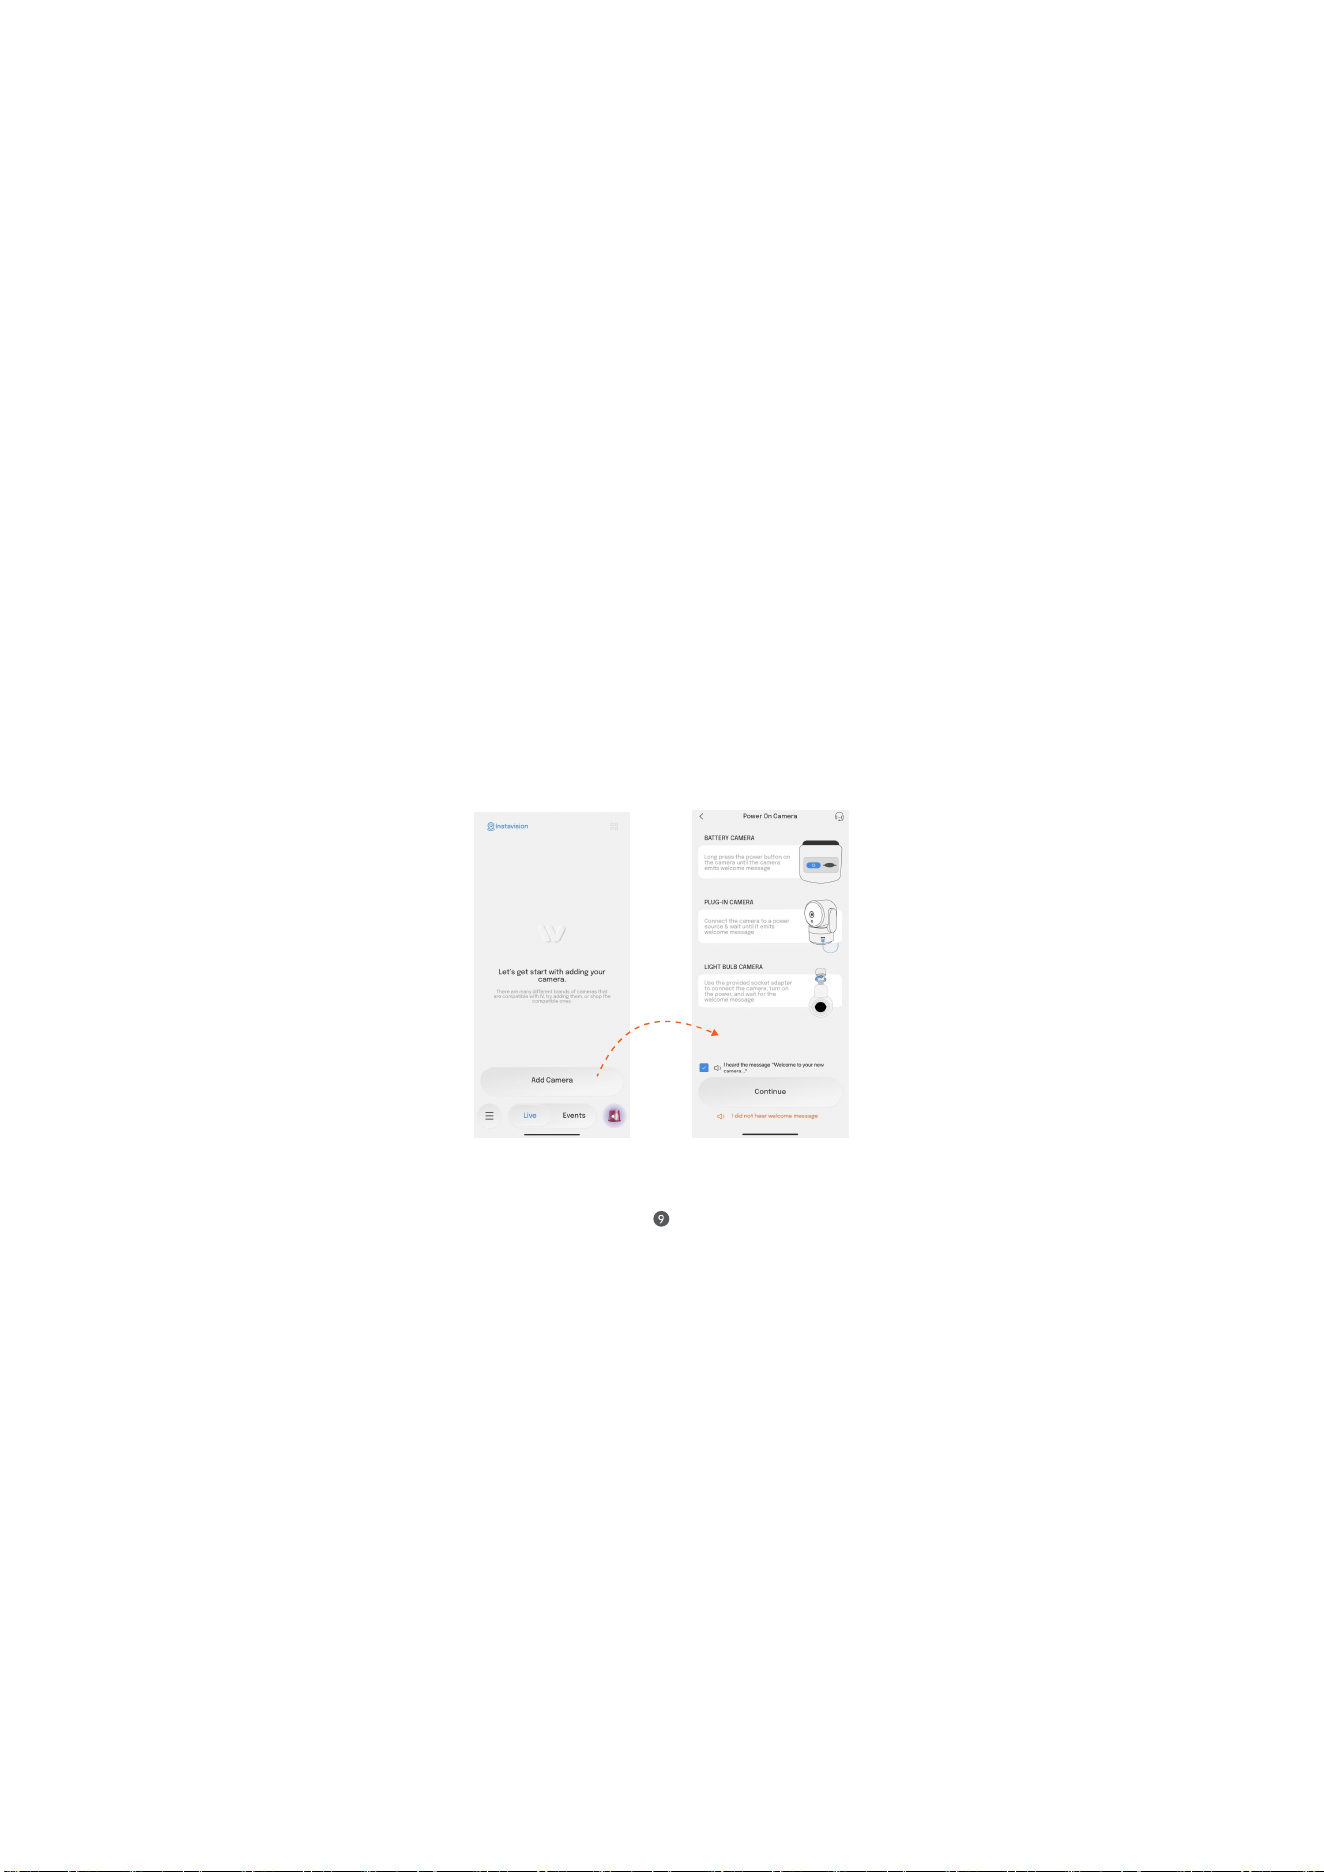
3. Agregar Cámara: Navegue a la Página de Inicio
dentro de la aplicación. Localice y seleccione
"Agregar Cámara" y luego siga las instrucciones
de preparación para encender su cámara
correctamente.
10
10
4.Acceso Bluetooth: Siga las instrucciones en
pantalla para habilitaar el acceso Bluetooth,
que es necesario para descubrir el disposittivo.
No omita este paso. Asegúrese de El acceso
Bluetooth está habilitado como se indica, lo que
permite que la aplicación descubra el dispositivo
a través de BLE.
Si no puede encontrar el dispositivo en los pasos
anteriores, presione y mantenga presionado el
botón de restablecimiento durante 5 segundos,
restablezca la cámara a los valores de fábrica
y vuelva a intentarlo.
*
11
5.Conectarse a Wi-Fi: La aplicación escanea
automáticamente los routers Wi-Fi de 2,4 GHz
y 5 GHz cercanos. Elija la red Wi-Fi deseada
de la lista proporcionada. Por favor, compruebe
la capacidad de su Cámara en términos de
2,4 GHz y 5 GHz.
12
6.Ingrese las credenciales de Wi-Fi: Ingrese la
contraseña de su red Wi-Fi seleccionada. Haga
clic en "Siguiente" para iniciar la conexión.
Espere unos segundos para que el dispositivo
se conecte a Internet. Escuchará un sonido de
progreso exitoso.
13
7.Ver vista en vivo: Una vez completada la
principal para ver la transmisión en vivo
de la cámara.
Si Bluetooth no está buscando el dispositivo,
puede optar por escanear el código QR para
agregarlo.
14
Soporte al Cliente
Para obtener más ayuda, póngase en contacto
con nuestro servicio de atención al cliente:
Si necesita más ayuda, póngase en contacto
con nuestro equipo de soporte al cliente. Puede
enviar un correo electrónico o llamar al servicio
al cliente a través del Página de "Contáctenos"
dentro de la aplicación.
Muchas gracias por elegir la aplicación
InstaVision. Nos esforzamos por ofrecerle
la mejor experiencia de usuario y seguridad
posible. Si tiene alguna sugerencia
o comentario, no dude en ponerse en contacto
con nosotros.
Teléfono: +1(888)688-4148
Correo electrónico: instaus@isecugroup.com
Manual de uso de la cámara de vídeo:

15
Declaración de la FCC
NOTA: Este equipo ha sido probado y cumple con los
límites establecidos para dispositivos digitales de
Clase B, de conformidad con la parte 15 de las normas
de la FCC. Estos límites están diseñados para propor-
cionar una protección razonable contra interferen-
cias perjudiciales en una instalación residencial. Este
equipo genera, utiliza y puede irradiar energía de
radiofrecuencia y, si no se instala y utiliza de acuerdo
con las instrucciones, puede causar interferencias
perjudiciales para las comunicaciones por radio. Sin
embargo, no se garantiza que no se produzcan
interferencias en una instalación concreta. Si este
equipo causa interferencias perjudiciales para la
recepción de radio o televisión, lo cual puede determi-
narse apagando y encendiendo el equipo, se
recomienda al usuario que intente corregir la interfer-
encia mediante una o varias de las siguientes
medidas Más de las siguientes medidas:
Reorientar o reubicar la antena receptora.
Aumente la separación entre el equipo
y el receptor.
Conecte el equipo a una toma de corriente de un
circuito diferente al que esté conectado el receptor.
Consulte al distribuidor o a un técnico experiment-
ado en radio y televisión para obtener ayuda.
16
Tiktok:superstarcameraclub
superstarcameras_club
SuperStar Cameras Club
IMPORTANTE:
aprobados expresamente por el fabricante respons-
able del cumplimiento podrían anular la autoridad
del usuario para operar el equipo.
Este dispositivo cumple con la parte 15 de las
normas de la FCC. Su funcionamiento está sujeto
a las dos condiciones siguientes:
(2)
(1) Este dispositivo no puede causar
interferencias perjudiciales.
este dispositivo debe aceptar cualquier interfer-
encia recibida, incluidas aquellas que puedan
provocar un funcionamiento no deseado.