IF YOU ENCOUNTER ANY ISSUES OR HAVE ANY QUESTIONS REGARDING YOUR NEW PRODUCT,
FEEL FREE TO CONTACT OUR HELPFUL CUSTOMER SUPPORT TEAM.
YOUR SATISFACTION IS OUR GOAL!
新製品に関して問題が発生したり、質問がある場合は、
お力添えできるカスタマーサポートチームにお気軽にお問い合わせください。
あなたの満足が私たちの目標です!
+86 0755-26601713WWW.TRETTITRE.COM TT[email protected]
TRETTITRE_OFFICIAL
TRETTITRE
TRETTITRE_OFFICIAL
TRETTITRE
TRETTITRE_SOUND
TRETTITRE
SHENZHEN TRETTITRE TECHNOLOGY CO., LTD.
ROOM 401, BUILDING 20A, CUIGANG INDUSTRIAL ZONE 4,
FUYONG STREET, BAO'AN DISTRICT, SHENZHEN, CN.
MADE IN CHINA
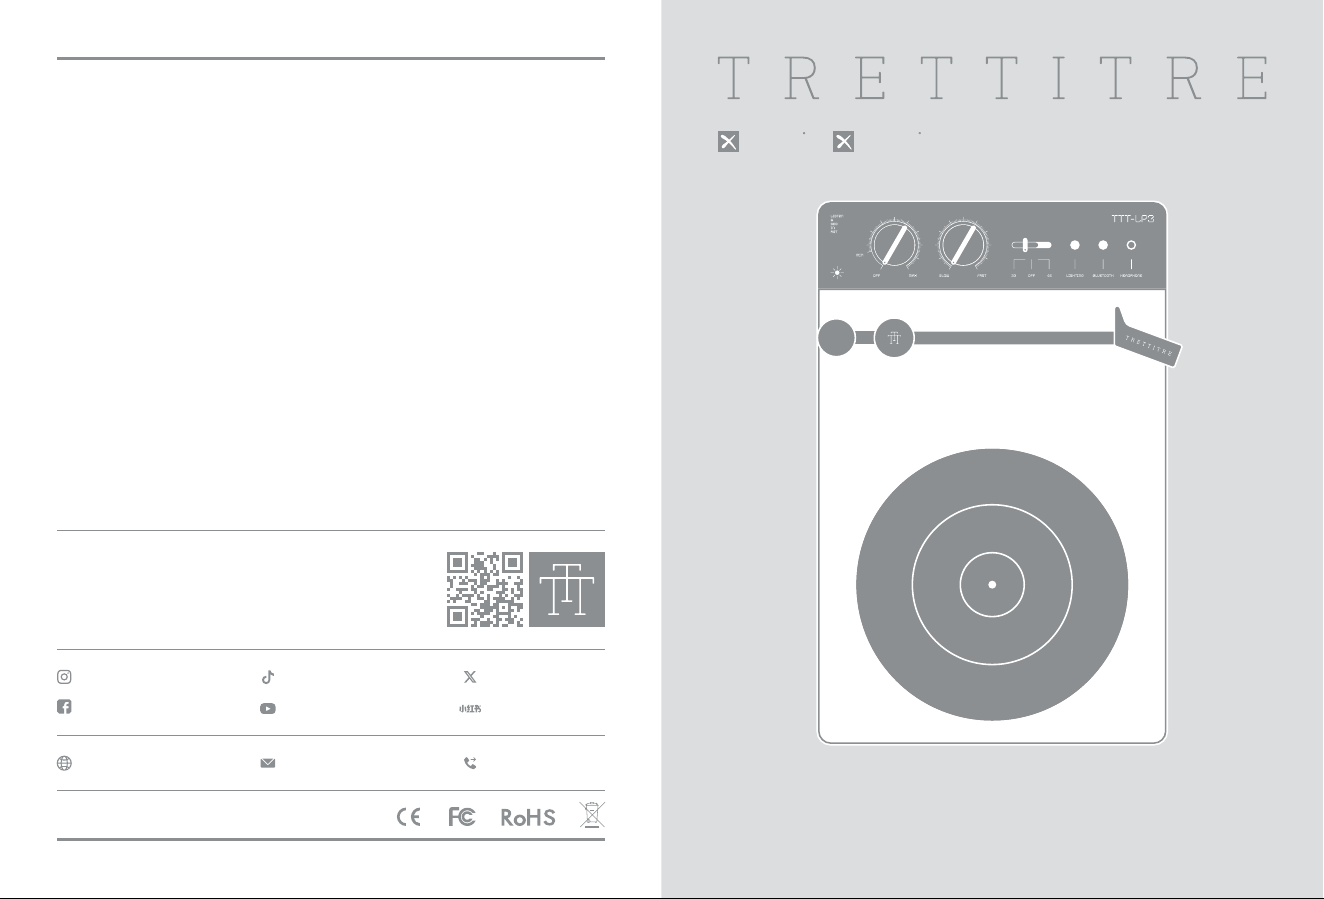
TTT-LP3 ALL-SCENARIO ATMOSPHERE WIRELESS VINYL PLAYER
LISTEN & SEE IN ART. DESIGNED AND DEVELOPED BY TTT.
Qualcomm
aptX
HD
TM
Qualcomm
aptX
Adaptive
TM
LISTEN & SEE IN ART. DESIGNED AND DEVELOPED BY TTT.
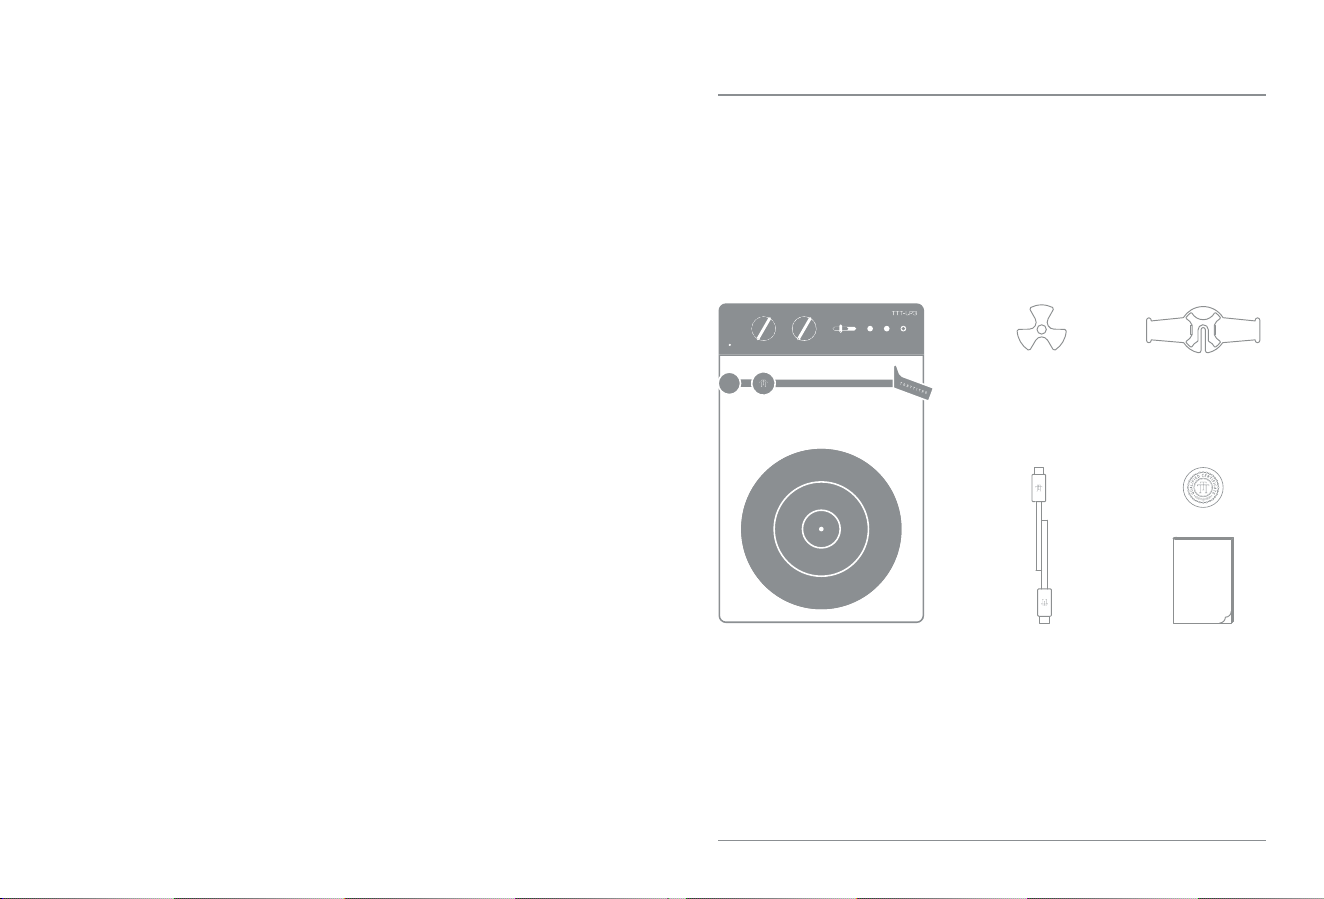
PACKAGE CONTENTSENGLISH
USB-C CABLE USER MANUAL & QC
EP ADAPTERTTT-LP3 RECORD HOLDER
TTT-LP3, EP ADAPTER, RECORD HOLDER, USB-C POWER CABLE,
USER MANUAL, QUALITY CERTIFICATE
CAREFULLY TAKE THE PRODUCT OUT OF THE PACKAGE,
AVOIDING ANY BUMPS OR COLLISIONS.
TTT-LP3
MADE IN CHINA
ALL-SCENARIO ATMOSPHERE WIRELESS VINYL PLAYER
LISTEN & SEE IN ART. DESIGNED AND DEVELOPED BY TTT.
FRONT VIEW REAR VIEW
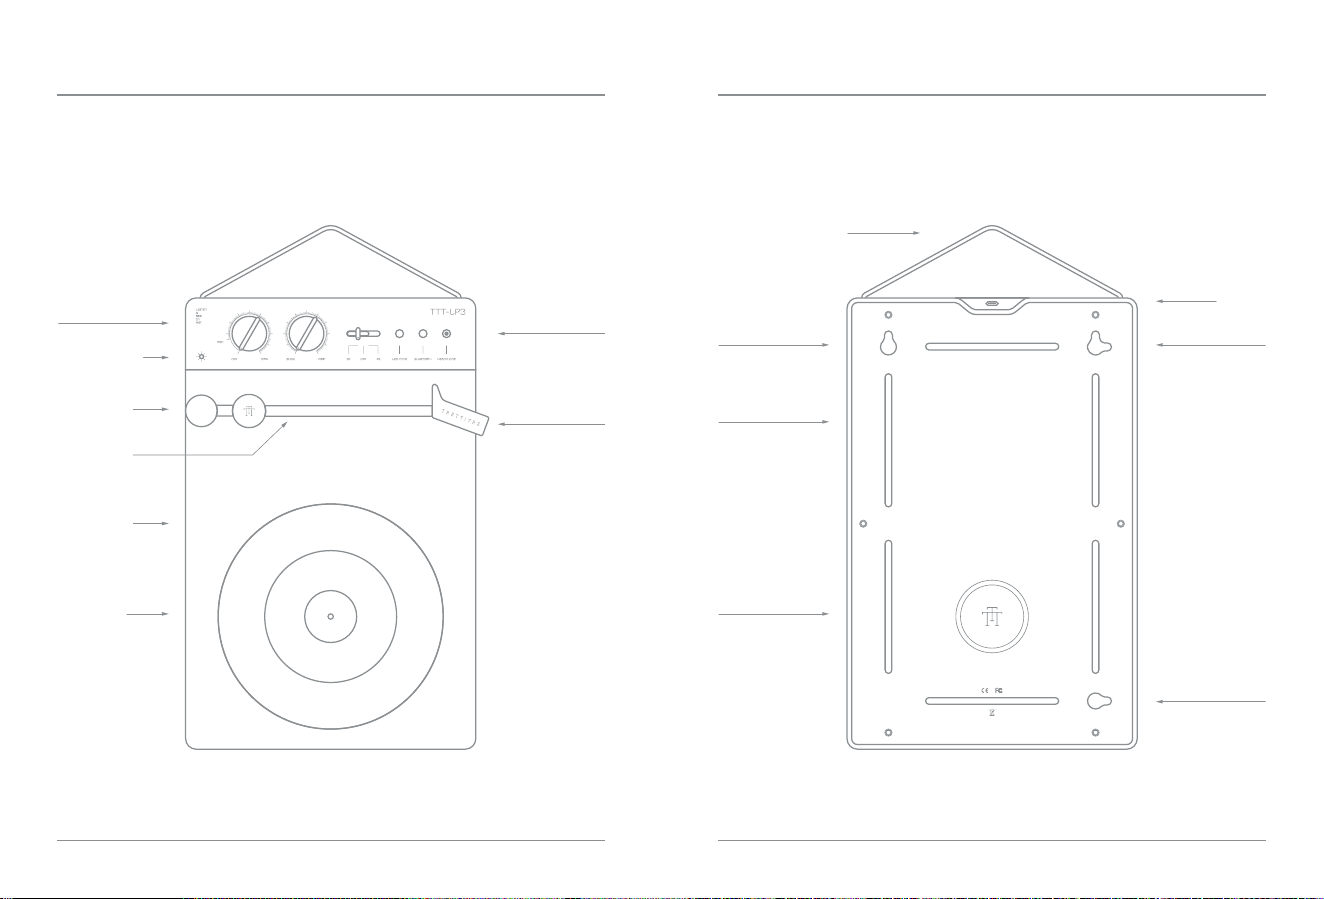
PRODUCT OVERVIEW
CARRYING STRAP
INDICATOR
LIGHT
TONEARM
CARTRIDGE
AT-3600LA
STYLUS
ATN3600L
SPEED 33/45
LIGHT
BLUETOOTH
HEADPHONE
WALL
MOUNTING
HOLES
WALL
MOUNTING
HOLES
WALL
MOUNTING
HOLES
USB-C
SILICONE FEET
WIRELESS
CHARGING
AMBIENT
LIGHT
TONEARM
REST
PLATTER
KNOB 1:
POWER / VOLUME
KNOB 2:
FINE SPEED
ADJUSTMENT
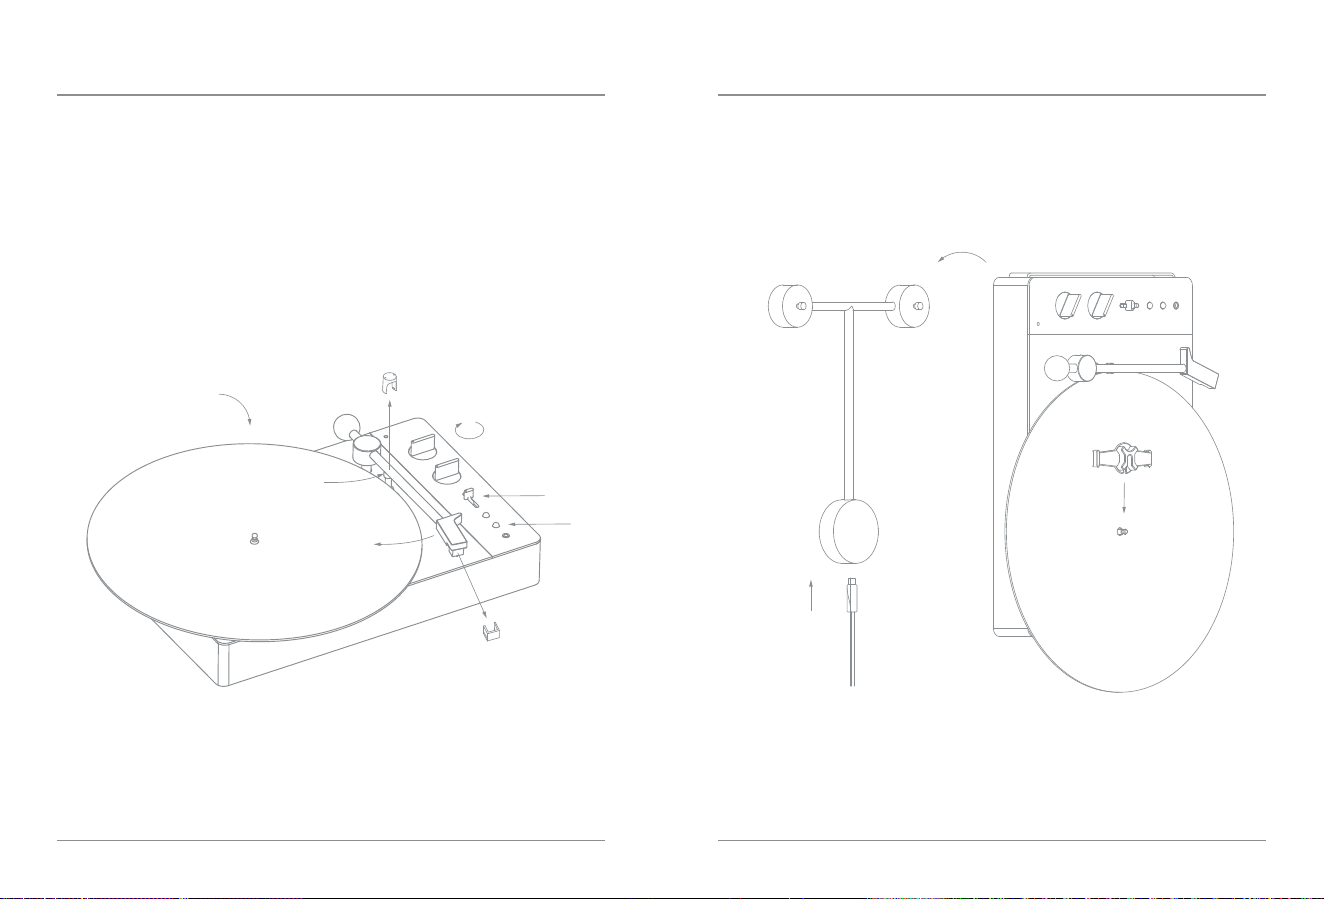
1. Secure the record holder onto the center metal spindle of the plaer to
ensure the record can rotate properly when hung on the wa�l.
2. Connect the USB-C power cable to the T-shaped mount, or directly to the
turntable unit.
3. A�ign the mounting holes and eas�ly hang the turntable onto the mount, or
directly onto the wa�l.
T/W-RACK TTT-LP3
3
2
1
The TTT-LP3 has bu�lt-in mounting holes for exible wa�l mounting – vertica�ly or
horizonta�ly. When paired with the T/W-RACK mount, wireless charging is enabled,
avoiding frequent plugging and unplugging of the power cable.
WALL MOUNTING
1. Remove the tonearm locking c�ip.
2. Remove the stylus protector, gently pu�l it horizonta�ly outward in the direction of
the cartridge.
3. Turn the power/volume knob clockwise to turn on the unit.
4. Connect your playback device via Bluetooth or 3.5mm audio cable.
5. Set the speed selector to match the record's rotation speed: 33 or 45 RPM (this
device does not support 78 RPM).
6. Place a record onto the plaer. (When playing an EP record, use the EP adapter.)
7. Li the tonearm and gently place the stylus onto the record. (The plaer w��l start
rotating once the tonearm is �ied.)
8. Aer playback nishes, return the tonearm to the tonearm rest. (The plaer w��l
stop rotating when the tonearm is placed back on the rest.)
WHEN NOT PLAYING A RECORD, PLEASE FOLLOW THE INSTRUCTIONS BELOW:
• Turn the power/volume knob counterclockwise to turn o the unit.
• Set the speed selector to [OFF].
• Store the record properly. Don’t leave the record holder / EP adapter aached to
the center spindle.
• Return the tonearm to the tonearm rest and reaach the tonearm locking c�ip.
• Replace the stylus protector onto the cartridge to prevent damage to the stylus.
INTELLIGENT TONEARM
no counterweight adjustment needed, ready to use right aer power-on.
PLAYBACK
6
7
8
3
5
4
1
2
Note: Auto power-o aer 10 minutes of no audio playback (tonearm down).
Restart by togg�ing the power/volume knob.
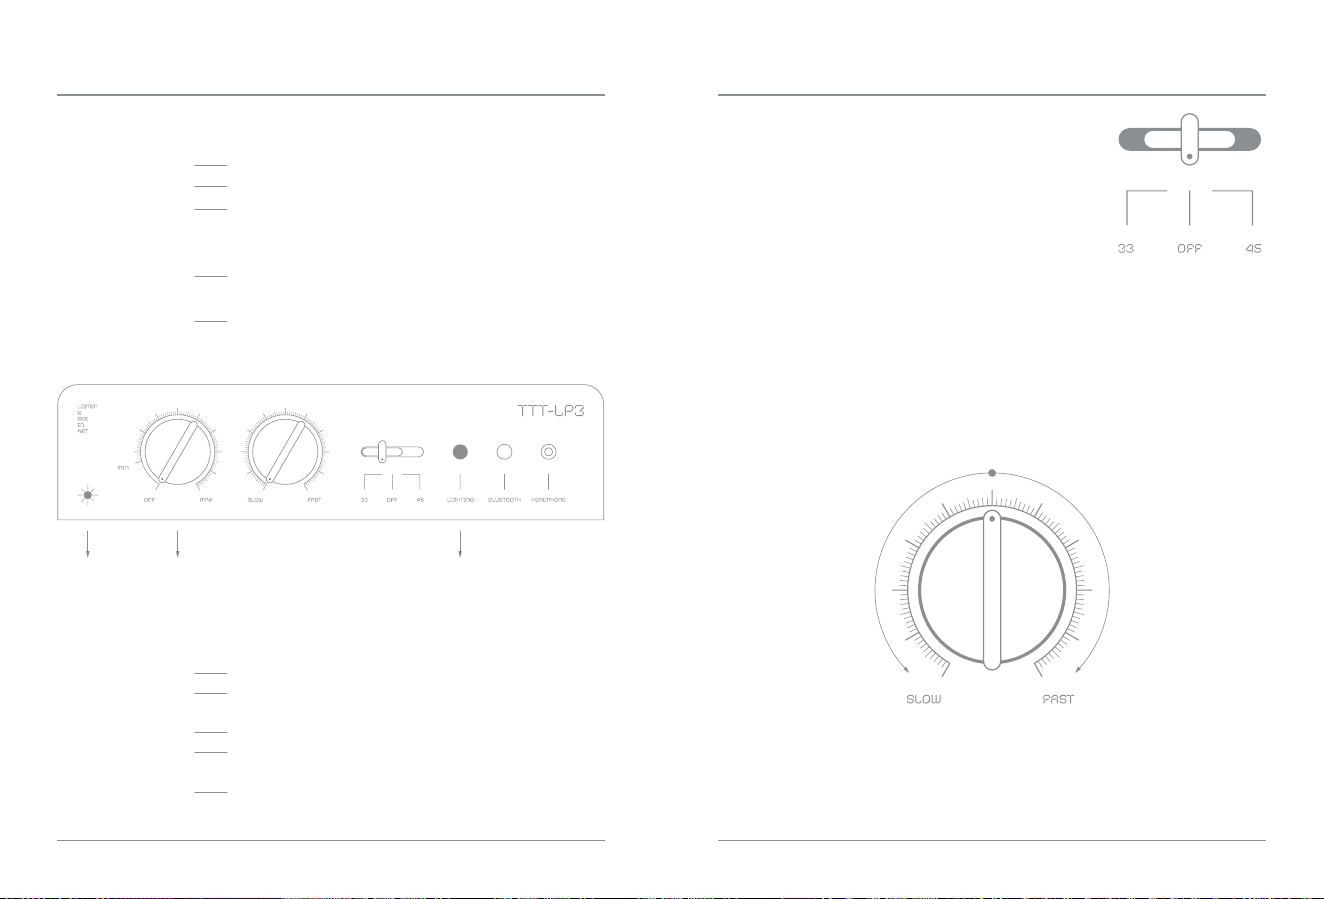
Indicator Light Light BuonPower/Volume Knob
• When the speed adjustment knob is at the 12 o'clock position, the turntable plays at
normal speed, as shown in the ��lustration.
• Turn clockwise to increase (speed up) the rotation speed.
• Turn counterclockwise to decrease (slow down) the rotation speed.
4"
7"
12"
mini
~17.8 cm
~30.5 cm
33
⅓ RPM
45 RPM
33
⅓ RPM
Does not support: 16" records / 78 RPM (SP).
Use this knob to ne-tune playback speed to your preference for varied sound
experiences. Adjustment range: >5%.
Power On
Press 2s
(Light Buon]
Short Press
Light Brightness
Charging Indicator
RGB mixed color gradient
Turn o ambient �ight
Cycle through 5 �ighting modes:
RGB mixed color gradient / RGB single color gradient /
Green / Pink / White
When no 3.5mm audio cable is connected,
brightness can be adjusted using the volume knob.
When power is connected, the white �ight ��luminates
for 2 seconds, then returns to the previous �ighting mode.
● SPEED 33/45
● FINE SPEED ADJUSTMENT
SPEEDLIGHT
● AMBIENT LIGHT
● INDICATOR LIGHT
Power On
Operating / Standby
Low Baery <20%
Charging
Fu�ly charged
Green slow ashing [BT searching]
Green so�id on [BT connected / headphone or audio cable connected]
Light O (BT is o and no headphone or audio cable is connected)
Orange fast ashing
Orange breathing [BT o]
Orange slow ashing [BT searching] so�id on [BT connected]
Green breathing [BT o]
Green slow ashing [BT searching] so�id on [BT connected]
TTT-LP3
MADE IN CHINA
ALL-SCENARIO ATMOSPHERE WIRELESS VINYL PLAYER
1. Place Bluetooth device within 1m and set to pairing mode.
2. Turn the knob on. The indicator w��l slowly ash wh�le searching for a connection...
3. When the indicator stays so�id on, the Bluetooth connection is successful.
When the baery level is ≤20%, the orange indicator w��l ash quickly,
indicating that the device needs to be charged.
Auto-Reconnect:
Connection Fa�led:
3.5mm Audio Priority:
Volume Control in BT:
Bluetooth On/O:
Clear Pairing History:
Aer initial pairing, no further pairing is needed – the device
w��l reconnect automatica�ly.
Check if your Bluetooth device is in pairing mode, then press
the Bluetooth buon again to search...
Plugging in a 3.5mm audio cable w��l turn o Bluetooth.
Unplugging the cable w��l automatica�ly reconnect Bluetooth.
The device's volume knob is disabled. Use your Bluetooth
device to adjust volume.
Press and hold the Bluetooth buon for 2 seconds to turn o;
press again to turn on.
Press and hold the Bluetooth buon for 5 seconds.
NOTES:
NOTES: Gradua�ly increase the volume when using headphones to
prevent hearing damage from excessive noise.
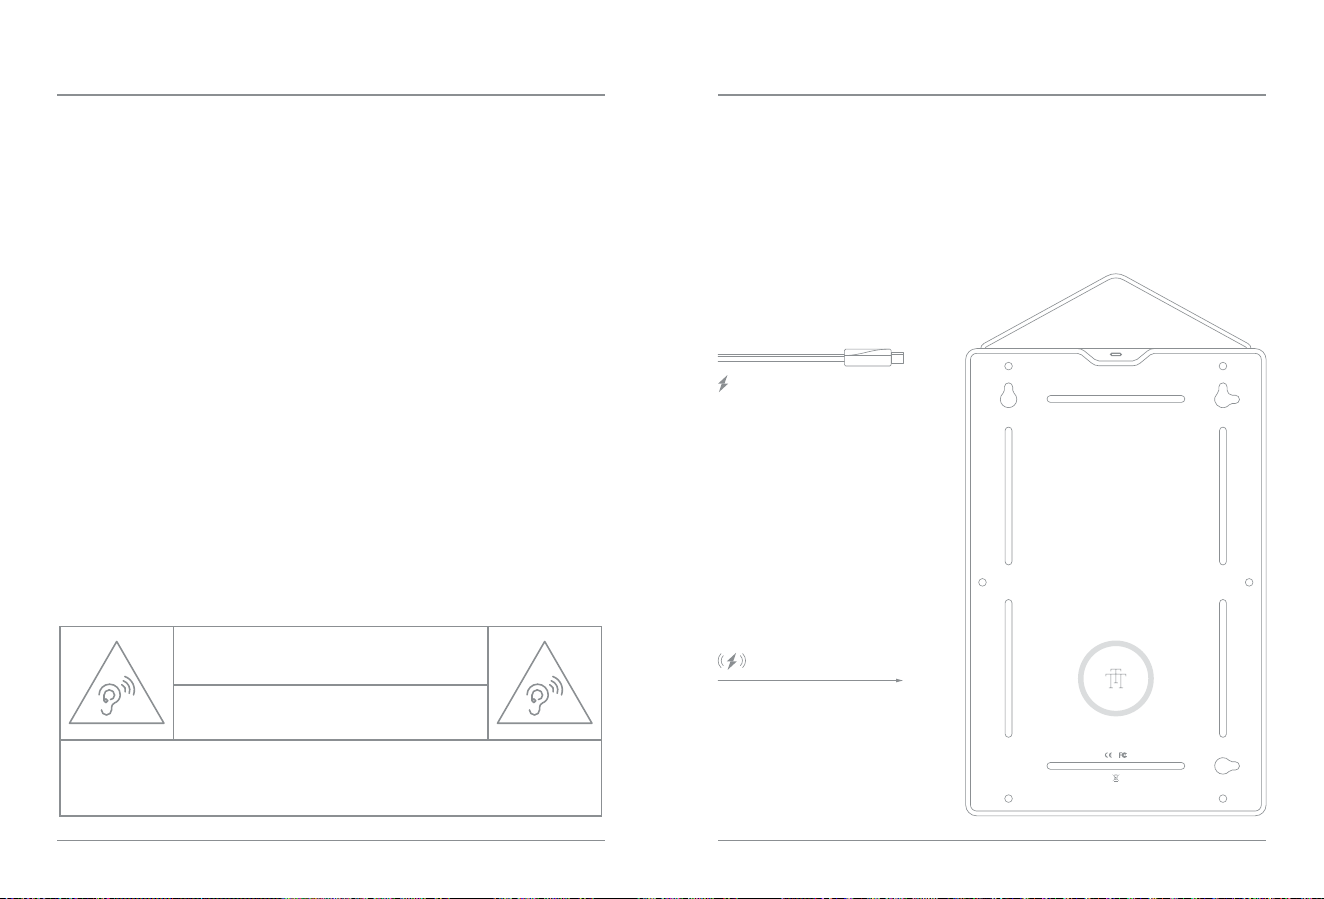
Port location: Top of the device (USB-C port)
Charging time: 2.5 hours
Indicator: Orange (charging) / Green (fu�l)
Module location: Boom of the device.
Charging power: 5–7.5W
Usage:
Ava�lable when the device is
hung on the T-RACK mount
CHARGINGBLUETOOTH & 3.5MM AUDIO
● BLUETOOTH CONNECTION
1. Turn the power/volume knob counterclockwise to set the volume to minimum.
2. Connect headphones, speakers, or a recording device to this unit via a 3.5mm audio
cable for stereo sound.
3. Turn the power/volume knob clockwise to adjust to the desired volume level.
● 3.5MM AUDIO CONNECTION
● USB-C CHARGING
● WIRELESS CHARGING
excessive volume can
damage hearing
to avoid hurting your ears, avoid excessive use.
CAUTION
USB-C 5V 2A
Protrusion
Groove
Cant�lever
Armature
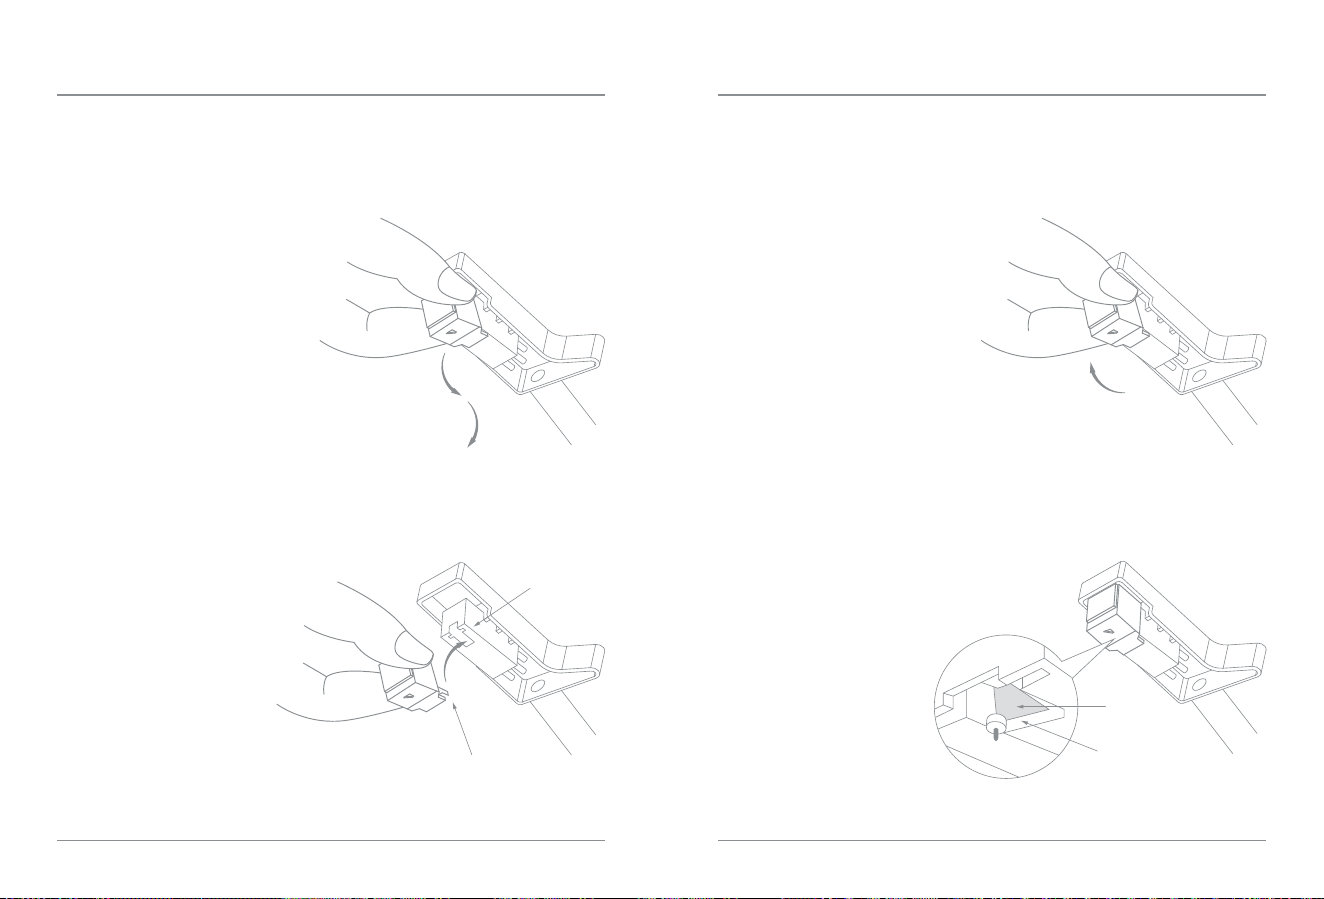
REPLACING THE STYLUS
The stylus is recommended for approximately 400 hours of use. Please replace the
stylus in time.
Use the Audio Technica ATN3600L, ATN3600LC, or ATN3600LE stylus for
replacement. Do not use any other stylus.
1
2
Snap into place:
Push the front end upward unt�l it c�icks
into place, as shown in the ��lustration.
Caution:
Do not apply excessive force to the
stylus tip, cant�lever, or armature.
Check a�ignment:
Aer insta�lation, ensure that the
stylus cant�lever is properly seated in
the groove of the armature.
Make sure the cant�lever is in the
correct position for optimal
performance.
3
4
Remove the old stylus:
Pu�l down on the tip of the stylus to
detach it downward.
Insert the new stylus:
Insert the protrusion on the
rear end of the replacement
stylus into the rear slot of the
cartridge.
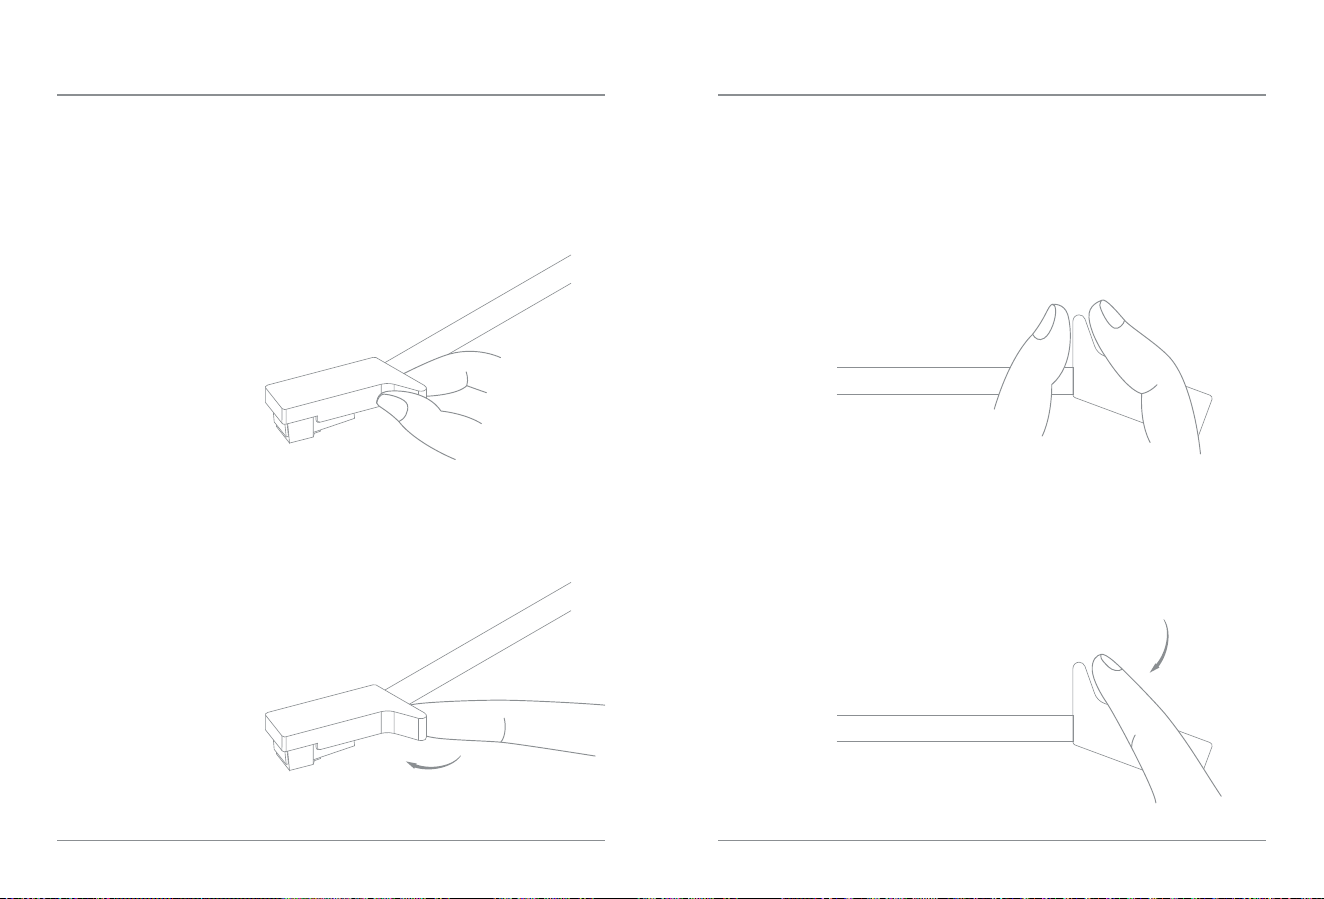
TONEARM CONTROL
When the device is placed horizonta�ly, it is recommended to use the fo�lowing two
methods to control the tonearm. Always handle it gently.
When the device is hung vertica�ly, it is recommended to use the fo�lowing two
methods to control the tonearm. Always handle it gently.
Gently hold the cartridge handle with your thumb and index nger,
as shown in the ��lustration.
This a�lows you to eas�ly control the tonearm
and adjust the cartridge to the desired position.
method
method
1
Gently press the side of the cartridge handle with your index nger,
as shown in the ��lustration.
This a�lows you to eas�ly control the tonearm
and precisely adjust the cartridge to the desired position.
Gently hold the cartridge handle with your thumb and index nger,
as shown in the ��lustration.
This a�lows you to eas�ly control the tonearm
and adjust the cartridge to the desired position.
Gently press the side of the cartridge handle with your index nger,
as shown in the ��lustration.
This a�lows you to eas�ly control the tonearm
and precisely adjust the cartridge to the desired position.
2
method
method
1
2

MODEL
INPUT
WIRELESS CHARGING INPUT
CHARGE TIME
BATTERY CAPACITY
MAXIMUM POWER
OUTPUT MODES
BLUETOOTH
BLUETOOTH RANGE
BLUETOOTH OUTPUT
HEADPHONE OUTPUT POWER
SNR
DUAL-SPEED PLAYBACK
SPEED ADJUSTABLE
CARTRIDGE
TRACKING FORCE
MATERIAL
DIMENSIONS
WEIGHT
TTT-LP3
USB-C 5V 2A
5 - 7.5W
2.5 Hours
3.7V 2000mAh
8W
3.5mm Audio Interface, Bluetooth
5.3(Qualcomm SBC, aptX Classic, aptX HD, aptX Adaptive)
10m
≥300mV+300mV
≥1mW+1mW(32Ω)
≥38dB
33
⅓
rpm, 45 rpm
>5%
Audio-Technica AT-3600LA
2.5~4.5g
Metal+PC+ABS
342*233*87mm
1395g
SPECIFICATIONS WARRANTY
WHAT IS NOT COVERED BY THE WARRANTY:
Our company warrants a�l products to be of the highest qua�ity in material,
crasmanship and service, eective from the date of purchase to the end of the
warranty period.
This warranty extends only to personal use and does not extend to any product that
has been used for commercial, rental, or any other use in which the product is not
intended for. There are no warranties other than the warranties expressly set forth
with each product.
This warranty is non-transferable. Our company is not responsible in any way for any
damages, losses or inconveniences caused by equipment fa�lure caused by user
neg�igence, abuse, or noncomp�iance with the user manual or non-comp�iance with
any additional safety recommendations or warnings included in the product
packaging and manual.
1. The warranty immediately becomes void if the product has been tampered with,
repaired or modied by non-authorized personnel.
2. Damage (accidental or otherwise) to the product that does not impact the
product's operation, including but not �imited to rust, change in color, texture or
nish, wear and tear, and gradual deterioration is not covered.
3. Damage caused by accident, abuse, natural disaster, intentional or accidental
misuse, re, neglect or improper maintenance, and use under abnormal conditions
is not covered.
4. Products that have exceeded the warranty service period stipulated by our
company are not covered.
5. The warranty immediately becomes void if the original serial number is removed,
ob�iterated or altered from the product.
6. Packaging and aached accessories, services and additional congurations other
than those promised by the salesperson are not covered.
7. The warranty immediately becomes void if the instructions in the user manual are
not fo�lowed.

FCC Warning
This device complies with part 15 of the FCC Rules.
Operation is subject to the following two conditions:
(1) This device may not cause harmful interference;
(2) This device must accept any interference received,including interference that may cause
undesired operation.
Changes or modifications not expressly approved by the party responsible for compliance
could void the user's authority to operate the equipment.
This equipment has been tested and found to comply with the limits for a Class B digital
device,pursuant to part 15 of the FCC Rules.These limits are designed to provide reasonable
protection against harmful interference in a residential installation.This equipment
generates,uses and can radiate radio frequency energy and,if not installed and used in
accordance with the instructions,may cause harmful interference to radio communications.
However,there is no guarantee that interference will not occur in a particlar installation.
If this equipment does cause harmful interference to radio or television reception,which can
be determined by turning the equipment off and on,the user is encouraged to try to correct
the interference by one or more of the following measures:
-Reorient or relocate the receiving antenna.
-Increase the separation between the equipment and receiver.
-Connect the equipment into an outlet on a circuit different from that to which the receiver
is connected.
-Consult the dealer or an experienced radio/TV technician for help.
This equipment complies with FCC radiation exposure limits set forth for an uncontrolled
environment. This equipment should be installed and operated with minimum distance 20cm
between the radiator & your body.