
MA300 User Manual
Page | 1 Copyright©2022 ZKTECO CO., LTD. All rights reserved.
Thank you for choosing our product. Please read the instructions
carefully before operation. Follow these instructions to ensure that the
product is functioning properly. The images shown in this manual are for
illustrative purposes only.
For further details, please visit our Company’s website
www.zkteco.com
.
User Manual
MA300
Date: March 2023
Doc Version: 3.1
English

MA300 User Manual
Page | 1 Copyright©2023 ZKTECO CO., LTD. All rights reserved
Copyright © 2023 ZKTECO CO., LTD. All rights reserved.
Without the prior written consent of ZKTeco, no portion of this manual can be
copied or forwarded in any way or form. All parts of this manual belong to
ZKTeco and its subsidiaries (hereinafter the "Company" or "ZKTeco").
Trademark
is a registered trademark of ZKTeco. Other trademarks involved in
this manual are owned by their respective owners.
Disclaimer
This manual contains information on the operation and maintenance of the
ZKTeco equipment. The copyright in all the documents, drawings, etc. in
relation to the ZKTeco supplied equipment vests in and is the property of
ZKTeco. The contents hereof should not be used or shared by the receiver
with any third party without express written permission of ZKTeco.
The contents of this manual must be read as a whole before starting the
operation and maintenance of the supplied equipment. If any of the content(s)
of the manual seems unclear or incomplete, please contact ZKTeco before
starting the operation and maintenance of the said equipment.
It is an essential pre-requisite for the satisfactory operation and maintenance
that the operating and maintenance personnel are fully familiar with the
design and that the said personnel have received thorough training in
operating and maintaining the machine/unit/equipment. It is further essential
for the safe operation of the machine/unit/equipment that personnel has
read, understood and followed the safety instructions contained in the
manual.

MA300 User Manual
Page | 2 Copyright©2023 ZKTECO CO., LTD. All rights reserved
In case of any conflict between terms and conditions of this manual and the
contract specifications, drawings, instruction sheets or any other
contract-related documents, the contract conditions/documents shall prevail.
The contract specific conditions/documents shall apply in priority.
ZKTeco offers no warranty, guarantee or representation regarding the
completeness of any information contained in this manual or any of the
amendments made thereto. ZKTeco does not extend the warranty of any kind,
including, without limitation, any warranty of design, merchantability or
fitness for a particular purpose.
ZKTeco does not assume responsibility for any errors or omissions in the
information or documents which are referenced by or linked to this manual.
The entire risk as to the results and performance obtained from using the
information is assumed by the user.
ZKTeco in no event shall be liable to the user or any third party for any
incidental, consequential, indirect, special, or exemplary damages, including,
without limitation, loss of business, loss of profits, business interruption, loss
of business information or any pecuniary loss, arising out of, in connection
with, or relating to the use of the information contained in or referenced by
this manual, even if ZKTeco has been advised of the possibility of such
damages.
This manual and the information contained therein may include technical,
other inaccuracies or typographical errors. ZKTeco periodically changes the
information herein which will be incorporated into new
additions/amendments to the manual. ZKTeco reserves the right to add,
delete, amend or modify the information contained in the manual from time
to time in the form of circulars, letters, notes, etc. for better operation and
safety of the machine/unit/equipment. The said additions or amendments are
meant for improvement /better operations of the machine/unit/equipment
and such amendments shall not give any right to claim any compensation or

MA300 User Manual
Page | 3 Copyright©2023 ZKTECO CO., LTD. All rights reserved
damages under any circumstances.
ZKTeco shall in no way be responsible (i) in case the machine/unit/equipment
malfunctions due to any non-compliance of the instructions contained in this
manual (ii) in case of operation of the machine/unit/equipment beyond the
rate limits (iii) in case of operation of the machine and equipment in
conditions different from the prescribed conditions of the manual.
The product will be updated from time to time without prior notice. The latest
operation procedures and relevant documents are available on
http://www.zkteco.com
.
If there is any issue related to the product, please contact us.
ZKTeco Headquarters
Address ZKTeco Industrial Park, No. 32, Industrial Road,
Tangxia Town, Dongguan, China.
Phone +86 769 - 82109991
Fax +86 755 - 89602394
For business related queries, please write to us at: sales@zkteco.com
.
To know more about our global branches, visit www.zkteco.com.

MA300 User Manual
Page | 4 Copyright©2023 ZKTECO CO., LTD. All rights reserved
About the Company
ZKTeco is one of the world’s largest manufacturer of RFID and Biometric
(Fingerprint, Facial, Finger-vein) readers. Product offerings include Access
Control readers and panels, Near & Far-range Facial Recognition Cameras,
Elevator/Floor access controllers, Turnstiles, License Plate Recognition (LPR)
gate controllers, and Consumer products including battery-operated
fingerprint and face-reader door locks. Our security solutions are multi-lingual
and localized in over 18 different languages. At the ZKTeco state-of-the-art
700,000 square foot ISO9001-certified manufacturing facility, we control
manufacturing, product design, component assembly, and logistics/shipping,
all under one roof.
The founders of ZKTeco have been determined for independent research and
development of biometric verification procedures and the productization of
biometric verification SDK, which was initially widely applied in PC security
and identity authentication fields. With the continuous enhancement of the
development and plenty of market applications, the team has gradually
constructed an identity authentication ecosystem and smart security
ecosystem, which are based on biometric verification techniques. With years
of experience in the industrialization of biometric verifications, ZKTeco was
officially established in 2007 and now has been one of the globally leading
enterprises in the biometric verification industry owning various patents and
being selected as the National High-tech Enterprise for 6 consecutive years. Its
products are protected by intellectual property rights.
About the Manual
This manual introduces the operations of MA300.
All figures displayed are for illustration purposes only. Figures in this manual
may not be exactly consistent with the actual products.

MA300 User Manual
Page | 5 Copyright©2023 ZKTECO CO., LTD. All rights reserved
Document Conventions
This document includes such notational conventions as tips, important
notices, and precautions. The notations contained in this manual include:
: indicates important information, including precautions, which must be
read carefully to achieve the optimal equipment performance.
: indicates the voice prompt generated by the device. In the event of
discrepancy between the voice prompts in this document and those
generated by the actual products, the latter shall prevail.

MA300 User Manual
Page | 6 Copyright©2023 ZKTECO CO., LTD. All rights reserved
Table of Contents
1 INSTRUCTION FOR USE ............................................................................... 8
FINGER POSITIONING ........................................................................................................... 8 1.1
INSTRUCTION FOR CARD SWIPE .......................................................................................... 9 1.2
CAUTIONS ............................................................................................................................. 9 1.3
2
INTRODUCTION OF ACCESS CONTROL DEVICE ....................................... 10
OVERVIEW OF DEVICE FUNCTIONS .................................................................................. 10 2.1
PRODUCT APPEARANCE ................................................................................................... 11 2.2
VERIFICATION STATE ......................................................................................................... 13 2.3
MANAGEMENT CARD ....................................................................................................... 14 2.4
OPERATION TIMEOUT ....................................................................................................... 15 2.5
3
DEVICE OPERATIONS ................................................................................ 16
MANAGEMENT CARD ....................................................................................................... 16 3.1
3.1.1
Enroll Management Card ................................................................................. 16
3.1.2 Enroll Ordinary User ........................................................................................... 17
3.1.3 Delete a Single User ............................................................................................ 23
USER VERIFICATION........................................................................................................... 26 3.2
U-DISK ............................................................................................................................... 28 3.3
TAMPER SWITCH ................................................................................................................ 29 3.4
4
WEBSERVER ............................................................................................... 31
LOGIN ................................................................................................................................. 31 4.1
DEVICE ............................................................................................................................... 33 4.2
4.2.1
Device Status ....................................................................................................... 33
4.2.2 Change Password ............................................................................................... 33
SETTINGS ........................................................................................................................... 34 4.3
4.3.1
Comm Settings .................................................................................................... 34
4.3.2 Cloud Settings ..................................................................................................... 35

MA300 User Manual
Page | 7 Copyright©2023 ZKTECO CO., LTD. All rights reserved
4.3.3 System Settings ................................................................................................... 36
4.3.4 Data Management ............................................................................................ 36
4.3.5 Date and Time ..................................................................................................... 37
4.3.6 Operation Log ..................................................................................................... 37
4.3.7 Wiegand Setup .................................................................................................... 38
DEVICE MANAGEMENT ..................................................................................................... 41 4.4
4.4.1
Update and Reset ............................................................................................... 41
4.4.2 Load Certificate ................................................................................................... 42
5 CONNECT TO ZKBIOACCESS IVS SOFTWARE ............................................ 43
SET THE COMMUNICATION ADDRESS .............................................................................. 43 5.1
ADD DEVICE TO THE SOFTWARE ...................................................................................... 44 5.2
ADD PERSONS TO THE SOFTWARE ................................................................................... 45 5.3
6
APPENDIX .................................................................................................. 47
LIST OF PARAMETERS ........................................................................................................ 47 6.1
PRIVACY POLICY ................................................................................................................ 48 6.2
ECO-FRIENDLY OPERATION .............................................................................................. 52 6.3
MA300 User Manual
Page | 8 Copyright©2023 ZKTECO CO., LTD. All rights reserved
1 Instruction for Use
Before getting into the device’s features and functions, it is recommended to
be familiar with the below fundamentals.
Finger Positioning 1.1
Recommended fingers: Index, middle, or ring fingers; Avoid using your
thumb or pinky on the fingerprint reader because they are difficult to press
accurately.
Note: Please use the correct method when pressing your fingers onto the
fingerprint reader for registration and identification. Our company will
assume no liability for recognition issues that may result from incorrect usage
of the product. We reserve the right of final interpretation and modification
concerning this point.
Too close to the edge
Vertical
Too low

MA300 User Manual
Page | 9 Copyright©2023 ZKTECO CO., LTD. All rights reserved
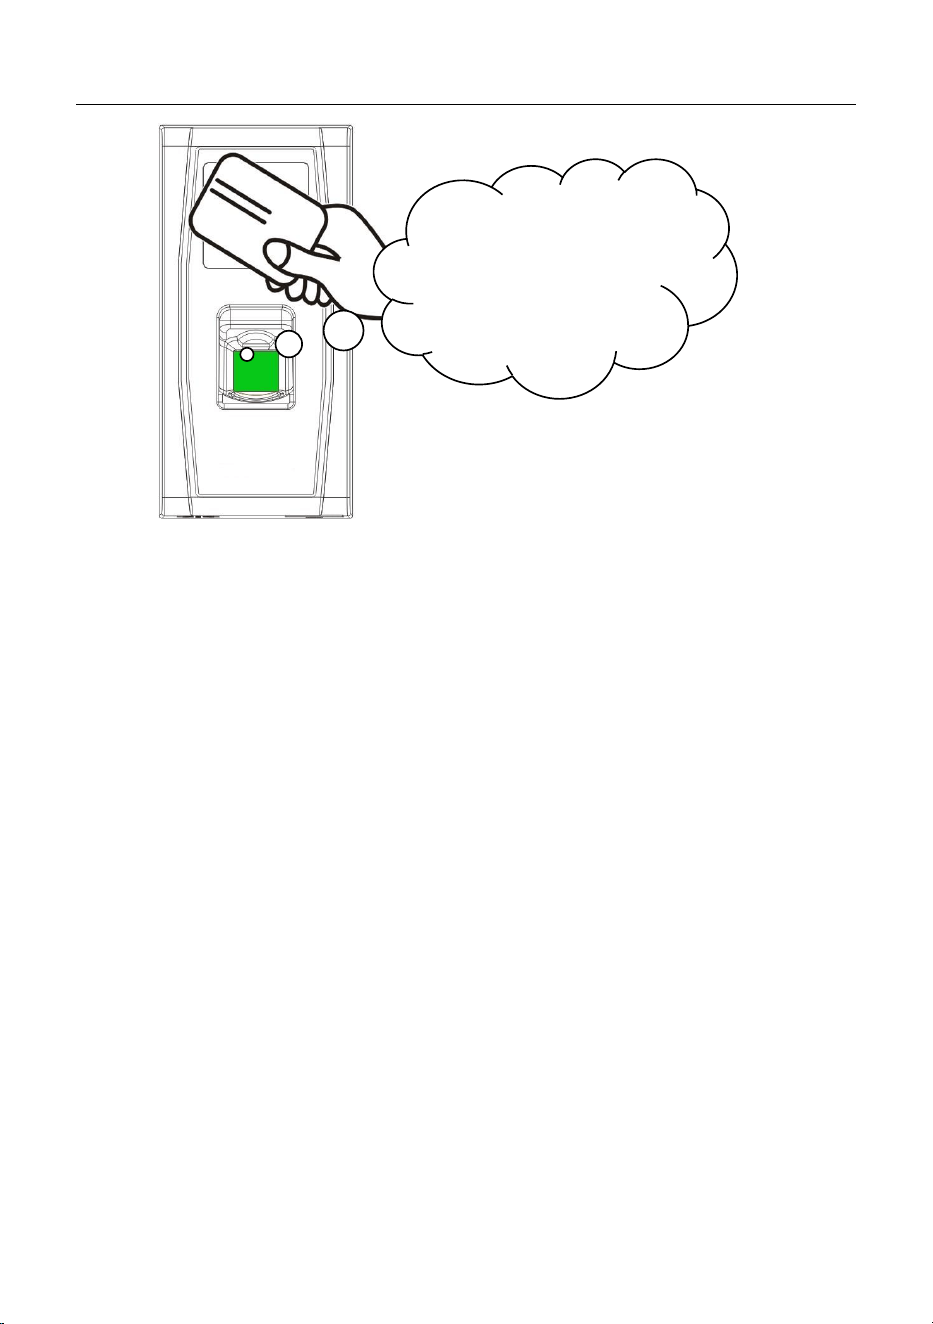
Instruction for Card Swipe 1.2
Integrated with a non-contact RF card reader module, this device supports
the ID cards and IC / HID cards (optional). By offering multiple verification
modes such as fingerprint verification and RF card verification, this device can
accommodate diversified user needs.
Swipe your card across the sensor area following the voice prompt and
remove your card after the device has sensed it. For the swipe area, see 2.2
Product Appearance.
Cautions 1.3
Protect the device from exposure to direct sunlight or strong beam, as strong
beam greatly affects the fingerprint collection and leads to fingerprint
verification failure.
To produce the best results, the device should be used at temperatures
ranging from 0°C to 50°C. It is advised to adopt a sunshade and heat
dissipation facilities if the device will be exposed to the outdoors for an
extended length of time, as extremely high or low temperatures will slow
down the device's performance and result in a high false rejection rate (FRR)
and false acceptance rate (FAR).
When installing the access control device, please connect the power cable
after connecting other cables. If the device does not operate properly, be sure
to shut down the power supply before performing the necessary inspection.
Note that any live-line working may cause damage to the device and the
device damage arising out of live-line working falls beyond the scope of our
normal warranty.
For matters that are not covered in this document, please refer to related
documents including the Installation Guide, and ZKBioAccess IVS User
Manual.
MA300 User Manual
Page | 10 Copyright©2023 ZKTECO CO., LTD. All rights reserved
2 Introduction of Access Control Device
Overview of Device Functions 2.1
Our product can be used with an electronic lock or an access controller as a
combined fingerprint and access control device. This device enables the
usage of management cards and has easy and flexible operations. You can use
a management card to conduct tasks like offline enrollment, user enrollment,
and U-disk management. Without the need of a screen and a keyboard, the
voice prompts will guide you through all the operations. It supports multiple
communication modes. The U-disk features simple and convenient operations.
The device's waterproof design and metal shell allow it to resist a strong
impact without being damaged.
Featuring a compact and simple design, this device allows users to connect
several devices through a PC and perform real-time monitoring.
MA300 User Manual
Page | 11 Copyright©2023 ZKTECO CO., LTD. All rights reserved
Product Appearance 2.2
Front View:
LED Indicator: The LED indicator is used to display device operation
results and exceptional statuses which are defined as follows:
Common Rules: If an operation succeeds, the green indicator is solid
on for one second; otherwise, the red indicator is solid on for one
second.
Enrollment State: The green LED blinks three times every other three
seconds.
Single User Deletion: The red LED blinks three times every other
three seconds.
Verification State: The green LED blinks once every other two
seconds.
LED Indicator
Card Swiping Area
Fingerprint Sensor
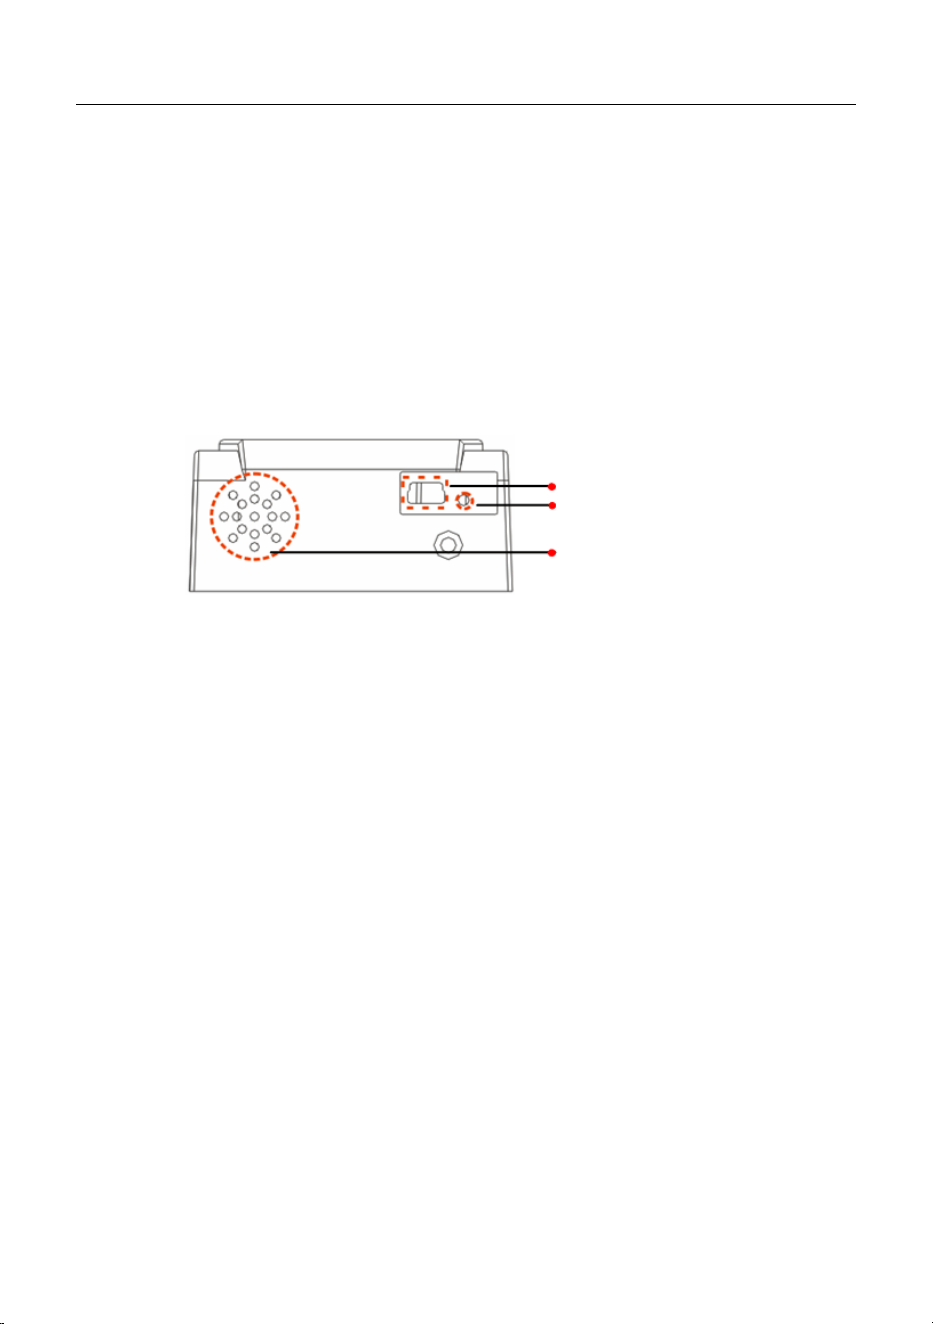
MA300 User Manual
Page | 12 Copyright©2023 ZKTECO CO., LTD. All rights reserved
Card Swiping Area: Refers to the area in the red dashed-line box as
shown in the figure above.
Fingerprint Sensor: Used to collect and match fingerprints and delete
users.
Bottom View:
USB Interface: Used to connect with a U-disk.
Reset Button: Used to restart the device.
Speaker: Used to play the BEEP sound and voice prompts. If a user
passes the verification, the speaker beeps once and prompts “Thank you”.
If the user fails to pass the verification by fingerprint, the speaker beeps
once and prompts “Please try again”. If the user fails to pass the
verification by card, the speaker beeps once and prompts “Please punch
your card again”. The default prompts during operation: Beep + voice
prompts.
Speaker
USB Interface
Reset Button
MA300 User Manual
Page | 13 Copyright©2023 ZKTECO CO., LTD. All rights reserved
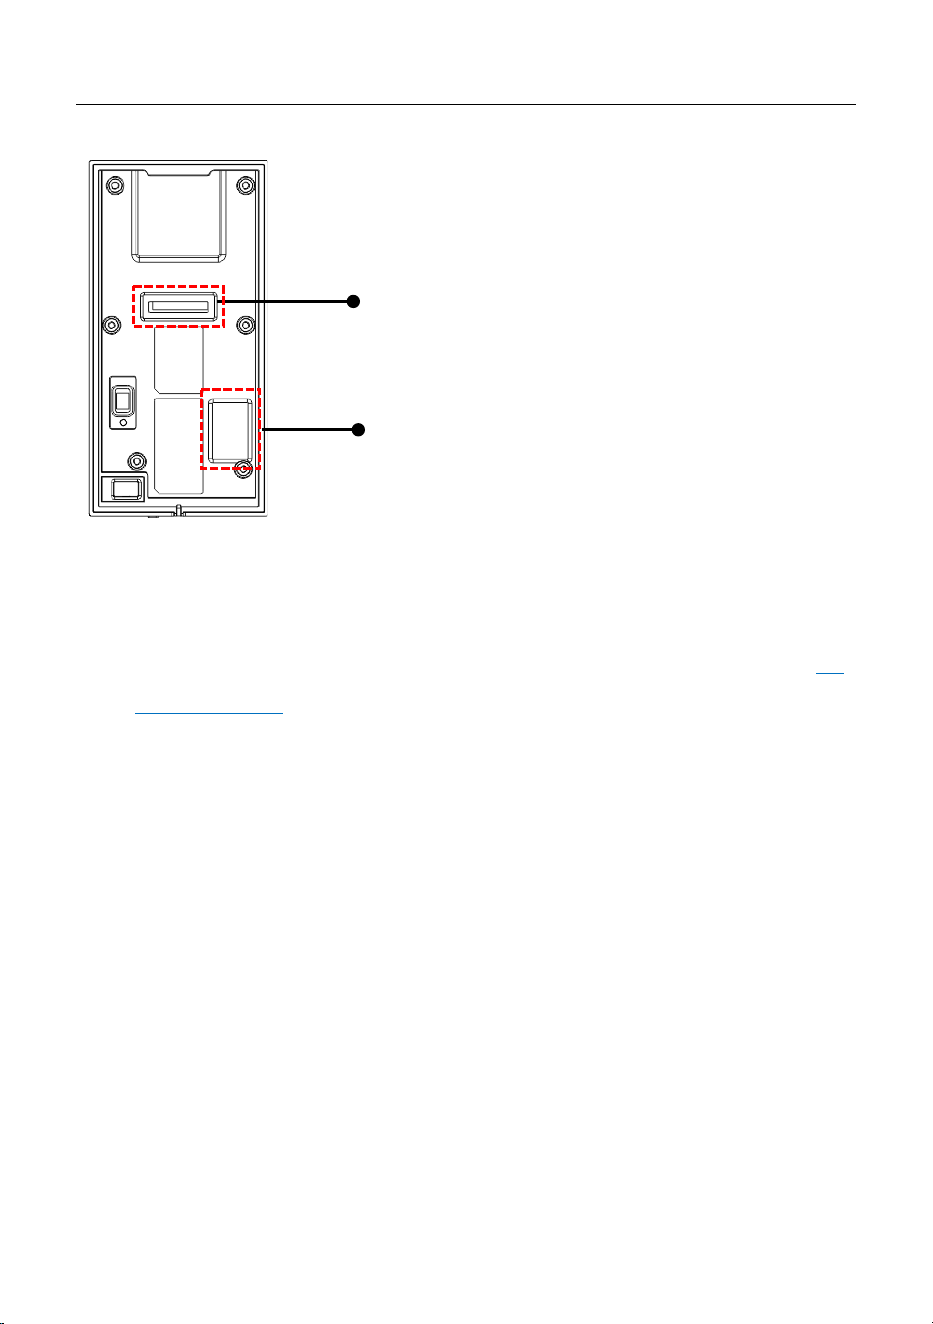
Rear View:
Wiring Terminal: Connects with lock, power supply and a PC through
cables (for detailed connection, see the Installation Guide).
Tamper Switch: Used to generate a tamper alarm. For details, see 3.4
Tamper Switch.
Verification State 2.3
Verification state: If you have enrolled or successfully enrolled in a
management card, or if any operation timeouts, the device enters the
verification state once it is turned on.
All users can verify their identification and unlock in the verification state (the
administrator with a management card can only unlock using his/her
previously enrolled fingerprints); the administrator may do operations like
user enrollment/deletion and U-disk management through the management
card.
Wiring Terminal
Tamper Switch

MA300 User Manual
Page | 14 Copyright©2023 ZKTECO CO., LTD. All rights reserved
Management Card 2.4
The device users are classified into administrator and ordinary users.
Administrator: An administrator is allowed to perform all operations
including user enrollment or deletion (deleting all the other users except
him/her) and U-disk management. The privileges of the device administrator
are implemented through the management card.
Ordinary Users: Ordinary users are only allowed to verify their identity and
unlock.
A management card is a card specially allocated for a super administrator.
Each device must enroll a management card. If no management card is
enrolled, you cannot perform any operation and the system will generate a
voice prompt “: Please register the management card”.
You c an implement different functions by swiping a management
card for different times in a row:
No U-disk is connected:
By swiping the management card once, you can go into the single user
enrollment state.
By swiping the management card five times in a row, you can enter the
single user deletion state.
U-disk is connected:
By swiping the management card once, you can go into the U-disk
management state.
Consecutive Swipes: Consecutive swipes mean the interval between two
swipes in a row is less than 5 seconds.
MA300 User Manual
Page | 15 Copyright©2023 ZKTECO CO., LTD. All rights reserved
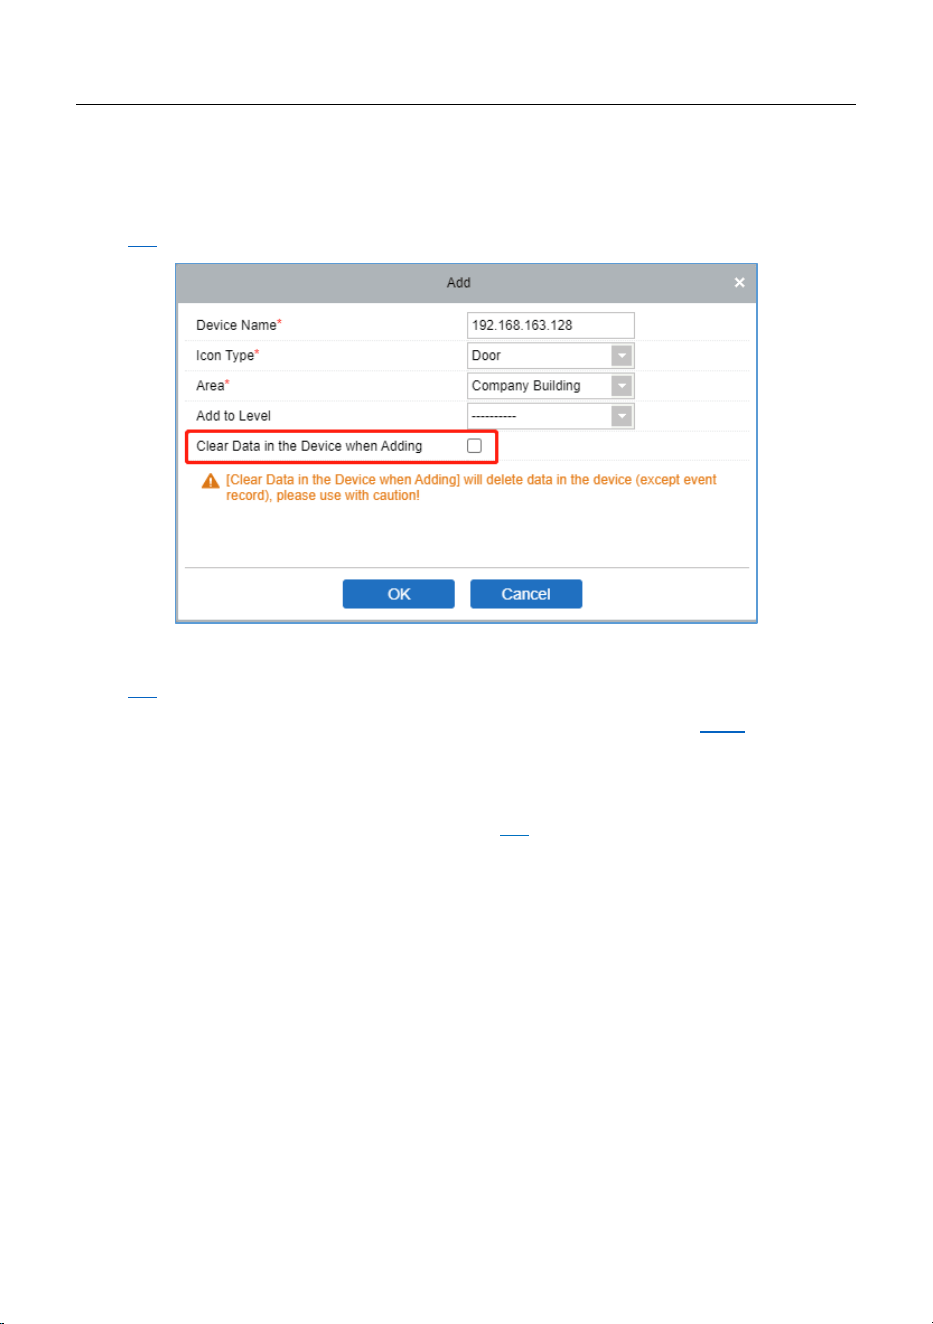
There are three ways to delete the management card:
ZKBioAccess IVS Software: Check the Clear Data in the Device when
Adding option when adding the device to the software. For details, see
5.2.
Tamper switch: To restore the device to factory settings. For details, see
3.4
.
Webserver: To delete all data in the device. For details, see 4.3.4.
The fingerprints of the user who bears a management card can only be
enrolled through software. For details, see 5.3
.
Tip: Users who bear management card can only verify their identity and
unlock using their fingerprints previously enrolled.
Operation Timeout 2.5
30 seconds is the default operation timeout. If there is no operation when you
delete/enroll a user, the system prompts you once every 10 seconds and then
it returns to the verification state after three prompts. The voice prompt is
“Operation timeout. The system returns to verification state”.

MA300 User Manual
Page | 16 Copyright©2023 ZKTECO CO., LTD. All rights reserved
3 Device Operations
Management Card 3.1
3.1.1 Enroll Management Card
To enroll in a management card, proceed as follows:
1. The device automatically detects whether there exists a management
card.
2. If the device fails to detect the presence of a management card, it enters
the management card enrollment state. Then proceed with step 3;
otherwise, skip to step 5.
3. After the system generates the voice prompt “: Please register the
management card”, you can swipe your card across the sensor area.
Tip: The device will always be in the management card enrollment state
until your card has been registered successfully.
4. If enrollment succeeds, the system generates the voice prompt “:
Registration is successful. The system returns to verification state”.
5. After returning to the verification state, the system generates the
voice prompt “: Verify users. Please press your finger or punch your
card”.
MA300 User Manual
Page | 17 Copyright©2023 ZKTECO CO., LTD. All rights reserved
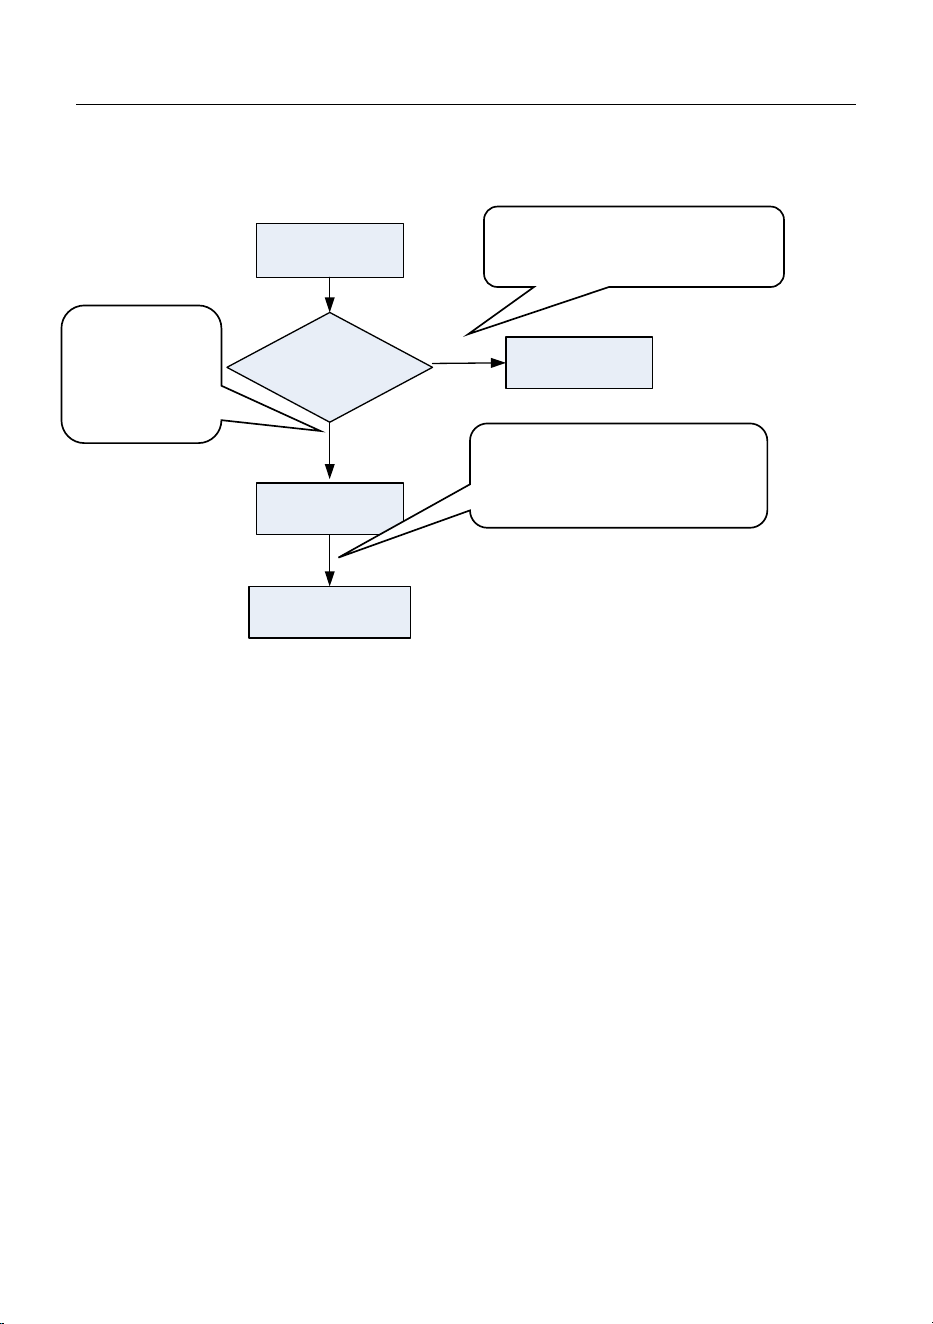
The management card enrollment flow chart is shown below:
System power-on
Does there
exist a management
card
Enroll a
management card
Return to the
verification state
Verification state
Yes
No
3.1.2 Enroll Ordinary User
Each time you enter the enrollment state, only one user can be enrolled.
When you enroll a new user, the system automatically assigns a minimum idle
ID to the user. Each user is allowed to enroll 10 fingerprints and one card at
most.
To enroll a user, proceed as follows:
1. In the verification state, the system goes into the ordinary user enrollment
state after you swipe a management card once (In the enrollment state,
swiping a management card once will return you to the verification state).
2. After the system generates the voice prompt “: Register users. Please
press your finger or punch your card”, you can start user enrollment. There
are the following two cases:
: Please
register the
management
card
: Verify users. Please press
your finger or punch your card
: Registration is successful.
The system returns to the
verification state.
MA300 User Manual
Page | 18 Copyright©2023 ZKTECO CO., LTD. All rights reserved
(1) Swipe the card first
a. When you swipe your new card and succeed in enrolling a user,
the device will generate a voice prompt “: User number **.
Registration is successful!” (** refers to the ID automatically
assigned to the user by the system; same below) and you can
proceed to step b.
b. After the device generates the voice prompt “: Register. Please
press your finger”, the system enters the specified fingerprint
enrollment state. Press the same finger over the sensor three
times following the voice prompts.
c. If fingerprint enrollment succeeds, the system generates the voice
prompt “: Registration is successful. Register. Please press your
finger” and directly enters the next fingerprint enrollment state; if
fingerprint enrollment fails, the system generates the voice prompt
“: Please press your finger again” and repeats step b.
“Register users. Please
press your finger or
punch your card.”

MA300 User Manual
Page | 19 Copyright©2023 ZKTECO CO., LTD. All rights reserved
d. The system automatically returns to the verification state when
both 10 fingers and card are enrolled, the management card is
swiped once or the operation times out.
(2) Press finger(s) first
a. Press the same finger over the sensor three times following the
voice prompts by adopting the proper fingerprint placement. If
fingerprint enrollment succeeds, the system generates the voice
prompt “: User number **. Registration is successful” and you
can proceed to step b; if fingerprint enrollment fails, the system
generates the voice prompt “: Please press your finger again”
and returns to the enrollment state, waiting for you to press your
finger or swipe your card.
b. After generating the voice prompt “: Register. Please press
your finger or punch your card”, the system enters the specified
user information enrollment state, waiting for you to swipe your
new card or press your finger.
c. If the card enrollment succeeds, the system generates the voice
prompt “: Registration is successful. Register. Please press your
finger” and enters the fingerprint enrollment state directly; if you
press a finger that is not enrolled before and succeeds in
enrollment of this finger, the system generates the voice prompt:
“: Registration is successful. Please press your finger or punch
your card” and you can continue enrolling new fingerprints and
card. After you enroll 10 fingerprints, the system will generate
the voice prompt “: Register. Please punch your card” to enroll
your card if your card is not enrolled.

MA300 User Manual
Page | 20 Copyright©2023 ZKTECO CO., LTD. All rights reserved
d. The system automatically returns to the verification state when
both 10 fingers and card are enrolled, the management card is
swiped once or the operation times out.
3. If you are already assigned with an ID, then there are the following two
cases for you to enroll your fingerprint(s) or card:
(1) Enroll fingerprint(s) when you have already enrolled card
a. After you swipe the enrolled card, the system will generate the
voice prompt “: User number **. Register. Please press your
finger” (** refers to the ID assigned to you; same below) and
enter the fingerprint enrollment state. Your enrolled fingerprints
will overwrite all previous fingerprints.
b. Press the same finger over the sensor three times following the
voice prompts by adopting the proper fingerprint placement. If
fingerprint enrollment succeeds, the system generates the voice
prompt “: Registration is successful. Please press your finger”
and gets ready for enrollment of the next fingerprint.
c. The system automatically returns to the verification state when
10 fingers are enrolled, the management card is swiped once or
the operation times out.
Tips:
The fingerprint(s) enrolled in this step will overwrite all your previously
enrolled fingerprints.
In this mode, the fingerprint of the user who bears the management card
cannot be enrolled because swiping the management card will return
the system to the verification state automatically.

MA300 User Manual
Page | 21 Copyright©2023 ZKTECO CO., LTD. All rights reserved
(2) Enroll card and fingerprint(s) when you have already enrolled
fingerprint(s)
a. Press the finger with the fingerprint already enrolled three times
following the voice prompts. If you are identified as the same
person in each verification attempt, the system enters the
fingerprint enrollment state.
b. After generating the voice prompt “: User number **. Register.
Please press your finger or punch your card”, the system starts to
enroll your fingerprint or card. Your fingerprint(s) enrolled in this
step will overwrite all your previous fingerprints.
c. If the card enrollment succeeds, the system generates the voice
prompt “: Registration is successful. Register. Please press your
finger” and enters the fingerprint enrollment state directly; if you
press a finger that is not enrolled before and succeeds in
enrollment of this finger, the system generates the voice prompt:
“: Registration is successful. Please press your finger or punch
your card” and you can continue enrolling new fingerprints and
card. After you enroll 10 fingerprints, the system will generate
the voice prompt “: Register. Please punch your card” to enroll
your card if your card is not enrolled.
d. The system automatically returns to the verification state when
both 10 fingers and card are enrolled, the management card is
swiped once or the operation times out.
MA300 User Manual
Page | 22 Copyright©2023 ZKTECO CO., LTD. All rights reserved
The flow chart is shown below:
Enrollment state
The number
of users is full
Return to the
verification state
New Card or
fingerprint?
Is new user
enrollment
successful?
Swipe card Press finger
Is the fingerprint
enrollment successful?
Is the fingerprint/card
enrollment successful?
Enrollment is
successful
Are both 10
fingers and card
enrolled?
Return to the
verification state
Yes
No
Yes
Yes
Yes
Yes
No
No
No No
No
: User number **.
Registration is
successful.
: The system returns
to the verification state
: The number of users is
full. The system returns to
verification state.
: Register users.
Please press your finger
or punch your card.
: Please press
your finger again
: User number **.
Register. Please press
your finger.
: Registration is
successful
: Please press
your finger again
: User number **.
Register. Please press your
finger or punch your card
: Please press your
finger again/The
card number is
repeated
MA300 User Manual
Page | 23 Copyright©2023 ZKTECO CO., LTD. All rights reserved
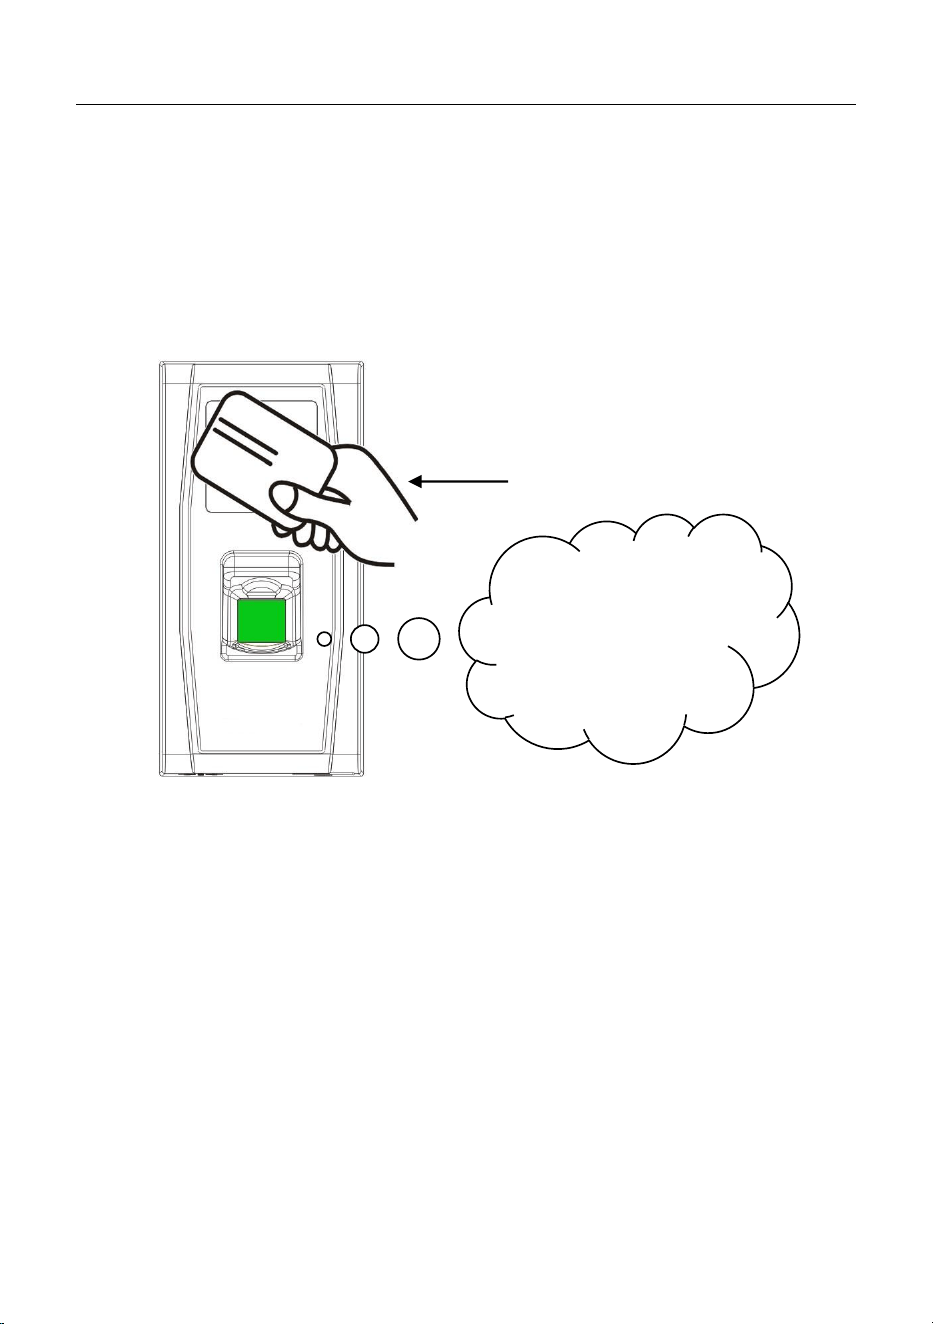
3.1.3 Delete a Single User
The operation steps for simple single-user deletion:
1. In the verification state, swipe your management card five consecutive
times to enter the simple single-user deletion state (swipe your card one
more time to return to the verification state).
2. Press your finger onto the fingerprint sensor or swipe the card over the card
reader.
(1) Press your finger onto the sensor to delete a user.
Press one of your enrolled fingers properly onto the sensor. If the
verification succeeds, the system will generate the voice prompt “:
User number **. Deletion is successful. Delete users. Please press your
finger or punch your card.” (** indicates the ID number of the user)
and automatically return to the deletion state. If the verification fails,
the system will generate the voice prompt “: Please try again.”
“Delete users. Please
press your finger or
punch your card.”
Swipe your management card for
five consecutive times

MA300 User Manual
Page | 24 Copyright©2023 ZKTECO CO., LTD. All rights reserved
(2) Swipe your card over the reader to delete a user.
Swipe a registered card over the reader. If the verification succeeds,
the system will generate the voice prompt “: User number **.
Deletion is successful. Delete users. Please press your finger or punch
your card.” and automatically return to the deletion state. If the
verification fails, the system will generate the voice prompt “: Please
punch your card again.”
3. If you swipe your management card one more time or your operation
times out, the system will return to the verification state.
Tip: In simple single-user deletion mode, the management card user
cannot be deleted because swiping the management card will return
the system to the verification state.
MA300 User Manual
Page | 25 Copyright©2023 ZKTECO CO., LTD. All rights reserved
Simple Single-User Deletion Procedure:
Verification state
Enter the deletion state
after swiping the
management card 5
times in a row
Card verification
Fingerprint
verification
Is card verification
successful?
Is fingerprint
verification
successful?
Delete user
Return to the verification
state after the management
card is swiped once or
operation times out
No
Yes
Yes
No
: Delete users. Press your
finger or punch your card.
: Please try again.
: Please punch
your card again.
: User number
**. Deletion is
successful.

MA300 User Manual
Page | 26 Copyright©2023 ZKTECO CO., LTD. All rights reserved
User Verification 3.2
Operation Steps:
1. When the device is in a verification state, the system generates the voice
prompt “: Verify users. Please press your finger or punch your card.”
2. Start user verification. The device supports two verification modes:
fingerprint verification and card verification.
(1) Fingerprint Verification
Press your finger on the fingerprint sensor in a proper way. If the
verification succeeds, the system generates the voice prompt “:
Thank you.” and concurrently triggers an unlocking signal. If the
verification fails, the system generates the voice prompt “: Please try
again.”
(2) Card Verification
Swipe your card over the card reader. If the verification succeeds, the
system generates the voice prompt “: Thank you.” and concurrently
triggers an unlocking signal. If the verification fails, the system
generates the voice prompt “: Please punch your card again.”
MA300 User Manual
Page | 27 Copyright©2023 ZKTECO CO., LTD. All rights reserved
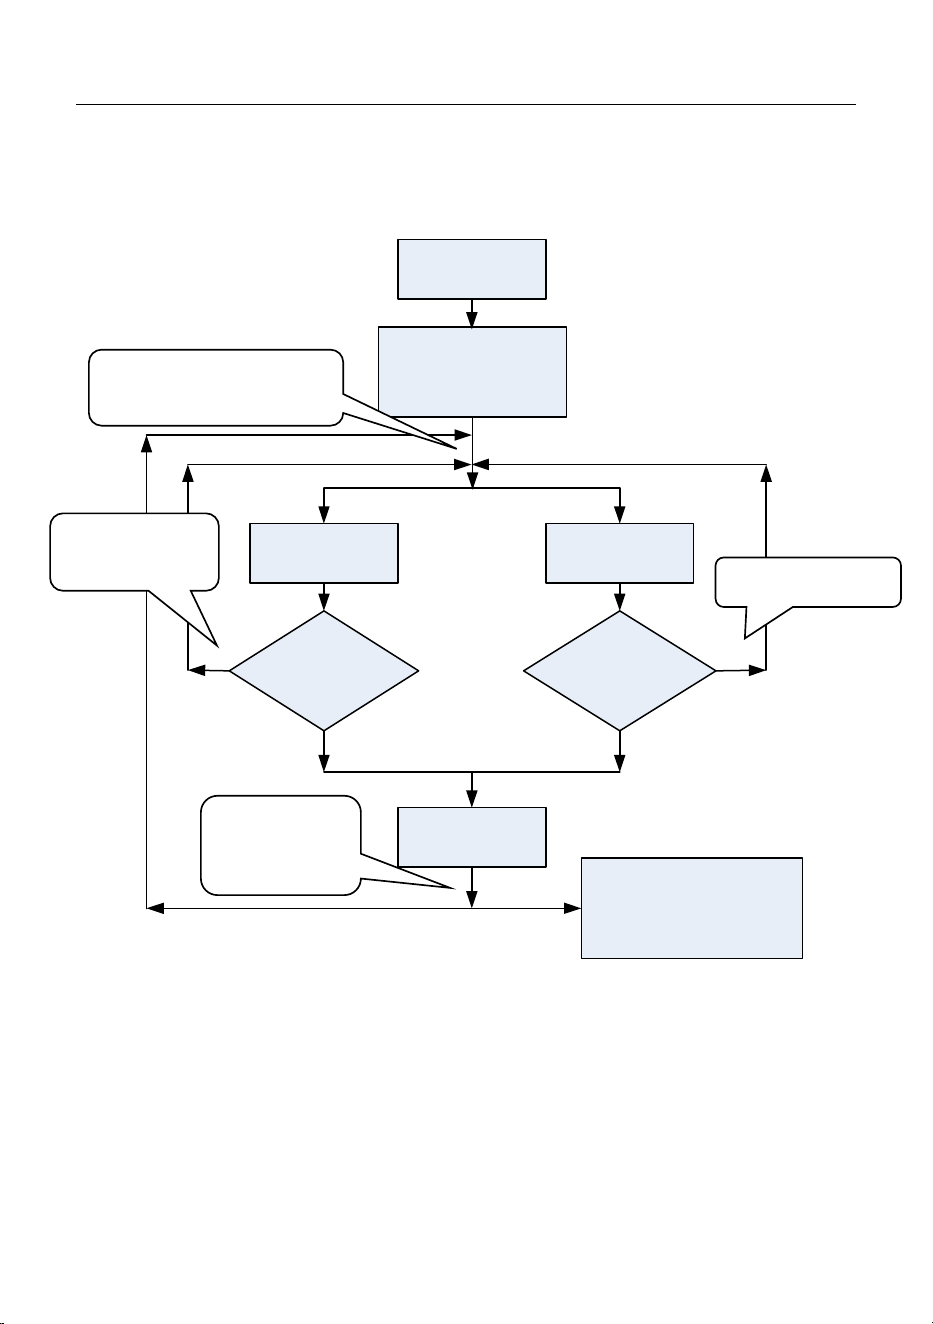
The user verification flow chart is shown as below:
Verification
state
Is the door
sensor or tamper
switch
exceptional?
Alarm
Card verification
Fingerprint
verification
Card verification
successful?
Fingerprint
verification successful?
Unlock and
delay
Lock
Door status
detection
Return to
verification state
Yes
No
Yes
No
Yes
No
Tip: The administrator can unlock by use of his/her enrolled fingerprints
instead of a management card.
: Please try again.
: Verify users. Please
press your finger or
punch your card
: Please
punch your
card again.
: Thank you.
: Thank you.

MA300 User Manual
Page | 28 Copyright©2023 ZKTECO CO., LTD. All rights reserved
U-disk 3.3
The user can perform record download, user download, user upload, and
firmware upgrade through a U-disk.
a. Download Records: Download the access records of all users from
the device to a U-disk.
b. Download Users: Download all user information such as fingerprints
and card numbers from the device to a U-disk.
c. Upload Users: Upload the user information from a U-disk to the
device.
d. Upgrade Firmware: Upgrade the device firmware through a U-disk.
U-disk Operations:
If you connect a U-disk to the device, the system will automatically prompt
you of the operations in sequence.
(1) After connecting a U-disk to the device, you can swipe the
management card once to enter the U-disk management state.
(2) The system generates the voice prompt “: ****. Please punch your
management card for confirmation.” (**** indicates the four operation
items from steps a to d in sequence; same below)
(3) If you want to perform the operation, swipe your management card
for confirmation. If your operation succeeds, the system will generate
the voice prompt “: The operation is successful.” and prompt you to
proceed to the next step. After you finish the four items, the system
MA300 User Manual
Page | 29 Copyright©2023 ZKTECO CO., LTD. All rights reserved
generates the voice prompt “: The system returns to verification
state.” If your operation fails, the system will generate the voice
prompt “: The operation fails. The system returns to verification
st a te.”
(4) If you do not swipe your management card, the system will
automatically skip over this step in 5 seconds and prompt you to the
next step. After you finish the four items, the system returns to the
verification state automatically.
Tamper Switch 3.4
The tamper switch is pressed and held down with a rear cover. When the
device is dismantled, the tamper switch will be lifted and then it will send an
alarm signal to trigger an alarm.
Clear Alarm: The user can clear the alarm by putting the magnet back on the
tamper switch.
Restore Factory Defaults: The factory defaults can be restored through the
tamper switch.
Power on the device, place the magnet on the tamper switch six times after it
prompts ‘’Verify users. Please press your finger or punch your card’’ for 30
seconds but no more than 60 seconds. After it is restored successfully, the
Please do not upgrade the firmware at your discretion because it may bring
problems and affect the normal use of the device. Contact our distributors for
technical support or upgrade notification.

MA300 User Manual
Page | 30 Copyright©2023 ZKTECO CO., LTD. All rights reserved
device will restart automatically and prompts ‘’Please register the
management card’’.
Tips:
1. The user data will be cleared including the administrator and
ordinary users.
2. The IP address of the device and the login password of the
Webserver will be restored to default.

MA300 User Manual
Page | 31 Copyright©2023 ZKTECO CO., LTD. All rights reserved
4 Webserver
The user can open the web application to set the relevant parameters of the
device.
Login 4.1
First, connect the device to the Internet. Open a browser and input the link:
https: //IP address (the device) to enter the login interface. (e.g., the default IP
address of the device is 192.168.1.201, and the webserver link is https:
//192.168.1.201.)
Note: The IP address of your PC and the device should be in the same
network segment, otherwise you cannot open the link. If you modify the IP
address of the device in Settings-Comm Settings, then the webserver link will
be changed accordingly.
MA300 User Manual
Page | 32 Copyright©2023 ZKTECO CO., LTD. All rights reserved
Enter the Username and Password.
Username: admin (default)
Password: admin@123 (default)
After successful login, it will jump to the Change Password page. Enter your
Previous password, New password and Confirm your password. Then click
OK, as shown below:
Note:
1. The password must be changed when logging in for the first time.
2. The new password must be 8-digits and it must consist of symbols and
any two of the three-character types: numbers, uppercase or lowercase
letters.
3. If you forget the password of the webserver, please restore factory
settings through the tamper switch. For details, see 3.4
.
After the modification is successful, it will return to the login interface.
MA300 User Manual
Page | 33 Copyright©2023 ZKTECO CO., LTD. All rights reserved
Device 4.2
4.2.1 Device Status
Click Device Status to view the Device name, Serial number, MAC address, etc.
of the current device.
4.2.2 Change Password
Click Change Password to modify the user password.
Enter your Previous password, New password and Confirm the password,
then click OK.
MA300 User Manual
Page | 34 Copyright©2023 ZKTECO CO., LTD. All rights reserved
Settings 4.3
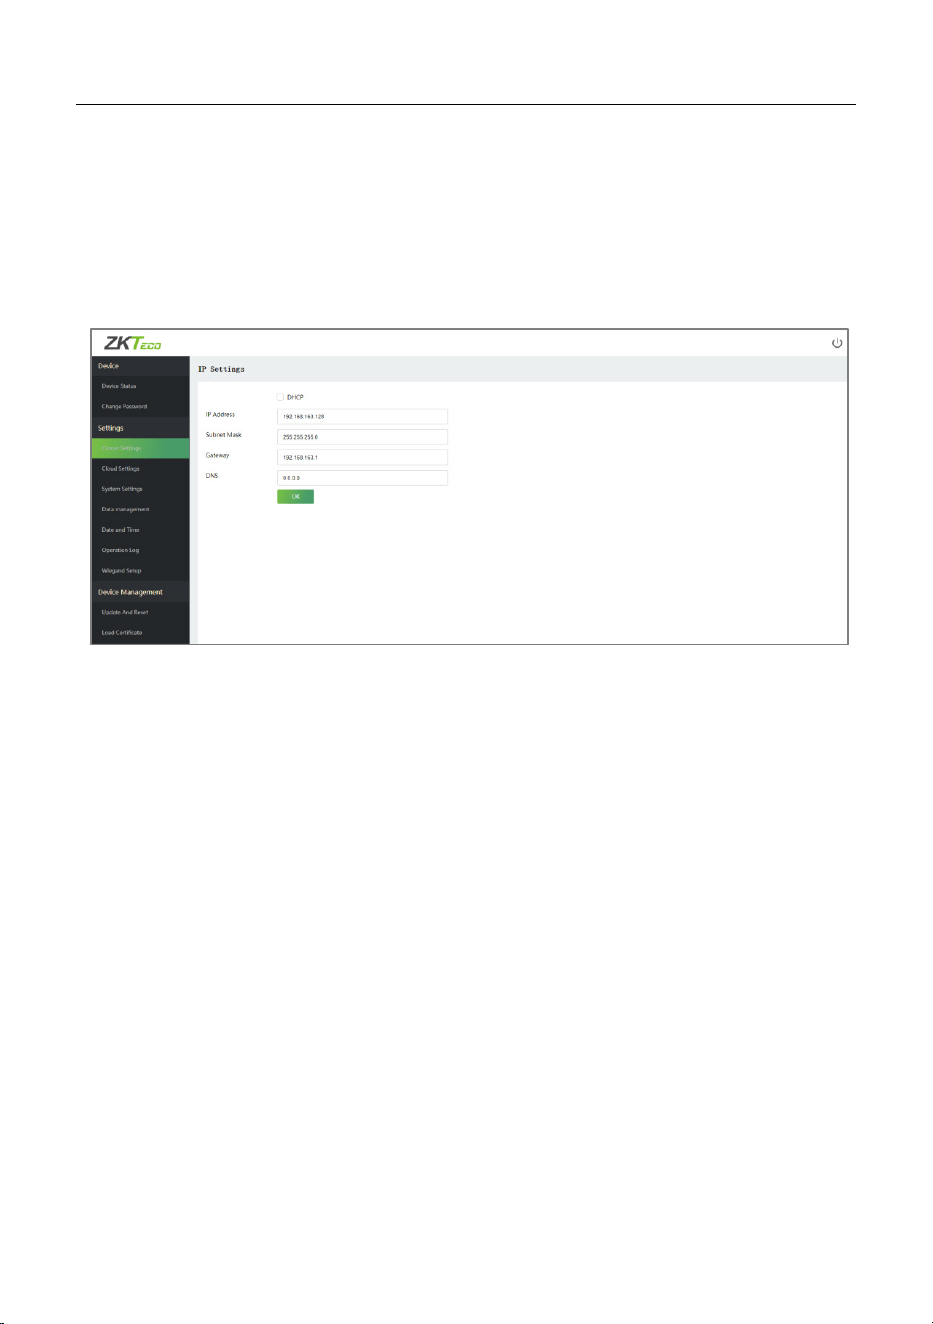
4.3.1 Comm Settings
When the device needs to communicate with the network, you need to
configure the IP settings.
The fields description is as follows:
DHCP: DHCP (Dynamic Host Configuration Protocol) dynamically allocates
the IP addresses for clients via server. If DHCP is enabled, IP addresses cannot
be set manually.
IP Address: The default value is192.168.1.201, it can be modified according to
the available network parameters.
Subnet Mask: The default value is 255.255.255.0, it can be modified
according to the available network parameters.
Gateway: The default value is 192.168.1.1, it can be modified according to the
available network parameters.
DNS: The default DNS address is 0.0.0.0. It can be modified according to
network availability.
MA300 User Manual
Page | 35 Copyright©2023 ZKTECO CO., LTD. All rights reserved
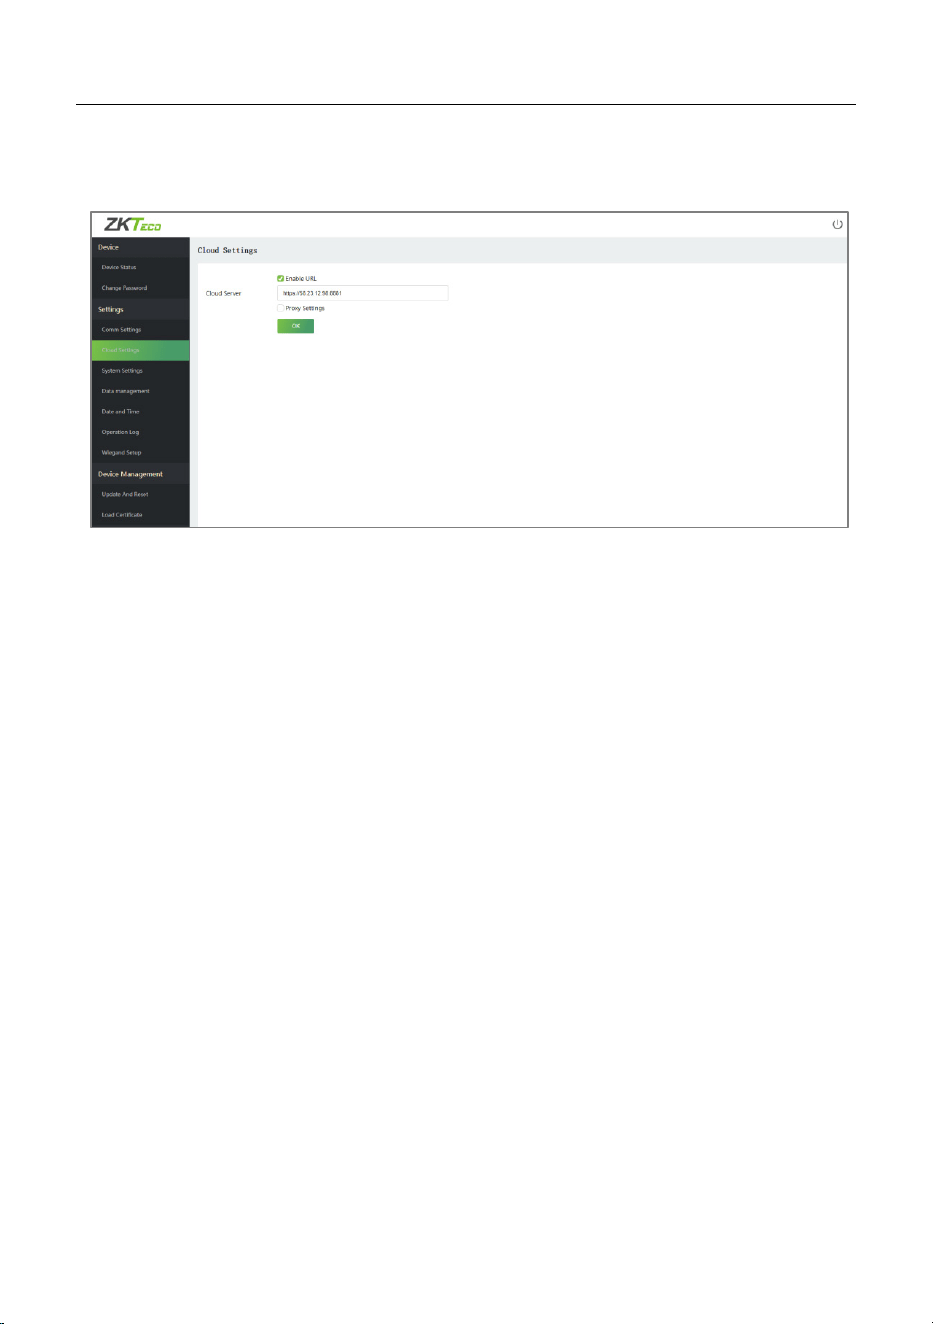
4.3.2 Cloud Settings
We can connect to the Cloud server by configuring the Cloud Server Settings.
The fields description is as follows:
Enable URL: When the software is in HTTPS mode, the setting should be
enabled, you need to type the complete server address and communication
port, as shown in the figure above.
Cloud Server: The IP address of the server.
Cloud Server Port: The port of the server.
Proxy Settings: The IP address and the port number of the proxy server are
set manually when the proxy is enabled.

MA300 User Manual
Page | 36 Copyright©2023 ZKTECO CO., LTD. All rights reserved
4.3.3 System Settings
Click System Settings to set the device volume.
Enter the volume value and click OK.
The fields description is as follows:
Volume: Adjust the volume of the device which can be set between 0 to100.
4.3.4 Data Management
Click Data Management to delete the relevant data in the device.
The fields description is as follows:
Clear Access Log: To delete all the access logs.
Delete All Data: To delete all the logs and user data (including the
MA300 User Manual
Page | 37 Copyright©2023 ZKTECO CO., LTD. All rights reserved
administrator and ordinary users). Please operate with caution! After the
operation is successful, you need to re-login the Webserver.
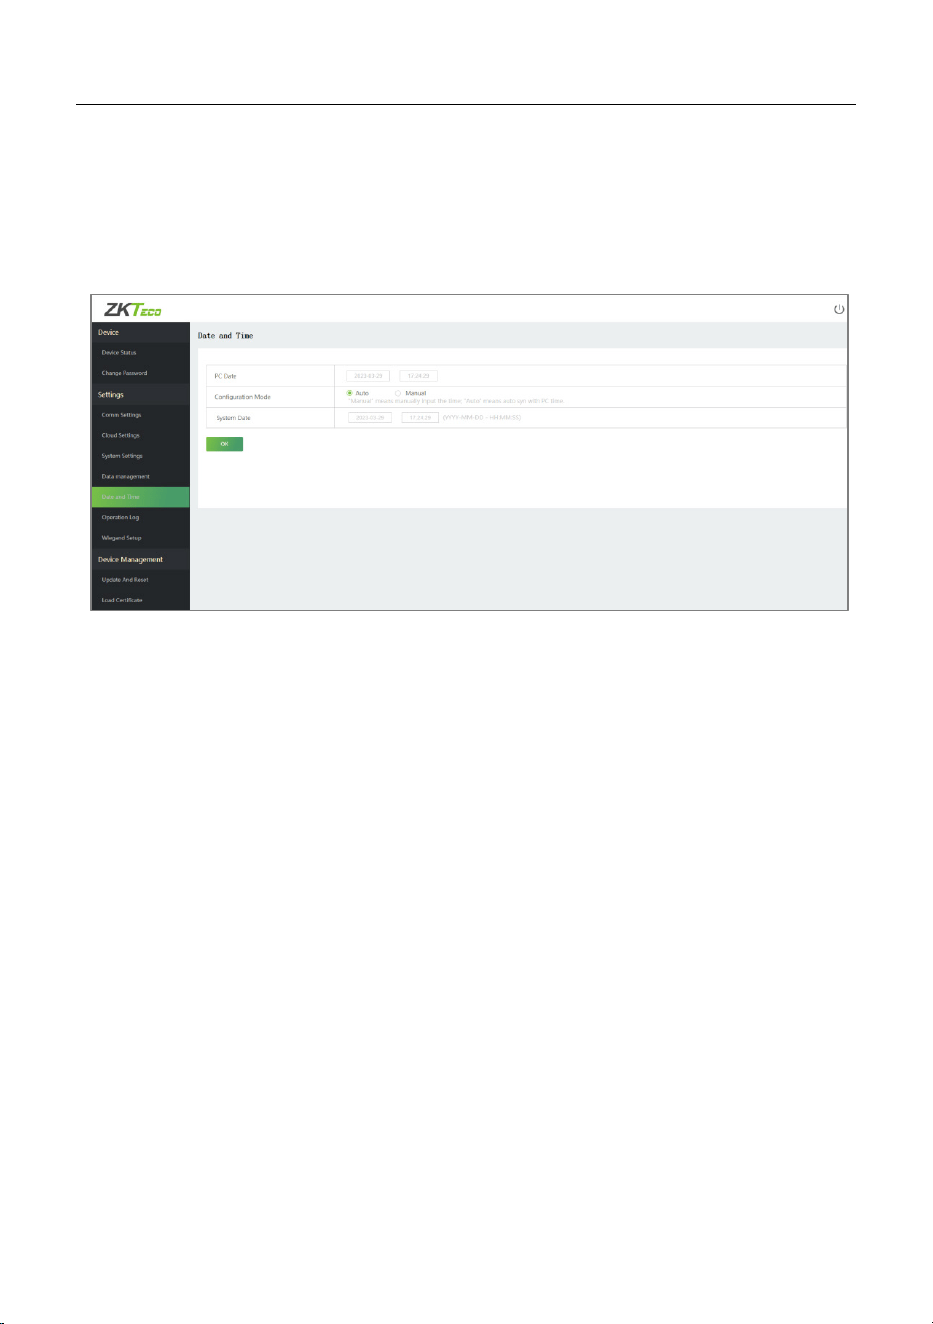
4.3.5 Date and Time
Click Date and Time to set the device date and time.
The fields description is as follows:
Auto: Automatically synchronizes the PC time.
Manual: Need to manually input the date and time.
Note: The date format is required to be YYYY-MM-DD-HH: MM: SS.
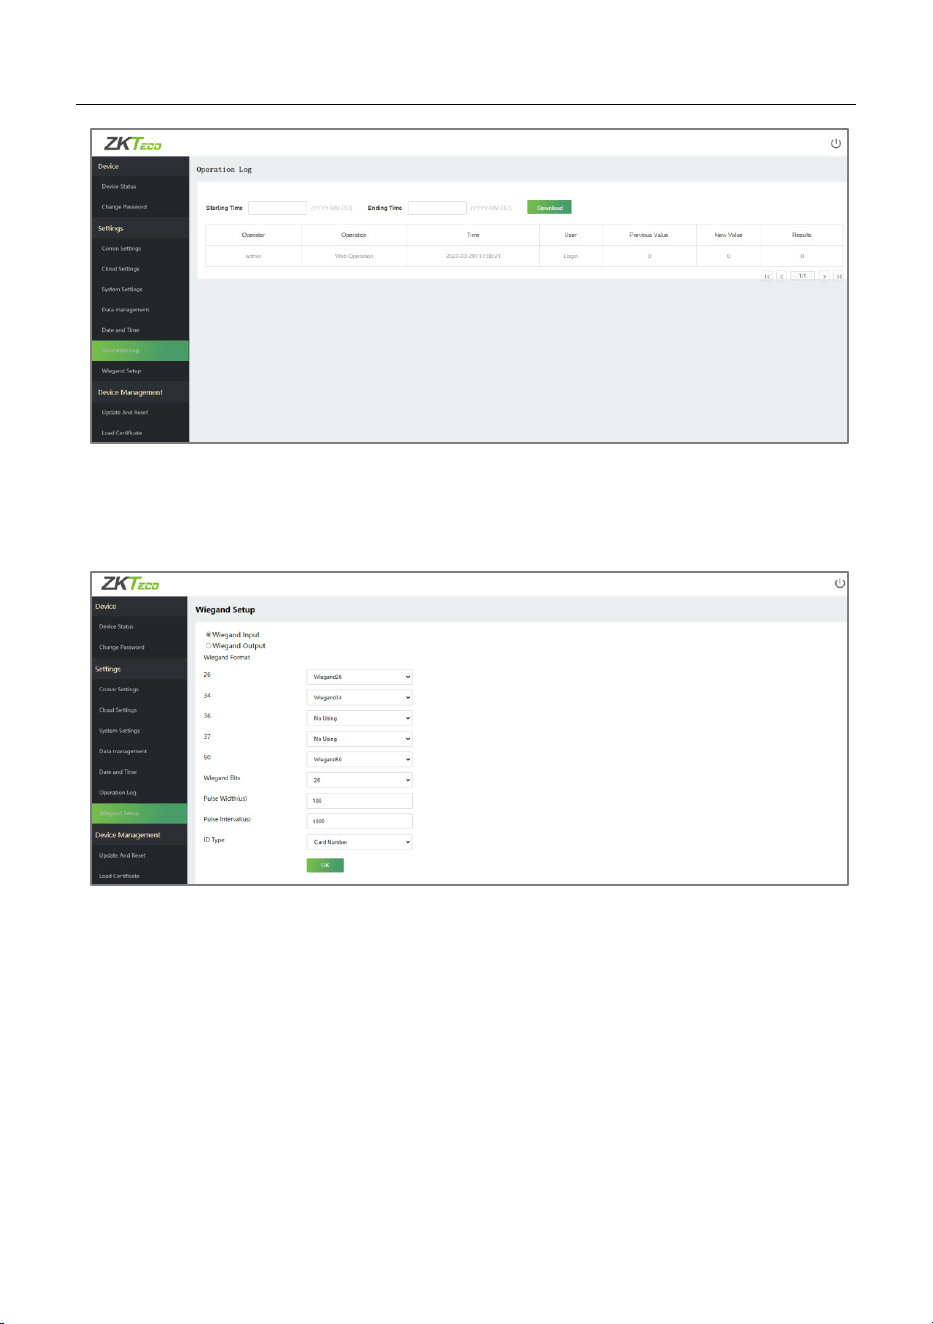
4.3.6 Operation Log
Click Operation Log to view all the device operation logs.
Download: Select the starting and ending time, and then click download, the
operation log of the selected time will be automatically downloaded.
MA300 User Manual
Page | 38 Copyright©2023 ZKTECO CO., LTD. All rights reserved
4.3.7 Wiegand Setup
Click Wiegand Setup to set the Wiegand input and output parameters.
The fields description is as follows:
Wiegand Format: Its value can be 26 bits, 34 bits, 36 bits, 37 bits, and 50 bits.
Wiegand Bits: The number of bits of the Wiegand data.
Pulse Width(us): The value of the pulse width sent by Wiegand is 100
microseconds by default, which can be adjusted within the range of 20 to 100
microseconds.
Pulse Interval(us): The default value is 1000 microseconds and can be
adjusted within the range of 200 to 20000 microseconds.

MA300 User Manual
Page | 39 Copyright©2023 ZKTECO CO., LTD. All rights reserved
ID Type: Select between the User ID and card number.
Various Common Wiegand Format Description:
Wiegand
Format
Description
Wiegand26
ECCCCCCCCCCCCCCCCCCCCCCCCO
It consists of 26 bits of binary code. The 1
st
bit is the even
parity bit of the 2
nd
to 13
th
bits, while the 26
th
bit is the odd
parity bit of the 14
th
to 25
th
bits. The 2
nd
to 25
th
bits is the card
numbers.
Wiegand26a
ESSSSSSSSCCCCCCCCCCCCCCCCO
It consists of 26 bits of binary code. The 1
st
bit is the even
parity bit of the 2
nd
to 13
th
bits, while the 26
th
bit is the odd
parity bit of the 14
th
to 25
th
bits. The 2
nd
to 9
th
bits is the site
codes, while the 10
th
to 25
th
bits are the card numbers.
Wiegand34
ECCCCCCCCCCCCCCCCCCCCCCCCCCCCCCCCO
It consists of 34 bits of binary code. The 1
st
bit is the even
parity bit of the 2
nd
to 17
th
bits, while the 34
th
bit is the odd
parity bit of the 18
th
to 33
rd
bits. The 2
nd
to 25
th
bits is the card
numbers.
Wiegand34a
ESSSSSSSSCCCCCCCCCCCCCCCCCCCCCCCCO
It consists of 34 bits of binary code. The 1
st
bit is the even
parity bit of the 2
nd
to 17
th
bits, while the 34
th
bit is the odd
parity bit of the 18
th
to 33
rd
bits. The 2
nd
to 9
th
bits is the site
codes, while the 10
th
to 25
th
bits are the card numbers.

MA300 User Manual
Page | 40 Copyright©2023 ZKTECO CO., LTD. All rights reserved
Wiegand36
OFFFFFFFFFFFFFFFFCCCCCCCCCCCCCCCCMME
It consists of 36 bits of binary code. The 1
st
bit is the odd
parity bit of the 2
nd
to 18
th
bits, while the 36
th
bit is the even
parity bit of the 19
th
to 35
th
bits. The 2
nd
to 17
th
bits is the
device codes. The 18
th
to 33
rd
bits is the card numbers, and
the 34
th
to 35
th
bits are the manufacturer codes.
Wiegand36a
EFFFFFFFFFFFFFFFFFFCCCCCCCCCCCCCCCCO
It consists of 36 bits of binary code. The 1
st
bit is the even
parity bit of the 2
nd
to 18
th
bits, while the 36
th
bit is the odd
parity bit of the 19
th
to 35
th
bits. The 2
nd
to 19
th
bits is the
device codes, and the 20
th
to 35
th
bits are the card numbers.
Wiegand37
OMMMMSSSSSSSSSSSSCCCCCCCCCCCCCCCCCCCE
It consists of 37 bits of binary code. The 1
st
bit is the odd
parity bit of the 2
nd
to 18
th
bits, while the 37
th
bit is the even
parity bit of the 19
th
to 36
th
bits. The 2
nd
to 4
th
bits is the
manufacturer codes. The 5
th
to 16
th
bits is the site codes, and
the 21
st
to 36
th
bits are the card numbers.
Wiegand37a
EMMMFFFFFFFFFFSSSSSSCCCCCCCCCCCCCCCCO
It consists of 37 bits of binary code. The 1
st
bit is the even
parity bit of the 2
nd
to 18
th
bits, while the 37
th
bit is the odd
parity bit of the 19
th
to 36
th
bits. The 2
nd
to 4
th
bits is the
manufacturer codes. The 5
th
to 14
th
bits is the device codes,
and15
th
to 20
th
bits are the site codes, and the 21
st
to 36
th
bits
are the card numbers.
MA300 User Manual
Page | 41 Copyright©2023 ZKTECO CO., LTD. All rights reserved
Wiegand50
ESSSSSSSSSSSSSSSSCCCCCCCCCCCCCCCCCCCCCCCCCCCCCC
CCO
It consists of 50 bits of binary code. The 1
st
bit is the even
parity bit of the 2
nd
to 25
th
bits, while the 50
th
bit is the odd
parity bit of the 26
th
to 49
th
bits. The 2
nd
to 17
th
bits is the site
codes, and the 18
th
to 49
th
bits are the card numbers.
"C" denotes the card number; "E" denotes the even parity bit; "O" denotes
the odd parity bit;
"F" denotes the facility code; "M" denotes the manufacturer code; "P"
denotes the parity bit; and "S" denotes the site code.
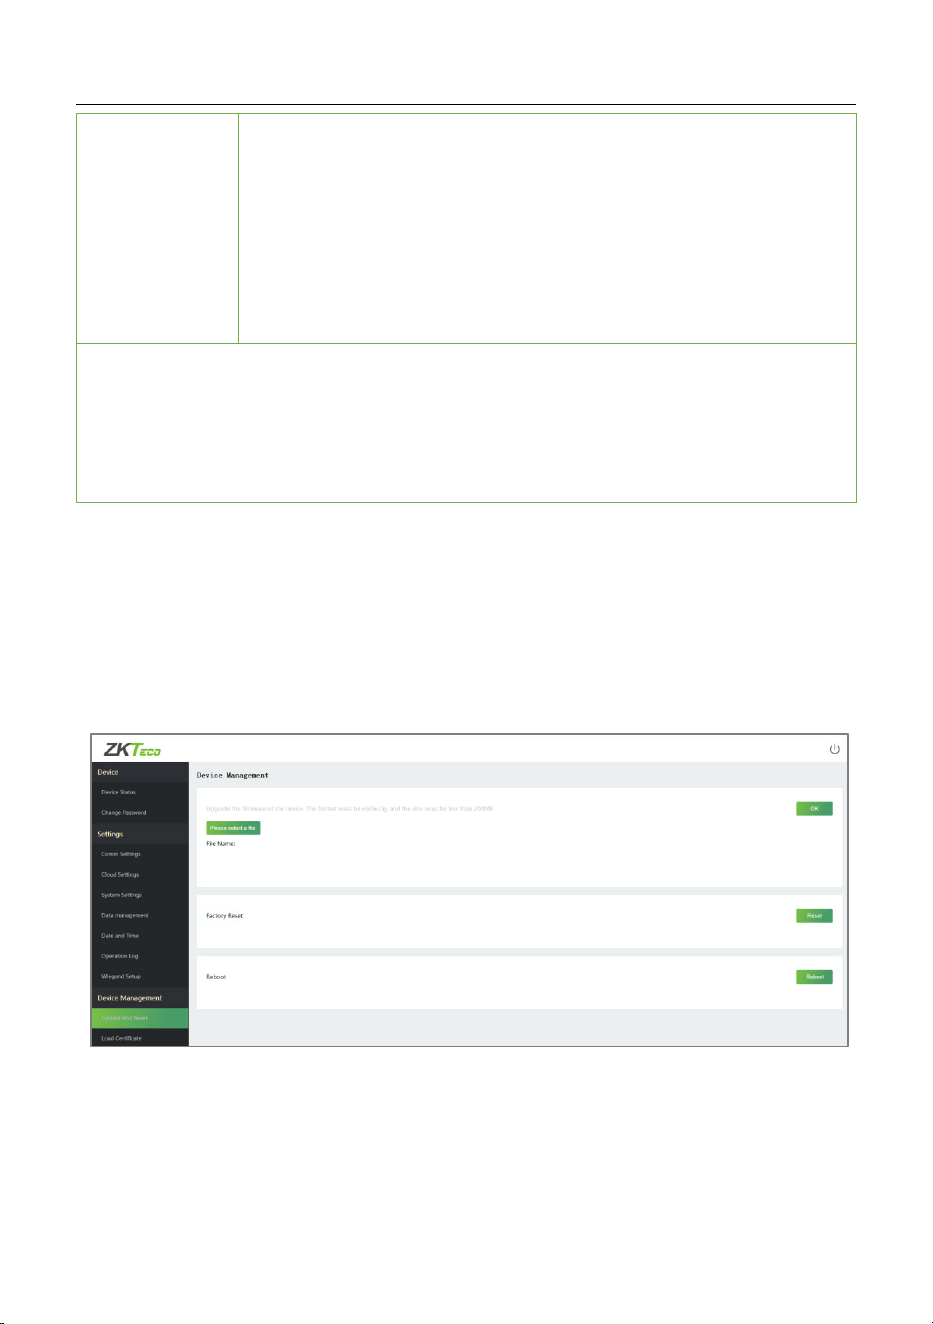
Device Management 4.4
4.4.1 Update and Reset
Click Update and Reset to set the device Update, Factory Reset, and Reboot
settings.
The fields description is as follows:
Update: Click Please select a file, the file format must be emfw. cfg, and the
size must be less than 200 MB.
Click OK to complete the firmware upgrade operation.
MA300 User Manual
Page | 42 Copyright©2023 ZKTECO CO., LTD. All rights reserved
Factory Reset: The Factory Reset function restores the device settings such as
communication settings and system settings, to the default factory settings.
Note:
1. The password of the webserver and IP address of the device will be
restored to default.
2. The user data won’t be cleared.
Reboot: Restart the device.
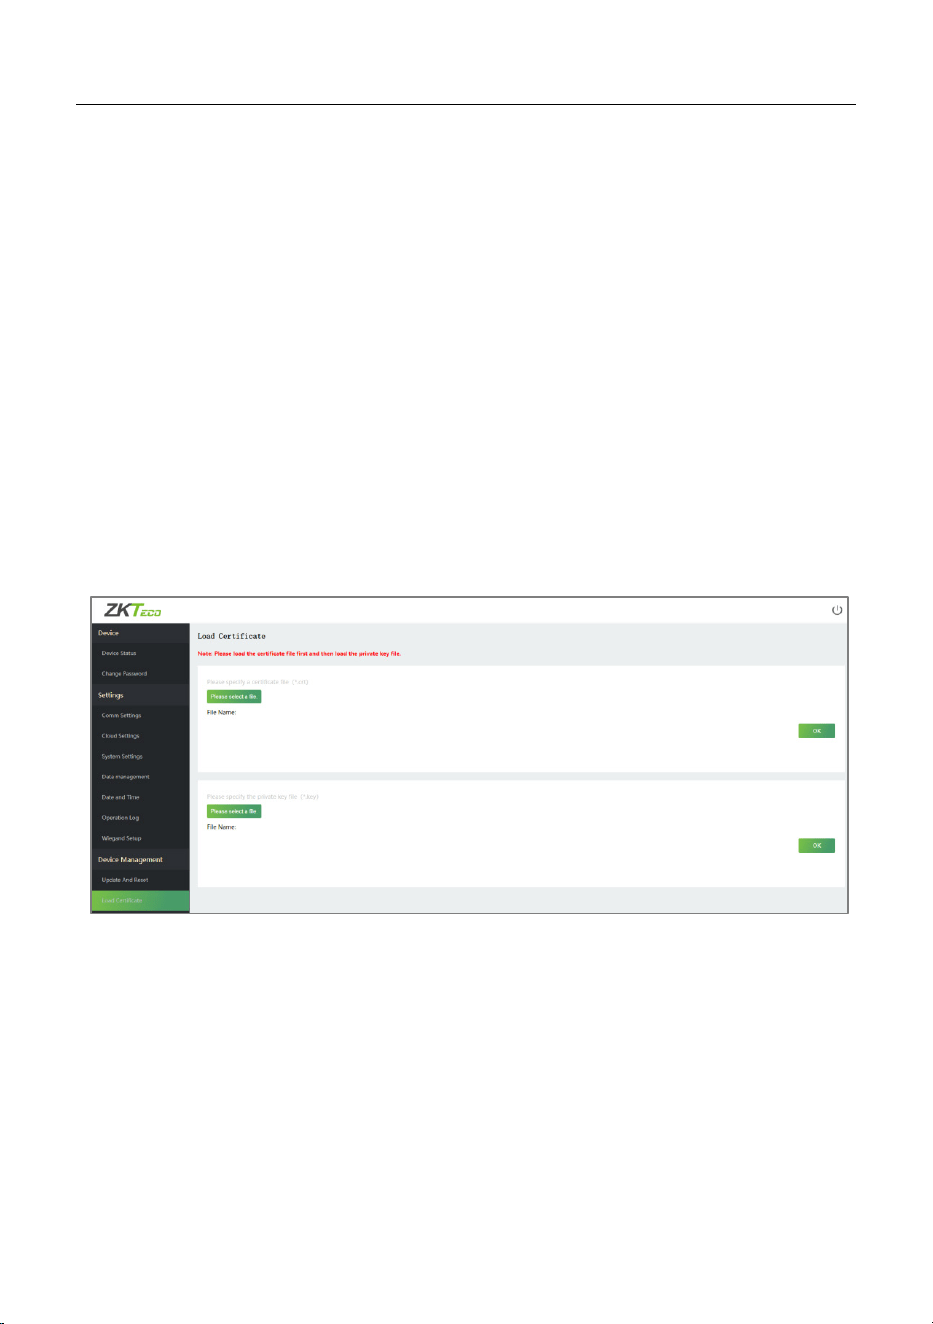
4.4.2 Load Certificate
Click Load Certificate to upload the device certificate file and private key file.
Click Please select a file, upload the certificate file and private key file, and
click OK to complete the file upload operation.
Note: Please load the certificate file first and then load the private key
file.

MA300 User Manual
Page | 43 Copyright©2023 ZKTECO CO., LTD. All rights reserved
5 Connect to ZKBioAccess IVS Software
Set the Communication Address 5.1
1. Login to the Webserver. Click Comm Settings to set the IP address
and Gateway of the device. (Note: The IP address should be able to
communicate with the ZKBioAccess IVS server.)
2. Click Cloud Settings to set the Server address and Server port.
Enable URL: When the software is in HTTPS mode, the setting should
be enabled, you need to type the complete server address and
communication port, as shown in the figure below.
Cloud Server: Set as the IP address of the ZKBioAccess IVS server.
Cloud Server Port: Set as the service port of ZKBioAccess IVS.
MA300 User Manual
Page | 44 Copyright©2023 ZKTECO CO., LTD. All rights reserved
Add Device to the Software 5.2
You can add a device by searching. The process is as follows:
1. Click Access > Device > Search, to open the Search interface.
2. Click Search, and it will prompt Searching…….
3. After searching, the list and the total number of access controllers will
be displayed.
4. Click Add to add the device.
MA300 User Manual
Page | 45 Copyright©2023 ZKTECO CO., LTD. All rights reserved
5. After the addition is successful, the device will be displayed in the
device list.
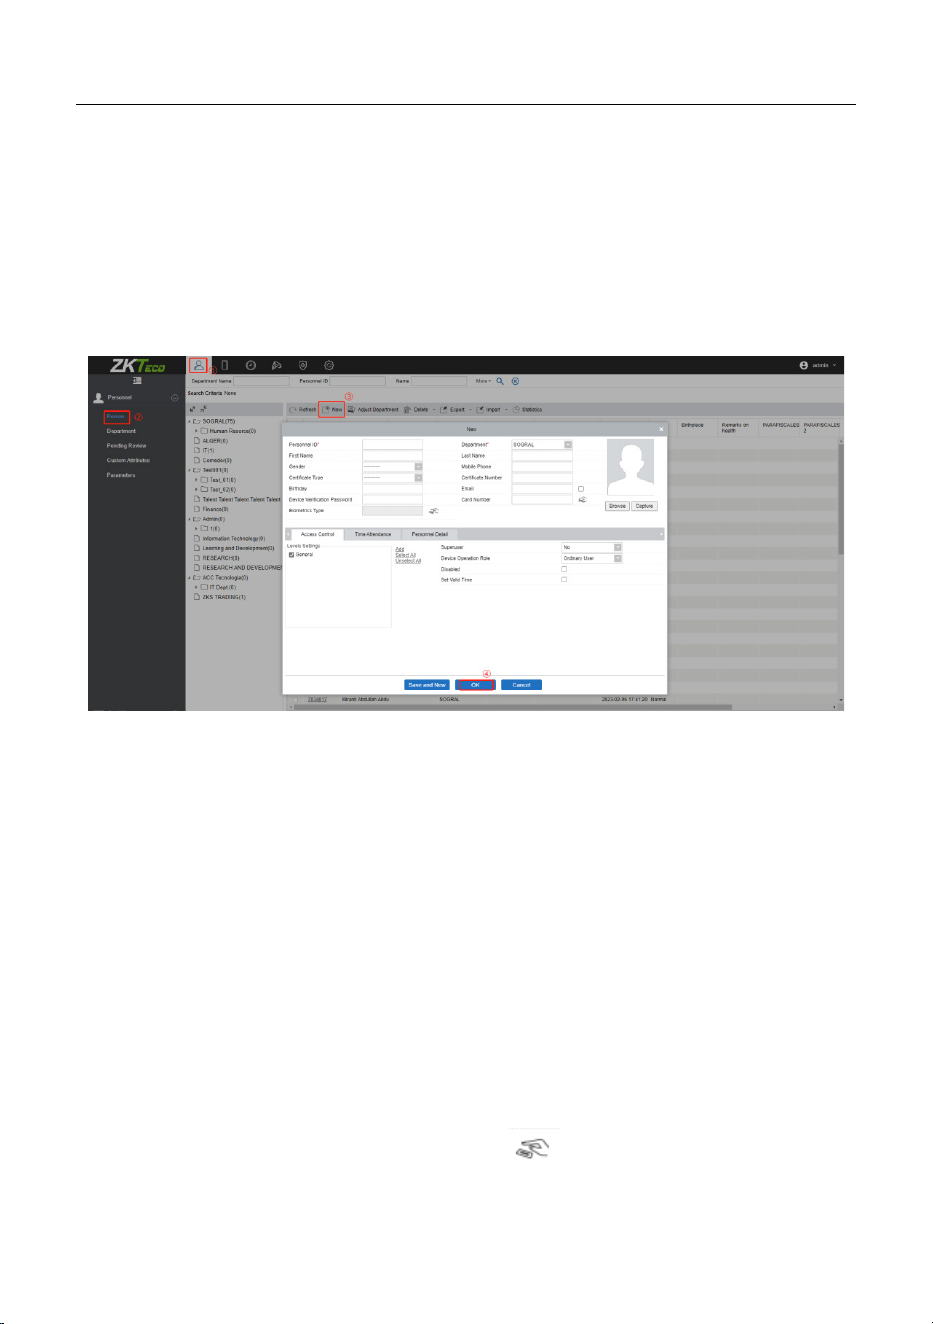
Add Persons to the Software 5.3
1. Click Personnel > Person > New.
2. Enter the required details of the user and click OK to save the user.
3. Click Access > Device, check the device to be operated, and click
Control > Synchronize All Data to Devices to synchronize all the
data to the device.
How to enroll the fingerprints of the user who bears the
management card?
1. Click Access > Device, check the device to be operated, and click
View/Get > Get Personnel Information to obtain the personnel
information.
2. Click Personnel > Person, select the user whose personnel ID is 1 to
enter the user edit interface. Click the icon to enroll the
MA300 User Manual
Page | 46 Copyright©2023 ZKTECO CO., LTD. All rights reserved
fingerprint. (Note: You need to connect a fingerprint reader to the PC
first).
3. After the registration is successful, click Access > Device, check the
device to be operated, and click Control > Synchronize All Data to
Devices to synchronize all the data to the device.
Note:
1. The MA300 currently doesn’t support online fingerprint registration.
2. For other specific operations, please refer to the ZKBioAccess IVS User
Manual.

MA300 User Manual
Page | 47 Copyright©2023 ZKTECO CO., LTD. All rights reserved
6 Appendix
List of Parameters 6.1
The following table lists the basic functional parameters of the device.
Item Note
Power Supply
12V, 3A
Function
Access control device, door sensor/alarm/lock/exit
button
One Wiegand input and one Wiegand output
User Quantity
10,000 (fingerprint and ID card)
Record Capacity
100,000 pieces of records
Enrollment
Capacity
(fingerprint/card)
1,500 fingerprints / 10,000 cards
Verification Mode
ID (IC / HID) card, fingerprint
Communications
TCP / IP, RS485
Speaker
Voice prompt
LED
Bi-color indication (red / green)

MA300 User Manual
Page | 48 Copyright©2023 ZKTECO CO., LTD. All rights reserved
Privacy Policy 6.2
Notice:
To help you better use the products and services of ZKTeco and its
affiliates, hereinafter referred to as "we", "our", or "us", the smart service
provider, we consistently collect your personal information. Since we
understand the importance of your personal information, we took your
privacy sincerely and we have formulated this privacy policy to protect
your personal information. We have listed the privacy policies below to
precisely understand the data and privacy protection measures related
to our smart products and services.
Before using our products and services, please read carefully and
understand all the rules and provisions of this Privacy Policy. If you
do not agree to the relevant agreement or any of its terms, you must
stop using our products and services.
I. Collected Information
To ensure the normal product operation and help the service
improvement, we will collect the information voluntarily provided
by you or provided as authorized by you during registration and use
or generated as a result of your use of services.
1. User Registration Information: At your first registration, the
feature template (Fingerprint template/Face template/Palm
template) will be saved on the device according to the device
type you have selected to verify the unique similarity between
you and the User ID you have registered. You can optionally
enter your Name and Code. The above information is necessary
for you to use our products. If you do not provide such

MA300 User Manual
Page | 49 Copyright©2023 ZKTECO CO., LTD. All rights reserved
information, you cannot use some features of the product
regularly.
2. Product information: According to the product model and
your granted permission when you install and use our services,
the related information of the product on which our services are
used will be collected when the product is connected to the
software, including the Product Model, Firmware Version
Number, Product Serial Number, and Product Capacity
Information. When you connect your product to the software,
please carefully read the privacy policy for the specific
software.
II. Product Security and Management
1. When you use our products for the first time, you shall set the
Administrator privilege before performing specific operations.
Otherwise, you will be frequently reminded to set the
Administrator privilege when you enter the main menu
interface. If you still do not set the Administrator privilege
after receiving the system prompt, you should be aware of
the possible security risk (for example, the data may be
manually modified).
2. All the functions of displaying biometric information are
disabled in our products by default. You can choose Menu >
System Settings to set whether to display the biometric
information. If you enable these functions, we assume that you
are aware of the personal privacy security risks specified in the
privacy policy.
3. Only your user ID is displayed by default. You can set whether

MA300 User Manual
Page | 50 Copyright©2023 ZKTECO CO., LTD. All rights reserved
to display other user verification information (such as Name,
Department, Photo, etc.) under the Administrator privilege. If
you choose to display such information, we assume that
you are aware of the potential security risks (for example,
your photo will be displayed on the device interface).
4. The camera function is disabled in our products by default. If
you want to enable this function to take pictures of yourself for
attendance recording or take pictures of strangers for access
control, the product will enable the prompt tone of the camera.
Once you enable this function, we assume that you are
aware of the potential security risks.
5. All the data collected by our products is encrypted using the
AES 256 algorithm. All the data uploaded by the Administrator
to our products are automatically encrypted using the AES 256
algorithm and stored securely. If the Administrator downloads
data from our products, we assume that you need to process
the data and you have known the potential security risk. In
such a case, you shall take the responsibility for storing the data.
You shall know that some data cannot be downloaded for sake
of data security.
6. All the personal information in our products can be queried,
modified, or deleted. If you no longer use our products, please
clear your personal data.
III. How we handle personal information of minors
Our products, website and services are mainly designed for adults.
Without the consent of parents or guardians, minors shall not create

MA300 User Manual
Page | 51 Copyright©2023 ZKTECO CO., LTD. All rights reserved
their own account. If you are a minor, it is recommended that you ask
your parents or guardian to read this Policy carefully, and only use our
services or information provided by us with the consent of your
parents or guardian.
We will only use or disclose personal information of minors collected
with their parents' or guardians' consent if and to the extent that such
use or disclosure is permitted by law or we have obtained their
parents' or guardians' explicit consent, and such use or disclosure is for
the purpose of protecting minors.
Upon noticing that we have collected personal information of minors
without prior consent from verifiable parents, we will delete such
information as soon as possible.
IV. Others
You can visit
https://www.zkteco.com/cn/index/Index/privacy_protection.html
to
learn more about how we collect, use, and securely store your personal
information. To keep pace with the rapid development of technology,
adjustment of business operations, and cope with customer needs, we
will constantly deliberate and optimize our privacy protection
measures and policies. Welcome to visit our official website at any time
to learn our latest privacy policy.
MA300 User Manual
Page | 52 Copyright©2023 ZKTECO CO., LTD. All rights reserved
Eco-friendly Operation 6.3
The product's "eco-
friendly operational period" refers to the time
during which this product will not discharge any toxic or hazardous
substances when used in accordance with the prerequisites in this
manual.
The eco-friendly operational period specified for this product does not
include batteries or other components that are easily worn down and
must be periodically replaced. The battery's eco-friendly operational
period is 5 years.
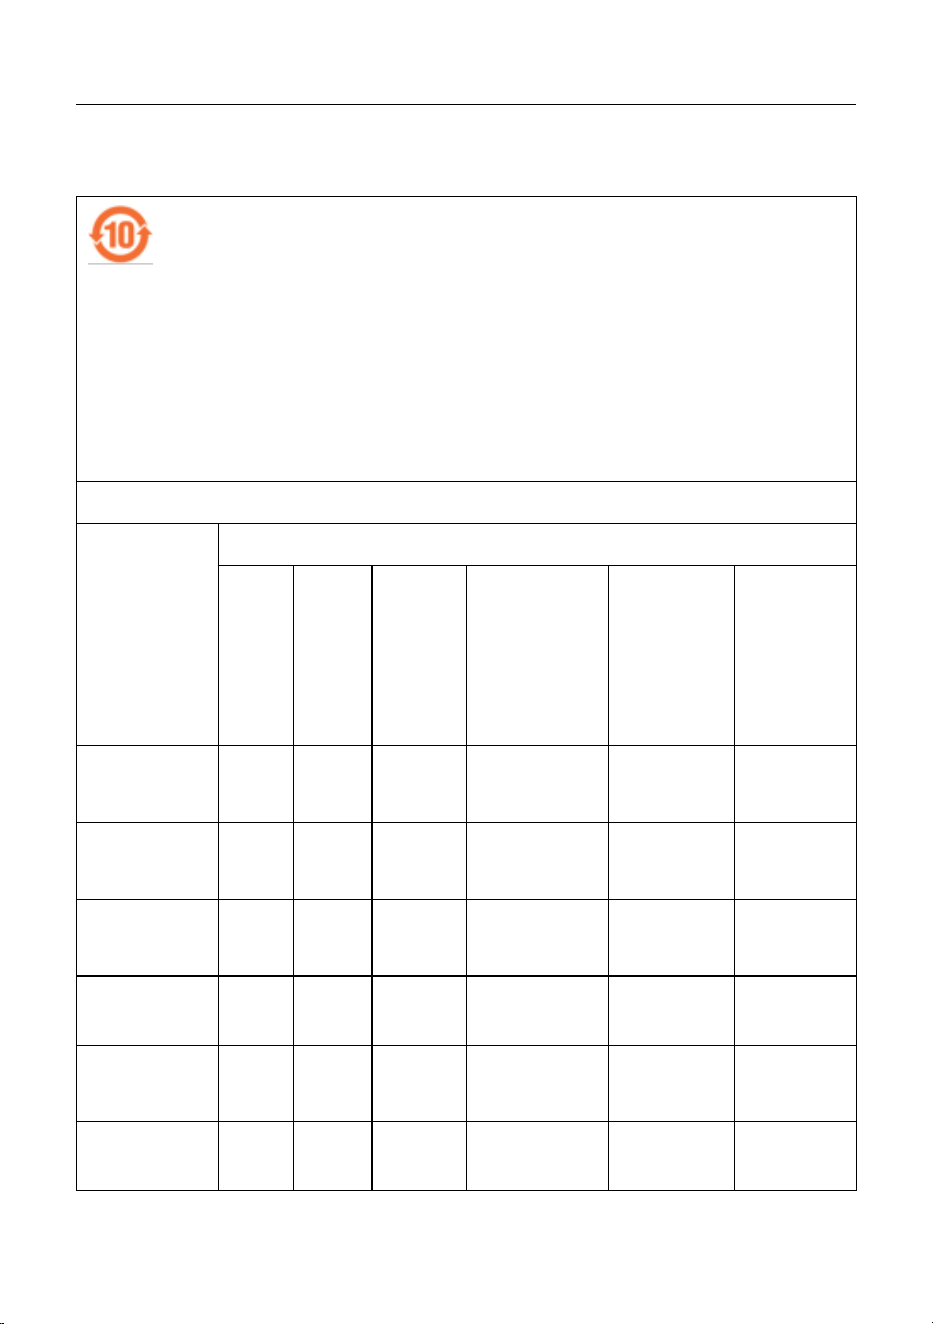
Hazardous or Toxic substances and their quantities
Component
Name
Hazardous/Toxic Substance/Element
Lead
(Pb)
Merc
ury
(Hg)
Cadmi
um
(Cd)
Hexavalent
Chromium
(Cr6+)
Polybromi
nated
Biphenyls
(PBB)
Polybrom
inated
Diphenyl
Ethers
(PBDE)
Chip
Resistor
× ○ ○ ○ ○ ○
Chip
Capacitor
× ○ ○ ○ ○ ○
Chip
Inductor
× ○ ○ ○ ○ ○
Diode × ○ ○ ○ ○ ○
ESD
component
× ○ ○ ○ ○ ○
Buzzer × ○ ○ ○ ○ ○

MA300 User Manual
Page | 53 Copyright©2023 ZKTECO CO., LTD. All rights reserved
Adapter × ○ ○ ○ ○ ○
Screws ○ ○ ○ × ○ ○
○: Indicates that the total amount of toxic content in all the homogeneous
materials is below the limit as specified in SJ / T 11363—2006.
×: Indicates that the total amount of toxic content in all the homogeneous
materials exceeds the limit as specified in SJ / T 11363—2006.
Note: 80% of this product’s components are manufactured using non-toxic
and eco-friendly materials. The components which contain toxins or harmful
elements are included due to the current economic or technical limitations
which prevent their replacement with non-toxic materials or elements.

ZKTeco Industrial Park, No. 32, Industrial Road,
Tangxia Town, Dongguan, China.
Phone : +86 769 - 82109991
Fax : +86 755 - 89602394
www.zkteco.com
Copyright © 2023 ZKTECO CO., LTD. All Rights Reserved.