
E S S E N T I A L S FOR LIFE
User
Manual
8kg Heat Pump
Clothes Dryer
MODEL
GGSHPD88W
V1.1 0925

2
Welcome
Congratulations on purchasing your new Heat Pump Clothes Dryer.
Sôlt is proudly distributed within Australia by Residentia Group Pty Ltd.
Please refer to the warranty card at the rear of this manual for information
regarding your product’s parts and labour warranty, or visit us online at:
→ www.residentiagroup.com.au
At Residentia Group, we are customer obsessed and our Support Team are
there to ensure you get the most out of your appliance. Should you want to
learn more about your unit, and importantly, taking care of the appliance, our
Support Team are here to help.
You can use our online Support Centre at any time by visiting:
→ http://support.residentiagroup.com.au
Or you can contact us via phone by dialling: 1300 11 HELP (4357).
It is important that you read through the following use and care manual
thoroughly to familiarise yourself with the installation and operation
requirements of your appliance to ensure optimum performance.
Again, thank you for choosing an Sôlt appliance and we look forward to being
of service to you.
Kind Regards,
The Residentia Team
Residentia Group
—
Head Office
165 Barkly Avenue
Burnley Victoria
Australia 3121
—
ACN
600 546 656
—
Online
residentia.group
www.Sôlt.house
@Solt.house
—
Postage
PO BOX 5177, Burnley
VIC Australia 3121
—
Telephone
1300 11 4357
—
Email

3
Sôlt recommends the use of original spare parts.
When contacting our customer service team by calling 1300 11 4357,
or by e-mailing support@residentiagroup.com.au, please ensure that
you have the following information at hand.
(found on your appliances’ rating plate).
• Model Number
• Serial Number
Safety Information 04
Your Clothes Dryer 06
Installation Instructions 07
Control Panel 08
Operating Instructions 09
Cleaning & Maintenance 12
Technical Specifications 14
Troubleshooting 15
Purchase Details 17
Warranty Information 18
Contents
Customer Care
4
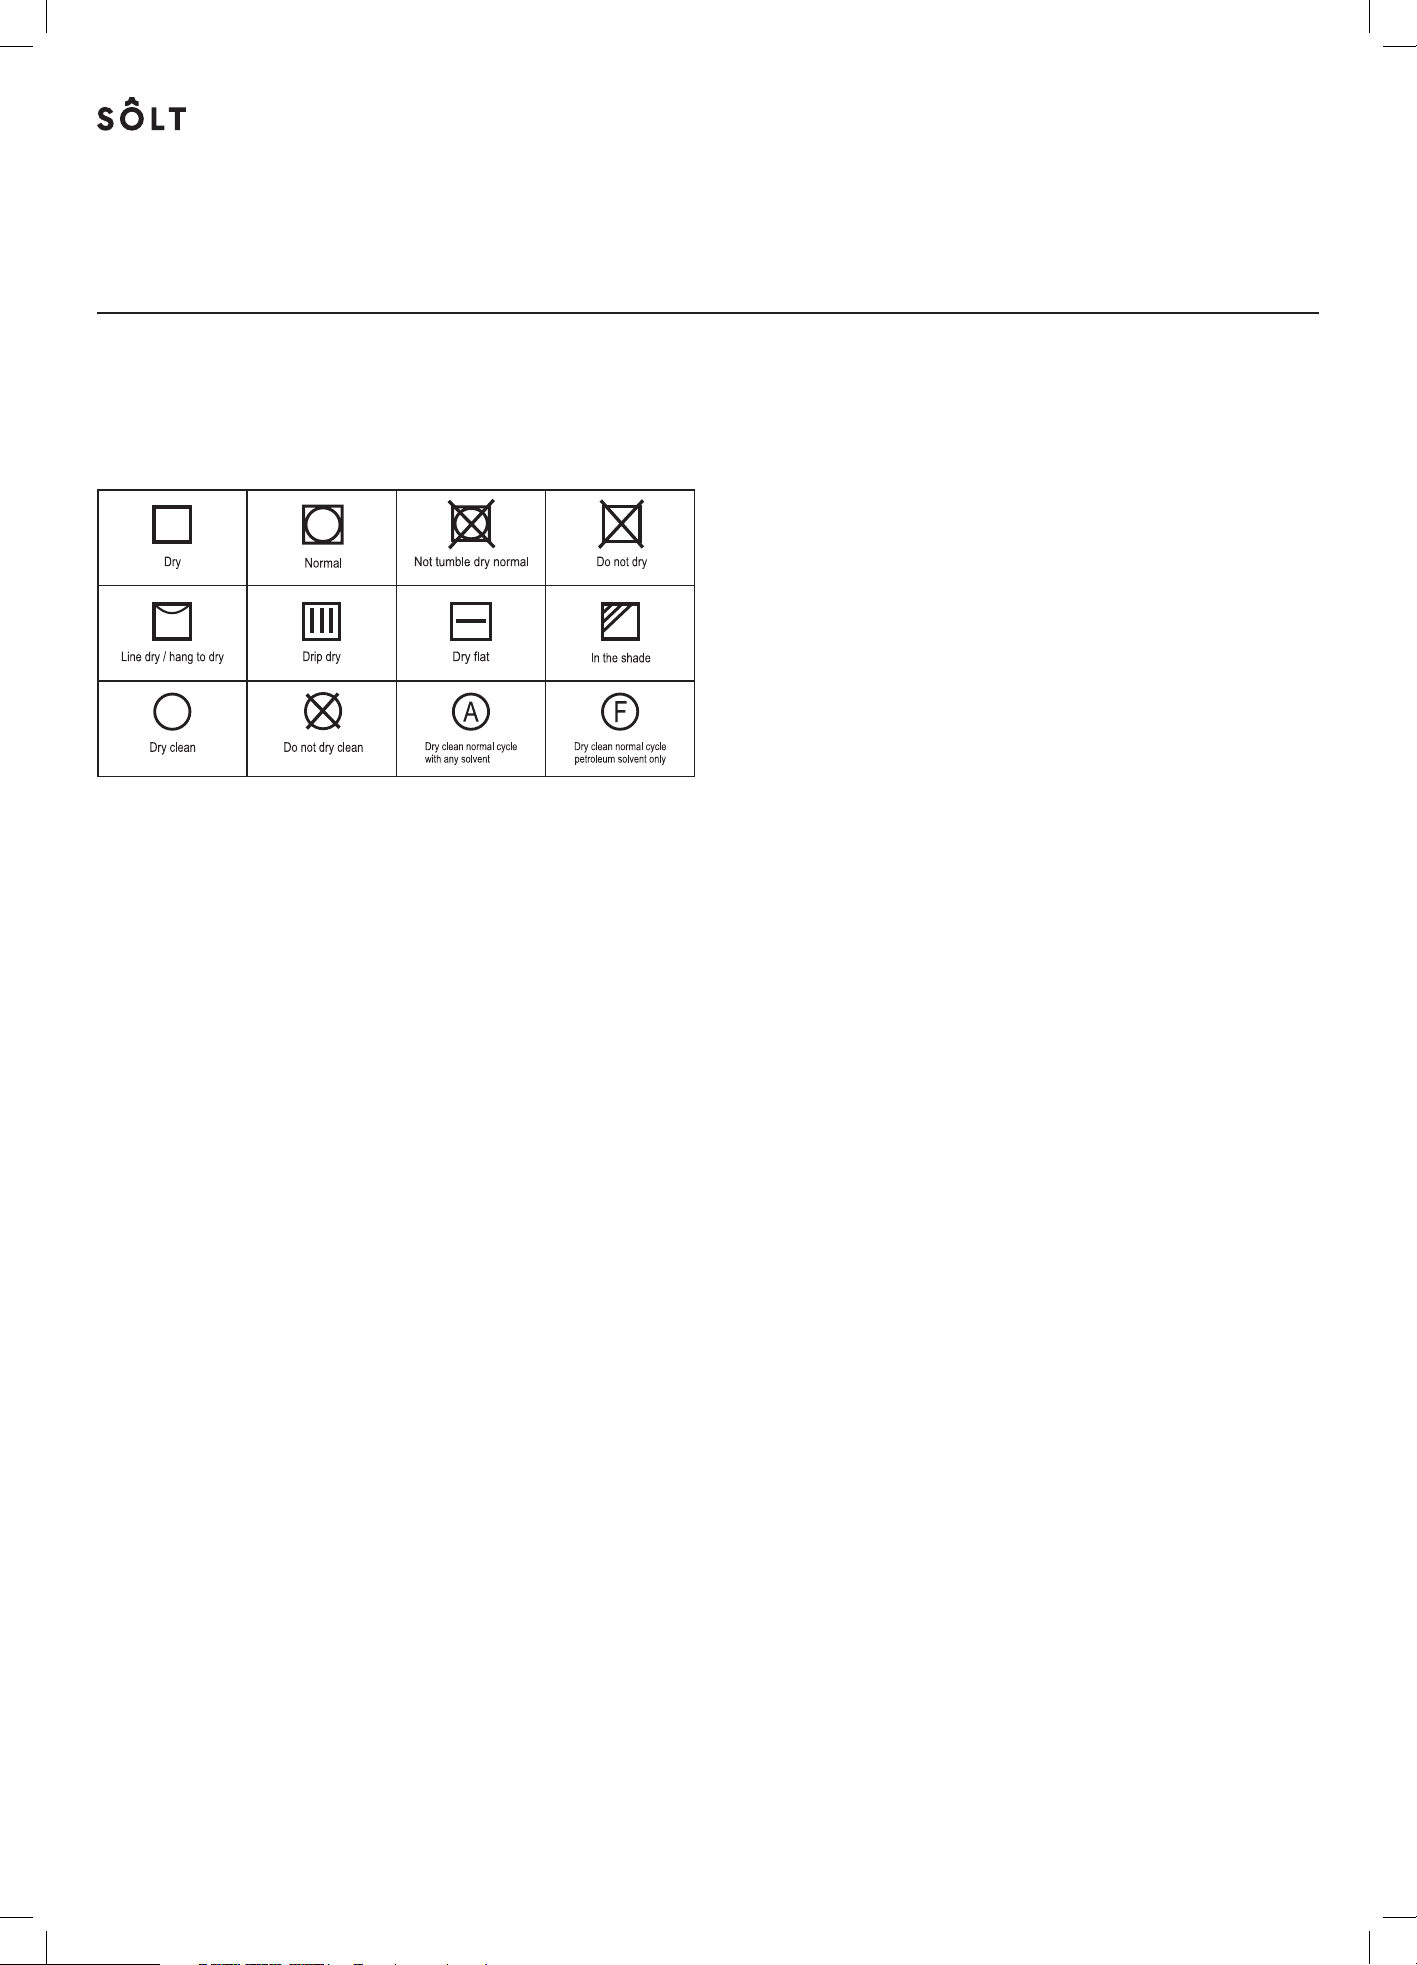
DRYER CARE SYMBOLS
Please pay attention to use the drying machine if the
materials of your clothes can not be dried by it or contain
the symbols as follows:
CONDITIONS OF USE
This heat pump dryer is intended for drying typical
amounts of household laundry, which have been washed
with water. It has been designed solely for private use and
is not suitable for commercial or shared use (i.e. by several
families in an apartment building).
IMPORTANT!
CAUTION: RISK OF FIRE!
To prevent any damages to your and others’ life or
property, you have to follow the safety notes.
• This product belongs to the category of electrical
appliances, and only for drying textiles which have been
washed with water in the household.
Please pay attention to the safety of power use during
the operation!
• The power source with reliable earthing must be
used. Its earth wire must be buried under the ground
and shall not be connected with the public utilities
such as city water pipe or gas pipe etc. The earth wire
and null wire shall be distinguished and shall not be
connected together.
• The maximum mass of dry textile material is 8 kilograms
to be used in the appliance.
• That the tumble dryer is not to be used if industrial
chemicals have been used for cleaning.
• Do not dry unwashed items in the tumble dryer.
• Adequate ventilation has to be provided to avoid
the back flow of gases into the room from appliance
burning other fuels, including open fires
• WARNING: never stop a tumble dryer before the end of
the drying cycle unless all items are quickly removed and
spread out so that the heat is dissipated.
• The exhaust air must not be discharged into a flue which
is used for exhausting fumes from appliance burning gas
or other fuels.
• The appliance must not be install behind a lockable
door, a sliding door or a door with a hinge on the
opposite side to that of the tumble dryer. In such a way
that a full opening of the tumble dryer door is restricted.
• Keep pets away from this appliance.
• Oil-affected items can ignite spontaneously, especially
when exposed to heat sources such as in a tumble dryer.
The items become warm, causing an oxidation reaction
in the oil. Oxidation creates heat. If the heat cannot
escape, the items can become hot enough to catch fire.
Piling, stacking or storing oil-affected items can prevent
heat from escaping and so can create a fire hazard.
• If it is unavoidable that fabrics that contain vegetable
or cooking oil or have been contaminated by hair care
products be placed in a tumble dryer they should first
be washed in hot water with extra detergent-this will
reduce, but not eliminate, the hazard.
• The appliance should not be overturned during normal
use or maintenance.
• If the power cable is damaged, it must be replaced by
the manufacturer, its service agent or similarly qualified
persons in order to avoid a hazard.
• This appliance is for indoor use only.
• The openings must not be obstructed by a carpet;
• Children of less than 3 years should be kept away
unless continuously supervised. If the appliance appear
high temperature abnormally, please draw
the mail plug immediately.
• The appliance is not intended for use by persons
(including children) with reduced physical, sensory
or mental capabilities, or lack of experience and
knowledge, unless they have been given supervision
or instruction concerning use of the appliance by a
person responsible for their safety. Children should be
supervised to ensure that they do not play with
the appliance.
• To ensure your and your family’s safety, please make
improvement immediately if any power use at your
home does not meet the above-mentioned requirement.
ELECTRIC SHOCK HAZARD
• Do not draw the power cord forcefully to pull out
the mains plug.
• Please do not plug/draw the mains plug with wet hands.
• Do not damage the power cord and the power plug.
INJURY DANGER
• Do not disassemble and install the dryer under no
instruction or supervision.
• Do not stack this dryer on washing machine without
stacking kits.(if want stacking on washing machine,
please purchase the Independent parts and it must
be installed by the manufacturer, its service agent or
Safety Information

5
similarly qualified persons in order to avoid a hazard.)
• Do not lean on the opened door of the dryer.
• Do not put any objects on the dryer, such as a candle or
electric cooker.
DAMAGE DANGER
• Do not dry over the rated capacity.
• Do not operate the dryer without the filter door and
filter base.
• Do not dry the clothes before being spun.
• Do not expose the dryer directly under the sun, and
indoor use only.
• Do not install the dryer in the humid and
drenching environment.
• At the cleaning and maintenance, please do remember
to pull out the power plug and do not directly wash the
dryer with water.
EXPLOSION & FIRE DANGER
• Please do not dry the clothes with some flammable
substances such as the coal oil, alcohol or there will be
the explosion.
• The appliance contains an environmentally friendly
but flammable R290 refrigerant. Keep away from open
flame And other sources of ignition.
• The tumble dryer is not to be used if industrial chemicals
have been used for cleaning.
• Do not dry unwashed items in the tumble dryer.
• Items that have been soiled with substances such as
cooking oil, acetone, alcohol, petrol, kerosene, spot
removers, turpentine, waxes and wax removers should
be washed in hot water with an extra amount of
detergent before being dried in the tumble dryer.
• Items such as foam rubber (latex foam), shower caps,
waterproof textiles, rubber backed articles and clothes
or pillows fitted with foam rubber pads should not be
dried in the tumble dryer.
• Fabric softeners, or similar products, should be used as
specified by the fabric softener instructions.
• Oil-affected items can ignite spontaneously, especially
when exposed to heat sources such as in a tumble dryer.
• The items become warm, causing an oxidation reaction
in the oil. Oxidation creates heat. If the heat cannot
escape, the items can become hot enough to catch fire.
Piling, stacking or storing oil-affected items can prevent
heat from escaping and so create a fire hazard.
• Remove all objects from pockets such as lighters
and matches.
• If it is unavoidable that fabrics that contain vegetable
or cooking oil or have been contaminated by hair care
products be placed in a tumble dryer they should first
be washed in hot water with extra detergent. This will
reduce, but not eliminate, the hazard.
• WARNING: Never stop a tumble dryer before the end of
the drying cycle unless all items are quickly removed and
spread out so that the heat is dissipated.
• Openings must not be obstructed.
• The lint trap has to be cleaned frequently.
• Lint must not to be allowed to accumulate around
the dryer.
UV RADIATION SAFETY
• This warning only covers products which contain a UV-C
lamp and which have a germs reduction function with
UV-C lamp.
• The device contains a lamp that emits UV-C rays.
Do not look at the source of light while the lamp
is operating!
• UV-C Lamp is used to provide germs reduction in
textile products.
• Do not take the UV-C Lamp out of the device
and do not operate it outside!
• Do not touch the lamp!
• Use of the product except for its purpose or damage
to the UV-C lamp protection glass or surrounding
may cause dangerous UV-C radiation to occur. UV-C
radiation can damage the eyes and skin even in low
doses. Do not operate any product which is damaged!
• Do not remove the UV-C lamp protection glass.
Do not operate the product without the UV-C lamp
protection glass!
• After the appliance stops due to various reasons
(power outage, fuse problem, machine door opening,
etc.) while UV Hygiene Programs are in progress, the
program will resume to germs reduction from where
it left.
• In cases where UV-C lamp and related parts need to be
replaced (expiration of lamp life, break of lamp glass,
etc.), call the technical service. Do not try to replace
the parts by yourself. When waiting for technical
service, make sure the machine is closed and the plug is
disconnected!
• Keep children away while using any programmes with
activated UV-C Lamp!
• Always read the product guide before using the device
and use the product according to the instructions!
• The placement of the UV Lamp and lamp protector glass
in your product is visually indicated.
• Hygiene programme incorporating UV is effective
for removing Escherichia coli, Staphylococcus aureus
bacteria
DISPOSAL OF PACKAGING
The packaging is designed to protect the appliance from
damage during transportation. The packaging materials
are environmentally friendly and should be recycled.
Recycling the packaging can reduce the use of raw
materials in the manufacturing process and the amount of
waste in landfill sites.
Safety Information (Continued)

6
NOTE!
The images in this user manual are for reference only. Your appliance may appear differently.
ACCESSORIES
The following parts are necessary
if you wish to use the drain hose to
drain the water externally. Please
follow the instructions below to do this.
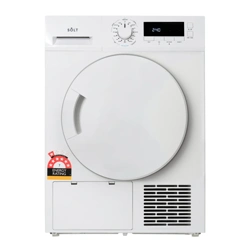
Your Clothes Dryer
Power Cord
Top Panel
Water Container
Drying Drum
Door Filter
Maintenance Cover
Air Inlet
Door
Control Panel
INSTALLATION
9
Accessories
Product Description
Note: The actual model you purchased might differ. Please see the product you purchased in kind prevail.
Installation
Connector
Hose holder
Drain hose joint
Pull up the drain
hose joint
Pull up the upper drain hose Connect the external
drain hose to the water
pump
Put the external drain hose
into the floor drain
(be careful not to bend the
external drain hose)
Power cord
Door filter
Water container
Door
Control panel
Air inlet
Maintenance cover
Drum
Top board
The following parts are necessary for this model to avoid the question of the housing drawer
is easy to fill full.
Please wear gloves to install them as per the instruction below.
Hose Holder
Condensing Drain Hose
Connector
1. Pull out the upper
drain hose
2. Put the external drain hose into the
floor drain (be careful not to bend
the external drain hose)
3. Put the hose holder in the washing
basin or any other sink.
xx
Drain Hose
Drain Hose
Max. 120cm
200cm
X
Overflow Hose
7
Installation Instructions
IMPORTANT!
If the power cord is damaged, it must be replaced by Residentia Group or one of it’s authorised service representatives.
Please contact 1300 11 HELP (4357) and ensure the appliance is completely disconnected from the power supply.
TRANSPORT
Move cautiously. Never grasp any salient parts of machine. The door cannot be used as the handle for transport.
If the dryer can't be transported upright the dryer can be tilted at an angle less than 30°.
Risk of injury and damage! Improper handling of the appliance may result in injury.
• The appliance is heavy. Never transport or carry the appliance alone; always with the assistance of another person.
• Remove all obstacles on the transport route and from the installation location, e.g. open doors and clear away
objects lying on the floor.
• Do not use the open door as a handhold.
• Remove all package material before using the appliance.
• Before setting up the tumble dryer, check it for any externally visible damage.
Do not install or use a damaged tumble dryer.
• Do not install the tumble dryer in a room where there is a risk of frost occurring. At temperatures around freezing
point the tumble dryer may not be able to operate properly. There is a risk of damage if the condensed water is
allowed to freeze in the pump and hoses.
INSTALLATION POSITIONING
• Children can become entangled in the packaging film or swallow small parts and suffocate. Do not allow children to
play with the packaging.
• The appliance must not be installed behind a lockable door, a sliding door or a door with a hinge on the opposite
side to that of the tumble dryer, in such a way that a full opening of the tumble dryer door is restricted.
• Do not restrict the floor clearance through deep pile carpets, strips of wood or similar. This might cause heat built-up
which would interfere with the operation of the appliance.
1. It is recommended that, for your convenience, the machine is positioned close to your washing machine.
2. Do not stack this dryer on washing machine without stacking kits. (If you want to stack this dryer on a washing
machine, please purchase the independent parts. Installation shall be done by the manufacturer, its service agent or
similarly qualified persons to avoid any hazards.)
3. The tumble dryer must be installed in a clean place, where dirt does not accumulate. Air must be able to circulate
freely around the appliance. Do not obstruct the front air inlet or the air intake grilles at the back of the machine.
4. To keep vibration and noise to a minimum level when the dryer is in use, it must be placed on a firm and level surface.
5. The feet must never be removed.
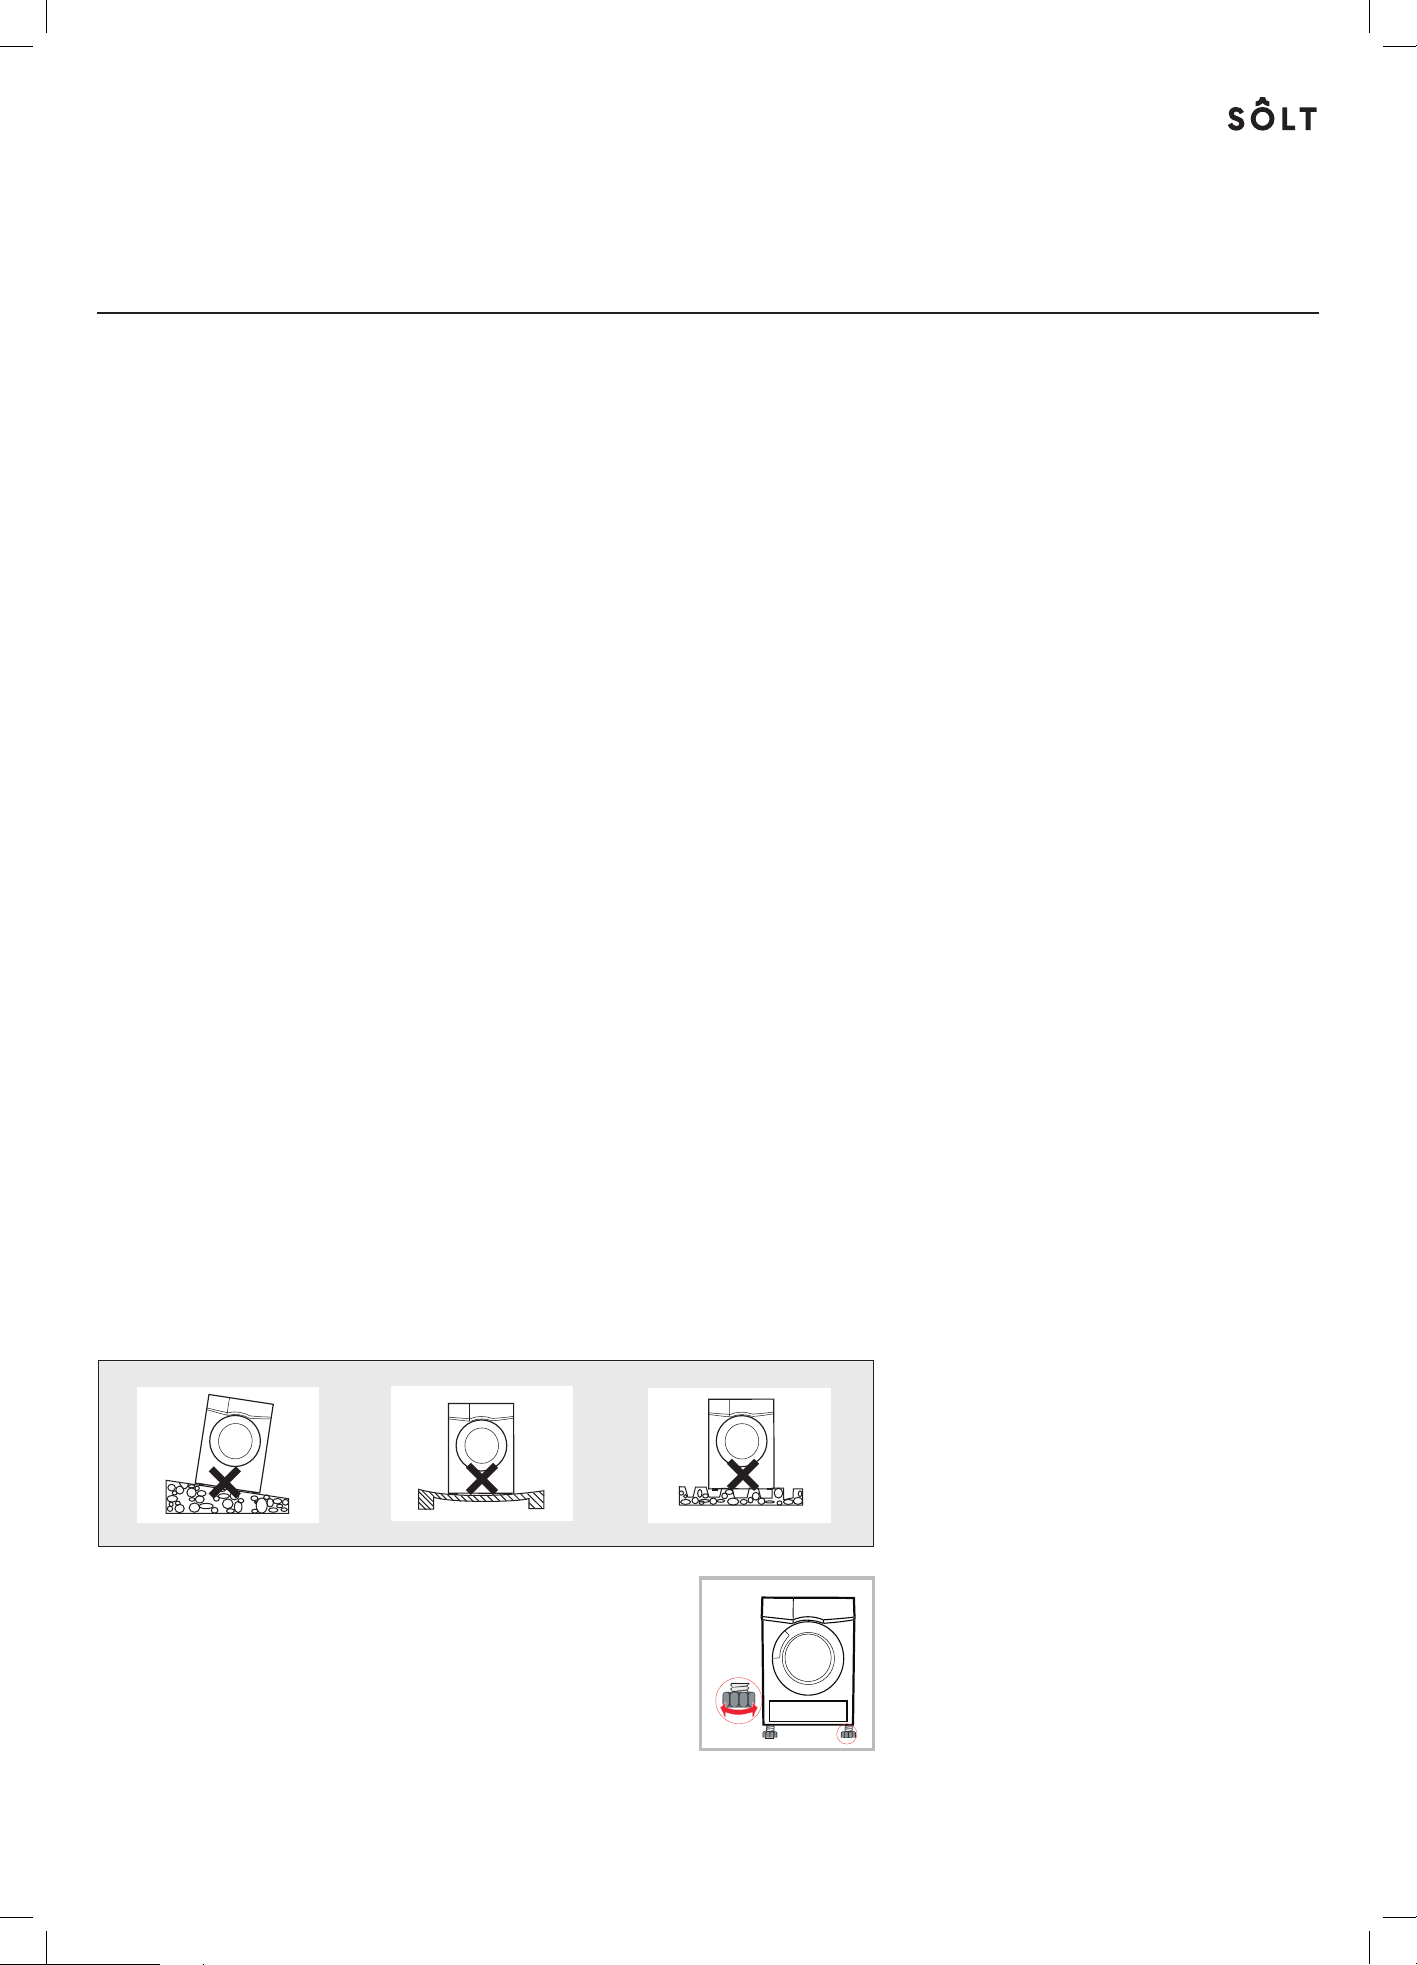
LEVEL ADJUSTING
Once in its permanent operating position, check that
the dryer is absolutely level with the aid of a spirit level.
If it is not, adjust the feet by hand or using a tool.
POWER SUPPLY CONNECTION
1. Make sure that the voltage of the power supply is the same as the electric specification.
2. Do not connect the dryer with the power connection board, a universal plug or socket, do not use multi-plug
adapters and extension cables.
11
INSTALLATION
Level Adjusting
Once in its permanent operating position, check that
the dryer is absolutely level with the aid of a spirit level.
If it is not, adjust the feet by hand or using a tool.
Power Supply Connection
4. To keep vibration and noise within minimum level when the dryer is in use, it must
be placed on a firm and level surface.
5. The feet must never be removed.
1.Make sure that the voltage of the power supply is the same as the electric specification.
2.Do not connect the dryer with the power connection board, a universal plug or socket,
do not use multi-plug adapters and extension cables.
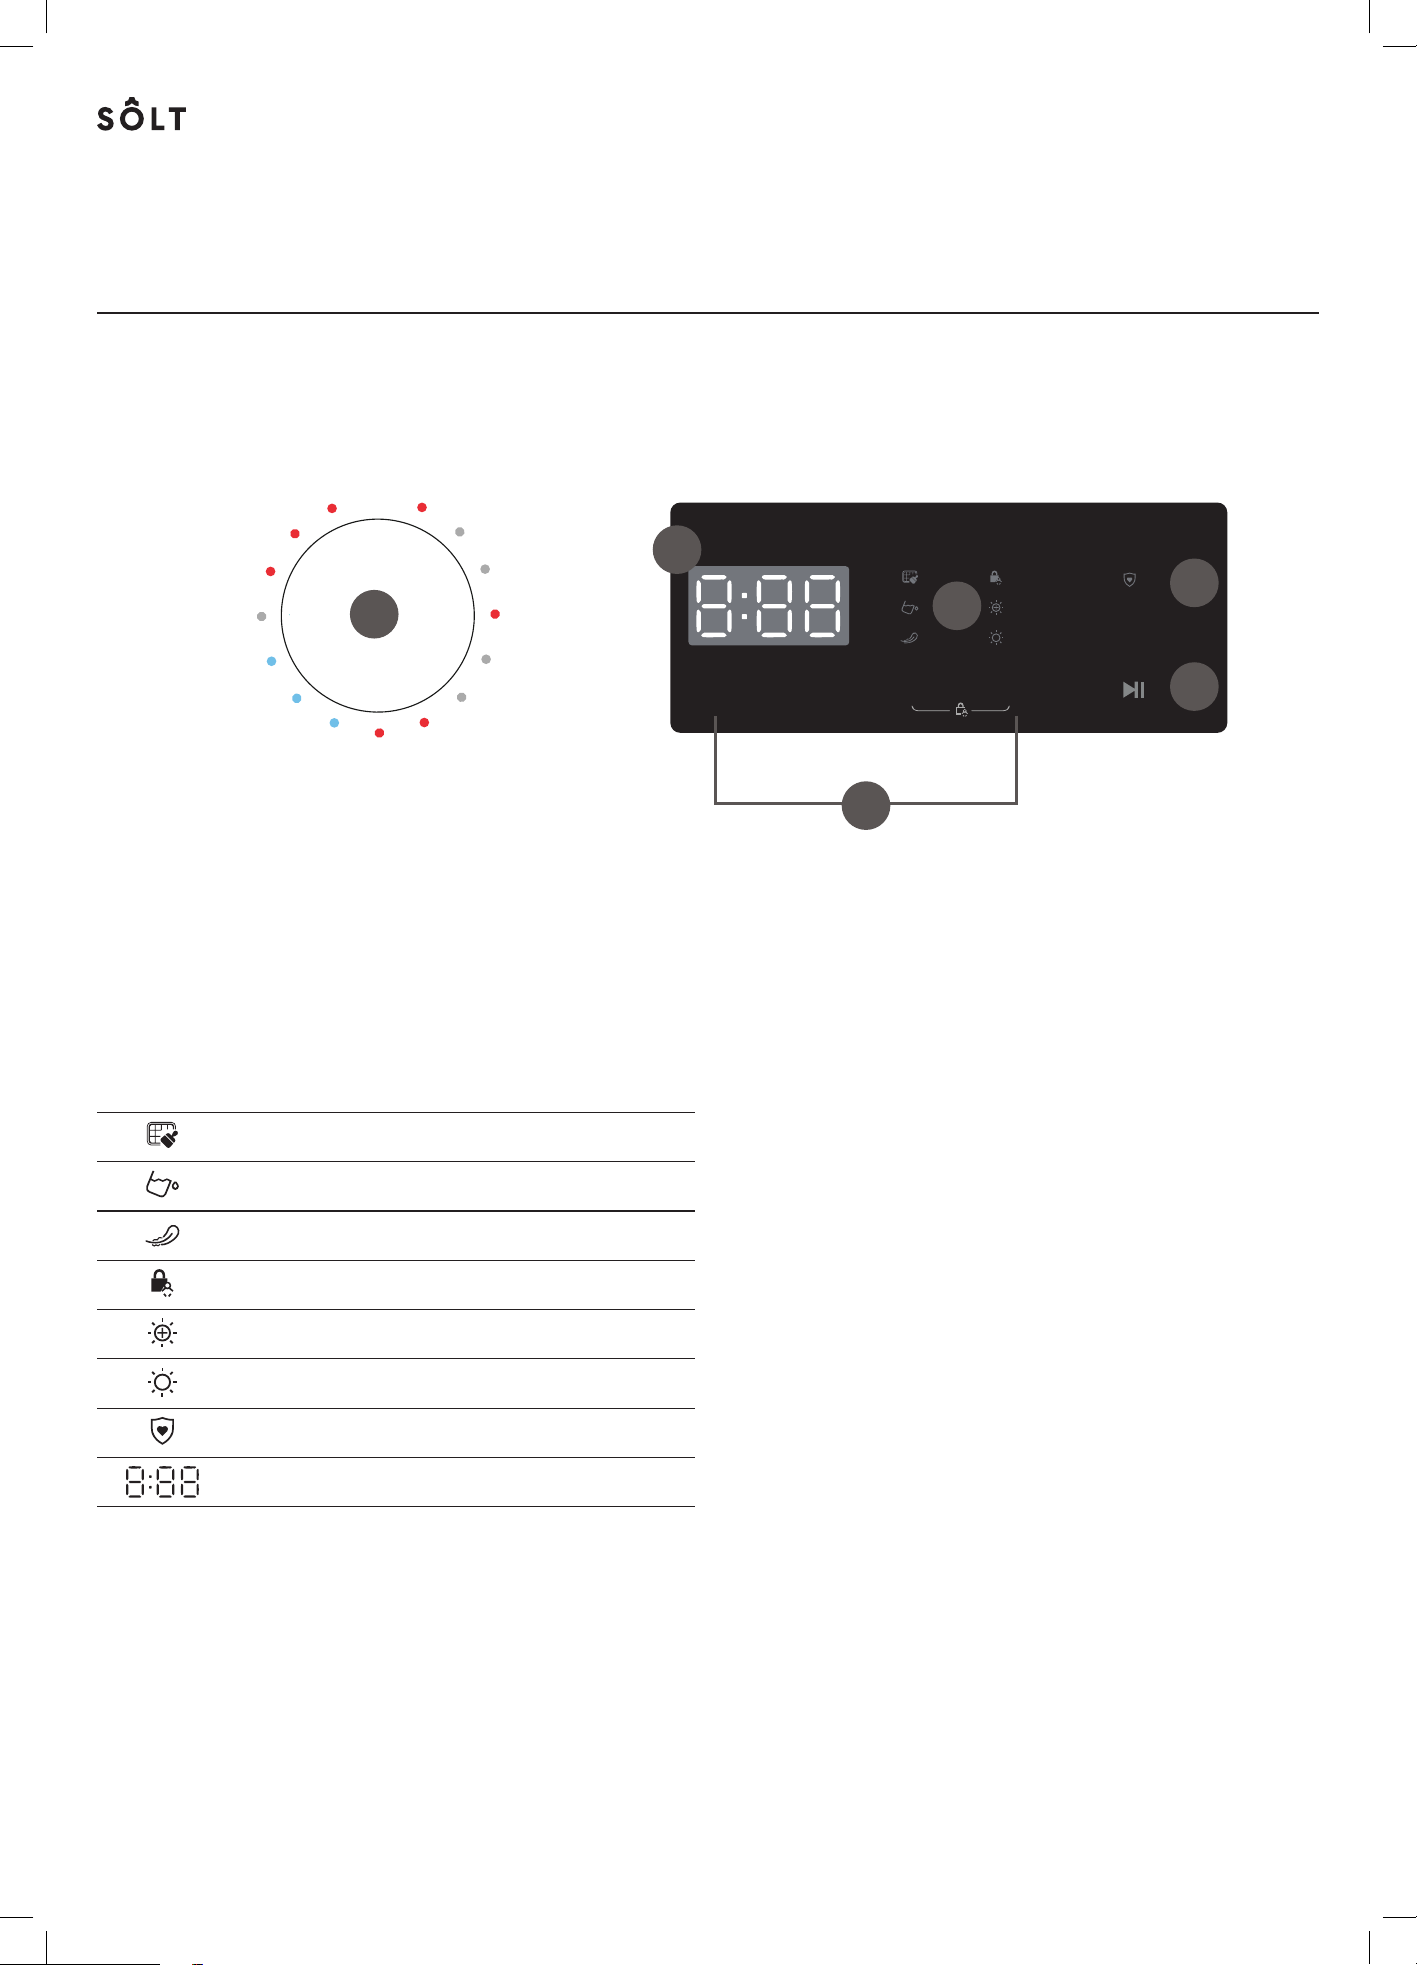
8
Jeans
Wool
Warm Dry
Cool Dry
Refresh
GGSHPD88W
OFF
Bulky Load
Cotton Extra
Cotton ECO
Cotton Iron
Sport Wear
Shirts
Delicate
Mix
Synthetic Extra
Synthetic
TIME DRYDE L AY
INTENSITY
HYGIE NE+
ANTI
CREASE
PRESS 3 SEC.
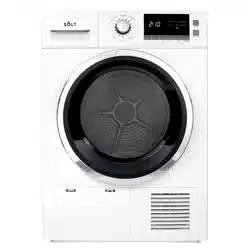
YOUR CONTROL PANEL
1. Program control dial
2. Additional Function Buttons
3. LED Display Screen
4. Function & Warning Indicators
5. Start/Pause
6. Hygiene+
DISPLAY SCREEN SYMBOLS
Clean Filters Warning
Empty Water Container Warning
Anti Crease
Child Lock
Intensity (Dryness Level Extra)
Intensity (Dryness Level Standard)
Hygiene+ (UV Sterilising)
Remaining Time / Error Message Display
Control Panel
5
6
3
4
1
2
9
Operating Instructions
BEFORE FIRST USE
Leave it to stand for 2 hours after transporting.
Before first use, please use some soft fabric to clean the inside drum.
1. Put some clean rags into the drum
2. Plug the power, turn the program dial to select the Refresh Program
3. Press Start/Pause button
4. After finishing this program, please refer to the “Maintenance and Cleaning” section to clean the door filter.
Note: During drying, the compressor and the water will generate some noise which is completely normal.
BEFORE DRYING
1. Before drying, thoroughly spin the laundry in washing machine. High spin speed shortens the drying time and
saves energy.
2. For uniform drying result, sort the laundry according to fabric type and select the appropriate drying program.
3. Before drying, please close zips, hooks and eyelets, button, tie fabric belts, etc.
4. Remove all objects from pockets such as lighters and matches.
5. Sew in or remove under wiring from bras.
6. Close duvet covers and pillow cases to prevent small items from being rolled up inside them.
7. Leave jackets open and undo any long zips so that textiles dry evenly.
8. Do not over dry the clothes, because over dried clothes can easily get creases.
9. Do not dry the articles containing rubber or similar elastic materials.
10. Keep the area around the tumble dryer clean. Coal dust or flour may cause an explosion.
11. The door shall be opened only after the program of the tumble dryer is finished to avoid being scalded by hot
steam or over heated drying machine.
12. Clean the lint filter and empty water container after each use to avoid extension of drying time and increase
of energy consumption.
13. Do not dry clothes after dry-clean process.
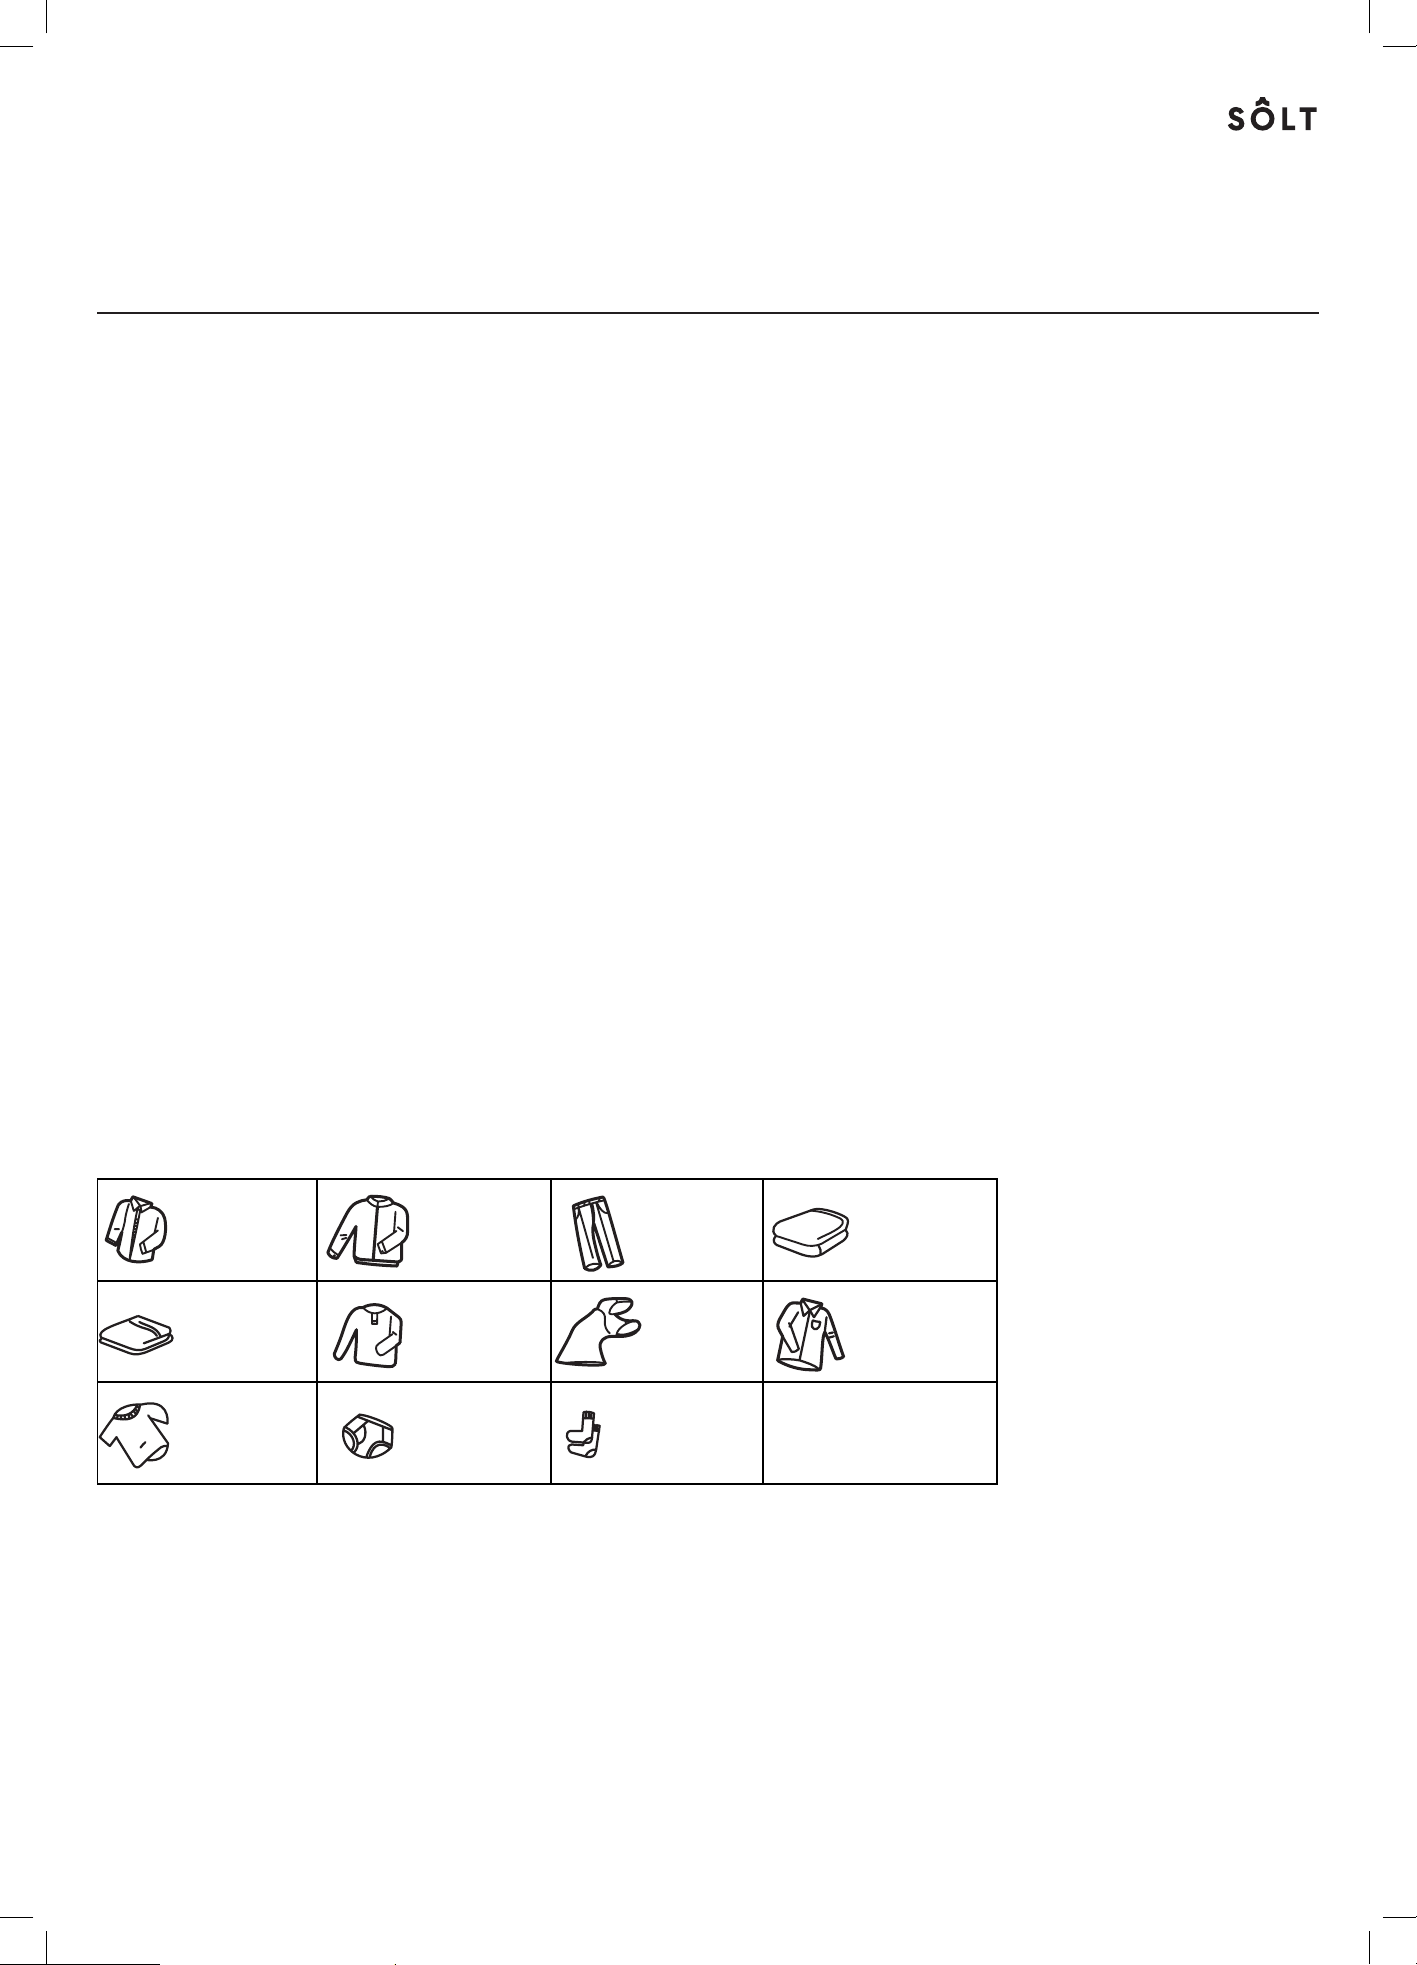
APPROXIMATE WEIGHTS OF DRY CLOTHES
Note: Do not put more clothing in the dryer than the rated capacity.
Do not dry dripping wet laundry, it may damage the laundry.
14
OPERATION
Do not put more load than rated.
• Do not dry dripping wet laundry. The dryer might get damaged
•
Note!
The reference weight of dry clothes (weight per item)
Sweater
(mixed 800g)
Jacket
( 800g ) cotton
Jeans
(800g)
Bath Towel
( 900g )cotton
Single bedsheet
( 600g )cotton
T-Shirt
( 180g )cotton
Work clothes
( 1120g)
Underwear
( 70g )cotton
Pyjamas
( 200g)
Socks
( 50g )mixed-weave
Shirt
( 300g )cotton
Only dry laundry suitable for tumble drying. Regard the laundry care labels:
Suitable for tumble drying
Normal drying process: Drying in the tumbler is possible under normal load and
temperature 80°.
Mild drying process: Caution is appropriate when tumble drying. Select mild
process with reduced thermal action.
Do not tumble dry: Articles unsuitable for drying in the tumbler.

10
USING THE ADDITIONAL FUNCTIONS
DELAY FUNCTION
This function is used for delaying the start of the drying program up to 24 hours. When the delayed program starts,
the time starts to countdown on the display and the delay icon blinks.
1. Load your laundry and make sure the machine door is closed.
2. Rotate the program selector knob to select the desired program.
3. You can additionally select the Anti Crease function according to your needs.
4. Press the Delay button.
5. Repeatedly to press the Delay button to select the desired delay time.
6. Then press the Start/Pause button and the dryer will be in standby and the delay time will start counting down.
The drying procedure will be automatically performed when the delay time is over.
7. If you press the Start/Pause button again, the delay function will be paused.
8. If you want to cancel the “Delay” function, please rotate the program selector knob to off.
TIME DRY
When the Time Dry program is selected, the Time Dry button can be used to adjust the drying time in
10 minute increments.
ANTI CREASE FUNCTION
At the end of the drying cycle, the anti crease operation time is automatically set to 30 minutes or 120 minutes if you
select it. Press the Anti Crease button to select the time. If you do not want to use this function simply remove your
laundry at the end of the cycle.
This function prevents the laundry from creases. The laundry can be removed during the Anti Crease phase.
This function cannot be used with the Wool program.
INTENSITY
You can adjust the dryness level of the laundry by pressing the Intensity button.
1. The intensity function can be activated only before the program starts.
2. Except the Cotton ECO, Cotton Extra, Iron, Wool and Time program, all the other programs can be adjusted with the
Intensity function.
HYGIENE+
1. After selecting a program, you can choose the Hygiene+ function according to your needs.
2. Press Hygiene+ button to select this function.
3. Press it again to cancel.
After selecting the Hygiene+ button , germs are removed during the drying process using the UV light, making the
clothes cleaner and safer. Use this function with caution for light, thin or delicate laundry.
This program can be used with Jeans, Bulky Load, Sport Wear, Cotton Extra, Delicate, Mix, Synthetic Extra, Synthetic and
Shirts programs are compatible with the Hygiene+ function.
CHILD LOCK
This machine incorporates a special child safety lock, which can prevent children from carelessly pressing buttons and
doing damage to themselves or the appliance.
1. When the drying cycle is running, press the Anti Crease button and the Intensity button at the same time for
3 seconds to start the child lock function.
2. When child lock function is set, the display will show Child lock icon and all button are deactivated.
3. To deactivate the child lock function, the Anti Crease button and the Intensity button shall be pressed at the same
time for 3 seconds.
Operating Instructions (Continued)
11
DRYING PROGRAMS TABLE
PROGRAM MAX LOAD RECOMMENDED USE/ PROPERTIES DELAY TIME
Cotton
Extra
8.0kg
For single or multi layered cotton laundry to be dried
completely for immediate storage.
Y N
Iron For single layered cotton to remain damp for ironing. Y N
ECO
For single or multi-layer cotton laundry to be
dried completely for direct wear.
Y N
Delicate - 1.0kg
For delicate laundry that is suitable for drying or
laundry advised to be hand washed at a low temp.
Y N
Mix - 3.5kg For mixed fabrics from cotton and synthetics. Y N
Synthetics
Extra
3.5kg
For thick or multi-layer synthetic fabrics to be
dried completely
Y N
Cupboard
To dry thin synthetic textiles, which are not ironed,
such as easy care shirts, baby cloths or socks.
Y N
Jeans - 8.0kg
To dry jeans or denim clothes that are spun at high
speed in the washing machine.
Y N
Sports - 3.0kg
To dry sportswear and thin fabrics from polyester,
which are not ironed.
Y N
Shirts - 1.0kg
For easy care laundry such as shirts and blouses
equipped with Anti Crease functionality to minimise
the ironing effort. Place clothes loosely in the dryer.
Once dried, remove quickly
and hang it on a clothes hanger.
Y N
Wool - 1.0kg
To refresh you wool items and make them more
fresh and fluffy.
Y N
Time
Warm Dry -
To dry individual items or to finish the drying process
of multi-layer fabrics with different drying behaviour,
such as jackets, pillows or voluminous items.
Min. 10 minutes — Max. 150 minutes.
Y Y
Cool Dry -
To air items without heating.
Min. 10 minutes — Max. 30 minutes.
Y Y
Refresh 1.0kg
To refresh clothes that have beenkept in a closed
environment for a long time or to remove odors.
Min. 20 minutes — Max. 180 minutes.
Y Y
Bulky
Load
- 3.5kg To dry bed linen, bed sheets or other large items. Y N
NOTE FOR TEST INSTITUTES:
1. Jeans + Intensity programme in accordance with Regulation AS/NZS 2442.2 for energy labelling, measured in
accordance with AS/NZS2442.1 and suitable for drying normal cotton load at rated load capacity.
2. Jeans + Intensity programme is suitable for drying normal wet cotton laundry and it is the most efficient programme
in terms of energy consumption for cotton.
Operating Instructions (Continued)
12
Cleaning & Maintenance
CLEANING AND CARE
EMPTYING THE WATER CONTAINER
WARNING!
Empty the water container after each use. Once the water container is filled completely, the program
will be paused and the " " icon will light. After the container is emptied, the dryer can be restarted by
pressing Start/Pause button.
• Do not drink the condensate water.
• Do not use the dryer without the water container.
CLEANING THE DOOR FILTER
This dryer has a primary door lint filter.
Make sure you clean the door filter after each cycle
to avoid increased energy consumption and cycle time
1. Open the door.
2. Take out the door filter.
3. Open the filter and remove the fluff on the filter
by hand. You can use a vacuum cleaner to help
clean it.
4. Throw lint in the garbage bin and do not wash it
down the drain to avoid micro plastics in the used
water system.
5. Reinstall the door filter.
WARNING!
• The fluff accumulated on the filter will block the air
circulation. Not cleaning the filter regularly will increase
drying time and energy consumption.
• Disconnect the power cord before cleaning!
• Do not operate the dryer without the filter!
CLEANING THE LOWER FILTER
1. Open the service panel
2. Detach the clips holding the cover and remove the cover
3. Remove the lower filter, clean it thoroughly and replace filter
4. Replace the cover and fasten the clips
5. Close the service panel
MAINTENANCE
21
Empty the water container
Clean the filter door
1. Pull out and hold the water container
with two hands.
2. Tilt the water container, pour out the
condensate water into the basin.
3. Install the
water container.
Clean the filters
Cleaning and Care
This dryer has a primary door lint filter and a base filter in front of the heat exchanger
for additional protection. Make sure you clean the door filter after each cycle.
The base filter need to be cleaned after each fifth drying programme.
1. Open the door.
2. Take out the filter.
3. Open the filter and remove the fluff on
the filter, You can clean it in water.
4. Dry the filter thoroughly before
installing it back.
door
running
door
• Take notice of the correct orientation
before to insert the door filter.
Note!
Door Filter
• Empty the water container after each use. Once the water container is filled
completely, the programme will be paused and the " " icon will light. After
the container is emptied, the dryer can be restarted by pressing
【Start/Pause】button.
• Do not drink the condensate water.
• Do not use the dryer without the water container.
Warning!
!!
Pull out the water
container and keep
level with two hands.
Tilt the water
container to pour out
condensate into the
basin.
MAINTENANCE
21
Empty the water container
Clean the filter door
1. Pull out and hold the water container
with two hands.
2. Tilt the water container, pour out the
condensate water into the basin.
3. Install the
water container.
Clean the filters
Cleaning and Care
This dryer has a primary door lint filter and a base filter in front of the heat exchanger
for additional protection. Make sure you clean the door filter after each cycle.
The base filter need to be cleaned after each fifth drying programme.
1. Open the door.
2. Take out the filter.
3. Open the filter and remove the fluff on
the filter, You can clean it in water.
4. Dry the filter thoroughly before
installing it back.
door
running
door
• Take notice of the correct orientation
before to insert the door filter.
Note!
Door Filter
• Empty the water container after each use. Once the water container is filled
completely, the programme will be paused and the " " icon will light. After
the container is emptied, the dryer can be restarted by pressing
【Start/Pause】button.
• Do not drink the condensate water.
• Do not use the dryer without the water container.
Warning!
!!
Reinstall the water
container once empty.
13
CLEANING THE HEAT EXCHANGER
WARNING! Do not touch the heat exchanger with your hand as it may cause injury.
As necessary, approx. once every 3 months, remove the fluff from the heat exchanger using a vacuum
cleaner with a dusting brush attached. Clean the heat exchanger without applying any pressure.
Otherwise the heat exchanger could be damaged. The dryer will not dry if the cooling fins are damaged
or bent.
MAINTENANCE
22
regularly will increase drying time and energy consumption.
• Disconnect the power cord before cleaning!
• Do not operate the dryer without the filter!
• The fluff accumulated on the filter will block the air circulation. Not cleaning the filter
Note!
As necessary, approx. once every 6 months, remove the fluff from the heat
exchanger using a vacuum cleaner with a dusting brush attached.
Clean the heat exchanger without applying any pressure. Otherwise the heat
exchanger could be damaged. The dryer will not dry
if the cooling fins are damaged or bent.
•
•
Clean the heat exchanger
Warning!
!!
Do not touch the heat exchanger with your hand,
which may cause an injury.
MAINTENANCE
WARNING!
• Disconnect the power cord before cleaning.
• Clean the dryer with a clean damp cloth only.
• Do not use solvents, abrasive cleaners, glass cleaners or all-purpose cleaners.
These could damage plastic surfaces and other parts.
• Please wear gloves when cleaning.
CLEANING YOUR DRYER
• Prepare a clean damp cloth using clean water.
• Clean the door, especially the inside window.
• Clean the sealing around the door opening.
• Clean the humidity sensor inside the drum.
• Take out the filter, clean the sealing and air flow openings.
• Before starting the dryer, dry all parts with a soft cloth.
Cleaning & Maintenance (Continued)
14
Below outlines the technical specifications for your Sôlt Heat Pump Dryer.
Model GGSHPD88W
Size 595W × 600D × 850H (mm)
Ambient Temperature
+2°C ~ +35°C
Rated Input Power
800W
Rated Voltage
220–240V~
Rated Frequency
50Hz
Refrigerant/Amount
R290/120g
Net Weight 41kg
Rated Capacity
8.0kg
GWP 3
CO
2
- eq 0.00t
Note:
• The rated capacity is the maximum capacity to be dried at one time. Make sure that the dry clothes which are loaded
into the appliance do not exceed the rated capacity.
• Do not install the tumble dryer in a room when there is a risk of frost occurring. At temperatures around freezing point
the tumble dryer may not be able to operate properly.
• There is a risk of damage if the condensate water is allowed to freeze in the pump, hoses and / or condensate
water container.
Technical Specifications
15
OPERATION IN CASE OF EMERGENCY
In the event of an emergency you should:
• Rotate the knob to the Off position.
• Switch the washing machine off at the power point or at the fuse box.
• Call the Residentia Support Team on 1300 11 HELP (4357).
Some minor faults can be fixed by referring to the instructions given in the Troubleshooting section
below. There is also a self-help section online at https://support.residentiagroup.com.au/
DESCRIPTION SOLUTION
Display is not on
• Check if the power supply works.
• Check if the mains plug is inserted.
• Check the selected program.
Displays
• Check the water container. If it's full, please pour out the condensate water
and restart the dryer.
• If the container is not full, please restart the dryer.
• If the icon is still lit after you have finished the first two steps, please
contact the after sales service team.
Displays
• Clean the lint filter.
Dyer does not start
• Connect the dryer to the mains.
• Turn on the tumble dryer.
• Check the door is closed.
• Check the program is set.
• Press the Start/Pause button.
Clothes not properly dry or drying
time is taking too long
• Clean lint filter.
• Empty the water container.
• Check the drain hose.
• Check installation place is appropriate.
• Keep the air inlet clean.
• Use higher drying intensity level program or time program.
There are humming noises
• The compressor is operating. These noises are quite normal and do not
indicate a fault.
The dryer switches off at the end of
the program
• This is normal operation. The dryer will switch off automatically for
energy saving
Troubleshooting
16
ERROR MESSAGES AND SOLUTIONS
WARNING! Never dismantle the dryer.
INDICATION REASON SOLUTION
"E82" displays PCB Communication error.
Please contact the Residentia Group support
term on 1300 11 HELP (4357).
"E33" displays Temperature sensor error.
displays
Water pump failure or water
level sensor failure.
Water Container is full. Empty the water container.
WARNING!
• Only authorised technicians can carry out repairs.
• If the LED displays other prompt and the dryer does not work, please call the Residentia Group support team.
Troubleshooting (continued)
17
For future reference, please record the following information which can be found
on the rating plate and the date of purchase which can be found on your sales invoice.
STORE DETAILS
STORE NAME
|
ADDRESS
|
TELEPHONE
|
PURCHASE DATE
|
PRODUCT DETAILS
MODEL NO.
|
SERIAL NO.*
|
Purchase Details
Attach Your Receipt Here

18
WARRANTY TERMS AND CONDITIONS
LAUNDRY APPLIANCES
This document sets out the terms and conditions of the
product warranties for Residentia Group Appliances. It is
an important document. Please keep it with your proof of
purchase documents in a safe place for future reference
should you require service for your Appliance.
1. IN THIS WARRANTY
(a) ‘acceptable quality’ as referred to in clause 10 of
this warranty has the same meaning referred to in
the ACL;
(b) ‘ACL’ means Trade Practices Amendment (Australian
Consumer Law) Act (No.2) 2010;
(c) ‘Appliance’ means any Residentia Group product
purchased by you accompanied by this document;
(d) ‘ASR’ means Residentia Group authorised service
representative;
(e) ‘Residentia Group’ means Residentia Group Pty Ltd
of 165 Barkly Ave, Burnley VIC 3121, ACN 600 546 656 in
respect of Appliances purchased in Australia;
(f ) ‘major failure’ as referred to in clause 10 of this warranty
has the same meaning referred to in the ACL and
includes a situation when an Appliance cannot be
repaired or it is uneconomic for Residentia Group, at its
discretion, to repair an Appliance during the Warranty
Period;
(g) ‘Warranty Period’ means:
(i) where the Appliance is used for personal,
domestic or household use (i.e. normal
single family use) as set out in the instruction
manual, the Appliance is warranted against
manufacturing defects for 24 months, following
the date of original purchase of the Appliance;
(h) ‘you’ means the purchaser of the Appliance not having
purchased the Appliance for re-sale, and ‘your’ has a
corresponding meaning.
2. This warranty only applies to Appliances purchased
and used in Australia and is in addition to (and does
not exclude, restrict, or modify in any way) any
non-excludable statutory warranties in Australia.
3. During the Warranty Period Residentia Group or its
ASR will, at no extra charge if your Appliance is readily
accessible for service, without special equipment and
subject to these terms and conditions, repair or replace
any parts which it considers to be defective. Residentia
Group or its ASR may use remanufactured parts to
repair your Appliance. You agree that any replaced
Appliances or parts become the property of Residentia
Group. This warranty does not apply to light globes,
batteries, seals, filters or similar perishable parts.
4. Parts and Appliances not supplied by Residentia Group
are not covered by this warranty.
Warranty Information

19
5. You will bear the cost of transportation, travel and
delivery of the Appliance to and from Residentia Group
or its ASR. If you reside outside of the service area, you
will bear the cost of:
(a) travel of an authorised representative;
(b) transportation and delivery of the Appliance to and
from Residentia Group or its ASR, in all instances, unless
the Appliance is transported by Residentia Group or its
ASR, the Appliance is transported at the owner’s cost
and risk while in transit to and from Residentia Group
or its ASR.
6. Proof of purchase is required before you can make
a claim under this warranty.
7. You may not make a claim under this warranty unless
the defect claimed is due to faulty or defective parts
or workmanship. Residentia Group is not liable in the
following situations (which are not exhaustive):
(a) the Appliance is damaged by:
(i) accident
(ii) misuse or abuse, including failure to properly
maintain or service
(iii) normal wear and tear
(iv) power surges, electrical storm damage or
incorrect power supply
(v) incomplete or improper installation
(vi) incorrect, improper or inappropriate operation
(vii) insect or vermin infestation
(viii) failure to comply with any additional instructions
supplied with the Appliance;
(b) the Appliance is modified without authority from
Residentia Group in writing;
(c) the Appliance’s serial number or warranty seal has
been removed or defaced;
(d) the Appliance was serviced or repaired by anyone
other than Residentia Group, an authorised repairer
or ASR.
8. This warranty, the contract to which it relates and the
relationship between you and Residentia Group are
governed by the law applicable where the Appliance
was purchased.
9. To the extent permitted by law, Residentia Group
excludes all warranties and liabilities (other than as
contained in this document) including liability for any
loss or damage whether direct or indirect arising from
your purchase, use or non use of the Appliance.
10. For Appliances and services provided by Residentia
Group in Australia, the Appliances come with a
guarantee by Residentia Group that cannot be
excluded under the Australian Consumer Law. You
are entitled to a replacement or refund for a major
failure and for compensation for any other reasonably
foreseeable loss or damage. You are also entitled
to have the Appliance repaired or replaced if the
Appliance fails to be of acceptable quality and the
failure does not amount to a major failure. The benefits
to you given by this warranty are in addition to your
other rights and remedies under a law in relation to the
Appliances or services to which the warranty relates.
11. At all times during the Warranty Period, Residentia
Group shall, at its discretion, determine whether repair,
replacement or refund will apply if an Appliance has a
valid warranty claim applicable to it.
12. Missing parts are not covered by warranty.
Residentia Group reserves the right to assess each
request for missing parts in a case by case basis.
Any parts that are not reported missing in the first week
after purchase will not provide free of charge.
13. To enquire about claiming under this warranty, please
follow these steps:
(a) carefully check the operating instructions, user manual
and the terms of this warranty;
(b) have the model and serial number of the Appliance
available;
(c) have the proof of purchase (e.g. an invoice) available;
(d) telephone the numbers shown below.
14. You accept that if you make a warranty claim,
Residentia Group and its ASR may exchange
information in relation to you to enable Residentia
Group to meet its obligations under this warranty.
IMPORTANT
Before calling for service, please ensure that the steps
in point 13 have been followed.
CONTACT SERVICE
→ Please call 1300 11 HELP (4357)
Our goods come with guarantees that cannot be excluded under the Australian Consumer Law.
You are entitled to a replacement or refund for a major failure and for compensation for any
other reasonably foreseeable loss or damage. You are also entitled to have the goods repaired
or replaced if the goods fail to be of acceptable quality and the failure does not amount to a
major failure.
The Australian Consumer Law requires the
inclusion of the following statement with
this warranty:

T. 1300 11 4357
E. support@residentiagroup.com.au
E S S E N T I A L S FOR LIFE
www.solt.house
An initiative by
Residentia Group