User manual
SV12 JN.00000 PN.000000-00-00
00.00.00 WEST VERSION NO.01
Contents
In the box
Getting started Dyson V10 Konical™ vacuum
Getting started Auto-empty Dok™
Charging your vacuum with
Auto-empty Dok™
Changing your click-in battery
Charging your machine with the Wall Dok™
Caring for your floors
Emptying your bin with Auto-empty Dok™
Emptying your bin
Changing the bin on your vacuum
Clearing blockages from your vacuum
Washing the Pre-filter
Washing the Post-filter
Clearing obstructions from your
All Floor Cones™ cleaner head
Clearing blockages from your
Mini motorized tool
Cleaning your tools
Changing your Auto-empty Dok™ liner
Washing the filter of your Auto-empty Dok™
Re-purchasing dust liners for your
Auto-empty Dok™
Looking after your machine
Dyson logo
Dyson V10 Konical logo
The Dyson V10 Konical™ vacuum
clik
clik
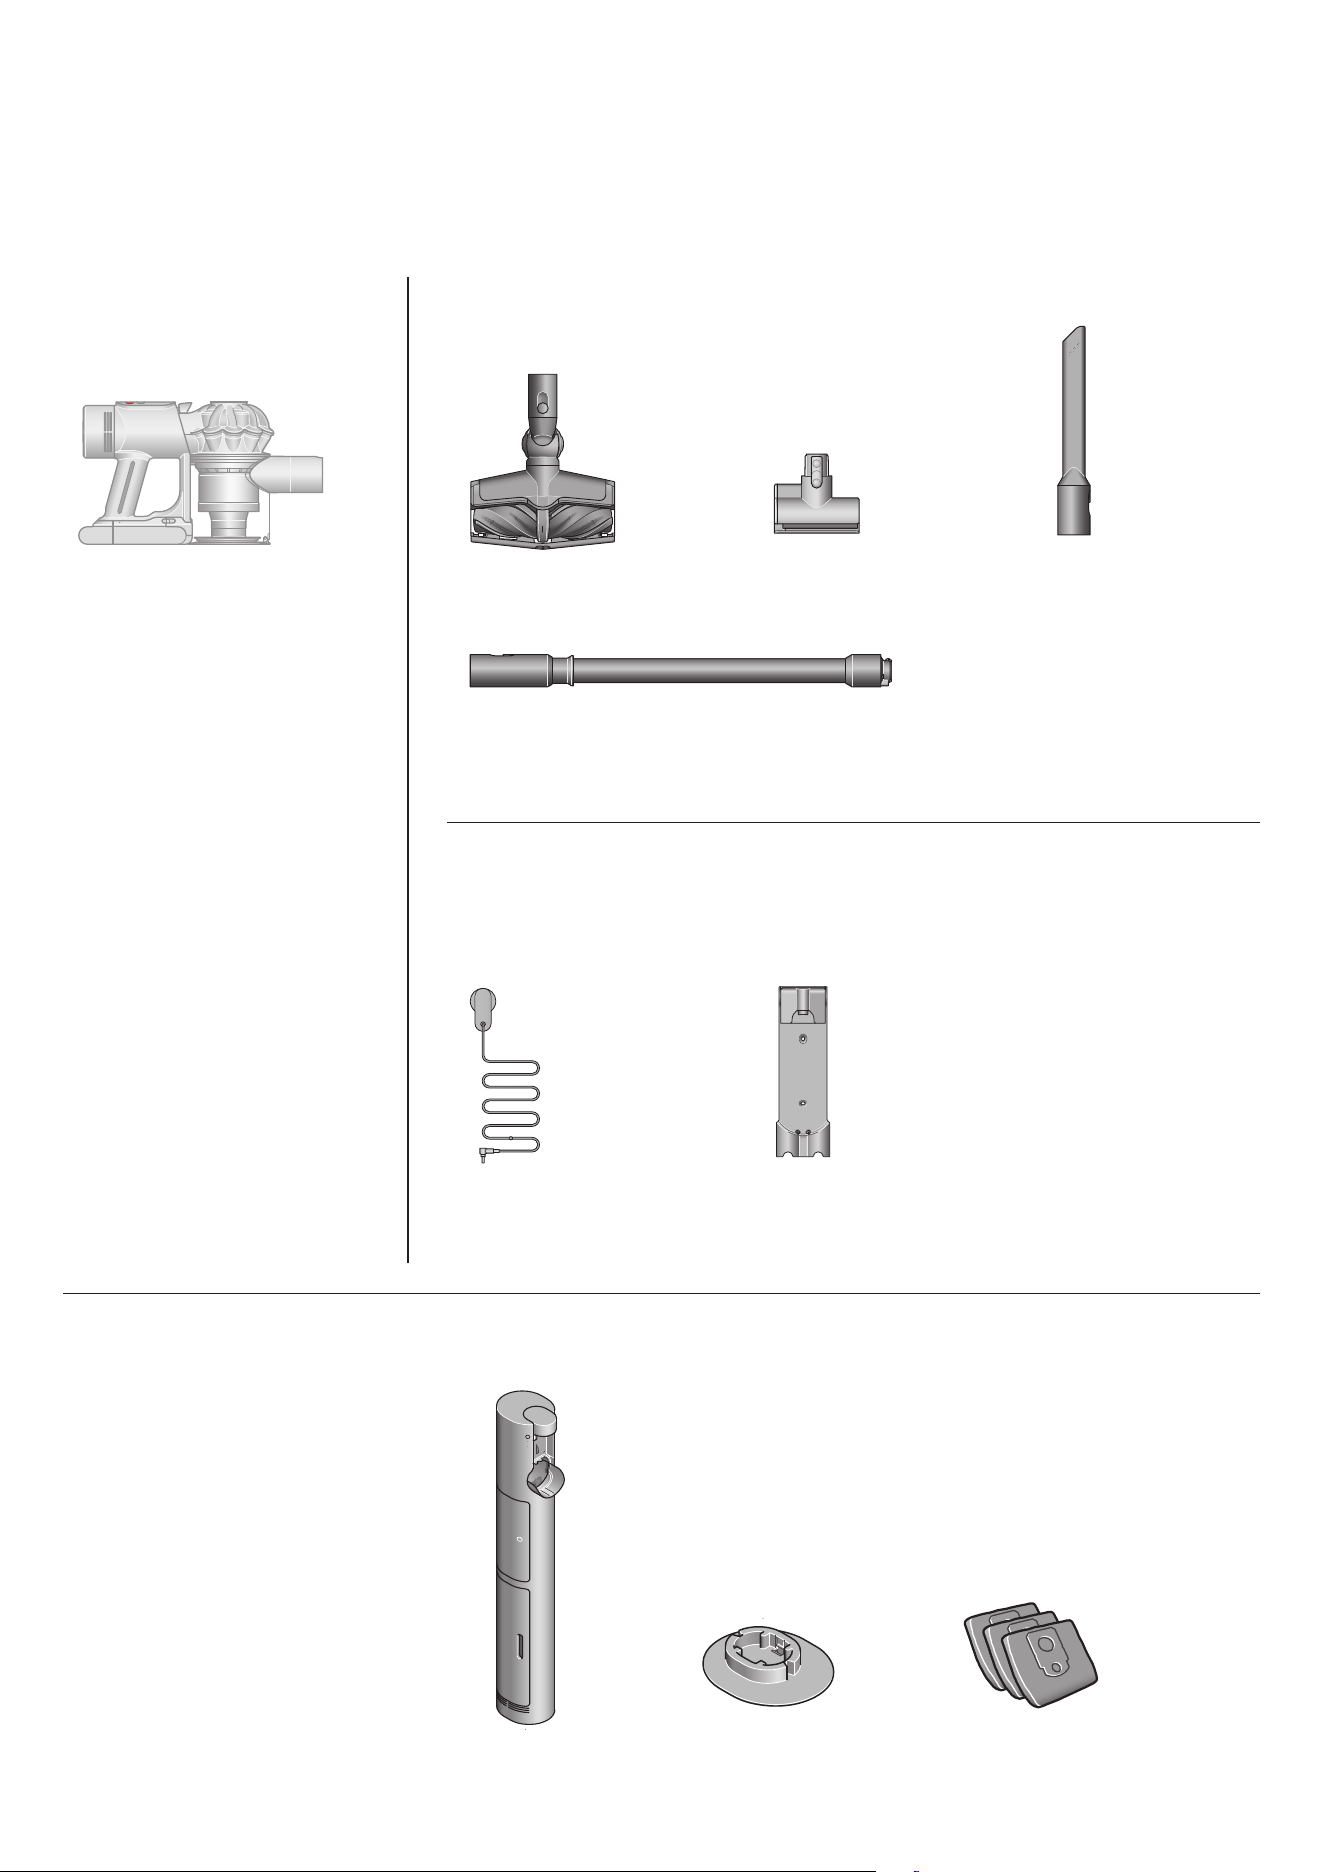
In the box
Your machine is boxed in 2 parts:
1. Machine body
2. Cleaner head/tools
Mini motorized tool Crevice tool
Machine body
Wand
All Floor Cones™
cleaner head
The charger can be used independently or as part of the dock.
Please note, these are not included when purchased with Auto-empty Dok™.
Simply attach the cleaner head or tool to the front end of the main body or wand.
Charger
The Wall Dok™
When purchased with Auto-empty Dok™:
Auto-empty Dok™ body Auto-empty Dok™ base Auto-empty Dok™ liners
Main body showing the handle
and bin attached
1
12
11
10
9
8
7
6
5
4
3
2
4 hrs
clik
clik
Getting started
Dyson V10 Konical™ vacuum
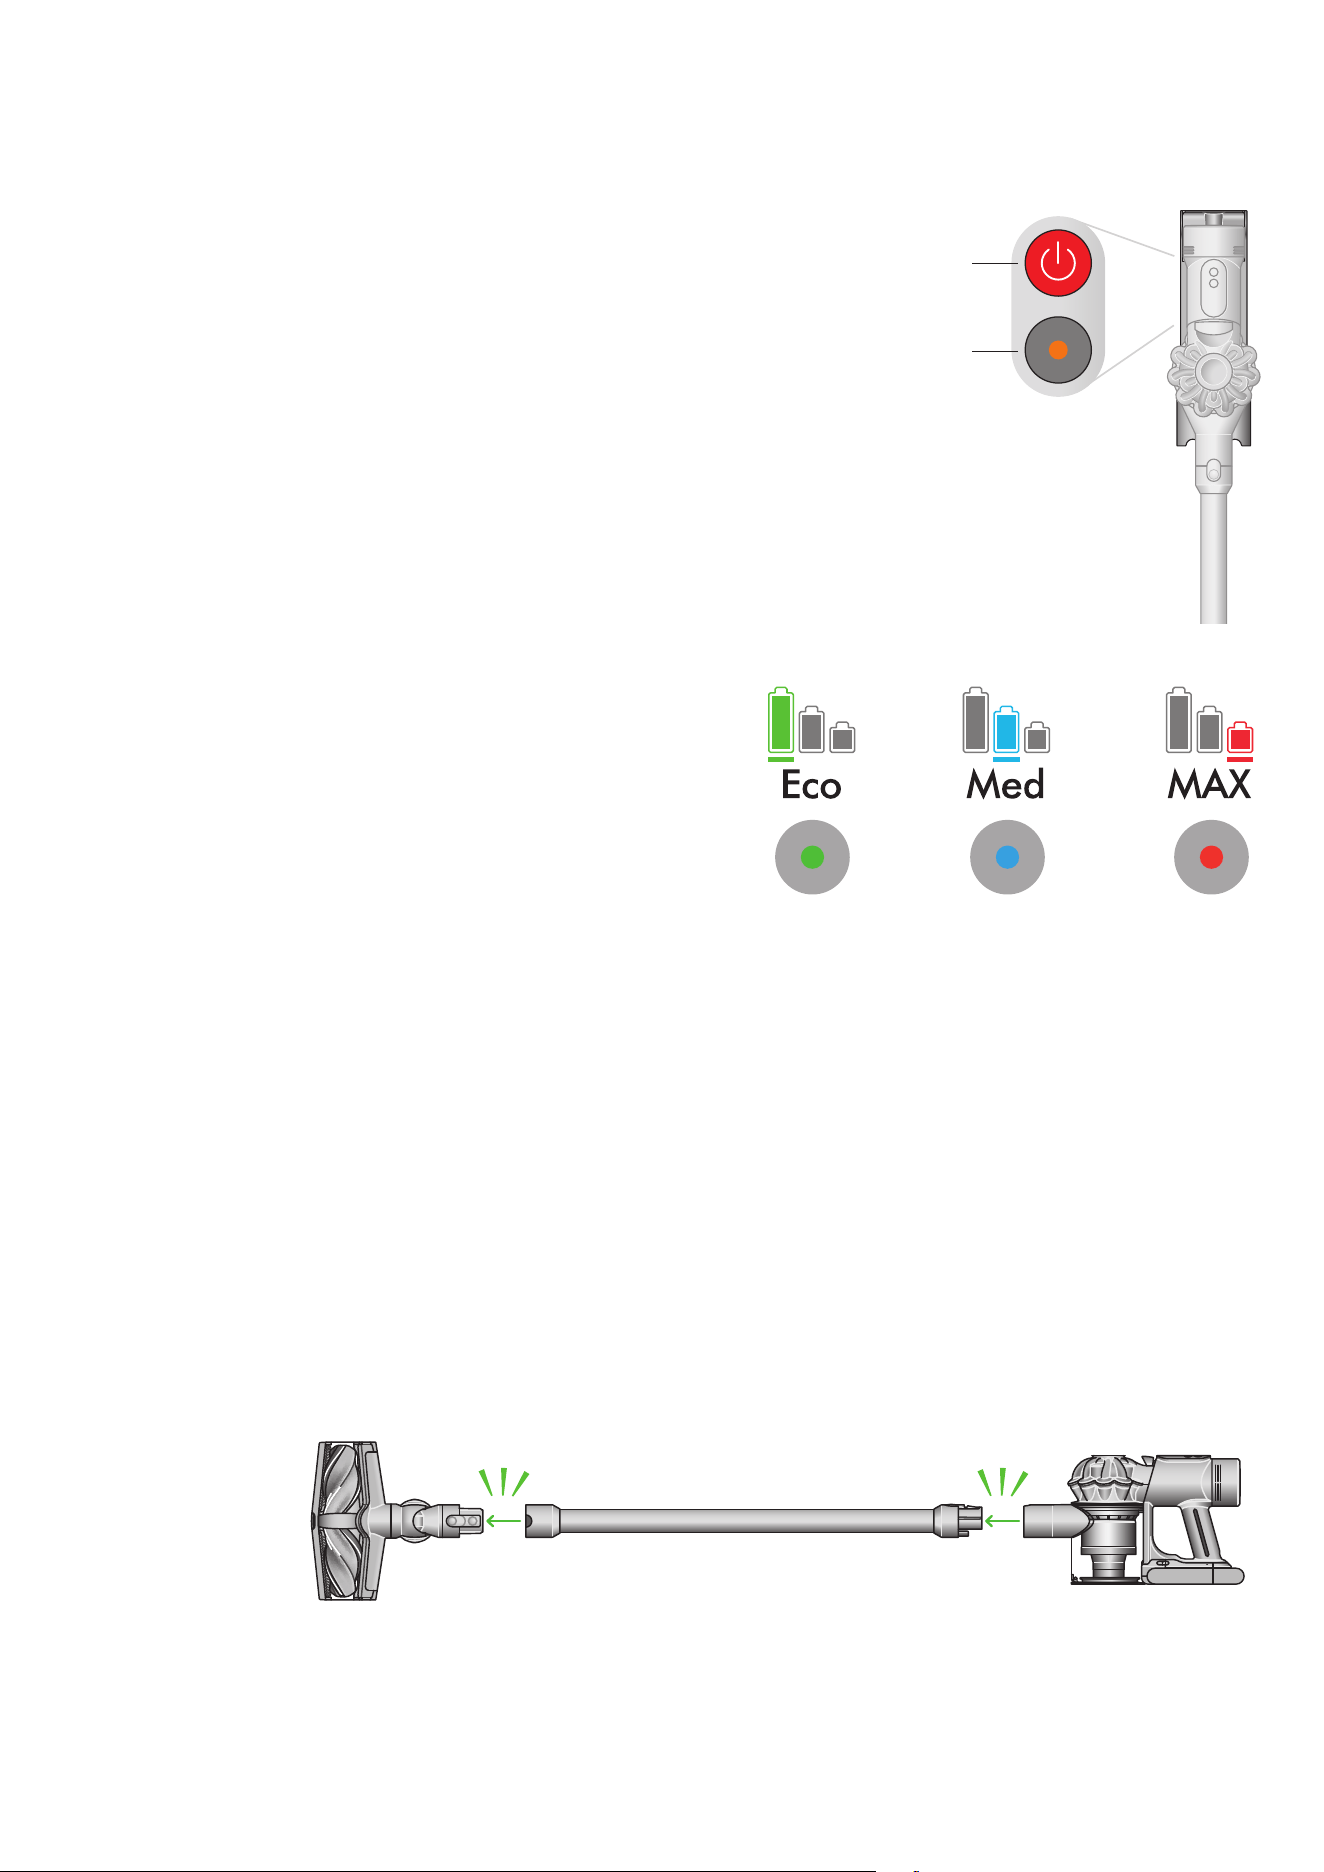
Three power modes
You can cycle between three power modes, depending on floor type
and the level of suction needed, using the Mode button.
Eco mode: For longer, lighter cleans
Medium mode: For regular cleaning
Max mode: For stronger suction
Clean awkward spaces
Remove the wand and connect your chosen tool directly
to the inlet pipe to use the vacuum as a handheld.
Mode select button
Power on/off button
Operating your machine
There are two easy-to-use buttons on the machine. The top button turns your
vacuum on and off, while the lower button changes power mode.
Tools and cleaner heads can be attached either to the wand or
directly to the main body of your vacuum. If using the wand, it
must also be connected to the main body of your vacuum.
The Power and Mode select buttons are adjacent on the
top of your vacuum’s body, the power button is red and
closer to the post-motor filter.
The Eco icon, a
tall green battery
The Med icon, a
medium-size
blue battery
The Max icon,
a short red
battery
clik
clik
clik
Getting started
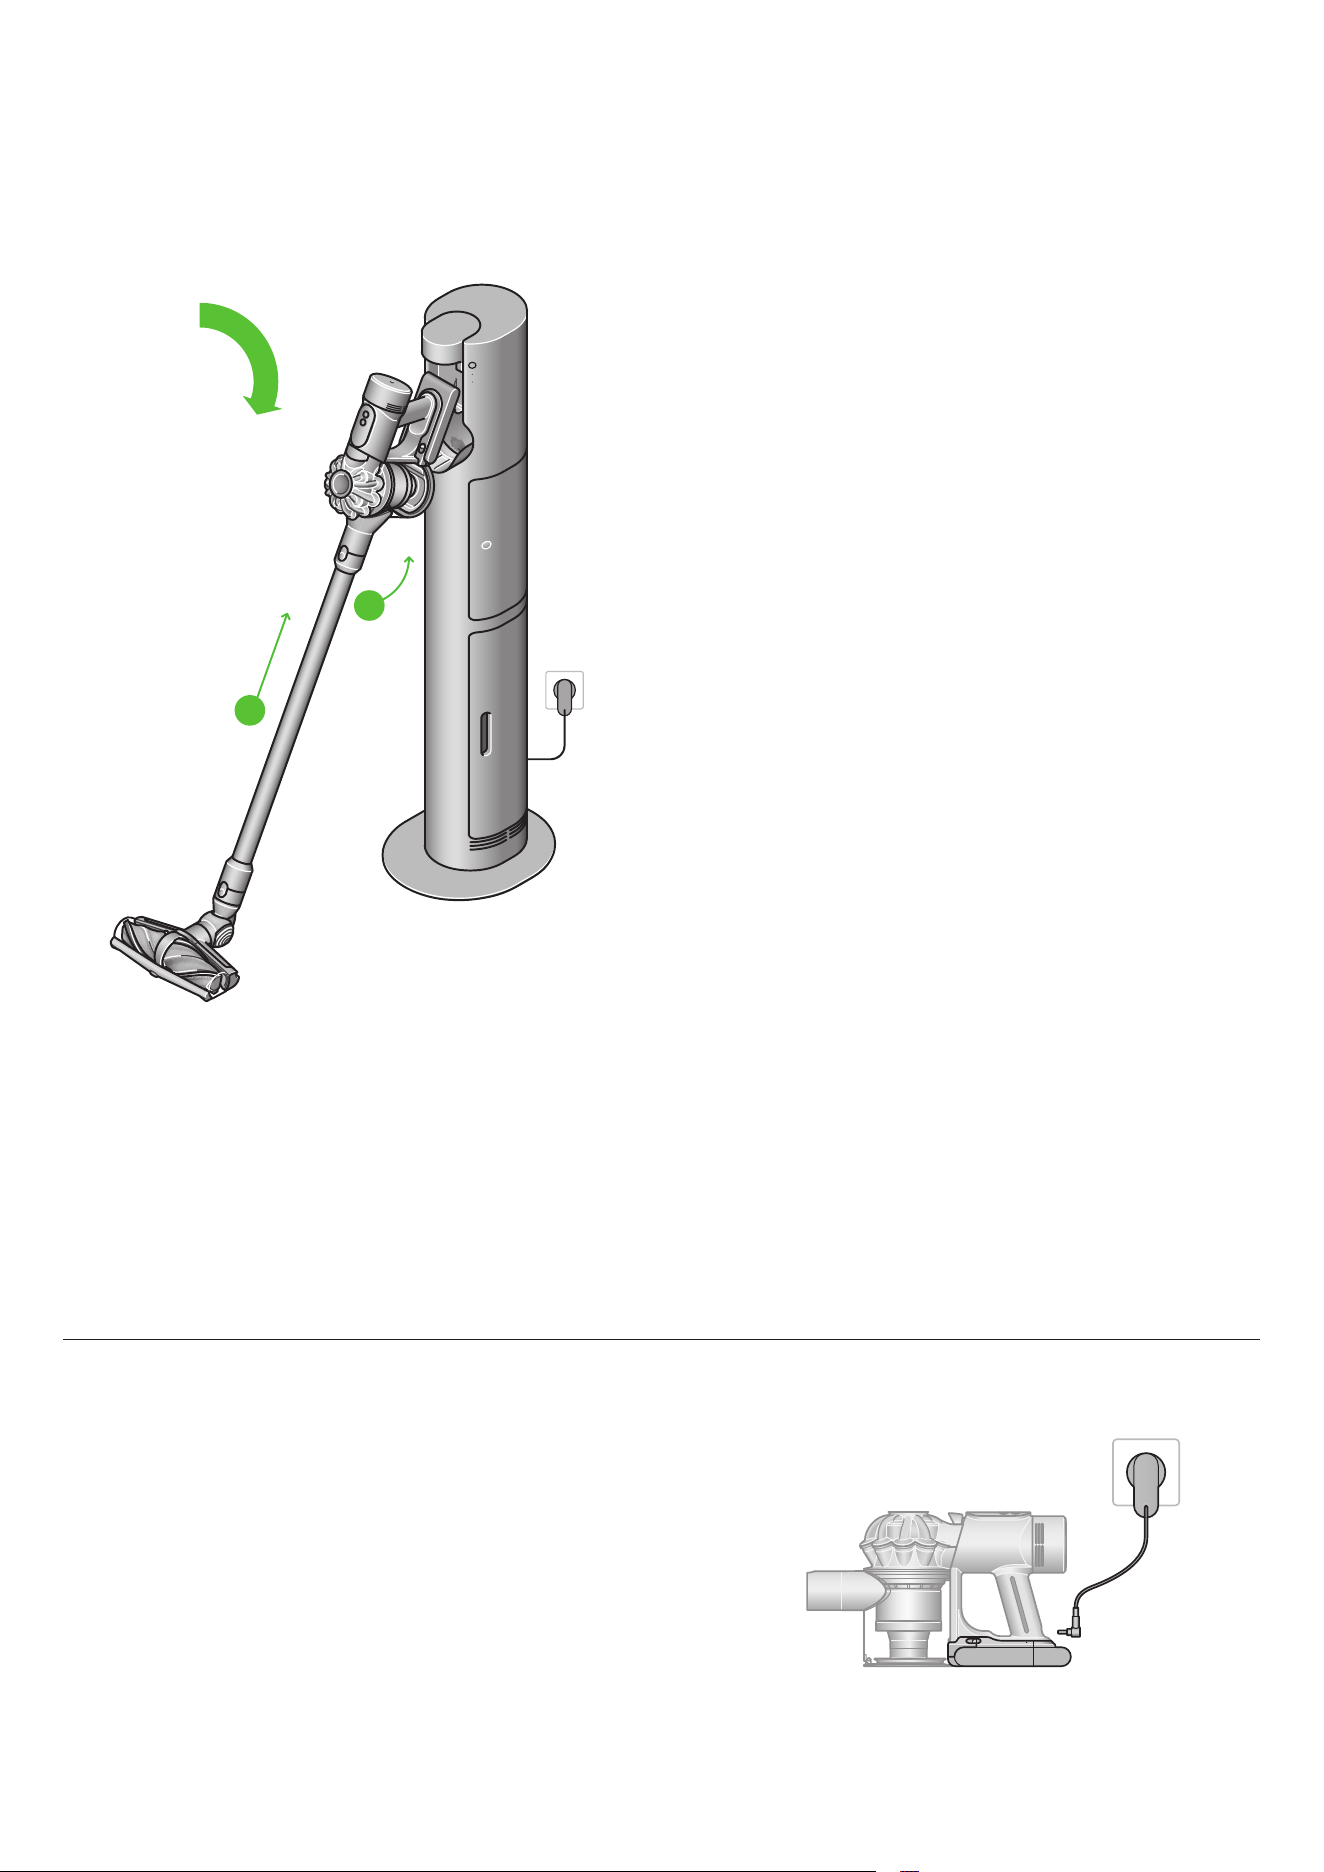
Auto-empty Dok™
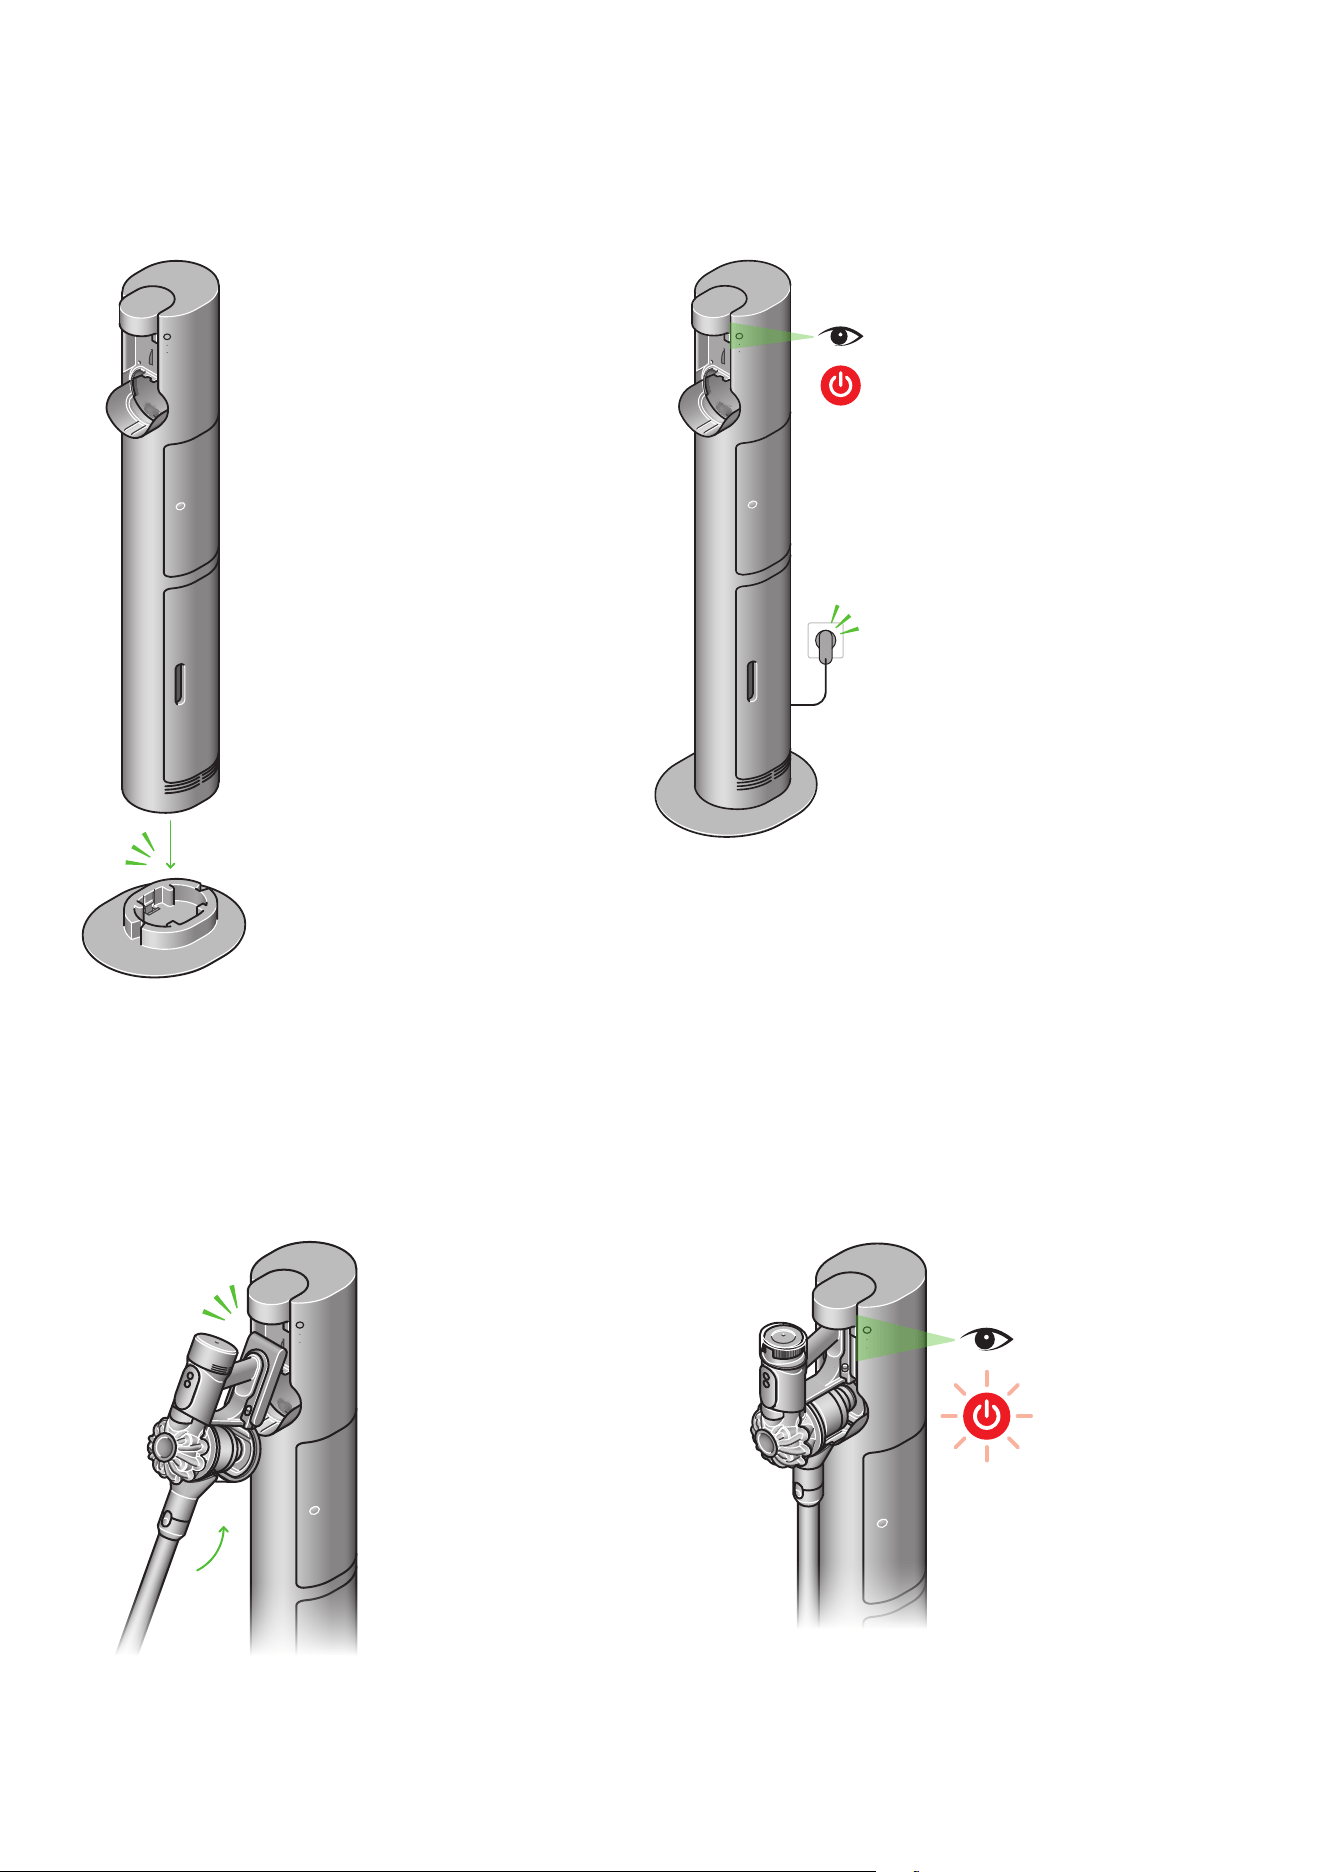
Place the body of the dock onto the base plate.
Tilt your vacuum forwards and move upward
to click into place.
Plug the dock in a socket, ready for use with your vacuum.
Look for the indicator light to check the machine is charging
1
12
11
10
9
8
7
6
5
4
3
2
4 hrs
1
2
Charging your vacuum
with Auto-empty Dok™
If you have an Auto-empty Dok™, place the
vacuum in the dock. Allow up to four hours
to ensure the vacuum cleaner fully charges
before the first use.
Changing your click-in battery
The battery is mounted below the
handle of your vacuum
If you have additional click-in batteries, we recommend that you
alternate the batteries to maintain even performance.
Removing your battery
Push the Battery release button on the handle and slide
the battery off your machine.
Charge the battery.
Refitting your battery
Align your second battery with the handle and slide it in.
Push firmly until it clicks into place.
1
12
11
10
9
8
7
6
5
4
3
2
4 hrs
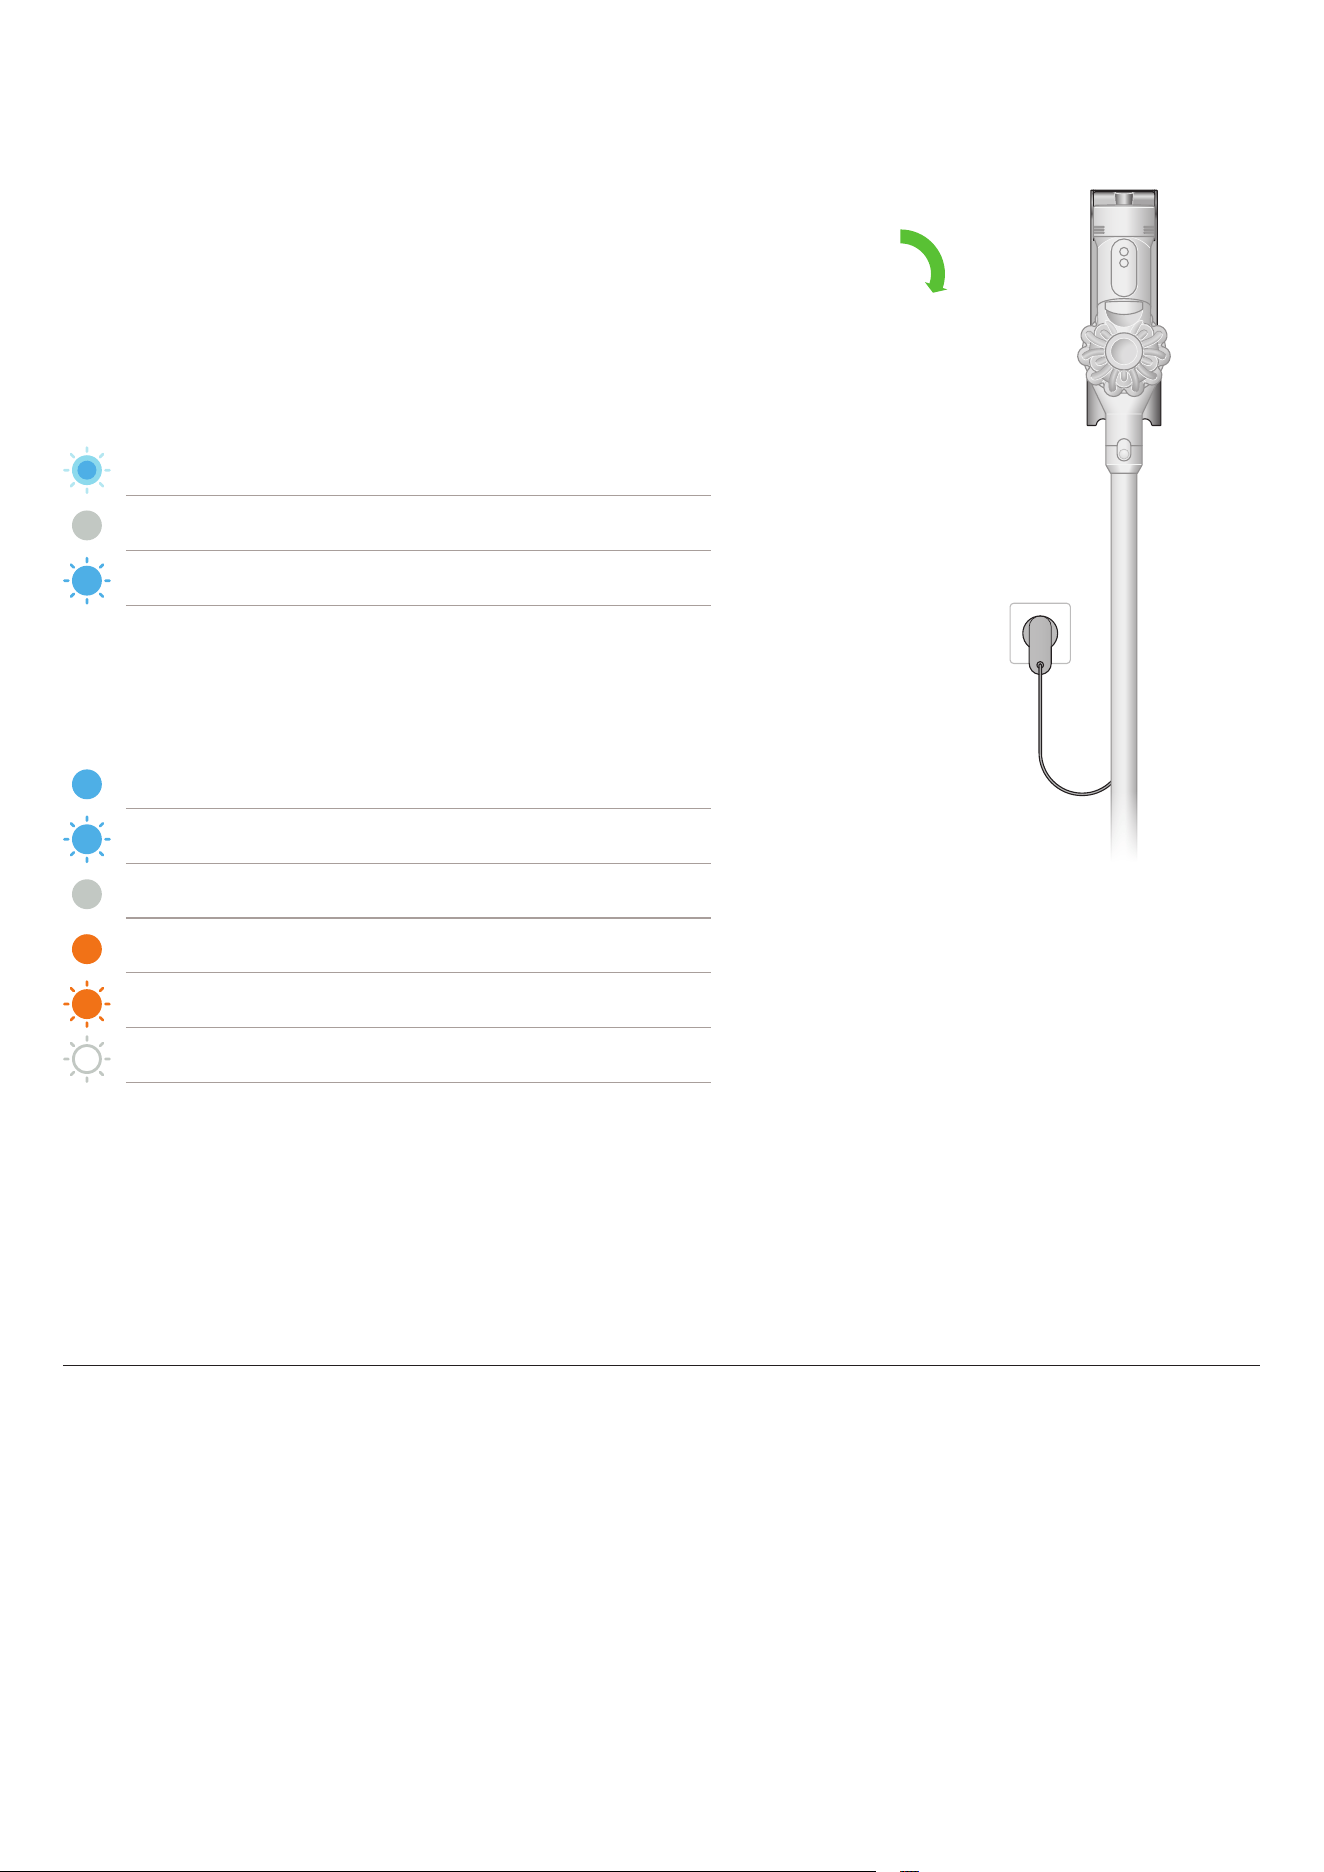
Charging your machine
with the Wall Dok™
Allow up to four hours to fully charge your machine before your first use.
While your battery is charging, the LED will flash to demonstrate the level of
charge. Once your machine is fully charged, the light will turn off.
Battery LED
Machine LED (Mode button)
Pulsing blue Machine is charging
No light Machine is fully charged
Flashing blue Battery fault
Solid blue, green or red Normal operation
Flashing blue, green or red Battery low
No light Battery empty
Solid orange light Motor fault
Flashing orange light Incompatible tool
Flashing white light Cyclone not fitted correctly
Check that the underside of the cleaner head or tool is clean and free from
any objects that may cause damage.
Before vacuuming your flooring, rugs and carpets, check the manufacturer’s
recommended cleaning instructions.
The brush bar on your cleaner head, or mini motorized tool, can damage
certain flooring. Some rug materials may fuzz if a rotating brush bar is used
when vacuuming. If this happens, we recommend vacuuming without the
motorized floor tool and consulting with your flooring manufacturer.
Caring for your floors

Emptying your bin
with Auto-empty Dok™
Simplify bin emptying by inserting your vacuum into the dock until you hear a click
and see the light on the dock with a pulsing white light. It should automatically
start the auto-empty cycle.
In case you need to run it again, press the red button on the dock.
Indicators on the dock
1. Emptying cycle is indicated by a white pulsing light.
2. Full dust liner is indicated by a solid orange light (not pulsing).
If the liner is missing or not inserted correctly the orange pulsing light will begin.
Either insert a new liner or remove and re-insert the original. Once corrected, the
light will turn off.
3. Blockages are indicated by a solid orange light. This means self-emptying is
impacted.
Dust liner LED indicator
Blockage LED indicator
Solid orange light Dust liner is full
Pulsing orange light Dust liner is missing
Solid orange light When filter or system blockage is detected
clik
clik
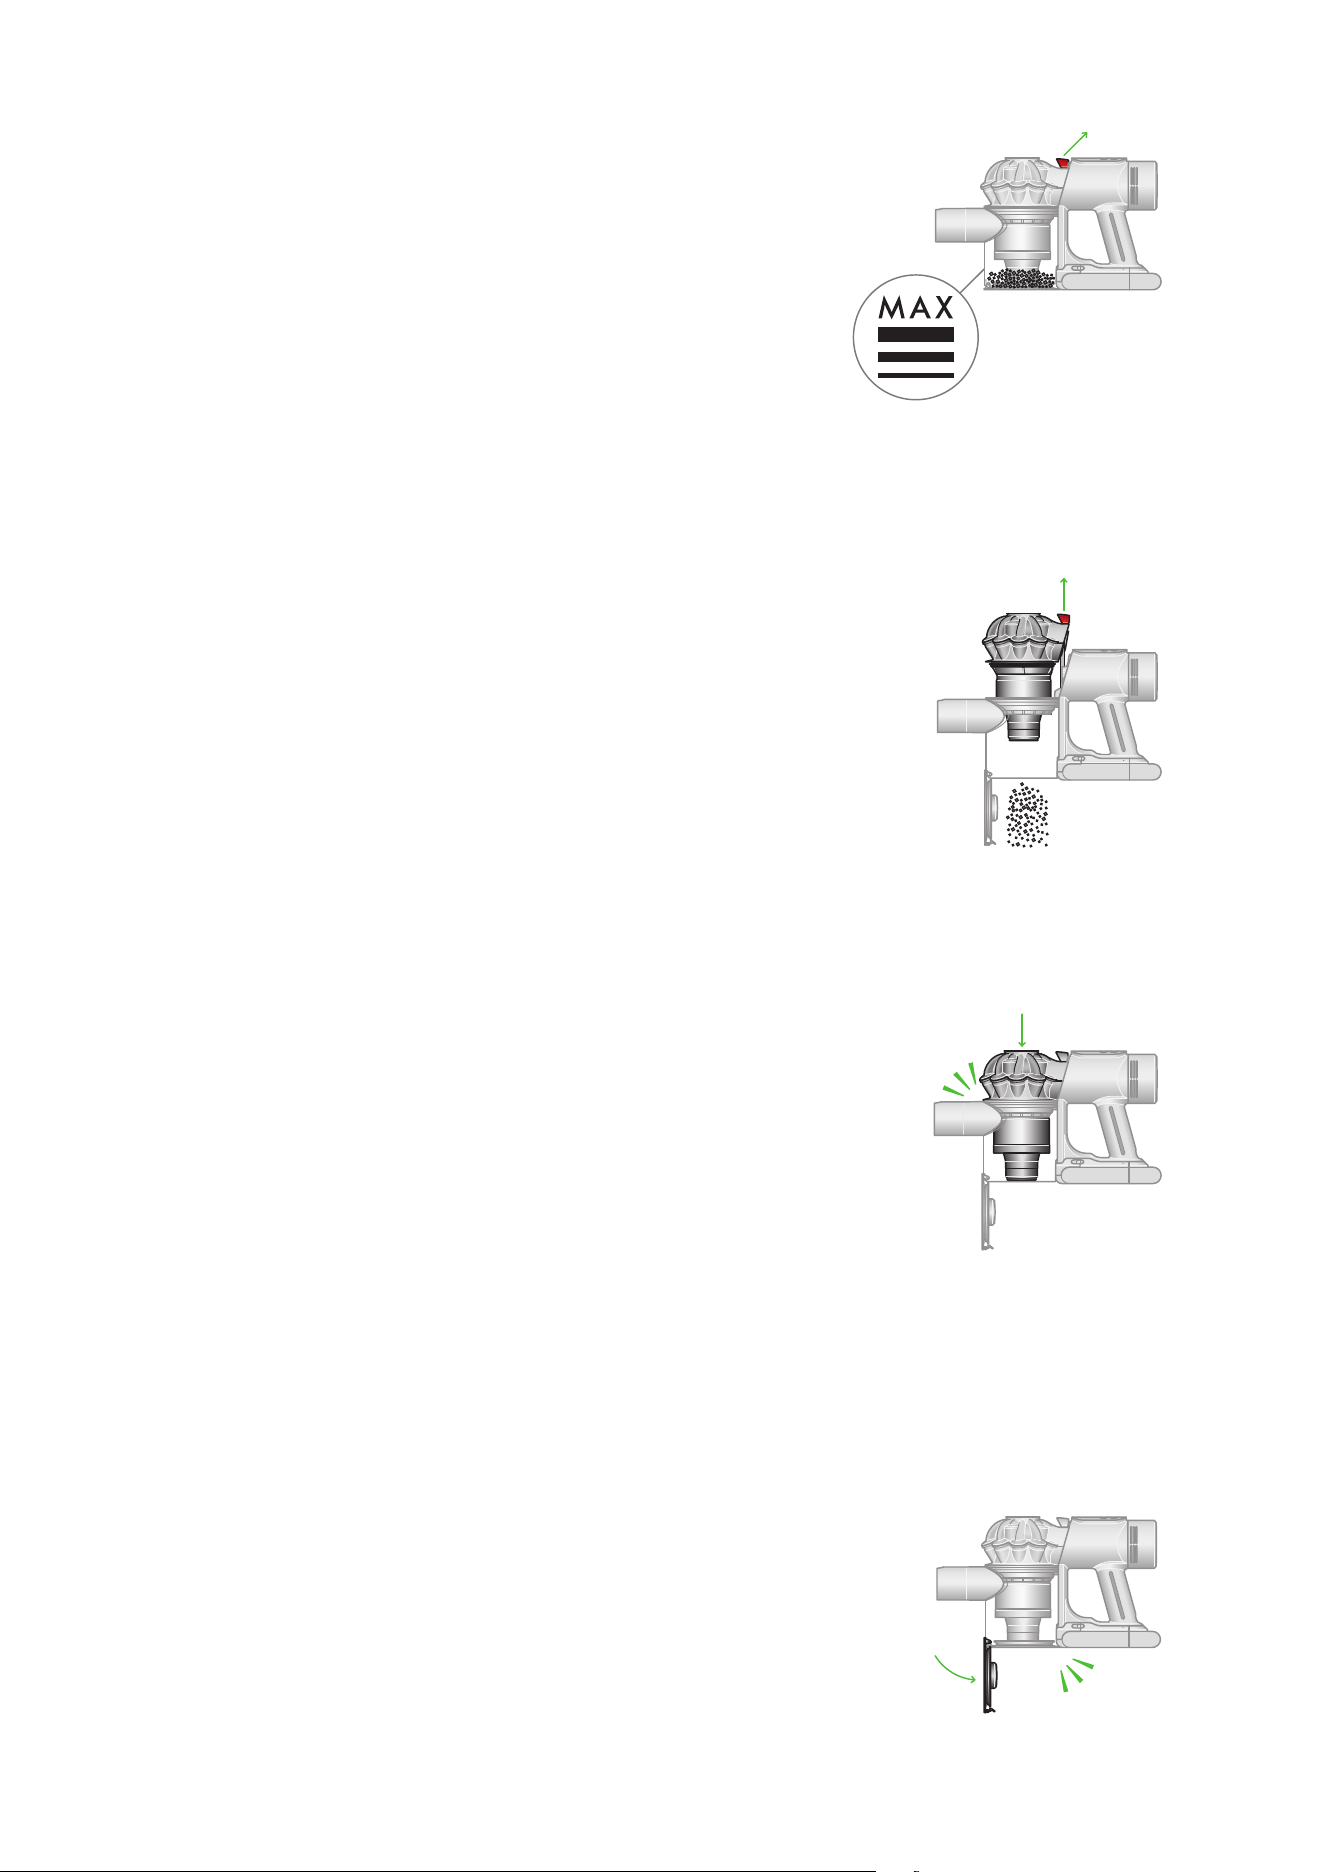
Emptying your bin
Empty as soon as the dirt reaches the MAX level – don’t overfill. Using your
machine when the dirt is above the top line may affect the performance and
require more frequent filter washing. The bin release button is next to the
cyclones on the top of your vacuum.
Minimize dust contact
Cover your bin tightly in a dust-proof bag while you empty. Remove the bin
carefully, seal the bag tightly and dispose.
Close the bin
Push down on the cyclone until it slides into position. Push the bin base
upwards until it closes securely.
Release the dirt
Remove the wand from your machine.
Hold your machine over a bin and pull the bin release catch upwards.
The cyclone will slide up and the bin base will open.
The MAX level mark can be seen on the side
of your machine’s bin.
2
3
2
1
1
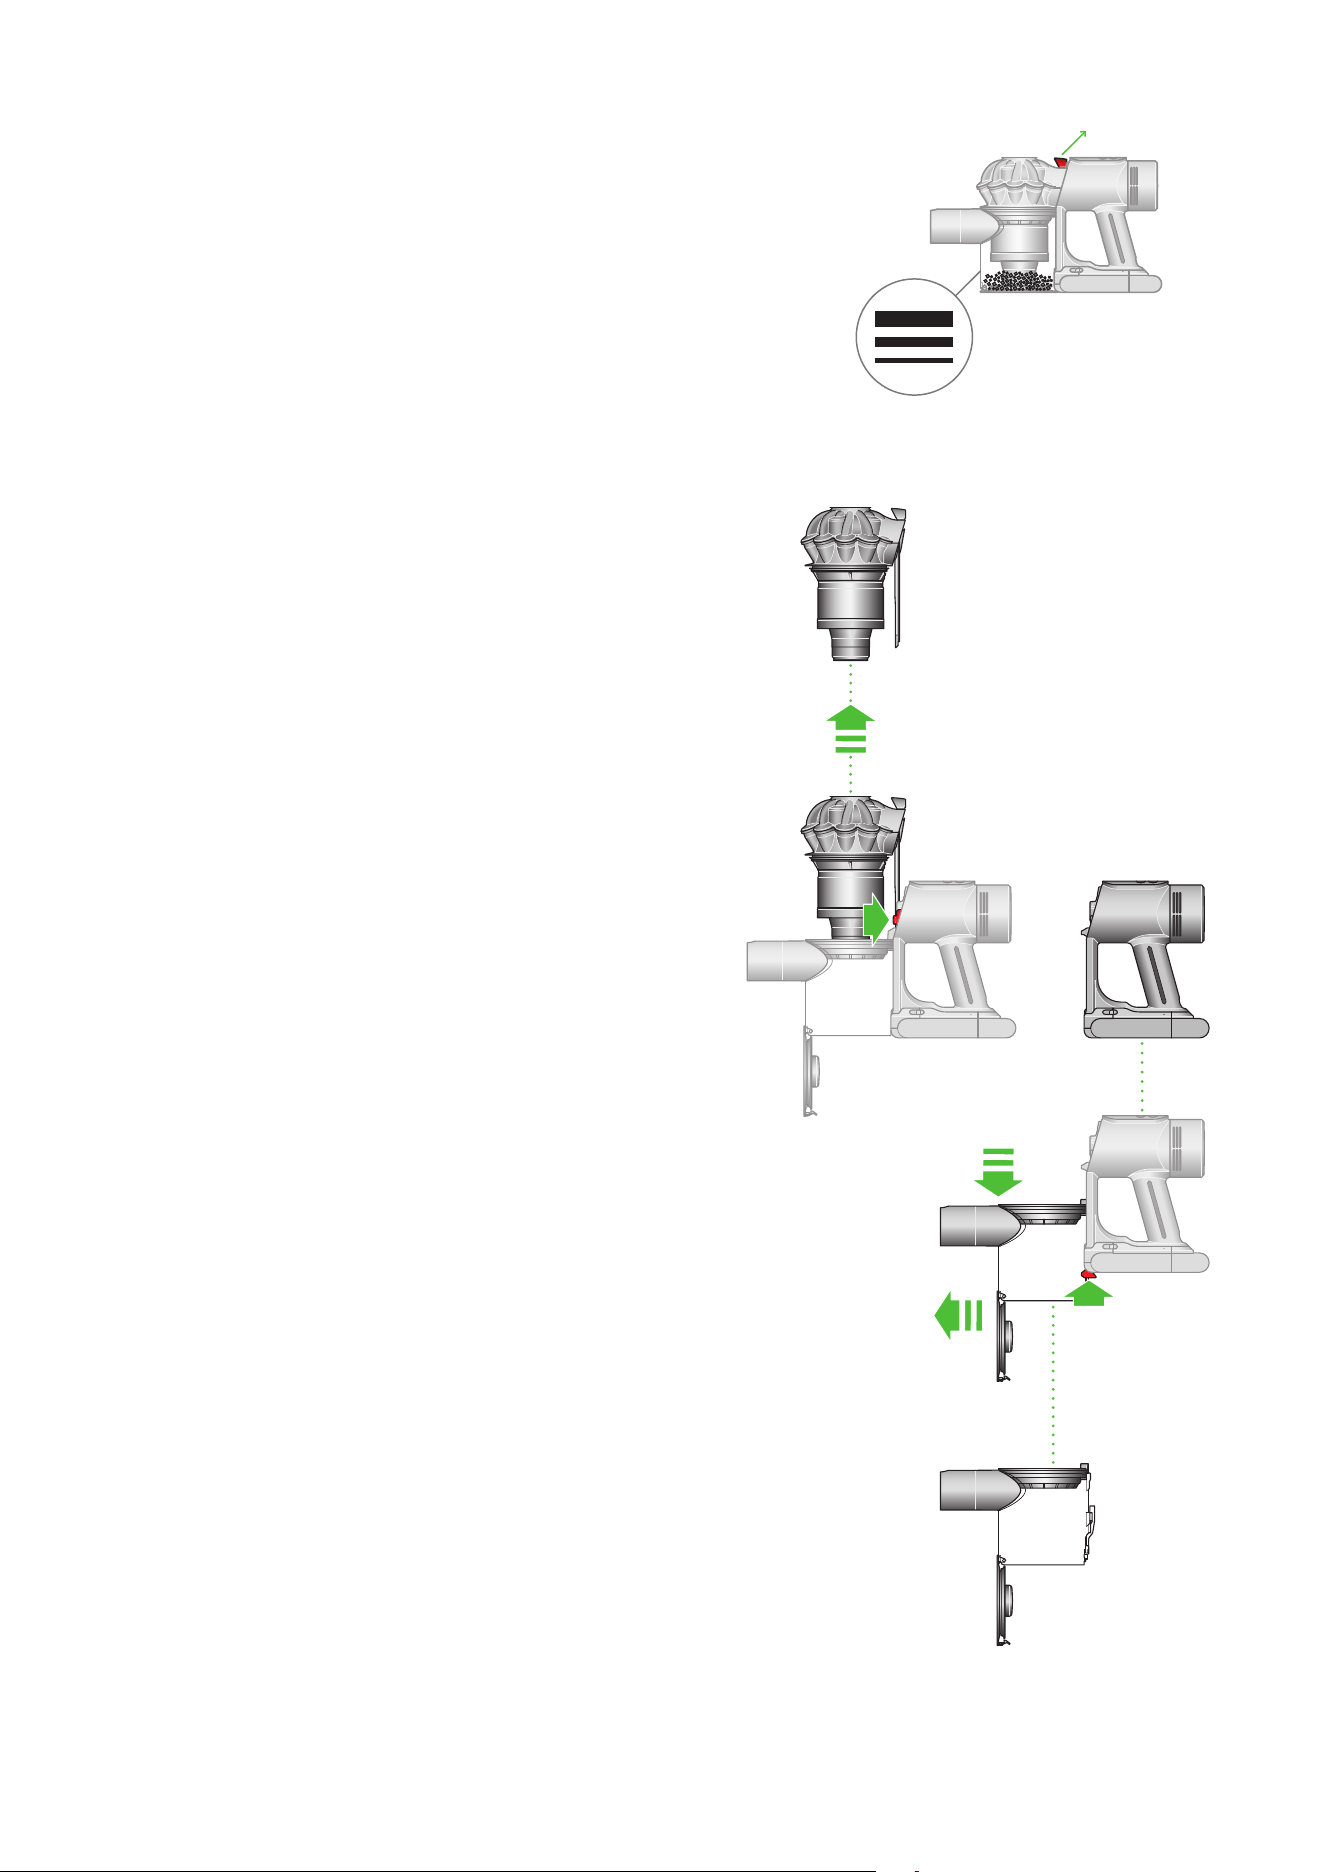
Cleaning the bin on your vacuum
Empty your bin as soon as the dirt reaches the top mark.
You may need to clean the filter more often if you use your machine with a
full bin.
Empty your bin
Remove the wand from your machine.
Hold your machine over a bin and pull the bin release catch upwards.
The cyclone will slide up and the bin base will open.
Remove the cyclone
Pull the bin release catch upwards. The cyclone will slide up and the bin
base will open.
Locate the cyclone release button behind the cyclone and push to
remove the cyclone from your machine.
Remove the bin
Pull back on the red catch located on the base, slide the bin down and pull it
off your machine.
Clean the bin
Wipe your bin with a damp, lint-free cloth. Don’t put the bin in a dishwasher
or use detergents, polishes or air fresheners.
Make sure the bin is completely dry before replacing.
Replace the bin
Align the tabs on the bin with the grooves on the main body and slide it
upwards until it clicks into place.
Replace the cyclone
Slide the cyclone into the grooves of the main body and push down until it is
in position.
Push the bin base up until it clicks firmly shut.
The MAX level mark can be seen on the
side of your machine’s bin.
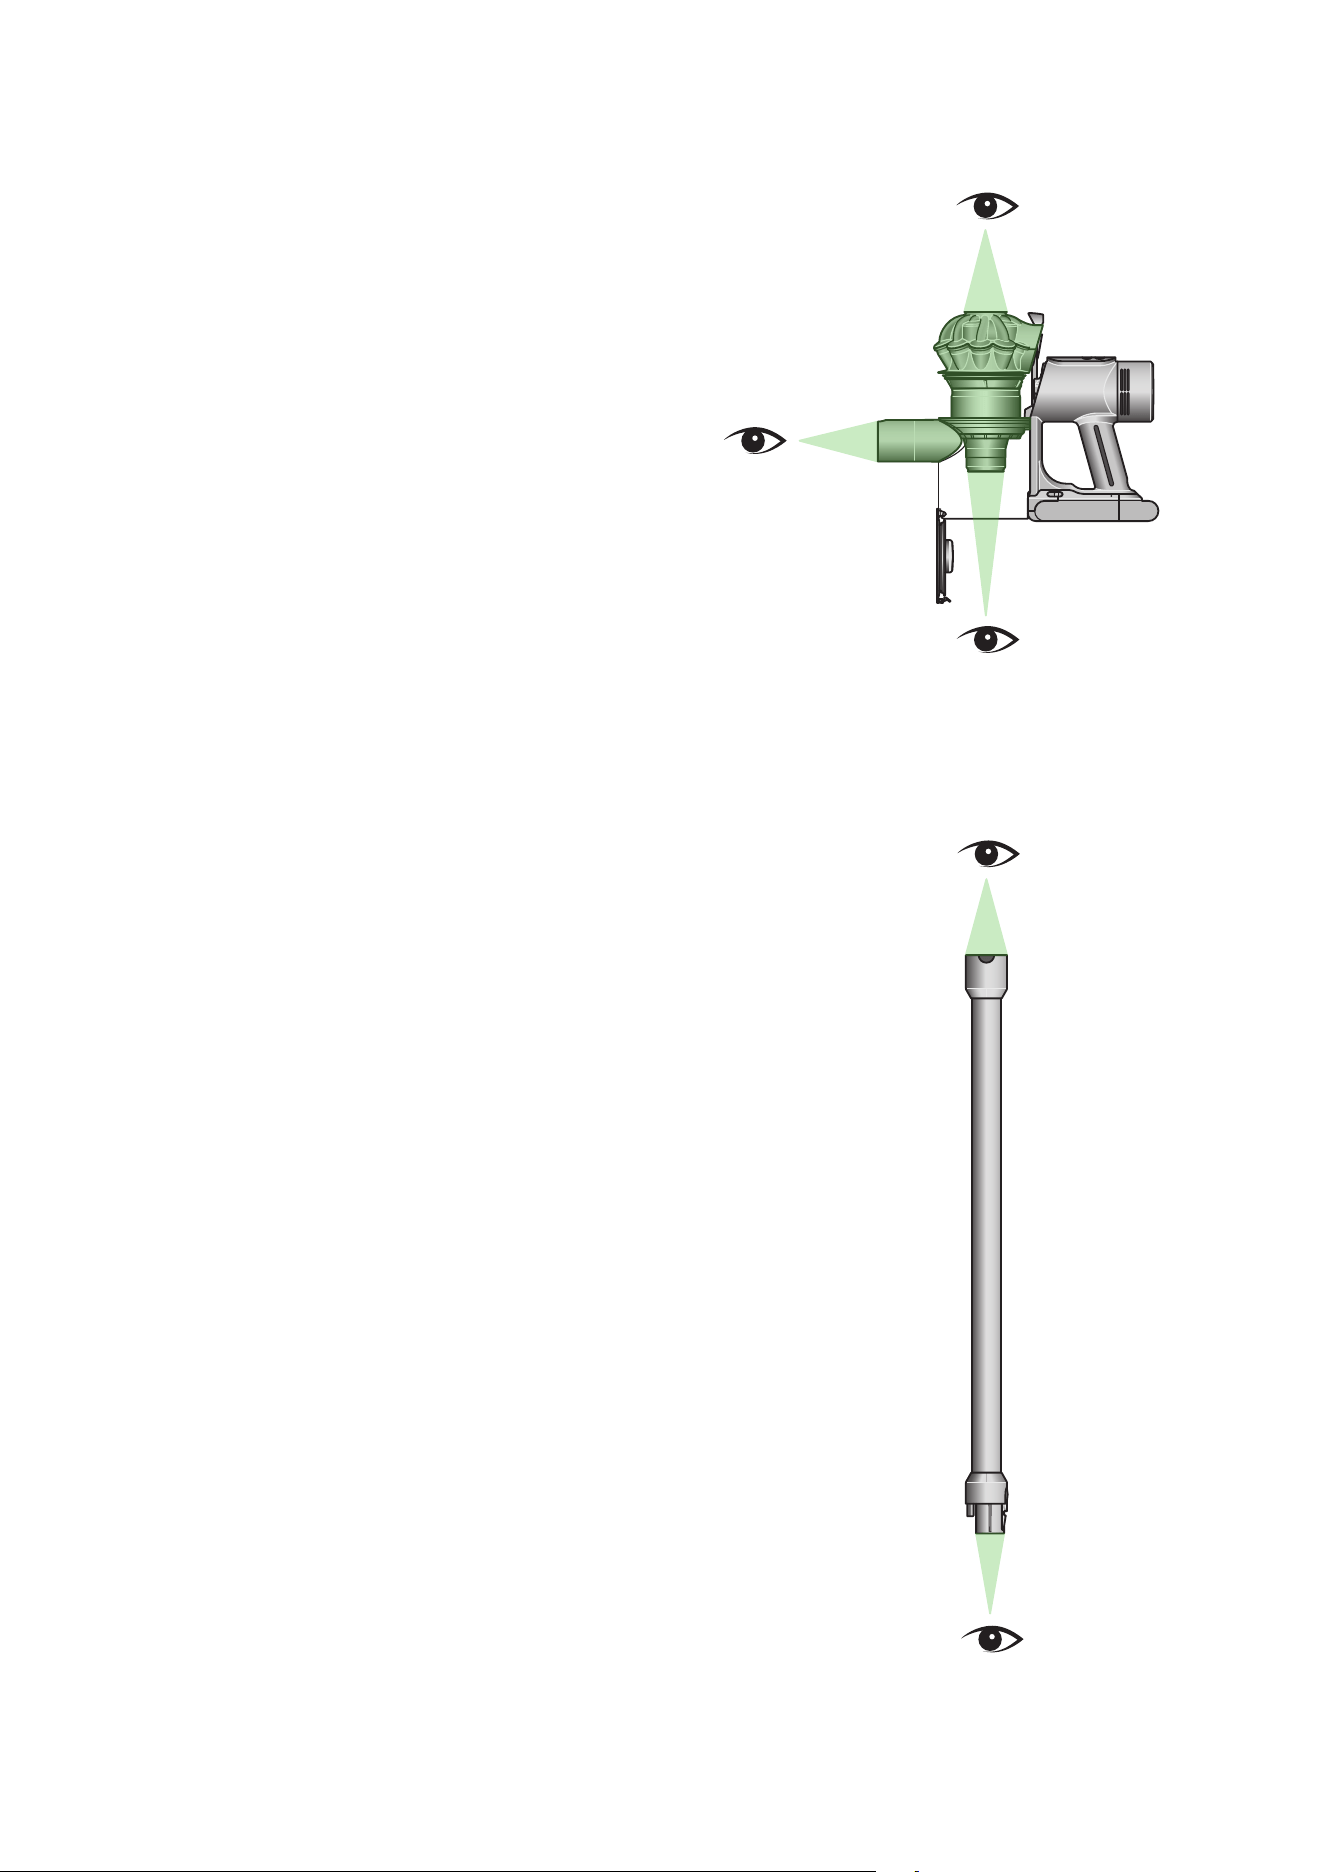
Clearing blockages from your vacuum
Your machine is fitted with an automatic cut-out. If any part of it is blocked,
your machine’s motor will pulse and won't function until the blockage has
been cleared.
Disconnect your machine from the charger before looking for blockages.
Be careful not to touch the trigger and be aware of sharp objects.
Leave your machine to cool down before looking for blockages.
Don't use your machine when looking for blockages as this could
cause injury.
With the bin open, examine your vacuum for
blockages. Pay particular attention in and around the
cyclones and the tool/wand attachment point.
With the wand removed from the machine and
cleaner head removed from the wand, check for
blockages at both ends of the wand. Turn the cleaner
head over to check for obstructions on the brush bar
and air inlet. Remove any obstructions.
12
11
10
9
8
7
6
5
4
3
2
1
24
hrs
12
11
10
9
8
7
6
5
4
3
2
1
24
hrs
12
11
10
9
8
7
6
5
4
3
2
1
24
hrs
12
11
10
9
8
7
6
5
4
3
2
1
24
hrs
12
11
10
9
8
7
6
5
4
3
2
1
24
hrs
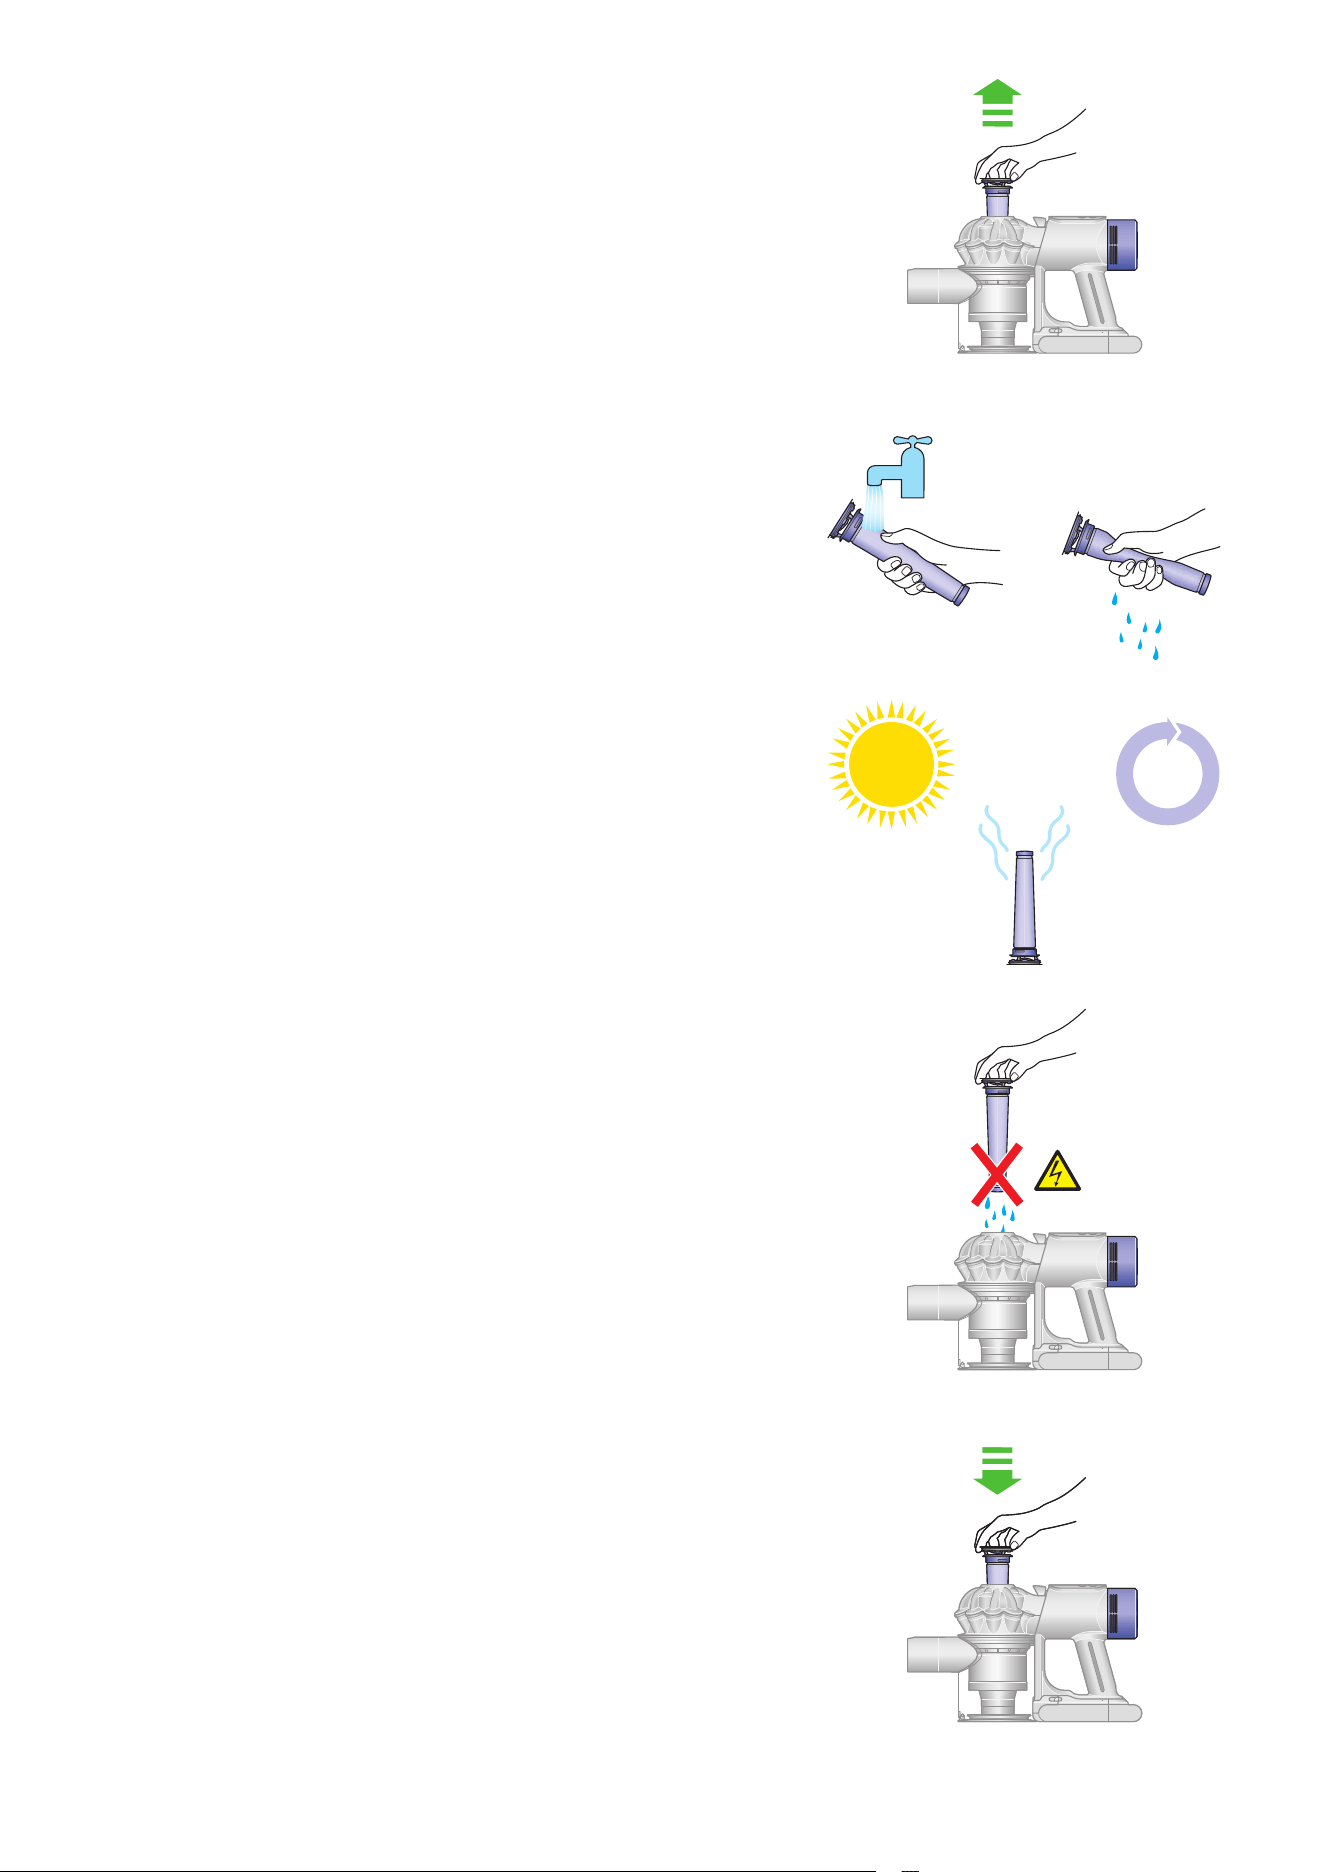
Washing the Pre-filter on your vacuum
Remove your filter
Lift the filter out of the top of the cyclone.
Tap to remove excess dust and debris.
Wash your filter
Hold the open end of the filter under a running tap, until the water runs clear.
Turn the filter upside down and tap it to remove excess water.
Run water over the outside of the filter until the water runs clear.
Squeeze and twist with both hands to make sure the excess water is removed.
Dry your filter
Leave your filter to dry for at least 24 hours in a well-ventilated, warm place.
Do not dry your filter in a tumble-dryer or near a naked flame.
Important: Your filter must be completely dry before you put it back into
the machine. Your machine could be damaged if used with a damp filter.
Refit your filter
Align the arrow on the top of the filter with the bin release button.
Push down to fit securely in place.
Caution: ensure your filter is fully dry
before reinserting to the cyclone.
12
11
10
9
8
7
6
5
4
3
2
1
24
hrs
12
11
10
9
8
7
6
5
4
3
2
1
24
hrs
12
11
10
9
8
7
6
5
4
3
2
1
24
hrs
12
11
10
9
8
7
6
5
4
3
2
1
24
hrs
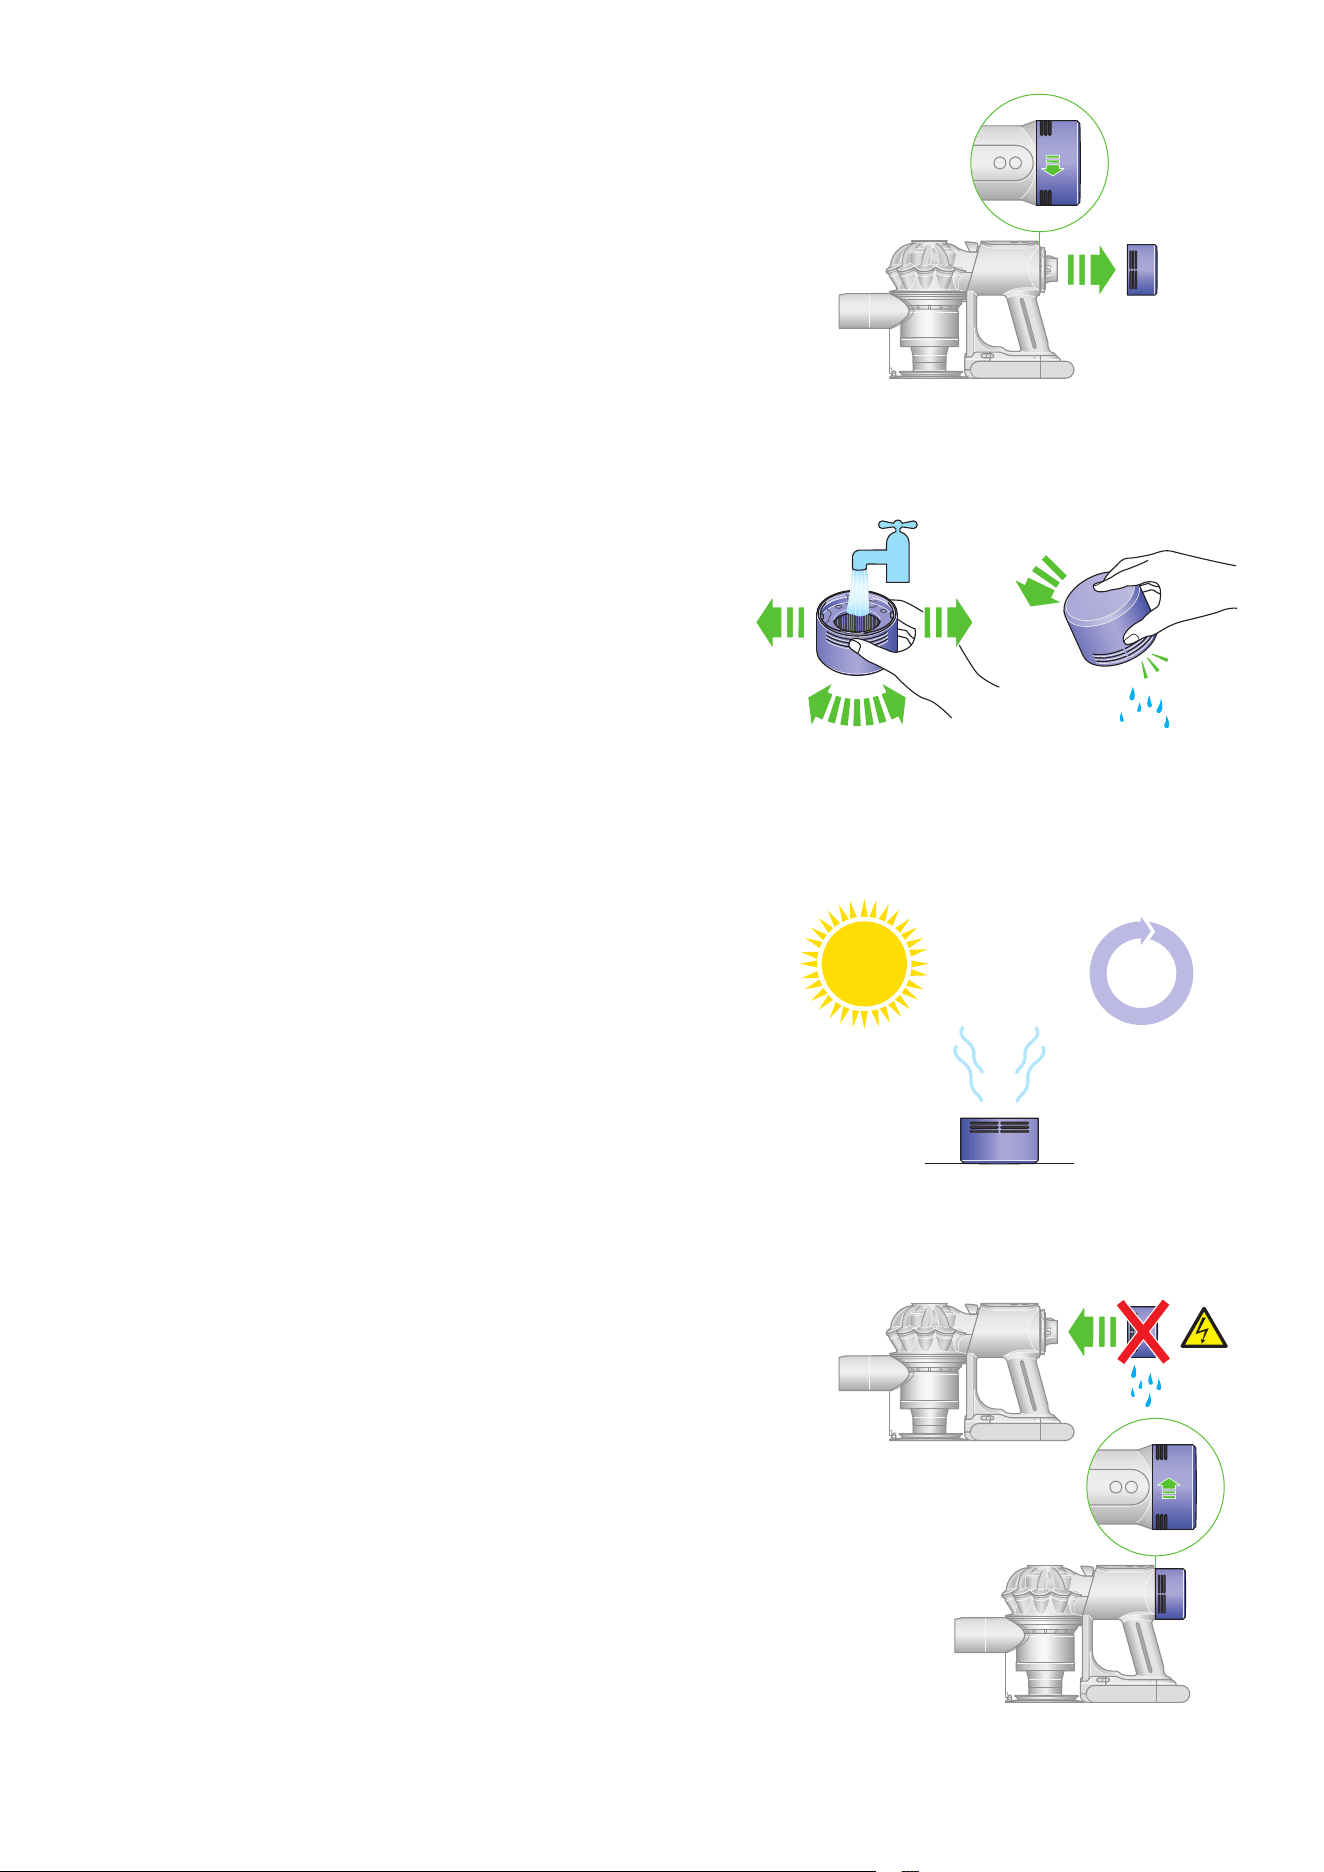
Washing the Post-filter on your vacuum
Twist off your filter
Twist your filter counterclockwise and pull it away from your machine.
Wash your filter
Wash the inside of the filter under cold, running water, rotating the filter to
make sure all of the inside is clean.
Repeat until the water runs clear.
Shake out the water
Empty the filter and shake firmly to remove excess water.
Keep shaking it until there’s no water coming from the filter.
Dry your filter
Place your filter, with the open end facing up, to dry.
Leave your filter to dry for at least 24 hours in a well-ventilated, warm place.
Do not dry your filter in a tumble-dryer or near a naked flame.
Important: your filter must be completely dry before you put it back into the
machine. Your machine could be damaged if used with a damp filter.
Replace your filter
Place your filter on your machine, aligned in the open position.
Twist clockwise until it clicks securely into position.
*Small details may vary
The Post-filter is removed from
the back of the machine, above
the handle.
Caution: ensure your filter is fully dry
before reinserting to the cyclone.
1
1
2
1
1
2
clik
1
1
2
clik
1
1
2
clik
1
1
2
clik
1
1
2
clik
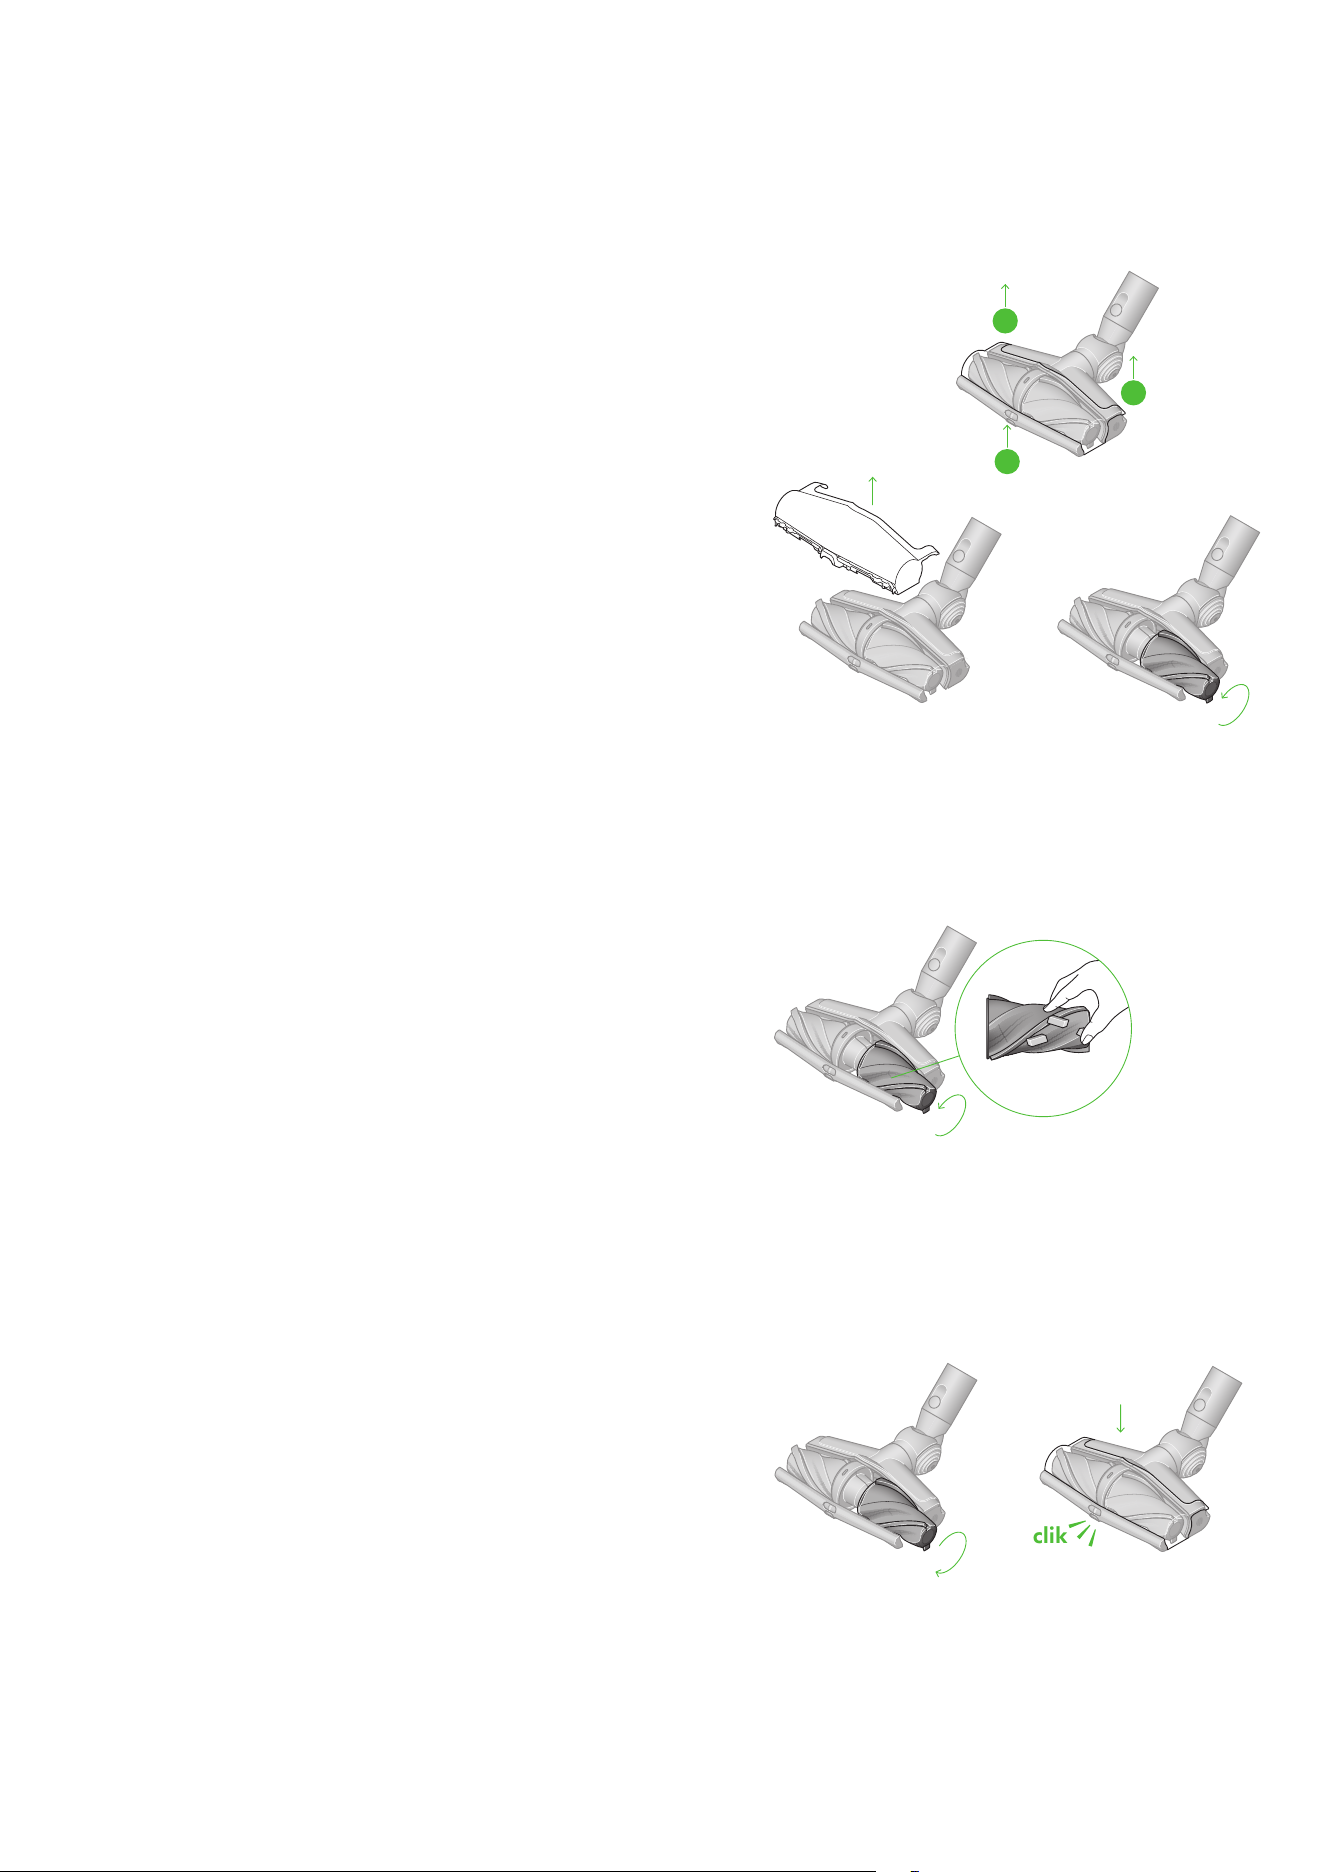
Remove the cover and brush bars
Lift the plastic clips at the back of the cleaner head on the left and right
to release the cover. Twist and pull each brush bar to remove.
Look for obstructions
Clear any debris from your brush bar. Check inside the cleaner head and
remove any debris or blockages. Your All Floor Cones™ cleaner head and
brush bar aren’t washable. Wipe over with a damp lint-free cloth.
Clearing obstructions from your
All Floor Cones™ cleaner head
Your All Floor Cones™ cleaner head doesn’t have a washable brush bar.
To maintain optimum performance, check your brush bars regularly and
clear obstructions. Make sure your machine is disconnected from the charger
and your machine power is turned off. Don’t put any part of your machine in
a dishwasher or use detergents, polishes or air fresheners.
Re-assemble the All Floor Cones™ cleaner head
Reattach each brush bar by matching the color of the plastic fitting on the
cone to the same color of the cleaner head. Refit the cover by gently slotting
back into place and snap the clips back into place.
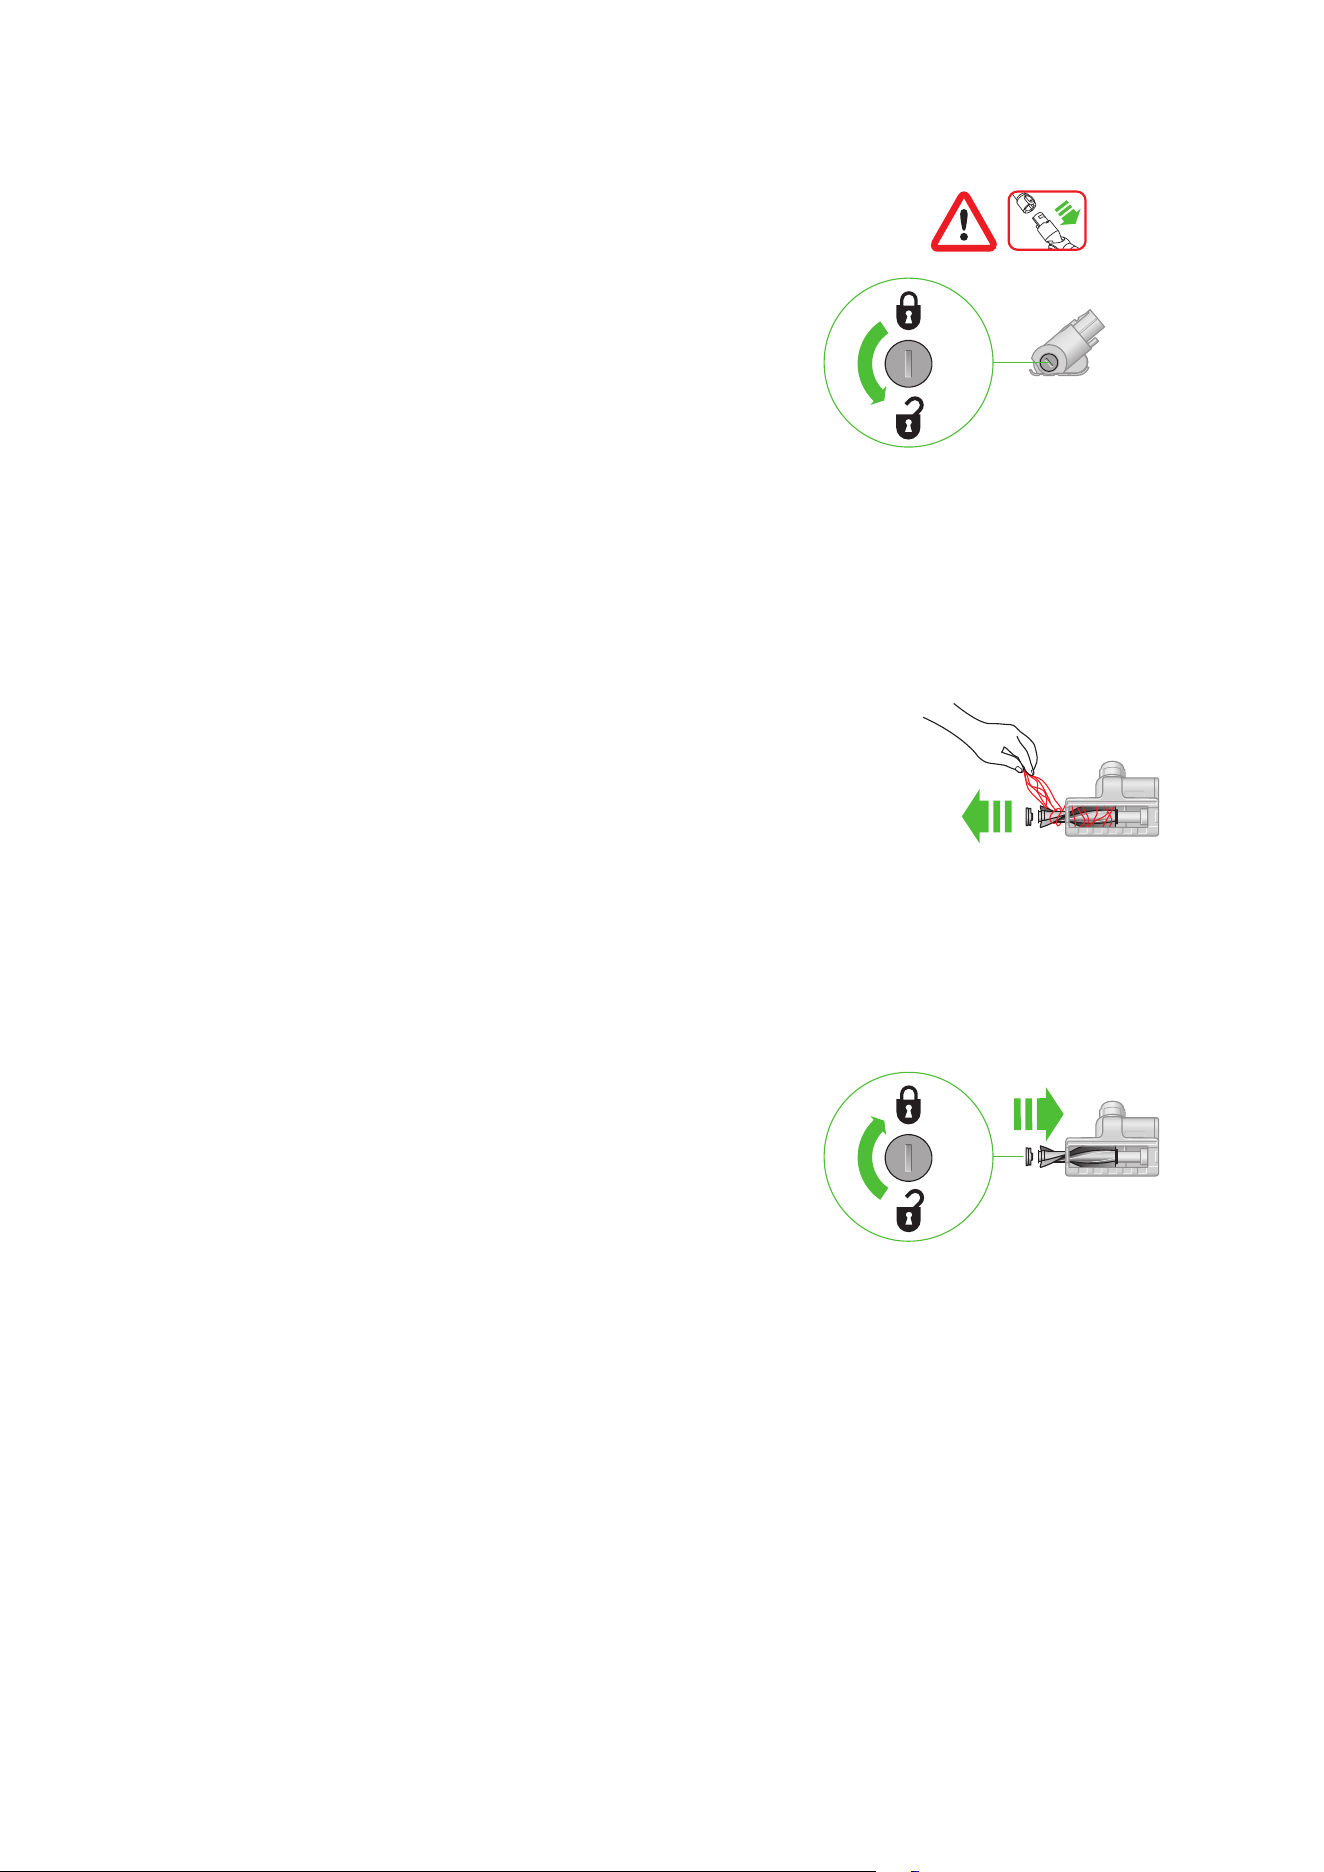
Clearing blockages from your
Mini motorized tool
Your Mini motorized tool doesn’t have a washable brush bar. To maintain
optimum performance, check your brush bar regularly and clear any
obstructions.
Make sure your machine is disconnected from the charger and take care not
to touch the power button.
Remove your brush bar
Don’t put any part of your machine in a dishwasher or use detergents,
polishers or air fresheners.
Use a coin to unlock the end cap.
Twist the end cap and remove it from your brush bar. Don’t wash
the end cap.
Slide your brush bar out of the cleaner head.
Look for obstructions
Clear any debris from your brush bar.
Check inside the cleaner head and remove any debris or blockages.
Your mini motorized tool and brush bar aren’t washable. Wipe over with a
damp lint-free cloth.
Replace your brush bar
Push the end cap back on to your brush bar and slide it back into the
cleaner head.
Turn the end cap clockwise into the locked position.
Your cleaner head isn’t washable and should only be wiped over with
a damp lint-free cloth.
Twist the end cap counterclockwise
to remove it from the brush bar
clik
clik
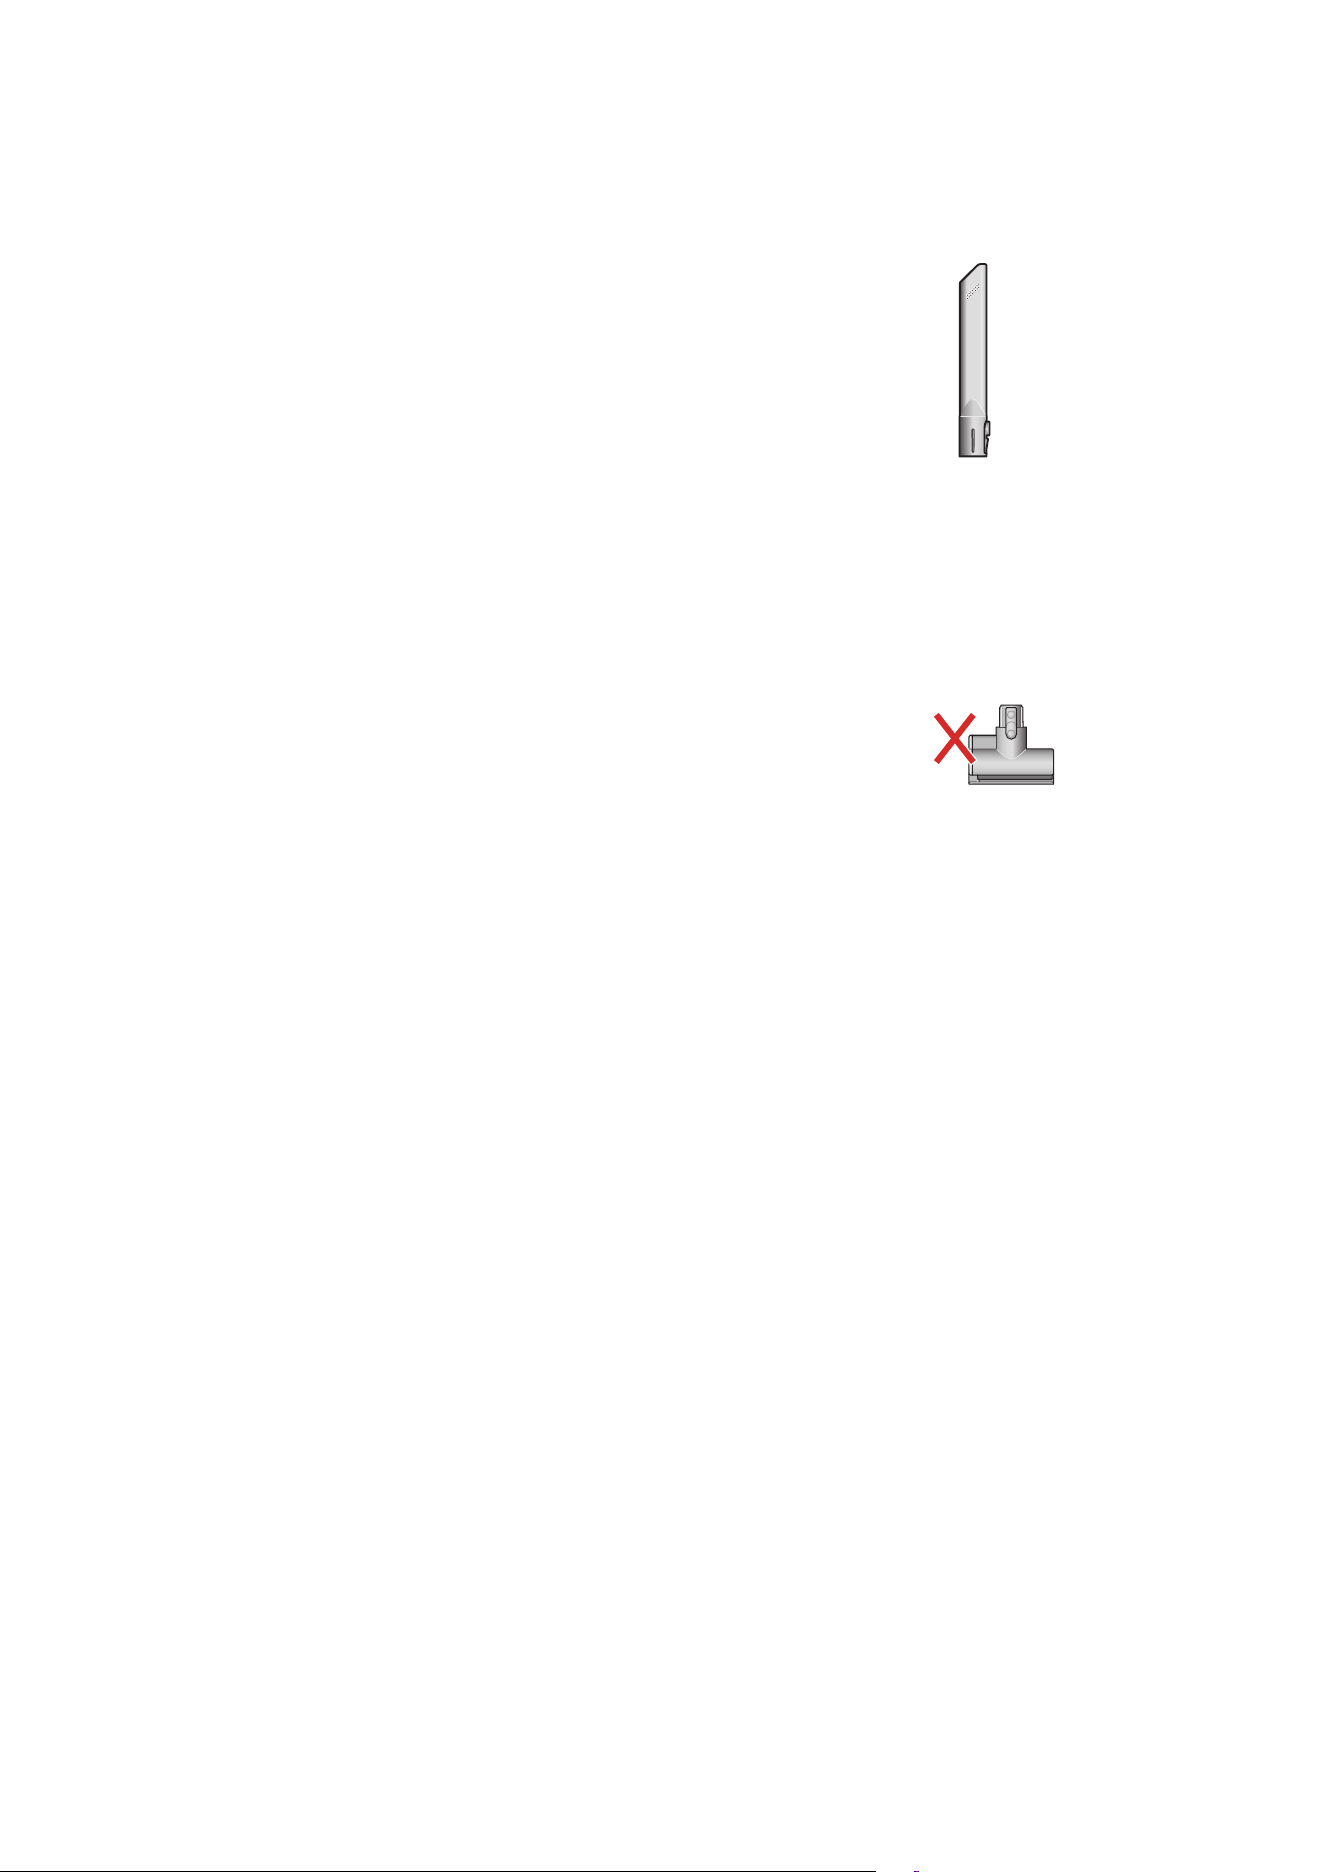
Cleaning your tools
Don’t put any part of your machine in a dishwasher or use detergents,
polishes or air fresheners.
Wipe with a damp, lint-free cloth, without touching the connector end.
Make sure your tools are completely dry before using.
Crevice tool
Do not wash any cleaner head or motorized tool. They contain electronic
components that could be compromised by exposure to water, detergents,
polishes or air fresheners.
Do not wash any cleaner head or motorized tool. They contain
electronic components that could be compromised by exposure
to water, detergents, polishes or air fresheners.
Crevice tool
Mini motorized tool
The mini motorized tool with
an X next to it to signify it is not
washable.
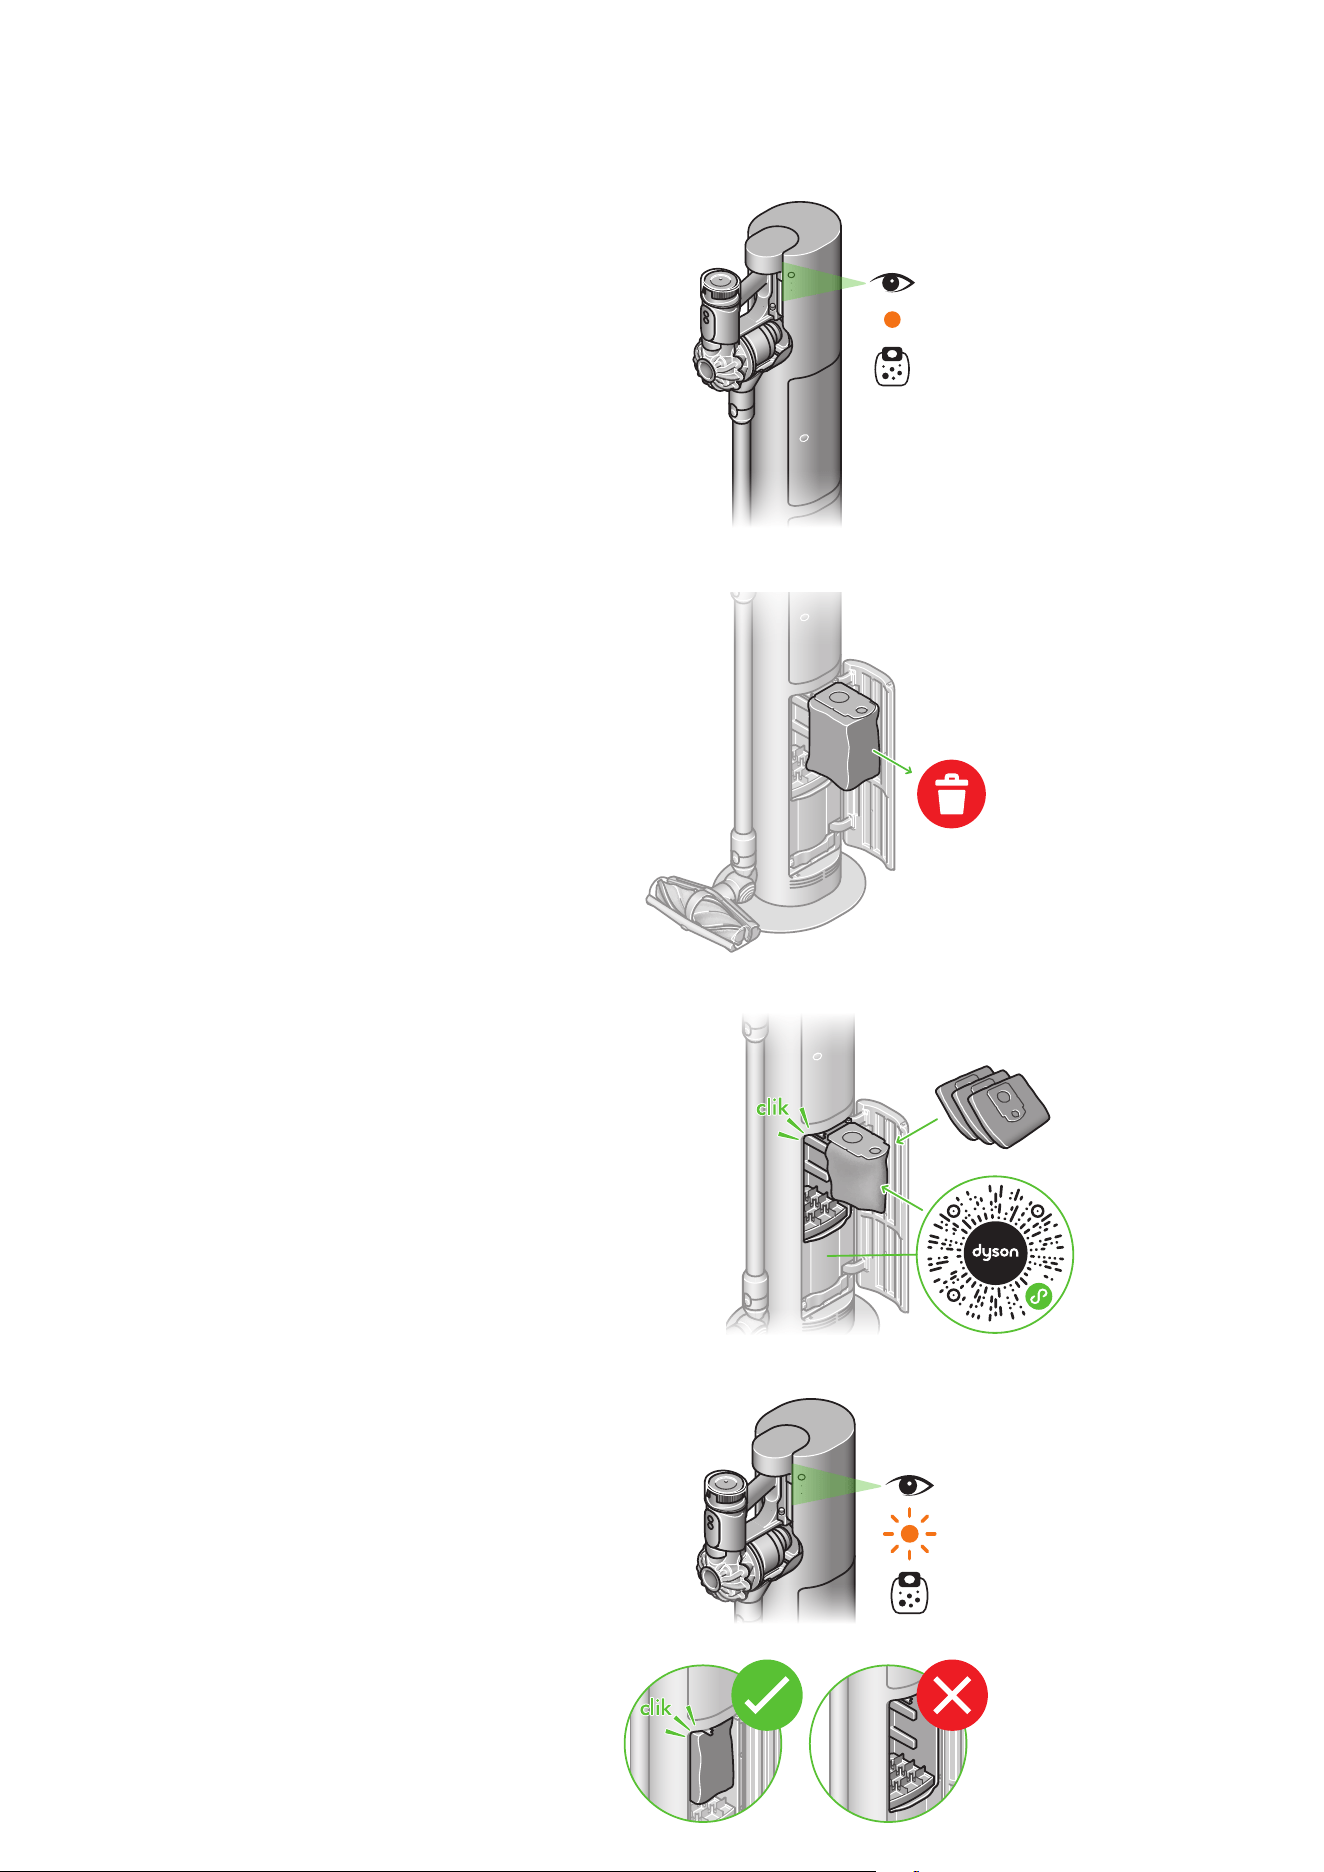
Changing your Auto-empty Dok™ liner
Step 2
Open the bottom door on the dock, and slide the full bin out of
the dock. Dispose of the bin liner with all the dust into the trash.
Step 3
Insert a new liner into the slot. To re-purchase bin liners, scan
QR code below the bin.
Step 4
Ensure the new liner is inserted correctly. If the
indicator light does not turn off, re-insert.
Step 1
When the liner is full, the indicator light will turn solid orange
when the machine is docked. The vacuum stops emptying
immediately when the liner is full.
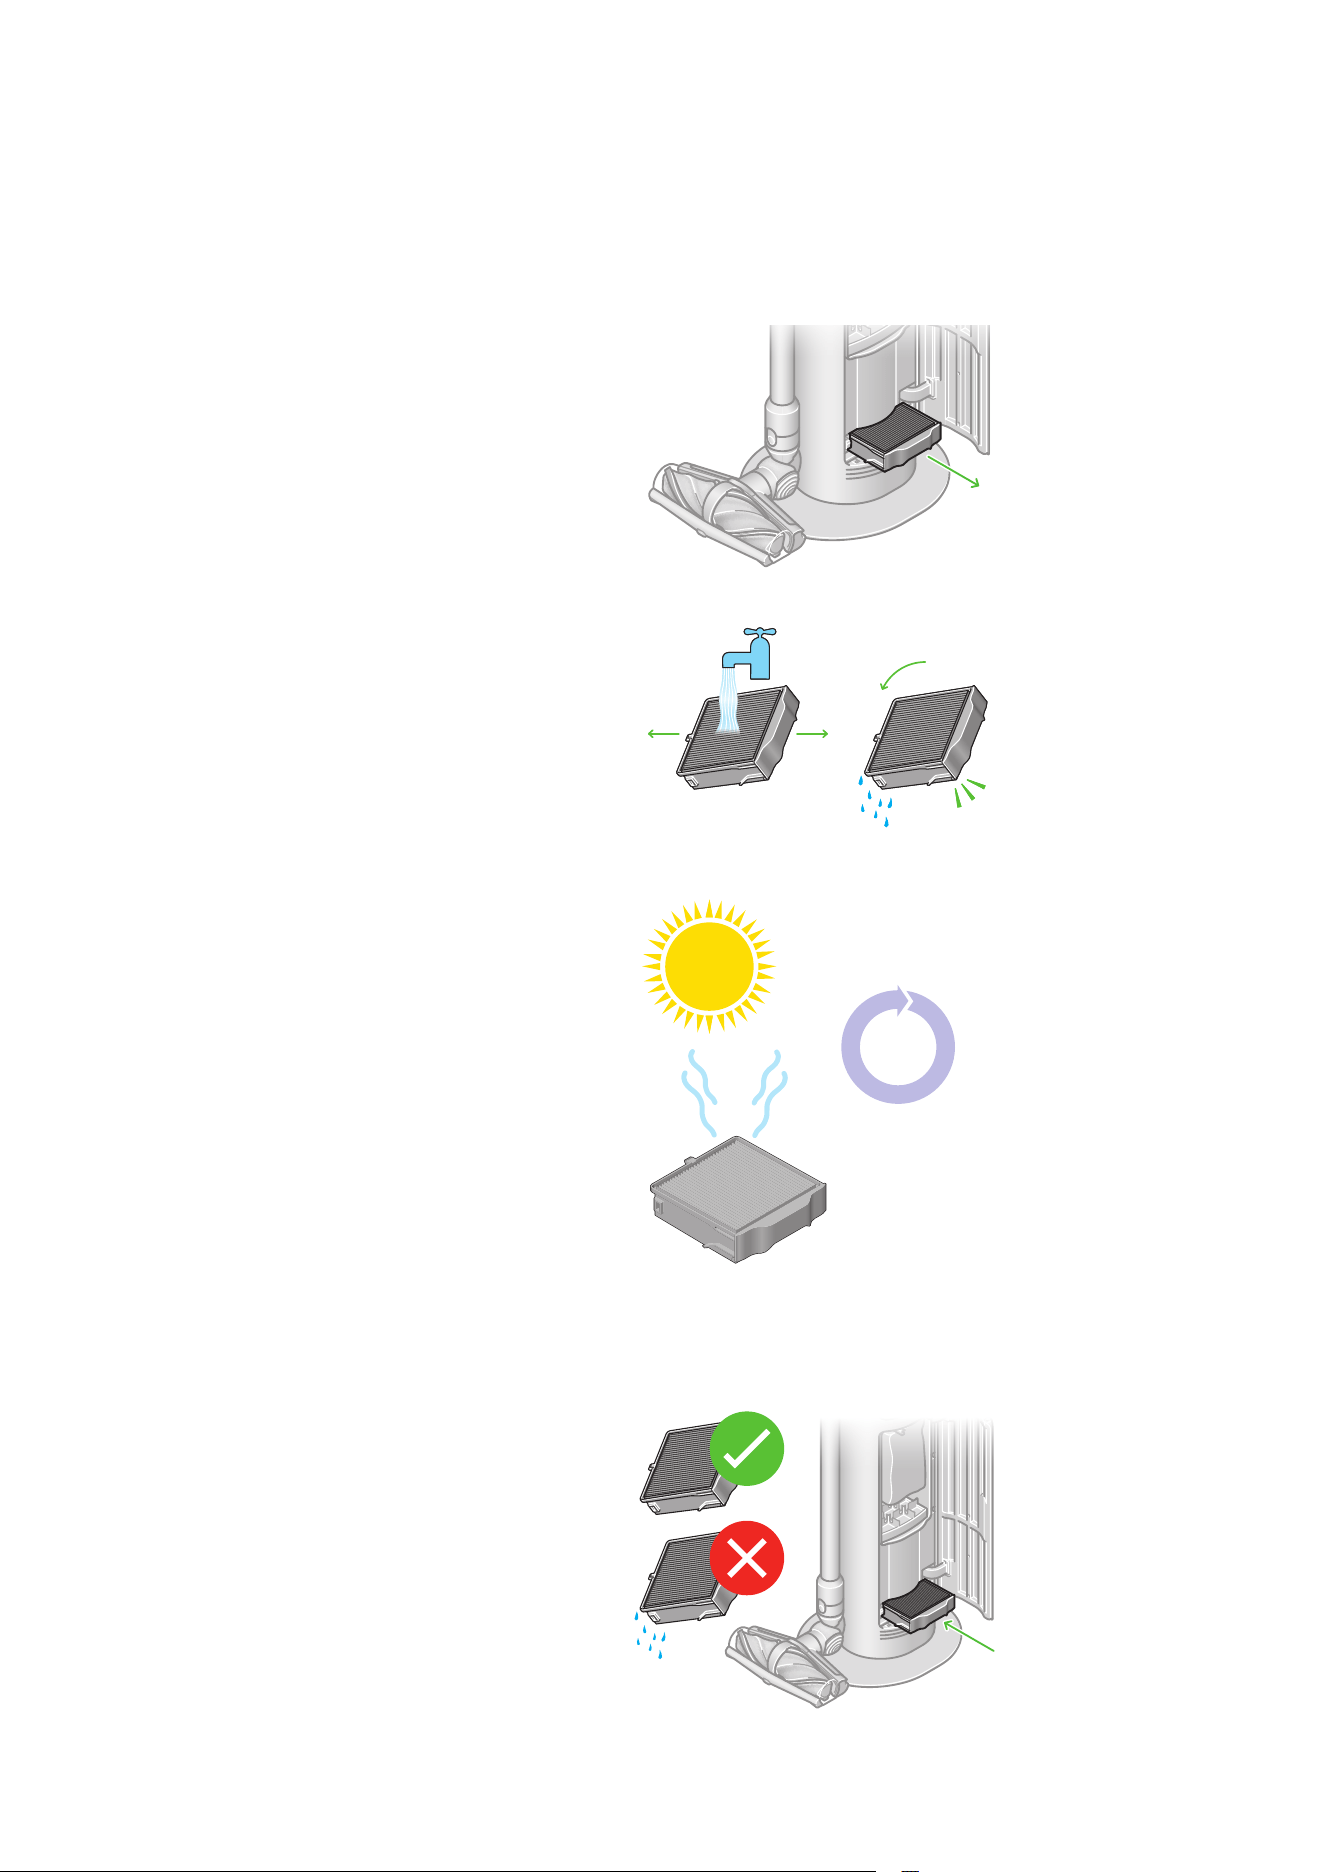
12
11
10
9
8
7
6
5
4
3
2
1
24
hrs
Washing the filter in
your Auto-empty Dok™
Ensure the filter is completely dry before inserting back
into the dock.
Ensure the filter is inserted into the dock and the bottom
door shut before starting self-emptying.
For the best care and to maintain the dock performance, it is
recommended to clean the dock filter every 2 months (60 days)
Pull and slide out the HEPA filter and run under tap water to clean it.
Shake and tilt it to ensure there is no excess water left it the filter.
The filter is located at the
base of your Auto-empty
Dok and can be accessed
with the bin door open.
Allow 24 hours for filter to dry

Re-purchasing dust liners
for your Auto-empty Dok™
Replacement and spare dust liners can be purchased by:
• Visiting the Accessories page at Dyson.com
• Using the MyDyson™ app
• Scanning the QR code on your dock
Looking after your machine
Day-to-day machine care
If your machine is dusty, wipe with a damp, lint-free cloth.
Look after your battery
For best performance and battery life, only use MAX mode when needed.
Your battery is designed to charge on the dock and stops charging when
complete, so returning the machine to the dock after use helps to maintain
battery life.
Your machine won’t operate or charge if the ambient temperature is below
41° F (5° C). This is designed to protect both the motor and battery.
Where to find your machine’s serial number
The serial number is printed on the main body of the machine, behind the
back of the clear bin.
Use the serial number to register your machine.
For more information and support videos for your machine,
go online: www.dyson.com/support
To always get the best performance from your machine, it’s important to
clean it regularly and check for blockages.