
Technical Support and E-Warranty Certificate
www.vevor.com/support
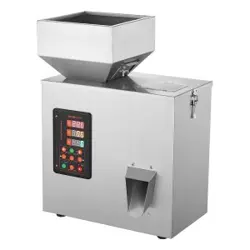
POWDER FILLING MACHINE
USER MANUAL
We continue to be committed to provide you tools with competitive price.
"Save Half", "Half Price" or any other similar expressions used by us only represents an
estimate of savings you might benefit from buying certain tools with us compared to the major
top brands and does not necessarily mean to cover all categories of tools offered by us. You
are kindly reminded to verify carefully when you are placing an order with us if you are
actually saving half in comparison with the top major brands.
- 1 -
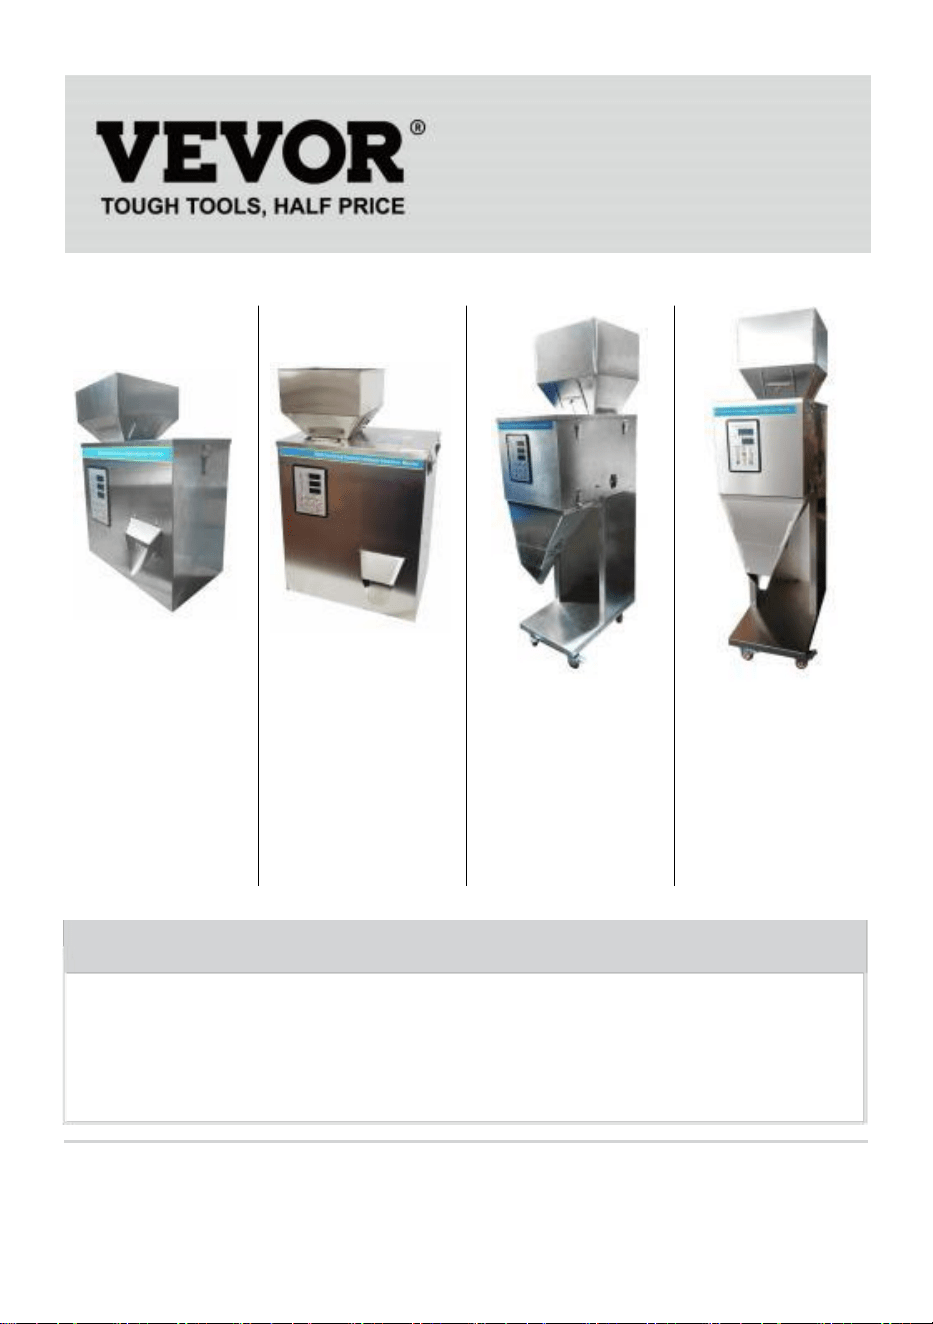
F-100-V1, F-200-V1,
F-100-V2, F-200-V2,
F-100-V3
F-500-V1
F-500-V2
F-999-V1
F-999-V2
F-999-V3
F-3000-V2
F-5000-V2
Have product questions? Need technical support? Please feel free to
contact us:
Technical Support and E-Warranty Certificate
www.vevor.com/support
NEED HELP? CONTACT US!
This is the original instruction, please read all manual instructions
carefully before operating. VEVOR reserves a clear interpretation of our
user manual. The appearance of the product shall be subject to the
product you received. Please forgive us that we won't inform you again if
there are any technology or software updates on our product.
Powder Filling Machine

- 2 -
1. Read carefully and understand all ASSEMBLY AND OPERATION
INSTRUCTIONS before operating.
2. Failure to follow the safety rules and other basic safety precautions may
result in serious personal injury.
GENERAL SAFETY RULES
Important reminder
1.Before use, please carefully read the product manual and ensure that
you understand and comply with all safety warnings and usage
precautions.
2. Do not use this product for other non-designated purposes to avoid
unexpected risks.
3. This product is only applicable to users within the specified age group
and scope of application. Please strictly comply with relevant age
restrictions and warnings.
4. If there are any abnormalities in the product, please stop using it
immediately and contact the after-sales service center for consultation or to
arrange for repair.
Environmental requirements for use
1. Please use in a dry and well-ventilated environment to avoid extreme
environmental conditions such as water activation, high temperature, high
humidity, and extremely low temperature.
2. Avoid direct sunlight or contact with fire sources to prevent product
damage or fire.
3. Please ensure a stable usage environment and prevent the product from
being hit or dropped to avoid damage.
Safety Operation Guidelines
1. Please use a suitable power supply and voltage, and do not use
damaged power cords or plugs.
2. When using this product, do not short-circuit circuits or connect
mismatched devices to avoid risks such as electric shock and fire.

- 3 -
3. When foreign objects are found on the surface of the product, please
immediately stop using and remove the foreign objects before continuing to
use.
4. When using this product continuously for a long time, please rest in good
time to avoid excessive fatigue.
5. Do not plug or unplug the power plug with wet hands to avoid the risk of
electric shock.
Maintenance and upkeep
1. Regularly maintain and clean the product. Before cleaning, please
disconnect the power supply and wipe it with a dry cloth. Be careful not to
use alcohol, acid or alkali solutions, etc
2. When the product is not in use for a long time, please disconnect the
power supply promptly to save energy and extend the product's lifespan.
3. Do not disassemble the product or replace components on your own. If
you encounter any malfunctions, please contact the after-sales service
center.
Emergency handling measures
1. When there are abnormal situations or accidents with the product,
please stop using it as soon as possible.
If overheating, smoking, or abnormal sound are found, please immediately
cut off the power supply and contact the after-sales service center.
2. If the product involves an emergency situation that may harm personal
safety, please call the emergency rescue number in a timely manner.
SAVE THESE INSTRUCTIONS

- 1 -
MODEL AND PARAMETERS
Model
F-100-
V1
F-100-
V2
F-100-
V3
F-200-
V1
F-200-
V2
F-500-
V1
F-500-
V2
Suitable
Particle
Granular and powdered
materials. Not floury
materials,smooth surface
particles
Granular and powdered materials. Not
floury materials,smooth surface
particles
Particle
Size
Φ<10mm
Φ<10mm
Φ<20mm
Filling
Range
1-99.9g
1-200g
10-500g
Voltage
AC120
V 60Hz
AC230
V 50Hz
AC230
V 50Hz
AC120
V 60Hz
AC230
V 50Hz
AC120
V 60Hz
AC230
V 50Hz
Power
(Max.)
28W
28W
28W
29W
29W
74W
74W
Model
F-999-V1
F-999-V2
F-999-V3
F-3000-V2
F5000-V2
Suitable
Particle
Granular and powdered materials.
Not floury materials,smooth surface
particles
Granular and powdered
materials. Not floury
materials,smooth
surface particles
Particle
Size
Φ<20mm
Φ<35mm
Φ<35mm
Filling
Range
10-999g
20-3000g
20-5000g
Voltage
AC120V
60Hz
AC230V
50Hz
AC230V
50Hz
AC230V
50Hz
AC230V
50Hz
Power
(Max.)
83W
83W
83W
88W
96W
- 2 -
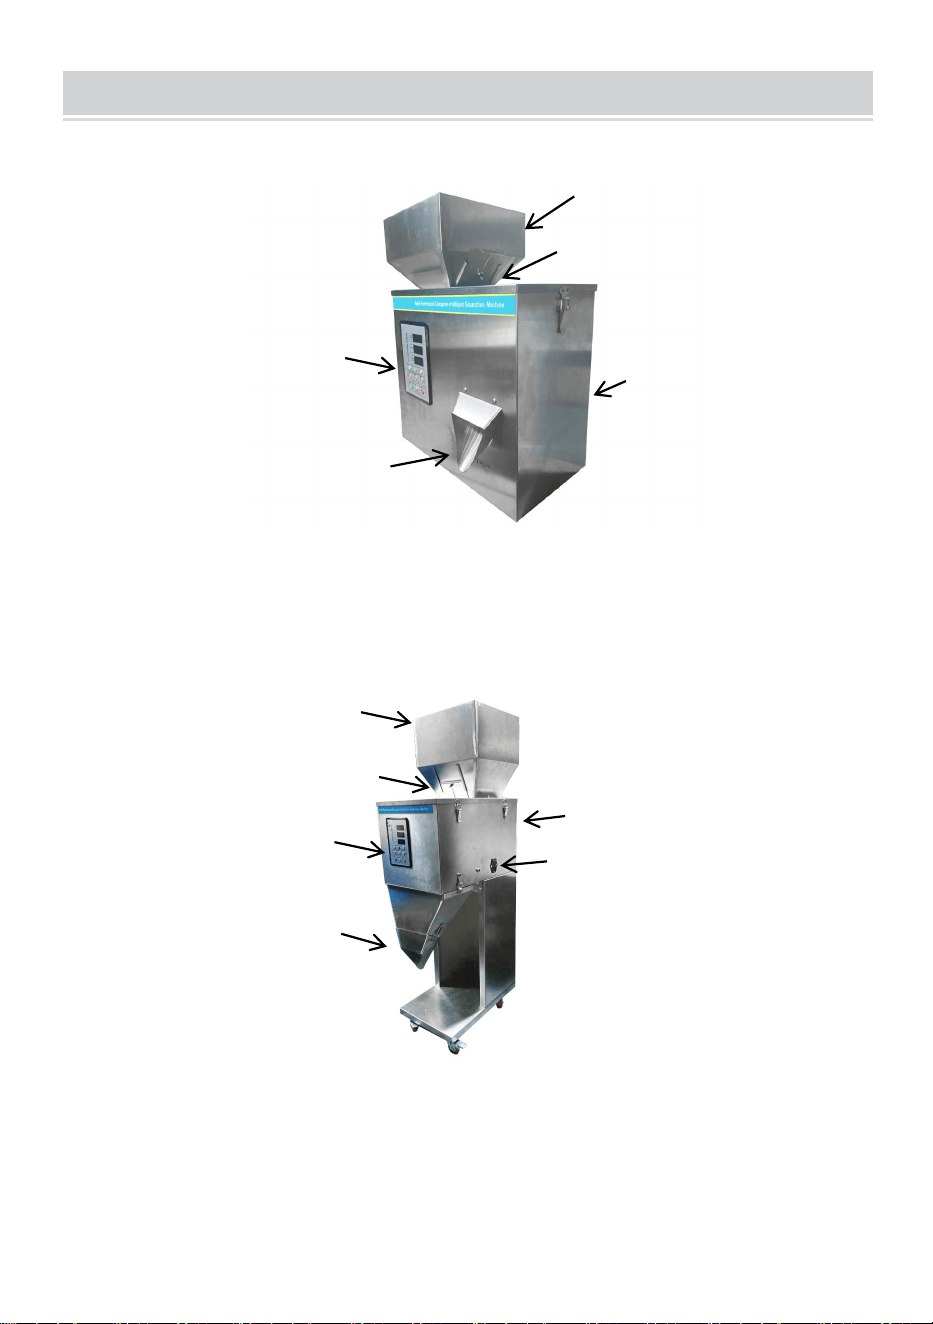
STRUCTURE DIAGRAM
F-100-V1, F-100-V2, F-100-V3 ,F-200-V1 ,F-200-V2 ,F-500-V1 ,F-500-V2
1. Hopper 2. Adjusting Plate 3.Host Machine 4.Outlet 5.Control Panel
F-999-V1, F-999-V2, F-999-V3 , F-3000-V2 ,F-5000-V2
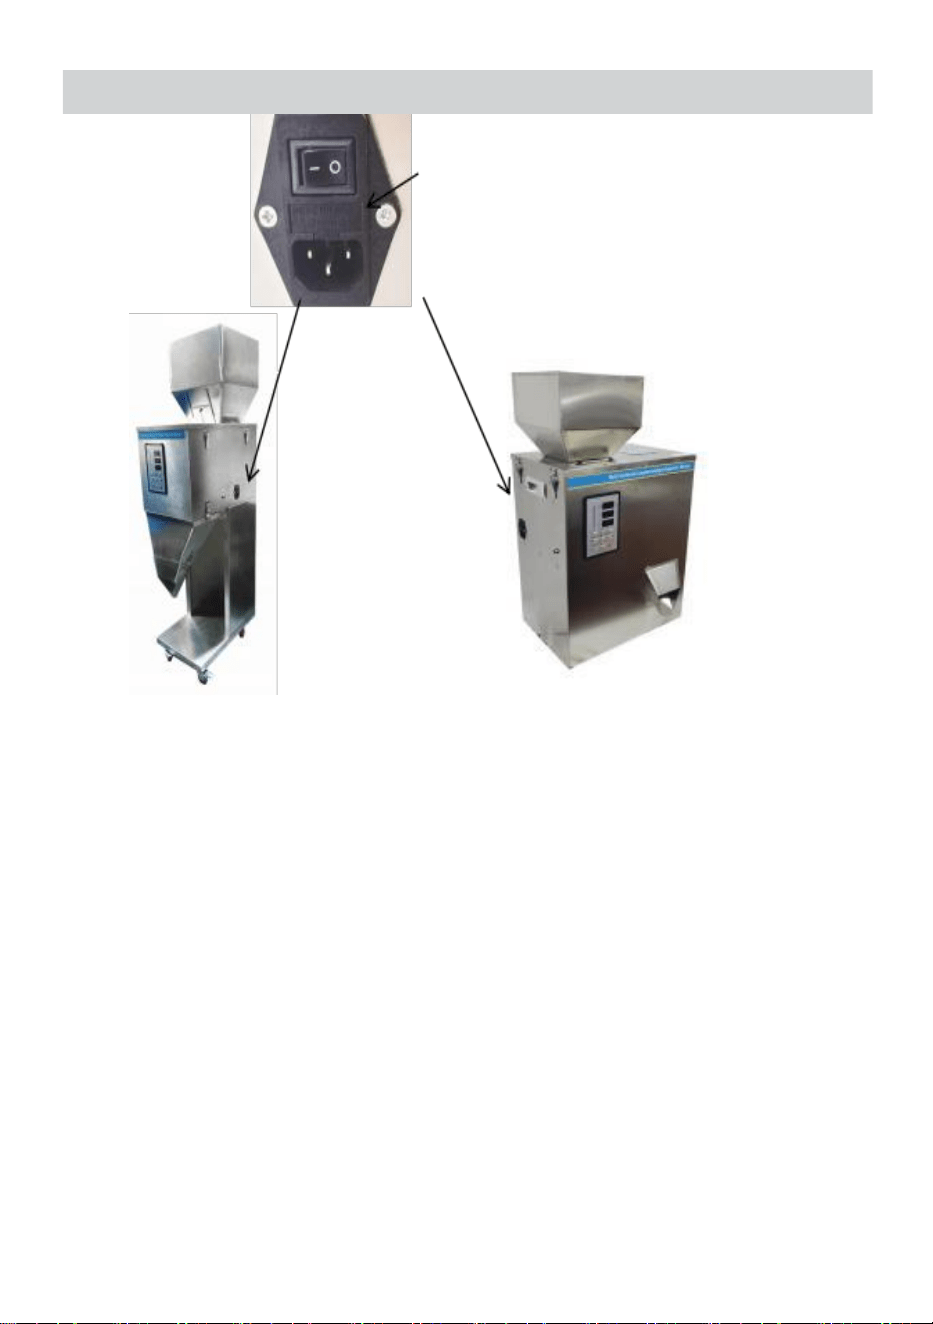
1.Hopper 2. Adjusting Plate 3.Host Machine 4.Power Outlet
5.Outlet 6.Control Panel
1
5
2
2
6
3
1
3
4
5
4

- 3 -
COMPONENTS
F-100-V1
F-100-V2
F-100-V3
F-200-V1
F-200-V2
F-500-V1
F-500-V2
F-999-V1
F-999-V2
F-999-V3
F-3000-
V2
F-5000-
V2
Powder
Filling
Machine
×1
×1
×1
×1
×1
×1
Open-end
Wrench
(10MM )
×1
×1
×1
/
/
/
Open-end
Wrench
(
14MM
)
/
/
/
×1
×1
×1
Power Cord
×1
×1
×1
×1
×1
×1
Pedal Switch
/
/
/
×1
×1
×1
User Manual
×1
×1
×1
×1
×1
×1
Model
Parts
- 4 -
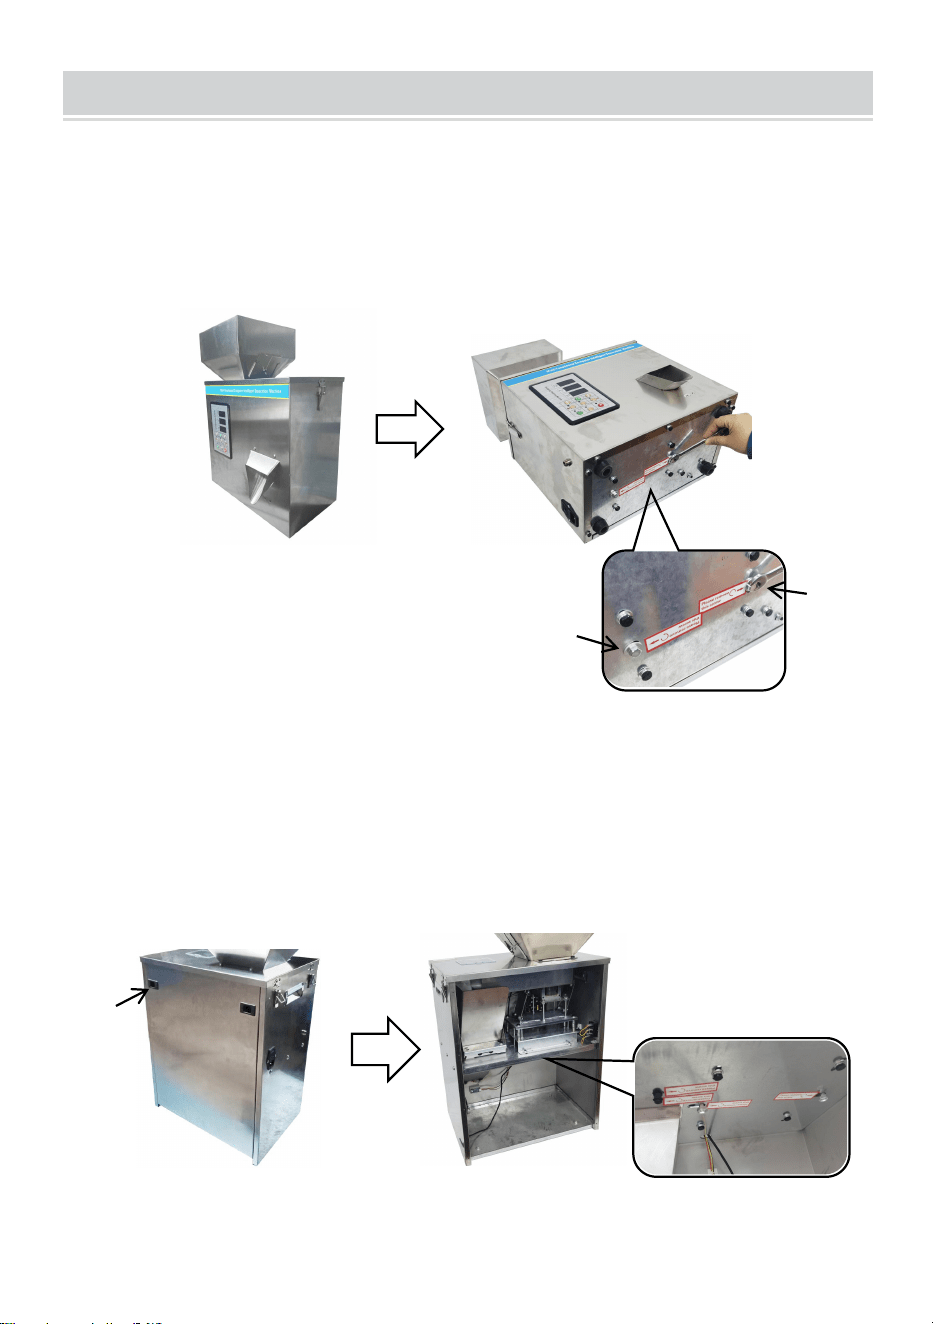
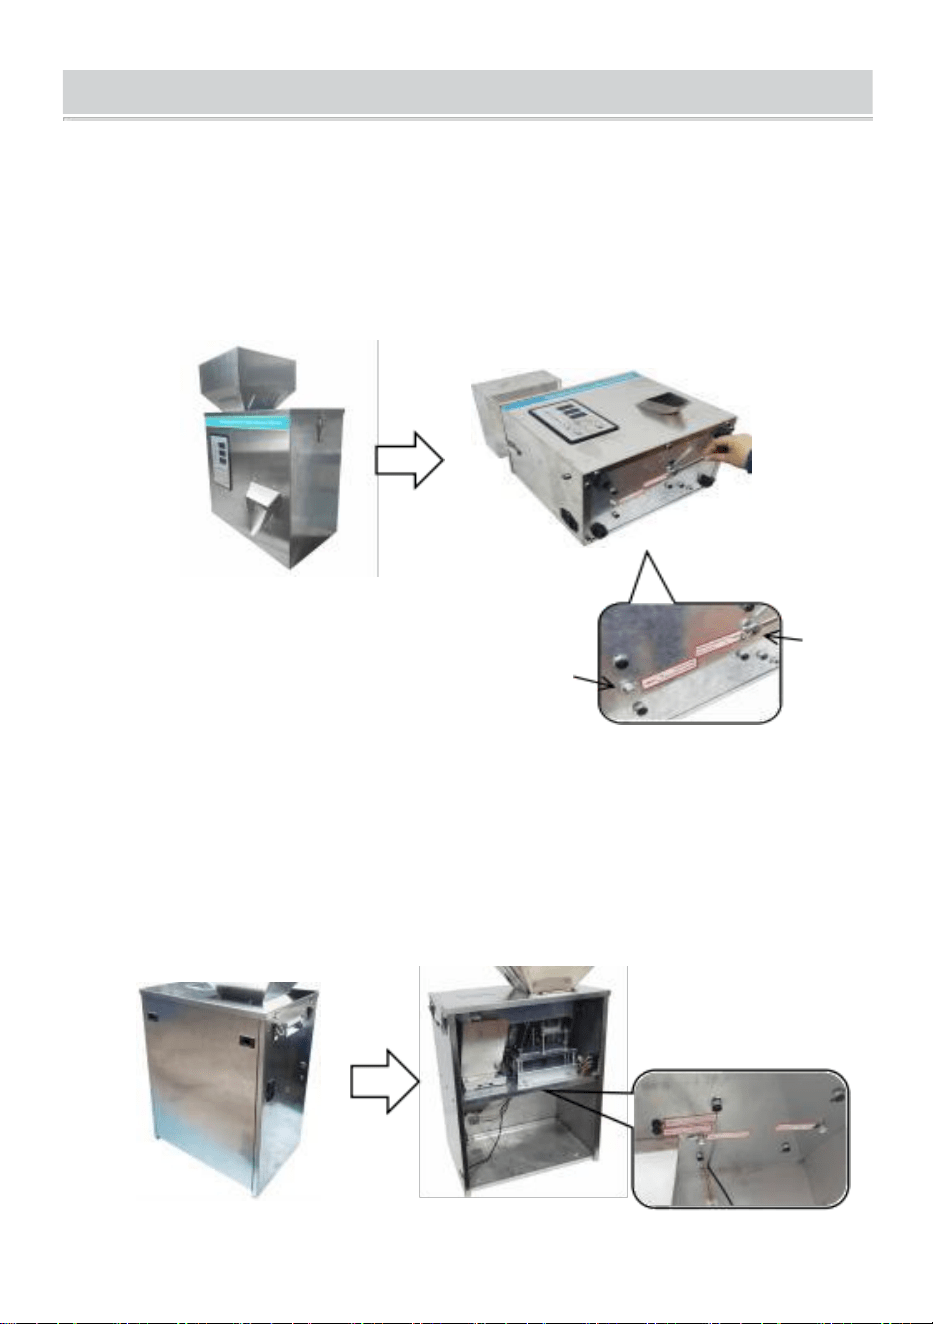
OPERATING INSTRUCTIONS
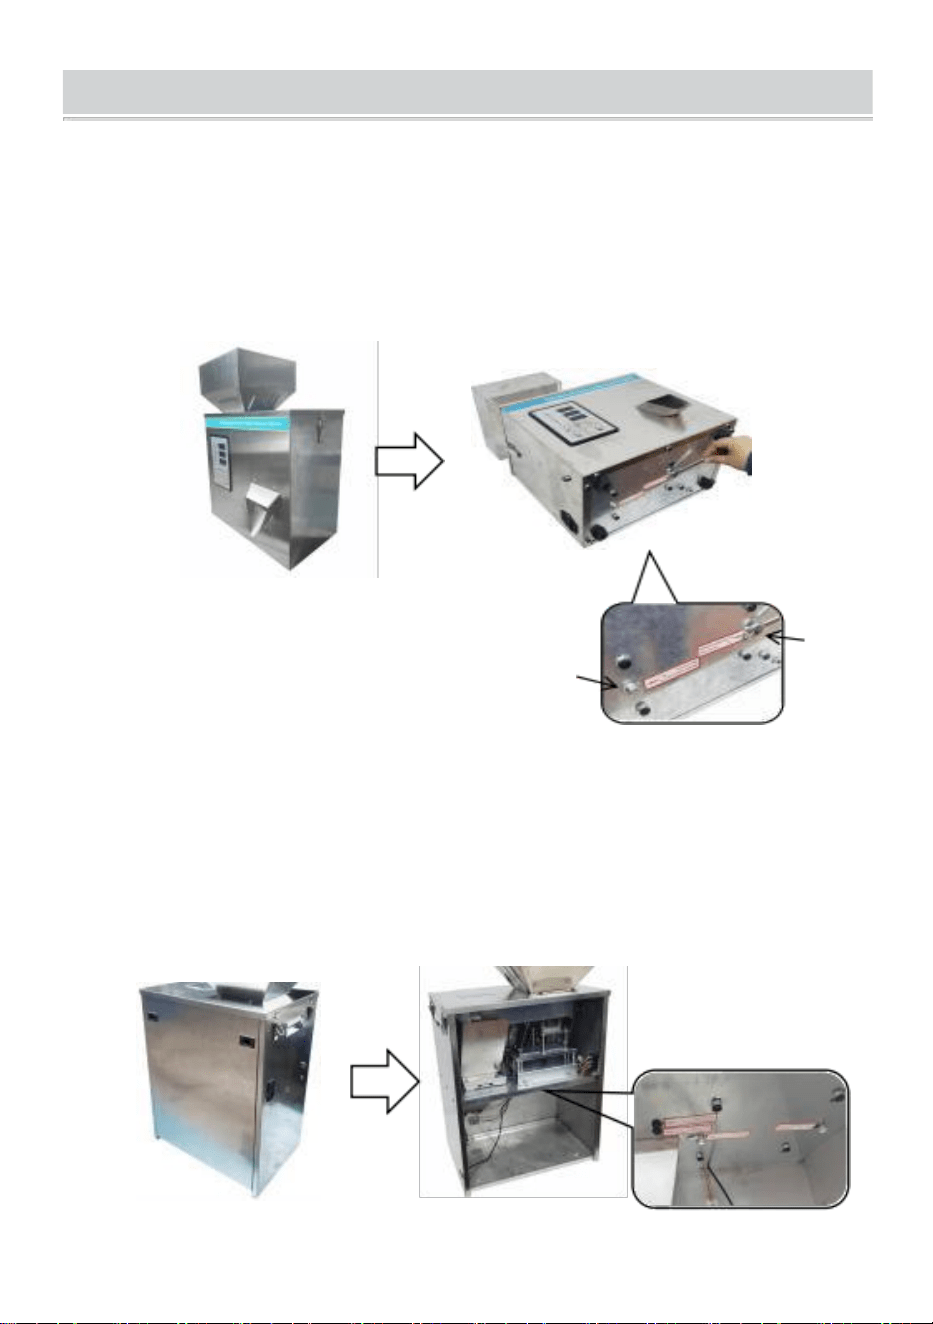
F-100-V1, F-100-V2, F-100-V3 ,F-200-V1 ,F-200-V2
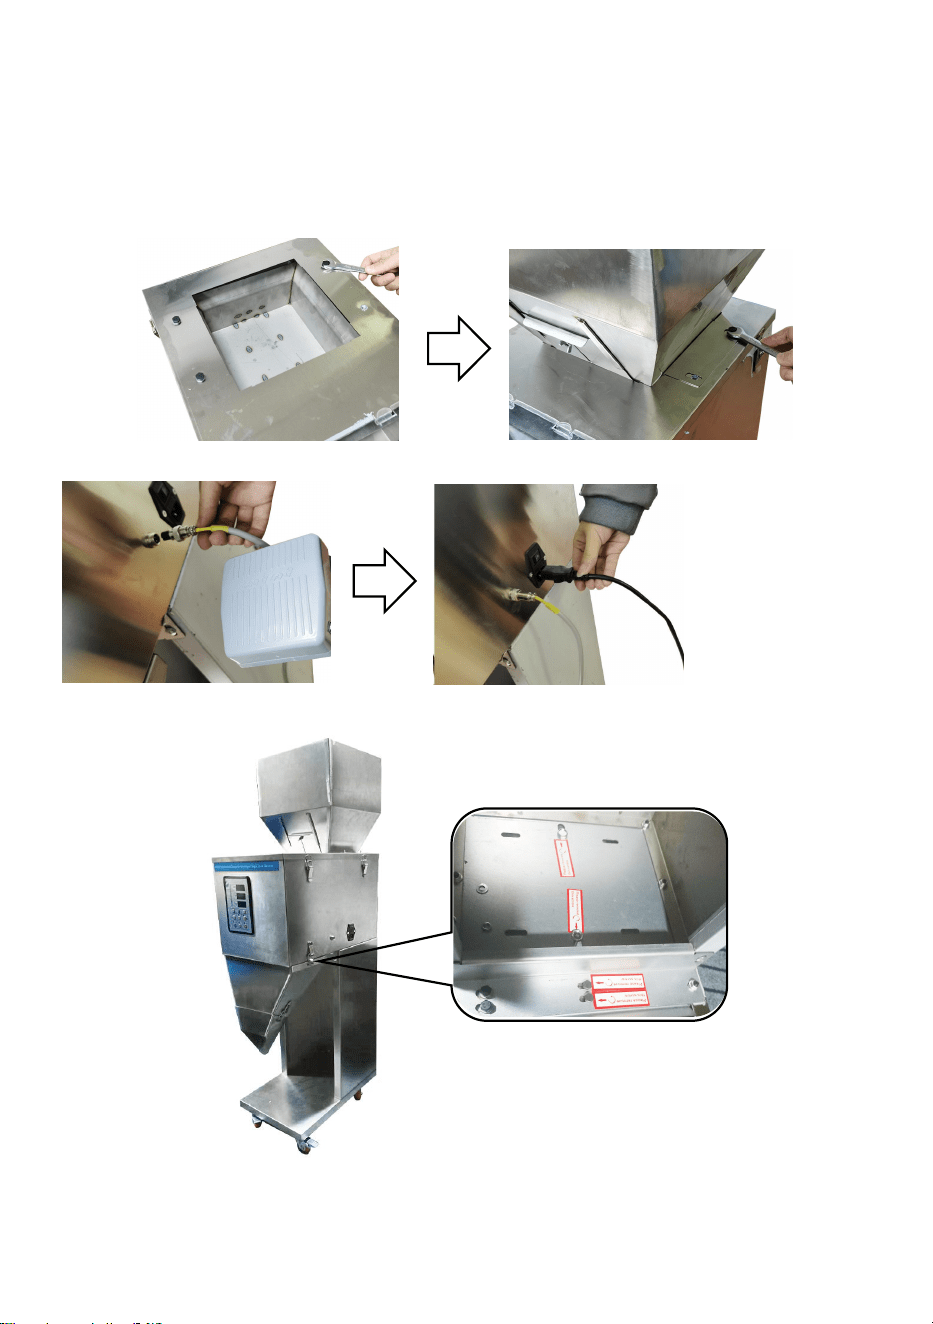
1. Lay the product flat and remove the screws (A,B)according to label
instructions as shown .
2. Put the product in a stable position, plug in the power cord, and then
you're ready to use.
F-500-V1, F-500-V2:
1.Open the buckle on the back cover and remove the back cover,and then
remove the screws according to label instructions as shown .Put back on
the back cover.
2.Put the product in a stable position, plug in the power cord, and then
you're ready to use.
A
B
Buckle
- 5 -
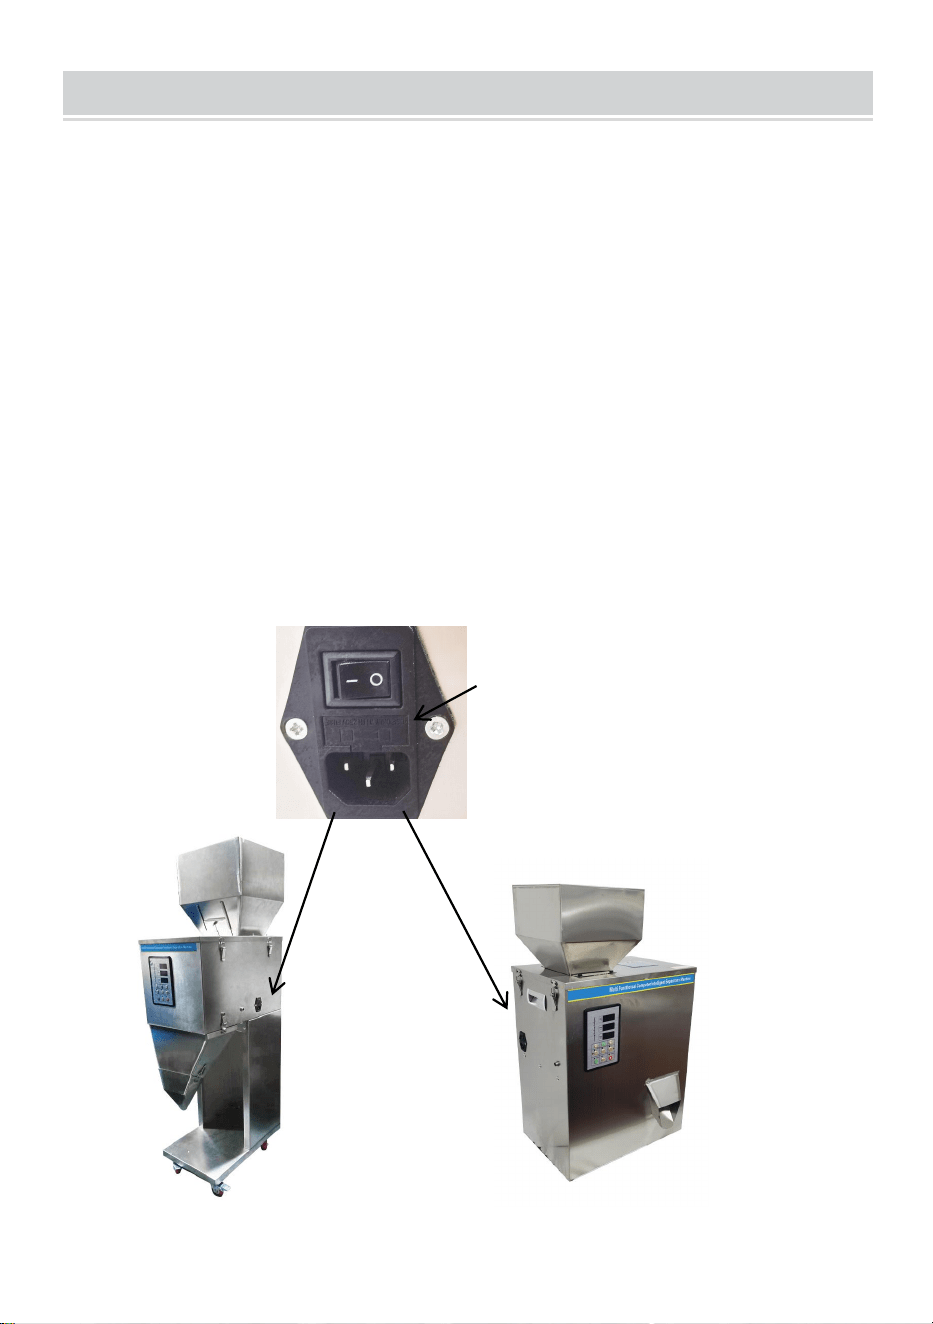
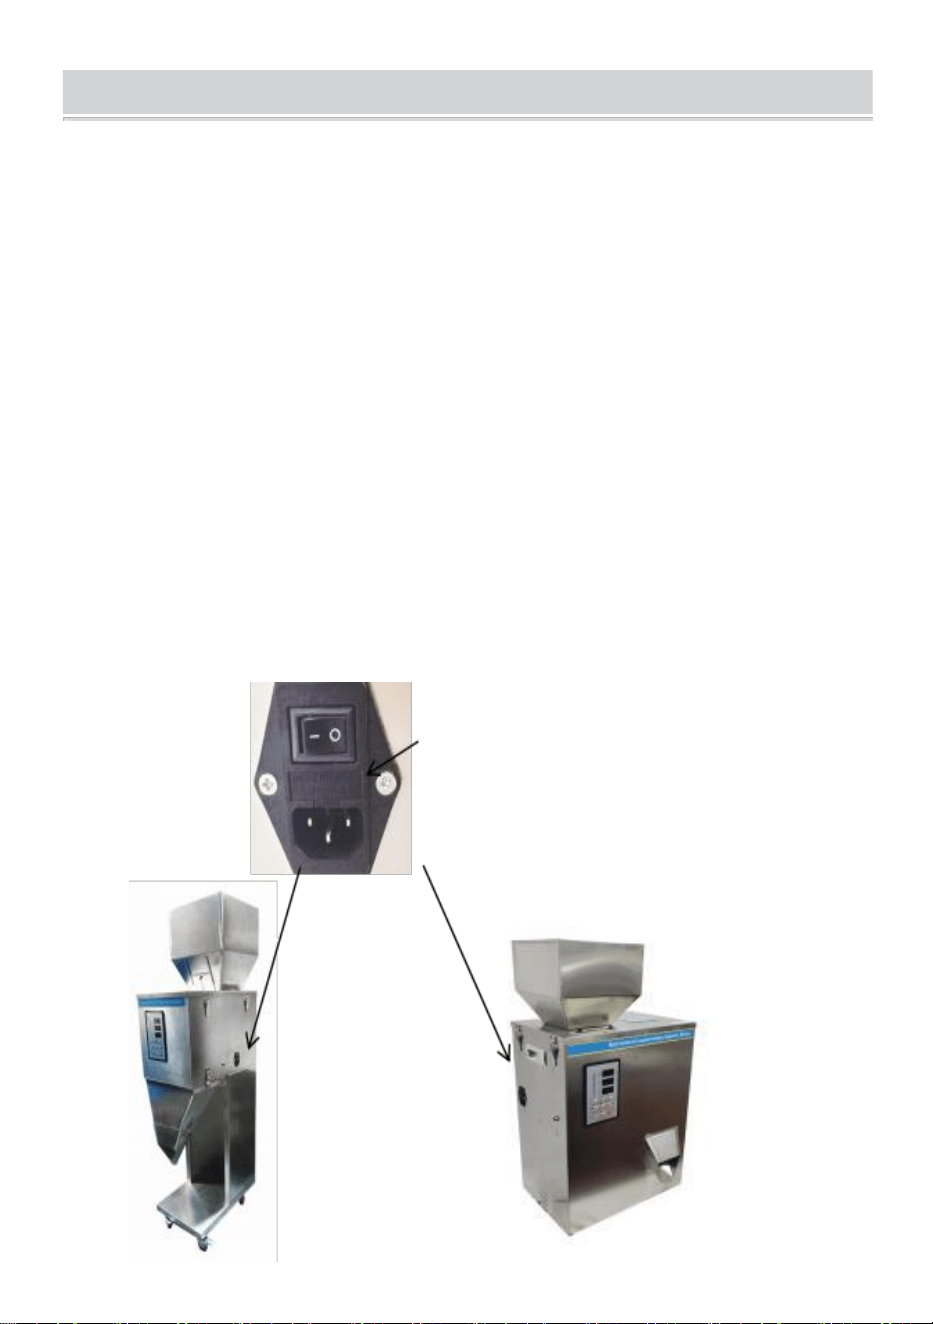
F-999-V1, F-999-V2,F-3000-V2,F-5000-V2:
1. Hopper installation
Remove the installed screws.Put the hopper in and lock it with the screws
you just removed as shown.(Tips:The side of the hopper with the adjusting
plate faces forward)
2.Plug in the power cord and pedal switch as shown.
3.Remove the screws according to label instructions as shown

- 6 -
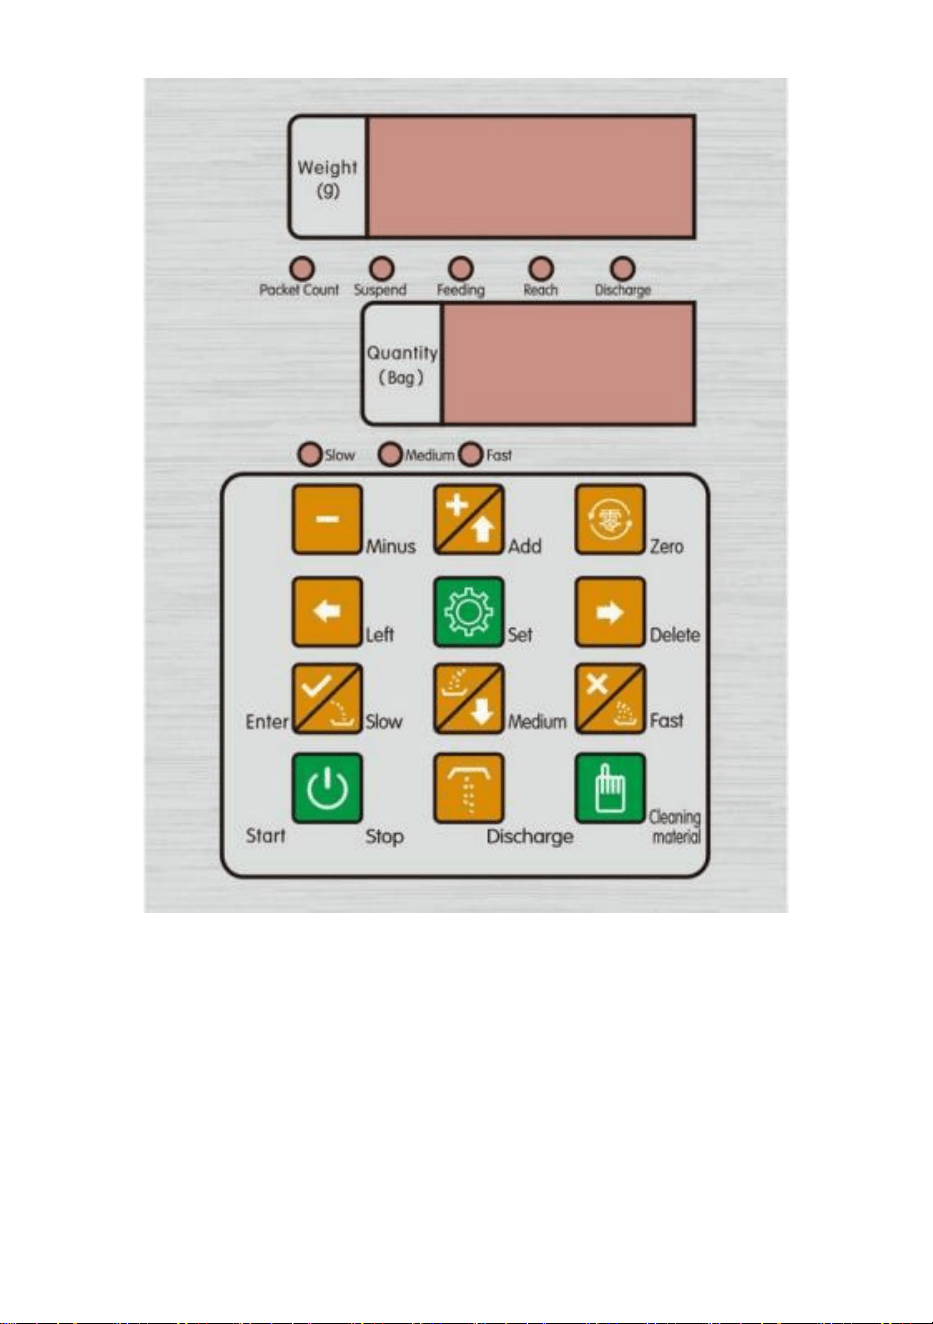
The operating instructions
F-100-V1,F-100-V2,F-100-V3 ,F-200-V1 ,F-200-V2,F-500-V1,F-500-V2,F-999-V1,
F-999-V2,F-999-V3
1. Turn on the power switch and the machine will makes a sound.The
machine is in a standby state at this time.
2. Press "Discharge" and then"Clear" to zero the Weight(g) window
display.
3. Set the weight of the material by pressing "Weight +/-"(For example,
08.0 stands for 8 grams).
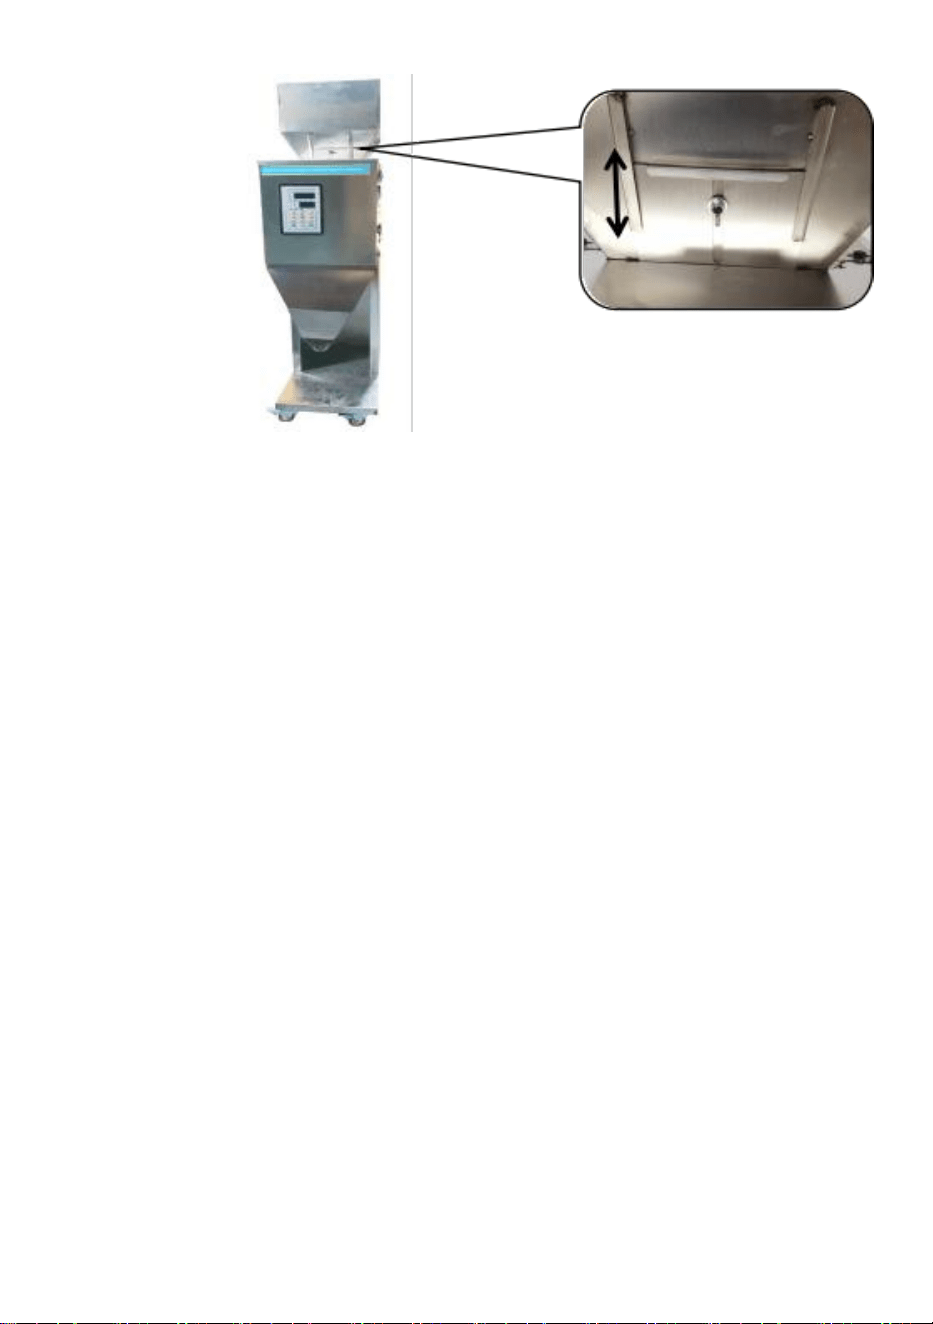
4.Lower the adjustment plate to the lowest position.Load material into the
hopper.Press start key. Adjust the position of the adjustment plate
according to the need for filling material.

- 7 -
5.Select the desired speed"Fast、Medium、Slow" according to different
materials on the control panel。
6.Press “Start”, the machine starts to work, and when a “tick” is heard, the
filling is complete.Place the container into the discharge port to receive the
material. (Tips:The container needs to be close to the sensor to trigger
it.)The container is removed and the machine performs the next round of
automatic filling.
Note:
1.To clear, press the "Clear" key.
2.To remove the remaining material, hold down the "Discharge"key for 5
seconds while the machine is stopped.The machine will continue to work,
when the material is finished, please press the “Stop “key to stop.(Tips:the
adjustment plate should be fully open.)
Sensor

- 8 -
F-3000-V2,F-5000-V2:
1. Turn on the power switch.
2. Press "Discharge" and then"Zero" to zero the Weight(g) window
display.
3. Set the weight of the material by pressing " +/-"(For example, 0800
stands for 800 grams).
4.Lower the adjustment plate to the lowest position.Load material into the
hopper.Press “start “key. Adjust the position of the adjustment plate
according to the need for filling material.

- 9 -
5.Select the desired speed"Fast、Medium、Slow" according to different
materials on the control panel.
6.Press “Start”, the machine starts to work, and when a “tick” is heard, the
filling is complete.Put the bag over the discharge port and press the foot
switch to automatically discharge the material.After discharging the
materials,the machine automatically fills the next round of material.
Note:
To remove the remaining material, Press the "Cleaning material"key while
the machine is stopped.The machine will continue to work, when the
material is finished, please press the “Stop “key to stop.(Tips:the
adjustment plate should be fully open.)
- 10 -
MAINTENANCE
1.The user shall select a quantitative filling machine of a suitable range
according to the said products.
2.The machine contains a precision electronic scale, it is forbidden to be
overweight.
3.When in use, please keep the machine level and stable to avoid big
vibrations or impact; otherwise, it may cause damage.
4.After use, please clean the material and keep the machine clean
5.When the machine is not in use, please empty the materials and store it
in a ventilated and dry place.
6.Please clean the product and the filter in time after each use.
7.Always keep the product outside clean.
Please store the product in a dry and ventilated place.
If the fuse is damaged, replace it as shown.
Fuse

- 11 -
TROUBLESHOOTING
Problem Possible Cause Possible Solution
The product doesn't
work
The power cord is not
plugged in properly
Reconnect the power
cord
Fuse failure Replace the fuse
Abnormal weight display
No material in the
hopper
Add material
Material stuck in the
internal weighing bin.
Clean stuck materials
The indicator on the
control panel is blinking
The power cord is not
plugged in properly
Reconnect the power
cord
The internal wiring of the
machine is loose
Find a professional
technician to repair
Filling m
aterial is slow
Material may be stuck
Clean up stuck materials
Manufacturer: Shanghaimuxinmuyeyouxiangongsi
Address: Shuangchenglu 803nong11hao1602A-1609shi, baoshanqu,
shanghai 200000 CN.
Imported to AUS: SIHAO PTY LTD. 1 ROKEVA STREETEASTWOOD
NSW 2122 Australia
Imported to USA: Sanven Technology Ltd. Suite 250, 9166 Anaheim
Place, Rancho Cucamonga, CA 91730
E-CrossStu GmbH
Mainzer Landstr.69, 60329 Frankfurt am Main.
YH CONSULTING LIMITED.
C/O YH Consulting Limited Office 147, Centurion House,
London Road, Staines-upon-Thames, Surrey, TW18 4AX


Support technique et Garantie électronique
Certificat www.vevor.com/support
POUDRE REMPLISSAGE
MACHINE
UTILISATEUR
MANUEL
Nous continuons à nous engager à vous fournir des outils avec compétitif prix.
"Sauvegarder Moitié", "Moitié Prix " ou toute autre expression similaire utilisée par nous
seulement représente un
estimation des économies que vous pourriez réaliser en achetant certains outils chez nous
par rapport aux principaux
grandes marques et fait pas signifie nécessairement couvrir tous catégories des outils
proposés par nous. Toi
nous vous rappelons de bien vouloir vérifier attentivement lorsque vous êtes placer un
commander avec nous si tu sont
en fait, on économise la moitié par rapport au top majeur marques.

- 1 -
Powder Filling Machine
F-100-V1, F-200-V1,
F-100-V2, F-200-V2,
F-100-V3
F-500-V1
F-500-V2
F-999-V1
F-999-V2
F-999-V3
F-3000-V2
F-5000-V2
BESOIN DE L'AIDE? CONTACT NOUS!
Avoir produit Des questions ? Besoin technique soutien? S'il te
plaît sentir gratuit à contact nous:
Assistance technique et certificat de garantie
électronique
www.vevor.com/support
C'est l'original instruction, s'il vous plaît lisez tout manuel instructions
soigneusement avant de l'utiliser. VEVOR se réserve une interprétation
claire de notre manuel d'utilisation. L'apparence du produit doit être
soumis à la
produit vous reçu. S'il te plaît, pardonne nous que nous ne le ferons pas
je vous informe à nouveau s'il existe une technologie ou un logiciel
mises à jour sur notre produit.

- 2 -
1. Lisez attentivement et comprenez tout le MONTAGE ET
OPÉRATION INSTRUCTIONS avant l'utilisation.
2. Non-respect des règles de sécurité et autres mesures de sécurité de
base. précautions peut résultat en termes personnels sérieux blessure.
RÈGLES GÉNÉRALES DE SÉCURITÉ
Rappel important
1.Avant utilisation, S'il vous plaît, faites attention lire le manuel du produit
et s'assurer que
toi comprendre et respecter tous les avertissements de
sécurité et usage précautions.
2. N'utilisez pas ce produit à d'autres fins. non désigné des fins à
éviter risques inattendus.
3. Ceci le produit s'applique uniquement aux utilisateurs au sein de
spécifié âge groupe et champ d'application . Veuillez respecter
strictement âge pertinent
restrictions et avertissements.
4. S'il y a des anomalies dans le produit, s'il te plaît arrêt en utilisant il
immédiatement et contactez le centre de service après-vente pour
consultation ou pour organiser la réparation.
Exigences environnementales pour l'utilisation
1. S'il te plaît utiliser dans un environnement sec et bien ventilé pour
éviter des conditions environnementales extrêmes telles que l'activation
de l'eau, la température élevée, haut humidité et température
extrêmement basse.
2. Évitez la lumière directe du soleil ou le contact avec des sources
de feu pour éviter produit dommages ou incendie.
3. Veuillez assurer un environnement d'utilisation stable et empêcher la
produit de être frappé ou laissé tomber pour éviter dommage .
Consignes de sécurité opérationnelle

- 2 -
1. S'il te plaît utiliser un e approprié alimentation et tension, et faire
pas utiliser cordons d'alimentation endommagés ou bouchons.
2. Lorsque vous utilisez ce produit , ne pas de court-circuit
circuits ou connectez des appareils incompatibles pour éviter
risques tels que le choc électrique et le feu.

- 3 -
3. Lorsque des objets étrangers sont trouvés sur la surface du produit, s'il
te plaît
cessez immédiatement d'utiliser et retirez les objets étrangers avant de
continuer utiliser.
4. Lorsque vous utilisez ce produit en continu pendant une longue période,
reposez-vous bien. il est temps d’éviter une fatigue excessive .
5. Ne pas brancher ou débrancher l'alimentation prise avec humide
mains à éviter le risque de choc électrique.
Maintenance et entretien
1. Régulièrement entretenir et nettoyer le produit. Avant de nettoyer ,
veuillez
débranchez l'alimentation électrique et essuyez-la avec un sec tissu. Être
prudent ne pas utiliser de l'alcool, de l'acide ou de l'alcali solutions, etc.
2. Lorsque le produit est pas en usage pour un long temps, s'il te plaît
déconnecter l' alimentation électrique rapidement pour économiser de
l'énergie et prolonger la durée de vie du produit durée de vie.
3. Ne pas démonter le produit ou remplacer les composants sur ton
propre. Si vous rencontrez des dysfonctionnements, veuillez contacter le
service après-vente
centre.
Mesures de gestion d'urgence
1. En cas de situations anormales ou d'accidents avec le produit, s'il
vous plaît, arrêtez d'utiliser c'est comme bientôt comme possible.
En cas de surchauffe, de fumée ou de bruit anormal , veuillez
immédiatement couper l'alimentation électrique et contacter le service
après-vente. centre.
2. Si le produit implique une situation d'urgence qui peut nuire personnel
sécurité, veuillez appeler les secours nombre dans un moment opportun
manière.
CONSERVEZ CES INSTRUCTIONS

MODELAND PARAMETERS
- 1 -
Modèle
F-100-
V1
F-100-
V2
F-100-
V3
F-200-
V1
F-200-
V2
F-500-
V1
F-500-
V2
Appropr
ié
Particul
e
Granulaire et en poudre
matériels. Pas farineux
matériaux, surface lisse
particules
Granulaire et en poudre matériels. Pas
farineux matériaux, surface lisse
particules
Particul
e
Taille
Φ < 10 mm
Φ < 10 mm
Φ < 20 mm
Remp
lissag
e
Gam
me
1-99,9 g
1-200g
10-500g
Tension
CA
120 V
60 Hz
CA
230 V
50 Hz
CA
230 V
50 Hz
CA
120 V
60 Hz
CA
230 V
50 Hz
CA
120 V
60 Hz
CA
230 V
50 Hz
Pouvo
ir ( Ma
x . )
28W
28W
28W
29W
29W
74W
74W
Modèle
F-999-V1
F-999-V2
F-999-V3
F-3000-V2
F5000-V2
Appropr
ié
Particul
e
Granulaire et en poudre matériels.
Pas farineux matériaux, surface lisse
particules
Granulaire et en poudre
matériels. Pas farineux
matériaux, lisses
surface particules
Particul
e
Taille
Φ < 20 mm
Φ < 35
mm
Φ < 35
mm
Remp
lissag
e
Gam
10-999g
20-3000g
20-5000g

MODELAND PARAMETERS
- 1 -
me
Tension
120 V
CA 60
Hz
230 V
CA 50
Hz
230 V
CA 50
Hz
230 V
CA 50
Hz
230 V
CA 50
Hz
Pouvo
ir ( Ma
x . )
83W
83W
83W
88W
96 W

STRUCTURE DIAGRAM
- 2 -
F-100-V1, F-100-V2, F-100-V3 ,F-200-V1 ,F-200-V2 ,F-500-V1 ,F -500-V2
1
2
5
3
4
1. Trémie 2. Réglage Plaque 3. Hôte Machine 4. Sortie 5. Contrôle
Panneau
F-999-V1, F-999-V2, F-999-V3 , F- 3000-V2 ,F-5000-V2
6
5
1
2
3
4
1. Trémie 2. Réglage Plaque 3. Machine hôte 4.
Alimentation Sortie 5.Prise de courant 6.Contrôle Panneau

COMPONENTS
- 3 -
Modèl
e Parties
F-100-V1
F-100-V2
F-100-V3
F-200-V1
F-200-V2
F-500-V1
F-500-V2
F-999-V1
F-999-V2
F-999-V3
F-3000-
V2
F-5000-
V2
Poudre
Remplissa
ge
Machine
×1
×1
×1
×1
×1
×1
Ouvert
Clé (10
MM )
×1
×1
×1
/
/
/
Ouvert
Clé (
14MM )
/
/
/
×1
×1
×1
Cordon
d'alimentatio
n
×1
×1
×1
×1
×1
×1
Pédale
Changer
/
/
/
×1
×1
×1
Utilisateur
Manuel
×1
×1
×1
×1
×1
×1
OPERATING INSTRUCTIONS
- 4 -
F-100-V1, F-100-V2, F-100-V3 ,F-200-V1 ,F-200-V2
1. Posez le produit à plat et retirer le vis (A,B) selon à étiquette
instructions comme indiqué .
2. Mettez le produit dans un écurie position , prise dans le pouvoir corde, et
alors
tu es prêt à utiliser.
F-500-V1, F-500-V2 :
UN
B
1.Ouvrez la boucle sur le couvercle arrière et retirez le couvercle arrière
,
puis retirer les vis selon l'étiquette instructions comme indiqué .Mettre dos
sur le quatrième de couverture.
2.Mettez le produit dans une position stable, prise dans le cordon
d'alimentation, et alors tu es prêt à utiliser.
O u i
Boucle

- 5 -
F-999-V1, F-999-V2, F-3000-V2, F-5000-V2 :
1. Installation de trémie
Retirez les vis installées. Placez la trémie dans et verrouillage avec ça le
vis que vous venez de retirer comme indiqué. (Conseils : le côté de la
trémie avec le réglage
(la plaque est tournée vers l'avant)
2. Branchez dans le cordon d'alimentation et interrupteur à pédale comme montré.
3. Retirez les vis conformément à l'étiquette l instructions comme montré

- 6 -
L'exploitation instructions
F-100-V1, F-100-V2, F-100-V3, F-200-V1, F-200-V2, F-500-V1, F-500-V2, F-999-
V1, F-999-V2, F-999-V3
1. Allumez l'interrupteur d'alimentation et le la machine va fait un
son.Le la machine est en veille État à ce sujet temps.
2. Appuyez sur « Décharger » puis sur « Effacer » pour mettre à zéro
la fenêtre Poids ( g ) afficher.
3. Réglez le poids du matériau en pressage "Poids +/-"(Pour exemple,
08.0 signifie pour 8 grammes ).
4. Abaissez le réglage plaque au plus bas Position.Chargez le matériau
dans la trémie.Appuyez sur la touche de démarrage.Réglez la position
du réglage plaque
selon le besoin de remplissage matériel.

- 7 -
5. Sélectionnez la vitesse souhaitée « Rapide »
,
« Moyenne »
、
Lent" selon différents matériaux sur le contrôle panneau
6. Appuyez sur « Démarrer », la machine commence à fonctionner, et
quand un "cocher" est entendu, le remplissage est terminé. Placez le
récipient dans le port de décharge pour recevoir le matériau. (Conseils : le
récipient doit être proche à le capteur à déclenchement
il.)Le conteneur est retiré et le machine effectue le suivant rond de
remplissage automatique.
Capteur
Note:
1. Pour effacer, appuyez sur "Effacer" clé.
2. À retirer le restant matériel , tenir vers le bas le Touche " Décharge "
pour 5 secondes pendant que la machine est arrêtée. La machine va
continuez à travailler, lorsque le matériel est terminé, s'il vous plaît

- 7 -
appuyez sur le bouton « Stop » «clé de arrêtez. (Conseils : la plaque de
réglage doit être complètement ouvert .)

- 8 -
F-3000-V2, F-5000-V2
:
1. Allumez le pouvoir changer.
2. Appuyez sur « Décharger » puis sur « Zéro » pour mettre à zéro le
poids
(
g
)
fenêtre afficher.
3. Réglez le poids du matériau en pressage " +/-"(Pour exemple,
0800 stands pour 800 grammes ).
4. Abaissez le réglage plaque au plus bas position.Chargez le matériau
dans la trémie.Appuyez sur « démarrer »clé. Régler la position de la
plaque de réglage
selon le besoin de remplissage matériel.
- 9 -
5. Sélectionnez la vitesse souhaitée « Rapide » , « Moyenne »、
Lent" selon différents matériaux sur le contrôle panneau.
6. Appuyez sur « Démarrer », la machine commence à fonctionner, et
quand un "cocher" est entendu, le remplissage est terminé. Placez le sac
sur l'orifice de décharge et presse l' interrupteur au pied pour décharger
automatiquement le matériau. Après avoir déchargé le
matériaux, la machine remplit automatiquement le suivant ronde de
matériel.
Note:
Pour retirer le reste matériel, Appuyez sur le bouton « Nettoyage »
matériau
"
touche pendant
la machine est arrêté. La machine continuera à fonctionner, lorsque
le matériau est terminé, veuillez appuyez sur le bouton « Stop »
touche pour arrêter. (Conseils : la
la plaque de réglage doit être complètement ouvert.)

MAINTENANCE
- 10 -
1.Le utilisateur devoir sélectionner un quantitatif remplissage machine
de un approprié gamme selon les produits dits.
2.Le machine contient un précision électronique échelle, il est interdit à
être embonpoint.
3.Quand dans utiliser, S'il vous plaît gardez le machine niveau et
écurie à éviter de grosses vibrations ou impacts ; sinon, il peut cause
dommage.
4.Après utilisation, veuillez nettoyer le matériau et garder le machine faire
le ménage
5.Lorsque le machine est pas dans utiliser, s'il te plaît vider le matériels et
magasin il dans un endroit ventilé et sec lieu.
6.Veuillez nettoyer le produit et le filtre dans temps après
chaque utiliser. 7.Toujours garder le produit à l'extérieur faire
le ménage.
Veuillez conserver le produit dans un sec et ventilé
lieu. Si le fusible est endommagé, remplacez -le. il
comme montré.

MAINTENANCE
- 10 -
Fusible

- 11 -
DÉPANNAGE
Problème
Cause possible
Solution possible
Le produit n'a pas
travail
Le pouvoir corde est
pas branché
correctement
Reconnect le pouvoir
corde
Défaillance du fusible
Remplacer le fusible
Affichage de poids
anormal
Non matériel dans
le
trémie
Ajouter matériel
Matériel bloqué dans
le pesée interne
poubelle.
Nettoyer coincé matériels
Le indicateur sur le
Panneau de contrôle est
clignotant
Le pouvoir corde est
pas branché
correctement
Reconnect le pouvoir
corde
Le câblage interne de la
machine est lâche
Trouver un
professionnel technicien
à réparation
Remplissage matériel est
lent
Matériel peut être coincé
Faire le ménage coincé
matériels
Fabricant : Shanghaimuxinmuyeyouxiangongsi
Adresse : Shuangchenglu 803nong11hao1602A-1609shi, baoshanqu,
Shanghai 200 000 CN.
Importé en Australie : SIHAO SOCIÉTÉ EN ACTION SARL 1 RUE
ROKEVA, ESTWOOD Nouvelle-Galles du Sud 2122 Australie
Importé aux États-Unis : Sanven Technology Ltd. Suite 250, 91 66
Anaheim Lieu, Rancho Cucamonga, Californie 91730
E-CrossStu GmbH
Rue Mainzer Landstr.69, 60329 Francfort-sur-le-Main Principal.
YH CONSULTING LIMITE D.
REP
REP

- 11 -
C/O YH Consulting Bureau limité 147, Centurion n
Maison, Londres Route, Staines-upon-Thames, Surrey,
TW18 4AX


- 11 -
Technischer Support und E-Garantie
Zertifikat www.vevor.com/support
PULVER FÜLLUNG
MASCHINE
BENUTZER
HANDBUCH
Wir sind weiterhin bestrebt, Ihnen Werkzeuge zur Verfügung zu stellen, mit
wettbewerbsfähig Preis.
"Speichern Halb", "Halber Preis " oder andere ähnliche Ausdrücke von uns nur
repräsentiert ein
Schätzung der Ersparnisse, die Sie durch den Kauf bestimmter Werkzeuge bei uns im
Vergleich zu den großen
Top-Marken und tut nicht bedeutet nicht notwendigerweise alle Kategorien der angebotenen
Werkzeuge von uns. Sie
Wir möchten Sie bitten, sorgfältig zu prüfen, wenn Sie Platzieren eines Bestellen mit uns
wenn du Sind
tatsächlich die Hälfte sparen im Vergleich zu den Top wesentlich Marken.

- 1 -
Powder Filling Machine
F-100-V1, F-200-V1,
F-100-V2, F-200-V2,
F-100-V3
F-500-V1
F-500-V2
F-999-V1
F-999-V2
F-999-V3
F-3000-V2
F-5000-V2
BRAUCHEN HILFE? KONTAKT UNS!
Haben Produkt Fragen? Brauchen technisch Unterstützung? Bitte
fühlen frei Zu Kontakt uns:
Technischer Support und E-Garantie-
Zertifikat www.vevor.com/support
Dies ist das Original Anweisung, bitte alles lesen Handbuch
Anweisungen
sorgfältig vor dem Betrieb. VEVOR behält sich eine klare Auslegung
unserer Bedienungsanleitung vor. Das Aussehen des Produkts soll
unterliegen dem
Produkt Sie erhalten. Bitte verzeihen Sie uns, dass wir nicht informiere
euch nochmal wenn es Technologien oder Software gibt Updates auf

- 1 -
unserer Produkt.

- 2 -
1. Lesen Sie sorgfältig und verstehen Sie alle MONTAGE UND
BETRIEB VORBEREITUNG DER INBETRIEBNAHME DIE
ANLEITUNG.
2. Nichtbeachtung der Sicherheitsvorschriften und anderer grundlegender
Vorsichtsmaßnahmen Mai Ergebnis in ernsten persönlichen Verletzung.
ALLGEMEINESICHERHEITSREGELN
Wichtiger Hinweis
1.Vor dem Gebrauch, bitte sorgfältig Lesen Sie das Produkthandbuch Und
stellen Sie sicher, dass
Du alle Sicherheitshinweise verstehen und befolgen und
Verwendung Vorsichtsmaßnahmen.
2. Verwenden Sie dieses Produkt nicht für andere nicht bezeichnet
Zwecke zu vermeiden unerwartete Risiken.
3. Dies Produkt ist nur anwendbar für Benutzer innerhalb der
angegeben Alter Gruppe und Anwendungsbereich . Bitte beachten Sie
unbedingt relevantes Alter
Einschränkungen und Warnungen.
4. Wenn es irgendwelche Anomalien im Produkt gibt, Bitte stoppen mit
Es
sofort und kontaktieren Sie den Kundendienst für eine Beratung oder
Reparatur veranlassen.
Umweltanforderungen für den Einsatz
1. Bitte in einer trockenen und gut belüfteten Umgebung verwenden, um
vermeiden extreme Umweltbedingungen wie Wasseraktivierung, hohe
Temperaturen , hoch Luftfeuchtigkeit und extrem niedrige Temperaturen.
2. Vermeiden Sie direkte Sonneneinstrahlung oder den Kontakt mit
Feuerquellen, um Produkt Beschädigung oder Feuer.
3. Bitte sorgen Sie für eine stabile Nutzungsumgebung und verhindern Sie
das Produkt von Sein getroffen oder fallen gelassen werden, Schaden .
Sicherheitshinweise zum Betrieb

- 2 -
1. Bitte verwenden Sie ein geeignetes Stromversorgung und
Spannung und nicht verwenden beschädigte Netzkabel oder
Stecker.
2. Wenn Sie dieses Produkt verwenden , nicht kurzschließen
Schaltkreise oder nicht übereinstimmende Geräte anschließen ,
um zu vermeiden Risiken wie Stromschlag und Feuer.

- 3 -
3. Wenn sich Fremdkörper auf der Oberfläche des Produkts befinden,
Bitte
Beenden Sie die Anwendung sofort und entfernen Sie die Fremdkörper,
bevor Sie fortfahren verwenden.
4. Wenn Sie dieses Produkt über einen längeren Zeitraum ununterbrochen
verwenden, ruhen Sie sich bitte gut aus Zeit, um übermäßige Ermüdung
zu vermeiden .
5. Nicht Stecken Sie den Netzstecker ein oder ziehen Sie den Stecker
Stecker mit nassen Hände Zu vermeiden Die Risiko von Stromschlag.
Wartung und Instandhaltung
1. Regelmäßig Warten und reinigen Sie das Produkt. Vor der Reinigung
bitte
Trennen Sie die Stromversorgung und wischen Sie sie mit A trocken
Tuch. Sei vorsichtig nicht zu Verwenden Sie Alkohol, Säure oder Lauge
Lösungen, usw
2. Wenn das Produkt nicht im Einsatz für eine lang Zeit, Bitte trennen
die Stromversorgung um Energie zu sparen und die Lebensdauer des
Produkts zu verlängern. Lebensdauer.
3. Das Produkt nicht zerlegen oder Ersetzen Sie Komponenten auf dein
eigen. Wenn Sie auf Bei Funktionsstörungen wenden Sie sich bitte an
den Kundendienst
Center.
Notfallmaßnahmen
1. Wenn es ungewöhnliche Situationen oder Unfälle mit dem
Produkt gibt , Bitte hören Sie auf zu verwenden es als bald als
möglich.
Wenn Sie eine Überhitzung, Rauchentwicklung oder ungewöhnliche
Geräusche feststellen , unterbrechen Sie bitte sofort die Stromzufuhr und
kontaktieren Sie den Kundendienst . Center.
2. Wenn das Produkt eine Notfallsituation betrifft, die Mai Schaden
persönlich Sicherheit, rufen Sie bitte den Notruf Nummer In eine
rechtzeitige Benehmen.

- 3 -
BEWAHREN SIE DIESE ANWEISUNGEN AUF

MODELAND PARAMETERS
- 1 -
Modell
F-100-
V1
F-100-
V2
F-100-
V3
F-200-
V1
F-200-
V2
F-500-
V1
F-500-
V2
Geeign
et
Teilche
n
Granulare und gepulvert
Materialien. Nicht mehlig
Materialien, glatte
Oberfläche
Partikel
Granulare und gepulvert Materialien.
Nicht
mehlig Materialien, glatte
Oberfläche
Partikel
Teilche
n
Größ
e
Φ < 10 mm
Φ < 10 mm
Φ < 20 mm
Füllun
g
Reich
weite
1-99,9 g
1-200g
10-500 g
Stromsp
annung
AC
120 V
60 Hz
AC
230 V
50 Hz
AC
230 V
50 Hz
AC
120 V
60 Hz
AC
230 V
50 Hz
AC
120 V
60 Hz
AC
230 V
50 Hz
Leistu
ng ( M
ax .)
28 W
28 W
28 W
29 W
29 W
74W
74W
Modell
F-999-V1
F-999-V2
F-999-V3
F-3000-V2
F5000-V2
Geeign
et
Teilche
n
Granulare und gepulvert Materialien.
Nicht mehlig Materialien, glatte
Oberfläche
Partikel
Granulare und gepulvert
Materialien. Nicht
mehlig
Materialien, glatt
Oberfläche Partikel
Teilche
n
Größ
e
Φ < 20 mm
Φ < 35
mm
Φ < 35
mm
Füllun
g
10-999 g
20-3000 g
20-5000g

MODELAND PARAMETERS
- 1 -
Reich
weite
Stromspan
nung
Wechsel
strom
120 V
60 Hz
Wechsel
strom
230 V
50 Hz
Wechsel
strom
230 V
50 Hz
Wechsel
strom
230 V
50 Hz
Wechsel
strom
230 V
50 Hz
Leistu
ng ( M
ax .)
83 W
83 W
83 W
88 W
96W

STRUCTURE DIAGRAM
- 2 -
F-100-V1, F-100-V2, F-100-V3 ,F-200-V1 ,F-200-V2 ,F-500-V1 ,F -500-V2
1
2
5
3
4
1. Trichter 2. Anpassen Platte 3. Gastgeber Maschine 4.Ausgang
5.Steuerung Bedienfeld
F-999-V1, F-999-V2, F-999-V3 , F- 3000-V2 ,F-5000-V2
6
5
1
2
3
4
1. Trichter 2. Einstellen Platte 3.Host-Maschine 4.Power
Auslauf 5.Ausgang 6.Steuerung Bedienfeld

COMPONENTS
- 3 -
Model
l
Ersatzteile
F-100-V1
F-100-V2
F-100-V3
F-200-V1
F-200-V2
F-500-V1
F-500-V2
F-999-V1
F-999-V2
F-999-V3
F-3000-
Versi
on 2
F-5000-
Versi
on 2
Pulver
Füllung
Maschine
×1
×1
×1
×1
×1
×1
Offenes
Ende
Schlüss
el ( 10
MM )
×1
×1
×1
/
/
/
Offenes
Ende
Schlüss
el ( 14
mm )
/
/
/
×1
×1
×1
Netzkabel
×1
×1
×1
×1
×1
×1
Pedal
Schalten
/
/
/
×1
×1
×1
Benutzer
Handbuch
×1
×1
×1
×1
×1
×1
OPERATING INSTRUCTIONS
- 4 -
F-100-V1, F-100-V2, F-100-V3 ,F-200-V1 ,F-200-V2
1. Legen Sie das Produkt flach und entfernen Die Schrauben (A,B)
gemäß Zu Etikett Anleitung wie abgebildet .
2. Legen Sie das Produkt in einem stabil Position , Stecker In Die Leistung
Kabel, Und Dann
du bist bereit Zu verwenden.
F-500-V1, F-500-V2 :
A
B
1.Öffnen Sie die Schnalle auf der Rückseite und entfernen Sie die
Rückseite . Entfernen Sie die Schrauben gemäß Etikett Anleitung wie
abgebildet .Setzen zurück An Die Rückseite.
2. Legen Sie das Produkt in einer stabilen Position, Stecker im
Netzkabel , Und Dann du bist bereit Zu verwenden.
刁
Schnalle

- 5 -
F-999-V1, F-999-V2,F-3000-V2,F-5000-V2:
1. Trichterinstallation
Die eingebauten Schrauben entfernen. Den Trichter einsetzen Und
sperren es mit Die Schrauben, die Sie gerade entfernt haben, wie gezeigt.
(Tipps: Die Seite des Trichters mit der Einstellschraube
Platte zeigt nach vorne)
2.Stecker im Netzkabel und Fußschalter als gezeigt.
3. Die Schrauben gemäß Etikett l entfernen Anweisungen als gezeigt

- 6 -
Das Betriebssystem Anweisungen
F-100-V1, F-100-V2, F-100-V3, F-200-V1, F-200-V2, F-500-V1, F-500-V2, F-999-
V1, F-999-V2,F-999-V3
1. Schalten Sie den Netzschalter ein und Maschine wird macht A
Klang.Der Maschine ist in einem Standby Zustand an diesem Zeit.
2. Drücken Sie „Entladen“ und dann „Löschen“, um das
Gewichtsfenster ( g ) auf Null zu setzen Anzeige.
3. Stellen Sie das Gewicht des Materials ein, indem Sie Drücken
"Gewicht +/-"(Für Beispiel, 08.0 steht für 8 Gramm ).
4. Senken Sie die Einstellung Platte auf die niedrigste Material in den
Trichter laden. Starttaste drücken. Position der Justierung anpassen
Platte
je nach Füllbedarf Material.

- 7 -
5.Wählen Sie die gewünschte Geschwindigkeit „Schnell
、
Mittel
、
Langsam" nach verschiedenen Materialien auf der Steuerung Platte 。
6.Drücken Sie „Start“beginnt die Maschine zu arbeiten, und wenn ein
"Tick" Ist gehört, die Füllung ist abgeschlossen.Stellen Sie den Behälter in
den Auslass, um erhalten das Material. (Tipps: Der Behälter muss in der
Nähe sein Zu Die Sensor zu auslösen
es.)Der Behälter wird entfernt und die Maschine führt die nächste ro und
von automatische Befüllung.
Sensor
Notiz:
1.Um zu löschen, Drücken Sie die Taste „Löschen“ Schlüssel.
2. Zu entfernen Die übrig Material , halten runter Die Taste „ Entladen “ für
5 Sekunden, während die Maschine angehalten ist. Die Maschine wird
weiterarbeiten , wenn das Material fertig ist, bitte Drücken Sie die „
Stopp “

- 7 -
-Taste „Schlüssel zu (Tipps: Die Einstellplatte sollte vollständig geöffnet
sein .)
- 8 -
F-3000-V2,F-5000-V2
:
1. Einschalten Die Leistung schalten.
2. Drücken Sie „Entladen“ und dann „Null“, um das Gewicht
(
g
) auf
Null zu setzen. Fenster Anzeige.
3. Stellen Sie das Gewicht des Materials ein, indem Sie Drücken " +/-
"(Für Beispiel, 0800 steht für 800 Gramm ).
4. Senken Sie die Einstellung Platte auf die niedrigste Position.Material
in den Trichter laden.„Start“ drückenTaste. Passen Sie die Position der
Einstellplatte an
je nach Füllbedarf Material.

- 9 -
5.Wählen Sie die gewünschte Geschwindigkeit „Schnell 、 Mittel、
Langsam" nach verschiedenen Materialien auf der Steuerung
Bedienfeld.
6.Drücken Sie „Start“beginnt die Maschine zu arbeiten, und wenn ein
"Tick" Ist gehört, die Füllung ist abgeschlossen.Stecken Sie den Beutel
über die Auslassöffnung Und drücken Der Fußschalter zum
automatischen Entladen des Materials. Nach dem Entladen
Materialien, füllt die Maschine automatisch die nächste Runde der Material.
Notiz:
Zum Entfernen der restlichen Material, Drücken Sie die Taste „ Reinigung
Material " -Taste, während
die Maschine wird gestoppt. Die Maschine wird weiterarbeiten,
wenn das Material fertig ist, bitte Drücken Sie die Taste „ Stopp “Tas
te zum Stoppen.(Tipps:die
Die Einstellplatte sollte sei völlig offen.)

MAINTENANCE
- 10 -
1.Die Benutzer soll wählen A quantitativ Füllung Maschine von A
geeignet Sortiment entsprechend der genannten Produkte.
2.Die Maschine enthält A Präzision elektronisch Skala, Es Ist verboten
Zu Sei Übergewicht.
3.Wann In verwenden, bitte behalten Die Maschine Ebene Und stabil
Zu vermeiden große Vibrationen oder Stöße ; sonst Mai Ursache
Schaden.
4. Reinigen Sie das Material nach dem Gebrauch Und halten Die
Maschine sauber
5.Wenn die Maschine Ist nicht In verwenden, Bitte leeren Sie den
Materialien Und speichern Es in einem belüfteten und trocken Ort.
6.Bitte reinigen Sie das Produkt und den Filter in Zeit nach
jede verwenden. 7.Immer Bewahren Sie das Produkt draußen
auf sauber.
Bitte lagern Sie das Produkt in A trocken Und
belüften Ort. Wenn die Sicherung beschädigt ist,
ersetzen Sie sie Es als gezeigt.

MAINTENANCE
- 10 -
Sicherung

- 11 -
FEHLERBEHEBUNG
Problem
Mögliche Ursache
Mögliche Lösung
Der Produkt nicht
arbeiten
Der Leistung Kabel Ist
nicht eingesteckt richtig
Erneut verbinden die
Macht
Kabel
Sicherungsausfall
Ersetzen Sie die
Sicherung
Abnormale
Gewichtsanzeige
NEIN Material In
Die
Trichter
Hinzufügen Material
Material gesteckt In
Die internes Wiegen
Behälter.
Sauber stecken
Materialien
Der Indikator An
Die Bedienfeld Ist
blinkend
Der Leistung Kabel Ist
nicht eingesteckt richtig
Erneut verbinden die
Macht
Kabel
Der interne Verkabelung
der Maschine Ist lose
Finden A
Professional Techniker
zu reparieren
Füllung Material ist
langsam
Material Mai feststecken
Sauber stecken geblieben
Materialien
Hersteller: Shanghaimuxinmuyeyouxiangongsi
Adresse: Shuangchenglu 803nong11hao1602A-1609shi, baoshanqu,
Shanghai, 200.000 CN.
Nach AUS importiert: SIHAO PTY LTD. 1 ROKEVA STRASSE
EASTWOOD NSW 2122 Australien
In die USA importiert: Sanven Technology GmbH Suite 250, 91 66
Anaheim Ort, Rancho Cucamonga, Kalifornien 91730
E-CrossStu GmbH
Mainzer Landstr.69, 60329 Frankfurt am Hauptsächlich.
YH-BERATUNG Daniele G.
REP
REP

- 11 -
C/O YH Consulting Begrenztes Büro 147, Centurio n
Haus, London Straße, Staines-upon-Thames, Surrey,
TW18 4AX


- 11 -
Supporto tecnico e Garanzia elettronica
Certificato www.vevor.com/support
POLVERE RIEMPIMENTO
MACCHINA UTENTE
MANUALE
Continuiamo a impegnarci per fornirti strumenti con competitivo prezzo.
"Salva Metà", "Metà prezzo " o altre espressioni simili utilizzate di noi soltanto
rappresenta UN
stima del risparmio che potresti ottenere acquistando determinati utensili con noi rispetto ai
principali
i migliori marchi e fa non significa necessariamente coprire Tutto categorie di strumenti offerti
di noi. Tu
si ricorda gentilmente di verificare attentamente quando si è posizionare un ordina con
noi se tu Sono
risparmiando effettivamente la metà rispetto al top maggiore marchi.
- 1 -
Powder Filling Machine
F-100-V1, F-200-V1,
F-100-V2, F-200-V2,
F-100-V3
F-500-V1
F-500-V2
Modello
F-999-V1
Modello
F-999-V2
Modello
F-999-V3
F-3000-V2
Modello F-
5000-V2
BISOGNO AIUTO? CONTATTO NOI!
Avere prodotto domande? Bisogno tecnico supporto? Per favore
Tatto gratuito A contatto noi:
Supporto tecnico e certificato di garanzia
elettronica
www.vevor.com/support

- 1 -
Questo è l'originale istruzione, per favore leggi tutto manuale istruzioni
accuratamente prima di operare. VEVOR si riserva una chiara
interpretazione del nostro manuale utente. L'aspetto del prodotto deve
essere soggetto al
prodotto tu ricevuto. Per favore perdonami noi che non lo faremo
informarti di nuovo se ci sono tecnologie o software aggiornamenti sul
nostro prodotto.

- 2 -
1. Leggere attentamente e comprendere tutto il MONTAGGIO E
OPERAZIONE ISTRUZIONI prima di operare.
2. Mancato rispetto delle norme di sicurezza e di altre misure di sicurezza
di base precauzioni Maggio risultato in caso di gravi problemi personali
infortunio.
NORMEGENERALI DISICUREZZA
Promemoria importante
1.Prima dell'uso, per favore con attenzione leggere il manuale del prodotto
E assicurarsi che
Voi comprendere e rispettare tutte le avvertenze di sicurezza e
utilizzo precauzioni.
2. Non utilizzare questo prodotto per altri scopi non designato scopi a
Evitare rischi imprevisti.
3. Questo il prodotto è applicabile solo agli utenti all'interno dell'
specificato età gruppo e ambito di applicazione . Si prega di attenersi
scrupolosamente a età rilevante
restrizioni e avvertenze.
4. Se ci sono delle anomalie nel prodotto, Per favore fermata usando
Esso
immediatamente e contattare il centro di assistenza post-vendita per una
consulenza o per provvedere alla riparazione.
Requisiti ambientali per l'uso
1. Per favore utilizzare in un ambiente asciutto e ben ventilato per Evitare
Condizioni ambientali estreme come l'attivazione dell'acqua, alte
temperature, alto umidità e temperature estremamente basse.
2. Evitare la luce solare diretta o il contatto con fonti di fuoco per
prevenire prodotto danni o incendi.
3. Garantire un ambiente di utilizzo stabile e prevenire l' prodotto da
essendo colpito o lasciato cadere per evitare danno .
Linee guida operative di sicurezza

- 2 -
1. Per favore utilizzare un adatto alimentazione e tensione, e fare
non utilizzo cavi di alimentazione danneggiati o spine.
2. Quando si utilizza questo prodotto , non non cortocircuitare
circuiti o collegare dispositivi non corrispondenti per evitare rischi
come scosse elettriche e fuoco.

- 3 -
3. Quando vengono rilevati oggetti estranei sulla superficie del prodotto,
Per favore
interrompere immediatamente l'uso e rimuovere gli oggetti estranei prima
di continuare a utilizzo.
4. Quando si utilizza questo prodotto ininterrottamente per un lungo
periodo, riposare in buone condizioni tempo per evitare un affaticamento
eccessivo .
5. Non fare collegare o scollegare l'alimentazione tappo con bagnato
mani A Evitare IL rischio Di scossa elettrica.
Manutenzione e cura
1. Regolarmente mantenere e pulire il prodotto. Prima di pulire , per favore
scollegare l'alimentazione e pulirla con UN Asciutto stoffa. Essere attento
non a usare alcol, acido o alcali soluzioni, ecc.
2. Quando il prodotto è non in uso per un lungo tempo, Per favore
disconnettere l' alimentazione elettrica rapidamente per risparmiare
energia e prolungare la durata del prodotto durata.
3. Non smontare il prodotto o sostituire i componenti su tuo Proprio. Se
incontri qualcuno malfunzionamenti, contattare il servizio post-vendita
centro.
Misure di gestione delle emergenze
1. Quando si verificano situazioni anomale o incidenti con il prodotto,
per favore smetti di usare esso come Presto COME possibile.
In caso di surriscaldamento, fumo o rumori anomali , interrompere
immediatamente l'alimentazione e contattare il servizio post-vendita.
centro.
2. Se il prodotto comporta una situazione di emergenza che Maggio
danno personale sicurezza, chiamare il soccorso d'emergenza numero
In un momento opportuno maniera.
SALVA QUESTE ISTRUZIONI

MODELAND PARAMETERS
- 1 -
Modello
F-100-
V1
F-100-
V2
F-100-
V3
F-200-
V1
F-200-
V2
F-500-
V1
F-500-
V2
Adatto
Particel
la
Granulare e in polvere
materiali. Non farinoso
materiali, superficie liscia
particelle
Granulare e in polvere materiali. Non
farinoso materiali, superficie liscia
particelle
Particel
la
Misur
are
Diametro < 10
mm
Diametro <
10 mm
Diametro <
20 mm
Riem
pimen
to
Alline
are
1-99,9 g
1-200g
10-500g
Voltaggio
Corren
te
alternat
a 120
E
Freque
nza 60
Hz
Corren
te
alternat
a 230
E
Freque
nza 50
Hz
Corren
te
alternat
a 230
E
Freque
nza 50
Hz
Corren
te
alternat
a 120
E
Freque
nza 60
Hz
Corren
te
alternat
a 230
E
Freque
nza 50
Hz
Corren
te
alternat
a 120
E
Freque
nza 60
Hz
Corren
te
alternat
a 230
E
Freque
nza 50
Hz
Energ
ia ( M
assim
o .)
28W
28W
28W
29Sett
embre
29Sett
embre
74W
74W
Modello
Modello F-
999-V1
Modello F-
999-V2
Modello F-
999-V3
F-3000-V2
F5000-V2
Adatto
Particel
la
Granulare e in polvere materiali.
Non farinoso materiali, superficie
liscia
particelle
Granulare e in polvere
materiali. Non farinoso
materiali,lisci
superficie particelle

MODELAND PARAMETERS
- 1 -
Particel
la
Misur
are
Diametro < 20 mm
Diametro
< 35 mm
Diametro
< 35 mm
Riem
pimen
to
Alline
are
10-999 g
20-3000g
20-5000g
Voltaggio
CA
120V
Frequ
enza
60 Hz
CA
230V
Frequ
enza
50 Hz
CA
230V
Frequ
enza
50 Hz
CA
230V
Frequ
enza
50 Hz
CA
230V
Frequ
enza
50 Hz
Energ
ia ( M
assim
o .)
83W
83W
83W
88W
96W

STRUCTURE DIAGRAM
- 2 -
F-100-V1, F-100-V2, F-100-V3 ,F-200-V1 ,F-200-V2 ,F-500-V1 ,F -500-V2
1
2
5
3
4
1. Tramoggia 2. Regolazione Piatto 3. Ospitare Macchina 4.Presa
5.Controllo Pannello
F-999-V1, F-999-V2, Modello F-999-V3 , F -3000-V2 ,F-5000-V2
6
5
1
2
3
4
1. Tramoggia 2. Regolazione Piastra 3.Macchina host
4.Alimentazione Presa 5. Presa 6. Controllo Pannello

COMPONENTS
- 3 -
Model
lo Parti
F-100-V1
F-100-V2
F-100-V3
F-200-V1
F-200-V2
F-500-V1
F-500-V2
Modello
F-999-V1
Modello
F-999-V2
Modello
F-999-V3
F-3000-
Versi
one
2
F-5000-
Versi
one
2
Polvere
Riempime
nto
Macchina
×1
×1
×1
×1
×1
×1
Aperto
Chiave
(10MM )
×1
×1
×1
/
/
/
Aperto
Chiave
( 14MM )
/
/
/
×1
×1
×1
Cavo di
alimentazion
e
×1
×1
×1
×1
×1
×1
Pedale
Interruttore
/
/
/
×1
×1
×1
Utente
Manuale
×1
×1
×1
×1
×1
×1

OPERATING INSTRUCTIONS
- 4 -
F-100-V1, F-100-V2, F-100-V3 ,F-200-V1 ,F-200-V2
1. Disporre il prodotto in piano e rimuovere IL viti (A,B) secondo A
etichetta istruzioni come mostrato .
2. Metti il prodotto in un stabile posizione , tappo In IL energia corda, E Poi
sei pronto A utilizzo.
F-500-V1, F-500-V2 :
UN
B
1. Aprire la fibbia sul coperchio posteriore e rimuovere il coperchio
posteriore , quindi rimuovere le viti secondo l'etichetta istruzioni come
mostrato .Mettere Indietro SU IL quarta di copertina.
2. Metti il prodotto in posizione stabile, tappo nel cavo di
alimentazione, E Poi sei pronto A utilizzo.
A v a n t i
Fibbia

- 5 -
F-999-V1, Modello F-999-V2, F-3000-V2, F-5000-V2:
1. Installazione della tramoggia
Rimuovere le viti installate. Inserire la tramoggia E serratura con esso IL
viti appena rimosse come mostrato. (Suggerimenti: il lato della tramoggia
con la regolazione
la piastra è rivolta in avanti)
2.Spina nel cavo di alimentazione e interruttore a pedale COME mostrato.
3. Rimuovere le viti come indicato sull'etichetta l istruzioni come mostrato

- 6 -
Il funzionamento istruzioni
F-100-V1, F-100-V2, F-100-V3, F-200-V1, F-200-V2, F-500-V1, F-500-V2, F-999-
V1, F-999-V2, F-999-V3
1. Accendere l'interruttore di alimentazione e il la macchina lo farà fa
UN suono.Il la macchina è in standby stato a questo tempo.
2. Premere "Scarica" e poi "Cancella" per azzerare la finestra Peso ( g
) display.
3. Impostare il peso del materiale tramite premendo "Peso +/-"(Per
esempio, 08.0 sta per 8 grammi ).
4.Abbassare la regolazione piastra al più basso posizione. Caricare il
materiale nella tramoggia. Premere il tasto di avvio. Regolare la
posizione della regolazione piatto
secondo la necessità di riempimento materiale.

- 7 -
5.Selezionare la velocità desiderata "Veloce
,
Media"
、
"Lento"
secondo diversi materiali sul controllo pannello .
6.Premi “Start”, la macchina inizia a funzionare e quando un "tic tac" È
sentito, il ripieno è completo. Posizionare il contenitore nella porta di
scarico per ricevere il materiale. (Suggerimenti: il contenitore deve essere
chiuso A IL se nsore a grilletto
Il contenitore viene rimosso e il macchina esegue il Prossimo girare Di
riempimento automatico.
Sensore
Nota:
1. Per cancellare, premere "Cancella" chiave.
2. A rimuovere IL rimanente materiale , tenere giù IL Tasto " Scarica " per
5 secondi mentre la macchina è ferma. La macchina continua a lavorare,
quando il materiale è finito, per favore premere il tasto “
Stop ”
“chiave per

- 7 -
fermarsi.(Suggerimenti: la piastra di regolazione dovrebbe essere
completamente aperto .)

- 8 -
F-3000-V2,F-5000-V2
:
1. Accendere IL energia interruttore.
2. Premere "Scarica" e poi "Zero" per azzerare il peso
(
g
)
finestra
display.
3. Impostare il peso del materiale tramite premendo " +/-"(Per
esempio, 0800 stand per 800 grammi ).
4.Abbassare la regolazione piastra al più basso posizione.Caricare il
materiale nella tramoggia.Premere “start”chiave. Regolare la posizione
della piastra di regolazione
secondo la necessità di riempimento materiale.

- 9 -
5.Selezionare la velocità desiderata "Veloce , Media"、 Lento"
secondo diversi materiali sul controllo pannello.
6.Premi “Start”, la macchina inizia a funzionare e quando un "tic tac" È
sentito, il ripieno è completo. Metti il sacchetto sopra la porta di scarico E
premere l' interruttore a pedale per scaricare automaticamente il
materiale.Dopo aver scaricato il
materiali, la macchina automatica alleata riempie il successivo giro di
materiale.
Nota:
Per rimuovere il rimanente materiale, Premere il tasto " Pulizia " materiale "
chiave mentre
la macchina si ferma. La macchina continuerà a lavorare, quando il
materiale è terminato, si prega di premere il tasto “ Stop ”tasto per
fermarsi.(Suggerimenti:il
la piastra di regolazione dovrebbe (essere completamente aperto.)
MAINTENANCE
- 10 -
1.Il utente deve selezionare UN quantitativo riempimento macchina Di
UN adatto variano a seconda dei prodotti in questione.
2.Il macchina contiene UN precisione elettronico scala, Esso È vietato A
Essere sovrappeso.
3.Quando In utilizzo, per favore tieni IL macchina livello E stabile A
Evitare grandi vibrazioni o urti ; altrimenti, Maggio causa danno.
4. Dopo l'uso, pulire il materiale E Mantenere IL macchina pulito
5.Quando il macchina È non In utilizzo, Per favore svuotare il materiali E
negozio Esso in un ambiente ventilato e Asciutto posto.
6. Si prega di pulire il prodotto e il filtro in tempo Dopo ogni
utilizzo. 7.Sempre tenere il prodotto fuori pulito.
Si prega di conservare il prodotto in UN Asciutto E
ventilato posto. Se il fusibile è danneggiato,
sostituirlo Esso COME mostrato.
Fusibile

- 11 -
RISOLUZIONE DEI PROBLEMI
Problema
Possibile causa
Possibile soluzione
IL prodotto non lo fa
lavoro
IL energia corda È
non collegato in modo
appropriato
Riconnettersi il potere
corda
Guasto del fusibile
Sostituire il fusibile
Visualizzazione del peso
anormale
NO materiale In IL
tramoggia
Aggiungere materiale
Materiale incollato In
IL pesatura interna
bidone.
Pulisci bloccato materiali
IL indicatore SU IL
pannello di controllo È
lampeggiante
IL energia corda È
non collegato in modo
appropriato
Riconnettersi il potere
corda
IL cablaggio interno del
macchina È sciolto
Trovare UN
professionale tecnico a
riparazione
Riempimento materiale è
lento
Materiale Maggio essere
bloccato
Pulito bloccato materiali
Produttore: Shanghaimuxinmuyeyouxiangongsi
Indirizzo: Shuangchenglu 803nong11hao1602A-1609shi, baoshanqu,
shanghai 200000 CN.
Importato in AUS: SIHAO Società a responsabilità limitata 1 ROKEVA
STRADA ESTWOOD Nuovo Galles del Sud 2122 Australia
Importato negli USA: Sanven Technology Suite 250, 91 66 Aniaheim
Posto, Rancho Cucamonga, CA 91730
E-CrossStu GmbH
Via del paese di Magonza 69, 60329 Francoforte sul Meno
Principale.
CONSULENZA YH LIMITE D.
REP
REP

- 11 -
C/O Consulenza YH Ufficio limitato 147, Centurione
Casa, Londra Strada, Staines-upon-Thames, Surrey,
TW18 4AX


- 11 -
Soporte técnico y Garantía electrónica
Certificado
www.vevor.com/support
POLVO RELLENO MÁQUINA
USUARIO MANUAL
Seguimos comprometidos a brindarle herramientas con competitivo precio.
"Ahorrar Mitad", "mitad de precio " o cualquier otra expresión similar utilizada por a
nosotros solo representa un
Estimación de los ahorros que podría obtener al comprar ciertas herramientas con nosotros
en comparación con las principales
Las mejores marcas y hace no necesariamente significa cubrir todo Categorías de
herramientas ofrecidas por Nosotros. Tú
Se recuerda que se debe verificar cuidadosamente cuando se está colocando un
Ordenar con a nosotros si usted son
En realidad, ahorra la mitad en comparación con el modelo superior.
importante marcas.

- 1 -
Powder Filling Machine
F-100-V1, F-200-V1,
F-100-V2, F-200-V2,
F-100-V3
F-500-V1
F-500-V2
F-999-V1
F-999-V2
F-999-V3
F-3000-V2
F-5000-V2
NECESIDAD ¿AYUDA? CONTACTO ¡A
NOSOTROS!
Tener producto ¿preguntas? Necesidad técnico ¿apoyo? Por favor
sentir gratis a contacto a nosotros:
Soporte técnico y certificado de garantía
electrónica
www.vevor.com/support
Este es el original instrucción, Por favor lea todo manual instrucciones
con cuidado antes de operar. VEVOR se reserva una interpretación
clara de nuestro manual de usuario. La apariencia del producto debe
estar sujeto a la
producto tu recibió. Por favor perdona nosotros que no lo haremos
informarle nuevamente Si hay alguna tecnología o software

- 1 -
actualizaciones sobre nuestro producto.

- 2 -
1. Lea atentamente y comprenda todo el MONTAJE Y OPERACIÓN
INSTRUCCIONES antes de operar.
2. No seguir las normas de seguridad y otras medidas básicas de
seguridad. precauciones puede resultado En serio personal lesión.
NORMASGENERALESDE SEGURIDAD
Recordatorio importante
1.Antes de usar, Por favor con cuidado Lea el manual del producto y
asegurar que
tú comprender y cumplir con todas las advertencias de
seguridad y uso precauciones.
2. No utilice este producto para otros fines. no designado propósitos
para evitar riesgos inesperados
3. Esto El producto solo es aplicable a usuarios dentro del especificado
edad grupo y ámbito de aplicación . Por favor, cumpla estrictamente
con edad relevante
Restricciones y advertencias.
4. Si hay alguna anomalía en el producto, por favor detener usando él
inmediatamente y comuníquese con el centro de servicio posventa para
realizar una consulta o para organizar la reparación.
Requisitos ambientales para su uso
1. Por favor Utilizar en un ambiente seco y bien ventilado. evitar
Condiciones ambientales extremas como activación del agua, alta
temperatura, alto humedad y temperatura extremadamente baja.
2. Evite la luz solar directa o el contacto con fuentes de fuego para
prevenir producto daño o incendio.
3. Asegúrese de que el entorno de uso sea estable y evite que producto
de ser Golpear o dejar caer para evitar daño .
Pautas de operación segura
1. Por favor Utilice un adecuado fuente de alimentación y voltaje, y
hacer no usar cables de alimentación dañados o Tapones.

- 2 -
2. Al utilizar este producto , no no cortocircuitar circuitos o
Conecte dispositivos no compatibles para evitarlo riesgos como
descarga eléctrica y fuego.

- 3 -
3. Cuando se encuentren objetos extraños en la superficie del producto,
por favor
Deje de usarlo inmediatamente y retire los objetos extraños antes de
continuar. usar.
4. Cuando utilice este producto de forma continua durante un tiempo
prolongado, descanse en buenas condiciones. Es hora de evitar la fatiga
excesiva .
5. No enchufar o desenchufar la corriente enchufar con mojado manos
a evitar el riesgo de descarga eléctrica.
Mantenimiento y conservación
1. Regularmente Mantener y limpiar el producto. Antes de limpiar , por
favor
Desconecte la fuente de alimentación y límpiela con a seco paño. Ser
cuidadoso No a Utilice alcohol, ácido o álcali soluciones, etc.
2. Cuando el producto es no en uso para un largo tiempo, por favor
desconectar La fuente de alimentación rápidamente para ahorrar
energía y extender la vida útil del producto. esperanza de vida.
3. No desmonte el producto ni Reemplazar componentes en su propio.
Si encuentras alguno En caso de avería, póngase en contacto con el
servicio posventa.
centro.
Medidas de manejo de emergencias
1. Cuando se produzcan situaciones anormales o accidentes con el
producto, Por favor, deja de usarlo Es como pronto como posible.
Si detecta sobrecalentamiento, humo o algún sonido anormal , corte
inmediatamente el suministro de energía y comuníquese con el servicio
posventa. centro.
2. Si el producto implica una situación de emergencia que puede dañar
personal seguridad, por favor llame al servicio de rescate de emergencia
número en un momento oportuno manera.
GUARDE ESTAS INSTRUCCIONES

MODELAND PARAMETERS
- 1 -
Modelo
F-100-
V1
F-100-
V2
F-100-
V3
F-200-
V1
F-200-
V2
F-500-
V1
F-500-
V2
Adecua
do
Partícul
a
Granular y en polvo
materiales. No harinoso
materiales,superficie lisa
Partículas
Granular y en polvo materiales. No
harinoso materiales, superficie lisa
Partículas
Partícu
la
Tama
ño
Diámetro < 10 mm
Diámetro < 10
mm
Diámetro < 20
mm
Relle
no
Rango
1-99,9 g
1-200 g
10-500 g
Voltaje
CA
120 V
60 Hz
CA
230 V
50 Hz
CA
230 V
50 Hz
CA
120 V
60 Hz
CA
230 V
50 Hz
CA
120 V
60 Hz
CA
230 V
50 Hz
Fuerz
a ( Má
x . )
28 W
28 W
28 W
29W
29W
74 W
74 W
Modelo
F-999-V1
F-999-V2
F-999-V3
F-3000-V2
F5000-V2
Adecua
do
Partícul
a
Granular y en polvo materiales.
No harinoso materiales, superficie
lisa
Partículas
Granular y en polvo
materiales. No
harinoso
materiales,lisos
superficie Partículas
Partícu
la
Tama
ño
Diámetro < 20 mm
Diámetro <
35 mm
Diámetro <
35 mm
Relle
no
Rango
10-999 g
20-3000g
20-5000g

MODELAND PARAMETERS
- 1 -
Voltaje
CA 120
V 60
Hz
CA 230
V 50
Hz
CA 230
V 50
Hz
CA 230
V 50
Hz
CA 230
V 50
Hz
Fuerz
a ( Má
x . )
83W
83W
83W
88W
96W

STRUCTURE DIAGRAM
- 2 -
F-100-V1, F-100-V2, F-100-V3 ,F-200-V1 ,F-200-V2 ,F-500-V1 ,F -500-V2
1
2
5
3
4
1. Tolva 2. Ajuste Lámina 3. Anfitrión Máquina 4.Salida 5.Control Panel
F-999-V1, F-999-V2, F-999-V3 , F- 3000-V2 ,F-5000-V2
6
5
1
2
3
4
1.Tolva 2. Ajuste Placa 3.Máquina anfitriona 4.Energía
Salida 5.Salida 6.Control Panel

COMPONENTS
- 3 -
Model
o Regiones
F-100-V1
F-100-V2
F-100-V3
F-200-V1
F-200-V2
F-500-V1
F-500-V2
F-999-V1
F-999-V2
F-999-V3
F-3000-
V2
F-5000-
V2
Polvo
Relleno
Máquina
×1
×1
×1
×1
×1
×1
Abierto
Llave
inglesa
(10MM )
×1
×1
×1
/
/
/
Abierto
Llave
inglesa (
14 mm )
/
/
/
×1
×1
×1
Cable de
alimentación
×1
×1
×1
×1
×1
×1
Pedal
Cambiar
/
/
/
×1
×1
×1
Usuario
Manual
×1
×1
×1
×1
×1
×1

OPERATING INSTRUCTIONS
- 4 -
F-100-V1, F-100-V2, F-100-V3 ,F-200-V1 ,F-200-V2
1. Coloque el producto plano y eliminar el tornillos (A,B) según a
etiqueta instrucciones como se muestra .
2. Coloque el producto En un estable posición , enchufar en el fuerza cable,
y entonces
Estás listo a usar.
F-500-V1, F-500-V2 :
A
B
1. Abra la hebilla de la cubierta posterior y retire la cubierta posterior
,
y
luego Retire los tornillos según la etiqueta. instrucciones como se muestra
.Poner atrás en el Contraportada.
2.Colocar el producto en una posición estable, enchufar en el cable
de alimentación , y entonces Estás listo a usar.
Y o
Hebilla

- 5 -
F-999-V1, F-999-V2,F-3000-V2,F-5000-V2:
1. Instalación de tolva
Retire los tornillos instalados. Coloque la tolva en y cerrar con eso el
tornillos que acaba de quitar como se muestra. (Consejos: El lado de la
tolva con el ajuste
la placa mira hacia adelante)
2.Enchufe en el cable de alimentación y interruptor de pedal como mostrado.
3. Retire los tornillos según la etiqueta l instrucciones como mostrado

- 6 -
El funcionamiento instrucciones
F-100-V1, F-100-V2, F-100-V3, F-200-V1, F-200-V2, F-500-V1, F-500-V2, F-999-
V1, F-999-V2, F-999-V3
1. Encienda el interruptor de encendido y el La máquina lo hará
marcas a sonido.El La máquina es En espera estado En este tiempo.
2. Pulse "Descargar" y luego "Borrar" para poner a cero la ventana de
Peso ( g ) mostrar.
3. Establezca el peso del material mediante prensado "Peso +/-"(Para
ejemplo, 08.0 se encuentra por 8 gramos ).
4. Bajar el ajuste placa al mas bajo Posición.Cargue el material en la
tolva.Presione la tecla de inicio. Ajuste la posición del regulador. lámina
según la necesidad de llenado material.

- 7 -
5. Seleccione la velocidad deseada "Rápida"
,
"Media".
、
Lento
"según diferentes materiales sobre el control Paneles 。
6.Presione “Iniciar”, la máquina empieza a funcionar, y cuando un
"garrapata" es escuchó, El relleno está completo. Coloque el contenedor
en el puerto de descarga para recibir el material. (Consejos: El
contenedor debe estar cerca a el sensor a desencadenar
Se retira el contenedor y se máquina realiza el próximo redondo de
llenado automático.
Sensor
Nota:
1.Para limpiar, Presiona el botón "Borrar" llave.
2. A eliminar el restante material , sostener abajo el Tecla " Descargar "
para 5 segundos mientras la máquina está parada.La máquina Continúe
trabajando, cuando el material esté terminado, por favor Presione el

- 7 -
botón “ Detener ” "clave para parada.(Consejos: la placa de ajuste debe
estar completamente abierto .)

- 8 -
F-3000-V2,F-5000-V2
:
1. Encender el fuerza cambiar.
2. Pulse "Descargar" y luego "Cero" para poner a cero el peso
(
g
)
ventana mostrar.
3. Establezca el peso del material mediante prensado " +/-"(Para
ejemplo, 0800 puestos para 800 gramos ).
4. Bajar el ajuste placa al mas bajo Posición.Cargue el material en la
tolva.Presione “iniciar”Llave. Ajuste la posición de la placa de ajuste.
según la necesidad de llenado material.

- 9 -
5. Seleccione la velocidad deseada "Rápida" , "Media".、 Lento
"según diferentes materiales sobre el control panel.
6.Presione “Iniciar”, la máquina empieza a funcionar, y cuando un
"garrapata" es escuchó, El relleno está completo. Coloque la bolsa sobre
el puerto de descarga y prensa el interruptor de pie para descargar
automáticamente el material.Después de descargar el material ,
materiales, la máquina llena automáticamente el siguiente ronda de
material.
Nota:
Para eliminar el resto material, Pulse el botón " Limpieza " material " clave
mientras
La máquina se detiene. La máquina continuará trabajando, cuando
el material se haya terminado, por favor Presione el botón “ Detener
”tecla para parar.(Consejos:la
La placa de ajuste debe estar completamente abierto.)

MAINTENANCE
- 10 -
1.El usuario deber seleccionar a cuantitativo relleno máquina de a
adecuado gama según dichos productos.
2.El máquina contiene a precisión electrónico escala, él es prohibido a
ser sobrepeso.
3.Cuando en usar, Por favor, manténgalo el máquina nivel y estable
a evitar grandes vibraciones o impactos ; de lo contrario, puede causa
daño.
4. Después del uso, limpie el material. y mantener el máquina limpio
5.Cuando el máquina es no en usar, por favor vaciar el materiales y
almacenar él En un lugar ventilado y seco lugar.
6. Limpie el producto y el filtro en tiempo después cada usar.
7.Siempre Mantener el producto afuera limpio.
Guarde el producto en a seco y ventilado lugar. Si
el fusible está dañado, reemplácelo . él como
mostrado.
MAINTENANCE
- 10 -
Fusible

- 11 -
SOLUCIÓN DE PROBLEMAS
Problema
Posible causa
Posible solución
El producto no
trabajar
El fuerza cable es no
atascado en forma
apropiada
Reconectar El poder
cable
Fallo de fusible
Reemplace el fusible
Visualización de peso
anormal
No material en el
tolva
Agregar material
Material atascado en
el pesaje interno
papelera.
Limpiar atascado
materiales
El indicador en el
Panel de control es
parpadeo
El fuerza cable es no
atascado en forma
apropiada
Reconectar El poder
cable
El cableado interno del
máquina es perder
Encontrar a
profesional Técnico a
reparar
Relleno material es lento
Material puede Estar
atrapado
Limpio atascado
materiales
Fabricante: Shanghaimuxinmuyeyouxiangongsi
Dirección: Shuangchenglu 803nong11hao1602A-1609shi,
baoshanqu, Shangai 200000 CN.
Importado a Australia: SIHAO Compañía Limitada. 1 CALLE ROKEVA
EASTWOOD Nueva Gales del Sur 2122 Australia
Importado a EE. UU.: Sanven Technology Ltd., Suite 250, 91 66
Anaheim Lugar, Rancho Cucamonga, CA 91730
E-CrossStu GmbH
Calle Mainz Landstr.69, 60329 Frankfurt am Principal.
CONSULTORÍA YH LÍMITE D.
REP
REP

- 11 -
Atención al cliente YH Consulting Oficina limitada 147,
Centurión n Casa, Londres Carretera, Staines-upon-
Thames, Surrey, TW18 4AX


- 11 -
Wsparcie techniczne i E-gwarancja Certyfikat
www.vevor.com/support
PROSZEK POŻYWNY
MASZYNA
UŻYTKOWNIK
PODRĘCZNIK
Nadal staramy się dostarczać Ci narzędzia z konkurencyjny cena.
"Ratować „Połowa”, „Połowa ceny ” lub jakiekolwiek inne podobne wyrażenia przez nas
tylko reprezentuje jakiś
Szacunkowe oszczędności, jakie możesz uzyskać kupując u nas niektóre narzędzia w
porównaniu do innych dużych firm
najlepsze marki i robi nie koniecznie oznaczać pokrycie Wszystko kategorie oferowanych
narzędzi przez nas. Ty
uprzejmie przypominamy o konieczności dokładnego sprawdzenia samochodu, gdy
umieszczanie zamów z nas jeśli ty Czy
faktycznie oszczędzając połowę w porównaniu z najlepszym główny marki.
- 1 -
Powder Filling Machine
F-100-V1, F-200-V1,
F-100-V2, F-200-V2,
F-100-V3
F-500-V1
F-500-V2
F-999-V1
F-999-V2
F-999-V3
F-3000-V2
F-5000-V2
POTRZEBOWAĆ POMOCY? KONTAKT NAS!
Mieć produkt pytania? Potrzebować techniczny wsparcie? Proszę
czuć bezpłatny Do kontakt nas:
Wsparcie techniczne i certyfikat e-gwarancji
www.vevor.com/support
To jest oryginał instrukcja, proszę przeczytać wszystko podręcznik
instrukcje
ostrożnie przed uruchomieniem. VEVOR zastrzega sobie prawo do
jednoznacznej interpretacji naszej instrukcji obsługi. Wygląd produktu
powinien podlegać
produkt ty otrzymane. Proszę wybaczyć nas, że nie będziemy
poinformuję cię ponownie jeśli istnieje jakaś technologia lub

- 1 -
oprogramowanie Aktualizacje na naszym produkt.

- 2 -
1. Przeczytaj uważnie i zrozum całą instrukcję MONTAŻU I
DZIAŁANIE INSTRUKCJE przed użyciem.
2. Nieprzestrzeganie zasad bezpieczeństwa i innych podstawowych zasad
bezpieczeństwa środki ostrożności móc wynik poważnie osobiście
obrażenia.
OGÓLNE ZASADYBEZPIECZEŃSTWA
Ważne przypomnienie
1.Przed użyciem, proszę ostrożnie przeczytaj instrukcję obsługi produktu I
zapewnić , że
Ty zrozumieć i przestrzegać wszystkich ostrzeżeń
dotyczących bezpieczeństwa i stosowanie środki ostrożności.
2. Nie należy używać tego produktu w innym celu. nieoznaczony cele
do unikać nieoczekiwane ryzyka.
3. To produkt jest dostępny wyłącznie dla użytkowników w określony
wiek Grupa i zakres zastosowania . Proszę ściśle przestrzegać
odpowiedni wiek
ograniczenia i ostrzeżenia.
4. Jeżeli w produkcie występują jakiekolwiek nieprawidłowości, Proszę
zatrzymywać się używając To
natychmiast skontaktuj się z centrum obsługi posprzedażowej w celu
konsultacji lub zlecić naprawę.
Wymagania środowiskowe dotyczące użytkowania
1. Proszę stosować w suchym i dobrze wentylowanym środowisku unikać
Ekstremalne warunki środowiskowe , takie jak aktywacja wody, wysoka
temperatura, wysoki wilgotność i ekstremalnie niska temperatura.
2. Unikaj bezpośredniego światła słonecznego lub kontaktu ze
źródłami ognia, aby zapobiec produkt uszkodzenia lub pożaru.
3. Zapewnij stabilne środowisko użytkowania i zapobiegaj produkt z
istnienie uderzyć lub upuścić, aby uniknąć szkoda .
Wytyczne dotyczące bezpieczeństwa

- 2 -
1. Proszę użyj odpowiedniego zasilanie i napięcie, i zrób nie
używać uszkodzone przewody zasilające lub buble.
2. Podczas stosowania tego produktu należy: nie powodować
zwarcia obwody lub podłącz niepasujące do siebie urządzenia,
aby uniknąć ryzyka takie jak porażenie prądem i ogień.

- 3 -
3. W przypadku wykrycia na powierzchni produktu ciał obcych, Proszę
natychmiast zaprzestań używania i usuń ciała obce przed kontynuowaniem
używać.
4. W przypadku długotrwałego, nieprzerwanego korzystania z produktu,
należy zapewnić mu odpowiedni odpoczynek. czas uniknąć nadmiernego
zmęczenia .
5. Nie podłącz lub odłącz zasilanie wtyczka z mokrym siła robocza Do
unikać ten ryzyko z porażenie prądem.
Konserwacja i utrzymanie
1. Regularnie konserwować i czyścić produkt. Przed czyszczeniem ,
proszę
odłącz zasilanie i wytrzyj je A suchy płótno. Być ostrożny nie do używać
alkoholu, kwasu lub zasady rozwiązania, itp
2. Kiedy produkt jest nie w użyciu dla długi czas, Proszę odłączyć
Zasilacz szybko oszczędzając energię i przedłużając żywotność
produktu długość życia.
3. Nie rozmontowuj produktu ani wymień komponenty na twój własny.
Jeśli napotkasz jakiekolwiek W przypadku awarii prosimy o kontakt z
serwisem posprzedażowym
centrum.
Środki zaradcze w sytuacjach awaryjnych
1. W przypadku wystąpienia nietypowych sytuacji lub wypadków z
produktem, proszę przestać używać to jako Wkrótce Jak możliwy.
W przypadku stwierdzenia przegrzania, dymu lub nietypowego dźwięku
należy natychmiast odłączyć zasilanie i skontaktować się z serwisem .
centrum.
2. Jeżeli produkt wiąże się z sytuacją awaryjną, móc szkoda osobisty
bezpieczeństwo, proszę zadzwonić po pogotowie ratunkowe numer W
na czas sposób.
ZAPISZ TE INSTRUKCJE
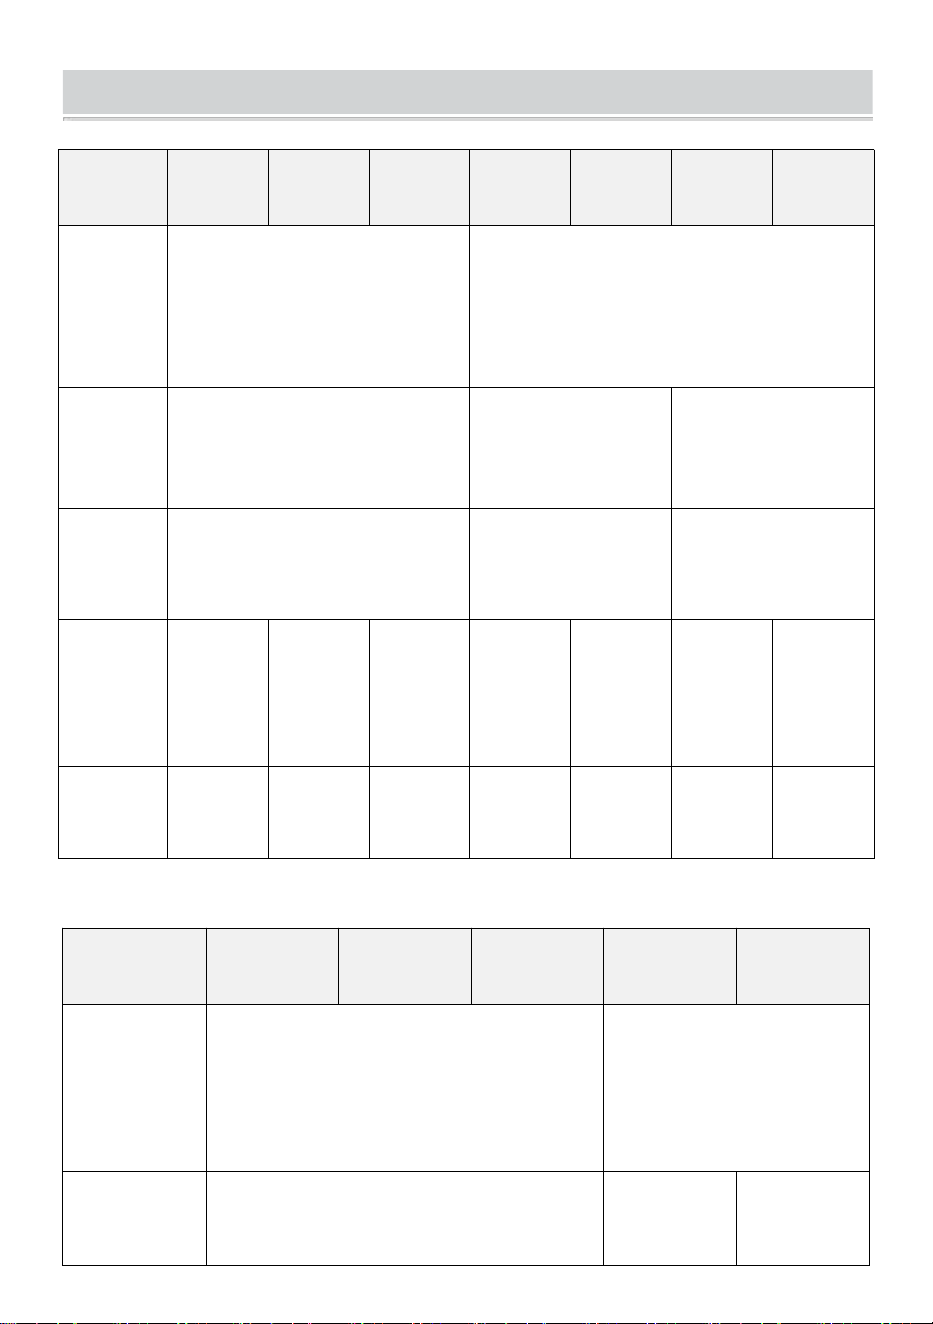
MODELAND PARAMETERS
- 1 -
Model
F-100-
V1
F-100-
V2
F-100-
V3
F-200-
V1
F-200-
V2
F-500-
V1
F-500-
V2
Odpowi
edni
Cząstk
a
Granulowany i
sproszkowany
przybory. Nie mączny
materiały,gładka
powierzchnia
cząsteczki
Granulowany i sproszkowany przybory.
Nie
mączysty materiały,gładka
powierzchnia
cząsteczki
Cząstk
a
Rozm
iar
Średnica < 10 mm
Średnica <
10 mm
Średnica <
20 mm
Poży
wny
Zakre
s
1-99,9 g
1-200g
10-500g
Woltaż
AC120
V
60 Hz
Prąd
zmienn
y 230
V 50
Hz
Prąd
zmienn
y 230
V 50
Hz
AC120
V
60 Hz
Prąd
zmienn
y 230
V 50
Hz
AC120
V
60 Hz
Prąd
zmienn
y 230
V 50
Hz
Moc (
Maks
. )
28W
28W
28W
29W
29W
74W
74W
Model
F-999-V1
F-999-V2
F-999-V3
F-3000-V2
F5000-V2
Odpowi
edni
Cząstk
a
Granulowany i sproszkowany
przybory.
Nie mączny materiały, gładka
powierzchnia
cząsteczki
Granulowany i
sproszkowany
przybory. Nie mączny
materiały,gładkie
powierzchnia
cząsteczki
Cząstk
a
Rozm
Średnica < 20 mm
Średnica
< 35 mm
Średnica
< 35 mm

MODELAND PARAMETERS
- 1 -
iar
Poży
wny
Zakre
s
10-999g
20-3000g
20-5000g
Woltaż
Prąd
zmien
ny 120
V 60
Hz
Prąd
zmien
ny 230
V 50
Hz
Prąd
zmien
ny 230
V 50
Hz
Prąd
zmien
ny 230
V 50
Hz
Prąd
zmien
ny 230
V 50
Hz
Moc (
Maks
. )
83W
83W
83W
88W
96W

STRUCTURE DIAGRAM
- 2 -
F-100-V1, F-100-V2, F-100-V3 ,F-200-V1 ,F-200-V2 ,F-500-V1 ,F -500-V2
1
2
5
3
4
1. Zasobnik 2. Naregulowanie Płyta 3. Gospodarz Maszyna 4.Wyjście
5.Sterowanie Płyta
F-999-V1, F-999-V2, F-999-V3 , F- 3000-V2 ,F-5000-V2
6
5
1
2
3
4
1.Zasobnik 2. Regulacja Płyta 3.Maszyna hosta 4.Moc
Wylot 5. Wyjście 6. Sterowanie Płyta

COMPONENTS
- 3 -
Model
Strony
F-100-V1
F-100-V2
F-100-V3
F-200-V1
F-200-V2
F-500-V1
F-500-V2
F-999-V1
F-999-V2
F-999-V3
F-3000-
Wers
ja 2
F-5000-
Wers
ja 2
Proszek
Pożywny
Maszyna
×1
×1
×1
×1
×1
×1
Otwarty
koniec
Klucz (
10MM )
×1
×1
×1
/
/
/
Otwarty
koniec
Klucz (
14MM )
/
/
/
×1
×1
×1
Przewód
zasilający
×1
×1
×1
×1
×1
×1
Pedał
Przełącznik
/
/
/
×1
×1
×1
Użytkownik
Podręcznik
×1
×1
×1
×1
×1
×1

OPERATING INSTRUCTIONS
- 4 -
F-100-V1, F-100-V2, F-100-V3 ,F-200-V1 ,F-200-V2
1. Połóż produkt płasko i usunąć ten śruby (A,B)zgodnie z Do etykieta
instrukcje jak pokazano .
2. Umieść produkt w stabilny pozycja , wtyczka W ten moc sznur, I
Następnie
jesteś gotowy Do używać.
F-500-V1, F-500-V2 :
A
B
1. Otwórz klamrę na tylnej pokrywie i zdejmij tylną pokrywę
,
a następnie
wykręć śruby zgodnie z etykietą instrukcje jak pokazano .Umieścić z
powrotem NA ten tylna okładka.
2. Umieść produkt w stabilnej pozycji, wtyczka w przewód zasilający d,
I Następnie jesteś gotowy Do używać.
刁
Klamra
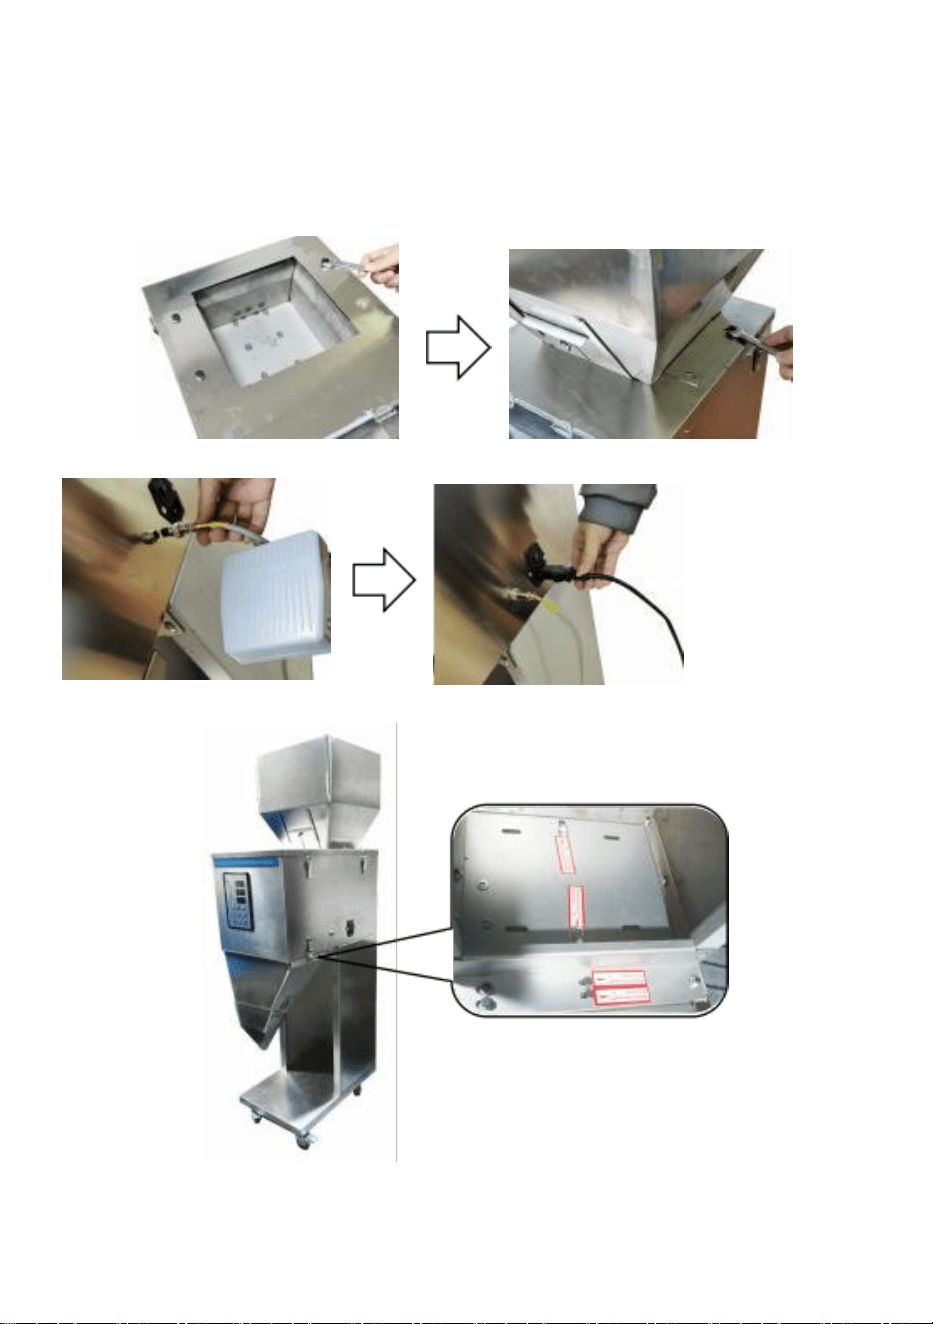
- 5 -
F-999-V1, F-999-V2, F-3000-V2, F-5000-V2:
1. Instalacja zasobnika
Wyjmij zamontowane śruby. Włóż zasobnik I zamek to z ten śruby, które
właśnie wyjąłeś, jak pokazano. (Wskazówki: Strona leja z regulacją
(płyta skierowana do przodu)
2.Wtyczka w przewód zasilający i przełącznik pedałowy Jak pokazano.
3. Wykręć śruby zgodnie z etykietą l instrukcje jako pokazano

- 6 -
Operacyjny instrukcje
F-100-V1, F-100-V2, F-100-V3, F-200-V1, F-200-V2, F-500-V1, F-500-V2, F-999-
V1, F-999-V2,F-999-V3
1. Włącz przełącznik zasilania i maszyna będzie sprawia A dźwięk.
maszyna jest w trybie gotowości państwo w tym czas.
okno wagi ( g ). wyświetlacz.
3. Ustaw ciężar materiału za pomocą pilny "Waga +/-"(Dla przykład,
08.0 stoi za 8 gramów ).
4. Obniż regulację talerz do najniższego pozycja. Załaduj materiał do
zasobnika. Naciśnij przycisk start. Dostosuj pozycję regulacji płyta
zgodnie z potrzebą wypełnienia tworzywo.

- 7 -
5. Wybierz żądaną prędkość: „Szybka”
,
„Średnia”
、
„Powoli” według
różnych materiały na temat kontroli panelu .
6. Naciśnij „Start”, maszyna zaczyna pracować, a kiedy "kleszcz" Jest
usłyszał, wypełnienie jest kompletny. Umieść pojemnik w porcie
wyładowczym, aby odbierać materiał . (Wskazówka: Pojemnik musi być
blisko Do ten nie patrz na to spust
Pojemnik jest usuwany i maszyna wykonuje Następny okrągły z
automatyczne napełnianie.
Transduktor
Notatka:
1. Aby wyczyścić, naciśnij "Wyczyść" klawisz.
2. Do usunąć ten pozostały materiał , trzymać w dół ten Klawisz „
Rozładuj ”
Do 5 sekund, gdy maszyna jest zatrzymana. Maszyna będzie
kontynuuj pracę, gdy materiał będzie skończony, proszę naciśnij „
Stop ”
„

- 7 -
klucz do zatrzymaj się.(Wskazówka: płyta regulacyjna powinna być
całkowicie otwartym .)

- 8 -
F-3000-V2,F-5000-V2
:
1. Włącz ten moc przełącznik.
2. Naciśnij „Rozładuj”, a następnie „Zero”, aby wyzerować wagę
(
g
).
okno wyświetlacz.
3. Ustaw ciężar materiału za pomocą pilny " +/-"(Dla przykład, 0800
stoi na 800 gramów ).
4. Obniż regulację talerz do najniższego pozycja. Załaduj materiał do
zasobnika. Naciśnij „start”klucz. Dostosuj położenie płytki regulacyjnej
zgodnie z potrzebą wypełnienia tworzywo.

- 9 -
5. Wybierz żądaną prędkość: „Szybka” , „Średnia”、 „Powoli” według
różnych materiały na temat kontroli płyta.
6. Naciśnij „Start”, maszyna zaczyna pracować, a kiedy "kleszcz" Jest
usłyszał, wypełnienie jest kompletny. Umieść worek nad otworem
wylotowym I naciskać przełącznik nożny do automatycznego
rozładowania materiału. Po rozładowaniu
materiały, maszyna automatycznie uzupełnia następny runda tworzywo.
Notatka:
Aby usunąć pozostałą część tworzywo, Naciśnij przycisk „ Czyszczenie ”
materiał " klucz podczas
Maszyna jest zatrzymany. Maszyna będzie kontynuować pracę. Po
zakończeniu materiału, proszę naciśnij „ Stop ”klawisz , aby
zatrzymać.(Wskazówki:
płyta regulacyjna powinna (Bądź całkowicie otwarty.)

MAINTENANCE
- 10 -
1. Ten użytkownik być wybierać A ilościowy pożywny maszyna z A
odpowiedni asortyment w zależności od wymienionych produktów.
2. Ten maszyna zawiera A precyzja elektroniczny skala, To Jest
zabroniony Do Być nadwaga.
3. Kiedy W używać, proszę zachować ten maszyna poziom I stabilny
Do unikać duże wibracje lub uderzenia ; w przeciwnym razie móc
przyczyna szkoda.
4. Po użyciu należy wyczyścić materiał I trzymać ten maszyna czysty
5. Kiedy maszyna Jest nie W używać, Proszę opróżnić przybory I sklep
To w wentylowanym i suchy miejsce.
6. Wyczyść produkt i filtr w czas Po każdy używać. 7. Zawsze
trzymać produkt na zewnątrz czysty.
Proszę przechowywać produkt w A suchy I
wentylowany miejsce. Jeżeli bezpiecznik jest
uszkodzony, należy go wymienić. To Jak pokazano.

MAINTENANCE
- 10 -
Bezpiecznik

- 11 -
ROZWIĄZYWANIE PROBLEMÓW
Problem
Możliwa przyczyna
Możliwe rozwiązanie
Ten produkt nie
praca
Ten moc sznur Jest
nie zatkany właściwie
Na nowo połączyć moc
sznur
Awaria bezpiecznika
Wymień bezpiecznik
Nieprawidłowy
wyświetlacz wagi
NIE tworzywo W
ten
zbiornik
Dodać tworzywo
Tworzywo
zablokowany W ten
ważenie wewnętrzne
kosz.
Wyczyść zakleszczone
przybory
Ten wskaźnik NA
ten Panel sterowania
Jest migający
Ten moc sznur Jest
nie zatkany właściwie
Na nowo połączyć moc
sznur
Ten okablowanie
wewnętrzne z maszyna
Jest luźny
Znajdować A
profesjonalny technik do
naprawa
Pożywny tworzywo jest
powolny
Tworzywo móc utknąć
Czysty utknął przybory
Producent: Shanghaimuxinmuyeyouxiangongsi
Adres: Shuangchenglu 803nong11hao1602A-1609shi, baoshanqu,
Szanghaj 200000 CN.
Importowane do AUS: SIHAO PTY LTD. 1 ULICA ROKEVA
WYSOKOŚĆ WOOD Nowa Południowa Walia 2122 Australia
Importowane do USA: Sanven Technology Sp. z o.o. Apartament
250, 91 66 Anaheim Miejsce, Rancho Cucamonga, Kalifornia 91730
E-CrossStu GmbH
Mainzer Landstr.69, 60329 Frankfurt nad Menem Główny.
KONSULTACJE YH LIMIT D.
REP
REP

- 11 -
C/O YH Consulting Biuro ograniczone 147, Centurio n
Dom, Londyn Droga, Staines-upon-Thames, Surrey,
TW18 4AX


- 11 -
Technische ondersteuning en E-Garantie
Certificaat www.vevor.com/support
POEDER VULLING
MACHINE
GEBRUIKER
HANDMATIG
Wij blijven ons inzetten om u de tools te bieden die u nodig hebt competitief prijs.
"Redden Half", "Halve prijs " of andere soortgelijke uitdrukkingen die worden gebruikt door
ons alleen vertegenwoordigt een
schatting van de besparingen die u kunt behalen door bepaalde gereedschappen bij ons te
kopen in vergelijking met de belangrijkste
topmerken en doet niet noodzakelijkerwijs betekenen bedekken alle categorieën van
aangeboden hulpmiddelen door wij. Jij
Wij herinneren u eraan om uw auto zorgvuldig te controleren wanneer u een plaatsen
bestellen met ons als je Zijn
feitelijk de helft besparen in vergelijking met de top belangrijk merken.

- 1 -
Powder Filling Machine
F-100-V1, F-200-V1,
F-100-V2, F-200-V2,
F-100-V3
F-500-V1
F-500-V2
F-999-V1
F-999-V2
F-999-V3
F-3000-V2
F-5000-V2
BEHOEFTE HULP? CONTACT ONS!
Hebben product vragen? Behoefte technisch steun? Alsjeblieft
gevoel vrij naar contact ons:
Technische ondersteuning en e-
garantiecertificaat
www.vevor.com/support
Dit is het origineel instructie, lees alles alstublieft handmatig instructies
voorzichtig voor gebruik. VEVOR behoudt zich een duidelijke
interpretatie van onze gebruikershandleiding voor. Het uiterlijk van het
product moet onderworpen zijn aan de
product jij ontvangen. Vergeef me alsjeblieft ons dat we niet zullen u
opnieuw informeren als er technologie of software is updates over onze
product.

- 2 -
alle MONTAGE-instructies zorgvuldig door en begrijp ze . EN
WERKING GEBRUIKSAANWIJZING vóór gebruik.
2. Het niet naleven van de veiligheidsregels en andere
basisveiligheidsvoorschriften voorzorgsmaatregelen kunnen resultaat in
serieuze persoonlijke blessure.
ALGEMENEVEILIGHEIDSREGELS
Belangrijke herinnering
1.Voor gebruik, voorzichtig alstublieft Lees de product handleiding En
ervoor zorgen dat
Jij alle veiligheidswaarschuwingen begrijpen en naleven en
gebruik voorzorgsmaatregelen.
2. Gebruik dit product niet voor andere doeleinden. niet-aangewezen
doeleinden om voorkomen onverwachte risico's.
3. Dit product is alleen van toepassing op gebruikers binnen de
gespecificeerd leeftijd groep en toepassingsgebied . Houd u strikt aan
de volgende regels: relevante leeftijd
beperkingen en waarschuwingen.
4. Indien er afwijkingen in het product zijn, Alsjeblieft stop gebruik
makend van Het
onmiddellijk en neem contact op met het after-sales servicecentrum voor
overleg of om Regel de reparatie.
Milieueisen voor gebruik
1. Alsjeblieft Gebruik in een droge en goed geventileerde omgeving om
voorkomen extreme omgevingsomstandigheden zoals wateractivering,
hoge temperatuur, hoog vochtigheid en extreem lage temperatuur.
2. Vermijd direct zonlicht of contact met vuurbronnen om brand te
voorkomen. product schade of brand.
3. Zorg voor een stabiele gebruiksomgeving en voorkom dat product van
wezen geraakt of laten vallen om te voorkomen schade .
Veiligheidsrichtlijnen voor de bediening

- 2 -
1. Alsjeblieft gebruik een geschikte e voeding en spanning, en
doen niet gebruik beschadigde netsnoeren of stekkers.
2. Wanneer u dit product gebruikt , doe dit dan: geen kortsluiting
schakelingen of Sluit niet-passende apparaten aan om te
voorkomen risico 's zoals elektrische schokken en vuur.

- 3 -
3. Wanneer er vreemde voorwerpen op het oppervlak van het product
worden aangetroffen, Alsjeblieft
Stop onmiddellijk met het gebruik en verwijder de vreemde voorwerpen
voordat u verdergaat gebruik.
4. Wanneer u dit product gedurende een lange tijd continu gebruikt, neem
dan een goede nachtrust. tijd om overmatige vermoeidheid te vermijden .
5. Niet doen de stroom aansluiten of loskoppelen stekker g met nat
handen naar voorkomen de risico van elektrische schok.
Onderhoud en verzorging
1. Regelmatig het product onderhouden en schoonmaken. Voordat u gaat
schoonmaken ,
koppel de stroomtoevoer los en veeg deze schoon met A droog lap. Zijn
voorzichtig niet om gebruik alcohol, zuur of alkali oplossingen, enz
2. Wanneer het product is niet in gebruik voor een lang tijd, Alsjeblieft
loskoppelen de stroomvoorziening om snel energie te besparen en de
levensduur van het product te verlengen levensduur.
3. Haal het product niet uit elkaar of vervang componenten op jouw eigen.
Als u een van deze tegenkomt Bij storingen kunt u contact opnemen met
de aftersalesservice
centrum.
Noodmaatregelen
1. Wanneer er sprake is van abnormale situaties of ongevallen met
het product, stop alsjeblieft met het gebruiken het als spoedig als
mogelijk.
Als u oververhitting, rookvorming of een abnormaal geluid constateert ,
dient u onmiddellijk de stroomtoevoer uit te schakelen en contact op te
nemen met de aftersalesservice . centrum.
2. Als het product een noodsituatie betreft die kunnen leed persoonlijk
veiligheid, bel dan de hulpdiensten nummer in een tijdige wijze.
BEWAAR DEZE INSTRUCTIES

MODELAND PARAMETERS
- 1 -
Model
F-100-
V1
F-100-
V2
F-100-
V3
F-200-
V1
F-200-
V2
F-500-
V1
F-500-
V2
Geschik
t
Deeltje
Granulair en gepoederd
materialen. Niet melig
materialen,glad oppervlak
deeltjes
Granulair en gepoederd materialen.
Niet
bloemig materialen, glad oppervlak
deeltjes
Deeltje
Maat
Φ < 10 mm
Φ < 10 mm
Φ < 20 mm
Vullin
g
Bereik
1-99,9 gram
1-200 gram
10-500 gram
Spanning
Wissel
stroom
120 V
60Hz
Wissel
stroom
230 V
50Hz
Wissel
stroom
230 V
50Hz
Wissel
stroom
120 V
60Hz
Wissel
stroom
230 V
50Hz
Wissel
stroom
120 V
60Hz
Wissel
stroom
230 V
50Hz
Stroo
m ( M
axima
al .)
28W
28W
28W
29W
29W
74W
74W
Model
F-999-V1
F-999-V2
F-999-V3
F-3000-V2
F5000-V2
Geschik
t
Deeltje
Granulair en gepoederd materialen.
Niet melig materialen, glad oppervlak
deeltjes
Granulair en gepoederd
materialen. Niet melig
materialen,glad
oppervlak deeltjes
Deeltje
Maat
Φ < 20 mm
Φ < 35
mm
Φ < 35
mm
Vullin
g
Bereik
10-999g
20-3000
gram
20-5000g

MODELAND PARAMETERS
- 1 -
Spanning
Wisselst
room
120V
60Hz
Wisselst
room
230V
50Hz
Wisselst
room
230V
50Hz
Wisselst
room
230V
50Hz
Wisselst
room
230V
50Hz
Stroo
m ( M
axima
al .)
83W
83W
83W
88W
96W

STRUCTURE DIAGRAM
- 2 -
F-100-V1, F-100-V2, F-100-V3 ,F-200-V1 ,F-200-V2 ,F-500-V1 ,F -500-V2
1
2
5
3
4
1. Trechter 2. Aanpassen Bord 3. Gastheer Machine 4.Uitlaat
5.Bediening Paneel
F-999-V1, F-999-V2, F-999-V3 , F- 3000-V2 ,F-5000-V2
6
5
1
2
3
4
1.Trechter 2. Aanpassen Plaat 3.Hostmachine 4.Power
Uitlaat 5.Uitlaat 6.Bediening Paneel

COMPONENTS
- 3 -
Model
Onderdele
n
F-100-V1
F-100-V2
F-100-V3
F-200-V1
F-200-V2
F-500-V1
F-500-V2
F-999-V1
F-999-V2
F-999-V3
F-3000-
V2
F-5000-
V2
Poeder
Vulling
Machine
×1
×1
×1
×1
×1
×1
Open-
einde
Moersle
utel (10
MM )
×1
×1
×1
/
/
/
Open-einde
Moersle
utel ( 14
MM )
/
/
/
×1
×1
×1
Stroomkabel
×1
×1
×1
×1
×1
×1
Pedaal
Schakelaar
/
/
/
×1
×1
×1
Gebruiker
Handmatig
×1
×1
×1
×1
×1
×1

OPERATING INSTRUCTIONS
- 4 -
F-100-V1, F-100-V2, F-100-V3 ,F-200-V1 ,F-200-V2
1. Leg het product plat neer en verwijderen de schroeven (A,B)
volgens naar label instructies zoals getoond .
2. Plaats het product in een stabiel positie , plug in de stroom koord, En
Dan
je bent klaar naar gebruik.
F-500-V1, F-500-V2 :
A
B
1. Open de gesp op de achterklep en verwijder de achterklep
.
verwijder de
schroeven volgens het etiket instructies zoals getoond .Neerzetten rug op
de achterkant.
2. Plaats het product in een stabiele positie, plug in de netsnoer , En
Dan je bent klaar naar gebruik.
e e n
Gesp
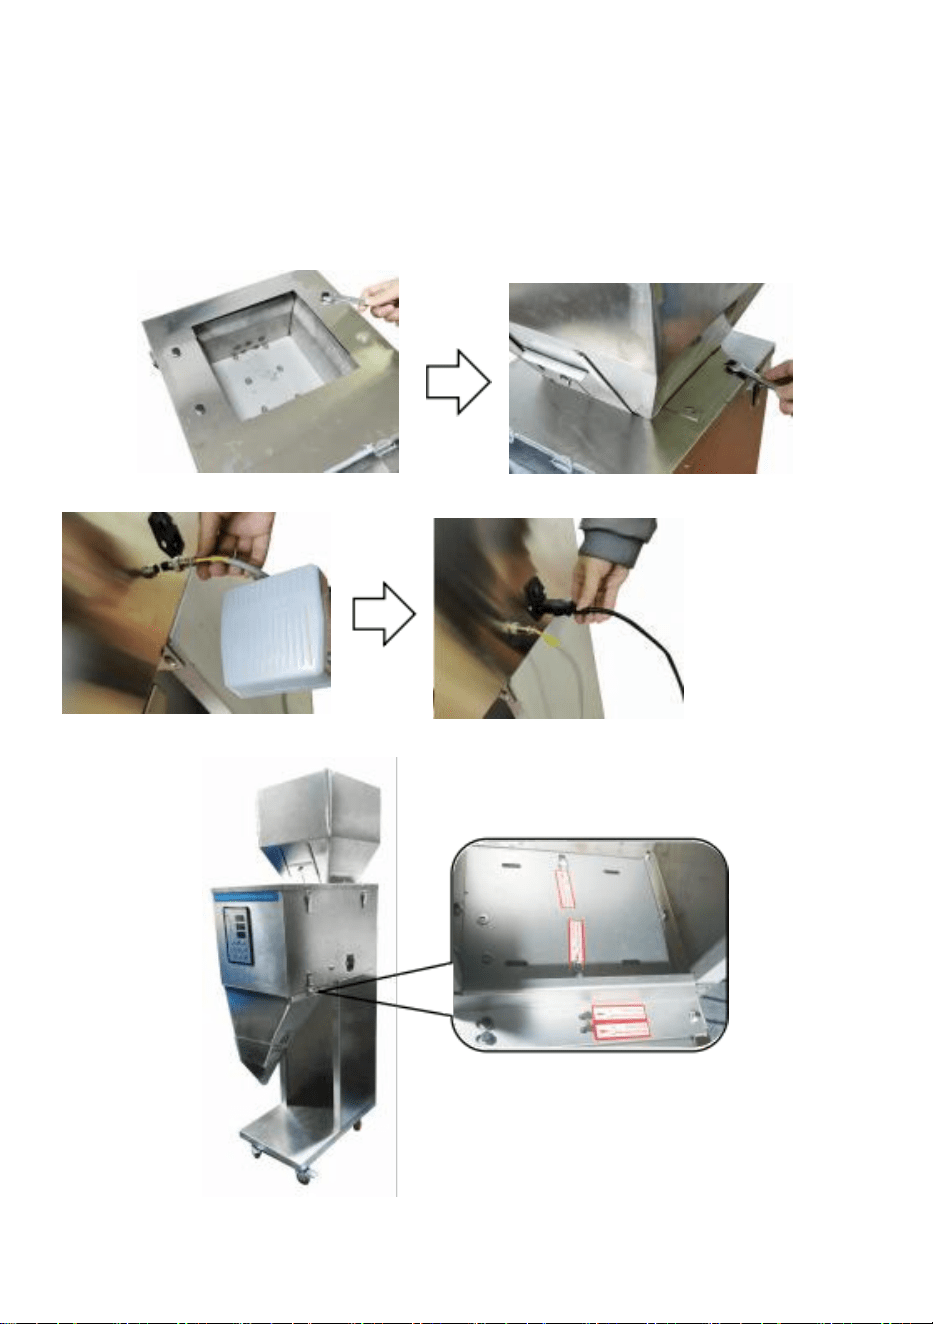
- 5 -
F-999-V1, F-999-V2, F-3000-V2, F-5000-V2:
1. Hopperinstallatie
Verwijder de gemonteerde schroeven. Plaats de trechter in En slot het
met de schroeven die u zojuist hebt verwijderd zoals afgebeeld. (Tips: De
zijkant van de trechter met de afstelbare
plaat naar voren gericht)
2.Stekker in de netsnoer en pedaal schakelaar als getoond.
3. Verwijder de schroeven volgens label l instructies als getoond
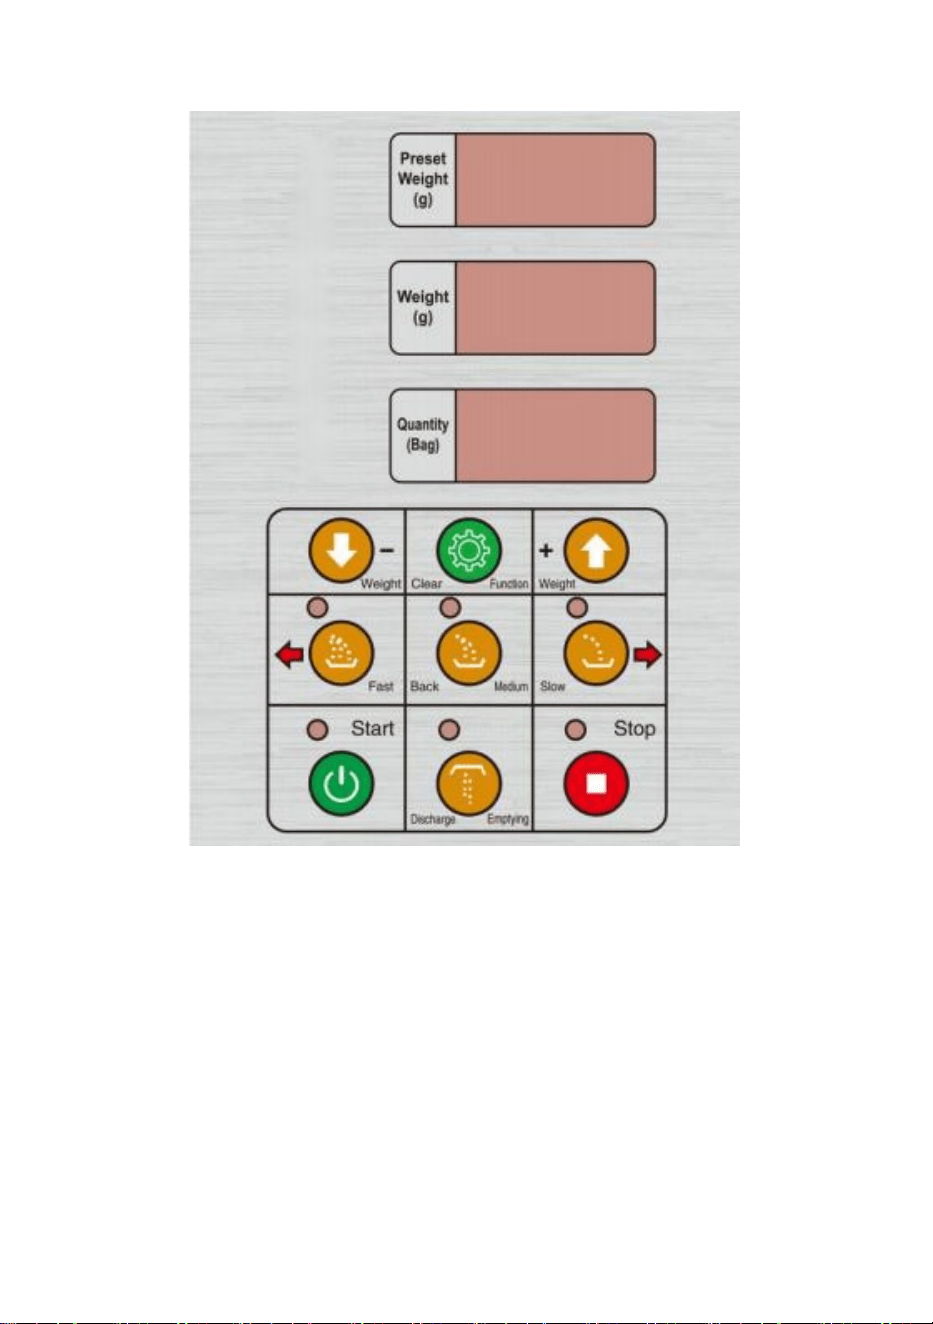
- 6 -
De werking instructies
F-100-V1,F-100-V2,F-100-V3,F-200-V1,F-200-V2, F-500-V1,F-500-V2,F-999-V1,
F-999-V2,F-999-V3
1. Zet de aan/uit-schakelaar aan en de machine zal maakt A
geluid.De machine is in een standby-stand staat op dit tijd.
venster Gewicht ( g ) op nul te zetten weergave.
3. Stel het gewicht van het materiaal in door drukken "Gewicht +/-
"(Voor voorbeeld, 08.0 staat voor 8 gram ).
4. Verlaag de aanpassing plaat naar de laagste positie.Laad materiaal in
de trechter.Druk op de starttoets.Pas de positie van de afstelling aan
bord
volgens de behoefte aan vulling materiaal.
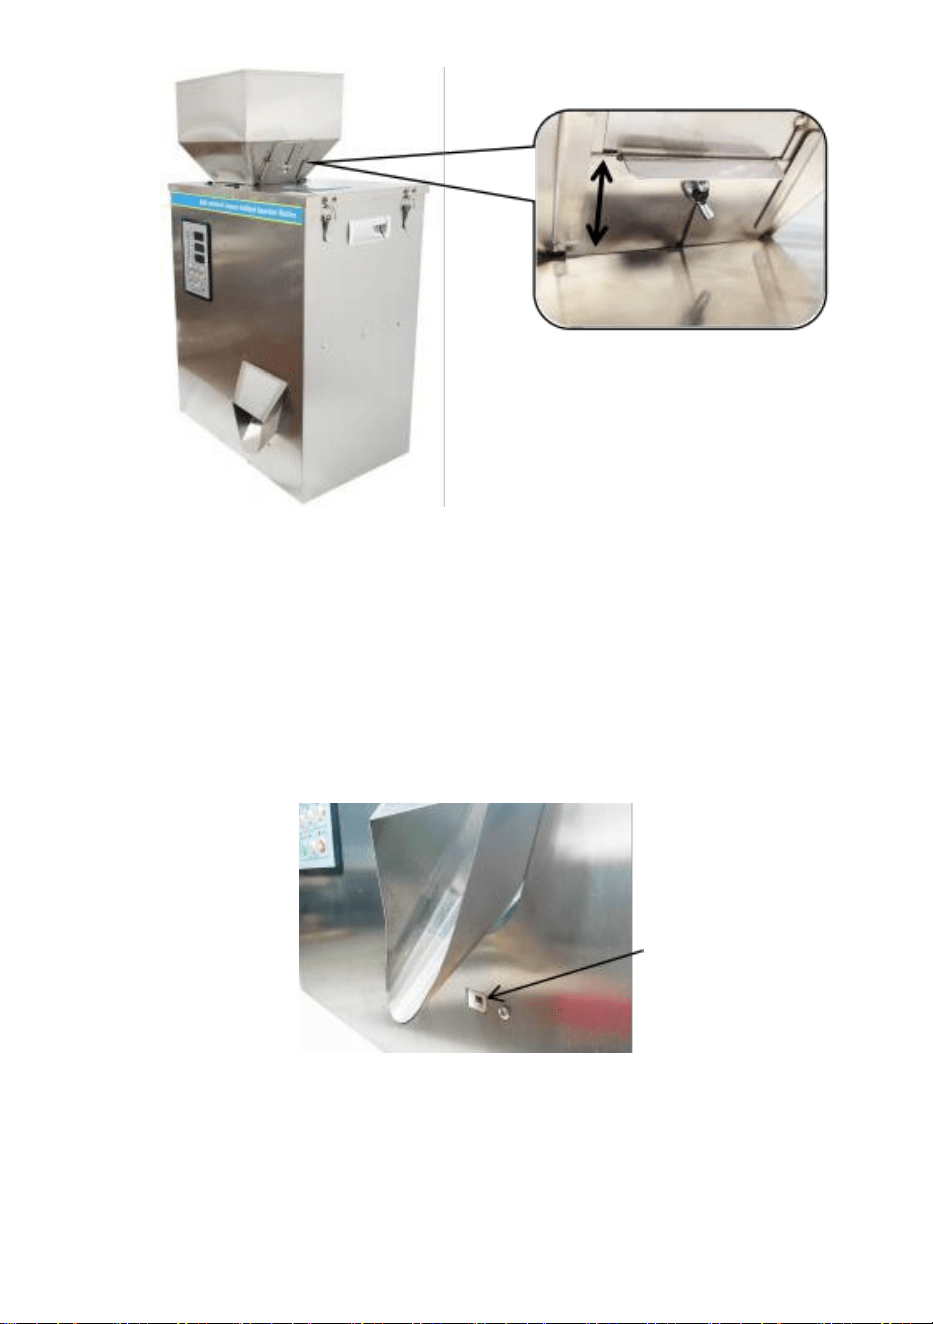
- 7 -
5. Selecteer de gewenste snelheid "Snel
、
Medium
、
Langzaam"
volgens verschillende materialen op de controle paneel 。
6. Druk op “Start”, de machine begint te werken, en wanneer een “vinkje”
is gehoord, de vulling is voltooid. Plaats de container in de afvoerpoort om
ontvangen het materiaal. (Tips: De container moet dicht bij de deur staan
naar de sensor naar trekker
(het.) De container wordt verwijderd en de machine voert de volgende
rond van automatisch vullen.
Sensor
Opmerking:
1.Om te wissen, druk op "Wissen" sleutel.
2. Aan verwijderen de overig materiaal , vasthouden omlaag de "
Ontlading "
-toets voor 5 seconden terwijl de machine is gestopt. De
machine zal Ga door met werken, als het materiaal klaar is, alstublieft

- 7 -
druk op de “ Stop ” knop “sleutel tot stop.(Tips: de afstelplaat moet volledig
open zijn .)

- 8 -
F-3000-V2, F-5000-V2
:
1. Inschakelen de stroom schakelaar.
2. Druk op "Ontladen" en vervolgens op "Nul" om het gewicht
(
g
)
op nul te zetten raam weergave.
3. Stel het gewicht van het materiaal in door drukken " +/-"(Voor
voorbeeld, 0800 staat voor 800 gram ).
4. Verlaag de aanpassing plaat naar de laagste positie. Laad materiaal
in de trechter. Druk op "start"sleutel. Pas de positie van de afstelplaat
aan
volgens de behoefte aan vulling materiaal.

- 9 -
5. Selecteer de gewenste snelheid "Snel 、 Medium、 Langzaam"
volgens verschillende materialen op de controle paneel.
6. Druk op “Start”, de machine begint te werken, en wanneer een “vinkje”
is gehoord, de vulling is voltooid. Plaats de zak over de afvoerpoort En
pers de voetschakelaar om het materiaal automatisch te ontladen. Na het
ontladen van de
materialen, de machine vult automatisch de volgende ronde van materiaal.
Opmerking:
Om de resterende materiaal, Druk op de knop " Reiniging " materiaal "
sleutel terwijl
de machine is gestopt. De machine zal doorgaan met werken,
wanneer het materiaal op is, gelieve druk op de “ Stop ” knoptoets
om te stoppen.(Tips:de
afstelplaat moet (volledig open zijn .)

MAINTENANCE
- 10 -
1.De gebruiker zullen selecteren A kwantitatief vulling machine van A
geschikt bereik volgens de genoemde producten.
2.De machine bevat A precisie elektronisch schaal, Het is verboden
naar zijn overgewicht.
3.Wanneer in gebruik, blijf alsjeblieft de machine niveau En stabiel
naar voorkomen grote trillingen of stoten ; anders is het kunnen oorzaak
schade.
4. Reinig het materiaal na gebruik En houden de machine schoon
5.Wanneer de machine is niet in gebruik, Alsjeblieft leeg de materialen En
winkel Het in een geventileerde en droog plaats.
6. Reinig het product en het filter in tijd na elk gebruik. 7. Altijd
Houd het product buiten schoon.
Bewaar het product in A droog En geventileerd
plaats. Als de zekering beschadigd is, vervang deze
dan . Het als getoond.

MAINTENANCE
- 10 -
Samensmelten

- 11 -
PROBLEEMOPLOSSING
Probleem
Mogelijke oorzaak
Mogelijke oplossing
De product doet niet
werk
De stroom koord is
niet aangesloten op de
juiste manier
Opnieuw verbinden de
kracht
koord
Zekering defect
Vervang de zekering
Weergave van afwijkend
gewicht
Nee materiaal in
de
trechter
Toevoegen materiaal
Materiaal vast in de
interne weging afvalbak.
Schoon vastgelopen
materialen
De indicator op de
bedieningspaneel is
knipperend
De stroom koord is
niet aangesloten op de
juiste manier
Opnieuw verbinden de
kracht
koord
De interne bedrading
van de machine is
loszittend
Vinden A
professioneel technicus
naar reparatie
Vulling materiaal is traag
Materiaal kunnen
vastzitten
Schoon vastgelopen
materialen
Fabrikant: Shanghaimuxinmuyeyouxiangongsi
Adres: Shuangchenglu 803nong11hao1602A-1609shi, baoshanqu,
Sjanghai 200000 CN.
Geïmporteerd naar AUS: SIHAO PTY BV 1 ROKEVA STRAAT
EASTWOOD Nieuw-Zuid-Wales 2122 Australië
Geïmporteerd naar de VS: Sanven Technology Ltd. Suite 250, 91 66
Anaheim Plaats, Rancho Cucamonga, CA 91730
E-CrossStu GmbH
Mainzer Landstr.69, 60329 Frankfurt am Voornaamst.
YH-CONSULTING BEPERKT .
C/O YH Consulting Beperkt kantoor 147, Centurio n Huis,
Londen Weg, Staines-upon-Thames, Surrey, TW18 4AX
REP
REP


- 11 -
Teknisk support och E-garanti Certifikat
www.vevor.com/support
PULVER FYLLNING MASKIN
ANVÄNDARE
MANUELL
Vi fortsätter att vara engagerade i att förse dig med verktyg konkurrenskraftig pris.
"Spara Halva, "Halva priset " eller andra liknande uttryck som används av oss endast
representerar en
uppskattning av besparingar du kan dra nytta av att köpa vissa verktyg hos oss jämfört med
de stora
toppmärken och gör inte nödvändigtvis innebära att täcka alla kategorier verktyg som
erbjuds av oss. Du
påminns om att kontrollera bilen noggrant när du är det placera en beställa med oss om
du är
sparar faktiskt hälften i jämförelse med toppen större varumärken.

- 1 -
Powder Filling Machine
F-100-V1, F-200-V1,
F-100-V2, F-200-V2,
F-100-V3
F-500-V1
F-500-V2
F-999-V1
F-999-V2
F-999-V3
F-3000-V2
F-5000-V2
BEHOV HJÄLP? KONTAKTA USA!
Ha produkt frågor? Behov tekniskt stöd? Behaga känsla gratis till
kontakta oss:
Teknisk support och e-garanticertifikat
www.vevor.com/support
Detta är originalet instruktion, snälla läs allt manuell instruktioner
försiktigt före drift. VEVOR reserverar sig för en tydlig tolkning av vår
användarmanual. Produktens utseende ska vara föremål för
produkt dig mottagen. Snälla förlåt oss att vi inte vill informera dig igen
om det finns någon teknik eller programvara uppdateringar på vår
produkt.

- 2 -
1. Läs noggrant och förstå A ll MONTERING OCH DRIFT
INSTRUKTIONER före användning.
2. Underlåtenhet att följa säkerhetsreglerna och annan grundläggande
säkerhet försiktighetsåtgärder maj resultat på seriös person skada.
ALLMÄNNASÄKERHETSFÖRESKRIFTER
Viktig påminnelse
1. Innan användning, vänligen försiktigt läs produktmanualen och se till att
du förstå och följa alla säkerhetsvarningar och användande
försiktighetsåtgärder.
2. Använd inte denna produkt för andra icke utpekad syften att
undvika oväntade risker.
3. Detta produkten är endast tillämplig på användare inom specificeras
åldras grupp och tillämpningsområde . Vänligen följ strikt relevant ålder
restriktioner och varningar.
4. Om det finns några avvikelser i produkten, behaga sto sid använder det
omedelbart och kontakta servicecentret för konsultation eller till ordna
reparation.
Miljökrav för användning
1. Behaga använd i en torr och välventilerad miljö för att undvika extrema
miljöförhållanden som vattenaktivering, hög temperatur , hög luftfuktighet
och extremt låg temperatur.
2. Undvik direkt solljus eller kontakt med brandkällor för att förhindra
produkt skada eller brand.
3. Säkerställ en stabil användningsmiljö och förhindra produkt från varelse
slå eller släppa för att undvika dama ge.
Säkerhet Drift Guidelines
1. Behaga använd en lämplig strömförsörjning och spänning, och
gör inte använda skadade nätsladdar eller pluggar.

- 2 -
2. När du använder den här produkten , gör inte kortsluta kretsar
eller ansluta felaktiga enheter för att undvika risker som elektriska
stötar och eld.

- 3 -
3. När främmande föremål hittas på produktens yta, behaga
sluta omedelbart använda och ta bort främmande föremål innan du
fortsätter använda.
4. När du använder denna produkt kontinuerligt under lång tid, var god vila
tid för att undvika överdriven trötthet .
5. Gör inte det koppla in eller ur strömmen plu g med blöt händer till
undvika de risk av elektrisk stöt.
Underhåll och skötsel
1. Regelbundet underhålla och rengöra produkten. Innan du städar ,
snälla
koppla bort strömförsörjningen och torka av den med a torka trasa. Vara
försiktig inte att använd alkohol, syra eller alkali lösningar, etc
2. När produkten är inte används för en lång tid, behaga koppla ur
strömförsörjningen snabbt för att spara energi och utöka produktens
livslängd.
3. Ta inte isär produkten eller byt ut komponenter på din egen. Om du
stöter på någon funktionsfel, vänligen kontakta kundtjänsten
centrum.
Akuthanteringsåtgärder
1. När det finns onormala situationer eller olyckor med produkten,
snälla sluta använda det som snart som möjlig.
Om överhettning, rökning eller onormalt ljud upptäcks , bryt omedelbart
strömförsörjningen och kontakta kundservice centrum.
2. Om produkten innebär en nödsituation som maj skada personlig
säkerhet, ring räddningstjänsten antal i en tid sätt.
SPARA DESSA INSTRUKTIONER

MODELAND PARAMETERS
- 1 -
Modell
F-100-
V1
F-100-
V2
F-100-
V3
F-200-
V1
F-200-
V2
F-500-
V1
F-500-
V2
Lämplig
Partikel
Granulär och pulveriserad
material. Inte mjöligt
material, slät yta
partiklar
Granulär och pulveriserad material.
Inte
mjölig material, slät yta
partiklar
Partikel
Storle
k
Φ < 10 mm
Φ < 10 mm
Φ < 20 mm
Fyllni
ng
Räckv
idd
1-99,9 g
1-200 g
10-500g
Spänning
AC
120 V
60 Hz
AC
230 V
50 Hz
AC
230 V
50 Hz
AC
120 V
60 Hz
AC
230 V
50 Hz
AC
120 V
60 Hz
AC
230 V
50 Hz
Driva
( Max
.)
28W
28W
28W
29W
29W
74W
74W
Modell
F-999-V1
F-999-V2
F-999-V3
F-3000-V2
F5000-V2
Lämplig
Partikel
Granulär och pulveriserad material.
Inte mjöligt material, slät yta
partiklar
Granulär och
pulveriserad
material. Inte mjöligt
material, slät
yta partiklar
Partikel
Storle
k
Φ < 20 mm
Φ < 35
mm
Φ < 35
mm
Fyllni
ng
Räckv
idd
10-999 g
20-3000g
20-5000g

MODELAND PARAMETERS
- 1 -
Spänning
AC
120V
60 Hz
AC
230V
50 Hz
AC
230V
50 Hz
AC
230V
50 Hz
AC
230V
50 Hz
Driva
( Max
.)
83W
83W
83W
88W
96W
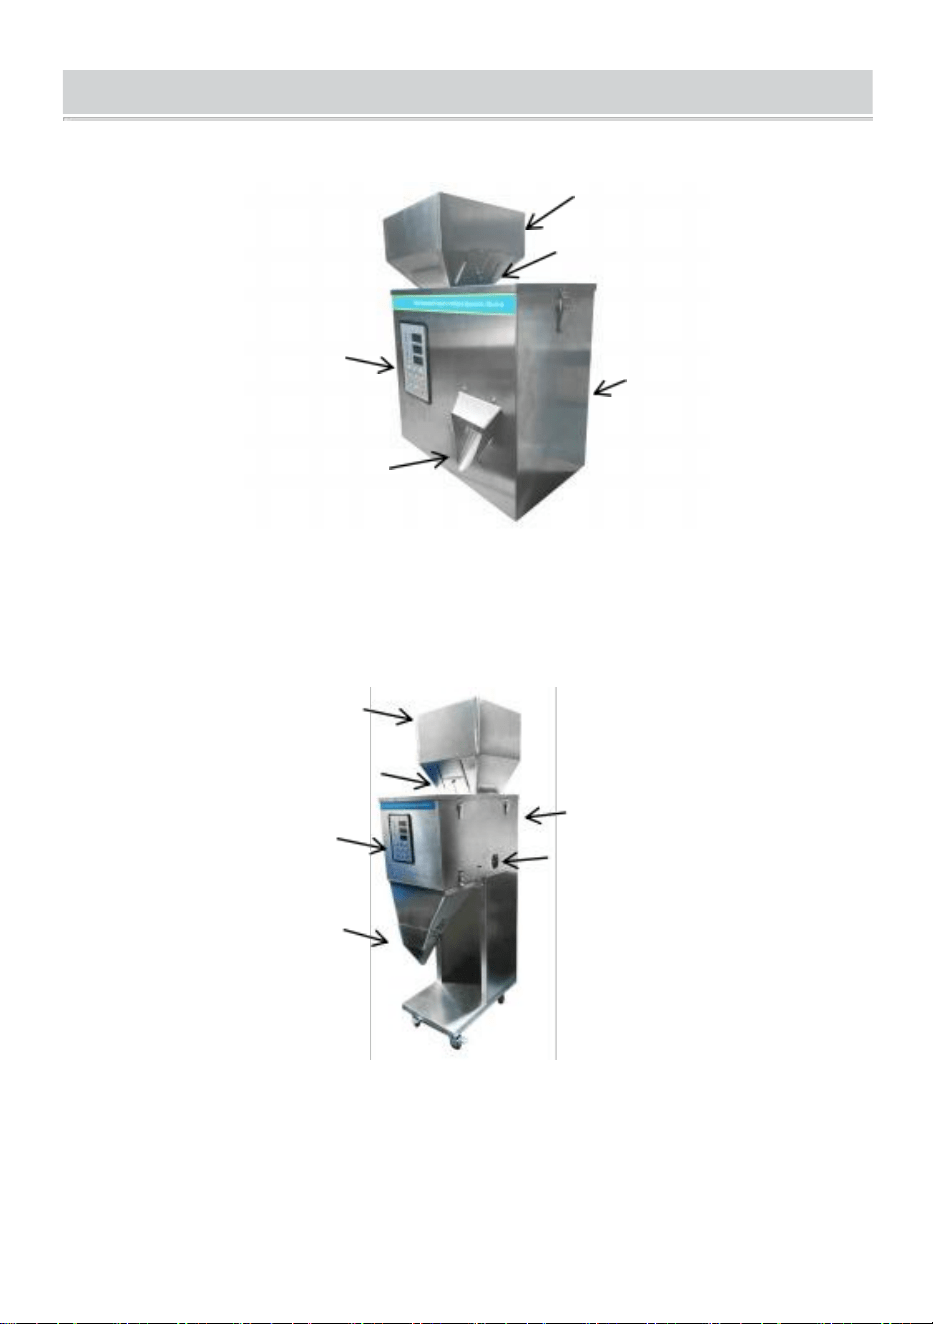
STRUCTURE DIAGRAM
- 2 -
F-100-V1, F-100-V2, F-100-V3 ,F-200-V1 ,F-200-V2 ,F-500-V1 ,F -500-V2
1
2
5
3
4
1. Behållare 2. Justeras Tallrik 3. Värd Maskin 4.Uttag 5.Kontroll Panel
F-999-V1, F-999-V2, F-999-V3 , F- 3000-V2 ,F-5000-V2
6
5
1
2
3
4
1. Hopper 2. Justering Platta 3. Värdmaskin 4. Ström Utlopp
5.Uttag 6.Kontroll Panel

COMPONENTS
- 3 -
Model
l Delar
F-100-V1
F-100-V2
F-100-V3
F-200-V1
F-200-V2
F-500-V1
F-500-V2
F-999-V1
F-999-V2
F-999-V3
F-3000-
V2
F-5000-
V2
Pulver
Fyllning
Maskin
×1
×1
×1
×1
×1
×1
Öppet
slut
Rycka (
10 MM )
×1
×1
×1
/
/
/
Öppet slut
Rycka
( 14MM
)
/
/
/
×1
×1
×1
Nätsladd
×1
×1
×1
×1
×1
×1
Trampa Växla
/
/
/
×1
×1
×1
Användare
Manuell
×1
×1
×1
×1
×1
×1
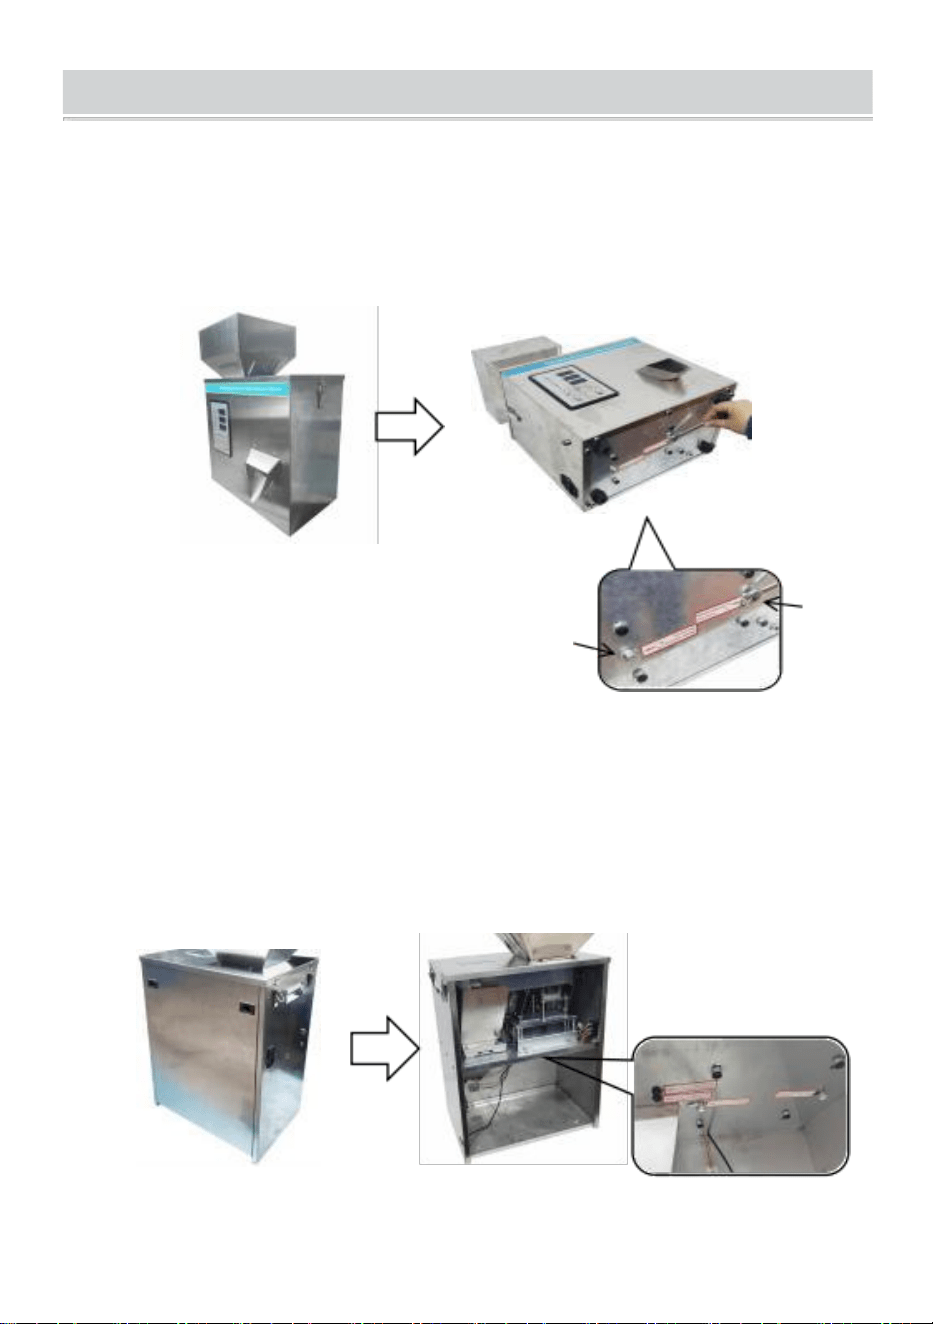
OPERATING INSTRUCTIONS
- 4 -
F-100-V1, F-100-V2, F-100-V3 ,F-200-V1 ,F-200-V2
1. Lägg produkten platt och ta bort de skruvar (A,B) enl till märka
instruktioner som visas .
2. Lägg produkten i en stabil position , plugg i de driva sladd, och sedan
du är redo till använda.
F-500-V1, F-500-V2 :
A
B
1.Öppna spännet på bakstycket och ta bort bakstycket
,
och sedan ta
bort skruvarna enligt etiketten instruktioner som visas .Sätta tillbaka på
de bakre omslag.
2.Sätt produkten i en stabil position, plugg i strömkabel d, och sedan
du är redo till använda.
刁
Spänne

- 5 -
F-999-V1, F-999-V2, F-3000-V2, F-5000-V2:
1. Installation av behållare
Ta bort de installerade skruvarna. Sätt i behållaren och låsa det med de
skruvar som du just tog bort enligt bilden.(Tips: Den sida av behållaren
med justering
plattan är vänd framåt)
2. Anslut i nätsladd och pedalomkopplare som visas.
3. Ta bort skruvarna enligt etikett l instruktioner som visas

- 6 -
Verksamheten instruktioner
F-100-V1, F-100-V2, F-100-V3, F-200-V1, F-200-V2 , F-500-V1, F-500-V2, F-999
-V1, F-999-V2, F-999-V3
1. Slå på strömbrytaren och maskinen kommer gör a sound.The
maskinen är i standby ange vid detta tid.
fönstret Vikt ( g ) visa.
3. Ställ in vikten på materialet med brådskande "Vikt +/-"(För exempel,
08.0 står för 8 gram ).
4.Sänk justeringen plattan till det lägsta läge. Ladda material i behållaren.
Tryck på startknappen. Justera läget för justeringen tallrik
efter behov av fyllning material.
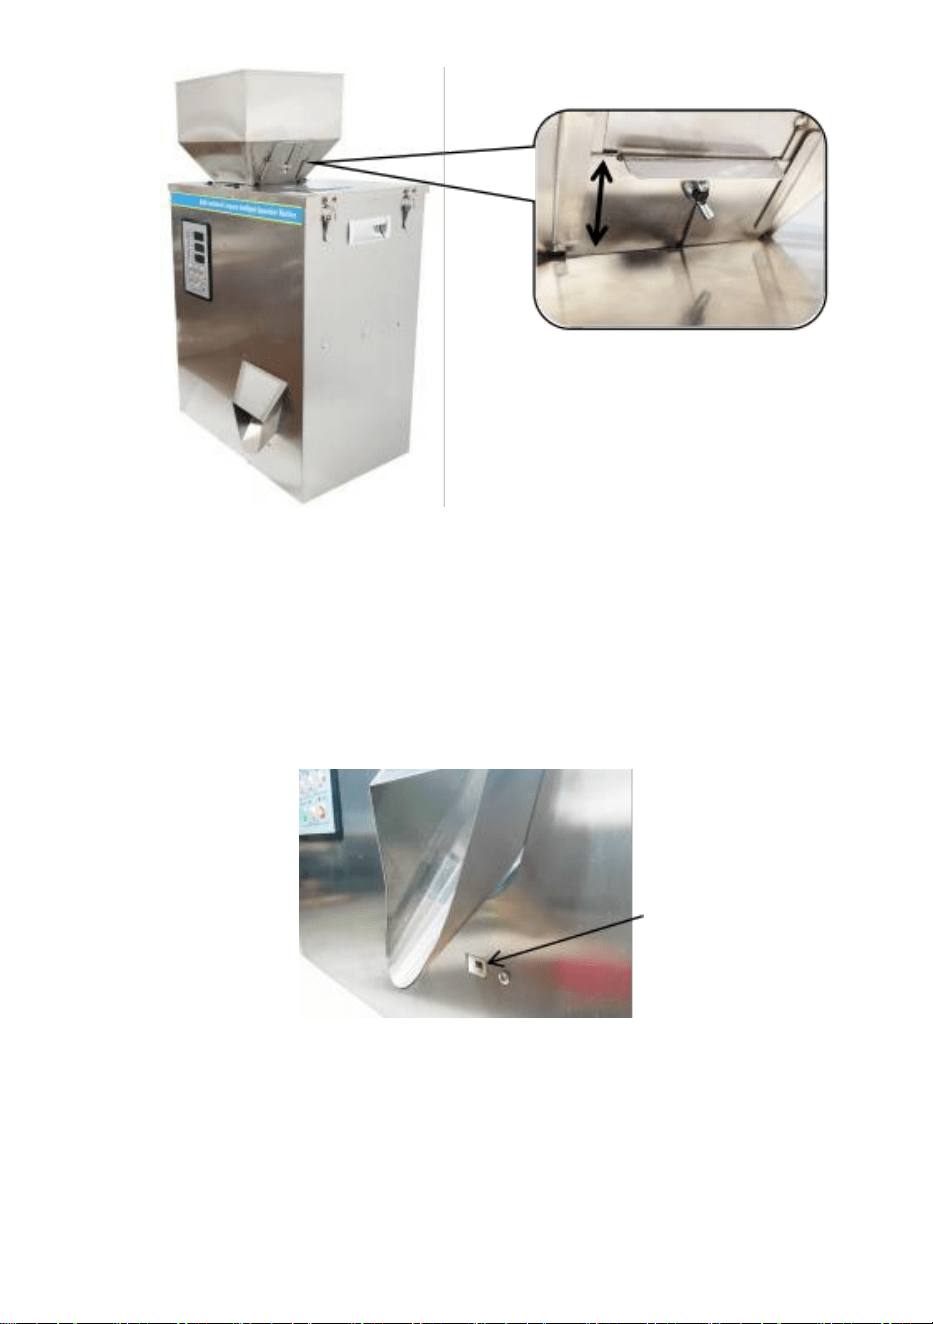
- 7 -
5.Välj önskad hastighet "Snabb
、
Medium
、
Långsam" enligt olika
material på kontrollen panel .
6. Tryck på "Start", maskinen börjar fungera och när en "bock" är hört,
fyllningen är klar. Placera behållaren i utloppsporten till få materialet .
(Tips: Behållaren måste vara nära till de se nsor till utlösare
det.)Behållaren tas bort och den maskin utför nästa ro und av
automatisk fyllning.
Sensor
Notera:
1.För att rensa, tryck på "Rensa" nyckel.
2. Till ta bort de återstående material , håll ner de
" Utladdningsknapp "
. för
5 sekunder medan maskinen är stoppad. Maskinen kommer fortsätt att
arbeta, när materialet är färdigt, tack tryck på " Stopp "nyckel till
stopp.(Tips: justeringsplattan ska vara helt öppen .)

- 8 -
F-3000-V2, F-5000-V2
:
1. Slå på de driva växla.
2. Tryck på "Utladdning" och sedan på "Noll" för att nollställa vikten
(
g ) fönster visa.
3. Ställ in vikten på materialet med brådskande " +/-"(För exempel,
0800 står för 800 gram ).
4.Sänk justeringen plattan till det lägsta läge. Ladda material i behållaren.
Tryck på "start"nyckel. Justera positionen på justeringsplattan
efter behov av fyllning material.

- 9 -
5.Välj önskad hastighet "Snabb 、 Medium、 Långsam" enligt olika
material på kontrollen panel.
6. Tryck på "Start", maskinen börjar fungera och när en "bock" är hört,
fyllningen är klar. Sätt påsen över utloppsporten och trycka
fotkontakten för att automatiskt tömma materialet. Efter tömning
material, fyller maskinen automatiskt nästa omgång av material.
Notera:
För att ta bort resterande material, Tryck på " Rengöring material " -
tangenten medan
maskinen är stoppad. Maskinen fortsätter att arbeta, när materialet
är färdigt, tack tryck på " Stopp "nyckel för att stoppa.(Tips:
justeringsplatta bör vara helt öppen.)
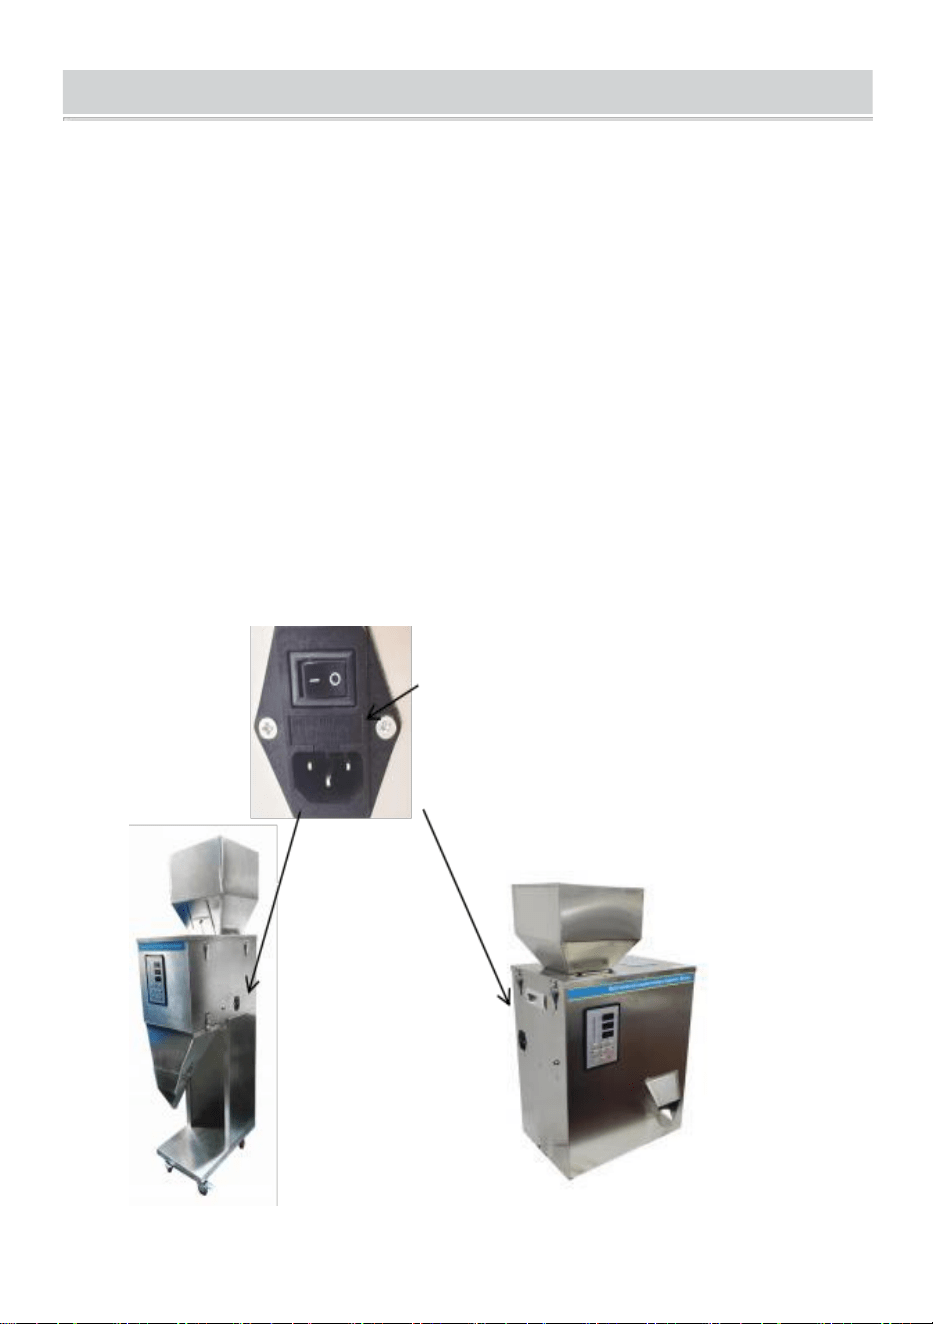
MAINTENANCE
- 10 -
1.Den användare skall välja a kvantitativ fyllning maskin av a lämplig
sortiment enligt nämnda produkter.
2.Den maskin innehåller a precision elektronisk skala, det är förbjuden
till vara övervikt.
3. När i använda, snälla behåll de maskin l nivå och stabil till undvika
stora vibrationer eller stötar ; annars det maj orsaka skada.
4. Rengör materialet efter användning och hålla de maskin rena
5. När maskin är inte i använda, behaga tömma material och s rev det i
en ventilerad och d ry plats.
6. Rengör produkten och filtret i tid efter varje använda. 7.
Alltid förvara produkten utanför rena.
Förvara produkten i a torka och ventilat utg plats. Om
säkringen är skadad, byt ut t det som visas.
Säkring
- 11 -
FELSÖKNING
Problem
Möjlig orsak
Möjlig lösning
De produkt gör det
inte
arbete
De driva sladd är inte
pluggat in ordentligt
Återanslut kraften
sladd
Säkringsfel
Byt ut säkringen
Onormal viktvisning
Inga material i de
ficka
Tillägga material
Material fast i de
intern vägning bin.
Rent fast material
De indikator på de
kontrollpanelen är
blinkning
De driva sladd är inte
pluggat in ordentligt
Återanslut kraften
sladd
De inre ledningar av
maskin är lösa
Hitta a
professionell tekniker till
reparera
Fyllning material är
långsam
Material maj vara fast
Rena upp fast material
Tillverkare: Shanghaimuxinmuyeyouxiangongsi
Adress: Shuangchenglu 803nong11hao1602A-1609shi, baoshanqu,
shanghai 200 000 CN.
Importerad till AUS: SIHAO PTY LTD. 1 ROKEVA
STREETEASTWOOD NSW 2122 Australien
Importerad till USA: Sanven Technology Ltd. Suite 250, 91 66
Anaheim Plats, Rancho Cucamonga, CA 91730
E-CrossStu GmbH
Mainzer Landstr.69, 60329 Frankfurt am Main.
YH KONSULTAT BEGRÄNSNING D.
C/O YH Consulting Begränsat kontor 147, Centurio n
Hus, London Road, Staines-upon-Thames, Surrey,
TW18 4AX
REP
REP