USER MANUAL
����W-Pro Portable Power Station
This manual is a general version. If the purchased unit does not support wireless charging, please disregard the related
descriptions.
Model: SR1KW8L-SG2-US
CONTENTS
�. Maintenance and Care
��
�. What’s in the box
��
�. Error Display&Solutions
��
�. FAQ (Frequently Asked Questions)
��
�.� Product Overview
�.� LCD Screen
�.� Use of Product
�.� AC Charging
�.� Solar/PV Charging
�.� Car Charging
�.� P-boost Function
�.� Use of APP
�
�
�
�
�
�
��
�.� Use of Expansion Battery Pack �
��
�.�� Wireless Charging (Optional) ��
�. Guideline for Users
�
�
�. Safety Guidelines
�.� Warning
�.� Disposal
�
�. Parameters
�.�� EPS Function (Emergency Power Supply) ��
�. Disclaimer
��
�. Parameters
�
Input
Output
General
Net weight
Dimension
Wi-Fi
≈��.�kg(≈��.�lbs)
���x���x���mm(��.�*�.�*��.� in)
Supported
Battery capacity
(UK/EU/FR/AU/ZA)
(US)
USB-C�/C�
USB-A�+A�
USB-C�/C�
Car charger
XT�� port
Wireless charging (Optional)
��W Max.
Car charger+ XT�� total output power ���W Max.
Total DC output power ���W Max.
��.�V ��A, ���W Max.
��.�V ��A, ���W Max.
�V �.�A, ��W Max.
PV charge XT�� input
Car charging input ��/��V battery supported, �A by default
��-��V ��A, ���W Max.
PV charge DC���� input
��-��V ��A, ���W Max.
(US)
(UK/EU/FR/AU/ZA)
����Wh, ��.�V , ��Ah
Inverter mode pure sine-wave,total ����W(Peak ����W), ���-���V~, ��Hz/��Hz, �A
Bypass mode �
��-���V~, ��Hz/��Hz, ����W Max., �A
Bypass mode ���-���V~, ��Hz, ����W Max., ��A
Inverter mode pure sine-wave,total ����W(Peak ����W), ���-���V~, ��Hz, ��A
AC input power
AC input voltage
����W
Max.,��A
���-���V~,��Hz/��Hz
AC input power
AC input voltage
����W Max., ��A
���-���V~, ��Hz
PV charging power ���W Max.
Car charging power ���W Max.
Input Charging
AC charging power ����W Max.
AC+PV charging power ����W Max.
*Inverter mode: the AC output power comes from the battery, not the grid.
*Bypass mode: the AC output power comes from the grid, not the battery.
�/�V �A, ��V �.�A, ��V �A, ��V �.�A, ��W Max.
�/�/��/��V �A, ��V �A, ��V �A, ���W Max.
AC socket*�
AC socket*�

�
�
*Whether the product can be charged or discharged is subject to the actual temperature of battery pack .
*Test conditions: ��% DOD, �.�C charge&discharge at +��±�°C,��%SOH.
Battery
Battery type
Life cycle
Protection type
Lithium iron phosphate battery(LiFePO4)
���� cycles
�. Safety Guidelines
�.� Warning
�.� Disposal
�. If conditions permit, please ensure the battery is fully discharged before placing the product in a designated
battery recycling bin. This product contains a battery, which is classified as hazardous chemical waste and must
not be disposed of in regular trash bins. For more details, please follow local laws and regulations regarding
battery recycling and disposal.
�. If the battery cannot be fully discharged due to a product malfunction, do not place it directly into a recycling
bin. Instead, contact a certified battery recycling company for proper handling.
�. If the battery is over-discharged and cannot be restarted, please treat it as waste and dispose of it accordingly.
�. Do not place this product near heat sources while it is operating, such as open flames or heaters.
�. Keep this product away from all liquids. Do not immerse it in water or allow it to get wet. Never use the
product in the rain or in humid environments.
�. Do not use this product in environments with strong static electricity or strong magnetic fields.
�. Do not disassemble or puncture this product in any way using sharp objects.
�. Do not short-circuit the product using wires or other metal objects.
�. Do not step on, sit on, or climb on the product.
�. Do not use any parts or accessories not provided by the manufacturer. For replacements, please refer to
official sales channels.
�. Use this product strictly within the operating temperature range specified in this manual. Excessive heat may
cause the battery to catch fire or even explode; excessive cold may severely reduce product performance and
affect normal use.
�. Do not place heavy objects on top of this product.
��. Do not forcibly block the fan while the product is in use. Avoid using the product in poorly ventilated or
dusty environments.
��. Avoid impacts, drops, or strong vibrations. If the product experiences significant external impact,
immediately power it off and stop using it. Secure the product during transport to prevent shock or collision.
��. If the product is accidentally dropped into water, place it in a safe and open area, and stay away until it is
completely dry. Do not reuse the product once dried. Dispose of it properly as described in Section �.�
(Disposal). If the product catches fire, use firefighting equipment in the following recommended order: water
or mist, sand, fire blanket, dry powder, or CO
� extinguisher.
��. If there is dirt on the product’s ports, wipe it off with a dry cloth.
��. Place the product securely to prevent it from tipping over. In case of severe damage caused by tipping,
immediately shut it down, place the battery in an open area away from flammable materials and people, and
dispose of it in accordance with local laws and regulations.
��. Keep the product out of reach of children and pets.
��. Store the product in a dry, well-ventilated place.
��. When using the product in humid environments (e.g., near the sea or water), it is recommended to use it with
a moisture-proof bag to avoid water ingress. If water enters the product, do not reuse or power it on.
��. This product is not recommended for powering life-support or safety-critical medical devices, including but
not limited to hospital-grade CPAP (Continuous Positive Airway Pressure) machines and ECMO (Extracorporeal
Membrane Oxygenation) systems. However, home-use CPAP machines for general household environments may
be used, as they typically do not require constant professional monitoring. Please follow medical advice and
consult the device manufacturer regarding usage limitations. For general medical equipment, always monitor
battery levels to avoid power depletion.
��. Power supplies will inevitably generate electromagnetic fields when it is in use, which might affect the
implantable medical device or normal operation of personal medical device, such as pacemaker devices,
cochlear implants, hearing AlDs, defibrillators, etc. lf any of these medical devices are used, please consult the
manufacturer about the restrictions on the use to ensure that power station is operated at a safe distance from
implanted medical devices such as pacemakers, cochlear implants, hearing AlDs, defibrillators, etc.
��. When connecting a refrigerator load in normal mode, power fluctuations may cause the power supply to shut
down automatically. For refrigerators storing medicine, vaccines, or other high-value items, make sure to set the
AC output to “Always On” via the app to ensure continuous power. Monitor the remaining battery level closely.
��. Do not place any items on top of the product while moving it by pushing or pulling.
��. Warning: Operating this device in a residential environment may cause radio interference.
Over-temperature protection, Low-temperature protection,
Over-discharging protection, Over-charging protection, Overload
protection, Short-circuit protection, Over-current protection
Operating temperature
Optimal operating temperature
Discharge temperature range
Charge temperature range
Storage ambient temperature
��℃~��℃ (��°F~��°F)
-��℃~��℃ (-�°F~���°F)
�℃~��℃ (��°F~���°F)
-��℃~��℃(��℃~��℃ preferred)【-�°F~���°F(��°F~��°F preferred)】
Battery Expansion Pack ���Wh
Capacity Supports up to � Battery Expansion Packs (sold separately).
Power input/Output ��-��.�V ��A charging(Max.), ��A discharging(Max.)
Battery Expansion Pack ����Wh
Capacity Supports up to � Battery Expansion Packs (sold separately).
Power input/Output
��-��.�V ��A charging(Max.), ��A discharging(Max.)
�. Guideline for Users
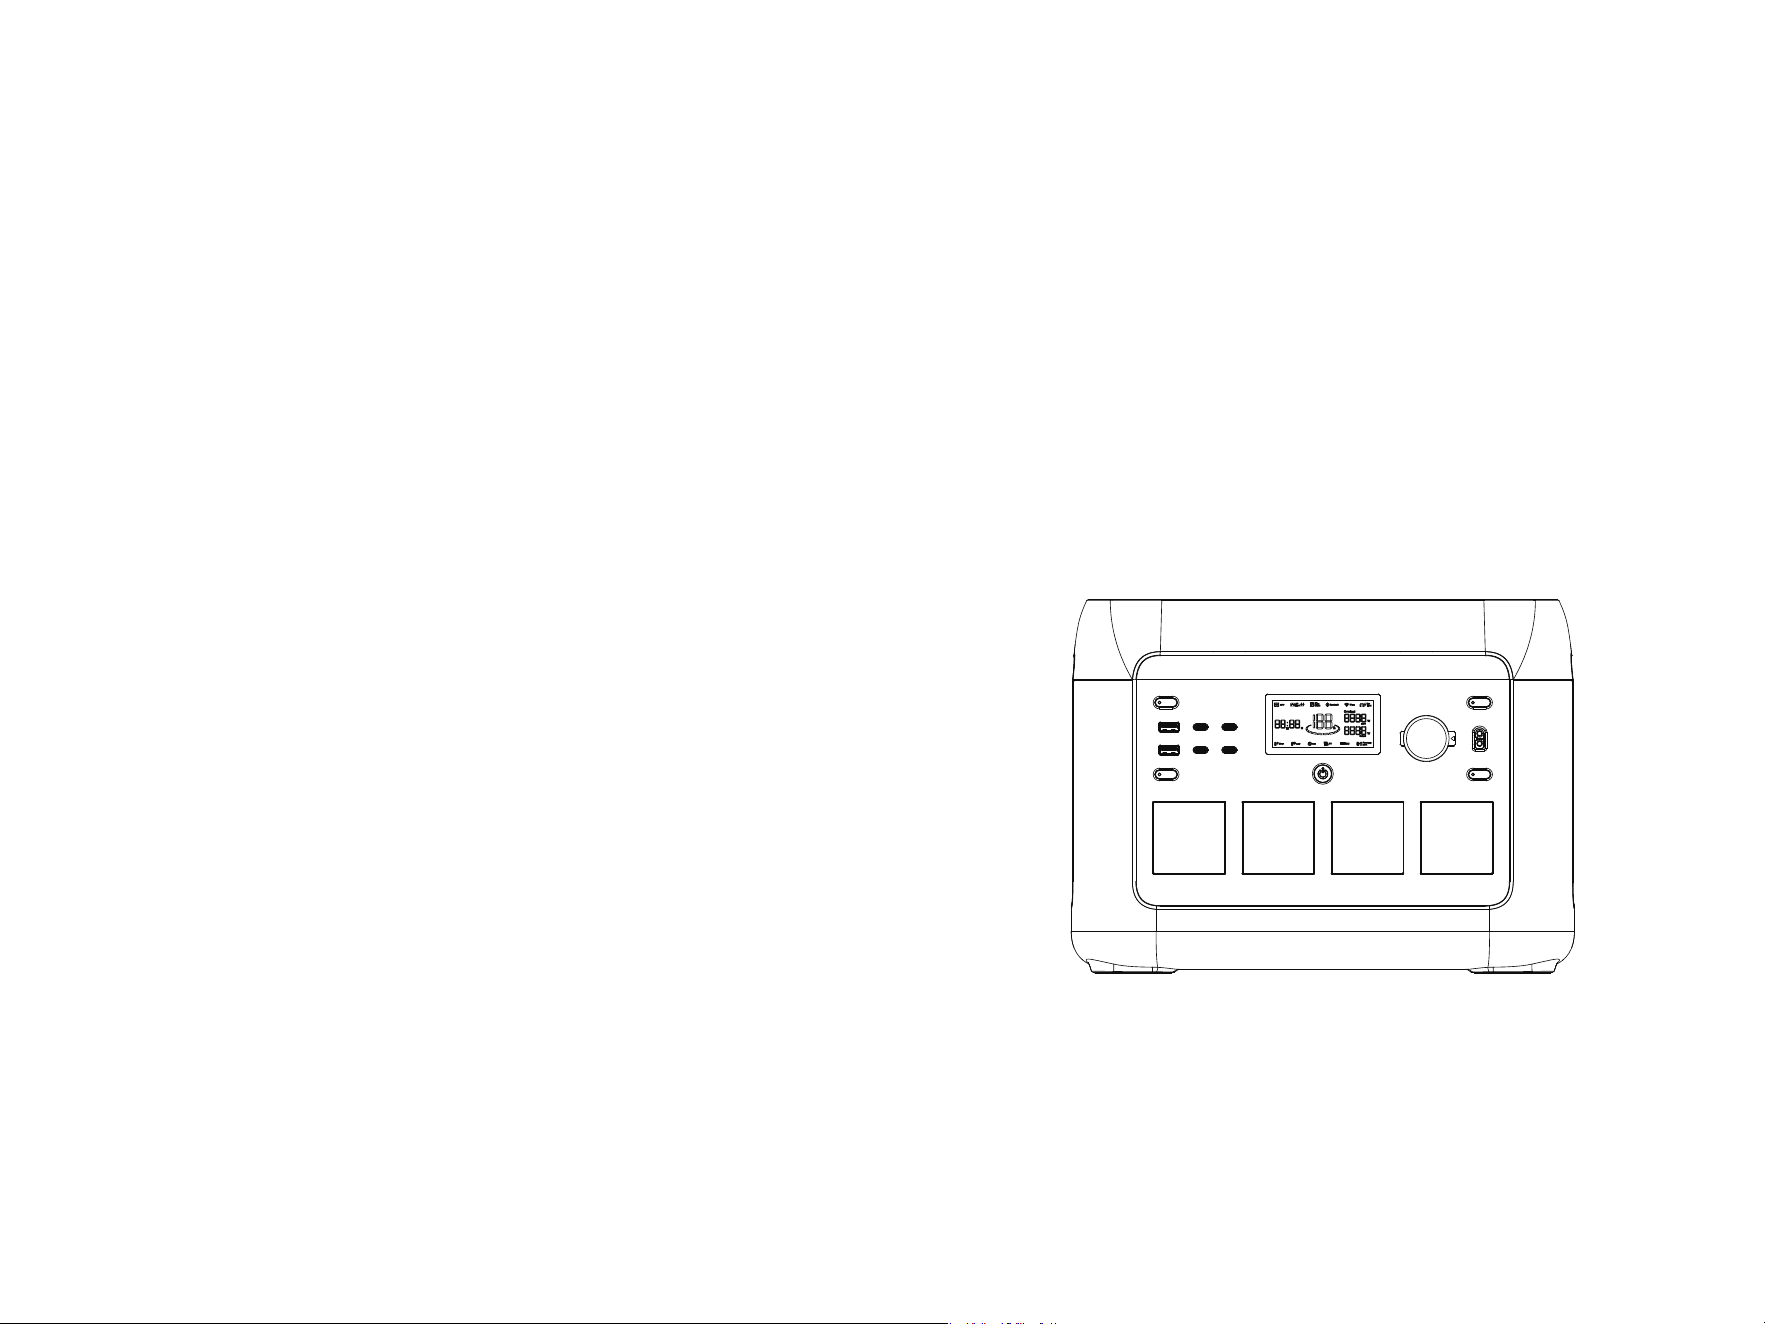
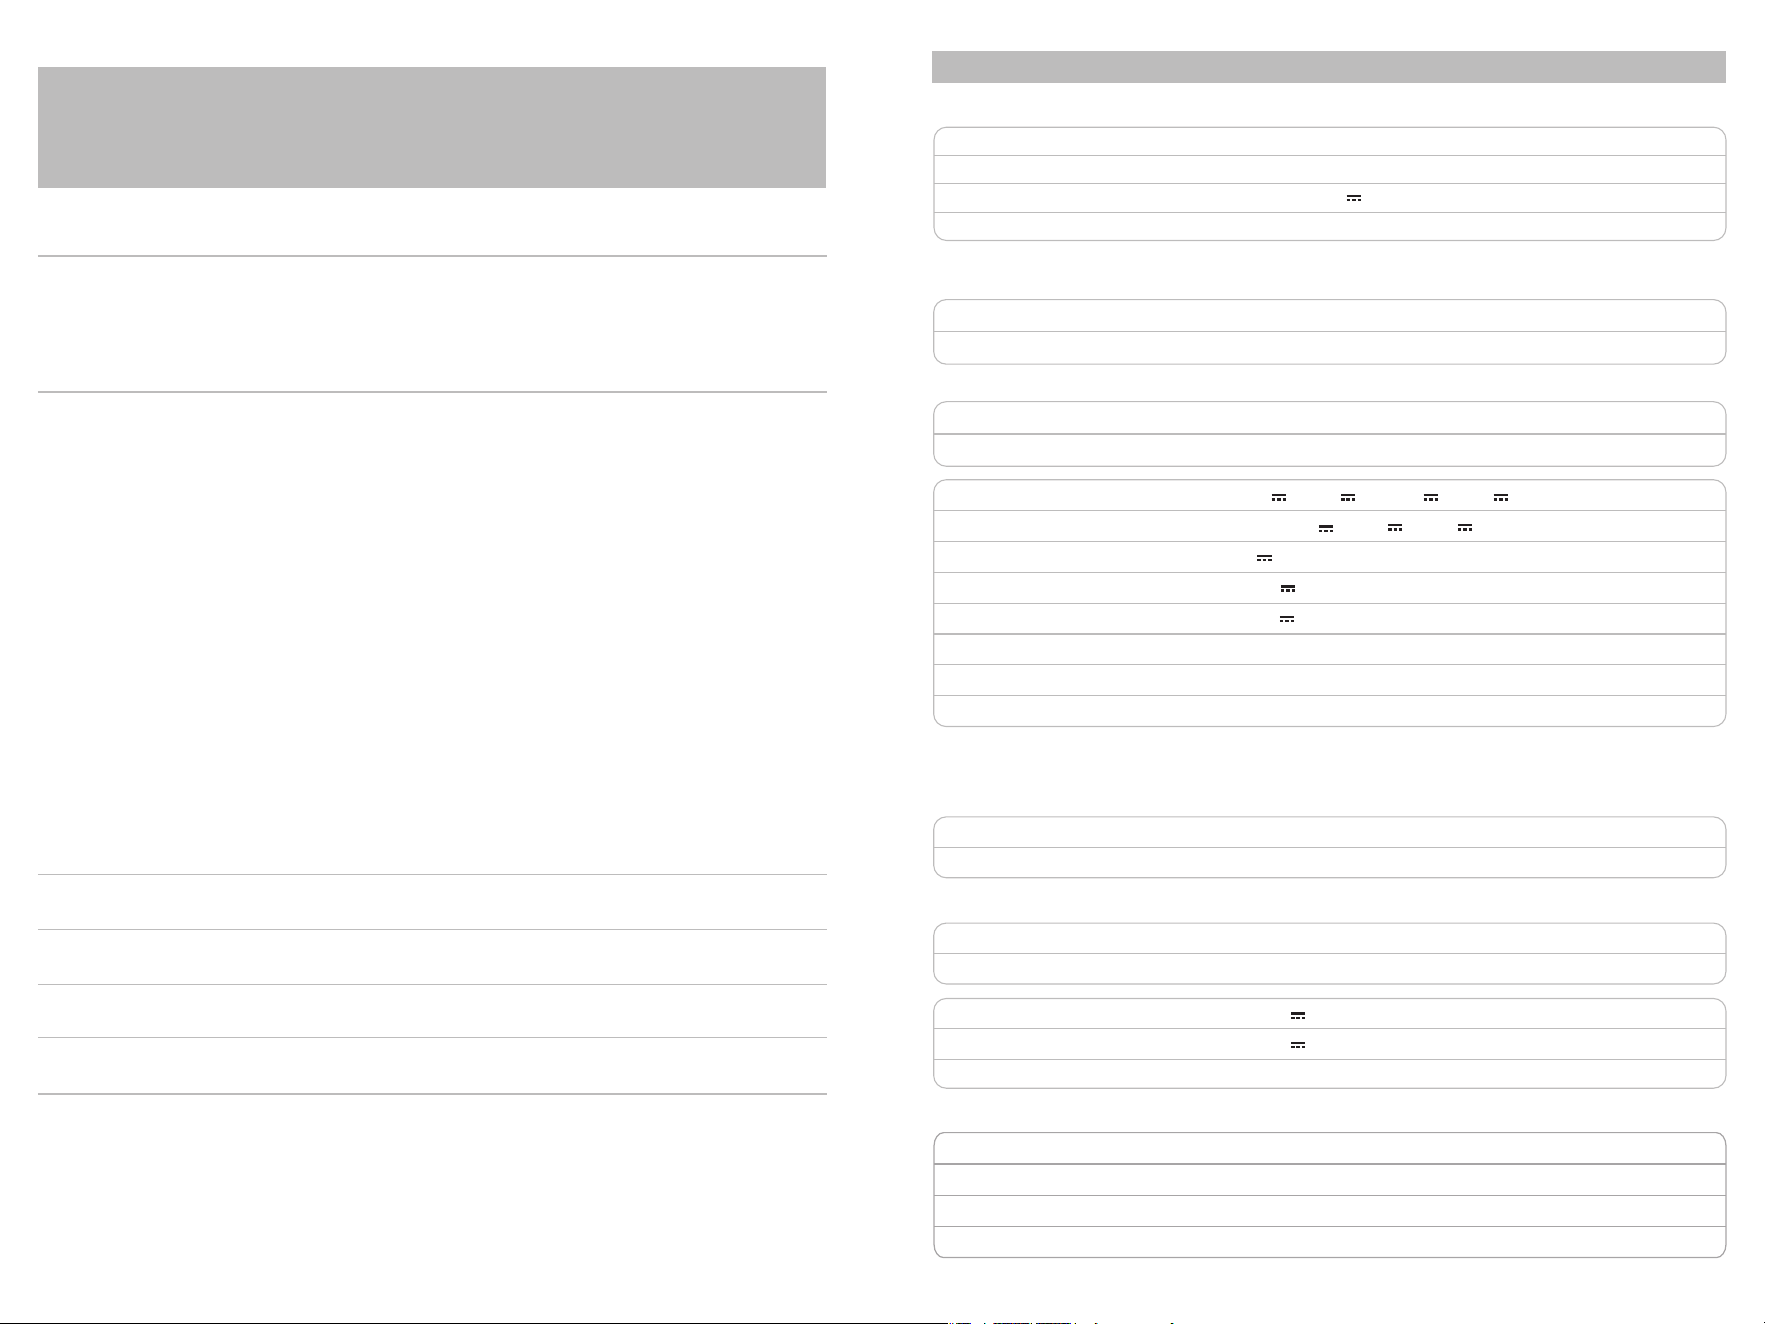
�.� Product Overview
�.� LCD Screen
�.� Use of Product
*For details on error codes and troubleshooting, please refer to Chapter �.
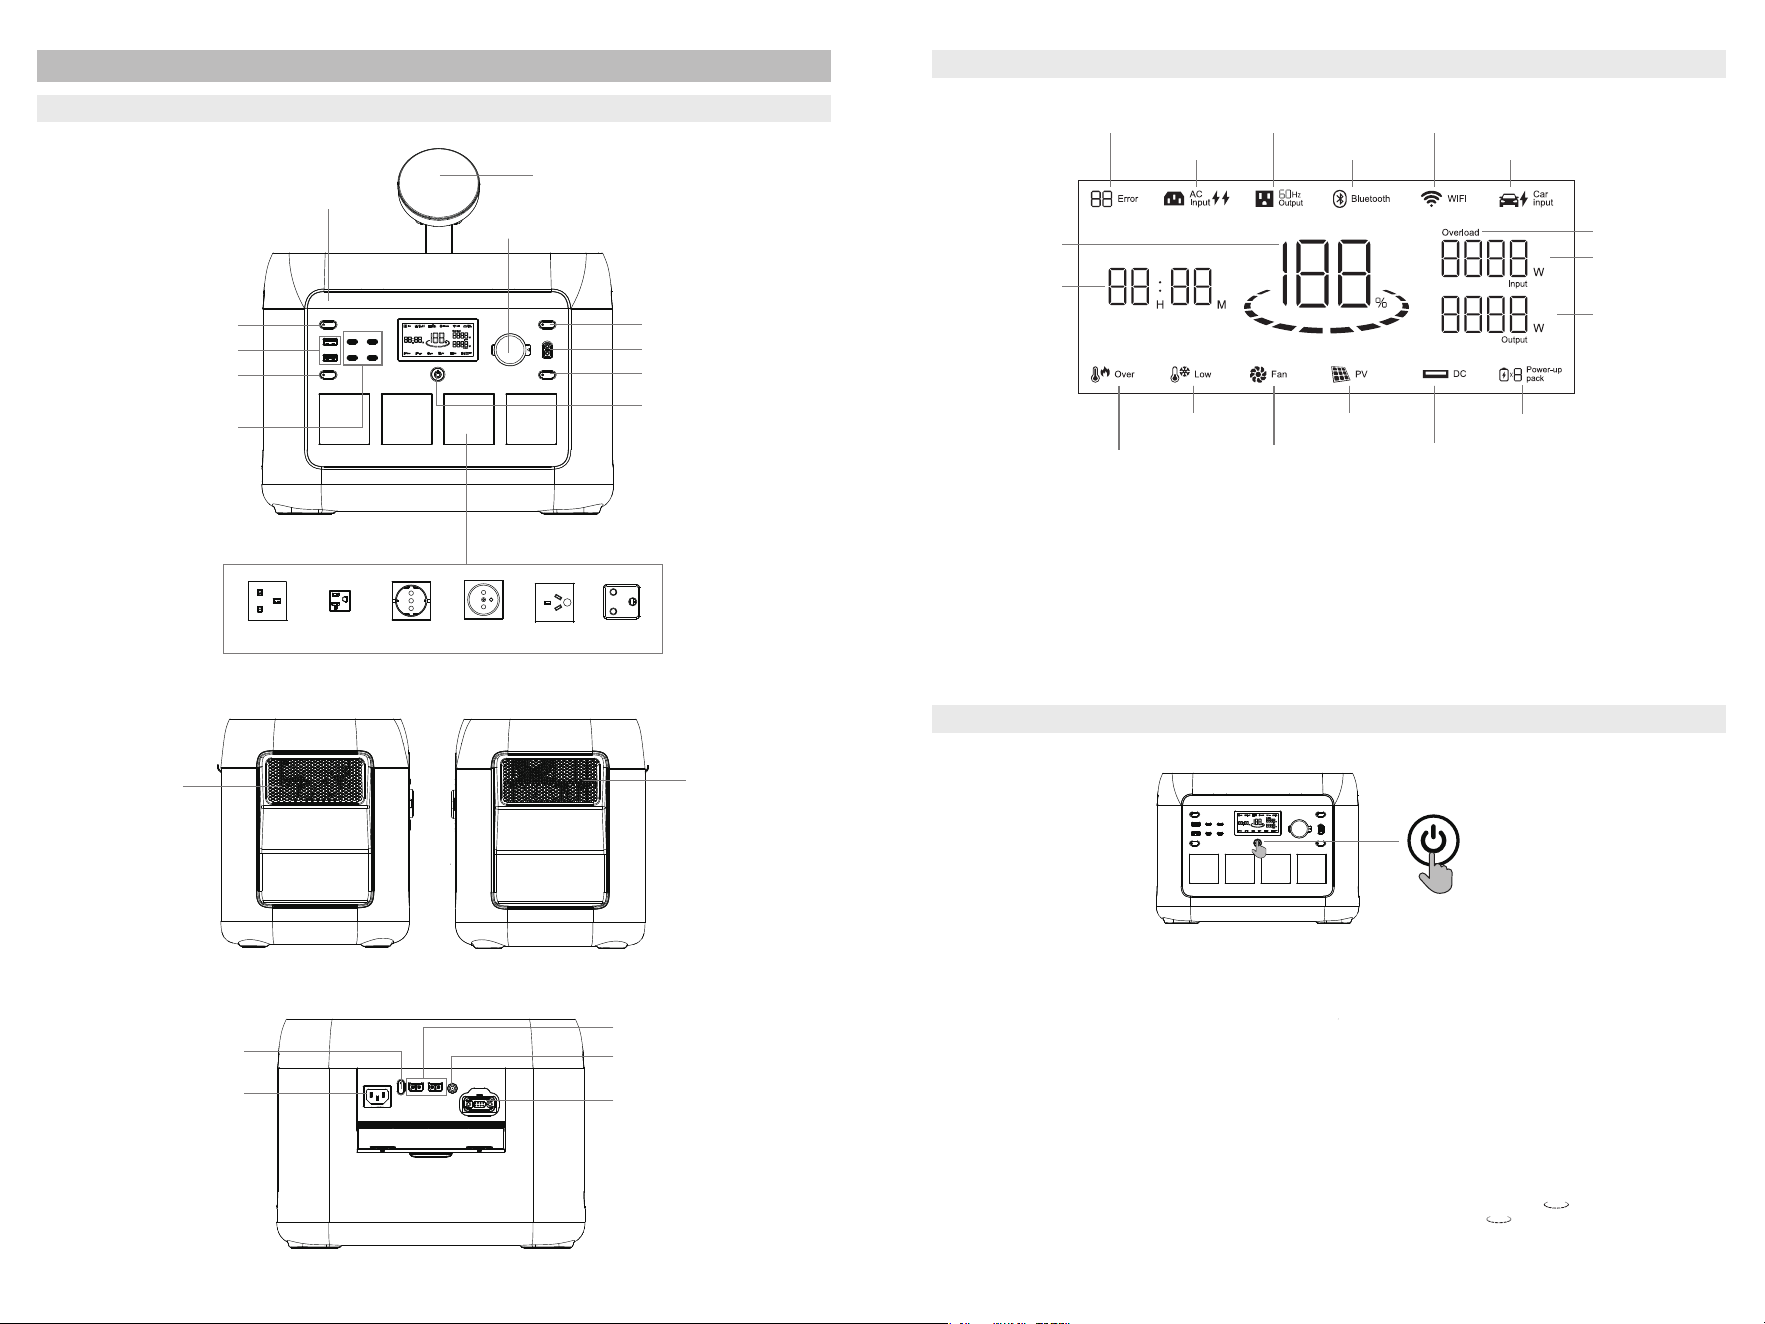
AC Output Power Button
XT�� Output Port
USB/Wireless Output
Power Button
AC Output Sockets *�
Car Output Port
ON/OFF button
DC Output Power Button
Wireless Charger
USB-C Output Ports *�
USB-A Output Ports *�
LED Light
LED Light Button
Wi-Fi Connection Status
Bluetooth
AC Output
Current
Battery Level
Power Expansion
Pack Connected
Remaining Charging
and Discharging
Time / Local time
Low Temperature
Warning
Over Temperature
Warning
Error Code
Car Charging
Fan Status
Solar Charging
DC Output
(including USB & Car Port
& Wireless charging)
Overload Warning
Current Input Power
Current Output Power
AC Input
Short press to power on
Long press to power off
UK US EU
FR
AU
ZA
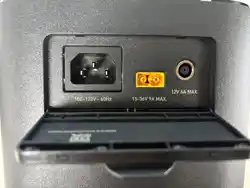
Solar/Car Charging Port
AC Input Socket
Solar Charging Port XT��*�
Power Expansion Port (IN)
Fast/Slow Charge
Switch Button
Heat
Dissipation
Vent
Heat
Dissipation
Vent
Time display: The time display on the LCD screen contains two types of information: the remaining charging/discharging time
of the current device(generally showing � seconds), and the local time of the region where the device is located(generally
showing � seconds).
Battery Capacity: When the power station is charging, the SOC (State of Charge) icon will blink.
Wi-Fi Connection Status: During Wi-Fi reset, the Wi-Fi icon will flash for � seconds. It will remain lit when the Wi-Fi is
successfully connected and will go out when the Wi-Fi is disconnected.
Bluetooth Connection Status: The Bluetooth icon will light up when the product is matched wirelessly. It will remain lit when
the Bluetooth connection is successful and will turn off when the Bluetooth is disconnected.
Power On and Off
· To turn on the device, press the main power switch. The screen will light up, and the main power indicator will turn on.
· If the device remains idle for � minutes, the LCD display will automatically turn off. The LCD will light up again when the device
is plugged in or unplugged from the grid, PV, car charger, or when the key operation is used. You can manually control the LCD
display by pressing the main power switch to turn it on or off.
· To completely power off the device, press and hold the main power switch.
Standby Mode
· In normal operation (when power is above �%), the default standby time is set to � hours. If the AC output switch is off, and there
is no charge or discharge activity for � hours, the device will automatically shut down. You can adjust the standby time via the
app.
· When the power level reaches �% or below, the device will enter low power mode. If there is no charge or discharge activity, the
standby time will adjust based on the remaining power, and the device will automatically shut down.
Never-Power-Off Mode
· In normal mode, press and hold the LED light button to enable Never-Power-Off mode. The icon on the screen will flash.
Press and hold again to re-enter the automatic shutdown mode, at which point the icon will remain steady.
Note: The automatic shutdown feature is designed to protect the battery from overdischarge. Exiting this setting may reduce
battery lifespan, so please proceed with caution.
� �
· After ensuring the power station is turned on, briefly press the AC output power switch
to activate the AC output. Press it again to turn off the AC output.
· The default standby time for the AC output port is � hour. If no load is connected within
this period, the AC output will automatically turn off. To enable the Never-Power-Off
function, press and hold the LED light button. The icon will flash to indicate the
change. Press and hold the LED light button again to exit the Never-Power-Off setting,
and the icon will stop flashing. (Note: The Never-Power-Off mode is disabled by
default. After restart, you need to press and hold the LED light button again to turn it on.)
· The option to enable the Never-Power-Off setting is suitable for AC equipment below
��W and pulse-operated devices.
· To conserve energy, please turn off the AC output and the Never-Power-Off mode when
it's not in use.
By default, the product is set to fast charging mode when powered on. If your product has Wi-Fi functionality,
you can control the charging rate via the app.
During the fast charging process, the lightning icon on the LCD display for AC input remains constantly
illuminated. If you need to switch between fast and slow charging, simply press the AC fast/slow charging
switch button briefly. (When Wi-Fi function is not available)
In fast charging mode, the maximum AC charging power is ����W, and it takes approximately �.�� hours to
fully charge.
In slow charging mode, the maximum AC charging power is ���W, and it takes about � hours to fully charge.
*AC Fast Charging Mode: charging time deviation ±�.�h.
*Conditions: New battery, fully discharged at �C rate under room temperature, then rested for � hours at
room temperature before performing AC fast charging at room temperature.
Please ensure to use the standard AC charging cable provided. Connect the cable directly to a wall outlet rated
for ��A or higher. We are not liable for any damages resulting from the use of unauthorized charging accessories
or failure to follow these instructions.
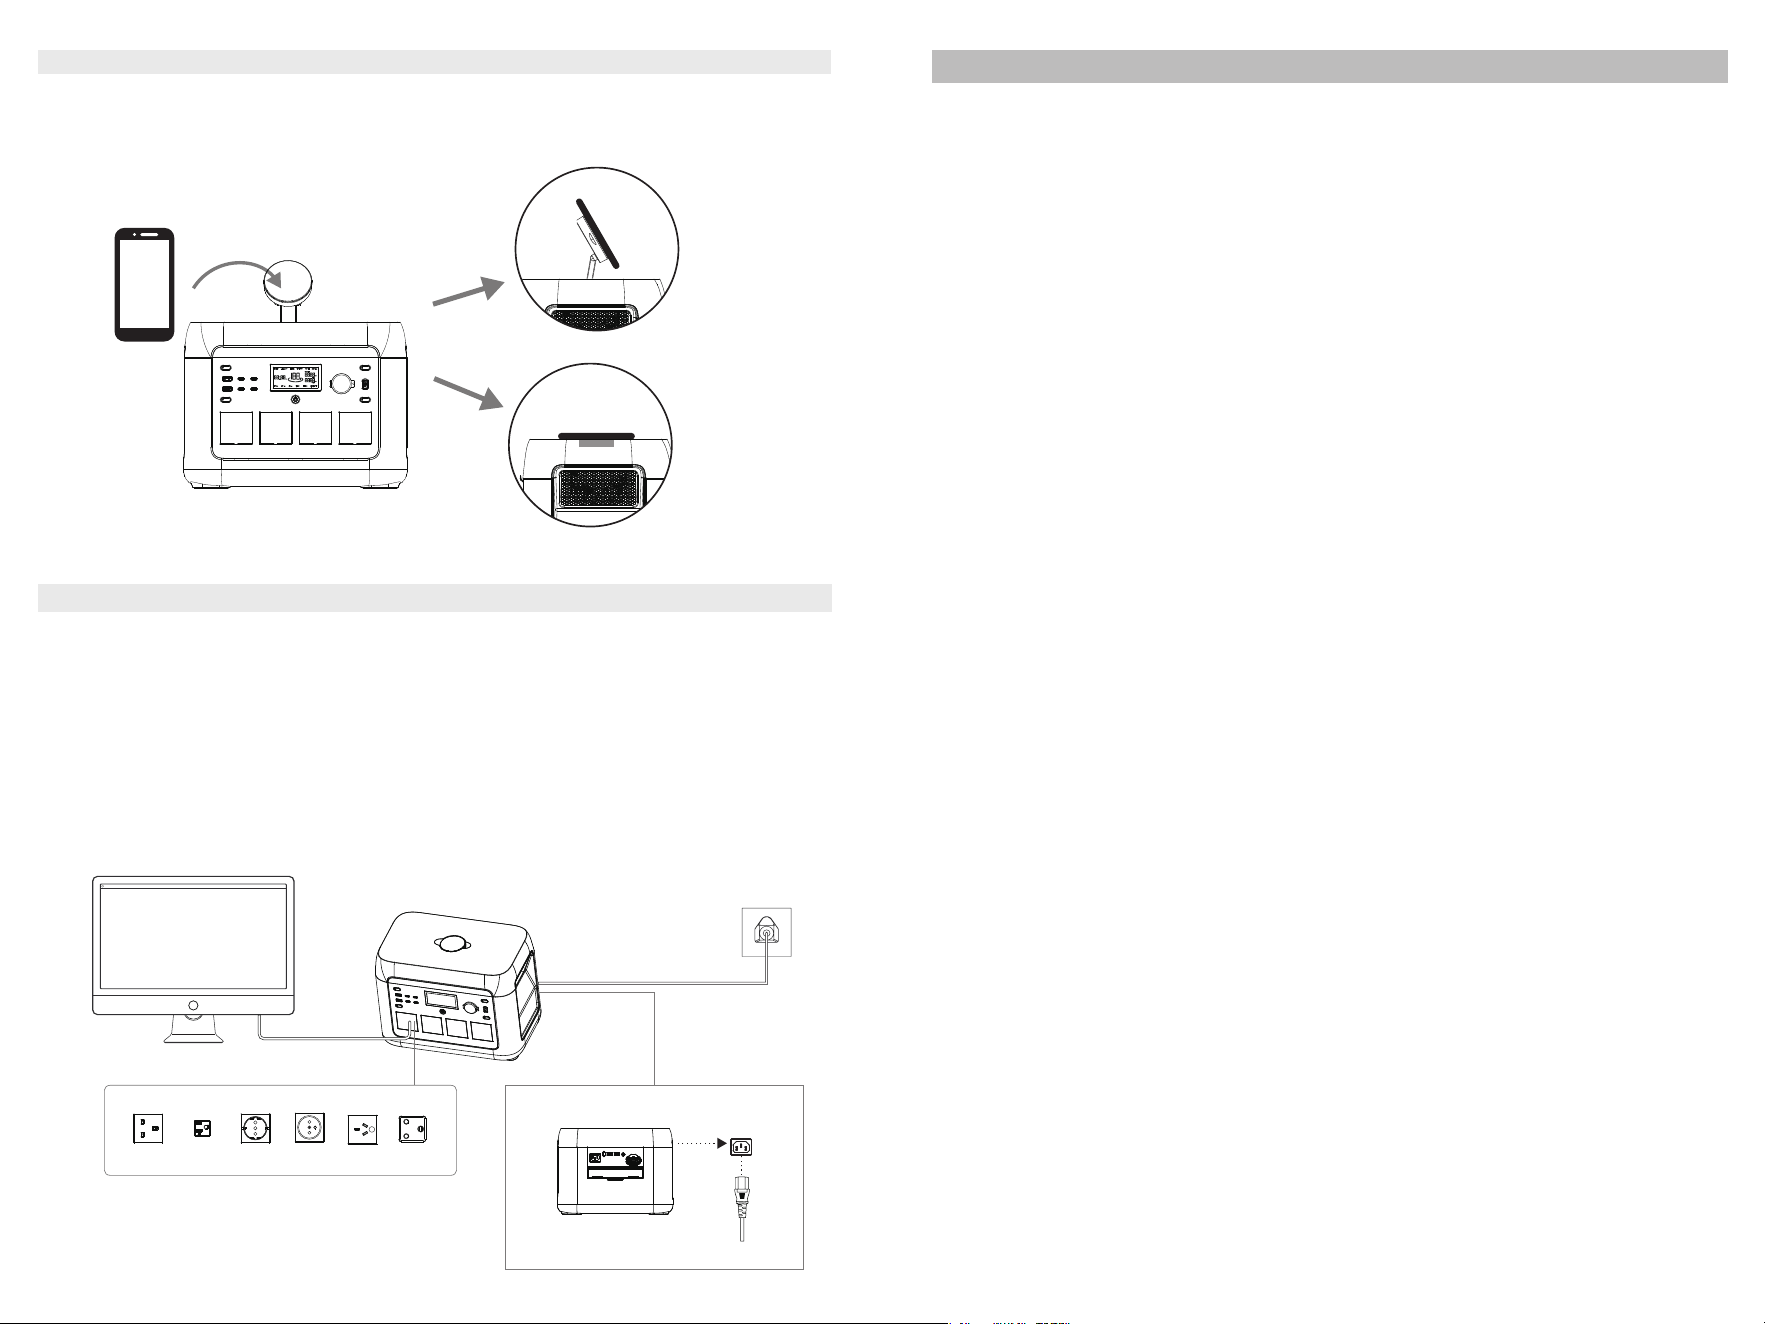
�.� AC Charging
AC Charging Cable
Using AC Output
Short press the AC Output Power Button
The cigarette lighter output is off by default.
To activate it, briefly press the DC output
switch after turning on the power station.
The wireless charger supports phones
compatible with the Qi�.� standard. To activate
the wireless charging function, briefly press the
USB/Wireless output switch after turning on the
power station.
The USB output is off by
default, to activate it, briefly
press the USB/Wireless output
switch after turning on the
power station.
Short press the LED light button to cycle through five modes: Low, Medium, High, SOS, and Off.
Using ��V DC Output
LED Light Usage
Short press the ��V
DC Output Power Button
Short press the USB/
Wireless Output
Power Button
Using USB Output
Note: When there is no AC input, you can switch the AC
off-grid output frequency( / )by long pressing
the AC output button for � seconds. The AC output icon will
flash three times to indicate successful switching.
Using wireless charging
� �
LED light button
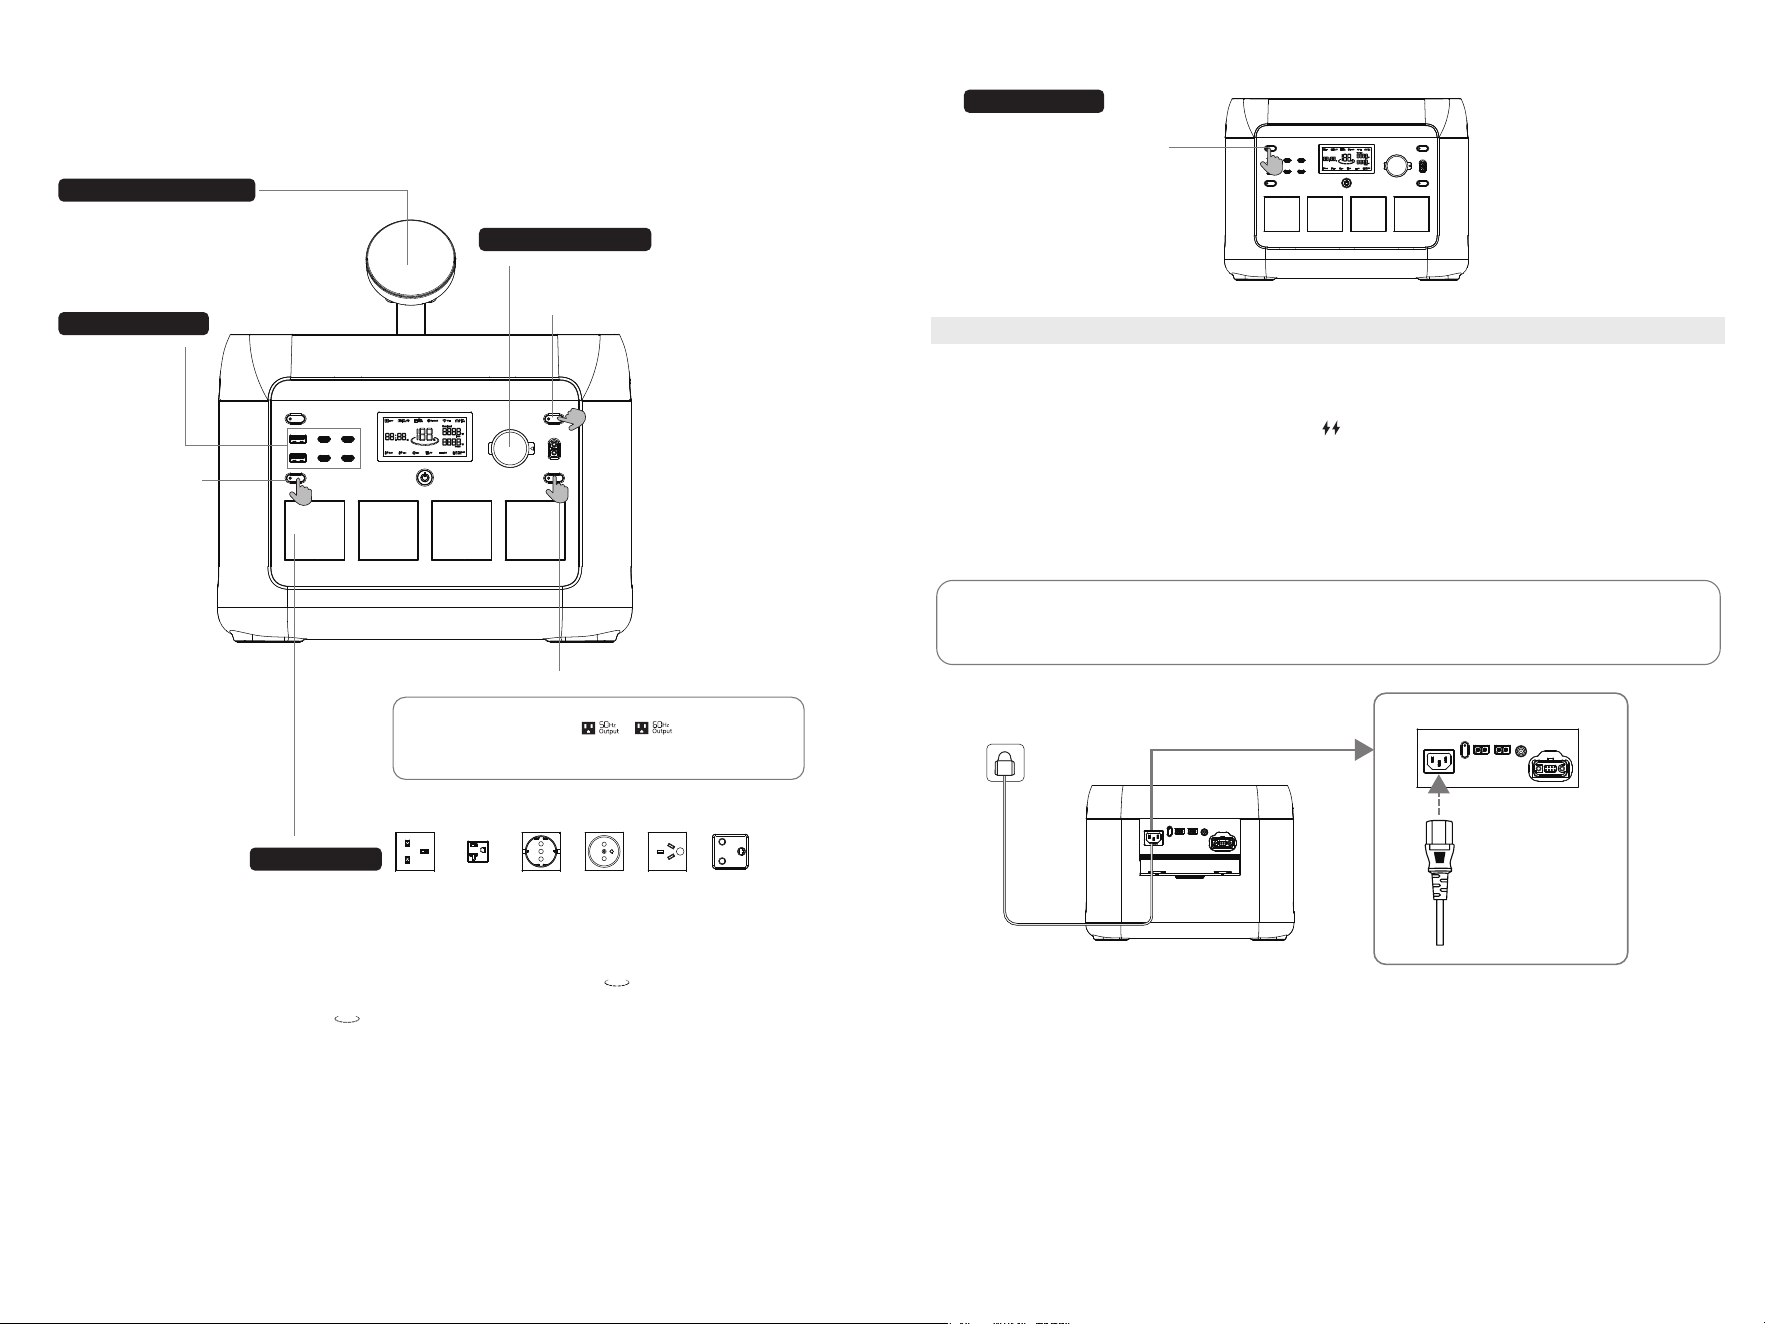
�.� Solar/PV Charging
Solar Charging Cable (DC����)
The user can charge the product with a solar panel as shown in the diagram.
�.� Car Charging
The power station can be charged via the vehicle’s cigarette lighter port. To prevent battery drain and
potential failure to start the engine, charging should only begin after the vehicle is running. Always ensure a
secure connection between the car charging port (DC����) and the cigarette lighter adapter. We are not liable
for any losses resulting from improper operation.
Note: The expansion battery pack
supports connection to the portable
power station via either of its two
ports.
The parallel connection cable is
reversible—both ends can be used
to connect to either the battery pack
or the power station's Expansion
Port.
Car Charging Cable (DC����)
· When using the company's solar panel to charge this product, please follow the connection guidelines outlined in the
user manual.
· Before connecting the solar panel, ensure that its output voltage is within the supported range of the product to avoid
damage.
· This product uses a DC���� connector. If an MC� to DC���� adapter cable is needed, please purchase it separately.
· This product supports solar charging via the XT�� and DC���� terminal. If an XT�� to MC� adapter cable is needed,
please purchase it seperately.
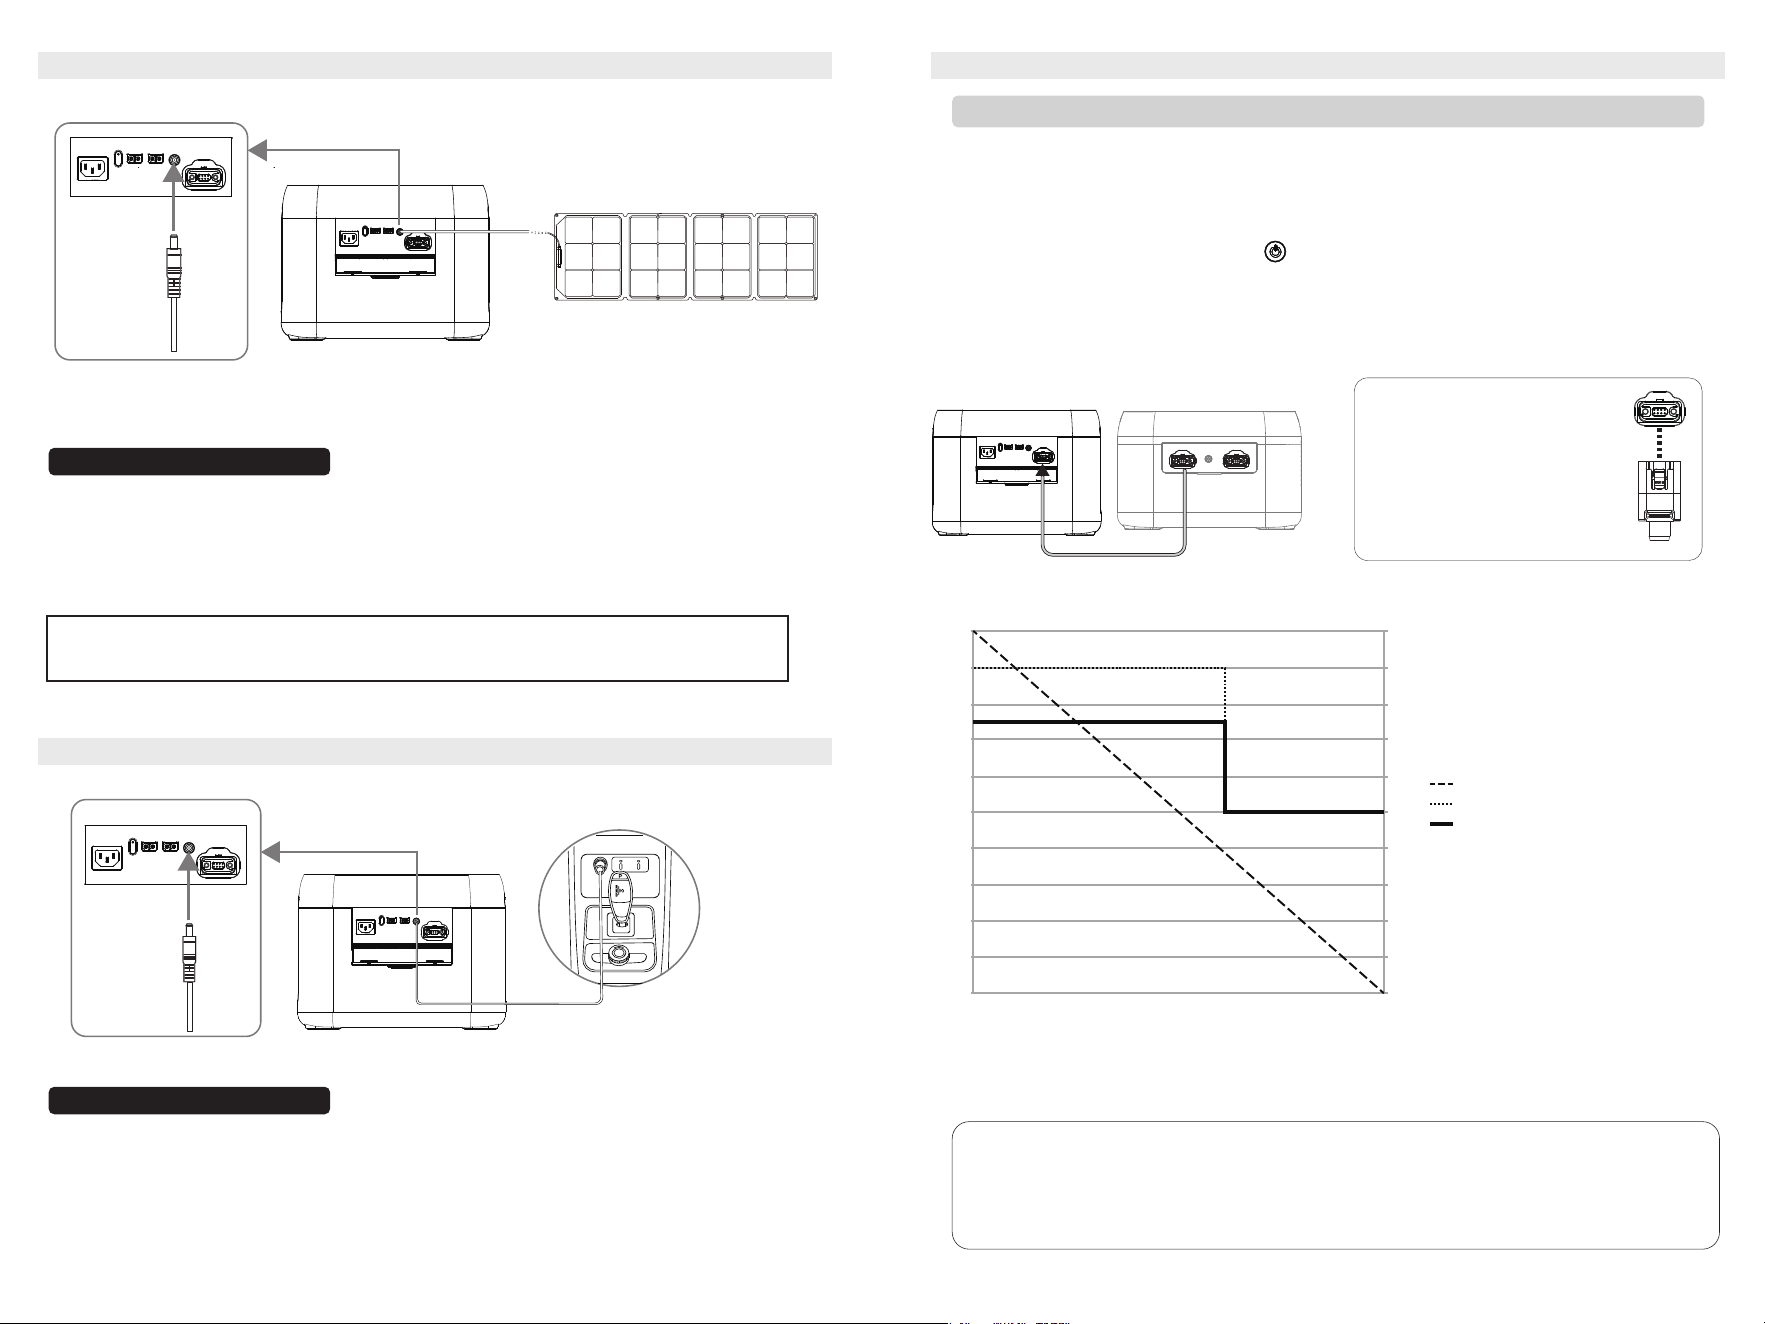
�. Turn off both the portable power station and the expansion battery pack before starting the parallel
connection.
�. Insert the parallel connection cable into the Expansion Port of the portable power station and the
Power Input/Output port of the expansion battery pack.
�. After connecting, press the power button on the portable power station to wake up both devices.
The displays will show their current battery levels, and the portable power station will indicate the
number of connected units, confirming a successful parallel connection.
�. Once connected, use the appropriate ports on the portable power station for charging or discharging
(refer to sections �.�, �.�, �.�, and �.� of the Quick Start Guide).
Note:It is not supported to use the XT�� port and the DC���� port simultaneously, meaning
that solar charging and car charging cannot be carried out at the same time.
Note:
When this product is used together with the ���Wh Expansion Pack, the system’s maximum
discharge power varies according to the State of Charge (SOC), as follows:
Discharge Stages:
System SOC ���%‒��%: Maximum discharge power is ����W (for Japan models: ����W).
System SOC ��%‒�%: Maximum discharge power is limited to ����W. (During this stage, if the
connected load exceeds ����W, the system will shut down the output. To restore power, turn off or
disconnect the high-power load and ensure the load remains below ����W.)
����
����
����
����
����
����
���
���
���
���
���
��
��
��
��
��
��
��
��
��
� �
SOC (%)
Maximum Discharge Power (W)
Japan Model (W)
Maximum Discharge Power Curve of the �.�kW Power Station
When Paired With the ���Wh Expansion Pack
� �
�.� Use of Expansion Battery Pack
Expansion Battery PackPower Station
Parallel Connection of One Portable Power Station and One ���Wh Expansion Battery Pack:
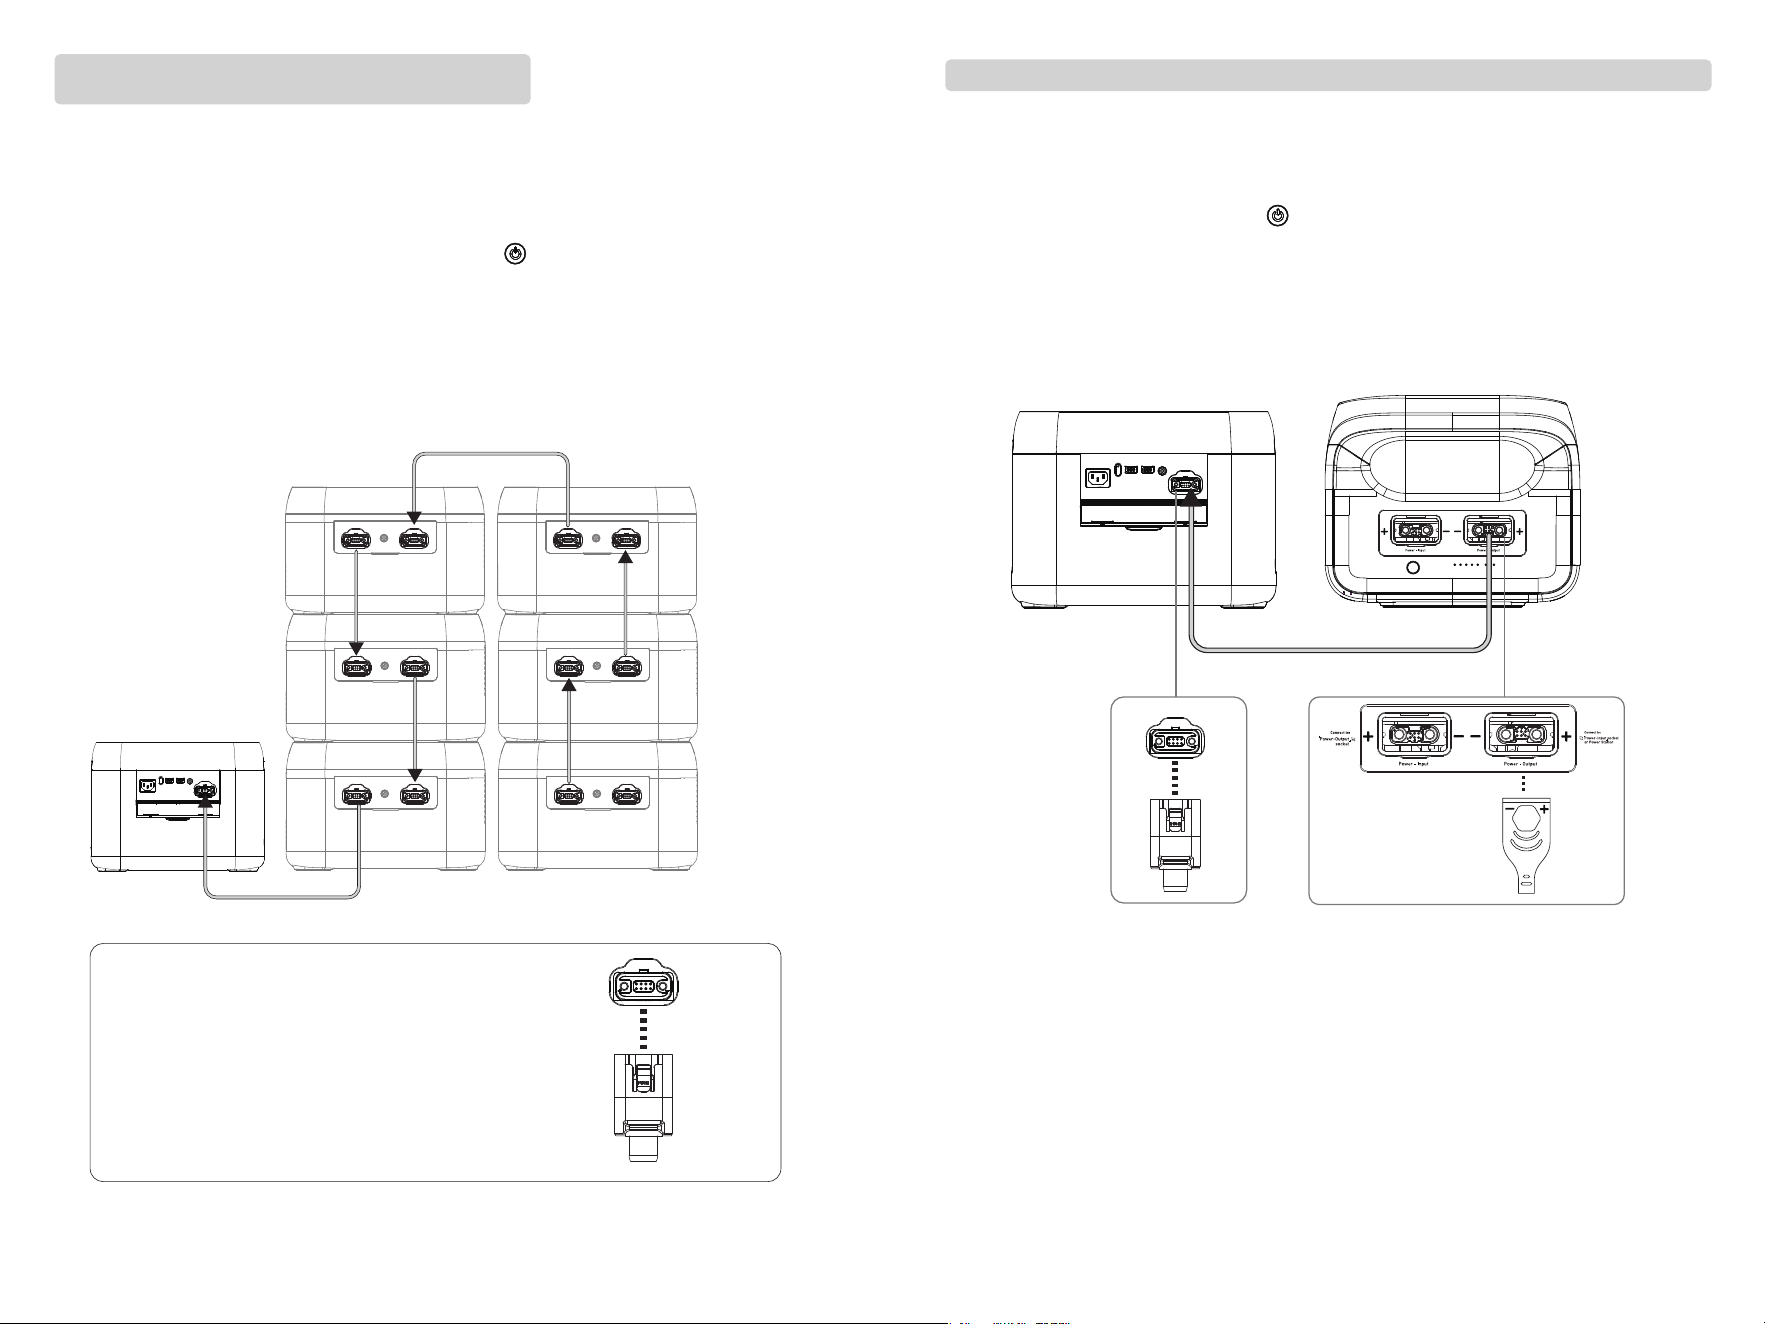
�� ��
Note: The expansion battery pack supports connection
to the portable power station via either of its two ports.
The parallel connection cable is reversible—both ends
can be used to connect to either the battery pack or the
power station's Expansion Port.
Note: The interface for the expansion battery pack has the symbols "+, -" to
prevent reverse connection.
�. Turn off both the portable power station and the expansion battery pack before starting the parallel
connection.
�. Insert the parallel connection cable into the Expansion Port of the portable power station and the
Power Input/Output port of the expansion battery pack.
�. After connecting, press the power button on the portable power station to wake up both devices.
The displays will show their current battery levels, and the portable power station will indicate the
number of connected units, confirming a successful parallel connection.
�. Once connected, use the appropriate ports on the portable power station for charging or discharging
(refer to sections �.�, �.�, �.�, and �.� of the Quick Start Guide).
�. Turn off the portable power station and all expansion battery packs before starting the parallel
connection.
�. Connect the parallel cable to the Expansion Port of the portable power station and the Power
Input/Output port of Expansion Battery Pack �. Then connect Expansion Battery Pack � to Expansion
Battery Pack � via their Power Input/Output ports, followed by connecting Expansion Battery Pack � to
Expansion Battery Pack �, and so on. Up to six expansion battery packs can be connected in parallel.
�. Once all connections are complete, press the power button on the portable power station to wake
up the system. The displays will show the current battery levels, and the portable power station will
indicate the number of connected units, confirming a successful parallel setup.
�. After the parallel connection is established, use the appropriate ports on the portable power station
for charging or discharging (refer to Quick Start Guide sections �.�, �.�, �.�, and �.�).
Expansion Battery Pack
Expansion
Battery Pack �
Expansion
Battery Pack �
Expansion
Battery Pack �
Expansion
Battery Pack �
Expansion
Battery Pack �
Expansion
Battery Pack �
Power Station
Power Station
Parallel Connection of One Portable Power Station with
Multiple ���Wh Expansion Battery Packs:
Parallel Connection of One Portable Power Station and One ����Wh Expansion Battery Pack:
�.� P-boost Function
The P-Boost function allows the product to power appliances that exceed its rated power without triggering
overload protection. In P-Boost Mode, the JP version of this product supports a load of ����W, while the
EU/UK/US/AU/ZA versions can handle a load of ����W. When high-power appliances are connected, the
inverter intelligently adjusts the output to maintain a stable power supply, ensuring the appliances
continue to operate reliably.
Important Notes for Using the P-Boost Function:
�. The P-Boost function is disabled by default and can be turned on/off via the app.
�. The P-Boost function will not be enabled in the following cases:
(�) When the AC output is turned on while the product is charging (which is in bypass mode).
(�) When the P-Boost function is turned off.
�. When using appliances that exceed the product's rated power, connect only one appliance at a time.
Connecting multiple appliances may cause voltage fluctuations, affecting the performance of other devices.
�. The P-Boost function is more suitable for resistive loads and not applicable to all electrical appliances.
Certain electrical appliances equipped with voltage protection (such as precision instruments) are not
suitable for the P-Boost function. To confirm whether a device can use this function, actual testing shall
prevail.
�.� Use of APP
Note: The interface for the expansion battery pack has the symbols "+, -" to
prevent reverse connection.
You can control and monitor the product's information and
data through the app. To download the software, search for
[Smart Life] in the Google App Store or Apple App Store, then
download, register, and open it. Alternatively, scan the QR code
below to download the app. For detailed instructions on using
the app, please refer to the App User Guide.
�. Turn off the portable power station and all expansion battery packs before starting the parallel
connection.
�. Connect the parallel cable to the Expansion Port of the portable power station and the Power
Input/Output port of Expansion Battery Pack �. Then connect Expansion Battery Pack � to Expansion
Battery Pack � via their Power Input/Output ports, followed by connecting Expansion Battery Pack � to
Expansion Battery Pack �, and so on. Up to six expansion battery packs can be connected in parallel.
�. Once all connections are complete, press the power button on the portable power station to wake
up the system. The displays will show the current battery levels, and the portable power station will
indicate the number of connected units, confirming a successful parallel setup.
�. After the parallel connection is established, use the appropriate ports on the portable power station
for charging or discharging (refer to Quick Start Guide sections �.�, �.�, �.�, and �.�).
�� ��
Expansion
Battery Pack �
Expansion
Battery Pack �
Expansion
Battery Pack �
Expansion
Battery Pack �
Expansion
Battery Pack �
Expansion
Battery Pack �
Power Station
Parallel Connection of One Portable Power Station with
Multiple ����Wh Expansion Battery Packs:
�.�� EPS Function (Emergency Power Supply)
�. FAQ (Frequently Asked Questions)
This product supports the EPS (Emergency Power Supply) function. To use it, connect the AC input port of the
product to the wall socket via the AC charging cable. In Bypass mode, the AC power is supplied by the grid, not
the battery. When the grid power is interrupted, the product will automatically switch to Inverter mode within
��ms, where AC power will be supplied by the battery instead of the grid. This function does not support �ms
switching. Do not connect it to devices requiring uninterrupted power supply, such as data servers or
workstations. If you choose to use it with such devices, ensure multiple tests are conducted to confirm
compatibility. It is recommended to use only one device at a time to avoid triggering overload protection.
Please note, if the device does not operate correctly or if data loss occurs due to non-compliance with these
instructions, our company will not be responsible for any resulting issues.
Electrical appliance
Wall insert
�.�� Wireless Charging (Optional)
Place your phone steadily on the wireless charging stand to charge devices that support the Qi�.� standard.
Note: Ensure that the USB/Wireless output is turned on before using the wireless charger. You can place
your phone flat on the wireless charger stand or at different angles for charging.
�. What kind of battery is used?
Lithium iron phosphate battery (LiFePO�).
The AC output port of the product has a high-rated power capacity, suitable for small household equipment.
We recommend verifying the power requirements of your equipment before use to ensure that the total power
consumption of all connected devices is lower than the rated power.
The time is displayed on the LCD screen, which can be referred to for estimating the runtime of equipment
with stable power consumption.
�. What kind of equipment can be connected to the AC output ports?
�. How to know it is charging?
When charging, the LCD will display the remaining charging time. The SOC icon will flicker, and input power
will be shown.
�. How to know how long the PPS can supply power?
�. How to clean the unit?
Clean the unit with a dry, soft and clean cloth or tissue.
�. How to store the unit?
Turn off the unit and store it in a dry, well-ventilated place. Avoid exposure to water. For long-term storage,
charge and discharge the unit every � months. Discharge it to �%, then charge it to ���%, and finally discharge
it to ��%‒��%.
�. Can it be taken on board an airplane?
No.
�� ��
UK US EU
FR
AU
ZA
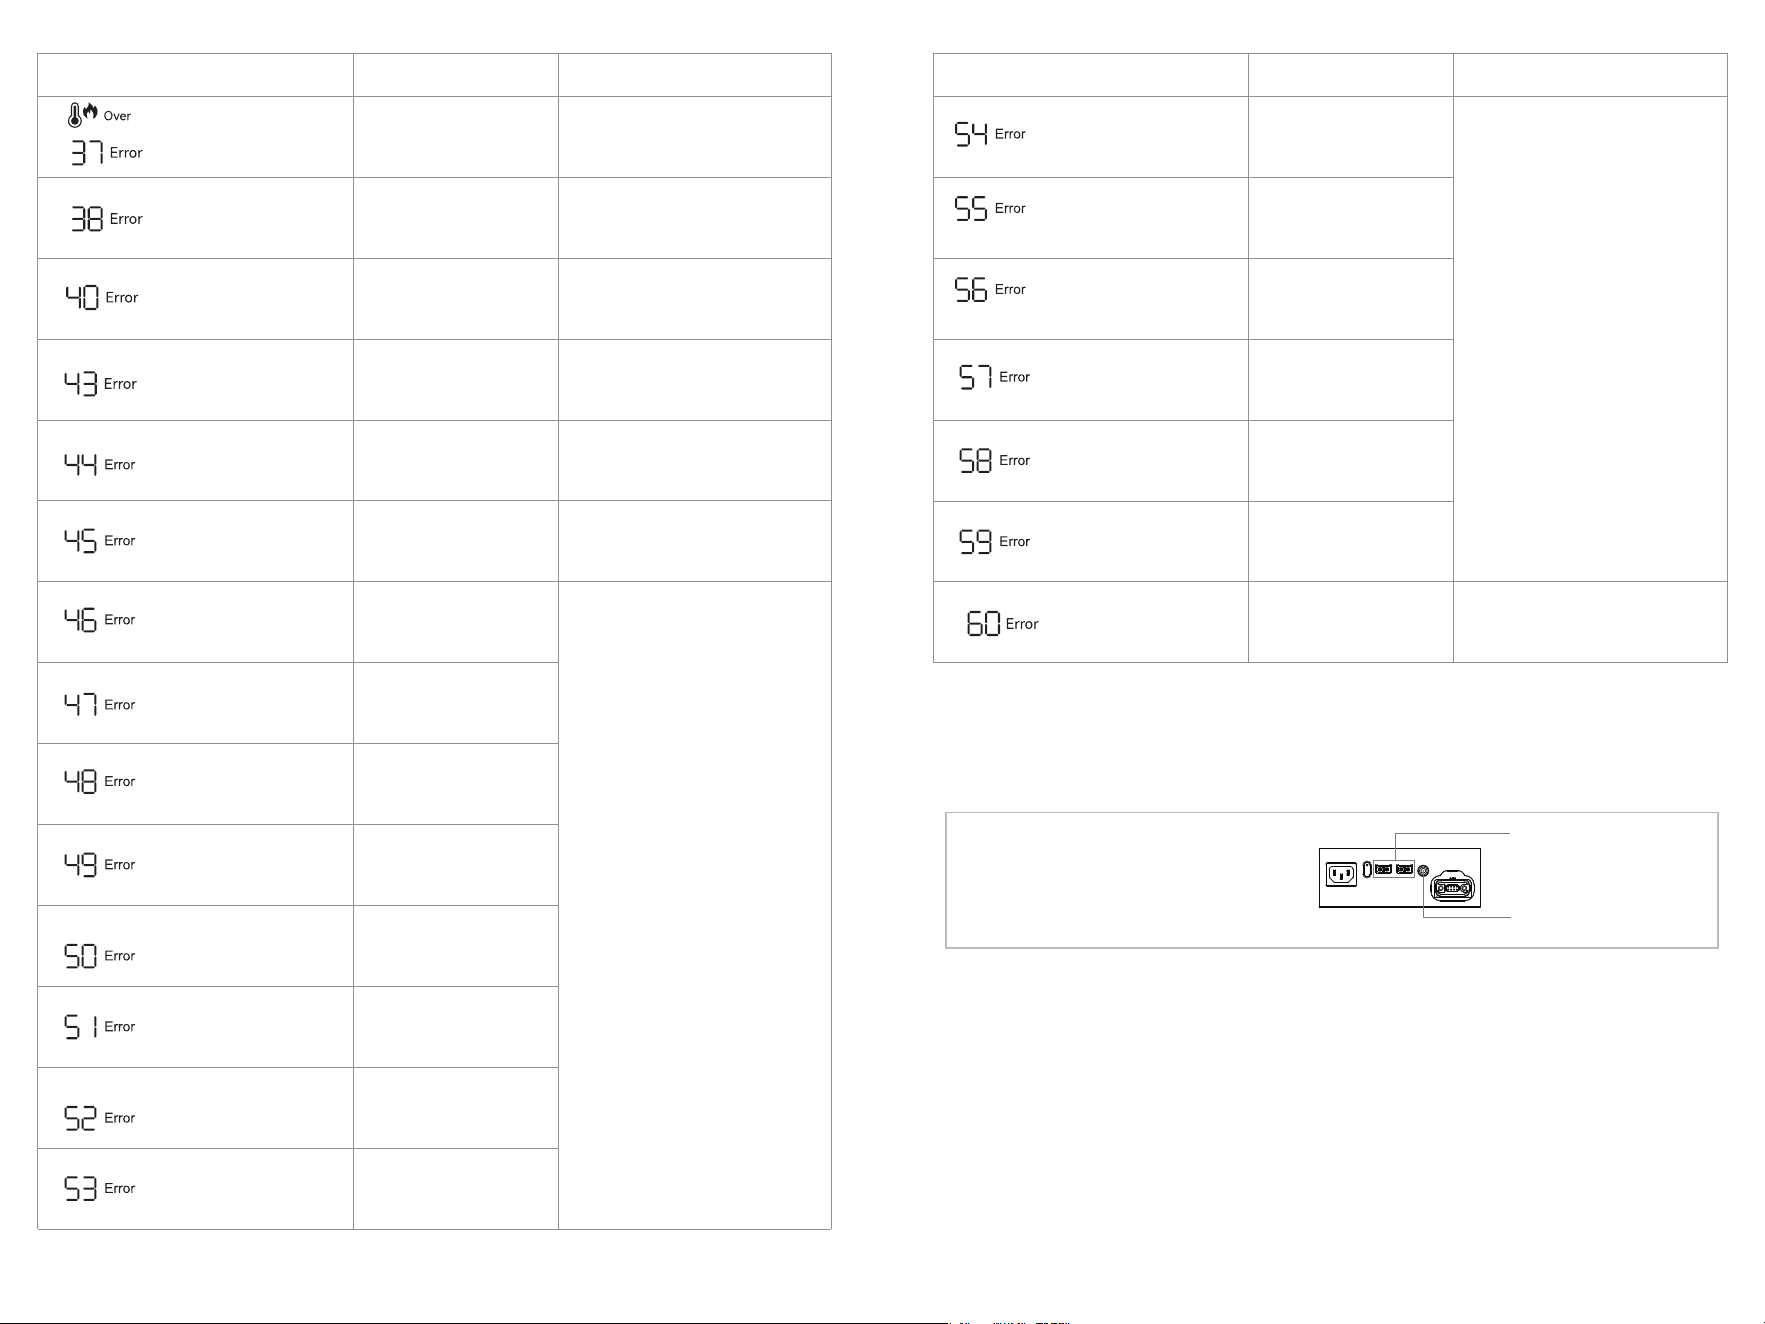
�. Error Display&Solutions
Error Icon Display
Fault Type Solution
Fault Code
(steady on)
Fault Code
(steady on)
Fault Code
(steady on)
Fault Code
(steady on)
Fault Code
(steady on)
Fault Code
(steady on)
Fault Code
(steady on)
Fault Code
(steady on)
Fault Code
(steady on)
Fault Code
(steady on)
Fault Code
(steady on)
Fault Code
(steady on)
Fault Code
(steady on)
Fault Code
(steady on)
Fault Code
(steady on)
Fault Code
(steady on)
Fault Code
(steady on)
Fault Code
(steady on)
Fault Code
(steady on)
BMS voltage fault
Fan power supply failure
Over Temp Icon (steady on)
Fault Code (steady on)
Abnormal INV Output
Over Temp Icon (steady on)
Fault Code (steady on)
Low Temp Icon (steady on)
Fault Code (steady on)
Overload Icon (steady on)
Fault Code (steady on)
Overload Icon (steady on)
Fault Code (steady on)
Over Temp Icon (steady on)
Fault Code (steady on)
Pre-charge abnormal
Over Temp Icon (steady on)
Fault Code (steady on)
Error Icon Display
Fault Type Solution
Cell voltage sampling fault
(open circuit)
Battery UTP (under
temperature protection) fault
OCP(Over current protection)
fault
BMS board over-temperature
fault
Battery undervoltage fault
INV battery port voltage
abnormal
Grid voltage/frequency
abnormal
INV BUS Battery Voltage
Abnormal
Battery OTP(over temperature
protection) fault
Excessive voltage difference
Restart the device to clear the fault. If
not recovered, contact the after-sales
service.
Inverter discharge overload
Charging overload
Hardware overcurrent brake
protection
MOS OTP(Over Temperature
Protection) Fault
Charging Soft Start Fault
MOS UTP (under temperature
protection) fault
DC Hardware Over-current
Protection
DC Input Software
Over-current Protection
Car output/XT�� Output
Over-current Protection
PV Output Over-voltage
Protection
DC Input Over-voltage
Protection
DC Input Over-temperature
Protection
Remove all charging and discharging
equipment, the fault will be automatically
cleared, and check whether the load
power exceeds the equipment
specifications.
Remove all charging and discharging
equipment, and the fault will be
automatically cleared. If there is a
connected load, check whether the load
power exceeds the equipment
specifications.
Check if the fan circuit is normal,
please contact the after-sales service
for handling.
Remove all charging and discharging
devices, and the fault will be
automatically cleared.
Remove all charging and discharging
equipment, keep away from
low-temperature sources, wait for the
product temperature to return to normal,
and the fault will be automatically cleared.
Remove the DC charging equipment,
the fault will be automatically cleared,
and check whether the DC input meets
the specifications.
The DC output turns off automatically,
and the fault will be cleared after a period
of time. Check whether the load power
exceeds the equipment specifications.
Fault Code
(steady on)
Parallel Operation Fault
Check the parallel connection cables and
restart the device multiple times. If the
problem persists, contact after-sales
service. (Single power station function is
not affected.)
Remove the PV input, the fault will be
automatically cleared, and check
whether the PV input voltage meets the
equipment specifications.
Remove the PV input, the fault will be
automatically cleared, and check whether
the PV input voltage meets the equipment
specifications or check if the fuse for the
DC output is disconnected.
Remove all charging and discharging
equipment, keep away from
high-temperature sources, wait for the
product temperature to return to normal,
and the fault will be automatically cleared.
Remove all charging and discharging
equipment, keep away from
high-temperature sources, wait for the
product temperature to return to normal,
and the fault will be automatically cleared.
Automatic shutdown, fault cleared
after temperature recovery.
Automatic shutdown, fault cleared
after temperature recovery.
Auto shutdown. Restart the device after
removing the overpowered equipment to
clear the fault.
Automatic shutdown. Requires charging.
Contact after-sales service if charging
fails repeatedly or is unavailable.
Remove all charging and discharging
devices, charge using AC or PV power,
and the fault will be automatically
cleared once charging starts successfully.
Remove all charging and discharging
equipment, the fault will be automatically
cleared, and check whether the voltage,
frequency, etc. of the charging equipment
meet the specifications.
Remove all charging and discharging
devices, and the fault will be
automatically cleared.
Remove all charging and discharging
devices, and the fault will be
automatically cleared.
Auto shutdown, restart to clear the
fault, if not recovered, contact the
after-sales service.
Auto shutdown, restart to clear the fault,
if not recovered, contact the after-sales
service.
Auto shutdown, restart to clear the fault,
if not recovered, contact the after-sales
service.
�� ��
�� ��
Fault Code
(steady on)
Fault Code
(steady on)
Fault Code
(steady on)
Fault Code
(steady on)
Fault Code
(steady on)
Fault Code
(steady on)
Fault Code
(steady on)
Fault Code
(steady on)
Fault Code
(steady on)
Fault Code
(steady on)
Fault Code
(steady on)
Fault Code
(steady on)
Fault Code
(steady on)
Fault Code
(steady on)
Fault Code
(steady on)
Fault Code
(steady on)
Fault Code
(steady on)
Fault Code
(steady on)
Fault Code
(steady on)
Fault Code
(steady on)
Over Temp Icon (steady on)
Fault Code (steady on)
Note: When charging with PV panels, please
connect the cable to the XT��
terminal(recommended) or DC����
terminal. For car charger usage, connect the
cable to the DC���� terminal.
DC����: For Solar(PV)
charging and Car charging
XT��: For Solar(PV)
charging
Error Icon Display
Fault Type Solution
Error Icon Display
Fault Type Solution
Battery Voltage Too Low /
Battery Damaged
TypeC�/TypeC� Over
Temperature Protection
Car Charger Output
OTP(Over-Temparature
Protection)
Abnormal DC input of the
Expansion battery
Overheating of the DC output
of the Expansion battery
MOS failure in the main circuit
of the BMS
Communication Error of
BMS AFE
Abnormal BMS EEPROM
Abnormal BMS voltage sensor
BMS current sensor
zero-offset fault
Abnormal BMS Main Circuit
BMS pre-charge timeout
Abnormal BMS current sensor
BMS battery fault (dead cell)
BMS‒inverter communication
abnormal
BMS internal CAN bus
abnormal
Communication Error
Turn off the PD output of ���Wh
Expansion battery. Once the temperature
returns to normal, the fault will be
cleared.
Disconnecting the DC charging of the
���Wh Expansion battery, the fault will
be cleared automatically after a certain
period of time.
BMS RS��� bus abnormal
BMS parallel address
recognition abnormal
BMS terminal fuse main
circuit abnormal
Auxiliary Power Fault
Contact after-sales service.
Power on and off the device to clear
fault. If not recovered, contact
after-sales service.
Restarting the machine, if the fault is
not resolved, contact the after-sales
service for handling.
Power on and off the device to clear
fault. If not recovered, contact
after-sales service.
Important: If a warning appears during product use, and the warning icon remains after restarting the
device, please stop using the product immediately. Do not attempt to charge or discharge it.
If the issue persists and the above steps do not resolve the problem, please contact customer service for
further assistance.
Restart the machine or change the
operating environment. If the fault is not
resolved, contact after-sales service for
handling.
Remove the devices connected to Type
C� and C�, keep power station away from
heat sources. The fault will be
automatically cleared when the
temperature returns to normal.
The DC output turns off automatically,
remove all charging and discharging
equipment, keep away from
high-temperature sources, wait for the
product temperature to return to normal,
and the fault will be automatically cleared.
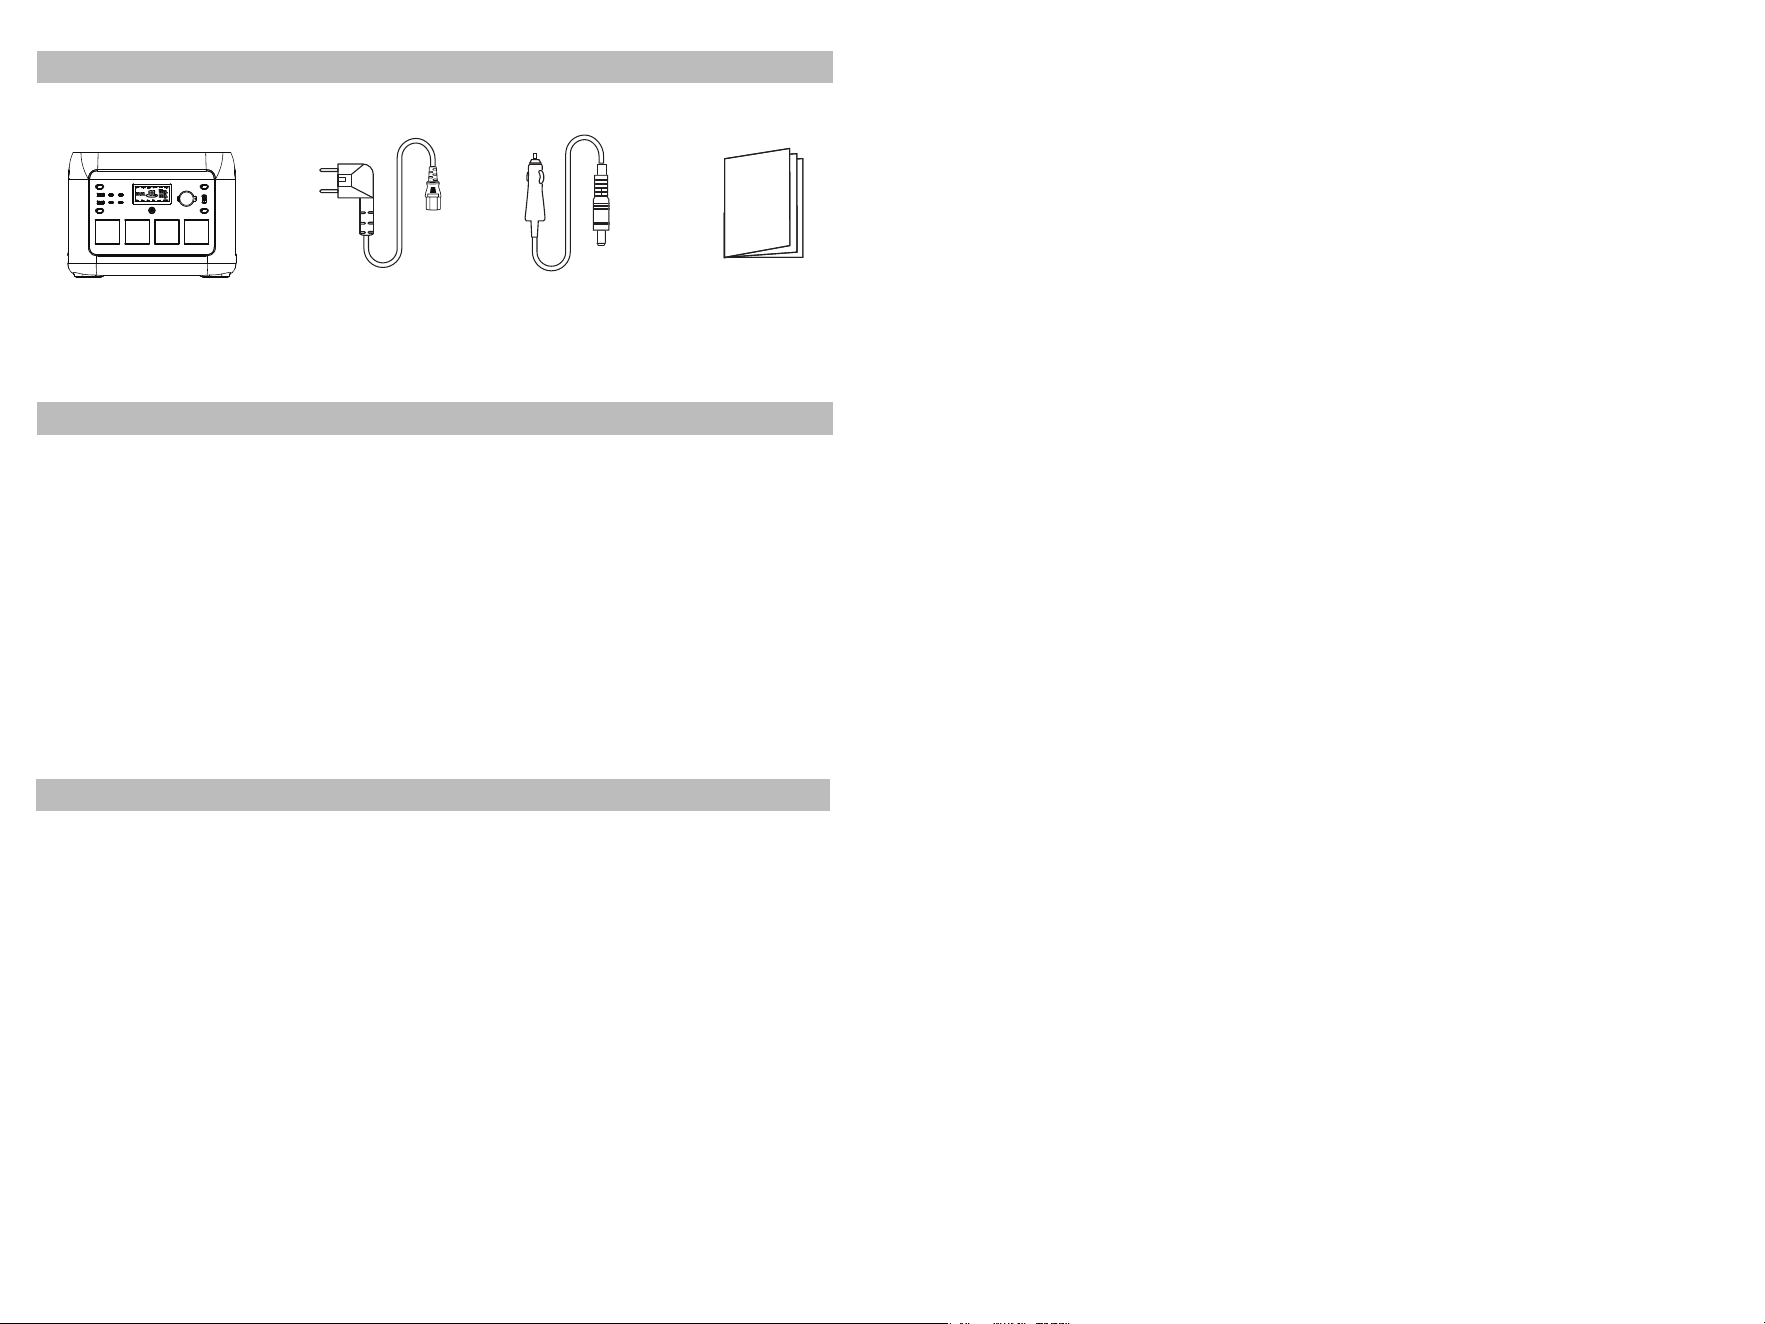
Power station
User manualAC cable
Car charge cable
�� ��
�. What’s in the box
�. Maintenance and Care
�. Disclaimer
· The product is equipped with a built-in battery management system, which provides several protections
including overcharge, overdischarge, overcurrent, short circuit, high and low temperature, and abnormal
communication. During use, these protections may activate and cause an interruption in output. The company
is not responsible for any indirect losses caused by accidental power failures, including those affecting medical
equipment or servers. Additionally, any damage resulting from improper use, tampering, or human error is not
the responsibility of the company.
· Before using the power station, please thoroughly read this user manual to ensure proper understanding and
safe usage. After reviewing the manual, please store it in a safe place for future reference. Improper operation
can lead to serious injury, product damage, or property loss. By using the power station, you acknowledge and
accept all terms and conditions outlined in this manual. Users are fully responsible for their actions and any
consequences resulting from non-compliance.
· In accordance with applicable laws and regulations, the company reserves the right to make the final
interpretation of this document and all related materials for this product. The content may be updated,
revised, or discontinued without prior notice. Please visit the official website for the most up-to-date product
information.
· It’s recommended to use or store the power station in an environment with ambient temperatures between
��°C and ��°C. Keep the unit away from water, heat sources, and metal objects to avoid damage.
· For storage periods exceeding � months, perform a cycle of charging and discharging every � months. First,
discharge to �%, then charge to ���%, and finally discharge to ��%-��% to maintain battery health.
· Do not store the power station in temperatures above ��°C or below -��°C, as this could damage the unit.
· If the battery capacity falls below �%, charge the unit to at least ��%. Storing the product with low power for
extended periods may cause irreversible damage to the cells, reducing the overall lifespan.
· If the power station has been idle for too long with insufficient battery, it will enter a "deep sleep" mode. To
reactivate it, simply charge the product.
· After charging or discharging, wait at least �� minutes before using the power station to ensure optimal
performance and safety.
FCC Statement
This device complies with Part �� of the FCC Rules. Operation is subject to the following two conditions:
(�)This device may not cause harmful interference.
(�)This device must accept any interference received, including interference that may cause undesired operation.
�. Changes or modifications not expressly approved by the party responsible for compliance could void the user’s authority to operate the equipment.
Note:This equipment has been tested and found to comply with the limits for a class B digital device,pursuant to Part �� of the FCC Rules. These limits are
designed to provide reasonable protection against harmful interference in a residential installation.
This equipment generates uses and can radiate radio frequence energy and, if not installed and used in accordance with the instructions, may cause harmful
interference to radio communications. However, there is no guarantee that interference will not occur in a particular installation. If this equipmemt does
cause harmful interference to radio or television reception, which can be determined by turning the equipment off and on, the user is encouraged to try to
correct the interference by one or more of the following measures:
· Reorient or relocate the receiving antenna.
· Increase the separation between the equipment and receiver.
· Connect the equipment into an autlet on a circuit different from that to which the receiver is connected.
· Consult the dealer or an experienced radio/TV technician for help.
The device has been evaluated to meet general RF exposure requirement, This equipment should be installed and operated with a minumum distance of ��
cm between the radiator and your body.
ISED Statement
This device contains licence-exempt transmitter(s)/receiver(s) that comply with Innovation, Science and Economic Development Canada’s licence-exempt
RSS(s). Operation is subject to the following two conditions:
This device may not cause interference.
This device must accept any interference, including interference that may cause undesired operation of the device.
This equipment should be installed and operated with a minimum distance of �� cm between the radiator and your body.
Le présent appareil est conforme aux CNR d'Industrie Canada applicables auxappareils radio exempts de licence. L'exploitation est autorisée aux deux
conditions suivantes :
(�)l'appareil ne doit pas produire de brouillage, et (�) l'utilisateur de l'appareil doit accepter toutbrouillage radioélectrique subi, même si le brouillage est
susceptible d'en compromettre lefonctionnement. Cet équipement doit être installé et utilisé avec une distance minimale de �� cm entre le radiateur et
votre corps.