www.midea.com/ca
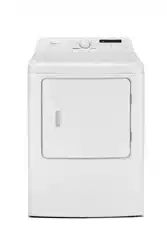
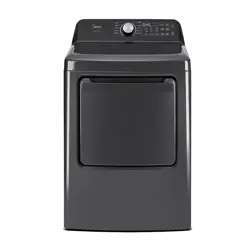
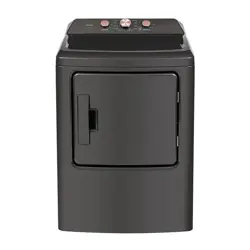
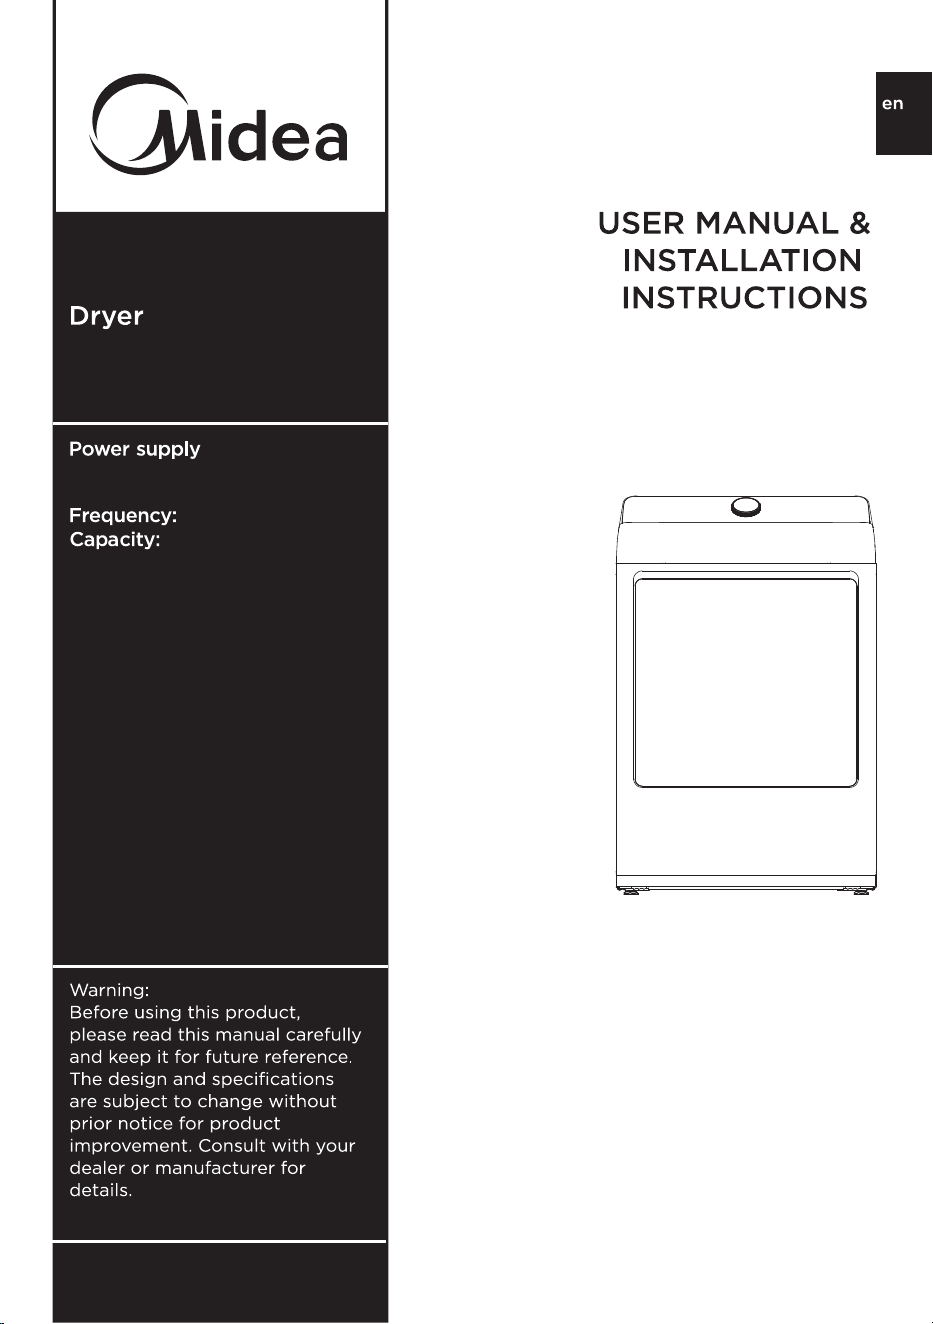
MLTE62S7ACG
MODEL NUMBER
120/208V~(E)
Version A
120/240V~(E)
120V~(G)
60Hz
7.4cu.ft
Remove Packaging
Exhausting Requirements
OPERATING INSTRUCTIONS
34
32
39
45
47
47
49
50
50
52
54
32
38
App Setup and Operation
Certifications
43
42
45
USER-MAINTENANCE INSTRUCTIONS
which
USER-MAINTENANCE
INSTRUCTIONS
OPERATING
INSTRUCTIONS
FIREOR EXPLOSION HAZARD
Failure to follow safety warnings exactly could result in serious
injury,death or property damage
manual
/or
There is a risk of suffocation and injury from entrapment.
Do not use replacement parts that have not been recommended by
the manufacturer(e.g. parts made at home using a 3D printer).
USER-MAINTENANCE
INSTRUCTIONS
OPERATING
INSTRUCTIONS
away
Electric Requirements
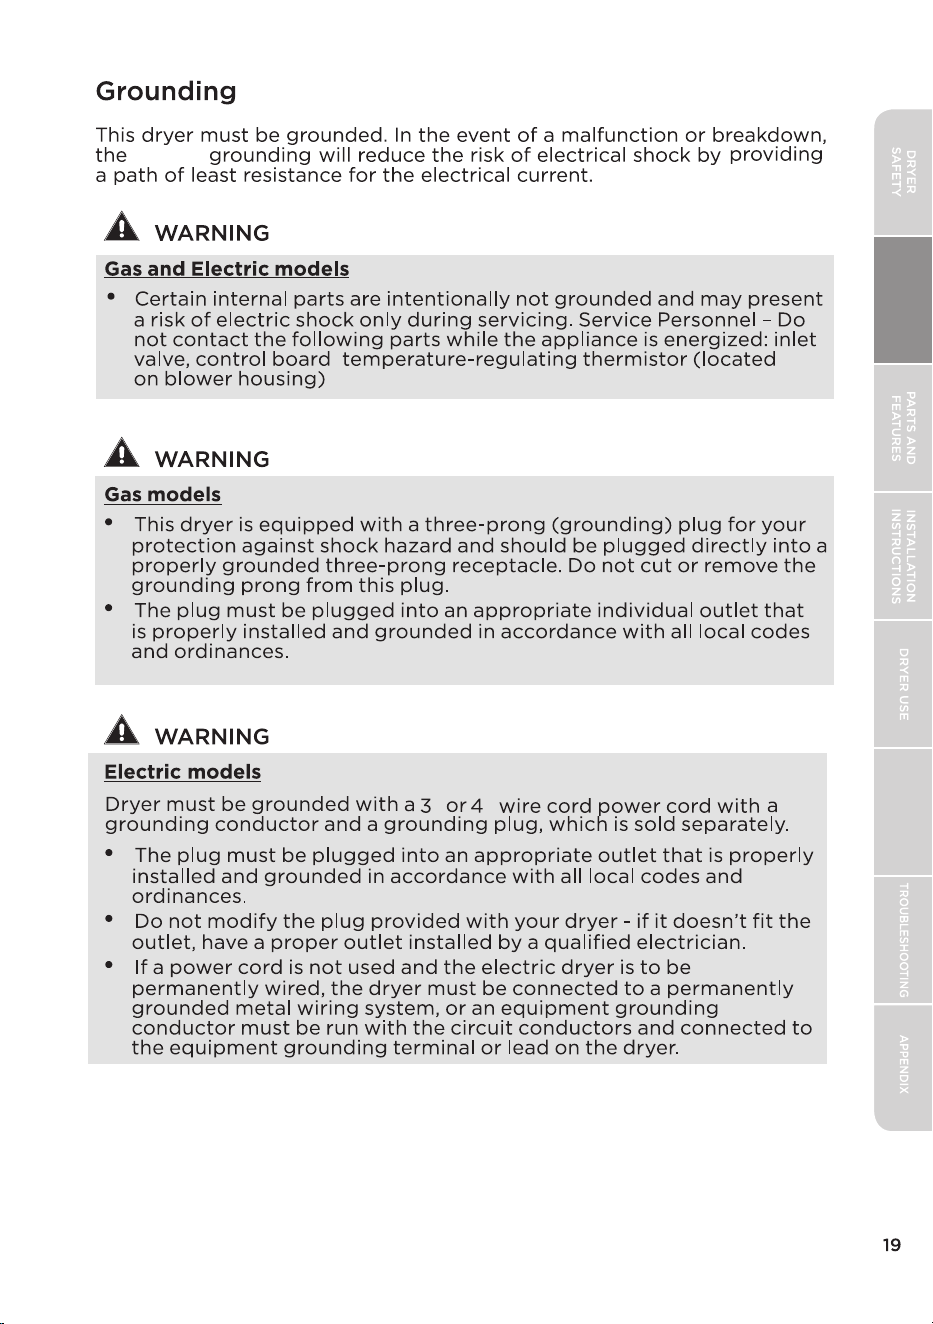
Grounding
OPERATION REQUIREMENTS
the
USER-MAINTENANCE
INSTRUCTIONS
OPERATING
INSTRUCTIONS
the
Installation Instructions
sources
USER-MAINTENANCE
INSTRUCTIONS
OPERATING
INSTRUCTIONS
USER-MAINTENANCE
INSTRUCTIONS
OPERATING
INSTRUCTIONS
Risk of reproductive harm from exposure to Lead.
See www.P65Warnings.ca.gov.
OPERATING INSTRUCTIONS
To reduce the risk of fire, electric shock, or injury to persons, read the
IMPORTANT SAFETY INSTRUCTIONS before operating this appliance.
suffocating.After unplugging a discarded
appliance, cut off the power cord.
OPERATING
INSTRUCTIONS
USER-MAINTENANCE
INSTRUCTIONS
Electric Requirements
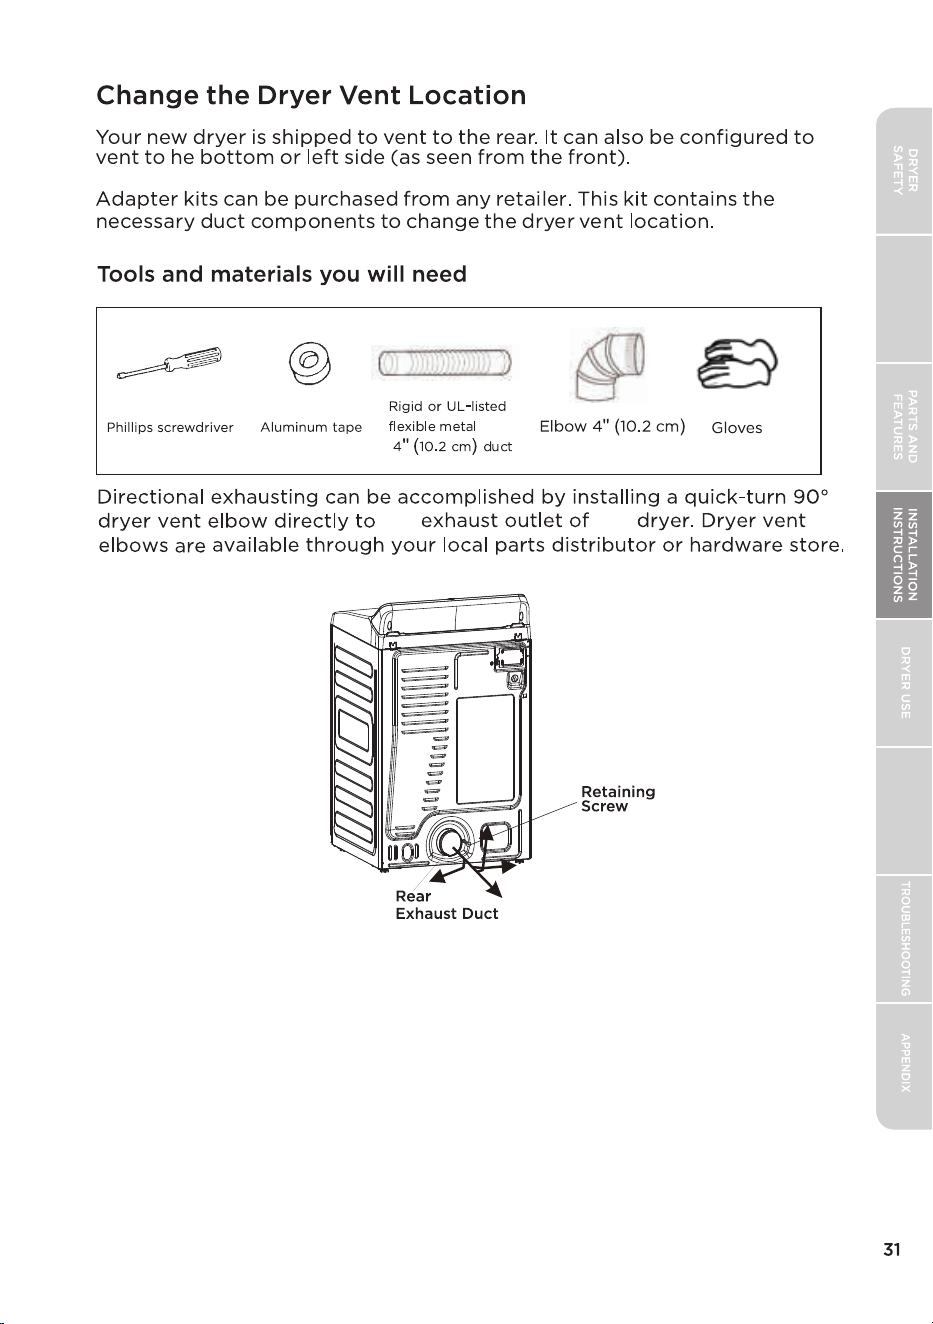
the Change the Dryer Vent Location
OPERATING
INSTRUCTIONS
USER-MAINTENANCE
INSTRUCTIONS
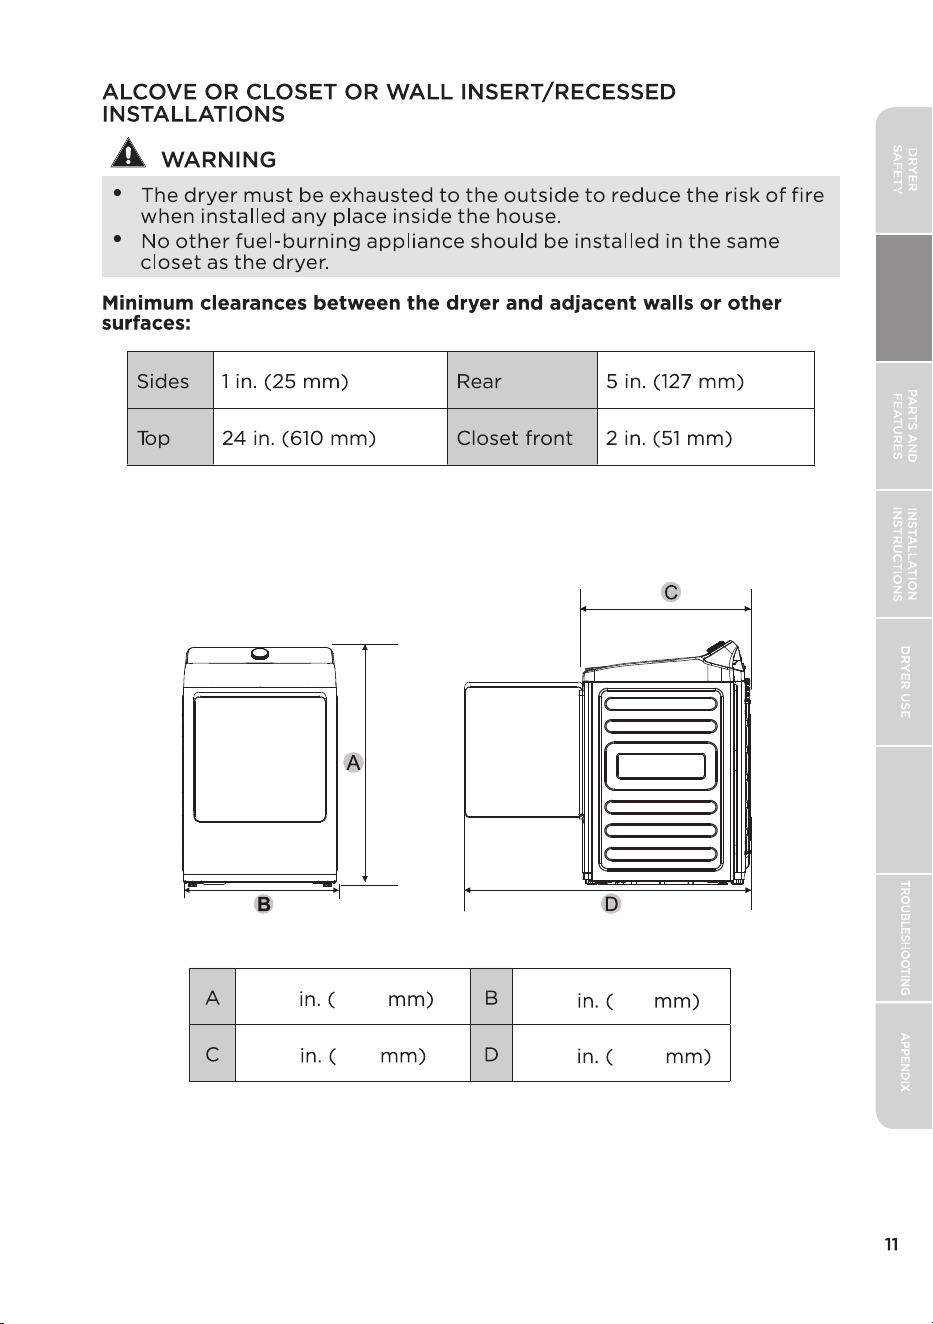
42.24 1073
25.87
713
26.37
670 49.29
1252
OPERATING
INSTRUCTIONS
USER-MAINTENANCE
INSTRUCTIONS
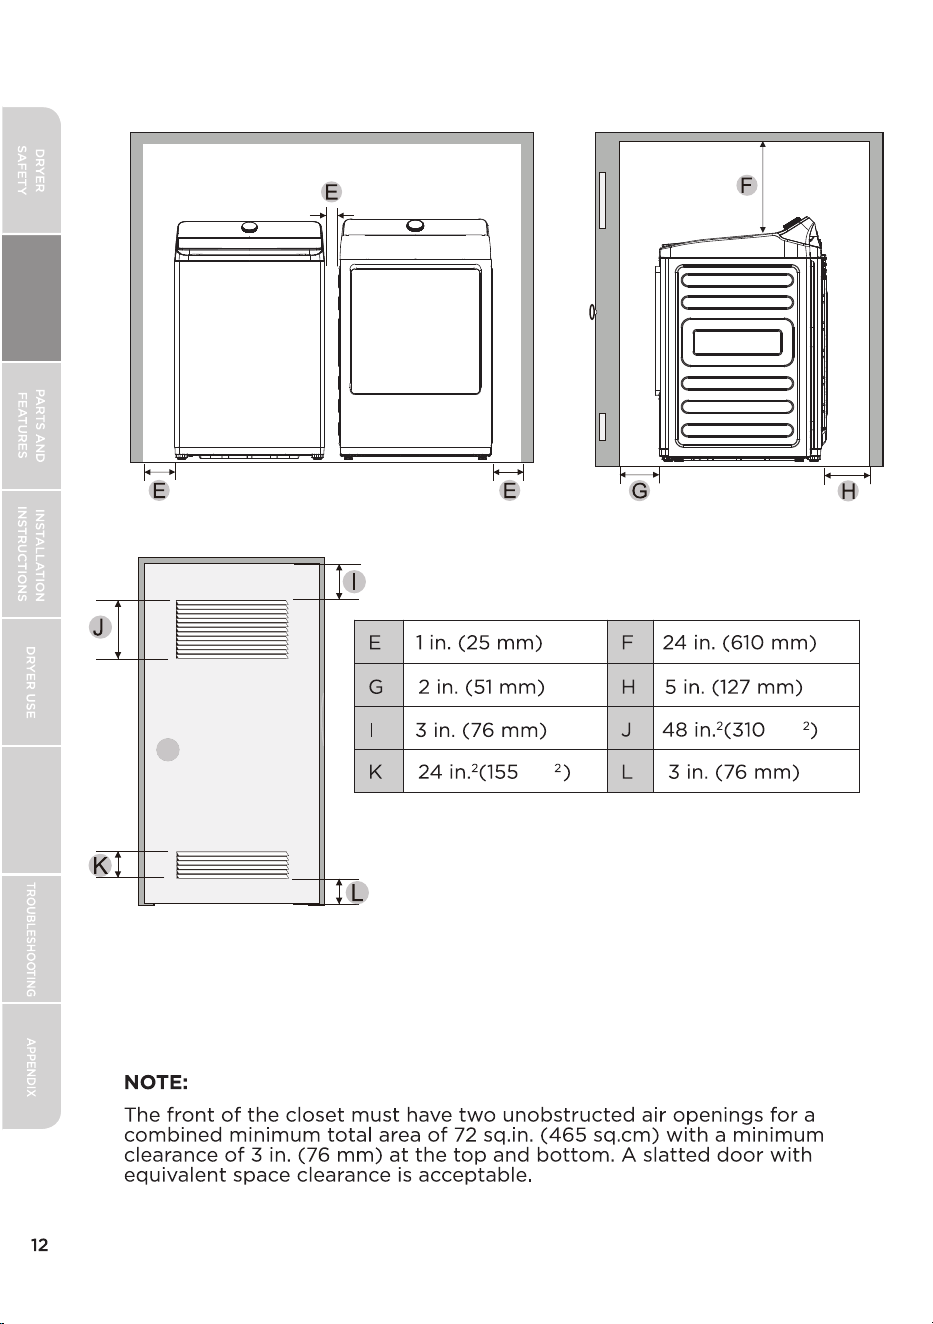
cm
cm
OPERATING
INSTRUCTIONS
USER-MAINTENANCE
INSTRUCTIONS
For best results, the static pressure in any exhaust system should be
between should be between 0.3 to 0.8 inches of water column, and
cannot be less than 0 under any circumstances.Measurement must
be done with a manometer at the point where the exhaust duct
connects to the dryer. The dryer must be running with a no-heat
setting, the lint filter must be clean, and the installed duct must have a
4-inch diameter.
Manometer measurements
OPERATING
INSTRUCTIONS
USER-MAINTENANCE
INSTRUCTIONS
the
and
with a
minimum of elbows.
the
Check ducting monthly
OPERATING
INSTRUCTIONS
USER-MAINTENANCE
INSTRUCTIONS
Do not use flexible plastic exhaust venting between dryer and house
exhaust duct.
annually
OPERATING
INSTRUCTIONS
USER-MAINTENANCE
INSTRUCTIONS
the
the
the
OPERATING
INSTRUCTIONS
USER-MAINTENANCE
INSTRUCTIONS
An
-
Some regions use 120/208V voltage, and the usage requirements are the
same as those for 120/240V voltage.
OPERATING
INSTRUCTIONS
USER-MAINTENANCE
INSTRUCTIONS
OPERATING
INSTRUCTIONS
USER-MAINTENANCE
INSTRUCTIONS
dryer’s
-
-
OPERATING
INSTRUCTIONS
USER-MAINTENANCE
INSTRUCTIONS
and electric filter assembly.
,
OPERATING
INSTRUCTIONS
USER-MAINTENANCE
INSTRUCTIONS
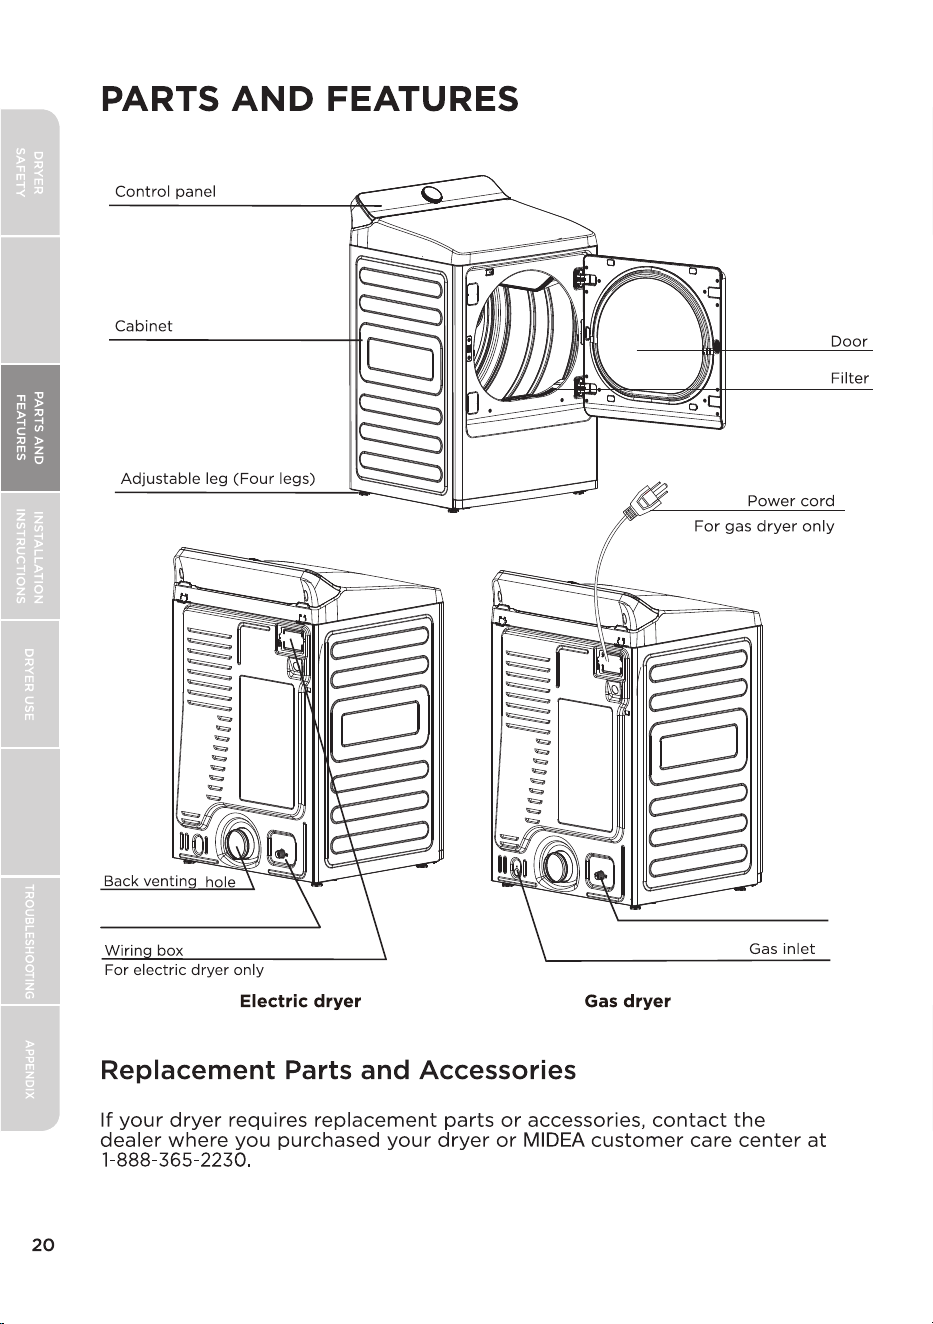
Water inlet
Water inlet
Remove Packaging
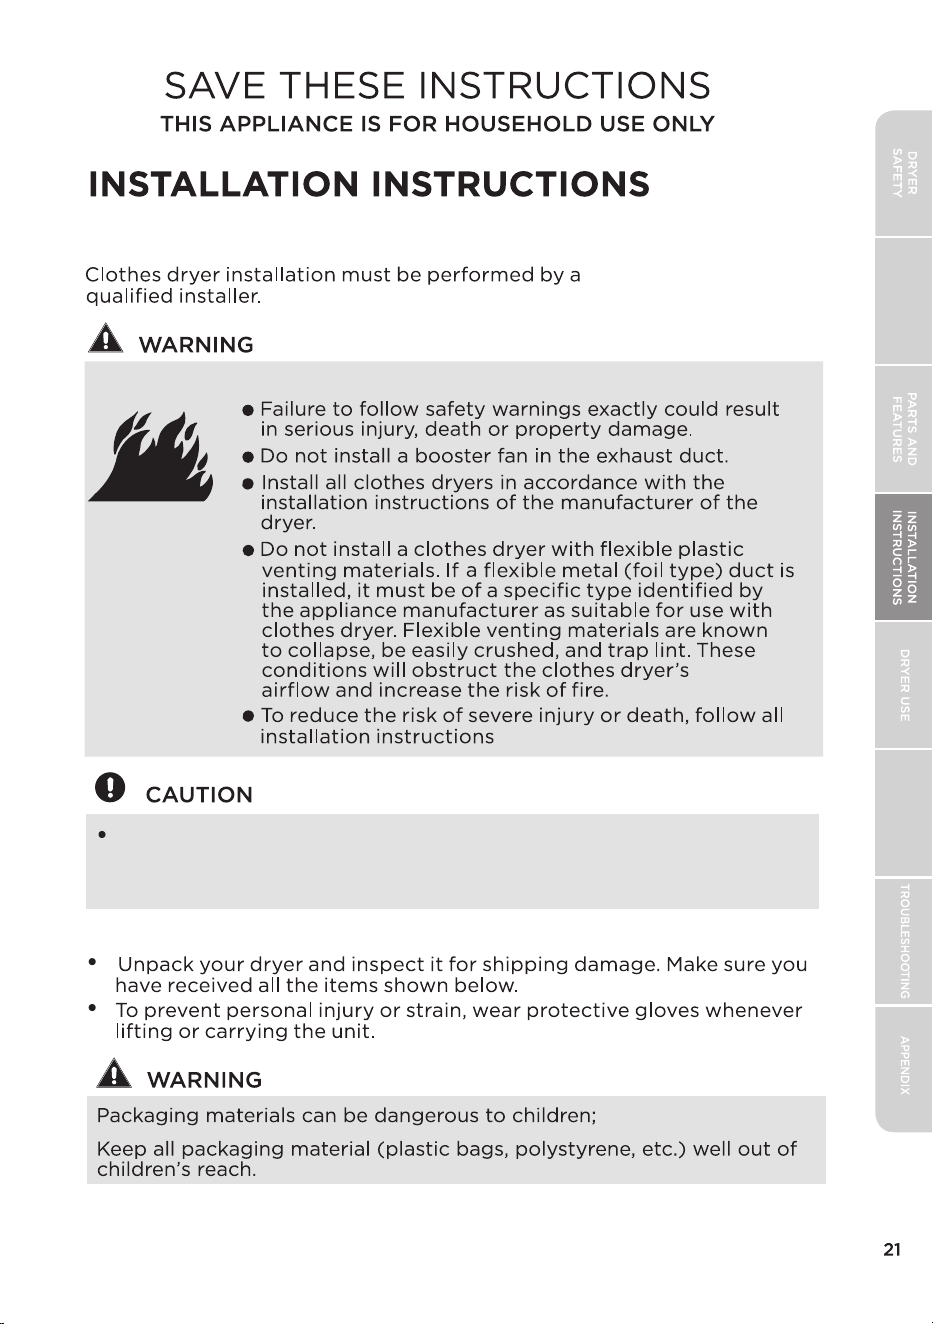
Install the clothes dryer according to the manufacturer's instructions and
local codes.
Risk of Fire
This appliance shall be secured to the structure or adjusted, using
the methods for installation and securing means provided with the
appliance.
USER-MAINTENANCE
INSTRUCTIONS
OPERATING
INSTRUCTIONS
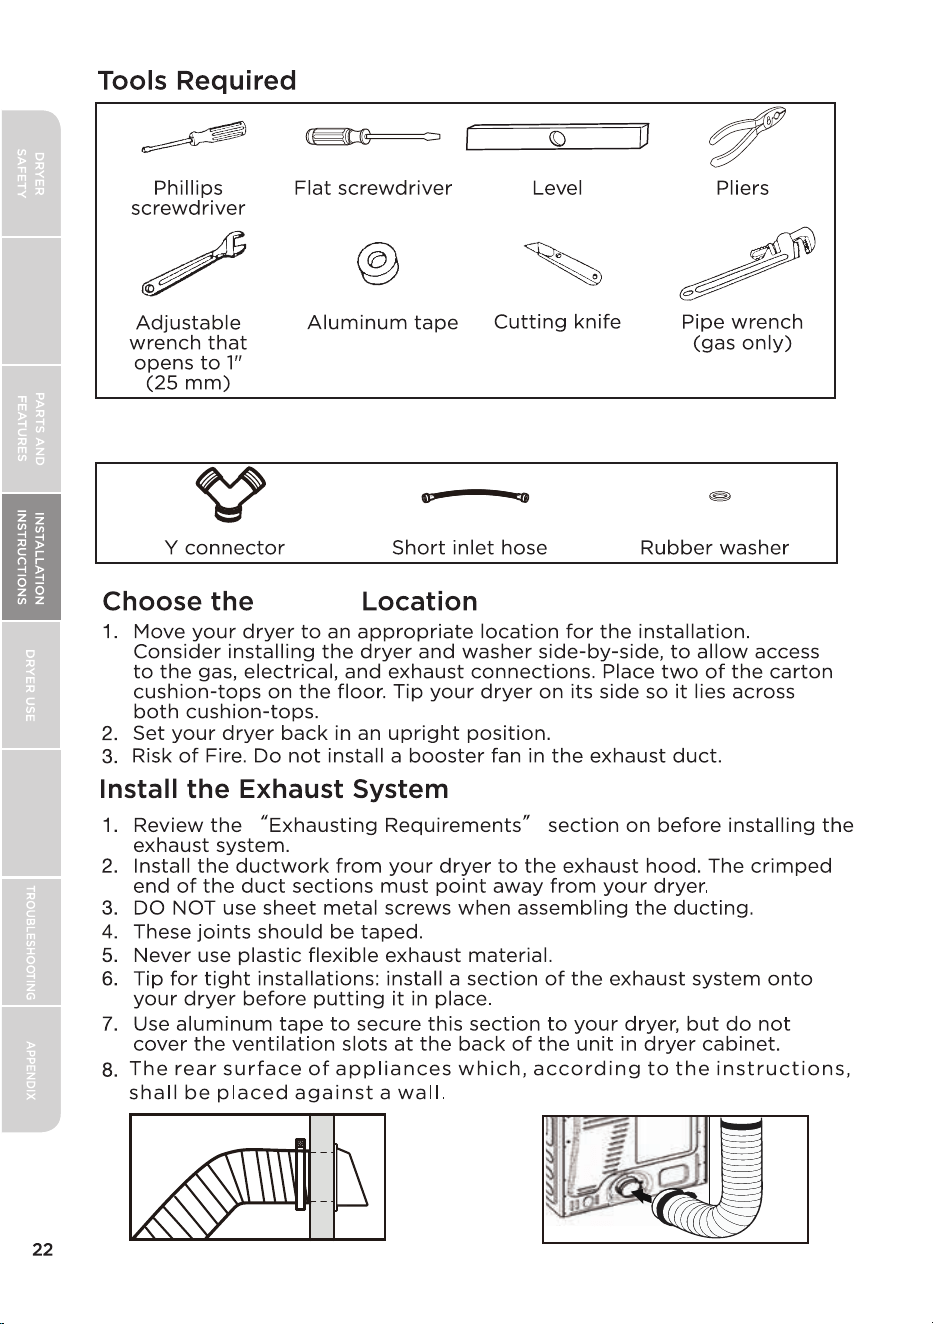
Proper
USER-MAINTENANCE
INSTRUCTIONS
OPERATING
INSTRUCTIONS
Parts Supplied
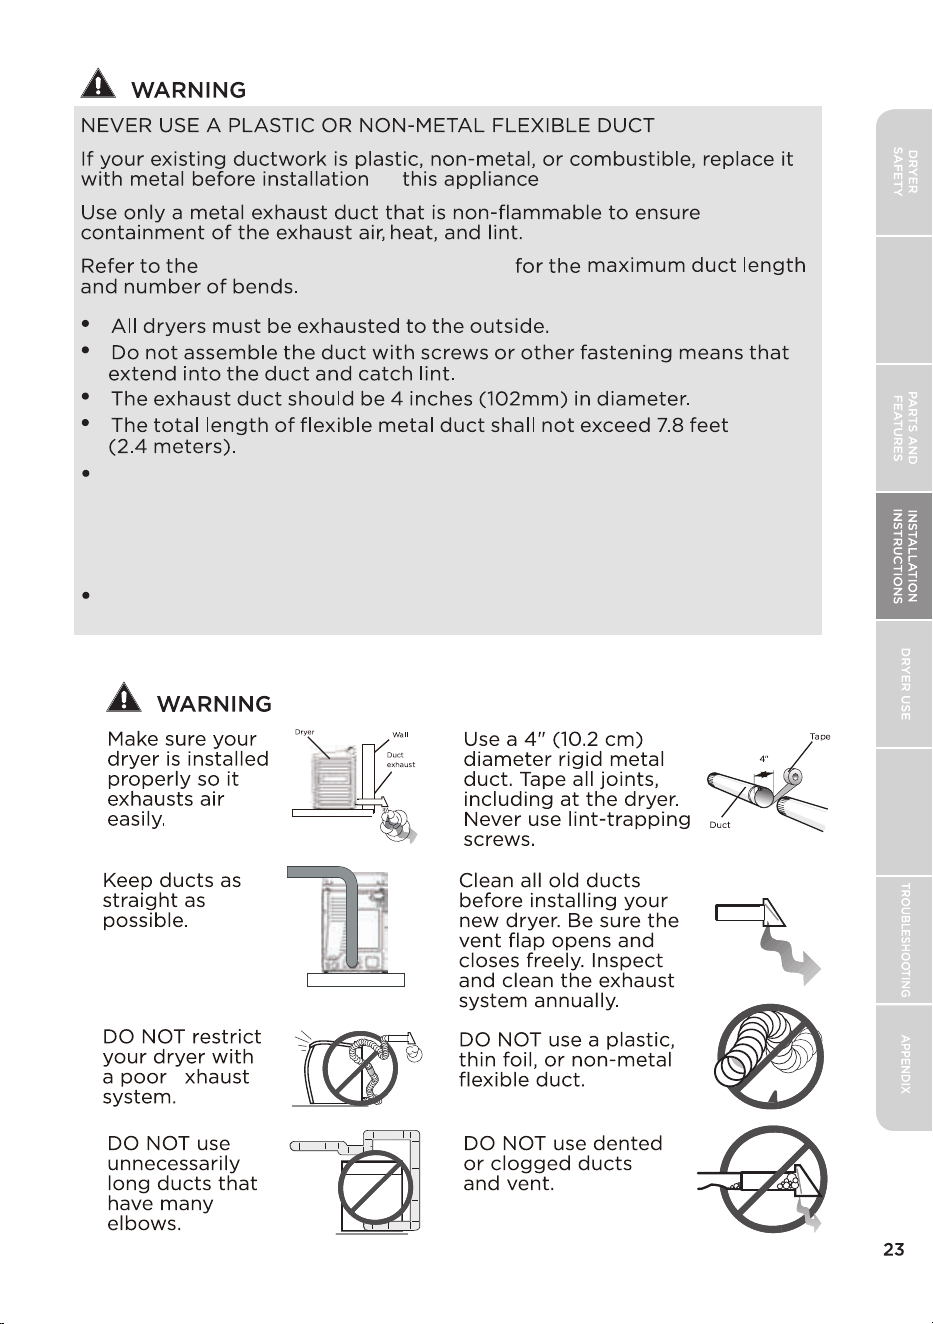
of
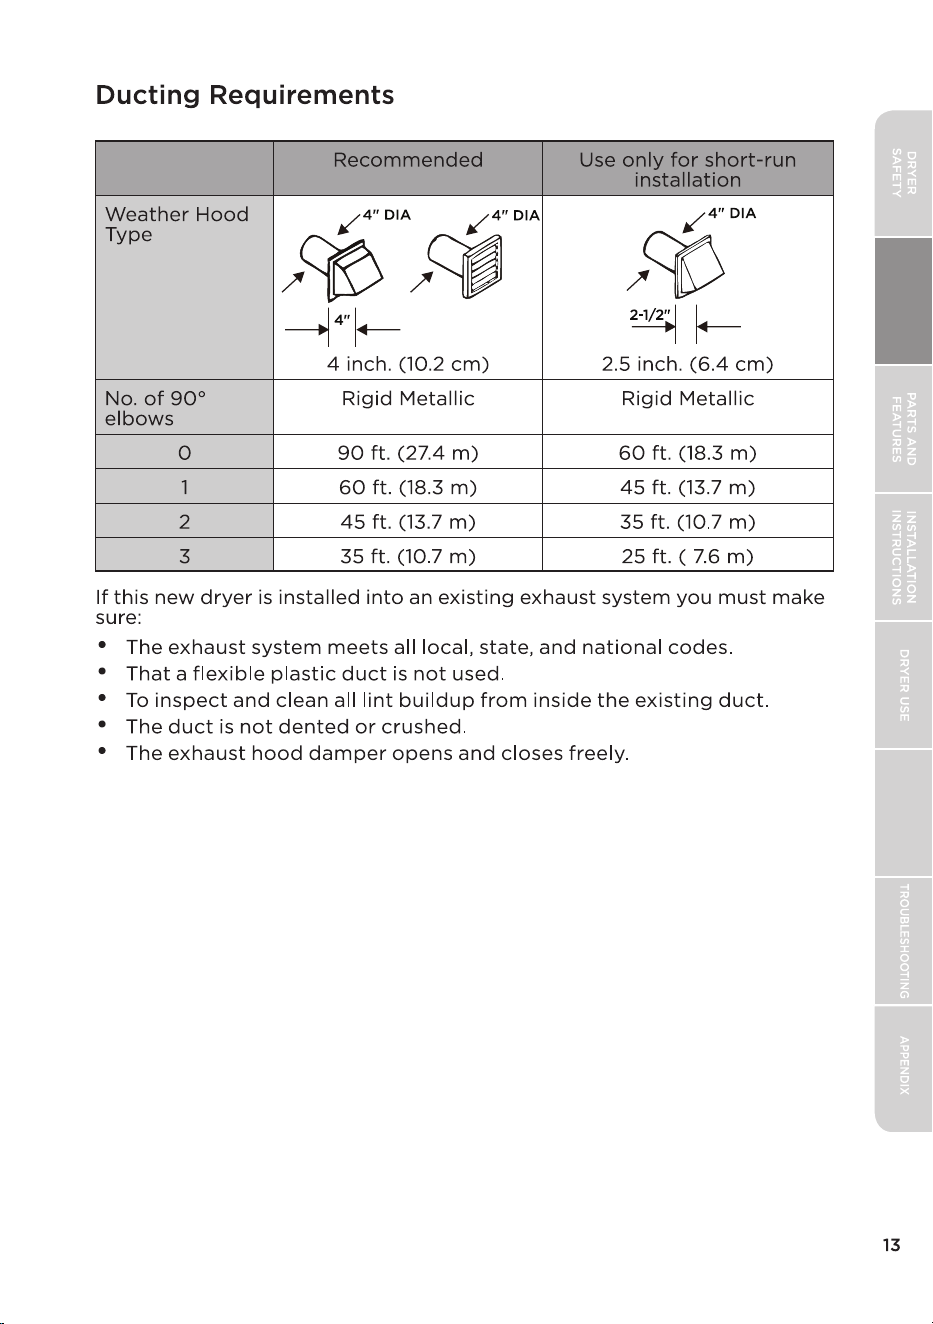
Ducting Requirements section
In Canada, that only those foil-type flexible ducts, if any, specifically
identified for use with the appliance by the manufacturer shall be used.
In the United States, that only those foil-type flexible ducts, if any,
specifically identified for use with the appliance by the manufacturer
and that comply with theUL 2158A, shall be used;
In Canada, that the exhaust duct shall be 102 mm in diameter. In the
United States, the required exhaust duct diameter;
USER-MAINTENANCE
INSTRUCTIONS
OPERATING
INSTRUCTIONS
e
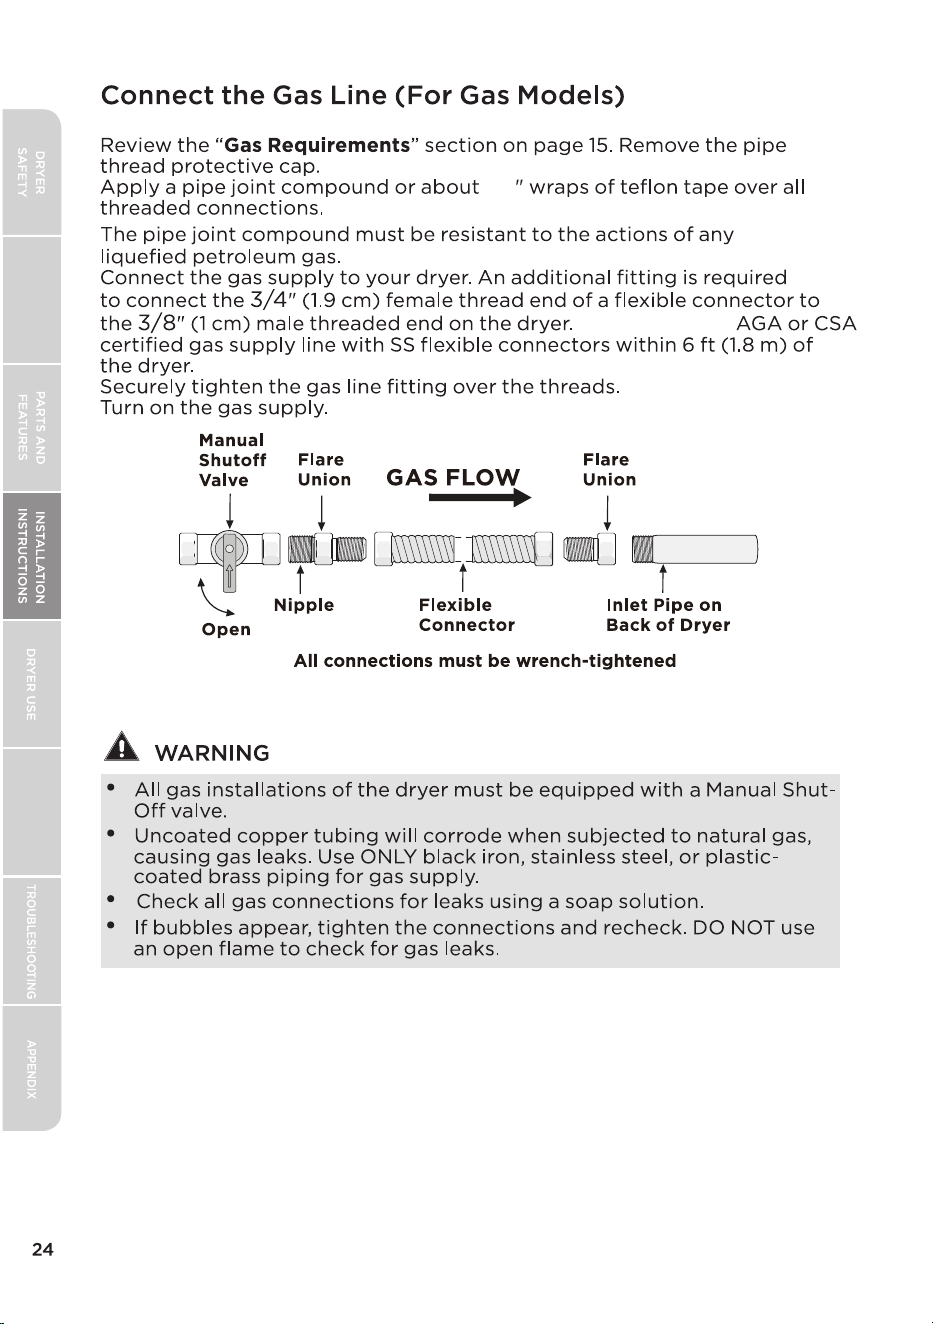
Only use a new
1.5
USER-MAINTENANCE
INSTRUCTIONS
OPERATING
INSTRUCTIONS
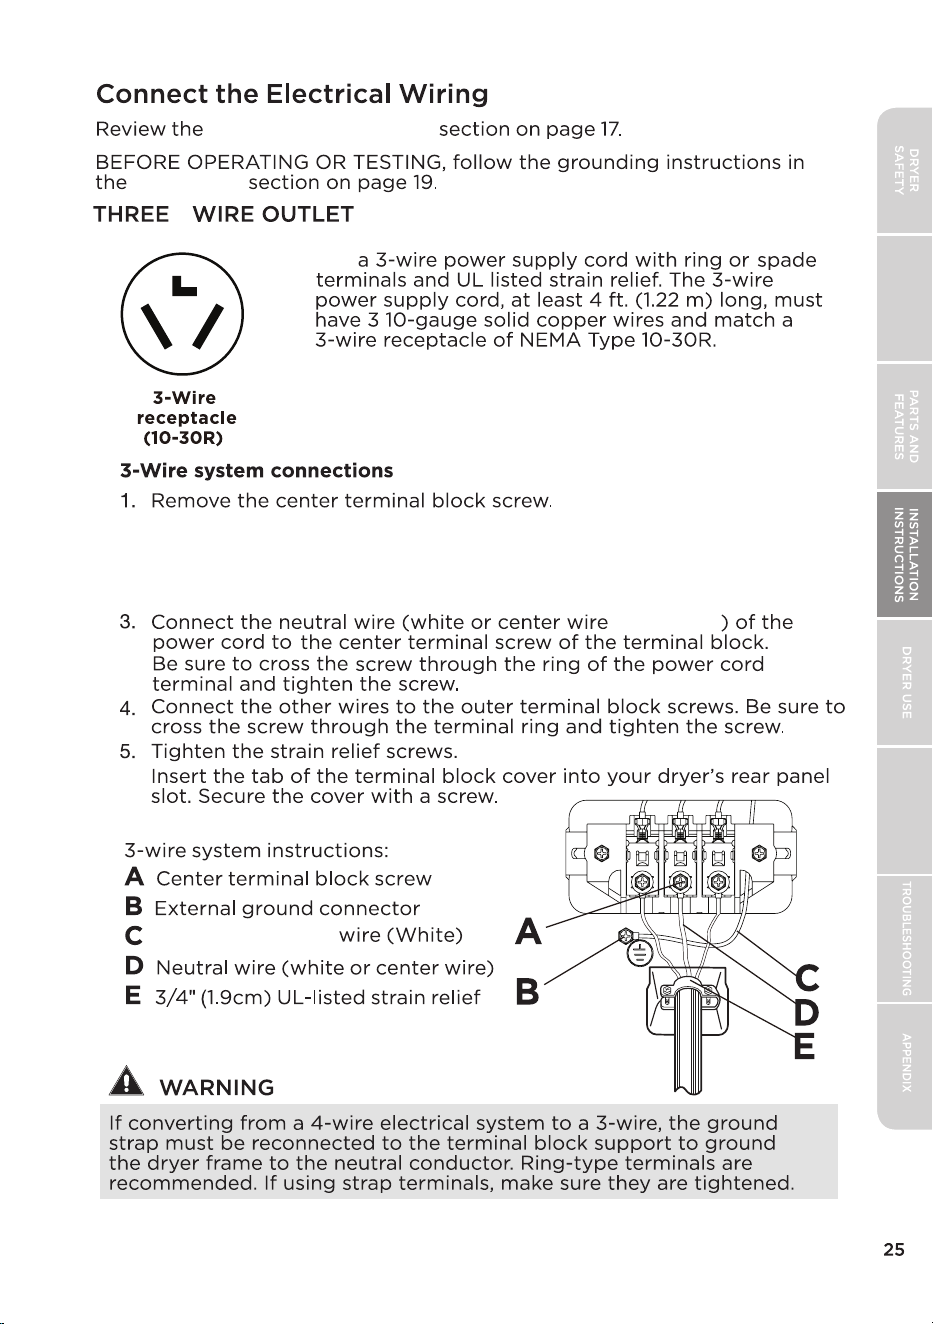
Electric Requirements
Grounding
-
Use
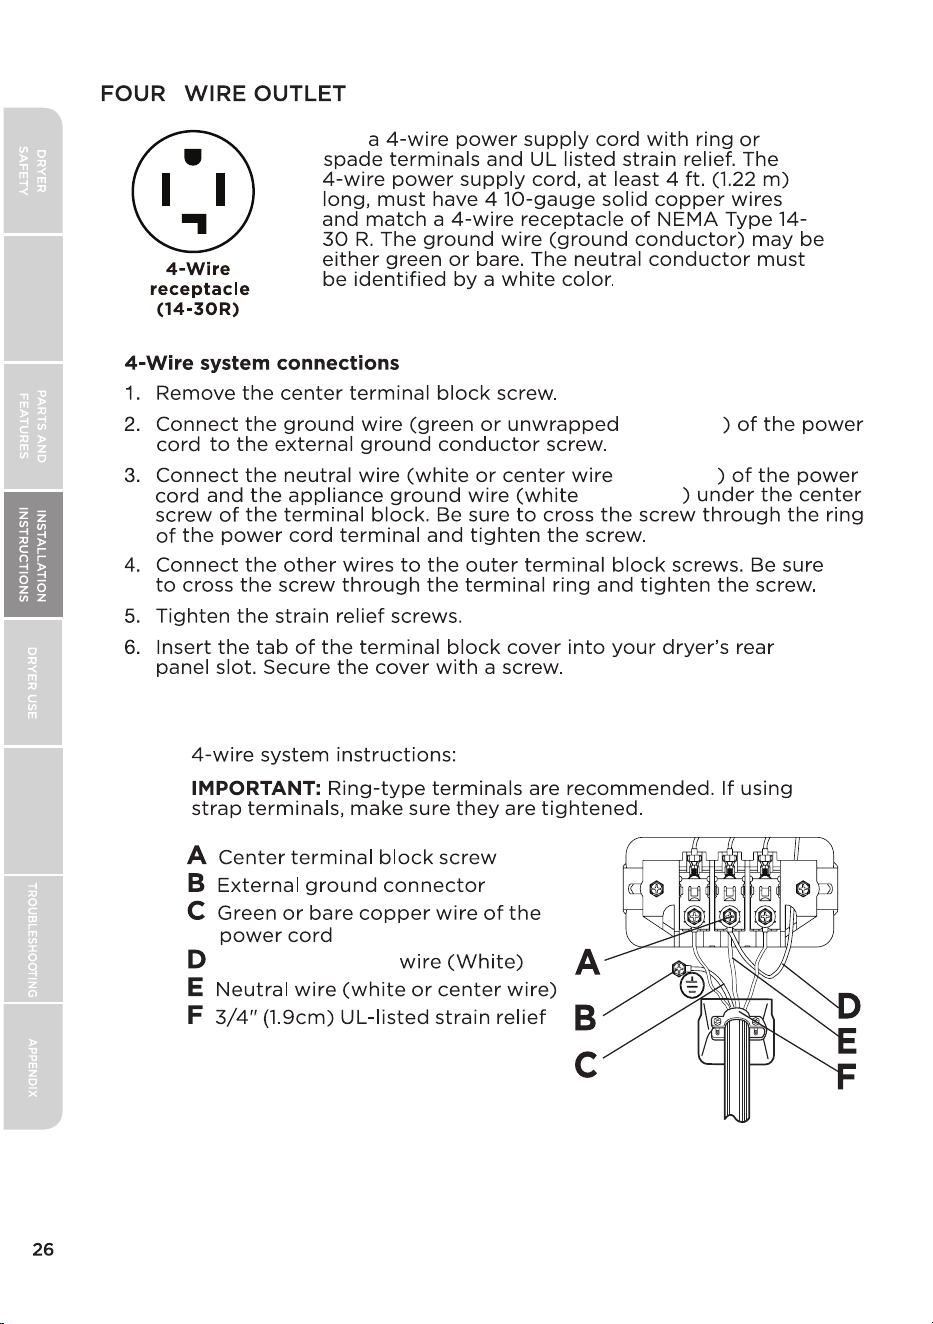
2. Take the appliance ground wire (white; labeled C) from the center
terminal block. Remove the external ground connector screw, connect
the appliance grounding wire to the external ground connector, then
replace and tighten the screw.
; labeled D
6.
Appliance ground
USER-MAINTENANCE
INSTRUCTIONS
OPERATING
INSTRUCTIONS
-
Use
;labeled C
;labeled E
;labeled D
Appliance ground
USER-MAINTENANCE
INSTRUCTIONS
OPERATING
INSTRUCTIONS
USER-MAINTENANCE
INSTRUCTIONS
OPERATING
INSTRUCTIONS
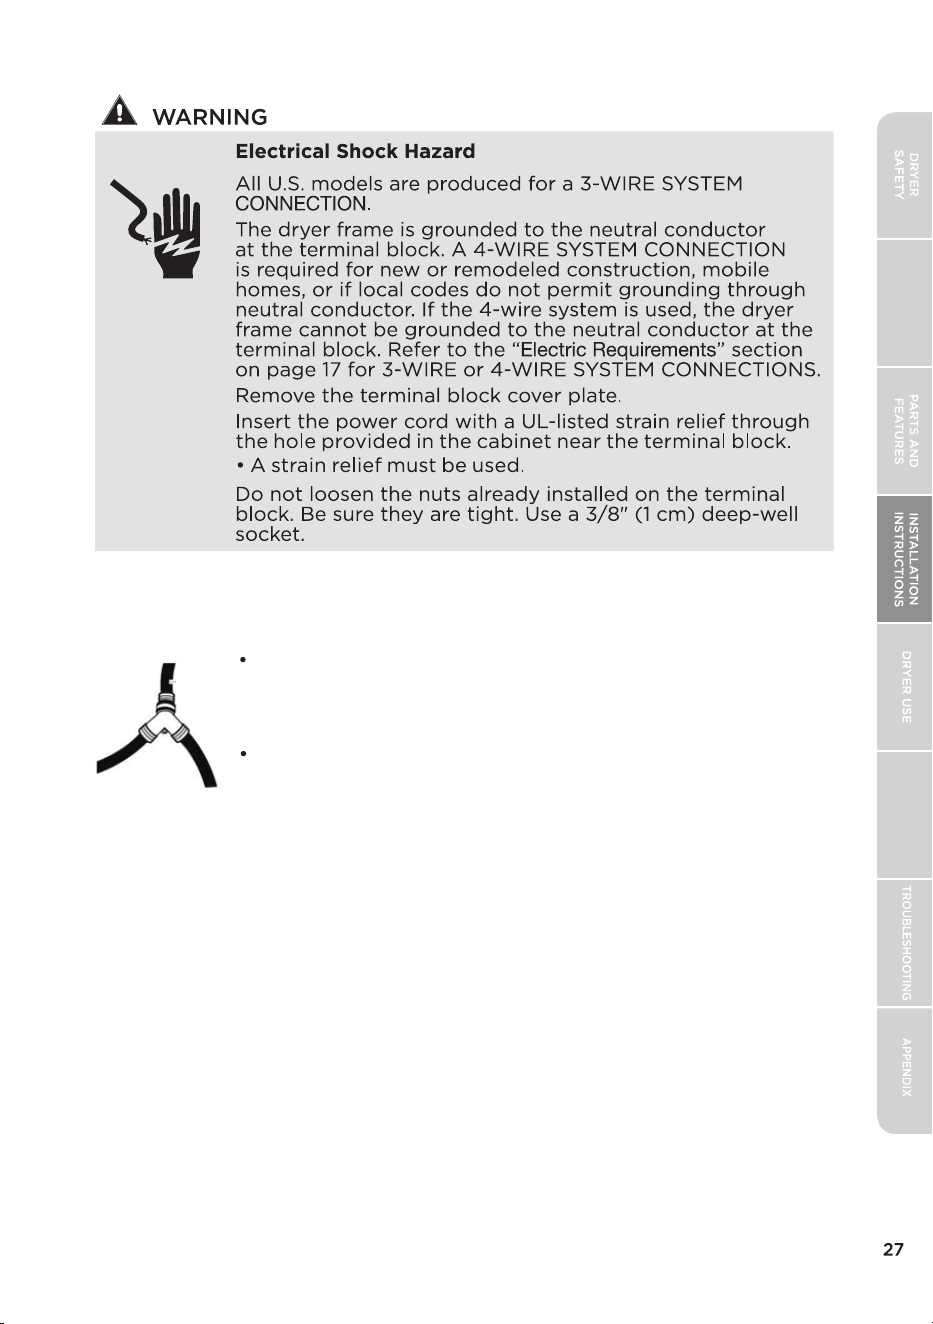
This dryer requires connection for Steam function.
With the water source turned off, use a “Y” connector to
connect the dryer water hose to the washer cold water
supply.
Verify all connections are secure and there are no water
leaks after the water supply is turned back on and prior
to use.
Instructions For Connecting Water To Dryer
gas models only
Make sure that...
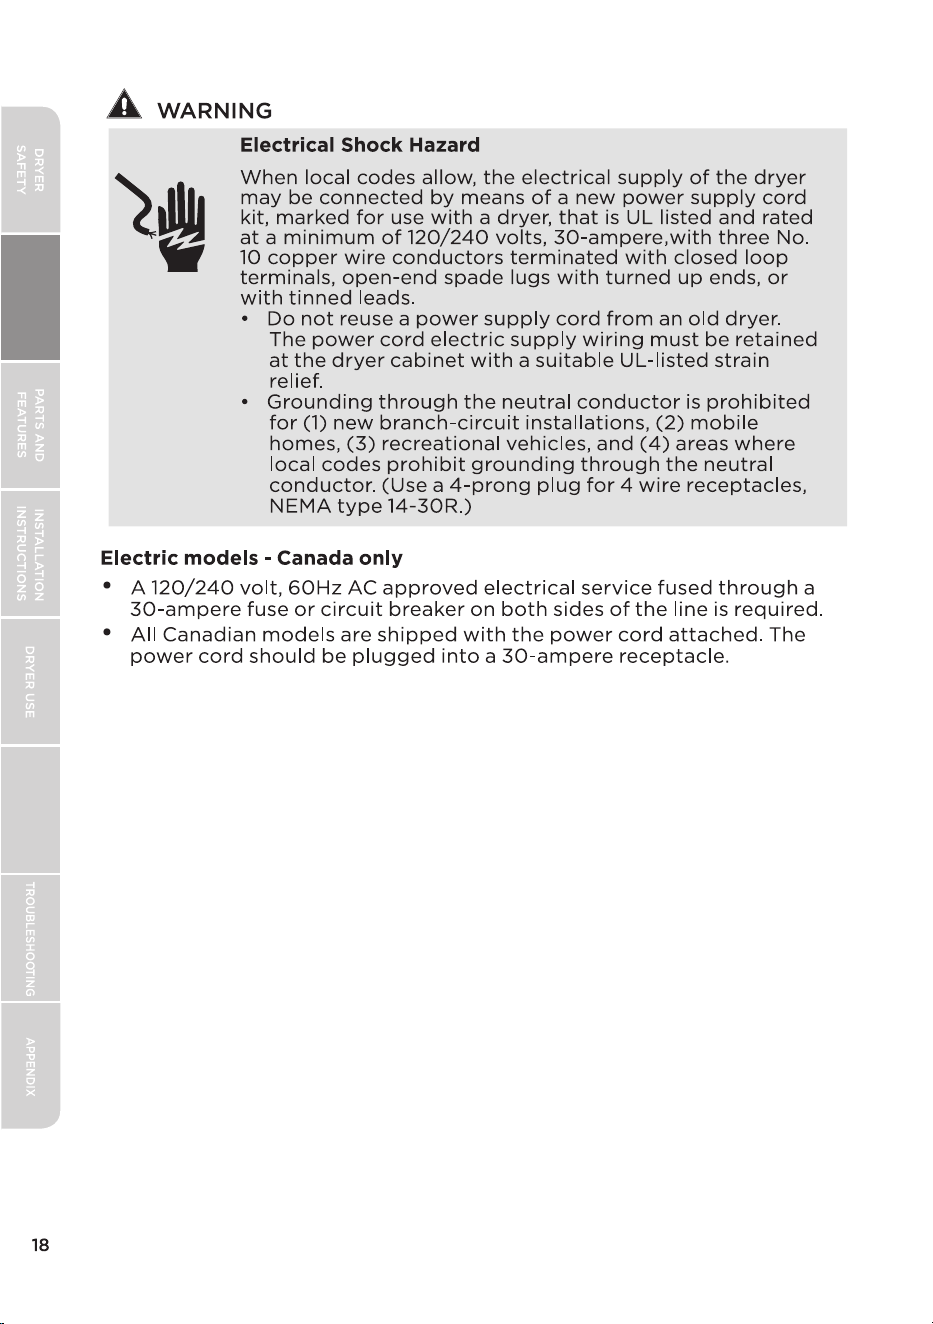
The dryer is plugged into an electrical outlet and is properly grounded.
The exhaust ductwork is hooked up and the joints are taped.
A plastic flexible duct is NOT used.
The vent material is rigid or stiff - walled flexible metal.
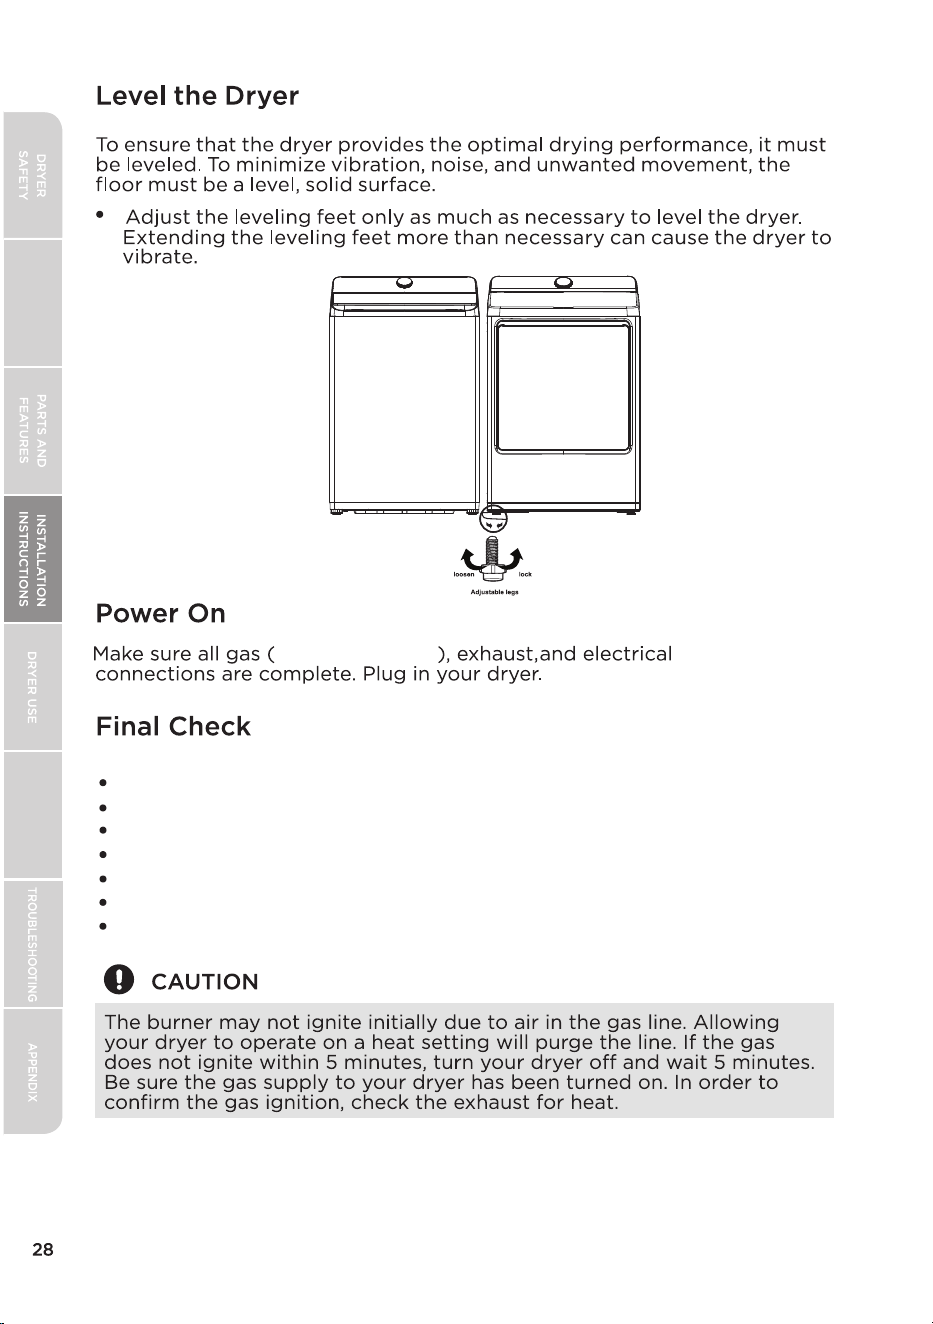
The dryer is leveled and is sitting firmly on the floor.
Gas models - the gas is turned on with no gas leakage.
Start your dryer to confirm that it runs, heats, and shuts off.
USER-MAINTENANCE
INSTRUCTIONS
OPERATING
INSTRUCTIONS
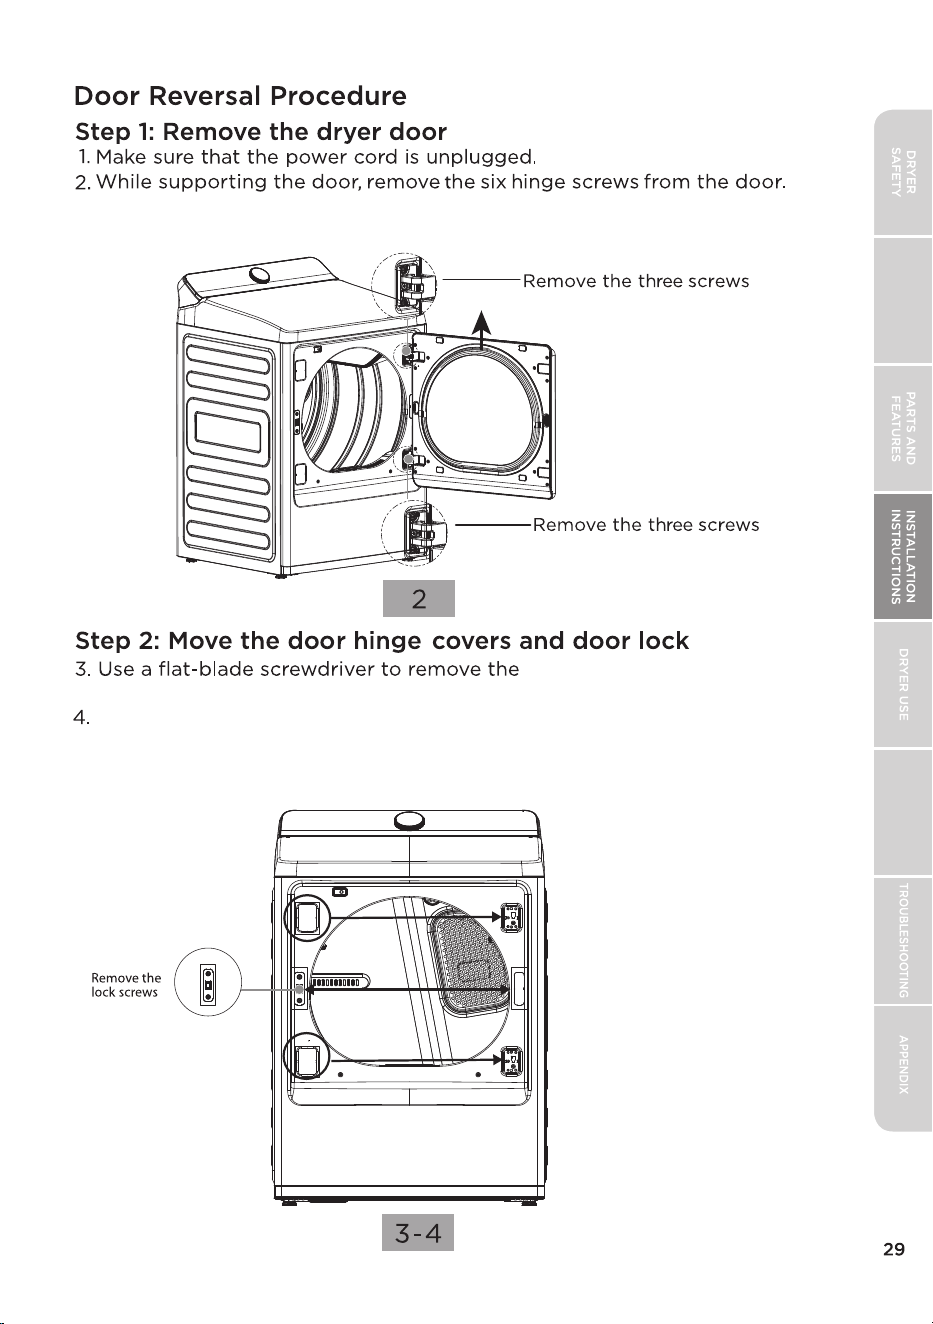
Set the hinge screws aside. Lift the door to remove it and set the
door aside.
two door hinge covers, then
install them on the opposite side.
Use a screwdriver to unscrew the door lock and lock cover, then install the
door lock on the side that now has hinge covers. Install the lock cover on
the opposite side. Once finished,the door lock and lock cover will have
exchanged positions.
USER-MAINTENANCE
INSTRUCTIONS
OPERATING
INSTRUCTIONS
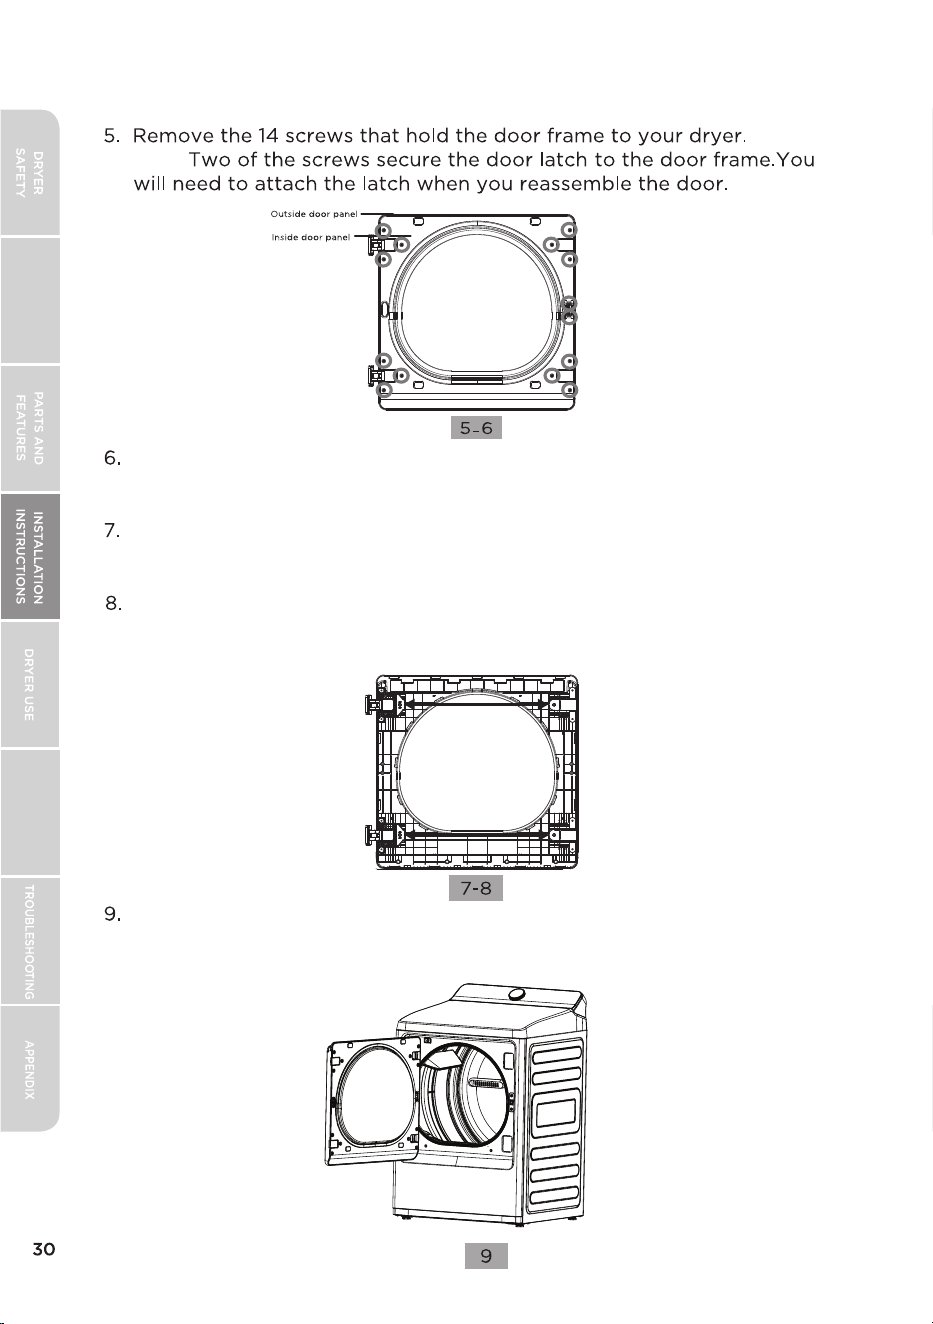
Note:
Step 3: Rotate the door
Use a flat-head screwdriver to pry open the 8 tabs between the inside and
outside doors. Run the screwdriver along each edge of the door, pushing
upwards to pop the inside door panel out of place.
Move door latch to the opposite side of the door. Move the hinges and hinge
covers to opposite positions as well. When finished, the hinges and hinge
covers will have exchanged positions.
Install the inside door panel with all 14 screws, including the 2 for the latch.
Make sure the rounded top of the inside door panel is oriented towards the
door handle at the top of the door.
Align the hinges on the door with the hinges on the machine. Mount the door
assembly onto the machine frame, then fasten it with the six screws you
removed in Step 1.
USER-MAINTENANCE
INSTRUCTIONS
OPERATING
INSTRUCTIONS
the
the
USER-MAINTENANCE
INSTRUCTIONS
OPERATING
INSTRUCTIONS
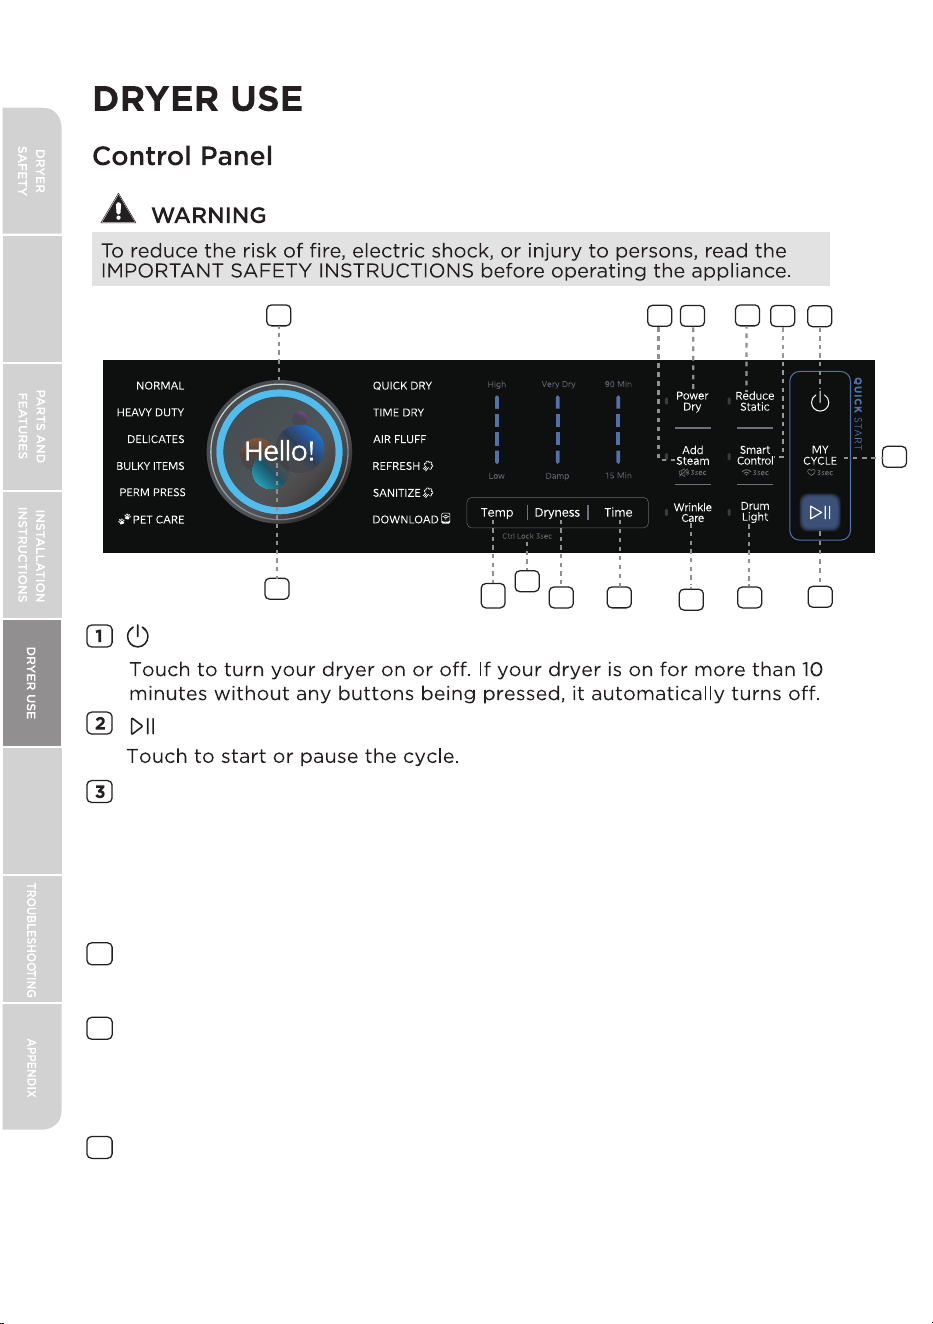
32
4
5
The Time buttons only work for Manual cycles. They do not work
if the dryer is set to a Sensor cycle. Press Time to increase the drying time.
Press Dryness to select the dry level (Damp to Very Dry). A different
dryness level will result in a different drying time. Select a lower dryness
level for clothes that will be ironed manually.
Select a suitable cycle for the type of load. The cycle you select determines
the heat level for the dryer. The NORMAL,HEAVY DUTY, BULKY ITEMS,
SANITIZE, PET CARE ,PERM PRESS,DOWNLOAD, and DELICATES cycles are
Sensor Dry cycles. The QUICK DRY, TIME DRY, REFRESH and AIR FLUFF
cycles are Manual Dry cycles.
Press Temp to adjust the drying temperature (Low to High).
POWER
START
Cycle selector
Time
Temp
Dryness
1
2
3
6
4
7
5
9
8
11
12
14
10
13
6
15
USER-MAINTENANCE
INSTRUCTIONS
OPERATING
INSTRUCTIONS
33
Press to activate the Power Dry function. Power Dry provides more
ecient drying.
Press and hold for 3 seconds to remember your selected cycle settings.
Press once to load your saved cycle settings.
When setting a cycle, the digital display will display the projected cycle
time. When the dryer is running, it will display the remaining cycle time.
10
11
12
- If the door is opened at any time, the smart control function will fail.
The smart control function automatically deactivates at the end
of each cycle. If you want to use the smart control cycle again, you
must reactivate it before the next cycle.
Smart Control
15
Digital display
14
Press and hold Temp and Dryness at the same time for three seconds to
activate the Ctrl Lock function. When Ctrl Lock is active, all buttons will
be deactivated except for the Power button. Press and hold Temp and
Dryness to deactivate Ctrl Lock.
Please see the Smart Control section for more information on how to
connect to the SmartHome app and controly your dryer remotely.
To control your dryer remotely, you must meet the following
conditions:
1.The dryer is connected to the internet.
2.The dryer door is closed.
Note:
Ctrl Lock 3sec
Power Dry
MY CYCLE
Wrinkle Care provides approximately 90 minutes of intermittent
tumbling in unheated air at the end of the cycle to reduce wrinkling.
The load is already dry and can be removed at any time during the
Wrinkle Care cycle.
Wrinkle Care
Press to activate or deactivate the Wrinkle Care function. When activated,
Reduce Static
Drum Light
13
Add Steam
Lights the dryer drum while the dryer is running.
This feature is designed to reduce static electricity in clothing.
Press to turn the Steam process on or off. When turned on, the Steam
indicator lights up. This process helps prevent wrinkles and turns on
after the laundry dryness level approaches Normal or above dryness.
OPERATING
INSTRUCTIONS
USER-MAINTENANCE
INSTRUCTIONS
Hold for 3 seconds to turn the signal on/off.
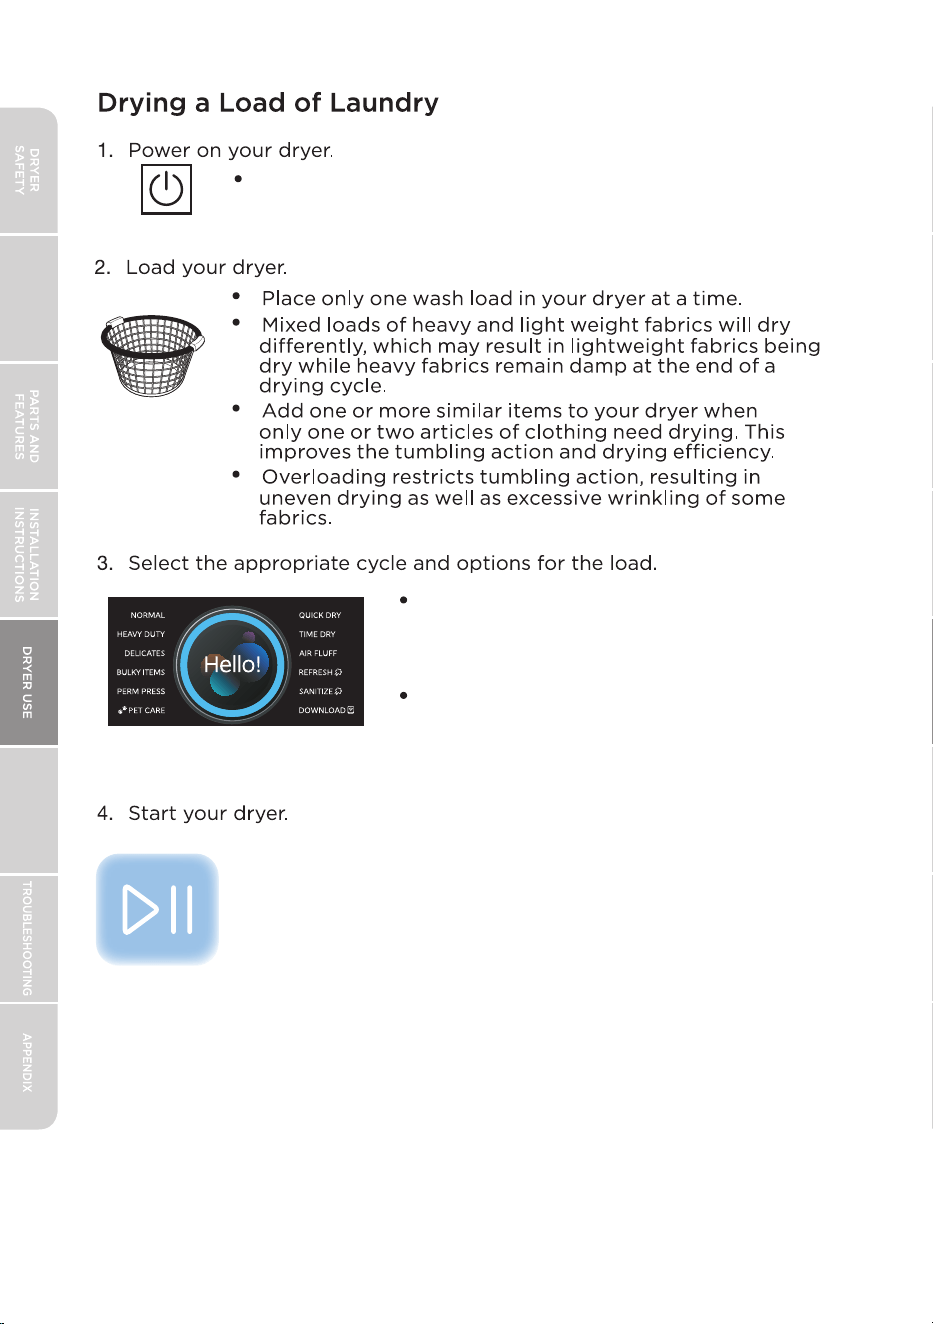
Use the Cycle Selector to select the
appropriate cycle for your laundry. See
the Cycle Chart on the next page for
more information.
34
Press the Power button.
Use the buttons to adjust your settings or
select the appropriate optional functions.
See the Cycle Chart for more information.
Pressing the Start/Pause button starts the selected cycle.
To pause an active cycle, press Start/Pause before opening the
door. Close the door and press Start/Pause again to resume the
cycle. Opening the door during an active cycle will always stop
the cycle. You must press Start/Pause to resume operation.
OPERATING
INSTRUCTIONS
USER-MAINTENANCE
INSTRUCTIONS
35
Very Dry
High
\
\
\
Very Dry
More
Normal
Damp
Very Dry
More
Normal
Damp
Very Dry
More
Normal
Damp
Very Dry
More
Normal
Damp
Very Dry
More
Normal
Damp
Very Dry
More
Normal
Damp
No Heat
High
Med High
Low
Low
90min
60min
30min
15min
90min
60min
30min
15min
90min
60min
30min
15min
Med High
Cotton
Underwear
Sensitive
Items
Linen
Med High
Med
Low
Med High
Med
Low
Low
High
Med High
Med
Low
DOWNLOAD - TOWELS
DOWNLOAD - COLOR CARE
DOWNLOAD - DRESS SHIRTS
DOWNLOAD - JEANS
NORMAL
QUICK DRY
TIME DRY
AIR FLUFF
REFRESH
SANITIZE
Very Dry
More
Normal
Damp
Quilt
Very Dry
More
Wrinkle-free
cottons
Synthetic
fabrics
Knits
Normal
PET CARE
BULKY ITEMS
Very Dry
More
Normal
Damp
Jeans
Corduroys
Work
clothes
Med
High
Med High
Low
Med
Med High
Med
Med
High
Med High
Med
Med High
Low
Med
High
Med High
Med
Damp
Very Dry
More
Normal
Damp
Pet mattress
Pet blanket
Pet coat
Pet scarf
OPERATING
INSTRUCTIONS
USER-MAINTENANCE
INSTRUCTIONS
Bedding
Comforter
\
Wrinkle-free
cottons
Knits
Dress
T-shirt
scarf
\
\
PERM PRESS
(No LED)
36
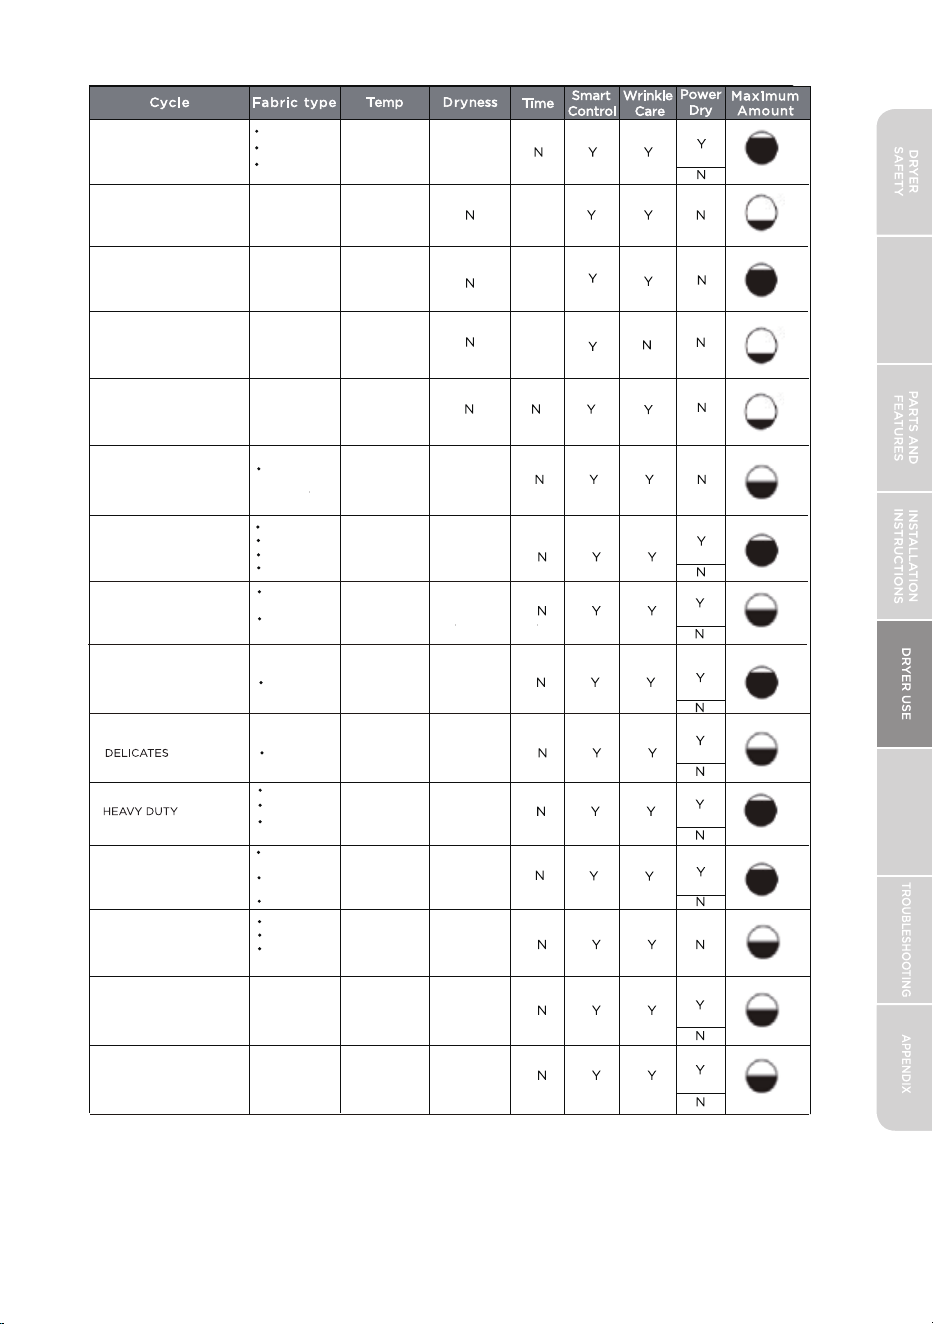
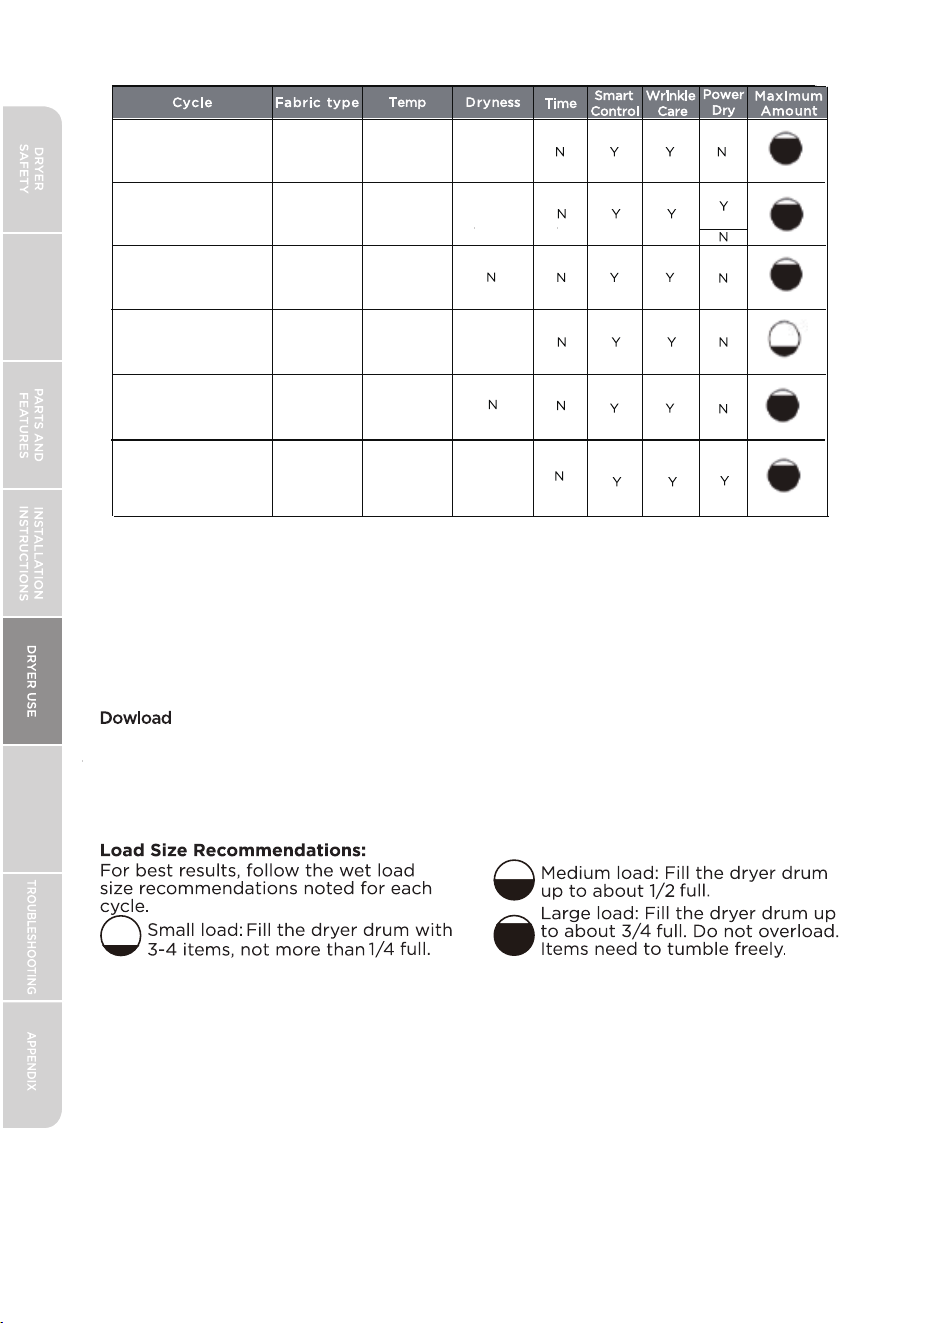
- Functions labeled "Y" are selectable for the cycle. Functions labeled "N" are
all optional functions that cannot be selected for the cycle.
- Please select higher dry levels to reduce any remaining moisture
content (dampness).
Set the Download cycle from the app menu. Select the cycle you want to use,
then press Download at the bottom of the next pop-up screen. The selected
cycle will be synced to your dryer and will be used when you select a
Download cycle.
- The 'Pet Care' program is specifically designed as a special cycle for drying
pet supplies. Please do not put pets into the dryer.
Very Dry
More
Normal
Damp
Very Dry
More
Normal
Damp
High
Med High
Medium
Low
No Heat
Low
Low
DOWNLOAD - EXTRA LARGE LOAD
DOWNLOAD - WATER PROOF
DOWNLOAD - DOWN JACKETS
DOWNLOAD - PREWASH - PET
HAIR LIFT
Very Dry
More
Normal
Damp
High
Med High
Medium
Low
DOWNLOAD - OVERNIGHT DRY
OPERATING
INSTRUCTIONS
USER-MAINTENANCE
INSTRUCTIONS
Note:
- “Independent testing shows that this product's "Sanitize" cycle reduces >99.9% of
common household bacteria on laundry.”
- “The sanitize cycle has preselected settings for sanitization which cannot modified.
For best sanitization use less than 8 lbs of fabric.”
DOWNLOAD - WHITES
High
Med High
Medium
Very Dry
More
\
\
\
\
\
\
- “Do not put live pets in dryer.”
(No LED)
- “Do not use sanitize cycle for items that cannot withstand high temperatures.”
37
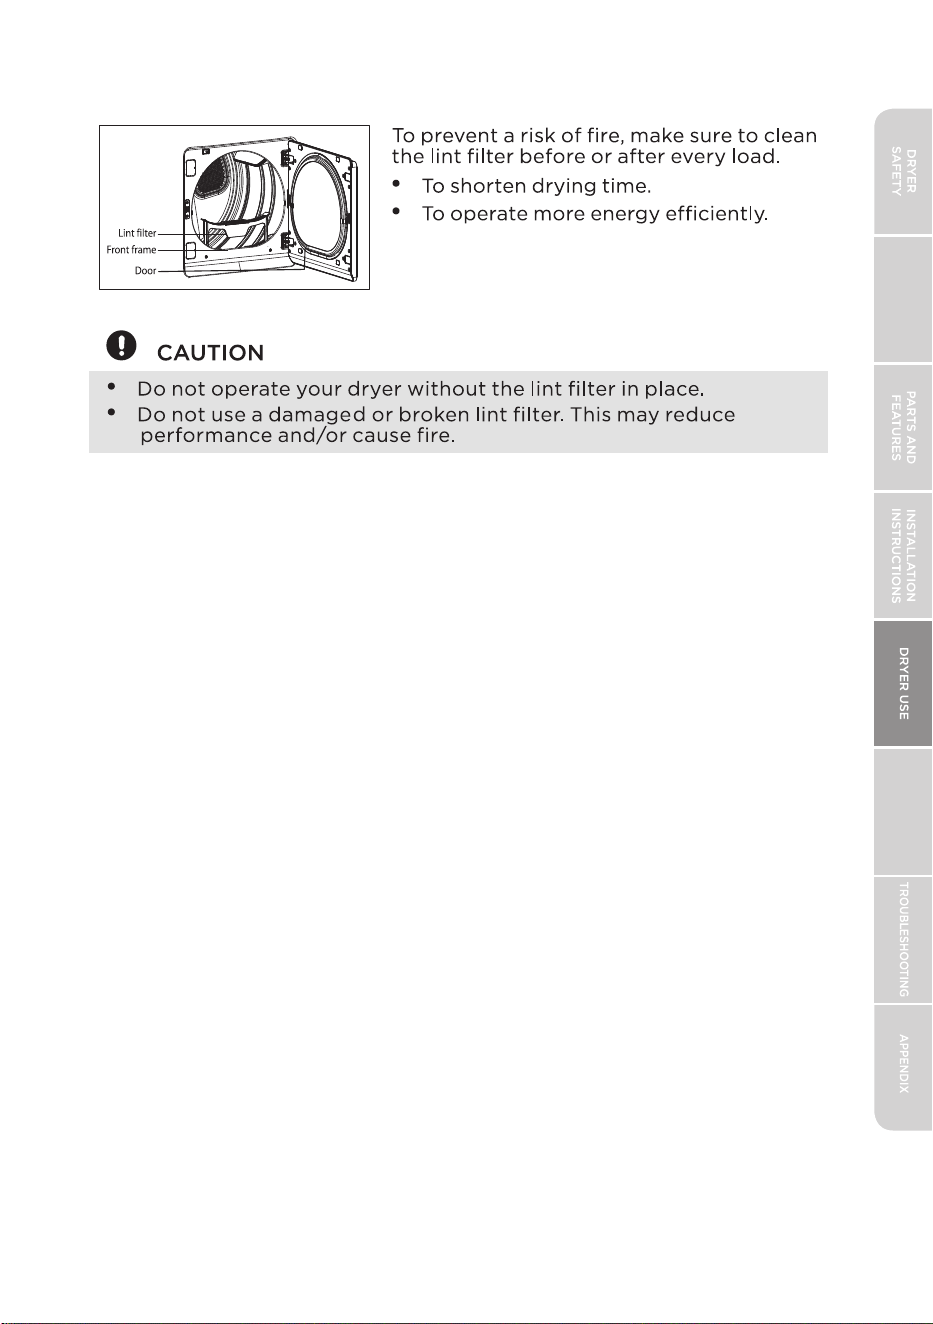
CLEAN THE FILTER
OPERATING
INSTRUCTIONS
USER-MAINTENANCE
INSTRUCTIONS
38
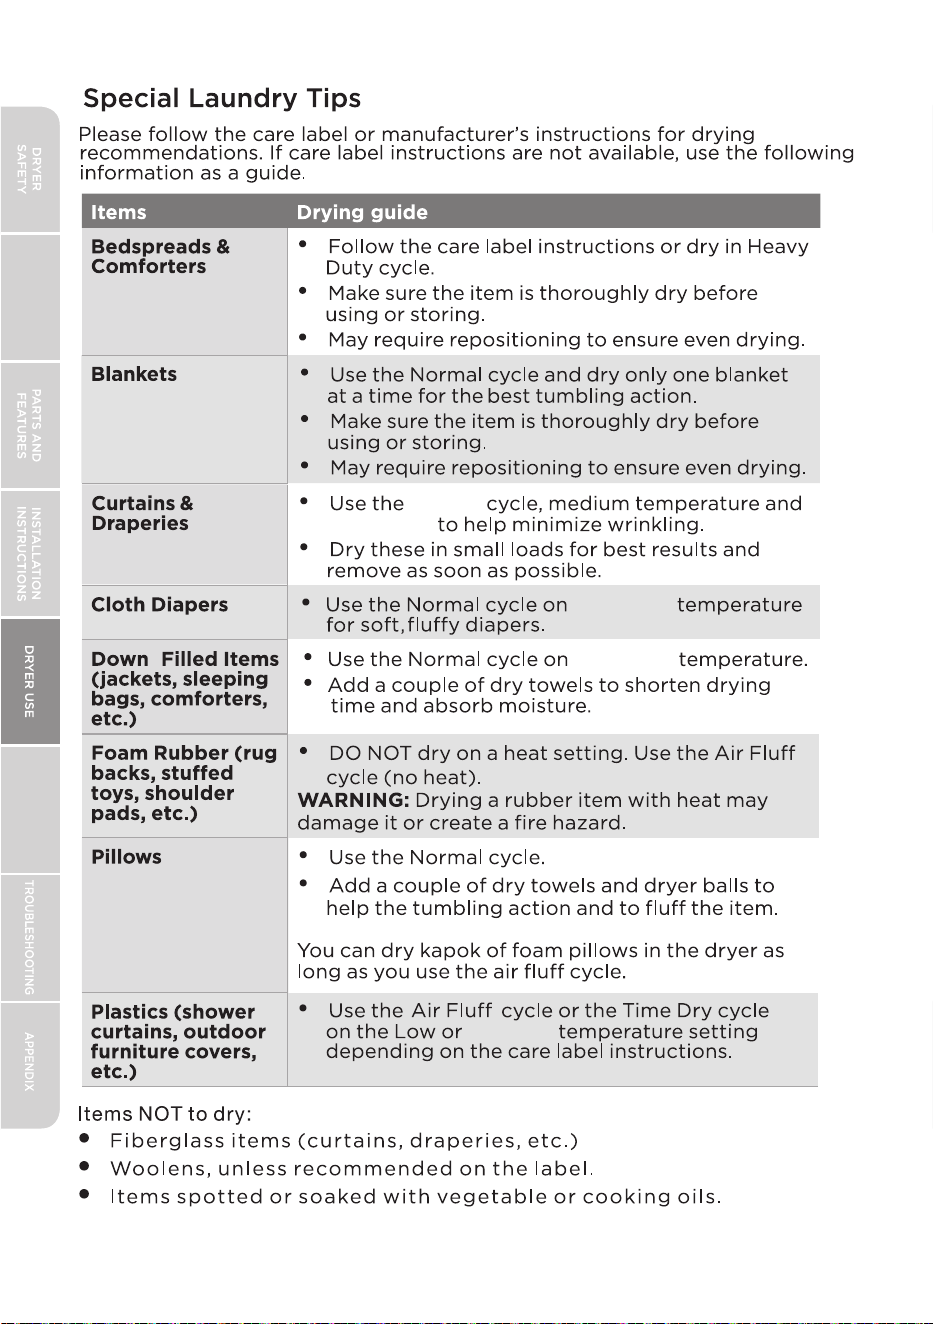
Normal
-
OPERATING
INSTRUCTIONS
USER-MAINTENANCE
INSTRUCTIONS
Damp Dry
Med High
Med High
No Heat
39
a
control your appliance with SmartHome
app and create a new account. You can also
register through a third- party account. If you already have an existing
account, use your existing account to log in.
has enabled Bluetooth and
connected to a wireless network. If not, go to Settings to activate
Bluetooth and connect to a wireless network.
Make sure your dryer is powered on. Press and hold Smart
Control for three seconds.
the
OPERATING
INSTRUCTIONS
USER-MAINTENANCE
INSTRUCTIONS
Note!
40
the wireless network
Press Smart Control on your appliance. This will connect your appliance to
the app and allow you to control the appliance remotely.
This appliance cannot connect to wireless networks that require further authentication,
which are often found in hotels, airports, etc. Please use a wireless network that does
not require further authentication.
a wireless network
If your device connected to a wireless network before but needs to reconnect, please
press + on the app's Home page and follow the instructions to connect your device.
.
If the connection fails
connection.
Frequency
operation
OPERATING
INSTRUCTIONS
USER-MAINTENANCE
INSTRUCTIONS
41
1
the
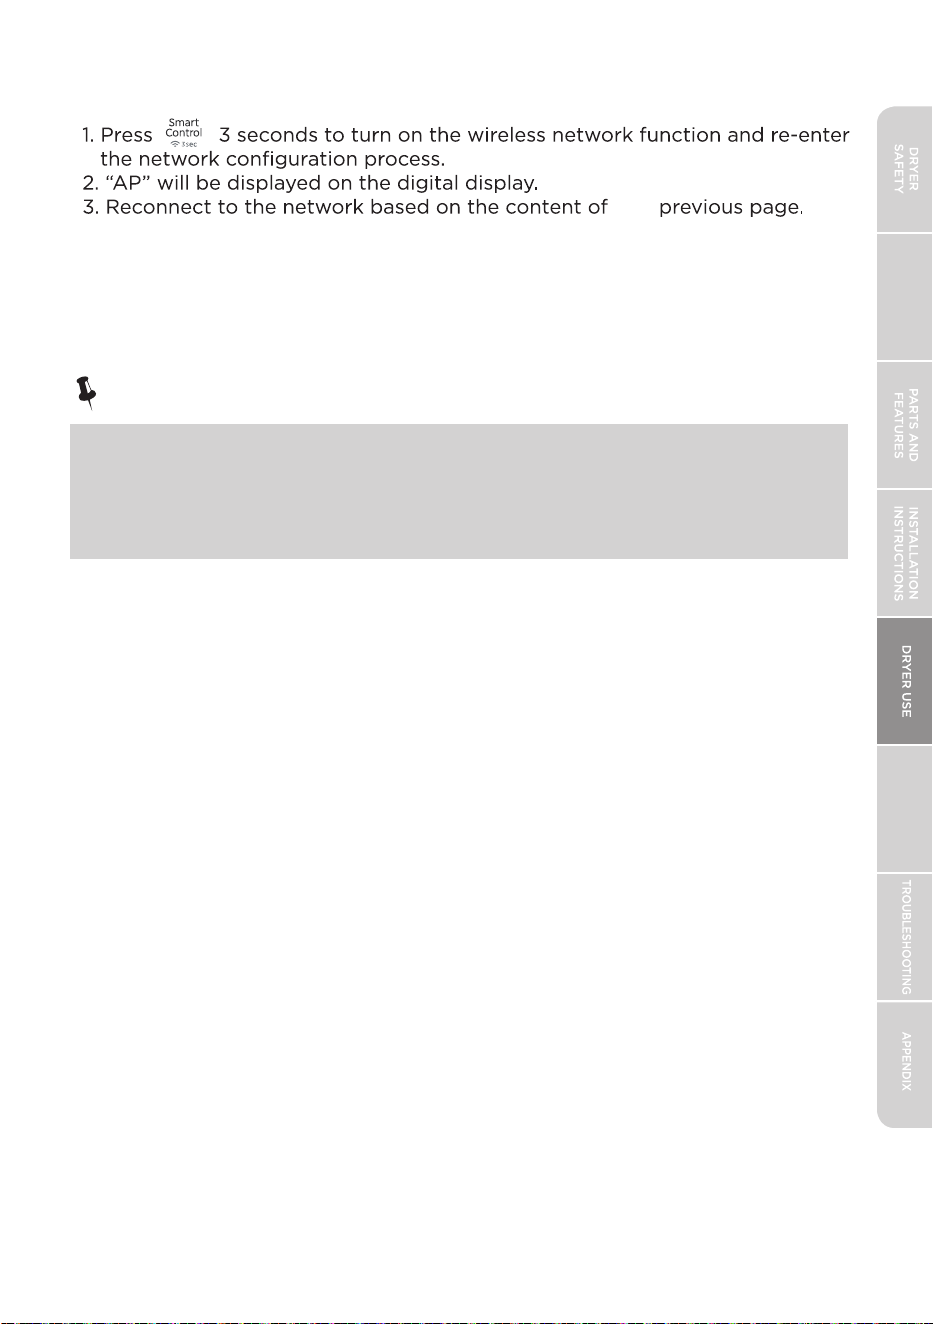
How to reset your wireless connection
OPERATING
INSTRUCTIONS
USER-MAINTENANCE
INSTRUCTIONS
Matter
This product is Matter-enabled. To get the most out of this feature, ensure
that your chosen third-party smart home platform or app fully supports the
Matter protocol.
Note!
When using third-party software to operate your appliance, follow the
instructions below if the program options do not appear:�
1. Exit the appliance operation screen and return to the main menu.�
2. Refresh the main menu page.
3. Select your appliance again,The program options should now be available.
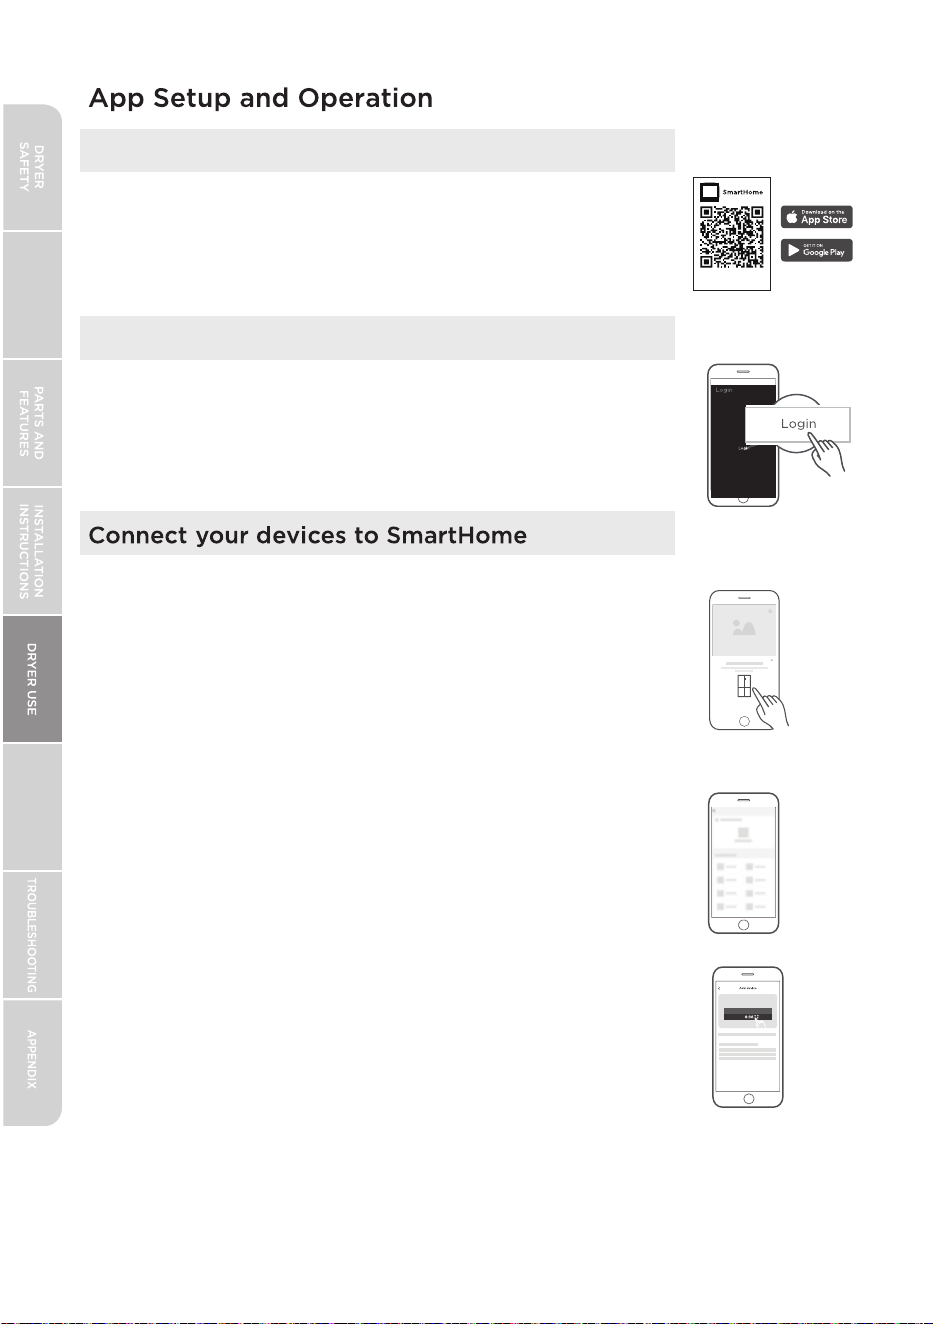
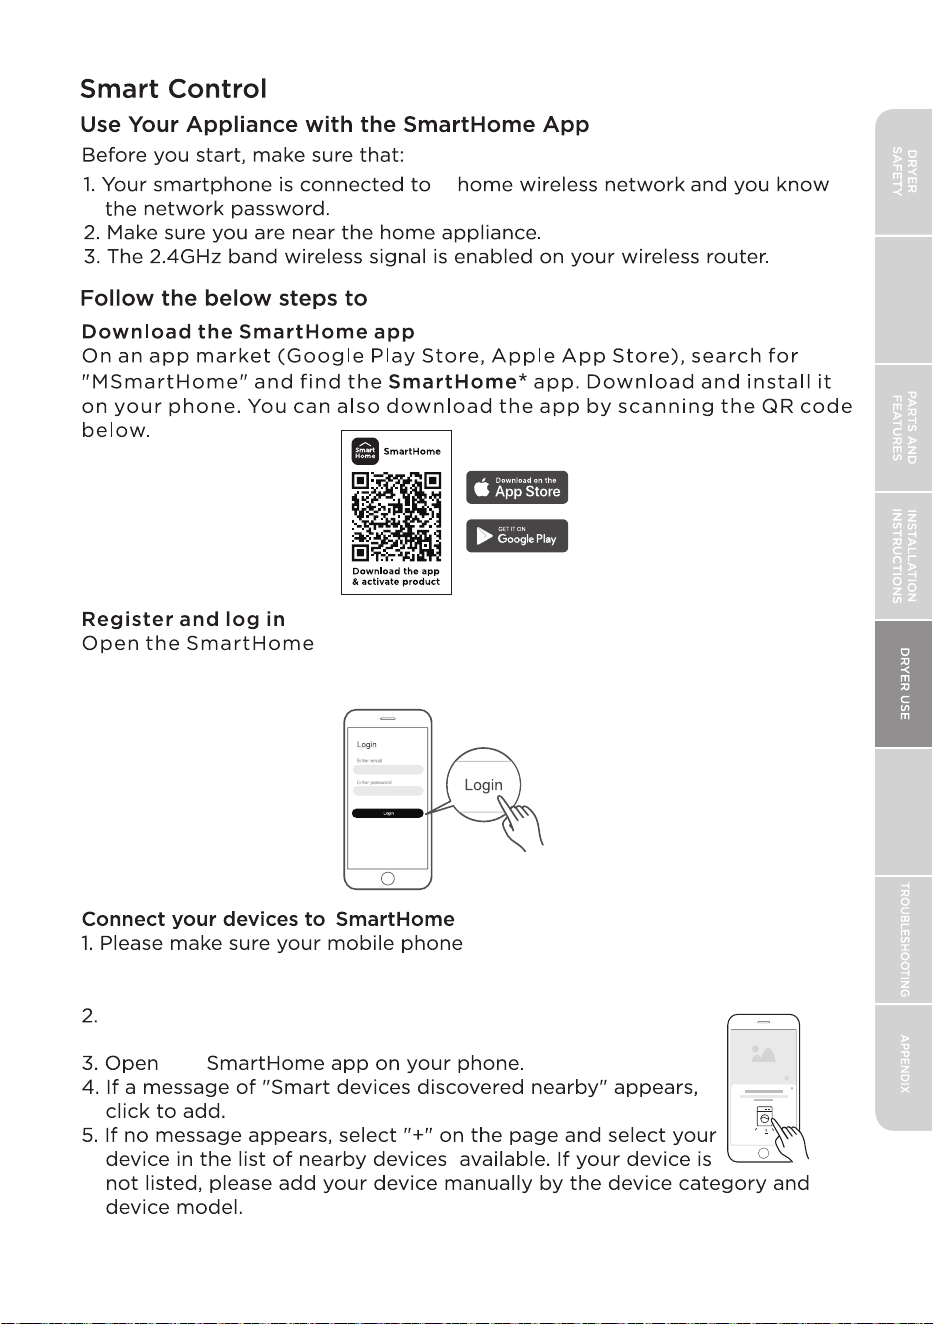
Download the SmartHome App
On an app market (Google Play Store, Apple App Store),
search for “MSmartHome” and find the SmartHome app.
Download and install it on your phone. You can also
download the app by scanning the QR code below.
Download the app
& activate product
Register and log in
Open the SmartHome app, and create a new account
to start (you can also register through a third-party
account). If you already have an existing account, use
the account to log in.
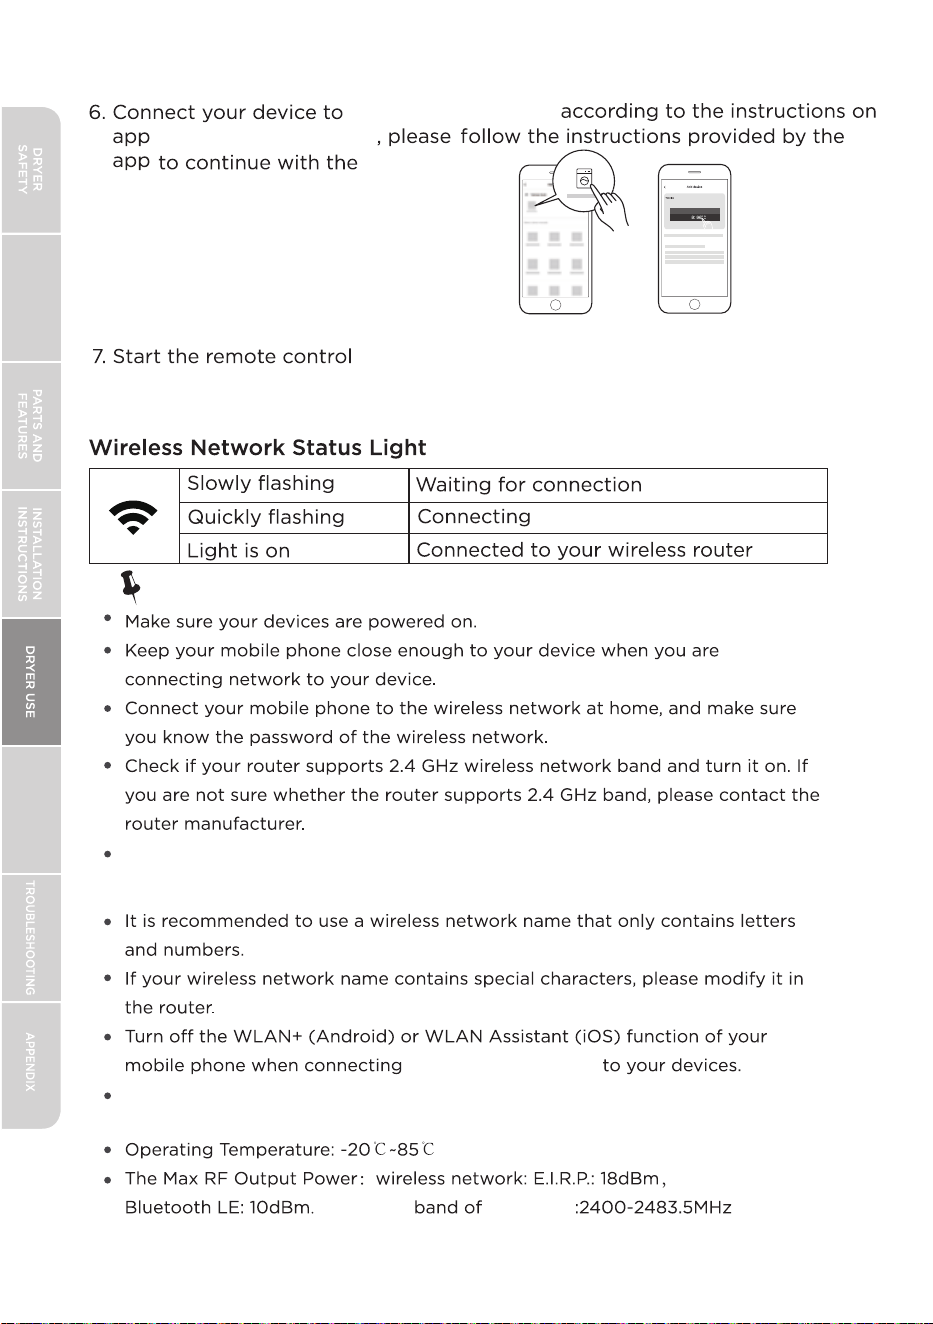
1. Please make sure your mobile phone is connected to a
wireless network. If it is not, go to Settings and enable
wireless networks and Bluetooth.
2. Please power on your devices.
3. Open SmartHome App on your phone.
4. If a message of "Smart devices discovered nearby" appears,
click to add.
5. If no message appears, select “+” on the page and select
your device in the list of nearby devices available. If your
device is not listed, please add your device manually by the
device category and device model.
6. Connect your device to the wireless network according to
instructions on app. If the connection fails, please follow
the instructions provided by the app to continue with the
operation.
42
OPERATING
INSTRUCTIONS
USER-MAINTENANCE
INSTRUCTIONS
Please note that changes or modifications of this product is not expressly approved by the party
responsible for compliance could void the user’s authority to operate the equipment.
This equipment complies with FCC’s RF radiation exposure limits set forth for an uncontrolled
environment.
The antenna(s) used for this transmitter must be installed and operated to provide a separation
distance of at least 20 cm from
all persons and must not be collocated or operating in conjunction
with any other antenna or transmitter. Installers must ensure that 20cm separation distance will be
maintained between the device (excluding its handset) and users.
This device complies with part 15 of the FCC rules. Operation is subject to the following two conditions:
(1) This device may not cause harmful interference, and (2) this device must accept any interference
received, including interference that may cause undesired operation.
Note: This equipment has been tested and found to comply with the limits for a Class B digital device,
pursuant to part 15 of the FCC Rules. These lim
its are designed to provide reasonable protection
a
gainst harmful interference in a residential installation. This equipment generates, uses and can radiate
radio frequency energy and, if not installed and used in accordance with the instructions, may cause
harmful interference to radio communications. However, there is no guarantee that interference will not
occur in a particular installation. If this e
quipment does cause harm
ful interference to radio or television
reception, which can be determined by turning the equipment o
and on, the user is encouraged to try
to correct the interference by one or more of the following measures:
• Reorient or relocate the receiving antenna.
• Increase the separation between the equipment and receiver.
• Connect the equipment into an outlet on a circuit di erent from that to which the receiver is
connected.
• Consult the dealer or an experienced radio/TV technician for help.
This equipment c
omplies with FCC radiation exposure limits set forth for an uncontrolled environment.
FCC Supplier’s Declaration of Conformity
Product Name:
Dryer
Model number:
Suppliers Name: Midea America (Canada) Corp.
Suppliers Address (Canada): Markham, ON L3R 5B4
Suppliers Website: http://midea.com/ca
Contact Email/Telephone: 1-888-365-2230
43
OPERATING
INSTRUCTIONS
USER-MAINTENANCE
INSTRUCTIONS
MLTE62S7ACG
This device complies with Industry Canada license-exempt RSS standard(s). Operation is subject to the
following two conditions: (1) this device may not cause interference, and (2) this device must accept
any interference, including interference that may cause undesired operation of the device.
CAN ICES-003(B)/NMB-003(B)
Midea is not responsible for any changes or modifications not expressly approved by Midea. Such
modifica
tions could void the user’s authority to operate the equipment.
For model: MWB-S-WB01
FCC ID: 2ADQOMWB-SWB01
IC ID: 12575A-WB01
44
OPERATING
INSTRUCTIONS
USER-MAINTENANCE
INSTRUCTIONS
45
This may scratch or damage the top cover of the dryer. Keep
them on the purchased pedestal or in a separate storage box.
USER-MAINTENANCE INSTRUCTIONS
WARNING – To reduce the risk of fire, electric shock, or
injury to persons, read the IMPORTANT SAFETY
INSTRUCTIONS before operating this appliance.
USER-MAINTENANCE
INSTRUCTIONS
OPERATING
INSTRUCTIONS
After opening the door, if there are gray marks, it is due to the tight
contact between the sealing ring and the metal, which is a normal
phenomenon. Simply wipe it with a damp cloth.
and electric filter assembly.
,
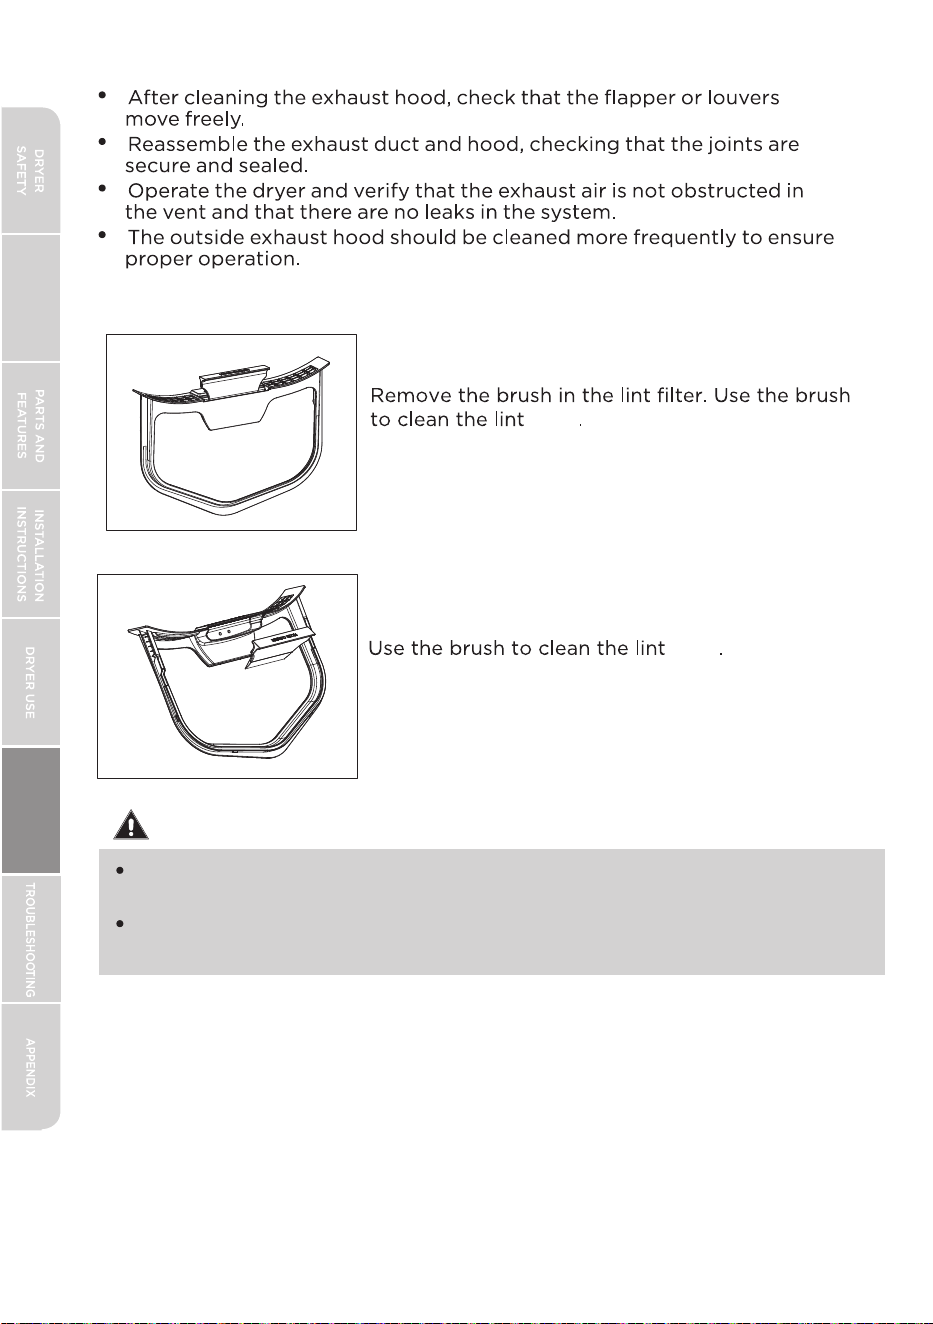
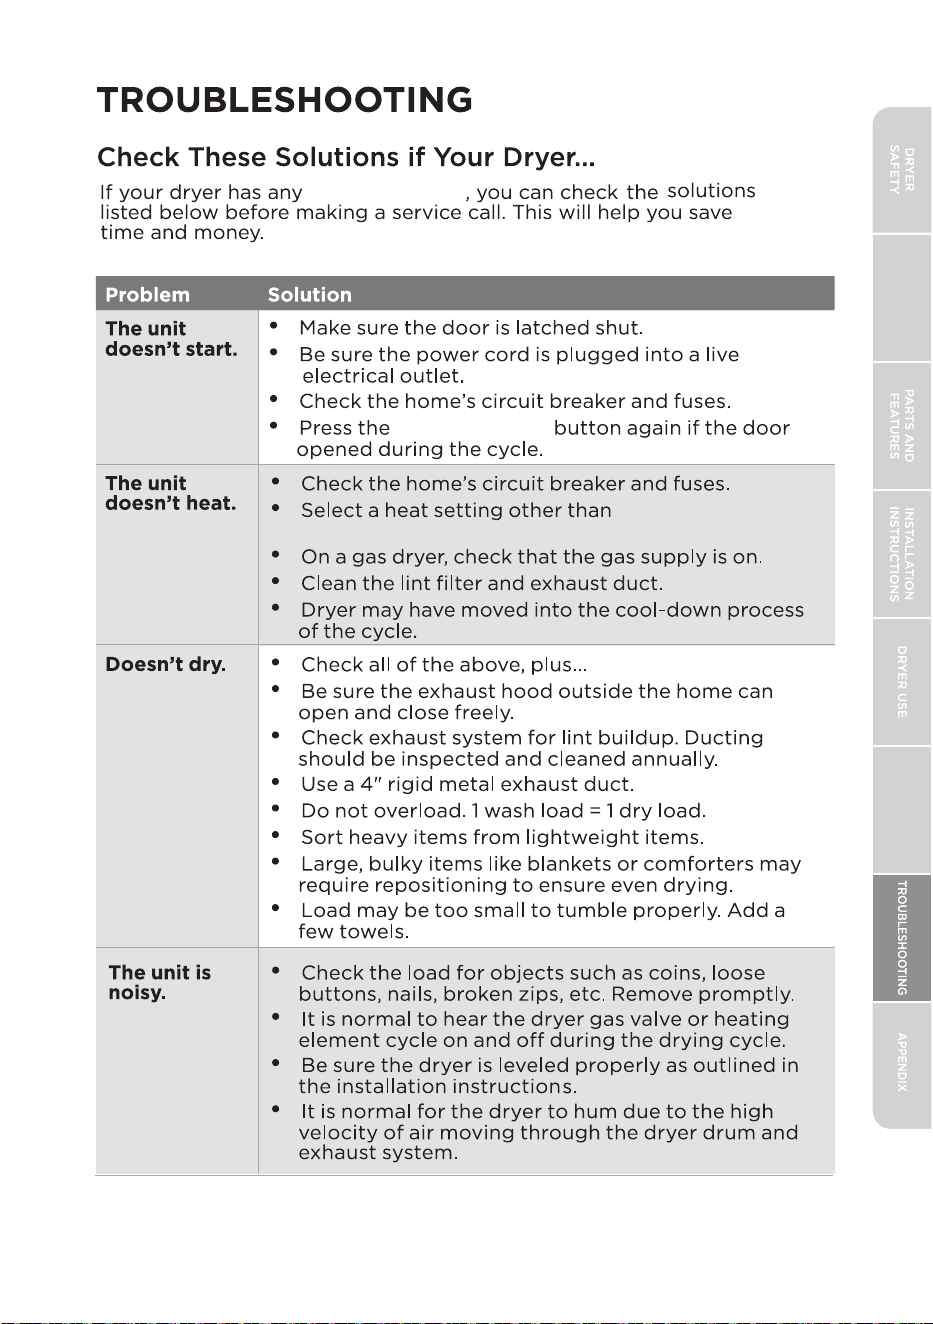
46
filter
filter
USER-MAINTENANCE
INSTRUCTIONS
OPERATING
INSTRUCTIONS
Filter:
Keeping dryer area clear and free from combustible materials,
gasoline, and other flammable vapours and liguids:
Keeping dryer area clear and free from items that would obstruct
the flow of combustion and ventilation air
WARNING
START/PAUSE
47
of the following
Air Fluff or another
no-heat cycle or setting.
was
USER-MAINTENANCE
INSTRUCTIONS
OPERATING
INSTRUCTIONS
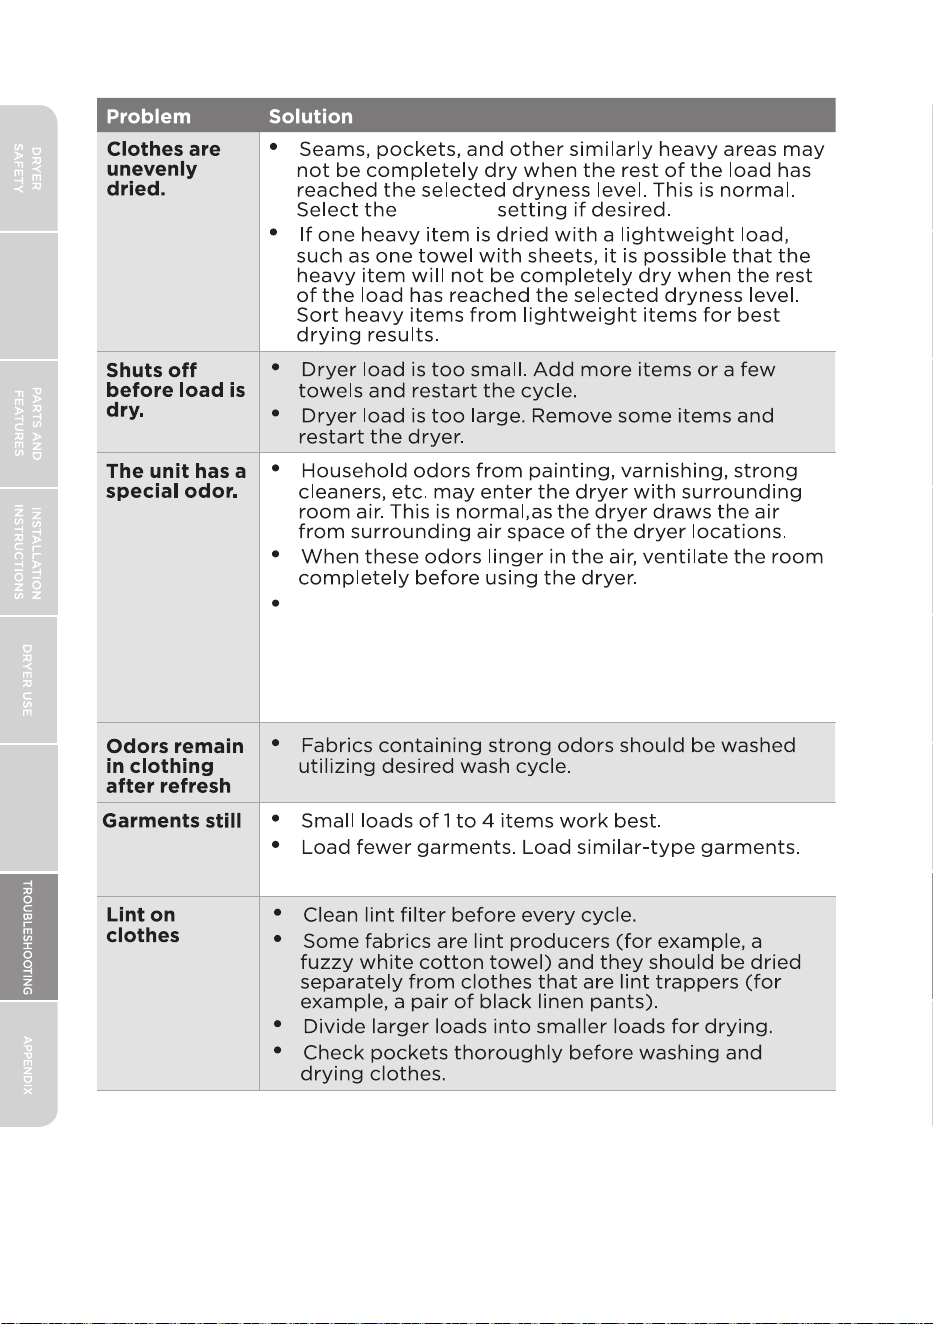
48
wrinkled
after
runing Wrinkle
Prevention
USER-MAINTENANCE
INSTRUCTIONS
OPERATING
INSTRUCTIONS
When the machine is used for the first time, a burnt
-like odor may occur during the initial heating phase.
This is caused by the evaporation of residual grease
on the heater protective cover after heating, which is
a normal phenomenon.
Very Dry
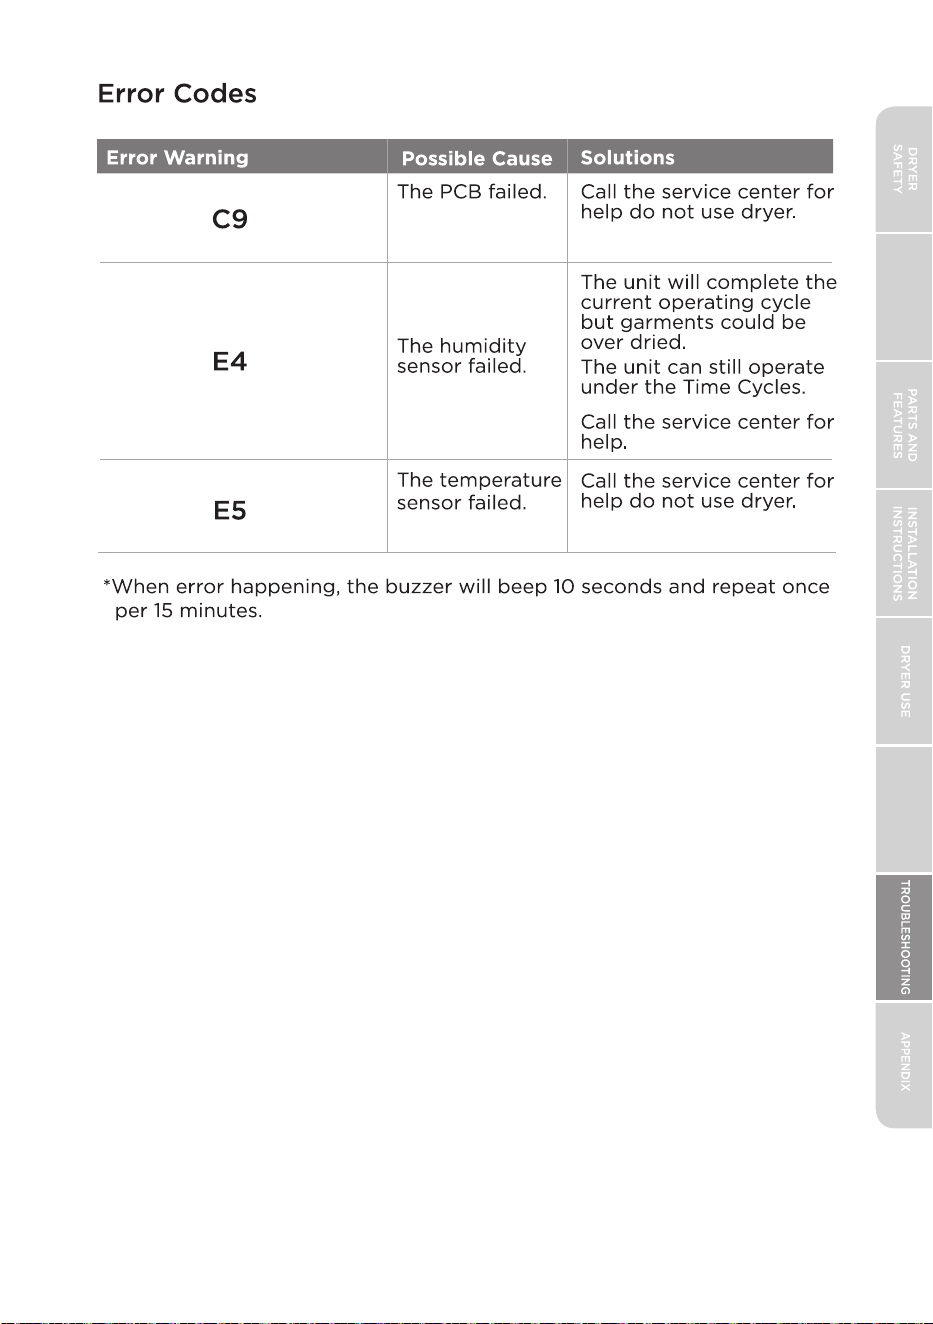
49
USER-MAINTENANCE
INSTRUCTIONS
OPERATING
INSTRUCTIONS
,
50
USER-MAINTENANCE
INSTRUCTIONS
OPERATING
INSTRUCTIONS

This product incorporates LVGL (Light and Versatile Graphics Library), an open
-source graphics library copyrighted by the LVGL development team (lvgl.io) and
distributed under the MIT open-source license.
The full LVGL copyright notice and license terms are provided below:
MIT licence
Copyright (c) 2021-2026 LVGL Kft
Permission is hereby granted, free of charge, to any person obtaining a copy of
this software and associated documentation files (the “Software”), to deal in the
Software without restriction, including without limitation the rights to use, copy,
modify, merge, publish, distribute, sublicense, and/or sell copies of the Software,
and to permit persons to whom the Software is furnished to do so, subject to the
following conditions:
The above copyright notice and this permission notice shall be included in all
copies or substantial portions of the Software.
THE SOFTWARE IS PROVIDED “AS IS”, WITHOUT WARRANTY OF ANY KIND,
EXPRESS OR IMPLIED, INCLUDING BUT NOT LIMITED TO THE WARRANTIES OF
MERCHANTABILITY, FITNESS FOR A PARTICULAR PURPOSE AND
NONINFRINGEMENT. IN NO EVENT SHALL THE AUTHORS OR COPYRIGHT
HOLDERS BE LIABLE FOR ANY CLAIM, DAMAGES OR OTHER LIABILITY,
WHETHER IN AN ACTION OF CONTRACT, TORT OR OTHERWISE, ARISING
FROM, OUT OF OR IN CONNECTION WITH THE SOFTWARE OR THE USE OR
OTHER DEALINGS IN THE SOFTWARE.
51
.
52
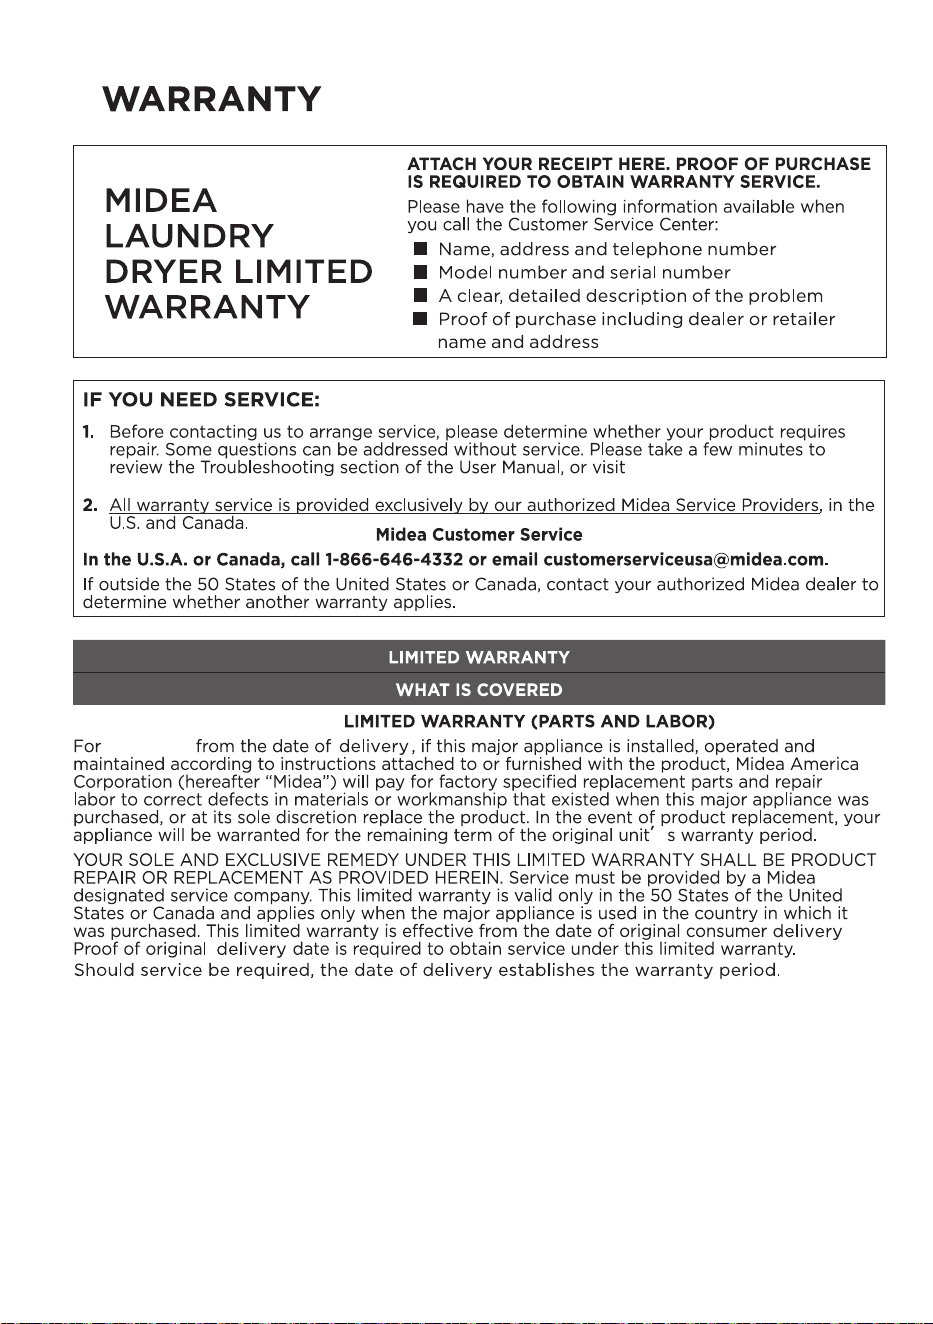
https://www.midea.com/ca
/support
two years
TWO YEARS
53
54
https://www.midea.com/ca/support