TUMBLE DRYER
OWNER’S MANUAL
Read This Manual
Read and follow the instructions carefully.
Keep the operation instructions handy for
use . future
Please contact the customer service if
you are in need of a new user manual.
MODEL:
TD-T37BS90HWM

CONTENTS
1
SAFETY INSTRUCTIONS
Safety Instructions ....................................................
INSTALLATION
Product Description .................................................
Installation ................................................................
OPERATION
Quick Start ..................................................................
Before Each Drying ...................................................
Control Panel .............................................................
Option..........................................................................
Display..........................................................................
Programmes................................................................
Instructions to Connection with the
...............................................................................
Drying Programmes Table .......................................
Steam Function ..........................................................
MAINTENANCE
Cleaning and Care .....................................................
Trouble Shooting ......................................................
Technical Specifications .........................................
TSmartLife
App
2
10
10
13
14
15
17
20
21
22
25
27
28
30
32
SAFETY INSTRUCTIONS
2
Intended use
Safety Instructions
For your safety,the information in this manual must be followed
to minimize the risk of fire or explosion, electric shock, or to
prevent property damage, personal injury or loss of life.
Explanation of the symbols:
This combination of symbol and signal word indicates
a potentially dangerous situation which may result in
death or serious injuries unless it’s avoided.
Warning!
This combination of symbol and signal word indicates
a potentially dangerous situation which may result in
slight or minor injuries.
Note!
This combination of symbol and signal word indicates
a potentially dangerous situation which may result in
slight or minor injuries or damage to property and the
environment.
Caution!
•
It is not for commercial use or shared use (i.e. by use
in an apartment.)
• This dryer is for indoor use only.
This dryer is intended for household use only.

SAFETY INSTRUCTIONS
3
Risk of Electric Shock
• Do not use any outlet with rated current less than that
of appliance.
• Do not pull the power cord forcefully. Hold power plug
instead.
• Do not .
• Do not bend, clamp or damage the power cord and the
power plug.
• If the power cable is damaged, it must be replaced by
the manufacturer, its service agent or similarly
qualified persons in order to avoid a hazard.
touch the plug with wet hands
Safety Instructions
• This appliance must be grounded. In the event of
malfunction or breakdown , grounding will reduce the
risk of electric shock by providing a path of least
resistance for electric current.
• This appliance is equipped with a cord having an
equipment-grounding conductor and grounding plug.
The plug must be plugged into an appropriate outlet
that is properly installed and grounded in accordance
with all local codes and ordinances.
• Improper connection for the appliance when using
not grounded outlet or when GND terminal of outlet
is not suitable with GND terminal of power plug, can
result in risk of electric shock. Check with a qualified
electrician or service person if you are in doubt as to
whether the appliance is properly grounded.
Warning!

SAFETY INSTRUCTIONS
4
•
external switching device, such as a timer, or connected
to a circuit that is regularly switched on and off by a utility.
• Do not use multiple outlet sockets,an extension power
cable or double adapter with this appliance.
• Plug must be accessible after installation.
The appliance must not be supplied through an
Risk of Injury
Do not attempt to repair,disassemble,or modify the appliance
yourself.
• Do not lean on the opened door of the dryer.
• Do not drink condensed water.
•
Risk of Prouduct Damage
•
See the related chapter in the user manual.
• Do not dry the clothes without spin-dry.
• Do not expose the dryer directly under the sun.
• Do not install the dryer in humid and wet environment.
• Before maintenance,unplug the appliance.
- Do not spray water on the appliance.
- Do not overturn the appliance.
Do not put more load than rated in this user manual.
• Do not operate the dryer without Doorfilter and Base
filter.

SAFETY INSTRUCTIONS
5
Risk of Explosion & Fire
•
substances such as kerosene or alcohol.
• The tumble dryer is not to be used if industrial chemicals
have been used for cleaning.
• Do not dry unwashed items in the tumble dryer.
• Items that have been soiled with substances such as
cooking oil, acetone, alcohol, petrol, kerosene, spot
removers, turpentine, waxes and wax removers should
be washed in hot water with an extra amount of detergent
before being dried in the tumble dryer.
• Items such as foam rubber (latex foam), shower caps,
waterproof textiles, rubber backed articles and clothes
or pillows fitted with foam rubber pads should not be
dried in the tumble dryer.
• Fabric softeners, or similar products, should be used as
specified by the fabric softener instructions.
• Oil-affected items can ignite spontaneously, especially
when exposed to heat sources such as in a tumble dryer.
The items become warm, causing an oxidation reaction
in the oil. Oxidation creates heat. If the heat cannot
escape, the items can become hot enough to catch fire.
Piling, stacking or storing oil-affected items can prevent
heat from escaping and so create a fire hazard.
• Remove all objects from pockets such as lighters and
matches.
Please do not dry the clothes with any flammable
Warning!

SAFETY INSTRUCTIONS
6
• If it is unavoidable that fabrics that contain vegetable or
cooking oil or have been contaminated by hair care
products are placed in a tumble dryer they should first
be washed in hot water with extra detergent. This will
reduce, but not eliminate, the hazard.
• Never stop a tumble dryer before the end of the drying
cycle unless all items are quickly removed and spread
out so that the heat is dissipated.
• Openings must not be obstructed.
• be cleaned frequently.
•
Door filter and Base filter should
Lint must not be allowed to accumulate around the
tumble dryer(heat exchanger, inside drum,around door
etc.)
Safety with children
• by Cleaning and user maintenance shall not be made
children without supervision.
• Animals and children may climb into the machine. Check
the machine before every operation.
• Glass door may be very hot during the operation. Keep
children and pets far away from the machine during the
operation .
• This appliance is not intended for use by persons
(including children) with reduced physical,sensory or
mental capabilities or lack of experience and knowledge
unless they have been given supervision or instruction
concerning use of the appliance by a person responsible
• Children should be supervised to ensure that they do not
play with the appliance.
for their safety.

7
•
•
For use in EU contries:
The appliance can be used by children aged from 8
years and above and persons with reduced physical,
sensory or mental capabilities or lack of experience
and knowledge if they have been given supervision
or instruction concerning use of the appliance in a
safe way and understand the hazards involved.
Children of less than 3 years should be kept away
unless continuously supervised.
UV Radiation Safety
This warning only covers products which contain a
UV-C lamp and which have a disinfection function
with UV-C lamp.
• The device contains a lamp that emits UV-C rays. Do
not look at the source of light while the lamp is
operating!
• UV-C Lamp is used to provide disinfection in textile
products.
• Do not take the UV-C Lamp out of the device and do
not operate it outside!
• Do not touch the lamp!
• Use of the product except for its purpose or damage
to the UV-C lamp protection glass or surrounding may
cause dangerous UV-C radiation to occur. UV-C
radiation can damage the eyes and skin even in low
doses. Do not operate any product which is damaged!
• Do not remove the UV-C lamp protection glass. Do not
operate the product without the UV-C lamp protection
glass!
•
SAFETY INSTRUCTIONS

SAFETY INSTRUCTIONS
8
• After the stops due to various reasons (power outage,
fuse problem, machine door opening, etc.) while UV
Hygiene Programs are in progress, the program will
resume to disinfection from where it left.
• In cases where UV-C lamp and related parts need to be
replaced (expiration of lamp life, break of lamp glass, etc.),
call the technical service. Do not try to replace the parts
by yourself. When waiting for technical service, make sure
the machine cover is closed and the plug is disconnected!
• Keep children away while using any programmes with
activated UV-C Lamp!
• It can cause allergies, don’t breathe directly!
• Always read the product guide before using the device and
use the product according to the instructions!
• The placement of the UV Lamp and lamp protector glass in
your product is visually indicated.
• Hygiene programme incorporating UV is effective for
removing Escherichia coli, Staphylococcus aureus bacteria.
SAFETY INSTRUCTIONS
9
Model
Rated capacity
TD-T37BS90HWM
8.0kg
For use in EU contries
This appliance is labelled in accordance with the European
Directive 2012/19/EU on waste electrical and electronic
equipment (WEEE). The directive provides the framework
for the EU-wide take-back and recycling of waste
equipment.
Disposal of old appliances
The devices marked with this symbol
must not be disposed of in household waste!
For use in other contries
This appliance doesn’t have symbol above. If you
want to dispose your appliance, please contact your
local authority or retailer for futher information on
collection and disposal.
ENVIRONMENT
INSTALLATION
10
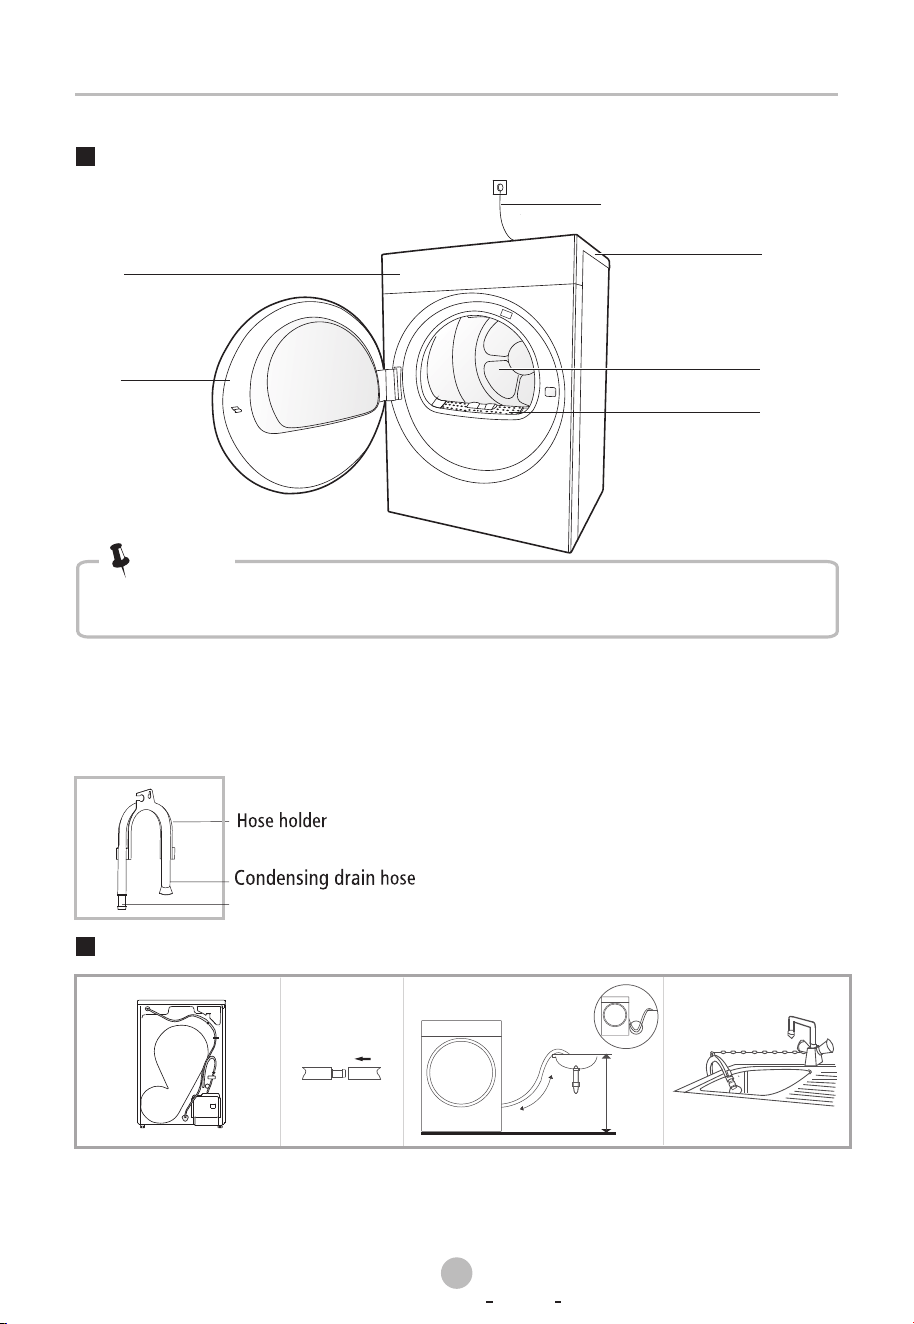
Product Description
Take off the drain hose.
Put the hose holder in the washing
basin or any other sink.
Installation
Insert the drain
hose and the
external drainage
hose into the
connector.
Max. 120cm
200c
m
x
Accessories
The following parts are optional for specific models.
If your dryer has following parts, please wear gloves to them
as per the instruction below .
install
Connector
The product picture is for illustration only, please refer to real product as
reference.
Note!
Door
Drum
Door filter
Control panel
Top board
Power cord
Transport
Move cautiously. Do not grasp any salient parts of machine. The machine door cannot
be used as the handle for transport. If the dryer can't be transported erectly, the dryer
can be tilted to right less than 30°.
Risk of injury and damage!
Improper handling of the appliance may result in injury.
11
INSTALLATION
• This appliance should only be transported by two or more people holding the
appliance securely.
• Remove all obstacles on the transport route and from the installation location, e.g.
open doors and clear away objects lying on the floor.
• Do not use the open door as a handhold.
• Remove all package material before using the appliance.
• Before setting up the tumble dryer, check it for any externally visible damage.
Do not install or use a damaged tumble dryer.
• Do not install the tumble dryer in a room where there is a risk of frost occurring.
At temperatures around freezing point the tumble dryer may not be able to operate
properly. There is a risk of damage if the condensed water is allowed to freeze in the
pump and hoses.
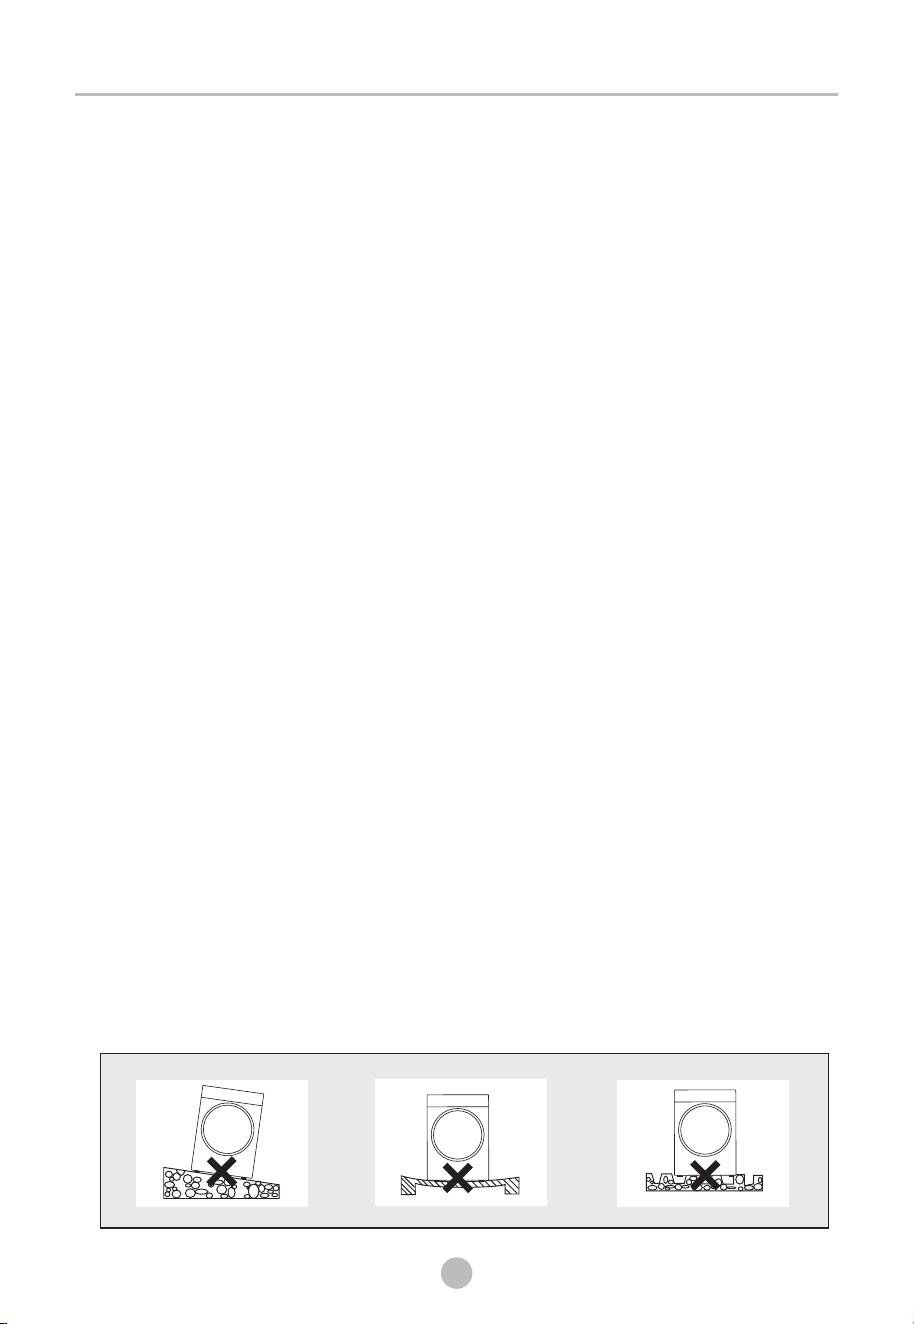
Installation Place
•
• The appliance must not be installed behind a lockable door, a sliding door or a door
with a hinge on the opposite side to that of the tumble dryer, in such a way that a
full opening of the tumble dryer door is restricted.
• Do not restrict the floor clearance through deep pile carpets, strips of wood or
similar. This might cause heat built-up which would interfere with the operation of
the appliance.
Do not allow children to play with packaging materials.
1. It is recommended that, for your convenience, the machine is positioned close to
your washing machine.
2. The tumble dryer must be installed in a clean place, where dirt does not accumulate.
Air must be able to circulate freely around the appliance. Do not obstruct the front
air inlet or the air intake grilles at the back of the machine.
3. To keep vibration and noise within minimum level when the dryer is in use, it must
be placed on a firm and level surface.
4. The feet must never be removed.
12
INSTALLATION
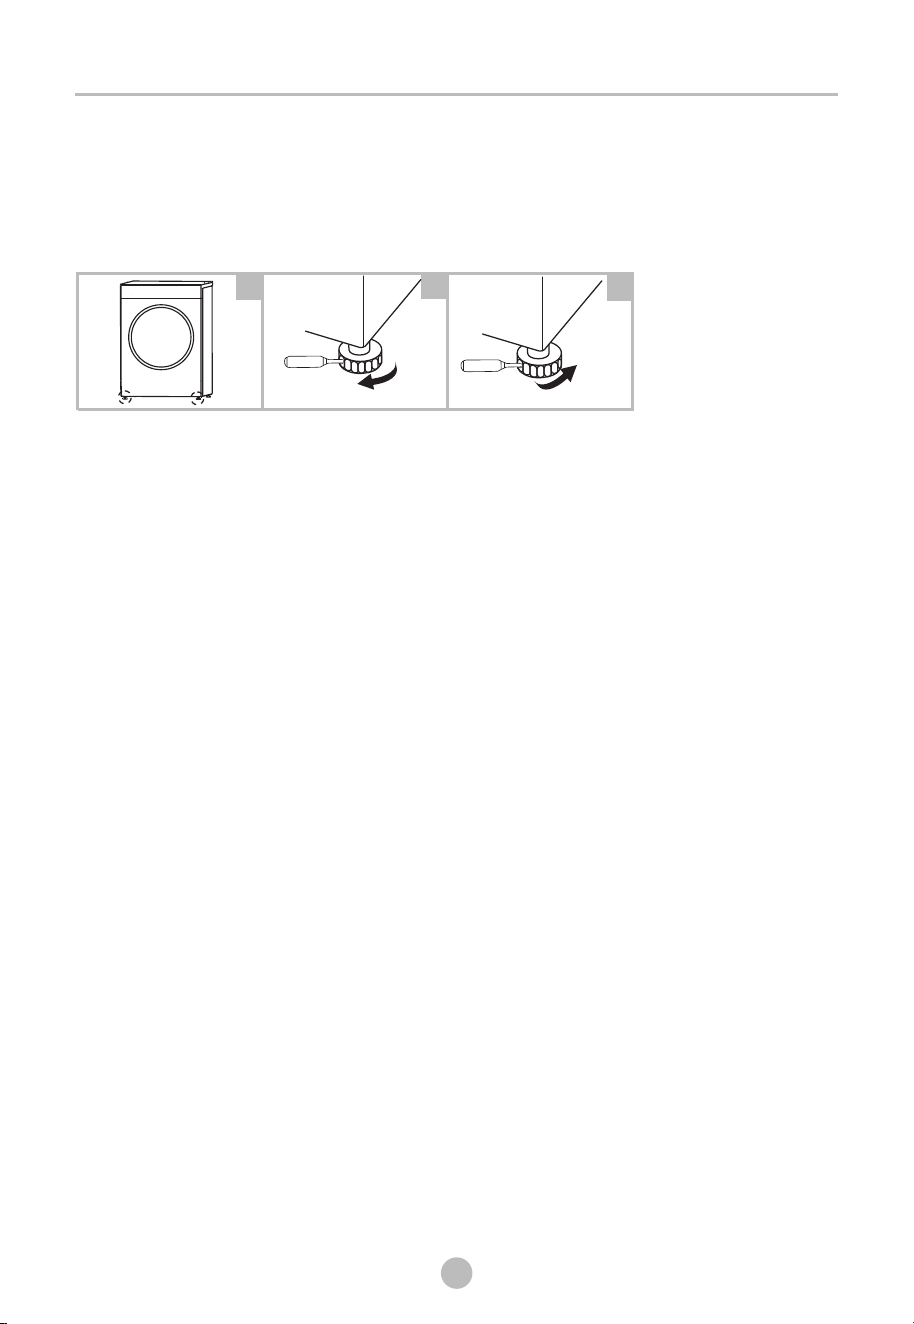
Level Adjusting
Once in its permanent operating position, check that
the dryer is absolutely level with the aid of a spirit level.
If it is not, adjust the feet by hand or using a tool.
Power Supply Connection
1.Make sure that the voltage of the power supply is more than the electric specification.
2.Do not connect the dryer with the power connection board, a universal plug or socket,
do not use multi-plug adapters and extension cables.
2
3
1
Raise
Lower

OPERATION
13
After Drying
Drying
Buzzer beep and " "on display.End
1
2 3
open the door and
take out laundry
clean the filter
power off
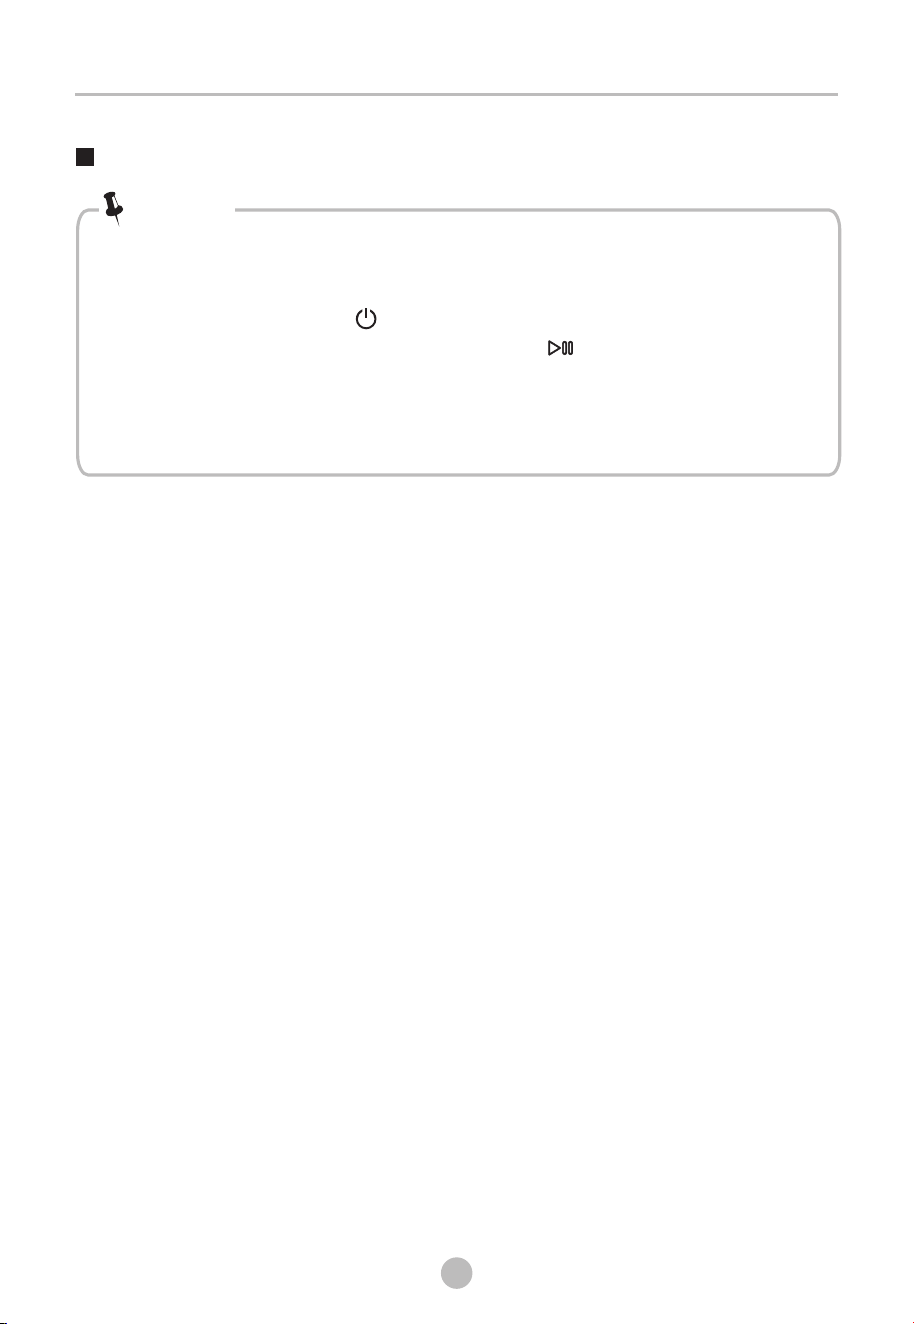
Quick Start
Before using, make sure the tumble dryer is installed correctly.
Note!
1
plug in
2
load
3
close the door
start
on
select program
select function
or default
• If the socket with a switch is used, please press the switch to turn off the power directly.
Note!
Before Drying
program
14
OPERATION
Before Each Drying
•
Put some clean rags into the drum.
Plug the power, press 【 】
Select the 【TIME DRY】 Programme, press 【 】button.
After finishing this programme, please follow the “cleaning and care ”
to clean the filter door.
• During drying, the compressor and the water will generate some noise
which is entirely normal.
Leave it to stand for 2 hours after transporting. Before first use, please use
the soft fabric to clean the inside drum.
1.
2. .
3.
4.
Note!
1.Before drying, thoroughly spin the laundry in washing machine. High spin speed
shortens the drying time and saves energy.
2.For even drying result, sort the laundry according to fabric type and select the
appropriate drying programme.
3.Before drying, please close zips, hooks and eyelets, buttons, tie fabric belts, etc.
4.Remove all objects from pockets such as lighters and matches.
5.Remove underwiring from bras.
6.Close duvet covers and pillow cases to prevent small items from being rolled up
inside them.
7.Leave jackets open and undo any long zips so that textiles dry evenly.
8.Do not over dry the clothes, because over dried clothes can easily get creases.
9.Do not dry the articles containing rubber or similar elastic materials.
10.Keep the area around the tumble dryer clean. Coal dust or flour may cause an
explosion.
11.The door can be opened only after the programme of the tumble dryer is finished
to avoid being scalded by hot steam or hot drum.
12.Clean the door filter after each use to avoid extension of drying time and increase
of energy consumption.
13.Do not dry clothes after dry-clean process.
2
1
4
3
5
15
OPERATION
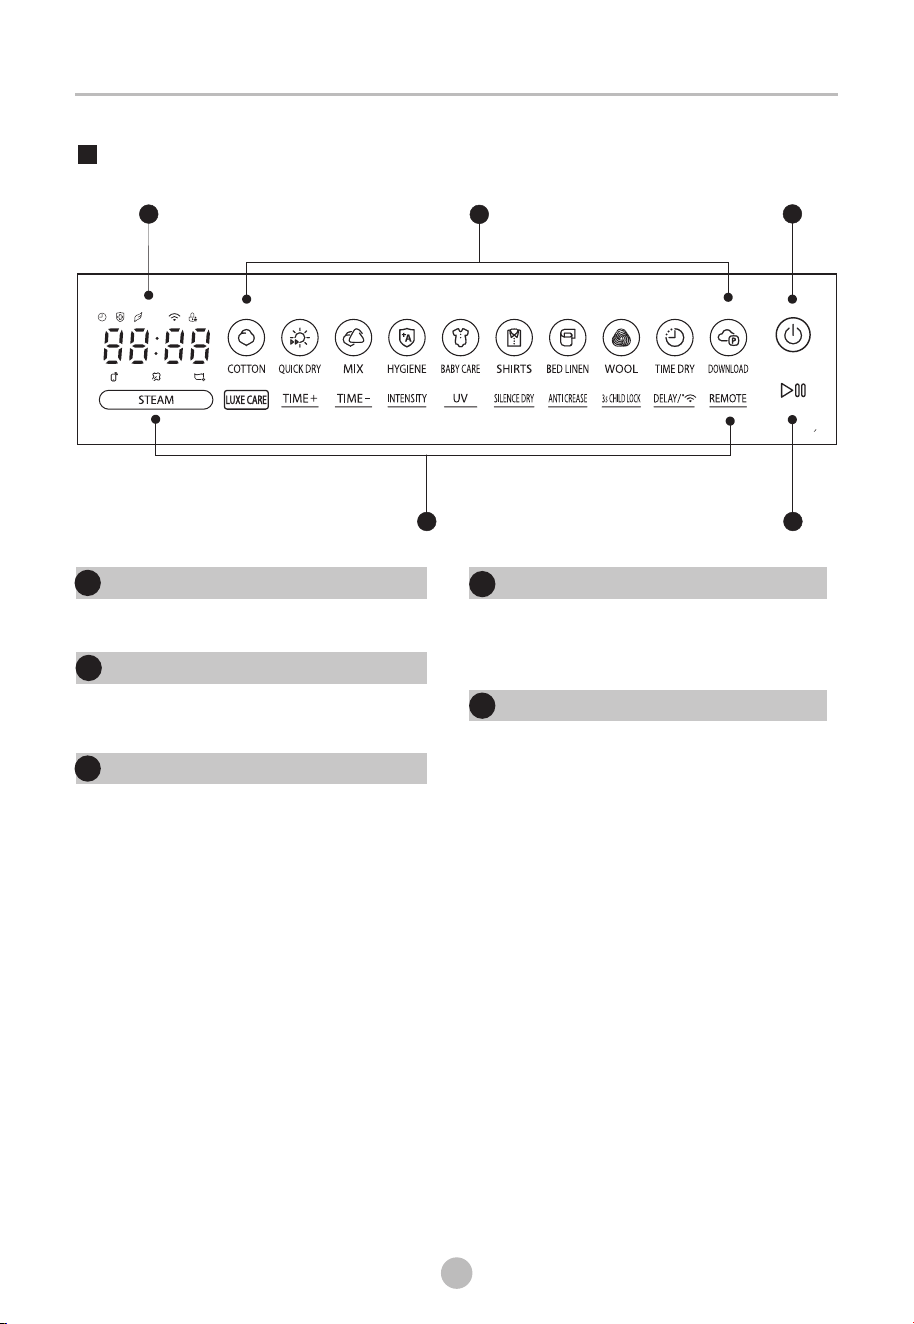
Control Panel
On/Off
Product is switched on or off.
1
1
Start/Pause
the button to start or pause the
drying cycle.
Press
1
2
Option
These buttons are used for setting
additional functions.
3
Display
The display shows the setting, estimated
program time remaining and status messages
of your dryer.
4
Programmes
Different drying cycles can be selected
according to the users need and the type of
laundry to be dried.
5
16
OPERATION
Do not put more load than rated.
• Do not dry dripping wet laundry. The dryer might get damaged.
•
Note!
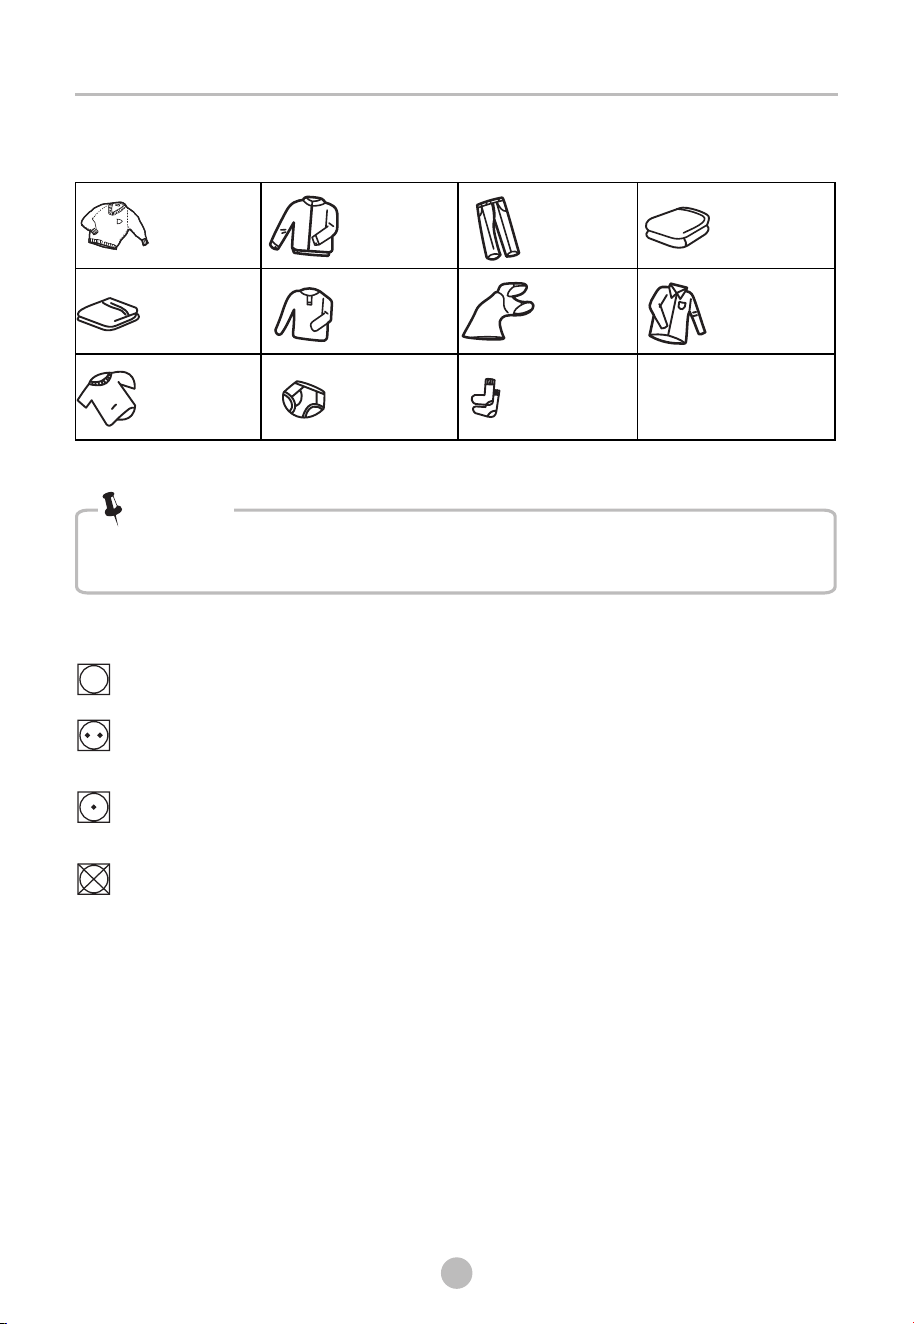
The reference weight of dry clothes (weight per item)
Sweater
(mixed 800g)
Jacket
( 800g ) cotton
Jeans
(800g)
Bath Towel
( 900g )cotton
Single bedsheet
( 600g )cotton
T-Shirt
( 180g )cotton
Work clothes
( 1120g)
Underwear
( 70g )cotton
Pyjamas
( 200g)
Socks
( 50g )mixed-weave
Shirt
( 300g )cotton
Only dry laundry suitable for tumble drying. Regard the laundry care labels:
Suitable for tumble drying.
Normal drying process : Dry under medium temparature.
Mild drying process: Dry under lower temparture.
Do not tumble dry: Articles unsuitable for drying in the tumbler.

17
OPERATION
Option
INTENSITY
You can adjust the dryness level of the laundry by pressing the【INTENSITY】button.
1.The intensity function can be activated only before the programme starts.
2.Press the【INTENSITY】button repeatedly to increase the drying grade.
3. Except the【WOOL】,【TIME DRY】,【HYGIENE】,【QUICK DRY】programme,
all the other programmes can be adjusted with the【INTENSITY】function.
INTENSITY
STEAM
By pressing the【STEAM】button, you can switch the steam On or Off.
1.【STEAM】is optional for the following program:【COTTON】,【BABY CARE】,
【SHIRTS】and【MIX】.
2. When dry level 【INTENSITY】 is selected, steam can not be selected and vice
versa.
LUXE CARE
The LUXE CARE function can reduce or eliminate wrinkles in clothes by
using steam, to make clothes more smooth and comfortable.
Users can select the corresponding program for luxe care based on the
material of the clothing.
LUXE CARE
TIME+/TIME-
When the【TIME DRY】 programme is selected, the 【TIME+】and【TIME-】
buttons can be used to adjust the drying time in 10 min. steps.
TIME+
TIME-
After selecting the program, you can choose the "UV" function
according to your needs. Press 【UV】 to select this function.
Press it again to cancel. After selecting the “Hygiene" function, the clothes
are sterilized during the drying process, making the clothes cleaner and
safer.
Use this function with caution for light, thin or delicate laundry.
UV
UV
18
OPERATION
SILENCE
DRY
SILENCE DRY
By pressing the 【SILENCE DRY】button, you can switch the silence dr y
On or Off.
When the silence dry programme starts, the whole machine sounds
quieter.
ANTI CREASE
ANTI CREASE
At the end of the drying cycle, the anti-crease time is 30 minutes (default)
or 120 minutes (selected). This function prevents the laundry from creases.
The laundry can be removed during the anti-crease phase.
Except【WOOL】, all the other programmes
have this function.
【QUICK DRY】, 【TIME DRY】
3s CHILD LOCK
1.This machine incorporates a special child safety lock, which can prevent
children from pressing buttons or operating unintentionally.
2.When the drying cycle is running, press the【3s CHILD LOCK】button
at the samefor time 3 seconds to start child lock function.
3.When child lock function is set, the display will show child lock icon and
the blinking “CL”, and all buttons are deactivated, except【 】button.
4. To deactivate the child lock function, the【3s CHILD LOCK】button
shall be pressed at the same time for 3 seconds.
DELAY
This function is used for delaying the end of the drying programme up to 24
hours. When the delayed programme starts, the time starts to countdown on
the display and the delay icon lights.
1.Load your laundry and make sure the machine door is closed.
2.Press the 【 】button, then use the programme selector knob to select
the desired programme.
3.You can additionally select the 【INTENSITY】or【SILENCE DRY】functions
according to your need.
4.Press the【DELAY/ 】 button to select the desired delay time.
5.After the 【 】 button is pressed, the Dryer is at the running condition.
The drying procedure will be automatically completed when the delay time
is over.
6.If you press the【 】button again, the delay function will be paused.
7.If you want to cancel the “Delay” function, please press the 【 】button.

19
OPERATION
WIRELESS NETWORK
Press【DELAY/ 】 for 3 seconds to configure the network or reset
the network.
REMOTE
This is the switch of remote control, if you want to use your smartphone
to control the machine remotely, you need to hold 【REMOTE】for 3
seconds. Considering the safe operation of the machine, the smartphone
remote control should meet the following conditions:
1. The appliance should connect to the internet;
2. The door of drum should be closed.
Remark:
-. If the door is opened at anytime, the remote control function will be
disabled.
-. The remote control function is turned off at the end of each cycle
automatically, if you want to use remote control function again, you
need turn on it again.
20
OPERATION
Delay
Child lock
Display
Remote Control
Wireless Network
UV
Remaining Time indicator/Error message
Anti crease
Steam
Steam water tank empty, please fill it.
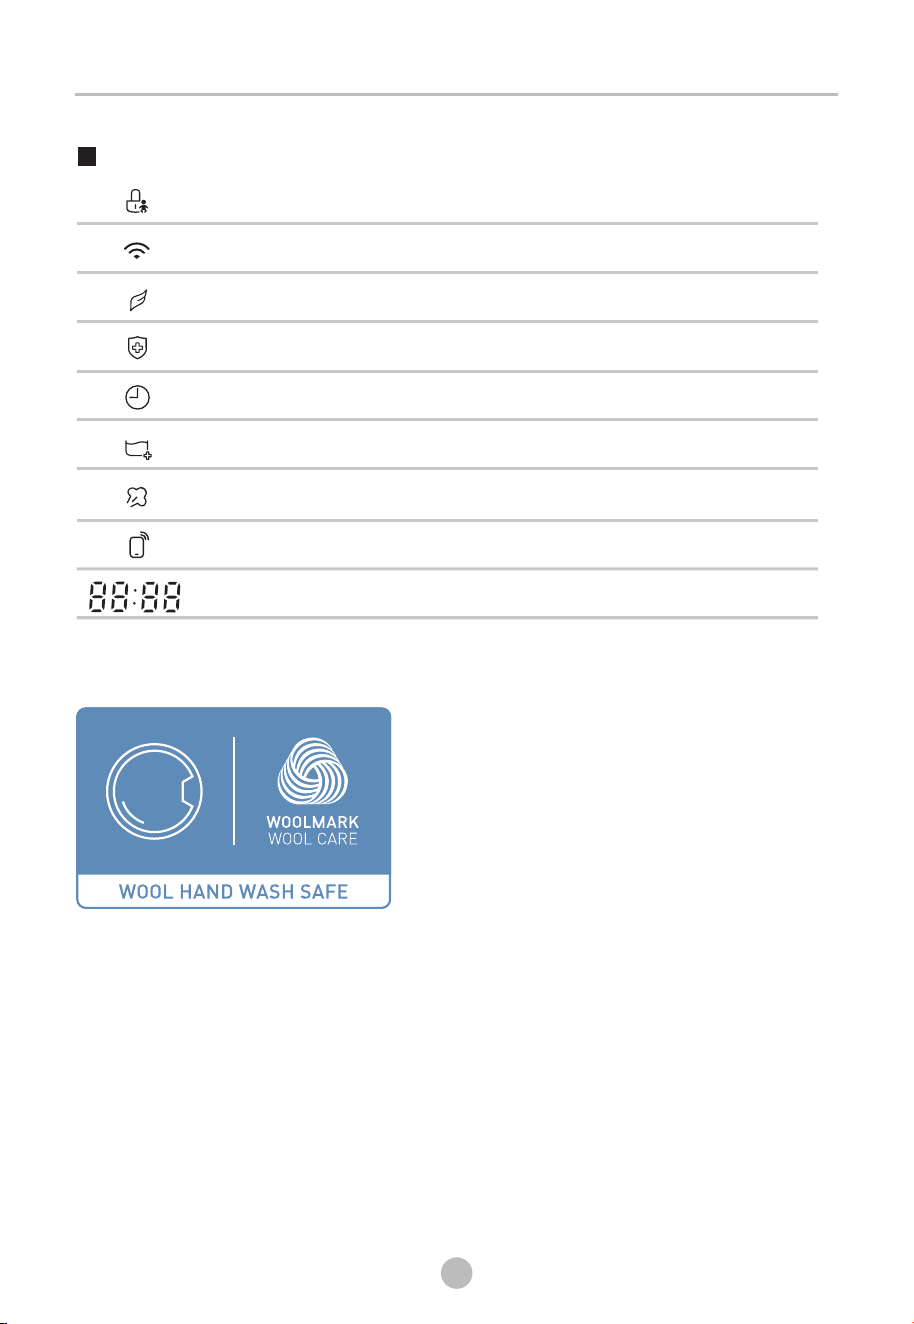
The wool drying cycle of this machine has
been tested and approved by The Woolmark
Company. The cycle is suitable to dry wool
garments which are labelled “hand wash”
provided that the garments are washed in
a Woolmark endorsed hand washing cycle
and dried according to the instrucions issued
by the manufacturer of this machine. M2132.

21
OPERATION
Programme selector
1.When the LED display screen brightens up, rotate the programme knob to select the
desired programme.
2.Select the【STEAM】, 【TIME+】, 【INTENSITY】, 【UV】, 【LUXE CARE】or
【SILENCE DRY】functions for additional options.
3.Press the【 】button.
4.Press the【 】button after the programme has completed.
Programme start
Programme end
The drum will rotate after the programme starts. and the remaining programme time
will be displayed.
Programmes
1. The drum will stop rotating after the programme ends. The display will show "End" ,
Please press【 】button after unloading the tumble dryer to cut off power and
pull out the plug.
22
OPERATION
1. Your smartphone is connected to home wireless network , and you know
the network password.
2. Make sure you are near the home appliance.
3. The 2.4GHz band wireless signal is enabled on your wireless router.
Follow the below steps to enter the remote control state
Before you start, make sure that:
Instructions to Connection with the
TSmartLife App
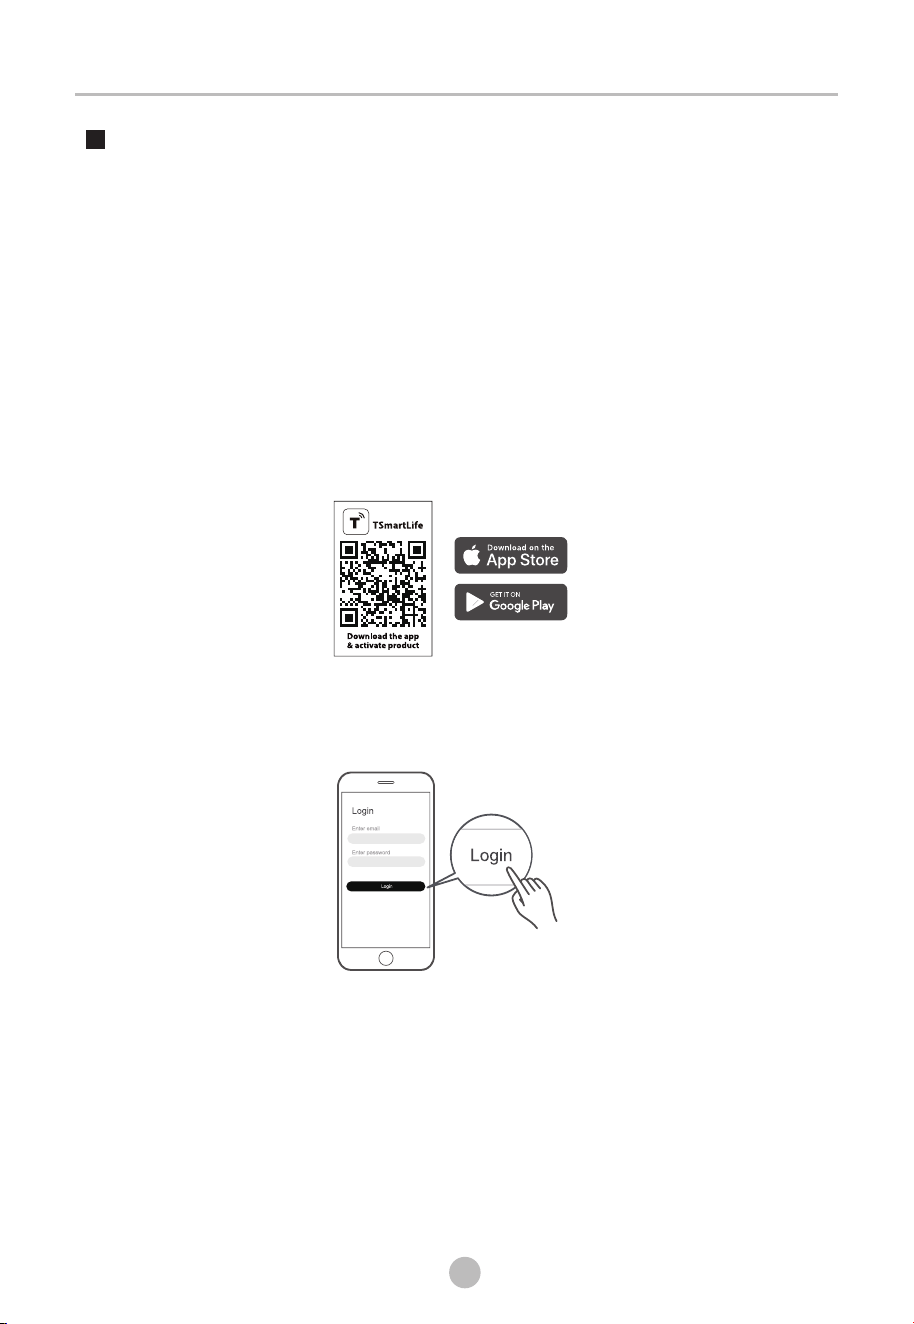
Download the TSmartLife App
On an app market (Google Play Store, Apple App Store), search for
"TSmartLife" and find the TSmartLife app. Download and install it on
your phone. You can also download the app by scanning the QR code
below.
Register and log in
Open the TSmartLife app, and create a new account to start (you can
also register through a third-party account). If you already had an
existing account, use the account to log in.
Connect your devices to TSmartLife
1:Please make sure your mobile phone is connected to .
If not, go to Settings and turn on the wireless connection, select and
connect to a . Also please turn on the Bluetooth on
your phone. If not, go to Settings and turn it on.
2:Please power on your devices.
3:Open TSmartLife app on your phone.
wireless network
wireless network
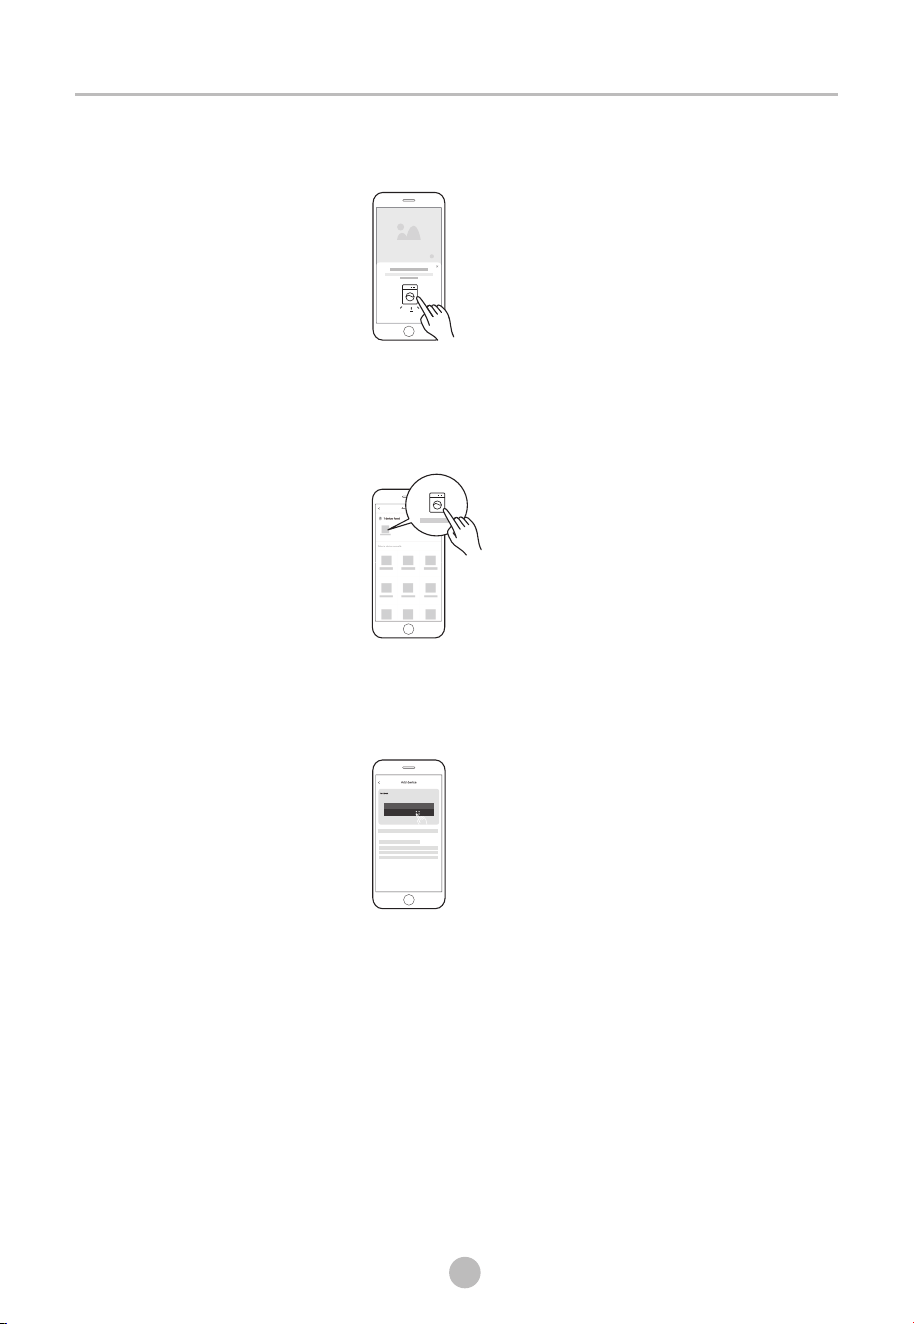
23
OPERATION
4:If a message of "Smart devices discovered nearby" appears, click to
add.
5:If no message appears, select " + " on the page and select your device
in the list of nearby devices available. If your device is not listed,
please add your device manually by the device category and device
model.
8: 88
6:Connect your device to according to the instructions
on app. If the connection fails, please follow the instructions provided
by the app to continue with the operation.
wireless network

24
OPERATION
Notes
Wireless Network Status Light
Slowly flashing
Waiting for connection
Quickly flashing
Connecting
Quickly flashing solid
Connected to your wireless router
Make sure your devices are powered on.
Keep your mobile phone close enough to your device when you
are connecting network to your device.
Connect your mobile phone to the wireless network at home, and
make sure you know the password of the .
Check if your router supports 2.4 Ghz band and
turn it on. If you are not sure whether the router supports 2.4 GHz
band, please contact the router manufacturer.
The device cannot connect to the that requires
authentication, and it usually appears in public area such as
hotels, restaurants, etc. Please connect to a that
does not require authentication.
It is recommended to use a name that only
contains letters and numbers. If your name
contains special characters, please modify it in the router.
Turn off the WLAN+ (Android) or WLAN Assistant (iOS) function of
your mobile phone when connecting network to your devices.
In the case that your device connected to before
but it needs to reconnect, please click "+" on app Home page,
and add your device again by the device category and model
according to the instructions on app.
wireless network
wireless network
wireless network
wireless network
wireless network
wireless network
wireless network
WIRELESS NETWORK
Working Frequency 2.4G
Extreme Temperature Range -20°C~85°C
Max RF Power Output Wireless Network: E.I.R.P 18dBm BT: 8dBm
INFORMATION
OPERATION
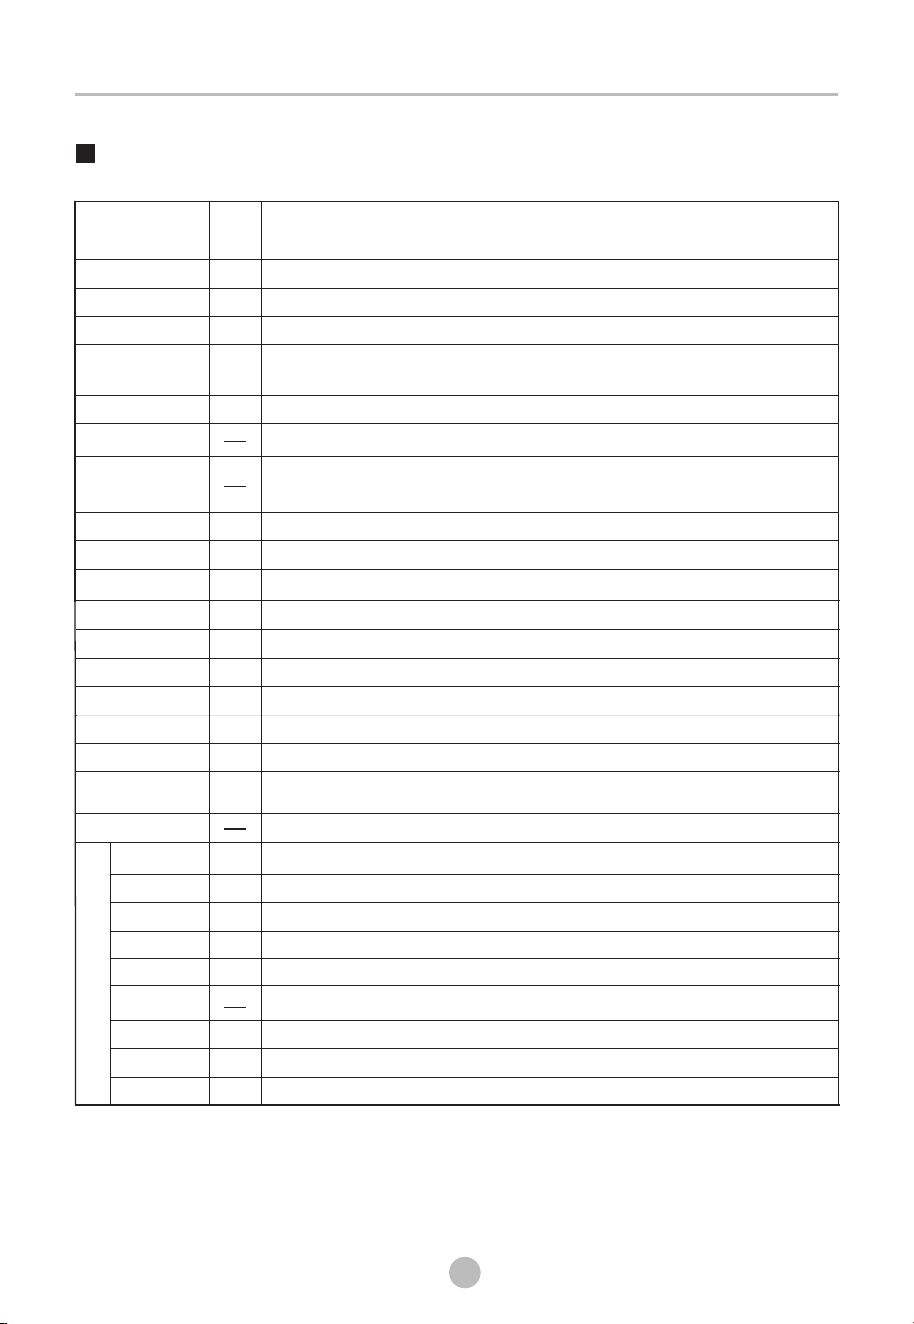
Drying Programmes Table(* Programmes can be set in App )
Programme
Application/Properties
Max
Load
Cotton
Baby Care
Bed Linen
Shirts
8.0kg
1.0kg
3.5kg
1.0kg
For single or multi-layer cotton laundry .
To dry small amount of baby clothing
To dry bed linen, bed sheets or other large items.
For
.Place clothes loosely in the dryer. Once dried, remove quickly and
hang it on a clothes hanger.
easy care laundry, such as shirts and blouses equipped with anti-crease function to
minimize the ironing effort
Wool
1.0kg
For machine washable wool items .
Download
Time Dry
Hygiene
5.0kg
Quick Dry
0.6kg
Mix
3.5kg
For mixed fabrics from cotton and synthetics.
To dry individual items or complete the drying process of multi-layer fabrics with different
drying behavior, such as jackets, pillows or voluminous items. Min 10 min. to max. 150min.
(in 10 min. steps)
To dry 1-3 pieces of lightweight clothing with low moisture content.
For sterilizing and mite removal of heat-resistant dry clothing.
You can set it as another program in the TsmartLife App and set the parameters, and sync it to
the panel cloud program.
25
Cotton
Baby Care
Bed Linen
Shirts
2.5kg
2.0kg
2.5kg
0.5kg
Wool
0.5kg
Suitable for dust and odor removal, and fluff care of wool clothing.
Suitable for steam wrinkle care of shirts.
To refresh clothes kept at closed environment for a long time or to remove odors.
Suitable for mite removal, odor elimination, and wrinkle care of cotton clothing.
Suitable for mite removal, odor elimination, and wrinkle care of baby clothing.
Luxe
Care
•
Cotton programme measured in accordance with IEC1 :2005
and suitable for drying normal cotton load at rated load capacity.
Note for Test Institutes:
61121
Quick-dry Clothing*
3.0kg
Yoga Clothing*
4.0kg
Outdoor*
3.0kg
To dry outdoor clothing.waterproof and breathable laundry items which are suitable for drying
in tumble dryer.
Jeans*
4.0kg
To dry jeans or leisure clothes that are spun at high speed in the washing machine.
Underwear*
1.0kg
Chiffon *
1.0kg
Warm*
1.0kg
Cool*
Blow warm air into the dryer bucket to warm clothes, and the timing can be adjusted between
20 to 150 minutes.
Blow cold air into the dryer bucket, and the timing can be adjusted between 10 and 30 minutes.
To dry yoga clothing made of synthetic fibers or cotton-linen materials.
For quick drying of small amount of synthetic fibers.
To dry underwear fabrics.
To dry lightweight chiffon clothing.
Self Clean*
Pet Refresh*
2.0kg
Silk Quilt*
2.0kg
Refresh*
To refresh clothes kept at closed environment for a long time or to remove odors.
2.5kg
Suitable for dehumidification, mite removal, and fluff care of silk summer quilts.
Suitable for sterilization and mite removal of pet clothes or supplies.
Used for cleaning the inner drum (without any clothes inside).
OPERATION
N N
N N
N N
N
N
Y
Y
Y
Y
Y
N
N
N
N
N
N
N
N
N
Y
Y
Y
Y
Cotton
Baby Care
Bed Linen
Shirts
Wool
N
YN N
Programme
Time+
UV
N Y
N Y
N Y
N
N
Y
N
Y N
Steam
Y
Y
Y
Y
Y
Y
Y
Y
Y
N
Y
Y
N
N
Y
N
N
Y
Y
Y
Y
N
Y
N
Y
Y
Y
Y
N
N
Y
N
N
Y
Y
Y
Y
N
N
N
Delay
Silence Dry
Intensity
Luxe Care
Cotton
Baby Care
Bed Linen
Shirts
Wool
Time Dry
Hygiene
Quick Dry
Mix
N
N
N
N
YY Y
Y N N
Luxe
Note!
means that the program comes with this feature by default.
Anti crease
N
N
N
N
N
N
N
N
26
Care
Yoga Clothing*
Outdoor*
Jeans*
Underwear*
Chiffon *
Warm*
Cool*
Quick-dry Clothing*
YY N N Y N N
NY N N Y N N
YY N N Y N N
YY N Y Y N N
YY Y Y Y N N
NY Y N N N N
NY N Y N N Y
NY N N N N Y
N
N N
Y
Y
Y N N N
N
Pet Refresh*
Silk Quilt*
Refresh*
Self Clean*
N
N
N
Y N N
N N N
N
N
N
N
N
N
N
N
N
N
N
N
N
N
OPERATION
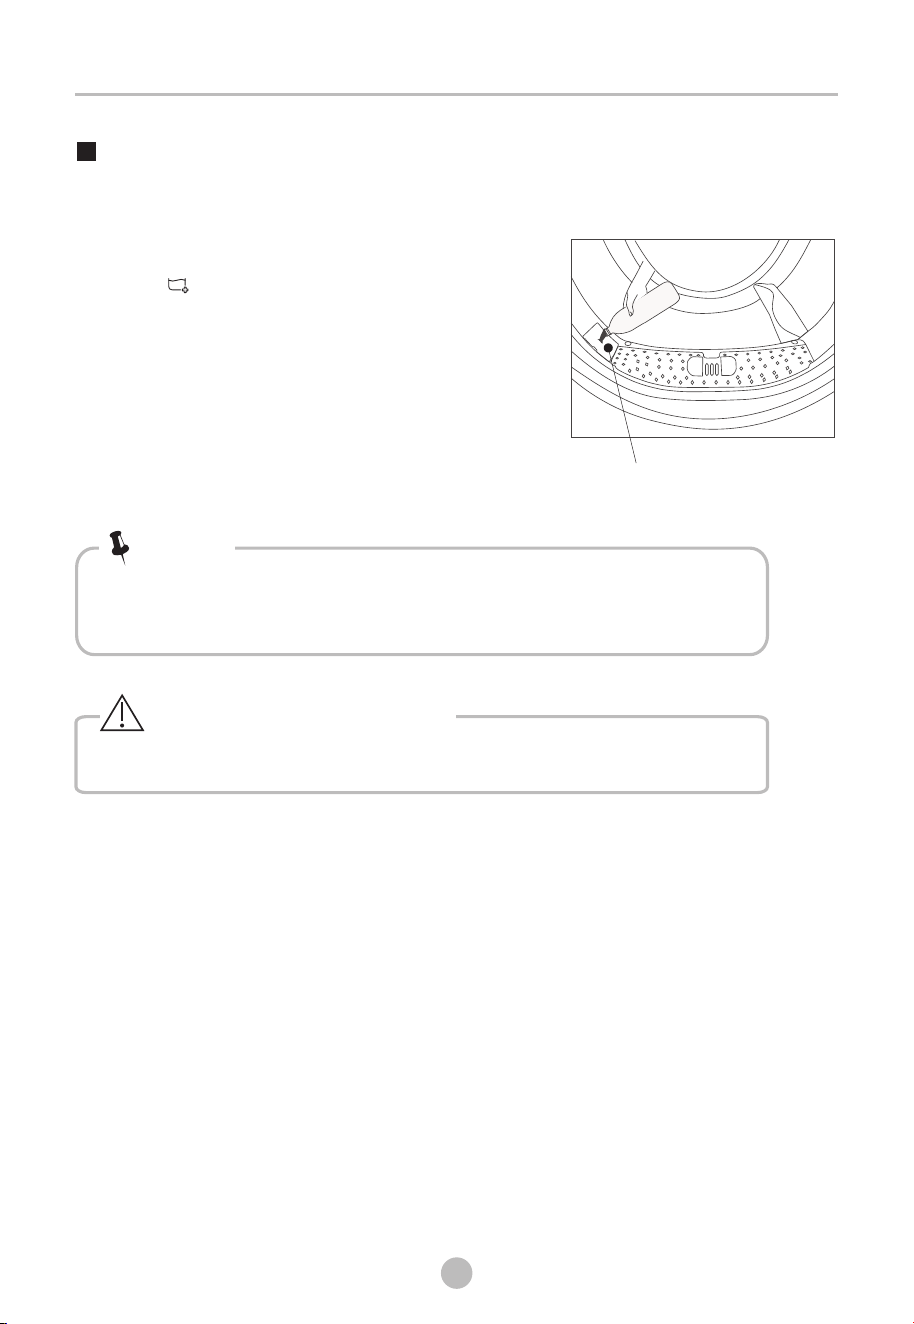
Only use purified water for【Steam】function.
Water inlet
• When using a program with steam function for the first time, a
buzzing sound is normal.
Note!
Steam Function
There will be hot steam, please use the appliance carefully.
Warning: Hot steam!
27
If the 【 】icon is blinking, please open the water
inlet cap at the left of the door filter and add the
purified water until the indicator disappears.
Then close the inlet cap.
It is suggested to add about 350ml of purified water.
The maximum capacity of the tank is 1000ml.
MAINTENANCE
28
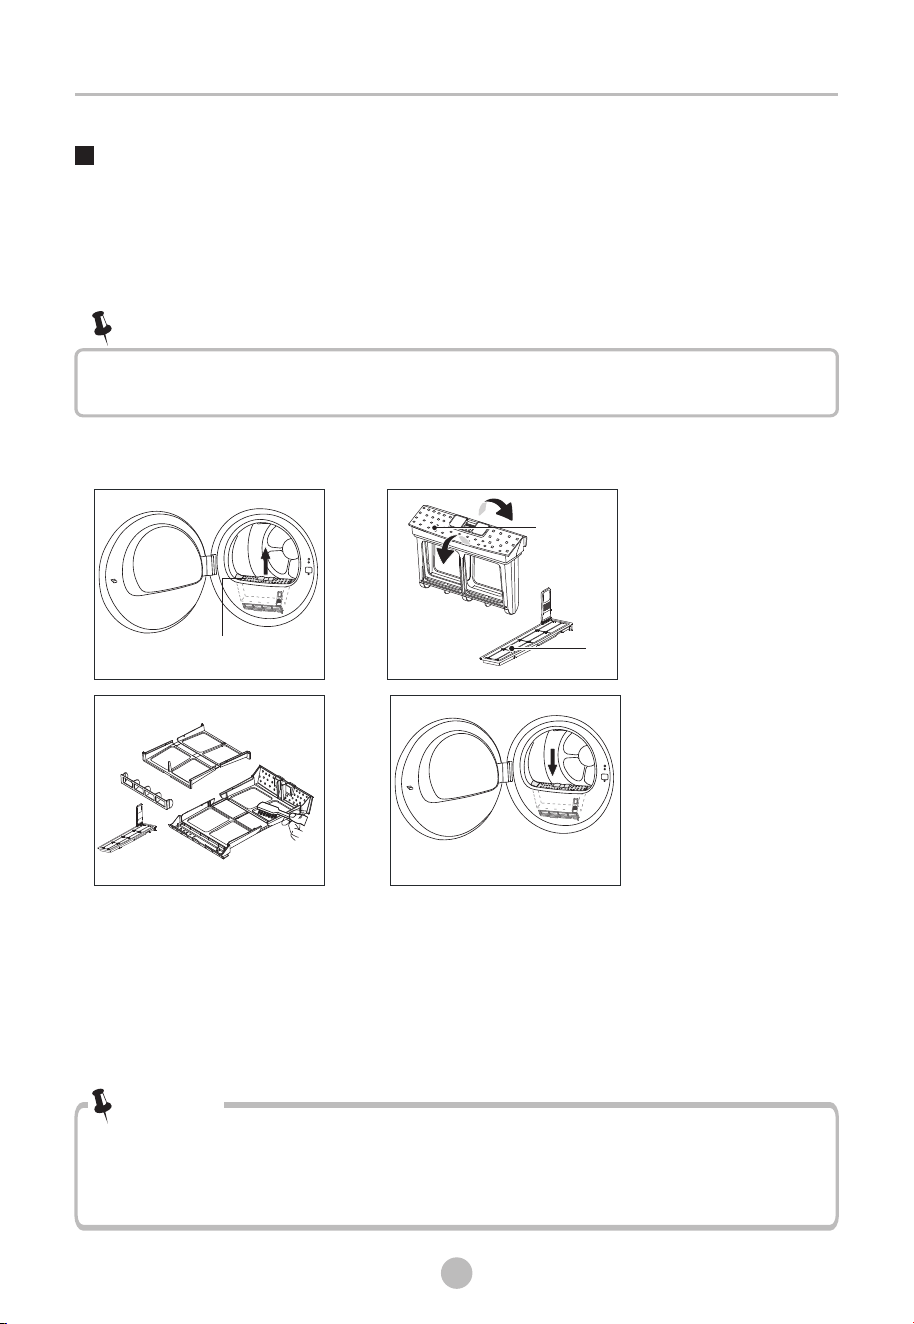
Cleaning and Care
Clean the filters
This dryer has a primary door lint filter.
Make sure you clean the door filter after each cycle to avoid increased energy
consumption and cycle time.
Door Filter
Clean the filter door
• Take notice of the correct orientation before to insert the door filter.
• The lower filter does not need to be cleaned every time. Depending on usage,
it is recommended to clean it once a month.
Note!
•
ends need to be aligned, and the middle slot and the rib need to be aligned.
To ensure the double-layer filter can be closed smoothly , the arrows at both
Note!
1. Open the door and take out the door filter.
2. Open the filter.
3.
the lint or clean it by hand.
Remove the fluff on the filter screen. You can use a vacuum cleaner to remove
4.
bin and do not wash it down the drain to avoid micro plastics in the used water
system.
Dry the door filter thoroughly before installing it back. Throw lint in the garbage
1.
lower
filter
filter
2.
4.
3.
MAINTENANCE
29
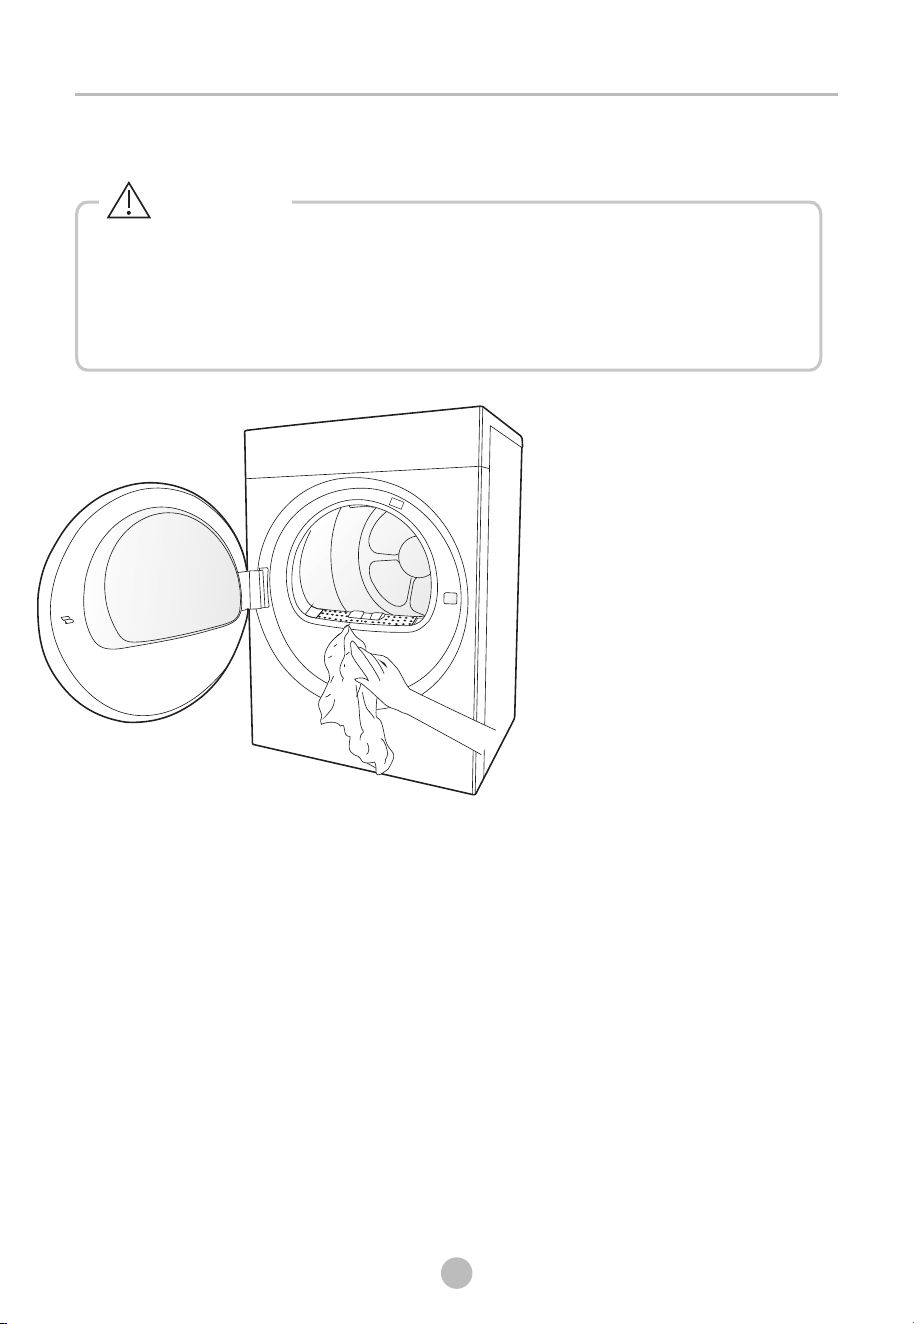
Clean Tumble dryer
• Disconnect the power cord before cleaning!
• Clean the dryer with a wet cloth which is only damped by clean water.
• Do not use solvents, abrasive cleaners, glass cleaners or all-purpose cleaners.
These could damage plastic surfaces and other parts.
• Prepare a wet cloth damped by clean water.
• Clean the door, especially the inside window.
• Clean the sealing around the door opening.
• Clean the humidity sensor inside the drum.
• Take out all the filters, clean the sealing and air flow openings.
• Before starting the dryer, dry all parts with a soft cloth.
Warning!
MAINTENANCE
30
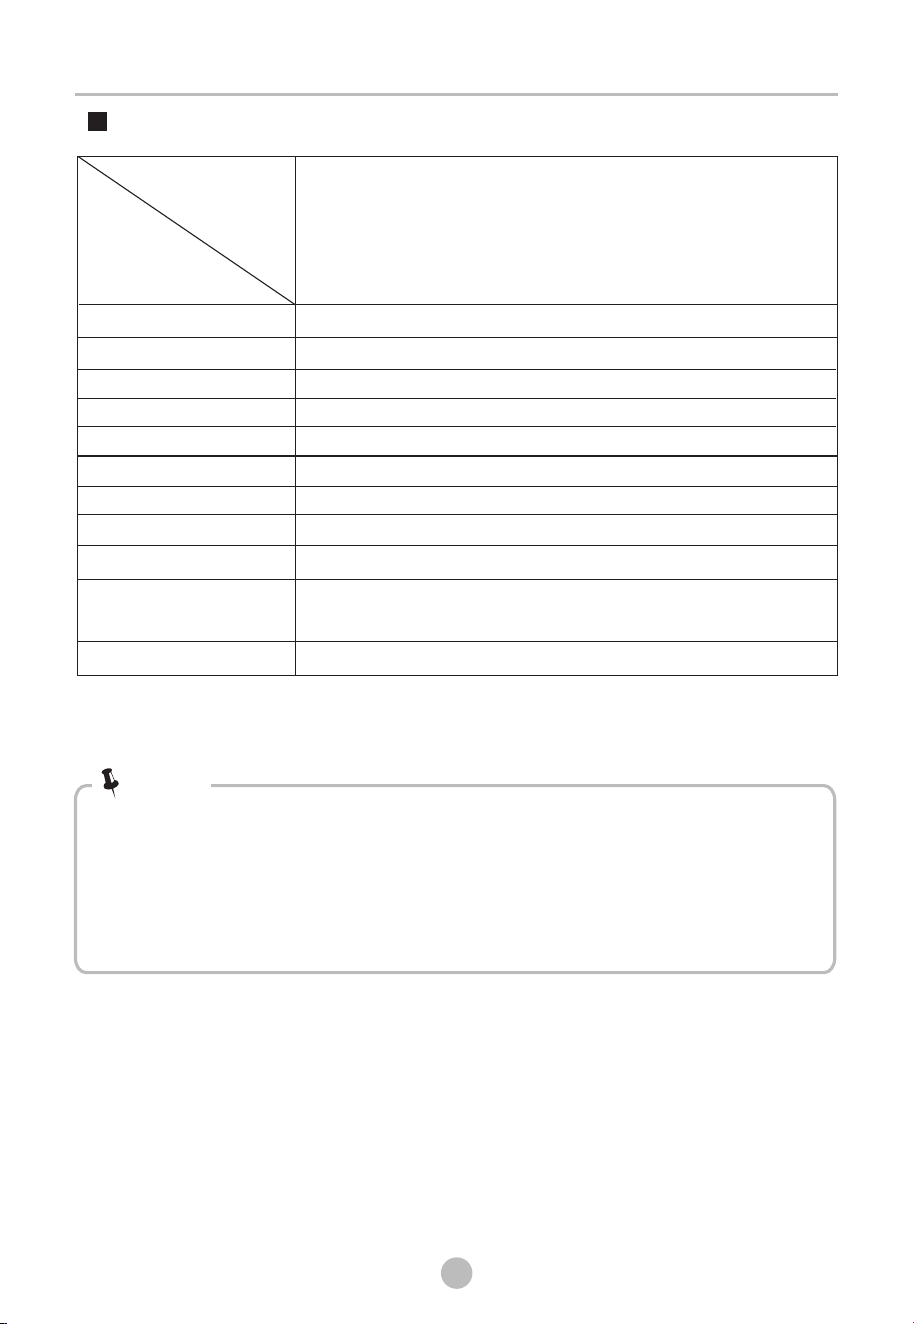
Trouble Shooting
If you encounter an issue with the dryer, first check the table below and try to solve
the issue before calling the service.
If the issue continues after trying the solutions, turn off dryer and diconnect
power plug, then call the service.
• Clean Door filter.
• Clean air inlet.
• Check if installation place is proper.
Problem
Solution
• Display is not
on
• Check if the power supply works.
• Check if power plug is inserted in wall socket
correctly.
• Check if dryer is turned on.
• Dryer does not start
• Check if the power supply works.
• Check if power plug is inserted in wall socket
correctly.
• Check if dryer is turned on.
• Check if door is closed correctly.
• Check if 【Start/Pause】is pressed.
• Cloths are not dried or
drying time is too long
• There are humming noises
• The compressor is operating. These noises are
quite normal and do not indicate a fault.
• The dryer switches off
at the end of the
programme
• The dryer switches off automatically
normal
function.
after the
end of operation. This is not an error but a
Warning!
MAINTENANCE
31
• Self-repair or non-professional repair may create safety risk and cease the
guarantee.
“ ” E32
“ ”E33
Display
Reason
Solutions
Humidity sensor error
Temperature sensor error
Please contact your local
problem occurs.
service center if the
“ ”E64
BLDC motor communication error
“ ”E82
PCB communication error
Warning!
“ ” E20
Water pump failure or water
level sensor failure
MAINTENANCE
32
• The rated capacity is the maximum capacity to be dried at one time. Make sure that
the dry clothes which are loaded into the appliance do not exceed the rated capacity.
• Do not install the tumble dryer in a room when there is a risk of frost occurring. At
temperatures around freezing point the tumble dryer may not be able to operate
properly.
• There is a risk of damage if the allowed to freeze in the pump and
hoses.
condensed water is
Technical Specifications
Note!
Contains fluorinated greenhouse gases covered by the Kyoto Protocol.
Hermetically sealed.
Rated capacity
Rated frequency
Dimension(W*D*H)
Rated input power
Rated voltage
Weight of product
Model
Parameter
Ambient temperature
Refrigerant
GWP
Quantity of refrigerant
+ 2° ~ +35°CC
220-240V~
595*595*850(mm)
1600W
49kg
8.0kg
50Hz
R134a
1430
0.372t
260g
TD-T37BS90HWM
2
Tonne(s) of CO
Equivalent