

To reduce the risk of injury, the user must read and understand the Operator’s
Manual before using this product. Save these instructions for future reference.

TABLE OF CONTENTS
2
1. SAFETY INFORMATION
2. OPERATING SAFETY
2.1 General Notes
2.2 Usage Safety
2.3 Chemical Handling
2.4 Battery Safety
2.5 Service Safety
3. EQUIPMENT PERFORMANCE
3.1 Backpack Spreader Design
3.2 TOMAHAWK® Battery
3.3 Specifications
3.4 Battery Spreader Parts
3.5 Unpacking the Unit
4. EQUIPMENT ASSEMBLY
4.1 Warnings
4.2 Assembly Guide
4.3 Spreading
5. CHARGING THE BATTERY
5.1 Warnings
5.2 How to Charge
5.3 While Charging
5.4 Installing the Battery
6. BACKPACK STRAPS ADJUSTMENT
7. OPERATION
7.1 Holding the Tool
7.2 Starting and Stopping the Machine
7.3 Cruise Control Setting
7.4 Filling the Tank
7.5 Leaf Blowing Tips
8. STORAGE
9. REPLACEMENT PARTS
10. TROUBLESHOOTING
11. EQUIPMENT WARRANTY
12. PARTS MANUAL
13. TOMAHAWK CATALOG
4
5
5
5
6
6
6
7
7
7
7
8
8
8
9
9
9
12
12
12
12
12
13
14
14
14
15
15
16
16
17
17
18
21
26
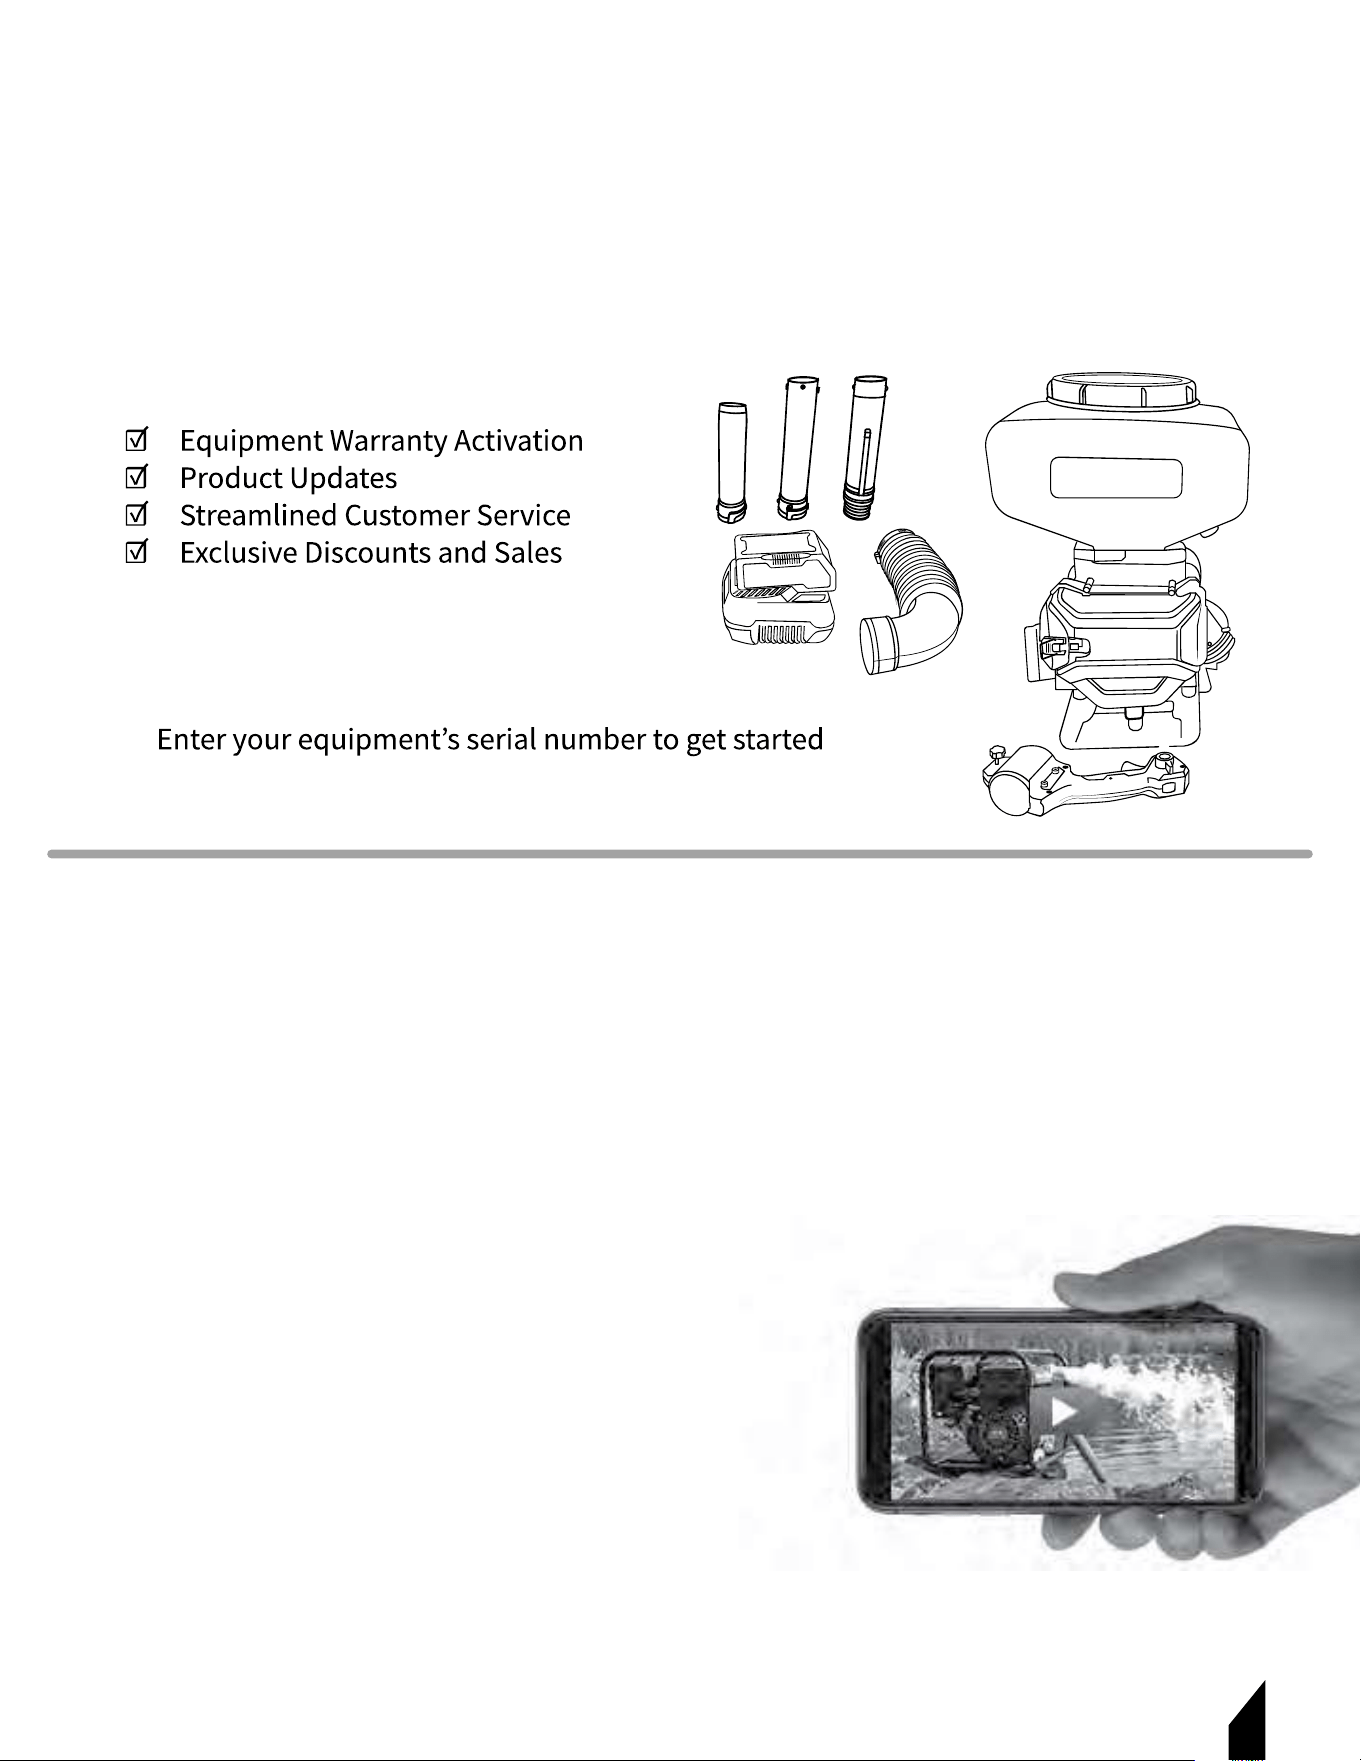
Equipment Resources
TOMAHAWK® Customer Service doesn’t stop at checkout. We understand to keep a job-site
running smoothly - the proper equipment, spare parts, instruction manuals, and more are
needed at the drop of a hat. Visit www.tomahawk-power.com to gain access to the incredible
resources below.
How To Video Library
More of a visual person? Visit our Video Library for equipment
assembly instructions, troubleshooting tips, and more!
Found on each product listing or the Service Videos Page
Manual and Assembly Guide Library
Visit our Manual Library if you are looking for a lost
operations manual or a particular spare part?
Found on each product listing or the Tomahawk Manuals Page
Service Requests
In need of a quick fix or a service center referral? Submit a
Service Request and a Tomahawk Technician will respond
shortly to get you the help you need.
Choose “Service Request” at the bottom of www.tomahawk-power.com
3
Register Your Equipment
Thank you for purchasing TOMAHAWK® equipment! Your product is covered by the
TOMAHAWK® Warranty Policy, but in order to activate your warranty, we need you to register
your product. In addition to activating your equipment warranty, product registration will
grant you access to important product updates, streamlined customer service, and more.
INCLUDED WITH YOUR REGISTRATION
STEPS TO REGISTER YOUR EQUIPMENT
1. Visit www.tomahawk-power.com
2. Choose “Product Registration” at the bottom of the page
3.
4. Provide all required information
5. Submit Registration
4
This manual provides information and procedures to safely operate and maintain this
equipment. For your own safety and protection from injury, carefully read, understand, and
observe the safety instructions described in this manual.
Keep this manual or a copy of it with the equipment. If you lose this manual or need an
additional copy, please contact Tomahawk Power, LLC or visit
www.tomahawk-power.com
This equipment is built with user safety in mind; however, it can present hazards if
improperly operated or serviced. Follow operating instructions carefully. If you have
questions about operating or servicing this equipment, contact TOMAHAWK®.
The information contained in this manual is based on equipment’s production at the time of
publication. TOMAHAWK® reserves the right to change any portion of this information
without notice.
No part of this publication may be reproduced in any form or by any means,
electronic or mechanical, including photocopying, without express written permission
from TOMAHAWK®.
Any type of reproduction or distribution not authorized by TOMAHAWK® represents an
infringement of valid copyrights and will be prosecuted. We expressly reserve the right to
make technical modifications, even without due notice, which aim at improving our
machines or their safety standards.
1. SAFETY INFORMATION
followed to reduce the possibility of personal injury, damage to the equipment,
or improper service.
This is the safety alert symbol. It is used to alert you to potential personal injury
hazards. Obey all safety messages that follow this symbol to avoid possible injury
or death.
DANGER indicates an imminently hazardous situation which, if not avoided, will
result in death or serious injury.
WARNING indicates a potentially hazardous situation which, if not avoided, could
result in death or serious injury.
CAUTION indicates a potentially hazardous situation which, if not avoided, may
result in minor or moderate injury.
DANGER
WARNING
CAUTION

5
2. OPERATING SAFETY
Familiarity and proper training are required for the safe operation of equipment!
the operating instructions contained in both this manual and the engine manual and
familiarize yourself with the location and proper use of all controls. Inexperienced operators
should receive instruction from someone familiar with the equipment before being allowed
to operate the machine.
2.1 General Notes
2.1.1 Individuals who operate this machine must be informed about the dangers related
to use of the machine.
2.1.2 Keep bystanders, especially children and animals, away from the work area.
2.1.3 The user is responsible for avoiding injury to third parties or damage to their property.
2.1.4 If you have any condition that might be aggravated by strenuous work, check with
your doctor before operating this power tool.
2.1.5 Minors should never be allowed to use this product.
2.2 Usage Safety
2.2.1 NEVER lend or rent your power tool without the instruction manual. Be sure that
anyone using it understands the information contained in this manual.
2.2.2 NEVER operate the machine if you are under the influence of any substance
(drugs, alcohol) which might impair vision, dexterity, or judgment.
2.2.3 NEVER operate the machine near open flame or explosive areas.
2.2.4 NEVER expose machine to wet conditions.
2.2.5 NEVER handle machine with wet hands.
2.2.6 ALWAYS wear ear protection.
2.2.7 OBSERVE all applicable local safety regulations, standards, and ordinances.
WARNING
Indicates a possibly dangerous situation. Where there is a risk of damaging the
machine or its individual components.
Indicates to read the Operation Manual. It is important that you read the operation
manual before first use and keep it in a safe place for future reference.

2.3 Chemical Handling
2.3.1 ALWAYS wear eye protection when handling chemicals.
2.3.2 ALWAYS wear the proper protective equipment/clothing when handling chemicals.
Proper protective equipment includes safety goggles or glasses, mask/respirator, and
a long-sleeved shirt and long pants.
2.3.3 ALWAYS use mask to protect mouth and face from dust and/or pesticide
when handling chemicals.
2.3.4 ALWAYS
2.4 Battery Safety
2.4.1 NEVER store or charge battery in wet conditions.
2.4.2 NEVER make any adjustments to the tool if battery is connected.
2.4.3 NEVER interfere with the batteries integrity as this can cause injury and void warranty.
2.4.4 NEVER use or dispose battery in fire as this can cause it to explode. Check local codes
for more information on proper battery disposal.
2.4.5 NEVER use equipment if it has been damaged or modified as this can cause injury.
2.4.6 When not in use, ensure battery is stored in a dry place away from any flammable objects.
2.4.7
2.4.8 Only use the manufacturer’s designated battery with this machine. Use of any other
battery can damage unit and will void warranty.
2.4.9 Battery leakage may occur when operated in extreme temperature conditions.
If battery liquid contacts skin, wash immediately with water and soap, following with white
distilled vinegar or lemon juice to neutralize. If the liquid comes in contact with eyes, flush
out eyes with water for 10 minutes and seek medical attention immediately.
2.4.10 Have all servicing done by an approved TOMAHAWK® Technician or Service Center
with original replacement parts.
2.5 Service Safety
Poorly maintained equipment can become a safety hazard! In order for the
equipment to operate safely and properly over a long period of time, periodic
maintenance and occasional repairs are necessary.
WARNING
6
WARNING
Always follow the chemical manufacturer’s instructions, safety
guidelines,and recommendations when using any chemicals/solutions with
this machine.
WARNING

3. EQUIPMENT PERFORMANCE
3.1 Backpack Fertilizer Spreader Design
TOMAHAWK® Battery Powered Fertilizer Spreaders are your best solution for revolutionary
lawn care. Powered by a 36V/7.5Ah Lithium-Ion battery and a powerful brush-less motor, this
or ice melt.
3.2 TOMAHAWK® Battery
TOMAHAWK® 36V Lithium-Ion 7.5 Ah batteries charge faster and work longer than standard
batteries, giving you superior performance. With a fast charge time, spend more time
working on the things that matter and less time waiting for a charge.
3.3 Specifications
7
Tank Size
Power
Battery Life
Battery Capacity
Charge Time
Voltage
Sray Reach
Sprayer Weight
Dimensions
Warranty
eTGS30 BATTERY POWERED SPREADER
5 Gallons (18.9 Liters)
0.7 kW
7.5 Ah
Up to 2 hrs at half load, 1 hr at full load
2 Hours
36V
25 - 30 Feet (7.6 - 9.1 meters)
18 Lbs (8.1 kg)
15"x 13"x 22" (38.1x33x55.8cm)
1 Year

3.4 Backpack Fertilizer Parts
Additional Parts
Tool Kit
Pipe Clamps
3.5 Unpacking the Unit
in the manual are in the box. Do not throw away the packaging or packing material until
you have inspected all parts and successfully operated the machine. Do not discard this
operations manual.
If any parts are missing or damaged, please contact TOMAHAWK® customer support by
email at support@tomahawk-power.com or call (866) 577-4476.
1. 36V Lithium-Ion Battery
2. Battery Charging Station
3. Tank
8
4. Backpack Straps
5. Throttle Control
6. Accordion Pipe
7. Connecting Pipe
8. Blower Pipe
9. Protective Frame
10. Volume Control Lever

4. EQUIPMENT ASSEMBLY
4.1 Warnings
4.2 Assembly Guide
4.2.1 Connect the accordion pipe
to the spreader’s blower housing.
Fasten in place using a phillips head
screwdriver and the hose clamp.
FIGURE 1.
4.2.2 Attach the connecting pipe to
the other end of the accordion pipe.
Fasten in place using a phillips head
screwdriver and the hose clamp.
FIGURE 2.
WARNING To avoid injury or damage to this machine, the blower tube
must be used when operating this backpack fertilizer spreader.
NOTE: The blower tube is not assembled on this unit.
WARNING
WARNING If any parts are missing or damaged, do not operate this backpack
fogger. Failure to do so may result in personal injury or damage to this machine.
WARNING
WARNING Never make modifications or fabricate accessories to be used with this
machine. Modifications or alterations may result in personal injury or damage
to this machine.
WARNING
WARNING Do not connect the battery before the machine is fully assembled. Failure
to comply may cause accidental starting and may result in personal injury or damage
to this machine.
WARNING
WARNING To prevent personal injury or damage to this machine, ensure the machine is
OFF, the battery is removed, and the impellers have stopped before removing any parts.
WARNING
FIGURE 2
FIGURE 1
9
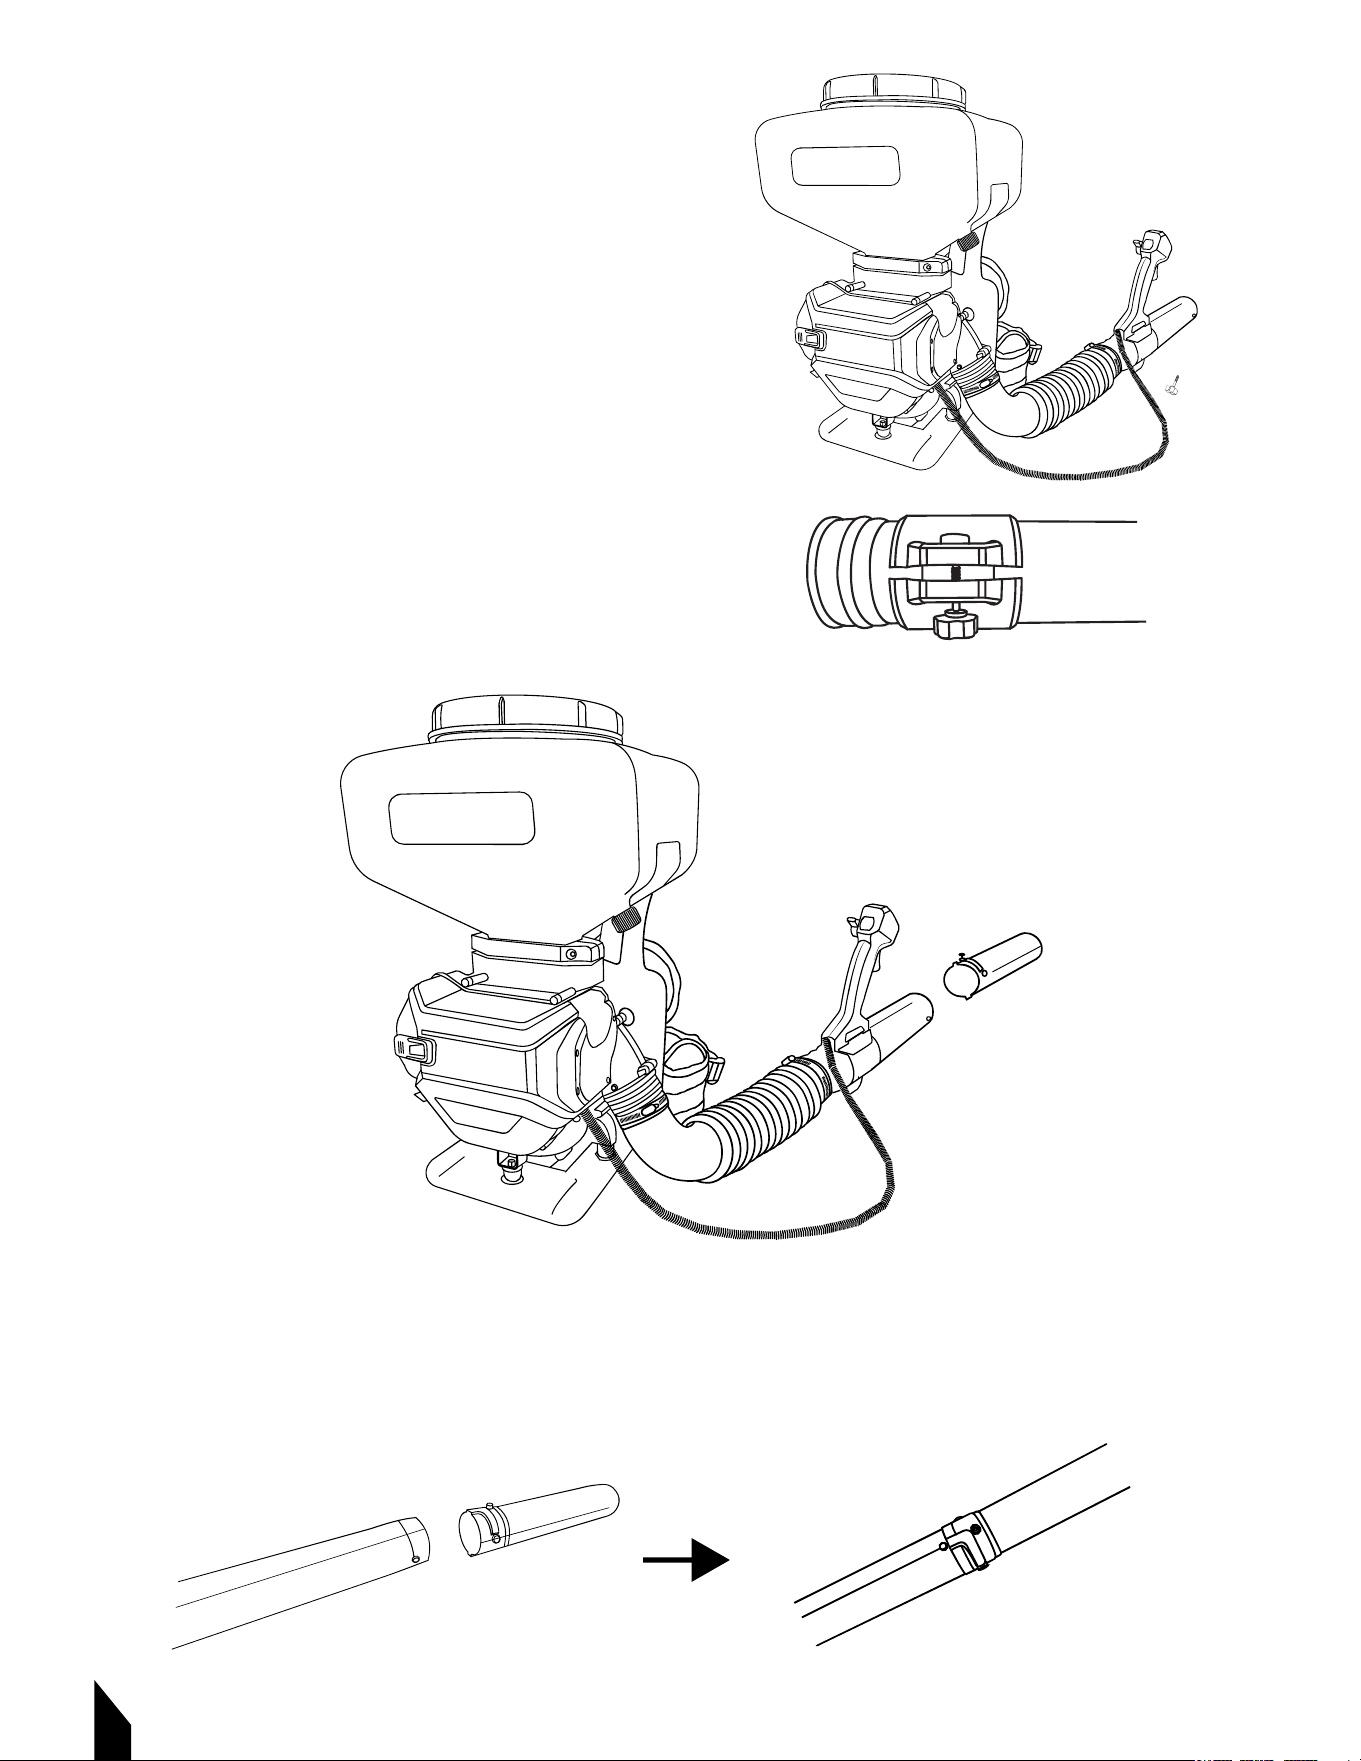
4.2.3 Slide the throttle control handle over
the connecting pipe and secure in place
with the screw. FIGURE 3.
4.2.4 Connect the blower pipe to the other
end of the connecting pipe. Twist to lock in
place. FIGURE 4.
NOTE: When connecting the extension
pieces twist to lock in place . FIGURE 5.
10
FIGURE 4
FIGURE 3
FIGURE 5

FIGURE 6
FIGURE 7
11
4.2.5 The eTGS30 Battery Powered Fertilizer Spreader is fully assembled. FIGURE 6.
4.3 Spreading
4.3.1 The throttle handle will control the speed of the engine- to adjust
the distance and spread of the granules spread.
4.3.2 The volume control lever [FIGURE 7] adjusts the amount granular chemicals
that leave the tank. In the down position no granular chemicals will spread.
In the up position the maximum amount of granules will exit
the fertilizer spreader
NOTE: At full throttle with the lever all the way up the this
machine will spread up to 38 lbs of fertilizer/ small granular per
minute.
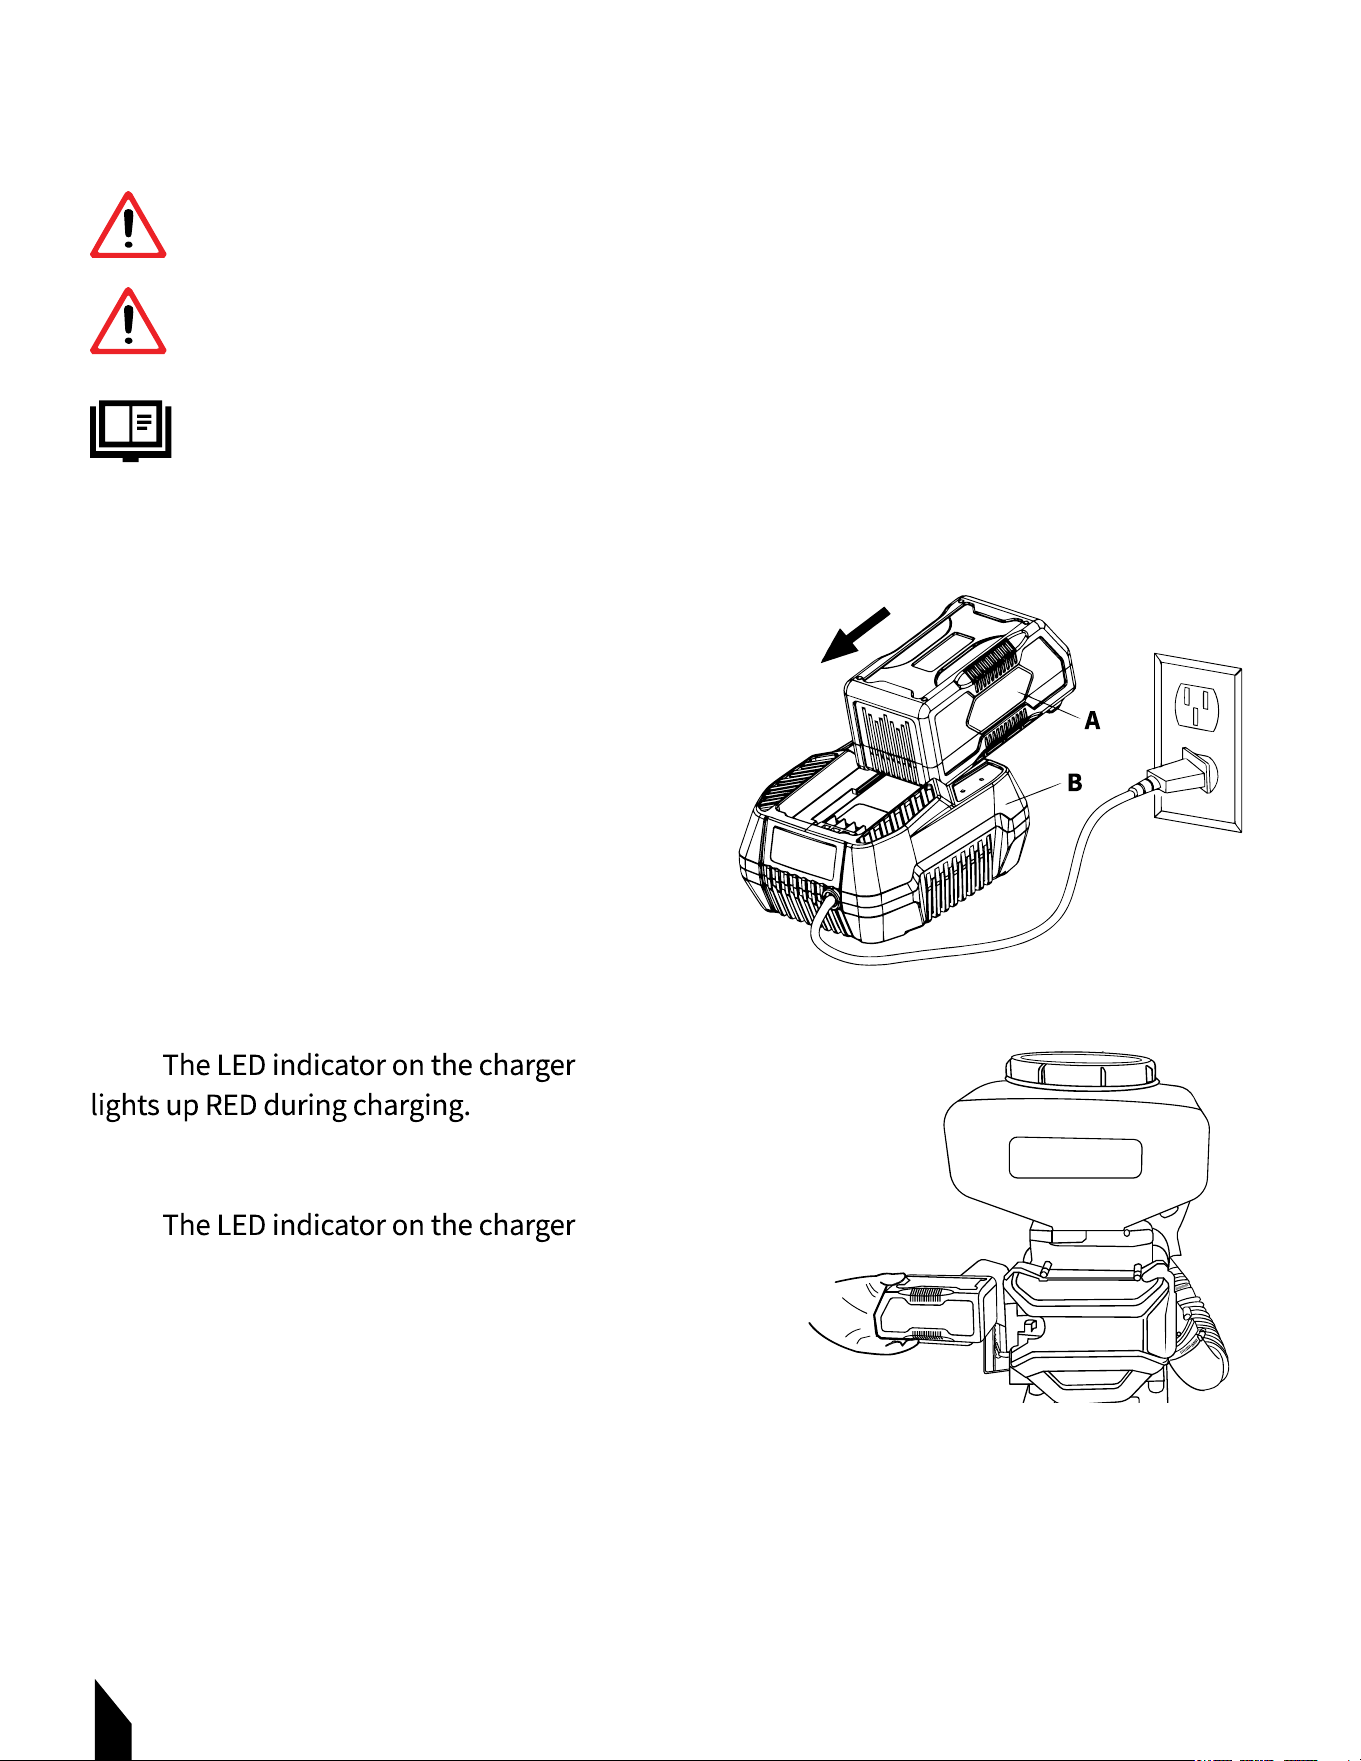
5. CHARGING THE BATTERY
5.1 Warnings
5.2 How to Charge
5.2.1 Remove the battery from the machine.
5.2.2 Plug the charger into a power outlet in
a dry location. FIGURE 9A.
5.2.3 Align the tongue of the battery (A) with the
guides in the charging dock (B).
5.2.4 Slide the battery into the charger docking
station using the guides on the battery and
charger docking station.
FIGURE 9A.
5.3 While Charging
5.3.1
5.3.2 The charging of the battery takes
approximately 2 hours.
5.3.3
lights up green when finished charging.
5.4 Installing the Battery
5.4.1 Open the door of the machine’s battery
compartment. FIGURE 9B.
5.4.2 Align the tongue of the battery with the guides in the battery compartment.
5.4.3 Grasp the machine firmly and slide the battery into the compartment until the
battery release button locks into place. Close the compartment door.
NOTE: Never force the battery pack. It should slide and click into place.
12
WARNING Do not insert any electrically conductive objects in the charging socket
or the battery may be damaged by a short circuit.
WARNING
WARNING - DANGER OF FIRE - A short circuit in the charging socket can lead to a
cable fire in the battery.
WARNING
The charger has a fully electronic voltage and current limitation function. This ensures
that a connected battery is always kept at the optimum state of charge. This prevents
overcharging of the battery. The battery is not fully charged on delivery. It is
recommended to fully charge the battery before operating the machine for the first time.
FIGURE 9B
FIGURE 9A
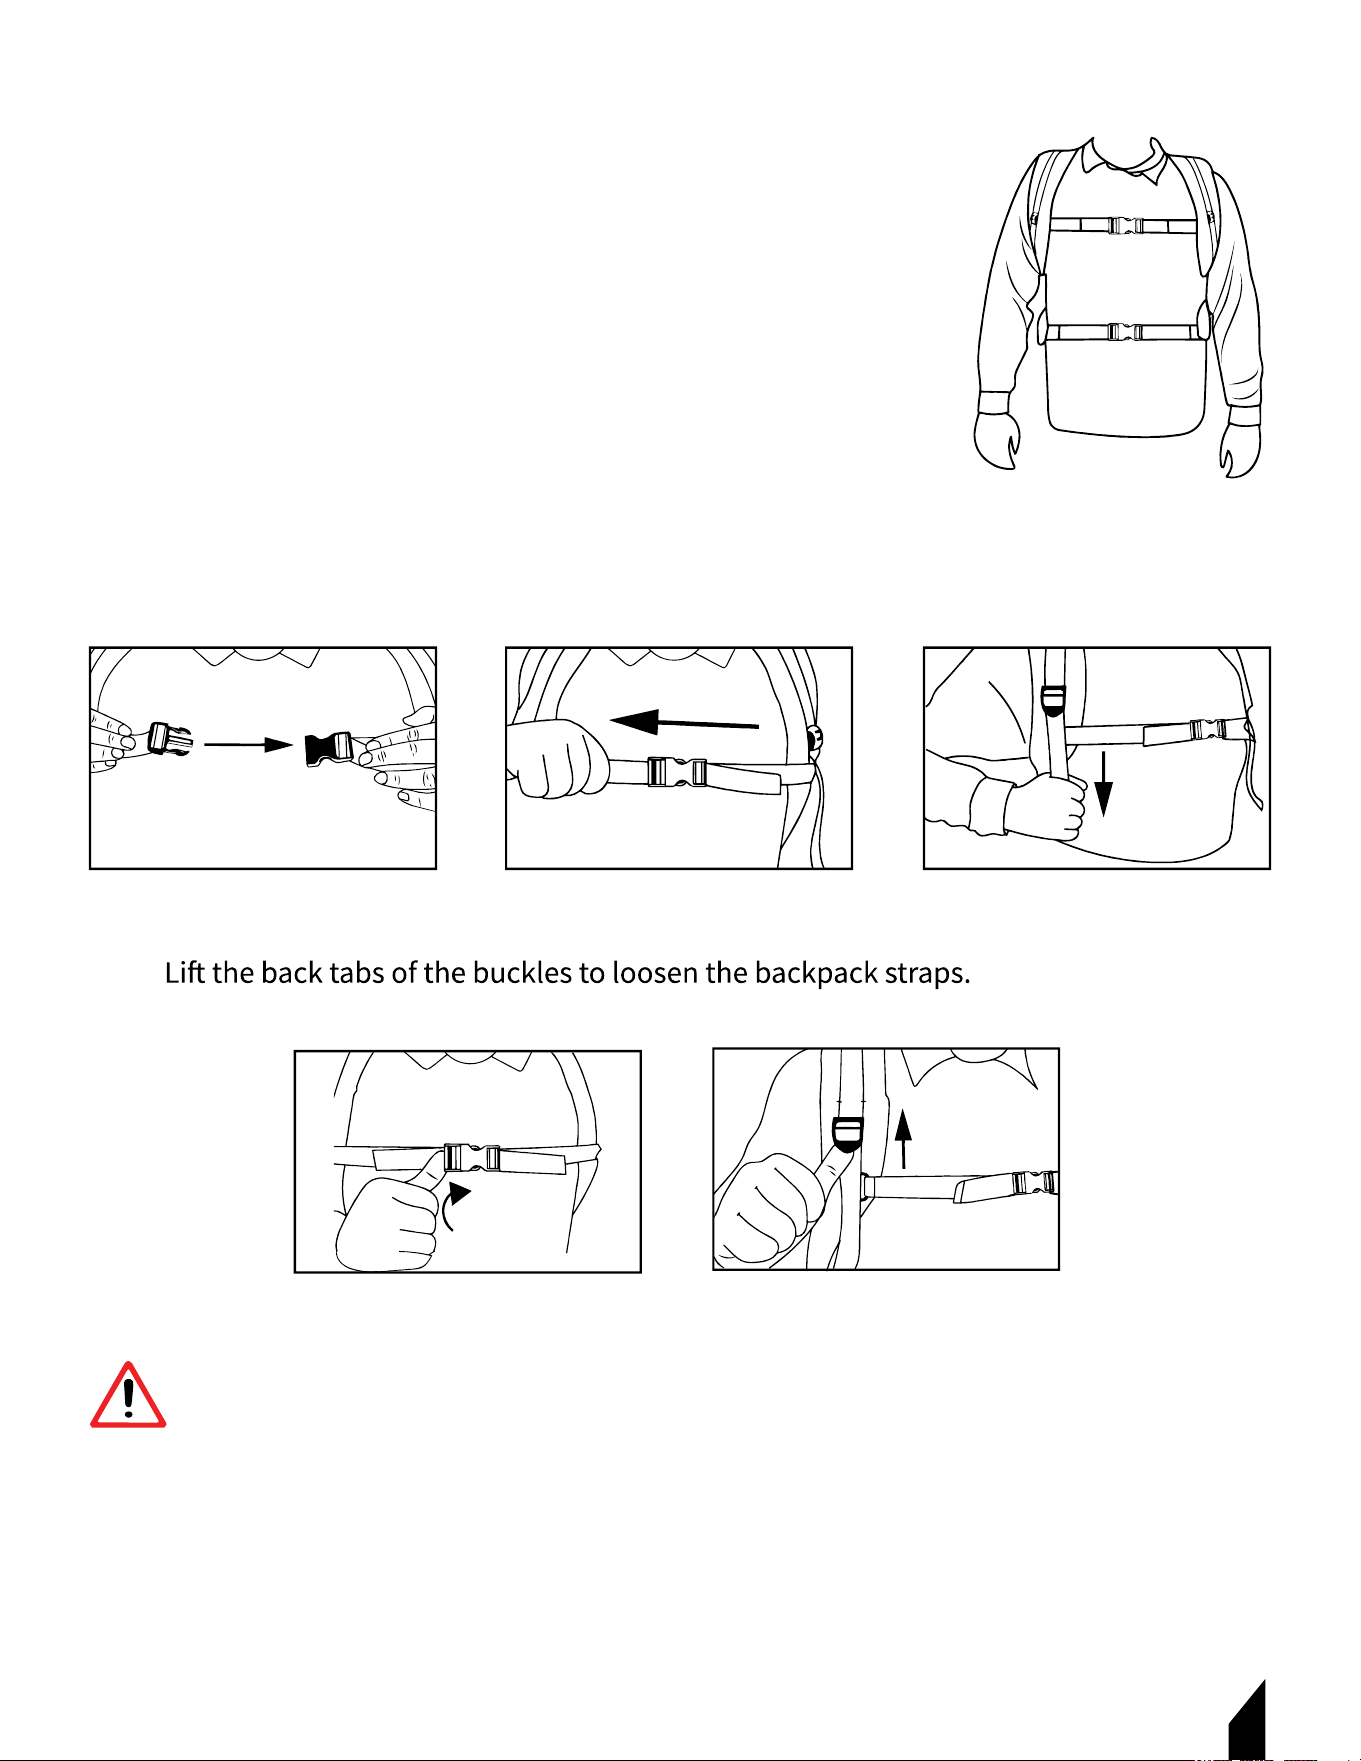
6. BACKPACK STRAPS ADJUSTMENT
Make sure your backpack straps and harness are well adjusted for
proper operation. Adjust the straps for comfortable machine
placement. Adjust the cross-body harness so the machine weight
is equally distributed across the operator’s shoulders.
6.1.1 Once the machine is comfortable on your back, connect the
top horizontal chest buckle FIGURE 10 and then tighten by pulling
on the end of the strap. FIGURE 11.
6.1.2 Pull the ends of the backpack straps downward to tighten. FIGURE 12.
6.1.3 FIGURE 13. FIGURE 14.
FIGURE 10 FIGURE 12
13
FIGURE 11
FIGURE 13 FIGURE 14
WARNING In the event of imminent danger, the machine must be removed quickly. The
horizontal chest strap must be released first before setting the machine on the ground.
WARNING
14
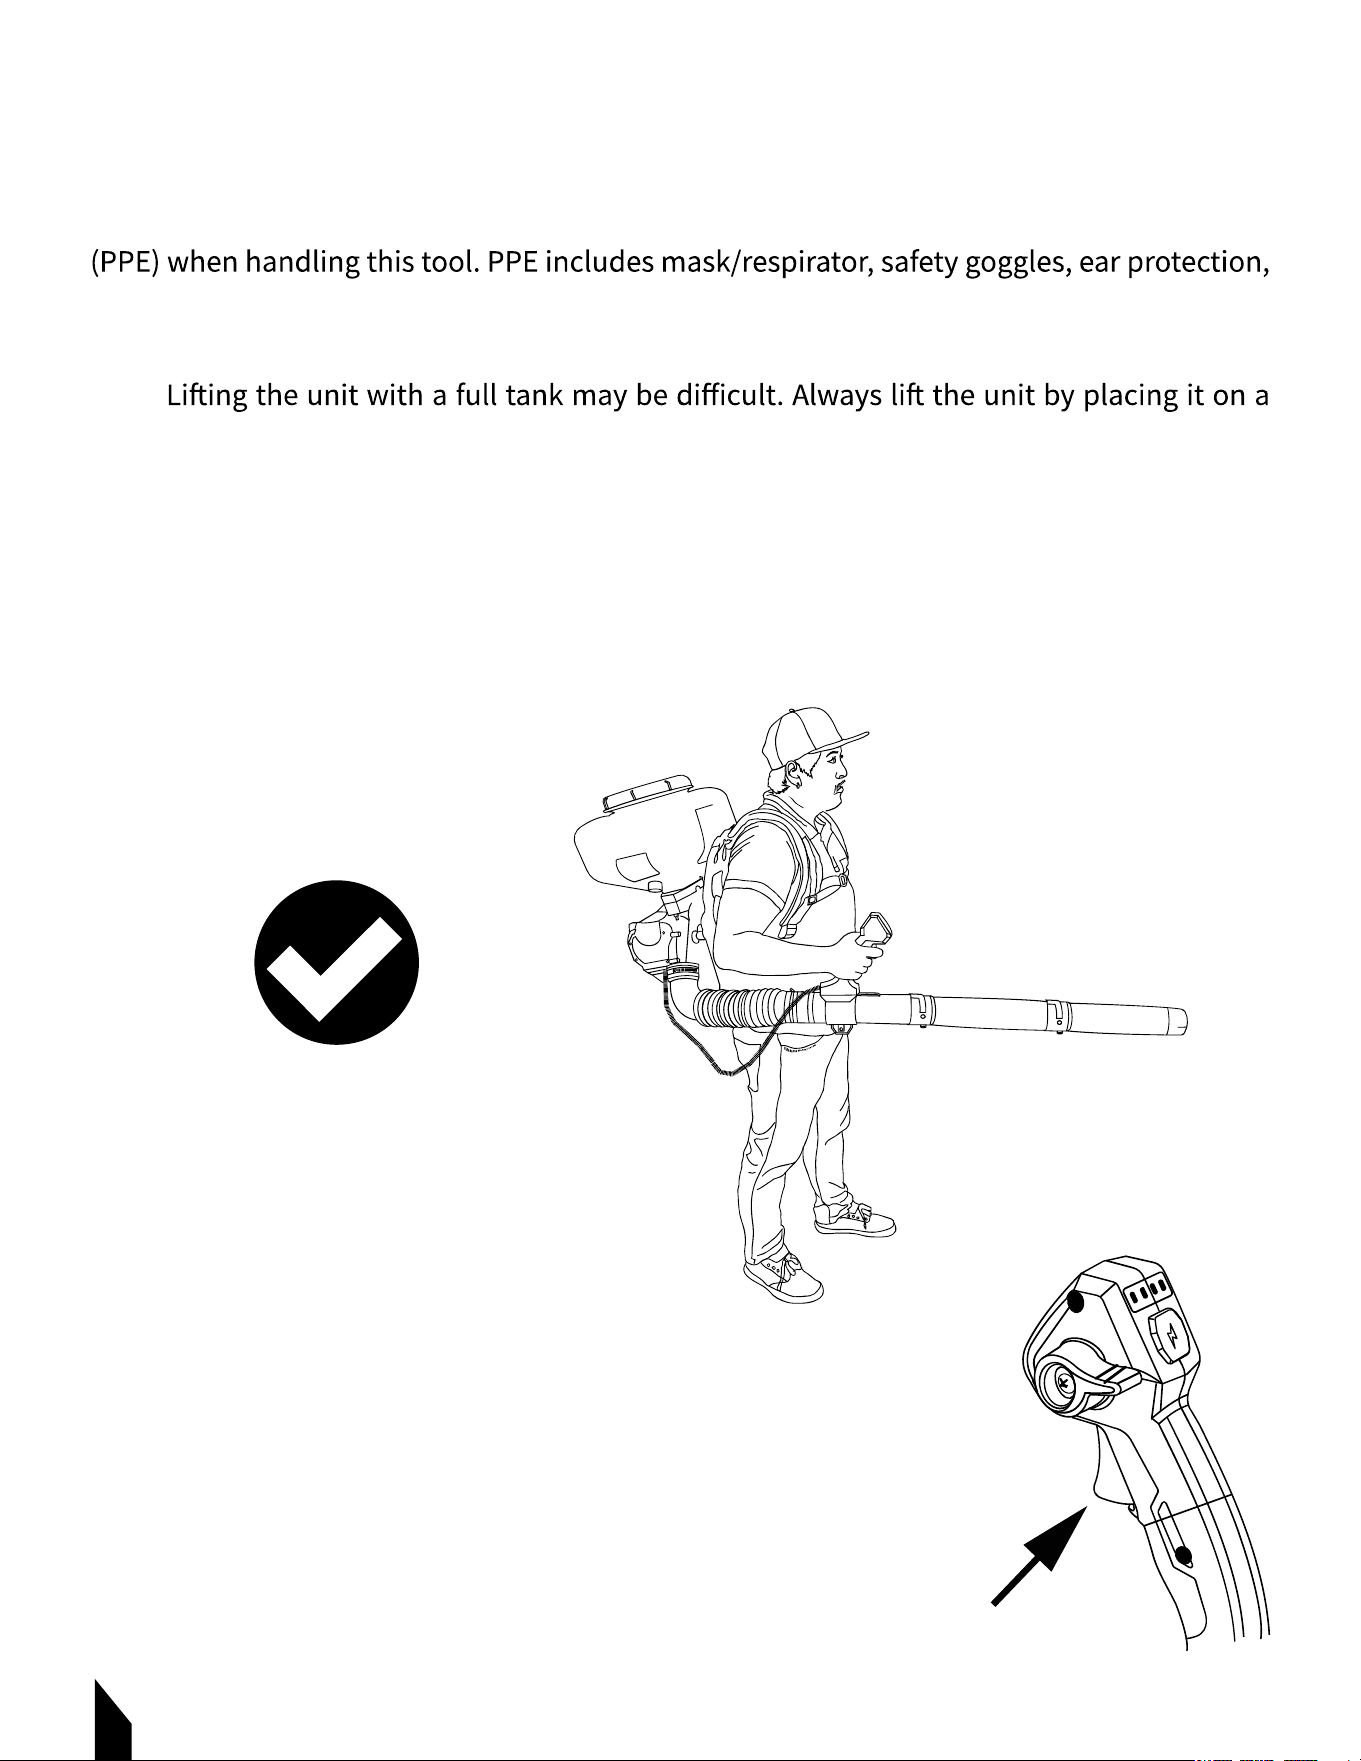
7. OPERATION
7.1 Holding the Tool
7.1.1 The operator should always wear the proper personal protective equipment/clothing
boots, gloves, and a long-sleeved shirt and long pants to cover as much exposed skin as
possible.
7.1.2
level wall or the back of a truck and then putting on the straps.
7.1.3 This tool is design to be operated with one hand.
7.1.4 This tool operates with a gravity fed tank. The nozzle should always be angled
downward or parallel with the ground. FIGURE 15.
NOTE: Pointing the nozzle up will disrupt the gravity feed, causing issues with the spread
pattern and proper machine operation.
7.2 Starting and Stopping the Machine
7.2.1 Before starting the spreader, ensure that the machine
is in perfect condition to ensure safe operation.
7.2.2 Install the battery into the machine’s battery compartment.
7.2.3 To start, squeeze the red trigger on the throttle control lever.
7.2.4 Squeeze the trigger more or less to change the spreading speed.
7.2.5 Release the trigger to stop the machine. FIGURE 16.
FIGURE 15
FIGURE 16
15
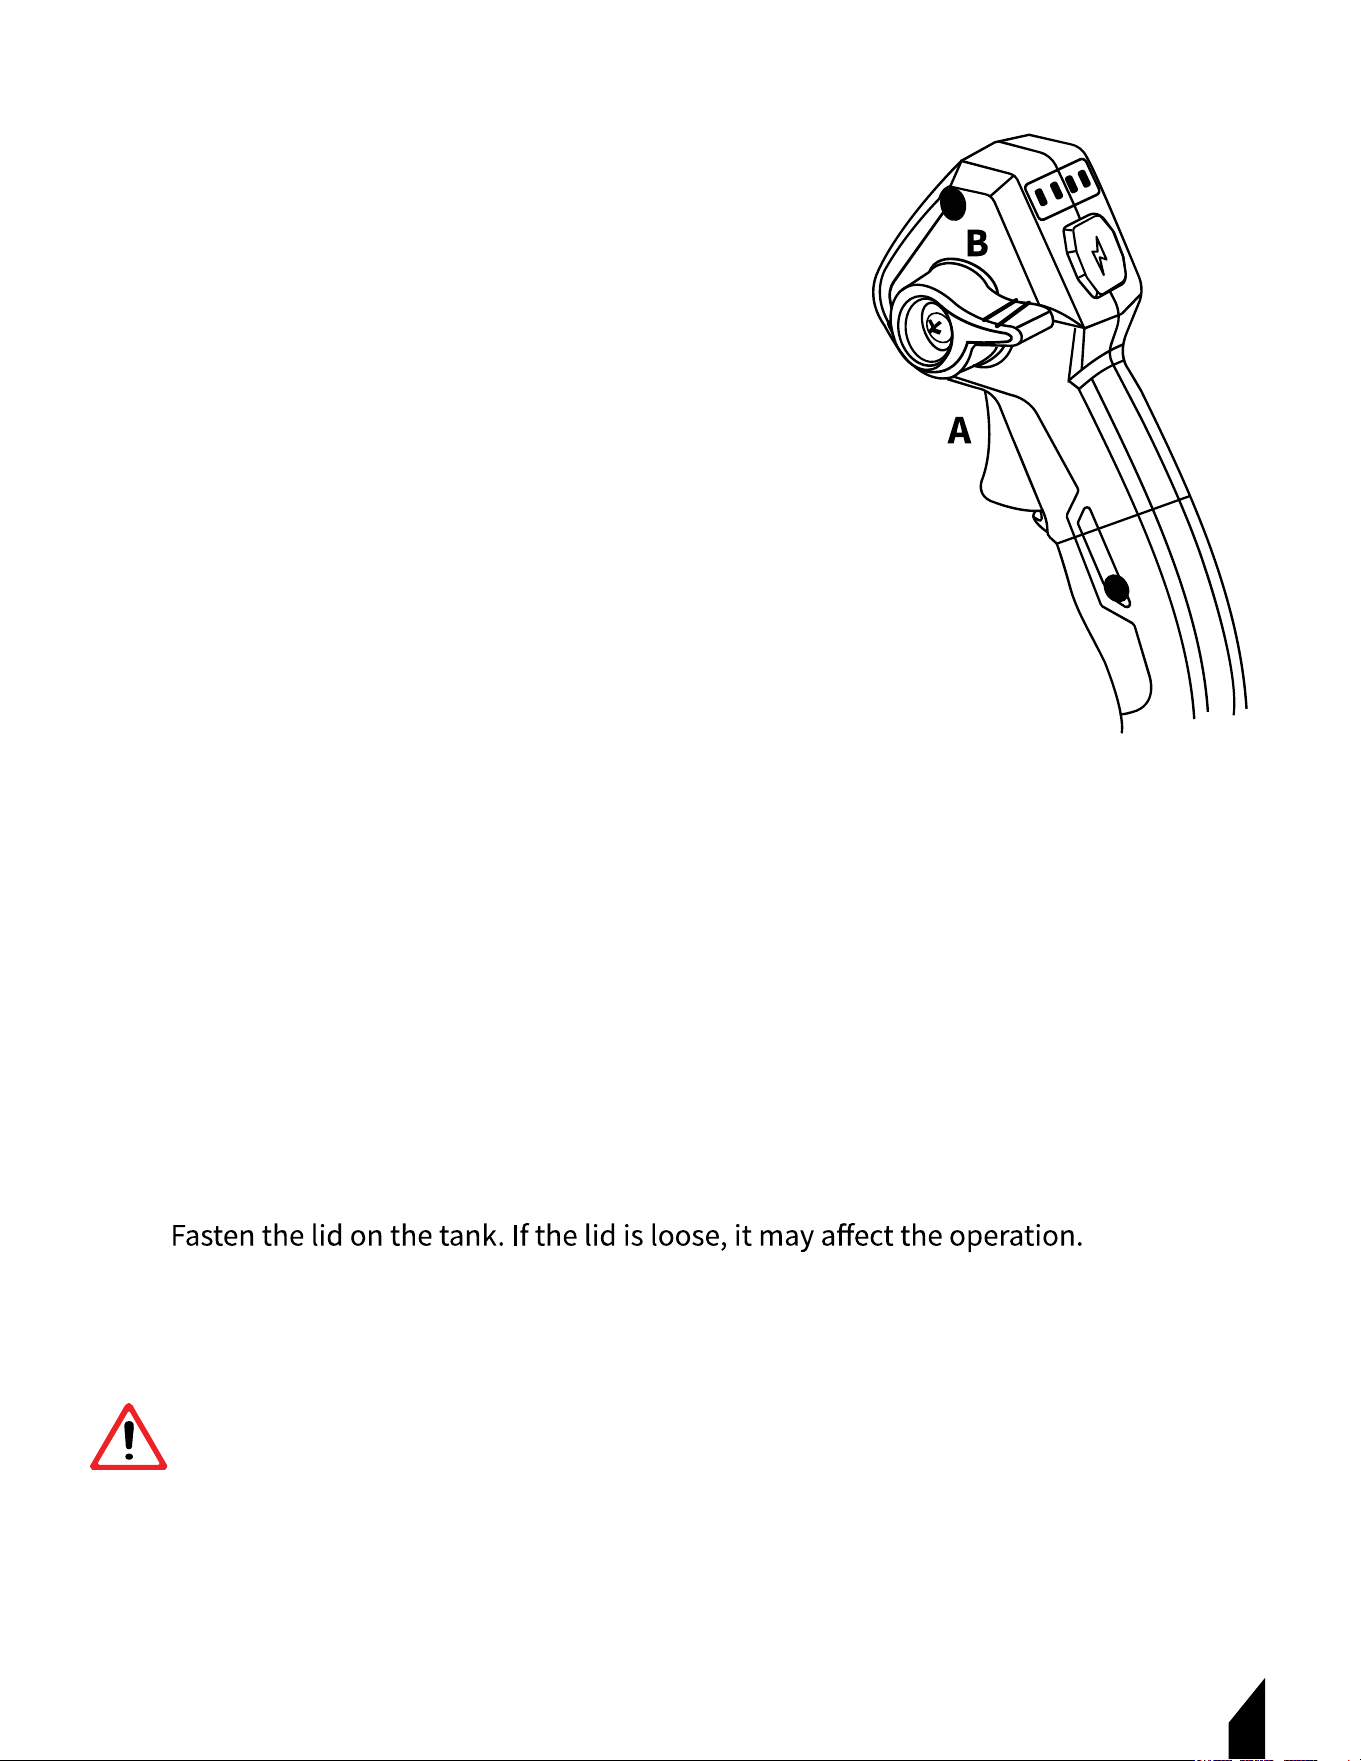
7.3 Cruise Control Setting
This tool’s throttle control handle includes a cruise
control function to set and lock your ideal blowing speed.
7.3.1 Start the machine’s spreading by squeezing the red
trigger (A) on the throttle control handle.
7.3.2 Once you have found your ideal blowing speed, pull
the red lever (B) back clockwise to lock the speed at the
desired setting.
7.3.3 To increase or decrease the blowing speed, push
the red lever (B) counter-clockwise to disengage the
Cruise Control Setting, then squeeze the red trigger (A) to
find your new desired blow setting. Pull the red lever (B)
back clockwise again to lock in place.
NOTE: Always disengage the Cruise Control Setting before removing the battery from your
machine. Failure to comply will cause the machine to start immediately when reinstalling
the battery, which may result in personal injury or damage to this machine.
7.4 Filling the Tank
7.4.1 Keep the dust lever down.
7.4.2 Remove the lid and pour the granules in the tank, being careful not to spill it.
Only fill the tank with the amount to be spread.
7.4.3
FIGURE 17
WARNING
Always follow the chemical manufacturer’s instructions, safety guidelines,
and recommendations when using any chemicals/solutions with this machine.
WARNING

16
7.5 Leaf Blowing Tips
7.5.1 Use brooms and/or rakes to loosen leaves and debris before blowing.
7.5.2 Hold the throttle control handle firmly. Sweep the blower nozzle from side to side,
while keeping the nozzle several inches above/around the ground or any foliage.
7.5.3 Walk slowing, while keeping the collected pile of leaves and debris in front of you.
7.5.4 Low speeds are recommended for blowing dry leaves and debris.
7.5.5 Operate a high speed for moving large debris or gravel.
7.5.6 Make sure that the nozzle is not directed at anybody or any loose debris before starting
the machine.
7.5.7
Make sure all pipes, tubes, and other parts are in place and secure.
7.5.8 Keep clear of open windows, children, pets, and blow leaves and debris safely away.
8. STORAGE
8.1.1
8.1.2 Secure the equipment during transportation in order to avoid transport damage.
8.1.3 ALWAYS Store the equipment upright, in a lockable, dry area - out of reach of children
and unauthorized persons.

9. REPLACEMENT PARTS
9.1.1 For replacement parts and technical questions visit www.tomahawk-power.com or
scan the QR code on the front of this manual.
9.1.2 Not all equipment components are available for replacement. The illustrations within
this manual are a convenient reference to the location and position of parts
in the assembly sequence.
9.1.3 When ordering parts, the following may be required: equipment model number, serial
number/lot, date code, and description. The manufacturer reserves the right to make design
changes and/or improvements to equipment, parts, accessories, and manuals without
notice.
10. TROUBLESHOOTING
17
Unit will not start
Unit will not spread
Battery is not charging
Battery is Not Charged
Charge Battery
Install Battery Correctly
Issue with Power Switch
Correctly And Not Defective
Battery is Low On Charge
Charger is Not Functioning
Battery is Damaged Replace Battery
Properly. Check That Led Is
Displaying Green Light
Charge Battery
Tank Valve is Jammed
Fix
Battery is Not Securely Attached
PROBLEM POSSIBLE CAUSES SOLUTION

18
11. EQUIPMENT WARRANTY
Your new TOMAHAWK® equipment is warranted to the original purchaser for a period of
one-year (12 months) from the original date of purchase. The TOMAHAWK® warranty is
against defects in design, materials and workmanship.
The following are not covered under the warranty:
11.1.1 Damage caused by abuse, misuse, dropping or other similar damage caused by or as
a result of failure to follow assembly, operation or user maintenance instructions.
11.1.2 Alterations, additions or repairs carried out by persons other than TOMAHAWK® or
their recognized agents.
11.1.3 Transportation or shipment costs to and from TOMAHAWK® or their recognized
agents, for repair or assessment against a warranty claim, on any machine.
11.1.4 Materials and/or labor costs to renew, repair or replace components due to fair
wear and tear.
11.1.5 TOMAHAWK® and/or their recognized agents, directors, employees or insurers will not
be held liable for consequential or other damages, losses or expenses in connection with or
by reason of or the inability to use the machine for any purpose.
Warranty Claims
Before submitting any warranty claim, you will need to register
your new TOMAHAWK® equipment through
www.tomahawk-power.com.
Follow the steps on page 3 or scan this QR codes to complete
all warranty claims should firstly be directed to TOMAHAWK®
through the online Service Request form found
at www.tomahawk-power.com/pages/service-request.

19
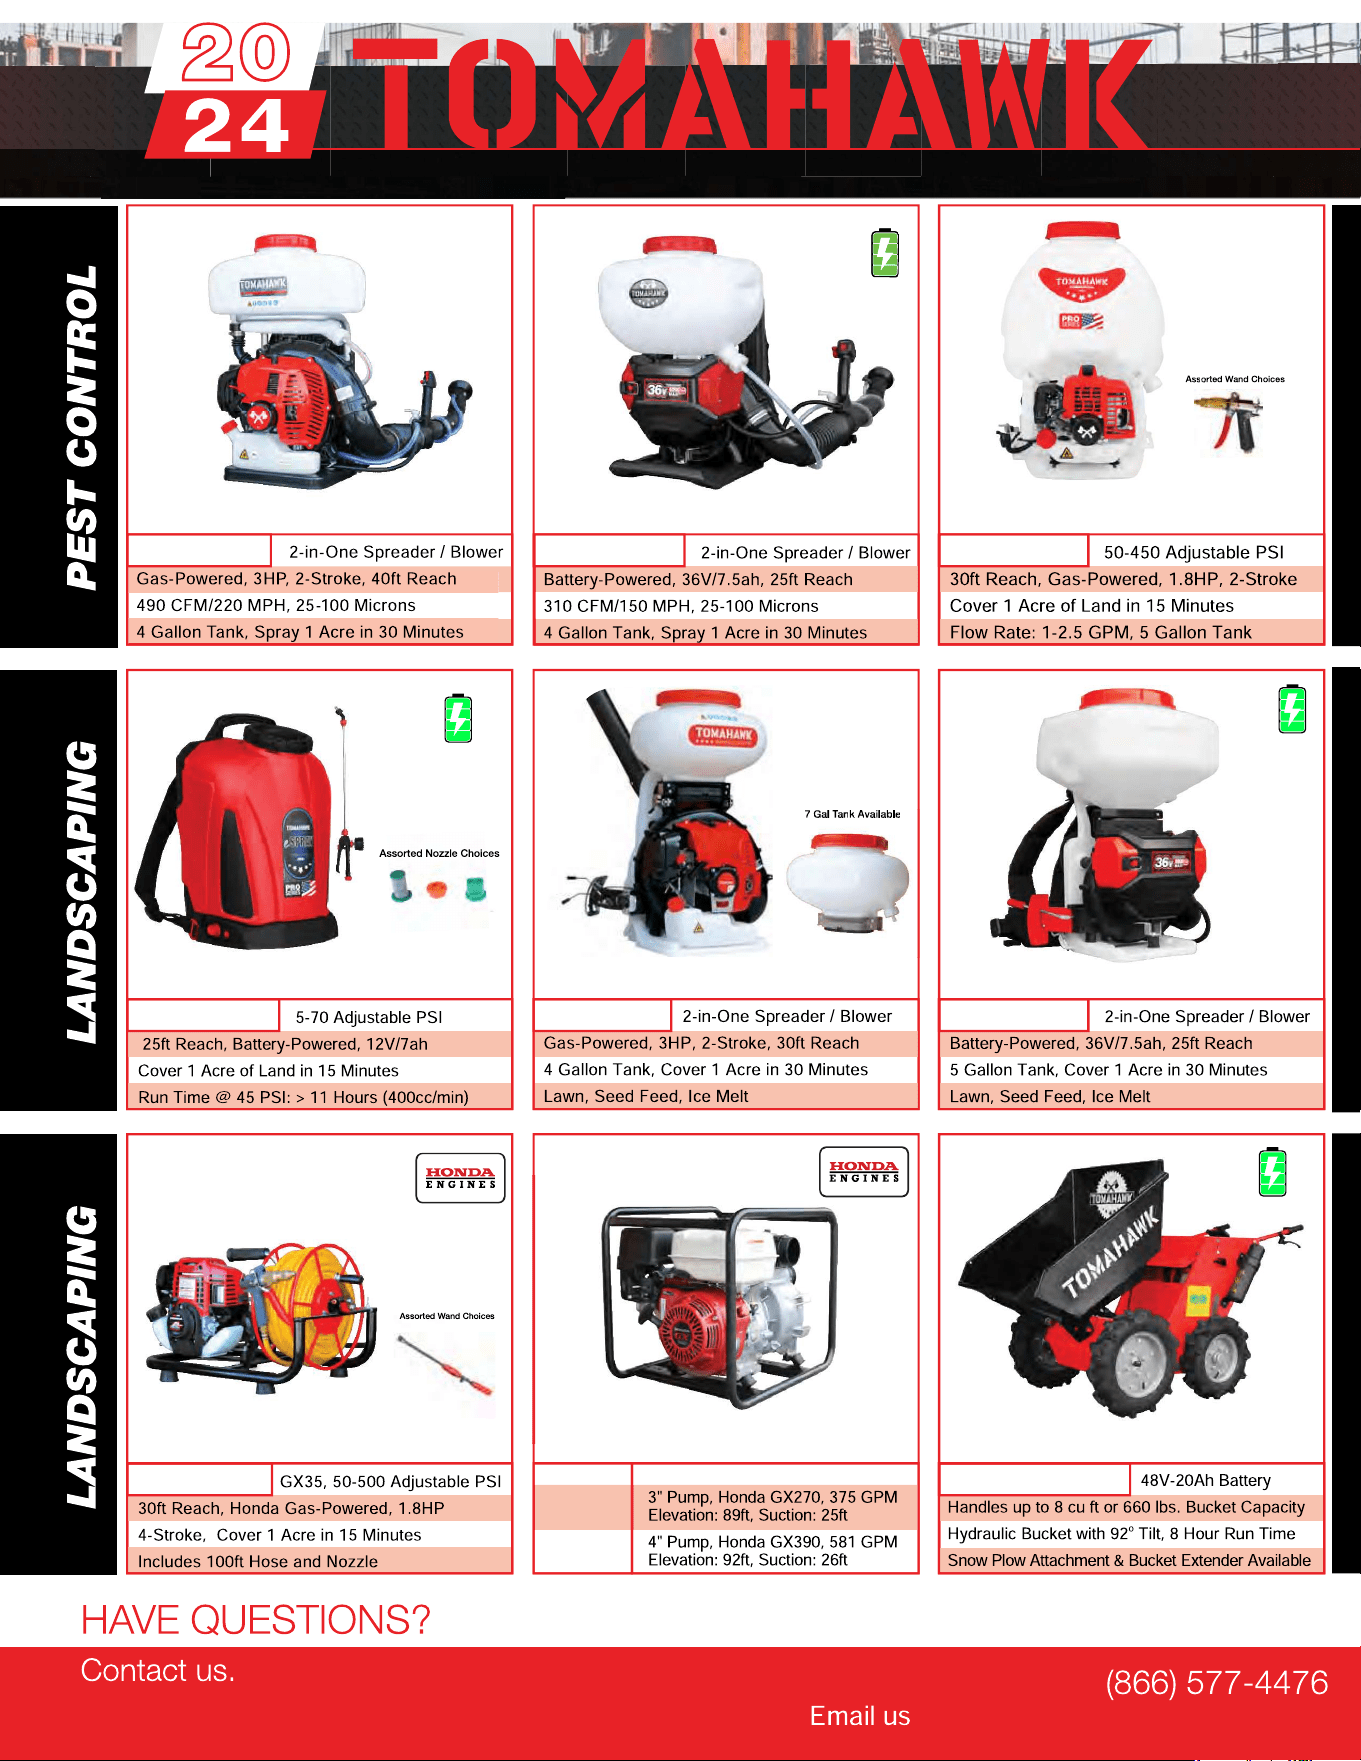
CHARGE AHEAD
Battery-Powered Foggers
TOMAHAWK® Battery Powered Mosquito Foggers
are your best solution for fighting annoying
mosquitoes. Powered by a 36V/7.5Ah Lithium-Ion
battery, spray 1 acre of land in less than 30 minutes
to stop pests fast!
Item #: eTMD14
4 GALLON BATTERY
BACKPACK FOGGER
www.tomahawk-power.com

Item #: TBS500
1.6HP SKID SPRAYER
+ 100FT HOSE & REEL
www.tomahawk-power.com
TRUSTED
NATIONWIDE
Powered by the industry’s most reliable
Honda GX35 engine, maintain constant,
adjustable pressure from 50 - 500 PSI with a
high flow rate of 2.8GPM to help you cover
more area so you can finish jobs faster!

21
22
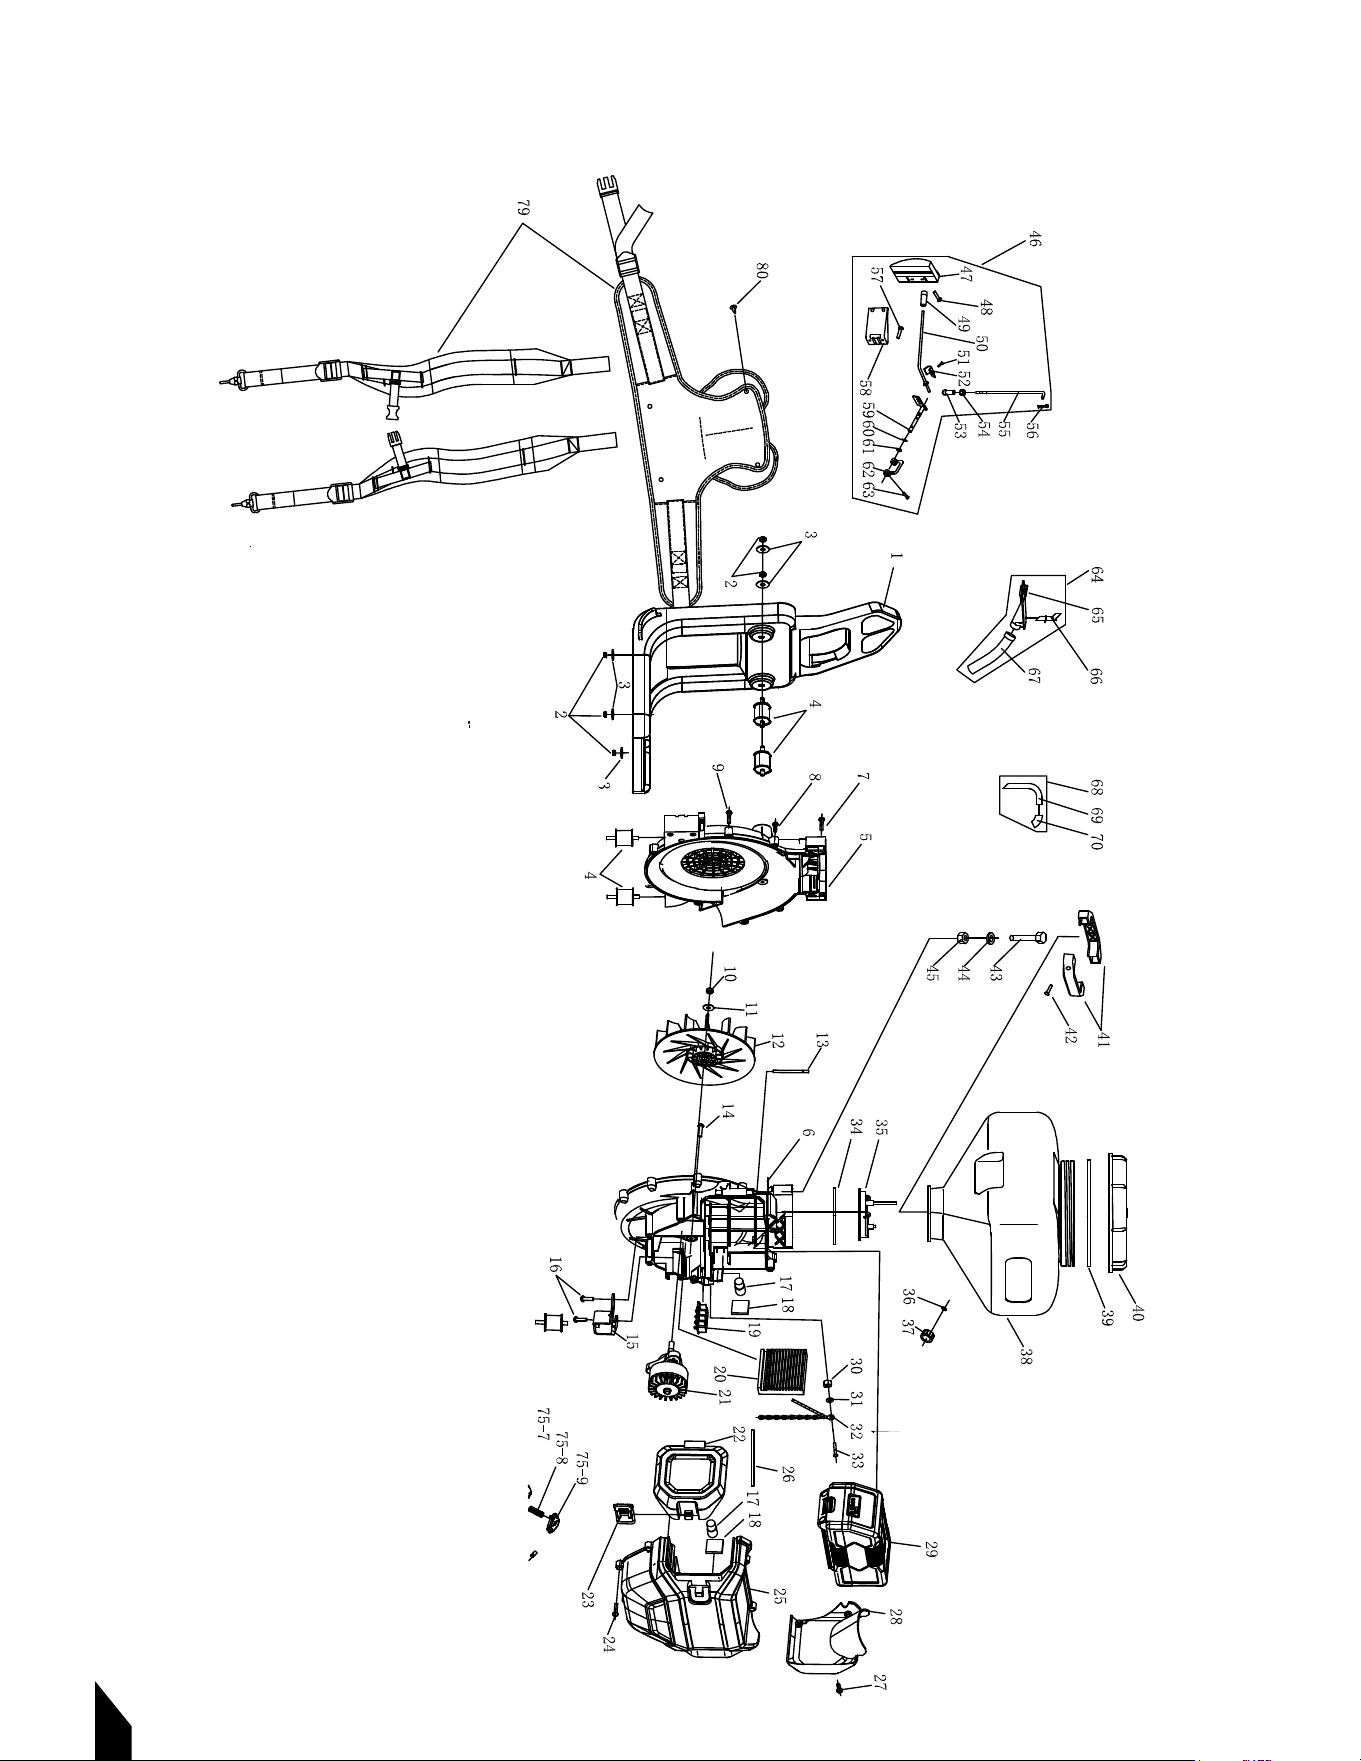
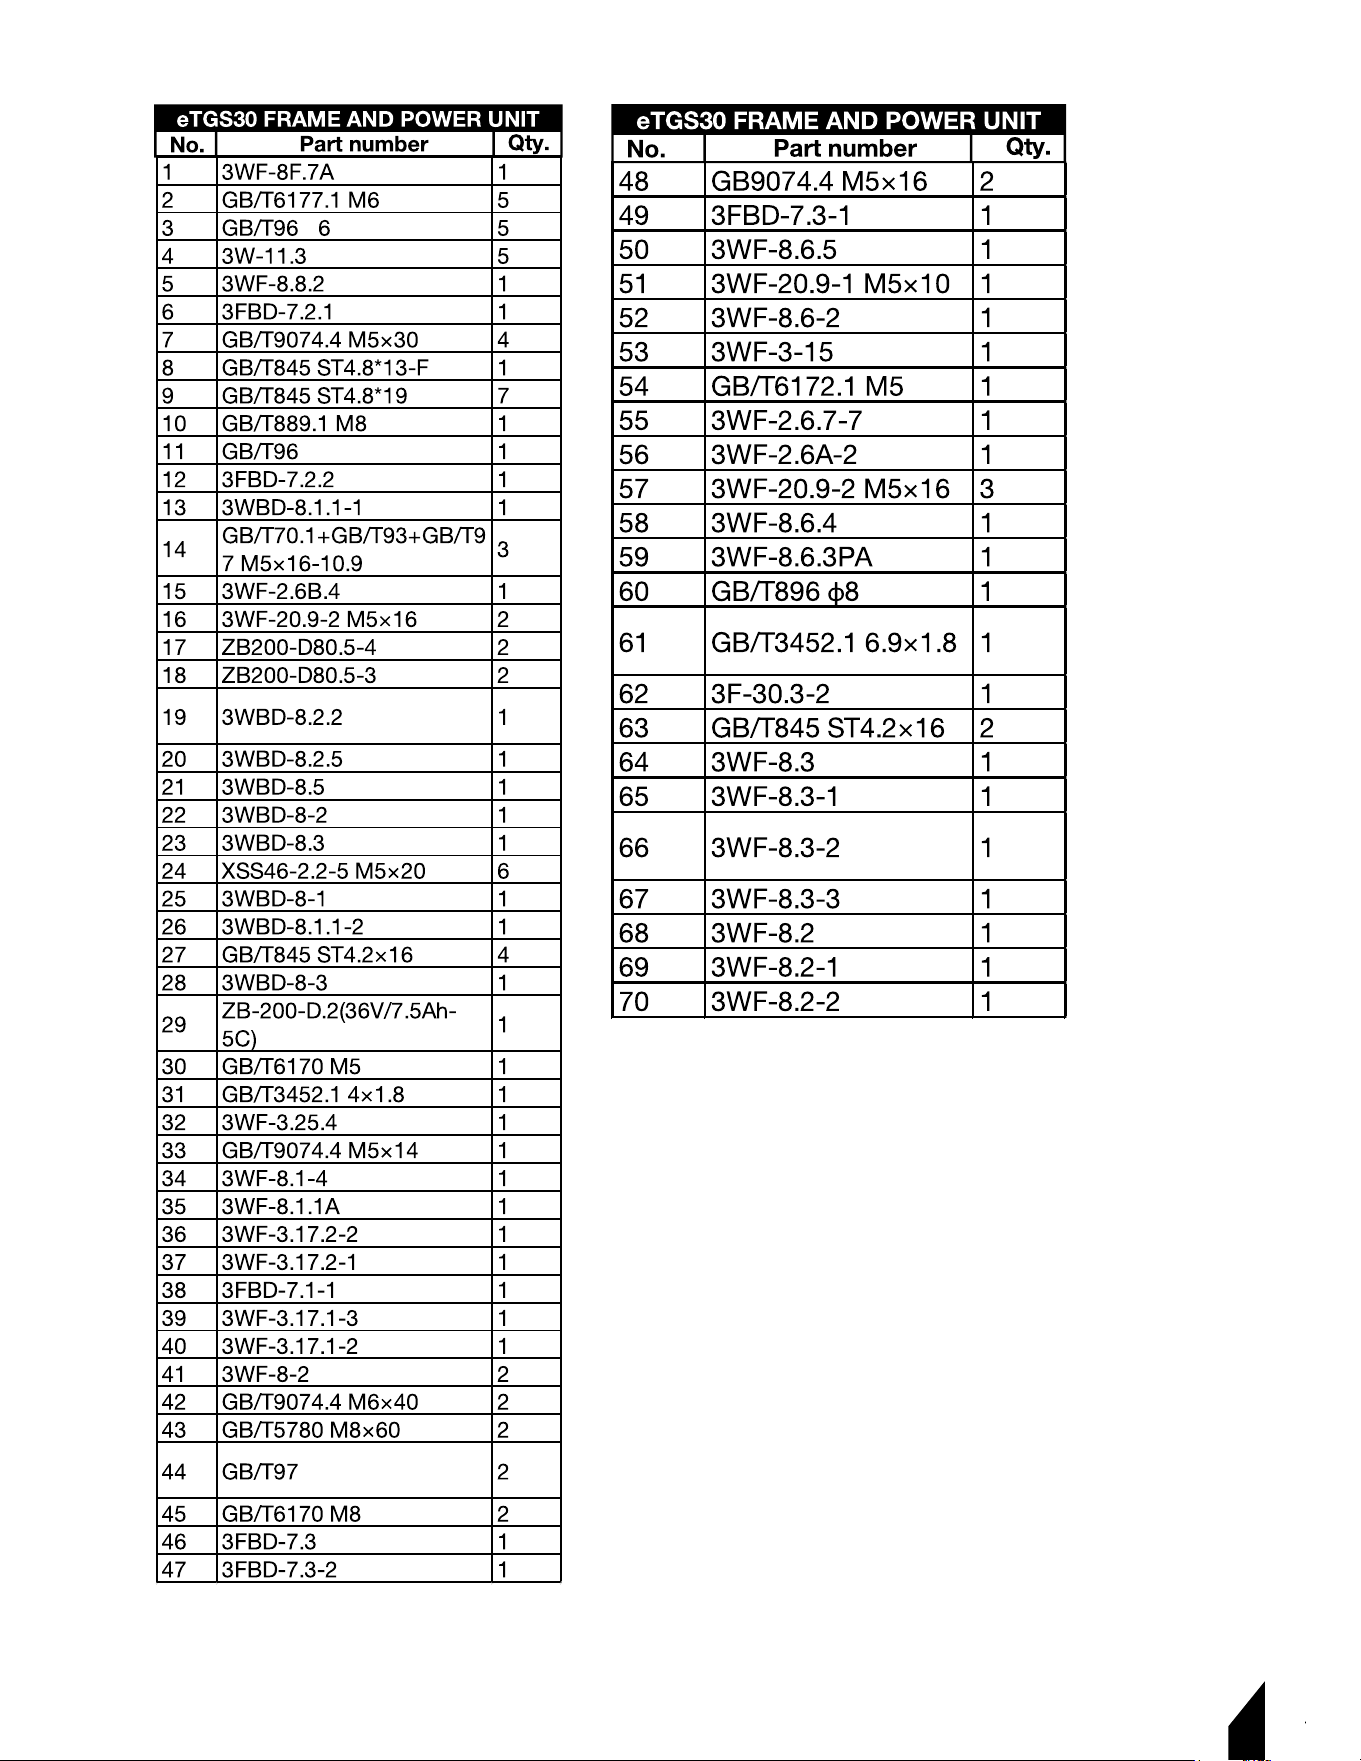
FRAME & POWER UNIT
23
24
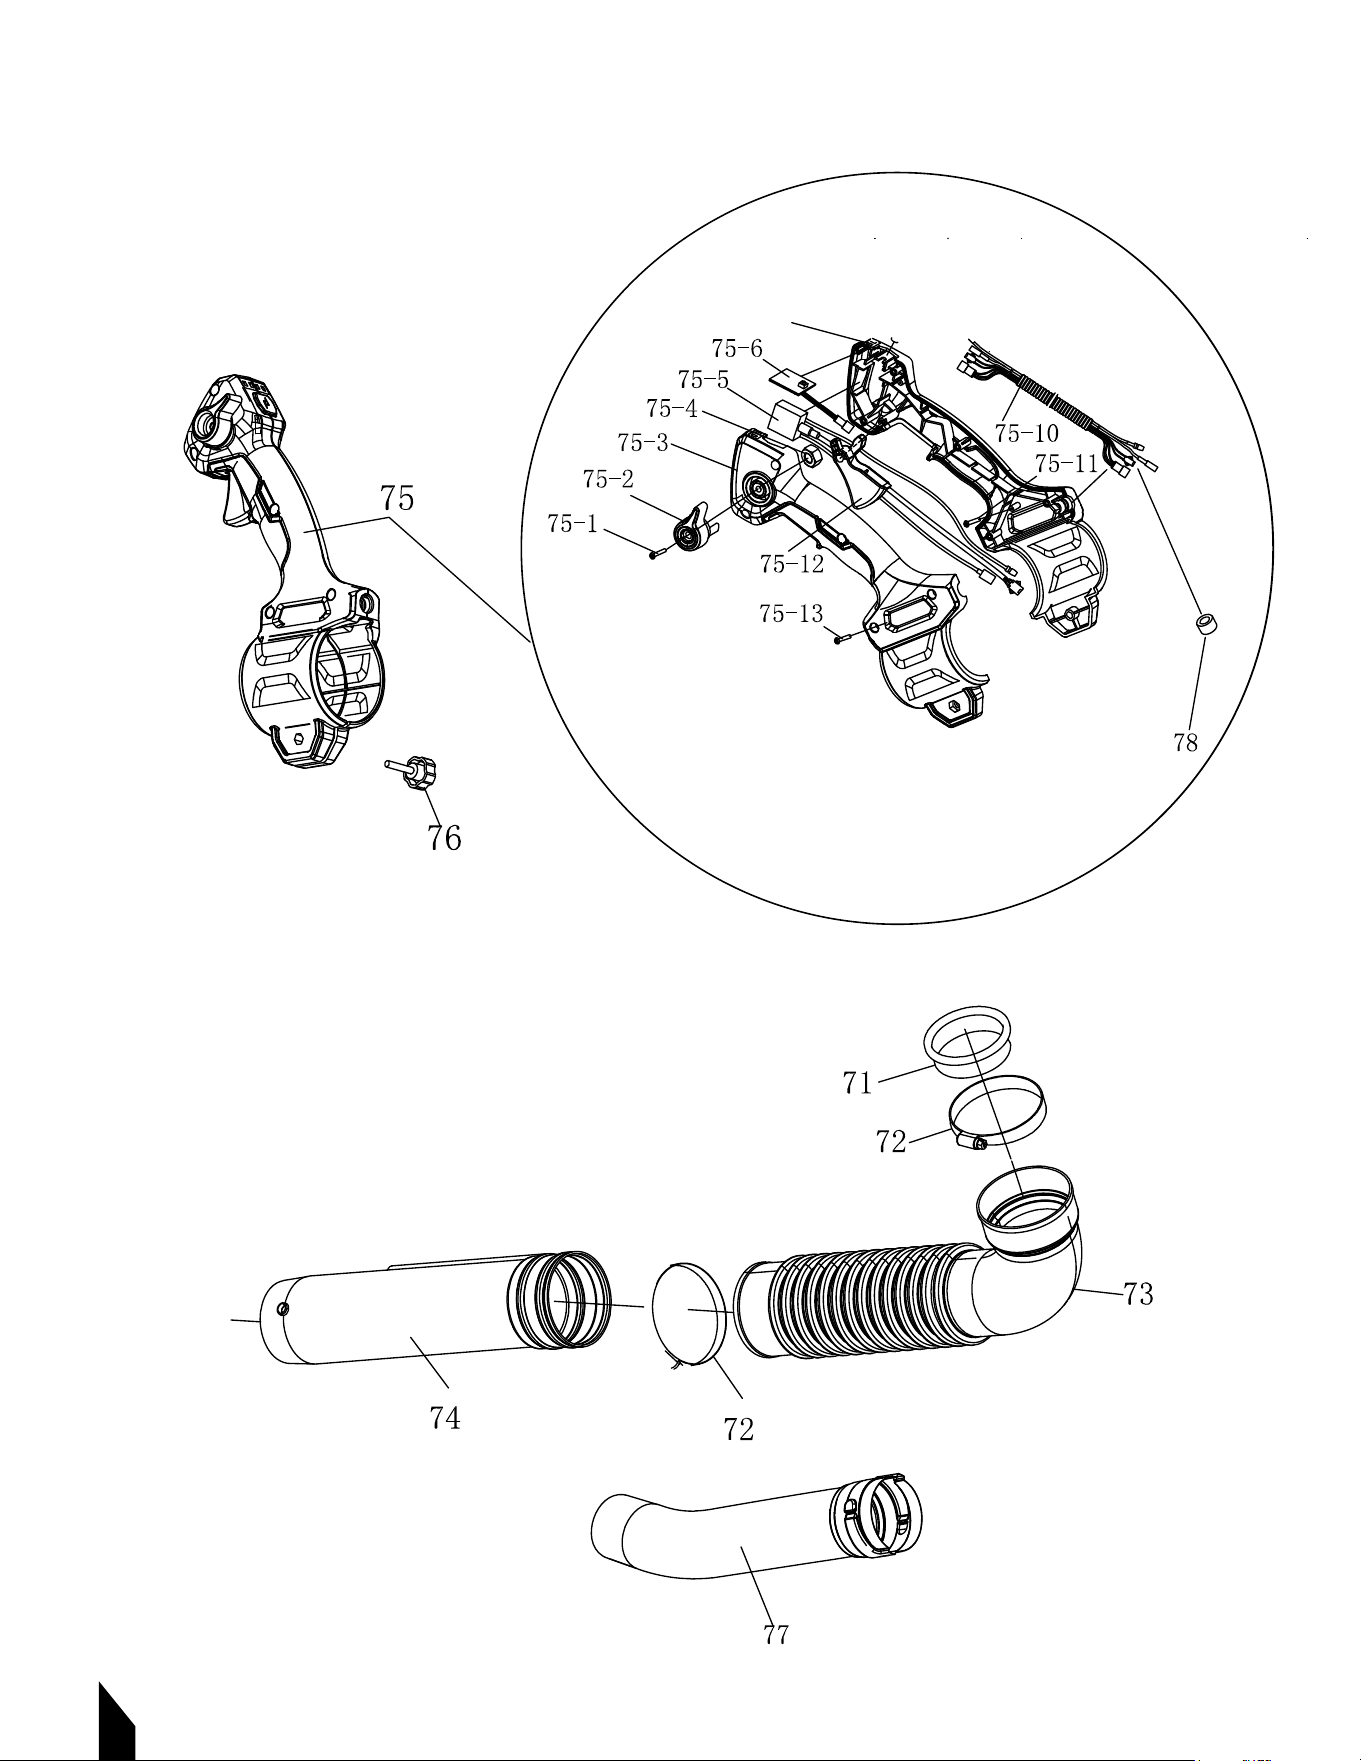
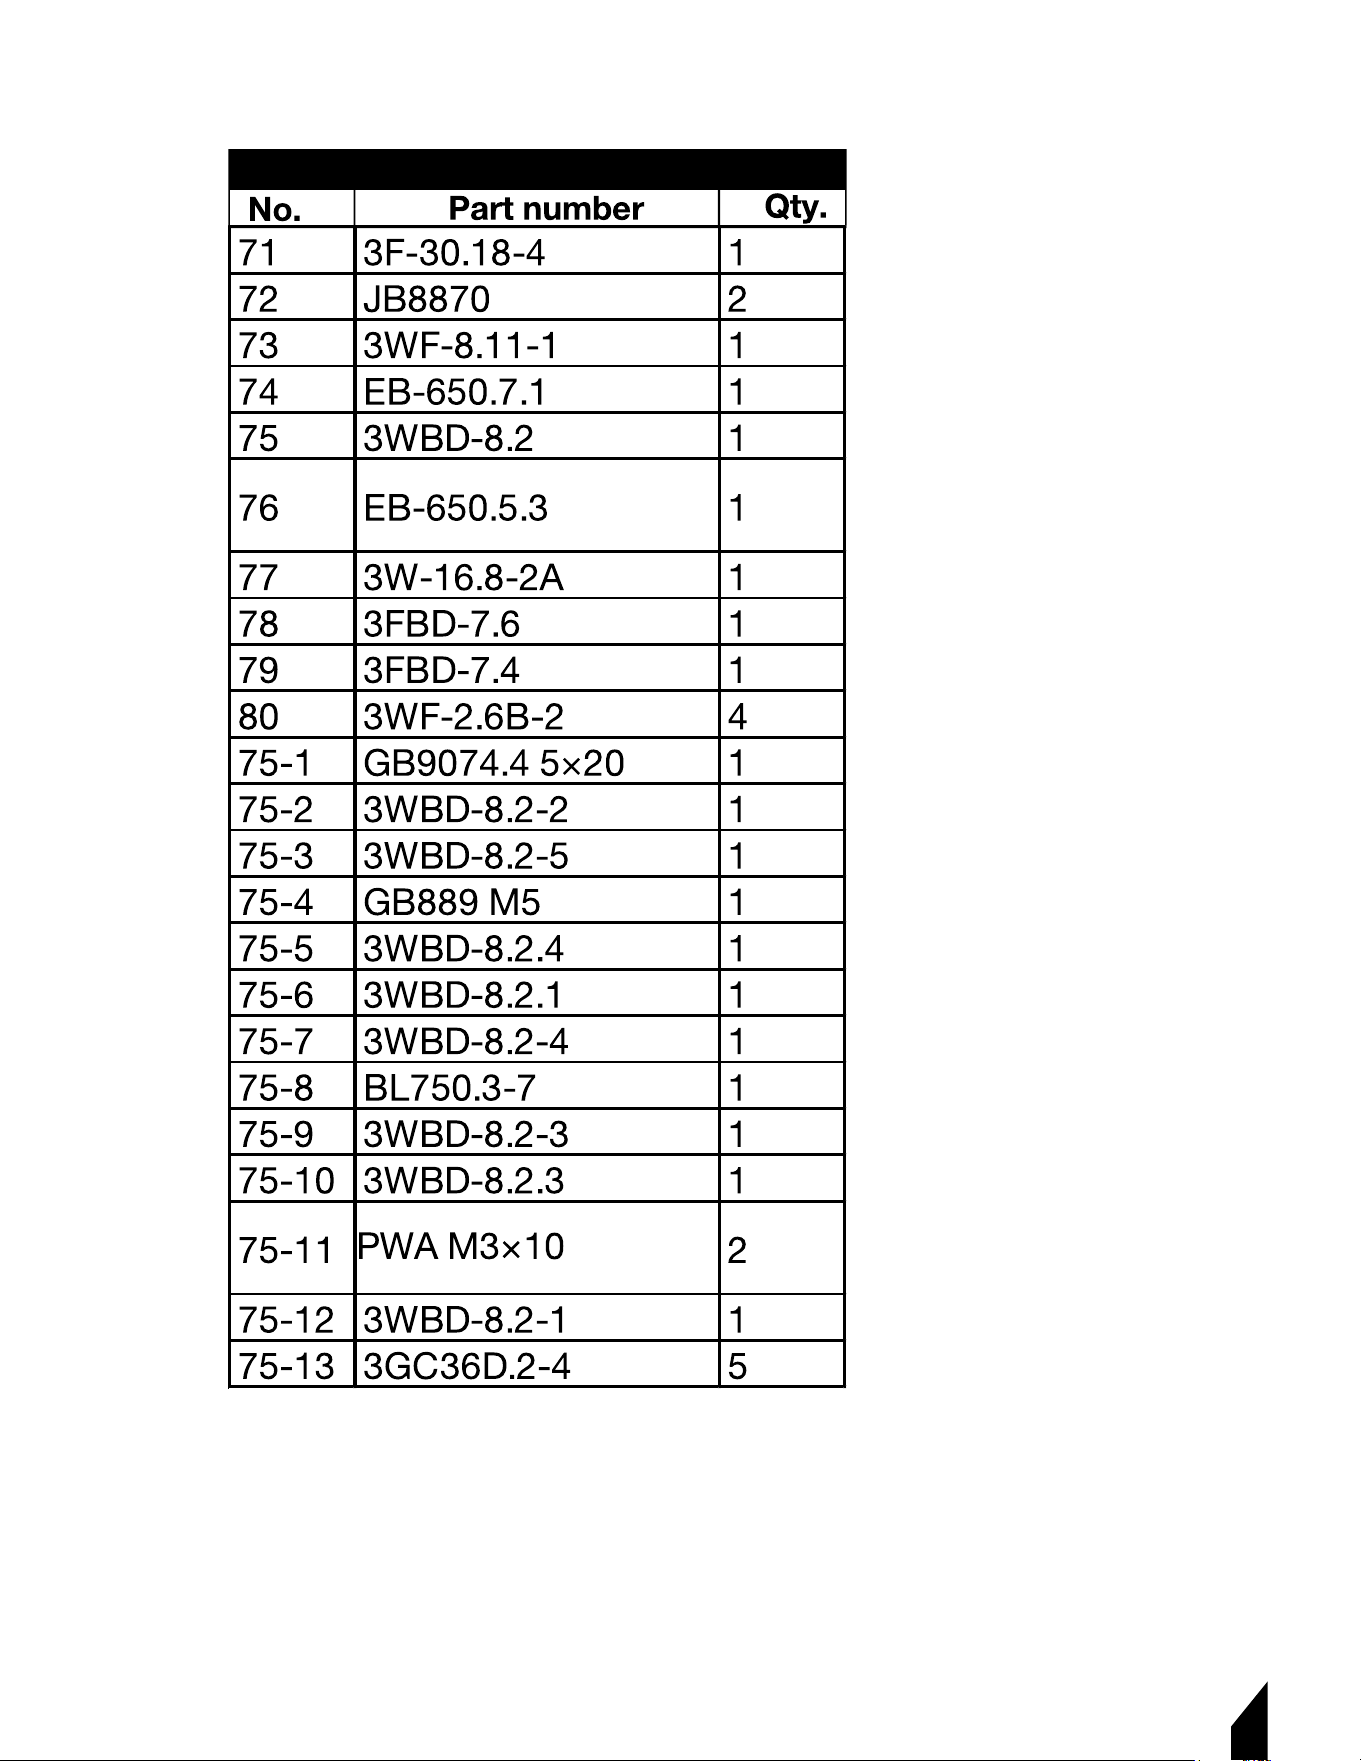
THROTTLE CONTROL & BLOWER ARM
25
eTSG30 THROTTLE CONTROL & BLOWER ARM
Part#:
eTMD14
Part#:
TPS25
4 Gal Mosquito Fogger/ Blower
Trash Water Pumps
Part#:
TW3H
TW4H
We’re here to help!
4 Gal Mosquito Fogger/ Blower
5 Gal Motorized Backpack Sprayer
Part#:
TGS30
Part#:
eTPS18
Part#:
eTGS30
5 Gal Backpack Battery Sprayer 4 Gal Fertilizer Spreader
5 Gal Battery Fertilizer Spreader
Equipment Guide
Power Buggy
Part#: TBUGGY300e
Part#:
TBS500
500 PSI Skid Sprayer
Part#:
TMD14
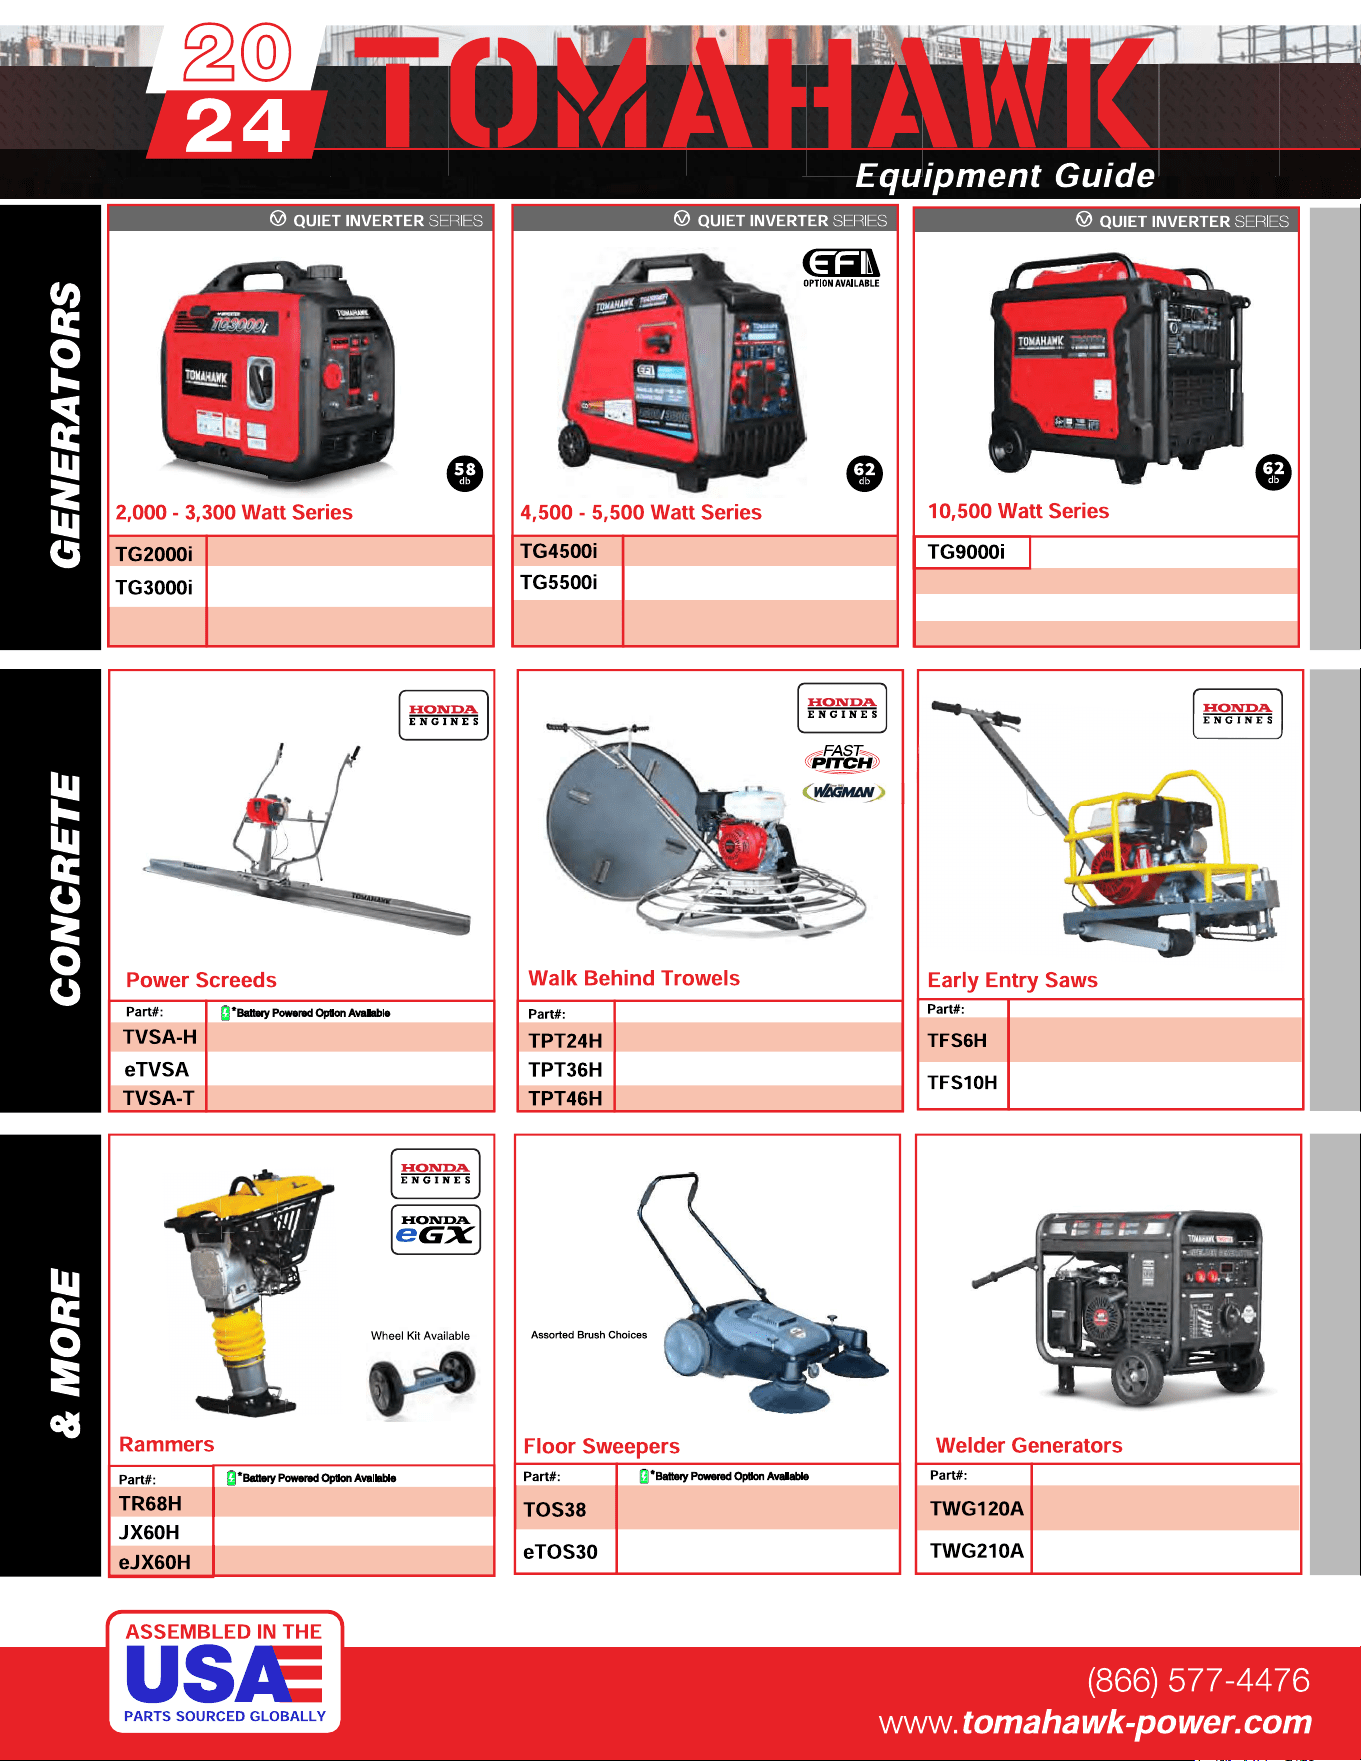
4,500w Max
/
3,800w Rated
5,500w Max / 5,000w Rated, 120/220V
Run Time 8 Hrs @ 50% Load
CARB Compliant, GFCI
10,500w Max
/
8,500w Rated
Voltage Selector, 120/220V
Run Time 14.5hrs @ 25% Load
CARB Compliant, GFCI, CO Detector
2,200w Max
/
2,000w Rated
3,300w Max
/
3,000w Rated,
120/220V, 30 AMP Twist Lock
Run Time 8 Hrs @ 50% Load
CARB Compliant, GFCI 120v
120 Amp Welder, 60% Duty Cycle,
2000w, Includes Wheel Kit
210 Amp Welder, 60% Duty Cycle,
2000w, Includes Wheel Ki
t
6010-7024 Rods Compatible
38" Working Width, Triple Broom
System, 14.5 Gallon
30" Working Width, Battery Powered
Triple Broom System, 13.5 Gallon
3,550 lbs/sq ft, Honda GX120
3,350 lbs/sq ft, Honda GX100
3,350 lbs/sq ft, Honda GXE2.0S
Honda, Gas-Powered, 6-16 ft Magnesium Blades
Battery-Powered, 6-16 ft Magnesium Blades
Gas-Powered, 6-14 ftAluminum Blades
2 ft Edger, Honda GX160, 0-28
o
Blade Pitch
3 ft, Honda GX160/GX270, 0-28
o
Blade Pitch
4 ft, Honda GX270/GX390, 0-28
o
Blade Pitch
Items Listed Includes Combo Blades
6" Blade Diameter, Blade Compatibility,
Honda GX120
10" Blade Diameter, Self Propelled,
Blade Compatibility, Honda GX270/GX390

TOMAHAWK®, LLC
San Diego, CA
(866) 577-4476
(866) 577-4476
Tomahawk understands to keep a job-site running smoothly the proper equipment and
spare parts are needed at the drop of a hat. With same day shipping and faster
delivery times, count on Tomahawk to keep you powered throughout the day! With
long lasting parts and engines, Tomahawk equipment will be the star of your fleet for
years to come. Visit www.tomahawk-power.com to get started today!
facebook.com/TomahawkPowerUSA
youtube.com/TomahawkPower
@tomahawkpower