
Installation Guide
For
Linux Driver
REV1.0.1
1910011724

TP-LINK Statement for Linux driver
TP-LINK has released Linux driver for some TP-LINK USB wireless adapters to support
Linux system. The driver file has included an installation guide about how to install and
use the adapter on Linux OS.
The driver is recommended to be installed on Linux OS which applies the kernel version
that we have listed on TP-LINK official website.
Since Linux is developed at an open system with various branches, we cannot guarantee
that our driver could work on your Linux system.
Given the specificity of the Linux system, we are very sorry that we cannot provide more
guidance on the installation, except the existing one, so we sincerely recommend you to
seek instruction on the related forums.
We have updated some FAQs about installing driver, please click this link:
http://www.tp-link.com/en/faq-1076.html

Contents
1. Development Environment .......................................................................................... 1
2. Compile the Driver ...................................................................................................... 1
3. Load the Driver ............................................................................................................ 2
4. Join the Wireless Network .......................................................................................... 3
4.1.1. Identify the device ................................................................................................ 3
4.1.2. Create the interface ............................................................................................. 3
4.1.3. Change the interface status to up ........................................................................ 4
4.1.4. Scan AP and see results ...................................................................................... 4
4.1.5. AP Connect to the AP .......................................................................................... 4
4.1.6. Enable DHCP client ............................................................................................. 6
1. Development Environment
System version: Ubuntu 14.04.1
Kernel version: 3.16.0-30-generic
Gcc version:4.8.2
2. Compile the Driver
Before you compile the driver, please make sure you have the correct compile tool and
kernel sources.
We can install compile tool gcc by command “apt-get install gcc”
Note : We recommend you use a suitable compile tool to compile our driver.
For example:
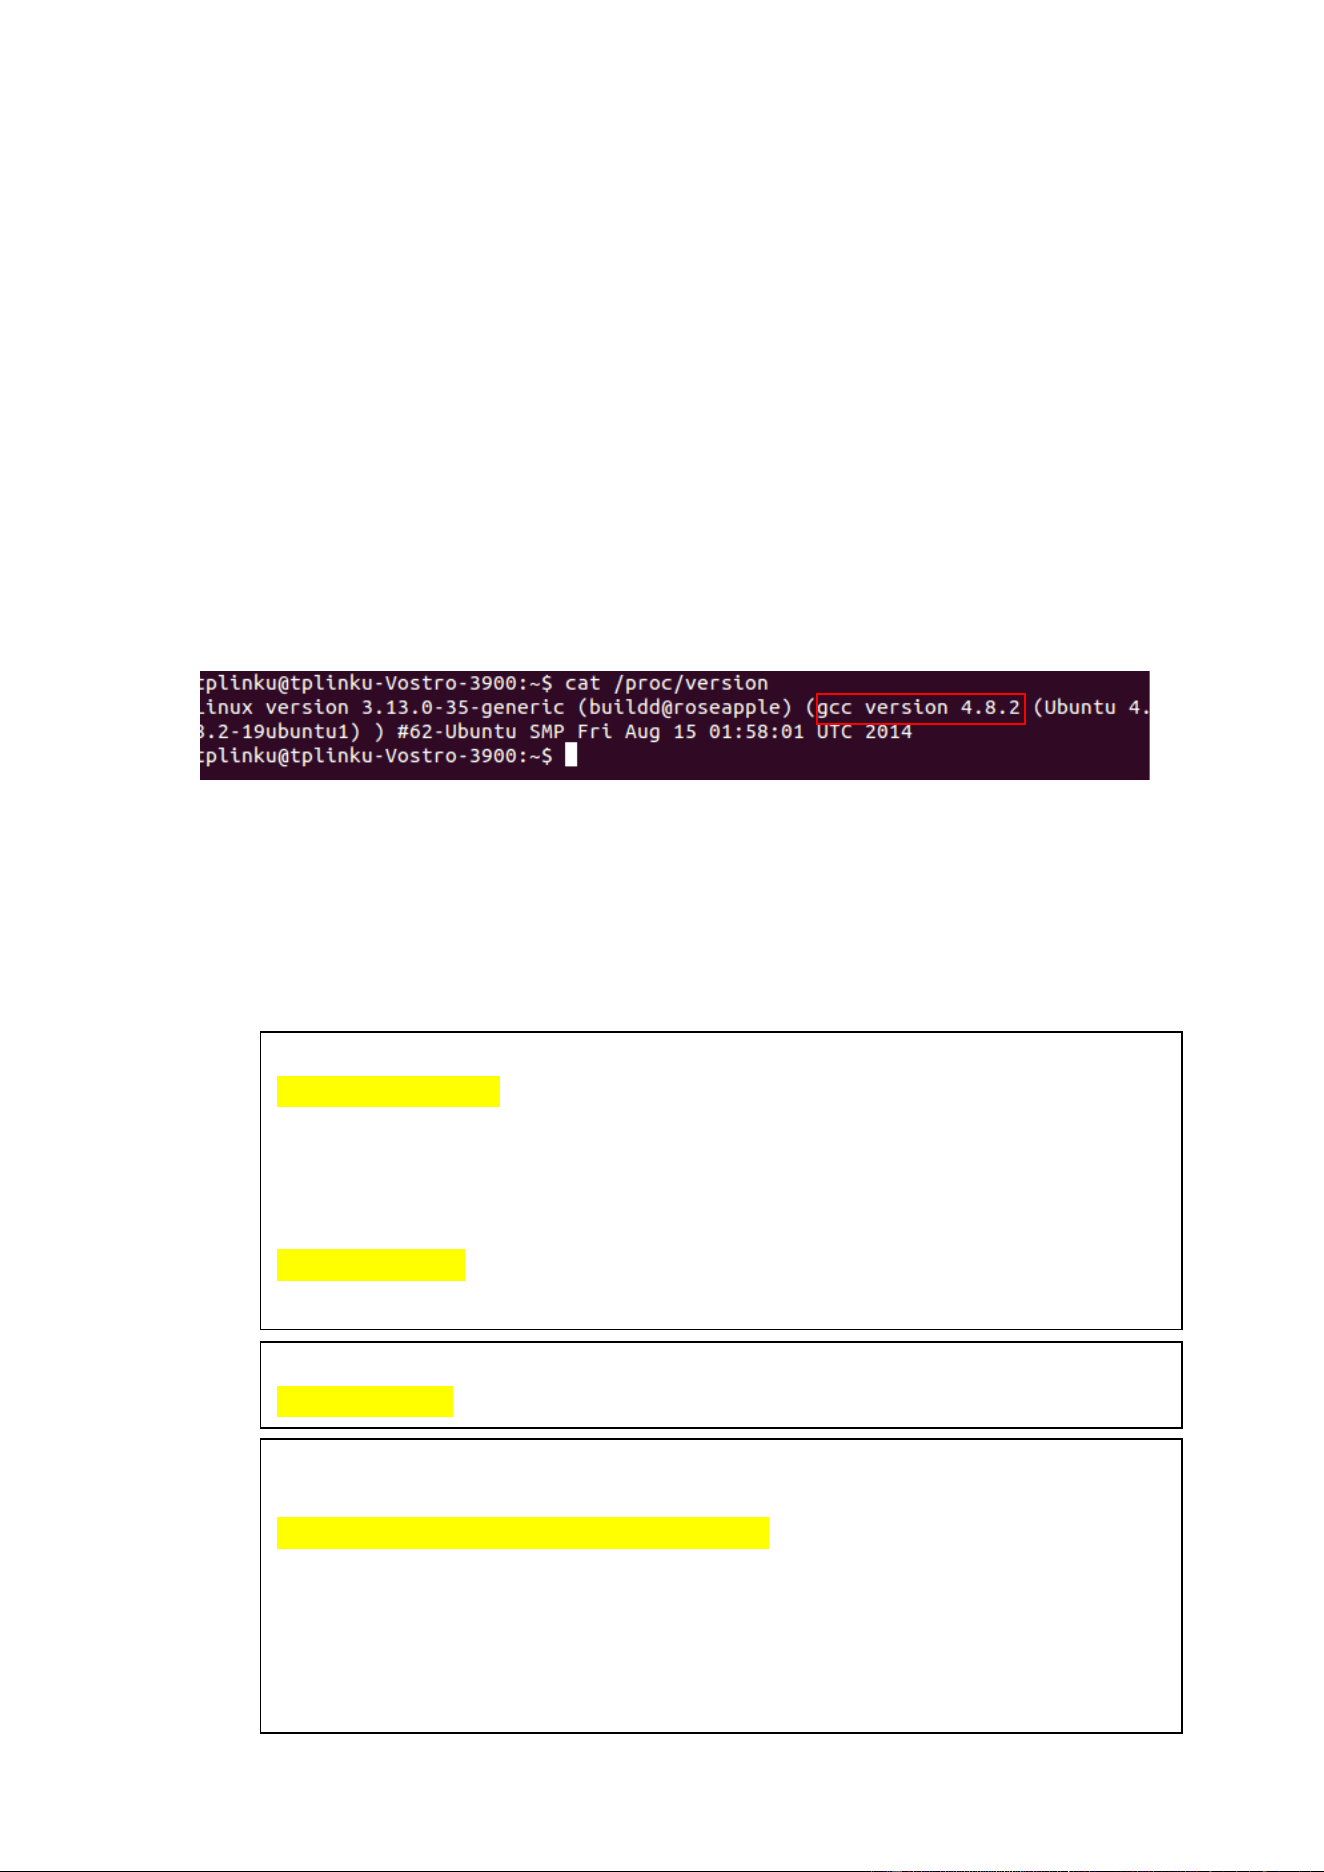
According to the command “cat /proc/version”, we could see your linux system is compiled
by gcc4.8.2. So we recommend you use gcc4.8.2 to compile our driver if possible.
To compile the driver:
1. Access the directory of driver.
2. Before compile, make sure the the path in makefile.c is suitable for your compile
environment of your Linux system.
ifeq ($(WIFI_MODE),)
RT28xx_MODE = STA
else
RT28xx_MODE = $(WIFI_MODE)
endif
ifeq ($(TARGET),)
TARGET = LINUX
endif
#PLATFORM: Target platform
PLATFORM = PC
ifeq ($(PLATFORM),PC)
# Linux 2.6
LINUX_SRC = /lib/modules/$(shell uname -r)/build
# Linux 2.4 Change to your local setting
#LINUX_SRC = /usr/src/linux-2.4
LINUX_SRC_MODULE = /lib/modules/$(shell uname -r)/kernel/drivers/net/wireless/
CROSS_COMPILE =
endif
1
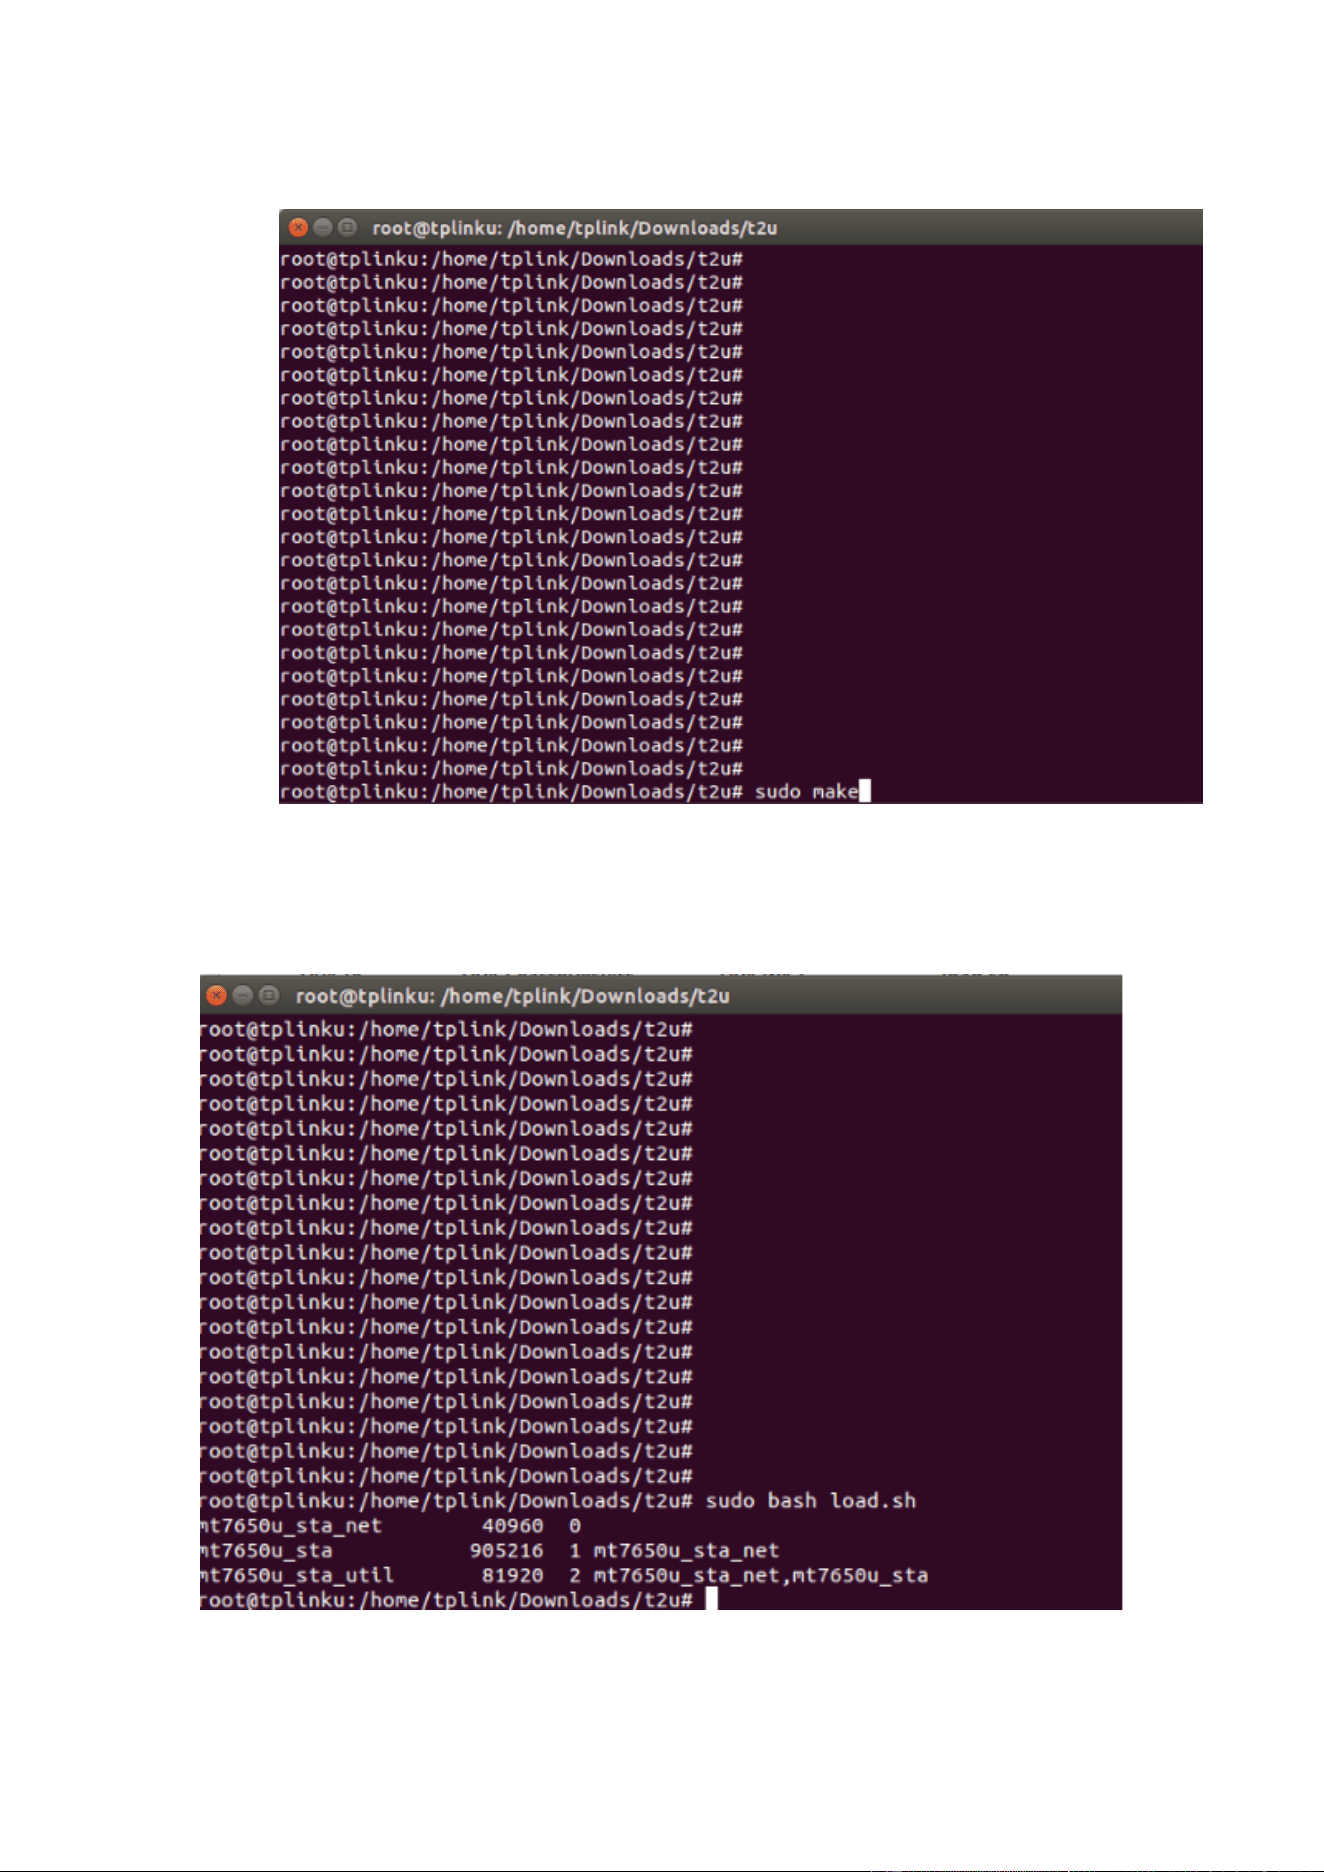
3. Type “sudo make” to compile the driver file.
3. Load the Driver
1) Go to the directory of the original driver file to run the command “sudo bash load.sh”
If it’s fail to run the load.sh, please type:
“rm -rf /etc/Wireless/RT2870STA/”
2
“mkdir /etc/Wireless/RT2870STA/”
“cp ./MODULE/conf/RT2870STA.dat /etc/Wireless/RT2870STA/RT2870STA.dat”
“chmod 777 -R /etc/Wireless/RT2870STA”
“insmod ./UTIL/os/linux/mt7650u_sta_util.ko”
“insmod ./MODULE/os/linux/mt7650u_sta.ko”
“insmod ./NETIF/os/linux/mt7650u_sta_net.ko”
“lsmod | grep "mt7650"“
“ifconfig ra0 up”
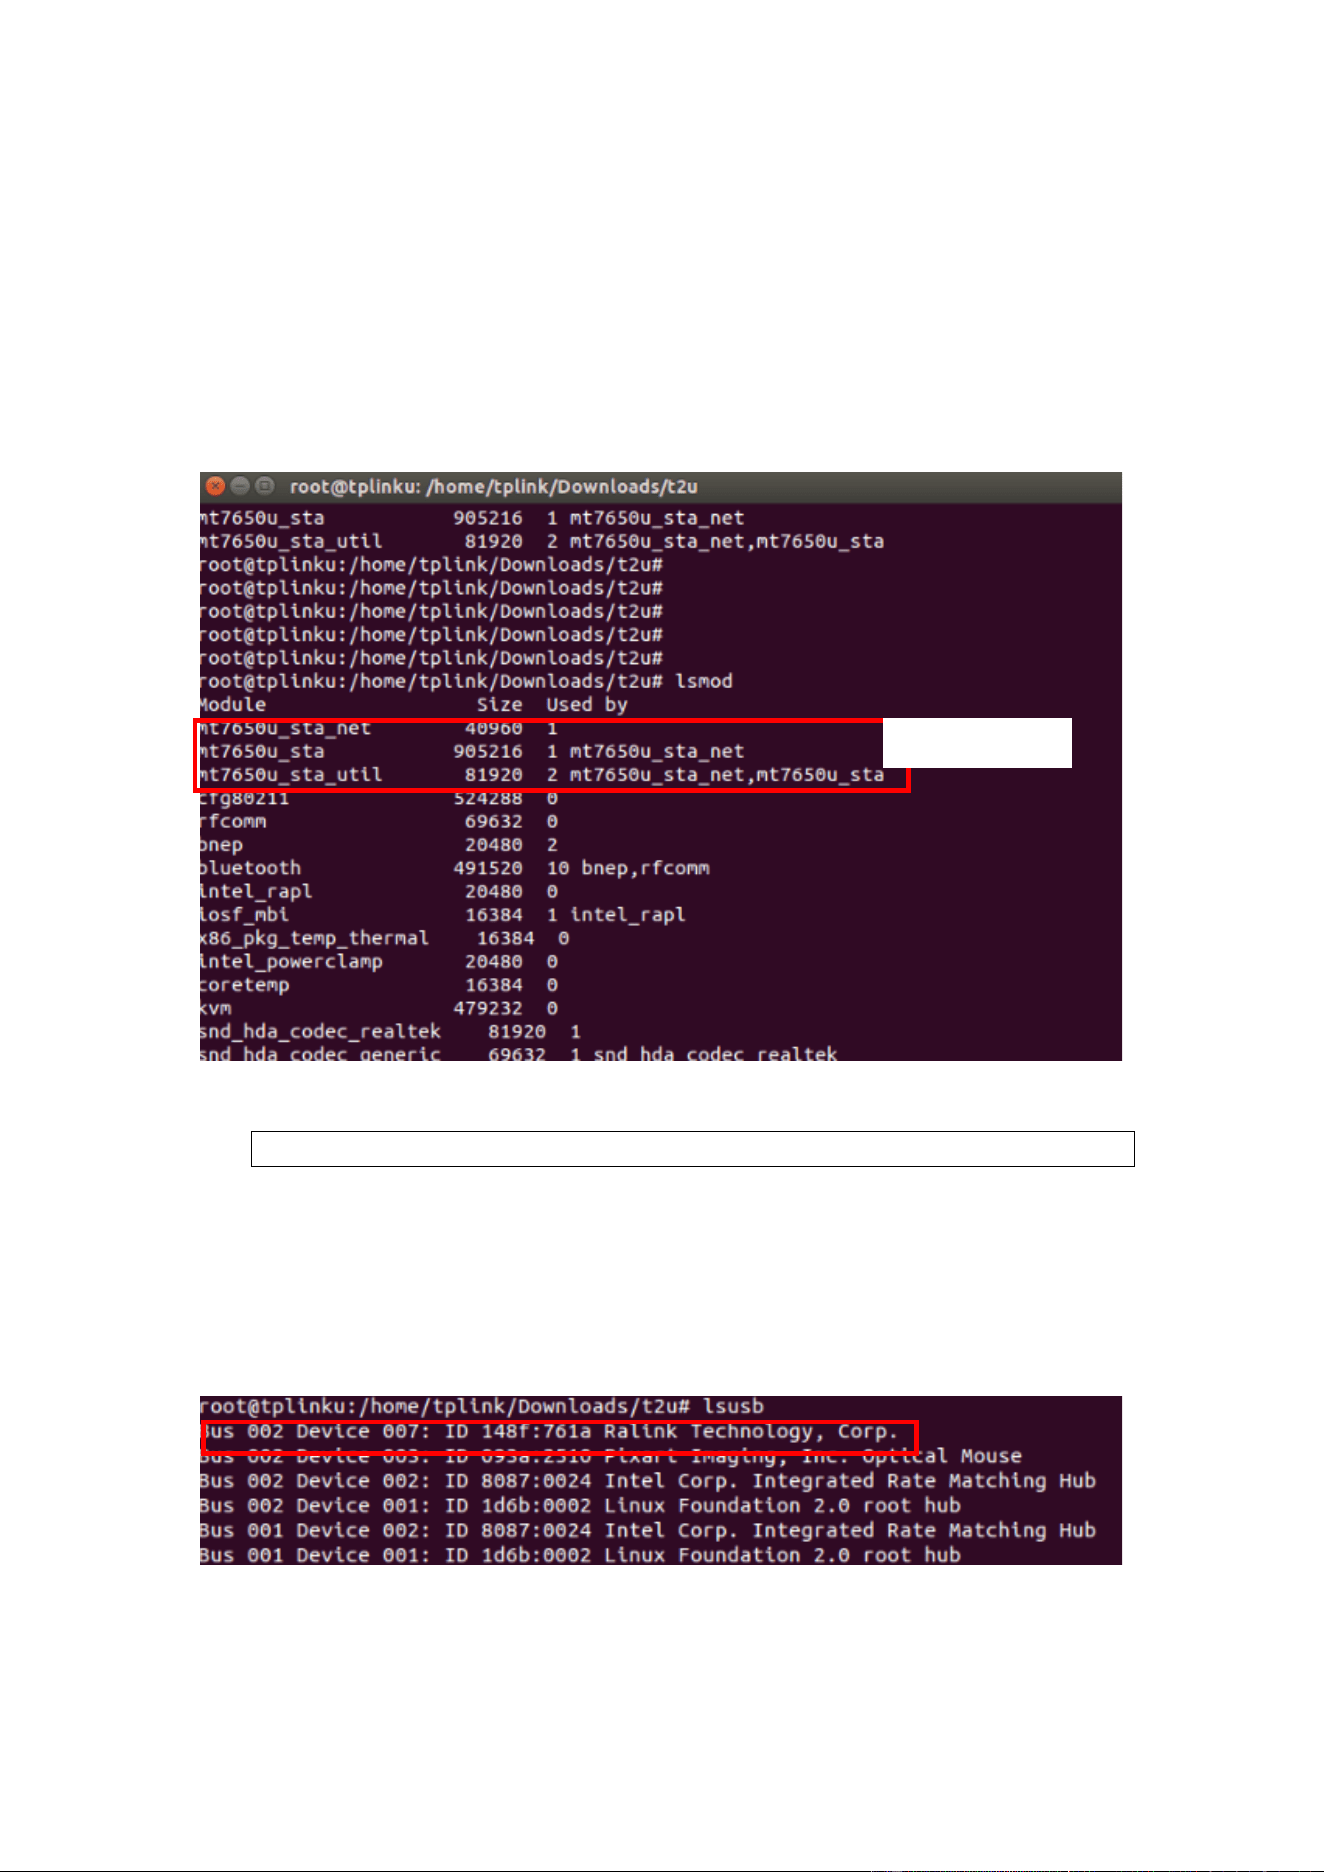
2) Type “lsmod” to check if the driver is successfully loaded.
If you want to unload the driver, run the following command in the same directory.
sudo bash unload.sh
4. Join the Wireless Network
4.1.1. Identify the device
After the driver is successfully loaded, insert the USB adapter and type “lsusb” to check if
the adapter is identified.
4.1.2. Create the interface
Type “ifconfig –a” to check if the wireless network interface is created.
D
river of T2U
3
4.1.3. Change the interface status to up
Check if the WLAN interface is up. If not, type “ifconfig ra0 up”.
4.1.4. Scan AP and see results
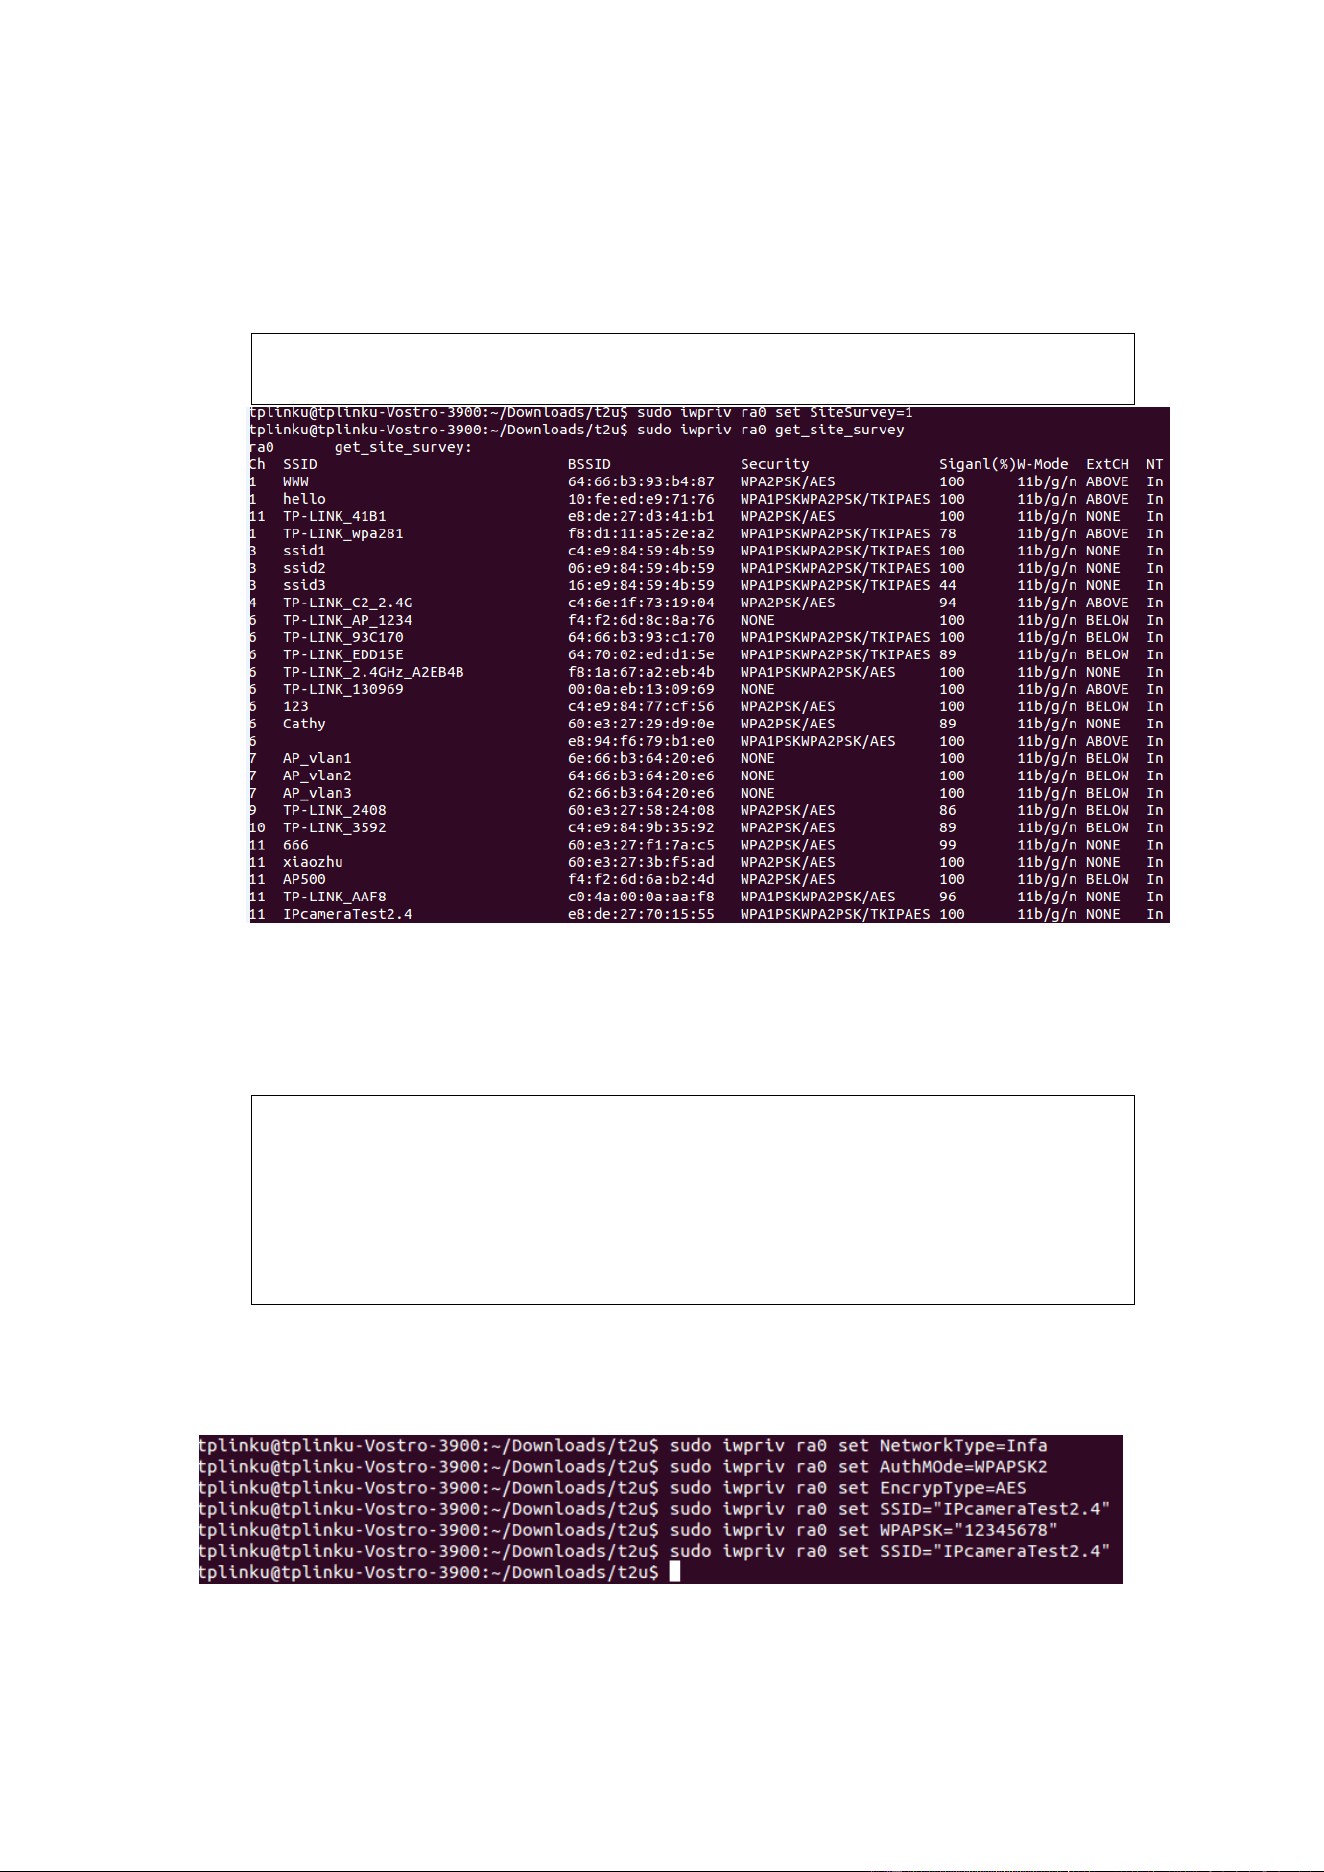
Run the following command to scan the signals.
sudo iwpriv ra0 set SiteSurvey=1
sudo iwpriv ra0 get_site_survey
4.1.5. AP Connect to the AP
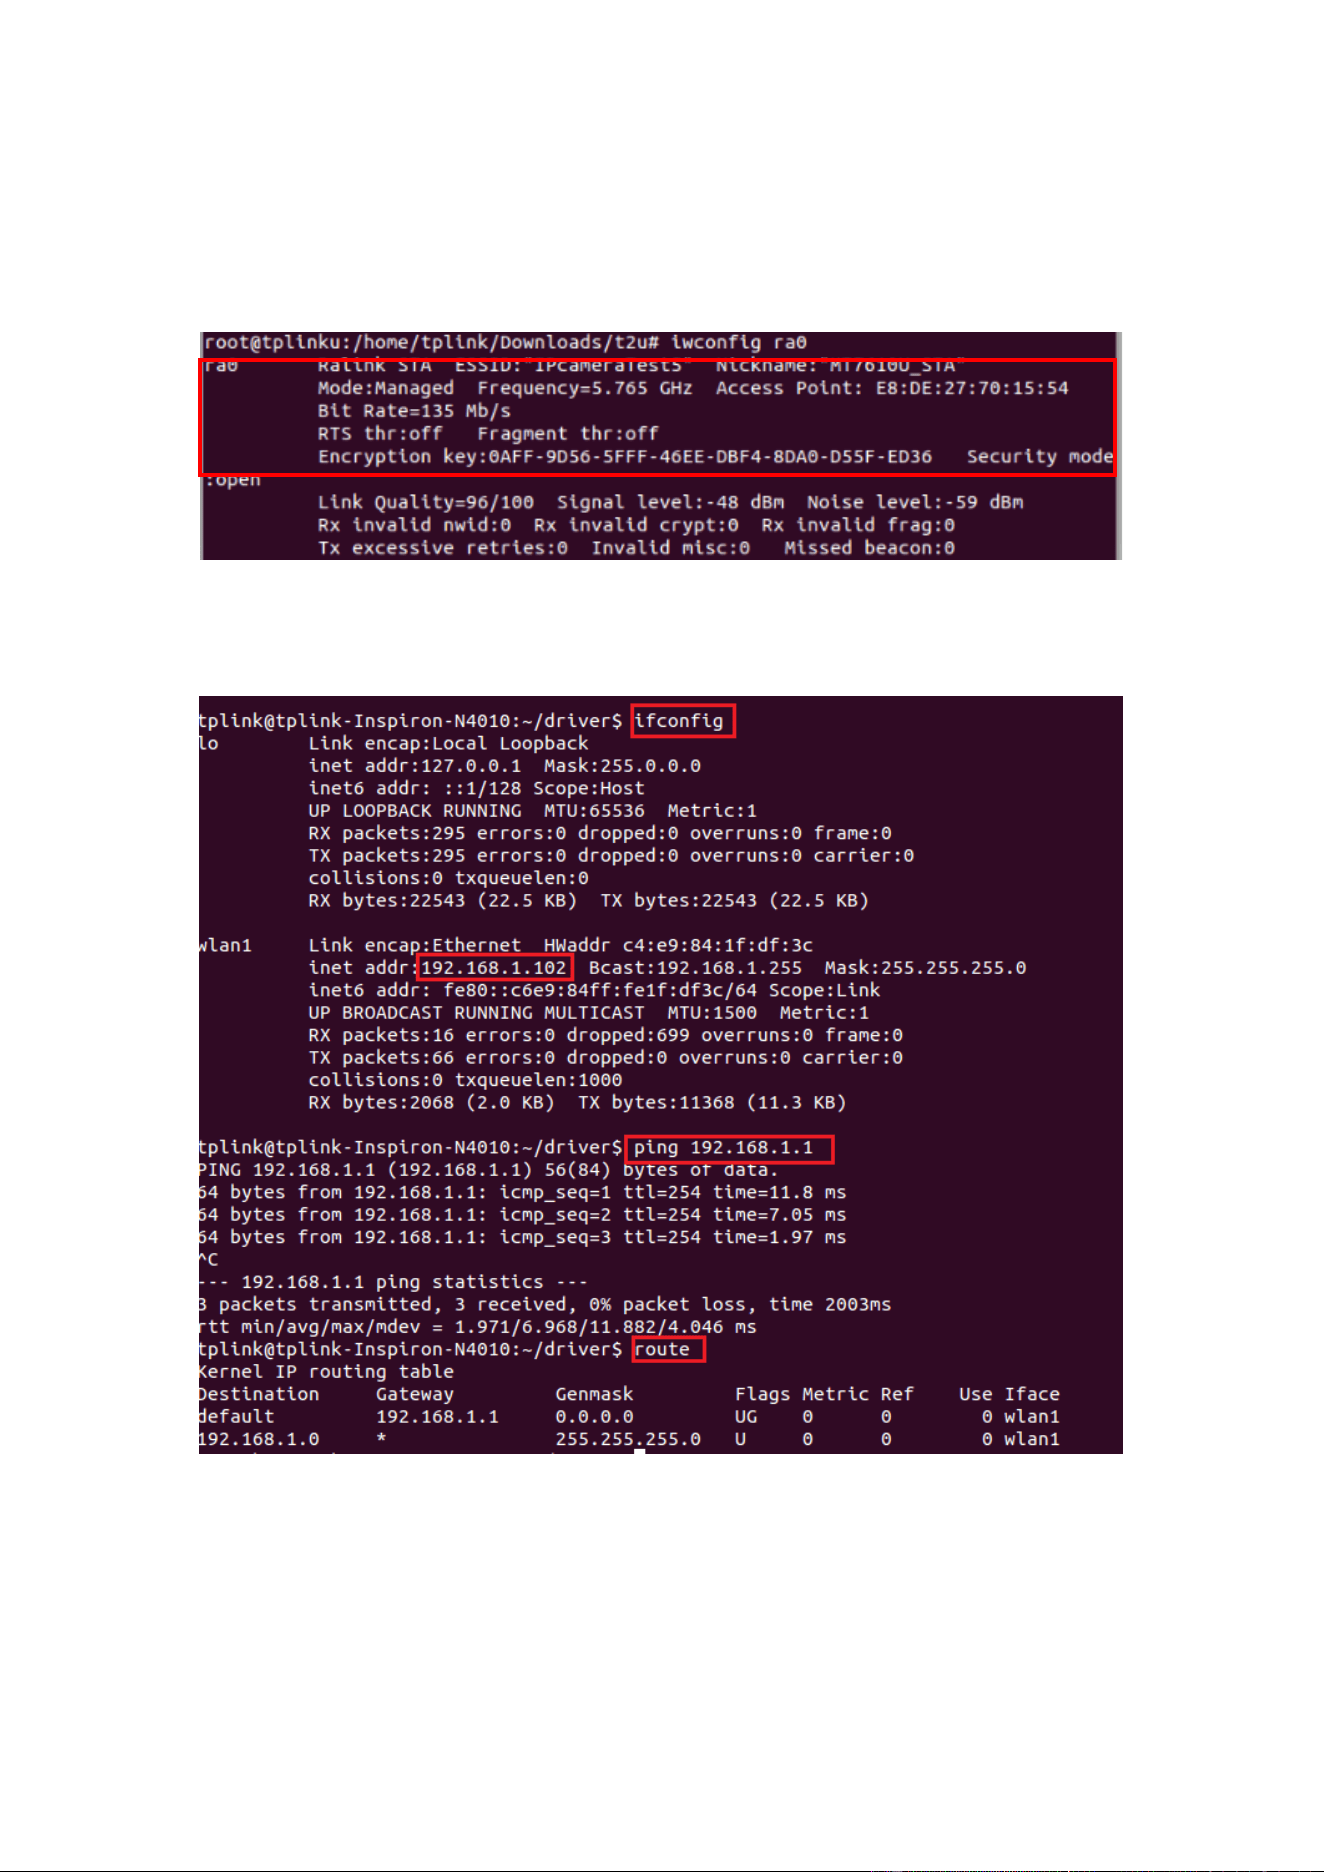
1) Config STA to link with AP which is WPA2PSK/AES(Authentication/Encryption)
iwpriv ra0 set NetworkType=Infra
iwpriv ra0 set AuthMode=WPA2PSK
iwpriv ra0 set EncrypType=AES
iwpriv ra0 set SSID="AP's SSID"
iwpriv ra0 set WPAPSK="AP's wpa-preshared key"
iwpriv ra0 set SSID="AP's SSID"
Take SSID “IpcameraTest2.4” as an example:
4

2) Config STA to link with AP which is OPEN/NONE(Authentication/Encryption)
iwpriv ra0 set NetworkType=Infra
iwpriv ra0 set AuthMode=OPEN
iwpriv ra0 set EncrypType=NONE
iwpriv ra0 set SSID="AP's SSID"
3) Config STA to link with AP which is SHARED/WEP(Authentication/Encryption)
iwpriv ra0 set NetworkType=Infra
iwpriv ra0 set AuthMode=SHARED
iwpriv ra0 set EncrypType=WEP
iwpriv ra0 set DefaultKeyID=1
iwpriv ra0 set Key1="AP's wep key"
iwpriv ra0 set SSID="AP's SSID"
4) Config STA to link with AP which is WPAPSK/TKIP(Authentication/Encryption)
iwpriv ra0 set NetworkType=Infra
iwpriv ra0 set AuthMode=WPAPSK
iwpriv ra0 set EncrypType=TKIP
iwpriv ra0 set SSID="AP's SSID"
iwpriv ra0 set WPAPSK="AP's wpa-preshared key"
iwpriv ra0 set SSID="AP's SSID"
5) Config STA to link with AP which is WPAPSK/AES(Authentication/Encryption)
iwpriv ra0 set NetworkType=Infra
iwpriv ra0 set AuthMode=WPAPSK
iwpriv ra0 set EncrypType=AES
iwpriv ra0 set SSID="AP's SSID"
iwpriv ra0 set WPAPSK="AP's wpa-preshared key"
iwpriv ra0 set SSID="AP's SSID"
6) Config STA to link with AP which is WPA2PSK/TKIP(Authentication/Encryption)
iwpriv ra0 set NetworkType=Infra
iwpriv ra0 set AuthMode=WPA2PSK
iwpriv ra0 set EncrypType=TKIP
iwpriv ra0 set SSID="AP's SSID"
iwpriv ra0 set WPAPSK=12345678
iwpriv ra0 set SSID="AP's SSID"
5
Note: if you want to establish a 11AC connection, type “iwpriv ra0 set WirelessMode=14”
or “iwpriv ra0 set WirelessMode=15” before type” iwpriv ra0 set SSID="AP's SSID"“.
4.1.6. Enable DHCP client
1) Type “iwconfig ra0” to check if your AP is connected successfully.
2) Type “dhclient ra0” to get an IP address.
After running the command, the adapter will get an IP assigned by the AP. Then you can
run the ping command to check if the wireless connection is successful.
Note: Run the commands under the root account.
6