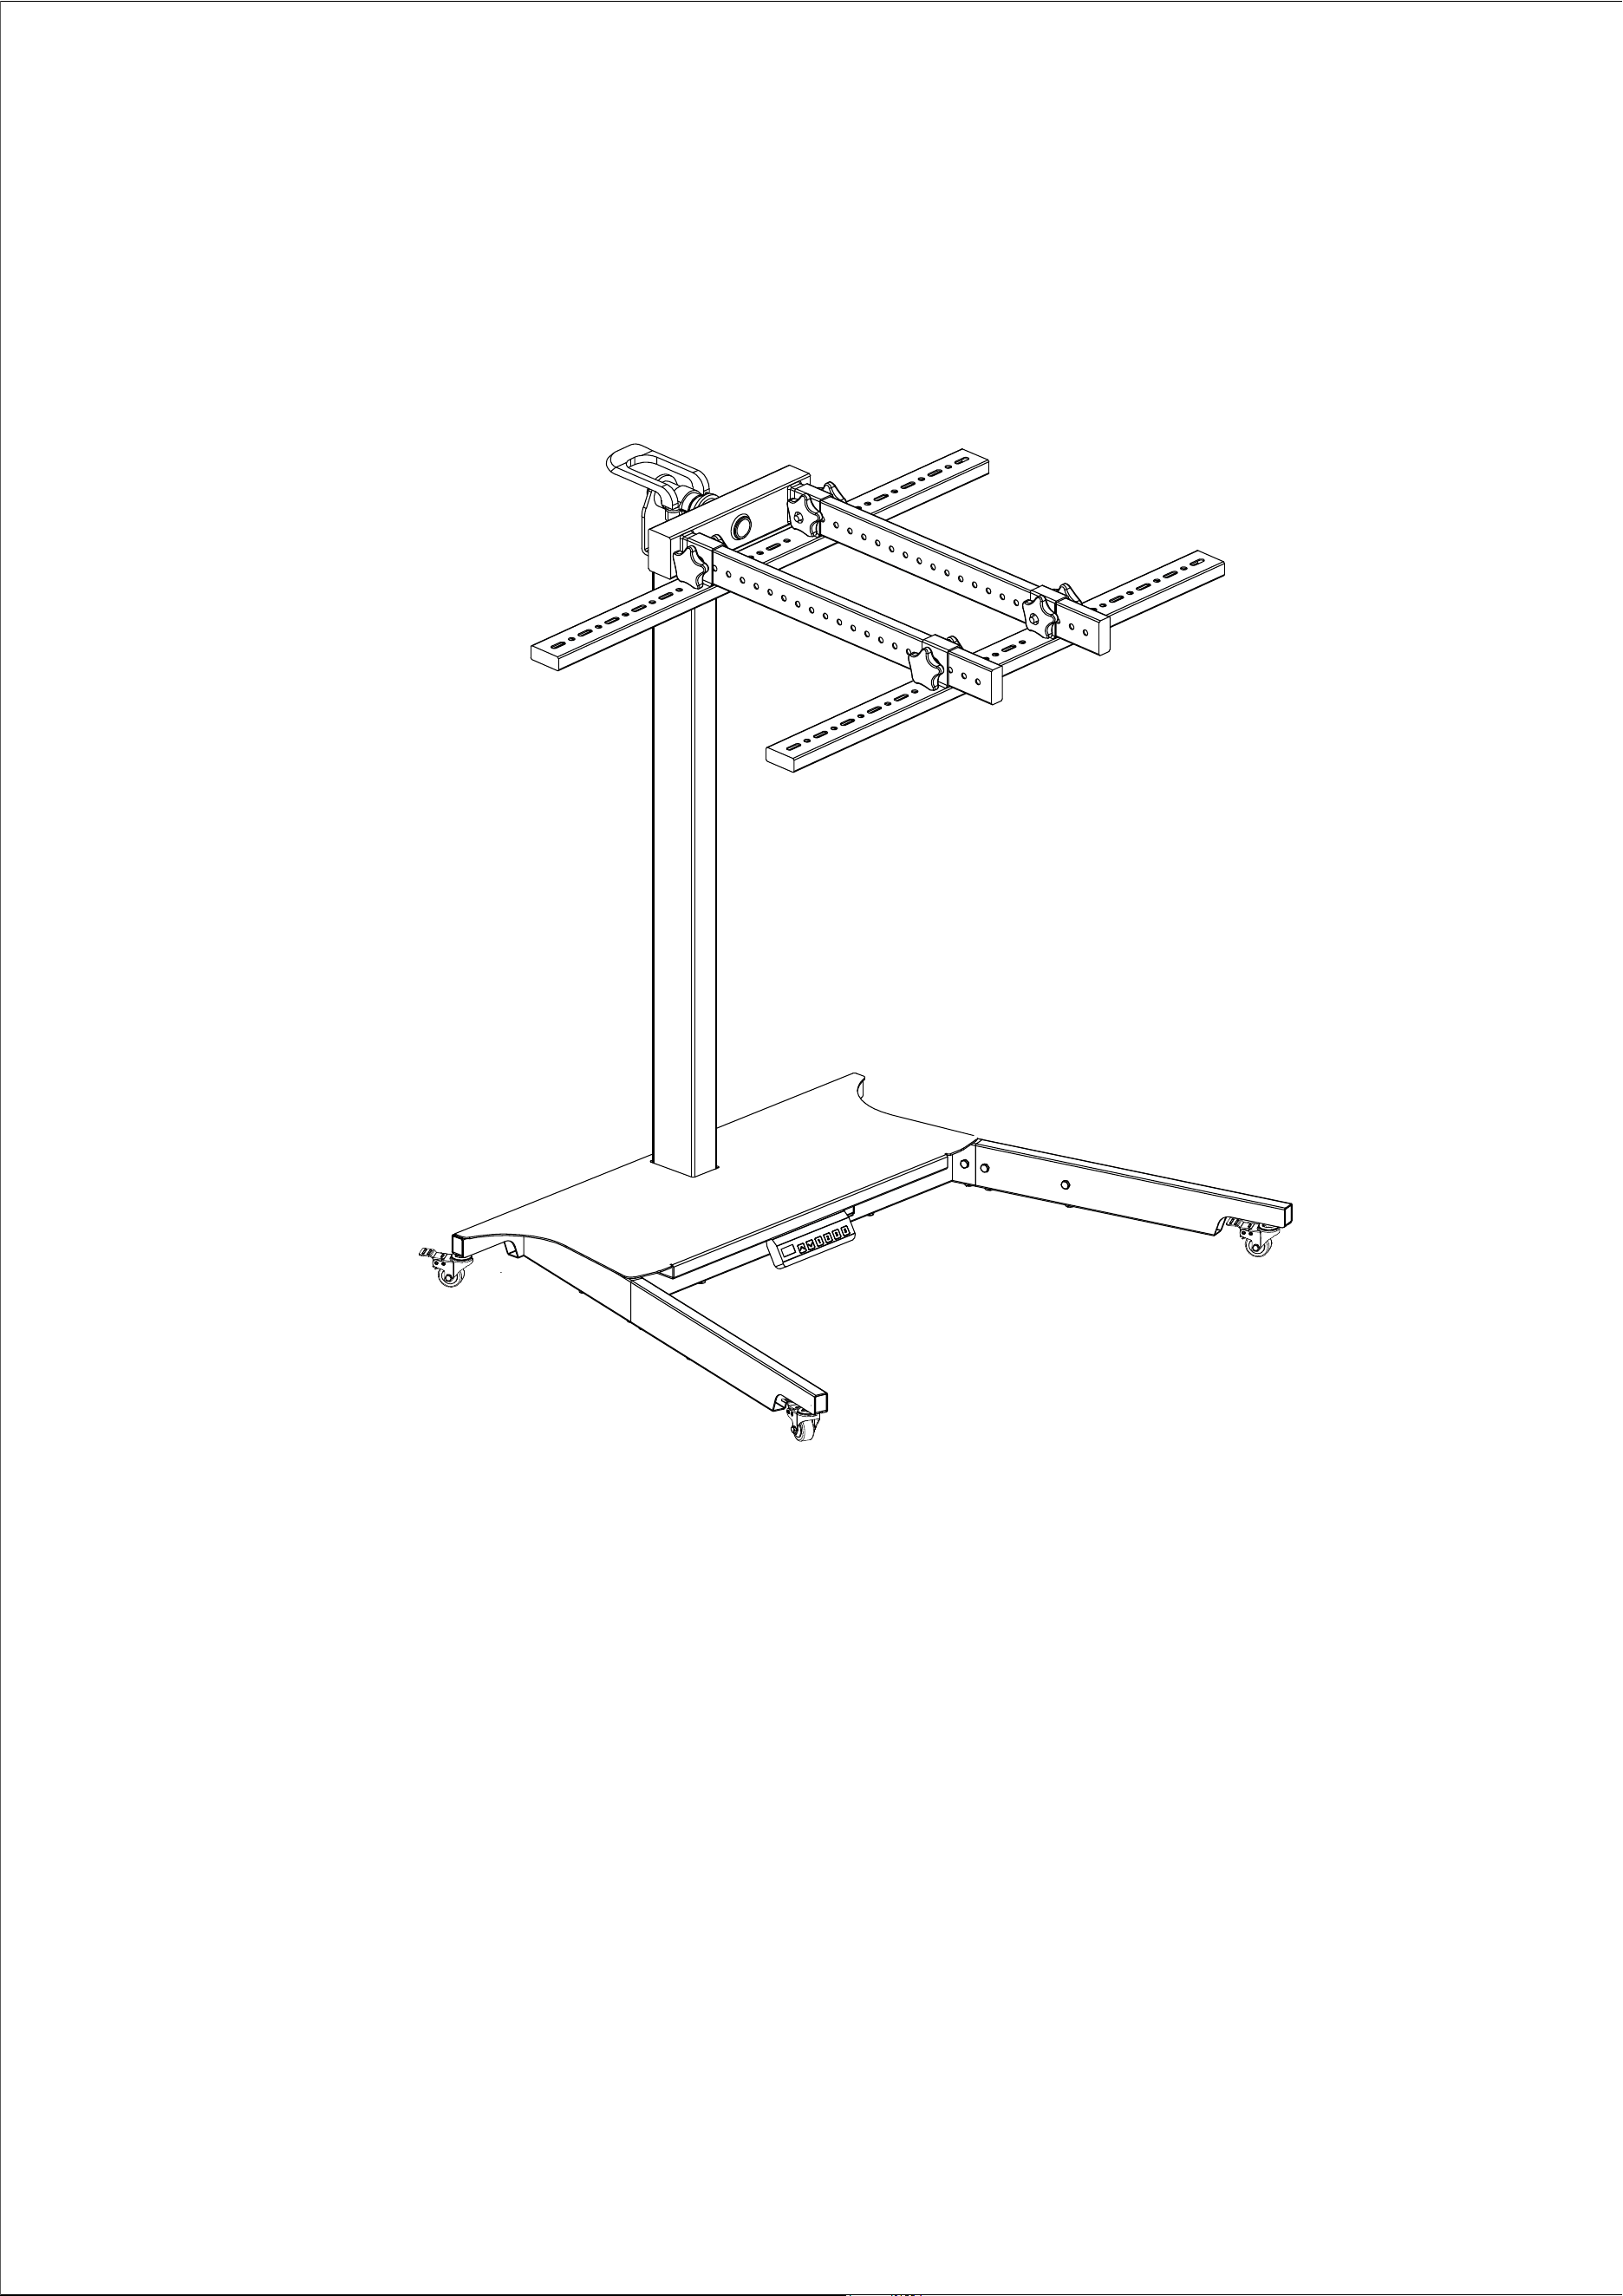
MOTORIZED STAND
Installation Guide
WARNING
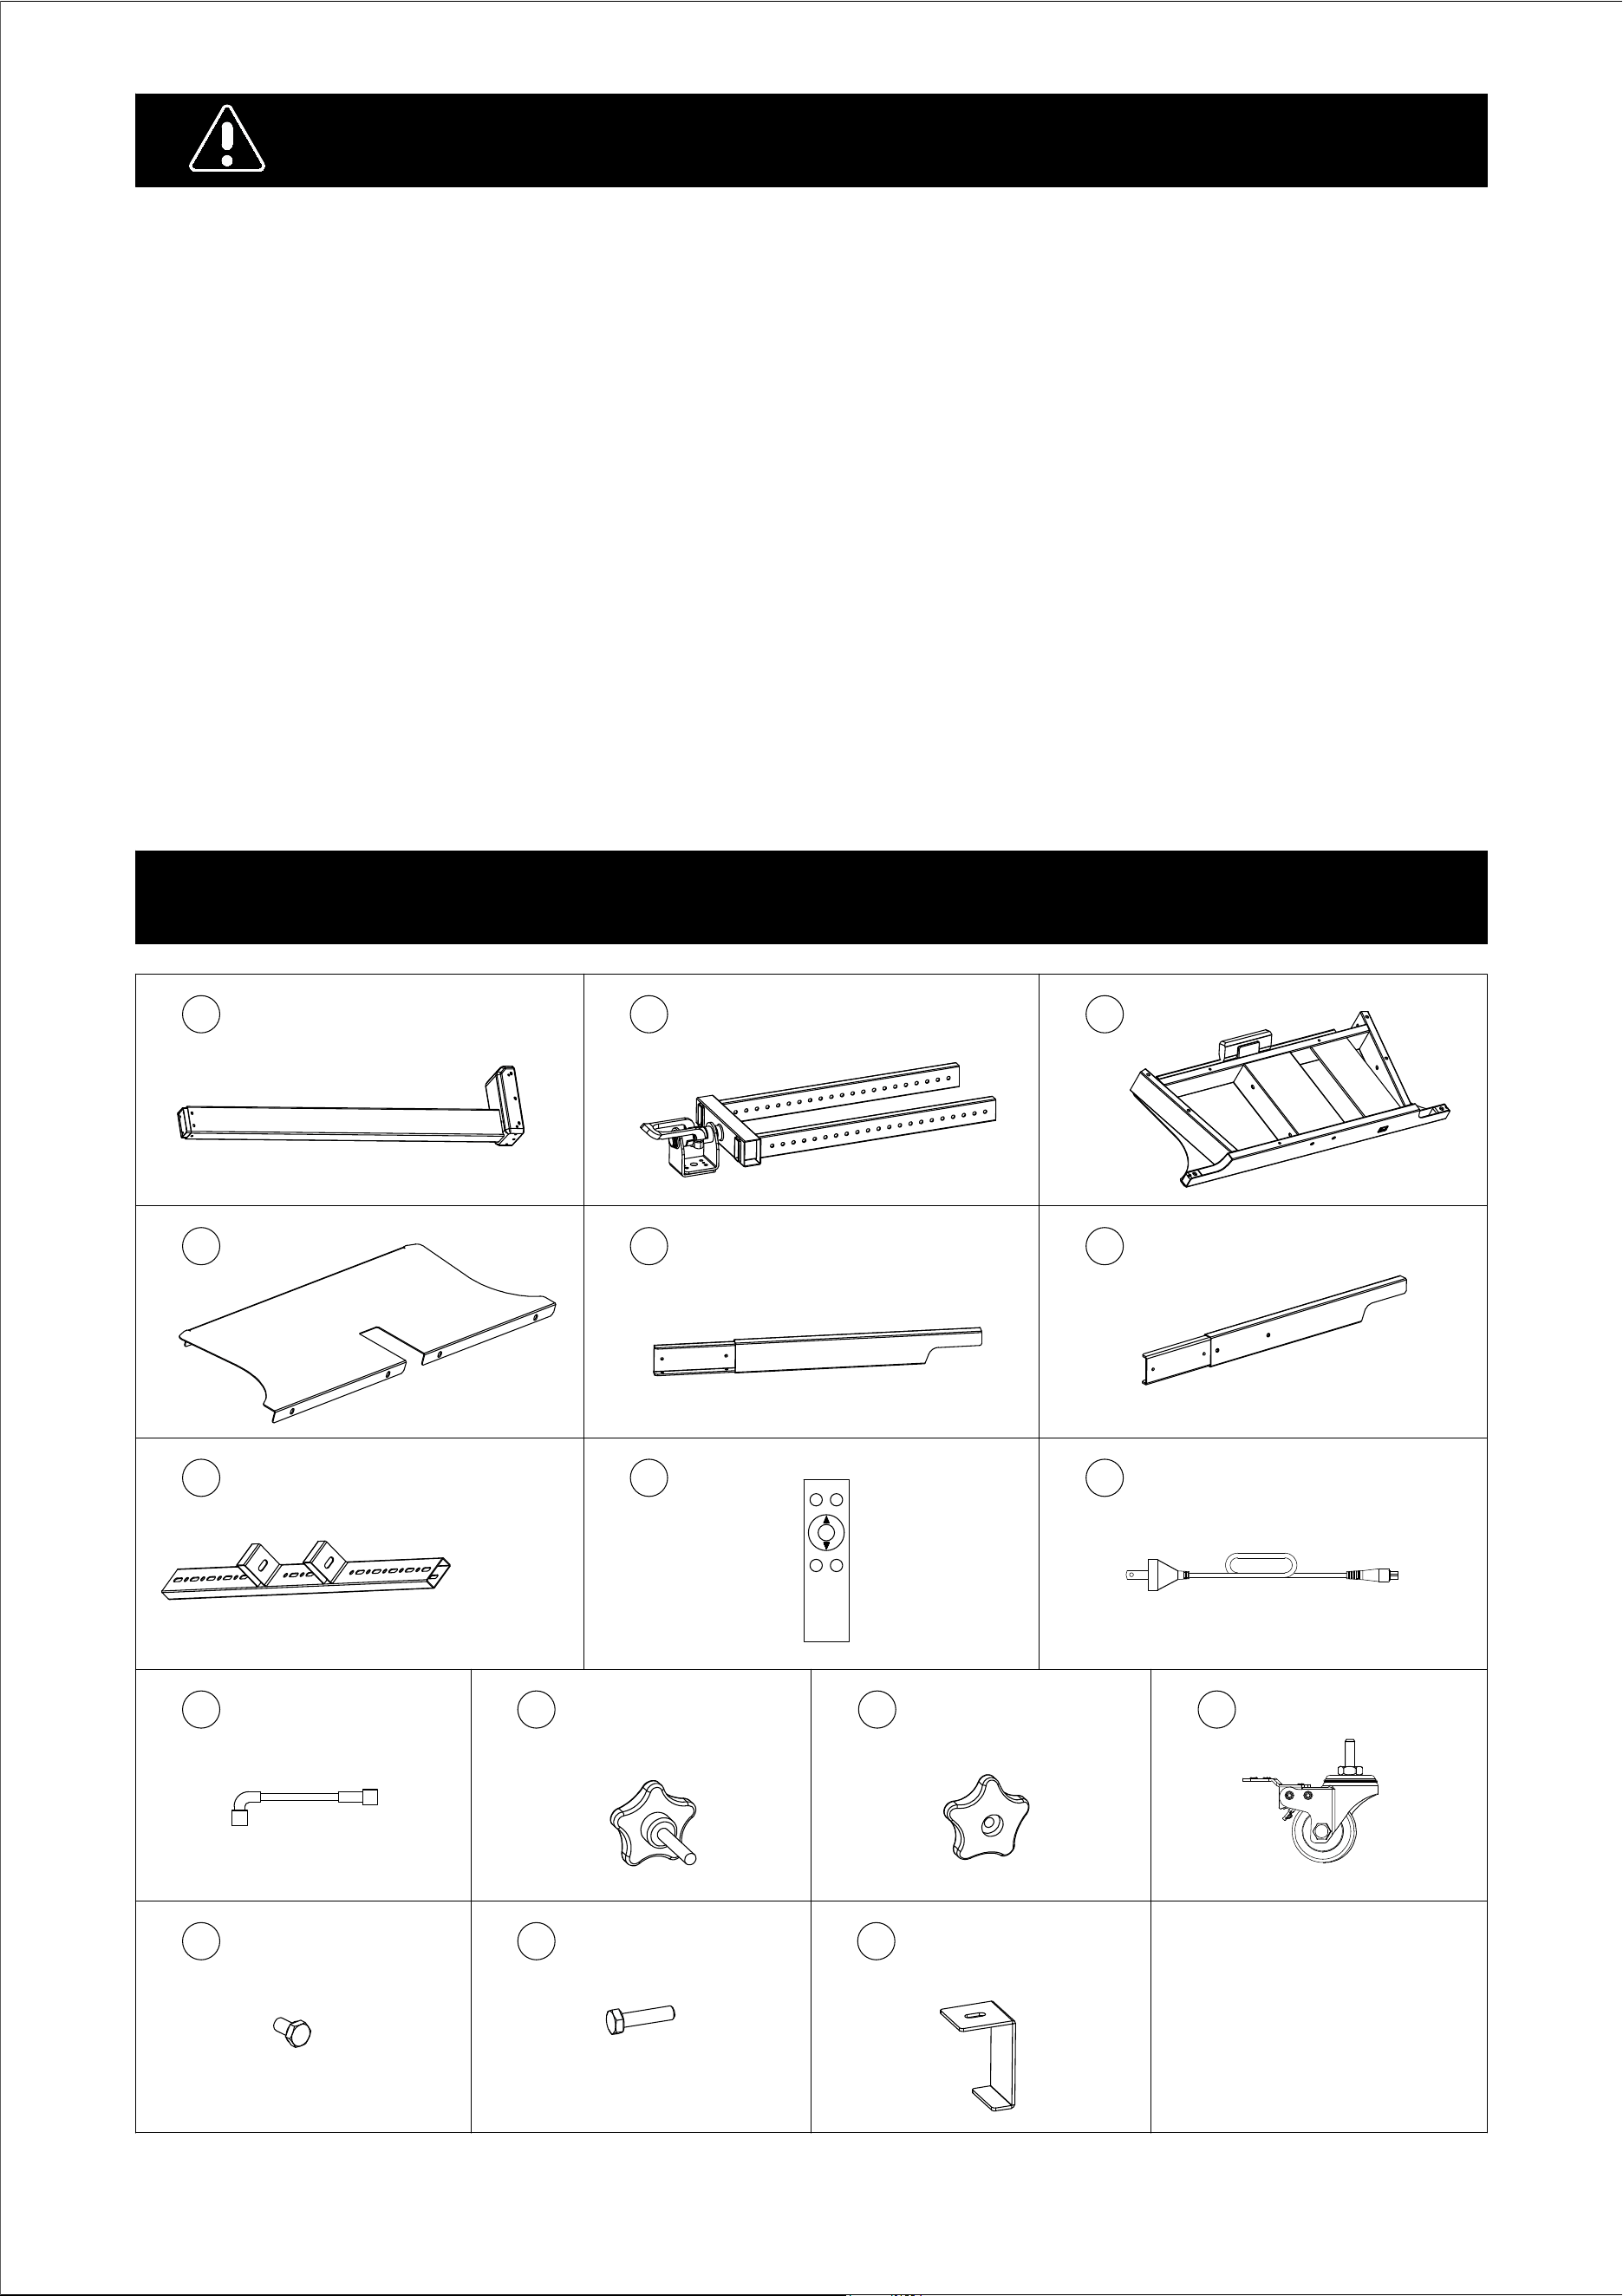
Parts List
A
×
B
×
C
×
D
×
E
×
F
×
G
×
H
×
I
×
J
×
K
×
L
×
N
×
M
×
O
×
P
×
Please read carefully before assembling the stand.
◆ Don't assemble the stand if any of its parts/hardware are damaged or missing, if you require
replacement parts, please contact us for assistance.
◆ Maximum load capacity: 50KG/110LBS.
◆ Use the stand only as intended by the manufacturer.
◆ This stand contains moving components, please use it with caution.
◆ We are not responsible for/do not cover: Damage from modification of the stand, improper assembly,
use with load over the specified weight range and damage ensuing from a natural disaster.
◆ Please do not use this stand in any other orientation than on the floor right side up,
any different positioning will damage the stand (r.g., suspended from ceiling).
◆ Rebound function under resistance
If the device encounters resistance or obstacles during the descent, it will run up 2cm. This is a
protective function. Please remove obstacles.
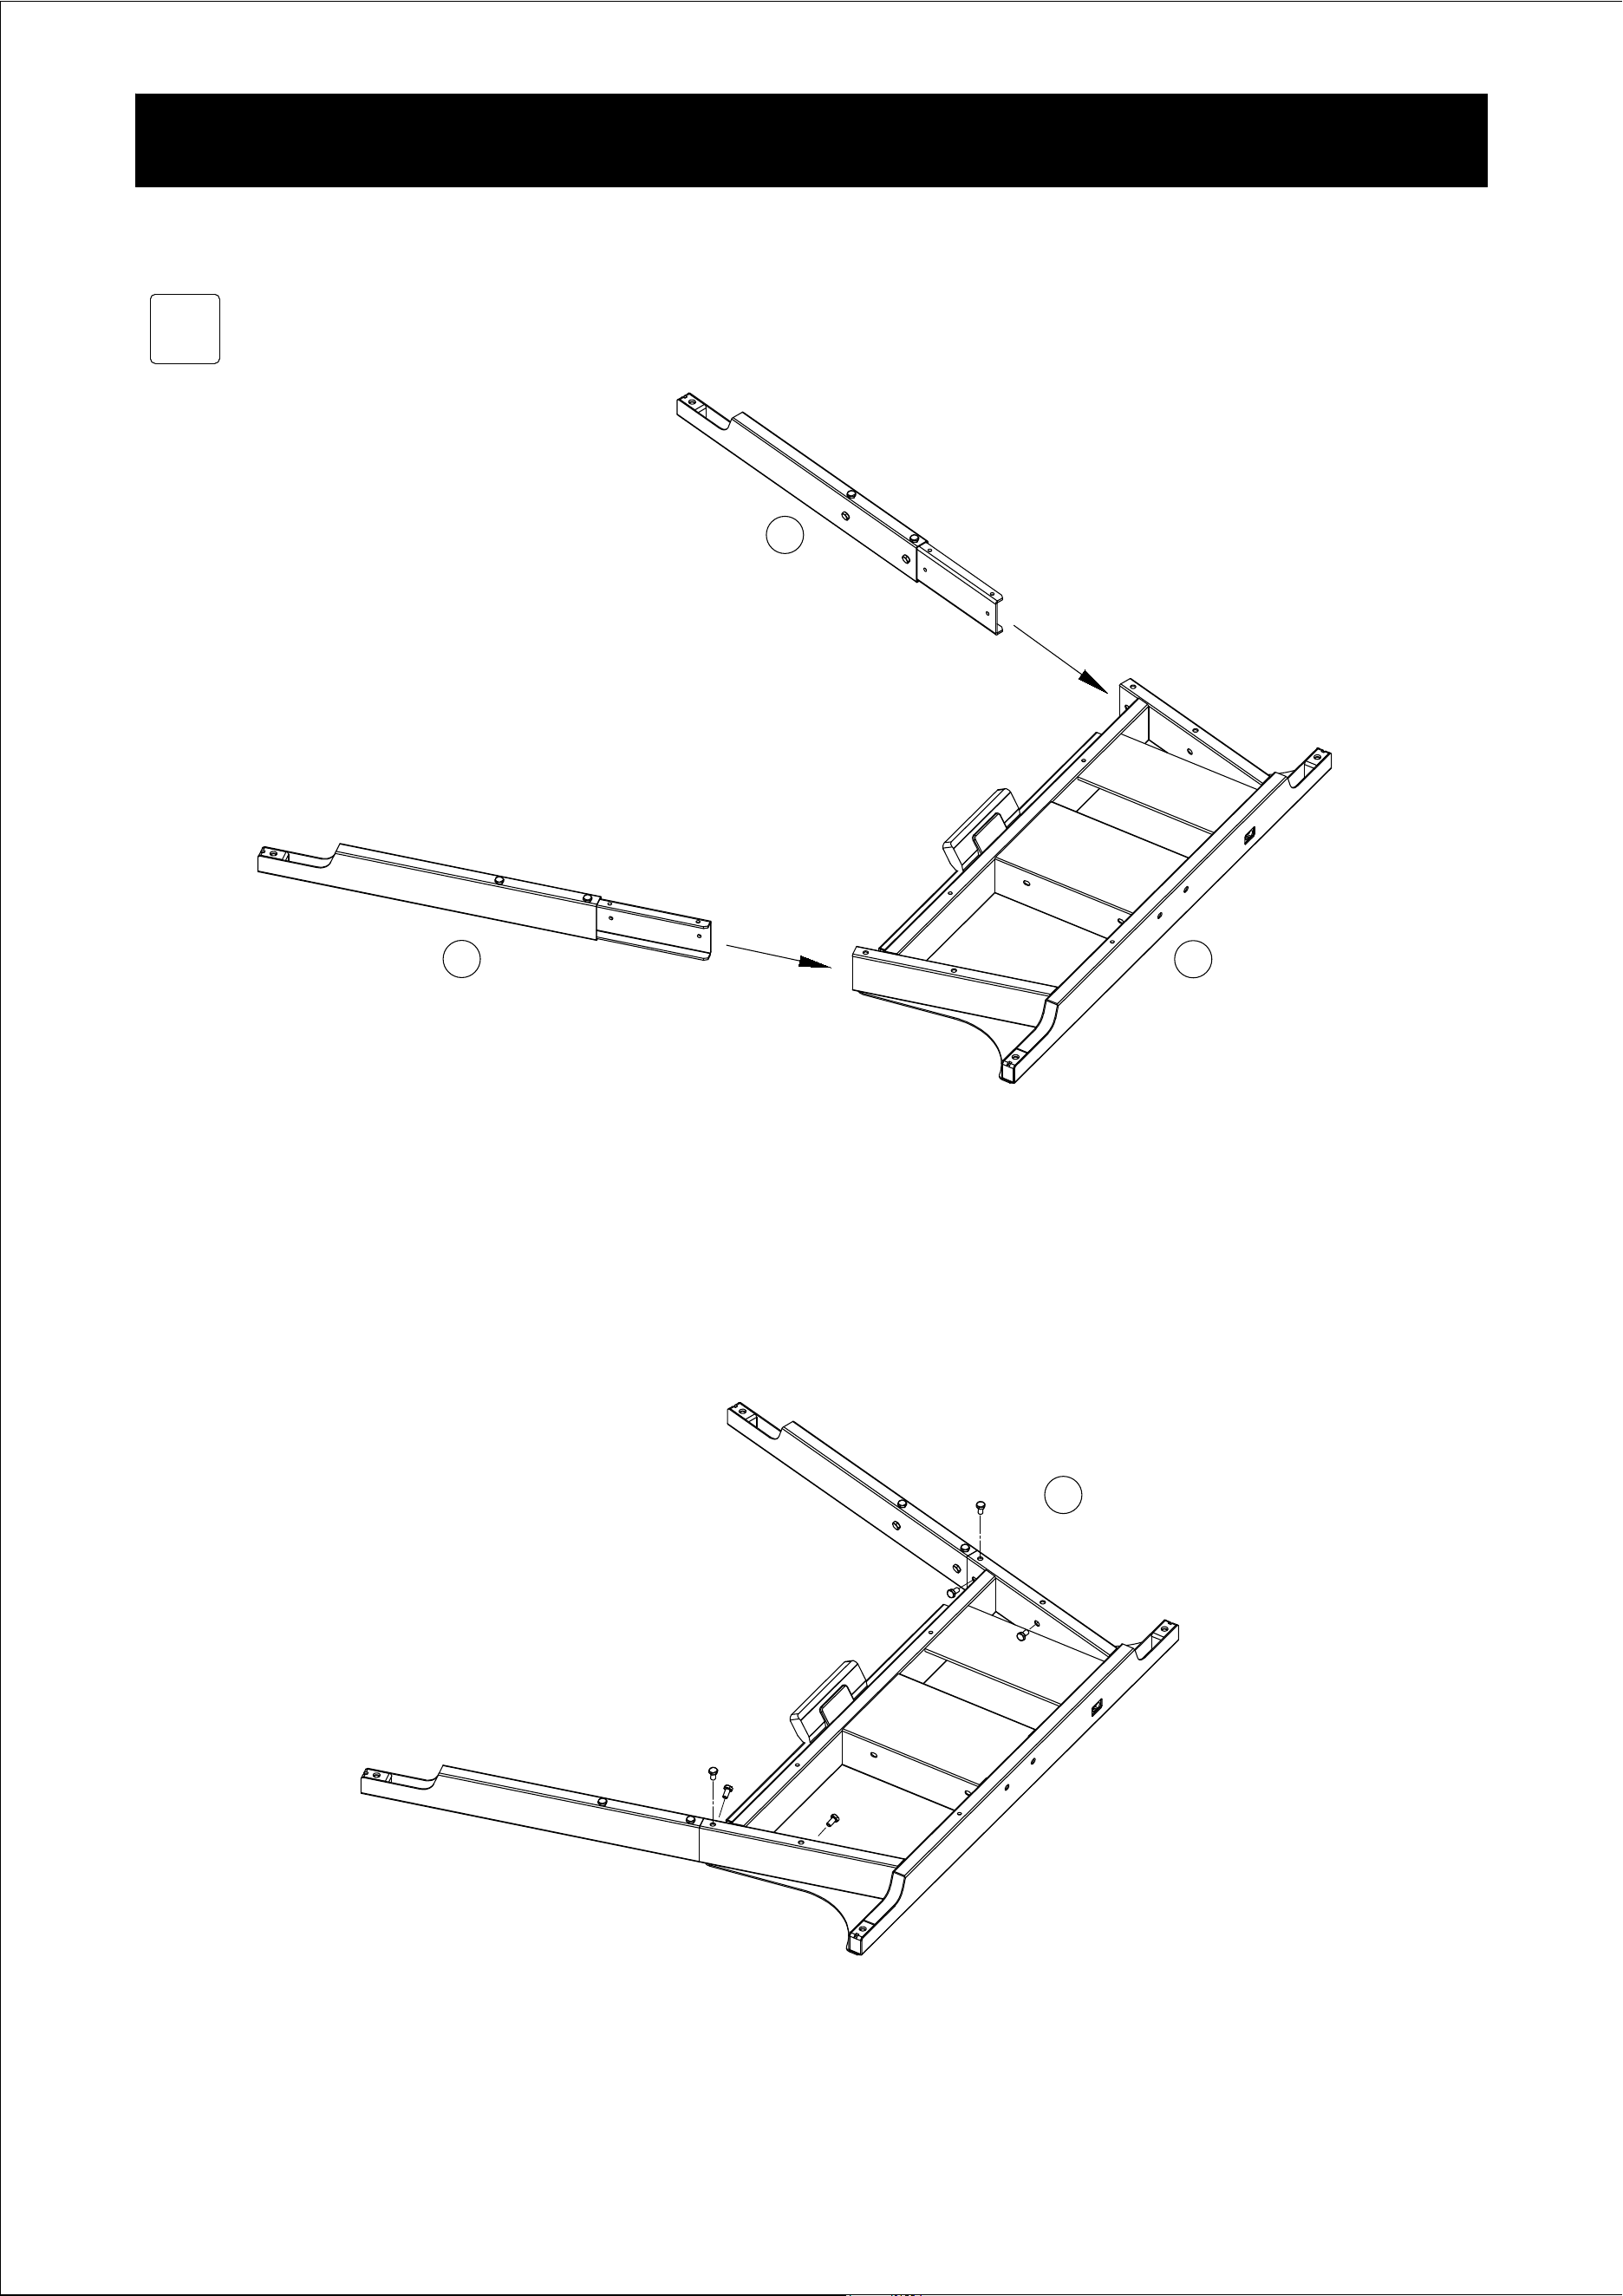
Install Instruction
1
F
E
C
N
×
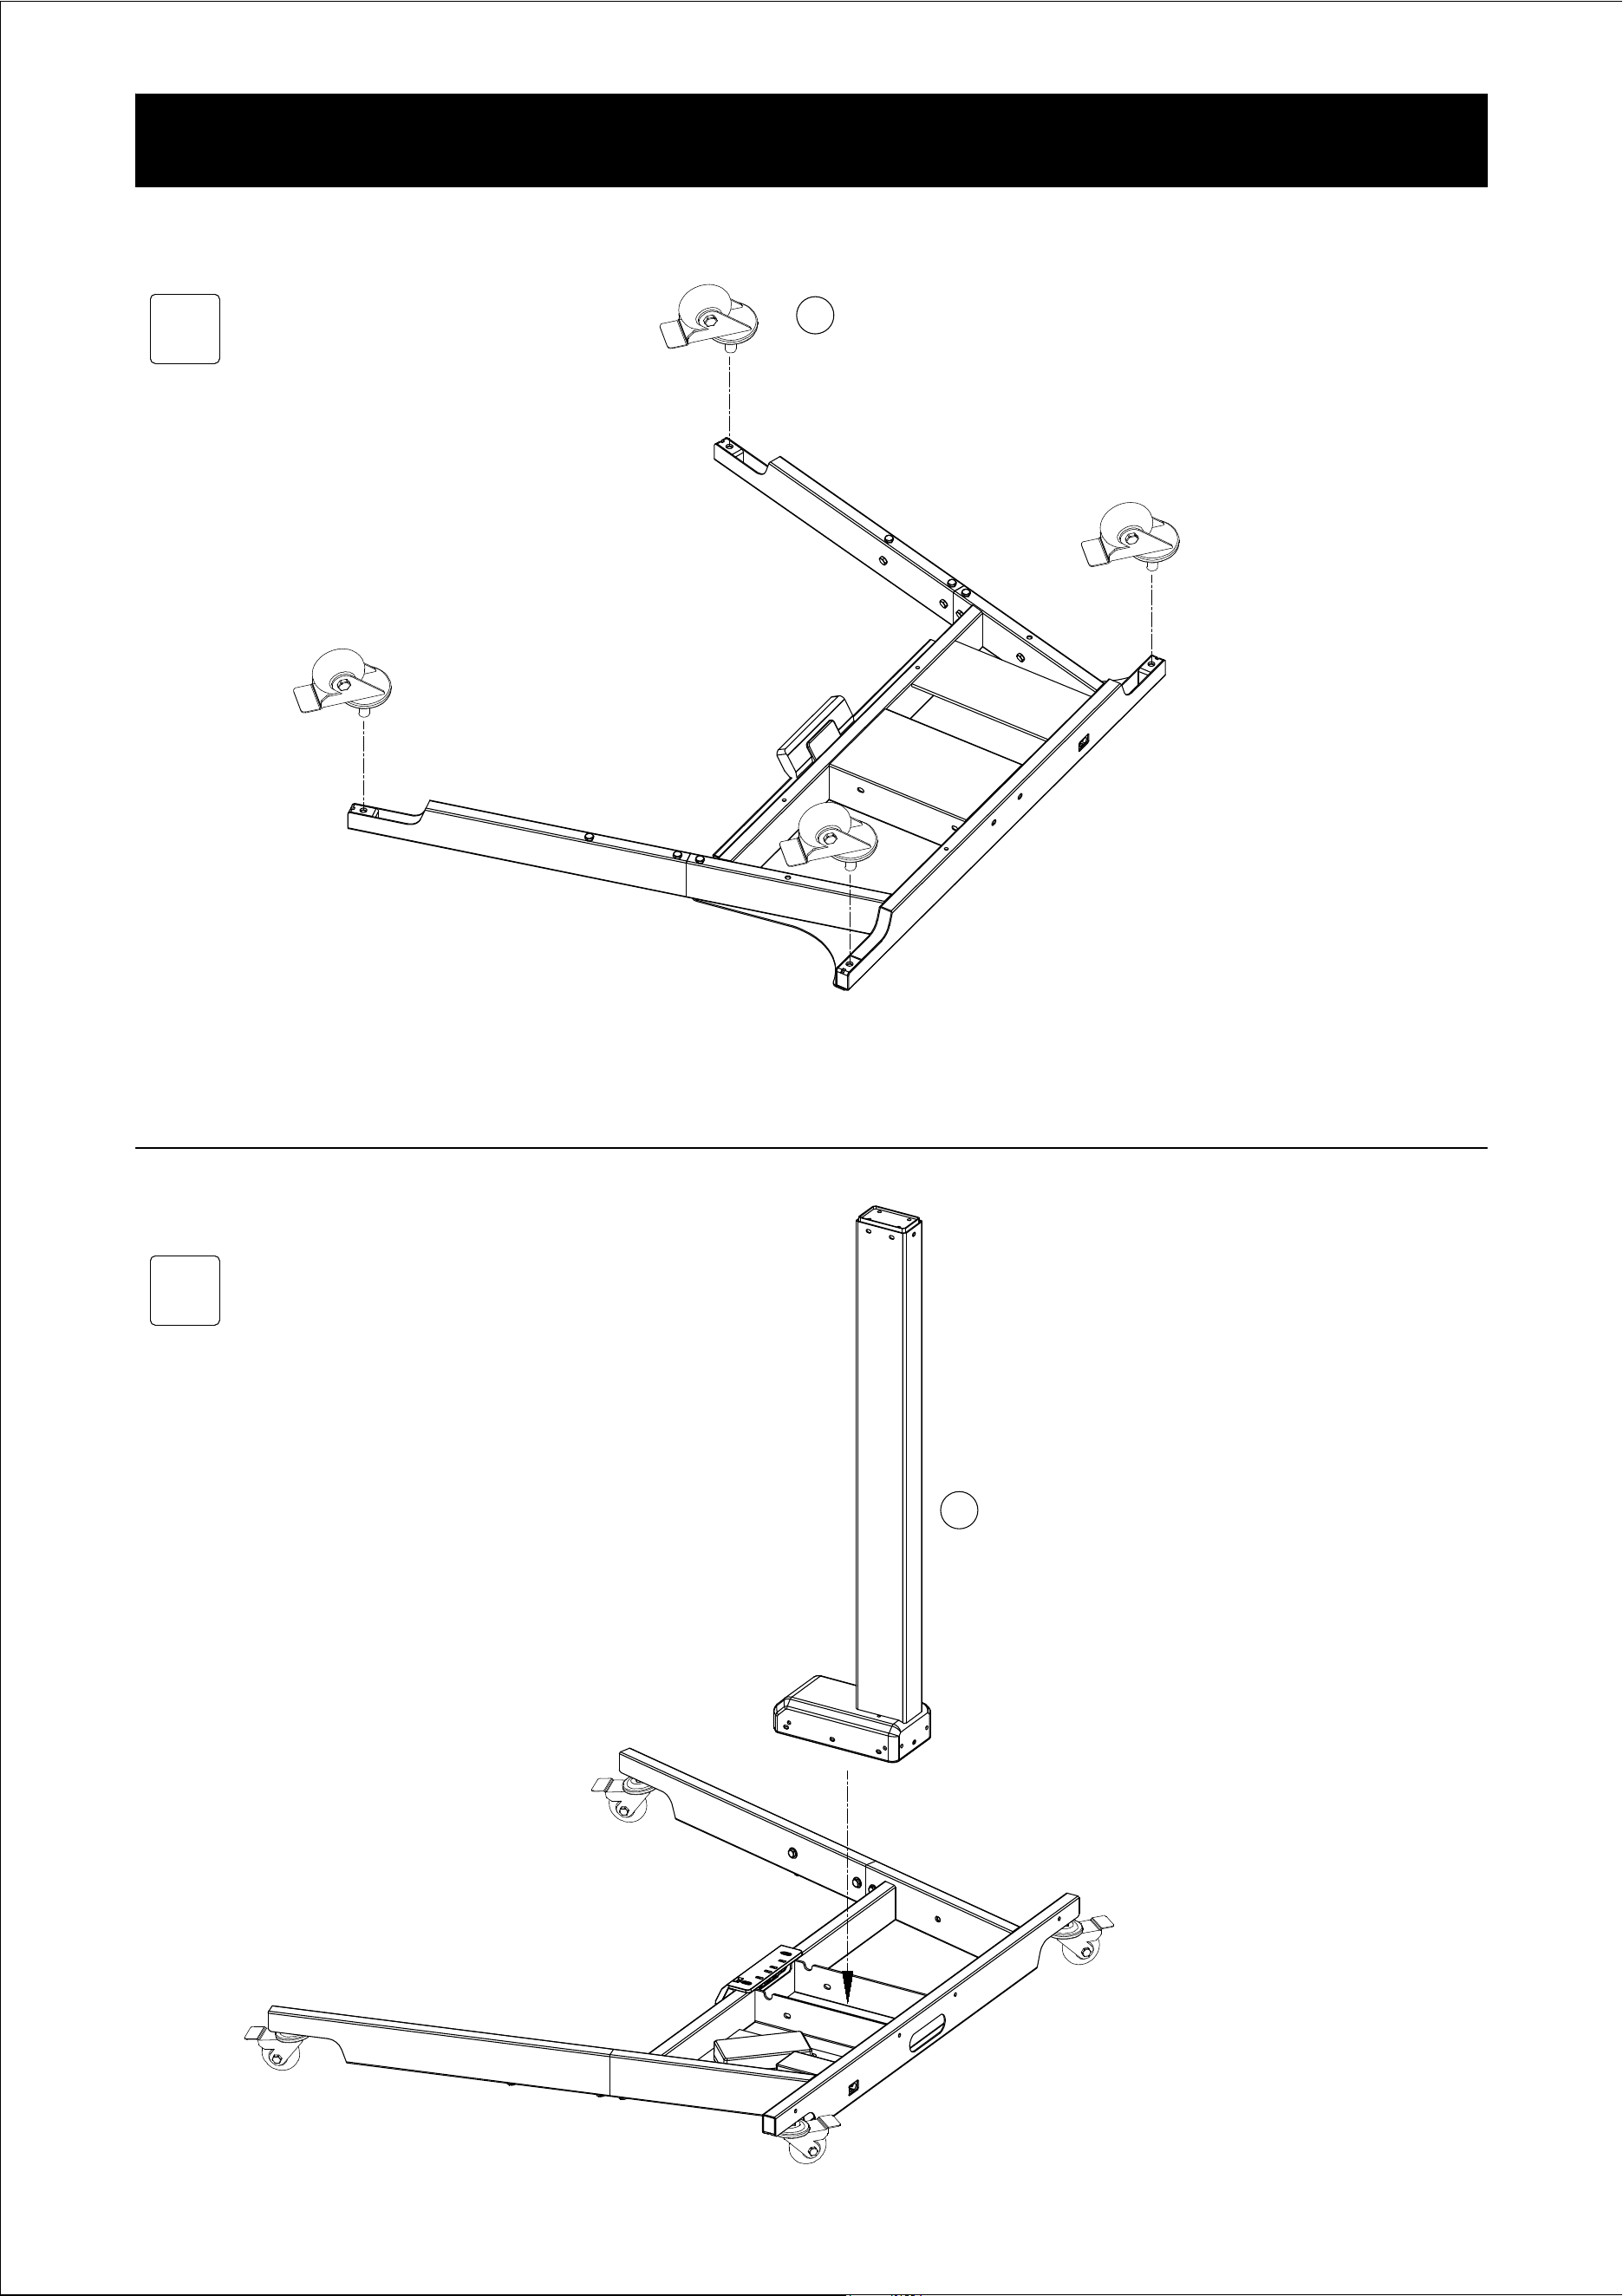
2
M
3
A
Insert the lifting column
through the base.
Install Instruction
×
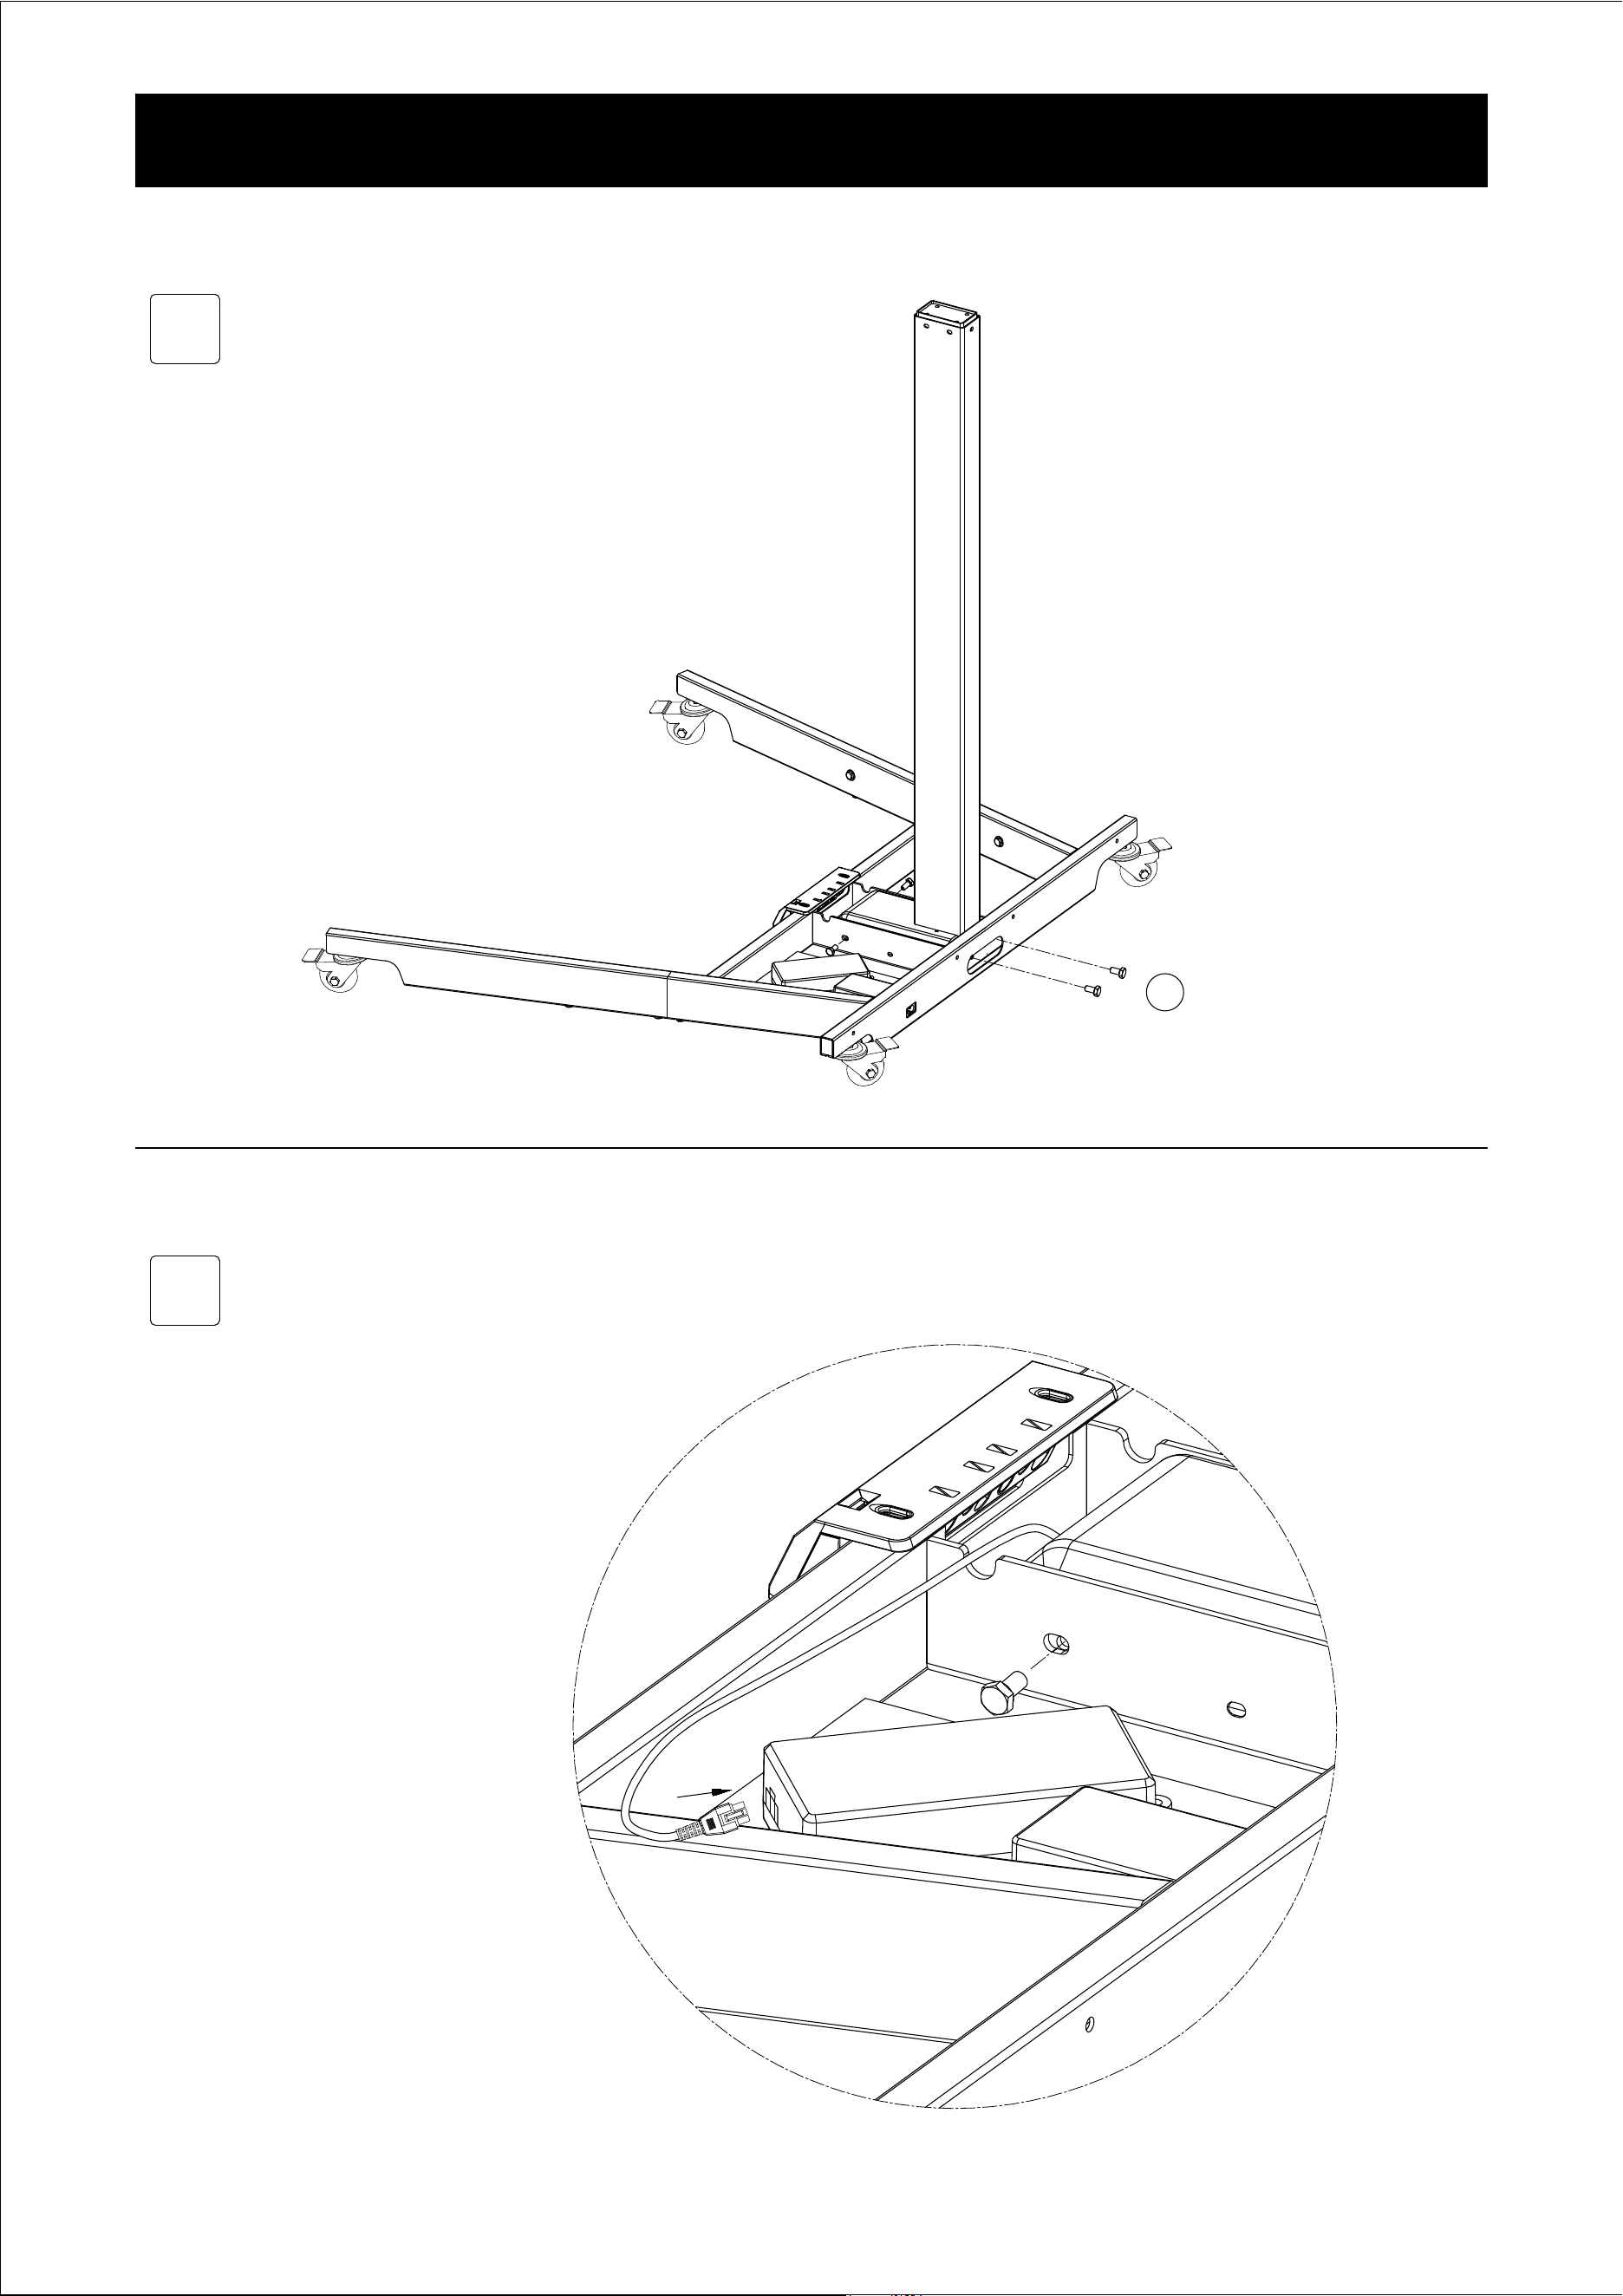
4
5
N
×
Plug in the cable
Use 4 bolts to screw the lifting
column to the base.
Install Instruction
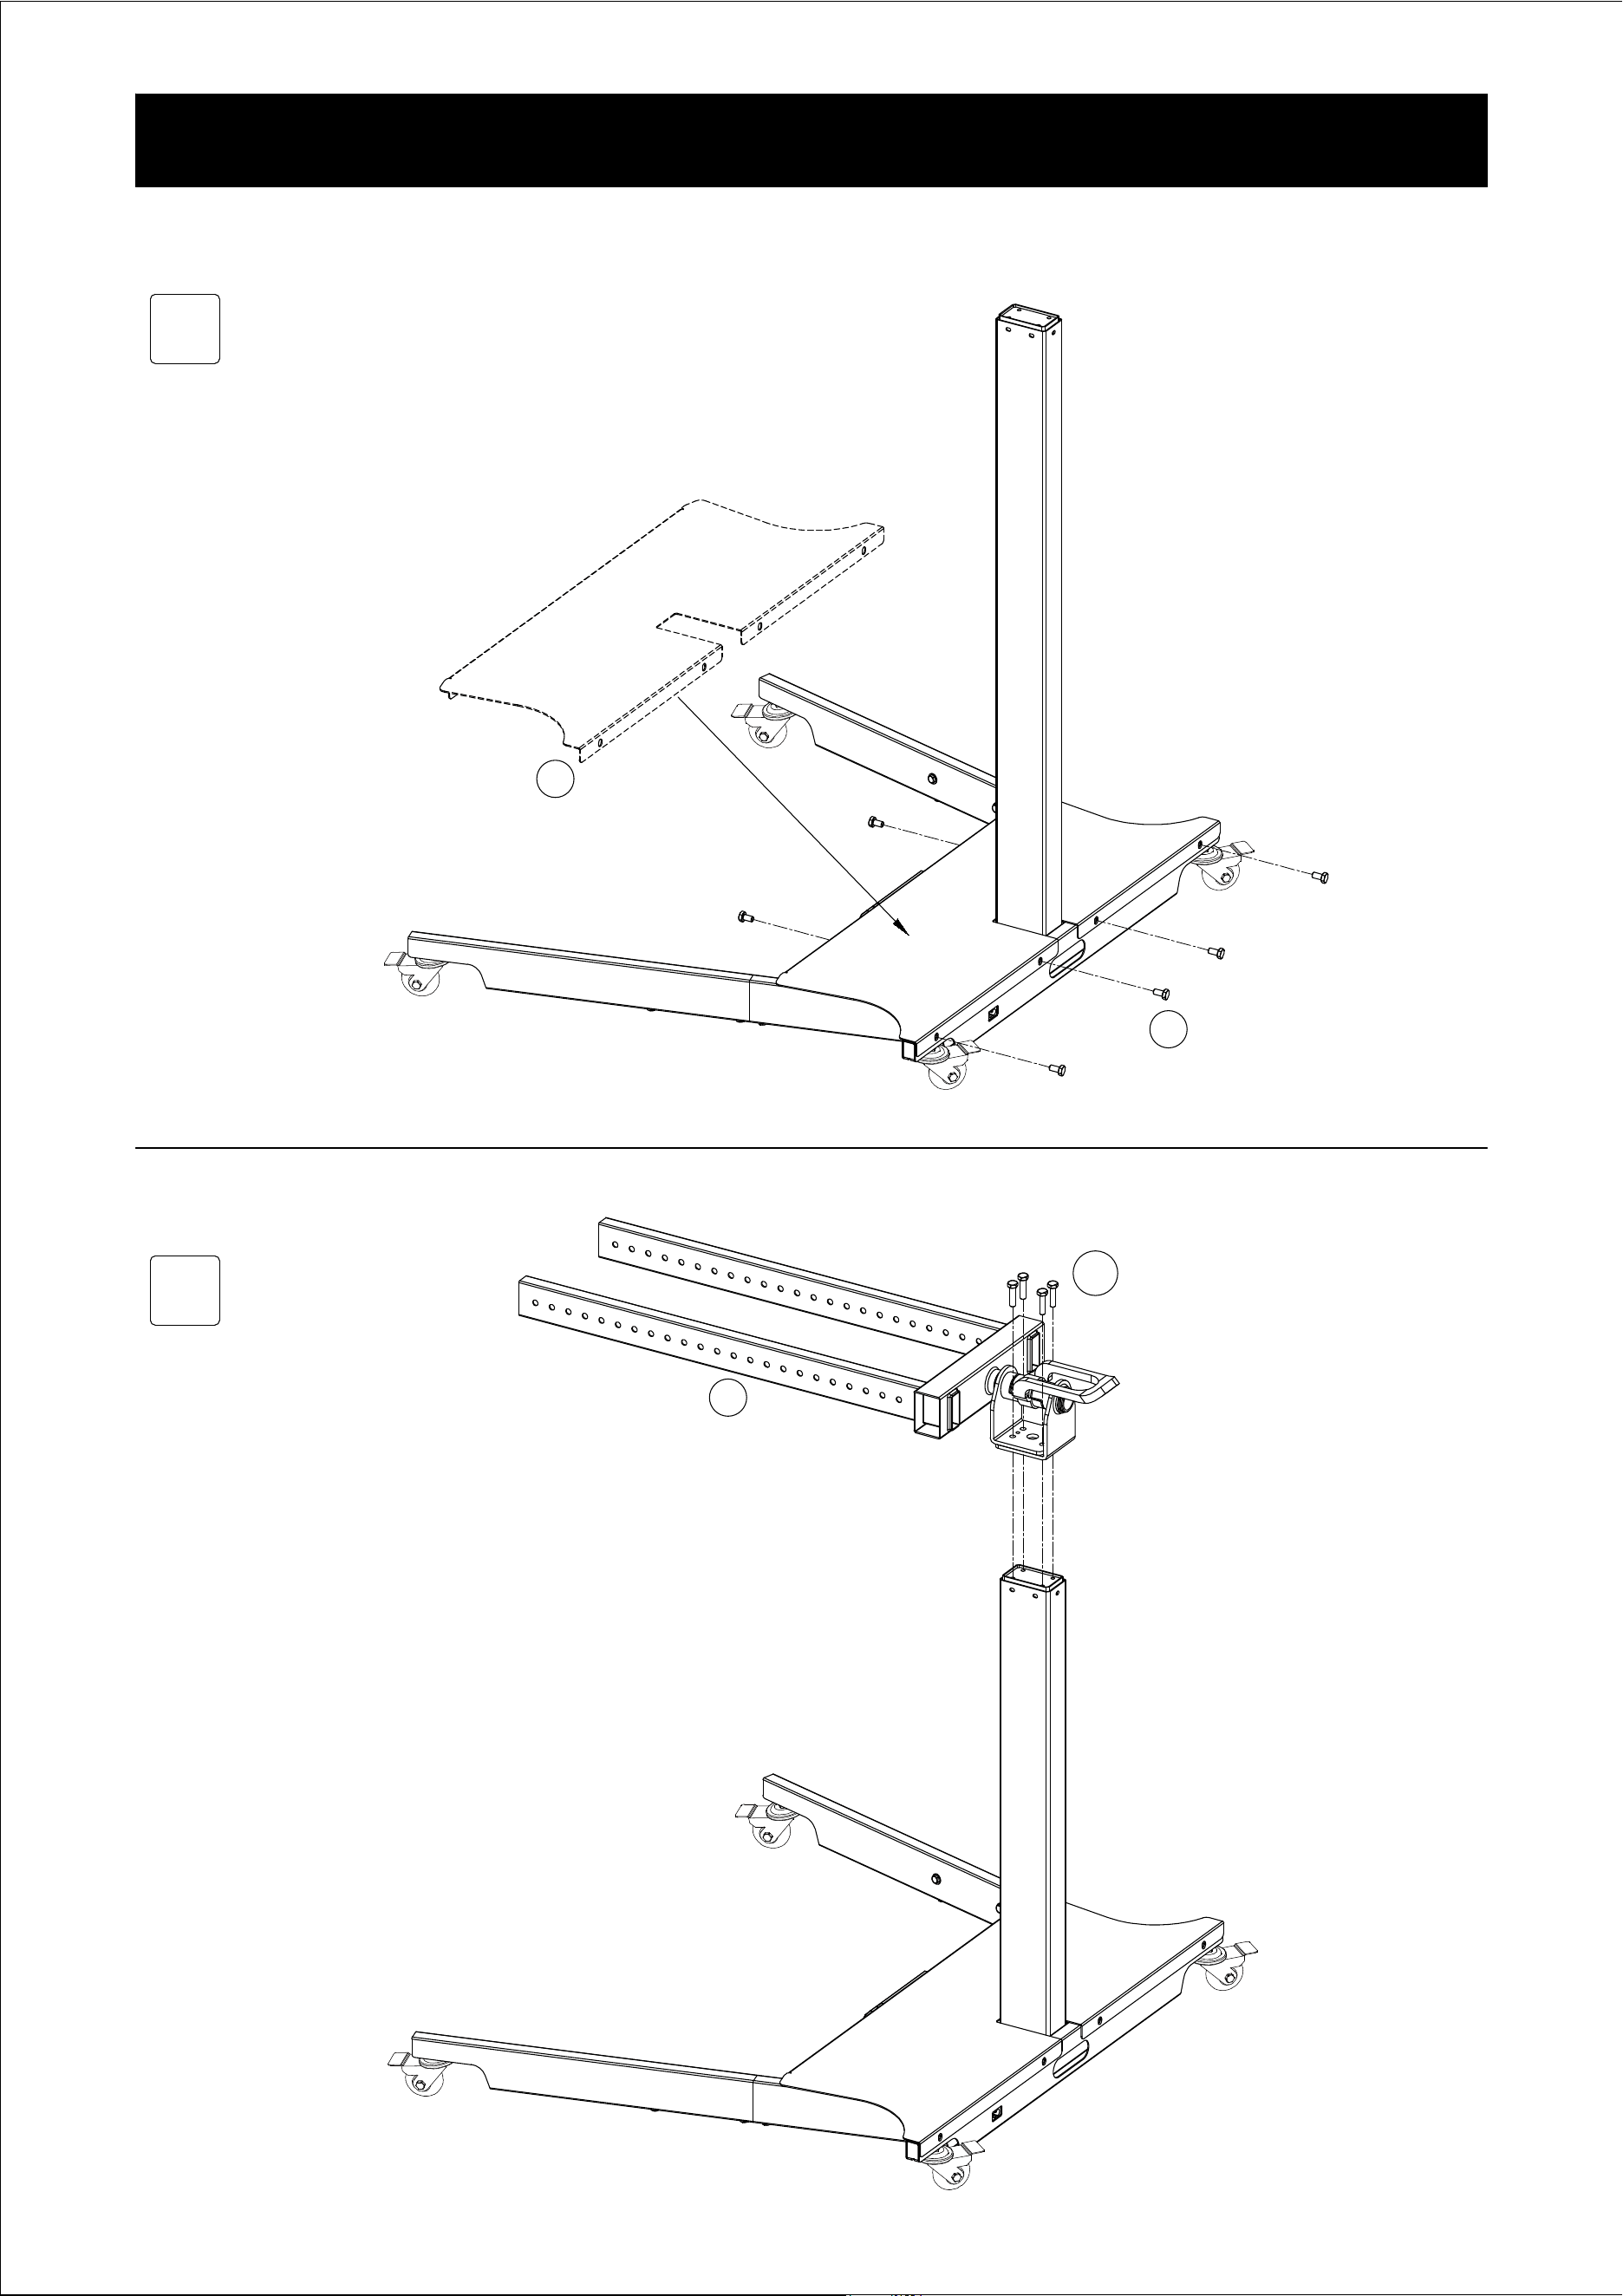
6
7
N
×
O
×
B
Use 6 bolts to screw the
base plate.
Use 4 bolts to screw the
light column to the neck.
Install Instruction
D
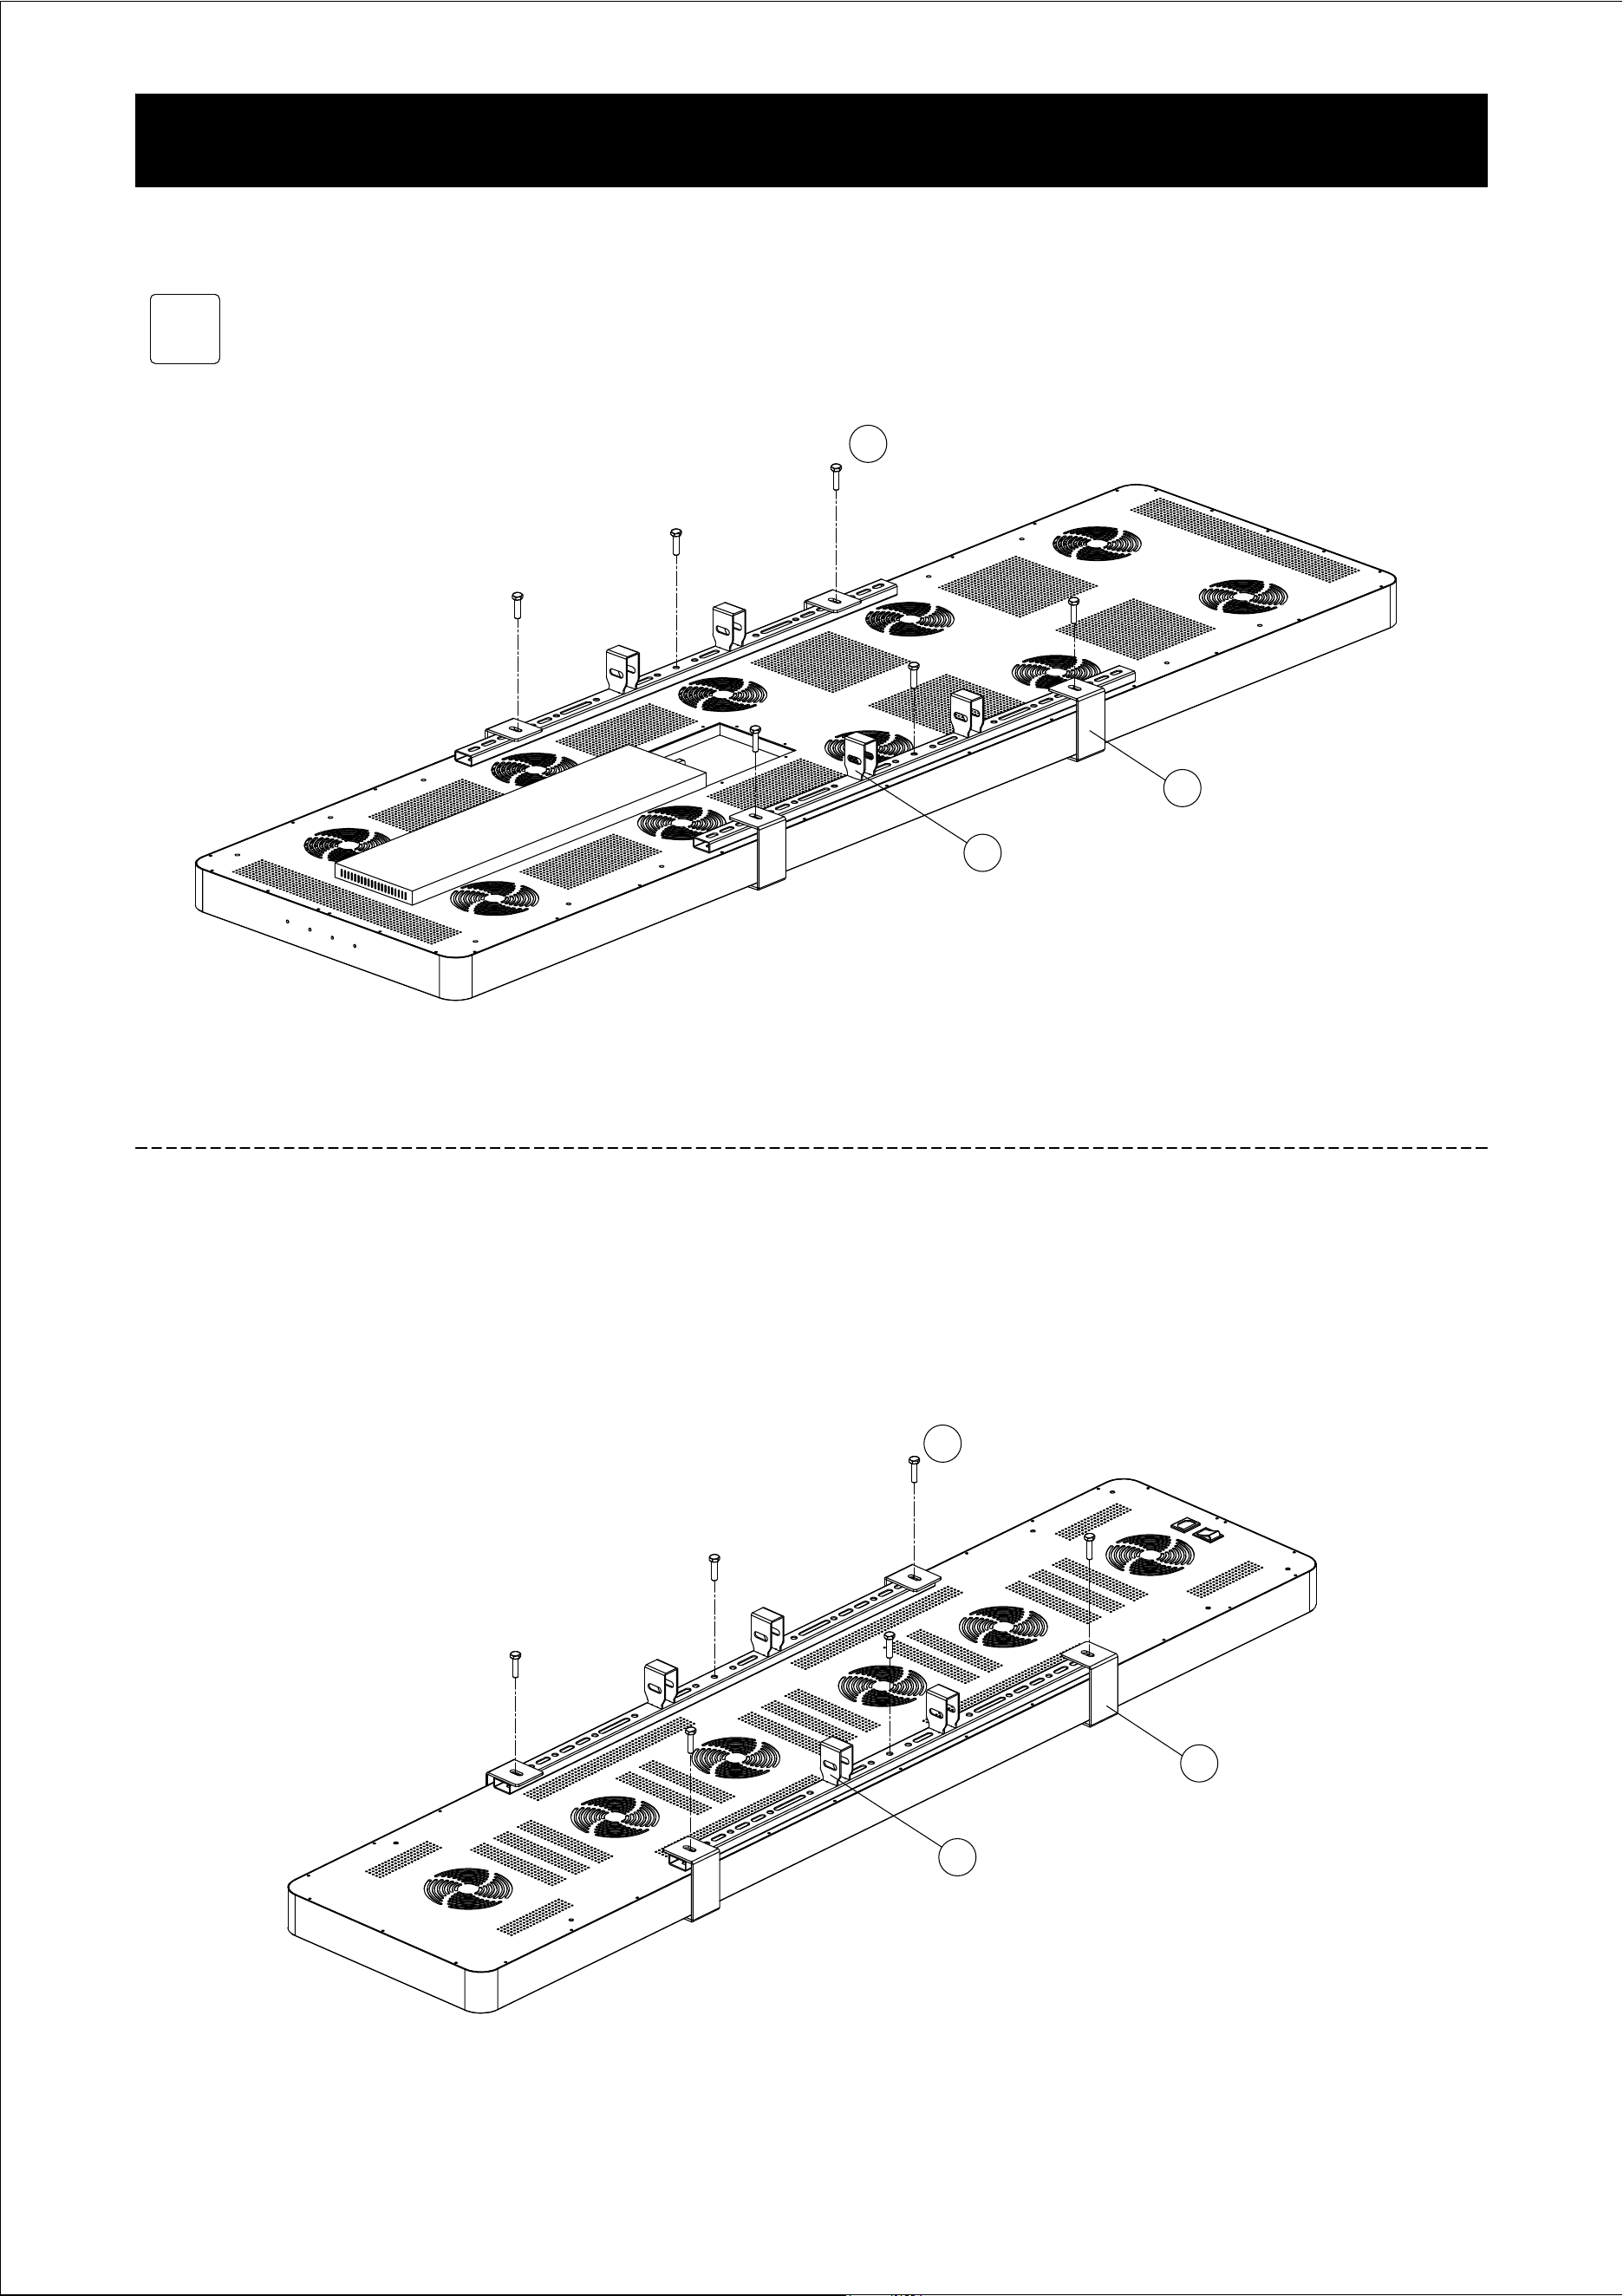
8
6
Installing One light on the stand
SP6000 (1200 LEDs)
×
×
×
SP3240 (648 LEDs)
×
×
×
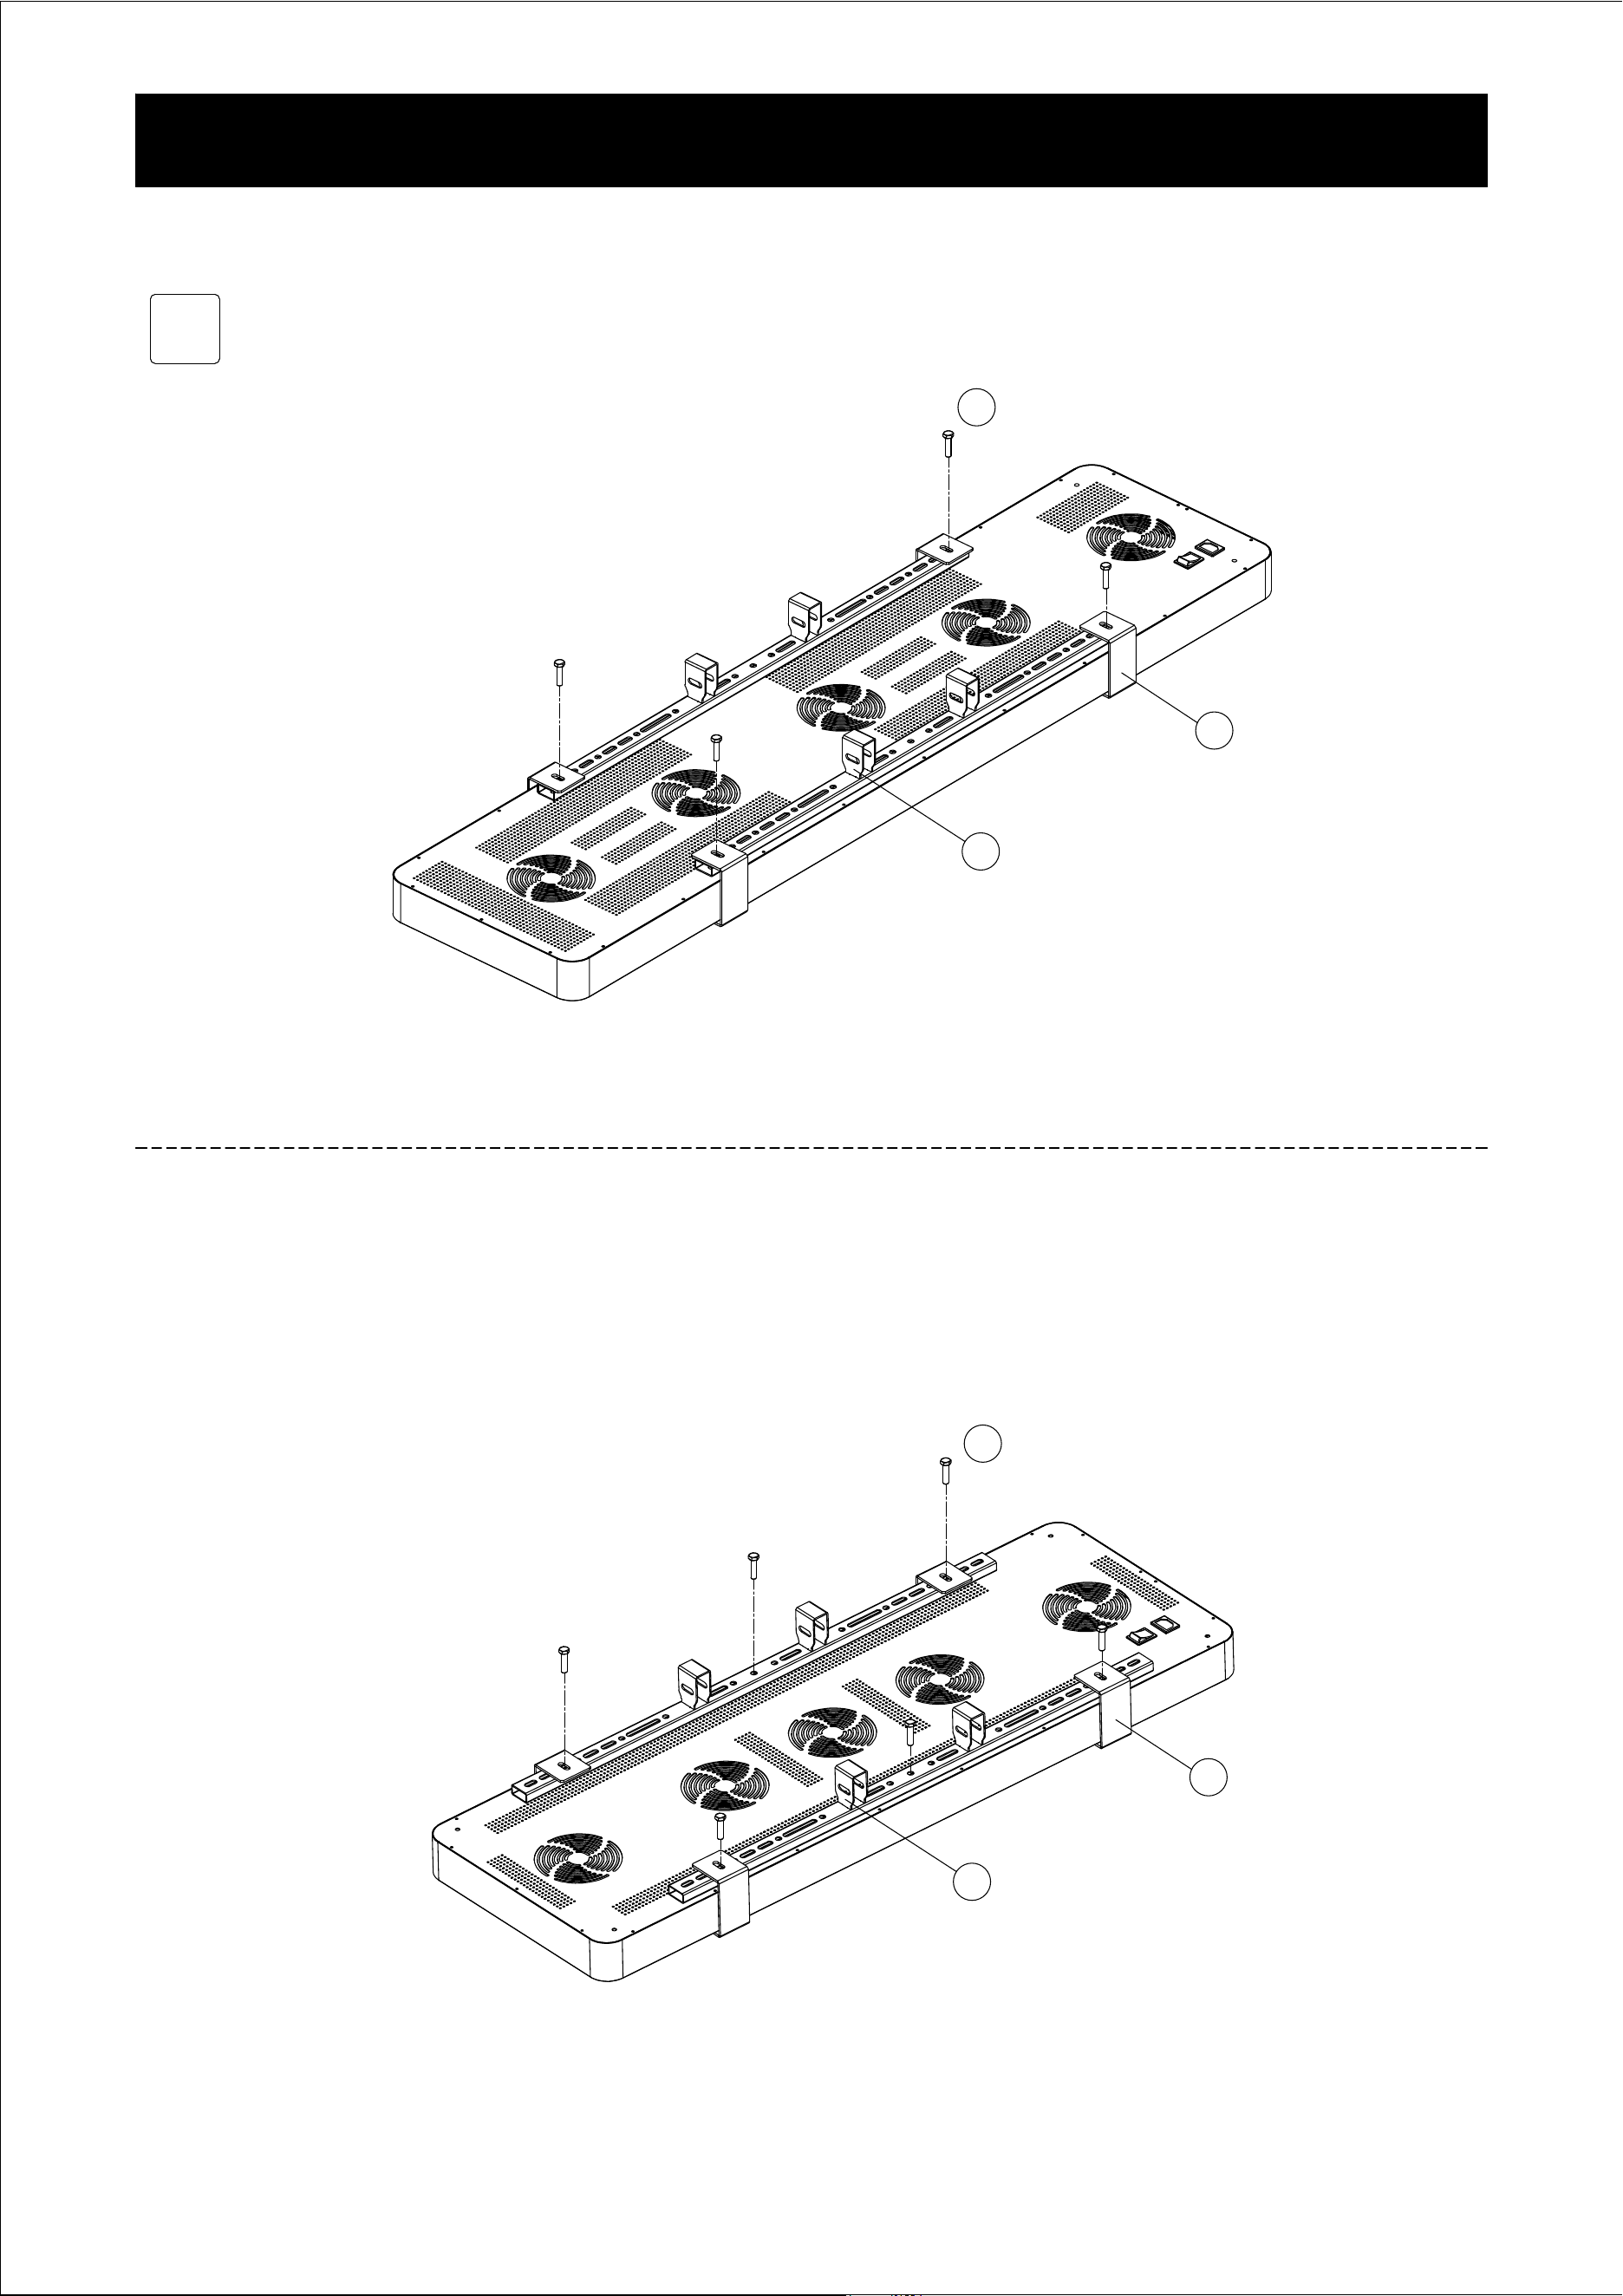
8
7
Installing One light on the stand
SP3000 (600 LEDs)
×
×
SP2160 (432 LEDs)
×
×
×
×
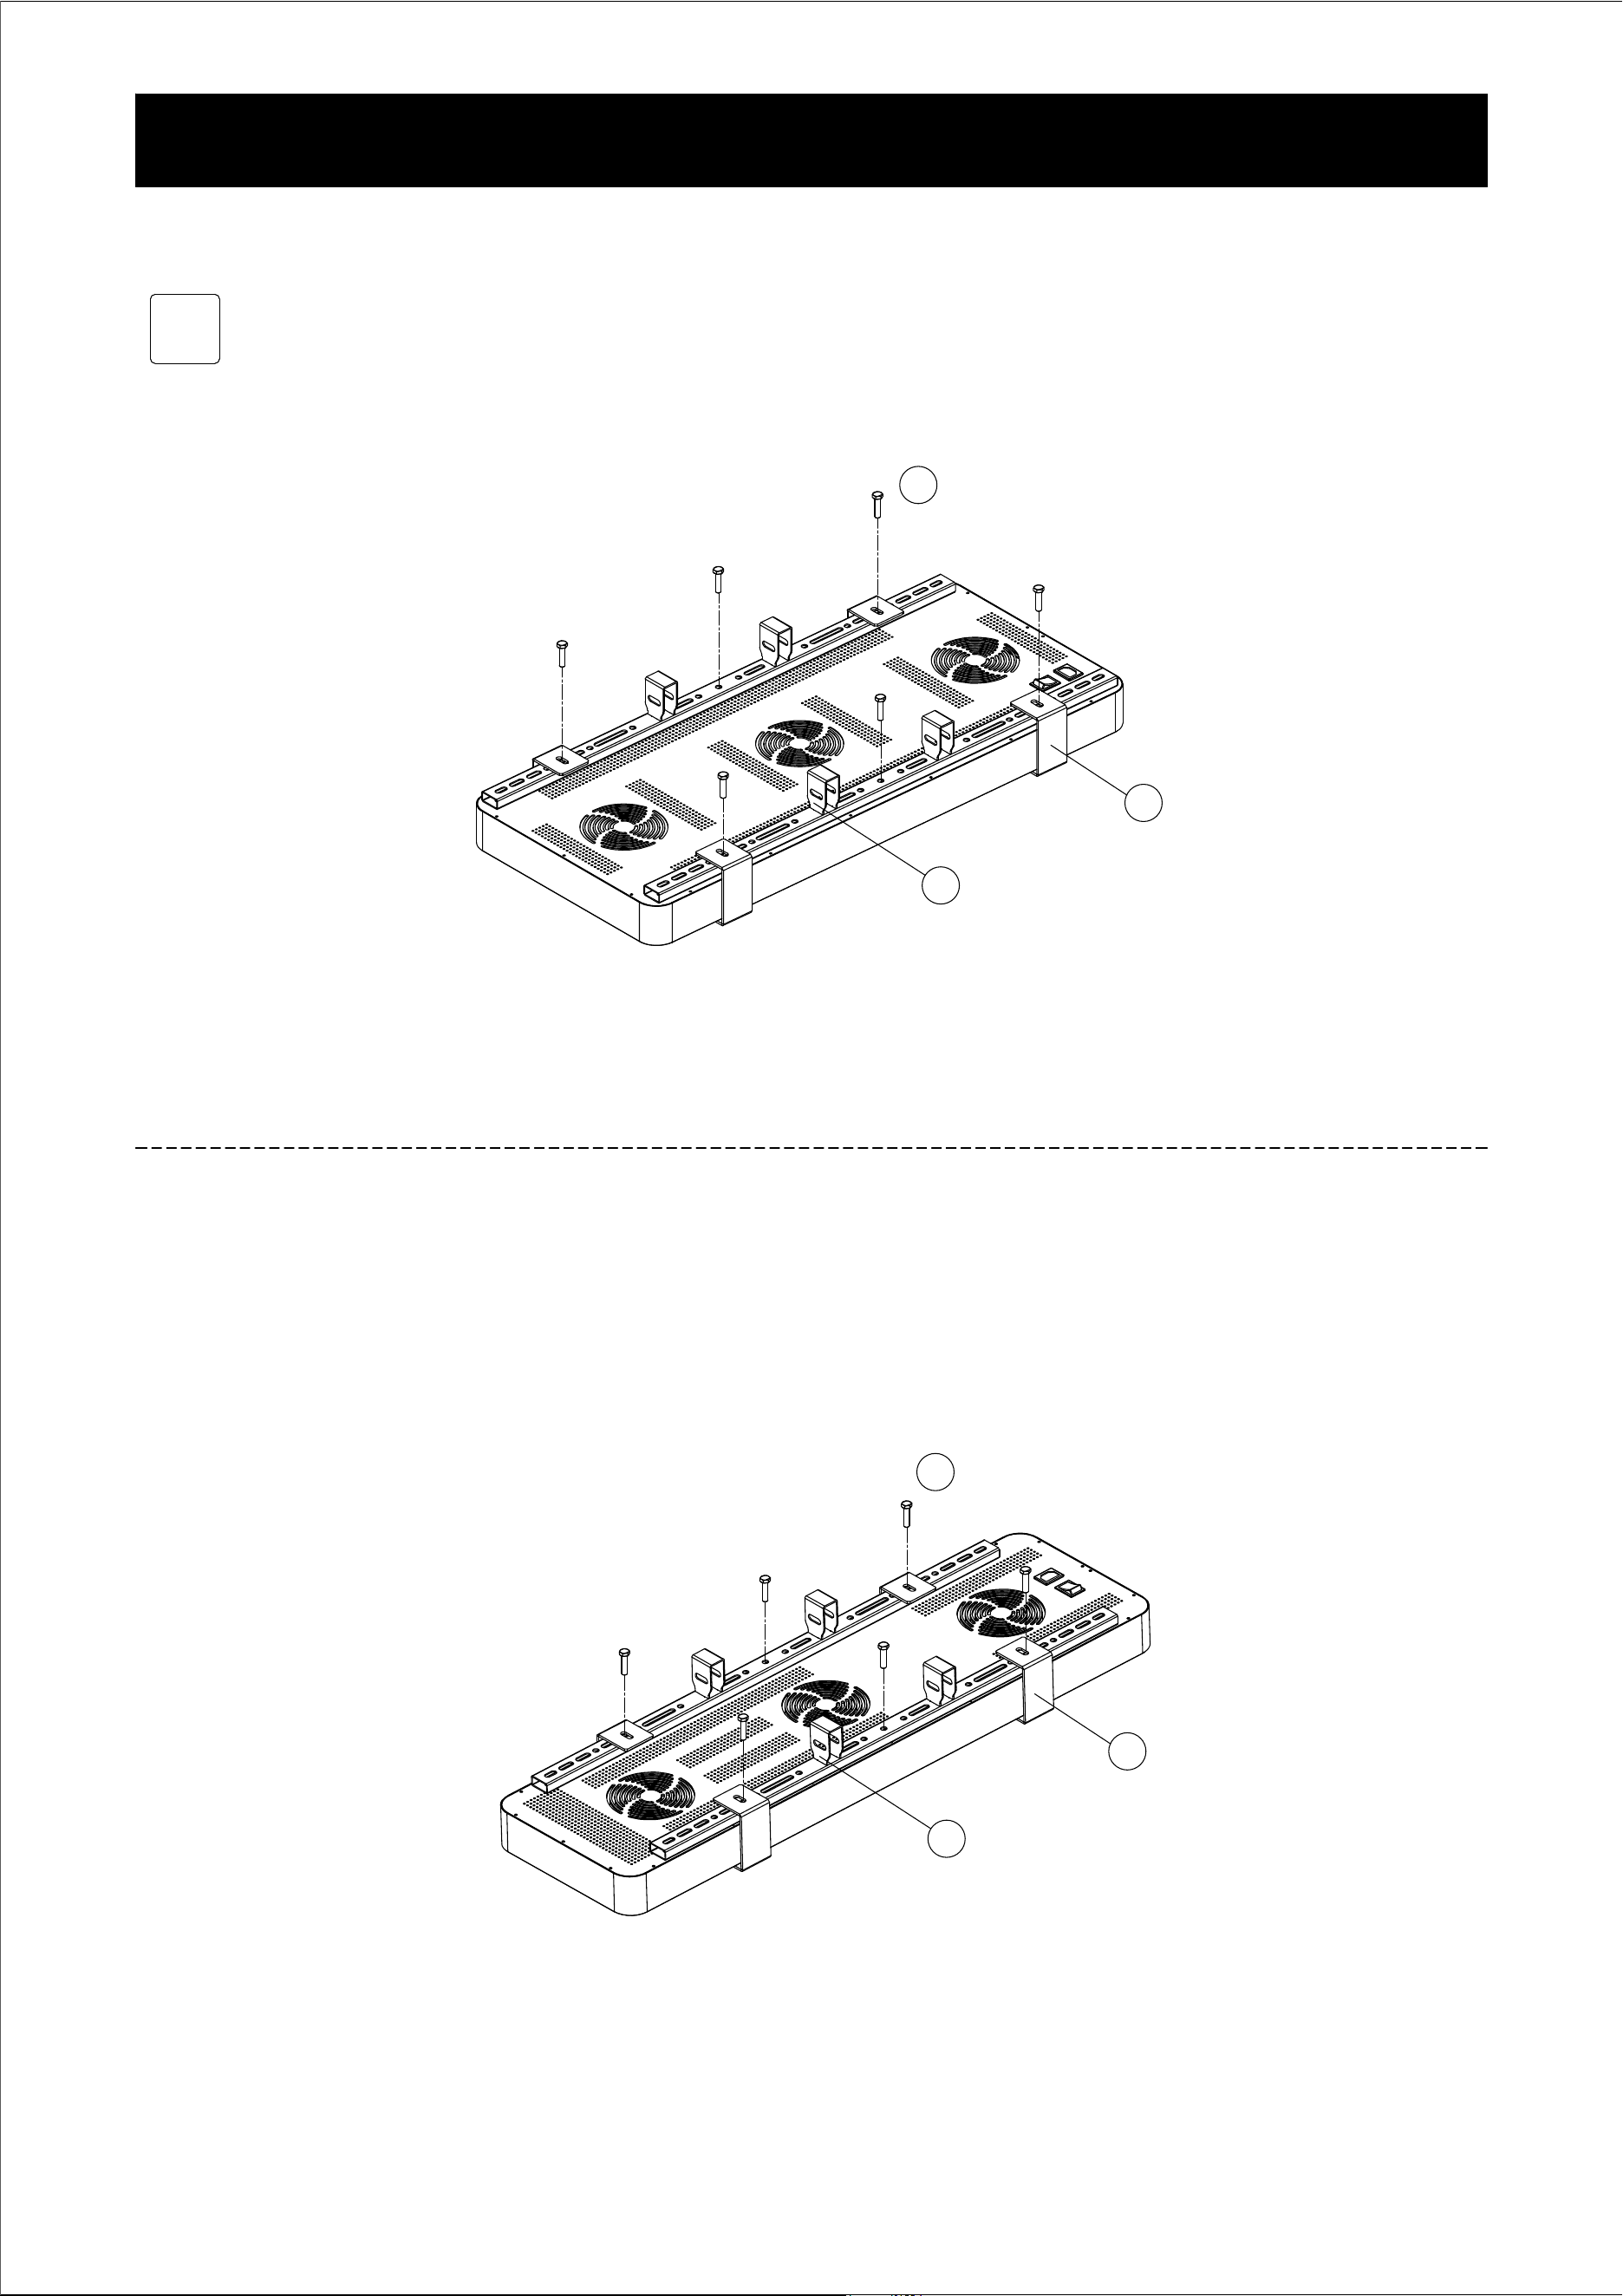
8
8
Installing One light on the stand
SP1620 (324 LEDs)
SP1500 (300 LEDs)
×
×
×
×
×
×
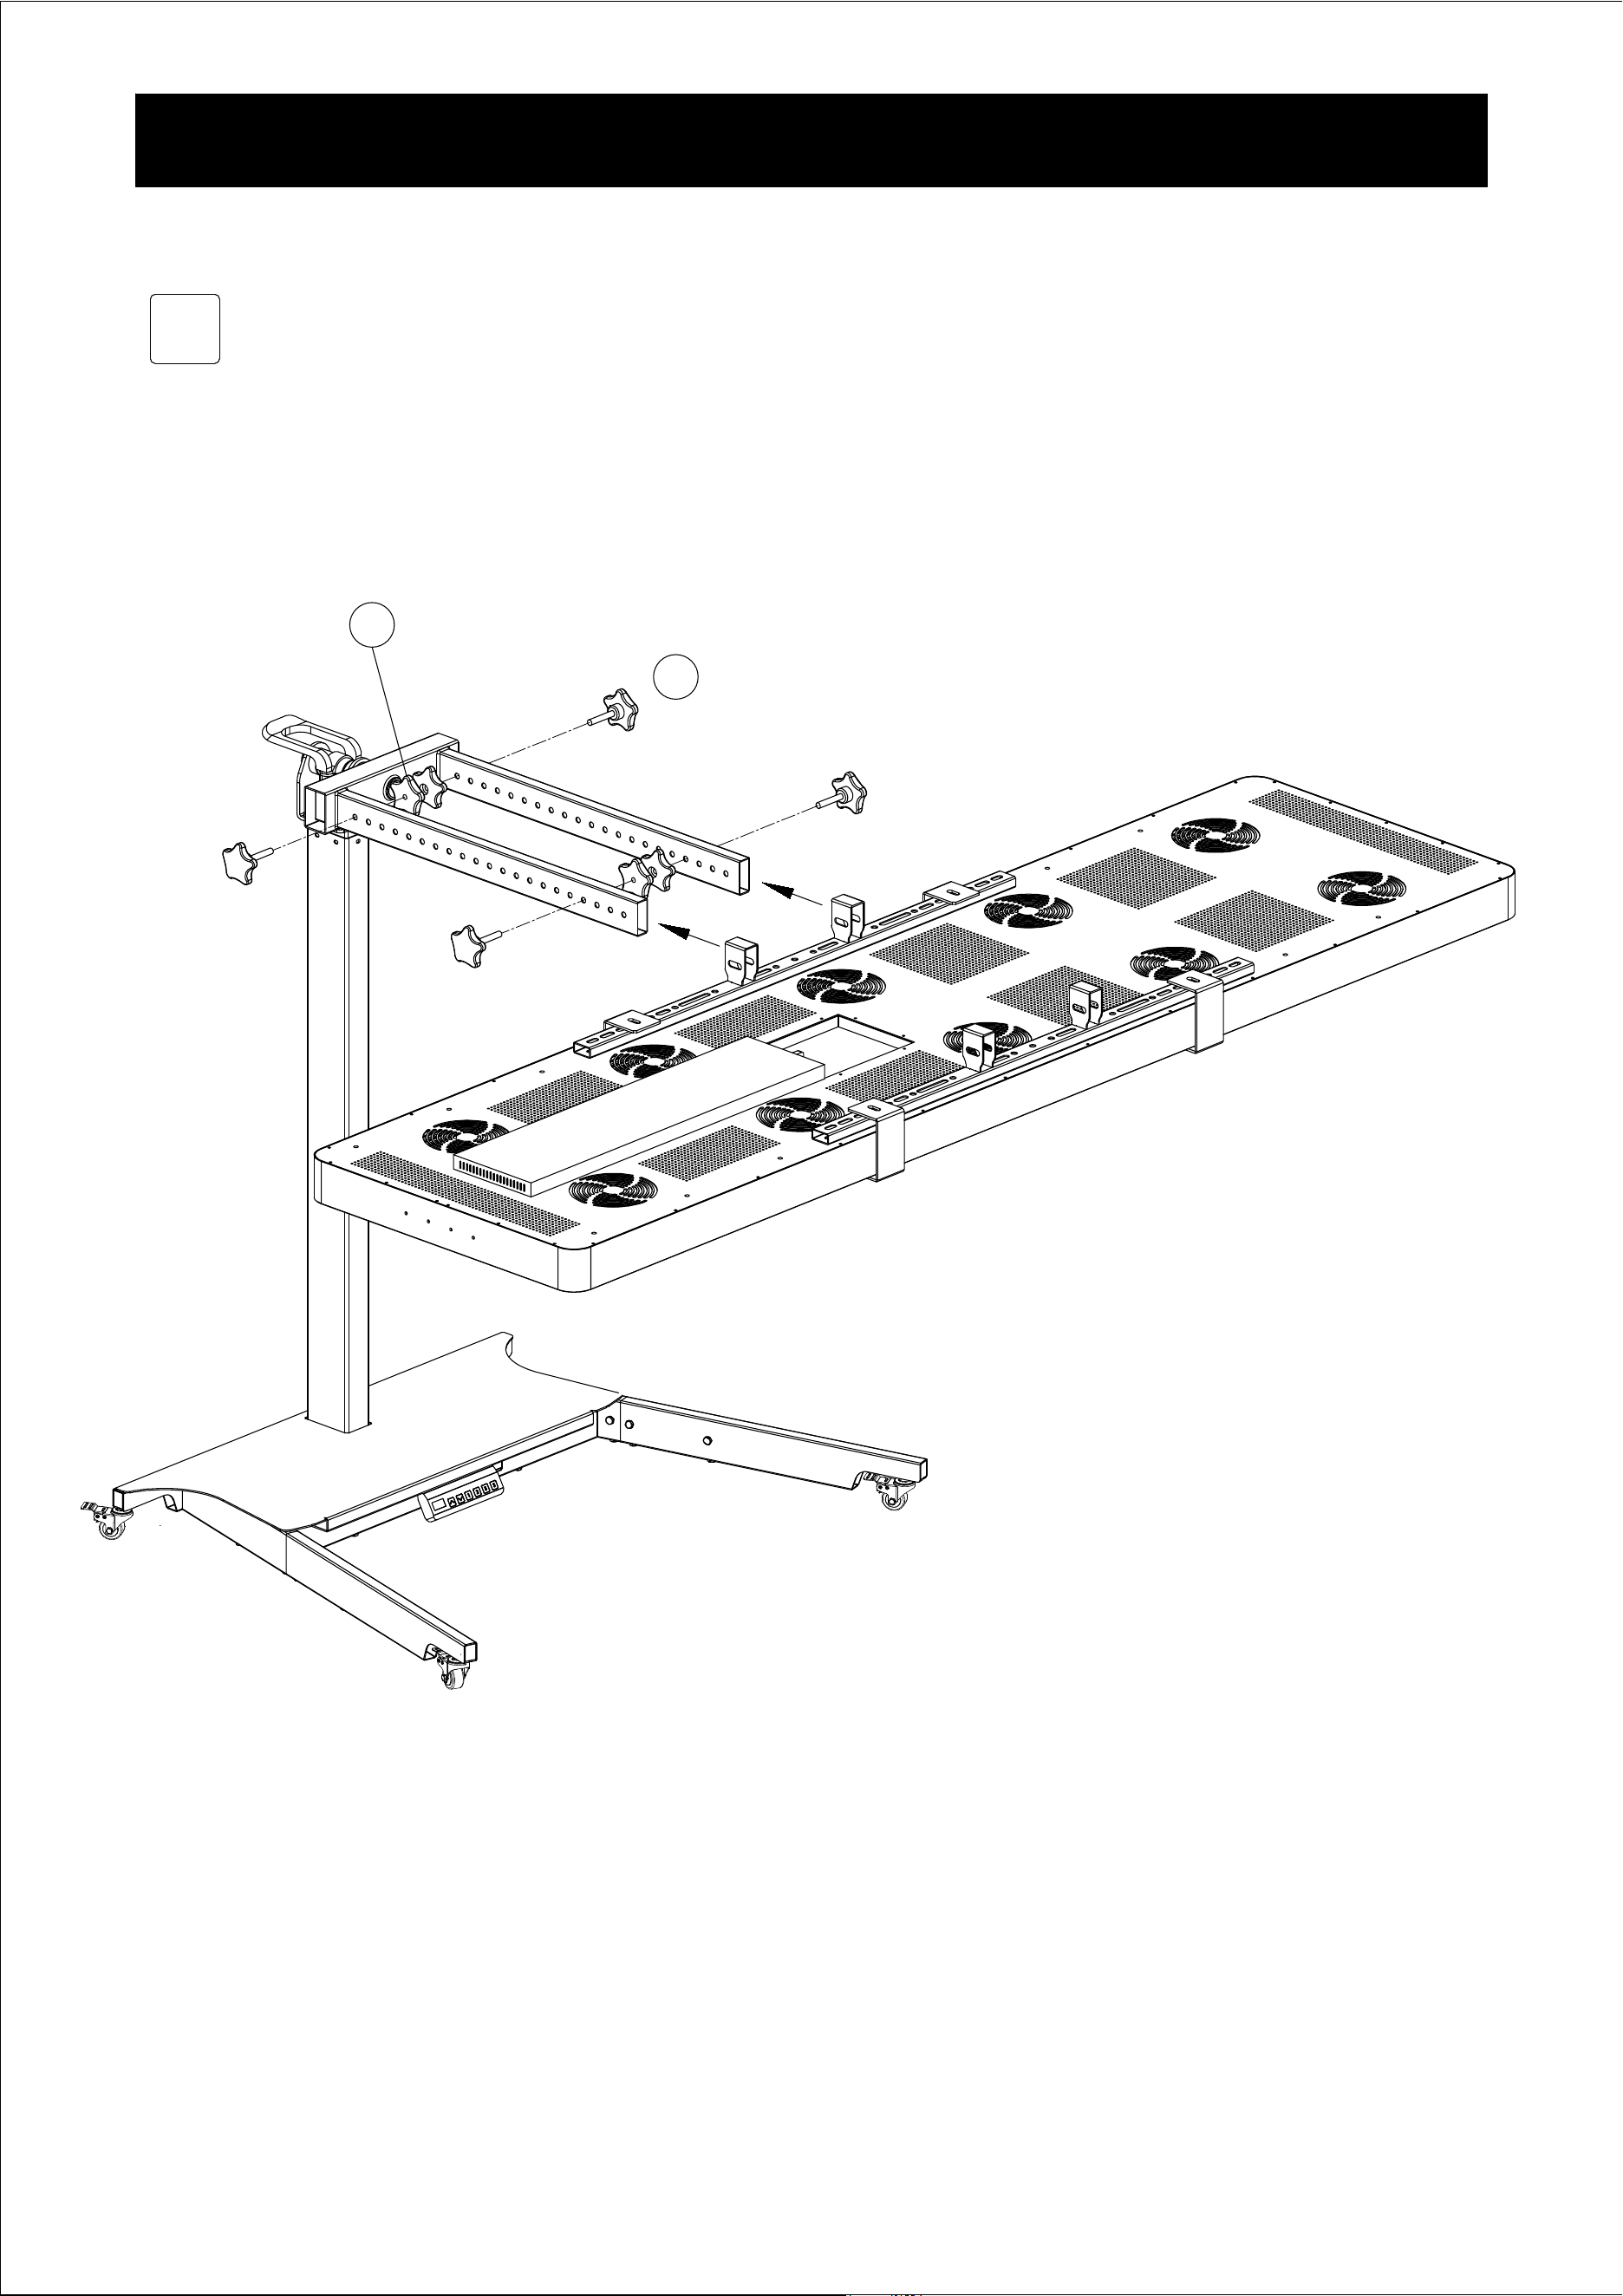
9
9
×
×
Installing One light on the stand
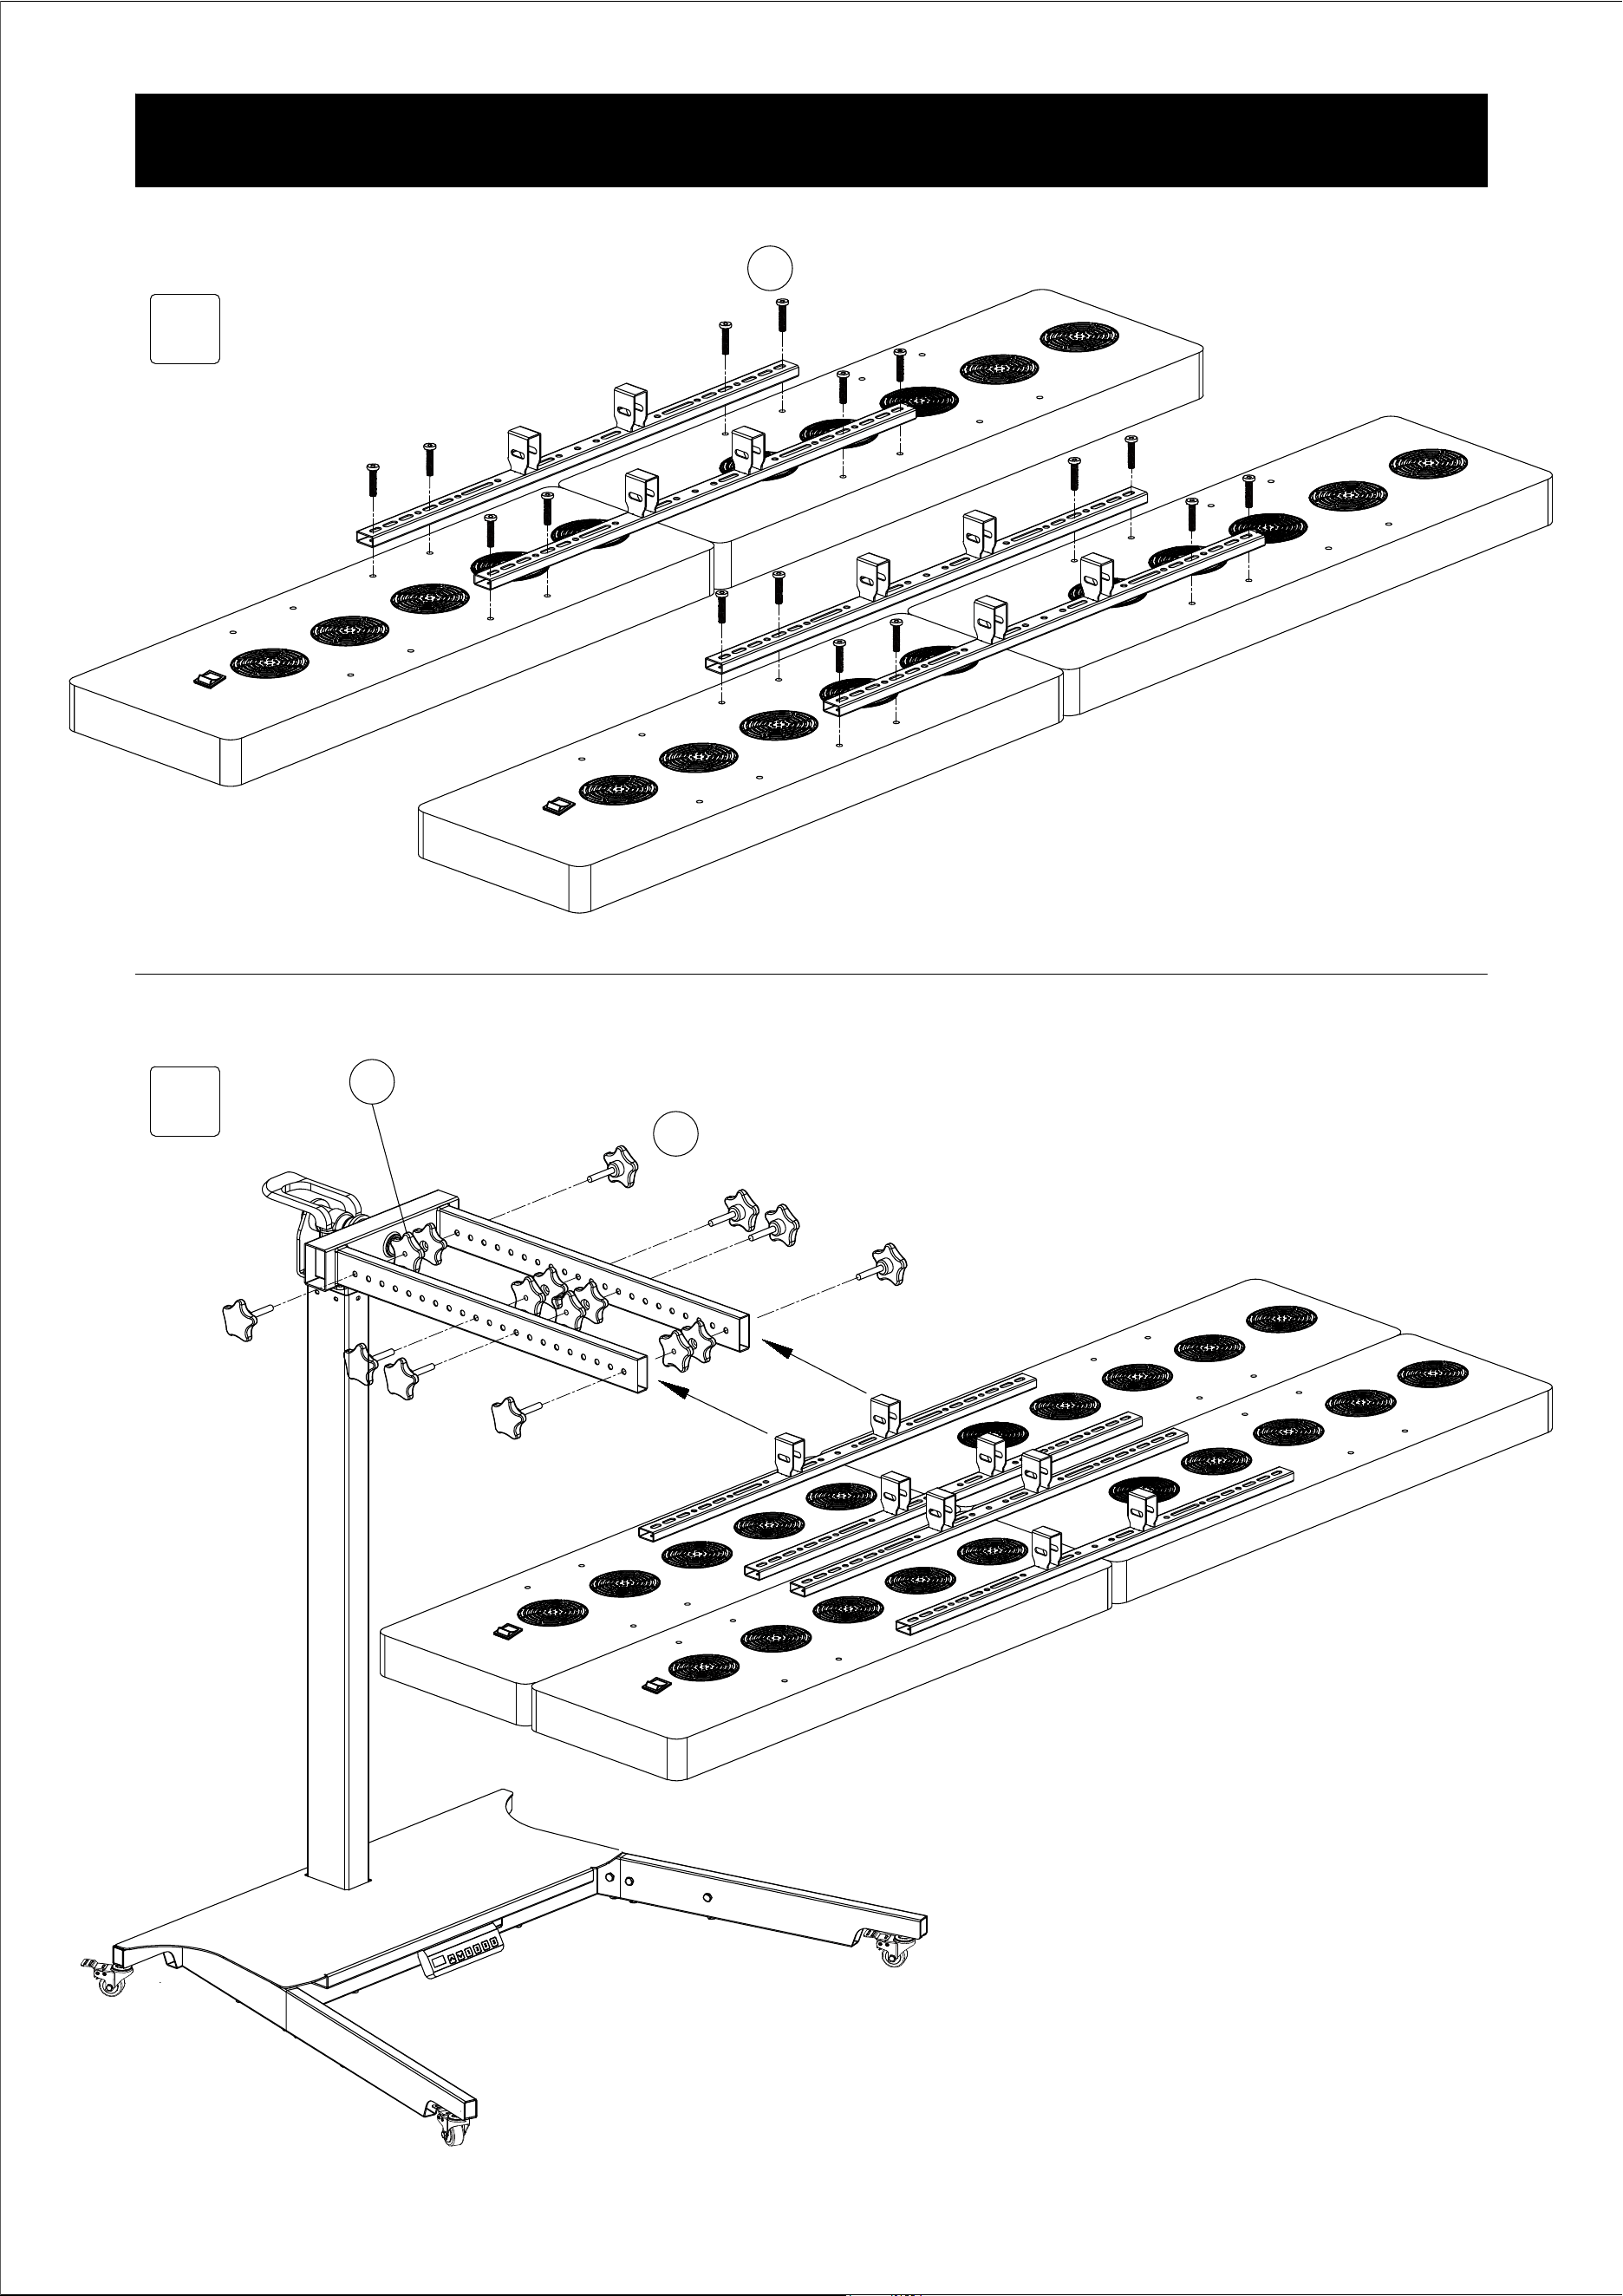
10
8
Installing Four lights on the stand
4 × Lights
9
×
×
×
The brackets and screws for
installing four lights are not
included, they are sold
separately. Please contact us
if needed.
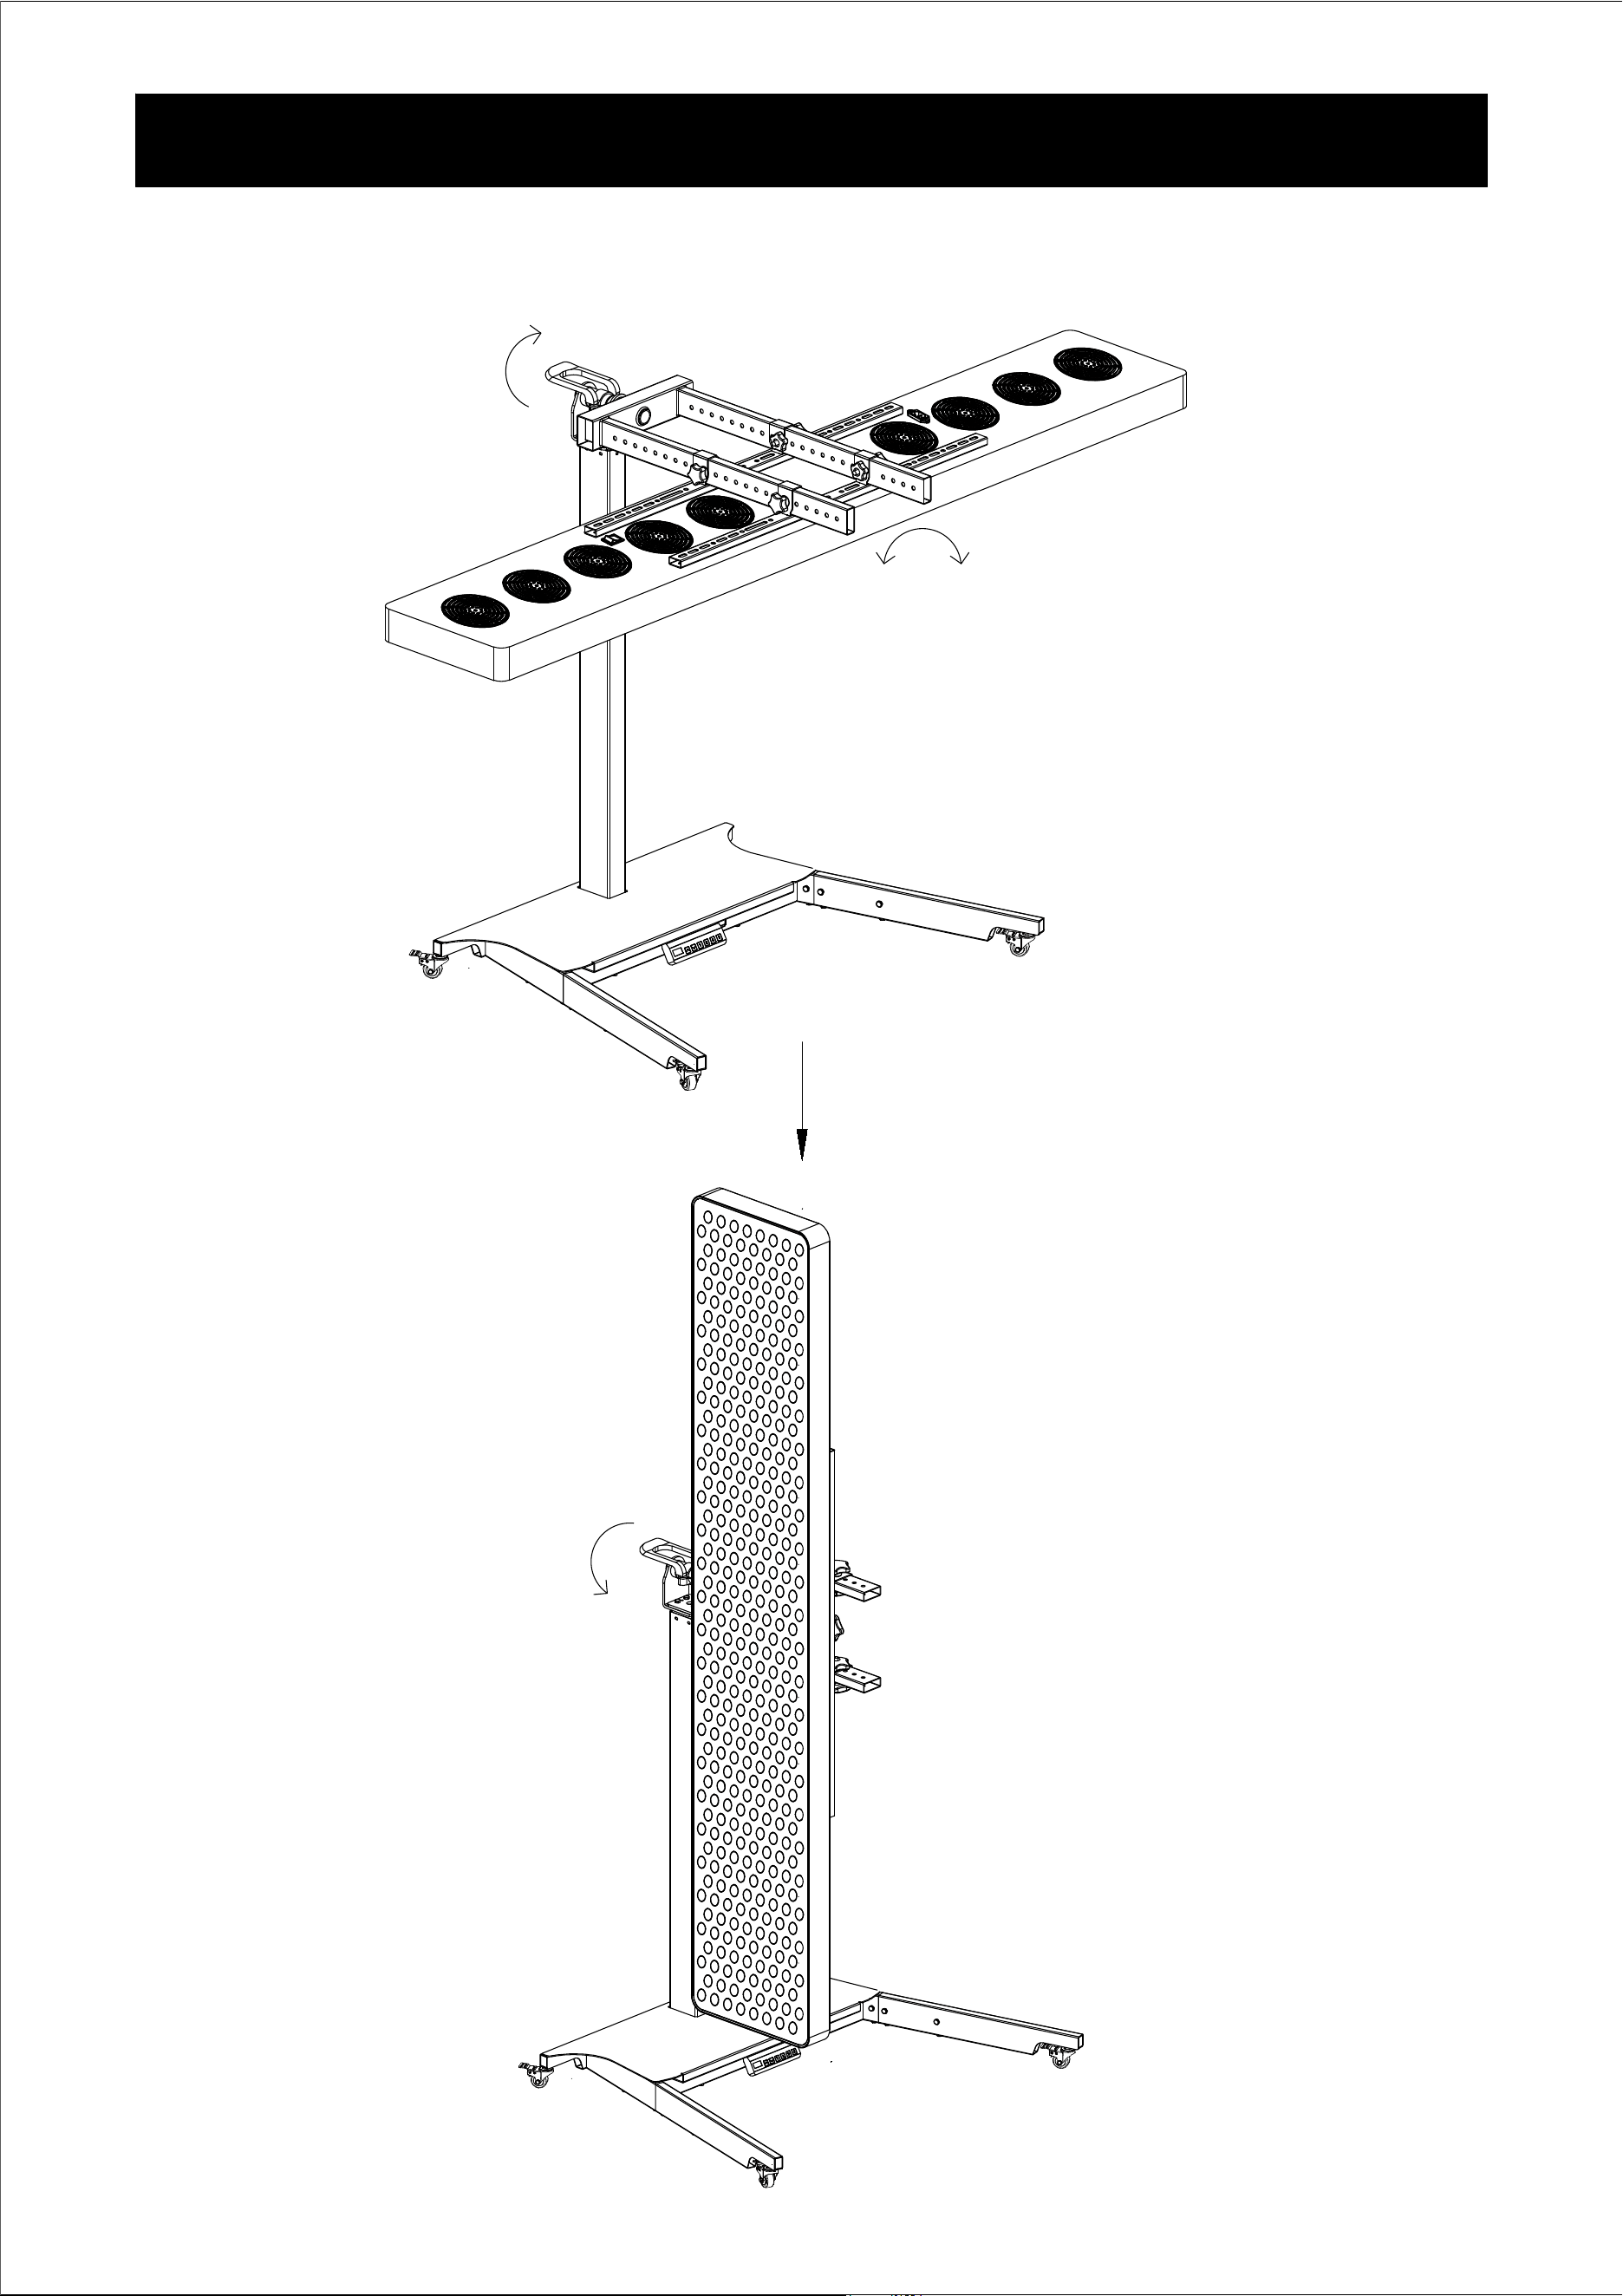
Rotation
11
1) Raise the stand to the highest position
2) Hold the panel with one hand,raise the handle upwards
3) Rotate the panel to your desired position
4) Press the handle down
to lock it
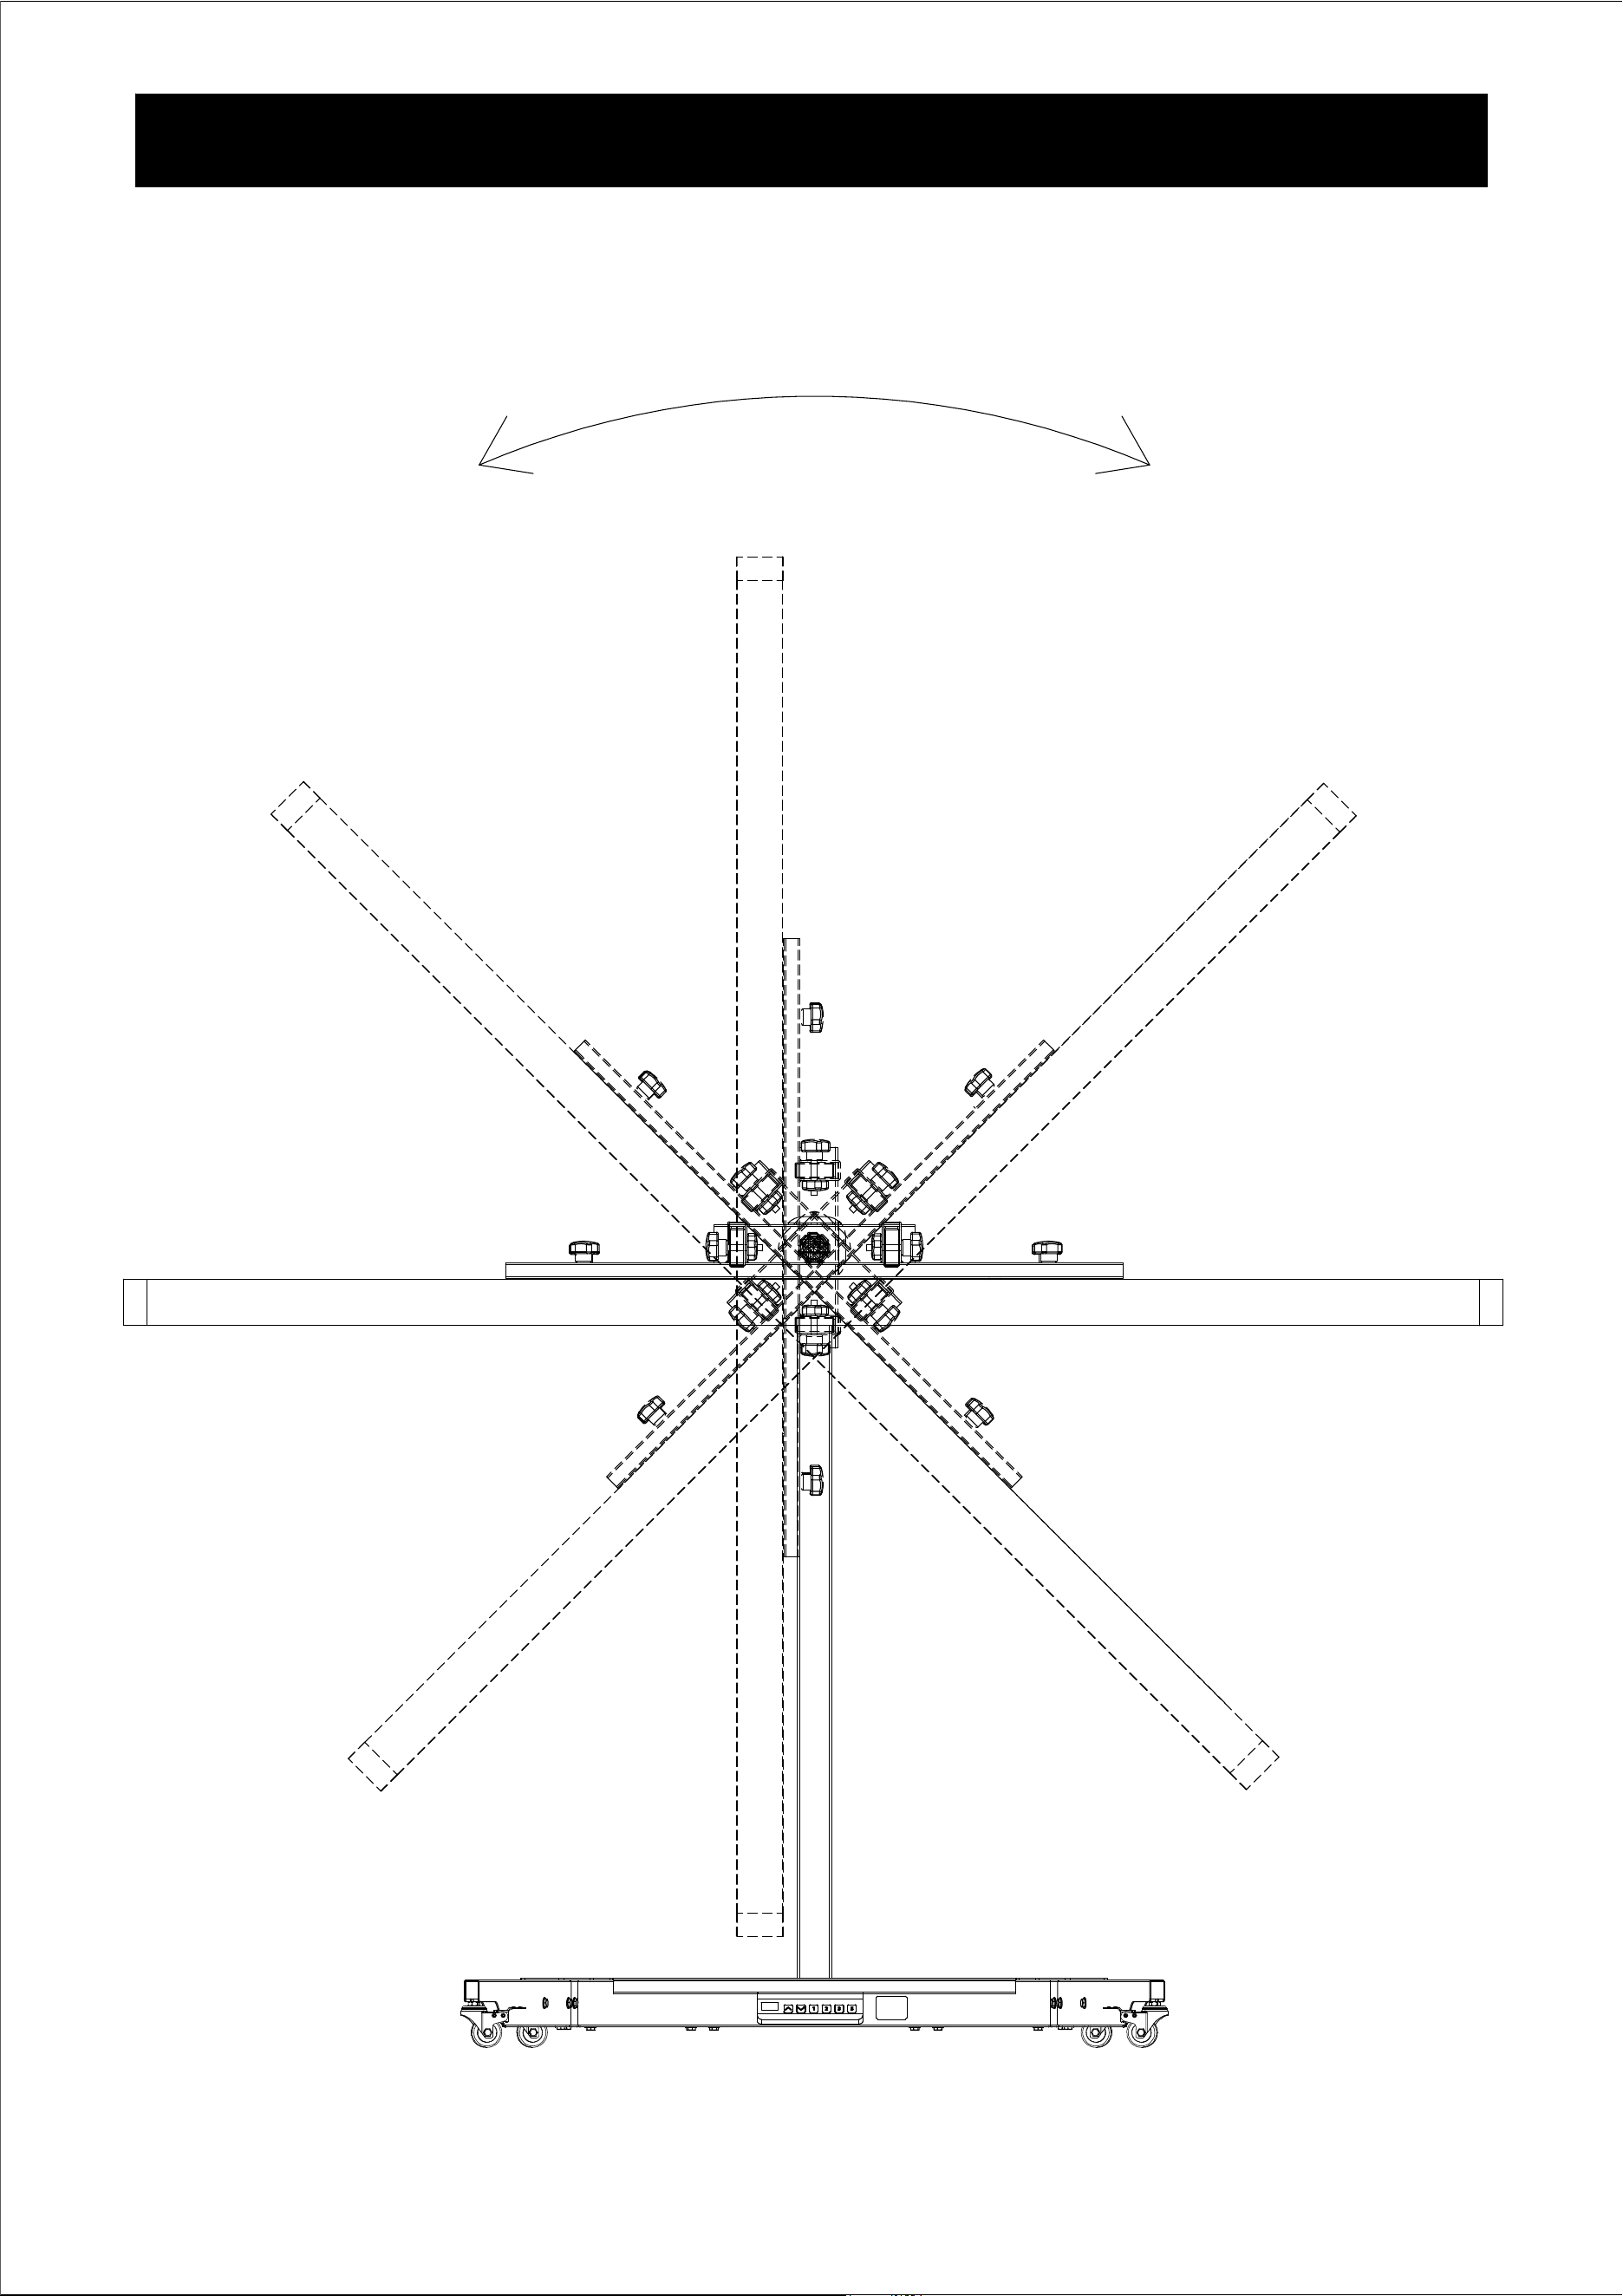
360° Rotating
360°
12
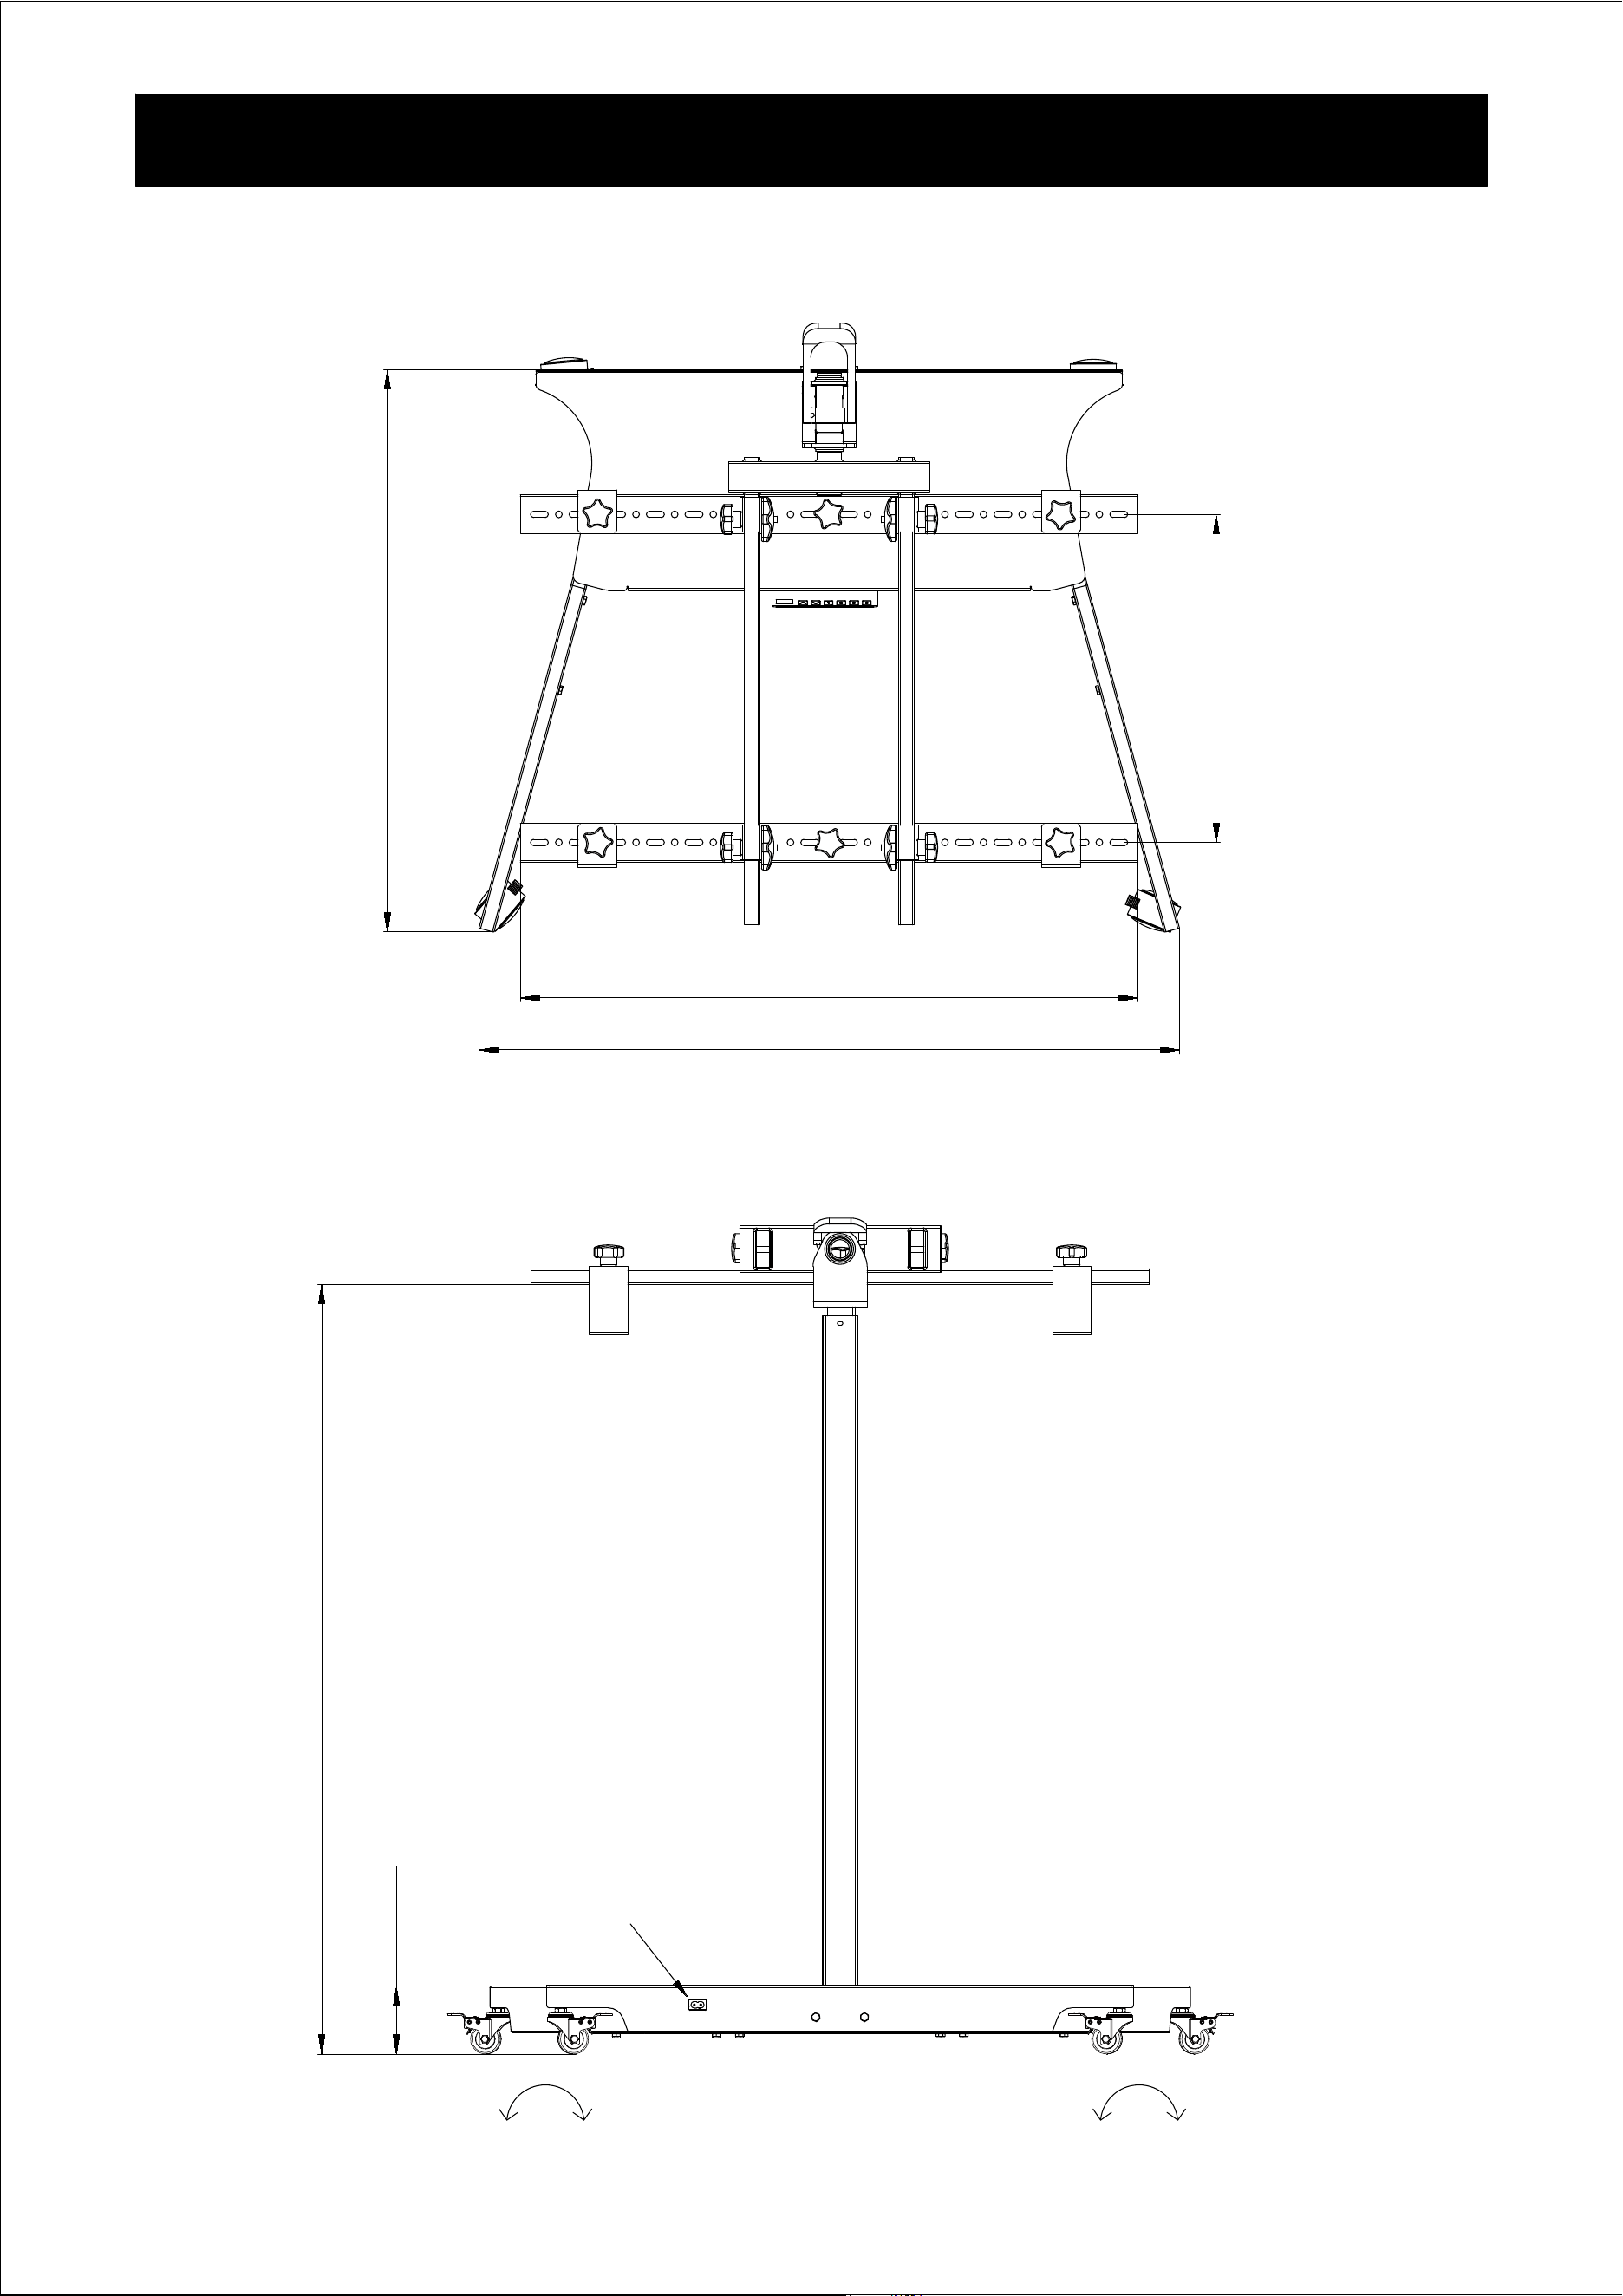
Dimensions
907mm
728mm
1000-1600mm
AC 100-240V
360° 360°
0-500mm
13
90mm
800mm
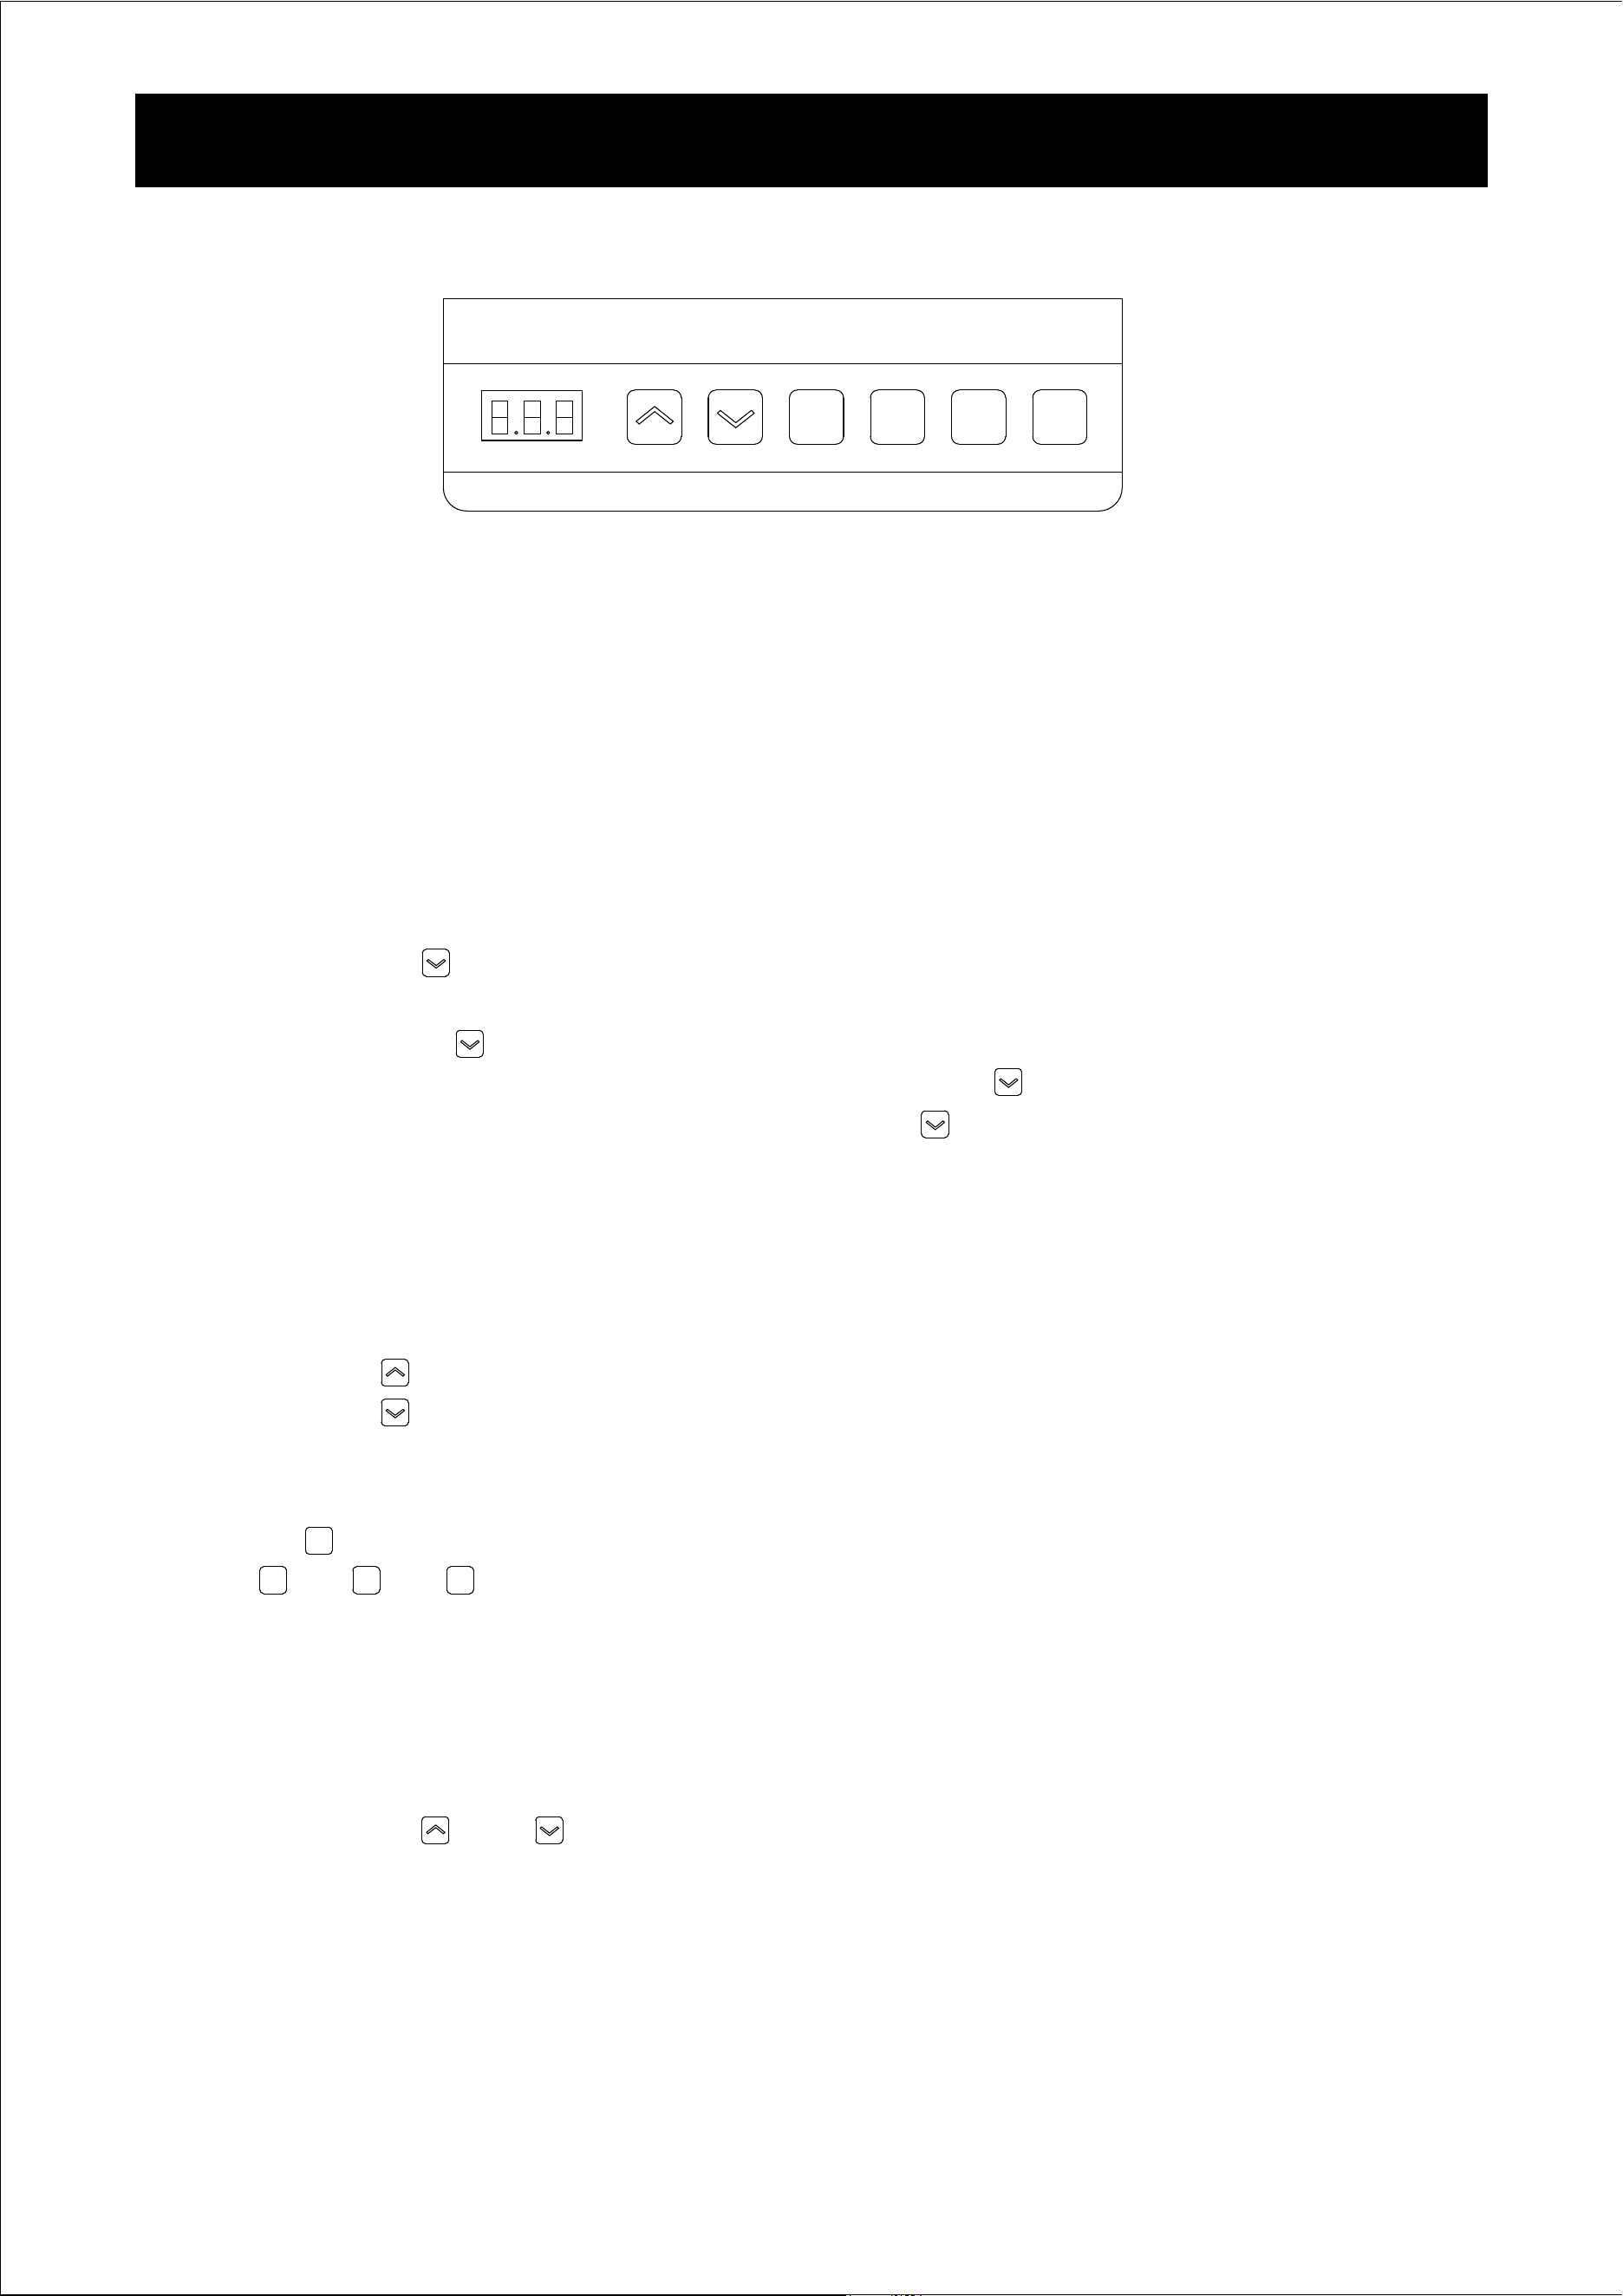
Instruction for Control Panel
Initial Power-On of the Product
1)When the stand is powered on (100-240VAC), the buzzer will emit a single beep, and the controller will display
the current height.
2) If the height value shown on the controller does not match the actual height, or if the height has changed
after reassembly, a reset operation will be necessary, Otherwise, the system can be used directly with the factory
settings.
Reset Operation
1)Press and hold the " " button, the stand stops for 5 seconds.
2)The controller will display "rst",the reset process will begin.
3)Continue holding the " " button as the stand slowly descends to its lowest point.
4)Once it reaches the lowest end and rebounds by 1cm, release the " " button to conclude the reset operation.
5)If an emergency arises during the reset, you can release the " " button at any time to stop the stand and end
the reset.
After an interrupted reset, it is necessary to reinitiate the reset operation until it is successfully completed; no
other operations can be performed until then.
Height Adjustment
Press and hold the " " button to raise height, release the button to stop.
Press and hold the " " button to lower height, release the button to stop.
Preset Height
1)Press the " " button,"S-" appears on the control display.
2)Press " " or " " or " " button to save the height to the selected button.
3)The control can store up to three heights, preserved even after power outages.
4)To recall a saved height, press the corresponding button, The stand will move automatically to that height.
5)Press any button during movement to stop immediately.
Lock or Unlock
1)Press and hold the " " and " " buttons together for 5 seconds.
2)The display shows "LOC," the stand is locked and cannot be adjusted.
3)Press and hold the same buttons until the display returns to the normal digital readout, the stand is unlocked.
Energy Saving Mode
If no button is pressed for 1 minute, the stand enters energy saving mode, turning of the display and reducing
power use.
Press any button to exit this mode.
1 2 3 S
14
Control Panel
1 2 3
S
HOME
RST SET
M1 M2
Fault
Fault Codes and Solutions
SolutionsCodes
HOT
E14
E12
E11
E16
E15
rst
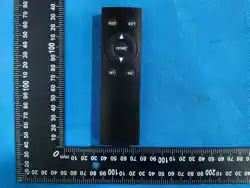
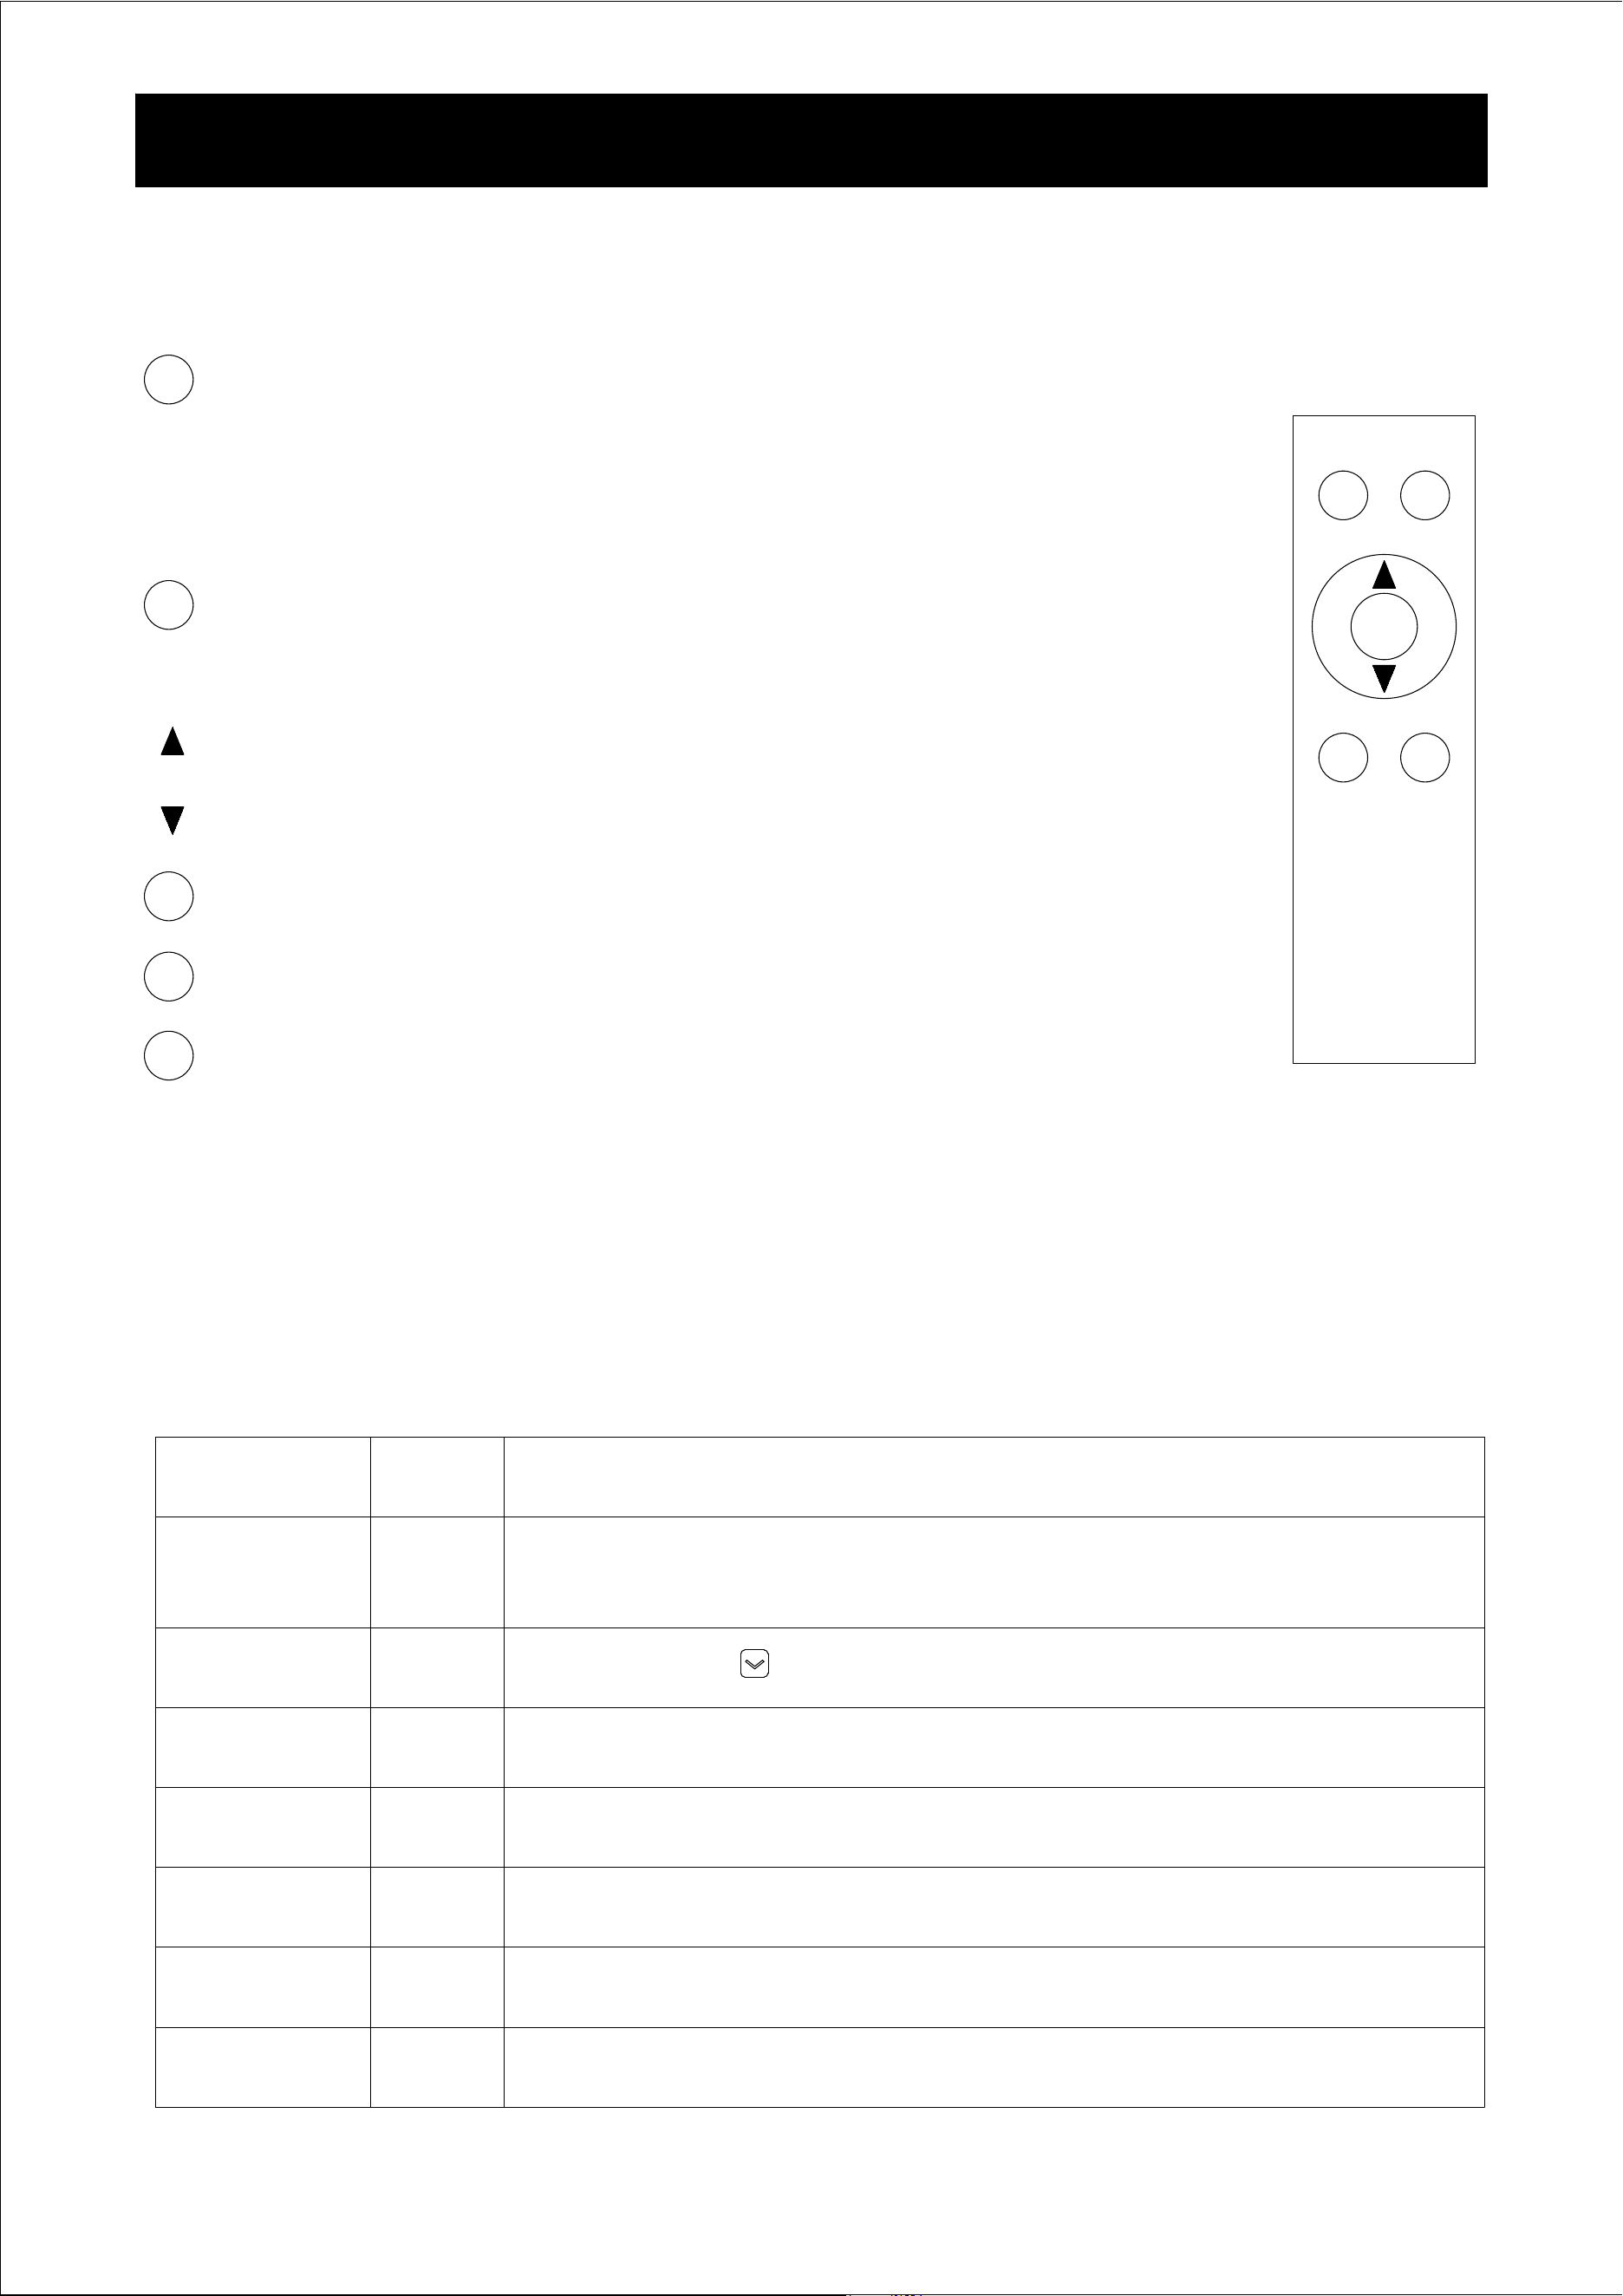
Instruction for Remote Control
RST
SET
HOME
M1
M2
Overheat
Protection
Reset Operation
Not Completed
Overload
Protection
Motor Operation
Abnormality
Anti-Collision
Protection
Motor Stall
Alarm
Motor Wire
Not Connected
Solution 1: No action needed, Automatically recover in 18 minutes.
Solution 2: Disconnect the power, wait for the screen to turn off, then reconnect the
power and resume use.
Press and hold the " " button on control panel until the reset is fully completed.
Remove any heavy objects from the stand.
Wait for the alarm to clear before using it again.
Turn off power, check the connection between the motor and the controller.
Turn it on again.
It will automatically reset by running in reverse for a specific distance.
It should operate normally after removed any obstacles.
If there is a severe overload or the transmission mechanism is stuck, remove any
overloaded objects and check for foreign objects within the transmission mechanism.
Check and reconnect the connection line between the motor and the controller.
Reset
1)Press and hold "RST" button for 3 seconds, a "beep" sound indicating the start of the reset process.
2)The stand lowers to the minimum height and rebounds 1cm.
3)Two "beep" sounds to signal reset completion.
Pairing
1)Unplug the power cable of the stand.
2)Press and hold the "SET" button on Remote Controller without releasing it.
3)Power on the stand, and upon hearing a "beep" sound indicating that pairing
is in progress, release the "SET" button.
Press and hold to raise height,release to stop
Press and hold to lower height,release to stop
Press to lower the stand to the minimum height. Press again to stop
Memorized height 1
Memorized height 2
Preset Height
1)The stand stop at a idea height
2)Press and hold "M1" or "M2" button for 3 seconds until a "beep" sound. To save the current height
3)Press "M1" or "M2" button to the memorized height
15
FCC Requirement
changes or modifications not expressly approved by the party responsible for compliance could
§ 15.105 Information to the user.
Note: This equipment has been tested and found to comply with the limits for a Class B digital device, pursuant to part 15 of the FCC Rules. These
limits are
designed to provide reasonable protection against harmful interference in a residential installation.
This equipment generates uses and can radiate radio frequency energy and, if not installed and used in accordance with the instructions, may cause
harmful
interference to radio communications. However, there is no guarantee that interference will not occur in a particular installation.
If this equipment does cause harmful interference to radio or television reception, which can be determined by turning the equipment off and on, the
user is encouraged to
try to correct the interference by one or more of the following
measures:
-Reorient or relocate the receiving antenna.
-Increase the separation between the equipment and receiver.
-Connect the equipment into an outlet on a circuit different from that to which the receiver is connected.
void the user's authority to operate the equipment. This device complies with Part 15 of the FCC Rules. Operation is subject to the following two
conditions:
(1)this device may not cause harmful interference,and
(2)this device must accept any interference received,including interference that may cause
undesired operation.
-Consult the dealer or an experienced radio/TV technician for help.
* RF warning for Portable device:
The device has been evaluated to meet general RF exposure requirement. The device can be used in portable exposure condition
without restriction.