User Manual
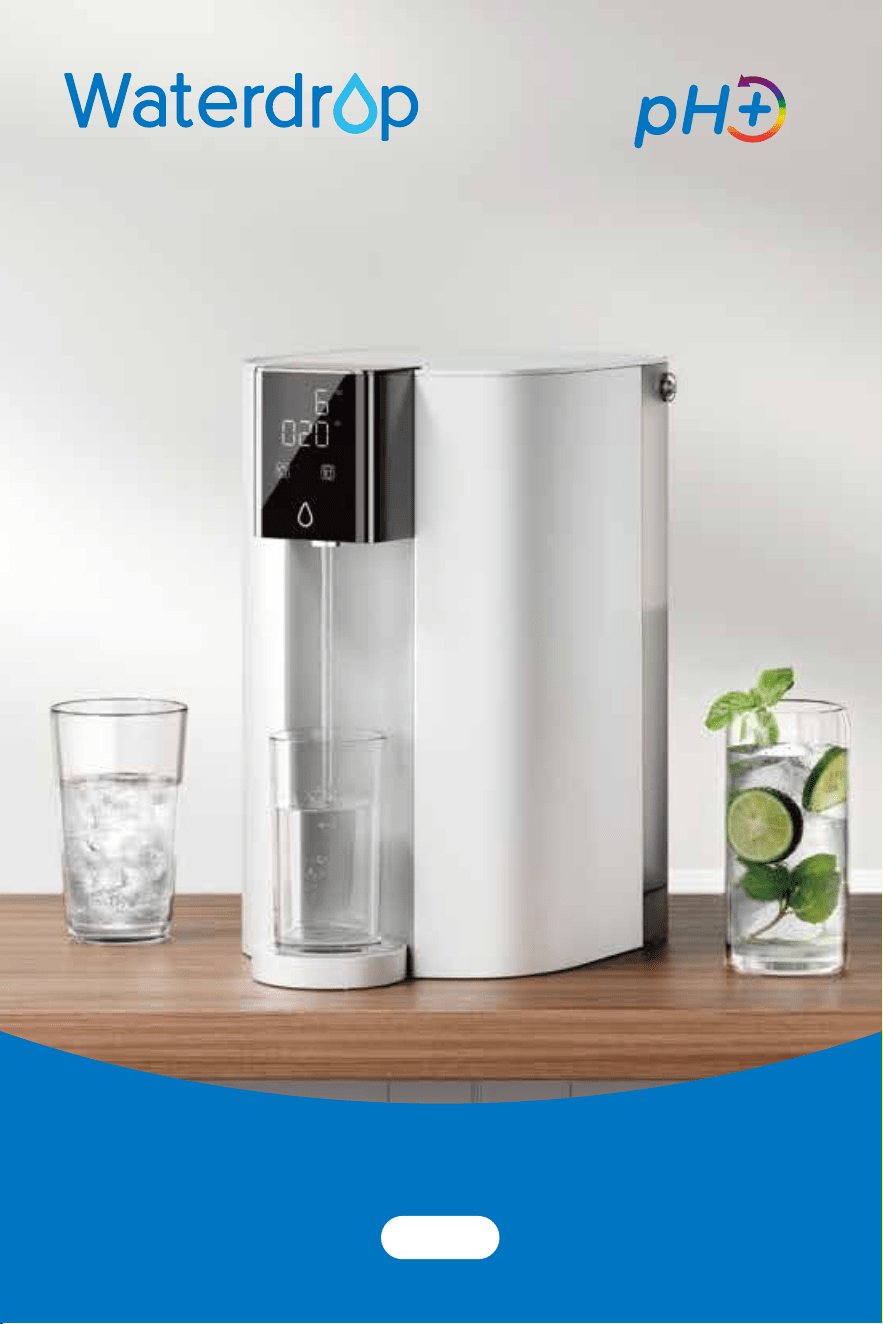
WD-C1SL Countertop Reverse Osmosis
Water Dispenser
Alkaline
Thank you for choosing Waterdrop!
Please if you need ASSISTANCE in operation,
replacement, return or any issues.
Your satisfaction will be guaranteed.
+1-888-352-3558 (U.S.)
IT ES

1. PREPARATION....................................................................................1
1.1 Precautions............................................................................................................................................... 1
1.2 Before Using .......................................................................................................................................... 2
1.3 Unit & Accessories List .................................................................................................................... 2
1.4 Unit Overview....................................................................................................................................... 2
2. INSTALLATION & OPERATION.....................................................4
2.1 Insert the Filter.....................................................................................................................................4
2.2 Flush the Unit ......................................................................................................................................4
2.3 Remove & Install Pure Water Tank.......................................................................................6
3. CONTROL PANEL.............................................................................7
3.1 Panel Operation................................................................................................................................... 7
3.2 Indicator Meanings..........................................................................................................................8
3.3 pH Levels Guide..................................................................................................................................8
4. MAINTENANCE ................................................................................9
4.1 Regular Cleaning ...............................................................................................................................9
4.2 Filter Replacement Cycle .......................................................................................................... 10
4.3 Filter Replacement Steps.......................................................................................................... 10
4.4 Manual Flushing ...............................................................................................................................11
4.5 Automatic Flushing.........................................................................................................................11
5. FAQ......................................................................................................12
6. TROUBLESHOOTING .....................................................................13
6.1 Common Problems & Solutions..............................................................................................13
6.2 Error Codes...........................................................................................................................................13
7. WARRANTY...................................................................................... 14
Contents
1
1. PREPARATION
1.1 Precautions
Note:
All contents in this chapter are safety-related, users MUST comply with it.
All contents in this chapter are only for the correct use of this unit.
the water and power supply quickly.
DO NOT disassemble the unit by yourself to
prevent water leakage and damage to the unit.
Warning
Prohibition
AVOID installing
under direct sunlight,
outdoor locations, or
placing the unit upside
down/diagonally —
keep it level.
DO NOT expose to an
environment below
5°C/41°F.
DO NOT store
near the unit.
0°C
32°F
Attention
DO NOT plug or unplug with wet hands.
AVOID squeezing, folding, knotting or
twisting the power cord to prevent damage.
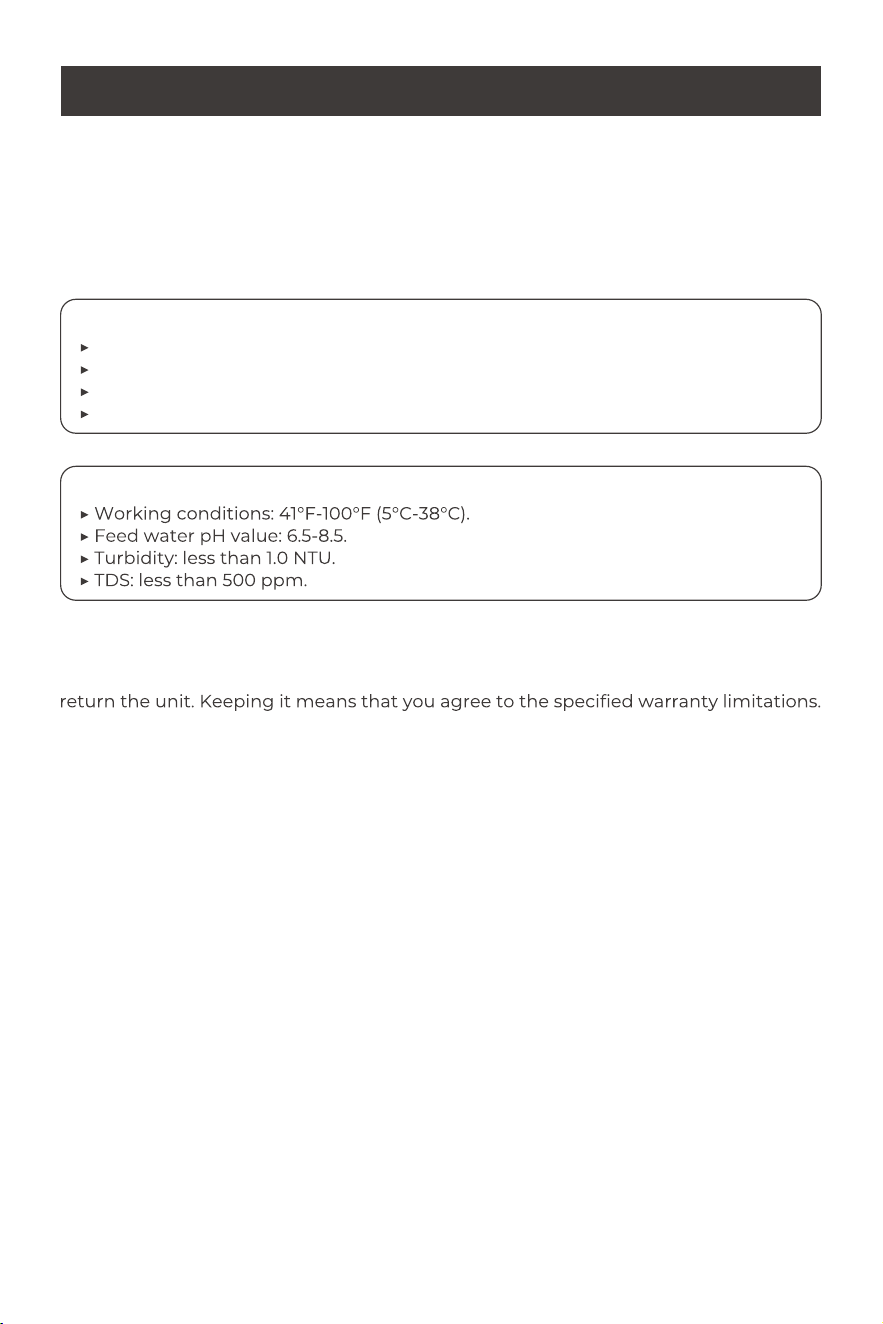
water source is 5°C-38°C/41°F-100°F.
Waterdrop.
Product versions vary by region (differences in screen display and plugs). Please refer
to the actual unit received.
2
1. PREPARATION
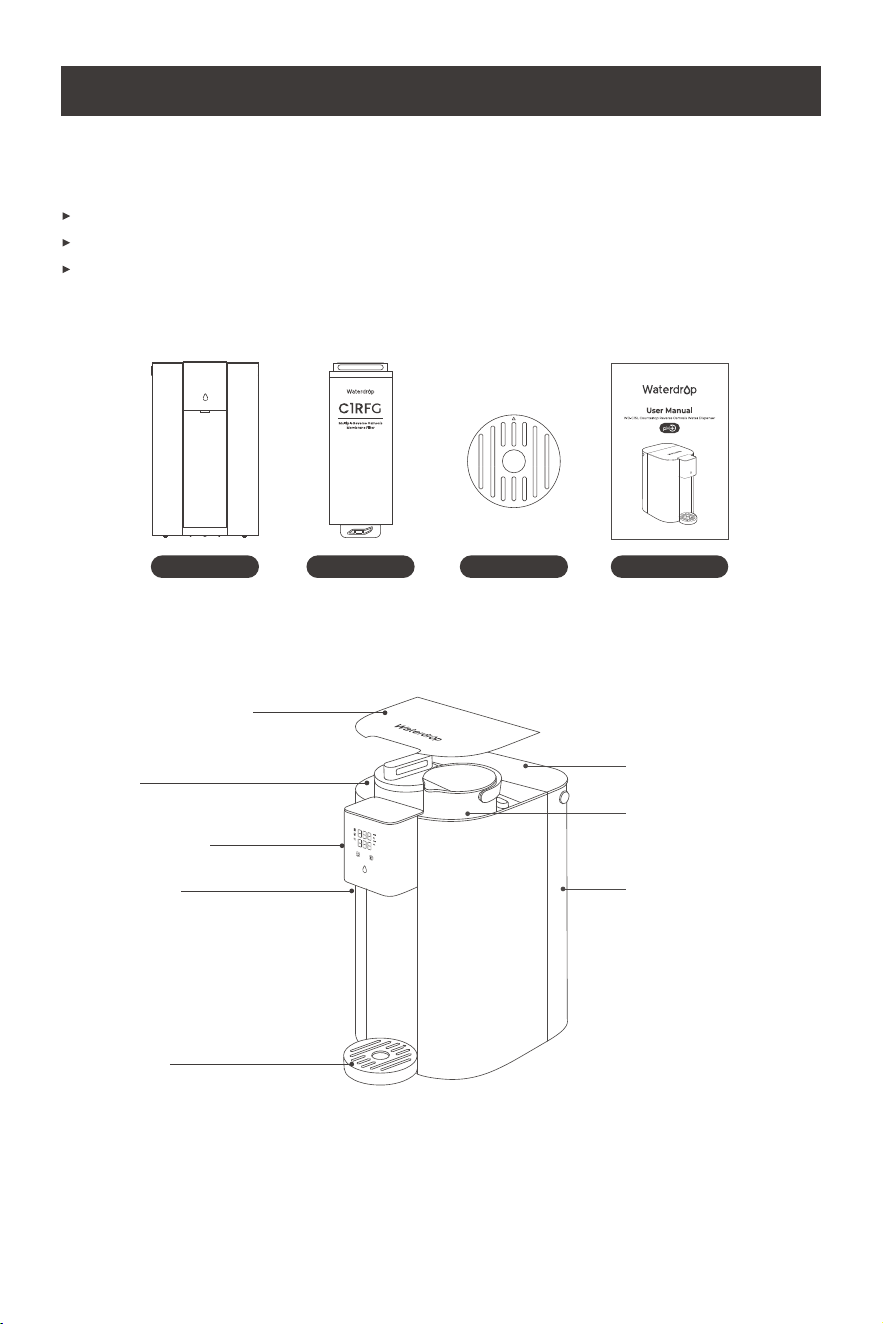
1.3 Unit & Accessories List
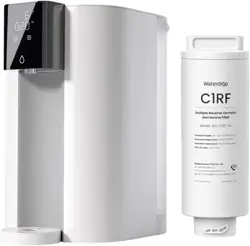
C1SL Unit Drip TrayFilter User Manual
1.2 Before Using
Refer to the user manual, check and ensure all parts are included and undamaged.
If any part is cracked or missing, please contact our customer service.
Connect only to a GFCI-protected circuit.
1.4 Unit Overview
Touch screen
(control panel)
Dispenser top cover
Tank cover
Portable pure water tank
The spout
Drip tray
Filter
Feed water tank
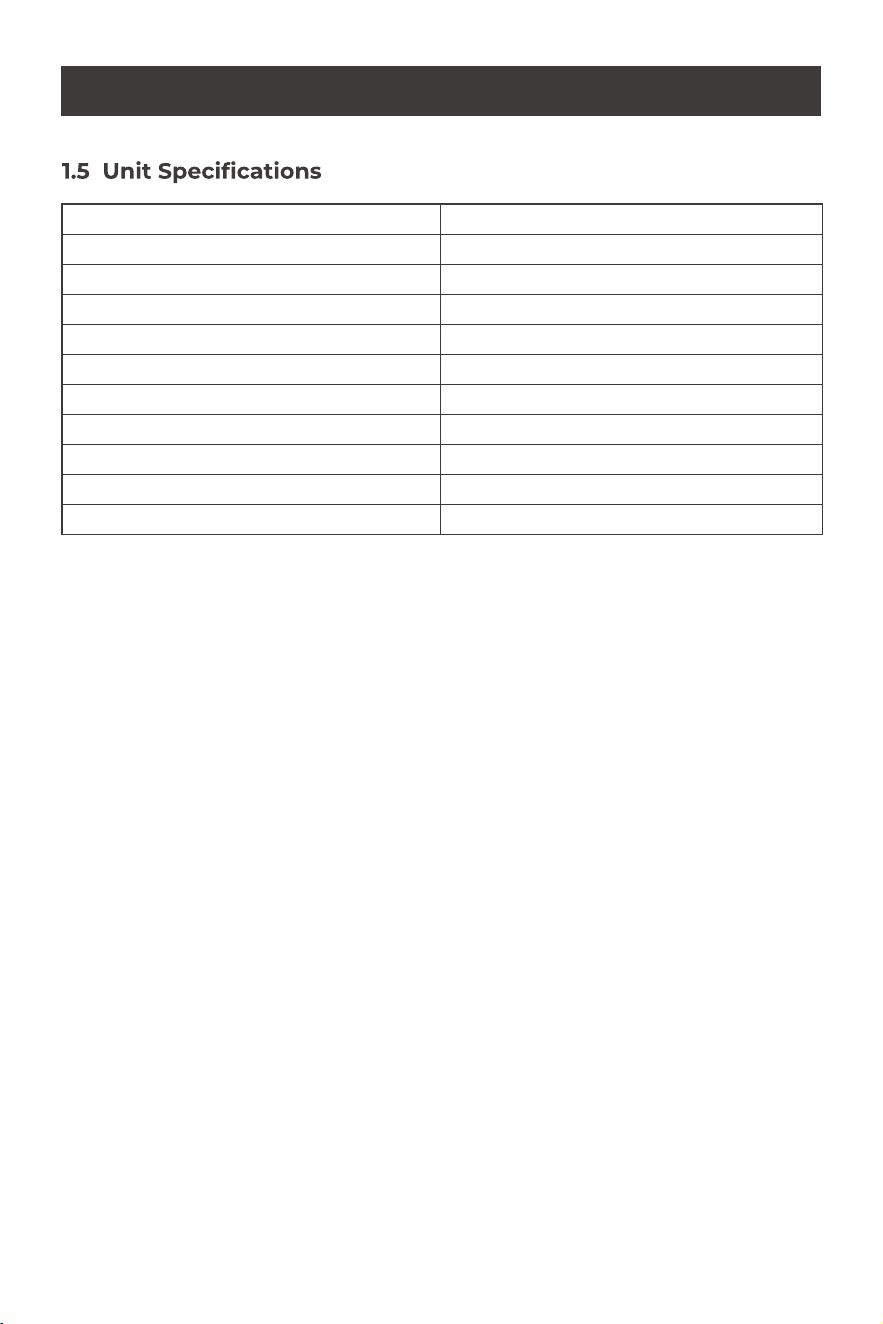
Unit model
WD-C1SL-DE/ WD-C1SL-UK
Dimensions (L
*
W
*
H) 297
*
211
*
348 mm
Feed water tank capacity 0.85G/3.2L
Pure water tank capacity 0.26G/1L
Rated voltage 100-240V~
Rated frequency 50/60Hz
Rated power 50W
Daily production rate
75GPD
Feed water requirement Municipal tap water
Water temperature requirement 5°C-38°C/ 41°F-100°F
TDS requirement for feed water TDS<500
1. PREPARATION
3
2. INSTALLATION & OPERATION
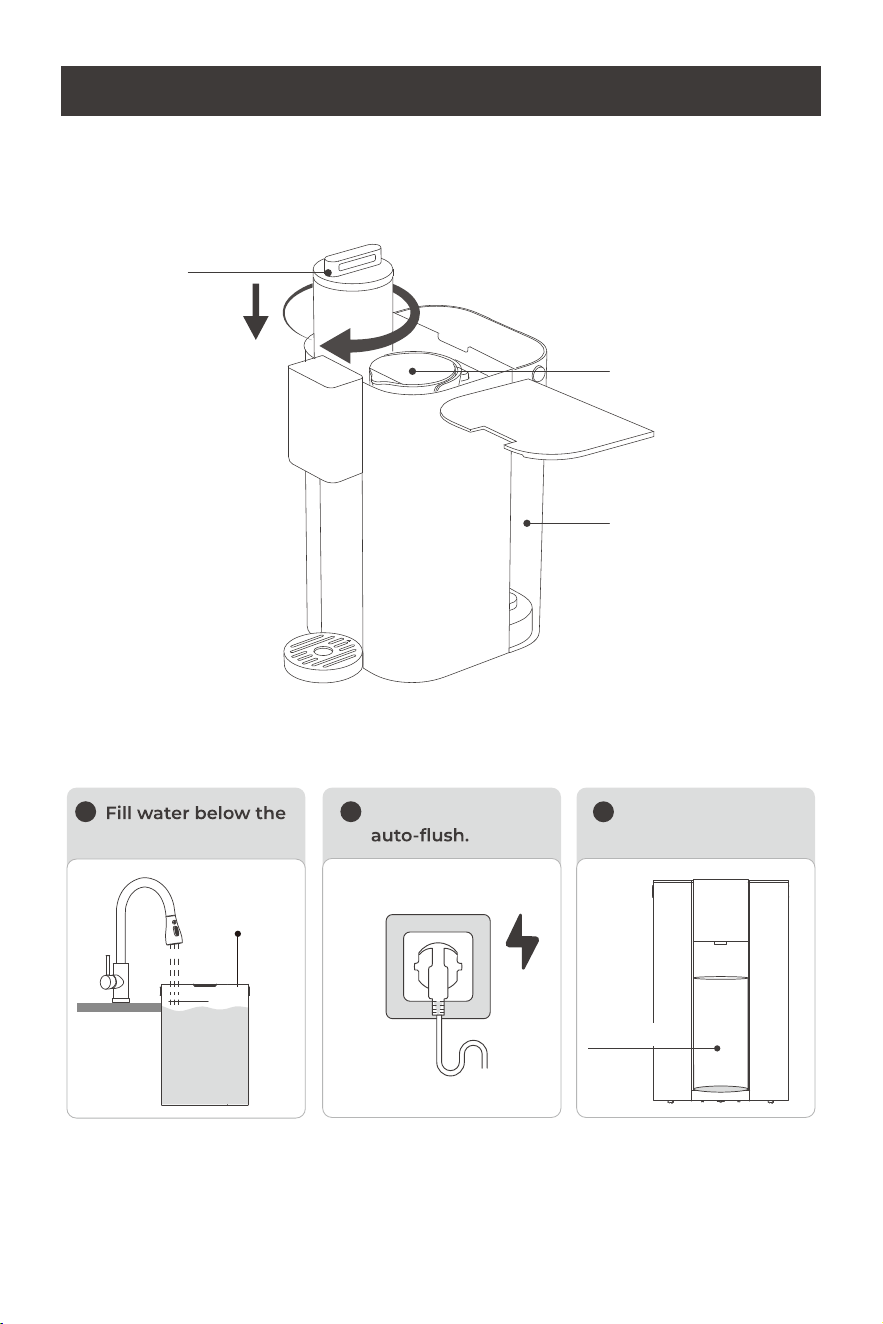
2.1 Insert the Filter
2.2 Flush the Unit
4
Portable
pure water tank
Feed water tank
Filter
Insert and twist
to the right
Connect power to
2
max level.
1
DO NOT exceed
Place a container.
3
MAX
≥1477mL
2. INSTALLATION & OPERATION
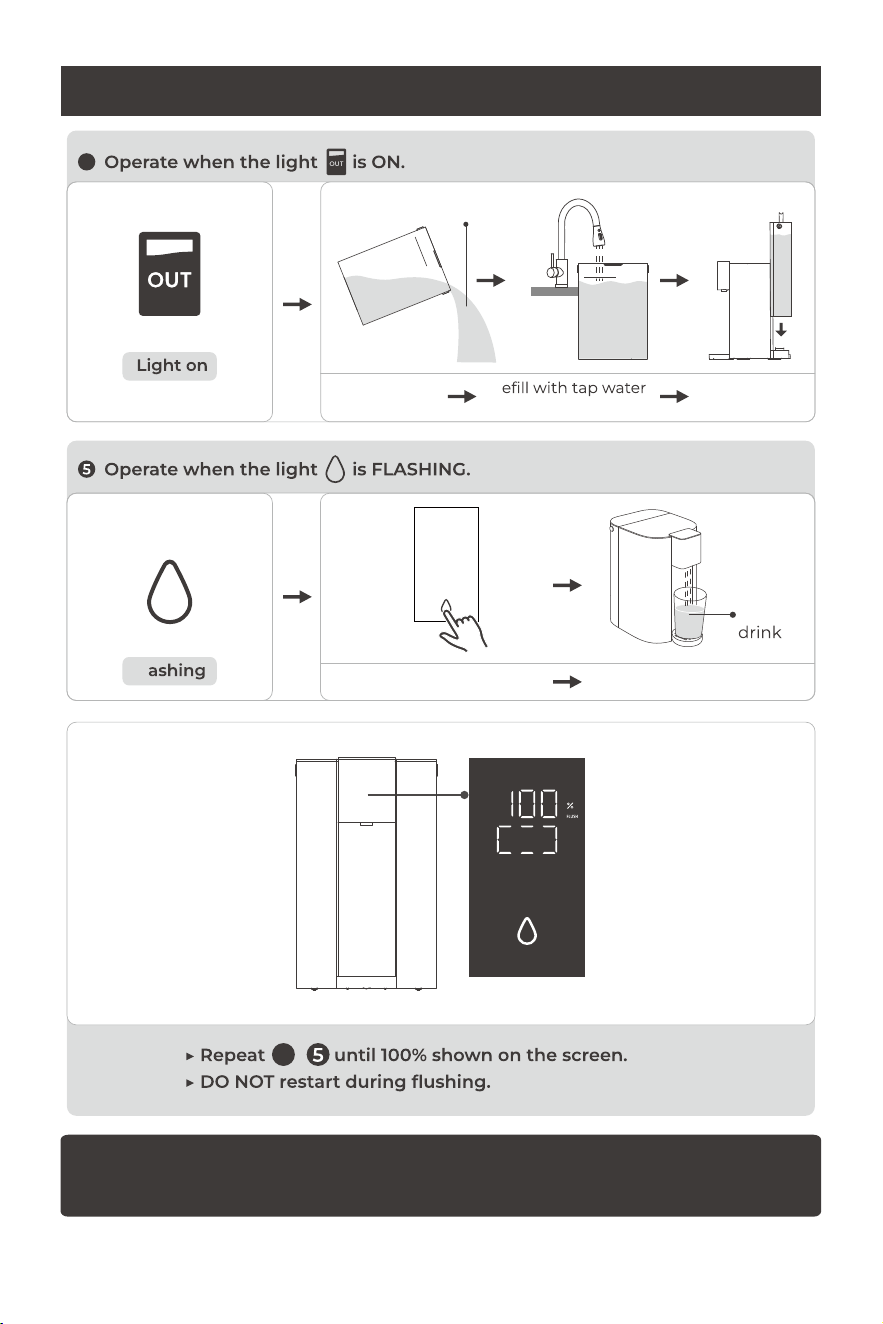
5
4
Tap it Dispense water
Fl
Empty tank
R
approx. to the MAX
Put it back
DO NOT reuse
4
MAX
MAX
DO NOT
Note:
The unit will flush the internal piping with purified water, which takes time.
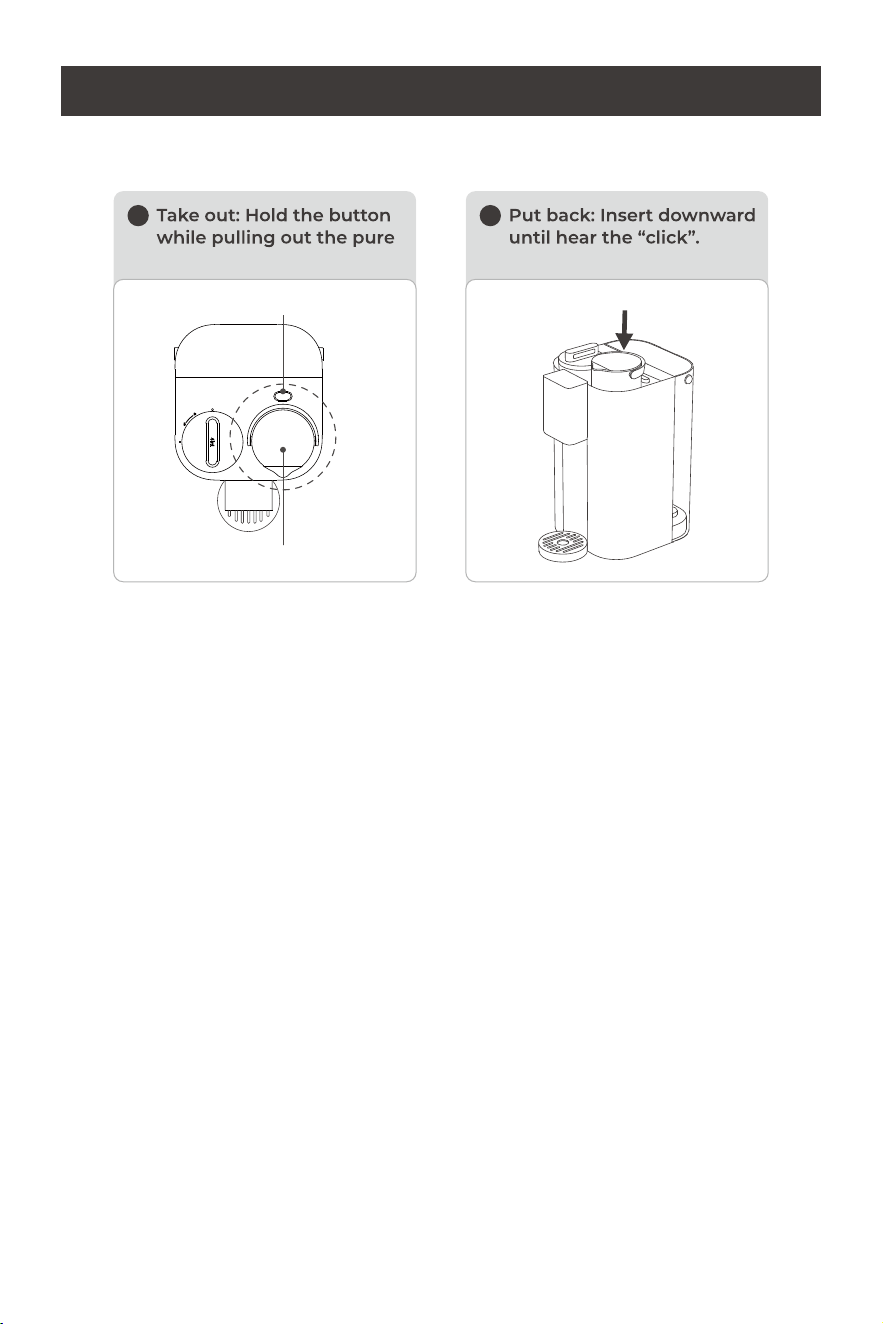
2.3 Remove & Install Pure Water Tank
6
2. INSTALLATION & OPERATION
1
water tank.
2
Hold the button
Pull out the pure water tank
Insert
mL
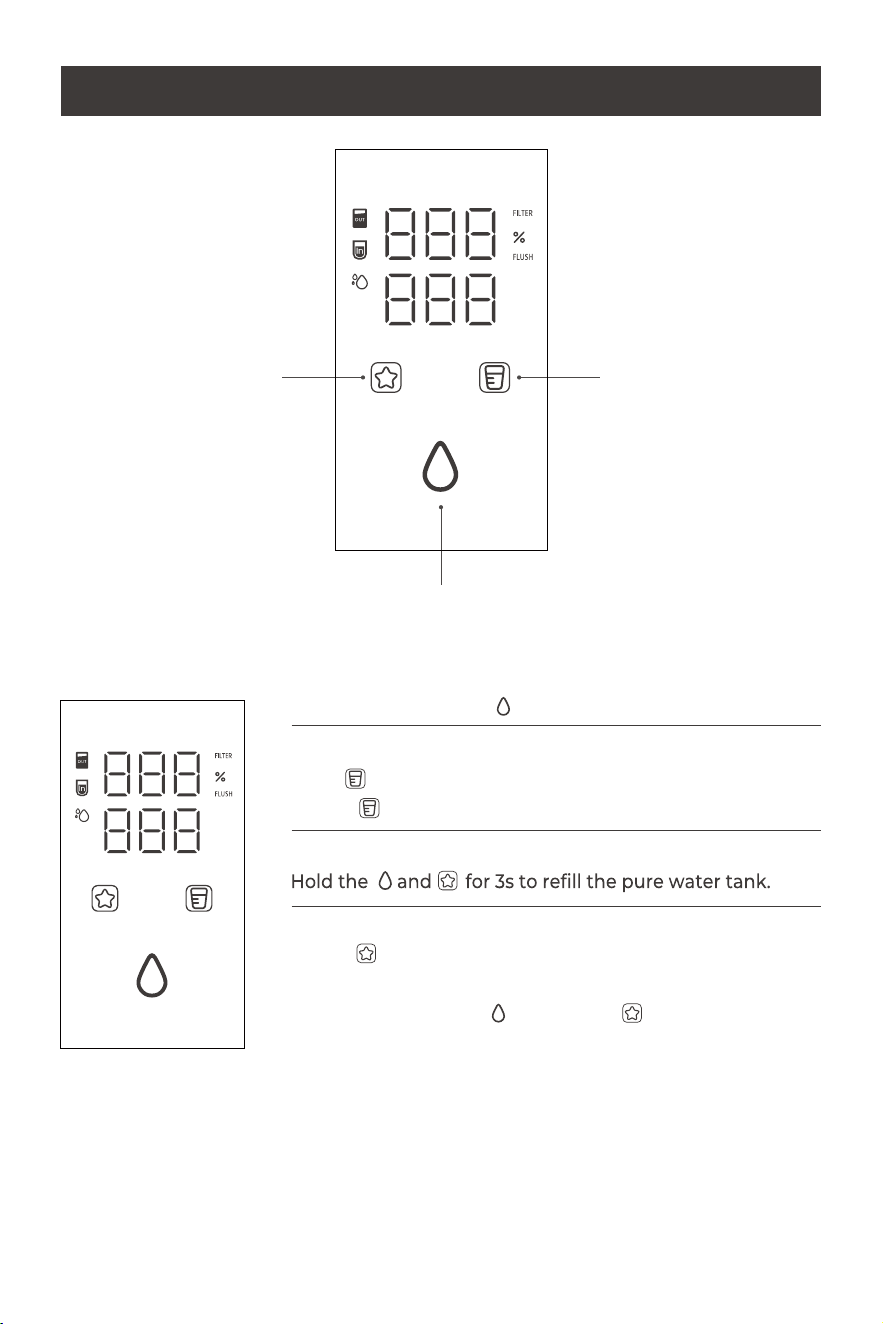
Dispense Water: Tap .
Set Cup Volume:
1. Tap to select
150mL, 250mL, 350mL, 500mL, MAX.
2. Hold for 3s and press to add 50mL each time.
Set Instant Water Filling Mode:
Set Favorite Mode:
1. Hold for 2s.
2. Adjust volume.
3. Exit by tapping the or hold the 2s, or wait for
auto-exit to default.
3.1 Panel Operation
3. CONTROL PANEL
7
Favorite mode key Water volume key
Water dispenser key
mL
* Product versions vary by region (differences in screen display and plugs). Please refer
to the actual unit received.
8
×
Avoid long-term drinking — Acidic water may erode tooth enamel and cause
stomach irritation.
bone health through better mineral absorption.
×
Potentially harmful — May disrupt the body's natural pH balance.
3. CONTROL PANEL
3.3 pH Levels Guide
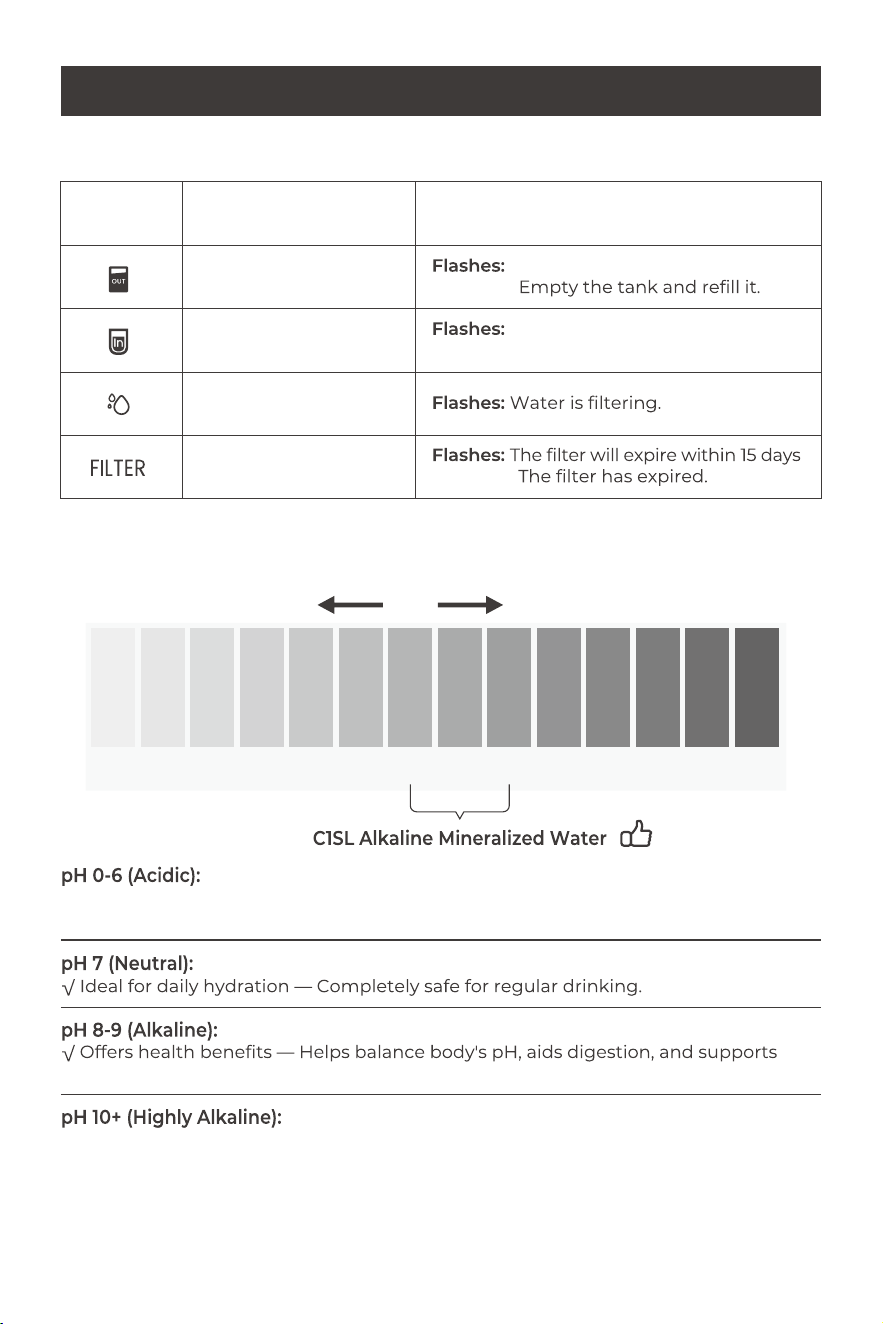
Indicator Meaning Status Explanations
Feed water tank status
Pure water tank status
Filtration Status
Filter Replacement
The tank is not correctly placed.
Stays on:
The tank is not correctly placed.
Stays on: Low water in tank.
.
Stays on:
3.2 Indicator Meanings
1 2 3 4 5 6 7 8 9 10 11 12 13 14
Acidic Alkaline
Note:
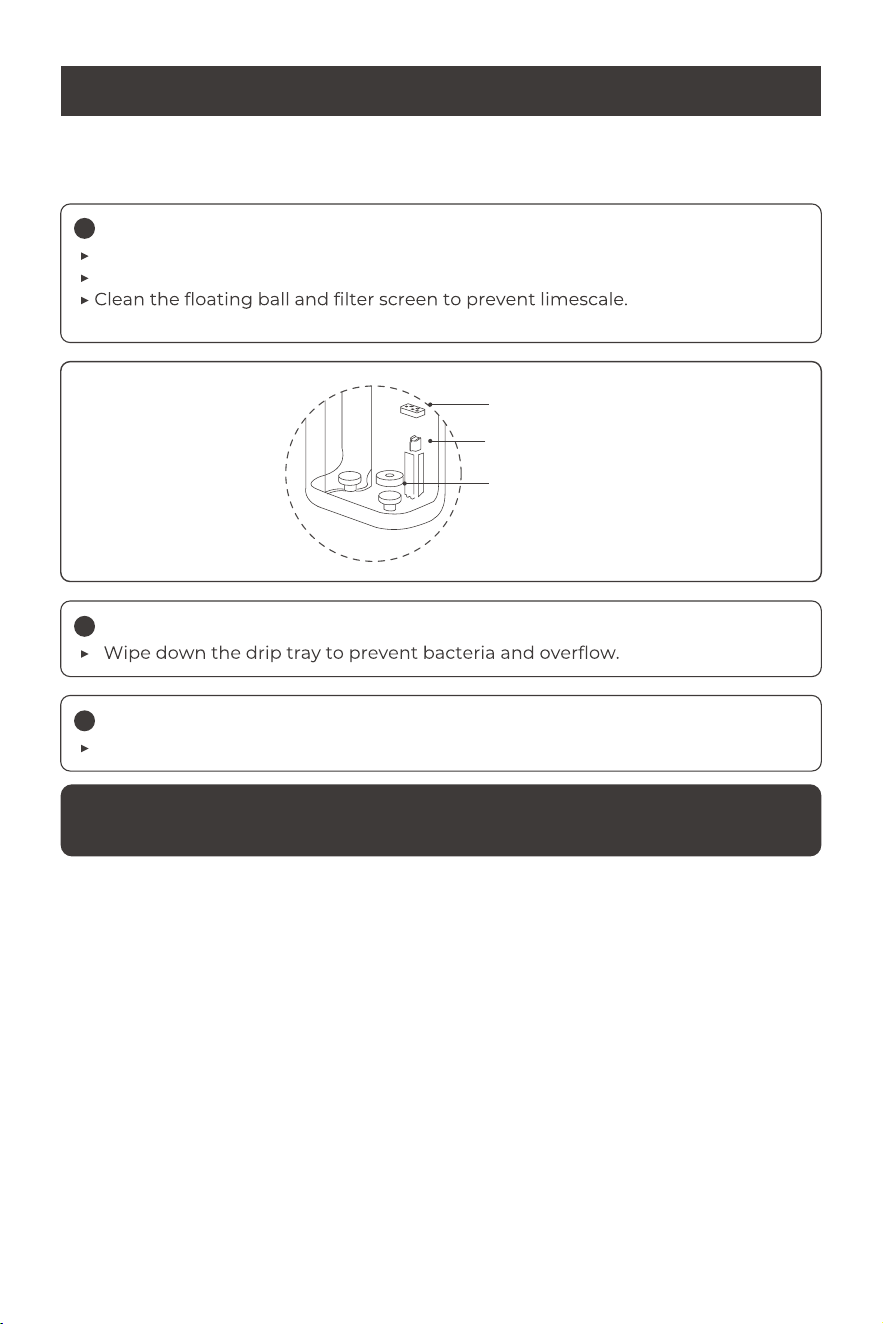
Replace feed and pure water tanks if unused for over 2 days.
During daily water replacements, clean the feed water tank.
*After cleaning, reassemble the parts in place to prevent loss.
Daily Cleaning:
4. MAINTENANCE
9
DO NOT use harsh chemicals (alcohol, gasoline, acetone), steel wool or abrasive
cleaners.
4.1 Regular Cleaning
1
Weekly Cleaning:
2
Soak feed water tank with citric acid (or other descalers) for 30 minutes.
Monthly Deep Cleaning:
3
Filter screen
Silicone cover
Floating ball
4. MAINTENANCE
10
Replacement Filter Model Replacement Cycle
WD-C1RFG Every 12 months
4.2 Filter Replacement Cycle
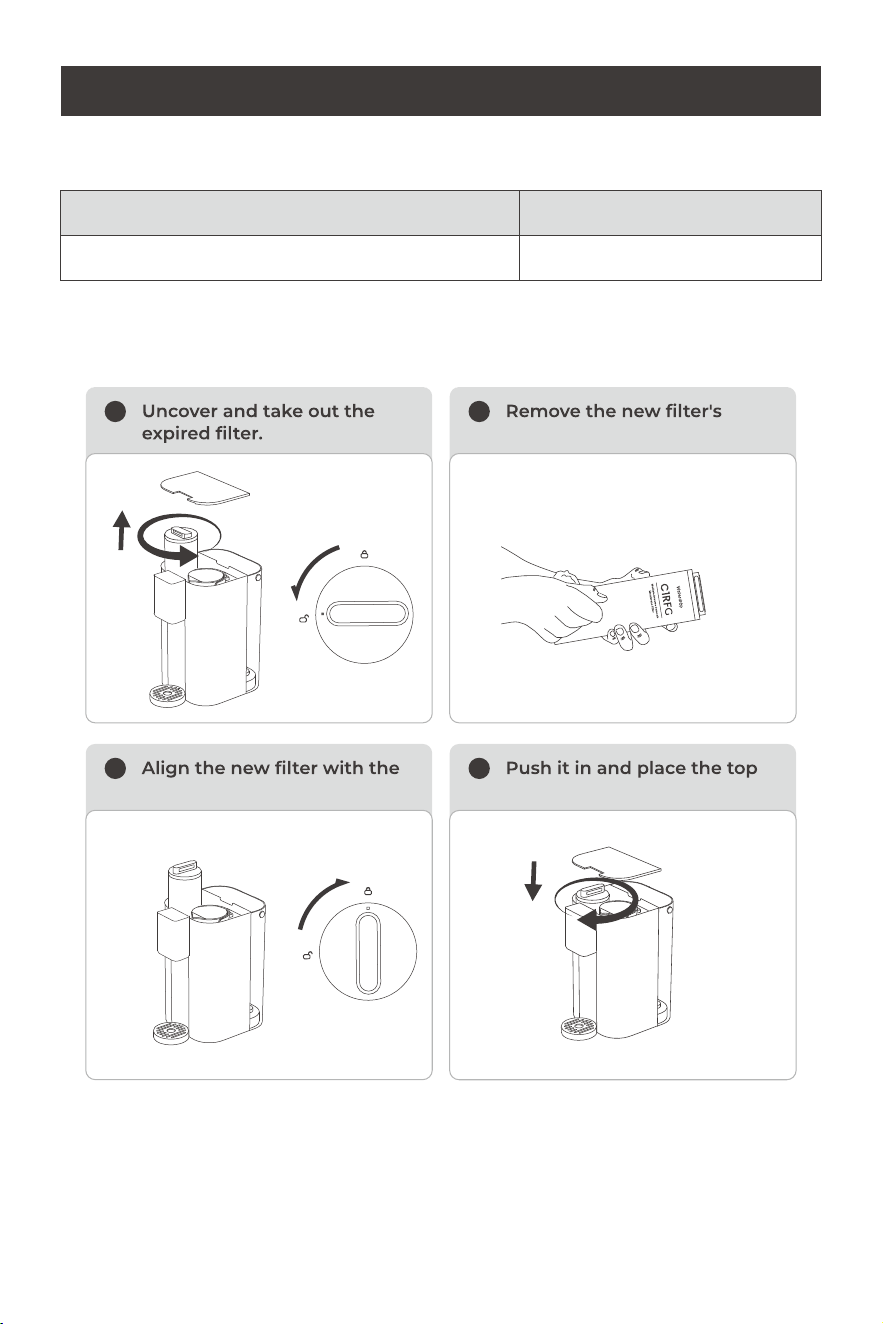
4.3 Filter Replacement Steps
1 2
wrapping.
RO FILTER
3
marker.
4
cover plate back.
11
Note:
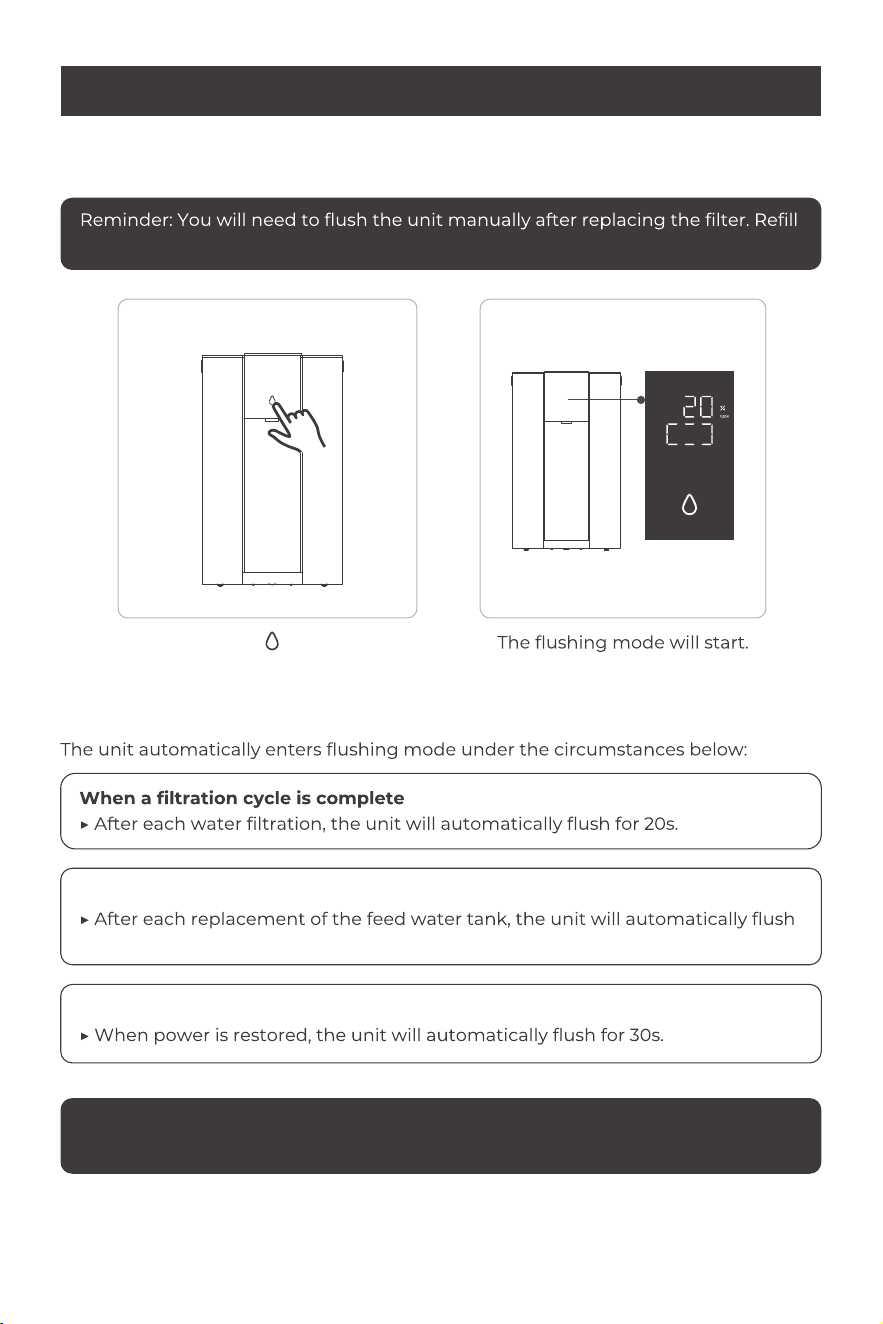
Flushing will not occur if water is being dispensed or the water tank is not in place.
4.5 Automatic Flushing
Press and hold for 5s to reset.
Refer to page 5 for details.
for 30s.
When the feed water tank is replaced
When power is restored
4. MAINTENANCE
the feed tank with tap water approx. to the MAX level.
4.4 Manual Flushing
All units go through a water-related test before leaving the factory. Having residual
water is normal.
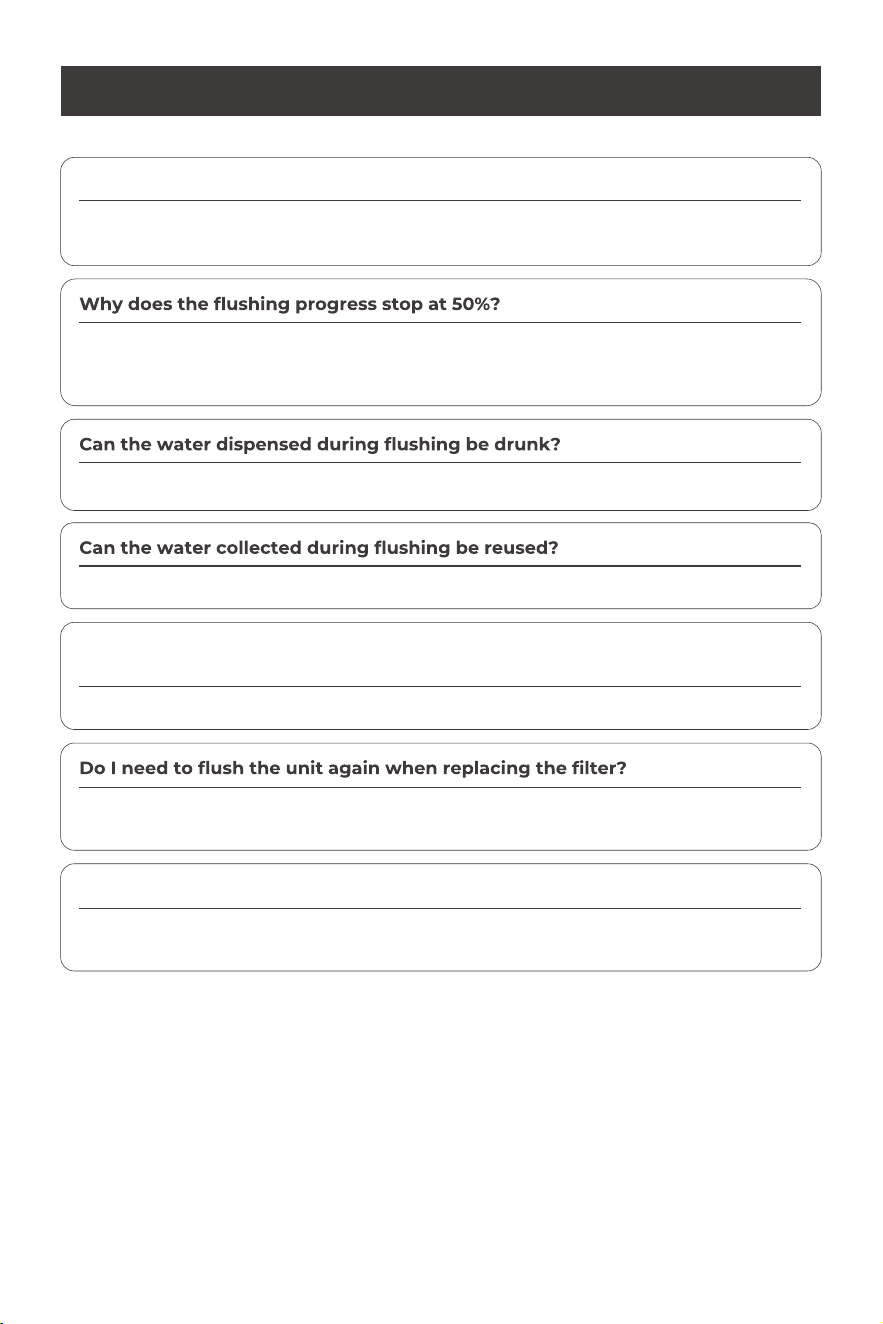
Why does the new unit have water droplets after unboxing?
During flushing, filtered pure water is undrinkable. Please wait till flushing ends.
No. Please refill the feed water tank with fresh tap water for flushing.
No. Please empty the remaining water and refill it with fresh tap water.
When the unit prompts to add water, can I keep the remaining water in
the tank?
Yes. Flush the unit to keep water fresh. Refer to the user manual (page 5) for
details.
Components like pumps in the unit may have deviations. A ±10% deviation is
normal.
Why is the water output different from the set amount?
At 50% progress, empty any remaining water in the feed water tank and refill with
fresh tap water. The unit will use purified water to flush the internal piping, which
takes time.
5. FAQ
12
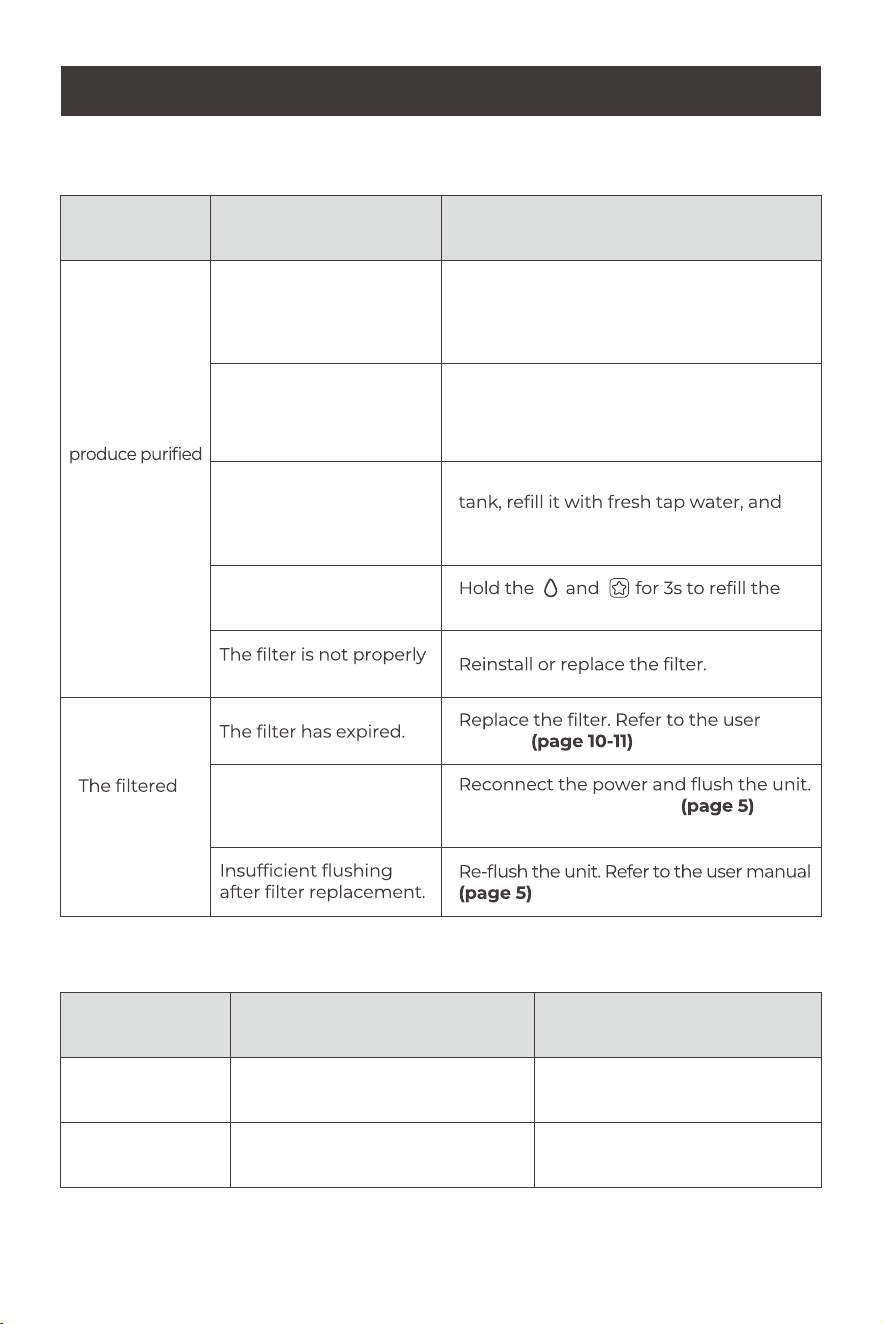
6.1 Common Problems & Solutions
SolutionPossible Reason
Problem
Description
The unit cannot
water.
The plug is not properly
connected to the power
source.
Check the power connection and make
sure the plug is securely inserted into
the socket.
Ensure both the feed water tank and
the pure water pitcher are properly
positioned.
pure water tank.
manual for details.
Refer to the user manual for
details.
for details.
Pour out any remaining water in the
make sure it DOES NOT exceed the
maximum water level.
The feed water tank or
pure water pitcher is
not in place.
The water level in the
feed water tank is below
the minimum line.
Low water in pure water
tank.
installed or has expired.
Unit is not used for a
long time.
water tastes
bad.
6.2 Error Codes
Code on
Display
Reason
E04
Solution
E11
Please CALL +1-888-352-3558
(U.S.)
The communication on the main
control panel is abnormal.
6. TROUBLESHOOTING
13
The unit or filter may be blocked.
Use the included descaling
agents to clean your unit.
14
Warranty Duration: 1 year from the original purchase date.
Coverage: Defects in materials and workmanship under normal use.
Warranty Measures: Repair or replacement of defective parts, or refund (minus
shipping costs).
7. WARRANTY
Tampering, alteration, improper use, or lack of maintenance.
Filters that need regular replacement due to usage.
Unit is bought from unauthorized sellers.
Damage in transit is not covered; claims should be made with the carrier.
Exclusions:
Warranty Conditions:
Note:
If your state DOES NOT permit restrictions on warranty terms, you have the option to

Double insulation equipment Description: This equipment meets the double
insulation standard (Class II) and does not need to be grounded. Do not use a ground
plug or connect the device to a ground power supply.
Electrical Safety Warning: This device has been designed as a double insulated
device to provide safe use. Do not attempt to disassemble or modify the device.
Otherwise, the insulation layer may be damaged and security risks may arise.
Maintenance warning: The insulation layer of the equipment should not be removed
or damaged at will. In case of equipment failure, seek professionally certified repair
services.
Warning:
• This appliance can be used by children aged from 8 years and above and persons with
reduced physical, sensory or mental capabilities or lack of experience and knowledge if they
have been given supervision or instruction concerning use of the appliance in a safe way and
understand the hazards involved.
• Children shall not play with the appliance.
• Cleaning and user maintenance shall not be made by children without supervision.
• The appliance is only to be used with the unit provided.
• If the supply cord is damaged, it must be replaced by the manufacturer or its service agent or
a similarly qualified person in order to avoid a hazard.