9 Cup Food Processor
5KFP0921A
W11517032B.indd 1W11517032B.indd 1 7/9/2021 11:44:27 AM7/9/2021 11:44:27 AM
21-Jul-2021 08:02:07 EDT | RELEASED
In some European factories the letter "W" of the part code mentioned herein will be automatically
replaced by the number "4000" (e.g. "W12345678" becomes "400012345678")
2
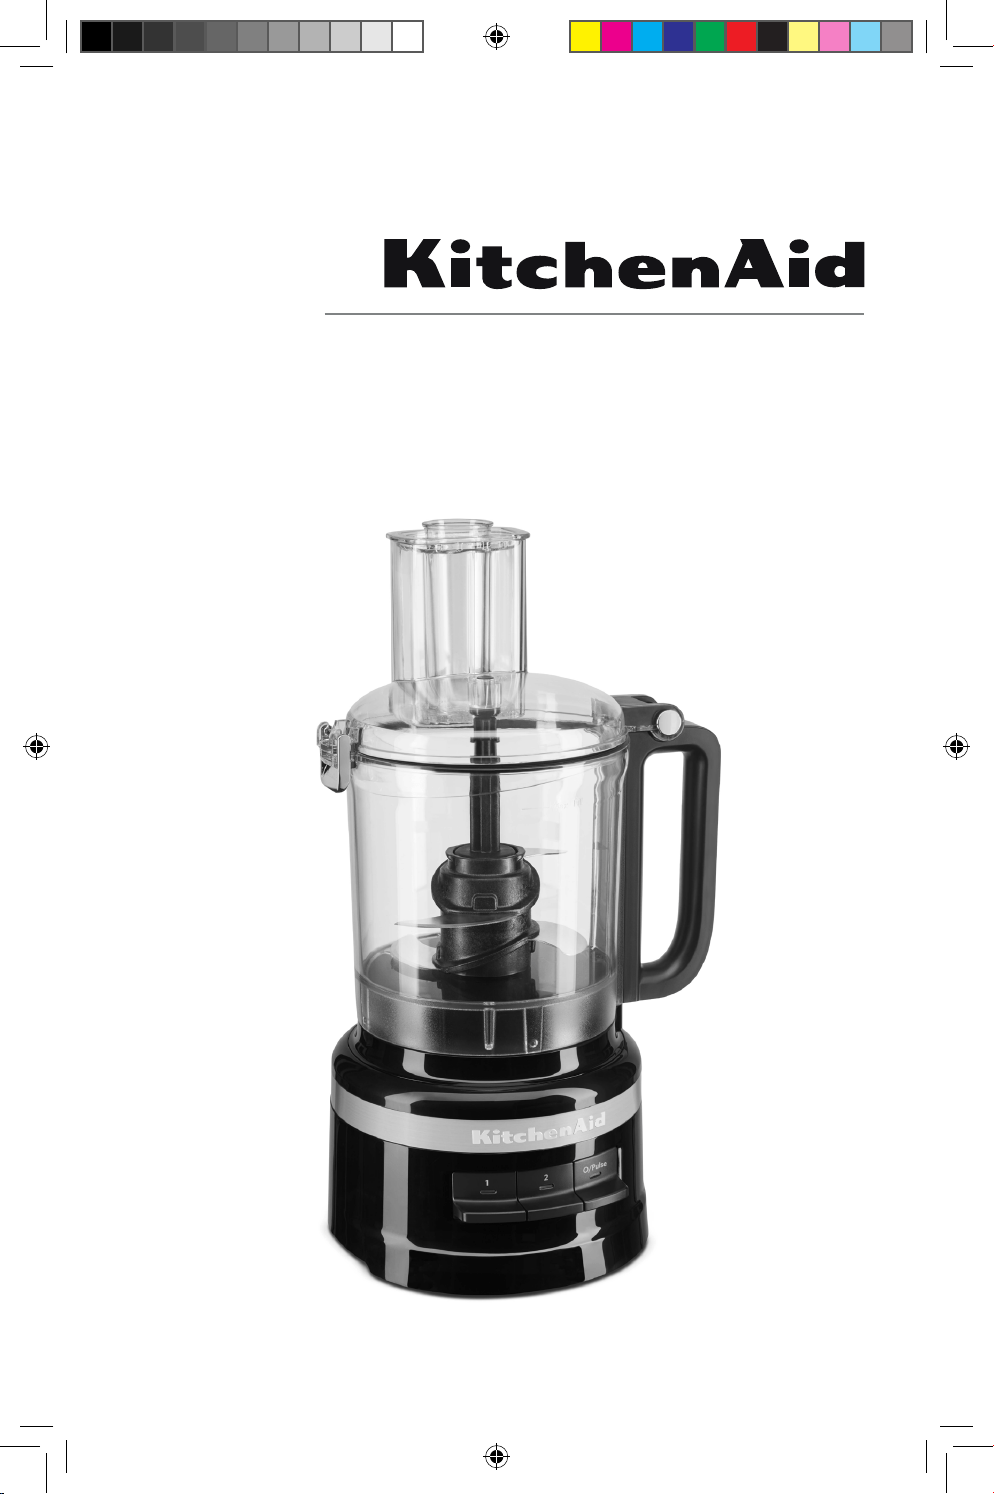
PARTS AND FEATURES
1 Heavy-Duty Base
2 Power Cord and Cord Storage
(not shown)
3 Drive Pin
4 9-Cup (2.1 L) Work Bowl
5 Handle Hinge
6 Lid Hinge
7 Work Bowl Cover with 2-in-1 Feed
Tube
8 Lid Latch
9 2-Piece Food Pusher
10 Refrigerator Lid
11 Reversible Slice/Shredding Disk
12 Whisking Accessory
13 Dough Blade
14 Multi-Purpose Four Blade
15 Drive Adapter
1
4
7
3
10
9
6
5
8
2
11
12
13
14
15
W11517032B.indd 2W11517032B.indd 2 7/9/2021 11:44:28 AM7/9/2021 11:44:28 AM
21-Jul-2021 08:02:07 EDT | RELEASED
In some European factories the letter "W" of the part code mentioned herein will be automatically
replaced by the number "4000" (e.g. "W12345678" becomes "400012345678")
ENGLISH
3
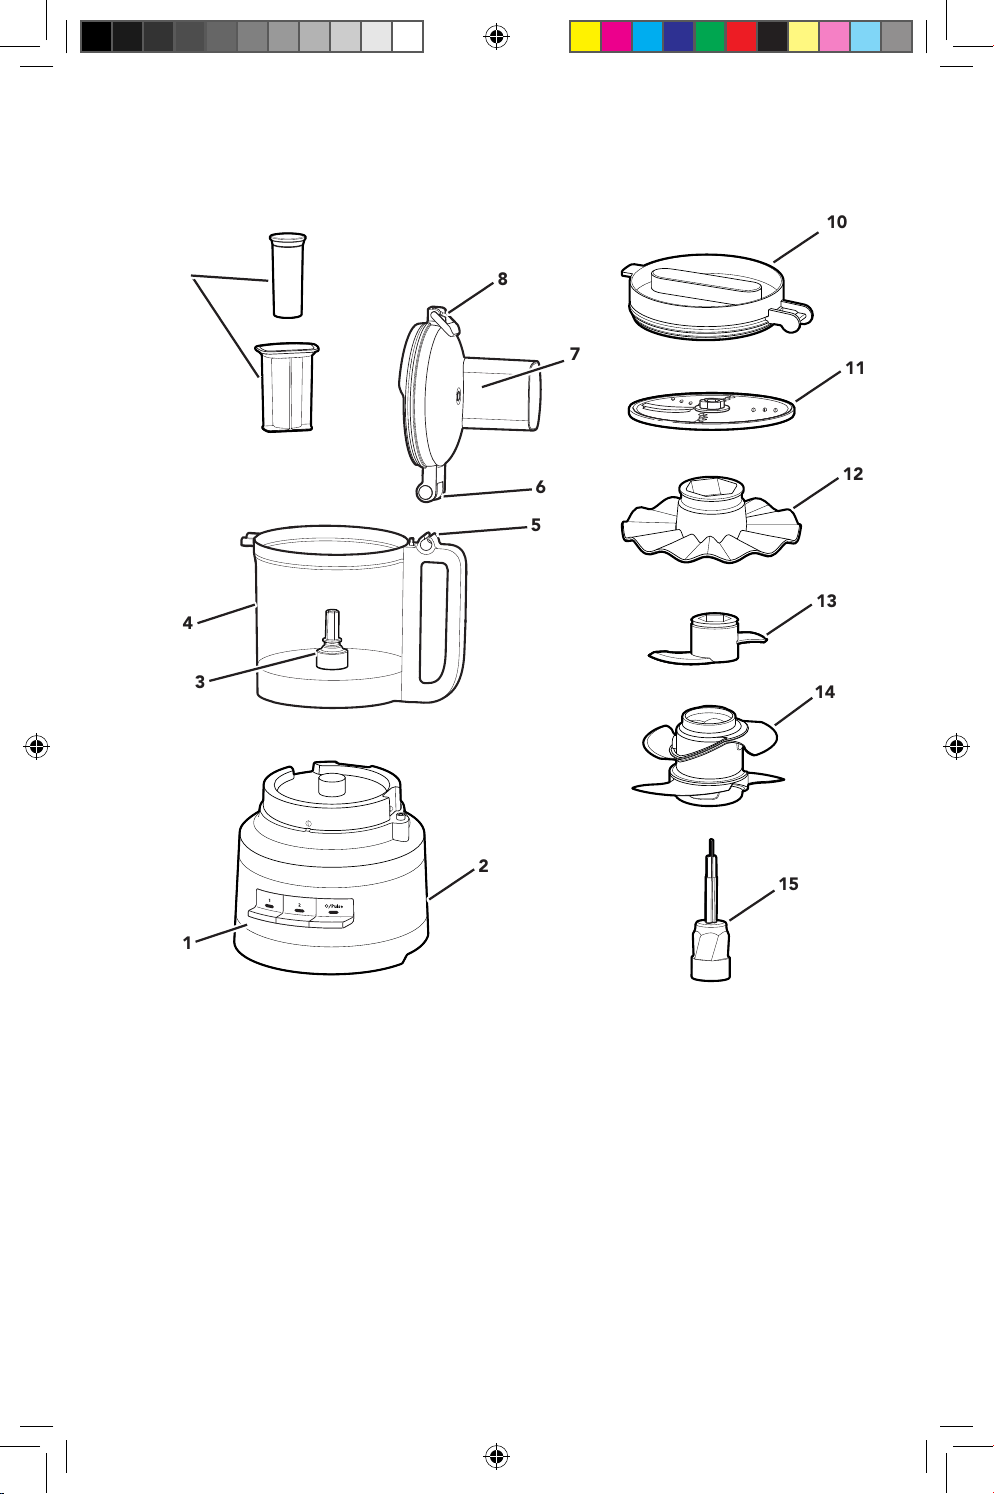
IMPORTANT SAFEGUARDS
When using electrical appliances, basic safety precautions should always
be followed, including the following:
1. Read all instructions. Misuse of appliance may result in personal injury.
2. To protect against risk of electrical shock, do not put Food Processor in water
or other liquid.
3. This appliance is not intended for use by persons (including children) with
reduced physical, sensory or mental capabilities, or lack of experience and
knowledge, unless they are closely supervised and instructed concerning use
of the appliance by a person responsible for their safety. Close supervision is
necessary when any appliance is used by or near children. Children should be
supervised to ensure that they do not play with appliance.
4. Turn the appliance OFF, then unplug from the outlet when not in use, before
assembling or disassembling parts and before cleaning. To unplug, grasp the
plug and pull from the outlet. Never pull from the Power Cord.
5. Avoid contacting moving parts.
6. Do not operate any appliance with a damaged cord or plug, or after the
appliance malfunctions, or is dropped or damaged in any manner. Return
appliance to the nearest Authorised Service Facility for examination, repair, or
electrical or mechanical adjustment.
7. The use of attachments not recommended or sold by KitchenAid may cause
re, electric shock, or injury.
8. Do not use outdoors.
9. Do not let cord hang over edge of table or counter.
10. Keep hands and utensils away from moving Blades or Discs while processing
food to reduce the risk of severe injury to persons or damage to the Food
Processor. A scraper may be used but must be used only when the Food
Processor is not running.
PRODUCT SAFETY
W11517032B.indd 3W11517032B.indd 3 7/9/2021 11:44:28 AM7/9/2021 11:44:28 AM
21-Jul-2021 08:02:07 EDT | RELEASED
In some European factories the letter "W" of the part code mentioned herein will be automatically
replaced by the number "4000" (e.g. "W12345678" becomes "400012345678")

4
11. Blades are sharp. Care should be taken when handling the sharp cutting
blades, emptying the bowl and during cleaning.
12. If the supply cord is damaged, it must be replaced by the manufacturer, its
service agent or similarly qualied persons in order to avoid hazard.
13. To reduce the risk of injury, never place cutting Blade or Discs on Base without
rst putting Bowl properly in place.
14. Never leave the appliance unattended while it is in operation.
15. Be certain Cover is securely locked in place before operating Food Processor.
16. Never feed food by hand. Always use Food Pusher.
17. Do not attempt to defeat the Cover interlock mechanism.
18. Do not ll the Bowl above the marked maximum ll line (or rated capacity) to
avoid risk of injury due to damage to the Cover or Bowl.
19. Refer to the “Care and Cleaning” section for instructions on cleaning the
surfaces in contact with food.
20. Be careful if hot liquid is poured into the food processor as it can be ejected
out of the appliance due to sudden steaming.
21. This appliance is intended to be used in household and similar applications
such as:
- staff kitchen areas in shops, ofces and other working environments;
- farm houses;
- by clients in hotels, motels and other residential type environments;
- bed and breakfast type environments;
SAVE THESE INSTRUCTIONS
PRODUCT SAFETY
ELECTRICAL REQUIREMENTS
Voltage: 220-240 V
Frequency: 50-60 HZ
Wattage: 250 W
NOTE: If the plug does not fit in the
outlet, contact a qualified electrician.
Do not modify the plug in any way.
Instructions are also available online, visit our website at:
www.KitchenAid.com.au or www.KitchenAid.co.nz
W11517032B.indd 4W11517032B.indd 4 7/9/2021 11:44:28 AM7/9/2021 11:44:28 AM
21-Jul-2021 08:02:07 EDT | RELEASED
In some European factories the letter "W" of the part code mentioned herein will be automatically
replaced by the number "4000" (e.g. "W12345678" becomes "400012345678")
ENGLISH
5
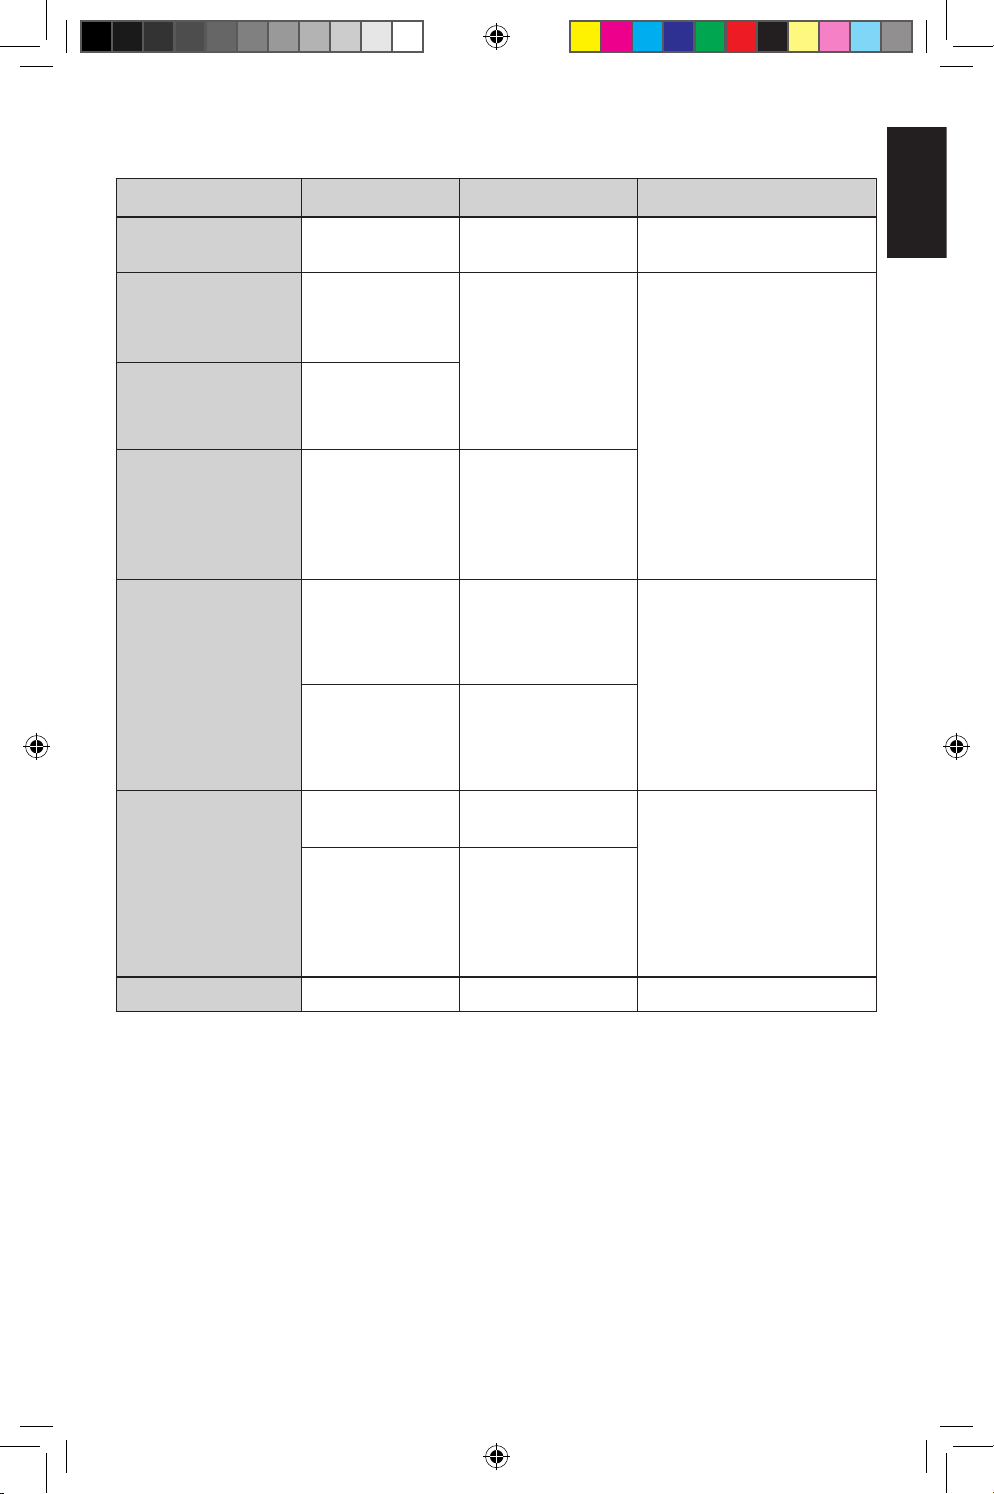
ACCESSORIES SELECTION GUIDE
Action Setting Food Accessory
Whisking/
Whipping
1 or 2 Cream, Eggs Whisk Accessory
Chop
1 or O/Pulse
Cheese
Chocolate
Fruits
Fresh herbs
Nuts
Tofu
Vegetables
Multi-Purpose Four Blade
Mince or Purée
2 or O/Pulse
Mix
1
Pasta Sauce
Pesto
Salsa
Sauces
Batters
Slice
1
Fruit (soft)
Potatoes
Tomatoes
Vegetables (soft)
Reversible Slicing/
Shredding Disc
(slicing side)
2
Cheese
Chocolate
Fruit (hard)
Vegetables (hard)
Shred
(Medium)
1
Potatoes
Vegetables (soft)
Reversible Slicing/
Shredding Disc
(shredding side)
2
Cabbage
Cheese
Chocolate
Fruits (hard)
Vegetables (hard)
Knead
O/Pulse / 2
Yeast Dough
Dough Blade
W11517032B.indd 5W11517032B.indd 5 7/9/2021 11:44:28 AM7/9/2021 11:44:28 AM
21-Jul-2021 08:02:07 EDT | RELEASED
In some European factories the letter "W" of the part code mentioned herein will be automatically
replaced by the number "4000" (e.g. "W12345678" becomes "400012345678")
6
Before first use
Before using your Food Processor for the first time, wash all parts and accessories either
by hand or in the dishwasher (see “Care and Cleaning” section).
NOTE: Your Food Processor is designed so that all accessories may be stored inside the
Work Bowl.
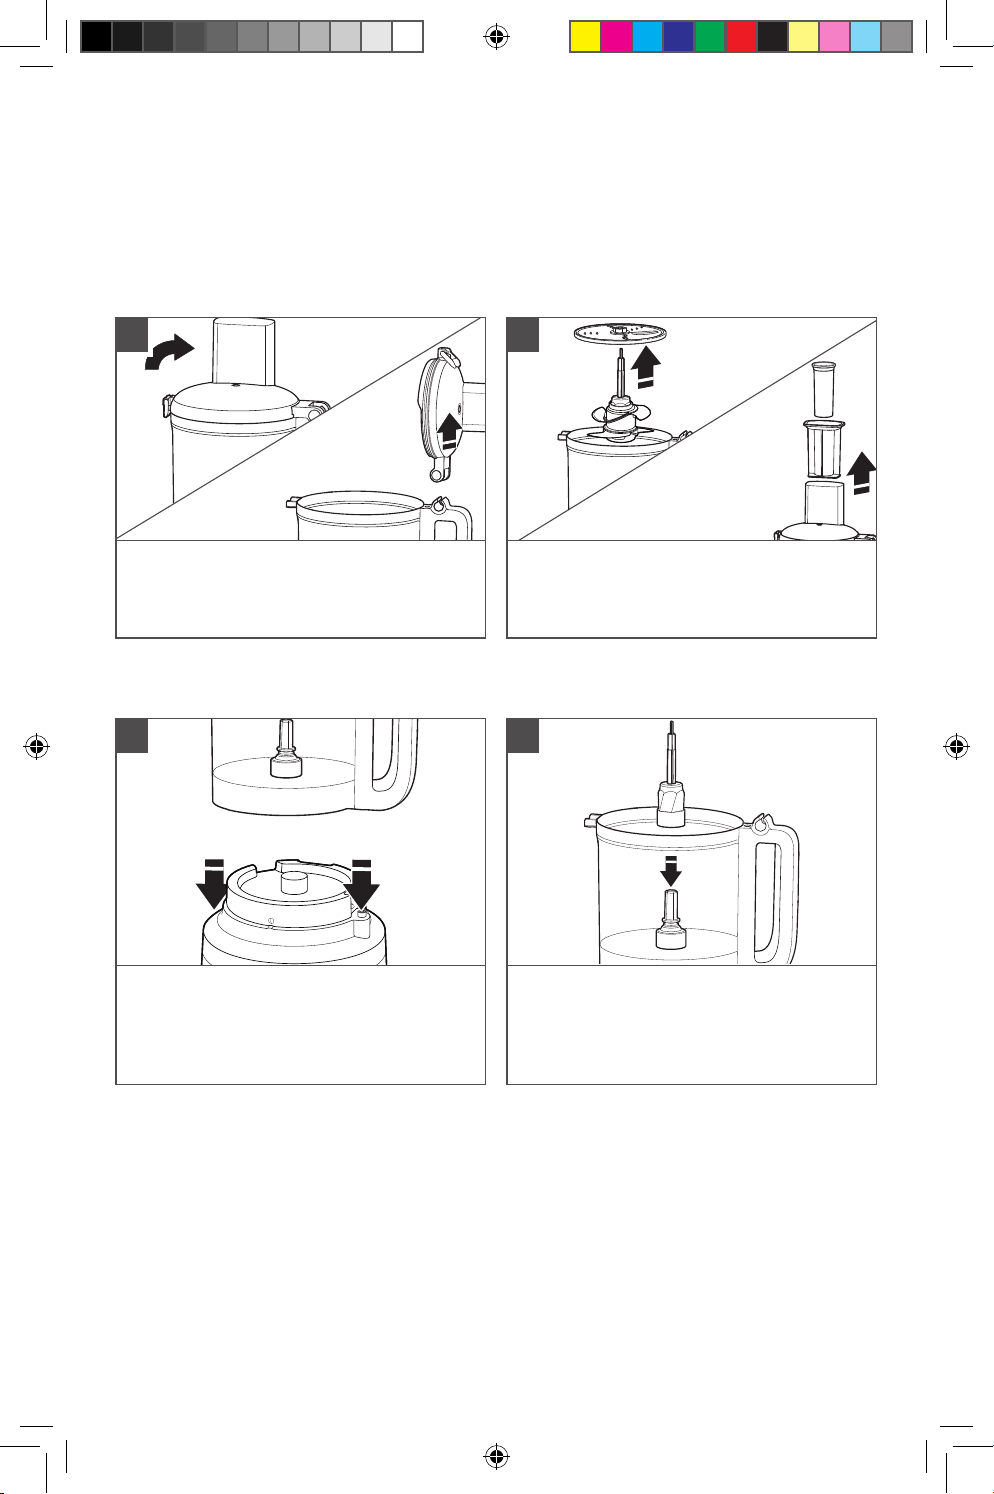
Lift up the Lid Latch to unlock the Cover.
Tilt the Work Bowl Cover back and lift it
straight up so that the Lid Hinge pulls out
of the Handle Hinge.
Remove all parts and accessories from
the Work Bowl, and lift the Food Pusher
out of the Feed Tube.
Place the Work Bowl on the Base, aligning
the Handle with the raised button on the
right side of the Base. The Bowl will click
into place and should be flush against the
Base when properly aligned.
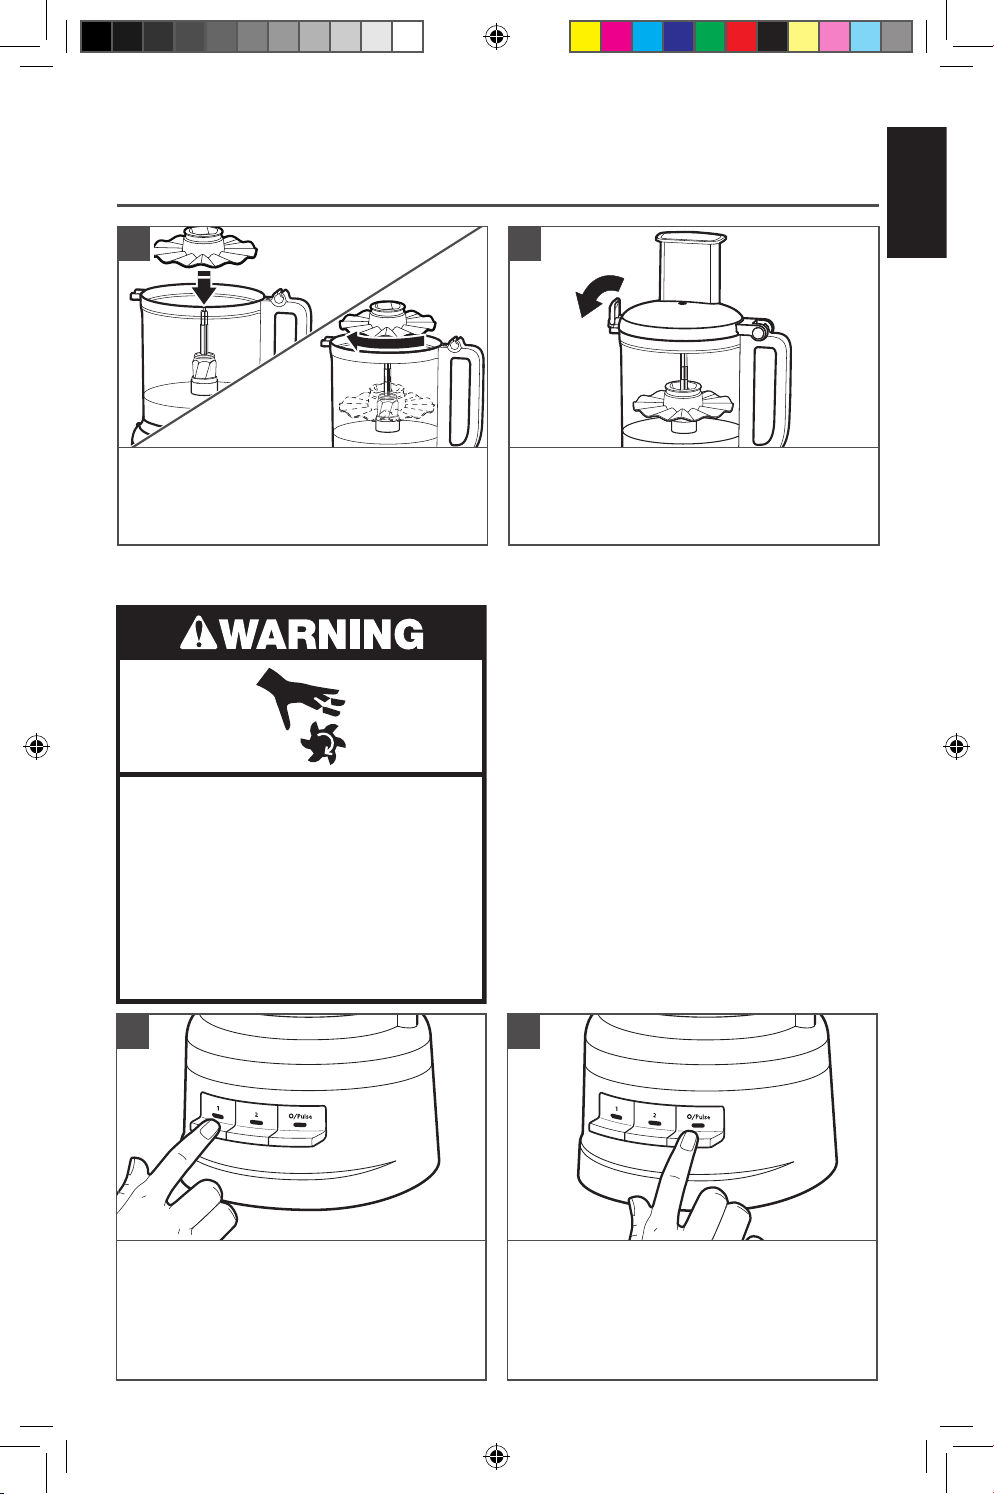
Place the Drive Adapter in the Work
Bowl, lowering it onto the Drive Pin.
PRODUCT ASSEMBLY
1
3
2
4
IMPORTANT: Place the Food Processor on a dry, level countertop with the controls
facing forward. Do not plug in the Food Processor until it is completely assembled.
W11517032B.indd 6W11517032B.indd 6 7/9/2021 11:44:29 AM7/9/2021 11:44:29 AM
21-Jul-2021 08:02:07 EDT | RELEASED
In some European factories the letter "W" of the part code mentioned herein will be automatically
replaced by the number "4000" (e.g. "W12345678" becomes "400012345678")
ENGLISH
7
PRODUCT ASSEMBLY
NOTE: For ease of assembly, install the desired Blade or Disc before attaching the Work
Bowl Cover.
NOTE: Your Food Processor will not operate unless the Work Bowl Cover is fully closed
and the Work Bowl is properly seated on the Base.
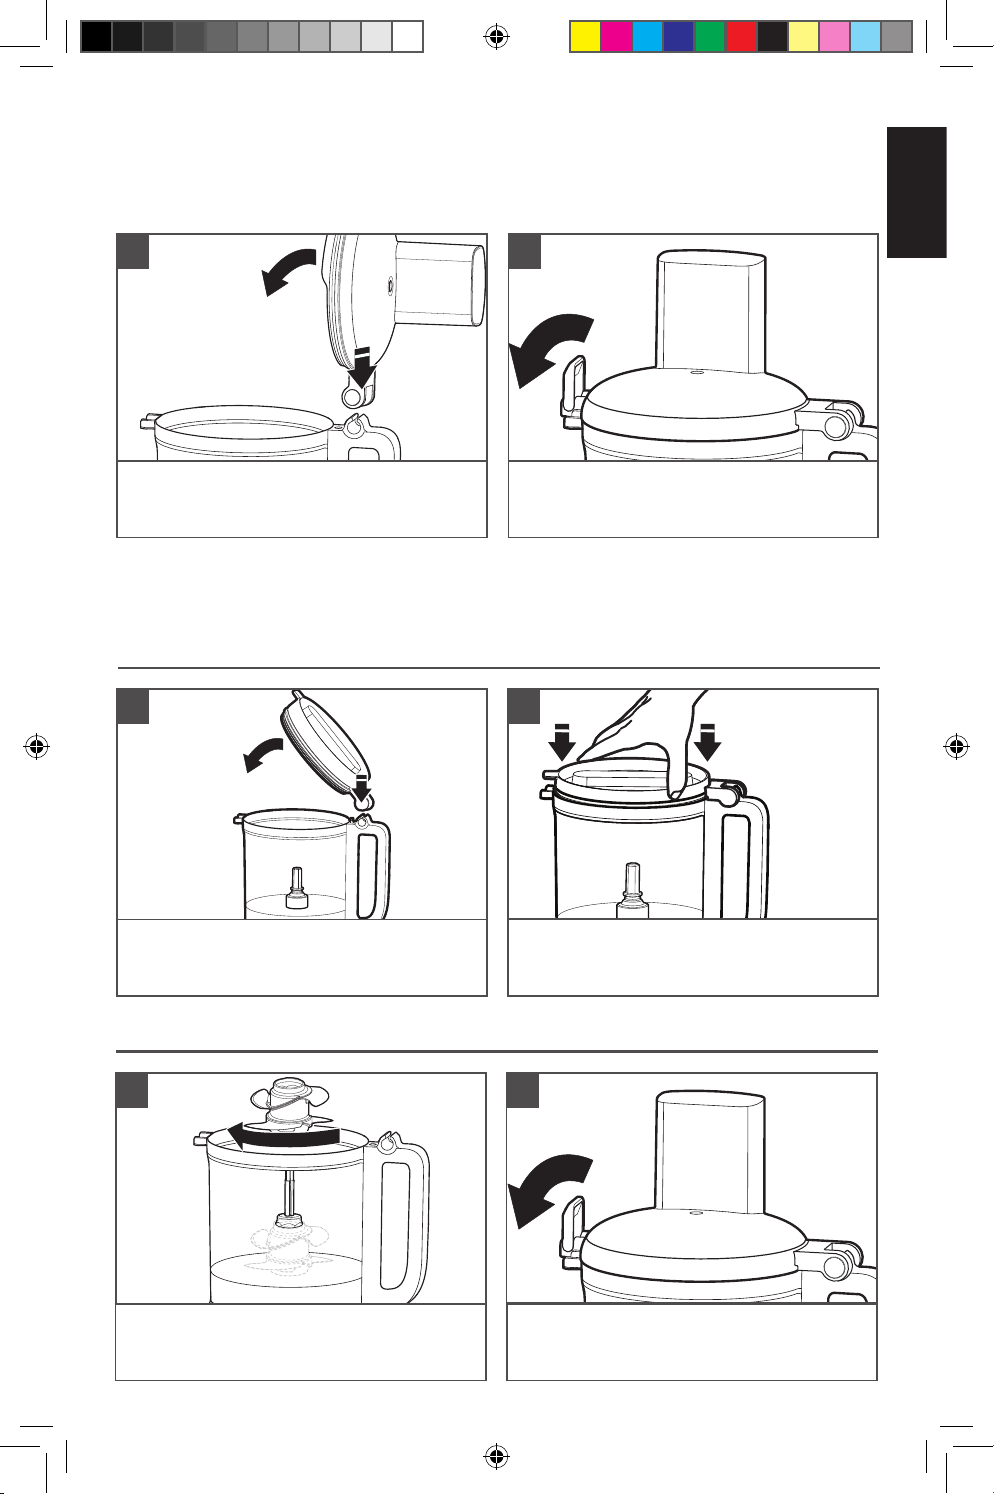
To attach the Work Bowl Cover, hook the
Lid Hinge into the Handle Hinge on the
Work Bowl and close the Cover.
Once the Work Bowl Cover is closed,
push the Lid Hinge down into the locked
position.
5 6
INSTALLING THE MULTIPURPOSE BLADE OR DOUGH BLADE
Place the Blade on the Drive Adapter.
Rotate the Blade so it falls down to the
base of the Adapter.
Install the Work Bowl Cover, and be sure
the Lid Latch is pushed down to the
locked position.
1
2
USING THE REFRIGERATOR LID
To attach the Refrigerator Lid, hook the
Lid Hinge into the Handle Hinge on the
Work Bowl and close the Lid.
Once the Refrigerator Lid is closed, push
the lid firmly to ensure closure.
1
2
W11517032B.indd 7W11517032B.indd 7 7/9/2021 11:44:29 AM7/9/2021 11:44:29 AM
21-Jul-2021 08:02:07 EDT | RELEASED
In some European factories the letter "W" of the part code mentioned herein will be automatically
replaced by the number "4000" (e.g. "W12345678" becomes "400012345678")
8
PRODUCT ASSEMBLY
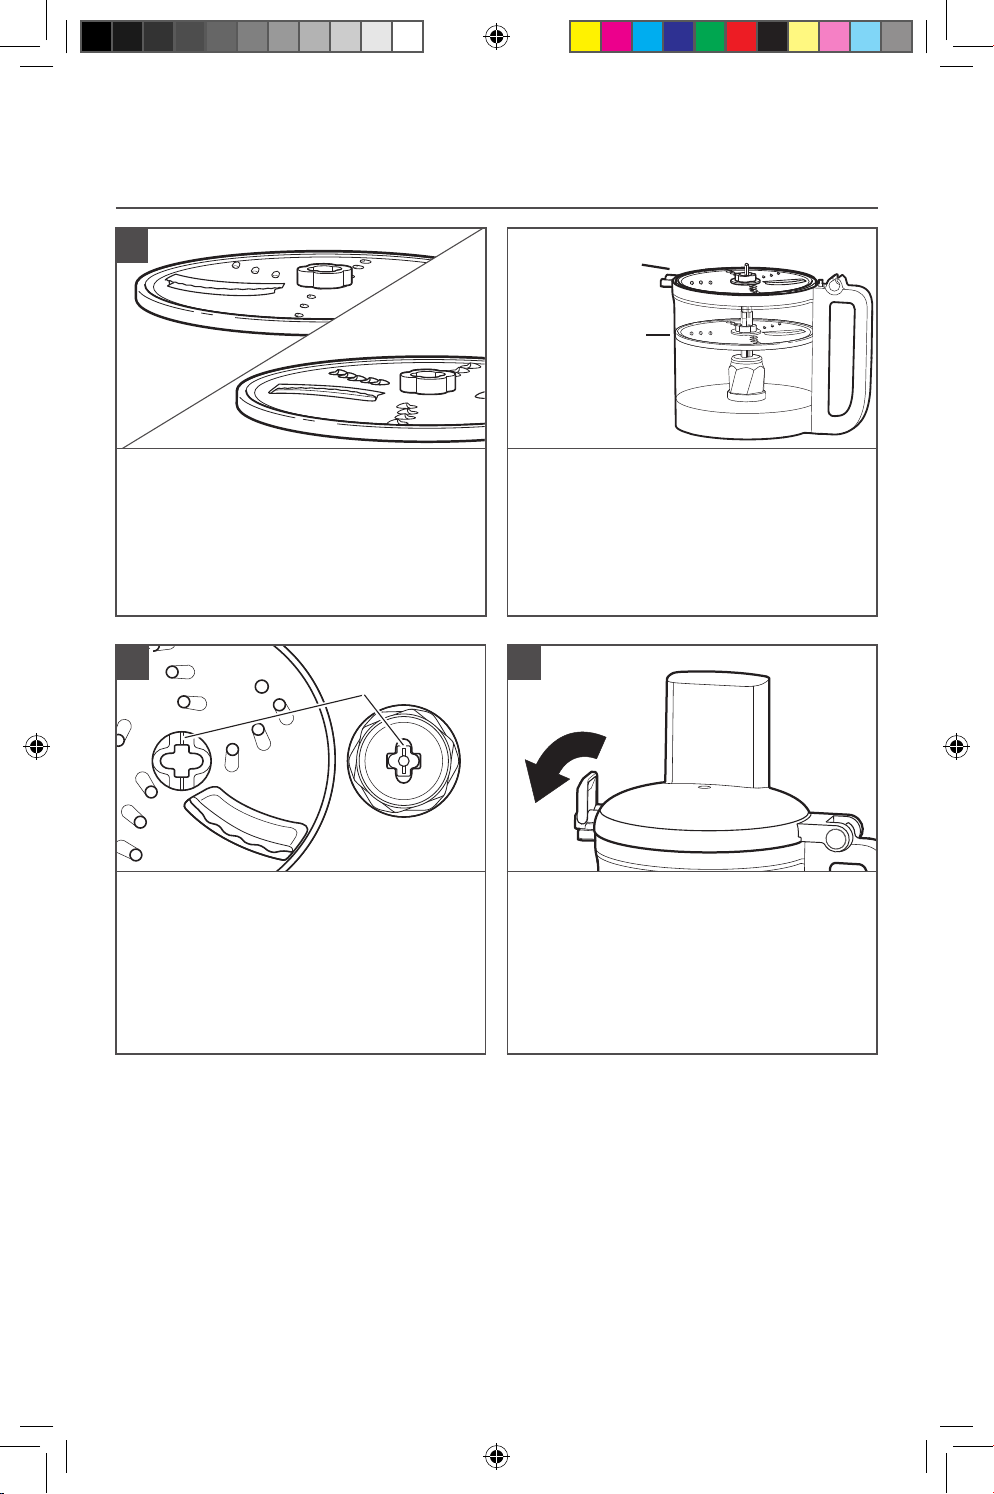
INSTALLING THE REVERSIBLE SLICING/SHREDDING DISC
To slice: Turn the Disc so that the raised
Slicing Blade is facing up.
To shred: Turn the Disc so that the small,
raised Shredding Blades are facing up.
The Disc can be placed in two different
positions: level with the top of the Bowl
for processing, and lower, inside of the
Bowl for storage.
NOTE: Make sure the Disc is level
with the top of the Bowl for best
performance.
1
Process
Storage
Hold the Disc by its centre hub and lower
it onto the Drive Adapter, aligning the
mark on the centre hub of the Disc to the
matching mark on the Adapter. When
properly placed, the Disc should be level
with the top of the Bowl. If the Disc falls
to the storage position, lift it out, turn it
90°, and lower it again.
Install the Work Bowl Cover, and be sure
the Lid Latch is pushed down to the
locked position.
2 3
Alignment
marks
W11517032B.indd 8W11517032B.indd 8 7/9/2021 11:44:30 AM7/9/2021 11:44:30 AM
21-Jul-2021 08:02:07 EDT | RELEASED
In some European factories the letter "W" of the part code mentioned herein will be automatically
replaced by the number "4000" (e.g. "W12345678" becomes "400012345678")
ENGLISH
9
USING THE WHISKING ACCESSORY
Place the Whisking Accessory onto the
Drive Adapter. Rotate the Whisking
Accessory so it falls down to the base of
the Adapter.
Install the work bowl Cover, and be sure
the Lid Latch is pushed down to the
locked position.
1 2
PRODUCT ASSEMBLY
PRODUCT USAGE
Rotating Blade Hazard
Always use food pusher.
Keep ngers out of openings.
Keep away from children.
Failure to do so can result in
amputation or cuts.
Before operating the Food Processor, be
sure the Work Bowl, Blades/Disc, and Work
Bowl Cover are properly assembled on the
Base (see the “Product Assembly” section).
To turn on, press 1 or 2. The Food
Processor will run continuously and the
indicator light will glow.
To turn off, press 1 or 2 again, or press
O/Pulse.
To use the Pulse function:
Press O/Pulse for short bursts, or press
and hold for longer bursts. The Pulse
function runs at high speed only. The
Food Processor will turn off when the
O/Pulse button is released.
1 2
W11517032B.indd 9W11517032B.indd 9 7/9/2021 11:44:30 AM7/9/2021 11:44:30 AM
21-Jul-2021 08:02:07 EDT | RELEASED
In some European factories the letter "W" of the part code mentioned herein will be automatically
replaced by the number "4000" (e.g. "W12345678" becomes "400012345678")
10
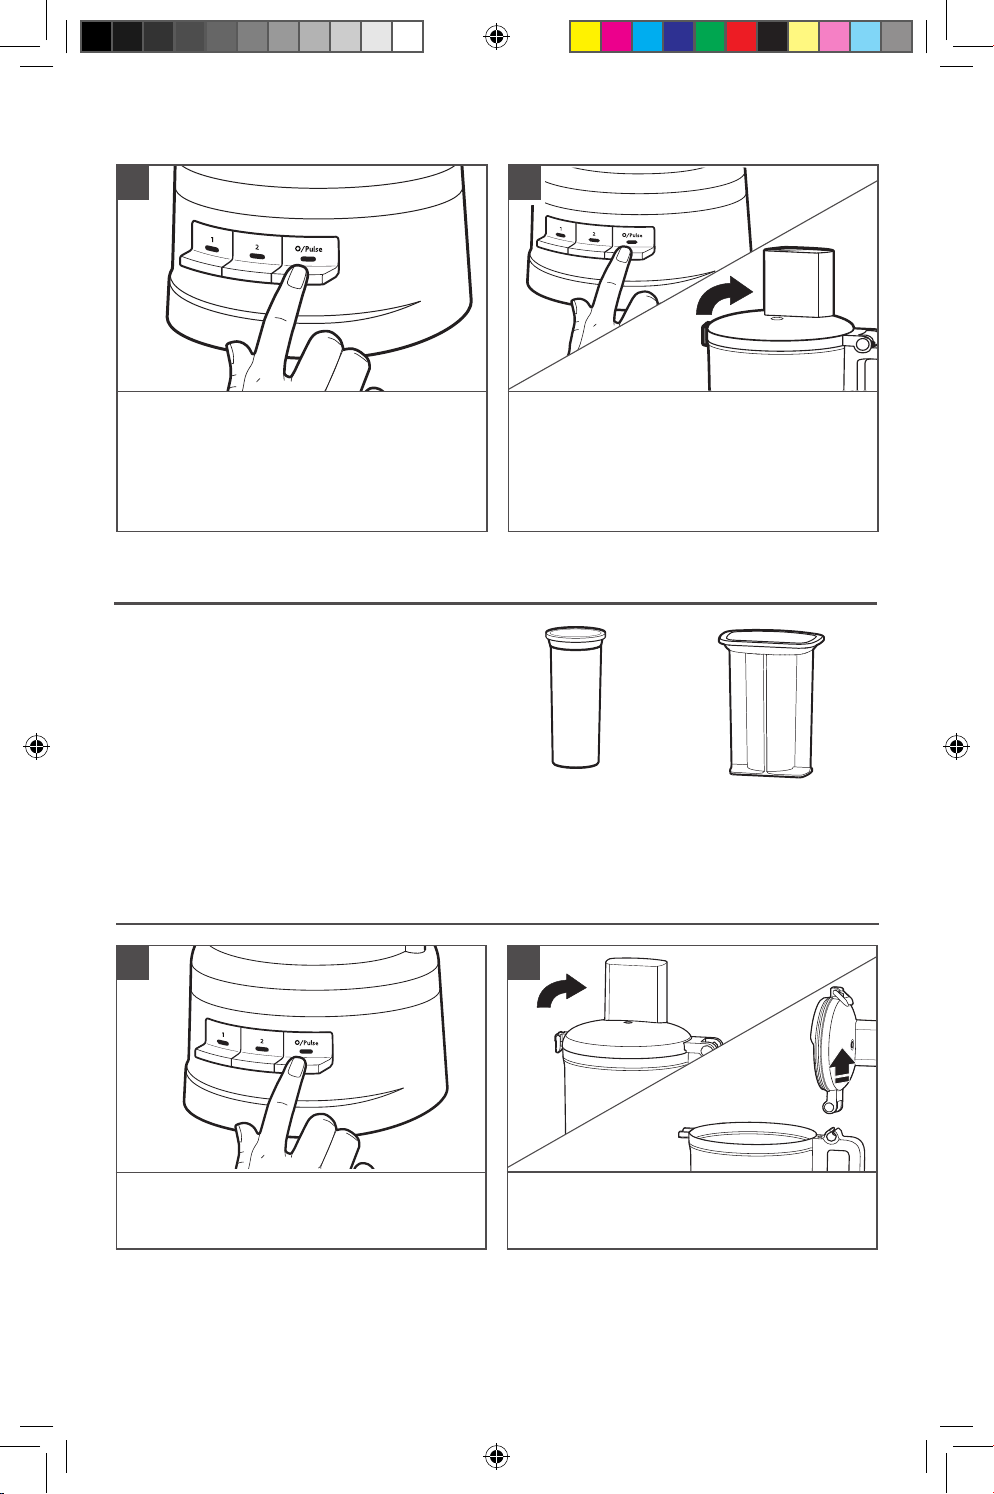
PRODUCT USAGE
USING THE 2-IN-1 FEED TUBE
The 2-in-1 feed tube features a 2-piece
Food Pusher. To slice or shred small items,
insert the 2-Piece Food Pusher into the
Feed Tube.
Use the small Feed Tube and pusher to
process small or slender items, like single
carrots or celery stalks.
To slowly drizzle oil into ingredients, just fill
the small pusher with the desired amount
of oil. A small hole in the bottom of the
pusher will drizzle the oil at a constant rate.
REMOVING PROCESSED FOODS
2-Piece
Food
Pusher
When finished, press the O/Pulse button.
The indicator light will go out
and the Blade or Disc will slow to a stop.
Wait until the Blade or Disc comes to a
complete stop before removing the Work
Bowl Cover. Be sure to turn off the Food
Processor before removing the Work
Bowl Cover, or before unplugging the
Food Processor.
3 4
Turn the Food Processor off: Press the
O/Pulse button and unplug the Food
Processor before disassembling.
Lift the Lid Latch to unlock the Work
Bowl Cover, then lift the Cover to
remove.
1 2
W11517032B.indd 10W11517032B.indd 10 7/9/2021 11:44:31 AM7/9/2021 11:44:31 AM
21-Jul-2021 08:02:07 EDT | RELEASED
In some European factories the letter "W" of the part code mentioned herein will be automatically
replaced by the number "4000" (e.g. "W12345678" becomes "400012345678")
ENGLISH
11
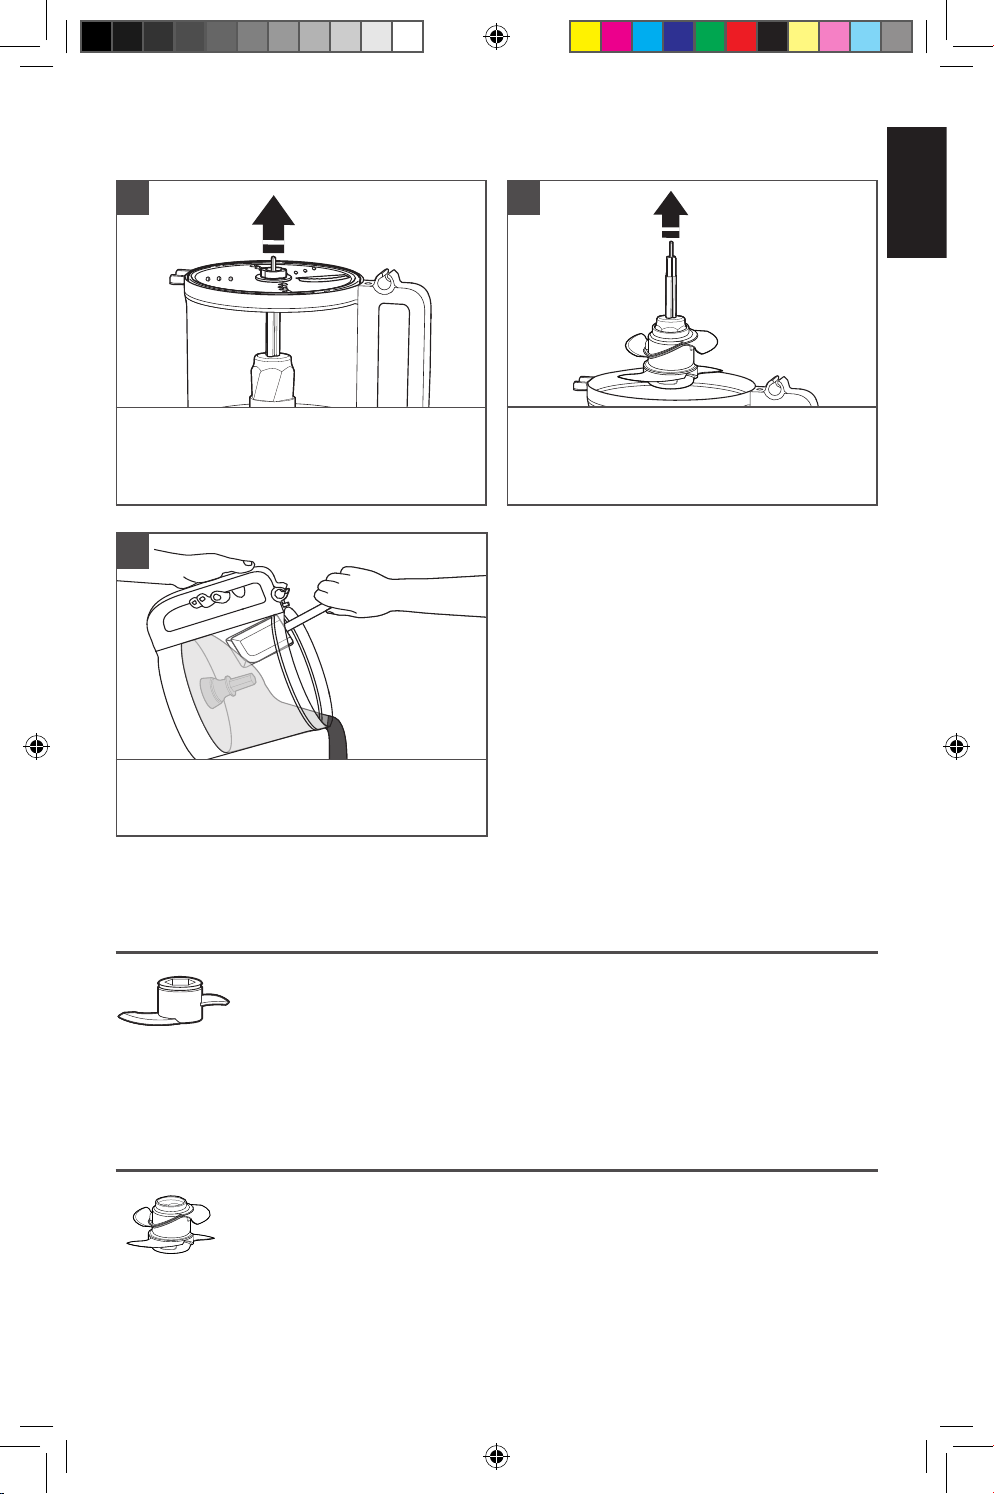
PRODUCT USAGE
If using the Disc, remove it before
removing the Bowl. Holding the Disc by
the centre hub, lift it straight up.
Remove the Drive Adapter and
Accessory, if using. The Blade will stay
in place on the Drive Adapter when you
remove the Adapter.
3 4
Lift the Work Bowl off of the Base to
remove food from the Bowl with a
spatula.
5
The dough blade is designed
for mixing and kneading
yeast dough quickly and
thoroughly. For the best
results, use O/Pulse to mix the dry
ingredients and then speed 2 when adding
water.
The maximum recommended amount is
375g (3 cups) flour and 260g/ml of water,
at a maximum duration of 2 minutes on
high speed.
USING THE DOUGH BLADE
RECOMMENDED USAGE AND HELPFUL HINTS
The multipurpose blade is
used to chop and puree foods
like fruits, vegetables, nuts,
and beans/legumes. This
blade will also mince meats like beef,
chicken and pork.
The maximum recommended amount for
mincing is 200g beef, on high speed for a
maximum duration of 10s.
USING THE MULTI-PURPOSE FOUR BLADE
W11517032B.indd 11W11517032B.indd 11 7/9/2021 11:44:31 AM7/9/2021 11:44:31 AM
21-Jul-2021 08:02:07 EDT | RELEASED
In some European factories the letter "W" of the part code mentioned herein will be automatically
replaced by the number "4000" (e.g. "W12345678" becomes "400012345678")
12
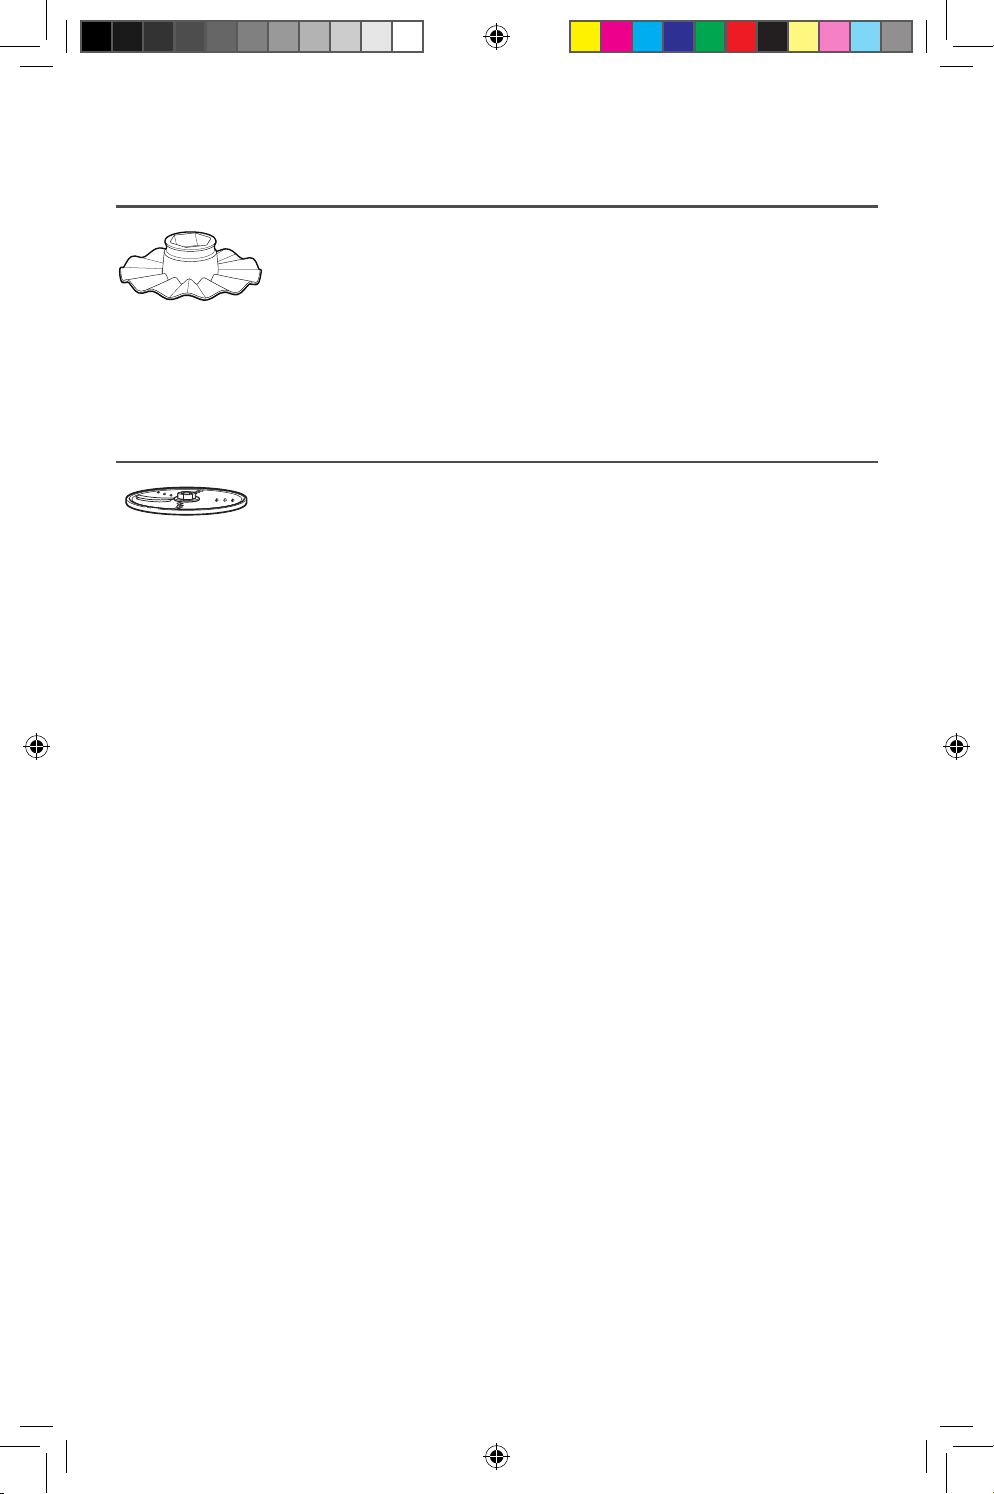
RECOMMENDED USAGE AND HELPFUL HINTS
The Slice/Shred disk is
used to slice and shred
fruits, vegetables, cheese and more.
The maximum recommended capacity for
shredding or slicing ingredients is 500g for
a maximum duration of 2 minutes.
USING THE SLICE AND SHRED DISCS
The whisking accessory
is used to whisk and
whip quickly and
thoroughly. For the
best results, use O/Pulse to whisk/whip to
desired texture.
The maximum recommended capacity
for liquid is 500g on high speed for a
maximum duration of 2 minutes.
USING THE WHISKING ACCESSORY
W11517032B.indd 12W11517032B.indd 12 7/9/2021 11:44:31 AM7/9/2021 11:44:31 AM
21-Jul-2021 08:02:07 EDT | RELEASED
In some European factories the letter "W" of the part code mentioned herein will be automatically
replaced by the number "4000" (e.g. "W12345678" becomes "400012345678")

ENGLISH
13
CARE AND CLEANING
Press the O/Pulse button, then unplug
the Food Processor before cleaning.
Wipe the base and cord with a warm,
damp cloth, and wipe clean with a damp
cloth. Thoroughly dry with a soft cloth. Do
not use abrasive cleaners or scouring pads.
Do not immerse base in water or other
liquid.
IMPORTANT: The BPA-free Bowl requires special handling. If you choose to use a
dishwasher instead of hand washing, please follow these guidelines.
1 2
NOTE: If washing the Food Processor parts by hand, avoid the use of abrasive cleansers
or scouring pads. They may scratch or cloud the Work Bowl and Cover.
All parts are top rack dishwasher safe.
Avoid laying the Bowl on its side.
Thoroughly dry all parts after washing.
Use gentle dishwashing cycles such as
normal. Avoid high-temperature cycles.
You can store up to two blades and
three discs, as well as the drive adapter
inside of the Work Bowl when the Food
Processor is not in use. Wrap the Power
Cord around the Cord Storage on the
bottom of the Base, then secure the plug
by clipping it to the housing.
3 4
W11517032B.indd 13W11517032B.indd 13 7/9/2021 11:44:32 AM7/9/2021 11:44:32 AM
21-Jul-2021 08:02:07 EDT | RELEASED
In some European factories the letter "W" of the part code mentioned herein will be automatically
replaced by the number "4000" (e.g. "W12345678" becomes "400012345678")
14
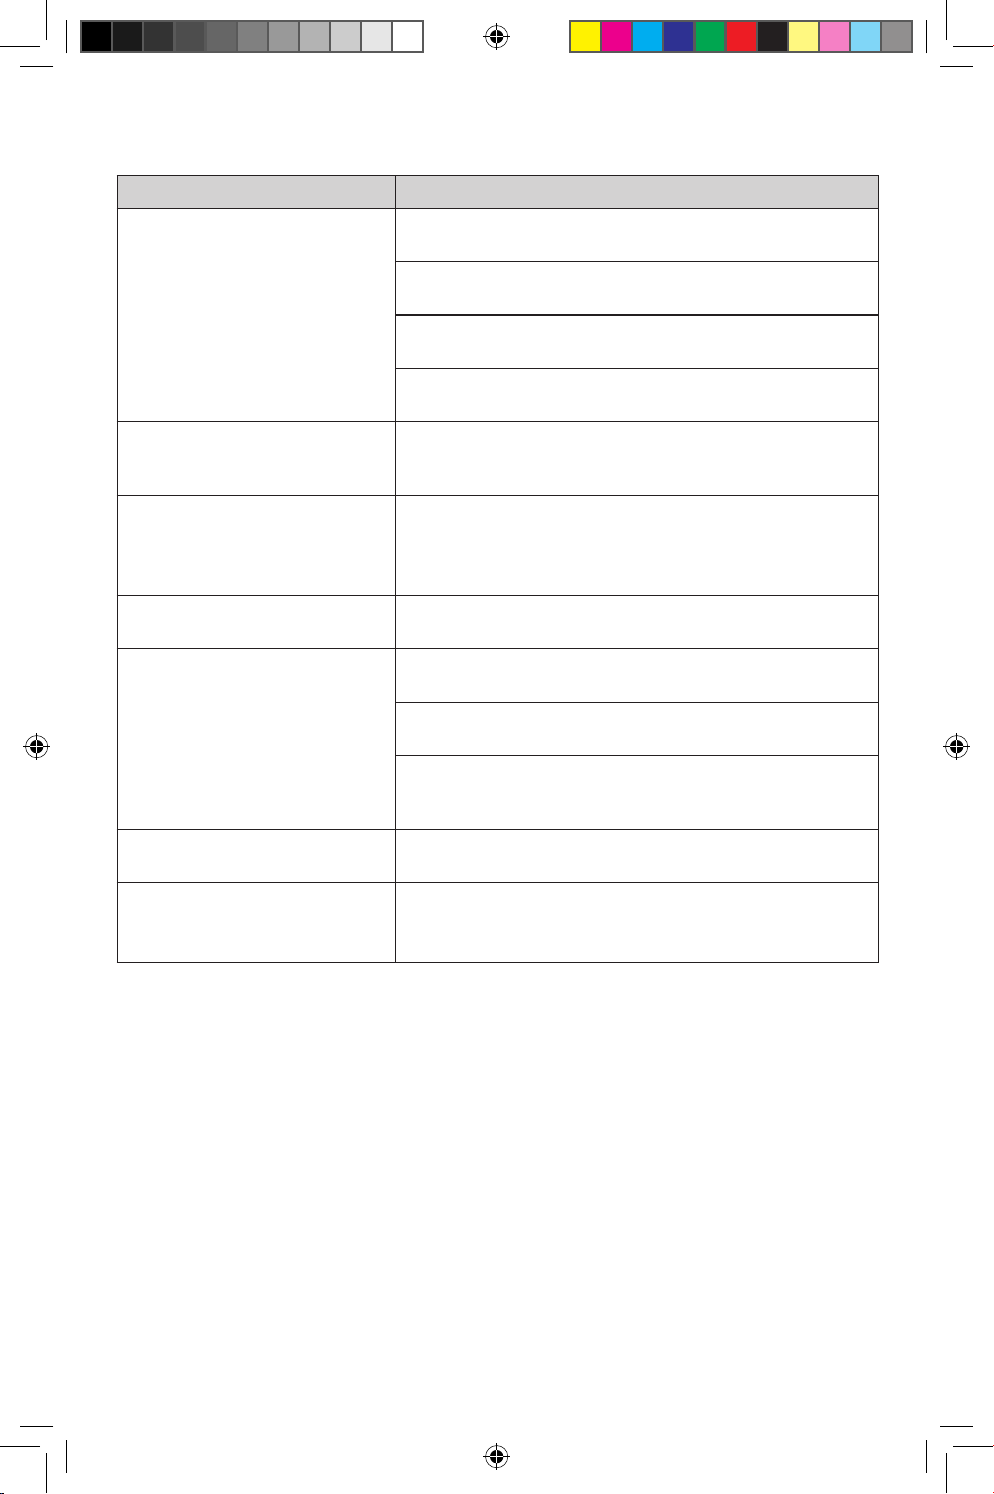
TROUBLESHOOTING GUIDE
Problem Solution
If your Food Processor should
malfunction or fail to operate,
check the following:
Check to see if the Food Processor is securely plugged
into a earthed electrical outlet.
Make sure that the Bowl and Lid are properly aligned
and locked in place.
Have you pressed more than one button at the same
time?
Unplug the Food Processor, then plug it back into the
outlet.
Is the fuse in the circuit to the
Food Processor in working
order?
If you have a circuit breaker box, be sure the circuit is
closed.
The Food Processor may need
to cool to room temperature:
If the speed light turns off and the O/Pulse light flashes,
wait until the O/Pulse light turns off and retry.
The Food Processor may take from 5-15 minutes to cool
completely.
The motor may be locked:
If the speed light stays on while the O/Pulse light flashes,
press the O/Pulse button to reset the motor.
Food Processor not shredding
or slicing properly:
Make sure the raised-Blade side of the Disc is positioned
face up on the Drive Adapter.
Make sure ingredients are suitable for slicing or
shredding.
Make sure the Disc is positioned in the process position
(near the top of the Bowl), and not the storage position
(low and inside of the Bowl).
If the Work Bowl Cover won’t
close when using the Disc:
Make sure the Disc is installed correctly, and is
positioned properly on the Drive Adapter.
If the problem cannot be
corrected:
See the “Customer Service” section.
Do not return the Food Processor to the retailer.
Retailers do not provide service.
W11517032B.indd 14W11517032B.indd 14 7/9/2021 11:44:32 AM7/9/2021 11:44:32 AM
21-Jul-2021 08:02:07 EDT | RELEASED
In some European factories the letter "W" of the part code mentioned herein will be automatically
replaced by the number "4000" (e.g. "W12345678" becomes "400012345678")

ENGLISH
15
CUSTOMER SERVICE
In Australia:
For any questions, or to find the nearest Authorised KitchenAid Service Centre,
please find our contact details below.
NOTE: All service should be handled locally by an Authorised KitchenAid Service
Centre.
Toll free number: 1-800-990-990
Phone number: 02 49026500
Address Australia:
KitchenAid Australia Pty Ltd
6-8 Billbrooke Close
Cameron Park NSW 2285, Australia
Phone: 1-800-990-990
Mobile: 0249026500
Email: [email protected]
In New Zealand:
Website: www.kitchenaid.co.nz
Email: [email protected]
Phone: 0800 881 200
In other countries:
For all product related questions and after-sales matters, please contact your dealer
to obtain the name of the nearest Authorised KitchenAid Service/Customer Centre.
For more information, visit our website at:
www.KitchenAid.com.au
©2021 All rights reserved.
W11517032B.indd 15W11517032B.indd 15 7/9/2021 11:44:32 AM7/9/2021 11:44:32 AM
21-Jul-2021 08:02:07 EDT | RELEASED
In some European factories the letter "W" of the part code mentioned herein will be automatically
replaced by the number "4000" (e.g. "W12345678" becomes "400012345678")

W11517032B 07/21
©2021 All rights reserved.
W11517032B.indd 16W11517032B.indd 16 7/9/2021 11:44:32 AM7/9/2021 11:44:32 AM
21-Jul-2021 08:02:07 EDT | RELEASED
In some European factories the letter "W" of the part code mentioned herein will be automatically
replaced by the number "4000" (e.g. "W12345678" becomes "400012345678")

