eviqo.io 1
EVIQO app GUIDE
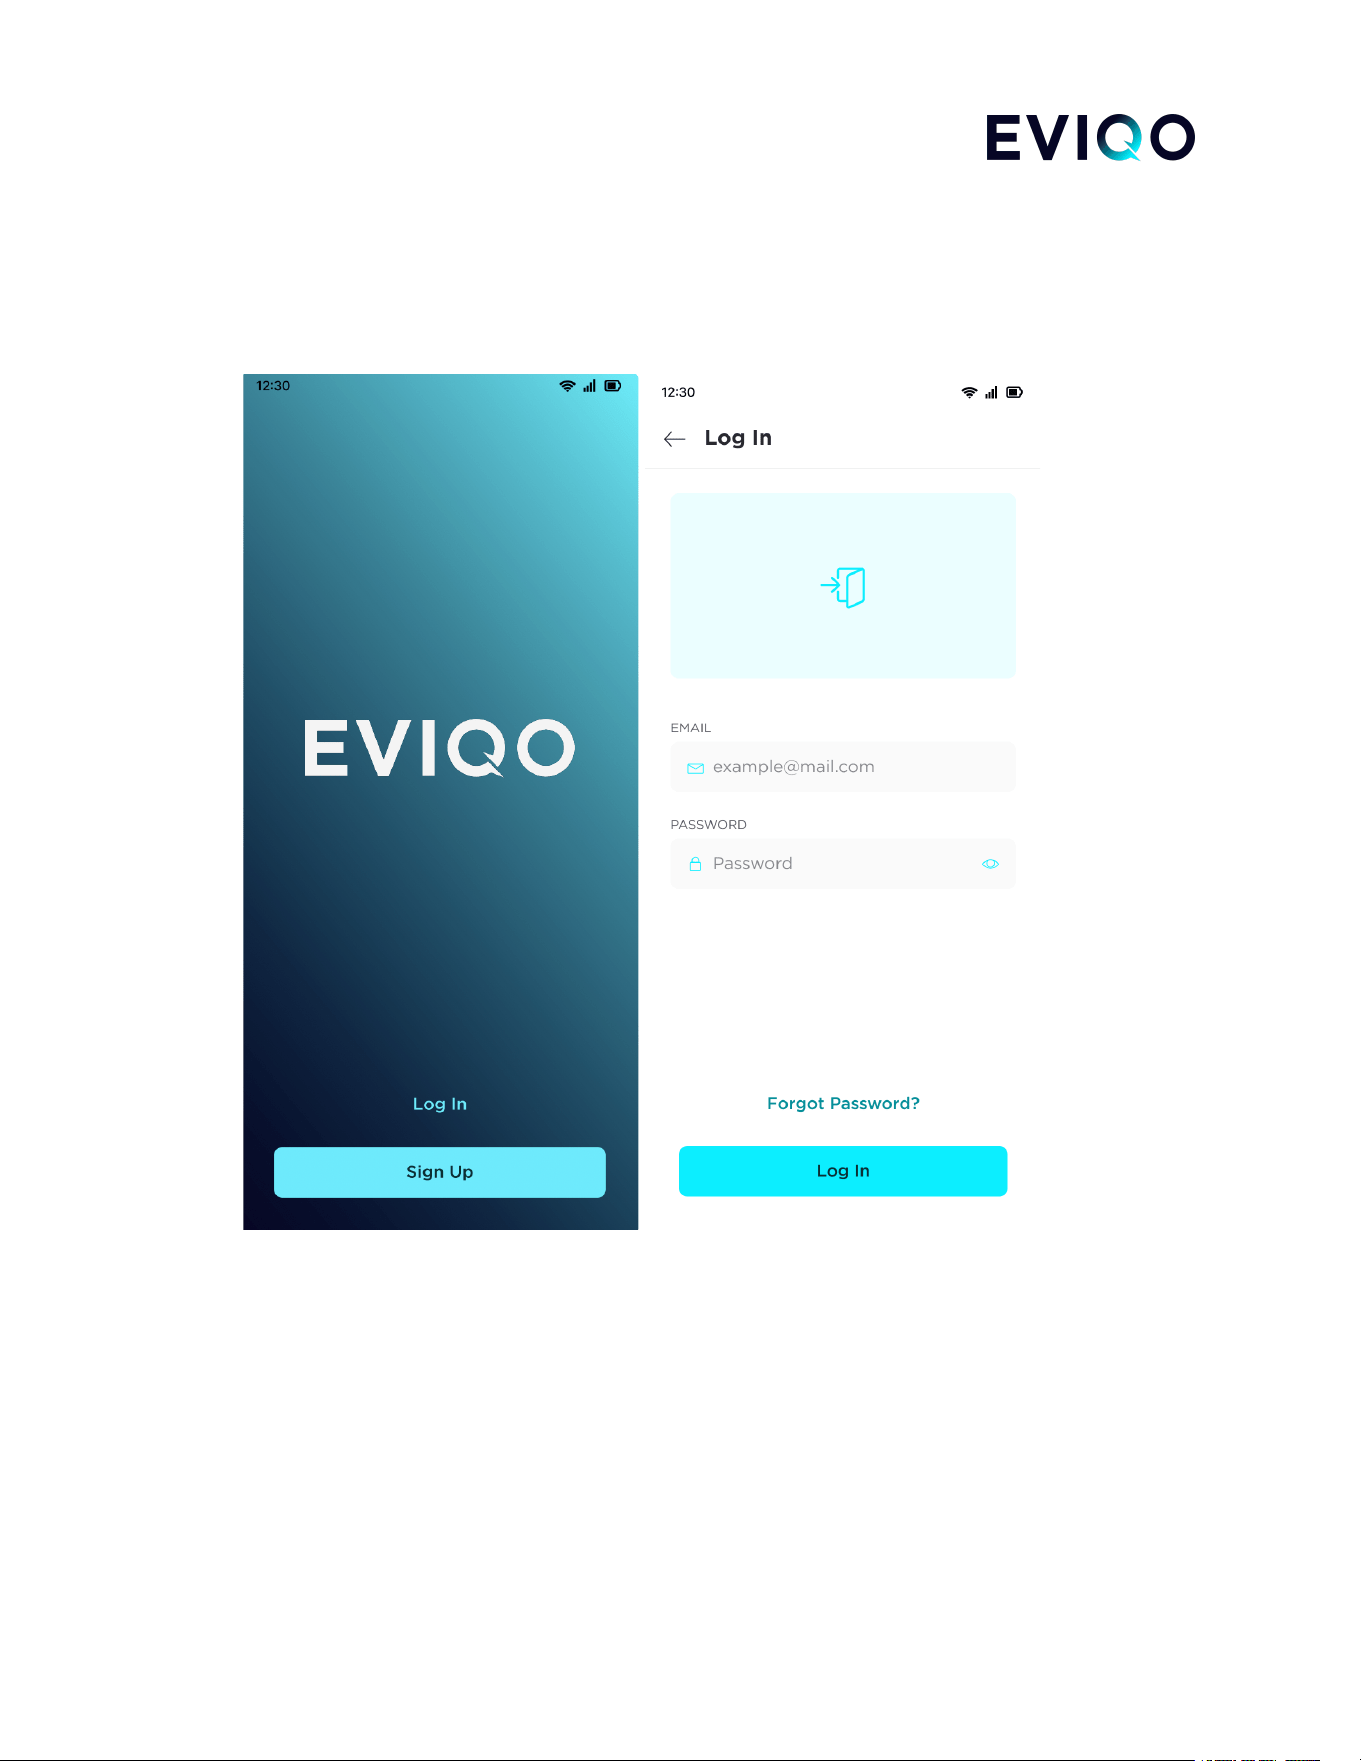
1. Log In / Sign Up
1.1. Please log into the EVIQO mobile app. In case you don't have an account, please create one.
eviqo.io 2
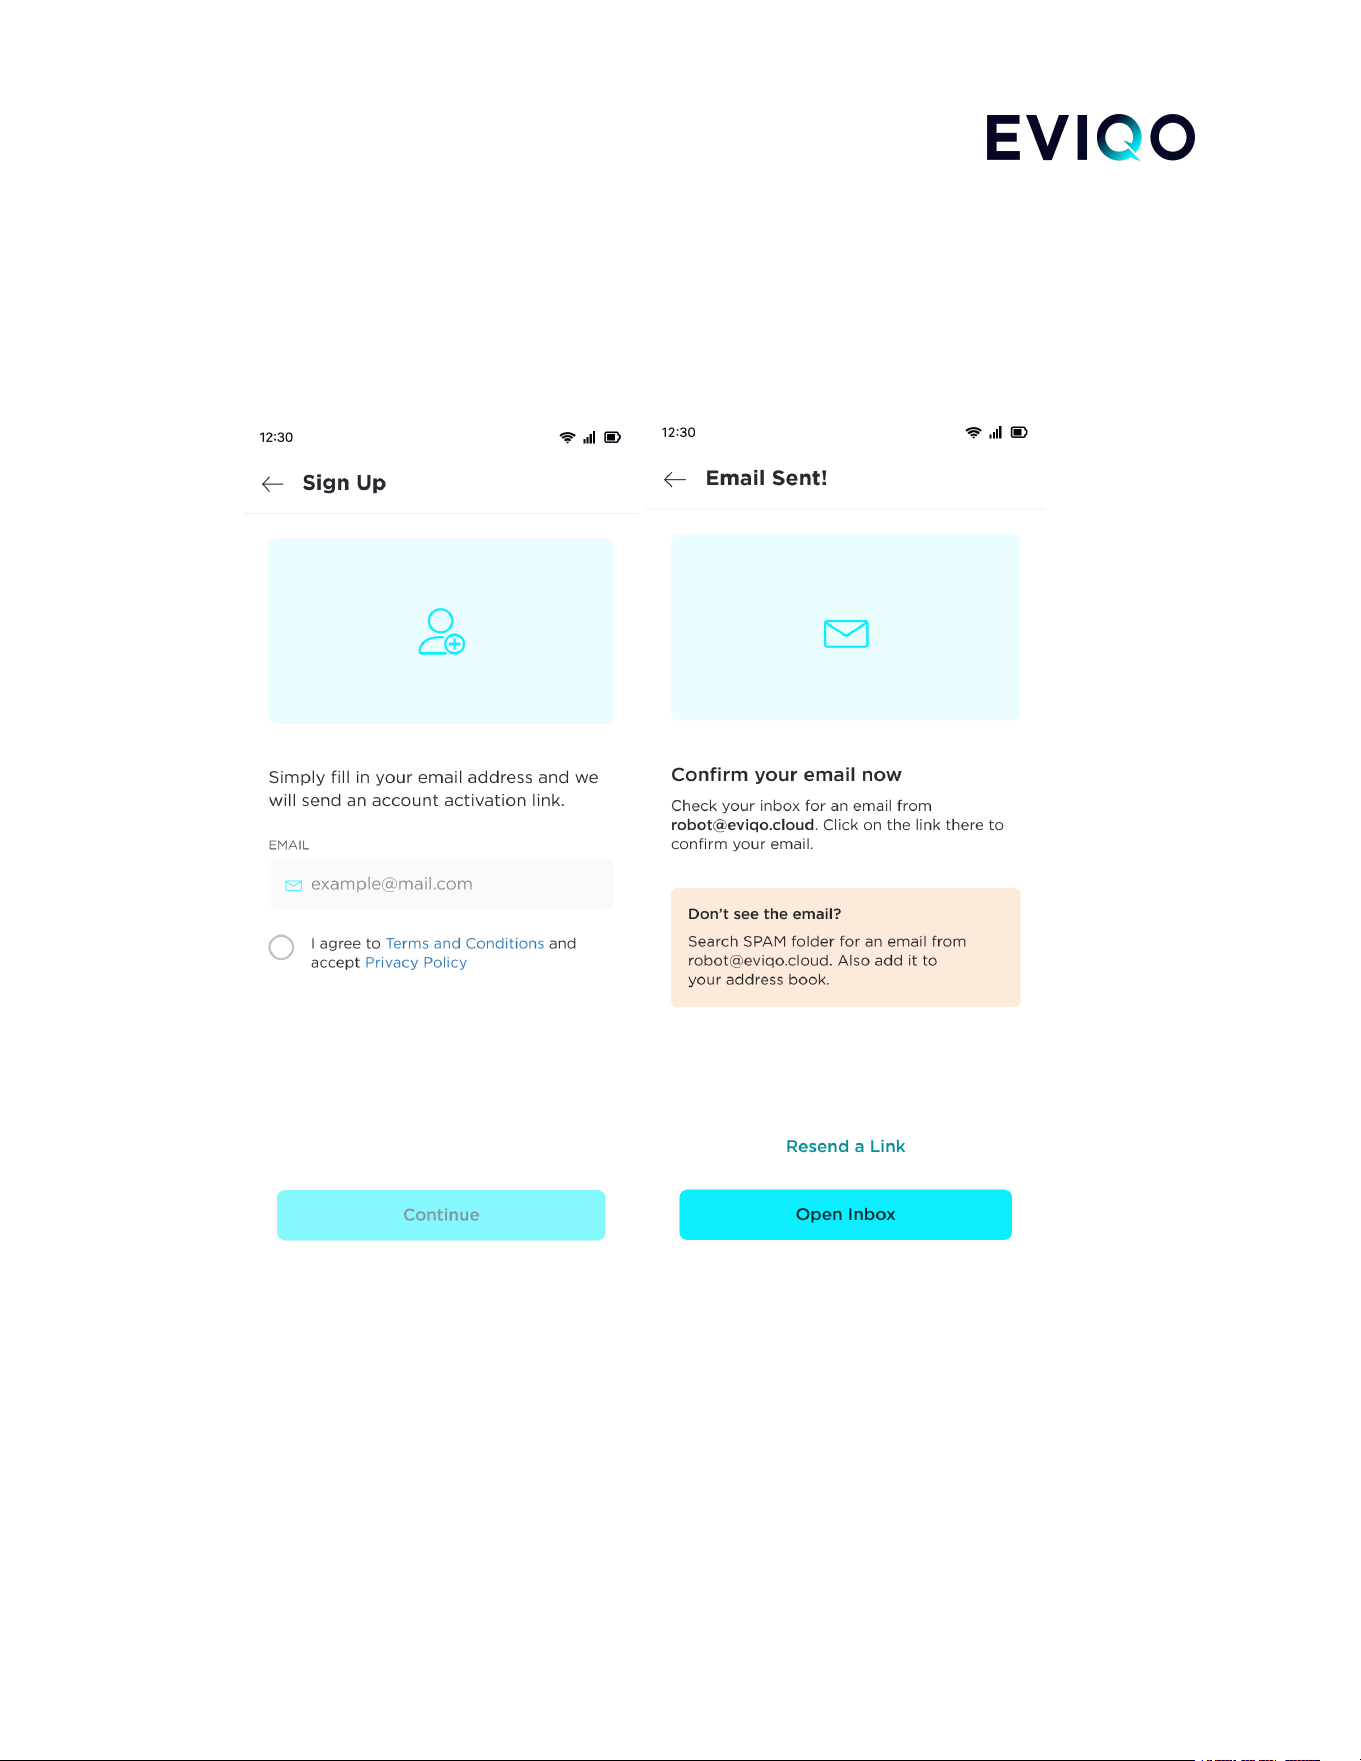
1.2. Please provide an active email address for signing up, we will use this email to troubleshoot any
potential issues and assist you throughout the process. Please note that once entered, this email cannot
be changed in the future.
You can invite new members to share the usage of your charger (please refer to page 23 of this guide).
If you wish to change the email address in the future, please be aware that it will require a full reset
of your device and configuring the setup from the beginning.
eviqo.io 3
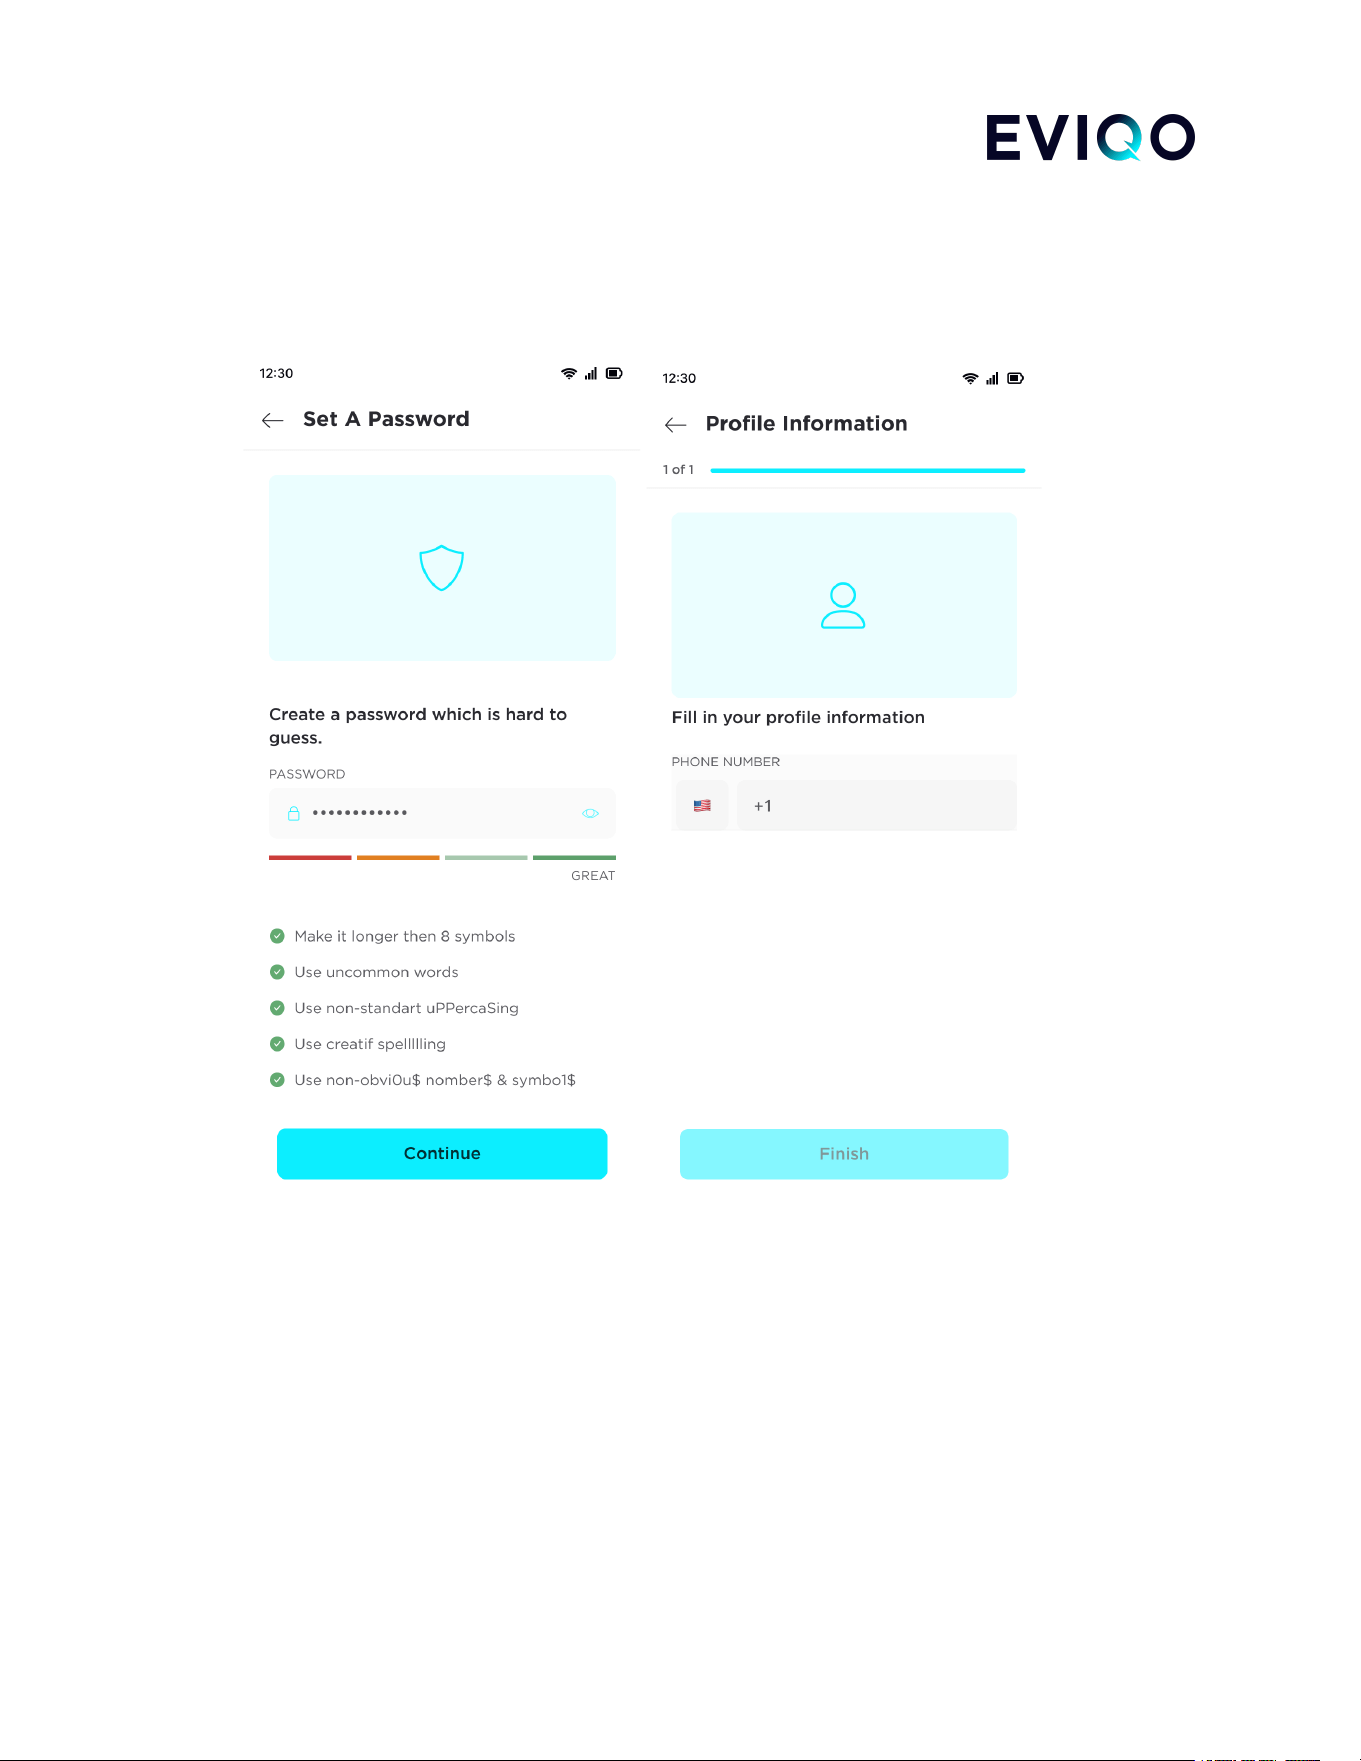
1.3. Please choose the password which is hard to guess. We highly prioritize your confidentiality and
assure you that your data will be securely protected and stored. You can opt for sending some crucial
notifications regarding the status of your device by email or sms.
eviqo.io 4
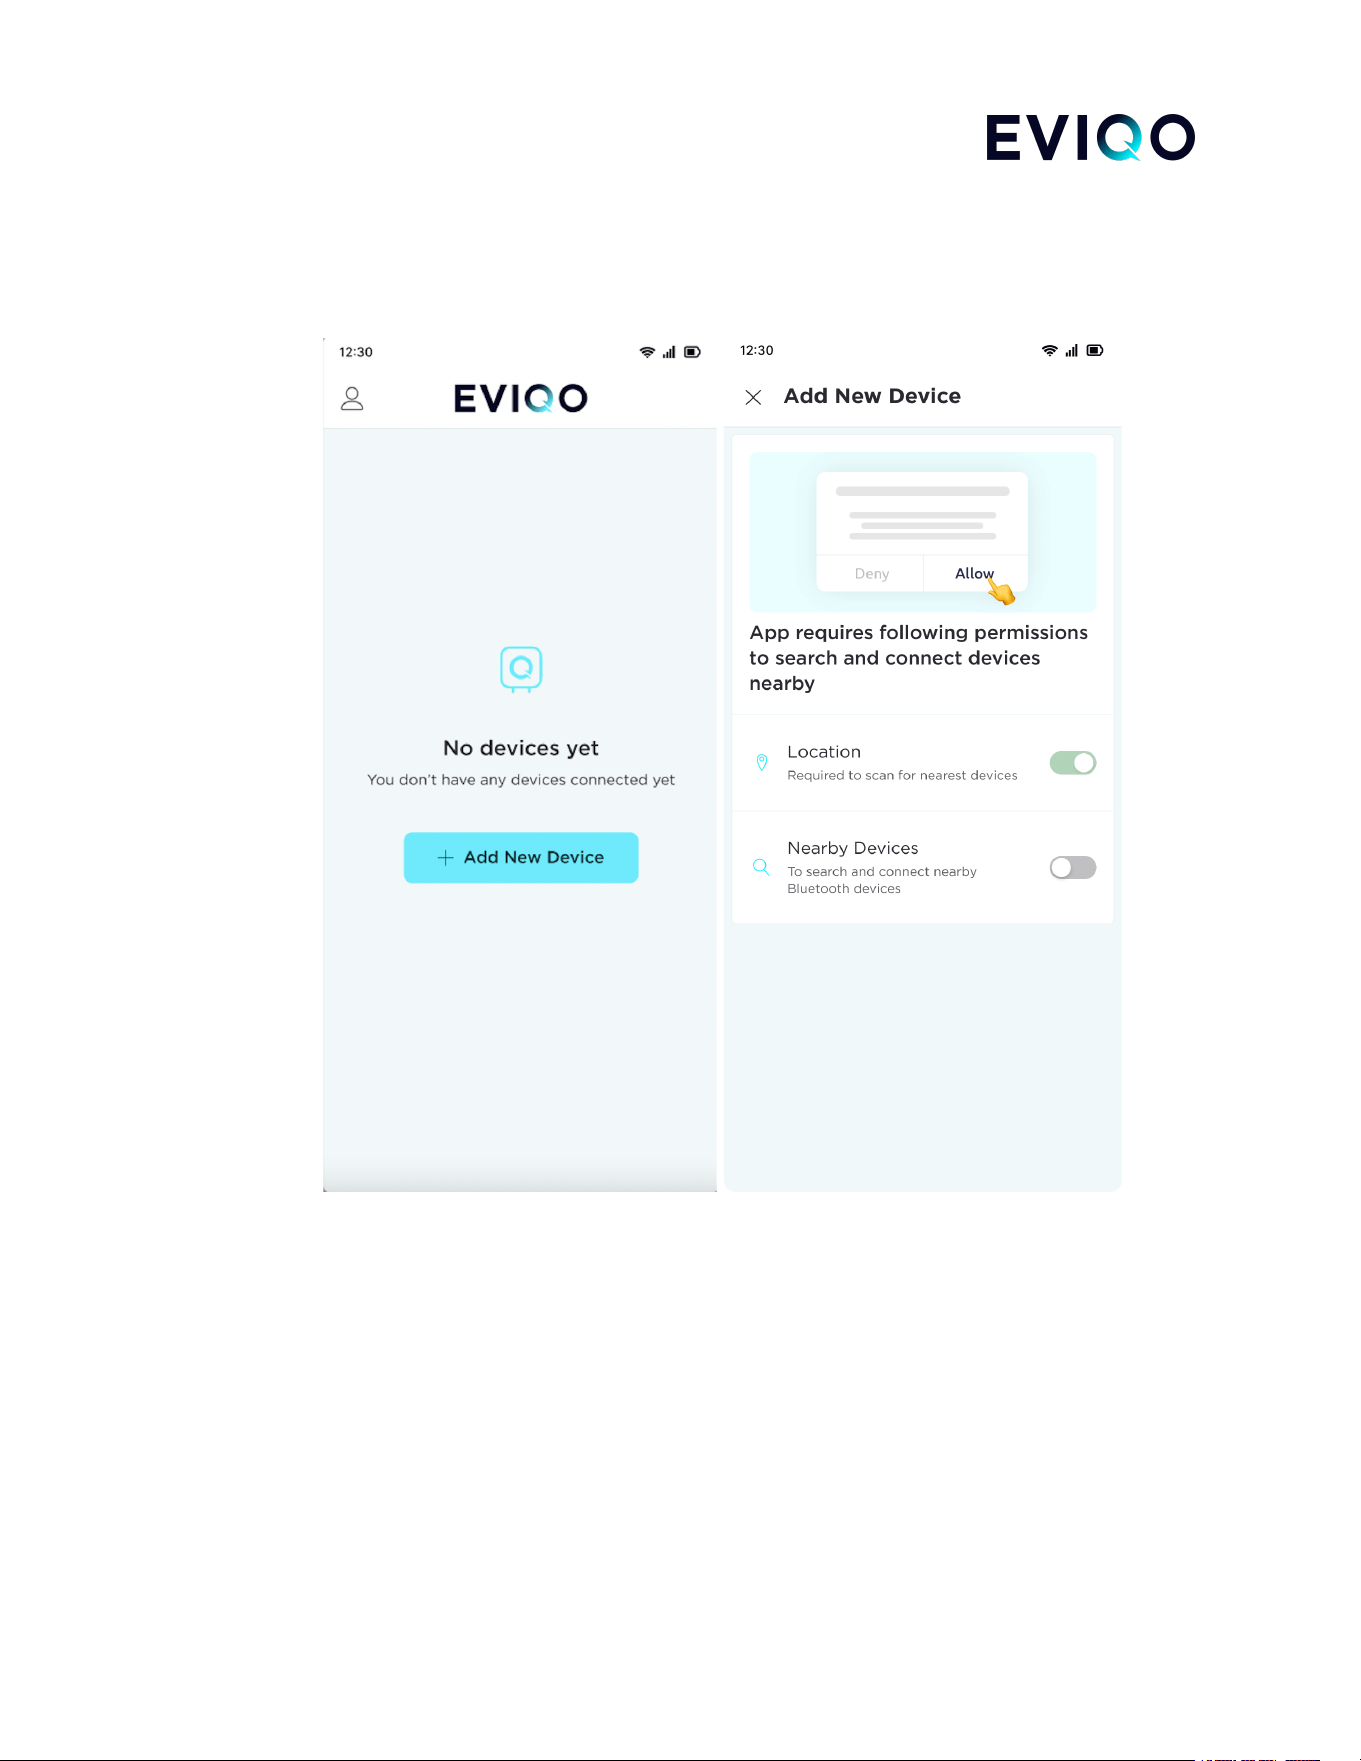
2. Add New Device
2.1. Once you have signed into your account, please click on the "Add New Device" button.
Please kindly note that to ensure effective service and tech support, your EVIQO Smart EV Charger will
ask your permission to access the device's location and nearby devices.
eviqo.io 5
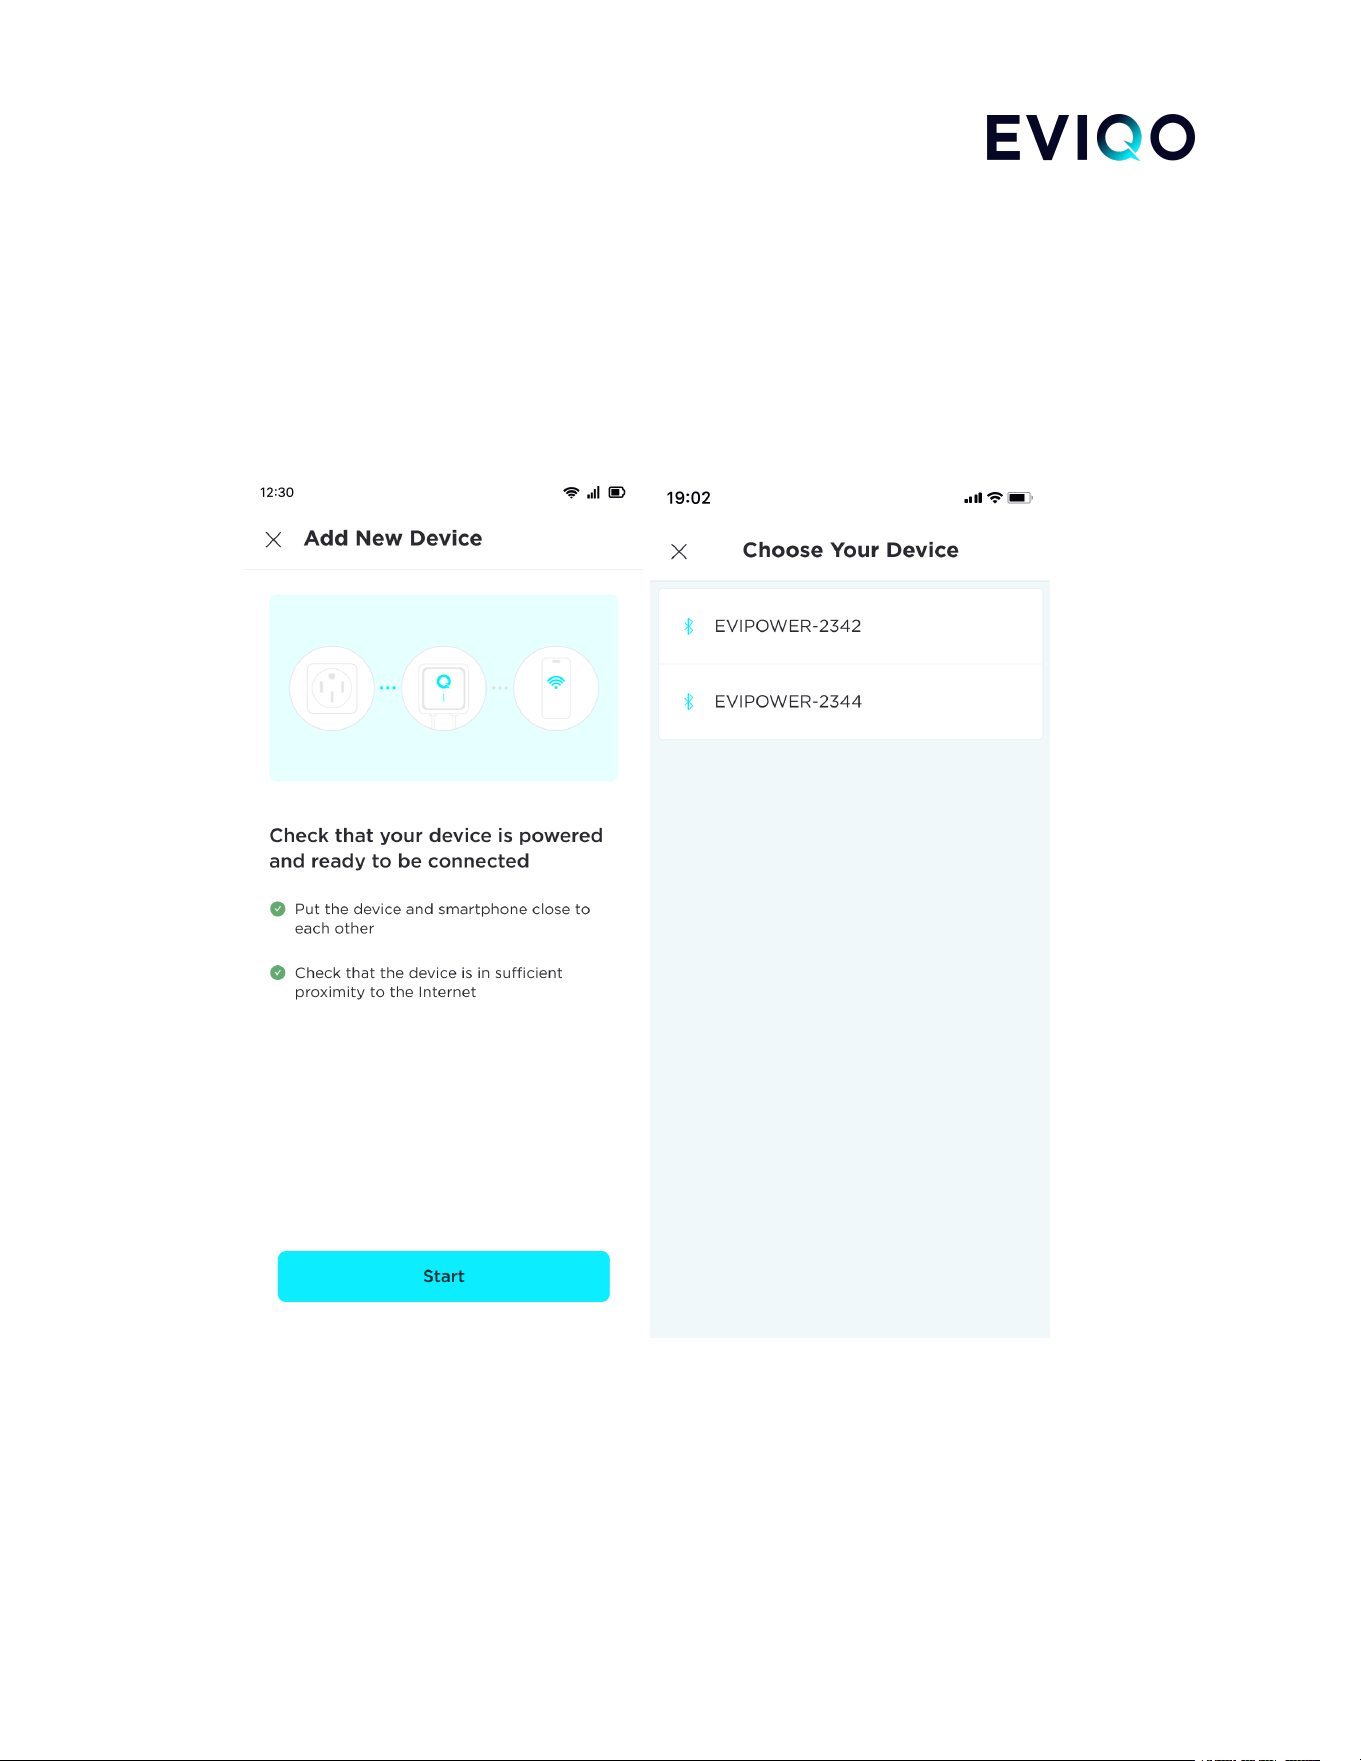
2.2. Before pressing “Start” button to successfully connect the EV charger, please follow these steps:
● Ensure that your EV charger is powered on;
● Ensure the EV charger is in close proximity to the Wifi router, ideally within a range of 16-25 ft
(5-7.5m);
● Check that your smartphone and the EV charger are close to each other, approximately 5 ft (1.6m);
● Ensure that you know the password for your local Wifi network.
eviqo.io 6
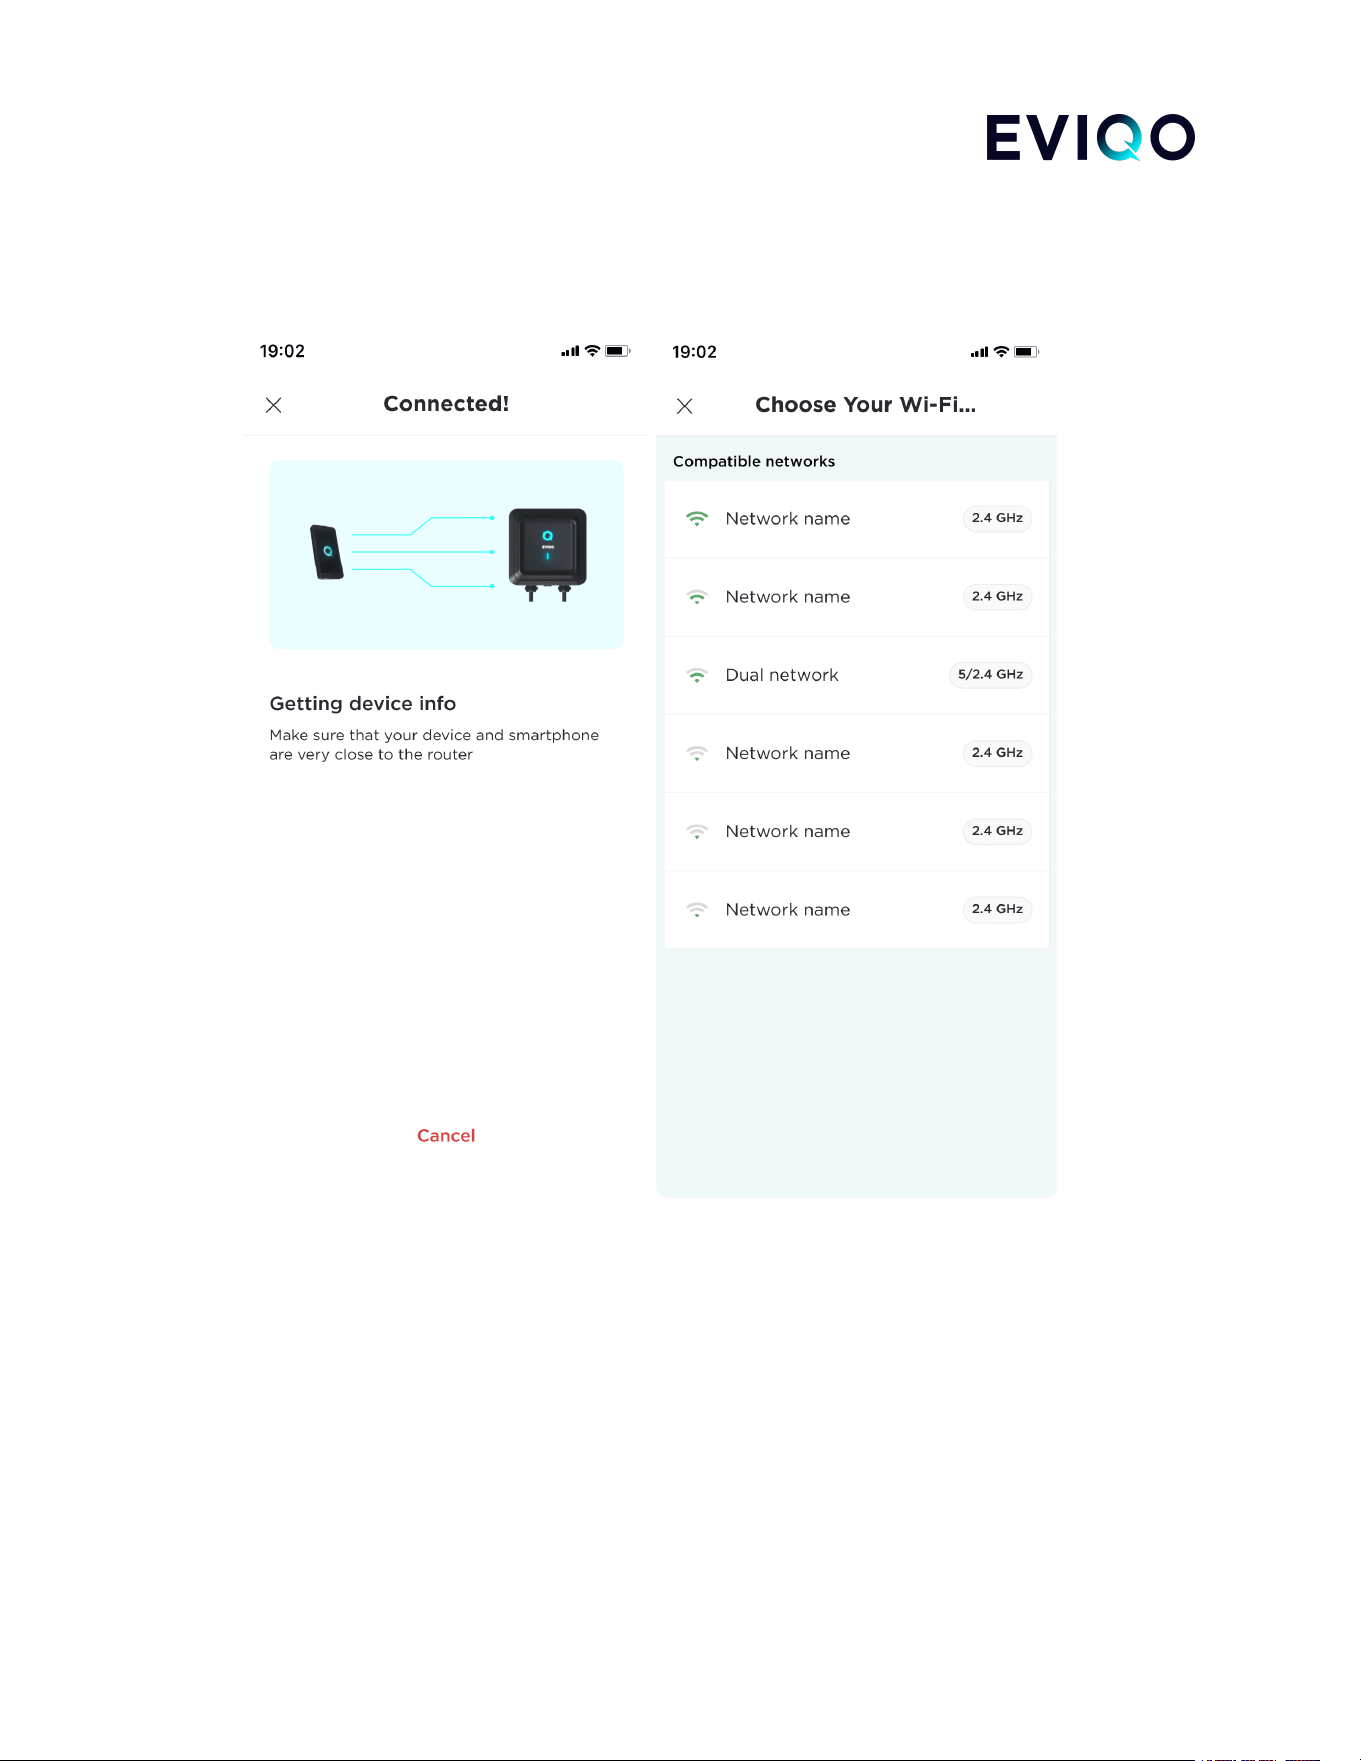
2.3. Once your smartphone is connected, you have to choose your Wifi network which should be 2.4 GHz
only.
eviqo.io 7
3. Plug and Charge
3.1. Once your account is set up, to start charging, simply plug in the connector to your vehicle. Once the
connector is plugged in, the charging session will start automatically (“Plug and Charge” function is
turned on by default right out of the box).
Enjoy the convenience of smart charging by adjusting the current using the Amperage Slider (referred to as
"the Slider"). Please allow up to 5 seconds for the charging dashboard to reflect the supplied amperage
and power. Please note that the default amperage is set to 40A. To get the maximum power of 48A,
hardwire installation to a dedicated circuit of 60A is required. To turn on 48A, please choose “3” on the Dial
Switch located inside the device (check the EVIQO Installation Guide, page 12, for the details).
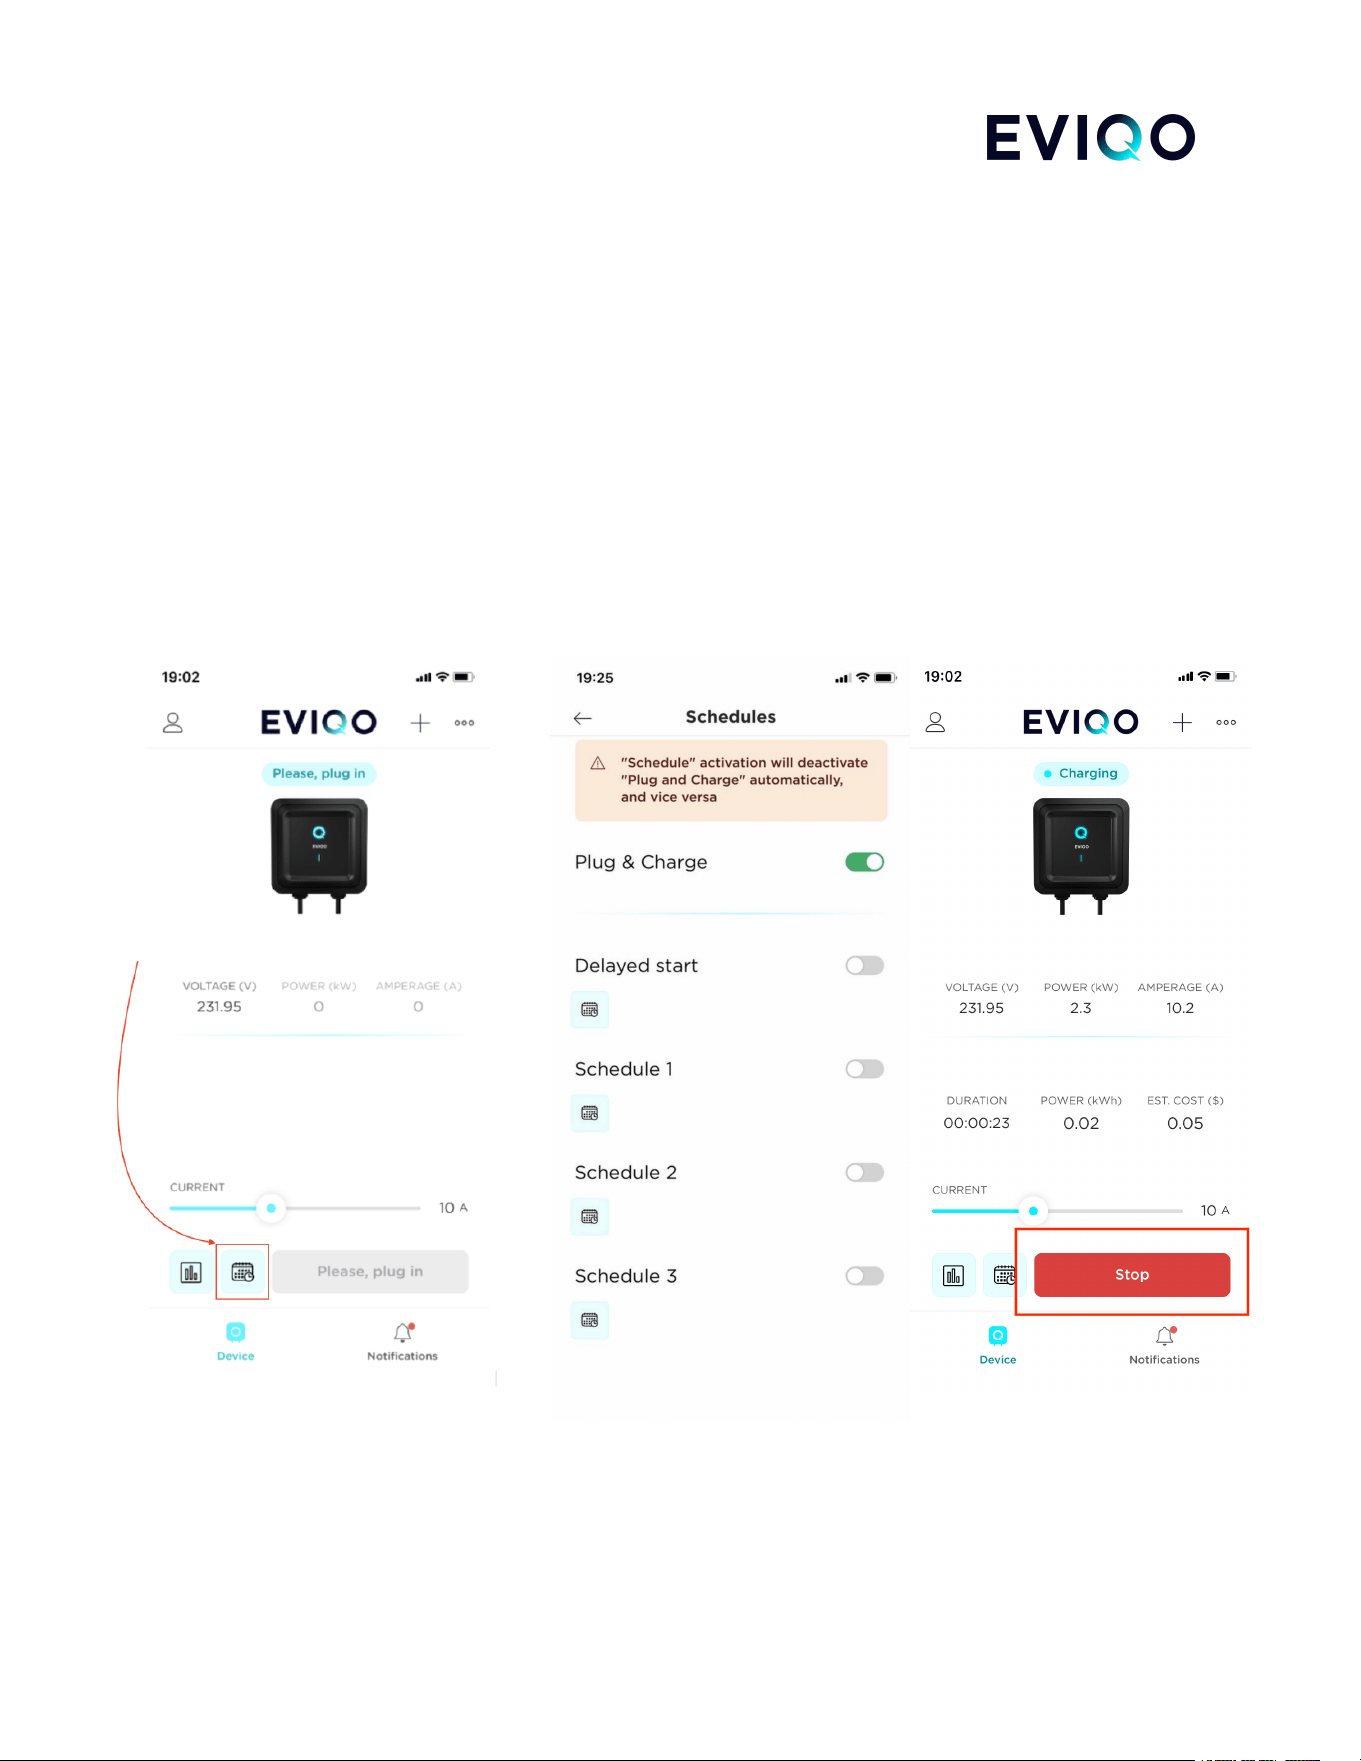
To end the charging session, simply press the "Stop" button. Please note, that by pressing the “Stop” the
“Plug and Charge” function will remain active and a new charging session will be initiated once you plug in
the connector the next time.
eviqo.io 8
3.2. Plug and Charge deactivates other mutually exclusive smart functions of your EVIQO Smart EV
Charger, such as the Schedule and the Delayed start (see pages 11 and 16 respectively).
If your EV charger is plugged in but Plug and Charge is switched off, no charging session will be initiated.
Switching on the Plug and Charge function activates the charging session automatically. Similarly, if the
connector is plugged in, turning on the Plug and Charge function will initiate the charging session
automatically.
eviqo.io 9
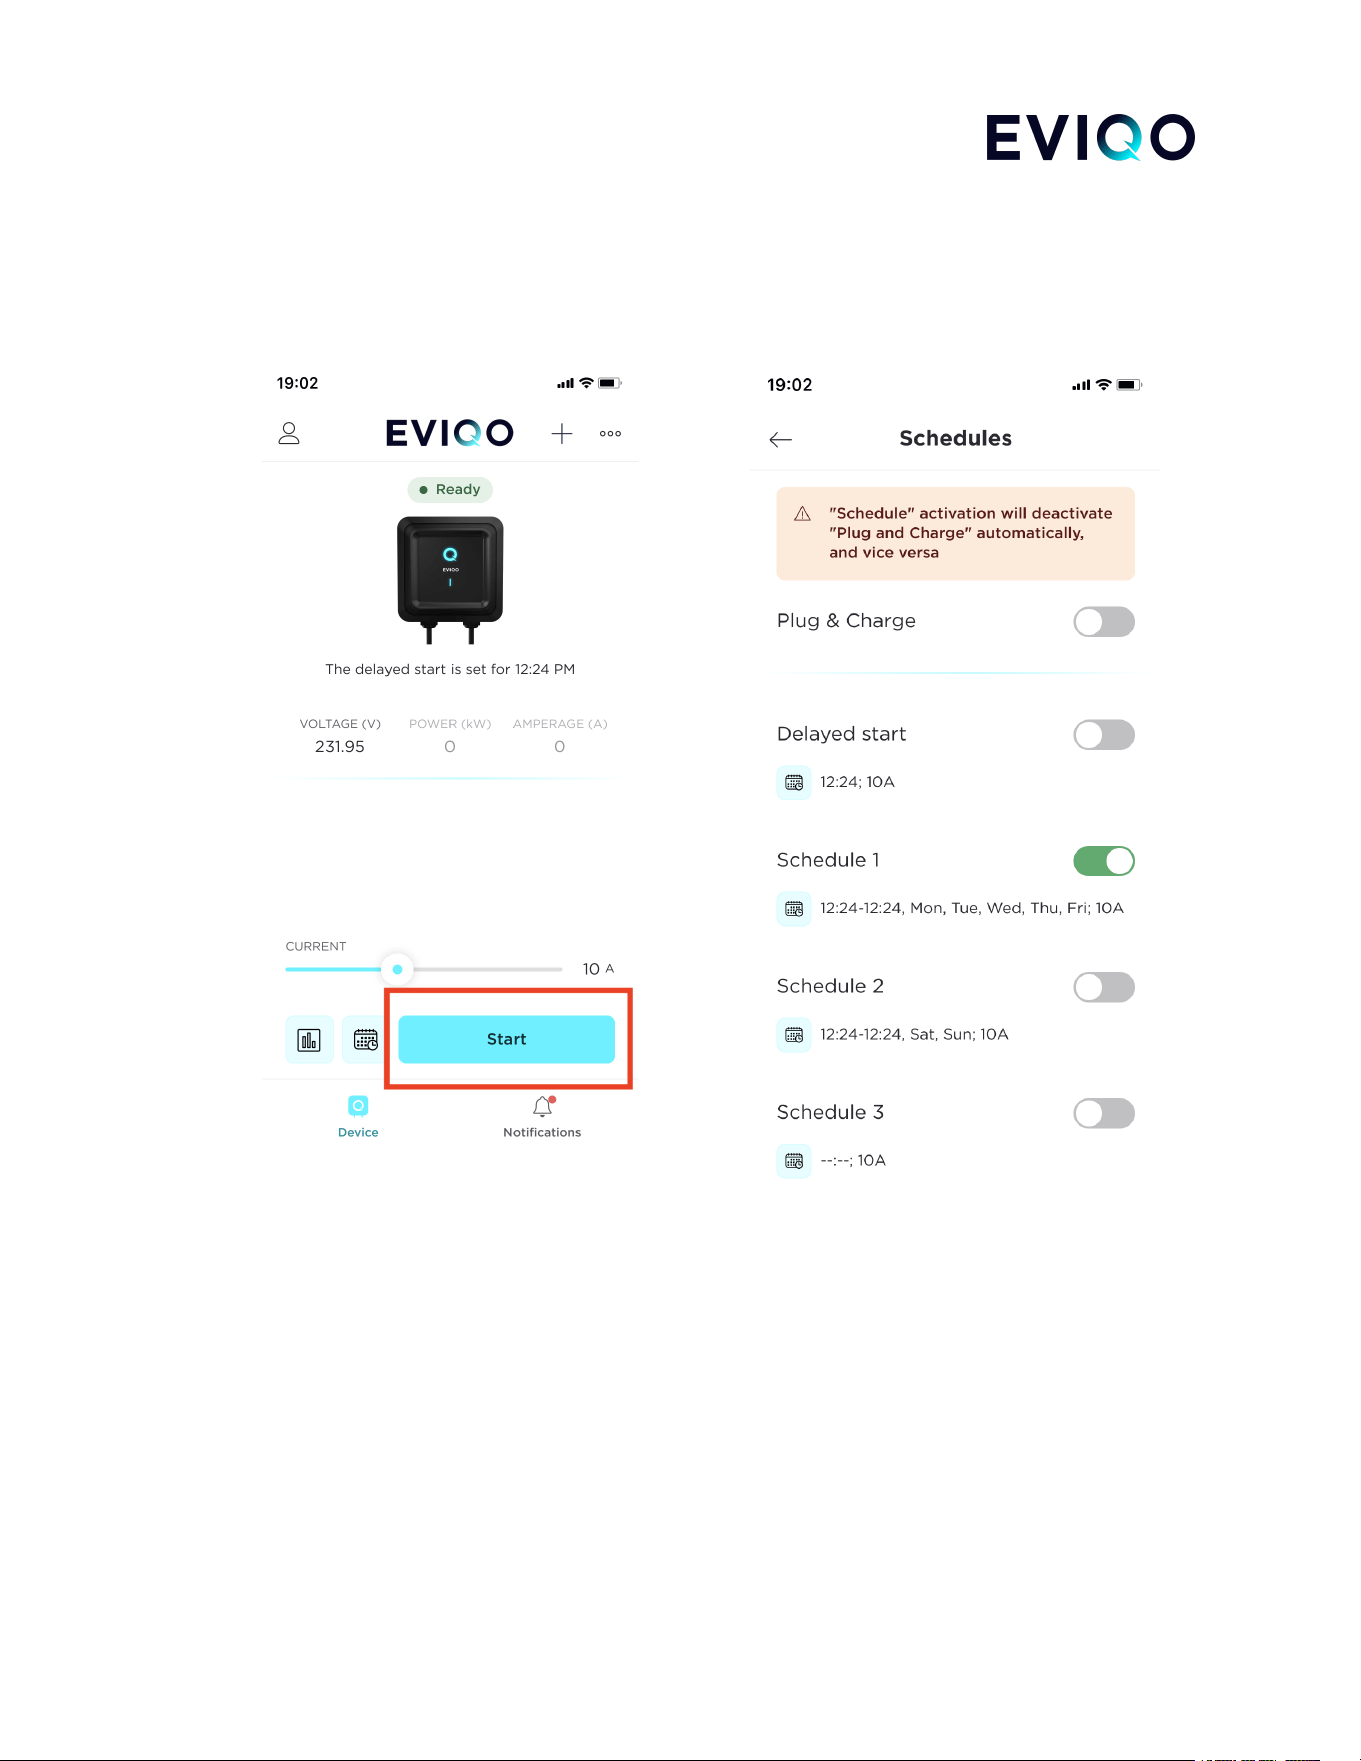
3.3. If you do not want to use the Plug and Charge function and automatic start of the charging once the
connector is plugged in, you can turn it off and initiate the charging session simply by pressing the “Start”
button on the EVIQO app’s dashboard.
eviqo.io 10
4. Schedules
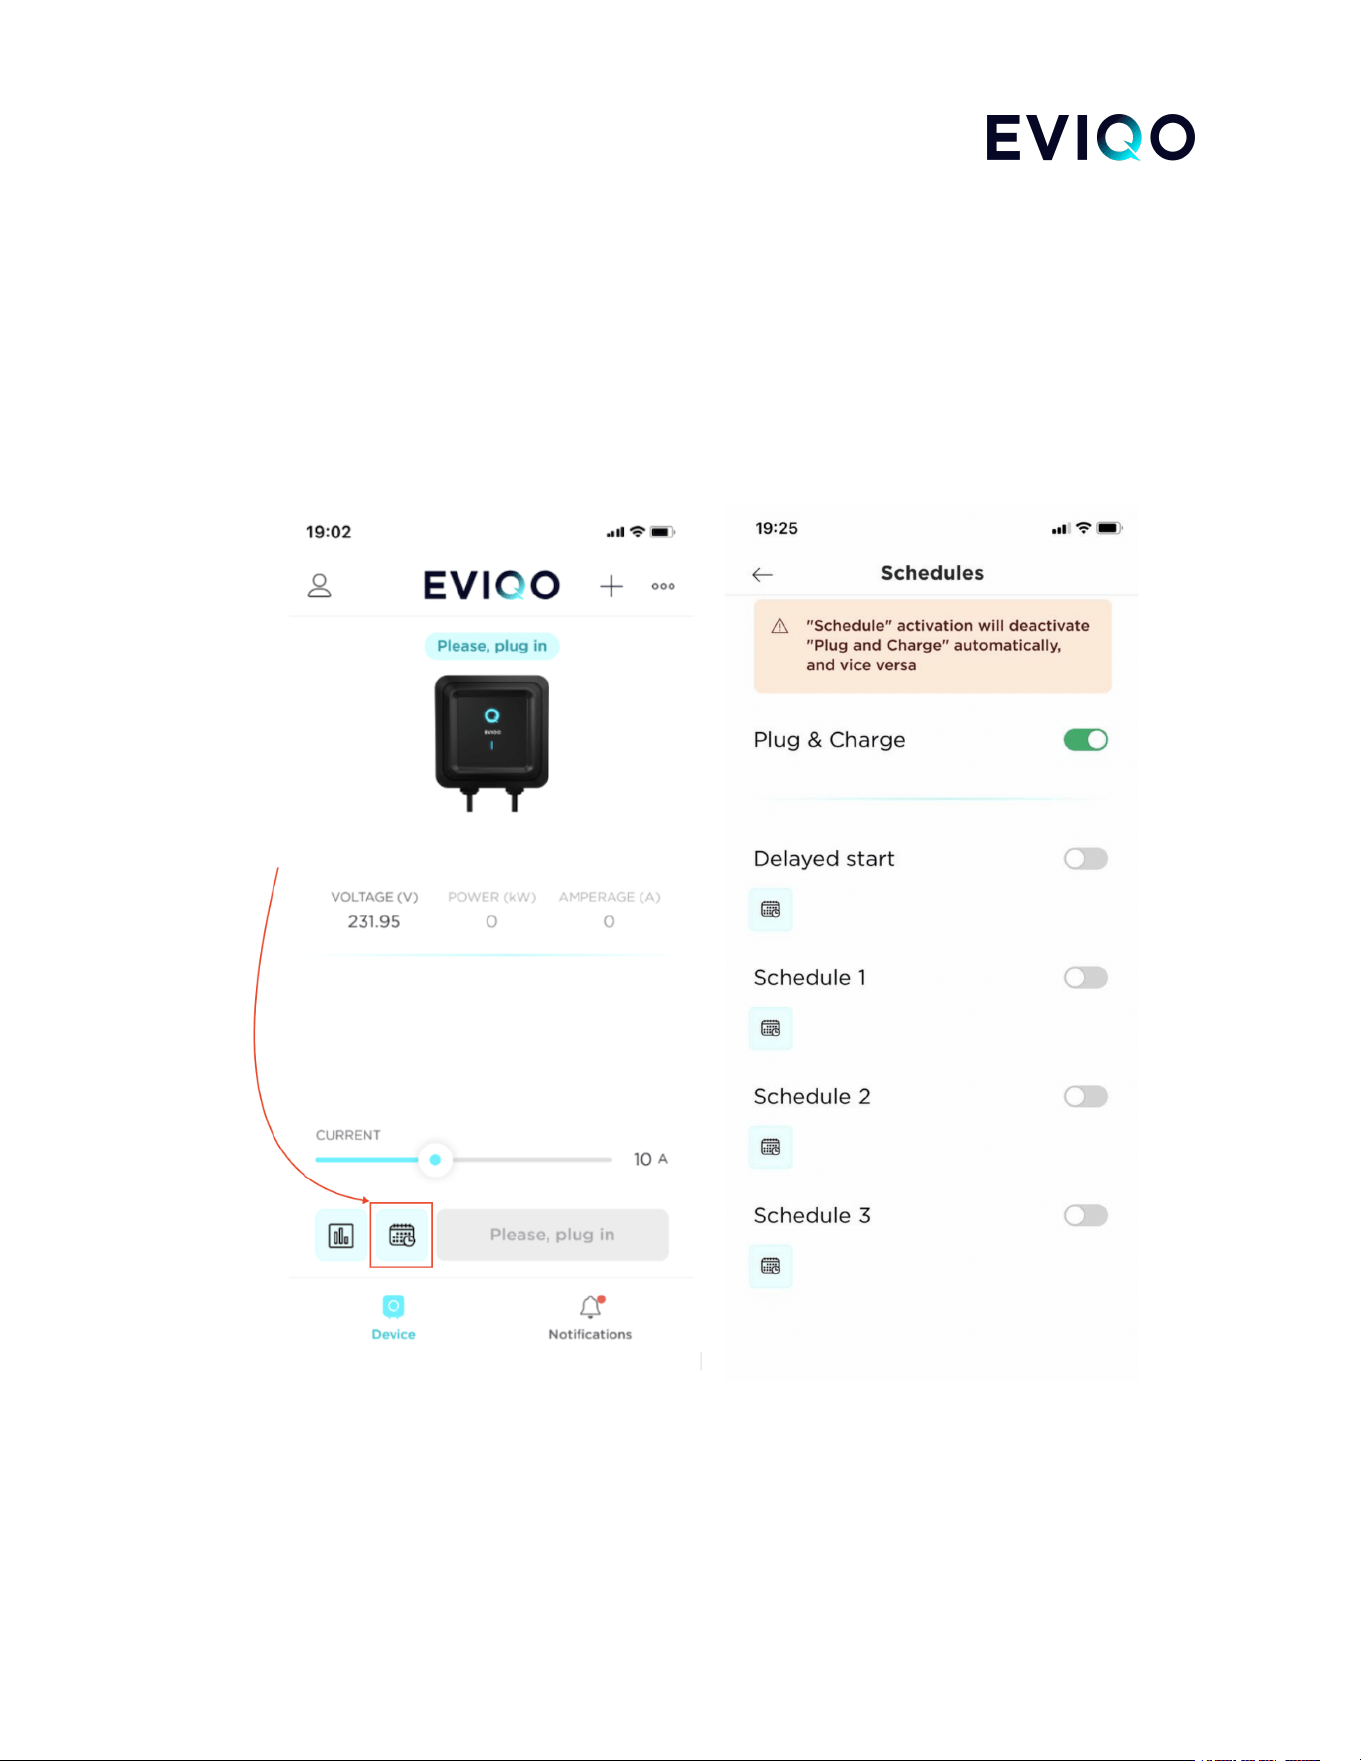
4.1. The EVIQO Smart EV Charger enables you to save on electricity costs by charging your vehicle during
off-peak hours. Choose days, Start Time and End Time for your Schedule. You can also pre-set specific
amperage for the scheduled charging session. You can set up to 3 different Schedules.
Please note that activating your Schedule (as well as the Delayed Start) will deactivate the Plug and Charge
function automatically, and vice versa. These smart functions are mutually exclusive and cannot work
simultaneously.
eviqo.io 11
4.2. If your Schedule is set for a specific time and you miss the start time, there's no need to worry. Once
you plug in the connector within the time period chosen for the Schedule, the charging session will start
automatically. You can also turn on the reminders to notify you about the upcoming scheduled charging
session 30 minutes, 1 hour or 2 hours before the scheduled start time. Same reminders can notify you
about the start of the Delayed Start charging session.
Please be aware that the charging process will be activated at the designated time providing the amperage
you have specified in the Schedule settings. You can change the pre-set amperage anytime during the
scheduled charging session by using the Slider on your dashboard. This will not change the amperage set
in the Schedule settings and the next scheduled charging session will start with the amperage set in the
Schedule settings. Once the scheduled charging with a pre-set amperage finishes, the Slider will get back
to the value set before the Schedule. Should you change the amperage during the Schedule, the amperage
you set will stay in place after the Schedule too.
eviqo.io 12
4.3. To terminate a charging session initiated by the Schedule before it’s completed, you can either press
the "Stop" button or unplug the connector.
For your convenience, if you unplug the connector and plug it back into the vehicle before the End Time of
the Schedule is reached - the charging will continue as a new charging session. The charging session will
stop when the End Time set in the Schedule is reached.
If the scheduled charging session is stopped by pressing the “Stop” button - the user will need to press
“Start” to initiate a new charging session.
eviqo.io 13
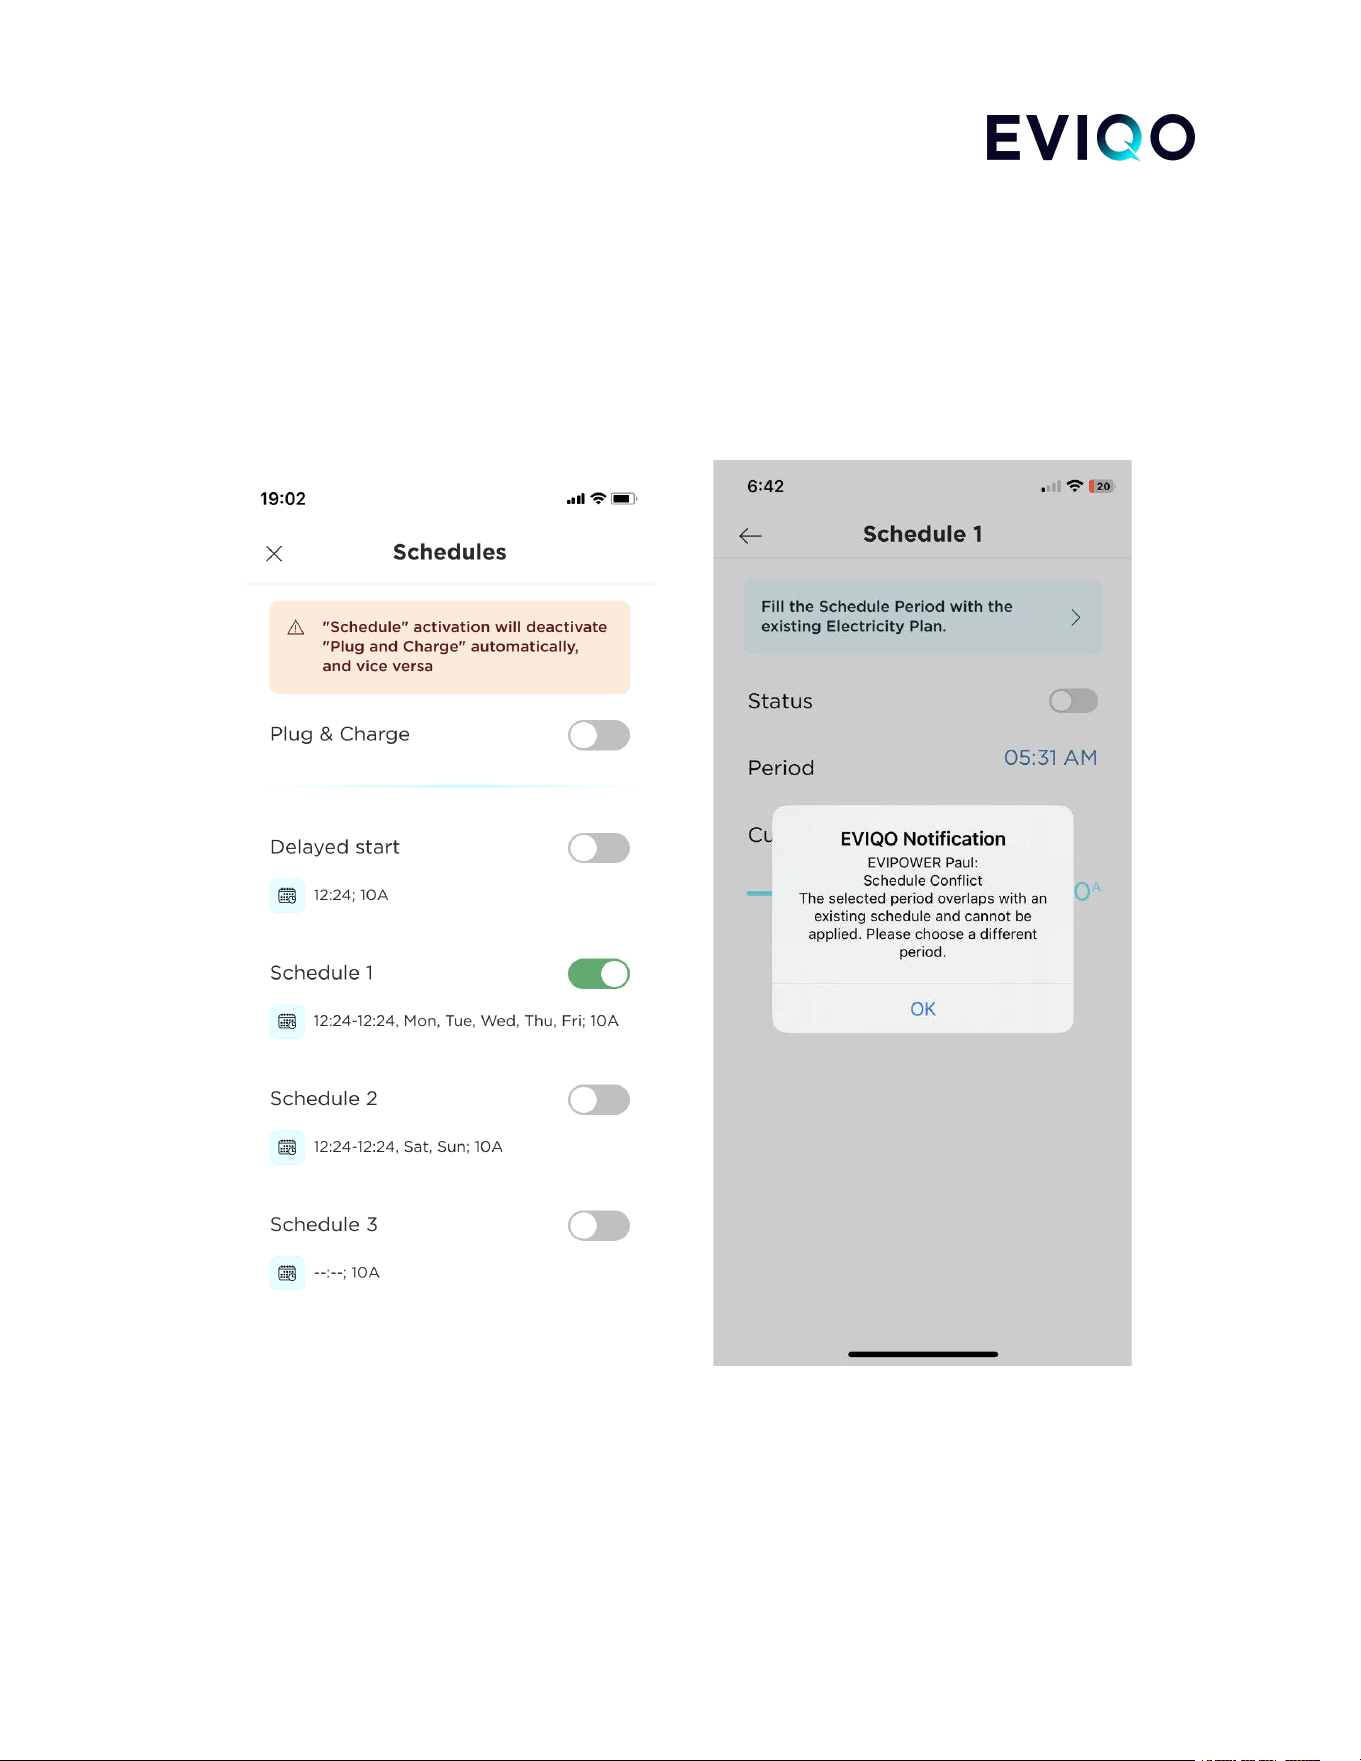
4.4. You can create multiple Schedules for your convenience. Please avoid Schedule overlaps (including
overlaps with the Delayed Start). The system will kindly notify you if your new Schedule overlaps with the
existing Schedule so you can choose a new time period which would not overlap with any of the existing
Schedules or Delayed Start sessions set.
If you still want to set a new Schedule with the specific time period which is conflicting to the existing
Schedule or Delayed Start and overlaps with it, you have to reset the time period of the existing Schedule.
eviqo.io 14
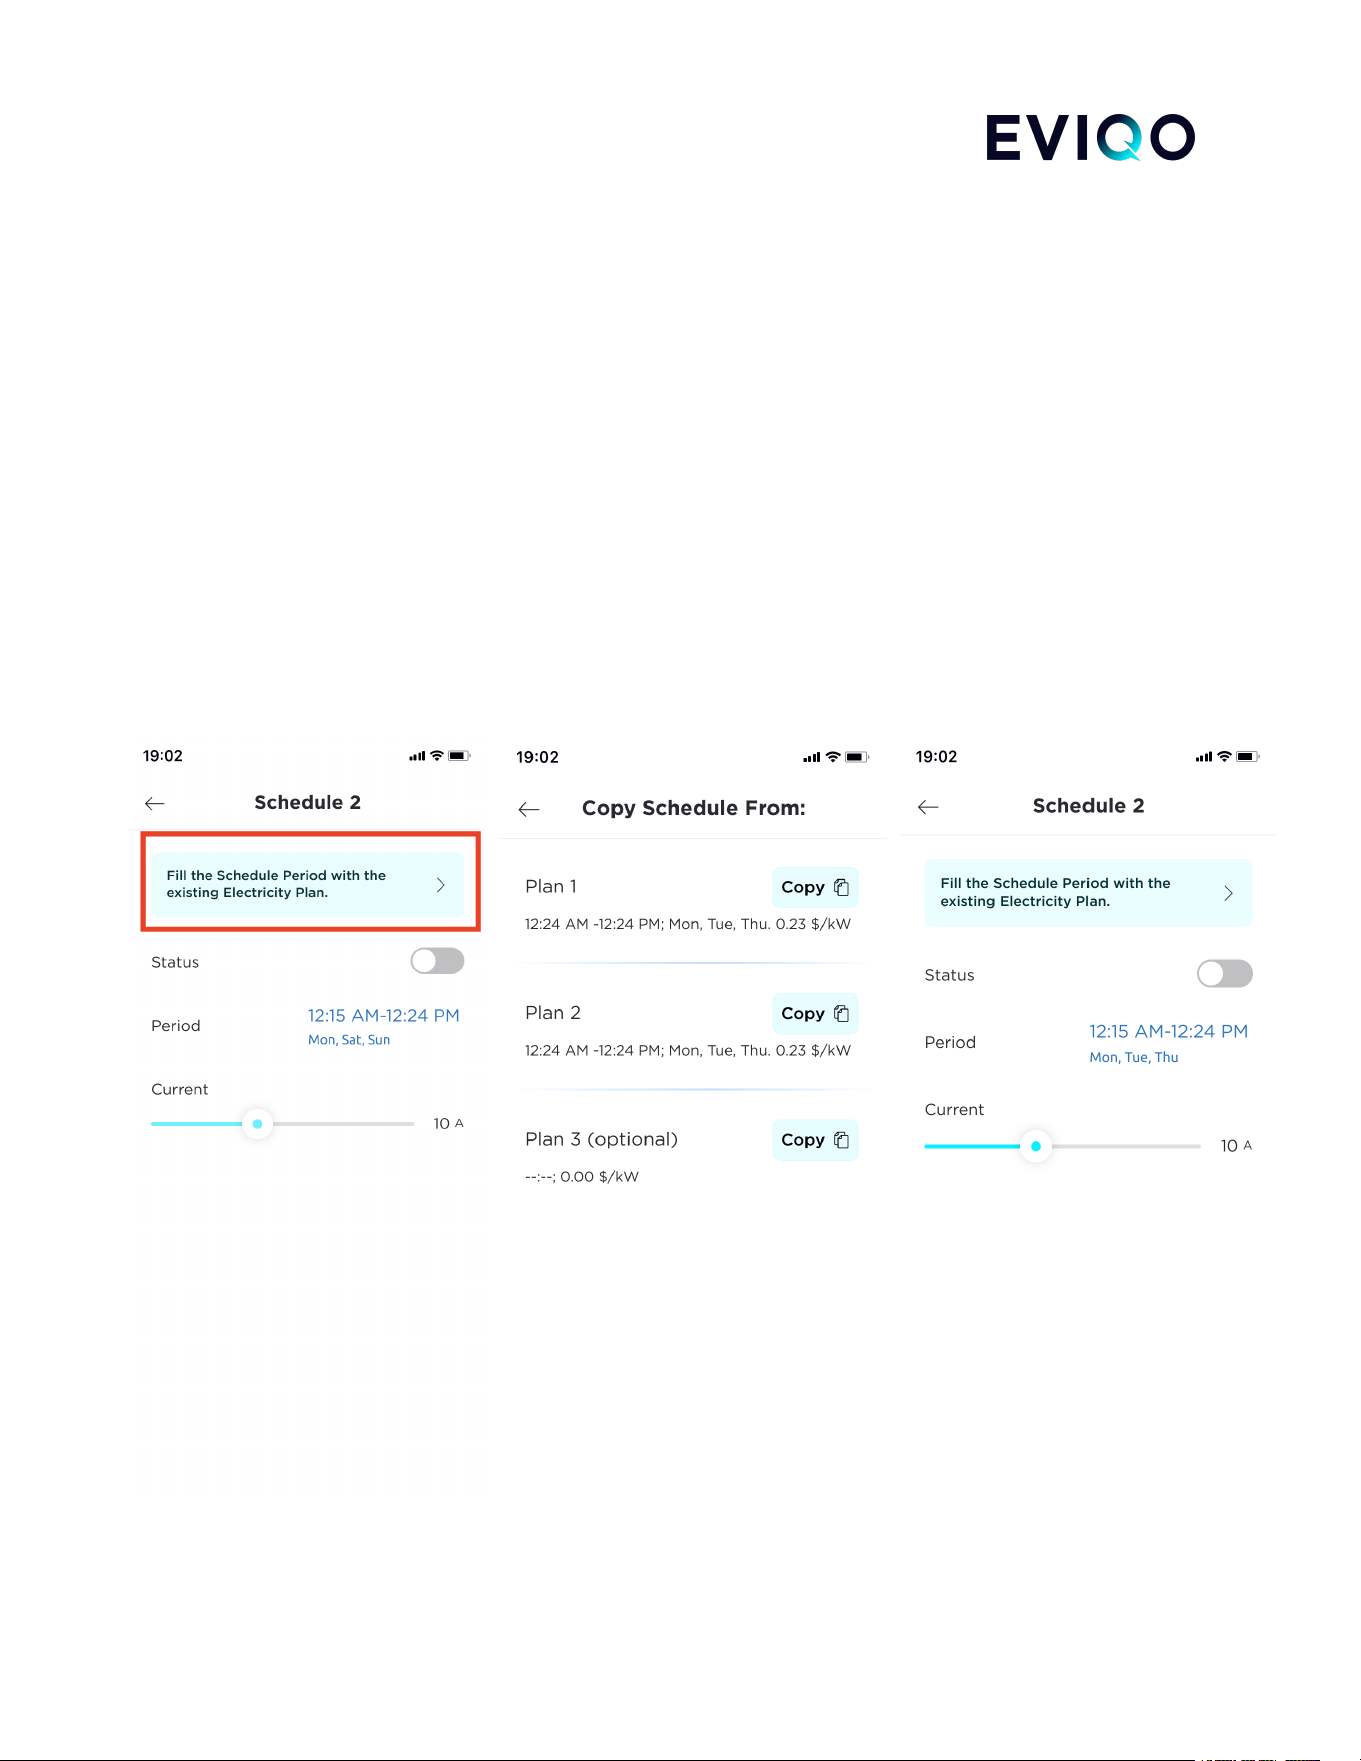
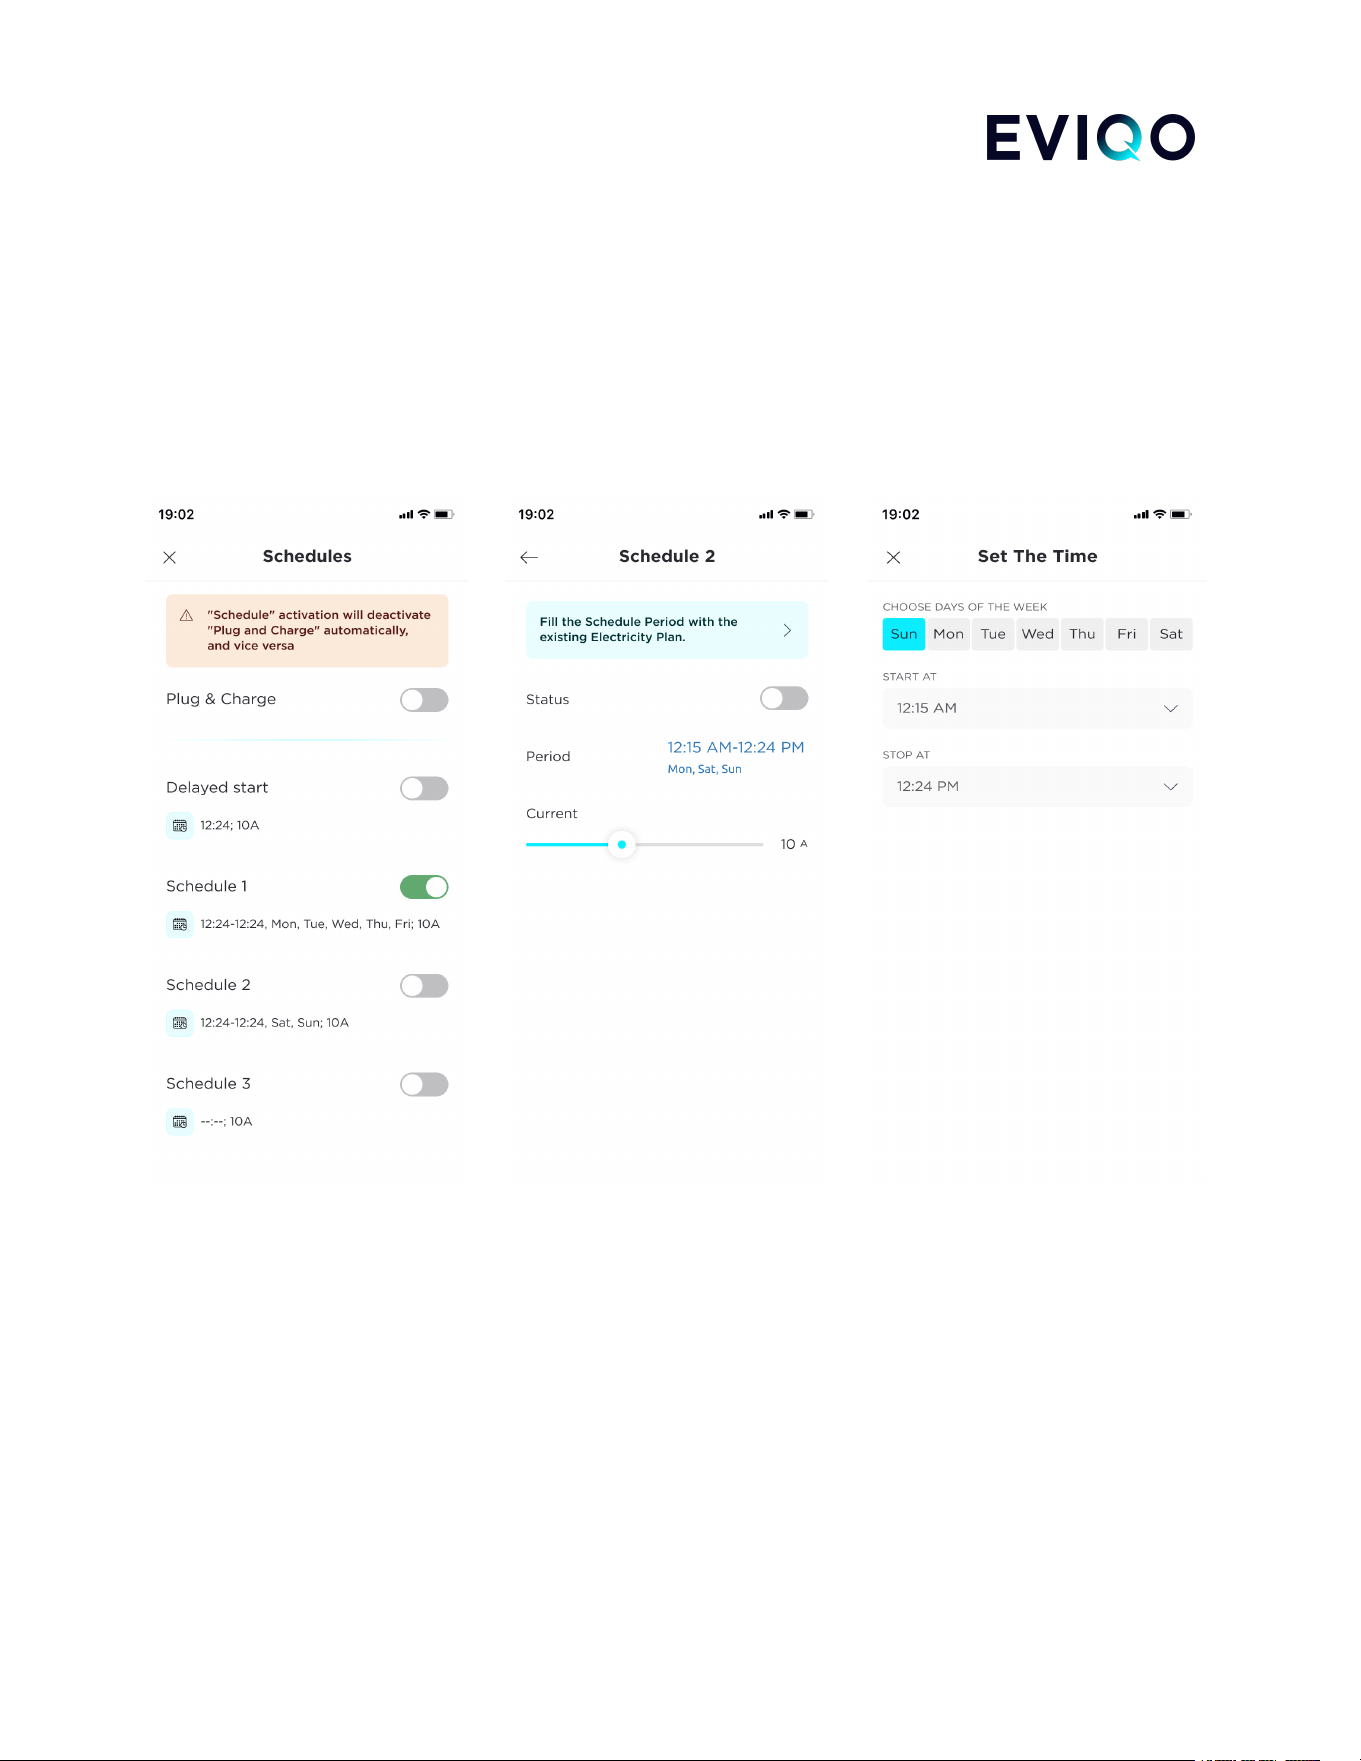
4.5 The EVIQO app provides smart tips, including the convenient feature of automatically filling the time
period for your Schedule using the cheaper electricity rates from your selected Electricity Plans. This
empowers you to effortlessly set up recurring charging sessions during the most cost-effective periods.
To utilize this feature, select your desired Schedule, and simply tap on the highlighted tip (marked in a red
box). From there, choose the Electricity Plan you wish to use, and the corresponding time period will be
automatically populated in the Schedule for your convenience.
During the charging session initiated by the Schedule, the estimated costs will be calculated based on the
rate of the corresponding Electricity Plan.
Please be aware that in order to copy the time period of your Electricity Plan to your Schedule, you
need to ensure that the Plan is filled with the correct time period and the corresponding price per
kW/h. For detailed instructions on how to fill out the Electricity Plans, please refer to page 18 of the
EVIQO app Guide. This section will provide you with the necessary guidance to accurately input the
required information for effective schedule management.
eviqo.io 15
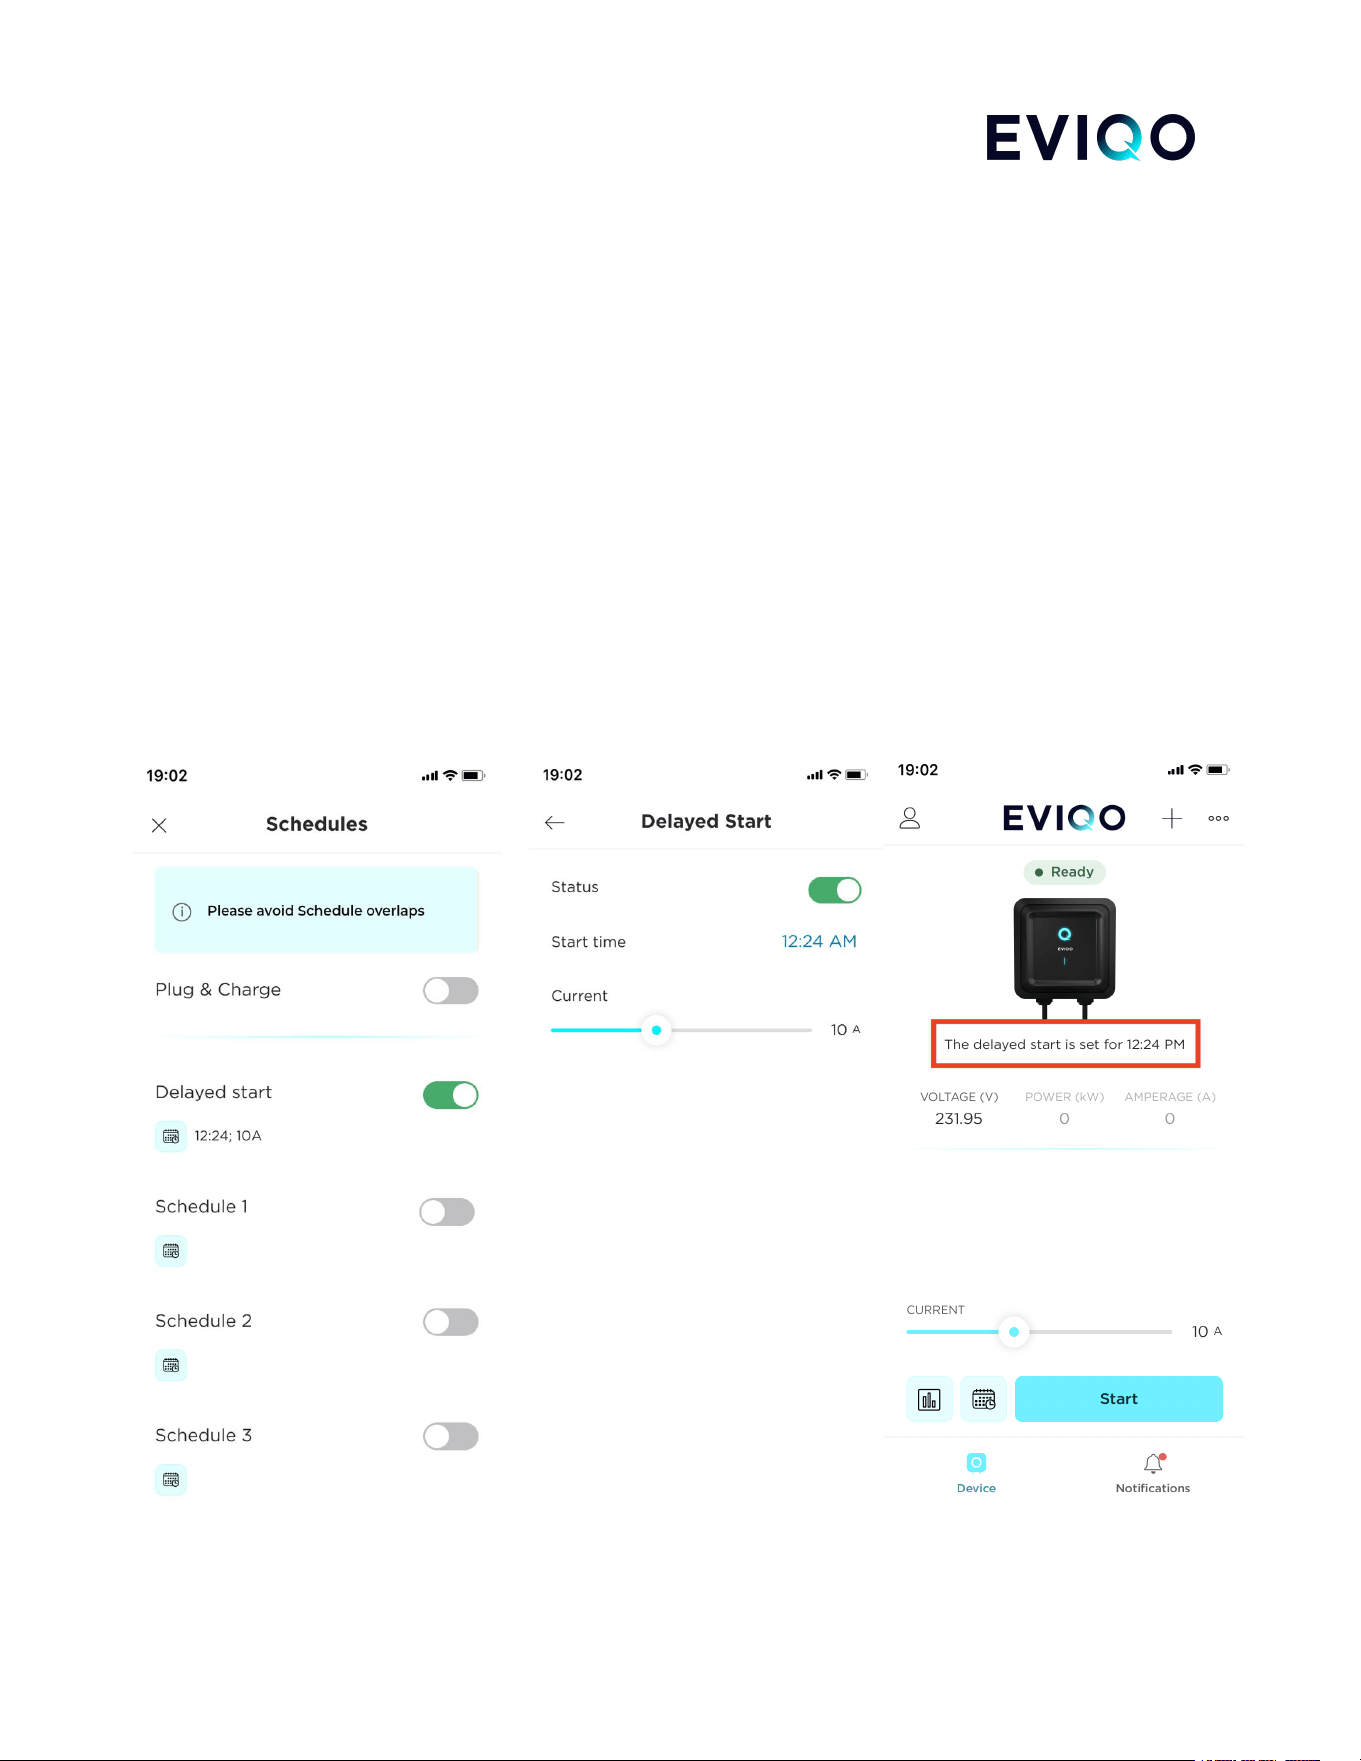
5. Delayed Start
5.1. The Delayed Start function initiates a one-time charging session at the specified time and with the
pre-set amperage on the closest date. If you wish to schedule charging for future dates, it is recommended
to use the Schedule.
Please be aware that activating the Delayed Start function (the same as Schedule) will automatically
deactivate the Plug and Charge feature, and vice versa.
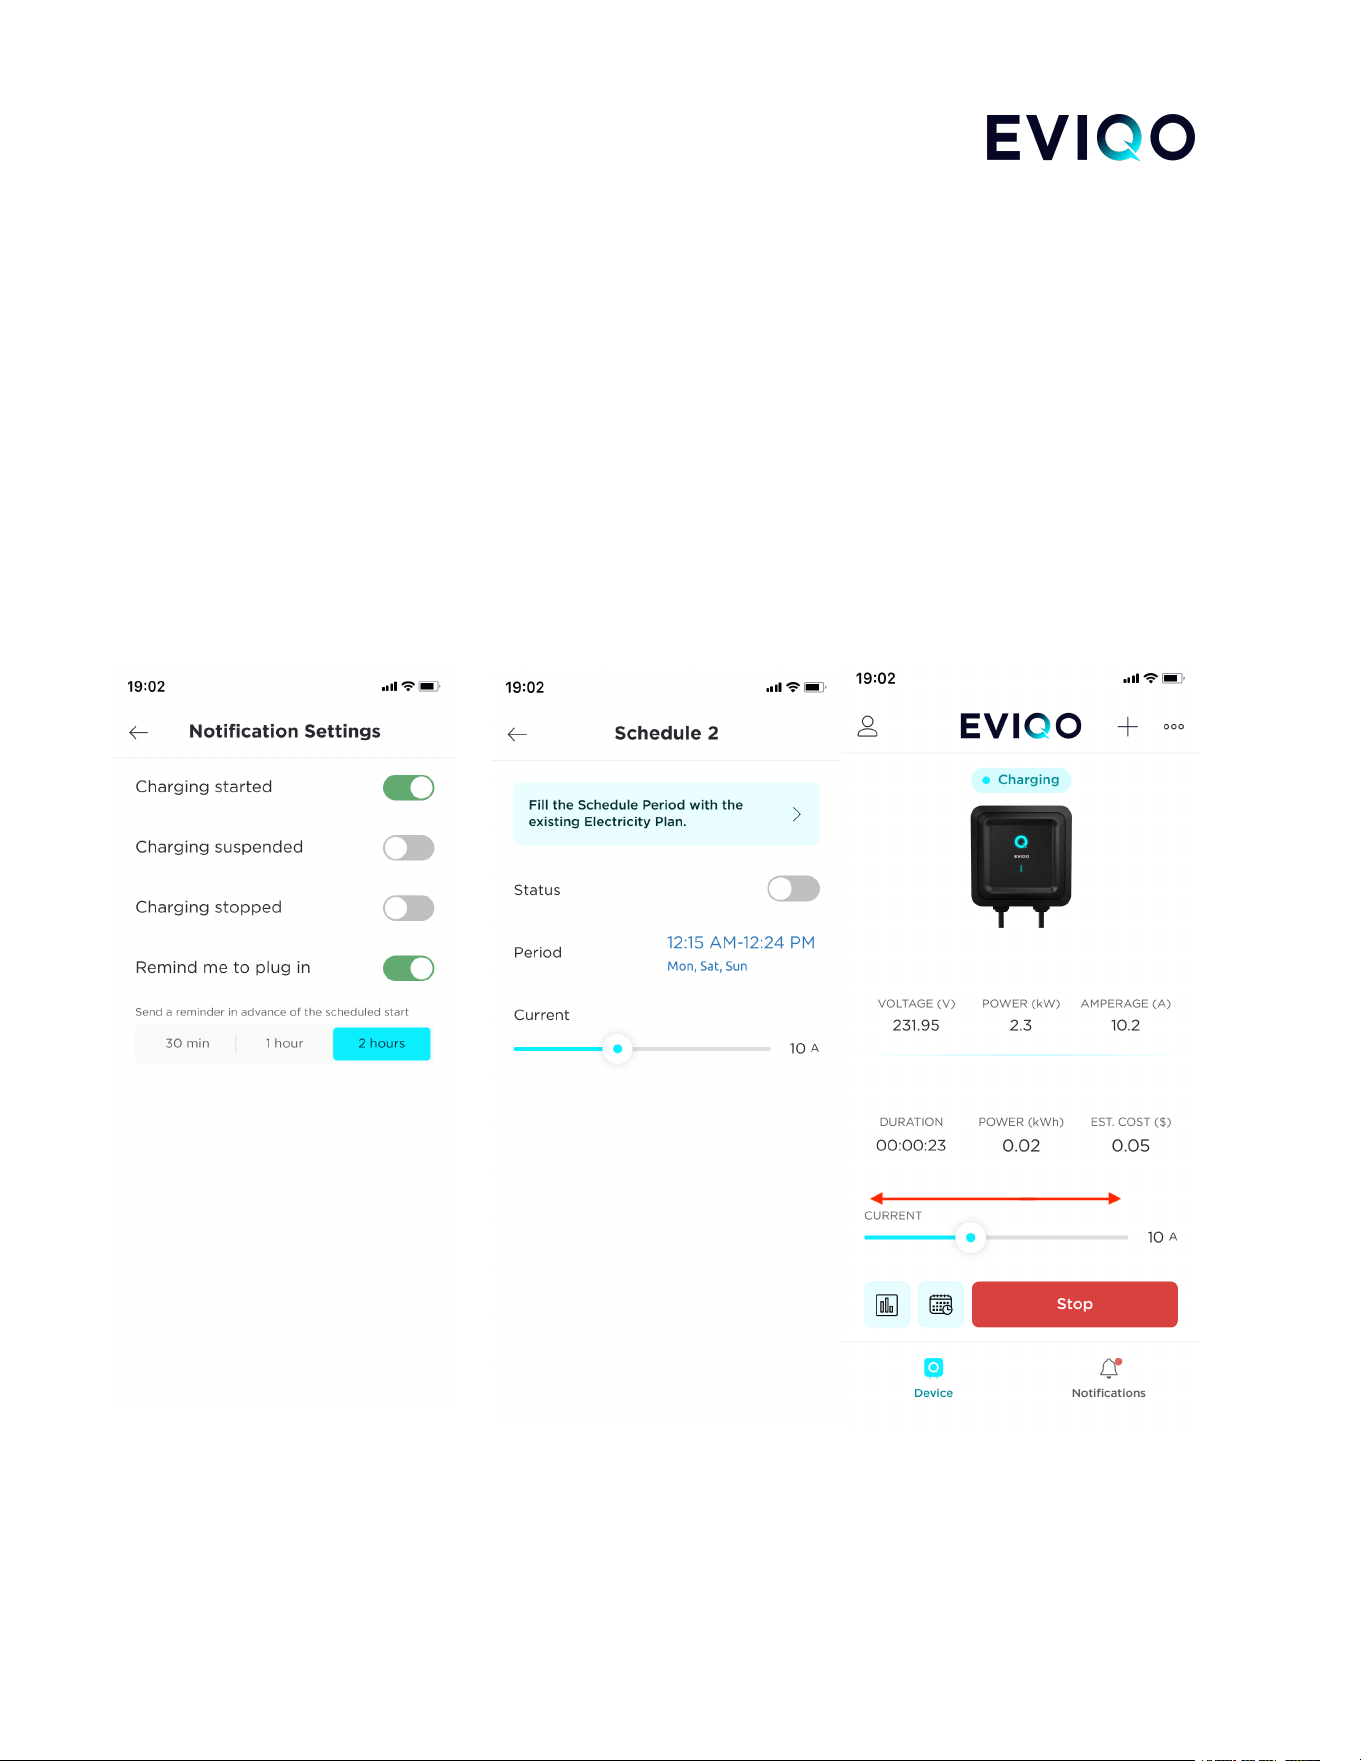
As far as Delayed Start is a one-off charging session (in contrast to the Schedule), you will see a
notification about the upcoming Delayed Start right on the dashboard (see a red box below). The
notification will disappear once you turn off the Delayed Start or after the Delayed Start has been initiated.
For your convenience, you can also set the “Remind me to plug in” notifications 30 minutes, 1 hour or 2
hours before the beginning of the charging session initiated by the Delayed Start.
eviqo.io 16
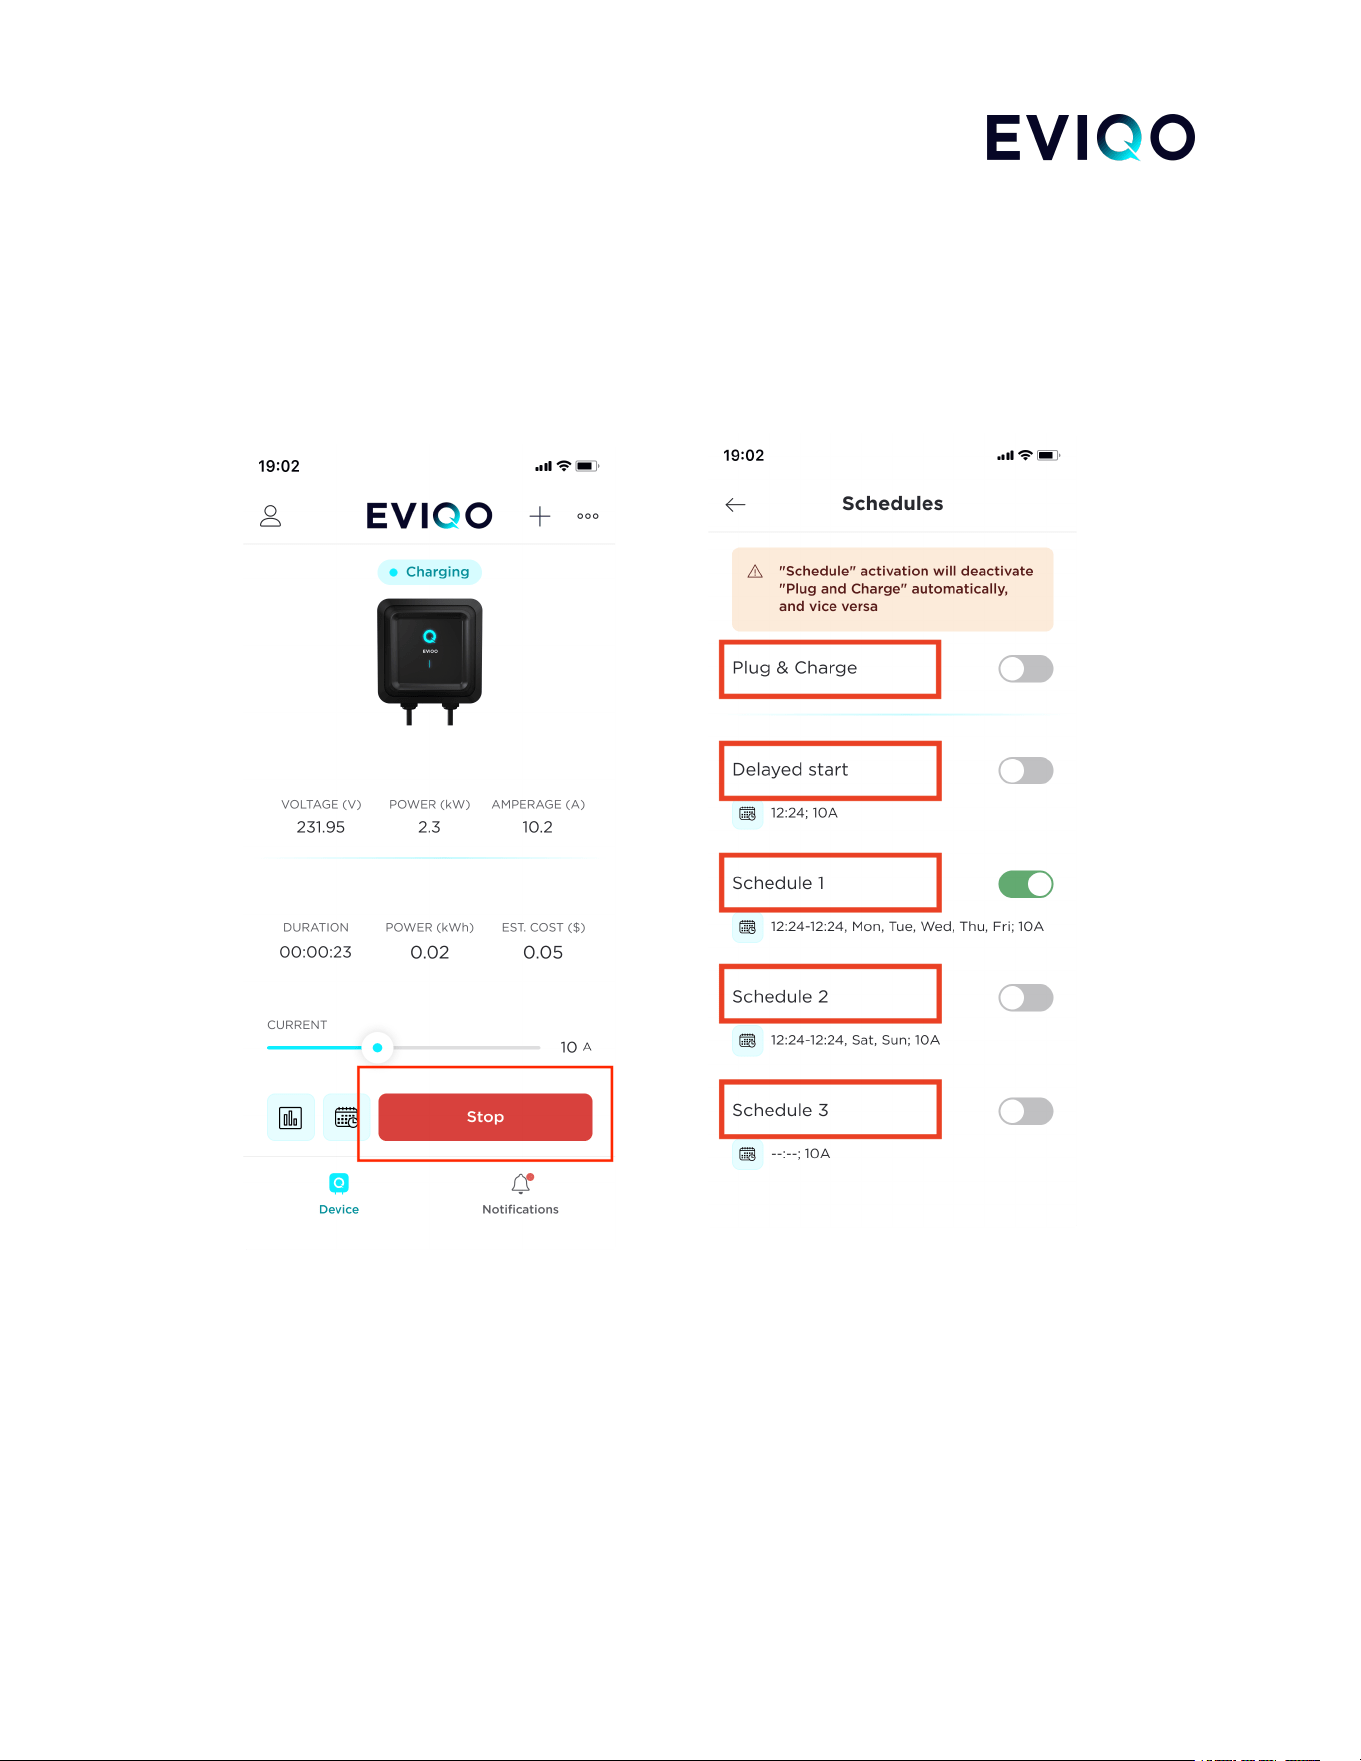
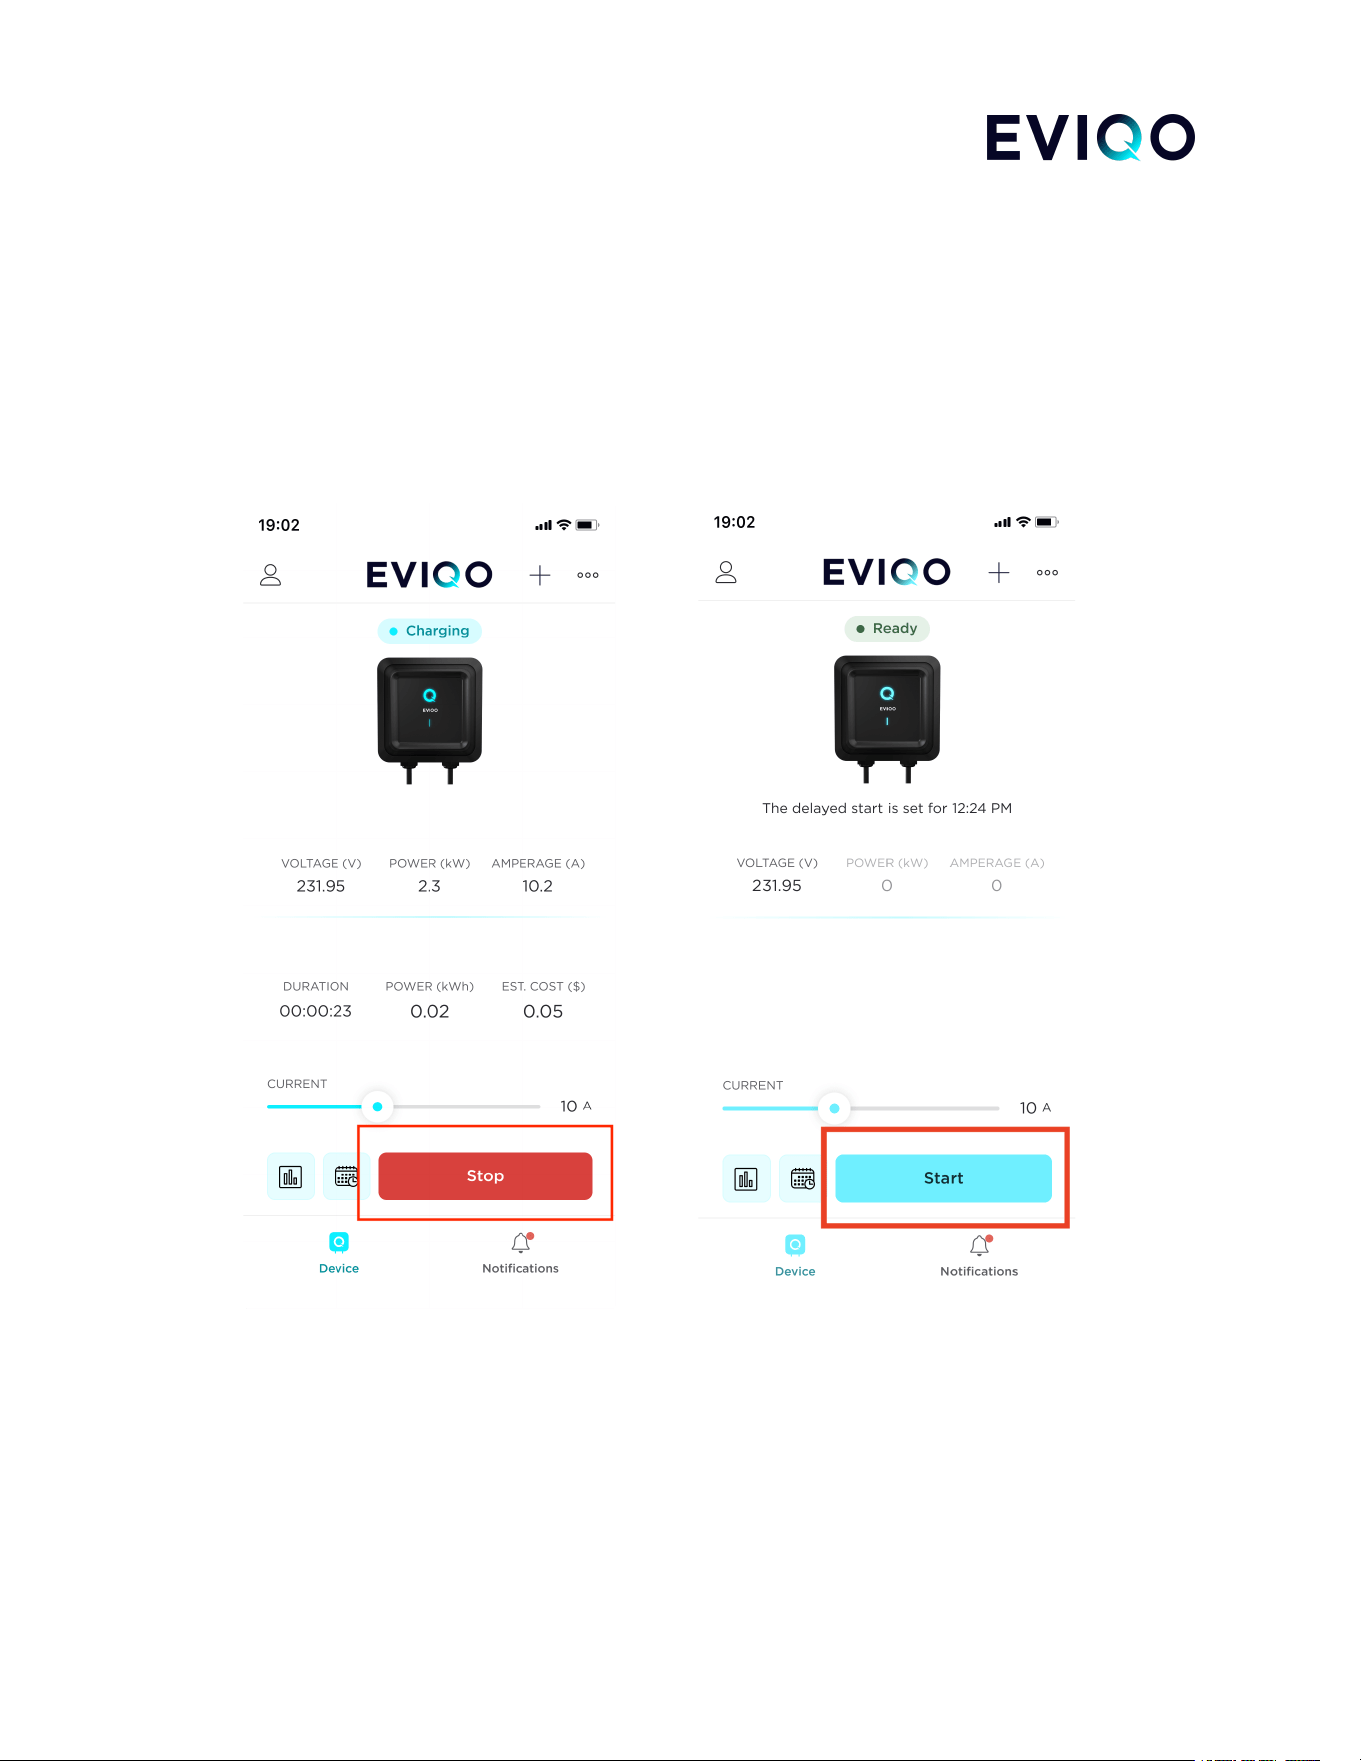
5.2. Since the charging session activated by the Delayed Start has no end time, to stop the charging,
simply press the “Stop” button or unplug the connector.
Please be aware that after ending a Delayed Start charging session and if no other smart functions are
enabled (such as Plug and Charge, Schedule, or another Delayed Start), you will need to press the "Start"
button to initiate a new charging session.
eviqo.io 17
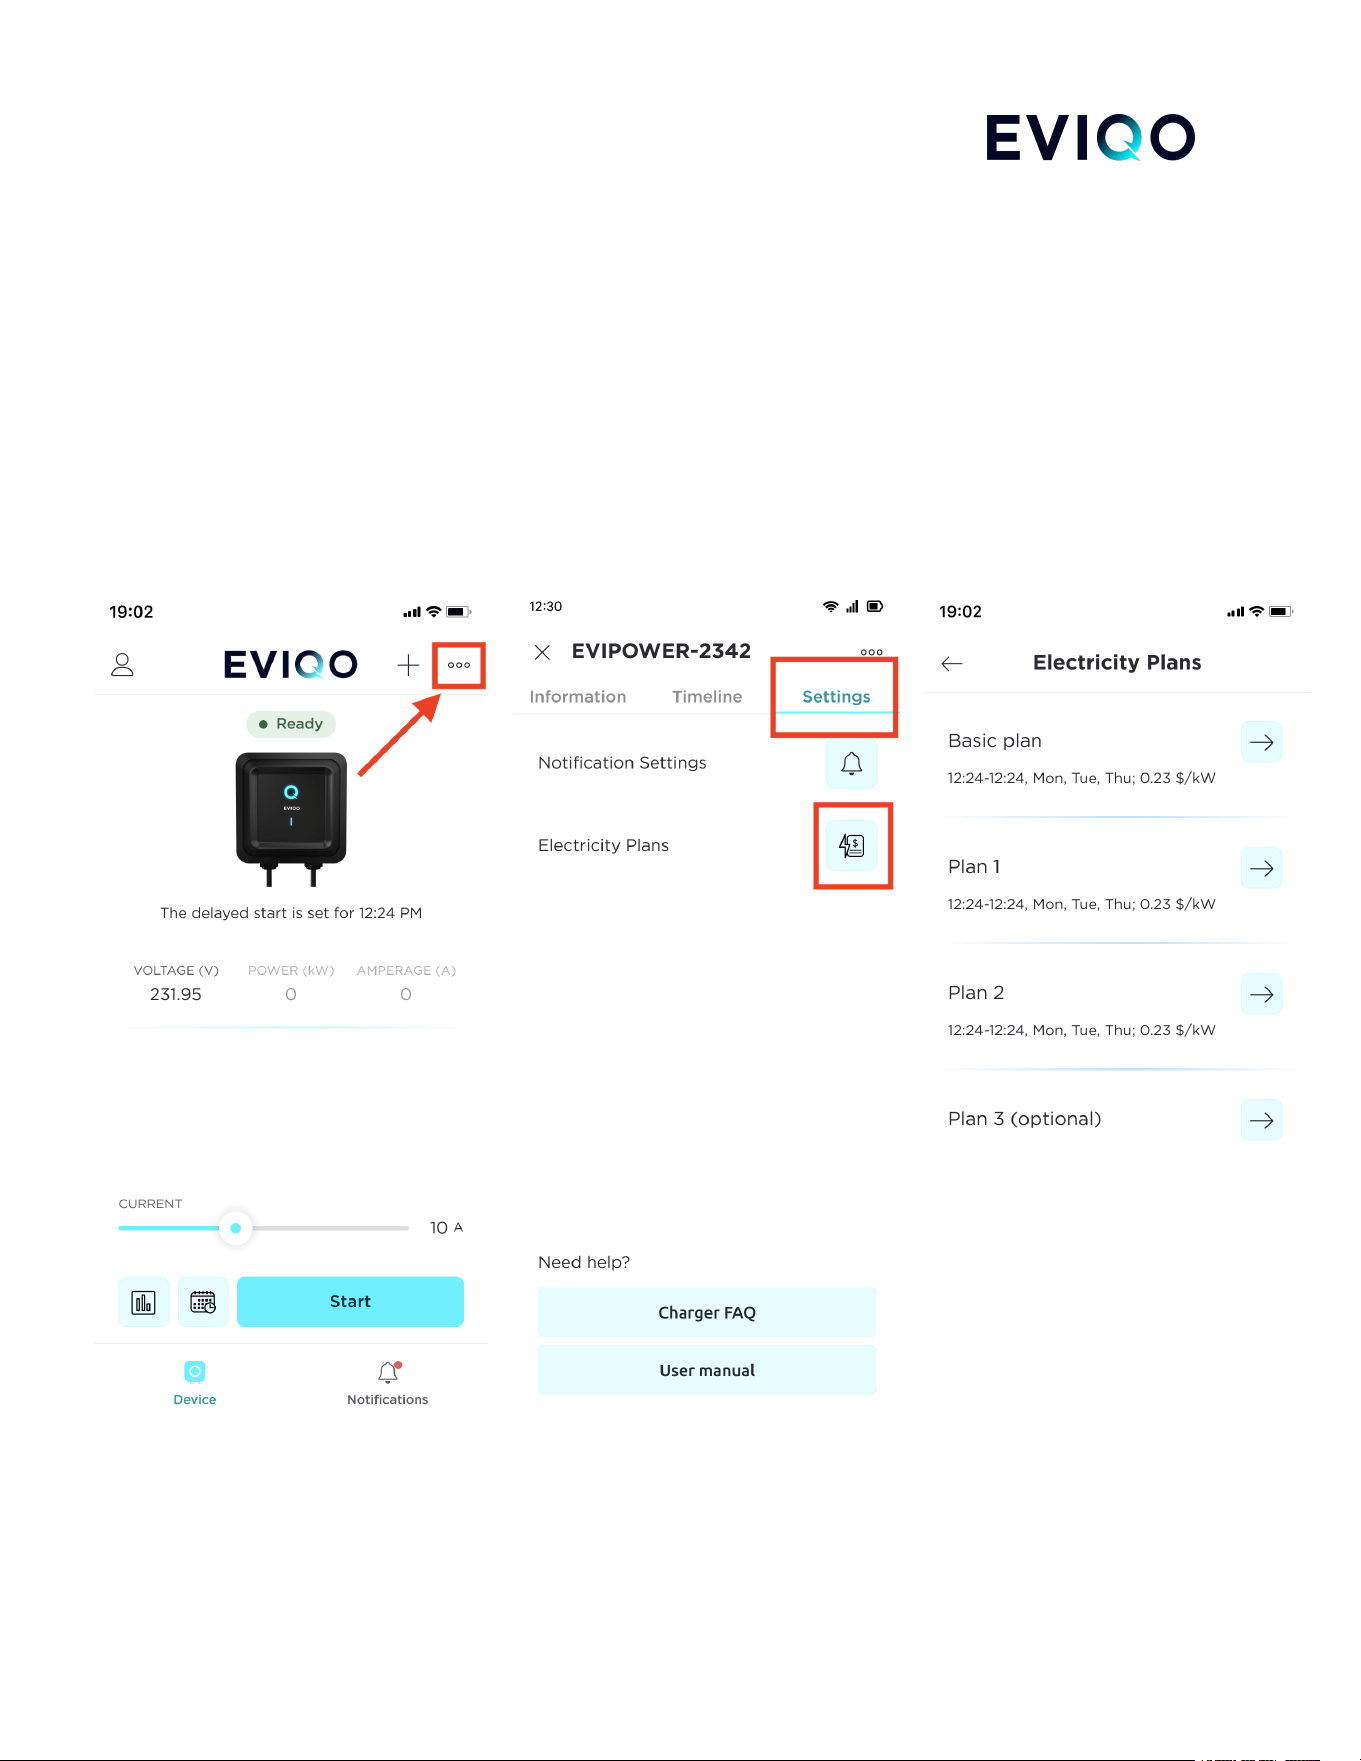
6. Electricity Plans
6.1. You can set multiple Electricity Plans that are effective in your area in order to track your estimated
cost of the charging sessions. Usually there’s Time-of-Use pricing for weekdays and weekends. For your
convenience, the EVIQO app allows you to set up to 3 different plans. The time periods which are not
covered by special Time-of-Use electricity rates (Plans 1, 2 or 3) will be covered by the Basic plan rate.
You can rename your plans for your convenience. To set the Electricity Plan, please choose the
correct time period and the price for kW/h. To accurately fill the time period and electricity rates per
1 kW/h, please ensure that you check your Time-of-Use tariffs. This will provide you with the
necessary information to set up the appropriate time periods and rates in the EVIQO app for
optimal charging efficiency.
eviqo.io 18
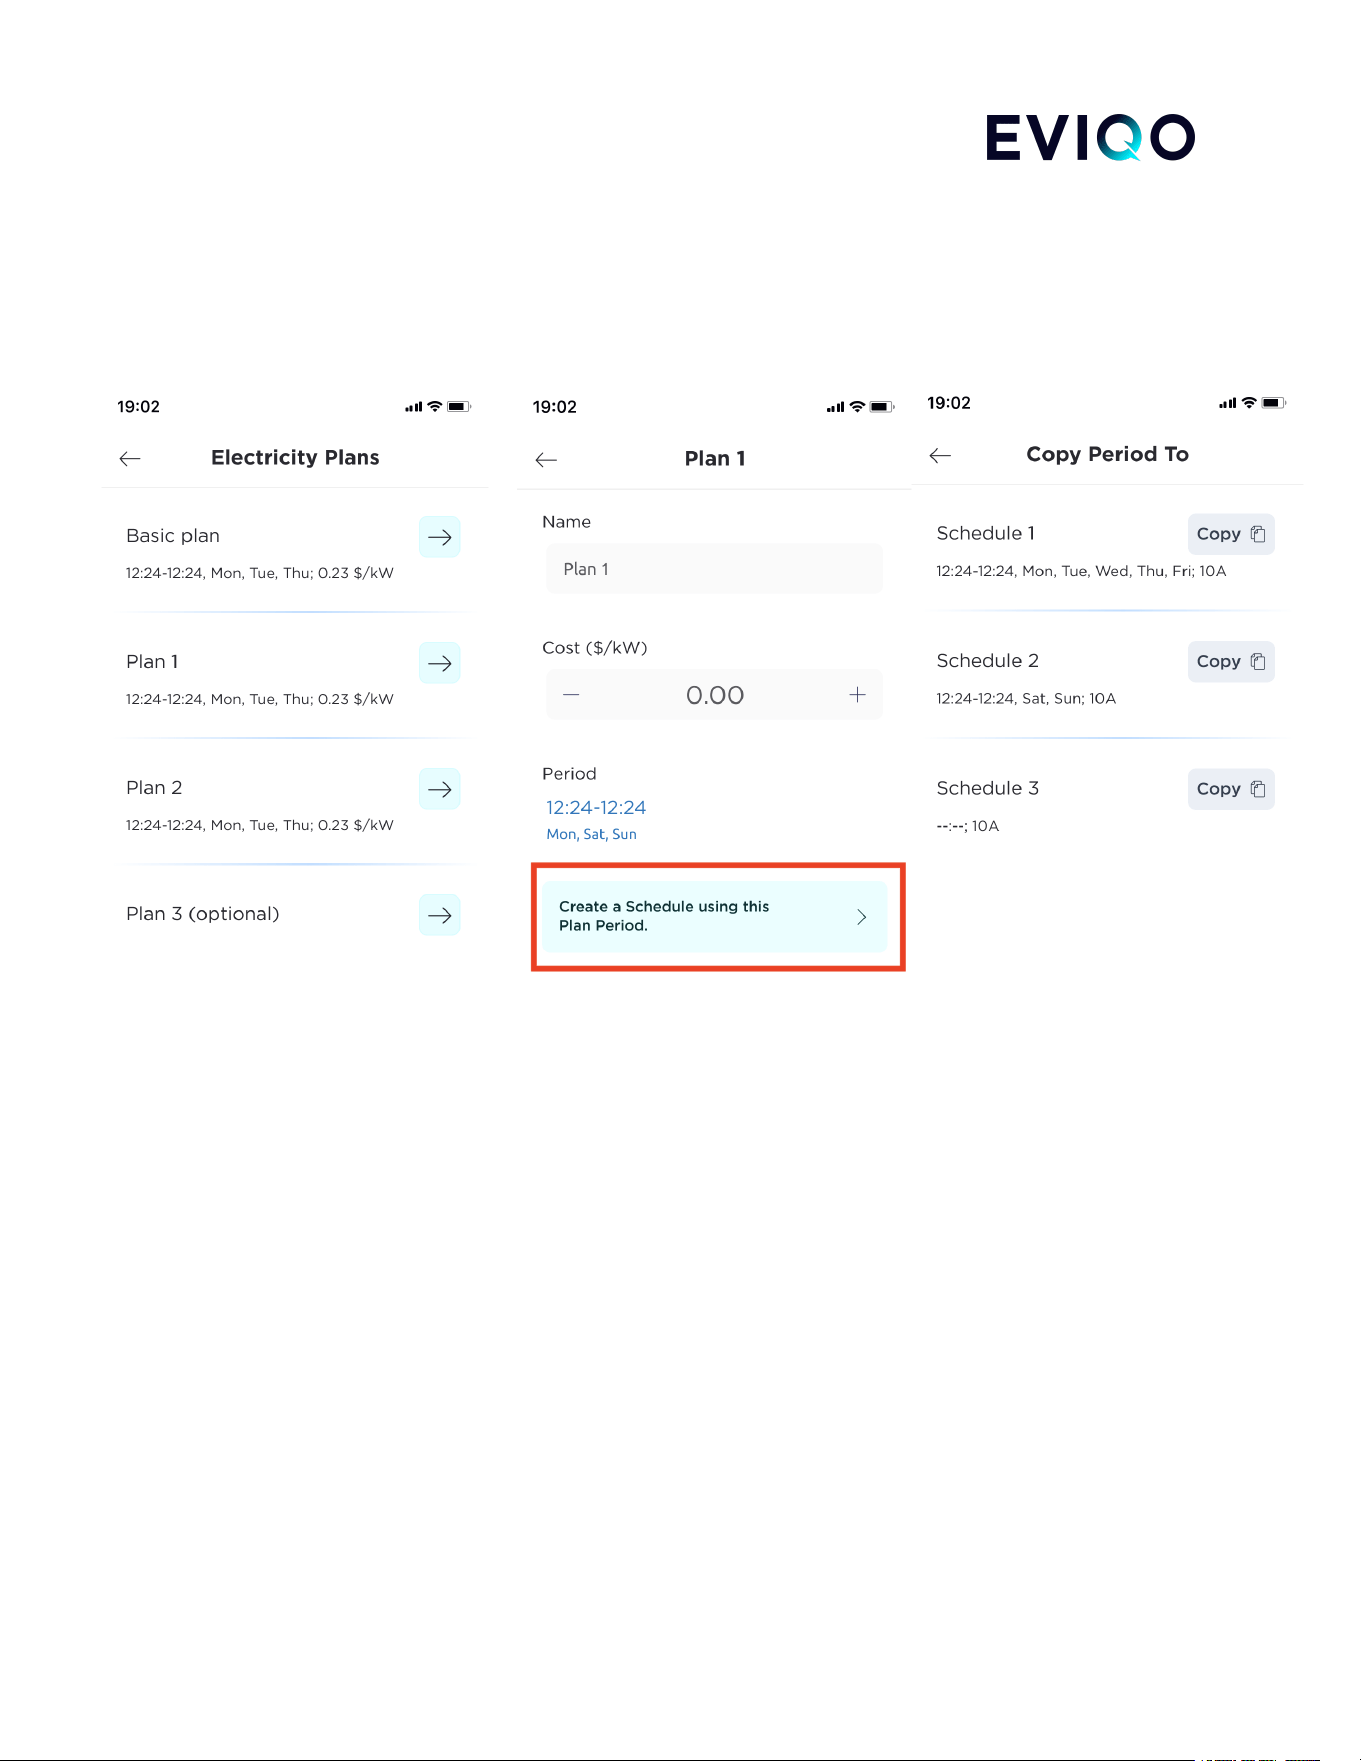
6.2. The EVIQO app offers smart tips, including the convenient option to copy your Electricity Plan periods
to one of the three available Schedules instantly. This feature empowers you to set automatic repetitive
charging sessions using precise control over your charging sessions and estimated costs. Simply select
the desired Schedule, and the time period will automatically be filled with the corresponding Start and End
Time from your chosen Plan.
eviqo.io 19
7. Alerts and notifications
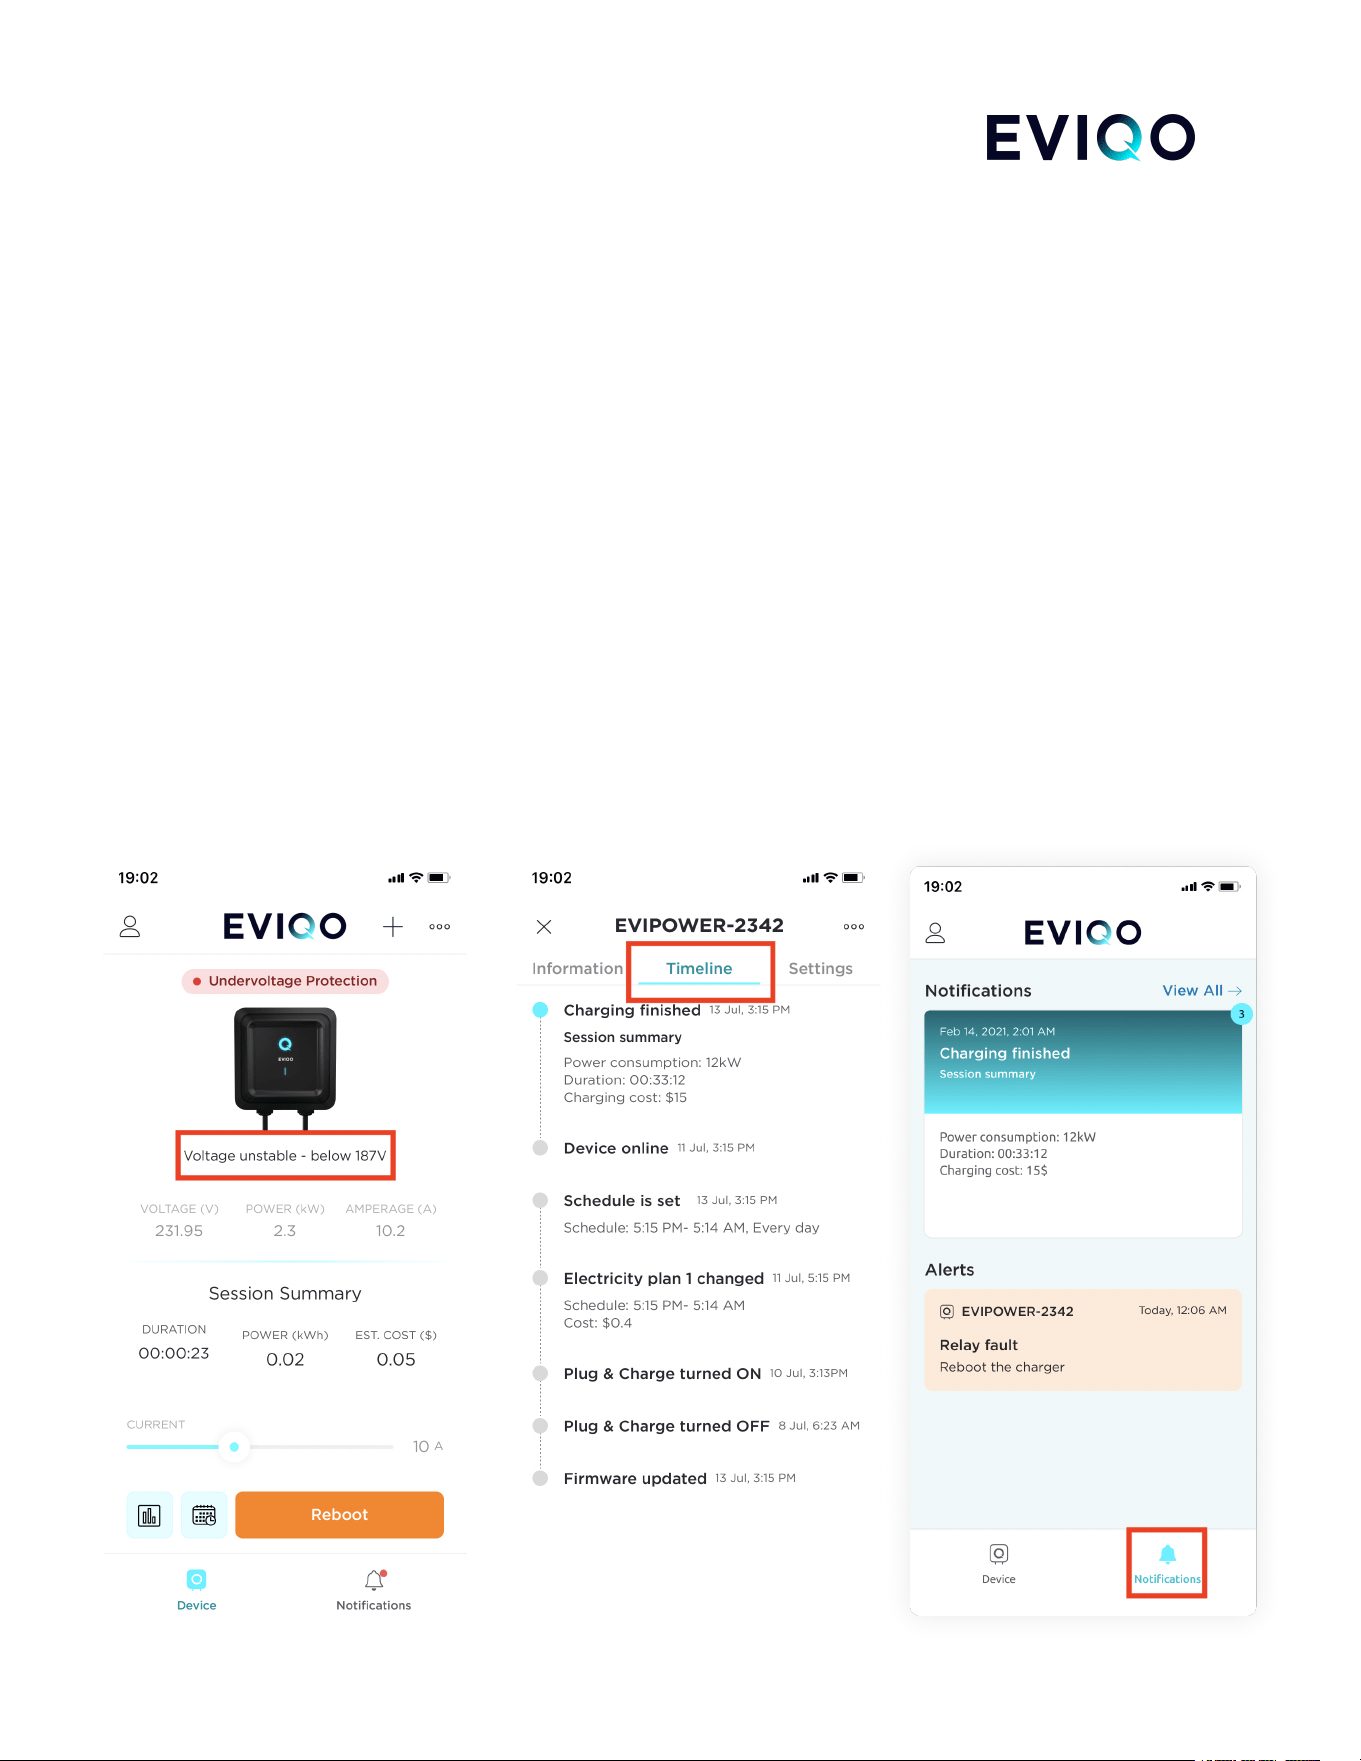
7.1. Stay informed and updated about your charging with the comprehensive notification system of the
EVIQO app. You'll receive important information through various channels:
Dashboard Notifications: Critical alerts regarding the faults, and Delayed Start time are prominently
displayed on the dashboard for quick access.
In-App and Push Notifications: Stay informed about charging start and end, Plug & Charge activation,
conflicting schedules, errors, and reminders to plug in. These notifications ensure you never miss any
important updates.
Timeline Notifications: Get a detailed timeline of charging events, including device status changes,
schedule setups, Plug & Charge status, Electricity Plans updates, session summaries, firmware updates
and many other important events. This feature provides a comprehensive overview of all possible events.
Notifications Tab: Access a concise and sleek overview of your charging sessions and receive critical
alerts in the dedicated Notifications tab.
For error troubleshooting, consult page 22 of the EVIQO Installation Guide or reach out to our support team
via email at [email protected] or through the help menu in the app. We're here to assist you with any
queries or issues you may encounter.
eviqo.io 20
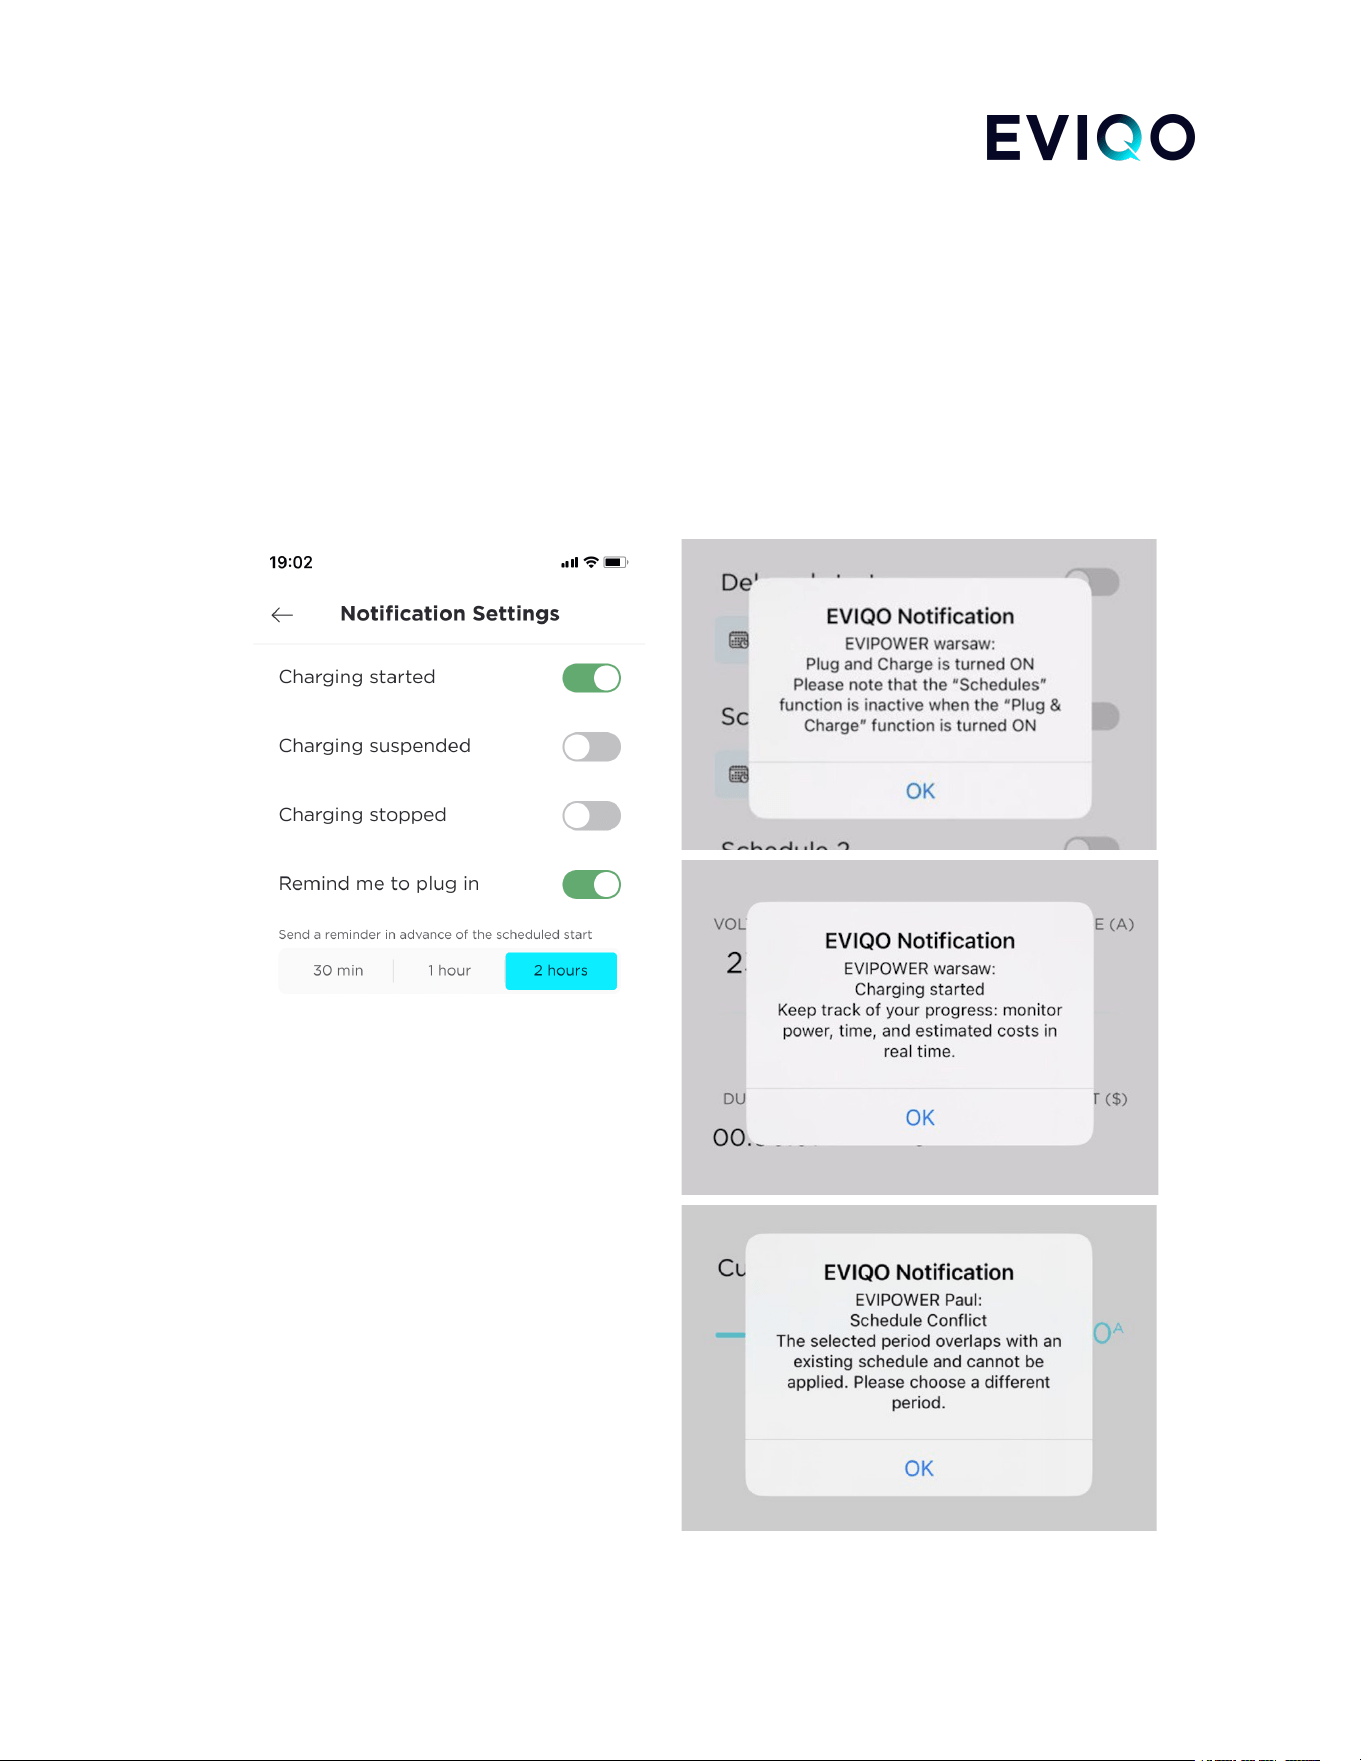
7.2. In the Notification Settings, you can choose to receive all the notifications relating to the charging
statuses. For example, Charging Stopped notification will provide you with the information of how much
power has been supplied to the car and at what estimated costs.
“Remind me to plug in” offers you to select the desired reminder time (30 minutes, 1 hour, or 2 hours)
before the scheduled charging session. The EVIQO app will send you a reminder notification to ensure you
don't forget to plug in your vehicle.
Additionally, the system will send you in-app and push notifications if there is a conflict of the overlapping
Schedules and/or Delayed Start, if the Plug & Charge is turned on or other important information.
eviqo.io 21
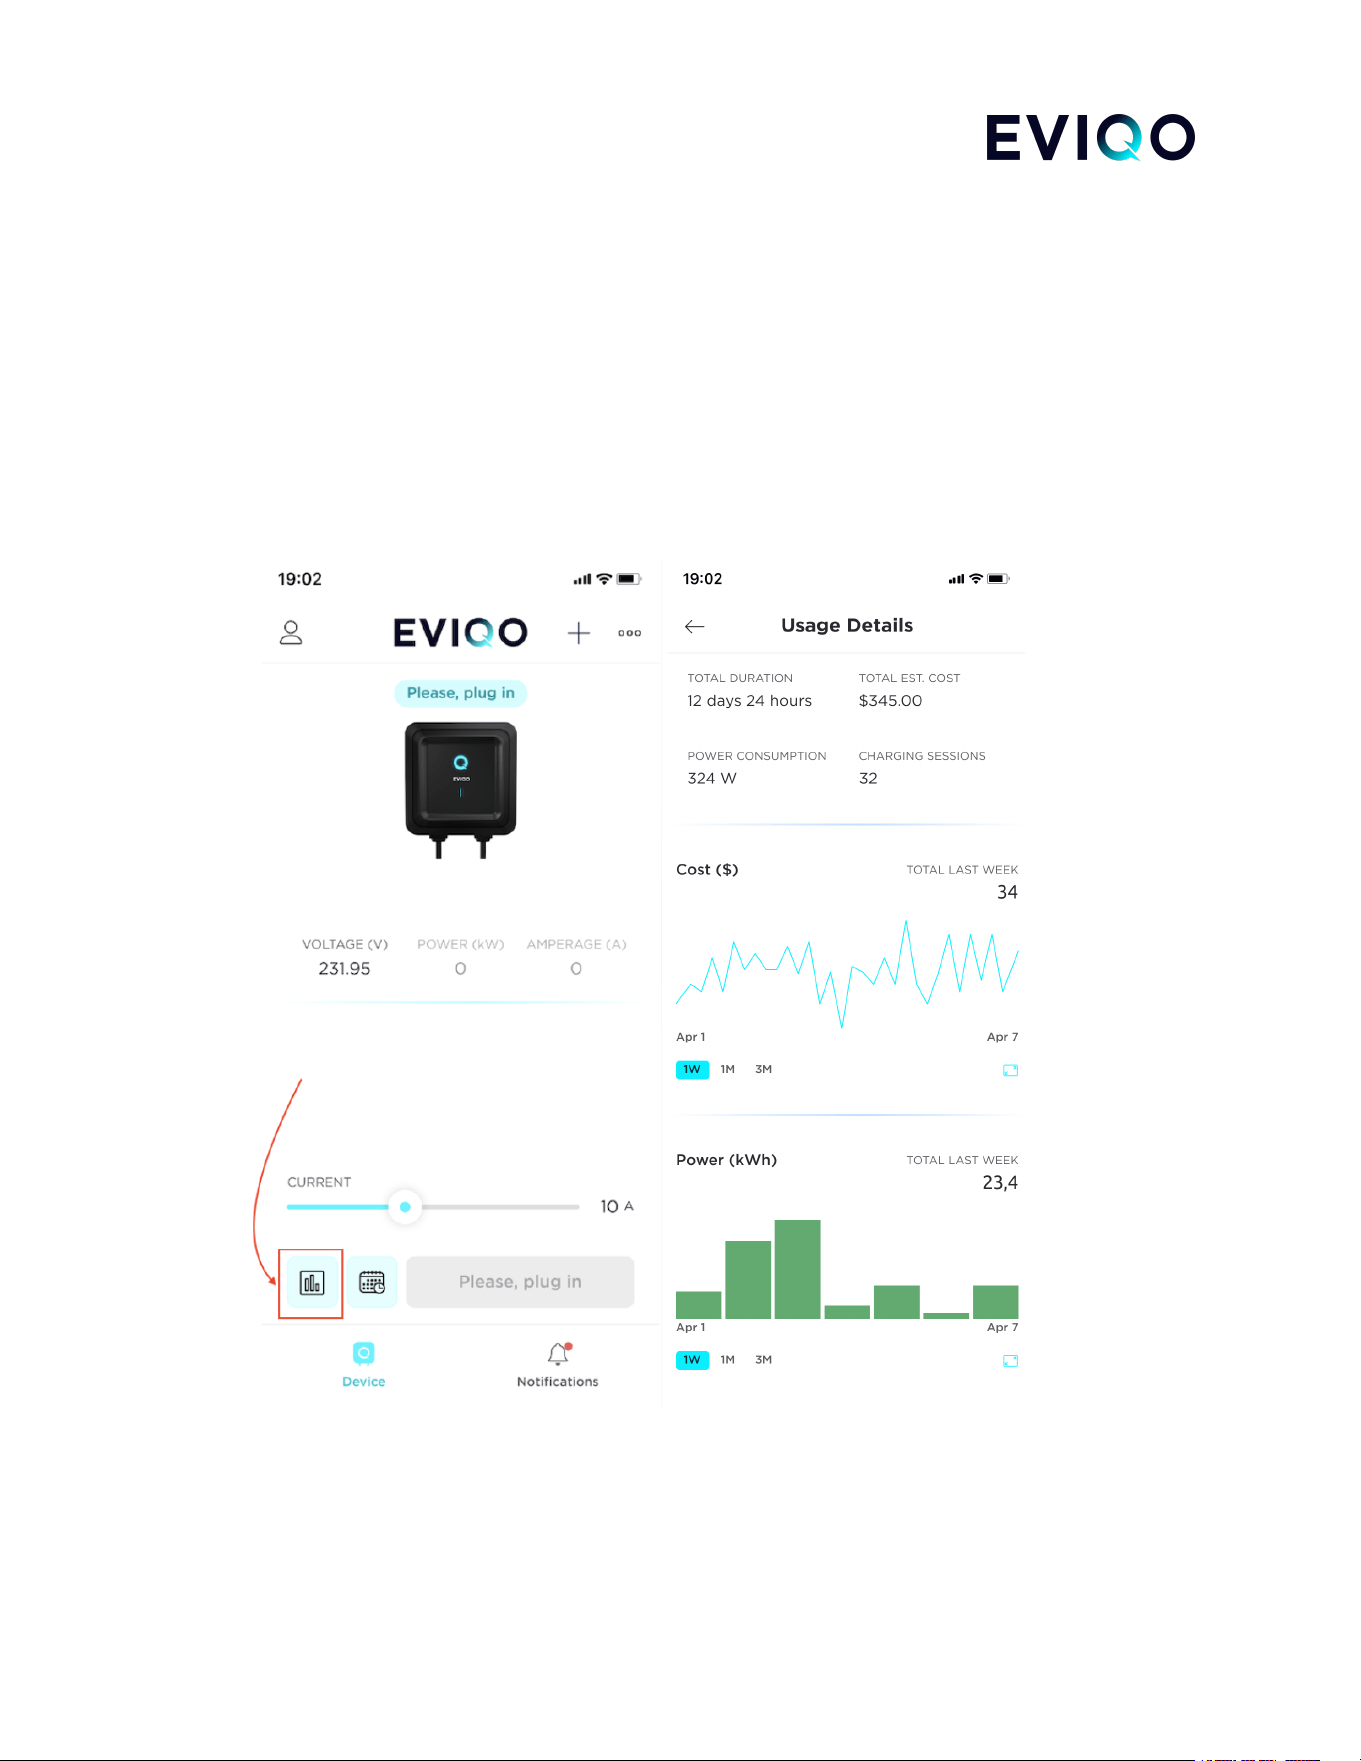
8. Usage Details
Monitor and analyze your charging behavior with EVIQO's tracking features. Track your lifetime
consumption or choose specific time periods such as 1 week, 1 month, or 3 months to evaluate your
charging performance. Power consumption and cost effectiveness interactive charts provide valuable
insights to help you optimize your charging costs. By identifying off-peak hours and scheduling charging
sessions accordingly, you can maximize cost savings and make informed decisions about your charging
habits.
eviqo.io 22
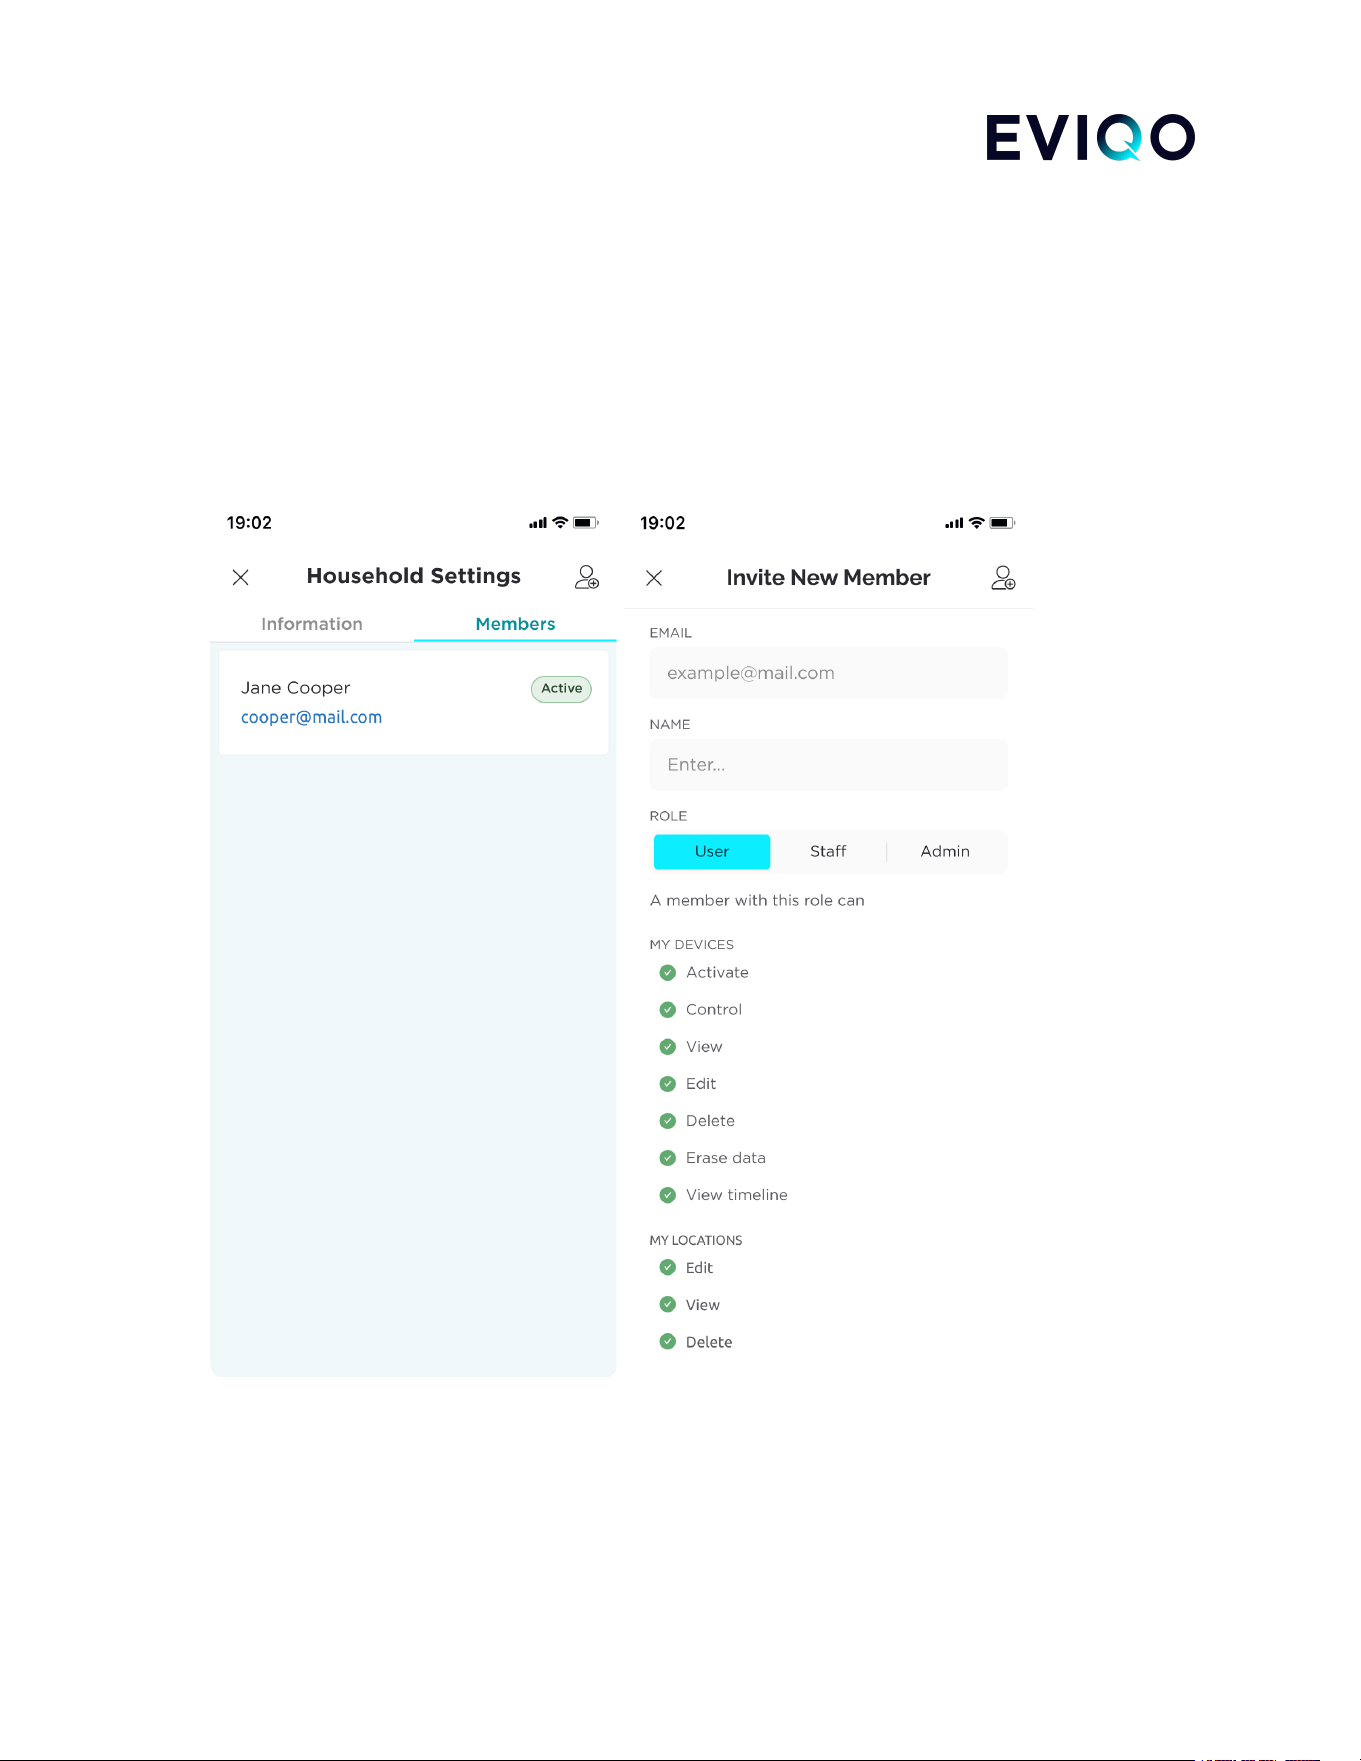
9. User invitation
Facilitate collaborative charger usage by inviting new members and assigning them specific roles.
With EVIQO, you can easily invite others to join and grant them customized access and
permissions. Whether it's sharing charger usage with family members, colleagues, or tenants,
you have control over who can access and manage the charger.
eviqo.io 23