2
After installation, return here to browse through the
Frequently Asked Questions, conveniently located
at the beginning for your easy access:
1. How to pair my EVIPOWER with the EVIQO app?
Once you power up the EV charger, the 15-minute configuration window starts
and a small vertical line indicator must be flashing blue. If the 15-minute
configuration window expired, restart the configuration window for pairing your
smartphone with the charger:
1. Restart the device (power off and back on) to restart the configuration window.
2. Ensure the signal indicator (small vertical line) is flashing blue, indicating the
configuration mode.
3. Keep your phone close to EVIPOWER; it might take a minute to detect.
4. Don't forget to grant the EVIQO app Bluetooth permissions.
2. My EVIPOWER cannot connect to the Internet. What shall I do?
Please restart your wifi router. It’s also recommended to restart EVIPOWER using
the reset button on the right side of the unit (power cycle, turn off and back on).
3.
My
car's
app
already
has
smart
features.
Is
it
necessary
to
also
use
the
EVIQO
smart
app?
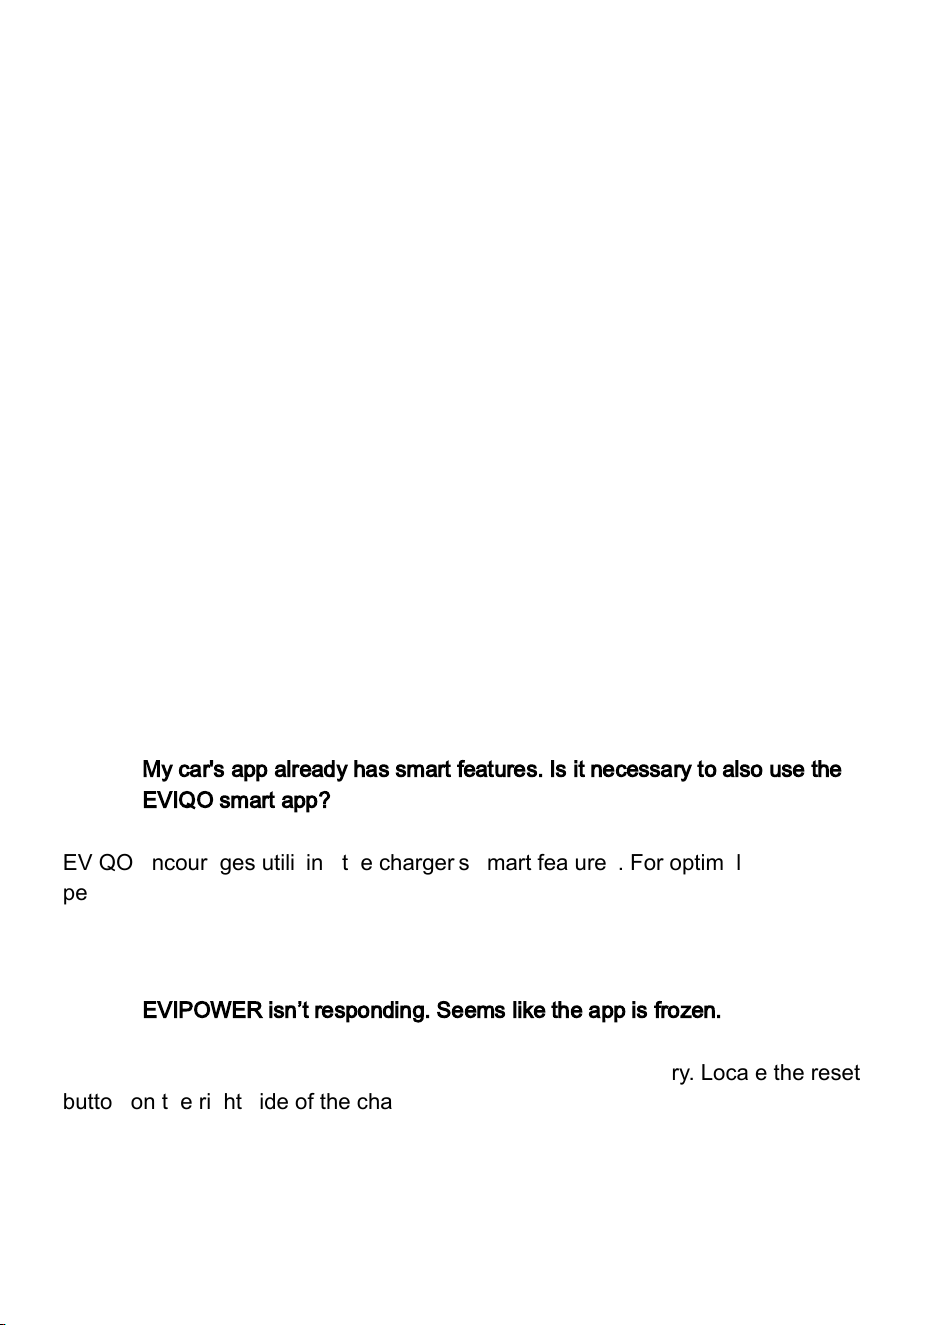
EVIQO encourages utilizing the charger's smart features. For optimal
performance, ensure harmony between the smart functions: if you intend to utilize
your car's smart features, refrain from duplicating settings in your car app to
maintain seamless communication with EVIPOWER.
4.
EVIPOWER
isn’t
responding.
Seems
like
the
app
is
frozen.
Performing a hard reboot (reset to factory settings) is necessary. Locate the reset
button on the right side of the charger’s enclosure by following these steps:
1. Press and hold the button for 15 seconds. The light indicators will turn solid red
for 3 seconds before the device shuts down, restarts, and restores to factory
settings. You will hear a beep sound. Please wait 1 min for the unit to reset.
2. After the reboot, the signal indicator (small vertical line) must go flashing blue -
3

configuration mode. You will need to reconfigure the device and pair it again with
the EVIQO app.
3. Your phone must be very close to the EV charger, please allow the EVIQO app
10-60 seconds to find a new device. Once done, follow the next steps in the app.
5.
How
to
set
the
Schedules
properly?
I’ve
got
the
“Conflict
of
Schedules”
notification.
Choose the correct day, start and stop: The chosen day and start time mark
when the schedule begins. The stop time is the closest selected time value that
follows the start time. For example, if you set Monday as the day, with a start time
of 9:00 PM and a stop time of 6:00 AM, the schedule will begin at 9:00 PM on
Monday and end at 6:00 AM on Tuesday.
Avoid Overlaps: Ensure there are no time overlaps with other schedules
(including those set up on the car’s side) or Delayed Start.
Avoid Missing the Mandatory Fields: If you missed to set any of the required
values such as day, start or stop - the schedule will be cleared and you will get a
notification asking to fill all the mandatory fields.
Delayed Start: Make sure schedules don't overlap with the Delayed Start feature.
Conflicting values will not be saved: If you attempt to set a schedule that
overlaps with an existing one, your changes will not be saved. To set the new
schedule, you'll need to clear the days, start, and stop times of the existing
schedule that would otherwise overlap with it. Don't forget to press “Done” or “
✔“
normally located in the top right corner to save the changes.
6. I set the Schedule but it didn’t start when it was supposed to. Why?
Check Wifi connection. Please also check the time zone in the EVIQO app. The
charger picks the time zone based on the IP address of the wifi router it’s
connected to. Press the ⓘ in the top right corner of the main page. Then scroll
down and choose the correct time zone.
4

7. What is the Delayed Start function, and how does it differ from the
Schedule?
Delayed Start is a one-time start time reservation. Once the start time is reached,
the Delayed Start feature automatically turns off. If you prefer a standardized
charging routine to benefit from regular off-peak rates, use the Schedules feature.
Please avoid setting a Delayed Start that conflicts with the existing Schedules.
8.
How
do
I
track
my
estimated
costs?
To monitor your estimated costs effectively, set your electricity rates:
1. Tap the ⓘ icon located in the top right corner of the main page.
2. Choose the Settings menu and select the Electricity Plans.
3. Establish your basic plan and any additional Plans (you can rename them).
9. What is a dip switch and where is it located?
Dip switch is a hardware maximum current output limiter. By default the unit is set
for 40A (number “2” on the dip switch) in the plug-in version (both 40A and 48A
plug-in models) and 48A (number “3”) for the hardwire version. You can adjust the
default amperage to 16A, 32A or 50A (number “0”, “1” or “4” on the dip switch,
respectively), subject to the circuit capacity and/or personal preferences. Follow
these steps to access the dip switch:
1. Remove EVIPOWER from the wall bracket, by unscrewing the anti-theft screws
on both sides of the device with the allen wrench provided in the box.
2. Remove the face part by unscrewing the 7 screws on the back side.
3. Locate the amperage dip switch on the motherboard located on the internal
side of the face part of EVIPOWER, positioned to the left and up diagonally from
the center of the motherboard. It’s light gray, small, and with a round shape.
10. I want to use my car’s preconditioning function. How can I ensure
EVIQO is compatible so that the EVSE compensates for the energy
used during preconditioning?
Enable Car Precondition Compatibility: Press the reset button located on the right
side of the charger for 3 times — unit beeps 3 times, flashes 3 times, then gives 1
long beep. Feature enabled. Press 3 times to deactivate. Follow these rules:
1. Set schedules, charge limit and precondition on the car. Use EVIQO in Plug &
Charge mode.
2. If you’re using Schedules in the EVIQO app (instead of the car), the
5

preconditioning period you set on your car must be within the scheduled
charging window set by the EVIQO app.
11. My family members also use my EV. How to add a second user to
the EVIQO app?
To add a new user, simply follow these steps:
1. Tap on the icon in the top left corner of the main page.
2. Press Household (you can rename it) -> Members (in the top) -> Invite New
Member (located in the top right corner).
3. Choose the role for the new member, and tap the icon in the top right corner to
confirm the invitation. The invited user will get an invitation email with instructions.
12. How to reset the unit?
See page 29. Locate the button on the right side of the charger’s enclosure:
1. For hard reboot to the factory settings: Press and hold the button for 15
seconds until you hear a beep sound.
2. For quick restart: Press the button for 5 seconds.
6
Disclaimer of Warranties and Limitation of Liabilities
All information, specifications and illustrations in this manual are based on the
latest information available at the time of printing. EVIQO TECHNOLOGIES
LIMITED reserves the right to make changes at any time without prior notice.
While information of this manual has been carefully checked for accuracy, it does
not represent any obligation on the part of the manufacturer. No guarantee is
given for the completeness and correctness of the contents, including but not
limited to the product specifications, functions, and illustrations. EVIQO
TECHNOLOGIES LIMITED will not be liable for any direct, special, incidental,
indirect damages or any economic consequential damages (including the loss of
profits). It is the user’s responsibility to comply with all relevant codes and safety
standards. Any resulting damage due to disregard or actions contrary to the
instructions in this Installation Guide is excluded from the product warranty.
The EVIPOWER Smart EV Charger by EVIQO is an
electronic device and should not be disposed of as
unsorted domestic waste. It is important to contact
local authorities to inquire about the appropriate
disposal methods for this product. Help contribute to
environmental sustainability by ensuring the proper
disposal or recycling of the EVIPOWER Smart EV
Charger by EVIQO.
©2025 EVIQO TECHNOLOGIES LIMITED. All rights reserved. This material is protected by copyright laws in the United States,
Canada and other countries. It may not be modified, reproduced, or distributed without the prior express written consent of
EVIQO TECHNOLOGIES LIMITED. The trademarks and service marks "EVIQO" and "EVIPOWER" are registered trademarks of
EVIQO TECHNOLOGIES LIMITED in the United States and other countries and cannot be used without the prior written consent
of EVIQO TECHNOLOGIES LIMITED.
7

TABLE OF CONTENTS
1. IMPORTANT SAFETY INSTRUCTIONS 9
2. PRODUCT INTRODUCTION AND DATA SHEET 11
3. VERIFY CONTENTS 14
4. GATHER TOOLS 16
5. PLAN THE INSTALLATION TYPE BASED ON
YOUR VERSION 17
6. WIRE THE CIRCUIT 19
7. PLAN THE MOUNTING LOCATION 20
8. MOUNTING 21
9. CONFIGURING YOUR DEVICE 24
10. LIGHT CODES 26
11. RESET AND HARD REBOOT BUTTON 29
12. CHARGING PORT OPEN / RELEASE BUTTON (NACS) 30
13. LIMITED WARRANTY 30
14. COMPLIANCE 33
8
1. Important Safety Instructions
PLEASE
KEEP
THESE
INSTRUCTIONS
SAFE
WARNING: This Installation Guide contains important instructions for your
EVIQO Smart EV Charger. Remember to always follow simple precautions
when using electronic products, including the following guidelines.
CAUTION: Strict compliance with the information provided in this manual
does not exempt the user from their responsibility to comply with all relevant
codes and safety standards. This Installation Guide outlines the typical
installation and mounting scenarios. If any situation arises where it is not
feasible to carry out an installation according to the procedures specified in
this document, please consult with a licensed installer. Please note that
EVIQO TECHNOLOGIES LIMITED cannot be held liable for any damages
that may arise from custom installations not specified in this document or
failure to comply with the recommendations provided.
1.1 General Warnings & Cautions
● WARNING: To avoid fire, property damage, injury or death, carefully read and follow
the instructions during installation, operation and maintenance. Install and operate
only as instructed in this Installation Guide.
● DO NOT put fingers into the electric vehicle connector.
● DO NOT use this product if the input power cord or EV cable is frayed, has broken
insulation, or any other signs of damage.
● DO NOT use this product if the enclosure or the EV connector is broken, cracked,
open, or shows any other indication of defect or damage.
● DO NOT operate EVIQO Smart EV Charger in temperatures outside its operating
range of -22°F to 131°F (-30°C to 55°C).
● DO NOT remove cover or attempt to open the enclosure in rain or other inclement
weather - risk of electric shock.
● DO NOT open the front cover of your charger while it is connected to the power
supply.
● DO NOT put heavy objects on the charger to avoid danger.
● WARNING: If removing the face cover of the device is required, avoid touching the
L1 IN, L2 IN, PE IN, L1 OUT, L2 OUT, PE OUT connectors, connection terminals,
ribbon cable terminals linking the front cover to the main motherboard, or any other
internal components if the device is still turned on - risk of electric shock.
● WARNING: This device should be supervised when used around children.
● WARNING: This device must be grounded. Failure to ground the charging station
can lead to risk of electrocution or fire.
● WARNING: To avoid a risk of fire or electric shock, do not use this device with an
9
extension cord.
● WARNING: It's recommended to install this device in a sufficiently ventilated area
and preferably avoid installing it in areas with super extreme direct sunlight.
● WARNING: In case of flooding, do not operate EVIQO charger while it or your EV is
submerged in water.
● WARNING: If EVIQO charger was submerged in water due to flooding, make sure a
qualified electrician inspect it before energizing or using it again.
● WARNING: The suitability of the use of flexible cord in accordance with CE code,
part I, rule 4-012, is to be determined by the local inspection authority.
● WARNING: To reduce the risk of fire, connect only to a dedicated circuit provided
with branch circuit overcurrent protection in accordance with the CSA C22.1–15
Canadian Electrical Code, Part 1 (Canada) or NOM-001-SEDE Electrical
installations (utility) (Mexico) or ANSI / NFPA 70 National Electrical Code (USA).
CAUTION: Please use the charger properly. Do not hit or press hard on the
enclosure. If the case is damaged, please contact a professional technician.
1.2 Installation Requirements
WARNING: For the installation of your EVIQO Smart EV Charger (hardwired installation
and/or EV-graded NEMA 14-50 outlet installation), it is recommended to only engage
licensed electrician with proper qualification and sufficient installation experience to ensure
compliance with both nat
ional and local building and electrical codes and standards as well
as all applicable safety standards, codes, ordinances and any local safety regulations. It’s
recommended to use a high quality circuit breaker and wiring (for hardwire installation)
and/or EV-graded NEMA 14-50 receptacle and wiring (plug-in installation).
WARNING: Disconnect electrical power to install the charging station.
WARNING: Be sure to preview this Installation Guide before installing the EVIQO Smart
EV Charger.
WARNING: Your EVIQO charger must be grounded to ensure safety.
Grounding provides a path of least resistance, reducing the risk of electric
shock if the charger malfunctions. The plug-in version of the charger comes
with a grounding conductor and plug, which must be connected to a properly installed
and grounded EV-graded NEMA 14-50 receptacle according to local codes. If you
hardwire your EVIQO, please consult a licensed electrician to ensure proper
grounding. If your device signals a Ground Fault, consult a licensed electrician to
ensure proper grounding. Improperly connecting the equipment-grounding conductor
can cause the risk of electric shock. If you're unsure if the product is properly
grounded, consult a qualified electrician or service technician. Do not modify the
10

provided plug. If it doesn't fit the receptacle, have a qualified electrician install the
appropriate EV-graded NEMA 14-50.
● CAUTION: Ensure proper safety measures by using appropriate protection when
connecting to the main power distribution cable.
● CAUTION: Install type B, C, or D circuit breakers that meet the rated current
requirements at the input terminal for effective protection.
● CAUTION: The device shall be mounted at height between 3ft and 5ft from ground.
1.3 Daily Maintenance
● CAUTION: Avoid moisture or water in the charger. If there is water or moisture ingress
in the charger, it is necessary to immediately power off to avoid immediate danger, and
notify the professional technician to carry out maintenance before next use.
● CAUTION: Your EVIQO charger contains no user-serviceable parts. Please do not
attempt to service or repair any part of the device yourself. For any servicing needs,
please contact EVIQO customer service.
● CAUTION: Please use the charger properly. Do not hit or press hard on the enclosure.
If it is damaged, please contact a professional technician or EVIQO TECHNOLOGIES.
● CAUTION: Take necessary precautions with electronic medical implants.
● CAUTION: Ensure that the charging cable is positioned in the way where possibility of
stepping on or tripping over it are excluded and a chance to cause damage is
minimized. Please do not close a garage door on the charging cable or the connector.
● CAUTION: Avoid placing the charger near hot objects and at high temperature
locations and away from dangerous substances such as flammable gases and
corrosive materials. Do not install EVIQO Smart EV Charger near flammable,
combustible or explosive materials.
● CAUTION: Do not put heavy objects on the charger to avoid danger.
● CAUTION: Before cleaning your EVIQO charger, disconnect it from the power. Avoid
using cleaning solvents; wipe it down with a clean, dry cloth to remove dust and dirt.
11
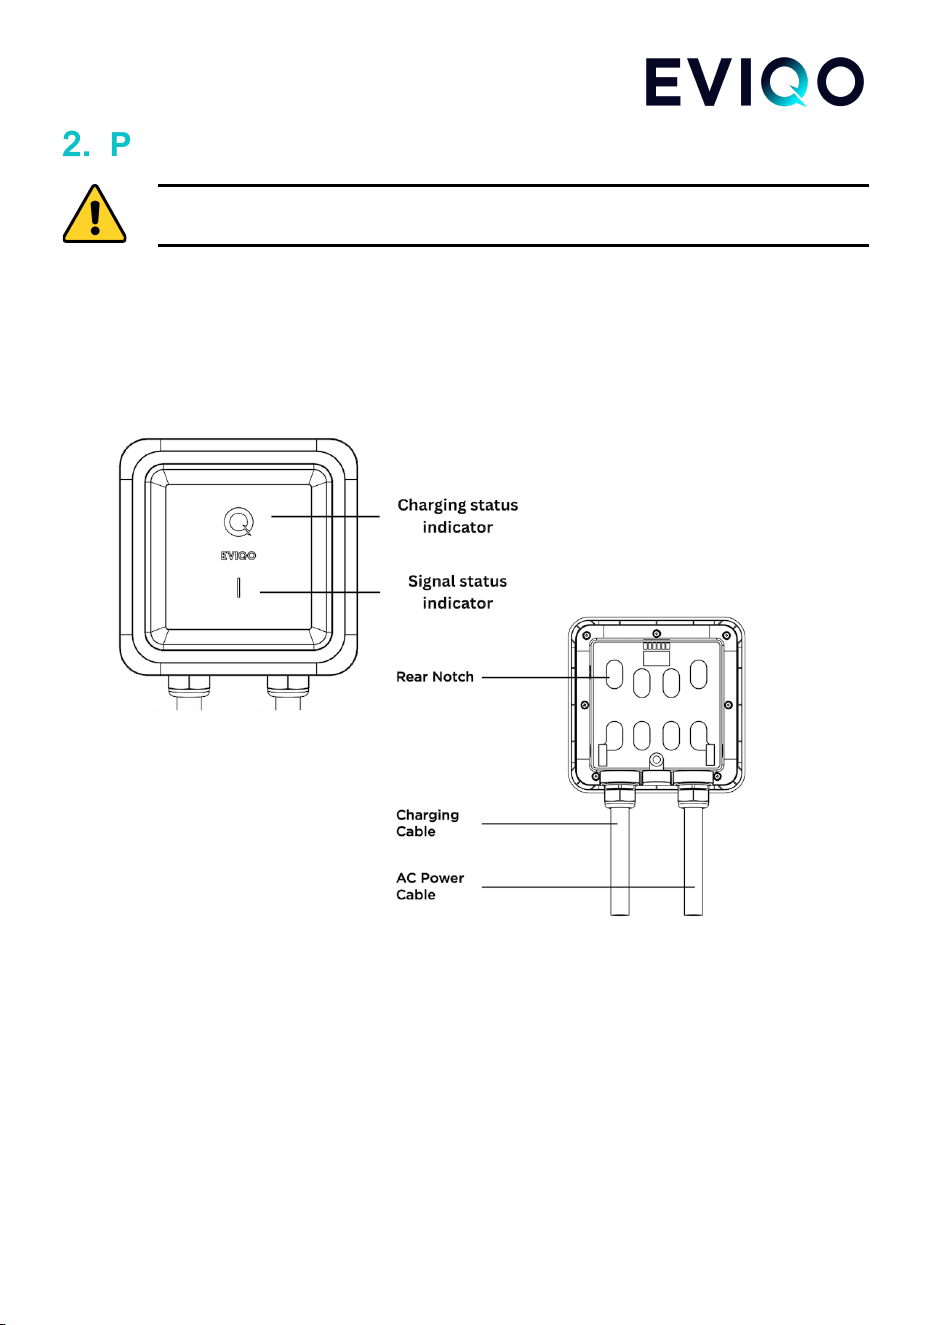
2.
Product Introduction and Data Sheet
IMPORTANT: Make sure you understand how the device works and its basic
interface. EVIQO Smart EV Charger must be installed by a licensed electrician.
2.1 Basic Interface
12
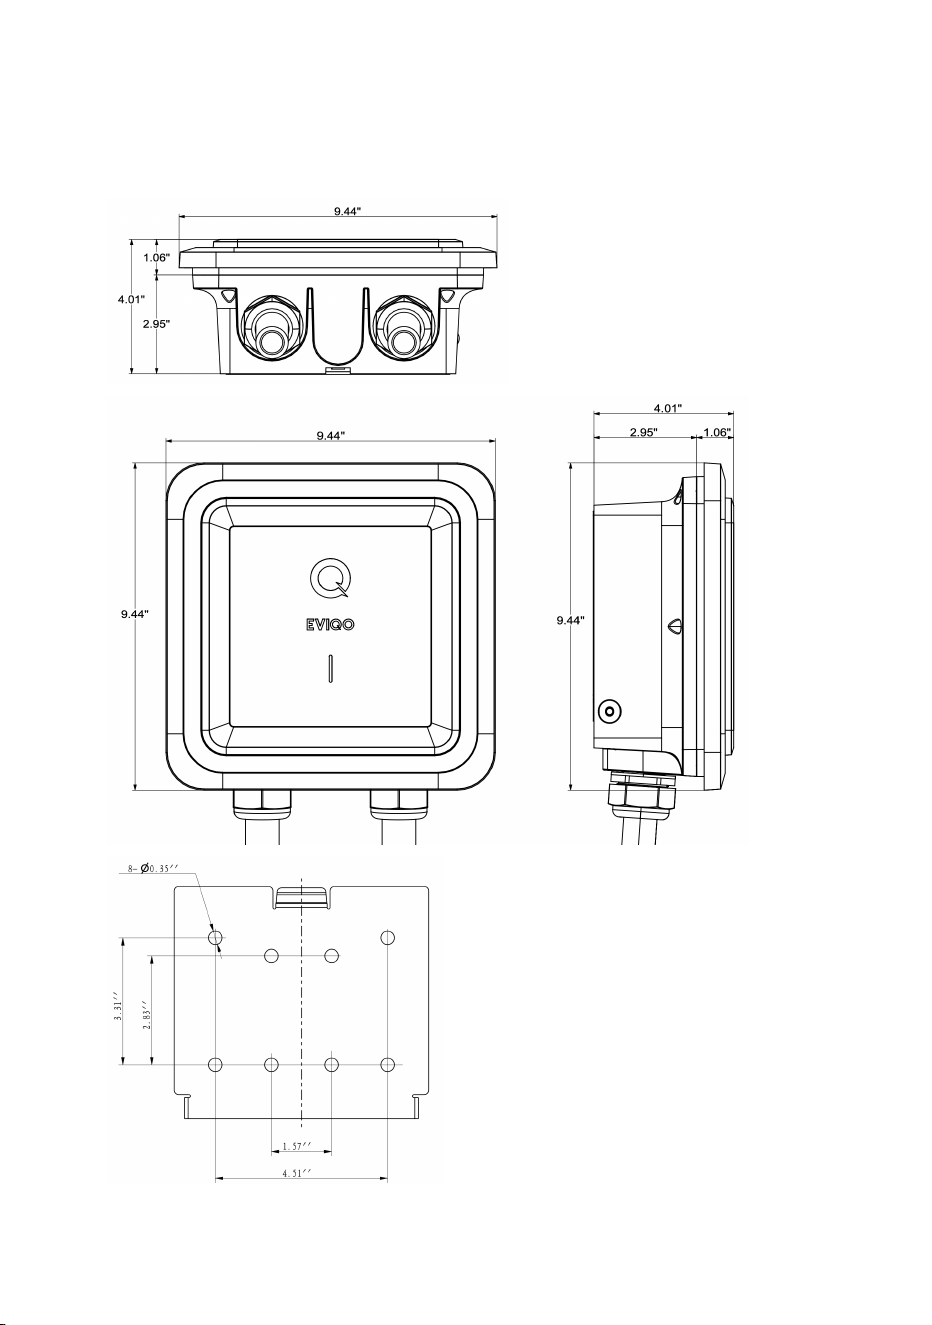
2.2 Basic Dimensions
13

2.3 Specifications of EVIQO Smart EV Charger
14
Model Number
EVIPOWER240J - J1772, plug-in (max 40A by default);
EVIPOWER248J - J1772, plug-in (set to 40A by default,
can be 48A/50A if hardwired) OR J1772, hardwire (set to
48A by default, can be 50A if set on dip switch);
EVIPOWER240N - NACS, plug-in (max 40A by default);
EVIPOWER248N - NACS, hardwire (set to 48A by default,
can be 50A if set on dip switch)
Rated Input Voltage
208-240 V AC
Rated Output Current
16A / 32A / 40A (plug-in max) / 48A (hardwire max)
Power Cable
37” input cable with NEMA 14-50 plug or 39” THWN-2 6
AWG (for L1 and L2) and 10 AWG (for PE) for hardwire
models
AC Power Frequency
60 Hz
Input Protection
UVP, OVP, RCD (CCID20), SPD,
Ground Fault Protection (pages 27-29)
Output Protection
OCP, OTP, Control Pilot Fault Protection (pages 27-29)
Output Interface
SAE J1772 AC Charging Connector
or
SAE J3400 AC Charging Connector (NACS)
Storage Temperature
-40°F to 167°F (-40°C to 75°C)
Operation Temperature
-22°F to 131°F (-30°C to 55°C)
Relative Operation Humidity
Up to 95% non-condensing
Relative Storage Humidity
Up to 95% non-condensing
Network Connection
Wi-Fi
Internet Function
10M / 100M Base-T
Wi-Fi Function
802.11 b/g/n
Cable Length
25ft Extra Long (+/- 3%)
Protection Level
NEMA 4, IP 66
Installation Type
Wall-Mounted
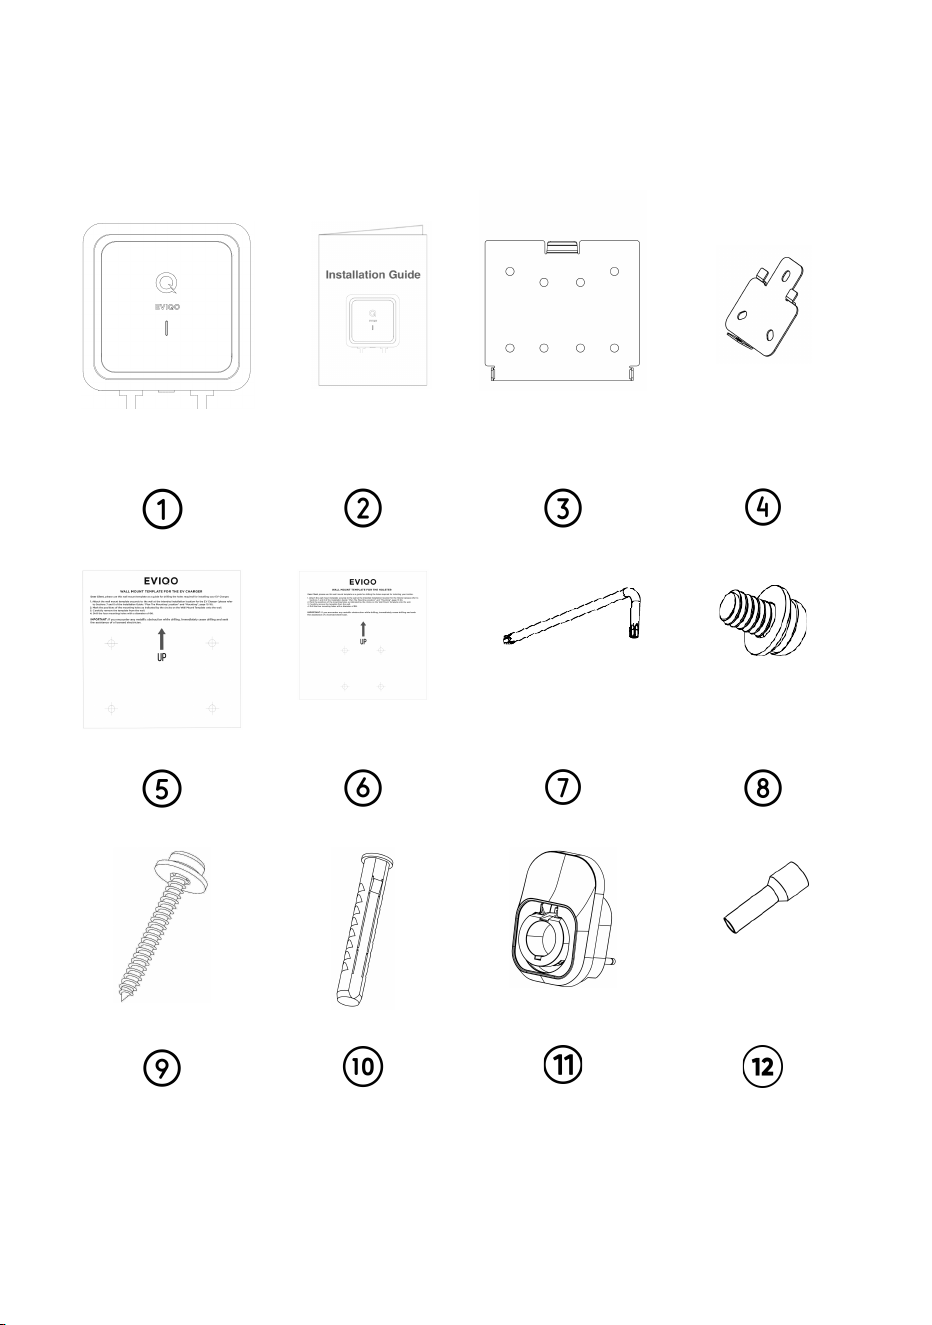
3. Verify Contents
Check the list to ensure you have this Installation Guide and all the parts listed below:
Note: If you are missing any of these parts, please contact [email protected]
15
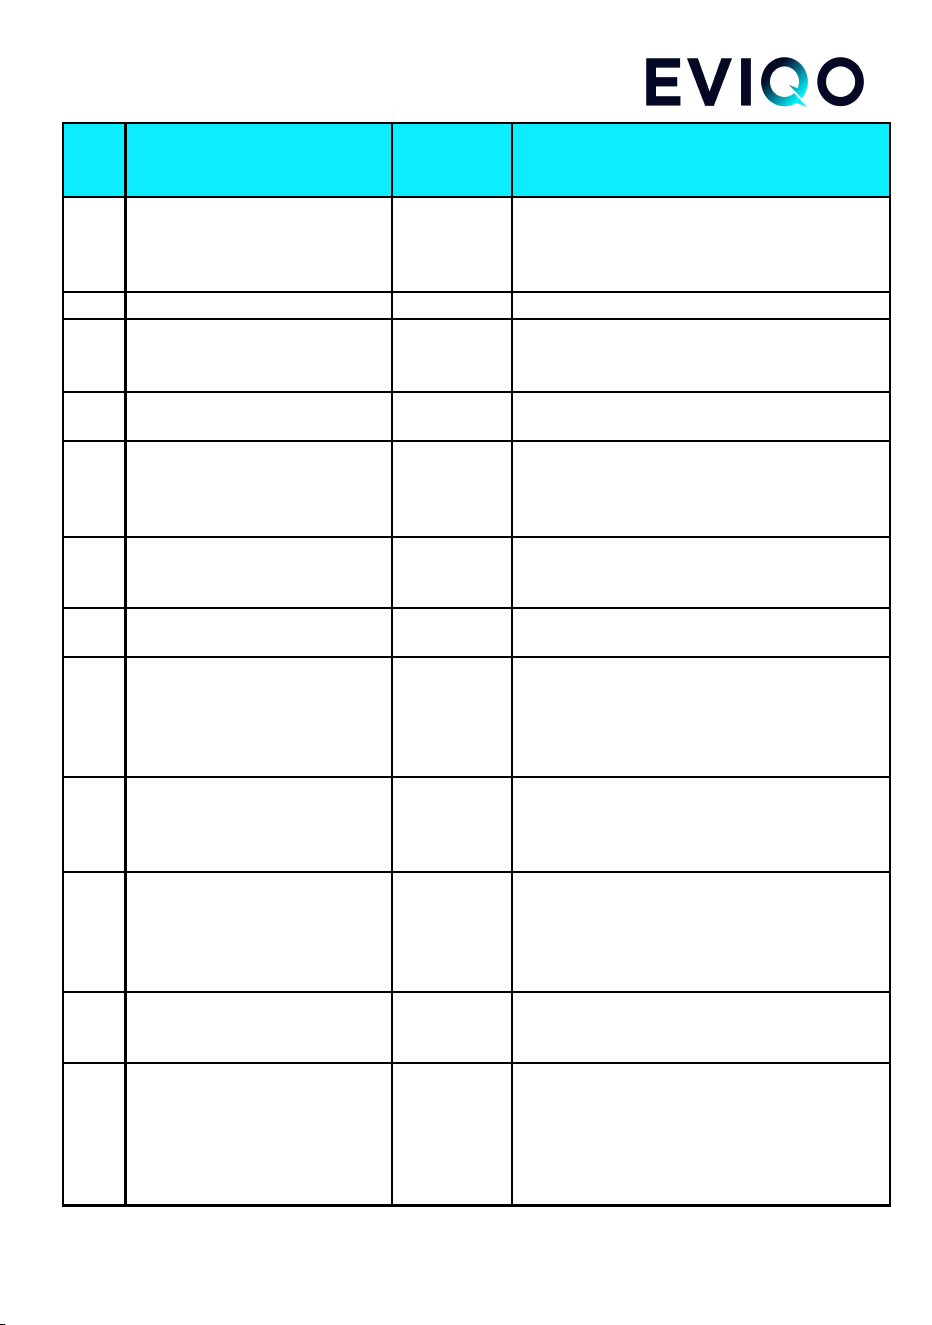
No
.
Product Name
Quantity
Description
1
EVIPOWER Smart EV
Charger by EVIQO
1
With attached input power cable (with NEMA
14-50 plug or 3-wire whip with a 3.2 ft conduit
for hardwiring) and 25 ft output charging
cable with J1772 or J3400 (NACS) connector
2
Installation Guide
1
Please read carefully before use
3
Wall-Mounted Bracket for
EVIQO Smart EV Charger
1
For mounting the EVIQO Smart EV Charger
to the wall. Comes already fixed to the
charging unit out of the box.
4
Wall-Mounted Bracket for the
Holster
1
For mounting the Holster to the wall. Comes
already fixed to the Holster out of the box.
5
Mounting Template for the EV
Charger
1
For easy drilling of 4 screw holes in masonry,
brick or concrete walls for the EVIQO Smart
EV Charger wall-mounted bracket
installation.
6
Mounting Template for the
Holster
1
For easy drilling of 3 screw holes in masonry,
brick or concrete walls for the Holster
wall-mounted bracket installation.
7
Allen Wrench
1
For tightening Anti-Theft Button Head Screws
on both sides of EVIQO Smart EV Charger.
8
Anti-Theft Button Head
Screws
4
For securing the EVIQO EV Charger and the
Holster to their Mounting Brackets. 2 screws
already screwed to the Charger’s Bracket by
default and 1 to the Holster. 1 piece provided
as a spare part for your convenience.
9
Phillips Pan Head Lag
Screws with gaskets
8
Used to install the EV Charger Mounting
Bracket and Holster Mounting Bracket onto
the wall. One spare piece of each hardware
is included for your convenience.
10
Universal Wall Anchors
8
Used together with the Phillips Pan Head Lag
Screws to securely mount the EV Charger
Mounting Bracket and Holster Mounting
Bracket onto walls where drilling is required
for installation.
11
Holster
1
Safely store the J1772/J3400 (NACS)
connector and output cable when they are
not in use using the provided Holster.
12
Pin Terminal Connectors - for
Plug-in versions only (in case
you want to hardwire the
Plug-In version capable of 48A
or 50A)
3
x2 pin connectors for L1/L2 IN, 8AWG
(F±0.47”,L±0.86”,W±0.29”, B±0.39”,
D±0.19”,C±0.17”), x1 pin connector for PE
IN, 10AWG (F±0.47”,L±0.82”, W±0.23”,
B±0.35”, D±0.15”,C±0.13”).
16
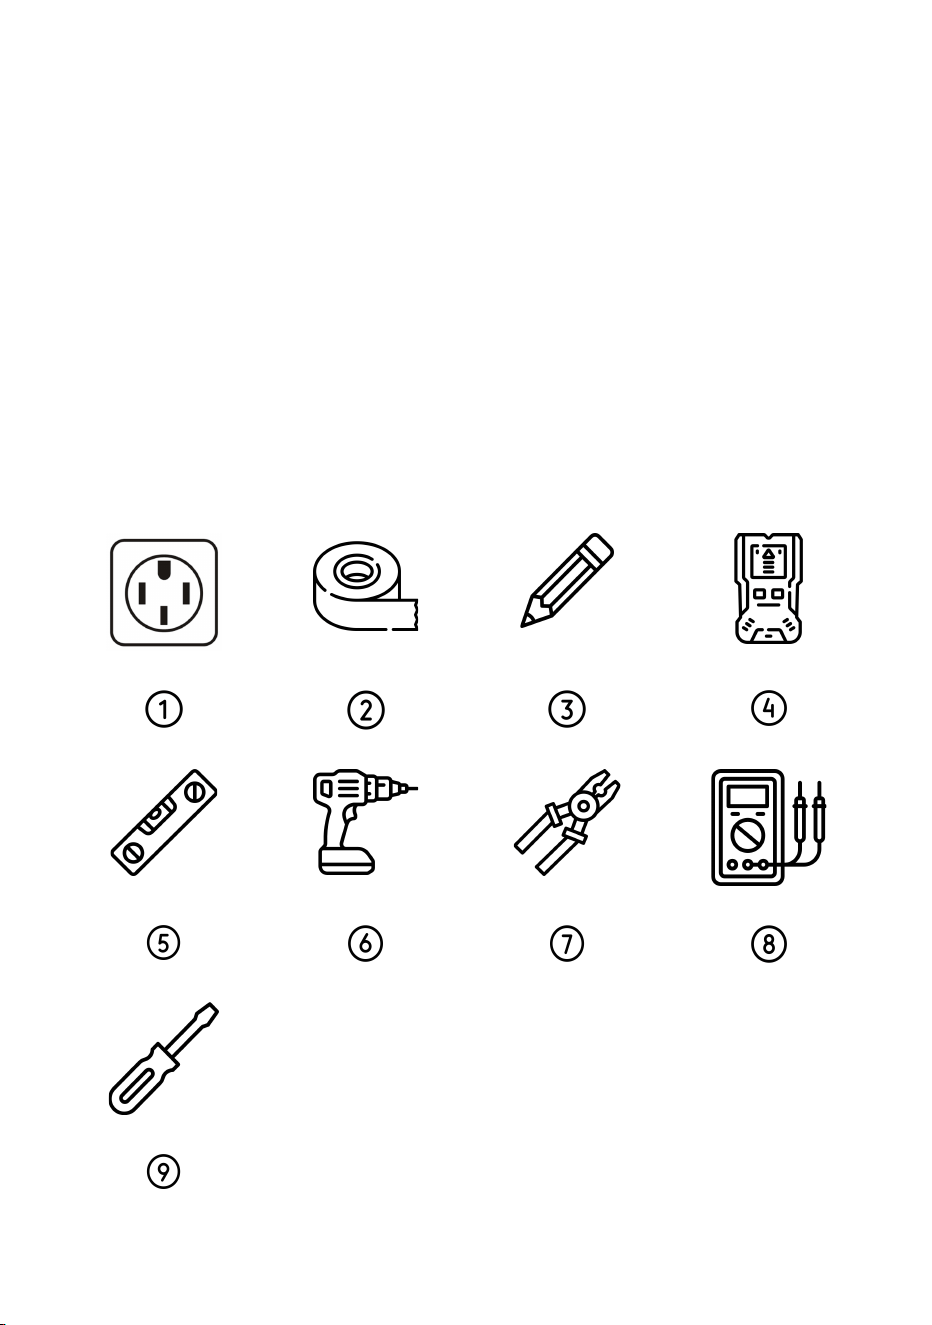
4. Gather Tools
For comfortable installation of the EVIQO Smart EV Charger and depending on the type
of installation (plug-in or hardwire), you might need:
1) EV-graded NEMA 14-50P 240V outlet or electrical materials for hardwire installation,
depending on your specific case (consult with the licensed installer).
2) Tape (optional, will help to attach the Mounting Templates to the wall, if needed).
3) Pencil (optional, will help to mark the holes to drill, if needed).
4) Stud finder (optional, to properly locate the studs, if needed).
5) Level (optional, to properly install the brackets).
6) Drill (optional).
7) Wire stripper (optional, for hardwired installation, if needed).
8) Voltmeter or digital multimeter (for measuring AC voltage at the installation site).
9) Screwdriver and/or torque screwdriver (optional, if you need to open the faceplate of the
plug-in version for hardwire installation).
Note: The above tools are important, ensure to have them all for proper installation.
17

5. Plan the Installation Type Based on Your
Version
Before installing your EVIQO charger, make sure to secure all required permits and
approvals in compliance with local electrical codes, regulations, and ordinances. These
may also be necessary to maintain your insurance eligibility.
There are 3 versions of EVIQO Smart EV Chargers:
1) 40A plug-in version (40A max by default, EV-graded NEMA 14-50 outlet and 50A circuit
required);
2) 48A plug-in version (40A max if used as a plug-in version, for 48/50A hardwiring
installation and 60A circuit is required);
3) 48A hardwire version (can provide 50A if the dip switch changed to position “4” and
connected to 70A circuit).
NOTE: 40A and 48A plug-in versions are capable of hardwiring, custom whip is required.
The amperage can be adjusted up or down (see page 18 for Dip Switch settings, its
location and operation) depending on your model, connection type, breaker size, electrical
panel and circuit capacity. The EVIQO app also offers an amperage adjuster with 1A step,
allowing you to precisely set any amperage value within the range set by the Dip Switch.
ATTENTION:
EVIQO
plug-in
version
(both
40A
and
48A
models)
is
pre-set
for
the
default
40A
max
output
which
is
the
maximum
amperage
allowed
by
the
regulations
for
NEMA
14-50
plug-in
EV
chargers.
To
get
40A
out
of
an
EV-graded
NEMA
14-50
outlet,
a
50A*
dedicated
circuit
is
required.
EVIQO
hardwire
version
is
pre-set
for
default
48A
output
and
requires
a
60A*
dedicated
circuit.
For
50A
output,
70A*
circuit
is
required.
*CAUTION:
The
National
Electrical
Code
“80%
rule”
stipulates
that
electrical
circuits
should
not
be
continuously
loaded
(three
hours
or
more)
to
more
than
80%
of
their
maximum
rated
capacity.
Don’t
try
to
get
48A
plug-in
EV
charging
out
of
NEMA
14-50
receptacle,
risk
of
fire.
EVIQO 40A and 48A plug-in versions are equipped with NEMA 14-50 input power plug and
are set for 40 Amps of max output load (Number “2” on the Amperage Dip Switch) by
default. If needed, the device can be hardwired too (hardwire custom whip is required -
please consult the licensed electrician in case you have any questions). For the
avoidance of doubt, even if the hardwired installation is chosen, 40A is the max
18
output of the EVIQO 40A plug-in version. If the user switches the Amperage Dip
Switch to any other value greater than “2” - the max output will still be 40A.
NOTE: If you choose to hardwire the 48A Plug-In version (set for 40A by default),
you can switch to 48A by choosing “3” on the Dip Switch once it’s connected to the
60A circuit. For 50A output, it must be hardwired and connected to a 70A circuit.
EVIQO 48A hardwire version is equipped with 3.2ft 3-wire whip, liquid tight connector and
a nonmetallic liquid tight flexible electrical conduit of 3.1 ft for hardwiring. The Amperage
Dip Switch is set for 48 Amps of output load (Number “3” on the Amperage Dip Switch
located inside the device) by default. If the Amperage Dip Switch is set to “4”, the
maximum output will be 50A, but this set up requires a dedicated 70A circuit.
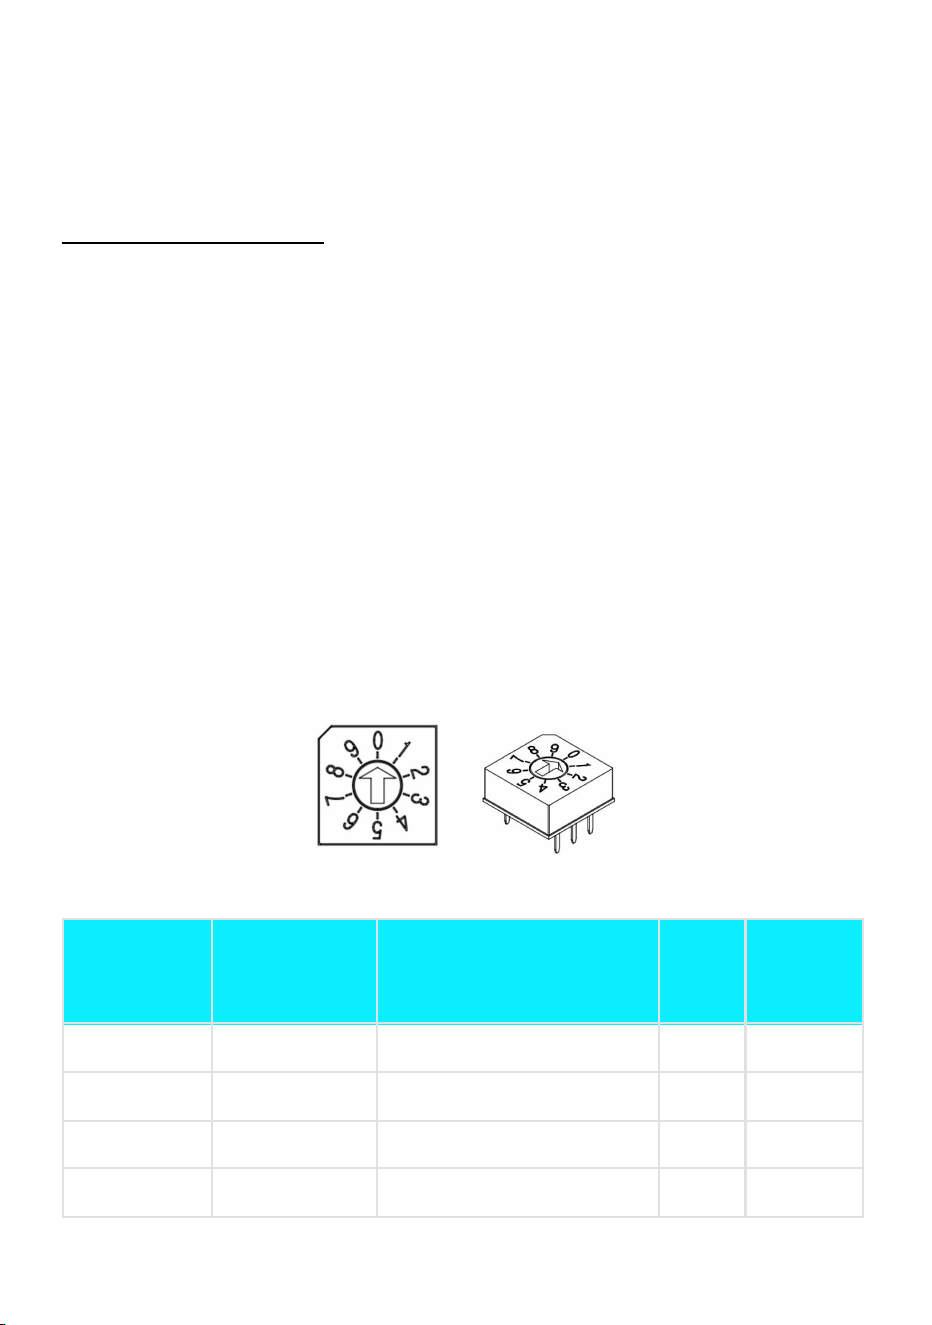
The Amperage Dip Switch is a hardware amperage output limiter. It’s located inside the
device. To access it:
1) Power off the device / turn off the power supply. Do not open the front cover of
your charger while it is connected to the power supply.
2) Remove EVIQO EV Charger from the Wall Bracket: Utilize the included allen
wrench to unscrew the anti-theft screws positioned on both sides of the device.
3) Unscrew the face part: Once the anti-theft screws are loosened, proceed to
unscrew the seven screws located on the back of the device.
4) Detach the faceplate of the EVIQO EV Charger. If you need to disconnect the
ribbon cable connecting both parts of the device, do so carefully to avoid damage.
5) The Amperage Dip Switch is located on the internal side of the faceplate,
positioned on the motherboard in the top left. It is small and gray in color.
Amperage Dip Switch
Dedicated
Circuit Rating
Max Output
Load for
EVIQO
Corresponding Value of the
Amperage Dip Switch
Plug-In
Hardwire
70 A
50 A
4
No
Yes
60 A
48 A
3
No
Yes
50 A
40 A
2
Yes
Yes
40 A
32 A
1
Yes
Yes
19

30 A
24 A
set for “1” (32A) and
decrease to 24A in app
No
Yes
20 A
16 A
0
No
Yes
CAUTION: In Canada, a plug-in installation is permitted exclusively with
a 50 Amps dedicated circuit, according to the regulatory requirements.
20
6. Wire the Circuit
ELECTRIC SHOCK HAZARD: Prior to installation, turn off the circuit breaker
at the panel supplying power to the circuit. Do not restore power until the
installation is fully completed. Failure to adhere to this critical warning may
result in the risk of electric shock or electrocution.
Once a plug-in or hardwired installation has been chosen:
1) For EV-graded NEMA 14-50 plug-in installation, use a dedicated 50A circuit wired
with a high-quality, EV-grade NEMA 14-50 outlet (40A circuit would limit the EV
charger’s output to 32A). Install the outlet with the ground prong facing up. Plug in
the Charger.
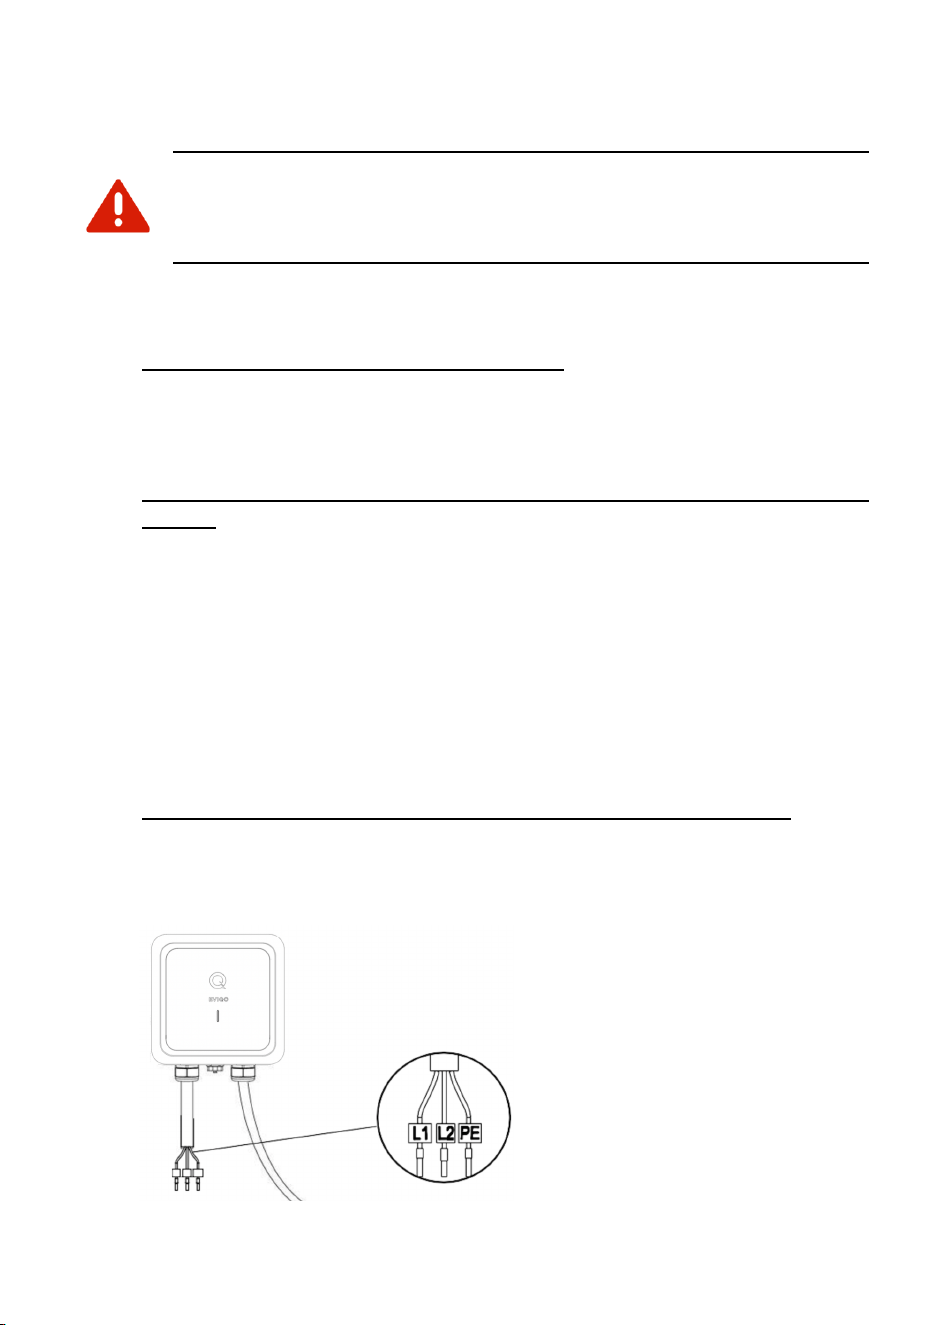
2) For hardwired installation of the 40A or 48A plug-in version of EVIQO Smart EV
Charger, remove the original input power cable with NEMA 14-50 plug first. To
remove the faceplate, unscrew the 7 screws on the back side. Then, you will need
THWN-2 copper wires with the following specs. If you hardwire a 40A plug-in
model: gauge size L1/L2 8AWG, PE 10AWG. If you hardwire a 48A plug-in model:
gauge size L1/L2 6AWG, PE 8AWG. The free pin terminal connectors for L1, L2
and PE are added to the plug-in version installation set (see page 15). Please use
UL certified components only. Connect the L1 lead to the grid L1, the L2 to L2,
and PE lead to the grid PE ground bar. Torque for L1/L2 IN: 1.8N.m - 2.0N.m.
Conduit of 1” and liquid tight connector will be required. Return the original input
power cable to the box. Attach the label with the rating to the circuit panel.
3) For hardwired installation of the hardwire version of EVIQO EV Charger, use the
original 3-wire whip of 3.2ft with nonmetallic liquid tight flexible electrical conduit
provided to hardwire the device following the connection instructions in point 2
above.
The EVIQO Smart EV Charger
has the GFCI protection included.
If you need access to the
Amperage Dip Switch and have
to detach the faceplate.
Note: Screws are on the back.
Close the device and tighten all 7
rear screws before wall-mounting
or fixing the conduit. Rear cable
entry is not supported.
21

WARNING: This device must be grounded. Disconnect electrical power prior
to installing the charging station.
WARNING: Improper connection of the equipment-grounding conductor would
result in a risk of electric shock. Check with a qualified electrician if you’re
unsure if the product is properly grounded. Don’t modify the plug provided with
the product. If it doesn’t fit the outlet, have a proper outlet installed..
22
7. Plan The Mounting Location
WARNING: In regions prone to frequent thunderstorms, it is
recommended to install surge protection at the service panel for all
circuits. Additionally, ensure that all power and ground connections,
especially those at the breaker and busbar, are clean and securely
tightened.
CAUTION: For reliable performance, ensure the device is installed
near the WiFi router to guarantee a strong signal and stable Internet
access. Please plan the device's location accordingly, avoiding
surfaces that may obstruct the WiFi signal.
Select the appropriate mounting location with electrical capacity sufficient for the
EVIQO Smart EV Charger operation:
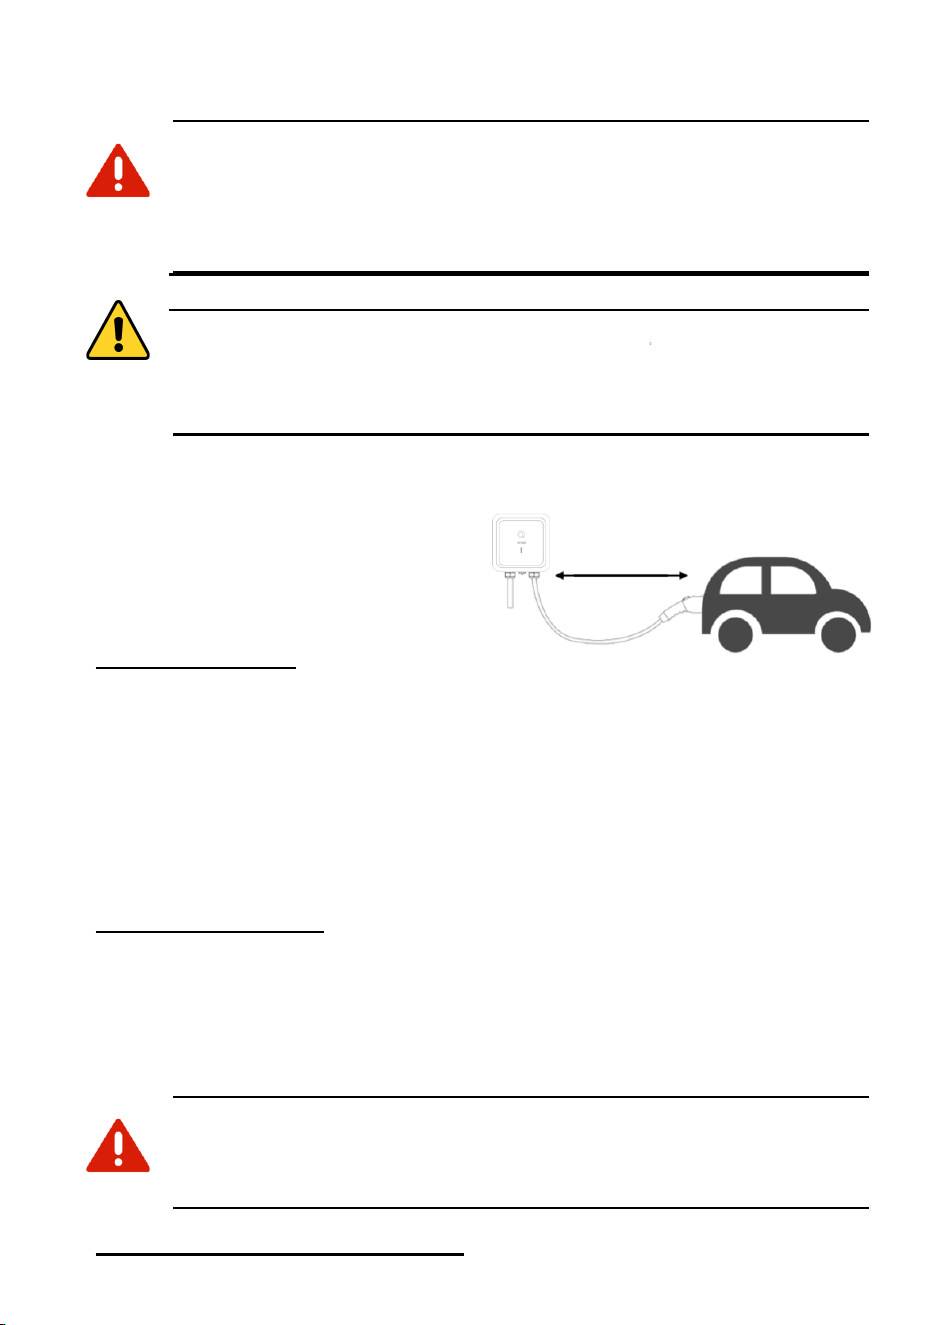
A. Please ensure you choose a mounting
location which allows the charging cable
to reach the car’s charging port while still
providing reasonable slack. The cable
length is 25 ft (7.62 m).
B. For plug-in installation: please check the
position of your EV-graded NEMA 14-50
outlet and preferable place for mounting the EVIQO Smart EV Charger before
mounting the device bracket or the holster bracket. Please ensure you have chosen a
mounting location which allows the input power cable with NEMA 14-50 plug to
effectively reach the EV-grade NEMA 14-50 outlet. Ensure the input power cable has a
slight curve and is not stretched. With NEMA cable installation, be sure to take into
account the 37” (95 cm) length of NEMA cable when positioning your charger in
relation to the EV-graded NEMA 14-50 outlet. This length provides sufficient flexibility in
choosing the mounting location for the EV Charger.
C. For hardwired installation: please check a mounting location which allows to effectively
hardwire the EV Charger. Note the distance to the breaker panel and/or the junction
box. The hardwire version of EVIQO Smart EV Charger comes with a 39” (around 1m)
3-wire whip with liquid tight connector and conduit. If you hardwire a 40A or 48A plug-in
version of EVIQO Charger - plan your mounting location based on your custom wiring.
The unit doesn’t have a rear access cable port, the bottom access port shall be used.
ELECTRIC SHOCK HAZARD: If the status light indicators turn on when the
EV charger is plugged in during the installation, the circuit is not off.
STOP
IMMEDIATELY.
Unplug EVIQO EV charger and switch off the power to the
outlet at the circuit breaker until the installation is complete.
D. Ground connection for plug-in installation: make sure the ground in your EV-graded
23

NEMA 14-50 outlet is placed on the top to match with the plug of the input power cable
which has the ground prong facing up.
E. Ground connection for hardwire installation: follow the National Electrical Code and all
local applicable codes. In case of Ground Fault - please consult a licensed electrician.
F. If you decide to install the EVIQO Smart EV Charger outdoors, this requires using an
outdoor-rated, weather-resistant EV-graded NEMA 14-50 outlet / hardwired installation.
G. Please ensure the holster bracket is mounted at approximately the same level as the
EV Charger bracket. It is recommended to keep a comfortable distance between the
EVIQO Smart EV Charger and the holster which would allow to properly store the loops
of the 25ft charging cable.
H. Both the device and holster must be securely anchored to a mounting surface, such as
a stud of sufficient size or a solid wall, to ensure proper installation of the EV charger.
I. It is recommended to mount the device at a height between 3 feet (91.5 cm) and 5.5
feet (167 cm) from the ground. The minimum installation height must be at least 18
inches (46 cm).
24
8. Mounting
For hardwired installation (if you had to detach the faceplate to get access to the
internal components): Please note that the screws are located on the back side so
you have to attach the faceplate of the EVIQO Smart EV Charger first, close the
device and tighten the 7 screws on the back side before mounting the device onto
the wall and fixing the conduit. There’s no rear cable entry.
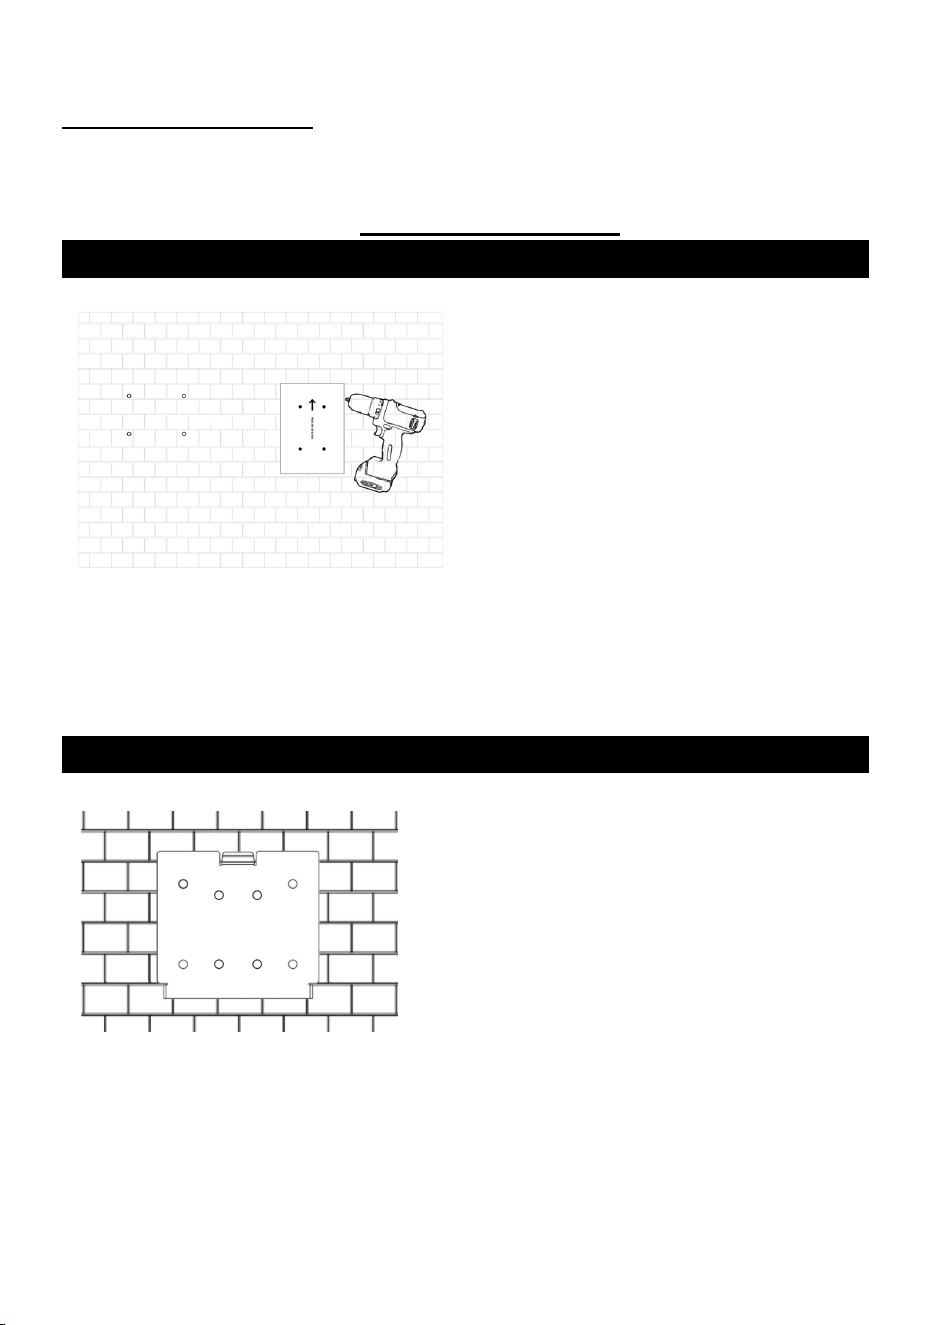
STEP 1
For concrete and brick walls: select the
desired mounting location for the EV
Charger and the Holster. Use the provided
Wall Mount Templates (one for the EV
Charger and one for the Holster) to mark
the holes for drilling. Use the ⌀8 (8mm /
5/16” diameter) drill. Drill 4 screw holes for
the EVIQO Smart EV Charger and 3 for
the Holster. The diameter of the holes
shall be around 5/16” (0.31" or 8mm) and
a depth of 2.05" (5.2cm). When drilling the
screw holes, please take note that both
templates have arrows indicating the top
side for proper alignment.
For wood studs: go to STEP 2, use Phillips Pan Head Screws provided. If you plan to
install the EV Charger on drywall, see Step 1 and ensure the drywall is sufficiently thick.
STEP 2
Detach the wall mounting bracket from the EV
charger using the Allen Wrench provided in the
box.
Don’t lose it, you’ll need it in the future.
Use the Wall Anchors and Phillips Pan Head
Screws provided to fix the wall-mounted
bracket for the EVIQO Smart EV Charger onto
the wall. Make sure the surface is sufficiently
thick to securely hold the EV Charger.
25
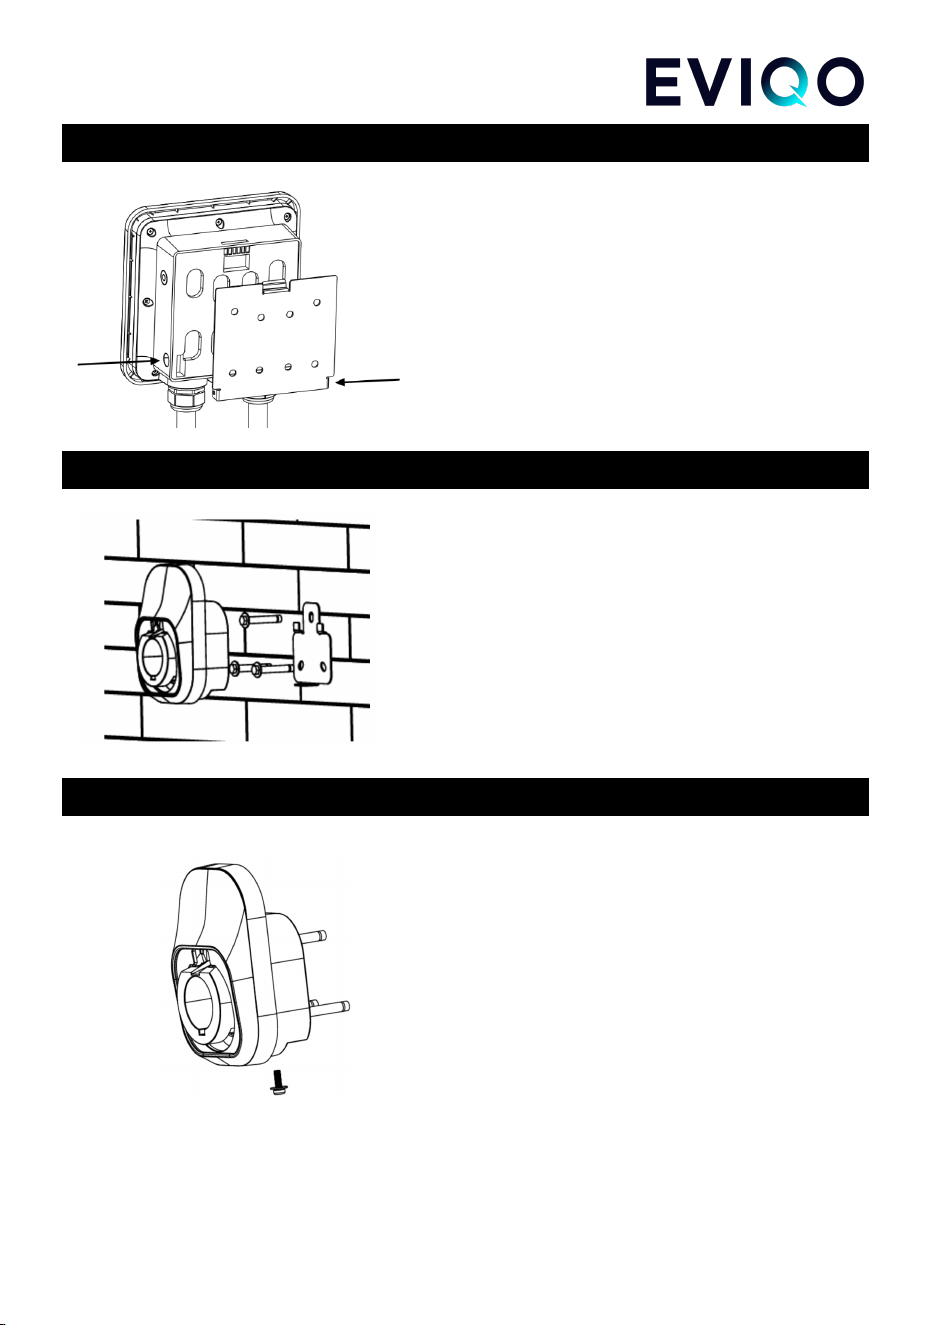
STEP 3
Align the rear notches of the EVIQO Smart EV
Charger with the wall-mounted bracket. Insert the
Anti-Theft Countersunk Head Screws through the
screw holes on the right and left sides of the
bracket. Then, use the Allen Wrench provided in
the box to securely fasten the EVIQO Smart EV
Charger to the wall-mounted bracket.
STEP 4
Detach the mounting bracket from the Holster
using the Allen Wrench provided in the box.
Don’t lose it, you’ll need it in the future.
Use the Wall Anchors and Phillips Screws
provided to securely fix wall-mounted bracket for
the Holster onto the wall.
STEP 5
Align the rear notches of the Holster with the
wall-mounted bracket. Insert the Anti-Theft
Countersunk Head Screw through the screw
hole on the bottom side of the bracket. Then,
use the Allen Wrench provided in the box to
securely fasten the Holster to the
wall-mounted bracket.
26

Final Preparation
Important notes before EVIQO Smart EV Charger is ready to go:
1. To ensure proper cable management, extend the cable to its full length, allowing
any kinks or tension to be released. Afterwards, securely store the cable using the
holster for neat and organized storage. You can also store the cable on the
EVIQO Smart EV Charger as the faceplate has a special lip to hold the cable
loops.
2. Restore power to the circuit at the electrical breaker panel by switching on the
corresponding breaker.
3. After powering up the EVIQO Smart EV Charger following the installation, the
charging status Q-indicator will get solid green, indicating it is ready to charge. By
default the EVIQO Smart EV Charger is set for Plug & Charge mode – just plug in
the connector to your car and the charging session will start automatically. No
need to pair it with the EVIQO app to start charging.
4. The small vertical line is the connection indicator located below the Q-indicator.
After powering up, it will get flashing blue, indicating it has entered into a
configuration mode. Please note the configuration window is 15 minutes.
Once expired, restart the device. In this status the device is prepared for
configuration and pairing with the smartphone through the EVIQO mobile app.
ATTENTION: Once the EVIQO Smart EV Charger gets powered up for the
first time, it may go into the firmware update. This happens OTA (over-the-air),
usually in the afternoon. Once updated, the charger will reboot itself to save
the changes and briefly go offline. After rebooting, it will power back on and
get back online. In case of rebooting, the charging session will be interrupted.
27
9. Configuring Your Device
ATTENTION: After mounting the EVIQO Smart EV Charger, it is
crucial to configure it in order to take full advantage of its wide
variety of smart functions.
ATTENTION:
Upon
powering
up,
the
EV
Charger
enters
a
15-minute
configuration
mode
if
not
yet
configured.
Failure
to
configure
the
device
within
this
timeframe
will
result
in
IDLE
mode.
If
you
miss
the
15-minute
configuration
window,
simply
unpower
the
device
and
power
it
back
on.
After
20
consecutive
skips
to
configure
it,
the
device
will
enter
a
constant
IDLE
mode
on
the
21st
power-up.
To
re-enter
configuration
mode,
perform
a
hard
reboot
(see
Question
4
on
page
4
of
this
Installation
Guide).
This
will
clear
the
device's
configuration.
28

EVIQO app smart features
1. Please note that EVIQO Smart EV Charger plug-in version has 40 Amps max output
(even if it's a 48A plug-in version which can be hardwired to get 48/50A). EVIQO Smart
EV Charger hardwire version is pre-set for 48 Amps.
2. The device is set to the default “Plug and Charge” mode, enabling seamless charging
without any prior configuration. Simply plug in the connector into the car, and the charging
process will start automatically, providing a hassle-free charging experience.
3. To maximize your savings and enhance the efficiency of your charging experience,
configure your EVIPOWER by setting your Electricity Plans, allowing you to track the
estimated costs of your charging sessions and take advantage of the most affordable
rates available. How to set: see Question 8 on Page 6 of this Installation Guide.
4. Additionally, activate the “Schedules” feature to automate your charging sessions,
ensuring that your EV charges at the most cost-effective times. By utilizing “Schedules”,
you can effectively manage your charging costs and enjoy a more convenient and
economical charging experience. The EVIQO app will help you to copy the chosen
periods of Electricity Plans to the Schedules in order to automatically charge during the
periods with the most affordable electricity tariffs.
How to set: see Question 5 on Page 5
of this Installation Guide.
5. If you require a one-time scheduled start for your charging session, along with the pre-set
amperage, take advantage of the “Delayed Start” function. This feature allows you to
conveniently set a specific start time for your charging session, ensuring it begins at the
desired time with the pre-configured amperage.
How to set: see Question 7 on Page 5
of this Installation Guide.
6. Please note that the “Plug and Charge” mode is mutually exclusive with the “Schedules”
and “Delayed Start”. If you have enabled the “Plug and Charge” mode, the charging
session will start automatically upon plugging the connector into your EV and without
pressing START. To utilize the “Schedules” or “Delayed Start” functions, disable the “Plug
and Charge” mode.
7. Effortlessly track the duration, power consumption, and estimated costs of your chargings
with a single click, utilizing weekly/monthly breakdowns on the Usage Details page of the
EVIQO app. Press on the charts to see the stats for a specific day.
8. The EVIQO app offers a multitude of helpful tips to enhance your charging experience.
For instance, when you set up your Electricity Plans within the app, it provides assistance
by suggesting the copying of corresponding time periods to your Schedules. This ensures
that you take full advantage of the more affordable tariffs during those specific periods.
Likewise, when configuring your Schedules, the app reminds of your Electricity Plans and
29

can automatically pre-fill the scheduled period using the time you have set in your Plans.
This feature simplifies the scheduling process and helps you optimize your charging
sessions.
9. The EVIQO app offers reminders to plug in before scheduled sessions, provides push
notifications with session stats upon completion, and prevents conflicting schedules that
overlap. With these capabilities, you can stay on top of your charging routine, receive
important charging updates, and ensure smooth and efficient scheduling without any
conflicts.
30
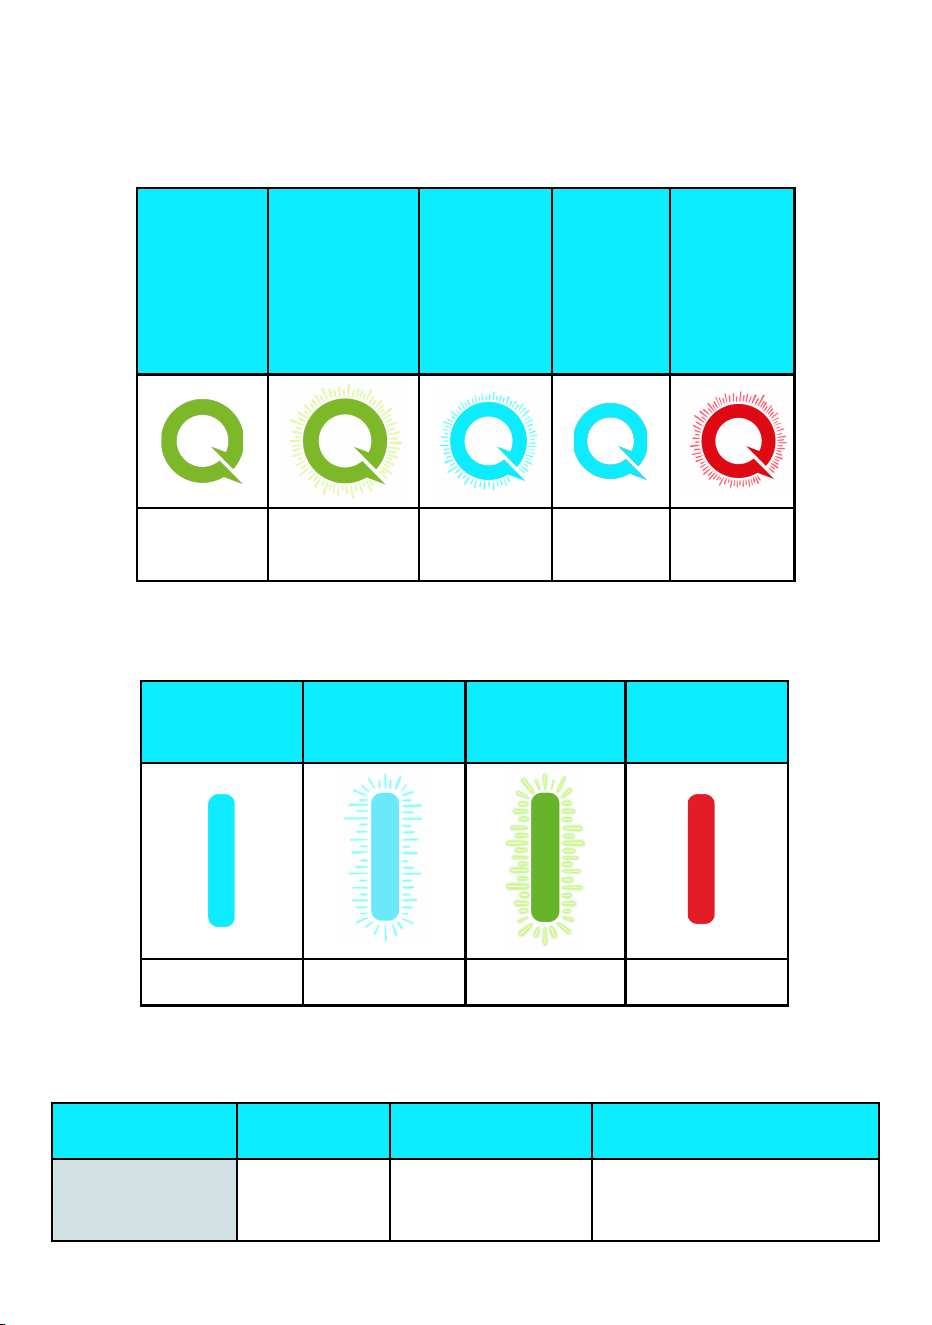
10. Light Codes
10.1 Charging Status Indicator
Please
Plug In
(Standby
mode)
Plugged In
(waiting to
start
charging,
communicati
ng with the
vehicle)
Charging
Charging
Finished
Fault
Solid Green
Slow Flashing
Green
Slow
Flashing
Electric Blue
Solid
Electric
Blue
Flashing
Red
10.2 Signal Status Indicator
Connected to
the cloud,
online
Configuration
mode
Connecting to
the Internet
No
Connection
Solid Electric
Blue
Flashing Electric
Blue
Flashing Green
Solid Red
10.3 Errors and Warning Messages
Name of the
error
Red LED
indication
Definition of the
error
Ways to fix the error
Voltmeter Fault
Flashing red 1
time
Meter fault
a) Unplug the J1772/J3400
connector and reboot the charger.
b) If the fault persists, contact
31
EVIQO technical support.
Control Pilot Fault
Flashing red 2
times
3 seconds interval
Charging guide
abnormal
a) Unplug the J1772/J3400
connector and reboot the charger.
b) Make sure the CP (Control
Pilot) line is fixed in the right place.
c) Check if the CP line in the
connector runs an electrical
short-circuit or open circuit.
d) The device will recover
automatically when the problem is
solved. Reconnect the charger to
the EV car for further normal use.
Undervoltage
Protection
Flashing red 3
times
3 seconds interval
UVP (Under Voltage
Protection) Fault.
UVP Fault is triggered
when the input voltage
is below 90%
(208V*0.9=187V) of
rated voltage.
a) Unplug the J1772/J3400
connector.
b) The device will recover
automatically when the input
voltage stabilizes within the
required range.
Overvoltage
Protection
Flashing red 4
times
3 seconds interval
OVP (Over Voltage
Protection) Fault.
OVP Fault is triggered
when the input voltage
is over 110%
(240V*1.1=264V) of
rated voltage.
a) Unplug the J1772/J3400
connector.
b) The device will recover
automatically when the input
voltage stabilizes within the
required range.
Overheat Protection
Activated
Flashing red 5
times
3 seconds interval
OTP (Over Temperature
Protection) Fault.
OTP Fault is triggered
when the temperature of
the charger interior is
over 185°F (85°C).
a) Unplug the J1772/J3400
connector.
b) The device will recover
automatically when the
temperature turns lower than
185°F (85°C).
c) If the problem persists, turn off
the power and carefully check if
the thermistor on the PCB works.
Overcurrent
Protection
Flashing red 6
times
3 seconds interval
OCP (Overcurrent
Protection) Fault.
OCP Fault is triggered
when the current is over
110% of rated current
set. For example for
48A set on the EV
a) Unplug the J1772/J3400
connector.
b) The device will recover
automatically when the current
goes down to a normal range.
Reconnect the charger to the EV
car for further normal use.
32
Charger ,OCP is
48A*1.1=53A. The value
of the overcurrent shall
be calculated based on
the rated current set
through the Amperage
Dial Switch inside the
EV charger, e.g. if the
current Amperage Dial
Switch is set for 2, the
rated current will be
40A, then the OCP is
110%*40A=44A. For
more information about
the Amperage Dial
Switch - go to page
11-12 of this Guide.
Ground Wire
Disconnected
Flashing red 7
times
3 seconds interval
Ground wire not
connected
a) Unplug the J1772/J3400
connector.
b) Please contact an electrician to
make sure the PE (Protective
Earthing) line is properly
connected.
c) In case the device is hardwired,
please make sure the input Live
line and Neutral line (L1 and L2
lines) are not inversely connected.
d) The device will recover
automatically when it comes to
normal.
If this fault occurs during charging,
remove the connector after the
ground line is properly connected.
Relay Fault
Flashing red 8
times
3 seconds interval
Relay failure during
charging
a) Unplug the J1772/J3400
connector and reboot the charger
if the problem persists after the
unplugging.
b) Avoid prolonged simulator or
loading machine usage.
c) Consult a professional to check
for electrical short-circuits and
ensure dry J1772/J3400
connector.
d) Test the relay module with a
multimeter while the EV charger is
on. Use the AC voltage gear to
measure L1_IN and L1_OUT or
L2_IN and L2_OUT. If the voltage
is between 208V~240V, the relay
33
is disconnected; if the measured
value is 0V, the relay is closed.
Contact technical support if there
are any inconsistencies.
Leakage Protection
Activated
Flashing red 9
times
3 seconds interval
RCD (Residual Current
Device) Abnormal Fault.
RCD Fault is triggered
when current leaks at a
range of 15-20mA.
a) Unplug the J1772/J3400
connector and reboot the charger.
b) If the fault persists, contact a
licensed electrician.
RCD Self-Test Fault
Flashing red 10
times
3 seconds interval
When the EV Charger is
powered on, it will
self-detect whether the
leakage detection
mechanism is effective.
a) Reboot the charger.
b) Please contact a licensed
electrician to fix the hardware
issue.
34
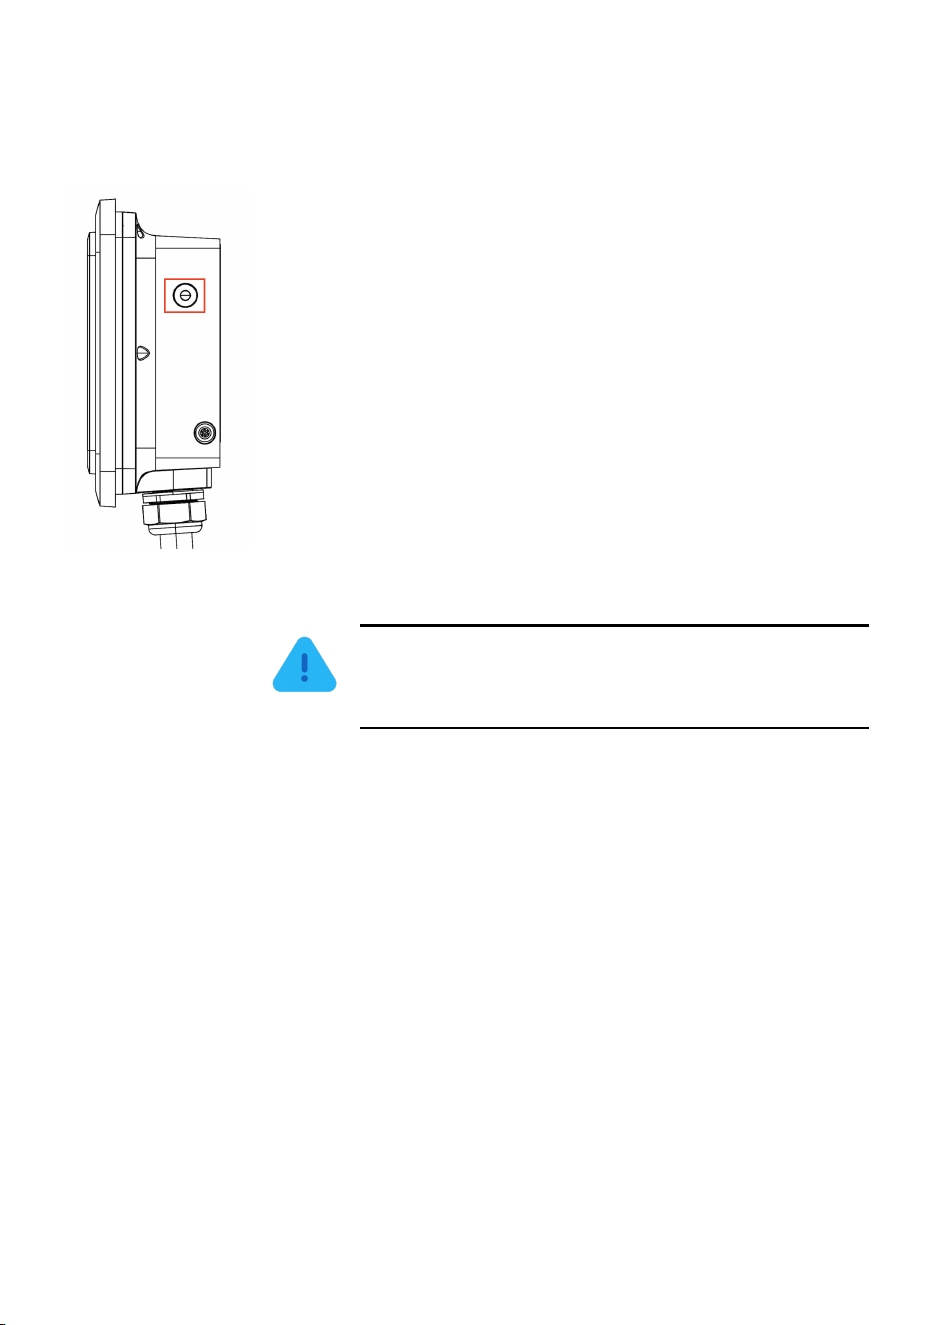
11. Reset and Hard Reboot Button. Precondition.
On the right side of the device, there’s a reset and hard reboot button.
1) To reset the charger: press and hold the button for 5
seconds, then release to reset the device. During the restart
process, both indicators located on the faceplate will cycle
through three colors: red, green, and blue. You will also hear a
beep sound.
2) To reset to factory settings (hard reboot): press and hold
the button for 15 seconds. The light indicators will turn solid
red for 3 seconds before the device shuts down, restarts, and
restores to factory settings. You will hear a beep sound.
Please wait 1-2 minutes for the unit to reset to factory settings.
You will need to reconfigure the device and pair it again with
the EVIQO app.
3) Enable Car Precondition Compatibility: Press 3 times
— unit beeps 3 times, flashes 3 times, then gives 1 long beep.
Feature enabled. Press 3 times to deactivate.
ATTENTION: To prevent accidental resets that
could disrupt charging, accidental clicking on the
reset button of less than 1 second does nothing.
35
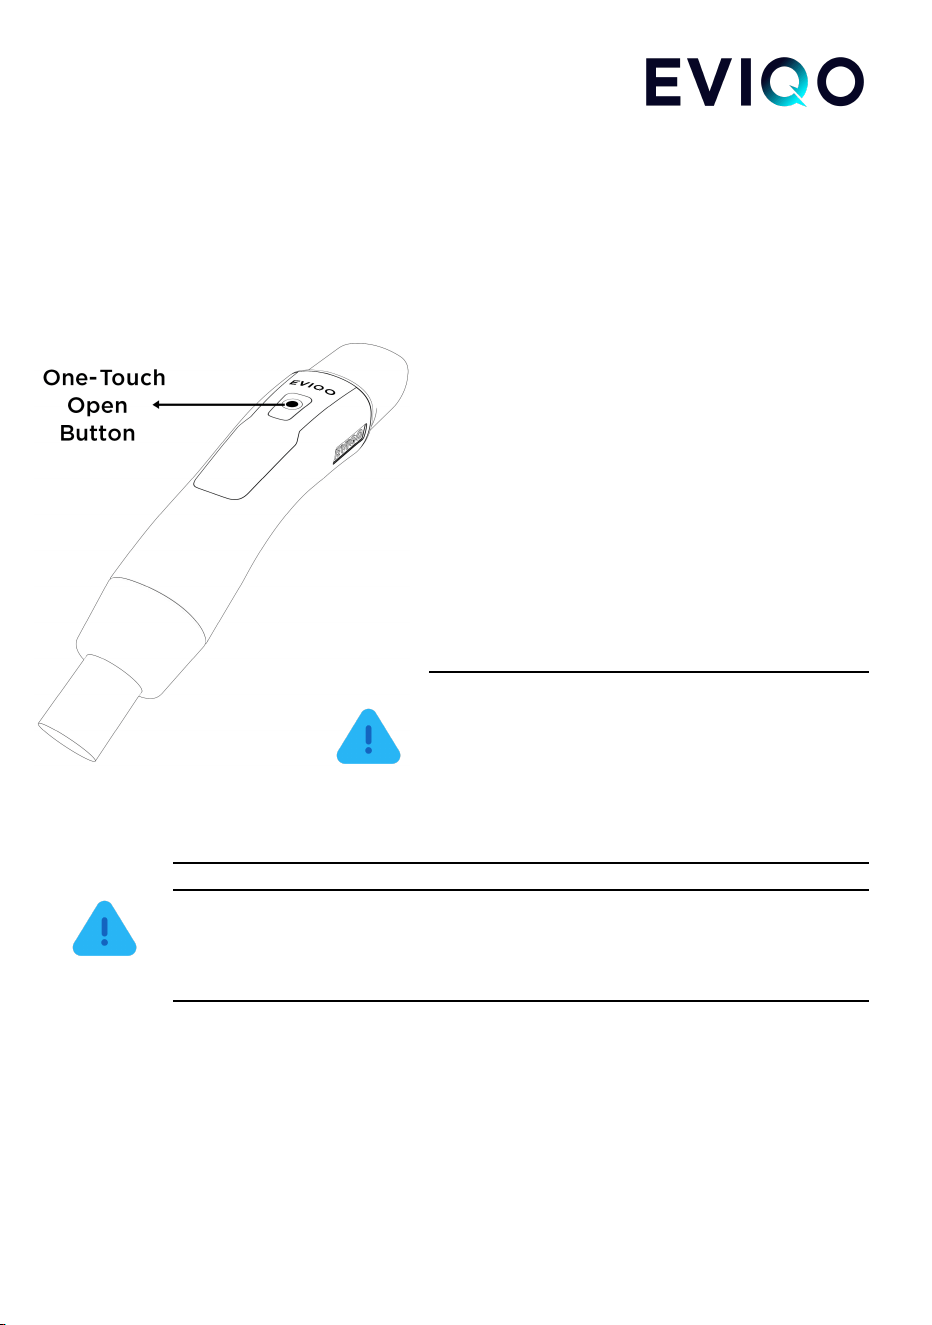
12. Charging port open / release button (NACS)
If your unit is equipped with a NACS connector, the button is conveniently located on the
top side of the handle. This feature operates at a frequency of 315 MHz and complies with
US standards. For compatible electric vehicles, a short press of the button will open the
car's charging port. The same button shall also be pressed to release the NACS connector
from the charging port after the charging session,
allowing you to safely remove it.
To open the charging port of compatible
electric vehicles:
1. Ensure the vehicle is unlocked or
recognizes the owner's smartphone in proximity.
2. Press the charging port open/release
button located on the NACS connector handle.
3. The vehicle will receive the 315 MHz
signal and automatically open the charging port
cover, allowing convenient access for charging.
ATTENTION: Please ensure there are no
obstacles nearby that could interfere with the
connector's signal. If the car's charging port does
not open, try pressing the button again from a
closer distance, or wait 10-15 seconds before
attempting again.
ATTENTION: The charging port open/release button will only function when
the vehicle is unlocked or detects the owner's smartphone nearby. This is
designed to prevent unauthorized access. Ensure both the vehicle and
smartphone are within the operational range for seamless functionality.
36

13. Limited Warranty
Limited Warranty for EVIPOWER Smart EV Charger by EVIQO.
This Limited Warranty (“Warranty”) is applicable to the original purchaser of a new
EVIPOWER Smart EV Charger by EVIQO ("EV Charger") for residential use in the USA
and Canada. The Warranty is non-transferable and exclusively valid for the purchaser.
LIMITED 3 YEAR PARTS EXCHANGE WARRANTY: EVIQO TECHNOLOGIES LIMITED
(“EVIQO”) provides a warranty for a period of three (3) years from the original purchase
date (the “Warranty Period”), covering defects in materials or workmanship of your EV
Charger, subject to the exclusions from Warranty coverage set forth below, provided the
EV Charger was used under normal operating conditions and all the recommendations
contained in the Installation Guide and EVIQO’s website were followed by the user. During
the Warranty Period, EVIQO will repair or replace, at its discretion, any defective EV
Charger upon the original purchaser’s written notice of the defect duly received during the
Warranty Period. The Warranty includes parts and factory labor required for repairing the
EV Charger, but excludes any on-site labor costs associated with uninstallation or
reinstallation of the repaired or replaced EV Charger. It is your responsibility to ensure the
correct uninstalling of any defective unit and installing the repaired or replacement EV
Charger that is returned to you. Additionally, the cost associated with shipping the EV
Charger to the designated address for repair or replacement is not included in the
Warranty. Please note the exclusions from Warranty as specified below. You hereby
understand and accept that EVIQO may provide remanufactured or reconditioned parts or
refurbished or repaired charging stations as replacements under the Warranty. Any
replaced parts, whether covered by warranty or not, are owned by EVIQO. Any
replacement parts or charging stations provided will be covered for the remaining duration
of the original Warranty Period. In cases where the EV Charger is determined by EVIQO
to be out-of-warranty or ineligible for warranty service, it will be returned to you. However,
if you approve, EVIQO can provide repair or replacement services at their standard
charges, which will be at your expense.
Limitation of Liability
EVIQO does not authorize any agent to modify or exceed the warranty obligations of
EVIQO. The remedies provided in this limited product warranty are the sole and exclusive
remedies available to you. EVIQO does not provide any other express or implied
warranties, except for the warranty stated above. All other warranties are excluded to the
maximum extent permitted by law. If any implied warranty cannot be disclaimed under
applicable law, such warranty shall be limited in duration to the warranty period described
above. No warranties apply after the expiration of the warranty period.
37
Exclusions from Limited Warranty
ATTENTION: Please note that the Warranty on your EV Charger shall
not apply to defects or service repairs resulting from the causes listed
below:
1. Improper installation, improper site preparation or choosing incorrect location for
the installation, improper use and/or maintenance of the EV Charger,
2. Unauthorized modifications, disassembling or alterations made to the EV
Charger.
3. Damage caused by accidents, misuse, abuse, vandalism, negligence or using
the EV Charger in a way other than as specified in the applicable documentation
(including but not limited to physical damage from being struck by a vehicle),
failure to comply with the federal and/or local laws and regulations, including
NEC.
4. Failure to follow the operating instructions, maintenance or storage guidelines,
including failure to use EV-graded NEMA 14-50 receptacle for 40A and 48A
plug-in model of EVIQO EV Chargers.
5. Power surges, electrical faults, extreme electromagnetic field or fluctuations in
voltage.
6. Environmental factors such as extreme temperatures, humidity, floods or
exposure to corrosive substances.
7. Repairs or modifications performed by unauthorized personnel.
8. Normal wear and tear, normal aging changes or cosmetic damage such as
scratches and dents.
9. Any damage or defects not directly attributable to manufacturing or workmanship
issues.
10. Any damage caused by using any third-party unauthorized software, interface,
parts, or supplies not supplied and/or approved by EVIQO TECHNOLOGIES in
advance in writing.
ATTENTION: The Warranty will not be applicable if the original
identification markings, including but not limited to serial numbers,
38

trademarks, safety warnings, or other markings on the EV Charger
enclosure, are damaged, altered, or removed, or if the charging station is
used or installed for purposes other than in a single-family residence.
ATTENTION: Please note EVIQO does not provide any Warranty for
the error-free operation or uninterrupted functionality of any of its
services.
Step-by-step instruction to obtain the Warranty service:
1. Contact Customer Service at [email protected] to request a Return Material
Authorization (“RMA”) number from EVIQO, if at any point during the Warranty
period you believe you have a defective EV Charger.
2. Please provide:
● a detailed description of the issue you are experiencing with the EV
Charger for effective troubleshooting, including photo- and video-
evidence,
● the model number and serial number of your EV Charger,
● proof of purchase,
● shipping information,
● any other relevant details that will assist EVIQO in addressing your
request accurately and efficiently.
3. If, upon reviewing your request, it is determined by EVIQO that the defect
appears to be covered by your valid Warranty, and your Warranty is still in effect,
EVIQO will issue you an RMA number and provide you with the address to return
the defective EV Charger.
4. Ship the defective EV Charger to the provided address, ensuring it is packaged in
the original shipping box provided or a suitable container to prevent damage.
Please ensure to include the RMA reference number in the shipping
documentation when returning the defective EV Charger. If your EV Charger is
covered by the Warranty, EVIQO will repair or replace it free of charge and cover
the shipping expenses for sending it back to you.
39

14. Compliance
This device complies with part 15 of the FCC Rules.
Operation is subject to the following two conditions:
1. This device may not cause harmful interference.
2. This device must accept any interference received,
including interference that may cause undesired operation.
FCC ID:
2BG8P-EVIPOWER248J for J1772 connector model (both 40A and 48A);
2BG8P-EVIPOWER248N for the NACS connector model (both 40A and 48A).
NOTE: This equipment has been tested and found to comply with the limits for a
Class B digital device, pursuant to part 15 of the FCC Rules. These limits are
designed to provide reasonable protection against harmful interference in a
residential installation.
This equipment generates uses and can radiate radio frequency energy and, if not installed
and used in accordance with the instructions, may cause harmful interference to radio
communications. However, there is no guarantee that interference will not occur in a
particular installation. If this equipment does cause harmful interference to radio or
television reception, which can be determined by turning the equipment off and on, the
user is encouraged to try to correct the interference by one or more of the following
measures:
- Reorient or relocate the receiving antenna.
- Increase the separation between the equipment and receiver.
- Connect the equipment into an outlet on a circuit different from that to which the receiver
is connected.
- Consult the dealer or an experienced radio/TV technician for help
NOTE: The manufacturer bears no responsibility for any radio or TV interference
caused by unauthorized modifications to this equipment. It is important to note that
such modifications have the potential to invalidate the user's authority to operate
the equipment.
This equipment is designed to comply with the FCC's radiation exposure limits for
uncontrolled environments. For safe operation, it should be installed and used with a
minimum distance of 20 cm between the radiator and your body. To ensure proper
functioning, it is important to avoid placing this transmitter in proximity to any other antenna
or transmitter.
40

Installation notes
______________________________________________________________
______________________________________________________________
______________________________________________________________
______________________________________________________________
______________________________________________________________
______________________________________________________________
______________________________________________________________
______________________________________________________________
______________________________________________________________
______________________________________________________________
______________________________________________________________
______________________________________________________________
41

______________________________________________________________
______________________________________________________________
______________________________________________________________
______________________________________________________________
______________________________________________________________
______________________________________________________________
______________________________________________________________
______________________________________________________________
______________________________________________________________
______________________________________________________________
______________________________________________________________
42
_____________________________________________________________
\\
43