
S1 Series Smart HomeGym
User Manual

WELCOME
TO
AEKE
Individual code number: 91440300MA5HDDFB3Q
Thankyou for choosing the S1 Series Smart Home Gym.
Before using the product, please read the product
information and precautions provided in this manual
How to get support?
We are here to help whenever you need us. You can
contact us in the following ways:
WEBSITE: www.aeke.com
EMAIL: support@aeke.com

DISCLAIMER
Qudong Future (Shenzhen) Technology Co., Ltd., hereinafter referred to as
"the Company," and the S1 Series Smart Home Gym and its related
accessories, hereinafter referred to as "the Product."
To protect your legal rights, please carefully read this manual and its
disclaimer before using the Product. You are required to use the Product
strictly in accordance with the instructions provided herein. By activating
and using the Product, you are deemed to have read, understood, acknowl-
edged, and accepted all terms and conditions of this manual and its disclaim-
er. Users undertake to be responsible for their own actions and all conse-
quences arising therefrom. Users agree to use the Product solely for legiti-
mate purposes and to comply with any current or future policies or guide-
lines established by the Company.
During the use and maintenance of the Product, you must strictly adhere to
and follow all requirements outlined in this manual, including but not limited
to its instructions. The Company shall not be liable for any personal injury,
accidents, property damage, legal disputes, or other adverse events result-
ing in conflicts of interest caused by failure to follow these instructions or
due to unforeseeable circumstances beyond our control. The Company shall
not bear any responsibility for any actions arising directly or indirectly from
the use of the Product that violate applicable laws or regulations. Users shall
assume full responsibility and liability for such incidents and losses. If any
operation seems overly complex or unsafe, we recommend contacting our
support team for professional guidance.
This device is "for consumer use only." The ownershall provide users with all
necessary warnings and instructions.

CONTENTS
01
02
03
04
05
Safety Information
01
Product Overview
Product Diagram 06
Package Contents 09
Product Specifications 11
Installation and Placement
Pre - Unpacking 12
Unpacking 13
Moving 14
Installing 15
Placement 16
Product Operation
Power On/Off 18
Standby / Reset / Turning Off 18
Bluetooth Connection 19
Wi-Fi Setup 20
Accessories Overview
Smart Grips View 21
Cross-bar & Resistance Controller 25
Triceps Rope View 27
Smart 8 Electrode scale 28
Heart Rate Armband 28
Camera cover 31

06
07
08
09
10
Troubleshooting
SN Lookup
Resistance Cable Can Not Retract
Technical Support
Maintenance and Care
Device Cleaning
Screen Maintenance
Power Maintenance
Resistance Cable Replacement
Prohibitions
Precautions
Permanent marker
Warranty and
After-Sales Service
Overview
Limited Product Warranty
Free Repair Conditions
Exclusions
How to Get Service
Return and
Refund policy
FCC&CE Statement
32
32
33
34
34
34
34
34
35
36
37
37
38
38
38
39
41

SAFETY INFORMATION
01
01
01 SAFETY INFORMATION
The S1 Series Smart Home Gym is a digital strength training system
designed exclusively for indoor use, compliant with CLASS H equipment
certification (ISO 20957). It is not intended for high-precision applications
but features a heavy load capacity and motor that generates substantial
resistance (2.5–50 kg per side). Improper use of this device or its accessories
may result in equipment damage or personal injury.
The S1 Series Smart Home Gym models SHG2501-1, SHG2601-1,
SHG2701-1, SHG2801-1, and SHG2901-1. These models differ only in color
and market distribution regions; all other specifications remain identical. The
operational principles, intended user demographics, and exercise modes of
these products are fully consistent.
• Before using the product, please inspect it and its accessories for any damage If any
abnormalities are detected , discontinue use immediately and contact official customer
service
• Do not attempt to repair the product yourself, and disassembly is strictly prohibited
• Do not remove or damage the warning labels or signage on the product or its accessories
If labels or signage are found to be damaged , illegible, or removed , please contact official
customer service
Maxim um Use r Weig ht ≤ 150 kg
Adj ust abl e Arm Tr ainin g L oad: ≤150 kg
Usage Categor y P recision: HC
The de vic e an d its pe dal s train ing load ≥15 0 kg.
The Motor Subst ant ial Re sist anc e (2. 5 - 50 kg per side)
Motor Gear Interva ls: Preci se 0.5kg Adj ustme nt
Do not exceed the devi ce's se t capaci ty
Befo re using the p roduct , pleas e r ea d the produc t in for matio n and pr ecau tions prov ided in
this man ua l.A dequ at e war nings fo llo win g th e gui del ine s of S pec ifi cat ion F1749 and F2276 .
All th e warn in g i nfo rma tio n mark ed on the prod uc t is also present ed in th e user manua l.
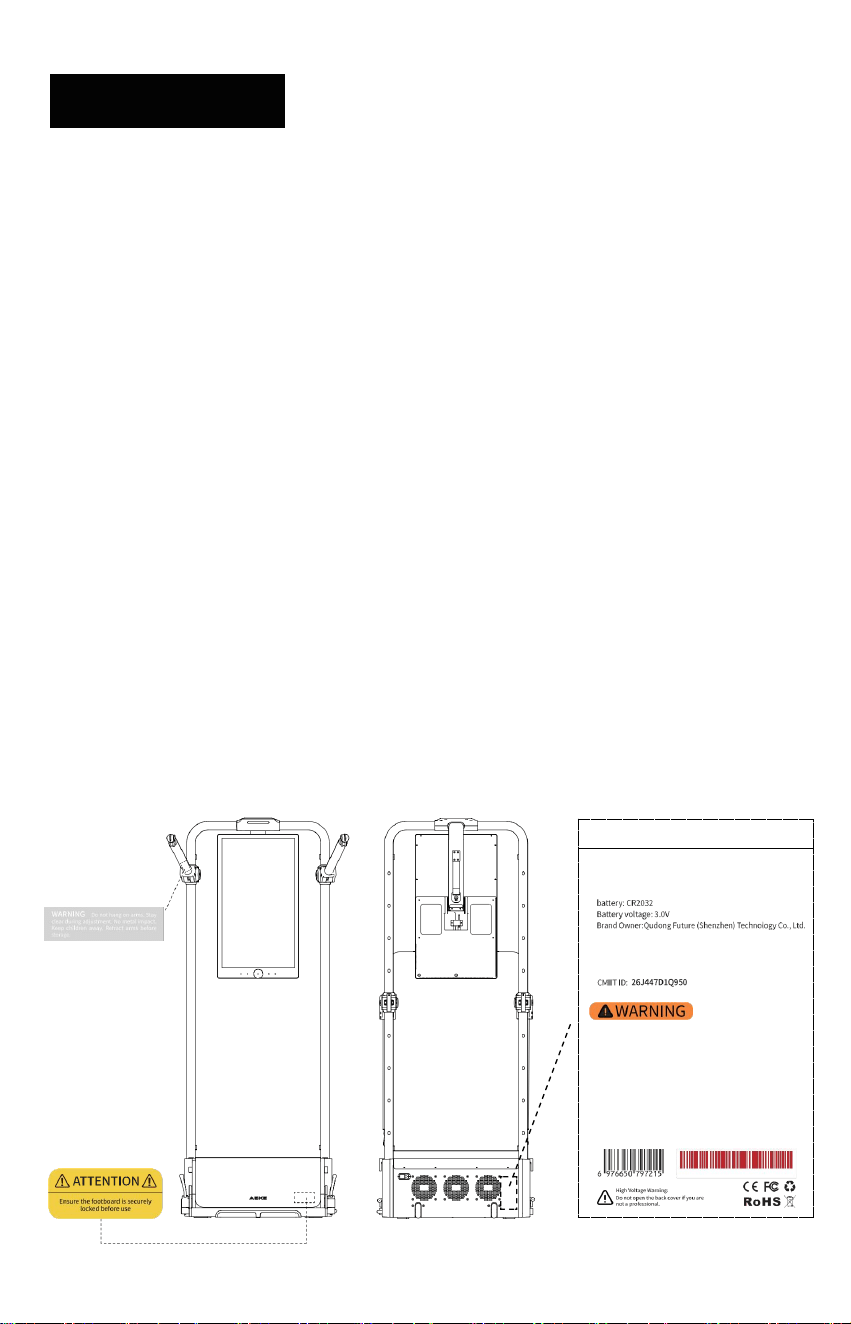
Do not hang on arms .
Sta y clea r du rin g adju stm ent. Ensu re the foo tbo ard is securely locked be for e use
Keep c hil dre n aw ay. An obse rv er must be pr ese nt whe n using the device.
For consu mer us e only
Standards: EN ISO 20957- 1 、EN ISO 20957- 2
tha t using the mach ine f or sup port du rin g str et chi ng or allo wing resis tance straps, ropes or
oth er mea ns to be att ached to it may result in se rio us injur y.
XXXXXXXXX
02
01 SAFETY INFORMATION
Installation Safety
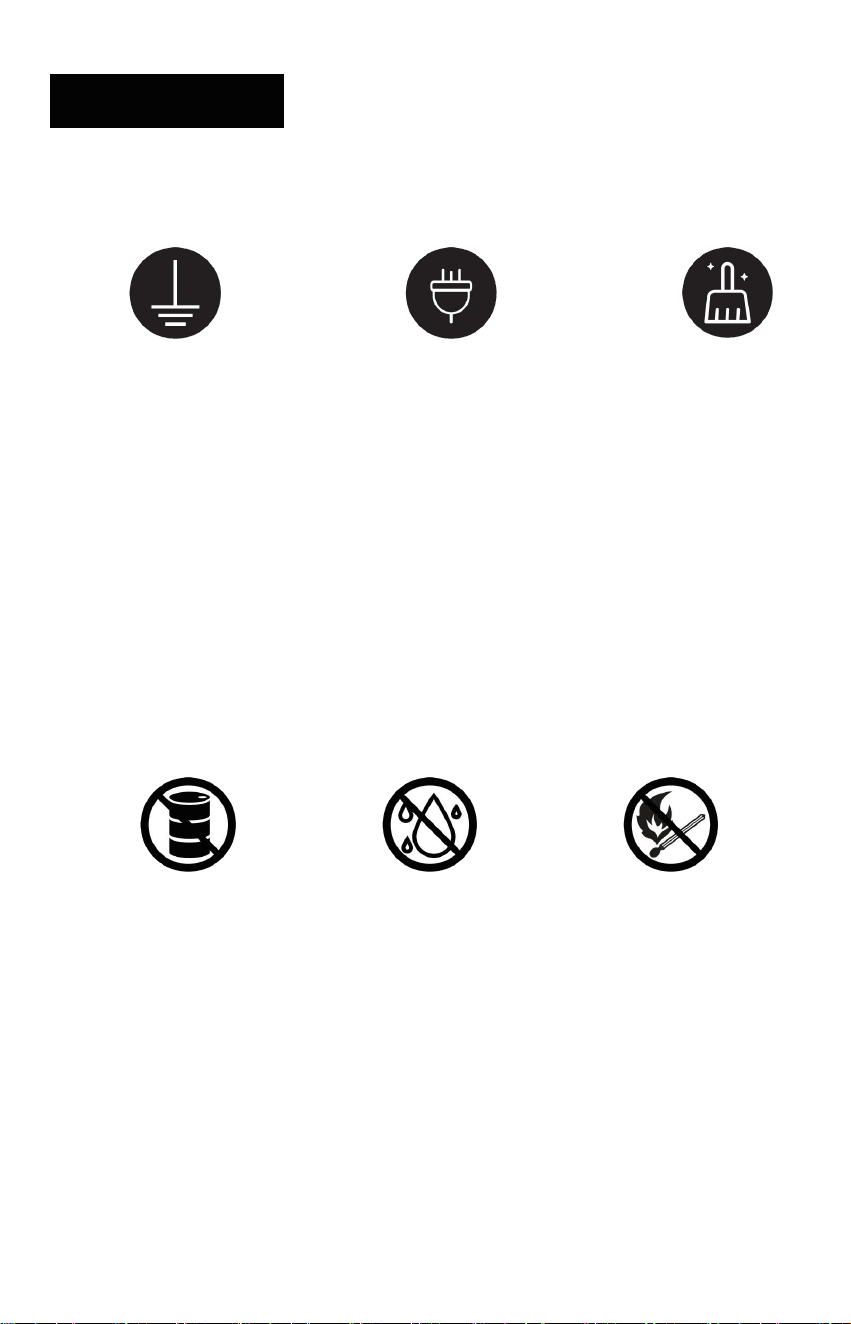
GROUND REQUIRED ORIGINAL 3-PRONG POWER KEEP AREA CLEAN
• Install the Product strictly according to this user manual.
• Use the original 3- prong power cord and connect only to a properly grounded outlet (⏚).
• Place the Product on a stable, level hard surface (e.g., marble, hardwood, or tile). Do not
place it on soft surfaces such as carpet or felt.
• Keep the area around the Product clear of clutter, heavy objects, and items that could fall to
prevent instability or damage to the mirrored screen.
Electrical Safety
NO FLAMMABLES NO DAMP NO OPEN FLAME
• The product is not waterproof and must be used in a dry,well-ventilated environment Do not
splash water on it, and prevent water from entering the power port, mirrored screen, or
internal gaps between the frame to avoid short circuits or other damage
• During severe weather conditions such as thunderstorms, unplug the power cord to
prevent damage to the product
• use only power outlets certified for safety by national standards, and avoid overloading
electrical circuits

03
01 SAFETY INFORMATION
• use the original power cord provided with the product Do not use power equipment from
other brands to power the product
• keep the product away from high electromagnetic interference environments, such as
mobile phone base stations or high-power transmission devices, during use
• If you notice unusual noises, odors, smoke, or any other irregularities during use, immedi-
ately turn off the power, unplug the cord, and contact official customer service
Operational Safety
• Avoid striking , pressing , or applying external force to the touch screen Do not scratch or
damage it, as this may cause it to crack or shatter
• Before using the product, wear appropriate workout clothing and shoes Avoid loose-fit-
ting garments or any equipment, jewelry,or accessories that may pose a safety risk during
exercise
Child and Pet Safety
• Minors should only use the product under the supervision and guidance of a guardian
• Position the product with its mirrored side facing a wall to avoid placement in pathways
frequented by children or pets
• Prevent children or pets from climbing on the product, which could cause it to tip over
• Ensure children and pets do not play, chase, jump, or interact with the product in anyway
that could lead to tipping or damage

04
01 SAFETY INFORMATION
Unsuitable Users
Please Consult a Doctor If You Fall Into the Following Categories
Before Using This Product!
To ensure your safety, individuals with the following conditions or circum-
stances must consult a doctor to determine if this product is suitable for use:
• Are 65 years or older;
• Are pregnant or in the perinatal/postpartum period;
• Are under medical treatment and/or taking medication;
• Have any chronic illness or current/recent injury;
• Have cardiovascular/cerebrovascular conditions (e.g., hypertension, heart disease,
stroke/cerebral infarction, insufficient cerebral blood supply);
• Have metabolic disorders (e.g., diabetes, hypoglycemia, gout);
• Have respiratory diseases (e.g., asthma);
• Have musculoskeletal/orthopedic conditions (e.g., muscle/ligament/myofascial injury,
arthritis, joint or soft-tissue injury, connective tissue disease);
• Have coordination, neurological, or peripheral vascular disorders;
• Have limited legal capacity;
• Are under the influence of alcohol, fatigued, unwell, after high-intensity work, or with irregu-
lar sleep;
• Are in a poorly ventilated or high-temperature environment (risk of heatstroke).

05
01 SAFETY INFORMATION
Safety Precautions
• Heart rate monitoring: Wear the supplied heart rate armband. Keep intensity within a safe
range. Avoid prolonged high-intensity exercise and overtraining.
• Stop if symptoms occur: Stop immediately if you feel chest tightness, dizziness, pain,
shortness of breath, or any unusual symptoms. Seek medical attention. Consult a doctor
before resuming.
• Implanted medical devices: If you have a pacemaker, defibrillator, or other implanted
device, consult a doctor before use. The product may generate electromagnetic fields. If
approved, keep a safe distance and follow guidance from your doctor/device manufacturer.
• Suspected interference: If you suspect interference with a medical device, stop using the
product immediately.

PRODUCT OVERVIEW
02
06
02 PRODUCT OVERVIEW
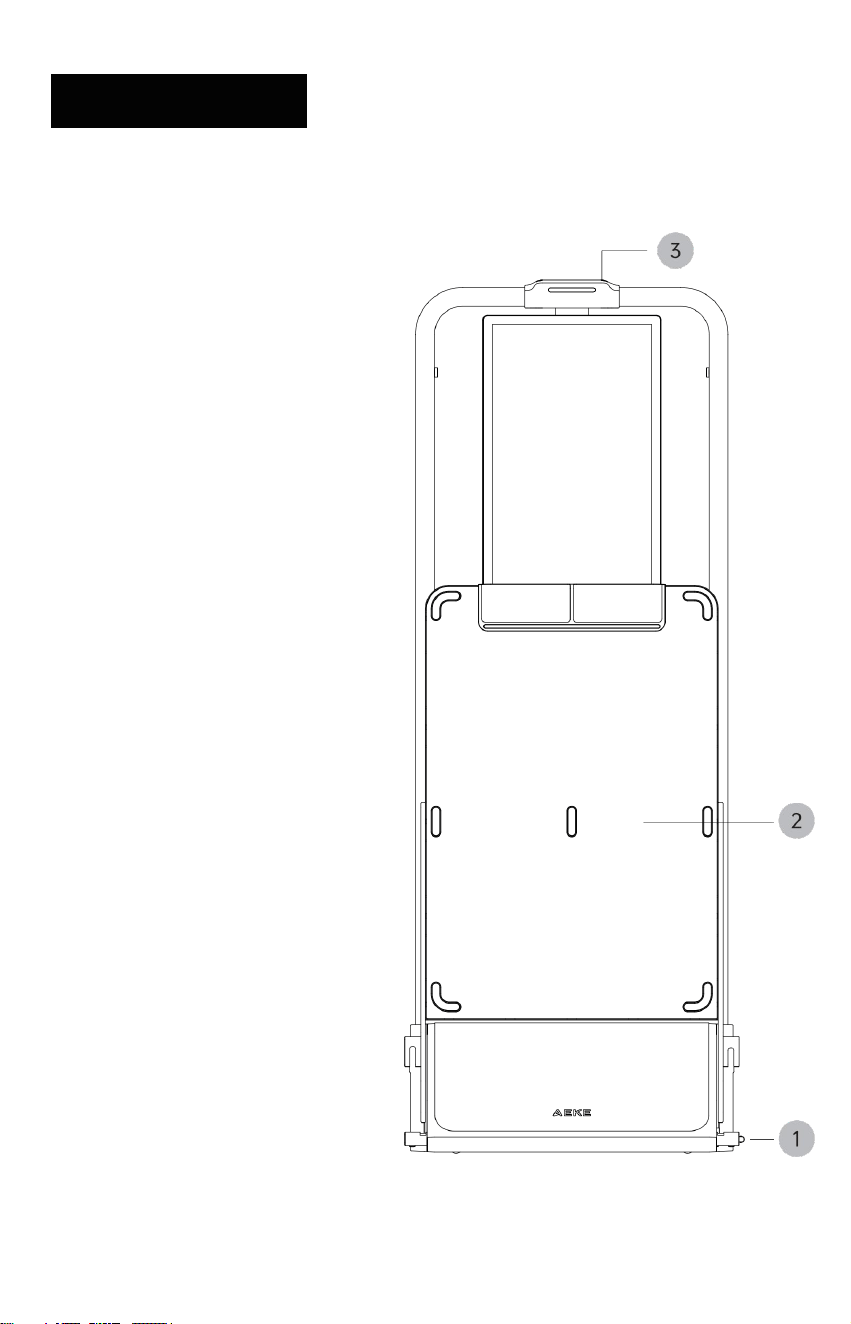
Product Diagram
① Footboard Release Pedal
② Hydraulic Soft-Lowering
Footboard
③ Top Interaction Light
Front View (Folded)
07
02 PRODUCT OVERVIEW
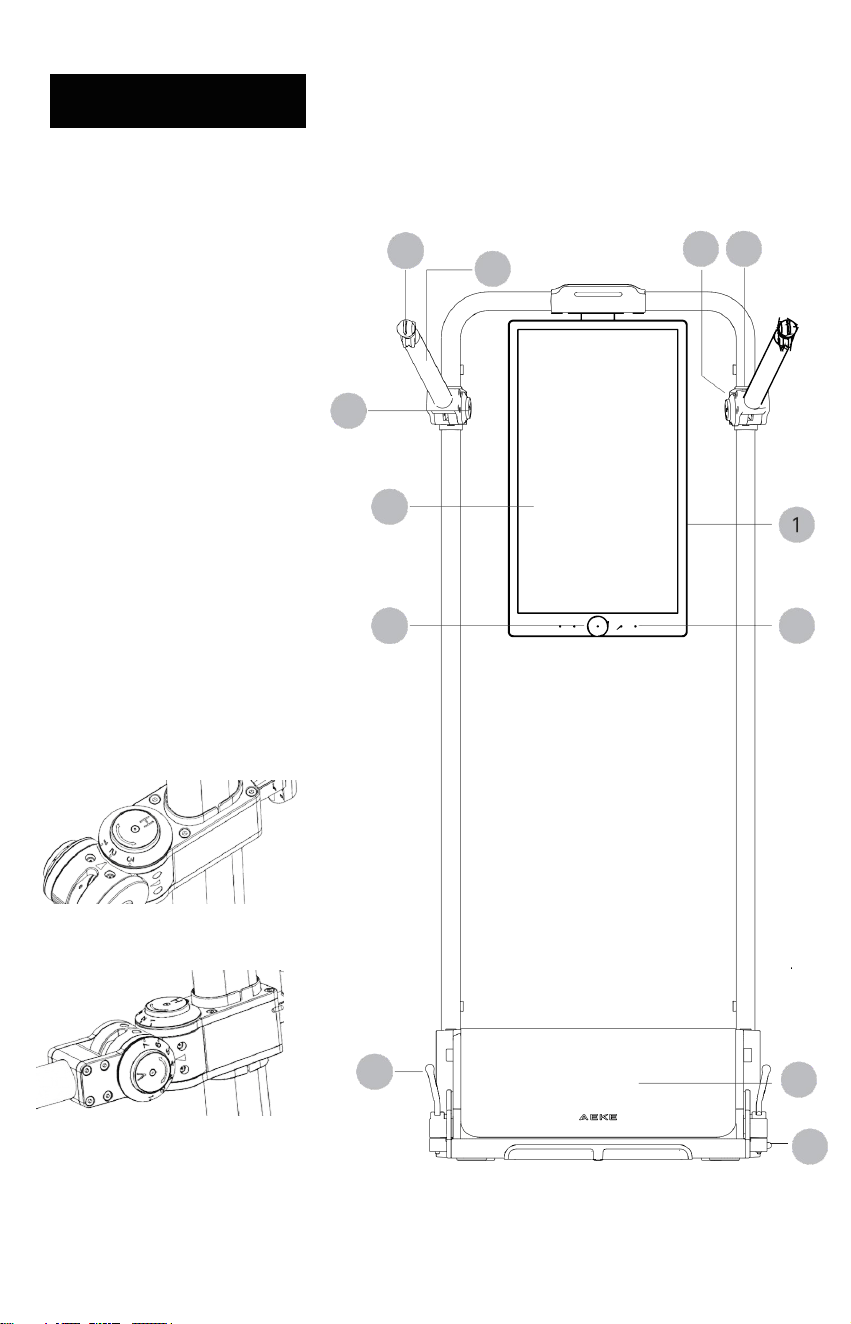
Product Diagram
① Sreen Power Button
② Footboard Lock Lever
③ 27-inch FHD Screen
④ AI Camera
⑤ Front Cover
⑥ Microphone voice
⑦ Footboard Release Pedal
⑧ Adjustable Arm
⑨ Adjustable Arm Horizontal
Adjustment Button (H)
⑩ Adjustable Arm Vertical
Adjustment Button (V)
5
⑪ Adjustable Arm
Height Adjustment Pin (R/L)
⑫ Cord Buckle
8
11
3
12
9
4
6
7
10
2
08
02 PRODUCT OVERVIEW
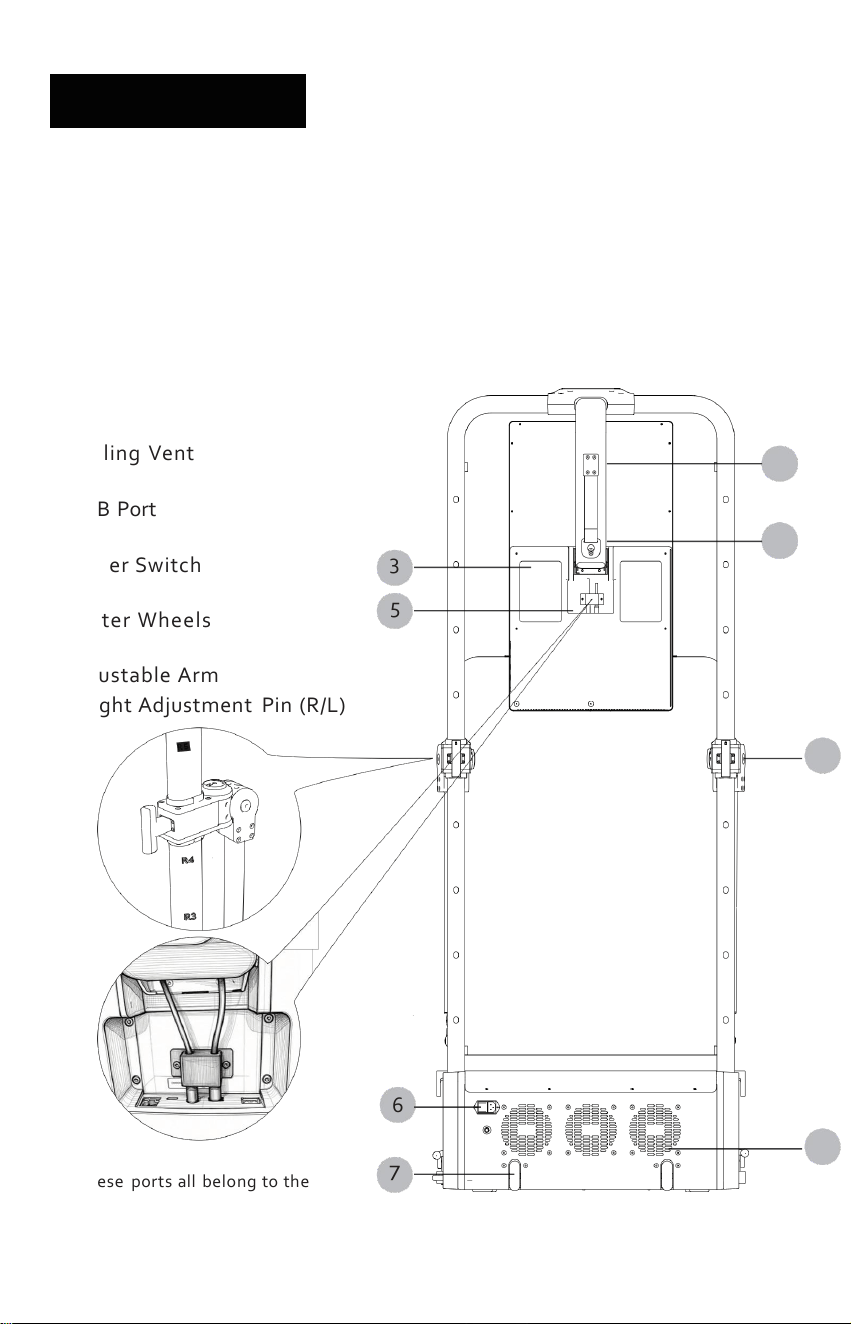
Product Diagram
① Screen Rotation Hinge
② Anti-Tip Wall Anchor Kit
③ Audio Cover Plate
④ Cooling Vent
⑤ USB Port
⑥ Power Switch
⑦ Caster Wheels
⑧ Adjustable Arm
Height Adjustment Pin (R/L)
8
6
4
These ports all belong to the
modulation ports of the product.
7
3
5
2
1
09
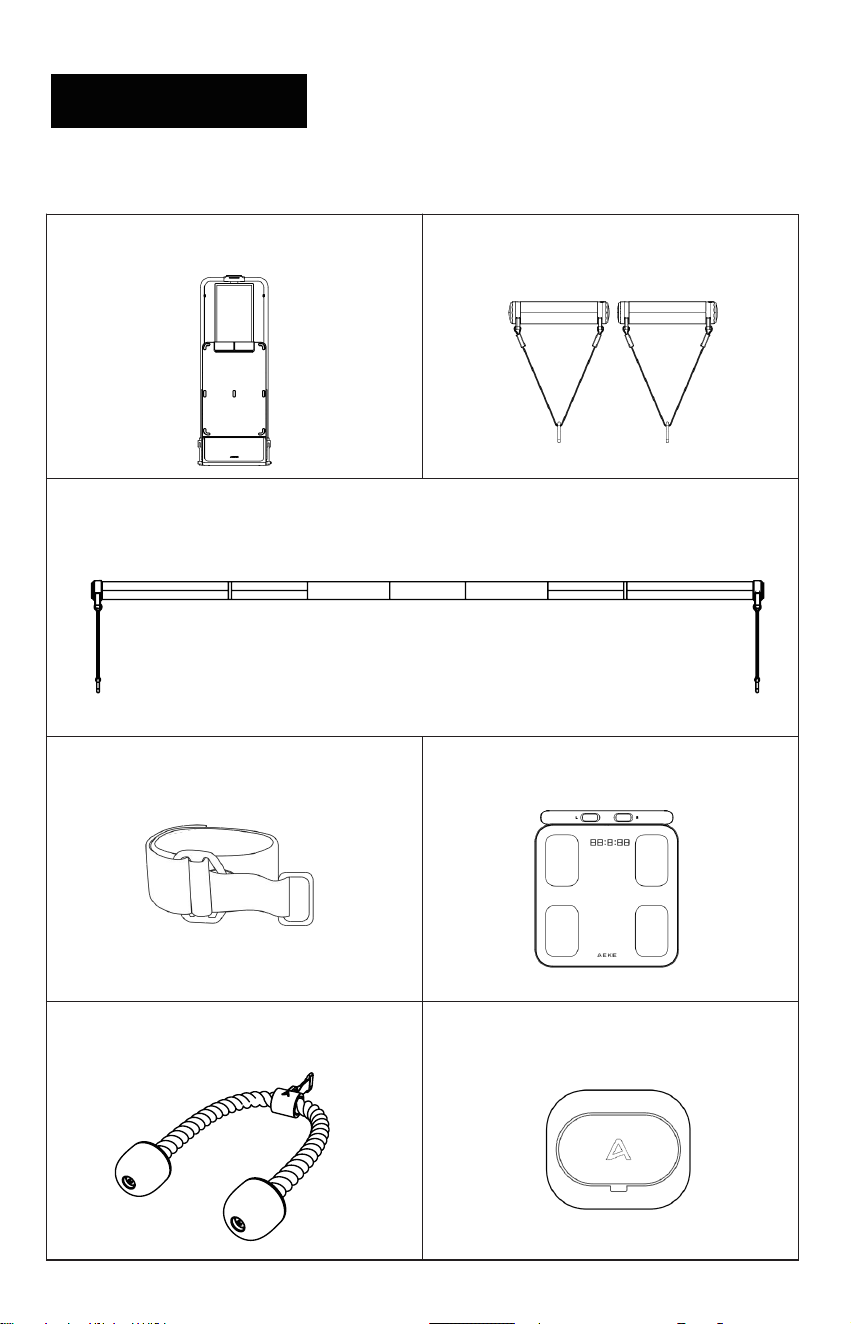
02 PRODUCT OVERVIEW
Package Contents
Smart Grips
Crossbar
Ankle Strap
Smart 8 Electrode Scale
Triceps Rope Resistance Controller
AEKE S1 Series Smart Home Gym
10
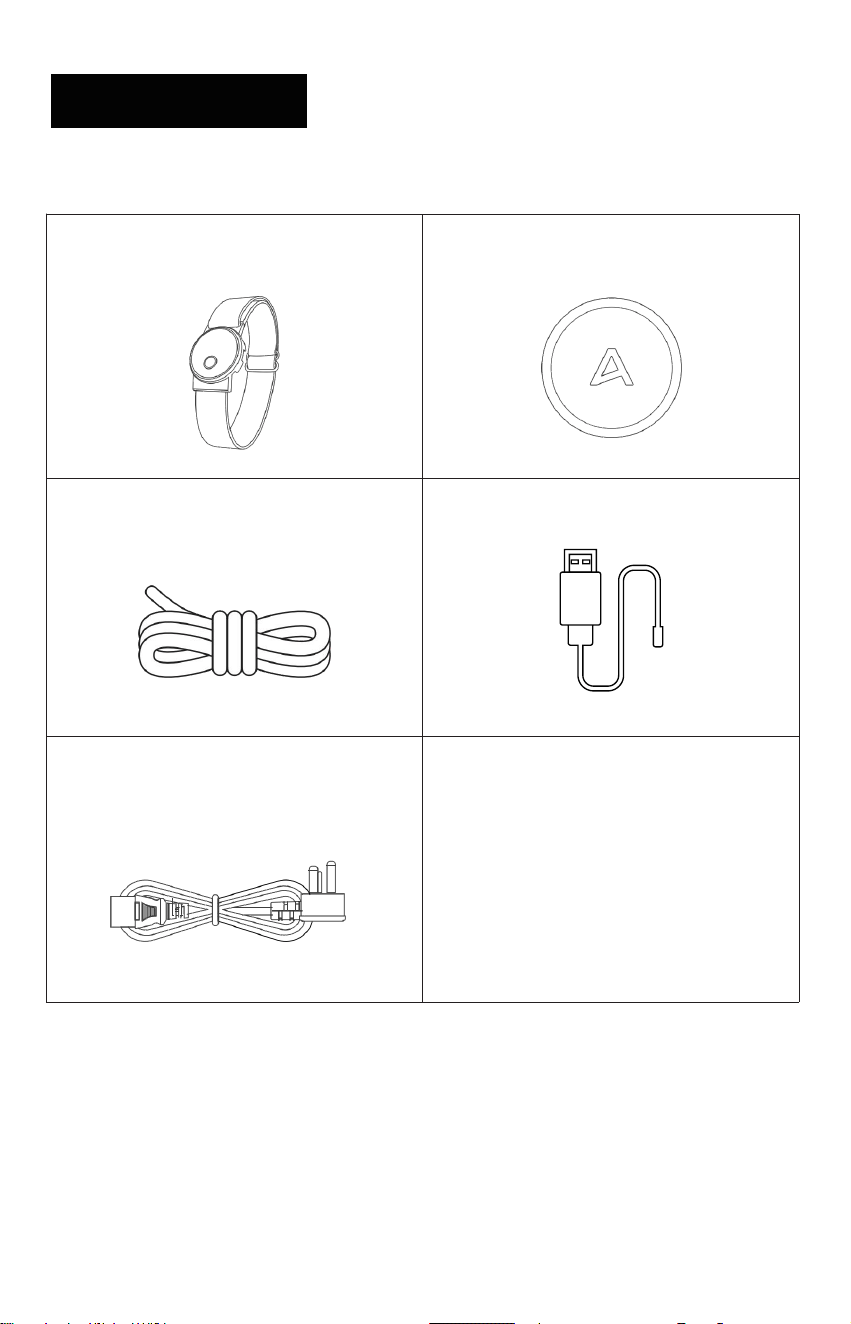
02 PRODUCT OVERVIEW
Package Contents
Heart Rate Armband
Camera Cover
Replacement Cable
Heart Rate Armband Charger
Power Cord

11
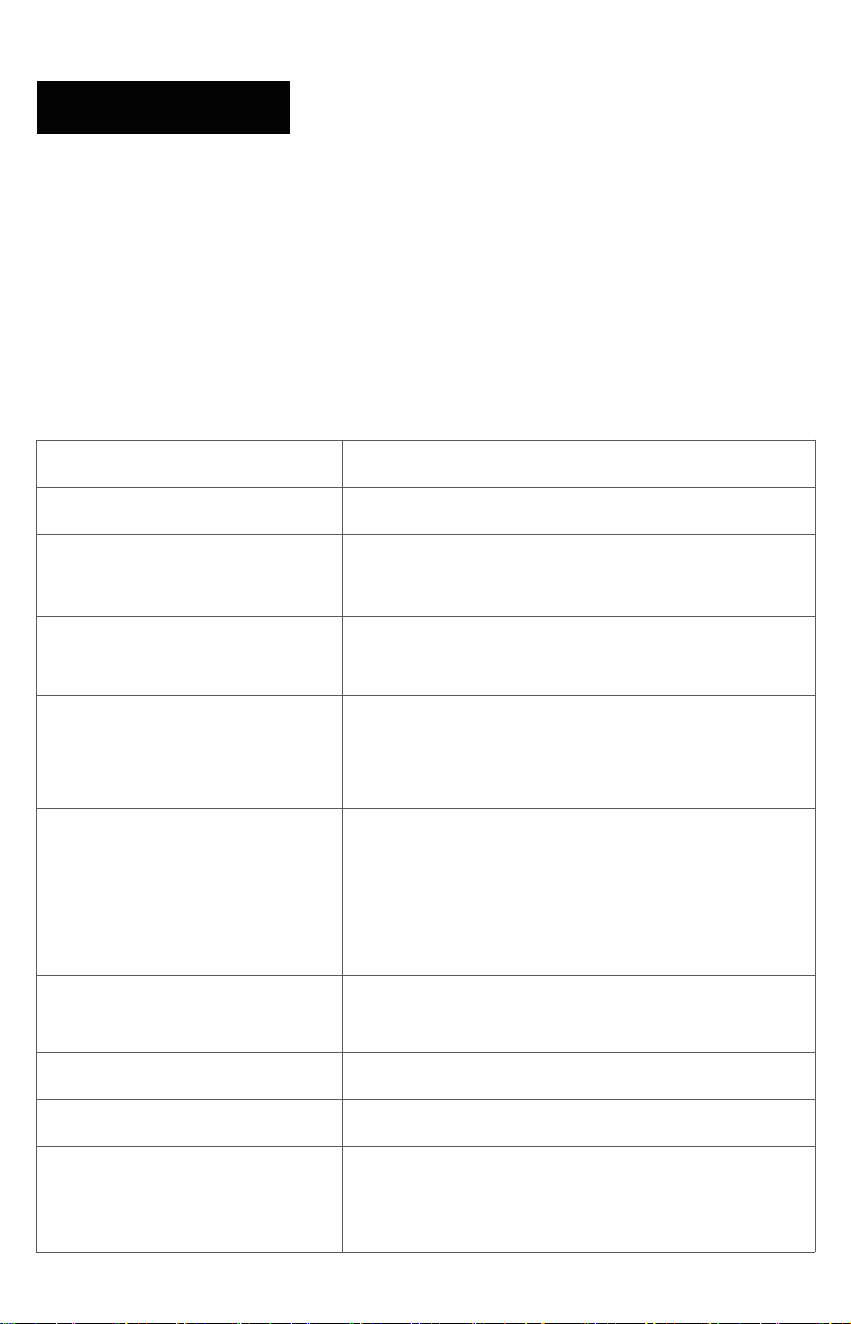
02 PRODUCT OVERVIEW
Product Specifications
Item
S1 Series Smart Home Gym
Model Number
SHG2501-1
Rated Power
1300 W
Rated Voltage
110–240 V, 50/60Hz
Connectivity
Wi-Fi (2.4G & 5.0G), Bluetooth 5.2
Net Weight
110 kg
Packaged Weight
130 kg
Wi-Fi Standard Protocol
IEEE 802.11a/b/g/n/ac/ax
Wi-Fi 2.4GHz
2400~2483.5MHz
Wi- Fi 5 GHz
5150~5250MHz,5725~5850MHz
The Wifi of Main PCBA Maximum
Conductive Power of Wireless
Transmitter
FCC Certification: WiFi 5G :15 dbm
WiFi 2.4G:16dbm
CE Certification:WiFi 5G:15dbm
WiFi 2.4G:15dbm
The BLE of Left Adjustable Arm Maximum
Conductive Power of Wireless Transmitter
FCC Certification:3 dbm
CE Certification:4dbm
The BLE of Right Adjustable Arm Maximum
Conductive Power of Wireless Transmitter
FCC Certification:3 dbm
CE Certification:4 dbm
The BT of Right Adjustable Arm Maximum
Conductive Power of Wireless Transmitter
FCC Certification:2 dbm
CE Certification:4 dbm
Unfolded Dimensions
715 mm × 1355 mm × 1850 mm
Folded Dimensions
715 mm × 425 mm × 1850 mm
Package Dimensions
840 mm x 520 mm x 2000 mm
Operating Temperature
0°C to 45°C
Storage Temperature
−20°C to 60°C
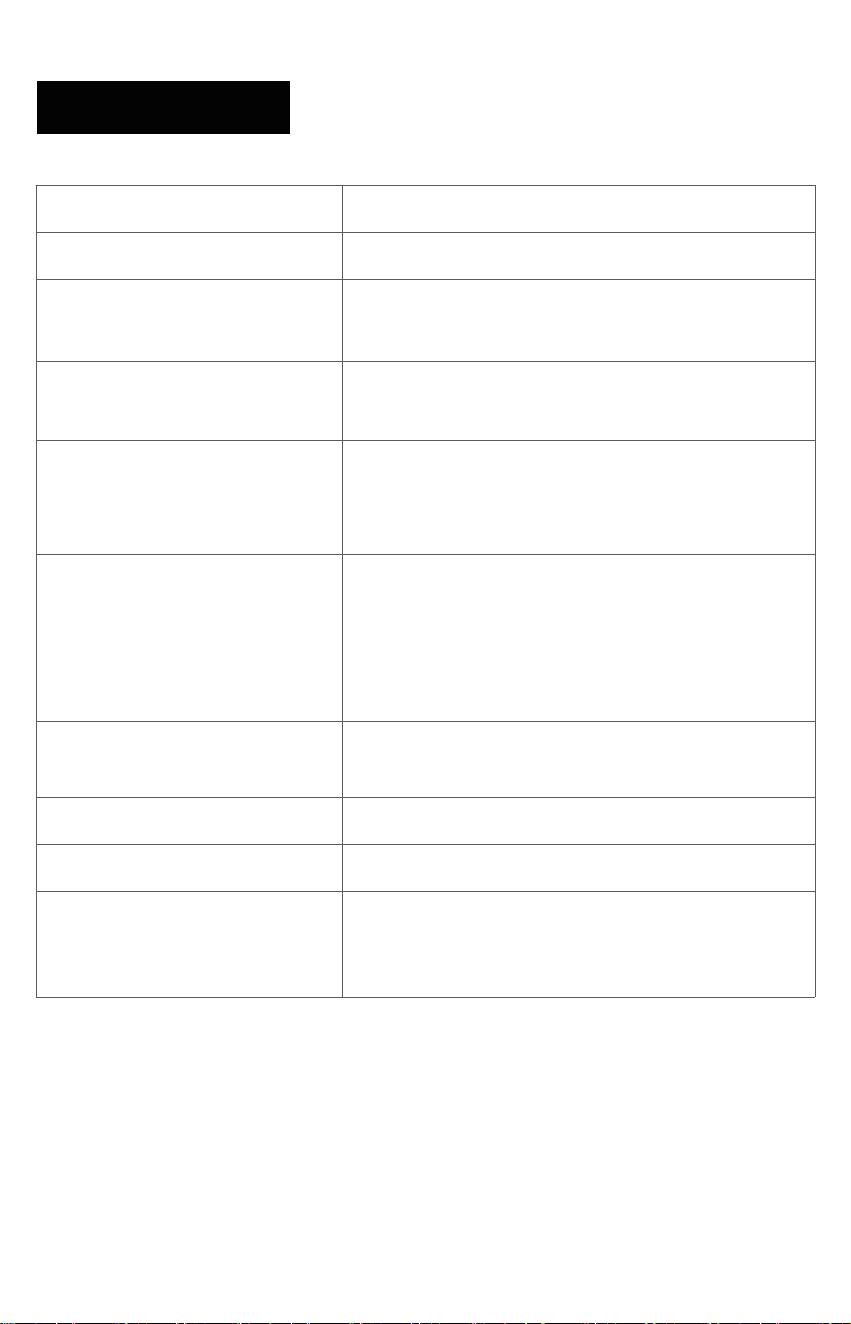
Item
Smart Grips
Model Number
SHG2501-2
BLE
2402MHz-2480MHz
The BLE of Smart Grips Maximum
Conductive Power of Wireless Transmitter
FCC Certification:-3dbm
CE Certification:-1dbm
Operating Temperature
0℃ to 45℃
Storage Temperature
-20℃ to 60℃
Note:
• If your household operates on a 110–120V electrical system, AEKE recommends plugging
the device into a 20-amp power outlet to ensure safer operation.
• If your household operates on a 200–240V electrical system, simply install the device in
your designated space and adjust it as needed.

INSTALLATION AND PLACEMENT
03

12
INSTALLATION
AND PLACEMENT
It is recommended that users retain the outer packaging for a period
after unboxing for future use (such as after-sales service or returns)
Pre-Unpacking
• This product requires no drilling for installation-it's ready to use right out of the box Before
use, remove all packaging materials, including the outer carton, foam protective shell ,
and any other coverings
• Ensure the product is placed on a flat, hard surface such as marble, hardwood, or ceramic
tiles Do not place it on soft surfaces like carpets, rugs, or felt
• Make sure the area around the product is clear of clutter, heavy objects, items that may tip
over, or anything that could affect its stability or damage the mirror screen
• position the product in a well-ventilated indoor area, away from heat sources, and avoid
direct sunlight exposure
• Do not place the product in humid or wet areas to prevent rust or reduced insulation
efectiveness
03
13
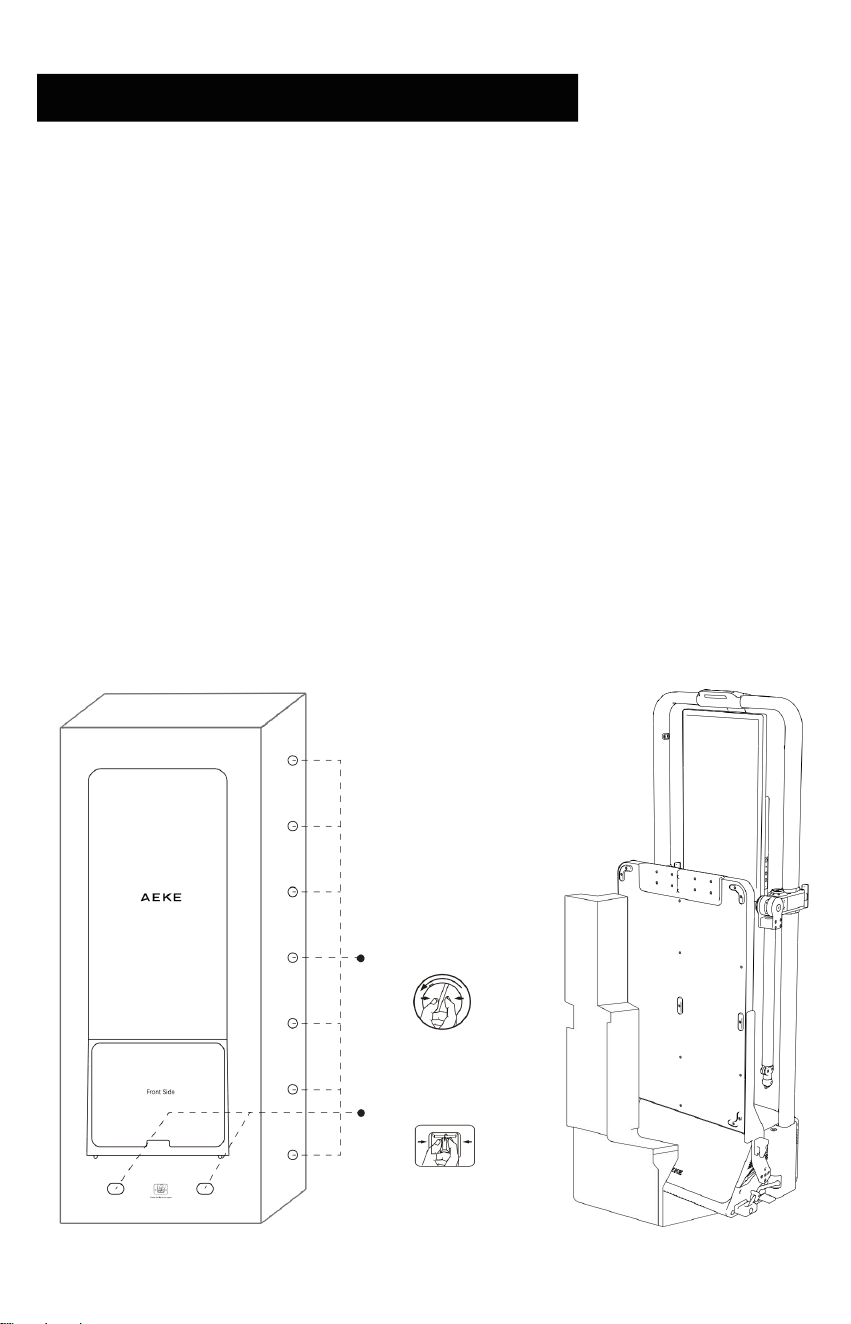
03
Unpacking
① Remove the plastic latches from top to bottom.
② Squeeze and remove the latches on both sides of the carton.
③ Open the carton and take out the scale and accessories box.
④ Remove the top cover and the upper foam protectors.
⑤ When shipped from the factory, the adjustable arm angle is setto R/L6, V1, H2
⑥ With two people, slightly tilt the unit and remove the bottom foam protectors (repeat on
both sides).
⑦ Carefully tilt and move the unit to remove the bottom support base
③~⑥
Remove the foam
①
Rotate and Remove
Foam
②
Squeeze and Remove
INSTALLATION
AND PLACEMENT
14
INSTALLATION
AND PLACEMENT
Moving
70。
50。
• Power off first. Before moving, turn off the unit and unplug the power cord and accessories.
• Maintain a safe tilt angle. Keep a safe tilt angle throughout the moving process to prevent
the unit from tipping over.
• Moving method. Stand behind the unit. Firmly grip both sides of the frame with both hands,
tilt the unit backward 50°–70°and pull it backward using the bottom moving wheels.
• Children shall not move the main unit. It is strictly prohibited for children to be within the
device's range when unattended, to prevent injuries caused by product impact.
03
15
INSTALLATION
AND PLACEMENT
Installing
STE P 1: p u s h & unlo c k
STEP 2:Lower slo
STEP 3:Lock lever
Push footboard inward and
step on gray unlock pedal.
Hold footboard lightly,
allow it lower slowly
Lock the footboard lever
before you workout
wly
03

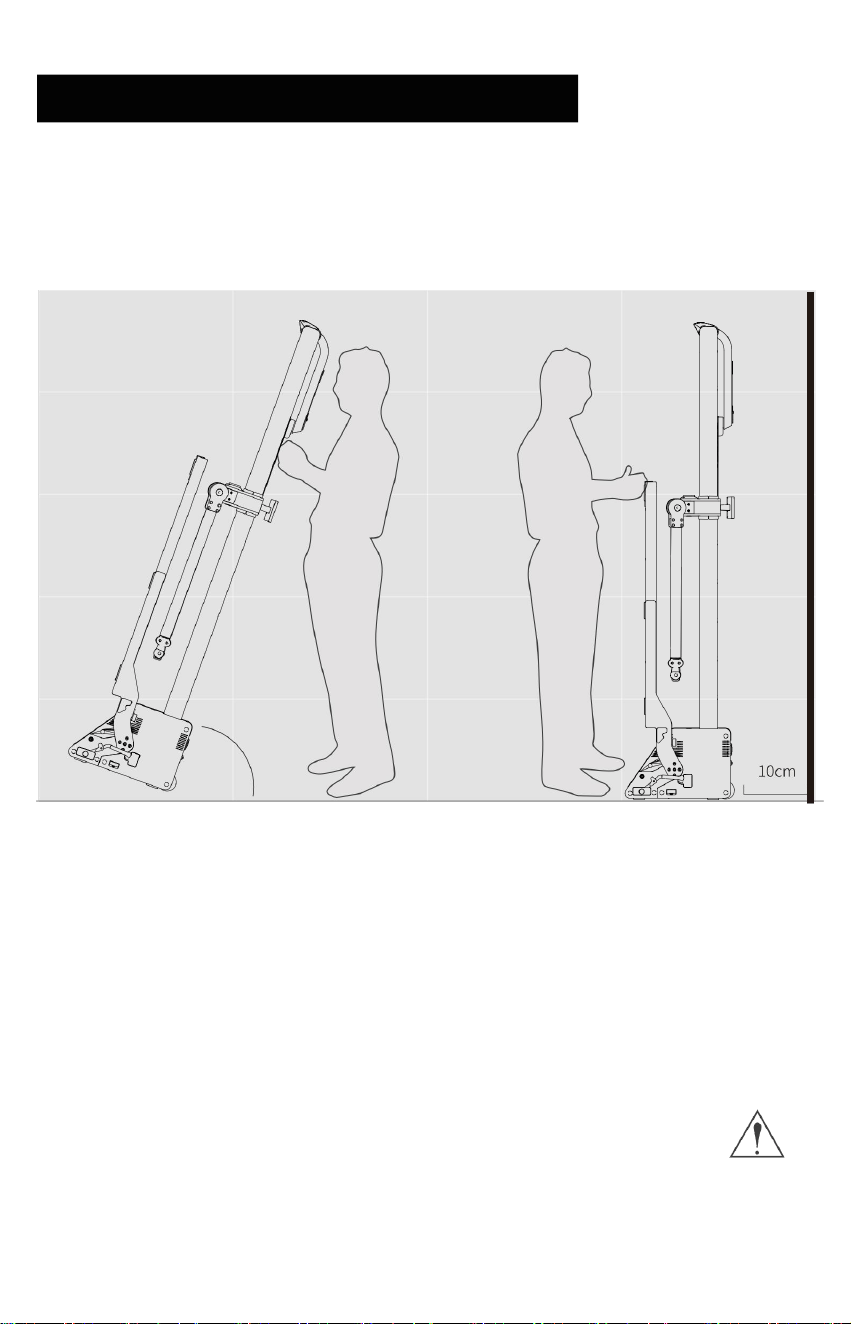
16
INSTALLATION
AND PLACEMENT
TOP
Placement
REAR
LEFT
RIGHT
FRONT
• Ensure the product is placed on a flat, hard surface (e.g., marble, solid wood, wood-like
flooring, or tiles).
• The product must be positioned at least 10 cm away from the wall to avoid direct contact
with the wall.
• Confirm the pedal Footboard is fully unfolded, then lock the pedal lock lever. Make sure it is
secure before use.
• AEKE will not be responsible for any issues arising from failure to follow these placement
requirements.
03

17
INSTALLATION
AND PLACEMENT
Precautions for Equipment Free Movement Area and Training Area:
• The free movement area should be at least 0.6 meters larger than the training area in the
direction the equipment enters.
• The free movement area should include an emergency disembarkation area.
• When equipment is arranged adjacent to each other, the free space can be shared.
03

PRODUCT OPERATION
04
18
04 PRODUCT OPERATION
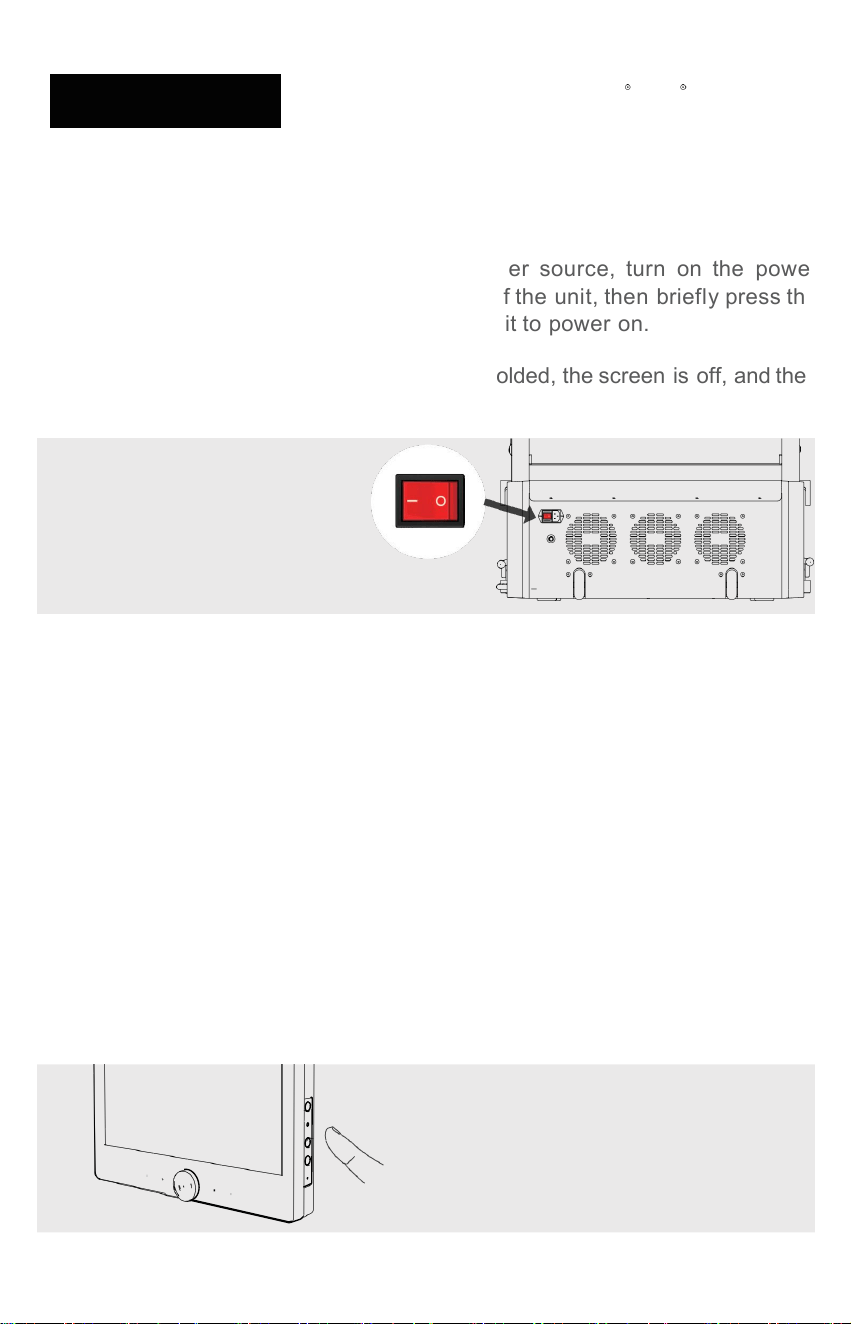
Power On/Off
• After connecting the main unit to a power source, turn on the power
switch located at the bottom of the back of the unit, then briefly press the
Power On/Off Button on the side of the unit to power on.
• To power off, ensure the pedals are fully folded, the screen is off, and then
turn off the main power switch.
The button of the unit
Standby / Reset / Turning Off
Standby
Reset
Turning Off
Sound
• Short press Power (≤0.5s): Screen off → Standby
• Short press Power (≤0.5s): Wake / Screen on
• Press and hold Power (≥2s, <5s): Menu pops up → select
Restart
• Press and hold Power (≥5s): Force power off
• Volume + / -: Increase / decrease volume
The right side of sreen
19
04 PRODUCT OPERATION
Bluetooth Connection
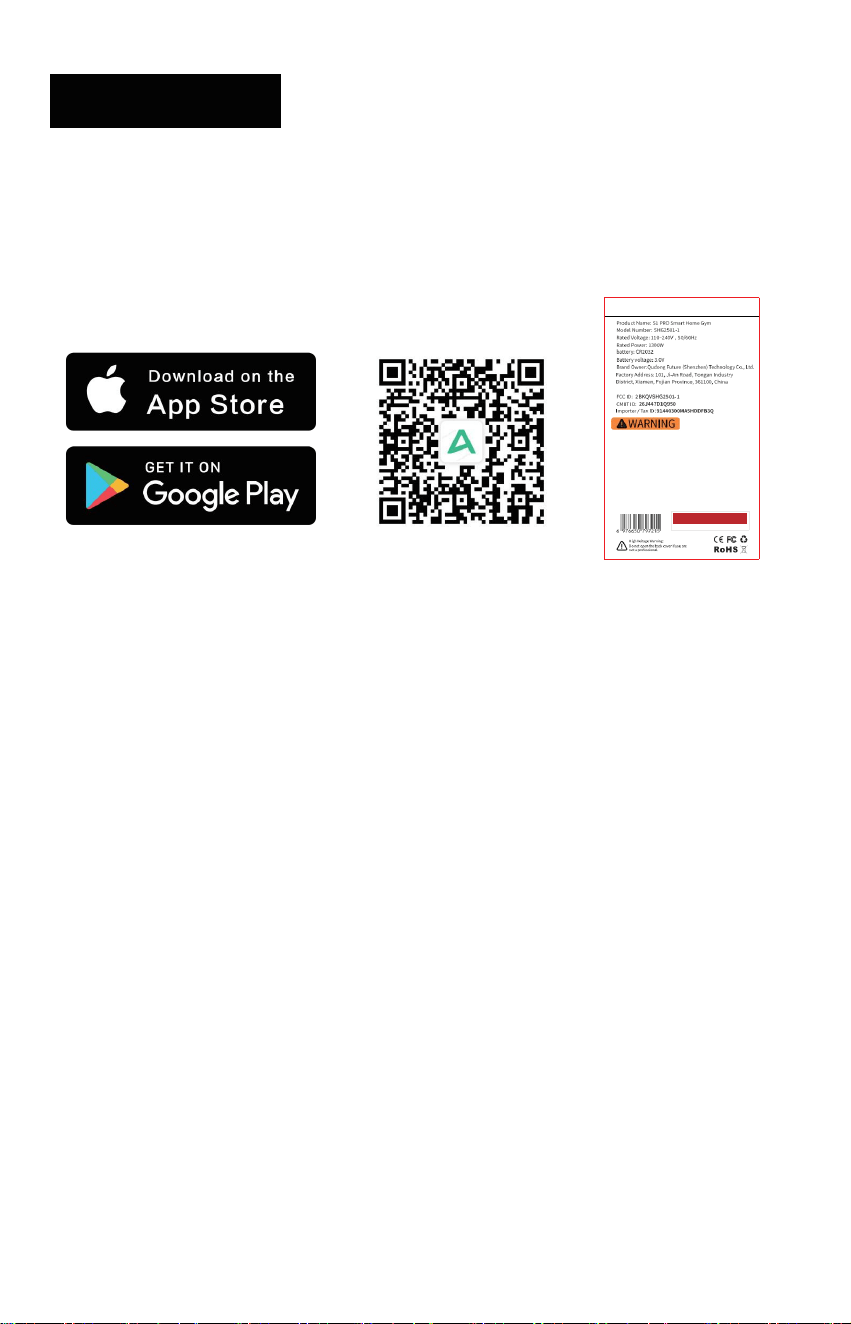
• Scan the QR code on the screen to download the AEKE App, then complete the registration
Ma xi m um Us er We ig ht ≤ 15 0 k g
Adju stab le Arm Train ing Load : ≤150 kg
Usag e Cate gory Prec ision : HC
The device and its peda ls traini ng load ≥150 kg.
The Motor Substan tial Resi stan ce (2.5 -50 kg per side)
Moto r Gear Int erva ls: Prec ise 0.5kg Adjustm ent
Do not exceed the device' s set capac ity
Befor e using the prod uct, please read the produ ct inform ation and prec auti ons provi ded in
this man ual. Adeq uat e warn ings foll owi ng the guideli nes of Spec ifi catio n F1749 and F2 276.
All the warnin g inform atio n marked on the product is also pre sente d in the user manual .
Do n ot h an g on a rm s.
Stay clea r duri ng adjust ment . En sure th e footb oard is secu rely loc ked befo re use
Keep child ren away. An observ er must be prese nt when using the devi ce.
For consum er use only
Sta nda rd s: EN I SO 20 9 57 -1 、EN I SO 20 957 -2
that usin g the mac hine for support dur ing stretc hing or allowin g resis tanc e stra ps, rop es or
othe r means to be attache d to it may result in serious injur y.
XXXXXXXXX
•
•
The path to the product training videos in the device is as follows:
• For first-time users, a pop-up window will automatically appear prompting: "Quickly learn
how to use AEKE." After watching this, watch "Insert the Battery into the Pin," and finally
"Lock the Footboard Lever."
• For registered users, from the Home screen, switch to the Lifestyle screen and find the
User Guide section to view the product usage introduction videos.
and login process.
I n the app, navigate to [Home] > [S1 Series Smart Home Gym] > [Add New Device]
Follow the on -
screen instructions to enable Bluetooth and location services on your phone, then
proceed to the nextstep
From the Bluetooth search results, select the currentS1 Series Smart Home
Gym to complete the connection
20
04 PRODUCT OPERATION
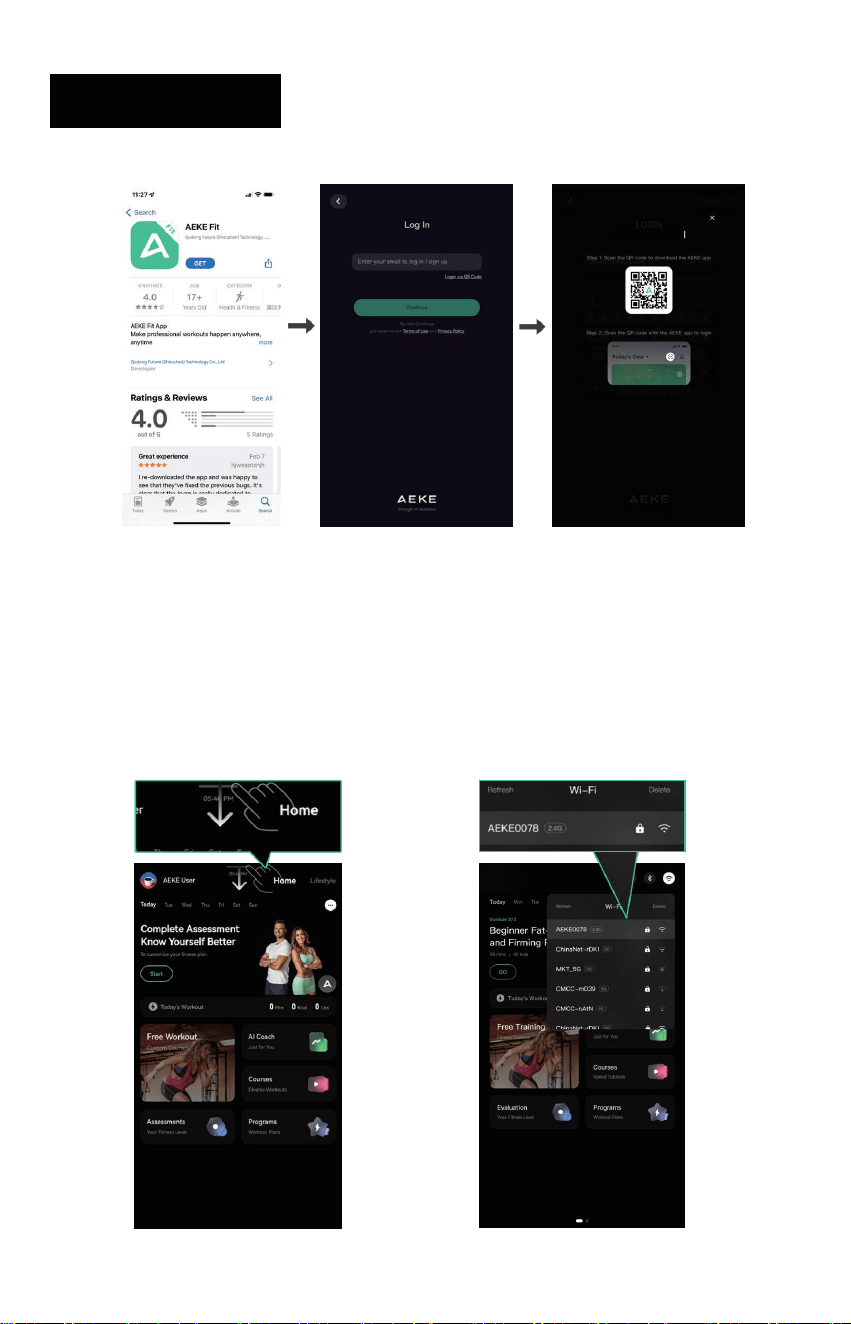
Log In AEKE S1 PRO
Wi-Fi Setup
1. Swipe down from the top of 2. Choose the wi-Fi network
the mirror screen and select and enter the password to
the [wi-Fi] icon connect
21
04 PRODUCT OPERATION
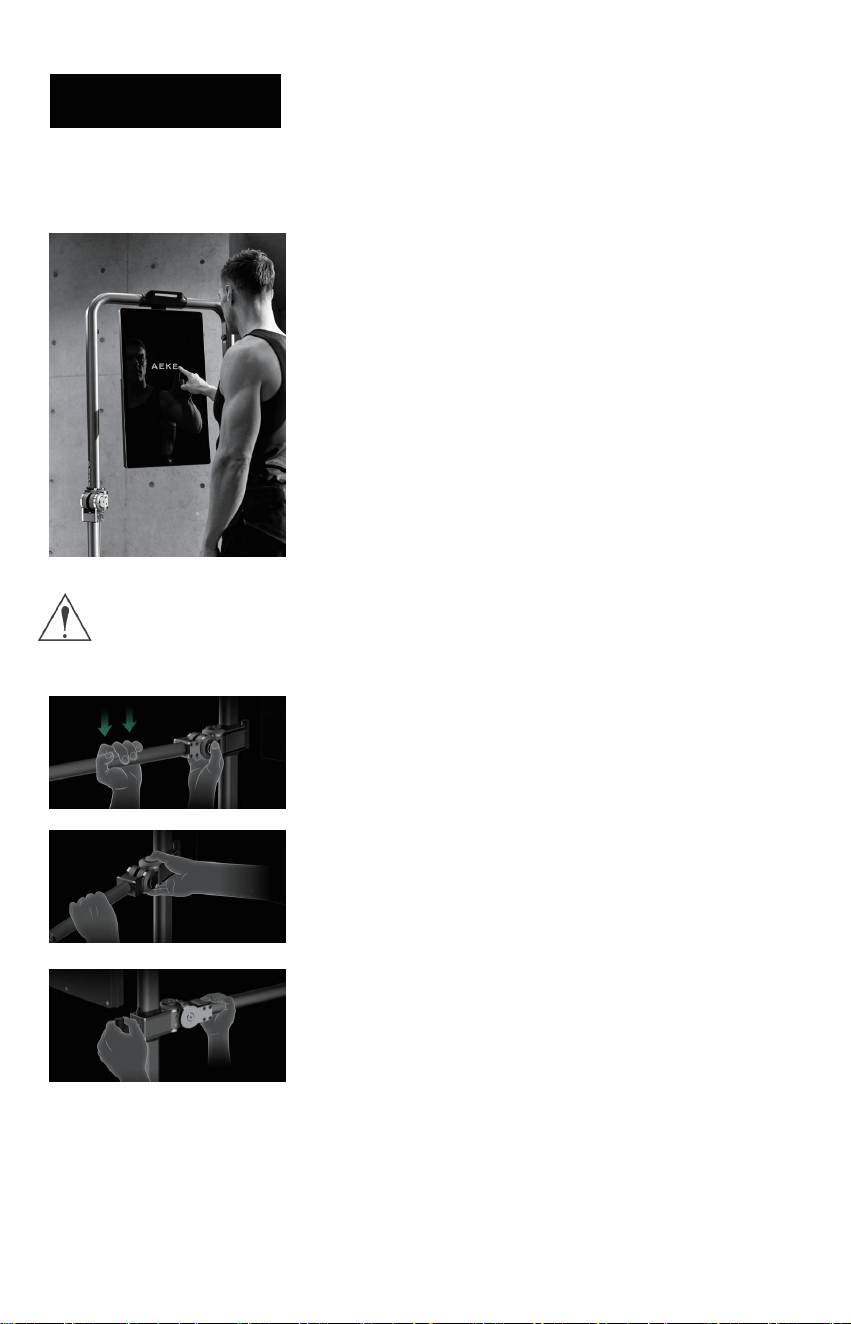
Usage and Adjustment
1. When using the device, users must follow the on-screen
instructional prompts for practice exercises. Failure to adhere
to these instructions may result in errors or excessive training,
potentially causing health risks.
For example, improper use of hand exercises with incorrect
components or techniques may easily lead to biceps brachii
injuries.
Exercising the back without using the correct equipment and
proper technique can easily lead to injuries such as scapular
damage.
The product must be used correctly. Children must stay away from
the device when unattended to avoid injury from collisions!
2.1 To adjust the vertical angle, simply press the V-shaped
button with one hand while holding the adjustable arm with the
other hand to select any of the 1–7 vertical angle settings.
2.2. To adjust the horizontal angle, simply press the H-shaped
button with one hand while using the other hand to grip the
adjustable arm, allowing adjustment across any of the 1–3
horizontal angle settings.
2.3. To adjust the gantry height, simply pull out the pin with
one hand while lifting the adjustable arm with the other hand
to select any of the 1–9 height settings.

ACCESSORIES OVERVIEW
05
22
05 ACCESSORIES OVERVIEW
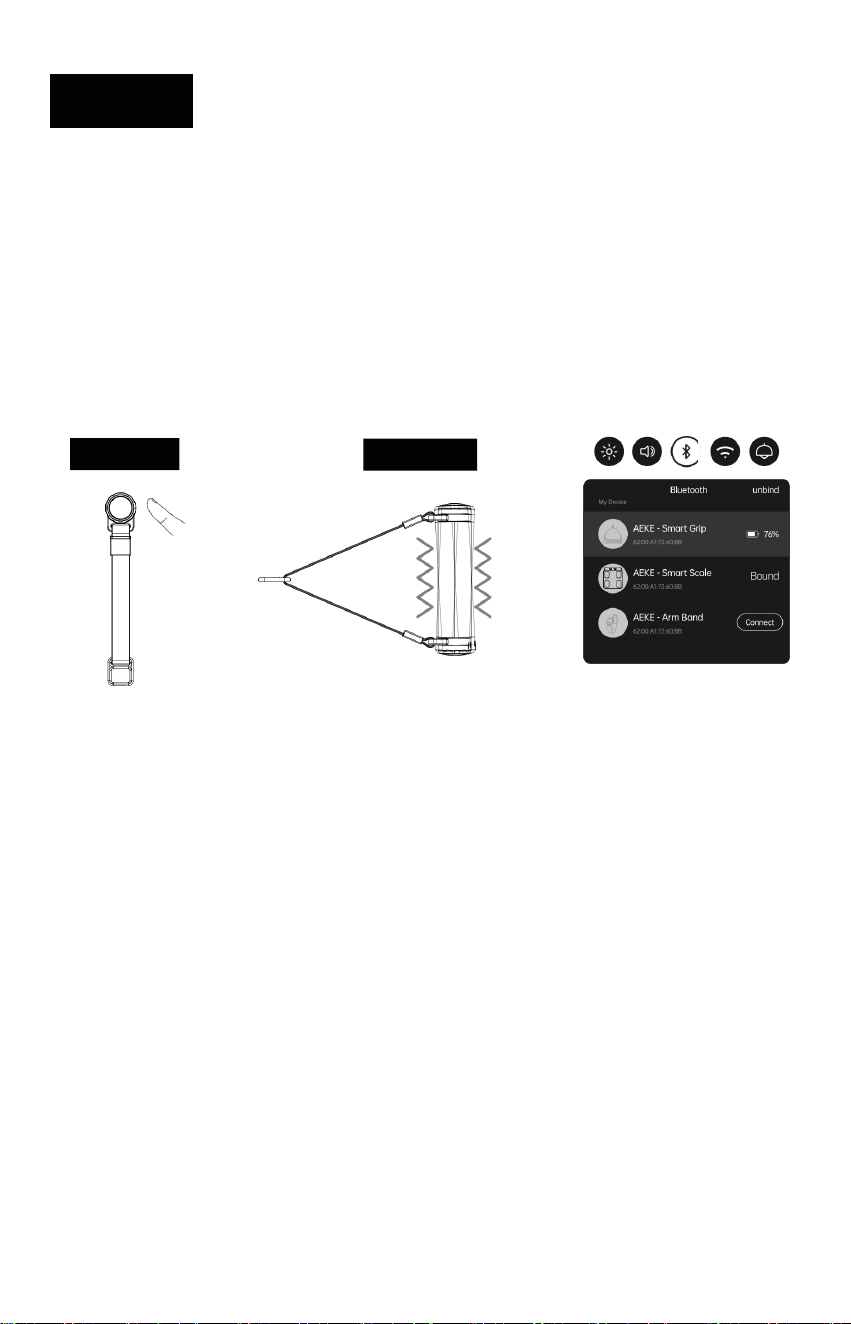
Smart Grips View
Function Introduction:
• The Smart Grips quickly connects to the resistance cable, enabling a wide range
of strength training exercises.
• During use, press the side release button to quickly release resistance.
Press
Bluetooth Connection:
• Pull down the S1 RPO Bluetooth toolbar to search for devices.
• Power on: Make sure the battery is sufficient, then press the button briefly until the grip
turn on the light
• Tap the detected “Smart Grips” to connect.
Light

23
05 ACCESSORIES OVERVIEW
Installation
• Press the button on the cord-lock.
• Insert the square buckle of the Smart Grips into the bayonet at the end of the pull cord.
• Release the button and confirm the Smart Grips is securely attached.
Detach
1. Press the button on the cord-lock.
2. Remove the Smart Grips from the bayonet to separate it.
24
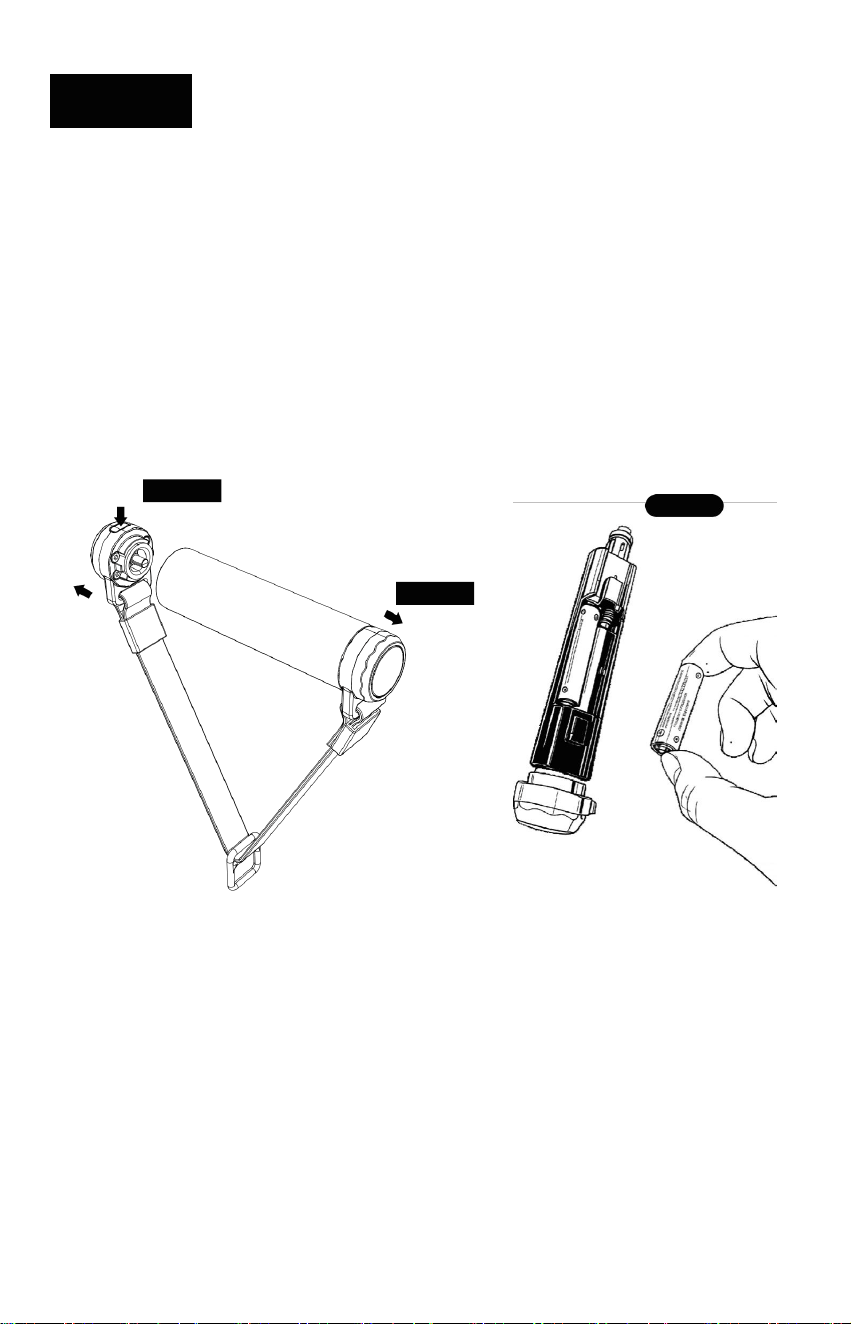
05 ACCESSORIES OVERVIEW
Battery replacement
• Press the release button on the end cap to unlock it.
• Pull out the end cap from the handle.
• Remove one battery from the battery compartment.
• Replace with a new battery, making sure the + / − polarity matches the markings.
• Reinsert the end cap and push until it clicks into place.
Press
Pull-out
Maintenance and care
• This product is not waterproof; do not rinse directly with water or immerse it in water
• To clean, gently wipe with a damp towel and allow itto air dry naturally
• when not in use, store the Smart Grips in the designated storage compartment on the
back of the main unit
Replace
25
05 ACCESSORIES OVERVIEW
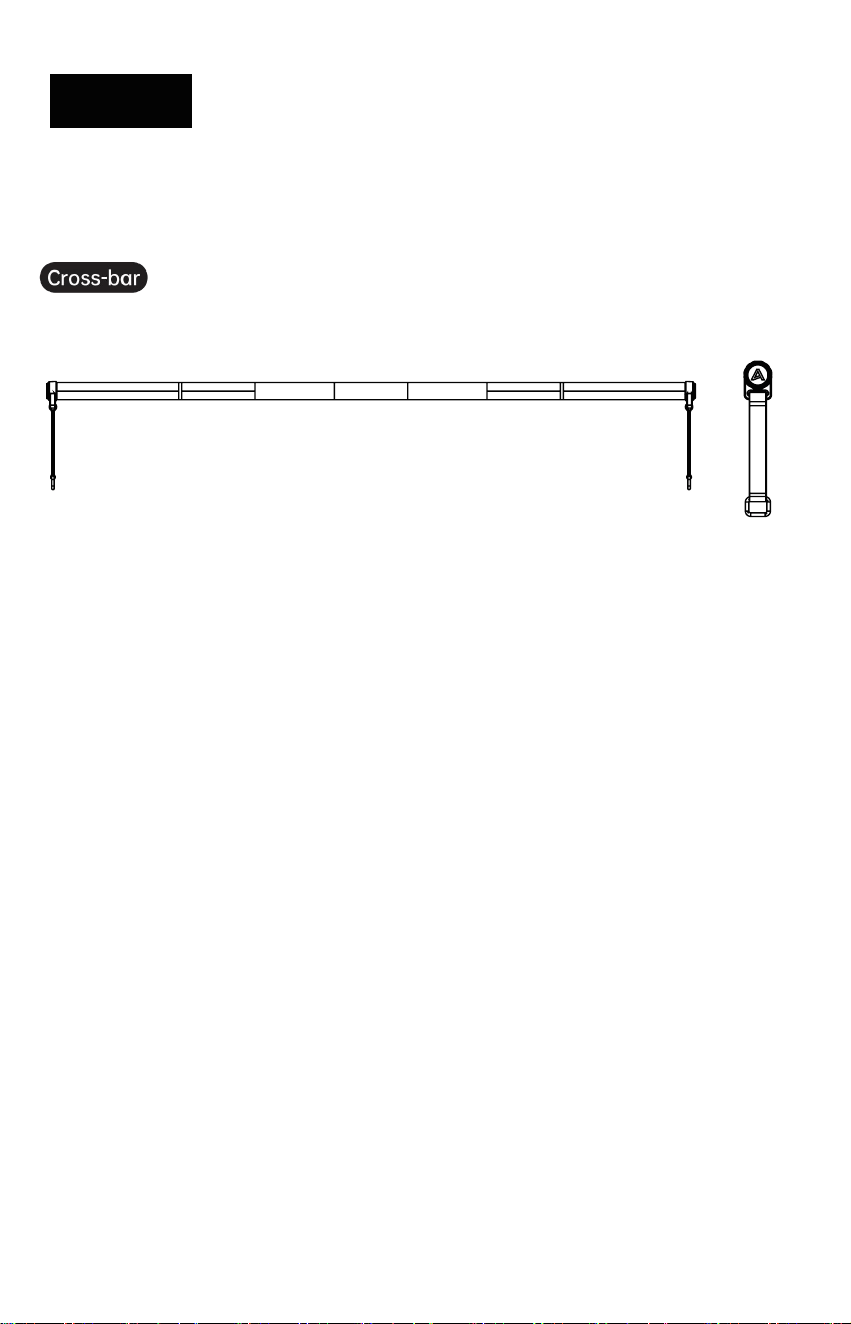
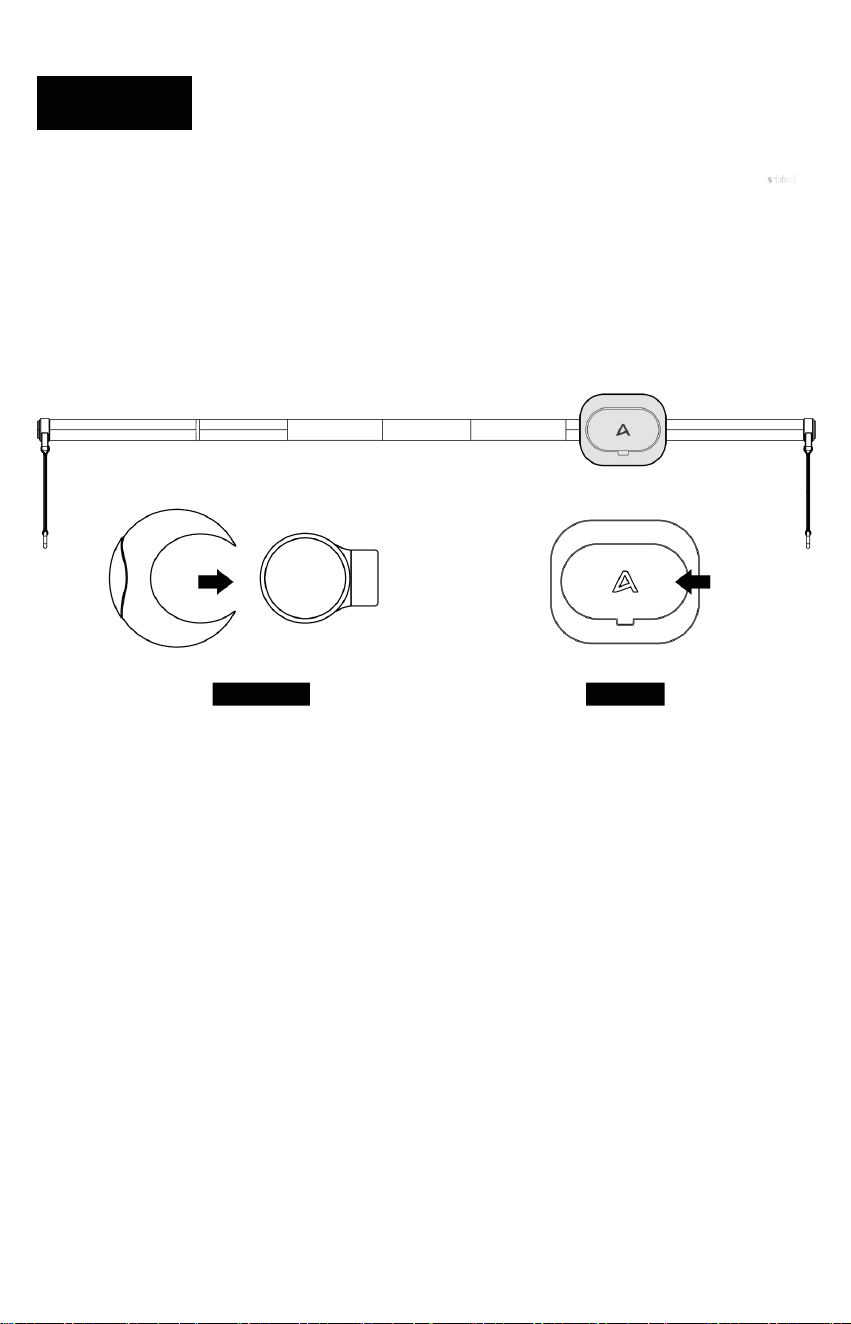
Cross-Bar & Resistance Controller
Function Introduction
• The Cross-Bar and Resistance Controller are designed to work together. They connect
quickly to the pull cord to support a variety of strength training exercises.
• The Resistance Controller has a built-in Bluetooth module and connects to the main unit via
Bluetooth.
• During use, lightly tap the Resistance Controller to quickly release resistance.
Bluetooth Connection
• Before first use, remove the insulating strip from the back of the Resistance Controller.
• Briefly press the Resistance Controller button. When the indicator light turns on, a pairing
prompt will appear on the S1 RPO screen—tap to connect.
• After connection, check the Resistance Controller status in the S1 RPO Bluetooth toolbar.
26
05 ACCESSORIES OVERVIEW
Installation and Use
The Cross-Bar and Unloader must be used together. Before use, attach the two circular buckles
to the Cross-Bar.
Secure the Unloader to a suitable position on the Cross-Bar and make sure it is firmly locked.
To remove the Unloader, press the release button to detach it.
Connected
Charging Instructions
• The Resistance Controller uses uses a CR2032 button battery and does not support
charging.
• When the Resistance Controller's battery is depleted, replace it. The initial battery life is
approximate-ly 3 months
Maintenance and Care
• The Resistance Controller is not waterproof. Do not rinse with water or immerse it in water.
• Clean by gently wiping with a damp towel and allow it to air dry naturally.
• When not in use, store the Resistance Controller in the appropriate compartment on the
back of the main unit.
Locked
27
05 ACCESSORIES OVERVIEW
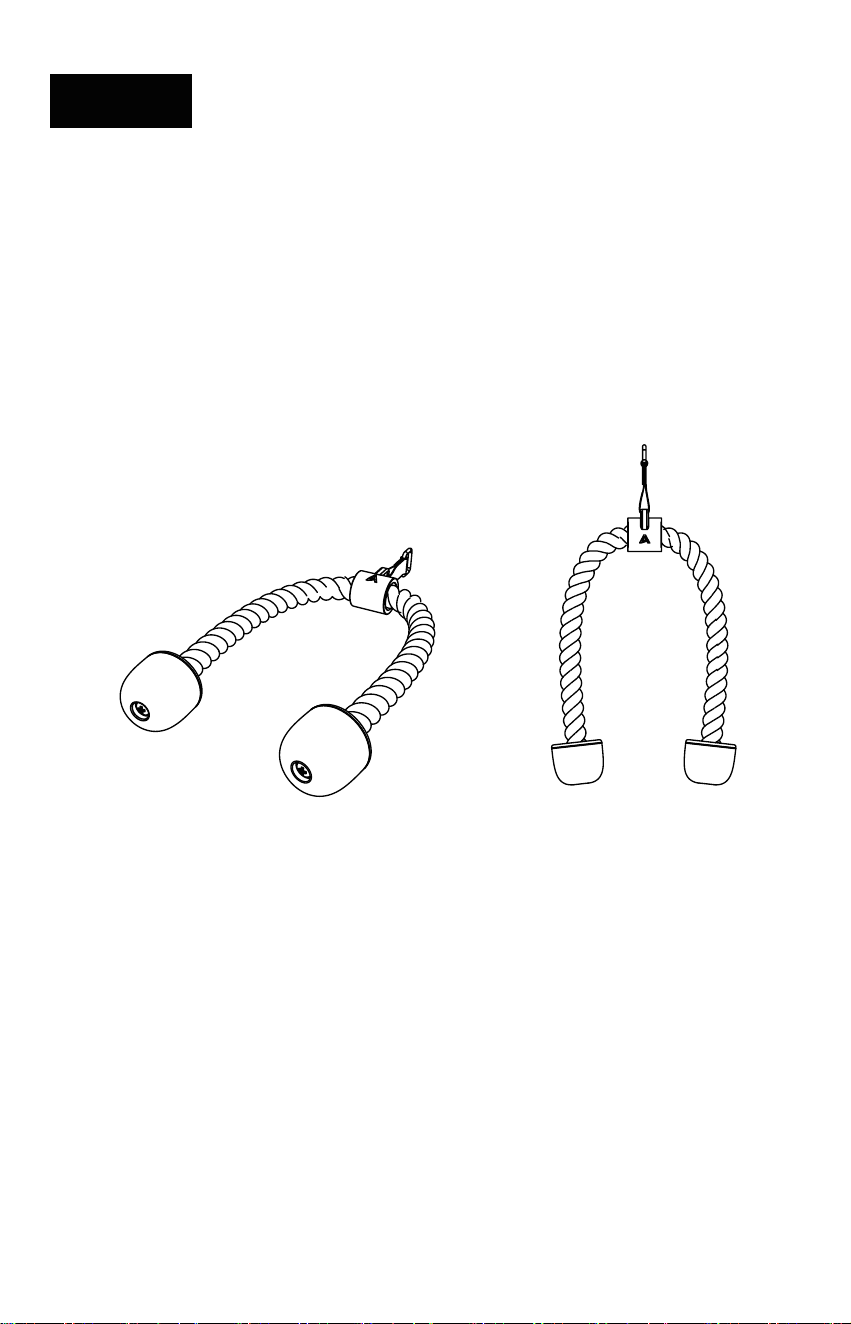
Triceps Rope View
Function Introduction
• The Triceps Rope connects to the resistance pull cord to support a wide range of strength
training exercises (e.g., pushdowns, rows, and crunches).
• It provides a comfortable grip and flexible range of motion for two-hand movements.
Installation and Use
• Press the button on the cord-lock.
• Insert the buckle/connector of the Triceps Rope into the bayonet at the end of the pull cord.
• Release the button and confirm the connection is secure before use.
• To detach, press the cord-lock button and remove the Triceps Rope.
28
05 ACCESSORIES OVERVIEW
Smart 8 Electrode Scale
• Refer to the Electrode Scale User Manual for details.
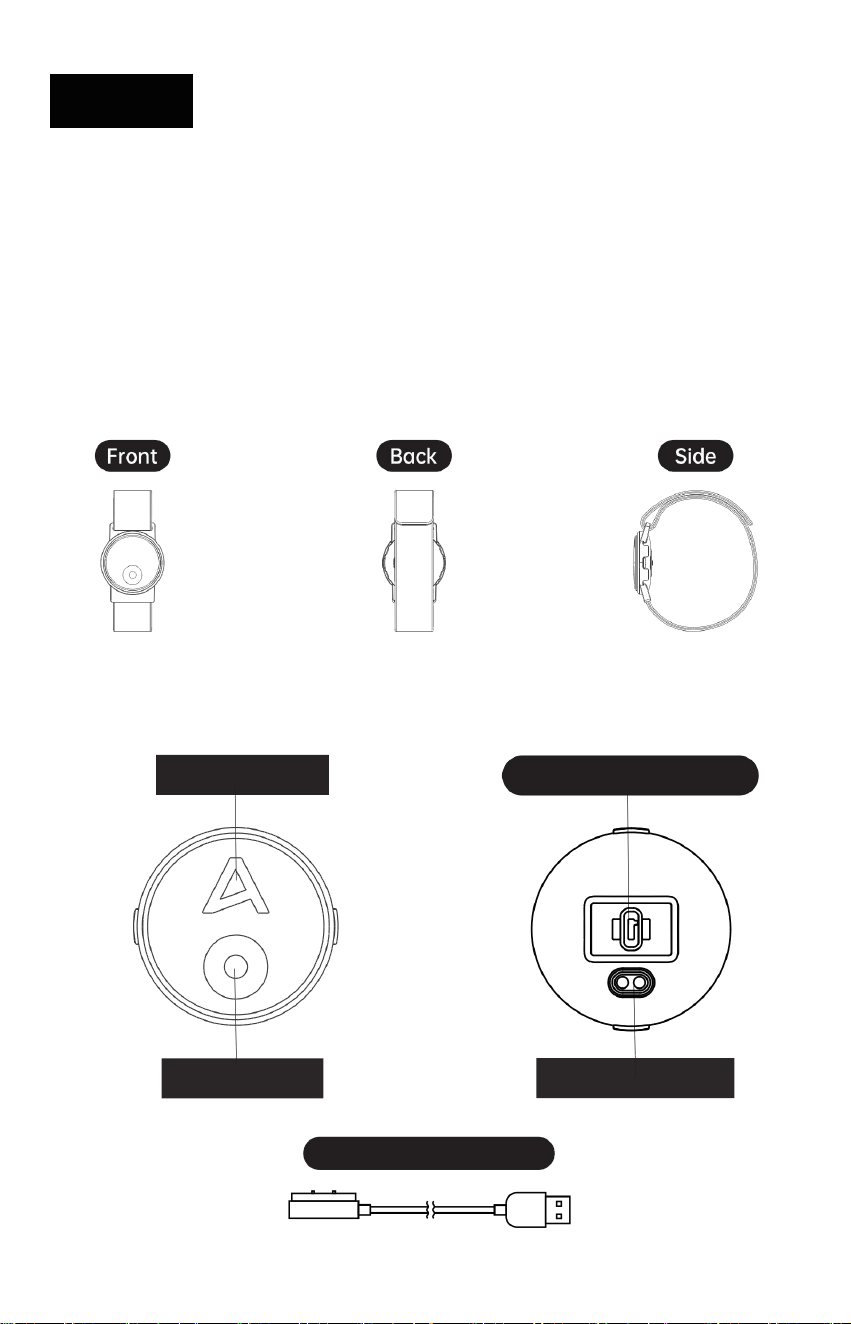
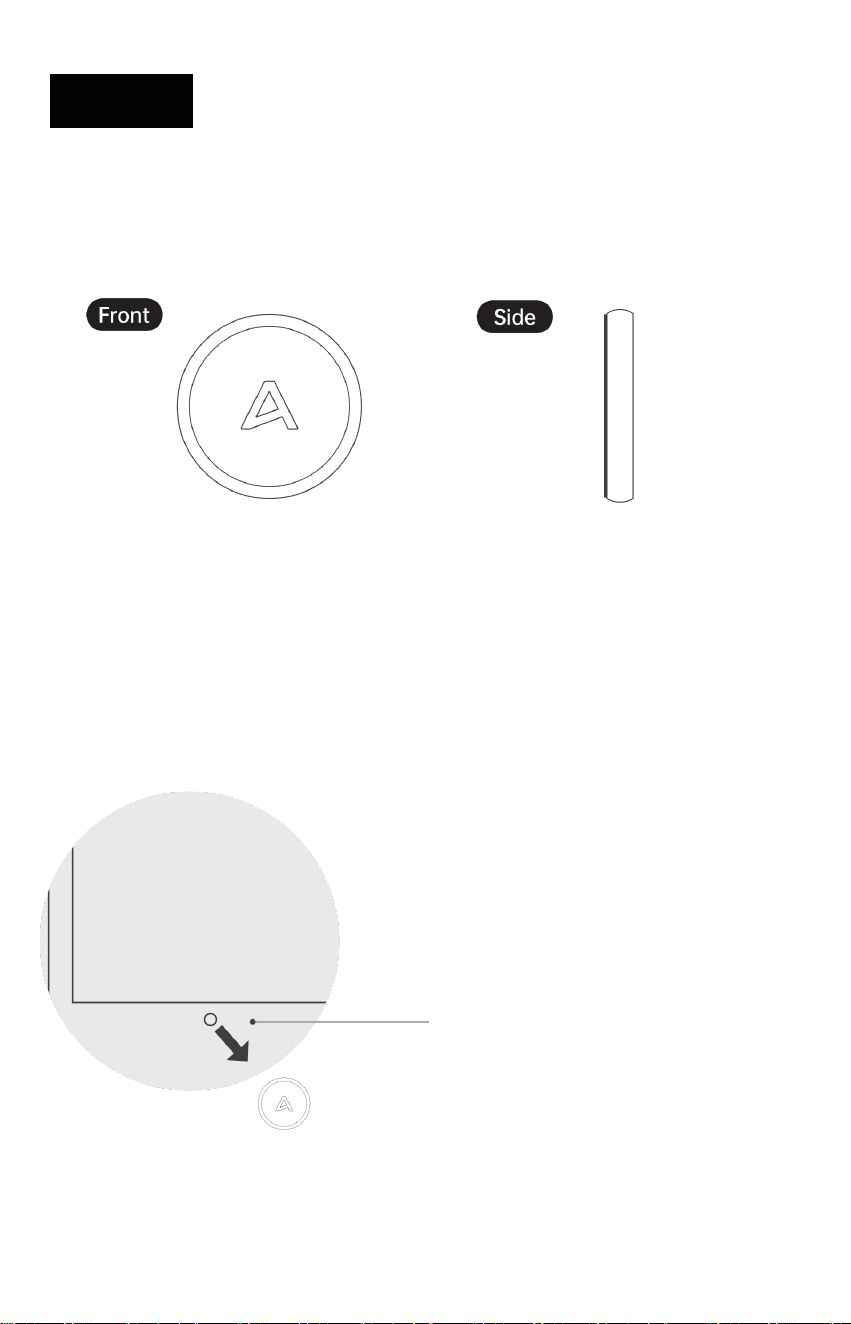
Heart Rate Armband
*This product is intended for fitness assistance only and cannot replace medical advice.
Indicator Light
Charging Contacts
Power Button
29
05 ACCESSORIES OVERVIEW
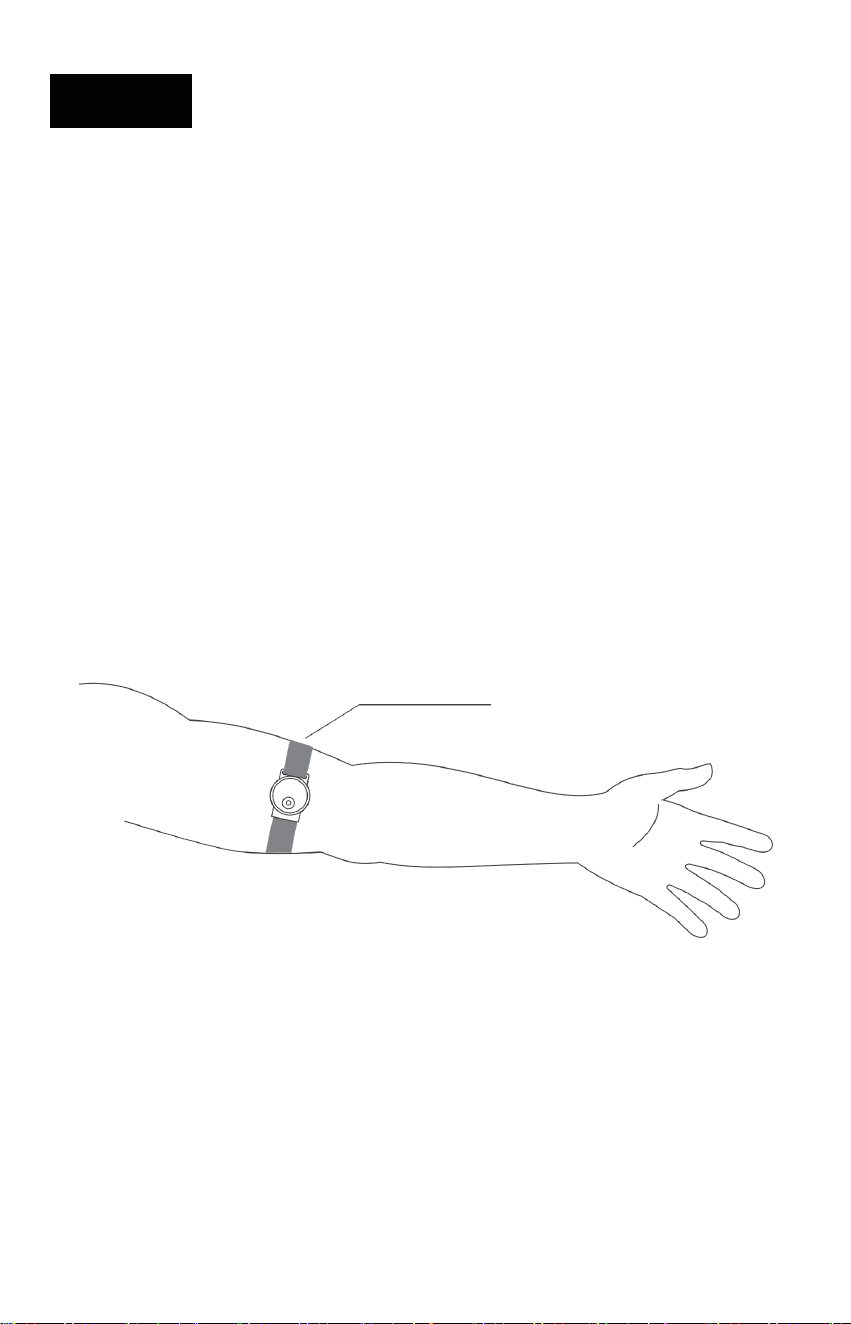
Function Introduction
• The sensor collects heart rate data once valid data is detected , the green light switches
from fast flashing to slow flashing
• This product features an auto-shutdown function: if no heart rate data is detected for over
90 seconds, it powers off automatically
• The auto-shutdown function activates if no heart rate data is detected for over 90 seconds
•
Wearing Instructions
• Wear on the upper arm, close to the inner elbow.
• Heart rate displays within 15 seconds.
Wearing position
30
05 ACCESSORIES OVERVIEW
Bluetooth Connection
• Long-press the power button on the heart rate armband until the LED flashes green. Swipe
down from the top of the mirror screen and select the [Bluetooth] icon.
• A connection window will appear on the screen; select the current [Heart Rate Armband] to
connect.
Charging Instructions
• The device requires charging before first use.
• Use the provided charging cable with a DC 5V power adapter to charge the device.
• During charging, red and green lights flash alternately; when fully charged, the green light
remains steady, indicating charging can stop.
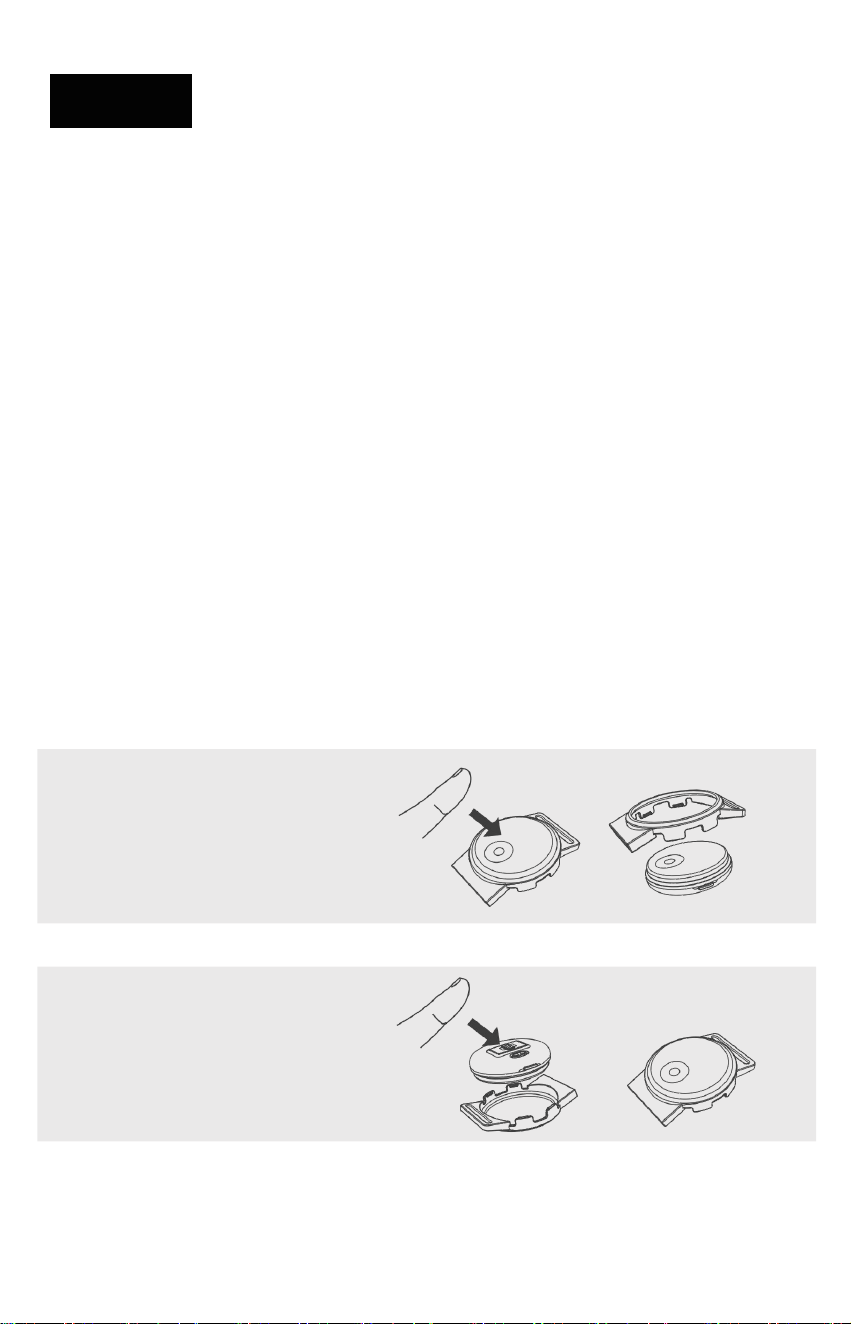
Main Unit Assembly/Disassembly
Removing the Main Unit
Press the front of the main unit
to remove it.
Installing the Main Unit
Align the protruding part of the
main unit with the slot and snap it
into place.
31
05 ACCESSORIES OVERVIEW
Camera Cover
Function Introduction
• The privacy cover has a built-in magnet and can be attached directly to the glass over the
built-in camera on the screen to protect user privacy.
During exercise, remove the cover and
attach it to the metal backplate of the main
unit.
Camera
Attach directly to the screen.

TROUBLESHOOTING
06
32
06 TROUBLESHOOTING
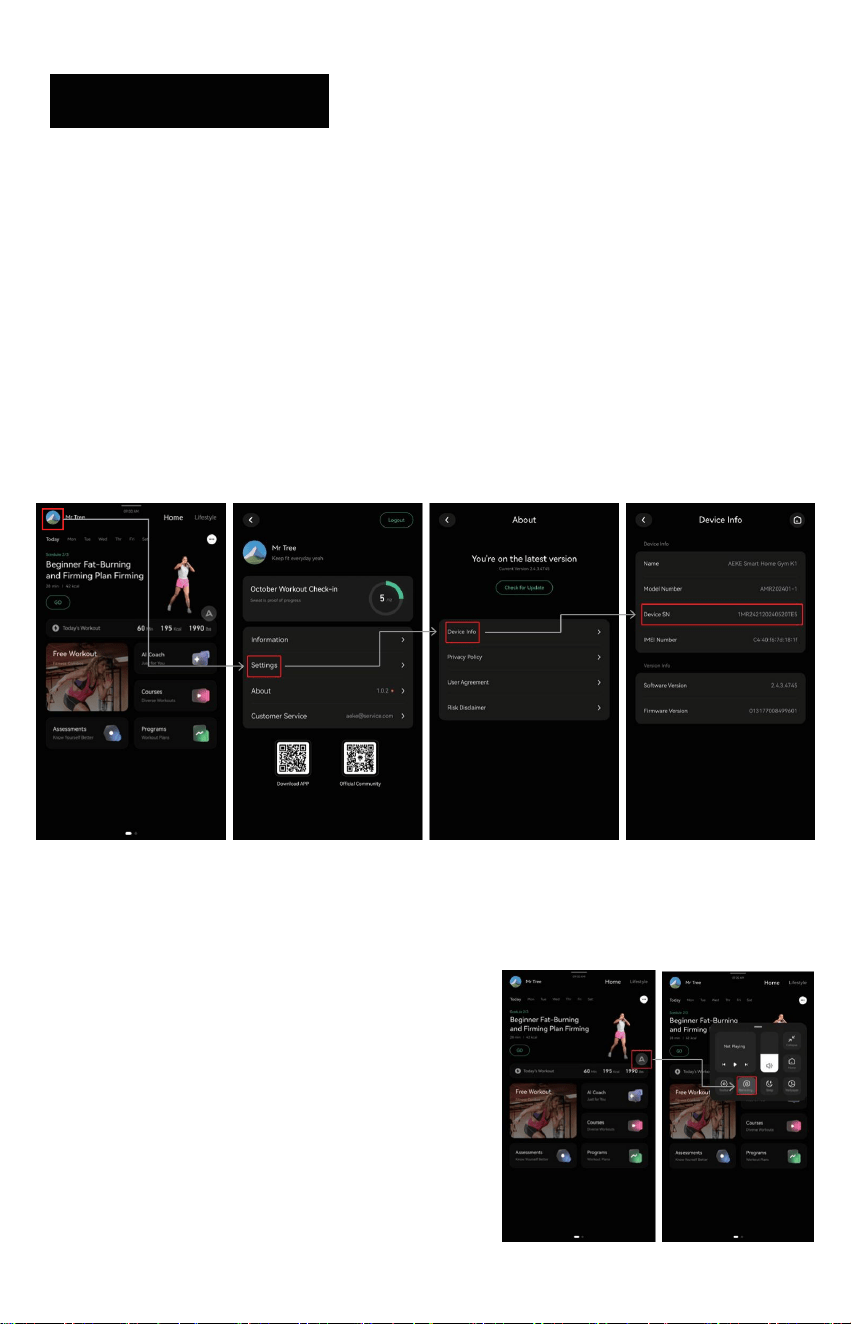
SN Lookup
Before we can help identify the issue, please share the SN code with us.
• Method A: Check the label on the back of the machine button for the SN
• Method B: On the top-left of the interface, goto Settings → Device Info → SN
• Method C: In the AEKE App, goto Device → Device Info → SN
Profile > Settings > Device Info > DeviceSN
Resistance Cable Can Not Retract
• Tap the floating “A” icon in the upper-right
corner of the screen.
• Click “Retracting” and wait for the cable to
retract.
• If the issue is not resolved, turn off the main
power, wait 30 seconds, then power it on
again.

33
06 TROUBLESHOOTING
Body Measurement Failure
This is usually caused by incorrect operation and may lead to an impedance measurement
failure.
• Watch the instructional video and repeat the measurement: [Video Link]
1. Enter the measurement screen
2. Pull and hold the grips
3. Stand barefoot on the electrode scale
4. Wait until you hear “Body Fat Measurement Complete” or the report appears
on screen
• If unresolved: The electrode scale batteries may be low. If “L0” appears, replace the batter-
ies.
Machine Interface Freezes / Touchscreen Unresponsive
1. Press and hold the side button for 10+ seconds to shut down.
2. Wait 30 seconds.
3. Press and hold the power button for 3 secondsto restart.
Technical Support
Contact: support@aeke.com

MAINTENANCE AND CARE
07

34
07 MAINTENANCE AND CARE
Notice: When cleaning the Product, unplug the power cord first.
1. Device Cleaning
• Power off and unplug the device.
• Use a clean, soft, dry cotton cloth to gently wipe the surface.
• Do not use chemical solutions, alcohol, or detergents.
• Avoid forceful wiping and do not use coarse or hard materials.
2. Screen Maintenance
• Power off the device before cleaning the screen
• Use a slightly damp cloth or an alcohol-based wet wipe to clean the screen.
• Ensure the screen is completely dry before powering the device back on to avoid affecting
touch sensitivity.
3. Power Maintenance
• When not in use, press and hold the side button for more than 6 seconds to power off.
• After evening workouts, press and hold the back button to power off the device.
4. Resistance Cable Replacement
• The number of resistance cable uses can be checked via the machine interface when
• Using the resistance cable at 20 kg , contact AEKE after-sales support to request a cable
replacement after reaching 60,000 pulls
5. Prohibitions

35
07 MAINTENANCE AND CARE
• If the product gets wet, do not use a hair dryer (hot air) to heat the affected area.
• Do not disassemble the product. Do not remove the back cover. Disassembly may cause
damage, injury, and void the warranty.
• For internal inspection or adjustment, contact official customer service only. Do not use
non-original parts or accessories for repair or replacement.
6. Precautions
• Do not modify the product or use it for purposes other than intended.
• Do not reverse-engineer, modify, or perform improper software upgrades.
• Do not cover the product with blankets, cloths, or other items during use to avoid blocking
heat dissipation.
• The safety performance rating of this equipment can only be maintained through regular
inspections of component damage and wear. Special attention must be paid to critical
components such as ropes, pulleys, and connection points. The equipment must not be
used without completing the required periodic inspections.
• In the event of equipment failure, the faulty component must be replaced immediately. If
issues such as the pedal buckle failing to secure properly or the force-arm rope not
retracting smoothly occur and cannot be promptly repaired, equipment operation should
be suspended until the repairs are completed and safety is confirmed before resuming
use.
• During daily use and inspection, special attention should be paid to wear-prone compo-
nents of the equipment, such as the tension ends of ropes, screen sensitivity, and motion
pedals. The wear condition should be monitored promptly, and maintenance or replace-
ment should be performed as needed.
• If any adjustment device, such as the adjsutable armor pedal, remains exposed, it may
interfere with the user's movements and restrict the range of motion.
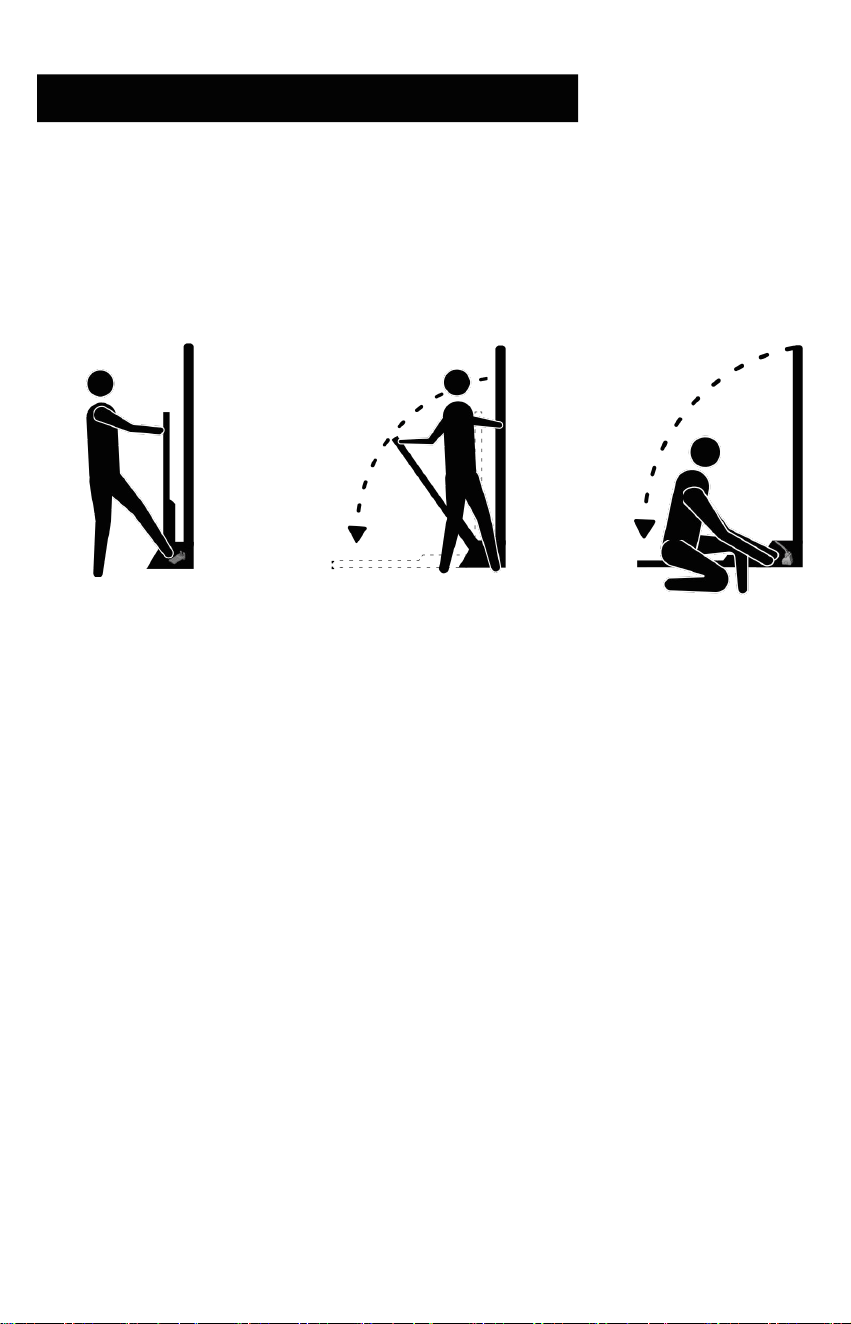
• Note: This device complies with industry stability standards when used for its intended
purpose. Using the device as a support during stretching, or attaching resistance bands,
ropes, or other devices to the device, may result in severe injuries.

36
07 MAINTENANCE AND CARE
7. Permanent marker
• Age range: Adults aged ≥18 years can register an account independently.
1. Users aged 18 and above can use the device independently
2. For use by adolescents and children under 18 years of age, a guardian must be
present throughout the operation, and an observer must always be present
when operating the device.
• The maximum user weight is ≤150 kg; the force arm training load is ≤150 kg; the training
load for the entire machine and exercise pedal may be ≥150 kg. Warning: Do not exceed the
equipment's capacity.
• The motor's load range is 2.5 kg to 50 kg per side.
• Motor gear interval: 0.5 kg for precise adjustment
• The product meets Class H performance requirements with Class C precision, complying
with the HC standard under ISO 20957 regulations.

WARRANTY AND
AFTER-SALES SERVICE
08

37
08
Overview
Limited Product Warrant
Name of the applicant company and manufacturer: Qudong Future (Shenzhen) Technology
Co., Ltd.
Address: 1001, Block A, Wanhai Building, Zhaoshang Street, Nanshan District, Shenzhen,
Guangdong Province
This warranty clause outlines the user rights for the AEKE S1 Series Smart Home Gym.
Additional rights may apply in accordance with local laws and regulations.
Please review this section for warranty terms and service procedures.
For complete legal details, please refer to local regulations or visit www.aeke.com.
y
•
Limited Product Warrant
AEKE warrants that your S1 RPO Smart Home Gym, when used and maintained per this
manual, will be free from defects in materials and workmanship during the warranty period.
Free repairs are provided for defects within this period. Outside the warranty period or for
user-caused damage, paid repairs are available. This applies only to products purchased
from AEKE or authorized dealers.
y
• Starts on delivery date (per receipt, invoice, or order).
• If no proof of purchase, starts 30 days after factory delivery.
Device
Item
Standard Warranty Period
Motor, Screen,
Power Supply, et
S1 Series Smart
Home Gym
c
24 months
Fitness BencFITNESS BENCH h
12 months
Accessories
Smart Grips, Cross-bar,
Resistance Controller,
Arm Band, Electrode Scale, etc
12 months
WARRANTY AND
AFTER-SALES SERVICE

38
08
Free Repair Conditions
Free repairs apply if:
WARRANTY AND
AFTER-SALES SERVICE
• Purchased from AEKE or authorized dealer.
• Defect occurs within warranty period (not user-caused).
• Used for personal/household purposes only.
• No unauthorized modifications or disassembly.
• Proof of purchase and serial number (SN) provided.
Exclusions
• Misuse or failure to follow this manual.
• Unauthorized repairs or non-AEKE parts.
• Extreme conditions (e.g., heat, corrosion).
• Normal wear (e.g., scratches, rust).
• Data loss from improper use.
How to Get Service
If your product fails within warranty, email support@aeke.com within 30 days of noticing the
issue. Provide:
• Proof of purchase (e.g., receipt, order number).
• Serial number (SN).
AEKE will troubleshoot remotely. If needed, send the product for repair. For valid claims, AEKE
covers costs. For non-warranty issues, you may pay for parts, labor, and shipping.
Contact Us:
• For support, email support@aeke.com. Expect a response within 24 hours, Monday through
Saturday.
• For more details, visit www.aeke.com or refer to AEKE's privacy policy.

RETURN AND REFUND POLICY
09

39
09
Overview
How to Return or Get a Refun
Not satisfied with your S1 Series Smart Home Gym?
You can request a return and refund within 30 days of receiving it, following this policy.
d
• Email support@aeke.com within 30 days of delivery.
• Include your order number, product name, quantity, reason for return, and photos/videos of
the full packaging.
• We’ll review your request within 2 business days.
• After we receive and check the returned product, we’ll refund you using your original
payment method.
Full Refund Conditions
You’ll get a full refund if:
• You contact support@aeke.com within 30 days with valid proof of purchase (e.g., receipt or
order number).
• The product has defects or quality issues right out of the box and is still in new or like-new
condition.
• It’s returned with all original packaging, accessories, and attachments.
Partial Refund Conditions
You’ll get a partial refund if:
• The return isn’t due to defects or quality issues.
• The product is missing accessories, attachments, or has visible damage (e.g., scratches,
dents).
• It’s not in its original packaging or was damaged due to poor packaging. We’ll assess the
condition and deduct fees, which we’ll confirm with you.
RETURN AND
REFUND POLICY

40
09
RETURN AND
REFUND POLICY
No Refund Conditions
Refunds aren’tavailable if:
• You request it more than 30 days after delivery.
• The product is damaged and can’t be used or resold.
• Damage is from misuse, unauthorized changes, or not following this manual.
• Damage is due to events like fire or flood.
• The product is activated/registered (if applicable).
• It’sa custom-made item.
• You don’t have valid proof of purchase or it’s been altered.
• Serial numbers don’t match or are tampered with.
Refund Timing
Refunds go back to your original payment method within 7–14 business days after we receive
and verify the product. Timing depends on your bank or card issuer.
• Delayed Refund? Check your bank account, then contact your card issuer. Still no refund?
Email support@aeke.com.
Shipping Costs
• Defects: We cover shipping for returns due to quality issues within 30 days.
• Other Reasons: You pay shipping for returns not related to defects.
Issue
AEKE
Client
Non-quality issue return/exchange
Quality issue return/exchange
Repairs within the warranty period
Repairs outside the warranty period

FCC & CE STATEMENT
10

41
10 FCC & CE STATEMENT
FCC Statement
This equipment has been tested and found to comply with the limits for a Class B
digital device, pursuant to Part 15 of the FCC Rules.Any changes or modifications not expressly
approved by the party responsible for compliance could void the user's authority to operate
the equipment. These limits are designed to provide reasonable protection against harmful
interference in a residential installation.This equipment generates, uses and can radiate radio
frequency energy and, if not installed and used in accordance with the instructions, may cause
harmful interference to radio communications. However, there is no guarantee that interfer-
ence will not occur in a particular installation. lfthis equipment does cause harmful interference
to radio or television reception, which can be determined by turning the equipment off and on,
the user is encouraged to try to correct the interference by one or more of the following
measures:
• Reorient or relocate the receiving antenna.
• Increase the separation between the equipment and receiver.
• Connect the equipment into an outlet on a circuit different from that to which the receiver
is connected.
• Consult the dealer or an experieced radio/TV technician for help.
This device complies with part 15 of the FCC Rules. Operation is subject to the following two
conditions: (1) This device may not cause harmful interference, and (2) this device must accept
any interference received, including interference that may cause undesired operation
Radiation Exposure Statement.
S1 Series Smart Home GymThis device complies with FCC radiation exposure limits set forth for
an uncontrolled environment and it also complies with Part 15 of the FCC RF Rules.This
equipment should be installed and operated with a minimum distance 20cm between the
device and your body.
.
Changes or modifications not expressly approved by the party responsible for compliance
could void the user’s authority to operate the equipment.
42
10 FCC & CE STATEMENT
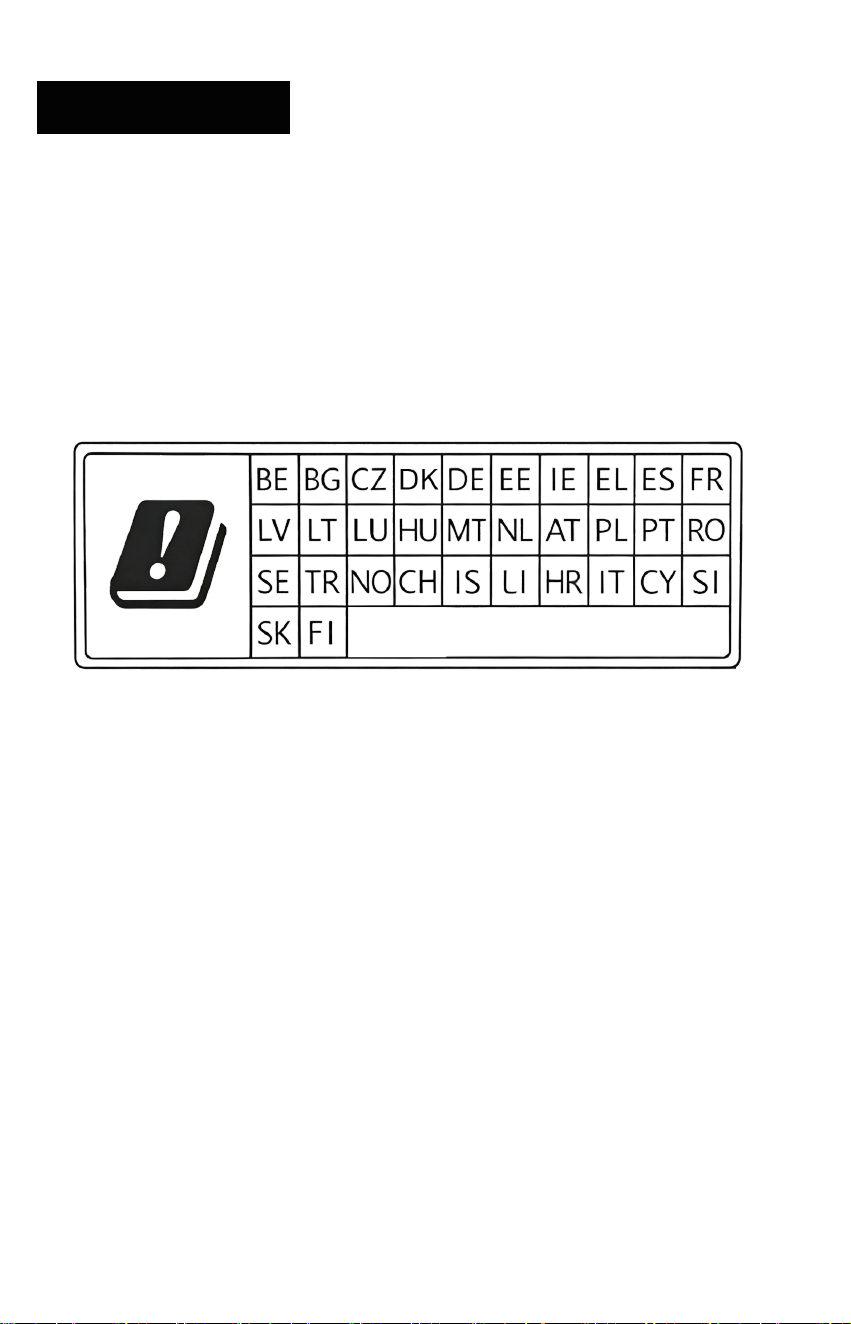
Inside the room:
The device is restricted to indoor use only when operating in 5150 to
5250MHz frequency range
20 cm Evaluation
:The antennas used for this transmitter must be installed to provide a
separation distance of at least 20cm from all persons and must not be located or operating in
conjunction with any other antenna or transmitter
S1 Series Smart Home Gym
.
43
10 FCC & CE STATEMENT
FCC ID : 2BKQVSHG2501-1
Smart Grips FCC ID:2BKQVSHG2501-2
Federal Communications Commission Number:
Manufacturer: Qudong Future (Shenzhen) Technology Co., Ltd.
Address: 1001 Wanhai Building, No.1031 Industrial 5th Road, Nanshan District, Shenzhen, China,
Postal Code: 51800
S1 Series Smart Home Gym
0
CE Statement
Item
Details
Product Name and Model
Manufacture
S1 Series Smart Home Gym(Model: SHG2501-1)
r
Qudong Future (Shenzhen) Technology Co., LTD.
Address: Room 1001, Wanhai Building, No.1031,
Industrial 5th Road, Nanshan District, Shenzhen
Declaration of Conformity
This product complies with the essential requirements
and other relevant provisions of the EU Radio
Equipment Directive (2014/53/EU).
Certification Number
EMC260127032-01-001,
RF260127032-01-001,RF260127032-01-002,RF2601
27032-01-003,RF260127032-01-004,RF260127032-0
1-005,RF260127032-01-006,SAF260127032-01-001
Test Standard – EMC
EN 55032:2015+A1:2020; EN IEC
61000-3-2:2019+A2:2024;
EN 61000-3-3:2013+A2:2021+AC:2022; EN
55035:2017+A11:2020;
ETSI EN 301 489-1 V2.2.3 (2019-11);ETSI EN 301
489-3 V2.3.2 (2023-01);ETSI EN 301 489-17 V3.3.1
(2024-09)
Test Standard – Radio
ETSI EN 300 328 V2.2.2 (2019-07);ETSI EN 301 893
V2.2.1 (2024-11);ETSI EN 300 440 V2.2.1 (2018-07)
Test Standard — Health
EN IEC 62311:2020
Test Standard – Safety
IEC 62368-1:2018 ,EN IEC 62368-1:2020+A11:2020
Radio Frequency
Exposure Information
Complies with the EU RF exposure requirements
specified in the EN IEC 62311 standard. Maintain a
minimum distance of at least 20 cm from the human
body during use.
44
10 FCC & CE STATEMENT
Item
Detailed information
Product Name and Model
Smart Grips (Model: SHG2501-2)
Manufacturer
Qudong Future (Shenzhen) Technology Co., LTD.
Address: Room 1001, Wanhai Building, No.1031,
Industrial 5th Road, Nanshan District, Shenzhen
Compliance Statement
This product complies with the fundamental require-
ments and other relevant provisions of the EU Radio
Equipment Directive (2014/53/EU).
Certification Number
EMC260127032-02-001,
RF260127032-02-001,RF260127032-02-002,SAF260
127032-02-001
Test Standard – EMC
EN 55032:2015+A1:2020; EN IEC
61000-3-2:2019+A2:2024;EN 55035:2017+A11:2020;
EN 61000-3-3:2013+A2:2021+AC:2022ETSI EN 301
489-1 V2.2.3 (2019-11)ETSI EN 301 489-17 V3.3.1
(2024-09)
Test Standard – Radio
ETSI EN 300 328 V2.2.2 (2019-07
Test Standard — Health
EN 62479:2010
Test Standard – Safety
IEC 62368-1:2018,EN IEC 62368-1:2020+A11:2020
Radio Frequency
Exposure Information
Complies with the EU RF exposure requirements
specified in the EN IEC 62311 standard.

STAY IN TOUCH
Instagram
Facebook
Youtube
Official AEKE Community