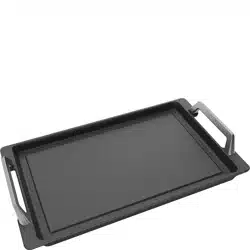

MANUALE D’USO
IT
GRIGLIA MULTIFUNZIONE
USER MANUAL
EN
MULTIUSE GRILL
MANUEL D’UTILISATION
FR
GRILLE MULTIFONCTION
BEDIENUNGSHANDBUCH
DE
MULTIFUNKTIONSGRILL
GEBRUIKSAANWIJZING
NL
MULTIFUNCTIONELE GRILL
MANUAL DE USO
ES
PARRILLA MULTIFUNCIÓN
MANUAL DE UTILIZAÇÃO
PT
GRELHADOR MULTIFUNÇÃO
BRUKSANVISNING
SV
MULTIFUNKTIONSGRILL
РУКОВОДСТВО ПО ЭКСПЛУАТАЦИИ
RU
МНОГОФУНКЦИОНАЛЬНЫЙ ГРИЛЬ
BRUGERVEJLEDNING
DA
UNIVERSALGRILL
INSTRUKCJA OBSŁUGI
PL
GRILL WIELOFUNKCYJNY
KÄYTTÖOPAS
FI
MONITOIMIGRILLI
BRUKSANVISNING
NO
BORDGRILL
AR
Informazioni importanti per l’utente
Important information for the user
Informations importantes pour l’utilisateur
Wichtige Informationen für den Benutzer
Belangrijke informatie voor de gebruiker
Información importante para el usuario
Informações importantes para o utilizador
Viktig information för användaren
Важная информация для пользователя
Vigtig information til brugeren
Ważne informacje dla użytkownika
Tärkeitä tietoja käyttäjälle
Viktig informasjon for brukere
Avvertenze / Recommendations / Avertissements / Hinweise / Waarschuwingen
/ Advertencias / Advertências / Varningar / Меры предосторожности /
Advarsler / Ostrzeżenia / Varoitukset / Advarsler /
Descrizione / Description / Description / Beschreibung / Beschrijving /
Descripción / Descrição / Beskrivning / Описание / Beskrivelse / Opis /
Kuvaus / Beksrivelse /
Uso / Use / Utilisation / Gebrauch / Gebruik / Uso / Utilização / Användning /
Использование / Anvendelse / Użytkowanie / Käyttö / Bruk /
Avvertenza di sicurezza / Safety instructions / Consignes de sécurité /
Sicherheitshinweise / Veiligheidswaarschuwingen / Advertencia de seguridad
/ Advertências de segurança / Säkerhetsvarning / Предупреждение о
безопасности / Sikkerhedsanvisninger / Ostrzeżenie dotyczące bezpieczeństwa
/ Turvallisuuteen liittyvät varoitukset / Sikkerhetsadvarsler /
Avvertenza di sicurezza / Safety instructions / Consignes de sécurité /
Sicherheitshinweise / Veiligheidswaarschuwingen / Advertencia de seguridad
/ Advertências de segurança / Säkerhetsvarning / Предупреждение о
безопасности / Sikkerhedsanvisninger / Ostrzeżenie dotyczące bezpieczeństwa
/ Turvallisuuteen liittyvät varoitukset / Sikkerhetsadvarsler /
Informazione / Information / Information / Information / Informatie /
Información / Informação / Information / Информация / Information /
Informacja / Tietoa / Informasjon /
Suggerimento / Advice / Conseil / Empfehlungen / Aanbeveling /
Sugerencia / Sugestões / Råd / Рекомендация / Forslag / Porada /
Neuvo / Forslag /

Gentile Cliente,La ringraziamo vivamente per il Suo acquisto. I nostri prodotti sono unici perché uniscono una spiccata
ricerca estetica alla progettazione tecnica innovativa. Essi sono coordinati con altri prodotti in gamma e possono
costituire elementi d’arredo e di design. Augurandole di apprezzare appieno le funzionalità del Suo elettrodomestico,
Le porgiamo i nostri più cordiali saluti.
Dear Customer, Thank you for purchasing one of our appliances. Our products are unique because they combine
iconic style with innovative technical solutions. They match perfectly with other products in our range and work
equally well as a standalone design objects in your kitchen. We hope you enjoy using your new appliance! Best
regards.
Cher client, merci beaucoup pour votre achat. Nos produits sont uniques car ils combinent une forte recherche
esthétique avec une conception technique innovante. Ils sont coordonnés avec d’autres produits de la gamme et
peuvent constituer des éléments d’ameublement et de design. En espérant que vous pourrez apprécier pleinement
votre nouvel appareil électroménager, nous vous adressons nos meilleures salutations.
Sehr geehrter Kunde, wir danken Ihnen herzlichst für den Kauf. Unsere Produkte sind einzigartig, da sich in ihnen eine
gewissenhafte Designforschung und eine innovative technische Planung vereinen. Sie sind mit anderen Produkten
des Sortiments kombinierbar und stellen ausgefallene Einrichtungs- und Designgegenstände dar. Wir hoffen, dass
Sie Ihr neues Haushaltsgerät voll und ganz schätzen werden und verbleiben mit freundlichen Grüßen.
Beste klant, hartelijk dank voor uw aankoop. Onze producten zijn uniek omdat ze esthetiek combineren met innovatief
technisch ontwerp. De producten zijn uitstekend te combineren andere producten van het assortiment en kunnen
worden gebruikt als meubel- en designelementen. We hopen dat u volop van uw nieuwe huishoudelijke apparaat
zult genieten. Met vriendelijke groet
Estimado cliente, le damos las gracias por su compra. Nuestros productos son únicos porque combinan una notable
búsqueda estética con un diseño técnico innovador. Se combinan con otros productos de la gama y se pueden utilizar
como elementos de decoración y diseño. Le deseamos que pueda apreciar plenamente su nuevo electrodoméstico.
Le enviamos nuestros saludos más cordiales.
Prezado cliente, Muito obrigado pela sua compra. Os nossos produtos são únicos porque combinam uma forte
busca estética com um desenho técnico inovador. São coordenados com outros produtos da linha e podem
constituir elementos de decoração e design. Esperando que possa desfrutar totalmente das funcionalidades do seu
eletrodoméstico, enviamos-lhe os nossos melhores cumprimentos.
Bäste kund, vi vill tacka dig för ditt köp. Våra produkter är unika eftersom de kombinerar ett estetiskt nytänkande
med innovativ teknik. Våra produkter passar med de andra i samma serie och kan användas som föremål inom
heminredningen för att ge en särskild känsla av stil i ditt hem. Vi hoppas att du till fullo kommer att uppskatta
funktionerna hos din hushållsmaskin. Med bästa hälsningar.
Уважаемый покупатель! Благодарим Вас за покупку. Наши изделия уникальны, поскольку они сочетают в
себе великолепный дизайн и передовые технические решения. Кроме того, они комбинируются с другими
изделиями из этой линейки и могут стать стильными элементами интерьера и дизайна. Надеемся, что Вы в
полной мере оцените функциональные возможности Вашего бытового прибора. С наилучшими пожеланиями.
Kære Kunde, mange tak for dit køb. Vores produkter er unikke, da de forener æstetisk research og innovativt teknisk
design. De passer perfekt sammen med de andre produkter i serien, og kan stå som et enkeltstående møbel af
design. Vi håber, at du vil værdsætte din hårde hvidevares funktionalitet, og sender de bedste hilsner.
Szanowny Kliencie, Dziękujemy za Twój zakup. Nasze produkty są wyjątkowe, ponieważ łączą intensywne badania
estetyczne z innowacyjnym projektem technicznym. Są one skoordynowane z innymi produktami z asortymentu
i mogą stanowić elementy wyposażenia i wystroju. Mamy nadzieję, że będą Państwo mogli w pełni korzystać z
funkcjonalności tego urządzenia. Serdecznie pozdrawiamy.
Arvoisa Asiakas, kiitämme sinua hankintasi johdosta. Tuotteemme ovat ainutlaatuisia, koska niissä yhdistyvät
esteettisyys ja innovatiivinen tekninen suunnittelu. Ne sopivat yhteen muiden valikoimaan kuuluvien tuotteiden
kanssa toimien samalla sisustus- ja design-tuotteina. Toivomme, että voit nauttia täysin siemauksin kodinkoneesi
toiminnoista. Sydämellisin terveisin.
Kjære kunde. Vi takker for at dere valgte å kjøpe et av våre produkter. Våre produkter er unike fordi de forener søken
etter estetikk med en nyskapende teknisk design. De koordineres med andre produkter i vårt sortiment og kan ha
funksjon som både møbel- og designvare. Vi håper du får fullt utbytte av ditt husholdningsapparat, og sender deg
våre beste hilsener.
SMEG S.p.A.
Model: MGF01
1
6
2
4
5
3
9
10
8
7
11a
11b
12
x2
x1
x1
11
B
A
BB
C
D
7
11
8
3
4
9
5 6 12
2 101
14
15
13
16
17
C
1
2
3
Model: MGF01
E
BF
B
L
BG BBH
B
B
I

21
EN
Instructions
1 Instructions
This user manual is an integral part of the
appliance and must therefore be kept in its
entirety and within the user’s reach for the
whole working life of the appliance.
1.1 Intended use
• Do not use appliance for other
than intended use.
• This appliance is intended to be
used in household and similar
applications such as:
- staff kitchen areas in shops,
ofces and other working
environments
- farm houses;
- by guests in hotels, motels
and other residential
accommodations
- bed and breakfast type
environment.
Failure to comply with the safety instructions
and failure to read the instructions for the
multiuse grill may lead to the appliance
being used incorrectly and cause personal
injury.
• Do not use the appliance for purposes
other than those for which it was
designed. Improper use may result in
injury.
• The appliance is not designed to operate
with external timers or with remote-
control systems.
WARNING: Do not install / use
the appliance outdoors. Use the
appliance indoors, protected from
the weather.
1.2 General safety instructions
Follow all safety instructions in order to use
the appliance safely:
• If the supply cord is damaged, it must be
replaced by the manufacturer, its service
agent or similarly qualied persons in
order to avoid a hazard.
• The appliance and its parts become very
hot during use. Small children should be
kept away from the appliance. Do not
touch the heating elements while the
appliance is in use.
• Protect your hands by wearing oven
gloves when moving food inside the grill.
• Never attempt to extinguish a re or
ames with water: Turn off the appliance
and smother the ames with a re
blanket or other appropriate cover.
• This appliance can be used by children
aged from 8 years and above and
persons with reduced physical, sensory or
mental capabilities or lack of experience
and knowledge if they have been given
supervision or instruction concerning
use of the appliance in a safe way
and understand the hazards involved.
Children must not play with the appliance.
Cleaning and user maintenance shall not
be made by children without supervision.
• Keep children under the age of 8 away
from the appliance and power cable
unless they are constantly supervised.
• Do not allow unsupervised children to
clean or maintain the appliance.
• Always monitor the cooking process. A
short cooking process must be constantly
monitored.

22
Instructions
• Never leave the appliance unattended
during cooking operations where fats
or oils could be released, as these could
then heat up and catch re.
• Be very careful.
• Do not pour water directly onto hot plates.
• The appliance and its parts become very
hot during use. Do not touch the heating
elements while the appliance is in use.
• Never move the appliance while it is in
use.
• Switch off the appliance immediately
after use.
• Allow the appliance to cool down after
use. Do not touch the internal plates or
heating elements as they can be very hot.
Risk of burning or scalding!.
• Do not put the appliance away until it has
cooled down completely.
• Do not use or store ammable materials
near the appliance.
• Do not use aerosols in the vicinity of this
appliance whilst it is in use.
• Do not modify this appliance.
• Do not try to repair the appliance yourself
or without the assistance of a qualied
technician.
• Do not pull the cable to unplug the
appliance.
• Only use extensions that comply with
current safety regulations, that are in
good condition and have a sufcient
cross-section.
1.3 Caution when using this
appliance
• Do not sit on the appliance.
• Do not use cleaning products containing
chlorine, ammonia or bleach on parts with
metallic surface nishes (e.g. anodized,
nickel-plated or chrome-plated).
• Do not use steam jets to clean the
appliance.
• Do not use sprays near the appliance.
• Do not block ventilation openings and
heat dissipation slots.
• Fire hazard: do not leave anything inside
the appliance.
• Do not use the appliance to heat rooms
for any reason.
• Do not use plastic cookware or containers
when cooking food.
• Do not cook food wrapped in plastic lm,
aluminium or tin foil.
• Do not use the handle to lift or move the
appliance.
• Make sure that nothing is stuck in the
seats provided for the plates.
• Use the appliance on a at, stable
surface.
• Avoid spilling liquids onto the power plug
and base.
• Disconnect the power supply before
working on the appliance.
23
EN
Instructions
Information on power consumption in
off/stand-by mode
Technical data on the appliance’s power
consumption in off/stand-by mode can be
found at “www.smeg.com” under the page
corresponding to the product in question.
1.4 Connecting the appliance
Make sure that the power supply voltage
and frequency match those specied on the
data plate on the bottom of the appliance.
If the plug of the appliance is not compatible
with the power outlet, contact an authorized
service centre for replacement.
• Do not allow children to play with the
appliance.
• Keep the appliance and power cord out of
reach of children.
• Always unplug the appliance when
leaving it unattended and before
assembling, disassembling or cleaning.
• Always turn off and unplug the
appliance before changing accessories
or approaching moving parts while the
appliance is in use.
1.5 Manufacturer liability
The manufacturer declines any liability for
damage to persons or property caused by:
• Use of the appliance other than the one
envisaged
• Not having read the user manual
• Tampering with any part of the appliance
• Use of non-original spare parts
• Failure to comply with the safety
instructions
Please store these instructions
carefully. If the appliance is
transferred to others, they should
also be given this instructions
booklet.
These instructions can be downloaded from
the Smeg website “www.smeg.com”.
1.6 Disposal
Electrical appliances must not be disposed
of together with household waste.
Devices marked with this symbol
are subject to European Directive
2012/19/EU requirements.
• All waste electrical and electronic
appliances must be disposed of
separately from household waste and
taken to authorised waste disposal
facilities. Disposing of the used appliance
correctly will help to safeguard the
environment and human health. For
further information regarding the
disposal of used appliances, please
contact your local authority waste
disposal department or the shop where
the appliance was purchased.
24
Description
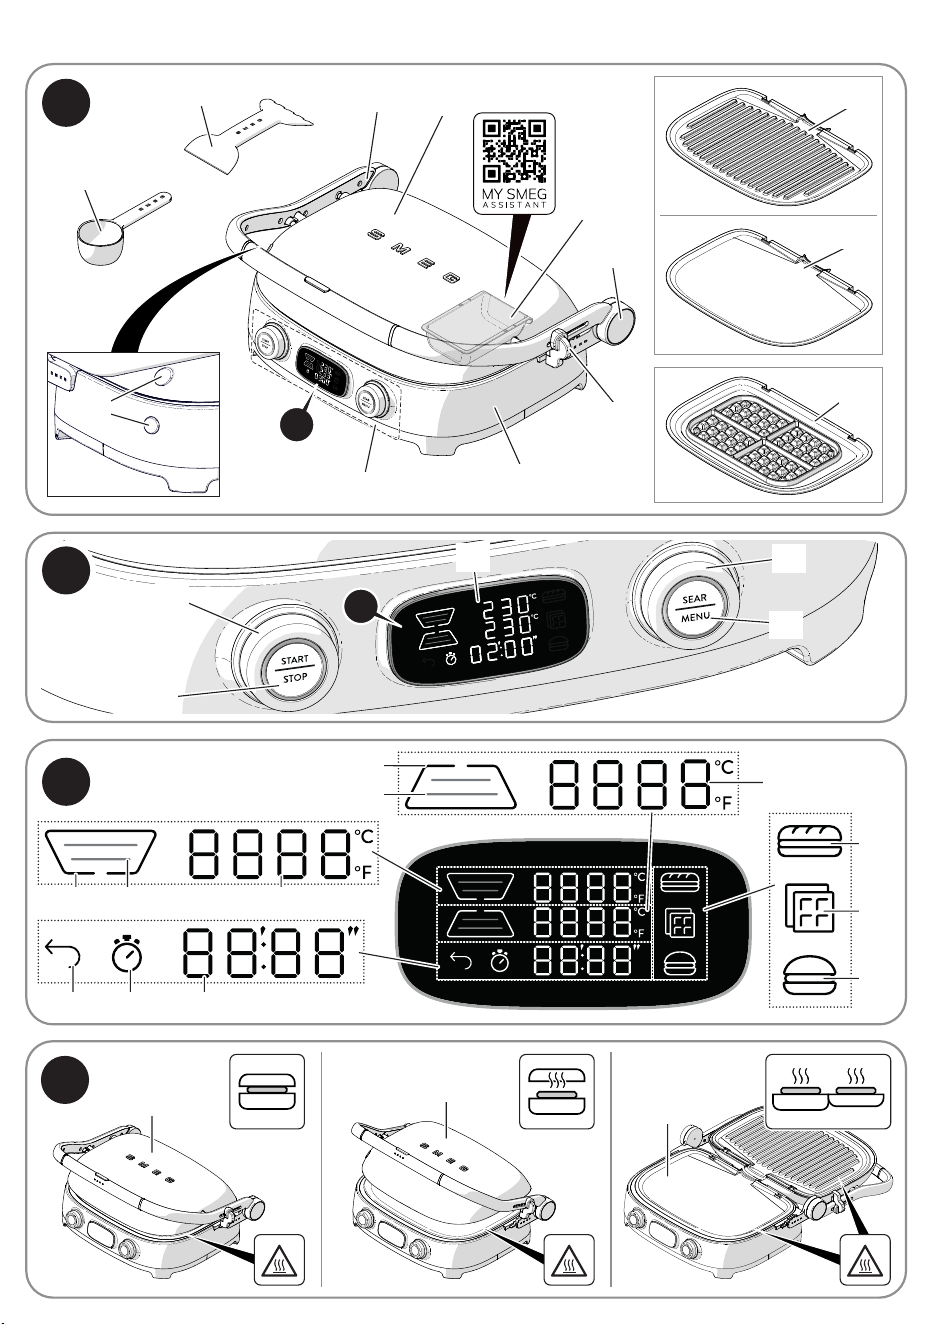
2.2 Description of the parts (Fig. A)
Positioning slider (5)
Release mechanism for adjusting the height
of the upper plate.
Hinge release button (6)
Hinge release button for placing the product
in the barbecue conguration.
Drip tray (7)
Removable tray to catch drips and fat when
cooking on the grill.
Plate release buttons (8)
Buttons to press to remove the plates.
2.3 Description of accessories
(Fig. A)
Double-sided spatula (9)
Tool for scraping off food.
Measuring cup (10)
Cup for measuring the wafe batter.
Grill and griddle plate set (11)
Set consisting of a ribbed plate (11a) and a
at plate (11b).
Wafe iron set (12)
Set of 2 wafe iron plates.
The accessories intended to come
into contact with food are made
of materials that comply with the
provisions of current legislation.
2 Appliance description
(Fig. A)
1) Control panel and display
2) Upper plate housing
3) Lower plate housing
4) Handle
5) Positioning slider
6) Hinge release button
7) Drip tray
8) Plate release buttons
9) Double-sided spatula
10) Measuring cup
11) Grill and griddle plate set
12) Wafe iron set
2.1 Before rst use
Danger of burns
High appliance temperature
• Failure to follow these
instructions may result in re,
burns, or scalds.
The grill is supplied in “LOCK”
mode. Unlock it before use.
• Remove any protective lm from the
outside or inside of the appliance,
including accessories.
• Remove any labels (apart from the
technical data plate) from the accessories
and shelves.
• Remove and wash all the appliance
accessories (see chapter “4 Cleaning and
maintenance”).
Before use, make sure that all the
components are intact.
25
EN
Description
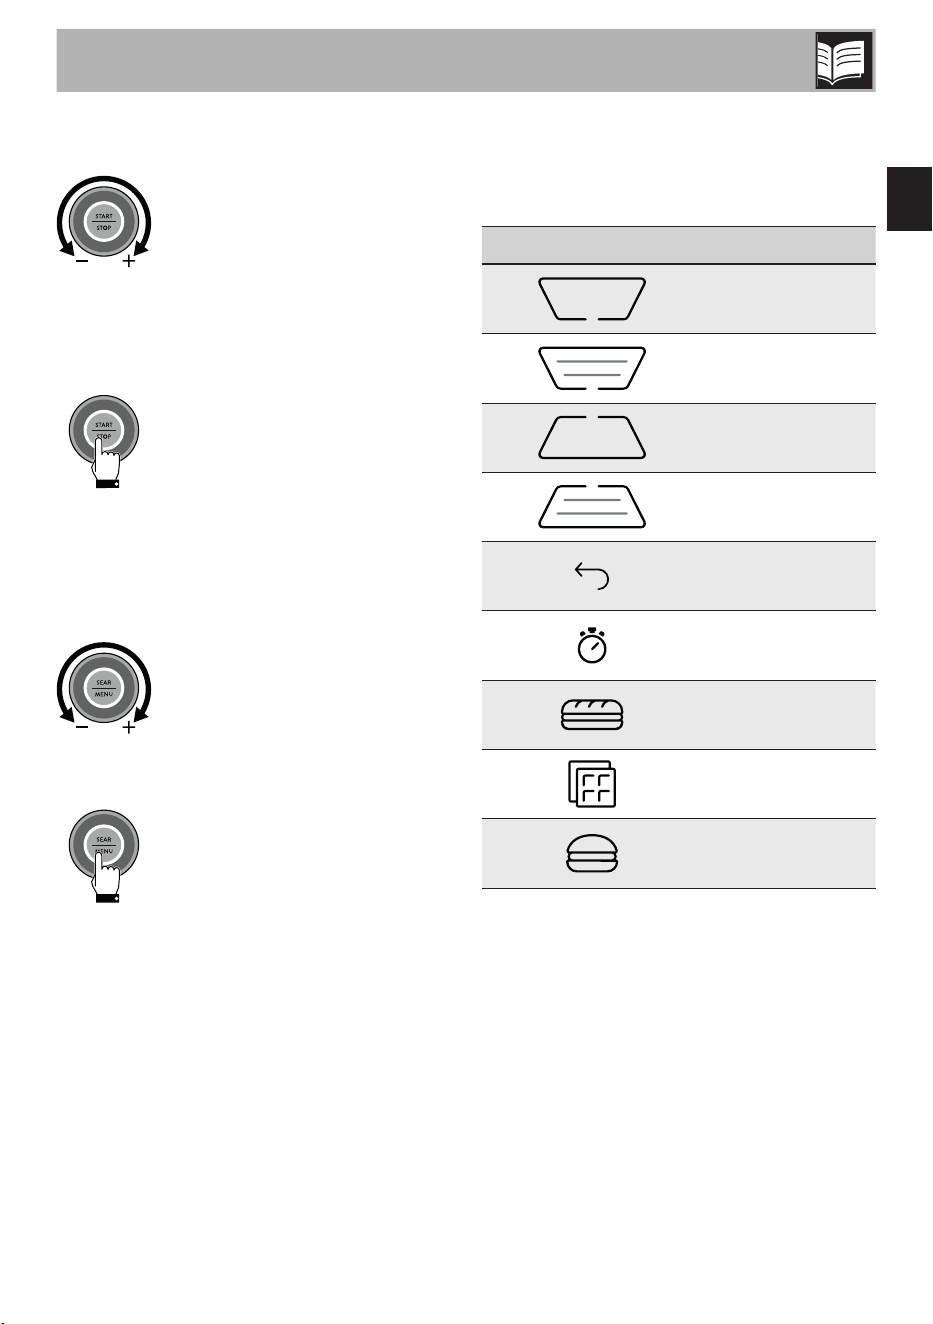
2.4 Description of the controls
(Fig. B)
Navigation knob (14)
Allows you to select either a single plate or
both plates together, as well as the timer
icon, through the different menus on the
user interface.
START/ STOP button (15)
Allows you to start (short press) or stop
(long press) the cooking process. The
corresponding LED lights up with a steady
light when cooking has started and goes
out when the cooking cycle has nished.
Parameter navigation knob (16)
Allows you to set the time and temperature
values shown on the display.
SEAR/ MENU button (17)
In manual mode, it gives access to the
three preset programmes (short press). In
manual mode, press and hold to access
the user setting menu. During preheating
and cooking, it activates the SEAR function
(long press). The corresponding LED lights
up when the SEAR function is active.
Display (18)
The display shows the functions, parameters
and the values of the cooking settings.
2.5 Description of the display
(Fig. C)
Display icons
Icon Meaning
1 Upper plate off
2 Upper plate on
3 Lower plate off
4 Lower plate on
5 Back
6 Cooking timer
7 Panini cooking preset
8 Wafe cooking preset
9 Burger cooking preset
Temperature (10)
Displays the cooking temperature of the top
plate (in °C or °F).
Temperature (11)
Displays the cooking temperature of the
lower plate (in °C or °F).
Timer (12)
Displays the cooking time set on the timer.

26
Use
3 Use
3.1 First use
• Heat the grill with the empty plates at the
maximum temperature to remove any
manufacturing residue.
• When the appliance is used for the
rst time, when heating, it may give off
unpleasant smells due to manufacturing
residues remaining on some components.
These smells usually disappear after the
appliance has been heated for the rst
time.
Using the accessories
Caution
Do not use the appliance without
the cooking plates.
Clean the plates and accessories
supplied (including the measuring
cup and spatula) before rst use
to remove any manufacturing
residue.
The plates are interchangeable and they
have integrated heating elements, which
optimise heat transfer.
Cooking modes (Fig. D)
To use the grill, you must set it to
the required cooking mode.
Contact mode (1)
• The contact mode is ideal for hamburgers
or grilled vegetables. It is perfect for
preparing food quickly.
• The upper plate, once released from
the handle, adjusts to the thickness and
shape of the food (oating hinge).
Oven mode (2)
• The oven mode is ideal for cooking
delicate foods, such as sh or meat
llets, and for those that do not need to
be pressed during cooking. It can also be
used to heat food.
• The upper plate remains raised compared
to the lower plate and can be adjusted
to 5 different heights, depending on
the thickness of the food. In this way,
the upper plate can just touch the food,
without crushing it.
BBQ mode (3)
• Allows you to cook different foods without
mixing them.
• The open position doubles the cooking
surface of the grill.

27
EN
Use
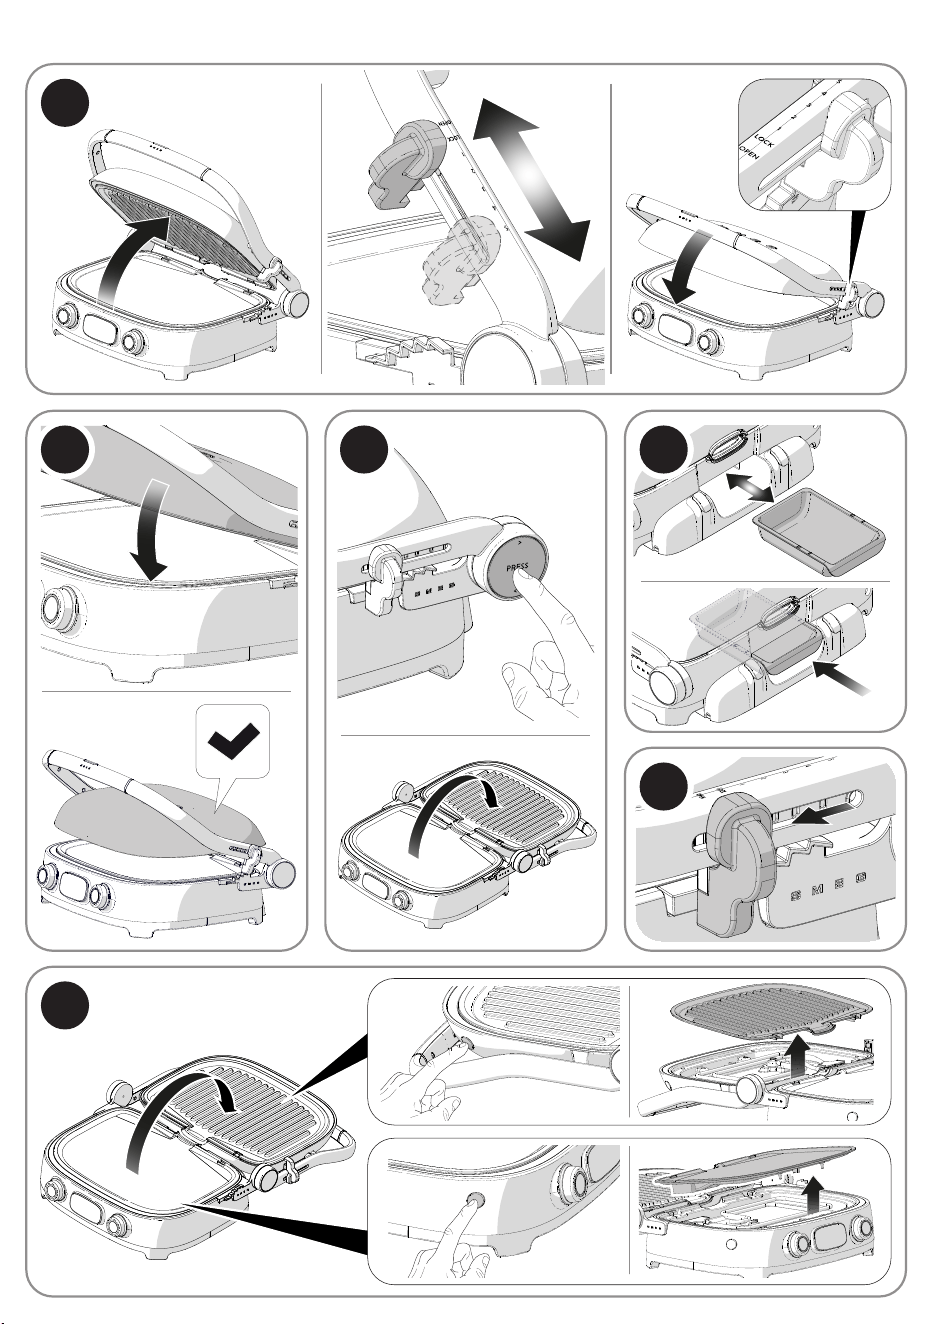
3.2 How to use the grill
Height adjustment (Fig. E)
Lifting the handle to move the positioning
slider and adjust the height.
Releasing the upper housing from the
handle (Fig. F)
The upper housing is attached to the handle.
To release it, tilt it down by hand so that it is
lowered by gravity and positioned parallel
to the lower plate.
Releasing the handle for barbecue mode
(Fig. G)
Press the PRESS button on the side to open
the grill to 180°, guiding the upper plate as
it opens.
Handle lock (Fig. I)
After using the appliance, set the positioning
slider to “LOCK” to prevent opening.
Releasing the plates (Fig. L)
Caution
Do not remove or replace the
plates until the appliance has
cooled down completely.
Lay the appliance at. To remove the plates,
press the release buttons on the housings.
3.3 Preheating
Cooking is always preceded by a
preheating phase, which allows
the appliance to reach cooking
temperature previously set.
During the preheating phase, the display
shows
PrEH
alternating with the set
temperature until the preheating is nished.
For example, if the temperature is set at
230°C, the display will alternate between
230°C and
PrEH
for both plates (upper
and lower, if set).
At the end of preheating, the grill will beep
and the PREH disappears and the timer,
if set, will start blinking. Add your food to
the plates and press START to start the
counting down of the timer.
Carry out the Preheating phase
with the grill in contact mode to
reduce heat dispersion.
28
Use
3.4 Manual mode
Setting the cooking temperature
To start using the grill, you can set a different
temperature for each plate.
The values can be set between 60°C and
230°C.
1) Turn the knob to the left to select the
icon corresponding to the parameter
you want to change on the upper and/
or lower plate.
2) Turn the knob to the right to increase or
decrease the temperature.
3) Press the START/STOP button to start
the cooking.
If either plate is switched off or no
temperature has been set, the plate icon
disappears and
OFF
appears.
Setting the timer
The timer can also be set:
1) Turn the left knob to select the timer
icon.
2) Turn the knob to the right to set the time
in minutes and seconds.
3) Press the START/STOP button to
conrm.
You can increase or decrease
the set time at any time during
cooking.
At the end of the preheating
phase
PrEH
, if the timer was
set before cooking, the left knob
and the timer on the display
ash to indicate that double
conrmation is required on order
to start the countdown.
If no timer is selected, the product
will turn off automatically after
60 minutes of operation.
3.5 Preset mode
To enter preset mode, make sure
you are in manual mode and
briey press the SEAR/MENU
button.
Selecting the preset mode
To start using the grill, you can select a
cooking preset.
Each preset consists of a xed upper and
lower plate temperature and a xed cooking
time.
Before starting the function:
1) Turn the knob to the left to select the
icon corresponding to the required
preset mode.
2) Press the START/STOP button to start
the function.
29
EN
Use
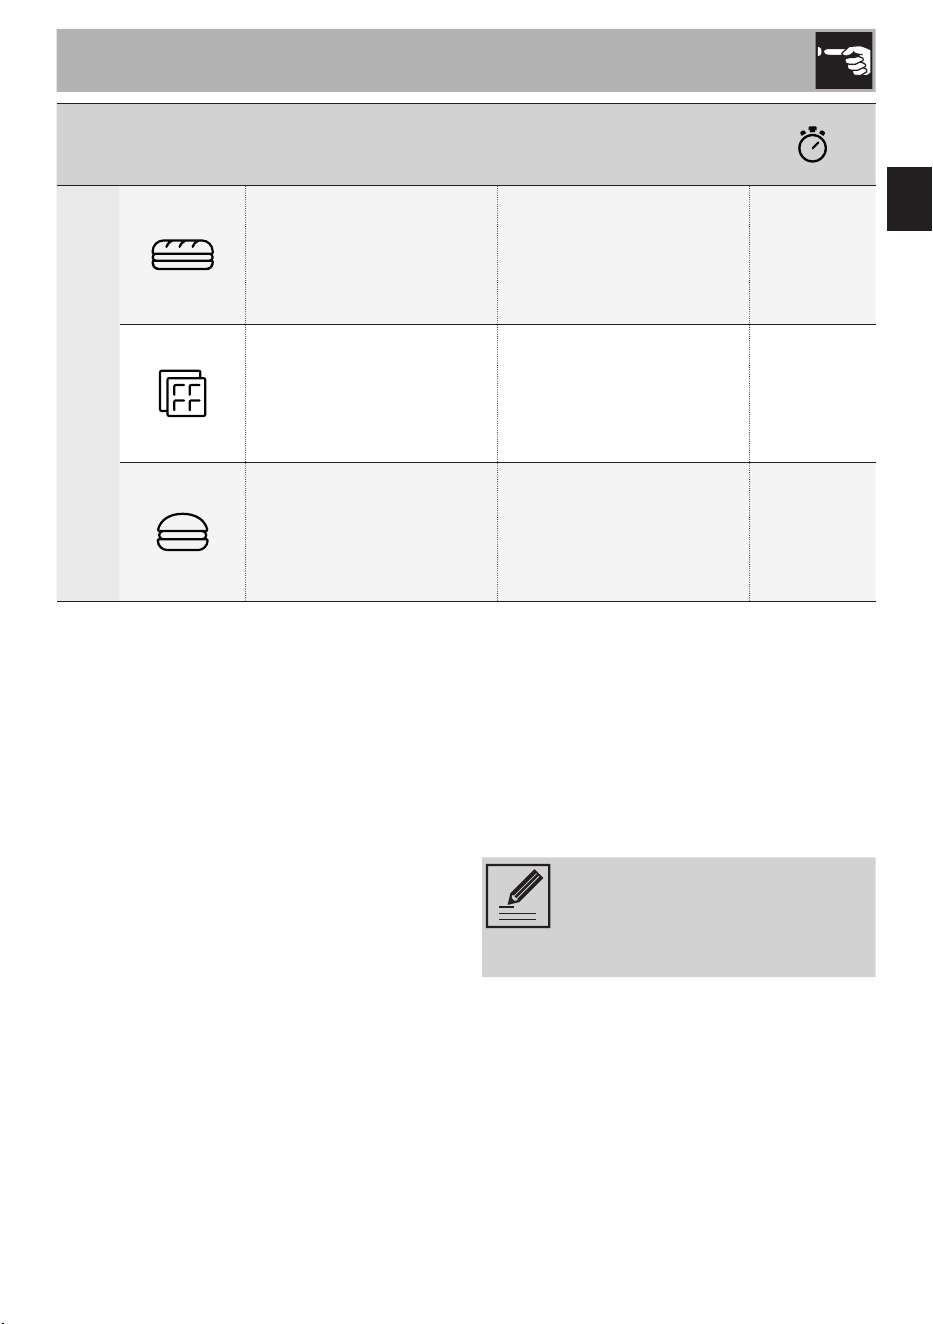
Preset Upper plate temperature Lower plate temperature
Panini
200°C 230°C 4 minutes
Wafe*
180°C 180°C 5 minutes
Burger
230°C 230°C 2 minutes
* For this particular preset, you must use the 2 special wafe iron plates provided.
Customising existing presets
You can modify the parameters of existing
presets and create custom settings for
future use.
1) Select the preset you wish to modify.
2) Press and hold the SEAR/MENU button
to enter edit mode.
3) Turn the left knob to navigate through
the parameters and turn the right knob
to set the values.
4) Press and hold the SEAR/MENU button
to save the new settings.
To restore the default values, make
sure you are in manual mode and
press and hold the START/STOP
button for 10 seconds.

30
Use
3.6 SEAR function
The SEAR mode is designed to seal food,
especially meat, by heating the plates to
the maximum temperature allowed by the
heating elements for 30 seconds.
To activate the SEAR function, press
and hold the SEAR/MENU button during
preheating or cooking.
• This function is only available
during preheating or cooking
when a temperature of at least
200°C has been set.
• This function can be used once
every 30 minutes.
• It is recommended to activate
the function during the
preheating phase.
During the preheating phase, the display
alternates between
SEAR
and
PrEH.
.
When the plates reach the maximum
temperature allowed the appliance emits
a beep,
SEAR
appears xed on the
display and the countdown of the function
will start.
When the function ends, the temperature
of the plates is automatically reduced to the
value set for each one.
3.7 Settings Menu
To access the user settings menu in manual
mode:
1) Press and hold the SEAR/MENU button.
2) Turn the left knob to navigate through
the items in the menu.
3) Turn the right knob to set the
required value and conrm using the
SEAR/MENU button.
unit
Setting the units of measurement
Sets the unit of temperature measurement
in Celsius (°C) or Fahrenheit (°F).
Snd
Sound
Enables (On) or disables (OFF) the sounds
emitted by the grill.
31
EN
Use
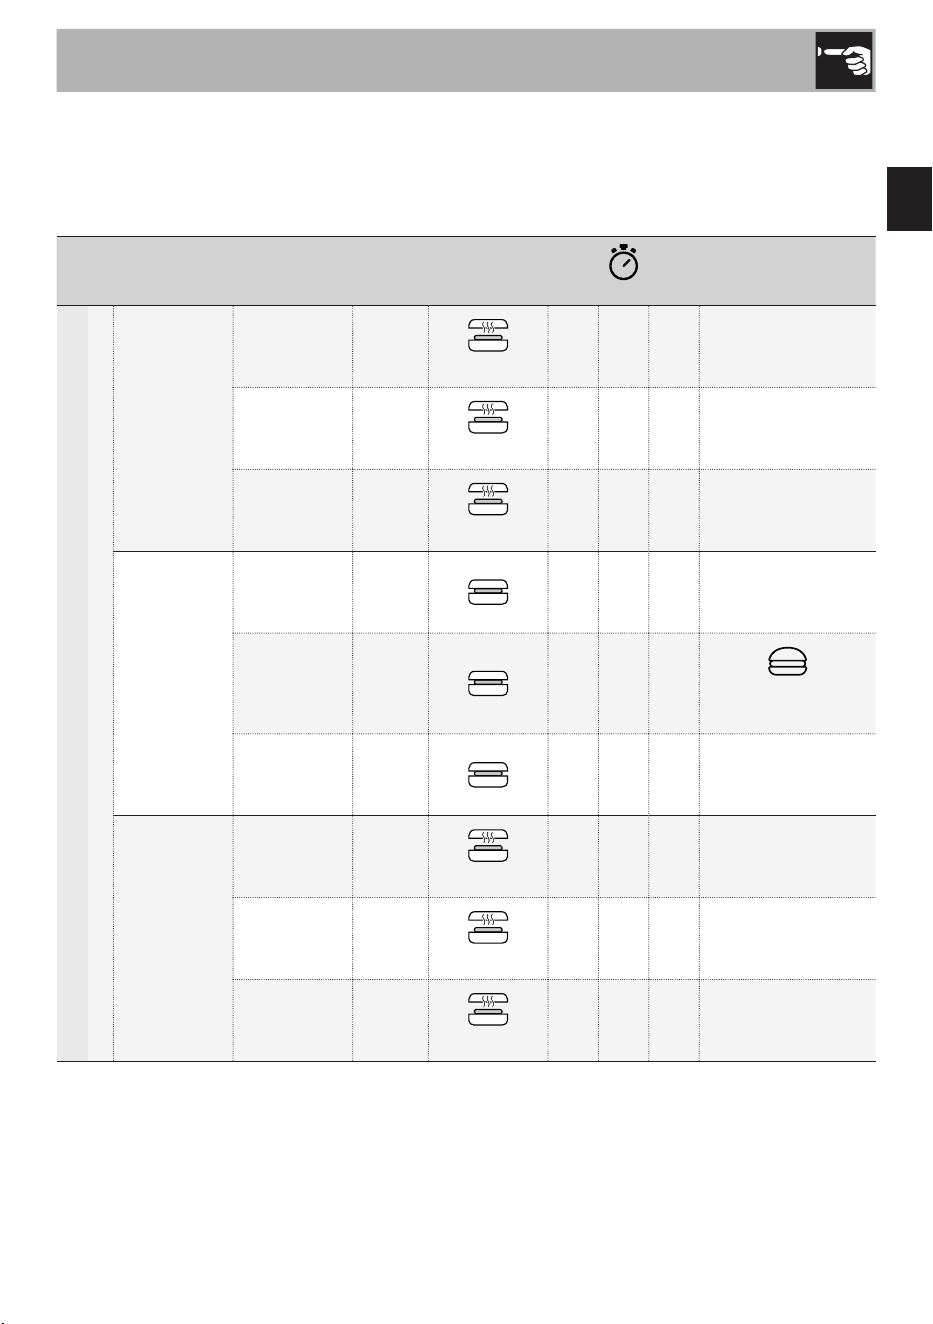
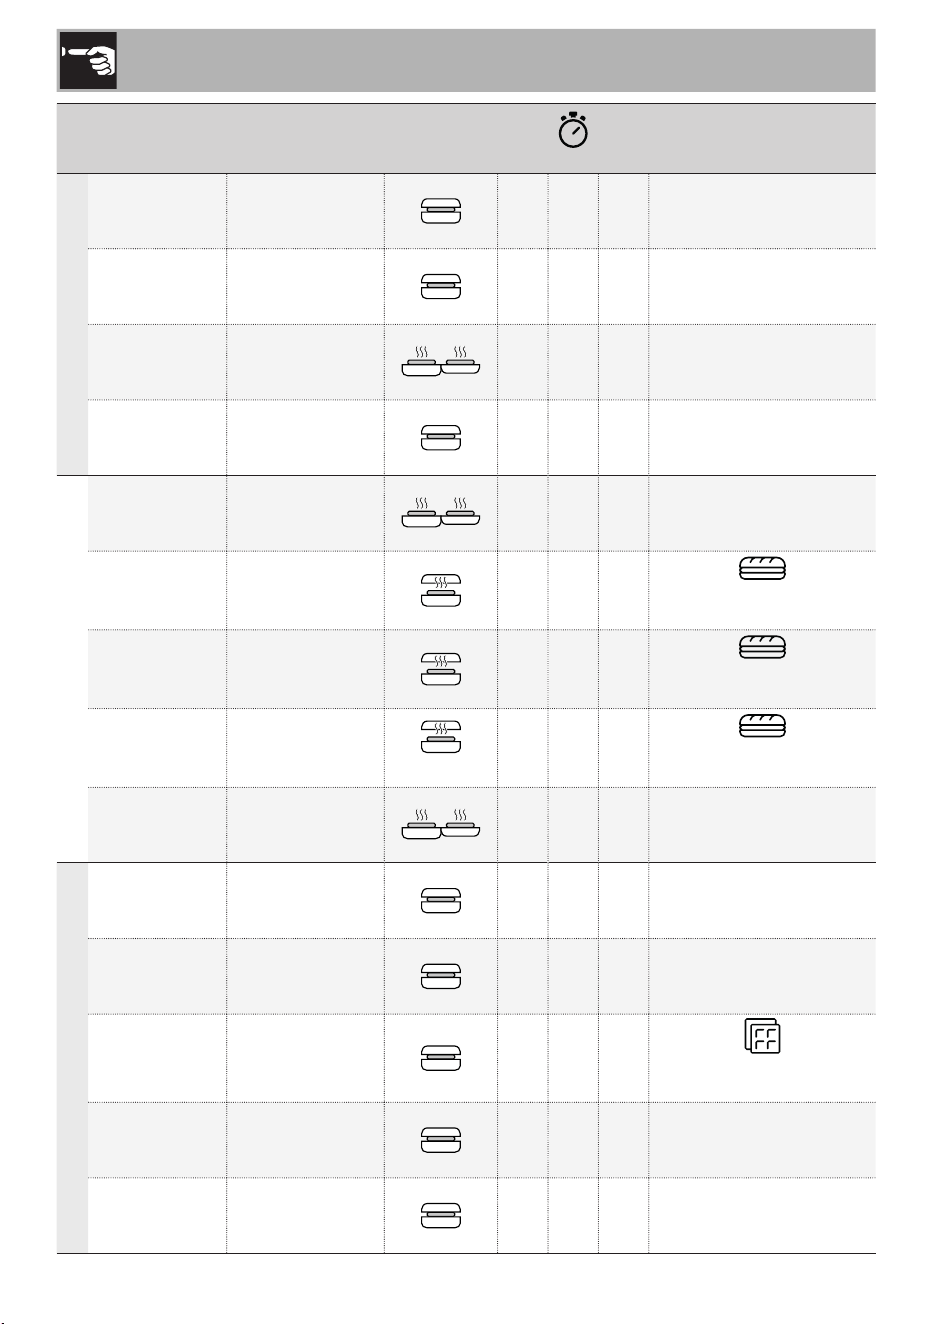
3.8 Cooking table
Cooking times provided are approximate and may vary based on the quality, thickness, and
nature of the food.
Type Cut Cooking level Quantity
Opening
Method
°C
(min)
SEAR Tips
Meat
Beef
Fillet
Rare
(50°)
3 / 4
STEP 2
230 5
Thickness: 3 cm
Turn half way
through cooking
Medium
(60°)
3 / 4
STEP 2
230 7
Thickness: 3 cm
Turn half way
through cooking
Well done
(70°)
3 / 4
STEP 2
230 10
Thickness: 3 cm
Turn half way
through cooking
Hamburger
Rare 4 230 1 X ~ 140 g each
Medium 4 - - X
You can use the
HAMBURGER preset
Well done 4 230 4 X ~ 140 g each
New York
Steak
Rare
(50°)
2 / 3
STEP 1
230 3
Thickness: 2 cm
Turn half way
through cooking
Medium
(60°)
2 / 3
STEP 1
230 5
Thickness: 2 cm
Turn half way
through cooking
Well done
(70°)
2 / 3
STEP 1
230 7
Thickness: 2 cm
Turn half way
through cooking
32
Use
Type Cut Cooking level Quantity
Opening
Method
°C
(min)
SEAR Tips
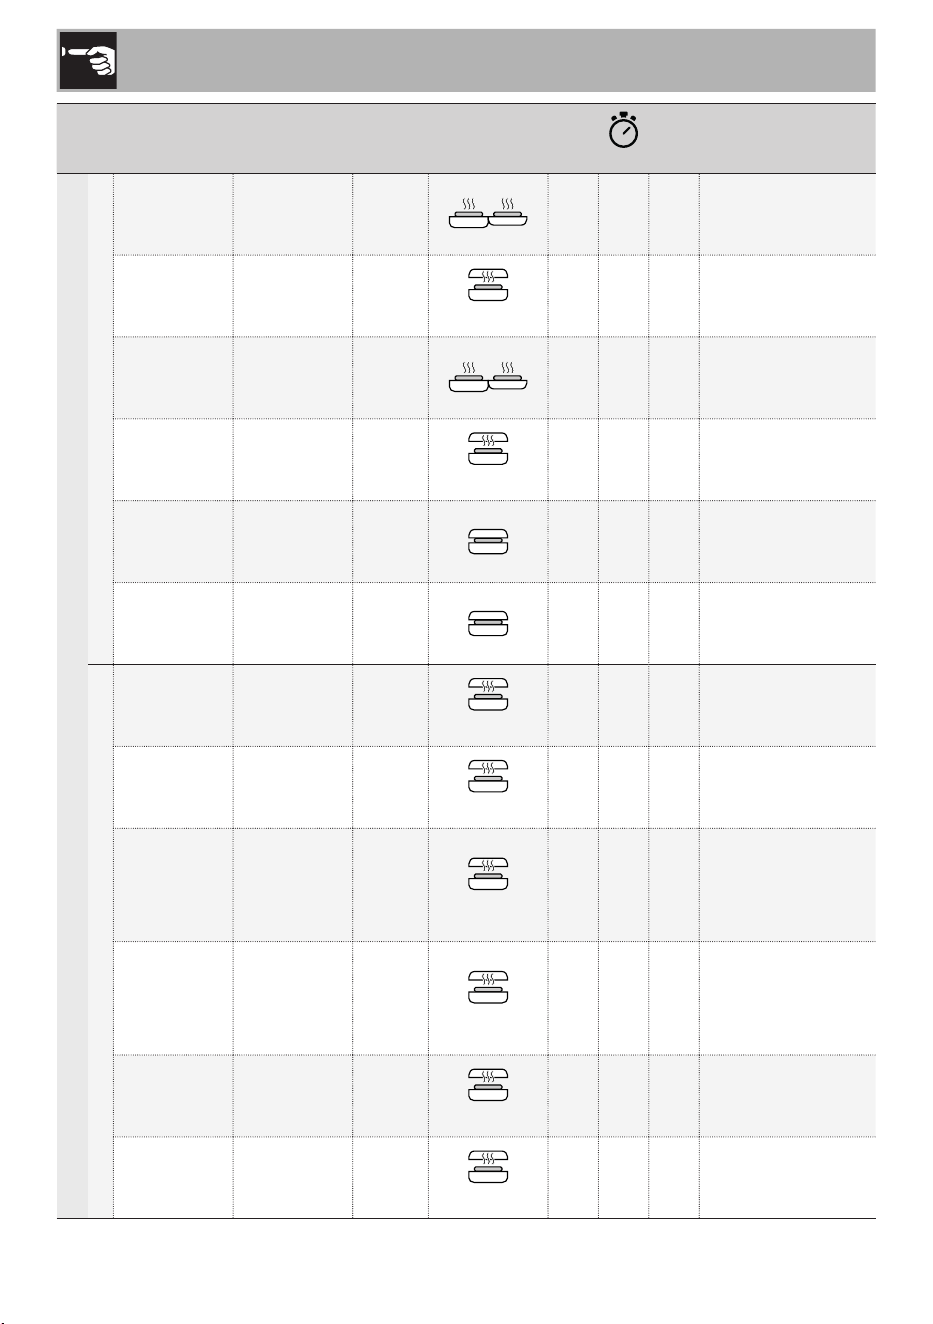
Meat
Pork
Bacon Well done 6 230 5 X -
Sausages Well done 6
STEP 2
210 18 X
140 g sausage,
approx. 3cm ø
Sausages Well done 12 230 30 X
140 g sausage,
approx. 3cm ø
Chop Well done 2 / 3
STEP 1
190 5
Thickness: 3 cm
Pork neck Well done 2 / 3 210 4
Thickness: 2.5 cm
Wurstel Well done 9 - 12 210 8 X 80 g each
Chicken and turkey
Buttery
chicken breast
Well done
4 from
a 325 g
breast
STEP 1
230 5 X
Upper plate just
touching the food
Fillets Well done 10 - 14
STEP 1
230 5 X
Upper plate just
touching the food
Chicken legs Well done
Up to 10
legs
STEP 3
210 40 X
Upper plate just
touching the food,
turn the product half
way through cooking
Chicken wings Well done
Up to 20
wings
STEP 2
200 30 X
Upper plate just
touching the food,
turn the product half
way through cooking
Devilled
chicken
Well done 1 - 2
STEP 1
230 20 X
600 g each
Turn half way
through cooking
Chicken
skewers
Well done 4 - 10
STEP 1
230 14 X
Turn several times
during cooking
33
EN
Use
Type Quantity
Opening
Method
°C
(min)
SEAR Tips
Fish
Salmon llet 2
STEP 2
230 5 X
Upper plate just
touching the food
Fish cutlets 2 / 3
STEP 1
200 8 X
Turn half way
through cooking
Octopus Precooked 230 8 X
Turn half way
through cooking
Prawns
(shelled tails)
20
STEP 1
230 3 X
The upper plate must
not touch the product,
if desired, turn half way
through cooking
Scallops 24 - 18 230 6 X -
Sea bream/
sea bass
2 whole
STEP 3
210 15 X
300/400 g each
Turn half way through
cooking
Upper plate just
touching the food
Sea bream/
sea bass llet
4 llets
STEP 1
230 3 X
80/100 g each
Upper plate just
touching the food
Tuna llet 4
STEP 2
230 3 X -
Fish skewers 4 - 10 230 12 X
Turn several times
during cooking
Vegetables
Courgettes 10 - 14 slices 200 8 X
Thickness: 1 cm
Turn half way
through cooking
Peppers 10 slices 210 10 X
Turn half way
through cooking
Aubergines 8 - 12 slices 210 8 X
Thickness: 1 cm
Turn half way
through cooking
Mushrooms
Variable weight
depending on the
type
230 13 X
Turn half way
through cooking
34
Use
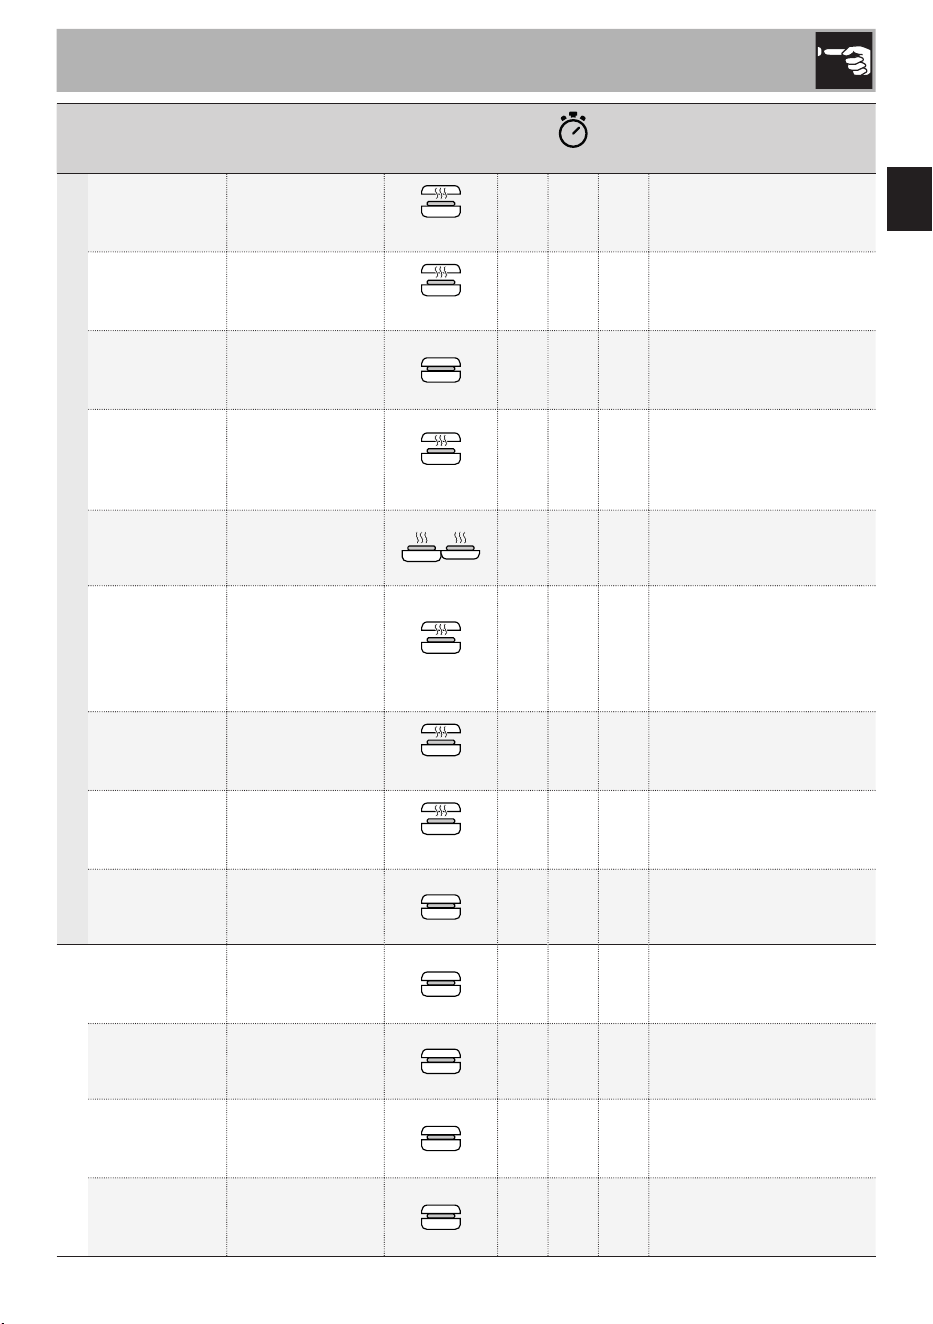
Type Quantity
Opening
Method
°C
(min)
SEAR Tips
Vegetables
Sliced potatoes 12 - 16 slices 160 18 X
Thickness: 1 cm
Turn half way
through cooking
Whole sliced
onion
12 - 16 slices 200 10 X
Thickness: 1 cm
Turn half way
through cooking
Sliced onion 1 - 3 onions 210 8 X
Stir regularly
during cooking
Vegetarian
hamburger
4 - 6 230 5 X 100 g each
Bread and eggs
French toast 2 - 3 200 8 X -
Stuffed
sandwich
2 - - X
You can use the
PANINI preset
Focaccia 2 - - X
You can use the
PANINI preset
Fresh bread 2 - 4 slices
STEP 1
- - X
You can use the
PANINI preset
Bullseye eggs 1 - 4 230 2 X -
Dessert
Caramelised
pineapple
3 / 4 230 6
Turn half way
through cooking
Pineapple 3 / 4 230 8
Turn half way
through cooking
Wafe 4 - - X
You can use the
WAFFLE preset
Cocoa wafe 4 180 8 X
Use the wafe
plates provided
Protein wafes 4 180 7 X
Use the wafe
plates provided

35
EN
Use
Type Quantity
Opening
Method
°C
(min)
SEAR Tips
Dessert
Pancakes 4 - 6 210 3 X -
Banana
pancakes
4 - 6 200 8 X -
Protein
pancakes
4 - 6 200 7 X -
WAFFLES
Ingredients for about 12 wafes:
• 300 g our
• 300 ml whole milk
• 2 eggs
• 1 vanilla pod
• 75 g sugar
• 100 g butter
• 2 pinches of salt
• 10 g of yeast
Procedure:
1) Melt the butter.
2) Place all the ingredients in a large jug.
3) With the help of an immersion blender,
mix well until the mixture is smooth.
4) Let it sit for at least 30 minutes.
5) With the help of the measuring cup
(1 measuring cup = 2 wafes), pour the
mixture onto the plate and cook for the
time shown on the cooking timetable.
COCOA WAFFLES
Ingredients for about 8 wafes:
• 180 g 00 our
• 100 g sugar
• 20 g cocoa powder
• 12 g baking powder
• 3 g salt
• 240 g whole milk
• 2 eggs
• 60 g butter
Procedure:
1) Melt the butter.
2) Place all the ingredients in a large jug.
3) With the help of an immersion blender,
mix well until the mixture is smooth.
4) Let it sit for at least 30 minutes.
5) With the help of the measuring cup,
pour the mixture onto the plate and
cook for the time shown on the cooking
timetable.

36
Use
PANCAKES
Ingredients for about 12 pancakes:
• 290 g 00 our
• 60 g sugar
• 16 g baking powder
• A pinch of baking soda
• 2 pinches of salt
• 440 ml milk
• 60 g melted butter
• 1 medium egg
• 1/2 vanilla pod
Procedure:
1) Melt the butter.
2) Place all the ingredients in a large jug.
3) With the help of an immersion blender,
mix well until the mixture is smooth.
4) Let it sit for at least 30 minutes.
5) Pour the mixture onto the plate and
cook for the time shown on the cooking
timetable.
PROTEIN PANCAKES
Ingredients for about 12 pancakes:
• 60 g 00 our
• 2 large eggs
• 1 tsp vanilla extract
• 70 g sugar
• 120 g natural Greek yoghurt
• 40 g whey protein powder (neutral or
vanilla avour)
• 16 g baking powder
• 1 tsp baking soda
Procedure:
1) Place all the ingredients in a large jug.
2) With the help of an immersion blender,
mix well until the mixture is smooth.
3) Let it sit for at least 30 minutes.
4) Pour the mixture onto the plate and
cook for the time shown on the cooking
timetable.
37
EN
Cleaning and maintenance
4 Cleaning and maintenance
The instructions manual contains cleaning
and maintenance instructions and
recommendations from the manufacturer to
the customer. Any other intervention should
be carried out by an authorised service
centre.
Caution
• Do not use steam jets to clean
the appliance.
• Do not use cleaning products
containing chlorine, ammonia,
bleach or alcohol on steel parts
or parts with metallic surface
nishes.
• Do not use abrasive or harsh
detergents (e.g. powder
products, stain removers and
metal scourers).
• Do not use rough or abrasive
materials or sharp metal
scrapers.
• Clean the components and
accessories regularly after use.
Hot surface
Accessible surface temperatures
can be high during appliance
operation.
WARNING: Before cleaning,
always remove the plug from the
mains power supply and allow the
appliance to cool down. To keep
the surfaces in good condition,
they should be cleaned regularly
after use. Let them cool rst.
Ordinary daily cleaning
Always and only use specic products that
do not contain abrasives or chlorine-based
acids.
Pour the product onto a damp cloth and
wipe the surface, rinse thoroughly and dry
with a soft cloth or a microbre cloth.
Food stains or residues
Do not use steel sponges and sharp
scrapers as they will damage the surface.
We recommend that you use the
spatula to remove any residues.
Use normal, non-abrasive products and a
wooden or plastic tool, if necessary. Rinse
thoroughly and dry with a soft cloth or a
microbre cloth.
Do not allow residues of sugary foods (such
as jam) to set in the appliance. If left to set
for too long, they can damage the enamel
lining of the appliance.
Cleaning the accessories
The cooking plates are dishwasher-safe,
but repeated use may cause a slight
discoloration. This is purely cosmetic
and does not affect performance. It is
recommended to clean the exterior of
the plates using a soft sponge or cloth
moistened with water and a mild detergent.
Avoid using metal tools to clean as they
may damage the surfaces.
IT is recommended to wash the spatula and
measuring cup by hand.
Removing the drip tray (Fig. H)
Check the drip tray frequently
during cooking.
The tray is removable for easy cleaning and
it is recommendend to wash it by hand.
Dispose of the collected fat properly.

38
What to do if...
Problem Possible cause Solution
The multipurpose grill does
not switch on.
The plug has not been
properly inserted into the
power socket.
Make sure the plug has
been inserted properly into
the power socket.
The cable is defective.
Contact your local technical
support centre.
No power.
Make sure that the power
supply is working properly. If
the problem persists, contact
a qualied electrician.
The display does not turn
on.
The plug has not been
properly inserted into the
power socket.
Make sure the plug has
been inserted properly into
the power socket.
Possible electronic board
failure.
Contact your local technical
support centre.
Cooking does not start
Failure to conrm after
preheating
Make sure that you conrm
the cooking phase when the
preheating stage ends (see
section “3.4 Manual mode”).
The heating element may be
faulty.
Contact your local technical
support centre.
Cooking has started but the
grill does not heat up.
The heating element may be
faulty.
Contact your local technical
support centre.

39
EN
What to do if...
Problem Possible cause Solution
There is a burning smell
when the oven is in
operation.
There may be a burning
smell when using the
appliance for the rst time.
Make sure you have
followed the instructions if
you are using the appliance
for the rst time.
Possible food residues inside
the appliance in contact
with the heating elements.
Make sure you follow the
cleaning and maintenance
instructions (see
section “4 Cleaning and
maintenance”).
The SEAR function is not
activated
The selected temperature is
lower than required.
Make sure that you have
set a temperature equal to
or greater than 200°C to
activate the function (see
section “3.6 SEAR function”).
The time elapsed since the
last activation is not long
enough.
Make sure that at least half
an hour has passed since
the last use of the function
(see section “3.6 SEAR
function”).
The SEAR function
deactivates after some
time.
It’s normal.
The SEAR function is
designed to remain active
for the time necessary
to ensure an excellent
seal. It remains active for
30 seconds, then
deactivates automatically
and the temperature will
return to the previously set
one.

40
What to do if...
Problem Possible cause Solution
The “Wafe” preset does
not appear on the display
The product is in BBQ mode.
Make sure that the product
is closed when you want to
select the preset.
The countdown does not
start
No conrmation after
preheating when a timer is
set to manual mode.
Make sure you have
conrmed the countdown
after preheating (see section
“Setting the timer”).
One of the following error
codes appears on the
display:
Err 1
Err 2
Err 3
Err 4
-
Contact your local technical
support centre.
If the problem has not been resolved or in the case of other types of fault, contact
your local technical support centre.

Scansiona il QR code per un accesso rapido al portale My Smeg Assistant
Scan the QR code for quick access to the My Smeg Assistant portal
Scannez le code QR pour un accès rapide au portail My SMEG Assistant
Für den schnellen Zugriff auf das Portal My Smeg
Assistant scannen Sie einfach den QR-Code
Scan de QR-code voor de Handleiding voor Snelle Installatie en Onderhoud
Escanee el código QR para acceder rápidamente al portal My Smeg Assistant
Leia o Código QR para ter acesso rápido ao portal My Smeg Assistant
Skanna QR-koden för att snabbt öppna portalen My Smeg Assistant
Отсканируйтe QR-код для быстрого доступа к порталу My Smeg Assistant
Scan QR-koden for hurtigt at få adgang til portalen My Smeg Assistant
Zeskanuj kod QR, aby uzyskać szybki dostęp do portalu My Smeg Assistant
Skannaa QR-koodi, jonka avulla pääset nopeasti My Smeg Assistant -portaaliin
Skann QR-koden for hurtig tilgang til portalen My Smeg Assistant
امسح رمز الاستجابة السريعة من أجل الوصول سريعًا إلى بوابة My Smeg Assistant
Notes

ll costruttore si riserva di apportare senza preavviso tutte le modiche che riterrà utili al miglioramento dei propri
prodotti. Le illustrazioni e le descrizioni contenute in questo manuale non sono quindi impegnative ed hanno solo
valore indicativo.
The manufacturer reserves the right to make any changes deemed necessary for the improvement of its products
without prior notice. The illustrations and descriptions contained in this manual are therefore not binding and are
merely indicative.
Le fabricant se réserve la faculté d’apporter, sans préavis, toutes les modications qu’il jugera utiles pour l’amélioration
de ses produits. Les illustrations et les descriptions gurant dans ce manuel ne sont pas contraignantes et n’ont
qu’une valeur indicative.
Der Hersteller behält sich vor, ohne vorherige Benachrichtigung alle Änderungen vorzunehmen, die er zur
Verbesserung seiner Produkte für nützlich erachtet. Die in diesem Handbuch enthaltenen Illustrationen und
Beschreibungen sind daher unverbindlich und dienen nur zur Veranschaulichung.
De fabrikant behoudt zich het recht voor zonder waarschuwing alle wijzigingen aan te brengen die hij nodig acht om
zijn producten te verbeteren. De afbeeldingen en de beschrijvingen die aanwezig zijn in deze handleiding zijn niet
bindend, en hebben enkel een aanduidende waarde.
El fabricante se reserva el derecho a aportar sin aviso previo todas las modicaciones que considere útiles para la
mejora de sus propios productos. Las ilustraciones y las descripciones contenidas en este manual no son vinculantes
y tienen solo valor indicativo.
O fabricante reserva-se o direito de efetuar, sem aviso prévio, qualquer modicação que vise o melhoramento dos
respetivos produtos. As ilustrações e descrições contidas neste manual não são, por isso, vinculativas e possuem
apenas valor indicativo.
Tillverkaren förbehåller sig rätten att genomföra alla de ändringar som anses nödvändiga för att förbättra de egna
produkterna utan att meddela detta i förväg. De illustrationer och beskrivningar som nns i aktuell manual är därmed
inte bindande utan endast indikativa.
Для улучшения выпускаемой продукции изготовитель оставляет за собой право вносить без предварительного
предупреждения любые изменения, которые он сочтет целесообразными. Рисунки и описания, содержащиеся
в данном руководстве, не являются обязывающими и носят ознакомительный характер.
Fabrikanten forbeholder sig retten til, uden varsel, at udføre alle de ændringer, der vurderes nyttige for at forbedre
egne produkter. Tegningerne og beskrivelserne i denne manual er derfor kun vejledende og ikke bindende.
Producent zastrzega sobie prawo do nanoszenia, bez uprzedniego powiadomienia, wszelkich zmian, które uzna za
stosowne w celu ulepszania swoich produktów. Rysunki i opisy zawarte w niniejszej instrukcji nie są zobowiązujące
i mają jedynie charakter orientacyjny.
Valmistaja pidättää itsellään oikeuden tehdä ohjeisiin mielestään tarpeellisia muutoksia ilman ennakkoilmoitusta.
Tässä oppaassa olevat kuvat ja piirrokset eivät näin ollen ole sitovia, vaan ne annetaan vain viitteellisessä mielessä.
Produsenten forbeholder seg rett til å foreta endringer på sine produkter grunnet tekniske fremskritt, uten forutgående
varsel. Illustrasjonene og beskrivelsene i denne bruksanvisningen er derfor ikke bindende og skal kun betraktes som
retningsgivende.