
USER MANUAL
EN
MULTI-USE GRILL
MANUEL D’UTILISATION
FR
GRILLE-VIANDE MULTIFONCTION
MANUAL DE USO
ES
GRILL MULTIUSOS
Important information for the user
Informations importantes pour l’utilisateur
Información importante para el usuario
Recommendations / Avertissements / Advertencias
Description / Description / Descripción
Use / Utilisation / Uso
Cleaning and care / Nettoyage et entretien / Limpieza y mantenimiento
Safety instructions / Consignes de sécurité / Advertencia de seguridad
Information / Information / Información
Advice / Conseil / Sugerencia

Dear Customer, Thank you for purchasing one of our appliances. Our products are unique because they combine
iconic style with innovative technical solutions. They match perfectly with other products in our range and work
equally well as a standalone design objects in your kitchen. We hope you enjoy using your new appliance! Best
regards.
Cher client, merci beaucoup pour votre achat. Nos produits sont uniques car ils combinent une forte recherche
esthétique avec une conception technique innovante. Ils sont coordonnés avec d’autres produits de la gamme et
peuvent constituer des éléments d’ameublement et de design. En espérant que vous pourrez apprécier pleinement
votre nouvel appareil électroménager, nous vous adressons nos meilleures salutations.
Estimado cliente, le damos las gracias por su compra. Nuestros productos son únicos porque combinan una notable
búsqueda estética con un diseño técnico innovador. Se combinan con otros productos de la gama y se pueden utilizar
como elementos de decoración y diseño. Le deseamos que pueda apreciar plenamente su nuevo electrodoméstico.
Le enviamos nuestros saludos más cordiales.
SMEG S.p.A.
Model: MGF01
8
11a
11b
12
x2
x1
x1
11
1
6
2
4
5
3
9
10
8
7
B
A
BB
C
D
7
11
3
4
9
5 6 12
2 101
1
2
3
14
15
13
16
17
C
Model: MGF01
E
BF
B
L
BG BBH
B
B
I

1
EN
IMPORTANT SAFEGUARDS
WARNING: If the instructions contained in this manual are
not followed precisely, a re or explosion may result causing
property damage, personal injury or death.
WARNING
Basic safety precautions should always be followed
when using the appliance.
• A short power cord should be provided to minimize
the risk of entanglement.
• Extension cords are available if used with care.
• If an extension cord is used, the marked electrical
rating of the extension cord should be at least as
great as 15A. The extension cord should be a
grounding 3-wire cord. The longer cord should
be arranged so that it does not drape over the
countertop or table top where it can be pulled on by
children or tripped over unintentionally.
READ AND SAVE THESE INSTRUCTIONS
Your safety and the safety of others are very important.
We have provided many important safety messages throughout
this manual and on the appliance.
Read all the instructions before using the appliance and always
obey all safety messages.
RECOGNIZE SAFETY INFORMATION
This is the safety alert symbol. This symbol alerts you to potential
hazards that can result in severe personal injury or death.
UNDERSTAND SIGNAL WORDS
A signal word – DANGER, WARNING, or CAUTION – is used
with the safety alert symbol. DANGER denotes the most serious
hazards. It means you could be killed or seriously injured if you
do not immediately follow the instructions. WARNING means
you could be killed or seriously injured if the instructions are not
followed. CAUTION indicates a potentially hazardous situation,
which, if not avoided, could result in minor to moderate injury.

2
IMPORTANT SAFEGUARDS
WARNING
• This appliance is intended for household use only.
• Use this appliance only for its intended purpose.
The manufacturer cannot be held liable for damage
caused by improper use of this appliance.
• This appliance complies with current safety
regulations. Improper use can result in personal
injury and material damage.
• Read all the instructions before installing or using
the appliance for the rst time.
• Keep these operating instructions in a safe place
and pass them on to any future user.
• Do not use the appliance for other than intended
use.
The safety messages will inform you of potential hazards, on how to
avoid the risk of injury and what can occur if the instructions are not
followed.
IMPORTANT: Observe all codes and ordinances in force.
WARNING: For your safety, the instructions contained in this
manual must be followed to minimize the risk of re or explosion
and to prevent property damage, personal injury or death.
Do not store or use gasoline or other ammable vapors, liquids or
materials near this or any other appliance.
NOTE: This appliance is NOT designed for installation in
manufactured (mobile) homes or in recreational vehicles
(RVs).
DO NOT install this appliance outdoors.

3
EN
IMPORTANT SAFEGUARDS
WARNING
To reduce the risk of re, electrical shock, personal
injury, or damage when using the appliance, follow
basic safety precautions, including the following:
WARNING
Basic safety precautions should always be followed
when using electrical appliances.
• Do not touch hot surfaces. Use handles or knobs.
• To protect against electric shock do not immerse the
appliance, power cord or plug in water or any other
liquid.
• Close supervision is necessary when any appliance
is used by or near children.
• Allow to cool before putting on or taking off parts,
and before cleaning the appliance.
• Do not operate any appliance with a damaged cord
or plug or after the appliance malfunctions, or has
been damaged in any manner. Return appliance
to the nearest authorized service facility for
examination, repair or adjustment.
• The use of accessory attachments not recommended
by the appliance manufacturer may cause injuries.
• Do not let cord hang over edge of table or counter,
or touch hot surfaces.
• Do not place on or near a hot gas or electric burner,
or in a heated oven.
• Extreme caution must be used when moving an
appliance containing hot oil or other hot liquids.

4
IMPORTANT SAFEGUARDS
1 Instructions
This user manual is an integral
part of the appliance and must
therefore be kept in its entirety and
be available to the user throughout
the entire life of the appliance.
1.1 Intended use
• Do not use appliance for
other than intended use.
• This appliance is intended
to be used in household
and similar applications
such as:
-staff kitchen areas in
shops, ofces and other
working environments;
-farm houses;
-by clients in hotels,
motels and other
residential type
environments;
-bed and breakfast type
environment.
Failure to observe the safety
instructions and to read the
instructions for the multiuse grill
may result in improper use of the
appliance and may cause personal
injury.
• Do not use the appliance for
purposes other than those for
which it was designed. Improper
use may result in injury.
• The appliance is not designed for
use with external timers or remote
control systems.
WARNING: Do not install /
use the appliance outdoors.
Use the appliance indoors,
protected from the weather.
1.2 General safety instructions
Follow all safety instructions in
order to use the appliance safely:
• If the supply cord is damaged,
it must be replaced by the
manufacturer, its service agent
or similarly qualied persons in
order to avoid a hazard.
• The appliance and its accessible
parts become very hot during
use. Small children should be kept
away from the appliance. Do not
touch the heating elements while
the appliance is in use.
• Protect your hands by wearing
oven mitts when handling food
inside the grill.
• Never attempt to extinguish a
re or ames with water: Turn off
the appliance and smother the
ames with a re blanket or other
appropriate cover.

5
EN
IMPORTANT SAFEGUARDS
• This appliance is not intended
for use by persons (including
children) with reduced physical,
sensory or mental capabilities,
or lack of experience and
knowledge, unless they have
been given supervision or
instruction concerning use of the
appliance by a person responsible
for their safety. Children should be
supervised to ensure that they do
not play with the appliance.
• Keep children under the age
of 8 away from the appliance
and power cord unless they are
supervised at all times.
• Do not allow unsupervised
children to clean or maintain the
appliance.
• Always monitor the cooking
process. A short cooking process
must be constantly monitored.
• Never leave the appliance
unattended during cooking
operations where fats or oils may
be released, as these may heat
up and catch re.
• Be very careful.
• Do not pour water directly onto
hot plates.
• The appliance and its parts
become very hot during use. Do
not touch the heating elements
while the appliance is in use.
• Do not move the appliance while
it is in use.
• Turn off the appliance immediately
after use.
• Allow the appliance to cool down
after use. Do not touch the internal
plates or heating elements as they
can be very hot. Risk of burning or
scalding!
• Do not put the appliance away
until completely cool.
• Do not use or store ammable
materials near the appliance.
• Do not use aerosols near this
appliance while it is in use.
• Do not modify this appliance.
• Do not attempt to repair this
appliance yourself or without
the assistance of a qualied
technician.
• Do not pull on the cord to unplug
the appliance.
• Use only extension cords that
comply with applicable safety
regulations, are in good condition
and have sufcient cross-
sectional area.

6
IMPORTANT SAFEGUARDS
1.4 Connecting the appliance
Make sure that the power supply
voltage and frequency match those
specied on the data plate on the
bottom of the appliance.
If the plug of the appliance is not
compatible with the power outlet,
contact an authorized service
center for replacement.
• Do not allow children to play with
the appliance.
• Keep the appliance and power
cord out of reach of children.
• Always unplug the appliance
when leaving it unattended and
before assembling, disassembling
or cleaning.
• Always turn off and unplug
the appliance before changing
accessories or approaching
moving parts while the appliance
is in use.
1.3 Caution when using this
appliance
• Do not sit on the appliance.
• Do not use cleaning products
containing chlorine, ammonia
or bleach on parts with metallic
surface nishes (e.g. anodized,
nickel-plated or chrome-plated).
• Do not use steam to clean the
appliance.
• Do not use sprays near the
appliance.
• Do not block ventilation openings
and heat dissipation slots.
• Fire hazard: do not leave anything
inside the appliance.
• Do not use the appliance to heat
rooms for any reason.
• Do not use plastic cookware or
containers when cooking food.
• Do not cook food wrapped in
plastic lm, aluminum or tin foil.
• Do not use the handle to lift or
move the appliance.
• Make sure nothing is stuck in the
seats provided for the plates.
• Use the appliance on a at, stable
surface.
• Avoid spilling liquids on the power
plug and base.
• Disconnect the power supply
before working on the appliance.
SAVE THESE INSTRUCTIONS

7
EN
IMPORTANT SAFEGUARDS
1.5 Manufacturer liability
The manufacturer accepts no
liability for damage to persons or
property caused by:
• Use of the appliance other than
for its intended purpose
• Failure to read the user manual
• Tampering with any part of the
appliance
• Use of non-original spare parts
• Failure to follow the safety
instructions
Please keep this manual in
a safe place. If the appliance
is passed on to others, they
should also receive this
booklet.
These instructions can be
downloaded from the Smeg website
“www.smeg.com”.
1.6 Disposal
Electrical appliances must not be
disposed of together with household
waste.
Products marked with
this symbol are subject
to European Directive
2012/19/EU.
• All waste electrical and electronic
appliances must be disposed
of separately from household
waste and taken to an authorized
waste disposal facility. Correct
disposal of this used appliance
will help protect the environment
and human health. For more
information on how to dispose
of used appliances, please
contact your local authority
waste disposal department or the
store where you purchased the
appliance.
8
Description
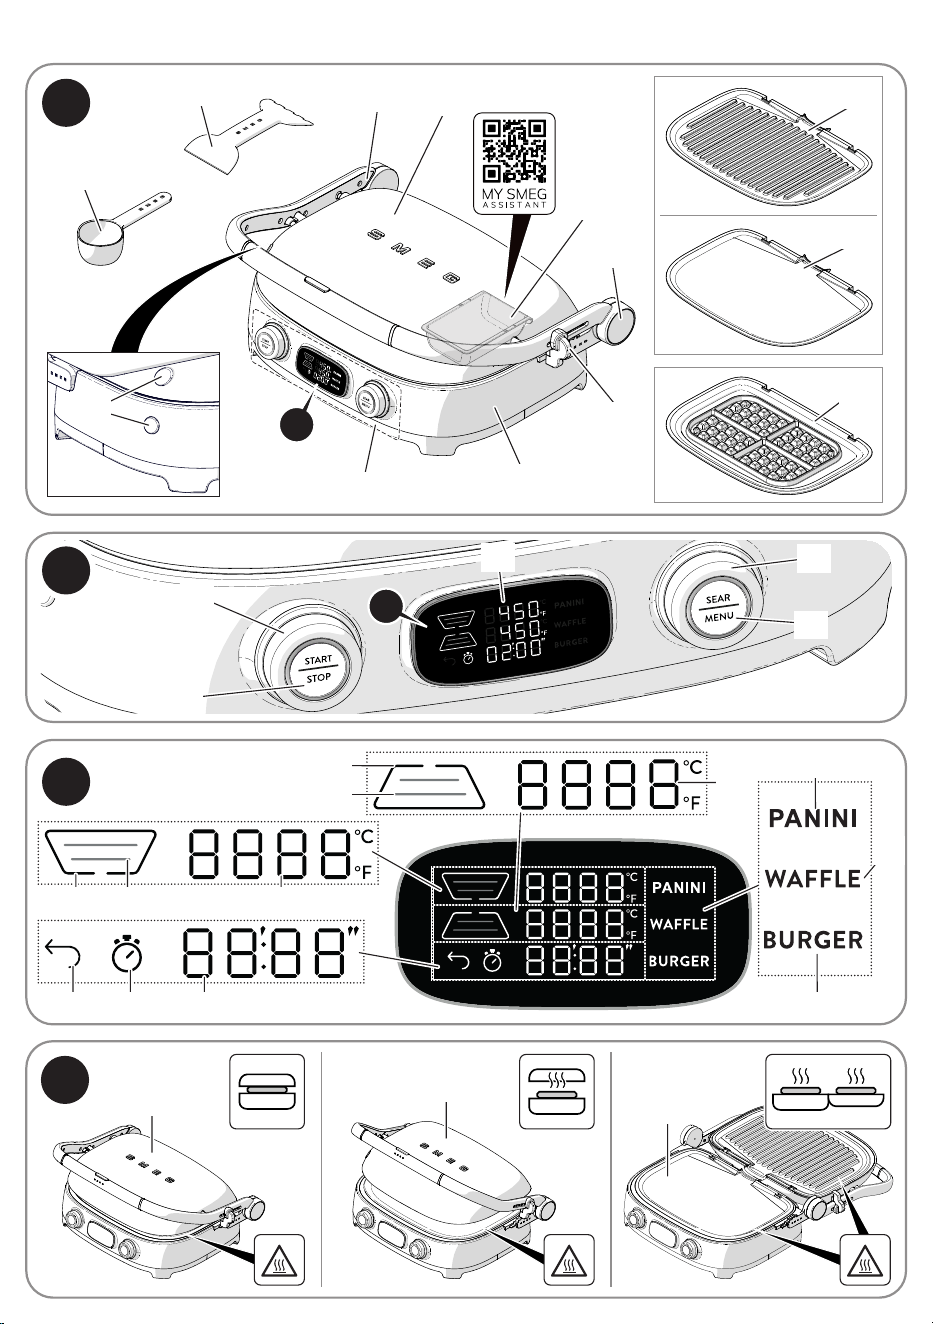
2 Appliance description
(Fig. A)
1) Control panel and display
2) Upper plate housing
3) Lower plate housing
4) Handle
5) Positioning slider
6) Hinge release button
7) Drip tray
8) Plate release buttons
9) Double-sided spatula
10) Dosing cup
11) Grill and griddle plate set
12) Wafe plate set
2.1 Before rst use
Risk of burns
High appliance temperature
• Failure to follow these
instructions may result in re,
burns, or scalds.
The grill is supplied in “LOCK”
mode. Unlock it before use.
• Remove any protective lm from the
outside or inside of the appliance,
including accessories.
• Remove all labels (except for the technical
data plate) from the accessories and
shelves.
• Remove and wash all accessories (see
section “4 Cleaning and maintenance”).
Check that all the parts are intact
before use.
2.2 Description of parts (Fig. A)
Positioning slider (5)
Release mechanism for adjusting the height
of the upper plate.
Hinge release button (6)
Hinge release button for placing the product
in the barbecue conguration.
Drip tray (7)
Removable tray to catch drips and grease
when cooking on the grill.
Plate release buttons (8)
Buttons to press to remove the plates.
2.3 Description of accessories
(Fig. A)
Double-sided spatula (9)
Tool for scraping off food.
Dosing cup (10)
Cup for measuring the wafe batter.
Grill and griddle plate set (11)
Set consisting of a grill plate (11a) and a
griddle plate (11b).
Wafe plate set (12)
Set of 2 wafe plates.
The accessories intended to come
into contact with food are made
of materials that comply with
current legislation.
9
EN
Description
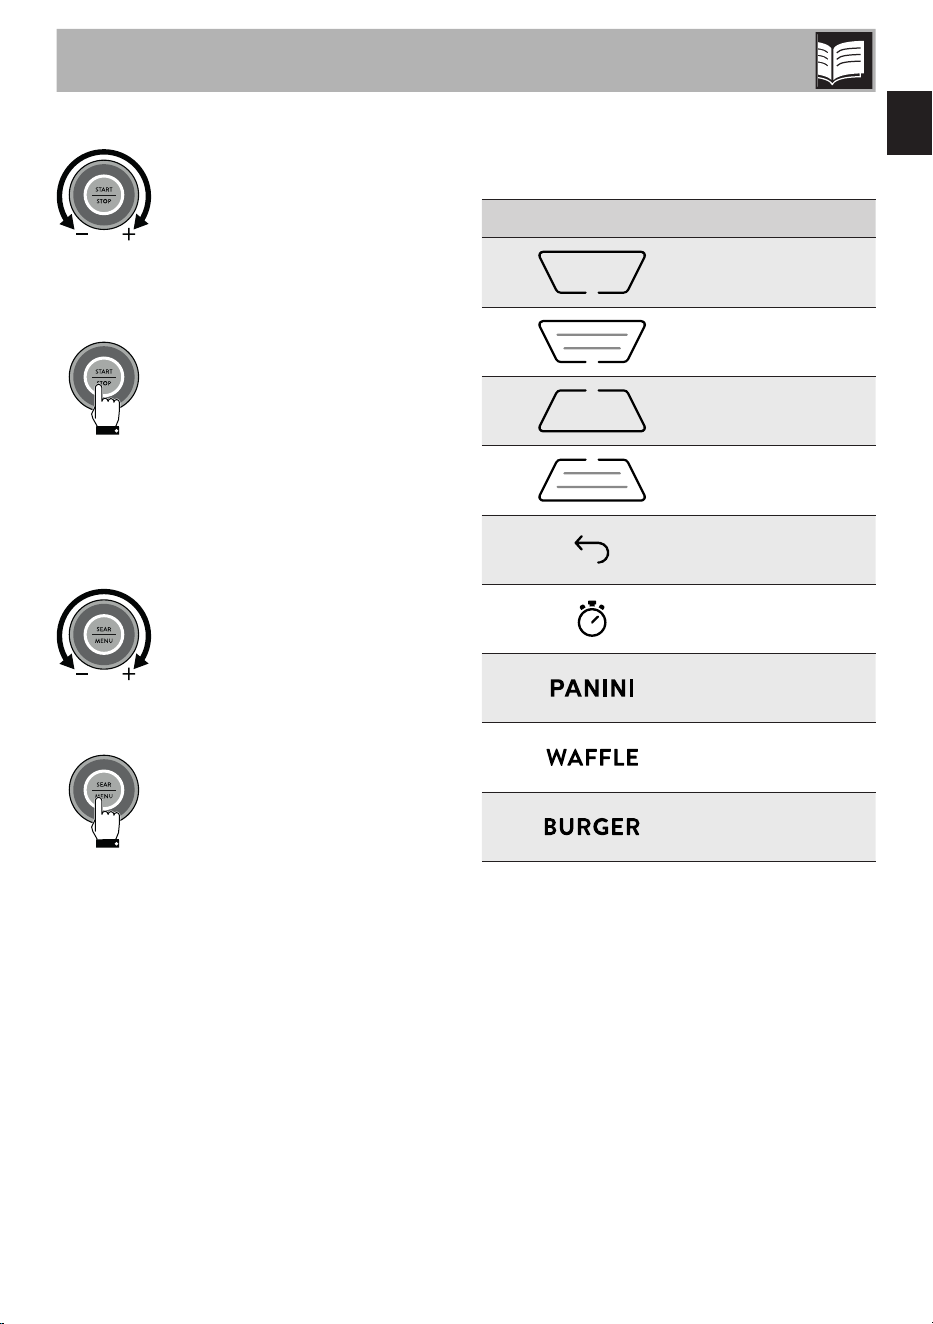
2.4 Description of controls (Fig. B)
Navigation knob (14)
Allows you to select one or both plates, as
well as the timer icon, through the different
menus on the user interface.
START/ STOP button (15)
Allows you to start (short press) or stop
(long press) the cooking process. The
corresponding LED lights up with a steady
light when cooking has started and goes
out when the cooking cycle has nished.
Parameter navigation knob (16)
Allows you to set the time and temperature
values shown on the display.
SEAR/ MENU button (17)
In manual mode, it gives access to the
three preset programs (short press). In
manual mode, press and hold to access
the user settings menu. During preheating
and cooking, it activates the SEAR function
(long press). The corresponding LED lights
up when the SEAR function is active.
Display (18)
The display shows the functions, parameters
and values of the cooking settings.
2.5 Display description (Fig. C)
Display icons
Icon Meaning
1 Upper plate off
2 Upper plate on
3 Lower plate off
4 Lower plate on
5 Back
6 Cooking timer
7 Panini cooking preset
8 Wafe cooking preset
9 Burger cooking preset
Temperature (10)
Displays the cooking temperature of the
upper plate (in °C or °F).
Temperature (11)
Displays the cooking temperature of the
lower plate (in °C or °F).
Timer (12)
Displays the cooking time set on the timer.
10
Use
3 Use
3.1 First use
• Heat the grill with empty plates at
maximum temperature to remove any
manufacturing residue.
• When used for the rst time, the
appliance may emit an unpleasant odor
during heating due to manufacturing
residue on some components. This odor
usually disappears after the appliance
has been heated for the rst time.
Using the accessories
Caution
Do not use the appliance without
the cooking plates.
Clean the supplied plates and
accessories (including the
measuring cup and spatula)
before rst use to remove any
manufacturing residue.
The plates are interchangeable and they
have integrated heating elements that
optimize heat transfer.
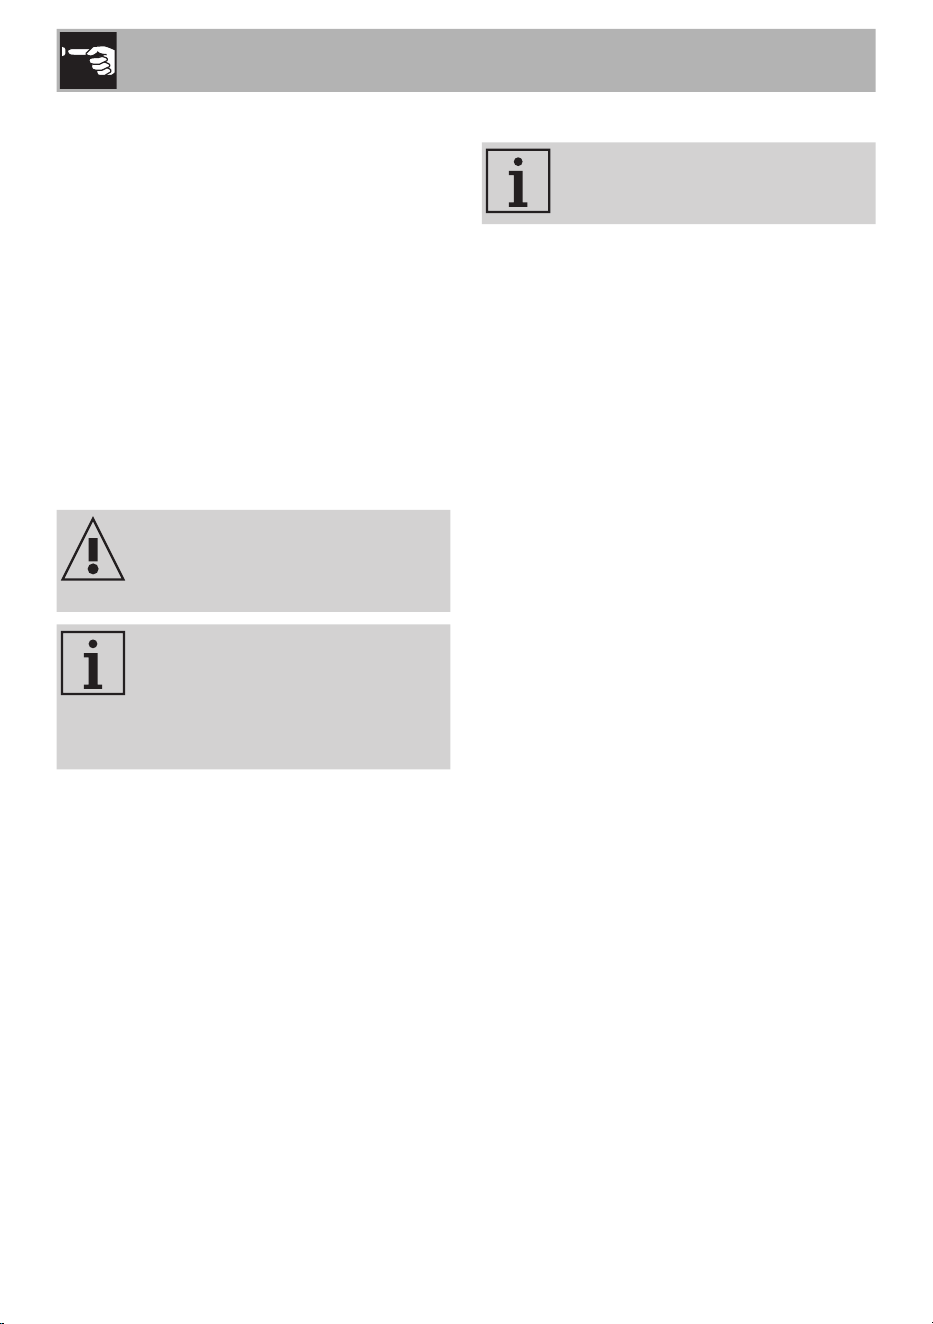
Cooking modes (Fig. D)
To use the grill, you must set it to
the required cooking mode.
Contact mode (1)
• Contact mode is ideal for cooking
hamburgers or grilling vegetables. It is
perfect for quickly preparing food.
• The upper plate, once released from
the handle, adjusts to the thickness and
shape of the food (oating hinge).
Oven mode (2)
• Oven mode is ideal for cooking delicate
foods such as sh or meat llets, or
foods that should not be pressed during
cooking. It can also be used to heat food.
• The upper plate remains raised compared
to the lower plate and can be adjusted
to 5 different heights depending on the
thickness of the food. This allows the
upper plate to just touch the food without
crushing it.
BBQ mode (3)
• Allows you to cook different foods without
mixing them.
• The open position doubles the cooking
surface of the grill.

11
EN
Use
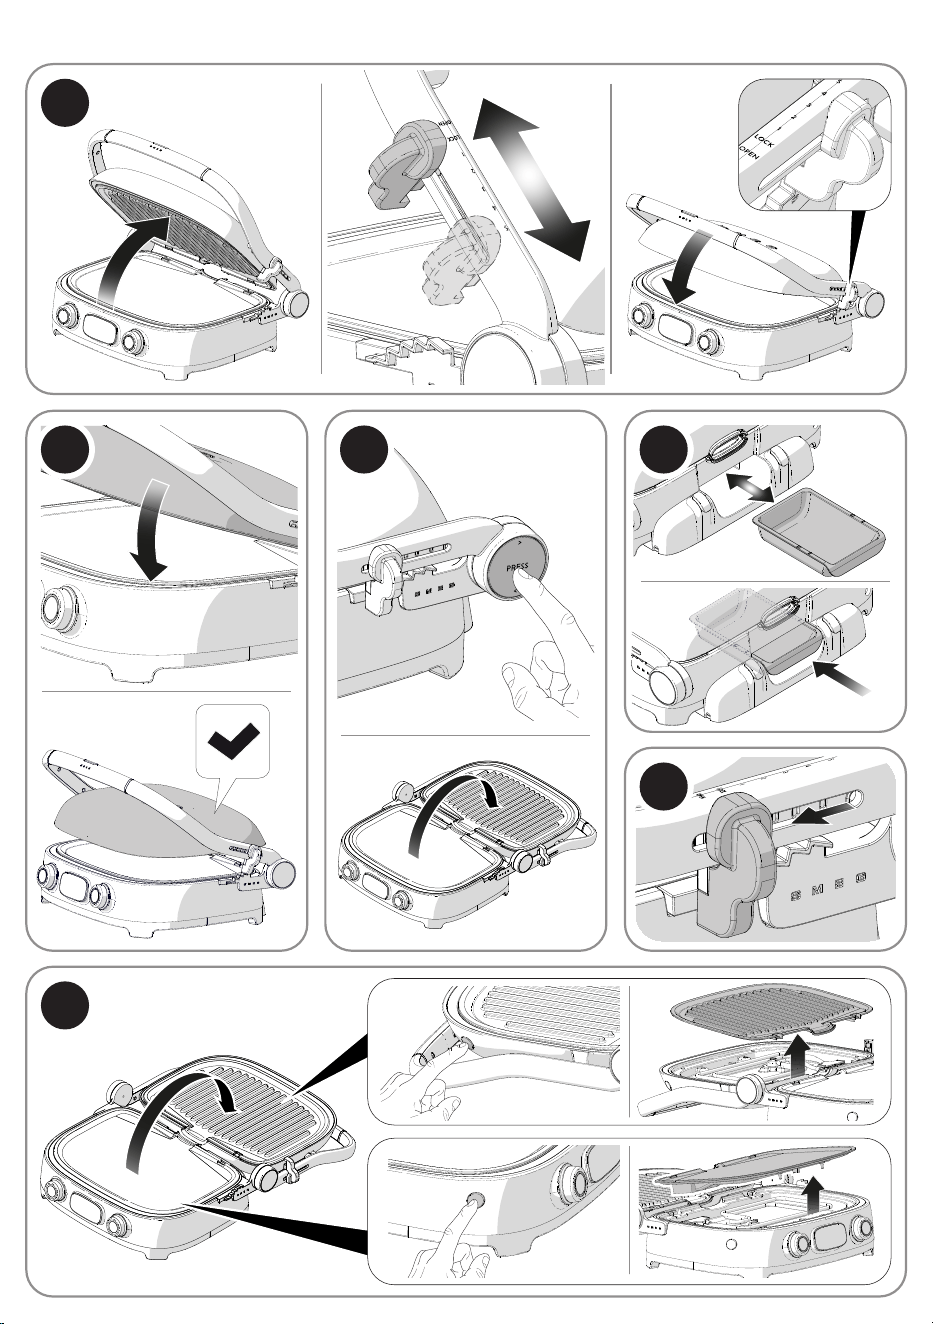
3.2 Using the grill
Height adjustment (Fig. E)
Lift the handle to move the positioning slider
and adjust the height.
Releasing the upper housing from the
handle (Fig. F)
The upper housing is attached to the handle.
To release it, tilt it down by hand so that it
lowers by gravity and is parallel to the lower
plate.
Releasing the handle for barbecue mode
(Fig. G)
Press the PRESS button on the side to open
the grill 180°, guiding the upper plate as it
opens.
Handle lock (Fig. I)
After using the appliance, set the positioning
slider to “LOCK” to prevent opening.
Releasing the plates (Fig. L)
Caution
Do not remove or replace the
plates until the appliance is
completely cool.
Lay the appliance at. Press the release
buttons on the housings to remove the
plates.
3.3 Preheating
Cooking always begins with a
preheating phase to allow the
appliance to reach the set cooking
temperature.
During preheating, the display shows
PrEH
alternating with the set
temperature until the preheating is nished.
For example, if the temperature is set at
450°F, the display will alternate between
450°F and
PrEH
for both plates (upper
and lower, if set).
When preheating is complete, the grill will
beep, the PREH indicator will disappear and
the timer will start blinking, if it is set. Place
your food on the plates and press START to
begin the timer countdown.
Carry out the Preheating phase
with the grill in contact mode to
reduce heat dispersion.
12
Use
3.4 Manual mode
Setting the cooking temperature
To start using the grill, you can set a different
temperature for each plate.
The values can be set between 150°F and
450°F.
1) Turn the left knob to select the symbol
corresponding to the parameter you
wish to modify on the upper and/or
lower plate.
2) Turn the right knob to increase or
decrease the temperature.
3) Press the START/STOP button to begin
cooking.
If either plate is off or no temperature has
been set, the plate icon will disappear and
OFF
will be displayed.
Setting the timer
The timer can also be set:
1) Turn the left knob to select the timer
icon.
2) Turn the right knob to set the time in
minutes and seconds.
3) Press the START/STOP button to
conrm.
You can increase or decrease
the set time at any time during
cooking.
At the end of the preheating
phase
PrEH
, if the timer was
set before cooking, the left knob
and the timer on the display
ash to indicate that double
conrmation is required on order
to start the countdown.
If no timer is selected, the product
will turn off automatically after
60 minutes.
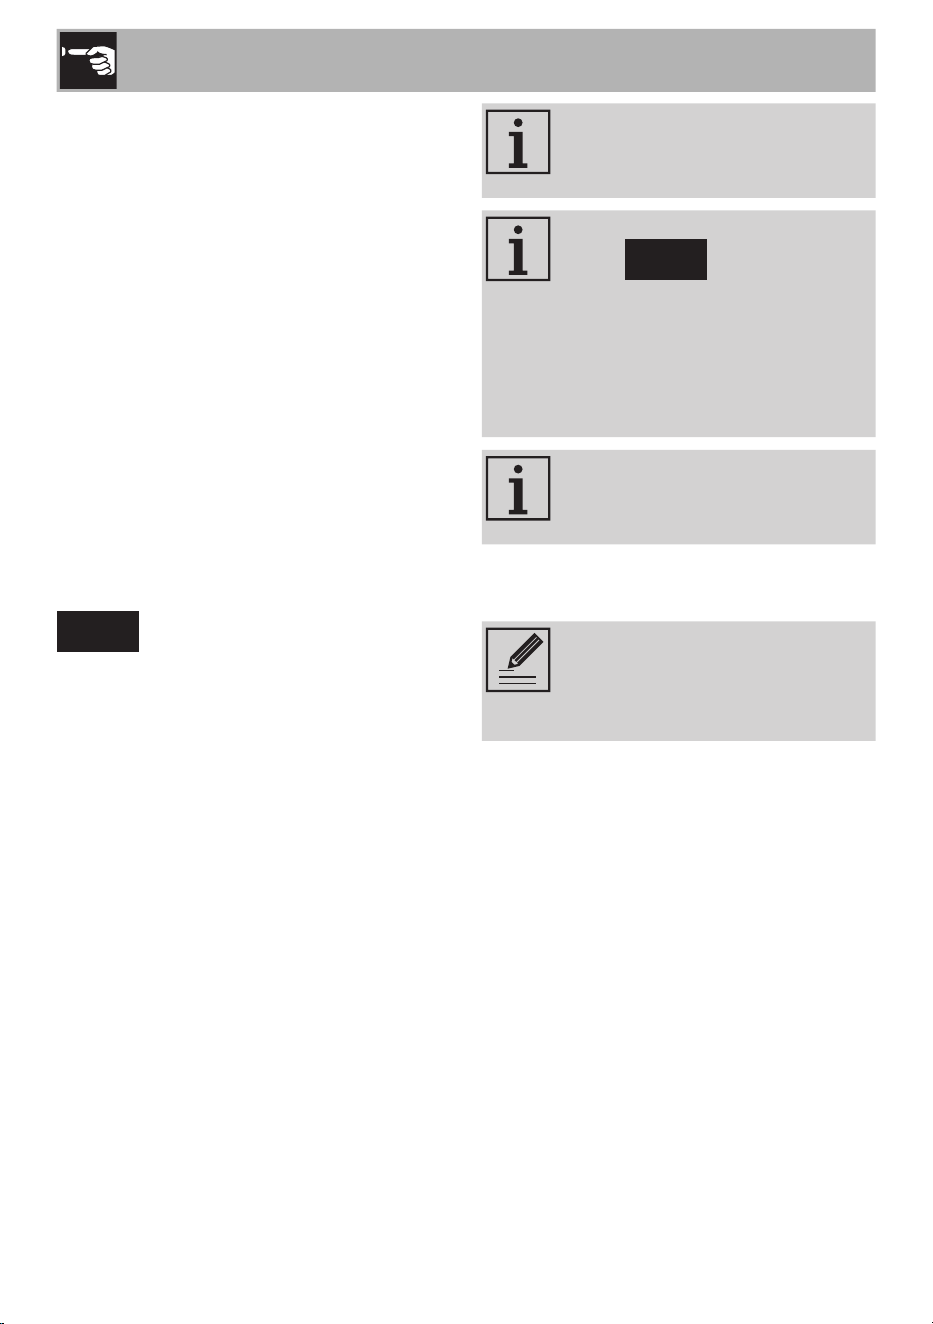
3.5 Preset mode
To enter preset mode, make sure
you are in manual mode and
press and release the SEAR/
MENU button.
Selecting the preset mode
To start using the grill, you can select a
cooking preset.
Each preset consists of a xed upper and
lower plate temperature.
Before starting the function:
1) Turn the left knob to select the icon
corresponding to the required preset
mode.
2) Press the START/STOP button to start
the function.
13
EN
Use
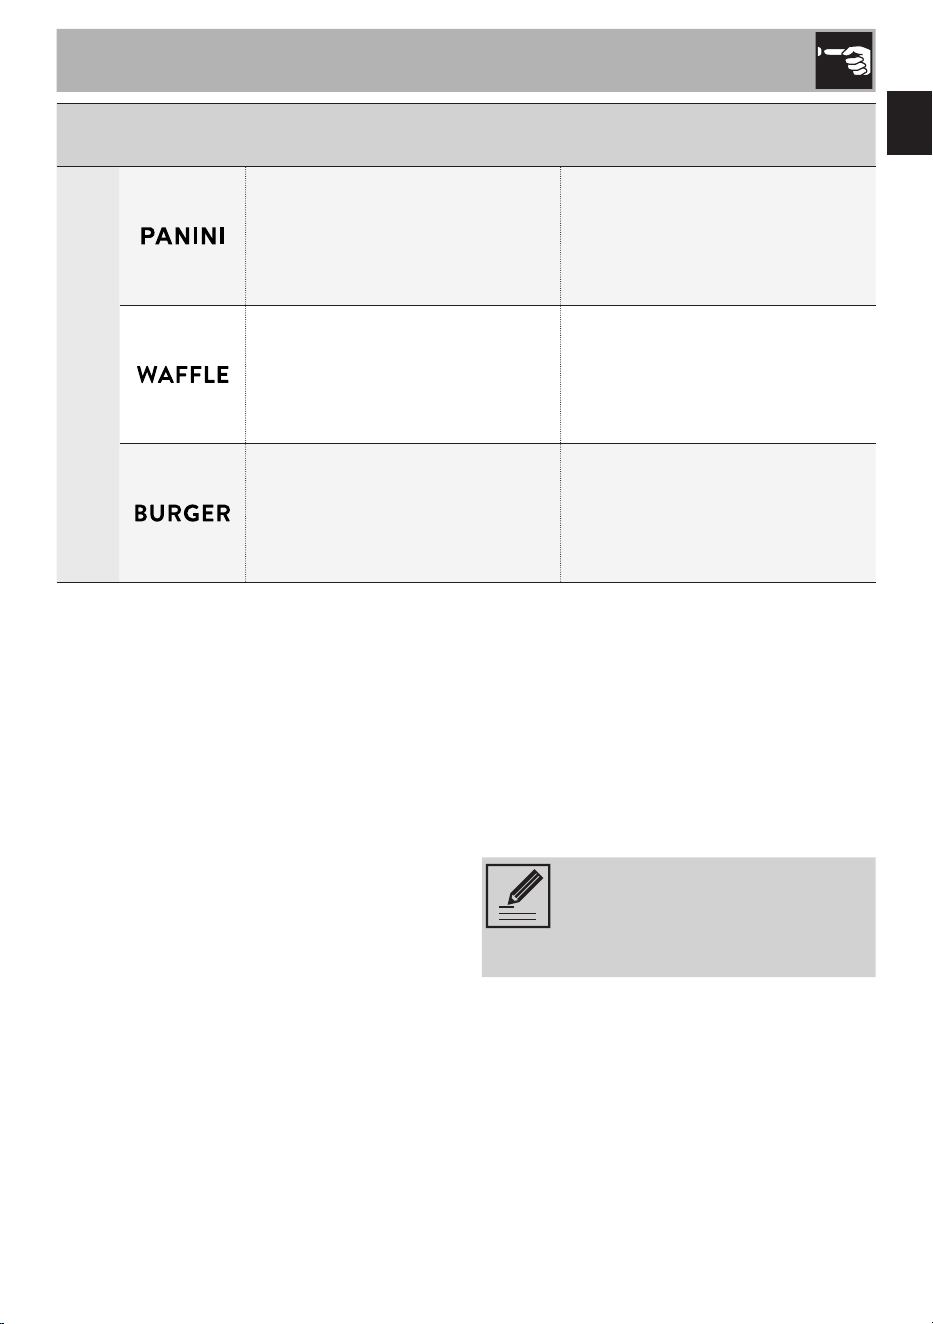
Preset Upper plate temperature Lower plate temperature
Panini
400°F 450°F
Wafe*
350°F 350°F
Burger
450°F 450°F
* For this particular preset, you must use the 2 special wafe plates provided.
Customizing existing presets
You can modify the parameters of existing
presets and create custom settings for
future use.
1) Select the preset you wish to edit.
2) Press and hold the SEAR/MENU button
to enter edit mode.
3) Turn the left knob to navigate through
the parameters and rotate the right
knob to set the values.
4) Press and hold the SEAR/MENU button
to save the new settings.
To restore the default values, make
sure you are in manual mode and
press and hold the START/STOP
button for 10 seconds.

14
Use
3.6 SEAR function
The SEAR mode is designed to seal food,
especially meat, by heating the plates to
the maximum temperature allowed by the
heating elements for a limited period of time.
To activate the SEAR function, press
and hold the SEAR/MENU button during
preheating or cooking.
• This function is only available
during preheating or cooking
when a temperature of at least
400°F is set.
• This function can be used once
every 30 minutes.
• It is recommended that you
activate this function during
the preheating phase.
During the preheating phase, the display
alternates between
SEAR
and
PrEH.
.
When the plates reach the maximum
allowed temperature, the appliance will
beep, and
SEAR
will appear steadily on
the display. The countdown for the function
will then start.
Once the function ends, the temperature of
each plate is then automatically reduces to
the set temperature.
3.7 Settings Menu
To access the User Settings menu in manual
mode:
1) Press and hold the SEAR/MENU button.
2) Turn the left knob to scroll through the
menu items.
3) Turn the right knob to set the required
value and press the SEAR/MENU
button to conrm.
unit
Setting the units of measurement
Sets the unit of temperature measurement
in Celsius (°C) or Fahrenheit (°F).
Snd
Sound
Enables (On) or disables (OFF) the sounds
emitted by the grill.
15
EN
Use
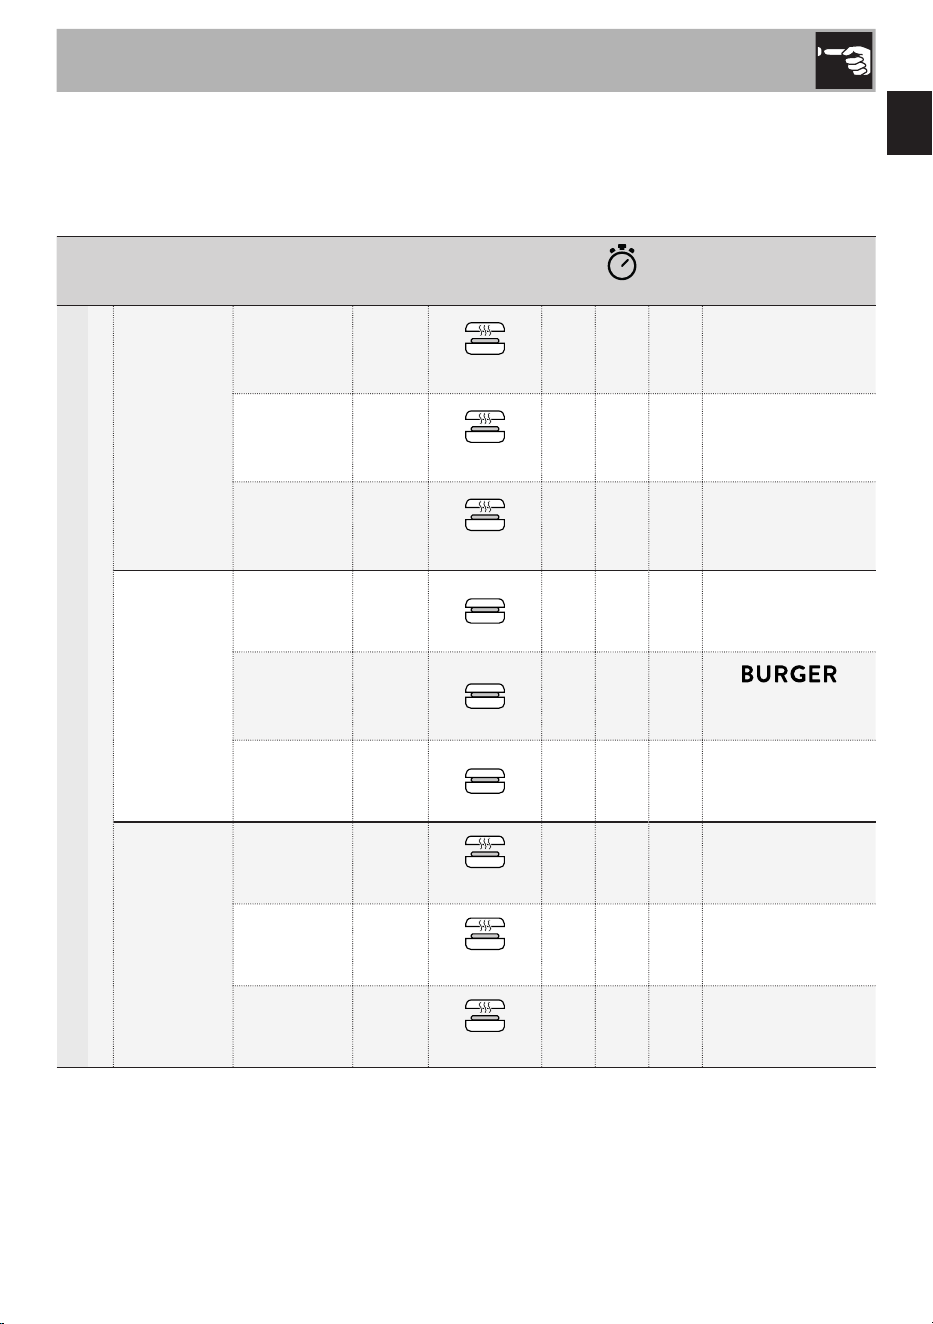
3.8 Cooking table
Cooking times provided are approximate and may vary based on the quality, thickness, and
nature of the food.
Type Cut Cooking level Quantity
Opening
Method
°F
(min)
SEAR Tips
Meat
Beef
Fillet
Rare
(50°)
3 / 4
STEP 2
450 5
Thickness: 3 cm
Turn half way
through cooking
Medium
(60°)
3 / 4
STEP 2
450 7
Thickness: 3 cm
Turn half way
through cooking
Well done
(70°)
3 / 4
STEP 2
450 10
Thickness: 3 cm
Turn half way
through cooking
Hamburger
Rare 4 450 1 X ~ 140 g each
Medium 4 - - X
You can use the
HAMBURGER preset
Well done 4 450 4 X ~ 140 g each
New York
Steak
Rare
(50°)
2 / 3
STEP 1
450 3
Thickness: 2 cm
Turn half way
through cooking
Medium
(60°)
2 / 3
STEP 1
450 5
Thickness: 2 cm
Turn half way
through cooking
Well done
(70°)
2 / 3
STEP 1
450 7
Thickness: 2 cm
Turn half way
through cooking

16
Use
Type Cut Cooking level Quantity
Opening
Method
°F
(min)
SEAR Tips
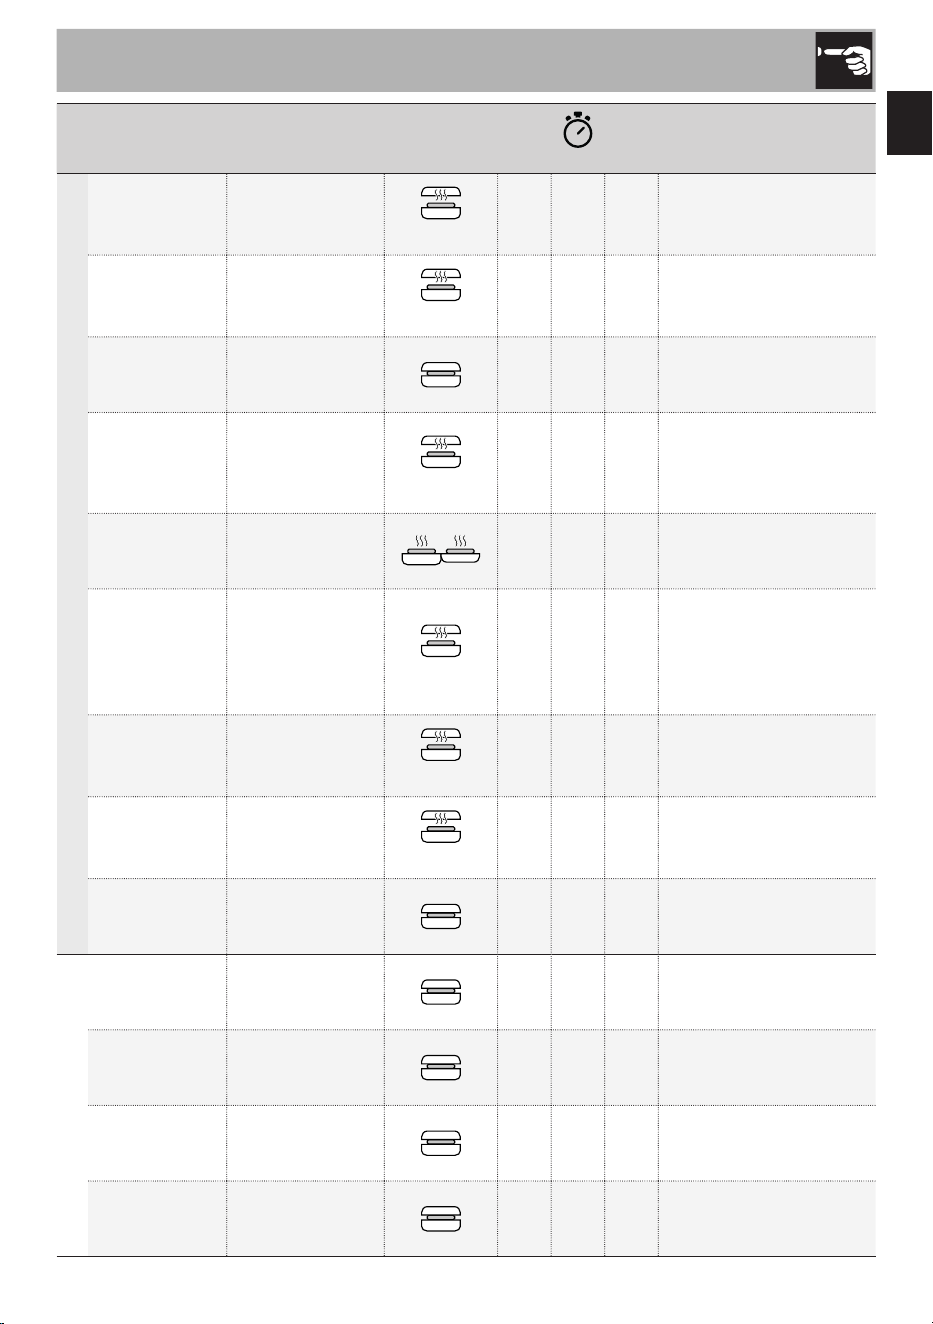
Meat
Pork
Bacon Well done 6 450 5 X -
Sausages Well done 6
STEP 2
400 18 X
140 g sausage,
approx. 3cm ø
Sausages Well done 12 450 30 X
140 g sausage,
approx. 3cm ø
Chop Well done 2 / 3
STEP 1
375 5
Thickness: 3 cm
Pork neck Well done 2 / 3 400 4
Thickness: 2.5 cm
Wurstel Well done 9 - 12 400 8 X 80 g each
Chicken and turkey
Buttery
chicken breast
Well done
4 from
a 325 g
breast
STEP 1
450 5 X
Upper plate just
touching the food
Fillets Well done 10 - 14
STEP 1
450 5 X
Upper plate just
touching the food
Chicken
legs
Well done
Up to 10
legs
STEP 3
400 40 X
Upper plate just
touching the food,
turn the product half
way through cooking
Chicken
wings
Well done
Up to 20
wings
STEP 2
400 30 X
Upper plate just
touching the food,
turn the product half
way through cooking
Deviled
chicken
Well done 1 - 2
STEP 1
450 20 X
600 g each
Turn halfway
through cooking
Chicken
skewers
Well done 4 - 10
STEP 1
450 14 X
Turn several times
during cooking
17
EN
Use
Type Quantity
Opening
Method
°F
(min)
SEAR Tips
Fish
Salmon llet 2
STEP 2
450 5 X
Upper plate in
contact with food
Fish cutlets 2 / 3
STEP 1
400 8 X
Turn half way
through cooking
Octopus Precooked 450 8 X
Turn half way
through cooking
Prawns
(shelled tails)
20
STEP 1
450 3 X
The upper plate must
not touch the product,
if desired, turn half way
through cooking
Scallops 24 - 18 450 6 X -
Sea bream/
sea bass
2 whole
STEP 3
400 15 X
300/400 g each
Turn half way
through cooking
Upper plate in contact
with the food
Sea bream/
sea bass llet
4 llets
STEP 1
450 3 X
80/100 g each
Upper plate just
touching the food
Tuna llet 4
STEP 2
450 3 X -
Fish skewers 4 - 10 450 12 X
Turn several times
during cooking
Vegetables
Zucchini 10 - 14 slices 400 8 X
Thickness: 1 cm
Turn half way
through cooking
Peppers 10 slices 400 10 X
Turn half way
through cooking
Eggplant 8 - 12 slices 400 8 X
Thickness: 1 cm
Turn half way
through cooking
Mushrooms
Variable weight
depending
on the type
450 13 X
Turn half way
through cooking
18
Use
Type Quantity
Opening
Method
°F
(min)
SEAR Tips
Vegetables
Sliced potatoes 12 - 16 slices 325 18 X
Thickness: 1 cm
Turn half way
through cooking
Whole sliced
onion
12 - 16 slices 400 10 X
Thickness: 1 cm
Turn half way
through cooking
Sliced onion 1 - 3 onions 400 8 X
Stir regularly
during cooking
Vegetarian
hamburger
4 - 6 450 5 X 100 g each
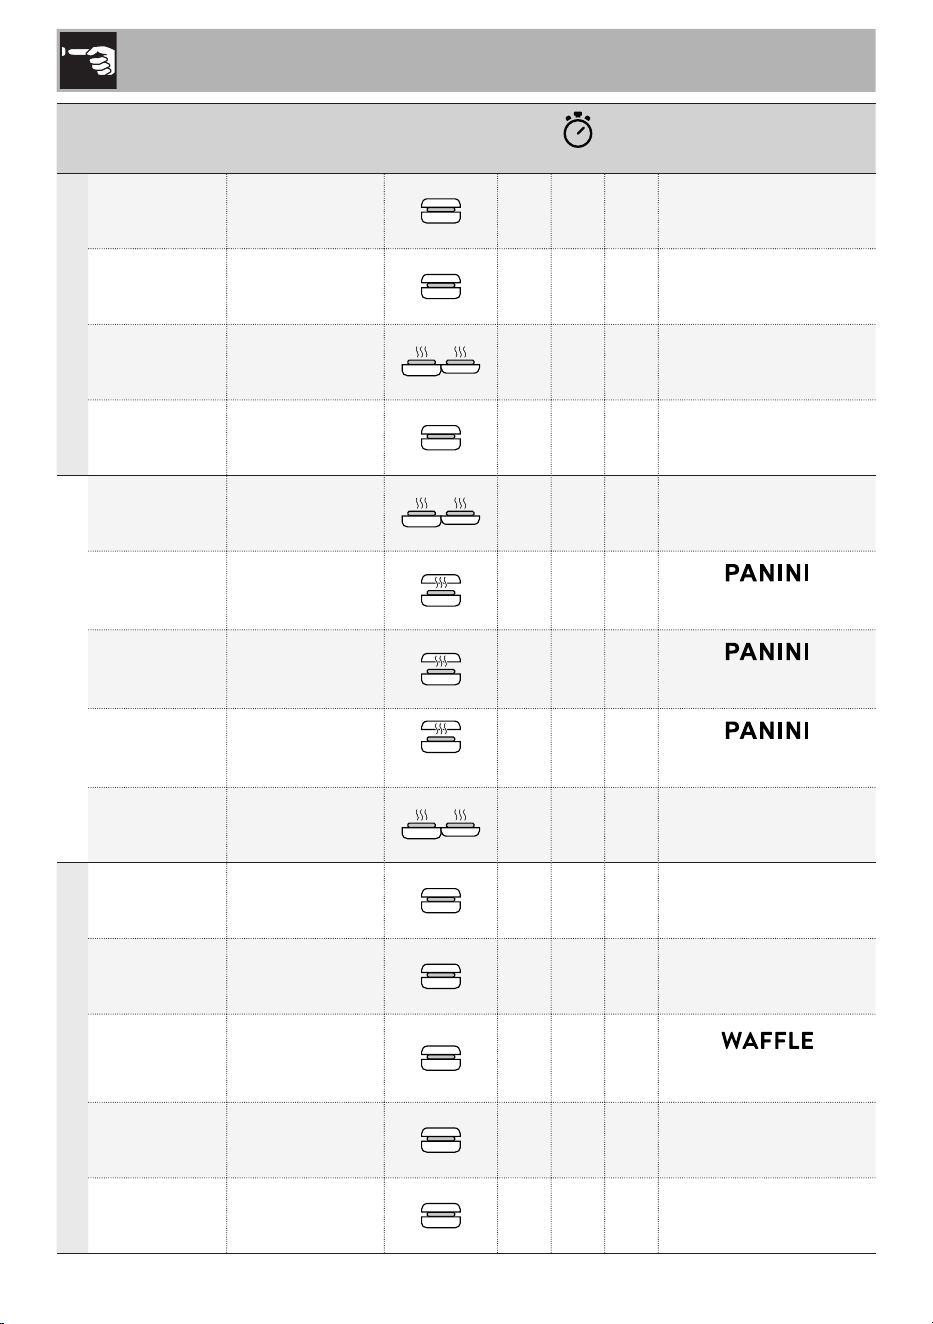
Bread and eggs
French toast 2 - 3 400 8 X -
Stuffed
sandwich
2 - - X
You can use the
PANINI preset
Focaccia 2 - - X
You can use the
PANINI preset
Fresh bread 2 - 4 slices
STEP 1
- - X
You can use the
PANINI preset
Bullseye eggs 1 - 4 450 2 X -
Dessert
Caramelized
pineapple
3 / 4 450 6
Turn half way
through cooking
Pineapple 3 / 4 450 8
Turn half way
through cooking
Wafe 4 - - X
You can use the
WAFFLE preset
Cocoa wafe 4 180 8 X
Use the wafe
plates provided
Protein wafes 4 180 7 X
Use the wafe
plates provided
19
EN
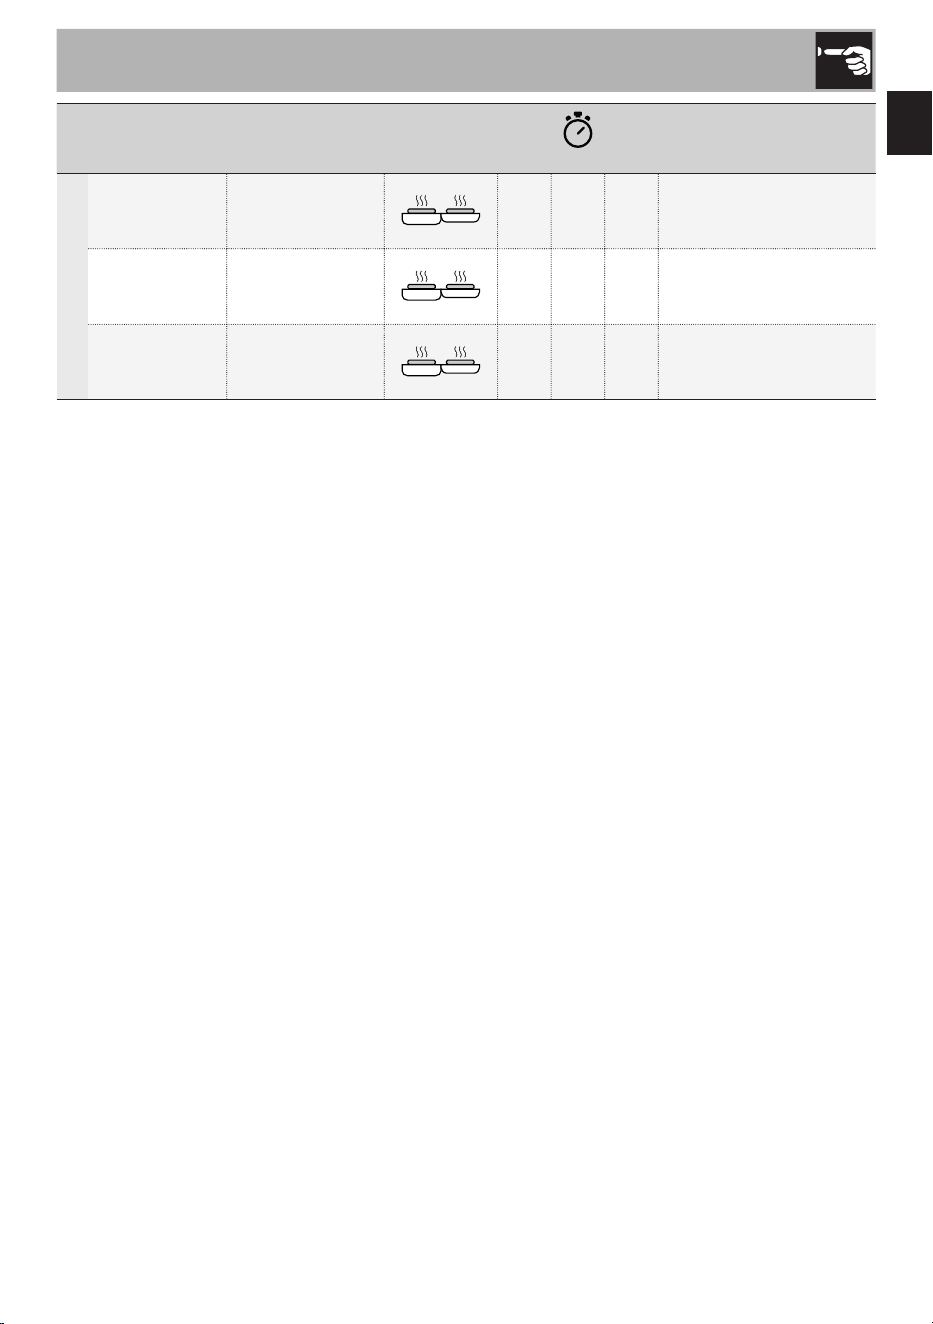
Use
Type Quantity
Opening
Method
°F
(min)
SEAR Tips
Dessert
Pancakes 4 - 6 400 3 X -
Banana
pancakes
4 - 6 400 8 X -
Protein
pancakes
4 - 6 400 7 X -
WAFFLES
Ingredients for about 12 wafes:
• 300 g our
• 300 ml whole milk
• 2 eggs
• 1 vanilla pod
• 75 g sugar
• 100 g butter
• 2 pinches of salt
• 10 g of yeast
Procedure:
1) Melt the butter.
2) Place all the ingredients in a large jug.
3) With the help of an immersion blender,
mix well until the mixture is smooth.
4) Let it sit for at least 30 minutes.
5) With the help of the measuring cup
(1 measuring cup = 2 wafes), pour the
mixture onto the plate and cook for the
time shown on the cooking timetable.
COCOA WAFFLES
Ingredients for about 8 wafes:
• 180 g 00 our
• 100 g sugar
• 20 g cocoa powder
• 12 g baking powder
• 3 g salt
• 240 g whole milk
• 2 eggs
• 60 g butter
Procedure:
1) Melt the butter.
2) Place all the ingredients in a large jug.
3) With the help of an immersion blender,
mix well until the mixture is smooth.
4) Let it sit for at least 30 minutes.
5) With the help of the measuring cup,
pour the mixture onto the plate and
cook for the time shown on the cooking
timetable.

20
Use
PANCAKES
Ingredients for about 12 pancakes:
• 290 g 00 our
• 60 g sugar
• 16 g baking powder
• A pinch of baking soda
• 2 pinches of salt
• 440 ml milk
• 60 g melted butter
• 1 medium egg
• 1/2 vanilla pod
Procedure:
1) Melt the butter.
2) Place all the ingredients in a large jug.
3) With the help of an immersion blender,
mix well until the mixture is smooth.
4) Let it sit for at least 30 minutes.
5) Pour the mixture onto the plate and
cook for the time shown on the cooking
timetable.
PROTEIN PANCAKES
Ingredients for about 12 pancakes:
• 60 g 00 our
• 2 large eggs
• 1 tsp vanilla extract
• 70 g sugar
• 120 g natural Greek yogurt
• 40 g whey protein powder (neutral or
vanilla avor)
• 16 g baking powder
• 1 tsp baking soda
Procedure:
1) Place all the ingredients in a large jug.
2) With the help of an immersion blender,
mix well until the mixture is smooth.
3) Let it sit for at least 30 minutes.
4) Pour the mixture onto the plate and
cook for the time shown on the cooking
timetable.

21
EN
Cleaning and maintenance
4 Cleaning and maintenance
This manual contains cleaning
and maintenance instructions and
recommendations from the manufacturer
to the customer. All other work should be
carried out by an authorized service center.
Caution
• Do not use steam to clean the
appliance.
• Do not use cleaning products
containing chlorine, ammonia,
bleach or alcohol on steel parts
or parts with metallic surface
nishes.
• Do not use abrasive or strong
detergents (e.g. powder
products, stain removers or
metal scourers).
• Do not use rough or abrasive
materials or sharp metal
scrapers.
• Clean components and
accessories regularly after use.
WARNING: Always unplug
the appliance and allow it to
cool before cleaning. To keep the
surfaces in good condition, clean
them regularly after use.
Normal daily cleaning
Always use specic products that do not
contain abrasives or chlorine-based acids.
Pour the product onto a damp cloth and
wipe the surface, rinse thoroughly and dry
with a soft cloth or microber cloth.
Food stains or residue
Do not use steel sponges or sharp scrapers,
as they will damage the surface.
We recommend that you use the
spatula to remove any residues.
Use ordinary non-abrasive products and a
wooden or plastic tool if necessary. Rinse
thoroughly and dry with a soft cloth or a
microber cloth.
Do not allow residues of sugary foods (such
as jam) to set in the appliance. If left too
long, they will harden and can damage the
enamel lining of the appliance.
Cleaning the accessories
The cooking plates are dishwasher-
safe, but repeated use may cause slight
discoloration. This discoloration is purely
cosmetic and does not affect performance.
It is recommended to clean the exterior
of the plates using a soft sponge or cloth
moistened with water and a mild detergent.
Avoid using metal tools to clean as they
may damage the surfaces.
It is recommended to wash the spatula and
measuring cup by hand.
Removing the drip tray (Fig. H)
Check the drip tray frequently
during cooking.
The tray is removable for easy cleaning and
it is recommendend to wash it by hand.
Dispose of collected grease properly.

22
Cleaning and maintenance
Problem Possible cause Solution
The multipurpose grill does
not turn on.
The plug is not properly
inserted into the outlet.
Make sure the plug is
properly inserted into the
outlet.
The power cord is defective.
Contact your local service
center.
No power.
Make sure the power supply
is working properly. If the
problem persists, contact a
qualied electrician.
The display does not turn
on.
The plug is not properly
inserted into the outlet.
Make sure the plug is
properly inserted into the
outlet.
Possible electronic board
failure.
Contact your local service
center.
Cooking does not start
Failure to conrm after
preheating
Make sure that you conrm
the cooking phase when the
preheating stage ends (see
section...).
The heating element may be
faulty.
Contact your local technical
support centre.
Cooking has started but the
grill does not heat up.
The heating element may be
defective.
Contact your local service
center.

23
EN
What to do if...
Problem Possible cause Solution
There is a burning smell
when the multiuse grill is in
operation.
There may be a burning
smell the rst time you use
the appliance.
Make sure you have
followed the instructions
when using the appliance
for the rst time.
Possible food residue inside
the appliance in contact
with the heating elements.
Be sure to follow the
cleaning and maintenance
instructions (see
section “4 Cleaning and
maintenance”).
The SEAR function is not
activated
The selected temperature is
lower than required.
Make sure you have set
a temperature equal to
or higher than 400°F to
activate the function (see
section “3.6 SEAR function”).
The time elapsed since the
last activation is not long
enough.
Make sure that at least half
an hour has elapsed since
the last use of the function
(see section “3.6 SEAR
function”).
The SEAR function
deactivates after some
time.
It’s normal.
The SEAR function is
designed to remain active
for the time necessary
to ensure an excellent
seal. It remains active for
30 seconds, then
deactivates automatically
and the temperature will
return to the previously set
one.

24
What to do if...
Problem Possible cause Solution
The “Wafe” preset does
not appear on the display
The product is in BBQ mode.
Make sure the product is
closed when you want to
select the preset.
The countdown does not
start
No conrmation after
preheating when a timer is
set to manual mode.
Make sure you have
conrmed the countdown
after preheating (see section
“Setting the timer”).
The display shows one of
the following error codes:
Err 1
Err 2
Err 3
Err 4
-
Contact your local service
center.
If the problem persists, or there are other faults, contact your local service center.

Scan the QR code for quick access to the My Smeg Assistant portal
Scannez le code QR pour un accès rapide au portail My Smeg Assistant
Escanee el código QR para acceder rápidamente al portal My Smeg Assistant
Notes

The manufacturer reserves the right to make any changes deemed necessary for the improvement of its products
without prior notice. The illustrations and descriptions contained in this manual are therefore not binding and are
merely indicative.
Le fabricant se réserve la faculté d’apporter, sans préavis, toutes les modications qu’il jugera utiles pour l’amélioration
de ses produits. Les illustrations et les descriptions gurant dans ce manuel ne sont pas contraignantes et n’ont
qu’une valeur indicative.
El fabricante se reserva el derecho a aportar sin aviso previo todas las modicaciones que considere útiles para la
mejora de sus propios productos. Las ilustraciones y las descripciones contenidas en este manual no son vinculantes
y tienen solo valor indicativo.
