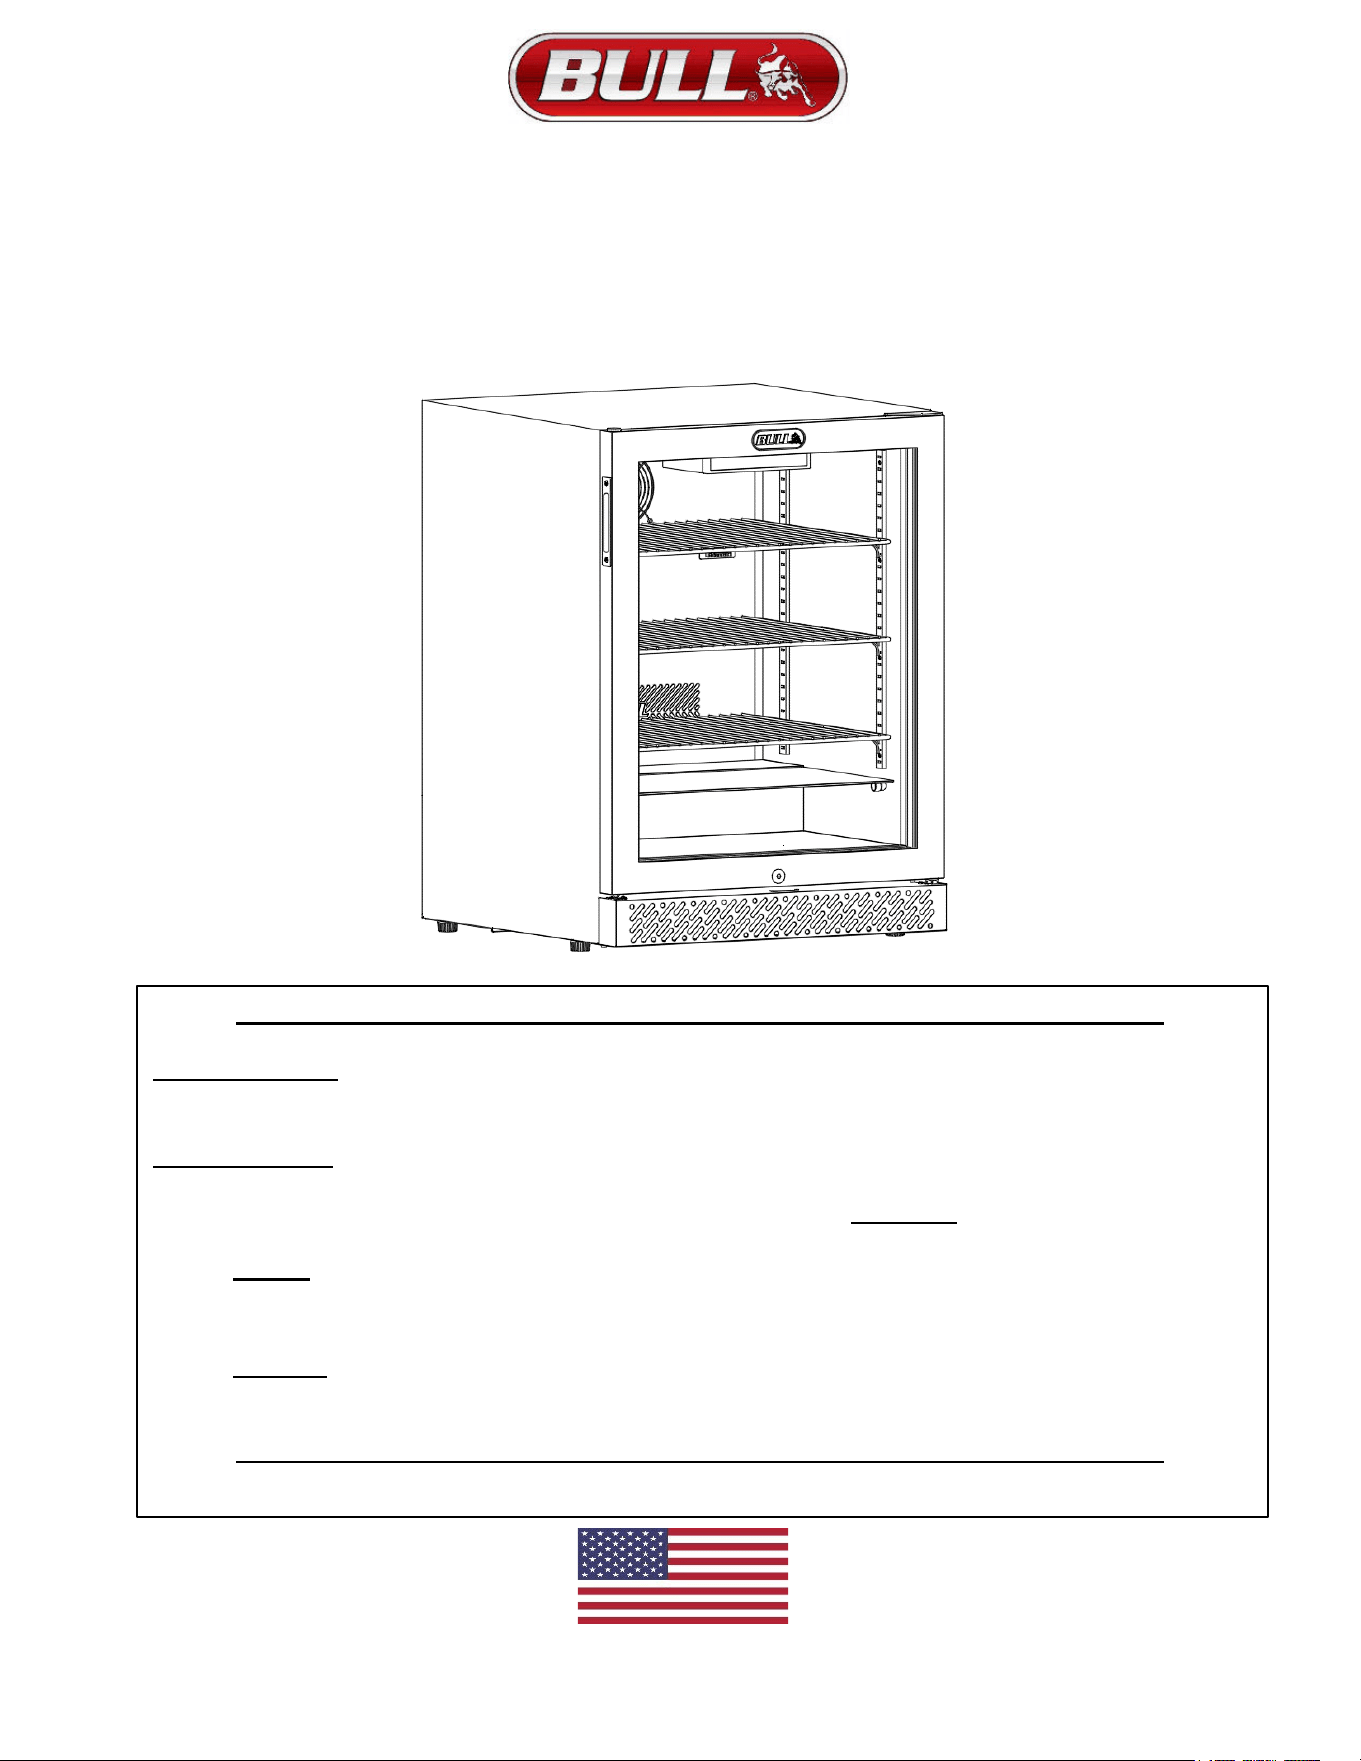
PREMIUM OUTDOOR
RATED REFRIGERATOR SERIES II
WITH GLASS DOOR
OWNER’S MANUAL
ITEM NO.13100
USA EDITION
1
READ AND RETAIN THIS OWNER’S MANUAL FOR FUTURE REFERENCE.
BEFORE USING
PLEASE READ AND FOLLOW ALL THE SAFETY RULES AND OPERATING INSTRUCTIONS.
PLEASE NOTE, YOUR GLASS DOOR REFRIGERATOR IS BUILT TO THE HIGHEST
STANDARDS, BUT EXCESSIVE HEAT AND SUNLIGHT WILL AFFECT OPERATING EFFICIENCY
AND PRODUCT LIFESPAN. THESE PRECAUTIONS SHOULD ALWAYS BE CONSIDERED
REGARDING WHERE IT IS OPERATED FOR BEST RESULTS:
1) AVOID INSTALLING REFRIGERATOR IN A LOCATION ALLOWING EXPOSURE TO
DIRECT SUNLIGHT AND OR EXCESSIVE HEAT. IF UNAVOIDABLE A SOLID DOOR
REPLACEMENT IS AVAILABLE THRU BULL.
2) DO NOT INSTALL IN LOCATION THAT COULD RESULT IN GLASS DOOR BEING
STRUCK, I.E. (PLAY AREA, ETC.)
READ AND RETAIN THIS OWNER’S MANUAL FOR FUTURE REFERENCE.
v2024.07.23
2
TABLE OF CONTENTS
PAGE NO.
APPLIANCE SAFETY
3-4
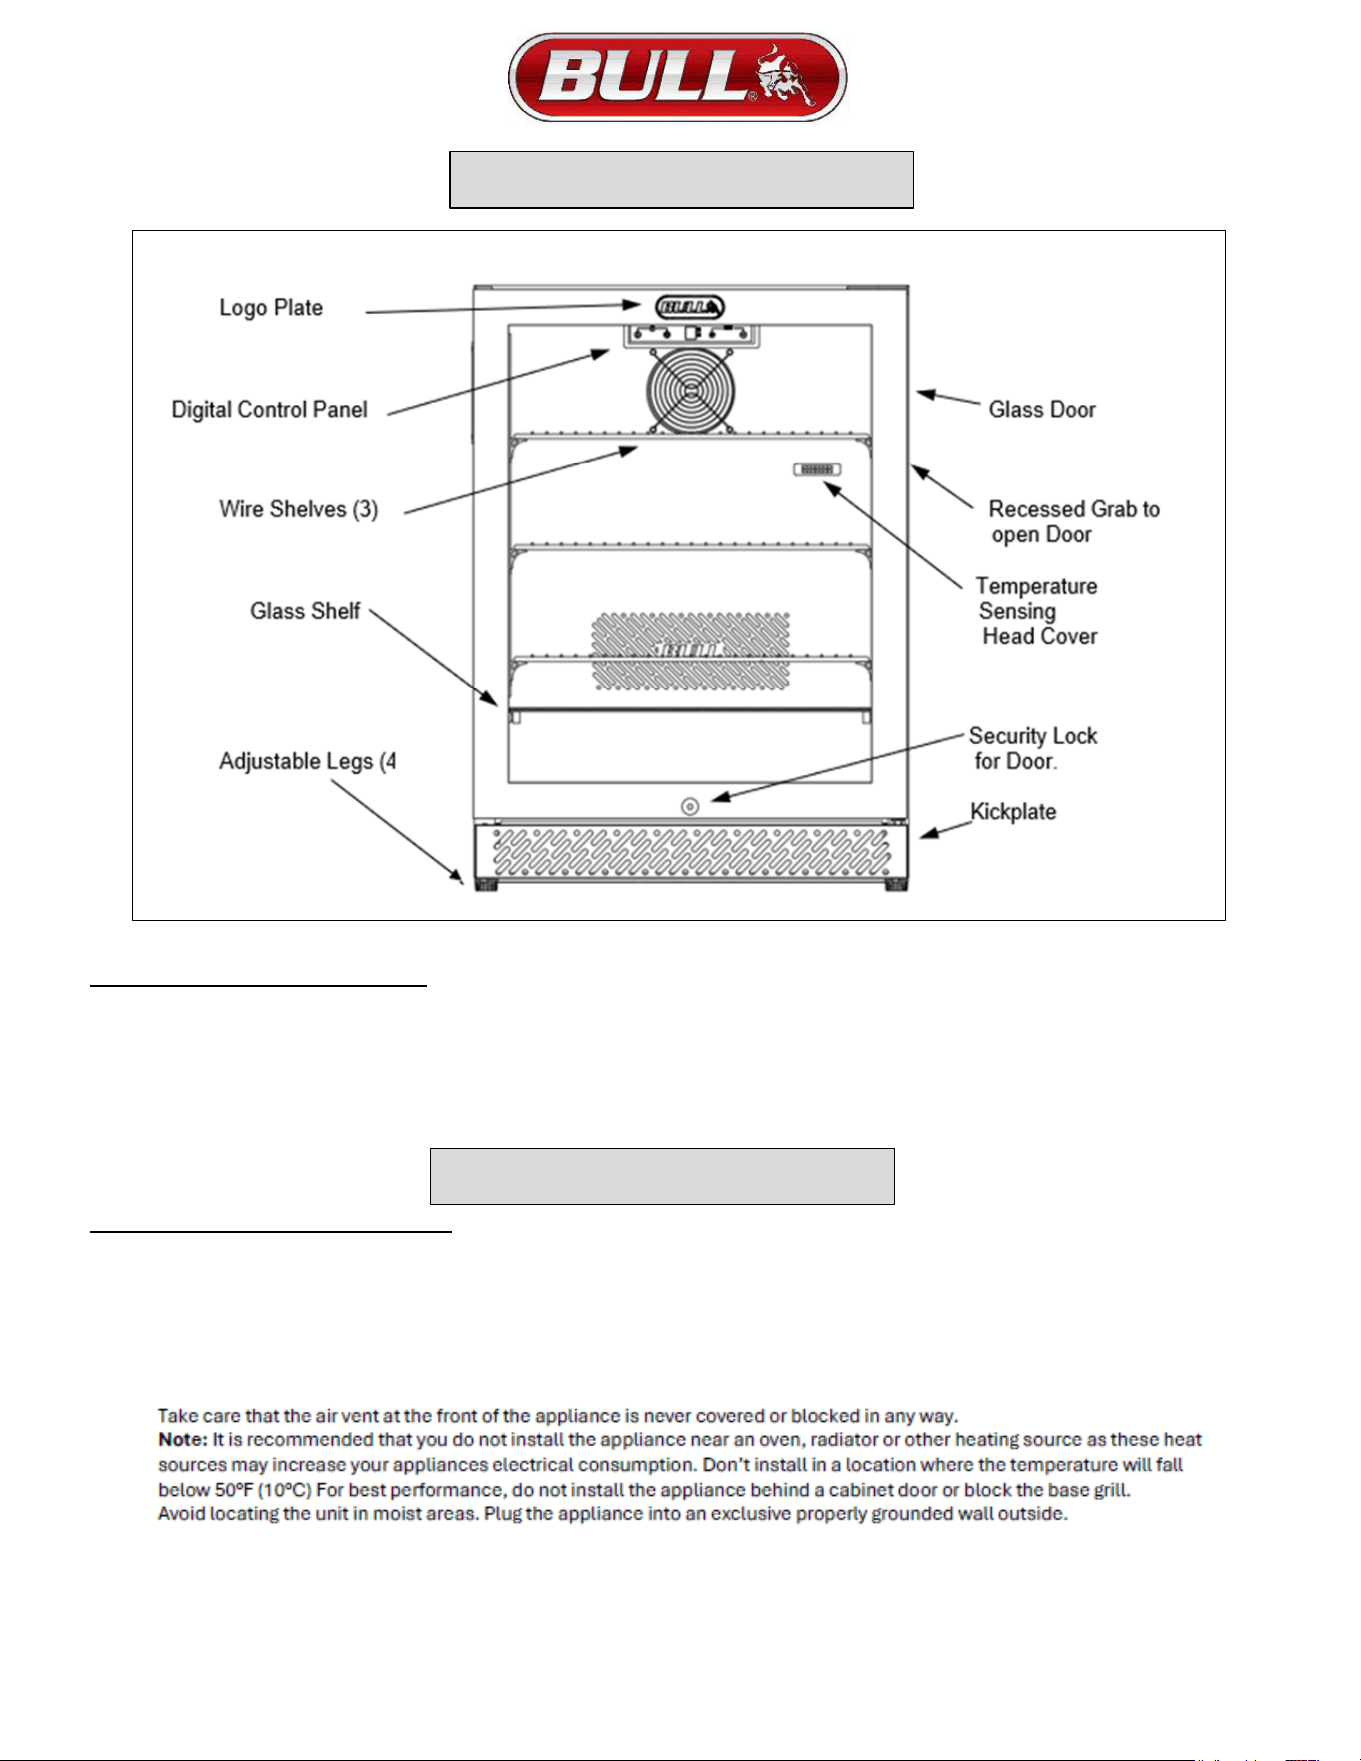
LOCATION OF PARTS
5
INSTALLATION INSTRUCTIONS
DO THIS BEFORE USING YOUR APPLIANCE
5
INSTALLATION (PREPARATION, GENERAL GUIDELINES
5
ELECTRICAL (EXTENSION CORD WARNING)
6
REVERSING THE DOOR SWING
6-9
OPERATING YOUR REFRIGERATOR
CONTROL PANEL
10
10
INTERIOR LIGHT
DEFROSTING
TEMPERATURE ALARM/ DOOR ALARM
DOOR LOCK
PREPARATION FOR USE
SHELVES
CARE AND MAINTENANCE
CLEANING
11
POWER FAILURE
VACATION TIME
MOVING YOUR REFRIGERATOR
ENERGY SAVING TIPS
APPLIANCE DISPOSAL
11
TROUBLE SHOOTING
12
PRODUCT REGISTRATION
ORDERING REPLACEMENT PARTS
13
REPLACEMENT PARTS LIST
EXPOLDED VIEW FOR PARTS LIST
14
WARRANTY POLICY
15-17
Your safety and safety of others is very important.
We have provided many important safety messages in this manual and on your appliance. Always read and obey all safety messages.
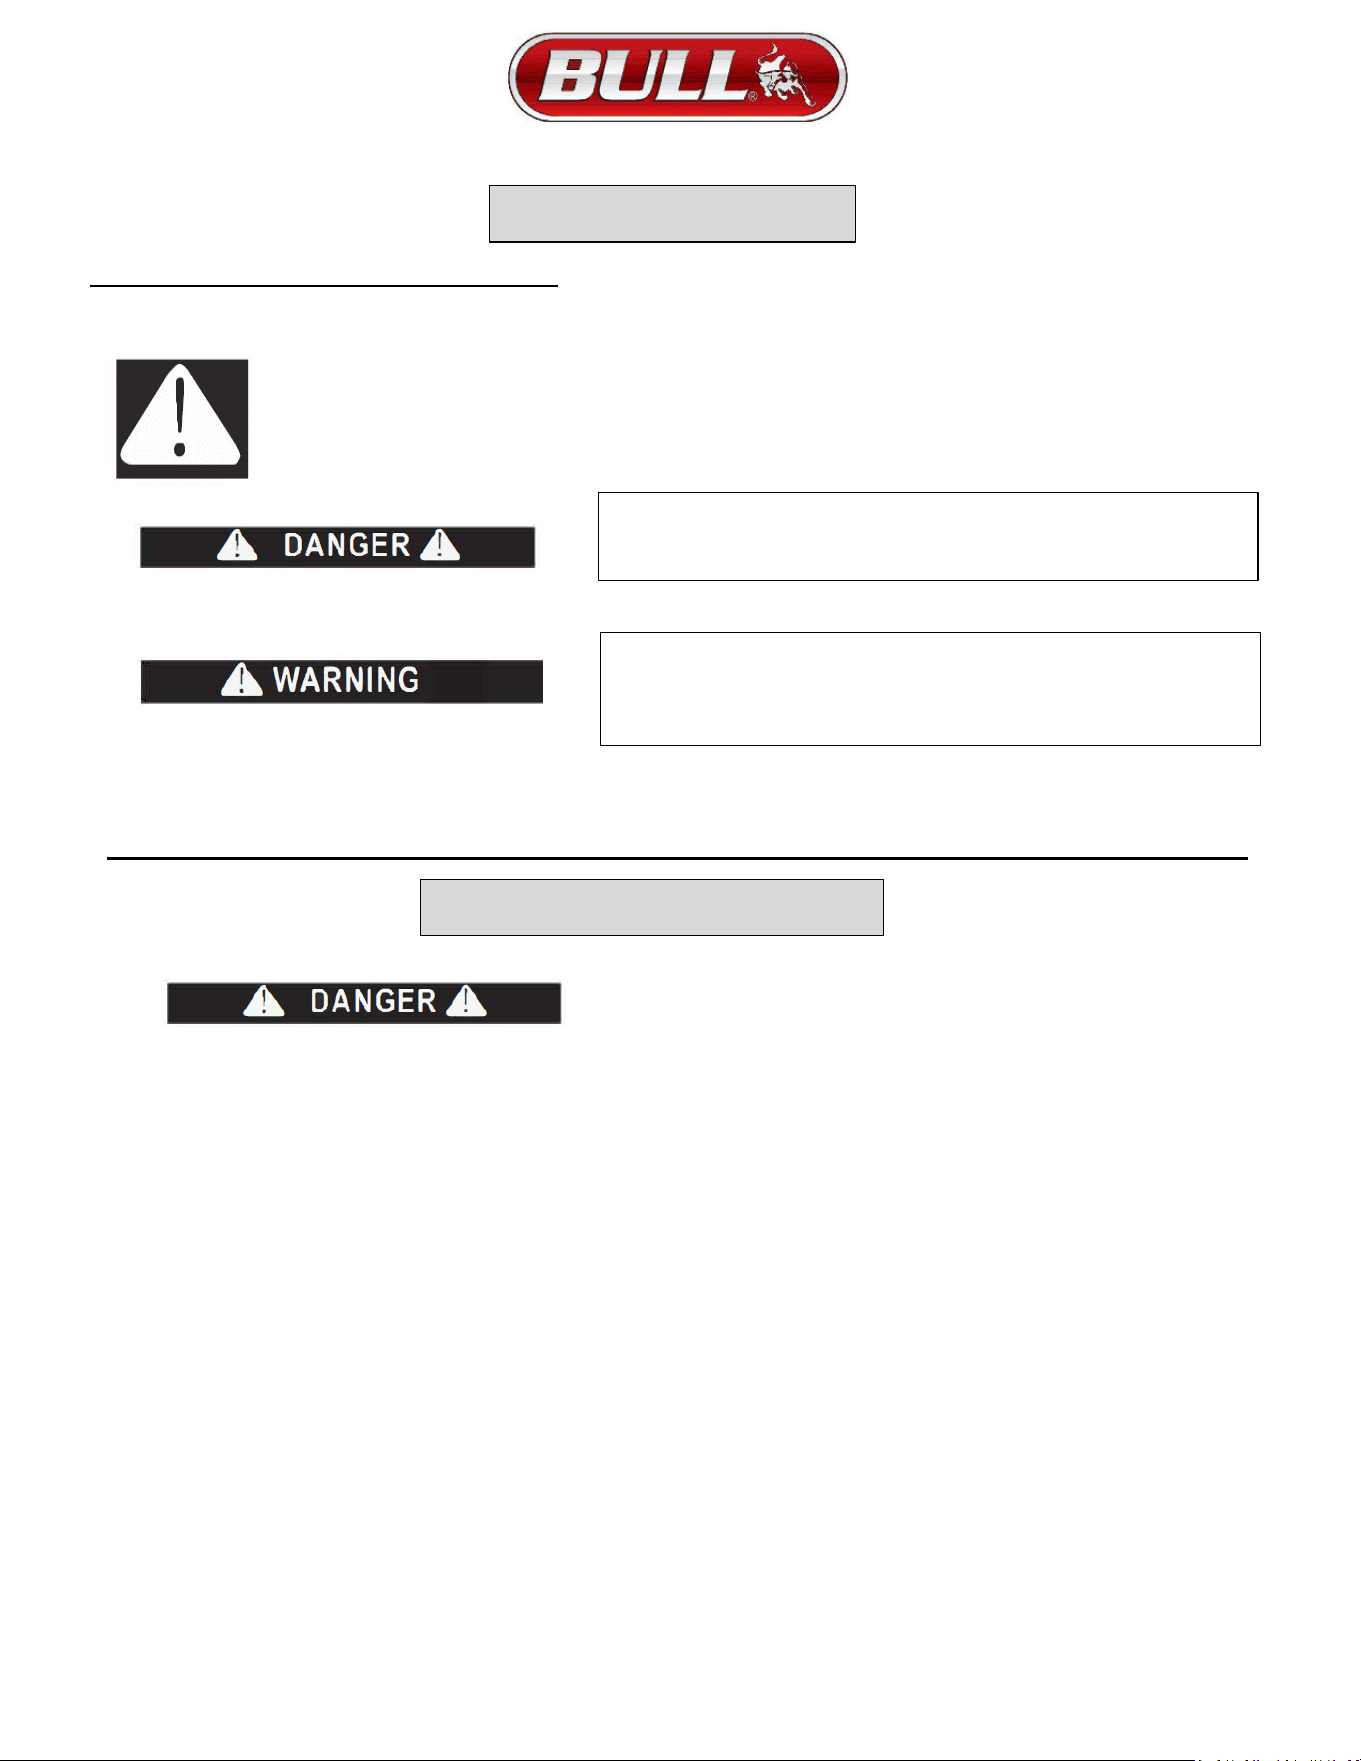
This is the Safety Alert Symbol. The symbol alert you to potential hazards that kill or injure you or others.
All safety messages will follow the Safety Alert Symbol or be identified by either the DANGER or WARNING label
that is shown and defined below. S
All safety messages will alert you about the potential hazard, tell you how to reduce the chance of injury, and let you know what
can happen if the instructions are not followed.
Before the appliance is used, it must be properly positioned and installed as described in this manual, so read the manual
carefully.
To reduce the risk of fire electrical shock or injury when using this appliance, follow basic precautions including the following:
1) Plug into a grounded outlet, do not remove grounding prong, do not use an adapter, and do not use an extension cord.
2) Replace all panels before operating.
3) It is recommended that a separate circuit serving only your appliance be provided. Use receptacles that cannot be turned off by
a switch or pull chain.
4) Never clean appliance parts with flammable fluids. These fumes can create a fire hazard or explosion. And do not store or use
gasoline or other flammable vapours and liquids in the vicinity of this or any other appliance. The fumes can create a fire hazard or
explosion.
5) Do not connect or disconnect the electric plug when your hands are wet.
6) Unplug the appliance or disconnect power before cleaning or servicing. Failure to do so can result in electrical shock or death.
7) Do not attempt to repair or replace any part of your appliance unless it is specifically recommended in this manual. All other
services should be referred to a qualified technician.
3
IMPORTANT SAFEGUARDS
WARNING means that failure to heed this safety statement
may result in extensive product damage, serious personal
injury, or death.
DANGER means that failure to heed this safety statement may
result in severe personal injury or death.
APPLIANCE SAFETY
FOLLOW WARNING CALLOUTS BELOW ONLY WHEN APPLICABLE TO YOUR MODEL.
Use two or more people to move and install this appliance. Failure to do so can result in back or other injury.
To ensure proper ventilation of this appliance, the front of the unit must be completely unobstructed.
Choose a well-ventilated area with temperatures above 50°F (10°C) and below 109.4°F (43°C).
The appliance should not be located next to ovens, grills or other sources of high heat.
The appliance must be installed with all electrical, water and drain connections in accordance with state and local codes. A standard
electrical supply, properly grounded in accordance with the National Electric Code and local codes and ordinances.
Do not kink or pinch the power supply cord of the
appliance.
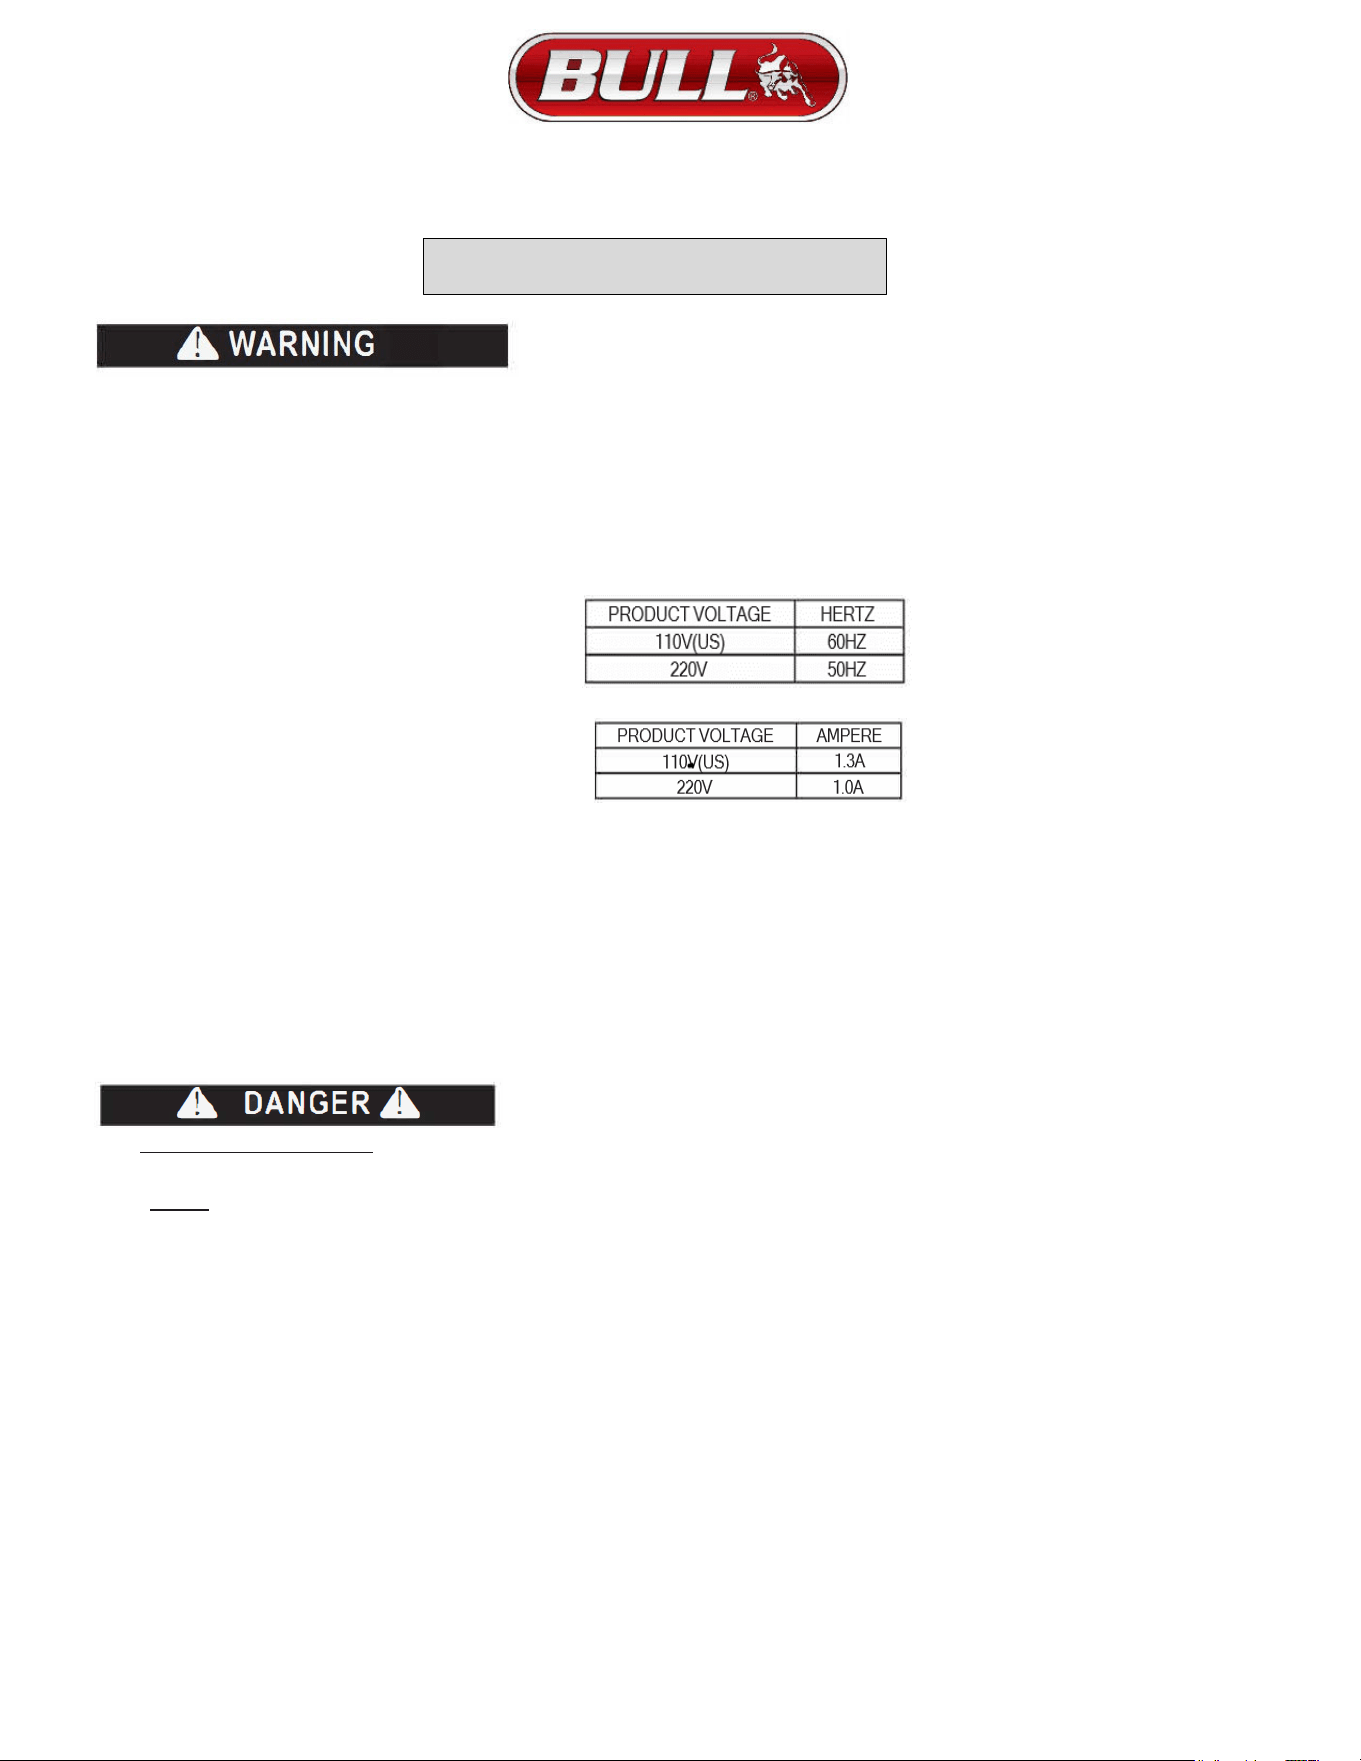
The size of the fuse (or circuit breaker) should be:
It is important that the appliance be levelled to work properly. You may need to make several adjustments to level it.
All installations must be in accordance with local plumbing code requirements. Make certain that the pipes are not pinched,
kinked, or damaged during installation. Check for leaks after connection.
Never allow children to operate, play with or crawl inside the appliance.
Do not use solvent-based cleaning agents or abrasives on the interior. These cleaners may damage or discolor the interior.
Use this appliance only for its intended purpose as described in this Instruction Manual.
Keep fingers out of the "pinch point" areas. Clearances between the door and cabinet are small by necessity.
Be careful closing door when children are in the area.
Risk of child entrapment!
Child entrapment and suffocation are not problems of the past. Junked or abandoned appliances are still dangerous, even if they will "just sit for a few days".
Before discarding your old refrigerator:
Take off the doors.
Leave the shelves in place so that children may not easily climb inside.
-SAVE THESE INSTRUCTIONS-
4
IMPORTANT SAFEGUARDS
BEFORE USING YOUR APPLIANCE
1)
Remove the exterior and interior packing.
2)
Before connecting the appliance to the power source, let it stand upright for approximately 24 hours. This will reduce the
possibility of a malfunction in the cooling system from handling during transportation.
3)
Clean the interior surface with lukewarm water using a soft cloth.
INSTALLATION OF YOUR APPLIANCE
1)
Please consider exposure to heat and sunlight when selecting the location for your refrigerator.
2)
The appliance is designed for built-in recessed or free-standing installation.
3)
Note: may be used this appliance for the storage of medicine and other medical products.
4)
Place your appliance on a floor that is strong enough to support it when it is fully loaded. To level the unit, adjust the front levelling legs.
5
INSTALLATION INSTRUCTIONS
LOCATION OF PARTS

For personal safety, this appliance must be properly grounded. Any questions concerning power and/or grounding should be
directed toward a qualified electrician or authorized service center.
This appliance requires a standard electrical outlet. Have the wall outlet and circuit checked by a qualified electrician to make
sure the outlet is properly grounded.
To prevent electrical accidental injury. The cord should be secured behind the appliance and not left exposed or dangling.
The appliance should always be plugged into its own individual electrical outlet which has a voltage rating that matches the rating
on the appliance. This provides the best performance and prevents overloading house wiring circuits that could cause a fire
hazard from overheating. Never unplug the appliance by pulling on the power cord. Always grip the plug firmly and pull straight
out from the receptacle. Repair or replace immediately all power cords that have become frayed or otherwise damaged. Do not
use a cord that shows cracks or abrasion damage along its length or at either end.
When moving the appliance, be careful not to damage the power cord.
EXTENSION CORD
Because of potential safety hazards under certain conditions. It is strongly recommended that you do not use an extension
cord with this appliance.
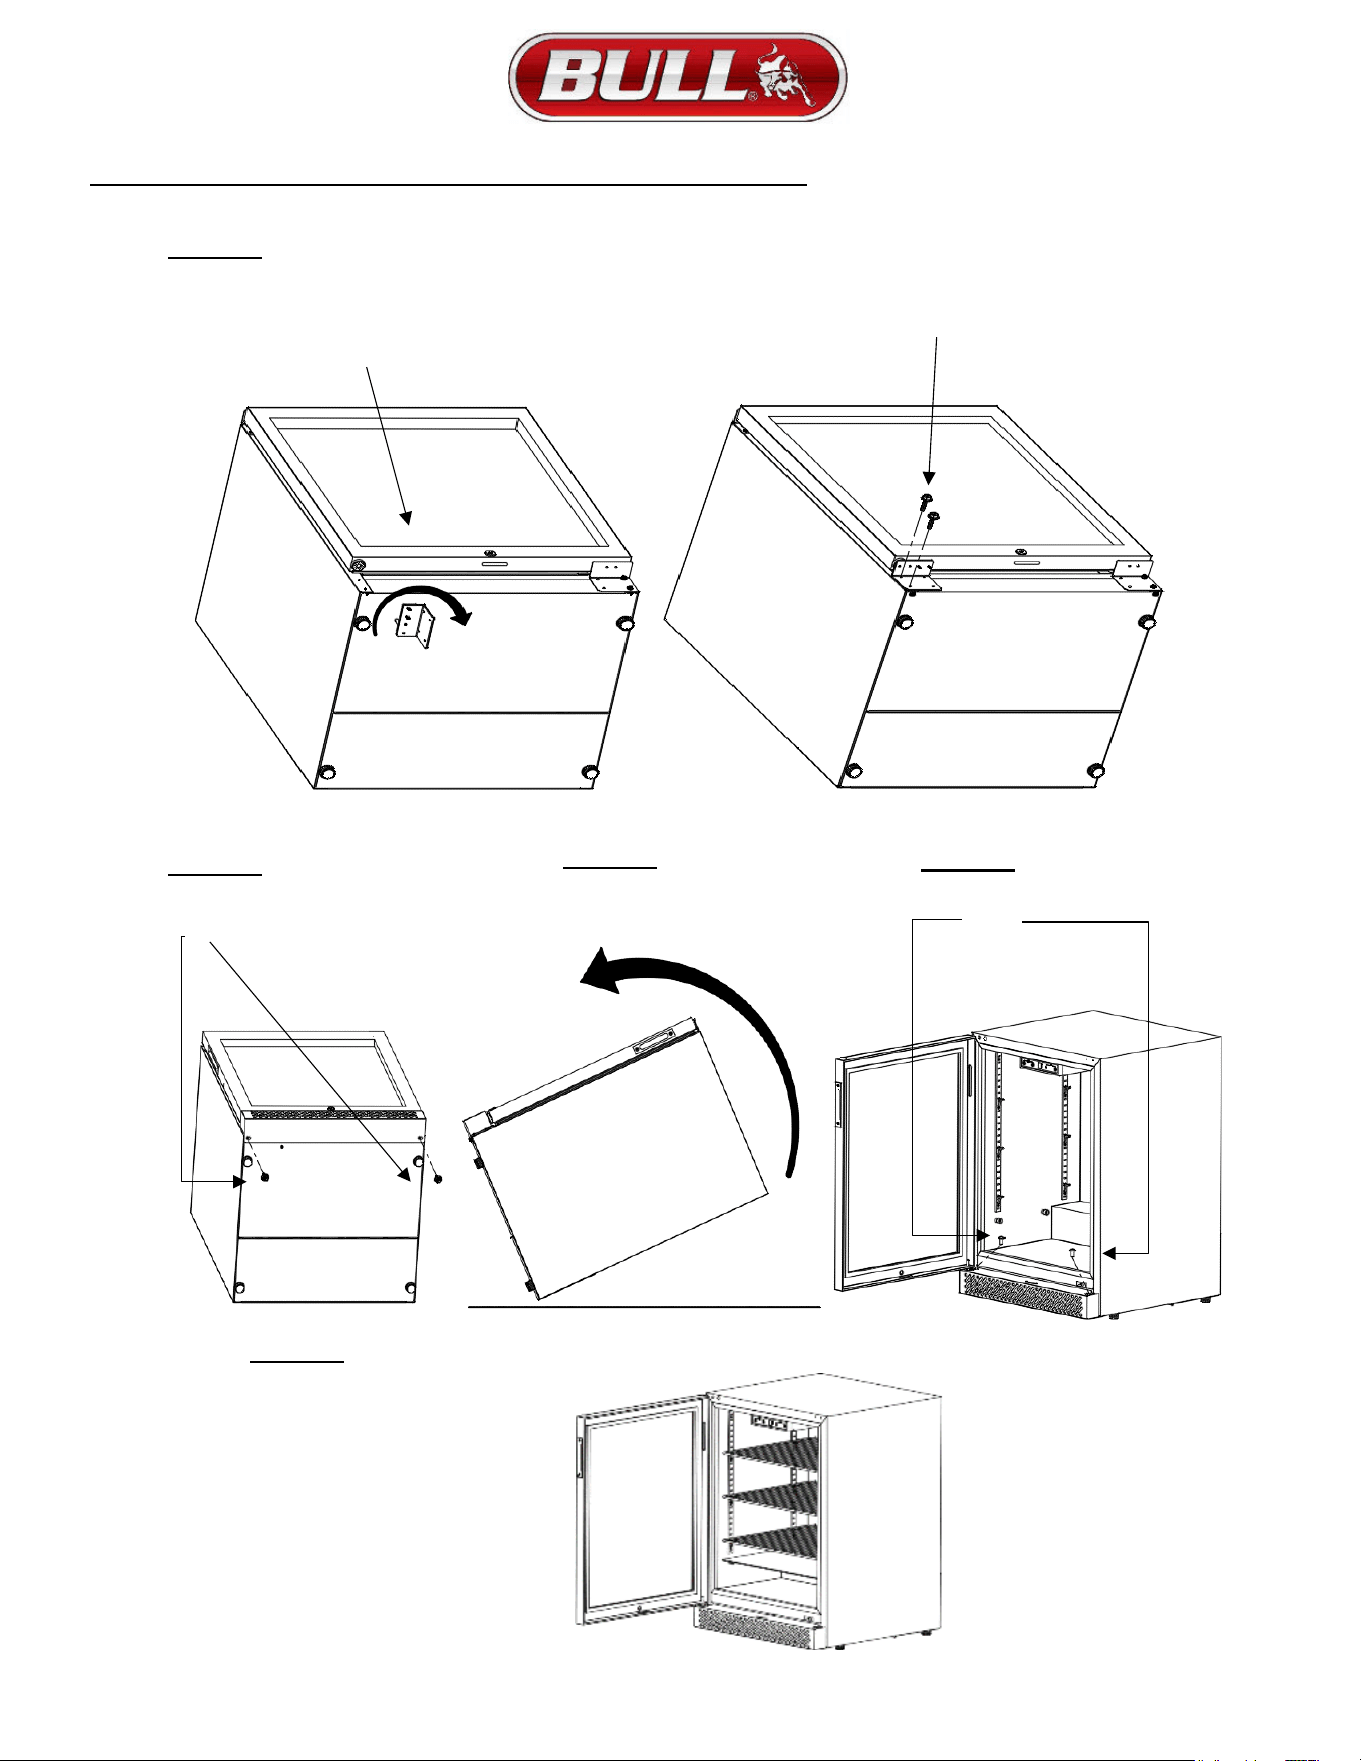
REVERSING THE DOOR SWING
This door of this appliance has the capability of swinging opening from either the left or right side. It is shipped to you with the door
opening on the left side.
(Before you start, un-plug power cord and empty contents)
Before reversing the door swing, please read pages 6-9 and carefully follow the reversing instructions. Skipping steps might
result in expected personal injury. To prevent serious injury wear Eye and Hand Protection.
(Appliance is shipped this way)
(Reversed door opening option)
Door opens on Left Side with Right Hinge Swing
Door opens on Right Side with Left Hinge Swing
CONTINUE TO NEXT PAGE FOR INSTRUCTIONS
6
Improper use of the grounded plug can result in the risk of electrical shock. If the power cord is damaged, have it replaced
by a qualified electrician or authorized service center.
Plug the appliance into an exclusive properly grounded wall outside.
ELECTRICAL CONNECTION
INSTRUCTIONS FOR REVERSING THE DOOR SWING
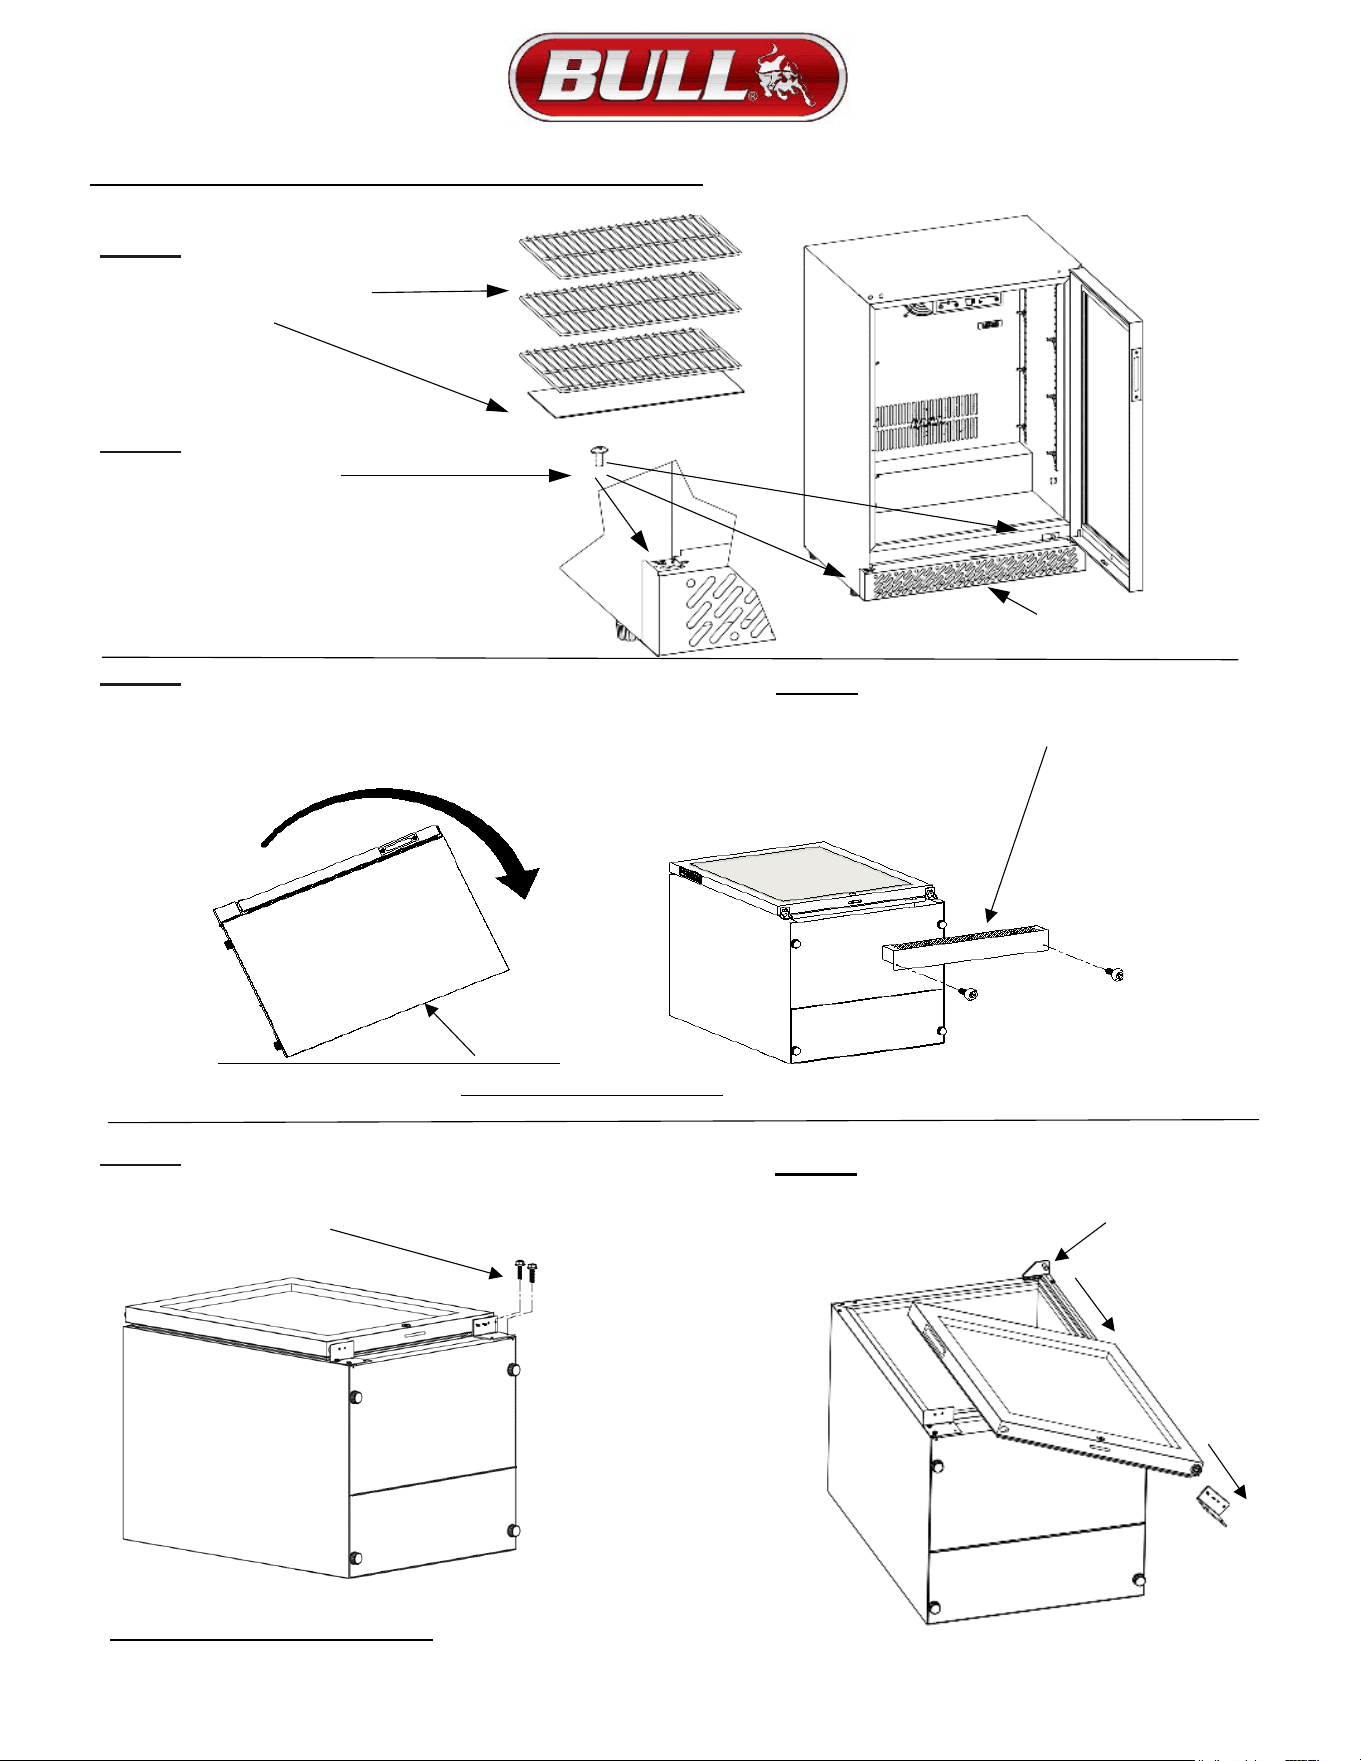
STEP 1:
Un-plug power cord and
remove the 3 wire shelves
and glass shelf.
STEP 2:
Remove the 2 screws
holding the Kickplate
as shown and put aside.
KICKPLATE
STEP 3:
You’ll need to place something on the ground such as sheets of cardboard to
protect the back side of the refrigerator. Next, carefully rotate Refrigerator so
backside is resting on ground as shown.
STEP 4:
Remove and retain the 2 screws on the bottom of the
Kickplate. Remove and retain Kickplate
BACKSIDE OF REFRIGERATOR
STEP 5:
Remove retain the 2 screws holding the bottom hinge support bracket, during
removal you’ll notice the bracket is under tension that will release while removing
the screws which is normal
STEP 6:
Slide the bottom hinge assembly out of the bottom of the
door. Then slide the door off the upper pivot hinge.
CONTINUE ON TO NEXT PAGE
7
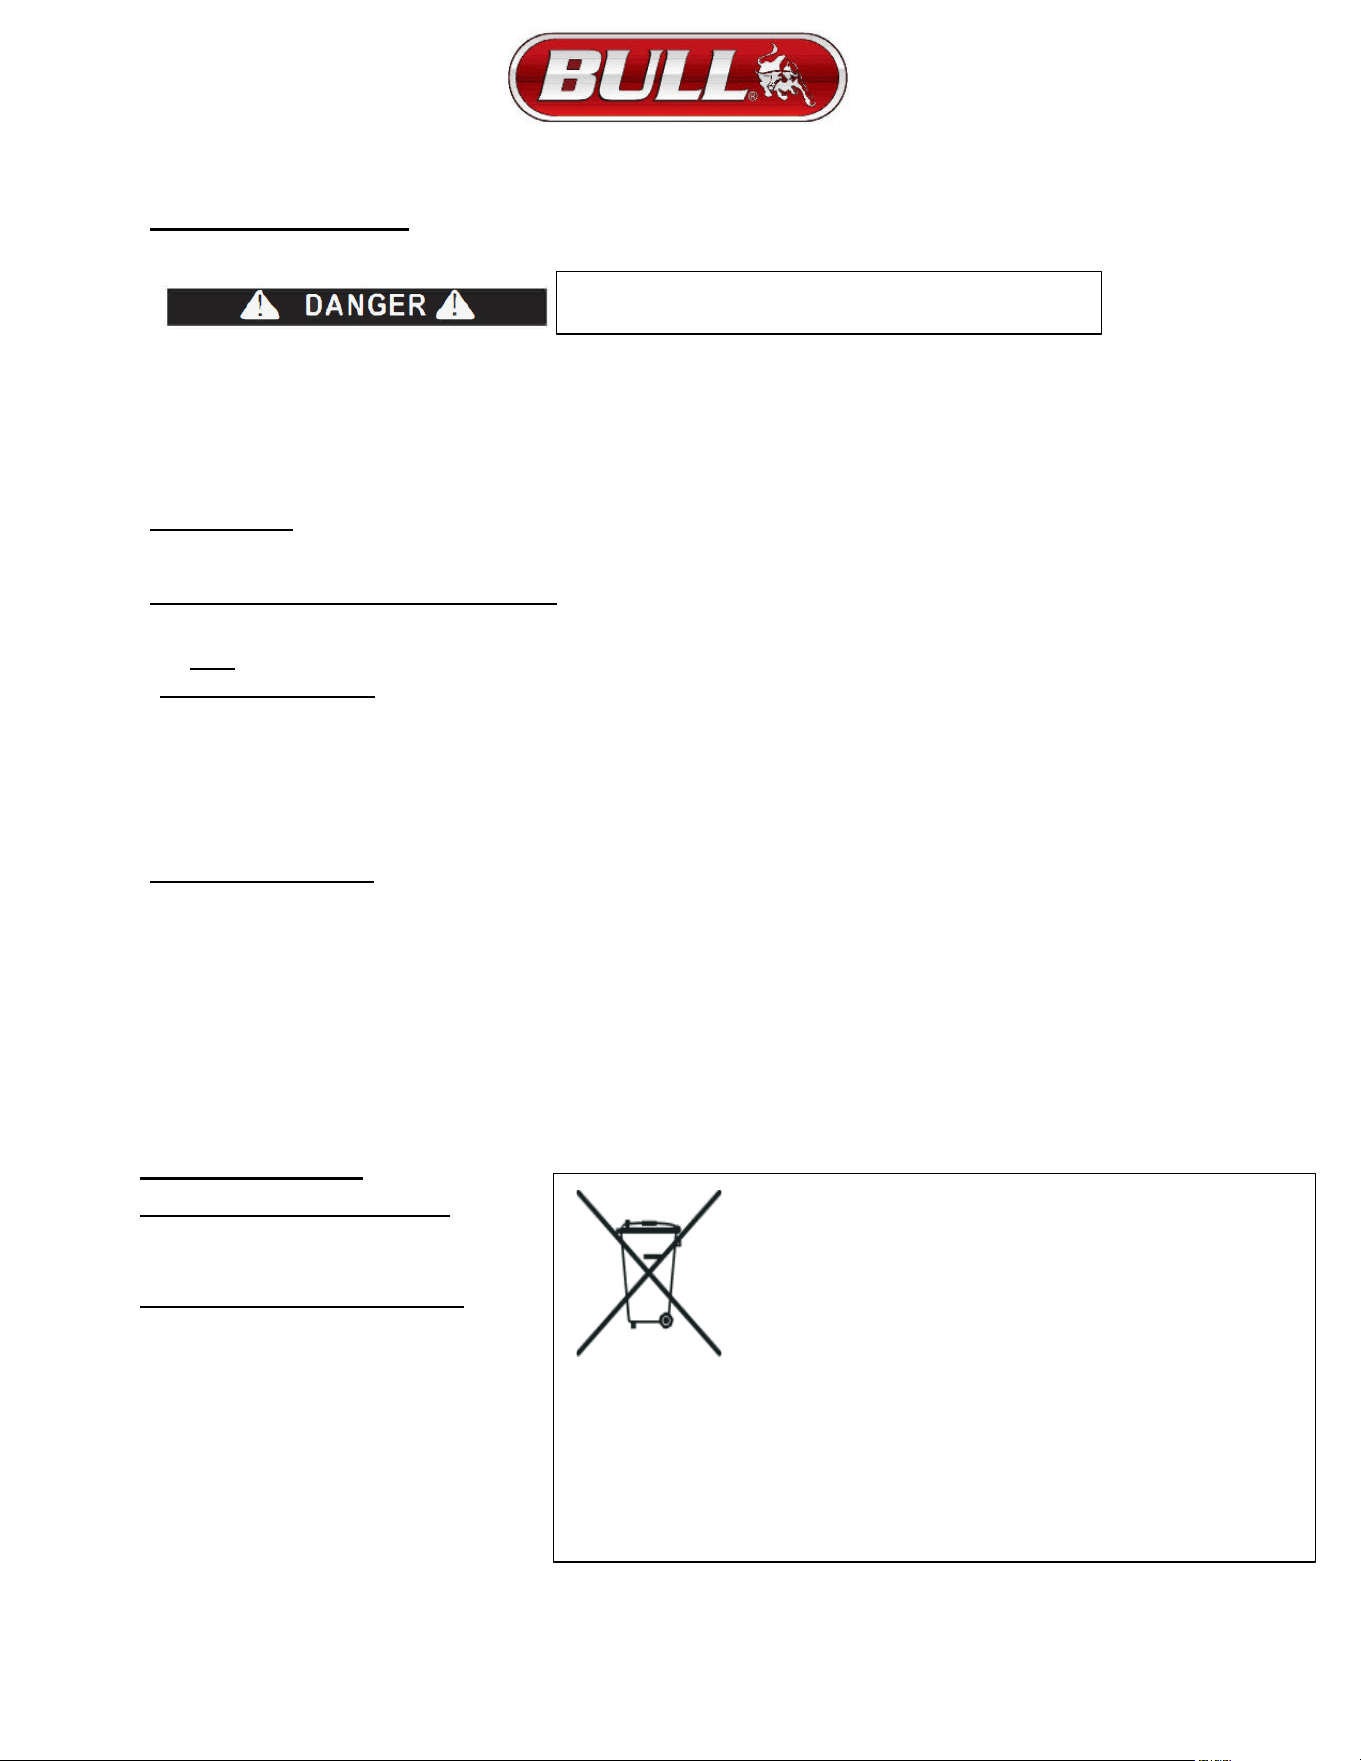
INSTRUCTIONS FOR REVERSING THE DOOR SWING (CONTINUED
)
(Un-plug power cord while doing this)
STEP 7:
STEP 8:
Install (x3 screws)
top left hinge
bracket (supplied
in parts bag).
Remove x3
decorative hole plugs
(top Left)
Push in x3
decorative hole
plugs (top right).
Remove top right
pivot hinge (x3
screws)
Move the kickplate
angle bracket from
bottom left to
bottom right (x2
screws)
Remove bottom left
angle bracket (x2
screws)
STEP 9:
Remove the
decorative plug
from the top left of
the door
STEP 10:
Remove the
spring tension
plug (off white
plastic) and
bearing from the
bottom right of
door.
Take the
decorative plug
from the top left of
the door and
install it into the
top right of the
door.
Install the black
spring tension
plug (supplied in
parts bag) to the
bottom left of the
door.
STEP 11:
Slide the door up onto the top left pivot hinge
and allow door to lay flat
STEP 12:
Take the angle
bracket pivot
assembly and
remove the two
screws
Screw the assembly
back together to be a
mirror image of `
Rotate the
spring tension
rod bracket
180 degrees.
CONTINUE ON TO NEXT PAGE
8
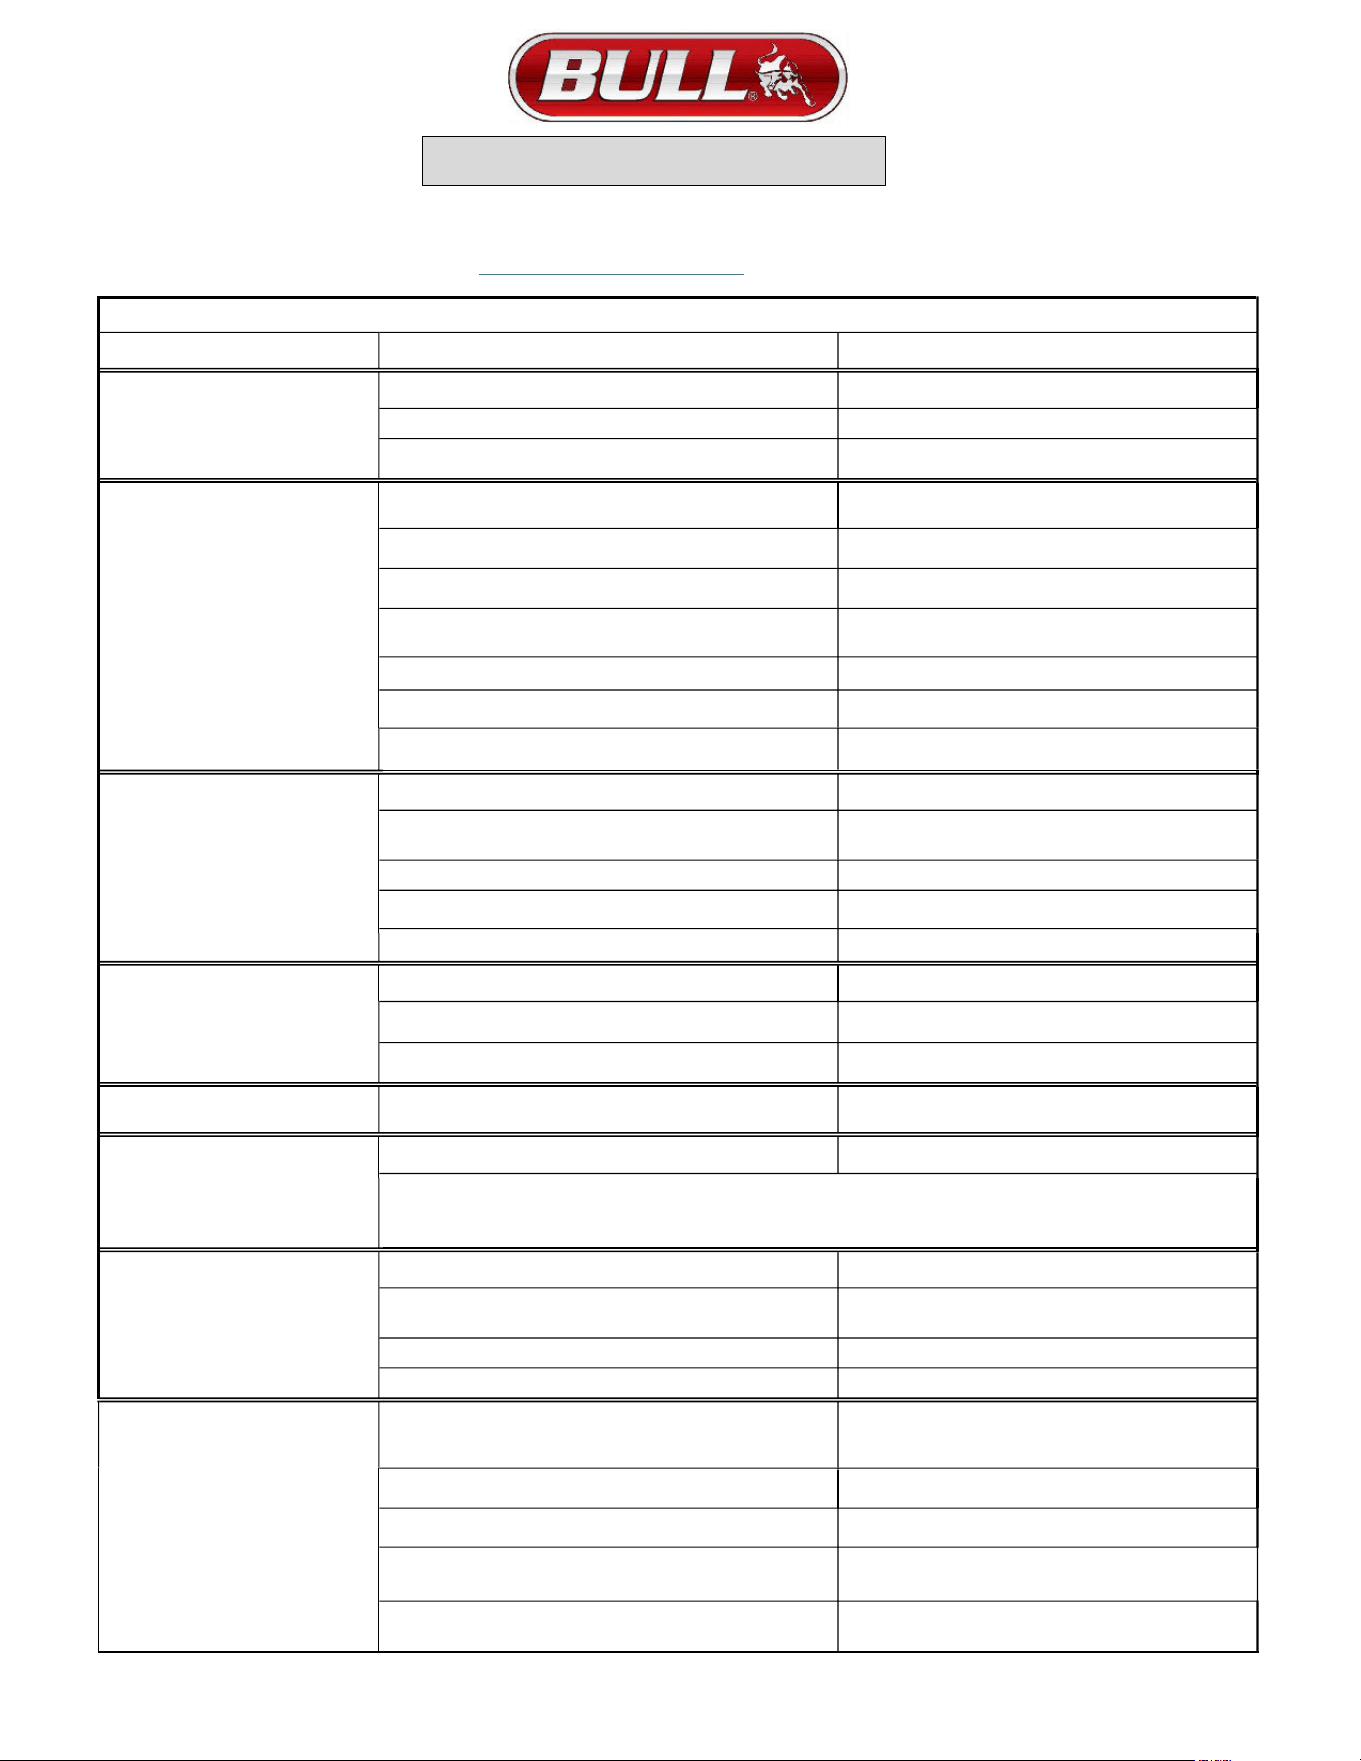
INSTRUCTIONS FOR REVERSING THE DOOR SWING (CONTINUED
)
STEP 13:
Insert the angle bracket pivot assembly into the spring tension plug (be sure the support bearings are still there).
refrigerator with screws retained during Step 7
When fully inserted and the spring is engaged, rotate the assembly 90 degrees clockwise and screw the bracket to the
bottom left of the refrigerator.
STEP 15:
Rotate the Fridge back on
Its feet.
STEP 16:
Complete installing the Kickplate
with screws removed during Step 2.
STEP 14:
Slide Kickplate back on to the
bottom and secure it with the two
screws retained during Step 4.
STEP 17:
Test the swing of the door to be sure it
closes on its own. Add the screw to bottom
kickplate with the door open for access.
Replace the shelves. Wait an hour before
turning the refrigerator back on.
9

It is recommended that you install the refrigerator is place where the ambient temperature is 50 ℉ and 109.4 ℉ (10℃ 43℃.
If the ambient temperature is above or below recommended temperatures, the performance of the unit may be affected.
For example, placing your refrigerator in extremely cold or hot conditions may cause interior temperatures to fluctuate.
The operating temperature range may not be reached. The display for your refrigerator’s Control Panel is shown below with numbers that
correspond with list below to explain the operational controls.
Interior Light
The unit is equipped with an interior LED light that turns ON when the door is open.
Opening the door automatically shuts off the interior fan at the same time.
You can press the button with lite symbol on the digital control panel to manually turn the light off or on.
Defrosting
The unit defrosts automatically in normal operating conditions.
The evaporator behind the rear wall of the unit defrosts automatically. The resulting condensation is collected in the drainage channel behind
the rear wall of the unit and flows through the drainage hole into the drip tray by the compressor where it evaporates.
Please note, if the door is opened in a high heat or high humidity location it may cause frost to accumulate on the evaporator. If the frost
pattern does not clear within 24 hours, your unit will require manual defrosting.
Press the button shown for 6 seconds to start defrosting the unit. To stop the defrost process press the button for 6 seconds.
Temperature Alarm
If the storage temperature is not cold enough an audible alarm will occur, and the temperature display will begin flashing.
Listed below are possible reasons for temperature being too high:
Warm or room temperature being placed inside.
The door was open long enough to allow warm outside air to raise the temperature.
Prolonged power failure.
Refrigerator is not functioning properly.
The refrigerator temperature alarm will shut off and the temperature display will stop flashing when the refrigerator temperature is sufficiently
cold again.
The evaporator behind the rear wall of the unit defrosts automatically. The resulting condensation is collected in the drainage channel behind
the rear wall of the unit and flows through the drainage hole into the drip tray by the compressor where it evaporates.
Please note, if the door is opened in a high heat or high humidity location it may cause frost to accumulate on the evaporator. If the frost
pattern does not clear within 24 hours, your unit will require manual defrosting.
Door Alarm
If the door is left open for more than 60 seconds, an audible alarm will sound. Pressing any button once will turn the alarm off.
Door Lock
The door of your unit has a lock and key provided. These should be in the plastic bag containing the owner’s manual. To lock the door, insert
the key in the door’s lock (make sure the pin for the lock is engaged) and turn it clockwise or counter clockwise.to unlock the door. When not in
use store the key in a secure location for safe keeping.
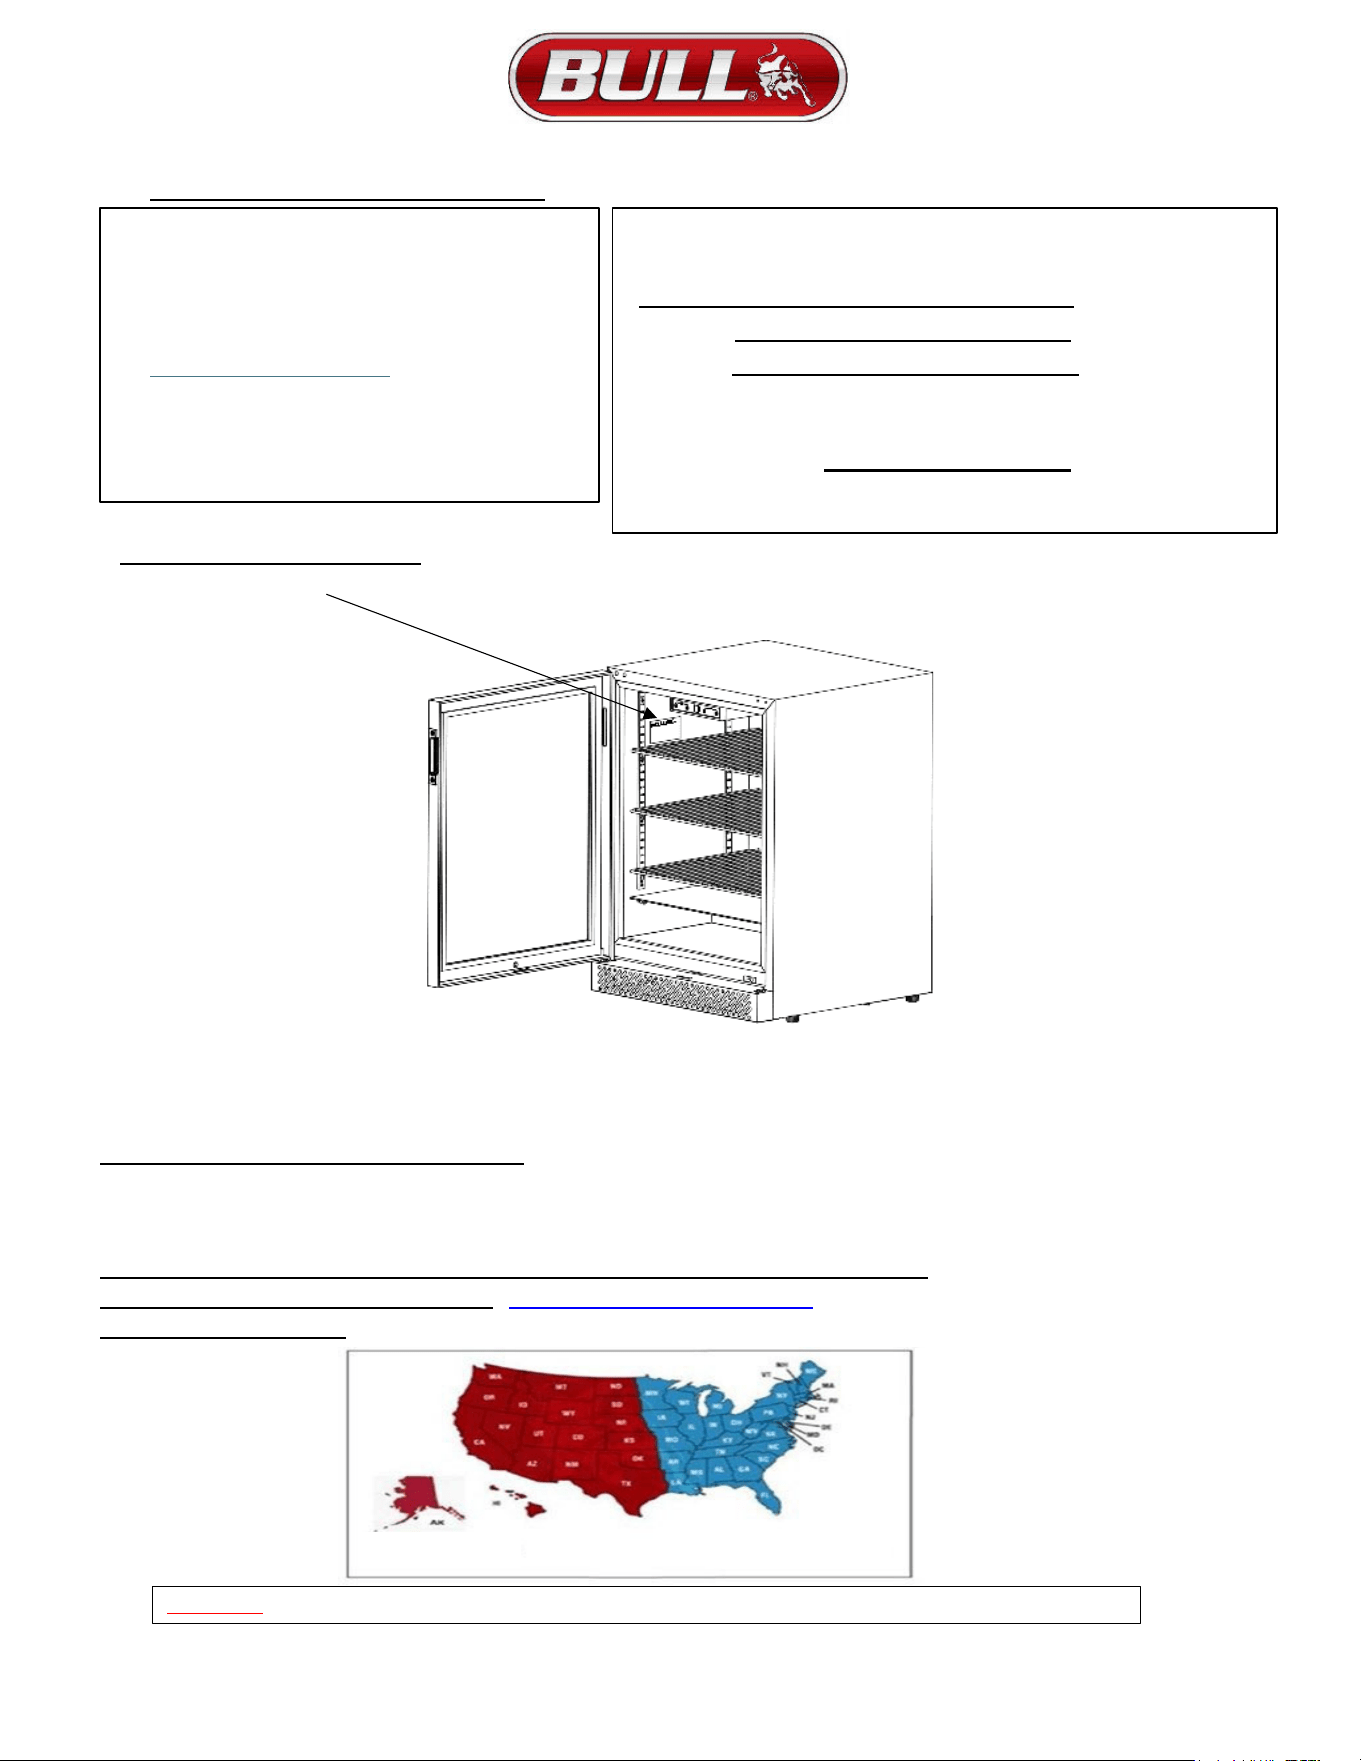
Shelf Install or Rearranging Preparation
First, remove all the items from the shelves.
Position the shelf supports inside the racks on the sides as shown below
at the level you require and number of shelves you’ll be using.
Installing the Shelves
Make sure you have the door open all the way to prevent
damaging the door gasket with the shelves when installing
them firmly on to the supports.
10
OPERATING INSTRUCTIONS
Cleaning Your Appliance
Turn off the appliance. Unplug the power cord and remove all items including the shelves.
Wash the inside surfaces with a solution of warm water and baking soda (about 2 tablespoons of baking soda per 1
gallon of water.
Wash the shelves with a mild detergent solution.
Wring out excess water from sponge of cleaning cloth before cleaning around control panel display, or electrical parts.
Wash the outside of the unit with a solution of warm water and mild detergent. Rinse well and dry with a clean, soft cloth towel.
When cleaning the outside of the unit be sure to use cleansers that are designated for stainless steel. Do not use steel wool scrubbing
pads or a wire brush.
Power Failure
Your refrigerator will maintain its temperature for a few hours if the door is kept closed in the event of a power failure. If the power failure
continues, you will need to remove the contents that are at risk.
Vacation Periods or times of (Non-Use)
Short Vacations / Less than 3 weeks, leave the unit on.
Long Vacations / Longer than 3 weeks. Remove the contents, unplug the unit and follow the cleaning instructions for interior and exterior.
Note: Odors or Mold growth can be avoided by blocking the door from fully closing, but with care not to harm the door gasket.
Moving Your Appliance
1) Remove all items.
2) Remove the shelves or use tape to secure them in place.
3) Turn the adjustable feet clockwise until they all the way in to avoid damaging them.
4) Tape the door shut.
5) Use moving blankets or equivalent to protect the outside while moving.
6) Always keep the unit in the upright position, never place on its side or upside down.
Energy Saving Tips
The appliance should be in the coolest area of the room or outdoor location, away from heat producing appliance and out of direct
sunlight.
Ensure the unit is adequately ventilated. Never cover air vents.
Do not keep the door any longer than necessary.
Let hot foods cool to room temperature before placing in the unit. Overloading the unit forces the compressor to run longer.
Be sure to wrap foods properly, and wipe containers dry before placing them in unit. This cuts down on frost build up inside the unit.
Unit shelves and storage bins should not be lined with aluminium foil, wax paper or paper towels. These liners interfere with air
circulation resulting in less operating efficiency.
Organize and label stored items to reduce door opening or extended searching for items.
Remove as many items as needed while avoiding opening door repeatedly. Always close door as soon as possible.
Appliance Disposal
Before disposal of the appliance.
1. Disconnect the main plug from the main socket.
2. Cut off the main cable and discard it.
Correct disposal of this appliance.
To prevent possible harm to the environment or
human health from uncontrolled waste disposal,
recycle it responsibly to promote the sustainable
reuse of material resources. To return your used
device, please use your local return and collection
system, or contact the retailer where the product
was purchased. They can take this product for
environmentally safe disposal.
11
This symbol on the product, or in its packaging,
indicates that this product may not be treated as
household waste. Instead, it should be taken to the
appropriate waste collection point for the recycling of
electrical and electronic equipment. By ensuring this
product is disposed of correctly, you will help prevent
potential negative consequences for the environment
and human health, which could otherwise be caused
by the inappropriate waste handling of this product.
For more detailed information about the recycling of
this product, please contact your local council, your
household waste disposal service, or the shop where
you purchased the product.
FAILURE TO UNPLUG THE APPLIANCE DURING COULD
RESULT IN ELECTRIC SHOCK OR OTHER PERSONAL INJURY.
TROUBLESHOOTING
If you’ve checked the table below and find that you still need help with your appliance, call our Customer
Service Facility at 1800-521-2855 or
https://bullbbq.com/contact/
We will do our best to answer your questions.
12
TROUBLE SHOOTING GUIDE
PROBLEM POSSIBLE CAUSE
REMEDY
Appliance does not operate.
The appliance is turned off.
Switch on the appliance.
Appliance is not connected to a power supply.
Connect the appliance.
Tripped circuit breaker or a blown fuse.
Switch circuit breaker or replace fuse.
Appliance is not cold enough.
The temperature is not set correctly.
Check the set temperature
The ambient temperature could require a lower setting.
Change setting to a lower temperature.
The door was opened too often.
Do not open door more than often than necessary.
The door was not completely closed.
Close door properly.
Door is not hermetically sealed.
Check the door seal and clean or replace.
The condenser is too dirty.
Clean the condenser when necessary.
The ventilation opening is blocked or too dusty.
Clear the obstructions and remove the dust.
Appliance turns itself on or off
frequently.
The room temperature is higher than average.
Put the appliance in a cooler place.
A large amount of food has been added to the unit.
Leave the appliance closed until the set temperature
has been reached.
The door is open too often. Do not open door more than often than necessary.
The door is not closed completely.
Close door properly.
The door gasket does not seal properly.
Check the door seal and clean or replace.
The interior light does not work
The light was switched off on the control panel
Switch on the light
Appliance is not connected to a power supply.
Connect the appliance.
Tripped circuit breaker or a blown fuse.
Switch circuit breaker or replace fuse.
Vibrations
The appliance was not properly levelled.
Level the appliance with the adjustable feet.
Excessive noise
The appliance was not properly levelled.
Level the appliance with the adjustable feet.
The rattling noise may come from the flow of refrigerant, which is normal.
As the cycle ends, you may hear gurgling sounds caused by the flow of refrigerant in the appliance. If temperature
fluctuations occur, the contraction and expansion of the inner walls may cause popping and cracking noises.
The door will not close.
The appliance was not properly levelled.
Level the appliance with the adjustable feet.
The door was reversed and not properly installed.
Check the door hinge and reassemble correctly.
The door gasket is dirty.
Clean the door gasket.
The shelves are out of position.
Check the shelves and refit correctly.
The temperature alarm and the
temperature display flash
Has the appliance door been open for longer than 60
seconds? If not, then the temperature has risen higher or
fallen lower than the temperature than it has been set to.
If yes, close the door and let it run until it reaches the
temperature setting
The door is open too often.
Do not open door more than often than necessary.
The ventilation opening is blocked or too dusty.
Clear the obstructions and remove the dust.
A lengthy interruption in the power supply
If yes, close the door and let it run until it reaches the
temperature setting
A large amount of food has been added to the unit.
Leave the appliance closed until the set temperature
has been reached.
REGISTERING YOUR REFRIGERATOR
SERIAL NUMBER LOCATION
The model and serial number is located inside your refrigerator on the upper left side.
HOW TO ORDER REPLACEMENT PARTS
This is where your Product Information Reference Card will come in handy for supplying necessary info needed by your Authorized
Dealer to assure you get the correct part(s) for your refrigerator. If you don’t have the card, you can still get the model number and
number located inside your refrigerator on the upper left side. This information is required for parts orders.
Please refer to your owner’s manual parts list and illustration to identify what you need.
To Order Replacement Parts on-line go to: https://www.bullbbq.com/buy-parts
Ordering Parts by phone: We are ready to help with two regional suppliers open 8:00 am to 5:00 pm Monday through Friday.
For West Region,
please call
(800) 258-6810
For East Region,
please call
(800) 229-3056
13
WARNING: Use of any part that is not factory authorized will void your warranty and may be dangerous.
EAST REGION
WEST REGION
For Warranty Claims or Replacement Parts ordering, please fill
out the area provided below:
PRODUCT INFORMATION REFERENCE CARD
1) Model #
2) Serial #
(The Serial Number is encoded with essential information for
ordering replacement parts or submitting Warranty claims.
Location of Serial Number and Model No. is shown below)
3) Date of Purchase
4) Copy of your Purchase Receipt or Invoice.
Warranty Questions call Customer Service at (800) 521-2855
Thank you for purchasing your Bull Outdoor
Products Refrigerator. To validate your
Limited Warranty, you must submit the
completed the Warranty Registration Form
within 90 days from the date of purchase.
Registration can be completed on-line
at
https://bullbbq.com/register
or by sending the completed Warranty
Registration Form and copy of your Purchase
Receipt or Invoice as proof of purchase to:
BULL OUTDOOR PRODUCTS, INC.
1011 East Pine St. Lodi, CA 95240
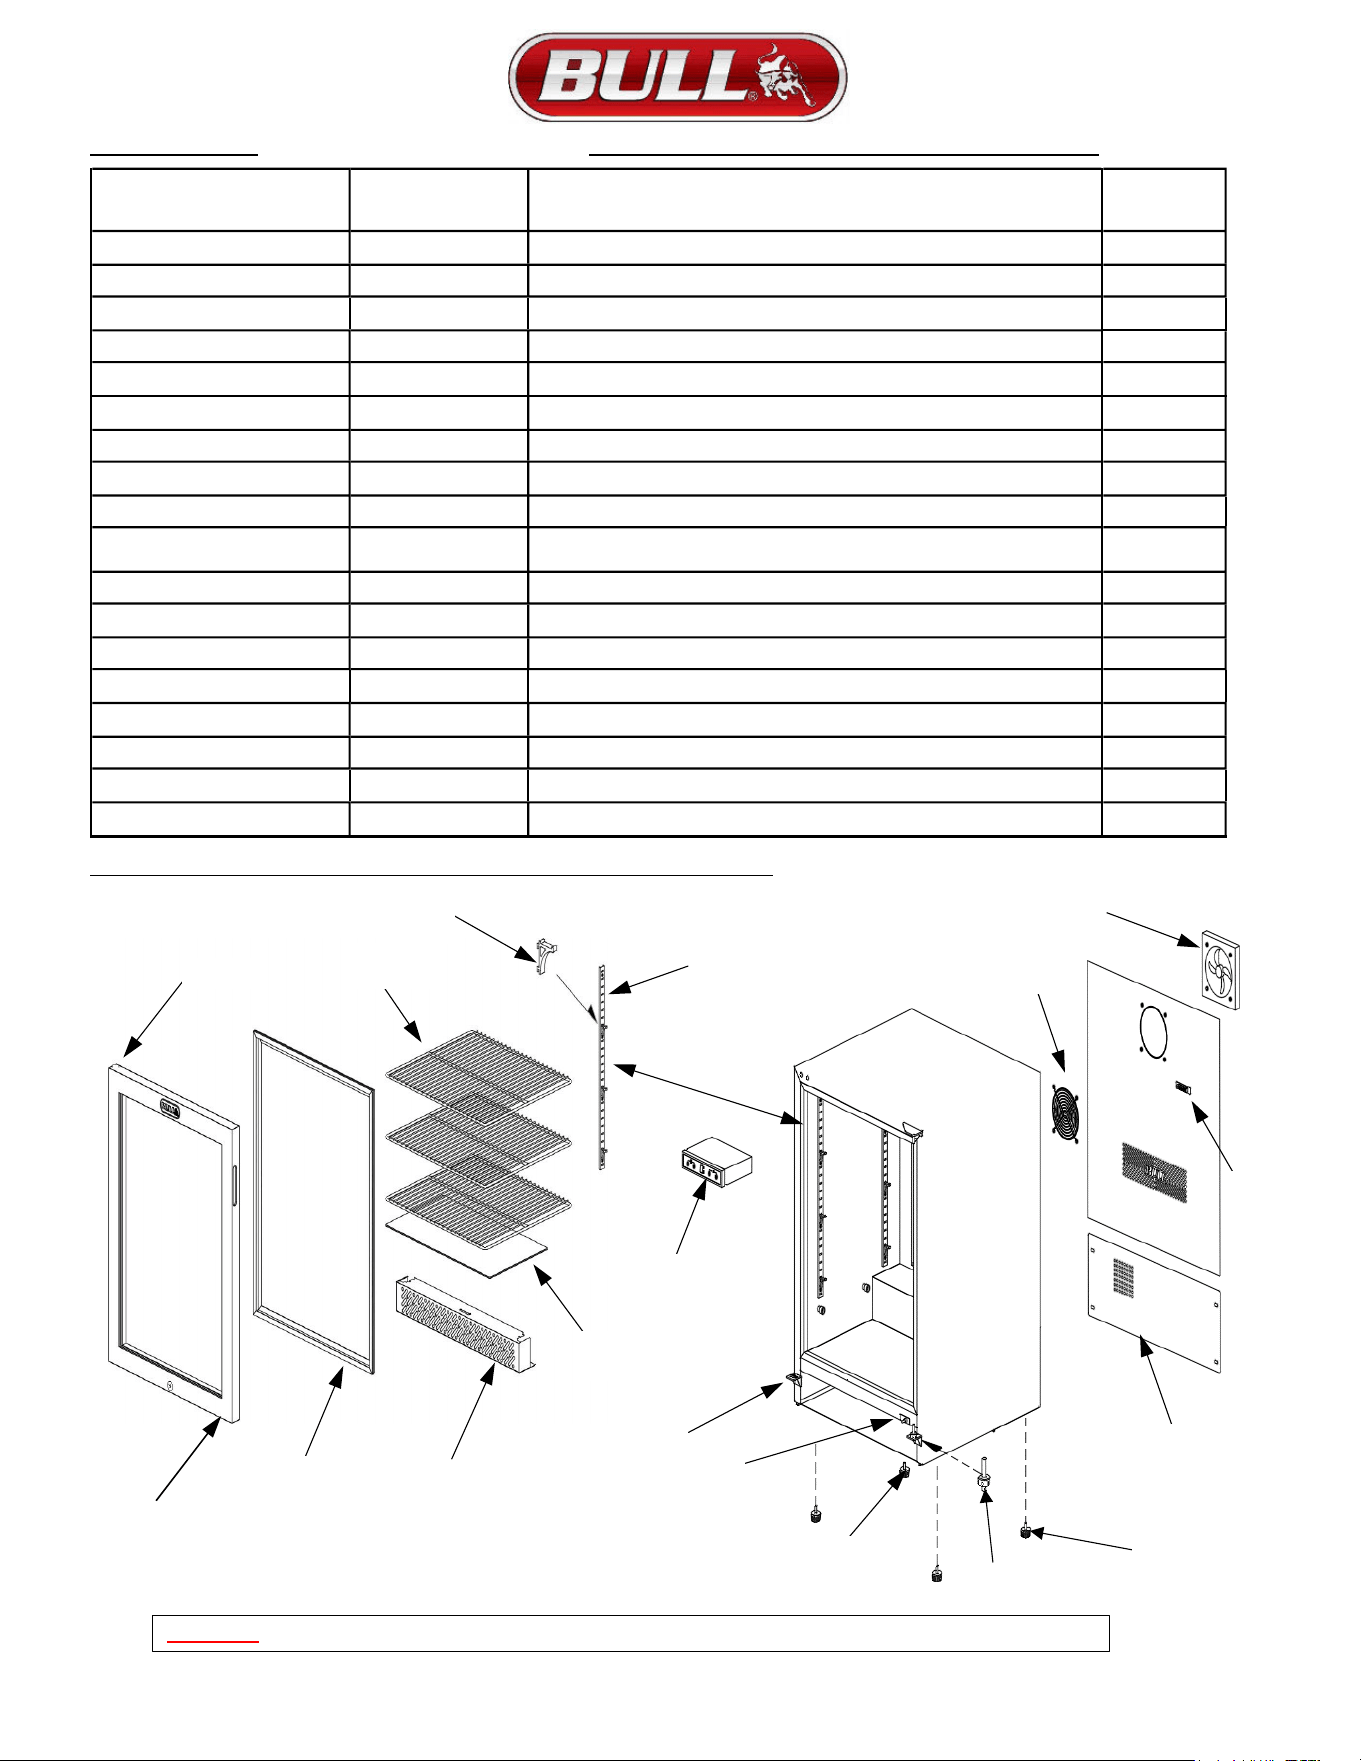
REPLACEMENT PARTS LIST MODEL NO. 13100 (WARRANTY PERIOD FOR ALL PARTS IS 1 YEAR)
MODEL NO. 13100 REPLACEMENT PARTS LIST EXPLODED VIEW
5
11
3
17
7
4
12
2
10
18
15
1
9
14
13
WARNING: Use of any part that is not factory authorized will void your warranty and may be dangerous.
14
16
6
REF # USED ON
EXPLODED VIEW
BULL
PART #
DESCRIPTION
QTY
1
13726
LOWER DOOR HINGE
1
2
13727
LOWER DOOR HINGE DECORATIVE PANEL
2
3
13706
K-
BAR
4
4
12103
CONTROL PANEL
1
5
13701 13716
FAN
1
6
13728
EVAPORATOR FAN COVER
1
7
13729
TEMPERATURE SENSING HEAD COVER
1
8
13730
AUTOMATIC DOOR CLOSING BUSHING LEFT SIDE
1
9
13731
ADJUSTABLE LOWER DOOR HINGE
1
10
13103
KICK PLATE
1
11
13704
SHELF CLIP
12
12
13708
GLASS
SHELF
1
13
13707
WIRE
SHELF
3
14
13733
PILLAR SWITCH
1
15
13714
LEVELING FEET
4
16
13734
COMPRESSOR COMPARTMENT REAR GRID
1
17
13101
DOOR
1
18
13102
PREMIUM DOOR GASKET
1
8

Warranty Policy
THISLIMITEDWARRANTYGIVESYOUSPECIFICLEGALRIGHTS. YOUMAYALSOHAVEOTHERRIGHTS,
WHICHVARYFROMSTATETOSTATE.
THISLIMITEDWARRANTYCANALSOBEFOUNDONOURWEBSITEAT:
https://www.bullbbq.com/support-warranty (UnitedStatesCustomers)
https://bullbbq.eu/customer-care/#warranty-registration-form (InternationalCustomers)
ANDINTHEOWNER’S/INSTALLATIONMANUALTHATWEPROVIDEWITHOURPRODUCT.
THISLIMITEDWARRANTYISSUBJECTTOTHEEXCLUSIONS,CONDITIONSANDLIMITATIONSSETFORTH
BELOW.
ANYIMPLIEDWARRANTIESIMPOSEDBYLAW,INCLUDINGWITHOUTLIMITATIONTHEIMPLIED
WARRANTIESOFMERCHANTABILITYANDFITNESSFORAPARTICULARPURPOSE,ARELIMITEDIN
DURATIONTOTHEDURATIONOFTHISEXPRESSLIMITEDWARRANTY.SOMESTATESDONOTALLOW
LIMITATIONSONHOWLONGANIMPLIEDWARRANTYLASTS,SOTHEABOVELIMITATIONMAYNOT
APPLYTOYOU.
WHOMAYUSETHISWARRANTY?
BULLOUTDOORPRODUCTS,INC. located at address 1011 East Pine St. Lodi, CA. 95240
("we") extend this limited warranty only to the consumer who originally purchased the product ("you") at
the original site of delivery or installation. It does not extend to any subsequent owner or other transferee
of the product. It does not apply to products installed in any rental, commercial or non-residential application.
Examples of excluded applications include, but are not limited to day care centers, schools, bed and breakfast
centers, churches, private clubs, fire stations, club houses, common areas in multi-family dwellings, restaurants,
hotels, nursing homes, food service locations and institutional food service locations.
WHATDOESTHISWARRANTYCOVER?
This limited warranty covers defects in materials and workmanship of the product and product components
identified below for the Warranty Periods defined below.
WHATISTHEPERIODOFCOVERAGE?
This limited warranty starts on the date of your purchase and lasts for the time or time periods specified above
(the "WarrantyPeriod"). The Warranty Period is not extended if we repair or replace the product. We may
change the availability of this limited warranty at our discretion, but any changes will not be retroactive.
15

Warranty Policy (Continued)
Grilling/PizzaAccessoriesandGrillCoversDONOTincludeawarrantyperiod.
GrillWarrantyPeriods
The following parts are covered for 1yearon all our current gas grill models:
• The lid, control panel, grease tray, bezels, knobs, temperature gauge, valves, regulator, flex tubes,
rotisserie burner, transformer, and all components of the lighting system.
The following parts are covered for 3yearson all our current gas grill models:
• The manifold, handle end caps, flame tamers, heat shields, and warming rack.
The following parts are covered for the lifetimeon all our current gas grill models:
• Insert assembly and the grates.
The warranty period for the grill burners varies by type:
• Cast stainless steel burners - Lifetime
•
•
Welded stainless steel burners – 5years
Porcelain coated burners – 3years
The warranty period for the charcoal grill is 1yearon all parts, except for the insert assembly, which is covered
for 5years.
ComponentWarrantyPeriods
All the parts for our components /grill carts/refrigerators/kegerators/drawers/doors/refrigerator frames/grill
jackets/finishing frames/ice chest/sinks/bar center are covered for 1yearwith these exceptions:
• PowerBurner
o
The insert/grates are lifetimecovered parts.
The manifold/burner are covered for 3years.
• SearingStation/SlideinDoubleSideburner
o The grates are covered for lifetime,
o The insert for 5years, and
o The manifold for 3years.
• SingleSideburner
o The grates are covered for 5yearsand
o The burner for 3years.
• Sidekick
o The burner is covered for 3years.
PizzaOvens/Islands/FireFeaturesWarrantyPeriods
• All the parts and construction materials are covered for 1year.
16
Warranty Policy (Continued)
WHATDOESTHISWARRANTYNOTCOVER?
This limited warranty does not cover any damage due to:
• Transportation.
• Storage
• Improper installation or use
• Use on improper fuel/gas supply.
• Failure to follow the product instructions or to perform any preventive maintenance.
• Modifications.
• Unauthorized repair.
• Normal wear and tear, rust, corrosion, oxidation, or discoloration.
• External causes such as accidents, abuse, or other actions or events beyond our reasonable control.
WHATOPTIONSAREOFFEREDBYBULLOUTDOORPRODUCTSUNDERTHISWARRANTY?
With respect to any defective product claim made during the Warranty Period, we will, in our sole discretion:
• Replace such product (or the defective part) free of charge or refund the purchase price of such
product.
WHATISEXCLUDEDBYBULLOUTDOORPRODUCTSUNDERTHISWARRANTY?
• We will not pay for shipping charges for repaired or replacement parts, or for any labor or labor
related charges.
• We will not pay for any accessory products or ancillary products purchased by you for use in
connection with the product.
HOWDOYOUNOTIFYBULLCUSTOMERSERVICEOFAPOTENTIALWARRANTYISSUE?
OurCustomerServiceisreadytohelp.Here’showtoreachus:
By Phone (800) 521-2855 Monday through Friday from 8:00 a.m. to 5:00 p.m. (EDT)
To submit a warranty claim on-line or message go to
https://www.bullbbq.com/support‐warranty
LIMITATIONOFLIABILITY
THE REMEDIES DESCRIBED ABOVE ARE YOUR SOLE AND EXCLUSIVE REMEDIES AND OUR ENTIRE
LIABILITY FOR ANY BREACH OF THIS LIMITED WARRANTY. OUR LIABILITY SHALL UNDER NO
CIRCUMSTANCESEXCEEDTHEACTUALAMOUNTPAIDBYYOUFORTHEDEFECTIVEPRODUCT,NORSHALL
WE UNDER ANY CIRCUMSTANCES BE LIABLE FOR ANY
CONSEQUENTIAL, INCIDENTAL, SPECIAL OR
PUNITIVEDAMAGESORLOSSES,WHETHERDIRECTORINDIRECT.
SOME STATES DO NOT ALLOW THE EXCLUSION OR LIMITATION OF INCIDENTAL OR CONSEQUENTIAL
DAMAGES,SOTHEABOVELIMITATIONOREXCLUSIONMAYNOTAPPLYTOYOU.
v2024.05
17
